formatting a paper in apa style for microsoft word...
TRANSCRIPT

Formatting a Paper in APA Style Word 2010 AR 20120221 1
Formatting a Paper in APA Style for Microsoft Word 2010
This document is a set of instructions to format a paper in APA style with Microsoft Word 2010. It covers the following:
1. General Document Guidelines
2. Setting the Document Attributes
3. Adding Title and Page Numbers to the Header
4. Title Page
5. Abstract
6. Body
7. In-text Citations
8. Quotations
9. References List
10. Saving Your Work
11. File Naming Tips
12. Sample APA Style Paper
1. General Document Guidelines
1.1. Spacing after Punctuation: two spaces follow the punctuation ending a sentence.
All other marks of punctuation are followed by one space. Exceptions: no space
is required after:
- opening parenthesis:
Example - Departing flights (except those already noted) are temporarily
grounded.
- opening quotation mark, and comma or period before a closing quotation mark
Example - The captain remarked, “The space is inadequate.” I agreed.
1.2. Paragraph indention: one “Tab” (or five spaces).
1.3. Active voice: as a general rule, use the active voice rather than the passive
voice. For example, use “We predicted that life would go on.” rather than “It was
predicted that life would go on.”
1.4. Avoid the use of contractions in your paper. For example, say “do not,” instead
of “don’t.”
1.5. Order of Pages: Title Page, Abstract, Body, References.

Formatting a Paper in APA Style Word 2010 AR 20120221 2
2. Setting the Document Attributes
An APA style paper should fit certain standard layout guidelines. This section describes how to meet those guidelines.
2.1. Set the font to 12-point Times New Roman.
2.1.1. Click on the HOME option from the main menu. FONT options should be
the second box.
2.1.2. Select TIMES NEW ROMAN from the first drop-down bar.
2.1.3. Select 12 from the second drop-down bar.
2.2. Set the page margins to one inch all around.
2.2.1. Click on the PAGE LAYOUT option from the main menu.
2.2.2. Click on MARGINS.
2.2.3. Select NORMAL, which shows one inch margins on each side and the top
and bottom.
2.3. Most of the document will be aligned left.
2.3.1. From the HOME menu, under the PARAGRAPH section be sure to select
the ALIGN TEXT LEFT icon, with the picture of several lines aligned to the
left.
Formatting a Paper in APA Style Word 2010 AR 20120221 3
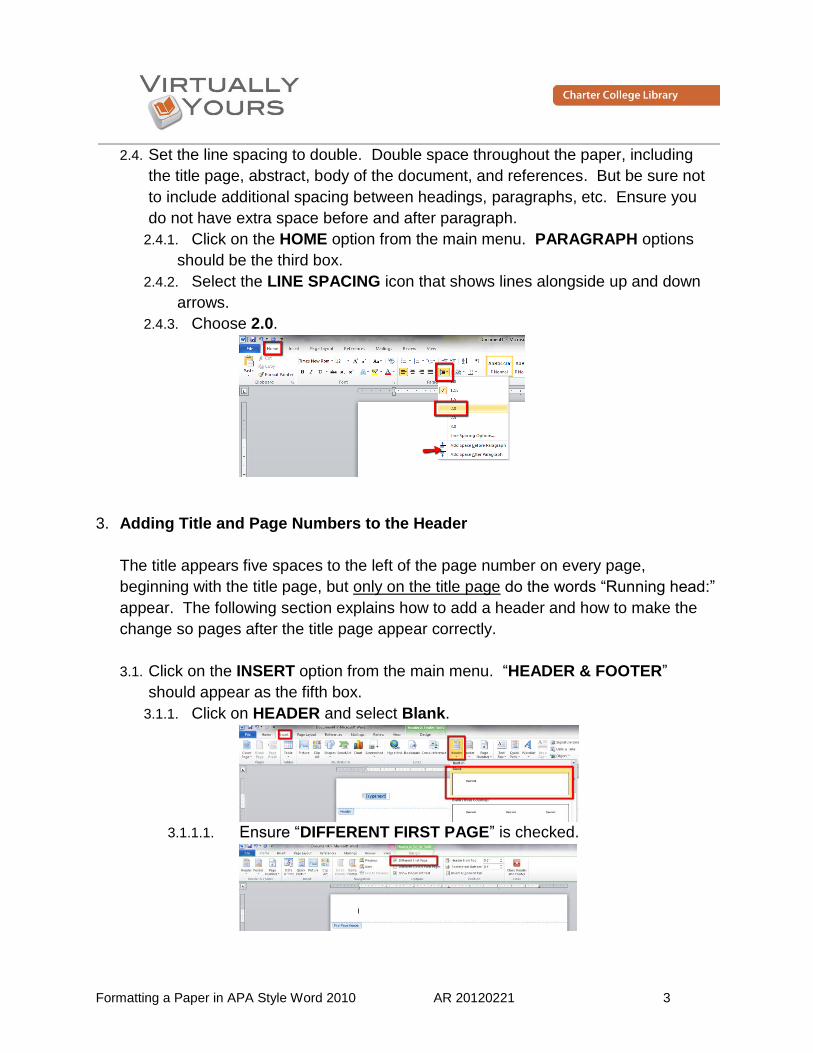
2.4. Set the line spacing to double. Double space throughout the paper, including
the title page, abstract, body of the document, and references. But be sure not
to include additional spacing between headings, paragraphs, etc. Ensure you
do not have extra space before and after paragraph.
2.4.1. Click on the HOME option from the main menu. PARAGRAPH options
should be the third box.
2.4.2. Select the LINE SPACING icon that shows lines alongside up and down
arrows.
2.4.3. Choose 2.0.
3. Adding Title and Page Numbers to the Header
The title appears five spaces to the left of the page number on every page,
beginning with the title page, but only on the title page do the words “Running head:”
appear. The following section explains how to add a header and how to make the
change so pages after the title page appear correctly.
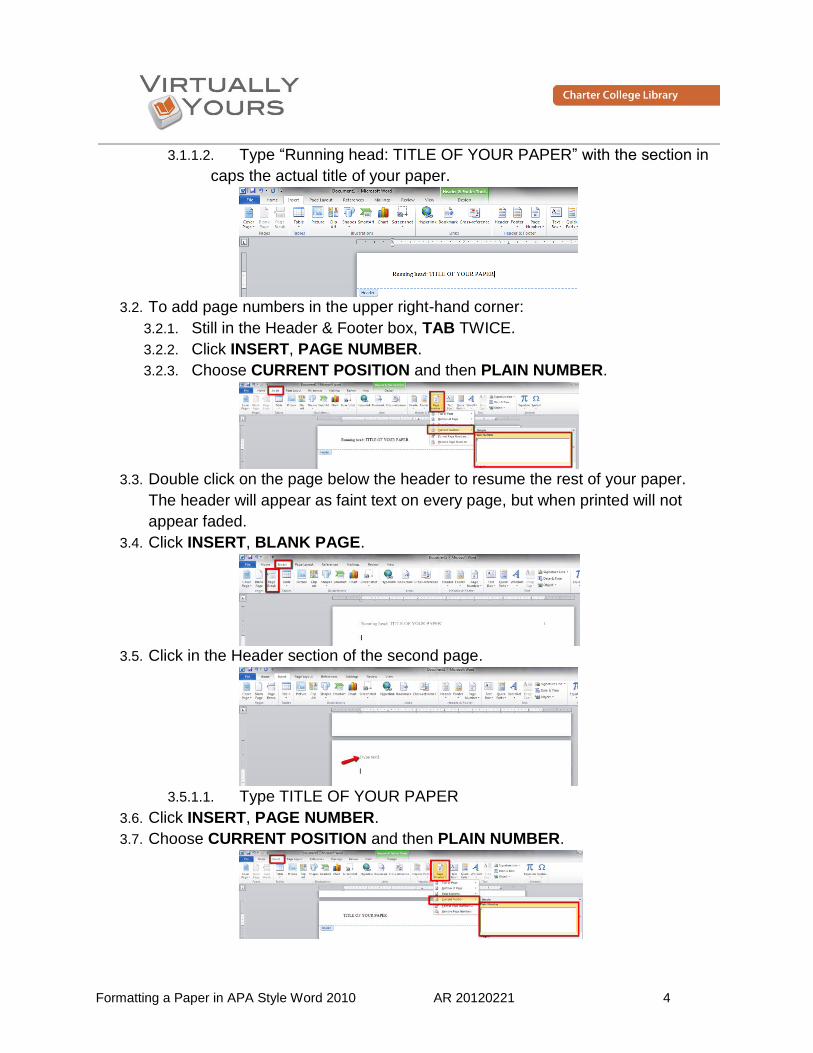
3.1. Click on the INSERT option from the main menu. “HEADER & FOOTER”
should appear as the fifth box.
3.1.1. Click on HEADER and select Blank.
3.1.1.1. Ensure “DIFFERENT FIRST PAGE” is checked.
Formatting a Paper in APA Style Word 2010 AR 20120221 4
3.1.1.2. Type “Running head: TITLE OF YOUR PAPER” with the section in
caps the actual title of your paper.
3.2. To add page numbers in the upper right-hand corner:
3.2.1. Still in the Header & Footer box, TAB TWICE.
3.2.2. Click INSERT, PAGE NUMBER.
3.2.3. Choose CURRENT POSITION and then PLAIN NUMBER.
3.3. Double click on the page below the header to resume the rest of your paper.
The header will appear as faint text on every page, but when printed will not
appear faded.
3.4. Click INSERT, BLANK PAGE.
3.5. Click in the Header section of the second page.
3.5.1.1. Type TITLE OF YOUR PAPER
3.6. Click INSERT, PAGE NUMBER.
3.7. Choose CURRENT POSITION and then PLAIN NUMBER.

Formatting a Paper in APA Style Word 2010 AR 20120221 5
4. Title Page
4.1. The Title Page is page one of your document.
4.1.1. Key elements: Paper Title: uppercase and lowercase letters, centered on
the page, Your Name, the College Name.
4.1.2. To center text between the side margins: Select the text. On the HOME
tab, in the PARAGRAPH group, select CENTER.
4.1.3. To center text between the top and bottom margins: select the text, on the
PAGE LAYOUT tab, in the PAGE SETUP group, click the PAGE SETUP
DIALOG BOX LAUNCHER and then click the LAYOUT tab. In the
VERTICAL ALLIGNMENT BOX, choose CENTER. In the APPLY TO BOX,
choose SELECTED TEXT and then click OK.

Formatting a Paper in APA Style Word 2010 AR 20120221 6
5. Abstract
An abstract summarizes, in 70-100 words, your subject, findings, and conclusions.
An abstract is on a page by itself. The abstract is page two.
5.1. The word “Abstract” is centered on the first line.
5.2. Hit ENTER, in the PARAGRAPH group choose ALIGN TEXT LEFT, then type
your abstract with no indentation.
5.3. In the case that an Abstract is not assigned, eliminate this page entirely (ask
your instructor). Note: If an abstract is assigned, write this section last as it is a
summary of the rest of your paper.

Formatting a Paper in APA Style Word 2010 AR 20120221 7
6. Body
The body begins on page three.
6.1. At the end of the abstract click INSERT, BLANK PAGE.
6.2. The title of the paper, typed in in uppercase and lowercase letters and centered
on the page, begins on the first line.
6.3. The first line of each paragraph is indented with one “Tab” (or five spaces).
Consecutive lines are flush with the one-inch margin. (Microsoft Word should
automatically format your paragraphs this way.)
7. In-text Citations
In APA style, source material is cited using a system that emphasizes the author and date of publication in its in-text citations. These in-text citations, used when source material is quoted, paraphrased, or summarized, point to full bibliographic citations located in the references page at the end of the document. The citation appears within the sentence punctuation.
7.1. Parenthetical Citation: when sources are referenced without a direct mention of
the author/source in the sentence, the author/source, date, and page number
(when applicable) are included in parenthesis at the end of the sentence.
Example - As metaphors for the workings of nature, Darwin used the
tangled bank, the tree of life, and the face of nature (Gould, 1989).
When a source does not provide an author, the title can be used instead.
7.2. When sources are referenced with a direct mention of the author/source in the
sentence, the date is included in parentheses directly after the author/source.
When page numbers apply, they are inserted in parenthesis at the end of the
sentence.
Example - As Part of the Narrative, Gould (1989) attributes Darwin’s
success to his gift for making the appropriate metaphor (p. 77).

Formatting a Paper in APA Style Word 2010 AR 20120221 8
8. Quotations
When a direct quotation is used, always include the author, title, and page number as part of the citation. Note: Using long quotations is not appropriate. Rather than quote a whole paragraph from an outside source, just quote a single sentence, or even a few words; use the space to write more of your own original thoughts. The rules for in-text citations also apply to quotations. Formatting Notes for Quotations:
8.1. A quotation of fewer than 40 words should be enclosed in double quotation
marks and incorporated into the formal structure of the paper.
8.2. Indenting Long Quotations
This section explains how to format long quotations in your paper using
Microsoft Word. A quotation is considered “long” if it takes up four or more lines
on your paper. If you do use a long quote, indent it one inch:
8.2.1. Where you are ready to begin the quote, press ENTER to begin a new
paragraph, and then click BACKSPACE to move the cursor to the far left.
8.2.2. Type the quoted material, without adding any quotation marks.
8.2.3. Highlight the quotation by clicking and holding the mouse key as you drag
over the whole quotation.
8.2.4. Indent the text in the following way:
8.2.4.1. Click the “INCREASE INDENT” icon (in the “PARAGRAPH” section
of the “HOME” menu).

Formatting a Paper in APA Style Word 2010 AR 20120221 9
9. References List
All sources cited in the Body of the paper must be included in the References section of the paper and all sources in the References section must be cited in the body of the paper. (The only exception for this is “Personal Communications” such as interviews, email, etc.) This section describes how to use the new “References” tool in Microsoft Word 2010 to format your References section in APA format. It is a very helpful tool that you can use to add citations from the very start of your paper. It will then collect those citations, format them properly, and compile them into a Reference List/Bibliography at the very end. Follow these steps when you need to include a citation in your paper.
9.1. Click on the REFERENCES tab.
9.2. Make sure the STYLE option in the CITATIONS & BIBLIOGRAPHY box is set
to APA SIXTH.
9.3. As you write your paper and include citations (quotations, paraphrases or any
information gained from a source), for each source (book, magazine, website,
journal article, etc.) that you use, click on INSERT CITATION from the
CITATIONS & BIBLIOGRAPHY box.
9.4. Choose the ADD NEW SOURCE option.
Formatting a Paper in APA Style Word 2010 AR 20120221 10
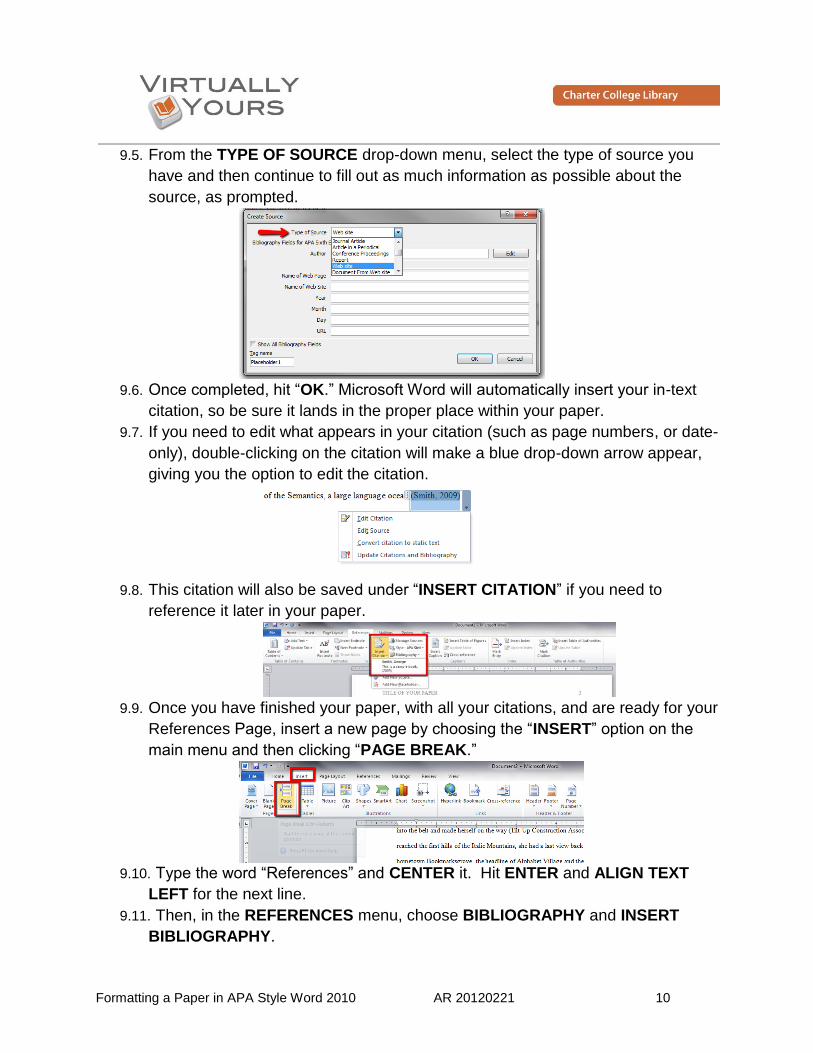
9.5. From the TYPE OF SOURCE drop-down menu, select the type of source you
have and then continue to fill out as much information as possible about the
source, as prompted.
9.6. Once completed, hit “OK.” Microsoft Word will automatically insert your in-text
citation, so be sure it lands in the proper place within your paper.
9.7. If you need to edit what appears in your citation (such as page numbers, or date-
only), double-clicking on the citation will make a blue drop-down arrow appear,
giving you the option to edit the citation.
9.8. This citation will also be saved under “INSERT CITATION” if you need to
reference it later in your paper.
9.9. Once you have finished your paper, with all your citations, and are ready for your
References Page, insert a new page by choosing the “INSERT” option on the
main menu and then clicking “PAGE BREAK.”
9.10. Type the word “References” and CENTER it. Hit ENTER and ALIGN TEXT
LEFT for the next line.
9.11. Then, in the REFERENCES menu, choose BIBLIOGRAPHY and INSERT
BIBLIOGRAPHY.

Formatting a Paper in APA Style Word 2010 AR 20120221 11
9.12. Your Bibliography will appear and be available for you to edit as needed,
including inserting any ready-made citations you retrieved from an online source
such as LIRN or ebrary.
9.12.1. Be sure that any citations you add to the Bibliography are put in
alphabetical order within your Reference List.
9.13. Make sure your Bibliography has the “Hanging Indent” format, in which every
line except the first line of each citation is indented.
9.13.1. Make the ruler visible by choosing the VIEW option on the main menu and
checking the RULER option.
9.13.2. Highlight the text of your Bibliography.
9.13.3. On the left-side ruler you should see two arrows (a top and a bottom
arrow) showing you where the text begins on the line. Ensure the bottom
arrow (and only the bottom arrow) in indented one-inch. This should apply
the format to the whole page.

Formatting a Paper in APA Style Word 2010 AR 20120221 12
10. Saving Your Work
Computer crashes can and will happen. To avoid losing a huge chunk of work, you should save your document frequently. WARNING: if you are working on a public computer (a library, any computer at the college, etc.), do not save your work on the “C” drive or under “My Documents”. Doing so means you would have to return to that same machine in order to retrieve your files. Also, many times personal files are regularly deleted from public computers so it may not be there even if you do return. Precautions with flash/removable drives:
- It could be forgotten at home, left in a computer lab, lost, or stolen.
- It could break.
- It could pick up a virus which could ruin your files as well as transfer to every
computer that you use.
Save your work, and then email yourself the document.
11. File naming tips
If you are writing multiple drafts of your paper, it is a good idea to not overwrite the previous draft but to save individual files for each draft.
11.1.1. Click on the FILE in the upper, left-hand corner.
11.1.2. Choose “SAVE AS” and pick a new file name for each draft.
11.1.3. Example: “GEN-230 Research Paper Draft 1” then “GEN-230 Research
Paper Draft 2” and so on.
11.1.4. It helps to include the course name and even assignment title in each file
name that you create so that you can easily keep track of your assignments.
12. Sample APA Style Paper
Click here for an example of an APA formatted paper.