for the windows operating system software version: 2
TRANSCRIPT

HP OpenView Client Configuration Manager for the Windows operating system
Software Version: 2.00
Administrator Guide
Document Release Date: October 2006
Software Release Date: October 2006
Legal Notices
Warranty
Hewlett-Packard makes no warranty of any kind with regard to this document, including, but not limited to, the implied warranties of merchantability and fitness for a particular purpose. Hewlett-Packard shall not be held liable for errors contained herein or direct, indirect, special, incidental or consequential damages in connection with the furnishing, performance, or use of this material.
A copy of the specific warranty terms applicable to your Hewlett-Packard product can be obtained from your local Sales and Service Office.
Restricted Rights Legend
Use, duplication, or disclosure by the U.S. Government is subject to restrictions as set forth in subparagraph (c)(1)(ii) of the Rights in Technical Data and Computer Software clause in DFARS 252.227-7013.
Hewlett-Packard Company United States of America
Rights for non-DOD U.S. Government Departments and Agencies are as set forth in FAR 52.227-19(c)(1,2).
Copyright Notices
© Copyright 2006 Hewlett-Packard Development Company, L.P.
No part of this document may be copied, reproduced, or translated into another language without the prior written consent of Hewlett-Packard Company. The information contained in this material is subject to change without notice.
Trademark Notices
Linux is a registered trademark of Linus Torvalds.
Microsoft®, Windows®, and Windows® XP are U.S. registered trademarks of Microsoft Corporation.
OpenLDAP is a registered trademark of the OpenLDAP Foundation.
Acknowledgements
PREBOOT EXECUTION ENVIRONMENT (PXE) SERVER Copyright © 1996-1999 Intel Corporation.
2

TFTP SERVER Copyright © 1983, 1993 The Regents of the University of California.
OpenLDAPCopyright 1999-2001 The OpenLDAP Foundation, Redwood City, California, USA. Portions Copyright © 1992-1996 Regents of the University of Michigan.
OpenSSL License Copyright © 1998-2001 The OpenSSLProject.
Original SSLeay LicenseCopyright © 1995-1998 Eric Young ([email protected])
DHTML Calendar Copyright Mihai Bazon, 2002, 2003
3

Documentation Updates
This guide’s title page contains the following identifying information:
• Version number, which indicates the software version
• Document release date, which changes each time the document is updated
• Software release date, which indicates the release date of this version of the software
To check for recent updates or to verify that you are using the most recent edition, visit the following URL:
ovweb.external.hp.com/lpe/doc_serv/
You will also receive updated or new editions if you subscribe to the appropriate product support service. Contact your HP sales representative for details.
4

Support
Please visit the HP OpenView support web site at:
www.hp.com/managementsoftware/support
This Web site provides contact information and details about the products, services, and support that HP OpenView offers.
HP OpenView online software support provides customer self-solve capabilities. It provides a fast and efficient way to access interactive technical support tools needed to manage your business. As a valuable support customer, you can benefit by using the support site to:
• Search for knowledge documents of interest
• Submit enhancement requests online
• Download software patches
• Submit and track progress on support cases
• Manage a support contract
• Look up HP support contacts
• Review information about available services
• Enter discussions with other software customers
• Research and register for software training
Most of the support areas require that you register as an HP Passport user and sign in.Many also require a support contract.
To find more information about access levels, go to:
www.hp.com/managementsoftware/access_level
To register for an HP Passport ID, go to:
www.managementsoftware.hp.com/passport-registration.html
5

6

Contents
1 Introduction .......................................................................... 17Audience ..................................................................................................................................17
Summary.................................................................................................................................17
Client Configuration Manager Overview..............................................................................19
Basic License Features ....................................................................................................20Premium License Features..............................................................................................21The Client Configuration Manager Management Console............................................22Management Agent..........................................................................................................24Configuration Management Administrator Publisher ..................................................26The Image Preparation Wizard.......................................................................................27The Settings Migration Manager....................................................................................27
Getting Help............................................................................................................................28
2 Installing Client Configuration Manager ................................... 31System Requirements.............................................................................................................31
Server................................................................................................................................31Database ...........................................................................................................................31Target Devices ..................................................................................................................32
Installing Client Configuration Manager .............................................................................34
Manually Installing the Management Agent .......................................................................41
Installing the Management Agent on Thin Clients .......................................................42Embeded Linux..........................................................................................................42Windows XPe .............................................................................................................44Windows CE...............................................................................................................44
Configuring PXE for OS Deployment....................................................................................45
3 Getting Started...................................................................... 47Logging In ...............................................................................................................................47
7
Quick Start Tasks...................................................................................................................48
4 Management.........................................................................55Device Management ...............................................................................................................55
General .............................................................................................................................56Devices ..............................................................................................................................58
Importing Devices......................................................................................................60Deploying the Management Agent from the Devices Tab ......................................60Removing the Management Agent ...........................................................................60Discovering Software/Hardware Inventory .............................................................61Discovering Patch Compliance .................................................................................61Discovering Application Usage .................................................................................62Remote Control ..........................................................................................................62Power Management...................................................................................................63Removing Devices......................................................................................................63Device Details ............................................................................................................63
Current Jobs.....................................................................................................................64Past Jobs...........................................................................................................................65
Group Management................................................................................................................65
General .............................................................................................................................66Group Types...............................................................................................................67
Groups...............................................................................................................................67Creating a Group .......................................................................................................69Deploying the Management Agent to a Group ........................................................70Removing the Management Agent from a Group....................................................70Discovering Software/Hardware Inventory for a Group .........................................71Discovering Patch Compliance a Group...................................................................71Discovering Application Usage Data a Group .........................................................72Power Management...................................................................................................72Removing Groups ......................................................................................................72Group Details.............................................................................................................73Group Details Window Tasks ...................................................................................75Adding and Removing Devices from Static Groups ................................................75Adding and Removing Software Entitlement from Groups....................................76Deploying, Removing, and Synchronizing Software from Groups .........................76Adding and Removing Patch Entitlement from Groups .........................................77Deploying Patches to Groups....................................................................................77
Current Jobs.....................................................................................................................78Past Jobs...........................................................................................................................78
Software Management ...........................................................................................................78
Contents 8

General .............................................................................................................................79Software ............................................................................................................................80
Deploying Software....................................................................................................82Adding Group Entitlement .......................................................................................82Importing a Service ...................................................................................................82Exporting a Service ...................................................................................................83Removing Software from OVCCM............................................................................83Software Details ........................................................................................................83
Current Jobs .....................................................................................................................87Past Jobs ...........................................................................................................................87
Patch Management.................................................................................................................87
General .............................................................................................................................89Patches..............................................................................................................................89
Deploying Patches .....................................................................................................90Adding Group Entitlement .......................................................................................90Importing a Service ...................................................................................................91Exporting a Service ...................................................................................................91Patch Details..............................................................................................................92
Current Jobs .....................................................................................................................95Past Jobs ...........................................................................................................................95
OS Management .....................................................................................................................95
General .............................................................................................................................96Operating Systems...........................................................................................................97
Deploying Operating Systems ..................................................................................98Deploying an OS Image using Local Service Boot (LSB)......................................102Deploying an OS Image using PXE ........................................................................103Deploying an OS Image using the Service CD ......................................................104Adding Group Entitlement .....................................................................................105Importing a Service .................................................................................................105Exporting a Service .................................................................................................106Removing Operating Systems from the Library....................................................106OS Details ................................................................................................................106
Current Jobs ...................................................................................................................108Past Jobs .........................................................................................................................109
Job Management...................................................................................................................109
General ...........................................................................................................................110Current Jobs ...................................................................................................................110
Job Controls .............................................................................................................111Job Status.................................................................................................................111Job Details................................................................................................................113
Contents 9
Past Jobs.........................................................................................................................115
5 Reporting............................................................................117Search Options......................................................................................................................118
Display Options ....................................................................................................................118
Search Criteria .....................................................................................................................118
Report Windows....................................................................................................................119
Using Search Options to Select Filters ...............................................................................119
The Directory/Group Filters Area.................................................................................120The Data Filters Area....................................................................................................121
Using Display Options to Select Reporting Views .............................................................123
Reporting View Types ....................................................................................................124Inventory Management Reports.............................................................................125Patch Management Reports....................................................................................125Usage Manager Reports..........................................................................................125
Viewing HP Hardware Reports.....................................................................................126
About Reporting Windows ...................................................................................................127
Using the Windows Action Bar .....................................................................................128Applying Filters from Report Data ........................................................................130
Creating Dynamic Reporting Groups ...........................................................................130
6 Configuration ......................................................................133Support ..................................................................................................................................134
Downloading Log Files ..................................................................................................134Updating Licensing Information...................................................................................135
Console Access ......................................................................................................................135
Creating additional console users .................................................................................136Removing console users .................................................................................................136Viewing and modifying console user details ................................................................137Changing the Console Password ...................................................................................137
Infrastructure .......................................................................................................................138
Managing Infrastructure Servers .................................................................................139Deploying the Infrastructure Service ...........................................................................140
10 Contents

Patch Management - Configuration ....................................................................................141
Configuring Patch Acquisition Schedule ......................................................................142Configuring Patch Acquisition Settings .......................................................................143
OS Management ...................................................................................................................146
Hardware Management .......................................................................................................147
Configuring CMI ............................................................................................................147Configuring TPM............................................................................................................148
Reporting...............................................................................................................................149
Database .........................................................................................................................150Usage Settings................................................................................................................150Usage Collection.............................................................................................................151
Configuring Usage Collection Filters .....................................................................153Defining Usage Criteria ..........................................................................................154
Maintenance ...................................................................................................................155
7 Wizards............................................................................. 157Import Device Wizard...........................................................................................................158
Agent Deployment Wizard ...................................................................................................159
Agent Removal Wizard.........................................................................................................160
Software/Hardware Inventory Wizard ................................................................................160
Patch Compliance Discovery Wizard...................................................................................161
Application Usage Collection Wizard ..................................................................................162
Power Management Wizard.................................................................................................163
Group Creation Wizard ........................................................................................................164
Creating a Static Group.................................................................................................164Creating a Dynamic Discovery Group ..........................................................................165Creating a Dynamic Reporting Group ..........................................................................166
Remote Control Wizard ........................................................................................................167
Software Deployment Wizard ..............................................................................................168
Service Import Wizard .........................................................................................................169
Service Export Wizard..........................................................................................................169
Software Synchronization Wizard .......................................................................................170
Contents 11

Patch Deployment Wizard ...................................................................................................171
Service Entitlement Wizard.................................................................................................172
Software Removal Wizard....................................................................................................172
User Creation Wizard ..........................................................................................................173
OS Deployment Wizard........................................................................................................174
Usage Collection Filter Creation Wizard ............................................................................175
Infrastructure Deployment Wizard .....................................................................................176
Infrastructure Removal Wizard...........................................................................................177
8 Preparing and Capturing OS Images .....................................179Windows OS Images.............................................................................................................179
Step 1 - Prepare the Reference Machine ......................................................................180Step 2 - Create Sysprep.inf............................................................................................183Step 3 - Run the Image Preparation Wizard................................................................185
Thin Client OS Images.........................................................................................................194
Windows XPe OS images...............................................................................................194Step 1 – Prepare the XPe Reference Machine .......................................................194Step 2 – Run the Image Preparation Wizard ........................................................195
Windows CE OS images ................................................................................................201Step 1 – Prepare the CE Reference Machine.........................................................201Step 2 – Run the Image Preparation Wizard ........................................................202
Embedded Linux OS images .........................................................................................205Step 1 – Prepare the Embedded Linux Reference Machine .................................205Step 2 – Run the Image Preparation Wizard ........................................................206
Publishing and Deploying OS images .................................................................................211
9 Using the Publisher...............................................................213Publishing Software .............................................................................................................214
Publishing Windows Installer Files..............................................................................214Publishing Using Component Select ............................................................................219
Publishing Operating System Images.................................................................................222
Publishing HP Softpaqs .......................................................................................................223
Publishing BIOS Settings ....................................................................................................225
12 Contents

Creating a BIOS Settings File ......................................................................................228
Viewing Published Services .................................................................................................229
CM Administrator Agent Explorer......................................................................................230
10Using the Application Self-Service Manager............................ 231Accessing the Application Self-Service Manager................................................................231
Application Self-Service Manager Overview ......................................................................232
Global Toolbar ................................................................................................................233The Menu Bar.................................................................................................................233Catalog List ....................................................................................................................234Service List .....................................................................................................................234
Using the Application Self-Service Manager User Interface.............................................235
Installing Software.........................................................................................................236Refreshing the Catalog ..................................................................................................236Viewing Information ......................................................................................................237Removing Software ........................................................................................................237Viewing History..............................................................................................................238Adjusting Bandwidth .....................................................................................................239Viewing Status ...............................................................................................................239
Customizing the User Interface...........................................................................................240
General Options .............................................................................................................241Service List Options .......................................................................................................242Connection Options ........................................................................................................245
OVCM System Tray Icon .....................................................................................................246
OVCM Status window....................................................................................................247
11Settings Migration ............................................................... 249Supported Applications and Settings ..................................................................................249
Creating the Configuration Template .................................................................................251
Using the Settings Migration Utility ..................................................................................254
Backing Up Settings ......................................................................................................255Stored Settings and Files ........................................................................................256
Restoring Settings..........................................................................................................257
Contents 13

Migrating Settings During OS Deployment .......................................................................260
File Rules ..............................................................................................................................260
Accessing File Rules.......................................................................................................261File Rules Dialog Box.....................................................................................................262
Application Support Notes ...................................................................................................263
Microsoft Office Support Notes .....................................................................................263Microsoft Office........................................................................................................263Microsoft Access.......................................................................................................264Microsoft Excel ........................................................................................................265Microsoft Frontpage ................................................................................................266Microsoft InfoPath...................................................................................................267Office Assistant Settings.........................................................................................267Office Shortcut Bar..................................................................................................268Microsoft OneNote...................................................................................................268Microsoft Outlook ....................................................................................................268Microsoft PowerPoint ..............................................................................................269Microsoft Project......................................................................................................270Microsoft Publisher .................................................................................................271Microsoft Word.........................................................................................................271
Other Supported Application and OS Notes ................................................................272ACT! 2000.................................................................................................................272Adobe Acrobat ..........................................................................................................273Lotus Notes 5.X, 6.X ................................................................................................274Microsoft Internet Explorer ....................................................................................274Microsoft NetMeeting..............................................................................................274Microsoft Outlook Express......................................................................................275Netscape ...................................................................................................................275Norton AntiVirus.....................................................................................................276Norton AntiVirus Corporate Edition......................................................................276Visio ..........................................................................................................................277WinZip ......................................................................................................................277WordPerfect for Office 2000 ....................................................................................278Dragon Naturally Speaking for WordPerfect ........................................................279Corel Utilities ..........................................................................................................279Corel Quattro Pro ....................................................................................................279Corel WordPerfect ...................................................................................................279Data Tansports ........................................................................................................279Windows Options.....................................................................................................280Desktop Shortcuts ...................................................................................................280Dial-Up Networking ................................................................................................280Folder Options .........................................................................................................280Local Printer Logging..............................................................................................280
14 Contents

Mapped Network Drives .........................................................................................281My Documents .........................................................................................................281Network and Shared Printer Settings ...................................................................281Network Settings .....................................................................................................281Taskbar and Quick Lanuch Bar .............................................................................281Windows Address Book ...........................................................................................282Control Panel ...........................................................................................................282Accessibility Options ...............................................................................................282Display......................................................................................................................282Internet Options ......................................................................................................282Keyboard ..................................................................................................................282Mouse Settings.........................................................................................................283Power Management.................................................................................................283Regional Setttings ...................................................................................................283Sounds ......................................................................................................................283Time Zones ...............................................................................................................283
12FAQs ................................................................................. 285How do I access the Management Console?........................................................................285
How do I determine what version I am using? ...................................................................285
How do I change my console password? ..............................................................................285
How do I begin to manage a device in my environment?...................................................286
How do I schedule inventory collection? .............................................................................286
How do I view inventory information for managed devices? .............................................287
How do I automate patch acquisition? ................................................................................287
How do I configure the patch compliance discovery schedule?..........................................288
How do I deploy software to all of my managed devices? ..................................................288
How do I acquire a particular Microsoft patch? .................................................................289
How do I update my license key?.........................................................................................289
How do I create a group of devices to target for an OS Service Pack? ..............................289
How do I deploy software to a single device? ......................................................................290
How do I install the Management Agent to a device without using the console? ............290
How do I publish a Windows Installer package? ................................................................291
How do I publish setup.exe?.................................................................................................291
How do I know that all my devices successfully received the software?...........................291
Contents 15

How do I make software available for a user to install? ....................................................292
How do I generate a device compliance report?..................................................................292
How do I capture an OS image? ..........................................................................................292
How do I add additional drivers to an OS image? ..............................................................293
How do I publish an OS image?...........................................................................................293
How do I deploy an OS image? ............................................................................................293
How do I start collecting usage data?..................................................................................294
How do I contact support?....................................................................................................294
13Troubleshooting ...................................................................295Log Files ................................................................................................................................295
Agent Deployment Issues.....................................................................................................296
OS Deployment Issues .........................................................................................................297
Application Self-Service Manager Issues............................................................................297
Power Management Issues ..................................................................................................298
A About Double Byte Character Support ....................................299Supported languages ............................................................................................................299
Changing the locale ..............................................................................................................299
Double-byte support for Sysprep files...........................................................................300
Index......................................................................................301
16 Contents

1 Introduction The HP OpenView Client Configuration Manager (OVCCM) is a PC software configuration management solution that provides software and HP hardware management features, including OS image deployment, patch management, remote control, HP hardware driver and BIOS updates, software distribution and usage metering all from an integrated web-based console.
This guide introduces OVCCM, shows you how to setup and install the product components, and provides detailed information and instructions for using the Management Console, Publisher, Application Self-Service Manager and the Image Preparation Wizard. See the following section for an overview of OVCCM features and components:
• Client Configuration Manager Overview on page 19
Audience This guide is intended for administrators who will be installing, configuring, and using OVCCM.
Summary
Chapter 1, Introduction
This chapter contains an overview of OVCCM and its available features and components.
Chapter 2, Installing Client Configuration Manager
This chapter provides detailed steps for installing and configuring OVCCM and its components.
17

Chapter 3, Getting Started
This chapter provides quick start instructions for OVCCM, including where to start, what to do first, and how to begin using the Management Console.
Chapter 4, Management
This chapter provides a closer look at the Management tab of the Management Console and each of its functions.
Chapter 5, Reporting
This chapter contains instructions for how to create and view reports using the Reporting section of the Management Console.
Chapter 6, Configuration
This chapter contains information about your OVCCM installation, console access, and patch, hardware, and reporting settings.
Chapter 7, Wizards
This chapter includes step by step instructions for each of the OVCCM wizards.
Chapter 8, Preparing and Capturing OS Images
This chapter explains how to prepare and capture operating system images for deployment to devices in your environment.
Chapter 9, Using the Publisher
This chapter includes instructions for using the OVCCM Publisher.
Chapter 10, Using the Application Self-Service Manager
This chapter contains instructions for how to use the Application Self-Service Manager (installed with the Management Agent).
Chapter 11, Settings Migration
Thic chapter contains information for the backup and restoration of user settings using OpenView Settings Migration Manager and the Settings Migration Utility.
18 Chapter 1

Chapter 12, FAQs
This chapter includes frequently asked questions regarding common management tasks available when using OVCCM and its components.
Chapter 13, Troubleshooting
This chapter includes information and steps for resolving common issues encountered while using OVCCM.
Appendix A, About Double Byte Character Support
This appendix includes information about double-byte character support.
Client Configuration Manager Overview OVCCM is available in two product levels, Basic and Premium. Information for both product levels is included in this guide. The following sections detail what OVCCM features are available with each license:
• Basic License Features on page 20
• Premium License Features on page 21
The following sections contain summary information about each OVCCM component:
• The Client Configuration Manager Management Console on page 22
• Management Agent on page 24
• Configuration Management Administrator Publisher on page 26
• The Image Preparation Wizard on page 27
• The Settings Migration Manager on page 27
Introduction 19

Figure 1 OVCCM Environment
Basic License Features
A Basic product level license offers the following management capabilities:
• Hardware and software inventory Hardware and software inventory collection is available for managed HP devices, including BIOS configuration information. The inventory information collected on devices is viewed through a central console. Reporting tools present the data in detailed or graphic views that can be easily filtered to show devices matching particular criteria.
• Hardware alert reporting Devices managed by OVCCM Basic can be configured centrally to report hardware alerts, such as fan failure or chassis opening, on the client device or to the central console. Using the HP Client Management
20 Chapter 1

Interface (CMI), this provides an administrator with the ability to target a system for repair before other hardware components are affected.
• Softpaq management Automatically acquire applicable Softpaqs for devices in an environment, determine whether or not a device requires a Softpaq to update the BIOS, device drivers, or HP provided applications, and deploy the Softpaqs to the device, all from a central console. The reporting area of the console provides information on which acquired and applicable Softpaqs have or have not yet been applied to a device.
• BIOS Management OVCCM Basic allows you to apply a password to protect the BIOS, adjust boot order on a device, enable Wake-on-LAN, or adjust other BIOS configuration settings. OVCCM can determine current BIOS settings for HP devices in the environment and update the BIOS settings to the desired configuration.
• ProtectTools management Configure ProtectTools security settings.
• Remote management Administrators can take control of problem devices with integrated remote control capabilities in the console. Beyond remote control, administrators have additional power management capabilities built in to the console, such as the ability to power down or reboot devices, and Wake-On-LAN.
• Thin client management Deploy Operating Systems and software to HP thin client devices running Windows XPe, CE and embedded Linux.
Premium License Features
A Premium product level license includes all of the functionality available with a Basic license detailed above, as well as the following additional features:
• OS deployment Deploy Windows 2000 or Windows XP to PC client devices. Operating systems can be deployed to bare metal devices (no existing operating system) or to devices currently running an existing Windows operating system.
• Settings migration User settings and files can be moved from machine to machine or
Introduction 21

migrated from OS to OS for an in place migration on the same device. Migration of settings is supported across product versions. For example, settings can be migrated from Office XP to Office 2003.
• Software deployment Deploy packaged software to managed devices in an environment. Software can be distributed to locally or remotely connected PCs. If a device is on the network, but not powered on when the deployment job is run, it can be powered on as part of the deployment process.
• Microsoft patch management OVCCM Premium provides the ability to manage Microsoft patches in an environment. Patches are automatically acquired from Microsoft. After acquisition, managed devices determine patch compliance, and patches can be deployed to devices. After patches are deployed, they are regularly verified to ensure the device is protected against the security threat addressed by the patch.
• Inventory and software usage collection In addition to hardware and software inventory collection, OVCCM Premium can collect software usage information. Usage information can be used to determine license compliance or determine which software licenses are required in an environment. Administrators can determine if they have too many or not enough software licenses with OVCCM’s usage management tracking and reporting capabilities.
• Remote content management To better facilitate remote offices, OVCCM Premium provides the ability to deploy Infrastructure Servers to deliver resources. This allows for client devices to get their resources from a more local source instead of pulling resources over slower wide area network connections.
The Client Configuration Manager Management Console
The Management Console is the main web interface used to manage devices, software, operating systems, and patches as well as create and view reports based on those managed devices.
Review the Management Console areas displayed in the figure below.
22 Chapter 1

Figure 2 OVCCM Management Console
Legend
a Console Tabs - the tabs across the top of the console allowing you to navigate to the three main console areas
b Workspace Tabs - tabs displayed within each section
c Contents - the available sections within a console tab
d Workspace - main area where contents are displayed
The Reporting tab of the console has a slightly different layout than the Management and Configuration tabs. Search and Display options appear on the left and the report query results are displayed in the workspace on the right.
Introduction 23

Figure 3 Reporting section of the Management Console
Management Agent
The Management Agent is used to manage devices that have been imported into OVCCM. An administrator deploys the Management Agent to a device then entitles and installs software and patches to that device or device’s group.
• Application Self-Service Manager When the Management Agent is deployed to a device, the Application Self-Service Manager is installed and made available for a user to manage software that has been entitled to that device.
See Using the Application Self-Service Manager on page 231 for more information.
24 Chapter 1

Figure 4 CM Application Self-Service Manager
Installing Software
There are two ways in which software is installed to a managed device.
1 A user selects the entitled software from the Application Self-Service Manager and installs them at their discretion. See Using the Application Self-Service Manager on page 231 for more information.
2 An administrator entitles and deploys software to a managed device directly from OVCCM without requiring any end-user interaction. See Software Management on page 78 for more information.
Introduction 25

Configuration Management Administrator Publisher
The Publisher is used to publish software, operating system images, BIOS configuration settings, or HP Softpaqs into the OVCCM database. Software services can then be entitled and deployed to managed devices within your environment.
A service is any entry in the Software Library, Patch Library, or OS Library. A service import deck or export deck contains all components necessary to install a particular service (files and folder structures, for example).
The Publisher should be installed to the device from which you plan to select and configure software services. You can install the Publisher using the Configuration Management Administrator installation file included on the OVCCM installation CD, or by using the CM Administrator Publisher service that is available in the Software Library for distribution to a managed device.
Figure 5 The Publisher
See Using the Publisher on page 213 for more information.
26 Chapter 1

• Configuration Management Agent Explorer The Agent Explorer is a component of the CM Administrator and is installed along with the Publisher. It is available to aid with troubleshooting and problem resolution and should not be used without direct instructions from HP Support.
The Image Preparation Wizard
The Image Preparation Wizard prepares and captures operating systems locally on a device. The wizard is part of the Image Preparation Wizard CD ISO that is available on the OVCCM CD-ROM.
See Preparing and Capturing OS Images on page 179 for detailed instructions.
The Settings Migration Manager
Use the Settings Migration Manager on the OVCCM server to define a template for capturing user settings for applications and operating systems on managed devices.
Introduction 27

Figure 6 Settings Migration Manager
When defined, deploy the Settings Migration Utility service to managed devices. Use the utility to backup and restore settings based on the configuration template defined on the OVCCM server.
See Settings Migration on page 249 for more information.
Getting Help
Click the Help button in the upper right corner of any window to open the OVCCM online help.
28 Chapter 1

Figure 7 OVCCM console online help
In addition to the console, the Publisher, Application Self-Service Manager and Image Preparation Wizard each contain specific online help based on information in this guide.
Introduction 29

30 Chapter 1

2 Installing Client Configuration Manager
This chapter explains how to install and configure the HP OpenView Client Configuration Manager and its components. Each of the following sections contains specific installation instructions and requirements for OVCCM, Publisher, and the Management Agent:
• System Requirements on page 31
• Installing Client Configuration Manager on page 34
• Installing the Publisher on page 39
• Manually Installing the Management Agent on page 41
System Requirements
OVCCM is recommended for managing software, patches, and inventory for up to 10,000 devices.
Server
• Dedicated server with dual processors, minimum 2GHz CPU
• 4 GB RAM
• Windows 2000 Server, Windows 2000 Advanced Server, Windows Server 2003 Standard Edition, Windows Server 2003 Enterprise Edition
Database
• Microsoft SQL Server 2000 SP3 or above locally installed or remotely accessible from the OVCCM server (SQL Server Personal Edition is recommended only for testing or demonstration purposes).
• SQL Server must be configured to use mixed mode authentication.
31

If you are installing OVCCM to Windows 2000 Server, assure that the local system has the latest Microsoft Data Access Components installed (this is required to access SQL Server remotely). Visit www.microsoft.com for more information.
Target Devices
• Devices to be managed should have Windows 2000 Professional with Service Pack 4 or Windows XP Professional installed.
• HP Thin Client devices to be managed should have Windows CE, XPe, or Embedded Linux installed.
• File and Print Sharing should be enabled.
• For target devices running Windows XP that are not part of an Active Directory, Simple File Sharing must be disabled.
• TPM enabled systems require Infineon Driver version 2.00 or higher.
32 Chapter 2

OVCCM uses several TCP ports for communication to managed devices. If corporate or personal firewall software is in place, then exclusions must be made.
Client device: If the client device has a personal firewall installed then the following port must be excluded for inbound traffic:
• TCP 3463
The following ports must be excluded to enable remote deployment of the Management Agent:
• TCP 139 and 445
• UDP 137 and 138
In addition to this port, the following program files must be excluded from the firewall:
• C:\Program Files\Novadigm\RadUIShell.exe
• C:\Program Files\Novadigm\Radexecd.exe
• C:\Program Files\Novadigm\nvdkit.exe
• C:\Novadigm\ManagementAgent\nvdkit.exe
OVCCM server: If a corporate firewall is installed, then the following ports must be excluded for TCP traffic on the server: 3460, 3464, 3465, 3466, 3467, 3468, 3469, 3470 and 3480
Installing Client Configuration Manager 33

Windows XPE thin client devices ship with Sygate firewall pre-installed. Sygate must be configured to allow OVCCM to operate.
1 Log on to Windows XPE as Administrator.
2 Right-click the Sygate icon in system tray and select Advanced Rules…
3 On the General tab:
⎯ Add description Allow OVCCM All
⎯ Select Allow this traffic
4 On the Applications tab, use the browse button to add the following applications from C:\Program Files\Novadigm:
⎯ Nvdkit
⎯ Radconct
⎯ Radpinit
⎯ Radexecd
⎯ Radstgrq
5 Make sure each item is selected (with a check mark next to each).
6 Click OK to save the new rule.
7 Click OK to exit.
8 Right-click the Enhanced Write Filter (EWF) icon in system tray and select commit. You are prompted to reboot. This will write your changes to the flash memory.
Installing Client Configuration Manager The next sections describe the steps required for installing and configuring OVCCM. Steps 1 and 2 must be completed in order.
1 Pre-Installation – Database Setup on page 35
2 Installing Client Configuration Manager on page 35
3 Installing the Publisher on page 39
34 Chapter 2

Task 1 Pre-Installation – Database Setup
Before you can install OVCCM, you must first set up your SQL Server database. To do this, attach the supplied database file (CCMDB_Data.MDF) to the SQL Server you will be using for OVCCM.
To attach the OVCCM database
1 From the OVCCM media, copy the Database folder to a location that your SQL Server can access.
2 Open SQL Server Enterprise Manager, and under the desired SQL Server (for example, local) click to highlight Databases.
3 From the File menu, click Action>All Tasks>Attach Database.
4 Browse to the Database folder that you copied, and select CCMDB_Data.MDF.
— Configure the database attachment to attach as CCMDB with the database owner name sa (or the appropriate name assigned by your database administrator).
The database owner name may not be sa if you are using Windows Authentication.
— The SQL Server name, admin user ID and password are required during OVCCM installation.
Now the database is attached. The next section will describe the OVCCM installation in detail.
Task 2 Installing Client Configuration Manager
Install OVCCM to a dedicated server in your environment.
Before installing OVCCM, you must first set up your SQL Server database. See the previous section for database setup instructions.
To install OVCCM
1 On the OVCCM media, double-click hpccm.exe.
The Welcome window opens.
2 Click Next.
The License Agreement window opens.
Installing Client Configuration Manager 35

3 Read and accept the License Agreement, and click Next.
The User Information window opens.
4 Enter your User Information and the location of your license file, and click Next.
The license file must be named license.nvd. If your license file has a different name, rename the file to license.nvd.
The ODBC Connection Configuration window opens.
36 Chapter 2

5 Configure an ODBC DSN connection to your OVCCM database. Enter the SQL Server name, the user account, and the user password and click Next.
The Target Drive window opens.
6 Select the target installation drive, and click Next.
The Proxy Configuration window opens.
7 If you need to use an Internet proxy to access the Internet, click Yes to display the Proxy Details and Advanced settings. Otherwise, accept the default No, and continue with step 10.
Installing Client Configuration Manager 37

8 Fill in the required Proxy Details and Advanced Proxy settings, if required, and click Next.
The OVCCM Server Hostname window opens.
9 Enter the hostname to be used by client computers connecting to this server.
This hostname would typically be setup by your network administrator as a static DNS entry, for example, OVCCM.acmecorp.com. This allows client computers to continue to access the OVCCM server in the event of a computer name or IP address change.
10 Click Next.
The Ready to Install the Application window opens.
11 If you want to change any of the installation settings click Back. When you are ready to install, click Next.
12 OVCCM is installed. Click Close to exit the application.
Launching the Client Configuration Manager Console
If you are launching OVCCM locally, you can double-click the HP OpenView Client Configuration Manager Console desktop icon.
Alternatively, you can access the OVCCM Console using a Web browser from any device in your environment (Microsoft Internet Explorer 6 or above is required).
38 Chapter 2

• Go to http://OVCCMhost:3480/CCM
Where OVCCMhost is the name of the server where OVCCM is installed.
At the Log In page, enter your user name and password and click Sign In. By default, the user name is admin and the password is secret.
Note about Windows 2003 Server: To allow local access to OVCCM on a device with Windows 2003 Server installed, make sure to check Bypass proxy server for local address within the Local Area Network (LAN) Settings for that device.
In order to view the Reporting section graphical reports, Java Runtime or Virtual Java Machine is required. For more information, go to http://java.com/en/index.jsp.
Removing Client Configuration Manager
Use the OVCCM installation program (hpccm.exe) to remove OVCCM from your server.
If you use the Windows Control Panel applet, Add/Remove Programs to remove OVCCM, some files and folders will be left on the server and must be removed manually (the directory C:\Novadigm and any files that were added or changed since the initial installation).
To remove OVCCM from your server
1 On the OVCCM server, double-click hpccm.exe.
2 Select Remove and click OK.
OVCCM is removed from your server.
Task 3 Installing the Publisher
Install the Publisher to the location from which you will be publishing software to OVCCM.
In addition to the installation file included with the product CD, a Publisher service, CM Administrator Publisher, is available in the OVCCM Software Library for distribution to a managed device. Use either of these methods to install the Publisher, explained in the following sections:
Installing Client Configuration Manager 39

• To install the Publisher using the installation program on page 40
• To install the Publisher using the Software Publisher service on page 41
To install the Publisher using the installation program
1 On the device you wish to install the Publisher, open the OVCCM media to the RadAdmin directory and double-click Radadmin42i_CCM.msi.
The Welcome Window opens.
2 Click Next to begin the installation.
The End-User License Agreement window opens.
3 Read and accept the License Agreement, and click Next.
4 Enter the IP address or hostname of your OVCCM server.
The default port 3464 should not be changed.
5 Click Next.
The Ready to Install the Application window opens.
6 Click Install to begin the installation.
7 When the installation is complete, click Finish.
40 Chapter 2

To install the Publisher using the Software Publisher service
1 Manage the target device by deploying the Management Agent. See Deploying the Management Agent on page 60 for details.
2 Entitle the Software Publisher service to the device. First add the device to a group and assign entitlement. See Group Management on page 65 for more information.
3 Deploy the CM Administrator Publisher service that is available in the OVCCM Software Library. See Software Management on page 78 for instructions on deploying software.
After it is deployed, you can use the Publisher to publish software, HP Softpaqs, BIOS settings, and OS image services.
Accessing the Publisher
• Access the Publisher using the Start menu:
Start > All Programs > HP OVCM Administrator > CM Adminitrator Publisher
Log in to the Publisher using the OVCCM Management Console user name and password. By default, the user name is admin and the password is secret.
For additional Publisher information, see Using the Publisher on page 213 or refer to the Publisher online help.
Manually Installing the Management Agent To manage devices not always connected to the network, install the Management Agent manually. A separate file is included with the OVCCM media to install the required components.
After the Management Agent is installed, client devices are added to the OVCCM database automatically.
The Management Agent cannot be deployed to Thin Client devices and must be installed manually. See Installing the Management Agent on Thin Clients on page 42 for installation instructions.
Installing Client Configuration Manager 41

To install the Management Agent manually
1 Use a command line and go to the RadAgent directory of the OVCCM media.
2 Type setup.cmd host, where host is the IP address or hostname of your OVCCM server.
3 Hit Enter.
The Management Agent is installed and the device is ready for management using OVCCM.
Installing the Management Agent on Thin Clients
In addition to devices not always connected to the network, you will need to manually install the Mnagement Agent to any Thin Client devices you want to manage.
Embeded Linux
Installation of the OVCCM Management Agent requires minimum free space of 3 MB on the /mnt file system. Certain thin client models and related images do not have enough space to install the agent. Currently, models that have only a 32MB flash memory cannot install the agent locally. See notes on running from an NFS share below, and restrictions on using Local Service Boot (LSB) for OS deployment.
Current models:
• Model T5525: 256MB flash memory and can be used to install the agent locally.
• Model t5515: supports a 32MB and 128MB image. The 128MB image can be used to install the agent locally.
• Model t5125: 32MB flash memory and cannot install the agent locally.
To install the Management Agent on Embedded Linux
1 Login to the target thin client device as root.
2 Create a new directory called /mnt/opt/OVCM.
3 Copy the contents of ThinClient.tar (located on the OVCCM media in the /ThinClient/Linux directory) to /mnt/opt/OVCM.
42 Chapter 2

Depending on your device model, you may have to un-tar these files from /tmp or on another machine as some models do not have sufficient disk space to contain both the tar file and its exploded contents (would require approximately 7-8 MB free). After un-tarring, you can delete the ThinClient.tar.
4 Change the current diretory to /mnt/opt/OVCM and run the installation by typing:
./install –i OVCCM_Server
Where OVCCM_Server is the hostname or IP address of the OVCCM server.
The Management Agent is installed.
These devices ship without the ability to contact and register with a DNS server. As such, you may not be able to ping this device. Also, the hosts file created on the factory image has 'localhost.localdomain' as its default hostname, and its (real) assigned hostname as an alias. As a result, the Management Agent registers the device as localhost.localdomain. You can switch the order in the hosts file to reflect the assigned hostname by placing it first in the list for the 127.0.0.1 entry
Management of these devices requires that the BIOS contain a valid serial number and machine UUID (setting asset tag is also recommended). Without these settings, OS deployment may not work properly.
If you are using a model that has only 32MB flash memory, you will not be able to install the Management Agent locally. You will also not be able to use the Local Service Boot option to deploy an OS image and must therefore use PXE for that purpose.
To run the agent remotely from an NFS share:
1 Update the install script and modify the MEDIA_RAM_ROOT and INFRA_MEDIA_ROOT variables to point to the NFS directory.
2 Create the directory /mnt/opt/OVCM and place the install script into this location, and place the rest of the installation package (thinclient.tar) into the NFS directory.
3 Run install as described in step 4 above.
Installing Client Configuration Manager 43

To remove the Management Agent from Embedded Linux
Use the uninstall script to remove the Management Agent from Embedded Linux.
1 Login to the Embedded Linux device as root.
2 Go to /tmp/OVCM/IDMSYS.
3 Type ./uninstall and hit Enter.
The Management Agent is removed.
Windows XPe
To install the Management Agent to Windows XPe
1 Access the OVCCM media from the Windowx XPe Thin Client device.
2 On the OVCCM media, go to SystemDrive:\ThinClient\XPE.
3 Double-click setup.exe.
4 Follow the steps in the installation.
5 When prompted for the IP address and Port number, type the IP address and port number for your OVCCM server.
The Management Agent is installed.
To remove the Management Agent from Windows XPE
Use the installation program setup.exe to remove the Management Agent from Windows XPE.
1 Double-click setup.exe
2 Select Remove.
3 Click OK.
The Management Agent is removed.
Windows CE
To install the Management Agent to Windows CE
1 Access the OVCCM media from the Windows CE thin client device.
44 Chapter 2

2 On the OVCCM media, go to SystemDrive:\ThinClient\WinCE.
3 Double-click radskman.X86.CAB.
4 Type the IP address or hostname of the OVCCM server and click OK.
The Management Agent is installed.
To remove the Management Agent from Windows CE
• Use the Windows Control Panel applet Add/Remove Programs to remove the Management Agent from Windows CE.
Configuring PXE for OS Deployment If you will be using PXE to deploy operating system images, use the following instructions to configure your DHCP and TFTP servers.
OVCCM assumes a TFTP server and DHCP server already exist in your environment. These are not included with the OVCCM media.
To configure PXE for OS deployment
• Configure your DHCP server to use a Boot File (DHCP Option 067) and a Boot Server (DHCP Option 066).
— The Boot file used in OVCCM is rombl.0
— The Boot Server must point to the IP address running the TFTP Server.
• Configure the TFTP server to serve the boot files.
— Copy the contents of the \OSManagement\PXE\ directory from the OVCCM CD-ROM to your TFTP server.
— In the newly copied \linux.cfg directory, edit the file, default to point to your OVCCM server. Note that this configuration file must use the IP address and not the hostname of your server. An example default configuration file follows.
DEFAULT bzImage
APPEND initrd=rootfs.gz root=/dev/ram0 rw ip=dhcp ISVR=192.168.1.11 ISVRPORT=3469
Installing Client Configuration Manager 45

In the example above, the OVCCM server IP address is 192.168.1.11 and the port number used for OS management is 3469.
PXE uses DHCP broadcast, multicast, or UDP protocols and receives broadcasts. This means that if broadcast traffic is restricted between subnets, you must place PXE severs in each subnet, enable broadcasts (which may not be an option), or use a DHCP helper function to pass DHCP broadcast traffic. This situation is similar to that of standard DHCP servers and is probably well understood by your network administrator.
For information about PXE industry standards, see: ftp://download.intel.com/design/archives/wfm/downloads/ pxespec.pdf
46 Chapter 2

3 Getting Started Now that you have installed and configured OVCCM, you are ready to start using the Management Console to manage your Windows client environment. The next sections get you started using OVCCM and introduce you to the essential tasks you will need to begin.
• Logging In on page 47
• Quick Start Tasks on page 48
Logging In Access OVCCM using the desktop icon, or by using a browser from any device in your environment with network access to the OVCCM server.
• Go to http://OVCCMhost:3480/CCM, where OVCCMhost is the name of the server where OVCCM is installed.
At the Log In page, enter your user name and password and click Sign In. By default, the user name is admin and the password is secret.
To learn how to change the password and add additional users, See Configuration on page 133.
The OVCCM Management Console may open additional browser instances when you are running wizards or displaying alerts. To access these wizards and alerts, be sure to include OVCCM as an Allowed Site in your browser’s pop-up blocker settings.
For security reasons, OVCCM logs out the current user automatically after 20 minutes of inactivity, after which time you will need to log in again to continue using the console.
47

Quick Start Tasks Begin managing your Windows client environment right away using the quick start tasks described in this section.
Some tasks require a premium license.
When you have completed these tasks, you will:
• have managed devices by importing them into OVCCM and deploying the Management Agent
• have configured the schedules needed for inventory and patch management
• know where to begin to publish software and acquire patches
• have been introduced to creating device groups then deploying software and patches to devices in those groups
• know where to create reports for all managed devices in your environment
The following sections discuss these tasks and point you to related sections for additional information:
1 Import Devices on page 49
2 Deploy the Management Agent on page 49
3 Configure Schedules on page 50
4 Publish Software and Acquire Patches on page 51
5 Create Groups on page 51
6 Entitle and Deploy Software or Patches on page 52
7 Generate and View Reports on page 53
48 Chapter 3

Figure 8 Quick Start tasks at a glance
Task 1 Import Devices
In order to collect inventory information or deploy software and patches, you first need to make OVCCM aware of the devices in your environment by importing them.
• From the Device Management General tab, click Import to launch the Import Device Wizard.
• Follow the steps in the wizard on page 158 to import devices.
Most tasks create a job than can be monitored in the Currnet Jobs and Past Jobs tabs or in the Job Management section.
When devices have been imported, Deploy the Management Agent to manage software, patches and inventory.
Task 2 Deploy the Management Agent
When devices are imported, deploy the Management Agent.
• From the Device Management General tab, click Deploy to launch the Agent Deployment Wizard.
Getting Started 49
• Follow the steps in the wizard on page 159 to deploy the Management Agent to your imported devices.
Now that you have begun to manage devices, Configure Schedules for inventory collection, patch compliance scanning and patch acquisition.
Task 3 Configure Schedules
To initiate inventory and patch acquisition schedules, use the Software/Hardware Inventory Wizard and Configuration tab.
To configure the inventory schedule
• From the Devices tab in the Device Management area, select managed devices (or select a Group from the Group Management, Groups tab).
toolbar button, then select Discover Software/Hardware Inventory to launch the Software/Hardware Inventory Wizard.
• Click the Inventory Collections
• Follow the steps in the wizard on page 160 to define software and hardware inventory collection for your devices and groups.
To configure patch acquisition schedule and settings
• Use the Configuration tab, Patch Management section to configure patch acquisition settings and schedule.
— Use the Schedule tab to enter a schedule for patch acquisitions.
— In the Settings tab, enter the required Windows patch and HP Softpaq acquisition settings.
Microsoft Patch Management requires a premium level license.
To configure a patch compliance discovery schedule
• From the Devices tab in the Device Management area, select managed devices.
• Click the Inventory Collections toolbar button, then select Discover Patch Compliance to launch the Patch Compliance Discovery Wizard.
• Follow the steps in the wizard on page 161 to create a patch compliance schedule for your devices and groups.
When schedules are configured, you can Publish Software and Acquire Patches.
50 Chapter 3

Task 4 Publish Software and Acquire Patches
Before you can deploy software and patches to managed devices, you must populate the Software Library and Patch Library.
• Use the CM Administrator Publisher to publish software into the OVCCM database.
— Launch the Publisher on the machine from which you plan to configure and publish software services. Refer to the Publisher online help or Chapter 9, Using the Publisher for more information.
Publishing software and operating systems requires a premium level license. With a Basic license, you can publish HP Softpaqs or BIOS settings (software and OS images can be published with Basic license for thin client devices only).
• Populate the Patch Library by acquiring patches from HP and Microsoft sources.
— From the Management tab, Patch Management section, click Acquire. Patches are downloaded and added to the Patch Library. OVCCM automatically downloads patches according to the acquisition schedule configured in the previous step, Configure Schedules.
Patches should be acquired initially to an OVCCM Server in a nonproduction lab environment for evaluation to prevent possible performance issues.
When software and patches are available in each library, Create Groups to entitle software and patches for deployment.
Task 5 Create Groups
To deploy software or patches, you must create a group that includes the target devices, and then entitle software or patches to that group.
• From the Group Management General tab, click Create a New Static Group. This will launch the Group Creation Wizard. Follow the steps in the wizard on page 164 to create a static group.
• OVCCM also supports dynamic device groups that are based on discovered devices (discovery group) or on selected inventory criteria (reporting groups). These groups are also created using the Group Creation Wizard. See Group Management on page 65 and Reporting on page 117 for additional information.
Getting Started 51

When the group has been created, Entitle and Deploy Software or Patches to the devices in the group.
Task 6 Entitle and Deploy Software or Patches
In the Group Management section, Groups tab, click the Group description to open the Group Details window. From here, you can entitle and deploy software or patches.
A premium level license is required to deploy software and patches. A Basic license allows for the deployment of BIOS settings and HP Softpaqs.
To entitle and deploy software
• Use the Group Details, Software tab to entitle software.
toolbar button to select software services and make them available to that group. Entitled software is displayed in the Software tab list and is is available to end users in the Application Self-Service Manager, but is not automatically deployed. This enables you to create a managed software catalog and allow users to determine what optional software to deploy at what time.
— Click the Add Software Entitlement
— To deploy software, select the software to deploy, then click the Deploy Software toolbar button. This opens the Software Deployment Wizard. Follow the steps in the wizard on page 168, to deploy software to devices in that group. Deployed software is automatically installed on end user devices.
To entitle and deploy patches
• Use the Group Details, Patches tab to entitle and deploy patches.
toolbar button to select patches and make them available to that group. Entitled patches are then displayed within the Patches tab list.
— Click the Add Patch Entitlement
— To deploy patches, select the patches to deploy, then click the Deploy Patches toolbar button. This opens the Patch Deployment Wizard. Follow the steps in the wizard on page 171 to deploy patches to devices in that group.
52 Chapter 3

Patch compliance and enforcement can be configured using the Patch Deployment Wizard.
Entitled patches are not shown in the Application Self-Service Manager catalog.
You have now successfully used OVCCM to deploy software and patches. Learn about creating reports by following the instructions in the section, Generate and View Reports below.
Task 7 Generate and View Reports
Use the Reporting tab to generate and view reports based on managed device information.
• Follow the instructions in Reporting on page 117 to generate device reports.
To generate a quick example report, click View Managed Devices in the Inventory Information area to display a list of all devices that have the Management Agent installed.
When a list of devices is generated, you can apply more filters by using the options on the left or by clicking any of the device column details.
When a report is generated, click the Create a New Dynamic Reporting Group toolbar button to create a dynamic group of devices in the report. This will open the Group Creation Wizard. Follow the steps in the wizard on page 164 to create the Reporting Group.
Getting Started 53

54 Chapter 3
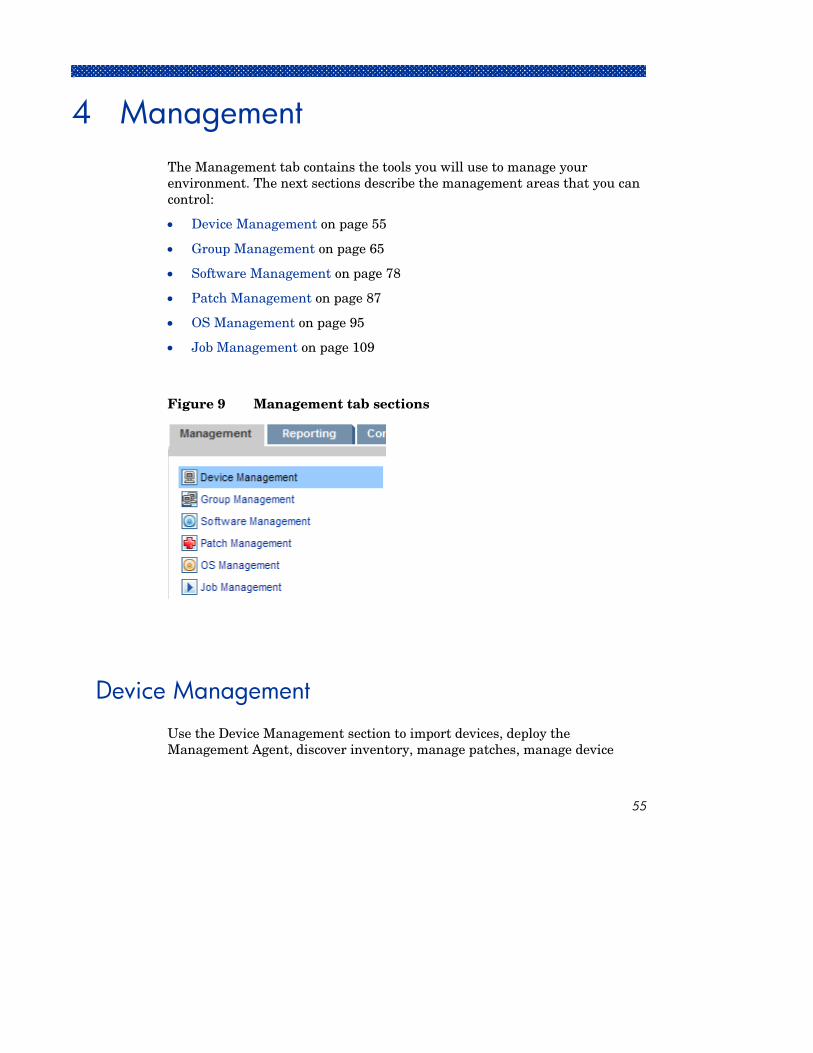
4 Management The Management tab contains the tools you will use to manage your environment. The next sections describe the management areas that you can control:
• Device Management on page 55
• Group Management on page 65
• Software Management on page 78
• Patch Management on page 87
• OS Management on page 95
• Job Management on page 109
Figure 9 Management tab sections
Device Management Use the Device Management section to import devices, deploy the Management Agent, discover inventory, manage patches, manage device
55

power options, control devices remotely, collect application usage information, and view reports based on all managed devices.
Device Management contains the following tabs:
• General on page 56
• Devices on page 58
• Current Jobs on page 64
• Past Jobs on page 65
Figure 10 Device Management section of the Management tab
General
Use the General tab to add devices, deploy management agents, view current and past Agent Deployment jobs, and view reports about your managed devices.
56 Chapter 4

The Summary section of the workspace shows the number of devices in your database, the number of managed devices (devices that have a management agent installed), and the total number of current jobs.
To import a device
• In the Common Tasks area, click Import. This will launch the Import Device Wizard.
Follow the steps in the wizard on page 158 to add new devices to OVCCM.
To deploy the Management Agent
• In the Common Tasks area, click Deploy. This will launch the Agent Deployment Wizard.
Follow the steps in the wizard on page 159 to deploy the Management Agent to devices in your database.
To deploy the Management Agent to remote devices you need access to administrative shares. Windows XP includes a security feature, Simple File Sharing (SFS) which blocks access to these shares. SFS is enabled by default for Windows XP devices that are part of a workgroup, and disabled automatically for devices that are joined to an Active Directory domain. If your target devices are running Windows XP and they are not part of an Active Directory domain, then you must turn off SFS to allow installation of the Management Agent. The following Microsoft knowledge base article provides more details on how to configure SFS:
http://support.microsoft.com/default.aspx?scid=kb;EN-US;q304040
The Management Agent cannot be remotely deployed to thin client devices and must be installed manually using the installation programs included in the \ThinClient directory on the OVCCM media.
Management 57

Devices
The Devices tab contains a table of all devices that have been imported into OVCCM.
When OVCCM is installed, the host server is added automatically to the Devices list. This device definition is required by OVCCM and cannot be removed.
Newly imported devices (imported within the last seven days) can be recognized by the word ‘new’ in parentheses (new) to the right of the device name.
Not all device information is available until a Management Agent is deployed.
Use the Devices toolbar to import devices, deploy or remove the Management Agent, discover inventory, manage patches, mange device power options, control devices remotely, discover application usage, and remove devices from the database.
Click any column heading in the device list to change the sort order or use the navigation buttons at the top of the table to jump to a specific section.
If computer names in your environment contain more than 15 characters, you may experience unexpected results when using OVCCM to deploy the Management Agent or create groups. HP recommends that computer names contain no more than 15 characters. For more information, refer to the Microsoft Knowledge Base article:
http://support.microsoft.com/default.aspx?scid=kb;en-us;188997
Use the Search function to narrow the list of devices. The first search box will always contain the column headings available depending on which section of the console you are currently in. The second box contains search parameters you can use to customize your query.
is displayed at the bottom of the table when you are viewing your query results. Filtered Results
58 Chapter 4
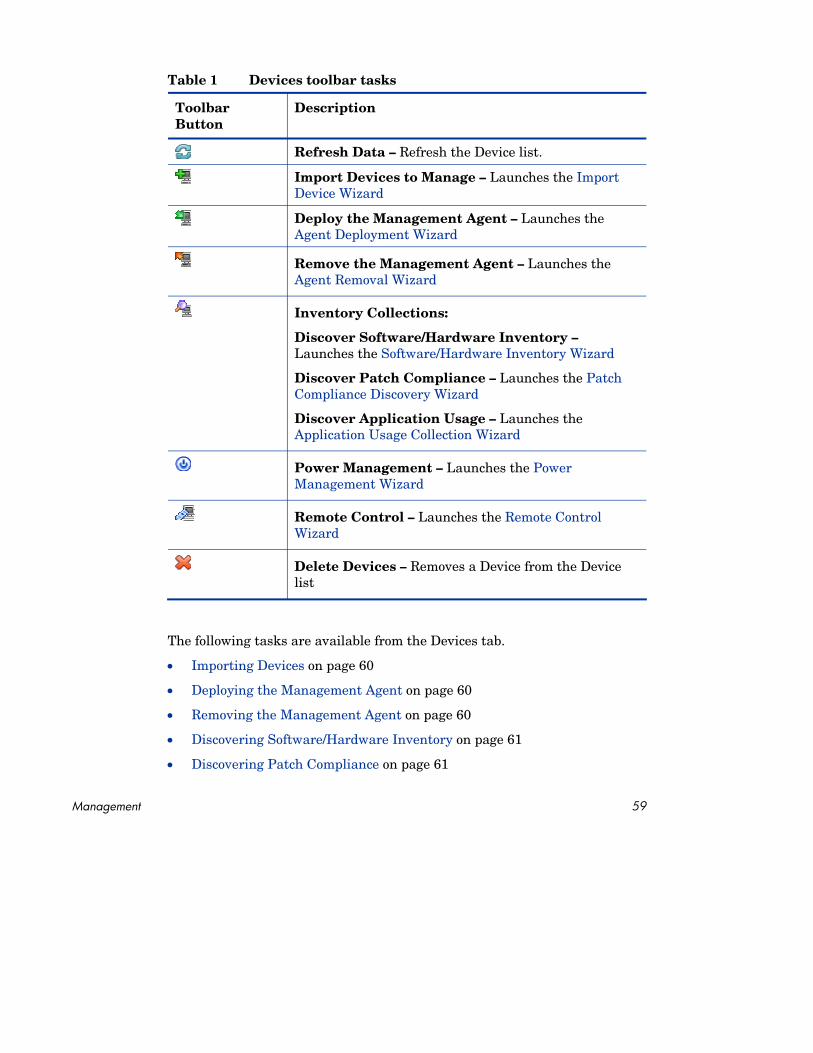
Table 1 Devices toolbar tasks
Toolbar Button
Description
Refresh Data – Refresh the Device list.
Import Devices to Manage – Launches the Import Device Wizard
Deploy the Management Agent – Launches the Agent Deployment Wizard
Remove the Management Agent – Launches the Agent Removal Wizard
Inventory Collections:
Discover Software/Hardware Inventory – Launches the Software/Hardware Inventory Wizard
Discover Patch Compliance – Launches the Patch Compliance Discovery Wizard
Discover Application Usage – Launches the Application Usage Collection Wizard
Power Management – Launches the Power Management Wizard
Remote Control – Launches the Remote Control Wizard
Delete Devices – Removes a Device from the Device list
The following tasks are available from the Devices tab.
• Importing Devices on page 60
• Deploying the Management Agent on page 60
• Removing the Management Agent on page 60
• Discovering Software/Hardware Inventory on page 61
• Discovering Patch Compliance on page 61
Management 59

• Discovering Application Usage on page 62
• Remote Control on page 62
• Power Management on page 63
• Removing Devices on page 63
• Device Details on page 63
Importing Devices
The Import Device Wizard allows you to manually import devices by name or IP address or to discover devices contained within either Active Directory or another LDAP-compliant directory, or within a network domain.
• To import one or more devices into OVCCM, click Import Devices to Manage toolbar button. This will launch the Import Device Wizard.
Follow the steps in the wizard on page 158 to add new devices to OVCCM.
Deploying the Management Agent from the Devices Tab
Use the Agent Deployment Wizard to deploy the Management Agent to devices in your environment.
To deploy the Management Agent
1 Select the check box in the first column to select the devices you want to manage
2 Click the Deploy the Management Agent toolbar button to launch the Agent Deployment Wizard.
3 Follow the steps in the wizard on page 159 to deploy the Management Agent to the selected devices.
Removing the Management Agent
Use the Agent Removal Wizard to remove the Management Agent from devices in your OVCCM database.
60 Chapter 4

To remove the Management Agent
1 Select the check box in the first column to select the devices from which you want to remove the Agent
2 Click the Remove the Management Agent toolbar button to launch the Agent Removal Wizard.
3 Follow the steps in the wizard on page 160 to remove the Management Agent from the selected devices.
Discovering Software/Hardware Inventory
Use the Software/Hardware Inventory Wizard to discover inventory for devices in your OVCCM database.
To discover software and hardware inventory
1 Select the check box in the first column to select the devices for which you want to discover inventory
2 Click the Inventory Collections toolbar button and select Discover Software/Hardware Inventory to launch the Software/Hardware Inventory Wizard.
3 Follow the steps in the wizard on page 160 to discover inventory for the selected devices.
Discovering Patch Compliance
Use the Patch Compliance Discovery Wizard to discover compliance for Devices in your OVCCM database.
To discover and enforce patch compliance
1 Select the checkbox in the first column to select the devices for which you want to target for patch compliance discovery.
2 Click the Inventory Collections toolbar button and select Discover Patch Compliance to launch the Patch Compliance Discovery Wizard.
3 Follow the steps in the wizard on page 161 to discover patch compliance for the selected devices.
4 Use the Reporting tab to view patch compliance reports for the selected devices.
Management 61

Discovering Application Usage
Use the Application Usage Collection Wizard to discover application usage for devices in your OVCCM database. The wizard installs the Collection Agent which then returns usage data defined by filters you create and enable. Additionally, if required, usage data can be obfuscated to ensure privacy. See the Reporting section of the Configuration tab on page 149 for additional information.
Usage data is returned one time for individual devices. Recurring usage data collection is available for groups only. See Discovering Application Usage Data on page 72 for information on collecting usage data for groups.
A premium level license is required for collecting application usage data.
To discover application usage
1 Select the check box in the first column to select the devices for which you want to target for application usage discovery.
toolbar button and select Discover Application Usage to launch the Application Usage Collection Wizard.
2 Click the Inventory Collections
3 Follow the steps in the wizard on page 162 to discover application usage for the selected devices.
4 Use the Reporting tab to view usage reports for the selected devices.
Remote Control
Use the Remote Control Wizard to launch a remote session with any device. The wizard allows you to connect to devices that have either RDP or VNC installed and enabled.
In order to use VNC, Sun Java Plugin for Internet Explorer must be installed. For more information, go to http://java.com/en/index.jsp.
To launch a remote session
1 Select the device from the list then click the Remote Control toolbar button to launch the Remote Control Wizard.
2 Follow the steps in the wizard on page 167 to launch a remote session for the selected device.
62 Chapter 4

The VNC Server installed on the managed device must support the VNC Java applet running on port 5800. To verify this, open a browser window to http://hostname:5800. If the applet is installed, the TightVNC login page opens.
Power Management
Use the Power Management wizard to turn on, turn off, or restart a device.
• Select the device you want to manage and click the Power Management toolbar button to launch the Power Management Wizard.
Follow the steps in the wizard on page 163 to create a Power Management job for the selected devices.
Removing Devices
Use the Devices toolbar to remove devices from your OVCCM database.
To remove devices from OVCCM
1 Select checkbox in the first column to select the devices you want to remove
2 Click the Delete Device(s) toolbar button to remove the devices from OVCCM.
Device Details
On the Devices tab, click any device name to open the Device Details window. The Device Details window presents the configuration model from the perspective of the selected device.
Use the Device details window to:
• view device properties
• view and modify device group membership
• view entitlements
• view a reporting summary
• deploy the Management Agent
• create device management jobs
Management 63

The following areas are available from the Device Details window.
General
The General tab displays common tasks available for the device. Additional configuration tasks are available by clicking any of the other management area tabs.
Properties
The Properties tab displays device properties. Not all device information is available until the Management Agent has been deployed.
Groups
The Groups tab displays all groups to which the current device belongs.
OS
The OS tab displays all operating systems entitled to the device based on the device’s group membership. Deploy OS images using the toolbar provided.
Software
The Software tab lists all entitled software, based on group membership. Use the toolbar buttons to deploy or remove software on the current device.
Patches
The Patches tab displays all entitled patches, based on group membership. Use the toolbar to deploy a patch to the current device.
After a patch is deployed it cannot be removed.
Reporting
The Reporting tab contains summary reports specific to the device you are viewing. For detailed reports, use the Reporting tab of the Management Console.
Current Jobs
Current Jobs displays all active or scheduled Device Management jobs. Device Management jobs target individual devices and can be used to either
64 Chapter 4
deploy or remove a Management Agent or administer software to devices in the OVCCM database.
Click any column heading to change the sort order or use the navigation buttons at the top of the table to jump to a specific section.
For information about Job Controls and Job Status, see Job Management, Current Jobs section on page 110.
Past Jobs
Past Jobs displays all completed Device Management jobs.
Click any column heading to change the sort order or use the navigation buttons at the top of the table to jump to a specific section.
Completed jobs are moved to the Past Jobs list one minute after completion.
Group Management Use the Group Management section to create and manage device groups. Creating device groups eases management and is required to deploy software and patches to managed devices. Group Management contains the following tabs:
• General on page 66
• Groups on page 67
• Current Jobs on page 78
• Past Jobs on page 78
Management 65

Figure 11 Group Management section
General
Use the General area to create new groups, manage existing groups, and view current and completed group management jobs.
Groups can consist of both managed and unmanaged devices.
To create a new static group
• In to Common Tasks area, click Create a New Static Group. This will launch the Group Creation Wizard.
Follow the steps in the wizard on page 164 to create a new device group for software and patch deployment.
To create a new Dynamic Discovery Group
• In the Common Tasks area, click Create a New Dynamic Discovery Group. This will launch the Group Creation Wizard.
Follow the steps in the wizard on page 164 to create a new device discovery group.
66 Chapter 4

To create a new Dynamic Reporting Group
• Use the Reporting tab to first define a query then click the Create a Dynamic Reporting Group toolbar button to begin the Group Creation Wizard. See Creating Dynamic Reporting Groups on page 130, for more information.
• Group TypesGroup Types
OVCCM uses four group types to manage devices.
Internal
Internal Groups are provided by OVCCM. For example, the All Devices group contains all imported devices, by default.
Static
Create static groups by selecting individual devices. To add or remove devices from a static group, you must modify the group membership manually using the Group Details window.
Discovery
A discovery group contains a dynamic list of devices, either managed or unmanaged, from an external source (LDAP, network discovery) according to the parameters you set during the Group Creation Wizard. Discovered devices are automatically added to the OVCCM device list.
Reporting
Create a reporting group from a list of devices returned in a report query. Reporting groups are updated automatically using a group management job. See Creating Dynamic Reporting Groups on page 130 for more information.
Two Reporting groups are included with OVCCM by default: All Windows XP Professional Devices and All Windows 2000 Professional Devices
These groups refresh each hour and will automatically add new managed devices they find that meet the dynamic group requirements.
Groups
The Groups tab lists all created groups. Newly created groups (created within the last seven days) display the word ‘new’ in parentheses (new) to the right of the group name.
Management 67

• Click the description link for any group to view specific group information.
• Click a column heading to sort the group list.
• Use the toolbar buttons to create inventory, patch, and power management jobs for devices in any group.
• Use the Search function to narrow the list of devices. The first search box always contains the column headings available depending on which section of the console you are currently in. The second box contains search parameters you can use to customize your query. Filtered Results
is displayed at the bottom of the table when you are viewing your query results.
The groups you create can determine which devices receive what software or patches based on either device inventory, location, or any other criteria you define. Make sure to plan group creation before you add any devices.
Table 2 Groups toolbar tasks
Toolbar Button
Description
Refresh – Refresh the Groups list.
Create a New Group – Launches the Group Creation Wizard
Deploy the Management Agent – Launches the Agent Deployment Wizard
Remove the Management Agent – Launches the Agent Removal Wizard
Inventory Collections:
Discover Software/Hardware Inventory – Launches the Software/Hardware Inventory Wizard
Discover Patch Compliance – Launches the Patch Compliance Discovery Wizard
Discover Application Usage – Launches the Application Usage Collection Wizard
Power Management – Launches the Power Management Wizard
68 Chapter 4

Toolbar Description Button
Delete Groups – Removes a Group from the Groups list
The following tasks are available from the Groups tab.
• Creating a Group on page 69
• Deploying the Management Agent on page 70
• Removing the Management Agent on page 70
• Discovering Software/Hardware Inventory on page 71
• Discovering Patch Compliance on page 71
• Discovering Application Usage Data on page 72
• Power Management on page 72
• Removing Groups on page 72
• Group Details on page 73
• Group Details Window Tasks on page 75
• Adding and Removing Devices from Static Groups on page 75
• Adding and Removing Software Entitlement from Groups on page 76
• Deploying, Removing, and Synchronizing Software from Groups on page76
• Adding and Removing Patch Entitlement from Groups on page 77
• Deploying Patches to Groups on page 77
Creating a Group
To create a Static Group
• Click the Create a New Group toolbar button then select Create a New Static Group. This will launch the Group Creation Wizard. Groups can becreated for both managed and unmanaged devices.
Follow the steps in the wizard on page 164 to create a new static device group for software and patch deployment.
Management 69

To create a Dynamic Discovery group
• Click the Create a New Group toolbar button then select Create a New Dynamic Discovery Group. This will launch the Group Creation Wizard.
Follow the steps in the wizard on page 164 to create a new Dynamic Discovery group for software and patch deployment.
Deploying the Management Agent to a Group
Use the Agent Deployment Wizard to deploy the agent to a group.
To deploy the Management Agent to a group of devices
1 Select the checkbox in the first column to select the group you want to either manage or redeploy the Management Agent to.
toolbar button to launch the Agent Deployment Wizard.
2 Click the Deploy the Management Agent
3 Follow the steps in the wizard on page 159 to deploy the Management Agent to the selected groups.
Deploying the Management Agent requires device authentication information (user name and password with administrator access). To deploy the Agent to a group, all devices within that group must share the same authentication information.
The Management Agent cannot be remotely deployed to Thin Client devices and must be installed manually using the installation programs included in the \ThinClient directory on the OVCCM media.
Removing the Management Agent from a Group
Use the Agent Removal Wizard to remove the Agent from a group of devices.
To remove the Management Agent from a group of devices
1 Select the checkbox in the first column to select the groups from which you want to remove the Agent.
70 Chapter 4

2 Click the Remove the Management Agent toolbar button to launch the Agent Removal Wizard.
3 Follow the steps in the wizard on page 160 to remove the Management Agent from all devices within the selected Groups.
Discovering Software/Hardware Inventory for a Group
Use the Software/Hardware Inventory Wizard to discover inventory for a group of devices.
To discover software and hardware inventory for a group of devices
1 Select the checkbox in the first column to select the groups for which you want to discover inventory.
2 Click the Inventory Collections toolbar button then select Discover Software/Hardware Inventory to launch the Software/Hardware Inventory Wizard.
3 Follow the steps in the wizard on page 160 to discover inventory for the devices within each selected Group.
4 Use the Reporting tab to view inventory reports for the selected groups.
Discovering Patch Compliance a Group
Use the Patch Compliance Discovery Wizard to discover patch compliance for a group of devices.
To discover patch compliance for a group of devices
1 Select the checkbox in the first column to select the groups for which you want to target for patch compliance discovery.
2 Click the Inventory Collections toolbar button then select Discover Patch Compliance to launch the Patch Compliance Discovery Wizard.
3 Follow the steps in the wizard on page 161 to discover and enforce patch compliance for the devices within the selected Groups.
4 Use the Reporting tab to view patch compliance reports for the selected groups.
Management 71

Discovering Application Usage Data a Group
Use the Application Usage Collection Wizard wizard to discover application usage for devices in your OVCCM database. The wizard installs the Collection Agent which then returns usage data defined by filters you create and enable. Additionally, if required, usage data can be obfuscated to ensure privacy. See the Reporting section of the Configuration tab on page 149 for additional information.
A premium level license is required for collection application usage data.
To discover application usage
1 Select the check box in the first column to select the groups for which you want to target for application usage discovery.
2 Click the Inventory Collections toolbar button and select Discover Application Usage to launch the Application Usage Collection Wizard.
3 Follow the steps in the wizard on page 162 to discover application usage for the selected groups.
4 Use the Reporting tab to view usage reports for the selected groups.
Power Management
Use the Power Management wizard to turn on, turn off, or restart a device.
• Select the Group you want to manage and click the Power Management toolbar button to launch the Power Management Wizard.
Follow the steps in the wizard on page 163 to create a Power Management job for the selected Group.
Removing Groups
Use the Groups toolbar to remove groups from OVCCM.
To remove Groups from OVCCM
1 Select the checkbox in the first column to select the groups you want to remove.
72 Chapter 4

2 Click the Delete Groups(s) toolbar button to remove the Group from OVCCM.
Group Details
Click any Group name to open the Group Details window. This window presents the configuration model from the perspective of the selected group.
Use the Group Details window to view group properties, view and modify device membership, view or modify entitlements, view a reporting summary, or create group management jobs. The following areas are available:
Figure 12 Group Details window
General
The General tab displays common tasks available for the group. Additional configuration tasks are available by clicking any of the other management area tabs.
Management 73

Properties
The Properties tab displays the group name and type.
Group Type
Static: update device membership manually using the Group Details, Devices section.
Reporting and Discovery: to update group membership, use the job controls under the Current Jobs tab to run the discovery job.
Internal: group membership cannot be altered.
Click Save to commit any changes.
Devices
Devices listed in the Devices tab are current members of the group.
• You must manually edit device membership of a Static group.
• Use the job controls under the Current Jobs tab to modify the membership refresh schedule for Dynamic Reporting or Discovery groups.
OS
Operating system images listed in the OS tab are entitled to the group. Use the toolbar buttons to complete group-specific OS entitlement and deployment tasks.
Software
Software listed in the Software tab is entitled to the group. Adding or removing software entitlements affects all existing device members as well as any devices added to the group in the future.
Use the toolbar buttons to add or remove entitlement, synchronize software, or deploy or remove software from devices in the group.
Removing a software entitlement does not automatically remove the software from devices in the group. To remove software, select the target devices and use the Remove Software button. After removing the software, you can remove the entitlement to ensure that the software is no longer available.
Patches
The Patches tab displays all patches entitled to the group.
74 Chapter 4

Use the toolbar buttons to add or remove patch entitlement for the group or to deploy a patch to devices in the group.
After a patch is deployed it cannot be removed from a device.
Reporting
The Reporting tab contains summary reports specific to the group. For detailed reports, use the Reporting tab of the Management Console.
Current Jobs
The Current Jobs tab displays all currently active or scheduled jobs for the group. Use the toolbar buttons to administer any of the available jobs.
Group Details Window Tasks
Use the Group Details window to complete the following tasks:
• Adding and Removing Devices from Static Groups on page 75
• Adding and Removing Software Entitlement from Groups on page 76
• Deploying, Removing, and Synchronizing Software from Groups on page 76
• Adding and Removing Patch Entitlement from Groups on page 77
• Deploying Patches to Groups on page 77
Adding and Removing Devices from Static Groups
Use the Group Details window to update static group membership.
To add devices to a static group
1 In the Group Details window, click the Devices tab.
2 Click Add Device(s) .
3 In the window that opens, select the devices you want to include in the group and click Add Devices.
To remove devices from a static group
1 In the Group Details window, click the Devices tab.
Management 75

2 Select the devices you want to remove from the group and click Remove Device(s) .
Adding and Removing Software Entitlement from Groups
Use the Group Details window to add or remove software entitlement for devices in a group.
To entitle software to a group
1 In the Group Details window, click the Software tab.
2 Click Add Entitlement . The Software Entitlement window opens.
3 Select the software you want to entitle to the group and click Add Entitlement.
To remove software entitlement from a Group
1 In the Group Details window, click the Software tab.
2 Select the software you want to remove entitlement for the group and click Remove Entitlement .
Deploying, Removing, and Synchronizing Software from Groups
Use the Group Details window to deploy, remove, or synchronize software for devices in a group.
To deploy software to a group
1 In the Group Details window, click the Software tab.
2 Select the software you want to deploy and click the Deploy Softwaretoolbar button.
3 To deploy the software to the managed devices within the group, follow the steps in the wizard Software Deployment Wizard on page 168.
To remove software from a group
1 In the Group Details window, click the Software tab.
2 Select the software you want to remove from the managed devices within the group and click the Remove Software toolbar button.
76 Chapter 4
3 To remove the software from the managed devices within the group, follow the steps in the Software Removal Wizard on page 172.
To synchronize software
1 In the Group Details window, click the Software tab.
2 Click the Synchronize Software toolbar button to launch the Software Synchronization Wizard, which will ensure all entitled software is installed to group members and that any new group members receive entitled software.
3 Follow the steps in the wizard on page 170 to set a software synchronization schedule for the group.
Adding and Removing Patch Entitlement from Groups
Use the Group Details window to add or remove patch entitlement for devices in a group.
To entitle patches to a group
1 In the Group Details window, click the Patches tab.
2 Click the Add Entitlement toolbar button. The Patch Entitlement window opens.
3 Select the patches you want to entitle to the group and click Add Entitlement.
Only patches that have not yet been entitled are shown in the Patch Entitlement window. Patches that have already been entitled to the group are not shown.
To remove patch entitlement from a group
1 In the Group Details window, click the Patches tab.
2 Select the patches for which you want to remove entitlement and click the Remove Entitlement toolbar button.
Deploying Patches to Groups
Use the Group Details window to deploy patches to devices in a group.
Management 77

To deploy patches to a group
1 In the Group Details window, click the Patches tab.
2 Select the patches you want to deploy and click the Deploy Patches toolbar button. The Patch Deployment Wizard opens.
3 Follow the steps in the wizard on page 171 to deploy the patches to the managed devices within the group.
After a patch is deployed it cannot be removed from a device.
Current Jobs
Current Jobs displays all active or scheduled Group Management jobs. Group Management jobs target specific groups and are used to administer software to devices in those groups or to refresh the devices in the Dynamic Reporting or Discovery groups that you have created.
Click any column heading to change the sort order or use the navigation buttons at the top of the table to jump to a specific section.
For information about the Job Controls and Job Status, see Current Jobs on page 110.
Past Jobs
Past Jobs displays all completed Group Management jobs. Click the description of any job to display more details about that job’s status.
Completed jobs are moved to the Past Jobs list one minute after they are finished.
Software Management Use the Software Management section to manage software services and software management jobs. Software is entitled to groups of managed devices then either deployed by the administrator using the OVCCM, or installed by the end user using the Application Self-Service Manager.
The Software Management tabs are described in the following sections:
78 Chapter 4

• General on page 79
• Software on page 80
• Current Jobs on page 87
• Past Jobs on page 87
Figure 13 Software Management section
A premium level license is required to deploy software. With a Basic license installed you can deploy BIOS settings and HP Softpaqs only.
General
Use the General tab to learn how to publish software, entitle and deploy software to managed devices, view current and past Software Management jobs and view software detail and summary reports.
Management 79

The Summary section displays how many software services are currently available in the OVCCM database as well as the number of current Software Management jobs.
To publish software
• Use the Publisher to publish software into OVCCM. Published Software is displayed in the Software Library.
Install the Publisher on the machine from which you will be selecting and configuring software services. See Installing the Publisher on page 39 for installation instructions. See Chapter 9, Using the Publisher for information about how to publish software into OVCCM.
To entitle and deploy software
1 In the Common Tasks area, click Deploy. This will launch the Software Deployment Wizard.
2 Follow the steps in the wizard on page 168 to entitle and deploy software to managed devices.
Software
The Software tab displays all software that has been published into OVCCM.
Use the tools provided to refresh software data, deploy software to managed devices or remove software from the library. Additionally, you can import and export software to and from the Software Library.
OVCCM contains the following software services by default:
• CCM_Publisher – CM Administrator Publisher. An alternative installation method for the Publisher, use this service to deploy the Publisher to a device from which you will capture and publish software, publish OS images, BIOS settings, or HP Softpaqs.
• CCM_TPM_ENABLEMENT – TPM Enablement. This service initializes the use and ownership of the TPM chip on compatible HP devices using the settings you configure in the Configuration tab, Hardware Management section. See Configuring TPM on page 148 for configuration options. Installing this service performs the following tasks:
— Enables the TPM chip in the BIOS
— Sets the specified BIOS Administrator password
— Sets up ownership of TPM and the owner password
80 Chapter 4

— Initializes the emergency recovery token and path
— Sets the password reset token and path and the backup archive path
After the TPM Enablement service is deployed, the device is ready for user-level initialization (performed by the end user through the HP ProtectTools Security Manager interface).
In order to enable and initialize the TPM security chip, the HP ProtectTools software must first be installed on the device. Some device models have this software pre-installed while for others you will need to either download or purchase the software separately. For more information, review the HP documentation for your particular device model.
• CCM_SMM – OpenView Settings Migration Manager. This service installs the Settings Migration Manager Utility which allows for backup and restore of user settings on individual devices. See Settings Migration on page 249 for information on using Settings Migration Manager.
These default services cannot be deleted from the Software Library.
Table 3 Software toolbar tasks
Toolbar Button
Description
Refresh Data – Refresh the Software Library.
Deploy Software – Launches the Software Deployment Wizard
Add Group Entitlement – Launches the Service Entitlement Wizard
Import Service – Launches the Service Import Wizard
Export Service – Launches the Service Export Wizard
Delete Software – Remove Software from the library
The following tasks are available from the Software tab.
• Deploying Software on page 82
• Adding Group Entitlement on page 82
• Importing a Service on page 82
Management 81

• Exporting a Service on page 83
• Removing Software from OVCCM on page 83
• Software Details on page 83
Deploying Software
Use the Software Deployment Wizard to deploy software to groups or devices.
To entitle and deploy software
1 Select the software for deployment and click the Deploy Software toolbar button. This will launch the Software Deployment Wizard.
2 Follow the steps in the wizard on page 168 to entitle and deploy software to managed devices.
Adding Group Entitlement
Software available in the library can be entitled to groups of devices.
To add group entitlement
1 Select the checkbox in the first column to select the software for group entitlement.
toolbar button to launch the Service Entitlement Wizard.
2 Click the Add Group Entitlement
3 Follow the steps in the wizard on page 172 to entitle the selected software to groups of devices that you will select using the wizard.
Importing a Service
OVCCM can import software services to the Software Library. To import a service, the service import deck must be located within the ChangeControldirectory on your OVCCM server (C:\Novadigm\ChangeControl, by default).
Importing a service is useful if you have created a testing environment. When you’ve approved a particular service in your test environment, export that service to your ChangeControl directory on your production OVCCM server.
82 Chapter 4

Then use the Import Service wizard to import that service to your production Software Library and deploy the software to managed devices.
To import a service
toolbar button to launch the Service Import Wizard.
2 Follow the steps in the wizard on page 169 to import the service to the Software Library.
1 Click the Import Service
Exporting a Service
Published software services can be exported to the ChangeControl directory on your OVCCM server. Exported services are available for import to any other OVCCM server libraries (within a testing environment, for example).
To export a service
1 Select the checkbox in the first column to select the software to export as a service.
2 Click the Export Service toolbar button to launch the Service Export Wizard.
3 Follow the steps in the wizard on page 169 to export the service to the ChangeControl directory on your OVCCM server machine.
Removing Software from OVCCM
Use the Software toolbar to remove software from the OVCCM database.
To remove software from the Software Library
1 Select the software you want to remove.
2 Click the Delete Software toolbar button.
Software Details
Click any Software name to open the Software Details window. Use the Software Details window to view software service properties, view or modify entitlements, deploy or remove software, or view a reporting summary.
Management 83

Figure 14 Software Details window
General
The General tab displays common tasks available for the software. Additional configuration tasks are available by clicking any of the other management area tabs.
Properties
Use the Properties tab to change the software details, including the catalog group and administrative functions.
• Software Category Type a category for the software. The Software Category is displayed in the Software Library and is available as a sort option.
• Catalog Visibility Select whether to display the software in the catalog on the managed device. Displaying software in the catalog allows the end user to install or remove the software.
84 Chapter 4

• Reboot Settings Select whether to reboot the managed device after the software is installed, and whether or not to prompt the end user.
• Install Command Line Command to run after the software is deployed to a device.
• Un-install Command Line Command to run after the software is removed from a device.
Make sure to click Save after making any changes to the software details.
Groups
The Groups tab displays all groups that have been entitled for the selected software. Use the toolbar buttons to alter entitlement or the installed state of the software on managed devices within each group.
• To entitle additional groups, click the Add Software Entitlement toolbar button.
• To remove entitlement from a group, select the group then click the Remove Software Entitlement toolbar button.
• To deploy the selected software to a specific group, select the group and click the Deploy Software toolbar button. This launches the Software Deployment Wizard. Follow the steps in the wizard on page 168 to deploy the selected software.
• To remove the software from a specific group, first select the group and click the Remove Software toolbar button. This launches the Software Removal Wizard. Follow the steps in the wizard on page 172 to remove the software from managed devices within that group.
• To discover software and hardware inventory for a group of devices, first select the group, click the Inventory Collections toolbar button, then select Discover Software/Hardware Inventory. This launches the Software/Hardware Inventory Wizard. Follow the steps in the wizard on page 160 to discover software and hardware inventory.
• To discover and enforce patch compliance for a group of devices, select the group, click the Inventory Collections toolbar button then select Discover & Enforce Patch Compliance. This launches the Patch Compliance Discovery Wizard. Follow the steps in the wizard on page 161 to discover and enforce patch compliance.
Management 85

• To discover application usage for a group of devices, select the group, click the Inventory Collections toolbar button then select Discover Application Usage. This launches the Application Usage Collection Wizard. Follow the steps in the wizard on page 162 to discover application usage data.
• To turn on, turn off, or reboot a group of devices, select the group then click the Power Management toolbar button. This launches the Power Management Wizard. Follow the steps in the wizard on page 163 to manage the devices.
Devices
The Devices tab displays all devices that have been entitled for the selected software. Deploy or remove software from a specific device using the toolbar at the top of the list.
• To deploy the selected software to a specific device, select the device and click the Deploy Software toolbar button. This launches the Software Deployment Wizard. Follow the steps in the wizard on page 168 to deploy the selected software.
• To remove the software from a specific device, first select the device and click the Remove Software toolbar button. This launches the Software Removal Wizard. Follow the steps in the wizard on page 172 to remove the software from managed devices within that group.
• To discover software and hardware inventory for devices, first select the devices, click the Inventory Collections toolbar button, then select Discover Software/Hardware Inventory. This launches the Software/Hardware Inventory Wizard. Follow the steps in the wizard on page 160 to discover software and hardware inventory.
• To discover and enforce patch compliance for devices, select the devices, click the Inventory Collections toolbar button then select Discover & Enforce Patch Compliance. This launches the Patch Compliance Discovery Wizard. Follow the steps in the wizard on page 161 to discover and enforce patch compliance.
• To discover application usage for devices, select the devices, click the toolbar button then select Discover Application
Usage. This launches the Application Usage Collection Wizard. Follow the steps in the wizard on page 162 to discover application usage data.
Inventory Collections
• To turn on, turn off, or reboot devices, select the devices then click the toolbar button. This launches the Power Power Management
86 Chapter 4

Management Wizard. Follow the steps in the wizard on page 163 to manage the devices.
Reporting
The Reporting tab contains summary reports specific to the software you are viewing. For detailed reports, use the Reporting tab of the Management Console.
Current Jobs
Current Jobs displays all currently active or scheduled software management jobs. Software Management jobs are used to entitle and deploy or remove software from managed devices in your OVCCM database.
Click any column heading to change the sort order or use the navigation buttons at the top of the table to jump to a specific section.
For information about the Job Controls and Job Status, see Current Jobs on page 110.
Past Jobs
Past Jobs displays all completed software management jobs.
Click any column heading to change the sort order, or use the navigation buttons at the top of the table to jump to a specific section.
Completed jobs (from the Current Jobs tab) are moved to the Past Jobs list one minute after they are finished.
Patch Management Use the Patch Management area to manage patches, HP Softpaqs, and patch management jobs.
Acquired patches and HP Softpaqs are entitled to groups of managed devices then deployed by the administrator using OVCCM. Also, entitled patches and Softpaqs are deployed automatically based on the compliance schedule you set. See Patch Management - Configuration on page 141. Softpaqs that are
Management 87

published using the Publisher are contained in the Software Library, while acquired Softpaqs are contained in the Patch Library.
The Patch Management tabs are described in the following sections:
• General on page 89
• Patches on page 89
• Current Jobs on page 95
• Past Jobs on page 95
Figure 15 Patch Management section of the Management tab
A premium level license is required for Microsoft patch management.
88 Chapter 4

General
Use the General tab to acquire and deploy patches, view current and completed Patch Management Jobs and view patch compliance detail and summary reports.
The Summary section shows you how many patches are currently available in the OVCCM database and the number of current Patch Management jobs.
Patches and Softpaqs are acquired from HP and Microsoft sources based on information entered in the Configuration section. See Patch Management - Configuration on page 141 for more information.
To acquire patches
1 In the Common Tasks area, click Acquire.
2 Patches are downloaded and added to the Patch Library. OVCCM will automatically download additional patches according to the acquisition schedule you configured.
Patches are deployed to managed devices from only the OVCCM Management Console, they are not available in the Application Self-Service Manager software catalog.
To deploy patches
1 In the Common Tasks area, click Deploy Patches to launch the Patch Deployment Wizard.
2 Follow the steps in the wizard, as described on page 171 to deploy patches to devices in selected groups.
Patches
Patches listed in the Patch Library are available for entitlement and deployment to your managed devices. The library contains the acquired patches and Softpaqs based on the acquisition settings you set in the Configuration tab, Patch Management section.
Management 89

Table 4 Patch Library toolbar tasks
Toolbar Button
Description
Refresh Data – Refresh the Patch Library.
Deploy Patches – Launches the Patch Deployment Wizard
Add Group Entitlement – Launches the Service Entitlement Wizard
Import Service – Launches the Service Import Wizard
Export Service – Launches the Service Export Wizard
The following tasks are available from the Patches tab.
• Deploying Patches on page 90
• Adding Group Entitlement on page 90
• Importing a Service on page 91
• Exporting a Service on page 91
• Patch Details on page 92
Deploying Patches
Patches available in the Patch library can be deployed to managed devices.
To deploy patches
1 Select the checkbox in the first column to select the patch for deployment.
2 Click the Deploy Patches toolbar button to launch the Patch Deployment Wizard.
3 Follow the steps in the wizard, as described on page 171 to deploy patches to devices in managed devices.
Adding Group Entitlement
Patches available in the Patch library can be entitled to groups of devices. Entitlement can allow patch compliance to be enfoced using the schedule configured in the Patch Deployment Wizard.
90 Chapter 4

To add group entitlement
1 Select the checkbox in the first column to select the patch for group entitlement.
2 Click the Add Group Entitlement toolbar button to launch the Service Entitlement Wizard.
3 Follow the steps in the wizard on page 172 to entitle the selected patches to groups of devices that you will select using the wizard.
Importing a Service
OVCCM can import patch services to the Patch Library. To import a service, the service import deck must be located within the ChangeControl directory on your OVCCM server (C:\Novadigm\ChangeControl by default).
Importing a service is useful if you have created a testing environment. When you have approved a particular service in your test environment, export that service to your ChangeControl directory on your production OVCCM server. Then use the Import Service wizard to import that service to your production Patch Library and deploy the patch to managed devices.
To import a service
toolbar button to launch the Service Import Wizard.
1 Click the Import Service
2 Follow the steps in the wizard on page 169 to import the service to the Patch Library.
Exporting a Service
Published patch services can be exported to the ChangeControl directory on your OVCCM server. Exported services are available for import to any other OVCCM server libraries (within a testing environment, for example).
To export a service
1 Select the checkbox in the first column to select the patch to export as a service
2 Click the Export Service toolbar button to launch the Service Export Wizard.
Management 91

3 Follow the steps in the wizard on page 169 to export the service to the ChangeControl directory on your OVCCM server machine
Patch Details
Click any Patch description to open the Patch Details window. Use the Patch Details window to view patch service properties, view and modify entitlements, or view a reporting summary. The following areas are available:
Figure 16 Patch details window
General
The General tab displays common tasks available for the patch service. Additional configuration tasks are available by clicking any of the other management area tabs.
92 Chapter 4

Properties
The Properties tab displays the bulletin number, description and type of bulletin, posted and revised dates, and a vendor information link.
Groups
The Groups tab displays all groups that have been entitled for the selected patch. Use the toolbar buttons to alter entitlement or the installed state of the patch on managed devices within each group.
toolbar button.
• To entitle additional groups, click the Add Group Entitlement
• To remove entitlement from a group, select the group then click the Remove Group Entitlement toolbar button.
• To deploy the selected patch to a specific group, select the group and click the Deploy Patches toolbar button. This launches the Patch Deployment Wizard. Follow the steps in the wizard on page 171 to deploy the selected patch.
• To discover software and hardware inventory for a group of devices, first select the group, click the Inventory Collections toolbar button, then select Discover Software/Hardware Inventory. This launches the Software/Hardware Inventory Wizard. Follow the steps in the wizard on page 160 to discover software and hardware inventory.
• To discover and enforce patch compliance for a group of devices, select the group, click the Inventory Collections toolbar button then select Discover & Enforce Patch Compliance. This launches the Patch Compliance Discovery Wizard. Follow the steps in the wizard on page 161 to discover and enforce patch compliance.
• To discover application usage for a group of devices, select the group, click the Inventory Collections toolbar button then select Discover Application Usage. This launches the Application Usage Collection Wizard. Follow the steps in the wizard on page 162 to discover application usage data.
• To turn on, turn off, or reboot a group of devices, select the group then click the Power Management toolbar button. This launches the Power Management Wizard. Follow the steps in the wizard on page 163 to manage the devices.
Management 93

Devices
Devices listed in the Devices tab have been entitled for the selected patch. Deploy the patch to a specific device using the toolbar buttons.
• To deploy the selected patch to a specific device, select the device and click the Deploy Patches toolbar button. This launches the Patch Deployment Wizard. Follow the steps in the wizard on page 171 to deploy the selected software.
After a patch is deployed it cannot be removed.
• To discover software and hardware inventory for devices, first select the devices, click the Inventory Collections toolbar button, then select Discover Software/Hardware Inventory. This launches the Software/Hardware Inventory Wizard. Follow the steps in the wizard on page 160 to discover software and hardware inventory.
• To discover and enforce patch compliance for devices, select the devices, click the Inventory Collections toolbar button then select Discover & Enforce Patch Compliance. This launches the Patch Compliance Discovery Wizard. Follow the steps in the wizard on page 161 to discover and enforce patch compliance.
• To discover application usage for devices, select the devices, click the Inventory Collections toolbar button then select Discover Application Usage. This launches the Application Usage Collection Wizard. Follow the steps in the wizard on page 162 to discover application usage data.
• To turn on, turn off, or reboot devices, select the devices then click the Power Management toolbar button. This launches the Power Management Wizard. Follow the steps in the wizard on page 163 to manage the devices.
Reporting
The Reporting tab contains summary reports specific to the patch you are viewing. For detailed reports, use the Reporting section of the Management Console.
94 Chapter 4

Current Jobs
Patch Management jobs are used to deploy security patches to devices in your environment. Current Jobs shows a list of active or scheduled jobs. Click the description of any job to display more details regarding the job’s status.
Use the toolbars to administer currently scheduled or active jobs.
For information about the Job Controls and Job Status, see Current Jobs on page 110.
Past Jobs
Past Jobs displays all completed Patch Management jobs. Click the description of any job to display more details regarding the job’s status.
Completed jobs are moved to the Past Jobs list one minute after they are finished.
OS Management Use the OS Management section to manage the operating systems (OS) used by your client devices. The areas in this section allow you to perform tasks such as OS Deployment, Service Import and Export and Entitlement. The following sections describe each of the OS Management tabs:
• General on page 96
• Operating Systems on page 97
• Current Jobs on page 108
• Past Jobs on page 109
Management 95

Figure 17 OS Management section
OVCCM OS mangament requries a premium level license.
General
Use the General tab to find information about publishing operating systems, entitle and deploy operating systems to managed devices, view current and past OS Management jobs and view operating system detail and summary reports.
The Summary section shows you how many operating system services are currently available in the OVCCM database and the number of current OS Management jobs.
To capture and publish OS images
For OS images to be available in the OS Library, they must be published to OVCCM. Capture OS images using the Image Preparation Wizard then publish them to OVCCM using the Publisher.
96 Chapter 4

• Use the Image Preparation Wizard to prepare and capture OS images. See Preparing and Capturing OS Images on page 179 or the Image Preparation Wizard online help for image preparation and capture details.
• Use the Publisher to publish operating system images to OVCCM. Published operating system services are displayed in the Operating System tab. See Using the Publisher on page 213 or the Publisher online help for information about publishing operating systems.
To deploy OS images
1 In the Common Tasks area, click Deploy. This launches the OS Deployment Wizard.
2 Follow the steps in the wizard on page 174 to entitle and deploy an operating system to managed devices.
For additional information about deploying operating systems, including requirements for target devices and deployment scenarios, see Deploying Operating Systems on page 98.
Operating Systems
On the Operating Systems tab you can view all available operating systems that have been published into OVCCM.
Use the tools provided to refresh operating system service data, deploy operating systems to managed devices, or remove operating systems from the library. Additionally, you can import and export operating system services to and from the Operating System Library.
Newly published services (published within the last seven days) can be recognized by the word ‘new’ in parentheses (new) to the right of the description.
Table 5 OS Library toolbar tasks
Toolbar Description Button
Refresh Data – Refresh the OS Library.
Deploy Operating System – Launches the OS Deployment Wizard
Management 97

Toolbar Button
Description
Add Group Entitlement – Launches the Service Entitlement Wizard
Import Service – Launches the Service Import Wizard
Export Service – Launches the Service Export Wizard
Delete Operating System – Remove Operating System from the library
The following tasks are available from the Operating System tab.
• Deploying Operating Systems on page 98
• Deploying an OS Image using Local Service Boot (LSB) on page 102
• Deploying an OS Image using PXE on page 103
• Deploying an OS Image using the Service CD on page 104
• Adding Group Entitlement on page 105
• Importing a Service on page 105
• Exporting a Service on page 106
• Removing Operating Systems from the Library on page 106
• OS Details on page 106
Deploying Operating Systems
To entitle and deploy an operating system
1 Select the operating system service to deploy, then click the Deploy Operating System toolbar button. This will launch the OS Deployment Wizard.
2 Follow the steps in the wizard on page 174 to entitle and deploy an operating system to managed devices.
Operating systems are deployed in either attended or unattended mode. See the Configuration tab, OS Management section on page 146 to select the deployment mode.
98 Chapter 4

See the sections below for deployment scenarios and target device requirements for OS deployment.
Deployment Scenarios
Deploying an operating system to devices in your environment depends on a number of variables. The following table describes multiple OS image deployment scenarios and instructions for deploying an operating system to those devices.
Table 6 OS Deployment Scenarios
Device State
Managed (Agent installed)
Un-managed (Agent not installed)
Instructions for deployment
If the device is already managed:
• Add the device to a group
• Entitle an operating system to the group (if not already entitled)
• Deploy the OS using the OS Deployment Wizard
Note: If you use LSB during the OS deployment process, you won't need to make preparations for PXE or the Service CD.
If the unmanaged device has an OS installed:
• Deploy the Management Agent to the device
• See instructions for Managed device, above
If unmanaged device does not have an OS installed:
• See the instructions below for deploying an OS to a bare-metal device
Management 99

Device State Instructions for deployment
Bare-metal (no OS installed) If the device was previously managed (for hard drive recovery, for example):
• Group membership and any OS entitlement should still be valid. Deploy the OS using PXE or the Service CD
If the device was not previously managed:
• Boot the device with PXE or the Service CD.
• A device is added to OVCCM using a variation on the MAC address as device name
• Add the new device to a group with OS entitlement
Note: If an OS is attached to the All Devices group, the OS is installed automatically. If multiple OSs are attached to All Devices, then a choice of OS to install is presented.
• The device is rebooted and the Service CD or PXE will continue with the OS deployment.
Note: LSB cannot be used for deploying an OS to a bare-metal device.
Requirements for Target Devices
The target device is a workstation on which you want to install, replace, or update an operating system. The following requirements must be met.
• Must meet the minimum hardware and BIOS requirements published by Microsoft (for Windows operating systems) or the machine manufacturer for running the OS to be deployed by OVCCM
100 Chapter 4

• If you want to report on, or make use of the machine's make, manufacturer, and unique identifier for policy, the BIOS must support SMBIOS (for systems management) specification. If a target device lacks SMBIOS support, the only criterion available for specifying policy on that machine will be the MAC address.
• Have an English, French, or German keyboard.
• Have 128 MB of RAM or more.
• If you are using a network (PXE) boot, you must:
— Be able to boot from the Boot Server. To do this, make sure that the BIOS is set to boot from the network before the hard drive.
— Have a network interface card (NIC) that supports PXE. Some network cards are PXE capable, but only actually support PXE with the addition of a network boot ROM. These cards must have the network boot ROM installed. Some older 3Com cards require a firmware upgrade to MBA 4.3 and PXE stack version 2.2.
— Be sure that the target devices have the same or a compatible HAL (Hardware Abstraction Layer) as the reference machine in order to use Microsoft Sysprep. Machines with the same version of HAL.DLL share the same Hardware Abstraction Layer. For more information on determining a machine's HAL, see:
http://support.microsoft.com/?kbid=237556
If you cannot check the HAL.DLL, consider deploying the image on a target machine in a lab environment to confirm success of the deployment.
• Must have an IDE or SCSI (Adaptec only) boot drive interface.
• Match the reference machine's ACPI characteristics (i.e., ACPI vs. non-ACPI, which is represented in the HAL) and boot drive interface.
• Be compatible with the programmable interrupt controller capabilities represented in the HAL captured on the reference machine (i.e., an Advanced Programmable Interrupt Controller (APIC) HAL will not run on a machine that does not have an APIC; however a PIC (standard on-board Programmable Interrupt Controller) HAL will run on a machine that has an APIC). Newer HP/Compaq computers often come with an APIC.
• Support NTFS and FAT32 file systems.
Management 101

• Windows XPe and CE images can be deployed to target machines with flash drives of equal or greater size. For example, an image that is 256 MB can be deployed to target devices of 256 or 512 MB.
• Embedded Linux images can be deployed only to target machines with flash drives of equal size. For example, an image that is 256 MB can be deployed only to target devices that have a flash drive of 256 MB.
Deploying an OS image will in some cases overwrite existing data depending on the number of hard drives and partitions on the target device. The following scenarios describe which partitions are affected and which are left intact during the re-imaging process:
1 HDD with 2 partitions:
• The boot partition is re-imaged. Second partition remains intact.
1 HDD with 1 partition:
• The hard drive is re-imaged. All existing data is overwritten.
2 HDDs with 1 partition each:
• First hard drive is re-imaged. All existing data on first hard drive is overwritten. Second hard drive remains intact.
2 HDDs with 2 partitions each:
• First hard drive boot partition is re-imaged. Second partition and second hard drive remain intact.
Deploying thin client factory images
If you are deploying a factory image of a supported thin client operating system, Windows XP Embedded (XPe), Windows CE, or Embedded Linux, note the following:
• After the image is deployed to the device, you must install the Management Agent to begin managing the device. See Installing the Management Agent on Thin Clients on page 42 for installation instructions.
Deploying an OS Image using Local Service Boot (LSB)
The Local Service Boot allows OVCCM to assume management of the OS on devices that are not booted from the network.
102 Chapter 4

When using Local Service Boot, existing machines do not need to be PXE-enabled and the boot order does not need to be configured locally in the BIOS for each target device.
See Deployment Scenarios on page 99 for prerequisite instructions for OS deployment.
To deploy an OS image using Local Service Boot
1 Select the image for deployment and click the Deploy Operating System toolbar button to launch the OS Deployment Wizard.
2 Follow the steps in the wizard, and when prompted for deployment method, select Local Service Boot (LSB).
3 This will install the LSB software to the target device which in turn will install the OS you selected. If multiple OS images are entitled to the device, you will be prompted to select which OS to install.
Deploying an OS Image using PXE
The PXE-based environment allows OVCCM to assume management of the OS on target devices that are booted from the network. See Deployment Scenarios on page 99 for prerequisite instructions for OS deployment.
Using PXE consists of configuring your DHCP server to provide clients booting from the network a boot image and a TFTP server that will supply these files.
• A DHCP server and TFTP server must be configured prior to using PXE for OS deployment. Refer to the product documentation for configuration instructions. See Configuring PXE for OS Deployment on page 45 for more information.
When PXE is configured, make sure your target devices boot from the network or have PXE enabled as the primary boot device. Make the necessary configuration adjustments to ensure this will happen (for example, with some BIOS versions, you can hit ESC during the reboot process and change the boot order in the configuration settings).
Now you are ready to deploy an OS image.
To deploy an OS image using PXE
1 Make sure PXE is configured.
Management 103

2 Select the image for deployment and click the Deploy Operating System toolbar button to launch the OS Deployment Wizard.
3 Follow the steps in the wizard on page 174, and when prompted for deployment method, select Local CD or PXE Server.
4 When the wizard finishes, the target device is rebooted using the settings you defined on your DHCP server.
5 The OS image is then deployed and installed on the target device (If multiple OS images are entitled to the device, you will be prompted to select the OS to install).
Deploying an OS Image using the Service CD
The Service CD is used to locally boot a target device that does not already have an operating system installed (a bare-metal machine).
Create the Service CD using the file, rom_cdsb.iso. The file is located on the OVCCM CD-ROM in the \OSManagement\ISO\DeploymentCD\ directory.
Since LSB cannot be used for devices that do not already have an OS installed, you must use either the Service CD or a PXE server to boot a bare-metal machine to allow for OS deployment.
The Service CD must be created and available locally at the target device.
See Deployment Scenarios on page 99 for prerequisite instructions for OS deployment.
To deploy an OS image using the Service CD
1 Insert the Service CD in the target device and boot off of the CD.
2 When prompted, enter your OVCCM server IP address or hostname and port number then press Enter to continue. For example, OVCCM.acmecorp.com:3469 or 192.168.1.100:3469. Port 3469 is reserved for OS imaging and deployment.
3 The device connects to the OVCCM server and is added to the Devices list using a variation on the MAC address as the device name. After the Service CD connects to the OVCCM server, a message is displayed: “This machine has no local OS or the OS is invalid” and “The machine cannot be used and will be shut down until an administrator specifies Policy and performs a Wake on LAN.”
4 At the OVCCM console, use the OS Management section to add the new device to a group.
104 Chapter 4

5 In the OS Management section, select the image for deployment and click the Deploy Operating System toolbar button to launch the OS Deployment Wizard.
6 Follow the steps in the wizard, and when prompted for deployment method, select Local CD or PXE Server.
7 After the wizard completes, reboot the target device again using the Service CD. During this reboot, the OS image is detected and deployed. This can take 10 to 15 minutes depending on the size of the image and network bandwidth (if multiple OS images are entitled to the device, you will be prompted to select the OS to install).
8 When the image is finished deploying, the target device reboots and starts Windows. The Sysprep process will start and initialize the new image.
Adding Group Entitlement
OS images available in the OS library can be entitled to groups of devices..
To add group entitlement
1 Select the checkbox in the first column to select the OS image for group entitlement.
2 Click the Add Group Entitlement toolbar button to launch the Service Entitlement Wizard.
3 Follow the steps in the wizard on page 172 to entitle the selected images to groups of devices that you will select using the wizard
Importing a Service
OVCCM can import OS services to the OS Library. To import a service, the service import deck must be located within the ChangeControl directory on your OVCCM server.
Importing a service is useful if you have created a testing environment. When you have approved a particular service in your test environment, export that service to your ChangeControl directory on your production OVCCM server. Then use the Import Service wizard to import that service to your production Software Library and deploy the software to managed devices.
Management 105

To import a service
1 Click the Import Service toolbar button to launch the Service Import Wizard.
2 Follow the steps in the wizard on page 169 to import the service to the OS Library.
Exporting a Service
Published OS image services can be exported to the ChangeControl directory on your OVCCM server. Exported services are available for import to any other OVCCM server libraries (within a testing environment, for example).
To export a service
1 Select the checkbox in the first column to select the OS image to export as a service
2 Click the Export Service toolbar button to launch the Service Export Wizard.
3 Follow the steps in the wizard on page 169 to export the service to the ChangeControl directory on your OVCCM server machine
Removing Operating Systems from the Library
Use the OS toolbar to remove software from the OVCCM database.
To remove an operating system service from the Operating System Library
1 Select the OS you want to remove
2 Click the Delete Operating System toolbar button
OS Details
Click any operating system service details link to open the Operating System Details window. Use the OS Details window to view OS properties, view or modify entitlements, view a reporting summary, or create OS management jobs. The following areas are available:
106 Chapter 4

Figure 18 OS Details window
The following areas area available within the details window:
General
The General tab displays common tasks available for the OS service. Additional configuration tasks are available by clicking any of the other management area tabs.
Properties
Use the Properties tab to change the operating system service details.
• Description The description displayed for the operating system service. This field is required.
• Contact Optional field to store contact information for this OS service.
• Web Site Optional field for a URL related to this service.
Click Save to commit any changes you make.
Management 107

Groups
Groups in the Groups tab have been entitled to the operating system. Use the toolbar to manage entitlement, deploy the OS, discover software and hardware inventory or discover and enforce patch compliance for the groups listed.
• To entitle additional groups, click the Add Group Entitlement toolbar button.
• To remove entitlement from a group, select the group then click the Remove Group Entitlement toolbar button.
• To deploy the operating system to a specific group, select the group and click the Deploy Operating System toolbar button. This launches the OS Deployment Wizard. Follow the steps in the wizard on page 174 to deploy the selected OS..
Devices
Devices in the Devices tab have been entitled to the operating system. Deploy the OS to a specific device using the toolbar.
• To deploy the operating system to a specific device, select the device and click the Deploy Operating System toolbar button. This launches the OS Deployment Wizard. Follow the steps in the wizard on page 174 to deploy the selected OS..
Reporting
The Reporting tab contains summary reports specific to the operating system service. For detailed reports, use the Reporting tab of the Management Console
Current Jobs
Current Jobs shows all currently active or scheduled OS Management jobs. OS Management jobs are used to entitle and deploy operating systems services from managed devices in your OVCCM database.
Click any column heading to change the sort order or use the navigation buttons at the top of the table to jump to a specific section.
For information about the Job Controls and Job Status, see Current Jobs on page 110.
108 Chapter 4

Past Jobs
Past Jobs shows all completed OS Management jobs.
Click any column heading to change the sort order or use the navigation buttons at the top of the table to jump to a specific section.
Completed jobs (from the Current Jobs tab) are moved to the Past Jobs list one minute after they are finished.
Job Management Use the Job Management section to view or manage all current and past jobs. The summary information shows the total number of all currently active and scheduled management jobs. Job Management consists of the following tabs:
• General on page 110
• Current Jobs on page 110
• Past Jobs on page 115
Management 109

Figure 19 Job Management section
General
Use the General tab to view all current and past jobs and the total number of all active and scheduled jobs.
Current Jobs
Current Jobs shows a list of all active or scheduled jobs. Click the description of any job to show more details about the job’s status.
Use the toolbar buttons to administer currently scheduled or active jobs.
• Job Controls on page 111
• Job Status on page 111
• Job Details on page 113
110 Chapter 4
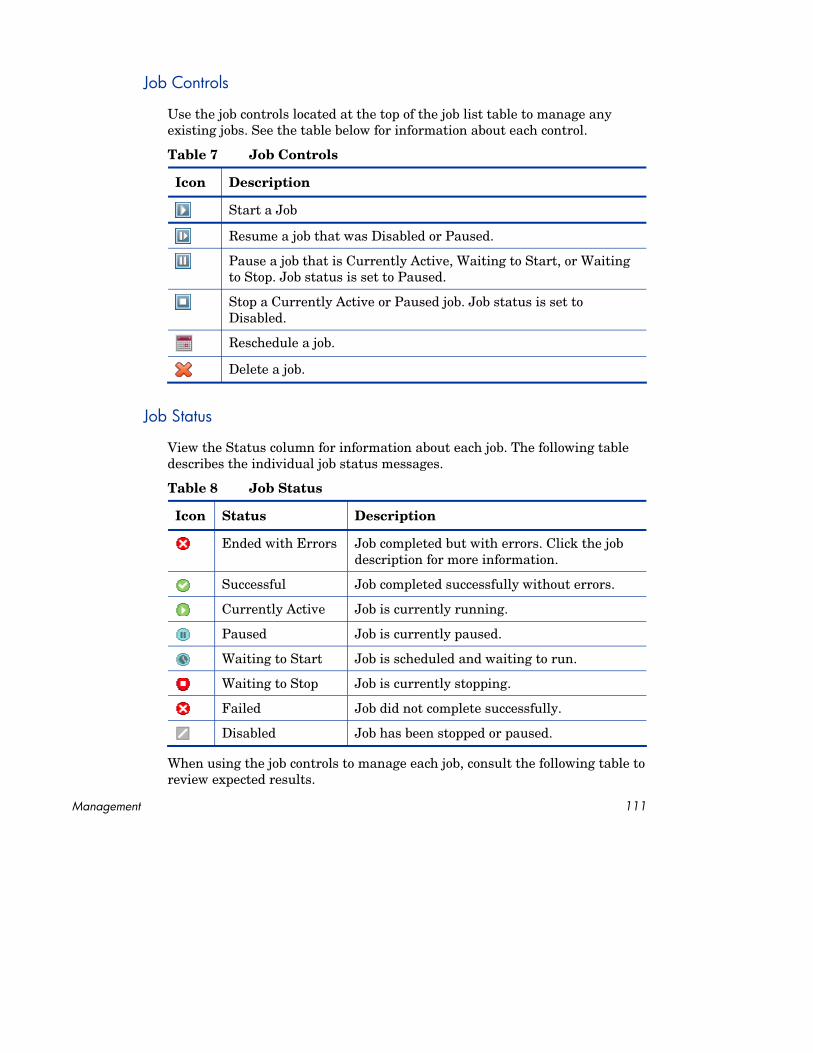
Job Controls
Use the job controls located at the top of the job list table to manage any existing jobs. See the table below for information about each control.
Table 7 Job Controls
Icon Description
Start a Job
Resume a job that was Disabled or Paused.
Pause a job that is Currently Active, Waiting to Start, or Waiting to Stop. Job status is set to Paused.
Stop a Currently Active or Paused job. Job status is set to Disabled.
Reschedule a job.
Delete a job.
Job Status
View the Status column for information about each job. The following table describes the individual job status messages.
Table 8 Job Status
Icon Status Description
Ended with Errors Job completed but with errors. Click the job description for more information.
Successful Job completed successfully without errors.
Currently Active Job is currently running.
Paused Job is currently paused.
Waiting to Start Job is scheduled and waiting to run.
Waiting to Stop Job is currently stopping.
Failed Job did not complete successfully.
Disabled Job has been stopped or paused.
When using the job controls to manage each job, consult the following table to review expected results.
Management 111

Table 9 Job Status and expected Job Control action
Job Control
Job Status Start Resume Pause Stop Reschedule Delete
Status N/A Status N/A Updates Job is Ended with changed changed applied deleted Errors to
Currently to Disabled
Active
Successful Status changed
N/A Status changed
N/A Updates applied
Job is deleted
to to Currently Active
Disabled
N/A N/A Status Status Updates N/A Currently Active
changed to paused
changed to Waiting
applied
to Stop
Paused N/A Status
changed N/A Status
changed Updates applied
N/A
to pre to paused state
Waiting to Stop
Status N/A Status N/A Updates Job is Waiting to Start
changed to
changed to
applied deleted
Currently Disabled Active
Waiting to Stop
N/A N/A Status changed to paused
N/A Updates applied
N/A
Failed Status changed
N/A Status changed
N/A Updates applied
Job is deleted
to to Currently Active
Disabled
112 Chapter 4

Job Control
Job Status Start Resume Pause Stop Reschedule Delete
Disabled N/A Status
changed N/A N/A Updates
applied Job is deleted
to pre-disabled state
Job controls are available only for jobs in the Current Jobs tabs, this includes currently active jobs and jobs with recurring schedules. Completed jobs in the Past Jobs tab cannot be controlled and should be re-created if you need to run them again.
For more detailed information about a job, click the link in the Description column. This will open a new window displaying the specific Job Details.
When a job is paused, the job action (deployment, collection, etc.) will continue for any currently targeted devices. When the action is complete, the job will not continue executing on additional devices until it is resumed.
Job Details
Click any job description link to open a new window displaying the specific information for that job. Depending on the Job type, the Job Details window may contain some of the tabs described below.
Management 113
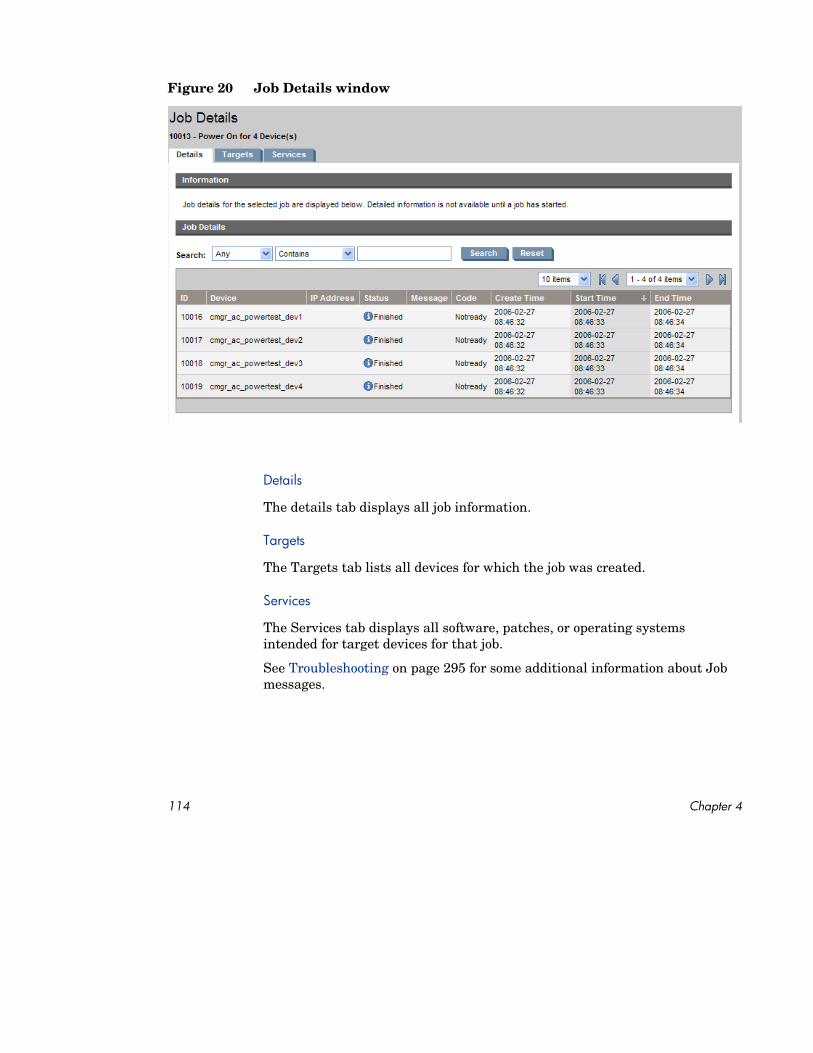
Figure 20 Job Details window
Details
The details tab displays all job information.
Targets
The Targets tab lists all devices for which the job was created.
Services
The Services tab displays all software, patches, or operating systems intended for target devices for that job.
See Troubleshooting on page 295 for some additional information about Job messages.
114 Chapter 4

Past Jobs
Past Jobs shows all completed Management jobs. Click the description of any job to show more details about the job’s status.
Completed jobs are moved to the Past Jobs list one minute after they are finished.
Management 115

116 Chapter 4

5 Reporting Use the Reporting interface to configure and view detailed reports about the devices and software in your environement. The Reporting interface contains the following areas:
Figure 21 Reporting interface
• Search Options on page 118
• Display Options on page 118
• Search Criteria on page 118
• Report Windows on page 119
In order to view the Reporting section graphical reports, Java Runtime or Virtual Java Mfachine is required. For more information, go to http://java.com/en/index.jsp.
117
Search Options Use the Directory/Group Filters or Data Filters area to apply one or more filters to the dataset being accessed for the current view. Any filters you apply are listed as Search Criteria above the reports.
Directory/Group Filters
• Click a Directory/Group entry to filter the current dataset to that level. See Using Search Options to Select Filters on page 119 for details on how to use this area..
Data Filters
• Use this area to generate or select a filter to be applied to the current dataset. See Using Search Options to Select Filters on page 119 for details on how to use this area.
Display Options Use the Display Options area to control your current session and display.
Reporting Views
• A Reporting View defines the set of reporting windows to display for the current dataset and initial settings related to each window (such as minimized or maximized, and the number of items per window). When you first access the Reporting Server, the Default View is applied. The current view is listed on the right of the Global Toolbar.
Use the Reporting Views area to change or customize your Reporting View. For details, see Using Display Options to Select Reporting Views on page 123.
Search Criteria Search Criteria is shown above the report windows and lists the filters that have been applied to the dataset using one of the Search Controls.
118 Chapter 5

• To remove a filter, click the X to the left of a filter name in the Search Criteria list.
Device Filters
Device Filters apply to any report that contains device-related information.
Report Specific Filters
Report Specific Filters are filters that apply only to data available within a specific Reporting View. For example, if you have applied a Usage by Device, Usage Manager Related Filter, displayed the Usage by Product data, then selected an individual product name, a Report Specific filter is applied to that report based on the criteria you selected.
Report Windows Report Windows display the current View.
• Click minimize on the Window title bar to collapse a report window.
• Click maximize on the Window title bar to expand a report window.
See About Reporting Windows on page 127 for details about using the Report Window Action Bar icons, as well as browsing, sorting, and viewing details for the items in a report.
Each window contains an Action Bar that includes tools that, depending on the current Report Window, allow you to create groups of devices, create CSV files, create a Web query list, or switch to a graphical view. See Using the Windows Action Bar on page 128 for more information.
OVCCM reports are displayed in GMT timezone.
Using Search Options to Select Filters The Search Options area gives you two ways to filter datasets within the Reporting Server. You can:
Reporting 119
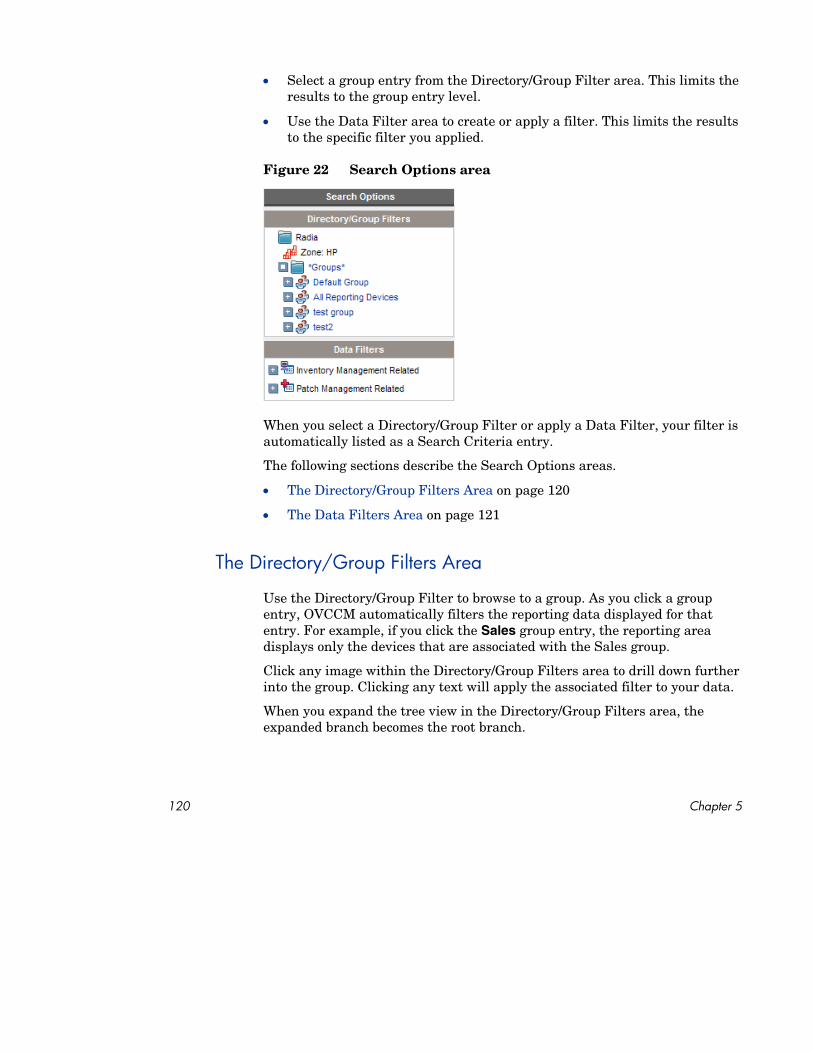
• Select a group entry from the Directory/Group Filter area. This limits the results to the group entry level.
• Use the Data Filter area to create or apply a filter. This limits the results to the specific filter you applied.
Figure 22 Search Options area
When you select a Directory/Group Filter or apply a Data Filter, your filter is automatically listed as a Search Criteria entry.
The following sections describe the Search Options areas.
• The Directory/Group Filters Area on page 120
• The Data Filters Area on page 121
The Directory/Group Filters Area
Use the Directory/Group Filter to browse to a group. As you click a group entry, OVCCM automatically filters the reporting data displayed for that entry. For example, if you click the Sales group entry, the reporting area displays only the devices that are associated with the Sales group.
Click any image within the Directory/Group Filters area to drill down further into the group. Clicking any text will apply the associated filter to your data.
When you expand the tree view in the Directory/Group Filters area, the expanded branch becomes the root branch.
120 Chapter 5

The Data Filters Area
The Data Filters area is always available as a Search Control (along the left side of the window). Use it to select a filter to apply to the current dataset. When a filter is applied, it is added to the Search Criteria list above the report windows.
To select and apply a filter using the Data Filter area
1 In the Data Filters area, expand a Filter Group to display the tree-view and select a sub-group. In the example shown in the figure below, Inventory Management Related then Hardware Related were selected.
2 In the tree-view, select a filter. In the example shown in the figure below, Device Related then Device Classification were selected.
3 In the Filter Value text box, type a specific value. For example, *Notebook*. You can use wildcards, including * for multiple characters, or ? or _ (underscore) for single characters.
4 Click Apply to add the filter to the report. After applying the filter, you will see it added to the Search Criteria list above the report windows.
The Reset button clears the Filter Value field and resets the Filter Group and Filter selections to their default values.
The figure below displays an example of the Data Filter entries used to limit the report to only Notebook devices.
Reporting 121

Figure 23 Applying a search criterion to limit report to Notebook Devices
Special Filter Value Characters and Wildcards
Finding the right records can be made easier by using special characters and wildcards in your search strings. Use these special characters in conjunction with the text you enter in the Filter Value text box. Table 10 below explains each special character.
Table 10 Special Characters and Wildcards
Character Description
* or % Return all records of specific text string. Example: Device Vendor Filter HP* returns all HP records. %HP% returns all records including HP.
122 Chapter 5

Character
? or _
!
Description
Return any single character Example: Device Classification Filter Not?book returns all records beginning with ‘Not’ and ending with ‘book’. Note_ook returns all records beginning with ‘Note’ and ending with ‘ook’.
Negates filter. The ! must be placed before the text string. Example: Device Vendor Filter !HP* will return all non-HP records.
Using Display Options to Select Reporting Views Within the Display Options area, Reporting Views specify which windows should be displayed on the report page, as well as their initial state (maximized or minimized).
Figure 24 Display Options area
To apply a View
1 In the Reporting Views area, expand a View Group list and select a group. Inventory Management Reports, Software Reports is expanded in the figure below.
2 Next, select a view for that group. The figure below shows the available report views for Managed Service Reports.
Reporting 123

When the view is selected, the appropriate report is displayed.
Figure 25 Sample Selections for Software Reports
Use the back button to return to any of the previous reporting windows.
The following sections describe Reporting Views in more detail:
• Reporting View Types on page 124
• Viewing HP Hardware Reports on page 126
Reporting View Types
Depending on the type of data you want to view, select the appropriate Reporting View.
• Inventory Management Reports on page 125
• Patch Management Reports on page 125
• Usage Manager Reports on page 125
OVCCM reports are displayed in GMT timezone.
124 Chapter 5

Inventory Management Reports
Inventory Management Reports display hardware and software information for all devices in OVCCM.
Patch Management Reports
Patch Management Reports display patch compliance information for managed devices and acquisition information for patches and Softpaqs.
• Compliance Reports - The Management Agent sends product and patch information to OVCCM. This information is compared to the available patches to see if managed devices require certain patches to remove vulnerabilities. Compliance reports show only the information applicable to detected devices in your environment.
• Patch Acquisition Reports - Acquisition based reports show the success and failures of the patch acquisition process from the vendor's web site.
• Research Reports – Research-based reports display information about the patches acquired from the software vendor's web site. Research based reports offer a Filter bar.
Usage Manager Reports
Usage Manager Reports show usage information for devices that have the Usage Collection Agent installed. Use the Application Usage Collection Wizard to install the collection agent and begin collecting usage data.
• Device Reports - Display collected usage information by the individual devices or users.
• Monthly Usage Reports – Display usage information by vendor, product, or application.
Usage Management Reports may contain some of the following data columns:
• Usage Time – the amount of time an application is running.
• Focus Time – the amount of time an application is the active window.
• Usage Count – tracks the number of times an application is run on a user’s device.
• Usage Status – represents the relation of Used versus Unused instances for an individual application or a group of applications.
Reporting 125
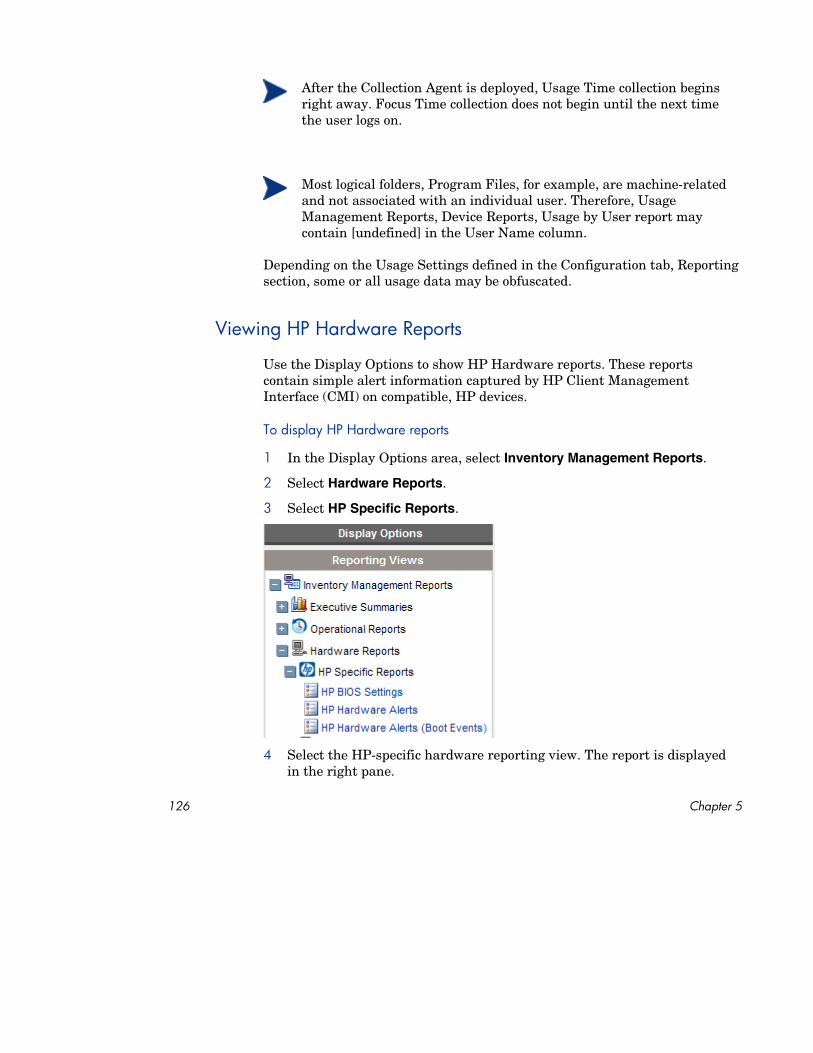
After the Collection Agent is deployed, Usage Time collection begins right away. Focus Time collection does not begin until the next time the user logs on.
Most logical folders, Program Files, for example, are machine-related and not associated with an individual user. Therefore, Usage Management Reports, Device Reports, Usage by User report may contain [undefined] in the User Name column.
Depending on the Usage Settings defined in the Configuration tab, Reporting section, some or all usage data may be obfuscated.
Viewing HP Hardware Reports
Use the Display Options to show HP Hardware reports. These reports contain simple alert information captured by HP Client Management Interface (CMI) on compatible, HP devices.
To display HP Hardware reports
1 In the Display Options area, select Inventory Management Reports.
2 Select Hardware Reports.
3 Select HP Specific Reports.
4 Select the HP-specific hardware reporting view. The report is displayed in the right pane.
126 Chapter 5

5 To search for a specific alert type or bios setting (based on the report view you chose) use the additional data filter search box displayed at the top of the report window.
About Reporting Windows The Report Page displays the windows specified in the applied view. The figure below shows an example of report windows displayed on the Report Page: Managed Devices and Managed Services. The Managed Devices window is minimized and the Managed Services window is maximized to show report data.
Figure 26 Sample Reporting Window
The following sections describe Reporting Windows features and options.
• Using the Windows Action Bar on page 128
• Creating Dynamic Reporting Groups on page 130
Reporting 127

Using the Windows Action Bar
Each window contains an Action Bar with the following possible icons:
Create new Dynamic Reporting Group – launches the Group Creation Wizard, described on page 164, and uses the devices returned in the report to create a new group.
The group creation button is only visible on reports that contain lists of devices.
Export to CSV – creates a comma-separated list of the report query that you can open or save.
Export to IQY – creates a Web query list of the report query that you can open or save as an MS Excel file. A live link to the source report is created allowing you to refresh the Reporting data from within the Excel spreadsheet by retrieving the data directly from OVCCM.
Switch to Graphical View – switches the reporting view to graphical mode.
Figure 27 Sample Reporting window
Browsing Items in a Report
There may be large number of items in a report. The Action Bar lets you customize how many items to view in a given window area. To browse to records outside your current window area, use the Browse buttons or drop-down list, as illustrated in the figure below.
Maximum items per window Use this drop-down list box to limit how many items to display in the current window. For example, if you select a maximum of 30 items, you will be able to scroll 30 items in the current window.
Browse Back and Forward Buttons If you set the maximum items per window smaller than the total items in the report, you will have the ability to browse through multiple windows. Use the
128 Chapter 5
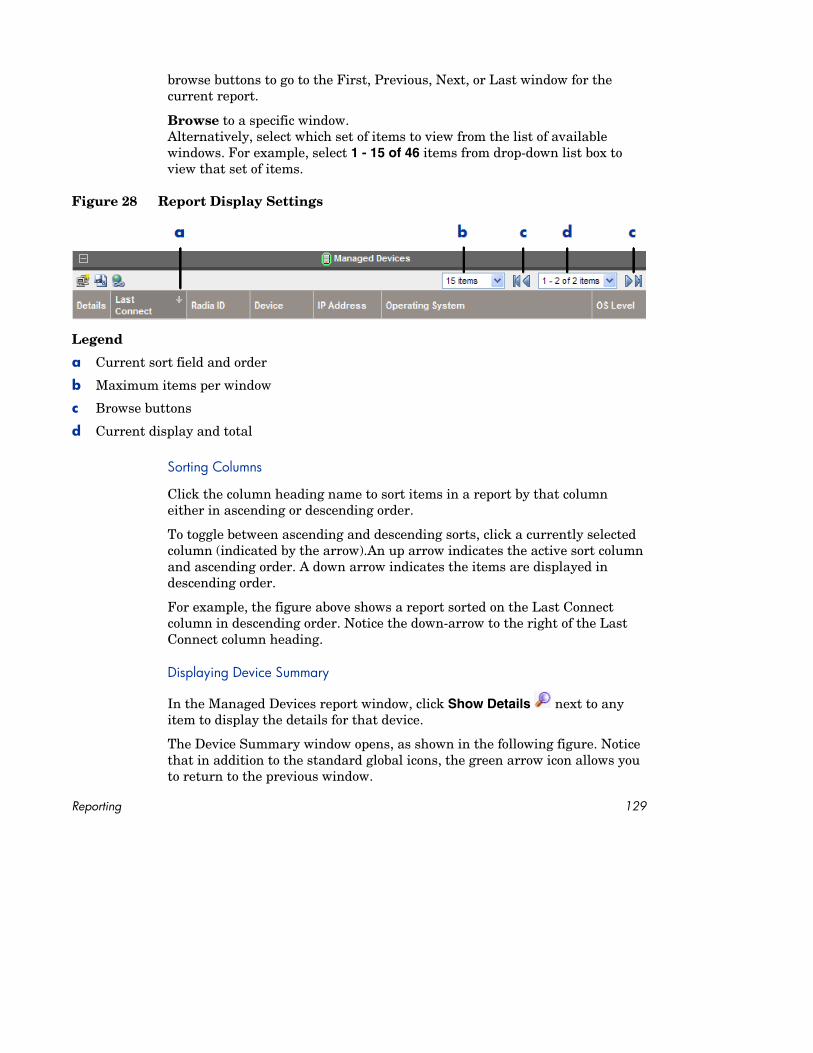
browse buttons to go to the First, Previous, Next, or Last window for the current report.
Browse to a specific window. Alternatively, select which set of items to view from the list of available windows. For example, select 1 - 15 of 46 items from drop-down list box to view that set of items.
Figure 28 Report Display Settings
Legend
a Current sort field and order
b Maximum items per window
c Browse buttons
d Current display and total
Sorting Columns
Click the column heading name to sort items in a report by that column either in ascending or descending order.
To toggle between ascending and descending sorts, click a currently selected column (indicated by the arrow).An up arrow indicates the active sort column and ascending order. A down arrow indicates the items are displayed in descending order.
For example, the figure above shows a report sorted on the Last Connect column in descending order. Notice the down-arrow to the right of the Last Connect column heading.
Displaying Device Summary
next to any item to display the details for that device.
The Device Summary window opens, as shown in the following figure. Notice that in addition to the standard global icons, the green arrow icon allows you to return to the previous window.
In the Managed Devices report window, click Show Details
Reporting 129

Figure 29 Device Summary Window
Click any heading at the bottom of the page to expand its listing. For example, if you expand HP Hardware Alerts, you will see the list of hardware alerts reported for that device.
The Device Summary contents will vary according to the starting Report Window.
Applying Filters from Report Data
Click hyperlinked data within a report to filter by that specific criterion. A filter is applied and displayed in the Search Criteria.
Creating Dynamic Reporting Groups
Dynamic Reporting groups contain devices returned as the result of a reporting query. Create a Dynamic Reporting group by first generating a list of devices in a report query, then using the Group Creation Wizard.
130 Chapter 5

To create a Dynamic Reporting group
1 Generate a list of devices using a report query, for example, from the default Reporting window, click View Managed Devices.
2 Filter the device list to include only devices you want to include in your group. For example, click Microsoft Windows XP Professional Version 5.1.2600, in the Operating System column. The report then displays all managed devices using Version 5.1.2600 of Windows XP Professional. You can filter the device list further by adding additional filters.
3 When you have the list of devices you want to add to your group, click the Create new Dynamic Reporting Group button to start the Group
Creation Wizard.
4 Follow the steps in the wizard on page 164 to create your dynamic group of devices.
About Dynamic Reporting Groups
• Dynamic Reporting group membership depends upon the devices meeting the criteria defined in the query used to create the original list. Membership is updated based on the schedule you define during the Group Creation Wizard or can be altered using the Group Details window.
• To modify the criteria used in a Reporting group, create a new device query, then use the Group Creation Wizard to create a new group with the new criteria.
Reporting 131

132
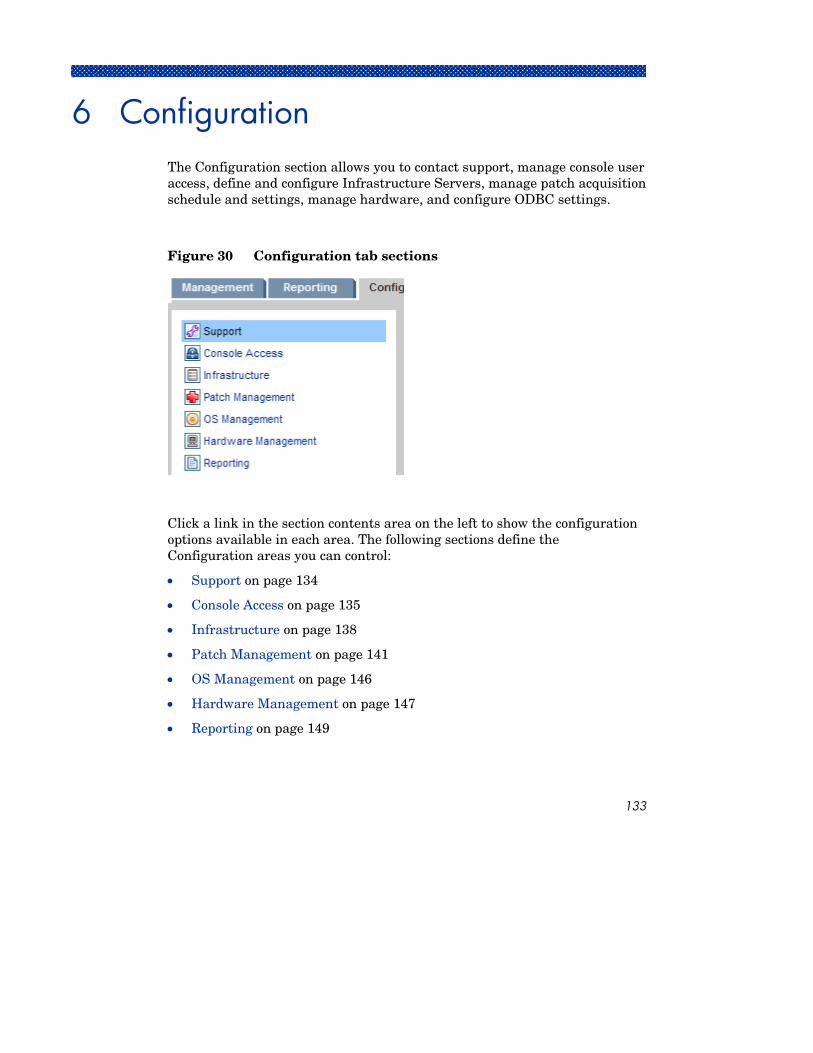
6 Configuration The Configuration section allows you to contact support, manage console user access, define and configure Infrastructure Servers, manage patch acquisition schedule and settings, manage hardware, and configure ODBC settings.
Figure 30 Configuration tab sections
Click a link in the section contents area on the left to show the configuration options available in each area. The following sections define the Configuration areas you can control:
• Support on page 134
• Console Access on page 135
• Infrastructure on page 138
• Patch Management on page 141
• OS Management on page 146
• Hardware Management on page 147
• Reporting on page 149
133

Support Use the Support section to locate support information, download current server log files, and review your licensing information.
The licensing section shows the type of OVCCM license, premium, or basic, you have installed.
Figure 31 Support section of the Configuration tab
The following tasks can be completed in the Support area:
• Downloading Log Files on page 134
• Updating Licensing Information on page 135
Downloading Log Files
When working with support, you may be asked to supply log files. Use the link provided to download and save a compressed file of current server log files.
134 Chapter 6
To download log files
1 In the Troubleshooting area, click the link Download Current Server Log Files. A new window opens.
2 When the log files are prepared, click Download logfiles.zip.
3 When prompted, click Save to store the compressed file on your computer.
4 Specify a location to store the file and click OK.
5 The log files are downloaded to your computer and saved in a single ZIP formatted file called logfiles.zip.
Updating Licensing Information
Current licensing information is required to use OVCCM. Use the Licensing section to view and update this information.
To apply a new license
1 Copy and paste the text from your new license.nvd file into the License Data text box.
2 Click Save.
Updated license information is displayed after Current License.
Console Access Use the Console Access section to manage console users. Management jobs contain a Creator field which displays the user ID used to create the job. This allows you to keep track of which console users created individual jobs.
By default, one console user exists, admin, with the default password of secret. This console user account cannot be deleted. Also, the currently active user account cannot be deleted. If you need to delete the currently active account, first log out then log back in as a different user. Then you will have the option to remove the previously active console user account.
Configuration 135

Figure 32 Console Access section
The following sections describe how to manage your console users:
• Creating additional console users on page 136
• Removing console users on page 136
• Viewing and modifying console user on page 137
• Changing the Console Password on page 137
Creating additional console users
• Click the Create New User toolbar button to launch the User Creation Wizard.
• Follow the steps in the wizard on page 173 to add additional console users.
Removing console users
• To remove a console user, first select the user from the list and then click the Delete Users toolbar button .
136 Chapter 6

Viewing and modifying console user details
Click any User ID to view that console user’s details.
From the User Details window, you can modify the display name, description, and password. Be sure to click Save to confirm any changes.
Figure 33 User Details window
Changing the Console Password
When console users are created, a console access password is defined. To change the password, use the User Details window.
To change a console password
1 Click the User ID to open the User Details window.
2 In the Password Change section, enter and confirm a new password by typing it into the text boxes provided.
3 Click Save.
Configuration 137

Infrastructure Use the Infrastructure section to manage Infrastructure Servers. Define servers by adding devices to the Infrastructure Server group then by deploying the Infrastructure service.
Implementing Infrastructure Servers allows you to optimize bandwidth and increase network performance by providing data caching services for managed devices.
Managed devices automatically detect the Infrastructure Server with the most efficient connection and will then use that server for data transfer tasks. This allows for increased performance and bandwidth optimization on the network.
Infrastructure Servers cache all requested data with the exception of operating system images.
Figure 34 Infrastructure Servers.
The Infrastructure Servers toolbar contains buttons you can use to define and configure Infrastructure Servers in your environment.
138 Chapter 6
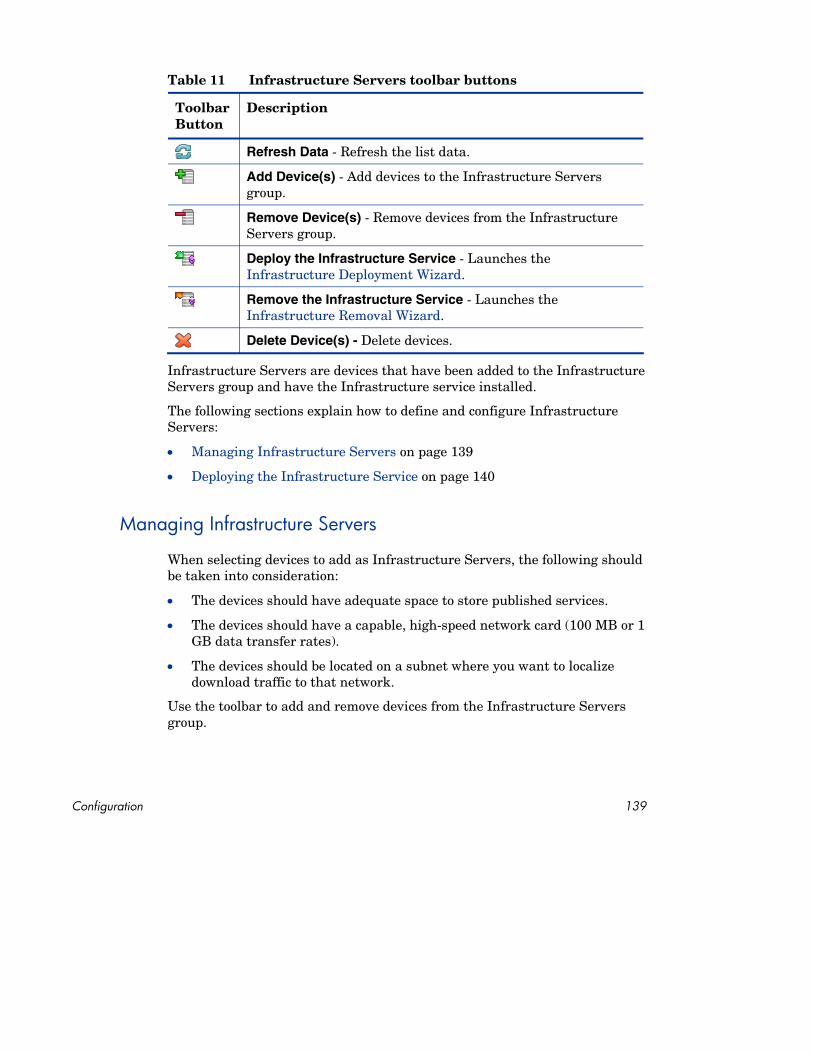
Table 11 Infrastructure Servers toolbar buttons
Toolbar Button
Description
Refresh Data - Refresh the list data.
Add Device(s) - Add devices to the Infrastructure Servers group.
Remove Device(s) - Remove devices from the Infrastructure Servers group.
Deploy the Infrastructure Service - Launches the Infrastructure Deployment Wizard.
Remove the Infrastructure Service - Launches the Infrastructure Removal Wizard.
Delete Device(s) - Delete devices.
Infrastructure Servers are devices that have been added to the Infrastructure Servers group and have the Infrastructure service installed.
The following sections explain how to define and configure Infrastructure Servers:
• Managing Infrastructure Servers on page 139
• Deploying the Infrastructure Service on page 140
Managing Infrastructure Servers
When selecting devices to add as Infrastructure Servers, the following should be taken into consideration:
• The devices should have adequate space to store published services.
• The devices should have a capable, high-speed network card (100 MB or 1 GB data transfer rates).
• The devices should be located on a subnet where you want to localize download traffic to that network.
Use the toolbar to add and remove devices from the Infrastructure Servers group.
Configuration 139
To add an Infrastructure Server
1 On the Infrastructure toolbar, click the Add Devices toolbar button. The OVCCM Infrastructure Servers group membership window opens and shows a list of all devices imported into OVCCM.
2 Select devices from the list and click Add Devices.
Devices added appear in the Infrastructure Servers list.
To remove an Infrastructure Server
1 On the Infrastructure toolbar, select the device you want to remove from the Infrastructure Servers group.
2 Click the Remove Device toolbar button.
The device is removed from the group.
If you remove a device from the Infrastructure group that had the Infrastructure Service installed, it will continue to operate as an Infrastructure Server until the service is removed. Use the Remove the Infrastructure Service toolbar button to remove the service.
When devices are added, you can begin Deploying the Infrastructure Service. This service is required to begin remote data caching on each server.
Deploying the Infrastructure Service
Deploy the Infrastructure service to enable remote services on the Infrastructure Server devices.
To deploy the Infrastructure Service
1 Select devices from the Infrastructure Servers list using the checkboxes in the left column.
toolbar button to launch the Infrastructure Deployment Wizard.
2 Click Deploy the Infrastructure Service
3 Follow the steps in the wizard on page 176 to deploy the Infrastructure Service to the selected devices.
140 Chapter 6

When the service is installed, managed devices automatically detect if the Infrastructure Server is located on a local subnet or "closer" than the OVCCM server. Devices will then receive resources from the Infrastructure Server.
Each time devices request resources not available on the Infrastructure Server's local cache, the data is retrieved from the OVCCM server, stored in the dynamic cache of the Infrastructure Server, and provided to the client devices.
To remove the Infrastructure Service
1 Select devices from the Infrastructure Servers list using the checkboxes in the left column.
toolbar button to launch the Infrastructure Removal Wizard.
2 Click Remove the Infrastructure Service
3 Follow the steps in the wizard on page 177 to remove the Infrastructure Service from selected devices.
Patch Management - Configuration Use the Patch Management section to acquire patches and HP Softpaqs, configure schedules for patch acquisition, and to define patch acquisition settings.
Entitled patches are deployed automatically based on the compliance discovery schedule you define using the Patch Compliance Discovery Wizard. Patches can be deployed immediately using the Patch Deployment Wizard.
Configuration 141

Figure 35 Patch Management section of the Configuration tab
The following sections explains each Patch Management tab:
• Configuring Patch Acquisition Schedule on page 142
• Configuring Patch Acquisition Settings on page 143
Configuring Patch Acquisition Schedule
Use the Schedule tab to acquire patches or to configure a patch acquisition schedule.
To ensure efficient acquisition of the latest available patches, we recommend configuring your Patch Acquisition Schedule to run during off-peak hours and no more than once daily.
Current Schedule shows the currently configured patch acquisition schedule.
To acquire patches
• Click Acquire Patches Now to acquire patches based on the current Patch Acquisition settings. Patches are downloaded and stored in the Patch Library.
• View acquired patches in the Patch Management, Patches tab.
142 Chapter 6

To configure the patch acquisition schedule
1 Use the tools provided to set the acquisition schedule.
— Run: Select whether to discover patches based on an interval hours, days, or weeks.
— Interval: Select the specific interval (hours, days, or weeks).
— Starting on: Use the drop-down lists to select the date patch compliance should be discovered.
— Current Server Time displays the current time of the OVCCM server.
2 When finished, click Save to commit your changes.
The new schedule is displayed after Current Schedule.
Configuring Patch Acquisition Settings
Use the Settings tab to configure the acquisition settings for the Windows patches and HP Softpaqs you want to acquire. Patches are acquired from HP and Microsoft sources and Softpaqs are acquired by leveraging HP Instant Support technologies.
Required fields are marked with an asterisk (*).
Configuration 143
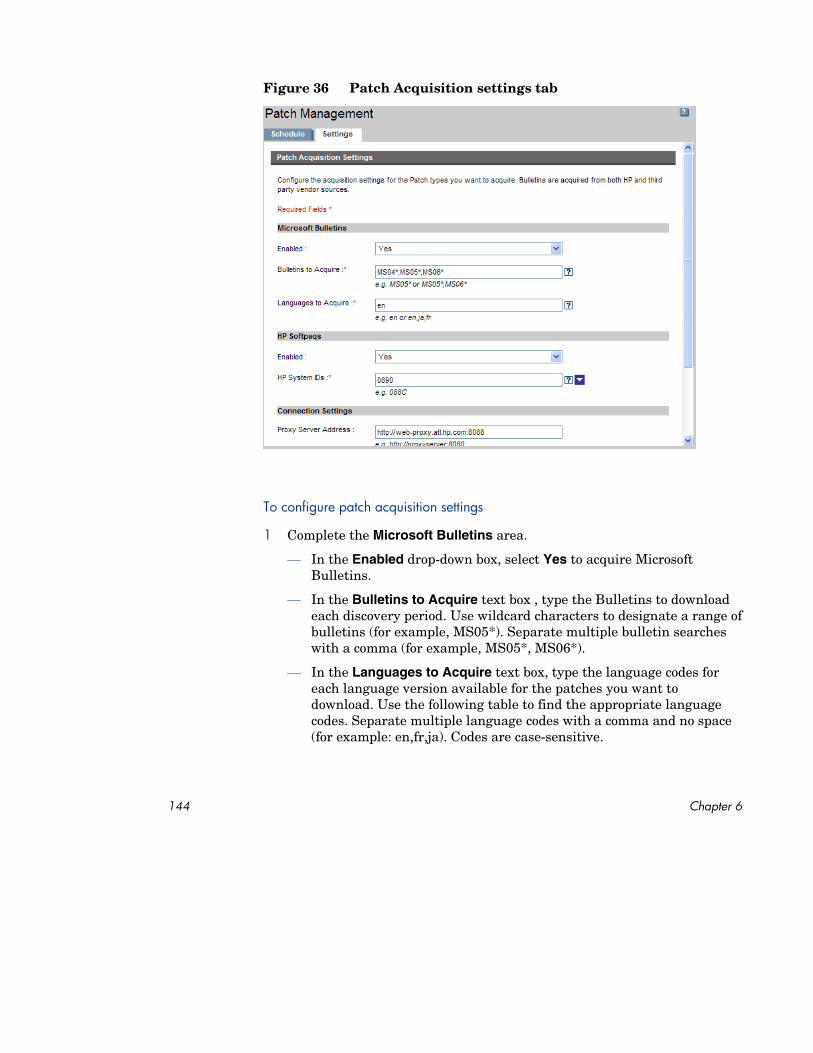
Figure 36 Patch Acquisition settings tab
To configure patch acquisition settings
1 Complete the Microsoft Bulletins area.
— In the Enabled drop-down box, select Yes to acquire Microsoft Bulletins.
— In the Bulletins to Acquire text box , type the Bulletins to download each discovery period. Use wildcard characters to designate a range of bulletins (for example, MS05*). Separate multiple bulletin searches with a comma (for example, MS05*, MS06*).
— In the Languages to Acquire text box, type the language codes for each language version available for the patches you want to download. Use the following table to find the appropriate language codes. Separate multiple language codes with a comma and no space (for example: en,fr,ja). Codes are case-sensitive.
144 Chapter 6

Table 12 Language Codes
Language = Code Language = Code Language = Code
Arabic = ar French = fr Norwegian (Bokml) = no
Chinese (Hong Kong S.A R) = zh-hk
German = de Polish = pl
Chinese (Simplified) = zh-cn Greek = el Portugese (Brazil) = pt-br
Chinese (Traditional) = zh-tw Hebrew = he Portugese (Portugal) = pt-pt
Czech = cs Hungarian = hu Russian = ru
Danish = da Italian = it Spanish = es
Dutch = nl Japanese = ja Swedish = sv
English = en Japanese (NEC) = ja-nec Turkish = tr
Finnish = fi Korean = ko
2 Complete the HP Softpaqs area.
— In the Enabled drop-down box, select Yes to acquire HP Softpaqs.
—
text box or by clicking the
In the HP System IDs text box, determine which device-related HPSoftpaqs are acquired by either typing a list of HP System IDs in the
Retrieve Data button to the right of the text box to automatically create the list of System IDs based on devices in OVCCM.
3 Complete the Connection Settings area if needed.
— Type a Proxy Server Address from which to obtain bulletins (for example, http://proxyserver:8080/).
— Type a Proxy User ID and Proxy Password to use when acquiring patches.
Patch acquisition is limited to proxy servers configured with basic authentication only.
4 Click Save to apply your changes.
Initial patch acquisition may take an extended period of time.
Configuration 145

OS Management Use the OS Management section to configure settings for operating system deployment.
Figure 37 OS Management section of the Configuration tab.
To configure the OS Deployment mode
• In the Configuration tab, OS Management section, select the OS Deployment Mode:
— Prompt User (Attended) -- A user must be present at the managed device during operating system deployment to continue the deployment process.
— Do not prompt user (Unattended) -- No dialogue windows are displayed on managed devices during operating system deployment. No user interaction is required.
Deploying an operating system image will in some cases overwrite existing data depending on the number of hard drives and partitions on the target device. If you select Do not prompt user (Unattended), be sure to back up existing data on target devices before deploying a new operating system.
146 Chapter 6

If you are migrating settings during operating system deployment, you will be required to supply a password to back up device settings before the operating system is installed.
• Click Save to commit your changes.
Changes to the OS Deployment Mode affect all new and scheduled OS deployment jobs.
Hardware Management Use the Hardware Management section to configure the HP Client Management Interface (CMI) alert options and the Trusted Platform Module (TPM) settings.
The following sections describe the hardware configuration options available:
• Configuring CMI on page 147
• Configuring TPM on page 148
Configuring CMI
The CMI Softpaq is installed to each HP targeted device as part of the OVCCM Agent Deployment. The HP Client Management Interface (CMI) provides enterprise managers and information technology professionals with an increased level of management instrumentation for HP business-class desktops, notebooks, and workstations.
CMI hardware-specific information is captured and available for reporting. Use the HP Specific Reports Reporting View in the Display Options section of the Reporting tab to create CMI hardware-related reports. (Select Inventory Management Reports, Hardware Reports, then HP Specific Reports to view CMI-related reporting options).
For additional CMI information see:
http://h20331.www2.hp.com/Hpsub/cache/284014-0-0-225-121.html
Use the CMI tab to modify HP CMI settings. Modified settings take effect the next time a managed client connects to the OVCCM infrastructure.
Configuration 147

CMI is compatible with only specific HP device models. Refer to your device description for compatibility information.
To enable Client Alert reporting
• Select Enabled from the Report Client Alerts drop-down list to report on captured client alerts from managed HP devices. Alert reporting is disabled by default.
• Select the minimum alert severity to report from the drop-down list.
To display Client Alerts on the client device
• Select Enabled from the Show Client Alerts drop-down list to turn on client alerts on managed HP devices. Alerts are disabled by default.
• Select the minimum alert severity to display on the client device.
• Type the number of seconds an alert should appear on the client device. By default, an alert is displayed for five seconds.
Configuring TPM
Use the TPM tab to configure the Trusted Platform Module chip on compatible HP devices. Deploy the CCM_TPM_ENABLEMENT service to intialize TPM ownership and apply these settings. See Deploying Software on page 82 for software deployment information.
In order to enable and initialize the TPM security chip, the HP ProtectTools software must first be installed on the device. Some device models have this software pre-installed while for others you will need to either download or purchase the software separately. For more information, review the HP documentation for your particular device model.
TPM is a hardware security chip that is installed on the motherboard of an HP business PC. It is included as part of HP ProtectTools Embedded Security.
For additional information see:
http://h20331.www2.hp.com/hpsub/cache/292199-0-0-225-121.html
148 Chapter 6

To configure TPM
1 Type the BIOS Admin and TPM Owner passwords.
2 Type the Emergency Recovery and Password Reset Tokens.
3 Select the Reboot Settings. After the TPM chip is enabled, the device is rebooted. This setting determines the level of interaction the end user will have.
— Accept Only – After reboot, user must accept enablement
— Accept or Reject – After reboot, user can accept or reject enablement
— Silent – User is not prompted to confirm enablement after reboot
4 Type the file paths for Backup Archive,Emergency Recovery Archive, and TPM Password Reset Archives.
5 Click Save.
Reporting Use the Reporting section tabs to change the database ODBC settings, configure usage data collection settings and manage usage collection filters.
• Database on page 150
• Usage Settings on page 150
• Usage Collection on page 151
• Maintenance on page 155
Configuration 149
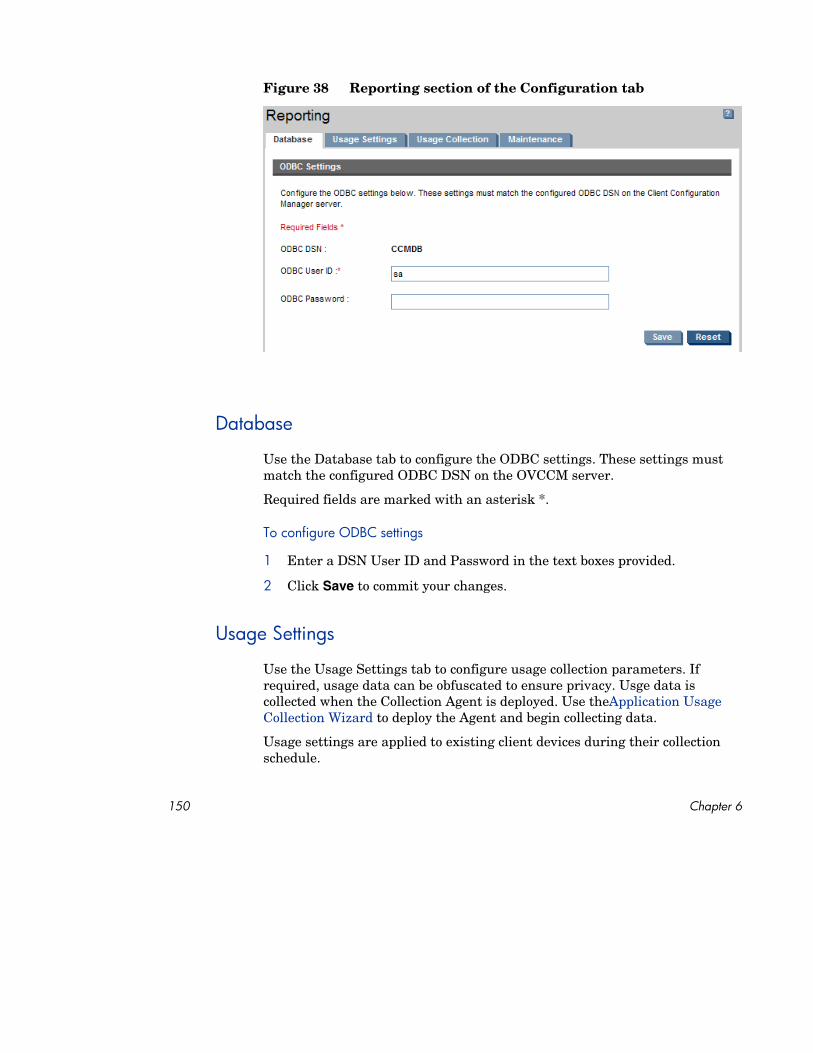
Figure 38 Reporting section of the Configuration tab
Database
Use the Database tab to configure the ODBC settings. These settings must match the configured ODBC DSN on the OVCCM server.
Required fields are marked with an asterisk *.
To configure ODBC settings
1 Enter a DSN User ID and Password in the text boxes provided.
2 Click Save to commit your changes.
Usage Settings
Use the Usage Settings tab to configure usage collection parameters. If required, usage data can be obfuscated to ensure privacy. Usge data is collected when the Collection Agent is deployed. Use theApplication Usage Collection Wizard to deploy the Agent and begin collecting data.
Usage settings are applied to existing client devices during their collection schedule.
150 Chapter 6

Obfuscation should be enabled prior to deploying the Collection Agent. If enabled after the Agent is deployed, some reporting data will appear as both obfuscated and non-obfuscated.
To obfuscate usage data
1 Use the drop-down boxes to select which usage data information, should be hidden.
— Computer – hide computer-related information. Computer name - reported as a random set of alphanumeric values.
— User – hide user-specific information. User name reported as [AnyUser].
— Domain – domain information. Domain name reported as a random set of alphanumeric values.
— Usage – hide usage counts and times. The executable file usage times and launch counts are all reported as zero values
2 Select Enabled next to the usage information you want to obfuscate within usage reports.
3 Save to commit the changes.
Usage Collection
Use the Usage Collection tab to create and manage usage collection filters.
Configuration 151
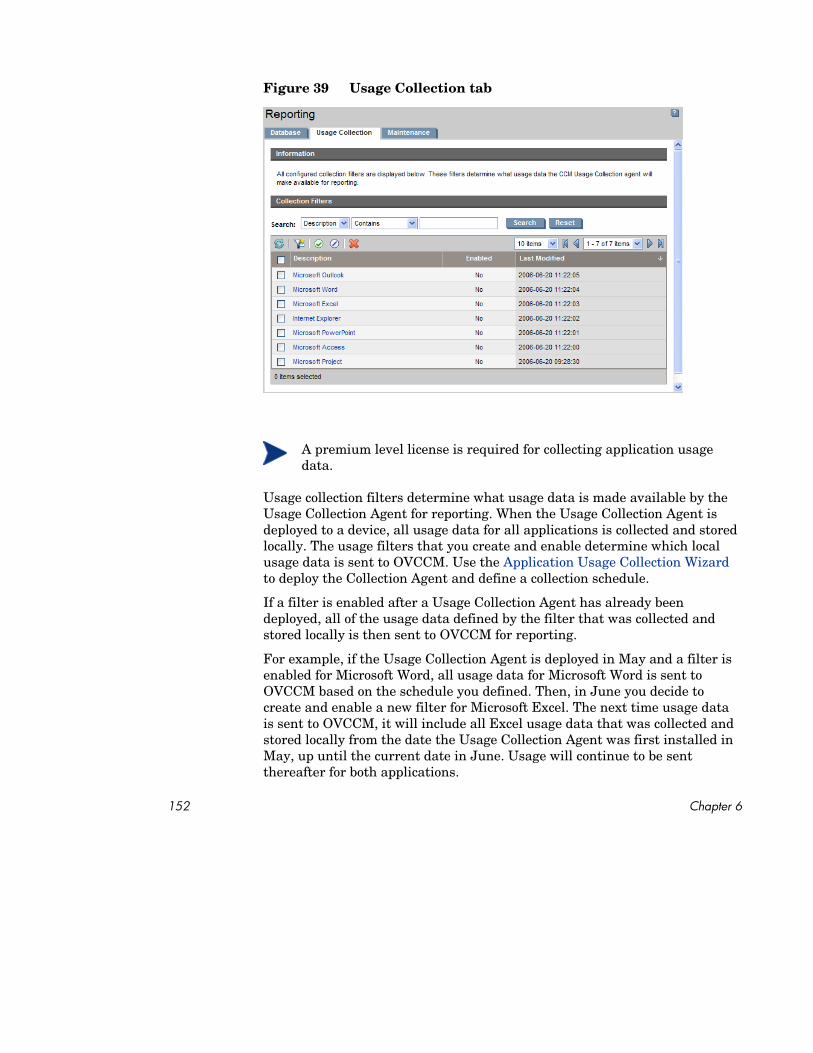
Figure 39 Usage Collection tab
A premium level license is required for collecting application usage data.
Usage collection filters determine what usage data is made available by the Usage Collection Agent for reporting. When the Usage Collection Agent is deployed to a device, all usage data for all applications is collected and stored locally. The usage filters that you create and enable determine which local usage data is sent to OVCCM. Use the Application Usage Collection Wizard to deploy the Collection Agent and define a collection schedule.
If a filter is enabled after a Usage Collection Agent has already been deployed, all of the usage data defined by the filter that was collected and stored locally is then sent to OVCCM for reporting.
For example, if the Usage Collection Agent is deployed in May and a filter is enabled for Microsoft Word, all usage data for Microsoft Word is sent to OVCCM based on the schedule you defined. Then, in June you decide to create and enable a new filter for Microsoft Excel. The next time usage data is sent to OVCCM, it will include all Excel usage data that was collected and stored locally from the date the Usage Collection Agent was first installed in May, up until the current date in June. Usage will continue to be sent thereafter for both applications.
152 Chapter 6

Usage data is stored locally on managed devices for 12 months.
For usage collection filter configuration instructions, see:
• Configuring Usage Collection Filters on page 153
• Defining Usage Criteria on page 154
Configuring Usage Collection Filters
Use the Usage Collection Filter Creation Wizard to create new usage collection filters. Use the Filter Details window to modify existing filters.
OVCCM contains pre-configured collection filters by default. You can use these filters as models for creating new filters or you can modify these filters to suit your needs.
Configuring filters to collect usage data based on wildcard characters can cause the collection of a large amount of data that can, over time, create severe reporting performance issues as the database grows in size. We strongly recommended creating filters to collect data for only those applications for which you want usage information.
Collecting usage data for all applications should be avoided.
To create a collection filter
toolbar button to launch the Usage Collection Filter Creation Wizard.
1 On the Usage Tab, click the Create New Filter
2 Follow the steps in the wizard, on page 175, to create and enable the new collection filter.
To enable a collection filter
1 In the Filter list, select the filter you want to enable by clicking the box to the left of the filter description.
toolbar button. 2 Click the Enable Selected Items
3 Click Save.
To modify an existing filter
1 In the Filter list, click the filter description link to open the Filter Details window.
Configuration 153

2 In the Filter Criteria area, type the specific filter criteria to use when collecting usage data. See Defining Usage Criteria on page 154 for help in determining what criteria to select.
3 Click Save.
Defining Usage Criteria
The Usage Collection Agent uses the file header information within each local executable to determine if that application meets defined filter criteria. You can use the file header information to determine what criteria to use to when defining a filter.
To determine file header information
1 Right-click an executable on your system.
2 Select Properties from the shortcut menu.
3 On the Properties window, click the Version tab.
Figure 40 Application properties window.
154 Chapter 6

The information contained in the Item Name and Value areas are used by the Usage Collection agent to filter the available usage data (with the exception of the Language and Internal Name items, which are not currently supported).
Be aware that not all executable files support or correctly populate values stored in the file header.
The following example describes how to create a filter to search for a specific application.
To filter usage data for notepad.exe
1 Create a new Usage Filter by launching the Usage Collection Filter Creation Wizard.
2 At the Properties step, define the following filter criteria:
— Decription: Notepad
— Enabled: Yes
— File/Application Name: notepad.exe
3 Deploy the Usage Collection agent to managed devices. See Deploying Software on page 82 for instructions on deploying software to managed devices.
Usage data will be sent to OVCCM weekly and will include all usage data for Notepad for all devices that have the Collection Agent installed.
Maintenance
The Maintenance tab shows all of the devices that have reporting data stored in OVCCM. Use the Maintenance tab toolbar to clean up reporting data for devices that may no longer be in your OVCCM database.
To remove device reporting data
1 On the Maintenance tab, select the devices for which you would like to remove reporting data from OVCCM.
2 Click the Delete Reporting Data toolbar button.
3 The reporting data is removed from OVCCM.
Configuration 155

Once reporting data is removed for a device, that data is no longer available when generating any reports.
If you are deleting reporting data for an actively managed device, to avoid reporting data discrepancies, you should remove then redeploy the Management Agent on that device.
156 Chapter 6

7 Wizards While using the HP OpenView Client Configuraion Manager (OVCCM), you will use many different wizards to deploy agents, add devices, create groups, publish software and patches, and more. This section contains each wizard and an explanation of the individual steps you will encounter.
Some wizards can be launched from multiple areas of the control panel.
• Import Device Wizard on page 158
• Agent Deployment Wizard on page 159
• Agent Removal Wizard on page 160
• Software/Hardware Inventory Wizard on page 160
• Patch Compliance Discovery Wizard on page 161
• Application Usage Collection Wizard on page 162
• Power Management Wizard on page 163
• Group Creation Wizard on page 164
• Remote Control Wizard on page 167
• Software Deployment Wizard on page 168
• Service Import Wizard on page 169
• Service Export Wizard on page 169
• Software Synchronization Wizard on page 170
• Patch Deployment Wizard on page 171
• Service Entitlement Wizard on page 172
• Software Removal Wizard on page 172
• User Creation Wizard on page 173
• OS Deployment Wizard on page 174
• Usage Collection Filter Creation Wizard on page 175
• Infrastructure Deployment Wizard on page 176
157

• Infrastructure Removal Wizard on page 177
The OVCCM Management Console may open additional browser instances when running wizards or displaying alerts. To access these wizards and alerts, you must include OVCCM as an Allowed Site in your browser’s pop-up blocker settings.
Import Device Wizard Use the Import Device Wizard to discover and add devices to your OVCCM database. When devices are imported, they can be targeted for management using the Agent Deployment Wizard.
To import devices using the Import Device wizard
1 To launch the wizard, click Import on the General tab in the Device Management section or click the Import Devices to Manage toolbar button on the Devices tab.
2 Click Next to begin the wizard.
3 Select the Device Source from the drop-down box.
— Manual Import – Type or paste a list of device host names or IP addresses into the text box provided.
— LDAP/Active Directory – To import devices automatically from Active Directory or another LDAP-compliant Directory Service, type the LDAP Host, Port, User ID, password (if required) and the DN to Query. Also select the scope, an advanced filter, or a device limit to apply to the query.
— Domain – To scan a network domain for devices to import, type the domain name (for example, type ABC for a full domain scan of the ABC domain) or part of the domain name and a wildcard character (ABC* returns all devices from domains beginning with ABC). To include specific devices from a domain, use the following syntax, domain\device. For example, Sales\WS* returns only devices beginning with WS from the Sales domain. Use an exclamation mark ! to exclude specific devices from a domain. For example, Sales,!Sales\WS* will return all devices from the Sales domain with the exception of devices beginning with WS.
158 Chapter 7

4 Click Import.
5 Click Close to exit the wizard.
Imported devices are displayed in the Devices tab.
Agent Deployment Wizard Use the Agent Deployment wizard to deploy the Management Agent to devices in your OVCCM database.
Launch the wizard from the Device Management, General area by clicking Deploy, or from the Devices area by first selecting devices for agent deployment, then clicking the Deploy the Management Agent toolbar button.
The Agent Deployment Wizard can also be launched from the Group Management, Groups area by clicking the Deploy the Management Agent toolbar button.
To deploy a Management Agent using the Agent Deployment Wizard
1 To launch the wizard:
— Click Deploy on the Device Management General tab.
— Click the Deploy the Management Agent toolbar button on the Device Management, Devices tab.
— Click the Deploy the Management Agent toolbar button from the Group Management, Groups tab.
2 Click Next to begin the wizard.
3 All available devices are displayed. Select each device to which you want to deploy a Management Agent, and click Next. Use the Search function to narrow the list of devices, if necessary.
4 Enter the required information for your selected devices, and click Next.
5 Select Run: Now to deploy the agent immediately after the wizard is complete, or select Run: Later and enter a date and time for agent deployment.
6 Click Next.
7 Review the summary information and click Submit.
Wizards 159

8 An Agent Deployment Job is created. Click Close to exit the wizard.
Agent Removal Wizard Use the Agent Removal Wizard to remove the Management Agent from devices in your OVCCM database.
Removing the Management Agent will disable the ability to deploy software and patches and to collect updated inventory information for that device. Unmanaged devices will remain within their respective groups until removed from the groups or deleted from OVCCM and will retain all deployed software.
To remove a Management Agent using the Agent Removal wizard
1 Launch the wizard from the Device Management, Devices tab or from the Group Management, Groups tab.
2 Select the devices or groups from which you want to remove the Management Agent and click the Remove the Management Agent toolbar button.
3 Click Next to begin the wizard.
4 Select Run: Now to remove the agent immediately after the wizard is complete, or select Run: Later and enter a date and time for Agent removal.
5 Click Next.
6 Review the summary information and click Submit.
7 An Agent Deployment Job is created. Click Close to exit the wizard.
Software/Hardware Inventory Wizard Use the Software/Hardware Inventory Wizard to create inventory audit jobs that will discover software and hardware inventory for the selected devices.
160 Chapter 7

To discover inventory using the Software/Hardware Inventory wizard
1 Launch the wizard from the Device Management, Devices tab or from the Group Management, Groups tab by clicking the Inventory Collections toolbar button then selection Discover Software/Hardwware Inventory.
2 Click Next to begin the wizard.
3 Select Run: Now to discover inventory immediately after the wizard is complete, or select Run: Later and enter a date and time for inventory discovery. To configure a recurring schedule, select Every ‘x’ Hours, Days, or Weeks then select the Interval from the drop-down box.
Recurring job schedule options (Every 'x' Days, for example) are available when creating group-related jobs only.
4 Select whether or not to enable Wake on LAN for the device. Selecting Yes from the drop down box allows OVCCM to turn on the device to discover inventory, if necessary.
5 Review the summary information and click Submit.
6 The job is successfully created. Click Close to exit the wizard.
Use the Current Jobs tab to view all pending Management Jobs.
Patch Compliance Discovery Wizard Use the Patch Compliance Discovery wizard to configure patch compliance schedules for selected devices and groups.
To discover patch compliance
1 Launch the wizard from the Device Management, Devices tab or from the Group Management, Groups tab by clicking the Inventory Collections toolbar button then selecting Discover Patch Compliance.
2 Click Next to begin the wizard.
3 Select Run: Now to schedule the job to run immediately after the wizard is complete, or select Run: Later and enter a date and time for the job to begin. To configure a recurring schedule, select Every ‘x’ Hours, Days, or Weeks then select the Interval from the drop-down box.
Wizards 161

Recurring job schedule options (Every 'x' Days, for example) are available when creating group-related jobs only.
4 Select whether or not to enable Wake on LAN for the device. Selecting Yes from the drop down box allows OVCCM to turn on the device if necessary.
5 Review the summary information and click Submit.
6 The job is successfully created. Click Close to exit the wizard.
When finished, use the Reporting tab to view compliance reports for the selected devices or groups.
Application Usage Collection Wizard Use the Application Usage Collection wizard to collect application usage data for targeted devices.or groups. The Application Usage Collection wizard installs the Collection Agent on the targeted devices then returns usage data based on the filters you create and enable. See Usage Collection on page 151 for additional information.
To discover application usage data
1 Launch the wizard from the Device Management, Devices tab or from the Group Management, Groups tab by clicking the Inventory Collections toolbar button then selecting Discover Application Usage .
2 Click Next to begin the wizard.
3 Select Run: Now to schedule the job to run immediately after the wizard is complete, or select Run: Later and enter a date and time for the job to begin. To configure a recurring schedule, select Every ‘x’ Hours, Days, or Weeks then select the Interval from the drop-down box.
Recurring job schedule options (Every 'x' Days, for example) are available when creating group-related jobs only.
Collecting application usage data on a weekly basis is recommended.
162 Chapter 7

4 Select whether or not to enable Wake on LAN for the device. Selecting Yes from the drop down box allows OVCCM to turn on the device if necessary.
5 Review the summary information and click Submit.
6 The job is successfully created. Click Close to exit the wizard.
Use the Current Jobs tab to view all pending Management Jobs.
Power Management Wizard Use the Power Management wizard to turn on, turn off, or restart selected devices.
Remotely turning on a device requires the Wake-On-LAN capability built into modern computers. Wake-On-LAN is a management tool that enables the OVCCM server to remotely power-on managed devices by sending a packet over the network. Devices may need to have their BIOS configured to enable remote wake up feature, refer to your hardware documentation for details. BIOS settings for HP devices can be modified and deployed using OVCCM. See Publishing BIOS Settings on page 225 for details.
Selecting the Power Off feature for Windows XPe devices results in the device rebooting once before powering off. This is necessary to clear the internal cache on the XPe device and is normal operation.
To remotely turn on, turn off, or restart a device
1 Launch the wizard from the Device Management, Devices area or from the Group Management, Groups area by clicking the Power Management
toolbar button.
2 Click Next to begin the wizard.
3 Select the Power Management function from the drop-down list. You can choose to turn on, turn off, or restart the selected device.
— Power On – turn on the selected device
— Power Off – turn off the selected device
Wizards 163

— Reboot – restart the selected device
4 Configure the run schedule for the job. Select Run: Now to schedule the job to run immediately, or select Run: Later to schedule a date and time for the job to begin. To configure a recurring schedule, select Every ‘x’ Hours, Days, or Weeks then select the Interval from the drop-down box.
Recurring job schedule options (Every 'x' Days, for example) are available when creating group-related jobs only.
5 Review the summary information and click Submit.
6 The job is successfully created. Click Close to exit the wizard.
Use the Current Jobs tab to view all pending Management Jobs.
Group Creation Wizard Software or patches must be deployed to groups of managed devices in your database. Use the Group Creation Wizard to define device groups based on devices you specify, discovered devices, or on the devices returned as part of a reporting query.
The Group Creation Wizard steps vary depending on the type of group you are creating. The following sections describe each version:
• Creating a Static Group on page 164
• Creating a Dynamic Discovery Group on page 165
• Creating a Dynamic Reporting Group on page 166
Creating a Static Group
To create a static group
1 Launch the wizard from Group Management, General tab by clicking Create a new Static Group or from the Groups tab by clicking the Create a New Static Group toolbar button .
2 Click Next to begin creating the group.
3 Enter a descriptive name for the group, for example Sales Devices.
4 Click Next.
164 Chapter 7

5 Select the devices you want to include in the group by checking the box in the first column for each device to include. You can use the Search function to narrow the list of devices, if necessary.
6 Click Next.
7 Review the summary information. Make sure the number of devices you selected matches the # Devices summary. Click Previous if you need to modify the group.
8 Click Create.
9 The group is successfully created. Click Close to exit the wizard.
Creating a Dynamic Discovery Group
Discovery group membership is based on the devices found during an LDAP query or domain scan.
To create a Dynamic Discovery group
1 Launch the wizard from Group Management, General tab by clicking Create a new Discovery Group or from the Groups tab by clicking the Create a New Group toolbar button then selecting Create a new Dynamic Discovery Group.
2 Click Next to begin creating the group.
3 Enter a descriptive name for the group, for example, Sales Domain Devices.
4 Click Next.
5 Select the discovery source.
— LDAP/Active Directory – Type the LDAP Host and Port number, User ID, password (if required) and the DN to query.
Additionally, select the scope, advanced filter or a device limit to apply to the query.
— Domain – to scan a network domain for devices to import, type the domain name (for example, type ABC for a full domain scan of the ABC domain) or part of the domain name and a wildcard character (ABC* returns all devices from domains beginning with ABC). To include specific devices from a domain, use the following syntax, domain\device. For example, Sales\WS* returns only devices beginning with WS from the Sales domain.
Wizards 165

Use an exclamation mark ! to exclude specific devices from a domain. For example, Sales,!Sales\WS* will return all devices from the Sales domain with the exception of devices beginning with WS.
6 Click Next.
7 Configure the refresh schedule for the dynamic group.
— Run: Select whether to update dynamic group membership based on an interval hours, days, or weeks.
— Interval: Select the specific interval (hours, days, or weeks).
— Starting on: Use the drop-down boxes to select the date the group should be refreshed.
— Current Server Time displays the current time of the OVCCM server.
8 Click Next.
9 Review the summary information and click Create.
10 Click Close to exit the wizard.
A Discovery Group is created containing the devices found during the LDAP query or domain scan. If discovered devices were not already a part of OVCCM, they are automatically added to the device list. The device membership of this group will update based on the refresh schedule you configured.
Creating a Dynamic Reporting Group
Reporting groups are created using the devices returned in a report query.
To create a Dynamic Reporting group
1 Launch the wizard from the Reporting area, Action Bar by clicking Create a new Dynamic Reporting Group .
2 Click Next to begin the wizard.
3 Enter a descriptive name for the group and click Next.
4 Configure the refresh schedule for the dynamic group.
— Run: Select whether to update dynamic group membership based on an interval hours, days, or weeks.
— Interval: Select the specific interval (hours, days, or weeks).
166 Chapter 7

— Starting on: Use the drop-down boxes to select the date the group should be refreshed.
— Current Server Time displays the current time of the OVCCM server.
5 Click Next.
6 Review the summary information and click Create.
7 A Reporting Group is created containing the current devices in the report query. The device membership of this group will be updated based on the refresh schedule you configured.
8 Click Close to exit the wizard.
Remote Control Wizard Use the Remote Control wizard to open a remote session with a managed device.
To launch a remote session using the Remote Control wizard
1 Launch the wizard from the Device Management, Devices area by clicking the Remote Control toolbar button. Click Next to begin the wizard.
2 Select the Remote Control Method from the available options.
Microsoft Client (RDP) – RDP (Remote Desktop Protocol) is a multichannel capable protocol available on Windows client devices. You can use RDP to remotely connect to a device with RDP enabled (for example, Windows XP).
VNC Client – VNC (Virtual Network Computer) is an open source remote control application. Use VNC to remotely connect to client devices that have VNC installed and enabled. If you select VNC you will be required to enter the VNC Java Viewer Port and VNC Listen Port. Default values are supplied for Windows devices (5800 and 5900 respectively). For Embedded Linux thin client devices, the default ports are typically 5801 and 5901.
3 Select the Screen Size for the remote session window.
4 Click Connect.
Wizards 167

5 The remote session opens in a new window.
6 Click Close to exit the wizard.
When you are finished with the remote session, close the window to disconnect from the device.
Software Deployment Wizard Use the Software Deployment Wizard to entitle and deploy software to managed devices in your environment.
To entitle and deploy software using the Software Deployment wizard
1 Launch the wizard from the Software Management General area by clicking Deploy or from the Software tab, Software Details window, or Group Details window by clicking the Deploy Software toolbar button.
2 Click Next to begin the wizard.
3 Select the software to entitle and deploy by checking the box in the first column.
4 Click Next.
5 Select the groups that will be entitled and targeted for deployment by checking the box in the first column.
6 Click Next.
7 Configure the run schedule for the software deployment job. Select Run: Now to deploy the software right away, or select Run: Later to schedule a date and time for software deployment. To configure a recurring schedule, select Every ‘x’ Hours, Days, or Weeks then select the Interval from the drop-down box.
Recurring job schedule options (Every 'x' Days, for example) are available when creating group-related jobs only.
8 Click Next.
9 Review the summary information and click Submit.
10 The job is successfully created and added to Current Jobs. View the current software deployment jobs by clicking the Current Jobs tab.
168 Chapter 7

11 Click Close to exit the wizard.
Service Import Wizard Use the Service Import Wizard to import services from the ChangeControl directory on the OVCCM server machine into a Software, Patch, or OS library.
To import a service using the Service Import wizard
1 Launch the wizard from the Software Management, Software area, Patch Management, Patch area, or the OS Management, Operating Systems area by clicking the Import Service toolbar button.
2 Click Next to begin the wizard.
3 Select the service to import. All service decks available within the OVCCM server’s ChangeControl directory appear in the list.
The fourth section of each service’s file name contains a descriptive name for that software, patch, or OS. For example, PRIMARY.SOFTWARE.ZSERVICE.ORCA is the service deck for the Orca software application.
4 Review the summary information and click Import.
5 The service is imported and will be available within the OVCCM library.
6 Click Close to exit the wizard.
Service Export Wizard Use the Service Export Wizard to export services from the OVCCM Software, Patch, or OS libraries to the ChangeControl directory on the OVCCM server machine.
To export a service using the Service Export wizard
1 Select a service to export (Software, Patch or OS).
Wizards 169

2 Launch the wizard from the Software Management, Software area, Patch Management, Patch area, or the OS Management, Operating Systems area by clicking the Export Service toolbar button
3 Click Next to begin the wizard.
4 Review the summary information and click Export.
5 The service is exported to the OVCCM server’s ChangeControl directory.
6 Click Close to exit the wizard.
The fourth section of each service’s file name contains a descriptive name for that software, patch, or OS. For example, PRIMARY.SOFTWARE.ZSERVICE.ORCA is the service deck for the Orca software application.
Software Synchronization Wizard Use the Software Synchronization Wizard to create a Software Synchronization Job that will automatically deploy all entitled software to group members that do not have the software installed. Also, Software Synchronization Jobs ensure all new group members automatically receive all entitled software.
To create a Software Synchronization Job
1 On the Group Details window, Software tab, click the Synchronize Software toolbar button to launch the wizard.
2 Configure the run schedule for the software synchronization job. Select Run: Now to schedule the job to run right away, or select Run: Later to schedule a date and time for the job. To configure a recurring schedule, select Every ‘x’ Hours, Days, or Weeks then select the Interval from the drop-down box.
Recurring job schedule options (Every 'x' Days, for example) are available when creating group-related jobs only.
3 Use the Wake On Lan drop down list to enable Wake On Lan for devices in the group. This allows OVCCM to power on the devices to perform the required job actions.
4 Review the summary information and click Submit.
170 Chapter 7

5 Click Close to exit the wizard.
Patch Deployment Wizard Use the Patch Deployment wizard to entitle and deploy patches to managed devices in your environment.
To entitle and deploy patches using the Patch Deployment wizard
1 Launch the wizard from the Patch Management General tab by clicking Deploy or from the Patch Library area, Patch Details or Group Details windows by clicking the Deploy Patch toolbar button.
2 Click Next to begin the wizard.
3 Select a deployment method.
Compliance Enforcement – Select this method to determine which patches are applicable to the target devices. Only applicable patches will be installed. As new patches are entitled to the devices, they will be installed the next time this job runs. You must create a recurring schedule in order to enforce patch compliance on an ongoing basis.
Manual Selectiom – Select this method to deploy the patches to the target devices. If the patches are not applicable to the devices, the job may end in error. Use this method to deploy the patches to target devices one time without creating a recurring compliance schedule.
4 Select the patches to entitle and deploy by checking the box in the first column.
5 Click Next.
6 Select the groups that will be entitled and targeted for deployment by checking the box in the first column.
7 Click Next.
8 Configure the run schedule for the job. Select Run: Now to schedule the job to run right away, or select Run: Later to schedule a date and time for the job. To configure a recurring schedule, select Every ‘x’ Hours, Days, or Weeks then select the Interval from the drop-down box.
A recurring schedule is only available when you select the Compliance Enforcement deployment method.
Wizards 171

9 Click Next.
10 Review the summary information and click Submit.
11 The job is successfully created and added to Current Jobs. View the current patch deployment jobs by clicking the Current Jobs tab.
12 Click Close to exit the wizard.
After a patch is deployed it cannot be removed from a device.
Service Entitlement Wizard The Service Entitlement Wizard entitles groups of devices to software, operating system images, and patch services.
To add group entitlement using the Service Entitlement wizard
Launch the wizard from the Patch Management, Patches tab or from the OS Management, Operating Systems tab.
1 Select te patches to entitle to a group then click the Add Group Entitlement toolbar button.
2 Click Next to begin the wizard.
3 Select the groups that will receive entitlement to the service by clicking the check box in the left column.
4 Click Next.
5 Review the summary information and click Submit.
6 The job is successfully created and added to the current jobs. View the current software removal jobs by clicking the Current Jobs tab.
7 Click Close to exit the wizard
Software Removal Wizard The Software Removal wizard uninstalls software from selected devices or groups.
172 Chapter 7

To remove software using the Software Removal wizard
1 From the Software Details window or the Group Details window, select the software to remove.
2 Click the Remove Software toolbar button to launch the wizard.
3 Click Next to begin the wizard.
4 Configure the run schedule for the software removal job. Select Run: Now to remove the software right away, or select Run: Later to schedule a date and time for software removal.
5 Click Next.
6 Review the summary information and click Submit.
7 The job is successfully created and added to the current jobs. View the current software removal jobs by clicking the Current Jobs tab.
8 Click Close to exit the wizard.
User Creation Wizard The User Creation wizard adds additional console users.
To create additional console users using the User Creation wizard
1 Launch the wizard from the Configuration tab, Console Access section by clicking the Create New User toolbar button.
2 Click Next to begin the wizard.
3 Type a User ID, for example jdoe. This is what you will use to log in to the console.
4 Type a Display Name. This is the name that will be displayed in the Creator field for management jobs.
5 Optionally, type a Description for the user.
6 Type a Password and then confirm your entry in the Confirm Password text box.
7 Click Create.
8 The user is created successfully.
Wizards 173

If a user with the same User ID already exists, you will not be able to create the new user.
9 Click Close to exit the wizard.
The new console user is displayed in the list of Users. Click the User ID to modify or view the console user properties.
OS Deployment Wizard The OS Deployment wizard deploys operating systems to managed devices. Operating systems are deployed in either attended or unattended mode. See the Configuration tab, OS Management section on page 146 to select the deployment mode.
To deploy and operating system using the OS Deployment wizard
1 Launch the wizard from the OS Management section, General or Operating Systems areas by clicking the Deploy Operating System toolbar button.
2 Click Next to begin the wizard.
Groups created for OS deployment should follow some basic guidelines, for example, all devices within the group should have similar, compatible hardware.
3 Select the groups for operating system entitlement and deployment.
4 Click Next.
5 Select the OS deployment method you will use for this job.
— Local Service Boot (LSB): Select this option if you want to install LSB in order to deploy the OS. Advantage to using LSB is, existing devices do not need to be PXE-enabled and the boot order does not need to be configured locally in the BIOS for each target device.
— Local CD or PXE Server: Select this option if you will be using a PXE Server or Service CD to install the operating system on your devices.
6 If you have a Premium license installed, you are prompted to select whether or not to Migrate User Data and Settings. Selecting Yes will deploy the Settings Migration Utility along with the operating system.
174 Chapter 7

During the operating system deployment, the Settings Migration Utility launches and prompts the user to back up their settings. After the new operating system is installed, deploy the Settings Migration Manager service to the device to restore settings. See Settings Migration on page 249 for additional information.
If you are using unattended mode for OS deployment and select settings migration, this process will also run unattended. The required information for Settings Migration, computer name and password, are automatically generated. The end user should use the Restore from operating system migration feature in the Settings Migration Utility to restore settings stored during an unattended OS deployment.
7 Configure the run schedule for the job. Select Run: Now to deploy the OS right away, or select Run: Later to schedule a date and time for OS deployment. To configure a recurring schedule, select Every ‘x’ Hours, Days, or Weeks then select the Interval from the drop-down box.
Recurring job schedule options (Every 'x' Days, for example) are available when creating group-related jobs only.
8 Configure any additional job tasks in the Additional Parameters section.
9 Click Next.
10 Review the summary information and click Submit.
11 The job is successfully created and added to Current Jobs. View the current OS deployment jobs by clicking the Current Jobs tab.
12 Click Close to exit the wizard
Usage Collection Filter Creation Wizard Use the Usage Collection Filter Creation Wizard to create new usage collection filters.
Wizards 175
To create a new collection filter
1 Launch the wizard by clicking the Create New Filter toolbar button on the Usage Collection tab within the Configuration tab’s, Reporting section.
2 Click Next.
3 Configure the filter parameters by typing criteria into each text box.
Only type values for those fields you wish to filter usage data against. Empty text boxes are ignored and not used as part of the filter criteria.
The values you enter are compared against the file header in the software executable to determine if collected usage data meets the filter criteria.
See Defining Usage Criteria on page 154 for methods on determining how to filter for a specific piece of software.
Configuring filters to collect and report on more than 50 applications will result in a large amount of data that can create severe reporting performance issues over time.
4 Click Create.
5 Click Close.
A new filter is added to the Collection Filters list.
Infrastructure Deployment Wizard Use the Infrastructure Deployment Wizard to install the Infrastructure service to Infrastructure Servers to enable remote services such as data caching.
To deploy the Infrastructure service
1 Launch the wizard by clicking the Deploy the Infrastructure Service toolbar button on Configuration tab’s, Infrastructure section.
2 Click Next.
3 Enter deployment credentials and click Next.
4 Select the installation drive for the Infrastructure Service and click Next.
176 Chapter 7

5 Configure the run schedule for the job. Select Run: Now to deploy the service right away, or select Run: Later to schedule a date and time for deployment.
6 Click Next.
7 Review the summary information and click Submit.
8 Click Close to exit the wizard
Infrastructure Removal Wizard Use the Infrastructure Removal Wizard to remove the Infrastructure service from devices in the Infrastructure Servers group.
To remove the Infrastructure service
1 Launch the wizard from the Configuration tab’s Infrastructure section toolbar.
2 Select the devices from which you want to remove the Infrastructure Service and click Remove the Infrastructure Service toolbar button.
3 Click Next to begin the wizard.
4 Select Run: Now to remove the service immediately after the wizard is complete, or select Run: Later and enter a date and time for Agent removal.
5 Click Next.
6 Review the summary information and click Submit.
7 Click Close to exit the wizard.
Wizards 177

178 Chapter 7
8 Preparing and Capturing OS Images Use the Image Preparation Wizard to prepare and capture operating system images for deployment to devices in your environment. After an image is captured, use the Publisher to publish it to OVCCM.
When you run the wizard, it collects inventory information associated with the image and sends the image file to the \upload directory on your OVCCM server (C:\Novadigm\OSManagerServer\upload by default).
Images should be sent to an OVCCM Server in a non-production lab environment to prevent performance issues.
The Image Preparation wizard is available as part of the osprepwiz.iso file on the OVCCM CD-ROM within the OSManagement\ISO\CaptureCD directory.
• Create an Image Preparation Wizard CD from this file before you begin.
Preparation and capture steps vary depending on the operating system. For OS-specific instructions, see the appropriate section below:
• Windows OS Image on page 179
• Thin Client OS Image on page 194
Windows OS Images The following sections explain how to prepare and capture a Windows operating system image:
• Step 1 - Prepare the Reference Machine on page 180
• Step 2 - Create Sysprep.inf on page 183
• Step 3 - Run the Image Preparation Wizard on page 185
179

Figure 41 OS image creation process
Step 1 - Prepare the Reference Machine
The image created on the reference machine (the machine used to create an image of the operating system) is deployed to target devices. Before using the HP supplied Image Preparation Wizard (prepwiz.exe) to create the image, do the following:
1 Set the reference machine to boot from the CD-ROM drive.
You must do this because the Image Preparation Wizard CD-ROM is bootable. When you run the Image Preparation Wizard, it reboots the device to the memory-resident Linux environment that boots from the CD-ROM in order to capture the image.
2 Run the installation for the OS on the reference machine. Make sure the reference machine is using DHCP.
180 Chapter 8

The OS must be stored on the C: drive because only the C: drive is captured.
3 Customize the OS as necessary. This may include installing a set of basic or required applications. Be sure to include the latest service pack for the OS and applications. Be sure to include all required drivers for all device configurations to which you will be deploying the image. The following Microsoft KB article contains information for including OEM drivers for Windows OS installations:
http://support.microsoft.com/default.aspx?scid=kb;en-us;314479
Windows XP images require Service Pack 1 at a minimum.
4 Deploy the Management Agent to the reference machine or install the Agent manually using the OVCCM CD-ROM. The agent is required so that when the OS image is deployed, the device can connect to the OVCCM server.
Additional Recommendations
1 Configure the BIOS power management so that the machine does not power down after a few minutes of keyboard or mouse inactivity before the upload process to the OVCCM server is finished.
2 Keep the image file size as small as possible. The ideal configuration would be a partition just large enough to fit the operating system. If the Resize partition before OS upload check box is selected, the Image Preparation Wizard will attempt to resize the partition to a smaller size.
If you do not want the Image Preparation Wizard do this for you, consider:
— Using the minimum partition size. When partitioning the drive on your reference machine for OS installation, use the minimal amount of space required.
– Windows 2000 Professional requires an 800 MB partition for installation.
– Windows XP with SP1 requires 1.5 GB.
— Disabling hibernation if you are using a laptop.
— Making the page file as small as possible while preserving OS performance.
Preparing and Capturing OS Images 181

For Windows XP consider the following:
– Turn off System Restore to stop tracking changes.
– Disable the paging file.
For Windows XP Professional with Service Pack 1 the page file will be enabled on the target machine if the KeepPageFile parameter is set to the default value (null) in the Sysprep file. See http://support.microsoft.com/?kbid=813138 for more information on KeepPageFile.
– Turn off hibernation. The page file is deleted.
For Windows XP SP1, you can use powercfg.exe to turn the hibernation file on from a command line. See http://support.microsoft.com/default.aspx?scid =kb;en-us;q324347.
For Windows 2000, consider the following:
– Disable the paging file by setting it to 0.
– Turn off hibernation.
— Creating free space. We recommend that when you have created the smallest partition with the least amount of free disk space as possible, set the ExtendOemPartition = 1 in the [Unattended] section of Sysprep.inf, to allow for the small image to be installed on a target machine with a much larger drive. When the ExtendOemPartition is set to 1, the Microsoft Mini-Setup Wizard will extend the OS installation partition into any available non-partitioned space that physically follows on the disk. The client can then use the free space on the volume for application installations.
— Before capturing the image, the OS Image Preparation Wizard can set to zero the free space at the end of the system drive partition.
This is an option offered when you use the OS Image Preparation Wizard.
— This increases the compressibility of the captured image, reducing its size. Smaller image files require less disk space to store and less bandwidth to move across the network.
182 Chapter 8

Step 2 - Create Sysprep.inf
Download Microsoft Sysprep to distribute Microsoft operating systems using cloned images.
Review Microsoft’s documentation for information about how to use Sysprep, how to create a Sysprep.inf, as well as the available parameters. For information on Microsoft Sysprep for Windows XP and Windows 2000, go to \support\tools\deploy.cab on the installation media. Deploy.cab contains three help files (Deploy.chm contains detailed Sysprep information).
In the last step of image creation, the Image Preparation Wizard runs Microsoft Sysprep for you. It strips out all of the security identifiers in the image and resets the image.
After the operating system image is delivered to the target machine, the Microsoft Mini-Wizard will run automatically when the target machine is started. After using the answers provided by Sysprep.inf, the Microsoft Mini-Wizard deletes the Sysprep directory on the target machine.
To set up Sysprep
1 Go to DEPLOY.CAB in the SUPPORT\TOOLS folder of the Microsoft Operating System installation CD-ROM. See Microsoft’s documentation for details.
2 Extract the Microsoft Sysprep files from the Deploy.cab file using the appropriate operating system CD-ROM. Copy these files to C:\SysPrep on the references machine and make sure the directory and files are not set to read-only.
Preparing and Capturing OS Images 183

Be sure that you are using Sysprep version 5.02195.2104r or higher. If you use an older version, you may receive the following error: Invalid Sysprep version error. Please install Sysprep version 5.02195.2104r and re-run the Wizard. Click OK to terminate.
If you do not have the appropriate version of Sysprep, you can download it from the Microsoft web site. Even if you have administrator rights, make sure that you have the appropriate user rights set to run Sysprep. See the article #270032 "User Rights Required to Run the Sysprep.exe Program" on the Microsoft web site.
http://support.microsoft.com/?kbid=270032 If you do not have the appropriate user rights, when Sysprep runs, you will receive the following error: You must be an administrator to run this application.
The Image Preparation Wizard will exit and when you set up the appropriate user rights you will need to run the wizard again.
3 Be sure that the reference machine is part of a WORKGROUP and not a domain in order to use the Microsoft Sysprep.
4 Create a Sysprep.inf and save it to C:\Sysprep.
To create Sysprep.inf
The Sysprep.inf file is delivered with the operating system image. You can create the file manually or use the Microsoft Setup Manager (Setupmgr.exe) to create Sysprep files. The Setup Manager can be found in the Deploy.cab file in the SUPPORT\TOOLS folder of a Microsoft OS distribution CD-ROM. See Microsoft’s documentation for more information.
Sample Sysprep.inf files are available on the Image Preparation CD in the \samples directory.
Below are a few tips to consider when creating the Sysprep.inf file:
• Adjust the TimeZone value for your enterprise.
• Set up the AdminPassword.
• Make sure to include a product key so that the user will not need to enter this at the target machine.
184 Chapter 8
• In order to have an unattended installation, you must include UnattendMode = FullUnattended in the [Unattended] section.
• Set ExtendOemPartition to 1, so that Microsoft Sysprep will extend the OS partition into any available non-partitioned space that physically follows on the disk.
• If JoinDomain is present in Sysprep.inf, then Sysprep.inf has to have the Admin User ID and Password of an account in the domain that has the rights to join the computer to the domain. Note that JoinDomain is case sensitive.
• ComputerName is also case sensitive.
When finished with these steps, continue with Step 3 - Run the Image Preparation Wizard on page 185.
Step 3 - Run the Image Preparation Wizard
The Image Preparation Wizard performs the following tasks:
1 Checks if there is enough free disk space on the machine and verifies that the OS Manager client is installed. See Step 1 - Prepare the Reference Machine on page 180. If there is not enough free disk space, the Image Preparation Wizard displays a message and terminates.
2 Creates an object that contains information (including hardware and BIOS capabilities) about the reference machine.
3 Runs Microsoft Sysprep on supported operating systems (Windows XPe, CE, and Embedded Linux do not support Sysprep).
4 Restarts the reference machine into Linux (booted from the Image Prep CD you created). The Linux-based portion of the OS Manager Image Preparation Wizard runs to collect the image and its associated files.
5 Creates and copies the following files to SystemDrive:\Novadigm\OSManagerServer\upload on the OVCCM Server.
— ImageName.IMGThis file contains the image. This is a compressed, sector-by-sector copy of the boot partition from the hard drive system that may be very large. The file contains an embedded file system that will be accessible when the image is installed.
— ImageName.MBRThis file contains the master boot record file of the reference machine.
Preparing and Capturing OS Images 185

— ImageName.PARThe file contains the partition table file of the reference machine.
— ImageName.EDMThis file contains the object containing inventory information.
While these files are being transferred, network speed will be less than optimal as the operating system image is compressed during transfer.
A comprehensive log (machineID.log) is also available in SystemDrive:\Novadigm\OSManagerServer\upload after the image is deployed.
To use the Image Preparation Wizard
1 Insert the Image Preparation Wizard CD-ROM you created into the CDROM drive of the reference machine. This CD is created using the osprepwiz.iso found within the OSCaptureISO directory on your OVCCM CD.
2 If autorun is enabled, the OpenView OVCCM OS Preparation and Capture CD homepage opens.
3 Click Browse to open the \OSPreparationWizard\win32\ directory.
4 Double-click prepwiz.exe. The Image Preparation Wizard verifies that the C:\Sysprep folder exists before continuing.
5 Click Next.
6 The End User Licensing Agreement window opens.
7 Click Accept.
The Type of Image Selection window opens.
186 Chapter 8

8 Accept the default, Standard, and click Next. PowerQuest is reserved for future use.
Preparing and Capturing OS Images 187

9 Type the IP address or host name and port for the OVCCM server. This must be specified in the following format: xxx.xxx.xxx.xxx:port. The OVCCM server port reserved for OS imaging is 3469.
If the Image Preparation Wizard cannot connect to the OVCCM server, a message opens and you must:
— Click Yes to continue anyway.
— Click No to modify the host name or IP address.
— Click Cancel to exit the Image Preparation Wizard.
10 Click Next.
The Image Name window opens.
11 Type a name for the image file. This is the image name that will be stored in the /upload directory on the OVCCM server.
12 Click Next.
A window opens so you can enter a description for the image.
188 Chapter 8

13 Type a description for the image file.
14 Click Next.
The Options window opens.
Preparing and Capturing OS Images 189

15 Select the appropriate options.
Build Mass Storage Section in Sysprep.inf. Select this check box to build a list of the Mass Storage drivers in the [SysprepMassStorage] section of the Sysprep.inf for Windows 2000 and above.
The list of Mass Storage Drivers is installed in the registry. This takes about 15-20 minutes, but provides fundamental mass storage device drivers to ensure success of image deployment across machine models and manufacturers. If there are any errors in these entries, subsequent Sysprep execution can fail.
Optimize compression of unused disk space. Select this check box to optimize compression of unused disk space. This adds zeroes up to the end of the disk. Note that this may take some time depending on the size of the hard drive.
Resize partition before OS upload. Select this check box to resize the partition to make it as small as possible. If you do not select this check box, make sure that your partition is sized appropriately.
Perform client connect after OS install. Select this check box to connect to the OVCCM server after the OS is installed to verify the OS was installed properly. If this is not selected, the OS Connect will not occur automatically after the OS is installed.
16 Accept the defaults and click Next.
The Summary window opens.
17 Click Start.
If you are working with an APIC machine, a new window opens.
190 Chapter 8

18 If necessary, select the check box.
Microsoft does not recommend this. Be sure to see their web site for more information before making this selection.
19 Click Next.
If you selected the check box in the previous step, the Select Windows CD window opens.
Preparing and Capturing OS Images 191

20 Browse to the Windows CD-ROM.
21 Click Next.
22 Click Finish to run Sysprep.
The Image Preparation Wizard will start Sysprep, this can take 15-20 minutes to complete. Sysprep will automatically reboot the machine when complete.
23 Click OK. Sysprep starts.
If you are using Windows 2000, Sysprep may take some time to run even if you do not see any activity on the screen.
After Sysprep restarts the device, the device must boot to the Image Preparation Wizard CD in the CD-ROM drive.
Make the necessary configuration adjustments to ensure this will happen (for example, with some BIOS versions, you can hit F10 during the reboot process and change the boot order in the configuration settings).
If the device does not boot to the CD (boots to Windows instead) you will need to restart the process from Step 1 - Prepare the Reference Machine, above.
192 Chapter 8

When the machine restarts, you will notice that the screen shows Fedora Core and looks similar to the following: To specify options manually, type sos opt1=xxx opt2=xxx enter Some quick boot specifications with preset options are SOS for PREPWIZ or ROMA, default after a few seconds TESTMODE – TESTMODE=1 DEBUG – runs in debug mode, SOSDEBUG=1 (no drivers loaded)
Wait a few seconds to continue or press Enter, causing the machine to boot. The options mentioned on screen should typically be used only if instructed by Technical Support.
The upload of the image may seem to take a long time. However, it is not the upload that is taking a long time, but rather the compression of the image and the optimization for compression of the unused disk space (especially if there is a lot of free disk space). This happens during the transfer of the image and therefore, the network pipe is not a bottleneck. Transfer speeds will be approximately 30-400 Kbps but may vary depending upon processor speeds and your network environment.
You may want to create copies of the files stored in the \upload directory so that you can retrieve them if necessary.
24 The Image Preparation Wizard connects to the network, and stores the image on the OVCCM server in the /upload directory.
When the upload process is complete, you will see the following messages
OS image was successfully sent to the OVCM OS Manager Server
**** If you had inserted a CD remove it now and reboot
25 Reboot the reference machine and readjust your boot settings if necessary to return to the original operating system.
Preparing and Capturing OS Images 193

Now you can use the Publisher to publish the image file to the OVCCM server for distribution to managed devices. See Publishing Operating System Images on page 222.
Thin Client OS Images The following sections explain how to prepare and capture supported Thin Client operating system images:
• Windows XPe OS images on page 194
• Windows CE OS images on page 201
• Embedded Linux OS images on page 205
Windows XPe OS images
The following sections explain how to prepare and capture a Windows XPe thin client operating system image:
• Step 1 – Prepare the XPe Reference Machine on page 194
• Step 2 – Run the Image Preparation Wizard on page 195
Step 1 – Prepare the XPe Reference Machine
To prepare an XPe thin client for image capture, you will need the following:
• OVCCM media
• XPe Embedded Toolkit CD-ROM
• Image Preparation CD-ROM
Before you can capture a Windows XPe image, you must do the following:
1 Log into Windows XPe as Administrator.
2 From the XPe Embedded Toolkit, copy etprep.exe to C:\Windows
3 From the XPe Embedded Toolkit, copy fbreseal.exe to C:\Windows\fba
4 Install the Management Agent.
194 Chapter 8

To install the Management Agent on Windows XPe
1 Access the OVCCM media from the Windowx XPe Thin Client device.
2 On the OVCCM media, go to SystemDrive:\ThinClient\XPE
3 Double-click setup.exe.
4 Follow the steps in the installation.
5 When prompted for the IP address and Port number, type the IP address and port number for your OVCCM server.
The Management Agent is installed.
Step 2 – Run the Image Preparation Wizard
The Image Preparation Wizard performs the following tasks:
1 Checks if there is enough free disk space on the machine and verifies that the Management Agent is installed. If there is not enough free disk space, the Image Preparation Wizard displays a message and terminates.
2 Creates an object that contains information (including hardware and BIOS capabilities) about the reference machine.
3 Restarts the reference machine into the service operating system (booted from the Image Prep CD you created). The Linux-based portion of the OS Manager Image Preparation Wizard runs to collect the image and its associated files.
4 Creates and copies the following files to SystemDrive:\Novadigm\OSManagerServer\upload on the OVCCM Server.
— ImageName.IBR This file contains the image. Thin Client image files are the same size as the reference machine’s flash drive. Windows XPe images can be deployed to target machines with flash drives of equal or greater size. The file contains an embedded file system that will be accessible when the image is installed.
— ImageName.EDMThis file contains the object containing inventory information.
Preparing and Capturing OS Images 195

While these files are transferred, network speed will be less than optimal as the operating system image is compressed during transfer.
A comprehensive log (machineID.log) is also available in SystemDrive:\Novadigm\OSManagerServer\upload after the image is deployed.
To use the Image Preparation Wizard
1 Insert the Image Preparation Wizard CD-ROM you created into the CDROM drive of the reference machine (Thin client devices require a USB CD-ROM drive). This CD is created using the osprepwiz.iso found within the OSCaptureISO directory on your OVCCM CD.
2 If autorun is enabled, the OpenView OVCCM OS Preparation and Capture CD homepage opens.
3 Click Browse to open the \OSPreparationWizard\win32\ directory.
4 Double-click prepwiz.exe. The Image Preparation Wizard verifies that etprep.exe and fbreseal.exe are available before continuing.
The Welcome window opens.
5 Click Next.
The End User Licensing Agreement window opens.
6 Click Accept.
196 Chapter 8

7 Type the IP address or host name and port for the OVCCM server. This must be specified in the following format: xxx.xxx.xxx.xxx:port. The OVCCM server port reserved for OS imaging is 3469.
If the Image Preparation Wizard cannot connect to the OVCCM server, a message opens and you must:
— Click Yes to continue anyway.
— Click No to modify the host name or IP address.
— Click Cancel to exit the Image Preparation Wizard.
8 Click Next.
The Image Name window opens.
Preparing and Capturing OS Images 197

9 Type a name for the image file. This is the image name that will be stored in the /upload directory on the OVCCM server.
10 Click Next.
A window opens so you can enter a description for the image.
198 Chapter 8
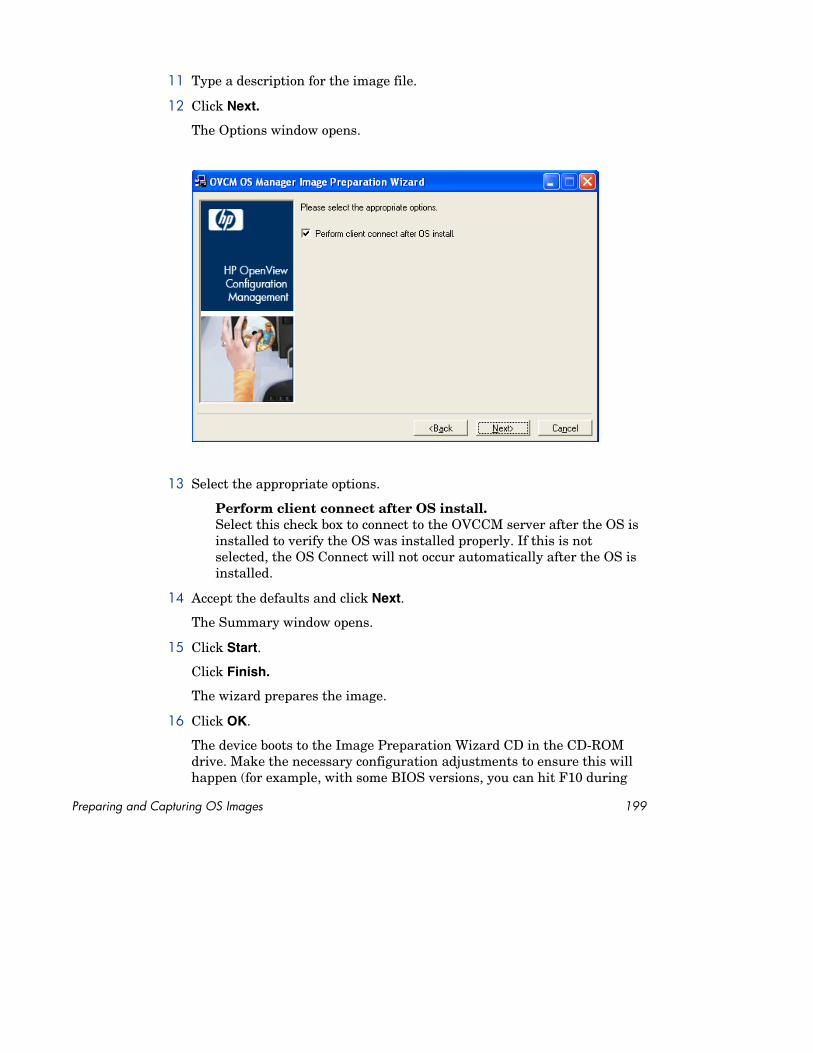
11 Type a description for the image file.
12 Click Next.
The Options window opens.
13 Select the appropriate options.
Perform client connect after OS install. Select this check box to connect to the OVCCM server after the OS is installed to verify the OS was installed properly. If this is not selected, the OS Connect will not occur automatically after the OS is installed.
14 Accept the defaults and click Next.
The Summary window opens.
15 Click Start.
Click Finish.
The wizard prepares the image.
16 Click OK.
The device boots to the Image Preparation Wizard CD in the CD-ROM drive. Make the necessary configuration adjustments to ensure this will happen (for example, with some BIOS versions, you can hit F10 during
Preparing and Capturing OS Images 199
the reboot process and change the boot order in the configuration settings).
If the device does not boot to the CD (boots to Windows XPe instead) you will need to restart the process from Step 1 – Prepare the XPe Reference Machine, above.
When the machine restarts, you will notice that the screen shows Fedora Core and looks similar to the following: To specify options manually, type sos opt1=xxx opt2=xxx enter Some quick boot specifications with preset options are SOS for PREPWIZ or ROMA, default after a few seconds TESTMODE – TESTMODE=1 DEBUG – runs in debug mode, SOSDEBUG=1 (no drivers loaded)
Wait a few seconds to continue or press Enter, causing the machine to boot. The options mentioned on screen should typically be used only if instructed by Technical Support.
The upload of the image may seem to take a long time. However, it is not the upload that is taking a long time, but rather the compression of the image and the optimization for compression of the unused disk space (especially if there is a lot of free disk space). This happens during the transfer of the image and therefore, the network pipe is not a bottleneck. Transfer speeds will be approximately 30-400 Kbps but may vary depending upon processor speeds and your network environment.
You may want to create copies of the files stored in the \upload directory so that you can retrieve them if necessary.
17 OS Image Preparation Wizard connects to the network, and stores the image on the OVCCM server in the /upload directory.
200 Chapter 8

When the upload process is complete, you will see the following messages
OS image was successfully sent to the OVCM OS Manager Server
**** If you had inserted a CD remove it now and reboot
18 Reboot the reference machine and readjust your boot settings if necessary to return to the original operating system.’
Now you can use the Publisher to publish the image file to the OVCCM server for distribution to managed devices. See Publishing Operating System Images on page 222.
Windows CE OS images
The following sections explain how to prepare and capture a Windows CE thin client operating system image:
• Step 1 – Prepare the CE Reference Machine on page 201
• Step 2 – Run the Image Preparation Wizard on page 202
Step 1 – Prepare the CE Reference Machine
To prepare a CE thin client for image capture, you will need the following:
• OVCCM media
• Image Preparation CD-ROM
Before you capture the image, you must install the Management Agent to the Windows CE device.
To install the Management Agent to Windows CE
1 Access the OVCCM media from the Windows CE thin client device.
2 On the OVCCM media, go to SystemDrive:\ThinClient\WinCE
3 Double-click radskman.X86.CAB.
4 Type the IP address or hostname of the OVCCM server and click OK.
The Management Agent is installed.
Preparing and Capturing OS Images 201

Step 2 – Run the Image Preparation Wizard
The Image Preparation Wizard performs the following tasks:
1 Checks if there is enough free disk space on the machine and verifies that the Management Agent is installed. If there is not enough free disk space, the Image Preparation Wizard displays a message and terminates.
2 Creates an object that contains information (including hardware and BIOS capabilities) about the reference machine.
3 Restarts the reference machine into the service operating system (booted from the Image Prep CD you created). The Linux-based portion of the OS Manager Image Preparation Wizard runs to collect the image and its associated files.
4 Creates and copies the following files to SystemDrive:\Novadigm\OSManagerServer\upload on the OVCCM Server.
— ImageName.IBR This file contains the image. Thin Client image files are the same size as the reference machine’s flash drive. Windows CE images can be deployed to target machines with flash drives of equal size. The file contains an embedded file system that will be accessible when the image is installed.
— ImageName.EDMThis file contains the object containing inventory information.
While these files are being transferred, network speed will be less than optimal as the operating system image is compressed during transfer.
A comprehensive log (machineID.log) is also available in SystemDrive:\Novadigm\OSManagerServer\upload after the image is deployed.
To use the Image Preparation Wizard
1 Insert the Image Preparation Wizard CD-ROM you created into the CDROM drive of the reference machine (Thin client devices require a USB CD-ROM drive). This CD is created using the osprepwiz.iso found within the OSCaptureISO directory on your OVCCM CD.
2 If autorun is enabled, the OpenView OVCCM OS Preparation and Capture CD homepage opens.
3 Click Browse to open the \OSPreparationWizard\WinCE\ directory.
202 Chapter 8

4 Double-click prepwiz.exe.
The Image Preparation Wizard opens.
5 Type the IP address or host name and port for the OVCCM server. This must be specified in the following format: xxx.xxx.xxx.xxx:port. The OVCCM server port reserved for OS imaging is 3469.
If the Image Preparation Wizard cannot connect to the OVCCM server, a message opens and you must:
— Click Yes to continue anyway.
— Click No to modify the host name or IP address.
— Click Cancel to exit the Image Preparation Wizard.
6 Click OK.
The wizard prepares the image.
The device boots to the Image Preparation Wizard CD in the CD-ROM drive. Make the necessary configuration adjustments to ensure this will happen (for example, with some BIOS versions, you can hit F10 during the reboot process and change the boot order in the configuration settings).
Preparing and Capturing OS Images 203

If the device does not boot to the CD (boots to Windows CE instead) you will need to restart the process Step 1 – Prepare the CE Reference Machine, above.
When the machine restarts, you will notice that the screen shows Fedora Core and looks similar to the following: To specify options manually, type sos opt1=xxx opt2=xxx enter Some quick boot specifications with preset options are SOS for PREPWIZ or ROMA, default after a few seconds TESTMODE – TESTMODE=1 DEBUG – runs in debug mode, SOSDEBUG=1 (no drivers loaded)
Wait a few seconds to continue or press Enter, causing the machine to boot. The options mentioned on screen should typically be used only if instructed by Technical Support.
The upload of the image may seem to take a long time. However, it is not the upload that is taking a long time, but rather the compression of the image and the optimization for compression of the unused disk space (especially if there is a lot of free disk space). This happens during the transfer of the image and therefore, the network pipe is not a bottleneck. Transfer speeds will be approximately 30-400 Kbps but may vary depending upon processor speeds and your network environment.
You may want to create copies of the files stored in the \upload directory so that you can retrieve them if necessary.
7 OS Image Preparation Wizard connects to the network, and stores the image on the OVCCM server in the /upload directory.
When the upload process is complete, you will see the following messages
204 Chapter 8

OS image was successfully sent to the OVCM OS Manager Server
**** If you had inserted a CD remove it now and reboot
8 Reboot the reference machine and readjust your boot settings if necessary to return to the original operating system.
Now you can use the Publisher to publish the image file to the OVCCM server for distribution to managed devices. See Publishing Operating System Images on page 222.
Embedded Linux OS images
The following sections explain how to prepare and capture an Embedded Linux operating system image:
• Step 1 – Prepare the Embedded Linux Reference Machine on page 205
• Step 2 – Run the Image Preparation Wizard on page 206
Step 1 – Prepare the Embedded Linux Reference Machine
To prepare an Embedded Linux thin client for image capture, you will need the following:
• OVCCM media
• Image Preparation CD-ROM
Before you can capture the image, the Management Agent must be installed on the embedded Linux thin client.
For additional thin client device information and instructions for running the installation using NFS, see the installation chapter in the guide or the README file included with ThinClient.tar.
To install the Management Agent on Embedded Linux
1 Login to the target thin client device.
2 Create a new directory called /mnt/opt/OVCM
3 Copy the contents of ThinClient.tar (located on the OVCCM media in the /ThinClient/Linux directory) to /mnt/opt/OVCM.
Preparing and Capturing OS Images 205

Depending on your device model, you may have to un-tar these files from /tmp or on another machine as some models do not have sufficient disk space to contain both the tar file and its exploded contents (would require approximately 7-8 MB free). After un-tarring, you can delete the ThinClient.tar.
4 Change the current diretory to /mnt/opt/OVCM and run the installation by typing:
./install –i OVCCM_Server
Where OVCCM_Server is the hostname or IP address of the OVCCM server.
The Management Agent is installed.
Step 2 – Run the Image Preparation Wizard
The Image Preparation Wizard performs the following tasks:
1 Checks if there is enough free disk space on the machine and verifies that the Management Agent is installed. If there is not enough free disk space, the Image Preparation Wizard displays a message and terminates.
2 Creates an object that contains information (including hardware and BIOS capabilities) about the reference machine.
3 Restarts the reference machine into the service operating system (booted from the Image Prep CD you created). The Linux-based portion of the OS Manager Image Preparation Wizard runs to collect the image and its associated files.
4 Creates and copies the following files to SystemDrive:\Novadigm\OSManagerServer\upload on the OVCCM Server.
— ImageName.DD This file contains the image. Thin Client image files are the same size as the reference machine’s flash drive. Embedded Linux images can be deployed only to target machines with flash drives of equal size. The file contains an embedded file system that will be accessible when the image is installed.
— ImageName.EDMThis file contains the object containing inventory information.
206 Chapter 8

While these files are transferred, network speed will be less than optimal as the operating system image is compressed during transfer.
A comprehensive log (machineID.log) is also available in SystemDrive:\Novadigm\OSManagerServer\upload after the image is deployed.
To use the Image Preparation Wizard
1 Insert the Image Preparation Wizard CD-ROM you created into the CDROM drive of the reference machine (Thin client devices require a USB CD-ROM drive). This CD is created using the osprepwiz.iso found within the OSCaptureISO directory on your OVCCM CD.
2 On the Image Preparation CD, go to /OSPreparationWizard/linux and run ./prepwiz
The Welcome window opens.
3 Click Next.
The End User Licensing Agreement window opens.
4 Click Accept.
Preparing and Capturing OS Images 207

5 Type the IP address or host name and port for the OVCCM server. This must be specified in the following format: xxx.xxx.xxx.xxx:port. The OVCCM server port reserved for OS imaging is 3469.
If the Image Preparation Wizard cannot connect to the OVCCM server, a message opens and you must:
— Click Yes to continue anyway.
— Click No to modify the host name or IP address.
— Click Cancel to exit the Image Preparation Wizard.
6 Click Next.
The Image Name window opens.
7 Type a name for the image file. This is the image name that will be stored in the /upload directory on the OVCCM server.
8 Click Next.
A window opens so you can enter a description for the image.
208 Chapter 8

9 Type a description for the image file.
10 Click Next.
The Options window opens.
Preparing and Capturing OS Images 209

11 Select the appropriate options.
Perform client connect after OS install. Select this check box to connect to the OVCCM server after the OS is installed to verify the OS was installed properly. If this is not selected, the OS Connect will not occur automatically after the OS is installed.
12 Accept the defaults and click Next.
The Summary window opens.
13 Click Start.
14 Click Finish. The wizard prepares the image.
15 Click OK.
The device boots to the Image Preparation Wizard CD in the CD-ROM drive. Make the necessary configuration adjustments to ensure this will happen (for example, with some BIOS versions, you can hit F10 during the reboot process and change the boot order in the configuration settings).
If the device does not boot to the CD (boots to Embeded Linux instead) you will need to restart the process from Step 1 – Prepare the Embedded Linux Reference Machine, above.
When the machine restarts, you will notice that the screen shows Fedora Core and looks similar to the following: To specify options manually, type sos opt1=xxx opt2=xxx enter Some quick boot specifications with preset options are SOS for PREPWIZ or ROMA, default after a few seconds TESTMODE – TESTMODE=1 DEBUG – runs in debug mode, SOSDEBUG=1 (no drivers loaded)
Wait a few seconds to continue or press Enter, causing the machine to boot. The options mentioned on screen should typically be used only if instructed by Technical Support.
210 Chapter 8

The upload of the image may seem to take a long time. However, it is not the upload that is taking a long time, but rather the compression of the image and the optimization for compression of the unused disk space (especially if there is a lot of free disk space). This happens during the transfer of the image and therefore, the network pipe is not a bottleneck. Transfer speeds will be approximately 30-400 Kbps but may vary depending upon processor speeds and your network environment.
You may want to create copies of the files stored in the \upload directory so that you can retrieve them if necessary.
16 OS Image Preparation Wizard connects to the network, and stores the image on the OVCCM server in the /UPLOAD directory.
When the upload process is complete, you will see the following messages:
OS image was successfully sent to the OVCM OS Manager Server
**** If you had inserted a CD remove it now and reboot
17 Reboot the reference machine and readjust your boot settings if necessary to return to the original operating system.
Now you can use the Publisher to publish the image file to the OVCCM server for distribution to managed devices. See Publishing Operating System Images on page 222.
Publishing and Deploying OS images After you have captured an image, publish it to OVCCM using the Publisher. For instructions, see Publishing Operating Systems on page 222 or refer to the Publisher online help.
When published to OVCCM, refresh the OS Library to view the new image. Use the OVCCM console toolbar to deploy the image to selected devices. See Deploying Operating Systems on page 98 for instructions.
Preparing and Capturing OS Images 211

212 Chapter 8
9 Using the Publisher Use the Publisher to publish software, BIOS configuration settings, HP Softpaqs, and operating system images to HP OpenView Client Configuration Manager (OVCCM). All published software is available in the Software Management, Software tab of the Management Console. Published operating systems are available within the OS Management, Operating Systems tab.
After publishing software, it must be entitled and deployed to managed devices in your environment.
The Publisher is installed separately from OVCCM using the Configuration Management Administrator installation file on the product CD or by using the CM Administrator Publisher service in the Software Library. See the installation instructions on page 39 for more information.
To start the Publisher
1 On the device where you installed the Publisher, use the Start menu and go to:
Start > All Programs > HP OVCM Administrator > CM Adminitrator Publisher
2 Log in to the Publisher using the OVCCM Management Console user name and password. By default, the user name is admin and the password is secret.
The following sections explain how to use the Publisher for publishing Windows installer files, operating system images, HP Softpaqs, and other software formats to OVCCM.
• Publishing Software on page 214
• Publishing Operating System Images on page 222
• Publishing HP Softpaqs on page 223
• Publishing BIOS Settings on page 225
213

Publishing options vary based on the the intended target devices and the OVCCM license you have installed:
• Publishing options, Component Select, OS Images, and Windows Installer require a premium level license.
• Thin client publishing options, OS Images and Component Select, are available for both basic and premium level licenses.
Publishing Software Depending on the type of software you intend to publish, you will use one of two publishing options. At the login screen, you are given the choice of Windows Installer to publish Windows Installer files (.msi) or Component Select to use when publishing non-Windows Installer files. The following sections explain the steps for publishing each file type.
• Publishing Windows Installer Files on page 214
• Publishing Using Component Select on page 219
Publishing Windows Installer Files
Windows Installer uses MSI files to distribute software services to your operating system. The Publisher uses the files to create a service that is then published to OVCCM. When the software service is contained in OVCCM, it is ready for distribution to managed devices in your environment.
To publish Windows Installer files
1 Start the Publisher (see, To start the Publisher on page 213).
2 At the Logon window, type your administrator User ID and password and click OK.
Log in to the Publisher using the OVCCM Management Console user name and password. By default, the user name is admin and the password is secret.
3 In the Publishing Options area, select Windows Installer and click OK.
214 Chapter 9
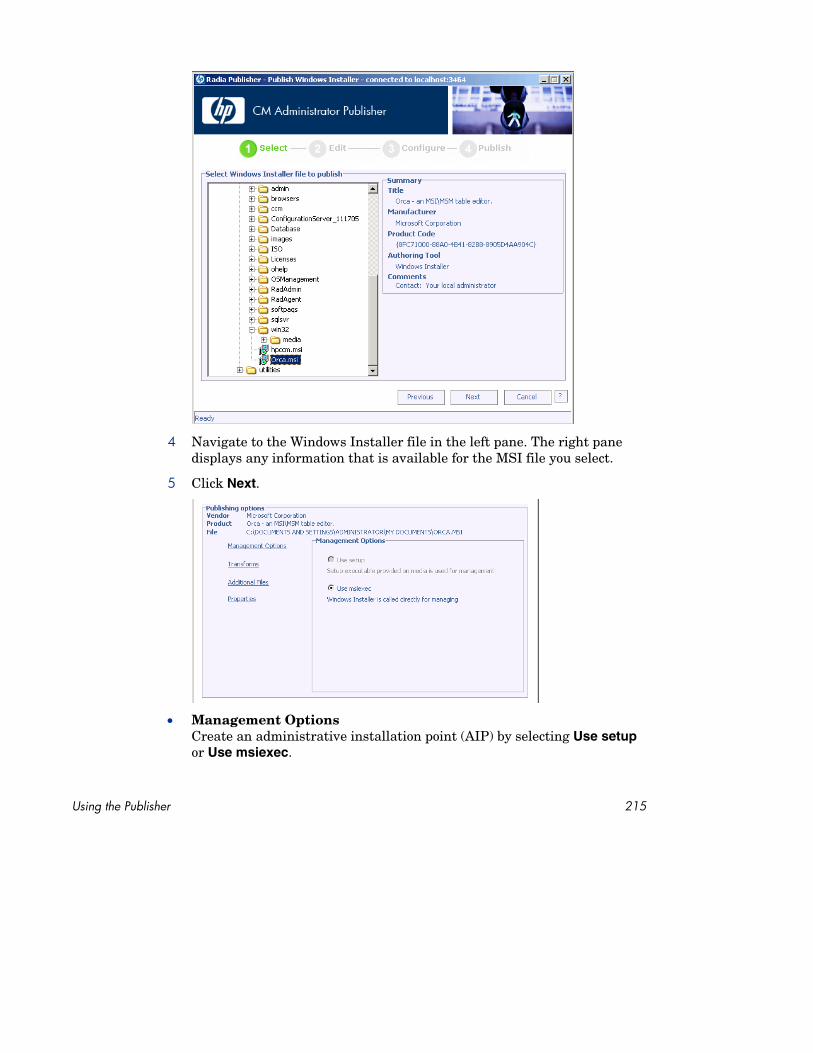
4 Navigate to the Windows Installer file in the left pane. The right pane displays any information that is available for the MSI file you select.
5 Click Next.
• Management Options Create an administrative installation point (AIP) by selecting Use setup or Use msiexec.
Using the Publisher 215

The AIP path is a temporary location and will be removed after the publishing session completes.
• Transforms Select and reorder the application of any transform files associated with the Windows Installer file.
• Additional Files Include additional files as part of the AIP.
— Click Select all to select all available files listed.
— Click Select none to deselect all files.
• Properties View and modify the msi file properties. Some Windows Installer files may require additional command line parameters to deploy correctly. For example, an application may require a custom property to pass a serial number during installation. Use the Properties dialog to include any additional parameters.
216 Chapter 9

6
7
8
Using the Publisher
— Click Add to add a new property.
— Click Remove to delete an existing property.
— To modify a property Name or Value, click the item you want to change and enter the new value.
When finished editing your publishing options, click Next.
Use the Application Information section to enter the software service information.
Use the Limit package to systems with section to limit the service to any specific operating system or hardware. Click on any link to display the configurable options.
Click Next.
217

9 Review the Summary section to verify the service information you provided during the previous steps. When you are satisfied, click Publish.
Click Finish when the publishing process is finished to close the Publisher. The Windows Installer service is now ready for distribution to your enterprise.
To apply additional parameters using a transform file
1 Create the transform using Orca or another MSI editor. Be sure to save the transform in the same directory as the Window Installer file are publishing.
2 Start a Windows Installer publishing session. Follow the instructions above for details.
3 At the Edit step, click Transforms.
4 Select the available transform file and continue with the publishing session.
When the software service is deployed, the transform file will be applied, supplying the additional command line parameters.
218 Chapter 9

Publishing Using Component Select
To publish software other than Windows Installer files, use the Component Select option and select the software you want to publish.
To publish using Component Select
1 Start the Publisher (see, To start the Publisher on page 213).
2 At the Logon window, type your administrator User ID and password and click OK.
Log in to the Publisher using the OVCCM Management Console user name and password. By default, the user name is admin and the password is secret.
3 In the Publishing Options area:
— If you are publishing for thin clients, select Thin Client Publishing.
— From the drop-down list, select Componenet Select.
4 Click OK.
The Select files to publish window opens.
5 Select the files to publish and click Next.
The directory path where the software is located (and published from) will be the directory path to where the software is deployed on target devices.
Using the Publisher 219

Although network shares are displayed, they should not be used to publish software (since they may not be available during deployment).
The File Layout window opens.
6 Enter the commands to run on application install and uninstall. For example, a command to run on install might be: C:\temp\installs \install.exe /quietmode /automatic c:\mydestination
while a command to run on uninstall could be: C:\temp\installs \uninstall.exe /quietmode /automatic
You can right-click any file to set it as the install or uninstall command
7 If you are publishing for thin clients, you must additionally select the install point.
8 Click Next.
The Application Information window opens.
220 Chapter 9

9 Use the Application Information section to enter the software service information.
10 Use the Limit package to systems with section to limit the service to any specific operating system or hardware. Click on any link to display the configurable options.
11 Click Next.
12 Review the Summary section to verify the service information you provided during the previous steps. When you are finished, click Publish.
Click Finish when the publishing process is finished to exit the Publisher. The software service is now ready for distribution to your enterprise.
Using the Publisher 221
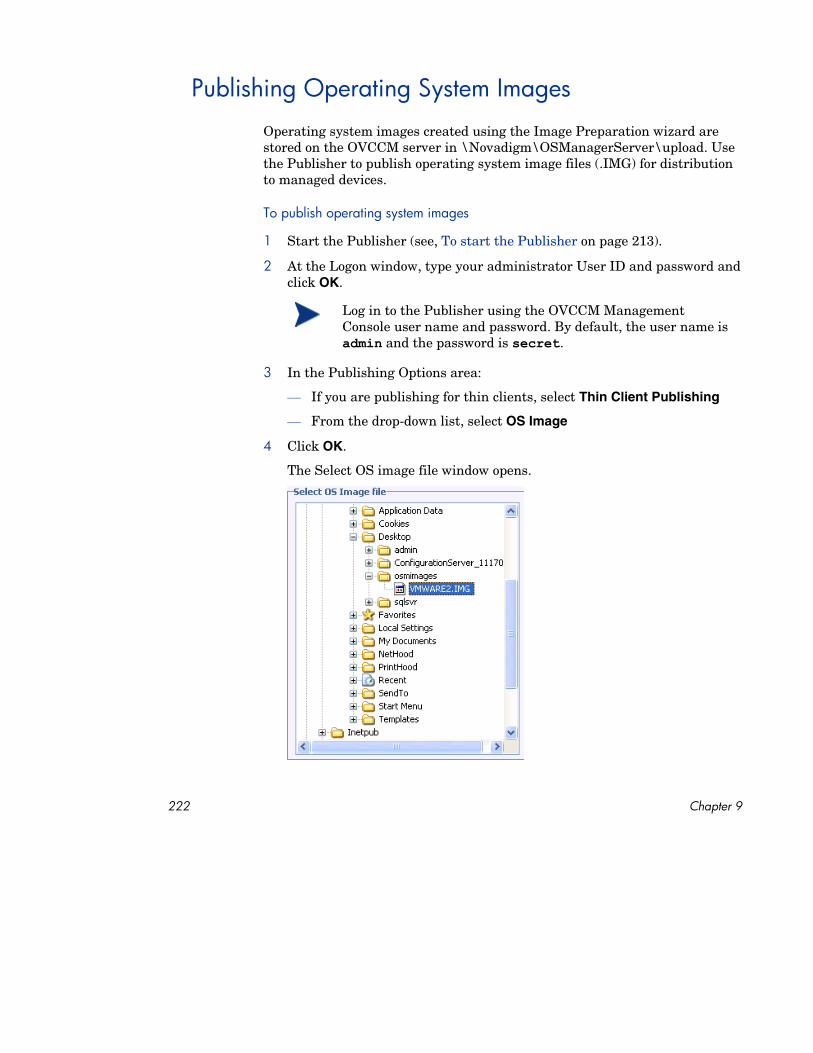
Publishing Operating System Images Operating system images created using the Image Preparation wizard are stored on the OVCCM server in \Novadigm\OSManagerServer\upload. Use the Publisher to publish operating system image files (.IMG) for distribution to managed devices.
To publish operating system images
1 Start the Publisher (see, To start the Publisher on page 213).
2 At the Logon window, type your administrator User ID and password and click OK.
Log in to the Publisher using the OVCCM Management Console user name and password. By default, the user name is admin and the password is secret.
3 In the Publishing Options area:
— If you are publishing for thin clients, select Thin Client Publishing
— From the drop-down list, select OS Image
4 Click OK.
The Select OS image file window opens.
222 Chapter 9

5 Use the Select window to find and select the file you want to publish. (Images created using the Image Preparation Wizard are stored on the OVCCM server in the \Novadigm\OSManagerServer\upload directory).
6 Use the Description area to verify the file before you continue. You can also add information to the description if you choose.
7 Click Next.
The Application Information window opens.
8 Use the Application Information section to enter the service information.
9 Click Next.
The Summary window opens.
10 Review the Summary information to verify the package and service information you provided during the previous steps. When you are satisfied, click Publish.
11 Click Finish to exit the Publisher when the publishing process is complete.
The service is now ready for distribution to managed devices in your enterprise.
You can view the published operating system image service in the OS Management section, Operating Systems OS Library list.
Publishing HP Softpaqs HP Softpaqs are bundles of support software, which may include device drivers, configuration programs, flashable ROM images, and other utilities available to keep devices up to date and performing at their best.
Using the Publisher 223

Softpaqs are available as executable (.EXE) files.
Use the Publisher to publish HP Softpaqs to OVCCM for distribution to managed devices.
To publish a Softpaq
1 Start the Publisher (see, To start the Publisher on page 213).
2 At the Logon window, type your administrator User ID and password and click OK.
Log in to the Publisher using the OVCCM Management Console user name and password. By default, the user name is admin and the password is secret.
3 In the Publishing Options area, select HP Softpaq and click OK.
The Select window opens.
4 Select the Softpaq file to publish.
— The Summary section shows the selected Softpaq information, including whether or not the Softpaq is SSM compliant. If the selected Softpaq is not SSM compliant and no silent install is included as part of the Softpaq, you must extract the Softpaq contents and read the accompanying documentation. Publish the required files and set up the installation method as instructed.
224 Chapter 9

— The System information dialog box shows all of the hardware the selected Softpaq supports.
5 Click Next.
The Application Information window opens.
6 View, and if necessary, modify the Softpaq information. The application information is pre-determined based on what is available from the Softpaq file.
7 Click Next.
The Summary window opens.
8 Review the summary information and when satisfied, click Publish.
9 When the publishing process is complete, click Finish to close the Publisher.
The Softpaq is published to OVCCM and is available for distribution to managed devices. View the published Softpaq in the OVCCM console Software Management, Software Library. Deployed Softpaqs are included within the HP Softpaq category group in the Application Self-Service Manager on managed devices.
Publishing BIOS Settings Use the Publisher to publish a BIOS settings file as a service for distribution to client devices. You can use the settings file to update or modify BIOS settings (for example, boot order) or to change the BIOS password on the client device.
A sample BIOS settings file (Common HP BIOS Settings.xml) is included with the Publisher installation and located by default in: C:\Program
Using the Publisher 225

Files\Novadigm\BIOS. Use this file to modify BIOS settings on target devices.
If the sample BIOS settings file does not include the options you require, or you would like to create a settings file for a specific device, see Creating a BIOS Settings File on page 228.
To publish BIOS settings
1 Start the Publisher (see, To start the Publisher on page 213).
2 At the Logon window, type your administrator User ID and password and click OK.
Log in to the Publisher using the OVCCM Management Console user name and password. By default, the user name is admin and the password is secret.
3 In the Publishing Options area, select HP BIOS Configuration and click OK.
The Select window opens
4 Select the BIOS settings file to publish. The sample BIOS settings file (Common HP BIOS Settings.xml) is located by default in: C:\ProgramFiles\Novadigm\BIOS.
226 Chapter 9

5 In the Current BIOS Admin Password area, type and then confirm a BIOS password if required. This is required to change any settings if the target devices have a BIOS password.
6 If you want to change the current BIOS password, select, Change BIOS Password, then type and confirm the new password. This is required only if you want to change the BIOS password on a client device.
7 Click Next.
The BIOS Options window opens.
8 Select the the BIOS settings to publish by clicking the check box to the left of the BIOS setting name.
9 If you need to change the value of a BIOS setting, click the setting name and adjust the available options as necessary.
10 Click Next.
The Application Information window opens.
Using the Publisher 227

11 View, and if necessary, modify the application information. Application information is pre-determined based on what is available from the settings file.
12 Click Next.
The Summary window opens.
13 Review the summary information and when satisfied, click Publish.
14 When the publishing process is complete, click Finish to close the Publisher.
The BIOS settings service is available in the Software library of the OVCCM console.
Creating a BIOS Settings File
If you would like to use a BIOS settings file other than the file included with OVCCM, you can use the HP System Software Manager (SSM) BIOS Configuration Utility to generate your own settings file.
SSM is installed with the Management Agent (C:\Program Files \Hewlett-Packard\SSM) or can be downloaded from the HP support site.
To create a BIOS settings file
1 Open a command prompt and change to the directory where the SSM BIOS Configuration Utility is located (C:\Program Files\Hewlett-Packard\SSM, by default).
228 Chapter 9

2 Type the following:
BiosConfigUtility.exe /GetConfig:"C:\tmp\MyBIOSconfig.xml" /Format:XML
This command will generate an XML file called MyBIOSconfig.xml and store it in C:\tmp.
If you want to create a text file instead of XML, type:
BiosConfigUtility.exe /GetConfig:"C:\tmp\MyBIOSconfig.txt" /Format:REPSET
This command will generate a text file called MyBIOSconfig.txt and store it in C:\tmp.
3 When you are ready to publish BIOS settings, select this file in Step 6 of To publish BIOS settings, above.
Viewing Published Services View published software in the Software tab of the OVCCM Management Console.
Using the Publisher 229

Figure 42 Software Library
Published operating systems are stored in the Operating System area within the OS Management section of the console.
CM Administrator Agent Explorer Installed along with the Publisher as part of the Configuration Management Administrator, the Agent Explorer is available to aid with troubleshooting and problem resolution and should not be used without direct instructions from HP Support.
230 Chapter 9

10 Using the Application Self-Service Manager
The Application Self-Service Manager is installed when the Management Agent is deployed to a device. Use the Application Self-Service Manager to install software that has been entitled to a device.
The following sections describe how to use the Application Self-Service Manager user interface:
• Accessing the Application Self-Service Manager on page 231
• Application Self-Service Manager Overview on page 232
• Using the Application Self-Service Manager User Interface on page 235
• Customizing the User Interface on page 240
• OVCM System Tray Icon on page 246
Accessing the Application Self-Service Manager Access the user interface through the Windows Start menu, or by double-clicking the Application Self-Service Manager icon on your desktop.
To access the user interface
• Go to Start > Programs > HP OVCM Client > CM Application Self-Service Manager
or
• Double-click the CM Application Self-Service Manager desktop shortcut.
231
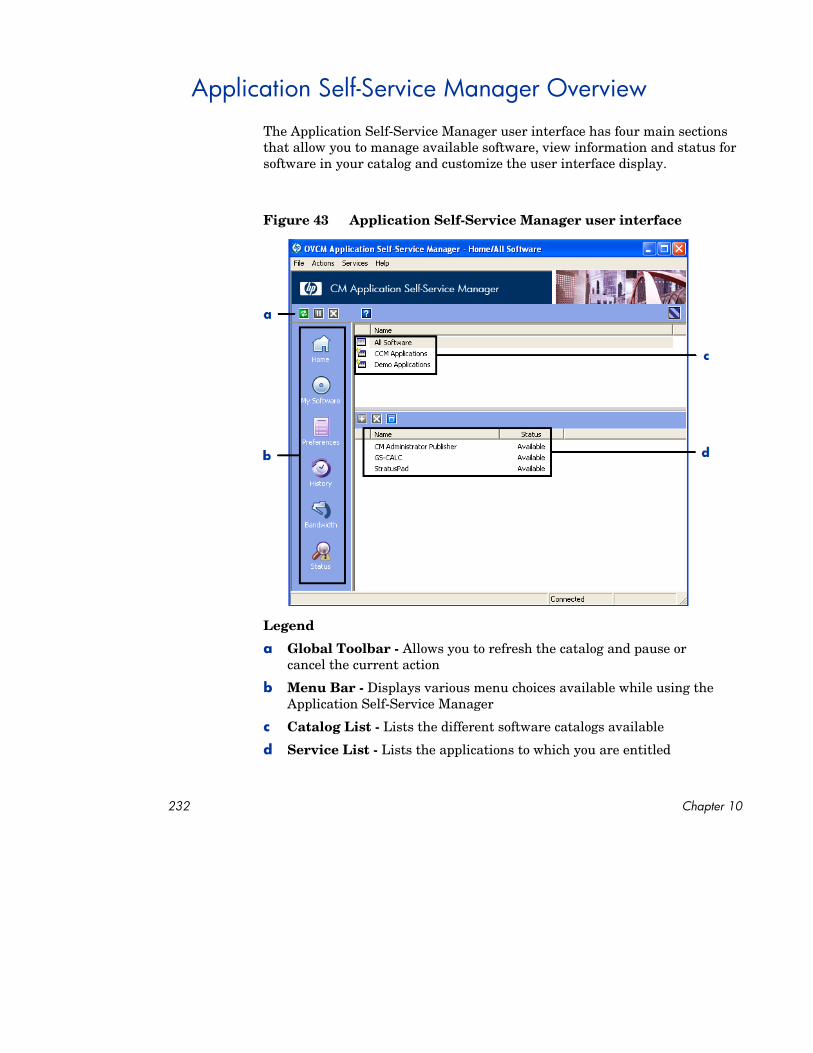
Application Self-Service Manager Overview The Application Self-Service Manager user interface has four main sections that allow you to manage available software, view information and status for software in your catalog and customize the user interface display.
Figure 43 Application Self-Service Manager user interface
Legend
a Global Toolbar - Allows you to refresh the catalog and pause or cancel the current action
b Menu Bar - Displays various menu choices available while using the Application Self-Service Manager
c Catalog List - Lists the different software catalogs available
d Service List - Lists the applications to which you are entitled
232 Chapter 10
The following sections describe the user interface sections in more detail:
• Global Toolbar on page 233
• The Menu Bar on page 233
• Catalog List on page 234
• Service List on page 234
Global Toolbar
The Global Toolbar allows you to refresh the catalog, pause the current action, or cancel the current action. When an action has been paused, no other action can take place until you either resume the action by clicking the Pause button again, or cancel the paused action by clicking the Cancel button.
Any time one of the buttons in the Global Toolbar is not available for the current action, it will appear grayed-out.
To refresh the catalog
• To refresh the selected catalog using the Global Toolbar,
click Refresh .
To pause or resume the current action
• To pause the current action using the Global Toolbar, click Pause .
• To resume a paused action, click Resume . (The Pause button is replaced with this button after you pause an action).
To cancel the current action
• To cancel the current action using the Global Toolbar, click Cancel .
The Menu Bar
Use the Menu Bar to configure and customize the Application Self-Service Manager.
The following sections describe each icon on the Menu Bar.
Using the Application Self-Service Manager 233

Home
Click this button to access your home catalog.
My Software
Click this button to display only those services that you have installed.
Preferences
Click this button to access various display options, service list options, and connection options for the Application Self-Service Manager.
At any point you can click OK, Apply, or Cancel in the top right corner of the Preferences section to keep or disregard any changes you make.
Catalog List
The Catalog List section lists the available software catalogs and any virtual catalogs.
To select a catalog
• In the Catalog List, click on the catalog you want to view in the Service List section. To refresh the catalog, right-click the name of the catalog and select Refresh from the shortcut menu.
Virtual Catalogs
Virtual catalogs are subsets of the default catalog defined by the administrator in OVCCM in the Software Details. Any services with the same catalog group value will be grouped together in a virtual catalog.
Service List
The Service list section lists the applications available to you. A check mark appears next to software that is already installed. The column headings
234 Chapter 10

displayed can be changed to suit your needs, see Preferences on page 234 for more information.
Table 13 Buttons in the Service List Section
Button Action Description
Install Installs the selected service on your machine.
Remove Removes the selected service from your machine.
Expand/Collapse Expands or collapses the selected service.
The buttons in the Service List section are gray when they are not available for the selected application.
Using the Application Self-Service Manager User Interface
You will use the user interface to install and remove software, refrersh the catalog of available software, and view information about the available software. The Menu Bar contains buttons for viewing session history, adjusting bandwidth, and viewing the current status of an application.
See the following sections for additional information:
• Installing Software on page 236
• Refreshing the Catalog on page 236
• Viewing Information on page 237
• Removing Software on page 237
• Viewing History on page 238
• Adjusting Bandwidth on page 239
• Viewing Status on page 239
Using the Application Self-Service Manager 235

Installing Software
The applications that are available to you are listed in the Service List. You can install one or more of these applications at any time.
To install software
1 In the Service List, click the name of the software that you want to install.
2 .Click the Install button
Some installations may display a set of dialog boxes. If so, follow the instructions. Otherwise, the installation begins immediately.
You can also right-click the name of the software that you want to install, then select Install from the shortcut menu that opens.
A progress bar indicates the installation progress.
— Click Cancel in the Global Toolbar to cancel the installation.
— Click Pause in the Global Toolbar to pause the installation. If you pause an action, you will not be able to perform any other actions until you either cancel or resume the currently paused action.
Refreshing the Catalog
The catalog is refreshed whenever you log on to the Application Self-Service Manager user interface. While you are logged on, if you believe that the list of
your installed applications have become available, click Refresh Catalog in the Global Toolbar to retrieve an updated list of applications.
applications that you are authorized to use has changed, or that updates to
236 Chapter 10
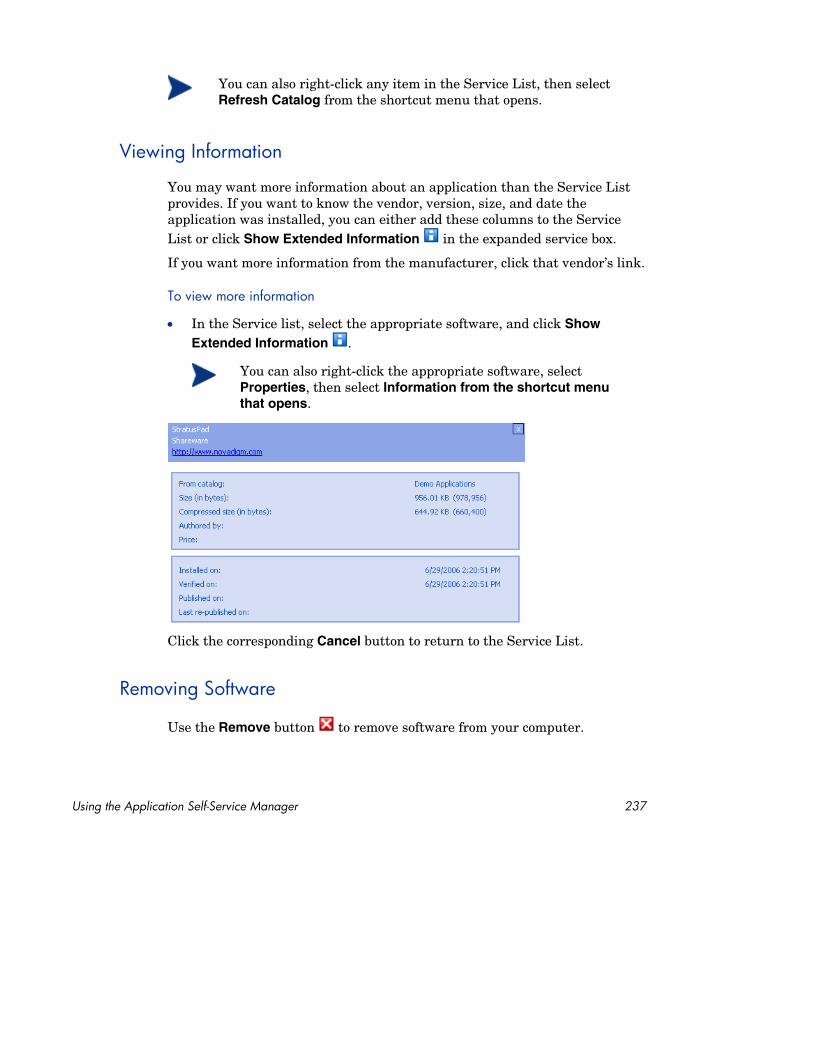
You can also right-click any item in the Service List, then select Refresh Catalog from the shortcut menu that opens.
Viewing Information
List or click
You may want more information about an application than the Service List provides. If you want to know the vendor, version, size, and date the application was installed, you can either add these columns to the Service
Show Extended Information in the expanded service box.
If you want more information from the manufacturer, click that vendor’s link.
To view more information
• In the Service list, select the appropriate software, and click Show Extended Information .
You can also right-click the appropriate software, select Properties, then select Information from the shortcut menu that opens.
Click the corresponding Cancel button to return to the Service List.
Removing Software
Use the Remove button to remove software from your computer.
Using the Application Self-Service Manager 237

To remove software
1 Select the software that you want to remove.
2 Click Remove
3 Click Yes if you are asked to confirm that you want to remove the
.
application.
You can also right-click the name of the installed software that you want to remove, then select Remove from the shortcut menu that opens.
Viewing History
In the Menu Bar, click History to display a history of the current session.
Figure 44 History window
Close the history window to show the service list.
238 Chapter 10

Adjusting Bandwidth
In the Menu Bar, click Bandwidth to display the bandwidth slider, as seen below. Changing this value dynamically changes the throttling value.
To adjust the bandwidth settings using the bandwidth slider
• Click and drag the slider to increase or decrease the amount of bandwidth throttling desired.
• You can also adjust bandwidth throttling from within the Preferences, Connection options section.
Viewing Status
In the Menu bar, click Status to display the status of the current action including the size, estimated time, progress, and available bandwidth.
Figure 45 Status display for selected application.
The Status window can be docked or un-docked from the Application Self-Service Manager. This enables you to position the Status window anywhere on your screen. The Status window is docked by default.
To un-dock the Status window
1 Click Status in the Menu Bar.
Using the Application Self-Service Manager 239

2 Right-click in the Status window that opens.
3 Select Docked from the shortcut menu. When the Status window is docked, a check mark will appear next to the word Docked in the shortcut menu.
The Status window will be released from the Application Self-Service Manager, allowing you to position it anywhere on your screen.
To dock the Status window
1 Click Status in the Menu Bar.
2 Right-click in the Status window that opens.
3 Select Docked from the shortcut menu (only if there is no check mark present).
The Status window will be docked into the Application Self-Service Manager.
Customizing the User Interface Click the Preferences button in the Menu Bar to view the customization options available.
The following sections describe each customization area:
• General Options on page 241
• Service List Options on page 242
• Connection Options on page 245
240 Chapter 10

General Options
Use the General options window to modify the appearance of the Application Self-Service Manager.
Figure 46 General options window
To modify the display
• If you want to display the menu, select the appropriate check box.
• If you want to display the catalog list, select the appropriate check box.
• If you want to be prompted to use the Application Self-Service Manager in offline mode at the beginning of each session, select the appropriate check box.
To modify the colors
• If you want to use the system colors, select the Use system colors option button.
Using the Application Self-Service Manager 241

• If you decide to use your own custom colors, select the Customize colors option button.
— After selecting Customize colors, click the box labeled:
– Set selection color to modify the color of selections.
– Set button color to modify the button colors.
– Set background color to modify the background color.
– Set work area color to modify the background color.
Service List Options
Use the Service list options to modify the appearance of the Service list.
Figure 47 Service List options
To customiae the column Names in the Service List
Use the Columns area to customize the columns that appear in your service List. The right column lists the column names displayed in your Service List. For a description of each available column heading, see Table 14 on page 243.
242 Chapter 10
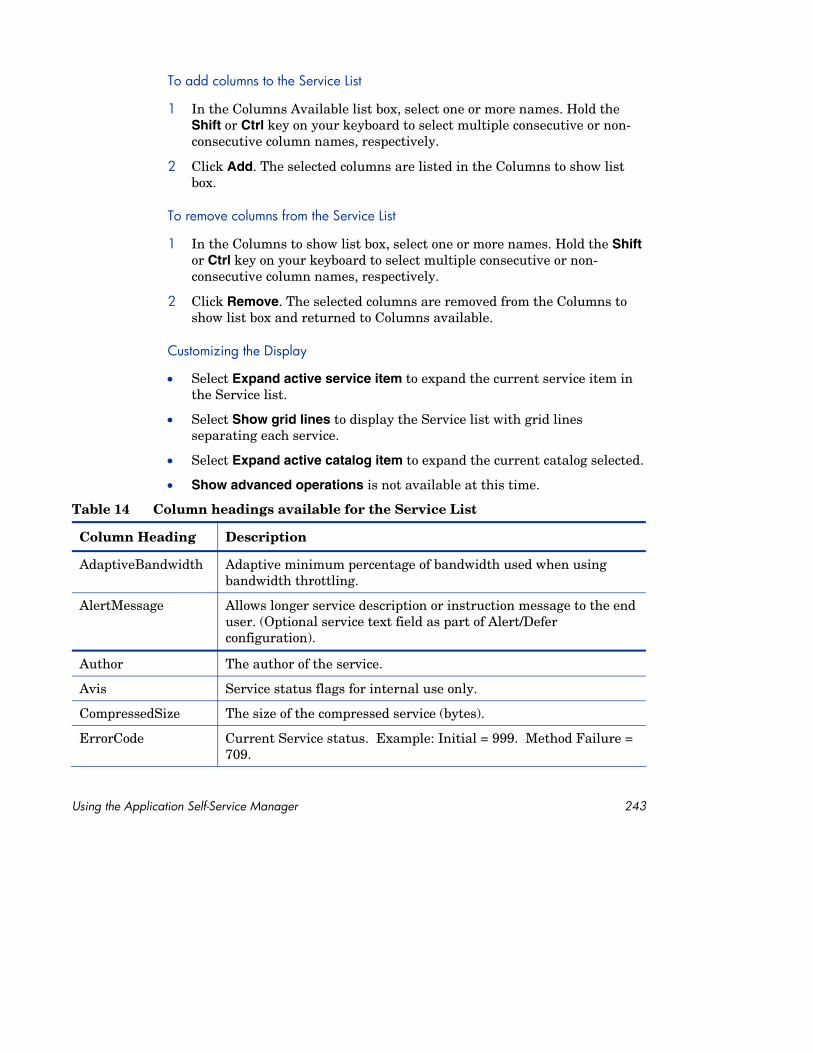
To add columns to the Service List
1 In the Columns Available list box, select one or more names. Hold the Shift or Ctrl key on your keyboard to select multiple consecutive or nonconsecutive column names, respectively.
2 Click Add. The selected columns are listed in the Columns to show list box.
To remove columns from the Service List
1 In the Columns to show list box, select one or more names. Hold the Shift or Ctrl key on your keyboard to select multiple consecutive or nonconsecutive column names, respectively.
2 Click Remove. The selected columns are removed from the Columns to show list box and returned to Columns available.
Customizing the Display
• Select Expand active service item to expand the current service item in the Service list.
• Select Show grid lines to display the Service list with grid lines separating each service.
• Select Expand active catalog item to expand the current catalog selected.
• Show advanced operations is not available at this time.
Table 14 Column headings available for the Service List
Column Heading Description
AdaptiveBandwidth Adaptive minimum percentage of bandwidth used when using bandwidth throttling.
AlertMessage
Author
Avis
CompressedSize
ErrorCode
Allows longer service description or instruction message to the end user. (Optional service text field as part of Alert/Defer configuration).
The author of the service.
Service status flags for internal use only.
The size of the compressed service (bytes).
Current Service status. Example: Initial = 999. Method Failure = 709.
Using the Application Self-Service Manager 243

Column Heading
Description
InstalledDate
LocalRepair
Name
Mandatory
OwnerCatalog
Price
PublishedDate
Reboot
RepublishedDate
ReservedBandwidth
ScheduleAllowed
Size
Status
SystemInstall
ThrottlingType
UIOption
UpgradedDate
Url
Vendor
VerifiedDate
Description
A short description of the service.
The date the service was installed on your computer.
If data is repairable locally (cached on your computer).
The name of the service.
Mandatory/Optional files defined on service (for internal use).
The originating application domain name.
Price of the service.
The date the service was published to the catalog.
Service Reboot settings (for internal use).
The date the service was republished to the catalog.
Reserved maximum percentage of bandwidth used when using bandwidth throttling.
Specifies whether end users are allowed to change the update schedule for the service, locally.
The size of the service (bytes).Note: You will need this amount of free space on your computer to successfully install the service.
Current status of the software
• Available • Installed • Update Available • Broken
Displays if service will be installed using System account.
Type of Bandwidth throttling to use. Possible values: ADAPTIVE, RESERVED or NONE.
Determines whether the status window is displayed.
The date the service was upgraded.
The software vendor's url.
The software vendor who supplied the service.
The date the service was last verified.
244 Chapter 10

Column Heading Description
Version The version of the service.
Connection Options
Use Connection options, as shown in the next figure, to select the type of bandwidth throttling to use or to specify the settings required for using a proxy server.
Figure 48 Connection Options
• Throttling
— Select None for no throttling.
— Select Reserve Bandwidth to select along the scale to indicate the maximum percentage of the network bandwidth to use. The reserve bandwidth can be changed in the user interface by the subscriber as the download is happening.
Using the Application Self-Service Manager 245
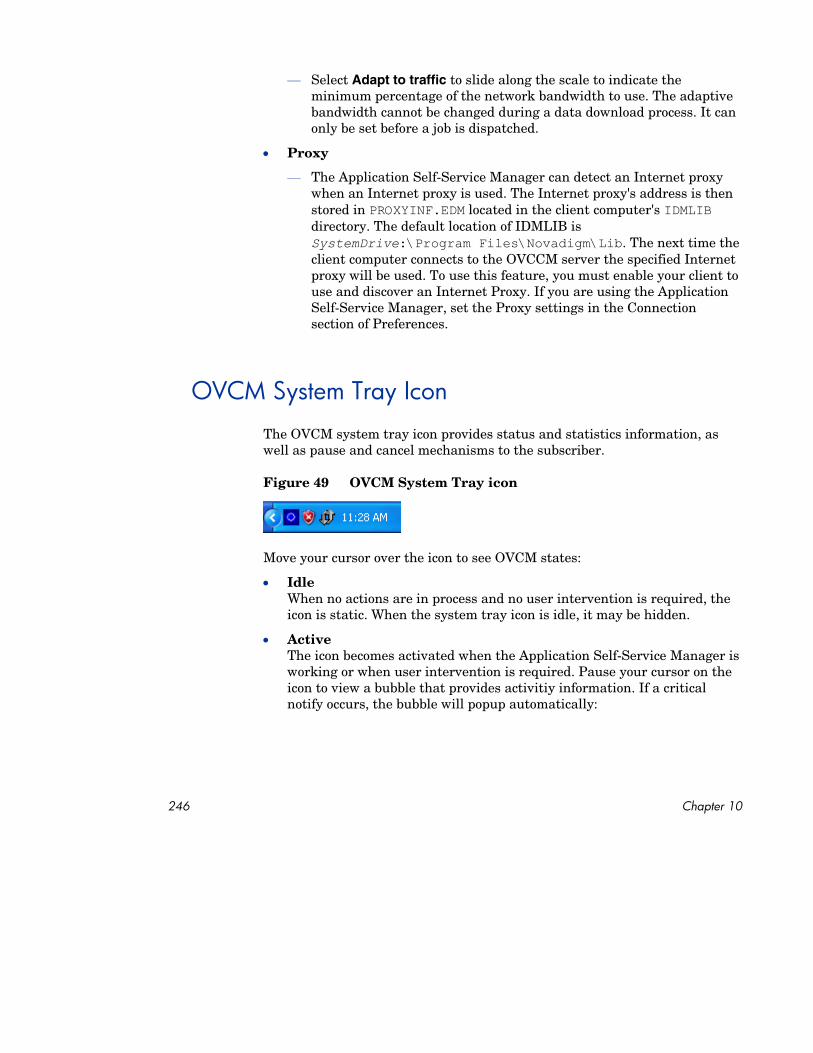
— Select Adapt to traffic to slide along the scale to indicate the minimum percentage of the network bandwidth to use. The adaptive bandwidth cannot be changed during a data download process. It can only be set before a job is dispatched.
• Proxy
— The Application Self-Service Manager can detect an Internet proxy when an Internet proxy is used. The Internet proxy's address is then stored in PROXYINF.EDM located in the client computer's IDMLIB directory. The default location of IDMLIB is SystemDrive:\Program Files\Novadigm\Lib. The next time the client computer connects to the OVCCM server the specified Internet proxy will be used. To use this feature, you must enable your client to use and discover an Internet Proxy. If you are using the Application Self-Service Manager, set the Proxy settings in the Connection section of Preferences.
OVCM System Tray Icon The OVCM system tray icon provides status and statistics information, as well as pause and cancel mechanisms to the subscriber.
Figure 49 OVCM System Tray icon
Move your cursor over the icon to see OVCM states:
• Idle When no actions are in process and no user intervention is required, the icon is static. When the system tray icon is idle, it may be hidden.
• Active The icon becomes activated when the Application Self-Service Manager is working or when user intervention is required. Pause your cursor on the icon to view a bubble that provides activitiy information. If a critical notify occurs, the bubble will popup automatically:
246 Chapter 10

OVCM Status window
Left-click the OVCM system tray icon to view OVCM Status window. OVCM Status window appears as shown in the figure below.
Figure 50 OVCM Status
Legend
a Button bar
b Information panel
c Status area
d Status message
The Status window contains the following areas:
• OVCM Button Bar Contains buttons for Pause and Cancel, and a logo that becomes animated when the Agent is actively working.
• Information Panel This area contains information about the active service, and also contains a progress bar that shows the percentage of the task finished.
• Status Area Contains statistics about the active processes, including transfer speed,
Using the Application Self-Service Manager 247

total size of transmission, bytes received, estimated time left of transmission, total files to be transmitted, number of files received, and number of services processed.
• Status Message Area The Status Message Area shows a message about the current process.
• Bandwidth Control
— If you set bandwidth throttling for the service on the OVCCM server,
and you click the bandwidth toggle button in the System Tray Console, a slider for bandwidth control appears. Adjust the slider to change the bandwidth throttle value.
248 Chapter 10

11 Settings Migration Settings Migration allows you to backup and restore user settings for applications and operating systems on individual managed devices. Settings and files are stored on the OVCCM server and are available for restoration to the original device, a new device, or to be included during operating system deployment.
The OpenView Settings Migration Manager is used to create and store a configuration template for capturing user settings and files on managed devices.
The OpenView Settings Migration Utility is deployed to individual devices and used to back up and restore those settings files.
Settings Migration requires a premium level license.
The following sections explain how to implement settings migration in your environment.
• Supported Applications and Settings on page 249
• Creating the Configuration Template on page 251
• Using the Settings Migration Utility on page 254
• Migrating Settings During OS Deployment on page 260
• File Rules on page 260
• Application Support Notes on page 263
Supported Applications and Settings The following tables list the applications and operating system settings supported for settings migration.
249

Table 15 Supported Applications
Supported Microsoft Appllications
• Microsoft Access 95, 97, 2000, XP, 2003
• Microsoft Excel 95, 97, 2000, XP, 2003
• Microsoft FrontPage 2000,XP, 2003
• Microsoft InfoPath 2003
• Microsoft OneNote 2003
• Microsoft Outlook (Windows Messaging), 97, 98, 2000, XP, 2003
• Microsoft PowerPoint 95, 97, 2000, XP, 2003
• Microsoft Project 98, 2000,2002, 2003
• Microsoft Publisher 2003
• Microsoft Word 95, 97, 2000, XP, 2003
Other Supported Applications
• Act! 2000
• Adobe Acrobat 4.x, 5.x, 6
• Acrobat Reader 4.x. 5.x, 6, 7
• Lotus Notes 5.x, 6.x
• Microsoft Internet Explorer 4.01, 5.x, 6.x
• Microsoft NetMeeting 2.x, 3.x
• Microsoft Outlook Express 5.x, 6.x
• Netscape 4.5, 4.6, 4.7, 6.x
• Norton AntiVirus 2000
• Norton AntiVirus Corporate Edition
• Visio 4.5, 5, 2000, 2002, 2003
• WinZip 7.x, 8.x, 9.0
• WordPerfect Office 2000
⎯ Corel Utilities
⎯ Dragon NaturallySpeaking for WordPerfect
⎯ Quattro Pro 9
⎯ WordPerfect 9
Chapter 11250

Table 16 Supported Settings
Windows Options
• Desktop Shortcuts
• Dial-Up Networking
• Folder Options
• Local Printer Logging
• Mapped Network Drives
• My Documents
• Network and Shared Printer Connections
• Network Settings
• Taskbar and Start Menu
⎯ Quick Launch Bar Shortcuts
⎯ Taskbar and Start Menu Settings
• Windows Address Book
Control Panel Settings
• Accessibility Options
• Display
⎯ Appearance and Themes
⎯ Background
⎯ Visual Effects
• Internet Options
• Keyboard
⎯ Keyboard Languages
⎯ Keyboard Settings
• Mouse Settings
⎯ Buttons and Motions
⎯ Pointers and Schemes
• Power Management
• Regional Settings
• Sounds
• Time Zones
See Application Support Notes on page 263 for additional notes on supported applications.
Creating the Configuration Template Use the Settings Migration Manager to create a template that determines which application settings, files, and operating systems settings will be backed up and available for restoring or installing on individual devices.
To use the Settings Migration Manager it must be first deployed using OVCCM.
Settings Migration 251

To deploy Settings Migration Manager
• Deploy the Settings Migration Manager using the OpenView Settings Migration Manager service in the OVCCM Software library. See the section Deploying Software on page 82 for detailed instructions on deploying software services
Use the Settings Migration Manager to create the configuration template. This template defines what application settings, files, and operating system settings are backed up when the Settings Migration Utility is run.
To start the Settings Migration Manager
1 On a device where Settings Migration Manager is installed, go to C:\Program Files\HP OpenView\nonOV\ovsmm.
2 Double-click SE.exe.
Figure 51 OpenView Settings Migration Manager
To create the configuration template
1 Start the Settings Migration Manager.
Chapter 11 252

2 Click Select for Extraction to view the list of applications available for settings and file backup.
3 Use the tree view to select or exclude application settings and files.
4 When you are satisified with the configuration settings, save the file using the toolbar or the File menu. The filename must be SE.CFG (this is the default name).
5 Close the Settings Migration Manager.
6 Copy the files se.rul, se.ptt, and SE.CFG from C:\Program Files\HP OpenView\nonOV\ovsmm to the OVCCM server directory C:\Novadigm\ProxyServer\upload.
Copying the files to the server directory makes the configuration settings available to the Settings Migration Utility that you will deploy to client devices. Each time the utility is run, it will access these files to determine which settings and files to backup.
When you have copied the configuration files to the OVCCM server, deploy the Settings Migration Manager service to enable settings migration on managed devices.
Settings Migration 253

Using the Settings Migration Utility The Settings Migration Utility is installed with the OpenView Settings Migration Manager service. See the section Deploying Software on page 82 for detailed instructions on deploying software services to managed devices.
When deployed to managed devices, use the utility to back up or restore settings. Each time the utility is run, it downloads the latest configuration template (SE.CFG) from the OVCCM server. See Creating the Configuration Template on page 251 for additional information.
To start the Setting Migration Utility
1 On a device where the Settings Migration Manger service was deployed, use the Start menu and go to:
Start > All Programs > OpenView Settings Migration > OpenView Settings Migration Utility
Figure 52 Settings Migration Utility
254 Chapter 11

The following sections explain how to use the Settings Migration Utility:
• Backing Up Settings on page 255
• Restoring Settings on page 257
Backing Up Settings
Use the Settings Migration Utility to backup settings and files and store them on the OVCCM server.
Settings are stored in the C:\Novadigm\ProxyServer\upload directory on the OVCCM server.
To backup settings and files
1 On the client device, start the Settings Migration Utility
2 Select Backup settings and files.
3 Click Next.
Settings Migration 255

Figure 53 Backup information.
4 Type and confirm a computer name and password. Make note of this information as it is required when restoring settings.
5 Click Next.
6 Review the summary information and click Finish.
7 When the process is finished, click OK.
Settings are now stored on the OVCCM server and available for restoration to a device.
Stored Settings and Files
Each time you back up settings and files, they are stored on the OVCCM server in the C:\Novadigm\proxyserver\upload directory.
All files associated with a device contain the device name as part of the file name.
256 Chapter 11
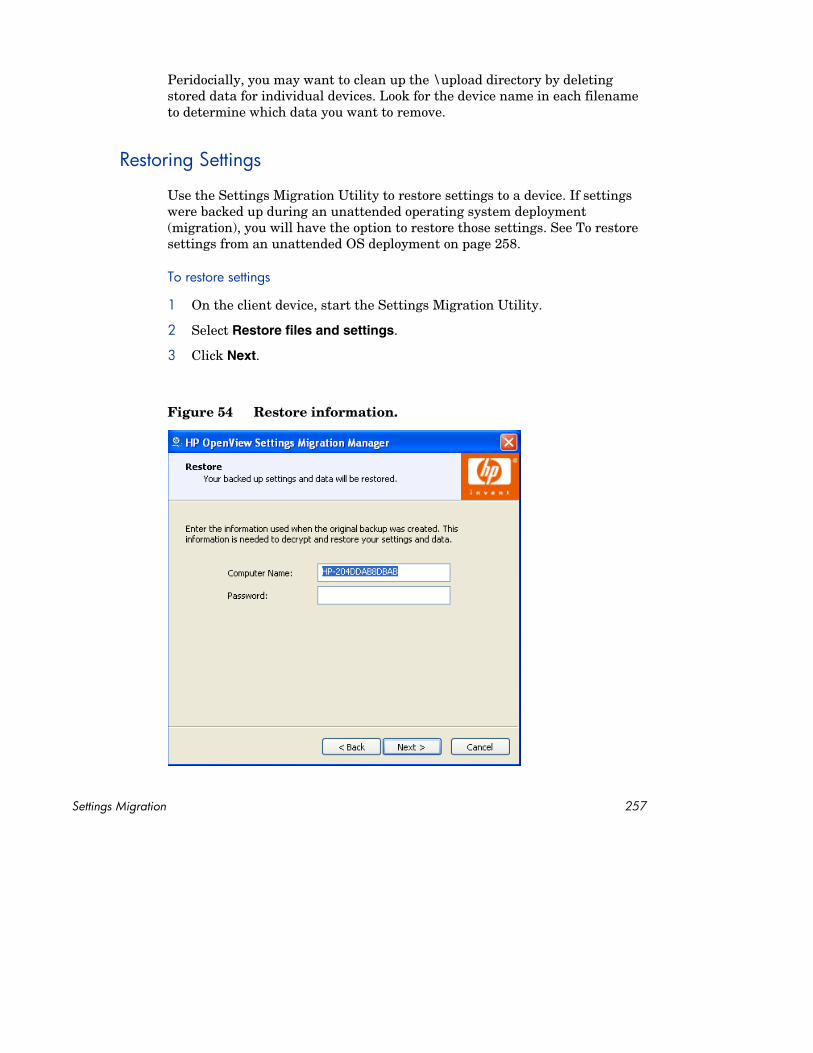
Peridocially, you may want to clean up the \upload directory by deleting stored data for individual devices. Look for the device name in each filename to determine which data you want to remove.
Restoring Settings
Use the Settings Migration Utility to restore settings to a device. If settings were backed up during an unattended operating system deployment (migration), you will have the option to restore those settings. See To restore settings from an unattended OS deployment on page 258.
To restore settings
1 On the client device, start the Settings Migration Utility.
2 Select Restore files and settings.
3 Click Next.
Figure 54 Restore information.
Settings Migration 257
4 Type the computer name and password for the settings you want to restore.
5 Click Next.
6 Review the summary information and click Finish.
7 When the restoration process is complete, click OK.
Settings and files are restored.
Restored settings may include domain profiles. Because of this, settings backed up from a device in a specific domain can only be restored to devices within that same domain.
To restore settings from an unattended OS deployment
1 On the client device, start the Settings Migration Utility.
2 Select Restore files and settings.
3 Click Next.
258 Chapter 11

Figure 55 Restore information.
4 Select Restore from operating system migration. Settings stored during the last unattended operating system deployment with migration enabled are accessed. This option is available only when these type of settings are detected.
5 Click Next.
6 Review the summary information and click Finish.
7 When the restoration process is complete, click OK.
Settings and files are restored.
Restored settings may include domain profiles. Because of this, settings backed up from a device in a specific domain can only be restored to devices within that same domain.
Settings Migration 259

Migrating Settings During OS Deployment Settings and files can be preserved during operating system deployment. Use OVCCM to deploy an operating system, see Deploying Operating Systems on page 98 for additional information.
During the OS Deployment Wizard, you are prompted to migrate user data and settings. If you select Yes, the Settings Migration Manager service is deployed with the new operating system. Then during deployment, the Settings Migration Utility runs and the end-user is prompted to backup their existing settings by supplying the device name and password. See Using the Settings Migration Utility on page 254 for additional information.
After the operating system installation is complete, redeploy the Settings Migration Manager service and use the Settings Migration Utility to restore the device settings that were backed up. Be sure to use the device name and password you suplied during the initial back up process.
If you are using unattended mode for OS deployment and select settings migration, this process will also run unattended. The required information for Settings Migration, computer name and password, are automatically generated. The end user should use the Restore from OS Migration feature in the Settings Migration Utility to restore settings stored during an unattended OS deployment.
File Rules Most desired data files can be migrated using OV Settings Migration Manager’s built-in support. Enterprise migration projects often require additional file migration support. For example, you may want to migrate proprietary file types created by internally developed applications.
Designed for major migration projects, File Rules provides a method to include or exclude files by path, type, date, and size. Subdirectories can be included or not. Multiple rules can be created to tailor a migration to meet project goals and requirements.
260 Chapter 11

File Rules take precedence over files selected using the File Tree.
The following sections explaine how to use File Rules:
• Accessing File Rules on page 261
• File Rules Dialog Box on page 262
Accessing File Rules
To access file rules, start the Settings Migration Manager and use the Edit > File Rules menu item.
Figure 56 File Rules
File Rules have hierarchical precedence. If two rules are mutually exclusive, the rule that appears higher in the list takes precedence over the rule that appears below. For example, precedence can be used to migrate all the .jpg files from the directory c:\files, yet prevent any other files in that directory from moving.
Files can also be redirected to a different directory on the target computer with the Destination Re-mapping feature. Any path can be specified as a destination including network paths. Subdirectory structure can be preserved or not.
Use the Add Rule, Edit Rule, and Delete Rule buttons to enter and manipulate rules.
Settings Migration 261
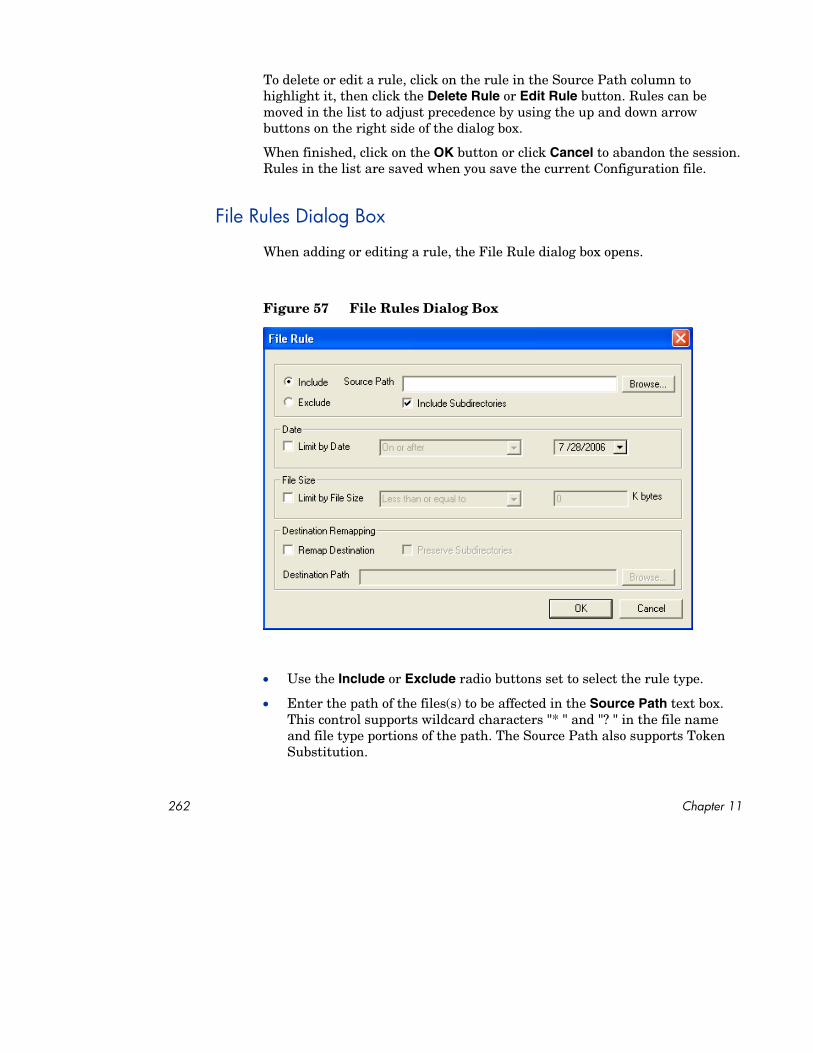
To delete or edit a rule, click on the rule in the Source Path column to highlight it, then click the Delete Rule or Edit Rule button. Rules can be moved in the list to adjust precedence by using the up and down arrow buttons on the right side of the dialog box.
When finished, click on the OK button or click Cancel to abandon the session. Rules in the list are saved when you save the current Configuration file.
File Rules Dialog Box
When adding or editing a rule, the File Rule dialog box opens.
Figure 57 File Rules Dialog Box
• Use the Include or Exclude radio buttons set to select the rule type.
• Enter the path of the files(s) to be affected in the Source Path text box. This control supports wildcard characters "* " and "? " in the file name and file type portions of the path. The Source Path also supports Token Substitution.
262 Chapter 11
• Separating files or file types with a ";" semi colon in the File Rule source path allows you to Include or Exclude multiple files or file types. For example if selecting Include and typing the following in the Source Path:
C:\*.doc;*.xls;*.mdb
Will find and extract files on the C: drive that match the specified file types.
Selecting Exclude and typing:
C:\*.mp3;*.dll;*.exe
Will exclude files on the C: drive from being extracted that match the specified file types.
Although you can create two or more rules that may specify the same file or files for migration, only the rule with the higher precedence (closer to the top of the list) will migrate those files.
Application Support Notes The following sections provide important usage notes as well as restrictions or limitations to keep in mind for each application setting.
Microsoft Office Support Notes
Following are important usage notes to keep in mind for Microsoft Office.
Microsoft Office
• Migrates data files, templates, and persistent settings for the following Office applications:
• MS Access
• MS Excel
• MS FrontPage
• MS InfoPath
• Office Assistant Settings
• Office Shortcut Bar
Settings Migration 263

• MS OneNote
• MS Outlook
• MS PowerPoint
• MS Project
• MS Publisher
• MS Word
The following versions of Office are supported:
• Office 95, Office 97, Office 2000, Office XP, and Office 2003
• Cross version migration is supported for the following paths:
• Office 95 to Office 97
• Office 95 to Office 2000
• Office 95 to Office XP
• Office 95 to Office 2003
• Office 97 to Office 97
• Office 97 to Office 2000
• Office 97 to Office XP
• Office 97 to Office 2003
• Office 2000 to Office 2000
• Office 2000 to Office XP
• Office 2000 to Office 2003
• Office XP to Office XP
• Office XP to Office 2003
• Office 2003 to Office 2003
Microsoft Access
Migrates Access data files, persistent settings, and templates.
The following file types are migrated:
Access Data Files:
264 Chapter 11
• .ade, .adp, .mad, .maf, .mag, .mam, .maq, .mar, .mas,.mat, .mav, .maw, .mda, .mdb, .mdbhtml, .mde, .mdt, .mdw
Access Template Files:
• .mdn, mdz, .wizhtml
The following versions of Access are supported:
• Access 95, Access 97, Access 2000, Access XP, Access 2003
Cross version migration is supported for the following paths:
• Access 95 to Access 97
• Access 95 to Access 2000
• Access 95 to Access XP
• Access 95 to Access 2003
• Access 97 to Access 97
• Access 97 to Access 2000
• Access 97 to Access XP
• Access 97 to Access 2003
• Access 2000 to Access 2000
• Access 2000 to Access XP
• Access 2000 to Access 2003
• Access XP to Access XP
• Access XP to Access 2003
• Access 2003 to Access 2003
Microsoft Excel
Migrates Excel data files, persistent settings, and templates.
The following file types are migrated:
Excel Data Files:
• .csv, .dqy, .iqy, .oqy, .rqy, .slk, .xla, .xlb, .xlc,.xld, .xlk, .xll, .xlm, .xls, .xlshtml, .xlv, .xlw
Excel Template Files:
• .xlt
Settings Migration 265

The following versions of Excel are supported:
• Excel 95, Excel 97, Excel 2000, Excel XP, Excel 2003
Cross version migration is supported for the following paths:
• Excel 95 to Excel 97
• Excel 95 to Excel 2000
• Excel 95 to Excel XP
• Excel 95 to Excel 2003
• Excel 97 to Excel 97
• Excel 97 to Excel 2000
• Excel 97 to Excel XP
• Excel 97 to Excel 2003
• Excel 2000 to Excel 2000
• Excel 2000 to Excel XP
• Excel 2000 to Excel 2003
• Excel XP to Excel XP
• Excel XP to Excel 2003
• Excel 2003 to Excel 2003
Microsoft Frontpage
Migrates FrontPage data files, persistent settings, and templates.
Selecting to migrate FrontPage data files will result in the migration of all .html and .htm files on your local disk drives unless the policies Exclude User's Temporary Directory and Exclude User's Temporary Internet Directory are set (default). This may not be welcomed behavior. If migrating all .html and .htm files is not desired you can use File Rules to exclude these file types entirely, or selectively in specified file folders on the local disk.
The following file types are migrated:
FrontPage Data Files:
• .asa, .asp, .cdx, .fphtml, .htm, .html, .htx, .shtm,.shtml, .stm
266 Chapter 11

FrontPage Template Files:
• .tem
The following versions of FrontPage are supported:
• FrontPage 2000, FrontPage XP, FrontPage 2003
Cross version migration is supported for the following paths:
• FrontPage 2000 to FrontPage 2000
• HP OpenView Settings Migration Manager 89
• HP OpenView Settings Migration Manager 90
• FrontPage 2000 to FrontPage XP
• FrontPage 2000 to FrontPage 2003
• FrontPage XP to FrontPage XP
• FrontPage XP to FrontPage 2003
• FrontPage 2003 to FrontPage 2003
Microsoft InfoPath
Migrates InfoPath data files, persistent settings, and templates.
The following file types are migrated:
InfoPath Data Files:
• .xml, .xsf
InfoPath Template Files:
• .xsn
The following versions of InfoPath are supported:
• InfoPath 2003
Cross version migration is supported for the following paths:
• InfoPath 2003 to InfoPath 2003
Office Assistant Settings
Migrates Persistent settings for Microsoft Office Assistant.
Settings Migration 267

Settings Migration Manager does not migrate the specific assistant, only the settings associated with the office assistant
Office Shortcut Bar
Migrates Persistent settings for Office Shortcut Bar.
Microsoft OneNote
Migrates OneNote data files and persistent settings.
The following file types are migrated:
OneNote Data Files:
• .mht, .one, .onetoc
The following versions of OneNote are supported:
• OneNote 2003
• Cross version migration is supported for the following paths:
• OneNote 2003 to OneNote 2003
Microsoft Outlook
Migrates Outlook data files, Outlook Mail Clients and associated files, and Outlook persistent settings.
Services on the target device must be the same as the services on the source device. For example, if the source device has Outlook set to Corporate Workgroup, then Outlook on the target device must also be set to Corporate Workgroup
The following file types are migrated:
Outlook Files:
• .ics, .msg, .oft, .pst (Inactive), .vcs
If you migrate .pst files without selecting Outlook Mail Clients and Associated Files, your active .pst files will be migrated, but they will not be made active on the target device.
Outlook Mail Clients and Associated Files:
268 Chapter 11
Outlook Exchange and Internet mail clients are migrated, including Windows messaging as an exchange client. Active personal folders (.pst files), address books (.pab files), and offline address books (.oab files) are also migrated.
The following versions of Outlook are supported:
• Windows Messaging, Outlook 97, Outlook 98, Outlook 2000, Outlook XP, Outlook 2003
Cross version migration is supported for the following paths:
• Windows Messaging to Outlook 97
• Windows Messaging to Outlook 98
• Windows Messaging to Outlook 2000
• Outlook 97 to Outlook 97
• Outlook 97 to Outlook 98
• Outlook 97 to Outlook 2000
• Outlook 97 to Outlook XP
• Outlook 97 to Outlook 2003
• Outlook 98 to Outlook 98
• Outlook 98 to Outlook 2000
• Outlook 98 to Outlook XP
• Outlook 98 to Outlook 2003
• Outlook 2000 to Outlook 2000
• Outlook 2000 to Outlook XP
• Outlook 2000 to Outlook 2003
• Outlook XP to Outlook XP
• Outlook XP to Outlook 2003
• Outlook 2003 to Outlook 2003
Microsoft PowerPoint
Migrates PowerPoint data files, persistent settings, and templates.
The following file types are migrated:
Settings Migration 269

PowerPoint Data Files:
• .pps, .ppt, .ppthtml, .ppz, .pwz
PowerPoint Template Files:
• .pot, .pothtml
The following versions of PowerPoint are supported:
• PowerPoint 95, PowerPoint 97, PowerPoint 2000, PowerPoint XP, PowerPoint 2003
Cross version migration is supported for the following paths:
• PowerPoint 95 to PowerPoint 97
• PowerPoint 95 to PowerPoint 2000
• PowerPoint 95 to PowerPoint XP
• PowerPoint 95 to PowerPoint 2003
• PowerPoint 97 to PowerPoint 97
• PowerPoint 97 to PowerPoint 2000
• PowerPoint 97 to PowerPoint XP
• PowerPoint 97 to PowerPoint 2003
• PowerPoint 2000 to PowerPoint 2000
• PowerPoint 2000 to PowerPoint XP
• PowerPoint 2000 to PowerPoint 2003
• PowerPoint XP to PowerPoint XP
• PowerPoint XP to PowerPoint 2003
• PowerPoint 2003 to PowerPoint 2003
Microsoft Project
Migrates Project data files, persistent settings, and templates.
The following file types are migrated:
Project Data Files:
• .mpd, .mpp, .mpw, .mpx
Project Template Files:
270 Chapter 11

• .mpt
The following versions of Project are supported:
• Project 98, Project 2000, Project 2002, Project 2003
Cross version migration is supported for the following paths:
• Project 98 to Project 98
• Project 98 to Project 2000
• Project 98 to Project 2002
• Project 98 to Project 2003
• Project 2000 to Project 2000
• Project 2000 to Project 2002
• Project 2000 to Project 2003
• Project 2002 to Project 2002
• Project 2002 to Project 2003
• Project 2003 to Project 2003
Microsoft Publisher
Migrates Publisher data files and persistent settings.
The following file types are migrated:
Publisher Data Files:
• .pub, .pubhtml, .pubmhtml,
The following versions of Publisher are supported:
• Publisher 2003
Cross version migration is supported for the following paths:
• Publisher 2003 to Publisher 2003
Microsoft Word
Migrates Word data files, persistent settings, and templates.
The following file types are migrated:
Word Data Files:
Settings Migration 271
• .doc, .dochtml, .gly, .rtf, .wbk, .wiz
Word Template Files:
• .dot, .dothtml
The following versions of Word are supported:
• Word 95, Word 97, Word 2000, Word XP, Word 2003
Cross version migration is supported for the following paths:
• Word 95 to Word 97
• Word 95 to Word 2000
• Word 95 to Word XP
• Word 95 to Word 2003
• Word 97 to Word 97
• Word 97 to Word 2000
• Word 97 to Word XP
• Word 97 to Word 2003
• Word 2000 to Word 2000
• Word 2000 to Word XP
• Word 2000 to Word 2003
• Word XP to Word XP
• Word XP to Word 2003
• Word 2003 to Word 2003
Other Supported Application and OS Notes
Following are important usage notes to keep in mind for each content item included in this release of OV Settings Migration Manager.
ACT! 2000
Migrates ACT! 2000 persistent settings and ACT! 2000 files.
The following file types are migrated:
ACT! 2000 Files:
272 Chapter 11

• .adt, .cly, .env, .gly, .lbl, .mpr, .rep, .rpt, .tpl,.usr, .wpa
ACT! 2000 Database Files:
• .dbf, .adb, .adx, .blb, .ddb, .ddf, .ddx, .edb, .edx,.gdb, .gdx, .hdb, .hdx, .lck, .mdx, .rel, .rem, .rex,.sdb, .sdx, .tdb, .tdx
Adobe Acrobat
Migrates Adobe Acrobat files and persistent settings for Adobe Acrobat and Adobe Acrobat Reader.
The following file types are migrated:
Adobe Acrobat Data Files:
• .akf, .apf, .eps, .fdb, .fdf, .joboptions, .ndx, .p7c,.pdf, .pdx, .pfx, .ps, .sequ
The following versions of Adobe Acrobat are supported:
• Acrobat Reader 4.x, Acrobat Reader 5.x, Acrobat Reader 6.x, Acrobat Reader 7.x, Adobe crobat 4.x, Adobe Acrobat 5.x, Adobe Acrobat 6.0.
Cross version migration is supported for the following paths:
• Adobe Acrobat 4.x to 4.x
• Adobe Acrobat 4.x to 5.x
• Adobe Acrobat 4.x to 6.0
• Adobe Acrobat 5.x to 5.x
• Adobe Acrobat 5.x to 6.0
• Adobe Acrobat 6.0 to 6.0
• Acrobat Reader 4.x to 4.x
• Acrobat Reader 4.x to 5.x
• Acrobat Reader 4.x to 6.x
• Acrobat Reader 4.x to 7.x
• Acrobat Reader 5.x to 5.x
• Acrobat Reader 5.x to 6.x
• Acrobat Reader 5.x to 7.x
Settings Migration 273

• Acrobat Reader 6.x to 6.x
• Acrobat Reader 6.x to 7.x
• Acrobat Reader 7.x to 7.x
Lotus Notes 5.X, 6.X
Migrates Lotus Notes data files and persistent settings. Only user ID files in the default location and the last used user ID file are migrated.
If the migration of user ID files stored in non-default locations is desired this can be accomplished using OV Settings Migration Manager File Rules.
Cross version migration is supported for the following paths:
• Lotus Notes 5.x to Lotus Notes 5.x
• Lotus Notes 5.x to Lotus Notes 6.x
• Lotus Notes 6.x to Lotus Notes 6.x
Microsoft Internet Explorer
Migrates Internet Explorer persistent settings, cookies, proxy settings, and favorites.
The following versions of Internet Explorer are supported:
• IE 4.01, IE 5.x, IE 6.x
Cross version migration is supported for the following paths:
• IE 4.01 to IE 4.01
• IE 4.01 to IE 5.x
• IE 4.01 to IE 6.x
• IE 5.x to IE 5.x
• IE 5.x to IE 6.x
• IE 6.x to IE 6.x
Microsoft NetMeeting
Migrates Microsoft NetMeeting settings.
274 Chapter 11
The following file types are migrated:
NetMeeting Whiteboard Files:
• .nmw, .wht
The following versions of Microsoft NetMeeting are supported:
• Microsoft NetMeeting 2.x
• Microsoft NetMeeting 3.x
Cross version migration is supported for the following paths:
• Microsoft NetMeeting 2.x to Microsoft NetMeeting 2.x
• Microsoft NetMeeting 2.x to Microsoft NetMeeting 3.x
• Microsoft NetMeeting 3.x to Microsoft NetMeeting 3.x
Microsoft Outlook Express
Migrates Microsoft Outlook Express persistent settings, Windows Address Book, mail, and news files.
The following file types are migrated:
Outlook Express Files:
• .eml, .nws, Outlook Express Stationery
The following versions of Microsoft Outlook Express are supported:
• Outlook Express 5.x
• Outlook Express 6.x
Cross version migration is supported for the following paths:
• Microsoft Outlook Express 5.x to Microsoft Outlook Express 5.x
• Microsoft Outlook Express 5.x to Microsoft Outlook Express 6.x
• Microsoft Outlook Express 6.x to Microsoft Outlook Express 6.x
Netscape
Migrates Netscape data files and persistent settings
The following versions of Netscape Communicator are supported:
• Netscape 4.5, Netscape 4.6, Netscape 4.7, and Netscape 6.x
Cross version migration is supported for the following paths:
Settings Migration 275

• Netscape 4.5 to Netscape 4.5
• Netscape 4.5 to Netscape 4.6
• Netscape 4.5 to Netscape 4.7
• Netscape 4.5 to Netscape 6.x
• Netscape 4.6 to Netscape 4.6
• Netscape 4.6 to Netscape 4.7
• Netscape 4.6 to Netscape 6.x
• Netscape 4.7 to Netscape 4.7
• Netscape 4.7 to Netscape 6.x
• Netscape 6.x to Netscape 6.x
Norton AntiVirus
Migrates Persistent settings for Norton AntiVirus
The following versions of Norton AntiVirus are supported:
• Norton AntiVirus 2000
Norton AntiVirus Corporate Edition
Migrates custom scans and user settings for Norton AntiVirus Corporate Edition.
The following versions of Netscape Communicator are supported:
• Norton AntiVirus Corporate Edition 7.6 and Symantec AntiVirus Corporate Edition 8.0.
Cross version migration is supported for the following paths:
• Norton AntiVirus Corporate Edition 7.6 to Norton AntiVirus Corporate Edition 7.6
• Norton AntiVirus Corporate Edition 7.6 to Symantec AntiVirus Corporate Edition 8.0
• Symantec AntiVirus Corporate Edition 8.0 to Symantec AntiVirus Corporate Edition 8.0
276 Chapter 11

Visio
Migrates Visio data files, persistent settings and templates.
The following file types are migrated:
Visio Data Files:
• .vsd, .vss, .vsw
Visio Template Files:
• .vst
The following versions of Visio are supported:
• Visio 4.5, Visio 5.0, Visio 2000, Visio 2002 and Visio 2003
Cross version migration is supported for the following paths:
• Visio 4.5 to Visio 4.5
• Visio 4.5 to Visio 5.0
• Visio 4.5 to Visio 2000
• Visio 4.5 to Visio 2002
• Visio 4.5 to Visio 2003
• Visio 5.0 to Visio 5.0
• Visio 5.0 to Visio 2000
• Visio 5.0 to Visio 2002
• Visio 5.0 to Visio 2003
• Visio 2000 to Visio 2000
• Visio 2000 to Visio 2002
• Visio 2000 to Visio 2003
• Visio 2002 to Visio 2002
• Visio 2002 to Visio 2003
• Visio 2003 to Visio 2003
WinZip
Migrates WinZip data files and persistent settings
Settings Migration 277

WinZip content does not migrate .cab files by design. If the migration of .cab files is desired this can be accomplished using OV Settings Migration Manager File Rules.
The following file types are migrated:
WinZip Files:
• .arc, .arj, .b64, .bhx, .gz, .hqx, .lzh, .mim, .tar,.taz, .tgz, .tz, .uu, .uue, .xxe, .z, .zip
The following versions of WinZip are supported:
• WinZip 7.x
• WinZip 8.x
• WinZip 9.0
Cross version migration is supported for the following paths:
• WinZip 7.x to WinZip 7.x
• WinZip 7.x to WinZip 8.x
• WinZip 7.x to WinZip 9.0
• WinZip 8.x to WinZip 8.x
• WinZip 8.x to WinZip 9.0
• WinZip 9.0 to WinZip 9.0
WordPerfect for Office 2000
Word Perfect Office 2000 will migrate data files, templates and persistent settings for the following applications:
• Corel Utilities (Address Book & QuickFinder)
• Dragon NaturallySpeaking for WordPerfect 3.x, and 4.x
• Quattro Pro 9.0
• WordPerfect 9.0
The following versions of WordPerfect Office are supported:
• WordPerfect Office 2000
Cross version migration is supported for the following paths:
• WordPerfect Office 2000 to WordPerfect Office 2000
278 Chapter 11
Dragon Naturally Speaking for WordPerfect
Migrates Dragon NaturallySpeaking data files and persistent settings.
The following versions of Dragon NaturallySpeaking are supported:
• Dragon NaturallySpeaking 3.x, Dragon NaturallySpeaking 4.x
Cross version migration is supported for the following paths:
• Dragon NaturallySpeaking 3.x to Dragon NaturallySpeaking 3.x
• Dragon NaturallySpeaking 3.x to Dragon NaturallySpeaking 4.x
• Dragon NaturallySpeaking 4.x to Dragon NaturallySpeaking 4.x
Corel Utilities
Corel Address Book: Migrates persistent settings and data files for Corel Address Books
Corel QuickFinder: Migrates settings for Corel Office 2000 Suite QuickFinder.
Corel Quattro Pro
Migrates Quattro Pro data files and persistent settings
The following file types are migrated:
Quattro Pro 9 Data Files:
• .qpw, .wb1, .wb2, .wb3, .wq1
Corel WordPerfect
Migrates WordPerfect data files and WordPerfect persistent settings
The following file types are migrated:
WordPerfect 9 Data Files:
• .frm, .lab, .usr, .wpd, .wpt
Data Tansports
Migrates files and registry values as set in File Rules, File Tree, and Registry Rules.
Settings Migration 279

Windows Options
Migrates persistent settings and files for: Control Panel, Desktop Shortcuts, Dial-up Networking, Folder Options, Local Printer Logging, Mapped Network Drives, My Documents, Network and Shared Printer Connections, Network Settings, Taskbar and Quick Launch Bar, and Windows Address Book.
Desktop Shortcuts
Migrates shortcuts on the desktop.
Desktop shortcuts that have broken links are not migrated by default. For example, if there is a shortcut to an installed application on the source machine's desktop but that application is not installed on the target machine, the shortcut will not be migrated because it would have become a broken link on the target machine. To migrate broken link files select Preferences from the Edit menu and check the Broken Shortcut Policy check box. The broken link files will be migrated to the source directory and placed in a folder named "Broken Shortcuts".
Dial-Up Networking
Migrates persistent settings and files for dial-up networking.
Persistent settings that are hardware related are not migrated by design
Folder Options
Migrates persistent settings for folder options.
Local Printer Logging
A file named printinfo.txt is created during injection on the users desktop that contains Printer information for both network and local printers.
280 Chapter 11

Mapped Network Drives
Migrates mapped network drives. If on the target machine a drive letter is in use that is the same as a mapped drive being migrated, the next available drive letter will be used for the migrated network drive.
Hardware related settings and files are not migrated by design
My Documents
Migrates the contents of the My Documents folder
If the My Documents folder is renamed or the location changed, OV Settings Migration Manager will still recognize this folder as "My Documents" and the contents of the folder will migrate to the "My Documents" folder on the target system.
Network and Shared Printer Settings
Migrates networked and shared printers. Printers are migrated if they have a valid UNC path and are accessible via the network or via a share. When printers are migrated a printer icon is placed on the target system's desktop. Double clicking on this icon will install the printer.
The OV Settings Migration Manager Operator must have full access to the printers being migrated for each user. Hardware related settings and files are not migrated by design.
Network Settings
Migrates computer name, workgroup/domain, description, IP address, DHCP, DNS, and WINS settings.
Migration of network settings can cause problems if all the issues are not fully understood.
Taskbar and Quick Lanuch Bar
Migrates Start Menu settings, Taskbar settings and Quick Launch Bar shortcuts.
Settings Migration 281

Windows Address Book
Migrates the windows address book.
Control Panel
Hardware related settings and files are not migrated by design.
Migrates Persistent settings and files for:
Accessibility Options, Display, Internet Options, Keyboard, Mouse Settings, Power Management, Regional Settings, Sounds, and Time Zones.
Accessibility Options
Migrates keyboard, sound, display, and mouse accessibility settings
Display
Migrates appearance and themes, background, and visual effects
Internet Options
Migrates Internet properties (home page, colors, fonts, languages)
Keyboard
Migrates Keyboard Languages and Keyboard Settings. Keyboard Languages are stored in different places and named differently, depending upon the operating system installed.
On Windows 98, the settings are stored under the following path:
• Control Panel \ Keyboard \ Language (tab)
On Windows NT and Windows 2000, the settings are stored under the following path:
• Control Panel \ Keyboard \ Input Locales (tab).
The settings can also be found under the following path for Windows 2000:
• Control Panel \ Regional Settings \ Input Locales.
282 Chapter 11

On Windows XP Pro, the settings can be found under the following path:
• Control Panel \ Regional and Language Options \Languages (tab) \ Details (button)
Mouse Settings
Migrates Persistent settings and files for Mouse (buttons, motion, pointers, and schemes).
Power Management
Migrates Persistent settings for Power Management.
Regional Setttings
Migrates Persistent Regional Settings.
If Country Codes between different Operating System Versions have changed or the Country Code is not present on the target machine the settings will not migrate.
Sounds
Migrates persistent settings and files for Windows system sounds.
Time Zones
Migrates persistent settings for Time Zones
Settings Migration 283

284 Chapter 11
12 FAQs
How do I access the Management Console? Use a browser from any device in your environment to access the OVCCM console.
• Go to http://OVCCMhost:3480/OVCCM, where OVCCMhost is the name of the server where OVCCM is installed.
How do I determine what version I am using?
• Use the Configuration area, Support section to view the OVCCM version Information.
How do I change my console password? Each console user has its own password defined by the administrator when the console user is created. Change a console user’s login password in the Console Access section of the Configuration area.
• Click the User ID of the console user to open the User Details window.
• Within the Password Change area, enter and confirm a new password by typing it into the text boxes provided.
• Click Save.
The new password has now been saved.
285

How do I begin to manage a device in my environment?
Devices are managed when the Management Agent is deployed. To deploy the Agent, the device must be added to OVCCM.
First, import the device:
• From Device Management, General tab, click Import Devices to Manage. The Import Device Wizard opens.
• Follow the steps in the wizard on page 158 to import your devices.
When the device is imported, deploy the Management Agent:
• From Device Management, General tab, click Deploy the Management Agent. The Agent Deployment Wizard opens.
• Follow the steps in the wizard on page 159 to deploy the Management Agent.
When the Agent is deployed, the device is successfully managed and ready for software, patch and inventory management.
How do I schedule inventory collection? Hardware and Software inventory is collected based on the schedule you define using the Software/Hardware Inventory Wizard.
• First select whether to schedule inventory collection for individual devices or a group by selecting them within either the Device Management, Devices section or the Group Management, Groups section.
toolbar button, then select Discover Software/Hardware Inventory to launch the wizard.
• On the toolbar, click the Inventory Collections
• Follow the steps in the wizard on page 160 to define software and hardware inventory collection for your devices and groups.
Additional inventory collection is taken after a software deployment job is completed.
286 Chapter 12

How do I view inventory information for managed devices?
Use the Reporting tab to view inventory information for managed devices.
• From the home page of the Reporting tab, click View Managed Devices under Inventory Information. A list of all managed devices is displayed.
• Use the tools on the left side of the page, or click any criteria within each list item, to filter the list further.
to display information for a single device. • Click Show Details
How do I automate patch acquisition? Use the Configuration tab, Patch Management section to define your patch acquisition schedule and settings.
1 In the Patch Acquisition Schedule area, use the tools provided to set the acquisition schedule.
— Run: Select whether to discover patches based on an interval hours, days, or weeks.
— Interval: Select the specific interval (hours, days, or weeks).
— Starting on: Use the drop-down list to select the date patch compliance should be discovered.
— Current Server Time displays the current time of the OVCCM server.
2 When finished, click Save to commit your changes. The new schedule is displayed after Current Schedule.
3 In the Patch Acquisition Settings area, enter the Bulletins to Acquire each discovery period. You can use wildcard characters to designate a range of bulletins (for example, MS05*). Separate multiple bulletin searches with a comma (for example, MS05*, MS06*).
4 Type a Proxy Server Address from which to obtain bulletins (for example, http://proxyserver:8080/).
5 If required, type a Proxy User ID and Proxy Password to acquire patches.
FAQs 287

6 Click Save to commit your changes.
How do I configure the patch compliance discovery schedule?
• To define a schedule for patch compliance discovery, select the managed devices from the Devices tab (or select a Group from the Groups tab).
toolbar button, then select Discover Patch Compliance to launch the Patch Compliance Discovery Wizard.
• Click the Inventory Collections
• Follow the steps in the wizard on page 161 to define a schedule for patch compliance for your devices and groups.
• Use the Reporting tab to view patch compliance reports for the selected devices.
How do I deploy software to all of my managed devices?
First, create a dynamic Reporting group containing all managed devices.
• Within the Reporting tab, under Inventory, click View Managed Devices.
• A list of all managed devices is displayed.
• Click Create new Dynamic Reporting Group . Follow the steps in the Group Creation wizard to create the group.
Now you can deploy software to devices in the newly created group.
• In the Management tab, click Software Management.
• Click Deploy Software.
• The Software Deployment Wizard opens. Follow the steps in the wizard to select the newly created group and software for deployment.
288 Chapter 12

How do I acquire a particular Microsoft patch?
• Use the Configuration tab, Patch Management section and define the specific patch bulletin number in the Patch Acquisition Settings, Bulletins to Acquire text box.
You can launch patch acquisition immediately after you define the settings. If your patch acquisition schedule is set to acquire patches on a regular basis, you must reset the acquisition settings values to prevent patch acquisition from acquiring only a specific patch during future acquisitions.
How do I update my license key?
• Use a text editor and open the new license file (for example license.nvd).
• Copy the contents of the file into the License Data text box found in the Configuration tab, Support section.
• Click Save to update your license information.
How do I create a group of devices to target for an OS Service Pack?
Use the Reporting tab to create a query that contains all devices that do not have the particular service pack. In this example, a group of all Windows XP devices without Service Pack 2 installed will be created.
• In the Data Filters area, click Inventory Management Related.
• Click OS Related
• Click Operating System and enter *Windows XP*
• Click Apply. All devices with Windows XP are displayed.
• Click Operating System Level and type !Service Pack 2
FAQs 289

• Click Apply. All Windows XP devices that do not have Service Pack 2 installed, are displayed.
and follow the steps in the Group Creation wizard to create the group of devices.
• Then click Create new Dynamic Reporting Group
How do I deploy software to a single device? Use the Software Details window to deploy software to a single device.
• Within the Management tab, click Software Management.
• Click Software Library to display all published software.
• Click the description link for the software you want to deploy to a single device. The Software Details window opens.
• Click the Devices tab and select the device to which you want to deploy the software.
to open the Software Deployment Wizard. • Click Deploy Software
• Follow the steps in the wizard to deploy software to that device.
How do I install the Management Agent to a device without using the console?
Use the Management Agent installation program included on the OVCCM CD-ROM to install the Agent to devices that may not be consistently connected to the network.
• Use the Management Agent setup.cmd file located on the OVCCM installation CD-ROM in the RadAgent directory.
• From a command line, type: setup.cmd OVCCM_IP_Addr where OVCCM_IP_Addr is the IP address of your OVCCM server.
• Hit Enter
The Management Agent is now installed.
290 Chapter 12

How do I publish a Windows Installer package?
• Use the Publisher and select Windows Installer as the Type of Data to Publish. Follow the steps in the Publisher to make the Windows Installer file available for distribution to your managed devices.
Refer to the Publisher online help or Chapter 9, Using the Publisher for more information.
How do I publish setup.exe?
• Use the Publisher and select Component Select as the Type of Data to Publish. Select the files to publish and follow the steps in the Publisher to make the file available for distribution to your managed devices.
Refer to the Publisher online help or Chapter 9, Using the Publisher for more information.
How do I know that all my devices successfully received the software?
• In the Management area, click Software Management.
• On the Reporting tab, click Software Summary. The Reporting area is displayed with a summary of all devices, managed services, and failed services.
You can also use the Software Details window, Devices tab to view the status of software organized by device.
• Click the description link for any software to open the Software Details window.
• Click Devices tab.
• View the Software Status column to see which managed devices have the software installed. Only entitled devices are displayed.
FAQs 291
How do I make software available for a user to install?
By adding software entitlement to a group of devices, that software is then available for the user to install from the Application Self-Service Manager.
• From the Group Management section of the Management tab, click the Groups tab.
• Click any Group description link to open the Group Details window.
• Click the Software tab to display all entitled software for that group.
• To entitle additional software, click Add Software Entitlement .
• Select the software to entitle and click Add Entitlement.
When entitled, software is available for deployment from the console or from the Application Self-Service Manager on the individual devices.
How do I generate a device compliance report?
• Use the Reporting tab to define which patch bulletin you want to see compliance for.
• In Data Filters, click Patch Management Related.
• Click Patch Compliance Status.
• Enter a bulletin name or partial name, and click Apply.
• Use the tools at the top of the report list to export or print the report.
How do I capture an OS image? Use the Image Preparation Wizard to prepare and capture operating system images.
• Create the Image Preparation CD from the osprepwiz.iso file. The file is located on the OVCCM CD-ROM in the \OSManagement\ISO\CaptureCD directory.
292 Chapter 12

• Follow the preparation steps in the Image Preparation Wizard online help or in the section Preparing and Capturing OS Images on page 179 for detailed instructions
How do I add additional drivers to an OS image? Before you capture an operating system image for deployment, it is a good idea to make sure any OEM drivers for all possible device hardware configurations are installed.
• The following Microsoft KB article contains information for including OEM drivers for Windows OS installations:
http://support.microsoft.com/default.aspx?scid=kb;en-us;314479
How do I publish an OS image?
• Use the Publisher and select OS Image as the Type of Data to Publish. Select the operating system image to publish and follow the steps within the Publisher to make the file available for distribution to your devices.
Images captured by the Image Preparation Wizard are stored, by default, in the \Novadigm\OSManagerServer\upload\ directory on the OVCCM server.
Refer to the Publisher online help or Chapter 9, Using the Publisher for more information.
How do I deploy an OS image? First, create a Static Group containing all devices to receive the OS image.
• Within the Group Management, General tab, click Create a new Static Group.
• The Group Management Wizard opens. Follow the steps in the Group Creation wizard to create the group.
FAQs 293

Now you can deploy software to devices in the newly created group.
• In the Management tab, click OS Management.
• Click Deploy Operating System.
The OS Deployment Wizard opens. Follow the steps in the wizard to first select the newly created group then the software for deployment. An OS Management Job is created.
How do I start collecting usage data? Usage data is collected and stored locally by the Usage Collection Agent on managed devices. You can begin collecting usage data by doing the following:
1 Create and enable collection filters using the Usage Collection Filter Creation Wizard. See Usage Collection on page 151 for additional infromation.
2 Use the Application Usage Collection Wizard to deploy the Usage Collection agent and begin colleting usage data. Follow the steps in the wizard on page 162 to define a schedule for usage data collection from groups or to force a one-time collection of data from individual devices. Usage data is stored on the local devices for 12 months.
Configuring filters to collect usage data based on wildcard characters can cause the collection of a large amount of data that can, over time, create severe reporting performance issues as the database grows in size. We strongly recommended creating filters to collect data for only those applications for which you want usage information.
Collecting usage data for all applications should be avoided.
How do I contact support?
• Use the Configuration tab of the Management Console to view Support Contact information.
294 Chapter 12

13 Troubleshooting Use the following sections to troubleshoot common problems you may encounter while using OVCCM.
• Log Files on page 295
• Agent Deployment Issues on page 296
• OS Deployment Issues on page 297
• Application Self-Service Manager Issues on page 297
• Power Management Issues on page 298
Log Files OVCCM log files are located in the following directories on the server:
— \Novadigm\Apache Group\Apache2\logs
— \Novadigm\ClientConfigurationManager\logs
— \Novadigm\ConfigurationServer\Log
— \Novadigm\ManagementPortal\logs
— \Novadigm\MessagingServer\logs
— \Novadigm\MobileManagementServer\logs
— \Novadigm\OSManagerServer\logs
— \Novadigm\PatchManager\Logs
— \Novadigm\ProxyServer\logs
— \Novadigm\ReportingServer\logs
Log file sizes will grow over time. Some logs will be in use while the OVCCM services are running. These active log files should not be deleted. Historical log files can be archived or removed as necessary.
295

Agent Deployment Issues The following table shows common Agent Deployment Job error messages and the steps to take to resolve possible issues.
Table 17 Agent Deployment Job messages and troubleshooting steps
Message Troubleshooting Steps
Failed to connect to device as user The OVCCM server creates an user. code: no network provider accepted the given network path.} {debug: exit(1), exit status was 1
administrative share in order to copy the agent install media. Personal firewalls such as Windows Firewall can block the share. Verify that port 3463 and File and Print Sharing services are added to the firewall exclusion list on the managed device.
Failed to connect to device as user user . code: logon failure: unknown user name or bad password.} {debug: exit(1), exit status was 1
Connection timed out
Verify that the login credentials used during the agent deployment wizard are correct and the userID has administrative privileges on the device. Blank passwords are not permitted. For Windows XP devices, verify that Simple File Sharing is not enabled.
After the OVCCM server deploys the agent to the device it establishes a TCP connection to the device using port 3463. If this port is blocked by a personal firewall, the device can not be managed by OVCCM. Verify that port 3463 and File and Print Sharing services are added to the firewall exclusion list on the managed device.
296 Chapter 13

Message Troubleshooting Steps
Timeout waiting for rma to register After the agent is installed to the device it registers back to the OVCCM server using port 3466. If this port is blocked by a firewall on the OVCCM server, the device can not be managed by OVCCM. Verify that port 3466 is added to the firewall exclusion list on the OVCCM server.
OS Deployment Issues This section includes common issues encountered during operating system image deployment.
TFTP server shuts down after starting
• Check to make sure you don’t have another TFTP server running on the same computer.
PXE cannot traverse subnet
• In order to allow PXE to navigate subnets, the DHCP helper must be enabled. The DHCP helper allows traversal of broadcast traffic on the DHCP ports, broadcast is typically turned off on routers.
Application Self-Service Manager Issues This section describes common Application Self-Service Manager issues and the steps to follow to resolve possible problems.
Application installation failed, Catalog displays as installed
Issue
Troubleshooting 297

The application may display as installed in the Catalog if the installation program returned a zero upon failure.
Possible Resolutions
The Application Self-Service Manager relies on a return code to detect whether or not the installation was a success. The installation must return a code of non-zero in order for the Application Self-Service Manager to detect the failure.
This can be accomplished by wrapping the installation in a command file and using logic to validate whether the process was a success or not by returning the proper code.
Power Management Issues This section describes issues and possible resolutions for tasks related to the OVCCM power management feature.
Device does not respond to power commands from the OVCCM server
If a managed device is not responding to a power on command from the OVCCM server the problem may exist in the configuration of network devices such as routers and switches.
• Test the network path from the OVCCM server to the managed device for Wake on LAN support. A number of third party tools exist for sending a remote power on command to a network device. Searching the internet for "Wake on Lan tools" will return many free tools for testing this capability.
298 Chapter 13

A About Double Byte Character Support This section covers the configuration changes that will set the locale for the service operating system (SOS).
When creating an image with the Image Preparation Wizard the locale for your reference and target machines must match. For example, if you want to create a Simplified Chinese OS image, you must run the Image Preparation Wizard on a Simplified Chinese reference machine.
If there are no double-byte requirements, do not make any of the following changes.
Supported languages Simplified Chinese, Japanese and Korean
Changing the locale
To add support for Simplified Chinese, Japanese or Korean in a PXE environment
1 Use a text editor to open \X86PC\UNDI\linux-boot\linux.cfg\default. The file looks similar to the following:
DEFAULT bzImage
APPEND initrd=rootfs.gz root=/dev/ram0 rw ISVR=10.10.10.1 ISVRPORT=3466
2 Add the LANG parameter to the end of the APPEND line and set the language code. Valid codes are:
— zh_CN = Simplified Chinese
— ja_JP = Japanese
— ko_KR = Korean
299

— en_US = English
3 As a result, the file will look similar to the following (the following example sets the language to Japanese):
DEFAULT bzImage
APPEND initrd=rootfs.gz root=/dev/ram0 rw ISVR=10.10.10.1 ISVRPORT=3466 LANG=ja_JA
4 Save and close the default file.
To add support for Simplified Chinese, Japanese or Korean when restoring from the Service CD-ROM
• Specify LANG=xx_XX in the ServiceCD section of the romsinfo.ini file. Where xx_XX is the language code for the language you want to set. Valid language codes are:
— zh_CN = Simplified Chinese
— ja_JP = Japanese
— ko_KR = Korean
— en_US = English
• The file romsinfo.ini is part of the Service CD iso.
Double-byte support for Sysprep files
If using double byte char in Sysprep, the file must be encoded in UTF-8 coding.
300 Appendix A

216
Index
A access
Management Console, 285 Acquire patches, 89
acquiring patches, 51
Action Bar, 119
icons, 128 using, 128
Active state of system tray, 246
adapt to traffic, 246
AdaptiveBandwidth, 243
adding columns to Service List, 243
adding group entitlement, 90, 105
Additional Files advanced publishing mode option,
advanced programmable interrupt controller. SeeAPIC
Agent Deployment wizard, 159
Agent Explorer, 27, 230
Agent Removal wizard, 160
AlertMessage, 243
All Devices group, 100
APIC, 101
APIC machine, 190
Application Self-Service Manager, 24
accessing, 231 Application Self-Service Manager user interface, 231
Catalog List, 234 Global Toolbar, 233 installing software, 236 Menu Bar, 233 refreshing the catalog, 236 removing software, 237 Service List, 234 viewing information, 237
Application Usage
discovering, 62 Application Usage Collection wizard, 162
Audience, 17
Author column, 243
Avis, 243
B back button, 124
bandwidth
reserving, 245 throttling, 245
Bandwidth Control, 248
bandwidth settings, adjusting, 239
bandwidth slider, 239
bandwidth throttling, 239, 248
Bare-metal, 100
Basic product, 19
features, 20 BIOS power management, 181
browse back button, 128
browse forward button, 128
browsing, 129
items in a report, 128 Build Mass Storage Section in Sysprep.inf check box,
190
C catalog
refreshing, 233 selecting, 234 virtual, 234
Catalog List, 234
catalog visibility, 84
CCMDB, 35
CCMDB_Data.MDF, 35
Client Configuration Manager, 17
installing, 34overview, 17, 19
CM Administrator Agent Explorer, 230
CM Administrator Publisher, 80
301

Columns Available list box, 243
Columns to show list box, 243
Component Select publishing, 219
CompressedSize column, 243
Configuration Management Administrator Publisher, 26
configuring
ODBC settings, 150 patch acquisition
schedule, 142 settings, 143
reporting, 149 schedules, 50
Connection options, 245
console access, 135
console user
viewing and modifying details, 137 console users
creating, 136 removing, 136
Create Groups, 51
creating
Dynamic Discovery groups, 165Dynamic Reporting groups, 130, 166 groups, 69static group, 164
current jobs
Device Management, 64, 110 os management, 108 patch management, 95 software management, 87
Customize colors option, 242
D Data Filters, 118, 121
database setup, 35
deivce details
reporting, 64Delete a job, 111, 112
deploy an operating system, 98
deploy software, 82, 288
Deploy.cab, 183
Deploy.chm, 183
deploying
Management Agent, 49 patches, 52, 77, 90 software, 52, 76
302
deployment mode, 98, 174
deployment scenarios
os images, 99 Description column, 244
device compliance report, 292
device details, 63
general, 64 groups, 64os, 64 patches, 64 properties, 64 software, 64
device discovery, 60, 158
device management, 55
Device Management
Current Jobs, 64Devices, 58 General, 56 Past Jobs, 65
Device Summary, reporting, 129
devices
device management, 58 importing, 49, 60removing, 63
Directory/Group Filters, 118, 120
discovering devices, 60
discovery group, 70
Display Options, 118, 123
docked Status window, 240
dynamic discovery groups
creating, 165 dynamic reporting groups
creating, 166 Dynamic Reporting groups
creating, 130
E Embedded Linux, 102, 205
Ended with Errors, 111, 112
entitling
patches, 52, 77 software, 52
ErrorCode, 243
Expand active catalog item, 243
Expand active service item, 243
Expand/Collapse button, 235
Index

Export Service, 81, 90, 98
export services, 83, 91, 106
Export to CSV, 128
Export to IQY, 128
ExtendOemPartition parameter, 182, 185
F filters
applying, 121 value characters, 122 wildcards, 122
firewall, 33
Focus Time, 125
G generating
reports, 53 Global Toolbar, 233
Group Creation wizard, 164
group details, 73
current jobs, 75devices, 74 general, 73 os, 74 patches, 74 properties, 74 reporting, 75software, 74
group details window
tasks, 75 group management, 65, 66
Group Management
Current Jobs, 78groups, 67Past Jobs, 78
group type, 74
groups
adding patch entitlement, 77 software entitlement, 76
creating, 69 deploying software, 76 discovery, 67 internal, 67 removing, 72
patch entitlement, 77 software, 76 software entitlement, 76
Index
reporting, 67static, 67 types, 67
H HAL, 101
Hardware Abstraction Layer. See HAL
Hardware Management, 147
Help, 28
hibernation, 181, 182
History button, 238
Home button, 234
HP Hardware reports, 126
HP Softpaqs
publishing, 223hpccm.exe, 35
IIdle state of system tray, 246
Image Preparation Wizard, 27, 185, 186, 196, 202, 207
using, 186, 196, 202, 207 ImageName.EDM, 186, 195, 202, 206
ImageName.IMG, 185
ImageName.MBR, 185
ImageName.PAR, 186
Import Device wizard, 158
Import Service, 81, 90, 98
import services, 82, 91, 105
importing devices, 49, 60
Information Panel of OVCM status windowConsole, 247
Infrastructure service, 138
Install button, 235
Install Command Line, 85
InstalledDate column, 244
installing
OVCCM, 31, 34Publisher to separate device, 39software using Application Self-Service Manager
user interface, 236 Instant Support
HP Instant Support, 143 Internet proxy detection, 246
303

inventory
discovering, 61 Inventory
discovering for group of devices, 71 Inventory Management Reports, 125
J job controls, 111
job details, 113
Job Details
details, 114 Services, 114 targets, 114
Job Management, 109
Current Jobs, 110 General, 110 Past Jobs, 115
job status, 111
JoinDomain parameter, 185
K KeepPageFile parameter, 182
L license key
update, 289 licensing information, updating, 135
Local Service Boot, 102
LocalRepair column, 244
log files, downloading, 134
logfiles.zip, 135
logging in, 47
M Management Agent, 24
deploying, 49, 60deploying to group, 70 installing manually, 41 removing, 60 removing from a group of devices, 70
Management Console, 22
Management Options publishing option, 215
managing
jobs, 110 software, 78
304
manual input, 158
Mass Storage drivers, 190
Mass Storage Drivers list, 190
Maximum items per window, 128
Menu Bar, 233
Microsoft patch, 289
Microsoft Sysprep, 183
My Software button, 234
N Name column, 244
O obfuscate usage data, 150
obfuscation of usage data, 62, 72
ODBC DSN, 37
ODBC settings, configuring, 150
online help, 28
OpenView Settings Migration Manager service, 81
operating system images, publishing, 222
Optimize compression of unused disk space check box, 190
OS Deployment wizard, 174
os details
groups, 108 properties, 107
OS Details, 106
OS Image Preparation Wizard, 182
OS image Target Devices
requirements, 100 os management
general, 96 OS Management, 95, 146
Current Jobs, 108 General, 96 operating systems, 97 Past Jobs, 109
OS partition, 185
OS Service Pack, 289
OVCCM_Publisher, 80
OVCCM_SMM, 81
OVCCM_TPM_ENABLEMENT, 80
OVCM Button Bar, 247
OVCM status window
Index

Status area, 247Status Message area, 248
OVCM Status window, 247
OVCM system tray, 246
OwnerCatalog column, 244
P page file, 181
partition size, 181
partitions
extending, 182 password
change, 137 past jobs
Device Management, 65 job management, 115 os management, 109 patch management, 95 software management, 87
patch acquisition, 287
schedule, 142 settings, 143
Patch Compliance
discovering, 61 patch compliance discovery schedule, 288
Patch Compliance Discovery wizard, 161
Patch Deployment Wizard, 171
patch details, 92
devices, 94 general, 92 groups, 93properties, 93 reporting, 94
patch management
configuration, 141 Patch Management, 87
Current Jobs, 95General, 89 Past Jobs, 95 Patches, 89
Patch Management Reports, 125
patches
acquiring, 51adding group entitlement, 90, 105 deploying, 52, 77, 89, 90 entitling, 52, 77removing entitlement, 77
Pause a job, 111
Index
Perform client connect after OS install check box, 190, 199, 210
Power Management, 59, 63
Power Management for a group of devices, 72
Power Management wizard, 163
Preferences button, 234
Premium product, 19
features, 21 prepwiz.exe, 186, 196, 203
Price column, 244
Properties publishing option, 216
Proxy, 38
proxy detection, 246
publish
os images, 97 published services, viewing, 229
PublishedDate column, 244
Publisher, 26
installing to a separate device, 39using, 213
publishing
component select, 219 modes
additional files, 216 management options, 215 properties, 216 transforms, 216
software, 51, 214 PXE, 103
PXE boot, 101
Q Quick Start Tasks, 48
R Reboot, 244
reboot settings, 85
reference machine
preparing, 180 refreshing catalog, 233
Remove button, 235
remove software, 83
removing
columns from Service List, 243patch entitlement, 77
305

software, 76, 237 Report Windows, 119
reporting
configuring, 149interface, 117 windows, 127
Reporting, 117
reporting groups
creating, 128 creating from report query, 128
Reporting tab, 117
Reporting Views, 118, 123
reports
generating, 53 viewing, 53
RepublishedDate column, 244
Reschedule a job, 111, 112
reserve bandwidth, 245
ReservedBandwidth, 244
Resize partition before OS upload check box, 190
Resume a job, 111
S schedule inventory, 286
ScheduleAllowed, 244
schedules, configuring, 50
SCSI, 101
Search Criteria, 118
Search Options, 118
filters, 119 using, 119
Service CD, 104
Service Entitlement wizard, 172
Service Export wizard, 169
Service Import wizard, 169
Service list, 234
Expand/Collapse button, 235 Install button, 235 options, 242 Remove button, 235
Service List
adding columns, 243 removing columns, 243
Settings Migration Manager, 27
Settings Migration Utility, 28
setup.exe, 291
Setupmgr.exe, 184
Show advanced operations, 243
Show Extended Information, 237
Show grid lines, 243
Size column, 244
small computer systems interface. See SCSI
software
adding group entitlement, 82 deploying, 52 entitling, 52 publishing, 51, 214 removing, 237
Software Category, 84
Software Deployment wizard, 168
software details, 83
devices, 86, 108general, 84, 107groups, 85properties, 84 reporting, 87, 108
software management, 79
Software Management, 78
Current Jobs, 87Past Jobs, 87 Software, 80
Software Removal wizard, 172
Software/Hardware Inventory wizard, 160
Sort Column, 129
SQL Server, 31
SQL Server Enterprise Manager, 35
SSM, 224
SSM compliant, 224
Start a Job, 111
static group, 74
static groups
adding devices, 75 creating, 164 removing devices, 75
Status button, 239
Status column, 244
Status window
docking, 240 undocking, 239
Stop a job, 111
support, 134
contacting, 294 Synchronize Software, 77
Index 306

Sysprep.inf file, 183
creating, 184 SysprepMassStorage section, 190
system requirements, 31
target devices, 100 System Restore, 182
system tray
active state, 246idle state, 246
SystemInstall, 244
T target device
definition, 100 requirements, 100
TCP ports, 33
thin client, 102
deploying factory OS images to, 102 Thin client
deploying Management Agent to, 41 management, 21preapre and capture images, 194 requirements, 32
Thin clients
installing the Management Agent, 42 throttling, 245
ThrottlingType, 244
TimeZone parameter, 184
TPM
configuring, 148TPM Enablement service, 80
transform file, 218
Transforms publishing option, 216
U UIOption, 244
UnattendMode parameter, 185
undocked Status window, 239
Un-install Command Line, 85
UpgradedDate column, 244
Url column, 244
Usage Count, 125
Usage Managed Products (Used), 127
Usage Manager Reports, 125
Usage Settings tab, 150
Index
Usage Status, 125
Usage Time, 125
Use system colors option, 241
User Creation wizard, 173
User Details window, 137
user interface for Application Self-Service Manager,231
VVendor column, 244
VerifiedDate column, 244
version, 285
Version column, 245
view inventory, 287
View, applying, 123
viewing
information in Application Self-Service Manager user interface, 237
published services, 229 reports, 53
virtual catalogs, 234
W Windows 2003 Server, 39
Windows CE, 102, 201
Windows Installer files, 214
Windows Installer package, 291
Windows XP Embedded, 102
Windows XPe, 194
wizards, 157
agent deployment, 159 agent removal, 160 application usage collection, 162group creation, 164 import device, 158 os deployment, 174 patch compliance discovery, 161patch deployment, 171 power management, 163 service export, 169 service import, 169 software deployment, 168 software removal, 172 software synchronization, 170 software/hardware inventory, 160 user creation, 173
307

X XPe, 102
308 Index