for support contact us at: 813.655.5100, option 2 or ... · for support contact us at:...
TRANSCRIPT
REV 9-2019 1
WebRTC User Guide FOR SUPPORT contact us at: 813.655.5100, Option 2 or [email protected]
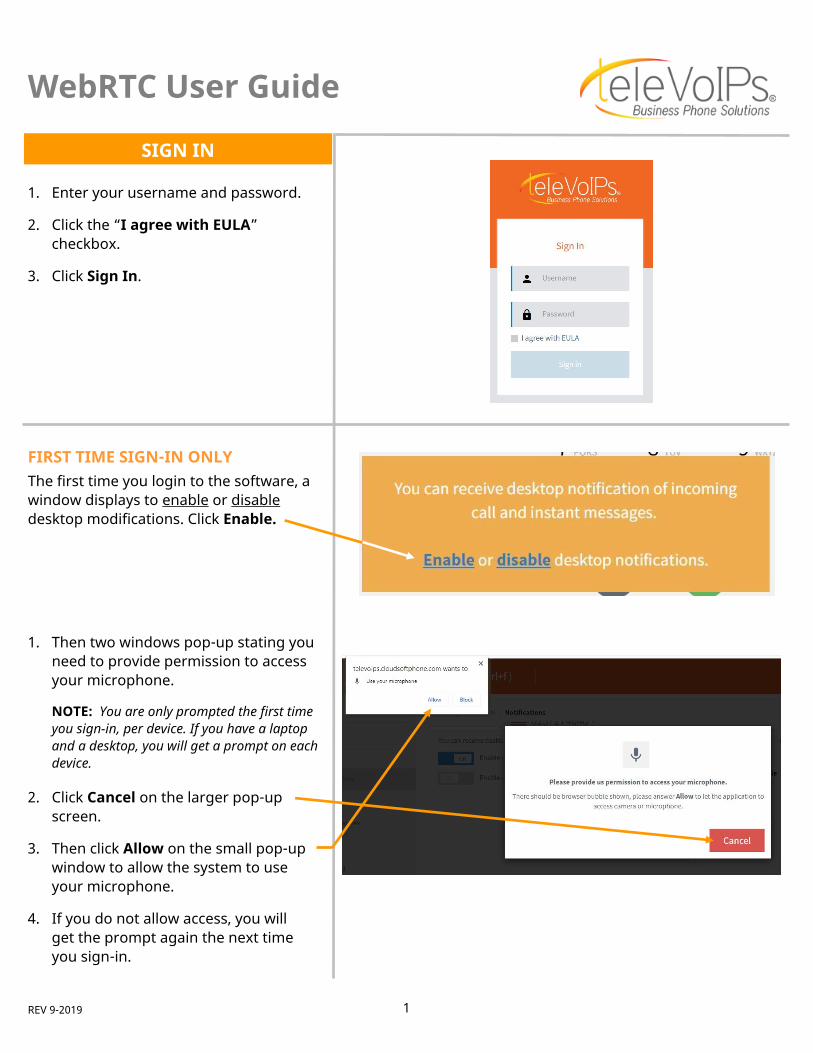
FIRST TIME SIGN-IN ONLY The first time you login to the software, a window displays to enable or disable desktop modifications. Click Enable.
1. Then two windows pop-up stating you need to provide permission to access your microphone.
NOTE: You are only prompted the first time you sign-in, per device. If you have a laptop and a desktop, you will get a prompt on each device.
2. Click Cancel on the larger pop-up screen.
3. Then click Allow on the small pop-up window to allow the system to use your microphone.
4. If you do not allow access, you will get the prompt again the next time you sign-in.
WebRTC User Guide
SIGN IN
1. Enter your username and password.
2. Click the “I agree with EULA” checkbox.
3. Click Sign In.
REV 9-2019 2
WebRTC User Guide FOR SUPPORT contact us at: 813.655.5100, Option 2 or [email protected]
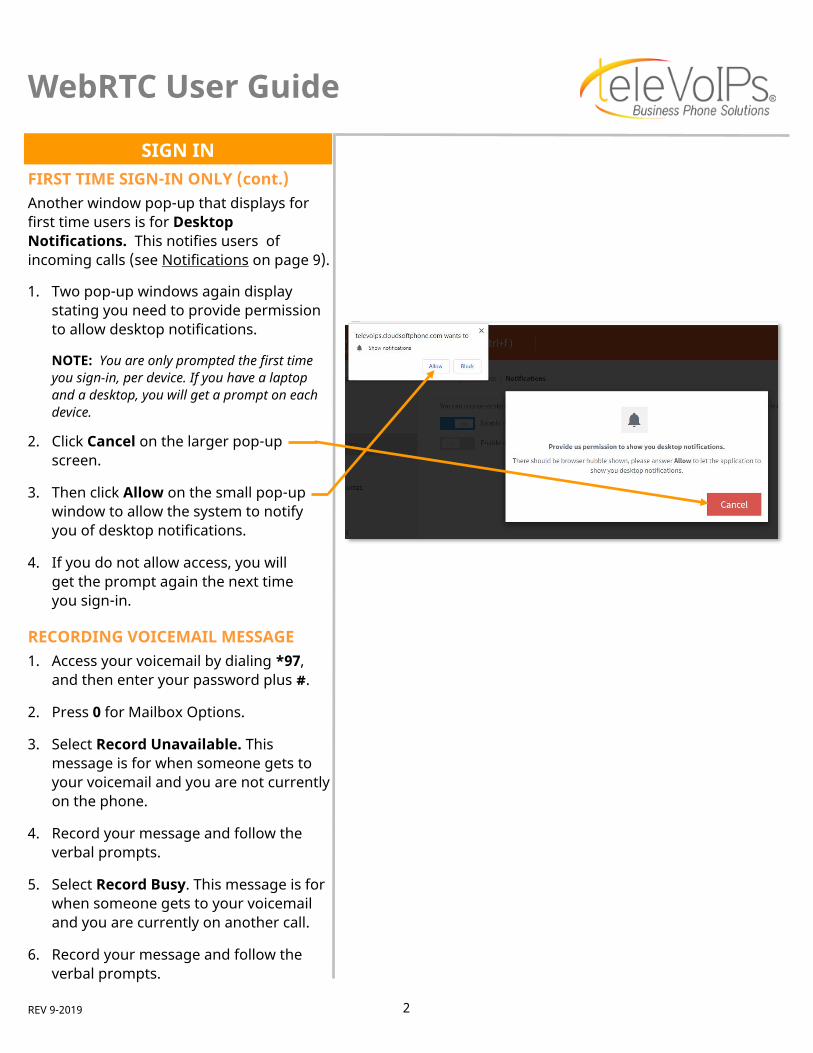
FIRST TIME SIGN-IN ONLY (cont.) Another window pop-up that displays for first time users is for Desktop Notifications. This notifies users of incoming calls (see Notifications on page 9).
1. Two pop-up windows again display stating you need to provide permission to allow desktop notifications.
NOTE: You are only prompted the first time you sign-in, per device. If you have a laptop and a desktop, you will get a prompt on each device.
2. Click Cancel on the larger pop-up screen.
3. Then click Allow on the small pop-up window to allow the system to notify you of desktop notifications.
4. If you do not allow access, you will get the prompt again the next time you sign-in.
WebRTC User Guide
SIGN IN
RECORDING VOICEMAIL MESSAGE 1. Access your voicemail by dialing *97,
and then enter your password plus #.
2. Press 0 for Mailbox Options.
3. Select Record Unavailable. This message is for when someone gets to your voicemail and you are not currently on the phone.
4. Record your message and follow the verbal prompts.
5. Select Record Busy. This message is for when someone gets to your voicemail and you are currently on another call.
6. Record your message and follow the verbal prompts.
REV 9-2019 3
WebRTC User Guide FOR SUPPORT contact us at: 813.655.5100, Option 2 or [email protected]
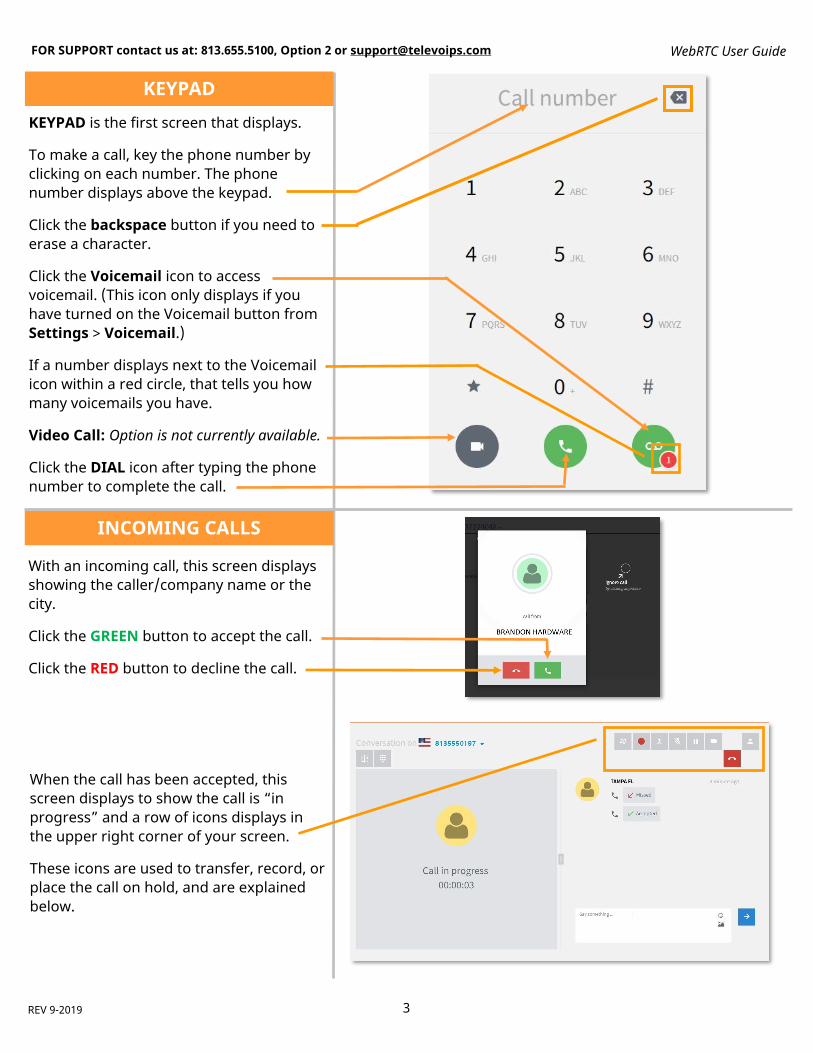
KEYPAD
KEYPAD is the first screen that displays.
To make a call, key the phone number by clicking on each number. The phone number displays above the keypad.
Click the backspace button if you need to erase a character.
Click the Voicemail icon to access voicemail. (This icon only displays if you have turned on the Voicemail button from Settings > Voicemail.)
If a number displays next to the Voicemail icon within a red circle, that tells you how many voicemails you have.
Video Call: Option is not currently available.
Click the DIAL icon after typing the phone number to complete the call.
INCOMING CALLS
With an incoming call, this screen displays showing the caller/company name or the city.
Click the GREEN button to accept the call.
Click the RED button to decline the call.
When the call has been accepted, this screen displays to show the call is “in progress” and a row of icons displays in the upper right corner of your screen.
These icons are used to transfer, record, or place the call on hold, and are explained below.

REV 9-2019 4
WebRTC User Guide FOR SUPPORT contact us at: 813.655.5100, Option 2 or [email protected]
BLIND TRANSFER See below on using this feature.
RECORD CALL Records the call; click again to stop recording.
ATTENDED TRANSFER See page 5 on using this feature.
MUTE Mutes the call so the caller cannot hear you; click again to unmute the call.
LOCAL HOLD Places the call on hold so you can take another call; click again to take the call off hold and you can speak to the caller.
END CALL Disconnects
the call.
VIDEO (NOT ENABLED)
CONTACT DETAILS Displays call details for the contact/number.
INCOMING CALLS (cont.)
BLIND TRANSFER This feature transfers the call immediately to the dialed extension and includes the caller’s original caller ID.
1. Click the Blind Transfer icon. The call is placed on hold.
2. The keypad screen displays; enter the extension or number the call is transferring to.
3. Press Enter and the call automatically transfers to that extension.
4. The message “Call was transferred successfully” displays.
REV 9-2019 5
WebRTC User Guide FOR SUPPORT contact us at: 813.655.5100, Option 2 or [email protected]
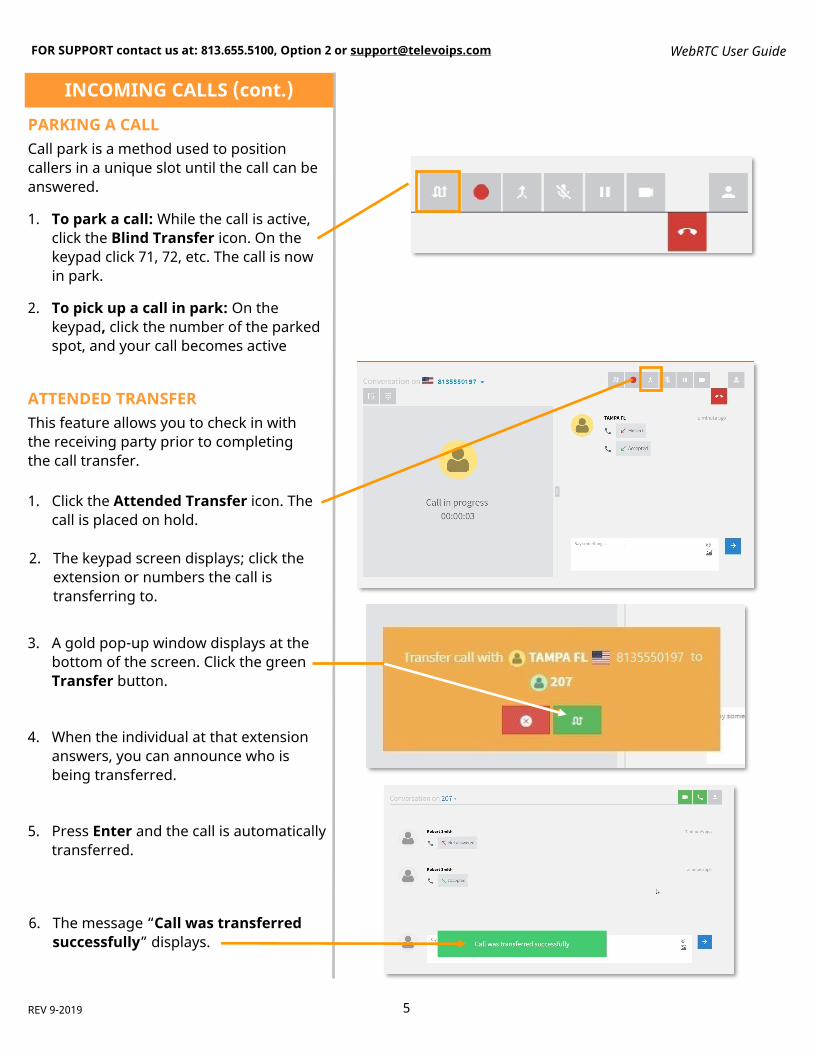
PARKING A CALL Call park is a method used to position callers in a unique slot until the call can be answered.
1. To park a call: While the call is active, click the Blind Transfer icon. On the keypad click 71, 72, etc. The call is now in park.
2. To pick up a call in park: On the keypad, click the number of the parked spot, and your call becomes active
INCOMING CALLS (cont.)
ATTENDED TRANSFER This feature allows you to check in with the receiving party prior to completing the call transfer.
1. Click the Attended Transfer icon. The call is placed on hold.
2. The keypad screen displays; click the extension or numbers the call is transferring to.
3. A gold pop-up window displays at the bottom of the screen. Click the green Transfer button.
4. When the individual at that extension answers, you can announce who is being transferred.
5. Press Enter and the call is automatically transferred.
6. The message “Call was transferred successfully” displays.
REV 9-2019 6
WebRTC User Guide FOR SUPPORT contact us at: 813.655.5100, Option 2 or [email protected]
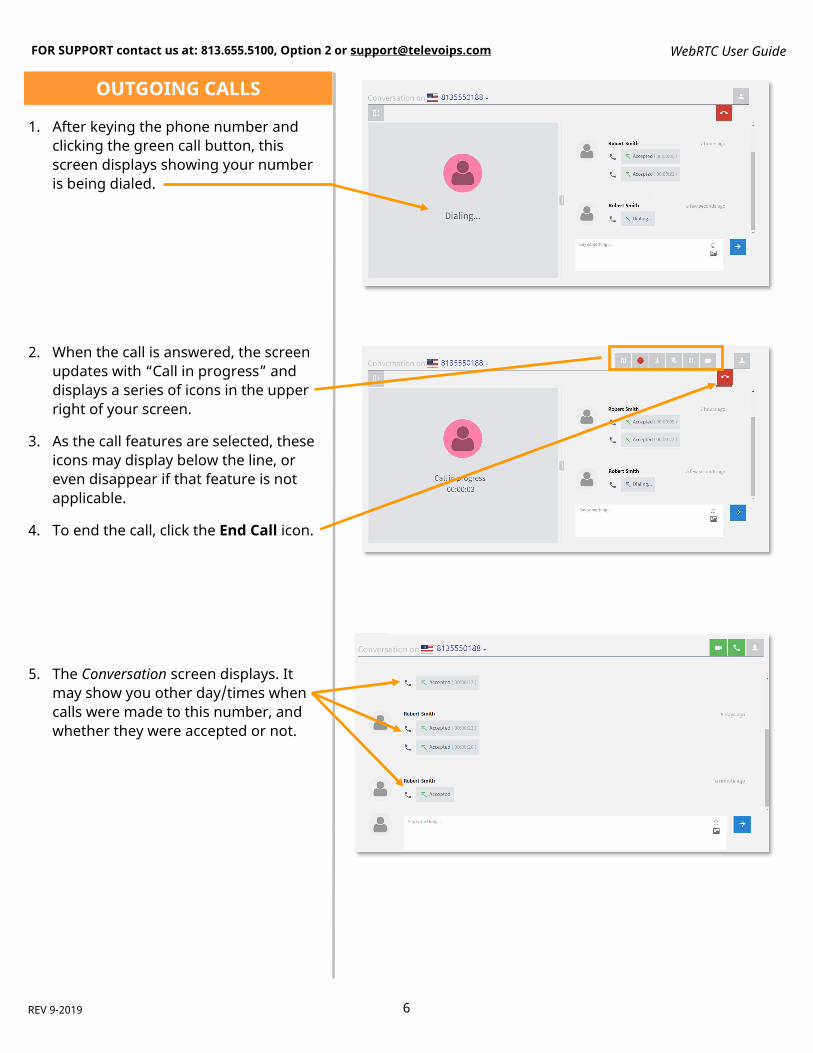
OUTGOING CALLS
1. After keying the phone number and clicking the green call button, this screen displays showing your number is being dialed.
2. When the call is answered, the screen updates with “Call in progress” and displays a series of icons in the upper right of your screen.
3. As the call features are selected, these icons may display below the line, or even disappear if that feature is not applicable.
4. To end the call, click the End Call icon.
5. The Conversation screen displays. It may show you other day/times when calls were made to this number, and whether they were accepted or not.

REV 9-2019 7
WebRTC User Guide FOR SUPPORT contact us at: 813.655.5100, Option 2 or [email protected]
CONTACTS
ALL This screen displays all contacts that have been added to your contact list.
Every outbound call is automatically added to the Contact List; this is currently the only way to add numbers to this list.
To add a number to the Quick Dial list, click the icon.
CALL HISTORY This screen displays all your recent incoming and outgoing calls:
QUICK DIAL This screen displays all calls you have added to Quick Dial. These are calls that you dial on a frequent basis.
To remove a number from the Quick Dial list, click the icon.
This number will not display the next time you access Quick Dial.
= Outgoing call was not answered
= Incoming call was answered
= Outgoing call was answered
= Incoming call was missed and not answered
Video Call (not available)
Voice Call Click to redial
number
Contact Details
Click to view contact details
REV 9-2019 8
WebRTC User Guide FOR SUPPORT contact us at: 813.655.5100, Option 2 or [email protected]
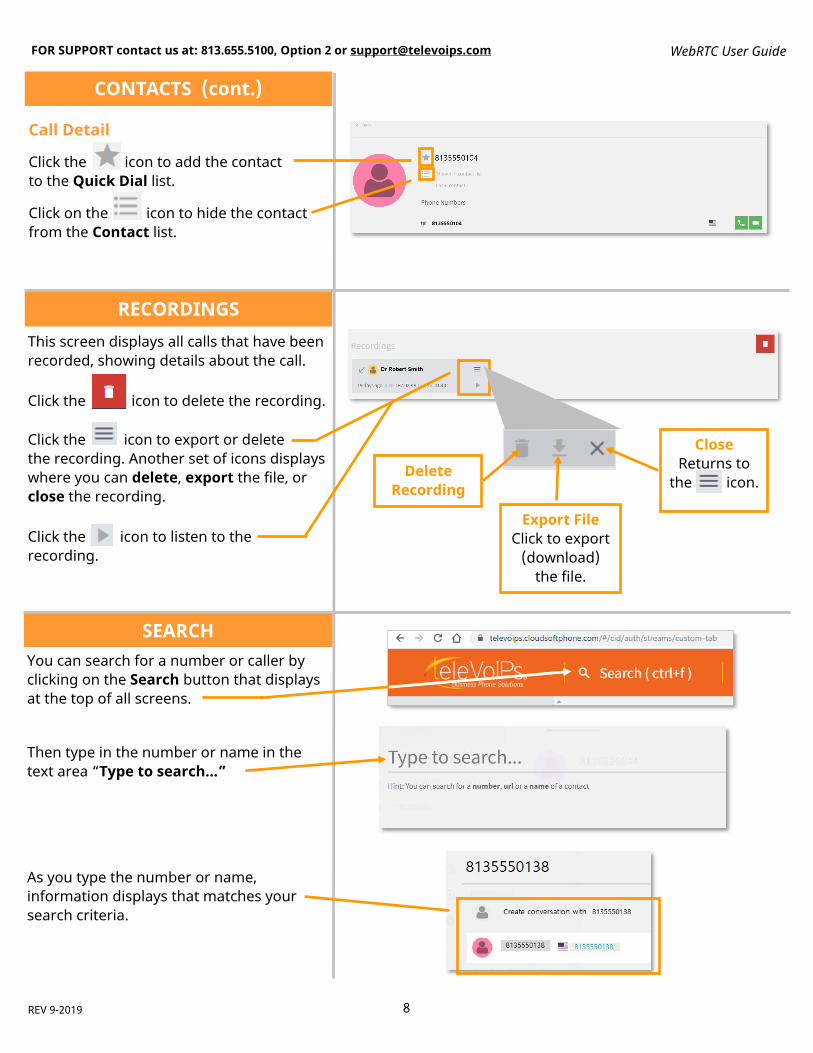
Call Detail
Click the icon to add the contact to the Quick Dial list.
Click on the icon to hide the contact from the Contact list.
CONTACTS (cont.)
RECORDINGS This screen displays all calls that have been recorded, showing details about the call.
Click the icon to delete the recording.
Click the icon to export or delete the recording. Another set of icons displays where you can delete, export the file, or close the recording.
Click the icon to listen to the recording.
Delete Recording
Export File Click to export
(download) the file.
Close Returns to
the icon.
SEARCH You can search for a number or caller by clicking on the Search button that displays at the top of all screens.
Then type in the number or name in the text area “Type to search…”
As you type the number or name, information displays that matches your search criteria.

REV 9-2019 9
WebRTC User Guide FOR SUPPORT contact us at: 813.655.5100, Option 2 or [email protected]
SETTINGS
Volume, Settings, and Log Out is located in the top right corner of your screen, where your name displays.
VOLUME You can adjust the volume on your headset by moving the square button to the right or left on the volume line.
To access settings, click Settings. The About screen displays.
NOTIFICATIONS If the Web RTC application is running but the window is minimized, you can enable desktop notifications to alert you about incoming calls.
1. Click Notifications. The Notifications screen displays.
2. Click to the right of Off in the grey rectangle.
3. They grey button turns blue, and ON displays.
NOTE: The Instant Messaging feature is not currently available.
4. Incoming desktop notifications will display.
5. To disable Notifications, click the blue rectangle to the left of the ON button and the button changes to grey and OFF displays.

REV 9-2019 10
WebRTC User Guide FOR SUPPORT contact us at: 813.655.5100, Option 2 or [email protected]
SETTINGS (cont.)
WARNING CONFIGURATION Storage configurations may have been set for your computer. They can be changed by entering the information to notify you of warnings. Click Set Limits.
RECORDINGS You can delete old recordings that are taking up storage by entering a number of MB to delete, then click Delete Recordings.
MEDIA MESSAGES Option is not currently available.
STORAGE Click Storage to review your storage features. The Storage screen displays.
MEDIA SOURCES This screen displays the Media Input and Output, and Video Input equipment on your computer.
VOICEMAIL 1. Click Voicemail to turn on the green
Voicemail button under the keypad numbers.
2. Click to the right of Off in the grey box.
3. The button turns blue and displays as On.

REV 9-2019 11
WebRTC User Guide FOR SUPPORT contact us at: 813.655.5100, Option 2 or [email protected]
To return to the main screen from Settings, click Back from the upper left of your screen.
SETTINGS (cont.)