contents for fw190.pdfcaution and notice for esc spare parts ... ★esc 40a ★servo 9gx7...
TRANSCRIPT


CONTENTS
Brief introduction
Main specifications
Main configuration
Products constitution
Assemble processes
Adjustment s
Saftey precautions
Charging method and cautions
Caution and Notice for Li-po battery
Caution and notice for ESC
Spare parts
....................................................................................1
........................................................................................1
...................................................................................1
.......................................................................................1
...................................................................................2
teps.........................................................................................3
. . . . . . . . . . . . . . . . . . . . . . . . . . . . . . . . . . . . . . . . . . . . . . . . . . . . . . . . . . . . . . . . . . . . . . . . . . . . . . . . . .5
..................................................................6
.....................................................6
....................................................................7
.. . . . . . . . . . . . . . . . . . . . . . . . . . . . . . . . . . . . . . . . . . . . . . . . . . . . . . . . . . . . . . . . . . . . . . . . . . . . . . . . . . . . . . . . . . .8
1.Please read this manual carefully and follow the instruction of the manual before you use this products;
2.Our airplane is not a toy,which is only suitable for the experienced manipulator or under the guidance of the experienced pilot.
3. Not recommended for the children under 14 years old.
4.Please adjust this plane according to the instruction and make sure that the finger and other parts of your body be out of the rotating parts of the plane, or it may cause damage to the plane or injury to your body.
5.Do not fly in the thunderstorm,strong wind or bad weather.
6.Never fly the plane where there are power lines overhead, automobiles,near aerodorme,railway or highway.
7.Never fly our plane where are crowds of people.Give yourslef plenty of room flying,as the plane can fly at a high speed.Remember that you are responsible for others safety.
8.Do not attempt to catch the plane when you are flying it.
9.The user should bear full responsibility of proper operation and usage with regards to this model.We, Top RC together with any distributor of us will not be responsible for any liability or loss due to improper operation.
Statment:

1
Thank you for purchasing the "FW-190" remote control model airplanes from Top RC, and we hope this plane will bring endless joy to you after you choose it.
★With the EPO foam materials, it is very light and strong. ★With the scale electric retractable landing gear and cabin,and it can collect and release the landing gear.★It has the flaps. ★The flashlight system in the main wings makes this model much more attractive in the night flight.★High scale, and beautiful appearance.
Fuselage, Main wing, Horizonal wing, main landing gear,propellor,Cowling set, .battery,charger,radio,accessary bag
RTF version
Brief introduction
★Wingspan 1200mm ★Length 1100mm ★Weight 1600g ★Thrust ≥1700g
★Flying time ≥5 min
1
Mian specifications
Mian configuration
Kits without radio
Kits without radio,charger and battery
Without any electronic parts
★Radio system 6ch 2.4Gzh E-601 radio★Motor TOP3511-750 ★Battery 2200mAh 11.1V 20C ★ESC 40A ★Servo 9gX7★electric retractable landing gear 2 PCS
Product constitution
ARF version
PNP version
KIT version

2
Assemble processes
1. Assembly of Main wings Take of the main wings and screw and screwdriver from the box.Please lock the main wings to the fuselage by the big screw. Open the cabin cover and connect the servo wire to the right chance of the receiver;
3. Assembly of the propellor Take of the propellor&spinner&accessory bag from the box.Assemble the propellor into the nose holder, and use the spacer&M4 nut to lock the motor shaft, then cover the nose and lock it to the motor shaft.
2. Assembly the horizontal wings Take of the horizontal wings& accessory bag and screwdriver from the box.Please insert the horizontal wings to the slot on the fuselages, then assemble the servo arm and connect the controlling steel wire.
3
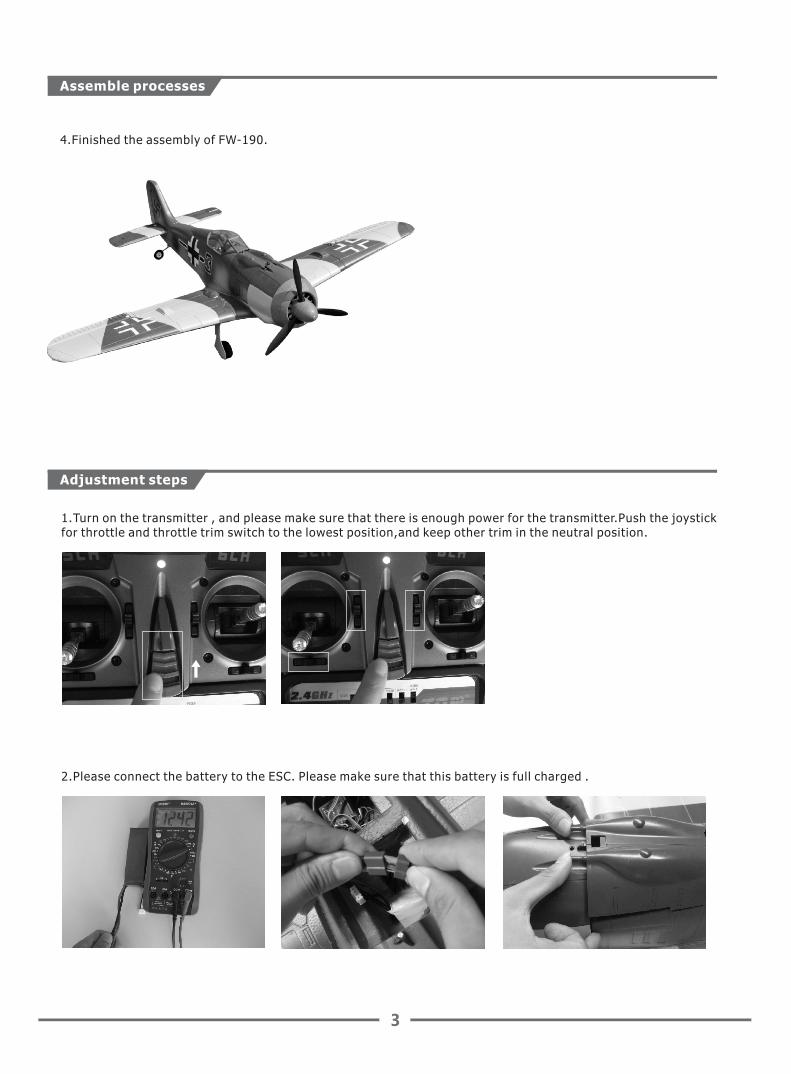
4.Finished the assembly of FW-190.
Assemble processes
Adjustment steps
1.Turn on the transmitter , and please make sure that there is enough power for the transmitter.Push the joystick for throttle and throttle trim switch to the lowest position,and keep other trim in the neutral position.
2.Please connect the battery to the ESC. Please make sure that this battery is full charged .

4
Adjustment steps
3.Hold the model in the sky amd push the 6 channel on the transmitter, the landing gear will be opened"
3.lease catch the back part of the fuselage and push the throttle slowly, which can check whether the motor can work or not.
4.Please check the control surface and front wheel to make sure that the wheel can work normally. Do not make it reverse, and make sure that the control surface& back wheel can work normally.

5
280-290mm
5.Check the center of gravity and make sure that the CG of the plane should be within the range as indicated by the arrows.
6.Finished the adjustment for FW-190.
Adjustment steps
1.If you have the simulator, we suggest that you can practise your skill by the simulator before you fly this model,which will bring some help for you.
2.Please climb the plane above the 50 meters with half throttle to fly it when you fly it for your first time, then you will be familiar with the performance of this plane.
3.You should learn how to control this model blandly, it will reduce the possibility of crash and prolong the usage life of the plane.
4.The turn radius should not be too little,or it will stall and it will increase the possibility of crash.
5.When taking off or landing the plane, you should against the wind.
6.Do not fly the model over your head or behind you, you should fly the model in front of you.
Saftey precautions

6
Operating
Then plug cigarette into its socket in car (Adapter should be connected if charge at home: connect the adapter to home power socket, then plug the adapter' DC end to charger). The LED will turn green indicating it is ready for charging. 2.Connect the battery to charger per its interface mark. The LED becomesred, which means charging is on the way.3.When LED flashing, the charger will enter the stage of drip current charging. The LED turns green when fully charged , and the battery will be used at any time.
1.
Notice
1. While charging is in process, please do not make it near flammable materials.
2.Expect Li poly battery, this charger is not allowed for other kinds of battery.
3. While charging, please keep it out of the reach of Children.
4. When this charger is in use, please do not go away and leave it unwatched, if any abnormality occurs
(such as the power indicator is off, the temperature of the battery rise rapidly, etc.) stop charging immediately.
5. Please do not use power with output voltage higher than 15V.
6. Please do not disassemble the charger or its accessories.
7. When the battery is not cool down, please do not urge to charge it.
Notice
1.Be fully charged under no more than 1 A voltage by using the specified charger.
2.Be discharged under 10C voltage but avoiding discharge time too long to harm the battery.
3.Repeat the first and second step one or two times.
4.When the Li-poly battery was stored more than 3 months, it needs to be recharged to maintain its voltage,
and ensure its life time.
Specifications:Input voltage: DC 10V~15VOutput voltage:2S-3S Li-Po batteryCharging current: 1.0A
Indicator state:Green: Charge complete & no batteryRed: ChargingThe batteries are inspected separately. When the voltage reaches 4.20V, the charging process stops.
Charging method and cautions
Li-Po battery(balance changer) specifications
Safety Instruction of Li-Po/Ni-MH battery
1. Do not disassemble or reconstruct the battery.
2. Do not short-circuit the battery.
3. Do not use or leave the battery nearby the fire, stove or heated place (more than 80℃).
4. Do not immerse the battery in water or sea water, do not get it wet.
5. Do not charge the battery under the blazing sunlight.

6. Do not drive a nail into the battery, strike it by hammer or tread it.
7. Do not impact or toss the battery.
8. Do not use the battery with conspicuous damage or deformation.
9. Do not charge a warm battery. Allow it to cool completely before attempting to charge.
10. Do not reverse charge or over discharge the battery.
11. Do not connect the battery to the ordinary charger socket or car cigarette jack.
12. Do not use the battery for unspecified equipment.
13. Do not touch the leaking battery directly, please wash your skin or clothes with
water if they are bedewed by liquid leaking from the battery.
14. Do not mix the Li-Poly battery with other un-chargeable battery in using.
15. Do not continue charging the battery over the prescribed time.
16. Do not put the battery into the microwave oven or high-pressure container.
17. Do not use the abnormal battery.
18. Do not use or keep the battery under the sunlight.
19. Do not use the battery nearby the place where generates static electricity (over 64V).
20. Do not charge the battery when the environmental temperature is under 0℃ or over 45℃.
21. If you find the battery leaking, smelling or abnormal, stop using it and return it to the seller.
22. When the battery is charging, please do not make it near the flammable materials!
23. Keep the battery away from the children.
24. Use the specified charger and observe charging requirement (under 1A).
25. When using by minors, parents should show them to the correct instruction.
1. The function of this ESC was in the best condition after factory setting; please do not change it by yourself.
2. Before connecting the battery, please make sure the throttle and trim were in the lowest position. If the
throttle and trim were not in the lowest position by mistake after connecting the battery, you can cut off the
battery; move the throttle and push to the lowest position, then connect the battery.
3. The ESC of the airplane was in a good cooling position after factory assembly; please do not move its position.
4. The ESC should be connected to the brushless motor correctly, otherwise the motor will be reversed turning,
and the model airplane can not fly correctly.
Notification for ESC
7

No:top00102Main wings A
No:top00103Horizontal wings A
No:top00104Propeller spinner A
No:top00101Fuselage A
No:top00105Landing gear
No:top00106electronic retractable landing gear
No: top402Motor(TOP3511-750KV)
No:top302019g servo(400mm)
No:top20440A Brushless ESC
No:11.1V,2200mah lipo battery
top507
No:top00107Propellor set
No:top00112Fuselage B
No:top00113Main wings B
No:top00114Horizontal wings B
No:top00115Propeller spinner B
8
Spare parts

9
Spare parts
No:top00111PCB board for cabin and retractable landing gear
No:top601 Balance charger and adaptor
No:top00110Y wire set
No:top302029g servo(250mm)
No:top00109LED lights
No:top302039g servo(200mm)
