foglight™ for virtualization, enterprise edition 8.5.5 ... · foglight™ for virtualization,...
TRANSCRIPT
Foglight™ for Virtualization, Enterprise Edition 8.5.5Foglight for Storage Management 4.4.0Virtual Appliance Installation and Setup Guide
Copyright© 2017 Dell Inc. All rights reserved.
This product is protected by U.S. and international copyright and intellectual property laws. Dell™, the Dell logo, Foglight, IntelliProfile, NetVault, OpenManage, PerformaSure, PowerEdge, Tag and Follow, and Toad are trademarks of Dell Inc. in the United States and/or other jurisdictions. “Apache HTTP Server”, Apache, “Apache Tomcat” and “Tomcat” are trademarks of the Apache Software Foundation. Google is a registered trademark of Google Inc. Android, Chrome, Google Play, and Nexus are trademarks of Google Inc. Red Hat, JBoss, the JBoss logo, and Red Hat Enterprise Linux are registered trademarks of Red Hat, Inc. in the U.S. and other countries. CentOS is a trademark of Red Hat, Inc. in the U.S. and other countries. Fedora and the Infinity design logo are trademarks of Red Hat, Inc. Microsoft, .NET, Active Directory, Internet Explorer, Hyper-V, Office 365, SharePoint, Silverlight, SQL Server, Visual Basic, Windows, Windows Vista and Windows Server are either registered trademarks or trademarks of Microsoft Corporation in the United States and/or other countries. AIX, IBM, PowerPC, PowerVM, and WebSphere are trademarks of International Business Machines Corporation, registered in many jurisdictions worldwide. Java, Oracle, Oracle Solaris, PeopleSoft, Siebel, Sun, WebLogic, and ZFS are trademarks or registered trademarks of Oracle and/or its affiliates in the United States and other countries. SPARC is a registered trademark of SPARC International, Inc. in the United States and other countries. Products bearing the SPARC trademarks are based on an architecture developed by Oracle Corporation. OpenLDAP is a registered trademark of the OpenLDAP Foundation. HP is a registered trademark that belongs to Hewlett-Packard Development Company, L.P. Linux is a registered trademark of Linus Torvalds in the United States, other countries, or both. MySQL is a registered trademark of MySQL AB in the United States, the European Union and other countries. Novell and eDirectory are registered trademarks of Novell, Inc., in the United States and other countries. VMware, ESX, ESXi, vSphere, vCenter, vMotion, and vCloud Director are registered trademarks or trademarks of VMware, Inc. in the United States and/or other jurisdictions. Sybase is a registered trademark of Sybase, Inc. The X Window System and UNIX are registered trademarks of The Open Group. Mozilla and Firefox are registered trademarks of the Mozilla Foundation. “Eclipse”, “Eclipse Foundation Member”, “EclipseCon”, “Eclipse Summit”, “Built on Eclipse”, “Eclipse Ready” “Eclipse Incubation”, and “Eclipse Proposals” are trademarks of Eclipse Foundation, Inc. IOS is a registered trademark or trademark of Cisco Systems, Inc. and/or its affiliates in the United States and certain other countries. Apple, iPad, iPhone, Mac OS, Safari, Swift, and Xcode are trademarks of Apple Inc., registered in the U.S. and other countries. Ubuntu is a registered trademark of Canonical Ltd. Symantec and Veritas are trademarks or registered trademarks of Symantec Corporation or its affiliates in the U.S. and other countries. OpenSUSE, SUSE, and YAST are registered trademarks of SUSE LCC in the United States and other countries. Citrix, AppFlow, NetScaler, XenApp, and XenDesktop are trademarks of Citrix Systems, Inc. and/or one or more of its subsidiaries, and may be registered in the United States Patent and Trademark Office and in other countries. AlertSite and DéjàClick are either trademarks or registered trademarks of Boca Internet Technologies, Inc. Samsung, Galaxy S, and Galaxy Note are registered trademarks of Samsung Electronics America, Inc. and/or its related entities. MOTOROLA is a registered trademarks of Motorola Trademark Holdings, LLC. The Trademark BlackBerry Bold is owned by Research In Motion Limited and is registered in the United States and may be pending or registered in other countries. Dell is not endorsed, sponsored, affiliated with or otherwise authorized by Research In Motion Limited. Ixia and the Ixia four-petal logo are registered trademarks or trademarks of Ixia. Opera, Opera Mini, and the O logo are trademarks of Opera Software ASA. Tevron, the Tevron logo, and CitraTest are registered trademarks of Tevron, LLC. PostgreSQL is a registered trademark of the PostgreSQL Global Development Group. MariaDB is a trademark or registered trademark of MariaDB Corporation Ab in the European Union and United States of America and/or other countries. Vormetric is a registered trademark of Vormetric, Inc. Intel, Itanium, Pentium, and Xeon are trademarks of Intel Corporation in the U.S. and/or other countries. Debian is a registered trademark of Software in the Public Interest, Inc. OpenStack is a trademark of the OpenStack Foundation. Amazon Web Services, the “Powered by Amazon Web Services” logo, and “Amazon RDS” are trademarks of Amazon.com, Inc. or its affiliates in the United States and/or other countries. Infobright, Infobright Community Edition and Infobright Enterprise Edition are trademarks of Infobright Inc. POLYCOM®, RealPresence® Collaboration Server, and RMX® are registered trademarks of Polycom, Inc. All other marks and names mentioned herein may be trademarks of their respective companies.
Foglight for Virtualization, Enterprise Edition/Foglight for Storage Management Virtual Appliance Installation and Setup Guide Updated - February 2017 Foglight for Virtualization, Enterprise Edition Version - 8.5.5 Foglight for Storage Management Version - 4.4.0
Legend
CAUTION: A CAUTION icon indicates potential damage to hardware or loss of data if instructions are not followed.
WARNING: A WARNING icon indicates a potential for property damage, personal injury, or death.
IMPORTANT NOTE, NOTE, TIP, MOBILE, or VIDEO: An information icon indicates supporting information.
Foglight for Virtualization, Enterprise Edition 8.5.5 / Foglight for Storage Management 4.4.0Virtual Appliance Installation and Setup Guide > Contents
3
Install and configure the virtual appliance . . . . . . . . . . . . . . . . . . . . . . . . . . . . . . 4
System requirements . . . . . . . . . . . . . . . . . . . . . . . . . . . . . . . . . . . . . . . . . . . . . . 4
Install as a VMware virtual appliance . . . . . . . . . . . . . . . . . . . . . . . . . . . . . . . . . . . 5Installation prerequisites . . . . . . . . . . . . . . . . . . . . . . . . . . . . . . . . . . . . . . . . 5Download the virtual appliance . . . . . . . . . . . . . . . . . . . . . . . . . . . . . . . . . . . . 5Deploy the virtual appliance . . . . . . . . . . . . . . . . . . . . . . . . . . . . . . . . . . . . . . 6
Power on and initialize the virtual appliance . . . . . . . . . . . . . . . . . . . . . . . . . . . . . . 7
Configure the virtual appliance . . . . . . . . . . . . . . . . . . . . . . . . . . . . . . . . . . . . . . . 8
Change the network settings . . . . . . . . . . . . . . . . . . . . . . . . . . . . . . . . . . . . . . . . . 9
Change the timezone . . . . . . . . . . . . . . . . . . . . . . . . . . . . . . . . . . . . . . . . . . . . . .11Option 1. Manually change the date . . . . . . . . . . . . . . . . . . . . . . . . . . . . . . . . .12Option 2. Manually change the timezone . . . . . . . . . . . . . . . . . . . . . . . . . . . . . .12Option 3. Change the hardware clock . . . . . . . . . . . . . . . . . . . . . . . . . . . . . . . .12Option 4. Change the localtime file . . . . . . . . . . . . . . . . . . . . . . . . . . . . . . . . .12Option 5. Change the timezone file . . . . . . . . . . . . . . . . . . . . . . . . . . . . . . . . . .13
Upgrade the virtual appliance . . . . . . . . . . . . . . . . . . . . . . . . . . . . . . . . . . . . . . 14
Upgrade paths . . . . . . . . . . . . . . . . . . . . . . . . . . . . . . . . . . . . . . . . . . . . . . . . . .14Foglight for Virtualization, Enterprise Edition upgrade path . . . . . . . . . . . . . . . . . .14Foglight for Storage Management upgrade path . . . . . . . . . . . . . . . . . . . . . . . . . .14
Upgrade the vApp . . . . . . . . . . . . . . . . . . . . . . . . . . . . . . . . . . . . . . . . . . . . . . . .14
About Dell . . . . . . . . . . . . . . . . . . . . . . . . . . . . . . . . . . . . . . . . . . . . . . . . . . . . 16
Contacting Dell . . . . . . . . . . . . . . . . . . . . . . . . . . . . . . . . . . . . . . . . . . . . . . . . . .16
Technical support resources . . . . . . . . . . . . . . . . . . . . . . . . . . . . . . . . . . . . . . . . .16
Contents
1
Install and configure the virtual appliance
This guide provides instructions for installing and configuring the Foglight™ for Virtualization, Enterprise Edition virtual appliance and the Foglight™ for Storage Management virtual appliance (hereafter called Foglight-FVE-FSM-vApp). The instructions are similar for the two appliances; any specific instructions are noted, where applicable.
The Foglight-FVE-FSM-vApp provides two installers that allow you to select the appropriate version, as needed:
• Foglight-FVE-FSM-vApp-large: install this version if there are less than 3000 virtual machines deployed in your environment.
• Foglight-FVE-FSM-vApp-small: install this version if there are less than 1000 virtual machines deployed in your environment.
The Foglight-FVE-FSM-vApp is delivered as a fully configured virtual appliance which contains two virtual machines and can be installed on a VMware® vSphere® virtualization platform. Before starting the installation, review the System requirements section, to ensure that your target system meets the requirements.
For more details, see these topics:
• Install as a VMware virtual appliance
• Power on and initialize the virtual appliance
• Configure the virtual appliance
• Change the network settings
• Change the timezone
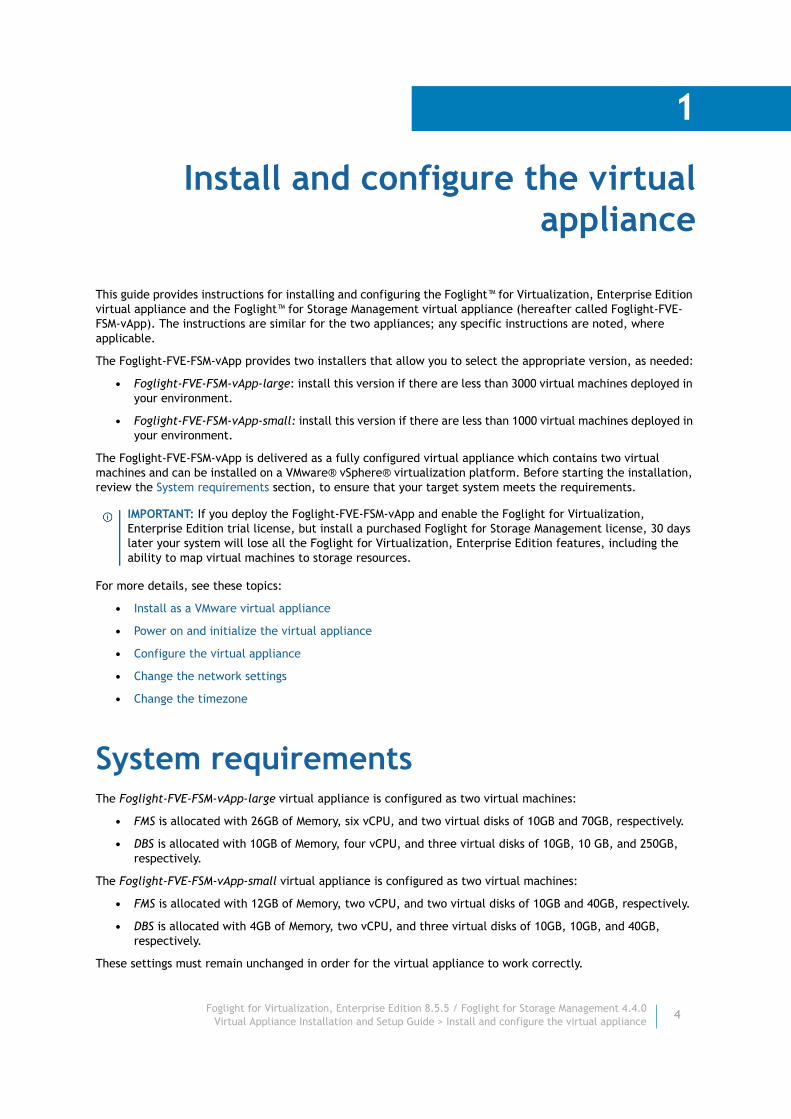
System requirementsThe Foglight-FVE-FSM-vApp-large virtual appliance is configured as two virtual machines:
• FMS is allocated with 26GB of Memory, six vCPU, and two virtual disks of 10GB and 70GB, respectively.
• DBS is allocated with 10GB of Memory, four vCPU, and three virtual disks of 10GB, 10 GB, and 250GB, respectively.
The Foglight-FVE-FSM-vApp-small virtual appliance is configured as two virtual machines:
• FMS is allocated with 12GB of Memory, two vCPU, and two virtual disks of 10GB and 40GB, respectively.
• DBS is allocated with 4GB of Memory, two vCPU, and three virtual disks of 10GB, 10GB, and 40GB, respectively.
These settings must remain unchanged in order for the virtual appliance to work correctly.
IMPORTANT: If you deploy the Foglight-FVE-FSM-vApp and enable the Foglight for Virtualization, Enterprise Edition trial license, but install a purchased Foglight for Storage Management license, 30 days later your system will lose all the Foglight for Virtualization, Enterprise Edition features, including the ability to map virtual machines to storage resources.
Foglight for Virtualization, Enterprise Edition 8.5.5 / Foglight for Storage Management 4.4.0Virtual Appliance Installation and Setup Guide > Install and configure the virtual appliance
4
VMware® Software Requirements:
• vSphere® 5.0 or later
Next step: Install as a VMware virtual appliance
Install as a VMware virtual applianceThe VMware® virtual appliance installation involves downloading the virtual appliance, and then deploying it to your VMware environment using the VMware Deploy OVF Template option.
For details, see these topics:
• Installation prerequisites
• Download the virtual appliance
• Deploy the virtual appliance
Installation prerequisitesBefore proceeding with installing the Foglight-FVE-FSM-vApp, ensure that the following prerequisites are met:
• Verify that you have permissions to deploy OVF templates to the inventory.
• Do not deploy the virtual appliance from an ESX® host. Deploy it only from the vCenter® Server.
• DRS is a requirement from VMware for all vApps. If the ESX® host is part of a cluster, enable DRS in the cluster. Otherwise it will not be able to power on the vApp.
• Verify that you are connected to a vCenter® Server system with the vSphere® Client.
• Verify that at least one internal network is configured.
• If firewall is enabled on the Agent Manager host, you must ensure that all of the UDP ports used for Netflow collections are open. By default, the UDP port 9995 is only open for Netflow collections on a virtual appliance. To open additional ports, update the /etc/sysconfig/SuSEfirewall2 file.
Next step: Download the virtual appliance
Download the virtual appliance
To download the virtual appliance:
1 Download the Foglight-FVE-FSM-vApp- large or small, as needed.
2 Unzip the compressed (.zip) file to a Windows® server or workstation.
The zipped file contains the OVF file and five VMDK files.
3 Copy the files to a location that is accessible to the VMware® vSphere® Client.
Next step: Deploy the virtual appliance
NOTE: This procedure contains instructions for deploying the virtual appliance using the Deploy OVF Template wizard. For complete information about this wizard and other vSphere® Client features, see your vSphere Client documentation.
NOTE: The Foglight-FVE-FSM-vApp respresents both Foglight-FVE-FSM-vApp-large and Foglight-FVE-FSM-vApp-small unless otherwise specified.
Foglight for Virtualization, Enterprise Edition 8.5.5 / Foglight for Storage Management 4.4.0Virtual Appliance Installation and Setup Guide > Install and configure the virtual appliance
5
Deploy the virtual appliance
To deploy the virtual appliance:
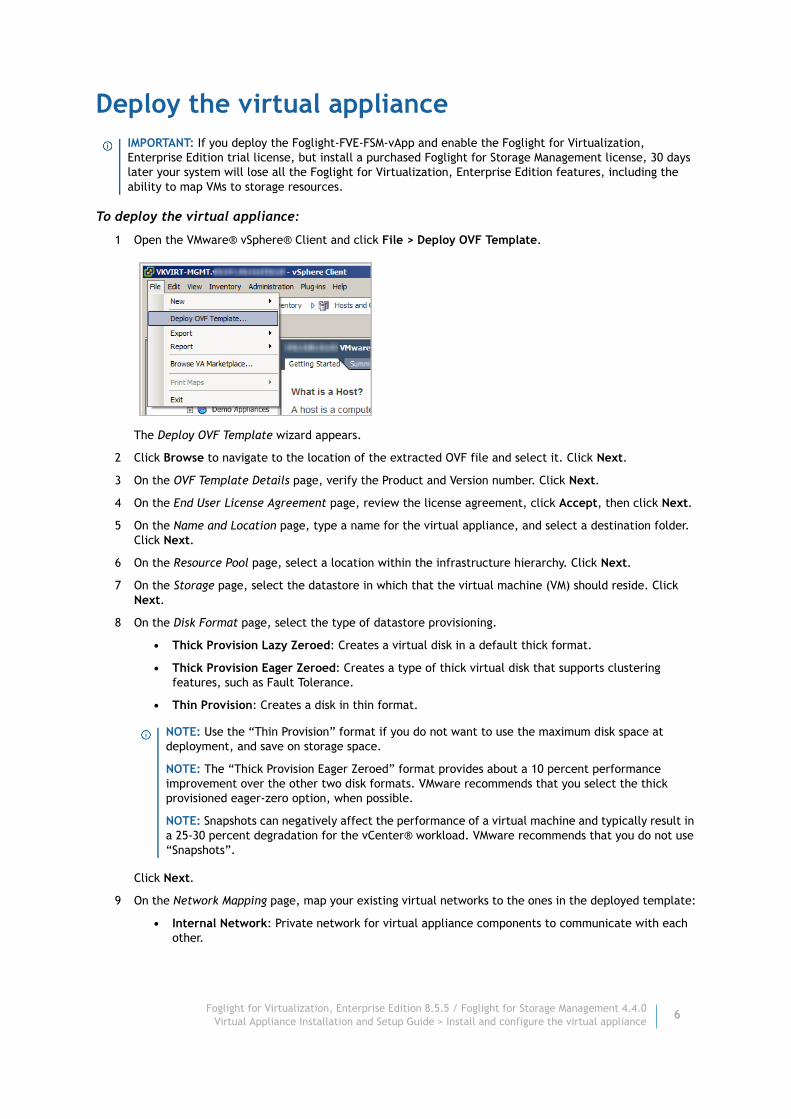
1 Open the VMware® vSphere® Client and click File > Deploy OVF Template.
The Deploy OVF Template wizard appears.
2 Click Browse to navigate to the location of the extracted OVF file and select it. Click Next.
3 On the OVF Template Details page, verify the Product and Version number. Click Next.
4 On the End User License Agreement page, review the license agreement, click Accept, then click Next.
5 On the Name and Location page, type a name for the virtual appliance, and select a destination folder. Click Next.
6 On the Resource Pool page, select a location within the infrastructure hierarchy. Click Next.
7 On the Storage page, select the datastore in which that the virtual machine (VM) should reside. Click Next.
8 On the Disk Format page, select the type of datastore provisioning.
• Thick Provision Lazy Zeroed: Creates a virtual disk in a default thick format.
• Thick Provision Eager Zeroed: Creates a type of thick virtual disk that supports clustering features, such as Fault Tolerance.
• Thin Provision: Creates a disk in thin format.
Click Next.
9 On the Network Mapping page, map your existing virtual networks to the ones in the deployed template:
• Internal Network: Private network for virtual appliance components to communicate with each other.
IMPORTANT: If you deploy the Foglight-FVE-FSM-vApp and enable the Foglight for Virtualization, Enterprise Edition trial license, but install a purchased Foglight for Storage Management license, 30 days later your system will lose all the Foglight for Virtualization, Enterprise Edition features, including the ability to map VMs to storage resources.
NOTE: Use the “Thin Provision” format if you do not want to use the maximum disk space at deployment, and save on storage space.
NOTE: The “Thick Provision Eager Zeroed” format provides about a 10 percent performance improvement over the other two disk formats. VMware recommends that you select the thick provisioned eager-zero option, when possible.
NOTE: Snapshots can negatively affect the performance of a virtual machine and typically result in a 25-30 percent degradation for the vCenter® workload. VMware recommends that you do not use “Snapshots”.
Foglight for Virtualization, Enterprise Edition 8.5.5 / Foglight for Storage Management 4.4.0Virtual Appliance Installation and Setup Guide > Install and configure the virtual appliance
6

• External Network: Public network to collect data from the virtual environment.
Click Next.
10 On the Properties page, select a time zone to set inside Guest OS. Also, implement the following network settings:
• FMS VM IP Address: IP address for the FMS VM interface. Leave this field blank when using DHCP.
• VM Netmask: Netmask for the vApps VMs. Leave this field blank when using DHCP.
• Default Gateway: Default gateway address for the vApps VMs.
• DNS: Domain name servers for the vApps VMs (separated by a semicolon).
Click Next.
11 Review the deployment settings and click Finish.
When the deployment process is complete, the vApp appears as a virtual machine in the inventory.
Next step: Power on and initialize the virtual appliance
Power on and initialize the virtual applianceAfter installing the OVF, you must power on and initialize the virtual machines.
To initialize the virtual appliance:
1 Open vCenter®, select the Foglight-FVE-FSM-vApp that you installed, then click Power on the vApp.
For Foglight for Virtualization, Enterprise Edition: Once the appliance is started, it initializes the operating systems on both virtual machines, and starts Foglight for Virtualization, Enterprise Edition. By default, Pool.ntp.org is used as the Network Time Protocol (NTP) server.
For Foglight for Storage Management: Once the appliance is started, it initializes the operating systems on both virtual machines, and starts Foglight for Storage Management. By default, Pool.ntp.org is used as the Network Time Protocol (NTP) server.
2 Wait until the IP address of Foglight for Virtualization, Enterprise Edition / Foglight for Storage Management appears in the vCenter Summary tab.
NOTE: The external and internal networks should be configured on the same ESX host. Also the internal network name should be unique inside vCenter® (only one ESX has such network name). If you have only one network, you can assign the same network to the template networks, but only one vApp copy can run in such environment. If you need to have several Foglight-FVE-FSM-vApp virtual appliances running, you must create the dedicated internal network for every vApp (with different names).
Foglight for Virtualization, Enterprise Edition 8.5.5 / Foglight for Storage Management 4.4.0Virtual Appliance Installation and Setup Guide > Install and configure the virtual appliance
7
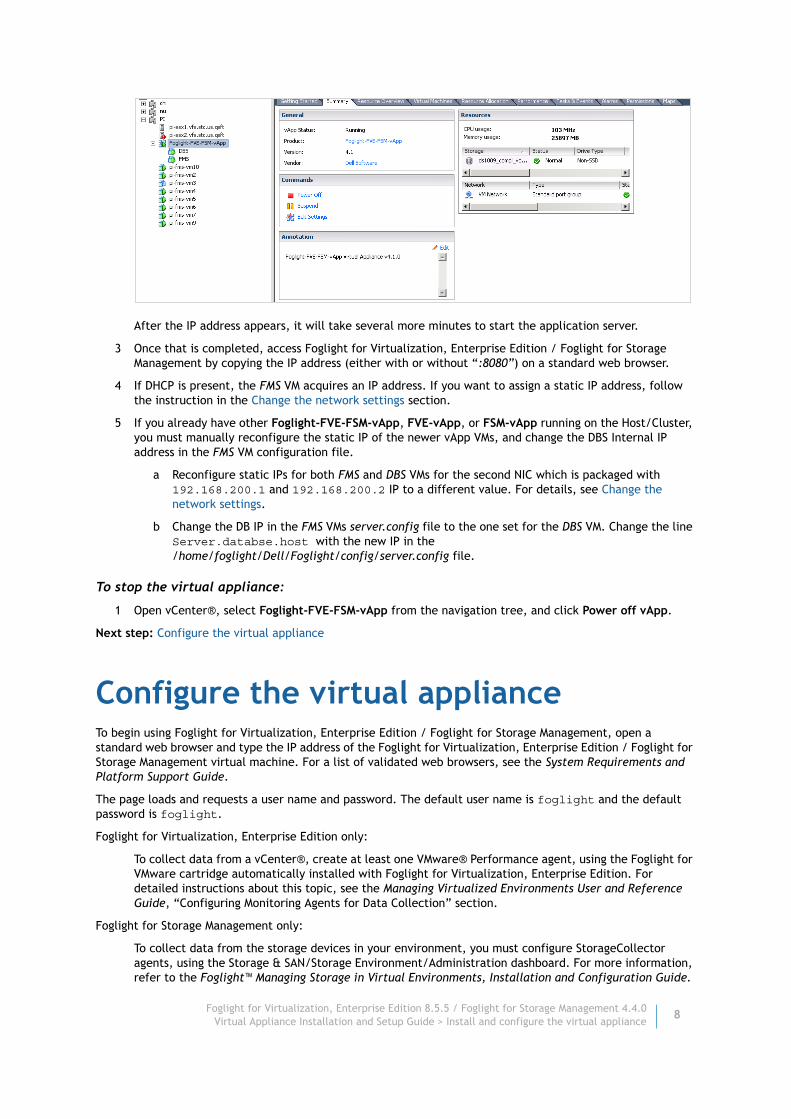
After the IP address appears, it will take several more minutes to start the application server.
3 Once that is completed, access Foglight for Virtualization, Enterprise Edition / Foglight for Storage Management by copying the IP address (either with or without “:8080”) on a standard web browser.
4 If DHCP is present, the FMS VM acquires an IP address. If you want to assign a static IP address, follow the instruction in the Change the network settings section.
5 If you already have other Foglight-FVE-FSM-vApp, FVE-vApp, or FSM-vApp running on the Host/Cluster, you must manually reconfigure the static IP of the newer vApp VMs, and change the DBS Internal IP address in the FMS VM configuration file.
a Reconfigure static IPs for both FMS and DBS VMs for the second NIC which is packaged with 192.168.200.1 and 192.168.200.2 IP to a different value. For details, see Change the network settings.
b Change the DB IP in the FMS VMs server.config file to the one set for the DBS VM. Change the line Server.databse.host with the new IP in the /home/foglight/Dell/Foglight/config/server.config file.
To stop the virtual appliance:
1 Open vCenter®, select Foglight-FVE-FSM-vApp from the navigation tree, and click Power off vApp.
Next step: Configure the virtual appliance
Configure the virtual applianceTo begin using Foglight for Virtualization, Enterprise Edition / Foglight for Storage Management, open a standard web browser and type the IP address of the Foglight for Virtualization, Enterprise Edition / Foglight for Storage Management virtual machine. For a list of validated web browsers, see the System Requirements and Platform Support Guide.
The page loads and requests a user name and password. The default user name is foglight and the default password is foglight.
Foglight for Virtualization, Enterprise Edition only:
To collect data from a vCenter®, create at least one VMware® Performance agent, using the Foglight for VMware cartridge automatically installed with Foglight for Virtualization, Enterprise Edition. For detailed instructions about this topic, see the Managing Virtualized Environments User and Reference Guide, “Configuring Monitoring Agents for Data Collection” section.
Foglight for Storage Management only:
To collect data from the storage devices in your environment, you must configure StorageCollector agents, using the Storage & SAN/Storage Environment/Administration dashboard. For more information, refer to the Foglight™ Managing Storage in Virtual Environments, Installation and Configuration Guide.
Foglight for Virtualization, Enterprise Edition 8.5.5 / Foglight for Storage Management 4.4.0Virtual Appliance Installation and Setup Guide > Install and configure the virtual appliance
8
To collect data from a vCenter®, create at least one VMware® Performance agent, using the Foglight for VMware cartridge automatically installed with Foglight for Storage Management. For more information, refer to the Foglight™ Managing Storage in Virtual Environments, Installation and Configuration Guide, “Configuring VMWare Performance Agents” section.
To collect data from Hyper-V servers in your environment, you must create Hyper-V Performance agents, using the Foglight for Hyper-V cartridge automatically installed with Foglight for Storage Management. For more information, refer to the Foglight™ Managing Storage in Virtual Environments, Installation and Configuration Guide, “Configuring Hyper-V Agents” section.
Next step: If you need to change the static IP address of the FMS VM, see Change the network settings.
Change the network settings
Both FMS and DBS VMs have two NICs — one for communication to the outside and one just for communication to each other. The two NICs that communicate between the VMs have static IPs that should not be changed (192.168.200.1 and 192.168.200.2, respectively).
Change the NICs that are used to communicate to the outside world (that is, eth0) on both FMS and DBS VMs.
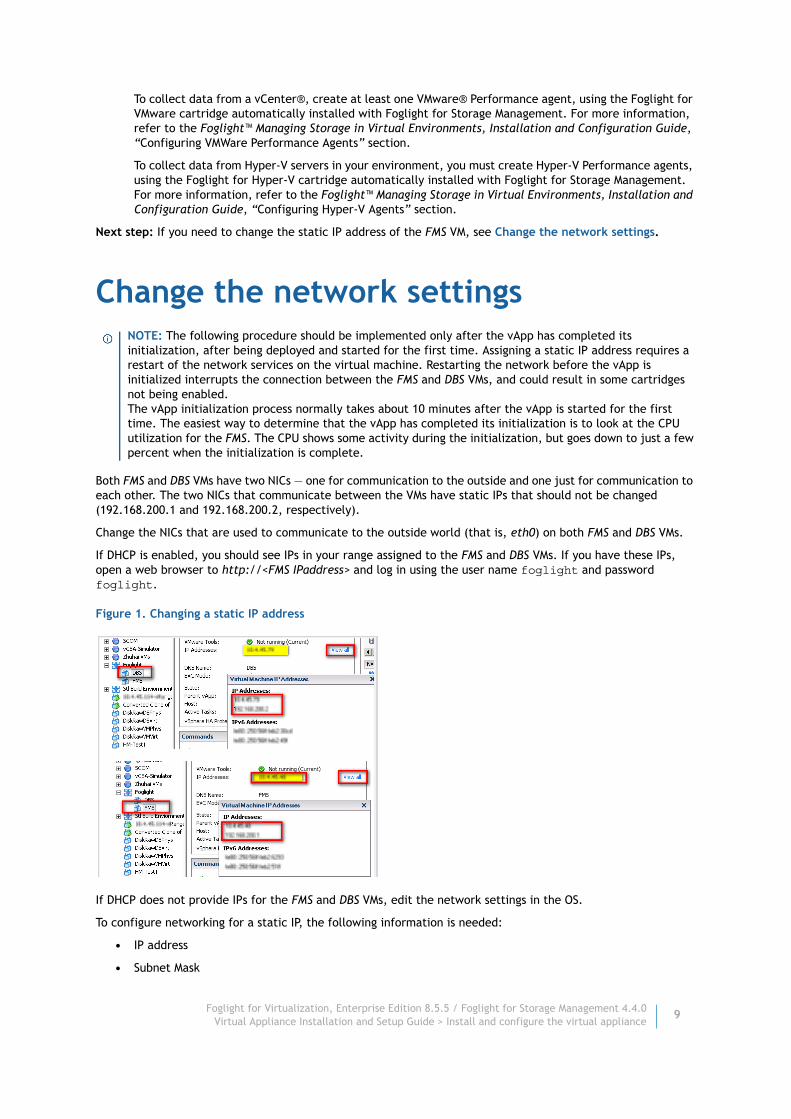
If DHCP is enabled, you should see IPs in your range assigned to the FMS and DBS VMs. If you have these IPs, open a web browser to http://<FMS IPaddress> and log in using the user name foglight and password foglight.
Figure 1. Changing a static IP address
If DHCP does not provide IPs for the FMS and DBS VMs, edit the network settings in the OS.
To configure networking for a static IP, the following information is needed:
• IP address
• Subnet Mask
NOTE: The following procedure should be implemented only after the vApp has completed its initialization, after being deployed and started for the first time. Assigning a static IP address requires a restart of the network services on the virtual machine. Restarting the network before the vApp is initialized interrupts the connection between the FMS and DBS VMs, and could result in some cartridges not being enabled. The vApp initialization process normally takes about 10 minutes after the vApp is started for the first time. The easiest way to determine that the vApp has completed its initialization is to look at the CPU utilization for the FMS. The CPU shows some activity during the initialization, but goes down to just a few percent when the initialization is complete.
Foglight for Virtualization, Enterprise Edition 8.5.5 / Foglight for Storage Management 4.4.0Virtual Appliance Installation and Setup Guide > Install and configure the virtual appliance
9

• Default gateway
• Nameserver(s)
To change a static IP address:
1 Open a console and log in using the user name root and password password.
2 Run yast.
The YAST® menu appears.
3 Use the arrow keys to select Network Devices > Network Settings, then press Enter.
4 Tab to Device eth0 and press F4 to edit this device.
5 Tab to Statically assigned IP Address and press the spacebar to select it.
6 Tab to and fill out the IP Address and Subnet Mask Fields.
Foglight for Virtualization, Enterprise Edition 8.5.5 / Foglight for Storage Management 4.4.0Virtual Appliance Installation and Setup Guide > Install and configure the virtual appliance
10
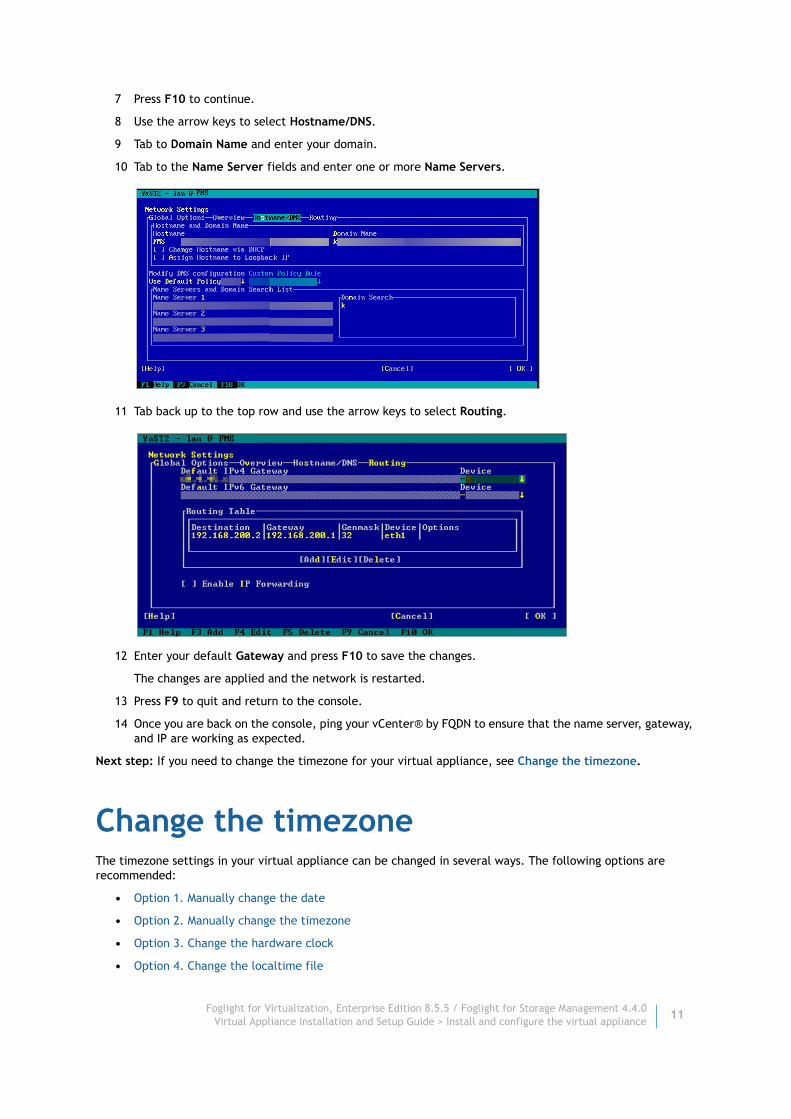
7 Press F10 to continue.
8 Use the arrow keys to select Hostname/DNS.
9 Tab to Domain Name and enter your domain.
10 Tab to the Name Server fields and enter one or more Name Servers.
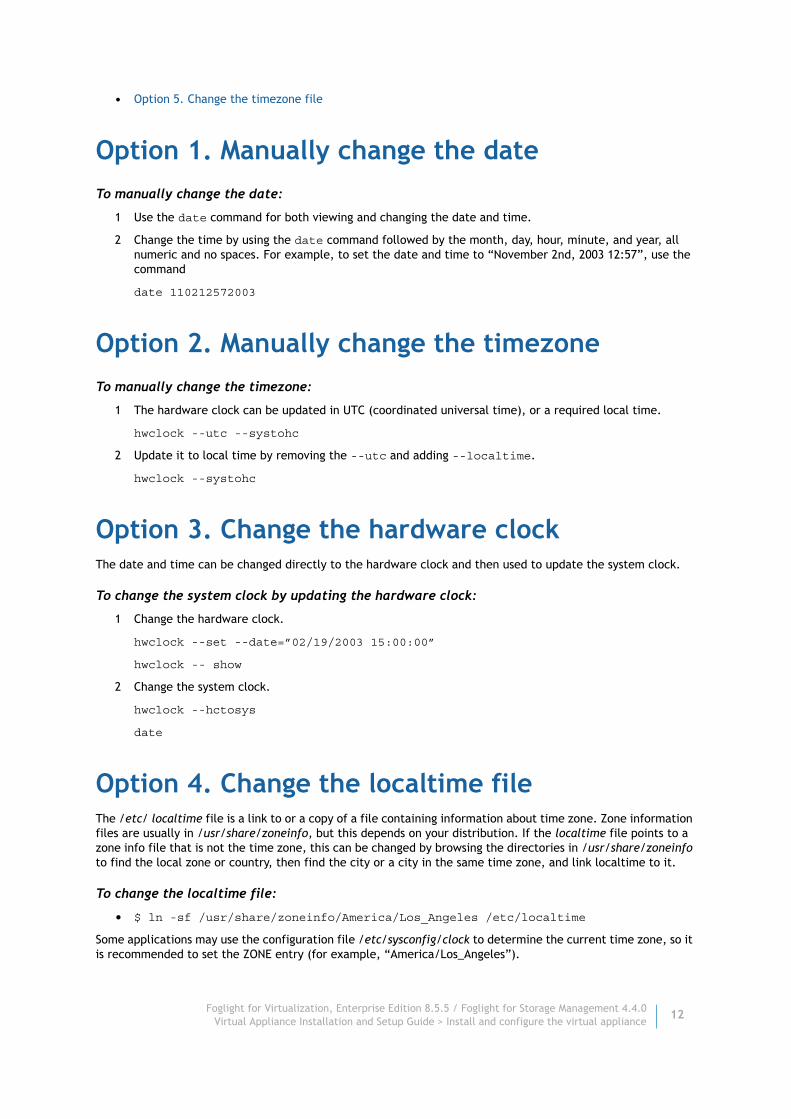
11 Tab back up to the top row and use the arrow keys to select Routing.
12 Enter your default Gateway and press F10 to save the changes.
The changes are applied and the network is restarted.
13 Press F9 to quit and return to the console.
14 Once you are back on the console, ping your vCenter® by FQDN to ensure that the name server, gateway, and IP are working as expected.
Next step: If you need to change the timezone for your virtual appliance, see Change the timezone.
Change the timezoneThe timezone settings in your virtual appliance can be changed in several ways. The following options are recommended:
• Option 1. Manually change the date
• Option 2. Manually change the timezone
• Option 3. Change the hardware clock
• Option 4. Change the localtime file
Foglight for Virtualization, Enterprise Edition 8.5.5 / Foglight for Storage Management 4.4.0Virtual Appliance Installation and Setup Guide > Install and configure the virtual appliance
11
• Option 5. Change the timezone file
Option 1. Manually change the date
To manually change the date:
1 Use the date command for both viewing and changing the date and time.
2 Change the time by using the date command followed by the month, day, hour, minute, and year, all numeric and no spaces. For example, to set the date and time to “November 2nd, 2003 12:57”, use the command
date 110212572003
Option 2. Manually change the timezone
To manually change the timezone:
1 The hardware clock can be updated in UTC (coordinated universal time), or a required local time.
hwclock --utc --systohc
2 Update it to local time by removing the --utc and adding --localtime.
hwclock --systohc
Option 3. Change the hardware clockThe date and time can be changed directly to the hardware clock and then used to update the system clock.
To change the system clock by updating the hardware clock:
1 Change the hardware clock.
hwclock --set --date=”02/19/2003 15:00:00”
hwclock -- show
2 Change the system clock.
hwclock --hctosys
date
Option 4. Change the localtime fileThe /etc/ localtime file is a link to or a copy of a file containing information about time zone. Zone information files are usually in /usr/share/zoneinfo, but this depends on your distribution. If the localtime file points to a zone info file that is not the time zone, this can be changed by browsing the directories in /usr/share/zoneinfo to find the local zone or country, then find the city or a city in the same time zone, and link localtime to it.
To change the localtime file:
• $ ln -sf /usr/share/zoneinfo/America/Los_Angeles /etc/localtime
Some applications may use the configuration file /etc/sysconfig/clock to determine the current time zone, so it is recommended to set the ZONE entry (for example, “America/Los_Angeles”).
Foglight for Virtualization, Enterprise Edition 8.5.5 / Foglight for Storage Management 4.4.0Virtual Appliance Installation and Setup Guide > Install and configure the virtual appliance
12

Option 5. Change the timezone file
To change the timezone file:
• Navigate to /etc/timezone and enter the required timezone. For example, if only “Asia/Vladivostok” is contained in this file, remove this entry using a text editor of your choice (for example vi) and replace it with the required entry (for example, “Australia/Melbourne”). A restart of the appliance/VM is not required after making this change.
Foglight for Virtualization, Enterprise Edition 8.5.5 / Foglight for Storage Management 4.4.0Virtual Appliance Installation and Setup Guide > Install and configure the virtual appliance
13

2
Upgrade the virtual appliance
This section provides instructions for upgrading the Foglight-FVE-FSM-vApp virtual appliance.
For details, see these topics:
• Upgrade paths
• Upgrade the vApp
Upgrade paths
Foglight for Virtualization, Enterprise Edition upgrade pathThe Foglight for Virtualization, Enterprise Edition 8.5.5 virtual appliance can be directly upgraded from version 8.5, 8.4, 8.3, or 8.2. To upgrade from version 7.2 or 8.0.1, you must first upgrade the virtual appliance to version 8.3, then to version 8.5.5.
Foglight for Storage Management upgrade pathThere is no longer a separate virtual appliance provided for Foglight for Storage Management. It is now bundled with the Foglight for Virtualization, Enterprise Edition virtual appliance.
Foglight for Storage Management versions 4.0 and later are upgraded when the virtual appliance is upgraded. For versions of Foglight for Storage Management prior to 4.0, you must first upgrade the virtual appliance to version 4.0, ensure all deployed agents are upgraded, and then upgrade the virtual appliance to the latest version.
Next step: Upgrade the vApp
Upgrade the vAppTo upgrade the virtual appliance:
1 Download the Foglight for Virtualization, Enterprise Edition Linux x86 64 installer from Dell Support:
https://support.software.dell.com/foglight-for-virtualization-enterprise-edition/download-new-releases
2 In preparation for the upgrade, take a backup or snapshot of all relevant VMs. This includes both the FMS and DBS VMs, as well as any additional VMs hosting agents.
NOTE: The FVE-FMS and FVE-MySQL VMs were renamed FMS and DBS, respectively, in the Foglight for Virtualization, Enterprise Edition 8.0.1 release.
Foglight for Virtualization, Enterprise Edition 8.5.5 / Foglight for Storage Management 4.4.0Virtual Appliance Installation and Setup Guide > Upgrade the virtual appliance
14
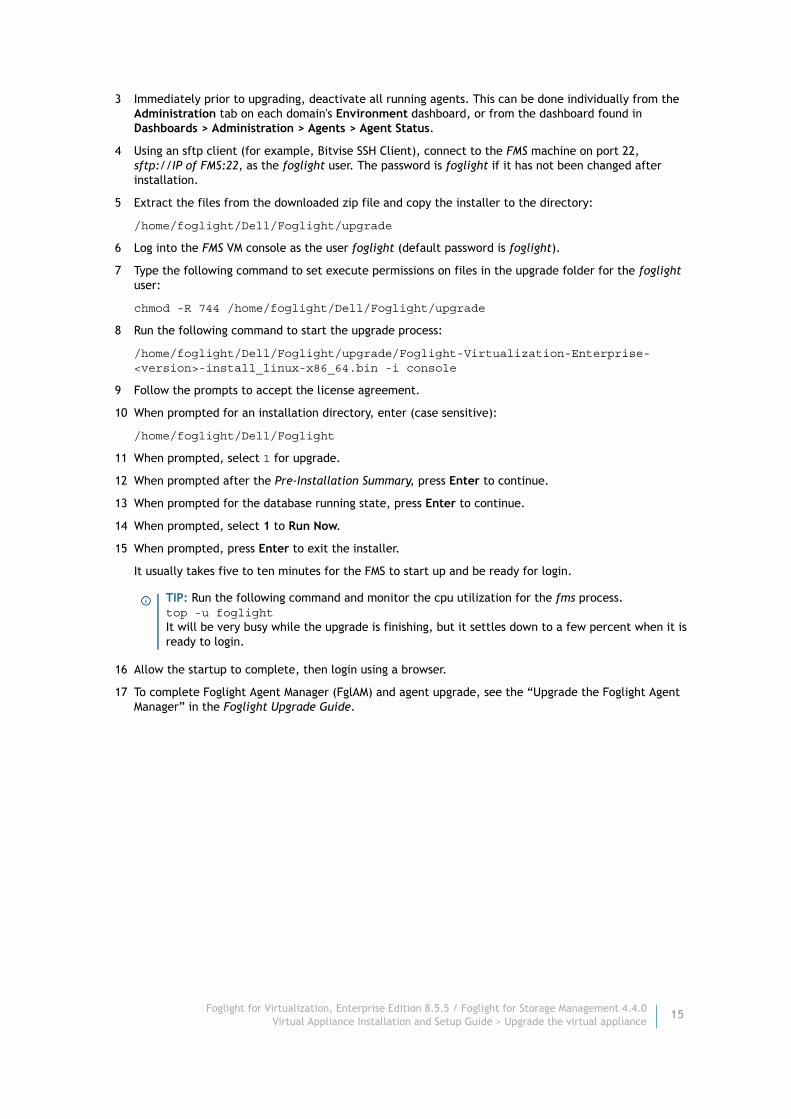
3 Immediately prior to upgrading, deactivate all running agents. This can be done individually from the Administration tab on each domain's Environment dashboard, or from the dashboard found in Dashboards > Administration > Agents > Agent Status.
4 Using an sftp client (for example, Bitvise SSH Client), connect to the FMS machine on port 22, sftp://IP of FMS:22, as the foglight user. The password is foglight if it has not been changed after installation.
5 Extract the files from the downloaded zip file and copy the installer to the directory:
/home/foglight/Dell/Foglight/upgrade
6 Log into the FMS VM console as the user foglight (default password is foglight).
7 Type the following command to set execute permissions on files in the upgrade folder for the foglight user:
chmod -R 744 /home/foglight/Dell/Foglight/upgrade
8 Run the following command to start the upgrade process:
/home/foglight/Dell/Foglight/upgrade/Foglight-Virtualization-Enterprise-<version>-install_linux-x86_64.bin -i console
9 Follow the prompts to accept the license agreement.
10 When prompted for an installation directory, enter (case sensitive):
/home/foglight/Dell/Foglight
11 When prompted, select 1 for upgrade.
12 When prompted after the Pre-Installation Summary, press Enter to continue.
13 When prompted for the database running state, press Enter to continue.
14 When prompted, select 1 to Run Now.
15 When prompted, press Enter to exit the installer.
It usually takes five to ten minutes for the FMS to start up and be ready for login.
16 Allow the startup to complete, then login using a browser.
17 To complete Foglight Agent Manager (FglAM) and agent upgrade, see the “Upgrade the Foglight Agent Manager” in the Foglight Upgrade Guide.
TIP: Run the following command and monitor the cpu utilization for the fms process. top -u foglight It will be very busy while the upgrade is finishing, but it settles down to a few percent when it is ready to login.
Foglight for Virtualization, Enterprise Edition 8.5.5 / Foglight for Storage Management 4.4.0Virtual Appliance Installation and Setup Guide > Upgrade the virtual appliance
15

About Dell
Dell listens to customers and delivers worldwide innovative technology, business solutions, and services they trust and value. For more information, visit http://www.software.dell.com.
Contacting DellFor sales or other inquiries, visit http://software.dell.com/company/contact-us.aspx or call 1-949-754-8000.
Technical support resourcesTechnical support is available to customers who have purchased Dell software with a valid maintenance contract and to customers who have trial versions. To access the Support Portal, go to https://support.software.dell.com.
The Support Portal provides self-help tools you can use to solve problems quickly and independently, 24 hours a day, 365 days a year. In addition, the Support Portal provides direct access to product support engineers through an online Service Request system.
The Support Portal enables you to:
• Create, update, and manage Service Requests (cases).
• View Knowledge Base articles.
• Obtain product notifications.
• Download software. For trial software, go to http://software.dell.com/trials.
• View how-to videos.
• Engage in community discussions.
• Chat with a support engineer.
Foglight for Virtualization, Enterprise Edition 8.5.5 / Foglight for Storage Management 4.4.0Virtual Appliance Installation and Setup Guide > About Dell
16