fjr1300 2014 (2013) fairing removal - lock.netatrophy.lock.net/do/fjr2014panelremoval.pdfdocument...
TRANSCRIPT

Document date 4 May 2015 FJR1300 2014 (2013...) Fairing Removal Page 1 of 8
Link to this file: http://atrophy.lock.net/do/ FJR2014PanelRemoval.pdf
Adapted from a posting: http://www.fjrforum.com/forum//index.php/topic/153923-i-give-how-do-you-remove-the-fairing-side-panels-on-the-2013/#entry1167477
Link to all the pictures: http://atrophy.lock.net/pi/20140805_FairingsEtc/index.php
Remove screws on centre plastic, two each side of the gauges.
Remove the push pin fasteners that hold the centre dash plastic to the side panels on each side down along the fork tubes. While you are there remove all of the other push pin type fasteners you can see down there on the edges of the side panels.

Document date 4 May 2015 FJR1300 2014 (2013...) Fairing Removal Page 2 of 8
Undo the Philips screws and remove knobs.
Carefully pop the centre panel loose along the top near the gauge cluster. Then slowly move outwards prize the centre panel in along the edge where it meets the fairing edge to pop the tabs loose. You'll need to open the glovebox lid to get it past the left side. Pull it up towards the cockpit for removal. With a little prodding it will come out.

Document date 4 May 2015 FJR1300 2014 (2013...) Fairing Removal Page 3 of 8
You can start removing the fasteners on the black side panels now. They are near the gas tank facing straight up and thePhilips head screw under the glovebox lid. The battery side has screws near the same locations on the right side.
Once removed, remove the black side panels. They come out easily compared to every other panel.
Left side:

Document date 4 May 2015 FJR1300 2014 (2013...) Fairing Removal Page 4 of 8
Right side:

Document date 4 May 2015 FJR1300 2014 (2013...) Fairing Removal Page 5 of 8
You need to remove all the screws and fasteners in the black panels that reside along the top of the front wheel in the fairing tunnel. There is a Philip head screw on each side and 4 (5) push pin style fasteners one each side. Note the two lower rear ones are longer than the others, remember this when re-installing. Once removed, pull the black panels out. They are flexible and come out easily.
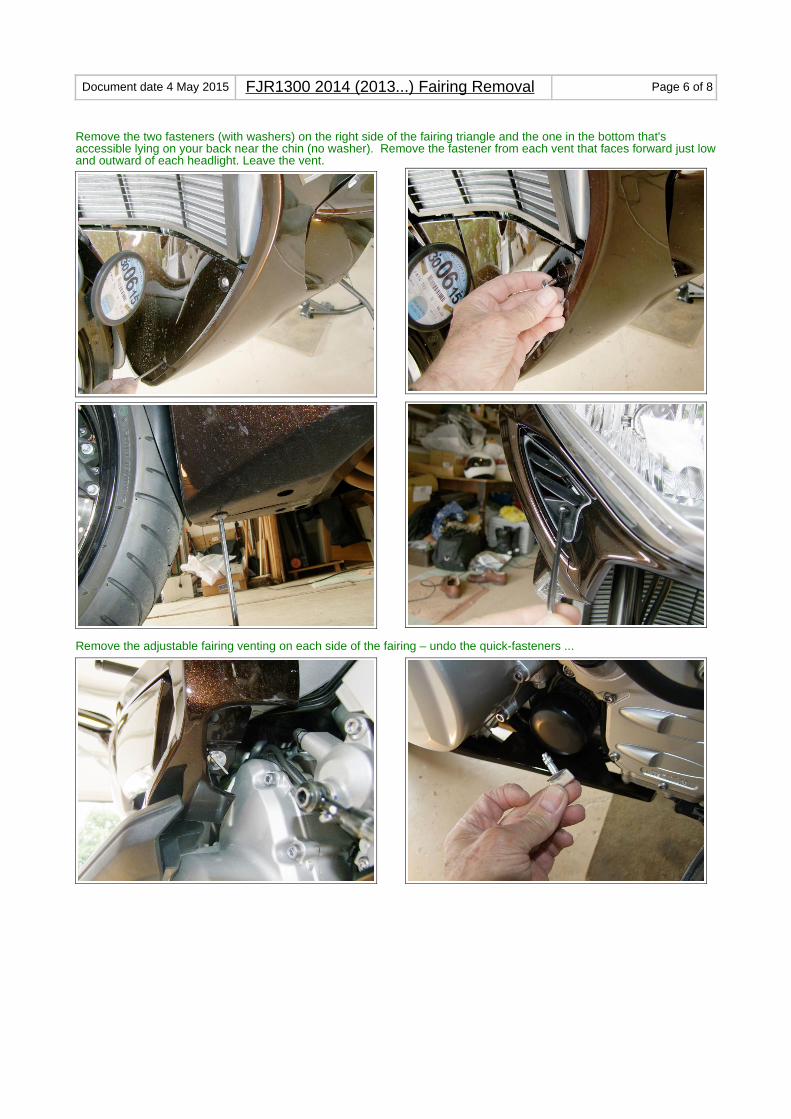
Document date 4 May 2015 FJR1300 2014 (2013...) Fairing Removal Page 6 of 8
Remove the two fasteners (with washers) on the right side of the fairing triangle and the one in the bottom that's accessible lying on your back near the chin (no washer). Remove the fastener from each vent that faces forward just lowand outward of each headlight. Leave the vent.
Remove the adjustable fairing venting on each side of the fairing – undo the quick-fasteners ...

Document date 4 May 2015 FJR1300 2014 (2013...) Fairing Removal Page 7 of 8
… then slide the vent forward and up.
Remove the fasteners at the bottom trailing edge of each side of the fairing. Lying down helps to see them, one on each side.
Remove the Philips screw from in front of the glovebox.

Document date 4 May 2015 FJR1300 2014 (2013...) Fairing Removal Page 8 of 8
The last fastener to remove is the one hiding behind theadjustable side panel. Remove it. You are now ready toremove the left side fairing.
The tabs we need to release are along the edge in front of the glovebox and behind the forward vent where you removedthe bolt earlier, unfortunately I failed to take pictures, I didn't have enough hands.
Grasp the fairing panel through the side vent with one hand and slowly tip the bottom of the fairing outward. The screw tab behind the vent will pop out, you may need to encourage it a little. You will see the tab that needs to be released rightnext to the silver Philips head screw you removed earlier in front of the glovebox. Tip and rotate the fairing panel out and back and it should release. Once you begin to pull the bottom rear of the panel out, the seam at the top front starts to spread. There's one tab at about the middle of it and two small bumps. It comes apart quite easily.
Disconnect the electrical connects from the glovebox and turnsignal and set the panel aside.
The right side is basically the same, only reversed. Same tabsand same locations.
To reinstall, work backwards through the removal procedure.Take care with getting all tabs tucked in correctly. Easy to get wrong, e.g. where the two fairings join underneath.
Any comments, please email me at [email protected]<end>