fixed asset module - mytraining.sdbor.edu · ffamast – fixed asset master maintenance form –...
TRANSCRIPT

Fixed Asset Module Fixed Assets
Page | 1
Fixed Asset Module
Updated 4/28/2010
Revised – 05/07/2010 – Added new Procedure from
pages 48‐50.
FFiixxeedd AAsssseett MMoodduullee
South Dakota Board of Regents Human Resources/Finance Information Systems

Fixed Asset Module Fixed Assets
Page | 2
Table of Contents
Introduction……………………………………………..........3
Glossary………………………………………………………..4
Rules, Validation, Maintenance forms………………….5-6
Creating Permanent Tags……………………………….7-14
Creating a Primary Tag………………………………..15-26
Creating an O-tag from a Document Tag (D-tag)…..27-31
Creating Gifts/Donations………………………………32-41
Deleting an O-Tag……………………………………….42-44
New Tag, Non Procurement……………………………45-47
New Tag, Non Procurement – Creating an O-Tag…48-50
Transfers………………………………………………….51-53
Write Off………………………………………………….54-55
Price Adjustments……………………………………….56-62
Quires and Reports……………………………………..63-64

Fixed Asset Module Fixed Assets
Page | 3
Introduction Overview The goal of the Fixed Asset Manual is to familiarize the users with the Procedures, Terminology, Reports, Queries and other areas of the Fixed Assets Module
Intended Audience This manual is intended for the Users of the Fixed Asset Module in the South Dakota Board of Regents System

Fixed Asset Module Fixed Assets
Page | 4
Glossary Origination Tag (O‐Tag): This is the temporary tag Banner will assign to an item when an invoice is paid
to a fixed asset expense account.
Permanent Tag (P‐Tag): This is a permanent tag that asset management personnel will assign to a
temporary origination tag.
Document Tag (D‐Tag): This is a document tag that can be created when journal entries, stores issues,
or a cash receipt are entered against the fixed asset or capital expense accounts. Dtags are converted
into Otags and then into Ptags.
Primary Tag: A primary tag is used to associate a group of assets together whether as a component or
attachment.
Component of Primary Tag: As a component of a primary tag, an asset is merely grouped with other
items, but can be assigned its own permanent tag number and can be adjusted and depreciated
independently.
Attachment Primary Tag: As an attachment primary tag, as asset cannot be assigned a permanent tag
number of its own (it will be referenced only using the origination tag number) and will be adjusted and
depreciated as part of the primary tag.

Fixed Asset Module Fixed Assets
Page | 5
Rule, Validation, Maintenance Forms
FFPOEXT – Fixed Asset Orig. Tab Extract – this form extracts the invoice into an Origination Tag. This
process should run automatically in Production. Right now we need to run this manually to extract the
invoices into an Origination Tag.
FFIPROC – Fixed Asset Procurement Query Form – This query shows the entire O‐Tags ready to be
converted to a P‐Tag, but it also shows the O‐Tags that already have been converted to a P‐Tag.
FFRPROC – Fixed Asset Procurement Report – This report can be run to see if each campus has new O‐
Tags to turn into a P‐Tag.
FAIINVE – Invoice/Credit Memo Query Form – This form shows the different screens for the
Invoice/Credit Memo Form. This form is just Query only. There is no way to change any data within this
form.
FAIINVL – Invoice/Credit Memo List Form – This form shows the listing of all invoices listed in Banner.
FFAMAST – Fixed Asset Master Maintenance Form – This form is the master Fixed Asset form. All of the
information from the Asset gets keyed into this form.
FFRMAST – Fixed Asset Master Record Report – This report produces a printed record of all of the data
appearing on the Asset Master record for selected assets.
FFAADJF – Fixed Asset Adjustment Form – This form allows you to do the following to a Fixed Asset:
Sale of an Asset, Write off’s or Write Downs, P‐Tag or O‐Tag Capitalization, Depreciation Adjustment,
Record Past Depreciation, GL Changes, No Posting to G/L, Reverse Cap for P‐Tags and O‐Tags.
FGIDOCR – Document Retrieval Inquiry Form – This document shows the different documents that are
out in Banner.
FOIDOCH – Document History Form – This form shows the different documents associated with a
document type. Example: you can look for a PO by placing PO in the Document Type field, then you can
key in the PO# in the Document Code field. This will show what documents are associated with that
particular PO.
FFAFDEL‐ Fixed Asset Master Delete – This report can be used to delete unwanted O‐Tags from the
module.
FFRAGRP – Fixed Asset/Asset Group Report – Allows you to select a specified asset master record or a
group of asset master records that are associated as attachments or components.
FFRDTGA – Fixed Asset DTAG Aging Report – This report displays the aging of Pending Dtags as of a
given cutoff date.

Fixed Asset Module Fixed Assets
Page | 6
Rule, Validation, Maintenance Forms Continued
FFRDTGT – Fixed Asset DTAG Transaction Report – This report displays Dtag transaction information as
specified in the parameters of the report.
FOADOCU – Document by User form – This form will show what documents have been completed by a
specific user.
FFIFALV – Fixed Asset List Form – This form gives you a listing of all of the Fixed Assets either by O‐Tag or
P‐Tag.
FGITRND – Detail Transaction Activity Form Enables you to display an online view of detailed transaction
activity for operating ledger accounts.
FGRGLTA ‐ The General Ledger Transaction Activity Report displays by Chart of Accounts and by fund
beginning/ending balances for general ledger accounts and all debit and credit activity against those
accounts.
FGRODTA ‐ This report is sorted by account and fund within each organization. This report displays
expenses, budget and encumbrance activity (operating ledgers record budget and encumbrance activity)
within a specified period.
FOIDOCH ‐ The Document History displays the receiving document associated with a purchase order
and/or invoice.
FFADEPR – Fixed asset Depreciation Form Allows you to specify the asset depreciation methodology and
account distribution for recording depreciation.
FFATRAN – Fixed Asset Transfer Form enables you to record responsible entity information when you
physically move an asset or recognize a change in accountability.

Fixed Asset Module Fixed Assets
Page | 7
Business Process
Creating Permanent Tags
1. Run the FFPOEXT – Fixed Asset Origination Tag Extraction. This will create Origination Tags for each Invoice that has a Fixed Asset. In Production this should be an automatic process. In Test we still have to run this process.
2. If the FFPOEXT has already been run, then run the FFRPROC – Fixed Asset Procurement Report. This will show you what Origination Tags (O‐Tags) that belongs to your specific campus Origination Codes.
3. You can also run the FFRPROC – Fixed Asset Procurement Query Form. This form will show each O‐Tag number with the purchase order, invoice, and receiver #. It will also show the cost of the asset.
4. Once you receive your list of O‐Tags for your University, you can start converting your Origination Tags (O‐Tags) to Permanent Tags (P‐Tags).
a. In the “Go To” field on the Main Screen, key in FFAMAST and enter. 1. A copy of what the form looks like after you hit enter at the Go to Field is
below. b. Enter in the O‐Tag you found in your report FFRPROC in the “Asset Tag” field. c. Tab over to the “Action” field. Select Convert to Permanent Tag. d. Perform a “Next Block” on the Tool Bar to go to the Master Information Form.
**Main FFAMAST form**
Action Field
Next Block

Fixed Asset Module Fixed Assets
Page | 8
**Master Information Form**
e. In the “Master Information Form”; i. In the “Permanent Tag” field, you can either key in Next so the system can assign the
next P‐Tag or you can use your Universities unique P‐Tag #. ii. Tab to the “Asset Description” Field. Enter the name in the field to what the asset is. iii. Tab to the “Asset Type” field.
1. This field is a Required Field. 2. You can do a search or you can use a list and just key in the Asset Type.
iv. Tab to through “Unit of Measure” field. This field will auto populate from the Invoice or Purchase Order.
v. Tab to the “User Status Code”. 1. You can do a search or use a list and just key in the User Status Code. 2. This is an optional field.
vi. Perform a “Next Block” to go to the Acquisition Information Form.

Fixed Asset Module Fixed Assets
Page | 9
**Acquisition Information Form**
f. In the “Acquisition Method” field; i. You can do a search or use a list and just key in the Acquisition Method information.
1. When you do a search, select the correct Acquisition Method and double click on the first column.
2. The most used Acquisition Methods use are: a. NN for New Purchase, GG for Gift, RR for Received from Surplus, and
AA for Received from other agency” ii. Key in the “Acquisition Date” from the Invoice. Can key in the date as follows:
MM/DD/YYYY, 15‐Mar‐2006, or MM/DD. Any one of these options will work. iii. Key in the Make, Model, Manufacture, and SN information in the appropriate fields. iv. Key in the “In Service Date” this date should be the same date at the “Acquisition
Date”. v. Tab to the “Condition Code” field.
1. This field is an optional field. vi. Tab to the “Title To” field.
1. This is where you will distinguish if it is a University Owned, Federal, State, Leased, or from a Private Source.
2. Use the appropriate code for your Universities. Usually this will be a University Owned Title To code.
vii. Perform a “Next Block” to go to the Procurement Information Form.

Fixed Asset Module Fixed Assets
Page | 10
**Procurement Information**
g. In the “Procurement Information”; i. Your curser will be at the Transfer Data location in the “COA” field. ii. If there is nothing in the “Organization” Field place an organization code for this asset.
1. The Organization Code distinguished what “Department” this piece of asset belongs to.
2. If this information came from the P.O. then this code will not be able to be changed unless you do a transfer. This is a separate procedure. It will require using an Adjustment Form.
iii. If there is nothing in the “Location” field place a location code for this asset. 1. The location code distinguishes what building this piece of asset resides in.
iv. The other fields are optional, so it is not necessary to place anything in these fields unless your University needs to have additional information for this piece of equipment.
1. The fields that are optional are Grant, Custodian ID, and Equipment Manager. v. Perform a “Next Block” to go to the Funding Source form.

Fixed Asset Module Fixed Assets
Page | 11
**Funding Source**
h. In the “Funding Source” you can verify the funding sources. i. If there are changes a journal voucher will need to be completed to correct the funding
source. This should be completed at a later time. ii. In the “Funding Source” double check to see if there are multiple funding sources.
1. Make a note of this for the next form. iii. “Write down the Program Code” to use when you depreciate the asset.
1. We will be using the program from the FOAPAL instead of using Program 10. iv. Perform a “Next Block” to go to the Capitalization Information form.
Write down
Program #

Fixed Asset Module Fixed Assets
Page | 12
**Capitalization Information**
i. In the “Capitalization Information”, this will show the default capitalization fund, equity and asset account and the accumulation depreciation account codes.
i. Verify if all of the codes – Capitalization Fund, Equity Account, Asset Account, and Accumulated Depreciation are populated.
ii. If one of the above codes are not populated – perform a “New Sequence.” 1. Verify that the Capitalization Fund and Equity Account are populated. If they
are not use the normal Capitalization Fund that is campus specific. a. Example for Capitalization Fund: X66000 – the X should be the
campus code. SDSU’s campus number is 3 so the Capitalization Fund code would be 366000.
b. Example for Equity Account: This code is not campus specific. So this should be account 400000 – Net Assets.
2. The Asset and Accumulated Depreciation Accounts are not campus specific. a. The Asset Account should be – 1G0030 and the Accumulated
Depreciation Account should be 1G0070. 3. **If there were “Multiple Fund Sources” and the P‐Tag needs to be
“Capitalized” you will need to perform a Record Remove, Record Remove to remove the additional sequences (with the Zero Dollar amount) added when completing a New Sequence.
a. Go to the scroll bar (if there are added Sequences) by the cost and scroll down to the Zero Dollar Amount Sequence.
b. This must be completed before you perform a “Next Block”. iii. Perform a “Next Block” to the User Defined Field form.
New Sequence
**Only if NOT all of
Capitalized Info is populated New Sequence with Multiple
Fund Sources
** Complete Record Remove,
Record Remove to remove
additional Sequence before

Fixed Asset Module Fixed Assets
Page | 13
**User Fields**
j. In the “User Fields”, you can place the room numbers for the particular asset. i. Click on the down arrow of the “User Attributes.” ii. This will show all of the room numbers and SDSU Misc Department Numbers/Names.
Select the appropriate room number and double click on the first column. iii. On the tool bar select the “Previous Block” icon. This will bring you back to the
Capitalization Information. 1. Go to the “Options” menu on the tool bar and select the “Depreciation
Information”.

Fixed Asset Module Fixed Assets
Page | 14
**Depreciation Information**
5. In the “Depreciation Information,”
a. Tab to the next field to bring up the name of the Asset b. Do a “Next Block”
i. This will bring you up to the “Asset Depreciation Information” 1. Tab to the Frequency field. Select “Annual” for how often Depreciation will run
or key an “A” in this field. 2. Tab till you get to the “Start Date” field. 3. Key in the “Start Date” that the depreciation needs to start calculating. This
should be the “Acquisition Date” of the Asset. ii. Do a “Next Block”
1. This will bring you to the “Asset Depreciation Expense Distribution.” 2. The Fund Field, Org, Acct, Prog, Activity, location, and Posting Codes should
be auto populated. a. The “Program Code” should be changed to what is in the Funding
Source – FOAPAL. (Screen – “Funding Source” Pg 5 of these procedures)
3. If they do not auto populate refer to the below guidelines. a. The Organization Code can be the code used as the funding source
when the gift was calculated. b. The Account Code is not campus specific. This code should be 799400
– Depr Exp – Equipment c. The Activity Code is unique for each campus. SDSU Activity Code is
3ZDEPR. d. The Posting Code field should be (P)ost Deprec.
4. Click on the “Save Icon” on the tool bar. 5. Click the”X” – to Exit this form. 6. This will bring you back to the previous form. 7. This asset is “Approved in Banner”. Repeat the above steps until all of the
assets have been approved in Banner.
Depreciation
Expense
Distribution
Fixed Asset Module Fixed Assets
Page | 15
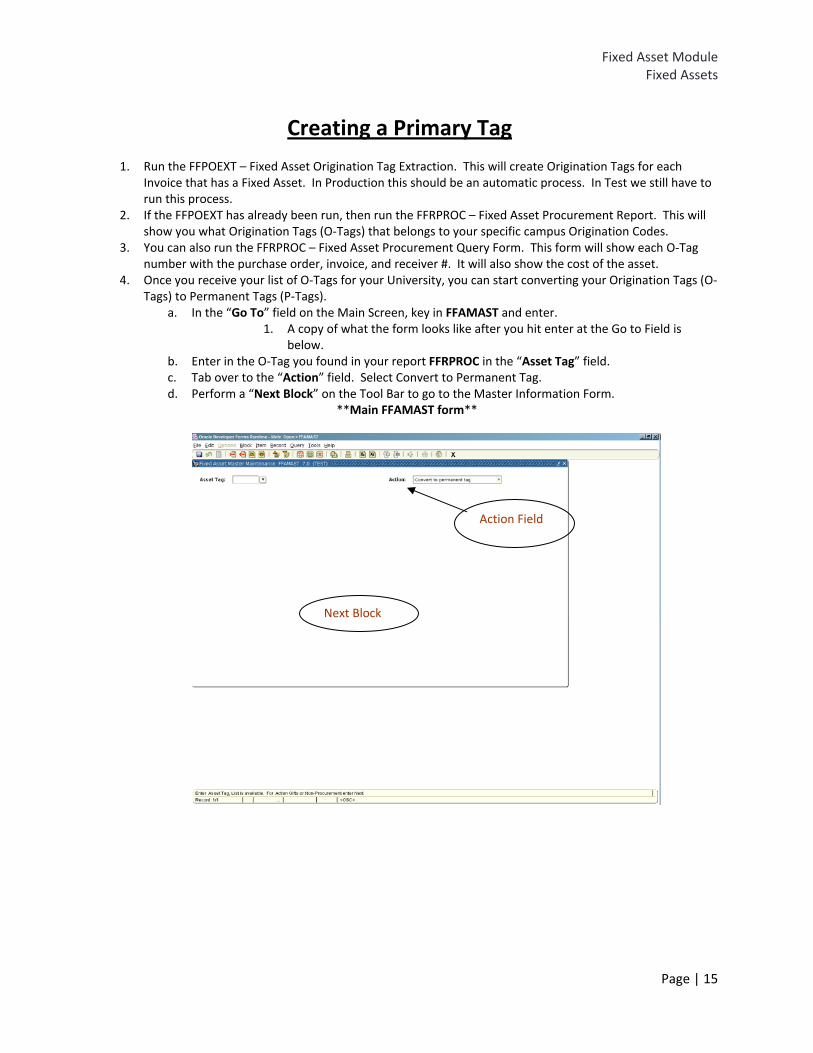
Creating a Primary Tag
1. Run the FFPOEXT – Fixed Asset Origination Tag Extraction. This will create Origination Tags for each
Invoice that has a Fixed Asset. In Production this should be an automatic process. In Test we still have to run this process.
2. If the FFPOEXT has already been run, then run the FFRPROC – Fixed Asset Procurement Report. This will show you what Origination Tags (O‐Tags) that belongs to your specific campus Origination Codes.
3. You can also run the FFRPROC – Fixed Asset Procurement Query Form. This form will show each O‐Tag number with the purchase order, invoice, and receiver #. It will also show the cost of the asset.
4. Once you receive your list of O‐Tags for your University, you can start converting your Origination Tags (O‐Tags) to Permanent Tags (P‐Tags).
a. In the “Go To” field on the Main Screen, key in FFAMAST and enter. 1. A copy of what the form looks like after you hit enter at the Go to Field is
below. b. Enter in the O‐Tag you found in your report FFRPROC in the “Asset Tag” field. c. Tab over to the “Action” field. Select Convert to Permanent Tag. d. Perform a “Next Block” on the Tool Bar to go to the Master Information Form.
**Main FFAMAST form**
Action Field
Next Block

Fixed Asset Module Fixed Assets
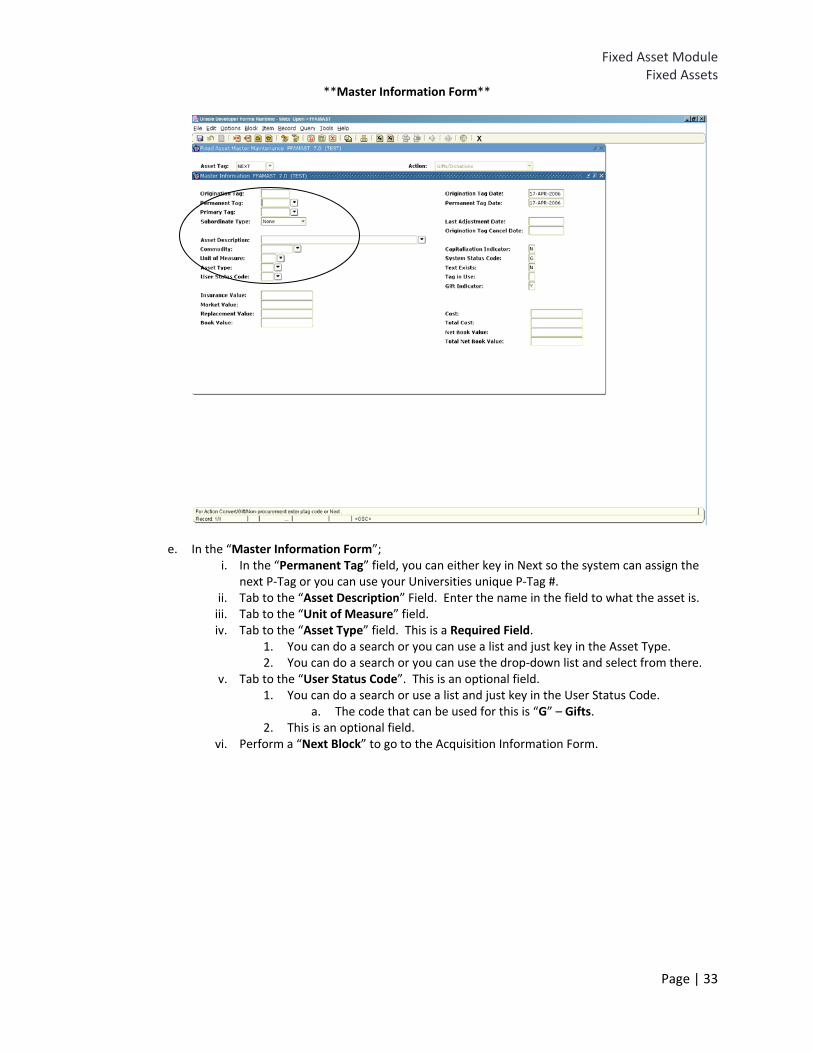
Page | 16
**Master Information Form**
e. In the “Master Information Form”; i. In the “Permanent Tag” field, you can either key in Next so the system can assign the
next P‐Tag or you can use your Universities unique P‐Tag #. ii. Tab to the “Asset Description” Field. Enter the name in the field to what the asset is. iii. Tab to the “Asset Type” field.
1. This field is a Required Field. 2. You can do a search or you can use a list and just key in the Asset Type.
iv. Tab to through “Unit of Measure” field. This field will auto populate from the Invoice or Purchase Order.
v. Tab to the “User Status Code”. 1. You can do a search or use a list and just key in the User Status Code. 2. This is an optional field.
vi. Perform a “Next Block” to go to the Acquisition Information Form.

Fixed Asset Module Fixed Assets
Page | 17
**Acquisition Information Form**
f. In the “Acquisition Method” field; i. You can do a search or use a list and just key in the Acquisition Method information.
1. When you do a search, select the correct Acquisition Method and double click on the first column.
2. The most used Acquisition Methods use are: a. NN for New Purchase, GG for Gift, RR for Received from Surplus, and
AA for Received from other agency” ii. Key in the “Acquisition Date” from the Invoice. Can key in the date as follows:
MM/DD/YYYY, 15‐Mar‐2006, or MM/DD. Any one of these options will work. iii. Key in the Make, Model, Manufacture, and SN information in the appropriate fields. iv. Key in the “In Service Date” this date should be the same date at the “Acquisition
Date”. v. Tab to the “Condition Code” field.
1. This field is an optional field. vi. Tab to the “Title To” field.
1. This is where you will distinguish if it is a University Owned, Federal, State, Leased, or from a Private Source.
2. Use the appropriate code for your Universities. Usually this will be a University Owned Title To code.
vii. Perform a “Next Block” to go to the Procurement Information Form.

Fixed Asset Module Fixed Assets
Page | 18
**Procurement Information**
g. In the “Procurement Information”; i. Your curser will be at the Transfer Data location in the “COA” field. ii. If there is nothing in the “Organization” Field place an organization code for this asset.
1. The Organization Code distinguished what “Department” this piece of asset belongs to.
2. If this information came from the P.O. then this code will not be able to be changed unless you do a transfer. This is a separate procedure. It will require using an Adjustment Form.
iii. If there is nothing in the “Location” field place a location code for this asset. 1. The location code distinguishes what building this piece of asset resides in.
iv. The other fields are optional, so it is not necessary to place anything in these fields unless your University needs to have additional information for this piece of equipment.
1. The fields that are optional are Grant, Custodian ID, and Equipment Manager. v. Perform a “Next Block” to go to the Funding Source form.

Fixed Asset Module Fixed Assets
Page | 19
**Funding Source**
h. In the “Funding Source” you can verify the funding sources. i. If there are changes a journal voucher will need to be completed to correct the funding
source. This should be completed at a later time. ii. In the “Funding Source” double check to see if there are multiple funding sources.
1. Make a note of this for the next form. iii. “Write down the Program Code” to use when you depreciate the asset.
1. We will be using the program from the FOAPAL instead of using Program 10. i. You can make changes to the cost here if needed. If you have multiple O‐Tags and need to
combine them into one, you can make that change here. NOTE: This is a step in the Price Adjustment Instructions. That method of price increases
is no longer valid due to the new Auto‐Capitalization rules. You will no longer need to
perform that method of price increases. You can now do a price increase while you
convert the O‐Tag to a P‐Tag here.
j. Perform a “Next Block” to go to the Capitalization Information form.
Write down
Program #
Enter Total Cost of
O‐Tags Here
Note: If there
is more than
one funding
source in this
form, the
sequence will
need to
remain

Fixed Asset Module Fixed Assets
Page | 20
**Capitalization Information**
k. In the “Capitalization Information”, this will show the default capitalization fund, equity and
asset account and the accumulation depreciation account codes.
i. Verify if all of the codes – Capitalization Fund, Equity Account, Asset Account, and Accumulated Depreciation are populated.
ii. You will need to perform a “New Sequence” and enter in the data needed. 1. Verify that the Capitalization Fund and Equity Account are populated. If they
are not use the normal Capitalization Fund that is campus specific. a. Example for Capitalization Fund: X66000 – the X should be the
campus code. SDSU’s campus number is 3 so the Capitalization Fund code would be 366000.
b. Example for Equity Account: This code is not campus specific. So this should be account 400000 – Net Assets.
2. The Asset and Accumulated Depreciation Accounts are not campus specific. a. The Asset Account should be – 1G0030 and the Accumulated
Depreciation Account should be 1G0070. 3. Enter the Cost of the Asset. This will be the total cost of the asset that was in
the Funding Source Screen. The two amounts must match.
New Sequence
**Only if NOT all of
Capitalized Info is populated New Sequence with Multiple
Fund Sources
** Complete Record Remove,
Record Remove to remove
additional Sequence before
Note: The sequence of amounts
from the Funding Source screen
will need to remain the same here.
After you press New Sequence,
enter the first amount shown and
then arrow down to the lines to
enter the other amounts.

Fixed Asset Module Fixed Assets
Page | 21
4. **If there were “Multiple Fund Sources” , you must enter the costs of the asset in the order in which they appear on the Funding source screen (image above)
a. Enter the first amount shown here in the cost line of the Capitalization Screen.
i. Scroll down once on the scroll bar and a new block of information will come up. Enter all necessary information and enter the second cost found in the Funding Source Screen in the cost line.
ii. Repeat these steps for all of the amounts found on the Funding Source Screen
b. Once this is completed and all costs and necessary information have been entered, Perform a “Next Block” to the User Fields.

Fixed Asset Module Fixed Assets
Page | 22
**User Fields**
l. In the “User Fields”, you can place the room numbers for the particular asset. i. Click on the down arrow of the “User Attributes.” ii. This will show all of the room numbers and SDSU Misc Department Numbers/Names.
Select the appropriate room number and double click on the first column.
1. Once you have all of the information, the Cost and the Capitalization information updated and the O‐Tag
converted to a P‐Tag, you will need to Capitalize the Asset.
2. To Capitalize the P‐Tag, go to FFAADJF.

Fixed Asset Module Fixed Assets
Page | 23
**Fixed Asset Adjustment Form – FFAADJF**
3. Capitalizing an P‐Tag. a. Go to form FFAADJF – Fixed Asset Adjustment Form.
i. Key “Next” in the Document Code field. ii. Click the down arrow from the “Function Code” field and select the “PTag
Capitalization.” iii. Perform a “Next Block”
b. Enter the reason why the adjustment is being completed. Example – Capitalize Helicopter SD37703.
i. Enter information in the Document Reference. The O‐Tag or P‐Tag are great things to put here. This will help identify which asset you are capitalizing on the FGRLGTA.
1. Perform a “Next Block.” c. Enter the permanent tag number that was just created for the gift in the “Permanent Tag field”.
i. Tab – this will fill in the rest of the information about the P‐Tag you just keyed in. ii. Perform a “Next Block”

Fixed Asset Module Fixed Assets
Page | 24
**Adjustment Balancing/Completion**
d. Keep track and write down the Document Code that is generated by the system. e. Verify that the amount is the correct amount. f. Hit the Complete button. g. This will bring you back to the beginning of the form FFAADJF. h. Write down the Document Number the system has created.
i. The document number should be at the bottom of the page. i. Click the “X” – to exit this form. j. Before completing the last steps, the posting process needs to be completed.
i. This should only take a minute, but you can check on the process by viewing the asset in FFAMAST. If the tag is in use, this item cannot be adjusted and you must wait to complete the other steps. If this tag is not in use and is Capitalized, you are free to Depreciate this asset.

Fixed Asset Module Fixed Assets
Page | 25
**Depreciation Information**
1. In FFAMAST, enter the P‐Tag into the Document Tag line and Choose Permanent Tag‐Update Asset in the Action Field.
2. Next Block. 3. Go to the “Options” menu on the tool bar and select the “Depreciation
Information”. 4. In the “Depreciation Information,”
k. Tab to the next field to bring up the name of the Asset l. Do a “Next Block”
i. This will bring you up to the “Asset Depreciation Information” 1. Tab to the Frequency field. Select “Annual” for how often Depreciation will run
or key an “A” in this field. 2. Tab till you get to the “Start Date” field. 3. Key in the “Start Date” that the depreciation needs to start calculating. This
should be the “Acquisition Date” of the Asset. ii. Do a “Next Block”
1. This will bring you to the “Asset Depreciation Expense Distribution.” 2. The Fund Field, Org, Acct, Prog, Activity, location, and Posting Codes should
be auto populated. a. The “Program Code” should be changed to what is in the Funding
Source – FOAPAL. (Screen – “Funding Source” Pg 5 of these procedures)
3. If they do not auto populate refer to the below guidelines. a. The Organization Code can be the code used as the funding source
when the gift was calculated. b. The Account Code is not campus specific. This code should be 799400
– Depr Exp – Equipment c. The Activity Code is unique for each campus. SDSU Activity Code is
3ZDEPR. d. The Posting Code field should be (P)ost Deprec.
Depreciation
Expense
Distribution

Fixed Asset Module Fixed Assets
Page | 26
4. Click on the “Save Icon” on the tool bar. 5. Click the”X” – to Exit this form. 6. This will bring you back to the previous form. 7. This asset is “Approved in Banner”. Repeat the above steps until all of the
assets have been approved in Banner.

Fixed Asset Module Fixed Assets
Page | 27
Creating an O‐tag from a Document tag (D‐tag)
1. Run FFRDTGT – Dtag Transaction Report to see all of the journal vouchers that need to be converted to a P‐Tag.
a. You can run this report through Database, to a printer, or your specific E~Print finance repository.
b. This will show all of the journal vouchers that have been posted. c. It is not campus specific unless you know the specific fund that was corrected. d. You could run the report for a single date or a range of dates.
2. Pull up the report in Word or E~Print. a. Look for the specific journal voucher for your University.
3. Write down the document number. The document number starts with “J”. This will be the document that will be changed to an o‐tag.
Select a date or a range of dates.
Select a fund or leave Blank for all

Fixed Asset Module Fixed Assets
Page | 28
4. Once you have the document # ‐ Key in FFADTGP – Fixed Asset Dtag Processing in the Go to box.
5. Type in the Document # from the FFRDTGT report. 6. Perform a “Next Block” twice.
Key FFADTGP in the Go to box.
Key in document #
Complete Next Block twice

Fixed Asset Module Fixed Assets
Page | 29
7. Tab to the Action Field. 8. Go to “Create” in the Action Field. Click the “Save” Button on the Tool Bar.
Tab to the “Action” Field
Go to “Create” in Action Field.

Fixed Asset Module Fixed Assets
Page | 30
9. Write down the origination Tag #.
10. Go to Options and select “Perform Action”.
Write down the Origination Tag #.
Go to Options and select “Perform Action”

Fixed Asset Module Fixed Assets
Page | 31
11. Click “Okay” when asked “Sequences are in Balance with Accounting Perform updates?”
12. If there is more than one sequence to the document, you will need to repeat steps 6 thru 11 until all of the sequences are completed.
13. Once this process is completed you will need will be able to Convert the O‐tag into a P‐tag.
Click “Okay” to the Pop‐
up window.

Fixed Asset Module Fixed Assets
Page | 32
Creating Gifts/Donations
1. Start creating your Gifts/Donations a. In the “Go To” field from the main menu – key in FFAMAST and hit enter.
1. A copy of what the form looks like after you hit enter is as follows. b. Enter “Next” in the ’Asset Tag” field. c. Tab over to the “Action” field. Select Gifts/Donations. d. Perform a “Next Block” on the Tool Bar to go to the Master Information Form.
**Main FFAMAST form**
Key in
FFAMAST
Select
Gifts/Donations
Next Block
Fixed Asset Module Fixed Assets
Page | 33
**Master Information Form**
e. In the “Master Information Form”; i. In the “Permanent Tag” field, you can either key in Next so the system can assign the
next P‐Tag or you can use your Universities unique P‐Tag #. ii. Tab to the “Asset Description” Field. Enter the name in the field to what the asset is. iii. Tab to the “Unit of Measure” field. iv. Tab to the “Asset Type” field. This is a Required Field.
1. You can do a search or you can use a list and just key in the Asset Type. 2. You can do a search or you can use the drop‐down list and select from there.
v. Tab to the “User Status Code”. This is an optional field. 1. You can do a search or use a list and just key in the User Status Code.
a. The code that can be used for this is “G” – Gifts. 2. This is an optional field.
vi. Perform a “Next Block” to go to the Acquisition Information Form.

Fixed Asset Module Fixed Assets
Page | 34
**Acquisition Information Form**
f. In the “Acquisition Method” field; i. You can do a search or use a list and just key in the Acquisition Method information.
1. When you do a search, select the correct Acquisition Method and double click on the first column.
2. You will use the GG – Gifts Acquisition Code for a Gift. ii. Key in the “Acquisition Date” from the Invoice. Can key in the date as follows:
MM/DD/YYYY, 15‐Mar‐2006, or MM/DD. Any one of these options will work. iii. Key in the Make, Model, Manufacture, and SN information in the appropriate fields. iv. Key in the “In Service Date” this date should be the same date at the “Acquisition
Date”. v. Tab to the “Condition Code” field.
1. You can do a search or you can use a list and just key in the Condition Code. vi. Tab to the “Title To” field.
1. This is where you will distinguish if it is a University Owned, Federal, State, Leased, or from a Private Source.
2. Use the appropriate code for your Universities. Usually this will be a University Owned Title To code.
vii. Perform a “Next Block” to go to the Procurement Information Form

Fixed Asset Module Fixed Assets
Page | 35
**Procurement Information**
g. In the “Procurement Information”; i. Enter in the received date in the “Received Date” field.
1. Key in the “COA”. a. This field should populate automatically.
2. If there is nothing in the “Organization” Field place an organization code for this asset. The Organization Code distinguished what “Department” this piece of asset belongs to.
3. If there is nothing in the “Location” field place a location code for this asset. The Location Code distinguishes what building this piece of asset resides in.
ii. The other fields are optional, so it is not necessary to place anything in these fields unless your University needs to have additional information for this piece of equipment.
1. This information in the Transfer Data area is for if we would want to transfer the original Organization and Location fields.
2. The fields that are optional are Grant, Custodian ID, and Equipment Manager. iii. Perform a “Next Block” to go to the Funding Source Form.
Enter Date

Fixed Asset Module Fixed Assets
Page | 36
**Funding Source**
h. In the “Funding Source” you need to add this information. i. Add the “Index Code, Account Code, and cost in these fields. The Fund, Organization,
and Program should auto populate from the Index Code. 1. Key in your Index Code for the Gift/Donation. 2. Account Field – the account usually keyed into this field is “1G0030 –
Equipment.” No expense code will be used for Gifts. 3. Cost – This should be the cost of the Gift being purchased.
ii. Perform a “Next Block” to go to the Capitalization Information Form.
Index
Code Account Code
Always 1G0030
Enter
Cost

Fixed Asset Module Fixed Assets
Page | 37
**Capitalization Information**
i. In the “Capitalization Information”, this will show the default capitalization fund, equity and asset account and the accumulation depreciation account codes.
i. Verify if all of the codes – Capitalization Fund, Equity Account, Asset Account, and Accumulated Depreciation are populated.
1. If this is not populated you will need to perform a “New Sequence”. ii. If one of the above codes is not populated – perform a “New Sequence.”
1. Verify that the Capitalization Fund and Equity Account are populated. If they are not the normal Capitalization Fund will be campus specific.
a. Example for Capitalization Fund: X66000 – the X should be the campus code. SDSU’s campus number is 3 so the Capitalization Fund code would be 366000.
b. Example for Equity Account: This code is not campus specific. So this should be account 400000 – Net Assets.
2. The Asset and Accumulated Depreciation Accounts are not campus specific. a. The Asset Account should be – 1G0030 and the Accumulated
Depreciation Account should be 1G0070. iii. Perform a “Next Block” to the User Defined Field form.

Fixed Asset Module Fixed Assets
Page | 38
**User Fields**
j. In the “User Fields”, you can place the room numbers for the particular asset. i. Click on the down arrow of the “User Attributes.” ii. This will show all of the room numbers. Select the appropriate room number and
double click on the first column. k. Click”X” – to Exit this form. l. Once the Gift has been added as an Asset. To Capitalize a Gift you will need to complete a form
called “FFAADJF – Fixed Asset Adjustment Form. i. The next page will show you how this is completed.

Fixed Asset Module Fixed Assets
Page | 39
**Fixed Asset Adjustment Form – FFAADJF**
2. Capitalizing a gift. a. Go to form FFAADJF – Fixed Asset Adjustment Form.
i. Key “Next” in the Document Code field. ii. Click the down arrow from the “Function Code” field and select the “PTag
Capitalization.” iii. Perform a “Next Block”
b. Enter the reason why the adjustment is being completed. Example – Capitalize a gift. i. Enter the acquisition date in the Trans Date field.
1. Remember the adjustment cannot be dated prior to the capitalization date. ii. Can enter information in the Document Reference – this is an optional field. This field
will link this adjustment to a particular source. 1. Perform a “Next Block.”
c. Enter the permanent tag number that was just created for the gift in the “Permanent Tag field”. i. Tab – this will fill in the rest of the information about the P‐Tag you just keyed in. ii. Perform a “Next Block”

Fixed Asset Module Fixed Assets
Page | 40
**Adjustment Balancing/Completion**
d. Keep track and write down the Document Code that is generated by the system. e. Verify that the amount is the correct amount. f. Hit the Complete button. g. This will bring you back to the beginning of the form FFAADJF. h. Write down the Document Number the system has created.
i. The document number should be at the bottom of the page. i. Click the “X” – to exit this form. j. Before completing the last steps for gifts, the posting process needs to be completed.
i. In Production this should only be a few seconds. But in Test it is around 3 to 5 Minutes.

Fixed Asset Module Fixed Assets
Page | 41
**FFADEPR ‐ Depreciation Information**
3. In the “Depreciation Information ‐ FFADEPR,” a. Tab to the next field to bring up the name of the Asset b. Do a “Next Block”
i. This will bring you up to the “Asset Depreciation Information” 1. Tab to the Frequency field. Select “Annual” for how often Depreciation will run
or key an “A” in this field. 2. Tab till you get back up to the “Depreciation Method” field. 3. Key in the “Start Date” that the depreciation needs to start calculating. This
should be the “Acquisition Date” of the Asset. ii. Do a “Next Block”
1. This will bring you to the “Asset Depreciation Expense Distribution.” 2. The Fund Field, Org, Acct, Prog, Activity, location, and Posting Codes should
be auto populated. a. The “Program Code” should be changed to what is in the Funding
Source – FOAPAL. (Screen – “Funding Source” Pg 5 of these procedures)
3. If they do not auto populate refer to the below guidelines. a. The Organization Code can be the code used as the funding source
when the gift was calculated. b. The Account Code is not campus specific. This code should be 799400
– Depr Exp – Equipment c. The Activity Code is unique for each campus. SDSU Activity Code is
3ZDEPR. d. The Posting Code field should be (P)ost Deprec.
4. Click on the “Save Icon” on the tool bar. 5. Click the”X” – to Exit this form. 6. This will bring you back to the previous form. 7. This asset is now approved in Banner. Repeat the above steps until all of the
Gifts have been approved in Banner.

Fixed Asset Module Fixed Assets
Page | 42
Deleting an O‐Tag
1. Go to FFAFDEL‐ Fixed Asset Master Delete. This form allows you to delete the O‐Tags that are not needed any longer.
2. Enter the O‐Tag you want to delete in the first Origination Tag line. The curser will default to that line. You may use a Wildcard % to query multiple O‐Tags, as in the example below.
3. Press F8 to execute the Query and to bring up all of the unattached O‐Tags available to be deleted in this form.
4. Check the boxes on the right hand side to select O‐Tags for deletion.

Fixed Asset Module Fixed Assets
Page | 43
5. When all O‐tags that need to be deleted are selected, Select Record from the Toolbar. 6. Click on Remove.
7. Once you selected Record then Remove, a message will appear requesting you to “Select ‘Delete All’ Again to delete”.
8. Select Record from the toolbar again and click on Remove.

Fixed Asset Module Fixed Assets
Page | 44
9. When you have selected Record and Remove twice, a dialog box will appear stating “Fixed Assets marked for delete and all detail records will be deleted”.
10. Press OK.
11. Once that is finished, the O‐Tags you selected will be deleted and will no longer be available for
conversion into a P‐tag.

Fixed Asset Module Fixed Assets
Page | 45
New Tag, Non Procurement
1. Open FFAMAST – Fixed Asset Master Maintenance.
2. Key in “Next” into the Asset Tag field. Tab to the action field and select “New Tag/Non Procurement”.
3. Perform a “Next Block”.
4. Complete the next two screens as directed in the Banner Procedures – Converting into P‐Tag.
Complete these screens
as you would in the
Converting P‐Tag
procedures.

Fixed Asset Module Fixed Assets
Page | 46
5. The Procurement Information Screen will be blank. a. The curser is at the COA field. b. Key in “S” in the COA field, your appropriate Organization and Location codes. c. Complete “Next Block”.
6. Get the FOAP from the original invoice. Key in the Index, Acct Code and Cost.
7. Perform a “Next Block”
8. Complete a new sequence. Then enter in the cost of the asset.
Key in FOAP, Account code and Cost

Fixed Asset Module Fixed Assets
Page | 47
9. Perform a “Next Block”
10. Enter room number for the Asset – Perform a Next Block.
11. Go to screen FFAADJF and Capitalize the Asset. 12. Once the asset is capitalized, you should be able to depreciate the asset. 13. The asset is now completed.
Complete a “New
Sequence”. Enter in the
cost. Make sure that the
Asset and Accum Depr

Fixed Asset Module Fixed Assets
Page | 48
*New ‐ New Tag, Non Procurement – Creating an O‐Tag
1. Open FFAMAST – Fixed Asset Master Maintenance.
2. Key in “Next” into the Asset Tag field. Tab to the action field and select “New Tag/Non Procurement”.
3. Perform a “Next Block”.
4. Complete the next two screens as directed in the Banner Procedures – Converting into P‐Tag. If you are trying to create an O‐Tag do not add Permanent Tag # in that field.
Complete these screens
as you would in the
Converting P‐Tag
procedures. Do not add
the Permanent‐Tag # or
Primary Tag #

Fixed Asset Module Fixed Assets
Page | 49
5. The Procurement Information Screen will be blank. a. The curser is at the COA field. b. Key in “S” in the COA field, your appropriate Organization and Location codes. c. Complete “Next Block”.
6. Get the FOAP from the original invoice. Key in the Index, Acct Code and Cost.
7. Perform a “Next Block”
Key in FOAP, Account code and Cost

Fixed Asset Module Fixed Assets
Page | 50
8. Complete a new sequence. Then enter in the cost of the asset.
9. Perform a “Next Block”
10. Enter room number for the Asset – Perform a Next Block.
11. Go to screen FFAADJF and Capitalize the Asset. 12. Once the asset is capitalized, you should be able to depreciate the asset. 13. The asset is now completed.
14. You should be able to attach this O‐Tag to an existing P‐Tag.
Complete a “New
Sequence”. Enter in the
cost. Make sure that the
Asset and Accum Depr

Fixed Asset Module Fixed Assets
Page | 51
Transfers
**Transferring Assets – FFATRAN**
1. You can also run the FFRMAST – Fixed Asset Master Record Report. This form will show the detail for the
asset you would like to transfer to a different organization, location, you can also add it to a primary tag,
change condition, title to, and you can add text.
2. Once you receive your list, you can start transferring your Asset – Permanent Tag. c. In the “Go To” field on the Main Screen, key in FFATRAN and enter.
1. A copy of what the form looks like after you hit enter at the Go to Field is below.
d. Enter in the P‐Tag you found in your report FFRMAST in the “Asset Tag” field. e. Tab to populate the Asset Description. f. Perform a “Next Block” on the Tool Bar to go to the next part of the form.
Next Block

Fixed Asset Module Fixed Assets
Page | 52
3. Go to the Options Menu and go to the “Transfer Information”
4. When you go to the “Transfer Information” it populates what is in the “TO” fields to the “From” fields.
Transfer
Information To:
From:

Fixed Asset Module Fixed Assets
Page | 53
5. You can adjust the Organization to and the Location to. a. Just find the org and location you would like to change it to and key the changes right in the
fields. You can also adjust or add a Grant To, Custodian To also. 6. Tab down to the Transfer Document.
a. This is NOT a required field. But if you would like to keep track of your transfers you can key in a transfer document for your records.
7. Keep the Transfer date as the current date. 8. You are required to key something in the Transfer Reason.
a. Why you are transferring this asset to the different location, organization, or what ever you would like to key there.
9. You can put a text message for this transfer. a. Go up to “Options” on the tool bar. Select Document Text. Key whatever information you would
like for this transfer. i. Click the “Save” button on the tool bar. Click the “X” to exit the form. ii. This will bring you back to the “Transfer Document”.
10. Before you complete this transfer you have the Option to “Attach” this asset to a “Primary Tag”. a. If you need to “Attach” this asset to a Primary Tag, go to the bottom of this page and key in the
Primary Tag and select “Attach To” in the Subordinate Type field. b. If NOT, go to Step 11.
11. Once all of your adjustments are completed, click the “Save” Button then the “X” to exit the form. 12. Your Asset is now adjusted. 13. To check, go to FFIMAST and pull up the Asset and double check the changes you just completed.
Adjust
Org to:
Click “Save”

Fixed Asset Module Fixed Assets
Page | 54
Write Off
**Fixed Asset Adjustment Form – FFAADJF**
1. Make sure you have all of your back up information to complete the Sale of an Asset Procedures. 2. In the Go To field on the main Banner Screen type FFAADJF – Fixed Asset Adjustment Form.
a. Type Next in the Document Code field. b. Tab over to the Function code. Make sure the function code states Write Off.
3. Perform a “Next Block”. a. Type in a description in the Description field for example “Disposed asset SDxxxxx”. b. Leave Transaction Date as current date. c. Tab to the Document Reference Field.
i. You can type in any type of reference number you would like to associate this asset with.
1. Example – I placed the P‐Tag as my reference code. 4. Perform a “Next Block”.
a. Type in the P‐Tag you are planning on disposing. b. Tab through to the Disposal Method.
i. Examples of Disposal Methods are: XX – Sold at Public or Private, LL – Lost, DD – Destroyed, VV – Salvaged, EE – Error, SS – Surplus, and TT – Traded In.
c. Perform a “Next Block” to the next form. **Fixed Asset Adjustment Form – FFAADJF**
Function
Code

Fixed Asset Module Fixed Assets
Page | 55
5. Write down the Document Code to future references 6. In the Input box, hit the Complete Button 7. Go to FFAMAST.
a. Type the P‐Tag that was just disposed of. b. Select in the Action field – Permanent Tag – update Asset c. Perform a “Next Block” to get you to the Master Information. d. On the right side of the form you will see that the System Status Code is marked as a “D” for
deletion. e. Perform a “Next Block” again to get you to the Acquisition Method. f. At the bottom of the form it will show the disposal method and the date it was disposed of.
8. This asset is now disposed of in Banner.

Fixed Asset Module Fixed Assets
Page | 56
New Price‐Increase/Decrease
1. Run the FFRPROC – Fixed Asset Procurement Report. This will show you what Origination Tags (O‐Tags) that belongs to your specific campus Origination Codes.
2. If the Origination Tag is capitalized you will need to Reverse Capitalization in the FFAADJF form. Once the Reversal of O‐tag is completed to all of the O‐Tags with this asset, you can go to the FFAMAST form and update the O‐Tag.
a. If there are multiple funding sources and Origination Tags, add up all of the different funding sources along with the different O‐Tags. Keep these totals for the Funding Source and Capitalization Screens.
3. Once you receive your list of O‐Tags for your University, you can start converting your Origination Tags (O‐Tags) to Permanent Tags (P‐Tags).
a. In the “Go To” field on the Main Screen, key in FFAMAST and enter. b. Enter in the O‐Tag you found in your report FFRPROC in the “Asset Tag” field. c. Tab over to the “Action” field. Select Origination Tag – Update Asset. d. Perform a “Next Block” on the Tool Bar to go to the Master Information Form.
**Main FFAMAST form**
Action Field –
“Origination
Tag – Update
Next Block

Fixed Asset Module Fixed Assets
Page | 57
**Master Information Form**
e. In the “Master Information Form”; i. Tab to the “Asset Description” Field. Enter the name in the field to what the asset is. ii. Tab to the “Asset Type” field.
1. This field is a Required Field. 2. You can do a search or you can use a list and just key in the Asset Type.
iii. Tab to the “User Status Code”. 1. You can do a search or use a list and just key in the User Status Code. 2. This is an optional field.
iv. Perform a “Next Block” to go to the Acquisition Information Form.

Fixed Asset Module Fixed Assets
Page | 58
**Acquisition Information Form**
f. In the “Acquisition Method” field; i. You can do a search or use a list and just key in the Acquisition Method information.
1. When you do a search, select the correct Acquisition Method and double click on the first column.
2. The most used Acquisition Methods use are: a. NN for New Purchase, GG for Gift, RR for Received from Surplus, and
AA for Received from other agency” ii. Key in the “Acquisition Date” from the Invoice. Can key in the date as follows:
MM/DD/YYYY, 15‐Mar‐2006, or MM/DD. Any one of these options will work. iii. Key in the Make, Model, Manufacture, and SN information in the appropriate fields. iv. Key in the “In Service Date” this date should be the same date at the “Acquisition
Date”. v. Tab to the “Condition Code” field.
1. This field is an optional field. vi. Tab to the “Title To” field.
1. This is where you will distinguish if it is a University Owned, Federal, State, Leased, or from a Private Source.
2. Use the appropriate code for your Universities. Usually this will be a University Owned Title To code.
vii. Perform a “Next Block” to go to the Procurement Information Form.

Fixed Asset Module Fixed Assets
Page | 59
**Procurement Information**
g. In the “Procurement Information”; i. Your curser will be at the Transfer Data location in the “COA” field. ii. If there is nothing in the “Organization” Field place an organization code for this asset.
1. The Organization Code distinguished what “Department” this piece of asset belongs to.
2. If this information came from the P.O. then this code will not be able to be changed unless you do a transfer. This is a separate procedure. It will require using an Adjustment Form.
iii. If there is nothing in the “Location” field place a location code for this asset. 1. The location code distinguishes what building this piece of asset resides in.
iv. The other fields are optional, so it is not necessary to place anything in these fields unless your University needs to have additional information for this piece of equipment.
1. The fields that are optional are Grant, Custodian ID, and Equipment Manager. v. Perform a “Next Block” to go to the Funding Source form.

Fixed Asset Module Fixed Assets
Page | 60
**Funding Source**
h. In the “Funding Source” you can verify the funding sources. i. In the “Funding Source” double check to see if there are multiple funding sources.
1. Make a note of this for the next form. 2. Change the cost of each funding source (if necessary), so the total of the asset
is equal to the total O‐tags that are part of the Asset. If only one funding source, just change that cost accordingly.
ii. Write down the “Program Code” to use when you depreciate the asset. 1. We will be using the program from the FOAPAL instead of using Program 10.
iii. Perform a “Next Block” to go to the Capitalization Information form.
Write down
Program #
These totals should equal
the total cost of the asset.
If multiple Funding
sources – change the

Fixed Asset Module Fixed Assets
Page | 61
**Capitalization Information**
i. In the “Capitalization Information”, this will show the default capitalization fund, equity and asset account and the accumulation depreciation account codes.
i. Verify if all of the codes – Capitalization Fund, Equity Account, Asset Account, and Accumulated Depreciation are populated.
ii. Perform a “New Sequence.” 1. Verify that the Capitalization Fund and Equity Account are populated. If they
are not use the normal Capitalization Fund that is campus specific. a. Example for Capitalization Fund: X66000 – the X should be the
campus code. SDSU’s campus number is 3 so the Capitalization Fund code would be 366000.
b. Example for Equity Account: This code is not campus specific. So this should be account 400000 – Net Assets.
2. The Asset and Accumulated Depreciation Accounts are not campus specific. a. The Asset Account should be – 1G0030 and the Accumulated
Depreciation Account should be 1G0070. 3. **If there were “Multiple Fund Sources” and the P‐Tag needs to be
“Capitalized” you will need to perform a Record Remove, Record Remove to remove the additional sequences (with the Zero Dollar amount) added when completing a New Sequence.
a. Go to the scroll bar (if there are added Sequences) by the cost and scroll down to the Zero Dollar Amount Sequence.
b. This must be completed before you perform a “Next Block”. iii. Perform a “Next Block” to the User Defined Field form.
“Perform a New Sequence”
** Complete Record Remove,
Record Remove to remove
additional Sequence before
completing a “Next Block” if
h l i l f di
Change the cost of the
asset. If multiple funding
sources – change them
accordingly.

Fixed Asset Module Fixed Assets
Page | 62
**User Fields**
j. In the “User Fields”, you can place the room numbers for the particular asset. i. Click on the down arrow of the “User Attributes.” ii. This will show all of the room numbers and SDSU Misc Department Numbers/Names.
Select the appropriate room number and double click on the first column. iii. Perform a “Next Block”.
4. After updating the Organization Tag with the correct dollar amounts, you will need to go to FFAADJF and re‐capitalize the O‐Tag.
5. Now that the O‐Tag is capitalized go FFAMAST and convert the O‐Tag to a P‐Tag. a. Once you have converted the O‐Tag to a P‐Tag, you can remove the rest of the O‐Tags that are
not capitalized through the FFAFDEL. b. If the O‐Tags went through FFAADJF to get un‐capitalized, you will need to go the FFAMAST.
i. Type in the O‐Tag to remove and select the Action of “Disposal of Uncapitalized Tag”. ii. Repeat this process until all of the O‐Tags that need to be removed are completed.

Fixed Asset Module Fixed Assets
Page | 63
Reports and Queries
Reports
FFRPROC – Fixed Asset Procurement Report – This report can be run to see if each campus has new O‐Tags to turn into a P‐Tag. FFRMAST – Fixed Asset Master Record Report – This report produces a printed record of all of the data appearing on the Asset Master record for selected assets. FFRAGRP – Fixed Asset/Asset Group Report – Allows you to select a specified asset master record or a group of asset master records that are associated as attachments or components. FFRDTGA – Fixed Asset DTAG Aging Report – This report displays the aging of Pending Dtags as of a given cutoff date. FFRDTGT – Fixed Asset DTAG Transaction Report – This report displays Dtag transaction information as specified in the parameters of the report. FGRODTA ‐ This report is sorted by account and fund within each organization. This report displays expenses, budget and encumbrance activity (operating ledgers record budget and encumbrance activity) within a specified period.
Queries
FFPOEXT – Fixed Asset Orig. Tab Extract – this form extracts the invoice into an Origination Tag. This process should run automatically in Production. Right now we need to run this manually to extract the invoices into an Origination Tag. FFIPROC – Fixed Asset Procurement Query Form – This query shows the entire O‐Tags ready to be converted to a P‐Tag, but it also shows the O‐Tags that already have been converted to a P‐Tag. FAIINVE – Invoice/Credit Memo Query Form – This form shows the different screens for the Invoice/Credit Memo Form. This form is just Query only. There is no way to change any data within this form. FAIINVL – Invoice/Credit Memo List Form – This form shows the listing of all invoices listed in Banner. FFAMAST – Fixed Asset Master Maintenance Form – This form is the master Fixed Asset form. All of the information from the Asset gets keyed into this form. FFAADJF – Fixed Asset Adjustment Form – This form allows you to do the following to a Fixed Asset: Sale of an Asset, Write off’s or Write Downs, P‐Tag or O‐Tag Capitalization, Depreciation Adjustment, Record Past Depreciation, GL Changes, No Posting to G/L, Reverse Cap for P‐Tags and O‐Tags.

Fixed Asset Module Fixed Assets
Page | 64
Queries Continued
FGIDOCR – Document Retrieval Inquiry Form – This document shows the different documents that are out in Banner. FOIDOCH – Document History Form – This form shows the different documents associated with a document type. Example: you can look for a PO by placing PO in the Document Type field, then you can key in the PO# in the Document Code field. This will show what documents are associated with that particular PO. FFAFDEL‐ Fixed Asset Master Delete – This report can be used to delete unwanted O‐Tags from the module. FOADOCU – Document by User form – This form will show what documents have been completed by a specific user. FFIFALV – Fixed Asset List Form – This form gives you a listing of all of the Fixed Assets either by O‐Tag or P‐Tag. FGITRND – Detail Transaction Activity Form Enables you to display an online view of detailed transaction activity for operating ledger accounts. FGRGLTA ‐ The General Ledger Transaction Activity Report displays by Chart of Accounts and by fund beginning/ending balances for general ledger accounts and all debit and credit activity against those accounts. FOIDOCH ‐ The Document History displays the receiving document associated with a purchase order and/or invoice. FFADEPR – Fixed asset Depreciation Form Allows you to specify the asset depreciation methodology and account distribution for recording depreciation. FFATRAN – Fixed Asset Transfer Form enables you to record responsible entity information when you physically move an asset or recognize a change in accountability.