five amazing keynotes the state of symfony - … · find out more and buy your ticket at...
TRANSCRIPT

Find out more and buy your ticket at world.phparch.com
WordPress, Drupal, Joomla!, Magento, Zend Framework, Symfony, Laravel, more...
November 10 -14th 2014
Washington, D.C.
Five Amazing Keynotes...
Luke StokesCo-founder and CTO of
FoxyCart.com
Angela ByronDrupal
Core Committer
Andrew NacinWordPress
Lead Developer
Jeffrey McQuireOpen Source Evangelist
at Acquia
The Greatest Panel on Earth!We will have key people representing seven of the biggest PHP frameworks and applications: WordPress, Drupal, Magento, Joomla!, Symfony, Laravel, and Zend Framework all together in one place to answer all your most difficult questions!
2
I ANFORMATION SSURANCE
ANALYZE | MITIGATE | MAINTAIN
Purchasing Power
ALSO INSIDE
Editorial:Embracing New
Challenges
Education Station:Instagram Mashups the
Easy Way in PHP
Confi dent Coder: Make the Reasons
Overwhelming
Laravel: Deploying Applications
Part 1: Homestead
fi nally{}:On Conferences
www.phparch.com September 2014VOLUME 13 - ISSUE 9
What is New in Magento 2?
High-Performance Magento in the Cloud
Easy WordPress Dev Environments with Vagrant and Ansible
The State of Symfony
php[architect] magazine Sep
temb
er 20
14P
urch
asing
Power
Volume 13
Issue 9
FREE SAMPLE ARTICLE
Easy WordPress Dev Environments with Vagrant and Ansible

Find out more and buy your ticket at world.phparch.com
WordPress, Drupal, Joomla!, Magento, Zend Framework, Symfony, Laravel, more...
November 10 -14th 2014
Washington, D.C.
Five Amazing Keynotes...
Luke StokesCo-founder and CTO of
FoxyCart.com
Angela ByronDrupal
Core Committer
Andrew NacinWordPress
Lead Developer
Jeffrey McQuireOpen Source Evangelist
at Acquia
The Greatest Panel on Earth!We will have key people representing seven of the biggest PHP frameworks and applications: WordPress, Drupal, Magento, Joomla!, Symfony, Laravel, and Zend Framework all together in one place to answer all your most difficult questions!
2
I ANFORMATION SSURANCE
ANALYZE | MITIGATE | MAINTAIN

FEATURE
2 | September 2014 phparch.com
Easy WordPress Dev Environments with Vagrant and AnsibleJason A. Lefkowitz
One of the evergreen hassles of Web development comes from the fact that the developer's work is useless without a server to run it on. From this springs a thorny question: Where, exactly, should you be doing your work? On the same server that hosts your live site? On a separate staging or development server somewhere? On your local PC?
2 | September 2014 phparch.com
Requirements
Requirements:• VirtualBox - https://www.virtualbox.org• Vagrant - http://www.vagrantup.com• Ansible - http://www.ansibleworks.com
Related URLs:• Hashicorp - http://www.hashicorp.com• Vagrant Cloud - https://vagrantcloud.com• Canonical Ubuntu images - http://cloud-images.ubuntu.com/vagrant/• Creating a Base Box - http://docs.vagrantup.com/v2/boxes/base.html• Vagrant Provisioners -
https://docs.vagrantup.com/v2/provisioning/index.html• YAML - http://www.yaml.org• Vagrant ansible.limit workaround -
https://github.com/mitchellh/vagrant/issues/3096#issuecomment-37237086• Ansible Modules - http://www.ansibleworks.com/docs/modules.html• APT Module - http://www.ansibleworks.com/docs/modules.html#apt• Service Module - http://www.ansibleworks.com/docs/modules.html#service• MySQL User - http://www.ansibleworks.com/docs/modules.html#mysql-user• MySQL DB - http://www.ansibleworks.com/docs/modules.html#mysql-db

phparch.com September 2014 | 3
Different developers have different needs, but, generally speaking, we can describe a few characteristics of the Ideal Development Environment:
• Private: The only people who should be able to see your work are you and your team. Nothing should be exposed to the world until you expose it.
• Homogeneous: The development environment should be as similar as possible to the deployment environment to avoid problems both while developing ("I don't understand why Jane is having problems; it works fine on my machine!") and deploying ("What do you mean the app requires an Apache module our host won't install?").
• Repeatable: Having to make all these decisions from scratch every time you start a new project is annoying; it would be much better to just have a baseline environment and then be able to point to it and say, "Give me another one of those, bartender."
• Easy: Setting new environments up and tearing old ones down should be as straightforward as possible to minimize the amount of time developers spend getting ready to code and to maximize the amount of time spent actually coding.
In the past, setting up a development environment that met all of these criteria was difficult, but a new generation of tools for system administrators has emerged. Happily, these same tools can be used by developers to manage development environments easily and efficiently.

4 | September 2014 phparch.com
Easy WordPress Dev Environments With Vagrant and Ansible
What You'll NeedThe approach we're going to use requires that three open-source software packages be
installed on your workstation (see Related URLs):
• VirtualBox• Vagrant• Ansible
VirtualBox is desktop virtualization software. It lets you run a complete virtual server, implemented entirely in software, on your desktop.
Vagrant is a tool for encapsulating virtual environments. It lets you "freeze" the state of a VirtualBox VM -- all its installed software and configuration -- into a file that can be shared with others or used as the starting point for other VMs.
Finally, Ansible is configuration management software. It lets you create a simple text file, called a "playbook," that specifies the steps required to set up a new machine and then run them locally or remotely against any machine you wish.
Vagrant: Setting Up the Base BoxLet's get started!
The first step is to set up a Vagrant "box." Vagrant needs an existing VirtualBox VM to use as its starting point. So we need a "base box" -- either our own VM snapshot or somebody else's.
The people behind Vagrant, Hashicorp, have started a free companion service called Vagrant Cloud that makes finding a good base box (or sharing your own) easy. Other sources for base boxes exist as well -- for example, Canonical offers pre-rolled base boxes using the server version of their Ubuntu Linux distribution. See Related URLs for the links.
Ubuntu Server is a solid Debian-based distribution, so for this exercise, we'll use the base box built on the 64-bit version of their latest long-term support (LTS) release, Ubuntu 14.04 (Trusty Tahr), at the following URL:
http://cloud-images.ubuntu.com/vagrant/trusty/ \ current/trusty-server-cloudimg-amd64-vagrant-disk1.box
When you're setting up "real" development environments, you'll want to start with a base box that matches your deployment environment as closely as possible; most common systems have base boxes already available, or for maximum fidelity, you can create your own base box so that it matches all your deployment environment's little project-specific quirks. See Related URLs for the Vagrant documentation link.
When you've found a base box, you register it with Vagrant with the vagrant box add command. This fetches a copy of the base box from the URL you give it, stashes the copy on your hard drive for future re-use, and registers the copy in Vagrant with a short handle of your choosing.

phparch.com September 2014 | 5
Easy WordPress Dev Environments With Vagrant and Ansible
To add our base box using the handle trusty64 and use the URL for this base box as of this writing, the command would be (all on one line):
vagrant box add trusty64 http://cloud-images.ubuntu.com/vagrant \ /trusty/current/trusty-server-cloudimg-amd64-vagrant-disk1.box
Note that boxes distributed via Hashicorp's Vagrant Cloud service get a little bit of extra love here -- they can be passed to the vagrant box add command with just the handle assigned to them on Vagrant Cloud rather than needing the full URL.
Vagrant: Meet the VagrantfileNow that we have a base box to work with, we can use Vagrant to set up a VM instance for us
based on it.
To begin, create an empty directory on your local file system, and change directories so that the newly created directory is your working directory.
Now you need to prepare this directory to host a Vagrant VM. This is simple, run the following command:
vagrant init
This command creates a new file in that directory with the name Vagrantfile. The Vagrantfile is the configuration file for a Vagrant VM. Vagrantfiles are written in Ruby, which can seem daunting if you're not a Rubyist. But fear not! You only need to make a couple of small changes to the Vagrantfile, and none require any real Ruby knowledge.
The first thing to do is link this Vagrantfile to a registered base box so Vagrant knows which one to use as this VM's initial template.
Look for this line near the top:
config.vm.box = "base"
All you need to do to use the Ubuntu image we registered above is change the value of config.vm.box from base to whatever handle you registered the base box under:
config.vm.box = "trusty64"
Save the Vagrantfile. Presto! You're ready to spin up a new VM based on that Ubuntu base box. Enter the following command:
vagrant up
... and Vagrant will work its magic. When the VM is up and running, you'll be returned to the shell prompt.
"OK," I hear you thinking, "but how do I know it actually worked?" Enter this command:
vagrant ssh

6 | September 2014 phparch.com
Easy WordPress Dev Environments With Vagrant and Ansible
... and you will shell into your new VM as the user "vagrant." Vagrant handles all the details of creating the user account, giving it passwordless sudo privileges, and setting up SSH when you run vagrant up, so you can just jump right in.
Now let's spin the VM down. First, make sure to exit so that your shell prompt is back on your local workstation instead of the VM. Then enter:
vagrant destroy
You'll be given a prompt:
Are you sure you want to destroy the 'default' VM? [y/N]
Answer "y" for "yes" and Vagrant will tear down (destroy) the VM. (If you find yourself doing this a lot, you can turn off the prompt with an argument at the command line: vagrant destroy -f.)
Destroying a VM sounds pretty final, but it's not. All it means is that the files associated with maintaining the VM's state are deleted, preventing them from cluttering up your hard drive. You can spin the VM up again in a 100% clean state just by running vagrant up again. (Go ahead, try it.)
What if you want to spin the VM down but hold onto its state so you can pick up later where you left off? Instead of vagrant destroy, you'd enter
vagrant halt
to power it down gracefully or
vagrant suspend
to put it into suspend mode. In either case, vagrant up will turn its lights back on later.
Vagrant: Provisioning with AnsibleNow we have a nice clean VM with Ubuntu installed. But by itself, that's not particularly useful.
We want a development environment, not a tabula rasa.
The way we get there is by using Vagrant's support for provisioners. A provisioner is software that tells Vagrant what to do with a particular VM after making a clean copy of its base box. When you run vagrant up, Vagrant consults the provisioner and follows whatever instructions it provides. Vagrant supports many provisioners, but we're going to use Ansible, so make sure to install it on your machine before we proceed.
Digression: Why Ansible?"But Vagrant supports lots of different provisioners," I hear you asking, "including ones I've
heard of before, like Chef and Puppet. It even supports provisioning via raw shell scripts. So what makes Ansible preferable to all these others?"
The answer is that, for people whose work is more developer-like than systems administrator-like, Ansible strikes a very appealing balance between simplicity and power. Chef and Puppet offer more power, but that power comes at the cost of complexity; some configurations require

phparch.com September 2014 | 7
Easy WordPress Dev Environments With Vagrant and Ansible
you to set up a "master server" to handle provisioning, for instance, which is a lot of overhead when you're only worried about setting up one-off development environments rather than fleets of thousands of Amazon EC2 instances. And for most PHPers, configuring environments in either tool will require learning a new programming language; Puppet environments are defined using their own proprietary language, while Chef uses a subset of Ruby. (That makes Chef preferable to Puppet for full-time Rubyists, but for a PHPer, it's a case of six of one, a half a dozen of the other.)
Ansible, on the other hand, requires no master server or other infrastructure; it can provision images right from your workstation, and it does so over good old reliable SSH, so the images don't need to have any client software installed before you can start working on them. And Ansible's configuration language isn't really a language at all; it's just plain text files formatted in YAML, with some basic additions bolted on like looping constructs and variable interpolation to make repetitive tasks less so. All of this adds up to a system that has all the power you need, without you having to take on a second career as a sysadmin just to make use of it.
Enough Digression; Let's Get Back to ProvisioningSo we want to use Ansible to configure a Vagrant box. How exactly do we go about doing that?
Since all the configuration for a Vagrant VM happens in its Vagrantfile, we'll need to edit it to connect it to Ansible. You'll have to install Ansible on your system. Then, on the line just below your config.vm.box directive, add this:
config.vm.network :private_network, ip: "192.168.50.50"
This tells Vagrant that you want this VM set up with a static IP address, 192.168.50.50, rather than having one dynamically allocated when it's created. (The actual IP address can be anything in your local network, so if you've already assigned 192.168.50.50, feel free to change it.)
Next in Listing 1 we add a block of commands near the bottom, just before the last end statement that closes out the Vagrantfile.
This tells Vagrant that we're using Ansible as our provisioner and sets up a few configuration variables:
• ansible.verbose tells Vagrant how much detail it should show you when running your Ansible instructions. You'll want this set to at least the lowest level of verbosity: "v". For more detail, just add more "v"s, up to "vvvv".
• ansible.inventory_path is the path to our inventory file, a text file that tells Ansible where it can find the systems we expect it to manage. This path is relative to the location of the Vagrantfile.
• ansible.playbook is the path to our playbook, the text file that Ansible will read to see how we want to configure the VM. It's also relative to the location of the Vagrantfile.
• ansible.host_key_checking tells Ansible whether or not it should pitch a fit if the host key of the VM is not present in your SSH list of approved keys when it tries to connect to it. These fits can stop the image from provisioning properly, so we disable the check. (Strict key checking is an important security precaution when connecting to live servers, but since we're working entirely on throwaway VMs set up within our own workstation here, we can safely turn it off.)
LISTING 1
01. config.vm.provision "ansible" do |ansible|02. ansible.verbose = "v"03. ansible.inventory_path = "vagrant-inventory"04. ansible.playbook = "setup.yml"05. ansible.host_key_checking = "false"06. ansible.limit = "all"07. end
8 | September 2014 phparch.com
Easy WordPress Dev Environments With Vagrant and Ansible
• ansible.limit is there to work around a limitation of the Ansible provisioner that shipped with with recent versions of Vagrant which ties itself into knots if the target machine is referred to by IP address rather than having the same name as specified in the Vagrantfile. Setting this value to "all" tells the provisioner just to read all the IP addresses specified in the inventory file (see below) and use those. For more information, see Related URLS.
Ansible: The Inventory FileAs noted above, Ansible uses an inventory file to let you specify which systems you want to set
up with a given configuration. Inventory files pull systems together into groups, with each group having its own name.
Create an empty file in the same directory as the Vagrantfile with the name "vagrant-inventory" (or whatever value you assigned to ansible.inventory_path in the Vagrantfile).
A basic inventory file is extremely simple:
[devboxes] 192.168.50.50
This tells Ansible that we have a group of systems we've given the name "devboxes," and that group has one system in it, which can be found at 192.168.50.50. If you assigned a different static IP address in the Vagrantfile, use that IP address instead.
(This example is pretty simple, but it also gives you a glimpse of the potential power of Ansible. Ansible can do much more than provision a single machine -- it can run your provisioning playbook against however many machines you want, setting them all up with exactly the same recipe, just by listing the IP addresses of all those machines in the devboxes group and telling Ansible to run the playbook directly. So the time you spend tuning your setup recipe for your dev environment can be easily repurposed to become a setup and maintenance recipe for all those VPSes you have floating around in the cloud.)
That's it for the inventory file!
Ansible: The PlaybookNow we need that Ansible playbook we pointed the
Vagrantfile at to actually exist.
Create another new file in the same directory and name it setup.yml. There's nothing magic about this name; the only important thing is that it matches the value you gave to ansible.playbook in the Vagrantfile.
Unlike Vagrantfiles, Ansible playbooks don't require knowledge of a programming language; they're just text files in the easy-to-read YAML format.
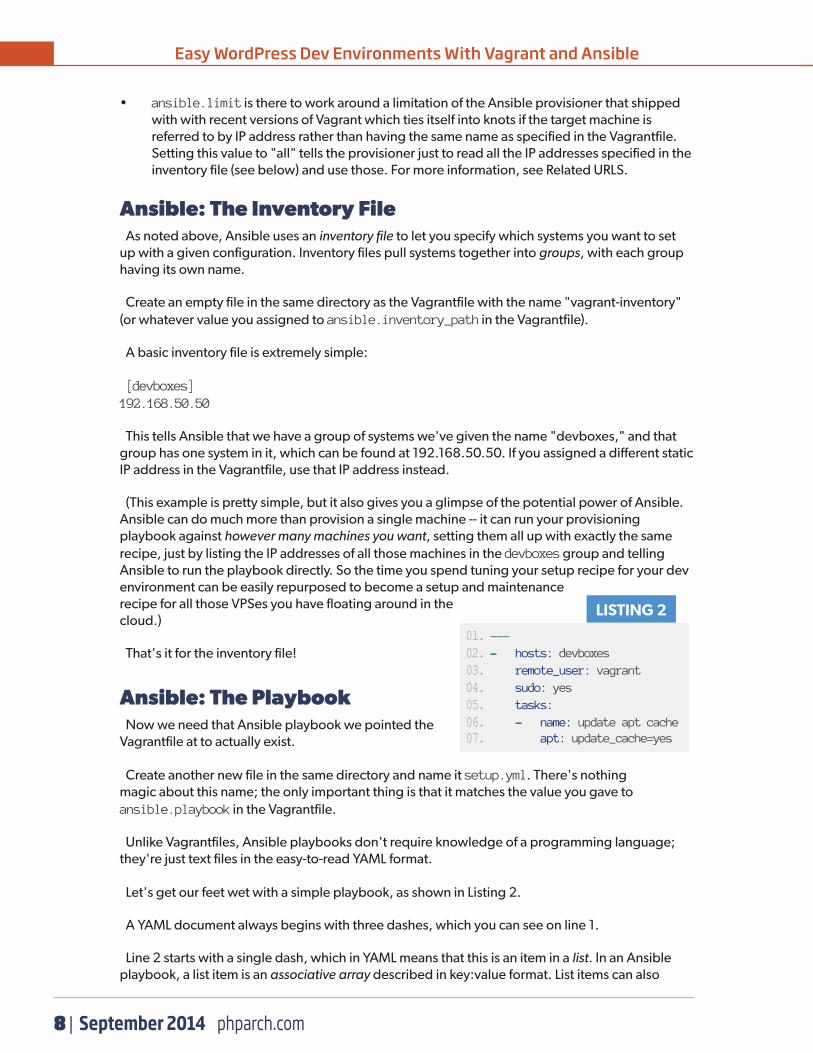
Let's get our feet wet with a simple playbook, as shown in Listing 2.
A YAML document always begins with three dashes, which you can see on line 1.
Line 2 starts with a single dash, which in YAML means that this is an item in a list. In an Ansible playbook, a list item is an associative array described in key:value format. List items can also
LISTING 2
01. ---02. - hosts: devboxes03. remote_user: vagrant04. sudo: yes05. tasks:06. - name: update apt cache07. apt: update_cache=yes

phparch.com September 2014 | 9
Easy WordPress Dev Environments With Vagrant and Ansible
contain lists of their own, as we'll see. The key in line 2 is hosts, and the value is devboxes. This tells Ansible that the instructions that follow are to be run against all systems included in the inventory file's group devboxes. (Remember, we only listed one IP address in the inventory file, the one for our Vagrant box, so this will only run against that IP -- but there's nothing stopping us from listing more if we needed to.)
Line 3 specifies the SSH user name that Ansible should use when it attempts to shell into those systems. Vagrant already set up a user named vagrant for us, so we just use that.
Line 4 tells Ansible to try to elevate its privileges via sudo after logging in. This ensures that it can do things that require root access without permissions problems.
Line 5 sets a new key: tasks. Unlike previous keys, this one will take as its value not a simple string but a nested list. This list is where you specify the actual things you want Ansible to do to provision this system and the order in which it should do them.
So far, the list has only one entry:
- name: update apt cache apt: update_cache=yes
In an Ansible playbook, each thing you want Ansible to do is called a task, and each task is an associative array with at least two keys. The first, name, is just a label to let you follow what Ansible is doing as it reports its progress. The second is the name of an Ansible module -- a bit of code that tells Ansible how to connect to various different systems and software packages.
Ansible comes with a rich library of modules. Here, we're using the module called apt, which lets us interface with Ubuntu's package manager. The value assigned to the apt key, update_cache=yes, tells apt to refresh its local cache of available packages. This is equivalent to running apt-get update at a console prompt.
Now let's try running this playbook. Tear down the VM if you haven't already:
vagrant destroy
Then enter:
vagrant up
You'll see the output you saw when you spun up the VM earlier, but now, after the output you saw before, there will be a new section that begins "Running provisioner: ansible..." and lists the result of each task in the playbook.
Stupid Ansible TricksThe rest of the process of developing your
playbook is just a matter of figuring out what things you normally do to set up a development environment and then translating those things into Ansible tasks.
We'll need a Web server, for instance. So set up the following task:
- name: install Apache apt: pkg=apache2 state=latest
This task tells Ansible to use apt to install the latest available version of Apache 2. Apt will automatically install Apache's dependencies, so we don't have to worry about installing them manually.
We'll want PHP, along with some commonly used libraries. We can do that with the apt module, too, as shown in Listing 3.
Here we see a slightly different syntax for the apt module -- instead of specifying a single package name in the pkg= parameter, we specify instead a variable, {{ item }}. This tells Ansible that we're going to give it a list of package names and that it needs to iterate over that list,
LISTING 3
01. - name: install PHP, with batteries02. apt: pkg={{ item }} state=latest03. with_items:04. - php505. - php5-cli06. - php5-mysql07. - php5-curl08. - php5-gd09. - php5-sqlite10. - php5-xmlrpc11. - php5-imagick12. - php5-xcache

10 | September 2014 phparch.com
Easy WordPress Dev Environments With Vagrant and Ansible
installing them one by one. We then put that list of package names as the value of a new key, with_items.
What next? Let's say that we want to install MySQL, set the password for the MySQL root user, and then have Ansible use that root user account to create an empty MySQL database for us to use with WordPress (See Listing 4).
The first task uses the familiar apt module to install the latest versions of both the MySQL client and server.
The second task uses another module, service, to check whether or not the MySQL service is up and running (state=started). If it isn't, the module will start it; if it is, the module does nothing.
(Ansible modules are designed to be idempotent -- safe to run multiple times without the end result being different. So you don't have to worry about multiple MySQL processes being spawned by this task.)
The third task uses another new module, mysql_user, to set the password of the root MySQL user to "mysql". name=root specifies the name of the user account we want to work with (in this case, "root"). password=mysql sets the value of that account's password. host=$item tells Ansible that we're going to provide a list of host names and that it should check for a user account named root at each one. Finally, state=present tells Ansible to create a user account named root at the given host name with the specified password if one does not already exist.
The fourth and final task uses another new module, mysql_db, to actually create our empty database. The login_user and login_password parameters tell Ansible to log into MySQL as root to create the database; the other parameters specify the database name, character set, and collation. (state=present tells Ansible to create this database if it does not already exist.)
Now let's fetch the WordPress software itself and install it, as shown in Listing 5.
First, the get_url module will download the file at the URL specified in the url parameter and save it in the directory specified in the dest parameter. In this case, we put it in /tmp.
The next command ensures that the unzip command is installed via apt. Once it is installed, Ansible can then unpack that ZIP archive and move it into the right place. The last two steps use another module, command, to extract and move the files. The command module simply runs any command you'd run in a shell.
LISTING 4
01. - name: install MySQL client and server02. apt: pkg={{ item }} state=latest03. with_items:04. - python-mysqldb05. - mysql-client06. - mysql-server07. 08. - name: start MySQL service, if not started already09. service: name=mysql state=started10. 11. - name: setup MySQL root user password12. mysql_user: name=root13. password=mysql14. host={{ item }}15. state=present16. with_items:17. - $ansible_hostname18. - 127.0.0.119. - ::120. - localhost21. 22. - name: setup empty database for WordPress23. mysql_db: name=wordpress24. encoding=utf825. collation=utf8_general_ci26. state=present27. login_user=root28. login_password=mysql

phparch.com September 2014 | 11
Easy WordPress Dev Environments With Vagrant and Ansible
The Big IdeaAs you work through the steps needed to turn a blank VM into a full-featured development
environment, your playbook grows. Eventually, it has a complete list of steps, and you can bootstrap a new dev VM with a simple vagrant up.
But what do we gain by doing it this way rather than by hand?
One advantage is that you only have to go through this process once. When you're done, you'll have a playbook that lays out the whole process. And when you move on to your next project, you can just copy the files you created here -- the Vagrantfile, setup.yml, and vagrant-inventory -- into a new directory, change the IP address in the Vagrantfile and in vagrant-inventory, and you've got a development environment ready to go for that project.
And because all the files we've used are text files, you can manage and share them with a version control system like Git. Others can then clone your setup and tweak it as needed for their own projects.
Allow me to demonstrate. There's not enough space in this article to actually list out the full contents of a complete playbook that can handle every single step required to bootstrap a WordPress dev environment. But we can get around that! I've posted my own playbook to GitHub https://github.com/jalefkowit/vagrant-ansible-wordpress so you can clone it and use it as the starting point for your own experimentation.
Ansible is a very powerful tool; this tutorial has only scratched the surface of what it can do. But I hope it has given you a sense of how you can use it to automate away some of the most tedious parts of starting a new project. And that should allow you to focus on doing what you do best: writing beautiful PHP.
LISTING 5
01. - name: download WordPress02. get_url: url=http://wordpress.org/latest.zip dest=/tmp/03. - name: install unzip04. apt: pkg=unzip state=latest05. - name: unzip WordPress06. command: unzip /tmp/latest.zip -d /tmp/07. - name: move WordPress directory into web root08. command: mv /tmp/wordpress /var/www/
JASON A. LEFKOWITZ is the founder and president of Rogue Repairman Productions in Alexandria, Virginia, a consulting firm that provides technology that doesn't suck to progressive advocacy groups, campaigns and non-profit organizations. He has been developing in PHP for nearly fifteen years, and has the therapy bills to prove it.
Twitter: @jalefkowit
phparch.com September 2014 | 11

magazine
books
conferences
training
phparch.com
Keep your skills current and stay on top of the latest PHP news and best practices by reading each new issue of php[architect], jam-packed with articles. Learn more every month about frameworks, security, ecommerce, databases, scalability, migration, API integration, devops, cloud services, business development, content management systems, and the PHP community.
We also offer digital and print+digital subscriptions starting at $49/year.
Get the complete issue for only $6!
Want more articles like this one?