fit user manual v10.01 aug16fittrackingsolutions.com/support/fitusermanual.pdf · manual, online...
TRANSCRIPT

User Manual
Version 10.01
Alcea Technologies Inc.www.fittrackingsolutions.com

1 About FIT .............................................................................................................................................................. 2
1.1 What’s New? ................................................................................................................................................ 21.2 Additional Documentation ............................................................................................................................. 21.3 Customer Support and Contact Information ................................................................................................. 21.4 About Alcea Technologies Inc. ...................................................................................................................... 3
2 Logging In to FIT ................................................................................................................................................... 4
2.1 Email New Password Feature ....................................................................................................................... 5
3 Dashboard ............................................................................................................................................................ 6
3.1 Configuring Components .............................................................................................................................. 73.1.1 List Component ..................................................................................................................................... 73.1.2 Calendar Component ............................................................................................................................. 93.1.3 Summary Component .......................................................................................................................... 10
3.2 Reports and Charts available in Dashboard ................................................................................................. 11
4 Main Menu ......................................................................................................................................................... 12
4.1 Viewing the Main Menu .............................................................................................................................. 12
5 User Profile ......................................................................................................................................................... 16
5.1 User Info ..................................................................................................................................................... 165.2 Email Preferences ....................................................................................................................................... 175.3 User Preferences ........................................................................................................................................ 185.4 Column Preferences ................................................................................................................................... 20
5.4.1 Edit Attributes ...................................................................................................................................... 215.4.2 Additional Column Preferences ........................................................................................................... 22
6 Creating and Updating Issues ............................................................................................................................. 23
6.1 Understanding Issue Tracking ..................................................................................................................... 236.1.1 Issue Tracking Definition ..................................................................................................................... 236.1.2 Tracking Issues within the Change Process ........................................................................................ 23
6.2 Issue Tracking Scenarios ............................................................................................................................. 236.2.1 General Information ............................................................................................................................. 236.2.2 Real-Life Scenario (Bug Tracking) ........................................................................................................ 246.2.3 Viewing and Hiding Closed Issues ....................................................................................................... 25
6.3 Creating Issues ........................................................................................................................................... 266.4 Updating Issues .......................................................................................................................................... 286.5 Cloning Issues ............................................................................................................................................. 286.6 Email Notification ........................................................................................................................................ 29
7 Filters ................................................................................................................................................................. 31
7.1 Filter Definition ............................................................................................................................................ 327.2 Using Preset Filters ..................................................................................................................................... 327.3 Creating Custom Filters .............................................................................................................................. 33

7.3.1 Quick Filter Tab .................................................................................................................................... 347.3.2 Filter Save Options .............................................................................................................................. 34
7.4 Editing and Deleting Custom Filters ............................................................................................................ 34
8 Reports ............................................................................................................................................................... 36
8.1 Running Saved Reports ............................................................................................................................... 368.2 Generating Custom Reports ....................................................................................................................... 36
8.2.1 Saving Custom Reports ....................................................................................................................... 398.3 Changing the Report Format ....................................................................................................................... 39
9 Charts ................................................................................................................................................................. 40
9.1 Running Saved Charts ................................................................................................................................. 409.2 Creating Custom Charts .............................................................................................................................. 41
10 Logging Out ...................................................................................................................................................... 43

1
© 2016 Alcea Technologies Inc. All rights reserved.
Information in this document is subject to change without notice. Alcea Technologies Inc. and the FIT logos are trademarks of Alcea Technologies, Inc. Windows® is a registered trademark of Microsoft Corporation. All other trademarks are the property of their respective owners. The software described in this document is furnished under a license agreement or nondisclosure agreement. The software may be used or copied only in accordance with the terms of those agreements. The contents of this manual and accompanying software are protected by copyright. No part of this publication may be reproduced, stored in a retrieval system, or transmitted, in any form or by any means, electronic, mechanical, recording, or otherwise without the written consent of Alcea Technologies Inc.

1 About FIT
FIT is an innovative and easy-to-use issue management solution, providing you with the tools to track issues, coordinate projects, and effortlessly manage the change process within your organization.
This publication provides you with an overview of FIT’s capabilities and also provides you with detailed steps for conducting typical tasks performed with this software.
A second publication — the FIT Administrator Manual — is also available. The administrator manual provides FIT administrators with technical setup steps and configuration options. For more information, see the FIT Administrator Manual, available at
http://www.fittrackingsolutions.com/support/documentation.html
1.1 What’s New?
Our latest free product upgrades, as well details about new and upcoming product releases as are available at
http://www.fittrackingsolutions.com/support/upgrades.html
1.2 Additional Documentation
Additional documentation, including the Administrator’s Manual, Database Module Manual, Online HelpDesk, product FAQs, and troubleshooting tips, are available at,
http://www.fittrackingsolutions.com/support/documentation.html
1.3 Customer Support and Contact Information
Still have a question, or need some additional help? You can contact us at the following numbers and email address:
Telephone: 1-613-563-9595
Toll free: 1-877-321-4463
Fax: 1-613-563-9494
HelpDesk: http://www.fittrackingsolutions.com/support/helpdesk.html
Email: [email protected]
2About FIT

1.4 About Alcea Technologies Inc.
Established by IT professionals for IT professionals, Alcea Technologies Inc. has been providing premium information technology solutions since 1997.
Our flagship product, Fit Tracking Solutions (FIT), is a market leader in issue management and tracking software. Each product is built off of the FIT platform, One Software Unlimited Solutions. Quick to install, easy to use, and simple to customize, FIT includes a support package that is unprecedented in the industry. FIT incorporates the use of templates that tailor to a specific tracking need and can be carefully configured to meet the exact needs of any organization.
Alcea's corporate mandate is to continue offering world class IT products and services to our global customers, which include public and private organizations, government departments, and Fortune 500 companies.
For more information about Alcea Technologies Inc., visit www.alceatech.com
For more information about FIT Software, visit www.fittrackingsolutions.com
3About FIT

2 Logging In to FIT
In order to log in, a FIT Administrator must configure your Login ID and Password. Once your Administrator has created a User account for you and provided you with your log in details, you can connect with your browser and log in. If you do not know your Login ID or Password, contact your Administrator.
For information about installing and starting FIT, see the FIT Administrator Manual available at
http://www.fittrackingsolutions.com/support/documentation.html
To log in to FIT
1 On the Login page, type your Login ID in the Login box.
2 Type your password in the Password box.
NOTES If you want FIT to remember your password each time you log in, select the Remember this password check box (must be enabled by admin).
Email New Password allows users to change their password without admin assistance. This option must be turned on in Security settings.
Create New Login allows new users to create an account. (must also be enabled)
Figure 1: Login Page
4Logging In to FIT

2.1 Email New Password Feature
If you have forgotten your password, click on the “Email New Password” link. You will be redirected to the following screen:
Once you enter your Login and click the Submit button a new password is generated and emailed to the address attached to your Login ID.
When you are done, you can click the “Back to Login Page” link and proceed to enter your Login information to gain access to the FIT application.
5Logging In to FIT

3 Dashboard
The dashboard feature provides a snapshot of separate components together in one location. These components can represent multiple sets of data in different formats and from different tracks. Each user has access to both a system dashboard and personal dashboard. The system dashboard is set up by the administrator of the system for a common set of components. The personal dashboard can be configured separately by each user. Users can toggle between the two dashboards using the Dashboard drop-down, displayed in the image below.
Figure 2: System Dashboard Toggle Example
The dashboard allows several different component types. The most common components can be added from the main menu options of any track, while the user is viewing the data they are trying to configure for the dashboard. Other components are also possible and will be listed as they become available. (ie: see report component below)
6Dashboard
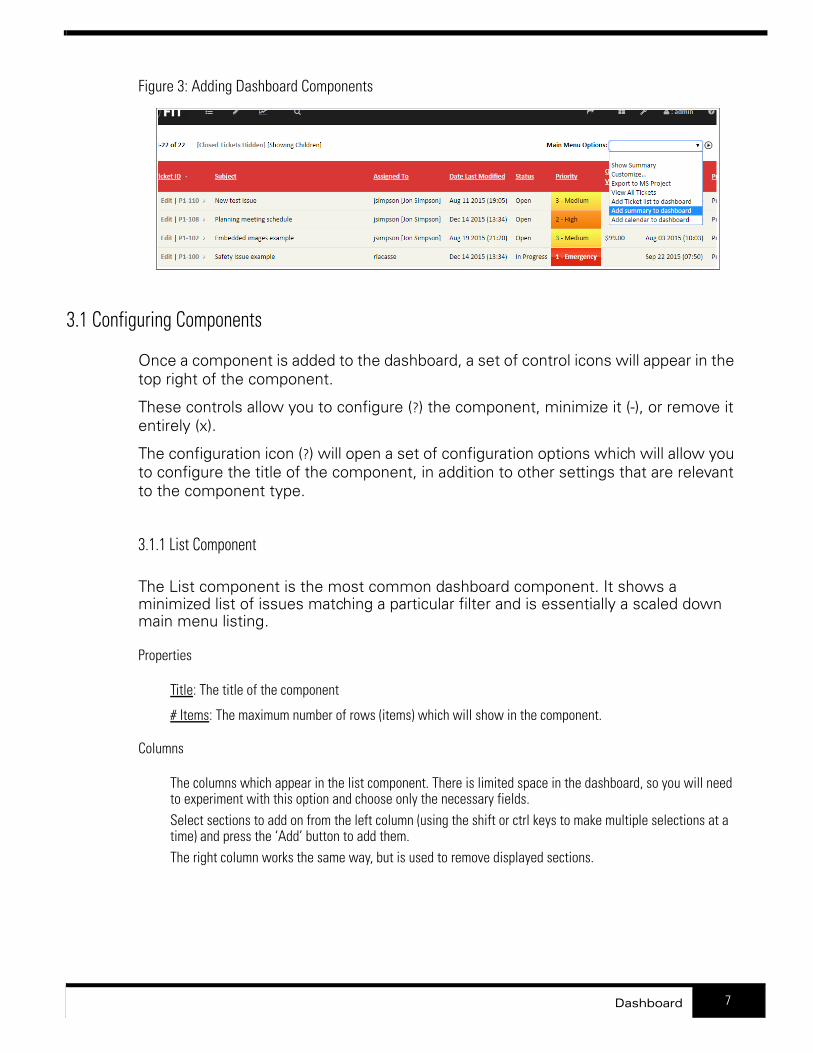
Figure 3: Adding Dashboard Components
3.1 Configuring Components
Once a component is added to the dashboard, a set of control icons will appear in the top right of the component.
These controls allow you to configure (?) the component, minimize it (-), or remove it entirely (x).
The configuration icon (?) will open a set of configuration options which will allow you to configure the title of the component, in addition to other settings that are relevant to the component type.
3.1.1 List Component
The List component is the most common dashboard component. It shows a minimized list of issues matching a particular filter and is essentially a scaled down main menu listing.
Properties
Title: The title of the component
# Items: The maximum number of rows (items) which will show in the component.
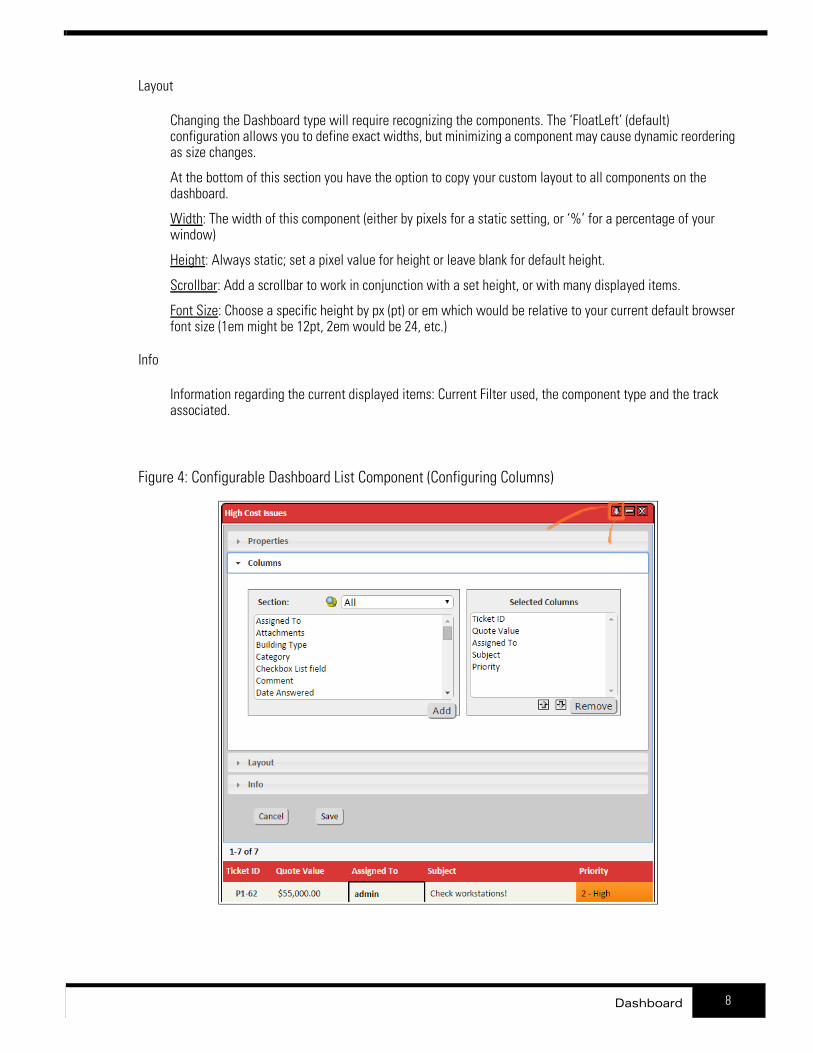
Columns
The columns which appear in the list component. There is limited space in the dashboard, so you will need to experiment with this option and choose only the necessary fields.Select sections to add on from the left column (using the shift or ctrl keys to make multiple selections at a time) and press the ‘Add’ button to add them.The right column works the same way, but is used to remove displayed sections.
7Dashboard
Layout
Changing the Dashboard type will require recognizing the components. The ‘FloatLeft’ (default) configuration allows you to define exact widths, but minimizing a component may cause dynamic reordering as size changes.
At the bottom of this section you have the option to copy your custom layout to all components on the dashboard.
Width: The width of this component (either by pixels for a static setting, or ‘%’ for a percentage of your window)
Height: Always static; set a pixel value for height or leave blank for default height.
Scrollbar: Add a scrollbar to work in conjunction with a set height, or with many displayed items.
Font Size: Choose a specific height by px (pt) or em which would be relative to your current default browser font size (1em might be 12pt, 2em would be 24, etc.)
Info
Information regarding the current displayed items: Current Filter used, the component type and the track associated.
Figure 4: Configurable Dashboard List Component (Configuring Columns)
8Dashboard

3.1.2 Calendar Component
A calendar highlights any days with issues matching the component date field. When a date is selected,a list of issues matching that date, or close to that date is given.
Title: The title of the component
Date Field: The date field that is used by the calendar. A list of issues with relevant values for this field will be listed under the calendar. Also, the calendar will highlight days which have any issues which match that date.
Max Events: the maximum number of events that will show in the details below the calendar
Figure 5: Configurable Dashboard Calendar Component (Configuring Layout)
NOTE Both the Layout and Info configurations are the same within each component.
9Dashboard
3.1.3 Summary Component
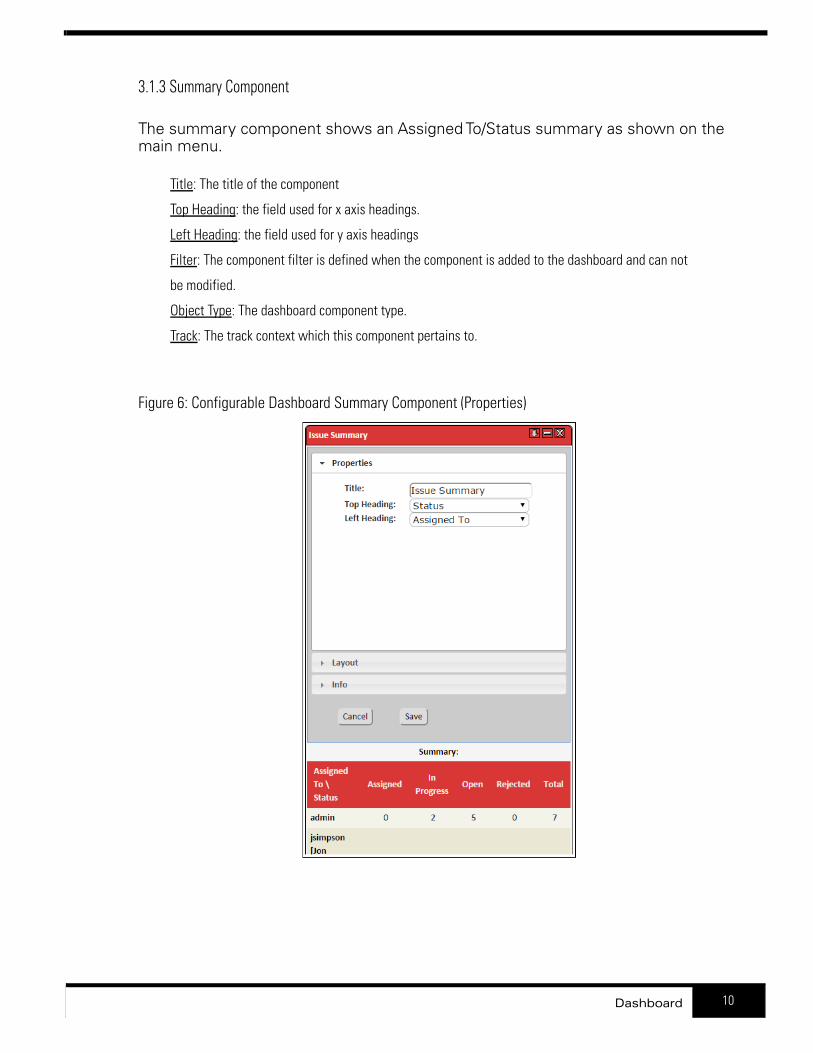
The summary component shows an Assigned To/Status summary as shown on the main menu.
Title: The title of the component
Top Heading: the field used for x axis headings.
Left Heading: the field used for y axis headings
Filter: The component filter is defined when the component is added to the dashboard and can not
be modified.
Object Type: The dashboard component type.
Track: The track context which this component pertains to.
Figure 6: Configurable Dashboard Summary Component (Properties)
10Dashboard

3.2 Reports and Charts available in DashboardOnce a report is configured and saved, you can then add it to your dashboard from the report configuration menu, as in the following image.
Figure 7: Adding Reports to the Dashboard
NOTE If the report is configured to show a chart, then you will see a report/chart toggle option on the dashboard, giving you access to both.
Figure 8: ‘Show Report/Chart’ Button
11Dashboard

4 Main Menu
Once you log in to FIT, you can view the Main Menu and customize the information that displays on this page.
4.1 Viewing the Main Menu
By default, after a successful login to FIT, the Main Menu is shown. The Main Menu, shown in Figure 10 and detailed in the corresponding table, provides you with an organized list of system information and navigational links that let you move through the system and view data. These options also provide access to other FIT menus (with extended functionality) and the ability to hide Open or Closed issues. For information about issues, see “Creating and Updating Issues” on page 23.
Please note that if you have normal privileges, the Main Menu page appears as outlined in the following two figures. If you have read-only privileges, you will not have access to the New Issue or Edit Profile menus. If you have administrator privileges, you have access to the features for normal users, plus access to the Bulk Update page and Admin page, which are not shown. (Note: The links to all pages are in the Navigation Bar at the top of the page, marked “1” in the figures below.)
Your FIT administrator can inform you of your privilege level (administrator, normal, or read-only) or you can see the FIT Administrator Manual available at http://www.fittrackingsolutions.com/support/documentation.html for more details.
Figure 9: FIT — Main Menu Page (‘Mega Navbar’)
21
4
6
5
3
12Main Menu

Figure 10: FIT — Main Menu Page (‘Black Curve’)
12
3
4
5
6
Figure 2 and Figure 3 show two of the many styles which are available with the FIT system. In each case, the Logo and color scheme can be customized to match your organization. The header section of the page (areas 1-3) is visible from every menu within the system making most features immediately accessible.
For more information about customizing FIT, see the FIT Administrator Manual available at
http://www.fittrackingsolutions.comsupport/documentation.html.
Table 1: FIT — Main Menu Page Options Defined
Diagram no. Title Description
1 Navigation Menu
Lets you access other FIT menus using the corresponding links. Note: If you are a FIT administrator, you can access the Admin Menu page and Bulk Update page in addition to the pages outlined below. For more information, see the FIT Administrator Manual available at http://www.fittrackingsolutions.com/support/documentation.html.
Menu Items
Main Menu Lets you access the Main Menu page as shown in Figure 10.
Dashboard A set of useful components that you can customize.
New IssueLets you access the New Issue page, from which you can log a new issue. If you are tracking additional items from another integrated system, there can be more New “ItemX” menus here.
Edit ProfileLets you access the Edit Profile page, from which you can change your current user profile. This includes password, user tag, user preferences and default column settings.
FiltersLets you access the Filters page, from which you can create and edit filters to help sort data.
13Main Menu

ReportsLets you access the Reports page, from which you can generate quick (preset) or custom reports.
ChartsLets you access the Charts page, from which you can generate quick (preset) or custom charts.
Logout Lets you log out of FIT.
2 Filters and Search Bar
Switch TrackIf you have integrated multiple systems, you can use this dropdown to switch between systems.
FiltersLets you select filters. Filters let you specify criteria in order to view only issues that possess similar characteristics. For example, you can create a filter to view only software issues for a project you specify.
SearchThe search field is a full-text search field of all issues within the system, allowing users to quickly find a particular issue, or related issues.
Goto Issue Lets you automatically navigate to a specific item using the ID.
3 Filter Definition
Summary Defines the active filter used to narrow down the issue data set.
Clear Filter Quick link to clear the current filter.
Closed Issues Hidden/Visible Toggle Link
Lets you toggle between viewing and hiding Closed issues. For more information about Open and Closed issues, see “Creating and Updating Issues” on page 23. The criteria for hiding issues can be configured by the administrator. For more information, see the FIT Administrator Manual available at http://www.fittrackingsolutions.com/support/documentation.html.
4 Issue MenuLets you view a listing of all the issues matching the current filter setting. All columns are sortable. The date format can be configured to match the date format used within your organization.
5 Current Issue Summary BoxLets you view a summary of the issues (Open, Closed and Total) currently assigned to each FIT user. You can create similar summary reports using the reporting feature
6 Main Menu Options
Lets you access a variety of customization options, which include:Customize... - the ability to edit user preferences and change the columns that display on the Main Menu page. This is simply a subset of the “Edit Profile” menu.Export to MS Project - Export current issues to MS Project.View All Issues - Show all issues (with details) matching the main filter in one long list. (may take time to display)Add to Dashboard Options - allows you to add what you are currently viewing as a component to the main dashboard.
Diagram no. Title Description
14Main Menu

15Main Menu
4.3 Editing User Preferences
You can edit a variety of user preferences in your profile by clicking the Customize link (as shown in Figure 4). You can also customize user preferences through the Edit Profile feature.
To edit user preferences
1 On the Main Menu, click the Edit Profile link or choose applicable option from Main Menu Options drop-down. The Edit Profile link is found as an Action on the main menu navigation bar.
2 Specify the appropriate user preferences in the User Preferences or Column Preferences tab.
3 Click Update User/Column Preferences.
Figure 9: (Main Menu Drop-Down > Customize)
6

5 User Profile
The Edit Profile menu lets you customize user options. These options are divided up into 4 tabs; User Info, Email Preferences, User Preferences, and Column Preferences.
5.1 User Info
The User Info tab is mainly used to change the password you use to access FIT. Depending on the format of your userid, you may also choose to create a User Tag. This tag is displayed in brackets wherever your userid is shown in our system. This can help identify your userid to other users in the system. Please note that your FIT administrator is initially responsible for setting up these options. For more information, contact your FIT administrator or see the FIT Administrator Manual available at http://www.fittrackingsolutions.com/support/documentation.html.
To change your password
1 On the Main Menu page, click the Edit Profile link on the main menu navigation bar.
2 On the Edit Profile page, locate the User Info tab.
3 Type a new password in the Enter New Password box.
4 Retype the password in the Confirm New Password box.
5 Click Update Password.
Figure 10: User Info Tab
16User Profile

5.2 Email Preferences
Email notification is a vital feature within FIT and the Email Preferences tab allows you to define your email address and formatting options for configuring email notifications. Additionally, you can define a second email address if you wish to send additional notifications in a different format. This can be useful for a handheld device. Please see the section on Email Notifications (under Creating and Updating Issues) to understand exactly when an email is sent from FIT.
> Email Address — Lets you specify the email address where all email notification is sent. This can include a list of email addresses (separated by commas or semi-colons).
> Plain Text Email — Lets you ensure any email notification of an issue is sent as a text-only message. This alters the product’s default functionality, which is to send email notification in HTML format.
> Disable Latest Change — Removes the Latest Change section from the top of email notifications.
> Disable Links — Removes the direct system links from the top of email notifications. These links are used for quick access to the FIT system.
> Disable Full Details — Removes the main Details section from email notifications.
> Disable Full History — Removes the History section from the top of email notifications.
> Send Redundant Notifications- This option will ensure that notifications are always sent to a user, rather than being skipped if the user is actually the one making the change to the issue. Please see the section on Email Notifications (under Creating and Updating Issues) for a complete understanding of how notification works.
Please note that a FIT administrator is required to set up email notification for this feature to work. For more information, contact your FIT administrator, or see the SMTP settings in the FIT Administrator Manual, available at http://www.fittrackingsolutions.com/support/documentation.html.
To change email preferences
1 On the Main Menu page, click the Edit Profile link.
2 On the Edit Profile page, locate the Email Preferences tab.
3 Modify email options detailed above.
4 Click Update Email Preferences.
17User Profile
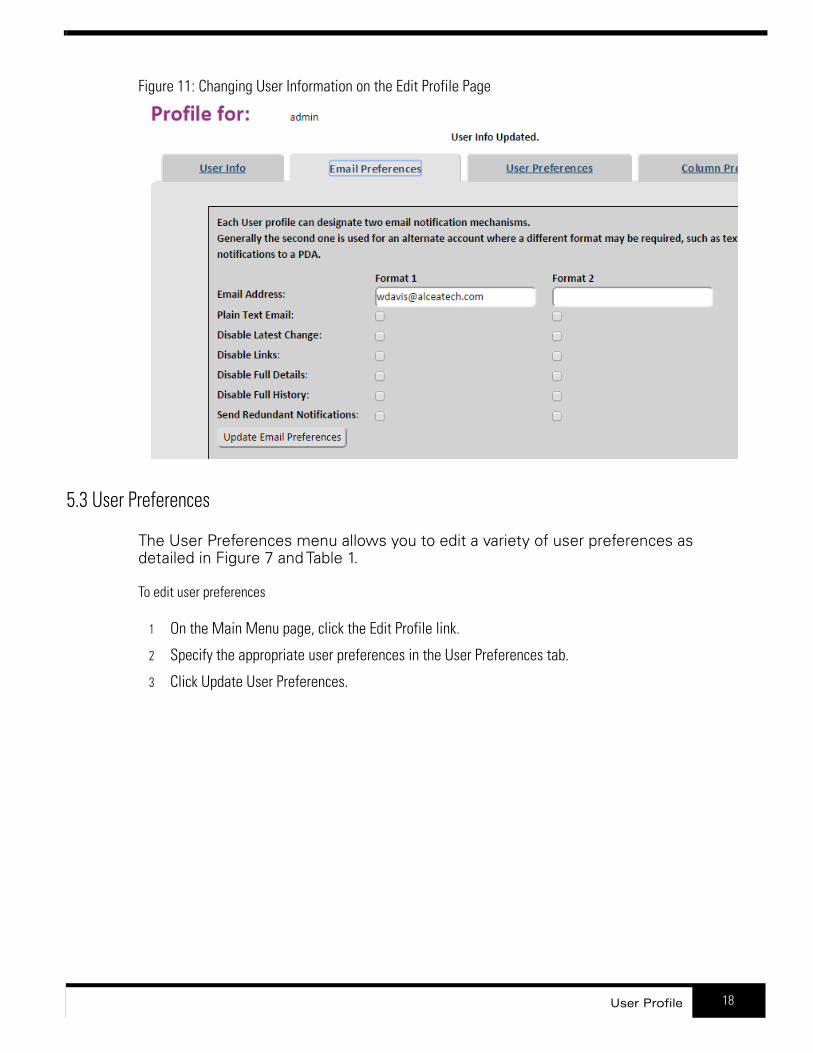
Figure 11: Changing User Information on the Edit Profile Page
5.3 User Preferences
The User Preferences menu allows you to edit a variety of user preferences as detailed in Figure 7 and Table 1.
To edit user preferences
1 On the Main Menu page, click the Edit Profile link.
2 Specify the appropriate user preferences in the User Preferences tab.
3 Click Update User Preferences.
18User Profile

Figure 12: Edit User Preferences
Click here.
Table 1: User Preferences List
Preference Lets you...
Display Issue Details Newest FirstDisplays the newest history entry fields first in the bug descriptions. The default setting is to display the entries in chronological order, but this can require a lot of scrolling if there are a lot of entries.
History TypeControls the default history type that is used in the history section when viewing issue details.
Font SizeDetermines how large to display the information about bugs. A smaller font size can allow you to see more bugs or fields on the screen at once.
Disable Color Coding This options disables the color coding attributes used to format the main menu.
Disable Menu Summary Allows the user to hide the summary box on the bottom of the main menu page.
Disable Time SummaryAllows the user to hide the time summary box on the bottom of the main menu page.
Disable Main Menu Grouping Allows users to show all issues in one list, in the main menu. (default size is 100) Warning: this can slow down your system if it has a large number of issues in it. Generally, you should keep this below 100.
Set Main Menu Grouping Size Allows users to control the grouping size in the main menu.
Time Zone Adjustment Adjust all dates to a specific time zone.
Language Allows user to default to another language.
Default Filter Allows user to control the default filter that is set when they log in.
19User Profile
5.4 Column Preferences
You can select the columns that you want to display on the Main Menu page as outlined in Figure 13, using the Column Preferences tab on the Edit Profile menu. The columns you select correspond to the fields shown in the Current Issue Summary on the Main Menu page. These fields are also used as the default setting for any reports you generate. For more information about reports, see “Reports” on page 36.
To select the columns to display
1 Under the Main Menu Options drop-down menu, choose Customize.
NOTE This can also be accessed through Administration Options > General Setup > Users > Edit Profile
2 Select the columns you wish to display (shift/control + click to make multiple selections) and then click the Add button.
NOTE Above the listed column items, you have the option to sort by category, or to use the Search button in order to find specific columns to use for display.
3 You now have the option to sort the order in which the columns appear by dragging (the top most item will appear on the left), then either Cancel or Save the changes made.
Show report after login Allows user to immediately display a saved report when they first login.
Preference Lets you...
20User Profile

Figure 13: Selecting Columns to Display
Click here.
on the Main Menu Page
5.4.1 Edit Attributes
Under the Edit Attributes header, the following options are available to modify the way the columns will be displayed, in-order to help organize your data appropriately.
Max Width: Set the maximum width for a field which will limit the number of pixels given to the column in the table.
Max Length: Specify the maximum number of characters that will be shown for the data of a field.
Wrapping: Specify that the data for the field will wrap dynamically using the dynamic width given to it by the table.
Full Row: Display the data for a field using the full width of the table, below the other standard field listings. The Comment field is using this option in the above example.
Historical: Show a historical list of values for a field. These values are prefixed by a [H] tag, where H denotes the entry id for each historical value. The Comment field is using this option in the above example.
Separated: Separate historical values with a bold time stamp. This option replaces the [H] tag, used by the Historical setting. The Comment field is using this option in the above example.
Child Columns: This option is used to show/hide the field when viewing child data, such as for the Child List field shown by a parent issue.
21User Profile

5.4.2 Additional Column Preferences
Showing Child Issue List For Each Parent: This option will create a hierarchy of child issues in the Main Menu, using highlighted color for each child level. Make sure to check off the child column fields that you want to see. If they are not checked off, the value will not be shown. This can help you clean up the page and identify data faster.
Figure 14: Child Issue List Example
NOTE The number of issues at the top of the Main Menu list indicates the number of issues listed that currently match the specified filter. However, all children will be listed under a parent for this option (assuming permissions). If the child issue does not match the current filter, the issue will be listed in a lighter gray font, rather than the normal black.
Add space between details for each row: This checkbox simply allows you to display a space between each row on the Main Menu.
22User Profile

6 Creating and Updating Issues
Before you create an issue, you may want to familiarize yourself with the concept of issue tracking.
If you are comfortable with your knowledge of issue tracking, you can create issues by navigating to the New Issue page. On the New Issue page, you can enter a variety of details to effectively track the issue, including the current issue’s subject, priority level, and the FIT users who are to be notified of the issue. You can also add project management details to the issue for tracking purposes.
After creating an issue, you and other FIT users can update its status (for example, from Open or Closed) for tracking purposes.
6.1 Understanding Issue Tracking
The concept of issue tracking is outlined below.
6.1.1 Issue Tracking DefinitionEffective change management requires a team to effectively monitor issues that impact its team members. Because teams work on many issues at once, each issue can pass through numerous states (for example, Open and Closed) until the issue is successfully resolved. FIT lets you track the states of outstanding issues and provides the ability to filter common issues.
6.1.2 Tracking Issues within the Change ProcessA change process is the set of rules that exist to control workflow. These rules define a set of states and determine how an issue can pass from one state to another. This includes the path that an issue can take as well as the states that you can assign to an issue (for example, Open or Closed).FIT is designed to allow you to follow your own change process. When FIT is installed, a default change process lets the product function immediately. This default functionality includes a common set of states, which are outlined in the Figure on the following page. These states can be configured to meet your organization’s needs. For more information about configuring these states, see the FIT Administrator Manual available at http://www.FitTrackingSolutions.com/support/documentation.html.
6.2 Issue Tracking Scenarios
6.2.1 General InformationOur default process begins in the Open state and progresses to the Ready for Retest state and then on to the Closed state. Closed issues are then hidden by default in the
23Creating and Updating Issues

system. If the issue is not tested successfully, it is rejected and/or sent back to the Open state to start the process again. An issue can enter the Deferred state at any time and remains in that state until you are ready to address it.
Figure 15: Bug Tracking Scenario
Rejected
Open Closed
Deferred
6.2.2 Real-Life Scenario (Bug Tracking)
1 A product issue is raised by a tester. > The tester uses FIT to describe the issue, including the environment, product revision, and
instructions to reproduce the issue (if possible). The tester assigns the issue to a project manager. The issue is marked as Open and the history trail begins.
2 The project manager is notified that a new product issue is entered in FIT.> The project manager identifies a developer to fix the product issue and reassigns the product
issue to the developer. 3 The developer reproduces the issue using the information provided by the users who directed the
developer to the issue. > The developer reproduces the issue using the information provided. The developer fixes the
product issue and changes the state to Ready for Retest. The developer passes the fixed product issue back to the testing department for validation.
4 The tester is notified of the product issue reassignment and tests the newest fix to the product to see if the fix works.> If the fix works, the tester changes the product issue status to Closed. If the fix doesn’t work, the
tester marks it as Rejected. A Rejected product issue is reassigned back to the developer, who must attempt to fix it again.
NOTE Throughout this process, the exact status and history of the issue is available to all FIT users. This information can also be used to generate reports. There is also a full history trail and accountability record as illustrated in Figure 16. Figure 16 represents an actual email notification format that is passed to each individual as they are assigned the issue in sequence.
24Creating and Updating Issues

Figure 16: Sample Email Notification for Issues
6.2.3 Viewing and Hiding Closed IssuesYou can view or hide Closed issues, which are listed on the Main Menu page. The link on the top left corner of the Main Menu page toggles to provide this functionality.Please note that FIT’s default view hides closed issues. However, the system can be configured to toggle the display of more states as required. For more information, see FIT Administrator User Manual available at http://www.FitTrackingSolutions.com/support/documentation.html.
To hide closed issues> Ensure the link on the top left corner of the Main Menu page displays Closed Issues Hidden.
To view closed issues > Ensure the link on the top left corner of the Main Menu page displays Closed Issues Displayed.
25Creating and Updating Issues

6.3 Creating Issues
You can create a new issue by navigating to the New Issue page and entering the issue details. After you create the issue, the assigned user is notified by email. This section shows you how to create an issue and outlines a description of the corresponding fields that appear on the New Issue page. Note the following when creating issues:> Fields with exclamation points (!) next to them are mandatory. You must enter data in these fields in
order to create an issue.> While drop down boxes allow you to select preset information, it is helpful to provide as much
information (in the description field) as possible for the purpose of reproducing issues. > The initial state of a new issue is Open by default unless configured in a different manner by your
administrator. > Subjects appear in the Current Issue Summary on the Main Menu page, making it worthwhile to
provide a succinct description. > Always set an appropriate priority level for an issue (for example, emergency or high). > Assign the issue to the appropriate individual within your organization. > Fill in an appropriate description for the issue.> If you do not want to create a new issue, navigate to another FIT page without submitting an issue.
To create an issue
1 On the Main Menu page, click the New Issue link.2 On the New Issue page, specify issue details in the required fields.
Figure 17 and Table 2 describe the available fields.3 Click Submit Issue.
The Current Issue Summary on the Main Menu page displays the issue ID associated with the issue.
NOTE Your user status (administrator, normal, read-only) and the administration settings impact your access to the various fields. For more information, consult your FIT administrator or see the FIT Administrator User Manual available at http://www.FitTrackingSolutions.com/support/documentation.html.
26Creating and Updating Issues

Figure 17: (Default) New Issue Page
Table 2:
New Issue Page Field Description
Subject Give a subject to your issue for easy recognition.
Assigned To Assign the issue to a FIT user.
Project Name the project to which the issue is associated.
Status Specify the status of the issue; for example, Open, Ready for Retest, or Closed.
Priority Specify the priority of the issue; for example, Emergency, High, or Low.
Comment/Description Detail the issue for assigned and notified individuals. This information will be tracked in the issue’s history once the issue is edited.
Notify List Specify the FIT users who are notified of changes to the issue.
AttachmentsBrowse to add attachments of any type, including documents and ZIP files. Attachments can be viewed by selecting the filename and the comment may be edited by clicking Edit.
New Issue Page Field Descriptions
27Creating and Updating Issues

6.4 Updating Issues
You, or any other FIT user, can update an issue by accessing the issue from the Current Issue List on the Main Menu page.
To update an issue
1 On the Main Menu page, navigate to the Current Issue Summary.
2 On the Current Issue List, navigate to the issue you want to edit.
3 Click Edit within the issue description.
4 Update the issue and click Save.
Figure 18: Updating an Issue
6.5 Cloning Issues
A “Create Clone of This Issue” link is available at the top of the edit page to allow you to create new issues more quickly. This allows users to create issues more quickly by
28Creating and Updating Issues

giving them a template from an existing issue, using the values of the parent issue as defaults for the fields of the new issue.
Additionally, the “Clone Issue” page has the following options:
> Start New History blanks out the history for the new cloned issue, rather than keeping the parents entries.
> Record Cloning Note simply places a “cloned from” note in the description.
6.6 Email Notification
Email Notification is the process of sending an email to a related party for the purpose of keeping them up to date on a current issue.
On any update to the system, the default behaviour of FIT is to send a notification to the user who is currently assigned to the modified issue. The one exception to this rule is if the person who is making the changes is actually also the assignee. In this case, there is no need to send a redundant email about information just entered by the same individual.
In addition, several notify lists can be used to direct notifications:
> Each issue includes a separate Notify List, which contains additional email addresses and/or users, who would like to remain informed as to any changes to a given issue. The contents of this list remain intact throughout the life of an issue, until they are manually removed.
> Filters can be saved with a Notify List which directs a notification to users any time an issue is saved and matches the associated saved filter.
> Mail Rules can contain notify lists for bug creation when using anonymous email retrieval.
> Workflow Actions have a notify list option if using workflow rules.
The system keeps track of where to send an issue, using the email address associated with that user, in their configurable profile. This address can actually include multiple addresses, if they are separated by a comma or semi-colon.
When a bug is modified, the system creates an email notification and directs it to a list which contains the following:
> A. All email addresses in the assignee profile
> B. Any addresses in the Notify Lists (defined above)
> C. Any addresses contained in the profiles for any users in the Notify Lists
This list is automatically stripped of duplicates and/or a matching assignee email address (which avoids the redundancy problem outlined above).
All notification is accomplished using a SMTP server, as configured in the Server Configuration menu of the Admin section.
29Creating and Updating Issues

NOTES - Email lists can include multiple addresses, which are delimited by semi colons ; or commas ,. Each address is then sent a notification. - The Notify List exists as a field for every bug so that a list of users can be notified about all updates to a specific bug. This list can contain user names or email addresses and there is a drop-down list (with add button) for quick additions. This list is configurable in the Admin menu. - The "Automatically add creator to notify list" option in the Server Configuration menu will add the creator to the notify list, so that they are kept informed throughout the life of an issue.
- A “Suppress Notification” option exists on edit pages to allow users to enter minor changes without having the system generate notifications.
TIP Your FIT administrator is responsible for ensuring proper email notification is set up. For more information about email notification, talk to your FIT administrator or see the FIT Administrator Manual at http://www.FitTrackingSolutions.com/support/documentation.html.
30Creating and Updating Issues

7 Filters
FIT uses a powerful filtering engine that lets you manage issues by sorting through common data sets.
Filters allow you to narrow down the list of relevant issues which are to be used for the current feature you are using. For example, use a filter to display only issues logged against a specific project or user. Then run a report which outputs data based on that filter.
Figure 19, “Filter Drop-down Tab,” shows the filter drop-down that is available at the top of any menu. This list consists of all the defined filters that are immediately available to the user.
Figure 19: Filter Drop-down Tab
This list consists of two types of filters; system filters and custom filters.
System filters are defined by the administrator and denoted with an asterisk(*) in the drop down list. Common default examples are:
• Assigned to [user] — Shows issues assigned to the user who is logged in to the system.
• Entered by [user] — Shows issues entered by the user who is logged in to the system.
• Open — Shows Open issues.
Custom filters are filters that have been created and saved in the past for future use, using the Save tab in the Filter menu.
If you have administrator privileges, you can create system-wide filters that can be used by all FIT users. For information on the creation of system-wide filters, see the FIT Administrator Manual at
http://www.FitTrackingSolutions.com/support/documentation.html.
31Filters
7.1 Filter Definition
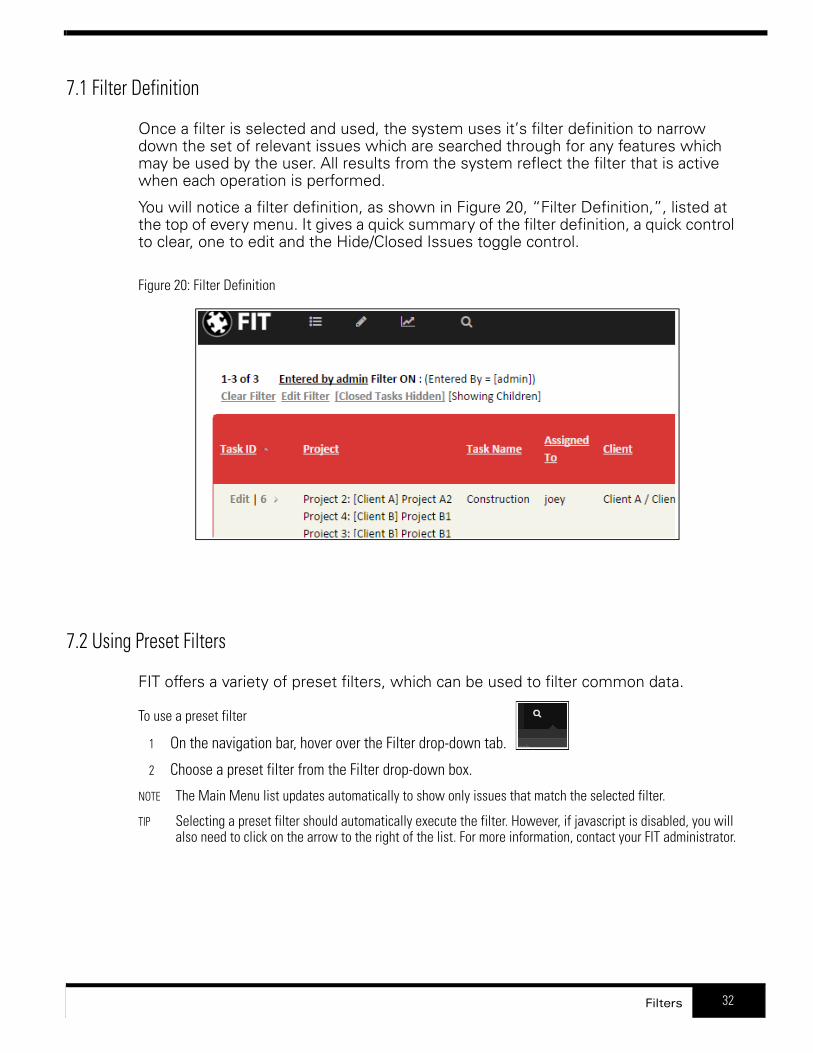
Once a filter is selected and used, the system uses it’s filter definition to narrow down the set of relevant issues which are searched through for any features which may be used by the user. All results from the system reflect the filter that is active when each operation is performed.
You will notice a filter definition, as shown in Figure 20, “Filter Definition,”, listed at the top of every menu. It gives a quick summary of the filter definition, a quick control to clear, one to edit and the Hide/Closed Issues toggle control.
Figure 20: Filter Definition
7.2 Using Preset Filters
FIT offers a variety of preset filters, which can be used to filter common data.
To use a preset filter
1 On the navigation bar, hover over the Filter drop-down tab.
2 Choose a preset filter from the Filter drop-down box.
NOTE The Main Menu list updates automatically to show only issues that match the selected filter.
TIP Selecting a preset filter should automatically execute the filter. However, if javascript is disabled, you will also need to click on the arrow to the right of the list. For more information, contact your FIT administrator.
32Filters
7.3 Creating Custom Filters
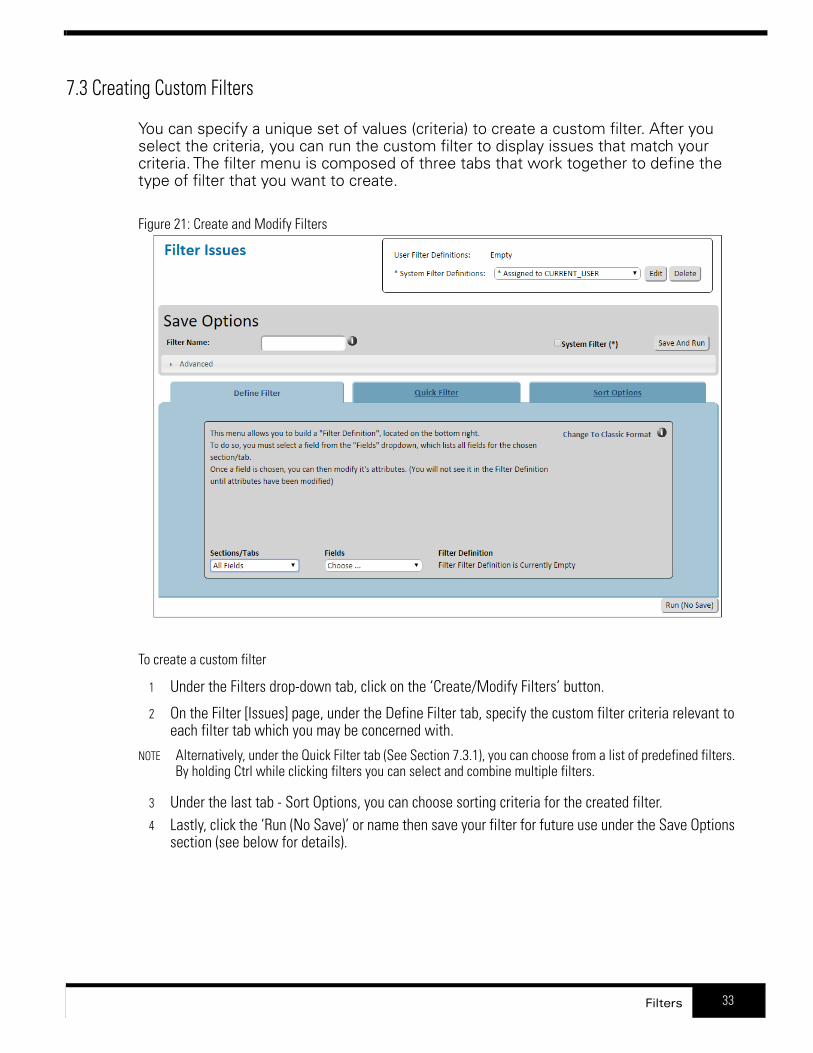
You can specify a unique set of values (criteria) to create a custom filter. After you select the criteria, you can run the custom filter to display issues that match your criteria. The filter menu is composed of three tabs that work together to define the type of filter that you want to create.
Figure 21: Create and Modify Filters
To create a custom filter
1 Under the Filters drop-down tab, click on the ‘Create/Modify Filters’ button.
2 On the Filter [Issues] page, under the Define Filter tab, specify the custom filter criteria relevant to each filter tab which you may be concerned with.
NOTE Alternatively, under the Quick Filter tab (See Section 7.3.1), you can choose from a list of predefined filters. By holding Ctrl while clicking filters you can select and combine multiple filters.
3 Under the last tab - Sort Options, you can choose sorting criteria for the created filter.4 Lastly, click the ‘Run (No Save)’ or name then save your filter for future use under the Save Options
section (see below for details).
33Filters
7.3.1 Quick Filter Tab
The Quick Filter tab is the fastest way to define a simple filter. This tab allows you to simply type a string to search for and then select the fields which you would like searched. Simply hold down the control key to select multiple fields to search for.
NOTE This tab can be used in conjunction with the other tabs.
7.3.2 Filter Save Options
Filters can be saved to the filter drop-down for later use. If the user has admin privileges, they have the option of saving a system filter (denoted with a * in the drop-down), for all users to see.Under the Save Option section, simply add a name for your filter in the ‘Filter Name’ box, denote whether or not this is a system filter with the check-box and then press the Save and Run button.Under the Advanced tab, you are given the option of sending e-mail notifications for when any update meets this filter’s criteria.Additionally, you can specify which groups will see the filter if it is to be added to the server filter list.
7.4 Editing and Deleting Custom Filters
Saved custom filters can be edited or deleted from the system.
To edit a filter
1 On the Main Menu page, click the Filter link under the Tools tab.
2 On the Filter Issues s page, click Edit beside the User Filter Definitions drop down box.
3 Change the custom filter settings under the Classic Filter tab.
4 Type a new filter name in the Save As box under the Save Options tab.
5 Press the User Filter button to save the new filter.
6 Delete the previous custom filter.
NOTE For information on deleting a filter, see the following procedure.
34Filters

Figure 22: Editing and Deleting Custom Filters
To delete a custom filter
1 On the Main Menu page, click the Filter link under the Tools tab.
2 On the Filter Issues page, click Delete beside the User Filter Definitions drop down box, after selecting the appropriate filter.
35Filters

8 Reports
The reports feature lets you report on any internal or custom fields created within FIT.
Custom reports can be created and saved for future use. They let you get creative by choosing any fields to appear within the report you generate.
Once you create a report, you can send it as an email, view it without a header, or view it within Microsoft Word or Microsoft Excel. When you choose to view the report in a Microsoft application, the respective application launches and your report appears within the software. You can then edit the report within the software application as required.
8.1 Running Saved Reports
FIT offers a set of default saved reports that are created on the first installation. Additionally, the administrator and individual users can create custom reports that can be added to this list. Figure 16 demonstrates this default selection under the hover-over ‘Reports’ tab.
Figure 23: The Reports Tab
8.2 Generating Custom Reports
You can create custom reports to access specific summary details of the FIT data.
To create custom reports
1 On the navigation bar, under the Reports drop-down tab click the ‘Create/Modify Reports’ button (Figure 23, “The Reports Tab,”).
2 In the Quick Report tab, choose an option from the Heading 1, Heading 2, or Heading 3 drop down box.
36Reports
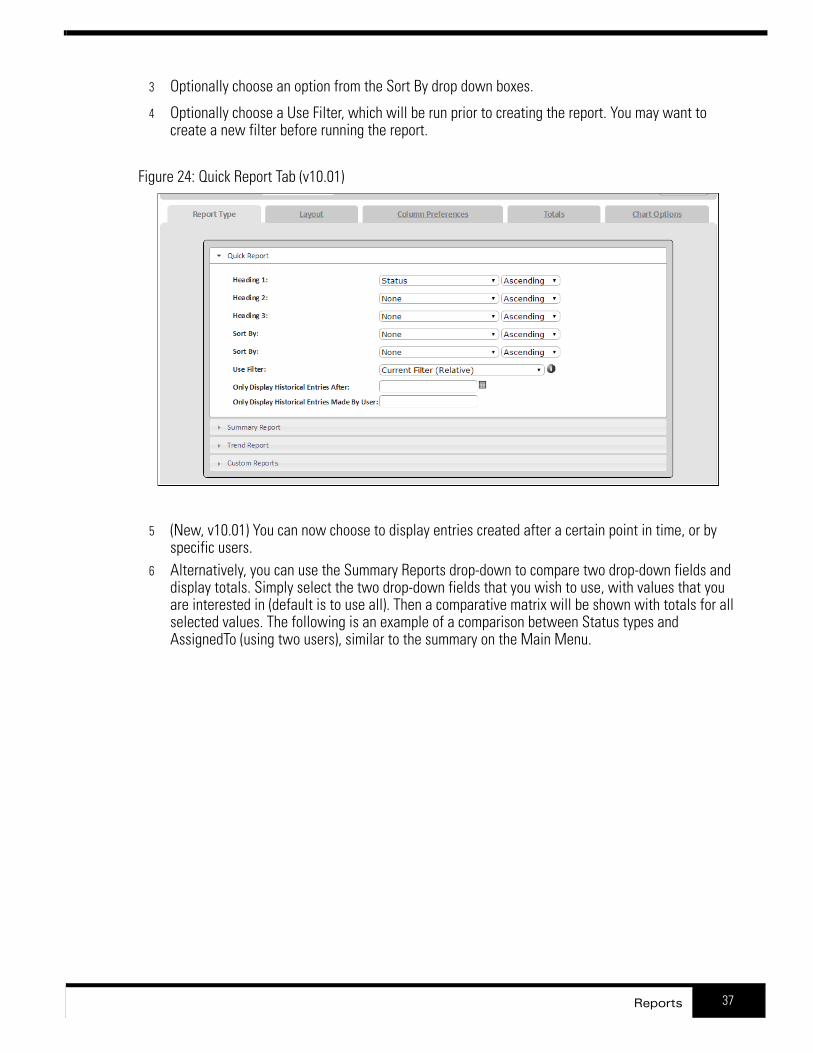
3 Optionally choose an option from the Sort By drop down boxes.
4 Optionally choose a Use Filter, which will be run prior to creating the report. You may want to create a new filter before running the report.
Figure 24: Quick Report Tab (v10.01)
5 (New, v10.01) You can now choose to display entries created after a certain point in time, or by specific users.
6 Alternatively, you can use the Summary Reports drop-down to compare two drop-down fields and display totals. Simply select the two drop-down fields that you wish to use, with values that you are interested in (default is to use all). Then a comparative matrix will be shown with totals for all selected values. The following is an example of a comparison between Status types and AssignedTo (using two users), similar to the summary on the Main Menu.
37Reports

Figure 25: Summary Report Tab (v10.01)
7 The Layout tab is yet another report type. Here you are given the option for a custom title (string) and to disable color coding. Below this you can set up a printable format, using your Quick Report settings, without the default Style sheet settings and colors. You can add optional headers/footers to control page numbers and titles. See the Header Notes for examples.
8 The Column Preferences tab allows you to select the columns corresponding to the details you want to display in the custom report. The options are explained further in the Edit Profile section.
9 The Totals tab allows you to pick a numeric field and calculate totals for every selected header. You can choose to display the total next to the header or at the bottom of the set of rows for that header.
Figure 26: The Totals Tab (v10.01)
10 Click ‘Run (No Save)’ or:
38Reports

8.2.1 Saving Custom Reports
Just like with filters (see “Filter Save Options” on page 34), the Save Options tab allows you to save a defined report so that it can be used again in the future. If you type a name into the name field and press the ‘Save And Run’ to add a user report to the Report drop-down, or check ‘System Report’ before saving to allow all user to see and access this report (Admin only by default).
8.3 Changing the Report Format
The resulting report has a list of additional options on the top right of the page. The first option allows you to email the generated report. You can also change the look of your reports by removing the header, viewing the document in Microsoft Word, or viewing the document in Microsoft Excel.
To change report views
1 Generate a report.
2 Click one of the following options:
Email Page
Export As CSV
View Report Without Header
View Report in MS Excel 2000
View Report in MS Word 2000
3 Click Submit
39Reports

9 Charts
FIT lets you create charts to visually review data. You can output the following types of charts: stack, pie, line, bar, and column (2D or 3D). Custom charts can be saved and let you get creative by choosing any fields to appear within the chart. Please note you can export or print charts using your Web browser’s functionality. For more information, contact your FIT administrator.
Running Saved Charts
FIT offers a set of default saved charts that are created on the first installation. Additionally, the administrator and individual users can create custom charts that can be added to this list.
To use a saved Chart
1 Along the navigation bar at the top, hover over the Reports drop-down tab.2 Select one of the charts along the right column.
NOTES If you are missing information about specific issues in your output, a filter has likely been set. If a filter is active, you will notice its definition at the top of the Charts page.
Once you create a chart, you can quickly change its type (pie, bar, etc.) by clicking the links on the right side of the Chart page.
Figure 27: Sample Saved Chart
40Charts
Creating Custom ChartsYou can create custom charts to access specific summary details of the FIT data. The chart options are laid out into a tab format where common controls are grouped. All tabs work together and are detailed below.
To create custom charts
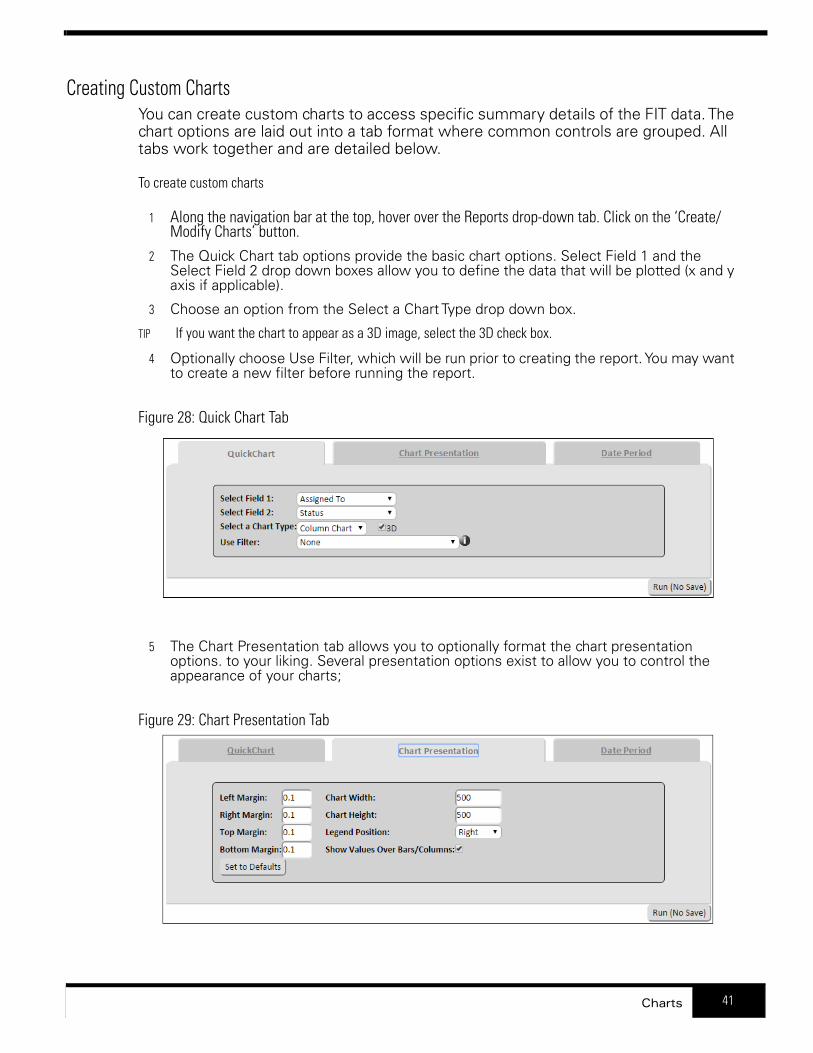
1 Along the navigation bar at the top, hover over the Reports drop-down tab. Click on the ‘Create/Modify Charts’ button.
2 The Quick Chart tab options provide the basic chart options. Select Field 1 and the Select Field 2 drop down boxes allow you to define the data that will be plotted (x and y axis if applicable).
3 Choose an option from the Select a Chart Type drop down box.
TIP If you want the chart to appear as a 3D image, select the 3D check box.
4 Optionally choose Use Filter, which will be run prior to creating the report. You may want to create a new filter before running the report.
Figure 28: Quick Chart Tab
5 The Chart Presentation tab allows you to optionally format the chart presentation options. to your liking. Several presentation options exist to allow you to control the appearance of your charts;
Figure 29: Chart Presentation Tab
41Charts

Left/Right/Top/Bottom Margin: allows users to control the margins around the charts.
Width/Height: allows users to control the size of the charts.
Legend Position: allows users to place the legend as desired.
Show Values over Bars/Columns: determines if values are shown for the extremes of each bar/column value. Allows you to see exact values when shown.
6 If you are charting a date in field1 and you want to restrict the time period for the displayed data, you can use the options in the Date Period tab. The Start/End date control the period for which dates are relevant for the chart. The Period will control the increments on the x-axis.
7 Click Generate Chart.
Saving Custom Charts
If you use the Save Options tab to type a name into the “Save As” field and press the “User Chart” button (or “System Chart” button for administrators), the report will be run and saved as a saved chart for future use.
42Charts

43Logging Out
10 Logging Out
After completing work within FIT, you can log out.
To log out of FIT
• On the Main Menu page, click the Logout link on the Navigation Bar or Logout under the Actions tab.FIT logs you out and the Login page displays.
NOTE Logging out will remove any password cookies if you are trying to use the save password option from the Login page.
Figure 30: Logging Out