first topic: nature of sound -...
TRANSCRIPT

RCF Academy – Sound Engineering Course – Module ACU02
Part 1: The human auditory system
The human auditory system is our earing organ and how it process sound and how our brain processes sound.
Generally speaking the human auditory system is divided in three parts: the outer ear, the middle ear and the inner ear.
Fig. 3 – The human ear.
The outer ear comprises the pinna and the external auditory duct which is closed at the end by the tympanic membrane.
The most visible part of human earing system is the external pinna, it’s just an external part of the whole system. Sound waves are reflected and
- 1 -

RCF Academy – Sound Engineering Course – Module ACU02
amplified when they hit the pinna, and these changes provide additional information that will help the brain determine the direction from which the sounds came.
The eardrum or tympanic membrane is air tight and impermeable and it divides the external ear from the middle ear.
Behind this membrane there is a cavity inside the skull bone filled by air, at the same pressure of the fluid outside, called tympanic cavity.
Fig. 4 – The middle ear.
If, for any reason, there’s a difference between the inside pressure and the outside pressure the tympanic membrane becomes loaded by a force. This “preload” affects the way of earing sounds, loosing sensitivity at low and high frequencies, feeling the ear closed.
Compensating the mismatch of pressure is possible thanks to the opening of the Eustachian tube that is a very thin pipe where the air passes with difficulty and it’s linked with the nose cavity. The opening of this tube can be done with some artificial actions like the Valsalva manoeuvre which consists in pinching the nose, closing the mouth and trying to breathe out through the nose. That will force the opening of the Eustachian tube. This is very effective under water where the high pressure of the water create a significant difference of pressure between the tympanic cavity and outside: this can break the membrane permitting the water to flow inside with very dangerous consequences. The Valsalva manoeuvre is only one of various manoeuvres to equalize the pressure that are called more generally “ear clearing” or “compensation” techniques.
The external sound, which is a pressure fluctuation, vibrates the air inside the external auditory meatus and this pressure arrive to the tympanic membrane so also the membrane starts to move according to the pressure applied to it. What happens is that this movement of the membrane is applied
- 2 -

RCF Academy – Sound Engineering Course – Module ACU02
to a bone chain, the ossicles, composed by the malleus, the incus and the stapes.
As sound waves vibrate the tympanic membrane, it in turn moves the nearest ossicle, the malleus, to which it is attached. The malleus(hammer) then transmits the vibrations, via the incus(anvil), to the stapes(stirrup), which has the function of a leverage, and so ultimately to the membrane of the oval window, the opening of the inner ear.
Fig. 5 – The Stapedius muscle.
Inserted in the neck of the stapes there’s the smallest skeletal muscle in the human body: the stapedius muscle. It dampens the ability of the stapes vibration and protects the inner ear from high noise levels, primarily the volume of your own voice. If a loud sound arrives to the ear, the stapedius becomes contracted lowering the pressure applied by the stapes to the eardrum. The stapedius muscle, that is an involuntary muscle, relaxes only after a certain time, depending also on how long the loud sound lasts.
The inner ear is liquid filled with an incompressible liquid and it consists of the cochlea and several non-auditory structures like the vestibular system.
- 3 -

RCF Academy – Sound Engineering Course – Module ACU02
Fig. 6 – The inner ear.
The vestibular system is the sensory system that provides the leading contribution about movement and sense of balance, giving information about the gravity field and the position of the body’s barycentre.
The vestibular system contains three semicircular canals. They are our main tools to detect rotational movements. The equilibrium system and the auditory one are strongly connected; if one of them is damaged also the other one will be affected because they refer to the same nerve channel.
The cochlea (the name refers to its coiled shape) is a spiralled, hollow, conical chamber of bone, in which waves propagate from the base (near the middle ear and the oval window) to the apex (the top or centre of the spiral).
Fig. 7 – The Cochlea.
- 4 -

RCF Academy – Sound Engineering Course – Module ACU02
A cross-section of the cochlea shows the basilar membrane dividing it in two ducts. The membrane has the capability of resonating at different frequencies, high at the begininning, and progressively lower towards the end of the ducts.
The initial part of the membrane is very thin and with a lot of tension causing it to resonate at very high frequency, going along to the basal membrane it becomes stiffer and the tension lowers, permitting it to resonate at lower frequencies, covering the entire spectrum.
This is our spectrum analyzer, it’s how we perceives different pitch.Along the entire length of the cochlear coil are arranged the hair cells.
Thousands of hair cells sense the motion via their cilia, and convert that motion to electrical signals that are communicated via neurotransmitters to many thousands of nerve cells. These primary auditory neurons transform the signals into electrochemical impulses, which travel along the auditory nerve to the brain.
The high frequency sound arrives faster at the brain then the lower one due to two facts:
One is related to the nervous system and how our brain process sounds.The other is related to a physiological effect due to the conformation of
the auditory system. Whereas the sound first hit the beginning part of the basilar membrane, the first signal sent to the brain is the one referring the high frequencies and then, a few milliseconds later, the low ones.
Also for these two reasons the sensitivity of the human ear is strongly non-linear; in fact it is lower at medium-low frequencies and at very high frequencies. That’s why the human ear perceives with different loudness, sounds of same SPL at different frequencies.
Isophone diagramTo see which SPL is required for creating the same loudness perception,
in phon at different frequencies, the equal-loudness contours are used, as derived by Fletcher and Munson.
Definition of PhonPhon: A tone is x phons if it sounds as loud as a 1000 Hertz sine wave of
x decibels (dB).
- 5 -

RCF Academy – Sound Engineering Course – Module ACU02
Fig. 8 – The original Fletcher and Munson iso-phon curves.
In these curves the reference sound pressure for the human auditory threshold is defined, that is 20 μPa at 1 kHz and the normal hearing sensitivity threshold that is 0 dB at 1 kHz.
The maximum sensitivity is around 4 kHz where the threshold is approximately at a SPL= -5 dB, this means that we can hear sounds also under 0 dB. This strong dependence of the SPL with frequency becomes less relevant with the rising of the loudness level.
Equal-loudness contours were first measured by Fletcher and Munson in 1933 at MIT University in Boston on 20-years-old students. Those curves are no more fitting the actual human sensitivity, mostly because of the changes of the society's habits (phones, earphones, mp3 players, etc.).
This has resulted in the recent acceptance of a new set of curves standardized as ISO 226:2003.
In the new standard, the iso-phon curves are significantly more curved.With these new curves, a sound of 40 dB at 1000 Hz corrisponds to a
sound of 64 dB at 100 Hz (it was just 50 dB before).
- 6 -

RCF Academy – Sound Engineering Course – Module ACU02
Fig. 9 – The ISO 226:2003 iso-phon curves (in red) compared with the “old” iso-phon curve of 40 phons (in blue).
Weighting curvesFor making a rough approximation of human variable sensitivity with
frequency, a number of simple passive filtering networks were defined, named with letters A through D, initially intended to be used for increasing SPL values.
Fig. 10 – The weighting curves A, B, C and D.
- 7 -

RCF Academy – Sound Engineering Course – Module ACU02
For example the A-weighting filter is the most commonly used. It emphasizes frequencies around 3–6 kHz where the human ear is most sensitive, while attenuating very high and very low frequencies to which the ear is insensitive. The aim is to ensure that measured A-weighted SPL values, in dB(A), corresponds well with subjectively perceived loudness.
Initially the concept was to employ the proper curve depending to the loudness of sound:
A-Curve 0 to 50 phonB-Curve 50 to 80 phon
C-Curve 80 to 100 phonD-Curve aircraft noise (> 100 phon)
In practice only the A-weighting curve is employed nowadays: it was originally defined for very low levels, but with the new ISO 226:2003 it became more or less reliable even for medium and large sound pressure level.
A-weighted dB values roughly represent sound levels which are perceived by the human ear in the same way, independently to the frequency.
Only for measuring sound pressure levels above 100 dB and peak sound pressure level the C-weighted curve is still used. The Italian law fixes at 87 dB(A) the maximum SPL permitted for an 8h workday at the workplace and at 130 dB(C) the maximum peak value. RMS values are A-weighted, Peak values are C-Weighted.
To calculate the A-weighting factor at a given frequency we can use either the formula or the easy-to-use table :
- 8 -

RCF Academy – Sound Engineering Course – Module ACU02
f (Hz) A (dB) f (Hz) A (dB)12.5 -63.416 -56.720 -50.525 -44.7
31.5 -39.440 -34.650 -30.263 -26.280 -22.5
100 -19.1125 -16.1160 -13.4200 -10.9250 -8.6315 -6.6400 -4.8500 -3.2630 -1.9800 -0.8
1000 0.01250 0.61600 1.02000 1.22500 1.33150 1.24000 1.05000 0.56300 -0.18000 -1.1
10000 -2.512500 -4.316000 -6.620000 -9.3
8000 -1.1
16000 -6.6
2000 1.2
4000 1.0
500 -3.2
1000 0.0
125 -16.1
250 -8.6
16 -56.7
31.5 -39.4
63 -26.2
Fig.11 – The A-weighting factors table.
- 9 -

RCF Academy – Sound Engineering Course – Module ACU02
Time and Frequency Masking
Time masking is an effect in which a loud sound temporally masks weaker sounds.
The most relevant cause is the contraction of the stapedius muscle (see above). Another cause it’s that wherever the loud tone is vibrating the cochlear membrane, another tiny sound which tries to vibrate it at the same place will not be noticeable. So after a loud sound, for a while, the hearing system remains “deaf “to weaker sounds, as shown by the Zwicker chart.
Fig.12 – Temporal masking after Zwicker
Masking will not only obscures a sound immediately following the masker (called post-masking) but also obscures a sound immediately preceding the masker (called pre-masking). Temporal masking's effectiveness attenuates exponentially from the onset and offset of the masker, with the onset attenuation lasting approximately 20 ms and the offset attenuation lasting approximately 100 ms. The pre-masking is possible because the neural system takes by 20 to 50 ms to process sound, so when you hear a sound it was already played a few milliseconds earlier. In this lapse of time the information about sound is travelling from the ear to the brain along a nerve which is an electrochemical transmitter. On an electrochemical neural circuit, stimuli run faster if they are louder, so the loud sound information travel faster then the weaker ones happened earlier, overrunning it and masking it.
- 10 -

RCF Academy – Sound Engineering Course – Module ACU02
Another kind of masking is frequency masking.
Fig.13 – The frequency masking.
A loud pure tone at a certain frequency masks tones of very nearby frequencies. So there is an interval of frequencies masked by a bell shaped curve called the masking curve.
Consequence of this is that tones which fall below the masking curve are inaudible.
Furthermore masking is wider on the high frequency side of the masking tone than on the low frequency side. That’s why a deep, loud tone covers up high pitched, soft tones, but a high pitched, loud tone does not cover up deep, soft tones very much.
Sound masking is important when we compress audio files because there’s no need to fill the file with all the information about sounds that are masked. There are algorithms that detect the loud sounds and erase all the information about masked ones permitting to obtain a smaller file with less information, this kind of compression is called “lossy compression”.
The most famous example of such compression algorithms is MP3, albeit it is now completely over-run by more advanced algorithms such as AAC, WMA and OGG.
- 11 -

RCF Academy – Sound Engineering Course – Module ACU02
Part 2: The Sound Level Meter
A sound level meter (SLM) is an instrument which measures sound pressure level. The current international standards that specify sound level meter functionality and performance are the IEC 61672:2003 for non-integrating instruments, and the IEC 61803:2003 for integrating instruments (which are mandatory by law, in Italy).
Figure 1: two sound level meters
Today’s sound level meters are bottle-shaped and high-tech instruments, and most of them have the same parts. Figure 2 shows the general structure of a sound level meter.
Figure 2: block diagram of a sound level meter
Microphone: even the cheapest sound level meter employs a condenser microphone, also called capacitor microphone, because this is the only type of microphone able to perceive pressure variations perfectly. A
- 12 -

RCF Academy – Sound Engineering Course – Module ACU02
Condenser, in fact, tends to be very sensitive and responsive, making these microphones well-suited in capturing subtle nuances in a sound.
Figure 3: Condenser microphone
Preamplifier: this block has the function of increasing, or decreasing, the gain of the system, in order to set the range of values within which the sound pressure level should be. In fact, sound level meters often have a limited range of measurement values, of just 60 or, more usually, 80 dB. The measurement can be considered valid only if result is inside this range. Because of this, the user must be able to change the gain, using some keys, placed in front of the instrument, making the instrument more or less sensitive Two wrong cases can occur:
the SPL is too small (sound level meter is under range); the SPL is too large (sound level meter is overloaded).
In these cases, the user has to change the full scale value and repeat the measurement.Some modern instruments, indeed, have a dynamic range exceeding 110 dB, and thus there is never any need to change the full scale value, which is fixed.
Frequency weighting filter: in front of a sound level meter, we can generally find keys which allow to choose which frequency weighting to use in sound analysis. We will discuss only about A-weighting and C-weighting.
AC output: it can be used to record analyzed sounds by means of an external digital audio recording unit (which usually stores the recording as a WAV file on an SD card, or the like). “Compressed” formats such as MP3 cannot be used for digital sound recording to be used for acoustical analysis, because these compressed formats are “lossy”, and the analysis resulting from them would be wrong.
Overload detector: if the sound pressure level is out of the valid range, this detector tells to the user, trough the display, that full scale value has to be changed.
- 13 -

RCF Academy – Sound Engineering Course – Module ACU02
RMS detector: this is the main block. It performs the most important function, in fact it computes the average sound pressure level, as shown in the following formula:
(1)
This value is now in Pascal and it’s converted in decibel (dB), using this formula:
(2)
where Pap 200
The sound level meter only measures pressure, the sound pressure level, and it’s displayed in dB.
Display: shows information graphically and numerically, providing results in both analog and numerical forms.
Figure 4: Graphical, numerical, pointer displays
Now we have seen how a sound level meter is generally structured. In the next part we will discuss in detail on how RMS block works.
The Equivalent Continuous Level
The equivalent continuous level is the average effective value of sound pressure, computed over a time interval T, and it’s defined as:
(3)
This is a time-averaged value, and this is easier to understand looking at Figure 5. The rectangle’s area is equal to the one subtended by the instantaneous sound pressure level profile.
- 14 -

RCF Academy – Sound Engineering Course – Module ACU02
Figure 5: Equivalent sound level
This value is computed trough a linear time average, so it’s very reliable and easy to compute. Every digital SLM can perform linear integration easily, and the long-term Leq is the quantity to be measured according to current law and regulations.
However, Leq can also be recomputed in post-processing, after a number N of short-term measurements have been done. In the most general case, each of these N measurements is a short-term average over a different measurement time Ti.
Thus we get:
(4)
Exponential Averaging: Slow, Fast, Impulse
Decades ago, when the SLMs were analog, an exponential averaging was easier to perform than a linear one, by means of a very simple and cheap circuit: a resistance and a condenser (RC circuit). Nowadays, on digital SLMs, performing the emulation of the behavior of an RC circuit is much more difficult than performing basic linear averaging, and only top-grade instruments can perform exponential averaging, with different time constants, while performing standard linear averaging.
In the case of exponential averaging, the “running” root mean square (RMS) value is computed by the following formula:
(5)
The main difference between linear and exponential averaging is that, in linear averaging, the same weight is given to all the signal along the whole
- 15 -

RCF Academy – Sound Engineering Course – Module ACU02
integration time T; now instead, with exponential averaging, the importance of sound events occurred in the past progressively decreases, more or less quickly, depending on the chosen value for the time constant T.
Setting Slow Fast Impulse
T = RC 1s 125ms 35 ms (rise)1.5 s (fall)
Figure 6 shows how the Slow setting determines progressive loss of weight for more ancient sounds.
Figure 6: “Slow” exponential averaging
The Fast setting is really useful: in fact it generates sound charts corresponding to human hear perception. This is possible because the human auditory system has about 100 ms of integration time, similar to Fast value (125 ms). In order to obtain correct simulitude to human hearing, weighting frequency filter has also to be set on A-weighting.
Impulse setting, instead, is an old instrument’s legacy. In fact, as we see in Figure 4, they displayed information by means of a moving pointer. A very intense and short sound results in a rapid and an hard-to-see movement of the pointer. Because of this, the Impulse setting was introduced: in fact, it forces the pointer to raise very quickly but it slows the falling, helping users in seeing results.
Nowadays, the Impulse setting survives for a different reason. Impulsive sounds are annoying, and a good sound technician must consider them, so they have to be detectable. Impulsive sounds can be detected using the Impulse setting. An impulsive sound can be detected by a sound analysis software, performing simultaneously both Slow and Impulse analysis, and verifying this simple inequation:
(6)
If the previous inequation is correct, then we know that an impulsive sound was occurred. Current Italian law establishes that, in this case, the equivalent sound level has to be increased by 3 dB, in order to consider the occurrence of the impulsive sound.
- 16 -

RCF Academy – Sound Engineering Course – Module ACU02
Calibration
In a measurement chain made by several components, used in sound measurements, there are many parts which can change gain between two different measurements. For example if we use the same sound level meter but not the same microphone, we have to re-calibrate the entire analysis system in order to obtain a reliable result.
We did not mention it before, but a sound analysis can be done even with a software, for example Audacity of other professional programs. Even in that case the chain of components may change: in fact it’s typically composed by a microphone, a sound-card and a computer equipped with a sound analysis software. If only one of these components changes we have to perform a new calibration.
Calibration, in both cases, can be done with a simple instrument: a calibrator, also known as a reference sound source. This instrument emits a fixed-frequency pure tone of very constant amplitude. We can mount it over the microphone to perform the calibration of the entire chain, as shown in Figure 7.
Figure 7: Calibration
When the calibrator is operating, our sound system analysis receives the pure tone emitted by the calibrator. Now, given the sound emitted, we can check if the system is working correctly. In fact, theory tells that a pure tone, issued with a frequency of 1000 Hz and with an effective pressure of 1 Pa, generates a sound pressure level of 94 dB. So, if our analysis system detects a different sound pressure level, we have to adjust it until the correct value is displayed.
Both sound level meters and analysis software are calibrated by changing their internal settings, forcing them to show the prescribed SPL value (usually 94 dB). This procedure usually updates a numerical offset to produce the correct result. After each calibration, the sound level meter memorizes the applied offset, in order to check for possible malfunctions.
- 17 -

RCF Academy – Sound Engineering Course – Module ACU02
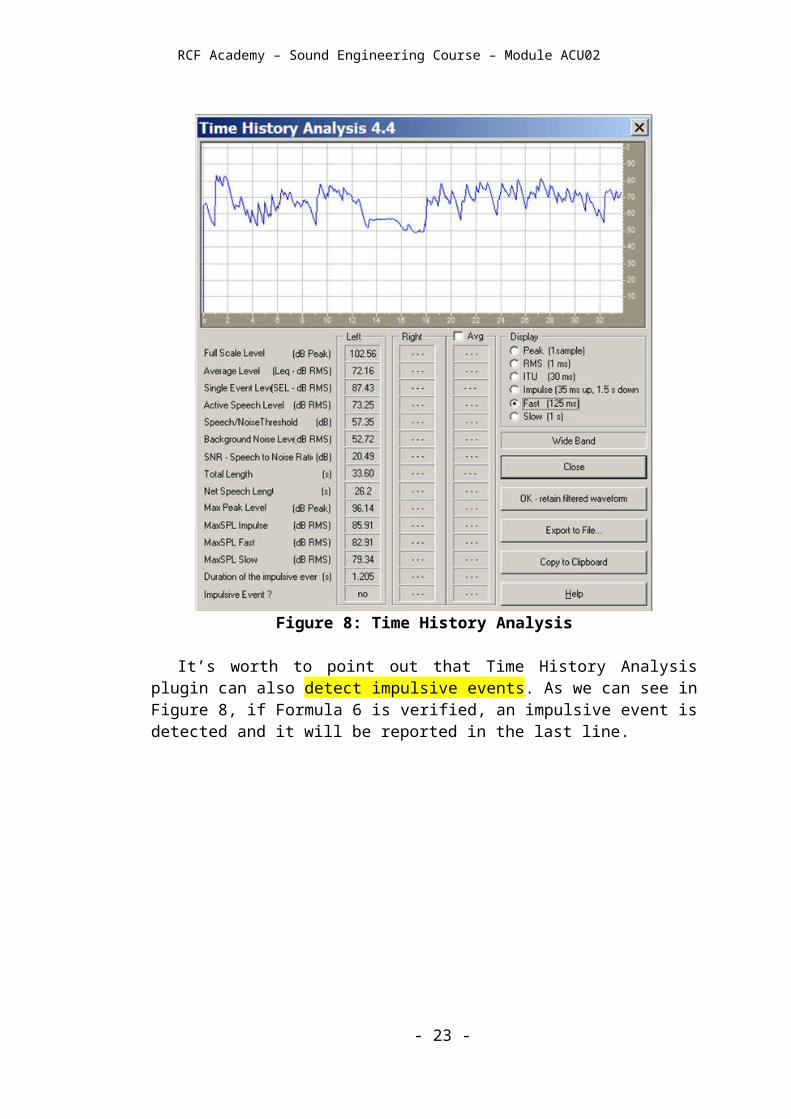
Time History Analysis
Time History Analysis is a plugin working inside some sound recording software (such as Adobe Audition or Audacity) and can be useful for many sound analysis steps. For example, it can be helpful for checking calibration. Its main function, however, is showing a time profiles of “instantaneous SPL”, and a table of results. In its result window the user can see the equivalent sound pressure level Leq of the analyzed sound, its maximum SPL values with different time constants, its fluctuations over time, and so on.
The “instantaneous” SPL profile is strongly affected by the chosen time constant (slow, fast, impulse). Figure 8 shows how a sound chart could appear if the Fast time constant is selected. Setting such a constant results in generating a profile similar to human perception of the sound.
The Slow time constant makes the chart smoother, reducing ripple. The Impulse time constant, instead, highlights rises and smoothes descents.
Figure 8: Time History Analysis
It’s worth to point out that Time History Analysis plugin can also detect impulsive events. As we can see in Figure 8, if Formula 6 is verified, an impulsive event is detected and it will be reported in the last line.
- 18 -

RCF Academy – Sound Engineering Course – Module ACU02
Decibel values: sum and difference
Decibels, are not units on which we could operate as of kilograms and meters, in fact if we take 2 decibels, it doesn’t mean take twice 1 decibel.
We need to perform basic mathematical operations (sum and difference) to properly use these parameters.
“Incoherent” (energetic) sum of two “different” sounds:
It is, for example, two sound sources that emit a certain sound pressure level (different “kind” from each other); when a source emits a sound of 80 dB, and the other emits a sound of 85 dB, what is the value in dB of the overall sound, which is the sum of the two?
Of course, it’s not the algebraic sum of the two, 80+85 doesn’t mean 165 dB, because Decibels are logarithmic quantities.
In reality, the physical quantity that adds up, in this case, is the sound energy, which is proportional to the square of the pressure.
Then we go to the square sum of the pressures, dividing all the factors for a term of reference refp :
(1)
We define the pressure level as:21
101 )(log10refppLp 22
102 )(log10refppLp
We extract from these formulas the values of p1 and p2:
The total sound pressure level results:
(2)
This is called Incoherent sum, because that is the hypothesis that the two sounds to be added are different (for example because they are generated by two separate machines or delayed in time).For example, if we have a sound of 80 dB and a sound of 85 dB, the sum of the two is given by the formula calculated previously:
Lp1 = 80 dB , Lp2 = 85 dB , LTOT = = 86,2 dB
- 19 -

RCF Academy – Sound Engineering Course – Module ACU02
0
0.2
0.4
0.6
0.8
1
1.2
1.4
1.6
1.8
2
2.2
2.4
2.6
2.8
3
0 1 2 3 4 5 6 7 8 9 10
difference between the two levels in dB
corre
ctio
n to
add
to th
e lar
ger l
evel
Figure 9: Graph for summing two incoherent signals
“Incoherent” (energetic) difference of two sounds: Just as before, if we have to make a subtraction:
Lp1 = 80 dB , Lp2 = ?, LTOT = 85 dB
This is the case, for example, when performing the measurement with the sound source switched on (85 dB), and then repeating the measurement with the machine switched of, hence measuring just the background noise (80 dB). We want now to subtract the background noise from the total measured level, so we get just the sound pressure level radiated by the machine, depurated of the effect of background noise:
Lp2 = = 83,35 dB
If we have two signals with the same sound pressure level and let them to add up, the total sound pressure level will be increased by 3 dB; this is a general rule.
If we have two signals which differ by 10 dB or more, then their sum will be equal to the larger of the two (the contribution of the smaller one is negligible).
For example Lp1 = 90 dB Lp2 = 80 dB LTOT = 90 dB
- 20 -

RCF Academy – Sound Engineering Course – Module ACU02
“Coherent” (energetic) sum of two “identical” sounds:
There is also the case of coherent sum between two signals, which is applied in the case in which the two signals are identical to each other; in this case the instantaneous values of sound pressure are going to sum.
But, as at any instant the two waveforms are identical, even after RMS time averaging we get that the average total RMS pressure is given by the sum of the two RMS averaged original pressures. Hence we have:
(3)
0
0.4
0.8
1.2
1.6
2
2.4
2.8
3.2
3.6
4
4.4
4.8
5.2
5.6
6
0 2 4 6 8 10 12 14 16 18 20
difference between the two levels in dB
corre
ctio
n to
add
to th
e lar
ger l
evel
Figure 10: Graph for summing two coherent signals.
- 21 -

RCF Academy – Sound Engineering Course – Module ACU02
Frequency Analysis - Spectrum
Frequency Analysis means to obtain the spectrum of a signal; but what is a spectrum?
A spectrum of a signal is a chart that has the frequencies on the abscissa, while as ordinates the sound pressure level in dB; simple tones have spectra composed by just a small number of “spectral lines”, whilst complex sounds usually have a “continuous spectrum”.
Now we will consider the spectra of four very basic cases:
a) Pure tone: this is a purely sinusoidal waveform, the corresponding spectrum presents only one vertical line because this tone has energy at only one single frequency, while all the others are null (just as the sound of a diapason).
Figure 11: Spectrum of a pure tone.
b) Musical sound: these types of sounds, are characterized by a "harmonic comb", that is a discrete number of pure tones normally placed at integer multiples of the “fundamental” frequency. The first frequency is called the fundamental frequency and gives the pitch of the note.There are also so-called inharmonic sounds, which have frequencies that are not integer multiples of the fundamental.
Figure 12: Spectrum of a musical sound.
c) Wide-band noise: these types of sound, have a continuous spectrum, in fact there is always energy at every frequency, loud or weak. These spectra are typical of noise sources.
- 22 -
RCF Academy – Sound Engineering Course – Module ACU02
Figure 13: Spectrum of a Wide-band noise.
d) “White noise”: the white noise is a particular type of noise that has the same energy level at all frequencies (a flat line); typically it is generated artificially, for example by a computer, an example of natural white noise is the compressed air coming out from a cylinder.
Figure 14: Spectrum of white noise.
- 23 -

RCF Academy – Sound Engineering Course – Module ACU02
Time-domain waveform and spectrumThere is a relationship between the wave shape in the time domain (like
the one shown by the oscilloscope) and the spectrum of the sound.
a) Sinusoidal waveform: A sinusoidal waveform translates into a pure tone. The vertical line is set at the fundamental frequency, which is the reciprocal of the period in the time domain.
Figure 15: Sinusoidal waveform (time domain) and its spectrum.
b) Periodic waveform: A periodic waveform translates into a musical sound. The period is given by the fundamental frequency of the spectrum.
Figure 16: Periodic waveform (time domain) and its spectrum.
c) Random waveform: A random sequency of number, a completely random distribution values. This is typically of noise, and the spectrum has energy ad every frequency.
Figure 17: Random waveform (time domain) and its spectrum.
- 24 -

RCF Academy – Sound Engineering Course – Module ACU02
Spectrum analysis by filter banksThere are two different methods to build the spectrum of a signal, in fact
there are two types of filter banks that are commonly employed for frequency analysis:
• constant bandwidth (FFT);• constant percentage bandwidth (1/1 or 1/3 of octave).
The second approach is usually better than the first one.
The first one is almost always implemented by an algorithm called FFT which means Fast Fourier Transform, but it relies on hypotheses that are usually not met in acoustic.
The FFT provides for the division of the band of frequencies in many narrow segments, equal to each others, of predefined length. The algorithm usually is applied to a digitally-sampled signal, of which a short segment is taken, with a length (in samples) that is equal to a multiple of 2 (1024, 2048, 4096 samples, etc.) because in this way the calculation of the spectrum is very rapid. The second one provides for the division of the frequency band into many segments different from each other: in case of octave band, each band has a width which is double of the previous (1 2 4...).We label each band after its center frequency, defined as the geometric mean value between the upper and lower extremes of the band analyzed:
(4)
For example the octave band of 1 kHz goes from 707 Hz to 1414 Hz, with a central frequency of 1000 Hz. This is also called the Central Octave.
An Octave band spans from a frequency to its double:
(5)
Instead if we use 1/3 octave band analysis, each octave is further divided by 3, so the ratio between the upper frequency and the lower frequency of each band results:
(6)
This is quite close to “human resolution”.
- 25 -

RCF Academy – Sound Engineering Course – Module ACU02
Figure 18: Reference frequencies for octave bands and 1/3 octave bands.
- 26 -

RCF Academy – Sound Engineering Course – Module ACU02
The same spectrum looks differentDepending on the filterbank chosen (constant bandwidth or constant
percentage), and on the choice for the frequency axis employed in the chart (linear or logarithmic), the spectrum of the same signal can appear graphically very different, as shown here (the signal IS THE SAME):
Figure 19: Different appearance of the same spectrum.
The most “skewed” one is at bottom-left, that is, constant-bandwidth with linear frequency axis. This kind of spectrum chart should be definitely avoided in acoustics.
The most preferable one is on the top-left (1/3 octave bands), as this corresponds, more or less, with human perception.
- 27 -

RCF Academy – Sound Engineering Course – Module ACU02
White noise and pink noise
White noise is flat in narrowband analysis (FFT) because at every 1 Hz band it takes the same sound pressure level.
However, if we look at the white noise in 1/3 octave bands, it is no longer flat, because every band is becoming larger, in fact every octave band is twice than the previous one, so it gets twice energy, that means 3 dB more every octave.
Figure 20: Spectrum of the White Noise in Narrowband (flat) and in 1/3 octave (growing 3 dB for octave).
The pink noise is a type of noise that is flat in 1/3 octave; and this of course means that it will not be flat in narrowband, but will be decreasing by 3 dB per octave.
Figure 21: Spectrum of the Pink Noise in 1/3 octave(flat) and in Narrowband (decreasing 3 dB for octave).
Pink noise is the most widely used noise in acoustics, while white noise is not a good test source, because it has a lot of energy at high frequency.
- 28 -

RCF Academy – Sound Engineering Course – Module ACU02
Critical bands (BARK)The Bark scale is a psychoacoustical scale proposed by Eberhard
Zwicker in 1961. It is named after Heinrich Barkhausen who proposed the first subjective measurements of loudness
The human auditory system operates in bands called BARK (critical bands); these bands are 24, as we see in the next figure.
At medium and high frequencies, the width of the BARK bands and the 1/3 octave bands are comparable.
At low frequencies, the critical bands remain very large (100 Hz), while those of 1/3 octave band are much narrower.
Figure 22: Bark bands (left) and 1/3 octave bands (right)
- 29 -

RCF Academy – Sound Engineering Course – Module ACU02
Confronto ampiezze di banda - Bark vs. 1/3 Octave
1
10
100
1000
10000
10 100 1000 10000
Frequenza (Hz)
Ban
dwid
th (H
z)
BarkTerzi
Figure 23: Comparison between bandwidth of Bark bands and 1/3 octave bands.
- 30 -