firesight user agent configuration guide version 2 · polling an active directory server allows an...
TRANSCRIPT

FireSIGHT User Agent Configuration Guide Version 2.2 August 20, 2015
THE SPECIFICATIONS AND INFORMATION REGARDING THE PRODUCTS IN THIS MANUAL ARE SUBJECT TO CHANGE WITHOUT NOTICE. ALL STATEMENTS, INFORMATION, AND RECOMMENDATIONS IN THIS MANUAL ARE BELIEVED TO BE ACCURATE BUT ARE PRESENTED WITHOUT WARRANTY OF ANY KIND, EXPRESS OR IMPLIED. USERS MUST TAKE FULL RESPONSIBILITY FOR THEIR APPLICATION OF ANY PRODUCTS.
Cisco Systems, Inc. www.cisco.comCisco has more than 200 offices worldwide. Addresses, phone numbers, and fax numbers are listed on the Cisco website at www.cisco.com/go/offices.

THE SOFTWARE LICENSE AND LIMITED WARRANTY FOR THE ACCOMPANYING PRODUCT ARE SET FORTH IN THE INFORMATION PACKET THAT SHIPPED WITH THE PRODUCT AND ARE INCORPORATED HEREIN BY THIS REFERENCE. IF YOU ARE UNABLE TO LOCATE THE SOFTWARE LICENSE OR LIMITED WARRANTY, CONTACT YOUR CISCO REPRESENTATIVE FOR A COPY.
The Cisco implementation of TCP header compression is an adaptation of a program developed by the University of California, Berkeley (UCB) as part of UCB’s public domain version of the UNIX operating system. All rights reserved. Copyright © 1981, Regents of the University of California.
NOTWITHSTANDING ANY OTHER WARRANTY HEREIN, ALL DOCUMENT FILES AND SOFTWARE OF THESE SUPPLIERS ARE PROVIDED “AS IS” WITH ALL FAULTS. CISCO AND THE ABOVE-NAMED SUPPLIERS DISCLAIM ALL WARRANTIES, EXPRESSED OR IMPLIED, INCLUDING, WITHOUT LIMITATION, THOSE OF MERCHANTABILITY, FITNESS FOR A PARTICULAR PURPOSE AND NONINFRINGEMENT OR ARISING FROM A COURSE OF DEALING, USAGE, OR TRADE PRACTICE.
IN NO EVENT SHALL CISCO OR ITS SUPPLIERS BE LIABLE FOR ANY INDIRECT, SPECIAL, CONSEQUENTIAL, OR INCIDENTAL DAMAGES, INCLUDING, WITHOUT LIMITATION, LOST PROFITS OR LOSS OR DAMAGE TO DATA ARISING OUT OF THE USE OR INABILITY TO USE THIS MANUAL, EVEN IF CISCO OR ITS SUPPLIERS HAVE BEEN ADVISED OF THE POSSIBILITY OF SUCH DAMAGES.
Cisco and the Cisco logo are trademarks or registered trademarks of Cisco and/or its affiliates in the U.S. and other countries. To view a list of Cisco trademarks, go to this URL: www.cisco.com/go/trademarks. Third-party trademarks mentioned are the property of their respective owners. The use of the word partner does not imply a partnership relationship between Cisco and any other company. (1110R)
Any Internet Protocol (IP) addresses and phone numbers used in this document are not intended to be actual addresses and phone numbers. Any examples, command display output, network topology diagrams, and other figures included in the document are shown for illustrative purposes only. Any use of actual IP addresses or phone numbers in illustrative content is unintentional and coincidental.
© 2014 Cisco Systems, Inc. All rights reserved.

C O N T E N T S
C H A P T E R 1 Introduction 1-1
Major Changes to the User Agent Version 2.2 1-1
Understanding User Agents 1-1
Understanding User Agent Functionality 1-2
Understanding Legacy Agent Support 1-4
Understanding Agents and Access Control in Version 5.x 1-4
Understanding the Users Database 1-4
Understanding the User Activity Database 1-5
Understanding the Access-Controlled Users Database 1-5
User Data Collection Limitations 1-6
C H A P T E R 2 Setting up a User Agent 2-1
Preparing to Connect to a Version 4.x Defense Center 2-2
Preparing to Connect to a Version 5.x Defense Center 2-3
Setting up a User Agent on the Defense Center 2-3
Setting up an LDAP Connection to Allow User Access Control 2-3
Configuring Permissions to Connect to an Active Directory Server 2-4
Enabling Idle Session Timeouts 2-5
Preparing the Computer for User Agent Installation 2-6
Backing Up User Agent Configurations 2-7
Installing a User Agent 2-8
Configuring a User Agent 2-9
Configuring User Agent Active Directory Server Connections 2-10
Configuring User Agent Defense Center Connections 2-13
Configuring User Agent Excluded Username Settings 2-14
Configuring User Agent Excluded Addresses Settings 2-15
Configuring User Agent Logging Settings 2-16
Configuring General User Agent Settings 2-17
Configuring User Agent Maintenance Settings 2-18
1Firepower User Agent Configuration Guide

Contents
2Firepower User Agent Configuration Guide

C H A P T E R 1
IntroductionVersion 2.2 of the User Agent works in conjunction with FireSIGHT System managed devices to gather user data. If you are using the agent with Version 5.x of the FireSIGHT System, the User Agent is also essential to implementing user access control.
User Agents monitor Microsoft Active Directory servers and report logins and logoffs authenticated via LDAP. The FireSIGHT System integrates these records with the information it collects via direct network traffic observation by managed devices.
For more information, see the following sections:
• Major Changes to the User Agent Version 2.2, page 1-1
• Understanding User Agents, page 1-1
Major Changes to the User Agent Version 2.2If you are upgrading your User Agent to Version 2.2, please note the following changes:
• When you remove Version 2.0 to Version 2.1.1 of the agent, you must back up the database to preserve your configuration settings. See Backing Up User Agent Configurations, page 2-7 for more information.
However, Version 2.2 of the agent preserves configuration settings for future upgrades automatically. If you uninstall and reinstall Version 2.2 of the agent, you do not need to manually back up the database.
• The agent can detect logins to a configured Active Directory server. When configuring the connection, select an IP address from the Local Login IP Address field.
• Configured Active Directory server connections support user passwords of up to 64 characters.
• The agent now supports an Active Directory Server Max Poll Length of 1 minute and 5 minutes. The shorter maximum poll lengths can improve real-time monitoring performance and logout detection.
Understanding User AgentsThe concepts in this section focus on the role of the User Agent in implementing user discovery on the FireSIGHT System. For a more detailed discussion of all concepts related to user discovery and network discovery (or RNA, in Version 4.x documentation), see the FireSIGHT System User Guide for the version of the FireSIGHT System running on your appliances.
For more information, see the following sections:
1-1FireSIGHT User Agent Configuration Guide

Chapter 1 Introduction Understanding User Agents
• Understanding User Agent Functionality, page 1-2
• Understanding Legacy Agent Support, page 1-4
• Understanding Agents and Access Control in Version 5.x, page 1-4
• Understanding the Users Database, page 1-4
• Understanding the User Activity Database, page 1-5
• Understanding the Access-Controlled Users Database, page 1-5
• User Data Collection Limitations, page 1-6
Understanding User Agent FunctionalityThe FireSIGHT System can obtain both user identity and user activity information from your organization’s LDAP servers. User Agents allow you to monitor users when they authenticate with Active Directory credentials against Microsoft Active Directory servers.
You can install an agent on any Microsoft Windows Vista, Microsoft Windows 7, Microsoft Windows 8, Microsoft Windows Server 2003, Microsoft Windows Server 2008, or Microsoft Windows Server 2012 computer with TCP/IP access to the Microsoft Active Directory servers you want to monitor. You can also install on an Active Directory server running one of the supported operating systems.
Each agent can monitor logins using encrypted traffic, either through regularly scheduled polling or real-time monitoring. Logins are generated by the Active Directory server when a user logs into a computer, whether at the workstation or through a Remote Desktop login.
Agents can also monitor and report user logoffs. Logoffs are generated by the agent itself when it detects a user logged out of a host IP address. Logoffs are also generated when the agent detects that the user logged into a host has changed, before the Active Directory server reports that the user has changed. Combining logoff data with login data develops a more complete view of the users logged into the network.
Polling an Active Directory server allows an agent to retrieve batches of user activity data at the defined polling interval. Real-time monitoring transmits user activity data to the agent as soon as the Active Directory server receives the data.
You can configure the agent to exclude reporting any logins or logoffs associated with a specific username or IP address. This can be useful, for example, to exclude repeated logins to shared servers, such as file shares and print servers, as well as exclude users logging into machines for troubleshooting purposes.
You can configure each agent to monitor up to five servers and send that encrypted data on to as many as five Defense Centers.
The agents send records of all detected logins and logoffs that do not contain an excluded username or IP address to Defense Centers, which log and report them as user activity. The agents detect the Defense Center version and send the login records in the appropriate data format. This supplements any user activity detected directly by managed devices. If you are using Version 5.x of the FireSIGHT System to perform access control, the logins reported by User Agents associate users with IP addresses, which in turn allows access control rules with user conditions to trigger.
User Agents monitor users as they log into the network or when accounts authenticate against Active Directory credentials for other reasons. Version 2.2 of the User Agent detects interactive user logins to a host, Remote Desktop logins, file-share authentication, and computer account logins, as well as user logoffs and Remote Desktop sessions where the user has logged off.
1-2FireSIGHT User Agent Configuration Guide

Chapter 1 Introduction Understanding User Agents
The type of login detected determines how the agent reports the login and how the login appears in the host profile. An authoritative user login for a host causes the current user mapped to the host IP address to change to the user from the new login. Other logins either do not change the current user or only change the current user for the host if the existing user on the host did not have an authoritative user login to the host. In these cases, if the expected user is no longer logged in, this generates a logoff for that user. User logins detected by network discovery only change the current user for the host if the existing user on the host did not have an authoritative user login to the host. Agent-detected logins have the following effect on the network map:
• When the agent detects an interactive login to a host by a user or a remote desktop login, the agent reports an authoritative user login for the host and changes the current user for the host to the new user.
• If the agent detects a login for file-share authentication, the agent reports a user login for the host, but does not change the current user on the host.
• If the agent detects a computer account login to a host, the agent generates a NetBIOS Name Change discovery event and the host profile reflects any change to the NetBIOS name.
• If the agent detects a login from an excluded user name, the agent does not report a login to the Defense Center.
When a login or other authentication occurs, the agent sends the following information to the Defense Center:
• the user’s LDAP user name
• the time of the login or other authentication
• the IP address of the user’s host, and the link-local address if the agent reports an IPv6 address for a computer account login
Note If a user uses a Linux computer to log in via Remote Desktop to a Windows computer, once the agent detects the login, it reports the Windows computer IP address, not the Linux computer IP address, to the Defense Center.
The Defense Center records login and logoff information as user activity. When a User Agent reports user data from a user login or logoff, the reported user is checked against the list of users. If the reported user matches an existing user reported by an agent, the reported data is assigned to the user. Reported users that do not match existing users cause a new user to be created.
Even though the user activity associated with an excluded user name is not reported, related user activity may still be reported. If the agent detects a user login to a machine, then the agent detects a second user login, and you have excluded the user name associated with the second user login from reporting, the agent reports a logoff for the original user. However, no login for the second user is reported. As a result, no user is mapped to the IP address, even though the excluded user is logged into the host.
Note the following limitations on user names detected by the agent:
• User names ending with a dollar sign character ($) reported to a Version 5.0.2+ Defense Center update the network map, but do not appear as user logins. Agents do not report user names ending with a dollar sign character ($) to any other versions of Defense Centers.
• Defense Center display of user names containing Unicode characters may have limitations.
The total number of detected users the Defense Center can store depends on your RNA or FireSIGHT license. After you reach the licensed user limit, in most cases the system stops adding new users to the database. To add new users, you must either manually delete old or inactive users from the database, or purge all users from the database.
1-3FireSIGHT User Agent Configuration Guide

Chapter 1 Introduction Understanding User Agents
Understanding Legacy Agent SupportVersion 1.0 (legacy) User Agents installed on Active Directory LDAP servers can continue to send user login data from the Active Directory server to a single Defense Center. Deployment requirements and detection capabilities of legacy agents are unchanged. You must install them on the Active Directory server to connect to exactly one Defense Center. Note, however, that the User Agent Status Monitor health module does not support legacy agents and should not be enabled on Defense Centers with legacy agents connected. You should plan to upgrade your deployment to use Version 2.2 of the User Agent as soon as possible, in preparation for future releases when support for legacy agents will be phased out.
Understanding Agents and Access Control in Version 5.xLicense: Control
If your organization uses Microsoft Active Directory LDAP servers, Cisco recommends that you install User Agents to monitor user activity via your Active Directory servers. If you want to perform user control in Version 5.x, you must install and use User Agents; the agents associate users with IP addresses, which in turn allows access control rules with user conditions to trigger. You can use one agent to monitor user activity on up to five Active Directory servers.
To use an agent, you must configure a connection between each Defense Center connected to the agent and the monitored LDAP servers. This connection not only allows you to retrieve metadata for the users whose logins and logoffs were detected by User Agents, but also is used to specify the users and groups you want to use in access control rules. For more information on configuring LDAP servers for user discovery, see the FireSIGHT System User Guide.
Note Legacy agents, which you install on your Microsoft Active Directory servers, also monitor users when they authenticate against Active Directory credentials. However, you should plan to transition to Version 2.2 of the User Agent as soon as possible in preparation for end of support for legacy agents in future releases.
Understanding the Users DatabaseLicense: FireSIGHT
The users database contains a record for each user detected by either managed devices or User Agents. The total number of detected users the Defense Center can store depends on your FireSIGHT license. After you reach the licensed limit, in most cases the system stops adding new users to the database. To add new users, you must either manually delete old or inactive users from the database, or purge all users from the database.
However, the system favors authoritative user logins. If you have reached the limit and the system detects an authoritative user login for a previously undetected user, the system deletes the user who has remained inactive for the longest time, and replaces it with the new user.
You can view the contents of the users database with the Defense Center web interface. For information on viewing, search for, and deleting detected users, see the FireSIGHT System User Guide.
1-4FireSIGHT User Agent Configuration Guide

Chapter 1 Introduction Understanding User Agents
Understanding the User Activity DatabaseLicense: FireSIGHT
The user activity database contains records of user activity on your network, either from a connection to an Active Directory LDAP server that is also monitored by a User Agent, or though network discovery. The system logs events in the following circumstances:
• when it detects individual logins or logoffs
• when it detects a new user
• when you manually delete a user
• when the system detects a user that is not in the database, but cannot add the user because you have reached your FireSIGHT licensed limit
You can view the user activity detected by the system using the Defense Center web interface. For information on viewing, searching for, and deleting user activity, see the FireSIGHT System User Guide. If you plan to use Version 2.2 of the FireSIGHT System User Agent to send LDAP login data to your Version 5.x Defense Centers, you must configure a connection for each agent on each Defense Center where you want the agent to connect. That connection allows the agent to establish a secure connection with the Defense Center, over which it can send login data. If the agent is configured to exclude specific user names, login data for those user names are not reported to the Defense Center.
In addition, if you are planning to implement user access control, you must set up a connection to each Microsoft Active Directory server where you plan to collect data, with user awareness parameters configured.
Understanding the Access-Controlled Users DatabaseLicense: Control
The access-controlled users database contains the users and groups that you can use in access control rules, so that you can perform user control with the FireSIGHT System. These users can be one of two types:
• An access-controlled user is a user that you can add to access control rules to perform user control. You specify the groups that access-controlled users must belong to when you configure the Defense Center-LDAP server connection.
• A non-access-controlled user is any other detected user.
The total number of access-controlled users the Defense Center can store depends on your FireSIGHT license.
You specify the groups that access-controlled users must belong to when you configure the Defense Center-LDAP server connection, as described in the FireSIGHT System User Guide.
If you plan to use Version 2.2 of the FireSIGHT System User Agent to send LDAP login and logoff data to your Version 5.x Defense Centers, you must configure a connection for each agent on each Defense Center where you want the agent to connect. That connection allows the agent to establish a secure connection with the Defense Center, over which it can send the user activity data.
If the agent is configured to exclude specific user names, user activity data for those user names are not reported to the Defense Center. These excluded user names remain in the database, but are not associated with IP addresses.
1-5FireSIGHT User Agent Configuration Guide

Chapter 1 Introduction Understanding User Agents
In addition, if you are planning to implement user access control, you must set up a connection to each Microsoft Active Directory server where you plan to collect data, with user awareness parameters configured.
User Data Collection LimitationsLicense: FireSIGHT
The following table describes the limitations of user data collection, either generally or as they specifically relate to agents.
Table 1-1 User Data Collection Limitations
Limitation Description
user control To perform user control, your organization must use Microsoft Active Directory LDAP servers. The system obtains the users and groups you can use in access control rules from Active Directory, and also ties users to IP addresses with the logins and logoffs reported by User Agents installed on Active Directory servers.
login detection The agent reports user logins to hosts with IPv6 addresses to Defense Centers running Version 5.2+.
The agent reports non-authoritative user logins and NetBIOS logins to Defense Centers running Version 5.0.1+.
The agent reports authoritative logins from actual user names to Defense Centers running Version 4.10.x+.
If you want to detect logins to an Active Directory server, you must configure the Active Directory server connection with the server IP address. See Configuring User Agent Active Directory Server Connections, page 2-10 for more information.
If multiple users are logged into a host using remote sessions, the agent may not detect logins from that host properly. See Enabling Idle Session Timeouts, page 2-5 for more information on how to prevent this.
logoff detection The agent reports detected logoffs to Version 5.2+ Defense Centers.
Logoffs may not be immediately detected. The timestamp associated with a logoff is the time the agent detected the user was no longer mapped to the host IP address, which may not correspond with the actual time the user logged off of the host.
Logoffs are generated by the agent itself when it detects a user logged out of a host IP address. Logoffs are also generated when the agent detects that the user logged into a host has changed, before the Active Directory server reports that the user has changed.
real-time data retrieval
The Active Directory server must be running Windows Server 2008 or Windows Server 2012.
1-6FireSIGHT User Agent Configuration Guide

Chapter 1 Introduction Understanding User Agents
multiple logins to the same host by different users
The system assumes that only one user is logged into any given host at a time, and that the current user of a host is the last authoritative user login. If only non-authoritative logins have been logged into the host, the last non-authoritative login is considered the current user. If multiple users are logged in through remote sessions, the last user reported by the Active Directory server is the user reported to the Defense Center.
multiple logins to the same host by the same user
The system records the first time that a user logs into a specific host and disregards subsequent logins. If an individual user is the only person who logs into a specific host, the only login that the system records is the original login.
If another user logs into that host, however, the system records the new login. Then, if the original user logs in again, his or her new login is recorded.
Unicode characters The user interface may not correctly display user names with Unicode characters.
The agent does not report user names with Unicode characters to Version 4.10.x Defense Centers.
LDAP user accounts in the users database
If you remove or disable an LDAP user on your user awareness or RUA LDAP servers, or exclude the user name from being reported to the Defense Center, the Defense Center does not remove that user from the users database, and that user continues to count against your licensed limit for users listed in the database. You must manually purge the user from the database. For Version 5.x, note that the user license limit is applied in parallel for access-controlled users; the user count for access-controlled users depends on the number of users retrieved by your LDAP configuration.
Table 1-1 User Data Collection Limitations (continued)
Limitation Description
1-7FireSIGHT User Agent Configuration Guide

Chapter 1 Introduction Understanding User Agents
1-8FireSIGHT User Agent Configuration Guide

C H A P T E R 2
Setting up a User AgentTo use Version 2.2 of the User Agent to collect user login data from Microsoft Active Directory servers and send it to Defense Centers, you must install it, connect it to each Defense Center and Microsoft Active Directory server, and configure general settings.
To set up a user agent:
Access: Admin
Step 1 Configure each Defense Center to allow agent connections from the IP address of the computer where you plan to install the agent. For more information, see:
• Preparing to Connect to a Version 4.x Defense Center, page 2-2
• Preparing to Connect to a Version 5.x Defense Center, page 2-3
Note If you plan to use a Version 5.x Defense Center to perform user control, you must also configure an LDAP connection with user awareness parameters to the Microsoft Active Directory server on your Defense Center.
Step 2 Configure the Windows and user permissions necessary to allow the agent to connect to an Active Directory server. For more information, see Configuring Permissions to Connect to an Active Directory Server, page 2-4.
Step 3 Optionally, enable timeouts for idle remote sessions. For more information, see Enabling Idle Session Timeouts, page 2-5.
Step 4 Install the prerequisite programs on the computer where you will install the agent. Set up the computer’s TCP/IP access to the Active Directory server. For more information, see Configuring Permissions to Connect to an Active Directory Server, page 2-4.
Step 5 Optionally, complete a backup of the agent database to retain configuration settings from a previous version of the User Agent. For more information, see Backing Up User Agent Configurations, page 2-7.
Step 6 Install the agent on the computer. For more information, see Installing a User Agent, page 2-8.
Step 7 Configure connections to up to five Microsoft Active Directory servers. Optionally, configure a polling interval and maximum poll length for the agent. For more information, see Configuring User Agent Active Directory Server Connections, page 2-10.
Step 8 Configure connections to up to five Defense Centers. For more information, see Configuring User Agent Defense Center Connections, page 2-13.
2-1FireSIGHT User Agent Configuration Guide

Chapter 2 Setting up a User Agent Preparing to Connect to a Version 4.x Defense Center
Step 9 Optionally, configure a list of user names and IP addresses to exclude from polling for login and logoff data. For more information, see Configuring User Agent Excluded Username Settings, page 2-14 and Configuring User Agent Excluded Addresses Settings, page 2-15.
Step 10 Optionally, configure the agent logging settings. For more information, see Configuring User Agent Logging Settings, page 2-16.
Step 11 Optionally, configure the agent name, start and stop the service, and view the service’s current status. For more information, see Configuring General User Agent Settings, page 2-17.
Step 12 Click Save to save the agent configuration.
Caution Do not modify the agent maintenance settings unless Support directs you to do so.
Preparing to Connect to a Version 4.x Defense CenterThe first step in collecting LDAP user login information using User Agents is to configure each Defense Center to allow connections from the agents you plan to connect to your Active Directory servers. This section describes the procedure for authorizing an agent connection on a Version 4.x Defense Center.
To configure the Defense Center to connect to a User Agent:
Access: Admin
Step 1 Select Operations > Configuration > RUA.
Step 2 Click Add RUA Agent.
Step 3 Type a descriptive name for the Agent in the Name field.
Step 4 Type the IP address or host name of the computer where the User Agent will reside in the Hostname or IP Address field. You must use an IPv4 address; you cannot configure the Defense Center to connect to a User Agent using an IPv6 address.
Step 5 Click Add RUA Agent.
The Defense Center is configured to allow connections from an agent with the configured IP address.
Tip To delete the Defense Center-agent connection, click Delete next to the connection you want to delete.
Step 6 Continue with Configuring Permissions to Connect to an Active Directory Server, page 2-4.
2-2FireSIGHT User Agent Configuration Guide

Chapter 2 Setting up a User Agent Preparing to Connect to a Version 5.x Defense Center
Preparing to Connect to a Version 5.x Defense CenterIf you plan to use Version 2.2 of the User Agent to send LDAP login data to your Version 5.x Defense Centers, you must configure a connection for each agent on each Defense Center where you want the agent to connect. That connection allows the agent to establish a secure connection with the Defense Center, over which it can send data.
In addition, if you are planning to implement user access control, you must set up a connection to each Microsoft Active Directory server where you plan to collect data, with user awareness parameters configured.
For more information, see the following sections:
• Setting up a User Agent on the Defense Center, page 2-3
• Setting up an LDAP Connection to Allow User Access Control, page 2-3
Setting up a User Agent on the Defense CenterThe first step in collecting LDAP user login information using User Agents is to configure each Defense Center to allow connections from the agents you plan to connect to your Active Directory servers. This chapter describes the procedure for authorizing an agent connection on a Version 5.x Defense Center.
To configure the Defense Center to connect to a User Agent:
Access: Admin/Discovery Admin
Step 1 Select Policies > Users.
Step 2 Click Add User Agent.
Step 3 Type a descriptive name for the agent in the Name field.
Step 4 Type the IP address or host name of the computer where the agent will reside in the Hostname or IP Address field. You must use an IPv4 address; you cannot configure the Defense Center to connect to a User Agent using an IPv6 address.
Step 5 Click Add User Agent.
The Defense Center can now connect to a User Agent on the configured host.
Step 6 You have the following options:
• If you want to perform user control, continue with Setting up an LDAP Connection to Allow User Access Control, page 2-3
• If you do not want to perform user control, continue with Configuring Permissions to Connect to an Active Directory Server, page 2-4.
Setting up an LDAP Connection to Allow User Access ControlIf you want to perform user control (that is, write access control rules with user conditions), you must configure and enable a connection between the Defense Center and at least one of your organization’s Microsoft Active Directory servers. This configuration, called an LDAP connection or a user awareness
2-3FireSIGHT User Agent Configuration Guide

Chapter 2 Setting up a User Agent Configuring Permissions to Connect to an Active Directory Server
authentication object, contains connection settings and authentication filter settings for the server. The connection’s user and group access control parameters specify the users and groups you can use in access control rules.
Note If you want to perform user control, you must use Microsoft Active Directory. The system uses User Agents running on Active Directory servers to associate users with IP addresses, which is what allows access control rules to trigger.
For more information on setting up an LDAP connection with user awareness configuration, see the FireSIGHT System User Guide.
Configuring Permissions to Connect to an Active Directory Server
After you prepare the computer with all agent prerequisites, verify that the Active Directory security logs are enabled so the Active Directory server can record login data to these logs. Then, configure user permissions and Windows security permissions to allow the agent to communicate with the Active Directory server, access the security logs to retrieve login data, and optionally, retrieve logoff data.
To verify the Active Directory server is logging login data:
Step 1 On the Active Directory server, select Start > All Programs > Administrative Tools > Event Viewer.
Step 2 Select Windows Logs > Security.
If logging is enabled, the Security log displays. If logging is disabled, see http://technet.microsoft.com/en-us/library/cc779487(v=ws.10).aspx for information on enabling security logging.
To allow the agent to communicate with the Active Directory server:
Step 1 Enable the Remote Administration firewall rule on the Active Directory server. You have the following options:
• If the Active Directory server is running Windows Server 2003, see http://technet.microsoft.com/en-us/library/cc738900%28v=ws.10%29.aspx for more information.
• If the Active Directory server is running Windows Server 2008 or Windows Server 2012, see http://msdn.microsoft.com/en-us/library/aa822854%28VS.85%29.aspx for more information.
To grant the agent permission to retrieve login data:
Step 1 Create a user on the computer where you installed the agent.
2-4FireSIGHT User Agent Configuration Guide

Chapter 2 Setting up a User Agent Enabling Idle Session Timeouts
Note Use these credentials when configuring the Active Directory server connection. See Configuring User Agent Active Directory Server Connections, page 2-10 for more information.
Step 2 Enable RPC on the Active Directory server for the user. You have the following options:
• If the Active Directory server is running Windows Server 2008 R2 or Windows Server 2012, and the user is not a member of the Administrators group, grant the user DCOM remote access, remote launch, and activation permissions. See http://msdn.microsoft.com/en-us/library/Aa393266.aspx for more information.
• If the Active Directory server is running any other supported version of Microsoft Windows, RPC is already enabled.
To grant the agent permission to retrieve logoff data:
Step 1 Grant the created user Administrator privileges to ensure the user can log into all workstations that authenticate against the Active Directory server.
To grant the agent permission to access the security logs:
Step 1 Grant the created user full permissions to the WMI Root/CIMV2 namespace on the Active Directory server. See http://technet.microsoft.com/en-us/library/cc787533%28v=WS.10%29.aspx for more information.
Continue with Enabling Idle Session Timeouts, page 2-5.
Enabling Idle Session TimeoutsAfter you configure permissions to connect to the Active Directory server, you can optionally enable idle session timeouts in the group policy. This helps prevent the agent from detecting and reporting extraneous logins due to multiple sessions on a host.
Terminal Services allows multiple users to log into a server at the same time. Enabling idle session timeouts helps reduce the instances of multiple sessions logged into a server.
Remote Desktop allows one user at a time to remotely log into a workstation. However, if the user disconnects from the Remote Desktop session instead of logging out, the session remains active. Without user input, the active session eventually idles. If another user logs into the workstation using Remote Desktop, two sessions are running. Multiple running sessions can cause the agent to report extraneous logins. Enabling idle session timeouts causes those sessions to terminate after the defined idle timeout period, which helps prevent multiple remote sessions on a host.
Citrix sessions function similarly to Remote Desktop sessions. Multiple Citrix user sessions can be running on a computer at once. Enabling idle session timeouts helps prevent multiple Citrix sessions on a host, reducing extraneous login reporting.
Note that depending on the configured session timeout, there may still be situations where multiple sessions are logged into a computer.
2-5FireSIGHT User Agent Configuration Guide

Chapter 2 Setting up a User Agent Preparing the Computer for User Agent Installation
To enable Terminal Services session timeout:
Step 1 Update the group policy settings for idle Terminal Services session timeout and disconnected Terminal Services session timeout. You have the following options:
• If the Active Directory server is running Windows Server 2008 or Windows Server 2012, see http://technet.microsoft.com/en-us/library/cc754272(v=ws.10).aspx for more information on enabling the session timeouts.
• If the Active Directory server is running Windows Server 2003, see http://technet.microsoft.com/en-us/library/cc758177(v=ws.10).aspx for more information on enabling the session timeouts.
Set session timeouts shorter than your configured logoff check frequency so idle and disconnected sessions have a chance to time out before the next logoff check. If you have a mandatory idle session or disconnected session timeout, set the configured logoff check frequency greater than the session timeout. For more information on configuring the logoff check frequency, see Configuring General User Agent Settings, page 2-17.
To enable Remote Desktop session timeout:
Step 1 Update the group policy settings for idle remote session timeout and disconnected session timeout. See http://technet.microsoft.com/en-us/library/ee791886%28v=ws.10%29.aspx for more information on enabling the session timeouts.
Set session timeouts shorter than your configured logoff check frequency so idle and disconnected sessions have a chance to time out before the next logoff check. If you have a mandatory idle session or disconnected session timeout, set the configured logoff check frequency greater than the session timeout. For more information on configuring the logoff check frequency, see Configuring General User Agent Settings, page 2-17.
To enable Citrix session timeout:
Step 1 Consult Citrix’s online documentation at http://support.citrix.com/.
Continue with Preparing the Computer for User Agent Installation, page 2-6.
Preparing the Computer for User Agent InstallationAfter you configure the Defense Center to connect to the Windows computer where you plan to install each user agent, set up the Windows computer with the following prerequisites:
• The computer is running Windows Vista, Windows 7, Windows 8, Windows Server 2003, Windows Server 2008, or Windows Server 2012. The computer does not have to be an Active Directory server.
• The computer has Microsoft .NET Framework Version 4.0 Client Profile and Microsoft SQL Server Compact (SQL CE) Version 3.5 installed. The framework is available from Microsoft as the .NET Framework Version 4.0 Client Profile redistributable package (dotNetFx40_Client_x86_x64.exe). The SQL CE is available from Microsoft as an executable file (SSCERuntime-ENU.exe).
2-6FireSIGHT User Agent Configuration Guide

Chapter 2 Setting up a User Agent Backing Up User Agent Configurations
Note If you do not have both the .NET Framework and SQL CE installed, when you open the agent executable file (setup.exe), it prompts you to download the appropriate files. See Installing a User Agent, page 2-8 for more information.
• The computer has TCP/IP access to the Active Directory servers you want to monitor, and uses the same version of the Internet Protocol as the Active Directory servers. If the agent is monitoring the Active Directory servers real-time, the computer’s TCP/IP access must be on at all times to retrieve login data.
• The computer has TCP/IP access to the Defense Centers where you want to report data and an IPv4 address.
• The computer has an IPv6 address, if you want to detect logoffs from hosts with IPv6 addresses, or an IPv4 address, if you want to detect logoffs from hosts with IPv4 addresses.
• The computer does not have a legacy agent or Version 2.x agent already installed. As these agents do not automatically uninstall, to uninstall an existing agent, open Add/Remove Programs in the control panel.
Caution If you have a previous version of the User Agent installed, you must complete a backup of the database to retain configuration settings.
Continue with Backing Up User Agent Configurations, page 2-7.
Backing Up User Agent ConfigurationsIf you have a previous version of the User Agent installed, installing a newer version of the user agent removes your existing configuration. To preserve these configuration settings, back up the database before installing the newer version of the user agent.
Note If you have Version 2.2 or later of the User Agent installed, you do not need to back up the database. Configuration settings are automatically imported when you install a newer version of the user agent. Continue with Installing a User Agent, page 2-8.
To retain your configuration settings:
Step 1 On the computer where you installed the agent, select Start > Programs > Sourcefire > Configure User Agent.
Step 2 Click the stop button ( ) to stop the agent service.
Step 3 Locate C:\SourcefireUserAgent.sdf on the computer where the agent is installed, and copy the file locally.
Step 4 Uninstall the Sourcefire User Agent by navigating to the control panel and opening Add/Remove Programs. Remove the agent.
Step 5 Install the latest version of the User Agent. See Installing a User Agent, page 2-8 for more information.
Step 6 On the computer where the agent is installed, select Start > Programs > Sourcefire > Configure User Agent.
Step 7 Click the stop button ( ) to stop the agent service.
2-7FireSIGHT User Agent Configuration Guide

Chapter 2 Setting up a User Agent Installing a User Agent
Step 8 Locate C:\SourcefireUserAgent.sdf on the computer where the latest version of the agent is installed. Replace the current file with the local backup made from the previous version of the agent.
Step 9 On the computer where the latest version of the agent is installed, select Start > Programs > Sourcefire > Configure User Agent.
Step 10 Click the play button ( ) to start. The agent service starts.
Continue with Configuring a User Agent, page 2-9.
Installing a User AgentLicense: FireSIGHT
After you configure permissions to connect to the Active Directory server, and whether you configured idle remote session timeouts, install the agent.
Caution If you have a previous version of the User Agent installed, to retain configuration settings, you must complete a backup of the database before installation. For more information, see Backing Up User Agent Configurations, page 2-7.
The agent runs as a service using the Local system account. If the Windows computer where the agent is running is connected to the network, the service continues to poll and send user data, even if a user is not actively logged into the computer.
Note Do not make changes to the service configuration; the agent does not function correctly using a different account.
For each agent you can configure connections to five Active Directory servers and five Defense Centers. Before you add a Defense Center connection, make sure you add the agent to the Defense Center configuration. For more information, see Preparing to Connect to a Version 4.x Defense Center, page 2-2 or Preparing to Connect to a Version 5.x Defense Center, page 2-3.
In a high availability configuration, add both Defense Centers to the agent to enable update of user login data to both the primary and the secondary so the data remains current on both.
To install a User Agent:
Access: Any
Step 1 Download the User Agent setup file (Sourcefire_User_Agent_2.2-9_Setup.zip) from the Support Site.
Note Download the setup files directly from the Support Site and do not transfer it by email. If you transfer the setup files by email, it may become corrupted.
Step 2 Copy the setup file to the Windows computer where you want to install the agent and unpack the file.
The agent requires 3 MB free on the hard drive for installation. Cisco recommends you allocate 4 GB on the hard drive for the agent local database.
2-8FireSIGHT User Agent Configuration Guide

Chapter 2 Setting up a User Agent Configuring a User Agent
Step 3 Open the setup executable file (setup.exe).
Tip If you are using an account that is not a member of the Administrators group and do not have permissions to install new applications on the Windows computer, you must elevate to a user that does belong to the group to have the appropriate permissions to start the installation. To access the escalation option, right click the setup.exe file and select Run As. Select an appropriate user and supply the password for that user.
Step 4 If you do not have both Microsoft .NET Framework Version 4.0 Client Profile and SQL CE Version 3.5 installed on the Windows computer where you install the agent, you are prompted to download the appropriate files. Download and install the files.
Step 5 Follow the prompts in the wizard to install the agent.
Step 6 To begin configuring the agent, see Configuring a User Agent, page 2-9.
Configuring a User AgentLicense: FireSIGHT
Once the agent is installed, you can configure it to receive data from Active Directory servers, report the information to Defense Centers, exclude specific user names and IP addresses from the reporting, and log status messages to a local event log or the Windows application log.
To configure the agent:
Access: Any
Step 1 On the computer where you installed the agent, select Start > Programs > Sourcefire > Configure Sourcefire User Agent.
The following table describes the actions you can take when configuring the agent and where to configure them.
Table 2-1 User Agent Configuration Actions
To... You can...
change the agent name, change the logoff check frequency, start and stop the service, and set a scheduling priority
select the General tab. See Configuring General User Agent Settings, page 2-17 for more information.
add, modify, or remove Active Directory servers, enable real-time Active Directory server data retrieval, and modify the Active Directory server polling interval and maximum poll length
select the Active Directory Servers tab. See Configuring User Agent Active Directory Server Connections, page 2-10 for more information.
add or remove Defense Centers select the Sourcefire DCs tab. See Configuring User Agent Defense Center Connections, page 2-13 for more information.
2-9FireSIGHT User Agent Configuration Guide

Chapter 2 Setting up a User Agent Configuring a User Agent
Configuring User Agent Active Directory Server ConnectionsLicense: FireSIGHT
You can add connections to up to five Active Directory servers from an agent, and configure:
• whether the agent retrieves login and logoff data real-time or polls the Active Directory servers at regular intervals for data
• how often the agent polls for user activity data, or attempts to establish or re-establish a real-time connection with an Active Directory server if the connection is lost
• what IP address the agent reports for logins to the Active Directory server itself
• how much login and logoff data the agent retrieves when it establishes or re-establishes a connection with an Active Directory server
When an agent is configured to retrieve data real-time and real-time monitoring is unavailable, the agent instead attempts to poll the Active Directory servers for data until real-time monitoring is again available.
Tip If your user agent retrieves significant amounts of user activity, Cisco recommends configuring polling instead of real-time data retrieval. In a high-activity environment, configure a 1 minute polling interval and no greater than a 10 minute maximum polling length.
Note that you cannot configure the agent to monitor an Active Directory server real-time if it is running Windows Server 2003. Real-time monitoring requires an Active Directory server running Windows Server 2008 or greater.
add, modify, or remove user names excluded from reporting
select the Excluded Usernames tab. See Configuring User Agent Excluded Username Settings, page 2-14 for more information.
add, modify, or remove IP addresses excluded from reporting
select the Excluded Addresses tab. See Configuring User Agent Excluded Addresses Settings, page 2-15 for more information.
view, export, and clear the event log, log to Windows application logs, and modify how long messages should be kept
select the Logs tab. See Configuring User Agent Logging Settings, page 2-16 for more information.
perform troubleshooting and maintenance tasks, as directed by Support
select the Logs tab, enable Show Debug Messages in Log, then select the Maintenance tab. See Configuring User Agent Maintenance Settings, page 2-18 for more information.
save changes to the agent settings click Save. A message displays below Save stating when you have unsaved changes.
close the agent without saving changes to the agent settings
click Cancel.
Table 2-1 User Agent Configuration Actions (continued)
To... You can...
2-10FireSIGHT User Agent Configuration Guide

Chapter 2 Setting up a User Agent Configuring a User Agent
From the agent, you can view the current Active Directory server polling status at the time the tab is selected, the last login reported to the agent, and the last time the agent polled an Active Directory server. You can also view whether the agent is polling an Active Directory server in real-time, and the real-time data retrieval status at the time the tab is selected. See the following table for more information on server statuses.
Note You should not connect more than one user agent to the same Active Directory server because the agents will report extraneous logins as each detects the other's connections. If you do, configure each agent to exclude the IP address of every other host running an agent that is polling the same Active Directory server and the user name the agent uses to log in. For more information, see Configuring User Agent Excluded Addresses Settings, page 2-15.
To configure Active Directory server connections:
Access: Any
Step 1 Select the Active Directory Servers tab.
Step 2 You have two options:
• To add a new connection to a server, click Add.
• To modify an existing connection, double-click the server name.
Tip To remove an existing connection, select the server name and click Remove.
Step 3 In the Server Name/IP Address field, type the fully distinguished server name or the IP address for the Active Directory server. If you want to detect logins to the Active Directory server, type the IP address.
Note If the agent is installed on an Active Directory server, to add the server where you installed the agent, type localhost as the server name. You have the option to add a user name and password. If you omit that information, you cannot detect logoffs for that Active Directory server. You can poll the server regardless of whether you enter a user name and password.
Table 2-2 Active Directory Server Statuses
Active Directory Server Status Polling Availability Real-time Availability
available The server is available for polling.
The server is available for real-time data retrieval.
unavailable The server is not available for polling.
The server is not available for real-time data retrieval, or the server is configured for polling.
pending The server configuration is added, but not yet saved.
The server configuration is added, but not yet saved.
unknown The agent has started and a status is not yet available, or the agent has not yet checked the Active Directory server.
The agent has started and a status is not yet available, or the agent has not yet checked the Active Directory server.
2-11FireSIGHT User Agent Configuration Guide

Chapter 2 Setting up a User Agent Configuring a User Agent
Step 4 Type a user name and password with rights to query for user login and logoff data on the Active Directory server. To authenticate with a user via proxy, type a fully qualified user name.
By default, the domain for the account you used to log into the computer where you installed the agent auto-populates the Domain field.
Note If your user password contains 65 or more characters, you cannot configure new server connections. To regain this functionality, shorten your password.
Step 5 Enter the domain that the Active Directory server is domain for in the Domain field.
Step 6 To detect logins to the Active Directory server, select an IP address from the Local Login IP Address field. The agent automatically populates this field with all IP addresses associated with the server specified in the Server Name/IP Address field.
If the Server Name/IP Address field is blank or contains localhost, this field is populated with all IP addresses associated with the local host.
Step 7 Select Process real-time events to enable the user agent to retrieve login events from this Active Directory server real-time.
Step 8 Click Add.
The server connection definition appears in the list of Active Directory servers. If you have more than one server connection configured, you can sort on Host, Last Reported, Polling Status, Last Polled, Real-time Status, or Real-time by clicking on the respective column headers.
Note If the agent cannot connect to the Active Directory server at configuration time, you cannot add the server. Check that the agent has TCP/IP access to the server, that the credentials you used can connect, and that you correctly configured the connection to the Active Directory server. See Configuring Permissions to Connect to an Active Directory Server, page 2-4 for more information.
Step 9 Optionally, to change the interval at which the agent automatically polls the Active Directory server for user login data, select a time from the Active Directory Server Polling Interval drop-down list.
After you save the settings, the next poll occurs after the selected number of minutes elapse, and recurs at that interval. If a poll takes longer than the selected interval, the next poll starts in the next interval after the poll ends. If real-time data retrieval is enabled for an Active Directory server, and the agent loses connectivity with the server, the agent keeps attempting polls until it receives a response and real-time data retrieval is available. Once the connection is established, real-time data retrieval resumes.
Step 10 Optionally, to change the maximum time span polled when the agent first establishes or reestablishes a connection to poll an Active Directory server for user login data, select a time from the Active Directory Server Max Poll Length drop-down list.
Note You cannot save a value in the Active Directory Server Max Poll Length drop-down list less than the value selected from the Active Directory Server Polling Interval drop-down list. The agent does not allow saving a configuration that would skip user activity data in each poll.
Step 11 To save and apply configuration changes to the agent, click Save.
Step 12 You have the following options:
• To add or remove Defense Center connections, select the Sourcefire DCs tab. For more information, see Configuring User Agent Defense Center Connections, page 2-13.
2-12FireSIGHT User Agent Configuration Guide

Chapter 2 Setting up a User Agent Configuring a User Agent
You must add at least one Defense Center to the agent to report user login and logoff data.
• To configure the agent, you can take any of the actions described in Table 2-1 on page 2-9.
Configuring User Agent Defense Center ConnectionsLicense: FireSIGHT
You can add connections to up to five Defense Centers from an agent. From the agent, you can also view the Defense Center status at the time the tab is selected (available, unavailable, or unknown when the agent first starts) and the last login reported by the agent. Before you add a connection, make sure you add the agent to the Defense Center configuration. For more information, see Preparing to Connect to a Version 4.x Defense Center, page 2-2 or Preparing to Connect to a Version 5.x Defense Center, page 2-3.
In a high availability configuration, add both Defense Centers to the agent to enable update of user login and logoff data to both the primary and the secondary so the data remains current on both.
To configure Defense Center connections:
Access: Any
Step 1 Select the Sourcefire DCs tab.
Step 2 Click Add.
Step 3 Type the hostname or IP address of the Defense Center you want to add.
Step 4 Click Add.
The Defense Center connection configuration is added. You cannot add a hostname or IP address more than once. You should not add a Defense Center by both hostname and IP address. If the Defense Center is multihomed, you should not add it multiple times using different IP addresses.
If you have more than one Defense Center connection configured, you can sort on Host, Status, or Last Reported by clicking on the respective column headers.
Note If the agent cannot connect to a Defense Center at configuration time, it cannot add that Defense Center. Check that the agent has TCP/IP access to the Defense Center.
Step 5 To save and apply configuration changes to the agent, click Save. The updated settings are applied to the agent.
Step 6 You have the following options:
• Optionally, to add or remove user names to or from the excluded user name list, select the Excluded Usernames tab. For more information, see Configuring User Agent Excluded Username Settings, page 2-14.
• Optionally, to add or remove IP addresses to the excluded IP address list, select the Excluded Addresses tab. For more information, see Configuring User Agent Excluded Addresses Settings, page 2-15.
• Optionally, to view the log message and configure logging, select the Logs tab. For more information, see Configuring User Agent Logging Settings, page 2-16.
• Optionally, to configure general agent settings, select the General tab. For more information, see Configuring General User Agent Settings, page 2-17.
2-13FireSIGHT User Agent Configuration Guide

Chapter 2 Setting up a User Agent Configuring a User Agent
• To configure the agent, you can take any of the actions described in Table 2-1 on page 2-9.
Configuring User Agent Excluded Username SettingsLicense: FireSIGHT
You can define up to 500 user names to be excluded when polling for login or logoff events. If the agent retrieves a login or logoff event by an excluded user name, the agent does not report the event to the Defense Center. Login and logoff events for a user name that are reported before the exclusion are not affected. If you remove a user name from the excluded user name list, future login and logoff events for that user name are reported to the Defense Center.
You can choose whether to exclude all logins and logoffs by a user from all domains, or from specific domains. You can also export and import lists of user names and domains, stored in comma-separated value files. Note that if you exclude a user already reported to the Defense Center, the user is never unmapped from the host, unless the host is purged from the database.
To configure excluded user names:
Access: Any
Step 1 Select the Excluded Usernames tab.
Step 2 In the next available row, type a user name you want to exclude in the Username column.
Excluded user names cannot include the dollar sign character ($) or the quotation mark character (").
Step 3 Optionally, type the domain associated with the user name in the Domain column. You can only define one domain per row. If you do not specify any domain, the user name in every domain is excluded.
Step 4 Repeat steps 2 and 3 to add additional user names. If you have more than one excluded user name configured, you can sort on Username or Domain by clicking on the respective column headers.
Step 5 To remove a row, you have the following options:
• Highlight the row and press the Delete key.
• Place your pointer at the end of the user name and press the Backspace key until it is deleted.
The row is removed.
To remove multiple rows, Ctrl-click to select multiple rows and press the Delete key.
Step 6 To export the list of user names and domains to a comma-separated value file, click Export List. Select a file path to save the file.
The file is saved. By default, the file is named Sourcefire_user_agent_excluded_users.csv.
Step 7 To import a list of user names and domains from a comma-separated value file, click Import List. Select a file to upload.
The existing user names are cleared, and the user names in the file are loaded. You cannot upload a file that contains duplicate user names. If there are any syntax errors in the file, you cannot upload the file.
Entries in the comma-separated value file must be in the following format:
"user name","domain"
A domain value is optional, but quotes are required as a placeholder.
Step 8 Click Save to save and apply configuration changes to the agent.
2-14FireSIGHT User Agent Configuration Guide

Chapter 2 Setting up a User Agent Configuring a User Agent
The updated settings are applied to the agent.
Step 9 You have the following options:
• To add or remove IP addresses to the excluded IP address list, select the Excluded Addresses tab. For more information, see Configuring User Agent Excluded Addresses Settings, page 2-15.
• To configure the agent, you can take any of the actions described in Table 2-1 on page 2-9.
Configuring User Agent Excluded Addresses SettingsLicense: FireSIGHT
You can configure up to 100 IPv4 or IPv6 addresses to be excluded when polling for login events. If the agent retrieves a login or logoff event that contains an excluded IP address, the agent does not report the event to the Defense Center. Login and logoff events from an IP address that are reported before the exclusion are not affected. If you remove an IP address from the excluded address list, future login and logoff events for that address are reported to the Defense Center.
To configure excluded IP addresses:
Access: Any
Step 1 Select the Excluded Addresses tab.
Step 2 In the next available row, type an IP address you want to exclude in the Address column. Repeat this to add additional IP addresses. If you have more than one excluded IP address configured, you can sort on Address by clicking on the respective column headers.
If you enter an invalid IP address, an exclamation mark icon ( ) appears in the row header. You cannot enter another address without fixing the invalid address.
Step 3 To remove an IP address, highlight the row and press the Delete key.
The IP address is removed. To remove multiple rows, Ctrl-click to select multiple rows and press the Delete key.
Step 4 To export the list of IP addresses to a comma-separated value file, click Export List. Select a file path to save the file.
The file is saved. By default, the file is named Sourcefire_user_agent_excluded_addresses.csv.
Step 5 To import a list of IP addresses from a comma-separated value file, click Import List. Select a file to upload.
The existing IP addresses are cleared, and the IP addresses in the file are loaded. You cannot upload a file that contains duplicate IP addresses. If there are any syntax errors in the file, you cannot upload the file.
Step 6 Click Save to save and apply configuration changes to the agent.
The updated settings are applied to the agent.
Step 7 You have the following options:
• To view the log message and configure logging, select the Logs tab. For more information, see Configuring User Agent Logging Settings, page 2-16.
2-15FireSIGHT User Agent Configuration Guide
Chapter 2 Setting up a User Agent Configuring a User Agent
• To configure the agent, you can take any of the actions described in Table 2-1 on page 2-9.
Configuring User Agent Logging SettingsLicense: FireSIGHT
You can view up to 250 status messages logged by the agent in the Logs tab. The agent logs status messages to the local event log for the following events when they occur:
• the agent successfully polls data from an Active Directory server
• the agent fails to connect to an Active Directory server
• the agent fails to retrieve data from the Active Directory server
• the agent successfully connects to a Cisco appliance
• the agent fails to connect to a Cisco appliance
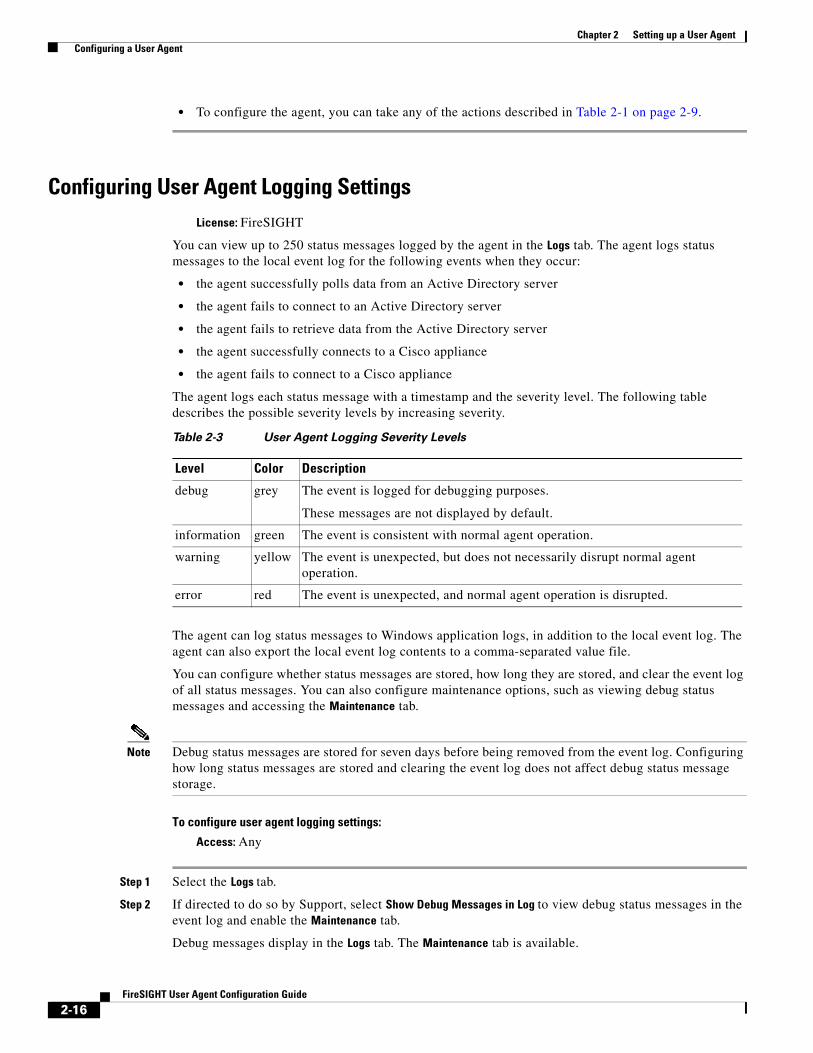
The agent logs each status message with a timestamp and the severity level. The following table describes the possible severity levels by increasing severity.
The agent can log status messages to Windows application logs, in addition to the local event log. The agent can also export the local event log contents to a comma-separated value file.
You can configure whether status messages are stored, how long they are stored, and clear the event log of all status messages. You can also configure maintenance options, such as viewing debug status messages and accessing the Maintenance tab.
Note Debug status messages are stored for seven days before being removed from the event log. Configuring how long status messages are stored and clearing the event log does not affect debug status message storage.
To configure user agent logging settings:
Access: Any
Step 1 Select the Logs tab.
Step 2 If directed to do so by Support, select Show Debug Messages in Log to view debug status messages in the event log and enable the Maintenance tab.
Debug messages display in the Logs tab. The Maintenance tab is available.
Table 2-3 User Agent Logging Severity Levels
Level Color Description
debug grey The event is logged for debugging purposes.
These messages are not displayed by default.
information green The event is consistent with normal agent operation.
warning yellow The event is unexpected, but does not necessarily disrupt normal agent operation.
error red The event is unexpected, and normal agent operation is disrupted.
2-16FireSIGHT User Agent Configuration Guide

Chapter 2 Setting up a User Agent Configuring a User Agent
Note Only select this option when Support directs you to do so.
Step 3 Select Log Messages to Windows Application Log to log non-debug status messages to both the Windows application logs and the local event logs.
To view the Windows application logs, open the Windows Event Viewer.
Step 4 Select a time period from the Message Cache Size drop-down list to configure how long status messages are saved before they are automatically deleted from the local event log.
Status messages, once logged to the local event log, are saved for the time period selected in the Message Cache Size drop-down list, then deleted.
Note The Message Cache Size setting only affects the local event log, not the Windows application logs, even if you select Log Messages to Windows Application Log.
Step 5 Click Refresh to view new status messages logged since the last refresh.
If new status messages have been logged since the last refresh, a note displays stating there are new status messages available. If the refresh results in more than 250 messages displayed, the oldest status messages are removed from the Logs tab. To view more than 250 messages, export the logs. See step 6 for more information.
Step 6 Click Export Logs to export the local event log contents to a comma-separated value file.
The comma-separated value file contains all event log status messages and debug messages.
Step 7 Click Clear Event Log to remove all non-debug status messages from the local event log.
The local event is cleared, except for a status message stating the agent removed the messages.
Step 8 To save and apply configuration changes to the agent, click Save.
The updated settings are applied to the agent.
Step 9 You have the following options:
• To configure general agent settings, select the General tab. For more information, see Configuring General User Agent Settings, page 2-17.
• To configure the agent, you can take any of the actions described in Table 2-1 on page 2-9.
Configuring General User Agent SettingsLicense: FireSIGHT
The General tab contains basic User Agent configuration. You can change the agent name reported to the Defense Center when the agent reports login data. You can also start and stop the agent service, change the logoff check frequency, and view the current service status.
To configure general User Agent settings:
Access: Any
Step 1 On the computer where you installed the agent, select Start > Programs > Sourcefire > Configure User Agent.
2-17FireSIGHT User Agent Configuration Guide
Chapter 2 Setting up a User Agent Configuring a User Agent
Step 2 Click the play button ( ) to start the agent service.
The agent service starts.
Step 3 Click the stop button ( ) to stop the agent service.
The agent service stops.
Step 4 Optionally, modify the Agent Name for the agent, which defaults to SFADUA. You can enter letters, numbers, underscores (_), and dashes (-).
Step 5 Optionally, for Version 5.2 and later, to change the frequency the agent checks for logoff data, select a time period from the Logout Check Frequency drop-down list. Select 0 to disable checking for logoff data.
Step 6 Optionally, to change the agent scheduling priority, select a level from the Priority drop-down list. Select High only if your agent monitors and retrieves significant amounts of user activity.
Step 7 To save settings, click Save.
The updated settings are applied to the agent.
Step 8 To configure the agent, you can take any of the actions described in Table 2-1 on page 2-9.
Configuring User Agent Maintenance SettingsLicense: FireSIGHT
In addition to configuration settings, the agent stores user-to-IP mapping information, the local event log, and reporting state information in the SQL CE database. The agent Maintenance tab allows you to clear portions of the database for maintenance purposes. You can clear cached user-to-IP mapping information and local event log information. You can also clear the reporting state cache, which forces a manual polling of the configured Active Directory servers.
Caution Do not change any settings on the Maintenance tab unless Support directs you to do so.
To configure user agent maintenance settings:
Access: Any
Step 1 Select the Logs tab.
Step 2 Select Show Debug Messages in Log to enable the Maintenance tab.
Step 3 Select the Maintenance tab.
Step 4 Click Clear user mapping data cache to clear all stored user-to-IP mapping data.
The agent deletes all stored user-to-IP mapping data from the local agent database. Stored user-to-IP mapping data in the Defense Center database are not affected by clearing the local agent database.
Step 5 Click Clear logon event log cache to clear all stored login event data.
The agent deletes all stored login event data from the local event log.
Step 6 Click Clear reporting state cache to clear data related to the last time the agent reported login and logoff information to the configured Defense Centers.
2-18FireSIGHT User Agent Configuration Guide

Chapter 2 Setting up a User Agent Configuring a User Agent
The agent deletes all information related to the last time it reported login and logoff information to the configured Defense Centers. At the start of the next polling interval, the agent manually polls all configured Active Directory Servers, retrieving information within the time span defined in the Active Directory Server Max Poll Length field. See Configuring User Agent Active Directory Server Connections, page 2-10 for more information.
Step 7 Select a level of logging granularity from the Debug Log Level drop-down to configure how detailed the logged debug messages are.
Step 8 To configure the agent, you can take any of the actions described in Table 2-1 on page 2-9.
2-19FireSIGHT User Agent Configuration Guide

Chapter 2 Setting up a User Agent Configuring a User Agent
2-20FireSIGHT User Agent Configuration Guide