finepix s3 pro manual - scad employee web spacekwitte/documents/s3_prooperation...test shots prior...
TRANSCRIPT

1
2
3
4
5
6
BL00430-201(1)
Getting Ready
Basic Photography
Advanced Photography
Settings
Advanced Features Playback
Connection
This manual will show you how to use your FUJIFILM DIGITAL CAMERA FinePix S3 Pro correctly. Please follow the instructions carefully.
OWNER’S MANUAL

2 3
EC Declaration of Conformity
WeName: Fuji Photo Film (Europe) G.m.b.H.Address: Heesenstrasse 31
40549 Dusseldorf, Germany
declare that the productProduct Name: FUJIFILM DIGITAL CAMERA FinePix S3 ProManufacture’s Name: Fuji Photo Film Co., Ltd.Manufacture’s Address: 26-30, Nishiazabu 2-chome, Minato-ku,
Tokyo 106-8620, Japan
is in conformity with the following StandardsSafety: EN60065EMC: EN55022: 1998 Classe B
EN55024: 1998EN61000-3-2: 1995 + A1:1998 + A2:1998
following the provision of the EMC Directive (89/336/EEC, 92/31/EEC and 93/68/EEC) and Low Voltage Directive (73/23/EEC).
Dusseldorf, Germany November 1, 2004
Place Date Signature/Managing Director
Bij dit produkt zijn batterijen geleverd. Wanneer deze leeg zijn, moet uze niet weggooien maar inleveren als KCA
Warning
For customers in the U.S.A.Tested To Comply
With FCC Standards FOR HOME OR OFFICE USE
FCC StatementThis device complies with part 15 of the FCC Rules. Operationis subject to the following two conditions: (1) This device maynot cause harmful interference, and (2) this device mustaccept any interference received, including interference thatmay cause undesired operation.
CAUTIONThis equipment has been tested and found to comply with thelimits for a Class B digital device, pursuant to Part 15 of theFCC Rules. These limits are designed to provide reasonableprotection against harmful interference in a residentialinstallation. This equipment generates, uses, and can radiateradio frequency energy and, if not installed and used inaccordance with the instructions, may cause harmfulinterference to radio communications. However, there is noguarantee that interference will not occur in a particularinstallation. If this equipment does cause harmful interferenceto radio or television reception, which can be determined byturning the equipment off and on, the user is encouraged to try
To prevent fire or shock hazard, do not expose the unit to rain or moisture.to correct the interference by one or more of the followingmeasures:— Reorient or relocate the receiving antenna.— Increase the separation between the equipment and receiver.— Connect the equipment into an outlet on a circuit different from
that to which the receiver is connected.— Consult the dealer or an experienced radio/TV technician for
help.You are cautioned that any changes or modifications notexpressly approved in this manual could void the user’s authorityto operate the equipment.
Notes on the Grant:To comply with Part 15 of the FCC rules, this product must beused with a Fujifilm-specified ferrite-core video cable, IEEE 1394cable, USB cable and DC supply cord.
For customers in CanadaCAUTIONThis Class B digital apparatus complies with Canadian ICES-003.
Please read the Safety Notes (➡P.141) and makesure you understand them before using the camera.
4
Contents
1 Getting Ready
Warning ......................................................................... 2EC Declaration of Conformity ........................................ 3Preface .......................................................................... 7Accessories included ..................................................... 8Camera parts and features ............................................ 9
Top display panel .................................................... 12LCD monitor ............................................................ 12Rear display panel .................................................. 13Viewfinder display ................................................... 15
ATTACHING THE STRAP ............................................................................................................... 16MOUNTING THE CAMERA LENS .................................................................................................. 17
Using CPU Nikkor lenses other than G-type lenses .................................................................... 18Lens compatibility ......................................................................................................................... 19
CHARGING THE BATTERIES ........................................................................................................ 21LOADING THE BATTERIES ............................................................................................................ 22INSERTING THE MEDIA ................................................................................................................ 24CHECKING THE BATTERY CHARGE ........................................................................................... 25TURNING ON AND OFF / SETTING THE DATE AND TIME ......................................................... 26CORRECTING THE DATE AND TIME / CHANGING THE DATE ORDER .................................... 27SELECTING THE LANGUAGE ....................................................................................................... 28DIOPTER ADJUSTMENT ............................................................................................................... 29LCD ILLUMINATOR ........................................................................................................................ 29
3 Advanced Photography
FOCUS SETTINGS ...................................................................................................................... 45■ Focus-related custom settings ............................................................................................. 45
SELECTING THE FOCUS MODE ............................................................................................... 46■ Focus modes ........................................................................................................................ 46
SELECTING THE AF AREA MODE ............................................................................................ 47■ The displays shown in the viewfinder and on the top display panel are shown below. ........ 47
SELECTING THE FOCUS AREA ................................................................................................ 48MANUAL FOCUS ......................................................................................................................... 49
, SINGLE-FRAME ................................................................................................................... 50RELEASE MODES
FOCUS SETTINGS
2 Basic PhotographyBASIC OPERATION GUIDE ........................................................................................................... 30
Command dials ............................................................................................................................ 33TAKING PICTURES (P Auto-Multi Program) .................................................................................. 34
Shooting with the camera held on end (vertically) ....................................................................... 36NUMBER OF AVAILABLE SHOTS ................................................................................................. 37
■ Standard number of shots for the media .................................................................................. 37AF-ASSIST ILLUMINATOR ............................................................................................................. 38SITUATIONS WHERE AUTOFOCUS MAY NOT WORK AS EXPECTED ..................................... 39USING AF LOCK ............................................................................................................................. 40
TAKING PICTURES WITH AE LOCK ........................................................................................ 41DEPTH OF FIELD CHECK BUTTON .............................................................................................. 42CCD PLANE INDICATOR ............................................................................................................... 42
VIEWING THE IMAGES (w PLAYBACK) ...................................................................................... 43Single-frame playback .................................................................................................................. 43Selecting images .......................................................................................................................... 43Playback zoom ............................................................................................................................. 44
PLAYBACK MODE
5
1
2
3
4
5
6
. CONTINUOUS SHOOTING ................................................................................................. 509 SELF-TIMER PHOTOGRAPHY ........................................................................................... 51p MULTIPLE EXPOSURE ....................................................................................................... 52METERING SYSTEMS ................................................................................................................ 54
l Matrix (10-segment) metering ........................................................................................ 54k Center-weighted metering .............................................................................................. 54j Spot metering ................................................................................................................. 54
ISO SENSITIVITY ........................................................................................................................ 55
P AUTO-MULTI PROGRAM .................................................................................................... 56Program chart ...................................................................................................................... 57
S SHUTTER-PRIORITY AUTO ................................................................................................ 58A APERTURE-PRIORITY AUTO ............................................................................................. 59M MANUAL ............................................................................................................................... 60
Bulb photography (™) ................................................................................................... 61b EXPOSURE COMPENSATION ............................................................................................ 63c AUTO EXPOSURE BRACKETING ...................................................................................... 64
FLASH PHOTOGRAPHY ............................................................................................................. 66SETTINGS FOR FLASH PHOTOGRAPHY ......................................................................... 66
BUILT-IN FLASH .......................................................................................................................... 67■ Flash control modes that can be used with the built-in flash ................................................ 67
SYNCHRO MODES AND THEIR FEATURES ............................................................................ 68a FRONT SYNCHRO MODE .............................................................................. 68ag SLOW SYNCHRO MODE ................................................................................ 68ah REAR SYNCHRO MODE ................................................................................. 69as RED-EYE REDUCTION MODE ....................................................................... 69asg RED-EYE REDUCTION SLOW SYNCHRO MODE ......................................... 69
TAKING PICTURES USING THE BUILT-IN FLASH ................................................................... 70■ Effective range of the built-in flash ....................................................................................... 71
LENSES THAT CAN BE USED WITH THE BUILT-IN FLASH .................................................... 72FLASH EXPOSURE COMPENSATION ...................................................................................... 73NIKON FLASH UNITS THAT CAN BE USED .............................................................................. 74
USING THE FUNCTION MENU WHEN TAKING PICTURES ..................................................... 76WHITE BALANCE .................................................................................................................... 77QUALITY .................................................................................................................................. 78RECORDED PIXELS ............................................................................................................... 79FILM SIMULATION .................................................................................................................. 79DYNAMIC RANGE ................................................................................................................... 80COLOR .................................................................................................................................... 80TONE ....................................................................................................................................... 81SHARPNESS ........................................................................................................................... 81AF AREA .................................................................................................................................. 82FUNCTION LOCK .................................................................................................................... 82FUNCTION RESET .................................................................................................................. 83
PHOTOGRAPHY FUNCTION MENU
FLASH PHOTOGRAPHY
EXPOSURE MODES
USING THE FUNCTION MENU .................................................................................................. 84HISTOGRAM ............................................................................................................................... 85ERASING SINGLE-FRAME ......................................................................................................... 86
PLAYBACK FUNCTION MENU
4 Advanced Features Playback

■ Test Shots Prior to PhotographyFor particularly important photographs (such asweddings and overseas trips), always take a testphotograph and view the image to make sure that thecamera is functioning normally.h Fuji Photo Film Co., Ltd. cannot accept liability for
any incidental losses (such as the costs ofphotography or the loss of income fromphotography) incurred as a result of faults with thisproduct.
■ Notes on CopyrightImages recorded using your digital camera systemcannot be used in ways that infringe copyright lawswithout the consent of the owner, unless intended onlyfor personal use. Note that some restrictions apply tothe photographing of stage performances,entertainments and exhibits, even when intendedpurely for personal use. Users are also asked to notethat the transfer of memory cards (xD-Picture Card orMicrodrive) containing images or data protected undercopyright laws is only permissible within therestrictions imposed by those copyright laws.
■ Liquid CrystalIf the LCD monitor is damaged, take particular carewith the liquid crystal in the monitor. If any of thefollowing situations arise, take the urgent actionindicated.h If liquid crystal comes in contact with your skin
Wipe the area with a cloth and then wash thoroughlywith soap and running water.h If liquid crystal gets into your eye
Flush the affected eye with clean water for at least15 minutes and then seek medical assistance.h If liquid crystal is swallowed
Flush your mouth thoroughly with water. Drink largequantities of water and induce vomiting. Then seekmedical assistance.
■ Notes on Electrical InterferenceIf the camera is to be used in hospitals or aircrafts,please note that this camera may cause interference
to other equipment in the hospital or aircraft. Fordetails, please check with the applicable regulations.
■ Handling Your Digital CameraThis camera contains precision electroniccomponents. To ensure that images are recordedcorrectly, do not subject the camera to impact orshock while an image is being recorded.
■ Trademark Informationh and xD-Picture Card™ are trademarks of
Fuji Photo Film Co., Ltd.h IBM PC/AT is a registered trademark of International
Business Machines Corp. of the U.S.A.h Macintosh, Power Macintosh, iMac, PowerBook, iBook
and Mac OS are trademarks of Apple Computer, Inc.,registered in the U.S. and other countries.h Adobe Acrobat® Reader® is a trademark of Adobe
Systems Incorporated of the U.S.h Microsoft, Windows, and the Windows logo are
trademarks, or registered trademarks of MicrosoftCorporation in the United States and/or othercountries. Windows is an abbreviated term referringto the Microsoft® Windows® Operating System.
✽ The “Designed for Microsoft® Windows® XP” logorefers to the camera and the driver only.h Other company or product names are trademarks or
registered trademarks of the respective companies.
■ Explanation of Color Television SystemNTSC: National Television System Committee, color
television telecasting specifications adoptedmainly in the U.S.A., Canada and Japan.
PAL: Phase Alternation by Line, a color televisionsystem adopted mainly by European countriesand China.
■ Exif Print (Exif ver. 2.2)Exif Print Format is a newly revised digital camera fileformat that contains a variety of shooting informationfor optimal printing.
76
Contents
◆ LCD cover ◆To prevent soiling or damage to the LCD monitor,attach the enclosed LCD cover to the camera whenyou are carrying or not using the camera.Attach the LCD cover by first fitting it into the groovesbelow the camera’s LCD monitor.
Preface
LCD cover
System Expansion Options ....................................... 121Accessories Guide .................................................... 122Notes on Using Your Camera Correctly .................... 124Cleaning the CCD ..................................................... 125Notes on the Power Supply ....................................... 129
Applicable Batteries .............................................. 129Notes on the Batteries ........................................... 129Using the AA-size Ni-MH Batteries ....................... 129
Notes on Using the Battery Charger ..................... 130AC Power Adapter ................................................ 130
Notes on the Media ................................................... 131Warning Displays ...................................................... 132Troubleshooting ......................................................... 136Specifications ............................................................ 138Explanation of Terms ................................................ 140Safety Notes .............................................................. 141
5 SettingsSET-UP ......................................................................................................................................... 101USING THE SET-UP SCREEN...................................................................................................... 101
■ SET-UP menu options ............................................................................................................ 102IMAGE DISPLAY ........................................................................................................................... 103
Procedure when “PREVIEW” is set ............................................................................................ 103Preview zoom ............................................................................................................................. 103Histogram ................................................................................................................................... 103Brightness warning and standard chart ...................................................................................... 103
SETTING THE CUSTOM WB ....................................................................................................... 104■ When the exposure is not measured correctly ....................................................................... 105
COLOR SPACES .......................................................................................................................... 105D-RANGE ...................................................................................................................................... 105AUTO ROTATE ............................................................................................................................. 106FORMAT ....................................................................................................................................... 106FRAME NO. ................................................................................................................................... 106DISCHARGING RECHARGEABLE BATTERIES .......................................................................... 107LIVE IMAGE .................................................................................................................................. 108TWO-BUTTON RESET ................................................................................................................. 109CUSTOM SETTING (CSM) ........................................................................................................... 110
Cancelling custom settings ........................................................................................................ 110■ Custom settings list ................................................................................................................ 111
6 ConnectionCONNECTING TO A TV ............................................................................................................... 113USING THE AC POWER ADAPTER ............................................................................................ 113CONNECTING TO A COMPUTER ............................................................................................... 114
USE AT DSC MODE .................................................................................................................. 115Disconnecting the camera .......................................................................................................... 116
CONNECTING THE CAMERA DIRECTLY TO THE PRINTER — PictBridge FUNCTION .......... 117Specifying images for printing on the camera ............................................................................ 117Specifying images for printing without using DPOF (single-frame printing) ............................... 118Disconnecting the printer ........................................................................................................... 120
SINGLE-FRAME PROTECT ........................................................................................................ 87MULTI-FRAME PLAYBACK ......................................................................................................... 88
o ERASING ALL FRAMES ........................................................................................................ 89i PROTECTING IMAGES: SET ALL / RESET ALL .................................................................. 91u HOW TO SPECIFY PRINT OPTIONS (DPOF) ...................................................................... 93u DPOF SET FRAME ................................................................................................................ 94u DPOF (RESET ALL) .............................................................................................................. 96[ AUTOMATIC PLAYBACK ...................................................................................................... 97] TRIMMING ............................................................................................................................. 98= LCD BRIGHTNESS .............................................................................................................. 100
PLAYBACK MENU

8 9
h AA-size Ni-MH Batteries (HR-AA) (4)
h Battery charger BCH-NH2 (1)✽Plug-in and cord-attached types are provided
depending on the intended country of use.
h Strap (1)
h Accessory shoe cover (1)Fitted on the camera body
h Eyepiece cap (1)
h LCD cover (1)Fitted on the camera body
h Camera body cap (1)Fitted on the camera body
h Video cable (1)(approx. 1.5 m (4.9ft.), mini-plug (3.5 mm-dia.) topin-plug cable)
h IEEE 1394 4-pin to 6-pin cable (1)(approx. 1.5 m (4.9ft.))
h USB cable (mini-B) (1)
h Cable holder (1)
h Clamp filter (1)
h Synchronizing terminal cap (1)Fitted on the camera bodyh Remote release socket cap (1)
Fitted on the camera bodyh Battery holder (1)
Fitted on the camera bodyh CD-ROM: Software for FinePix AX (1)h Owner’s Manual (this manual) (1)h Software Quick Start Guide (1)
Accessories included
AF-assist illuminator (P.38)
Self-timer lamp (P.51)
Red-eye reduction lamp (P.69)
Accessory shoe (P.75)
Accessory shoe cover
Power switch (P.26)
Sub-command dial (P.33)
Depth of field check button (P.42)
Shutter button for vertical shooting(P.36)
Strap mount (P.16)
Flash exposure compensation button (P.73)
Exposure compensation button (P.63)
Top display panel (P.12)
LCD illuminator button (P.29)
Shutter button (P.36)
Release mode switchunlock button
Exposure mode dial
Release mode switch
Synchronizing terminal cap
Synchronizing terminal
Lock lever for vertical shooting(P.36)
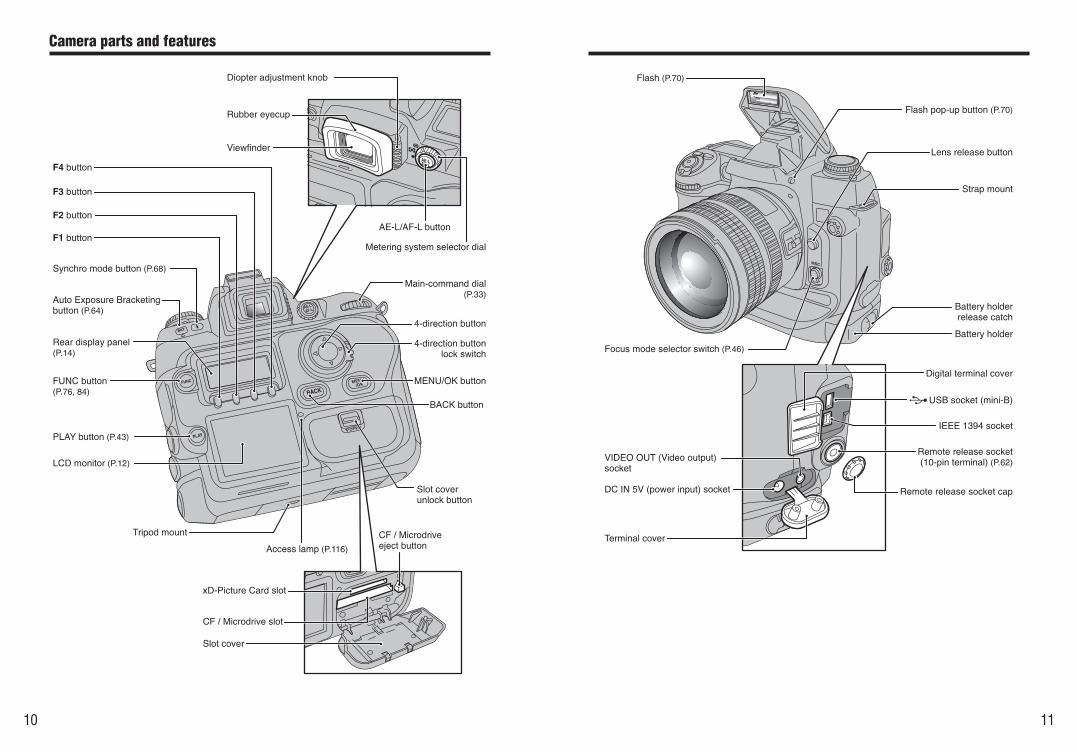
Camera parts and features ✽ Refer to the pages in parentheses for information onusing the camera parts or features.
10 11
Camera parts and features
Flash pop-up button (P.70)
Focus mode selector switch (P.46)
Battery holderrelease catch
Lens release button
Strap mount
Flash (P.70)
USB socket (mini-B)
Battery holder
IEEE 1394 socket
VIDEO OUT (Video output) socket
DC IN 5V (power input) socket
Terminal cover
Digital terminal cover
Remote release socket (10-pin terminal) (P.62)
Remote release socket cap
Tripod mount
Slot coverunlock button
Main-command dial (P.33)
Access lamp (P.116)
4-direction buttonlock switch
MENU/OK button
BACK button
xD-Picture Card slot
CF / Microdrive eject button
CF / Microdrive slot
Slot cover
4-direction button
AE-L/AF-L button
Metering system selector dial
PLAY button (P.43)
FUNC button (P.76, 84)
F1 button
F2 button
F3 button
F4 button
LCD monitor (P.12)
Rear display panel (P.14)
Synchro mode button (P.68)
Auto Exposure Bracketingbutton (P.64)
Diopter adjustment knob
Rubber eyecup
Viewfinder

12 13
Top display panel Rear display panel
LCD monitor
●! The LCD used in the top display panel will turn dark at high temperatures and will respond a little more slowly at lowtemperatures. However, it will operate normally again at normal temperatures.
●! There may be some unevenness in the brightness at the bottom of the LCD monitor. This is due to variations in thelighting of the LCD itself and is not a fault.
Camera parts and features
Protection
DPOF
Histogram
Shutter speed / Exposure compensation value Aperture
Flash exposurecompensation (P.73)
Custom Setting (P.110)
Battery level warning (P.25)
Exposurecompensation (P.63)
Flash synchro mode (P.68) Bracketing bar graphs (P.64)
Auto Exposure Bracketing (P.64) Focus area (P.47)
Flexible Program(P.56)
ISO200 01 / 01 / 2004
12 : 00 AM
Quality
AF area mode
Function lock
Sharpness
Tone
Color
Recording icon (when recording)/ Color space
(when AdobeRGB is set)
Media
Press the “FUNC” button to switch between functions.
Date / Time
Photography mode
Sensitivity
Battery charge indicator
Number of available shots
White balance Recorded pixels
Film simulation
Dynamic range
Function reset
■ During shooting
h Photographed image display: For checking
Histogram (P.103)
Standard chart display (P.103)Record
Erase

14 15
Viewfinder display
●! The viewfinder will be dark without battery power but brightens after installation of fresh batteries. This is not amalfunction.
●! The LCD panel in the upper part of the viewfinder (focus area and On-Demand Grid Lines) will become paler at hightemperatures and will become darker and respond a little more slowly at low temperatures. However, it will operatenormally again at normal temperatures.
●! The LCD panel in the viewfinder display (where the icons and numbers are displayed) will turn dark at high temperaturesand will respond a little more slowly at low temperatures. However, it will operate normally again at normal temperatures.
◆ About Advanced Focusing Screen Display ◆The new Advanced Focusing Screen Display of the FinePix S3 Pro employs the convenient Vari-BriteFocus Area display system; it enables clear display of the focus brackets at the selected focus area inthe viewfinder for easy identification. When the finder image is bright, the focus brackets are displayedin black and when the finder image is dark, the focus brackets are momentarily illuminated in red. Theselected focus area can be identified easily in both bright and dark conditions with this function.Also, the new Advanced Focusing Screen Display allows the superimposition of On-Demand GridLines. The grid lines can be displayed by using Custom Setting Menu #2 (➡P.111). These grids assistyou in composing the frame, in taking landscape pictures or in shifting/tilting PC-Nikkor lenses.✽ Due to characteristics of the LCD used in the Vari-Brite Focus Area display system, a thin line
outside the selected focus area may also be displayed or the entire viewfinder may be illuminated inred under certain conditions. These are not malfunctions.
12mm-dia reference circle for center-weighted metering area (P.54)
Focus indicator (P.36)
Flash ready-light (P.70)
Exposure compensation value / Flash exposure
compensation value (P.63, 73)
Shutter speed
Aperture
Focus area (P.47)
Metering system (P.54)
Multiple exposure (P.52)AE-L (Auto exposure lock)indicator (P.41)
Exposure compensation (P.63)
Flash exposure compensation (P.73)
Exposure mode (P.56-62) / Electronicanalog exposure display / Exposure
compensation value display (P.63)
● Viewfinder information display
On-Demand Grid Lines (P.111)
Focus areaSpot metering area (P.54)
Rear display panel
Camera parts and features
■ During playback
100-0009
100-0009125 F5.6 ISO200D:AUTO C:STD T:STD S:STD
100-0009 01 / 01 / 2004 12 : 00 AMWB:AUTO NORMAL 6M F:STD
Media
Press the “FUNC” button to switch between functions.
Playback modeFrame number
Multi-frame playback
Protection
Shutter speed Aperture
Sensitivity
Recorded pixels
White balance
Date / Time
Erase
Histogram
Sharpness
Tone
Color
Quality
Battery charge indicator
Color space (only AdobeRGB shown)
Film simulation
Dynamic range

16 17
Gettin
gR
eady
1
1
Fastener A
Fastener B
2
3
Pass one end of the strap through the strap mounton the camera body.
Pass the end of the strap through the fastener Aand B as shown in the figure.
Adjust the strap length. Use the same procedure toattach the other end of the strap to the other strapmount.
●! Check that the strap is pulled tight after it is attached.
MOUNTING THE CAMERA LENS
1
2
Check the lens type.
Set the Power switch to “OFF” to turn the cameraoff.
CPU contacts of CPU lensThe lens is fitted with CPU
signal contacts.
CPU Nikkor lens otherthan G-type
(with aperture ring)
G-type Nikkor lens (without aperture ring)
3 Position lens in the camera’s bayonet mount sothat the mounting indexes on lens and camerabody are aligned, then twist lens counterclockwiseuntil it locks into place.
●! Always change the lens in an area free of dirt and dust.●! When attaching the lens, take care not to press the lens
release button.●! When the lens is not attached or when a non-CPU Nikkor
lens is attached and the power switch is turned on, “§”blinks in the top display panel and viewfinder, and the shuttercannot be released. See P.20 for a non-CPU lens.
●! Take care not to mount the lens when it is at an angle to thecamera as this can damage the lens mount on the camera.
●! See “Lens compatibility” (➡P.19) for details.
ATTACHING THE STRAP1 Getting Ready
Continued
◆ Using the cable holder ◆Feed the cables through the cable holder.
Attach the cable holder to the strap mount.
Cableholder
IEEE 1394
DC IN 5V
Strapmount

18 19
Gettin
gR
eady
1
MOUNTING THE CAMERA LENS
Using CPU Nikkor lenses other than G-type lenses
1 Set the aperture ring to the minimum aperture.
2 Lock the aperture ring. If you turn the camera onwithout first selecting the minimum aperture (theaperture setting with the largest number), “¡”f lashes on the top display panel and in theviewfinder, and the shutter will not operate.
◆ Removing the lens ◆Push and hold the lens release button, then turn thelens clockwise.
While the lens is removed from the camera, fit thecamera body cap provided onto the camera toprotect the inside of the camera and prevent soilingof the mirror and viewfinder screen.You can also use the Nikon BF-1A Body Cap.
Lens compatibilityUse a CPU lens (except IX-Nikkor) with this camera. D- or G-type AF lenses give you access to allavailable functions (➡P.17).
✽ 1 Spot metering area can be shifted with focus area selector (➡P.54) with CPU Nikkor lens.✽ 2 IX-Nikkor lenses cannot be attached.✽ 3 This camera is compatible with the Vibration Reduction function of the VR Nikkor lens.✽ 4 The camera’s exposure metering and flash control system do not work properly when shifting and/or tilting the lens, or
when using an aperture other than the maximum aperture.✽ 5 Without shifting and/or tilting the lens.✽ 6 Compatible with AF-S and AF-I Nikkor except AF-S 17-35 mm f/2.8D IF-ED, AF-S 28-70 mm f/2.8D IF-ED, AF-S 12-
24mm f/4G, AF-S DX ED 17-55mm f/2.8G, AF-S DX ED 18-70mm f/3.5-4.5G, AF-S ED 24-85mm f/3.5-4.5G and AF-SVR ED 24-120mm f/3.5-5.6G.
✽ 7 With maximum effective aperture of f/5.6 or faster.✽ 8 With maximum aperture of f/5.6 or faster.✽ 9 Some lenses/accessories cannot be attached (➡P.20).✽ 10 With exposure mode set to Manual. The exposure meter cannot be used.✽ 11 With exposure mode set to Manual and shutter speed set to 1/60 sec. or slower but the exposure meter cannot be
used.✽ 12 Can be mounted when used with the Nikon Auto extension ring.i Reprocopy Outfit PF-4 can be attached in combination with Nikon Camera Holder PA-4.
✓: Compatible, —: Imcompatible
Continued
✓ ✓ ✓ ✓ ✓ ✓ — ✓
— ✓✽5 ✓ — ✓ ✓ — ✓
✓✽7 ✓✽7 ✓ ✓ ✓ ✓ — ✓
✓ ✓ ✓ ✓ ✓ — ✓ ✓
— ✓✽8 ✓ ✓ ✓ — ✓ ✓
— ✓✽8 ✓ — ✓✽10 — — —
— ✓ ✓ — ✓✽11 — — —
— — ✓ — ✓✽10 — — —
— ✓✽5 ✓ — ✓✽10 — — —
— ✓✽7 ✓ — ✓✽10 — — —
— ✓✽7 ✓ — ✓✽10 — — —
— ✓✽7 ✓ — ✓✽10 — — —
■ Types of CPU lenses and other usable lenses/accessoriesFocus modeMode
Lens/accessoriesAutofocus
Manual withelectronic
rangefinderManual
Exposure mode
Any modeother than
MM
Metering system
Matrix
3D 10-segment
10-segment
Center-Weighted,
Spot✽1
CP
UN
ikko
r✽2
Non
-CP
UN
ikko
r✽9
D-type AF Nikkor✽3,G-type AF Nikkor✽3,AF-S, AF-I Nikkor
PC Micro-Nikkor 85 mm f/2.8D✽4
AF-I/AF-S Teleconverter✽6
Non-D/G-type AF Nikkor (exceptAF Nikkor for F3AF)
AI-P Nikkor
AI-S or AI type Nikkor,Series-E, AI-modified Nikkor
Medical-Nikkor 120 mm f/4
Reflex-Nikkor
PC-Nikkor
AI-S or AI typeTeleconverters
Bellows Focusing Attachment PB-6✽12
Auto Extension Rings (PK-11A, PK-12, PK-13 and PN-11)

20 21
Gettin
gR
eady
1
MOUNTING THE CAMERA LENS
◆ G-type Nikkor and other CPU Nikkor lens ◆
◆ When a non-CPU lens is attached ◆
◆ Nikkor lenses/accessories that cannot be attached to the FinePix S3 Pro ◆
Batteries that can be charged
Charge the AA-size Ni-MH batteries (HR-AA).
h AA-size Ni-MH batteries (included)
●! Always use the battery charger BCH-NH2 bundled with the camera to charge Ni-MH batteries. Attempting to chargebatteries other than those specified for use with the charger (such as manganese, alkaline or lithium batteries) can causethe batteries to burst or leak. This could result in a fire or injury and consequent damage to the surroundings.
1 Load the Ni-MH batteries (included) into the batterycharger BCH-NH2 bundled with the cameracorrectly as indicated by the polarity icons.
●! The Ni-MH batteries are not fully charged when purchasedand must be fully charged before being used.
●! When first used after purchasing or when left unused for along period, charge and discharge the battery using thecamera’s “Discharging rechargeable batteries” function andthen recharge them (➡P.107).
●! If the terminals of battery are soiled, it may not be possible tocharge them. Clean the battery terminals and battery chargerterminals with a clean, dry cloth.
2 Plug the battery charger into a power outlet tobegin charging. After completing the charging, thecharging lamp turns off. Unplug the battery chargerfrom the power outlet when it is not in use.
●! If Ni-MH batteries are charged repeatedly before they arefully discharged, the battery charge indicator will appear whilethere is still ample charge remaining in the batteries. At thattime, discharge and recharge them several times using thecamera’s “Discharging rechargeable batteries” function(➡P.107).
●! The socket-outlet shall be installed near the equipment andshall be easily accessible.
●! The shape of the plug and socket-outlet depends on thecountry of use.
✽Plug-in and cord-attached types are provideddepending on the intended country of use.
CHARGING THE BATTERIES
Set exposure mode to “M” Manual with a non-CPU lens (When other modes are selected, shuttercannot be released). The camera’s exposure meter cannot be used and the aperture cannot be setusing the Sub-command Dial when using non-CPU lenses. “§” appears in place of the apertureindication in the top display panel and viewfinder; set/confirm aperture using the lens aperture ring.
h The G-type Nikkor lens has no aperture ring; aperture should be selected from camera body. Unlikeother CPU Nikkor lenses, aperture does not need to be set to minimum (largest f-number).h CPU Nikkor lenses other than G-type Nikkor lens have an aperture ring. Set the lens aperture to its
minimum and lock. When the lens is not set to its minimum aperture setting and the power switch isturned on, “¡” blinks in the top display panel and viewfinder and the shutter cannot be released.
The following Nikkor lenses/accessories cannot be attached to the FinePix S3 Pro (otherwise camerabody or lens may be damaged):
h TC-16A Teleconverterh Non-AI lensesh 400mm f/4.5, 600 mm f/5.6, 800 mm f/8 and 1200 mm f/11 with Focusing Unit AU-1h Fisheye 6 mm f/5.6, 7.5 mm f/5.6, 8 mm f/8 and OP 10 mm f/5.6h Old type 21 mm f/4h K1, K2 ring, Auto Extension Ring PK-1, PK-11, Auto Ring BR-2, BR-4h ED 180-600 mm f/8 (No. 174041-174180)h ED 360-1200 mm f/11 (No. 174031-174127)h 200-600 mm f/9.5 (No. 280001-300490)h 80 mm f/2.8, 200 mm f/3.5 and TC-16 Teleconverter for F3AFh PC 28 mm f/4 (No. 180900 or smaller)h PC 35 mm f/2.8 (No. 851001-906200)h Old type PC 35 mm f/3.5h Old type Reflex 1000 mm f/6.3h Reflex 1000 mm f/11 (No. 142361-143000)h Reflex 2000 mm f/11 (No. 200111-200310)

22 23
Gettin
gR
eady
1
LOADING THE BATTERIES
Compatible Batteriesh AA-size Ni-MH batteries (HR-AA) (4)
◆ How to use the battery ◆hUse only Ni-MH (nickel-metal hydride) batteries.hNever use the following types of batteries, as they could cause serious
problems such as battery fluid leakage or overheating:1. Batteries with split or peeling outer casings2. Combinations of different types of batteries or new and used batteries
togetherhSoil (such as fingerprints) on the battery terminals makes the batteries charge less reducing the
number of images they will allow you to take. Carefully wipe the battery terminals with a soft dry clothbefore loading.hSee P.129 for other notes on using batteries.hWhen first used after purchasing or left unused for a long period, the time for which AA-size Ni-MH
rechargeable batteries can be used may be shorter. You are advised to check the detailedinformation provided on P.129 and then charge the batteries before using the camera (within 1 week).
Outer casing
Set the Power switch to “OFF” to turn the cameraoff.1
1Lift out the battery holder release catch.2Turn the battery holder release catch
counterclockwise to unlock the battery holder.3Pull the battery holder out.
2
Push the battery holder in and hold it in place asyou turn the battery holder release catch clockwiseto securely lock the battery holder.
4
●! Remove the batteries more easily by pushing the batteriesupwards from the gap at the opposite end from the batteryholder release catch.
01
0102
03
Load the AA-size Ni-MH rechargeable batteries inthe direction indicated by the ≠ and – labels onthe holder. Align the battery ends with the terminalsin the sequence shown in the figure and thenslowly push them into the place.
3 01
02
03
04
02
03

Access lamp
24 25
Gettin
gR
eady
1
INSERTING THE MEDIAUse either xD-Picture Card or CF/Microdrive as recording media in the FinePix S3 Pro.
h If an xD-Picture Card and a CF/Microdrive are inserted at the same time, images will be recordedonto the media selected as the “MEDIA” (➡P.102).hData cannot be copied between the two media types on the FinePix S3 Pro.
1 Set the Power switch to “OFF” and check that theaccess lamp is off. Then open the slot cover.
Never open the slot cover while the camera is on.This could destroy the image data or damage themedia itself.
h If the camera loses power while it is shooting or saving an image, it cannot save the photographedimage. Note the battery level carefully when shooting long-exposure images (e.g. bulb photography)or when shooting images that will take some time to save (continuous shooting or shots with thequality set to “HIGH”).h Use the optional AC adapter (AC-5VX) when camera is used for long periods for indoor shots, etc.
The camera displays no battery level icons when the AC adapter is used.
2
●! Insert only the appropriate media types into the xD-Picture Card and CF/Microdrive slots. Inserting the incorrectmedia will damage the camera or media.
●! If the media is oriented incorrectly, it will not go all the way into the slot. Do not apply force when inserting an xD-Picture Card or CF/Microdrive.
●! If the media is not fully inserted into the slot, “`” appears.
Gold marking
Align the gold marking on the xD-PictureCard slot with the gold contact area onthe xD-Picture Card and push the cardfirmly all the way into the slot.
Push the CF/Microdrive firmly all the wayinto the CF/Microdrive slot.Compatibility is listed on Fujifilm website:http://home.fujifilm.com/products/digital/
xD-Picture Card CF/Microdrive
3 Close the slot cover.
◆ How to replace the xD-Picture Card ◆Push the xD-Picture Card into the slot and thenslowly remove your finger. The lock is released andthe xD-Picture Card is pushed out.
◆ How to replace the CF/Microdrive ◆Open the slot cover, press the CF/Microdrive ejectbutton and remove the CF/Microdrive.
CF/Microdrive eject button
CHECKING THE BATTERY CHARGETurn the camera on and check the battery charge indicator.
◆ Auto Power Off Function ◆If you leave the camera turned on without using it, this function automatically turns the camera off (➡P.112).When the Auto Power Off function has turned the camera off, restore power to the camera by pressing theshutter button on the top of the camera down halfway or by pressing the LCD illuminator button.
●! Auto Power Off cannot be cancelled using the shutter button for vertical shooting.
1No iconBatteries charged.
3LitLights when there is noremaining battery charge andthe camera shutdownprocedure has been completed.The batteries must be replaced.
1There is ample charge inthe batteries.
2The batteries are flat.Have replacement batteriesready.
3The batteries are ful lydepleted. You must replacethe batteries.
2BlinkingNo remaining battery charge.Camera shutting down.
●! If you turn the camera on again after the icon in 3 has been displayed, theicon in 1 may reappear but there is actually no charge left in the batteries andthey must be replaced.
ISO20009 / 23 / 2004
10 : 00 AM3 Blinking
Lit
Lit1
2
Top display panel
Rear display panel
●! When storing CF/Microdrives, always use the specialprotective case.

26 27
Gettin
gR
eady
1
1 1Unlock the 4-direction button.2Press the “MENU/OK” button.
DATE/TIMEDATE/TIME
2004 . 1 . 12004 . 1 . 1
12 : 00 AM12 : 00 AM
YYYY.MM.DDYYYY.MM.DD
SETSETCANCELCANCEL
DATE/TIME NOT SETDATE/TIME NOT SET
SETSETNONO
TURNING ON AND OFF / SETTING THE DATE AND TIME
2 After purchasing the camera, first time whenturning camera on, the date and time are cleared.Press the “MENU/OK” button to set the date andtime.
●! If the message (see figure at left) does not appear, refer to“Correcting the date and time” (➡P.27) and check and correctthe date and time settings.
●! The message also appears when the batteries have beenremoved and the camera has been left for a long period.
●! To set the date and time later, press the “BACK” button.●! If you do not set the date and time, this message will appear
each time you turn the camera on.
3
4
1Unlock the 4-direction button.2Press “d” or “c” to select Year, Month, Day,
Hour or Minute and then press “a” or “b” toadjust the selected setting.
1Once you have set the date and time, press the“MENU/OK” button.
2When you have finished the procedure, lockthe 4-direction button to prevent accidentalimproper use.
●! Holding down “a” or “b” changes the numbers continuously.●! When the time displayed passes “12:00”, the AM/PM setting
changes.
●! At the time of purchase and after leaving the camera for along period with the batteries removed, settings such as thedate and time are cleared. Once the AC power adapter hasbeen connected or the batteries have been loaded for 2 daysor more, the date and time settings will be retained forroughly 6 months even when the camera has no power(batteries removed and AC power adapter disconnected).
01 02
2004 . 9 . 232004 . 9 . 23
10 : 00 AM : 00 AM
YYYY.MM.DDYYYY.MM.DD
DATE/TIMEDATE/TIME
SETSETCANCELCANCEL
01 02
To turn the camera on, set the Power switch to“ON”.To turn the camera off, set the Power switch to“OFF”.
1
9 / 23 / 2004 9 / 23 / 2004
10 : 00 AM : 00 AM
MM/DD/YYYYMM/DD/YYYY
DATE/TIMEDATE/TIME
SETSETCANCELCANCEL
2004 . 9 . 232004 . 9 . 23
10 : 00 AM10 : 00 AM
YYYY.MMYYYY.MM.DD.DD
DATE/TIMEDATE/TIME
SETSETCANCELCANCEL
CORRECTING THE DATE AND TIME / CHANGING THE DATE ORDER
Correcting the date and time
Changing the date order
2 1Press “d” or “c” to move to option 3 and thenpress “a” or “b” to select “DATE/TIME”.
2Press “c”.
1Press “d” or “c” to select the date order.2Press “a” or “b” to set the order. Refer to the
table below for details of the settings.3Always press the “MENU/OK” button after the
settings are completed.
0102 03
3
4
1Press “d” or “c” to select Year, Month, Day,Hour or Minute.
2Press “a” or “b” to correct the setting.3Always press the “MENU/OK” button after the
settings are completed.
When you have finished the procedure, lock the 4-direction button to prevent accidental improper use.
●! Holding down “a” or “b” changes the numbers continuously.●! When the time displayed passes “12:00”, the AM/PM setting
changes.
0102 03
DATE/TIME SETDATE/TIME SET
SET-UPSET-UP
USB MODE :USB MODE :1394 MODE :1394 MODE :
21 3 4 5
BEEP :LOWBEEP :LOW
SETSETCANCELCANCEL
01 02
01 02
Date order Explanation
YYYY.MM.DDDisplays the date in the “year. month. day”format.
MM/DD/YYYYDisplays the date in the “month / day / year”format.
DD.MM.YYYYDisplays the date in the “day. month. year”format.

28 29
Gettin
gR
eady
1
SELECTING THE LANGUAGE DIOPTER ADJUSTMENT / LCD ILLUMINATOR
The finder diopter enables near- or far-sighted photographers to adjust the eyepiece diopter to suittheir vision.
Displays in the top and rear display panels can be confirmed in the dark with the LCD illuminator.
When you press the “m” LCD illuminator button,the top and rear display panels light up.
hDisplay panel i l lumination turns off in thefollowing situations:iWhen you press the “m ” LCD illumination
button againiWhen you release the shutteriWhen the Auto Power Off function turns the
camera off
While looking through the viewfinder, adjust theposition of the diopter adjustment knob until thefocusing frame or the image in the viewfinderappears sharpest.
h The diopter setting can be adjusted from –2.0 m-1
(shortsighted) to +1.0 m-1 (farsighted). Nikon alsoprovides 9 types of diopter adjustment lensranging from –5 m-1 to +3 m-1.
DIOPTER ADJUSTMENT
LCD ILLUMINATOR
Since the diopter adjustment knob is located next to the viewfinder, be careful not to poke yourselfin the eye with your finger or fingernail while sliding the knob.
CSM 14: The illuminator can be set to come on when any button is pressed (➡P.112).
●! Pressing the shutter button down halfway temporarily turnsdisplay panel illumination off.
01 021
言語言語/LANG. ENGLISH/LANG. ENGLISH
SET-UPSET-UP
VIDEO SYSTEM :NTSCVIDEO SYSTEM :NTSCDISCHARGE :OKDISCHARGE :OK
21 3 4 5
FRAME NO. :CONT.FRAME NO. :CONT.
SETSETCANCELCANCEL
01 022
1Turn the camera on.2Press the “MENU/OK” button to display the SET-
UP screen.
1The “SET-UP” screen appears. Press “d” or “c”to move to option 4 and then press “a” or “b” toselect “ ”.
2Press “c” to select “ENGLISH”, “FRANCAIS”,“DEUTSCH”, “ESPAÑOL”, “ITALIANO”, “ ”or “ ”. Press “c ” to cycle through thelanguage settings.
●! The screens in this manual are shown in English.●! See P.102 for more information on the “SET-UP” menu.

30 31
Basic
Ph
oto
grap
hy
2
xRelease mode switch unlock button
Hold down this button to move the release mode switch.
xExposure mode dialAllows you to select the exposure mode, the custom settings and the ISO setting,
: Programmed Auto : Shutter-priority Auto : Aperture-priority Auto : Manual : Custom settings : ISO setting (sensitivity)
xRelease mode switchSelects Single-frame, Continuous, Self-timer or Multi Exposure as the shutter release mode.
xLens release buttonHold down this button as you remove the lens.
xPower switchTurns the camera on and off.
xFocus mode selector switchSelects AF-S (Single-AF servo), AF-C (Continuous-AF servo) or M (Manual) as the focus mode.
xRemote release socketUsed to connect a 10-pin remote release.
xFlash pop-up buttonTo use the built-in flash, press this button to pop-up the flash.
xSynchronizing terminalUse this to connect flash units that require a synchro cord.
xTop display panelDisplays the informationshown in the viewfinder along with other information.
xMain command dialChanges settings such as the shutter speed.
xAccessory shoeMount an external flash here. xDepth of field check
buttonThis button allows you to check the depth of field.
xShutter buttonPress this button down halfway to restore the camera to Photography mode. Press down fully to take a picture.
xSub-command dialChanges the aperture and other settings.
xDiopter adjustment knobMakes the image in the viewfinder easier to see. Set this knob to the position where the focusing area appears sharpest.
xFlash exposure compensation button
Used with the Main-command dial to select the flash exposure compensation value.
xAuto exposure bracketing buttonUsed with the camera dials to select Auto Exposure Bracketing.Main-command dial: Turns Auto Exposure Bracketing ON and OFF.Sub-command dial: Selects a combination of exposure offset and number of shots.
xSynchro mode buttonUsed with the Main-command dial to select Synchro mode.
xMetering system selector dialSelects Multi, Center-weighted or Spot as the metering system.
xAE-L / AF-L buttonLocks the exposure and focus while pressed.
xLCD illuminator buttonIlluminates the display panel.
xExposure compensation button
Used with the Main-command dial to select the exposure compensation value.
BASIC OPERATION GUIDE2 BasicPhotography

32 33
Basic
Ph
oto
grap
hy
2
Sub
Main
Main
Main
+
Main
+
Main
+
BASIC OPERATION GUIDE
Command dialsThe FinePix S3 Pro’s Main- and Sub-command dials are used alone or in combination withother buttons to select/set various functions or modes.
Main
SET-UPSET-UP
IMAGE DISP. OFFIMAGE DISP. OFFCUSTOM WB :SETCUSTOM WB :SETCOLOR SPACES :sRGBCOLOR SPACES :sRGBD-RANGE :WIDED-RANGE :WIDE
21 3 4 5
SETSETCANCELCANCEL
Frame advance : dcPlayback zoom : ab
1Menu option selection : dc2Setting selection : ab3Confirmation : MENU/OK
Cancel : BACK
1Option selection : ab 2Setting selection : dc
xFUNC buttonSelects the information displayed on the rear display panel.
xRear display panelDisplays information during shooting or playback.
xPLAY buttonSwitches playback display on and off.
x F1 to F4 buttonsUse these buttons to select items in the rear display panel.
xMENU/OK buttonPress this button to confirm an action in the menu screen.
x4-direction button lock switch
Release this switch to use the 4-direction button.
xBACK buttonPress this button to cancel an action in the menu screen.
x Access lampLights during media access.
x4-direction buttonUse this button to select menu options or the focus area.
Photography
Menu SET-UPPlayback
xPlayback, Menu and SET–UP Operations
LCD monitorOFF
Shutter button pressed halfway
ERASEERASE
ALL FRAMESALL FRAMESBACKBACK
Exposure mode dial
Auto ExposureBracketing button
Sub-commanddial
Main-command dial
Exposurecompensation
button
Flash exposurecompensation
button
Synchro modebutton
Setting Exposure mode setting Procedure
Program shift “P”
Slower Faster
MainShutter speed setting “S, M”
Aperture setting “A, M”
Exposure compensation amount “P, S, A, M”
Auto Exposure Bracketing ON/OFF
“P, S, A, M”
Number of shots and exposure offset for AutoExposure Bracketing
Sensitivity setting “ISO”
Custom setting option selection
“CSM”
Custom setting option modification
Synchro mode setting
“P, S, A, M”
Sub
+
Main
+
Flash exposure compensation amount
Open Close
Sub

34 35
Basic
Ph
oto
grap
hy
2
SingleArea AF
DynamicAF
TAKING PICTURES (P Auto-Multi Program)
6 Set the metering system selector dial to “/ ”(Matrix metering).
●! Matrix metering indication “l” appears in the viewfinder.
●! When shooting with the camera held vertically, see thesection on vertical shooting (➡P.36).
●! Take care not to obscure the lens with your fingers or theshoulder strap.
7 Set the Exposure mode dial to “P” (Auto-MultiProgram).
8 Brace your elbows against your body and hold thecamera with both hands.
9 Position the central focus area over the subject.
●! If the subject is outside the focus area, either move the focusarea or take the picture using the AF Lock function (➡P.40).
1 Set the focus mode selector switch to “S” (Single-AF Servo).
2 1Press the “FUNC” button to display the AFsetting on the rear display panel.
2Press the “F1” button to select “7” Single areaAF.
●! Make sure to turn the focus mode selector switch until itclicks into position.
3 1Unlock the 4-direction button.2Press “d ”, “c ”, “a ” or “b ” to position the
focusing area in the center.
4 Lock the 4-direction button to prevent accidentalimproper use.
5 Hold down the release mode switch unlock buttonand set the release mode switch to “,” (Single-frame).
●! The selected focus area indicator appears on the top displaypanel, in the viewfinder display and on the viewfinder screen(➡P.47).
01 02
01
02
Continued

36 37
Basic
Ph
oto
grap
hy
2
TAKING PICTURES (P Auto-Multi Program)
10 Press the shutter button down halfway to focus theshot. The focus indicator “● ” appears in theviewfinder display.
●! If the focus indicator is flashing, the camera cannot focus andthe shutter will not release.
●! When you are not using the shutter button for verticalshooting, engage the lock lever for vertical shooting toprevent the shutter button from being pressed by mistake.
●! Auto Power Off cannot be cancelled using the shutter buttonfor vertical shooting. Press the shutter button on the top ofthe camera to restore power to the camera.
11 Without releasing the shutter button, press it downall the way (fully pressed) to take the shot.
NUMBER OF AVAILABLE SHOTSThe number of available shots is displayed on therear display panel.ISO200
09 / 23 / 200410 : 00 AM
■ Standard number of shots for the mediaBecause the amount of data needed to record an image varies slightly depending on the type of subject, the number ofavailable shots may not decrease after an image is recorded, or may decrease by 2 in some cases. Also, the differencebetween the standard number of shots and the actual number of available shots increases for media with a higher capacity.
●! See P.78-79 for information on changing the number ofrecorded pixels/Quality (compression ratio) setting.
●! The factory default settings set at shipment are 6M and N(Quality: NORMAL).
The shutter button for vertical shooting makes taking pictures in this mode as convenient as normalshooting.
Shooting with the camera held on end (vertically)
1 Shutter button for vertical shooting
Lock lever for vertical shooting
Unlock the shutter button for vertical shooting.
2 Hold the camera vertically to take the picture.
✽ Number of available shots for formatted media.
Quality Mode
Image File Size
DPC-16 (16 MB)
DPC-32 (32 MB)
DPC-64 (64 MB)
DPC-128 (128 MB)
FINE
Number of recordedpixels 4 4256 × 2848 1 1440 × 9603 3024 × 2016 2 2304 × 1536
DPC-256 (256 MB)
DPC-512 (512 MB)
Approx.4.7 MB
13
26
6
3
53
107
NORMAL
Approx.2.4 MB
26
53
13
6
107
214
FINE
Approx.3.0 MB
21
42
10
5
85
170
NORMAL
Approx.1.5 MB
42
84
20
10
169
339
FINE
Approx.1.7 MB
36
72
17
8
146
292
NORMAL
Approx.880 KB
72
144
35
17
290
580
FINE
Approx.1 MB
61
122
30
14
245
491
NORMAL
Approx.520 KB
120
241
59
29
484
967
Microdrive (340 MB) 73 146 116 232 200 396 338 671
Microdrive (1 GB) 220 437
D-RANGEWIDE
` CCD-RAW
Approx.25 MB
0 1
1 2
2 4
5 9
10 19
20 39
13 27
41 81
D-RANGESTANDARD
HIGH
Approx.13 MB
349 698 597 1173 995 1932

38 39
Basic
Ph
oto
grap
hy
2
AF-ASSIST ILLUMINATORWhen the subject is dark and the shutter button is pressed down halfway, the camera’s AF-assistilluminator automatically turns on and enables autofocus operation in a dark environment.
AF-assist illuminator automatically turns on in thefollowing situations:Focus mode is Single AF servo, AF Nikkor lens isused, subject is dark and center focus area isselected or Dynamic AF Mode with Closest SubjectPriority is activated.
Focal length of the usable AF Nikkor lens is 24-200mm and the distance range of the AF-assistilluminator is approx. 0.5-3 m (1.6-9.8 ft.).
CSM 15: AF-assist illuminator can be cancelled (➡P.112).
When the AF-assist illuminator is used continuously, illumination is limited temporarily to protectthe firing tube. The illumination restarts after a few moments. Also, when the AF-assist illuminatoris used repeatedly in a short period of time, be careful not to touch the AF-assist illuminator lampbecause it may have become hot.
◆ Nikon flash units and active assist illuminator ◆If you use an SB-28/28DX, SB-27, SB-26, SB-25, SB-24, SB-800 or SB-600 Nikon flash to takepictures when the conditions for active assist illuminator are met, the active assist illuminator on theNikon flash automatically fires. With other Nikon flash models, the AF-assist illuminator on the cameraautomatically lights.
◆ Lenses for which vignetting occurs ◆h Autofocus using the camera’s AF-assist illuminator cannot be performed due to vignetting with
following lenses at shooting distance within 1m (3.3 ft):i AF Micro 200 mm f/4 IF-ED i AF 24-120 mm f/3.5-5.6 IFi AF-S 17-35 mm f/2.8 IF-ED i AF-S 28-70 mm f/2.8 IF-EDi AF 18-35 mm f/3.5-4.5 ED i AF Micro 70-180 mm f/4.5-5.6 EDi AF 20-35 mm f/2.8 IF i AF 24-85 mm f/2.8-4i AF 24-85mm f/2.8-4D i AF-S DX ED 12-24mm f/4Gi AF-S DX 18-70mm f/3.5-4.5G i AF-S ED 24-85mm f/3.5-4.5G i AF-S VR ED 24-120mm f/3.5-5.6G i AF ED 28-200mm f/3.5-5.6G
h At shooting distances of 2 meters or less, the AF-S DX ED 17-55mm f/2.8G (IF) cannot be used forautofocus photography where the AF-assist illuminator is used.h Autofocus using the camera’s AF-assist illuminator cannot be performed due to vignetting with AF-S
80-200 mm f/2.8 IF-ED, AF 80-200 mm f/2.8 ED, AF VR 80-400 mm f/4.5-5.6 ED, AF-S VR ED 70-200mm f/2.8D and AF-S VR ED 200-400mm f/4G.
Approx. 0.5-3 m(1.6-9.8 ft.)
SITUATIONS WHERE AUTOFOCUS MAY NOT WORK AS EXPECTEDAutofocus may not work as expected in the following situations. In such situations, focus manuallyusing the clear matte field or focus on a different subject located at the same distance, use AF lock(➡P.40) then recompose.
Low-contrast scenesFor example, where the subject is wearing clothingthe same color as a wall or other background.
Scenes with subjects within the focus bracketslocated at different distances from the cameraFor example, when shooting an animal in a cage ora person in a forest.
Patterned subject or sceneFor example, building windows.
Scenes with pronounced differences in brightnesswithin the focus bracketsFor example, when the sun is in the backgroundand the main subject is in shadow.

40 41
Basic
Ph
oto
grap
hy
2
TAKING PICTURES WITH AE LOCKAE lock allows you to set the exposure for a specific subject in your shot. This technique is usefulwhen brightness of your subject differs greatly from its surroundings.
1 Center-weighted metering
Spot metering
Set the metering system selector dial to “- ”Center-weighted or “0” Spot metering.
hMatrix metering is not recommended since theeffect of the Auto Exposure Lock cannot beeffectively attained.
2 Position the focus area over the subject you wantcorrectly exposed, press and hold the shutterbutton down halfway and then press the “AE-L/AF-L” button. The “EL” (exposure lock) indicatorappears in the viewfinder.
h The exposure and focus are locked as long asthe “AE-L/AF-L” button is held down (defaultsetting).h If you press the “AE-L/AF-L” button in the “AF-S”
or “AF-C” focus mode when the shot is not infocus, the exposure is locked with the shot out offocus. Always check that the focus indicator “●”is lit.
3 While keeping the “AE-L/AF-L” button pressed,recompose, focus and shoot.
h Because the settings are maintained after youtake the shot for as long as the “AE-L/AF-L”button is held down, you can keep the samesettings as you recompose the shot.h The following functions can be operated while the
“AE-L/AF-L” button is kept pressed:1. In “P” exposure mode: Sets program shift.2. In “S” exposure mode: Changes the shutter
speed.3. In “A” exposure mode: Changes the aperture.hRotating the metering system selector to another
setting does not change the metering systemduring Auto Exposure Lock operation. Releasethe AE lock.
CSM 5: Auto Exposure Lock can be set to be activated by pressing the shutter button downhalfway (➡P.111).
CSM 9: The operation performed when the “AE-L/AF-L” button is pressed can be modified(➡P.111).
Operation: AF/AE lock (default setting), AE lock only, AF lock only, AE lock maintained, AFoperation
USING AF LOCKIf you take a shot with this type of compositionusing Single-area AF with the focus area in thecenter, the subjects (the two people in this case)are outside the focus area and will not be in focus.
Move the camera slightly so that one of thesubjects is in the AF frame.
1
4
3
2
◆ When AF (Auto Focus) does not focus the shot ◆h Position the focus area over another subject at roughly the same distance and press the shutter
button down halfway. Then recompose the shot and take the picture.h You can also set the focus and take the shot by selecting “M” (manual) as the focus mode.
Keep the shutter button pressed down halfway (AFlock) and check that the focus indicator “●” is lit inthe viewfinder display.
Continue to hold the shutter button down halfway(AF lock). Move the camera back to the originalimage and then fully press down on the shutterbutton.
●! You can reapply the AF lock as many times as you likebefore releasing the shutter.
●! The AF lock operates in all photography modes and can beused to ensure excellent results.
●! If you are using the “AF-C” focus mode, hold the shutterbutton down halfway and press the “AE-L/AF-L” button(➡P.41).
42 43
Basic
Ph
oto
grap
hy
2
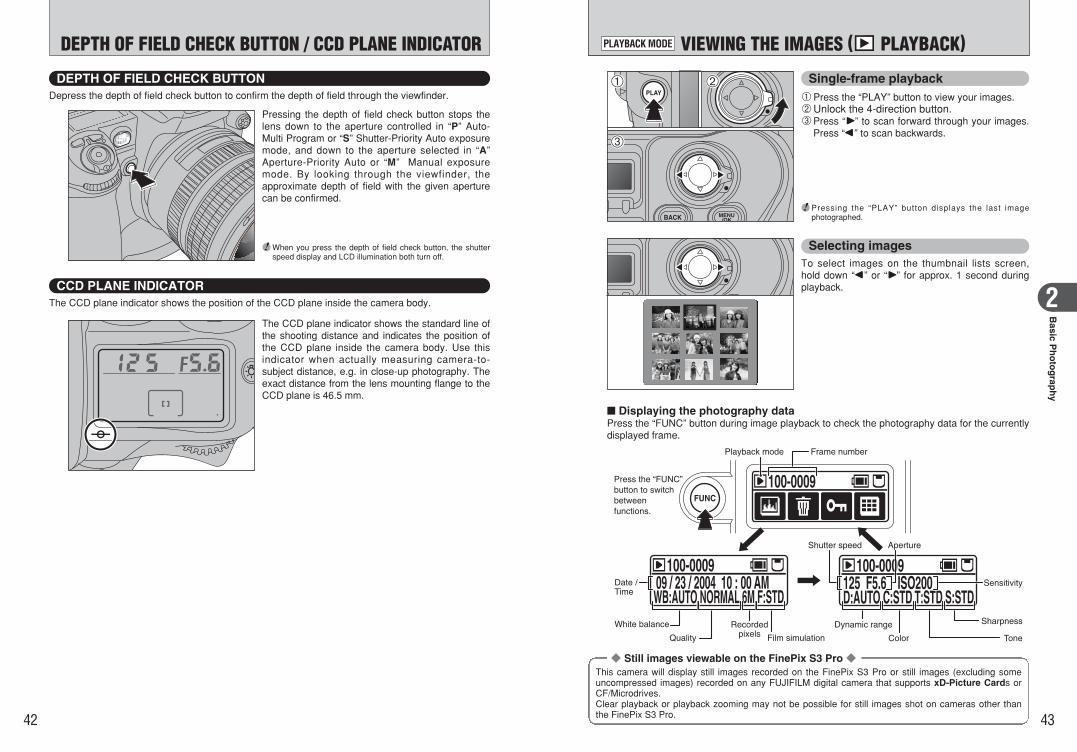
Depress the depth of field check button to confirm the depth of field through the viewfinder.
Pressing the depth of field check button stops thelens down to the aperture controlled in “P” Auto-Multi Program or “S” Shutter-Priority Auto exposuremode, and down to the aperture selected in “A”Aperture-Priority Auto or “M” Manual exposuremode. By looking through the viewfinder, theapproximate depth of field with the given aperturecan be confirmed.
●! When you press the depth of field check button, the shutterspeed display and LCD illumination both turn off.
●! Pressing the “PLAY” button displays the last imagephotographed.
The CCD plane indicator shows the position of the CCD plane inside the camera body.
The CCD plane indicator shows the standard line ofthe shooting distance and indicates the position ofthe CCD plane inside the camera body. Use thisindicator when actually measuring camera-to-subject distance, e.g. in close-up photography. Theexact distance from the lens mounting flange to theCCD plane is 46.5 mm.
DEPTH OF FIELD CHECK BUTTON
CCD PLANE INDICATOR
DEPTH OF FIELD CHECK BUTTON / CCD PLANE INDICATOR
◆ Still images viewable on the FinePix S3 Pro ◆This camera will display still images recorded on the FinePix S3 Pro or still images (excluding someuncompressed images) recorded on any FUJIFILM digital camera that supports xD-Picture Cards orCF/Microdrives.Clear playback or playback zooming may not be possible for still images shot on cameras other thanthe FinePix S3 Pro.
100-0009
100-0009125 F5.6 ISO200D:AUTO C:STD T:STD S:STD
100-0009 09 / 23 / 2004 10 : 00 AMWB:AUTO NORMAL 6M F:STD
Playback mode Frame number
Date / Time
White balance Recordedpixels
Shutter speed Aperture
Sensitivity
Sharpness
ToneColorQuality
Press the “FUNC” button to switch between functions.
Film simulation
Dynamic range
Single-frame playback1Press the “PLAY” button to view your images.2Unlock the 4-direction button.3Press “c” to scan forward through your images.
Press “d” to scan backwards.
Selecting imagesTo select images on the thumbnail lists screen,hold down “d” or “c” for approx. 1 second duringplayback.
■ Displaying the photography dataPress the “FUNC” button during image playback to check the photography data for the currentlydisplayed frame.
VIEWING THE IMAGES (w PLAYBACK)PLAYBACK MODE
01 02
03

45
Ad
vanced
Ph
oto
grap
hy
3
44
Quality mode Max. zoom scale
4 (4256 × 2848 pixels) Approx. 26.6×
3 (3024 × 2016 pixels) Approx. 18.9×
2 (2304 × 1536 pixels) Approx. 14.4×
1 (1440 × 960 pixels) Approx. 9.0×
Playback zoomPress the “a” or “b” during single-frame playbackto zoom (enlarge) the still image. A zoom barappears.Press the “BACK” button to return to single-frameplayback.
PANNINGPANNING
Zoom bar
1Press “PLAY” button to select to “PANNING”.2Press “a”, “b”, “d”, or “c” to display another
area.The current displayed image appears on thenavigation screen.Press the “PLAY” button to return to playbackzoom.
ZOOMZOOM
01 02
■ Zoom scales
Pages 45 to 49 provide explanations of how to use and set the camera’s focusing functions, alongwith various related topics. The diagram below is a page map to this section. Refer to the pagesindicated for details.
■ Focus-related custom settings
Selecting the focus mode (➡P.46)
Switches between:S: Single-AF servoC: Continuous-AF servoM: Manual focus
AF-S or AF-C
Selecting the AF area mode (➡P.47)
Select the number of focus areas used forfocusing.Single: 1Dynamic: 5
Single
MF
Dynamic
Closest-subject priority setting
ON: The camera focuses using the focusarea containing the closest subject.
OFF: The camera focuses using the specifiedfocus area.
Selecting the focus area (➡P.48)
Manual: Select the focus area to be used forfocusing.
Automatic: This option is disabled when theclosest-subject priority setting is“ON”.
OFF ON
AutomaticManual (choose from 5 points)
AF-CAF-SMF
FOCUS SETTINGSFOCUS SETTINGS3 AdvancedPhotography
CSM 3: Illumination for focus area Sets the automatic illumination setting for the focus areain the viewfinder
➡P.111
➡P.111
➡P.111
➡P.111
➡P.111
CSM 4: Focus area selection Sets the focus area selection method
CSM 7: Closest-subject priority dynamic AF at S-AFmode
Closest-subject priority dynamic AF settings
CSM 8: Closest-subject priority dynamic AF at C-AFmode
Sets the closest-subject priority dynamic AF settings
CSM 9: AE-L/AF-L button Selects AE/AF concurrent locking, independent locking,or maintained locking
VIEWING THE IMAGES (w PLAYBACK)PLAYBACK MODE
Navigation screen
46 47
Ad
vanced
Ph
oto
grap
hy
3
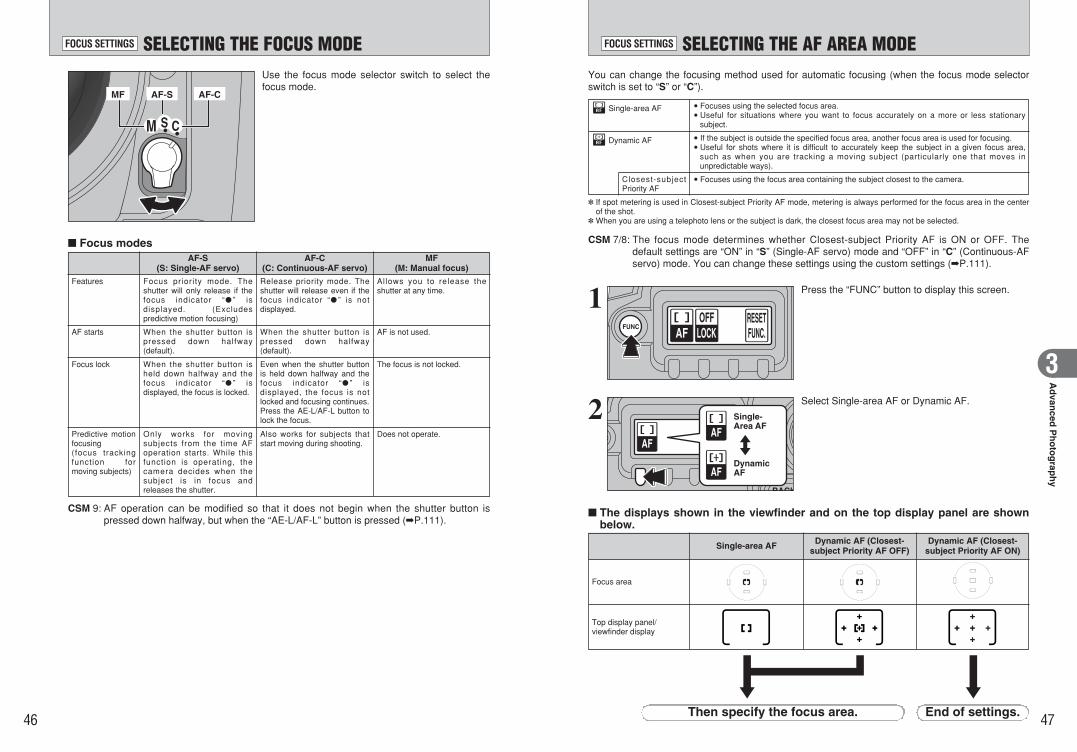
SELECTING THE AF AREA MODEFOCUS SETTINGS
You can change the focusing method used for automatic focusing (when the focus mode selectorswitch is set to “S” or “C”).
7 Single-area AF i Focuses using the selected focus area.i Useful for situations where you want to focus accurately on a more or less stationary
subject.
8 Dynamic AF i If the subject is outside the specified focus area, another focus area is used for focusing.i Useful for shots where it is difficult to accurately keep the subject in a given focus area,
such as when you are tracking a moving subject (particularly one that moves inunpredictable ways).
Closest-subjectPriority AF
i Focuses using the focus area containing the subject closest to the camera.
✽ If spot metering is used in Closest-subject Priority AF mode, metering is always performed for the focus area in the centerof the shot.
✽ When you are using a telephoto lens or the subject is dark, the closest focus area may not be selected.
CSM 7/8: The focus mode determines whether Closest-subject Priority AF is ON or OFF. Thedefault settings are “ON” in “S” (Single-AF servo) mode and “OFF” in “C” (Continuous-AFservo) mode. You can change these settings using the custom settings (➡P.111).
1FUNCRESETAF LOCK
OFF
Press the “FUNC” button to display this screen.
2 Single-Area AF
DynamicAF
Select Single-area AF or Dynamic AF.
■ The displays shown in the viewfinder and on the top display panel are shownbelow.
Focus area
Single-area AF Dynamic AF (Closest-subject Priority AF OFF)
Dynamic AF (Closest-subject Priority AF ON)
Top display panel/viewfinder display
Then specify the focus area. End of settings.
SELECTING THE FOCUS MODEFOCUS SETTINGS
AF-CAF-SMF
Use the focus mode selector switch to select thefocus mode.
■ Focus modesAF-S
(S: Single-AF servo)AF-C
(C: Continuous-AF servo)MF
(M: Manual focus)
Features Focus priority mode. Theshutter will only release if thefocus indicator “● ” isdisplayed. (Excludespredictive motion focusing)
Release priority mode. Theshutter will release even if thefocus indicator “● ” is notdisplayed.
Allows you to release theshutter at any time.
AF starts When the shutter button ispressed down halfway(default).
When the shutter button ispressed down halfway(default).
AF is not used.
Focus lock When the shutter button isheld down halfway and thefocus indicator “● ” isdisplayed, the focus is locked.
Even when the shutter buttonis held down halfway and thefocus indicator “● ” isdisplayed, the focus is notlocked and focusing continues.Press the AE-L/AF-L button tolock the focus.
The focus is not locked.
Predictive motionfocusing (focus trackingfunction formoving subjects)
Only works for movingsubjects from the time AFoperation starts. While thisfunction is operating, thecamera decides when thesubject is in focus andreleases the shutter.
Also works for subjects thatstart moving during shooting.
Does not operate.
CSM 9: AF operation can be modified so that it does not begin when the shutter button ispressed down halfway, but when the “AE-L/AF-L” button is pressed (➡P.111).
48 49
Ad
vanced
Ph
oto
grap
hy
3
SELECTING THE FOCUS AREAFOCUS SETTINGS
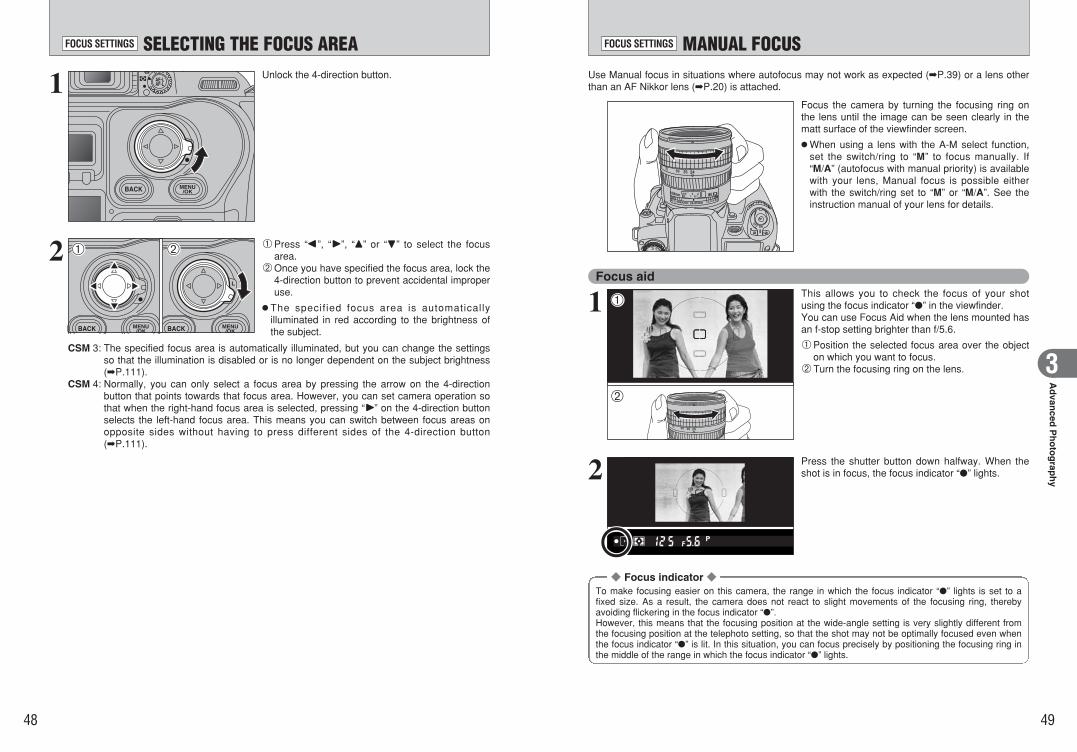
1 Unlock the 4-direction button.
2 1Press “d”, “c”, “a” or “b” to select the focusarea.
2Once you have specified the focus area, lock the4-direction button to prevent accidental improperuse.
h The specif ied focus area is automaticallyilluminated in red according to the brightness ofthe subject.
CSM 3: The specified focus area is automatically illuminated, but you can change the settingsso that the illumination is disabled or is no longer dependent on the subject brightness(➡P.111).
CSM 4: Normally, you can only select a focus area by pressing the arrow on the 4-directionbutton that points towards that focus area. However, you can set camera operation sothat when the right-hand focus area is selected, pressing “c” on the 4-direction buttonselects the left-hand focus area. This means you can switch between focus areas onopposite sides without having to press different sides of the 4-direction button(➡P.111).
MANUAL FOCUSFOCUS SETTINGS
Use Manual focus in situations where autofocus may not work as expected (➡P.39) or a lens otherthan an AF Nikkor lens (➡P.20) is attached.
Focus aid
Focus the camera by turning the focusing ring onthe lens until the image can be seen clearly in thematt surface of the viewfinder screen.
hWhen using a lens with the A-M select function,set the switch/ring to “M” to focus manually. If“M/A” (autofocus with manual priority) is availablewith your lens, Manual focus is possible eitherwith the switch/ring set to “M” or “M/A”. See theinstruction manual of your lens for details.
This allows you to check the focus of your shotusing the focus indicator “●” in the viewfinder.You can use Focus Aid when the lens mounted hasan f-stop setting brighter than f/5.6.
1Position the selected focus area over the objecton which you want to focus.
2Turn the focusing ring on the lens.
Press the shutter button down halfway. When theshot is in focus, the focus indicator “●” lights.
01
02
1
2
◆ Focus indicator ◆To make focusing easier on this camera, the range in which the focus indicator “●” lights is set to afixed size. As a result, the camera does not react to slight movements of the focusing ring, therebyavoiding flickering in the focus indicator “●”.However, this means that the focusing position at the wide-angle setting is very slightly different fromthe focusing position at the telephoto setting, so that the shot may not be optimally focused even whenthe focus indicator “●” is lit. In this situation, you can focus precisely by positioning the focusing ring inthe middle of the range in which the focus indicator “●” lights.
01 02

50 51
Ad
vanced
Ph
oto
grap
hy
3
The release mode is normally set to Single-frame. Set the release mode to Continuous Shooting totake sequential shots of moving subjects or to take a series of shots using Auto ExposureBracketing.
In this mode, one shot is taken each time you press the shutter button. Use this mode to take asingle clearly defined shot in each frame.
●! If you take a number of single-frame shots in rapid succession, the number of available shots is highlighted in the sameway as in continuous shooting. Once this happens, no further shots can be taken. Wait until the number of available shotsis no longer highlighted.
, SINGLE-FRAME
This mode allows you to take up to 12 consecutive shots by holding down the shutter button (Max.2.5 frames/sec.).
hOnce you have shot the maximum number of continuous frames, the number of available shotsshown on the rear display panel is highlighted. No further continuous shots can be taken at thatpoint. Wait until the number of available shots is no longer highlighted.
The number of available frame and the maximum number of continuous frames varies dependingon the dynamic range (D-RANGE) and quality settings in SET-UP.
. CONTINUOUS SHOOTING
Hold down the release mode switch unlock buttonand set the release mode switch to “,” (Single-frame) or “.” (Continuous Shooting).
ISO20009 / 23 / 2004
10 : 00 AM
ISO20009 / 23 / 2004
10 : 00 AM●! You cannot use continuous shooting with the built-in flash.●! If “ON” or “PREVIEW” is selected for “IMAGE DISP.” (➡P.103) when continuous shooting is used, only the photographed
image for the final frame is displayed and automatically recorded.●! If you use continuous shooting when the number of available shots is low, the number of available shots may temporarily
change to 0.
9 SELF-TIMER PHOTOGRAPHYRELEASE MODES
You can use the self-timer when you want to be in the photograph. Use a tripod or place the cameraon a stable surface before using the self-timer.
1 Hold down the release mode switch unlock buttonand set the release mode switch to “9” self-timer.
2 1Position the focus area over the subject.2Press the shutter button down halfway to focus
the shot.3Without releasing the shutter button, press the
shutter button down fully to start the self-timer.
3 The self-timer lamp flashes for 8 seconds and thenstays lit for 2 seconds, after which the shot is taken.h Press the “MENU/OK”, “FUNC” or “PLAY” button
to cancel self-timer shooting.h You can change the self-timer running time from
10 seconds to 2, 5 or 20 seconds (➡P.112).
◆ Before shooting ◆h The self timer does not operate in situations where the camera shutter is disabled, such as when the
focus is not set in AF-S (Single-AF Servo) mode.h In exposure modes other than “M” (Manual), you must prevent any back-entry light from the eyepiece
to obtain the correct exposure. Before pressing the shutter button, cover the eyepiece with your handor the eyepiece cap provided. To attach the eyepiece cap, remove the rubber eyecup and slide thecap down over the eyepiece from above.h Do not stand in front of the lens when setting the self-timer in autofocus mode.
02
01
03
D-RANGE setting in SET-UP WIDE STANDARD
QualityHIGH FINE, NORMAL HIGH FINE, NORMAL
RAW JPEG RAW JPEG
Max. number of available frames Max. 1.4 frames/sec. Max. 1 frame/sec. Max. 2.5 frames/sec.
Max. continuous frames 3 6 7
Minimum shooting interval inmultiple exposure shooting
Max. 1.4 frames/sec. Max. 2.5 frames/sec.
Max. no. of consecutive shots inmultiple exposure shooting
3 7
12
, SINGLE-FRAME / . CONTINUOUS SHOOTING
RELEASE MODES
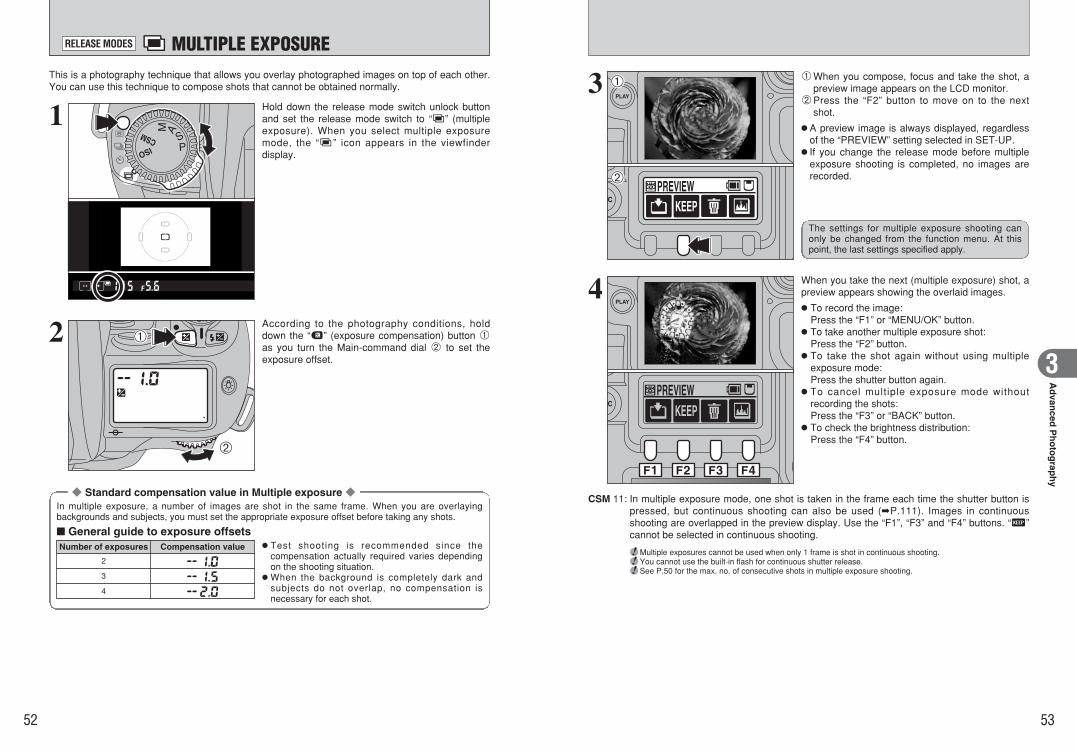
52 53
Ad
vanced
Ph
oto
grap
hy
3
PREVIEW
PREVIEW
F1 F2 F3 F4
This is a photography technique that allows you overlay photographed images on top of each other.You can use this technique to compose shots that cannot be obtained normally.
1 Hold down the release mode switch unlock buttonand set the release mode switch to “p” (multipleexposure). When you select multiple exposuremode, the “p” icon appears in the viewfinderdisplay.
2 According to the photography conditions, holddown the “b” (exposure compensation) button 1as you turn the Main-command dial 2 to set theexposure offset.
◆ Standard compensation value in Multiple exposure ◆In multiple exposure, a number of images are shot in the same frame. When you are overlayingbackgrounds and subjects, you must set the appropriate exposure offset before taking any shots.
h Test shooting is recommended since thecompensation actually required varies dependingon the shooting situation.hWhen the background is completely dark and
subjects do not overlap, no compensation isnecessary for each shot.
■ General guide to exposure offsetsNumber of exposures
2
3
4
01
02
013 1When you compose, focus and take the shot, apreview image appears on the LCD monitor.
2Press the “F2” button to move on to the nextshot.
h A preview image is always displayed, regardlessof the “PREVIEW” setting selected in SET-UP.h If you change the release mode before multiple
exposure shooting is completed, no images arerecorded.02
4 When you take the next (multiple exposure) shot, apreview appears showing the overlaid images.
h To record the image: Press the “F1” or “MENU/OK” button.h To take another multiple exposure shot:
Press the “F2” button.h To take the shot again without using multiple
exposure mode:Press the shutter button again.h To cancel multiple exposure mode without
recording the shots:Press the “F3” or “BACK” button.h To check the brightness distribution:
Press the “F4” button.
CSM 11: In multiple exposure mode, one shot is taken in the frame each time the shutter button ispressed, but continuous shooting can also be used (➡P.111). Images in continuousshooting are overlapped in the preview display. Use the “F1”, “F3” and “F4” buttons. “K”cannot be selected in continuous shooting.
●! Multiple exposures cannot be used when only 1 frame is shot in continuous shooting.●! You cannot use the built-in flash for continuous shutter release.●! See P.50 for the max. no. of consecutive shots in multiple exposure shooting.
The settings for multiple exposure shooting canonly be changed from the function menu. At thispoint, the last settings specified apply.
Compensation value
p MULTIPLE EXPOSURERELEASE MODES

ISO20009 / 23 / 2004
10 : 00 AM
54 55
Ad
vanced
Ph
oto
grap
hy
3
METERING SYSTEMSNormally, the Matrix metering system will provide the optimum exposure for your shot. However,you can choose from 3 metering modes for shots where you want to select a different exposurelevel (AE lock or exposure compensation) or for particular scenes (such as backlit shots or shotswith very strong contrast).
Turn the Metering system selector dial to desiredmetering system.The icon for the selected metering system appearsin the viewfinder.
The camera sets the optimum exposure based ondata (the maximum brightness and brightnesscontrast) measured independently for 10 segmentsin the photography screen.With D- or G-type Nikkor lenses, 10-segment 3-Dmatrix metering is used, factoring in the distance tothe subject as well as the maximum brightness andbrightness contrast to ensure even more accuratemetering.
l Matrix (10-segment) metering
Center-weighted metering determines the exposurevalue based primarily on a 12-mm circle in thecenter of the viewfinder.
k Center-weighted metering
Spot metering determines the exposure value byconcentrating metering on the equivalent of a 4-mmdiameter area in the viewfinder (approx. 2% of theentire frame).The metering area moves to follow shifts in theselected focus area. However, spot meteringalways remains in the center of the shot whenClosest-subject Priority Dynamic AF mode is used.
j Spot metering
ISO SENSITIVITY
1 Set the Exposure mode dial to “ISO”.
2 Turn the Main-command dial to set the ISOsensitivity.
h Available ISO sensitivity settings100, 160, 200 (factory default setting), 400, 800and 1600
●! If you shoot dimly lit scenes with a low sensitivity setting andwithout using the flash, the color tones for the entire imagemay be incorrect.
Images shot in high-sensitivity photography (ISO400 or higher) may appear coarse and may also beaffected by noise such as white dots.
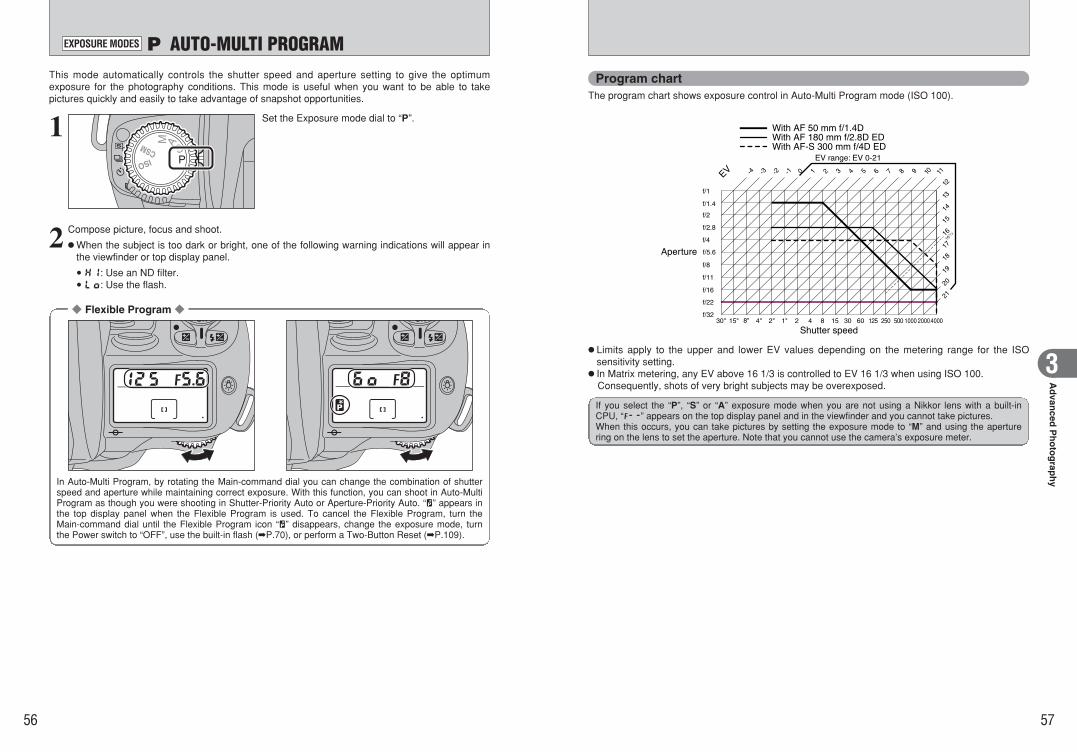
56 57
Ad
vanced
Ph
oto
grap
hy
3
This mode automatically controls the shutter speed and aperture setting to give the optimumexposure for the photography conditions. This mode is useful when you want to be able to takepictures quickly and easily to take advantage of snapshot opportunities.
1 Set the Exposure mode dial to “P”.
2 Compose picture, focus and shoot.
hWhen the subject is too dark or bright, one of the following warning indications will appear inthe viewfinder or top display panel.
i£: Use an ND filter.i¢: Use the flash.
◆ Flexible Program ◆
In Auto-Multi Program, by rotating the Main-command dial you can change the combination of shutterspeed and aperture while maintaining correct exposure. With this function, you can shoot in Auto-MultiProgram as though you were shooting in Shutter-Priority Auto or Aperture-Priority Auto. “W” appears inthe top display panel when the Flexible Program is used. To cancel the Flexible Program, turn theMain-command dial until the Flexible Program icon “W” disappears, change the exposure mode, turnthe Power switch to “OFF”, use the built-in flash (➡P.70), or perform a Two-Button Reset (➡P.109).
P AUTO-MULTI PROGRAMEXPOSURE MODES
Program chartThe program chart shows exposure control in Auto-Multi Program mode (ISO 100).
h Limits apply to the upper and lower EV values depending on the metering range for the ISOsensitivity setting.h In Matrix metering, any EV above 16 1/3 is controlled to EV 16 1/3 when using ISO 100.
Consequently, shots of very bright subjects may be overexposed.
With AF 50 mm f/1.4DWith AF 180 mm f/2.8D EDWith AF-S 300 mm f/4D ED
EV range: EV 0-21
EV
Shutter speed
Aperture
If you select the “P”, “S” or “A” exposure mode when you are not using a Nikkor lens with a built-inCPU, “§” appears on the top display panel and in the viewfinder and you cannot take pictures.When this occurs, you can take pictures by setting the exposure mode to “M” and using the aperturering on the lens to set the aperture. Note that you cannot use the camera’s exposure meter.

58 59
Ad
vanced
Ph
oto
grap
hy
3
S SHUTTER-PRIORITY AUTOEXPOSURE MODES
In this mode, the photographer sets the shutter speed (1/4000 sec. to 30 sec.) and the cameraautomatically controls the aperture setting. This mode is best when the shutter speed takes priority,such as shots where a fast shutter speed is used to freeze the action or a slow shutter speed isused to convey the sense of movement.
1 Set the Exposure mode dial to “S”.
h If “™” is selected in “M” Manual exposuremode and the exposure mode is changed to “S”Shutter-Priority Auto without cancelling “™”,“™” blinks and the shutter locks. When thisoccurs, select a shutter speed other than“™”.
2 Set the shutter speed (1/4000 sec. to 30 sec.) onthe Main-command dial.
3 Compose picture, focus and shoot.
hWhen the subject is too dark or bright, one of the following warning indications will appear inthe top display panel or viewfinder (Electronic analog exposure display will also indicate theamount of under- or overexposure).
i£: Select higher shutter speed. If the warning indication still remains on, use an ND filter.i¢: Select a slower shutter speed. If the warning indication still remains on, use the flash.
●! At slow shutter speeds (1/8 sec. or slower), the camera performs noise removal processing after the shutter closes.As a result, the access lamp may not light for several seconds, increasing the interval between shots.
If you select the “P”, “S” or “A” exposure mode when you are not using a Nikkor lens with a built-in CPU,“§” appears on the top display panel and in the viewfinder and you cannot take pictures.When this occurs, you can take pictures by setting the exposure mode to “M” and using the aperturering on the lens to set the aperture. Note that you cannot use the camera's exposure meter.
If you select the “P”, “S” or “A” exposure mode when you are not using a Nikkor lens with a built-in CPU,“§” appears on the top display panel and in the viewfinder and you cannot take pictures.When this occurs, you can take pictures by setting the exposure mode to “M” and using the aperturering on the lens to set the aperture. Note that you cannot use the camera's exposure meter.
Images shot with long exposures (4 second orlonger) may appear coarse and may also beaffected by noise such as white dots.
A APERTURE-PRIORITY AUTOEXPOSURE MODES
In this mode, the photographer sets the aperture (minimum aperture to maximum aperture) and thecamera automatically controls the shutter speed. This mode is best for photographs where thepriority is on the depth of field (the area where objects are in focus), such as shots where both nearand distant objects are in clear focus (minimum apertures) or where the background is out of focus(maximum apertures).
1 Set the Exposure mode dial to “A”.
2
3
Use the Sub-command dial to set the aperture(minimum aperture to maximum aperture).
Compose picture, focus and shoot.
hWhen the subject is too dark or too bright, one of the following warning indications will appearin the top display panel or viewfinder (Electronic analog exposure display will also indicate theamount of under- or overexposure).
i£: Select smaller aperture (larger f-number). If the warning indication still remains on, usean ND filter.
i¢: Select larger aperture (smaller f-number). If the warning indication still remains on, usethe flash.

60 61
Ad
vanced
Ph
oto
grap
hy
3
◆ Electronic analog exposure display ◆The electronic analog exposure display in the viewfinder indicates the difference between the selectedexposure (shutter speed and aperture) and the correct exposure. Not available with long time exposure.The electronic analog exposure display blinks when the subject brightness is beyond the camera’sexposure range.The following examples show electronic analog exposure display indications:
Correct exposure –1/2 EV Over +3 EV
3 Compose picture, focus and shoot.
If you are not using a Nikkor lens with a built-in CPU, you can take pictures by using the aperture ringon the lens to set the aperture. However, you cannot use the camera’s exposure meter. “§” alsoappears on the top display panel and in the viewfinder.
M MANUALEXPOSURE MODES
In this mode, the photographer is free to set any shutter speed (1/4000 sec. to 30 sec. or “™”)or aperture setting (narrowest aperture to widest aperture). This allows the photographer todetermine the exposure to suit the conditions and the desired effect while watching the electronicanalog exposure display in the viewfinder.
CSM 6: To use the “™” shutter speed (for long exposures), the custom settings must bemodified (➡P.111).
While watching the electronic analog exposure display in the viewfinder, use the Main-commanddial to set the shutter speed (1/4000 sec. to 30 sec. or “™”) and the Sub-command dial toset the aperture setting (minimum aperture to maximum aperture).
hWhen the exposure compensation (➡P.63) is set, only the electronic analog exposure displaychanges—selected shutter speed and aperture do not change.
1 Set the Exposure mode dial to “M”.
2
Images shot with long exposures (4 second or longer) may appear coarse and may also beaffected by noise such as white dots.
001
CUSTOM SETTINGCUSTOM SETTING6.LONG EXP.(BULB) AT MANUAL 6.LONG EXP.(BULB) AT MANUAL MODEMODE
DISABLEDDISABLEDACTIVATEDACTIVATED
MAINMAIN MENUMENU SETTINGSETTINGSUBSUB
Bulb photography (™)Bulb photography is useful when you want to take pictures with any shutter speed. You should usea tripod to keep the camera steady because the shutter stays open for as long as the shutter buttonis held down.
1 CSM 6: To use the “™” shutter speed (for longexposures), the custom settings must bemodified (➡P.111).
1Set the Exposure mode dial to “CSM”.2Use the Main-command dial to select “6. LONG
EXP. (BULB) AT MANUAL MODE”.3Use the Sub-command dial to select “1:
ACTIVATED”.
0302
01
Images shot with long exposures (4 second or longer) may appear coarse and may also be affected bynoise such as white dots.
Continued

62 63
Ad
vanced
Ph
oto
grap
hy
3
M MANUALEXPOSURE MODES
2 Set the Exposure mode dial to “M”.
h Bulb photography can only be used in Manualexposure mode.h A tripod should be used for bulb photography.
3 1 Use the Main-command dial to set the shutterspeed to “™ ” and then 2 use the Sub-command dial to set the aperture setting (minimumaperture to maximum aperture).
4 Compose picture, focus and shoot.
h The shutter will be open as long as the shutter release button is kept fully depressed.hUsing the cable release (sold separately) or remote release (sold separately) instead of
holding the shutter release button down with your finger reduces camera shake.
02
01
Exposure compensation allows you to intentionally vary the optimum exposure value controlled bythe camera. This can be useful when intentionally achieving under- or overexposure. Use Center-weighted or Spot metering. Exposure compensation can be performed in any exposure mode(However in “M” exposure mode, only the electronic analog exposure display changes—selectedshutter speed and aperture do not change).
1
2
Set exposure compensation by rotating the Main-command dial while pressing the “b” button untilthe desired compensation value appears (–3 EV to+3 EV in 1/2 EV steps).
hWhen the exposure compensation is set, “d”appears on the top display panel and viewfinder.The Electronic analog exposure display alsoappears in the viewfinder. The compensationvalue can be checked by pressing the “b ”button.h Electronic analog exposure display indicates the
exposure compensation value and “0” blinks.hNormally, you should compensate exposure to
the + side when the background is brighter thanyour main subject, or to the – side when thebackground is darker.h See P.73 for information on using flash exposure
compensation to adjust the amount of lightemitted by the flash.
Compose picture, focus and shoot.
h To cancel exposure compensation, set the compensation amount to “0.0” or perform a Two-Button Reset (➡P.109) (Turning the camera off does not cancel exposure compensation).
–0.5 EV compensation
<Electronic analog exposure display>
+2 EV compensation
01
02
◆ Remote Release Compatibility ◆This camera can be used with 10-pin remote releases.Use the remote release (sold separately) with a tripod (sold separately) to prevent camera shake.Connect the remote release to the 10-pin terminal by matching the indicators on the terminal andaccessory cord.
Nikon accessories that can be used with the 10-pin terminal.i Remote Cord MC-20 i Remote Cord MC-30i Extension Cord MC-21 i Luminosity Controller Set ML-3i Remote Cord MC-22 i Conversion Cord MC-25
●! When not using the 10-pin terminal, always fit the terminal cap.Dust or soiling in the terminal can cause malfunctions.
●! If Auto Power Off has shut down the camera, the camera cannot be started up again from an accessory. (Use thecustom settings to specify the delay until Auto Power Off shuts down the camera.)
●! The Connection Cord MC-23 is not supported.●! If the camera loses power while you are using a cable release or directly holding down the shutter button, it cannot
save the photographed image. If you are using a 10-pin remote-control cable, the image is saved at the point thebatteries run out of charge.
●! Attach the bundled clamp filter when using the remote release(Secure the clamp filter by looping the cord through the filter atthe connector end of the cord, as shown in the figure on theright).
b EXPOSURE COMPENSATION
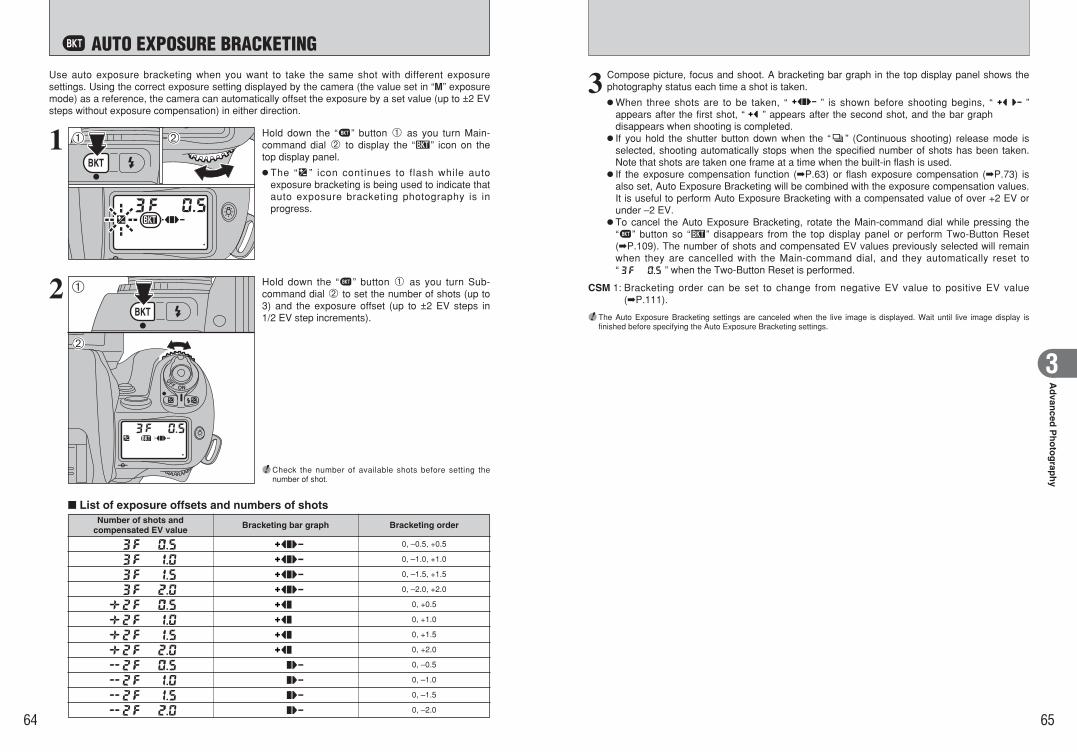
64 65
Ad
vanced
Ph
oto
grap
hy
3
Use auto exposure bracketing when you want to take the same shot with different exposuresettings. Using the correct exposure setting displayed by the camera (the value set in “M” exposuremode) as a reference, the camera can automatically offset the exposure by a set value (up to ±2 EVsteps without exposure compensation) in either direction.
Hold down the “c” button 1 as you turn Main-command dial 2 to display the “Q” icon on thetop display panel.
h The “d ” icon continues to flash while autoexposure bracketing is being used to indicate thatauto exposure bracketing photography is inprogress.
01
02
2
1
Hold down the “c” button 1 as you turn Sub-command dial 2 to set the number of shots (up to3) and the exposure offset (up to ±2 EV steps in1/2 EV step increments).
■ List of exposure offsets and numbers of shotsNumber of shots and
compensated EV value Bracketing bar graph Bracketing order
0, –0.5, +0.5
0, –1.0, +1.0
0, –1.5, +1.5
0, –2.0, +2.0
0, +0.5
0, +1.0
0, +1.5
0, +2.0
0, –0.5
0, –1.0
0, –1.5
0, –2.0
01 02
●! Check the number of available shots before setting thenumber of shot.
3 Compose picture, focus and shoot. A bracketing bar graph in the top display panel shows thephotography status each time a shot is taken.
hWhen three shots are to be taken, “ ” is shown before shooting begins, “ ”appears after the first shot, “ ” appears after the second shot, and the bar graphdisappears when shooting is completed.h If you hold the shutter button down when the “.” (Continuous shooting) release mode is
selected, shooting automatically stops when the specified number of shots has been taken.Note that shots are taken one frame at a time when the built-in flash is used.h If the exposure compensation function (➡P.63) or flash exposure compensation (➡P.73) is
also set, Auto Exposure Bracketing will be combined with the exposure compensation values.It is useful to perform Auto Exposure Bracketing with a compensated value of over +2 EV orunder –2 EV.h To cancel the Auto Exposure Bracketing, rotate the Main-command dial while pressing the
“c” button so “Q” disappears from the top display panel or perform Two-Button Reset(➡P.109). The number of shots and compensated EV values previously selected will remainwhen they are cancelled with the Main-command dial, and they automatically reset to“ ” when the Two-Button Reset is performed.
CSM 1: Bracketing order can be set to change from negative EV value to positive EV value(➡P.111).
●! The Auto Exposure Bracketing settings are canceled when the live image is displayed. Wait until live image display isfinished before specifying the Auto Exposure Bracketing settings.
c AUTO EXPOSURE BRACKETING
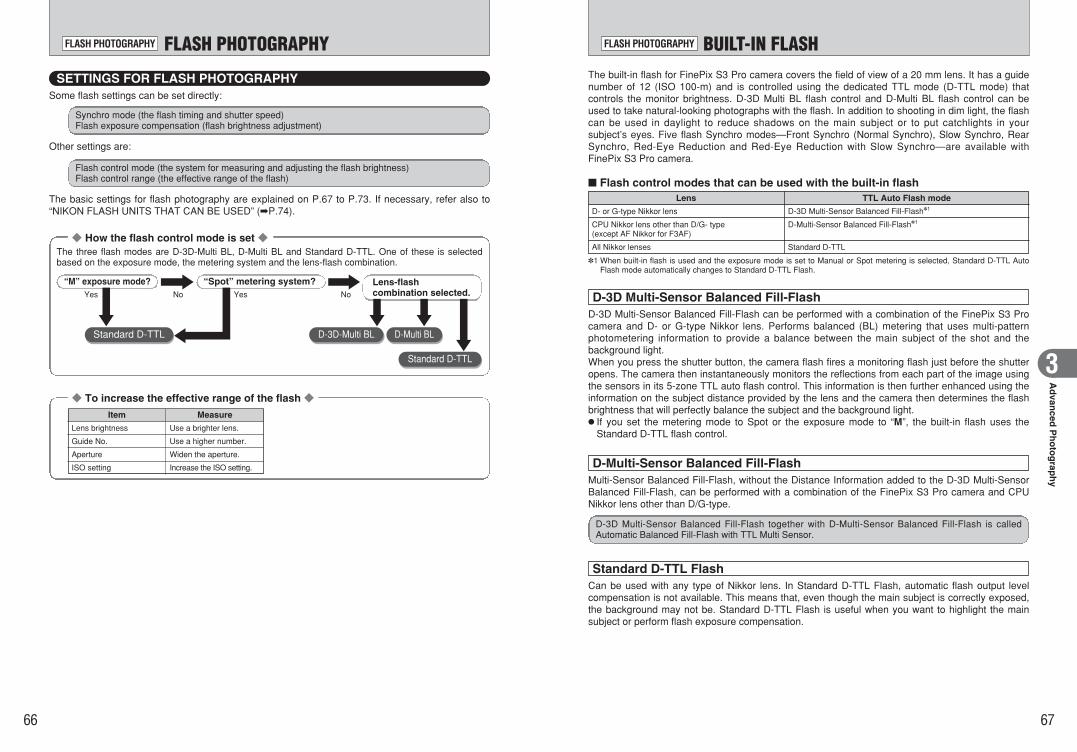
66 67
Ad
vanced
Ph
oto
grap
hy
3D-3D-Multi BL D-Multi BL
BUILT-IN FLASHFLASH PHOTOGRAPHY
Multi-Sensor Balanced Fill-Flash, without the Distance Information added to the D-3D Multi-SensorBalanced Fill-Flash, can be performed with a combination of the FinePix S3 Pro camera and CPUNikkor lens other than D/G-type.
D-Multi-Sensor Balanced Fill-Flash
Can be used with any type of Nikkor lens. In Standard D-TTL Flash, automatic flash output levelcompensation is not available. This means that, even though the main subject is correctly exposed,the background may not be. Standard D-TTL Flash is useful when you want to highlight the mainsubject or perform flash exposure compensation.
Standard D-TTL Flash
D-3D Multi-Sensor Balanced Fill-Flash together with D-Multi-Sensor Balanced Fill-Flash is calledAutomatic Balanced Fill-Flash with TTL Multi Sensor.
FLASH PHOTOGRAPHYFLASH PHOTOGRAPHY
Some flash settings can be set directly:
Other settings are:
Synchro mode (the flash timing and shutter speed)Flash exposure compensation (flash brightness adjustment)
The basic settings for flash photography are explained on P.67 to P.73. If necessary, refer also to“NIKON FLASH UNITS THAT CAN BE USED” (➡P.74).
Flash control mode (the system for measuring and adjusting the flash brightness)Flash control range (the effective range of the flash)
SETTINGS FOR FLASH PHOTOGRAPHY The built-in flash for FinePix S3 Pro camera covers the field of view of a 20 mm lens. It has a guidenumber of 12 (ISO 100-m) and is controlled using the dedicated TTL mode (D-TTL mode) thatcontrols the monitor brightness. D-3D Multi BL flash control and D-Multi BL flash control can beused to take natural-looking photographs with the flash. In addition to shooting in dim light, the flashcan be used in daylight to reduce shadows on the main subject or to put catchlights in yoursubject’s eyes. Five flash Synchro modes—Front Synchro (Normal Synchro), Slow Synchro, RearSynchro, Red-Eye Reduction and Red-Eye Reduction with Slow Synchro—are available withFinePix S3 Pro camera.
D-3D Multi-Sensor Balanced Fill-Flash can be performed with a combination of the FinePix S3 Procamera and D- or G-type Nikkor lens. Performs balanced (BL) metering that uses multi-patternphotometering information to provide a balance between the main subject of the shot and thebackground light.When you press the shutter button, the camera flash fires a monitoring flash just before the shutteropens. The camera then instantaneously monitors the reflections from each part of the image usingthe sensors in its 5-zone TTL auto flash control. This information is then further enhanced using theinformation on the subject distance provided by the lens and the camera then determines the flashbrightness that will perfectly balance the subject and the background light.h If you set the metering mode to Spot or the exposure mode to “M”, the built-in flash uses the
Standard D-TTL flash control.
✽1 When built-in flash is used and the exposure mode is set to Manual or Spot metering is selected, Standard D-TTL AutoFlash mode automatically changes to Standard D-TTL Flash.
■ Flash control modes that can be used with the built-in flashLens TTL Auto Flash mode
D- or G-type Nikkor lens D-3D Multi-Sensor Balanced Fill-Flash✽1
CPU Nikkor lens other than D/G- type(except AF Nikkor for F3AF)
D-Multi-Sensor Balanced Fill-Flash✽1
All Nikkor lenses Standard D-TTL
Item Measure
Lens brightness Use a brighter lens.
Guide No. Use a higher number.
Aperture Widen the aperture.
ISO setting Increase the ISO setting.
D-3D Multi-Sensor Balanced Fill-Flash
◆ How the flash control mode is set ◆
◆ To increase the effective range of the flash ◆
“M” exposure mode? “Spot” metering system? Lens-flashcombination selected.No NoYesYes
Standard D-TTL
The three flash modes are D-3D-Multi BL, D-Multi BL and Standard D-TTL. One of these is selectedbased on the exposure mode, the metering system and the lens-flash combination.
Standard D-TTL

68 69
Ad
vanced
Ph
oto
grap
hy
3
Can be used in all exposure modes. In the “P” and“A” exposure modes, a slow shutter speed is used.The flash fires just before the shutter closes. Thismode is effective in capturing the subject'smovement as a flow of light in a way that looksnatural.
●! Rear Synchro cannot be used with a studio flash systemsince the correct synchronization cannot be obtained.
ah REAR SYNCHRO MODE
Can be used in all exposure modes.The red-eye reduction lamp lights for approx. 1 sec.before the flash fires in order to reduce the red-eyeeffect in photos of people or animals.
as RED-EYE REDUCTION MODE
Can be used in the “P” and “A” exposure modes.This mode combines red-eye reduction with a slowshutter speed.
●! When a Nikon SB-80DX SB-28/28DX, SB-27 or SB-26 flashunit is used, the red-eye reduction lamp on the external flashfires.
●! Take care to ensure that the camera and the subjects(people) in the shot do not move until the shutter is released.
●! Depending on the type of lens mounted, the light from thered-eye reduction lamp may not reach the person, in whichcase the effect of the red-eye reduction lamp is lost.
asg RED-EYE REDUCTIONSLOW SYNCHRO MODE
■ Shutter SpeedsThe synchronized shutter speed is 1/180 sec.The shutter speeds that can be set vary depending on the combination of synchro mode andexposure mode, as shown below.
Exposure mode
Synchro mode
Z Front Synchro
P or A S M
1/180 to 1/60 sec. (automatically set by the camera✽1) 1/180 to 30 sec. 1/180 to 30 sec. and
™
X Slow Synchro1/180 to 30 sec. (automatically set by the camera✽2) – –
C Rear SynchroAutomatically set to Slow Synchro.1/180 to 30 sec. (automatically set by the camera✽1 ✽2)
1/180 to 30 sec. 1/180 to 30 sec. and™
V Red-eye Reduction1/180 to 1/60 sec. (automatically set by the camera)
1/180 to 30 sec. 1/180 to 30 sec. and™
B Red-eye ReductionSlow Synchro
1/180 to 30 sec. (automatically set by the camera✽2) – –
✽1 When a Nikon SB-26, SB-25 or SB-24 flash unit is used, the synchro selector on the external flash unit sets theshutter speed.
✽2 Because a slow shutter speed is used, a tripod should be used to prevent camera shake.
SYNCHRO MODES AND THEIR FEATURESFLASH PHOTOGRAPHY
You can select any of 5 modes to suit the type of shot and the desired effect.
Front Synchro Red-eye Reduction
Red-eye Reduction Slow Synchro
Slow Synchro Rear Synchro
●! When some exposure mode and synchro mode combinations are selected, the synchro mode may be automaticallychanged subsequently.
Exposuremode
P or A
Synchro mode Display duringselection
Display afterselection Operation
Rear SynchroAutomatically set to SlowSynchro.
S or M
Red-eye Reduction SlowSynchro
Slow Synchro
Slow Synchro is cancelled(shutter speed not changed).
Can be used in all exposure modes.Select this mode for normal flash photography.
a FRONT SYNCHRO MODE
Can be used in the “P” and “A” exposure modes.Because this mode uses a slow shutter speed, itcaptures the background while at the same timefiring the flash to produce a shot that captures theatmosphere of a twilight or nighttime scene.
ag SLOW SYNCHRO MODE
1Press the flash pop-up button to pop up theflash.
2Hold down the “v” button.3Turn the Main-command dial to select the
synchro mode. The icon shown on the top display panel changesas shown below.
●! When you are not using the flash, always keep it stowedaway to prevent battery depletion.
02
01
03

70 71
Ad
vanced
Ph
oto
grap
hy
3
ISO setting
Maximum aperture (built-in flash) 2.8 3.3 4
100
3.3
160 200 400
4.8
800
5.6
1600
4 Check that the “a” (ready light) is displayed in theviewfinder.
5 Bear in mind the composition, focus and effective flash range when taking pictures.
●! If the “a” (ready light) flashes for about 3 seconds after the shutter is released, this is a warning that the flash fired atfull power and the shot may be underexposed. Play the image back to check it. If you decide to retake the shot,check the shooting distance, aperture, flash control range, etc. again before shooting.
●! If the subject is dark, the AF-assist illuminator fires to set the focus. See P.38 for details.●! When you use the flash, shots are not taken continuously when the release mode is set to Continuous Shooting.●! If the built-in flash is charging, camera-shake correction is not performed on a VR lens while the shutter button is
pressed down halfway.
●! If you take a number of continuous shots with the built-inflash, the “a” (ready light) may take a few moments to light.
●! The shutter cannot be released unless “a” (ready light)appears without blinking in the viewfinder.
■ Effective range of the built-in flashThe effective range of the built-in flash varies depending on the ISO sensitivity and aperture settingsused. Refer to the table below.
TAKING PICTURES USING THE BUILT-IN FLASHFLASH PHOTOGRAPHY
Operation described in this section applies when the built-in flash and D- or G-type AF Nikkor areattached.
1 Center-weighted metering
Matrix metering
Set the metering system selector dial to “Matrixmetering” or “Center-weighted metering”.
2 1Press the flash pop-up button to pop up theflash.
2Hold down the “v” button.3Turn the Main-command dial to select the
synchro mode.
3 Set exposure mode and confirm shutter speed andaperture.
✽ Shutter speeds faster than the synchronized speed (1/180 sec.) cannot be set. When “180” appears in the viewfinderdisplay and the specified shutter speed flashes on the display panel, the actual shutter speed is 1/180 sec.
✽ The shooting distance is determined by the ISO setting and the aperture. For the “A” and “M” exposure modes, see thetable below.
✽ For the “P” exposure mode, the maximum aperture that can be set by the camera varies depending on the ISO setting.See P.75.
●! If you select “0” (Spot Metering), the flash control mode isswitched to “Standard D-TTL”.
●! When you are not using the flash, always keep it stowedaway to prevent battery depletion.
Exposure mode
P
S
A
M
Shutter speed Aperture Flash control mode
Synchronized shutter speed: 1/180sec. See P.69 for details.
Automatically set by thecamera
Any aperture
D-3D Multi BL
Standard D-TTL
02
01
03
Photography sensitivity (ISO) and aperture setting
100 160 200 400 800 1600
1.4 1.8 2 2.8 4 5.6
Metering range
2-8.5 m (6.6-27.9 ft.)
2 2.5 2.8 4 5.6 8 1.4-6 m (4.6-19.7 ft.)
2.8 3.5 4 5.6 8 11 1-4.2 m (3.3-13.8 ft.)
4 5 5.6 8 11 16 0.7-3 m (2.3-9.8 ft.)
5.6 7.1 8 11 16 22 0.6-2.1 m (2.0-6.9 ft.)
8 10 11 16 22 32 0.6-1.5 m (2.0-4.9 ft.)
11 14 16 22 32 — 0.6-1.1 m (2.0-3.6 ft.)
16 20 22 32 — — 0.6-0.8 m (2.0-2.6 ft.)
✽ The minimum effective range for flash control using the built-in flash is 0.6 meters.
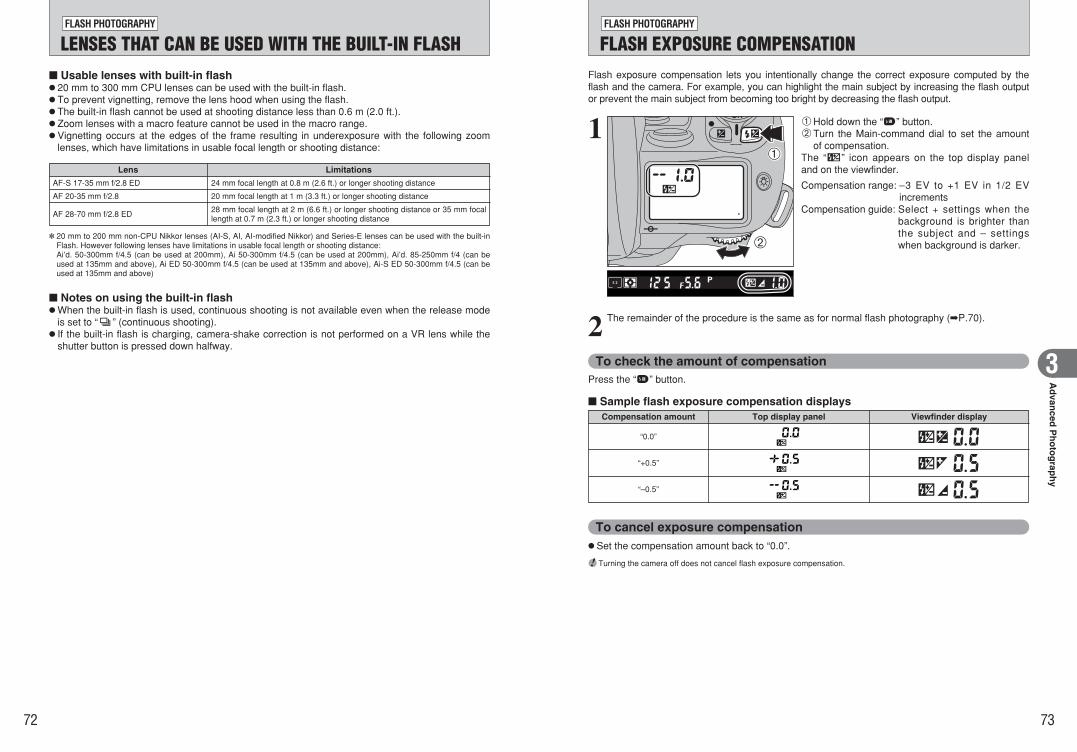
72 73
Ad
vanced
Ph
oto
grap
hy
3
FLASH EXPOSURE COMPENSATIONFLASH PHOTOGRAPHY
Flash exposure compensation lets you intentionally change the correct exposure computed by theflash and the camera. For example, you can highlight the main subject by increasing the flash outputor prevent the main subject from becoming too bright by decreasing the flash output.
1 1Hold down the “n” button.2Turn the Main-command dial to set the amount
of compensation.The “f” icon appears on the top display paneland on the viewfinder.
Compensation range: –3 EV to +1 EV in 1/2 EVincrements
Compensation guide: Select + settings when thebackground is brighter thanthe subject and – settingswhen background is darker.
2 The remainder of the procedure is the same as for normal flash photography (➡P.70).
Press the “n” button.
To check the amount of compensation
h Set the compensation amount back to “0.0”.
●! Turning the camera off does not cancel flash exposure compensation.
To cancel exposure compensation
■ Sample flash exposure compensation displaysCompensation amount
“0.0”
Top display panel Viewfinder display
“+0.5”
“–0.5”
01
02
LENSES THAT CAN BE USED WITH THE BUILT-IN FLASHFLASH PHOTOGRAPHY
■ Usable lenses with built-in flashh 20 mm to 300 mm CPU lenses can be used with the built-in flash.h To prevent vignetting, remove the lens hood when using the flash.h The built-in flash cannot be used at shooting distance less than 0.6 m (2.0 ft.).h Zoom lenses with a macro feature cannot be used in the macro range.h Vignetting occurs at the edges of the frame resulting in underexposure with the following zoom
lenses, which have limitations in usable focal length or shooting distance:
■ Notes on using the built-in flashhWhen the built-in flash is used, continuous shooting is not available even when the release mode
is set to “.” (continuous shooting).h If the built-in flash is charging, camera-shake correction is not performed on a VR lens while the
shutter button is pressed down halfway.
Lens
AF-S 17-35 mm f/2.8 ED 24 mm focal length at 0.8 m (2.6 ft.) or longer shooting distance
AF 20-35 mm f/2.8 20 mm focal length at 1 m (3.3 ft.) or longer shooting distance
AF 28-70 mm f/2.8 ED28 mm focal length at 2 m (6.6 ft.) or longer shooting distance or 35 mm focallength at 0.7 m (2.3 ft.) or longer shooting distance
Limitations
✽ 20 mm to 200 mm non-CPU Nikkor lenses (AI-S, AI, AI-modified Nikkor) and Series-E lenses can be used with the built-inFlash. However following lenses have limitations in usable focal length or shooting distance:Ai’d. 50-300mm f/4.5 (can be used at 200mm), Ai 50-300mm f/4.5 (can be used at 200mm), Ai’d. 85-250mm f/4 (can beused at 135mm and above), Ai ED 50-300mm f/4.5 (can be used at 135mm and above), Ai-S ED 50-300mm f/4.5 (can beused at 135mm and above)
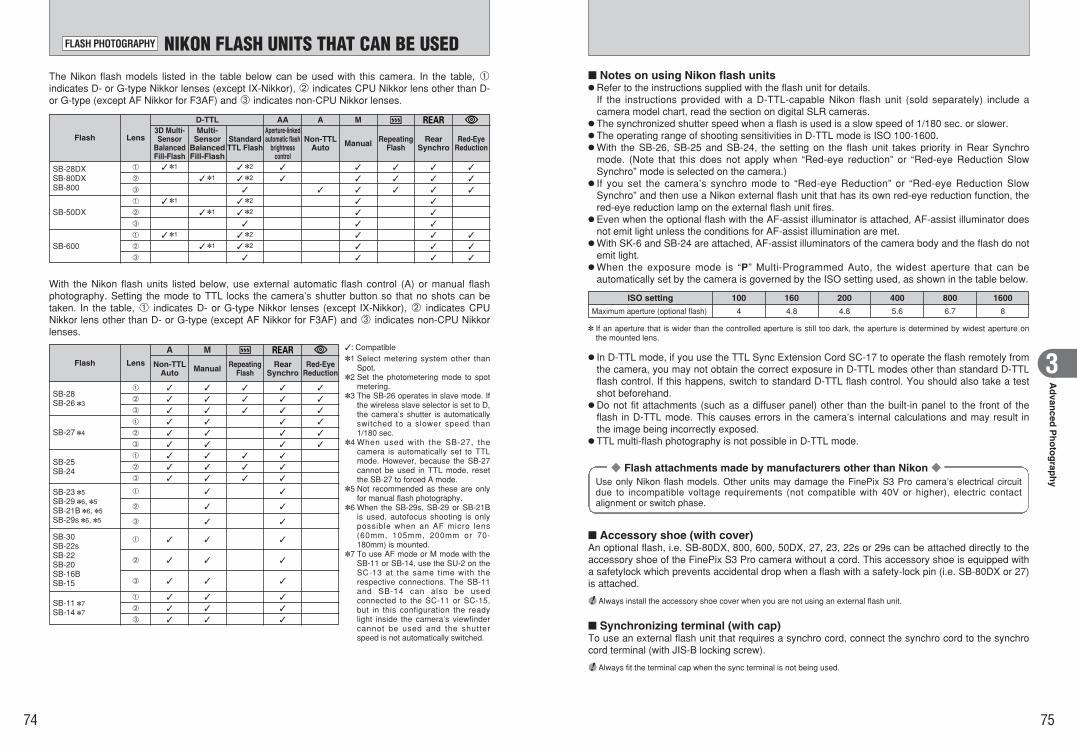
74 75
Ad
vanced
Ph
oto
grap
hy
3
■ Accessory shoe (with cover)An optional flash, i.e. SB-80DX, 800, 600, 50DX, 27, 23, 22s or 29s can be attached directly to theaccessory shoe of the FinePix S3 Pro camera without a cord. This accessory shoe is equipped witha safetylock which prevents accidental drop when a flash with a safety-lock pin (i.e. SB-80DX or 27)is attached.
●! Always install the accessory shoe cover when you are not using an external flash unit.
■ Synchronizing terminal (with cap)To use an external flash unit that requires a synchro cord, connect the synchro cord to the synchrocord terminal (with JIS-B locking screw).
●! Always fit the terminal cap when the sync terminal is not being used.
h In D-TTL mode, if you use the TTL Sync Extension Cord SC-17 to operate the flash remotely fromthe camera, you may not obtain the correct exposure in D-TTL modes other than standard D-TTLflash control. If this happens, switch to standard D-TTL flash control. You should also take a testshot beforehand.hDo not fit attachments (such as a diffuser panel) other than the built-in panel to the front of the
flash in D-TTL mode. This causes errors in the camera’s internal calculations and may result inthe image being incorrectly exposed.h TTL multi-flash photography is not possible in D-TTL mode.
✽ If an aperture that is wider than the controlled aperture is still too dark, the aperture is determined by widest aperture onthe mounted lens.
◆ Flash attachments made by manufacturers other than Nikon ◆Use only Nikon flash models. Other units may damage the FinePix S3 Pro camera’s electrical circuitdue to incompatible voltage requirements (not compatible with 40V or higher), electric contactalignment or switch phase.
■ Notes on using Nikon flash unitshRefer to the instructions supplied with the flash unit for details.
If the instructions provided with a D-TTL-capable Nikon flash unit (sold separately) include acamera model chart, read the section on digital SLR cameras.h The synchronized shutter speed when a flash is used is a slow speed of 1/180 sec. or slower.h The operating range of shooting sensitivities in D-TTL mode is ISO 100-1600.hWith the SB-26, SB-25 and SB-24, the setting on the flash unit takes priority in Rear Synchro
mode. (Note that this does not apply when “Red-eye reduction” or “Red-eye Reduction SlowSynchro” mode is selected on the camera.)h If you set the camera’s synchro mode to “Red-eye Reduction” or “Red-eye Reduction Slow
Synchro” and then use a Nikon external flash unit that has its own red-eye reduction function, thered-eye reduction lamp on the external flash unit fires.h Even when the optional flash with the AF-assist illuminator is attached, AF-assist illuminator does
not emit light unless the conditions for AF-assist illumination are met.hWith SK-6 and SB-24 are attached, AF-assist illuminators of the camera body and the flash do not
emit light.hWhen the exposure mode is “P” Multi-Programmed Auto, the widest aperture that can be
automatically set by the camera is governed by the ISO setting used, as shown in the table below.
NIKON FLASH UNITS THAT CAN BE USEDFLASH PHOTOGRAPHY
The Nikon flash models listed in the table below can be used with this camera. In the table, 1indicates D- or G-type Nikkor lenses (except IX-Nikkor), 2 indicates CPU Nikkor lens other than D-or G-type (except AF Nikkor for F3AF) and 3 indicates non-CPU Nikkor lenses.
ISO setting
Maximum aperture (optional flash) 4 4.8 5.6
100
4.8
160 200 400
6.7
800
8
1600
With the Nikon flash units listed below, use external automatic flash control (A) or manual flashphotography. Setting the mode to TTL locks the camera’s shutter button so that no shots can betaken. In the table, 1 indicates D- or G-type Nikkor lenses (except IX-Nikkor), 2 indicates CPUNikkor lens other than D- or G-type (except AF Nikkor for F3AF) and 3 indicates non-CPU Nikkorlenses.
✓: Compatible✽1 Select metering system other than
Spot.✽2 Set the photometering mode to spot
metering.✽3 The SB-26 operates in slave mode. If
the wireless slave selector is set to D,the camera’s shutter is automaticallyswitched to a slower speed than1/180 sec.
✽4 When used with the SB-27, thecamera is automatically set to TTLmode. However, because the SB-27cannot be used in TTL mode, resetthe SB-27 to forced A mode.
✽5 Not recommended as these are onlyfor manual flash photography.
✽6 When the SB-29s, SB-29 or SB-21Bis used, autofocus shooting is onlypossible when an AF micro lens(60mm, 105mm, 200mm or 70-180mm) is mounted.
✽7 To use AF mode or M mode with theSB-11 or SB-14, use the SU-2 on theSC-13 at the same time with therespective connections. The SB-11and SB-14 can also be usedconnected to the SC-11 or SC-15,but in this configuration the readylight inside the camera’s viewfindercannot be used and the shutterspeed is not automatically switched.
SB-28DXSB-80DXSB-800
1 ✓ ✽1 ✓ ✽2 ✓ ✓ ✓ ✓ ✓
2 ✓ ✽1 ✓ ✽2 ✓ ✓ ✓ ✓ ✓
3 ✓ ✓ ✓ ✓ ✓ ✓
SB-50DX1 ✓ ✽1 ✓ ✽2 ✓ ✓
2 ✓ ✽1 ✓ ✽2 ✓ ✓
3 ✓ ✓ ✓
SB-6001 ✓ ✽1 ✓ ✽2 ✓ ✓ ✓
2 ✓ ✽1 ✓ ✽2 ✓ ✓ ✓
3 ✓ ✓ ✓ ✓
Flash
D-TTL AA A M
Lens3D Multi-Sensor
BalancedFill-Flash
Multi-Sensor
BalancedFill-Flash
StandardTTL Flash
Aperture-linkedautomatic flash
brightnesscontrol
Non-TTLAuto Manual Repeating
FlashRear
SynchroRed-Eye
Reduction
SB-28SB-26 ✽3
1 ✓ ✓ ✓ ✓ ✓
2 ✓ ✓ ✓ ✓ ✓
3 ✓ ✓ ✓ ✓ ✓
SB-27 ✽4
1 ✓ ✓ ✓ ✓
2 ✓ ✓ ✓ ✓
3 ✓ ✓ ✓ ✓
SB-25SB-24
1 ✓ ✓ ✓ ✓
2 ✓ ✓ ✓ ✓
3 ✓ ✓ ✓ ✓
SB-23 ✽5SB-29 ✽6, ✽5SB-21B ✽6, ✽5SB-29s ✽6, ✽5
1 ✓ ✓
2 ✓ ✓
3 ✓ ✓
SB-30SB-22sSB-22SB-20SB-16BSB-15
1 ✓ ✓ ✓
2 ✓ ✓ ✓
3 ✓ ✓ ✓
SB-11 ✽7SB-14 ✽7
1 ✓ ✓ ✓
2 ✓ ✓ ✓
3 ✓ ✓ ✓
A M
Lens Non-TTLAuto Manual Repeating
FlashRear
SynchroRed-Eye
ReductionFlash

76 77
Ad
vanced
Ph
oto
grap
hy
3
WHITE BALANCEPHOTOGRAPHY FUNCTION MENU
Change the settings when you want to set the white balance to suit the natural or artificial lightingconditions when you shoot.When AUTO is selected, the correct white balance sometimes cannot be obtained under speciallight sources or for subjects where people’s faces are highlighted, etc. In such cases, select thecorrect white balance setting for the light source.
h Factory default setting: AUTO
hWhen the flash fires, the white balance setting (excluding custom white balance) for the flash is used.Consequently, to achieve a particular effect, the flash mode should be set to Suppressed flash.
Display Name Description
AUTOThe camera automatically determines the amount of light and the color information for theshot and takes the picture with a natural white balance.
FineSelect this setting for outdoor shots in fine weather when the light source for the shot is thesun.
Shade Select this setting for shots taken in shade or on cloudy days.
Fluorescent 1 Select this setting for shots taken under “Daylight” fluorescent lamps.
Fluorescent 2 Select this setting for shots taken under “Warm White” fluorescent lamps.
Fluorescent 3 Select this setting for shots taken under “Cool White” fluorescent lamps.
Incandescent Select this setting for shots when the light source is incandescent bulbs or lights.
Custom 1
This setting uses the white balance setting specified by the photographer in the “SET-UP”menu (➡P.104).
Custom 2
ISO200ISO20009 / 23 / 200409 / 23 / 2004
10 : 00 AM10 : 00 AM
Press the “FUNC” button to switch between functions.
White balance
USING THE FUNCTION MENU WHEN TAKING PICTURESPHOTOGRAPHY FUNCTION MENU
You can use the Function menu to change the quality settings (White Balance, Quality, Resolution,Film simulation, Dynamic range, Color, Tone, Sharpness) of saved images and the AF areasettings.
Turn the camera on and set the camera to Photography mode. If the Auto Power Off functionhas turned the camera off, press the shutter button down halfway to turn it back on.1
ISO20009 / 23 / 2004
10 : 00 AM
The setting changes each time you press the button.
The settings can be changed by holding down the button and pressing “a” or “b”.
Method 1
Method 2
The functions change each time the “FUNC” button is pressed.2
3
WHITE BALANCE

78 79
Ad
vanced
Ph
oto
grap
hy
3
QUALITY / RECORDED PIXELS / FILM SIMULATIONPHOTOGRAPHY FUNCTION MENU
ISO200ISO20009 / 23 / 200409 / 23 / 2004
10 : 00 AM10 : 00 AM
Press the “FUNC” button to switch between functions.
Recorded pixelsQuality Film simulation
QUALITYSets the quality of the photographed image. Select settings suited to the purposes for which thephotograph will be used.Select “FINE” for better quality or “HIGH” to shoot CCD-RAW images.The “NORMAL” setting provides ample image quality for most purposes.
h Factory default setting: NORMAL
◆ Shooting CCD-RAW images ◆Because CCD-RAW images are not processed in the camera, the bundled software or the optionalHyper-Utility Software HS-V2 (➡P.123) must be used to process the images on a PC.
h To shoot CCD-RAW images, set the quality to “HIGH”. The image size setting automatically changesto “RAW” and cannot be changed.
●! When you display a CCD-RAW image, the frame number is highlighted.
RECORDED PIXELSSets the size of the photographed image.
h Factory default setting: 3024×2016
h You cannot set the image size when the quality is set to “HIGH”.
Guide to printed image sizes
Display Name Description
NORMAL Allows you to record the largest number of images.
FINERecords images in high quality bettered only by the “High” setting. This mode allows youto record more images than the “High” setting.
HIGHCCD-RAW (➡P.140): No image processing is performed on the camera. Select this setting
when you want to process the image on a PC.
Display Name Description
1MSets the image size to 1440 × 960 pixels (approx. 1.38 megapixels).You can record the largest number of images in this mode.
3M Sets the image size to 2304 × 1536 pixels (approx. 3.54 megapixels).
6M Sets the image size to 3024 × 2016 pixels (approx. 6.10 megapixels).
12MSets the image size to 4256 × 2848 pixels (approx. 12.10 megapixels).You can record the fewest images in this mode.
Name Description
1M Printing at up to 3R (8.9 × 12.7 cm/3.5 × 5 in.) size
3M Printing at up to 6R (15.2 × 20.3 cm/6 × 8 in.) / A5 size
6M Printing at up to 10R (25.4 × 30.5 cm/10 × 12 in.) / A4 size
12M Printing at up to 35.6 × 43.2 cm (14 × 17 in.) / A3 size
FILM SIMULATIONSets the image formation parameters for photographed images.
h Factory default setting: STANDARD
Display Name Description
STANDARDThis is the standard image composition mode and is ideal for a wide range of subjects,including portraits and scenery.
FILMSIMULATION
F1
This mode suppresses flaring in flash highlights when the flash is used and also stressessmooth tonal transitions in the reproduction of skin tones. It is ideal for studio portrait workwhere the aim is professional-standard negatives.
FILMSIMULATION
F2
This mode provides vibrant reproduction of natural colors such as blue skies and is idealfor landscape and nature photography.
h If you want to change this setting, select “sRGB” as the color space and “WIDE” as the “D-RANGE” (Dynamic range) setting in SET-UP.

80 81
Ad
vanced
Ph
oto
grap
hy
3
DYNAMIC RANGE / COLOR / TONE / SHARPNESSPHOTOGRAPHY FUNCTION MENU
COLORUse the procedure below to set the density of the color used when images are shot.
h Factory default setting: STD
h If you want to view or print the image data directly, do not select “ORG”.
h If you want to change this setting, select “WIDE” as the “D-RANGE” (Dynamic range) setting in SET-UP.
ISO20009 / 23 / 2004
10 : 00 AM
Press the “FUNC” button to switch between functions.
Color ToneSharpnessDynamic range
h If you want to view or print the image data directly, do not select “ORG”.
TONEUse the procedure below to set the contrast when images are shot.
h Factory default setting: STD
h If you want to view or print the image data directly, do not select “OFF”.
SHARPNESSUse this setting to soften or sharpen the outlines in an image and to adjust the quality of thephotographed image.
h Factory default setting: STD
DYNAMIC RANGESets the dynamic range used for photographed images.
h Factory default setting: AUTO
Display Name Description
AUTO
The camera automatically varies the dynamic range between 100% and 400% accordingto the scene being shot before taking the picture. This mode suppresses white flaring andblack patches in scenes with high contrast while also enabling you to achieve good levelsof contrast in pictures taken indoors or in cloudy weather where a wide dynamic range isnot needed.
WIDE 1 Takes the picture with the dynamic range set to 230% regardless of the scene being shot.
WIDE 2 Takes the picture with the dynamic range set to 400% regardless of the scene being shot.
Display Name Description
STD(STANDARD)
This setting sets the contrast for photographed images to the standard level.
HARD This setting provides a higher level of contrast than the “STD” setting.
ORG(ORIGINAL)
This setting specifies a lower contrast than the “STD” setting. Use this setting for images that will undergo image processing for use in commercialprinting.
Display Name Description
STD(STANDARD)
This setting applies the optimum level of sharpness for normal shots.
HARDThis setting sharpens the outlines in an image and is best for images of subjects such asbuildings or text where clarity is important.
OFFSharpness processing is not applied in this setting. Use this setting for images that willundergo image processing for use in commercial printing.
Display Name Description
STD(STANDARD)
This setting sets the standard color density.
HIGH This setting provides a higher color density than the “STD” setting.
ORG(ORIGINAL)
This setting specifies a lower color density than the “STD” setting. Use this setting forimages that will undergo image processing for use in commercial printing.
B/W This setting converts the colors in the photographed image to black and white.
◆ The dynamic range, color, tone and sharpness cannot be changed ◆Selecting “F1” or “F2” as the film simulation setting (➡P.79) preventsthese settings from being changed. Select “STD” as the filmsimulation setting.
FILM SIMULATION F1
FILM SIMULATION F2
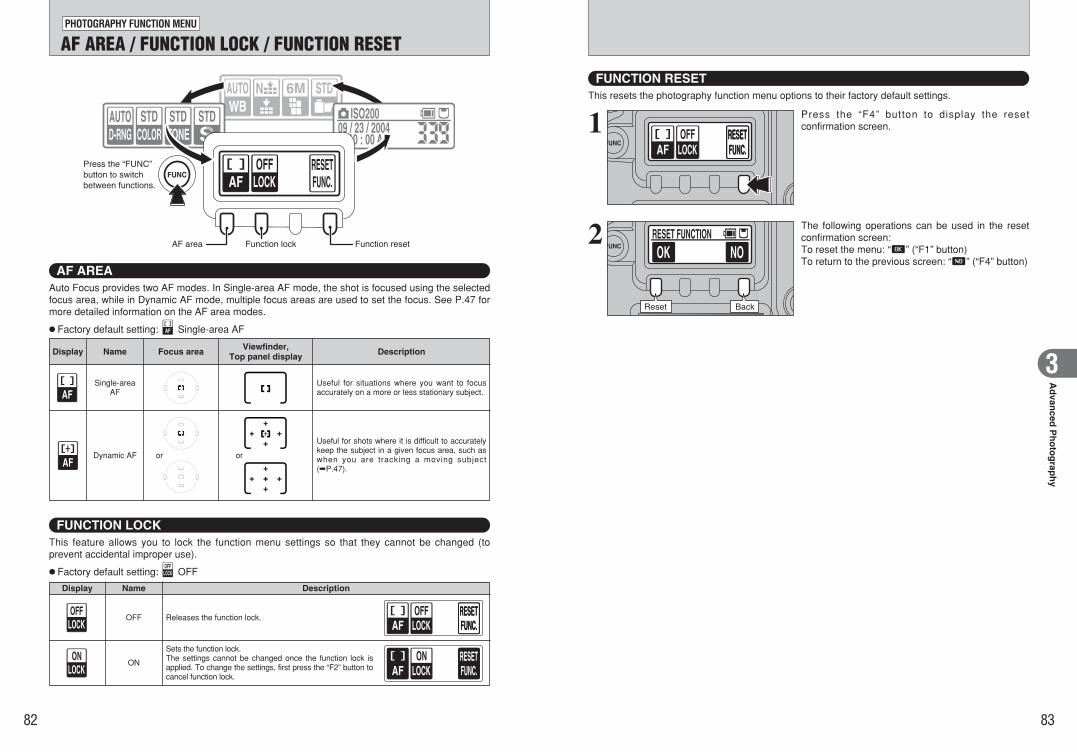
82 83
Ad
vanced
Ph
oto
grap
hy
3
AF AREA / FUNCTION LOCK / FUNCTION RESETPHOTOGRAPHY FUNCTION MENU
ISO20009 / 23 / 2004
10 : 00 AM
Press the “FUNC” button to switch between functions.
Function resetFunction lockAF area
AF AREAAuto Focus provides two AF modes. In Single-area AF mode, the shot is focused using the selectedfocus area, while in Dynamic AF mode, multiple focus areas are used to set the focus. See P.47 formore detailed information on the AF area modes.
h Factory default setting: Single-area AF
FUNCTION RESETThis resets the photography function menu options to their factory default settings.
Display Name Focus area Viewfinder, Top panel display Description
Single-areaAF
Useful for situations where you want to focusaccurately on a more or less stationary subject.
Dynamic AF or or
Useful for shots where it is difficult to accuratelykeep the subject in a given focus area, such aswhen you are tracking a moving subject(➡P.47).
FUNCTION LOCKThis feature allows you to lock the function menu settings so that they cannot be changed (toprevent accidental improper use).
h Factory default setting: OFF
Display Name Description
OFF Releases the function lock.
ON
Sets the function lock.The settings cannot be changed once the function lock isapplied. To change the settings, first press the “F2” button tocancel function lock.
Press the “F4” button to display the resetconfirmation screen.1
RESET FUNCTION
Reset Back
The following operations can be used in the resetconfirmation screen:To reset the menu: “H” (“F1” button)To return to the previous screen: “J” (“F4” button)
2
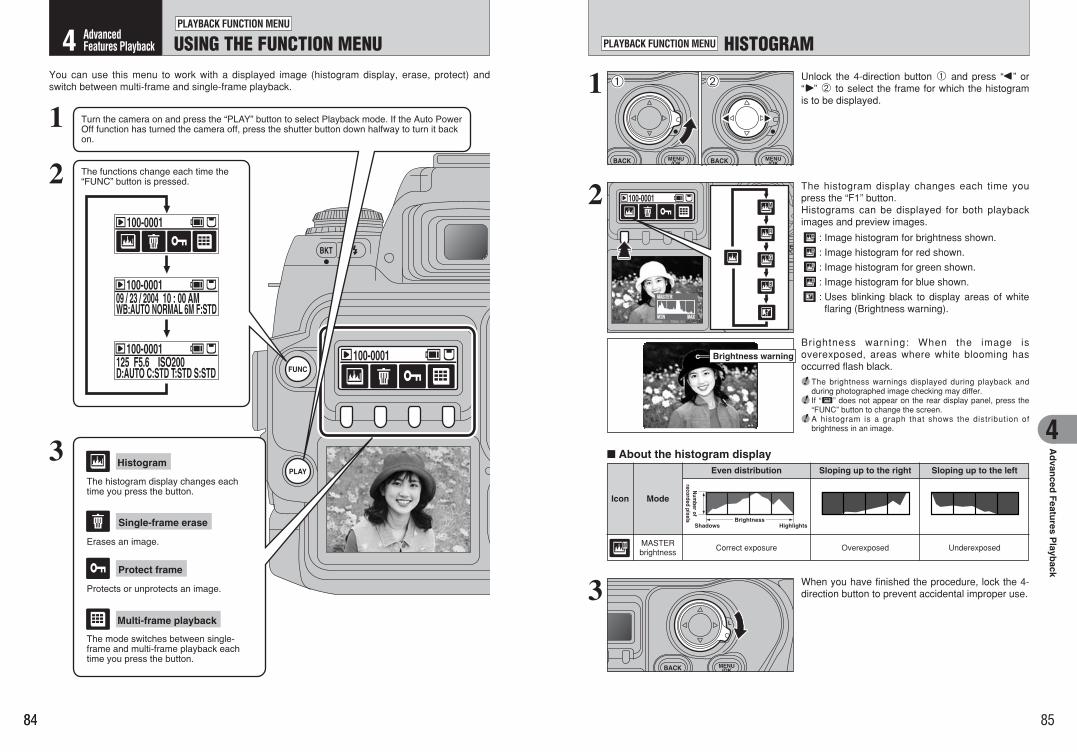
8484 85
Ad
vanced
Featu
resP
layback
4
Shadows HighlightsBrightness
Num
ber ofrecorded pixels
HISTOGRAMPLAYBACK FUNCTION MENU
Icon Mode
Even distribution Sloping up to the right Sloping up to the left
MASTERbrightness
Correct exposure Overexposed Underexposed
100-0001
100-0001
100-000109 / 23 / 2004 10 : 00 AMWB:AUTO NORMAL 6M F:STD
100-0001125 F5.6 ISO200D:AUTO C:STD T:STD S:STD
Histogram
Protect frame
Multi-frame playback
Single-frame erase
Turn the camera on and press the “PLAY” button to select Playback mode. If the Auto Power Off function has turned the camera off, press the shutter button down halfway to turn it back on.
The functions change each time the “FUNC” button is pressed.
The histogram display changes each time you press the button.
The mode switches between single-frame and multi-frame playback each time you press the button.
Erases an image.
Protects or unprotects an image.
You can use this menu to work with a displayed image (histogram display, erase, protect) andswitch between multi-frame and single-frame playback.
1
2
3
100-0001
01 021 Unlock the 4-direction button 1 and press “d” or“c” 2 to select the frame for which the histogramis to be displayed.
2 The histogram display changes each time youpress the “F1” button.Histograms can be displayed for both playbackimages and preview images.
: Image histogram for brightness shown.
: Image histogram for red shown.
: Image histogram for green shown.
: Image histogram for blue shown.
: Uses blinking black to display areas of whiteflaring (Brightness warning).
Brightness warning: When the image isoverexposed, areas where white blooming hasoccurred flash black.
●! The brightness warnings displayed during playback andduring photographed image checking may differ.
●! If “G” does not appear on the rear display panel, press the“FUNC” button to change the screen.
●! A histogram is a graph that shows the distribution ofbrightness in an image.
3 When you have finished the procedure, lock the 4-direction button to prevent accidental improper use.
■ About the histogram display
USING THE FUNCTION MENUPLAYBACK FUNCTION MENU
4 AdvancedFeatures Playback
Brightness warning

8686 87
Ad
vanced
Featu
resP
layback
4
ERASING SINGLE-FRAMEPLAYBACK FUNCTION MENU
Unlock the 4-direction button.1
100-0001Press the “F2” button to display the eraseconfirmation screen.2
100-0001
back delete
last frame
next frameThe following operations can be used in the eraseconfirmation screen:To select the frame: “d” or “c”To erase the displayed frame: “H” (“F4” button)To return to the previous frame:
“J” (“F1” button) or “BACK” button
3
When you have finished the procedure, lock the 4-direction button to prevent accidental improper use.4
●! If “F” does not appear on the rear display panel, press the“FUNC” button to change the screen.
●! If the currently displayed frame is protected, “'” appearsinstead of “F” and the “S” icon is displayed in the top-rightcorner of the LCD monitor.
●! “1” displayed for a frame indicates that theframe is protected. Unprotect the frame before erasing it.
SINGLE-FRAME PROTECTPLAYBACK FUNCTION MENU
Unlock the 4-direction button.1
100-0001Press the “F3” button to display the protectionscreen.
The following operations can be used in theprotection screen:To select the frame: “d” or “c”To protect the frame: “L” (“F1” button)To unprotect the frame: “:” (“F4” button)To return to the previous frame: “BACK” button
2
100-0001
Protect
last frame
back
next frame
unprotect
3
When you have finished the procedure, lock the 4-direction button to prevent accidental improper use.4
●! If “S” does not appear on the rear display panel, press the“FUNC” button to change the screen.
●! If the currently displayed frame is protected, “D” is displayedinstead of “S”.
LCD monitor Rear display panel (protection screen)
Rear display panel (during single-frame playback)
100-0001
100-0001 100-0001
Protected
No iconNot protected
■ To check protected frames
If “4” appears, press the“H” (“F4” button) to erase the frames (files).
100-0001
Protection is a setting that prevents frames (files)from being accidentally erased. However, the“FORMAT” function erases all the frames (files),including protected frames (files) (➡P.106).
Erased frames (files) cannot be recovered. Back upimportant frames (files) onto your computer oranother media.

ERASEERASE
ALL FRAMESALL FRAMESBACKBACK
ERASEERASE
ALL FRAMESALL FRAMESBACKBACK
8888 89
Ad
vanced
Featu
resP
layback
4
1 01 02 1Press the “PLAY” button to select Playbackmode.
2Unlock the 4-direction button.
1Press the “MENU/OK” button to display themenu screen.
2Press “d” or “c” to select “o” ERASE.
1Press “a” or “b” to select “ALL FRAMES”.2Press the “MENU/OK” button.
2 0201
Returns to playback without erasing any frames(files).
Erases all unprotected frames (files).Back up important frames (files) onto your computeror another media.
\ BACK
ALL FRAMES
02013
MULTI-FRAME PLAYBACKPLAYBACK FUNCTION MENU
Unlock the 4-direction button.1
100-0001
Multi-frame playback
Single-frame playback
Press the “F4” button.2
Press “d”, “c”, “a” or “b” to move the cursor (theorange frame) and select a frame. Press “a” or “b”several times to move to the next or previous page.
3
100-0001You can view the selected image enlarged bypressing the “F4” button again.4
When you have finished the procedure, lock the 4-direction button to prevent accidental improper use.5
●! If “A” does not appear on the rear display panel, press the“FUNC” button to change the screen.
o ERASING ALL FRAMESPLAYBACK MENU
Continued
Erased frames (files) cannot be recovered. Back upimportant frames (files) onto your computer oranother media.

9090 91
Ad
vanced
Featu
resP
layback
4
Pressing the “MENU/OK” button erases all theframes (files).
ALL FRAMES
●! Protected frames (files) cannot be erased. Unprotect theframes (files) before erasing them (➡P.87).
ALL FRAMESALL FRAMES
ERASE ALL OK?ERASE ALL OK?
IT MAY TAKE A WHILEIT MAY TAKE A WHILE
YESYESCANCELCANCEL
If “4 ” or“5” appears, press the“MENU/OK” button again to erase the frames (files).
◆ To stop the procedure midway ◆Press the “BACK” button to cancel erasing of all theframes (files). Some unprotected frames (files) will beleft unerased.
●! Even if you stop the procedure immediately, some frames(files) will be erased.
ALL FRAMESALL FRAMESALL FRAMES
CANCELCANCEL
When you have finished the procedure, lock the 4-direction button to prevent accidental improper use.4
1 01 02 1Press the “PLAY” button to select Playbackmode.
2Unlock the 4-direction button.
SET ALLSET ALL
PROTECTPROTECT
RESET ALLRESET ALL
2 1Press the “MENU/OK” button to display themenu on the screen.
2Press “d” or “c” to select “i” PROTECT.
3 1Press “a” or “b” to select “SET ALL” or “RESETALL”.
2Press “MENU/OK” button to confirm yourselection.
RESET ALLRemoves the protection from all the frames (files).
SET ALLProtects all the frames (files).
01 02
SET ALLSET ALL
PROTECTPROTECT
RESET ALLRESET ALL
01 02
Protection is a setting that prevents frames (files)from being accidentally erased. However, the“FORMAT” function erases all the frames (files),including protected frames (files) (➡P.106).
o ERASING ALL FRAMESPLAYBACK MENU i PROTECTING IMAGES: SET ALL / RESET ALLPLAYBACK MENU
Continued

9292 93
Ad
vanced
Featu
resP
layback
4
Press the “MENU/OK” button to protect all theframes (files).
SET ALLSET ALLSET ALL
SET ALL OK?SET ALL OK?
IT MAY TAKE A WHILEIT MAY TAKE A WHILE
YESYESCANCELCANCEL
Press the “MENU/OK” button to unprotect all theframes (files).
RESET ALLRESET ALLRESET ALL
RESET ALL OK?RESET ALL OK?
IT MAY TAKE A WHILEIT MAY TAKE A WHILE
YESYESCANCELCANCEL
◆ To stop the procedure midway ◆If the images are very large, protecting orunprotecting all the frames (files) may take sometime.If you want to take a picture during the procedure,press the “BACK” button. To then return to protectingor unprotecting all the frames (files), start theprocedure on P.91 from step 1.
SET ALLSET ALL
CANCELCANCEL
When you have finished the procedure, lock the 4-direction button to prevent accidental improper use.4
i PROTECTING IMAGES: SET ALL / RESET ALLPLAYBACK MENU u HOW TO SPECIFY PRINT OPTIONS (DPOF)PLAYBACK MENU
DPOF stands for Digital Print Order Format and refers to a format that is used forrecording printing specifications for images shot using a digital camera on media such asan xD-Picture Card and CF/Microdrive. The recorded specifications include informationon which frames are to be printed.
This section gives a detailed description of how to order your prints with the FinePix S3Pro.
✽ Note that some printers do not support date and time imprinting or specification of thenumber of prints.
✽ Note that the warnings shown below may be displayed while you are specifying theprints.
45 (➡P.86, 90)
When erasing the image, the DPOF setting for that image is deleted at the same time.
6 (➡P.94)
When inserting a media that contains images specified for printing on by anothercamera, those print specifications are all reset and replaced by the new printspecifications.
u (➡P.134)
Up to 999 images can be specified on the same media.
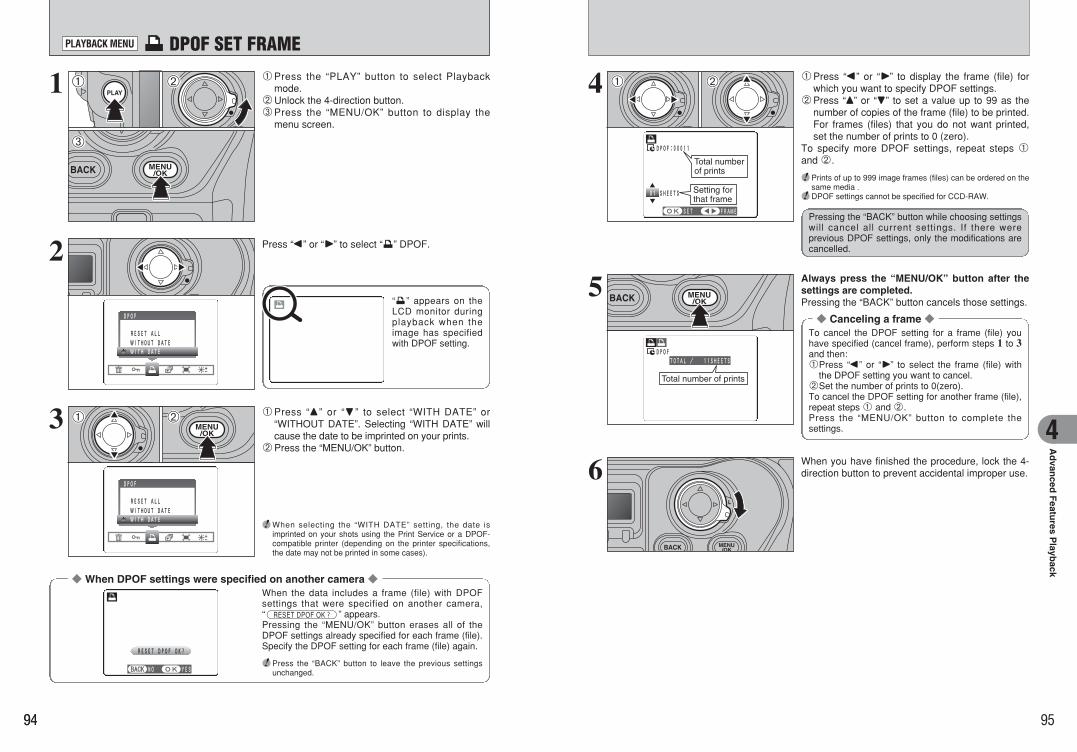
9494 95
Ad
vanced
Featu
resP
layback
4
1Press the “PLAY” button to select Playbackmode.
2Unlock the 4-direction button.3Press the “MENU/OK” button to display the
menu screen.
2 Press “d” or “c” to select “u” DPOF.
WITH DATEWITH DATE
DPOFDPOF
RESET ALLRESET ALLWITHOUT DATEWITHOUT DATE
1
“u” appears on theLCD monitor duringplayback when theimage has specifiedwith DPOF setting.
3 1Press “a ” or “b ” to select “WITH DATE” or“WITHOUT DATE”. Selecting “WITH DATE” willcause the date to be imprinted on your prints.
2Press the “MENU/OK” button.
WITH DATEWITH DATE
DPOFDPOF
RESET ALLRESET ALLWITHOUT DATEWITHOUT DATE
◆ When DPOF settings were specified on another camera ◆When the data includes a frame (file) with DPOFsettings that were specified on another camera,“6” appears.Pressing the “MENU/OK” button erases all of theDPOF settings already specified for each frame (file).Specify the DPOF setting for each frame (file) again.
●! Press the “BACK” button to leave the previous settingsunchanged.
01 02
RESET DPOF OK?RESET DPOF OK?
YESYESNONO
●! When selecting the “WITH DATE” setting, the date isimprinted on your shots using the Print Service or a DPOF-compatible printer (depending on the printer specifications,the date may not be printed in some cases).
5 Always press the “MENU/OK” button after thesettings are completed.Pressing the “BACK” button cancels those settings.
Total number of prints
TOTAL / 11SHEETSTOTAL / 11SHEETSDPOFDPOF
4 1Press “d” or “c” to display the frame (file) forwhich you want to specify DPOF settings.
2Press “a” or “b” to set a value up to 99 as thenumber of copies of the frame (file) to be printed.For frames (files) that you do not want printed,set the number of prints to 0 (zero).
To specify more DPOF settings, repeat steps 1and 2.
●! Prints of up to 999 image frames (files) can be ordered on thesame media .
●! DPOF settings cannot be specified for CCD-RAW.Setting for that frame
Total number of prints
FRAMEFRAMESETSET
DPOF:00011DPOF:00011
01 01 SHEETSSHEETS
Pressing the “BACK” button while choosing settingswill cancel all current settings. If there wereprevious DPOF settings, only the modifications arecancelled.
01 02
◆ Canceling a frame ◆To cancel the DPOF setting for a frame (file) youhave specified (cancel frame), perform steps 1 to 3and then: 1Press “d” or “c” to select the frame (file) with
the DPOF setting you want to cancel.2Set the number of prints to 0(zero).To cancel the DPOF setting for another frame (file),repeat steps 1 and 2.Press the “MENU/OK” button to complete thesettings.
01 02
03
When you have finished the procedure, lock the 4-direction button to prevent accidental improper use.6
u DPOF SET FRAMEPLAYBACK MENU
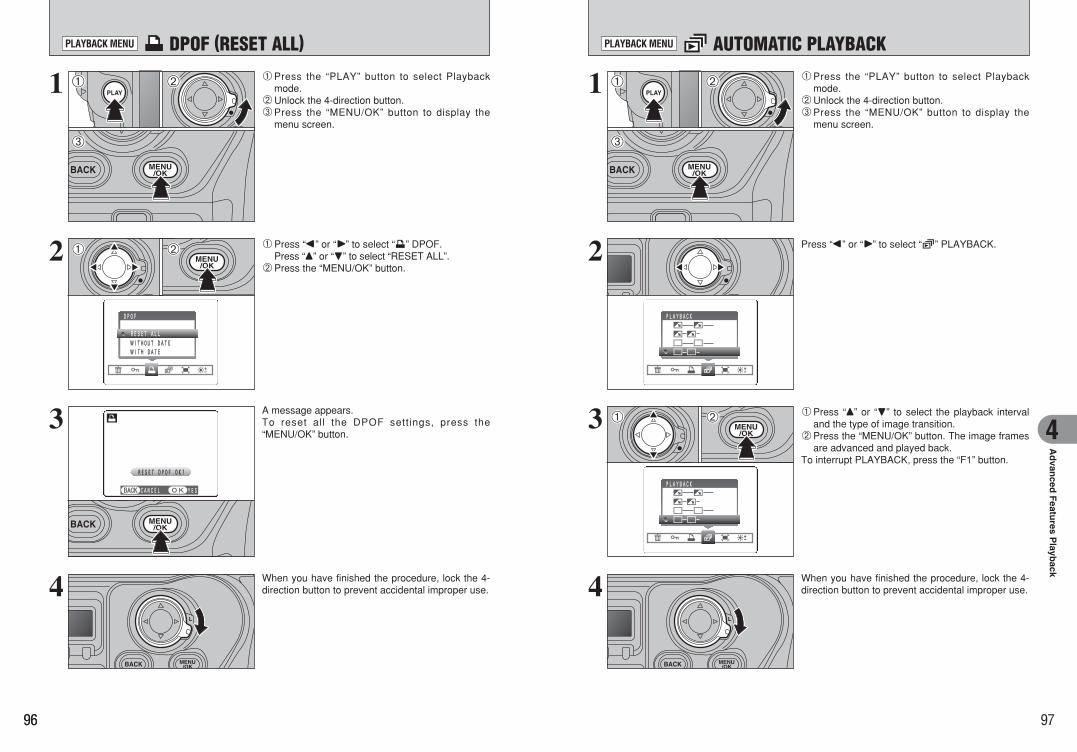
9696 97
Ad
vanced
Featu
resP
layback
4
2 1Press “d” or “c” to select “u” DPOF.Press “a” or “b” to select “RESET ALL”.
2Press the “MENU/OK” button.
3 A message appears.To reset all the DPOF settings, press the“MENU/OK” button.
WITH DATEWITH DATE
DPOFDPOF
RESET ALLRESET ALLWITHOUT DATEWITHOUT DATE
01 02
RESET DPOF OK?RESET DPOF OK?
YESYESCANCELCANCEL
1Press the “PLAY” button to select Playbackmode.
2Unlock the 4-direction button.3Press the “MENU/OK” button to display the
menu screen.
1 01 02
03
When you have finished the procedure, lock the 4-direction button to prevent accidental improper use.4 When you have finished the procedure, lock the 4-
direction button to prevent accidental improper use.4
1Press the “PLAY” button to select Playbackmode.
2Unlock the 4-direction button.3Press the “MENU/OK” button to display the
menu screen.
1 01 02
03
Press “d” or “c” to select “[” PLAYBACK.
1Press “a” or “b” to select the playback intervaland the type of image transition.
2Press the “MENU/OK” button. The image framesare advanced and played back.
To interrupt PLAYBACK, press the “F1” button.
2
3
PLAYBACKPLAYBACK
PLAYBACKPLAYBACK
01 02
u DPOF (RESET ALL)PLAYBACK MENU [ AUTOMATIC PLAYBACKPLAYBACK MENU

9898 99
Ad
vanced
Featu
resP
layback
4
] TRIMMINGPLAYBACK MENU
2 1Press “d” or “c” to select “]” TRIMMING.2Press the “MENU/OK” button.
3 1Press “a” to zoom in. Press “b” to zoom out ona still image. A zoom bar appears on the LCDmonitor.
2Press the “PLAY” button to move to another partof the image.
●! Press the “BACK” button to return to single-frame playback.
●! Press the “PLAY” button to return to zooming.
01 02
4 1Press “a”, “b”, “d” or “c” to display anotherarea. The current displayed image appears onthe navigation screen.
2Press the “MENU/OK” button to save the image.
SETSET
TRIMMINGTRIMMING
PANNINGPANNINGSETSETCANCELCANCEL
Zoom bar
ZOOMZOOMSETSETCANCELCANCEL
Saved image size varies depending on the zoomscale. Up to 1M can be saved.
01 02
01 02
1Press the “PLAY” button to select Playbackmode.
2Unlock the 4-direction button.3Press the “MENU/OK” button to display the
menu screen.
1 01 02
03
5 Check the saved image size and press the“MENU/OK” button. The trimmed image is addedas a separate file in the final frame.
6M
3M
■ Image SizesPrinting at up to 10R (25.4 × 30.5 cm/10 × 12 in.) /A4 size
Printing at up to 6R (15.2 × 20.3 cm/6 × 8 in.) / A5size
1M Printing at up to 3R (8.9 × 12.7 cm/3.5 × 5 in.) size
REC OK?REC OK?1M
RECRECCANCELCANCEL
When you have finished the procedure, lock the 4-direction button to prevent accidental improper use.6
Navigation screen

101
Settin
gs
5
SET-UPSET-UP
21 3 4 5
CUSTOM WB :SETCUSTOM WB :SETCOLOR SPACES :sRGBCOLOR SPACES :sRGBD-RANGE :WIDED-RANGE :WIDE
IMAGE DISP. :OFFIMAGE DISP. :OFF
SETSETCANCELCANCEL
++-
SETSETCANCELCANCEL
SETSET
MONITOR BRIGHTNESSMONITOR BRIGHTNESS
100100
= LCD BRIGHTNESSPLAYBACK MENU
1 01 02 1Press the “PLAY” button to select Playbackmode.
2Unlock the 4-direction button.
2 1Press the “MENU/OK” button to display themenu screen.
2Press “d ” or “c ” to select “=” MONITORBRIGHTNESS.
0201
3 1Pressing the “MENU/OK” button displays themonitor brightness setting screen.
2Press “d ” or “c ” to adjust the monitorbrightness.
3Always press the “MENU/OK” button after thesettings are completed.
◆ Brightness adjustment checking bar ◆You can specify whether or not the brightness adjustment checking bar is displayed in the brightnesssetting screen.
100-0009
0201
When you have finished using the menu, lock the4-direction button to prevent accidental use.
When you have finished using the menu, lock the4-direction button to prevent accidental use.
USING THE SET-UP SCREEN
Press “d” or “c” to move to options 1 to 5.
After you have changed the settings, press the“MENU/OK” button to confirm the changes.
1Press “a” or “b” to select a menu option.2Press “d” or “c” to change the setting. Press “c ” for “CUSTOM WB”, “FORMAT”,“DATE/TIME”, “DISCHARGE”, “RESET” or “LIVEIMAGE”.
3
4
SET-UPSET-UP
2 31 4 5
MEDIA :MEDIA :AUTO ROTATE :OAUTO ROTATE :ON
TEST-SHOOTING(NO CARD) ONTEST-SHOOTING(NO CARD) ONFORMAT :OKFORMAT :OK
SETSETCANCELCANCEL
01 02
2
MEDIA :MEDIA :AUTO ROTATE :OAUTO ROTATE :ON
SET-UPSET-UP
TEST-SHOOTING(NO CARD):ONTEST-SHOOTING(NO CARD):ONFORMAT :OKFORMAT :OK
21 3 4 5
SETSETCANCELCANCEL
1 0201 1Turn the camera on and select Photographymode.
2Press the “MENU/OK” button to display the SET-UP screen.
●! Always turn the camera off when replacing the batteries.Pulling out the battery holder or disconnecting the AC poweradapter while the camera is still turned on may return thecamera settings to the factory default values.
+-
SETSETCANCELCANCEL
SET-UP5 Settings
03

3
4
5
114
117
USB MODE !~@/$ !~@
!~@: DSC (Mass storage device) modeThis mode provides a simple way to read images from an amedia and store images onto a media.The USB interface connection can be used for high-speedfile transfer.
$: PictBridgeIf a printer that supports PictBridge is available, images canbe printed by connecting the camera directly to thePictBridge-compatible printer without using a computer.
114
114
1394 MODE !~@/q1394@ !~@
!~@: DSC (Mass storage device) modeThis mode provides a simple way to read images from an amedia and store images onto a media.The IEEE 1394 interface connection can be used for high-speed file transfer.
q1394@: 1394 ShootingAllows you to control the camera and take pictures from aPC. Also allows the photographed images to beautomatically saved on the PC.
% BEEP LOW/HIGH/OFF LOWSets the volume of the tone emitted when the cameracontrols are used.
—
FRAME NO. CONT./RENEW CONT.Specif ies whether frame numbers are assignedconsecutively from previous numbers or begin again.
106
DATE/TIME SET — Corrects the date or time. 27
28ENGLISH Specifies the language used for LCD monitor display.
—VIDEO SYSTEM NTSC/PAL — Specifies whether video output is set to NTSC or PAL.
107DISCHARGE OK — Discharges Ni-MH batteries.
108LIVE IMAGE ON — Displays the live image on the LCD monitor.
—RESET OK —
Resets all the camera settings (other than the CUSTOMWB, FORMAT, DATE/TIME, LANG. and VIDEO SYSTEM,LIVE IMAGE) to the factory default values set at shipment.A confirmation message appears when you press “c”. Toreset the camera settings, press the “MENU/OK” buttonagain.
102 103
Settin
gs
5
SET-UP
IMAGE DISPLAYThis setting allows you to specify whether the resulting image is displayed after you take a shot.
OFF: The photographed image is automatically recorded without being displayed.ON: The photographed image is displayed for about 2 seconds and is then automatically
recorded.PREVIEW: The photographed image is displayed and then automatically recorded.
Pressing the “F2” button (Erase) while the image is displayed deletes the recordedimage. Pressing “F1” (End checking), “MENU/OK”, “BACK” or the shutter buttonclears the display ready for the next shot.
Procedure when “PREVIEW” is set
End checking
Erase Histograms
Standard chart
Preview zoomUnlock the 4-direction button and press “a” or “b”to zoom in or out.To view another part of the image, press the“PLAY” button and then press “a”, “b”, “d” or “c”to move around. To return to zoom mode, press the“PLAY” button again.
HistogramPressing this button displays the histogram.The display changes in a cycle from MASTER ➡ R➡ G ➡ B each time the button is pressed.
●! See P.85 for more information on histograms.
PANNINGPANNING
MIN
MASTER
MAX
Histogram
Brightness warning and standard chartThe display switches between the brightnesswarning indicator and the standard chart each timeyou press the button.Use these features to check the brightness andcolor tones in the image.
■ SET-UP menu options
1
2
Settings Display Factory default Explanation page
IMAGE DISP. OFF/ON/PREVIEW OFFSpecifies whether the preview images (the photographedimage) is displayed after taking a picture.
103
CUSTOM WB SET —Use this setting to specify an the correct white balancesetting for a light source.
104
COLORSPACES
sRGB/AdobeRGB sRGB Sets the color space to sRGB or Adobe RGB (1998). 105
D-RANGE WIDE/STANDARD WIDESpecifies whether the standard dynamic range (100%) or anextended dynamic range (400%) is used.
105
AUTOROTATE
ON/OFF ONSpecifies whether the camera automatically detects shotstaken in the vertical position.
106
TEST-SHOOTING(NO CARD)
ON/OFF ONSelect “ON” in this setting to release the shutter even whenno media is loaded in the camera. Note that no image isrecorded (unless a media is loaded).
—
FORMAT OK — Erases all files. 106
—MEDIA ! (xD-Picture Card)~ (CF/Microdrive) !
Sets the media to be used when an xD-Picture Card andCF/Microdrive are loaded in the camera.
Gray scale
Color bar
Brightness warning
✽ How to display the SET-UP menu (➡P.101)

104 105
Settin
gs
5
SET-UP
SETTING THE CUSTOM WB
COLOR SPACES
Use this function to set the correct white balance for a light source. You can also use thisfunction to achieve a desired special effect.Press the “F1” (custom WB 1) button or the “F4” (custom WB 2) button to select the customwhite balance you want to set.
1
2
WBCUS.2
Custom WB 1 Custom WB 2
Turn the focus mode selector switch to “M” (Manualfocus) and set the focus manually.
3
4
Set the exposure mode to “P”, “S” or “A”.
●! The camera’s auto focus function may be unable to focus ona subject such as a white sheet of paper, which will preventthe shutter from operating.
●! While a custom white balance can also be measured in “M”mode, the image may be extremely overexposed orunderexposed so that the optimum measurement is nottaken.
Hold up a page of white paper or a similar objectunder the target light source so that the paperfills the viewfinder screen. Then press the shutterbutton to set the custom white balance.
hRange of custom WB settingsColor temperatures from approx. 2800 K to9500 K
5 If the exposure is measured correctly,“7” appears on the LCD monitor.Press the “MENU/OK” button to confirm the setting.
Selects the color space used when pictures aretaken. For normal photography, select sRGB.Adobe RGB (1998) is best for images to be usedfor commercial printing.
WIDE: Allows photography using a wide dynamicrange that takes advantage of the particularcharacteristics of the Super CCD SR II. Thecontinuous shooting speed and interval areslower than for standard mode (roughlydouble), so the number of continuous shotsavailable roughly half.
STANDARD: The dynamic range is 100%, as onthe previous digital camera (FinePixS2 Pro), but the continuous shootingspeed and the number of continuousshots available are increased foreasier shooting.
●! After taking the picture, check the color tones (white balance)in the image.i Select “PREVIEW” as the photographed image display
option (➡P.103) in the SET-UP screen.i Press the “PLAY” button (➡P.43).When you have finished setting the white balance, select thefocus mode you want to use.
■ When the exposure is not measured correctlyRemedy
The subject is too bright. Use a negative (–) exposure compensation value and set thewhite balance again.
The subject is too dark. Use a positive (+) exposure compensation value and set the whitebalance again.
Because the exposure is outside the range of valid custom white balance settings, themaximum (or minimum) value has been set.h Available custom WB settings: Color temperatures of approx. 2800 K to 9500 K
COMPLETED !COMPLETED !
SETSETCANCELCANCEL
SET-UPSET-UP
21 3 4 5
CUSTOM WB :SETCUSTOM WB :SETCOLOR SPACES sRGBCOLOR SPACES sRGBD-RANGE :WIDED-RANGE :WIDE
IMAGE DISP. :OFFIMAGE DISP. :OFF
SETSETCANCELCANCEL
D-RANGE
SET-UPSET-UP
21 3 4 5
CUSTOM WB :SETCUSTOM WB :SETCOLOR SPACES :sRGBCOLOR SPACES :sRGBD-RANGE WIDED-RANGE WIDE
IMAGE DISP. :OFFIMAGE DISP. :OFF
SETSETCANCELCANCEL
◆ Matching customized white balance using an external flash ◆If you use an external flash with the exposure mode set to “M”, you can make it easier to match thewhite balance to the photography settings (aperture, flash brightness, etc.) by using a commerciallyavailable 18% grey standard chart instead of white paper.
✽ How to display the SET-UP menu (➡P.101)

106 107
Settin
gs
5
SET-UP
FORMATFORMAT
CANCELCANCELOKOK
FORMAT OK?FORMAT OK?ERASE ALL DATAERASE ALL DATA
SETSET
FORMAT
DISCHARGING RECHARGEABLE BATTERIESInitialize (format) the media for use with thecamera.Because initializing the media erases all the frames(files), including protected frames (files). Back upimportant frames (files) onto your computer oranother media.1Press “d” or “c” to select “OK”.2Pressing the “MENU/OK” button erases all the
frames (files) and initializes the media.
●! Always check the media to be formatted on the screen beforeproceeding.h Formatted media8: xD-Picture Cards9: CF/Microdrives
●! If “i”, “0”, “-” or“=” appears, see P.134 for informationbefore formatting the media.
01 02
Specifies whether frame numbers are assignedconsecutively from previous numbers or beginagain.CONT. : Pictures are stored beginning from the
highest file number stored on the lastmedia used.
RENEW: Pictures are stored on each mediabeginning with a file number “0001”.
Setting this function to “CONT.” makes fi lemanagement easier as it ensures that file namesare not duplicated when images are downloaded toa PC.
●! When the camera settings are “RESET”, the frame numbersetting (“CONT.” or “RENEW”) is changed to “CONT.” andthe frame number itself does not return to “0001”.
●! When the media already contains image files with filenumbers higher than the highest file number on the lastmedia, images are stored beginning from the highest filenumber on the current media.
Check the file number by viewing the image. Thelast 4 digits of the 7-digit number are the filenumbers, while the first 3 digits show the directorynumber.
●! When changing the media, always turn the camera off beforeopening the slot cover. Opening the slot cover without turningthe camera off may cause the frame number memory to notfunction.
●! File number runs from 0001 to 9999. Once 9999 is exceeded,the directory number changes from 100 to 101. Themaximum number is 999–9999.
●! The displayed frame number may differ for imagesphotographed on other cameras.
●! When “q” appears, see P.134.
FRAME NO.
AA
BB
CONT. RENEW
Formatted media used for both A and B.
100-0009
Frame number
Directory number
File number
The “Discharging rechargeable batteries” function can only be used with Ni-MHbatteries.Use the “Discharging rechargeable batteries” function in the following situations:i When the batteries only last for a short time after being charged normallyi When the batteries have not been used for a long periodi When you purchase new Ni-MH batteriesDo not use the “Discharging rechargeable batteries” function while using the AC power adapter. Inthese situations, the Ni-MH batteries will not be discharged due to the external power supply.
1 1Press “d” or “c” to move to option 4 and thenpress “a” or “b” to select “DISCHARGE”.
2Press “c”.
SET-UPSET-UP
21 3 54
言語言語/LANG. :ENGLISH/LANG. :ENGLISHVIDEO SYSTEM :NTSCVIDEO SYSTEM :NTSCDISCHARGE DISCHARGE OKOK
FRAME NO. :CONT.FRAME NO. :CONT.
SETSETCANCELCANCEL
01 02
Detects whether the camera is used horizontally orvertically so that images are automatically rotatedwhen opened in the optional dedicated software,Hyper-Utility Software HS-V2 Ver. 3.0.
●! The camera may record the horizontal/vertical positioninformation incorrectly during panning or when pictures aretaken facing upwards or downwards. In such situations,select “OFF”.
●! Rotated display does not apply to playback images.
AUTO ROTATE
SET-UPSET-UP
2 31 4 5
MEDIA :MEDIA :AUTO ROTATE OAUTO ROTATE ON
TEST-SHOOTING(NO CARD):ONTEST-SHOOTING(NO CARD):ONFORMAT :OKFORMAT :OK
SETSETCANCELCANCEL
✽ How to display the SET-UP menu (➡P.101)
2
DISCHARGE OK?DISCHARGE OK?IT MAY TAKE A WHILEIT MAY TAKE A WHILE
FOR DISCHARGINGFOR DISCHARGING
DISCHARGEDISCHARGE
CANCELCANCELOKOK
SETSET
1Press “d” or “c” to select “OK”.2Press the “MENU/OK” button.The screen changes and discharging begins.When the battery level indicator blinks red anddischarging ends, the camera turns off.
01 02
●! To cancel discharging, press the “BACK” button.
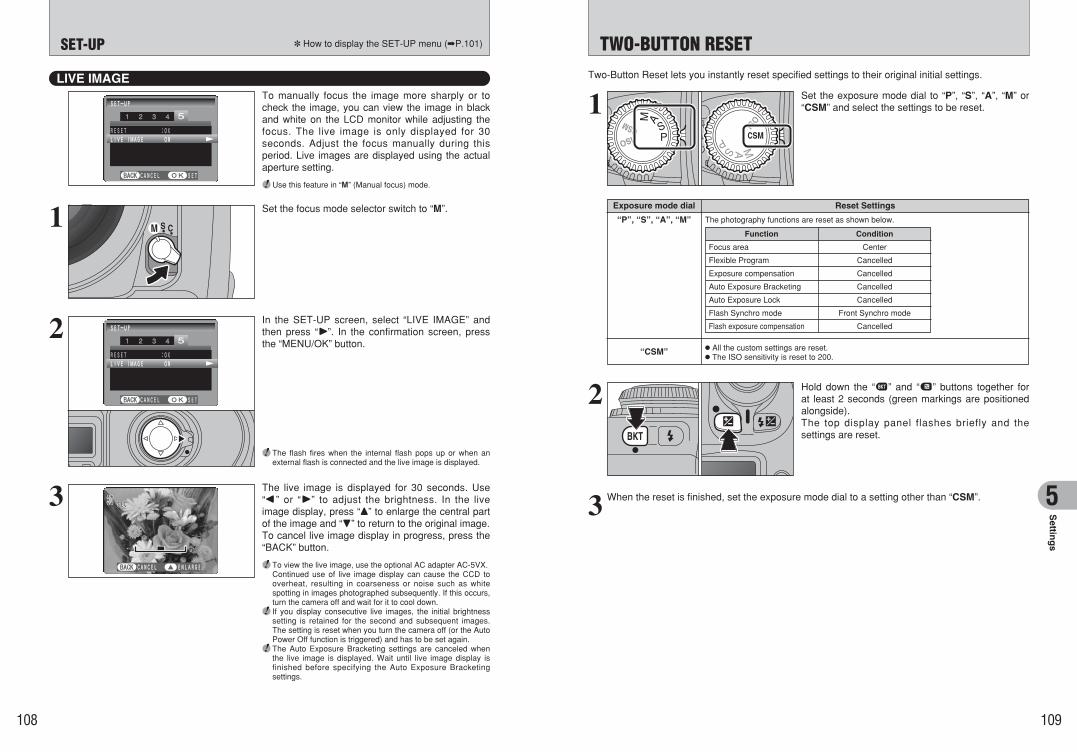
108 109
Settin
gs
5
TWO-BUTTON RESETTwo-Button Reset lets you instantly reset specified settings to their original initial settings.
1 Set the exposure mode dial to “P”, “S”, “A”, “M” or“CSM” and select the settings to be reset.
2 Hold down the “c” and “b” buttons together forat least 2 seconds (green markings are positionedalongside).The top display panel flashes briefly and thesettings are reset.
Exposure mode dial Reset Settings
“P”, “S”, “A”, “M” The photography functions are reset as shown below.
“CSM” h All the custom settings are reset.h The ISO sensitivity is reset to 200.
3 When the reset is finished, set the exposure mode dial to a setting other than “CSM”.
SET-UP
LIVE IMAGE
Function Condition
Focus area Center
Flexible Program Cancelled
Exposure compensation Cancelled
Auto Exposure Lock Cancelled
Auto Exposure Bracketing Cancelled
Flash Synchro mode Front Synchro mode
Flash exposure compensation Cancelled
SET-UPSET-UP
LIVE IMAGE ONLIVE IMAGE ONRESET :ORESET :OK
21 3 54
SETSETCANCELCANCEL
SECSECSEC
CANCELCANCEL ENLARGEENLARGE
3 The live image is displayed for 30 seconds. Use“d” or “c” to adjust the brightness. In the liveimage display, press “a” to enlarge the central partof the image and “b” to return to the original image.To cancel live image display in progress, press the“BACK” button.
●! To view the live image, use the optional AC adapter AC-5VX.Continued use of live image display can cause the CCD tooverheat, resulting in coarseness or noise such as whitespotting in images photographed subsequently. If this occurs,turn the camera off and wait for it to cool down.
●! If you display consecutive live images, the initial brightnesssetting is retained for the second and subsequent images.The setting is reset when you turn the camera off (or the AutoPower Off function is triggered) and has to be set again.
●! The Auto Exposure Bracketing settings are canceled whenthe live image is displayed. Wait until live image display isfinished before specifying the Auto Exposure Bracketingsettings.
1 Set the focus mode selector switch to “M”.
To manually focus the image more sharply or tocheck the image, you can view the image in blackand white on the LCD monitor while adjusting thefocus. The live image is only displayed for 30seconds. Adjust the focus manually during thisperiod. Live images are displayed using the actualaperture setting.
●! Use this feature in “M” (Manual focus) mode.
●! The flash fires when the internal flash pops up or when anexternal flash is connected and the live image is displayed.
2 In the SET-UP screen, select “LIVE IMAGE” andthen press “c”. In the confirmation screen, pressthe “MENU/OK” button.
SET-UPSET-UP
LIVE IMAGE ONLIVE IMAGE ONRESET :ORESET :OK
21 3 54
SETSETCANCELCANCEL
✽ How to display the SET-UP menu (➡P.101)

110 111
Settin
gs
5
001
CUSTOM SETTINGCUSTOM SETTING 1 BRACKETING ORDER 1 BRACKETING ORDER
METERED VALUE→UNDER→OVERMETERED VALUE→UNDER→OVERUNDER→METERED VALUE→OVERUNDER→METERED VALUE→OVER
MAINMAIN MENUMENU SETTINGSETTINGSUBSUB
CUSTOM SETTING (CSM)
The custom settings allow to modify camera functions such as how information is displayed in theviewfinder and which functions are assigned to which buttons.
Cancelling custom settings
1 Set the Exposure mode dial to “CSM”.
2 1Turn the Main-command dial to select an option.2Turn the Sub-command dial to change the
setting.3 “E” appears on the top display panel.
3 When you have finished the settings, set the exposure mode dial to a setting other than “CSM”.
●! The custom settings are retained when the camera is turned off.
1Set the Exposure mode dial to “CSM”.2Hold down the “c” and “b” buttons together
for at least 2 seconds (green markings arepositioned alongside).
The top display panel flashes briefly and thesettings are reset.
h All the custom settings are reset to their defaultvalues.h The ISO sensitivity is reset to 200.
0201
03
02
01
02
■ Custom settings listSettingNo. Display Details
0: METERED VALUE➡ UNDER ➡ OVER(default)
1: UNDER ➡METERED VALUE➡ OVER
BRACKETING ORDER 1
2
3
4
5
6
7
8
9
10
Allows you to change the compensation sequencewhen auto exposure bracketing is used.
0: OFF (default)1: ON
ON-DEMAND GRIDLINES DISPLAY
If you display the On-Demand Grid Lines, you can usethe intersections of the horizontal and vertical lines toposition your main subject in the shot or align one of thehorizontal lines with the horizon. This allows you tocompose the desired shot while monitoring the subject'ssize and the balance.
0: AUTO (default)1: OFF2: ON
ILLUMINATION FORFOCUS AREA
Specifies the illumination used for the focus area in theviewfinder.
0: NORMAL (default)1: ENABLES
ROTATION
FOCUS AREASELECTION
Selecting cyclic focus area selection allows you toselect the opposite focus area without changing whichpart of the 4-direction button you have to press.
0: DISABLED (default)1: ACTIVATED
AE-LOCK Set this parameter to “1” to apply the AE lock when theshutter button is pressed half way.
0: DISABLED (default)1: ACTIVATED
LONG EXP. (BULB) ATMANUAL MODE
Select “1” to take bulb shots in the “M” exposure mode.
0: ENABLED (default)1: DISABLED
CLOSEST-SUBJECT-PRIORITY DYNAMIC AFAT AF-S MODE
If you select “1”, Closest-subject Priority Dynamic AF isnot used in AF-S mode.
0: DISABLED (default)1: ENABLED
CLOSEST-SUBJECT-PRIORITY DYNAMIC AFAT AF-C MODE
If you select “1”, Closest-subject Priority Dynamic AF isused in AF-C mode.
0: AE/AF LOCK(default)
1: AE LOCK ONLY2: AF LOCK ONLY3: AE REMAINS
LOCKED4: AF OPERATION
AE/AF LOCK BUTTON Normally, AE lock (exposure recording) and AF lock(focus lock) are both applied concurrently when youpress the “AE-L/AF-L” button. However, this can bechanged so that only AE lock or only AF lock is applied,or so that that the AE lock status is maintained. If theAE/AF lock is used with the “Maintain AE lock” setting,pressing the “AE-L/AF-L” button again or releasing theshutter cancels the lock.In addition, though the auto focus (AF) normallyoperates when the shutter button is pressed downhalfway, you can change this so that AF operates whenthe “AE-L/AF-L” button is pressed. (In this case, AFdoes not operate when the shutter button is presseddown halfway.)
0: DISABLED (default)1: ENABLED
COMMAND DIALFUNCTIONS
Use this setting to change the Main-command dial andSub-command dial operation during photography.0: Main: Changes the shutter speed.
Sub: Changes the aperture.1: Main: Changes the aperture.
Sub: Changes the shutter speed.
11 0: SINGLE SHUTTERRELEASE (default)
1: CONTINUOUSSHUTTERRELEASE
MULTIPLE EXPOSURE Changing this setting allows you to use continuousshooting for multiple exposure shots.

113
Co
nn
ection
6
112
SettingNo. Display Details
DC IN 5V socket
CUSTOM SETTING (CSM)
Using the AC Power adapter (sold separately)
Connecting to a TV
The AC Power Adapter is useful since it allows you to take pictures, play back images (connectedto a TV, etc.) and connect to a computer without worrying about using up the battery charge.
h Compatible AC power adapterModel: AC-5VX
01 02Check that the camera is turned off. Open theterminal cover and plug the AC power adapterconnector into the “DC IN 5V” socket. Then plugthe AC power adapter into a power outlet.
●! Use only the FUJIFILM products listed above.●! See P.130 for notes on using the AC power adapter.●! The socket-outlet shall be installed near the equipment and
shall be easily accessible.●! The shape of the plug and socket-outlet depends on the
country of use.
Turn off the camera and TV. Open the terminalcover and plug the bundled video cable into thecamera’s “VIDEO OUT” (video output) socket.
1VIDEO OUT socket
●! If there is a power outlet available, connect the AC PowerAdapter AC-5VX.
Plug the other end of the cable into the video inputsocket on the TV. Then turn the camera and TV onand take pictures or play back images as youwould normally.
2To videoinput socket
●! Refer to the instructions provided with your TV for moreinformation on video input for your TV.
13 2: 2 SEC.5: 5 SEC.
10: 10 SEC. (default)20: 20 SEC.
SELF-TIMERDURATION
Sets the running time for the self-timer.
14 0: OFF (default)5: 5 SEC.
15: 15 SEC.
LCD ILLUMINATION Allows you to change the settings so that the LCDillumination lights when buttons are used.
15 0: ON (default)1: OFF
AF-ASSISTILLUMINATOR
Allows you to prevent the built-in AF-assist illuminatorfrom operating. Note that this may prevent the autofocus from successfully setting the focus in some cases.
CONNECTING TO A TV /USING THE AC POWER ADAPTER6 Connection
12 0: OFF15: 15 SEC. (default)2: 2 MIN.5: 5 MIN.
AUTO POWER OFF Sets the delay time until the Auto Power Off functionoperates.

114 115
Co
nn
ection
6DSC
USO EN EL MODO DSC
CONNECTING TO A COMPUTERThe “Connecting to a computer” section explains how to connect the camera to your computerusing the USB cable (IEEE 1394 cable) and describes the functions you can use once the cameraand computer are connected.
If the power cuts out during data transmission, the data will not be transmitted correctly. Always use theAC power adapter when connecting the camera to a computer.
Refer to Software Quick Start Guide the first time you connect thecamera to your computer.Install the software first. Do not connect the camera withthe computer before installing all the software.
CD-ROM(Software for FinePix)
h If your PC supports USB 2.0 (High-speed USB), data can be transferred faster than with previousUSB versions.
●! This camera does not support IEEE 1394b (FireWire 800). Use IEEE 1394 (FireWire 400).
This mode provides a simple way to read images from a media and store images onto a media. TheUSB or IEEE 1394 (FireWire) interface connection can be used for high-speed file transfer (➡P.115).To connect via an IEEE 1394 port, check that the interface is OHCI compliant and then refer to thetable below to check whether it is supported by your operating system.
!~@ DSC (Mass storage device) mode
For information on taking pictures using IEEE 1394, refer to the Hyper Utility Software HS-V2Ver.3.0 (or later) Quick Start Guide.
IEEE 1394 photography function
SET-UPSET-UP
21 3 4 5
DATE/TIME :SETDATE/TIME :SETUSB MODE USB MODE 1394 MODE :1394 MODE :
BEEP :LOWBEEP :LOW
SETSETCANCELCANCEL
1 Insert a media with images into the camera.2Turn the camera on and press the “MENU/OK”
button.3Select “!~@ ” in “USB MODE” or “1394
MODE” in the SET-UP menu (➡P.101) and thenturn the camera off.
●! Use the AC Power Adapter AC-5VX (sold separately) for theconnection (➡P.113). If shutting off power supply duringcommunication, the files on the media may be damaged.
●! If inserting an xD-Picture Card and a CF/Microdrive into thecamera at the same time, images will be recorded onto themedia selected as the “MEDIA” (➡P.102).
1Turn your PC on.2Connect the camera to the PC using the USB
cable (mini-B) or IEEE 1394 cable.3Turn the camera on.
●! Always use the cable provided with your camera. If you useother cable, your camera may not work correctly.
●! Make sure that the USB cable (mini-B) or IEEE 1394 cable isconnected correctly and is pushed in.
●! Do not connect the USB cable (mini-B) and the IEEE 1394cable at the same time.
h The access lamp blinks when the camera andcomputer are exchanging data.h “w ” is displayed on rear display
panel.h Power save and Auto power off are disabled
during DSC connection.
●! Before replacing the media, always disconnect the camerafrom the PC using the procedure on P.116.
●! Do not disconnect the USB cable (mini-B) or IEEE 1394cable while communication is in progress. If shutting offpower supply during communication, the files on the mediamay be damaged.
01
03
02
USE AT DSC MODE
1 Set a camera
2 Connect a camera to a computer
DC IN 5V socket
USB socket (mini-B)
Camera
USB socket PC
IEEE1394 socket
DC IN 5V socket
CameraIEEE1394 socket
PC
■ Operating system compatibility chart (Windows) ✓: Can be connected —: Cannot be connected
OS
Connection typeWindows 98
—
Windows 98 SE(Second Edition)
✓✽2
Windows Me(Millennium Edition)
✓
Windows 2000(Professional)
✓
Windows XP
✓IEEE 1394
✓✽1 ✓ ✓ ✓ ✓USB
✽1 Can be used by installing the driver from the bundled CD-ROM.✽2 Select Windows Update from the Start button menu and update the 1394 device driver (Your system must be
capable of connecting to the Internet).
■ Operating system compatibility chart (Macintosh) ✓: Can be connected
✽1 Contact Apple Computers (http://www.apple.com) for information on software updates.✽2 Versions 10.2.6 to 10.3.5 as at November 2004. Refer to the FUJIFILM website for information on supported
operating systems. http://home.fujifilm.com/products/digital/
OS
Connection typeMac OS 9.2.2✽1
✓
Mac OS X✽2
IEEE 1394
✓
✓
✓USB

Drag the “Removable drive” icon on the desktop to theTrash.
●! When you drag the icon to the Trash, “REMOVE OK” appears onthe camera’s screen.
DC IN 5V socket
USB socket (mini-B)
116 117
Co
nn
ection
6
CONNECTING THE CAMERA DIRECTLY TO THE PRINTER —PictBridge FUNCTION
When a printer that supports PictBridge is available, images can be printed by connecting thecamera directly to the PictBridge-compatible printer without using a PC.
●! In PictBridge function, images photographed on other than a camera may not be printed.●! Always turn the camera off when disconnecting or connecting the USB cable. Connecting the camera to the printer while
the camera is turned on could damage the media.
Specifying images for printing on the camera
SET-UPSET-UP
21 3 4 5
DATE/TIME :SETDATE/TIME :SETUSB MODE USB MODE 1394 MODE :1394 MODE :
BEEP :LOWBEEP :LOW
SETSETCANCELCANCEL
DC IN 5V socket
USB socket (mini-B)
2
1Set the Power switch to “ON”.2Select “$” in “USB MODE” in the “SET-UP”
menu (➡P.101).3Set the Power switch to “OFF” to turn the
camera off.
●! Do not connect to a PC when the USB mode setting is set to“$”. See P.137 if you connect to a PC by mistake.
1
1Connect the camera to the printer using the USBcable (mini-B).
2Turn the printer on.
4 “$ CHECKING USB” appears on the reardisplay panel for a few moments and then themenu screen appears on the LCD monitor.
●! If the menu does not appear, check whether the USB modesetting is “$”.
●! Depending on the printer, some functions are disabled.
●! The camera cannot be used to specify printer settings suchas the paper size and print quality.
●! Please connect the AC Power Adapter AC-5VX (soldseparately) to your camera.
●! Use a media that was formatted on the camera.
Set the Power switch to “ON”.3
01 033
02
CONNECTING TO A COMPUTER
1
OFF
Quit all applications (FinePixViewer etc.) that are using the camera.
Check that the access lamp is off (no data is beingexchanged with the computer).
2 Perform the steps shown below before you turn the camera off. This procedure differsdepending on the operating system software (or PC) you are using.
●! In some cases, the camera and computer may still becommunicating even after the “Copying” message disappearsfrom the computer screen. Always check that the accesslamp is off.
Disconnecting the camera
2Left-click the Eject icon in the taskbar and select “USB Disk”.
3The menu option shown below appears. Click on this option.
4The “Safe To Remove Hardware” message box appears. Click the [OK] button or the closebutton.
✽ Screen for Windows XP
✽ Screen for Windows XP
Macintosh
3 1Turn the camera off.2Unplug the USB cable (mini-B) or IEEE 1394
cable from the camera.
01 02
Windows 98/98 SE (USB)No PC operation is needed.
Windows 98 SE (IEEE 1394) /Me/2000 Professional/XP1Right-click the removable disk icon in the “My Computer”
window and select Eject. This step is only required inWindows Me.
Continued
CHECKING USBCHECKING USB

118 119
Co
nn
ection
6
CONNECTING THE CAMERA DIRECTLY TO THE PRINTER — PictBridge FUNCTION
Specifying images for printing without using DPOF (single-frame printing)
5 1Press “a” or “b” to select “u PRINT DPOF”.2Press the “MENU/OK” button.
●! When “t” appears, the DPOF settings are notspecified.
●! To use DPOF printing, the DPOF settings must be specifiedon FinePix S3 Pro beforehand (➡P.94).
●! Even when “WITH DATE” is specified in the DPOF settings,the date is not inserted on printers that do not support dateprinting.
01 02
6 Press the “MENU/OK” button to download the datato the printer and print the frames specified in theDPOF settings.Press the “BACK” button to return to step 5.
●! Press the “BACK” button to cancel the printing. Depending onthe printer, the printing may not be canceled immediately orprinting may stop midway through. When printing stopsmidway, briefly turn the camera off and then on again.
PRINTPRINT DPOFDPOF
PICTBRIDGEPICTBRIDGE
PRINTPRINT WITHOUTWITHOUT DATEDATEPRINTPRINT WITHWITH DATEDATE
SETSET
PRINT DPOFPRINT DPOF
CANCELCANCEL
1/ 19SHEETS 1/ 19SHEETS
PRINTINGPRINTING
PRINT DPOF OK?PRINT DPOF OK?
PRINT DPOFPRINT DPOFTOTAL/ 19SHEETSTOTAL/ 19SHEETS
YESYESCANCEL CANCEL
SET-UPSET-UP
21 3 4 5
DATE/TIME :SETDATE/TIME :SETUSB MODE USB MODE 1394 MODE :1394 MODE :
BEEP :LOWBEEP :LOW
SETSETCANCELCANCEL
1Set the Power switch to “ON”.2Select “$” in “USB MODE” in the “SET-UP”
menu (➡P.101).3Set the Power switch to “OFF” to turn the
camera off.
●! Do not connect to a PC when the USB mode setting is set to“$”. See P.137 if you connect to PC by mistake.
1 01 033
02●! “PRINT WITH DATE” is not available when the camera is
connected to a printer that does not support date printing.
5 1Press “a” or “b” to select “PRINT WITH DATE”or “PRINT WITHOUT DATE”. If “PRINT WITHDATE” is selected, the date is imprinted on yourprints.
2Press the “MENU/OK” button.
01 02
Set the Power switch to “ON”.3
4 “$ CHECKING USB” appears on the reardisplay panel for a few moments and then themenu screen appears on the LCD monitor.
●! If the menu does not appear, check whether the USB modesetting is “$”.
●! Depending on the printer, some functions are disabled.
DC IN 5V socket
USB socket (mini-B)
2 1Connect the camera to the printer using the USBcable (mini-B).
2Turn the printer on.
●! The camera cannot be used to specify printer settings suchas the paper size and print quality.
●! Please connect the AC Power Adapter AC-5VX (soldseparately) to your camera.
●! Use a media that was formatted on the camera.
PRINT DPOFPRINT DPOFPRINT WITHOUT DATEPRINT WITHOUT DATEPRINT WITH DATEPRINT WITH DATE
SETSET
PICTBRIDGEPICTBRIDGE
Continued
CHECKING USBCHECKING USB

121120
●! Press the “BACK” button to cancel the printing. Depending onthe printer, the printing may not be canceled immediately orprinting may stop midway through. When printing stopsmidway, briefly turn the camera off and then on again.
8 Press the “MENU/OK” button to download the datato the printer and start printing the specifiednumber of prints.
6 1Press “d” or “c” to display the frame (file) forwhich you want to specify PRINT settings.
2Press “a” or “b” to set a value up to 99 as thenumber of copies of the frame (file) to be printed.For frames (files) that you do not want printed,set the number of prints to 0 (zero).
To specify more PRINT settings, repeat steps 1and 2.3Press the “MENU/OK” button.
01 03302
CONNECTING THE CAMERA DIRECTLY TO THE PRINTER — PictBridge FUNCTION
7 Always press the “MENU/OK” button after thesettings are completed.
●! Press the “BACK” button to return to step 5.
Disconnecting the printer1Check that “y” is not displayed on the
camera’s screen.2Turn the camera off. Unplug the USB cable
(mini-B).
DC IN 5V socket
USB socket (mini-B)
CANCELCANCEL
100-0001100-0001
YESYESFRAMEFRAME
TOTAL:00001TOTAL:00001
SHEETSSHEETS0101
CANCELCANCEL
PRINTINGPRINTING
1/ 1 1/ 19SHEETSSHEETS
CANCELCANCEL YESYES
TOTAL/ 19SHEETSTOTAL/ 19SHEETS
PRINT OK?PRINT OK?
System Expansion Options
eBy using the FinePix S3 Pro together with other optional FUJIFILM products, your system can beexpanded to fill a wide range of uses.
COMPACTFLASH
DPC-CF
TM
for
xD-Picture Card
CARD ADAPTER
FinePix S3 ProDigital Camera
FinePix S3 ProDigital Camera
FinePix S3 ProDigital Camera
■ Image input/output to the PC
■ Print creation
■ Visual output
Printer(commercially available)
xD-Picture Card
xD-Picture Card
Digital PhotoPrinter CX-550
TV monitor (commercially available)
Visual output
(PC card slot)
(CF card slot)
Personal Computer (commercially available)
Personal Computer (commercially available)
Image Memory Card ReaderDPC-R1
PC Card Adapter DPC-AD
xD-Picture Card™ USB DriveDPC-UD1
CompactFlash™ Card AdapterDPC-CF
USB / IEEE 1394
USB
(USB)
(USB)
PictBridge
CF / Microdrive(commercially available)
(PC card slot)
PC Card Adapter
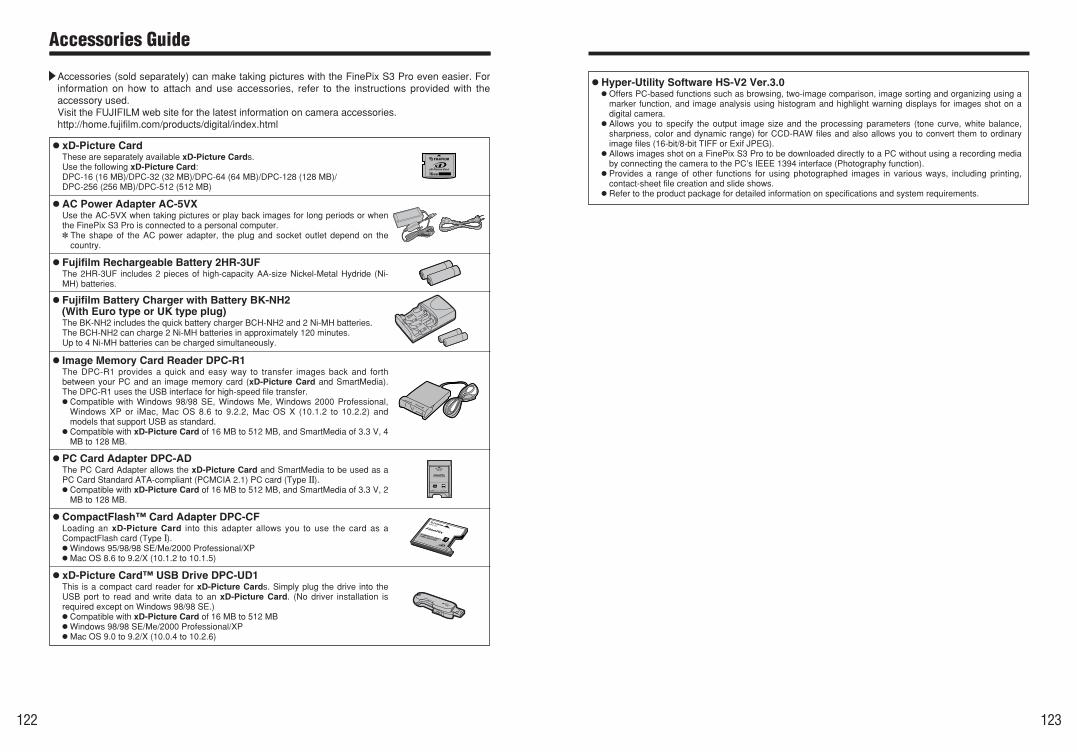
h Image Memory Card Reader DPC-R1The DPC-R1 provides a quick and easy way to transfer images back and forthbetween your PC and an image memory card (xD-Picture Card and SmartMedia).The DPC-R1 uses the USB interface for high-speed file transfer.h Compatible with Windows 98/98 SE, Windows Me, Windows 2000 Professional,
Windows XP or iMac, Mac OS 8.6 to 9.2.2, Mac OS X (10.1.2 to 10.2.2) andmodels that support USB as standard.h Compatible with xD-Picture Card of 16 MB to 512 MB, and SmartMedia of 3.3 V, 4
MB to 128 MB.
h PC Card Adapter DPC-ADThe PC Card Adapter allows the xD-Picture Card and SmartMedia to be used as aPC Card Standard ATA-compliant (PCMCIA 2.1) PC card (Type II).h Compatible with xD-Picture Card of 16 MB to 512 MB, and SmartMedia of 3.3 V, 2
MB to 128 MB.
h CompactFlash™ Card Adapter DPC-CFLoading an xD-Picture Card into this adapter allows you to use the card as aCompactFlash card (Type I).hWindows 95/98/98 SE/Me/2000 Professional/XPh Mac OS 8.6 to 9.2/X (10.1.2 to 10.1.5)
COMPACTFLASH
DPC-CF
TM
for
xD-Picture Card
CARD ADAPTER
h xD-Picture Card™ USB Drive DPC-UD1This is a compact card reader for xD-Picture Cards. Simply plug the drive into theUSB port to read and write data to an xD-Picture Card. (No driver installation isrequired except on Windows 98/98 SE.)h Compatible with xD-Picture Card of 16 MB to 512 MBhWindows 98/98 SE/Me/2000 Professional/XPh Mac OS 9.0 to 9.2/X (10.0.4 to 10.2.6)
122 123
Accessories Guide
h Hyper-Utility Software HS-V2 Ver.3.0h Offers PC-based functions such as browsing, two-image comparison, image sorting and organizing using a
marker function, and image analysis using histogram and highlight warning displays for images shot on adigital camera.h Allows you to specify the output image size and the processing parameters (tone curve, white balance,
sharpness, color and dynamic range) for CCD-RAW files and also allows you to convert them to ordinaryimage files (16-bit/8-bit TIFF or Exif JPEG).h Allows images shot on a FinePix S3 Pro to be downloaded directly to a PC without using a recording media
by connecting the camera to the PC’s IEEE 1394 interface (Photography function).h Provides a range of other functions for using photographed images in various ways, including printing,
contact-sheet file creation and slide shows.h Refer to the product package for detailed information on specifications and system requirements.
eAccessories (sold separately) can make taking pictures with the FinePix S3 Pro even easier. Forinformation on how to attach and use accessories, refer to the instructions provided with theaccessory used.Visit the FUJIFILM web site for the latest information on camera accessories.http://home.fujifilm.com/products/digital/index.html
h xD-Picture CardThese are separately available xD-Picture Cards. Use the following xD-Picture Card:DPC-16 (16 MB)/DPC-32 (32 MB)/DPC-64 (64 MB)/DPC-128 (128 MB)/DPC-256 (256 MB)/DPC-512 (512 MB)
h AC Power Adapter AC-5VXUse the AC-5VX when taking pictures or play back images for long periods or whenthe FinePix S3 Pro is connected to a personal computer.✽ The shape of the AC power adapter, the plug and socket outlet depend on the
country.
h Fujifilm Rechargeable Battery 2HR-3UFThe 2HR-3UF includes 2 pieces of high-capacity AA-size Nickel-Metal Hydride (Ni-MH) batteries.
h Fujifilm Battery Charger with Battery BK-NH2(With Euro type or UK type plug)The BK-NH2 includes the quick battery charger BCH-NH2 and 2 Ni-MH batteries.The BCH-NH2 can charge 2 Ni-MH batteries in approximately 120 minutes.Up to 4 Ni-MH batteries can be charged simultaneously.

124 125
Notes on Using Your Camera Correctly
eBe sure to read this information in conjunction with “Safety Notes” (➡P.141), to ensure that youuse your camera correctly.
■ Places to AvoidDo not store or use the camera in the following types of locations:h In the rain or in very humid, dirty or dusty places.h In direct sunlight or in places subject to extreme temperature rises, such as in a closed car in summer.h Extremely cold places.h Places subject to strong vibration.h Places affected by smoke or steam.h Places subject to strong magnetic fields (such as near motors, transformers or magnets).h In contact with chemicals such as pesticides or next to rubber or vinyl products for long periods of time.
■ Notes on Immersion in Water or SandThe FinePix S3 Pro is particularly adversely affected by water and sand. When you are at the beach or close towater, ensure that the camera is not exposed to water or sand. Take care also not to place the camera on awet surface. Water or sand inside the camera can cause faults that may be irreparable.
■ Notes on CondensationIf the camera is carried suddenly from a cold location into a warm place, water droplets (condensation) mayform on the inside of the camera or on the lens. When this occurs, switch the camera off and wait an hourbefore using the camera. Condensation may also form on the media. In this event, remove the media andwait a short time before using it again.
■ When the Camera is Unused for Long PeriodsIf you do not intend to use the camera for a long period of time, remove the battery and the media cardbefore storing the camera.
■ Cleaning Your Camerah Use a blower brush to brush away any dust on the lens, LCD monitor surface, viewfinder or external AF
sensor and then gently wipe the camera with a soft, dry cloth. If any soiling remains, apply a smallamount of lens cleaning liquid to a piece of FUJIFILM lens cleaning paper and wipe gently.h Do not scratch hard objects against the lens, LCD monitor screen or viewfinder as these surfaces are
easily damaged.h Clean the body of the camera with a soft, dry cloth. Do not use volatile substances such as thinners,
benzine or insecticide, as these may react with camera body and cause deformation or remove thecoating.h This camera is equipped with a CCD photosensitive element. This CCD is located behind the shutter
screen. If dust or other soiling attaches to the surface of the CCD and pictures are then taken, this soilingmay appear as spots in the image, depending on the camera settings and the type of subject. If thisoccurs, the CCD must be cleaned. Because the surface of the CCD is extremely fragile, whereverpossible the camera should be returned to an authorized FUJIFILM dealer for cleaning (for a charge).Any repairs carried out by an authorized FUJIFILM service facility to CCDs that were scratched ordamaged during cleaning by the customer will be charged to the customer. Note that such repairs willprobably involve replacing the CCD and will be expensive.
Take the following precautions to ensure that no dirt or dust gets onto the CCD:i Before a FUJIFILM digital camera is shipped from the factory, it is carefully checked for dust inside
the camera and on the surface of the CCD to ensure that it conforms to FUJIFILM standards.i Bear in mind also that some types of soiling on the CCD surface cannot be removed even by an
authorized FUJIFILM dealer.Should this occur, you can use features such as the despeckling function provided in the imageprocessing software to remedy the problem.
■ Using the Camera OverseasWhen traveling overseas, do not place your camera in the check-in baggage. Baggage handling at airportsmay subject baggage to violent shocks, and the camera may be damaged internally even when no externaldamage is visible.
Cleaning the CCD
This camera is equipped with a CCD photosensitive element. This CCD is located behind theshutter screen.If dust or other soiling attaches to the surface of the CCD and pictures are then taken, this soilingmay appear as spots in the image, depending on the camera settings and the type of subject. If thisoccurs, the CCD must be cleaned. Because the surface of the CCD is extremely fragile, whereverpossible the camera should be returned to an authorized FUJIFILM dealer for cleaning (for acharge).Any repairs carried out by an authorized FUJIFILM dealer to CCDs that were scratched or damagedduring cleaning by the customer will be charged to the customer. Note that such repairs willprobably involve replacing the CCD and will be expensive.
1 Check that the camera is turned off.Open the terminal cover and fully insert theconnector plug from the AC power adapter AC-5VX(sold separately) into the “DC IN 5V” socket. Thenplug the AC power adapter into the power outlet.
●! When cleaning the camera, always use the AC poweradapter AC-5VX (sold separately) to prevent camera damagedue the mirror dropping down or the shutter closing.
●! See P.130 for more information on using the AC poweradapter.
3 Hold down the Lens release button and turn thelens in the direction of the arrow.
◆ Dust inside the camera and on the surface of the CCD ◆h Before a FUJIFILM digital camera is shipped from the factory, it is carefully checked for dust inside
the camera and on the surface of the CCD to ensure that it conforms to FUJIFILM standards.h Bear in mind also that some types of soiling on the CCD surface cannot be removed even by an
authorized FUJIFILM dealer.Should this occur, you can use features such as the despeckling function provided in the imageprocessing software to remedy the problem.
2 Press the built-in flash down to stow it away.
Checking the condition of the CCD surface
DC IN 5V socket
Continued
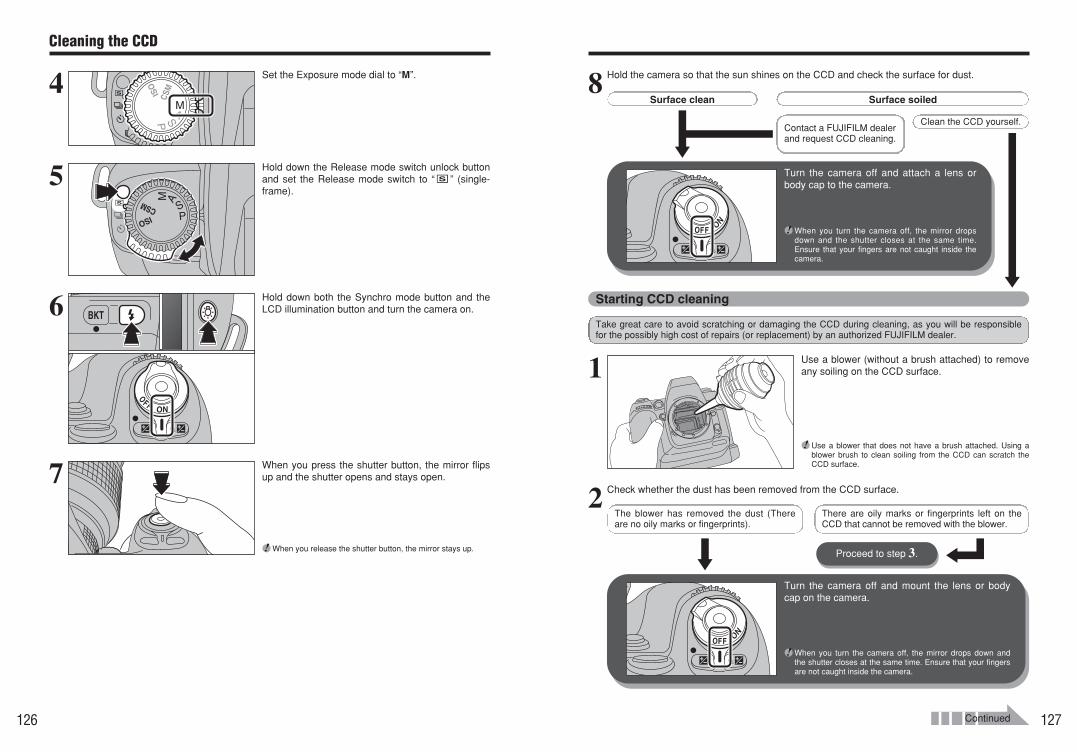
126 127
5 Hold down the Release mode switch unlock buttonand set the Release mode switch to “,” (single-frame).
6 Hold down both the Synchro mode button and theLCD illumination button and turn the camera on.
7 When you press the shutter button, the mirror flipsup and the shutter opens and stays open.
●! When you release the shutter button, the mirror stays up.
1 Use a blower (without a brush attached) to removeany soiling on the CCD surface.
8 Hold the camera so that the sun shines on the CCD and check the surface for dust.
Surface clean Surface soiled
Contact a FUJIFILM dealerand request CCD cleaning.
Clean the CCD yourself.
Turn the camera off and attach a lens orbody cap to the camera.
●! When you turn the camera off, the mirror dropsdown and the shutter closes at the same time.Ensure that your fingers are not caught inside thecamera.
Starting CCD cleaning
Take great care to avoid scratching or damaging the CCD during cleaning, as you will be responsiblefor the possibly high cost of repairs (or replacement) by an authorized FUJIFILM dealer.
●! Use a blower that does not have a brush attached. Using ablower brush to clean soiling from the CCD can scratch theCCD surface.
2 Check whether the dust has been removed from the CCD surface.
The blower has removed the dust (Thereare no oily marks or fingerprints).
There are oily marks or fingerprints left on theCCD that cannot be removed with the blower.
Turn the camera off and mount the lens or bodycap on the camera.
●! When you turn the camera off, the mirror drops down andthe shutter closes at the same time. Ensure that your fingersare not caught inside the camera.
Proceed to step 3.
Cleaning the CCD
4 Set the Exposure mode dial to “M”.
Continued

129
Notes on the Power Supply
h Use only nickel-metal hydride (Ni-MH) batteries withthis camera. AA size alkaline, AA-size manganese orlithium batteries cannot be used.
Incorrect use of the batteries could cause them to leak,become hot, ignite or burst. Always observe theprecautions given below.h Do not heat the batteries or throw them into a fire.h Do not carry or store the batteries with metal objects
such as necklaces or hairpins that could come intocontact with the metal positive ≠ and negative – polesof the battery.h Do not expose the batteries to fresh or sea water, and
take particular care to keep the terminals dry.h Do not attempt to deform, disassemble or modify the
batteries.h Do not attempt to peel off or cut the battery casing.h Do not drop, strike or otherwise subject the batteries to
strong impacts.h Do not use the batteries that are leaking, deformed,
discolored or exhibit any other obvious abnormality.h Do not store the batteries in very warm or moist
locations.h Keep the batteries out of reach of infant and young
children.hWhen loading the batteries into the camera, ensure that
the battery polarity (≠ and –) is as indicated on thecamera.h Do not use new batteries together with used batteries.
In the case of rechargeable batteries, do not usecharged and discharged batteries together. Do not usebatteries of different types or brands together.h If you do not intend to use the camera for a long
period of time, remove the batteries from the camera(Note that if the camera is left with the batteriesremoved, the time and date settings are cleared).h The batteries may feel warm immediately after being
used. Before removing the batteries, switch thecamera off and wait until the batteries cool down.hWhen replacing the batteries, always fit 4 new
batteries.Here, ‘new batteries’ refers to Ni-MH (nickel metalhydride) batteries that have recently been fullyrecharged together.h In cold locations (at temperatures of +10°C/+50°F or
below), battery performance deteriorates and the timefor which they can be used shortens markedly. In coldconditions, put the batteries in your pocket or a similarplace to warm them before loading them into thecamera. If you use a body warmer to warm thebatteries, ensure that they are not in direct contactwith the warmer.h Soil (such as fingerprints) on the battery terminals can
markedly reduce the number of available shots.Carefully wipe the battery terminals clean with a softdry cloth before loading the batteries.
If any liquid at all leaks from the batteries, wipe thebattery compartment thoroughly and then load newbatteries.If any battery fluid comes into contact with yourhands or clothing, flush the area thoroughly withwater. Note that battery fluid can cause loss ofeyesight if it gets into your eyes. If this occurs, donot rub your eyes. Flush the fluid out with cleanwater and contact your physician for treatment.
■ Disposing of BatteriesWhen disposing of batteries, do so in accordance with yourlocal waste disposal regulations.
h As a power source in digital cameras, AA-size Ni-MHbatteries are superior to alkaline batteries in severalways, such as allowing more shots to be taken withthe camera. However, care must be taken with theway Ni-MH batteries are used if their originalperformance is to be maintained.h Ni-MH batteries left unused in storage for long periods
can become “deactivated”. Also, repeatedly chargingNi-MH batteries that are only partially discharged cancause them to suffer from the “memory effect”.Ni-MH batteries that are “deactivated” or affected by“memory” suffer from the problem of only providingpower for a short time after being charged. To preventthis problem, discharge and recharge them severaltimes using the camera’s “Discharging rechargeablebatteries” function. By repeating this cycle severaltimes, the temporary reduction in performance causedby “memory” or “deactivation” can be remedied andthe batteries can be restored to their originalperformance levels.Deactivation and memory are specific to Ni-MHbatteries and are not in fact battery faults. See P.107for the procedure for “Discharging rechargeablebatteries”.h To charge Ni-MH batteries, use the battery charger
(included). Refer to P.21 to make sure that the chargeris used correctly.h Do not use the battery charger to charge other
batteries.h Note that the batteries feel warm after being charged.h Due to the way the camera is constructed, a small
amount of current is used even when the camera isturned off. Note in particular that leaving AA-size Ni-MH batteries in the camera for a long period willoverdischarge the batteries and may render themunusable even after recharging.h Ni-MH batteries will self-discharge even when not
used, and the time for which they can be used may beshortened as a result.h Ni-MH batteries wil l deteriorate rapidly if
overdischarged (e.g. by discharging the batteries in aflashlight). Use the “Discharging rechargeablebatteries” function provided in the camera to dischargethe batteries.h Ni-MH batteries have a limited service life. If a battery
can only be used for a short time even after repeateddischarge-charge cycles, it may have reached the endof its service life.
Notes on the Batteries
128
If this does not remove the soiling, repeat steps 3 to 5 with a new Sensor swab or contact anauthorized FUJIFILM dealer.
Always use this procedure to clean the CCD. Never clean the CCD in bulb photography mode.A current runs through the CCD in bulb photography mode and cleaning could cause damage.
●! Do not use the swab when it is dry or not moistened withcleaning fluid.
●! When you turn the camera off, the mirror drops down and theshutter closes at the same time. Take care to ensure thatyour fingers are not caught inside the camera.
◆ Ensure that you have the cleaning equipment ready ◆hCleaning swabs
Sensor Swab (Photographic Solutions, Inc.)✽ For information on suppliers outside Japan, visit the web site listed below
(http://www.photosol.com/swabproduct.htm).hCleaning fluid
Anhydrous ethanol, EE Cleaner (Olympus)
3 Moisten the bottom 5 mm (0.2 in) of the Sensorswab evenly with cleaning fluid.
4 Slowly and gently wipe one side of the swab justonce across the full width of the CCD from left toright.
5 Then wipe the other side of the Sensor swab across the full width of the CCD from left to rightonce more. Do not reuse Sensor swabs.
6 Turn the camera off and mount the lens or bodycap on the camera.
Cleaning the CCD
Applicable Batteries
Using the AA-size Ni-MH Batteries

131
Notes on the MediaNotes on the Power Supply
■ Image Memory Cardh This Image Memory Card is a new image recording
media (xD-Picture Card) developed for digitalcameras. The Image Memory Card consists of asemiconductor memory (NAND-type flash memory)to record digital image data.The recording process is electrically performed andenables erasure of existing image data as well as re-recording of new image data.hWhen using a new Memory Card, or a Memory Card
that has been formatted by a PC, be sure to formatthe card with your digital camera before using it.
■ MicrodrivesMicrodrives are compact, lightweight hard disk drives thatconform to the CF+ Type II standard. Due to their amplecapacity for large image data files and their low per-megabyte recording cost, Microdrives provide a moreeconomical way to save high-resolution image files.
■ Protecting Your Datah Images and movies may be lost or destroyed in the
following situations. Please note that FUJIFILMassumes no responsibility for data that is lost ordestroyed.1. Removal of the memory card or turning the power off
while the memory card is being accessed (i.e., duringrecord, erase, initialization, and playback operations).
2. Improper handling and use of the memory card bythe user or third party.
h Save your important data to another media (i.e., MOdisk, CD-R, hard disk, etc.).
■ Handling Media (all types)hWhen inserting the media into the camera, hold the
media straight as you push it in.h Never remove the media or turn the camera off
during data recording or erasing (media formatting)as this could be damaged to the media.h Do not bend, drop or otherwise subject the media to
strong force or shocks.h Do not use or store these media in places with
affected by strong static electricity or electrical noise.h Do not use or store media in hot humid places or in
places where they are exposed to corrosivesubstances.
■ Handling xD-Picture CardhWhen storing xD-Picture Cards, make sure that they
are kept out of the reach of children. An xD-PictureCard could be swallowed cause suffocation. If a childswallows an xD-Picture Card, seek medicalattention or call emergency number right away.h Do not expose an xD-Picture Card to shock. Do not
apply pressure, and avoid bending.h Do not use the xD-Picture Card in a hot or humid
place.h Clean the xD-Picture Card with a soft dry piece of
cloth when dirty.hWhen carrying or storing an xD-Picture Card, keep it
in the special protective case.h The xD-Picture Card will work well for long time, but
will sooner or later lose its ability to store and playback images or movies. If this happens replace itwith a new xD-Picture Card.h The use of xD-Picture Cards is recommended with
the FinePix S3 Pro.The recording quality cannot be guaranteed whenxD-Picture Cards other than those manufactured byFUJIFILM are used.
h The xD-Picture Card may feel warm when it isremoved from the camera after taking pictures. Thisis normal.h Do not put labels on the xD-Picture Card. Peeling
labels can cause the camera not to work properly.
■ Using Microdriveh Do not use hard-pointed pens to write on the
Microdrive label.h Do not peel off the Microdrive label.h Do not stick additional labels onto a Microdrive.hWhen carrying or storing a Microdrive, keep it in the
protective case provided.hWhen a Microdrive is used, vibration or impacts
during image data recording may prevent the imagedata from being recorded correctly. Put the cameradown carefully when placing it on a desk or table, etc.h Do not use Microdrive in CF+ Type II slots that do
not have an eject function.h Take care when handling Microdrive that have been
used for long periods as they may become hot.h Do not place Microdrives close to strong magnetic
fields.h Keep Microdrive dry.h Do not apply strong pressure to the Microdrive cover.
■ Using Compact FlashContact the CompactFlash card manufacturer forinformation on the CompactFlash functions, operationdetails and system requirements.Card types approved for use with the FinePix S3 Proare listed on the FUJIFILM website.http://home.fujifilm.com/products/digital/h The CompactFlash card may be hot immediately
after being used in the camera and should behandled with care.h Do not touch the card contact area with your fingers
or metal objects.h Unused CompactFlash cards should be formatted
before being used.
■ Using media with a PChWhen taking pictures using a media that has been
used on a PC, reformat the media using your camerafor best quality.hWhen formatting a media, a directory (folder) is
created. Image data is then recorded in this directory.h Do not change or delete the directory (folder) or file
names on the media because this will make itimpossible to use the media in your camera.h Always use the camera to erase image data on a
media.h To edit image data, copy the image data to the PC
and edit the copy.h Do not copy files other than those that will be used
by the camera.
■ SpecificationsType Image memory card for digital
cameras (xD-Picture Card)Memory type NAND-type flash memoryConditions for use Temperature:
0°C to +40°C(+32°F to +104°F)Humidity: 80% max. (no condensation)
Dimensions 25 mm × 20 mm × 2.2 mm(0.98 in. × 0.79 in. × 0.09 in.) (W × H × D)
130
Always use the AC Power Adapter AC-5VX (soldseparately). The use of an AC Power adapter other thanAC-5VX can cause damage to your digital camera.h Use the AC power adapter for indoor use only.h Plug the connection cord plug securely into the DC
input terminal of the FUJIFILM Digital camera.h Turn off the FUJIFILM Digital camera before
disconnecting the cord from the FUJIFILM Digitalcamera’s DC input terminal. To disconnect, pull outthe plug gently. Do not pull on the cord.h Do not use the AC power adapter with any device
other than your camera.h During use, the AC power adapter will become hot to
the touch. This is normal.h Do not take apart the AC power adapter. Doing so
could be dangerous.h Do not use the AC power adapter in a hot humid
place.h Do not subject the AC power adapter to strong shocks.h The AC power adapter may emit a humming. But this
is normal.h If used near a radio, the AC power adapter may cause
static. If this happens, move the camera away from theradio.
AC Power Adapterh Ni-MH batteries or the battery charger itself will
become warm due to the power stored inside thebatteries. This is normal and does not indicate a fault.Wherever possible, use the battery charger in a well-ventilated location.h There may be vibration noises from inside the battery
charger during use. This is normal and does notindicate a fault. h Do not use the battery charger to charge batteries
other than Ni-MH batteries.h The battery charger could cause interference if placed
close to a radio during charging. In this event, movethe radio and charger further apart.h Do not touch the connections or contact points on
rechargeable batteries with other metal objects as thiscan cause a short circuit.h Do not leave the battery charger in the following types
of locations:i Extremely humidity or high temperatures, such as
close to a heating appliance or in direct sunlighti Places with strong vibrationi In very dusty placesh The battery charger accepts input voltages of 100-240
V AC at 50 or 60 Hz and can be used all over theworld. However, the shape of the plug and socket-outlet depends on the country of use. Consult yourtravel agent for details.
Notes on Using the Battery Charger
■ Battery Charger BCH-NH2 SpecificationsRated input 100-240 V AC, 50/60 HzInput capacity 16-21 VA (U.S.A and Canada)
10 W (other countries)Rated output DC1.2 V 565 mA (× 4)Applicable batteries AA-size Ni-MH Battery × 4Charging time Approx. 255 minutesDimensions 105 mm × 65 mm × 27.5 mm
(4.1 in. × 2.6 in. × 1.1 in.) (L × W × D)
Mass (Weight) Approx. 95 g (3.4 oz.) (excluding batteries)
Operating 0°C to + 40°C temperatures (+ 32°F to + 104°F)

133132
—
Turn the camera off and replace thebatteries. Then turn the camera back onand try again.If this does not resolve the problem, set theExposure mode dial to “M”, set the focusingmode to “M” (Manual focus), press theshutter button and then briefly turn thecamera off.
The batteries are low on charge orthe camera mechanism has stoppeddue to cold and cannot take pictures.
(blinking)
Warning Displayed
Top displaypanel Viewfinder
Explanation Remedy
In certain cases, due to static electricity or poorly loaded batteries, the FinePix S3 Pro microcomputermay turn the camera off, even with fresh, properly installed batteries. For the same reason, theoperation of camera may not advance properly during either “USB mode” or “IEEE 1394 mode”. Ineach of these cases, to resume operation, simply turn the power off, then turn it on again. Or, removeand reinstall the batteries. When this happens, the camera settings may be initialized. Check therequired camera settings before using the camera.
Set the Exposure mode dial to “M” andpress the shutter button again. If thewarning indication remains, or this warningappears frequently, contact you FUJIFILMdealer.
Malfunction detected.
(blinking) (blinking)
(blinking/lit)
(blinking)
Warning Displayed
Top displaypanel Viewfinder
Explanation Remedy
i CPU Nikkor lens other than G-typeis not set to its minimum aperture.i Attached flash is not set at TTL
Auto Flash in “P” mode.
i Set lens to minimum aperture.
i Set the external flash mode to TTL, or setthe camera’s exposure mode to “S”, “A” or“M”.
(blinking) (blinking)
Batteries have no remaining charge. Turn the power off and replace batterieswith new ones.
Attach CPU lens (except IX-Nikkor). With anon-CPU lens, set the exposure mode to“M” and set the aperture with lens’ aperturering.
—
Non-CPU lens is attached or lens isnot attached.
(blinking) (blinking)
Focus manually.Autofocus is not possible.—
(blinking)
i In “P” mode, use ND filter (If the warningindication remains after performing aboveremedies in “S” or “A” mode, use ND filteras well).i In “S” mode, select faster shutter speed.i In “A” mode, select smaller aperture
(larger f-number).
Overexposure warning (subject is toobright).
(lit) (lit)
i In “P” mode, use flash (If the warningindication remains after performing aboveremedies in “S” or “A” mode, use flash aswell).i In “S” mode, select slower shutter speed.i In “A” mode, select larger aperture
(smaller f-number).
Underexposure warning (subject istoo dark.).
(lit) (lit)
When the subject is too bright, use ND filterand when the subject is too dark, use flash.The electronic analog exposure displayremains blinking when the flash is used.
Subject brightness is beyondcamera’s exposure range.
—
Electronicanalog
exposuredisplay
(blinking)
Release the shutter as it is to take a flashpicture (Shutter speed automatically shiftsto 1/180 sec.).
Shutter speed faster than sync speedis selected in “S” or “M” mode.
Shutterspeed
indication(blinking)
(lit)
Cancel the “™” or select “M” mode.Shutter speed is set to “™” in“S” mode.
(blinking)
Shoot again after confirming focus distance,aperture or flash shooting distance range.
Flash has fired at full output andunderexposure may have occurred.—
(blinking)
Warning Displays eThe table below lists the warning messages displayed on thetop display panel or in the viewfinder.
Turn the camera off and replace thebatteries. Then turn the camera back onand try again.
—The batteries are low on charge orflat.
(lit)

RemedyExplanationLCD monitor
Warning Displayed
The camera is not connected to PCor printer.
i Check that the USB cable is connectedcorrectly.i Check that your printer is turned on.
Displayed for PictBridge. This message appears when printing isperformed from a FUJIFILM printer thatsupports PictBridge. Refer to the Owner’sManual for the printer for details.
An attempt was made to use DPOFprinting for a RAW image file.
DPOF printing cannot be used with RAWimage files.
An attempt was made to trim a 1Mimage or an image shot using theRAW setting.
The image cannot be trimmed.
i An attempt was made to trim animage shot using a camera otherthan FinePix S3 Pro.i The image is damaged.
The image cannot be trimmed.
Prints were specified for 1000 ormore frames in the DPOF framesettings.
The maximum number of frames for whichprints can be specified on the same mediais 999.Copy the images for which you want toorder prints onto another media and thenspecify the DPOF settings.
135134
Warning Displays eThe table below lists the warning that are displayed on theLCD monitor.
Warning Displayed
LCD monitorExplanation Remedy
(lit)
The batteries are flat. Replace the batteries.(blinking)
The batteries are low on charge. Have replacement batteries ready.
Warning Displayed
Rear display panelExplanation Remedy
eThe table below lists the warnings that are displayed on the rear display panel.
No media is inserted. Insert a media.
i The media is not formatted.i The media contact area is soiled.
i Camera fault.
i Format the media on the camera.iWipe the contact area on the media with
a soft dry cloth. It may be necessary toformat the media. If the message stillappears, replace the media.i Contact your FUJIFILM dealer.
The media is full. Erase some images or use a media thathas ample free space.
i The played back fi le was notrecorded correctly.i The media contact area is soiled.
i Camera fault.
i Images cannot be played back.
iWipe the contact area on the media witha soft dry cloth. It may be necessary toformat the media. If the message stillappears, replace the media.i Contact your FUJIFILM dealer.
The frame number has reached999–9999.
1 Insert a formatted media into thecamera.
2 Set “RENEW” as the FRAME NO.setting in the “SET-UP” menu.
3 Start taking pictures (The framenumbers start from “100-0001”).
4 Set “CONT.” as the FRAME NO.setting in the “SET-UP” menu.
i The data could not be recorded dueto a media error or a connectionerror between the media andcamera.i The image cannot be recorded as it
is too large to fit in the availablespace on the media.
i Re-insert the media or turn the cameraoff and then on again. If the messagestill appears, contact your FUJIFILMdealer.i Use a new media.
A protected file was encountered. Protected files cannot be erased. Removethe protection.
i The media contact area is soiled.i The media is damaged.i The media format is incorrect.
i Camera fault.
iWipe the contact area on the media witha soft dry cloth. It may be necessary toformat the media. If the message stillappears, replace the media.i Contact your FUJIFILM dealer.
Displayed for PictBridge. i Check that the printer is not out of paperor out of ink.i Turn the printer off briefly and then turn
it back on.i Refer to the user manual supplied with
your printer.
Displayed for PictBridge. Check that the printer is not out of paperor out of ink. Printing automaticallyrestarts when the error is cleared. If themessage still appears after checking,press the “MENU/OK” button to restartprinting.
Displayed for PictBridge. i Refer to the user manual for the printerbeing used and check whether theprinter supports the JFIF-JPEG or Exif-JPEG image format. If not, the printercannot print the images.iWas the image data photographed
using FinePix S3 Pro?You may not be able to print someimages photographed on othercameras.
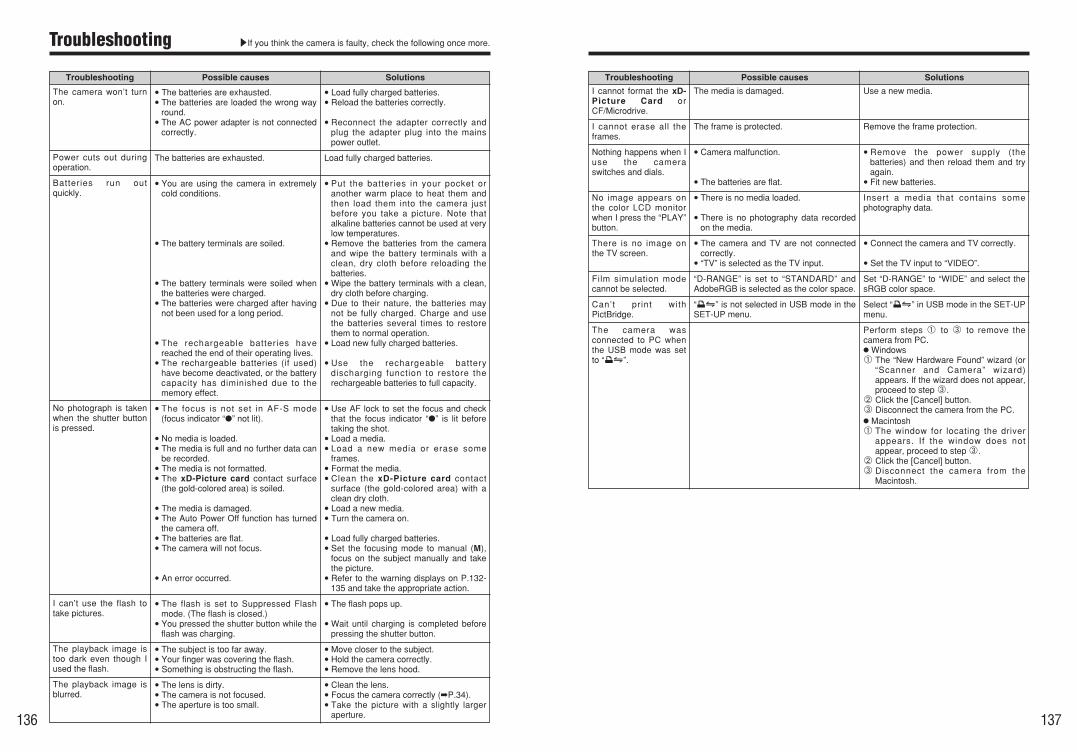
137136
I cannot format the xD-Picture Card orCF/Microdrive.
I cannot erase all theframes.
Nothing happens when Iuse the cameraswitches and dials.
No image appears onthe color LCD monitorwhen I press the “PLAY”button.
There is no image onthe TV screen.
Film simulation modecannot be selected.
Can’t print withPictBridge.
The camera wasconnected to PC whenthe USB mode was setto “$”.
Use a new media.
Remove the frame protection.
i Remove the power supply (thebatteries) and then reload them and tryagain.i Fit new batteries.
Insert a media that contains somephotography data.
i Connect the camera and TV correctly.
i Set the TV input to “VIDEO”.
Set “D-RANGE” to “WIDE” and select thesRGB color space.
Select “$” in USB mode in the SET-UPmenu.
Perform steps 1 to 3 to remove thecamera from PC.hWindows1 The “New Hardware Found” wizard (or
“Scanner and Camera” wizard)appears. If the wizard does not appear,proceed to step 3.
2 Click the [Cancel] button.3 Disconnect the camera from the PC.h Macintosh1 The window for locating the driver
appears. If the window does notappear, proceed to step 3.
2 Click the [Cancel] button.3 Disconnect the camera from the
Macintosh.
Troubleshooting Possible causes Solutions
The media is damaged.
The frame is protected.
i Camera malfunction.
i The batteries are flat.
i There is no media loaded.
i There is no photography data recordedon the media.
i The camera and TV are not connectedcorrectly.i “TV” is selected as the TV input.
“D-RANGE” is set to “STANDARD” andAdobeRGB is selected as the color space.
“$” is not selected in USB mode in theSET-UP menu.
Troubleshooting eIf you think the camera is faulty, check the following once more.
The camera won’t turnon.
Power cuts out duringoperation.
Batteries run outquickly.
No photograph is takenwhen the shutter buttonis pressed.
I can’t use the flash totake pictures.
The playback image istoo dark even though Iused the flash.
The playback image isblurred.
i Load fully charged batteries.i Reload the batteries correctly.
i Reconnect the adapter correctly andplug the adapter plug into the mainspower outlet.
Load fully charged batteries.
i Put the batteries in your pocket oranother warm place to heat them andthen load them into the camera justbefore you take a picture. Note thatalkaline batteries cannot be used at verylow temperatures.i Remove the batteries from the camera
and wipe the battery terminals with aclean, dry cloth before reloading thebatteries.iWipe the battery terminals with a clean,
dry cloth before charging.i Due to their nature, the batteries may
not be fully charged. Charge and usethe batteries several times to restorethem to normal operation.i Load new fully charged batteries.
i Use the rechargeable batterydischarging function to restore therechargeable batteries to full capacity.
i Use AF lock to set the focus and checkthat the focus indicator “●” is lit beforetaking the shot.i Load a media.i Load a new media or erase some
frames.i Format the media.i Clean the xD-Picture card contact
surface (the gold-colored area) with aclean dry cloth.i Load a new media.i Turn the camera on.
i Load fully charged batteries.i Set the focusing mode to manual (M),
focus on the subject manually and takethe picture.i Refer to the warning displays on P.132-
135 and take the appropriate action.
i The flash pops up.
iWait until charging is completed beforepressing the shutter button.
i Move closer to the subject.i Hold the camera correctly.i Remove the lens hood.
i Clean the lens.i Focus the camera correctly (➡P.34).i Take the picture with a slightly larger
aperture.
Troubleshooting Possible causes Solutions
i The batteries are exhausted.i The batteries are loaded the wrong way
round.i The AC power adapter is not connected
correctly.
The batteries are exhausted.
i You are using the camera in extremelycold conditions.
i The battery terminals are soiled.
i The battery terminals were soiled whenthe batteries were charged.i The batteries were charged after having
not been used for a long period.
i The rechargeable batteries havereached the end of their operating lives.i The rechargeable batteries (if used)
have become deactivated, or the batterycapacity has diminished due to thememory effect.
i The focus is not set in AF-S mode(focus indicator “●” not lit).
i No media is loaded.i The media is full and no further data can
be recorded.i The media is not formatted.i The xD-Picture card contact surface
(the gold-colored area) is soiled.
i The media is damaged.i The Auto Power Off function has turned
the camera off.i The batteries are flat.i The camera will not focus.
i An error occurred.
i The flash is set to Suppressed Flashmode. (The flash is closed.)i You pressed the shutter button while the
flash was charging.
i The subject is too far away.i Your finger was covering the flash.i Something is obstructing the flash.
i The lens is dirty.i The camera is not focused.i The aperture is too small.

139138
Input/Output TerminalsVideo output NTSC/PAL selectableDigtal Interface USB 2.0 (High-speed), IEEE 1394DC input Socket for specified AC Power adapter AC-5VX (sold separately)
Power Supply and OthersPower supply Use one of the following:
i 4× AA-size Ni-MH (Nickel-Metal Hydride) batteriesi AC Power Adapter AC-5VX (sold separately)
Dimensions and weight Camera body dimensions: 147.8 mm × 135.3 mm × 78.5 mm/5.8 in. × 5.3 in. ×(W × H × D) 3.1 in. (excluding lens and attachments)
Camera body weight: 815 g/28.7 oz (excluding lens, batteries and recording media)Weight when shooting: Dependent on the lens used
Operating conditions Temperature: 0°C to +40°C. (+32°F to +104°F) ✽Note that the range for Microdrive is +5°C to +40°C (+41°F to +104°F).Humidity: 80% or less (no condensation)
Guide to the number of available frames for battery operation
Accessories See P.8Optional accessories See P.122-123
■ Standard Number of Available Shots per MediaThe number of available shots varies slightly depending on the type of subject. Also, the discrepancy between the actualnumber of available shots and the standard number grows as the capacity of the media increases.
For CCD-RAW files, “`” is displayed as the resolution.
✽1: CCD-RAW is a format specific to the FinePix S3 Pro. The enclosed “FinePixViewer” software or the optional Hyper-Utilitysoftware “HS-V2 Ver. 3.0” is required to interpret the images.
✽2: Images shot in high-sensitivity photography (ISO 400 or higher) may appear coarse and may also be affected by noise suchas white dots.
✽3: Images shot with long exposures (about 4 second or longer) may appear coarse and may also be affected by noise such as white dots.✽4: See P.50 for the max. no. of consecutive shots and the shooting intervals for multiple exposure shooting.
✽ These specifications and performance data are subject to change without notice. FUJIFILM accepts no liability whatsoeverfor errors or omissions in this manual.
✽ The color LCD monitor on your digital camera is manufactured using advanced high-precision technology. Even so, up to0.01% of the pixels may fail to light or may remain permanently lit. This phenomenon will not appear on the recorded image.
✽ The operation error may be caused in a digital camera by the strong radio interference (i. e. electric fields, staticelectricity, line noise, etc.).
Quality Mode
Image File Size
DPC-16 (16 MB)DPC-32 (32 MB)DPC-64 (64 MB)DPC-128 (128 MB)
FINE
Number of recordedpixels 4 4256 × 2848 1 1440 × 9603 3024 × 2016 2 2304 × 1536
DPC-256 (256 MB)DPC-512 (512 MB)
Approx.4.7 MB
1326
63
53107
NORMAL
Approx.2.4 MB
2653
136
107214
FINE
Approx.3.0 MB
2142
105
85170
NORMAL
Approx.1.5 MB
4284
2010
169339
FINE
Approx.1.7 MB
3672
178
146292
NORMAL
Approx.880 KB
72144
3517
290580
FINE
Approx.1 MB
61122
3014
245491
NORMAL
Approx.520 KB
120241
5929
484967
Microdrive (340 MB) 73 146 116 232 200 396 338 671Microdrive (1 GB) 220 437
D-RANGEWIDE
HIGH
` CCD-RAW
Approx.25 MB
0 11 22 45 9
10 1920 3913 2741 81
D-RANGESTANDARDApprox.13 MB
349 698 597 1173 995 1932
According to the CIPA (Camera & Imaging Products Association) standard procedure for measuringdigital still camera battery consumption (extract):When using Ni-MH batteries, use the batteries supplied with the camera. The storage media shouldbe xD-Picture Card.Shots taken at 23°C, one shot every 30 seconds using a 50mm AF1.4D lens with 1-time AFoperation, full flash for every other shot, the camera turned off/on every 10 shots and auxiliary AFlighting turned off.h Note: Because the number of available shots varies depending on the level of charge in Ni-MH batteries,
the figures shown here for the number of available shots using batteries are not guaranteed.The number of available shots will also decline at low temperatures.
Ni-MH batteries 2300 mAh Approx. 400 frames
Battery Type With LCD monitor ON
Specifications
SystemModel Digital camera FinePix S3 ProEffective pixels 12.34 million (S-pixel: 6.17 million, R-pixel: 6.17 million) pixelsCCD Large-format (23.0 × 15.5 mm) Super CCD SR II with primary color filter
Total 12.9 megapixels (S-pixels: 6.45 million; R-pixels: 6.45 million)Storage media xD-Picture Card (16/32/64/128/256/512 MB)
CF card and Microdrive TM (FAT32-compatible) (Compatibility is listed onFujifilm website: http://home.fujifilm.com/products/digital/)
File format DCF-compliantCompressed: Exif Ver.2.21 JPEG, DPOF-compatibleUncompressed: CCD-RAW (RAF) ✽1
Max. recording resolution 4256 × 2848 (12.1 million)Number of recorded pixels 4256 × 2848 pixels/3024 × 2016 pixels/2304 × 1536 pixels/1440 × 960 pixelsLens mount Nikon F mount (with AF coupling and AF contacts)Focal length Approx. 1.5× the nominal focal length of the lens (35mm camera equivalent)Sensitivity ISO 100/160/200/400/800/1600 ✽2
Metering modes TTL open metering/3D 10-zone Matrix, Center-weighted, SpotExposure control Program AE, Shutter-priority AE, Aperture-priority AE, Manual exposureExposure compensation –3.0 EV to +3.0 EV 1/2 EV step Shutter Electronically controlled vertical-travel focal-plane shutterShutter speeds 30 to 1/4000 sec, Bulb X contact: Max. 1/180 sec. ✽3
Continuous shooting ✽4 Max. 2.5 frames/sec.: Up to max. 12 frames. (D-range: Standard; JPEG mode)Up to max. 7 frames. (D-range: Standard; RAW mode)
Max. 1 frame/sec.: Up to max. 6 frames. (D-range: Wide; JPEG mode)Max. 1.4 frames/sec.: Up to max. 3 frames. (D-range: Wide; RAW mode)
Auto bracketing ±0.5 EV, ±1.0 EV, ±1.5 EV, ±2.0 EV, Focus Mode: Single-AF servo, Continuous AF servo, Manual
AF system: TTL phase difference detection with auxiliary AF flashAF frame selection: Single-area AF, Dynamic AF (Dynamic AF Mode withClosest Subject Priority is available)
White balance Automatic scene recognition/Preset (Fine, Shade, Fluorescent (Daylight),Fluorescent (Warm White), Fluorescent (Cool White), Incandescent, Custom (2settings)
Self-timer 20 sec./10 sec./5 sec./2 sec.Flash Manual pop-up, D-3D Multi-BL flash control, D Multi-BL flash control, Standard
D-TTL flash controlGuide No.: 12 (ISO 100-m); Sync. shutter speed: 1/180 sec. or slower
Flash modes Front Synchro, Slow Synchro, Rear synchro, Red-eye Reduction and Red-eyeReduction Slow Synchro, suppressed flash
Accessory shoe Standard ISO-type with hot-shoe contact (Safty lock provided)Synchro contacts X contacts only, synchronizing speed: 1/180 sec. or slowerSynchro terminal Equipped with ISO 519 synchro terminal as standard, lock screw providedViewfinder Eye-level pentaprism (coverage: Approx. 93% vertical, approx. 95% horizontal),
dioptric adjustment mechanism, viewfinder magnification approx. 0.8×)LCD monitor 2.0-inch 235,000-pixels low-temperature polysilicon TFT color LCD panel
(approx. 100% coverage for playback)Remote release Release socket built into the shutter release button
10-pin remote release terminal provided on camera body frontPhotography functions Color space selection, dynamic range selection, film simulation mode selection,
framing guideline, frame no. memory, multiple exposure shooting ✽4, shutterbutton for vertical shooting, live image
Playback functions Trimming, Auto Play, multi-frame playback, histogram display, brightnesswarning display
Other functions PictBridge compatibility, Exif Print compatibility, PRINT Image Matching IIcompatibility, language selection (Japanese, English, French, German, Spanish,Italian, Chinese), discharging function
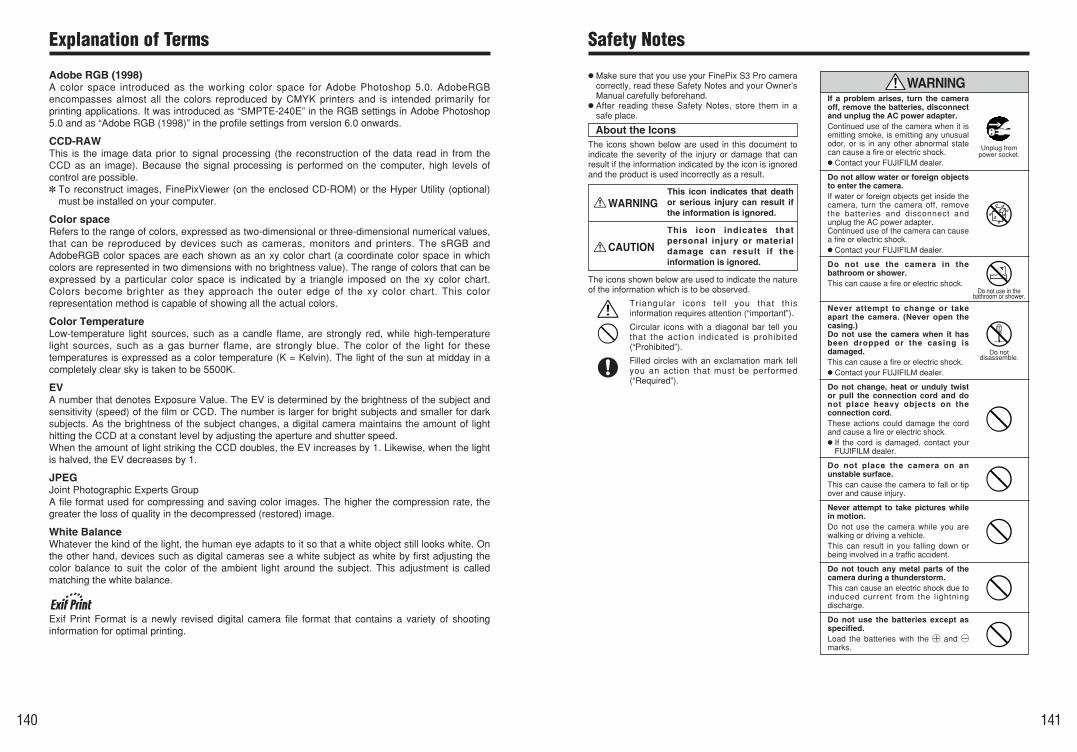
141
Safety Notes
h Make sure that you use your FinePix S3 Pro cameracorrectly, read these Safety Notes and your Owner’sManual carefully beforehand.h After reading these Safety Notes, store them in a
safe place.
About the IconsThe icons shown below are used in this document toindicate the severity of the injury or damage that canresult if the information indicated by the icon is ignoredand the product is used incorrectly as a result.
WARNINGThis icon indicates that deathor serious injury can result ifthe information is ignored.
CAUTION
This icon indicates thatpersonal injury or materialdamage can result if theinformation is ignored.
The icons shown below are used to indicate the natureof the information which is to be observed.
Triangular icons tell you that thisinformation requires attention (“important”).
Circular icons with a diagonal bar tell youthat the action indicated is prohibited(“Prohibited”).
Filled circles with an exclamation mark tellyou an action that must be performed(“Required”).
If a problem arises, turn the cameraoff, remove the batteries, disconnectand unplug the AC power adapter.Continued use of the camera when it isemitting smoke, is emitting any unusualodor, or is in any other abnormal statecan cause a fire or electric shock.h Contact your FUJIFILM dealer.
Do not allow water or foreign objectsto enter the camera.If water or foreign objects get inside thecamera, turn the camera off, removethe batteries and disconnect andunplug the AC power adapter.Continued use of the camera can causea fire or electric shock.h Contact your FUJIFILM dealer.
Do not use the camera in thebathroom or shower.This can cause a fire or electric shock.
Never attempt to change or takeapart the camera. (Never open thecasing.)Do not use the camera when it hasbeen dropped or the casing isdamaged.This can cause a fire or electric shock.h Contact your FUJIFILM dealer.
Do not change, heat or unduly twistor pull the connection cord and donot place heavy objects on theconnection cord.These actions could damage the cordand cause a fire or electric shock.h If the cord is damaged, contact your
FUJIFILM dealer.
Do not place the camera on anunstable surface.This can cause the camera to fall or tipover and cause injury.
Never attempt to take pictures whilein motion.Do not use the camera while you arewalking or driving a vehicle.This can result in you falling down orbeing involved in a traffic accident.
Do not touch any metal parts of thecamera during a thunderstorm.This can cause an electric shock due toinduced current from the l ightningdischarge.
Do not use the batteries except asspecified.Load the batteries with the ≠ and –marks.
WARNING
Unplug from power socket.
Do not use in thebathroom or shower.
Do notdisassemble.
140
Explanation of Terms
Adobe RGB (1998)A color space introduced as the working color space for Adobe Photoshop 5.0. AdobeRGBencompasses almost all the colors reproduced by CMYK printers and is intended primarily forprinting applications. It was introduced as “SMPTE-240E” in the RGB settings in Adobe Photoshop5.0 and as “Adobe RGB (1998)” in the profile settings from version 6.0 onwards.
CCD-RAWThis is the image data prior to signal processing (the reconstruction of the data read in from theCCD as an image). Because the signal processing is performed on the computer, high levels ofcontrol are possible.✽ To reconstruct images, FinePixViewer (on the enclosed CD-ROM) or the Hyper Utility (optional)
must be installed on your computer.
Color spaceRefers to the range of colors, expressed as two-dimensional or three-dimensional numerical values,that can be reproduced by devices such as cameras, monitors and printers. The sRGB andAdobeRGB color spaces are each shown as an xy color chart (a coordinate color space in whichcolors are represented in two dimensions with no brightness value). The range of colors that can beexpressed by a particular color space is indicated by a triangle imposed on the xy color chart.Colors become brighter as they approach the outer edge of the xy color chart. This colorrepresentation method is capable of showing all the actual colors.
Color TemperatureLow-temperature light sources, such as a candle flame, are strongly red, while high-temperaturelight sources, such as a gas burner flame, are strongly blue. The color of the light for thesetemperatures is expressed as a color temperature (K = Kelvin). The light of the sun at midday in acompletely clear sky is taken to be 5500K.
EVA number that denotes Exposure Value. The EV is determined by the brightness of the subject andsensitivity (speed) of the film or CCD. The number is larger for bright subjects and smaller for darksubjects. As the brightness of the subject changes, a digital camera maintains the amount of lighthitting the CCD at a constant level by adjusting the aperture and shutter speed.When the amount of light striking the CCD doubles, the EV increases by 1. Likewise, when the lightis halved, the EV decreases by 1.
JPEGJoint Photographic Experts GroupA file format used for compressing and saving color images. The higher the compression rate, thegreater the loss of quality in the decompressed (restored) image.
White BalanceWhatever the kind of the light, the human eye adapts to it so that a white object still looks white. Onthe other hand, devices such as digital cameras see a white subject as white by first adjusting thecolor balance to suit the color of the ambient light around the subject. This adjustment is calledmatching the white balance.
Exif Print Format is a newly revised digital camera file format that contains a variety of shootinginformation for optimal printing.

142
CAUTIONDo not use this camera in locationsaffected by oil fumes, steam,humidity or dust.This can cause a fire or electric shock.
Do not leave this camera in placessubject to extremely hightemperatures.Do not leave the camera in locations suchas a sealed vehicle or in direct sunlight.This can cause a fire.
Keep out of the reach of smallchildren.This product could cause injury in thehands of a child.
Do not place heavy objects on thecamera.This can cause the heavy object to tipover or fall and cause injury.
Do not move the camera while theAC power adapter is still connected.Do not pull on the connection cordto disconnect the AC power adapter.This can damage the power cord orcables and cause a fire or electric shock.
Do not use the AC power adapterwhen the plug is damaged or theplug socket connection is loose.This could cause a fire or electric shock.
Do not cover or wrap the camera orthe AC power adapter in a cloth orblanket.This can cause heat to build up anddistort the casing or cause a fire.
When you are cleaning the cameraor you do not plan to use the camerafor an extended period, remove thebatteries and disconnect and unplugthe AC power adapter.Failure to do so can cause a fire orelectric shock.
When charging ends, unplug thecharger from the power socket.Leaving the charger plugged into thepower socket can cause a fire.
Using a flash too close to a person’smay temporarily affect the eyesight.Take particular care when takingpictures of children.
When an xD-Picture Card isremoved, the card could come out ofthe slot too quickly. Use your fingerto hold it and gently release the card.
Request regular internal testing andcleaning for your camera.Build-up of dust in your camera cancause a fire or electric shock.h Contact your FUJIFILM dealer to
request internal cleaning every 2 years.Please note this is not a free of chargeservice.
Do not heat, change or take apart thebatteries.Do not drop or subject the batteriesto impacts.Do not attempt to recharge lithium oralkaline batteries.Do not store the batteries withmetallic products.Do not use chargers other than thespecified model to charge thebatteries.Any of these actions can cause thebatteries to burst or leak and cause fireor injury as a result.
Use only the batteries or AC poweradapters specified for use with thiscamera.Do not use voltages other than thepower supply voltage shown.The use of other power sources cancause a fire.
If the battery leaks and fluid gets incontact with your eyes, skin orclothing. Flush the affected area withclean water and seek medicalattention or call emergency numberright away.
Do not use the charger to chargebatteries other than those specifiedhere.The charger is designed for Fujifilm HR-AA Ni-MH batteries. Using the chargerto charge conventional batteries orother types of rechargeable batteriescan cause the battery to leak fluid,overheat or burst.
When discarding or storing batteries,cover the battery terminals withinsulation tape.h Contact with other metallic objects or
batteries could cause the batteries toignite or burst.
Keep xD-Picture Cards out of thereach of small children.Because xD-Picture Cards are small,they can be swallowed by children. Besure to store xD-Picture Cards out ofthe reach of small children. If a childswallows an xD-Picture Card, seekmedical attention or call emergencynumber.
WARNING
Safety Notes

Printed in Japan FGS-406110-FG
Printed on recycled paper.
26-30, Nishiazabu 2-chome, Minato-ku, Tokyo 106-8620, Japan
http://home.fujifilm.com/products/digital/