fine tuning horse jumping - cloud object storage | … · fine tuning horse jumping: ... and there...
TRANSCRIPT

Fine Tuning Horse Jumping: Hunter-Jumper Expert Steven Weiss and Former Olympics’
Equestrian Jim Wofford on the Horse-and-Rider Takeoff
Strengthen your skills over fences with these simple, targeted exercises.
Visit MyHorseDaily.com Equine Network/Not to be reprinted/All rights reserved/www.MyHorseDaily.com
A Note From The Editor
Here at MyHorse Daily we are committed to bringing you the latest information designed to keep you and your horse healthy, happy and productive.
Enjoy the read!
Amy Herdy, Managing Editor MyHorse Daily
Countdown to Takeoff Focus on your horse’s middle gear to find your distance to a fence.
Visit MyHorseDaily.comEquine Network/Not to be reprinted/All rights reserved/www.MyHorseDaily.com
3
In any jumping discipline, one of the most elusive skills for riders to mas-ter is “seeing the distance”—guiding the horse to the correct takeoff spot in front of the jump. Only the most experienced upper-level riders—and
a few uncommonly talented riders—can see their distances from 10 or more strides away. For everybody else, the se-cret to finding good distances consistent-ly is not practicing until your horse’s legs give out. It is a combination of two basic skills: staying on the correct track—not cutting your corners or bulging out on the turns—and maintaining a medium pace. This article explains what the latter is and how to achieve it.
What is Medium Pace?In general, the term “pace” means
your horse’s energy level and stride length. In any gait, his medium pace is his middle gear. There should be at least one gear above it—a forward, more extended pace—and one gear below it—a slower, more collected pace. When you’re in the medium pace, your horse should feel energetic and balanced, nei-ther tipping forward onto his forehand
Learn about timing and seeing distances when jumping your horse.
Adapted from an article by Steven WeissPhotos by Stacey Nedrow-Wigmore
Countdown to Takeoff Focus on your horse’s middle gear to find your distance to a fence.
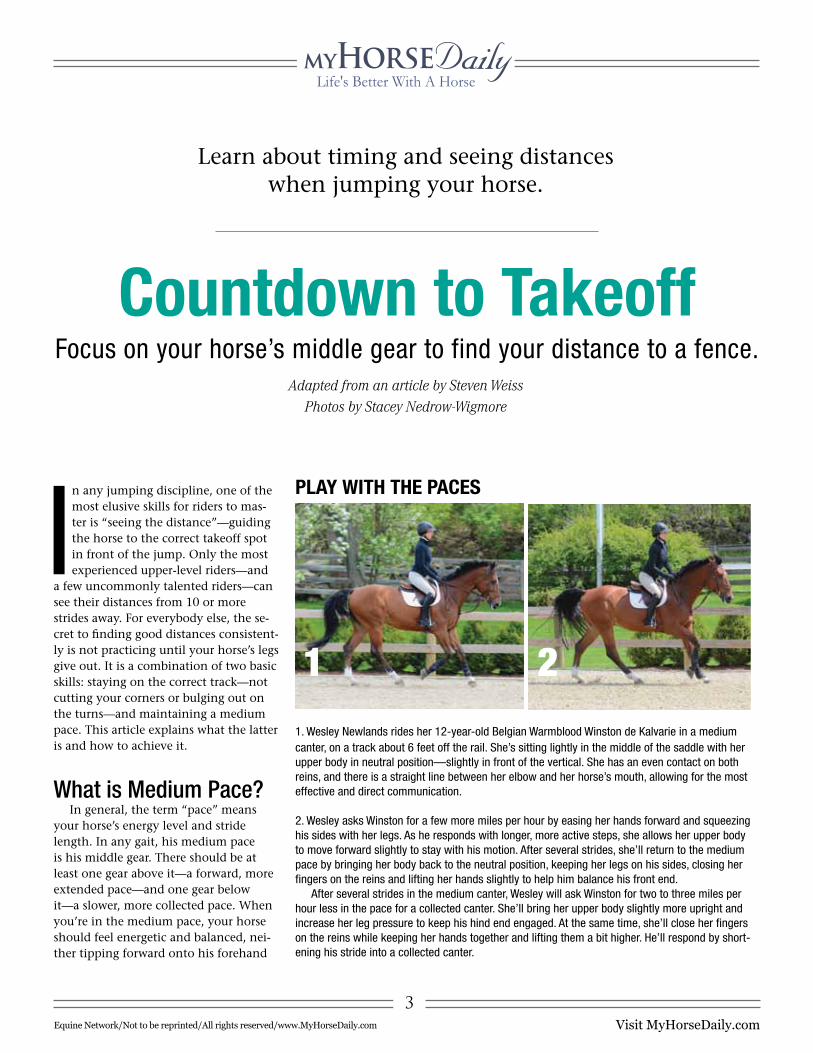
1. Wesley Newlands rides her 12-year-old Belgian Warmblood Winston de Kalvarie in a medium canter, on a track about 6 feet off the rail. She’s sitting lightly in the middle of the saddle with her upper body in neutral position—slightly in front of the vertical. She has an even contact on both reins, and there is a straight line between her elbow and her horse’s mouth, allowing for the most effective and direct communication.
2. Wesley asks Winston for a few more miles per hour by easing her hands forward and squeezing his sides with her legs. As he responds with longer, more active steps, she allows her upper body to move forward slightly to stay with his motion. After several strides, she’ll return to the medium pace by bringing her body back to the neutral position, keeping her legs on his sides, closing her fingers on the reins and lifting her hands slightly to help him balance his front end.
After several strides in the medium canter, Wesley will ask Winston for two to three miles per hour less in the pace for a collected canter. She’ll bring her upper body slightly more upright and increase her leg pressure to keep his hind end engaged. At the same time, she’ll close her fingers on the reins while keeping her hands together and lifting them a bit higher. He’ll respond by short-ening his stride into a collected canter.
1 2
Play wiTh The PaCes

Visit MyHorseDaily.com Equine Network/Not to be reprinted/All rights reserved/www.MyHorseDaily.com
44
nor feeling stuck and unresponsive be-hind your leg.
The medium pace in the canter should produce strides about 11 to 12 feet long. By comparison, collected-canter strides should be about 8 or 9 feet long, while extended-canter, or gallop, strides should be about 13 or 14 feet
long. Because jump courses are set pri-marily based on 12-foot striding, riding them in a medium pace produces the best flow. In essence, your striding turns out well because of what you didn’t do, not what you did. Riders traveling with too much pace get to the jumps too ear-ly and down the lines too early. Overly
conservative riders disrupt the flow by clutching and grabbing the reins, arriv-ing at the jumps with too little pace. Either error produces added or left-out strides and awkward jumps.
From the medium pace, you can also solve the most problems. For example, if you approach a jump at a gallop (your “high gear”) and recognize that you need to adjust the stride, you only have one option: to slow down. When you approach in a medium canter, you have two options: slow down or go forward. With this flexibility, you can smoothly “downshift” to a lower gear for shorter lines or “shift up” to a higher gear for longer lines.
One of the hardest things about the medium pace is knowing how it should feel. Here are a few exercises to deter-mine if you’re riding in it. The first is riding transitions within a gait on the flat. The second is riding over a line of ground poles at the medium pace, then leaving out a stride at a more forward pace and adding a stride at a more col-lected pace. Finally, after riding over the ground poles in the medium pace, you’ll canter around the corner and maintain the pace to a single fence, with added tips for staying at the medium pace around a course. These exercises will also
• give you a good physical workout while saving your horse’s legs,
• spice up your schooling sessions at home and
• make your horse more rideable (eas-ier to move forward and back whenever necessary), which will, in turn …
• give you more confidence in chal-lenging situations, such as gaining con-trol over an old campaigner who wants to take charge in the ring.
Exercise 1: Play with the Paces
My first exercise will help you find your medium pace and stay on your
1
2 31. I’ve placed two ground poles in a straight line on the long side of the arena five strides apart, about 60 feet. (You don’t need to add room for takeoff and landing since there’s no jump.) Wesley established a medium canter and approached the poles on a straight line. As Winston steps over the first pole, Wesley stays light in the saddle with her upper body slightly in front of the vertical. She maintains an even contact and the straight line between her elbow and his mouth.
2. As they continue down the line, Wesley feels Winston’s sides with her legs to maintain the me-dium pace and keeps her upper body slightly in front of the vertical. She focuses on the second pole and counts the five even strides to it.
3. Winston takes a nice medium canter stride over the second ground pole while Wesley main-tains her position. If Winston had added a stride in the line, Wesley would know she was under the medium pace. If he took fewer than five strides, she’d know she had too much pace. She’ll repeat this exercise until they are consistently cantering down the line in five even strides.
MediuM CanTer over Ground Poles
Visit MyHorseDaily.comEquine Network/Not to be reprinted/All rights reserved/www.MyHorseDaily.com
55
track. It is done on the flat, but its ben-efits will carry over to your jumping, too.
1. Start at the walk in what you think is a medium pace, with even contact on both reins, staying about 6 feet off the rail. (Adjust the distance from the rail, making it closer or farther, depending on the size of your arena.) For the rest of this exercise, maintain this same distance from the rail. This will force you to con-centrate on your track, without relying on the rail to steer your horse.
2. Squeeze your horse’s sides with your legs and ever so slightly ease the pressure on the reins to encourage him to increase his pace. He should respond with longer, more active steps. If he breaks into the trot, you know that you were not in your medium pace to start with; you were one gear above it in an extended pace.
3. After several strides, slightly in-crease your rein pressure to return to your medium pace.
4. Next, close your fingers on the reins and increase your leg pressure again, this time to ask your horse to slow his pace. Adding leg pressure is crucial here—and in every downward transition between and within all gaits—because it keeps his hind end engaged. Again, if your horse can’t produce a slower walking pace without halting, you weren’t starting in a medium pace; you were one gear below it in a more collected pace.
5. Repeat this several times at the walk until you feel your horse producing three clearly different paces. Then try the same exercise at the trot. Ideally, you should be able to do it both rising and sitting, but if you’re not comfortable at sitting trot yet, stick to rising trot.
When the exercise is going well at the trot, try it at the canter, first sitting lightly in the saddle with your upper body in neutral position—slightly in front of the vertical:
1. Start in what you think is a me-dium canter, sitting in the middle of the saddle with your hands together above
1
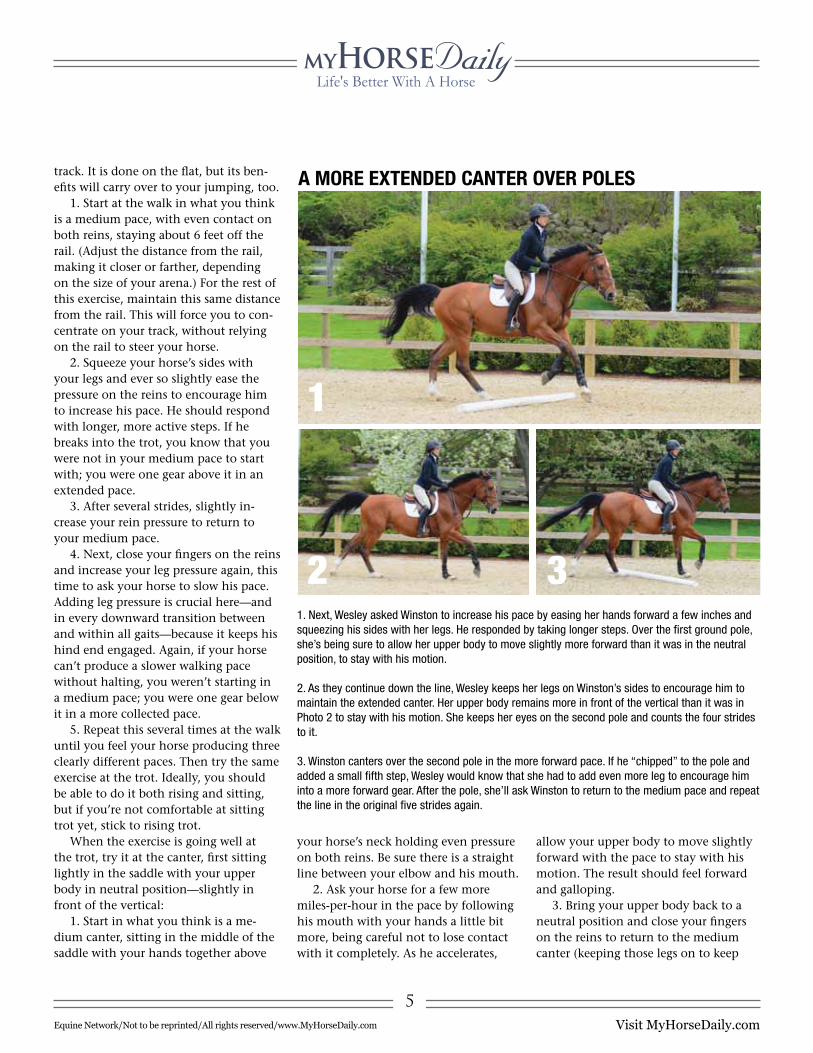
2 31. Next, Wesley asked Winston to increase his pace by easing her hands forward a few inches and squeezing his sides with her legs. He responded by taking longer steps. Over the first ground pole, she’s being sure to allow her upper body to move slightly more forward than it was in the neutral position, to stay with his motion.
2. As they continue down the line, Wesley keeps her legs on Winston’s sides to encourage him to maintain the extended canter. Her upper body remains more in front of the vertical than it was in Photo 2 to stay with his motion. She keeps her eyes on the second pole and counts the four strides to it.
3. Winston canters over the second pole in the more forward pace. If he “chipped” to the pole and added a small fifth step, Wesley would know that she had to add even more leg to encourage him into a more forward gear. After the pole, she’ll ask Winston to return to the medium pace and repeat the line in the original five strides again.
a More exTended CanTer over Poles
your horse’s neck holding even pressure on both reins. Be sure there is a straight line between your elbow and his mouth.
2. Ask your horse for a few more miles-per-hour in the pace by following his mouth with your hands a little bit more, being careful not to lose contact with it completely. As he accelerates,
allow your upper body to move slightly forward with the pace to stay with his motion. The result should feel forward and galloping.
3. Bring your upper body back to a neutral position and close your fingers on the reins to return to the medium canter (keeping those legs on to keep

Visit MyHorseDaily.com Equine Network/Not to be reprinted/All rights reserved/www.MyHorseDaily.com
6
the impulsion). Lift your hands slightly to help your horse balance his front end in the downward transition.
4. After several even strides in me-dium canter, ask your horse for two or three miles per hour less in the pace. Bring your upper body taller and slightly more upright, increase the rein pressure and close your legs on his sides. Keep your hands together and lift them a
tiny bit higher—but never so high that you break the straight line between your elbow and his mouth. You should feel him shorten his stride to produce a controlled, organized, smooth collected canter.
Once you’ve mastered this, try the exercise in two-point position, keeping your seat out of the saddle throughout all of the steps. This is much harder to
do because it’s more difficult to keep your leg on while balancing your weight out of the saddle, so it’s a great workout.
If your horse continually breaks from canter to trot when you ask him to collect, first check that you are using enough leg during the transition. If he still breaks, he may need a transition tune-up. Go back to working on basic downward transitions, from trot to walk, canter to trot, etc., until he’s more re-sponsive to your aids.
Similarly, if he resists shifting up from medium pace to gallop, practice upward transitions between the gaits.
Continue playing with these gears until you can easily increase or decrease your pace in every gait.
Exercise 2: Play Over Ground Poles
Set up two ground poles in a straight line on the long side of your arena, five strides apart, about 60 feet. (You don’t need extra room for takeoff or landing, since it’s not a jump.)
1. Establish a steady rhythm in your medium canter and approach the poles on a straight line. After your horse steps over the first pole, maintain the same pace and count the strides he takes to the second pole. If he takes more than five strides, you were a little under the pace. If he takes fewer than five, you had too much pace. Adjust your pace as necessary and repeat the exercise until the five strides fit nicely between the poles. (If your horse repeatedly struggles to make it down the line in five strides and keeps trying to add a sixth stride, his stride might be naturally shorter than 12 feet. Move the two ground poles a little closer together. Realize, though, that his shorter stride length will make it more challenging for him to make it down the lines at a show in the correct striding.)
2. Next, using the aids you practiced on the flat, ask him for a forward gallop-ing pace and ride the line in four strides.
1. Wesley asked Winston to collect his stride by bringing her upper body taller and slightly more upright, increasing her rein pressure and closing her legs on his sides. She’s correctly lifted her hands a tiny bit higher to help him balance, but she still maintains the straight line from her elbow to his mouth.
2. In the middle of the line, Winston has maintained the quieter pace. Wesley is sitting close to the vertical and her seat is in the saddle a little more to help him bring his hind end underneath him-self more. She has a little more feel of the reins, and she’s looking at the second pole and counting the six strides she wants to fit in the line. 3. Winston canters over the second pole in a more collected pace. If he had left long, Wesley would know that she’d need to collect his pace even more to fit in the six strides. After the poles, she’ll add her leg and ask Winston to return to the medium pace and repeat the line in the five strides.
a More ColleCTed CanTer over Poles
1
2 3
Visit MyHorseDaily.comEquine Network/Not to be reprinted/All rights reserved/www.MyHorseDaily.com
77
3. Repeat the line in the original five strides, then ask him to collect his canter in the approach to the first pole. Maintain that quieter pace to fit in six strides.
Exercise 3: Add a FenceNow you’re ready to test your gears
over a single, small (1- to 2-foot-high)
vertical. Set it up on the side of the ring opposite from the line of poles.
1. Ride the line of poles again in your medium canter, asking for five strides.
2. Maintain this pace around the corner to the vertical. As you approach the jump, concentrate on meeting it squarely in the middle—and not pull-ing on the reins to try to “pick” a spot. If your pace was right to start with, it
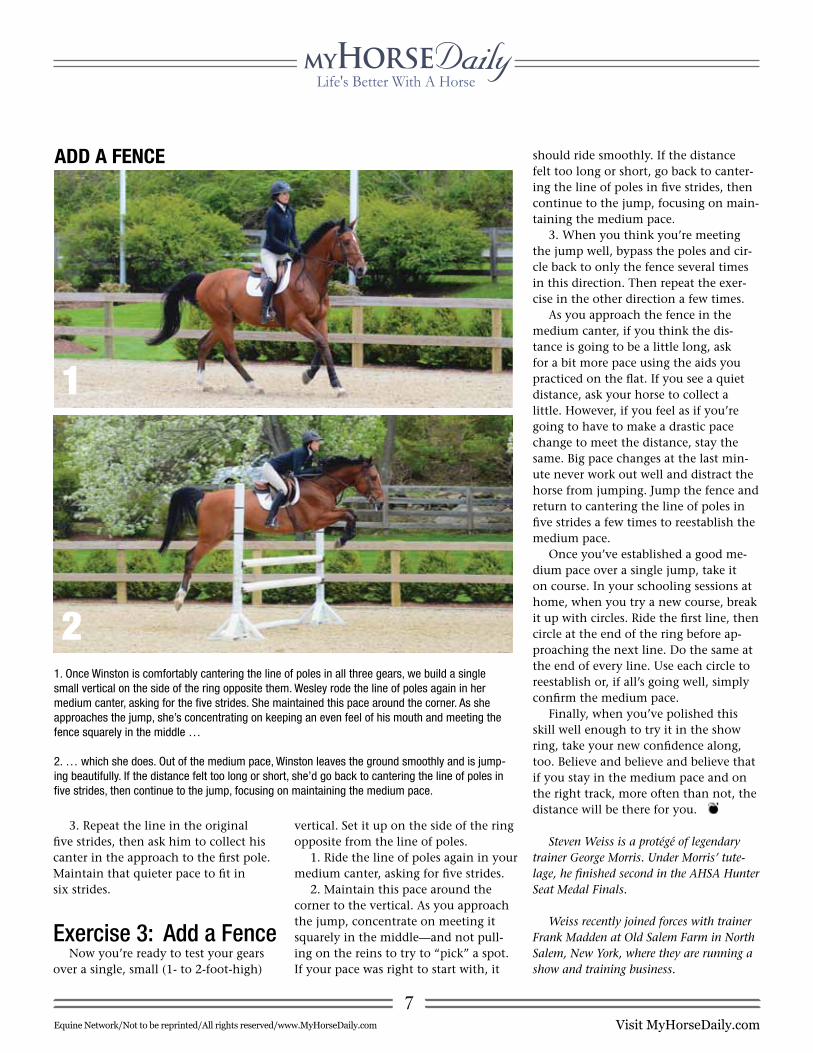
1. Once Winston is comfortably cantering the line of poles in all three gears, we build a single small vertical on the side of the ring opposite them. Wesley rode the line of poles again in her medium canter, asking for the five strides. She maintained this pace around the corner. As she approaches the jump, she’s concentrating on keeping an even feel of his mouth and meeting the fence squarely in the middle …
2. … which she does. Out of the medium pace, Winston leaves the ground smoothly and is jump-ing beautifully. If the distance felt too long or short, she’d go back to cantering the line of poles in five strides, then continue to the jump, focusing on maintaining the medium pace.
add a FenCe
1
2
should ride smoothly. If the distance felt too long or short, go back to canter-ing the line of poles in five strides, then continue to the jump, focusing on main-taining the medium pace.
3. When you think you’re meeting the jump well, bypass the poles and cir-cle back to only the fence several times in this direction. Then repeat the exer-cise in the other direction a few times.
As you approach the fence in the medium canter, if you think the dis-tance is going to be a little long, ask for a bit more pace using the aids you practiced on the flat. If you see a quiet distance, ask your horse to collect a little. However, if you feel as if you’re going to have to make a drastic pace change to meet the distance, stay the same. Big pace changes at the last min-ute never work out well and distract the horse from jumping. Jump the fence and return to cantering the line of poles in five strides a few times to reestablish the medium pace.
Once you’ve established a good me-dium pace over a single jump, take it on course. In your schooling sessions at home, when you try a new course, break it up with circles. Ride the first line, then circle at the end of the ring before ap-proaching the next line. Do the same at the end of every line. Use each circle to reestablish or, if all’s going well, simply confirm the medium pace.
Finally, when you’ve polished this skill well enough to try it in the show ring, take your new confidence along, too. Believe and believe and believe that if you stay in the medium pace and on the right track, more often than not, the distance will be there for you.
Steven Weiss is a protégé of legendary trainer George Morris. Under Morris’ tute-lage, he finished second in the AHSA Hunter Seat Medal Finals.
Weiss recently joined forces with trainer Frank Madden at Old Salem Farm in North Salem, New York, where they are running a show and training business.
Visit MyHorseDaily.com Equine Network/Not to be reprinted/All rights reserved/www.MyHorseDaily.com
8
We’ve all heard that “tim-ing is everything.” Fortunately, this is not true when it comes to riding horses over obstacles. Timing isn’t
everything, but it can help your horse jump better.
First, however, let’s define our terms. “Timing” refers to a rider’s ability to predict— and influence—the remaining increments of stride before an obstacle. While elite riders develop their ability to regulate their horses’ strides so as to consistently arrive at the ideal spots for their takeoffs in front of the obstacles, the rest of us are not so accurate.
Just in front of the jump, riders often have the experience of thinking, “Oh boy, this is not going to work.” Even though we know what’s going to hap-pen, it’s too late to affect the outcome. The good news is if you have trained your horse along the lines that we dis-cuss in my monthly column in Practical Horseman magazine, he will make the necessary adjustment for you. Despite the awkward takeoff spot, you will land on the other side of the obstacle, patting him and planning the special treats you are going to put into his bran mash to-night. Better timing can help you avoid
too many repetitions of this scenario.So your next question is, “If timing
is important, where can I get some?” First, you must realize that if you jump only small obstacles (up to 3-foot-6) on a nice horse, regardless of the discipline in which you ride, you will never need to develop your timing. Ride in such a way that you approach, jump, land and depart—all in the same rhythm. Over small fences, the quality of the jump will be determined almost exclusively by your horse’s rhythm. When you ride in rhythm, you ride in balance. When you ride in balance, your horse will jump to the best of his ability.
Regardless, you always want to improve your skills, so here are some exercises that you can use to improve your timing. If you are ambitious about your riding, you will eventually arrive at a level where timing becomes an essential skill.
Throughout the exercises, it is im-portant that you build the gymnastics accurately. If you are asked to set up two obstacles a certain number of feet apart, be sure to use a tape measure. Tape the exercise accurately; then pace it. Practice pacing distances until you can pace 60 feet within 6 inches, because you will not be able to use a tape measure at the
competition. You will not be very accurate at first, but stick with it. There are enough variables in training horses without introducing another one by accident. You want to make sure you know the training question you are ask-ing your horse.
One final point before describing timing exercises: To measure distance, you must have a fixed point of reference. For our purposes, the fixed point is the jump. Chances are you were taught to look above the jump. For these exercises, you will need to look at the jump, not above it. Look at the jump through your horse’s ears—until it goes out of sight, and then move your eyes to the next obstacle. Look at the top rail of a vertical, the front rail of an oxer, the top rail of a hogsback and the back rail of a triple bar. (You can experience this virtually with “The Rider’s Eye,” a video with top rider Doug Payne; his “helmet cam” shows where he is looking as he rides a course. Find it at www.HorseBooksEtc.com; to watch a preview of it, go to www.PracticalHorsemanMag.com.) To learn more on how to use your eyes effectively, read “Where to Look Before You Leap,” also at www.PracticalHorsemanMag.com.
Adapted from an article by Jim Wofford
It’s About TimingHone your ability to “see” your takeoff spot
with these gymnastics.
Visit MyHorseDaily.comEquine Network/Not to be reprinted/All rights reserved/www.MyHorseDaily.com
99
It’s About TimingHone your ability to “see” your takeoff spot
with these gymnastics.
Exercise 1Our first timing exercise does not
actually involve jumping, but you will need a friend on the ground while you try this. Walk your horse toward the cen-ter of a 3-foot vertical. Keep your eyes on the top rail and halt when you think you are three canter strides from your takeoff point. Have your friend make a mark in the footing where your horse’s front feet were when you thought you were three strides away. Now have your friend (using a tape measure, remember) measure 40 feet from the base of the same jump and make a separate mark. Chances are good that your horse’s front feet will have halted significantly farther from the jump than the 40-foot mark.
Why 40 feet? This distance provides room for three 12-foot strides, plus 4 feet for the takeoff—in other words, a com-fortable takeoff for you and your horse. Usually when students are asked to do this exercise, they will stop several feet more than 40 feet from the jump. Ever wonder why your jumping technique always seems to produce long, “flat” takeoffs? Here is the answer: You do not yet recognize your distance correctly.
Have your friend measure 40 feet from several obstacles of various shapes and sizes in your ring and make a mark to show that distance. Practice walking toward these obstacles with your eyes focused through your horse’s ears on the top of the fence. When your horse steps on the premeasured marker, halt and tell yourself, “That’s three strides.” Repeat this until you become more accurate at predicting when you are three strides away from a comfortable takeoff point.
Exercise 2Once you are confident with this 40-
foot exercise, your second exercise is to put rails on the ground in your arena and trot, then (later) canter, over them. Do not put the rails too close together
… that can come later. I like these first two exercises because you can practice your timing without stressing your horse’s legs.
Continue to watch the rail through your horse’s ears. At the trot you should be able to predict your horse’s reaction to the rail: You need to know whether he is going to take a long, medium or short step in front of the rail. Another exercise that teaches you how to feel your horse’s movement is for you to say which front foot reaches over the rail first. You would be surprised how often riders are not able to do this accurately.
Do not attempt to make your horse step long or short, or left or right front foot first. Merely maintain the rhythm while he steps calmly over the rail. If your horse is not calm during this exer-cise, practice it until he is. A horse who
rushes a rail on the ground will most likely rush around a show-jumping course and might be actively dangerous cross-country.
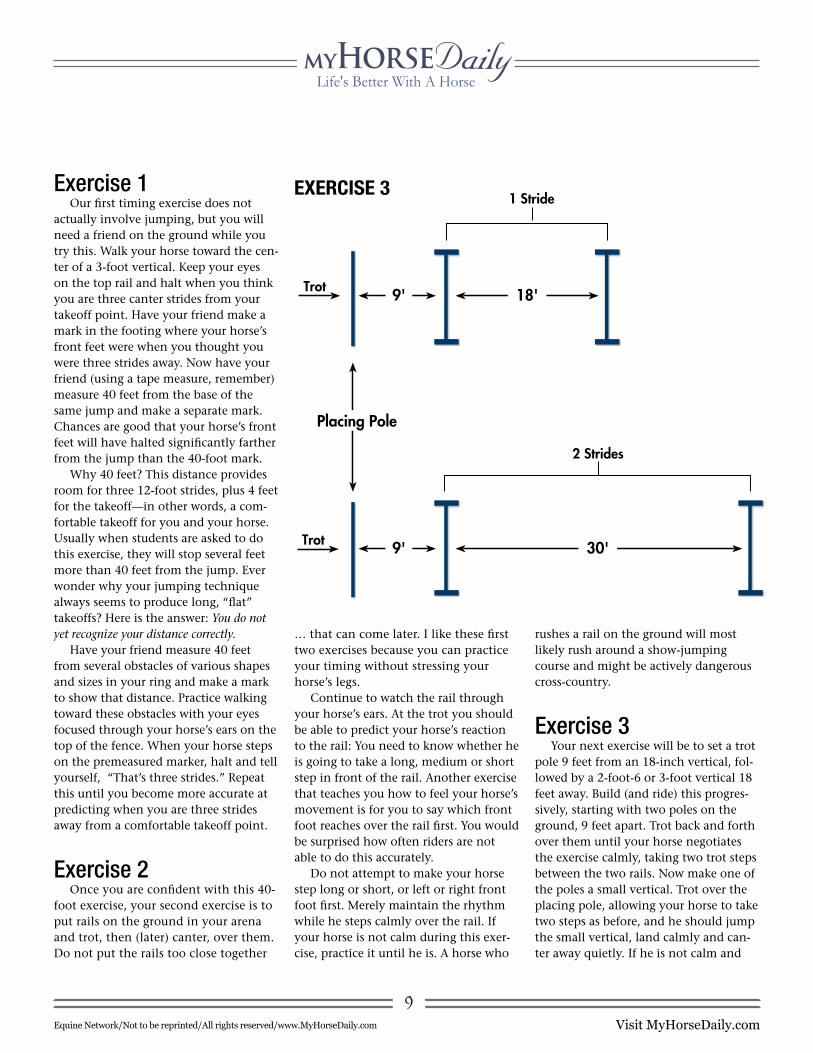
Exercise 3Your next exercise will be to set a trot
pole 9 feet from an 18-inch vertical, fol-lowed by a 2-foot-6 or 3-foot vertical 18 feet away. Build (and ride) this progres-sively, starting with two poles on the ground, 9 feet apart. Trot back and forth over them until your horse negotiates the exercise calmly, taking two trot steps between the two rails. Now make one of the poles a small vertical. Trot over the placing pole, allowing your horse to take two steps as before, and he should jump the small vertical, land calmly and can-ter away quietly. If he is not calm and
18'
1 Stride
Trot
Trot
2 Strides
30'
9'
Placing Pole
9'
exerCise 3
Visit MyHorseDaily.comEquine Network/Not to be reprinted/All rights reserved/www.MyHorseDaily.com
10
Credits
Fine Tuning Horse Jumping: Hunter-Jumper Expert Steven Weiss and Former Olympics’ Equestrian Jim Wofford on the Horse-and-Rider Takeoff
This report is brought to you by the editors of EquiSearch.com and Practical Horseman magazine.
balanced, he is not yet ready for the rest of the exercise.
Once he is calm about one jump-ing effort, add the second vertical. As your horse jumps the first vertical, look through his ears and tell yourself “that’s one,” meaning you are one stride away from the next obstacle. Practice this until you are a bit bored with it, which means you are comfortable and confi-dent with the exercise and ready for the next step.
Leave the placing pole 9 feet in front of the first vertical, but move the sec-ond vertical back (using a tape measure, of course) to 30 feet. (Later on you can make the second obstacle into an oxer, but keep it simple for now.) This is the same exercise you did before, except now you will land and take two strides between the obstacles instead of one stride. Just as before, trot into the exer-cise. Over the first obstacle tell yourself “that’s two,” meaning you will land and take two strides before jumping the second obstacle. Remind yourself to look at the next fence through your horse’s ears, but do not look down in the air. When the rail goes out of sight, it is time to focus your eyes ahead.
As a general rule, riders will have more trouble when the obstacles are two strides apart than they did when they were one stride apart, and even more trouble when we move the second obstacle out to three strides (40 feet for trotting in). If you have not trained your horse to maintain a balanced stride before and after the jump, your horse will rush through the exercise. If you are having difficulty maintaining your rhythm between the obstacles, check to make sure you are not part of the problem: Are you throwing your upper body forward too much and too soon? Are you gripping with your heels to maintain your position? Pulling on the reins as your horse jumps? All these habits can cause your horse to rush.
When your horse jumps the first
obstacle, say “land” when his front feet touch the ground behind the obstacle. Then, in rhythm, count “one, two” for the strides. Make sure you count in rhythm and that you say “two” as your horse’s front feet step onto his takeoff spot. If your voice speeds up or changes pitch, you are contributing to your horse’s nerves. If you want to control your horse, you first have to control yourself.
The process going on in these ex-ercises is the training of your subcon-scious to recognize certain distances. You need to jump these 18- and 30-foot distances quite often. Remember to tell yourself “one” or “two” strides while you are in the air over the first obstacle to remind your subconscious that the distance you see ahead of you correlates to a certain number of strides.
If this exercise goes well, try removing the placing pole and first vertical from the 18-foot exercise but leave the open standards. Then canter through the open standards and jump the second vertical as a single obstacle at the canter. Before we do this, remember that you should say to yourself in your mind “one” (meaning you are one stride away from takeoff) just as you pass the open standards where the first obstacle was a moment ago. As you become adept at this, try doing the same through the 30-foot distance and, later, the 40-foot distance. The 40-foot distance will produce three strides as before.
Practice these simple exercises and you will find that your sense of timing will improve. Timing is a useful skill, but remember that your horse’s rhythm is the most important part of riding over jumps.
Jim Wofford is a five-time winner of the U.S. National Championship, as well as an esteemed Olympic coach, a regular colum-nist for Practical Horseman magazine and the author of four books.