finding nature in your neighborhood€¦ · tensive. however, new smart phone technologies that...
TRANSCRIPT

Finding Nature in Your Neighborhood
A Field Mapping Protocol for Community Based Assessment of Greenspace Access

Finding Nature in Your Neighborhood
A Field Mapping Protocol for CommunityBased Assessment of Greenspace Access
Cover image: Nadaka Nature Park, Lee Dayfield


Introduction 8 What Is EpiCollect? 10
Getting Started 11
EpiCollect for Android 12
EpiCollect for iPhone 19
In the Field 25
GreenAccess Field Guide Checklist 27
GreenAccess Cheat Sheet 28
Post-Collection Data Analysis 30
EpiCollect Project Administration 32
Contents


WELCOME!

8 Finding Nature in Your Neighborhood
Introduction
�e ability to assess the proximity of parks and green spaces and determine population service areas in a GIS (Geographic Information System) requires accurate access point data. Accurate access point data can be used to map nearest walking distances to a given greenspace along the walkable street or trail network. Nearest walking distances can be used to calculate greenspace service areas and the demographic characteristics of the population served. �is information can in turn be used by local governments, community organizations, and residents to prioritize access improvements, especially for underserved populations (see map to right).
Most available access point data have been derived using a semi-automated process within a GIS by intersecting walkable street and trail network data with open space polygon data. While cheaper than �eld mapping, this approach is error prone. Field data collection is often more accurate and detailed but also more costly and labor in-tensive. However, new smart phone technologies that allow users to geo-locate using cell phone towers have reduced some of the costs of �eld data collection and created the opportunity to enlist local residents in �eld-based mapping of access points and assessment of open space access in their communities.
�e Audubon Society of Portland and PSU Capstone students developed the Greens-pace Access Point Field Mapping Protocol during the summer of 2013. �e protocol was developed as a tool for a community-based approach to inventorying open space access points and to generate more accurate information on open space access in the Portland-Metro region.

9A Guide to Mapping Green Spaces
Walking distances from park access points can be used to define service areas and determine populations served.

Finding Nature in Your Neighborhood10
EpiCollect is a technology-based data collection and geographic location tagging tool developed by the Imperial College of London for use by �eld researchers. It allows the data collector to use cell phones, tablets and other electronic devices to take notes and pictures, and capture GPS coordinates. Data can be collected remotely and then later synchronized to an online server accessible to researchers. Data are grouped together by project, which allows a wider audience than just �eld researchers to track data col-lection, map data patterns, and see a project’s progress in real time.
�e software can be adapted to a wide variety of projects: wildlife and plant surveys and public health surveys are a few common uses for this versatile software. A quick and e�cient way of collecting GPS-based data in the �eld, EpiCollect can also be used for personal projects. It’s free, easy to use, and is available for most platforms via iTunes or Google Play.
One of the key features of EpiCollect is the ability to collect data to a local device and then upload them at a later time. You don’t have to be in within cell phone service or connected to wi-� to collect data. �is manual o�ers a general explanation of how to install the EpiCollect application, as well as how speci�cally to use EpiCollect for the greenspace access point mapping project developed by Portland State University and Portland’s Audubon Society. �e Epicollect website has an excellent tutorial for those interested in creating other projects for organizational or personal use. Please see www.epicollect.net for further details.
As this data-collection tool is a project-based application, the unique web interface al-lows anyone in possession of the unique project URL and interest in the data to view entries online. Data can also be viewed and sorted in Google Earth and/or Google Maps.
Epicollect is available for a wide range of Android and Apple devices and platforms. A list of the veri�ed and tested devices can be found at: http://www.epicollect.net/instructions/handsets.html. While this list is not exhaustive, our team has found that most devices will run the software with little or no problem. Please note; however, that screen images may di�er on your device from those pictured in this manual Epicol-lect is a free application and can be downloaded and installed from either the Android Market (Google Play) or the Apple App Store.
What Is EpiCollect?

A Guide to Mapping Green Spaces 11
Getting StartedIn order to complete an access point assessment of a greenspace using EpiCollect, follow the steps below.
Step 1: Download the EpiCollect application for iPhone or Android Step 2: Download your organization’s EpiCollect GreenAccess form Step 3: Learn How to Collect Green Space Access Points Step 4: Review Field Data Collection Protocol and Tools Step 5: Prepare and Satisfy Field Work Prep Requirements Step 6: Collect Data in the Field Step 7: Upload Data to Database(s) and Perform Data Analysis

Finding Nature in Your Neighborhood12
When you open the EpiCollect app, you will see the screen at left.
Before you can do anything else, you will need to select a project.
To select a project, tap the menu button on your device.
�is will give you the option to load a project or delete a project.
Loading a ProjectSelect the “Load Project” option.
Enter in the name of the EpiCollect form that your organization is currently using. �e name is case sensitive. Once you have entered the project name, select “OK.”
Note that now there is a name in the blue box under “Select Project.” If you load more than one project, and you want to switch projects, click the down arrow to open a menu where you can select the name of the project you would like to access.
Below the name of the selected project is the URL for the web site where the data you collect and sync can be found.
To create an entry, select the “New Entry” button.
EpiCollect for Android
A Guide to Mapping Green Spaces 13
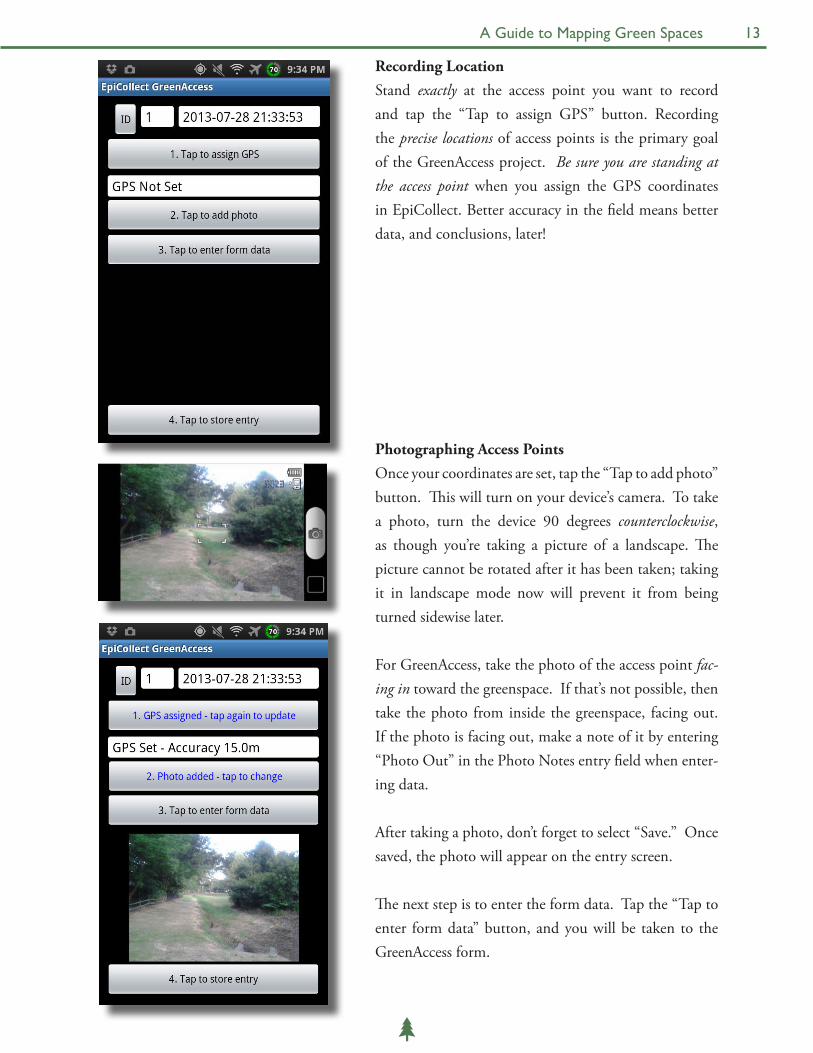
Recording LocationStand exactly at the access point you want to record and tap the “Tap to assign GPS” button. Recording the precise locations of access points is the primary goal of the GreenAccess project. Be sure you are standing at the access point when you assign the GPS coordinates in EpiCollect. Better accuracy in the �eld means better data, and conclusions, later!
Photographing Access Points Once your coordinates are set, tap the “Tap to add photo” button. �is will turn on your device’s camera. To take a photo, turn the device 90 degrees counterclockwise, as though you’re taking a picture of a landscape. �e picture cannot be rotated after it has been taken; taking it in landscape mode now will prevent it from being turned sidewise later.
For GreenAccess, take the photo of the access point fac-ing in toward the greenspace. If that’s not possible, then take the photo from inside the greenspace, facing out. If the photo is facing out, make a note of it by entering “Photo Out” in the Photo Notes entry �eld when enter-ing data.
After taking a photo, don’t forget to select “Save.” Once saved, the photo will appear on the entry screen.
�e next step is to enter the form data. Tap the “Tap to enter form data” button, and you will be taken to the GreenAccess form.

Finding Nature in Your Neighborhood14
Entering Form Data�e �rst �eld on the form is the “Photo Notes” �eld, where you can make notes about the pho-to that you just took. If you took your photo from inside the greenspace, facing out, then this is where you would make a note of it by typing “photo out.”
Categorizing Access Points�e next �eld is the “Access Point Category,” where you are able to indicate whether the access point is formal access, open access, or informal access.
Formal Access is a path, gate, or an opening which has been intentionally created by the cus-todians of the greenspace in order to allow public entry.
Open Access is where a person may enter the greenspace unobstructed anywhere along an edge of a greenspace, such as where the grassy edge of a park meets the sidewalk.
Formal Access Open Access

A Guide to Mapping Green Spaces 15
Informal Access is a point where people have worn or broken through grass, bushes, fences, or other barriers which would otherwise prevent entry.
Restricted Pedestrian Access�e next �eld is where you can indicate if an access point is not accessible to pedestrians. If an access point is blocked by a locked gate, temporary clo-sure, or signage, then check “Yes” for this �eld. If the access point is open to pedestrians, but closed to bikes, cars, or other modes of transportation, do not check “Yes” for this �eld. For this project, we are concerned with pedestrian access.
Informal Access
Restricted Pedestrian Access

Finding Nature in Your Neighborhood16
Accessibility to Persons with Limited Mobility To assess whether an access point is accessible to persons with limited mobility, there are sev-eral factors that must be considered.
If the access point is level with the walkable street and trail network, is wide enough for a wheelchair to get through, and the surface is paved, then it is accessible.
If the access point is not level with the walkable street and trail network, then the access point must have a ramp or a curb cut to be consid-ered accessible.
If the access point appears accessible to persons with limited mobility, then check “Yes” for this �eld.
Additional CommentsUse the “Access Point Comments” �eld to note: 1) how pedestrian access is restricted, 2) how access is restricted for a person with limited mobility, 3) safety or security issues, 4) poten-tial con�icts between recreational users, such as bikes and pedestrians, 5) potential impacts to environmentally sensitive areas, such as an informal trail through a nature preserve. Try to keep comments brief.
Surveyor NameEnter your �rst and last name under “Surveyor Name.” You need only to do this at the �rst ac-cess point you record. For other access points you record on the same day, leave this �eld blank.

A Guide to Mapping Green Spaces 17
Saving the EntryOnce you have entered all of the form data, select “con�rm.” You will be taken back to the entry screen, which will now look like this:
Now, you should tap the “Tap to store entry” but-ton. Once you do that, the “Entry Saved” window will appear:
Editing Your EntryIf you want to go back and look at or edit the entry you just made, select “Return to Entry.”
Making a New EntryTo log another access point, select “New Entry.” You will be taken to a new entry screen, where you can begin recording the next access point.
Listing and Synchronizing Your Entries To look at all or your entries, or to synch your en-tries, select “List/Synch.” When you select “List/Synch,” you will be taken to this screen.
Entries which have not been synchronized will have an “N” next to them. If you want to look at or edit an entry that has not been synchronized, tap the entry.

Finding Nature in Your Neighborhood18
Once you have synchronized your entries, you will not be able to edit them. Your organization will be able to edit entries via the EpiCollect website; if there is something you think needs to be changed, contact your project administrator.
To synchronize your entries, select the “Tap to Synchronise Entries” button. If synchronization is successful, entries that have been synchronized will have a “Y” next to them.
Once you have synchronized your entries, you can view them at: http://epicollectserver.appspot.com/project.html?name=GreenAccess

A Guide to Mapping Green Spaces 19
Loading a ProjectWhen you open the EpiCollect app, you will see a screen that looks like the screen at left.
Before you can do anything else, you will need to load a project. To load a project, open the “Settings” menu.
Tap the box under “User Email” and enter your e-mail address.
Tap the box under the word “Project” to select a project. �is window will open:
Select new, and enter in the name of the GreenAccess form that your organization is currently using. �e form name is case sensitive.
Select “OK” to download the project form. When downloaded, the Form URL will appear in the box above the project name.
Once the form is downloaded, you will be noti�ed that the download is complete. Select “OK”.
Now, press the EpiCollect button at the top of the settings screen to return to the main screen.
EpiCollect for iPhone

Finding Nature in Your Neighborhood20
Making an EntryTo make an entry, open the “New Entry” menu.
Recording the LocationOn this form, you will �rst see the entry time, and the entry status.
Below that, you will see your location, in latitude and longitude.
Stand exactly at the access point, then tap the “Tap to use your current location” button to record your current location as the location of the access point. Recording the precise locations of access points is the primary goal of the GreenAccess project. Be sure you are standing at the access point when you assign the GPS coordinates in EpiCollect. Better accuracy in the �eld means better data, and conclusions, later!
Photographing Access PointsOnce your coordinates are set, tap the camera button at the bottom of your screen. �is will turn on your device’s camera.
To take a photo, turn the device 90 degrees counterclockwise, as though you’re taking a picture of a landscape. �e picture cannot be rotated after it has been taken; taking it in landscape mode now will prevent it from being turned sidewise later.
For GreenAccess, take the photo of the access point facing in toward the greenspace. If that’s not possible, then take the photo from inside the greenspace, facing out. If the photo is facing out, make a note of it by entering “Photo Out” in the Photo Notes entry �eld when entering data.

A Guide to Mapping Green Spaces 21
Making an Entry�e “Photo Notes” �eld is where you can make notes about the photo that you just took. If you took your photo from inside the greenspace, facing out, then this is where you would make a note of it by typing “photo out.”
Categorizing Access Points�e next �eld is the “Access Point Category.” Here is where you indicate whether the access point is a formal access point, open access, or informal access.
Formal Access is like a path, a gate, or an opening which has been created by the custodians of the greenspace in order to allow entry.
Open Access is where a person may enter the greenspace unobstructed anywhere along an edge of a greenspace. An example of this kind of access point is where the grass of a park meets the sidewalk.
Formal Access
Open Access

Finding Nature in Your Neighborhood22
Informal Access is a point where people have worn through or broken through grass, bushes, fences, or other barriers which would otherwise prevent entry.
Restricted Pedestrian Access�e next �eld is where you can indicate if an access point is not accessible to pedestrians. If an access point is blocked by a locked gate, temporary clo-sure, or signage, then check “Yes” for this �eld. If the access point is open to pedestrians, but closed to bikes, cars, or other modes of transportation, do not check “Yes” for this �eld. For this project, we are concerned with pedestrian access.
Informal Access
Restricted Pedestrian Access

A Guide to Mapping Green Spaces 23
Accessibility to Persons with Limited MobilityTo assess whether an access point is accessible to persons with limited mobility, there are several factors that must be considered.
If the access point is level with the walkable street and trail network, is wide enough for a wheelchair to get through, and the surface is paved, then it is accessible.
If the access point is not level with the walkable street and trail network, then the access point must have a ramp or a curb cut to be considered accessible.
If the access point appears accessible to persons with limited mobility, then check “Yes” for this �eld.
Additional CommentsUse the “Access Point Comments” �eld to note 1) how pedestrian access is restricted, 2) how access is restricted for a person with limited mobility, 3) safety or security issues, 4) potential con�icts between recreational users, such as bikes and pedestrians, 5) potential impacts to environmentally sensitive areas, such as an informal trail through a nature preserve. Try to keep comments brief.
Surveyor NameEnter your �rst and last name under “Surveyor Name.” You need only to do this at the �rst access point you record. For other access points you record on the same day, leave this �eld blank.

Finding Nature in Your Neighborhood24
Saving, Listing and Syncing Entries
Saving Your EntryOnce you have entered all of the form data, tap the “save” button at the bottom of your screen.
Listing/Syncing Your EntriesTo list, edit, and sync your entries, go back to the main EpiCollect screen.
Tap the “List Entries” button. You will be taken to the entries screen.
Editing Past EntriesTo edit a past entry, tap that entry to go to the data form for that entry. Once you have synced your entries, you will not be able to edit them from your device. If you believe that an entry that has already been synced needs to be changed, contact your project administrator, so that the entry can be changed on the website.
Synchronizing Your EntriesEntries which have not been synchronized will have text below them telling you that they have not been synchronized. To synchronize your entries, tap the “Sync” button. If synchronization is suc-cessful, the heading at the top of the screen will say “Sync complete,” and there will no longer be any text below the entries.
Once you have synchronized your entries, you can view them at: http://epicollectserver.appspot.com/project.html?name=GreenAccess

A Guide to Mapping Green Spaces 25
Once you’ve downloaded your organization’s EpiCollect project, it is important to review the following:
• A copy of this training manual• A satellite map of greenspace geographical features• A GoogleMaps street network map• The Field Cheat Sheet• The Field Guide Checklist• The project database on EpiCollect’s website
Please carefully consider this manual prior to collecting data, and be sure to contact your project administrator if you have any questions. In the Appendices, you will �nd a Field Cheat Sheet and a Field Guide Checklist.
Plan Your RouteBefore you set out on your green space survey, plan your route and time with your survey partner. It is advisable that volunteers to take on consistent roles for the duration of the survey. Volunteers should initiate their survey at a corner of the assigned green space and proceed around its perimeters by walking in a clockwise direction, which reduces the risk of data duplication. A phone-baesd mapping application – such as Google Maps – can help you navigate the street network surrounding the greenspace. An aerial map as found on Google Earth, Google Maps, or Bing can provide you with additional geographic or topographic landmarks that can be useful in survey time management and to orientate possible access points.
�e organization’s sta�, especially in cases of uno�cial greenspace surveys, may provide maps for you. Maps of o�cial parks and natural areas can be found by conducting a web search on such Internet engines as Google and Bing.
Using MapsSatellite and street network maps will assist you in your assessment of the location of access points that connect a green space to the street network. Once you’ve planned
In the Field

Finding Nature in Your Neighborhood26
your route, you will survey the perimeter of a designated green space. Moving in a clockwise direction, pay attention to where and how streets, paths, trails, or other pedestrian thoroughfares connect with the green space. Some greenspaces do not have many intersecting streets or formal access points, so it is important to carefully observe where pedestrians can walk into a greenspace from the street network.
Pre-Survey Check ListAfter you’ve read and considered this manual, you are ready to go into the �eld and begin your survey. In the �eld, you’ll need these materials:
• A smartphone (iPhone or Android) with Epicollect’s GreenAccess form• The Field Cheat Sheet• The Field Guide Checklist• Aerial and satellite maps of the greenspace• A binder or folder to keep maps and materials organized• A time tracking device• Weather appropriate clothing, comfortable footwear, and a bottle of water/
snacks

A Guide to Mapping Green Spaces 27
Pre-Survey• Download Epicollect application onto IPhone or Android smartphone• Download your organization’s EpiCollect GreenAccess form onto smartphone• Read “A Guide to Mapping Green Spaces”• Prepare two maps of green space area: satellite and street network map• Plan route with time and green space area in mind• Obtain Field Cheat Sheet• Obtain a binder or folder for material/map organization• Obtain a time tracking device• Remember weather-appropriate clothing, comfortable footwear, and water/
snacks
Conducting the Survey• Begin survey at green space site corner
• Begin to track the time
• Walk along site perimeters in clockwise direction
• Reference maps for street and landmark guidance
• Onceyourteamhasidentifiedanaccesspoint,enterdataontotheEpiCollect
form
Survey Entries• Tap for GPS location
• Take photo of access point
• Provide any necessary photo notes
• Select one access point category
• If applicable,selectYes ifpointisPedestrianRestricted
• If applicable,selectYes ifpointisaccessibletoPersonswithLimitedMobility
• Provideadditionalcomments,ifnecessary
• Provide one daily entry of surveyor’s last name
• Synchronize data entries post day’s surveys
Post-Survey• UploaddataentriesontoGoogleMaps,GoogleEarthandArcGIS
GreenAccess Field Guide Checklist

Finding Nature in Your Neighborhood28 Finding Nature in Your Neighborhood28
1. Location Stand at the access point and tap location bar to get current GPS Location.
GreenAccess Field Guide
2. take a Photo Turn device 90 degrees counter clockwise.
3. Photo notes
Note if you take the photo facing out of the greenspace and type “photo out” in the Photo Notes text field.
4. access category
Select only one category to describe...Formal access
Informal access
Open access
X
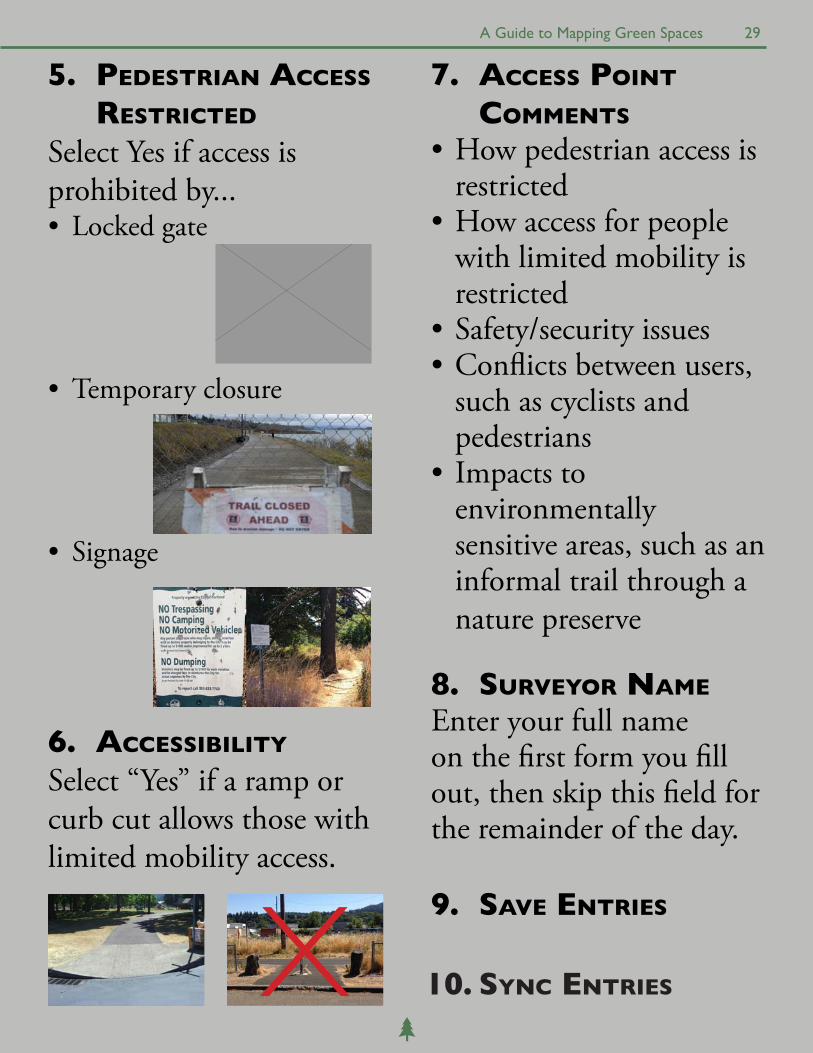
5. PEDESTRIAN ACCESS
RESTRICTED Select Yes if access isprohibited by...• Locked gate
•Temporary closure
• Signage
6. ACCESSIBILITY Select “Yes” if a ramp or curb cut allows those with limited mobility access.
8. SURVEYOR NAME Enter your full name on the �rst form you �ll out, then skip this �eld for the remainder of the day.
9. SAVE ENTRIES
7. ACCESS POINT COMMENTS •How pedestrian access is
restricted•How access for people
with limited mobility is restricted
•Safety/security issues•Con�icts between users,
such as cyclists and pedestrians
• Impacts to environmentally sensitive areas, such as an informal trail through a nature preserve
X 10. SYNC ENTRIES
A Guide to Mapping Green Spaces 29

Finding Nature in Your Neighborhood30
After �eld data collection is complete, you will want to trasfer the data to a usable GIS format. �e instructions below describe how to export the data from an online EpiCollect project to Google Maps or ArcGIS.
Load Points in Google Earth• Go to project page < http://epicollectserver.appspot.com/project.html?name=GreenAccess>• Click Show Map• Above the map click Google Earth• Click where it say “Click here (or the icon) to view data in Google Earth” to
download the .kml �le which can then be opened by clicking (or double clicking) the �le
• Ignore the Access the KML Feed option unless you need to see the points being added in near real-time
CSV to ArcMap• Download CSV from EpiCollect project page data• Rename �le with appropriate title• Add CSV �le to your map• Right-click on its name and click on “Display XY Data”• “X Field” should default to “longitude” and “Y Field” should default to “latitude”
“Z Field” should be changed from “<None>” to altitude. Coordinate system defaults to State Plane Oregon North
• Click the “Edit” button and choose “Geographic Coordinate Systems” WGS 1984 Click OK, then OK again to plot your points
• On the Table of Contents, select the “List by Drawing Order” option• Right click on the layer you have created and choose Data->Export. �is will create
a new shape�le• Add the new layer to the map and remove the CSV �le
Important NotesIn order to reduce problems with projections it is recommended that you �rst load data in the projection you will be working in the most. For most applications in the state of Oregon this would mean loading a shape�le from RLIS to ensure that NAD_1983_HARN_StatePlane_Oregon_North_FIPS_3601_Feet_Intl is used.
Post-Collection GIS Data Analysis

A Guide to Mapping Green Spaces 31
!H!?!H !H!?!? !H
!?
!?!H!?!?!?
!H!H
!R!H!R!H!H!H!H!H!H!H!H!H
!R!H!H
!H!?!?!H!H!H!H!H!?!H
!H!H!H!H!H!H!H!H
!H!H!H!H!H!H!H!H!H!R!H
!H!H!H
!H!H!H!H!H
!?!?!H
!H
!H
!H!H
!H!H !H
!H!?!?!?!?!H!H
!?!?
!H!H!H!H!H!H!?!H!H!H!H!H!H
!H!H
!R!R!R
!R!R!R!H
!H!H!H!H!H
!H!H!H!H!H!H!H
!H!H!?!?!H!?!H!H!H
!H!H!H!H!H!H!?
!H!H!H
!H
!H!H!H!H
!H!H!H!H
!H!H
!H!H!H!H!?!?!H
!R!H!H!H
!H!?!H!?!?!?!H!H!?!?!H
!H!H!H!R
!H!?!H!H!H
!?!?!?!?!?!H
!?!?!?!?!?!?!?!R!H
!H!?!H!H!R!?
!?!?!H!H !H!?!H!?!?
!?
!?!H!?!?!?!?!?!H!H
!H
!H
!H!H
!H!H!H
!?!?!H!H!?
!H!H!H!?
!?!H!H
!?!H!?!?
!H!H
!H!H!H
!H!H!H!H!H!R!R
!H !H
!H!H
!R!R!H!H!H!R!R!R
!H
!H!H !H
!R!H!H!H!H!R
!H!H
!R
!R!H!H!R!?
!H!R!H!R!R!H!R
!H!H!R!R
!H
!H!H!H!H
!H
!H!H!H!H!H
!H!H!H!H
!H
!H!H!H
!H!H!H!H
!H!H!H
!H!H!H
!H
!H!?!H!?
!H!H
!H!R
!H!R
!? !R!?!R
!H
!H
!R!R!R!R!H!R!H!H
!H
!H
!H!H!H!H
!H!H!H!H
!H!H!H!H!H!H
!H!R!H!H !H!H!H!R!H
!H!?!H!H
!H!H
!H !R!H
!H
!H!H
!R!?!R !?!?
!R!?!H
LENTS
PLEASANT VALLEY
CENTENNIAL
HAZELWOOD
POWELLHURST-GILBERT
MILL PARK
MONTAVILLA
GRESHAM - CENTENNIAL
GRESHAM - ROCKWOOD
HAPPY VALLEY
GRESHAM - SOUTHWEST
HAPPY VALLEY
GLENFAIR
LENTS/POWELLHURST-GILBERT
CENTENNIAL/PLEASANT VALLEY
PLEASANT VALLEY/POWELLHURST-GILBERT
HAPPY VALLEY
GRESHAM - NORTHWEST
0 1 20.5Miles
´Access Type
Unassigned
!H Formal
!? Informal
!R Open
®s®s®s®s®s®s®s®s®s®s®s
®s®s®s®s®s
®s®s®s
®s®s®s®s®s®s®s®s
®s®s
®s
®s
®s
®s®s
®s®s®s®s
®s®s
®s®s®s®s
®s®s®s®s®s®s®s
®s
®s®s®s®s
®s®s®s ®s®s®s®s®s
®s®s®s®s
®s
®s®s
®s®s
®s®s®s
®s®s
®s
®s®s
®s®s®s
®s
®s®s®s®s
®s®s®s ®s
®s®s®s
®s®s®s
®s
®s®s®s
®s®s®s
®s
®s®s
®s®s®s®s®s®s
®s®s®s®s
®s
®s
®s®s®s®s®s®s
®s®s®s®s
®s®s®s®s®s
®s®s®s®s®s®s®s®s®s
®s
®s
®s
®s®s
®s
LENTS
PLEASANT VALLEY
CENTENNIAL
HAZELWOOD
POWELLHURST-GILBERT
MILL PARK
MONTAVILLA
GRESHAM - CENTENNIAL
GRESHAM - ROCKWOOD
HAPPY VALLEY
GRESHAM - SOUTHWEST
HAPPY VALLEY
GLENFAIR
LENTS/POWELLHURST-GILBERT
CENTENNIAL/PLEASANT VALLEY
PLEASANT VALLEY/POWELLHURST-GILBERT
HAPPY VALLEY
GRESHAM - NORTHWEST
0 1 20.5Miles
´Handicap Accessibility
Not Accessible
®s Accessible
At the time this guide was written, the tool included with ArcMap 10.1 to convert KMZ �les to Layers was found to be unsatisfactory as attribute data would be lost. Various other tools purporting to convert KMZ to SHP were evaluated and found to be de�cient as well. Should the quality of these tools improve in the future, it would be appropriate to reconsider using the KMZ �les in ArcMap rather than the CSV �les as described here.
Maps illustrate access points collected using EpiCollect in ArcGIS with select attributes.
Finding Nature in Your Neighborhood32
EpiCollect administration can only be performed by the administrator account which set up the project. �is section describes the additional functionality that is added when the user is logged into this account using the EpiCollect login interface.
Project Administration• Ability to Create/Edit Project Form• Ability to Update Homepage description and picture
View Data• Ability to Add Entry, Edit Entry, or Remove Entry To login as administrator, perform the following steps:1. Navigate to the EpiCollect Project website. a. Use the standard navigation link: www.epicollect.net/project.html?name={Replace_with_ProjectName}2. On the project website click on ‘Login’ at the bottom on the website a. Login using the Project Owner gmail account with password b. Select and allow the development server access to the Google account.
�is presents the Project Administration section, which contains the following options:Create or Edit Project Form �is function will allow the administrator to change the survey form that was created for the project.
Update Homepage Description and Picture �is function will allow the administrator to change the project homepage description and picture/icon. �e website homepage is what the visitor/user sees upfront.
Change/Edit Project FormCaution: Make sure that all volunteers have synced their data prior to making changes to the form. When making changes to an active project, unintended consequences or data loss may result.
1. Click on ‘Create or Edit Project Form’2. �is will bring up the Form Builder interface. �is is a Drag and drop interface.
EpiCollect Project Administration
!

A Guide to Mapping Green Spaces 33
Instructions on the Form Elements, Form (preview), and Form Details can be found at www.epicollect.net/instructions/FormBuilder.html
3. Change the form as desired.4. To save the current form click on ‘Finished – Save Form!’ button5. To discard the form changes and return to the Home menu click on the ‘Back to
project home’ icon at the top left of the screen.6. Note: All changes will be discarded and not saved.
Change Homepage Description and/or Homepage Image1. Click on ‘Update Homepage description and picture’2. �is will bring up the current description a prompt for a new description along
with the current picture. �is page will also give the option to upload the a project image or to simply remove the current image.
3. To make changes: Click the ‘Save Changes’ button. To discard changes: Click the ‘Revert to saved version’ button.
EpiCollect Administration also allows for the data to be added, edited or removed from the tables. �is ability is granted only to the Project Administrator/Owner. �is is an additional menu item line in the Browse Project Data within View Data section.
Edit, Add, or Remove Data1. Click on the ‘Browse Project Data’ within the ‘View Data’ section2. �is will bring up the standard Database Entries interface.
To Add an Entry Click on the Add Entry menu item on the web page.You’ll be presented with a pop-up Add/Edit entry page. �is will allow you to enter the entry details, entry image and location. Follow the prompts as presented and click on ‘Save’ to save the data or ‘Cancel’ to close the pop-up.
To Edit an EntryHighlight the entry and Click on the Edit Entry menu item on the web page.You’ll be presented with a popup Add/edit entry page. �is will allow you to change the entry details, entry image and Location. Follow the prompts as presented and click on ‘Save’ to save the data or ‘Cancel’ to close the popup.
To Remove an EntryHighlight the Entry and Click on the Remove Entry menu item on the web page. �is will remove the highlighted entry from the database. Please note the action is permanent.

Produced byJames BryantMark CordellGarry Deihl
Abel GebrezgiTamara Layden
�omas Arenas MarshallKathryn Newman
Amy Pitts-LoreLeah Sobieck
Designed and Edited byAmy Pitts-Lore
In Association WithJim Labbe, Audubon Society of Portland
Meg Merrick, Ph.D., Institute of Portland Metropolitan Studies, PSUAugust 2013
Special thanks to Josh Darling from Portland Parks & Recreation for helping with base data and project development.