final project report - vtechworks.lib.vt.edu pseudo relevance feedback ... this is a very important...
TRANSCRIPT

Final Project Report
CS 5604: Information Storage and Retrieval
Solr/Lucene Team
Instructor: Dr. Edward A. Fox
Andrej Galad, Long Xia, Shivam Maharshi, Tingting Jiang {agalad, longxia1, shivam1, virjtt03} @ vt.edu
Virginia Polytechnic Institute and State University May 4th, 2016

1
Table of Contents
1. Abstract ........................................................................................................................ 42. Overview ...................................................................................................................... 4
2.1 Management ........................................................................................................ 42.2 Problems Faced .................................................................................................. 52.3 Solutions Developed (work in progress) .............................................................. 5
3. Literature Review ......................................................................................................... 64. Requirements ............................................................................................................... 75. Design .......................................................................................................................... 8
5.1 Current Design .................................................................................................... 85.2 Additions to Current Design ................................................................................. 9
6. Implementation ............................................................................................................. 96.1 Overview .............................................................................................................. 96.2 Timeline Table ................................................................................................... 106.3 Weekly Status .................................................................................................... 12
7. User Manual ............................................................................................................... 157.1 Import Collection into HBase Column Family .................................................... 157.2 Set Up a Proxy to Access Solr Service on the Cluster ...................................... 197.3 Extend Solr with custom libraries ...................................................................... 20
8. Developer Manual ...................................................................................................... 238.1 Architecture ....................................................................................................... 23
8.1.1 HBase .......................................................................................................... 238.1.2 Lucene ......................................................................................................... 258.1.3 Solr .............................................................................................................. 258.1.4 Morphline [23] .............................................................................................. 298.1.5 Lily HBase Batch / NRT Indexer .................................................................. 33
8.2 Installation and Configuration ............................................................................ 348.2.1 HBase .......................................................................................................... 348.2.2 Solr .............................................................................................................. 358.2.3 Lily HBase Batch / NRT Indexer .................................................................. 368.2.4 ZooKeeper ................................................................................................... 36
8.3 Tutorials ............................................................................................................. 378.3.1 HBase .......................................................................................................... 378.3.2 Lucene ......................................................................................................... 428.3.3 Solr .............................................................................................................. 43
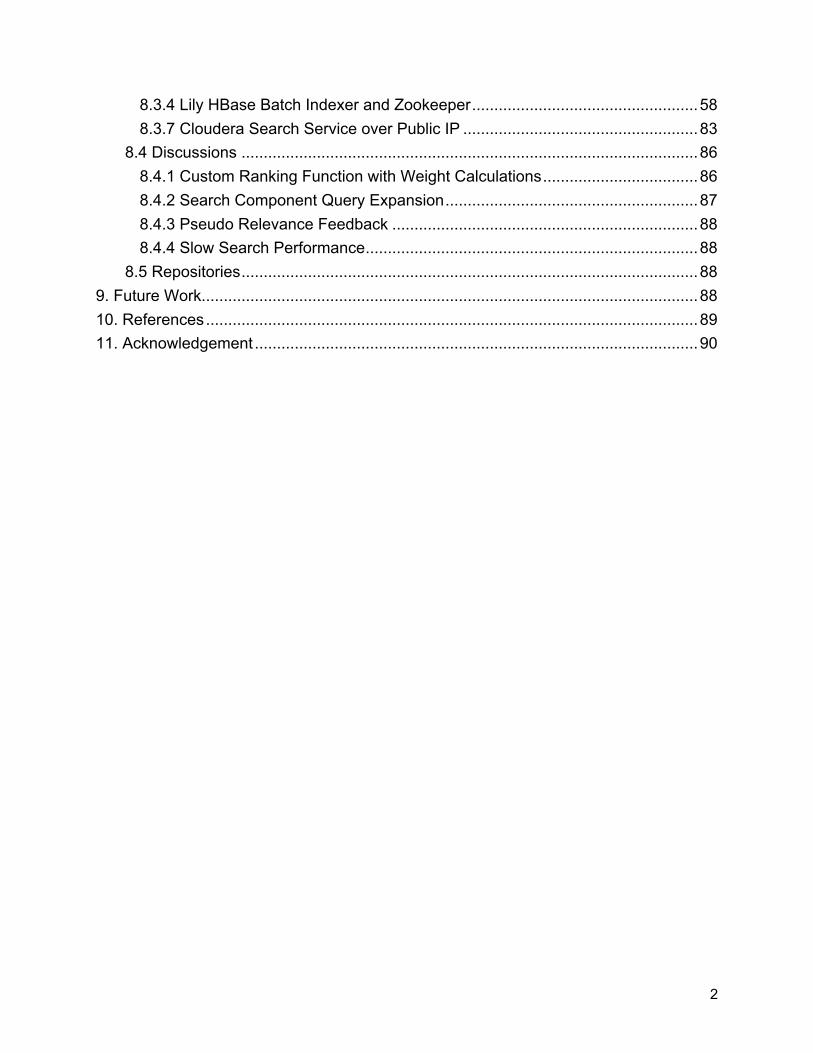
2
8.3.4 Lily HBase Batch Indexer and Zookeeper ................................................... 588.3.7 Cloudera Search Service over Public IP ..................................................... 83
8.4 Discussions ....................................................................................................... 868.4.1 Custom Ranking Function with Weight Calculations ................................... 868.4.2 Search Component Query Expansion ......................................................... 878.4.3 Pseudo Relevance Feedback ..................................................................... 888.4.4 Slow Search Performance ........................................................................... 88
8.5 Repositories ....................................................................................................... 889. Future Work................................................................................................................ 8810. References ............................................................................................................... 8911. Acknowledgement .................................................................................................... 90

3
Table of Figures
# Title Page 1. Architecture of IDEAL Project 8 2. HBase Architecture 24 3. HBase Data Model 25 4. Solr Glossary 26 5. Solr Overview 26 6. Interaction of Solr 27 7. Lily HBase Indexer Workflow 33 8. HBase-Lily-Solr Integration 34 9. Cloudera Manager 38 10. Hadoop Web Interface 41 11. Hue Web Interface 42 12. HBase Shell Import Verification 42 13. Solritas 47 14. Solr Request-Response Workflow 48 15. Solr Query Parameters 56
Table of Tables # Title Page 1. Timeline of Solr Team 10 2. Transform data from HBase table into Solr document fields 31 3. Multi-valued Solr document fields split into single-valued
Solr document fields 32
4. Solr Log Parameters 54

4
1. Abstract This report describes the contribution of the Solr/Lucene team to the improvement of general search infrastructure used for tweet and web page collections. We present our work as a collection of multiple small components and describe each of them in detail in their specific section. We get us specialized in the knowledge of Solr/Lucene, Lily Indexer, Morphline and HBase to improve the existing search infrastructure. Apart from the aforementioned technologies, since the Solr schema as well as the related configuration files has to be deployed on the Hadoop Cluster and managed by ZooKeeper, we also learned the Hadoop Distributed File System (HDFS) and ZooKeeper which run on the Hadoop Cluster. In addition, since data loaded into the Solr cores for indexing is stored in the HBase column families, in-depth knowledge on HBase data structures is also required. The Solr team is aiming to achieve three major goals. Firstly, besides achieving successful batch indexing on the cluster, we will also provide additional support of a Near Real Time (NRT) indexing mechanism capable of updating the index automatically with new additions/ modifications of data in HBase column families. Secondly, we will use our indexed data to develop custom ranking functionalities in the Solr query processor to provide better search results. Thirdly, we will provide user access pattern information to the Collaborative Filtering team by storing the user logs generated by Solr/Hue in HBase tables. To accomplish our first goal we need to closely collaborate with other teams in understanding their HBase schema. To accomplish our second goal we need to update the existing custom ranking function in the Solr query processor, examine its performance and optimize it by iterating to achieve accurate result sets. To accomplish the third task we need to closely collaborate with the Collaborative Filtering team and provide them with user access search pattern information via the Solr logs. This includes user login and logout information, search queries made and the documents which are clicked or viewed by the end users. Apart from these three major goals we also need to work in close collaboration with the Front End team to make sure that the newly indexed data adds value to the existing system by providing a more flexible and wide variety of query sets with more precise results.
2. Overview
2.1 Management A good management of work is essential for the success of our project. To achieve this we decided to have two meetings every week to discuss our progress, plans, blockers and provide status updates recorded on our project reports. To organize and share information we created a Google Group and a GitHub repository. For online coordination and meetings we used Emails, Google Hangout and Skype.

5
Learning the technologies and achieving our end goals were two main objectives of every Solr team member. Hence we decided that all of us must have a complete knowledge of any work that is accomplished by our team. However in doing so we did not want to duplicate work and waste time, which was very limited. Hence we decided to break big pieces of work into smaller manageable units of tasks that each individual team members could accomplish alone. Learning the technologies in the existing infrastructure was a big challenge since we had no prior experience with these technologies. Hence we assigned one/two technologies to each individual team member. The responsibility of every team member would be to learn that technology and create lucid tutorials for other team members to try out for effective learning. This way, we managed to keep every team member updated with all technologies involved, at the same time keeping up the pace of our progress.
2.2 Problems Faced 1. A clear understanding of the existing infrastructure required many documentation
iterations and architecture reviews due to two reasons. Firstly, the existing infrastructure, even though not very complicated, is far from trivial. Secondly, the existing infrastructure involves many technologies that we were not at all accustomed with.
2. Learning many new technologies in a short period of time was a bit of a challenge. There were many technologies like HBase, Solr, Lily Indexer and Morphline that we directly dealt with. We had to learn a few other technologies that were part of the complete search infrastructure for a better understanding of the architecture. For example, even though our work did not involve a direct work on HDFS or Hadoop, the knowledge of these technologies is essential to our indexing work on top of the Hadoop Cluster.
3. The Solr instances that we set up, to learn and perform some basic tasks, previously were on our individual local Virtual Machines using Cloudera Search Virtual Manager. However, the deployment configurations on the Hadoop cluster were quite different. Figuring out how to properly setup the configurations on the cluster was time-consuming.
4. Understanding exactly the requirements of the Collaborative Filtering team was difficult due to the lack of specific details. Additionally, most of the communication was verbal during class and hence no requirement documentation was present for reference. After a few conversations specific requirements were received.
5. While deploying some of our solutions like Lily HBase NRT indexing on the Cluster and custom Solr search handler, we faced problems due to the lack of the required administrative privileges. We talked to Sunshin for guidance, who was very helpful and supportive during the process.
6. As Solr is deployed separately in the cluster - on a different machine (not node1.dlrl) - we couldn’t integrate our custom search component with our collection (as this requires copying compiled jars to the machine where Solr is hosted).
2.3 Solutions Developed (work in progress) We have developed the following solution:
1. We have set up a common Cloudera search virtual machine and made it available for all the team members. This will help us to better collaborate with each other and verify our

6
scripts before executing them in the real IDEAL infrastructure. This way, we will make sure not to break anything in the IDEAL environment or block the other teams.
2. Since the majority of our work deals with Solr, everyone in our team has set up their own Solr instance on our desktop machines for its in-depth understanding.
3. We have learned about the IDEAL infrastructure on the Hadoop Cluster in more depth. Since now we are comfortable with that environment, we are deploying our solutions (developed on Cloudera Search Virtual Machine) on it in an incremental fashion.
4. In this project, we are dealing with large collections across distributed nodes in the Hadoop Cluster. Apache ZooKeeper is a centralized service to maintain and coordinate the distributed processing. We have learned how to install, run and configure ZooKeeper in our Cloudera Search Virtual Machine.
5. We have successfully configured the Lily indexer so that our Cloudera Virtual Machine performs near real time indexing. That is, when we turn on NRT indexing, all the updates in an HBase table are automatically reflected in our Solr indexing. We could not deploy it on the Hadoop Cluster for now due to lack of privileges but we are currently working with Sunshin to resolve them.
6. We have finished building up the initial Solr schema to index the common data provided by the Collection Management team.
7. We have figured out how user access data can be obtained from the Solr logs and have shared this detail with the Collaborative Filtering team. We have proposed that the Collaborative Filtering team will fetch the required information from these logs.
8. We experimented with Solr supported query functions to score and rank documents to better match user’s information need.
3. Literature Review Since the majority of our work is the extension of the Solr team last year, we took pointers from their report for relevant references. However we also referred to many additional information sources for the technologies involved in our work. We decided to read the Manning’s Solr in Action and Lucene in Action since the majority of our work deals with Solr. These books provide us with a core understanding of the internals and usage of Solr which was essential for us. We also went through the official documentation of Cloudera Search service [1], Lily indexer [2], ZooKeeper [3,4] and HBase [5,6,7,8]. These helped us understand their basic usage and internal information in more depth which we might need in case we run into related difficulties in the future. The textbook Introduction to Information Retrieval [7] is giving us a powerful theoretical background on many concepts that are important for us to understand techniques like indexing, similarity measures, etc. We have reviewed chapters 6 & 7 which cover ranking functions and similarity measures. In Section 6.1 we learned about parametric and zone indexing techniques that allow us to retrieve documents by metadata. In Section 6.2 we learned the idea of weighting the importance of terms in a document represented by the Vector Space Model, discussed in Section 6.3. This is a very important topic from the perspective of Solr, where we can boost relevance of certain terms using weights. Section 6.4 introduces the famous tf-idf weighting

7
function. Section 7.1 describes a ranking algorithm, the knowledge of which will prove to be very useful while writing our custom ranking function for the Solr query processor. Solr in Action [8] provides the knowledge and techniques necessary to get Solr up and running. It also gives information about the underlying Solr architecture and covers key concepts through several out-of-the-box features. We are also referring to the Solr Reference Guide [9] that comes with the bundle and the Solr wiki [10] to get the latest information on Solr configurations and features. Lucene is the underlying Java search library for Solr. Lucene in Action [11] covers the overall architecture of Lucene and how it can be manipulated to get the customized features using Solr.
4. Requirements At a high level, we have identified a list of requirements that we need to accomplish in this project.
1. Build a Solr schema to index data from the new HBase column families created by teams such as - Collection Management, Collaborative Filtering, Topic Analysis, Classification and Clustering & Social Network. This requires collaboration with all these teams.
2. Configure the Lily indexer to add the support of Near Real Time (NRT) indexing for the data received from the HBase column families. This requires updating Lily configuration files without breaking the current batch indexing support.
3. Create a custom ranking function in the existing Solr query processor using the data from the new HBase column families to improve the Solr search query results.
4. Enable Solr logs to store the user access data for the Collaborative Filtering team to use. The following are the exact requirements that have been acquired from the Collaborative Filtering team after a few discussions:
a. They need Hue end user names and activities associated with them, such as login/logout information along with:
b. Search queries issued by these users; c. Documents, such as tweets and/or web pages clicked on (and viewed) by these
users. 5. Design a system for the Collaborative Filtering team to access the user data in an
effective way. 6. Verify the correct execution of NRT indexing by the Lily Indexer on the Cluster. 7. Verify the accuracy of our custom Solr ranking function by testing it over different
datasets. 8. Optimize our custom Solr ranking function to give accurate results. This would require
multiple iterations for proper tuning of the function.

8
5. Design We had multiple rounds of design discussions with Mr. Lee in the classroom and in the Digital Library Research Laboratory. These discussions were mainly around the existing architecture and our design proposal to achieve our end goals. During our classroom discussions, we also had detailed design discussions with other teams to understand their requirements and expectations from our Solr team. Through these discussions we recognized that the current IDEAL infrastructure is fairly mature and extensible. Hence it made sense for us to build our system on top of the same design with our own additions. We describe below the design and the additions proposed to achieve our end goals.
5.1 Current Design
Figure 1: Architecture of IDEAL Project [12]
Figure 1 shows the diagram of the current IDEAL infrastructure. The components and workflows marked in black represent the currently supported features and the ones marked in blue represent those to be completed. Following is a basic description of the current design:
1. Crawled tweets and web pages are stored in HDFS in their raw format. 2. Documents are parsed and run through linguistic processing (language and format
detection, tokenization, and stemming) by the Collection Management Team.
9
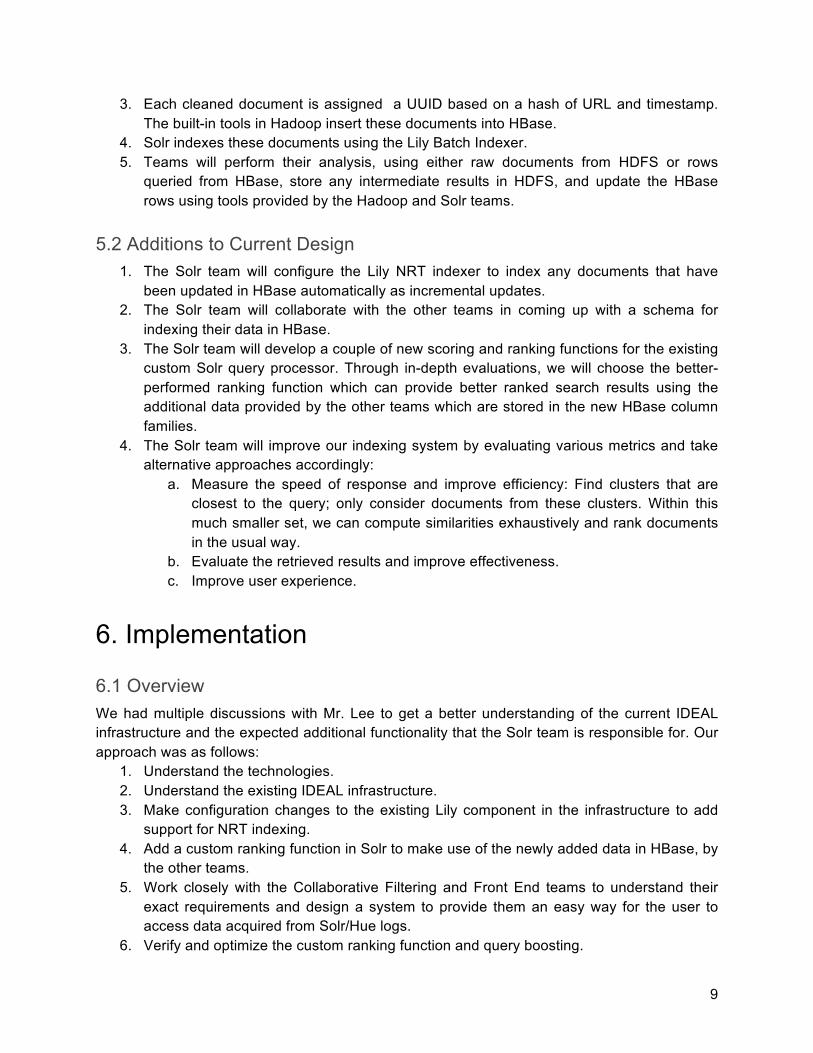
3. Each cleaned document is assigned a UUID based on a hash of URL and timestamp. The built-in tools in Hadoop insert these documents into HBase.
4. Solr indexes these documents using the Lily Batch Indexer. 5. Teams will perform their analysis, using either raw documents from HDFS or rows
queried from HBase, store any intermediate results in HDFS, and update the HBase rows using tools provided by the Hadoop and Solr teams.
5.2 Additions to Current Design 1. The Solr team will configure the Lily NRT indexer to index any documents that have
been updated in HBase automatically as incremental updates. 2. The Solr team will collaborate with the other teams in coming up with a schema for
indexing their data in HBase. 3. The Solr team will develop a couple of new scoring and ranking functions for the existing
custom Solr query processor. Through in-depth evaluations, we will choose the better-performed ranking function which can provide better ranked search results using the additional data provided by the other teams which are stored in the new HBase column families.
4. The Solr team will improve our indexing system by evaluating various metrics and take alternative approaches accordingly:
a. Measure the speed of response and improve efficiency: Find clusters that are closest to the query; only consider documents from these clusters. Within this much smaller set, we can compute similarities exhaustively and rank documents in the usual way.
b. Evaluate the retrieved results and improve effectiveness. c. Improve user experience.
6. Implementation
6.1 Overview We had multiple discussions with Mr. Lee to get a better understanding of the current IDEAL infrastructure and the expected additional functionality that the Solr team is responsible for. Our approach was as follows:
1. Understand the technologies. 2. Understand the existing IDEAL infrastructure. 3. Make configuration changes to the existing Lily component in the infrastructure to add
support for NRT indexing. 4. Add a custom ranking function in Solr to make use of the newly added data in HBase, by
the other teams. 5. Work closely with the Collaborative Filtering and Front End teams to understand their
exact requirements and design a system to provide them an easy way for the user to access data acquired from Solr/Hue logs.
6. Verify and optimize the custom ranking function and query boosting.

10
6.2 Timeline Table Table 1 gives a tentative schedule of the Solr Team which mentions the task, timeline, status and person responsible for accomplishment.
Table 1: Timeline of Solr Team
# Task Timeline Status Assigned To
1. Set up Solr on local machine and do tutorial
1/28 - 2/5 Done All
2. Set up Solr on a common machine and make it
accessible for the whole team
1/28 - 2/5 Done Shivam
3. Learn Lily indexer, do tutorials and document them for ease of learning by the
team members
2/2 - 2/7 Done Long
4. Learn Apache Zookeeper, do tutorials and document
them
2/2 - 2/7 Done Tingting
5. Study HBase and create user/developer tutorials
2/2 - 2/7 Done Andrej
6. Learn Hadoop (Pseudo Distributed Mode), do
tutorials and document them
2/2 - 2/7 Done Shivam
7. Set up a Cloudera VirtualBox VM on a common machine and make it accessible for
the whole team
2/5 - 2/9 Done Shivam
8. Create a HBase table and import a small collection into
the HBase table
2/8 - 2/14 Done Andrej
9. Index small sample data in HBase table using Lily HBase Batch indexer
2/8 - 2/14 Done Tingting & Long
10. Modify the existing schema to incorporate the demands
of other teams
2/13 - 2/23 TBD All
11. Index small sample HBase data using Lily HBase NRT
indexer
2/16 - 2/20 Done Long/Tingting
11
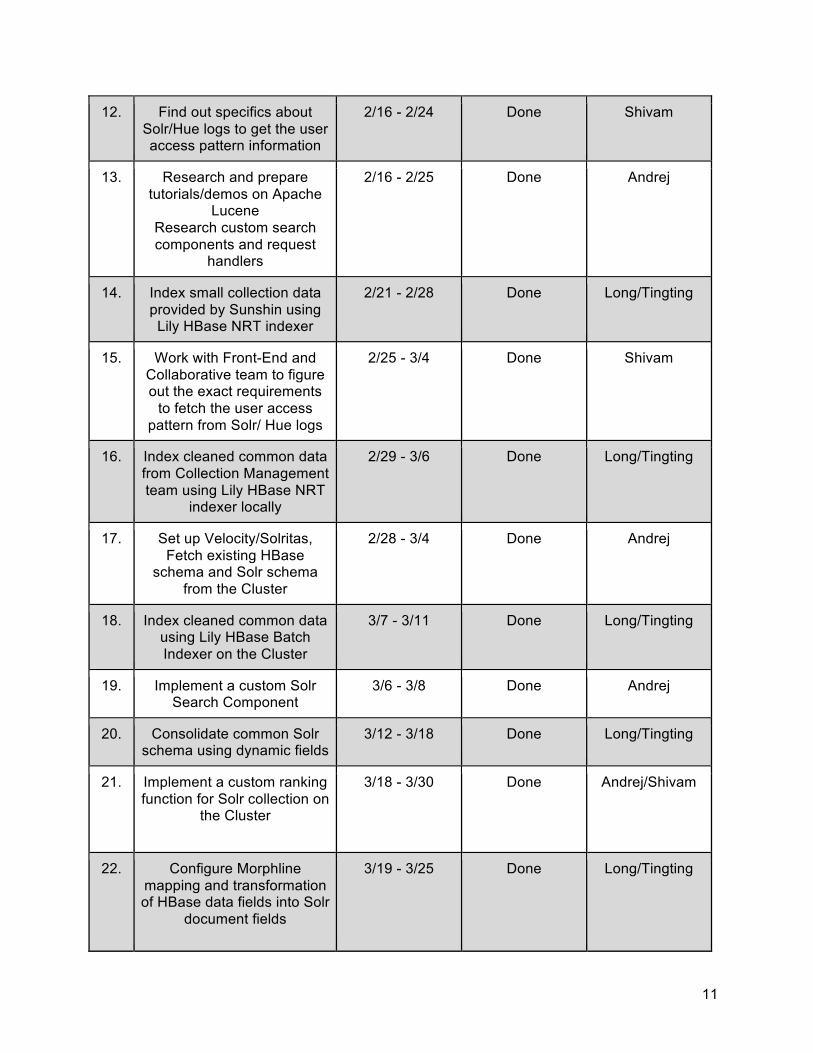
12. Find out specifics about Solr/Hue logs to get the user access pattern information
2/16 - 2/24 Done Shivam
13. Research and prepare tutorials/demos on Apache
Lucene Research custom search components and request
handlers
2/16 - 2/25 Done Andrej
14. Index small collection data provided by Sunshin using Lily HBase NRT indexer
2/21 - 2/28 Done Long/Tingting
15. Work with Front-End and Collaborative team to figure out the exact requirements
to fetch the user access pattern from Solr/ Hue logs
2/25 - 3/4 Done Shivam
16. Index cleaned common data from Collection Management team using Lily HBase NRT
indexer locally
2/29 - 3/6 Done Long/Tingting
17. Set up Velocity/Solritas, Fetch existing HBase
schema and Solr schema from the Cluster
2/28 - 3/4 Done Andrej
18. Index cleaned common data using Lily HBase Batch Indexer on the Cluster
3/7 - 3/11 Done Long/Tingting
19. Implement a custom Solr Search Component
3/6 - 3/8 Done Andrej
20. Consolidate common Solr schema using dynamic fields
3/12 - 3/18 Done Long/Tingting
21. Implement a custom ranking function for Solr collection on
the Cluster
3/18 - 3/30 Done Andrej/Shivam
22. Configure Morphline mapping and transformation of HBase data fields into Solr
document fields
3/19 - 3/25 Done Long/Tingting

12
23. Configure Extended DisMax Query Parser for boosting
queries
3/22 - 3/28 Done Shivam
24. Test Solr schema and configurations on the 6 small
collections on the cluster
3/26 - 4/2 Done Tingting/Long
25. Run Multiple Linear Regression using Apache
Math Commons Java Library
3/29 - 4/4 Done Shivam
26. Adjust Solr field names and data representations given the feedbacks from other
teams
4/3 - 4/11 Done Tingting/Long
27. Enable Velocity UI and configure custom
SearchComponent in the cluster
4/8 - 4/12 Done Andrej
28. Batch index data input for 12 collections from all the teams
in the cluster
4/12 - 4/20 Done Long/Tingting
29. Implement Query expansion strategy and results re-
ranking in custom Search Component
4/19 Done Andrej
30. Implement Pseudo Relevance Feedback in
custom Search Component
4/12 - 4/25 Done Shivam
31. Calculate weights for custom ranking parameters
4/19 - 4/25 Done Shivam
32. Verify and optimize the ranking function
4/19 - 5/2 Done All
33. Tune the configurations on the cluster to achieve NRT
indexing
4/20 - 5/2 Done Tingting/Long
6.3 Weekly Status Every Solr team member updates this document once a week. This has two major benefits. Firstly, this process allows every member in the team to keep track of our progress as whole.
13
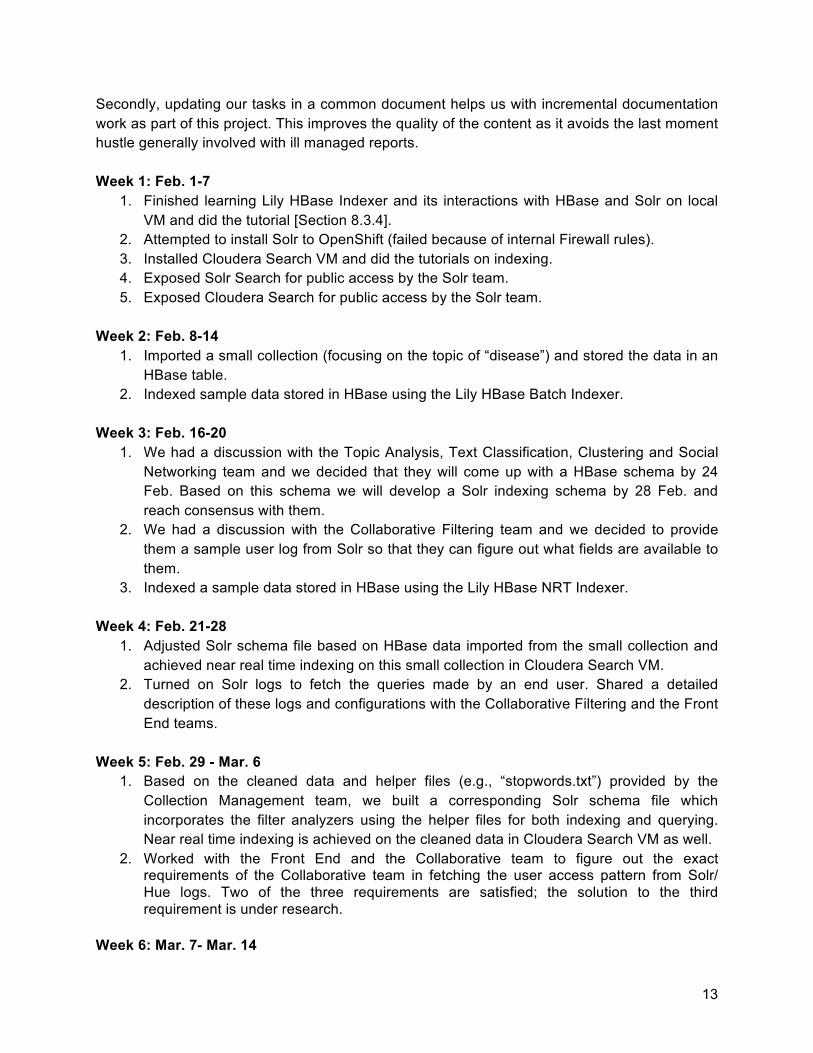
Secondly, updating our tasks in a common document helps us with incremental documentation work as part of this project. This improves the quality of the content as it avoids the last moment hustle generally involved with ill managed reports. Week 1: Feb. 1-7
1. Finished learning Lily HBase Indexer and its interactions with HBase and Solr on local VM and did the tutorial [Section 8.3.4].
2. Attempted to install Solr to OpenShift (failed because of internal Firewall rules). 3. Installed Cloudera Search VM and did the tutorials on indexing. 4. Exposed Solr Search for public access by the Solr team. 5. Exposed Cloudera Search for public access by the Solr team.
Week 2: Feb. 8-14
1. Imported a small collection (focusing on the topic of “disease”) and stored the data in an HBase table.
2. Indexed sample data stored in HBase using the Lily HBase Batch Indexer. Week 3: Feb. 16-20
1. We had a discussion with the Topic Analysis, Text Classification, Clustering and Social Networking team and we decided that they will come up with a HBase schema by 24 Feb. Based on this schema we will develop a Solr indexing schema by 28 Feb. and reach consensus with them.
2. We had a discussion with the Collaborative Filtering team and we decided to provide them a sample user log from Solr so that they can figure out what fields are available to them.
3. Indexed a sample data stored in HBase using the Lily HBase NRT Indexer. Week 4: Feb. 21-28
1. Adjusted Solr schema file based on HBase data imported from the small collection and achieved near real time indexing on this small collection in Cloudera Search VM.
2. Turned on Solr logs to fetch the queries made by an end user. Shared a detailed description of these logs and configurations with the Collaborative Filtering and the Front End teams.
Week 5: Feb. 29 - Mar. 6
1. Based on the cleaned data and helper files (e.g., “stopwords.txt”) provided by the Collection Management team, we built a corresponding Solr schema file which incorporates the filter analyzers using the helper files for both indexing and querying. Near real time indexing is achieved on the cleaned data in Cloudera Search VM as well.
2. Worked with the Front End and the Collaborative team to figure out the exact requirements of the Collaborative team in fetching the user access pattern from Solr/ Hue logs. Two of the three requirements are satisfied; the solution to the third requirement is under research.
Week 6: Mar. 7- Mar. 14

14
1. Learned how to incorporate a basic ranking function into the Solr search component. 2. Performed Lily HBase Batch Indexing of the clean data on the Cluster.
Week 7: Mar. 15 - Mar. 21
1. Held discussions with other teams and helped them design HBase column families. 2. Investigated query parsers to choose the most efficient for our use case.
Week 8: Mar. 22 - Mar. 29
1. Configured EDisMax query parser to boost search fields. 2. Defined HBase table basic schema (in collaboration with Sunshin, Collection
Management). Finalized tweet-webpage relationships. 3. Created an HBase table locally which contains the same columns with the HBase table
“ideal-tweet-cs5604s16” on the cluster, but has smaller data collection and performed both batch and NRT indexing on this small data collection.
Week 9: Mar. 30 - Apr. 5
1. Worked with Sunshin to change necessary configuration files and schema on the Cluster so that we can perform both batch and NRT indexing on the large collection on the Cluster.
2. Implemented a custom ranking function on the cluster once the NRT indexing is achieved.
3. Evaluated Apache Math commons Java library to perform multiple linear regression for calculating weights of scores from various teams like Topics, Clustering & Collection etc.
Week 10: Apr. 6 - Apr. 12
1. Discussed various strategies to calculate scoring weight with Sunshin and Mohammed. 2. Discussed different techniques to develop a custom ranking function with Dr. Fox.
Techniques like Pseudo Relevance Feedback and Query Expansion were planned for the custom Solr search component.
3. Enabled Solr custom JARs in the cluster (see User Guide). 4. Finalized the Solr schema.xml and Morphline configuration files, which conform to the
Column Family/Column definitions (along with the data types) provided by all other teams as they upload their data into our common HBase table.
Week 11: Apr. 13 - Apr. 18
1. Developed a basic Pseudo Relevance Feedback in the custom Solr search component. 2. Developed query expansion mechanism and document re-ranking in the custom Solr
search component. 3. Besides our current field specific query search, we extended our query service to free
text query search. We set the free text query default search field as ‘text’ which including data from both original tweet text and cleaned webpage text.
4. Adjust Solr field names and data representations given the feedbacks from other teams Week 12: Apr. 19 - Apr. 25
15
1. Calculated weights for custom ranking parameters. 2. Finished implementing Pseudo Relevance Feedback for custom Solr search component. 3. Tuned the configurations on the cluster to achieve NRT indexing 4. Batch-indexed data input for 12 collections from all the teams in the cluster
Week 13: Apr. 26 - May 2
1. Developed query expansion mechanism and document re-ranking in the custom Solr search component.
2. Besides our current field specific query search, we extended our query service to free text query search. We set the free text query default search field as ‘text’ which including data from both original tweet text and cleaned webpage text.
7. User Manual This section is intended for the other teams like Front End, Collaborative Filtering which are the users/clients of the Solr team. The Front End team uses Hue to provide the end users of IDEAL a search interface that takes the input from the user and converts them into a Solr query. These Solr queries are directed to the Solr collection which can be chosen from the Hue search interface. We are currently working with the Front End team in understanding how they intend to customize the search interface. This user manual shall have more information when such specifics are agreed upon. For the Collaborative Filtering team we have provided a detailed guide of how to access Solr logs, where to find them and how to interpret them, in the Developer’s Manual section 8.3.3 Solr Tutorials. We feel that this section is an appropriate place to state all the information related with Solr.
7.1 Import Collection into HBase Column Family Before importing, our Solr team has created a common HBase table in our cluster. The following describes where to locate the HBase table and how to import your data into a corresponding column family in our common HBase table.
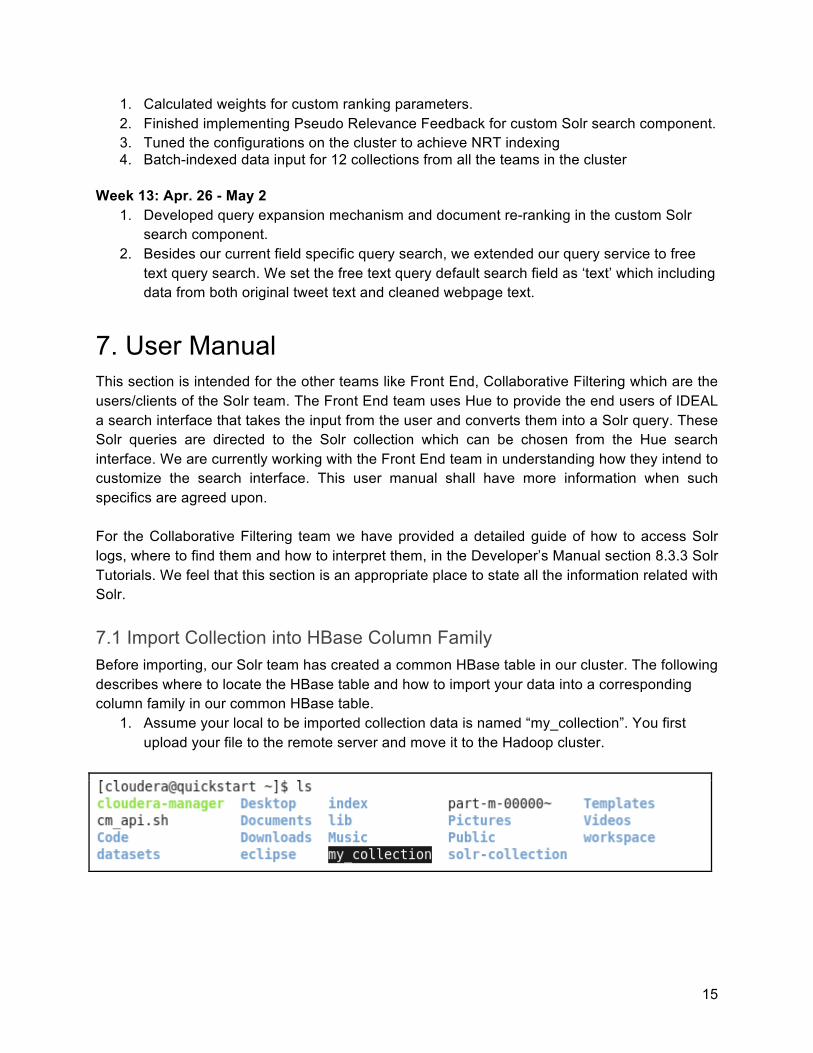
1. Assume your local to be imported collection data is named “my_collection”. You first upload your file to the remote server and move it to the Hadoop cluster.
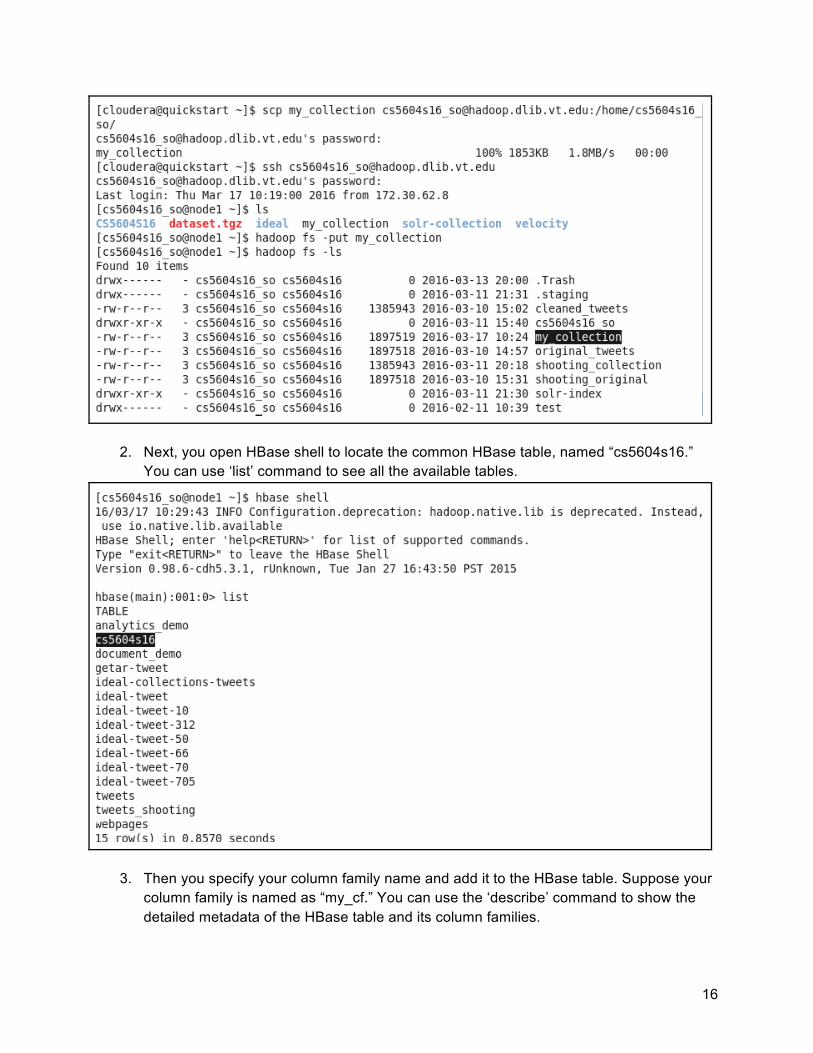
16
2. Next, you open HBase shell to locate the common HBase table, named “cs5604s16.” You can use ‘list’ command to see all the available tables.
3. Then you specify your column family name and add it to the HBase table. Suppose your column family is named as “my_cf.” You can use the ‘describe’ command to show the detailed metadata of the HBase table and its column families.

17
4. After that, you can use importTsv MapReduce job to import your collection into the corresponding column family.
Note that if you have multiple columns under one column family, for example, suppose you have two columns named “c1” and “c2” under “my_cf”, then you can perform the following command:
Upon success, you will see outputs similar to the following. Note that the collections in each of the column families will be matched by row ID automatically.

18
5. Now you can use the ‘scan’ command to see the contents. The rows will be in ascending order by the row ID. You can choose to display only the data from the specified column family. Note that we often deal with a large collection of data; you’d better set the limit on the number of rows to be displayed.
19
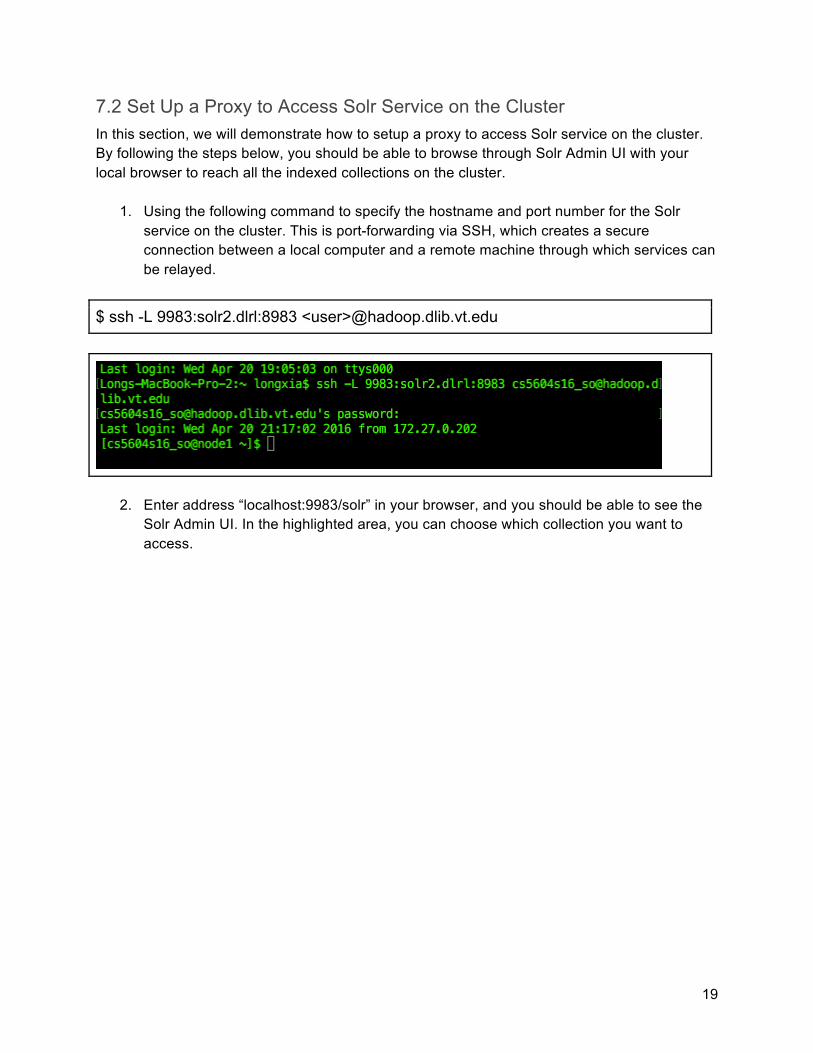
7.2 Set Up a Proxy to Access Solr Service on the Cluster In this section, we will demonstrate how to setup a proxy to access Solr service on the cluster. By following the steps below, you should be able to browse through Solr Admin UI with your local browser to reach all the indexed collections on the cluster.
1. Using the following command to specify the hostname and port number for the Solr service on the cluster. This is port-forwarding via SSH, which creates a secure connection between a local computer and a remote machine through which services can be relayed.
$ ssh -L 9983:solr2.dlrl:8983 <user>@hadoop.dlib.vt.edu
2. Enter address “localhost:9983/solr” in your browser, and you should be able to see the Solr Admin UI. In the highlighted area, you can choose which collection you want to access.

20
7.3 Extend Solr with custom libraries Ultimately, Solr is a Java web application and as such is composed of compiled JAR files containing classes to handle requests, create indexes, manage Solr cores and return search results. Additionally, Solr provides high degree of customizations as it allows its user to implement and set up custom behavior with the use of Solr plugins. This section contains information on how to configure the Solr with custom libraries and JARs. Currently, the only way to add user-written JARs to Solr is by uploading them directly to the file system of the machine running Solr service -- unlike indexes, Solr cannot import custom classes from HDFS. Additionally, if run in clustered/cloud mode, every machine running Solr must contain a copy of the JAR files located under the same (absolute) file path. Solr loads libraries dynamically, via reflection, based on the instruction provided in solrconfig.xml. These libraries are only loaded once - when collection/core starts or restarts (is reloaded). As such, library update doesn’t require neither Solr restart nor administrative rights. Steps:
1. Create a directory that will contain custom JAR files on all the machines running Solr service. Make sure this directory can be found at the same path for all of them. Additionally, make sure that Solr Linux user has read, write and execute rights on the directory (on all the machines).

21
Note: Currently, only solr2.dlrl hosts Solr service. Ask TAs to create a user for you so that you can use SSH and SCP utilities.
$ mkdir bin $ chmod -R a+x bin $ chmod -R a+r bin $ chmod -R a+w bin
2. Upload custom JARs to create directories on all the machines hosting Solr using SCP. 3. Add necessary entries to solrconfig.xml of particular collection for which you wish to
enable your code. As the configuration gets stored and subsequently loaded from Zookeeper this step can be run just once (does not have to be repeated on all the machines).

22
4. Update collection configuration in Zookeeper and reload Solr collection. As the configuration gets stored and subsequently loaded from Zookeeper this step can be run just once (does not have to be repeated on all the machines).
$ solrctl instancedir --update <collection_name> <collection_configuration> $ solrctl collection --reload <collection_name>
5. Verify that the JAR files were loaded by Solr by examining collection plugins. If you get an error (while reloading collection) you should start debugging the problem by verifying solr logs located in /var/log/solr directory on the machine running Solr.

23
8. Developer Manual
8.1 Architecture
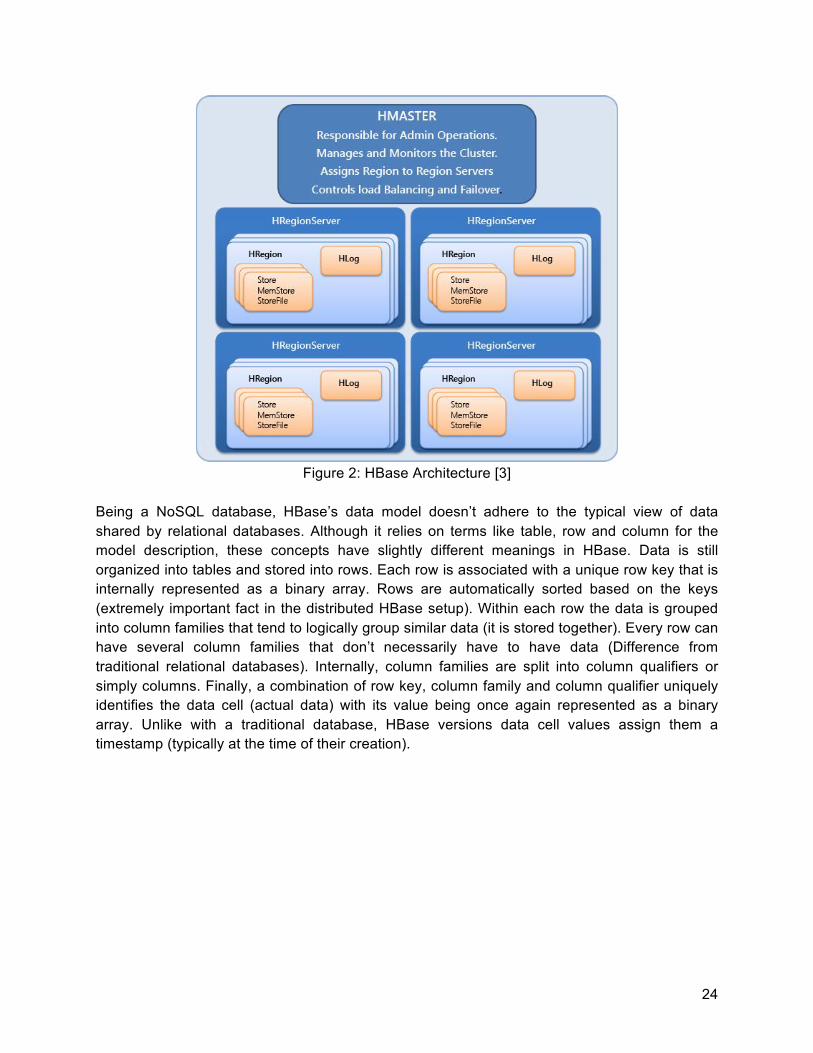
8.1.1 HBase HBase is a non-relational, column-family-oriented, key-value-based, multidimensional distributed database. Just like Apache Cassandra, HBase is an open-source implementation of Google’s BigTable architecture. Being a NoSQL database HBase trades off some of the typical relational guarantees (ACID) for massive improvement in scalability and flexibility of schema. Although the HBase instance can be run against the local file system (standalone mode), it is primarily meant for highly distributed HDFS. The HBase architecture consists of servers in a Master-Slave relationship. Typically, the HBase Cluster has one master node called HMaster and multiple region servers called HRegionServer. Each region server contains multiple regions called HRegions. Data in HBase is stored in Tables, which in turn are stored in Regions. Whenever a table becomes too large it is partitioned into multiple Regions, effectively replicating it across the cluster.
24
Figure 2: HBase Architecture [3]
Being a NoSQL database, HBase’s data model doesn’t adhere to the typical view of data shared by relational databases. Although it relies on terms like table, row and column for the model description, these concepts have slightly different meanings in HBase. Data is still organized into tables and stored into rows. Each row is associated with a unique row key that is internally represented as a binary array. Rows are automatically sorted based on the keys (extremely important fact in the distributed HBase setup). Within each row the data is grouped into column families that tend to logically group similar data (it is stored together). Every row can have several column families that don’t necessarily have to have data (Difference from traditional relational databases). Internally, column families are split into column qualifiers or simply columns. Finally, a combination of row key, column family and column qualifier uniquely identifies the data cell (actual data) with its value being once again represented as a binary array. Unlike with a traditional database, HBase versions data cell values assign them a timestamp (typically at the time of their creation).

25
Figure 3: HBase Data Model [4]
By default HBase supports 2 modes: Standalone and Distributed. Standalone mode is the default mode where all the HBase daemons (master, region server) and local Zookeeper all run in the same Java Virtual Machine (1 process). This mode doesn’t require presence of HDFS and as such shouldn’t be used in production. Distributed mode on the other hand can be subdivided into two: Pseudo-distributed mode where all the daemons and services run on a single node (different processes) - Cloudera VM - and Fully-distributed mode where all the services are scattered across different cluster nodes (typical production environment).
8.1.2 Lucene Apache Lucene is an open-source Java full-text search library. Cross-platform, fast and reliable, it is capable of indexing every imaginable text file. When indexed, the textual information contained in the document can be extracted. Lucene uses compressed bitsets to store an inverted index and supports binary operations such as AND, OR and XOR, which can be performed at lightning-fast speeds, even for billions of records.
8.1.3 Solr Apache Solr is a scalable, ready-to-deploy search engine built upon Lucene [8]. It is optimized for searching large volumes of text-centric data, supports from the simplest keyword search through very complex query searches with multiple fields and filters, and returns search results tailored to user specified query needs as well as providing faceted search results.
26
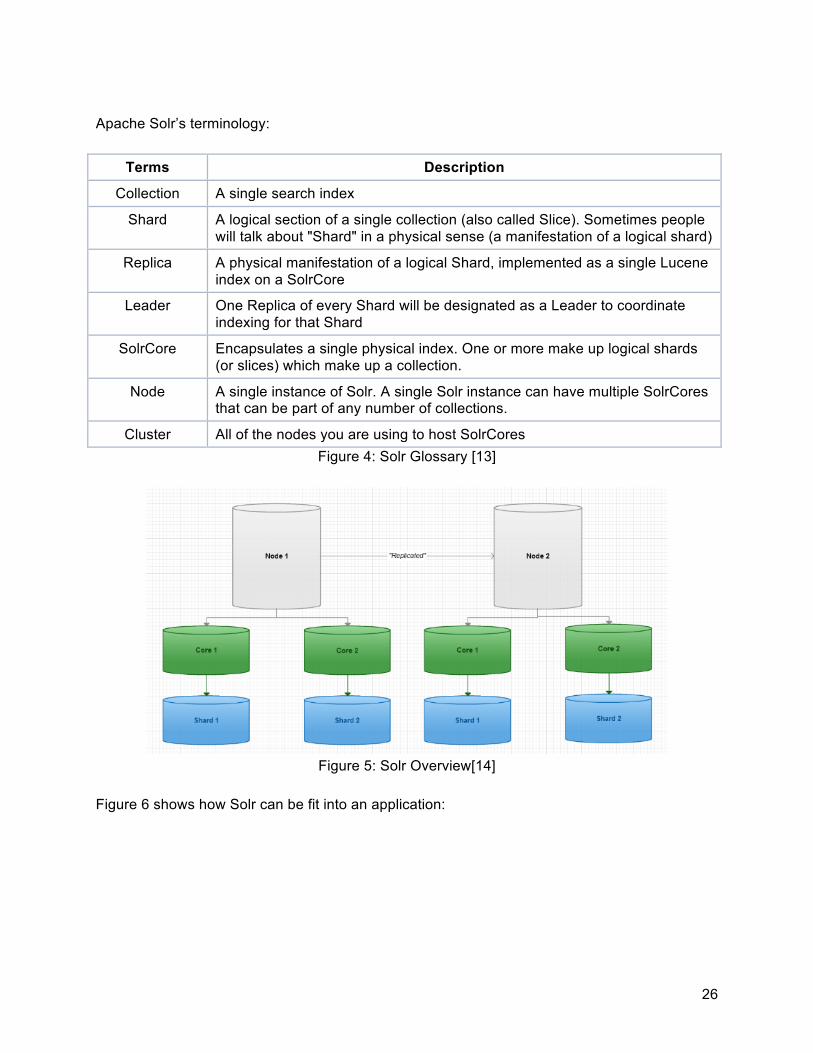
Apache Solr’s terminology:
Terms Description
Collection A single search index
Shard A logical section of a single collection (also called Slice). Sometimes people will talk about "Shard" in a physical sense (a manifestation of a logical shard)
Replica A physical manifestation of a logical Shard, implemented as a single Lucene index on a SolrCore
Leader One Replica of every Shard will be designated as a Leader to coordinate indexing for that Shard
SolrCore Encapsulates a single physical index. One or more make up logical shards (or slices) which make up a collection.
Node A single instance of Solr. A single Solr instance can have multiple SolrCores that can be part of any number of collections.
Cluster All of the nodes you are using to host SolrCores Figure 4: Solr Glossary [13]
Figure 5: Solr Overview[14]
Figure 6 shows how Solr can be fit into an application:

27
Figure 6: Interaction of Solr [15]
When integrating the Solr search engine into the application architecture, the very important first two steps are:
1. Define a schema (schema.xml) which tells Solr about the contents of documents it will be indexing.
2. Deploy Solr to the application server and specify the configuration options for Solr server in solr.xml
After collecting all the requirements for the project and numerous discussions with other team members, we came up with a common Schema for this class project as shown below. In the our Solr Schema, we applied the following strategies (we provide detailed explanations on each of the defined Solr fields in the corresponding comment section in the screenshots of Schema.xml below):
1. Dynamic fields were used in the schema instead of using specific fields. The biggest advantage is that we do not need to frequently change the solr schema whenever new fields are added or changes are made on existing ones. Instead, we only need to change morphline to accommodate our frequent updates.

28
2. We use one Solr field “text” as the default search field, and copy all the Solr fields that searched by free-text queries into this default search field. This way, we can flexibly select any Solr free-text search fields based on the system’s specific needs.

29
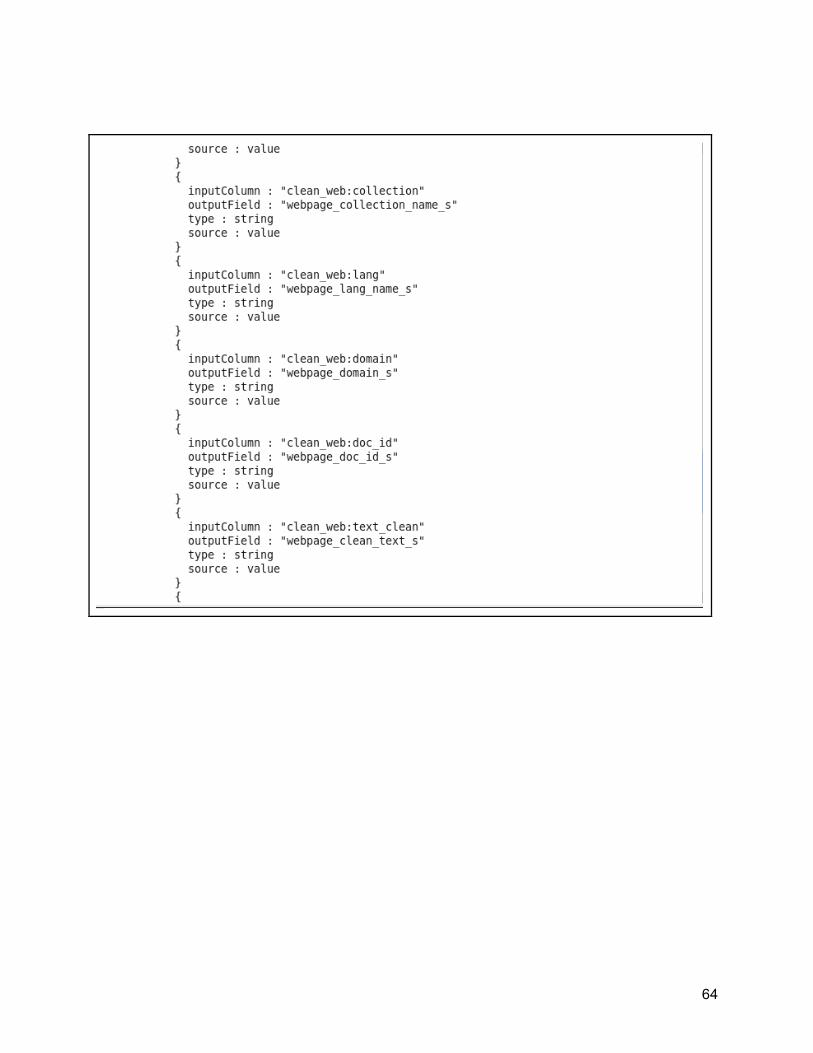
8.1.4 Morphline [23] Overview A morphline is a configuration file that can extract, transform and load data from HBase table into Solr Cores. To process the data uploaded by all the other teams and generate all the Solr fields to meet our query search needs, we defined the mapping and generation of Solr fields in our Morphline configuration file, “morphlines.conf.” The snippets of the file are shown in the screenshots below: In particular, we use “extractHBaseCells” command to parse specific “column_family:column” fields in HBase table into corresponding Solr document fields. For example, as shown in the screenshot below, the “clean_text” is one of the columns in the “clean_tweet” column family in our HBase table. The mapping takes “clean_tweet:clean_text” as the “inputColumn” fileld and maps it to the corresponding Solr document field “clean_text_t” in the “outputField”, where the “*_t” indicates it is a dynamic fields with “text_general” as its data type. In total, we mapped 31 HBase data fields to the corresponding Solr fields. Note that the “inputColumn” and “outputField” do not have a one-to-one matching relationship. We can extract multiple fields and combine them into one Solr field. For example, in our configuration file, we decide to combine the “clean_tweet:urls” and “clean_web:urls” into one “urls_s” Solr field so that the search query will look for matching documents in both column families.

30
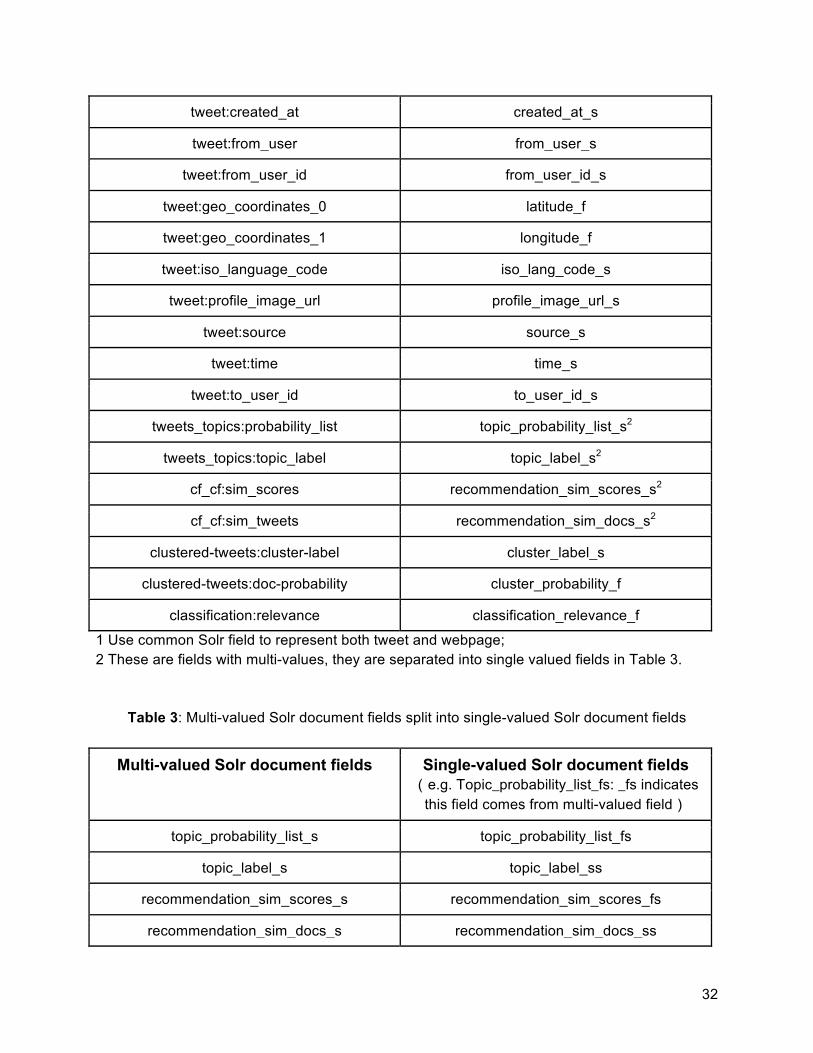
Conversely, we can use “split” command to transform a string field into a multi-valued array field as shown in the screenshot below. For example, the “topic_probability_list_s” is a Solr field transformed by the above “extractHBaseCells” command from one “column_family:column” field in the HBase table. As the proper type of this field should be an array of float values, we split it into a multi-valued Solr field with each element of a float data type. In total, we split and come up with four multi-valued Solr fields.
Besides mapping and splitting, we use other transformation commands to generate the properly formatted fields. For example, we use the “convertTimestamp” command as shown in the screenshot below to transform the output format of a Solr field. Oftentimes, there exists redundant data in the HBase table that need not to be indexed. For example, we decide not to index raw text from both tweets and webpages in the

31
HBase table. Then there is no need for us to define the mapping in the Morphline configuration file.
Table 2: Transform data from HBase table into Solr document fields
HBase column family:column (e.g. clean_tweet:clean_text: clean_tweet
specify the column family in the HBase table and clean_text is the specific column under
clean_tweet column family)
Solr document fields (e.g. clean_text_t: this is output field in the Solr. _t specific the data type is text-general.
_s indicates string, _f indicates float, etc. Please refer to Solr schema.xml for more
details about dynamic fields)
Clean_tweet:clean_text / clean_web:text_clean_profanity
clean_text_t1
Clean_tweet:collection / clean_web:collection collection_name_s1
clean_tweet:hashtags hashtags_s
clean_tweet:urls / clean_web:urls urls_s1
clean_tweet:mentions mentions_s
clean_web:lang lang_s
clean_web:domain domain_s
clean_web:title title_s
doctype:doctype doctype_s
tweet:archivesource archivesource_s
32
tweet:created_at created_at_s
tweet:from_user from_user_s
tweet:from_user_id from_user_id_s
tweet:geo_coordinates_0 latitude_f
tweet:geo_coordinates_1 longitude_f
tweet:iso_language_code iso_lang_code_s
tweet:profile_image_url profile_image_url_s
tweet:source source_s
tweet:time time_s
tweet:to_user_id to_user_id_s
tweets_topics:probability_list topic_probability_list_s2
tweets_topics:topic_label topic_label_s2
cf_cf:sim_scores recommendation_sim_scores_s2
cf_cf:sim_tweets recommendation_sim_docs_s2
clustered-tweets:cluster-label cluster_label_s
clustered-tweets:doc-probability cluster_probability_f
classification:relevance classification_relevance_f
1 Use common Solr field to represent both tweet and webpage; 2 These are fields with multi-values, they are separated into single valued fields in Table 3.
Table 3: Multi-valued Solr document fields split into single-valued Solr document fields
Multi-valued Solr document fields Single-valued Solr document fields (e.g. Topic_probability_list_fs: _fs indicates
this field comes from multi-valued field)
topic_probability_list_s topic_probability_list_fs
topic_label_s topic_label_ss
recommendation_sim_scores_s recommendation_sim_scores_fs
recommendation_sim_docs_s recommendation_sim_docs_ss
33
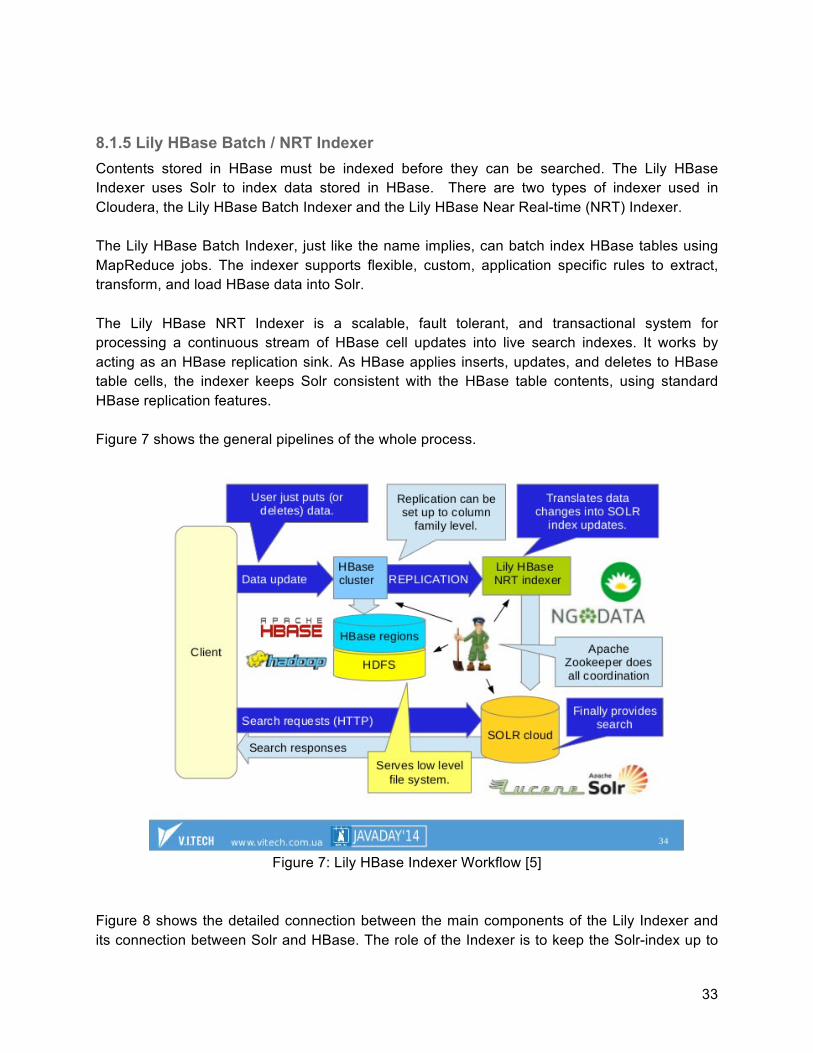
8.1.5 Lily HBase Batch / NRT Indexer Contents stored in HBase must be indexed before they can be searched. The Lily HBase Indexer uses Solr to index data stored in HBase. There are two types of indexer used in Cloudera, the Lily HBase Batch Indexer and the Lily HBase Near Real-time (NRT) Indexer. The Lily HBase Batch Indexer, just like the name implies, can batch index HBase tables using MapReduce jobs. The indexer supports flexible, custom, application specific rules to extract, transform, and load HBase data into Solr. The Lily HBase NRT Indexer is a scalable, fault tolerant, and transactional system for processing a continuous stream of HBase cell updates into live search indexes. It works by acting as an HBase replication sink. As HBase applies inserts, updates, and deletes to HBase table cells, the indexer keeps Solr consistent with the HBase table contents, using standard HBase replication features. Figure 7 shows the general pipelines of the whole process.
Figure 7: Lily HBase Indexer Workflow [5]
Figure 8 shows the detailed connection between the main components of the Lily Indexer and its connection between Solr and HBase. The role of the Indexer is to keep the Solr-index up to
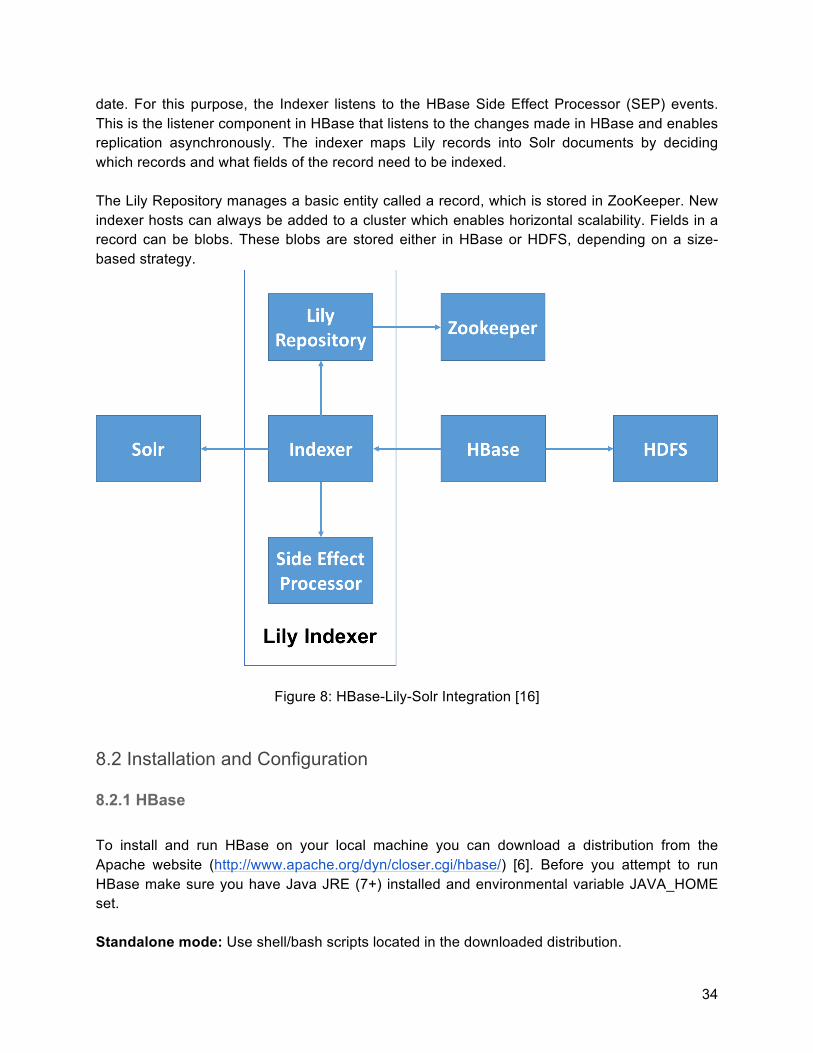
34
date. For this purpose, the Indexer listens to the HBase Side Effect Processor (SEP) events. This is the listener component in HBase that listens to the changes made in HBase and enables replication asynchronously. The indexer maps Lily records into Solr documents by deciding which records and what fields of the record need to be indexed. The Lily Repository manages a basic entity called a record, which is stored in ZooKeeper. New indexer hosts can always be added to a cluster which enables horizontal scalability. Fields in a record can be blobs. These blobs are stored either in HBase or HDFS, depending on a size-based strategy.
Figure 8: HBase-Lily-Solr Integration [16]
8.2 Installation and Configuration
8.2.1 HBase To install and run HBase on your local machine you can download a distribution from the Apache website (http://www.apache.org/dyn/closer.cgi/hbase/) [6]. Before you attempt to run HBase make sure you have Java JRE (7+) installed and environmental variable JAVA_HOME set. Standalone mode: Use shell/bash scripts located in the downloaded distribution.

35
bin/start-hbase.sh bin/stop-hbase.sh Pseudo-distributed mode: Cloudera VM comes with preconfigured HBase in the pseudo-distributed mode. Every service/daemon runs on a separate thread as standalone Linux/Windows services. We strongly recommend this setup.
8.2.2 Solr As in HBase, Solr installation requires the same Java JREl. After checking the installed Java version (with $java -version), you can go to http://lucene.apache.org/solr, find the current stable mirror site to download Solr, extract the Solr distribution and land on the Solr home directory: $tar zxf solr-5.4.1.tgz $cd solr-5.4.1 Cloudera VM already contains a fully installed Solr distribution (labeled as Cloudera Search). In this particular setup, Solr features only one node where each collection typically consists of one shard (one core) as shown in the screenshot.

36
8.2.3 Lily HBase Batch / NRT Indexer The Lily HBase indexer service is installed and preconfigured with Cloudera Search VM. That is, after installing the Cloudera VM, you can start using the Lily HBase Indexer service. (Please find installation instructions on how to deploy a Cloudera VM from Canvas under File/2016/Tutorials.) You can have as many Lily HBase Indexer services running on different nodes as needed to accommodate the HBase ingest load. Please consult HBase replication documentation for details on how to plan the capacity. You can co-locate Lily HBase Indexer service processes with SolrCloud on the same set of nodes.
8.2.4 ZooKeeper 1. To start ZooKeeper, we need a configuration file to set the data directory with dataDir
parameter and data log directory with dataLogDir parameter, etc. 2. Then start ZooKeeper and connect to the server, where 2181 is the port defined in the
configuration file:
3. Next, we can play with ZooKeeper simple APIs to create/delete a node, as well as
set/get data:

37
4. Cloudera VM already features preconfigured ZooKeeper. When deploying Cloudera
search, we run ZooKeeper in replicated mode. A replicated group of servers is called a Quorum where each of the servers has the same copy of the configuration file. Once the ZooKeeper service is running, configure each Solr node with ZooKeeper Quorum address(es) in /etc/default/solr.
8.3 Tutorials
8.3.1 HBase Administration and Monitoring Much like other Cloudera’s services you can manipulate and monitor HBase through the Cloudera Manager UI. Here you can start/stop/restart services, and check setups, logs and metrics and diagnose problems.

38
Figure 9: Cloudera Manager
Interaction Although HBase supports a plethora of ways to interact with data - MapReduce jobs, Spark (+ Kafka), Java API, Thrift API, REST services - the easiest and the most straight-forward one is definitely HBase Shell. Once HBase server is running you can open the shell by simply typing hbase shell.
Useful HBase Commands
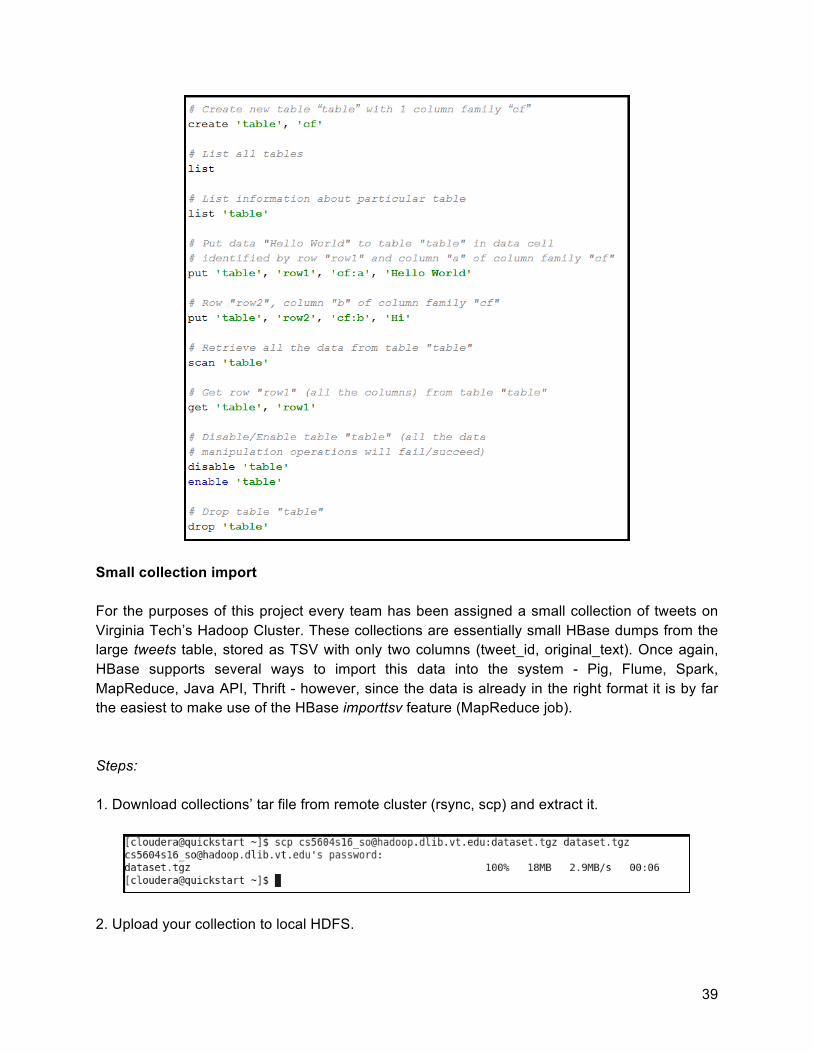
39
Small collection import For the purposes of this project every team has been assigned a small collection of tweets on Virginia Tech’s Hadoop Cluster. These collections are essentially small HBase dumps from the large tweets table, stored as TSV with only two columns (tweet_id, original_text). Once again, HBase supports several ways to import this data into the system - Pig, Flume, Spark, MapReduce, Java API, Thrift - however, since the data is already in the right format it is by far the easiest to make use of the HBase importtsv feature (MapReduce job). Steps: 1. Download collections’ tar file from remote cluster (rsync, scp) and extract it.
2. Upload your collection to local HDFS.

40
3. Create HBase table for your collection (tweets_disease with one column family - raw).
4. Run importtsv MapReduce job to import collection to the newly created HBase table. Simply type
$ hbase org.apache.hadoop.hbase.mapreduce.ImportTsv -Dimporttsv.columns=<tweet_id in TSV file>,<column_family>:<column> <hbase_table> <hdfs_collection> (raw:tweet_text (cf:c), tweets_disease (table), disease_collection (TSV collection in HDFS)).
5. To monitor the running MR job you open it up in the browser (MapReduce). Here you can see the progress and different stages of the job or debug potential errors. Note: If your job keeps failing because the container is failing this is most likely because MapReduce is running out of memory. Make sure you allocate at least 5GB of memory to Cloudera VM, effectively increasing MR’s JVM heap.
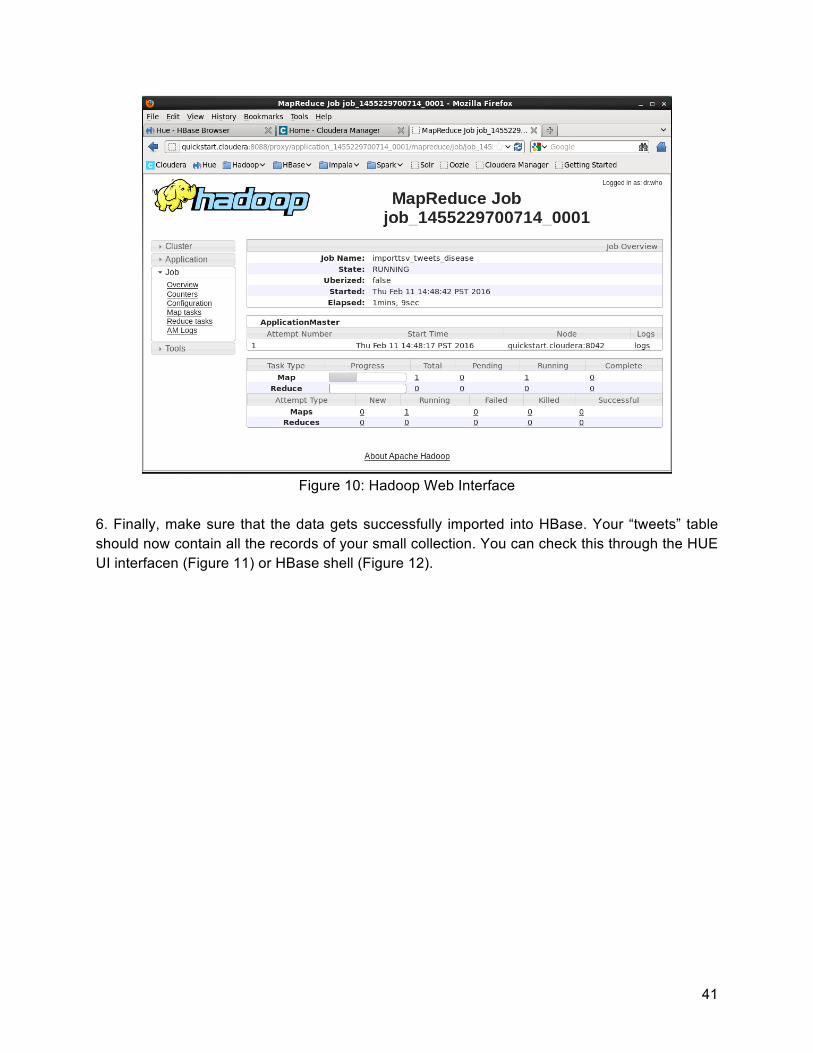
41
Figure 10: Hadoop Web Interface
6. Finally, make sure that the data gets successfully imported into HBase. Your “tweets” table should now contain all the records of your small collection. You can check this through the HUE UI interfacen (Figure 11) or HBase shell (Figure 12).

42
Figure 11: Hue Web Interface
Figure 12: HBase Shell Import Verification
8.3.2 Lucene
43
Solr heavily relies on Lucene in all aspects related to index creation and maintenance, query processing and result ranking. The best way to download the Lucene library is via the Maven central repository. There you can search either for lucene-core or solr-core (which contains lucene-core as its dependency) and add it to your Maven/Gradle project. Lucene provides an extensive API for index creation and manipulation allowing users to build indexes in memory, on the filesystem or in the distributed environment such as Hadoop HDFS. Here are some of the examples showcasing fundamental concepts in Lucene: In-memory Lucene index https://github.com/shivam-maharshi/IDEAL/blob/master/src/main/java/edu/vt/ideal/demo/SimpleLuceneDemo.java NRT Lucene indexing https://github.com/shivam-maharshi/IDEAL/blob/master/src/main/java/edu/vt/ideal/demo/NRTLuceneDemo.java Text file Lucene indexer https://github.com/shivam-maharshi/IDEAL/blob/master/src/main/java/edu/vt/ideal/TextFileIndexer.java
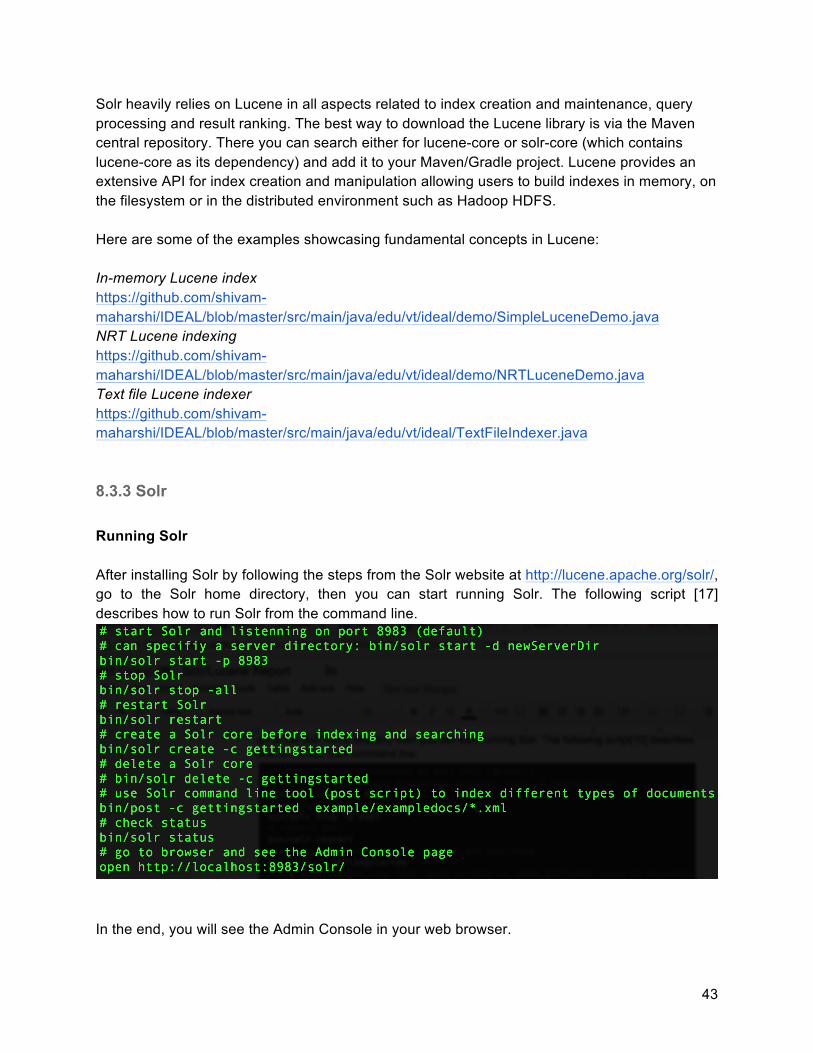
8.3.3 Solr Running Solr After installing Solr by following the steps from the Solr website at http://lucene.apache.org/solr/, go to the Solr home directory, then you can start running Solr. The following script [17] describes how to run Solr from the command line.
In the end, you will see the Admin Console in your web browser.

44
Query Search After running Solr and indexing the documents, it is time to make query requests against indexed files. You can perform queries either through the Solr web interface or use the curl command line tool (As submitted the query form is equivalent to sending HTTP GET requests to the Solr core.) Query through cURL: The commonly used query syntax options are listed in the following script [18] where you can curl the results directly.
Note that Solr provides facet of search, which allows the search results to be arranged into subsets and provides a count for each subset. The way to do this is to set facet=true and facet.field=fieldname. You can further filter results by constraining queries to the Solr request using fq=fieldname:term. Query through Solr UI: Alternatively, we can perform queries through the Solr web interface. From the Core Selector drop down, choose the Solr core to search against and then click on the Query tab underneath.

45
Through the query builder interface in the middle panel, based on the query need, set the query parameters by following the syntax described above in the cURL script. By clicking on the Execute Query button at the bottom, query results will be displayed in the right panel formatted as specified by the user (JSON with indent is the format by default). As shown in the snapshot below, a user makes a query search for price ranging from 0 to 400 and facet field being set to cat. The results are filtered by only showing the id, name and price fields and faceting for cat field with the value of software.

46
As we can see from the top of the result panel, there is a URL link (pointed to by the arrow) which displays the search results in a separate page or can be directly invoked by cURL. Looking into the results, two top-level responseHeader and response sections are displayed. The header provides general information about the query and response details to the matching documents returned by Solr. If a facet search is included, a third section, facet_counts, will be added at the end of the returned results. Velocity/Solritas Solr includes a sample search UI based (also known as Solritas) that demonstrates several useful features, such as searching, faceting, highlighting, autocomplete, and geospatial searching. When enabled, it allows to browse individual collections displaying various details. For instance: http://quickstart.cloudera:8983/solr/products/browse

47
Figure 13: Solritas
Every Solr collection has a Velocity Search Component enabled by default but typically the libraries with actual compiled Velocity classes are not present on the classpath (thus when attempting to access the above URL an exception is thrown). Thus, in order to enable Velocity for the particular collection you need to include Velocity jars in specified collection directories (see screenshot below).
Once the jar files are located in <collectionname_dir>/lib directory, Velocity starts working. Custom Search Components

48
First and foremost, Apache Solr is a Java web application and as such it can be easily customized or extended. For the latter, Solr allows developers to write custom plugins that can:
● Handle incoming requests ● Modify user queries ● Alter results (modify ranking, supplement results) ● Augment responses with additional sections
Below is a typical Solr flow when handling requests.
Figure 14: Solr Request-response Workflow [19]
Under usual circumstances developers typically create custom search handlers and search components. To enable custom request/response handling logic, the SolrRequestHandler Java class should be extended. This class provides one method - handleRequest - that takes two parameters - SolrQueryRequest and SolrQueryResponse. A good example of SolrRequestHandler implementation is SearchHandler - Solr native class that handles all incoming requests on URLs such as <collection>/select or <collection>/query. For the purposes of this project - custom ranking - it is sufficient to develop a custom search component and connect it to a particular collection. Much like in the case of custom search handlers it is sufficient to extend the existing Solr class and let Solr know about it. In this case the necessary class is called SearchComponent and the user is required to provide implementation for at least two methods - prepare and process. Prepare gets invoked before the query is executed and it is typically the right place to prepare state for the process which gets invoked after the query has been executed and results have been obtained. In the process
49
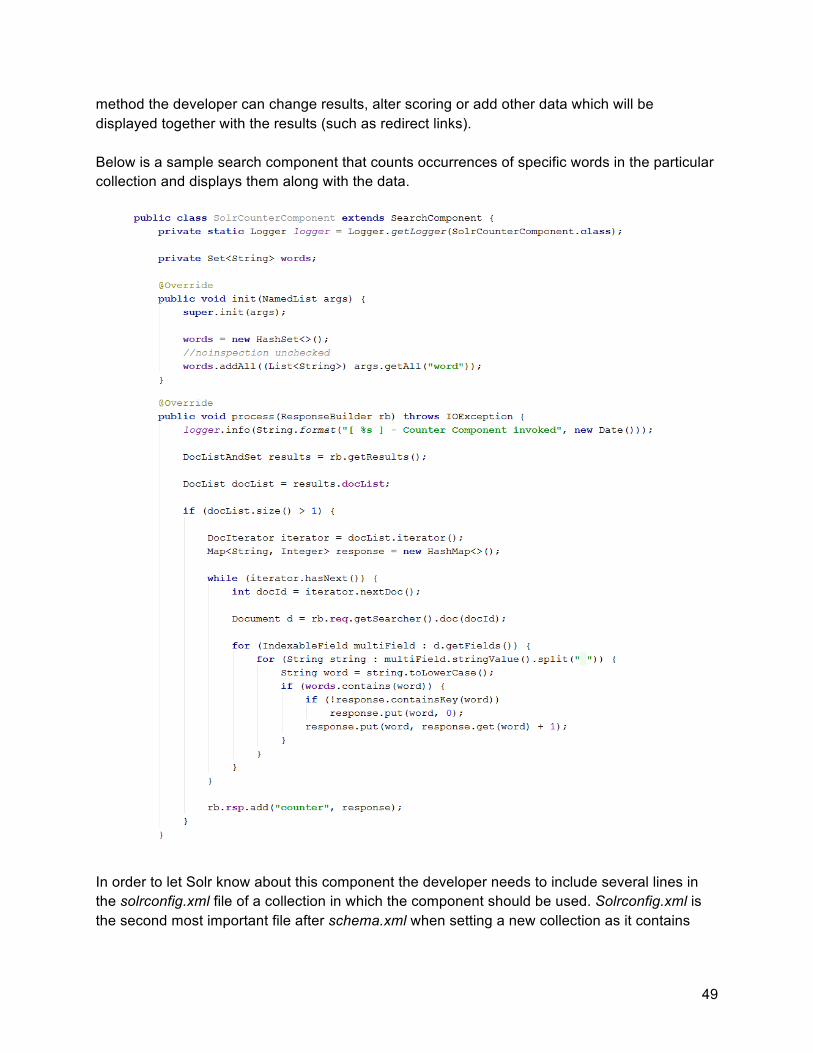
method the developer can change results, alter scoring or add other data which will be displayed together with the results (such as redirect links). Below is a sample search component that counts occurrences of specific words in the particular collection and displays them along with the data.
In order to let Solr know about this component the developer needs to include several lines in the solrconfig.xml file of a collection in which the component should be used. Solrconfig.xml is the second most important file after schema.xml when setting a new collection as it contains

50
information on actual physical locations of indexes; describes filters, request handlers and search components; and configures query caches. To add our custom CounterComponent to the products collection we first need to specify where the Solr should look for it on a local filesystem. This can be achieved by specifying the lib directive in solr config (see below).
Secondly, we need to declare the component - point Solr to a particular class file and assign it a name.
In this case we instruct Solr to use our custom class and assign it a name - counterComponent. On top of that we specify 5 parameters for our component - these are named, string parameters available to the component under the name word. As you can see, we are fetching these in the init method of our component, and later using them for actual processing. Lastly, we need to associate our component with the particular search handler. In this case we are simply using the default - /select - request handler. In solrconfig.xml you may notice that Solr makes use of several default search components - QueryComponent, FacetComponent, MoreLikeThisComponent - that are not explicitly configured with search handlers. However, as

51
our component isn’t part of solr-core libraries we need to explicitly mention (by name) in the configuration section of /select request handler.
As suggested in the documentation, we can make our component overwrite the default components or append/prepend it to the list of existing components. As our CounterComponent counts occurrences of specific words in the result set it makes sense to invoke it last - thus last-components. Finally, it is necessary to reload the altered collection configuration to Zookeeper and reload the collection itself. This can be achieved with the help of the solrctl tool.
# reload collection configuration for collection products solrctl instancedir --reload products products/ # reload collection itself solrctl collection --reload products
Now we can finally verify that our custom component is being used.

52
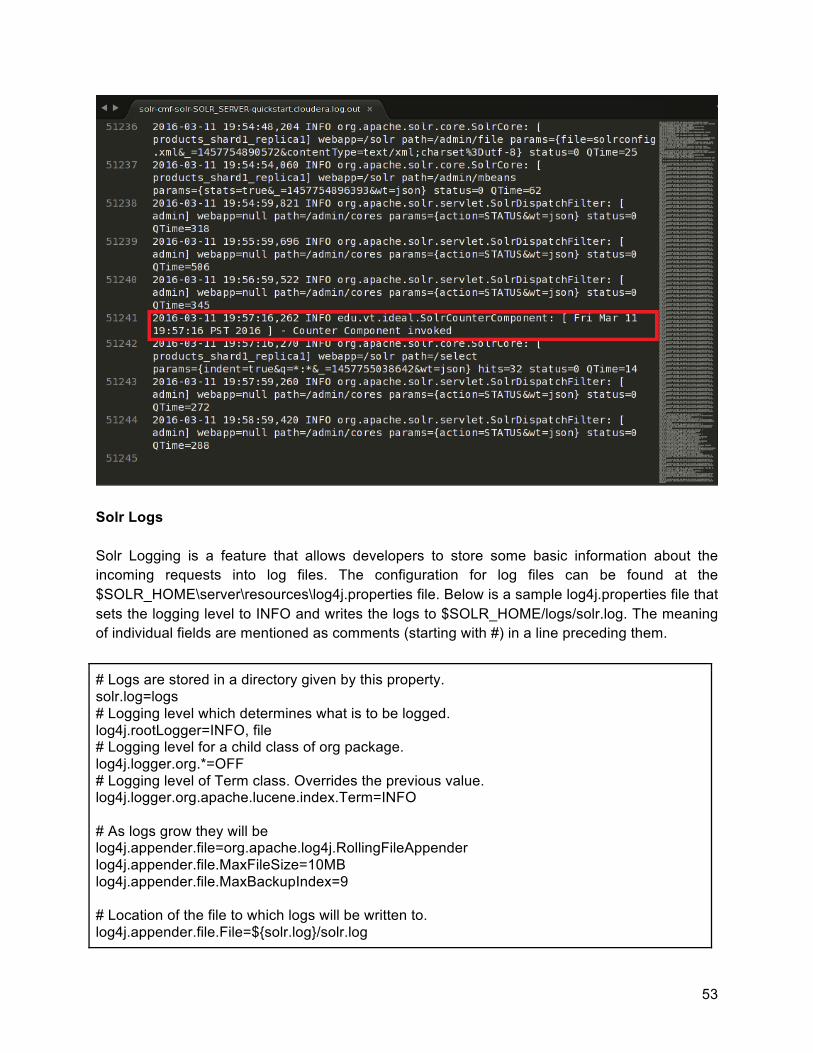
53
Solr Logs Solr Logging is a feature that allows developers to store some basic information about the incoming requests into log files. The configuration for log files can be found at the $SOLR_HOME\server\resources\log4j.properties file. Below is a sample log4j.properties file that sets the logging level to INFO and writes the logs to $SOLR_HOME/logs/solr.log. The meaning of individual fields are mentioned as comments (starting with #) in a line preceding them.
# Logs are stored in a directory given by this property. solr.log=logs # Logging level which determines what is to be logged. log4j.rootLogger=INFO, file # Logging level for a child class of org package. log4j.logger.org.*=OFF # Logging level of Term class. Overrides the previous value. log4j.logger.org.apache.lucene.index.Term=INFO # As logs grow they will be log4j.appender.file=org.apache.log4j.RollingFileAppender log4j.appender.file.MaxFileSize=10MB log4j.appender.file.MaxBackupIndex=9 # Location of the file to which logs will be written to. log4j.appender.file.File=${solr.log}/solr.log

54
# Layout of the data that will be written to the log files. log4j.appender.file.layout=org.apache.log4j.EnhancedPatternLayout # This determines what information will be written to the logs. log4j.appender.file.layout.ConversionPattern=%d{yyyy-MM-dd HH:mm:ss.SSS} %-5p (%t) [%X{collection} %X{shard} %X{replica} %X{core}] %c{1.} %m\n # Logging level of Zookeeper class. log4j.logger.org.apache.zookeeper=WARN # Logging level of Hadoop class. log4j.logger.org.apache.hadoop=WARN # set to INFO to enable infostream log messages log4j.logger.org.apache.solr.update.LoggingInfoStream=OFF
The Solr Logs on the Cluster can be found at solr-cmf-solr-SOLR_SERVER-node1.dlrl.log.out. Below is a sample log output for a query run in Solr. The logs were filtered to remove the extra data that is of no use to the Collaborative team, for example, internal class logging details, etc. Log Format "Date" "LoggingLevel" ("ServerId" - "ThreadId") ["x:CollectionName"] "RequestType" ["CollectionName"] webapp="SolrPath" path = "/QueryParser" params="{q=QueryParameters"&_="SomeId"} "hits"=NoOfHits "status"=value "QTime"=TimeTaken Sample: 2016-03-01 01:44:46.003 INFO (qtp1450821318-22) [ x:jcg] o.a.s.c.S.Request [jcg] webapp=/solr path=/select params={q=cat:book&indent=true&fl=id,cat,name,price,author&start=0&fq=id:*&fq=price:7.99&sort=name+desc&rows=5&wt=json&debugQuery=true&_=1456796685907} hits=4 status=0 QTime=88 In the example above, these are the values and their explanations.
Table 4: Solr Log Parameters
Parameter Value Notes
Date 2016-03-01 00:59:33.591 Time of query
LoggingLevel INFO Level of logging for Log4j in Solr
ServerId
qtp1450821318 A unique identifier generated at the startup of Solr server

55
and remains the same with every query. There is no
information about this on Solr doc.
CollectionName jcg The name of the Solr index collection/core.
RequestType o.a.s.c.S.Request The type of request that has been made. This signifies the
class object. Here it is org.apache.solr.handler.component.SearchHandler class.
SolrPath /solr The path of the Solr instance
QueryParser select The query parser that served this request. For any custom parser, this could be /custom
or anything we define
Query
q The query being made on the Solr indexed collection
Parameters
cat%3Abook&fq=id%3A*&fq=price%3A7.99&sort=name+asc&start=0&rows=5&fl=id%2
Ccat%2Cname%2Cprice%2Cauthor&wt=json&indent=true
&debugQuery=true
The parameters that are sent with the query.
SomeId
1456793973491 A random ID generated with every query. From empirical observation, this ID had a
different value for every query generated.
hits 4 The number of document hits for the query made.
QTime 88 Time taken by the query for completion in milliseconds.
For an individual understanding of these parameters, please refer to Figure 15.
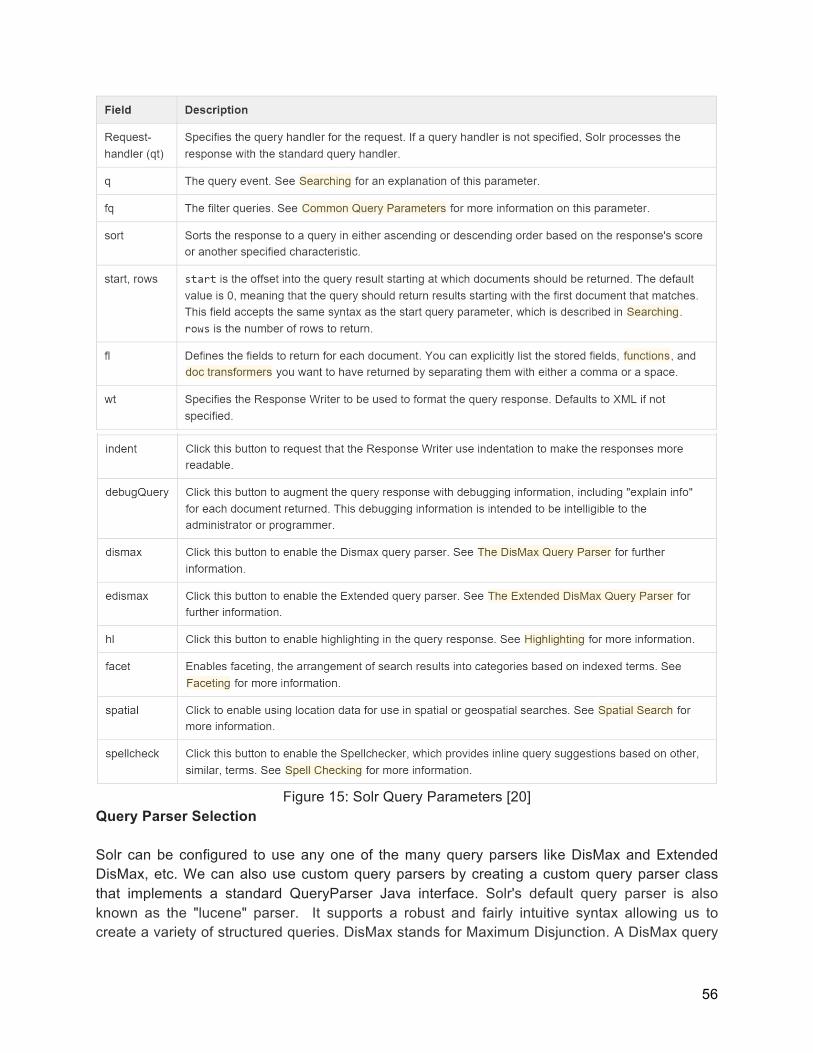
56
Figure 15: Solr Query Parameters [20]
Query Parser Selection Solr can be configured to use any one of the many query parsers like DisMax and Extended DisMax, etc. We can also use custom query parsers by creating a custom query parser class that implements a standard QueryParser Java interface. Solr's default query parser is also known as the "lucene" parser. It supports a robust and fairly intuitive syntax allowing us to create a variety of structured queries. DisMax stands for Maximum Disjunction. A DisMax query

57
is a query that generates the union of documents produced by its subqueries, and that scores each document with the maximum score for that document as produced by any subquery, plus a tie breaking increment for any additional matching subqueries [21]. DisMax request handler was primarily designed to be easy to use and to accept almost any input without returning an error. The Extended DisMax (eDisMax) query parser is an improved version of the DisMax query parser [22]. It has additional functionality which makes it more advanced and flexibility to use as compared with DisMax. After careful consideration of our requirements and review of many technical blogs we have decided to use the Extended DisMax query parser for two reasons. Firstly, even though the standard query parser is robust and fairly intuitive it's largest disadvantage is that it is very intolerant of syntax errors. Extended DisMax on the other hand is designed to throw as few errors as possible. Hence EDisMax query parser has been the choice for many commercial search engines. Secondly, the EDisMax query parser is simpler to use than the Lucene query parser since it takes responsibility for building a good query from the user's input using Boolean clauses containing DisMax queries across fields and boosts specified by the user. Thirdly, Extended DisMax provides numerous additional features without adding any performance penalties or sacrificing the ease of use. For example EDisMax lets the Solr administrator provide additional boosting queries, boosting functions, and filtering queries to artificially affect the outcome of all searches. Features like these gives us more flexibility and scope for further improvement of our search engine. Configuring Extended DisMax To make use of the EDisMax query parser and its functionality with our request handler, we can either pass the values for the required parameters with the query or add them as defaults in the SolrConfig.xml file. If these parameters are passed with the query then they override the values mentioned as defaults. Below is our SolrConfig.xml file which places more weights on fields like HashTags and Authors, since this configuration will yield more documents relevant to our end user search case scenario. This is because our data set is for events and fetched from tweets. SolrConfig.xml - To be updated tomorrow.
<requestHandler name="/select" class="solr.SearchHandler"> <lst name="defaults"> <str name="echoParams">explicit</str> <int name="rows">20</int> <str name="defType">edismax</str> <str name="qf"> title^10 collection^1 hashtags^1 </str> <str name="q.alt">*:*</str> <str name="fl">*,score</str> </lst> </requestHandler>
58
8.3.4 Lily HBase Batch Indexer and Zookeeper We followed instructions [2] in Cloudera Documentation: Using the Lily HBase Batch Indexer for Indexing. Configuration As mentioned in section 8.2.3, the Lily HBase indexer service is installed and preconfigured with Cloudera Search VM. Once you have the Cloudera VM installed, you can start using the Lily HBase Indexer service. We will provide step by step configuration instructions on how to use the Lily HBase Batch indexer on a small collection data imported into the HBase table. For easy reference, we will start from importing the raw data from the small collection (although the detailed steps and explanations can also be found in section 8.3.1) and finish by showing the Batch indexing results in Solr search UI. Development in local Cloudera Virtual Machine
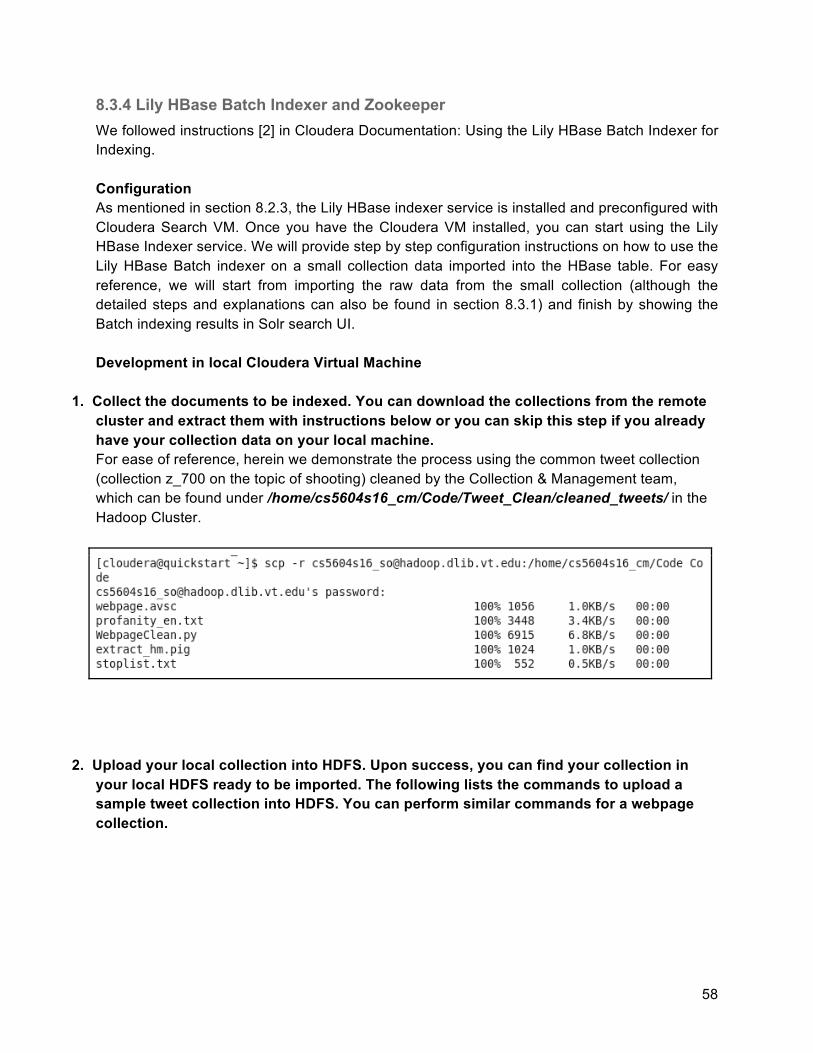
1. Collect the documents to be indexed. You can download the collections from the remote cluster and extract them with instructions below or you can skip this step if you already have your collection data on your local machine. For ease of reference, herein we demonstrate the process using the common tweet collection (collection z_700 on the topic of shooting) cleaned by the Collection & Management team, which can be found under /home/cs5604s16_cm/Code/Tweet_Clean/cleaned_tweets/ in the Hadoop Cluster.
2. Upload your local collection into HDFS. Upon success, you can find your collection in
your local HDFS ready to be imported. The following lists the commands to upload a sample tweet collection into HDFS. You can perform similar commands for a webpage collection.

59
3. Create HBase table for your collection (tweets_shooting with one column family named
‘raw’).
4. Run importtsv MapReduce job to import collection to the newly created HBase table.
5. Create a corresponding SolrCloud collection by following the steps below:

60
Before using Solr for indexing, we need to configure a collection holding the index. Configuration files including schema.xml, solrconfig.xml and other helper files for a collection are managed as part of the instance directory. First, we generate a skeleton of the instance directory under your HOME directory.
Then edit schema.xml to accommodate the types of HBase column families and qualifiers to be indexed.
We define dynamic fields in our schema.xml file here. Dynamic fields can make your application less brittle by providing some flexibility in the documents that you add to Solr. The schema.xml file looks similar to the following:
Besides the schema file, you also need to add helper files into your configuration directory as well. Here, we added “stoplist.txt” and “profanity.txt” from the Collection Management team. These files, among others, are used by the filter analyzers in schema.xml for indexing and query processing as shown below.

61
Next, you need to upload the configuration directory used by the collection to ZooKeeper so that the configuration files are available for Solr to use. To verify your instance directory is successfully uploaded and available, you can use solrctl to list the contents of your instance directory.
Now you can create your Solr collection as follows:
You should be able to check if the collection is active through the Solr Admin UI.
62
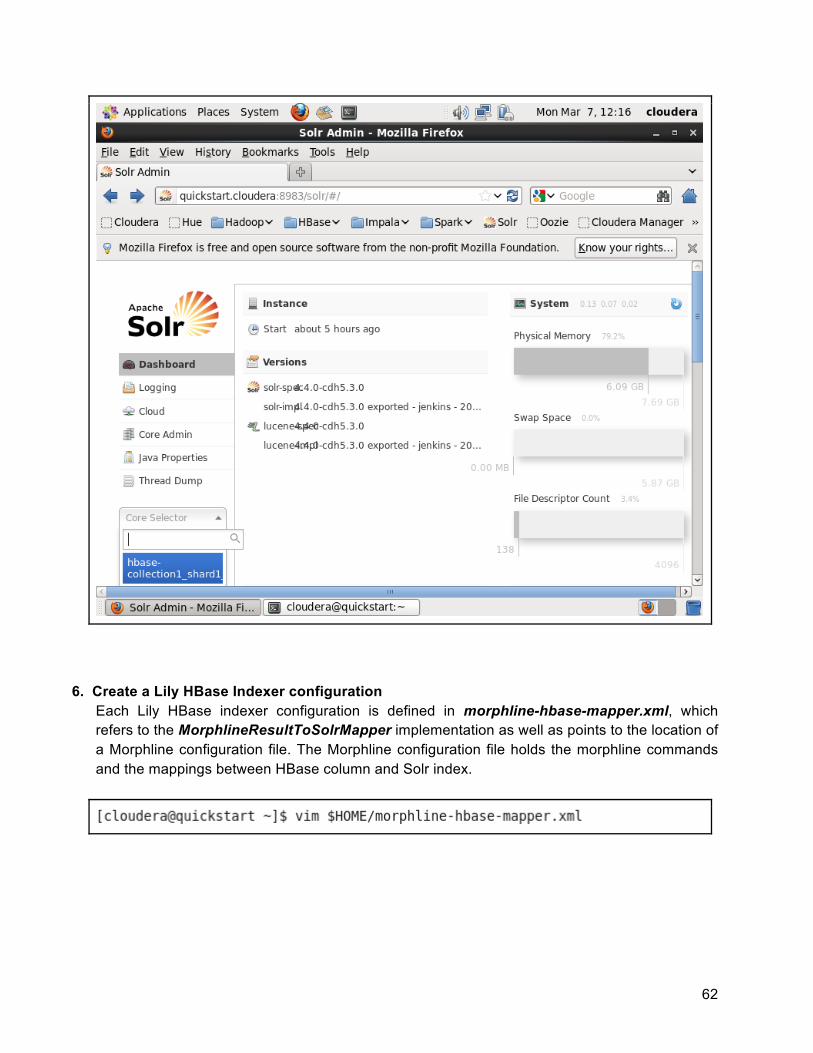
6. Create a Lily HBase Indexer configuration
Each Lily HBase indexer configuration is defined in morphline-hbase-mapper.xml, which refers to the MorphlineResultToSolrMapper implementation as well as points to the location of a Morphline configuration file. The Morphline configuration file holds the morphline commands and the mappings between HBase column and Solr index.

63
7. Create a Morphline Configuration File To control the behavior of the Lily HBase indexer, we configure morphline ETL transformation
commands in a morphlines.conf configuration file, which typically starts with an extractHBaseCells command.
64

65
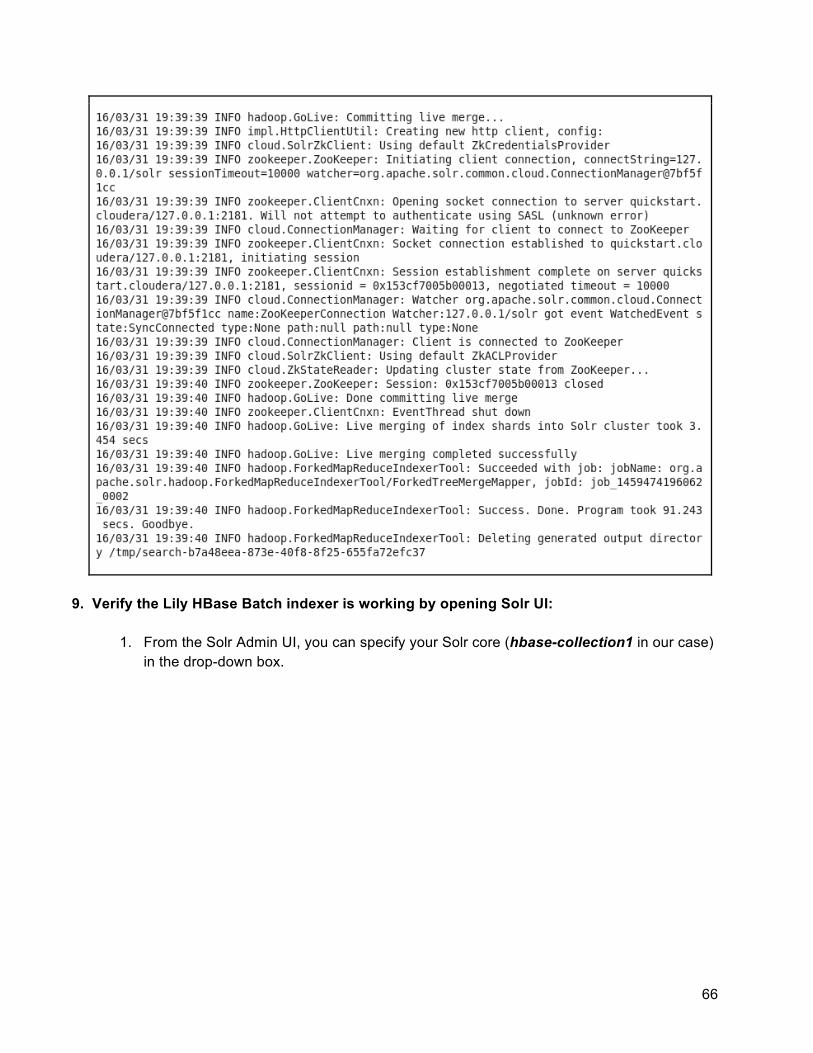
8. Run HBaseMapReduceIndexerTool to index the HBase table using a MapReduce job:
This process will take a while to finish. Upon success, you can see the following:
66
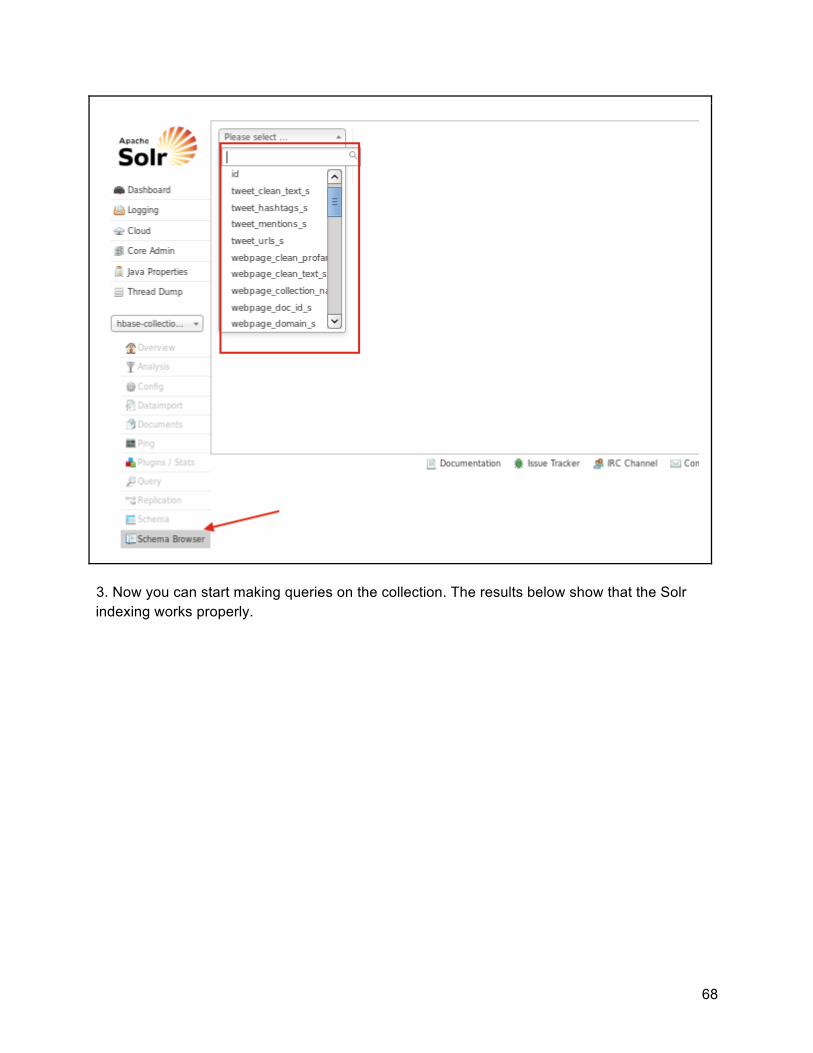
9. Verify the Lily HBase Batch indexer is working by opening Solr UI:
1. From the Solr Admin UI, you can specify your Solr core (hbase-collection1 in our case) in the drop-down box.

67
2. In the left-hand navigation bar, you can select the “Schema Browser” tab under the core
name. Then, you can go to the top of the right panel and see all the dynamic names defined in our schema.xml and processed by morphlines.conf.
68
3. Now you can start making queries on the collection. The results below show that the Solr
indexing works properly.

69
10. Use the Lily HBase NRT Indexer Up to step 9, we know how to perform batch indexing using the Lily HBase batch indexer. However, since in real life, we often need to apply frequent inserts, updates, and deletes to HBase table cells, automatic incremental indexing which keeps Solr consistent with the HBase table contents is preferred. The Lily HBase NRT indexer can be used to process a continuous stream of HBase cell updates into live search indexes. The Lily HBase NRT Indexer Service must be deployed in an environment with a running HBase Cluster, a running SolrCloud Cluster, and at least one ZooKeeper Cluster. The following is the step-by-step instructions on how to achieve NRT indexing.
1. Point a Lily HBase NRT Indexer Service at an HBase Cluster that is to be indexed This is done through Zookeeper. Add the following property to /etc/hbase-solr/conf/hbase-indexer-site.xml, where localhost is the actual ensemble string for the hbase-cluster-zookeeper:

70
2. Start the Lily HBase NRT Indexer Service
3. Enable replication on HBase Column Families In the ‘ideal’ HBase table, there are two column families: “clean_tweet” and “clean_web.” Use the HBase shell to define column-family replication settings. For every existing table, set the REPLICATION_SCOPE on every column family that needs to be indexed.

71
4. Register a Lily HBase Indexer configuration with the Lily HBase Indexer Service Once the content of the Lily HBase Indexer configuration XML file is satisfactory, register it with
the Lily HBase Indexer Service. This is done with a given SolrCloud collection by uploading the Lily HBase Indexer configuration XML file to ZooKeeper.
Verify that the indexer was successfully created as follows:

72
5. Verify the Lily HBase NRT indexer is working Once you successfully finish all the above steps, the Lily HBase NRT indexer should be
working, and you should able able to see any updates you make to the HBase table without another batch indexing. We can do the following steps to verify that. You should see something like:
1. Add rows to the indexed HBase table. For example:
2. To check if the system performs NRT indexing successfully, you can go to the Solr Admin
Console, select the appropriate core, and then check if the newly added row is shown in the query result.

73
Development in our Hadoop Cluster (This section will mostly consist of screenshots as the instructions are very similar to those introduced in development in local Cloudera VM.) Note that we achieved Lily HBase Batch indexing in the cluster. For Lily HBase NRT indexing in cluster, since we need to restart the hbase-solr-indexer in sudo mode, we need to ask Mr. Sunshin Lee to perform the configuration steps for us.
1. Login to our Hadoop Cluster.
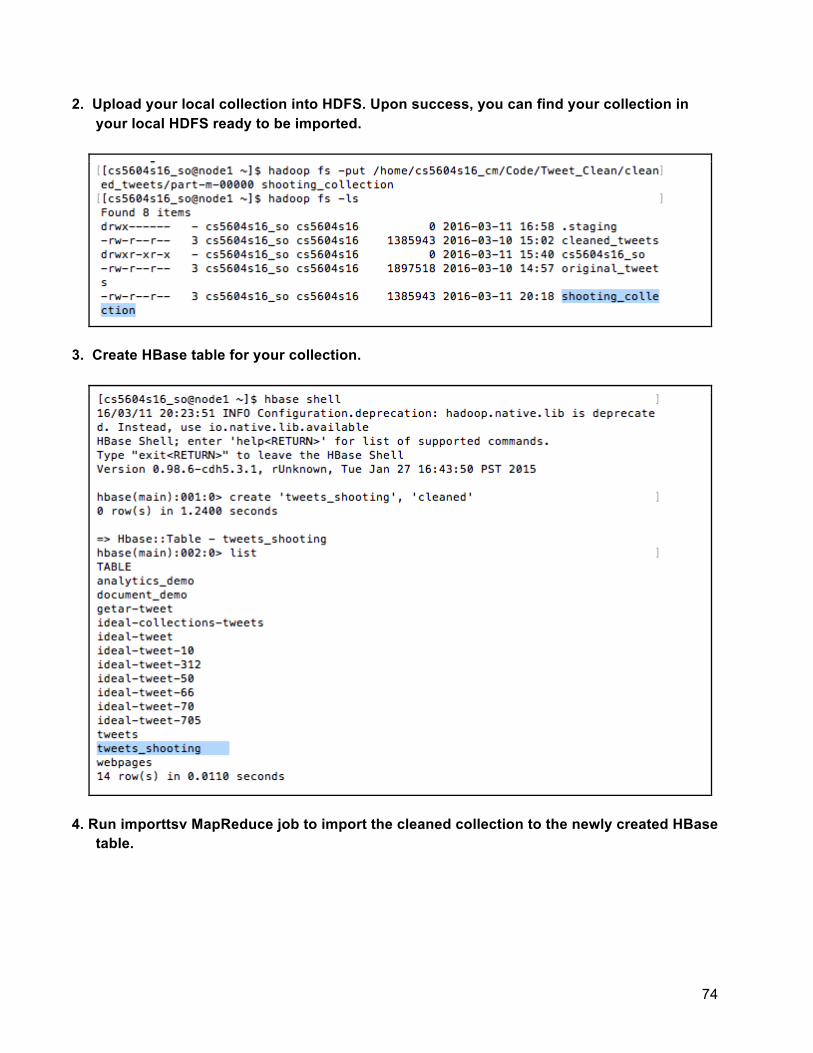
74
2. Upload your local collection into HDFS. Upon success, you can find your collection in your local HDFS ready to be imported.
3. Create HBase table for your collection.
4. Run importtsv MapReduce job to import the cleaned collection to the newly created HBase
table.

75
5. Create a corresponding SolrCloud collection.
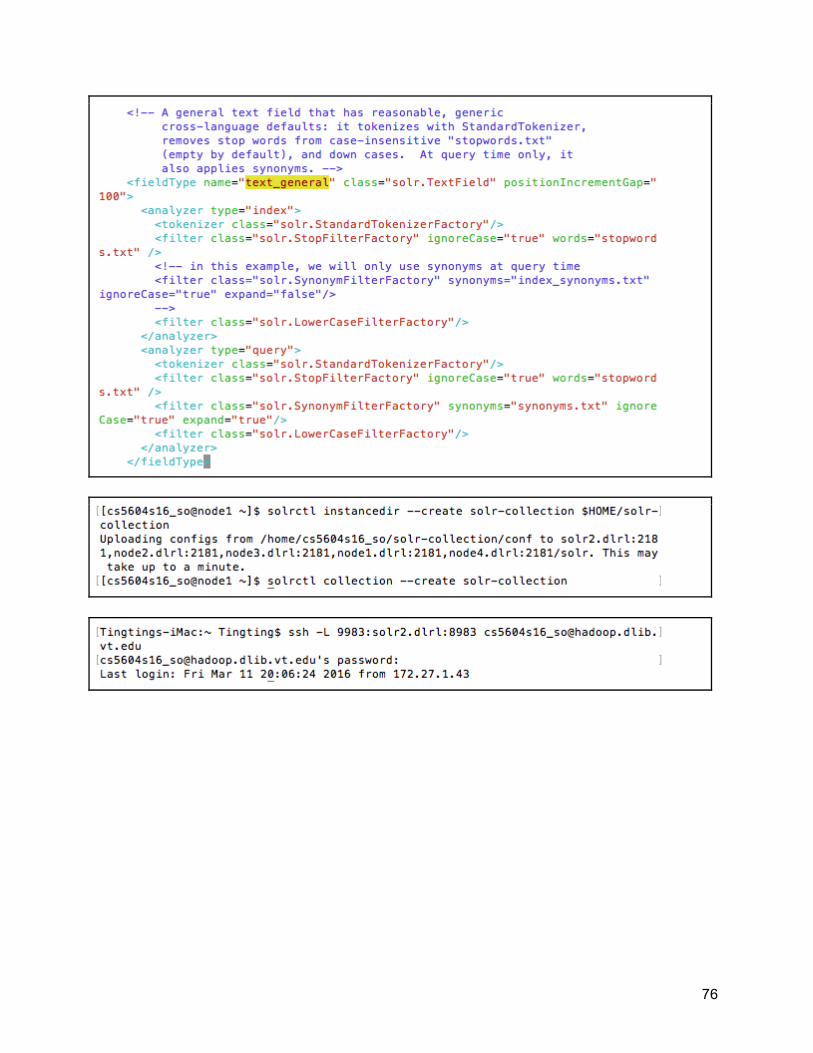
76

77
6. Create a Lily HBase Indexer configuration
7. Create a Morphline Configuration File

78
8. Run HBaseMapReduceIndexerTool to index the HBase table using a MapReduce job:

79
9. Verify the Lily HBase Batch indexer is working by copying the index data to our local
Cloudera VM since we do not have permission to access the Solr server in the cluster.

80
The following steps are done in your local Cloudera VM to verify the success of Solr indexing.

81

82

83
The following figure shows that the stopword “a” is removed.
8.3.5 Lily HBase NRT Indexing in Cluster
8.3.7 Cloudera Search Service over Public IP Please follow the given steps to make Cloudera search services available for accessibility over the public IP. 1. Find your global IP by opening “WhatIsMyPublicIp.com” in your browser. You will get a response like below.

84
2. Enter your public IP fetched from the step above into your browser. This will open the configuration page of your router between your private network and the internet as shown below.
3. Now click on the Advanced tab as shown in the red circle above. You will see the screen shown below.

85
4. Now click on the Port Forwarding tab as shown in the red circle in the screenshot above. Now click on the Add Service button which will take you to the screen shown below.
5. Now
a. Choose an appropriate Service Name for this port forwarding service. b. Choose TCP as Service Type / Transport layer protocol.
86
c. Choose the IPv4 Address of the machine to which you want this request to be forwarded. This IPv4 address is the address allocated by your router to the devices within the network.
d. Choose the appropriate port on which you want to set up the port forwarding. For SSH this would be port number 22. For Solr services this would be port 8983 by default. For Hue services this would be port 8888 by default.
8.4 Discussions
8.4.1 Custom Ranking Function with Weight Calculations We had discussions with Dr. Fox, Mohammed and Sunshin to figure out different ways to come up with weights for incorporating relevance scores from different teams. These weights are significant because they contribute to the total relevance scores. WTopic represents the weightage given to the relevance score from the Topics team in the total relevance score. (Document Score)Topic represents the score of a document belonging to a specific topic. Hence our custom ranking relevance scoring function looks like: Custom Relevance Score = WTopic * (Document Score)Topic + WClustering * (Document Score)Clustering + WCollection * (Document Score)Collection Where (Document Score)X is a floating point number � (0, 1) and WX is a non-negative float value with no upper limit. However for practical purpose and fair search results, it must not be too high. To calculate the values of these weights we thought of these two techniques. A. Multiple Linear Regression One way to calculate these weights was using multiple linear regression. In this technique we would make two assumptions. Firstly that our ranking function closely resembles a linear graph where scores from different teams are the inputs and the final relevance score is the output. Secondly, the inputs are independent of each other. By assuming this linear model for our ranking function we could represent it with this equation: Y = beta*X + c, Here Y is the final relevance score matrix, X is the input matrix representing the values of various document scores given by various teams and beta is a matrix representing the weights of the data from various teams. Hence given the values of Y and X, we can calculate the values of beta using linear regression. For this purpose we used Apache Commons Math Java Library [24]. Thus we can generate a set of queries that represent a good coverage of our collection set and run them against our system. By observing the search results we will have a clear order of documents appearing in the results. However we must assign values to these documents manually since Y has to be a matrix of floating point values. This method however has two

87
disadvantage. Firstly, translating the search result orders to a floating point numbers, representing Y, is a major challenge since it is a non-trivial. Secondly, this process is also very time consuming since the assigning scores requires manual evaluation of the search results. Hence we choose another technique described next. B. Empirical Analysis for the Fractional Relevant Documents In this technique we generate a set of queries that represent a good coverage of search results over various collection set. We run these queries against our system and collect the search results. Then we manually evaluate the fraction of documents from the search results that are actually relevant to the topic, cluster or class. For example, to calculate WTopic we make queries like “Disease”, “Earthquakes”, “Shooting” etc. Since these queries are topic labels, it is highly likely that the top search results will belong to the documents belonging to these topics. Hence if we receive a total of 100 documents in the search results but only top 50 documents belong to these topics then we assign WTopic a value of 50/100 = 0.5. The decision of evaluating whether a document in the search result belongs to a particular topic can be made programmatically. This is possible since the value of the probability of a document falling into the topic under context is stored in the Probability List column of the Topics column family in the HBase table. The same process can also be applied to collections and classification weights. This techniques has two advantage over the aforementioned Multiple Linear Regression technique. Firstly, this technique is relatively simpler since it does not involve any manual assignment of relevance score for populating Y matrix. Secondly, even though this process requires some manual intervention, a large portion can be automated since evaluation of a document falling into a topic, cluster or class is not manual.
8.4.2 Search Component Query Expansion To improve both precision and recall of our results we make use of query expansion technique. Implementation-wise we wish to leverage work of other teams - namely Topic Management. Using their HBase metadata table containing topic label to words mappings allows us to match the original query terms with topic label and expand the query. To support fast lookup we load HBase values into Solr effectively creating an in-memory index upon collection/core initialization phase. Then for each query we simply extract term values and use the text of each to find obtain the most likely topic label which is used to supplement the original query. For actual re-ranking part we discussed 2 strategies. Once the augmented query gets evaluated and the results are fetched custom score gets calculated as a combination of tf-idf and weighted probabilities for each individual document. One way we can improve the precision based on the query is to extract the terms and match them against fields containing probabilities. Then, only scores that get used in re-ranking are the ones corresponding to matched labels. Another way puts more emphasis on the recall. Here we only take into account the highest probability, regardless of the label, effectively boosting those documents that have higher topic probability. The second approach, albeit less precise, is easier to implement and tends to be less compute intensive (O(1) as opposed O(n)).
88
8.4.3 Pseudo Relevance Feedback We decided to use Pseudo Relevance Feedback to improve our search results. In this technique we use the original query given by an end user, run it on solr and fetch top-k results (5 in our case). Then we assume that these results are a close representation of the data desired by the end user. Hence the original query is reformulated to yield results just like the top-k results fetched in the step before. This technique is thus Relevance Feedback because we take feedback from the search results and it is Pseudo because this feedback is not taken directly from the user but inferred from the top-k search results itself. This is the algorithm for our query reformulation using the top-k search results:
1. Read the top-k search results and store the topics, clustering and classification fields from the index for these documents.
2. Append the name of the topic, cluster and class for these documents into the search query.
8.4.4 Slow Search Performance As the size of the Solr indexes grows to several hundred gigabytes, the speed of search response becomes unacceptably slow. For example, our tweet and webpage index is about 660GBs and search query on it takes several minutes. This is obviously not an acceptable behavior since the end user of our systems would expect the search results to appear immediately. To solve this problem we propose the following design. Rather than having one Solr server, running on one core, we can have multiple Solr servers, running multiple cores. When a request is made to the Hue front end, it forwards that search request to a web server forwards this search request to multiple backend solr cores. Upon receiving results from these multiples Solr backend servers, the web service aggregates all the search results and returns them back to Hue to view.
8.5 Repositories We use GitHub to upload any data like scripts, schemas, sample data, tutorial information and configuration files. We have also requested a collection from the Virginia Tech library department on http://vtechworks.lib.vt.edu/ as stated in the instructions on the Canvas. We will upload all our work there once we achieve our end goals of this project. GitHub: https://github.com/shivam-maharshi/IDEAL
9. Future Work We have identified a few major future work that would lead to further improvement in the search capability of IDEAL.
1. In order to evaluate any search system it is important to calculate its Precision and Recall. We haven’t evaluated the Precision and Recall for our search system. Hence

89
one major step in the future would be to device an efficient method and calculate the precision and recall. Quantifying the performance for IDEAL will help us perform further improvements and make better decisions.
2. We found that query re-ranking is not performant for large result sets. Augmenting tf-idf from document fields proved to be highly inefficient as field extraction introduce huge overhead. We need to find a better a solution by first identifying the bottleneck (boosting or ranking) and then figure out a way to limit a number of results to only a couple of relevant ones.
3. In the custom ranking the individual weights given to the fields “Topics”, “Collection”, “Classification” are presently defaulted to value 1. However their value should be calculated on the basis of how much importance/weightage they should hold in the final query. To do this we have suggested two approaches in 8.4 Discussions section.
10. References [1] Cloudera QuickStart. http://www.Cloudera.com/content/Cloudera/en/documentation/core/latest/topics/quickstart.html [2] Cloudera Documentation: Using the Lily HBase Batch Indexer for Indexing http://www.Cloudera.com/documentation/archive/search/1-3-0/Cloudera-Search-User-Guide/csug_hbase_batch_indexer.html [3] Big Data: An Introduction to HBase. http://www.stratapps.net/intro-hbase.php [4] Hadoop Essential: The HBase Data Model. https://www.safaribooksonline.com/library/view/hadoop-essentials/9781784396688/ch05s04.html [5] Crazy dances on the elephant’s back. http://www.slideshare.net/romannikitchenko/hbasecrazydances [6] Getting Started with HBase. http://hbase.apache.org/book.html#_get_started_with_hbase [7] Manning, Christopher D. et al. An Introduction to Information Retrieval. Cambridge University Press, 2009. [8] Grainger, Trey, Timothy Potter, and Yonik Seeley. Solr in Action. Manning, 2014. [9] Apache Solr Reference Guide Covering Apache Solr 5.4. http://www.us.apache.org/dist/lucene/solr/ref-guide/apache-solr-ref-guide-5.4.pdf [10] 2012. Integrating Solr - Solr Wiki - Apache Wiki. https://wiki.apache.org/solr/IntegratingSolr [11] McCandless, Michael, Erik Hatcher, and Otis Gospodnetic. Lucene in Action: Covers Apache Lucene 3.0. Manning Publications Co., 2010. [12] Sunshin Lee, Data_Flow_Diagram_20160201.pdf. https://canvas.vt.edu/courses/21271/files/folder/2016/Tutorials [13] Solr Wiki about SolrCloud http://wiki.apache.org/solr/SolrCloud#Glossary [14] http://lucene.472066.n3.nabble.com/Starting-multiple-cores-shards-on-a-single-node-td4007526.html [15] http://www-eu.apache.org/dist/lucene/solr/ref-guide/apache-solr-ref-guide-5.5.pdf

90
[16] A.Choudhury, R.Gruss, J.Cadena, N.Komawar et al. “CS5604 Spring 2015: Proposed HBase Schema,” Google Docs. Virginia Tech. March 22, 2015. URL: https://docs.google.com/document/d/18GrMmbcLgY7F6xKBIUW4LMJpnwpLmmZhfKmlgARb7qc/edit [17] run_solr.bash Solr Team Git Repository https://github.com/shivam-maharshi/IDEAL/blob/master/run_solr.sh [18] curl_query_solr.bash Solr Team Git Repository https://github.com/shivam-maharshi/IDEAL/blob/master/curl_query_solr.bash [19] Introduction to Distributed Solr Components http://engineering.bloomreach.com/introduction-to-distributed-solr-components/ [20] Solr UI Screen: https://cwiki.apache.org/confluence/display/solr/Query+Screen [21] DisMax Query Parser: https://cwiki.apache.org/confluence/display/solr/The+DisMax+Query+Parser [22] Extended DisMax Query Parser: https://cwiki.apache.org/confluence/display/solr/The+Extended+DisMax+Query+Parser [23] Morphline: http://kitesdk.org/docs/1.1.0/morphlines/morphlines-reference-guide.html [24] Apache Commons Math Library: https://commons.apache.org/proper/commons-math/
11. Acknowledgement We want to thank NSF grant IIS - 1319578, III: Small: Integrated Digital Event Archiving and Library (IDEAL) for the funding support that provides the resources and data used in this project. We especially thank Dr. Edward A. Fox for his insightful advice. We want to express great appreciation to the GRA for this course, Mr. Sunshin Lee, who helped us enormously in every aspect during the development of this project. We also want to thank our fellow classmates, who closely collaborated with us as well as providing useful data to us.
“The path of the righteous man is beset on all sides by the inequities of the selfish and the tyranny of evil men. Blessed is he, who in the name of charity and good will, shepherds the weak through the valley of darkness, for he is truly his brother's keeper and the finder of lost children. And I will strike down upon thee with great vengeance and furious anger those who
would attempt to poison and destroy my brothers. And you will know my name is the Lord when I lay my vengeance upon thee.”