final cut server user manual - apple inc. · this chapter provides an overview of the final cut...
TRANSCRIPT
Final Cut ServerUser Manual

Copyright © 2009 Apple Inc. All rights reserved.
Your rights to the software are governed by theaccompanying software license agreement. The owner orauthorized user of a valid copy of Final Cut Server softwaremay reproduce this publication for the purpose of learningto use such software. No part of this publication may bereproduced or transmitted for commercial purposes, suchas selling copies of this publication or for providing paidfor support services.
The Apple logo is a trademark of Apple Inc., registered inthe U.S. and other countries. Use of the “keyboard” Applelogo (Shift-Option-K) for commercial purposes withoutthe prior written consent of Apple may constitutetrademark infringement and unfair competition in violationof federal and state laws.
Every effort has been made to ensure that the informationin this manual is accurate. Apple is not responsible forprinting or clerical errors.
Note: Because Apple frequently releases new versionsand updates to its system software, applications, andInternet sites, images shown in this manual may be slightlydifferent from what you see on your screen.
Apple1 Infinite LoopCupertino, CA 95014408-996-1010www.apple.com
Apple, the Apple logo, DVD Studio Pro, Final Cut,Final Cut Pro, Final Cut Studio, FireWire, iDVD, Keynote,Leopard, Mac, Macintosh, Pages, QuickTime, Soundtrack,and Xsan are trademarks of Apple Inc., registered in theU.S. and other countries.
Finder, Snow Leopard, and Spotlight are trademarks ofApple Inc.
AppleCare is a service mark of Apple Inc., registered in theU.S. and other countries.
Java and all Java-based trademarks and logos aretrademarks or registered trademarks of Sun Microsystems,Inc. in the U.S. and other countries.
Other company and product names mentioned hereinare trademarks of their respective companies. Mention ofthird-party products is for informational purposes onlyand constitutes neither an endorsement nor arecommendation. Apple assumes no responsibility withregard to the performance or use of these products.
Ducati and the Ducati logo are registered trademarks ofDucati Motor Holding S.p.A. Used by permission.
Production stills from the film “Koffee House Mayhem”provided courtesy of Jean-Paul Bonjour. “Koffee HouseMayhem” © 2004 Jean-Paul Bonjour. All rights reserved.http://www.jeanpaulbonjour.com
Production stills from the film “Les Poupets” providedcourtesy of Jean-Paul Bonjour. “Les Poupets” © 2006Jean-Paul Bonjour. All rights reserved.http://www.jeanpaulbonjour.com

Welcome to Final Cut Server7PrefaceAbout Final Cut Server7About the Final Cut Server Documentation7Additional Resources8
An Introduction to the Final Cut Server Client9Chapter 1About Final Cut Server9The Final Cut Server Client Workflow10Installing the Final Cut Server Client11
The Final Cut Server Interface13Chapter 2The Final Cut Server Main Window13Views for Assets and Productions Panes17Search Options and Saved Searches19Asset Info Window20Final Cut Pro Project Asset Info Window21Final Cut Studio Project Asset Info Window21Production Info Window22Annotations Window23Downloads & Uploads Window24Search All Jobs Window25Search Devices Window25Preferences Window26Using Shortcut Menus in Final Cut Server27Using Keyboard Shortcuts in Final Cut Server28
Uploading Files to Final Cut Server29Chapter 3About Creating Final Cut Server Assets29Types of Files That Can Be Uploaded to Final Cut Server30About Metadata and Metadata Sets30Strategies for Uploading Media and Project Files31Uploading Media Files32Uploading Image Sequences35Uploading Final Cut Pro Projects37
3
Contents

Uploading Final Cut Studio Projects40About the Asset Info Window47
Organizing and Searching the Final Cut Server Catalog53Chapter 4Organizing Assets in Final Cut Server53Searching in Final Cut Server62Displaying Search Results69Tracking the Status of an Asset or Production with Metadata69Adding and Changing Asset Metadata71Searching Devices and Jobs72
Working in Final Cut Server77Chapter 5Final Cut Server Client Actions77Viewing an Asset79Adding Versions for a Media or Project Asset80Locking and Unlocking an Asset82Writing Annotations on a Video Asset86Duplicating an Asset88Using the Edit-in-Place Feature89Monitoring Jobs89Setting Final Cut Server Client Preferences92
Working with Media Assets95Chapter 6About Caching95Checking Media Assets In and Out97Preparing Media Assets to Be Used on an Offline Computer99Exporting Media Assets102
Working with Final Cut Pro Projects103Chapter 7About Final Cut Pro Projects103Using Final Cut Pro and Final Cut Server Together104Resolving Offline Media Issues105Moving Projects Between Final Cut Server and Final Cut Pro106Checking Out a Final Cut Pro Project106Editing a Checked-Out Project in Final Cut Pro108Checking In a Final Cut Pro Project109Making Versions of Final Cut Pro Project Assets110Working on Projects While Away from the Final Cut Server Network111Exporting a Final Cut Pro Project114
Working with Final Cut Studio Projects117Chapter 8About Editing Final Cut Studio Project Assets117Checking Bundle Assets In and Out118Checking Projects and Media Files In and Out119
4 Contents

Exporting a Project Asset and Its Media124
Using Status Metadata in the Final Cut Server Workflow127Chapter 9Using Status Metadata to Track Assets and Productions127About the Review and Approve Feature131Using the Review and Approve Feature132
Exporting, Archiving, and Deleting Completed Assets and Projects137Chapter 10Outputting a Final Project137Archiving and Restoring Media Assets140Deleting Assets from Final Cut Server141
Solving Problems143AppendixResources for Solving Problems143Contacting AppleCare Support143
145Glossary
5Contents


Final Cut Server is extremely flexible and configurable. It is also designed to become fullyfunctional quickly, allowing you to expand its capabilities as your needs grow.
This preface covers the following:
• About Final Cut Server (p. 7)
• About the Final Cut Server Documentation (p. 7)
• Additional Resources (p. 8)
About Final Cut ServerFinal Cut Server is powerful media asset management and workflow automation software.Final Cut Server makes it easy to manage large collections of media files. Its capabilitiesalso extend to tracking job status, orchestrating reviews and approvals, and automatingcomplex sequences of tasks—all in a single product designed to work with Final Cut Pro.
About the Final Cut Server DocumentationFinal Cut Server comes with various documentation that will help you get started as wellas provide detailed information about the application.
• Final Cut Server Setup Guide: The printed installation document provided in theFinal Cut Server box describes how to install and configure Final Cut Server.
• Final Cut Server User Manual: This user manual describes how to use the Final Cut Serverclient for the day-to-day use of the system, such as browsing assets, managing jobs,and managing productions.
• Final Cut Server Administrator Guide: The administrator guide describes how to administermost components of the Final Cut Server system. It does not describe day-to-day useof the system, such as browsing assets and managing jobs, productions, and orders,which are described in the Final Cut Server User Manual.
Important: An understanding of the material in the Final Cut Server User Manual isassumed in the Final Cut Server Administrator Guide.
7
Welcome to Final Cut Server
Pref
ace

Additional ResourcesAlong with the documentation that comes with Final Cut Server, there are a variety ofother resources you can use to find out more about Final Cut Server.
Final Cut Server WebsiteFor general information and updates, as well as the latest news on Final Cut Server, goto:
• http://www.apple.com/finalcutserver
Apple Service and Support WebsitesFor software updates and answers to the most frequently asked questions for all Appleproducts, go to the general Apple Support webpage. You’ll also have access to productspecifications, reference documentation, and Apple and third-party product technicalarticles.
• http://www.apple.com/support
For software updates, documentation, discussion forums, and answers to the mostfrequently asked questions for Final Cut Server, go to:
• http://www.apple.com/support/finalcutserver
For discussion forums for all Apple products from around the world, where you can searchfor an answer, post your question, or answer other users’ questions, go to:
• http://discussions.apple.com
8 Preface Welcome to Final Cut Server

This chapter provides an overview of the Final Cut Server, including information aboutthe Final Cut Server workflow and how to install the Final Cut Server client.
This chapter covers the following:
• About Final Cut Server (p. 9)
• The Final Cut Server Client Workflow (p. 10)
• Installing the Final Cut Server Client (p. 11)
About Final Cut ServerFinal Cut Server works similarly to other client/server computer networks. A client computersends a request to the server computers. Upon receiving the request, the server computerperforms a job to process the request and then sends the result (or message of completionof the job) back to the client computer. Jobs can include uploading, copying, transcoding,cataloging, and otherwise tracking media files. Media can be stored on the servercomputer’s internal and external drives as well as on many supported network devices.Larger facilities may use an Apple Xsan storage area network (SAN) for asset andproduction storage.
The Final Cut Server client is the focus of this user manual. The Final Cut Server client issoftware that communicates with the Final Cut Server server. The client allows you, oneof multiple users, to access the assets shared across your organization’s system. In yourFinal Cut Server client, you can quickly search your organization’s asset catalog and transfermedia files between your local computer and the devices on which the assets are stored.You can run the Final Cut Server client on Mac OS X and Windows XP or Windows Vistaoperating systems. For information about system requirements, see the Before You InstallFinal Cut Server and the Final Cut Server Setup Guide documents.
The Final Cut Server client provides many features to help you manage your media. Thesefeatures all use Final Cut Server assets. When you upload a media or project file toFinal Cut Server, an asset is created for it. This asset contains metadata, the original file(called the primary representation file), and proxy copies of the primary representation filethat are used within Final Cut Server.
9
An Introduction to theFinal Cut Server Client 1

Final Cut Server can help you do the following tasks:
• Find the assets you need: As the number of assets in your Final Cut Server catalogincreases, creating and managing searches becomes more important. Final Cut Serverprovides multiple ways to search and organize the assets in your organization’sFinal Cut Server catalog.
• Have immediate access to media: Final Cut Server provides immediate access to mediafrom the Final Cut Server client software. You can easily get information and view amedia asset from the client software. If you want to edit the media asset, you can checkout a Final Cut Server–managed copy of the file to your local computer, edit it, andthen check it back in to Final Cut Server. Because Final Cut Server is managing thechecked-out file, the new edits are tracked by Final Cut Server.
• Track the status of media: Final Cut Server provides metadata fields and saved searchesto help you track assets as they move through your organization’s workflow. YourFinal Cut Server administrator can further customize the metadata fields to increasethe effectiveness of asset tracking for your organization.
• Perform powerful media conversion: Final Cut Server uses Compressor, a powerfultranscoding application that is part of Final Cut Studio, to convert media from onevideo format to another when uploading, exporting, and copying media files.
• Work while not connected to the Final Cut Server network: You can check outFinal Cut Server–managed project and media files and then edit them while notconnected to the Final Cut Server network. When you later connect to theFinal Cut Server network, you can check the edited files back in to Final Cut Server.When you check in the files, the assets that track the files are updated with the newfiles.
The Final Cut Server Client WorkflowFinal Cut Server makes it easy for users to find, access, and track media and project files,as well as transcode media and easily check assets in and out for editing.
Although different organizations perform each of these tasks slightly differently, thetypical Final Cut Server workflow involves four stages:
Stage 1: Organizing Existing Media and Uploading New MediaThe project you’re working on might use media that has already been uploaded toFinal Cut Server, or it may require new media. Media can be uploaded using an automatedscan set up by your administrator or uploaded manually by any person in yourorganization.
10 Chapter 1 An Introduction to the Final Cut Server Client

Stage 2: Editing the Media and ProjectThis stage of editing within your organization can include creating and editing aFinal Cut Pro project, creating and revising artwork and graphic overlays or motion effects,or other workflows your organization uses to create projects for client review. The finalpart of this stage involves putting all the finished pieces together into a review copy ofthe project.
Stage 3: Reviewing and Approving the ProjectThis stage may involve your coworkers or clients logging in to Final Cut Server and viewingthe project or sending copies of the project out for review. If your Final Cut Serveradministrator has configured your system to automatically send out Review and Approveemails, they are used in this stage.
Stage 4: Outputting and Archiving the Final Media and ProjectThis stage includes creating backup copies of the assets and archiving the final assets inFinal Cut Server.
Final Cut Server can be customized to meet the specific needs of your organization’sworkflow. For more information, contact your Final Cut Server administrator.
Installing the Final Cut Server ClientYour Final Cut Server administrator will provide you with a URL from which you candownload a copy of the Final Cut Server client to your computer. Your administrator willalso give you a user name and password for the Final Cut Server client.
After the Final Cut Server client is downloaded, a login screen appears. You can log in toFinal Cut Server using the user name and password provided by your Final Cut Serveradministrator.
You can log out of the Final Cut Server client by choosing Log Out from the Server pop-upmenu, or by clicking the close button in the Final Cut Server main window.
After the Final Cut Server client is installed on your computer, you can open it bydouble-clicking the application icon that appears in the location where you installed theapplication.
11Chapter 1 An Introduction to the Final Cut Server Client


This chapter provides descriptions of the Final Cut Server user interface. You can use thischapter to orient yourself while learning to use Final Cut Server. You’ll find moreinformation about the features described in this chapter in the following chapters.
This chapter covers the following:
• The Final Cut Server Main Window (p. 13)
• Views for Assets and Productions Panes (p. 17)
• Search Options and Saved Searches (p. 19)
• Asset Info Window (p. 20)
• Final Cut Pro Project Asset Info Window (p. 21)
• Final Cut Studio Project Asset Info Window (p. 21)
• Production Info Window (p. 22)
• Annotations Window (p. 23)
• Downloads & Uploads Window (p. 24)
• Search All Jobs Window (p. 25)
• Search Devices Window (p. 25)
• Preferences Window (p. 26)
• Using Shortcut Menus in Final Cut Server (p. 27)
• Using Keyboard Shortcuts in Final Cut Server (p. 28)
The Final Cut Server Main WindowAfter logging in to Final Cut Server, you see the Assets pane of the Final Cut Server mainwindow. The Assets pane may be empty or filled with media that has been scanned byyour Final Cut Server administrator or uploaded by other Final Cut Server users.
13
The Final Cut Server Interface 2

Note: The screen shots shown in this manual show a default Final Cut Server system.Because your Final Cut Server administrator can configure different media types andmetadata fields, your system may look different from the system shown on these pages.
14 Chapter 2 The Final Cut Server Interface

The Assets pane and Productions pane are the two views of the Final Cut Server mainwindow. An asset is used by Final Cut Server to track every file that is uploaded to theserver or scanned. The Assets pane shows all the assets that Final Cut Server is managing.Productions are used to group assets. The Productions pane shows all the productionsthat have been created by you or other people who use your Final Cut Server system.
You switch between the Assets and Productions panes by clicking either Assets orProductions at the top-left area of the Final Cut Server main window.
Assets PaneAfter you click Assets, all of the assets that exist in Final Cut Server are listed in the mainpart of the window. You can move through the assets by clicking the page controls inthe top-right corner of the Assets pane. The Toolbar includes the Lock button, the CheckOut button, and the New Production from Selection button. After an asset is selected,these buttons become active.
Move through multiple pages of assets using
these controls.
Assetsare here.
The Information pane shows information about the selected asset.
The New Production from Selection button
Lock button The Check Out button
15Chapter 2 The Final Cut Server Interface

See Working with Media Assets to learn more about media assets. See Working withFinal Cut Pro Projects to learn more about Final Cut Pro project assets. See Working withFinal Cut Studio Projects to learn more about Final Cut Studio project assets.
Productions PaneAfter you click Productions, all of the productions that exist in Final Cut Server are listedin the main part of the window. The Productions pane varies somewhat from the Assetspane. Its Toolbar has a New Production button.
The information pane shows information about the selected production.
Click Productions to see the Productions pane.
Productions areshown here.
The Production Toolbar has a New Production button.
See Organizing Assets in Final Cut Server to learn more about productions.
16 Chapter 2 The Final Cut Server Interface

Views for Assets and Productions PanesThe Assets and Productions panes can be displayed as lists or thumbnails. You can changethe view by clicking the Thumbnail View button or List View button.
List View button
Thumbnail View button
Thumbnails ViewThumbnails view displays a thumbnail image of the assets or productions. The thumbnailimage can be a frame from the video file that was uploaded, the graphics or image filethat was uploaded, or an icon representing the type of asset or production. Thumbnailsview is useful when you want to browse a number of assets or productions in a compactformat without other information.
Thumbnails view selected
This video asset is represented with a thumbnail image.
This Final Cut Pro project asset is represented with
a Final Cut Pro icon.
17Chapter 2 The Final Cut Server Interface

List ViewList view displays the assets or productions titles and other metadata in columns. Thisview is useful when you want to view asset or production information or sort by any field.
List view selected
Final Cut Server marks assets and productions with icons to identify them. In Thumbnailsview, the icons appear on the asset or production tile, just above the Thumbnails imageor icon. In List view, the icons appear to the left of the Title column and in the Statecolumn.
The icons you see on assets and productions include:
DescriptionIcon
Final Cut Pro project asset
Video clip asset
Image asset
Audio asset
Asset (unknown) or bundle asset (if the asset is a Final Cut Studioproject, the application’s icon will be displayed on the thumbnail)
An asset alias, used in productions to link from a production to theoriginal asset
A production
18 Chapter 2 The Final Cut Server Interface

DescriptionIcon
Asset checked out by me
Asset checked out by another user
Asset locked by me
Asset locked by another user
Asset archived (yellow) indicates you can restore this asset from itsarchive
Asset archived (white) indicates you do not have permission torestore the asset from its archive
Unlinked Final Cut Pro project element
Primary representation for this asset is missing from its device
Final Cut Server cache is out of date
For specific information about these icons, see the chapter that describes the type ofasset or the state that the icon describes.
Search Options and Saved SearchesA search field is at the top of the Assets and Productions panes. You can use this searchfield to find a specific asset or production, or to limit the number of assets or productionsshown. Clicking the search disclosure triangle reveals advanced searching options. TheAssets and Productions panes have different advanced search options.
Open the disclosure triangle to show the advanced search settings.
Smart searches that you create are listed under the My Smart Searches heading.
19Chapter 2 The Final Cut Server Interface

You can save searches you create as smart searches. Final Cut Server comes with severaldefault smart searches listed under the My Smart Searches heading on the left of themain Final Cut Server window. These smart searches, as well as any you create, are uniqueto your Final Cut Server client. Other smart searches that are configured and managedby your Final Cut Server administrator and that appear on every Final Cut Server client inyour system may appear under Smart Searches. If your administrator has not createdsmart searches for your organization, you will not see the Smart Searches heading in yourFinal Cut Server client. See Organizing and Searching the Final Cut Server Catalog formore information.
Asset Info WindowThe info window contains a large amount of information about the asset. When youdouble-click an asset that is listed in the Assets pane or in a production (or Control-clickan asset and then choose Get Info from the asset’s shortcut menu), the asset’s info windowappears.
The left side of the asset info window displays the asset’s thumbnail image and generalasset metadata. The right side of the asset is organized into multiple panes that list specifictypes of information. You can view the information in each pane by clicking the pane’sbutton.
The asset’s thumbnail image and general asset metadata
Click the Metadata button to display the Metadata pane.
The Metadata pane
• Metadata pane: This pane lists metadata for the primary representation file (the filethat was originally uploaded to Final Cut Server) and metadata for the asset.
• Resources pane: This pane lists information about the primary representation and proxyfiles that were generated for the asset. It also displays other information about wherethe asset is used.
20 Chapter 2 The Final Cut Server Interface

• Versions pane: This pane lists information about versions of the asset that have beensaved.
• Locks pane: This pane lists locks that have been applied to the asset.
• Review & Approve pane: This pane shows the asset’s status and is used for the EmailNotification feature.
See About the Asset Info Window for more information about the Metadata, Resources,Versions, and Locks panes. See About the Review and Approve Feature for moreinformation about the Review & Approve pane.
Final Cut Pro Project Asset Info WindowYou can view a Final Cut Pro project’s info window by double-clicking a Final Cut Proproject asset (or Control-click the asset, then choose Get Info from the shortcut menu).
When Final Cut Pro projects are uploaded to Final Cut Server, an asset is created for theproject file. In addition to the panes included in the asset info window, the Final Cut Proproject asset info window includes an Elements pane. This pane lists the media assetsthat are used in the Final Cut Pro project file.
The Elements pane lists the media that is used in the Final Cut Pro project.
Click Elements to view the Elements pane.
See Working with Final Cut Pro Projects for more information about Final Cut Pro projectassets.
Final Cut Studio Project Asset Info WindowYou can view a Motion, Soundtrack Pro, or DVD Studio Pro project asset’s info windowby double-clicking a Final Cut Pro project asset (or Control-click the asset, then chooseGet Info from the shortcut menu).
21Chapter 2 The Final Cut Server Interface

When Final Cut Studio project files are uploaded to Final Cut Server, the asset that iscreated for the Final Cut Studio project represents only the project file. Unlike Final Cut Proproject assets, the Final Cut Studio project asset does not contain a list of the media linkedto the project.
A Final Cut Studio project asset info window includes Metadata, Resources, Versions,Locks, and Review & Approve panes. You can view the information in each pane byclicking the pane’s button.
See Working with Final Cut Studio Projects for more information about Final Cut Studioproject assets.
Production Info WindowIn Final Cut Server, you can use productions to group related assets. If you click to openthe Productions pane at the top-left area of the Final Cut Server main window and thendouble-click one of the productions (or Control-click the production, then choose GetInfo from the shortcut menu), that production’s info window is displayed.
22 Chapter 2 The Final Cut Server Interface

The Assets and Productions pane shows all of the assets contained in the production; theMetadata pane shows the production’s metadata.
The path describes the production’s location.
Click a button to display more information about the production.
This production contains two alias files.
See Organizing Assets in Final Cut Server to learn more about productions.
Annotations WindowYou can mark a single video asset with comments in the Annotations window. Becausecomments added in the Annotations window stay with the video asset in Final Cut Server,annotations are useful for internal reviews and communication with other Final Cut Serverusers.
23Chapter 2 The Final Cut Server Interface

To view the Annotations window, open a video asset’s info window and click the Annotatebutton.
Click the Annotate button in a video asset’s info pane to open the Annotations window.
You can preview the clip here.
You can add text in the Annotation field.
Annotations that have been added to a video asset appear here.
Downloads & Uploads WindowThis window helps you more closely monitor the status of files that you are uploadingto or downloading from Final Cut Server.
24 Chapter 2 The Final Cut Server Interface

You can open the Downloads & Uploads window by clicking the Downloads and Uploadsbutton in the Final Cut Server main window (or by choosing Downloads & Uploads fromthe Window pop-up menu).
See The Downloads & Uploads Window for more information.
Search All Jobs WindowThe Search All Jobs window is opened from the Server pop-up menu (located at thetop-left corner of the Final Cut Server main window). It shows a list of recent jobs thatwere initiated by all Final Cut Server users.
The Search All Jobs window shows a list of the most recent jobs initiated by all Final Cut Server users.
See Searching for a Job for more information about the Search All Jobs window.
Search Devices WindowThe Search Devices window is opened from the Server pop-up menu in the Final Cut Servermain window. In it, you can search a device directly, viewing all the assets (files that havebeen uploaded to Final Cut Server) as well as other files that have not been uploaded toFinal Cut Server and are stored on the device.
25Chapter 2 The Final Cut Server Interface

Warning: Use the Search Devices window with caution. Devices can contain files thatboth have and have not been added to the Final Cut Server catalog. Working with filesin the Search Devices window could result in making duplicate copies of an asset inyour Final Cut Server server system, or in deleting all copies of a file from a device.
See Searching Devices for more information about the Search Devices window.
Preferences WindowYour Final Cut Server administrator is responsible for configuring most of the preferencesthat affect you while working with your Final Cut Server client. However, there are a fewsettings that you specify for your Final Cut Server client. These include search displaypreferences, the location and size of the Final Cut Server cache, and the location to whichyou can save alias copies of prepared media files.
26 Chapter 2 The Final Cut Server Interface

You can open the Preferences window by choosing Preferences from the Server pop-upwindow.
See Setting Final Cut Server Client Preferences for more information about the preferencesfor your Final Cut Server client.
Using Shortcut Menus in Final Cut ServerYou can take many actions in Final Cut Server by making choices from shortcut menus.You can view a shortcut menu’s items by Control-clicking an asset, a Final Cut Pro project,or another area of Final Cut Server.
The asset shortcut menu
Mac users using a multibutton mouse can also use right-click to access shortcut menus.
Note: If you’re a Windows user, note that a right-click on a Windows system is theequivalent of a Control-click on a Mac. To display the shortcut menu on your Windowssystem, right-click.
27Chapter 2 The Final Cut Server Interface

Using Keyboard Shortcuts in Final Cut ServerMany of the standard Mac OS X keyboard shortcuts are available in Final Cut Server. Inaddition, application-specific keyboard shortcuts are available for the Final Cut ServerAnnotations window.
28 Chapter 2 The Final Cut Server Interface

Before you can manage and track your files in Final Cut Server, you first need to uploadthe files. This chapter describes how to upload three different types of files toFinal Cut Server: media files, Final Cut Pro project files, and Final Cut Studio projects andtheir linked media files.
This chapter covers the following:
• About Creating Final Cut Server Assets (p. 29)
• Types of Files That Can Be Uploaded to Final Cut Server (p. 30)
• About Metadata and Metadata Sets (p. 30)
• Strategies for Uploading Media and Project Files (p. 31)
• Uploading Media Files (p. 32)
• Uploading Image Sequences (p. 35)
• Uploading Final Cut Pro Projects (p. 37)
• Uploading Final Cut Studio Projects (p. 40)
• About the Asset Info Window (p. 47)
About Creating Final Cut Server AssetsThe first step in building a Final Cut Server asset catalog is to upload media toFinal Cut Server. You can manually upload media files, Final Cut Pro projects, and otherFinal Cut Studio project files to Final Cut Server. Additionally, your Final Cut Serveradministrator can set up automated processes to automatically upload files. Even if yourFinal Cut Server administrator has created useful automated upload workflows, you willoften manually upload files to Final Cut Server.
When a file is uploaded to Final Cut Server, an asset is created. The asset is used byFinal Cut Server to track the media or project file that you uploaded. The asset containsthe original file (called the primary representation file) and the metadata from the file.Depending on the type of file that has been uploaded, the asset may also contain severalproxy files, including a Clip Proxy (for video files) and a Thumbnail and Poster frame proxy(for all media files). More information about proxy files is included later in this chapter.
29
Uploading Files to Final Cut Server 3

Because media assets, Final Cut Pro project assets, and Final Cut Studio (Motion,Soundtrack Pro, and DVD Studio Pro) project assets are managed differently inFinal Cut Server, how to work with each type of asset is explained throughout this manual.
Types of Files That Can Be Uploaded to Final Cut ServerFinal Cut Server can manage many types of files, including the following:
Supported file typesMedia category
Final Cut Pro projects (.fcp) and many of the video file formatsavailable for output from Final Cut Pro and Compressor, including.mov and .mpeg
Video
Image sequences can be uploaded as a single video/image sequenceasset. A QuickTime movie clip proxy is automatically created so youcan view the image sequence within Final Cut Server.
Image Sequence
Photoshop files (.psd) and other graphic and image files including.tif, .jpeg, .png, .bmp, and .gif
Still images and graphics
Motion projects (.motn)Motion graphics
Soundtrack Pro files (.stap and .stmp) and other audio files, including.aif, .ac3, uncompressed audio files, .mp3, .mp4, .m4a, and .wav
Audio
DVD Studio Pro project files (.dspproj), iDVD (.dvdproj) projectsDVD
Pages files (.pages), Keynote files (.key), and other document filesincluding .doc, .txt, and .pdf
Text files
About Metadata and Metadata SetsWhen you import an asset, it comes in with a variety of metadata. The specific metadatathat a file brings with it into Final Cut Server varies depending on the type of file that theasset is and the application or applications with which the asset was created and edited.Some asset types include standard metadata, such as XMP or EXIF metadata.
Metadata is an important part of the assets and productions included in the Final Cut Servercatalog. Because you search for asset and production metadata, it is important that youadd as much metadata as possible when you are uploading the original file. The metadatafields that are available depend on the metadata set that you choose in the Uploadwindow.
Common metadata, including XMP and QuickTime, is supported by Final Cut Server. Ifyou have specific questions about the metadata supported by Final Cut Server, contactyour Final Cut Server administrator.
30 Chapter 3 Uploading Files to Final Cut Server

Note: If you’ve added metadata to a QuickTime file using the default QuickTime annotationfields, that metadata appears in the QuickTime metadata group of the Media metadataset. You must assign the asset’s metadata set to Media to view the QuickTime annotationinformation; if you apply any other metadata set, the QuickTime metadata is not visiblein the Final Cut Server asset.
Final Cut Server comes with default metadata sets to describe your assets. If the defaultmetadata sets do not meet the needs of your organization’s workflow, your Final Cut Serveradministrator can add metadata fields to existing sets or create entirely new metadatasets.
When you’re working in Final Cut Server, you can use the metadata that an asset containsto search for, sort, and identify assets and productions in Final Cut Server, and to trackinformation within your workgroup. After a file is uploaded, you and others can manuallyadd and change the metadata that describes the asset at any time. For example, keywordscan be added to identify the project or production that an asset is part of. Similarly, anymetadata you add to a production when or after it is created can be used in a search.
Strategies for Uploading Media and Project FilesYour Final Cut Server administrator may have set up scans that automatically upload filesto Final Cut Server. When you want to upload media and project files manually, you cando it in two ways:
• You can drag files from your system or a connected device to Final Cut Server. This isthe option to use when you have a few pieces of media you want to add to your assetcatalog.
• You can open the Upload window from the Server pop-up menu in the Final Cut Servermain window, navigate to a folder of media files, and then select the ones to beuploaded. This is the option to use if you are uploading multiple media files.
Important: It is recommended that you include file extensions on all files uploaded toFinal Cut Server.
In the Upload window that appears, you have many options. You can choose a metadataset for the new asset. You should also add several types of metadata to the file at upload.
You can also choose to convert the file being uploaded to another codec (using thetranscode settings for video and audio files from Compressor) during upload, and groupthe asset in a production.
When you upload a file, the filename is entered, by default, in the Title field in the Uploadwindow. You can choose to enter a new name in the Title field; however, it is importantto understand that the Title field is used exclusively in Final Cut Server. The asset’s titlewill not appear in the asset’s metadata if you export a copy of the asset.
31Chapter 3 Uploading Files to Final Cut Server

Important: If you are uploading large project or media files, turn off your computer’ssleep function. If the computer on which the Final Cut Server client is running goes tosleep during an upload, the upload will be canceled.
About Uploading QuickTime Reference MoviesA QuickTime reference movie can contain a list of references to movies that have differentdata rates. This allows an application to choose the best-looking movie that can playsmoothly as it downloads over the Internet, based on the user’s connection speed.When you upload a QuickTime reference movie, a dialog appears advising you that themovie has one or more external alias files and asking you if you want to flatten the filebefore uploading it. Flattening the file creates a new file that contains all of the mediathat was previously in the external alias file or files. It is recommended that you chooseto flatten any QuickTime reference movies that you upload to Final Cut Server.
Uploading Media FilesWhen you upload a media or project file to Final Cut Server, the asset that is createdcontains the original media file, which Final Cut Server calls the primary representation.
At upload, Final Cut Server creates proxy files for certain types of media assets. Proxy filesare copies of the primary representation that are used for certain operations withinFinal Cut Server.
If the file being uploaded is a graphics or video file, Final Cut Server creates two proxygraphics files: a Poster frame and a Thumbnail. These are used to represent the asset’smedia within Final Cut Server.
If the file being uploaded is a video asset, Final Cut Server also creates a Clip Proxy file.The Clip Proxy file is created by transcoding the primary representation file to alower-resolution codec. The Clip Proxy is used for viewing the file in Final Cut Server.
32 Chapter 3 Uploading Files to Final Cut Server

Here’s an example. When you upload an uncompressed HD video clip to Final Cut Server,a Final Cut Server asset is created. This asset holds the original file (the primaryrepresentation). The original file is also transcoded to create the Clip Proxy file, and JPEGimages are created to be used as Thumbnail and Poster frame proxy files for the asset.
Media file
Media assetClip Proxy
Thumbnail
Poster frameMetadata
Primaryrepresentation
Upload video clip to Final Cut Server
After the upload is complete, you can view a list of the proxy files created for the assetin the Resources pane of the asset’s info window.
You can see proxy files created for the asset in the Resources pane of the asset info window.
You can upload one or more media files to Final Cut Server. When you upload multiplemedia files, keep in mind that any setting you define in the Multiple Upload window,including metadata, will apply to all the files being uploaded. For example, if you specifya transcode format, all of the files being uploaded will be transcoded.
Important: It is recommended that you include file extensions on all files uploaded toFinal Cut Server.
33Chapter 3 Uploading Files to Final Cut Server

To upload one or more media files1 Do one of the following:
• Drag the media file or files that you want to upload from the Finder, the desktop, or aconnected volume to the column on the left of the Final Cut Server main window, theAssets pane, or a production.
• Choose Upload File from the Server pop-up menu, select the media file or files in thefile browser that appears, then click Upload.
Depending on the number of files you uploaded, the Upload, Link Upload, or MultipleUpload window appears.
The Upload window includes an editable Filename field.
The Upload windows are very similar. In the Upload and Link Upload windows, you canenter a filename for the asset (the filename is entered automatically). In the MultipleUpload window, the filename field is hidden, and each asset being uploaded isautomatically named with the filename.
Note: You can change an asset’s title at any time after uploading in the asset info window’sMetadata pane.
2 Some of the information and metadata in the Upload or Upload Multiple window isautomatically entered. You can change the metadata set from the Metadata set pop-upmenu and add metadata for the new asset or assets.
Important: If you are uploading a file that you previously added metadata to using thedefault QuickTime annotation fields, you must choose the Media metadata set for theasset. When you do this, the metadata that was assigned to the file in QuickTime appearsin Final Cut Server in the QuickTime metadata group of the Media metadata set. If youapply any other metadata set to the asset, the QuickTime metadata will not appear inthe Final Cut Server asset.
Remember that all the metadata you apply for a multiple upload will be attached to eachof the assets being created.
34 Chapter 3 Uploading Files to Final Cut Server

3 If necessary, choose a new destination device from the Destination pop-up menu. Thisspecifies the device on which the file will be stored. If you have questions about whichdevice to choose, contact your Final Cut Server administrator.
Note: Media and Library are the primary Final Cut Server devices. Talk with yourFinal Cut Server administrator about which other configured devices are appropriate formedia file storage.
4 If you want to group the media asset or assets in a production, click Choose at the rightof the Associate with Production field and specify a production. (If you dragged the fileinto a production in step 1, this field will automatically display the path to that production.)
See Organizing Assets in Final Cut Server for more information.
5 If you want to convert the original media file or files to a different codec, click the Choosebutton and then select a new transcode setting in the window that appears.
6 Click Begin Upload to create assets from the media file or files.
The upload begins. The upload progress is displayed above the Information pane in thebottom-left corner of the Final Cut Server main window.
7 To monitor the progress of the file upload, click the Downloads and Uploads button todisplay the Downloads & Uploads window.
8 After the file is uploaded, click “Assets created by me” listed under the My Smart Searchesheading to view the new asset or assets that you just uploaded.
For information about how to get information about the asset that was just created, seeAbout the Asset Info Window.
Uploading Image SequencesAn image sequence is a movie exported as a series of numbered image files, stored in afolder. When you upload a folder of image files, Final Cut Server presents a dialog askingif you want to create an image sequence asset. If you choose to create an image sequenceasset, the folder of individual numbered image files is uploaded and stored as the primaryrepresentation. A Clip Proxy QuickTime video is created using the image files; this videois used to view the image sequence in Final Cut Server. Two proxy graphics files, a Posterframe and a Thumbnail, are also created; these are used to represent the asset’s media.
When you export the asset, the folder of numbered image files is exported to the locationyou provide in the export dialog.
To upload a folder containing an image sequence1 Do one of the following:
• Drag the folder to the column on the left of the Final Cut Server main window, to theAssets pane, or to a production in the Productions pane.
35Chapter 3 Uploading Files to Final Cut Server

• Choose Upload File from the Server pop-up menu (the pop-up menu in theFinal Cut Server main window that appears when you click the Server button), selectthe folder in the file browser that appears, then click Upload.
2 In the dialog that appears, choose to create an image sequence asset, then click Create.
Important: By clicking Create, you state that the folder you are uploading contains onlya series of image sequence files. Any other file types included in the upload, such asFinal Cut Pro projects or media files, must be uploaded independently from the imagesequence.
3 The Link Upload window appears. Specify any other upload settings including thefollowing:
• The Video Frame Rate is set by default to 29.97. If necessary, choose a different videoframe rate from the Video Frame Rate pop-up menu, or choose Auto to use anautomatically generated frame rate gleaned from the media’s metadata or use thesystem default Video Frame Rate setting. Talk to your administrator to learn moreinformation about the default Video Frame Rate setting.
Note: The video frame rate settings are provided by Compressor. If the video framerate you need is not listed in the pop-up menu, talk to your Final Cut Serveradministrator.
• If necessary, choose a new destination device from the Destination pop-up menu.
Important: It is recommended that image sequences be uploaded to a device set upfor image sequences only. Talk with your Final Cut Server administrator about whichconfigured devices are appropriate for image sequence file storage.
• If you want to group the Final Cut Pro project asset in a production, click Choose at theright of the Associate with Production field and specify a production.
See Organizing Assets in Final Cut Server for more information about productions,including creating a new production.
• Choose a metadata set for the asset from the Metadata Set pop-up menu, and addmetadata to one or more fields, defining this as a bundle asset.
4 Click the Upload button to create the asset.
The file is uploaded and the image sequence asset is created.
For information about how to get information about the asset that was just created, seeAbout the Asset Info Window.
36 Chapter 3 Uploading Files to Final Cut Server

Uploading Final Cut Pro ProjectsFinal Cut Pro project assets have a different structure than media assets. When you uploada Final Cut Pro project to Final Cut Server, the Final Cut Pro project file is the primaryrepresentation for the asset. Final Cut Server discovers the video and other media filesthat are linked to the Final Cut Pro project and uploads each of the media files as a uniquemedia asset. Final Cut Server then lists each of the project’s linked media files as an elementof the Final Cut Pro project.
Note: If your Final Cut Server administrator has turned on Edit Proxy file creation, an EditProxy will also be created for every video file that is linked to the Final Cut Pro project.This Edit Proxy is used for checking out Final Cut Pro projects for editing. For moreinformation about the Edit Proxy feature, talk to your Final Cut Server administrator.
The illustration below shows a Final Cut Pro project at upload. Notice that the elementslist is inside the asset, but the media assets that the elements list references areindependent media assets. Any of the media assets can be found by double-clicking theelement in the Elements pane; when you do this, the media asset’s info window opens.
Project assetFinal Cut Pro project
Upload Final Cut Pro project to Final Cut Server
List of linked media elements
.mov
.jpeg
.aif
.mov
.jpeg
.aif
Clip Proxy
37Chapter 3 Uploading Files to Final Cut Server

After a Final Cut Pro project has been uploaded, you can get information about theproject’s linked media files in the Elements pane of the Final Cut Pro project’s asset infowindow.
The linked media is shown in the asset info window’s Elements pane.
Alternately, you can look at the Resources pane of a media asset’s info window to see ifa media asset is linked to a Final Cut Pro project.
An instance of this media asset is used in the Final Cut Pro project titled “3133_Motorbikes.”
The production “Motorbikes1” includes this media file.
38 Chapter 3 Uploading Files to Final Cut Server

Considerations When Uploading Final Cut Pro ProjectsKeep the following things in mind when uploading Final Cut Pro projects:
• Uploading a Final Cut Pro project that contains a SmoothCam filter: If you upload aFinal Cut Pro project that uses the SmoothCam filter, the analyze file created from itis not uploaded to Final Cut Server. When you check out the project asset fromFinal Cut Server for editing, Final Cut Pro automatically re-analyzes the SmoothCamfilter to re-create the project’s analyze file. This analyze process could take some time.
• Uploading a Final Cut Pro project that contains render files: If you upload a Final Cut Proproject that contains render files, the render files are not uploaded to Final Cut Server.After checking out or exporting a Final Cut Pro project, you will need to rerender thefiles in Final Cut Pro.
• Uploading a Final Cut Pro project that uses a Motion master template: It is recommendedthat you upload Final Cut Pro projects that contain a Motion master template only toedit-in-place devices.
• Include file extensions on all files uploaded to Final Cut Server: It is recommended thatyou include file extensions on all files uploaded to Final Cut Server.
To upload a Final Cut Pro project file1 Do one of the following:
• Drag the Final Cut Pro project file to the column on the left of the Final Cut Server mainwindow, to the Assets pane, or to a production in the Productions pane.
• Choose Upload File from the Server pop-up menu (the pop-up menu in theFinal Cut Server main window that appears when you click the Server button), selectthe Final Cut Pro project file in the file browser that appears, then click Upload.
The Upload Final Cut Pro Project window appears.
39Chapter 3 Uploading Files to Final Cut Server

2 Some of the information in the Link Final Cut Pro Upload window is automatically entered.You can change the metadata set and add any metadata for the new Final Cut Pro projectand the linked media.
Important: Any metadata you enter for the project asset will be applied to the new projectasset and to each asset being created for the linked media files.
3 If necessary, choose a new destination device from the Destination pop-up menu.
This specifies the device on which the file will be stored. If you have questions aboutwhich device to choose, contact your Final Cut Server administrator.
Note: Media and Library are the primary Final Cut Server devices. Talk with yourFinal Cut Server administrator about which other configured devices are appropriate formedia file storage.
4 If you want to group the Final Cut Pro project asset in a production, click Choose at theright of the Associate with Production field and specify a production.
See Organizing Assets in Final Cut Server for more information about productions, includingcreating a new production.
5 Click Upload.
The upload begins. The upload progress is displayed above the Information pane in thebottom-left corner of the Final Cut Server main window.
6 To monitor the progress of the file upload, click the Downloads and Uploads button todisplay the Downloads & Uploads window.
7 After the file is uploaded, click the “Assets created by me” Smart Search listed under theMy Smart Search heading to view the new asset or assets that you just uploaded.
For information about how to get information about the Final Cut Pro project asset thatwas just created, see About the Asset Info Window.
Uploading Final Cut Studio ProjectsFinal Cut Pro project assets are unique in that the relationship between a Final Cut Proproject and its linked media files is managed by Final Cut Server. Final Cut Studio projectfiles can also be uploaded as assets and tracked by Final Cut Server, but the referencesbetween the project file and the media files are not automatically managed byFinal Cut Server.
It is recommended that you upload a folder containing the Final Cut Studio project fileand all of the media files linked to the project to Final Cut Server.
40 Chapter 3 Uploading Files to Final Cut Server

Important: It is possible to upload only a Motion, Soundtrack Pro, or DVD Studio Proproject file to Final Cut Server. When you upload only the project file, an asset will becreated for only the project file. Unlike a Final Cut Pro project file, the Final Cut Studioproject file will not include a list of elements. Instead of uploading a single project file, itis recommended that you upload a folder containing the Motion, Soundtrack Pro, orDVD Studio Pro project file and all of the media files linked to the project file toFinal Cut Server.
When you upload a folder containing the Motion, Soundtrack Pro, or DVD Studio Proproject file and all of the media files linked to the project file, a dialog appears asking ifyou want to upload the folder and the files it contains as a bundle asset or as individualassets.
If you select Create Bundle Asset, the project file and each of the media files are uploadedas a bundle asset. Uploading the folder as a bundle asset guarantees that when you checkout or export the bundle asset, all of the media files that were checked in with the projectwill still be there. The bundle asset can be checked out, edited, and checked back in; itcan also be exported. However, when you upload a folder of files as a bundle asset, thefiles that the bundle asset contains are not available as separate assets in Final Cut Server.
If you select Create Individual Assets, the project file and each of its linked media files areuploaded to Final Cut Server as single and unique assets. Because Final Cut Server doesnot manage the references between the project and media files, it is advised that yougroup the project asset and media assets in their own production, and that you addunique metadata to the project asset and media assets. You can perform both these tasksin the Upload window that appears after selecting Create Individual Assets. Althoughuploading a folder of files as individual assets requires some planning, it is useful becauseeach of the files in the folder is uploaded as an individual asset and can be accessed fromwithin Final Cut Server.
Important: It is recommended that you include file extensions on all files uploaded toFinal Cut Server.
Uploading a Project and Its Media Files as a Bundle AssetIf you upload a Final Cut Studio project and its media files as a bundle asset, a single assetis created in Final Cut Server. This bundle asset is easy to work with: after checking outor exporting the bundle asset, the folder becomes visible and you can open the projectfile contained in the folder in the appropriate Final Cut Studio application. Assuming thatthe media was linked to the project file when the folder was uploaded to Final Cut Server,the project file will open with all its media connected and ready to use.
41Chapter 3 Uploading Files to Final Cut Server

The illustration below shows a Final Cut Studio project being uploaded as a bundle asset.The bundle asset appears in Final Cut Studio as a single generic asset, with no indicationof its project file or its linked media files.
Bundle asset
Folder
Project
BikeBlur.motn
Road_3232.mov
Music_3225.aif
Rider_322.jpg Quill_5344.jpg
Motorbikes.aif
Upload folder to Final Cut Server
If you upload a Final Cut Studio project and its media files as a bundle asset, the mediaand project files are not available to be viewed from within Final Cut Server. To accessthe media assets, you must check out the bundle asset and access the media files frominside the folder.
Important: If a Final Cut Studio project and its media files are uploaded as a bundle assetto a device that has been automated by your Final Cut Server administrator to scan fornew assets, the files in the bundle asset will be analyzed and new assets will be createdfor each file in the bundle. If you upload a Final Cut Studio project and its media files asa bundle asset and then notice new assets have been created for the files in the bundle,contact your Final Cut Server administrator.
To upload a Final Cut Studio project file and its media files as a bundle asset1 In the Final Cut Studio application, save the project and choose to collect the media. In
Motion and Soundtrack Pro, you can do this by choosing File > Save As and choosing tocollect the media in the Save As dialog. In DVD Studio Pro, you need to manually placethe project and media files in a folder.
For specific information about using Motion, Soundtrack Pro, or DVD Studio Pro, see theapplication’s user manual.
Important: When uploading a DVD Studio Pro project file and its linked media files, thereis no need to upload .par files. When you check out and open the project inDVD Studio Pro, the .par files will be automatically re-created.
42 Chapter 3 Uploading Files to Final Cut Server

The project file and its media files are saved in a folder at the location you specified.
A Motion project
The Motion project’s media files
2 In Final Cut Server, create a new production for the project and its assets by followingthese steps:
a Open the Productions pane by clicking Productions in the column at the left of themain Final Cut Server window.
b Click the New Production button in the Toolbar.
c Choose a metadata set for the new production from the Metadata Set pop-up menu.
d Depending on the production type you chose, a number of production metadata fieldsappear. Enter a title and other unique metadata for the project in these fields. Fieldsmarked with an asterisk (*) must be filled in.
e Click Save Changes to save the new production.
3 Drag the folder that contains the project file and its linked media from the Finder to thenew production in the Final Cut Server Productions pane.
4 In the dialog that appears, choose to upload a bundle asset and then click Create.
The Link Upload window appears. Note that the Associate with Production field showsthe production that you dragged the folder to.
Add metadata to define the type of project being uploaded.
The name of the production that you dragged the folder to appears here.
43Chapter 3 Uploading Files to Final Cut Server

5 Choose a metadata set for the asset from the Metadata Set pop-up menu, and addmetadata to one or more fields, defining this as a bundle asset.
6 If necessary, choose a new destination device from the Destination pop-up menu.
This specifies the device on which the file will be stored. If you have questions aboutwhich device to choose, contact your Final Cut Server administrator.
Note: Media and Library are the primary Final Cut Server devices. Talk with yourFinal Cut Server administrator about which other configured devices are appropriate formedia file storage.
7 Click the Upload button to create the asset.
The file is uploaded and the bundle asset is created.
8 After the bundle asset is created, select the Productions pane, click the production youcreated, and click the Search button to view the new asset in Final Cut Server.
The bundled Motion project asset has a generic project icon in the top-left corner and a Motion application icon as its thumbnail.
If you need to identify the bundle asset later, you can open the asset’s info window andview the metadata you added at upload.
Use the metadata you added at upload to identify the bundle asset.
To learn how to get information about the asset that was just created, see About theAsset Info Window.
44 Chapter 3 Uploading Files to Final Cut Server
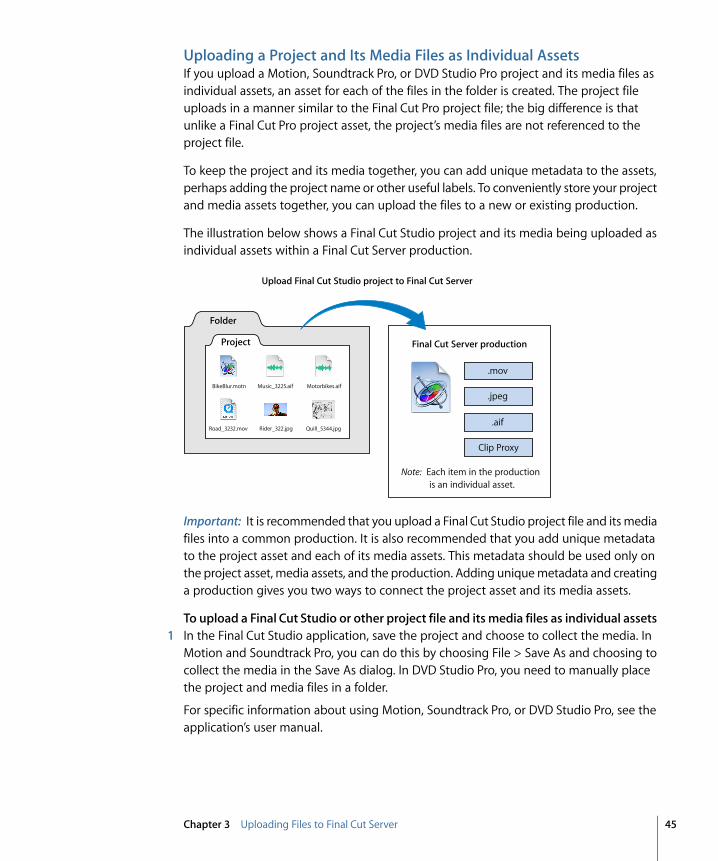
Uploading a Project and Its Media Files as Individual AssetsIf you upload a Motion, Soundtrack Pro, or DVD Studio Pro project and its media files asindividual assets, an asset for each of the files in the folder is created. The project fileuploads in a manner similar to the Final Cut Pro project file; the big difference is thatunlike a Final Cut Pro project asset, the project’s media files are not referenced to theproject file.
To keep the project and its media together, you can add unique metadata to the assets,perhaps adding the project name or other useful labels. To conveniently store your projectand media assets together, you can upload the files to a new or existing production.
The illustration below shows a Final Cut Studio project and its media being uploaded asindividual assets within a Final Cut Server production.
Upload Final Cut Studio project to Final Cut Server
Note: Each item in the production is an individual asset.
Final Cut Server production
Folder
Project
.mov
.jpeg
.aif
Clip Proxy
BikeBlur.motn
Road_3232.mov
Music_3225.aif
Rider_322.jpg Quill_5344.jpg
Motorbikes.aif
Important: It is recommended that you upload a Final Cut Studio project file and its mediafiles into a common production. It is also recommended that you add unique metadatato the project asset and each of its media assets. This metadata should be used only onthe project asset, media assets, and the production. Adding unique metadata and creatinga production gives you two ways to connect the project asset and its media assets.
To upload a Final Cut Studio or other project file and its media files as individual assets1 In the Final Cut Studio application, save the project and choose to collect the media. In
Motion and Soundtrack Pro, you can do this by choosing File > Save As and choosing tocollect the media in the Save As dialog. In DVD Studio Pro, you need to manually placethe project and media files in a folder.
For specific information about using Motion, Soundtrack Pro, or DVD Studio Pro, see theapplication’s user manual.
45Chapter 3 Uploading Files to Final Cut Server

Important: When uploading a DVD Studio Pro project file and its linked media files, thereis no need to upload .par files. When you check out and open the project inDVD Studio Pro, the .par files will be automatically re-created.
The project file and its media are saved in a folder at the location you specified.
2 In Final Cut Server, create a new production for the project and its assets by followingthese steps:
a Open the Productions pane by clicking Productions in the column at the left of themain Final Cut Server window.
b Click the New Production button in the Toolbar.
c Choose a metadata set for the new production from the Metadata Set pop-up menu.
d Depending on the production type you chose, a number of production metadata fieldsappear. Enter a title and other unique metadata for the project in these fields. Fieldsmarked with an asterisk (*) must be filled in.
e Click Save Changes to save the new production.
3 Drag the folder that contains the project file and its linked media from the Finder to thenew production in the Final Cut Server Productions pane.
4 In the dialog that appears, choose to upload individual assets and then click Create.
5 A dialog appears, advising that Final Cut Server is unable to manage references that mayexist in the project file you are uploading. Click Continue.
The Multiple Link Upload window appears. Note that the Associate with Production fieldshows the production that you dragged the folder to.
Add metadata to differentiate the files being uploaded.
The name of the production that you dragged the folder to appears here.
6 Choose a metadata set for the assets from the Metadata Set pop-up menu.
Add unique metadata to the files being uploaded. Adding project-related metadata willhelp you keep track of the assets that are linked to the project asset.
7 If necessary, choose a new destination device from the Destination pop-up menu.
46 Chapter 3 Uploading Files to Final Cut Server

This specifies the device on which the file will be stored. If you have questions aboutwhich device to choose, contact your Final Cut Server administrator.
Note: Media and Library are the primary Final Cut Server devices. Talk with yourFinal Cut Server administrator about which other configured devices are appropriate formedia file storage.
8 Click the Begin Upload button to create assets for the project file and its linked mediafiles.
The files are uploaded. The upload progress is displayed above the Information pane inthe bottom-left corner of the Final Cut Server main window. If you want to monitor theprogress of the file upload, click the Downloads and Uploads button to display theDownloads & Uploads window.
9 After the files are uploaded, select the Productions pane, click the Search button, anddouble-click the production to view the asset aliases.
The Final Cut Studio project file and each of its media files have been uploaded as assets.The assets also appear in the Assets pane of the Final Cut Server main window.
To learn how to get information about the assets that were just created, see About theAsset Info Window.
About the Asset Info WindowWhen you double-click any asset, including an image sequence, bundle asset, orFinal Cut Pro project asset, in the Assets pane or click the asset’s alias that is inside aproduction, the asset’s info window appears. Final Cut Server uses the information in theinfo window to track and manage the asset.
The icons displayed in the Assets pane also appear in the individual asset info window.
Clicking any of these buttons displays specific information about the asset.
47Chapter 3 Uploading Files to Final Cut Server

About Media, Image Sequence, and Bundle Asset Info WindowsMedia asset info windows contain panes for information about metadata, resources,versions, locks, and the Review and Approve feature.
• Metadata pane: This pane shows the metadata for both the asset and its primaryrepresentation file. You can update any field in this pane by typing text or a value andthen clicking the Save Changes button.
• Resources pane: This pane shows information about the primary representation andproxy files created for the asset. It also shows other places the asset is used and otherassets that this asset is linked to.
48 Chapter 3 Uploading Files to Final Cut Server

• Versions pane: This pane shows different versions that have been created for the asset.See Adding Versions for a Media or Project Asset for more information about creatingversions.
• Locks pane: This pane shows information about any locks on the asset. See Lockingand Unlocking an Asset for more information.
49Chapter 3 Uploading Files to Final Cut Server
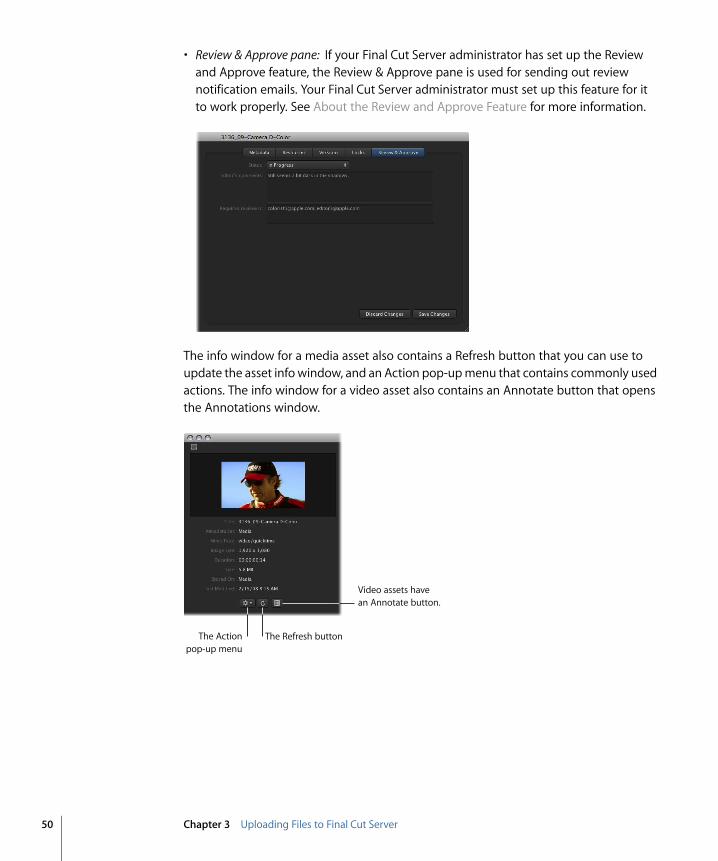
• Review & Approve pane: If your Final Cut Server administrator has set up the Reviewand Approve feature, the Review & Approve pane is used for sending out reviewnotification emails. Your Final Cut Server administrator must set up this feature for itto work properly. See About the Review and Approve Feature for more information.
The info window for a media asset also contains a Refresh button that you can use toupdate the asset info window, and an Action pop-up menu that contains commonly usedactions. The info window for a video asset also contains an Annotate button that opensthe Annotations window.
Video assets have an Annotate button.
The Action pop-up menu
The Refresh button
50 Chapter 3 Uploading Files to Final Cut Server

About the Final Cut Pro Project Info WindowA Final Cut Pro project info window is slightly different than other types of asset infowindows. A Final Cut Pro project info window’s Action pop-up menu does not have allof the items that are in the Action pop-up menu for other types of assets because certainactions cannot be performed on a Final Cut Pro asset. It also contains an additional pane,the Elements pane.
The Elements pane shows the items that are part of the Final Cut Pro project.
A Final Cut Pro project asset info window
Final Cut Pro project elements are representations of the clips that are used in theFinal Cut Pro project. Final Cut Server creates the elements from the media assets thatare created when the Final Cut Pro project is uploaded to Final Cut Server. See UploadingFinal Cut Pro Projects for more information about elements.
51Chapter 3 Uploading Files to Final Cut Server


When you upload assets, they are added to your Final Cut Server catalog, along with theother assets uploaded by you and other Final Cut Server users that make up theFinal Cut Server catalog. As the number of assets in your catalog increases, creating andmanaging searches becomes more important. This chapter covers ways you can useFinal Cut Server to organize and search for your assets.
This chapter covers the following:
• Organizing Assets in Final Cut Server (p. 53)
• Searching in Final Cut Server (p. 62)
• Displaying Search Results (p. 69)
• Tracking the Status of an Asset or Production with Metadata (p. 69)
• Adding and Changing Asset Metadata (p. 71)
• Searching Devices and Jobs (p. 72)
Organizing Assets in Final Cut ServerBefore you can organize or search for assets in the Final Cut Server catalog, you mustunderstand how the Assets and Productions panes are structured.
When you click Assets in the Final Cut Server main window, all of the assets that havebeen uploaded to Final Cut Server are displayed. All assets remain on this single level inthe Assets pane.
53
Organizing and Searching theFinal Cut Server Catalog 4
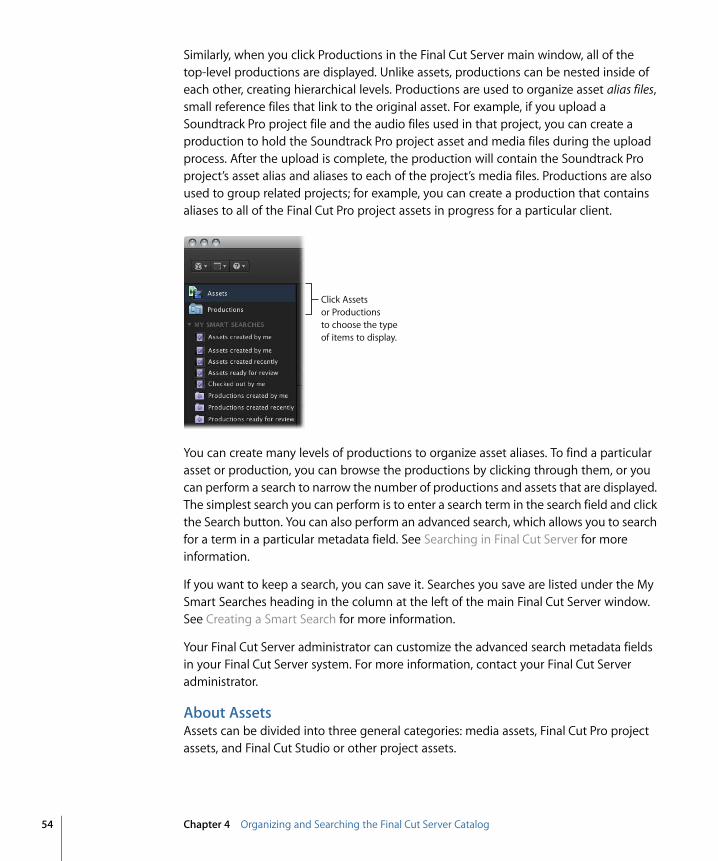
Similarly, when you click Productions in the Final Cut Server main window, all of thetop-level productions are displayed. Unlike assets, productions can be nested inside ofeach other, creating hierarchical levels. Productions are used to organize asset alias files,small reference files that link to the original asset. For example, if you upload aSoundtrack Pro project file and the audio files used in that project, you can create aproduction to hold the Soundtrack Pro project asset and media files during the uploadprocess. After the upload is complete, the production will contain the Soundtrack Proproject’s asset alias and aliases to each of the project’s media files. Productions are alsoused to group related projects; for example, you can create a production that containsaliases to all of the Final Cut Pro project assets in progress for a particular client.
Click Assets or Productions to choose the type of items to display.
You can create many levels of productions to organize asset aliases. To find a particularasset or production, you can browse the productions by clicking through them, or youcan perform a search to narrow the number of productions and assets that are displayed.The simplest search you can perform is to enter a search term in the search field and clickthe Search button. You can also perform an advanced search, which allows you to searchfor a term in a particular metadata field. See Searching in Final Cut Server for moreinformation.
If you want to keep a search, you can save it. Searches you save are listed under the MySmart Searches heading in the column at the left of the main Final Cut Server window.See Creating a Smart Search for more information.
Your Final Cut Server administrator can customize the advanced search metadata fieldsin your Final Cut Server system. For more information, contact your Final Cut Serveradministrator.
About AssetsAssets can be divided into three general categories: media assets, Final Cut Pro projectassets, and Final Cut Studio or other project assets.
54 Chapter 4 Organizing and Searching the Final Cut Server Catalog

Media assets are created when audio, video, graphic, or other media files are uploadedto Final Cut Server. Final Cut Pro project assets are created when Final Cut Pro projectsare uploaded to Final Cut Server. The Final Cut Pro project asset info window contains anElements pane that lists the media assets that are used by the Final Cut Pro project file.Final Cut Studio project assets are created when Motion, Soundtrack Pro, andDVD Studio Pro project files are uploaded to Final Cut Server. Unlike Final Cut Pro projectassets, these project files require you to manually organize the project’s linked mediaassets. (Note that a Final Cut Studio project and its media can be uploaded as either abundle asset or as individual assets.) See Uploading Files to Final Cut Server for moreinformation about the assets you can upload to Final Cut Server.
Many assets display an icon (video, audio, and graphic icons, for example) or an applicationsymbol on their thumbnails (Final Cut Studio project files, for example) to help you identifythe type of asset.
An audio asset aliasA Final Cut Pro asset alias
55Chapter 4 Organizing and Searching the Final Cut Server Catalog

You can also get information about an asset by looking at its MIME type. The MIME typedescribes either the type of information contained in the primary representation file orthe application in which the primary representation file was created.
The MIME type for this image asset is shown here.
You can search for a specific MIME type; if you use that search often, you can save it asa Smart Search. See Searching in Final Cut Server for more information.
About ProductionsProductions are containers you can use to organize asset aliases and other productions.You can nest productions inside each other to create complex hierarchies of productions.
The assets that are available through the Assets pane in the main window ofFinal Cut Server cannot be copied or moved into a production. Instead, when you upload,move, or copy an asset into a production, an alias that points to the original asset appearsin the production. An alias looks very similar to an asset; its distinguishing feature is thealias icon that appears on the top-left corner of the asset (in Thumbnails view) or in theleftmost column (in List view). For more information about asset icons and thumbnailand list view, see List View.
56 Chapter 4 Organizing and Searching the Final Cut Server Catalog
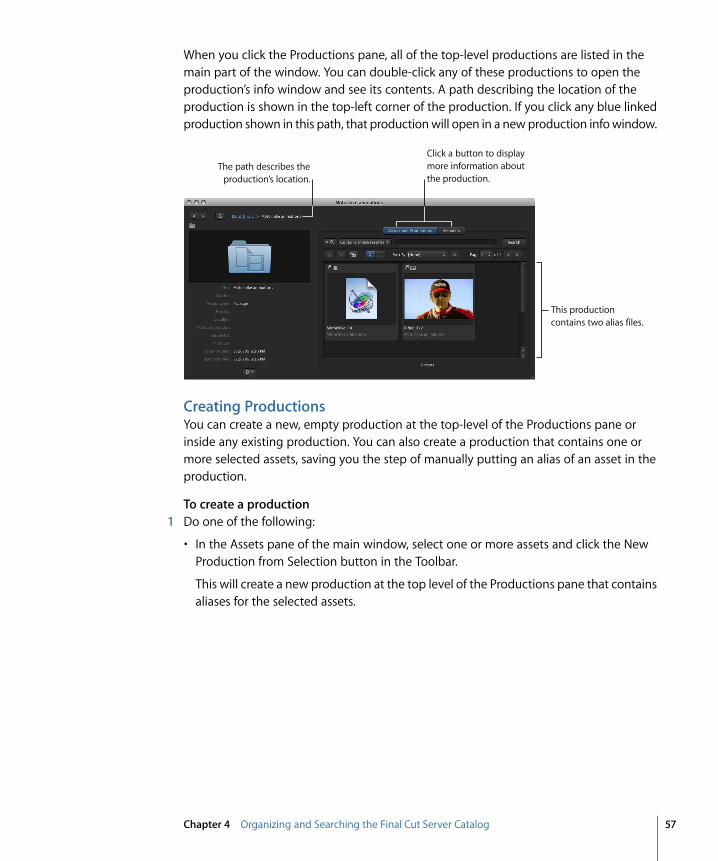
When you click the Productions pane, all of the top-level productions are listed in themain part of the window. You can double-click any of these productions to open theproduction’s info window and see its contents. A path describing the location of theproduction is shown in the top-left corner of the production. If you click any blue linkedproduction shown in this path, that production will open in a new production info window.
The path describes the production’s location.
Click a button to display more information about the production.
This production contains two alias files.
Creating ProductionsYou can create a new, empty production at the top-level of the Productions pane orinside any existing production. You can also create a production that contains one ormore selected assets, saving you the step of manually putting an alias of an asset in theproduction.
To create a production1 Do one of the following:
• In the Assets pane of the main window, select one or more assets and click the NewProduction from Selection button in the Toolbar.
This will create a new production at the top level of the Productions pane that containsaliases for the selected assets.
57Chapter 4 Organizing and Searching the Final Cut Server Catalog

• In the Productions pane of the main window, click the New Production button in theToolbar.
Click the New Production button to create a new production.
This will create a new, empty production at the top level of the Productions pane.
• In an open production info window, click the New Production button in the Toolbar.
This will create a new, empty production inside the existing production.
The Production window appears.
2 Choose a metadata set for the production from the Metadata Set pop-up menu.
Choose a metadata set.
3 Depending on the metadata set you chose, a number of metadata fields appear. Enterinformation for the production, including a title and priority status, and parent productionif applicable, in these fields.
Note: Fields marked with an asterisk (*) must be filled in.
4 Click Save Changes.
The Production window closes.
After you create a production, it appears in the Productions pane if it is a top-levelproduction, or nested inside a production. You can view productions in several ways.
58 Chapter 4 Organizing and Searching the Final Cut Server Catalog
Browsing and Searching for ProductionsAfter you create a production, it can be located in the top level of the Productions pane,or nested inside a production. You can browse the production hierarchy; you can alsosearch for specific productions within the Final Cut Server catalog. How you choose tosearch for the production you are looking for can depend on the number of productionsthat exist in your organization’s Final Cut Server catalog and the depth of the production,as well as your workflow.
To view all the top-level productions in the Productions paneµ Click Productions. All of the existing top-level productions are shown in the display area.
After viewing a top-level production, you have more ways to navigate the productionhierarchy.
To browse the contents of a top-level production within a single production infowindowDo one of the following:
µ Double click any top-level production to view its contents.
A new production info window appears, displaying the asset aliases and productions itcontains. A count of the items shown is displayed at the bottom of the production infowindow.
µ From within a production info window, double-click any production to view its contents.The production info window refreshes, displaying the asset aliases and productions itcontains. A count of the items shown is displayed at the bottom of the production infowindow.
As you browse a production hierarchy by double-clicking productions, the productioninfo window continues to refresh and display new production information. The path ofeach open production is displayed in the top-left corner of the production info window.You can keep track of where you are in the production hierarchy by watching the pathat the top.
µ Final Cut Server remembers productions that have been viewed. You can click any partof the blue linked production path to go to that production, or click the left or right arrowto move to previously viewed productions.
µ Control-click any portion of the production path to display a shortcut menu containingall the components of the path. Choose one of the components to display it.
As you navigate, you may find it helpful to open additional production info windows.
To open a new production info windowµ Control-click a production, then choose New Window or Get Info from the shortcut menu.
µ Double-click an arrow button or a production to open that production in a new productioninfo window.
59Chapter 4 Organizing and Searching the Final Cut Server Catalog

You can also search productions. For information about searching, see Searching inFinal Cut Server.
Organizing Assets and ProductionsWhen organizing assets and productions, it is important to remember that assets appearonly in the Assets pane of the main window of Final Cut Server. Aliases to the assets inthe Assets pane are used within productions.
The following sections explain how to move, copy, and delete asset aliases andproductions.
Organizing Asset AliasesYou can add asset aliases to productions either from within Final Cut Server or whenuploading new files to Final Cut Server. For instructions on how to add a media or projectasset to a production during the upload process, see Uploading Files to Final Cut Server.
To create an asset alias in a production1 Browse to the production you want to create the alias in and double-click it to view the
production info window.
2 Browse to the asset in the Asset catalog.
3 Drag the asset into the production info window.
You’ll see a green plus sign near the cursor in the production info window that you arecopying to.
The asset alias appears in the production info window.
To move or copy an asset alias from one production to another1 Browse to the production you want to move or copy an asset alias to, either by clicking
Productions in the main window and browsing to the production or by searching for theproduction.
Then double-click the production to view its production info window.
2 Browse to the asset alias in an existing production.
3 Do one of the following:
• Drag the asset alias into the open production window to move it from one productionto another.
• Option-drag the asset alias into the open production window to copy it to the openproduction.
The asset alias appears in the production info window you moved or copied it to. Thetitle and production info for the asset alias is shown on the asset in both Thumbnails viewand List view; this information becomes useful when looking at search results.
60 Chapter 4 Organizing and Searching the Final Cut Server Catalog
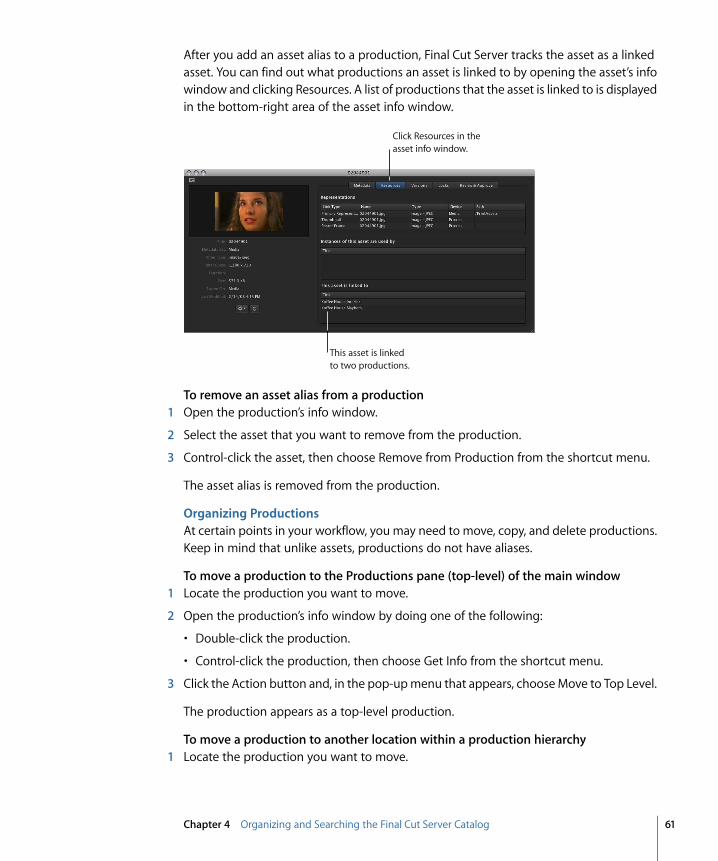
After you add an asset alias to a production, Final Cut Server tracks the asset as a linkedasset. You can find out what productions an asset is linked to by opening the asset’s infowindow and clicking Resources. A list of productions that the asset is linked to is displayedin the bottom-right area of the asset info window.
This asset is linked to two productions.
Click Resources in the asset info window.
To remove an asset alias from a production1 Open the production’s info window.
2 Select the asset that you want to remove from the production.
3 Control-click the asset, then choose Remove from Production from the shortcut menu.
The asset alias is removed from the production.
Organizing ProductionsAt certain points in your workflow, you may need to move, copy, and delete productions.Keep in mind that unlike assets, productions do not have aliases.
To move a production to the Productions pane (top-level) of the main window1 Locate the production you want to move.
2 Open the production’s info window by doing one of the following:
• Double-click the production.
• Control-click the production, then choose Get Info from the shortcut menu.
3 Click the Action button and, in the pop-up menu that appears, choose Move to Top Level.
The production appears as a top-level production.
To move a production to another location within a production hierarchy1 Locate the production you want to move.
61Chapter 4 Organizing and Searching the Final Cut Server Catalog

2 In a new window, browse to the nested production you want to move the otherproduction to.
3 Drag the production to its new location.
You will see the production folder move to its new location; however, the productionfolder will also remain in the old location.
The production is in its new location.
To copy a production to another location within a production hierarchy1 Locate the production you want to move.
2 In a new window, browse to the nested production you want to move the otherproduction to.
3 Option-drag the production to its new location.
You’ll see a green plus sign near the cursor in the production info window that you arecopying to.
The production folder appears in both locations.
When you delete a production, any productions or asset aliases that it contains will bedeleted.
To delete a production and all of its contents1 In the Productions pane, Control-click the production that you want to delete, then choose
Delete from the shortcut menu.
2 In the delete dialog that appears, click Delete to continue.
The production and its contents are deleted.
Searching in Final Cut ServerFinal Cut Server provides several ways to search for assets and productions. You cansearch the Assets and Productions panes in Final Cut Server, searching by various metadataincluding title, creation date, location, keywords, and more. For example, you can createa keyword and then create a saved search in Final Cut Server to locate all assets andproductions that contain that keyword. You can save frequently used searches under theMy Smart Searches heading, or use system-wide Smart Searches that are set up by youradministrator and listed under the Smart Searches heading. Finally, you can performspecific searches on available devices and search for jobs performed by Final Cut Server.
Important: Search results will include every alias for an asset. Depending on the amountof aliases used in your catalog, a search could return many aliases pointing to the sameasset.
62 Chapter 4 Organizing and Searching the Final Cut Server Catalog

After configuring a search, you can save the search, making it available to you with oneclick of your mouse.
Doing a Simple SearchTo perform a simple search of the Assets or Productions pane in Final Cut Server, youchoose a search type and enter a term. Final Cut Server searches for that term in everymetadata field on every asset or production. Searching is not case sensitive.
In the Simple Search field, you can choose between two simple search types:
• Choosing Contains finds the term you enter within a single metadata field. If, forexample, you enter the term se, Final Cut Server searches for all terms that include se,including serenade, sunset, and dense, in a single metadata field.
• Choosing Matches Word searches for a particular word or words in every availablemetadata field. Matches Word searches are based on stemming, a process that identifiesthe root of the word, which gets modified by the grammatical requirements of theEnglish language. For example, the stem of work, works, worked, and working is work.Therefore, if you enter the search term working, Final Cut Server stems the term to workand then returns all assets with a stemmed term of work in any of the asset’s metadatafields.
Note: In stemming a phrase, common words such as the, a, and, and but are ignored.
You can make simple searches more specific by using a search delimiter.
ReturnsExampleSearch limiter
Assets with the terms hurricane,wind, and water
hurricane wind waterMultiple search terms
Assets with the entire searchphrase Hurricane Alma
“Hurricane Alma”Search terms in quotation marks
Assets with the term Hurricane,(and without the term Alma)
“Hurricane-Alma”Negative (-) search term
To perform a simple search1 In the Assets or Productions pane, choose a search type (Contains or Matches Word) from
the Search pop-up menu.
2 Enter one or more search criteria in the search field.
For example, if you want to search for a specific MIME type, enter the complete MIMEtype in the search field.
63Chapter 4 Organizing and Searching the Final Cut Server Catalog

3 Click the Search button.
Then click Search.Choose a search type
from the pop-up menu. Enter a search term.
Every asset and production that contains the search criteria you entered is returned, andthe number of assets found appears in the bottom of the main window.
Important: After entering a search term, the search field remembers the term you lastentered. This makes it simple for you to repeat the search you entered previously. Toclear the search field, you must click the delete button on the far right of the search fieldor delete the search term.
Doing an Advanced SearchWhen you click to open the search disclosure triangle, you see the advanced search fields.These fields let you search specific metadata fields in an asset or production for the termor terms you enter.
The Assets and Productions panes have different advanced search fields.
The Assets pane’s advanced search fields
The Productions pane’s advanced search fields
Note: If the advanced search fields in your copy of Final Cut Server are different than thefields shown above, your Final Cut Server administrator has customized the advancedsearch fields. Talk to your administrator about how to use fields specific to yourorganization.
64 Chapter 4 Organizing and Searching the Final Cut Server Catalog
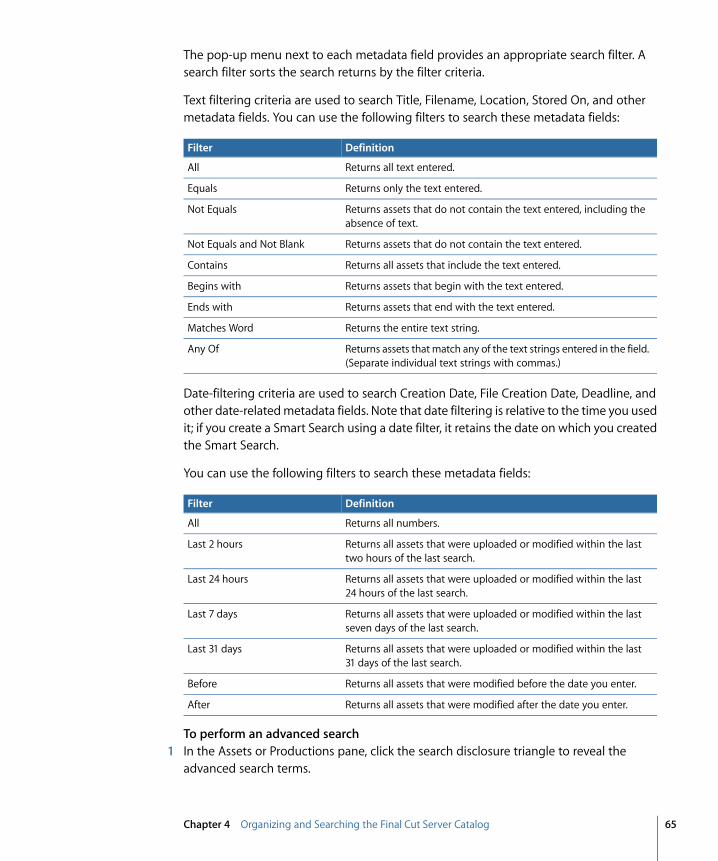
The pop-up menu next to each metadata field provides an appropriate search filter. Asearch filter sorts the search returns by the filter criteria.
Text filtering criteria are used to search Title, Filename, Location, Stored On, and othermetadata fields. You can use the following filters to search these metadata fields:
DefinitionFilter
Returns all text entered.All
Returns only the text entered.Equals
Returns assets that do not contain the text entered, including theabsence of text.
Not Equals
Returns assets that do not contain the text entered.Not Equals and Not Blank
Returns all assets that include the text entered.Contains
Returns assets that begin with the text entered.Begins with
Returns assets that end with the text entered.Ends with
Returns the entire text string.Matches Word
Returns assets that match any of the text strings entered in the field.(Separate individual text strings with commas.)
Any Of
Date-filtering criteria are used to search Creation Date, File Creation Date, Deadline, andother date-related metadata fields. Note that date filtering is relative to the time you usedit; if you create a Smart Search using a date filter, it retains the date on which you createdthe Smart Search.
You can use the following filters to search these metadata fields:
DefinitionFilter
Returns all numbers.All
Returns all assets that were uploaded or modified within the lasttwo hours of the last search.
Last 2 hours
Returns all assets that were uploaded or modified within the last24 hours of the last search.
Last 24 hours
Returns all assets that were uploaded or modified within the lastseven days of the last search.
Last 7 days
Returns all assets that were uploaded or modified within the last31 days of the last search.
Last 31 days
Returns all assets that were modified before the date you enter.Before
Returns all assets that were modified after the date you enter.After
To perform an advanced search1 In the Assets or Productions pane, click the search disclosure triangle to reveal the
advanced search terms.
65Chapter 4 Organizing and Searching the Final Cut Server Catalog
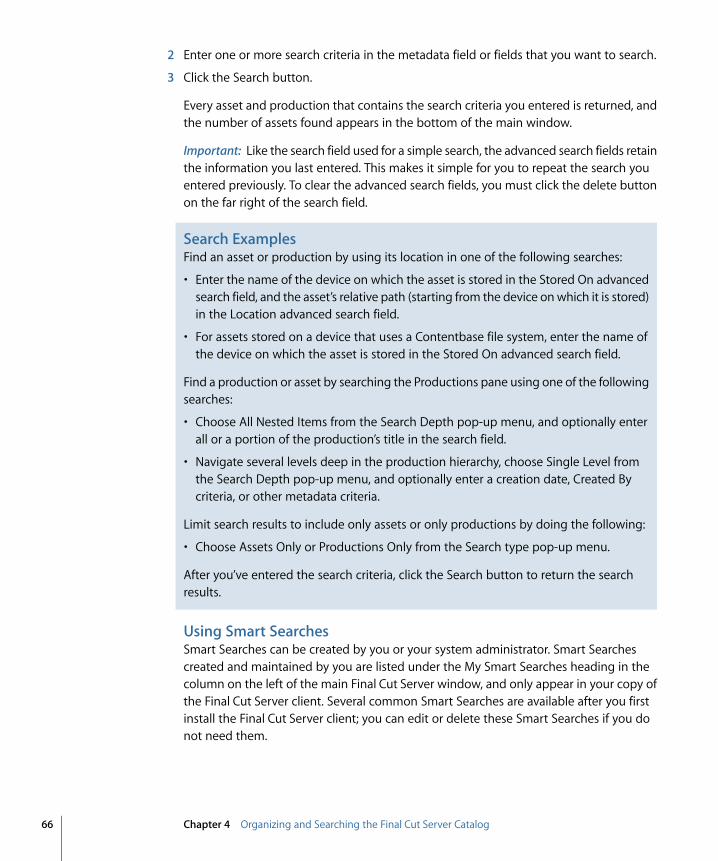
2 Enter one or more search criteria in the metadata field or fields that you want to search.
3 Click the Search button.
Every asset and production that contains the search criteria you entered is returned, andthe number of assets found appears in the bottom of the main window.
Important: Like the search field used for a simple search, the advanced search fields retainthe information you last entered. This makes it simple for you to repeat the search youentered previously. To clear the advanced search fields, you must click the delete buttonon the far right of the search field.
Search ExamplesFind an asset or production by using its location in one of the following searches:
• Enter the name of the device on which the asset is stored in the Stored On advancedsearch field, and the asset’s relative path (starting from the device on which it is stored)in the Location advanced search field.
• For assets stored on a device that uses a Contentbase file system, enter the name ofthe device on which the asset is stored in the Stored On advanced search field.
Find a production or asset by searching the Productions pane using one of the followingsearches:
• Choose All Nested Items from the Search Depth pop-up menu, and optionally enterall or a portion of the production’s title in the search field.
• Navigate several levels deep in the production hierarchy, choose Single Level fromthe Search Depth pop-up menu, and optionally enter a creation date, Created Bycriteria, or other metadata criteria.
Limit search results to include only assets or only productions by doing the following:
• Choose Assets Only or Productions Only from the Search type pop-up menu.
After you’ve entered the search criteria, click the Search button to return the searchresults.
Using Smart SearchesSmart Searches can be created by you or your system administrator. Smart Searchescreated and maintained by you are listed under the My Smart Searches heading in thecolumn on the left of the main Final Cut Server window, and only appear in your copy ofthe Final Cut Server client. Several common Smart Searches are available after you firstinstall the Final Cut Server client; you can edit or delete these Smart Searches if you donot need them.
66 Chapter 4 Organizing and Searching the Final Cut Server Catalog

System-wide Smart Searches are created and maintained by your Final Cut Serveradministrator. After your administrator creates one and you quit and restart yourFinal Cut Server client, the Smart Search will appear under the new Smart Searches headingin the column on the left of the main Final Cut Server window.
Smart Searches created by your Final Cut Server administrator
Your personal Smart Searches
To search the Assets or Productions pane using a Smart Searchµ Click a Smart Search listed under the My Smart Searches or Smart Searches heading in
the column on the left of the main Final Cut Server window.
Assets Smart Searches
Productions Smart Searches
The search results appear in the main part of the window.
Creating a Smart SearchIf you want to save a simple or advanced search that you have configured, you can createa Smart Search. Smart Searches are useful because you can customize them for your localcomputer and personal workflow. Once you create a local Smart Search, you can use itagain and again.
67Chapter 4 Organizing and Searching the Final Cut Server Catalog

Note: A Smart Search is only saved for the user who created it. The Smart Search is notsaved to other users’ or the administrator’s Final Cut Server clients.
To create a local Smart Search1 After configuring a search, click the Save as Smart Search button in the bottom-right
corner of the Final Cut Server main window.
The Smart Search appears in the Smart Searches list in the column on the left of thewindow. It is titled “Untitled” and is selected.
After you click Save as Smart Search, a new Smart Search appears.
2 Enter a name for the Smart Search, then press Return.
The new Smart Search is added to the Smart Searches list in alphabetical order.
The Smart Searches name is saved in Final Cut Server.
After you have created a Smart Search, you cannot modify it. You can, however, deletea Smart Search at any time.
To delete a Smart Search that you createdµ Control-click the Smart Search, then choose Delete from the shortcut menu.
68 Chapter 4 Organizing and Searching the Final Cut Server Catalog
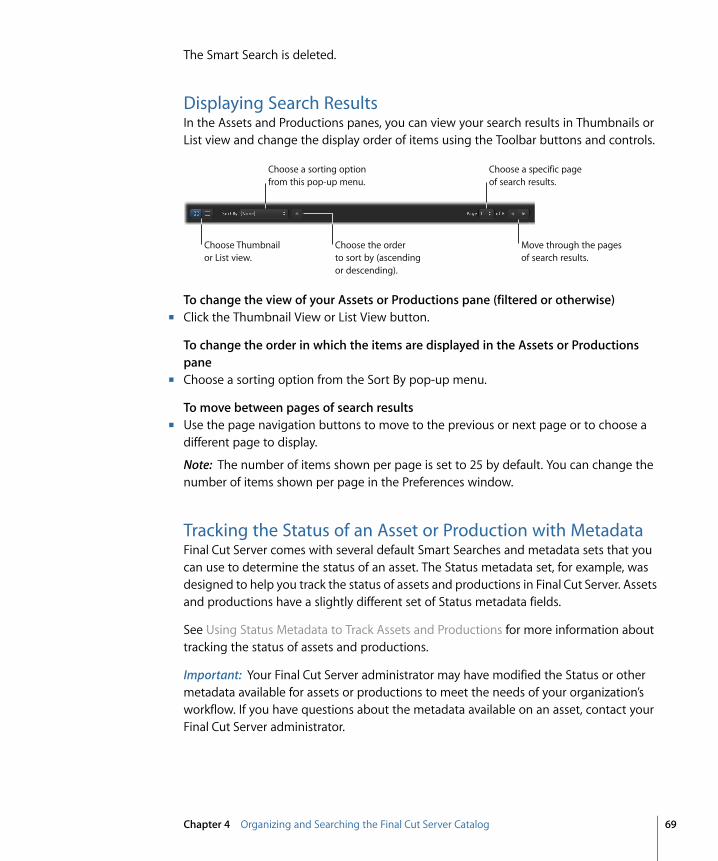
The Smart Search is deleted.
Displaying Search ResultsIn the Assets and Productions panes, you can view your search results in Thumbnails orList view and change the display order of items using the Toolbar buttons and controls.
Choose Thumbnail or List view.
Choose a sorting option from this pop-up menu.
Choose the order to sort by (ascending or descending).
Move through the pages of search results.
Choose a specific page of search results.
To change the view of your Assets or Productions pane (filtered or otherwise)µ Click the Thumbnail View or List View button.
To change the order in which the items are displayed in the Assets or Productionspane
µ Choose a sorting option from the Sort By pop-up menu.
To move between pages of search resultsµ Use the page navigation buttons to move to the previous or next page or to choose a
different page to display.
Note: The number of items shown per page is set to 25 by default. You can change thenumber of items shown per page in the Preferences window.
Tracking the Status of an Asset or Production with MetadataFinal Cut Server comes with several default Smart Searches and metadata sets that youcan use to determine the status of an asset. The Status metadata set, for example, wasdesigned to help you track the status of assets and productions in Final Cut Server. Assetsand productions have a slightly different set of Status metadata fields.
See Using Status Metadata to Track Assets and Productions for more information abouttracking the status of assets and productions.
Important: Your Final Cut Server administrator may have modified the Status or othermetadata available for assets or productions to meet the needs of your organization’sworkflow. If you have questions about the metadata available on an asset, contact yourFinal Cut Server administrator.
69Chapter 4 Organizing and Searching the Final Cut Server Catalog

As your work progresses, you can search for assets that are in a particular phase of yourworkflow by searching for their status or other metadata. Final Cut Server comes withseveral preconfigured Smart Searches that make it easy for you to find recently modifiedassets or assets marked with the Status metadata field set to “Ready for Review.”
Click this Smart Search to see all assets with Status set to Ready for Review.
70 Chapter 4 Organizing and Searching the Final Cut Server Catalog

You can configure your own search using the advanced search options. For example, youcan search for all assets that have a Status metadata field set to In Progress. After settingup a search, you can save it as a Smart Search.
Set the Status field to In Progress to search for those assets.
Click this button to save the current search setting as a
Smart Search.
The assets area highlights to indicate that the search configuration does not match a Smart Search.
Adding and Changing Asset MetadataAs an asset moves through your organization’s workflow, you may want to add or changethe metadata associated with the asset. For example, when an asset has been edited andis ready to be reviewed by a client, you can set the asset’s Status metadata field to “Readyfor Review.”
To add or change the metadata associated with an asset1 Double-click the asset in the Assets pane or in a production.
2 In the asset info window, click Metadata.
71Chapter 4 Organizing and Searching the Final Cut Server Catalog

3 Choose a metadata group to view.
Click Metadata to view the asset’s or production’s metadata.
Click a metadata group to view.
When you’ve made the necessary changes, click Save Changes.
4 Enter new details in any of the metadata fields or make choices from the pop-up menus.
5 When you’ve finished modifying the metadata, click Save Changes.
The changes you made are saved.
Note: Make sure you click the Search button after updating asset metadata to refreshthe Assets pane.
Searching Devices and JobsTwo advanced user searches, Search Devices and Search All Jobs, are available in theFinal Cut Server client. Depending on your permissions, these searches may or may notbe available for your use. If you have questions about when it is appropriate for you touse these searches, contact your Final Cut Server administrator.
Searching DevicesIf your Final Cut Server administrator has given you permission, you can search for a fileon any device connected to Final Cut Server. This allows you to examine the contents ofa device, including items that have not been added to the Final Cut Server catalog.
The devices that you, as a client user, have access to are determined by yourFinal Cut Server administrator. Consider speaking to your Final Cut Server administratorbefore searching for or working with a file on a device.
72 Chapter 4 Organizing and Searching the Final Cut Server Catalog

Warning: Use the Search Devices window with caution. When you search a device, youare searching for files, not Final Cut Server assets. Devices can contain files that bothhave and have not been added to the Final Cut Server catalog. From the Search Deviceswindow, you can add a media file to your Final Cut Server catalog, and copy, delete,and download the file to your local system; taking some of these actions could resultin making duplicate copies of an asset in your Final Cut Server server system or deletingall copies of a file from a device.
To search a device1 Click the Server button, then choose Search Devices from the Server pop-up menu.
2 In the Search Devices window that appears, choose the device to search from the Devicepop-up menu.
3 Click the Search button to search from the device’s root level. You can also click theChoose button to open a dialog that allows you to specify a folder to search.
4 If you want to limit the search, enter a term in the search field or click the search disclosuretriangle to reveal advanced searching options.
Important: Be sure to enter entire words in the search field. Unlike the search field in theFinal Cut Server main window, the Search Devices search field does not return full wordsif you search for a partial word. For example, if you want to find all assets that containthe word frame, you must search for the entire word. Searching for fra only finds assetswith the characters fra and the word frame is not found.
5 Click the Search button.
After you select one or more items, you can choose to do the following actions byControl-clicking the filename in the list of search results and choosing one of these optionsfrom the shortcut menu:
• Catalog asset: Adds the file to the Final Cut Server catalog.
73Chapter 4 Organizing and Searching the Final Cut Server Catalog
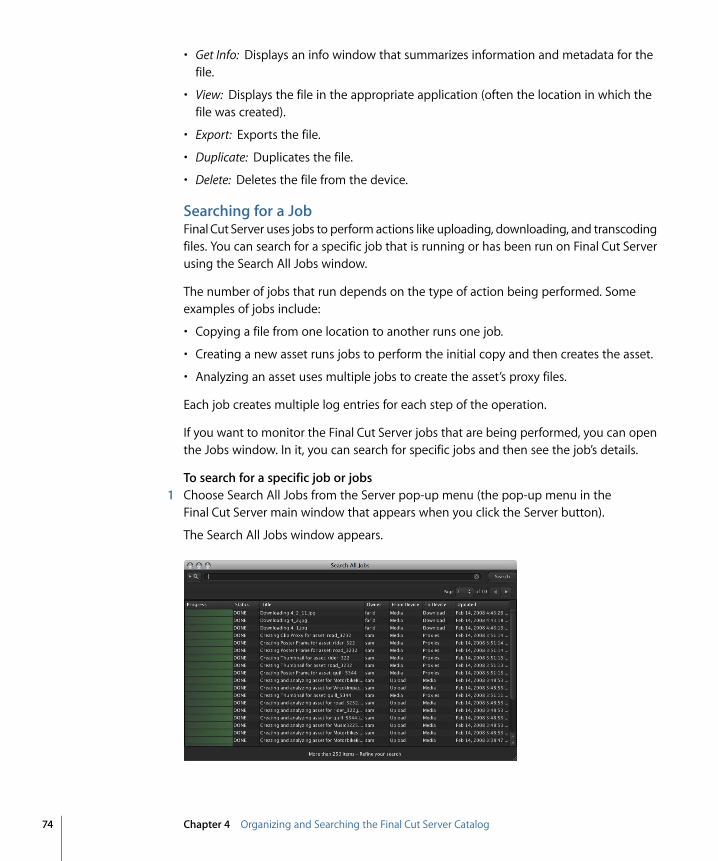
• Get Info: Displays an info window that summarizes information and metadata for thefile.
• View: Displays the file in the appropriate application (often the location in which thefile was created).
• Export: Exports the file.
• Duplicate: Duplicates the file.
• Delete: Deletes the file from the device.
Searching for a JobFinal Cut Server uses jobs to perform actions like uploading, downloading, and transcodingfiles. You can search for a specific job that is running or has been run on Final Cut Serverusing the Search All Jobs window.
The number of jobs that run depends on the type of action being performed. Someexamples of jobs include:
• Copying a file from one location to another runs one job.
• Creating a new asset runs jobs to perform the initial copy and then creates the asset.
• Analyzing an asset uses multiple jobs to create the asset’s proxy files.
Each job creates multiple log entries for each step of the operation.
If you want to monitor the Final Cut Server jobs that are being performed, you can openthe Jobs window. In it, you can search for specific jobs and then see the job’s details.
To search for a specific job or jobs1 Choose Search All Jobs from the Server pop-up menu (the pop-up menu in the
Final Cut Server main window that appears when you click the Server button).
The Search All Jobs window appears.
74 Chapter 4 Organizing and Searching the Final Cut Server Catalog

2 Enter your search criteria by doing one of the following:
• Enter a word or value in the search field.
• Click the search disclosure triangle to reveal the advanced search options. Choose alimiter from the pop-up menu and enter a value in one or more search fields.
3 When you’ve entered the criteria by which you would like to search the jobs, click theSearch button.
The jobs that match your search criteria appear in the main part of the window. Rememberthat your search results may span several pages; you can navigate through the searchresults using the page controls at the right of the window.
75Chapter 4 Organizing and Searching the Final Cut Server Catalog


This chapter explains how to work with all types of assets in the Final Cut Server client.It explains how to interpret the information that is contained in a project or media assetinfo window. It also includes descriptions of all the actions available in Final Cut Server.
This chapter covers the following:
• Final Cut Server Client Actions (p. 77)
• Viewing an Asset (p. 79)
• Adding Versions for a Media or Project Asset (p. 80)
• Locking and Unlocking an Asset (p. 82)
• Writing Annotations on a Video Asset (p. 86)
• Duplicating an Asset (p. 88)
• Using the Edit-in-Place Feature (p. 89)
• Monitoring Jobs (p. 89)
• Setting Final Cut Server Client Preferences (p. 92)
Final Cut Server Client ActionsThis section gives an overview of the actions you can perform from the Toolbar, shortcutmenus, and other locations in the Final Cut Server client.
This table describes the various actions you can perform in Final Cut Server:
DescriptionAction
Provides information and metadata for the selected asset orproduction.See About Assets or About Productions for more information.
Get Info
Provides a view of the asset in an appropriate media viewer; theviewing application could be QuickTime Player, Preview, or anothermedia application.See Viewing an Asset for more information.
View
77
Working in Final Cut Server 5

DescriptionAction
Adds a copy of the asset to the local computer’s cache. This is thefirst step in performing many operations in Final Cut Server.See About Caching for more information.
Add to Cache
Checking out the asset allows you to edit the primary representationbeing tracked by the asset and prevents the asset from beingmodified by all other users.See Checking Media Assets In and Out for more information aboutchecking out a media asset.See Checking Out a Final Cut Pro Project for more information aboutchecking out a Final Cut Pro project.See Working with Final Cut Studio Projects for more informationabout checking out a Final Cut Studio project asset or checking outa bundle asset.When an asset is checked out, you can discover the location towhich the files were checked out by Control-clicking the asset andchoosing Reveal Checked Out Media.
Check In/Check Out/CancelCheck Out/Reveal Checked OutMedia
Creates alias copies of media assets. You can use this action to createcopies of video assets, and then use those assets to create a newFinal Cut Pro project while you are disconnected from theFinal Cut Server network.See Working on Projects While Away from the Final Cut ServerNetwork for information on working with an existing Final Cut Proproject when not connected to the Final Cut Server network.
Prepare for Disconnected Use
Prevents other users from editing the file contained in the asset.See Locking and Unlocking an Asset for more information.
Lock/Unlock
Archiving an asset creates a restorable copy of an asset.See Archiving and Restoring Media Assets for more information.
Archive To/Restore
Creates a new production for the selected asset or assets.See Organizing Assets in Final Cut Server for more information.
New Production from Selection
Opens the selected production in a new window.See Browsing and Searching for Productions for more information.
New Window
Creates a copy of an asset.See Duplicating an Asset for more information.
Duplicate
Creates a copy of the asset to the local file system or an externalvolume.See Outputting a Final Project for more information.
Export
Deletes the asset, its primary representation file, and all of its proxyfiles from the Final Cut Server catalog.See Deleting Assets from Final Cut Server for more information.
Delete
78 Chapter 5 Working in Final Cut Server

Viewing an AssetYou can view many video, audio, and image assets. For video and image assets, you canchoose to view the file’s original media, or one of several proxy files. After you choose atype of file to view, it opens in QuickTime Player or in another appropriate application(this could be the application in which the file was created).
Note: Keep in mind that Final Cut Server cannot preview any bundle assets or Final Cut Proor other project files.
To view an assetDo one of the following:
µ Click the media icon in the asset thumbnail.
Click an asset’s icon to view the asset.
µ Control-click the asset, then choose View and a viewing format from the shortcut menu.
The asset you selected appears in an appropriate viewing application. The video clipshown in this example appears in QuickTime Player.
When you view an image, the full-sized image appears.
All of the information and metadata for a media file and its asset are displayed in theasset info window.
79Chapter 5 Working in Final Cut Server

Adding Versions for a Media or Project AssetIf an asset’s version control feature is turned on, Final Cut Server creates a version everytime the asset is checked in. Final Cut Server numbers the versions in the order they arecreated; therefore, the version with the highest number represents the asset that wasmost recently checked in.
Any user can turn on version control for an asset. Your Final Cut Server administrator mayhave also turned on asset control for all assets in the catalog. You can see if version controlis turned on for an asset by looking at the version checkbox in the Versions pane in theasset’s info window. When the version control feature is turned on, you can view an asset’sversions in an asset’s info window.
The version checkbox is selected, indicating that version control is turned on for this asset.
Three versions exist for this asset.
Important: When an asset’s version control feature is turned on, Final Cut Server createsa version every time an asset is checked in. Before enabling Final Cut Server to trackversions of an asset, check that you have sufficient disk capacity. If you have questionsabout whether you should turn on the version control feature for a particular asset, contactyour Final Cut Server administrator.
To verify that version control is turned on for an asset1 Double-click the asset.
2 Click the Versions button.
3 If the “Store and track versions of this asset” checkbox is not selected, select it.
Select the versions checkbox to be able to create versions for this asset.
Click Versions to enable versions for this asset.
80 Chapter 5 Working in Final Cut Server

To check out and edit an asset1 Select the asset, then do one of the following:
• Click the Check Out button in the Toolbar.
• Control-click the asset, then choose Check Out from the shortcut menu.
2 In the Check Out window that appears, enter a checkout location and click Check Out.
3 Edit the asset.
4 When you’re finished editing, save the asset.
To check in an edited asset as a new version1 Select the asset, then do one of the following:
• Click the Check In button in the Toolbar.
• Control-click the asset, then choose Check In from the shortcut menu.
2 If you want, you can add a comment in the Version Comment field in the Check In windowthat appears.
3 Click the Check In button.
When you check in the asset, a version appears in the version list.
Important: You will not see the comment you just added to the version you checked inbecause it is the current version and the Versions pane only shows older versions.
You can perform several actions to a specific version of an asset. When you Control-clicka version in the Versions pane, the shortcut menu that appears includes:
• Get Info: Choose this option to view information about the version.
• View: Choose this option to view the version in an appropriate viewer.
• New Asset from Version: Choose this option to create a new asset from the version orto copy the selected version of an asset to another device.
• Revert to this Version: Choose this option to delete the assets that were created afterthe selected version. When you revert to a previous version, the current version isreplaced with the selected version.
81Chapter 5 Working in Final Cut Server

Your Final Cut Server administrator has configured the version control feature to meetyour organization’s needs. To get more information on other ways to configure versioncontrol, contact your Final Cut Server administrator.
Locking and Unlocking an AssetIn Final Cut Server, locks function to protect the primary representation file, proxy files,and metadata in the asset.
There are several types of locks. The User lock is the most obvious lock because it is theonly lock that you apply manually. The User lock is applied to an asset from the Toolbaror from the asset’s shortcut menu. You can tell an asset is locked when you see the “lockedby me” or “locked by other” icon on an asset’s thumbnail.
The yellow lock icon indicates that you have locked the asset.
Select an asset, then click the Lock button to lock or unlock an asset.
A white lock icon indicated someone else
has locked the asset.
Checkout and Reference locks are not applied manually. They are applied when you checkout a Final Cut Pro project asset.
The following sections describe the types of locks you will find in Final Cut Server.
82 Chapter 5 Working in Final Cut Server

User LockYou or another user can put a User lock on an asset by clicking the Lock button in theToolbar or by choosing Lock from the asset’s shortcut menu. After a User lock has beenapplied to an asset, a lock icon (either “locked by me” or “locked by other”) appears onthe asset’s thumbnail. Also, the lock that was applied is noted as a User lock in the Lockspane of the asset info window.
The Locks pane shows the lock details.
When you lock the asset, the primary representation of the file cannot be edited, checkedout, deleted, or archived by another user.
Important: A User lock does not prevent the asset’s metadata and proxy files from beingedited by you or another user.
Checkout LockA Checkout lock is applied when an asset is checked out by you or another user.
The Lock Type shows that this is a Checkout lock.
When an asset is checked out, no part of the asset, including the primary representationof the file, proxy files, or metadata, can be edited, and the asset cannot be edited, checkedout, deleted, or archived.
See Checking Media Assets In and Out for more information about checking out a mediaasset. See Checking Out a Final Cut Pro Project and Reference Lock for more informationabout checking out a Final Cut Pro project. See Working with Final Cut Studio Projectsfor more information about checking out a Final Cut Studio project asset.
83Chapter 5 Working in Final Cut Server
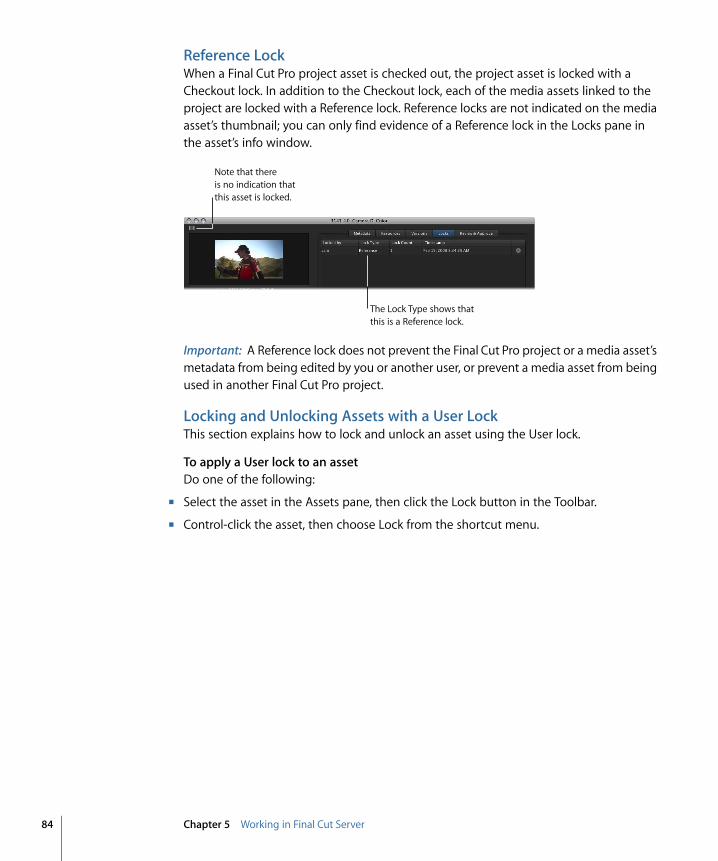
Reference LockWhen a Final Cut Pro project asset is checked out, the project asset is locked with aCheckout lock. In addition to the Checkout lock, each of the media assets linked to theproject are locked with a Reference lock. Reference locks are not indicated on the mediaasset’s thumbnail; you can only find evidence of a Reference lock in the Locks pane inthe asset’s info window.
The Lock Type shows that this is a Reference lock.
Note that there is no indication that this asset is locked.
Important: A Reference lock does not prevent the Final Cut Pro project or a media asset’smetadata from being edited by you or another user, or prevent a media asset from beingused in another Final Cut Pro project.
Locking and Unlocking Assets with a User LockThis section explains how to lock and unlock an asset using the User lock.
To apply a User lock to an assetDo one of the following:
µ Select the asset in the Assets pane, then click the Lock button in the Toolbar.
µ Control-click the asset, then choose Lock from the shortcut menu.
84 Chapter 5 Working in Final Cut Server
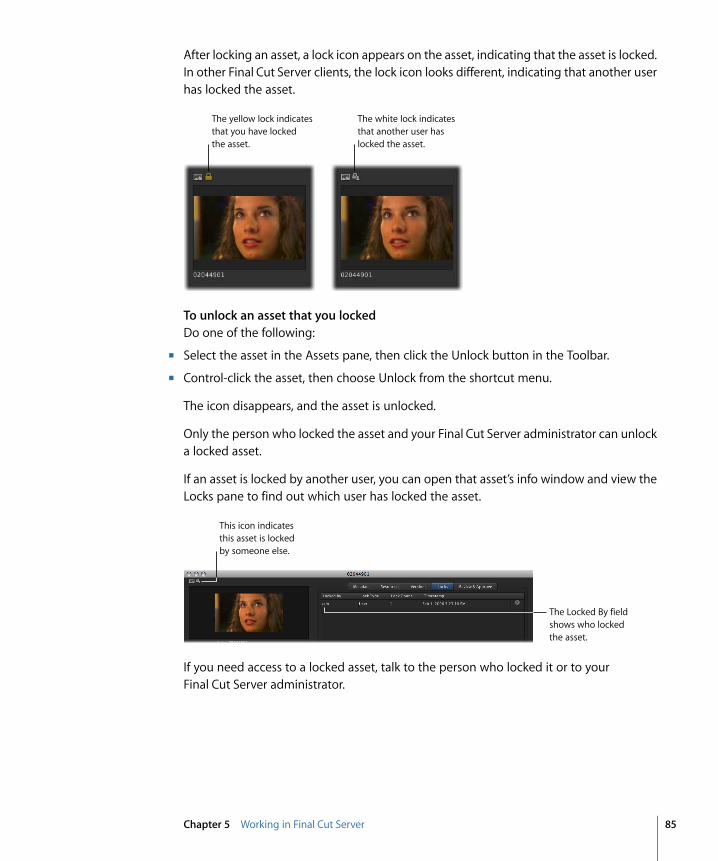
After locking an asset, a lock icon appears on the asset, indicating that the asset is locked.In other Final Cut Server clients, the lock icon looks different, indicating that another userhas locked the asset.
The yellow lock indicates that you have locked the asset.
The white lock indicates that another user has locked the asset.
To unlock an asset that you lockedDo one of the following:
µ Select the asset in the Assets pane, then click the Unlock button in the Toolbar.
µ Control-click the asset, then choose Unlock from the shortcut menu.
The icon disappears, and the asset is unlocked.
Only the person who locked the asset and your Final Cut Server administrator can unlocka locked asset.
If an asset is locked by another user, you can open that asset’s info window and view theLocks pane to find out which user has locked the asset.
The Locked By field shows who locked the asset.
This icon indicates this asset is locked by someone else.
If you need access to a locked asset, talk to the person who locked it or to yourFinal Cut Server administrator.
85Chapter 5 Working in Final Cut Server
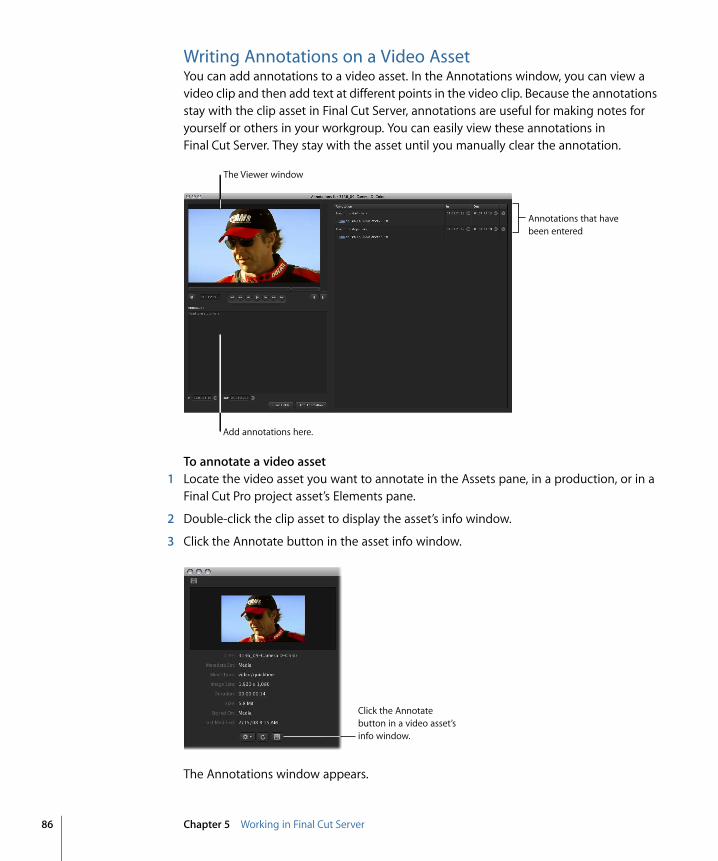
Writing Annotations on a Video AssetYou can add annotations to a video asset. In the Annotations window, you can view avideo clip and then add text at different points in the video clip. Because the annotationsstay with the clip asset in Final Cut Server, annotations are useful for making notes foryourself or others in your workgroup. You can easily view these annotations inFinal Cut Server. They stay with the asset until you manually clear the annotation.
The Viewer window
Add annotations here.
Annotations that have been entered
To annotate a video asset1 Locate the video asset you want to annotate in the Assets pane, in a production, or in a
Final Cut Pro project asset’s Elements pane.
2 Double-click the clip asset to display the asset’s info window.
3 Click the Annotate button in the asset info window.
Click the Annotate button in a video asset’s info window.
The Annotations window appears.
86 Chapter 5 Working in Final Cut Server

You must mark an In point or an Out point for each annotation.
4 Position the playhead at the In point, either by dragging the playhead or using thenavigation controls. Then click the Mark In button or press I on your keyboard.
You can set an Out point using the same process.
Drag this slider to locate frames of video.
Click the Mark In and Mark Out buttons (or press your keyboard’s I or O key) to mark In and Out points.
Use these controls to play and navigate through the video.
Click this button to open the asset’s info window.
Important: The keyboard commands are not available when the Annotation field is active.This allows you to type annotations in the field.
5 Type a comment in the Annotation field below the viewer window.
Click the Add Annotation button to save the
annotation.
The annotation
The In and Out points associated with the annotation
6 To add the annotation to the Annotation list at the right, click the Add Annotation button.
The annotation is added to the list.
The annotation you added appears in this list.
87Chapter 5 Working in Final Cut Server
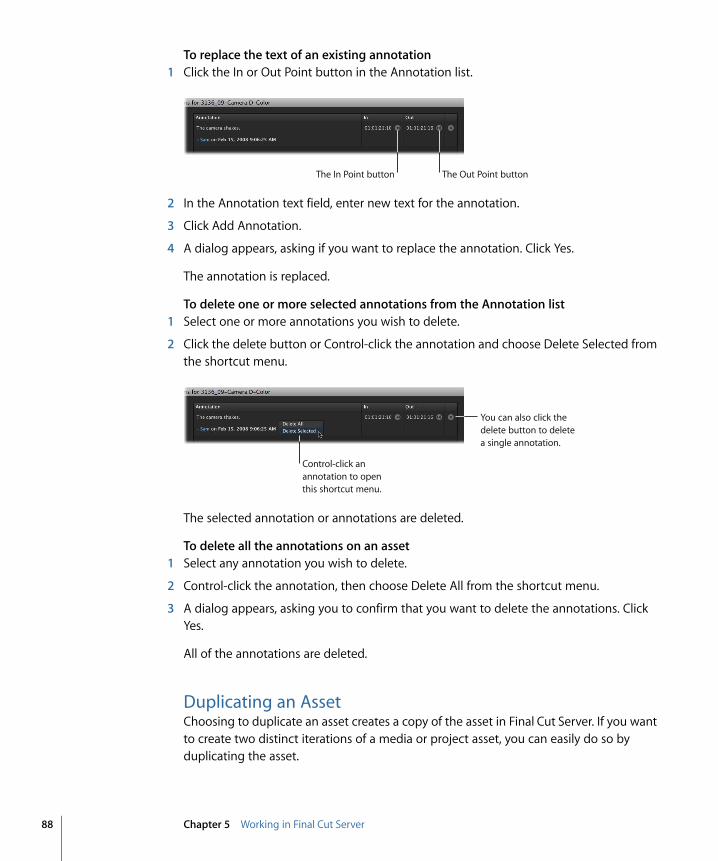
To replace the text of an existing annotation1 Click the In or Out Point button in the Annotation list.
The In Point button The Out Point button
2 In the Annotation text field, enter new text for the annotation.
3 Click Add Annotation.
4 A dialog appears, asking if you want to replace the annotation. Click Yes.
The annotation is replaced.
To delete one or more selected annotations from the Annotation list1 Select one or more annotations you wish to delete.
2 Click the delete button or Control-click the annotation and choose Delete Selected fromthe shortcut menu.
You can also click the delete button to delete a single annotation.
Control-click an annotation to open this shortcut menu.
The selected annotation or annotations are deleted.
To delete all the annotations on an asset1 Select any annotation you wish to delete.
2 Control-click the annotation, then choose Delete All from the shortcut menu.
3 A dialog appears, asking you to confirm that you want to delete the annotations. ClickYes.
All of the annotations are deleted.
Duplicating an AssetChoosing to duplicate an asset creates a copy of the asset in Final Cut Server. If you wantto create two distinct iterations of a media or project asset, you can easily do so byduplicating the asset.
88 Chapter 5 Working in Final Cut Server

To duplicate an asset1 Control-click the asset, then choose Duplicate from the shortcut menu.
The Duplicate window appears.
2 Choose a destination device from the Destination pop-up menu.
If you want to place the duplicate file within the file structure of the device, click theChoose button and navigate to the appropriate location in the file browser.
The destination file path appears in the Destination field.
3 If you want to associate the new asset with a production, click the Choose button to theright of Production, select a production, and click Open.
The production you selected appears in the “Associate with Production” field.
4 If you want to transcode the asset, change the metadata set, or add metadata to theasset, click the Advanced Options disclosure triangle and make the necessary changes.
5 Click the Duplicate button to duplicate the file and create a new asset.
Using the Edit-in-Place FeatureYour Final Cut Server administrator can configure the edit-in-place feature and createcopies of assets for editing directly on an Xsan server or other shared storage locations.When the edit-in-place feature is set up, you no longer need to download, cache, or checkout the asset; instead, you can drag your asset directly from the asset catalog to anapplication for editing.
Important: Edit-in-place must be set up by your Final Cut Server administrator. Contactyour administrator to find out if edit-in-place is configured before you try to use thefeature.
Monitoring JobsFiles are constantly being uploaded and downloaded by Final Cut Server. The job progressindicator, Downloads & Uploads window, and Search All Jobs window all displayinformation about the progress of files being uploaded to and downloaded fromFinal Cut Server.
89Chapter 5 Working in Final Cut Server

The Jobs in Progress IndicatorThe Jobs in Progress indicator appears in the bottom-left corner of the Final Cut Servermain window when files are being uploaded or downloaded. It looks like a spinning gearand indicates that a certain number of jobs are being performed.
Click this button to display the Downloads & Uploads window.
The Jobs in Progress indicator
The Downloads & Uploads WindowFor more information about files being uploaded or downloaded, you can open theDownloads & Uploads window, which shows the specific files being downloaded andinformation about the status of each.
Note: The Downloads & Uploads window does not show details about files beingtranscoded to create proxy files. You can see the details about the transcoding of thesefiles in the Search All Jobs window.
To open the Downloads & Uploads windowµ Click the Downloads and Uploads button in the bottom-left corner of the Final Cut Server
main window.
Note: If an upload or download fails, an error icon appears in the Downloads & Uploadswindow. You must clear the jobs listed in the Downloads & Uploads window to makethis icon disappear.
Open the disclosure triangle to view the files that are part of a job.
90 Chapter 5 Working in Final Cut Server

To clear the jobs listed in the Downloads & Uploads windowµ Click Clear in the bottom-left corner of the Downloads & Uploads window.
The Search All Jobs WindowYou can get detailed information about each of the files being uploaded or downloadedin the Search All Jobs window. Unlike the Downloads & Uploads window, the Search AllJobs window contains a detailed history of the jobs Final Cut Server has performed. Jobsare shown for copying a file from one location to another, uploading files, creating thenew asset’s proxy files, and more. Each job also creates multiple log entries for each stepof the operation.
To narrow the jobs shown in the Jobs window, you can search the Jobs window.
To search for a specific job or jobs1 Choose Search All Jobs from the Server pop-up menu.
The Search All Jobs window appears.
Click this button to see advanced search options. Enter a search term.
2 Enter your search criteria by doing one of the following:
• Enter a word or value in the search field and limit the search to find files that containthe search term as part of the title using the “Contains (more results)” option or thatmatch the search term exactly using the “Matches Word (faster)” option.
• Click the search disclosure triangle to reveal the advanced search options. Choose alimiter from the pop-up menu and enter a value in one or more search fields.
3 When you’ve entered the criteria by which you want to search the jobs, click the Searchbutton.
91Chapter 5 Working in Final Cut Server

The jobs that match your search criteria are listed in the Search All Jobs window.Remember that your search results may span several pages; you can navigate throughthe search results using the page controls at the far right.
Setting Final Cut Server Client PreferencesYour Final Cut Server administrator is responsible for configuring most of the preferencesthat affect you while working with your Final Cut Server client. However, there are a fewsettings that you can change in your client copy only.
You can define the location and size of your cache memory.
You can change how the search results in your client are displayed.
To open the Preferences windowDo one of the following:
µ Choose Final Cut Server > Preferences.
µ Choose Preferences from the Server pop-up menu (the pop-up menu in the Final Cut Servermain window that appears when you click the Server button).
To make changes in the Preferences windowµ Enter a number or enter a file path (by clicking the Choose button and then specifying
a file path) in the field you want to change, then click the Apply Changes button.
About Search PreferencesThe search preferences control the number of results Final Cut Server finds and how manyitems are displayed per page. This can be useful if you have a large or small display.
Searching preferences include:
• Maximum # of Search Results: Enter a value that is the maximum number of items thatappear after a search.
92 Chapter 5 Working in Final Cut Server

• Items Per Page: Search results are divided into pages to make viewing more efficient.You can enter a value that defines how many items appear on each page.
• Remember the last search: Select this checkbox to have Final Cut Server remember andrun the last search that you performed the next time you log in.
About Local Media PreferencesThe cache is where your local copies of media files are downloaded. It is not suggestedthat users view or move files that are in the cache. Instead, export copies of files that youwant to use to your desktop or another convenient location.
However, you can decide where you want your cache to be located. In the Preferenceswindow, you can change the location and size of the cache. You can also quickly clearthe cache in the Preferences window.
Cache preferences include:
• Save cached files to: Click the Choose button to choose a location to use for storingyour caches. The default locations are /username/Library/Caches/ when running theclient on a Mac computer and the /username/AppData/ directory on a Windowscomputer.
Important: Changing the cache location results in all current caches becomingunavailable. If you change the cache’s location, you will need to manually add assetsthat you need to the new cache location.
• Maximum Cache Size: Enter a value to define a maximum cache size.
• Clear Cache: Click the Clear Cache button to delete the files in the cache location.
• Saved aliases for prepared media files: Click the Choose button to choose a location touse for storing aliases to cache files. This location is used when you choose the Preparefor Disconnected Use option for assets.
Note: If your local cache exceeds the limit defined in the Preferences window, a messageappears, advising you to clear the cache, cancel the action, or continue the action. It isrecommended that you choose to clear your cache.
About General PreferencesThese preferences affect how Final Cut Server displays productions and messages.
• Disable Resource Fork Warning checkbox: Select this checkbox to turn off “DisableResource Fork” messages.
• Use Generic thumbnail for Productions: Select this checkbox to display a genericproduction icon to represent a production. By default, a still image contained in aproduction is displayed on the production thumbnail and in list view.
93Chapter 5 Working in Final Cut Server

About the Saved Aliases for Prepared Media Files FieldPreparing media assets for disconnected use allows you to create alias copies of a mediafile that is stored in your Final Cut Server cache on a portable computer. You can use thealias files to create a new Final Cut Pro project while you are disconnected from theFinal Cut Server network. You can set the location where Final Cut Server saves alias copiesof the prepared media files in the Preferences window. See Preparing Media Assets to BeUsed on an Offline Computer for more information about preparing media assets fordisconnected use.
94 Chapter 5 Working in Final Cut Server

This chapter explains how to edit media assets, including video clips, graphics, and imagesequences, in applications other than Final Cut Server. You can edit a managed copy ofa media asset by checking out the asset, editing the checked-out file, and then checkingthe edited file back in. A separate workflow is provided for preparing media files to beused in a new Final Cut Pro project that you create while disconnected from theFinal Cut Server network. You can also copy or export an unmanaged copy of a mediaasset from Final Cut Server.
This chapter covers the following:
• About Caching (p. 95)
• Checking Media Assets In and Out (p. 97)
• Preparing Media Assets to Be Used on an Offline Computer (p. 99)
• Exporting Media Assets (p. 102)
About CachingCaching an asset downloads the asset to the Final Cut Server cache on your local computer.After you’ve cached a media asset, you can check it out and work with that managedcopy in another application, or you can drag a copy of the media asset fromFinal Cut Server or export a copy of the media asset and create an unmanaged copy.
After caching an asset, you can tell the asset is cached because the asset’s thumbnailchanges to a lighter gray color.
Note: If your Final Cut Server system is connected to an Apple Xsan storage area network(SAN) device and the edit-in-place feature is enabled, your assets are always cached andready to use. For more information, contact your Final Cut Server administrator.
Final Cut Server prompts you when you need to cache an asset, so caching often onlyrequires you to click the Add to Cache button that appears in the dialog. However, youcan also manually add an asset to your Final Cut Server cache.
To add an asset to your cacheµ Control-click the asset, then choose Add to Cache from the shortcut menu.
95
Working with Media Assets 6

When the asset is cached, the asset’s background changes to a lighter gray color (inThumbnails view) or gets a dot icon (in List view).
Asset 4_2, with the lighter gray background, is cached.
3236_03-Camera B-Color, with the dot next to it, is cached.
In some situations, a file that is stored in your Final Cut Server cache may expire. Whenthis happens, an icon appears on the asset, indicating that the file that is cached for thatasset is expired.
This icon indicates that the file that is cached for this asset is expired.
96 Chapter 6 Working with Media Assets

To correct an expired cacheµ Control-click the asset, then choose Remove from Cache from the shortcut menu.
The icon disappears, indicating that the expired file has been removed from yourFinal Cut Server cache.
You can change several settings for your Final Cut Server cache in Final Cut ServerPreferences. See About Local Media Preferences for more information.
Important: Final Cut Server manages the files in your local computer’s cache. In mostsituations, you do not need to manually work in your computer’s cache. If you want tomodify your cache, talk with your Final Cut Server administrator.
Checking Media Assets In and OutA media asset represents a single media file, and as such, is easy to work with. To edit amedia asset, you can check it out, edit it, and then check it back in to Final Cut Server.
A media asset can also be exported, edited, and then uploaded to Final Cut Server as anew asset; however, when you export a media asset, the asset is no longer managed byFinal Cut Server. If you make changes to the media file and want Final Cut Server tomanage it again, you will need to create a new asset for the file by checking the file backin to Final Cut Server.
Although a media asset represents a single media file, a media asset is rarely unattached.Media assets can be referenced as elements of a Final Cut Pro project asset or referencedin other Final Cut Studio project assets. When you modify an asset, you could inadvertentlybe modifying how that asset appears in several different project assets. It’s good practiceto always check the Resources pane of a media asset to verify which projects an asset islinked to.
If you know that the changes you are about to make to an asset apply to every one ofthe projects it is connected to, go ahead and edit the asset. If you don’t recognize thelinked assets that are shown in the Resources pane, consider exporting the asset andthen uploading it again as a new media asset, and manually replacing the asset in thenecessary projects. Doing this might take a few extra minutes, but it could save you andyour coworkers hours of backtracking later on.
Remember that when a media asset is checked out, the asset cannot be edited, checkedout, deleted, or archived by another user.
To check out a media asset, edit it, and check the edited media file back in toFinal Cut Server
1 Locate the media asset that you want to check out.
97Chapter 6 Working with Media Assets

2 Do one of the following:
• Select the asset, then click the Check Out button in the Toolbar.
• Control-click the media asset, then choose Check Out from the shortcut menu or clickthe Check Out button.
Click the Check Out button.
3 In the Check Out window that appears, choose a location to save the checked-out mediafile.
4 Click the Check Out button.
5 To open the file in its original application, do one of the following:
• Drag the file from Final Cut Server to the application icon in your Dock.
• Drag the file from the checkout location to the original application icon in your Dock.
• Open the file in its original application by choosing File > Open.
6 Edit the file.
Tip: While you’re editing the media asset, you can update it in Final Cut Server. Aftersaving the asset in its original application, locate the asset in Final Cut Server, Control-clickthe asset, then Choose Update Asset from the shortcut menu. If version control is turnedon for the asset, you can optionally enter a comment in the Check In window that appears.
7 Save the new file to the checkout location.
Important: Saving to any location other than the original checkout location will preventFinal Cut Server from managing the file.
8 In Final Cut Server, check the file back in by doing one of the following:
• Select the checked-out asset, then click the Check In button in the Toolbar.
• Control-click the asset, then choose Check In from the shortcut menu.
If version control is not turned on for the asset, the asset is checked in.
98 Chapter 6 Working with Media Assets

9 If version control is turned on for the asset, a Check In window appears. If appropriate,enter a version comment and click Check In.
See Adding Versions for a Media or Project Asset for more information about versioncontrol.
The updated media asset is checked back in to Final Cut Server, and the checkout icondisappears from the asset thumbnail.
Preparing Media Assets to Be Used on an Offline ComputerSometimes you may want to make a selection of media assets available to be used in anew Final Cut Pro project that you create while you are offline and not connected to theFinal Cut Server network.
Preparing media assets for disconnected use allows you to create alias copies of a mediafile that is stored in your Final Cut Server cache on your local computer. Later, when youare away from the Final Cut Server network, you can add those media files to a newFinal Cut Pro project. When you return to work and connect to the Final Cut Server network,you can upload the new Final Cut Pro project to Final Cut Server. When you do this, anew asset is created for the Final Cut Pro project, but because the media assets alreadyexist in Final Cut Server the media is not uploaded.
Important: You can only prepare files for disconnected use on a portable computer thatcontains a Final Cut Server local cache. You cannot prepare files for disconnected use andput the files on an external drive.
To prepare media assets for disconnected use1 Choose Preferences from the Server pop-up menu (the pop-up menu in the Final Cut Server
main window that appears when you click the Server button).
99Chapter 6 Working with Media Assets

2 In the Final Cut Server Preferences window, verify the location at which the alias files willbe placed. If you want to change the location, click Choose and enter a new location onyour local computer, then click Apply Changes to save the new location.
Click the Choose button.
Alias copies of the media files are placed in the location specified in this field.
3 In the Assets pane, select the media assets that you want to prepare for disconnecteduse.
• To select a series of items: Click an item, hold down the Shift key, and click the last itemin the series.
• To select individual items: Hold down the Command key, and click discontinuous items.
4 Control-click one of the selected assets, then choose Prepare for Disconnected Use fromthe shortcut menu.
The files are copied to the Final Cut Server cache, and alias copies of the files are put inthe location you specified in the “Saved aliases for prepared media files” field in thePreferences window.
Now that the media assets have been prepared for disconnected use, you can use thefiles while your local computer is not connected to Final Cut Server.
To create a Final Cut Pro project using the files that have been prepared fordisconnected use
1 Create a new project in Final Cut Pro.
2 Drag the alias files into the new project.
Important: Be sure to maintain the path of the media files in the Prepared for DisconnectedUse location. Do not move the aliases or change the filenames.
You can also add media files that are not being managed by Final Cut Server to the newFinal Cut Pro project. When you upload the new Final Cut Pro project to Final Cut Server,these new files are uploaded as new media assets.
100 Chapter 6 Working with Media Assets

3 Edit the project.
4 When you have finished working on the project, save it.
The last stage of this process is to upload the new Final Cut Pro project to Final Cut Server.When you upload the project, the media assets that you prepared for disconnected useare updated, if necessary, in Final Cut Server, the new Final Cut Pro project is uploadedas a new asset, and any new media files are uploaded to Final Cut Server as new mediaassets.
To upload the new Final Cut Pro project to Final Cut Server1 Do one of the following:
• Drag the Final Cut Pro project file from the Finder to the column on the left of theFinal Cut Server main window, to the Assets pane, or to a production.
• Choose Upload File from the Server pop-up menu (the pop-up menu in theFinal Cut Server main window that appears when you click the Server button), selectthe Final Cut Pro project file in the file browser that appears, then click Upload.
The Upload Final Cut Pro Project window appears.
2 Some of the information in the Upload Final Cut Pro Project window is automaticallyentered. If necessary, you can change the metadata set or add any metadata for the newFinal Cut Pro project and the linked media. Click to move through the metadata categorieson the left to view all the available metadata fields.
3 If you want to put the Final Cut Pro project asset in a production, click Choose at the rightof the Associate with Production field and specify a production.
See Organizing Assets in Final Cut Server for more information about productions.
4 Click Upload.
101Chapter 6 Working with Media Assets

The file is uploaded and a new asset is created. The upload progress is displayed abovethe Information pane in the bottom-left corner of the Final Cut Server main window.
5 If you want to monitor the progress of the file upload, click the Downloads and Uploadsbutton to display the Downloads & Uploads window.
After the file is uploaded, select the Assets pane and click the Search button to view thenew asset or assets created from the Final Cut Pro project file and any new media files.
Exporting Media AssetsExporting is useful for creating copies of media files for editing or for making a backupcopy. You can export copies of media assets even if the asset is locked or checked outby another user.
Important: After you export a media asset, the exported file is no longer managed byFinal Cut Server. If you want to create a managed copy of an asset that can be checkedin and tracked by Final Cut Server, check out the asset.
To export one or more media assets1 Select one or more assets, Control-click an asset, then choose Export from the shortcut
menu.
The Export or Multiple Export window appears.
2 In the window, choose a destination to save the media files to by clicking the Choosebutton and identifying a location in the file browser.
3 If desired, choose a transcode setting.
4 If you are exporting a single file, you can also optionally change the filename.
5 Click the Start button.
The media file is exported to the location you specified in the Export window.
102 Chapter 6 Working with Media Assets

This chapter explains how to work with Final Cut Pro projects. You can edit Final Cut Proprojects by checking out the project asset, editing the checked-out file in Final Cut Pro,and then checking the edited file back in to Final Cut Server. A separate workflow isprovided for editing a Final Cut Server–managed copy of a Final Cut Pro project whileyou are not connected to the Final Cut Server network. You can also export a copy of aFinal Cut Pro project from Final Cut Server.
This chapter covers the following:
• About Final Cut Pro Projects (p. 103)
• Using Final Cut Pro and Final Cut Server Together (p. 104)
• Resolving Offline Media Issues (p. 105)
• Moving Projects Between Final Cut Server and Final Cut Pro (p. 106)
• Checking Out a Final Cut Pro Project (p. 106)
• Editing a Checked-Out Project in Final Cut Pro (p. 108)
• Checking In a Final Cut Pro Project (p. 109)
• Making Versions of Final Cut Pro Project Assets (p. 110)
• Working on Projects While Away from the Final Cut Server Network (p. 111)
• Exporting a Final Cut Pro Project (p. 114)
About Final Cut Pro ProjectsWhen you upload a Final Cut Pro project to Final Cut Server, the Final Cut Pro project isuploaded as an asset, and each media file that is linked to that Final Cut Pro project assetis also uploaded as an independent media asset, called an element of that project.Final Cut Server uses elements to track the linked media assets. Elements are listed in theproject asset’s Elements pane.
103
Working with Final Cut Pro Projects 7
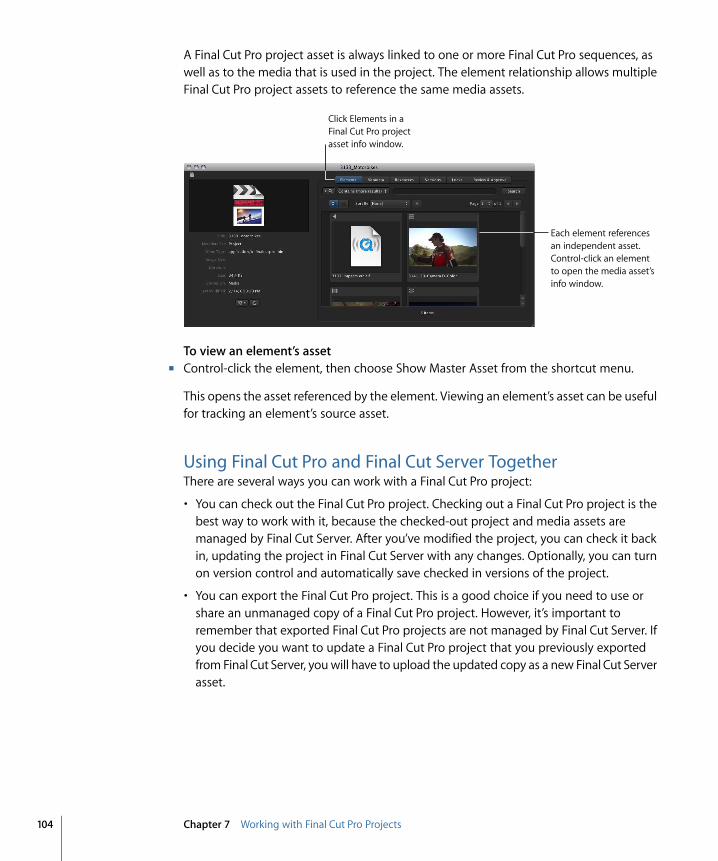
A Final Cut Pro project asset is always linked to one or more Final Cut Pro sequences, aswell as to the media that is used in the project. The element relationship allows multipleFinal Cut Pro project assets to reference the same media assets.
Each element references an independent asset. Control-click an element to open the media asset’s info window.
Click Elements in a Final Cut Pro project asset info window.
To view an element’s assetµ Control-click the element, then choose Show Master Asset from the shortcut menu.
This opens the asset referenced by the element. Viewing an element’s asset can be usefulfor tracking an element’s source asset.
Using Final Cut Pro and Final Cut Server TogetherThere are several ways you can work with a Final Cut Pro project:
• You can check out the Final Cut Pro project. Checking out a Final Cut Pro project is thebest way to work with it, because the checked-out project and media assets aremanaged by Final Cut Server. After you’ve modified the project, you can check it backin, updating the project in Final Cut Server with any changes. Optionally, you can turnon version control and automatically save checked in versions of the project.
• You can export the Final Cut Pro project. This is a good choice if you need to use orshare an unmanaged copy of a Final Cut Pro project. However, it’s important toremember that exported Final Cut Pro projects are not managed by Final Cut Server. Ifyou decide you want to update a Final Cut Pro project that you previously exportedfrom Final Cut Server, you will have to upload the updated copy as a new Final Cut Serverasset.
104 Chapter 7 Working with Final Cut Pro Projects

Whether you are uploading a new Final Cut Pro project into Final Cut Server or checkingan existing Final Cut Pro project asset back in to Final Cut Server, it’s important tounderstand the following:
• Final Cut Server does not support folder hierarchies in the Final Cut Pro bin. Items you’veorganized in the Final Cut Pro bin come into Final Cut Server in a flat structure.
• Final Cut Server does not recognize markers set in Final Cut Pro. Markers and markercomments created in Final Cut Pro cannot be viewed in Final Cut Server. However,when you check out or export a Final Cut Pro project from Final Cut Server, the markersand their text appear again in Final Cut Pro.
• Final Cut Server does not recognize text generator clip names. After you check out orexport a Final Cut Pro project that contains a text generator clip from Final Cut Serverand open the project in Final Cut Pro, the text generator clip reverts to its default clipname. However, the text used in the text generator clip is not affected and appearscorrectly in the video shown in the Canvas.
• Remember to save checked-out project files. Save checked-out project files often, andonly save them to the Final Cut Server checkout location. Do not move checked-outfiles from their checkout location.
• Remember that projects that are exported from Final Cut Server are no longer managedby Final Cut Server. You cannot update an existing Final Cut Pro project asset inFinal Cut Server unless you have checked out the asset, edited it, and then checked itback in. If you edited a Final Cut Pro project asset that was exported or duplicated, itis no longer managed by Final Cut Server.
Resolving Offline Media IssuesAfter uploading or checking in a Final Cut Pro project, you may find that one or more ofthe project’s media files have gone offline. You know that the media is offline becausean offline icon appears on the asset.
This icon shows that one or more of the project’s media files are offline.
105Chapter 7 Working with Final Cut Pro Projects

Final Cut Server cannot modify a Final Cut Pro project’s media links. While Final Cut Serveris managing a Final Cut Pro project, media can go offline because the project asset wasuploaded incorrectly, or because the media files went offline while the project was beingedited in Final Cut Pro and was then uploaded with offline media.
If the project’s media was not linked correctly at upload or checkin and went offline whenit was uploaded to Final Cut Server, you should check out the project, relink the media,and then check it back in to Final Cut Server.
If the project’s media is unlinked in Final Cut Pro, you should attempt to relink the mediain Final Cut Pro.
Moving Projects Between Final Cut Server and Final Cut ProAfter uploading a Final Cut Pro project, it’s easy to revise and update the original project.Simply check out the project, modify it in Final Cut Pro, save it, and then check the projectback in. At checkin, the Final Cut Pro project asset is updated in Final Cut Server.
Important: Your Final Cut Server administrator can create a copy of the asset for editingdirectly on an Xsan server, thus eliminating the need to download, cache, or check outthe asset; instead, you can drag your asset directly from the Assets pane to an applicationfor editing. To do this, edit-in-place must be set up by your Final Cut Server administrator.Ask your Final Cut Server administrator if edit-in-place is configured on your Final Cut Serversystem.
You can save versions of previous project assets by turning on version control. Afterturning on version control, you can save a copy every time a new version of an asset ischecked in. See Adding Versions for a Media or Project Asset for more information aboutversion control.
Remember that checking out the Final Cut Pro project is the only way to maintain theproject asset. If you export a copy of the Final Cut Pro asset, or if you simply drag theasset out onto your desktop, you are creating an unmanaged copy of the Final Cut Proproject that is not tracked by Final Cut Server. If you make changes to an unmanagedFinal Cut Pro project, you will have to upload it to Final Cut Server as a new asset.
Checking Out a Final Cut Pro ProjectChecking out a Final Cut Pro project creates a managed copy of the project at the locationyou specify. When you check out a Final Cut Pro project, the project asset’s primaryrepresentation is locked and cannot be modified by other users. Additionally, every mediaasset that is used in the project is locked with a Reference lock and cannot be modifiedby other users.
106 Chapter 7 Working with Final Cut Pro Projects
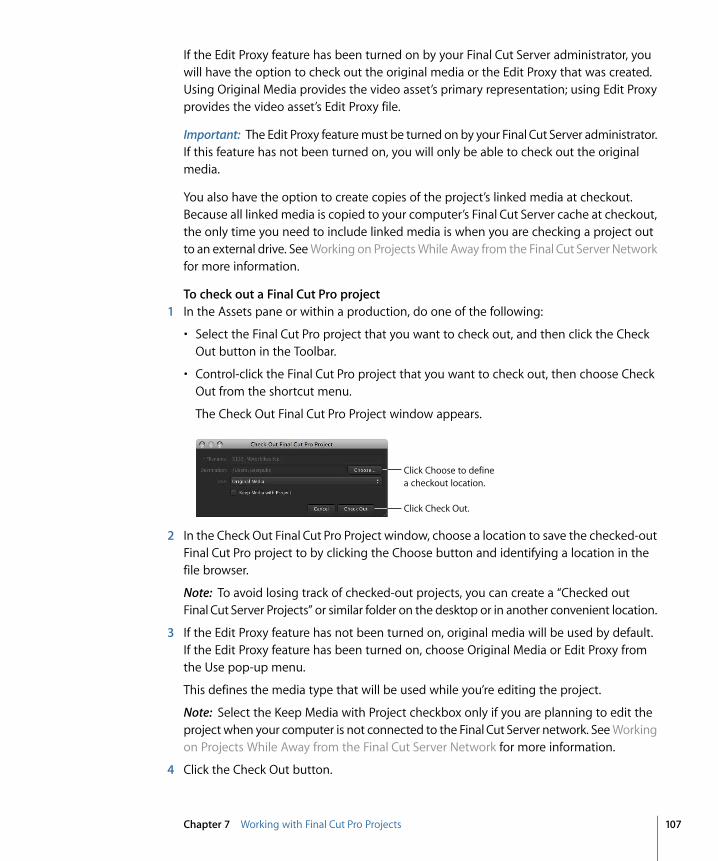
If the Edit Proxy feature has been turned on by your Final Cut Server administrator, youwill have the option to check out the original media or the Edit Proxy that was created.Using Original Media provides the video asset’s primary representation; using Edit Proxyprovides the video asset’s Edit Proxy file.
Important: The Edit Proxy feature must be turned on by your Final Cut Server administrator.If this feature has not been turned on, you will only be able to check out the originalmedia.
You also have the option to create copies of the project’s linked media at checkout.Because all linked media is copied to your computer’s Final Cut Server cache at checkout,the only time you need to include linked media is when you are checking a project outto an external drive. See Working on Projects While Away from the Final Cut Server Networkfor more information.
To check out a Final Cut Pro project1 In the Assets pane or within a production, do one of the following:
• Select the Final Cut Pro project that you want to check out, and then click the CheckOut button in the Toolbar.
• Control-click the Final Cut Pro project that you want to check out, then choose CheckOut from the shortcut menu.
The Check Out Final Cut Pro Project window appears.
Click Choose to define a checkout location.
Click Check Out.
2 In the Check Out Final Cut Pro Project window, choose a location to save the checked-outFinal Cut Pro project to by clicking the Choose button and identifying a location in thefile browser.
Note: To avoid losing track of checked-out projects, you can create a “Checked outFinal Cut Server Projects” or similar folder on the desktop or in another convenient location.
3 If the Edit Proxy feature has not been turned on, original media will be used by default.If the Edit Proxy feature has been turned on, choose Original Media or Edit Proxy fromthe Use pop-up menu.
This defines the media type that will be used while you’re editing the project.
Note: Select the Keep Media with Project checkbox only if you are planning to edit theproject when your computer is not connected to the Final Cut Server network. See Workingon Projects While Away from the Final Cut Server Network for more information.
4 Click the Check Out button.
107Chapter 7 Working with Final Cut Pro Projects

The Final Cut Pro project asset is marked with the checkout icon in Final Cut Server. Acopy of the project is downloaded to the checkout location you specified. All media linkedto the checked-out project is added to the Final Cut Server cache. When the project isopened in Final Cut Pro, this locally cached media is used to automatically reconnect tothe checked-out project.
You can track the checkout progress by watching the Jobs in Progress indicator or, formore information, you can open the Downloads & Uploads window.
Editing a Checked-Out Project in Final Cut ProWhen you have checked out a Final Cut Pro project, you can edit the project inFinal Cut Pro.
When you open a project file that you just checked out in Final Cut Pro, the project fileshould open with all of its media links intact.
To open a checked-out project in Final Cut Proµ Drag the project from its checkout location to the Final Cut Pro icon in your Dock.
The project opens in Final Cut Pro. Now you can edit the project as you want.
Note: You should not have to manually relink the project’s media files. If you do have torelink the media files, the project was probably uploaded to Final Cut Server with unlinkedmedia.
To save a checked-out Final Cut Pro projectµ Save the project in the location you specified at checkout.
Important: You must save the project in exactly the same location from which you checkedit out. If you don’t save your Final Cut Pro project before checking it back in, the edits youperformed won’t be maintained.
While you’re editing the project in Final Cut Pro, you can update saved changes to theproject in Final Cut Server. When you update the Final Cut Pro project asset, changes tothe project file and any new media that is added to the project are automatically uploadedto Final Cut Server.
To update a Final Cut Pro project asset1 In Final Cut Pro, save the project file.
2 In Final Cut Server, Control-click the project asset, then Choose Update Asset from theshortcut menu. If version control is turned on for the asset, the Check In window appears.Optionally enter a comment and click Check In.
108 Chapter 7 Working with Final Cut Pro Projects

The project asset is updated in Final Cut Server, and the asset remains checked out soyou can continue editing it. If version control is enabled for the asset, a new version ofthe asset is created in Final Cut Server.
About Using Media Manager with a Checked-Out ProjectUsing the Final Cut Pro Media Manager to organize a project that is managed byFinal Cut Server can cause various media management problems. You can use the MediaManager to organize a project’s media before you upload the project to Final Cut Server,but using the Media Manager while Final Cut Server is managing the project is notrecommended.
Checking In a Final Cut Pro ProjectWhen you check a Final Cut Pro project back in to Final Cut Server, the new project replacesthe project that you checked out. Any linked media (including unused media that is in abin or folder) is updated, and any new media that was added is uploaded toFinal Cut Server.
If you are using version control with the Final Cut Pro project, the older checked-outproject is saved as a version of the project asset. If you are not using version control, theold project asset is overwritten.
Checking in a project removes both the Checkout lock that was applied to the Final Cut Proproject asset and the Reference locks that were applied to the media assets.
To check a project back in to Final Cut Server1 In the Assets pane or in a production, do one of the following:
• Select the asset, then click the Check In button in the Toolbar.
• Control-click the project, then choose Check In from the shortcut menu.
109Chapter 7 Working with Final Cut Pro Projects

When you check in the project, a Check In window appears.
If version control is turned on, the Version Comments field appears.
Enter any appropriate metadata.
Click Check In.
2 If version control is turned on, you can type comments in the Version Comments field.
3 If you have added new media files to the Final Cut Pro project, you can choose a metadataset for the new media asset and add metadata to any of the available fields.
4 When you’re ready to check in the project, click the Check In button.
Final Cut Server uploads the new, edited project as well as any new linked media in theproject. If version control is turned on for the project asset, the old project is saved as aversion; if version control is not turned on, the old project is overwritten.
Making Versions of Final Cut Pro Project AssetsFinal Cut Server can track Final Cut Pro project files as you edit them, providing a versionfor each changed version of a project that is checked in to Final Cut Server.
If your Final Cut Server administrator turned on asset version control during the installationprocess, your system may already be creating new versions of assets as you revise them.
Important: When version control is turned on for an asset, Final Cut Server creates a copyof every version that is checked in. Before enabling Final Cut Server to track versions ofan asset, check that you have sufficient disk capacity. If you have questions about whetheryou should turn on the version control feature for a particular asset, contact yourFinal Cut Server administrator.
To create a version of a Final Cut Pro project asset1 Verify that the version control feature is turned on for the Final Cut Pro project asset by
doing the following:
a Double-click the project asset to open the asset’s info window.
b Click the Versions button.
110 Chapter 7 Working with Final Cut Pro Projects

c If the “Store and track versions of this asset” checkbox is not selected, select it.
2 Check out the Final Cut Pro project by doing one of the following:
• Click the Check Out button in the Toolbar.
• Control-click the asset, then choose Check Out from the shortcut menu.
3 In the Check Out window that appears, enter a checkout location and click Check Out.
4 Edit the Final Cut Pro project.
5 When you’ve finished editing, save the project.
6 Check in the Final Cut Pro project by doing one of the following:
• Click the Check In button in the Toolbar.
• Control-click the asset, then choose Check Out from the shortcut menu.
7 Add a comment in the window that appears.
Type comments about this version here.
8 Click the Check In button.
When you check in an updated version of the asset, the previous version appears in theVersions pane of the asset’s info window.
Working on Projects While Away from the Final Cut ServerNetworkYou can easily work on checked-out Final Cut Pro projects while your computer is notconnected to the Final Cut Server network.
111Chapter 7 Working with Final Cut Pro Projects
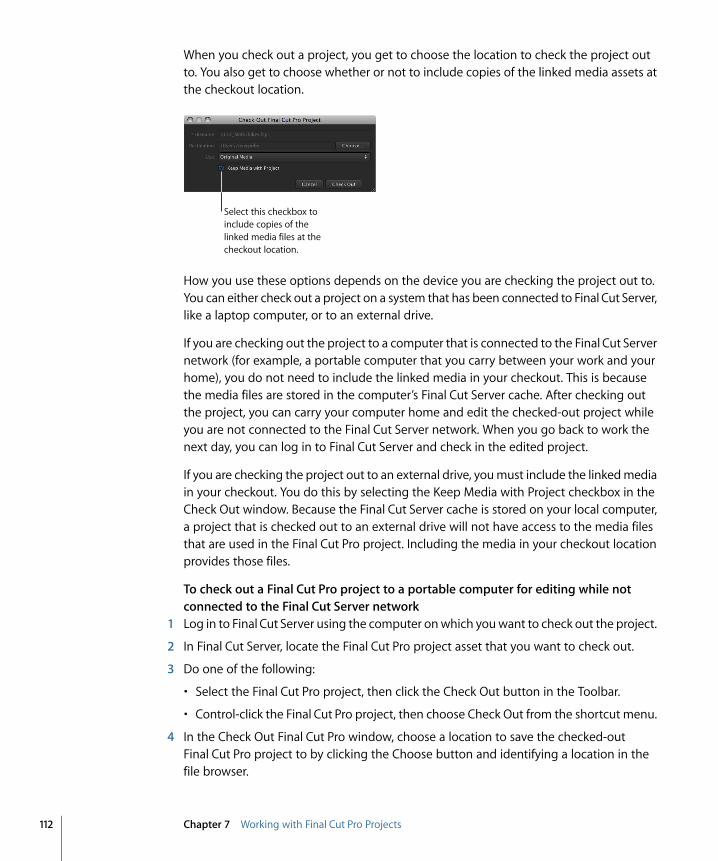
When you check out a project, you get to choose the location to check the project outto. You also get to choose whether or not to include copies of the linked media assets atthe checkout location.
Select this checkbox to include copies of the linked media files at the checkout location.
How you use these options depends on the device you are checking the project out to.You can either check out a project on a system that has been connected to Final Cut Server,like a laptop computer, or to an external drive.
If you are checking out the project to a computer that is connected to the Final Cut Servernetwork (for example, a portable computer that you carry between your work and yourhome), you do not need to include the linked media in your checkout. This is becausethe media files are stored in the computer’s Final Cut Server cache. After checking outthe project, you can carry your computer home and edit the checked-out project whileyou are not connected to the Final Cut Server network. When you go back to work thenext day, you can log in to Final Cut Server and check in the edited project.
If you are checking the project out to an external drive, you must include the linked mediain your checkout. You do this by selecting the Keep Media with Project checkbox in theCheck Out window. Because the Final Cut Server cache is stored on your local computer,a project that is checked out to an external drive will not have access to the media filesthat are used in the Final Cut Pro project. Including the media in your checkout locationprovides those files.
To check out a Final Cut Pro project to a portable computer for editing while notconnected to the Final Cut Server network
1 Log in to Final Cut Server using the computer on which you want to check out the project.
2 In Final Cut Server, locate the Final Cut Pro project asset that you want to check out.
3 Do one of the following:
• Select the Final Cut Pro project, then click the Check Out button in the Toolbar.
• Control-click the Final Cut Pro project, then choose Check Out from the shortcut menu.
4 In the Check Out Final Cut Pro window, choose a location to save the checked-outFinal Cut Pro project to by clicking the Choose button and identifying a location in thefile browser.
112 Chapter 7 Working with Final Cut Pro Projects

Note: To avoid losing track of checked-out projects, you can create a “Checked outFinal Cut Server projects” or similar folder on the desktop or in another convenient location.
5 Click the Check Out button.
The Final Cut Pro project asset is marked with the checkout icon in Final Cut Server. Theproject and its linked media files are downloaded to your Final Cut Server cache location,and an alias to the cached copy of the Final Cut Pro project is created in the location youspecified in the Check Out Final Cut Pro Project window.
You can track the progress of the checkout by watching the Jobs in Progress indicator.The spinning gear indicates that Final Cut Server is downloading copies of the files youchecked out, and the number indicates the number of files being downloaded. For moreinformation, you can open the Downloads & Uploads window, which shows the specificfiles being downloaded and information about the status of each downloaded file.
To check out a Final Cut Pro project to an external drive that will be connected to acomputer that is not connected to the Final Cut Server network
1 Locate the Final Cut Pro project asset that you want to check out.
2 Do one of the following:
• Select the Final Cut Pro project, then click the Check Out button in the Toolbar.
• Control-click the Final Cut Pro project, then choose Check Out from the shortcut menu.
3 In the Check Out Final Cut Pro window, navigate to the external drive you will be usingto transport the Final Cut Pro project by clicking the Choose button and identifying alocation in the file browser.
Note: To avoid losing track of checked-out projects, you can create a “Checked outFinal Cut Server Projects” or similar folder.
4 If the Edit Proxy feature has not been turned on, original media will be used by default.If the Edit Proxy feature has been turned on, choose Original Media or Edit Proxy fromthe Use pop-up menu.
This defines the media type that will be used while you’re editing the project.
5 Select the Keep Media with Project checkbox.
113Chapter 7 Working with Final Cut Pro Projects

Important: If you do not select the Keep Media with Project checkbox while checkingout a project to an external drive, the media files will not be available for you to use later.
Make sure that the Keep Media with Project checkbox is selected.
6 Click Check Out.
The Final Cut Pro project asset is marked with the checkout icon in Final Cut Server. Theproject and its media files are checked out to the location on your external drive that youspecified in the Check Out window.
Exporting a Final Cut Pro ProjectYou can always export a copy of a Final Cut Pro project for editing, even if a project islocked or checked out by another user. Exporting without a transcode yields a simplecopy of the project and its media, ready for editing.
Important: Exported project files cannot be checked in or otherwise referenced to theoriginal Final Cut Pro project asset. If you want to track an exported Final Cut Pro projectin Final Cut Server, you must upload it as a new asset.
To export a copy of a Final Cut Pro project1 Control-click the Final Cut Pro project asset, then choose Export from the shortcut menu.
2 In the Export Final Cut Pro window, choose a location to save the exported Final Cut Proproject file and its media to by clicking the Choose button and identifying a location inthe file browser.
Note: To avoid losing track of exported projects, you can create a “Checked outFinal Cut Server Projects” or similar folder on the desktop or in another convenient location.
3 If the Edit Proxy feature has not been turned on, original media will be used by default.If the Edit Proxy feature has been turned on, choose Original Media or Edit Proxy fromthe Use pop-up menu.
This defines the media type that will be used while you’re editing the project.
114 Chapter 7 Working with Final Cut Pro Projects

4 If you want local copies of the media used in the project, select the Keep Media withProject checkbox.
Select the Keep Media with Project checkbox.
5 Click the Export button.
A copy of the project file is exported to the location you specified in the ExportFinal Cut Pro window.
Important: Remember, you cannot check an exported Final Cut Pro project file back into Final Cut Server. If you want to track this exported copy in Final Cut Server, you mustupload the project file as a new asset.
115Chapter 7 Working with Final Cut Pro Projects


Working with Final Cut Studio project and media assets requires different strategies thanworking with Final Cut Pro project assets. This chapter explains how to check out; checkin; and export Motion, Soundtrack Pro, and DVD Studio Pro projects and their linked mediafiles.
This chapter covers the following:
• About Editing Final Cut Studio Project Assets (p. 117)
• Checking Bundle Assets In and Out (p. 118)
• Checking Projects and Media Files In and Out (p. 119)
• Exporting a Project Asset and Its Media (p. 124)
About Editing Final Cut Studio Project AssetsFinal Cut Server can manage Soundtrack Pro, Motion, and DVD Studio Pro project assetsand their linked media files.
Unlike Final Cut Pro project assets, Final Cut Studio project assets do not contain elementsthat represent the project’s linked media files. Therefore, the media files that are referencedby a Final Cut Studio project asset must be explicitly tracked by Final Cut Server users.Final Cut Server provides two methods for managing Final Cut Studio projects and theirlinked media files.
When you upload a folder containing the project file and media files, Final Cut Serverdisplays a dialog asking you if you want to upload the folder as a bundle asset or asindividual assets. This chapter explains how to check out and export Final Cut Studioprojects that have been uploaded using either of these options.
How you check out a Final Cut Studio project depends on how you uploaded it. If youuploaded the project and its linked media files as a bundle asset, you can check out thebundle asset in the same way that you would check out a media asset. If you uploadedthe project file and its linked media files as individual assets, you need to separately checkout the project asset and each of the media assets.
117
Working with Final Cut StudioProjects 8
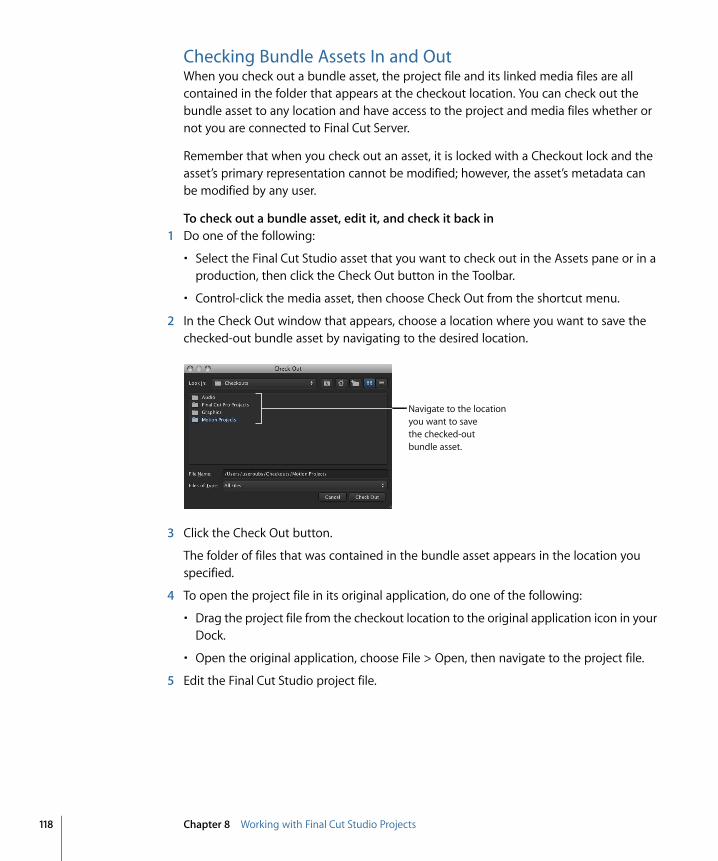
Checking Bundle Assets In and OutWhen you check out a bundle asset, the project file and its linked media files are allcontained in the folder that appears at the checkout location. You can check out thebundle asset to any location and have access to the project and media files whether ornot you are connected to Final Cut Server.
Remember that when you check out an asset, it is locked with a Checkout lock and theasset’s primary representation cannot be modified; however, the asset’s metadata canbe modified by any user.
To check out a bundle asset, edit it, and check it back in1 Do one of the following:
• Select the Final Cut Studio asset that you want to check out in the Assets pane or in aproduction, then click the Check Out button in the Toolbar.
• Control-click the media asset, then choose Check Out from the shortcut menu.
2 In the Check Out window that appears, choose a location where you want to save thechecked-out bundle asset by navigating to the desired location.
Navigate to the location you want to save the checked-out bundle asset.
3 Click the Check Out button.
The folder of files that was contained in the bundle asset appears in the location youspecified.
4 To open the project file in its original application, do one of the following:
• Drag the project file from the checkout location to the original application icon in yourDock.
• Open the original application, choose File > Open, then navigate to the project file.
5 Edit the Final Cut Studio project file.
118 Chapter 8 Working with Final Cut Studio Projects

Tip: While you’re editing the Final Cut Studio asset, you can update it in Final Cut Server.Note that only the asset will be updated, and you will need to manually upload any newmedia files to Final Cut Server. After saving the asset in its original application, locate theasset in Final Cut Server, Control-click the asset, then Choose Update Asset from theshortcut menu. If version control is turned on for the asset, you can optionally enter acomment in the Check In window that appears.
6 Save the Final Cut Studio project file to the checkout location.
Important: Saving to any location other than the original location prevents Final Cut Serverfrom managing the file.
7 In Final Cut Server, check the folder back in by doing one of the following:
• Select the checked-out bundle asset in the Assets pane or in a production, then clickthe Check In button.
• Control-click the checked-out bundle asset in the Assets pane or in a production, thenchoose Check In from the shortcut menu.
8 If version control is not turned on for the bundle asset, it is checked in. If version controlis turned on for the bundle asset, a Check In window appears. If appropriate, enter aversion comment and click Check In.
See Adding Versions for a Media or Project Asset for more information about versioncontrol.
The updated folder is checked back in to Final Cut Server.
Checking Projects and Media Files In and OutIf you uploaded a Final Cut Studio project and its linked media files as individual assets,you need to individually check out the project asset and each of the media assets. If theFinal Cut Studio project asset and its linked media assets were put in a Final Cut Serverproduction and given unique metadata at upload, finding and downloading theFinal Cut Studio project and its media is easy. You can open the production or search forthe unique metadata common to the Final Cut Studio project and its media to find theproject and media assets. Then you can check out the project and each of its media assets.
119Chapter 8 Working with Final Cut Studio Projects

If the Final Cut Server project upload was not explicitly organized with a production orkeyword, you may need to download the project, open it in its original application, andthen manually search for the media needed for the project. Then you can download eachpiece of media and edit the project. When you check the project back in, you can organizethe project in a production and apply a project keyword.
Remember that when you check out any asset, it is locked with a Checkout lock and theasset’s primary representation cannot be modified; however, the asset’s metadata canbe modified by any user.
Checking Out a Project Asset and Its Linked Media AssetsBefore you can successfully open a Final Cut Studio project, you need to check out orexport copies of the project’s media assets. Checking out an asset is the only way thatyou can create a managed copy of the asset that you can check back in to Final Cut Server.Check out the project asset using the steps below and then check out each of the mediaassets. After checking out all of the media files, you can open the project file, reconnectthe media files, and begin editing.
To check out a Final Cut Studio project asset or media asset1 Do one of the following:
• Select the project asset in the Assets pane or in a production, then click the Check Outbutton in the Toolbar.
• Control-click the project asset, then choose Check Out from the shortcut menu.
2 In the Check Out window, choose a location to save the checked-out project to bynavigating to the desired location.
Note: To make it easier to reconnect the project’s media, save the project file and all itslinked media files in the same location. You can create a “Checked out Final Cut Serverprojects” or similar folder on the desktop or in another convenient location.
3 Click the Check Out button.
The project is checked out to the location you specified.
120 Chapter 8 Working with Final Cut Studio Projects

After checking out all of the media assets, you can open the project file, reconnect themedia files, and begin editing.
If you will not be editing the media files, you can export the files. Because you can exportmultiple files, this is the faster choice. See Exporting a Project Asset and Its Media forinstructions on exporting media files.
Editing a Project File in Its Original ApplicationAfter checking out the project asset and checking out or exporting the project’s mediaassets, you can open the project file in its original application.
To open a project file in its original applicationDo one of the following:
µ Drag the project from the location to which you checked it out to the appropriateapplication icon in your Dock.
µ Open the original application, choose File > Open, then navigate to the project file.
When the project is open in its original application, you can edit it. Be sure to save youredits often.
You may need to relink your project file to its media files. If you get a media offline orrelink message, you know that the project needs to be relinked. For more informationabout relinking project files, see the documentation that came with the application.
Reconnecting a Motion Project to Its Media FilesWhen you first open a project file with media that is unavailable, a dialog appears listingall the media files that can’t be found. You can display a dialog to navigate directly to thefiles without having to search.
To reconnect Motion media files1 In the dialog listing all of the media files that cannot be found, click Reconnect.
2 In the dialog that appears, navigate to each file’s location, then click Open.
The media is reconnected.
For more information about reconnecting Motion projects, see the documentation thatcame with the application.
Reconnecting a Soundtrack Pro Project to Its Media FilesWhen you open a Soundtrack Pro multitrack project, the application checks to see if themedia files the project uses exist in the same location they were in when the project waslast opened. If the media files are not in the expected location, Soundtrack Pro displaysa Can’t Find File dialog with three choices:
• Skip All: Opens the project without reconnecting any missing files.
• Skip File: Opens the project without reconnecting the missing file.
121Chapter 8 Working with Final Cut Studio Projects

• Locate: Presents a dialog that lets you locate the missing file and reconnect it to theproject.
To reconnect Soundtrack Pro media files using the Locate option1 In the Can’t Find File dialog, click Locate.
2 The window that appears displays the filename that needs to be reconnected as thewindow’s title. In the file browser that appears in the window, navigate to the file’slocation.
3 When you’ve identified the file location, click Open.
The file is reconnected.
If you choose to open the project in Soundtrack Pro without reconnecting its files, youcan reconnect individual audio files from the Timeline or the Bin tab and reconnect avideo file in the video track in the Timeline.
To reconnect an audio or a video file in Soundtrack Pro1 Control-click the clip in the Timeline or video track, then choose Reconnect [filename]
from the shortcut menu.
2 In the dialog that appears, locate the file you want to reconnect.
3 Click Open to reconnect the file.
For more information about reconnecting Soundtrack Pro projects, see the documentationthat came with the application.
Reconnecting a DVD Studio Pro Project to Its Media FilesIf the project file and all its media files are in the same folder, DVD Studio Pro projectsshould not need to be reconnected. However, if you open a project and DVD Studio Procannot locate an asset in its original location, a Missing Files window appears.
To locate a missing asset when opening a DVD Studio Pro project1 Select the asset in the Missing Files window.
2 Do one of the following:
• Click Locate and use the window that appears to find the asset.
• If the asset is a QuickTime file and its MPEG-2 or AIFF encoded version is available, youcan click “Replace with encoded file.”
For more information about reconnecting DVD Studio Pro projects, see the documentationthat came with the application.
Checking the Project and Its Linked Media Files Back InAfter you’ve edited the project file, you need to check it and its linked media files backin to Final Cut Server. Each asset must be checked in separately.
122 Chapter 8 Working with Final Cut Studio Projects

Note: If you added any new assets to a project, you have to upload them separately. SeeUploading Final Cut Studio Projects for more information.
To check in a project asset1 In the project’s original application, save the project to the checkout location.
2 In the Final Cut Studio application, save the project and choose to collect the media. InMotion and Soundtrack Pro, you can do this by choosing File > Save As and choosing tocollect the media in the Save As window. In DVD Studio Pro, you need to manually placethe project and media files in a folder.
For specific information on using these applications, see the documentation that camewith the application.
Important: When uploading a DVD Studio Pro project file and its linked media files, thereis no need to upload .par files. When you check out and open the project inDVD Studio Pro, the .par files are automatically re-created.
3 In Final Cut Server, check the project file back in by doing one of the following:
• Select the checked-out project asset in the Assets pane or in a production, then clickthe Check In button in the Toolbar.
• Control-click the project, then choose Check In from the shortcut menu.
4 If version control is not turned on for the asset, the asset is checked in. If version controlis turned on for the asset, a Check In window appears. If appropriate, enter a versioncomment and click Check In.
See Adding Versions for a Media or Project Asset for more information about versioncontrol.
The Final Cut Studio project file is checked back in to Final Cut Server.
To check in a media asset1 In Final Cut Server, check the file back in by doing one of the following:
• Select the checked-out media asset in the Assets pane or in a production, then clickthe Check In button in the Toolbar.
• Control-click the checked-out media asset, then choose Check In from the shortcutmenu.
123Chapter 8 Working with Final Cut Studio Projects

2 If version control is not turned on for the asset, the asset is checked in. If version controlis turned on for the asset, a Check In window appears. If appropriate, enter a versioncomment and click Check In.
See Adding Versions for a Media or Project Asset for more information about versioncontrol.
The updated media asset is checked back in to Final Cut Server.
Exporting a Project Asset and Its MediaYou can always export a copy of a Final Cut Studio project asset and its media files thatwere uploaded as a bundle asset, or a project asset and media assets that were uploadedas individual assets, even if the project or media assets are locked or checked out byanother user. However, it’s important to note that exported project and media files cannotbe checked in or otherwise referenced to the original project or media assets.
If you uploaded the original project and its media files as a bundle asset, you can exportthe bundle asset in one step. If you uploaded the original project and its media files asindividual assets, you need to export the project asset, then export all of the media assets.Exporting media assets takes less time than checking out media assets, because you canexport multiple assets from Final Cut Server.
To export a copy of a bundle asset1 Control-click the bundle asset, then choose Export from the shortcut menu.
The Save window appears.
2 In the Save window, choose a destination to save the exported bundle asset to by clickingthe Choose button, identifying a location in the file browser, and clicking Save.
The Export window appears.
3 In the Export window, click the Export button.
Important: Do not choose a transcode setting for the bundled asset. Choosing a transcodesetting while exporting a project asset and its media files will transcode all the files tothe setting you specify, and corrupt one or more files.
124 Chapter 8 Working with Final Cut Studio Projects

A copy of the folder that is contained in the bundle asset is exported to the location youspecified in the Export window.
To export a Final Cut Studio project asset and linked media assets that were uploadedas individual assets
1 Select the project asset and media assets. If the project and media assets were createdusing the recommended method, the assets should be grouped in a Final Cut Serverproduction and have metadata that is unique to the project and media assets.
See Uploading Final Cut Studio Projects for more information on the recommendedmethod for uploading a Final Cut Studio project and its media files as individual assets.
Note: Switching to List view in the Productions pane can make it easier to Shift-click alist of assets.
2 Control-click one of the selected assets, then choose Export from the shortcut menu.
The Multiple Export window appears.
3 In the Multiple Export window, choose a destination to save the media assets to by clickingthe Choose button and identifying a location in the file browser.
Note: To avoid losing track of exported projects, you can create a folder for the projectand its media on the desktop or in another convenient location.
4 Do not choose a transcode setting.
5 Click the Start button.
Each of the selected assets is exported to the location you specified in the Multiple Exportwindow.
125Chapter 8 Working with Final Cut Studio Projects


This chapter explains how to use the Status metadata field to aid in tracking assets throughyour Final Cut Server workflow. If your organization diligently updates the Status metadatafield on each of its assets and productions, you can easily search for every asset andproduction that is in each stage of the workflow process. This chapter also discusses usingemails to notify others when an asset’s Status metadata field is set to Ready for Review.
This chapter covers the following:
• Using Status Metadata to Track Assets and Productions (p. 127)
• About the Review and Approve Feature (p. 131)
• Using the Review and Approve Feature (p. 132)
Using Status Metadata to Track Assets and ProductionsThe Status metadata field shows you where an asset is in the Final Cut Server workflow.
This Final Cut Pro project asset’s status is set to In Progress.
127
Using Status Metadata in theFinal Cut Server Workflow 9
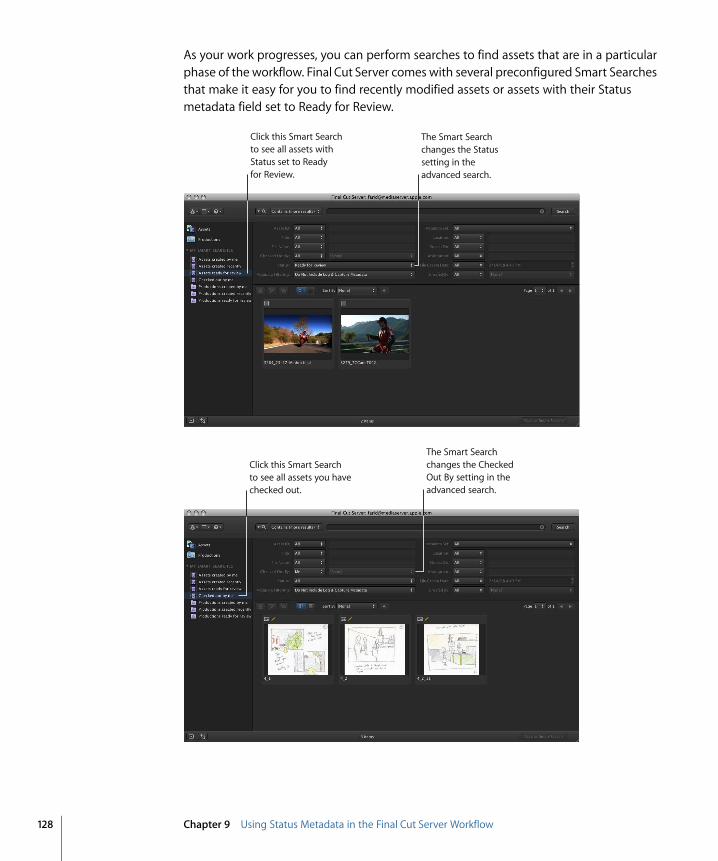
As your work progresses, you can perform searches to find assets that are in a particularphase of the workflow. Final Cut Server comes with several preconfigured Smart Searchesthat make it easy for you to find recently modified assets or assets with their Statusmetadata field set to Ready for Review.
Click this Smart Search to see all assets with Status set to Ready for Review.
The Smart Search changes the Status setting in the advanced search.
Click this Smart Search to see all assets you have checked out.
The Smart Search changes the Checked Out By setting in the advanced search.
128 Chapter 9 Using Status Metadata in the Final Cut Server Workflow

As your workflow grows and changes, you can create your own Smart Searches to useto speed up your work. Or your administrator can create Smart Searches to be used bythe members of your workgroup. For more general information about Smart Searches,see Using Smart Searches.
Applying Status Metadata to an Asset or ProductionYou can apply status and other metadata when you upload the file or after the asset orproduction has been created.
Important: When you apply metadata to an asset or production, it is not applied to otherassociated assets. For example, if you change the status of a Final Cut Pro project, thestatus on each of the linked media assets does not change.
To change an asset’s or production’s Status metadata1 In the Assets or Productions pane, double-click the asset or production to view its info
window.
2 Click Metadata to view the Metadata pane.
3 Click Asset to view the Asset metadata group.
Depending on the metadata set for the asset or production, several groups of metadataare displayed.
Click Metadata to see the asset’s metadata sets and their fields.
Click Asset to view the Asset metadata group.
129Chapter 9 Using Status Metadata in the Final Cut Server Workflow

4 Choose the appropriate Status setting from the Status pop-up menu.
Choose a Status setting from the Status pop-up menu.
Click Save Changes.
5 Click the Save Changes button.
The metadata is modified.
Searching for Assets or Productions Using Status MetadataAfter defining the status of an asset or production, you can search for status metadatato find all assets or productions that contain a particular Status metadata setting.
To search for assets or productions by status1 In the Assets or Productions pane, click the Search disclosure triangle to reveal the
advanced search options.
2 Choose a Status metadata setting to search for from the Status pop-up menu.
3 Click the Search button.
The results of the search are displayed in the main part of the window.
Using Smart Searches to Locate Items Ready for ReviewFinal Cut Server comes with a default Smart Search configured to search for assets andproductions that have their Status metadata field set to Ready for Review. It is listed underthe My Smart Searches heading.
130 Chapter 9 Using Status Metadata in the Final Cut Server Workflow

To search for assets or productions that have the Status metadata field set to Readyfor Review
µ Click “Assets ready for review” or “Productions ready for review” listed under the My SmartSearches heading.
Smart Searches for the Assets pane
Smart Searches for the Productions pane
About the Review and Approve FeatureThe Review and Approve feature works in conjunction with the Status metadata field.When an asset is ready for review, you can easily change the asset’s Status metadata fieldto Ready for Review, add editorial comments, and send a notification email to requiredreviewers from within the Final Cut Server client. Using the information in the email, thereviewers can find, view, annotate, and approve assets without having to download largefiles.
The Status metadata choices for an asset
131Chapter 9 Using Status Metadata in the Final Cut Server Workflow

Important: Your Final Cut Server administrator must configure this feature before it worksas described in this section.
Click Review & Approve to enter comments and email addresses.
Depending on how your administrator configured the Review and Approve feature, you can enter comments and email addresses here.
You can set the Status in the Metadata or Review & Approve pane.
Using the Review and Approve FeatureWhen your Final Cut Server administrator installed Final Cut Server, he or she set up theReview and Approve feature to meet your organization’s needs. The options theadministrator could configure included writing the text of the email, making editor’scomments (which are entered in the Review & Approve pane) and other metadata appearin the body of the notification email, and more.
The administrator also chooses one of three ways to specify who is defined as a requiredreviewer and thus receives Review and Approve emails. Emails can go to anadministrator-defined recipient list, emails can go to the addresses that the user manuallyenters in the “Required reviewers” field, or emails can go to both the administrator-definedrecipient list and any addresses manually entered in the “Required reviewers” field by theuser.
It is difficult for a Final Cut Server client user to discern if the Review and Approve featurehas been set up, and if it has been, to discern which of these three approaches yourFinal Cut Server system uses. Your Final Cut Server administrator should be your first pointof contact for questions about using the Review and Approve feature with yourFinal Cut Server system.
Note: These examples show ways for you to manually enter email addresses. Dependingon how your Final Cut Server system has been configured, your administrator can createa pop-up menu that you can use to assign email addresses. For more information, contactyour Final Cut Server administrator.
132 Chapter 9 Using Status Metadata in the Final Cut Server Workflow

Sending Review Emails to Administrator-Defined ReviewersIn this configuration, the Final Cut Server administrator manually enters each requiredreviewer’s email address during setup. As a result, the Final Cut Server user does not seethe list of required reviewers and cannot manually enter email addresses in the “Requiredreviewers” field of the Review & Approve pane.
When the email addresses have been entered manually by the administrator, emailnotifications are automatically sent whenever the Status metadata field is set to Readyfor Review (and any time the asset is modified while it is set to Ready for Review).
This configuration is best if you know that the same set of reviewers should receive Reviewand Approve email notifications for all assets. Also, this configuration does not requireyou to enter required reviewer email addresses; in fact, if you enter email addresses, theyare ignored.
To send Review and Approve email notifications to a set of defined reviewers1 Locate the asset or project that you want to send out for review in the Assets or
Productions pane, then double-click the asset or project to display its info window.
2 In the asset or project info window, click the Review & Approve button to open the Review& Approve pane.
Click to open the Review & Approve pane.
133Chapter 9 Using Status Metadata in the Final Cut Server Workflow

3 If you want to add notes to the email, you can type them in the “Editor’s comments” field.
Type comments in the “Editor’s comments” field.
When you’re ready to send the email notification, click Save Changes.
Change the Status metadata field to Ready for Review.
4 When you are ready to send the email notification to the required reviewers, change theStatus metadata field to Ready for Review.
Note: The Status metadata field is available in both the Metadata and the Review &Approve panes.
5 Click the Save Changes button at the bottom of the Review & Approve pane.
This change causes the notification email to be sent.
Note: Your Final Cut Server administrator controls who can receive email within theFinal Cut Server system. To add email addresses to Final Cut Server, contact youradministrator.
Entering Reviewer Email Addresses ManuallyFor this configuration, the Final Cut Server user must manually enter the complete emailaddress of each required reviewer.
After the email addresses have been entered, saving the changes prompts the Review &Approve email to be sent. The email is not sent unless the changes are saved.
This configuration lets the user choose who receives the email and how often reviewemails are sent. However, this configuration is less automated, requiring more work forthe user.
To manually define who receives Review and Approve email notifications1 Locate the asset or project that you want to send out for review and double-click the
asset or project to reveal its info window.
134 Chapter 9 Using Status Metadata in the Final Cut Server Workflow
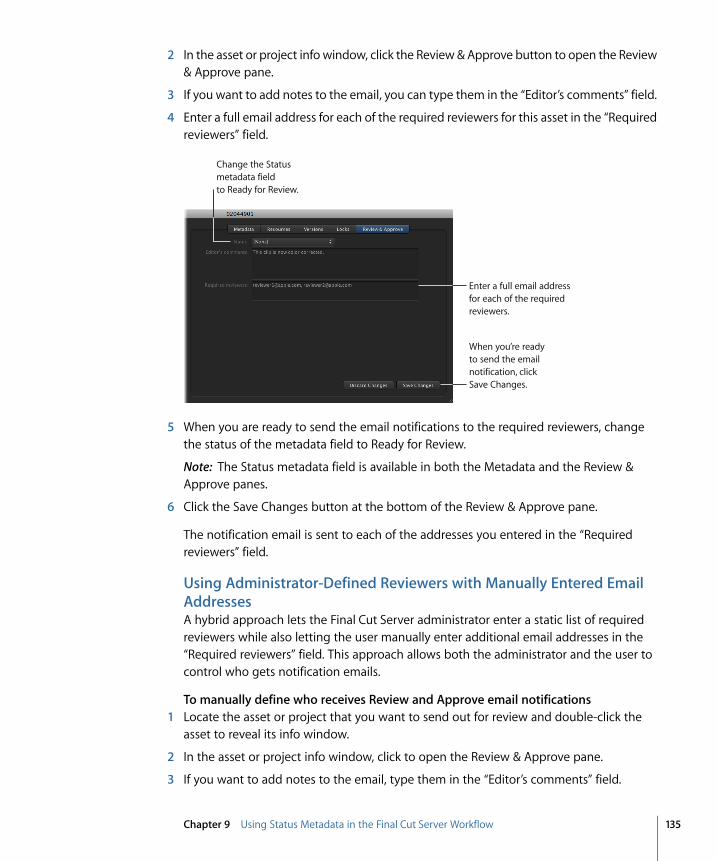
2 In the asset or project info window, click the Review & Approve button to open the Review& Approve pane.
3 If you want to add notes to the email, you can type them in the “Editor’s comments” field.
4 Enter a full email address for each of the required reviewers for this asset in the “Requiredreviewers” field.
Enter a full email address for each of the required reviewers.
When you’re ready to send the email notification, click Save Changes.
Change the Status metadata field to Ready for Review.
5 When you are ready to send the email notifications to the required reviewers, changethe status of the metadata field to Ready for Review.
Note: The Status metadata field is available in both the Metadata and the Review &Approve panes.
6 Click the Save Changes button at the bottom of the Review & Approve pane.
The notification email is sent to each of the addresses you entered in the “Requiredreviewers” field.
Using Administrator-Defined Reviewers with Manually Entered EmailAddressesA hybrid approach lets the Final Cut Server administrator enter a static list of requiredreviewers while also letting the user manually enter additional email addresses in the“Required reviewers” field. This approach allows both the administrator and the user tocontrol who gets notification emails.
To manually define who receives Review and Approve email notifications1 Locate the asset or project that you want to send out for review and double-click the
asset to reveal its info window.
2 In the asset or project info window, click to open the Review & Approve pane.
3 If you want to add notes to the email, type them in the “Editor’s comments” field.
135Chapter 9 Using Status Metadata in the Final Cut Server Workflow

4 Enter a full email address for each of the required reviewers.
The addresses that you enter are added to the list of reviewers that was set up by yourFinal Cut Server administrator.
Enter a full email address for each of the required reviewers.
Important: Remember, your Final Cut Server administrator also defined a list of reviewerswho will receive every email sent from the Review & Approve pane. Be careful not tosend duplicate emails to reviewers by manually adding their addresses in the Review &Approve pane.
5 When you are ready to send the email notifications to the required reviewers, changethe status of the metadata field to Ready for Review.
Note: The Status metadata field is available in both the Metadata and the Review &Approve panes.
6 Click the Save Changes button at the bottom of the Review & Approve pane.
The notification email is sent to each of the addresses you entered in the “Requiredreviewers” field and to each of the required reviewers that your Final Cut Serveradministrator entered as default required reviewers.
136 Chapter 9 Using Status Metadata in the Final Cut Server Workflow

This chapter covers the final steps of working with an asset: outputting a final copy andcreating backup copies of assets. It also explains how to delete assets and productionsfrom Final Cut Server.
This chapter covers the following:
• Outputting a Final Project (p. 137)
• Archiving and Restoring Media Assets (p. 140)
• Deleting Assets from Final Cut Server (p. 141)
Outputting a Final ProjectYou can use the Export command to output media and project assets. You can export toan external drive or another backup device, or you can export to your local system andthen move the files using the Finder.
If you are exporting a media asset, you can transcode the asset during export. However,transcoding Final Cut Studio project assets and bundle assets is not recommended.
How you export your final project or media asset depends on the asset type. This chapterpresents steps for exporting a Final Cut Pro project, a Final Cut Studio or other projectasset and its linked media assets, a single media file, and a bundle asset.
Important: After you export an asset from Final Cut Server, the asset is no longer trackedby Final Cut Server.
Exporting a Media AssetExporting an individual media asset is simple.
To export an individual media asset1 Control-click the asset, then choose Export from the shortcut menu.
The Export window appears.
137
Exporting, Archiving, and DeletingCompleted Assets and Projects 10

2 In the Export window, choose a destination to save the media asset to by clicking theChoose button and identifying a location in the file browser.
Click the Choose button to change the export
location.
If desired, choosea transcode setting.
Click Export.
3 If desired, choose a transcode setting.
4 Click the Export button.
The media asset is exported to the location you specified in the Export window.
Exporting an Image SequenceWhen you export an image sequence asset, the folder and the images inside it are exportedto the location you specify.
To export an image sequence asset1 Control-click the bundle asset, then choose Export from the shortcut menu.
The Export window appears.
2 In the Export window, choose a destination to save the bundle to by clicking the Choosebutton and identifying a location in the file browser.
Note: If you want to create a QuickTime movie or other video file from the image sequence,choose a transcode setting in the export window. To keep the original file format, do nottranscode the image asset sequence during export.
3 Click the Export button.
A folder containing the image sequence files is exported to the location you specified inthe Export window.
Exporting a Final Cut Pro Project and Its Linked Media AssetsYou can export a Final Cut Pro project asset and all its linked media assets in one process.
To export a copy of a Final Cut Pro project and its linked media assets1 Control-click the asset, then choose Export from the shortcut menu.
The Export Final Cut Pro window appears.
2 In the Export Final Cut Pro window, choose a location to save the exported Final Cut Proproject file and its linked media files to by clicking the Choose button and identifying alocation in the file browser.
138 Chapter 10 Exporting, Archiving, and Deleting Completed Assets and Projects

3 Do one of the following:
• If the Edit Proxy feature has not been turned on: Original media will be used by default.
• If the Edit Proxy feature has been turned on: Choose Original Media or Edit Proxy fromthe Use pop-up menu. This defines the media type that will be exported.
4 Select the Keep Media with Project checkbox to include the media files in the export.
Important: If you don’t select the Keep Media with Project checkbox, only the Final Cut Proproject asset is exported.
5 Click the Export button.
A copy of the project is exported to the location you specified in the Export Final Cut Prowindow.
Note: After export, the project and media files are no longer tracked by Final Cut Server.
Exporting a Final Cut Studio Bundle AssetWhen you upload a Final Cut Studio project file and its media files, you upload either abundle asset that contains the project file and media files, or the project file and each ofits media files as independent assets. If you upload the project file and its media files asa bundle asset, you can export the bundle asset in three simple steps.
To export a bundle asset1 Control-click the bundle asset, then choose Export from the shortcut menu.
The Export window appears.
2 In the Export window, choose a destination to save the bundle to by clicking the Choosebutton and identifying a location in the file browser.
3 Click the Export button.
The folder that the bundle asset contains is exported to the location you specified in theExport window.
Exporting a Final Cut Studio Project and Individual Media AssetsIf you upload a Final Cut Studio project asset and media assets as individual assets, youneed to export the project asset, then export all of the media assets.
To export a copy of a Final Cut Studio project asset and its linked media assets1 Select the Final Cut Studio project asset and all of the project’s linked media.
Note: Switching to List view in the Productions pane can make it easier to Shift-click alist of media assets.
2 Control-click one of the selected assets, then choose Export from the shortcut menu.
The Multiple Export window appears.
139Chapter 10 Exporting, Archiving, and Deleting Completed Assets and Projects

3 In the Multiple Export window, choose a destination to save the media files to by clickingthe Choose button and identifying a location in the file browser.
Note: To avoid losing track of exported projects, you can create a folder for the projectand its media on the desktop or in another convenient location.
4 Do not choose a transcode setting.
5 Click the Start button.
Each of the selected media files is exported to the location you specified in the MultipleExport window.
Archiving and Restoring Media AssetsYou can move the primary representation of a media asset to the archive device that wasset up by your Final Cut Server administrator. Because only the primary representation ismoved, the asset stays in the Final Cut Server catalog so you can still locate the asset andsearch its metadata. The primary representation file, however, is safely archived andcannot be downloaded or modified.
If you attempt to archive a media asset that is being used by a project asset, a dialogappears, asking you if you want to continue the archive process. If you choose to continue,the media asset will not be available for the project.
If you have questions about archiving, contact your Final Cut Server administrator.
To archive an assetµ Control-click the media asset, then choose “Archive to” and an archive device from the
shortcut menu.
The media asset is archived, and the archive icon appears on its thumbnail.
To restore a media asset and move the asset’s primary representation off the archivedevice
µ Control-click the archived asset, then choose Restore from the shortcut menu.
The archive icon disappears, indicating that the media asset’s primary representation hasbeen moved off the archive device. The media asset is available for use.
140 Chapter 10 Exporting, Archiving, and Deleting Completed Assets and Projects

Deleting Assets from Final Cut ServerWhen you delete an asset from Final Cut Server, you delete the asset’s primaryrepresentation file, the proxy files that were created for the asset, and all the metadataassociated with the asset. Because a single asset can be linked to one or more Final Cut Proor other project assets, deleting assets should be approached with caution. You shouldonly delete assets from Final Cut Server if you are certain that the asset will not be needed.
You can view what project or media assets an asset is related to in the Resources paneof the asset info window.
Other assets that use the asset are listed in the Instances list.
Deleting a media or bundle asset and deleting a Final Cut Pro project asset are describedin the steps below.
To delete a media asset or a bundle asset from the Final Cut Server catalog1 Control-click the media asset or bundle asset, then choose Delete from the shortcut menu.
2 In the dialog that appears, click Delete.
The asset is deleted from the Final Cut Server catalog.
To delete a Final Cut Pro project asset from the Final Cut Server catalog1 Control-click the asset, then choose Delete from the shortcut menu.
A dialog appears, informing you of which assets and files will be deleted.
2 Read through this message and confirm that you want to delete all of the assets and fileslinked with the Final Cut Pro project asset.
3 When you are ready to delete the asset and all of its linked media, click Delete.
The Final Cut Pro asset and all of its linked assets are deleted from the Final Cut Servercatalog.
141Chapter 10 Exporting, Archiving, and Deleting Completed Assets and Projects


This appendix provides information to help you solve problems you may encounter whileusing Final Cut Server.
This appendix covers the following:
• Resources for Solving Problems (p. 143)
• Contacting AppleCare Support (p. 143)
Resources for Solving ProblemsIf you run into problems while working with Final Cut Server, there are several resourcesyou can use to find a solution.
• Release Notes: The Release Notes document, available from the Final Cut Server Helpmenu, provides up-to-date information that didn’t make it into the manual. Be sure toconsult this document as soon as you install or upgrade Final Cut Server.
• AppleCare Knowledge Base: AppleCare Support maintains a database of common supportissues that is updated and expanded to include new issues as they arise. This is anexcellent, free resource for Final Cut Server users. To access the AppleCare KnowledgeBase, go to the AppleCare support page at http://www.apple.com/support.
• AppleCare Support: There are a variety of support options available to Final Cut Servercustomers. For details, see the service and support information that came withFinal Cut Server.
Contacting AppleCare SupportInformation about the support options available from Apple is included in yourFinal Cut Server box. Several levels of support are available. Whatever your issue, it’s agood idea to have the following information immediately available when you contactApple for support. The more of this information you have to give to the support agents,the faster they will be able to address your issue.
• The Final Cut Server Support ID number found on the back of the Final Cut ServerSetup Guide.
143
Solving Problems
App
endi
x

Note: The 11-digit Support ID number is different from the product serial number usedto install Final Cut Server.
• The version of Mac OS X you have installed. To find the version, choose Apple menu >About This Mac.
• The version of Final Cut Server you have installed that you have a question about. Tofind the version of Final Cut Server on your computer, choose Final Cut Server > AboutFinal Cut Server.
• The model of computer you are using.
• The amount of RAM installed in your computer. You can determine this by choosingApple menu > About This Mac.
• What other third-party hardware is connected to or installed in the computer, and whothe manufacturers are. Include hard drives, graphics cards, and so on.
To access AppleCare Support for Final Cut Server, go tohttp://www.apple.com/support/finalcutserver.
There is also an item in each Final Cut Server client’s Help menu that will take you directlyto the AppleCare website.
To go to the AppleCare website from within a Final Cut Server clientµ Choose Help > Final Cut Server Support.
144 Appendix Solving Problems

alias file An alias file is a small reference file that links to the master or original file.Final Cut Server uses aliases to represent assets in productions and creates aliases whenpreparing assets for disconnected use.
archive After a project or production is finished, you can use the archive feature to movethe assets from their current device to an archive device, which can be a FireWire drive,a large slower drive, or another volume where disk space is not an issue. The assets remainin the Final Cut Server catalog in an inactive state. They can be restored whenever theyare needed later.
asset Final Cut Server creates an asset for every uploaded media or project file. An assetcontains the primary representation file (the file that was uploaded), and can contain oneor more proxy files.
automation Final Cut Server supports a wide variety of automation features, making itpossible to configure Final Cut Server to automatically perform many tasks.
bundle asset In Final Cut Server, you can upload a folder of files as a bundle asset. Thebundle asset contains all of the files in the folder, and the files cannot be accessed fromwithin Final Cut Server. Bundle assets are used to track Soundtrack Pro, Motion, andDVD Studio Pro project assets and their linked media files.
cache To use an asset from the Final Cut Server catalog on a client’s computer, thecomputer must have a local copy of the asset. Final Cut Server maintains a cache area onthe client computer to store the local copies of the assets. You can define the locationand size of the cache in the client’s Preferences window.
catalog The catalog is the collection of assets that are managed by Final Cut Server.
client The user interacts with the Final Cut Server catalog by using a Final Cut Serverclient. Final Cut Server clients are Java-based applications that can run on computersusing Mac OS X, Windows XP, and Windows Vista operating systems.
Clip Proxy At upload, Final Cut Server automatically creates a lower resolution Clip Proxyfile for video assets. The Clip Proxy is used in place of the actual video file when viewingthe asset in Final Cut Server. See also proxy.
145
Glossary
Glo
ssar
y

device Devices are storage locations. They can be folders in a local volume on the servercomputer, network volumes, or folders from an Xsan volume.
edit-in-place Generally, in order to use an asset from the Final Cut Server catalog on aclient’s computer, the computer must have a local copy of the asset. An exception is ifthe device that contains the asset is configured as an edit-in-place device and the clientcomputer has it mounted as a volume. The most common example of this is an Xsansystem because they support a high enough data bandwidth for video data to betransferred in real time. See also Xsan.
Edit Proxy At upload, an Edit Proxy file can be created for video files that are uploadedto Final Cut Server as part of a Final Cut Pro project. Edit Proxy files are intended to beused when checking out a Final Cut Pro project. Note that Edit Proxy files are not createdautomatically; the Final Cut Server administrator must turn on the Edit Proxy feature togenerate Edit Proxy files. See also proxy.
elements Final Cut Pro project assets contain a list of media assets that are linked to theFinal Cut Pro project file. Final Cut Pro project elements can include media files andFinal Cut Pro sequences.
image sequence A movie exported as a series of numbered image files, stored in a folder.Each image file contains one frame of video. When you import a folder of numberedimage files into Final Cut Server, you have the option to save them as an image sequenceasset.
jobs Any action that Final Cut Server performs on an asset is a job. These actions caninclude uploading, downloading, copying, and transcoding an asset.
managed file When you check out an asset, Final Cut Server creates a managed copy ofthe file. The managed file can be edited and checked back in to update the original asset.See also unmanaged file.
metadata Metadata is information about a file. In Final Cut Server, metadata is used todescribe the asset’s primary representation file and to describe the asset itself.
metadata set Final Cut Server organizes metadata into metadata sets. Metadata setscontain groups of metadata; metadata groups contain metadata fields.
Poster frame A Poster frame is a JPEG proxy file generated from a media asset’s primaryrepresentation file at upload. See also proxy.
prepared media In Final Cut Server, you can prepare media files to be used later in a newFinal Cut Pro project. When you select one or more media files and choose Prepare forDisconnected Use, alias copies of the files in the cache are created in the location youchoose. Later, when your computer is disconnected from Final Cut Server, you can usethe prepared media files to create a new Final Cut Pro project.
146 Glossary

primary representation This is the original media file that was uploaded toFinal Cut Server.
production To help organize the assets in your Final Cut Server catalog, you can createproductions. Productions can be nested within each other to create production hierarchies,and productions can contain asset aliases.
project Many of the applications in Final Cut Studio use project files, which use one ormore linked media files to create a project. Final Cut Server tracks project files with projectassets.
proxy Still images and video files can be very large and difficult to work with.Final Cut Server automatically creates proxy files during the analyze process when youadd assets to its catalog. These proxy files can be used in place of the actual files forediting and review purposes. See also Clip Proxy, Edit Proxy, Poster frame, Thumbnail.
Thumbnail In the Final Cut Server main window, you can view the assets or productionsin List or Thumbnails view. In Thumbnails view, each asset is represented with a thumbnailimage. This image comes from the asset’s Thumbnail proxy file (a JPEG proxy file that isgenerated from a media asset’s primary representation file at upload). See also proxy.
transcode Transcoding converts a media asset from one codec to another. Final Cut Serveruses video and audio codecs supplied by Compressor. See also transcode settings.
transcode settings Final Cut Server uses transcode settings to convert a media assetfrom its current codec to a different one. Most often you use transcode settings to convertan asset into one that is smaller or easier to play. The transcode settings for video andaudio assets are from Compressor (which is installed on the server computer). Thetranscode settings for images are internal to Final Cut Server.
unmanaged file When you copy or export a file, Final Cut Server creates an unmanagedcopy of the file. The unmanaged file cannot be edited and checked back in to updatethe original asset. If you want to track an unmanaged file in Final Cut Server, you mustupload it and create a new asset. See also managed file.
version Final Cut Server can be configured to retain previous versions of selected assets,making it possible to restore an earlier version if needed. If you check out an asset fromthe Final Cut Server catalog, make a change to it, and check it back in, Final Cut Serverfirst copies the current version to the version device and then copies the new version towhere the current version was.
Xsan An Apple Xsan storage area network (SAN) is a device that provides fast access tomedia files. Xsan devices support edit-in-place when you are connected using a FibreChannel network. See also edit-in-place.
147Glossary
