final cut pro x workshop instructor: john...
TRANSCRIPT

Final Cut Pro X WorkshopInstructor: John Aden
Class Objectives:
● Learn good file management skills● Increase familiarity with the interface● Learn the basics of editing with Final Cut Pro X
Final Cut Pro X and Denver Open Media 1. A quick comparison of Final Cut Pro 7 to Final Cut Pro X.
2. Again, the primary focus of this curriculum is to ensure that you assemble your projects correctly, that you understand the interface of FCP, and that you understand where all your files are saved so that you never lose your work. The more advanced and aesthetic aspects of editing are best to learn on your own or in our advanced editing class. 3. If you decide to purchase an Equipment Access Membership at DOM (and you are certified in Final Cut Pro), you will receive your own personal partition (100 GB) on our server to store your projects. An Equipment Access Membership costs $250 for an entire year, and will grant you access to the editing lab, post-production software (including the complete Final Cut and Adobe Creative Suite), and the ability to upload your finalized projects to both the television stations and website.
Getting Started
Interface Overview
There are three main windows in FCPX:
Event Browser: This contains your Event Library, through which you will organize and access all the source media you import. The Event Library contains Events (which you can think of as folders, or bins for FCP legacy users), and the Event Browser will display the clips for the Event
1
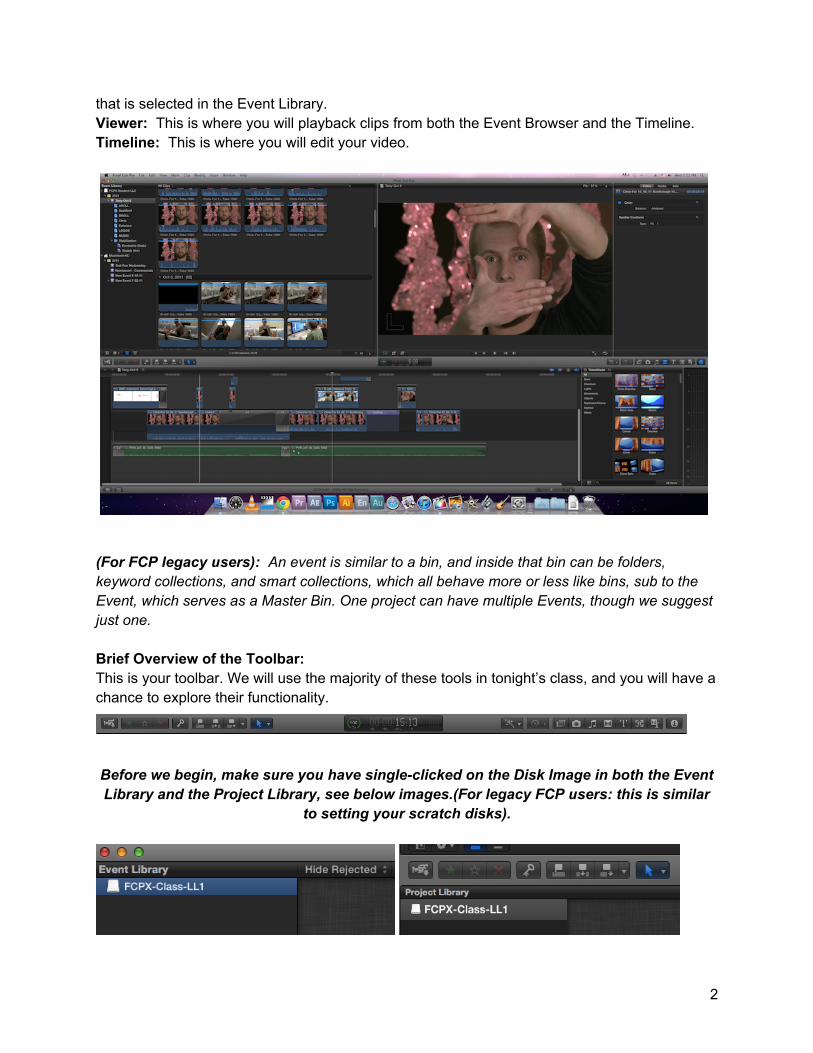
that is selected in the Event Library.Viewer: This is where you will playback clips from both the Event Browser and the Timeline.Timeline: This is where you will edit your video.
(For FCP legacy users): An event is similar to a bin, and inside that bin can be folders, keyword collections, and smart collections, which all behave more or less like bins, sub to the Event, which serves as a Master Bin. One project can have multiple Events, though we suggest just one.
Brief Overview of the Toolbar:This is your toolbar. We will use the majority of these tools in tonight’s class, and you will have a chance to explore their functionality.
Before we begin, make sure you have single-clicked on the Disk Image in both the Event Library and the Project Library, see below images.(For legacy FCP users: this is similar
to setting your scratch disks).
2

BLUE is an important color in FCPX - it indicates something is activated/selected.
STEP 1: GETTING FINAL CUT PRO X READY FOR A PROJECT
Create a New Library (stores INGREDIENTS and RECIPES)Library is where Events and Projects are stored.
Create a New Event (INGREDIENTS)Our first step in editing is creating a new Event. An event should be thought of like a collection of media. Create a new Event in the Event Library
1. If you don’t see the Event Library, click the Event Library button at the bottom-left corner of the Event Browser.
2. In the Event Library, you will see any mounted drives recognized by FCPX, including your internal Macintosh Hard Drive and any external or networked drives (Note: Drives must be formatted as MAC OS in order to be recognized by the system).
3. It is important to know where all of your files live and on which hard drive, and it is always best to store all media files for a project in a single location so that it is easy to move the all files required for a project when necessary. So your first step is to select the drive where you want your Event (and thus, all your media files) to be located. If you select Macintosh HD, the Event will be stored in the “Movies” folder of your user account. If you select any other drive, the Event will be stored in a new “Final Cut Events” folder, which FCPx will create as a top-level folder in that drive. AGAIN, MAKE SURE YOU HAVE SELECTED YOUR DISK IMAGE.
4. Select the destination drive (THIS IS YOUR DISK IMAGE) in your Event Library by single clicking on it, then choose “File > New Event” (or press Option-N).
5. A new Event appears in the Event Library.
6. Type a name for the Event and include the word “Event” after the name (you will use this name for your project name as well, i.e. Westword Event will be the Event name and Westword Project will be the Project name) and press Return.
Create a New Project (RECIPE)
3

Next we also need to create a project, which provides a record of your editing decisions and the media you use. (Similar to a ‘sequence; for legacy FCP users) Then you add clips to the project Timeline and edit them.AGAIN, MAKE SURE YOU HAVE SELECTED YOUR DISK IMAGE.
1. In Final Cut Pro, choose File > New Project (or press Command-N).2. Make sure the Project Library is open, and click the New Project button.
3. In the window that appears, type the name for the project in the Name field (i.e FCPX-Class-LL1).
4. Choose the corresponding Event for the project - (i.e. FCPX-Class-LL1)5. If you drag any media files from the Finder directly to the project’s Timeline, or add
media to the project from one of the media browsers, that media is automatically added to the project’s default Event.
6. If you want to make any changes to the project’s video or audio properties, select Custom and use the pop-up menus.
7. Unless you have a specific requirement for the project you’re creating, it’s best to leave “Set automatically based on first video clip” selected.
1. Default Event○ Default Event: When you create a project, you assign the project a default Event to
hold media that is dragged directly into the project’s Timeline from the Final Cut Pro media browsers or the Finder.
2. Video Properties○ Format: A specific method of encoding the video.○ Resolution: Determines the frame size of the video.○ Rate: Determines frames per second (fps).
You should know what settings you used to capture the footage but if you do not, open a clip in Quicktime and hit Command+I to get the information you’ll need for setting up the Video Properties.
4

8.
Click OK.
9.
The new project appears in the Project Library with the name you
gave it in Step 210. Double click anywhere on the blue highlighed project to load it.
At the bottom left of your Timeline window you will see 3 buttons. The Reel button reveals and hides your Project Library. The Plus icon adds a project to the Project Library. The Folder + icon allows you to add folders to your Project Library, with which you can organize projects.
Open the Finder on your computer to see how the Events and Projects folders and files are organized by FCPX.
STEP 2: BRING ALL YOUR MEDIA INTO FINAL CUT PRO X
Importing Your Media: Importing your media into Final Cut Pro is the first step towards editing your video. The first time you open FCPX, you will not have any media associated with your
project, so you will need to bring media in, or import media.Buttons appear in the Event Browser to help you quickly import from: a file-based (tapeless) camera/device, Apple devices (iPhones, iPads, etc), tape-based device, iMovie, iPhoto, hard disk, or camera archive. Each has a different workflow. In this course, we will cover importing from hard disks.
To import media files from a hard disk: You can import media—video, audio, still images, and graphics files—from your computer’s hard disk, a connected external storage device, a memory card inserted in your computer’s card slot or a card reader, or a network attached volume. In this class we will import media using the Import Files window.
5

1. In FCPX, select, File>Import>Media2. Select a file or folder, or Command-click to select multiple files to import.3. Make sure the your Event you just created is selected as the destination event.4. Click Import Selected...
5. Once you click Import Selected...you will see the dialog box below.
6
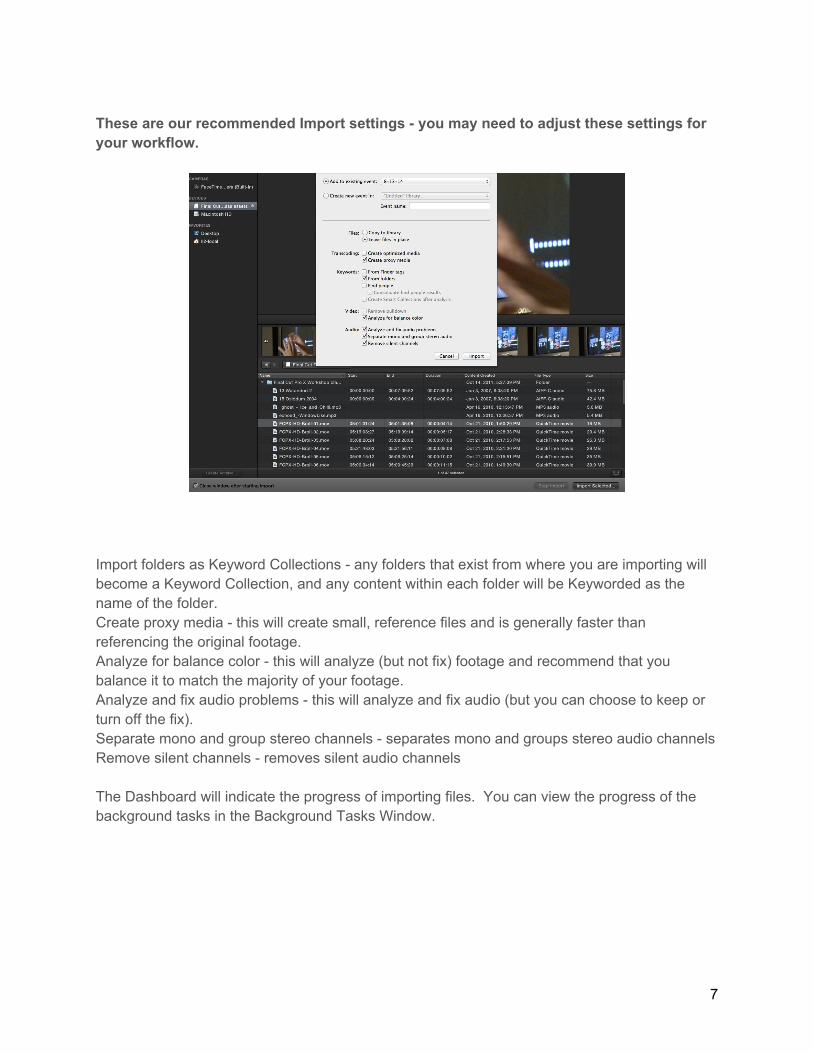
These are our recommended Import settings - you may need to adjust these settings for your workflow.
Import folders as Keyword Collections - any folders that exist from where you are importing will become a Keyword Collection, and any content within each folder will be Keyworded as the name of the folder.Create proxy media - this will create small, reference files and is generally faster than referencing the original footage.Analyze for balance color - this will analyze (but not fix) footage and recommend that you balance it to match the majority of your footage.Analyze and fix audio problems - this will analyze and fix audio (but you can choose to keep or turn off the fix).Separate mono and group stereo channels - separates mono and groups stereo audio channelsRemove silent channels - removes silent audio channels
The Dashboard will indicate the progress of importing files. You can view the progress of the background tasks in the Background Tasks Window.
7

Analyzing your Media You can have Final Cut Pro analyze your media and automatically correct common problems it may find in your video, still images, and audio (as we have done for this class, in the import dialog above). For example, you can analyze your media to stabilize shaky video, to balance color, and to remove excess hum or loudness. This will have an impact on FCPX’s performance since it will be performing more tasks in the background.
NOTE: You can set these same options, as default for FCPX, through Final Cut Pro>Preferences>Import. There is also an Editing and a Playback button here. For this class, we will leave Editing and Playback at their defaults - you may choose to make changes to specific settings, as needed.
File Organization:As with previous versions of FCP, it is still paramount that you understand where all your files live. By default, FCPX is designed to collect everything in your Final Cut Projects and Final Cut Events folders. As with earlier versions, you also have the option to manage your media files elsewhere (on an external hard-drive or networked drive, for example) if you wish - this is dictated by what you have selected in the Event Library and Project Library.
-When editing at DOM: Currently, the workflow at DOM is the same as the workflow you are learning in this course. Please refer to this curriculum.
-When working at home or with an external drive: You can either choose store all your assets (media, audio, stills, etc) and project file(s) on an external drive OR on your local hard drive ( generally Macintosh HD on Mac computers). However, if you are using an external drive, it needs to be formatted to MAC OS in order for you to use it with FCPX. This means that if the drive is formatted to MS-DOS (FAT), FCPX will not recognize the drive.
Before we start editing we will review how to playback, organize and keyword your footage. Having your media assets well organized and keyworded will make the edit process much smoother.
STEP 3: LEARN YOUR TWO BASIC NAVIGATION TOOLS
Playback and Skim MediaYou use two tools to preview and playback media in Final Cut Pro, whether it’s in the Event Browser, Event Library, or Timeline:
● The playhead marks your project’s current position in the Timeline or the Event Browser. You can move the playhead by dragging it or clicking another area of the Timeline or Event Browser. You use the playhead to scrub, or play back from its current position.
● The playhead appears as a gray vertical line that is fixed in place unless you move it or click elsewhere.
8

● The skimmer lets you preview clips in the Timeline, Event Browser, or Project Library, without affecting the playhead position. You use the skimmer to skim, or freely move over clips to play back at the position and speed of the pointer.
● SNAPPING: The skimmer appears as a pink vertical line as you move the pointer over the area you’re skimming. If you have snapping turned on, the skimmer turns orange when it snaps to a position. To toggle snapping on and off, press the N key.
When skimming is turned on (see image to the bottom left on how to turn skimmer on and off), you can skim to see what’s in other clips, but still keep your playhead position in the Timeline. If both the playhead and skimmer are present in the same clip, the skimmer becomes the default position for playback or editing. When skimming is turned off or the skimmer is not present in a clip, the playhead assumes the default position.
Use the J, K, and L keys for playback
●
To begin forward playback at normal (1x) speed: Press L.
●
To begin reverse playback at normal (1x) speed: Press J.
●
To pause playback: Press K.
●
To double the current playback speed: Press L or J twice.
●
To immediately reverse the playback direction: Press J to play in reverse, or press L to play forward.
● To move the playhead one frame at a time: Hold down the K key, and press J or L. Another way is to use the left and right arrows.
I = set In pointO = set Out pointHome = go to the beginning of timelineEnd = go to the end of the timelineRight and left arrows = advance or go back by one frame at a timeUp and down arrows = go to previous or next cut in timeline
Adjusting window sizes on layout
● Use mouse to size windows (Event Library, Viewer, Timeline) - arrow will turn to double-line/double-arrow icon when you are ready to resize windows
● To revert back to the original layout, select Revert to Original Layout in the Window menu.
9

You can adjust the view of the assets in your Event Browser by using the slider with magnifying glass at the bottom right of the Event Browser.
STEP 4: ORGANIZE YOUR FOOTAGE
Organizing Your Media When you import video, audio, and still images, or record directly into Final Cut Pro, the source media files (your raw footage) appear as clips in one or more Events in the Event Library.
When you select an Event in the Event Library, the media it contains appears as clips in the Event Browser. You select clips or portions of clips in the Event Browser to work with them. You can sort clips in the Event Browser by creation date, as well as by date imported, reel, scene, clip duration, and file type.
Selecting Clips:1. To select clips that are adjacent = click on the first clip, then hold down SHIFT and click on the last clip you’d like to select.2. To select individual clips = click on the first clip, then hold down COMMAND to select additional clips.
KeywordsIt’s important to understand the way that Keywords are used in FCPX (and how it differs from previous versions of FCP). In FCPX Keywords will help you quickly locate the clips you need to create your video. Keywords are added when the Import folders into Keyword Collection is checked in the Import dialog, when footage is analyzed by FCPX, when you manually add keywords, and when you mark either Favorite (F) or Rejected (Delete). Keywords can be applied to entire clips, sections of clips, or multiple clips. You can add one or more keywords in two ways - 1. Using the Keyword Editor, or 2. Using keyboard shortcuts. When Keywords are added FCPX automatically creates a Keyword Collection in the Event.
Organizing within Smart Collections:Organizing within an event is done by keywording, collections and Smart collections. You might end up with a clip or parts of a clip appearing in multiple places since more than one keyword
10
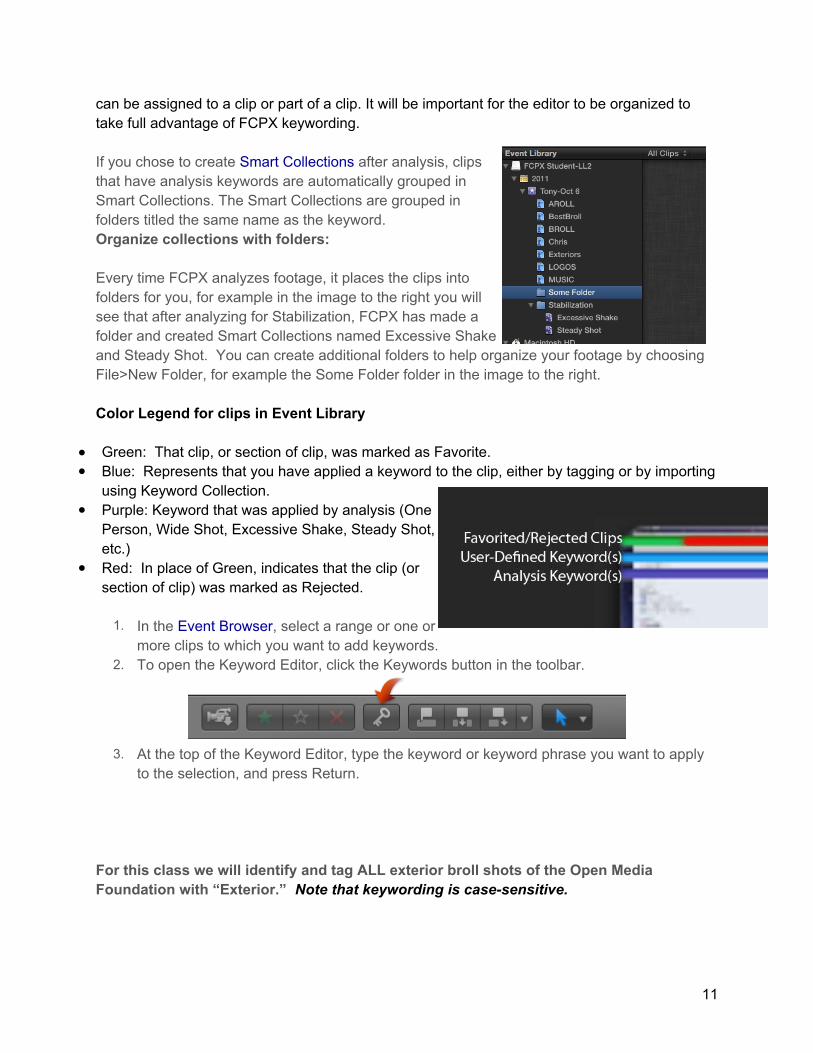
can be assigned to a clip or part of a clip. It will be important for the editor to be organized to take full advantage of FCPX keywording.
If you chose to create Smart Collections after analysis, clips that have analysis keywords are automatically grouped in Smart Collections. The Smart Collections are grouped in folders titled the same name as the keyword.Organize collections with folders:
Every time FCPX analyzes footage, it places the clips into folders for you, for example in the image to the right you will see that after analyzing for Stabilization, FCPX has made a folder and created Smart Collections named Excessive Shake and Steady Shot. You can create additional folders to help organize your footage by choosing File>New Folder, for example the Some Folder folder in the image to the right.
Color Legend for clips in Event Library
● Green: That clip, or section of clip, was marked as Favorite.● Blue: Represents that you have applied a keyword to the clip, either by tagging or by importing
using Keyword Collection.● Purple: Keyword that was applied by analysis (One
Person, Wide Shot, Excessive Shake, Steady Shot, etc.)
● Red: In place of Green, indicates that the clip (or section of clip) was marked as Rejected.
1. In the Event Browser, select a range or one or more clips to which you want to add keywords.
2. To open the Keyword Editor, click the Keywords button in the toolbar.
3. At the top of the Keyword Editor, type the keyword or keyword phrase you want to apply to the selection, and press Return.
For this class we will identify and tag ALL exterior broll shots of the Open Media Foundation with “Exterior.” Note that keywording is case-sensitive.
11
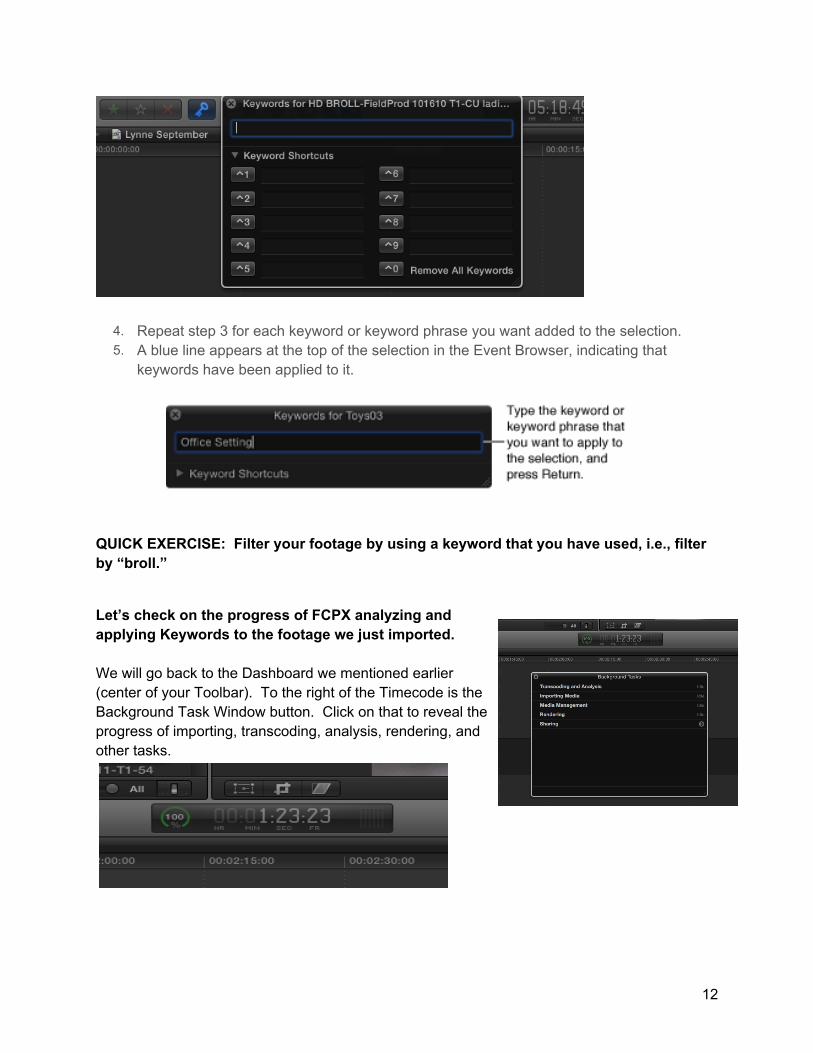
4. Repeat step 3 for each keyword or keyword phrase you want added to the selection.5. A blue line appears at the top of the selection in the Event Browser, indicating that
keywords have been applied to it.
QUICK EXERCISE: Filter your footage by using a keyword that you have used, i.e., filter by “broll.”
Let’s check on the progress of FCPX analyzing and applying Keywords to the footage we just imported.
We will go back to the Dashboard we mentioned earlier (center of your Toolbar). To the right of the Timecode is the Background Task Window button. Click on that to reveal the progress of importing, transcoding, analysis, rendering, and other tasks.
12

Note that you can also turn on and off the Audio Meters by clicking to the right of the Timecode.
STEP 5: SELECTING AROLL
Editing your ProjectJust like in the video, our goal in this class will be to take a few interview clips, trim them down to the most essential, concise portions possible, and then add some interesting b-roll to illustrate the topic being discussed and cover jump cuts or problematic edit areas.
Well-edited projects:● are trimmed clearly and concisely ● contain a good amount of b-roll (when appropriate)● only use solid speaking points. ● contain titles & lower thirds● contain soundtrack to match the piece/energy● contain text (when appropriate)
Note that Final Cut Pro X, unlike earlier versions, only autosaves, which means that there is no need for the editor to save, since the app will do this for you.
We’ll start with AROLL footage. Take a minute and review the footage in the AROLL Event. Choose which clips you would like to include in your edit and mark them FAVORITE. Then select and drag the first clip to the Storyline - the dark, middle section of the Timeline. Then drag supporting clips to the storyline, keeping all clips on the main storyline.
Ways to get the clip from the Event to the Storyline.● Drag and drop: select and drag and drop the clip the the storyline.● Use toolbar buttons:
○ Connect (We’ll use this during the BROLL footage addition): This will connect the clip to any clip that is on the main storyline.
○ Insert: This will insert the clip you have selected in your Event Library to the main storyline
○ Append: This will append the clip to the end of all the clips on the storyline○ Replace: This will replace the clip in the Timeline with the clip you are bring in
13
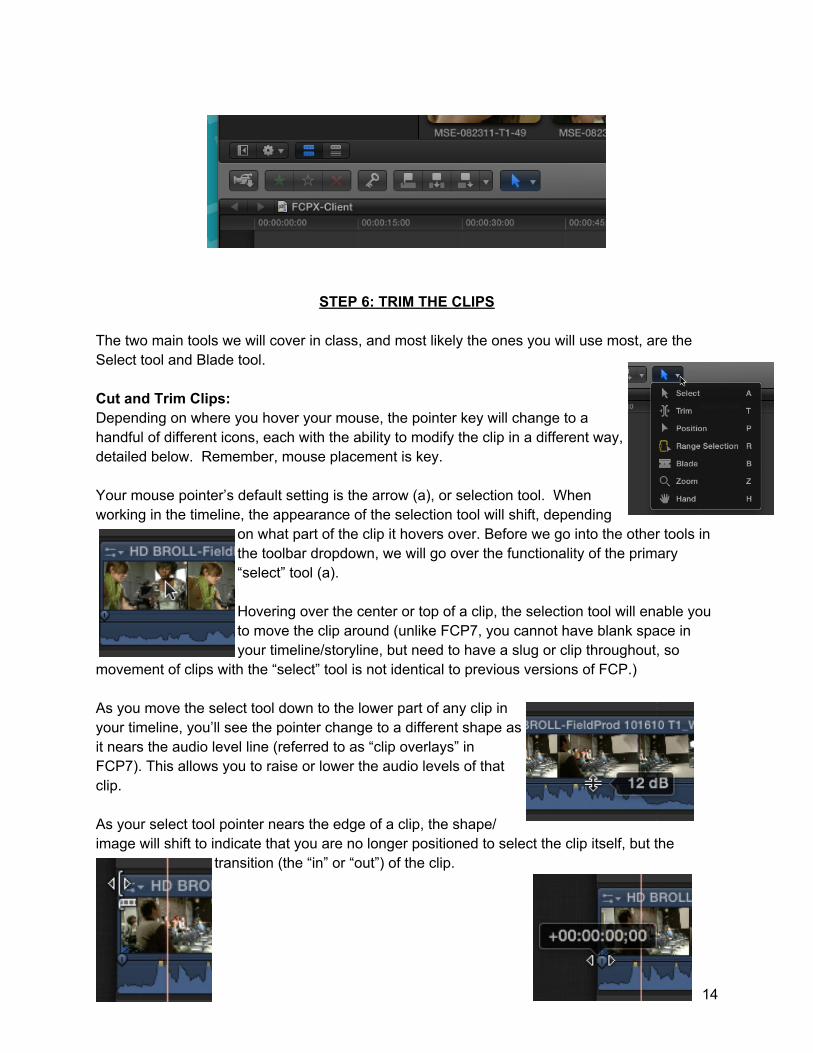
STEP 6: TRIM THE CLIPS
The two main tools we will cover in class, and most likely the ones you will use most, are the Select tool and Blade tool.
Cut and Trim Clips:Depending on where you hover your mouse, the pointer key will change to a handful of different icons, each with the ability to modify the clip in a different way, detailed below. Remember, mouse placement is key.
Your mouse pointer’s default setting is the arrow (a), or selection tool. When working in the timeline, the appearance of the selection tool will shift, depending
on what part of the clip it hovers over. Before we go into the other tools in the toolbar dropdown, we will go over the functionality of the primary “select” tool (a).
Hovering over the center or top of a clip, the selection tool will enable you to move the clip around (unlike FCP7, you cannot have blank space in your timeline/storyline, but need to have a slug or clip throughout, so
movement of clips with the “select” tool is not identical to previous versions of FCP.)
As you move the select tool down to the lower part of any clip in your timeline, you’ll see the pointer change to a different shape as it nears the audio level line (referred to as “clip overlays” in FCP7). This allows you to raise or lower the audio levels of that clip.
As your select tool pointer nears the edge of a clip, the shape/image will shift to indicate that you are no longer positioned to select the clip itself, but the
transition (the “in” or “out”) of the clip.
14

Moving your selection tool down along the edge of the clip, you will once again see a change as it nears the “audio keyframe” that marks the
beginning of the audio. This allows you to fade audio in or out without adding a transition.
Modifying the length of a clip:
To modify the length of a clip, hover either at the end of the clip, or at an edit point between two clips.
Now you can drag the edge of the clip left or right to modify the length. If you want to modify the length of a clip that is next to another clip, make sure that the flim strip icon is pointing in the direction towards the clip that you want to modify.
Once you begin to drag on the edge of that clip, you are not only modifying the length of that clip, but FCPX is also dragging the attached clip along with your newly modified clip. You have not changed the duration of the attached clip.
Other Keyboard Shortcuts:
Option+W = Insert GapShift+Z = Bring everything on the timeline into view.Cmd and +/- = Zoom in and outCmd+Z = Undo
Blade: (shortcut is ‘B’)Use the blade tool (same as it was in FCP7) to cut a clip on your storyline. This is useful if you want to cut a clip and insert another clip, or cut a clip and delete one piece or the other.
Insert Gap: You will notice that as you added your aroll clips FCPX has put them all adjacent to each other on the storyline - so there are no gaps in between the clips. Pacing is important in any video and we will now build in a little breathing room between the aroll clips. We will do this by inserting gaps (for legacy FCP users, these are like slugs).
1. Place your playhead (or if you have skimming on, the skimmer. NOTE: If you have skimming on the gap will be placed where the skimmer is located on the Timeline) where you would like the gap to be inserted.
2. Click Option+W to insert the gap. You can also go to Edit>Insert Gap.3. You can now control the duration of the gap as if it were a clip of content.4. You can also create a gap by selecting a clip and pressing the small delete key (the one
next to the home and end keys. Pressing the big delete key (the on the same row as the numbers) will remove the gap.
15

Before (NO GAP) After (GAP INSERTED BETWEEN TWO CLIPS)
You can adjust the appearance of clips in your timeline by clicking on the lightswitch icon in the bottom right of the Timeline. Some of the appearance options will allow you to see the waveforms of the audio for the clips.
STEP 7: ADD SOME BROLL
Now that we have our AROLL on the storyline, and trimmed to where we want it, let’s add some BROLL footage. You’ll use the same techniques we just used for AROLL, but we will be CONNECTING the BROLL to the AROLL, which is on the main Storyline. (In previous versions of FCP, there were tracks. This is not the case in FCPX, instead there are storylines--primarily a main storyline, and connected clips.) You connect clips by either dragging and dropping above the existing AROLL or selecting a clip in the Event Browser and hitting the Connect button (see below) or the letter Q.
Instructor: Review Timeline, point out and explain Jump Cuts.
Now, let’s review our footage in the BROLL Event. Make selections and tag them as favorites, and then you can add them to the the Timeline, covering all jump cuts.
NOTE: Deleting a clip that has a broll clip attached to it will also delete the broll clip.
16

STEP 8: ADD SOME MUSIC (15 MIN)WATCH INSTRUCTOR, THEN YOUR TURN.
You’ve already imported a folder with several soundtrack choices, which is an Event called “Music”. Review your soundtrack options and using the drag and drop method place your top two choices in the timeline one after the other.
To adjust the volume levels of an audio clip:
● Drag the volume control (the horizontal line across the audio waveform) up or down.● As you drag, the level reading in dB appears, and the waveform changes shape to
reflect your adjustments.
Now let’s insert some music. Review the audio tracks and select the track you would like to use. Using the drag and drop method, insert your audio track on your timeline. If you play your piece now, you’ll notice that your audio tracks are competing with each other so you’ll need to adjust the soundtrack audio so it doesn’t compete with your AROLL audio.
To adjust audio in the middle of a clip, use the “Range Selection” tool.
○ The pointer changes to the Range Selection tool icon .1. Drag across the area where you want to adjust the volume or effect.
17
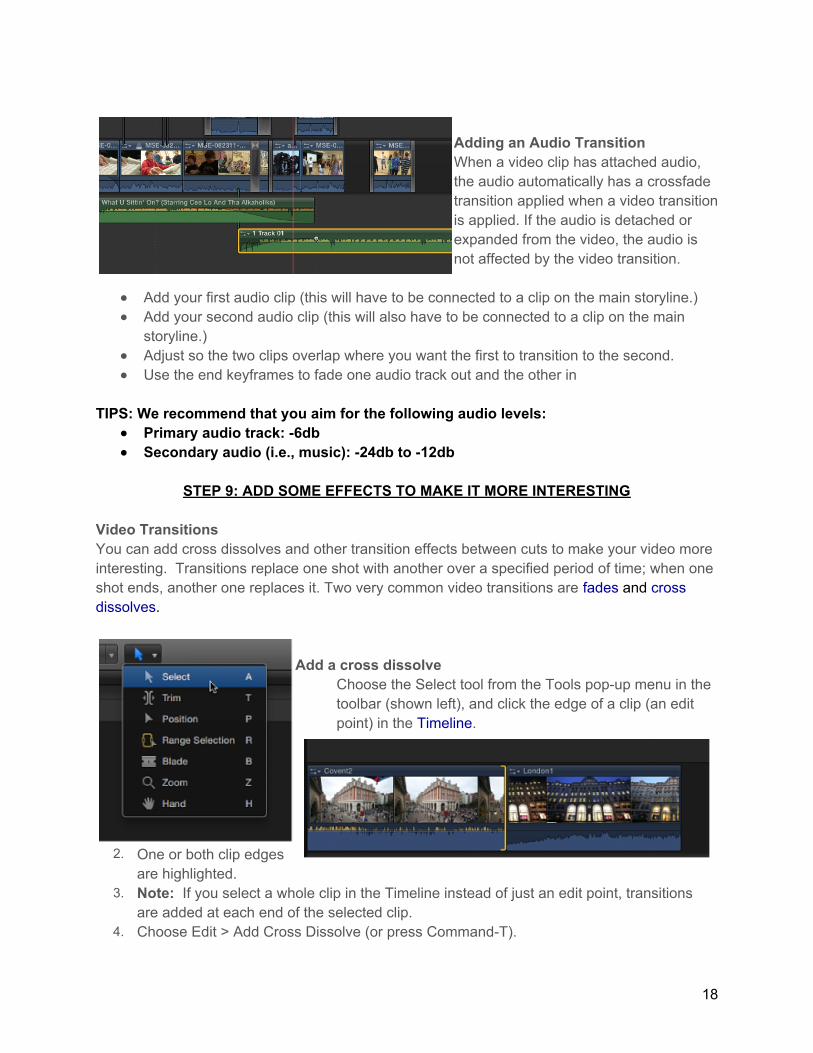
Adding an Audio TransitionWhen a video clip has attached audio, the audio automatically has a crossfade transition applied when a video transition is applied. If the audio is detached or expanded from the video, the audio is not affected by the video transition.
● Add your first audio clip (this will have to be connected to a clip on the main storyline.)● Add your second audio clip (this will also have to be connected to a clip on the main
storyline.)● Adjust so the two clips overlap where you want the first to transition to the second.● Use the end keyframes to fade one audio track out and the other in
TIPS: We recommend that you aim for the following audio levels:● Primary audio track: -6db● Secondary audio (i.e., music): -24db to -12db
STEP 9: ADD SOME EFFECTS TO MAKE IT MORE INTERESTING
Video TransitionsYou can add cross dissolves and other transition effects between cuts to make your video more interesting. Transitions replace one shot with another over a specified period of time; when one shot ends, another one replaces it. Two very common video transitions are fades and cross dissolves.
Add a cross dissolve
1.
Choose the Select tool from the Tools pop-up menu in the toolbar (shown left), and click the edge of a clip (an edit point) in the Timeline.
2. One or both clip edges are highlighted.
3. Note: If you select a whole clip in the Timeline instead of just an edit point, transitions are added at each end of the selected clip.
4. Choose Edit > Add Cross Dissolve (or press Command-T).
18

The cross dissolve is inserted using the “Apply transitions using” setting. For more information, see Set transition defaults. If the video clip has attached audio, a crossfade transition is applied to the audio.
You can copy and paste attributes of one clip to another clip. For instance, if you like an effect (color correction, etc.) on one clip, select that clip in the Timeline, press Command-C, select the clip you which to apply that same effect to, and click on either Paste Attributes or Paste Effects in the Edit menu.
STEP 10: TITLES AND LOWER THIRDS
You will need something to introduce your video (title) and you will also need to identify the speakers in your AROLL footage (lower thirds).
You can create titles and credits within Final Cut Pro with title effects. When you add a title as a connected clip directly above another clip, the underlying clip appears as the title’s background. If you want a title on a solid color or background, use Generators Browser.
Add a title to a project clip1. Drag the playhead in the Timeline to the point where you want to add the title.2. Click the Titles button in the toolbar (or press Command-5).
3. In the Titles Browser, double-click a title.
To enter text for your titleOnce you’ve added a title to your project in the Timeline, you can type text for your title in the Viewer.
1. Select a title in the Timeline.2. In the Viewer, double-click the title text.3. Type text for your title.
19

Adjust a title’s opacityIf you’re placing a title over an existing clip, you can adjust the title’s transparency.
1. Select a title in the Timeline.2. Choose Window > Show Inspector (or press Command-4), and click the Video button at
the top of the pane that appears.
3. In the Compositing section, adjust the opacity settings.Note: You can also keyframe a title’s opacity setting.Modify a title’s text styleYou can modify the text style for each text box in a title.
1. Select a title in the Timeline.2. Choose Window > Show Inspector (or press Command-4), and click the Title button at
the top of the pane that appears.
20
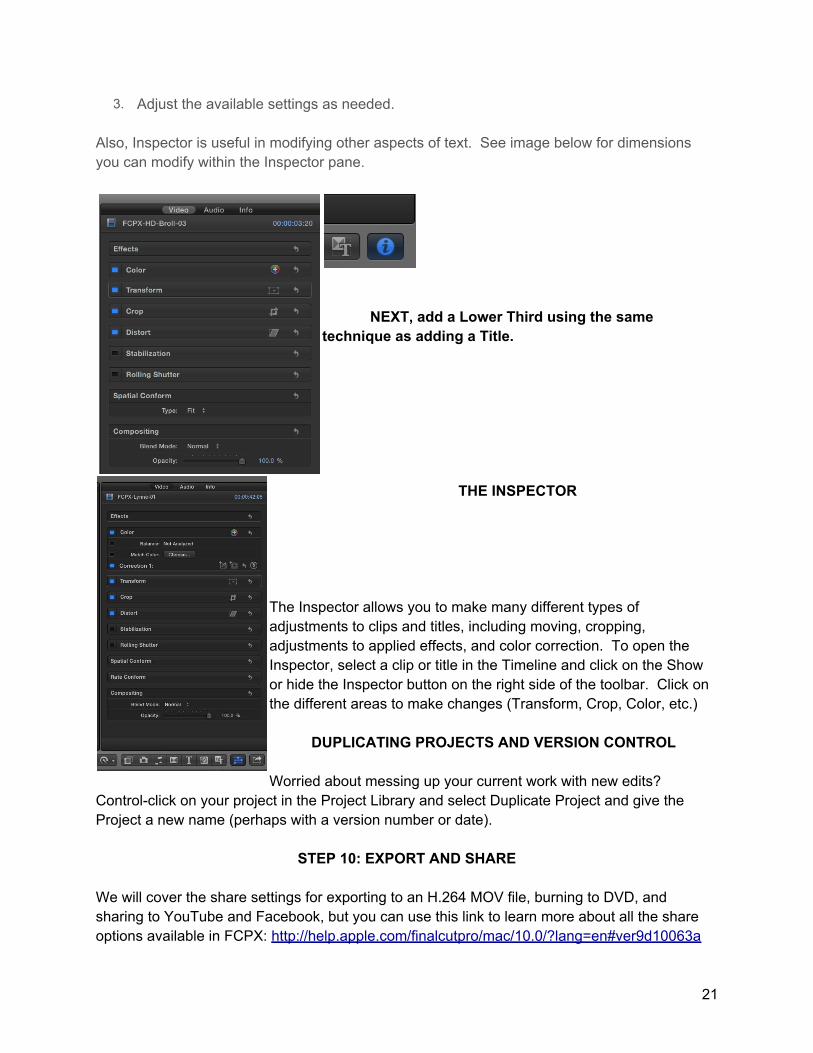
3. Adjust the available settings as needed.
Also, Inspector is useful in modifying other aspects of text. See image below for dimensions you can modify within the Inspector pane.
NEXT, add a Lower Third using the same technique as adding a Title.
THE INSPECTOR
The Inspector allows you to make many different types of adjustments to clips and titles, including moving, cropping, adjustments to applied effects, and color correction. To open the Inspector, select a clip or title in the Timeline and click on the Show or hide the Inspector button on the right side of the toolbar. Click on the different areas to make changes (Transform, Crop, Color, etc.)
DUPLICATING PROJECTS AND VERSION CONTROL
Worried about messing up your current work with new edits? Control-click on your project in the Project Library and select Duplicate Project and give the Project a new name (perhaps with a version number or date).
STEP 10: EXPORT AND SHARE
We will cover the share settings for exporting to an H.264 MOV file, burning to DVD, and sharing to YouTube and Facebook, but you can use this link to learn more about all the share options available in FCPX: http://help.apple.com/finalcutpro/mac/10.0/?lang=en#ver9d10063a
21

The FCPX Share menu gives you a variety of options for you to
distribute your project. Most options are specific to the end use - i.e. DVD
or Blu-ray disc, a specific website (YouTube, Facebook, etc.) but you can also choose a setting that will
allow you to share to a specific file type for multiple uses.
H.264 MOV file: This is a good file to use if you are unsure of your final use. Go to Share>Export Movie... / Set Export: H.264 / After Export: Do Nothing / Include: Video and AudioClick Next.
Burning to DVD:
With FCPX it is very easy to burn to a playable DVD. Go to Share>DVD.
Output device: Choose the built in DVD drive to burn directly to a blank DVD.Layers: Generally, leave this on Automatic unless you are using a dual-layer DVD.Disc template: This gives you the option of either a black or white background for the DVD menu.
22

When disc loads: Choose Show Menu to show the basic menu when you insert the finished DVD or Play Movie if you want the video to just start
playing when the DVD is placed in a DVD player or DVD drive.Background: You can specify an image to be displayed as the background for the DVD menu or leave this empty. If you select an image, be aware that it will be cropped so you may need to manipulate the image prior to importing it in FCPX.Click Burn.
Sharing to Websites: This is how you upload directly to certain websites - YouTube, Facebook, Vimeo, and CNN iReport. Go to Share> and choose one of those. You will have to enter your account info, as well as certain required fields depending on which service you select. You can also choose for FCPX to Set size automatically, or uncheck this option to choose a share size manually. The largest dimensions you can share will be dictated by the project settings. You can hove the mouse over the blue i button to see the fps (frames per second), Mbps (megabits per second), and estimated file size of the file that will be shared.
Exporting for ingest to Denver Open Media: Use these settings if you plan to ingest your video to Denver Open Media.
1. Go to your Project Library.2. Right click on your project and choose Duplicate Project (Cmd+D)
23
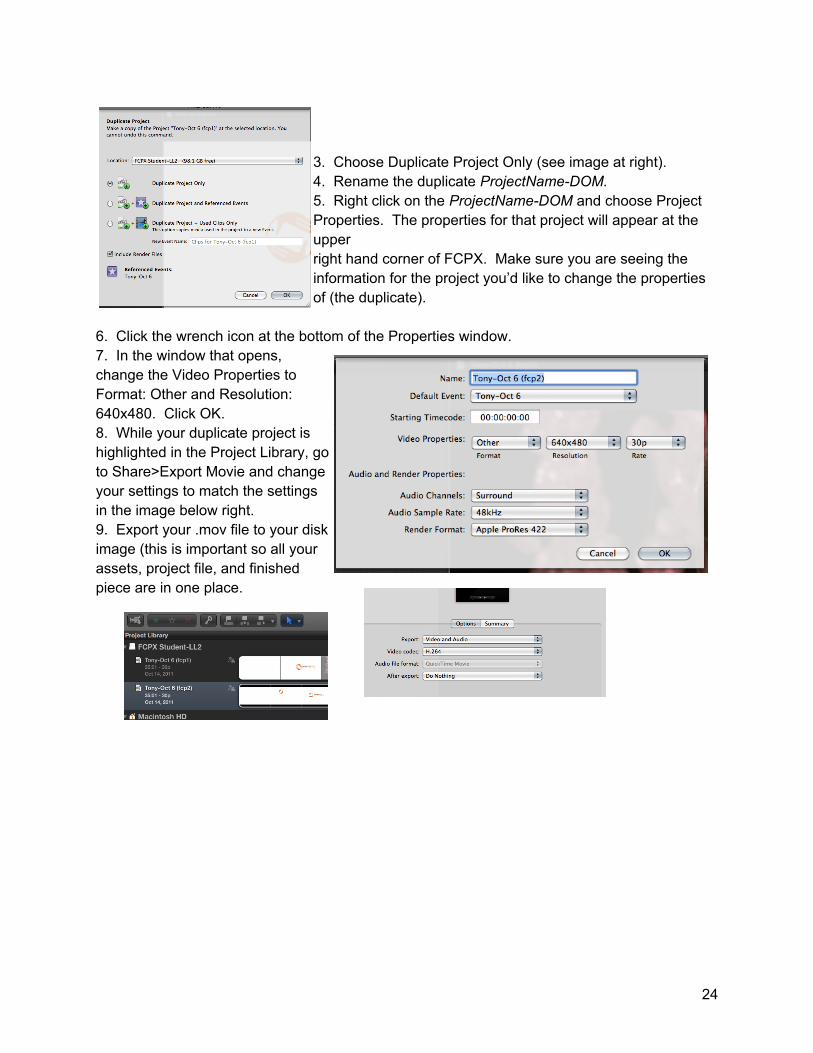
3. Choose Duplicate Project Only (see image at right).4. Rename the duplicate ProjectName-DOM.5. Right click on the ProjectName-DOM and choose Project Properties. The properties for that project will appear at the upper right hand corner of FCPX. Make sure you are seeing the information for the project you’d like to change the properties of (the duplicate).
6. Click the wrench icon at the bottom of the Properties window.7. In the window that opens, change the Video Properties to Format: Other and Resolution: 640x480. Click OK.8. While your duplicate project is highlighted in the Project Library, go to Share>Export Movie and change your settings to match the settings in the image below right.9. Export your .mov file to your disk image (this is important so all your assets, project file, and finished piece are in one place.
24