Download - Copy-Based Transition Guide - NetApp Support
7-Mode Transition Tool 3.2
Copy-Based Transition GuideFor Transitioning to ONTAP®
February 2017 | [email protected]

Contents
Transition overview ...................................................................................... 6Copy-based transition by using the 7-Mode Transition Tool ...................................... 6
Transition terminology ................................................................................................ 7
Limits for transition ..................................................................................................... 8
Collecting and assessing the inventory information .................................. 9Storage, host, and FC switches version requirements for transition assessment ...... 10
Preparing the 7-Mode systems and hosts for transition assessment .......................... 10
Assessing controllers and hosts ................................................................................. 11
Generating an assessment report by adding systems to the 7-Mode
Transition Tool ......................................................................................... 12
Generating an assessment report by importing the inventory report XML ... 14
Generating an FC zone plan ...................................................................................... 15
Supported configurations for generating an FC zone plan ............................ 16
How you can use the assessment executive summary for transition assessment ...... 17
Copy-based transition workflow ............................................................... 19Migration process and phases ................................................................... 20
How you transition a stand-alone volume ................................................................. 21
How you transition volumes in a SnapMirror relationship ....................................... 25
Preparing for copy-based transition ......................................................... 31Requirements for copy-based transition .................................................................... 31
Port requirements for communicating with the 7-Mode Transition Tool .................. 32
Restrictions for transition .......................................................................................... 33
Preparing the 7-Mode system for transition .............................................................. 34
Preparing the network for transition .......................................................................... 35
Considerations for transitioning 7-Mode IP addresses ................................. 36
Preparing the cluster for transition ............................................................................ 36
Preparing 7-Mode aggregates and volumes for transition ......................................... 38
Restrictions for transitioning 7-Mode volumes ............................................. 39
Preparing for transitioning to ONTAP 8.3 and later ..................................... 39
Considerations for deduplication and compression ...................................... 42
Considerations for FlexClone volumes ......................................................... 43
Considerations for quotas .............................................................................. 43
Support for transitioning SnapLock volumes ............................................................ 44
Considerations for transitioning of SnapLock Enterprise volumes ............... 44
Considerations for transitioning of SnapLock Compliance volumes ............ 44
Considerations for transitioning of SnapLock Audit volumes ...................... 44
Considerations for transitioning of 7-Mode SnapLock options .................... 45
Preparing to transition name services ........................................................................ 45
Name services transition: supported and unsupported configurations,
and required manual steps ....................................................................... 45
Considerations for transitioning DNS, NIS, and LDAP configurations ....... 46
Table of Contents | 3
Considerations for transitioning netgroups and UNIX users and groups ...... 47
Preparing for NFS transition ..................................................................................... 48
Prerequisites for transitioning NFS configurations ....................................... 48
NFS transition: supported and unsupported configurations, and required
manual steps ............................................................................................ 48
How NFS exports are transitioned ................................................................ 50
Preparing for CIFS transition .................................................................................... 53
Prerequisites for transitioning CIFS configurations ...................................... 54
CIFS transition: supported and unsupported configurations, and required
manual steps ............................................................................................ 56
Considerations for transitioning CIFS local users and groups ...................... 58
Preparing for MetroCluster configuration transition ................................................. 59
Preparing for SAN transition ..................................................................................... 60
Preparing SAN hosts for transition ............................................................... 60
Configuring zones by using the FC zone plan .............................................. 60
Creating SAN LIFs before transition ............................................................ 61
SAN transition: supported and unsupported configurations, and required
manual steps ............................................................................................ 61
Space considerations when transitioning SAN volumes ............................... 63
Preparing data protection features for transition ....................................................... 63
Data protection transition: supported and unsupported configurations ......... 63
Considerations for using SnapMirror for transition ...................................... 64
Guidelines for deciding when to perform cutover ..................................................... 65
Impact of takeover and giveback on transition .......................................................... 65
Migrating data and configuration from 7-Mode volumes ...................... 67Transition preparation checklist ................................................................................ 68
Adding controllers and clusters ................................................................................. 72
Creating a transition project ...................................................................................... 72
Customizing the transition of 7-Mode configurations .............................................. 76
Running prechecks .................................................................................................... 77
Severity levels for precheck messages .......................................................... 78
Starting baseline data copy ........................................................................................ 78
Applying 7-Mode configurations .............................................................................. 79
Configuring zones by using the FC zone plan .......................................................... 81
Performing on-demand SnapMirror updates ............................................................. 82
Completing a transition project ................................................................................. 83
Transitioning volumes by using the 7-Mode Transition Tool CLI ......... 85Scenarios for selecting volumes in a project ............................................................. 85
Transitioning volumes by using the 7-Mode Transition Tool command-line
interface ............................................................................................................... 86
Creating a transition project .......................................................................... 86
Customizing the transition of 7-Mode configurations by using the CLI ...... 89
Running prechecks ........................................................................................ 95
Starting data copy for a transition project ..................................................... 96
Applying configurations to ONTAP volumes ............................................... 97
4 | Copy-Based Transition Guide
Completing the transition .............................................................................. 98
Commands for managing transition .......................................................................... 99
Performing manual post-transition tasks ............................................... 103Configuring zones by using the FC zone plan ........................................................ 103
Recovering from a failed LUN transition ................................................................ 104
Viewing transitioned SAN configurations ............................................................... 105
Limitations with 7-Mode Snapshot copies of LUNs managed by SnapDrive and
SnapManager after transition ............................................................................ 106
Configuring cron job schedules on the remote site after transitioning a
MetroCluster configuration ............................................................................... 107
Deleting 7-Mode volume Snapshot copies from transitioned volumes .................. 107
Consolidating cron schedules from transitioned volumes ....................................... 108
Managing a transition project ................................................................. 109Editing a project ...................................................................................................... 109
Managing SnapMirror transfers and schedule ........................................................ 109
Creating a data copy schedule for SnapMirror transfers ............................. 109
Considerations for creating a data copy schedule ....................................... 114
Editing or deleting a data copy schedule for SnapMirror transfers ............. 114
Managing logical interfaces .................................................................................... 116
Removing volumes from a project .......................................................................... 117
Pausing and resuming a project ............................................................................... 118
Aborting a project .................................................................................................... 118
Deleting a project .................................................................................................... 119
Troubleshooting issues ............................................................................. 120Downloading transition log files ............................................................................. 120
Log files for the 7-Mode Transition Tool ................................................................ 120
Continuing with the transition if ignorable errors occur ......................................... 121
Ignorable errors during transition ................................................................ 121
Transitioning a MetroCluster configuration that failed due to switchover or
switchback ......................................................................................................... 123
Cannot select a secondary volume from the Volume selection pane ...................... 123
Cannot select a volume for transition if the tool fails to retrieve the volume
information ........................................................................................................ 123
Cannot proceed from the Volume mapping pane if the selected SVM has no
aggregate ............................................................................................................ 124
Compression is not enabled after transition from Data ONTAP 7.3.x .................... 124
Copyright information ............................................................................. 125Trademark information ........................................................................... 126How to send comments about documentation and receive update
notifications .......................................................................................... 127Index ........................................................................................................... 128
Table of Contents | 5
Transition overview
Transitioning to ONTAP involves identifying your current environment, defining the transition scope,designing the optimal configuration of the destination systems, planning how to migrate data andconfigurations, as well as making necessary environmental updates.
You must first collect information about the current environment, including both the current storageenvironment as well as the hosts and applications. After collecting the storage inventory, you canassess the current features and functionality that are used and identify any differences in the ONTAPversion selected. You can use 7-Mode Transition Tool to perform these tasks.
You can then define your migration project. This involves identifying what volumes and workloadsyou want to migrate together, then you can design your cluster, and plan your transition. You canbegin planning your migration by first selecting the optimal migration method. When designing yourcluster, you can use the information gathered about your storage environment to map existingconfiguration items to their equivalent items in ONTAP. For example, a 7-Mode volume should bemapped to a Storage Virtual Machine (SVM) and a volume in ONTAP and an IP address that will betransitioned should be mapped to LIFs. You should also determine if any environmental changes haveto be made on the ONTAP system.
Implementation includes deploying and configuring the cluster, migrating data, applyingconfiguration changes, disconnecting clients and reconnecting to the destination ONTAP system,verifying access, as well as performing any necessary environmental changes.
Related information
NetApp Documentation: ONTAP 9
NetApp Technical Report 3982: NetApp Clustered Data ONTAP 8.2 Introduction
Copy-based transition by using the 7-Mode Transition ToolThe 7-Mode Transition Tool enables you to perform copy-based transition by collecting informationand assessing 7-Mode controllers, hosts, switches, and applications for transition. You can thenmigrate your data and configurations from 7-Mode to ONTAP.
The 7-Mode Transition Tool runs on a Windows or Linux system. The 7-Mode Transition Toolprovides both a web interface and a command-line interface for managing your transition operations.
Collecting and assessing ONTAP systems, hosts, "switches" and applications
You can perform the following collect and assess tasks by using the 7-Mode Transition Tool:
• Collect inventory information from ONTAP systems (7-Mode controllers and nodes in thecluster), hosts, switches, and host applications.
• Generate the FC Zone plan to configure the zones for grouping the initiator hosts and targets.
• Assess the features and functionalities of the 7-Mode systems, and identify how these featuresand functionalities work in the ONTAP version selected for transition.
Moving data and configurations from 7-Mode to ONTAP
Copy-based transition uses SnapMirror technology to copy 7-Mode volumes and configurations fromData ONTAP 7G and 7-Mode to ONTAP.
You can perform the following tasks by using the 7-Mode Transition Tool for copy-based migration:
6
• Migrate a group of 7-Mode stand-alone volumes or a group of 7-Mode volumes in volumeSnapMirror relationships from systems running different 7-Mode versions to clustered DataONTAP 8.2.x or later.
• Run prechecks on volumes included in a transition project to verify their compatibility fortransition and view possible corrective actions.
• Apply 7-Mode configurations to ONTAP before disconnecting client access, reducing thedowntime.
Copy-based transition supports the transition of NAS and SAN configurations.
Note: SAN transition is supported only to clustered Data ONTAP 8.3 and later.
Related concepts
Requirements for copy-based transition on page 31
Transition terminologyUnderstanding the transition terminology related to the 7-Mode Transition Tool helps you tounderstand the transition process.
Collect and assess
Before transitioning data and configurations to clustered Data ONTAP, you must collectinformation about the storage environment that includes storage systems, hosts, andapplications. You must then assess the features and functionalities of these systems, andidentify how these features and functionalities work in the Data ONTAP version selectedfor transition.
Migrate
Refers to transitioning data and configurations from the 7-Mode volumes to Data ONTAP.Migration should be performed after assessing the 7-Mode controllers.
Project
In the 7-Mode Transition Tool, a project enables you to configure and manage thetransition of a group of volumes.
Transition projects are of three types: stand-alone, primary, and secondary.
Stand-alone project
Volumes in this project are either not in any SnapMirror relationship with volumes inother storage systems, or you want to transition these volumes without retaining theirSnapMirror relationships.
Primary project
Volumes in this project are the source volumes of a SnapMirror relationship.
Secondary project
Volumes in this project are the destination volumes of a SnapMirror relationship.
Project group
In the 7-Mode Transition Tool, a project group is a logical container that you can use tohold related migration projects. There is always one default group with Default_Groupname that exists in the system.
Transition peer relationship
Transition peer relationship is an authorization mechanism that enables SnapMirror toestablish relationships between a 7-Mode storage system and an SVM in the cluster forcopying data from the 7-Mode volumes to the ONTAP volumes for transition. A transition
Transition overview | 7
peer relationship can be created only by a cluster administrator and is initiated from thecluster.
Transition data protection relationship
Transition data protection (TDP) relationships are volume SnapMirror relationships thatare established between a 7-Mode system and a ONTAP system.
Transition data protection is supported only for transition. You should not keep thisrelationship for long periods of time because it is not possible to resynchronize data froma ONTAP volume back to a 7-Mode volume.
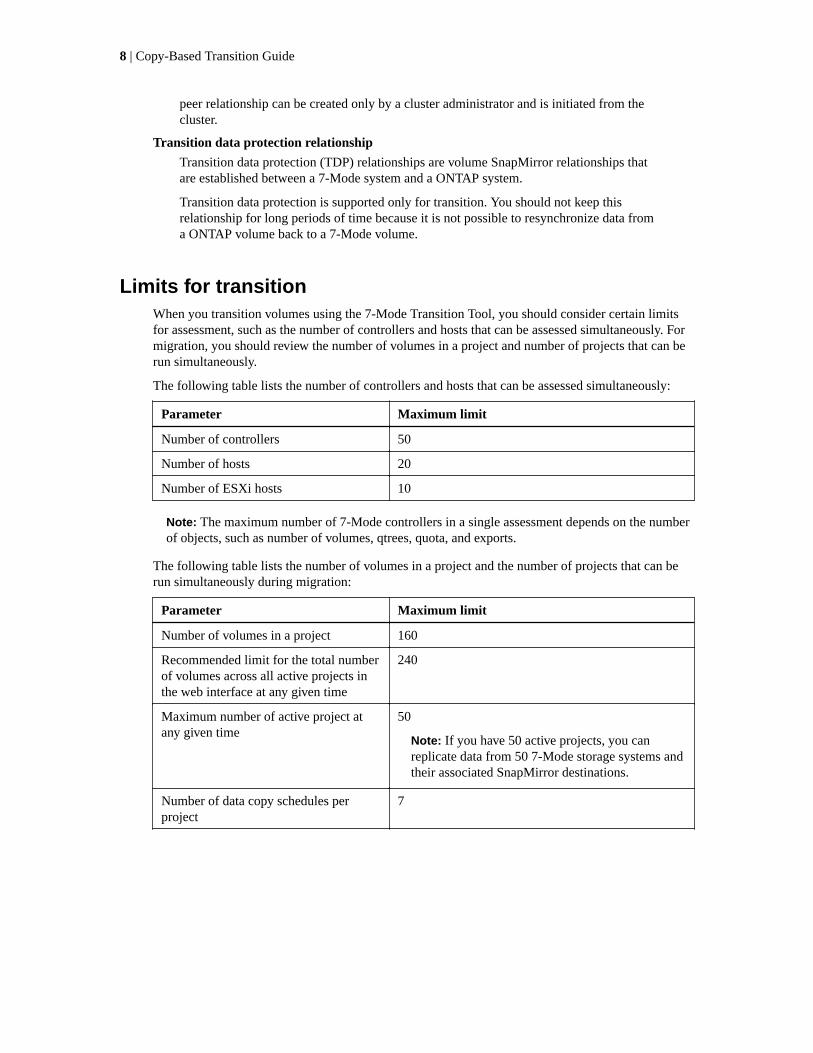
Limits for transitionWhen you transition volumes using the 7-Mode Transition Tool, you should consider certain limitsfor assessment, such as the number of controllers and hosts that can be assessed simultaneously. Formigration, you should review the number of volumes in a project and number of projects that can berun simultaneously.
The following table lists the number of controllers and hosts that can be assessed simultaneously:
Parameter Maximum limit
Number of controllers 50
Number of hosts 20
Number of ESXi hosts 10
Note: The maximum number of 7-Mode controllers in a single assessment depends on the numberof objects, such as number of volumes, qtrees, quota, and exports.
The following table lists the number of volumes in a project and the number of projects that can berun simultaneously during migration:
Parameter Maximum limit
Number of volumes in a project 160
Recommended limit for the total numberof volumes across all active projects inthe web interface at any given time
240
Maximum number of active project atany given time
50
Note: If you have 50 active projects, you canreplicate data from 50 7-Mode storage systems andtheir associated SnapMirror destinations.
Number of data copy schedules perproject
7
8 | Copy-Based Transition Guide
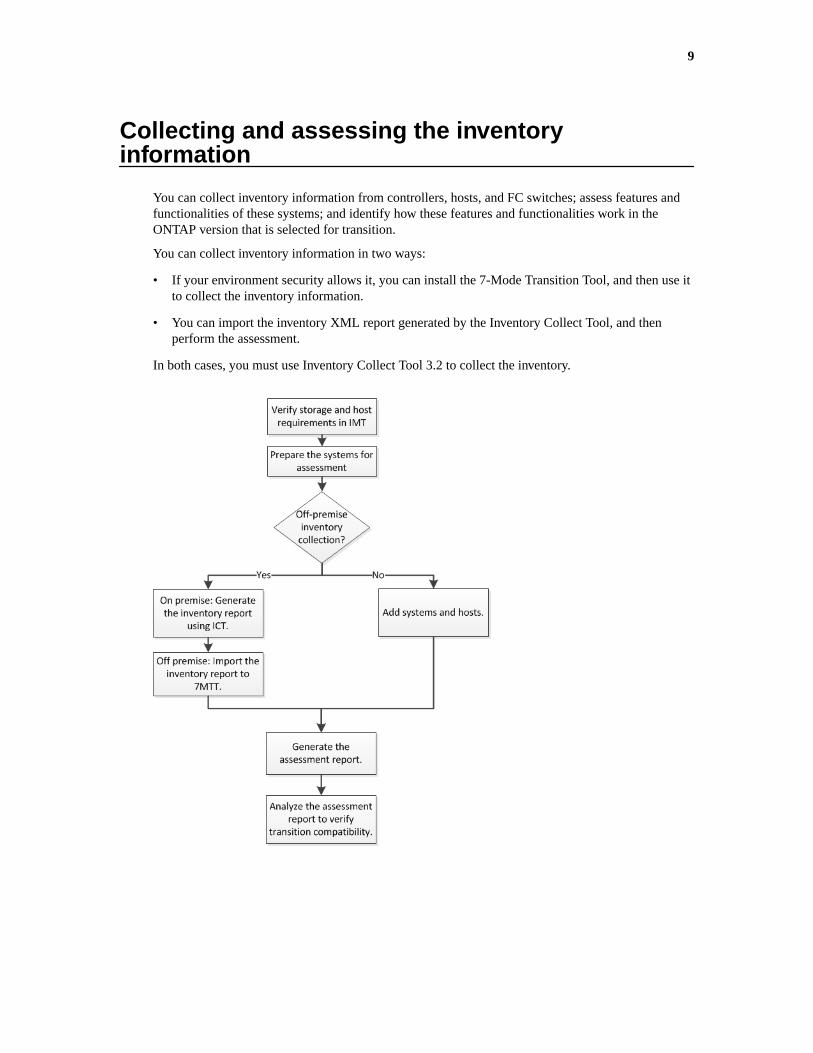
Collecting and assessing the inventoryinformation
You can collect inventory information from controllers, hosts, and FC switches; assess features andfunctionalities of these systems; and identify how these features and functionalities work in theONTAP version that is selected for transition.
You can collect inventory information in two ways:
• If your environment security allows it, you can install the 7-Mode Transition Tool, and then use itto collect the inventory information.
• You can import the inventory XML report generated by the Inventory Collect Tool, and thenperform the assessment.
In both cases, you must use Inventory Collect Tool 3.2 to collect the inventory.
9
Storage, host, and FC switches version requirements fortransition assessment
You must be aware of the versions of Data ONTAP operating in 7-Mode, hosts, and FC switches thatare supported for transition assessment.
For the list of 7-Mode versions, hosts, and FC switches that are supported for assessment by the 7-Mode Transition Tool, see the NetApp Interoperability Matrix Tool.
NetApp Interoperability Matrix Tool
Preparing the 7-Mode systems and hosts for transitionassessment
You must ensure that the 7-Mode systems and hosts meet certain network and protocol requirementsfor successfully generating an assessment report.
Steps
1. Enable HTTPS on the 7-Mode system:
options httpd.admin.ssl.enable on
2. Enable TLS on the 7-Mode system:
options tls.enable on
Important: The best practice is to enable TLS because of the security vulnerabilities in SSLv3.
3. Enable SSL and disable SSLv2 and SSLv3 on the 7-Mode system:
a. Set up and start SSL:
secureadmin setup ssl
b. Enable SSL:
options ssl.enable on
c. Disable SSLv2 and SSLv3:
options ssl.v2.enable off
options ssl.v3.enable off
Important: The best practice is to disable SSLv2 and SSLv3 to avoid securityvulnerabilities.
4. Enable SSH on the 7-Mode system:
a. Set up SSH on the 7-Mode system:
secureadmin setup -f ssh
The -f option forces the setup to run even if the SSH server is already configured.
b. Enable SSH:
secureadmin enable ssh2
c. Enable password authentication on the SSH server:
10 | Copy-Based Transition Guide

options ssh.passwd_auth.enable
d. Enable SSH access to the host:
options ssh.access
5. Prepare your Windows host systems:
• Enable WMI access.
For more information about enabling WMI access, see the host documentation.
• If you have Windows Server 2003, verify that you have installed the Microsoft Fibre ChannelInformation Tool (fcinfo) package and run the tool once on your Windows host system.
This tool enables you to collect the HBA configuration information of the host.
• If the system on which the 7-Mode Transition Tool is run does not belong to a domain, verifythe following:
◦ The host system belongs to a domain.
◦ If the host has a local user, and the user name for that user is in the following format:
SystemName\Username
6. Enable SSH on the Linux or ESXi host.
For more information about enabling SSH, see the host documentation.
7. Verify that you have installed the latest NetApp Host Utilities software for each host.
For information about downloading and installing the NetApp Host Utilities software, see theNetApp Support Site.
8. Verify that all the hosts and storage systems can be reached by the Windows system from whichthe 7-Mode Transition Tool is run.
Related information
Documentation on the NetApp Support Site: mysupport.netapp.com
Assessing controllers and hostsYou can collect and assess information about the controllers and hosts by using either the 7-ModeTransition Tool or the Inventory Collect Tool, depending on the security regulations in yourenvironment.
About this task
• The 7-Mode Transition Tool collects inventory information about controller and hosts by addingthe systems or by using the inventory report generated by the Inventory Collect Tool.
The 7-Mode Transition Tool then assesses inventory information and creates the transitionassessment report.
• You must be aware of the following considerations when performing transition assessment:
◦ You should not perform both assessment and migration operations simultaneously on acontroller.
◦ You should avoid performing assessment operations on active storage controllers during peakhours.
Collecting and assessing the inventory information | 11
Choices
• Generating an assessment report by adding systems to the 7-Mode Transition Tool on page 12
• Generating an assessment report by importing the inventory report XML on page 14
Generating an assessment report by adding systems to the 7-ModeTransition Tool
You can collect inventory information for controllers, hosts, and FC switches by adding the systemsto the 7-Mode Transition Tool. You can then create an assessment report to assess the features andfunctionalities of those systems, and to identify how they work in the ONTAP version selected fortransition.
Before you begin
• The user name for the storage system and hosts must have sufficient privileges to execute thecommands listed in the readme file.
The readme file is located at 7-Mode Transition Tool_installed_location\bin\ict.
• You must have prepared the 7-Mode systems, hosts, and FC switches for transition assessment.
• For assessing Windows systems, you must have a domain user account.
• If you are adding multiple systems for assessment, you must create a text file that is encoded inthe ASCII or UTF-8 format and must contain the system details in the form of one system perline.
Each system details must be in the following format:
(ontap|windows|vmware|linux|cisco|brocade)://[(user|domain_user)[:password]@](host_name|ip)
• The controller or host must be accessible by the system on which the 7-Mode Transition Tool isinstalled and run.
• All features must be configured or their license enabled so that the workbook can containinventory information about these features.
• The user name for the storage system must have sufficient administrative privileges to collectinventory information.
• All host names and storage system configurations, such as CIFS share names, user names, andgroup names, must be in the UTF-8 format.
About this task
If the 7-Mode Transition Tool service or the system on which this tool is installed is restarted, thenthe system details added to the tool are lost and the system must be added to the tool again.
Steps
1. If you want to use the latest Interoperability Matrix (IMT) data for transition assessment, performthe following steps:
a. Download the IMT data from the Interoperability Matrix and save it:
i. From the Reports menu, click Complete Daily Exports.
ii. In the Complete Daily Exports dialog box, enter FAS in the search field.
iii. Download the FAS SAN Host excel file and save it.
12 | Copy-Based Transition Guide
IMT database
b. From the CLI, import the IMT data by using the transition imt import command.
c. Verify that the import is successful by using the transition imt show command.
Troubleshooting: If the IMT data import operation fails due to some reason, you can revertto the previous data by using the transition imt restore command.
2. Log in to the 7-Mode Transition Tool, and then click Get Started in the Collect and Assesssection.
3. Click Add Systems.
4. In the Add System window, perform one of the following actions:
• Add a single system:
a. Enter the fully qualified domain name (FQDN) or IP address of the system.
b. Enter the user name and password for the specified system.
c. Select the system type:
◦ Data ONTAP storage systems
◦ Hosts: Microsoft Windows, Red Hat Linux Enterprise, and VMware ESXi
◦ FC switches: Cisco and Brocade
• Add multiple systems by clicking Browse, and then selecting the text file that contains thecredentials for multiple systems.
5. Click Add.
If the assessment status of a system is Ready, then you can perform transition assessment for thatsystem.
6. Generate the transition assessment report by performing the following steps:
a. Select the systems for transition assessment.
b. Click Create Transition Assessment Report.
c. In the Create Transition Assessment Report dialog box, select the Data ONTAP version ofthe target cluster.
d. Specify a prefix for the file name of the reports.
e. Click Generate Report.
The assessment workbook (report name appended with “AssessmentWorkbook”) and assessmentexecutive summary (report name appended with “AssessmentExecutiveSummary”) reports aregenerated in XML format.
You can access the assessment workbook, assessment summary, and the inventory XML files thatare used to generate the assessment report from the ...etc/webapp/transition-gui/tmcfolder.
7. View the assessment workbook in Microsoft Excel and assessment executive summary inMicrosoft Word by using Microsoft Office 2007 or later versions.
In the assessment workbook, see the Transition Feasibility (CBT), Config Precheck Summary,Config Precheck Details, and CBT Precheck Summary tabs for copy-based transition assessmentdetails.
Collecting and assessing the inventory information | 13
In the assessment executive summary, see the Copy-Based Transition Feasibility section forcontroller-level assessment details.
You might have to enable macros in Excel to view the assessment workbook.
In the data collection summary of the assessment workbook, if the access status of a system isFAILED, then the inventory information for that system is invalid. In the assessment executivesummary, the value of some of the fields of this system is displayed as Not Assessed.
Related tasks
Downloading transition log files on page 120
Generating an assessment report by importing the inventory report XML
You can import the inventory XML report generated by the Inventory Collect Tool to assess thefeatures and functionalities of hosts and controllers. You can then identify how these host andcontrollers work in the ONTAP version selected for transition by creating an assessment report.
Before you begin
• You must have run the Inventory Collect Tool and generated the inventory report XML file.
Note: To assess hosts and controllers for copy-based transition, you must use Inventory CollectTool 3.2 to collect inventory.
• You must have prepared the 7-Mode systems and hosts for transition assessment.
About this task
The systems that you want to assess need not be reachable while importing the inventory report andperforming transition assessment.
Steps
1. Log in to the 7-Mode Transition Tool, and then click Collect and Assess in the home page.
2. Click Import Inventory Report XML.
3. Click Browse, and then select the XML report generated by the Inventory Collect Tool.
4. Click Import.
The assessment status of the system shows Imported;Ready.
5. Select the system for which you want to perform transition assessment.
6. Click Create Transition Assessment Report.
7. In the Create Transition Assessment Report dialog box, select the Data ONTAP version of thetarget cluster.
8. Optional: Specify a prefix for the file name of the reports.
9. Click Generate Report.
The AssessmentWorkbook and AssessmentExecutiveSummary reports are generated in XMLformat.
10. View the AssessmentWorkbook report in Microsoft Excel and the AssessmentExecutiveSummaryreport in Microsoft Word by using Microsoft Office 2007 or later versions.
To view the AssessmentWorkbook report in Microsoft Excel, you might have to enable macros inExcel.
14 | Copy-Based Transition Guide
Related tasks
Downloading transition log files on page 120
Generating an FC zone planFor FC switches, you must generate an FC zone plan as part of the transition assessment report toconfigure the zones for grouping the initiator hosts and targets after the migration.
Before you begin
• The 7-Mode system, hosts, and the cluster must be connected to the same switch.
Supported configurations for generating an FC zone plan on page 16
• You must have created the required target SVMs and FC LIFs on the cluster.
• The FC LIFs that are created on the target SVMs will have WWPN, which are different from 7-Mode WWPNs. Therefore, perform FC zoning while you transition SAN for FCP.
Steps
1. In the Collect and Assess section, click Add Systems.
2. In the Add System window, perform one of the following actions:
• Add a single system:
a. Enter the FQDN or IP address of the system.
b. Enter the user name and password for the specified system.
c. Select the system type:
◦ Data ONTAP storage systems
◦ Hosts: Microsoft Windows, Red Hat Linux Enterprise, and VMware ESXi
◦ FC switches: Cisco and Brocade
• Add multiple systems by clicking Browse, and then selecting the text file that contains thecredentials for multiple systems.
3. Click Add.
If the assessment status of a system is Ready, then you can perform transition assessment for thatsystem.
4. Generate the transition assessment report with the FC zone plan:
a. Select the systems, including the required FC switches, for transition assessment.
b. Click Create Transition Assessment Report.
c. In the pair systems and start FC zone planner dialog box, select the 7-Mode systems(single controller or HA pair), the switch connected to the cluster, and an SVM in the cluster.
d. Click FC Zoning for paired systems.
e. In the Create Transition Assessment Report dialog box, select the Data ONTAP version ofthe target cluster.
f. Specify a prefix for the file name of the reports.
Collecting and assessing the inventory information | 15
g. Click Generate Report.
Result
The FC zone plan is generated as a .zip file. The plan contains zones created per the igroupconfigurations on the 7-Mode systems. Each zone contains a single initiator WWPN and multipleSVM target WWPNs.
After you finish
You must use the FC zone plan for configuring the zones to group the initiator hosts and targets forproviding data access from the cluster.
Supported configurations for generating an FC zone plan
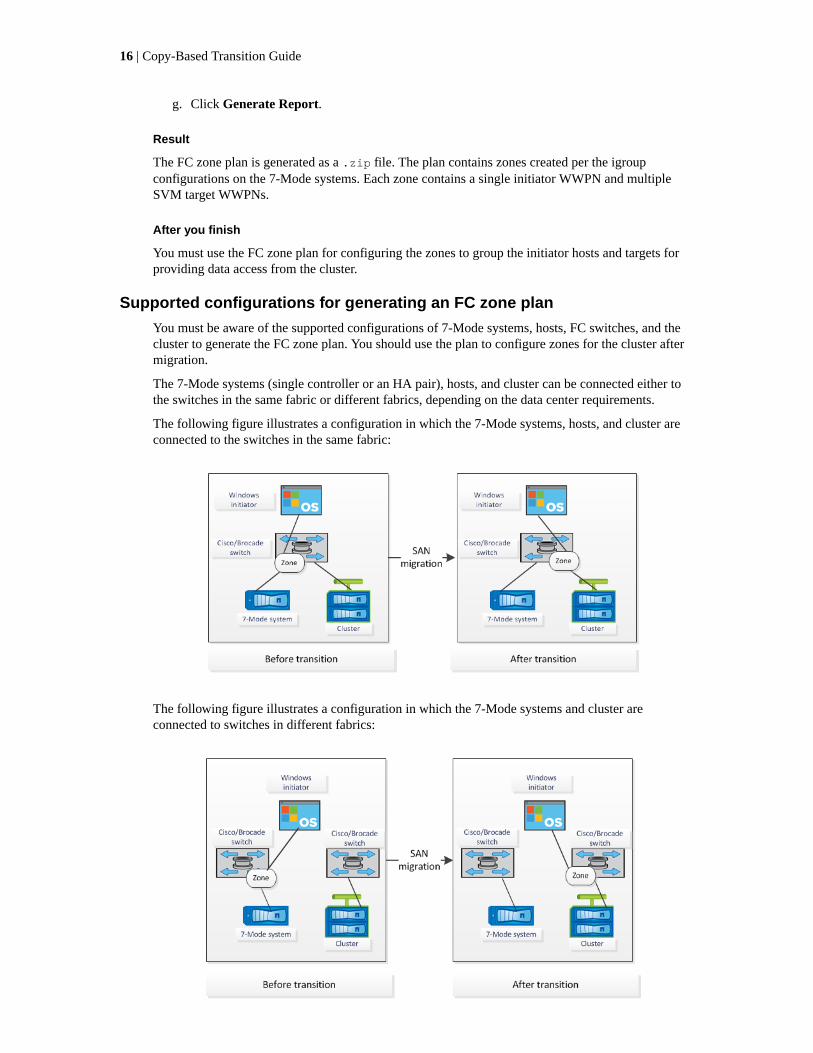
You must be aware of the supported configurations of 7-Mode systems, hosts, FC switches, and thecluster to generate the FC zone plan. You should use the plan to configure zones for the cluster aftermigration.
The 7-Mode systems (single controller or an HA pair), hosts, and cluster can be connected either tothe switches in the same fabric or different fabrics, depending on the data center requirements.
The following figure illustrates a configuration in which the 7-Mode systems, hosts, and cluster areconnected to the switches in the same fabric:
The following figure illustrates a configuration in which the 7-Mode systems and cluster areconnected to switches in different fabrics:
16 | Copy-Based Transition Guide
How you can use the assessment executive summary fortransition assessment
The transition executive summary provides a summary of the 7-Mode controllers, hosts, and FCswitches in your environment. It provides an assessment report of the current features andfunctionality that are used and recommends the transition methodology for each volume within yourstorage environment. You can use the summary to plan your transition.
The executive summary has the following main sections:
Target cluster
This section lists the ONTAP version of the target cluster that you selected during assessment.
Data collection summary
You can view the list of 7-Mode controllers, hosts, and switches for which you have collectedinformation. You can view the ONTAP version and model details of the 7-Mode controller. You canalso view the OS type, version, and model of the hosts.
Transition feasibility and recommended transition methodology
This section provides a summary of the prechecks that are run on each controller and the feasibilityof transition at the controller and volume level. The volumes that belong to vFiler units that are in thestopped or inconsistent state or the volumes that are offline or restricted are not included forassessment. The report displays the count of errors and warnings reported in the precheck againsteach controller. You should review these errors and warnings and resolve any issues beforetransitioning. Details of these prechecks are available in the Config Precheck Summary tab of theassessment workbook.
Based on the volume and controller configurations and the precheck summary, the executivesummary provides a recommendation about the best transition methodology for each assessedvolume. For example, you cannot transition 7-Mode traditional volumes or FlexCache volumesbecause these features are not supported in ONTAP.
For most of the configurations, the 7-Mode Transition Tool is the recommended tool for transition.However, there are some workloads that cannot be transitioned by using the 7-Mode Transition Tool,and for those you should use an application-based or host-based migration method.
NetApp Technical Report 4052: Successfully Transitioning to Clustered Data ONTAP (Data ONTAP8.2.x and 8.3)
Storage inventory
This section provides the following information:
• Storage objects: Provides information about the number of storage objects, such as volumes,qtrees, LUNs, vFiler units, SnapMirror relationships, shares, and exports, in each controller.
• Storage utilization: Provides information about the used space, available space, and space utilizedby the 7-Mode controllers.
• Licenses: Provides the list of feature licenses enabled on each controller.
• Protocol configuration: Provides details about the protocols configured on the controllers, such asCIFS, NFS, and SAN protocols, and the versions.
Collecting and assessing the inventory information | 17
• SnapMirror interconnectivity: Provides information about the controllers or volumes that areeither the source or destination of a SnapMirror relationship.
You can use this information to identify controllers that are in SnapMirror relationships with thecontrollers listed in the report, but are not included for assessment.
• SnapVault interconnectivity: Provides information about the controllers, volumes, or qtrees thatare either the source or destination of a SnapVault relationship with the specified controller,volumes, or qtrees in the controller.
SVM consolidation considerations
If you are considering consolidating volumes from different vFiler units or 7-Mode controllers to asingle SVM, you can use the information provided in this section to identify whether 7-Modesystems are bound to different Active Directory domains, have different NIS configurations, have thesame volume names or CIFS share names, and how many local users and groups there are in eachcontroller. These considerations are important in identifying issues when consolidating differentvFiler units or 7-Mode controllers and planning the transition to a single SVM.
Data collection errors
This section provides details about controller and host information that could not be collected by the7-Mode Transition Tool and the reason for the failure. Details of the data collection errors areavailable in the Data Collection Errors tab of the assessment workbook. You can resolve these errorsand assess the systems again.
18 | Copy-Based Transition Guide
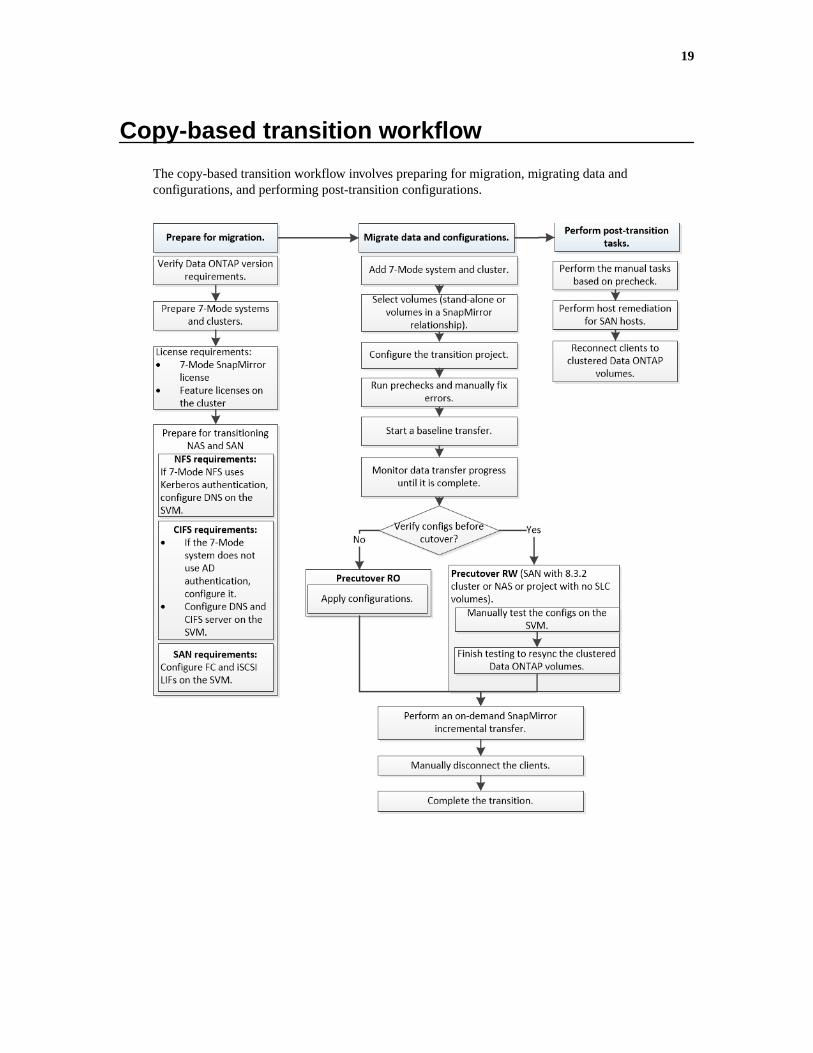
Copy-based transition workflow
The copy-based transition workflow involves preparing for migration, migrating data andconfigurations, and performing post-transition configurations.
19
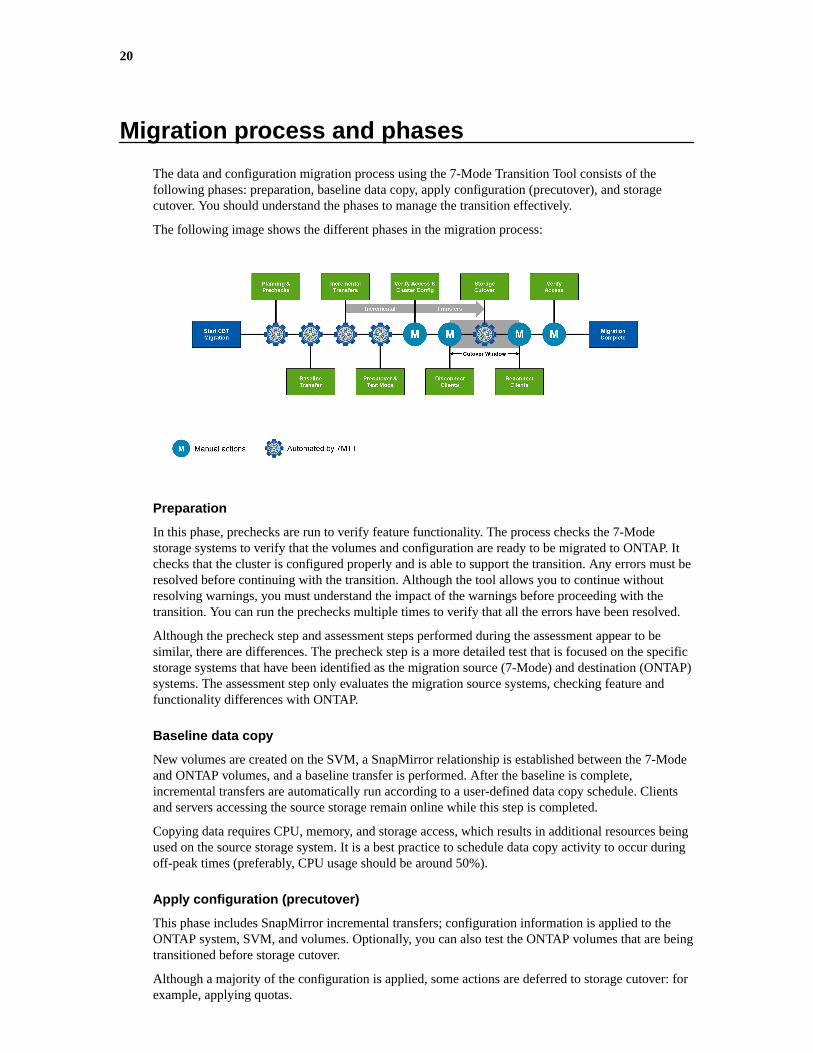
Migration process and phases
The data and configuration migration process using the 7-Mode Transition Tool consists of thefollowing phases: preparation, baseline data copy, apply configuration (precutover), and storagecutover. You should understand the phases to manage the transition effectively.
The following image shows the different phases in the migration process:
Preparation
In this phase, prechecks are run to verify feature functionality. The process checks the 7-Modestorage systems to verify that the volumes and configuration are ready to be migrated to ONTAP. Itchecks that the cluster is configured properly and is able to support the transition. Any errors must beresolved before continuing with the transition. Although the tool allows you to continue withoutresolving warnings, you must understand the impact of the warnings before proceeding with thetransition. You can run the prechecks multiple times to verify that all the errors have been resolved.
Although the precheck step and assessment steps performed during the assessment appear to besimilar, there are differences. The precheck step is a more detailed test that is focused on the specificstorage systems that have been identified as the migration source (7-Mode) and destination (ONTAP)systems. The assessment step only evaluates the migration source systems, checking feature andfunctionality differences with ONTAP.
Baseline data copy
New volumes are created on the SVM, a SnapMirror relationship is established between the 7-Modeand ONTAP volumes, and a baseline transfer is performed. After the baseline is complete,incremental transfers are automatically run according to a user-defined data copy schedule. Clientsand servers accessing the source storage remain online while this step is completed.
Copying data requires CPU, memory, and storage access, which results in additional resources beingused on the source storage system. It is a best practice to schedule data copy activity to occur duringoff-peak times (preferably, CPU usage should be around 50%).
Apply configuration (precutover)
This phase includes SnapMirror incremental transfers; configuration information is applied to theONTAP system, SVM, and volumes. Optionally, you can also test the ONTAP volumes that are beingtransitioned before storage cutover.
Although a majority of the configuration is applied, some actions are deferred to storage cutover: forexample, applying quotas.
20
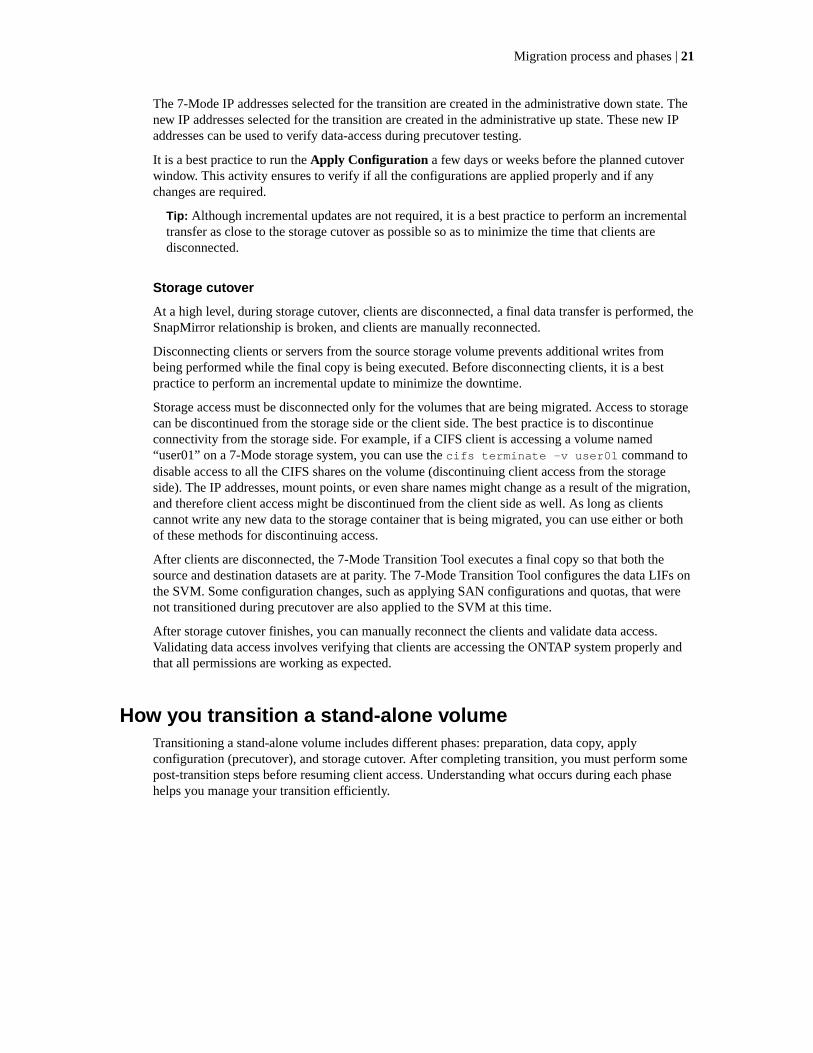
The 7-Mode IP addresses selected for the transition are created in the administrative down state. Thenew IP addresses selected for the transition are created in the administrative up state. These new IPaddresses can be used to verify data-access during precutover testing.
It is a best practice to run the Apply Configuration a few days or weeks before the planned cutoverwindow. This activity ensures to verify if all the configurations are applied properly and if anychanges are required.
Tip: Although incremental updates are not required, it is a best practice to perform an incrementaltransfer as close to the storage cutover as possible so as to minimize the time that clients aredisconnected.
Storage cutover
At a high level, during storage cutover, clients are disconnected, a final data transfer is performed, theSnapMirror relationship is broken, and clients are manually reconnected.
Disconnecting clients or servers from the source storage volume prevents additional writes frombeing performed while the final copy is being executed. Before disconnecting clients, it is a bestpractice to perform an incremental update to minimize the downtime.
Storage access must be disconnected only for the volumes that are being migrated. Access to storagecan be discontinued from the storage side or the client side. The best practice is to discontinueconnectivity from the storage side. For example, if a CIFS client is accessing a volume named“user01” on a 7-Mode storage system, you can use the cifs terminate -v user01 command todisable access to all the CIFS shares on the volume (discontinuing client access from the storageside). The IP addresses, mount points, or even share names might change as a result of the migration,and therefore client access might be discontinued from the client side as well. As long as clientscannot write any new data to the storage container that is being migrated, you can use either or bothof these methods for discontinuing access.
After clients are disconnected, the 7-Mode Transition Tool executes a final copy so that both thesource and destination datasets are at parity. The 7-Mode Transition Tool configures the data LIFs onthe SVM. Some configuration changes, such as applying SAN configurations and quotas, that werenot transitioned during precutover are also applied to the SVM at this time.
After storage cutover finishes, you can manually reconnect the clients and validate data access.Validating data access involves verifying that clients are accessing the ONTAP system properly andthat all permissions are working as expected.
How you transition a stand-alone volumeTransitioning a stand-alone volume includes different phases: preparation, data copy, applyconfiguration (precutover), and storage cutover. After completing transition, you must perform somepost-transition steps before resuming client access. Understanding what occurs during each phasehelps you manage your transition efficiently.
Migration process and phases | 21
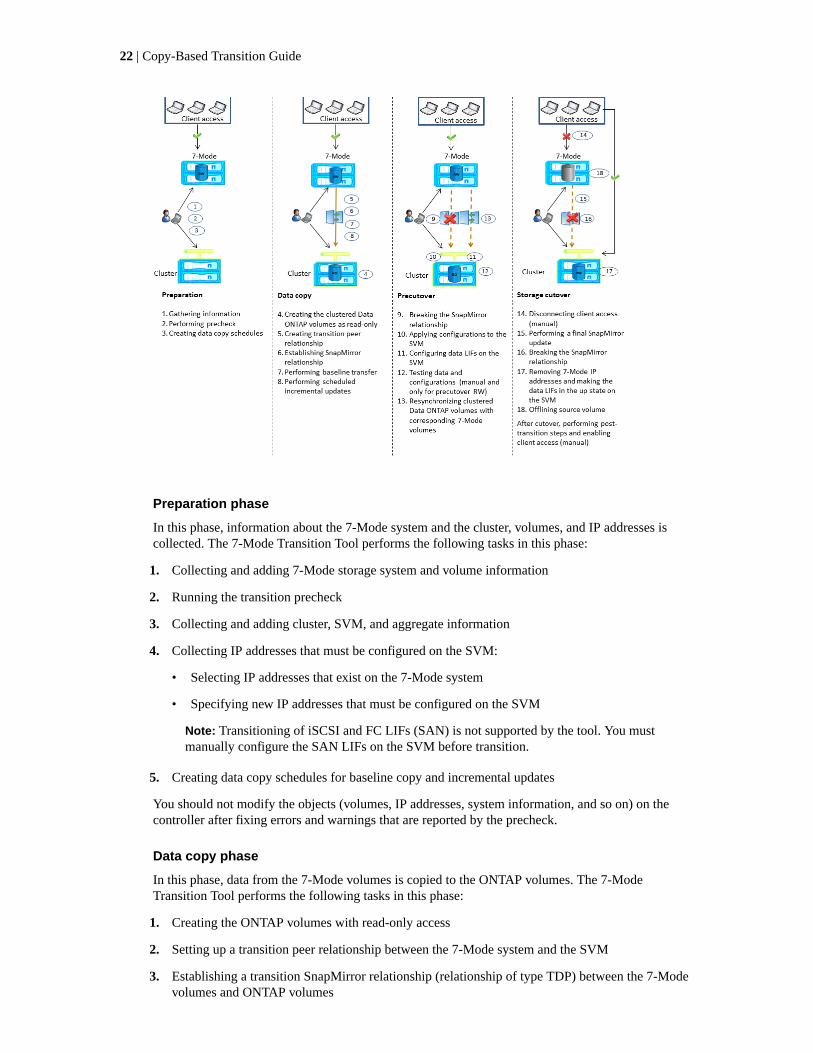
Preparation phase
In this phase, information about the 7-Mode system and the cluster, volumes, and IP addresses iscollected. The 7-Mode Transition Tool performs the following tasks in this phase:
1. Collecting and adding 7-Mode storage system and volume information
2. Running the transition precheck
3. Collecting and adding cluster, SVM, and aggregate information
4. Collecting IP addresses that must be configured on the SVM:
• Selecting IP addresses that exist on the 7-Mode system
• Specifying new IP addresses that must be configured on the SVM
Note: Transitioning of iSCSI and FC LIFs (SAN) is not supported by the tool. You mustmanually configure the SAN LIFs on the SVM before transition.
5. Creating data copy schedules for baseline copy and incremental updates
You should not modify the objects (volumes, IP addresses, system information, and so on) on thecontroller after fixing errors and warnings that are reported by the precheck.
Data copy phase
In this phase, data from the 7-Mode volumes is copied to the ONTAP volumes. The 7-ModeTransition Tool performs the following tasks in this phase:
1. Creating the ONTAP volumes with read-only access
2. Setting up a transition peer relationship between the 7-Mode system and the SVM
3. Establishing a transition SnapMirror relationship (relationship of type TDP) between the 7-Modevolumes and ONTAP volumes
22 | Copy-Based Transition Guide
4. Completing the baseline data copy transfer based on schedule inputs
5. Performing scheduled incremental updates to the ONTAP volumes
Apply configuration (precutover) phase
It is a best practice to run Apply Configuration a few days or weeks before the planned cutoverwindow. This activity is to verify if all the configurations are applied properly and if any changes arerequired.
In this phase, configurations from the 7-Mode volumes are copied to ONTAP volumes.
There are two modes for the apply configuration (precutover) phase: precutover read-only andprecutover read/write.
The precutover read/write mode is not supported when the project contains:
• SAN volumes and the target cluster is running Data ONTAP 8.3.1 or earlier. In this situation, thefollowing configurations are not applied in the precutover phase, instead they are applied duringthe cutover phase:
◦ SAN configurations
◦ Snapshot Schedule configurations
• SnapLock Compliance volumes.
If the project contains SnapLock Compliance volumes, then the Snapshot Scheduleconfigurations are not applied in the precutover phase, instead these configurations are appliedduring the cutover phase.
See Considerations for transitioning of SnapLock Compliance volumes on page 44.
If the target cluster is running Data ONTAP 8.3.1 or earlier, and you want to run the precutoveroperation in read/write mode for NAS volumes, then you must create separate projects for the NASand SAN volumes. This action is required because the precutover read/write mode is not supported ifyou have SAN volumes in your project.
If the project contains SnapLock Compliance volumes, and you want to run precutover operation inread/write mode for non-SnapLock Compliance volumes, then you must create separate projects forSnapLock Compliance volumes and non-SnapLock Compliance volumes. This action is requiredbecause the precutover read/write mode is not supported if you have SnapLock Compliance volumesin your project.
The tool performs the following steps in the precutover read-only mode:
1. Performing an incremental update from 7-Mode volumes to ONTAP volumes
2. Breaking the SnapMirror relationship between 7-Mode volumes and ONTAP volumes
Note: For SnapLock Compliance volumes, the SnapMirror relationship between the 7-Modevolume and ONTAP volumes is not broken. The SnapMirror relationship is not broken becausethe SnapMirror resynchronization operation between 7-Mode and ONTAP volumes is notsupported for SnapLock Compliance volumes.
3. Collecting configurations from 7-Mode volumes, and applying the configurations to the ONTAPvolumes and SVM
4. Configuring the data LIFs on the SVM:
• Existing 7-Mode IP addresses are created on the SVM in the administrative down state.
• New IP addresses are created on the SVM in the administrative up state.
5. Resynchronizing the SnapMirror relationship between 7-Mode volumes and ONTAP volumes
Migration process and phases | 23
The tool performs the following steps in the precutover read/write mode:
1. Performing an incremental update from 7-Mode volumes to ONTAP volumes
2. Breaking the SnapMirror relationship between 7-Mode volumes and ONTAP volumes
3. Collecting configurations from 7-Mode volumes, and applying the configurations to the ONTAPvolumes and SVM
4. Configuring the data LIFs on the SVM:
• Existing 7-Mode IP addresses are created on the SVM in the administrative down state.
• New IP addresses are created on the SVM in the administrative up state.
5. After you apply configuration, the ONTAP volumes are available for read/write access so thatread/write data access can be tested on these volumes during precutover testing.
6. Manual: Verifying the configurations and data access in ONTAP
7. Manual: Finish testingThe ONTAP volumes are resynchronized.
Storage cutover phase
The 7-Mode Transition Tool performs the following tasks in this phase:
1. Optional: Performing an on-demand SnapMirror update to reduce the downtime after cutover
2. Manual: Disconnecting client access from the 7-Mode system
3. Performing a final SnapMirror update from 7-Mode volumes to ONTAP volumes
4. Breaking and deleting the SnapMirror relationship between the 7-Mode volumes to ONTAPvolumes, making the ONTAP volumes read/writeIf a selected volume is the SnapLock Compliance volume and it is the destination of aSnapMirror relationship, then the SnapMirror relationship between 7-Mode volume and DataONTAP volume is deleted without SnapMirror break operation. This action is performed toensure that secondary ONTAP SnapLock Compliance volumes remain in read-only mode. Thesecondary ONTAP SnapLock Compliance volumes must be in read-only mode for theresynchronization operation to be successful between primary and secondary SnapLockCompliance volumes.
5. Applying Snapshot schedules configuration if:
• The target cluster is running ONTAP 8.3.0 or 8.3.1 and project contains SAN volumes
• The project contains SnapLock compliance volumes
6. Applying SAN configurations, if the target cluster is running Data ONTAP 8.3.1 or earlier.
7. Applying quota configurations, if any
8. Removing the existing 7-Mode IP addresses selected for transition from the 7-Mode system andbringing the data LIFs on the SVM to the administrative up state
Note: SAN LIFs are not transitioned by the 7-Mode Transition Tool.
9. Optional: Taking the 7-Mode volumes offline
Post-transition steps
After the storage cutover phase finishes successfully and transition is completed, you must performsome post-transition manual tasks:
24 | Copy-Based Transition Guide
1. Perform any steps to configure features that were not transitioned or were partially transitioned,as listed in the precheck report.For example, IPv6 and FPolicy must be configured manually after transition.
2. For SAN transition, reconfigure the hosts.SAN host transition and remediation
3. Ensure that the SVM is ready to serve data to the clients by verifying the following:
• The volumes on the SVM are online and read/write.
• The IP addresses are up and reachable on the SVM.
4. Redirect client access to the ONTAP volumes.
Related tasks
Migrating data and configuration from 7-Mode volumes on page 67
How you transition volumes in a SnapMirror relationshipIf you want to transition 7-Mode volumes that are in a SnapMirror relationship, the secondaryvolumes must be transitioned first. Then, a volume SnapMirror relationship is established betweenthe 7-Mode primary volumes and ONTAP secondary volumes.
After transitioning the primary volumes, the 7-Mode Transition Tool establishes a volumeSnapMirror relationship between ONTAP primary and secondary volumes.
Note: The SnapMirror relationship transition of SnapLock Compliance volumes is not automatedby the tool. All SnapLock Compliance volumes that are in a SnapMirror relationship must betransitioned as stand-alone volumes. After the primary and secondary SnapLock Compliancevolumes are transitioned to ONTAP, you must manually perform the SnapMirror resynchronizationoperation between these volumes.
You can perform precheck, baseline copy, incremental transfers, and precutover on the secondary andprimary projects simultaneously; however, the storage cutover for the secondary project must beperformed first.
Preparation phase
In this phase, the 7-Mode system, cluster, volumes, and IP addresses are selected. The 7-ModeTransition Tool performs the following tasks in this phase:
1. Adding 7-Mode storage system and volume information
2. Gathering information about 7-Mode source volumes and SnapMirror relationships:
• For transitioning a secondary volume, collecting information about the 7-Mode primarysystem
• For transitioning a primary volume, collecting information about the 7-Mode secondarysystem
3. Running the transition precheck
4. Adding cluster, SVM, and aggregate information
5. Collecting IP addresses that must be configured on the SVM:
• Selecting IP addresses that exist on the 7-Mode system
• Specifying new IP addresses that must be configured on the SVM
Migration process and phases | 25
Note: Transitioning iSCSI and FC LIFs (SAN) is not supported by the tool. You must manuallyconfigure the SAN LIFs on the SVM before transition.
6. Creating the data copy schedules for baseline and incremental transfers
You must not modify the objects (volumes, IP addresses, system information, and so on) on thecontroller after fixing errors and warnings that are reported by the precheck.
Data copy phase
In this phase, data from the 7-Mode volumes is copied to the ONTAP volumes. The 7-ModeTransition Tool performs the following tasks in this phase:
1. Creating the ONTAP volumes with read-only access
2. Setting up a transition peer relationship between the 7-Mode system and the SVM
3. Establishing a SnapMirror relationship between the 7-Mode volumes and ONTAP volumes
4. Completing the baseline data transfer based on schedule inputs
5. Performing scheduled SnapMirror data copy updates to the ONTAP volumes
Apply configuration (precutover) phase
It is a best practice to run Apply configuration a few days or weeks before the planned cutoverwindow. This precheck enables you to have enough time to verify that all of the configurations areapplied properly and whether any changes are required.
In this phase, configurations from the 7-Mode volumes are copied to the ONTAP volumes.
There are two modes for the precutover phase: precutover read-only and precutover read/write.
The precutover read/write mode is not supported when the project contains the following:
• SAN volumes and the target cluster is running Data ONTAP 8.3.1 or earlier
In this situation, the following configurations are not applied in the precutover phase, instead theyare applied during the cutover phase:
◦ SAN configurations
◦ Snapshot schedule configurations
• SnapLock Compliance volumes
If the project contains SnapLock Compliance volumes, then the Snapshot schedule configurationsare not applied in the precutover phase, instead these configurations are applied during thecutover phase.
Considerations for transitioning of SnapLock Compliance volumes on page 44.
If the target cluster is running Data ONTAP 8.3.1 or earlier and you want to run the precutoveroperation in read/write mode for NAS volumes, then you must create separate projects for the NASand SAN volumes. This action is required because the precutover read/write mode is not supported ifyou have SAN volumes in your project.
If the project contains SnapLock Compliance volumes and you want to run the precutover operationin read/write mode for non-SnapLock Compliance volumes, then you must create separate projectsfor SnapLock Compliance volumes and non-SnapLock Compliance volumes. This action is requiredbecause the precutover read/write mode is not supported if you have SnapLock Compliance volumesin your project.
The following steps are performed by the tool in the precutover read-only mode:
1. Performing an incremental update from 7-Mode volumes to ONTAP volumes
26 | Copy-Based Transition Guide

2. Breaking the SnapMirror relationship between 7-Mode volumes and ONTAP volumes
Note: For SnapLock Compliance volumes, the SnapMirror relationship between the 7-Modevolume and ONTAP volumes is not broken. The SnapMirror relationship is not broken becausethe SnapMirror resynchronization operation between 7-Mode and ONTAP volumes is notsupported for SnapLock Compliance volumes.
3. Collecting configurations from 7-Mode volumes and applying the configurations to the ONTAPvolumes and SVMs
4. Configuring the data LIFs on the SVM:
• Existing 7-Mode IP addresses are created on the SVM in the administrative down state.
• New IP addresses are created on the SVM in the administrative up state.
5. Resynchronizing the SnapMirror relationship between 7-Mode volumes and ONTAP volumes
The following steps are performed in the precutover read/write mode:
1. Performing an incremental update from 7-Mode volumes to ONTAP volumes
2. Breaking the SnapMirror relationship between 7-Mode volumes and ONTAP volumes
3. Collecting configurations from 7-Mode volumes and applying the configurations to the ONTAPvolumes and SVMs
4. Configuring the data LIFs on the SVM:
• Existing 7-Mode IP addresses are created on the SVM in the administrative down state.
• New IP addresses are created on the SVM in the administrative up state.
5. Testing the read/write data access on the ONTAP volumes during precutover testing
These ONTAP volumes will be available for read/write access after you have applied theconfiguration.
After you apply the configuration, the ONTAP volumes are available for read/write access so thatread/write data access can be tested on these volumes during precutover testing.
6. Manual: Verifying the configurations and data access in ONTAP
7. Manual: Finish testing
The ONTAP volumes are resynchronized.
Storage cutover (secondary volumes) phase
The 7-Mode Transition Tool performs the following tasks in this phase:
1. Optional: Performing an on-demand SnapMirror update on the ONTAP secondary volumes
2. Manual: Disconnecting client access, if required
3. Performing a final SnapMirror update from the 7-Mode secondary volume to the ONTAPsecondary volume
4. Breaking and deleting the SnapMirror relationship between the 7-Mode secondary volume andthe ONTAP secondary volume, and making the destination volumes read/write
5. Applying the Snapshot schedules configuration, if the target cluster is running Data ONTAP 8.3.0or 8.3.1 and the project contains SAN volumes
6. Applying SAN configurations, if the target cluster is running Data ONTAP 8.3.1 or earlier
Migration process and phases | 27
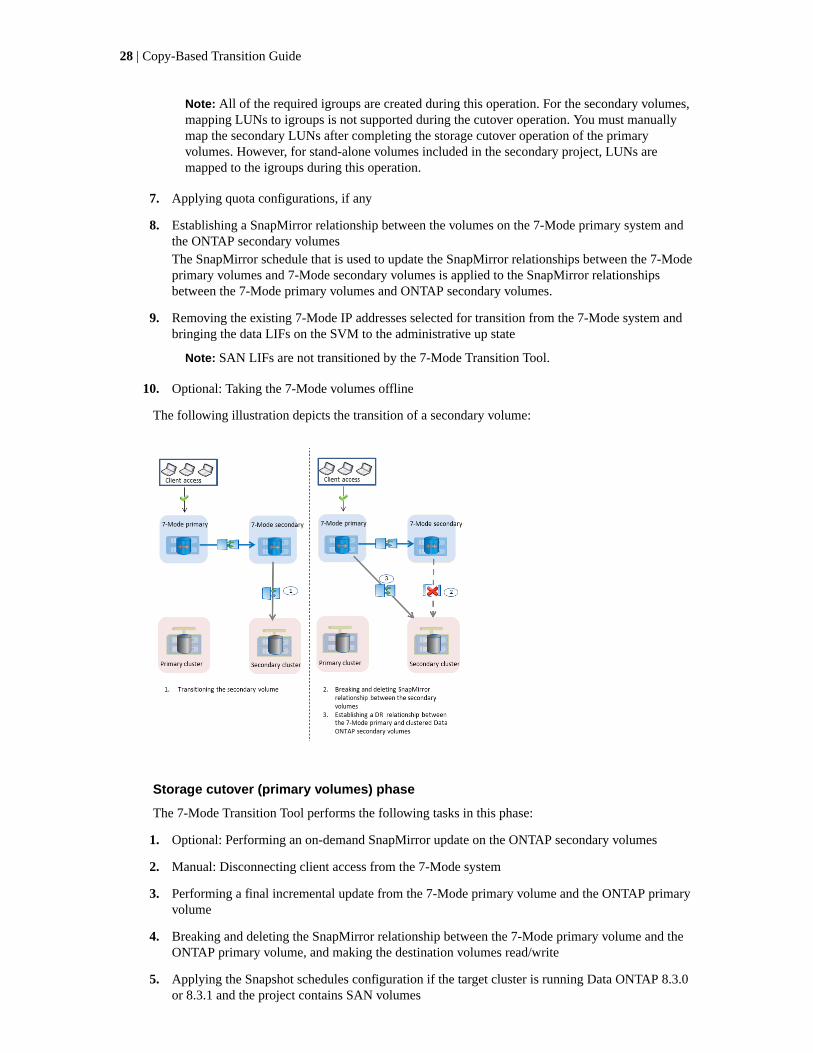
Note: All of the required igroups are created during this operation. For the secondary volumes,mapping LUNs to igroups is not supported during the cutover operation. You must manuallymap the secondary LUNs after completing the storage cutover operation of the primaryvolumes. However, for stand-alone volumes included in the secondary project, LUNs aremapped to the igroups during this operation.
7. Applying quota configurations, if any
8. Establishing a SnapMirror relationship between the volumes on the 7-Mode primary system andthe ONTAP secondary volumes
The SnapMirror schedule that is used to update the SnapMirror relationships between the 7-Modeprimary volumes and 7-Mode secondary volumes is applied to the SnapMirror relationshipsbetween the 7-Mode primary volumes and ONTAP secondary volumes.
9. Removing the existing 7-Mode IP addresses selected for transition from the 7-Mode system andbringing the data LIFs on the SVM to the administrative up state
Note: SAN LIFs are not transitioned by the 7-Mode Transition Tool.
10. Optional: Taking the 7-Mode volumes offline
The following illustration depicts the transition of a secondary volume:
Storage cutover (primary volumes) phase
The 7-Mode Transition Tool performs the following tasks in this phase:
1. Optional: Performing an on-demand SnapMirror update on the ONTAP secondary volumes
2. Manual: Disconnecting client access from the 7-Mode system
3. Performing a final incremental update from the 7-Mode primary volume and the ONTAP primaryvolume
4. Breaking and deleting the SnapMirror relationship between the 7-Mode primary volume and theONTAP primary volume, and making the destination volumes read/write
5. Applying the Snapshot schedules configuration if the target cluster is running Data ONTAP 8.3.0or 8.3.1 and the project contains SAN volumes
28 | Copy-Based Transition Guide
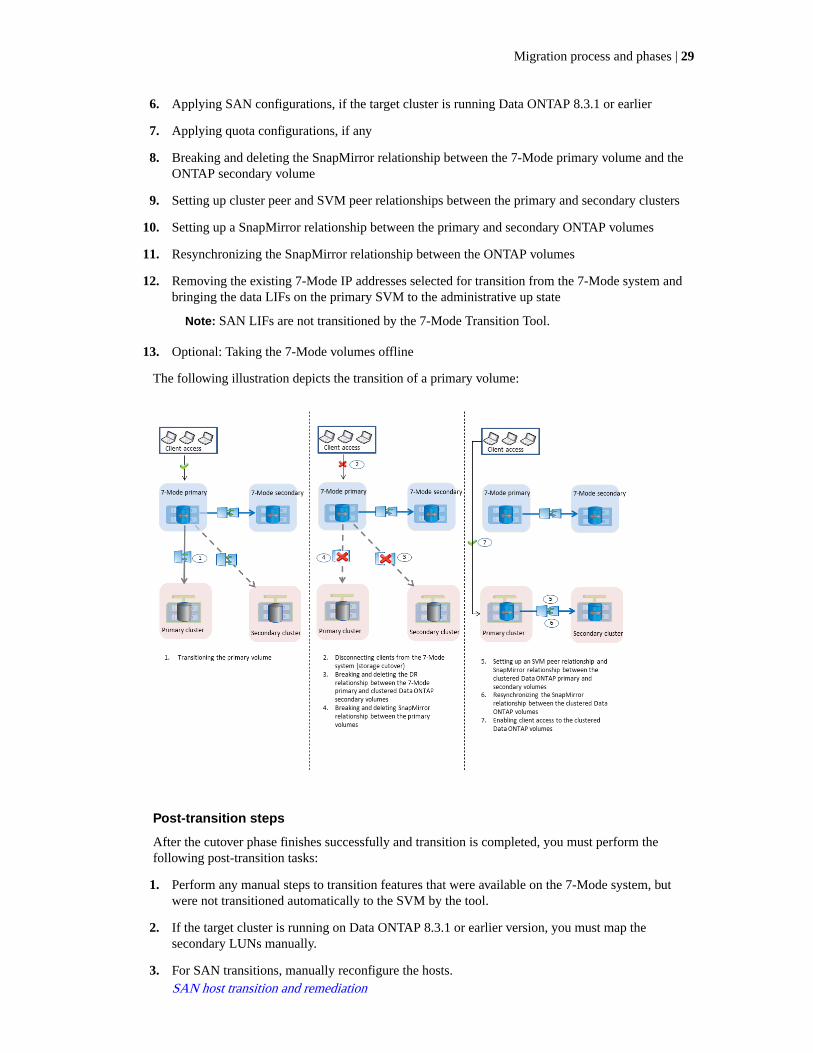
6. Applying SAN configurations, if the target cluster is running Data ONTAP 8.3.1 or earlier
7. Applying quota configurations, if any
8. Breaking and deleting the SnapMirror relationship between the 7-Mode primary volume and theONTAP secondary volume
9. Setting up cluster peer and SVM peer relationships between the primary and secondary clusters
10. Setting up a SnapMirror relationship between the primary and secondary ONTAP volumes
11. Resynchronizing the SnapMirror relationship between the ONTAP volumes
12. Removing the existing 7-Mode IP addresses selected for transition from the 7-Mode system andbringing the data LIFs on the primary SVM to the administrative up state
Note: SAN LIFs are not transitioned by the 7-Mode Transition Tool.
13. Optional: Taking the 7-Mode volumes offline
The following illustration depicts the transition of a primary volume:
Post-transition steps
After the cutover phase finishes successfully and transition is completed, you must perform thefollowing post-transition tasks:
1. Perform any manual steps to transition features that were available on the 7-Mode system, butwere not transitioned automatically to the SVM by the tool.
2. If the target cluster is running on Data ONTAP 8.3.1 or earlier version, you must map thesecondary LUNs manually.
3. For SAN transitions, manually reconfigure the hosts.
SAN host transition and remediation
Migration process and phases | 29

4. Ensure that the SVM is ready to serve data to the clients by verifying the following:
• The volumes on the SVM are online and read/write.
• The transitioned IP addresses are up and reachable on the SVM.
5. Redirect client access to the ONTAP volumes.
Related tasks
Migrating data and configuration from 7-Mode volumes on page 67
30 | Copy-Based Transition Guide
Preparing for copy-based transition
Before initiating a data copy operation from 7-Mode to clustered Data ONTAP, you must understandthe requirements and restrictions for migration, and complete certain tasks on the 7-Mode system andthe cluster.
You must ensure that the following requirements are met before transition:
• The 7-Mode and clustered Data ONTAP systems must be reachable from the host on which thetool is installed.
• The 7-Mode systems must be running the supported Data ONTAP versions.
• SnapMirror must be licensed on the 7-Mode system.
• Required feature licenses, if they exist on the 7-Mode system, must be installed on the cluster.
• The NTP server must be configured and the time must be synchronized across the 7-Mode systemand cluster.
• All preparatory tasks on the 7-Mode system must be completed.
• All preparatory tasks on the cluster must be completed.
Related references
Transition preparation checklist on page 68
Related information
NetApp KB Article 3014031: FAQ: 7MTT v2.0/Transitioned Data ONTAP features
NetApp Interoperability Matrix Tool
Requirements for copy-based transitionYou must be aware of the ONTAP version requirements, licensing requirements, and 7-ModeTransition Tool requirements for copy-based transition.
Data ONTAP operating in 7-Mode
For a list of the 7-Mode versions supported for migration by the 7-Mode Transition Tool,see the NetApp Interoperability Matrix Tool.
ONTAP
7-Mode Transition Tool 3.2 supports transition to ONTAP 8.2.x or later by using copy-based migration.
Licensing requirements
SnapMirror must be licensed on the 7-Mode storage system. If the 7-Mode system doesnot have a SnapMirror license, you can obtain a temporary SnapMirror license fortransition from your sales representative.
7-Mode Transition Tool service
For the data copy schedules to take effect, the 7-Mode Transition Tool service must bealways up and running on the Windows or Linux system on which the tool is installed.However, it does not require the web interface to be active or open for the schedules totake effect. You can close the web interface and re-login whenever required.
31

Storage, host, and FC switch version requirements for transition assessment
For the list of 7-Mode versions, hosts, and FC switches that are supported for assessmentby the 7-Mode Transition Tool, see the NetApp Interoperability Matrix Tool.
Port requirements for communicating with the 7-ModeTransition Tool
The 7-Mode Transition Tool communicates with the 7-Mode system and the cluster over certainports. You must ensure that these ports on the 7-Mode system and the cluster are open to allowcommunication with the 7-Mode Transition Tool.
Ports that must be open on the 7-Mode systems
7-Mode Transition Tool communicates with the 7-Mode systems by using HTTPS on port 443.
The following ports are required by the cluster to communicate with the 7-Mode systems forSnapMirror replication:
• 10565/TCP
• 10566/TCP
• 10567/TCP
• 10568/TCP
• 10569/TCP
• 10670/TCP
Ports that must be open on the cluster
7-Mode Transition Tool communicates with the cluster by using HTTPS on port 443.
The following ports are required by the 7-Mode systems to communicate with the cluster forSnapMirror replication:
• 10565/TCP
• 10566/TCP
• 10567/TCP
• 10568/TCP
• 10569/TCP
• 10670/TCP
• 11105/TCP
Additionally, the 7-Mode Transition Tool performs a ping operation from the intercluster LIFs to thedata copy IP address of the 7-Mode system to verify reachability.
Ports that must be open on the 7-Mode Transition Tool
Port 8444 of the 7-Mode Transition Tool must be open for the web interface.
To transition netgroups and CIFS local users and groups, the following requirements must be met:
• Port 8088 of the 7-Mode Transition Tool must be available.
32 | Copy-Based Transition Guide

For an alternative to port 8088, you must change the port specified by the tool.http.portparameter in the transition-tool.conf file of the 7-Mode Transition Tool install directory.
Note: You must restart the 7-Mode Transition Tool service after changing the port in theconfiguration file.
• Each node in the cluster must have at least one data LIF configured for the target SVM.
• All SVM data LIFs must be able to communicate with the 7-Mode Transition Tool port 8088 orthe port specified by the tool.http.port parameter in the transition-tool.conf file.
Note: You must verify that firewalls do not block this traffic.
Related information
7-Mode Transition Tool installation and administration
Restrictions for transitionYou must be aware of certain restrictions for transitioning some 7-Mode volumes and configurations.
• No volume within the same project can cut over until all volumes in the same project havecompleted their baseline transfers.
• If you want to transition 7-Mode primary and secondary volumes when both the 7-Mode sourceand destination are running Data ONTAP 7.3.x or 8.0.x, you must start transitioning the 7-Modesecondary volume only when there are no data updates from the 7-Mode primary to the 7-Modesecondary volume.
You must verify that the data update schedules for the 7-Mode primary volume to the 7-Modesecondary volume do not conflict with the schedules for the 7-Mode secondary volume to theONTAP secondary volume.
• You must not initiate a transition while the aggregates on either the 7-Mode system or cluster areupgrading from 32-bit to 64-bit format; otherwise the transition fails.
• The 7-Mode Transition tool does not transition a volume with a qtree that is the destination of aqtree SnapMirror relationship.
The qtree SnapMirror relationship must be broken before the volume can be transitioned.
• You cannot transition a fanout SnapMirror relationship (a primary volume that is in SnapMirrorrelationships with more than one secondary volume in different controllers) by using the 7-ModeTransition Tool web interface.
To transition the SnapMirror relationships in a fanout configuration, you must use the 7-ModeTransition Tool CLI. You should create separate projects for each secondary volume, complete thetransition of the secondary projects, and then create and complete the transition of the primaryvolume.
• You cannot transition volumes from different vFiler units or from different 7-Mode controllers tothe same SVM at the same time.
You must complete the transition of volumes from a given vFiler unit or 7-Mode controller beforeyou can start the transition of volumes from another vFiler unit or 7-Mode controller.
• The 7-Mode Transition tool does not transition a vFiler unit as a single entity.
However, you can transition all of the volumes in a vFiler unit by selecting them as a part of oneor more projects.
• The 7-Mode Transition tool does not transition the root volume of a vFiler unit if the root volumeis based on a qtree that belongs to the default vFiler unit.
Preparing for copy-based transition | 33

• The 7-Mode Transition tool does not transition a volume with a qtree if the volume and qtree areowned by different vFiler units.Transitioning such a volume causes the qtree to become inaccessible.
The precheck operation displays information about some of these restrictions.
Preparing the 7-Mode system for transitionBefore starting a transition, you must complete certain tasks on the 7-Mode system, such as addingthe SnapMirror license, enabling the 7-Mode system to communicate with the target cluster, andenabling TLS.
Before you begin
All the 7-Mode volumes that you want to transition must be online.
Steps
1. Add and enable the SnapMirror license on the 7-Mode system:
a. Add the SnapMirror license on the 7-Mode system:
license add license_code
license_code is the license code you purchased.
b. Enable the SnapMirror functionality:
options snapmirror.enable on
2. Configure the 7-Mode system and the target cluster to communicate with each other by choosingone of the following options:
• Set the snapmirror.access option to all.
• Set the value of the snapmirror.access option to the IP addresses of all the interclusterLIFs on the cluster.
• If the snapmirror.access option is legacy and the snapmirror.checkip.enableoption is off, add the SVM name to the /etc/snapmirror.allow file.
• If the snapmirror.access option is legacy and the snapmirror.checkip.enableoption is on, add the IP addresses of the intercluster LIFs to the /etc/snapmirror.allowfile.
3. If HTTPS is not enabled on the storage system, enable HTTPS:
options httpd.admin.ssl.enable on
HTTPS is enabled by default.
4. Enable TLS on the 7-Mode storage systems for enabling the 7-Mode Transition Tool tocommunicate with the 7-Mode systems:
a. If SSL is not already enabled on the storage system, set up and start SSL:
secureadmin setup ssl
SSL is set up for the storage systems by default. If SSL has been previously set up for thestorage system, you are asked whether you want to continue. You can exit the SSL setup ifyou do not want to make any changes.
b. Enable SSL:
options ssl.enable on
34 | Copy-Based Transition Guide
This option must be enabled for allowing communication over TLS.
c. Enable TLS:
options tls.enable on
d. Disable SSLv2 and SSLv3 on the 7-Mode system:
options ssl.v2.enable off
options ssl.v3.enable off
The 7-Mode Transition Tool uses TLS or SSL protocols for communicating with the 7-Modestorage systems. The tool communicates with the storage system using the TLS protocol if TLS isenabled on the storage system. If TLS is disabled and SSLv3 is enabled on a storage system, thetool uses SSLv3 to communicate with the storage system.
Important: The best practice is to enable TLS and disable SSLv2 and SSLv3 in order to avoidsecurity vulnerabilities.
5. Depending on the Data ONTAP version of your 7-Mode system, perform the following steps:
a. Allow SnapMirror traffic on all the interfaces:
options interface.snapmirror.blocked ""
b. If you are running Data ONTAP version 7.3.7, 8.0.3, or 8.1 and you are using the IP addressof the e0M interface as the management IP address to interact with 7-Mode Transition Tool,allow data traffic on the e0M interface:
options interface.blocked.mgmt_data_traffic off
6. If you have set the I2P, read allocations, or NVFAIL options on the volume, perform thefollowing steps:
a. Verify that other operations are not impacted if these options are disabled.
b. Disable the options:
vol options vol_name no_i2p off
vol options vol_name read_realloc off
vol options vol_name nvfail off
Preparing the network for transitionYou must prepare the data network of the cluster for transition by creating logical ports (VLANs andinterface groups).
Before you begin
The NTP server must be configured and the time must be synchronized across the 7-Mode systemsand cluster.
Steps
1. Create VLANs or interface groups on the target cluster nodes, if required.
To provide network connectivity after transition, you should transition the 7-Mode IP addresses toa similar network topology in ONTAP. For example, if the 7-Mode IP addresses are configured onphysical ports, the IP addresses should be transitioned to appropriate physical ports in ONTAP.Similarly, IP addresses configured on VLAN ports or interface groups should be transitioned toappropriate VLAN ports or interface groups in ONTAP.
Preparing for copy-based transition | 35
ONTAP 9 man page: network port vlan create
ONTAP 9 man page: network port ifgrp create
2. If you want SVMs in the non-default IPspace, create the required IPspaces.
The 7-Mode IP addresses or the new LIFs that are selected for transition are created in theIPspace of the mapped SVM.
Note: IPv6 addresses cannot be transitioned and must be configured manually post-transition.
ONTAP 9 man page: network ipspace create
Related information
Network and LIF management
Considerations for transitioning 7-Mode IP addresses
You must be aware of certain considerations when transitioning 7-Mode IP addresses to StorageVirtual Machines (SVMs) in ONTAP.
• You can transition existing 7-Mode IP addresses or specify new IP addresses to be configured onthe SVM by using the 7-Mode Transition Tool.
◦ Existing 7-Mode IP addresses are created on the SVM in the administrative down state in theapply configuration (precutover) phase.
◦ New IP addresses are created on the SVM in the administrative up state in the applyconfiguration (precutover) phase.
• IPv6 addresses cannot be transitioned and must be manually configured after the transition.
• iSCSI and FC LIFs are not transitioned and must be manually configured after the transition.
Preparing the cluster for transitionBefore transition, you must ensure that the cluster meets requirements such as allowing HTTPS,setting up intercluster LIFs, and verifying the network connectivity for transition.
Before you begin
• The cluster and the SVM must already be set up.
Software setupThe target SVM must not be in an SVM disaster recovery relationship.
• The cluster must be healthy and none of the nodes must be in takeover mode.
• The target aggregates, which will contain the transitioned volumes, must have an SFO policy.
• The aggregates must be on nodes that have not reached the maximum volume limit.
• If you want to transition volumes from a 32-bit aggregate of a 7-Mode system to a 64-bitaggregate of a Data ONTAP 8.2.x cluster, you must have provided an additional 5 percent spacein the destination aggregate.
The additional space is required to upgrade the transitioned volume to 64-bit format.
Disk and aggregate management
• For establishing an SVM peer relationship when transitioning a volume SnapMirror relationship,the following conditions must be met:
36 | Copy-Based Transition Guide
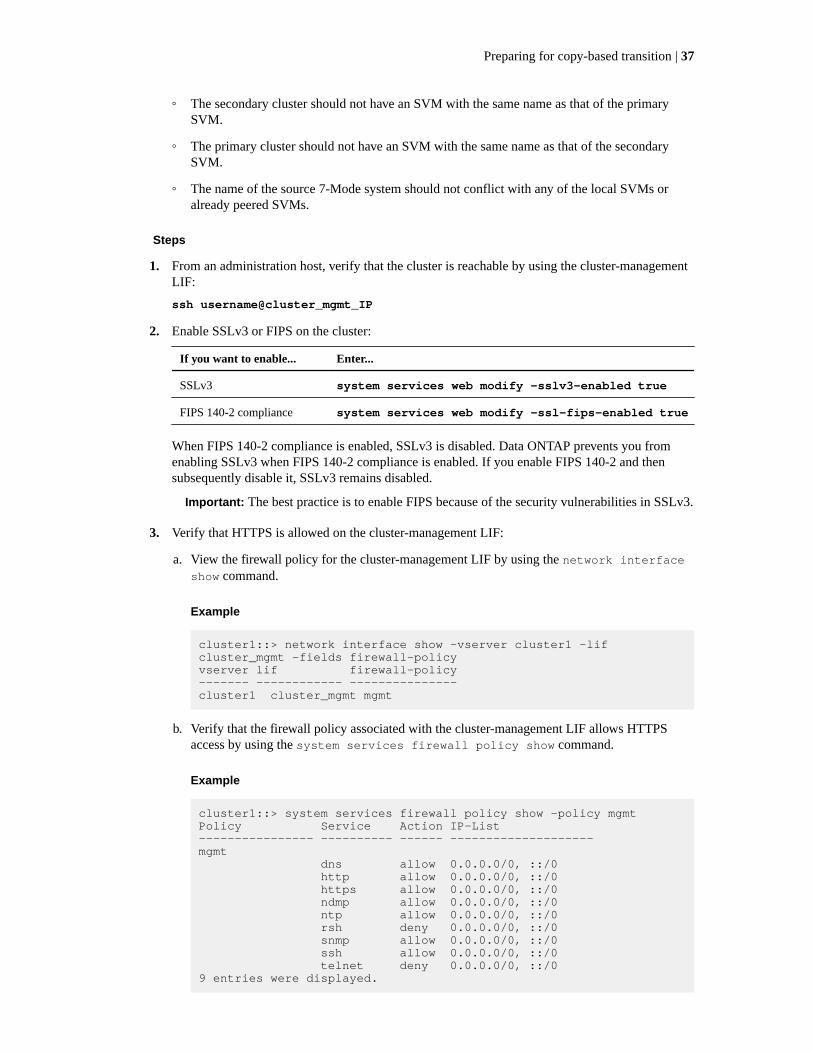
◦ The secondary cluster should not have an SVM with the same name as that of the primarySVM.
◦ The primary cluster should not have an SVM with the same name as that of the secondarySVM.
◦ The name of the source 7-Mode system should not conflict with any of the local SVMs oralready peered SVMs.
Steps
1. From an administration host, verify that the cluster is reachable by using the cluster-managementLIF:
ssh username@cluster_mgmt_IP
2. Enable SSLv3 or FIPS on the cluster:
If you want to enable... Enter...
SSLv3 system services web modify -sslv3-enabled true
FIPS 140-2 compliance system services web modify -ssl-fips-enabled true
When FIPS 140-2 compliance is enabled, SSLv3 is disabled. Data ONTAP prevents you fromenabling SSLv3 when FIPS 140-2 compliance is enabled. If you enable FIPS 140-2 and thensubsequently disable it, SSLv3 remains disabled.
Important: The best practice is to enable FIPS because of the security vulnerabilities in SSLv3.
3. Verify that HTTPS is allowed on the cluster-management LIF:
a. View the firewall policy for the cluster-management LIF by using the network interfaceshow command.
Example
cluster1::> network interface show -vserver cluster1 -lif cluster_mgmt -fields firewall-policyvserver lif firewall-policy------- ------------ ---------------cluster1 cluster_mgmt mgmt
b. Verify that the firewall policy associated with the cluster-management LIF allows HTTPSaccess by using the system services firewall policy show command.
Example
cluster1::> system services firewall policy show -policy mgmtPolicy Service Action IP-List---------------- ---------- ------ --------------------mgmt dns allow 0.0.0.0/0, ::/0 http allow 0.0.0.0/0, ::/0 https allow 0.0.0.0/0, ::/0 ndmp allow 0.0.0.0/0, ::/0 ntp allow 0.0.0.0/0, ::/0 rsh deny 0.0.0.0/0, ::/0 snmp allow 0.0.0.0/0, ::/0 ssh allow 0.0.0.0/0, ::/0 telnet deny 0.0.0.0/0, ::/09 entries were displayed.
Preparing for copy-based transition | 37
System administration
4. Create the intercluster LIF on each node of the cluster for communication between the cluster and7-Mode system:
a. Create an intercluster LIF by using the network interface create command.
Example
cluster1::> network interface create -vserver cluster1-01 -lif intercluster_lif -role intercluster -home-node cluster1-01 -home-port e0c -address 192.0.2.130 -netmask 255.255.255.0
b. If you are transitioning to ONTAP 8.3.x or later, create a static route for the intercluster LIFby using the network routing-groups route create command.
Example
cluster1::> network routing-groups route create -vserver cluster1-01 -routing-group i192.0.0.0/18 -destination 0.0.0.0/0 - gateway 192.0.2.129
c. If you are transitioning to clustered Data ONTAP 8.3.x, create a static route for the interclusterLIF by using the network route create command.
Example
cluster1::> network route create -vserver vs0 -destination 0.0.0.0/0 -gateway 10.61.208.1
d. Verify that you can use the intercluster LIF to ping the 7-Mode system by using the networkping command.
Example
cluster1::> network ping -lif intercluster_lif -lif-owner cluster1-01 -destination system7modesystem7mode is alive
For multipathing, you must have two intercluster LIFs on each node.
Network and LIF management
Related information
NetApp Documentation: Product Library A-Z
Preparing 7-Mode aggregates and volumes for transitionBefore transition, you must ensure that the 7-Mode aggregates and volumes are eligible for transitionand perform some manual steps before transition. For example, some volume types cannot betransitioned and any 32-bit data must be removed from the 7-Mode systems before transition.
38 | Copy-Based Transition Guide
Restrictions for transitioning 7-Mode volumes
You must be aware of certain restrictions for transitioning 7-Mode volumes. Some of the restrictionsare due to features that are not supported in ONTAP. For some restrictions, you can perform acorrective action that enables you to continue with the transition.
Volume types
The following types of volumes are not supported for transition:
• Traditional volumes
You can use host-based transition methods to transition traditional volumes.
NetApp Technical Report 4052: Successfully Transitioning to Clustered Data ONTAP (DataONTAP 8.2.x and 8.3)
• SnapLock volumes
• FlexCache volumes
Volume states
Transition is blocked if any of the 7-Mode volumes selected for the transition are in one of thefollowing states:
• Offline
• Restricted
• Inconsistent (wafl inconsistent)
Volume with qtrees that belong to a different vFiler unit
You cannot transition volumes with qtrees, where the qtrees are owned by a different vFiler unit thanthat of the volume. Before transition, you must ensure that each volume and all of its qtrees belong tothe same vFiler unit by performing one of the following actions:
• Move the qtrees to the vFiler unit that owns the volume.
• Delete the qtrees.
Inode to parent pathname translation setting
The inode to parent pathname translations must be enabled on each volume. You can enable theparent to pathname translations by turning off the no_i2p option:
vol options vol_name no_i2p off
You do not have to wait for the i2p scan to finish, and you can continue with the transitionpreparation.
Preparing for transitioning to ONTAP 8.3 and later
32-bit aggregates, volumes, and Snapshot copies are not supported in ONTAP 8.3 and later.Therefore, you must expand the 32-bit aggregates to 64-bit, and then find and remove any 32-bitvolumes and Snapshot copies from the 7-Mode system before transition. Because all 7-Mode
Preparing for copy-based transition | 39
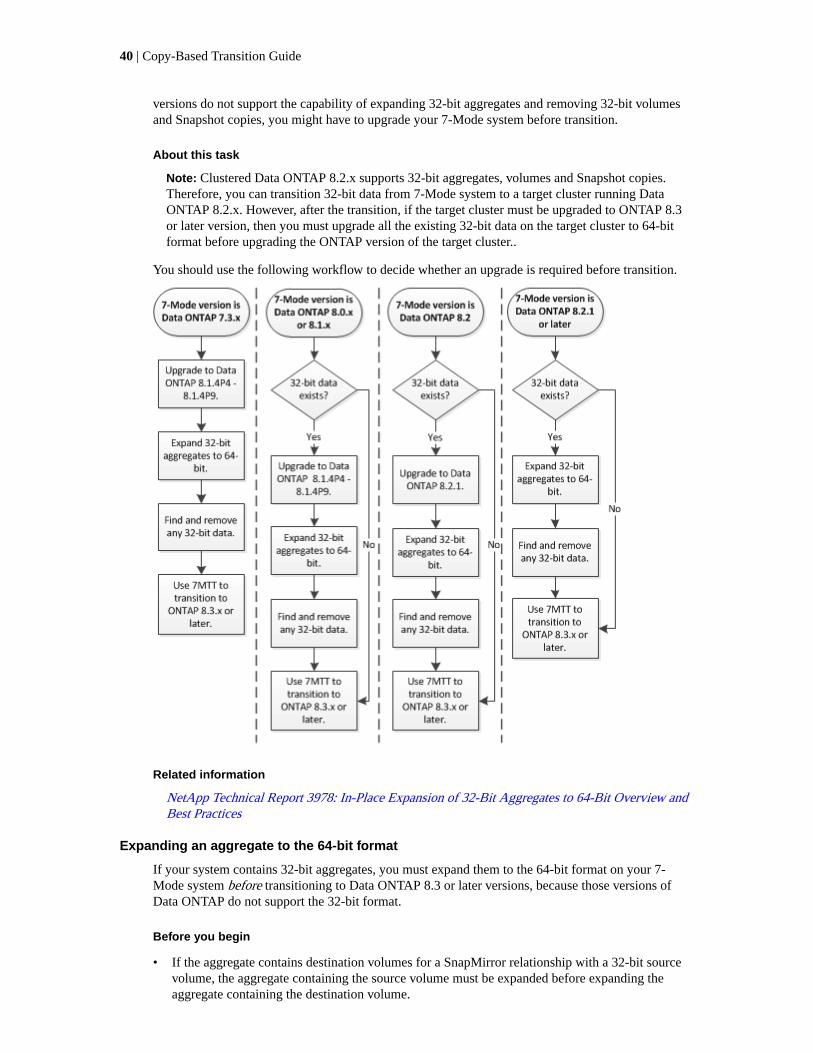
versions do not support the capability of expanding 32-bit aggregates and removing 32-bit volumesand Snapshot copies, you might have to upgrade your 7-Mode system before transition.
About this task
Note: Clustered Data ONTAP 8.2.x supports 32-bit aggregates, volumes and Snapshot copies.Therefore, you can transition 32-bit data from 7-Mode system to a target cluster running DataONTAP 8.2.x. However, after the transition, if the target cluster must be upgraded to ONTAP 8.3or later version, then you must upgrade all the existing 32-bit data on the target cluster to 64-bitformat before upgrading the ONTAP version of the target cluster..
You should use the following workflow to decide whether an upgrade is required before transition.
Related information
NetApp Technical Report 3978: In-Place Expansion of 32-Bit Aggregates to 64-Bit Overview andBest Practices
Expanding an aggregate to the 64-bit format
If your system contains 32-bit aggregates, you must expand them to the 64-bit format on your 7-Mode system before transitioning to Data ONTAP 8.3 or later versions, because those versions ofData ONTAP do not support the 32-bit format.
Before you begin
• If the aggregate contains destination volumes for a SnapMirror relationship with a 32-bit sourcevolume, the aggregate containing the source volume must be expanded before expanding theaggregate containing the destination volume.
40 | Copy-Based Transition Guide
About this task
For volumes in a SnapMirror relationship, the destination volume inherits the format of the sourcevolume while the mirror is intact. If the aggregate you are expanding contains a destination volumewhose source is a 32-bit volume and you break the mirror before expanding the aggregate, thedestination volume is expanded to the 64-bit format. However, if you reestablish the mirror and thesource volume is still 32-bit, the destination volume returns to the 32-bit format. For this reason, youmust expand the aggregate containing the source volume before reestablishing the SnapMirrorrelationship if you want to expand all 32-bit volumes in the aggregate to the 64-bit format.
Steps
1. Enter advanced privilege mode:
priv set advanced
2. Initiate the expansion:
aggr 64bit-upgrade start aggr_name
3. Perform the appropriate action:
If the command... Then...
Initiates successfully Proceed to the next step.
Indicates that one or morevolumes could not beexpanded because they didnot have enough space
Retry the command, adding the grow-all option.
Indicates that the expansioncould not be completed forsome other reason
Perform the appropriate action, based on the issue outlined in the errormessage.
4. Display the status of the expansion:
aggr 64bit-upgrade status aggr_name
The current status of the expansion is displayed. When the message indicates that there is noupgrade in progress, the expansion is complete.
5. Optional: Confirm that all volumes in the aggregate are 64-bit format:
aggr 64bit-upgrade status aggr_name -all
6. Return to administrative privilege mode:
priv set admin
Result
The aggregate is expanded to the 64-bit format. However, even if all volumes are expanded, some 32-bit Snapshot copies might remain. The presence of 32-bit Snapshot copies in the source volumesprevents an upgrade or transition to Data ONTAP 8.3 or later.
Finding and removing 32-bit volumes and Snapshot copies
Even if you have expanded all of your aggregates to the 64-bit format, some 32-bit or mixed-formatFlexVol volumes or Snapshot copies can remain. These volumes and Snapshot copies must beremoved before your data can be accessed by a cluster running Data ONTAP 8.3 or later.
Before you begin
• You must have expanded all 32-bit aggregates on the system to the 64-bit format.
Preparing for copy-based transition | 41

About this task
You must repeat the steps in this task for each aggregate that contains 32-bit volumes and Snapshotcopies.
Steps
1. Enter advanced mode:
priv set advanced
2. Display the format of all volumes in the aggregate:
aggr 64bit-upgrade status aggr_name -all
Each volume in the aggregate is displayed with its format.
3. For each 32-bit or mixed-format volume, determine the reason that the volume has not beenexpanded to the 64-bit format, and then take the appropriate action.
If you cannot determine the reason that the volume was not expanded, retry the aggregateexpansion.
If the volume… Then…
Is the destination of aSnapMirror relationship
Expand the aggregate containing the source volume to the 64-bit format.
Is a read-only volume (butnot a SnapMirror destination)
Make the volume writable and retry the expansion, or destroy thevolume.
Did not expand because ofinsufficient free space in thevolume or aggregate
Increase the free space in the volume or aggregate and retry theexpansion.
All 32-bit and mixed-format volumes in the aggregate are now 64-bit. You can confirm this byrepeating the previous step.
4. Display the format of all Snapshot copies on the system:
snap list -fs-block-format
5. Remove the 32-bit Snapshot copies by using the snap delete command.
Attention: This action deletes the data in the Snapshot copies. You must be certain that you donot need to retain the Snapshot copies before you delete them. Alternatively, you can wait forthe 32-bit Snapshot copies to be aged out. The amount of time this takes depends on yourSnapshot copy schedule.
If a Snapshot copy is the base Snapshot copy for a FlexClone volume, you must split theFlexClone volume from its parent before you can remove the Snapshot copy.
All 32-bit Snapshot copies are removed. You can confirm this by repeating the previous step.
6. Return to the administrative privilege level:
priv set admin
Considerations for deduplication and compression
When using compression, the source and the destination volumes must belong to a 64-bit aggregate.All compression and deduplication savings on the source volume are retained over the networkduring transition. After transition, the destination volume inherits all of the compression anddeduplication attributes and storage savings from the source volume.
Transitioning deduplicated and compressed data helps in reducing the network bandwidth duringtransition because of the following reasons:
42 | Copy-Based Transition Guide
• Shared blocks are transferred only once.
• Compression is maintained throughout the transfer.
• Compressed and deduplicated data involves smaller transfer sizes as a result of compression anddeduplication space savings; therefore, the transfers are completed more quickly.
You should not start compression or deduplication of existing data on the source volume duringtransition. If deduplication or compression is in progress, you should start the transition only after thededuplication or compression operation is complete. Therefore, undeduplicated or uncompresseddata and additional temporary metadata files are not sent over the network to the destination volume.
For deduplication and compression to take effect on any new data written on the ONTAP volume,you must enable deduplication and compression schedules after the transition.
Beginning with Data ONTAP 8.1, deduplication maintains a partially ordered fingerprint database inthe volume along with the aggregate copy. As a result, the destination system will have the spacesavings from the source volume as well as a copy of the ordered fingerprint database. Aftermigration, when volume efficiency is run on the new volume for the first time, the aggregatefingerprint database is automatically constructed from the copy in the destination volume. This canresult in a one-time increase in the time it takes for volume efficiency operations to complete.
If your source volume is running a Data ONTAP operating in 7-Mode prior to 8.1, you must run thevolume efficiency start command with the -scan-old-data option parameter tooptimize space savings. After the migration is complete, you should verify whether the deduplicationschedule meets your requirements on your cluster and consider switching to a volume efficiencypolicy.
Considerations for FlexClone volumes
When transitioning FlexClone volumes to the SVM, the clones are split from the parent volumes andare transitioned as FlexVol volumes to the destination cluster. As a result, the clone hierarchy andstorage efficiency are lost in the transition process.
If the target cluster is running Data ONTAP 8.3 or earlier, FlexClone volumes cannot be created fromSnapshot copies that are transitioned from 7-Mode. You can create FlexClone volumes only fromnew Snapshot copies that are created after the volume is transitioned to ONTAP. Beginning withclustered Data ONTAP 8.3.1, you can create FlexClone volumes from Snapshot copies that aretransitioned from 7-Mode.
Considerations for quotas
You must be aware of how quotas are transitioned when “apply configuration” (precutover) is run inread-only and read-write mode.
Quotas are applied in the following ways during the precutover phase:
• Read-only mode
Quotas are not applied in the precutover read-only mode on the ONTAP system; they are appliedonly during the storage cutover phase.
• Read-write mode
Quotas are applied in the precutover read-write mode on the ONTAP system, so that you can testthem in ONTAP. However, the quotas are removed during resynchronization (after testing iscompleted) of the ONTAP volumes. The quotas are applied again during the storage cutoverphase.
Preparing for copy-based transition | 43
Support for transitioning SnapLock volumesThe 7-Mode Transition Tool supports the transition of SnapLock volumes to target clusters runningONTAP 9.0 or later.
The SnapLock Enterprise and SnapLock Compliance volumes are supported for transition to targetclusters that are running ONTAP 9.0 or later. However, SnapLock Compliance volume transition isnot supported to the target clusters that are in MetroCluster configurations.
Considerations for transitioning of SnapLock Enterprise volumes
The 7-Mode Transition Tool supports the transition of stand-alone SnapLock Enterprise volumes andSnapLock Enterprise volumes that are in a SnapMirror relationship.
The workflow for transitioning SnapLock Enterprise volumes is the same as for FlexVol volumes.
SnapMirror relationships are preserved during the transition.
Note: The 7-Mode Transition Tool only supports like-to-like transition for SnapMirrorrelationships of SnapLock Enterprise volumes. That is, both the source and destination volumesmust be SnapLock Enterprise volumes.
Considerations for transitioning of SnapLock Compliance volumes
The 7-Mode Transition Tool supports the transition of standalone SnapLock Compliance volumesand SnapLock Compliance volumes that are in a SnapMirror relationship.
The workflow for transitioning standalone SnapLock Compliance volumes is the same as fortransitioning FlexVol volumes.
The transition of SnapMirror relationships for SnapLock Compliance volumes is not automated bythe 7-Mode Transition Tool. You must transition the primary and secondary SnapLock Compliancevolumes as stand-alone volumes, and then manually resynchronize the relationships.
You can include the SnapLock Compliance volumes (both stand-alone and the volumes that are inSnapMirror relationships) as a standalone volume in stand-alone, primary, and secondary projects.
The precutover read/write mode is not supported for projects with SnapLock Compliance volumes. Itis a best practice to create separate projects for SnapLock Compliance volumes and non-SnapLockCompliance volumes because the precutover read/write mode is not supported if SnapLockCompliance volumes are included in the project.
During the cutover operation, if the selected volume is a SnapLock Compliance volume and it is thedestination of a SnapMirror relationship, then the SnapMirror relationship between the 7-Modevolume and the ONTAP volume is deleted without SnapMirror break operation. This action enablesthe secondary ONTAP SnapLock Compliance volumes to remain in read-only mode. The secondaryONTAP SnapLock Compliance volumes must be in read-only mode for the resynchronizationoperation to be successful between the primary and secondary SnapLock Compliance volumes.
See NetApp KB Article 1015960: How to transition the 7-Mode SnapLock Compliance volumeswith SnapMirror relationship to clustered Data ONTAP
Considerations for transitioning of SnapLock Audit volumes
The 7-Mode Transition Tool supports the transition of SnapLock Audit volumes. The workflow totransition SnapLock Audit volumes is the same as the transition of SnapLock Compliance volumes.
After you transition audit volumes to the ONTAP, you must manually designate the transitioned auditvolume as SnapLock Audit volume for the target SVM.
44 | Copy-Based Transition Guide
In ONTAP, the audit volumes are configured at an SVM level. In Data ONTAP operating in 7-Mode,an audit volume serves as a consolidated repository for all of the volumes in the controller across thevFiler units.
SnapLock Audit volumes are a type of SnapLock Compliance volume. The transition of SnapLockAudit volumes is not supported if the target cluster is in a MetroCluster configuration.
See NetApp KB Article 1015961: How to configure audit volume in clustered Data ONTAP for thetransitioned SnapLock volumes
Considerations for transitioning of 7-Mode SnapLock options
The 7-Mode Transition Tool supports the transition of a few 7-Mode options that are related toSnapLock volumes.
Data ONTAP operating in 7-Mode has the following options that are related to SnapLock volumes:
• snaplock.autocommit_period
This option is at a volume level in Data ONTAP, and is transitioned to Data ONTAP during thetransition.
• snaplock.compliance.write_verify
This option is not applicable in Data ONTAP.
• snaplock.log.default_retention
• snaplock.log.maximum_size
Although the snaplock.log.default_retention and snaplock.log.maximum_size optionsare supported in ONTAP, the 7-Mode Transition Tool does not transition these options to DataONTAP versions. You must manually set these options for audit volume after the transition iscompleted.
Preparing to transition name servicesName service configurations that include DNS, LDAP, NIS, hosts, name services switch, UNIX usersand groups, and netgroups configurations are transitioned by the 7-Mode Transition Tool. You mustbe aware of some considerations before transitioning name services configurations.
Name services transition: supported and unsupported configurations, andrequired manual steps
You must be aware of the name services configurations that are transitioned by the 7-ModeTransition Tool. Some name services configurations are not transitioned to ONTAP because eitherthese are not supported in ONTAP or these must be manually transitioned.
You should verify all the precheck error and warning messages to evaluate the impact of suchconfigurations on transition.
Configurations that are transitioned
At a high level, the following name services configurations are transitioned by the 7-Mode TransitionTool:
• DNS configuration (/etc/resolv.conf)
• LDAP configuration
• NIS configuration
Preparing for copy-based transition | 45
• Name service switch configuration (/etc/nsswitch.conf and /etc/resolv.conf)
• Hosts configuration (/etc/hosts)
• UNIX users and groups (/etc/passwd and /etc/group)
• Netgroups configuration (/etc/netgroup)
See the precheck results for details about these name services configurations.
Unsupported configurations in ONTAP
• NIS slave
• NIS broadcast
• NIS groups caching
• Dynamic DNS
• DNS cache
• Shadow database
• Host database sources other than file or DNS
ONTAP supports only file and DNS for host lookup; other database sources are not supported.Host lookup order in the /etc/nsswitch.conf is ignored during transition.
Configurations that must be manually configured
You must manually configure the following LDAP options on the SVMs:
• ldap.usermap.attribute.unixaccount
• ldap.password
• ldap.usermap.base
• ldap.ssl.enable
Related information
NFS management
Network and LIF management
Considerations for transitioning DNS, NIS, and LDAP configurations
You must be aware of how the DNS, NIS, and LDAP configurations in 7-Mode are transitioned andapplied in ONTAP.
Considerations for DNS transition
A maximum of six domain names and three name servers for DNS configurations per SVM aresupported in ONTAP. If the unique number of domain names or name servers across 7-Mode andtarget SVM exceed the supported limit, the 7-Mode Transition Tool produces a blocking error. Tocontinue with the transition, ignore the transition of DNS configuration from the tool.
Note: If you ignore the transition of DNS configuration, you must manually configure it on thetarget SVM.
46 | Copy-Based Transition Guide
Considerations for NIS transition
• The length of the NIS domain name on the 7-Mode system must not exceed 64 characters.
• The nis.servers option on the 7-Mode system must be configured only with IP addresses, andnot an FQDN.
You must configure the nis.servers option on the 7-Mode system with IP addresses beforetransition.
Considerations for LDAP transition
• If multiple base and scope values are set for the ldap.base, ldap.base.passwd,ldap.base.group, or ldap.base.netgroup option, and if you are transitioning to clusteredData ONTAP 8.2 or 8.2.1, only one value for each option is transitioned.
After transition, there might be lookup issues for these options. You must manually add the baseand scope values after transition.
• If multiple scope values are set for the ldap.base, ldap.base.passwd, ldap.base.group,or ldap.base.netgroup option, and if you are transitioning to clustered Data ONTAP 8.2.2,only one value for each option is transitioned.
• If separate base and scope values are specified for user mapping (ldap.usermap.base) anduser password (ldap.base.passwd) lookups in the 7-Mode system, the base and scope valuesfor only the user password are transitioned.
The base and scope values are used for user mapping and user password lookups in Data ONTAP,which can cause security issues. You must manually add the base and scope values for usermapping to the user distinguished name (DN) option in ONTAP after transition, if required.
Considerations for transitioning netgroups and UNIX users and groups
Netgroup configuration is transitioned only if the 7-Mode /etc/netgroup file is less than 5 MB insize. UNIX users and groups are transitioned only if the total number of UNIX users and groups onthe SVM do not exceed the limits for users and groups in ONTAP.
Considerations for netgroups
If the /etc/netgroup file on 7-Mode is greater than 5 MB, the netgroup configuration is nottransitioned. You must perform one of the following actions to continue with the transition:
• Exclude the transition of netgroups.
• Move the netgroup configuration to NIS or LDAP servers before transition.
Considerations for UNIX users and groups
If the total number of transitioning UNIX users and groups exceed the limit of UNIX users andgroups in ONTAP, the 7-Mode Transition Tool blocks the transition. You must perform one of thefollowing actions to continue with the transition:
• Exclude the transition of UNIX users and groups.
• Move the UNIX users and groups to NIS or LDAP servers before transition.
Related information
NFS management
Preparing for copy-based transition | 47
Preparing for NFS transitionIf NFS is licensed and NFS service is running on the systems operating in 7-Mode, you mustmanually prepare the cluster and target SVMs for transitioning NFS configurations. You must also beaware of what configurations are transitioned.
Some NFS configurations operating in 7-Mode are not supported in clustered Data ONTAP. Someconfigurations are not transitioned by the 7-Mode Transition Tool and must be manually applied tothe SVMs.
Prerequisites for transitioning NFS configurations
NFS configurations are transitioned by the 7-Mode Transition Tool only when certain prerequisitesare met on the 7-Mode system and the cluster. If any of the conditions are not met, the tool does nottransition the configuration.
7-Mode prerequisites
• NFS must be licensed.
• If MultiStore is licensed, NFS must be enabled on the vFiler unit that owns the transitioningvolumes.
• For transitioning a Microsoft Active Directory (AD) based Kerberos server to a new SVM, a DNSentry must exist for the AD domain.
Note: To transition the Kerberos configuration, at least one LIF must be transitioned as part ofthe project and the LIF must be resolvable to a host name.
• If you want to transition in-memory export rules, you must add them to the /etc/exports filebefore transition.
The 7-Mode Transition Tool transitions only the persistent export rules that are defined inthe /etc/exports file.
Cluster prerequisites
• NFS must be licensed.
• For transitioning a Microsoft AD-based Kerberos server to an existing SVM with DNSconfigured, a DNS entry must exist for the AD domain.
• The clock skew between the Kerberos key distribution center (KDC) and the ONTAP systemmust be less than or equal to 5 minutes.
Related concepts
How NFS exports are transitioned on page 50
Related information
NetApp Documentation: ONTAP 9
NFS transition: supported and unsupported configurations, and requiredmanual steps
Some NFS configurations are not transitioned to ONTAP because they are not supported in ONTAP,there are functionality differences from 7-Mode, or they must be manually transitioned. You should
48 | Copy-Based Transition Guide
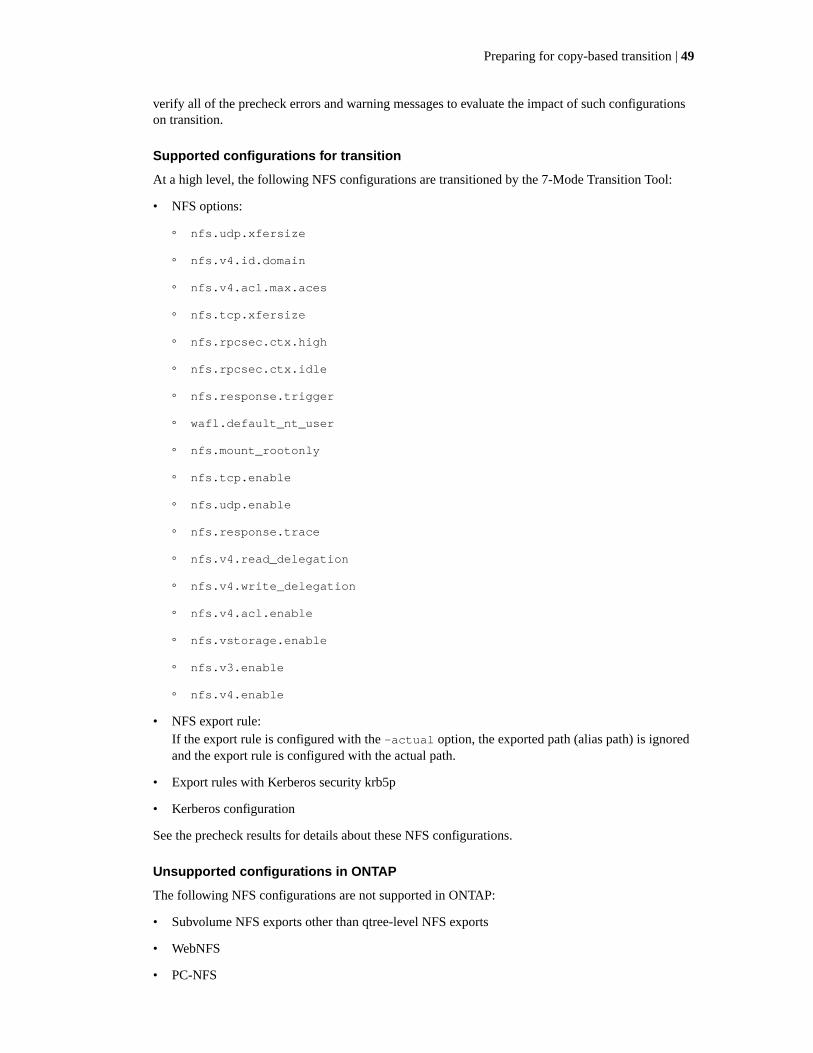
verify all of the precheck errors and warning messages to evaluate the impact of such configurationson transition.
Supported configurations for transition
At a high level, the following NFS configurations are transitioned by the 7-Mode Transition Tool:
• NFS options:
◦ nfs.udp.xfersize
◦ nfs.v4.id.domain
◦ nfs.v4.acl.max.aces
◦ nfs.tcp.xfersize
◦ nfs.rpcsec.ctx.high
◦ nfs.rpcsec.ctx.idle
◦ nfs.response.trigger
◦ wafl.default_nt_user
◦ nfs.mount_rootonly
◦ nfs.tcp.enable
◦ nfs.udp.enable
◦ nfs.response.trace
◦ nfs.v4.read_delegation
◦ nfs.v4.write_delegation
◦ nfs.v4.acl.enable
◦ nfs.vstorage.enable
◦ nfs.v3.enable
◦ nfs.v4.enable
• NFS export rule:
If the export rule is configured with the -actual option, the exported path (alias path) is ignoredand the export rule is configured with the actual path.
• Export rules with Kerberos security krb5p
• Kerberos configuration
See the precheck results for details about these NFS configurations.
Unsupported configurations in ONTAP
The following NFS configurations are not supported in ONTAP:
• Subvolume NFS exports other than qtree-level NFS exports
• WebNFS
• PC-NFS
Preparing for copy-based transition | 49

• NFSv2
• Fencing of NFS clients from one or more file system paths
• Some NFS options
See the precheck warning messages for a complete list of unsupported options.
Configurations that must be manually transitioned
There are some NFS configurations that are supported in ONTAP, but are not transitioned by the 7-Mode Transition Tool.
The following NFS configurations generate a warning message in the precheck operation, and youmust manually apply the configurations on the SVMs:
• NFS audit configuration
• NFS options:
◦ rpc.nsm.tcp.port
◦ rpc.nsm.udp.port
◦ rpc.mountd.tcp.port
◦ rpc.mountd.udp.port
◦ nfs.export.neg.timeout
◦ nfs.export.pos.timeout
◦ nfs.export.harvest.timeout
ONTAP 9 man page: vserver nfs modify
• Export rules with Kerberos security krb5p
Configurations that are functionally different in ONTAP
The following NFS configurations are functionally different in ONTAP:
• NFS export rules
• NFS export access cache
• NFS diagnostic commands
• Support for the showmount command
• NFS Kerberos encryption
• NLM version support
Related information
NFS management
How NFS exports are transitioned
You must be aware of how NFS exports are configured on the SVM after transition. You might haveto perform some manual steps if the 7-Mode export configurations are not supported in ONTAP.
You must be aware of the following considerations about NFS exports transition:
50 | Copy-Based Transition Guide
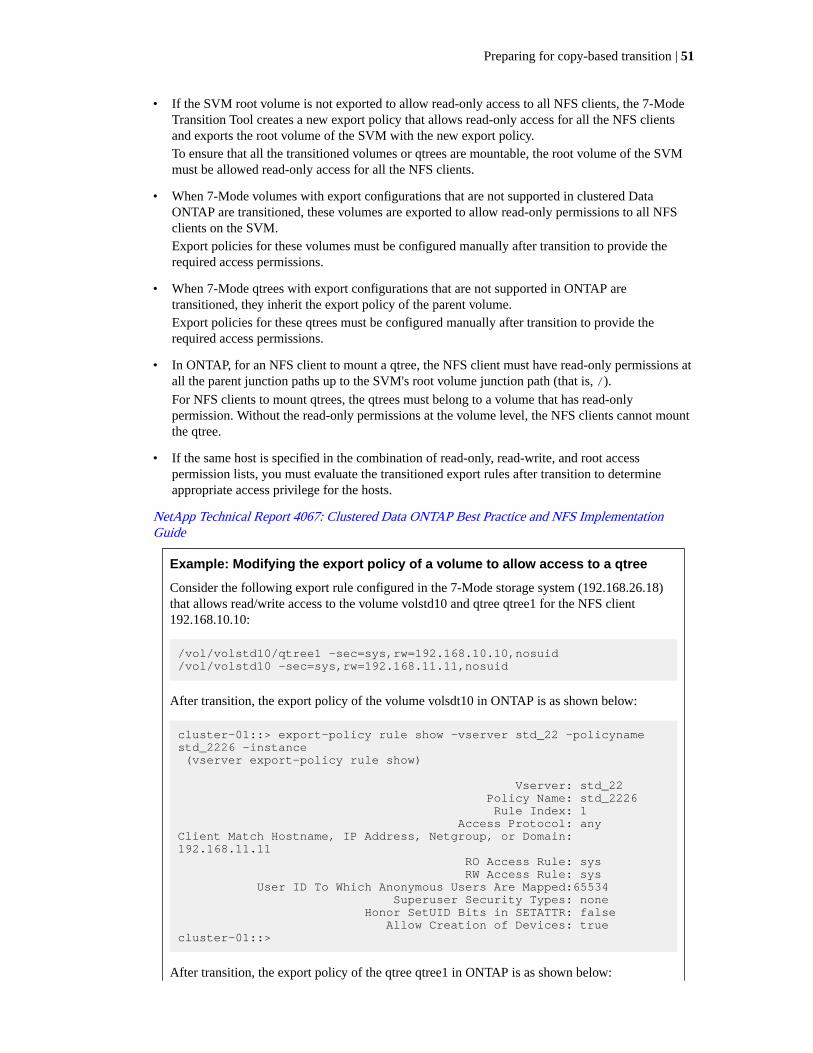
• If the SVM root volume is not exported to allow read-only access to all NFS clients, the 7-ModeTransition Tool creates a new export policy that allows read-only access for all the NFS clientsand exports the root volume of the SVM with the new export policy.
To ensure that all the transitioned volumes or qtrees are mountable, the root volume of the SVMmust be allowed read-only access for all the NFS clients.
• When 7-Mode volumes with export configurations that are not supported in clustered DataONTAP are transitioned, these volumes are exported to allow read-only permissions to all NFSclients on the SVM.
Export policies for these volumes must be configured manually after transition to provide therequired access permissions.
• When 7-Mode qtrees with export configurations that are not supported in ONTAP aretransitioned, they inherit the export policy of the parent volume.
Export policies for these qtrees must be configured manually after transition to provide therequired access permissions.
• In ONTAP, for an NFS client to mount a qtree, the NFS client must have read-only permissions atall the parent junction paths up to the SVM's root volume junction path (that is, /).
For NFS clients to mount qtrees, the qtrees must belong to a volume that has read-onlypermission. Without the read-only permissions at the volume level, the NFS clients cannot mountthe qtree.
• If the same host is specified in the combination of read-only, read-write, and root accesspermission lists, you must evaluate the transitioned export rules after transition to determineappropriate access privilege for the hosts.
NetApp Technical Report 4067: Clustered Data ONTAP Best Practice and NFS ImplementationGuide
Example: Modifying the export policy of a volume to allow access to a qtree
Consider the following export rule configured in the 7-Mode storage system (192.168.26.18)that allows read/write access to the volume volstd10 and qtree qtree1 for the NFS client192.168.10.10:
/vol/volstd10/qtree1 -sec=sys,rw=192.168.10.10,nosuid/vol/volstd10 -sec=sys,rw=192.168.11.11,nosuid
After transition, the export policy of the volume volsdt10 in ONTAP is as shown below:
cluster-01::> export-policy rule show -vserver std_22 -policyname std_2226 -instance (vserver export-policy rule show)
Vserver: std_22 Policy Name: std_2226 Rule Index: 1 Access Protocol: anyClient Match Hostname, IP Address, Netgroup, or Domain: 192.168.11.11 RO Access Rule: sys RW Access Rule: sys User ID To Which Anonymous Users Are Mapped:65534 Superuser Security Types: none Honor SetUID Bits in SETATTR: false Allow Creation of Devices: truecluster-01::>
After transition, the export policy of the qtree qtree1 in ONTAP is as shown below:
Preparing for copy-based transition | 51
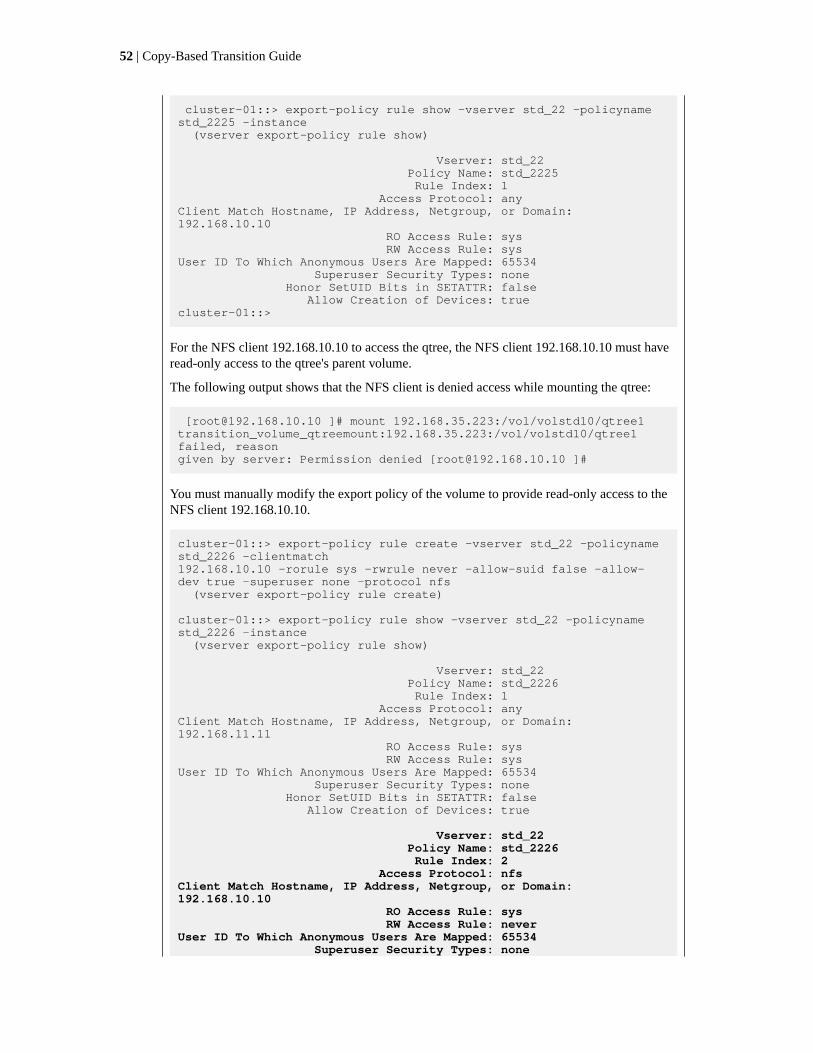
cluster-01::> export-policy rule show -vserver std_22 -policyname std_2225 -instance (vserver export-policy rule show) Vserver: std_22 Policy Name: std_2225 Rule Index: 1 Access Protocol: anyClient Match Hostname, IP Address, Netgroup, or Domain: 192.168.10.10 RO Access Rule: sys RW Access Rule: sysUser ID To Which Anonymous Users Are Mapped: 65534 Superuser Security Types: none Honor SetUID Bits in SETATTR: false Allow Creation of Devices: truecluster-01::>
For the NFS client 192.168.10.10 to access the qtree, the NFS client 192.168.10.10 must haveread-only access to the qtree's parent volume.
The following output shows that the NFS client is denied access while mounting the qtree:
[[email protected] ]# mount 192.168.35.223:/vol/volstd10/qtree1 transition_volume_qtreemount:192.168.35.223:/vol/volstd10/qtree1 failed, reason given by server: Permission denied [[email protected] ]#
You must manually modify the export policy of the volume to provide read-only access to theNFS client 192.168.10.10.
cluster-01::> export-policy rule create -vserver std_22 -policyname std_2226 -clientmatch192.168.10.10 -rorule sys -rwrule never -allow-suid false -allow-dev true -superuser none -protocol nfs (vserver export-policy rule create) cluster-01::> export-policy rule show -vserver std_22 -policyname std_2226 -instance (vserver export-policy rule show) Vserver: std_22 Policy Name: std_2226 Rule Index: 1 Access Protocol: anyClient Match Hostname, IP Address, Netgroup, or Domain: 192.168.11.11 RO Access Rule: sys RW Access Rule: sysUser ID To Which Anonymous Users Are Mapped: 65534 Superuser Security Types: none Honor SetUID Bits in SETATTR: false Allow Creation of Devices: true
Vserver: std_22 Policy Name: std_2226 Rule Index: 2 Access Protocol: nfsClient Match Hostname, IP Address, Netgroup, or Domain: 192.168.10.10 RO Access Rule: sys RW Access Rule: neverUser ID To Which Anonymous Users Are Mapped: 65534 Superuser Security Types: none
52 | Copy-Based Transition Guide
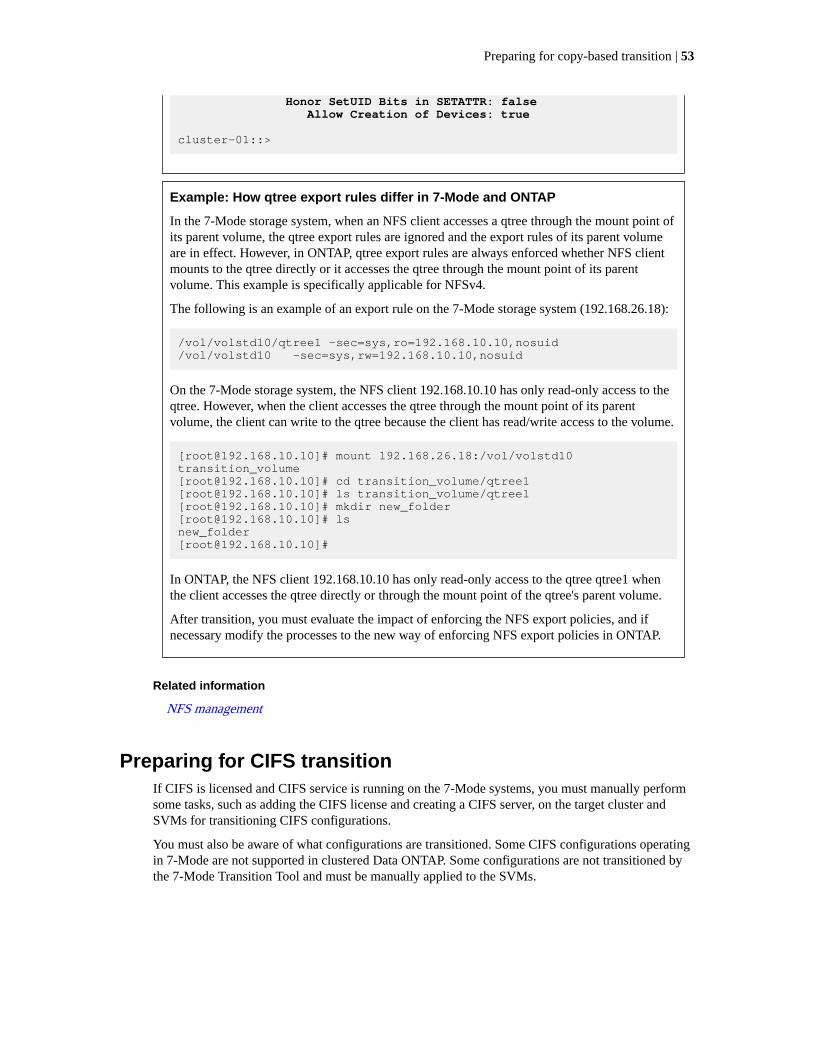
Honor SetUID Bits in SETATTR: false Allow Creation of Devices: true cluster-01::>
Example: How qtree export rules differ in 7-Mode and ONTAP
In the 7-Mode storage system, when an NFS client accesses a qtree through the mount point ofits parent volume, the qtree export rules are ignored and the export rules of its parent volumeare in effect. However, in ONTAP, qtree export rules are always enforced whether NFS clientmounts to the qtree directly or it accesses the qtree through the mount point of its parentvolume. This example is specifically applicable for NFSv4.
The following is an example of an export rule on the 7-Mode storage system (192.168.26.18):
/vol/volstd10/qtree1 -sec=sys,ro=192.168.10.10,nosuid/vol/volstd10 -sec=sys,rw=192.168.10.10,nosuid
On the 7-Mode storage system, the NFS client 192.168.10.10 has only read-only access to theqtree. However, when the client accesses the qtree through the mount point of its parentvolume, the client can write to the qtree because the client has read/write access to the volume.
[[email protected]]# mount 192.168.26.18:/vol/volstd10 transition_volume[[email protected]]# cd transition_volume/qtree1[[email protected]]# ls transition_volume/qtree1[[email protected]]# mkdir new_folder[[email protected]]# lsnew_folder[[email protected]]#
In ONTAP, the NFS client 192.168.10.10 has only read-only access to the qtree qtree1 whenthe client accesses the qtree directly or through the mount point of the qtree's parent volume.
After transition, you must evaluate the impact of enforcing the NFS export policies, and ifnecessary modify the processes to the new way of enforcing NFS export policies in ONTAP.
Related information
NFS management
Preparing for CIFS transitionIf CIFS is licensed and CIFS service is running on the 7-Mode systems, you must manually performsome tasks, such as adding the CIFS license and creating a CIFS server, on the target cluster andSVMs for transitioning CIFS configurations.
You must also be aware of what configurations are transitioned. Some CIFS configurations operatingin 7-Mode are not supported in clustered Data ONTAP. Some configurations are not transitioned bythe 7-Mode Transition Tool and must be manually applied to the SVMs.
Preparing for copy-based transition | 53
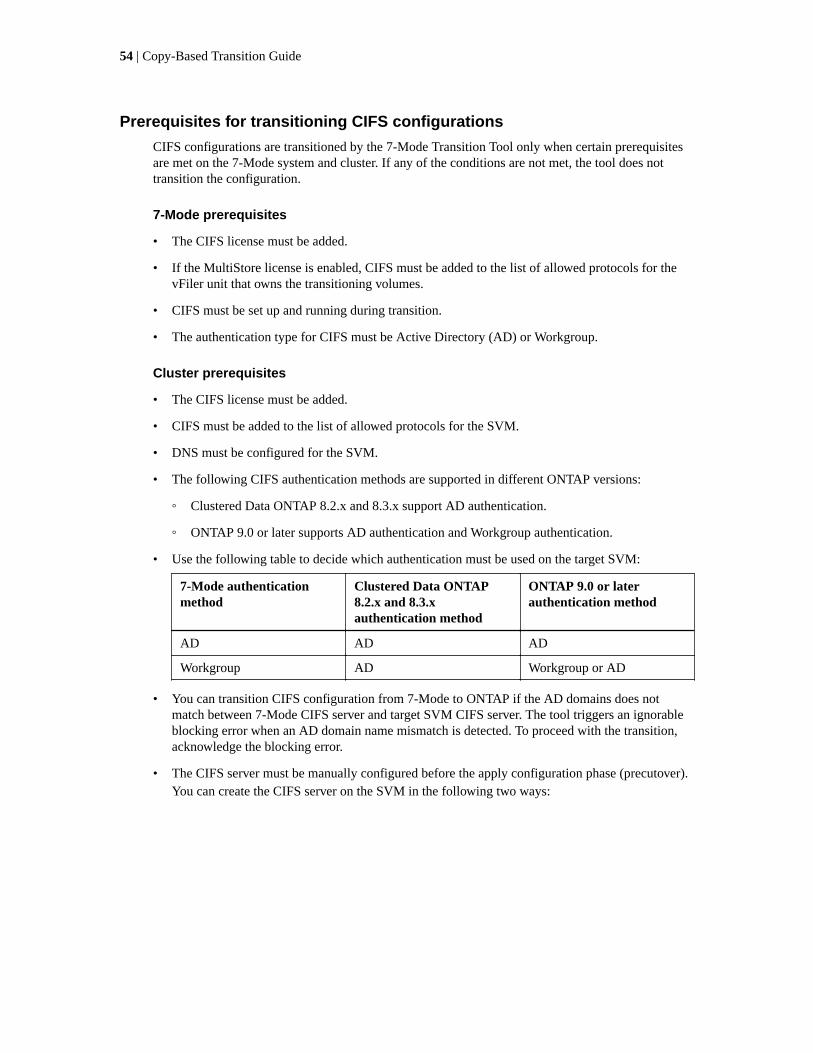
Prerequisites for transitioning CIFS configurations
CIFS configurations are transitioned by the 7-Mode Transition Tool only when certain prerequisitesare met on the 7-Mode system and cluster. If any of the conditions are not met, the tool does nottransition the configuration.
7-Mode prerequisites
• The CIFS license must be added.
• If the MultiStore license is enabled, CIFS must be added to the list of allowed protocols for thevFiler unit that owns the transitioning volumes.
• CIFS must be set up and running during transition.
• The authentication type for CIFS must be Active Directory (AD) or Workgroup.
Cluster prerequisites
• The CIFS license must be added.
• CIFS must be added to the list of allowed protocols for the SVM.
• DNS must be configured for the SVM.
• The following CIFS authentication methods are supported in different ONTAP versions:
◦ Clustered Data ONTAP 8.2.x and 8.3.x support AD authentication.
◦ ONTAP 9.0 or later supports AD authentication and Workgroup authentication.
• Use the following table to decide which authentication must be used on the target SVM:
7-Mode authenticationmethod
Clustered Data ONTAP8.2.x and 8.3.xauthentication method
ONTAP 9.0 or laterauthentication method
AD AD AD
Workgroup AD Workgroup or AD
• You can transition CIFS configuration from 7-Mode to ONTAP if the AD domains does notmatch between 7-Mode CIFS server and target SVM CIFS server. The tool triggers an ignorableblocking error when an AD domain name mismatch is detected. To proceed with the transition,acknowledge the blocking error.
• The CIFS server must be manually configured before the apply configuration phase (precutover).
You can create the CIFS server on the SVM in the following two ways:
54 | Copy-Based Transition Guide

If you want to… Do the following…
Transfer or preserve theCIFS server identity to thetarget SVM
◦ You must plan to transition all of the volumes in the source7-Mode system or vFiler unit in a single project.
This plan is required because the 7-Mode system loses theoriginal CIFS server identity after the transition and cannotserve clients. The maximum number of volumes that can betransitioned in one project is 160; therefore, to preserve theCIFS server identity, the 7-Mode system can have amaximum of 160 volumes and all these volumes must betransitioned in a single project.
You have the following two options to create the CIFS server:
1. Applicable for all versions of ONTAP:
◦ Before the “apply configuration” phase (precutover), youmust reconfigure the CIFS server on the 7-Mode systemby using a temporary CIFS identity.
This reconfiguration allows the original CIFS serveridentity to be configured on the SVM. You must verifythat the CIFS server is running on the 7-Mode systemduring the “apply configuration” phase (precutover)operation with the new temporary identity. This action isrequired to read CIFS configurations from 7-Modeduring precutover.
◦ You must configure the CIFS server on the target SVMwith the original 7-Mode CIFS identity.
◦ After these conditions are met, you can perform theprecutover operation.
You must then plan to perform the storage cutoverimmediately after precutover for enabling client access toONTAP volumes.
2. Applicable for ONTAP 9.0 or later versions:
◦ Use the vserver cifs modify command to changethe CIFS server name (CIFS Server NetBIOS Name).
Using this feature, you should create a CIFS server on thetarget SVM with a temporary identity, and then performthe apply configuration (precutover) operation.
◦ After the “apply configuration”' phase, you can run thevserver cifs modify command on the target clusterto replace the target SVM CIFS identity with the 7-ModeCIFS identity.
Preparing for copy-based transition | 55
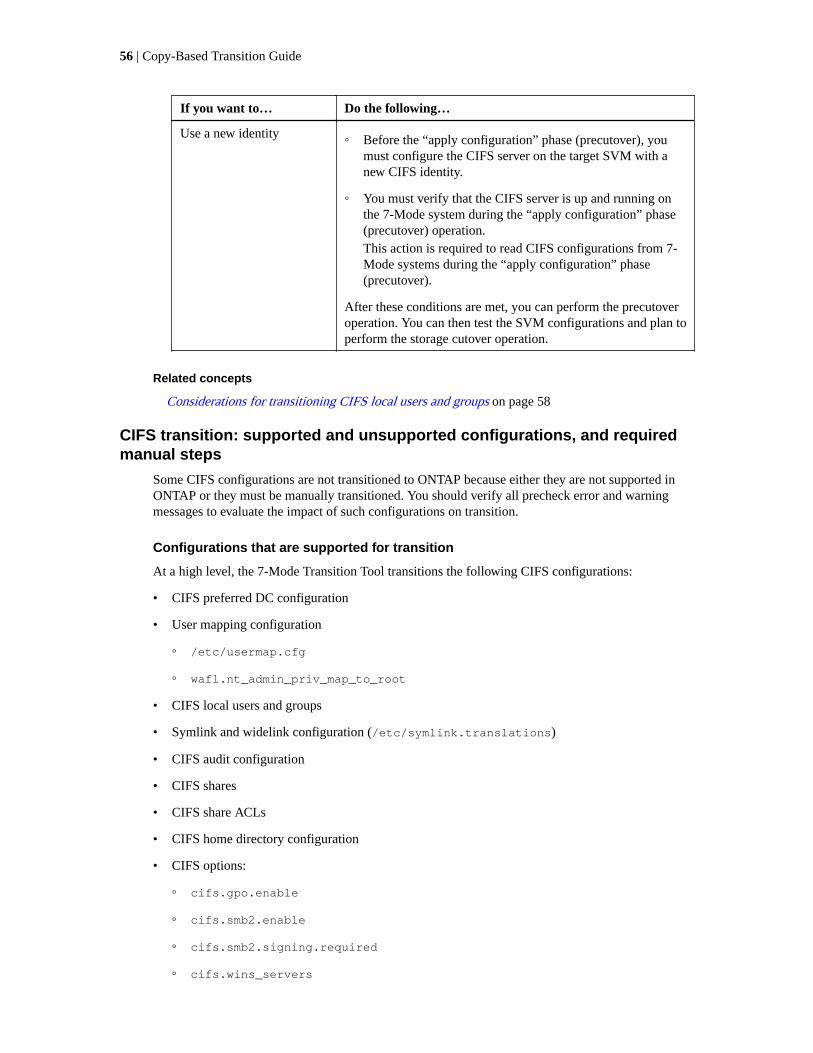
If you want to… Do the following…
Use a new identity ◦ Before the “apply configuration” phase (precutover), youmust configure the CIFS server on the target SVM with anew CIFS identity.
◦ You must verify that the CIFS server is up and running onthe 7-Mode system during the “apply configuration” phase(precutover) operation.
This action is required to read CIFS configurations from 7-Mode systems during the “apply configuration” phase(precutover).
After these conditions are met, you can perform the precutoveroperation. You can then test the SVM configurations and plan toperform the storage cutover operation.
Related concepts
Considerations for transitioning CIFS local users and groups on page 58
CIFS transition: supported and unsupported configurations, and requiredmanual steps
Some CIFS configurations are not transitioned to ONTAP because either they are not supported inONTAP or they must be manually transitioned. You should verify all precheck error and warningmessages to evaluate the impact of such configurations on transition.
Configurations that are supported for transition
At a high level, the 7-Mode Transition Tool transitions the following CIFS configurations:
• CIFS preferred DC configuration
• User mapping configuration
◦ /etc/usermap.cfg
◦ wafl.nt_admin_priv_map_to_root
• CIFS local users and groups
• Symlink and widelink configuration (/etc/symlink.translations)
• CIFS audit configuration
• CIFS shares
• CIFS share ACLs
• CIFS home directory configuration
• CIFS options:
◦ cifs.gpo.enable
◦ cifs.smb2.enable
◦ cifs.smb2.signing.required
◦ cifs.wins_servers
56 | Copy-Based Transition Guide
◦ cifs.grant_implicit_exe_perms
◦ cifs.restrict_anonymous
• FPolicy native file blocking configuration
See the precheck results for details about these CIFS configurations.
Configurations that are not supported in ONTAP
The following 7-Mode configurations are not supported in ONTAP. Therefore, these configurationscannot be transitioned.
• NT4, and password authentication types
• Separate options for SMB1 and SMB2 signing
• CIFS statistics on a per-client basis
• SMB2 client for communicating with external servers, such as domain controllers
• Authentication for clients earlier than Windows NT
• Auditing of account management events for local users and groups
• Usermap entries with IP addresses, host names, network names, or network names with subnetspecified in dotted notation
• CIFS shares with access restriction for machine accounts
Machine accounts can access all shares after transition.
Configurations that must be manually transitioned
Some CIFS configurations are supported in ONTAP, but are not transitioned by the 7-ModeTransition Tool.
The following CIFS configurations generate a warning message in the precheck. You must manuallyapply these configurations on the SVMs:
• Antivirus settings
• FPolicy configuration
7-Mode FPolicy and antivirus servers do not work with ONTAP. You must contact the servervendors for upgrading these servers. However, you must not decommission the 7-Mode FPolicyand antivirus servers until you commit the transition. These are required in case you decide to rollback the transition.
• BranchCache configuration
• Character mapping configuration (charmap)
• Forcegroup attribute of CIFS shares to create files with a specified UNIX group as owning group
• Maxusers attribute of CIFS shares to specify the maximum number of simultaneous connectionsallowed to a 7-Mode CIFS share
• Storage-Level Access Guard (SLAG) configurations
• Share-level ACLs with UNIX-style permission
• Share ACLs for UNIX users and groups
• LAN Manager authentication level
• NetBIOS aliases
Preparing for copy-based transition | 57
• CIFS search domains
• Some CIFS options
See the precheck results for details about these options.
Considerations for transitioning CIFS local users and groups
You must be aware of the considerations for running the transition operations when migrating CIFSlocal users and groups.
• If the destination cluster is running clustered Data ONTAP 8.2, transition should not be attemptedfor 7-Mode volumes that are serving CIFS data and are being accessed by local users and groups.
The 7-Mode Transition Tool does not support the transition of local users and groups to clusteredData ONTAP 8.2.
• Transition of CIFS data-serving volumes from a 7-Mode controller or a vFiler unit that has localusers and groups to an SVM that has non-BUILTIN CIFS local users and groups is not supported.
The SVM must have only BUILTIN CIFS local users and groups for transition.
While transitioning local users and groups from a specific 7-Mode controller or a vFiler unit to aspecific SVM, local users and groups from the first transition project are transitioned. In thesubsequent transition of projects with the same 7-Mode controller or vFiler unit to the sameSVM, the transition of local users and groups is ignored, although transition succeeds. The localuser's name on the 7-Mode system must not be the same as the CIFS server name on the SVM.
• You must be aware of the limits on the number of local users and groups supported in clusteredData ONTAP 8.2.1 and later.
• A local user account with an empty password or local user accounts with passwords containingmore than 14 characters on the 7-Mode system are transitioned to ONTAP with the passwordcifsUser@1.
After the transition is complete, you can access these users from the Windows system by usingthe password cifsUser@1. You must then manually change the password for such CIFS localusers on the SVM by using the following command:
cifs users-and-groups local-user set-password -vserver svm_name -user-name user_name
.
• The SVM to which the local users and groups are transitioned must have a data LIF.
• If a local group has multiple member system identifiers (SIDs) mapped to a single domain user orgroup on the 7-Mode system, the 7-Mode Transition Tool blocks the transition of local users andgroups to ONTAP during the precheck phase.
If you see this error during the precheck phase, you must manually remove the additional SIDsthat are mapped to a single domain user or group on the 7-Mode system. You must then rerun theprecheck operation with only a single SID mapped to the domain user or group.
NetApp KB Article 2017310: Troubleshooting Workflow: CIFS: Device attached to the system isnot functioning
Related information
CIFS management
58 | Copy-Based Transition Guide
Preparing for MetroCluster configuration transitionBefore transitioning to a MetroCluster configuration, you must understand the requirements andconsiderations for transitioning 7-Mode volumes to a MetroCluster configuration in ONTAP.
Prerequisites
• The MetroCluster configuration in ONTAP must already be set up.
• The SVM type must be sync-source.
• The 7-Mode controllers must not be in a taken over state or waiting for a giveback.
• The nodes in the MetroCluster configuration in ONTAP must not be switched over or waiting fora switchback.
Considerations
• Transitioning SnapLock Compliance volumes is not supported if the target cluster is in aMetroCluster configuration.
• You can transition volumes from a 7-Mode controller, HA configuration, or MetroClusterconfiguration to a MetroCluster configuration in ONTAP as stand-alone volumes.
• If a 7-Mode MetroCluster configuration has volumes that are in volume SnapMirror relationshipswith volumes in another 7-Mode controller, you can transition the SnapMirror relationships asprimary and secondary relationships.
You should install the 7-Mode Transition Tool on each MetroCluster site and transition thevolumes from each site.
• Different subnets configured for a 7-Mode fabric MetroCluster configuration cannot beconfigured on the MetroCluster configuration in ONTAP.
• The preferred port configured in a 7-Mode fabric MetroCluster configuration cannot beconfigured for the MetroCluster configurations in ONTAP.
• If your 7-Mode fabric MetroCluster configuration is using Brocade 6510 switches, you can sharethe existing switch fabrics with the new MetroCluster configuration in ONTAP.
It is best to share the switch fabrics only for the duration of the transition.
Fabric-attached MetroCluster installation and configuration
• The cron job schedules created during transition are not replicated to the remote site, andtherefore the negotiated switchover fails after transition.
You must manually create the cron job schedules on the remote site after the transition.
Related concepts
Impact of takeover and giveback on transition on page 65
Related tasks
Configuring cron job schedules on the remote site after transitioning a MetroCluster configurationon page 107
Transitioning a MetroCluster configuration that failed due to switchover or switchback on page123
Preparing for copy-based transition | 59
Preparing for SAN transitionBefore transitioning a SAN environment, you must understand what configurations are supported forSAN transition, create SAN LIFs on the SVMs, and prepare the SAN hosts for transition.
Preparing SAN hosts for transition
Before transitioning a SAN environment, you must perform some manual steps to prepare the SANhosts for transition.
Before you begin
You must have generated the inventory workbook for the SAN hosts by using the Inventory CollectTool.
Host and storage transition information collection
Steps
1. Verify that the host is supported for transition.
NetApp Interoperability Matrix Tool
2. Perform the pretransition steps on the host.
SAN host transition and remediation
Configuring zones by using the FC zone plan
Before transitioning a SAN FC environment, you must configure zones by using the FC zone plannerto group the initiator hosts and targets.
Before you begin
• The cluster and initiator hosts must be connected to the switch.
• The FC zone script file must be accessible.
Steps
1. If there are any changes to the igroup configurations on the 7-Mode systems, modify andregenerate the FC zone plan.
Generating an assessment report by adding systems to the 7-Mode Transition Tool on page 12
2. Log in to the CLI of the switch.
3. Copy and execute the required zone commands one at a time.
Example
The following example runs the zone commands on the switch:
switch1:admin>config terminal# Enable NPIV featurefeature npivzone name auto_transition_igroup_d31_194bf3 vsan 10member pwwn 21:00:00:c0:dd:19:4b:f3member pwwn 20:07:00:a0:98:32:99:07member pwwn 20:09:00:a0:98:32:99:07
60 | Copy-Based Transition Guide
.......
.......
.......copy running-config startup-config
4. Verify the data access from the cluster by using the test initiator hosts.
5. After the verification is complete, perform the following steps:
a. Disconnect the test initiator hosts.
b. Remove the zone configuration.
Creating SAN LIFs before transition
Because FC and iSCSI LIFs are not transitioned by the 7-Mode Transition Tool, you must createthese LIFs on the SVMs before transition. You must configure SAN LIFs on both the node that ownsthe LUN and the node's HA partner.
Before you begin
The required SAN (FC or iSCSI) license must be added to the cluster.
About this task
For redundancy, you must create SAN LIFs on both the node hosting the LUNs as well as its HApartner.
Steps
1. Create an FC or iSCSI LIF on the target node to which the LUNs are transitioned, depending onthe protocol used.
If you want to reuse the 7-Mode IP address for iSCSI LIFs, you must create the LIFs inadministrative down state. You can bring these LIFs to the administrative up state after thecutover operation.
ONTAP 9 man page: network interface create
2. Create a LIF on the HA partner of the node.
3. Verify that you have set up your LIFs correctly.
ONTAP 9 man page: network interface show
Related information
SAN administration
SAN transition: supported and unsupported configurations, and requiredmanual steps
You must be aware of the SAN configurations that are transitioned by the 7-Mode Transition Tool.You should also be aware of the 7-Mode SAN features that are not supported in ONTAP, so that youcan take any necessary actions before the transition.
You should verify all of the precheck error and warning messages to evaluate the impact of suchconfigurations on transition.
Configurations that are transitioned
The following SAN configurations are transitioned by the 7-Mode Transition Tool:
Preparing for copy-based transition | 61
• FC and iSCSI services
• igroups and LUN maps
Note:
◦ 7-Mode igroups that are not mapped to any LUNs are not transitioned to the target SVMs.
◦ For clustered Data ONTAP 8.3.0 and 8.3.1, the transition of igroups and LUN mappingconfigurations is not supported during the precutover operation.
Instead, the required igroups are created during the cutover operation. For primary andstand-alone volumes, LUNs are mapped to igroups during the cutover operation. However,for secondary volumes, the mapping of LUNs to igroups is not supported during the cutoveroperation. You must manually map the secondary LUNs after completing the transition ofprimary volumes.
◦ For ONTAP 8.3.2 or later, igroups and LUN mapping configurations are applied during theprecutover operation.
Unsupported configurations in ONTAP
The unsupported configurations in ONTAP are as follows:
• 7-Mode Snapshot copy-backed LUN clones
Snapshot copy-backed LUN clones present in the Snapshot copies are not supported for anyrestore operation. These LUNs are not accessible in ONTAP. You must split or delete the 7-ModeSnapshot copy-backed LUN clones before transition.
• LUNs with an ostype parameter value of vld, image, or any user-defined string
You must either change the value of the ostype parameter for such LUNs or delete the LUNsbefore transition.
• LUN clone split
You must either wait for the active LUN clone split operations to finish or abort the LUN clonesplit and delete the LUN before transition.
The following 7-Mode features enable you to continue with the transition process, but are notsupported in ONTAP:
• The lun share command
Sharing a LUN over NAS protocols
• SnapValidator
Configurations that must be manually transitioned
The following configurations must be transitioned manually:
• SAN LIFs
You must manually create the LIFs before transition.
• Portsets
You must manually configure igroups that are bound to a portset after transition.
• iSCSI access list information
• iSNS configuration
• iSCSI CHAP and RADIUS configurations
62 | Copy-Based Transition Guide
Related information
NFS management
Network and LIF management
Space considerations when transitioning SAN volumes
You must ensure that sufficient space is available in the volumes during transition. In addition to thespace required for storing data and Snapshot copies, the transition process also requires 1 MB ofspace per LUN for updating certain filesystem metadata.
Before cutover, you can use the df -h command on the 7-Mode volume to verify whether free spaceof 1 MB per LUN is available in the volume. The volume should also have free space equivalent tothe amount of data that is expected to be written to the volume before final cutover. If the volumedoes not have sufficient free space available, the required amount of space must be added to the 7-Mode volume.
If the transition of LUNs fails due to lack of space on the destination volume, the following EMSmessage is generated: LUN.vol.proc.fail.no.space: Processing for LUNs in volumevol1 failed due to lack of space.
In this case, you must set the filesys-size-fixed attribute to false on the destination volume,and then add 1 MB per LUN of free space to the volume.
If there are volumes containing space-reserved LUNs, growing the volume by 1MB per LUN mightnot provide sufficient space. In such cases, the amount of additional space that has to be added is thesize of the Snapshot reserve for the volume. After space is added to the destination volume, you canuse the lun transition start command to transition the LUNs.
Related information
NetApp Documentation: ONTAP 9
NetApp Technical Report 3784: Data Protection Handbook
Preparing data protection features for transitionYou must perform some manual steps for transitioning 7-Mode SnapMirror relationships. You mustalso be aware of the data protection relationships that are supported and unsupported for transition.
Data protection transition: supported and unsupported configurations
You can transition a volume that is part of a SnapMirror relationship. However, some data protectionand disaster recovery configurations are not supported for transition and therefore you have toperform some manual steps for transitioning these configurations.
Supported configurations
You can transition volume SnapMirror relationships by using the 7-Mode Transition Tool. You canalso transition 7-Mode volumes from a MetroCluster Configuration to a MetroCluster Configurationin ONTAP 8.3 or later.
Unsupported configurations
• SnapVault relationships
Volumes that are the source of a SnapVault relationship can be migrated; however, the SnapVaultrelationship is not transitioned. A volume that is the destination of a SnapVault relationship canbe migrated only after the SnapVault backups are stopped.
Preparing for copy-based transition | 63

NetApp Technical Report 4052: Successfully Transitioning to Clustered Data ONTAP (DataONTAP 8.2.x and 8.3)
• Qtree SnapMirror relationshipsVolumes with qtrees that are the source of a qtree SnapMirror relationship can be transitioned, butthe qtree SnapMirror relationship is not transitioned. A volume with a qtree that is the destinationof a qtree SnapMirror relationship can be migrated only after the qtree SnapMirror relationship isbroken.
• Disaster recovery vFiler unitVolumes that are the source of a disaster recovery vFiler unit can be migrated; however, thedisaster recovery vFiler unit is not transitioned. A volume that is the destination of a disasterrecovery vFiler unit can be migrated only after the disaster recovery relationship is deleted.
• NDMP configurationAfter the transition is complete, you must manually set up backup policies for the transitionedvolumes in ONTAP.Data protection using tape backup
• Synchronous SnapMirror relationshipsThis feature is not supported in ONTAP; however, the volumes that are part of the relationshipcan be transitioned.
Considerations for using SnapMirror for transition
You can create data copy schedules and customize the SnapMirror data transfers for transitionoperations without affecting the existing 7-Mode to 7-Mode SnapMirror or SnapVault operations.
Maximum number of concurrent SnapMirror transfers
During transition, the maximum number of concurrent SnapMirror transfers supported on the 7-Mode and ONTAP systems depend on the number of volume SnapMirror replication operationsallowed for a specific storage system model.
For information about the maximum number of concurrent volume SnapMirror transfers for yoursystem model, see the Data ONTAP Data Protection Online Backup and Recovery Guide for 7-Mode.
Data copy schedules
• The number of concurrent SnapMirror transfers that the tool uses for running the SnapMirroroperations (baseline, update, or resynchronization) is based on the schedules you configure whilecreating the project.
• If different projects are transitioning volumes from the same 7-Mode controller, you must ensurethat the data copy schedules do not overlap across different projects.
• You can ensure that your existing backup and disaster recovery (DR) operations are not impactedby the 7-Mode Transition Tool transition operations in the following ways:
◦ You should create SnapMirror data copy schedules for a project such that it does not overlapwith the existing 7-Mode SnapMirror or SnapVault schedules.
◦ You should configure the number of concurrent SnapMirror transfers to run in such a way thatthe existing 7-Mode SnapMirror or SnapVault schedules do not fail.You can also release some transfers by editing the active schedule and modifying themaximum number of concurrent volume SnapMirror transfers to zero.
• You must ensure that the number of concurrent SnapMirror transfers and the throttle configuredfor the operations (precutover, cutover, and on-demand update) are available on the 7-Modestorage system for the entire duration of the operation.
64 | Copy-Based Transition Guide

The cutover operation fails if the final incremental update operation fails even for one of thevolumes in the project.
• For secondary projects, after cutover, the incremental SnapMirror updates for the SnapMirrorrelationship between the 7-Mode primary volumes and the ONTAP secondary volume is based onthe 7-Mode to 7-Mode SnapMirror relationship schedule.
You must ensure that there are sufficient concurrent SnapMirror transfers available on the 7-Modeprimary controller for these updates to occur.
Using multiple paths for transition
You can specify two paths for transition by using a data copy IP address and a multipath IP address.However, both paths can be used only for load-balancing, not for failover.
Related concepts
Considerations for creating a data copy schedule on page 114
Related tasks
Creating a data copy schedule for SnapMirror transfers on page 109
Related information
Data ONTAP 8.2 Data Protection Online Backup and Recovery Guide for 7-Mode
Documentation on the NetApp Support Site: mysupport.netapp.com
Guidelines for deciding when to perform cutoverBecause transition cutover is disruptive to clients, you must plan the activity to minimize thedowntime. You must schedule the cutover during a low-activity window. You should update theONTAP volumes and wait for the transfers to complete before disconnecting clients and initiatingstorage cutover for reducing the downtime.
You must keep monitoring the SnapMirror status for each volume. If the last transfer duration of theprevious few updates for the volume is within an acceptable limit, most of the data changes in thevolume should have been copied and the time for final data update during cutover should be withinthe acceptable limit.
You can derive the approximate downtime depending on the number of volumes that are transitioned.
To minimize the cutover time, the network latency between the 7-Mode Transition Tool and storagesystems should be minimum. For transitioning a volume SnapMirror relationship, the networklatency between the tool and the primary systems should be minimum.
Related tasks
Performing on-demand SnapMirror updates on page 82
Impact of takeover and giveback on transitionTransition operations, such as transition prepare, start, pause, resume, or complete, fail during acontroller takeover or giveback.
If a transition operation fails due to a takeover, you must wait for the giveback to finish, and then runthe transition operation again.
If a controller takeover occurs during a baseline transfer, the transfer fails. To resume the baselinetransfer from the point where it was aborted, you must wait for the giveback to finish.
Preparing for copy-based transition | 65

Data copy resumes based on the configured schedule.
66 | Copy-Based Transition Guide
Migrating data and configuration from 7-Modevolumes
To migrate volumes or a volume SnapMirror relationship by using the 7-Mode Transition Tool, youmust first configure projects, start a baseline copy, and complete the projects.
Before you begin
• The 7-Mode controllers and clusters that you want to include in the transition must be reachablefrom the Windows host where the tool is installed.
• You must have all administrator-level privileges for the controllers and clusters that you want toinclude in the transition project.
• The 7-Mode Transition Tool service must be running on the machine on which it is installed.
The service is set to automatic by default, and should start when you restart the machine.
About this task
• You should not perform assessment and migration operations on a controller simultaneously.
• You should not modify the objects (volumes, IP addresses, system information, and so on) on the7-Mode controllers and clusters after fixing errors and warnings that are reported by precheck.
• You should avoid using multiple web interface sessions that are writing to the same SVMsimultaneously to prevent undesired results.
• You should avoid modifying the controller and cluster passwords during the transition process.
• You should avoid using the Back and Forward browser buttons, as the tool does not support webbrowser navigation and might cause undesired results.
• You should avoid browser refresh while transition is in progress, because it might cause undesiredresults.
The following image illustrates the migration process:
Steps
1. Transition preparation checklist on page 68
2. Adding controllers and clusters on page 72
3. Creating a transition project on page 72
4. Customizing the transition of 7-Mode configurations on page 76
5. Running prechecks on page 77
6. Starting baseline data copy on page 78
7. Applying 7-Mode configurations on page 79
8. Configuring zones by using the FC zone plan on page 81
9. Performing on-demand SnapMirror updates on page 82
67
10. Completing a transition project on page 83
Related concepts
How you transition a stand-alone volume on page 21
How you transition volumes in a SnapMirror relationship on page 25
Transition preparation checklistBefore you start transition, you should verify that you have met all of the prerequisites for transition.
• Data ONTAP version requirements on page 68
• Licensing requirements on page 68
• SnapMirror requirements on the 7-Mode system on page 69
• Volume options on the 7-Mode system on page 69
• Managing access to the cluster on page 69
• Managing access to the 7-Mode system on page 70
• Networking requirements on page 70
• Port requirements on page 70
• NFS requirements on page 71
• CIFS requirements on page 71
Data ONTAP version requirements
Item Yes
Supported 7-Mode version
NetApp Interoperability Matrix Tool
Your cluster must be running one of the following Data ONTAP versions:
• Data ONTAP 8.2.x
• Data ONTAP 8.3.x
• ONTAP 9.0 or later
Licensing requirements
Item Yes
SnapMirror license is enabled on the 7-Mode system
SnapMirror licenses are enabled on the primary and secondary clusters fortransitioning a volume SnapMirror relationship
CIFS license is enabled on the cluster, if it is enabled on the 7-Mode system
NFS license is enabled on the cluster, if it is enabled on the 7-Mode system
iSCSI license is enabled on the cluster, if it is enabled on the 7-Mode system
FC license is enabled on the cluster, if it is enabled on the 7-Mode system
68 | Copy-Based Transition Guide

Item Yes
Other feature licenses, if available on the 7-Mode system, are added to thecluster
SnapMirror requirements on the 7-Mode system
Item Yes
SnapMirror license
options snapmirror.enable on
options interface.snapmirror.blocked ""
Verify if one of the following is true:
• The snapmirror.access option is set to all
• The snapmirror.access option is set to the IP addresses of all theintercluster LIFs on the cluster
• If the snapmirror.access option is set to legacy and thesnapmirror.checkip.enable option is off, the SVM name is addedto the /etc/snapmirror.allow file
• If the snapmirror.access option is set to legacy and thesnapmirror.checkip.enable option is on, the IP addresses of theintercluster LIFs are added to the /etc/snapmirror.allow file
Volume settings on the 7-Mode system
Item Yes
Volume is online
Volume is not restricted
The following volume options are disabled:
• no_i2p
• read_realloc
• nvfail
Managing access to the cluster
Item Yes
SSL is enabled
system services web show
HTTPS is allowed on the cluster-management LIF
system services firewall policy show
Migrating data and configuration from 7-Mode volumes | 69
Managing access to the 7-Mode system
Item Yes
HTTPS is enabled
options httpd.admin.ssl.enable on
SSL is enabled
secureadmin setup ssl
options ssl.enable on
SSLv2 and SSLv3 are disabled
options ssl.v2.enable off
options ssl.v3.enable off
Networking requirements
Item Yes
Cluster is reachable using the cluster-management LIF
One or more intercluster LIFs are set up on each node of the cluster
For multipathing, two intercluster LIFs are required on each node
Static routes are created for the intercluster LIFs
7-Mode system and cluster are reachable from the Windows system on which7-Mode Transition Tool is installed
NTP server is configured and the 7-Mode system time is synchronized with thecluster time
Port requirements
Item Yes
7-Mode system
• 10565/TCP
• 10566/TCP
• 10567/TCP
• 10568/TCP
• 10569/TCP
• 10670/TCP
• 80/TCP
• 443/TCP
70 | Copy-Based Transition Guide
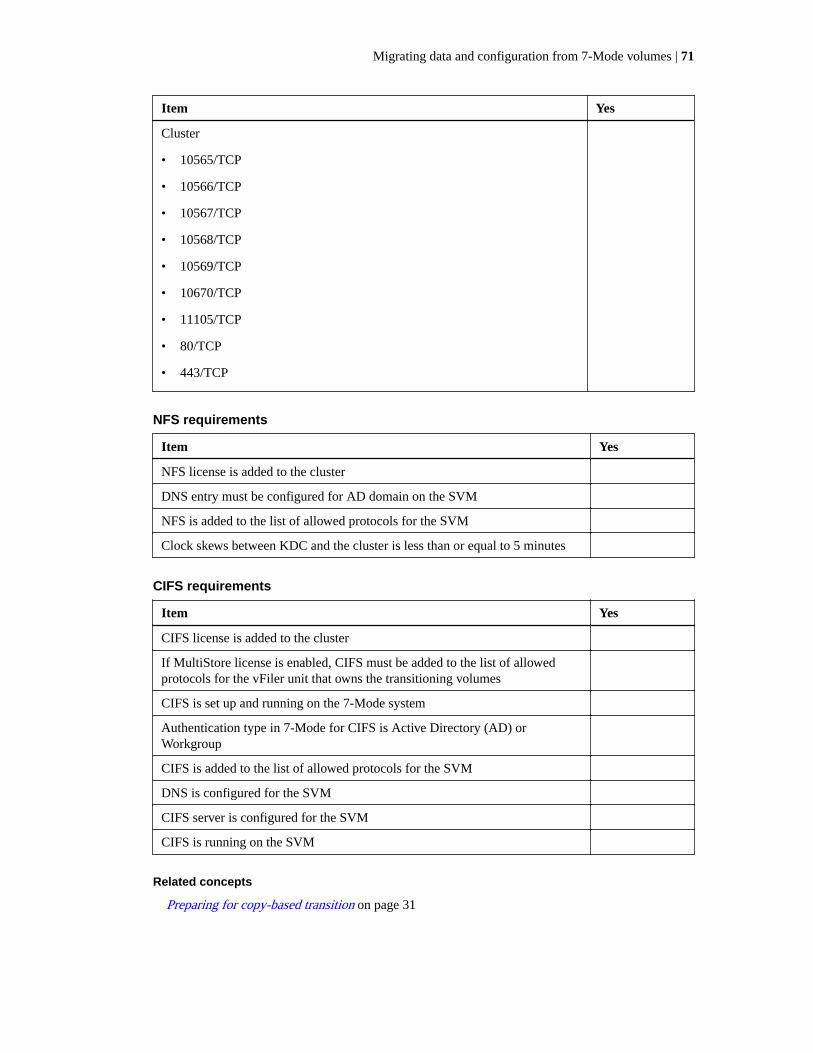
Item Yes
Cluster
• 10565/TCP
• 10566/TCP
• 10567/TCP
• 10568/TCP
• 10569/TCP
• 10670/TCP
• 11105/TCP
• 80/TCP
• 443/TCP
NFS requirements
Item Yes
NFS license is added to the cluster
DNS entry must be configured for AD domain on the SVM
NFS is added to the list of allowed protocols for the SVM
Clock skews between KDC and the cluster is less than or equal to 5 minutes
CIFS requirements
Item Yes
CIFS license is added to the cluster
If MultiStore license is enabled, CIFS must be added to the list of allowedprotocols for the vFiler unit that owns the transitioning volumes
CIFS is set up and running on the 7-Mode system
Authentication type in 7-Mode for CIFS is Active Directory (AD) orWorkgroup
CIFS is added to the list of allowed protocols for the SVM
DNS is configured for the SVM
CIFS server is configured for the SVM
CIFS is running on the SVM
Related concepts
Preparing for copy-based transition on page 31
Migrating data and configuration from 7-Mode volumes | 71
Adding controllers and clustersBefore you start the transition, you must add the 7-Mode controllers and clusters that are required forthe transition. The 7-Mode controllers that are included for assessment are automatically added formigration.
About this task
• The 7-Mode controller and cluster information that you provide is not persistent.
If the 7-Mode Transition Tool service is restarted, the tool prompts you for information aboutcontrollers and clusters that are part of active projects. You must provide the same host name thatyou provided for your system when you created the project.
• If a 7-Mode controller is part of an HA pair, the tool does not request for credentials of the HApartner of the 7-Mode controller (unless the HA partner is part of another active project.)
Steps
1. From the top pane, click Storage Systems.
2. In the Hostname field, enter the FQDN or IP address of the 7-Mode controller or the ONTAPsystem.
For a cluster, you can specify the IP address or FQDN of the cluster-management interface. For a7-Mode controller, you must specify the IP address of the default vFiler unit, because the IPaddresses of individual vFiler units are not accepted.
3. Enter the administrator credentials for the specified host, and then click Add.
The 7-Mode controllers are added to the “7-Mode Controllers” table and clusters are added to the“Clustered Data ONTAP Systems” table.
4. Repeat Steps 2 and 3 to add all of the controllers and clusters that you require for the transition.
5. If the Status column indicates that the credentials of the system are missing or the credentials
have changed from what was initially entered in the tool, click the icon, and then enter thecredentials again.
Creating a transition projectCreating a transition project includes selecting and mapping 7-Mode volumes to the Storage VirtualMachine (SVM), mapping interfaces, and creating data copy schedules for volume SnapMirrortransfers.
Before you begin
You must have created the required SVM on the cluster.
About this task
All of the volumes within a project are migrated to the same SVM. If you want to migrate thevolumes to different SVMs, you must create multiple projects.
If the target cluster is running Data ONTAP 8.3.1 or earlier and you want to run the precutoveroperation in read/write mode for NAS volumes, then you must create separate projects for the NASand SAN volumes. This action is required because the precutover read/write mode is not supported ifyou have SAN volumes in your project.
72 | Copy-Based Transition Guide

If the project contains SnapLock Compliance volumes and you want to run the precutover operationin read/write mode for non-SnapLock Compliance volumes, then you must create separate projectsfor SnapLock Compliance volumes and non-SnapLock Compliance volumes. This action is requiredbecause the precutover read/write mode is not supported if you have SnapLock Compliance volumesin your project.
Steps
1. Select the Copy-Based Transition migration method from the homepage, and then click StartPlanning.
If the controller and cluster that are required by the new project have not been added, you canenter the details in the Enter Device Credentials pane.
2. Verify that all of the required 7-Mode and ONTAP systems are added to the tool, and then clickNext.
The Select Source Volume page appears.
3. Select the 7-Mode volumes that you want to transition.
a. From the 7-Mode Controller pane, select the 7-Mode controller or the vFiler unit from whichyou want to add volumes.
b. Add the volumes that you want to include in the project group by selecting one of thefollowing transition options:
If you want totransition...
Then...
Stand-alonevolumes
Select Transition as stand-alone for the volumes that you want totransition.
A stand-alone project is created if you select the first volume from thiscolumn.
VolumeSnapMirrorrelationship
i. Select Transition with SnapMirror Relationship for all of theprimary volumes.
Two projects are created—a primary project for the primaryvolumes and a secondary project.
ii. Optional: If the secondary controller is not included in the project,enter the details for the controller in the Need additional storagesystem credentials dialog box.
If you have at least one LUN in your volume, the volume type is shown as SAN.
The hyperlink provided on the volume name opens a dialog box that lists the qtrees and LUNsin the volume and their attributes.
Tip: It is a best practice to have all volumes within a single project to be of the samedefinition (stand-alone, primary, or secondary). For example, a project should contain allstand-alone volumes rather than a mix of stand-alone and SnapMirror relationships.
c. After you have selected all of the volumes that you want to include in the project, click CreateProject and Continue, enter the project name and project group details from the dialog boxthat appears, and then click Save to create the project.
4. Select the 7-Mode IP address and multipath IP address to be used for SnapMirror data copy.
a. Enter the 7-Mode data copy IP address.
Migrating data and configuration from 7-Mode volumes | 73

By default, this field is prepopulated with the management IP address of the 7-Mode system.If required, you can change this IP address to any valid IPv4 address with data copypermission.
b. Optional: If you want to use multiple paths for load balancing the data transfers, enter an IPaddress in the IP Configuration pane, and then click Next.
5. From the Select an SVM page, select the target cluster and SVM and follow these steps:
a. Select the target cluster by clicking on the cluster name in the Select a Clustered DataONTAP System
The SVMs are loaded in the Select and SVM pane pane.
b. Select the target SVM to transition the volumes from the Select and SVM pane.
c. Click Next.
For transitioning 7-Mode volumes to a MetroCluster configuration in ONTAP, the SVM subtypemust be sync-source.
If you select an SVM that belongs to clustered Data ONTAP 8.2, a dialog box is displayed forconfirming whether there are local users and groups, CIFS shares or files configured on the 7-Mode storage system. The 7-Mode Transition Tool does not support the transition of local usersand groups to clustered Data ONTAP 8.2. If you have local users and groups, you can select anSVM that belongs to ONTAP 8.2.1 or later.
6. Optional: In the SVM audit logs destination path dialog box, enter a path on the destinationSVM to enable transition of the audit configuration from the 7-Mode storage system.
This path is used to save the audit logs in the ONTAP system.
7. From the Map Volumes page, select the target volumes for transition to map each source volumeto the required aggregate.
a. From the Map Origin Volumes to Aggregates on Target Cluster pane, select the aggregatesto which the 7-Mode volumes must be copied.
b. Optional: To change the name of the target volume on the cluster, enter a different name inTarget Volume.
c. Click Next.
If all of the volumes and qtrees that are included in the project are configured to serve only NFSrequests, then you do not have to provide the audit path because the audit configuration is nottransitioned (even if you provide the audit path, this input is ignored) .
8. Optional: From the Network Configuration pane, provide information about the LIFs that mustbe created on the SVM.
Note: FC and iSCSI LIFs cannot be transitioned. You must manually create them on the SVM.
If you want to... Then...
Transition an existing 7-ModeIP address
a. Click Select 7-Mode LIF.
b. Select the required 7-Mode IP addresses and provide target node andtarget port details.
c. Click Save.
74 | Copy-Based Transition Guide
If you want to... Then...
Create a new LIFa. Click Add New LIF.
b. In the dialog box that appears, enter the details for the new LIF.
c. Click Save.
To provide network connectivity after a successful transition, you must transition the 7-Mode IPaddresses to a similar network topology in ONTAP. For example, if the 7-Mode IP addresses areconfigured on physical ports, the IP addresses should be transitioned to appropriate physical portsin ONTAP. Similarly, IP addresses configured on VLAN ports or interface groups should betransitioned to appropriate VLAN ports or interface groups in ONTAP.
After you add all the required IP addresses, click Next.
9. In the Configure Schedule page, configure the data copy schedules for baseline and incrementaltransfers, the number of concurrent volume SnapMirror transfers, and the throttle limit for theSnapMirror transfers for transition.
You can provide data copy schedules and a throttle limit to effectively manage your DR andtransition data copy operations. You can create multiple schedules, with a maximum of sevenschedules for each project. For example, you can create customized schedules for weekdays andweekends.
Note: The schedules are effective based on the source 7-Mode controller time zone.
a. In the Configure Schedule pane, click Create Schedule.
b. In the Create Data Copy Schedule dialog box, enter a name for the new schedule.
c. In the Recurring Days pane, select Daily or Select Days to specify the days on which thedata copy operations should run.
d. In the Time Interval pane, specify the Start Time and Duration for the data transfers.
e. In the Time Interval pane, either specify the Update Frequency for the incremental transfersor select Continuous Update.
If you select continuous updates, the updates start with a minimum delay of 5 minutes,depending on the availability of concurrent SnapMirror transfers.
f. In the Parameters for Transition Data Copy Operations (based on Volume SnapMirror)pane, specify the maximum number of concurrent volume SnapMirror transfers (as apercentage of available SnapMirror transfers at run time and as a number) and the throttlelimit (maximum bandwidth for all the volumes in the project).
Note: The default values provided in the fields are the recommended values. Whenchanging the default values, you must analyze the 7-Mode SnapMirror schedules andensure that the values that you provide do not affect these schedules.
g. Click Create.
The new schedule is added to the Transition Schedule pane.
h. After you add all the required data copy schedules, click Next.
Related concepts
Considerations for creating a data copy schedule on page 114
Managing SnapMirror transfers and schedule on page 109
Migrating data and configuration from 7-Mode volumes | 75
Related tasks
Creating a data copy schedule for SnapMirror transfers on page 109
Customizing the transition of 7-Mode configurations by using the CLI on page 89
Managing logical interfaces on page 116
Removing volumes from a project on page 117
Customizing the transition of 7-Mode configurationsWhen planning the transition of configurations from 7-Mode to ONTAP, you can customize theconfiguration transition in two ways. Firstly, you can ignore or skip the transition of one or moreconfigurations. Secondly, you can consolidate the 7-Mode NFS export rules, and reuse an existingNFS export policy and Snapshot policy on the target SVM.
About this task
You must perform this task before you apply the configuration (precutover) phase, because after thisphase, the Plan Configuration pane is disabled for any modification. You use the command-lineinterface (CLI) of the 7-Mode Transition Tool for excluding the configurations that are appliedduring the cutover phase.
The 7-Mode Transition Tool does not perform prechecks for the configuration that is excluded.
By default, all 7-Mode configurations are selected for transition.
It is a best practice to run the prechecks with all configurations first, and then exclude one or moreconfigurations in the subsequent run of the prechecks. This helps you to understand whichconfigurations are excluded from transition and which prechecks are skipped subsequently.
Steps
1. From the Plan Configuration page, select the Select Target SVM pane.
2. Select the following options from the SVM Configuration pane.:
• For excluding the transition of configurations, clear the check box for those configurations.
• For consolidating similar 7-Mode NFS export rules to a single export policy in ONTAP, whichcan then be applied to the transitioned volume or qtree, select the Consolidate NFS ExportPolicies on 7-Mode check box.
• For reusing an existing NFS export policy on the SVM that matches the export policy that willbe created by the tool, which can be applied to the transitioned volumes or qtrees, select theReuse Export Policies of SVM check box.
• For consolidating similar 7-Mode Snapshot schedules to a single Snapshot policy in ONTAP,which can then be applied to the transitioned volume, select the Consolidate 7-ModeSnapshot Policies check box.
• For reusing an existing Snapshot policy on the SVM that matches the Snapshot policy thatwill be created by the tool, which can be applied to the transitioned volumes, select the ReuseSnapshot Policies of SVM check box.
3. Repeat steps 1 and 2 for each target SVM.
4. Click Save and go to Dashboard.
Related concepts
CIFS transition: supported and unsupported configurations, and required manual steps on page 56
76 | Copy-Based Transition Guide
NFS transition: supported and unsupported configurations, and required manual steps on page 48
Name services transition: supported and unsupported configurations, and required manual steps onpage 45
SAN transition: supported and unsupported configurations, and required manual steps on page 61
Related references
Examples of consolidating NFS export rules and Snapshot schedules for transition on page 92
Configurations that can be excluded from transition on page 90
Running prechecksYou can run prechecks to identify any issues before you start a transition. Prechecks verify that the 7-Mode sources, ONTAP targets, and configurations are valid for your transition. You can runprechecks any number of times.
About this task
The prechecks run more than 200 different checks. For example, the tool checks for items such as ifvolumes are online and network access exists between the systems.
Steps
1. From Dashboard, select the project for which you want to run the prechecks.
2. Click Run Prechecks.
After the prechecks are complete, the result summary is displayed in the dialog box.
Note: The prechecks usually take only a few minutes to run, but the duration of the precheckphase depends on the number and type of errors or warnings that you resolve.
3. Choose an option under Apply Type Filter to filter the results:
• To view all messages related to security, select Error, Warning, Informational, and SecurityOnly.
• To view all error messages related to security, select Error and Security Only.
• To view all warning messages related to security, select Warning and Security Only.
• To view all informational messages related to security, select Informational and SecurityOnly.
4. To save the raw results in comma-separated values (CSV) format and export the results, clickSave As CSV.
You can view the transition operations that have been performed during the transition along withthe operation type, status, start time, end time, and results in the Operation History tab on theDashboard pane.
After you finish
You must resolve all the errors detected by the prechecks before you start data copy. It is also a bestpractice to resolve all warnings prior to proceeding with the migration process. Resolution can beresolving the source issue of the warning message, implementing a workaround, or accepting theresult of the issue.
Migrating data and configuration from 7-Mode volumes | 77
Severity levels for precheck messages
You can verify whether the 7-Mode volumes can be transitioned by running the transition precheckoperation. Transition precheck reports all the transition issues. Transition issues are assigned differentseverity levels, depending on the impact of the issue on the transition process.
The issues detected by the prechecks are classified into the following categories:
Error
Configurations that cannot be transitioned.
You cannot continue the transition if there is even one error. The following are a fewexample configurations on the 7-Mode system that cause an error:
• Traditional volumes
• SnapLock volumes
• Offline volumes
Warning
Configurations that can cause minor problems after transition.
Features that are supported in ONTAP, but are not transitioned by the 7-Mode TransitionTool, also generate a warning message. You can continue the transition with thesewarnings. However, after the transition you might lose some of these configurations ormight have to complete some manual tasks for enabling these configurations in ONTAP.
The following are a few example configurations on the 7-Mode system that generate awarning:
• IPv6
• NFSv2
• NDMP configurations
• Interface groups and VLANs
• Routing Information Protocol (RIP)
Information
Configurations that have been successfully transitioned.
Starting baseline data copyAfter you create a project and complete the precheck operation, you must initiate data copy from the7-Mode volumes to ONTAP. You can start baseline data copy operation for individual projects. Youshould stop unnecessary system processes and network activity during the data copy.
Before you begin
You must have created at least one data copy schedule.
About this task
You can estimate the time to complete baseline transfers and evaluate the performance achieved byvolume SnapMirror transfers in your environment by performing a test migration. The following aresome of the factors that can affect performance:
• Transition data copy schedule options selected
78 | Copy-Based Transition Guide
This schedule controls both the maximum number of SnapMirror concurrent transfers and themaximum bandwidth to be used for the transfers.
• Maximum number of concurrent volume SnapMirror transfers supported by the 7-Mode sourcecontrollers
• Network bandwidth between the 7-Mode source and ONTAP destination controllers
Network traffic that is unrelated to the migration activity must be minimized so that thethroughput is maximized and response time is minimized between the source and destinationsystems.
• Performance capabilities of both the source and destination controllers
The source and destination systems should have optimum CPU utilization and memory available.
• Number of 7-Mode volume SnapMirror transfers occurring during the data copy
Steps
1. From Dashboard, select the project for which you want to start the baseline data copy.
2. Click Start Baseline.
The precheck is run once again in the background, and if no errors are detected, the baselinetransfer is started based on the data copy schedule. The Operation Progress dialog box displaysthe information about the status of the precheck operations run during the baseline data copy.
3. Click the Volumes tab to view the status and progress of the baseline transfer.
To view the detailed SnapMirror details of each volume, you can click View Transition Details.The number of concurrent SnapMirror transfers is based on the input provided in the schedulethat is currently active. You can track the active schedule from the Data Copy Schedule tab onDashboard.
After the baseline data copy operation is completed, the incremental SnapMirror updates startbased on the schedule provided while creating the project.
Related tasks
Creating a data copy schedule for SnapMirror transfers on page 109
Applying 7-Mode configurationsAfter the baseline data copy is completed, you can copy and apply all configurations from the 7-Mode system (including protocols and services configuration) to the ONTAP volumes. If the targetcluster is running ONTAP 8.3.2 or later, SAN configuration is transitioned in this phase.
Before you begin
If you are transitioning SAN volumes, you must have created at least one data LIF of the appropriateprotocol (iSCSI or FC) for every node in the cluster.
About this task
• The configurations are applied in the apply configuration (precutover) phase, which has twomodes: precutover read-only mode and precutover read/write mode.
The precutover read/write mode is not supported when the project contains:
• SAN volumes and the target cluster is running Data ONTAP 8.3.1 or earlier. In this situation, thefollowing configurations are not applied in the precutover phase, instead they are applied duringthe cutover phase:
Migrating data and configuration from 7-Mode volumes | 79
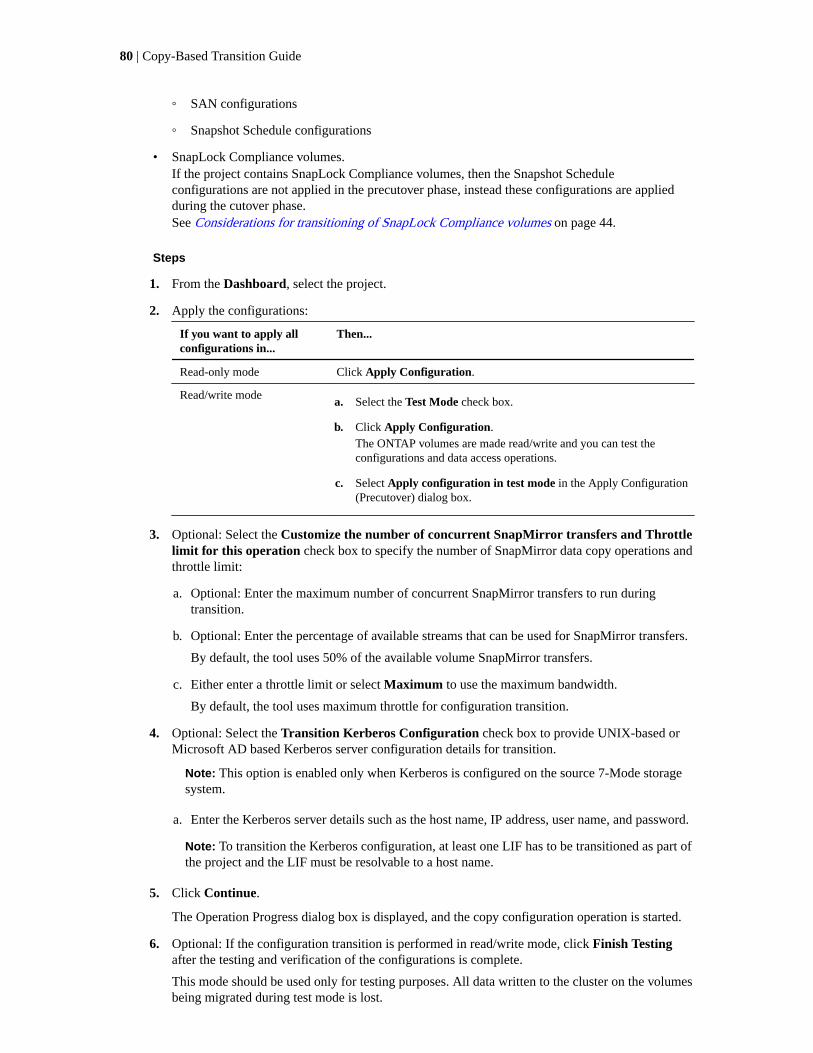
◦ SAN configurations
◦ Snapshot Schedule configurations
• SnapLock Compliance volumes.If the project contains SnapLock Compliance volumes, then the Snapshot Scheduleconfigurations are not applied in the precutover phase, instead these configurations are appliedduring the cutover phase.See Considerations for transitioning of SnapLock Compliance volumes on page 44.
Steps
1. From the Dashboard, select the project.
2. Apply the configurations:
If you want to apply allconfigurations in...
Then...
Read-only mode Click Apply Configuration.
Read/write modea. Select the Test Mode check box.
b. Click Apply Configuration.
The ONTAP volumes are made read/write and you can test theconfigurations and data access operations.
c. Select Apply configuration in test mode in the Apply Configuration(Precutover) dialog box.
3. Optional: Select the Customize the number of concurrent SnapMirror transfers and Throttlelimit for this operation check box to specify the number of SnapMirror data copy operations andthrottle limit:
a. Optional: Enter the maximum number of concurrent SnapMirror transfers to run duringtransition.
b. Optional: Enter the percentage of available streams that can be used for SnapMirror transfers.
By default, the tool uses 50% of the available volume SnapMirror transfers.
c. Either enter a throttle limit or select Maximum to use the maximum bandwidth.
By default, the tool uses maximum throttle for configuration transition.
4. Optional: Select the Transition Kerberos Configuration check box to provide UNIX-based orMicrosoft AD based Kerberos server configuration details for transition.
Note: This option is enabled only when Kerberos is configured on the source 7-Mode storagesystem.
a. Enter the Kerberos server details such as the host name, IP address, user name, and password.
Note: To transition the Kerberos configuration, at least one LIF has to be transitioned as part ofthe project and the LIF must be resolvable to a host name.
5. Click Continue.
The Operation Progress dialog box is displayed, and the copy configuration operation is started.
6. Optional: If the configuration transition is performed in read/write mode, click Finish Testingafter the testing and verification of the configurations is complete.
This mode should be used only for testing purposes. All data written to the cluster on the volumesbeing migrated during test mode is lost.
80 | Copy-Based Transition Guide
The tool reestablishes the SnapMirror relationship and resynchronizes (based on the activeschedule for that project at that time) the ONTAP volumes. Any data written to the 7-Mode isresynchronized with the ONTAP volumes.
Note: For a successful resynchronization, a common Snapshot copy must exist between the 7-Mode and clustered Data ONTAP volumes. You should not manually delete the commonSnapshot copy; otherwise, resynchronization fails.
Result
The 7-Mode IP addresses remain operational. The LIFs are configured on the Storage VirtualMachine (SVM) in the following ways:
• Existing 7-Mode IP addresses are created in the administrative down state.
During the storage cutover, these IP addresses are removed from the 7-Mode system and thecorresponding Storage Virtual Machine (SVM) LIFs are brought to the administrative up state. Ifyou select the precutover read/write mode, you must use a different LIF to gain access to thevolumes being migrated to the cluster.
• New IP addresses are created in the administrative up state.
If you select the precutover read/write mode, these LIFs can be used for testing access to thevolumes being migrated in the cluster.
Related concepts
Considerations for quotas on page 43
Related tasks
Managing logical interfaces on page 116
Related information
NetApp KB Article 3014031: FAQ: 7MTT v2.0/Transitioned Data ONTAP features
Configuring zones by using the FC zone planBefore transitioning a SAN FC environment, you must configure zones by using the FC zone plannerto group the initiator hosts and targets.
Before you begin
• The cluster and initiator hosts must be connected to the switch.
• The FC zone script file must be accessible.
Steps
1. If there are any changes to the igroup configurations on the 7-Mode systems, modify andregenerate the FC zone plan.
Generating an assessment report by adding systems to the 7-Mode Transition Tool on page 12
2. Log in to the CLI of the switch.
3. Copy and execute the required zone commands one at a time.
Example
The following example runs the zone commands on the switch:
Migrating data and configuration from 7-Mode volumes | 81
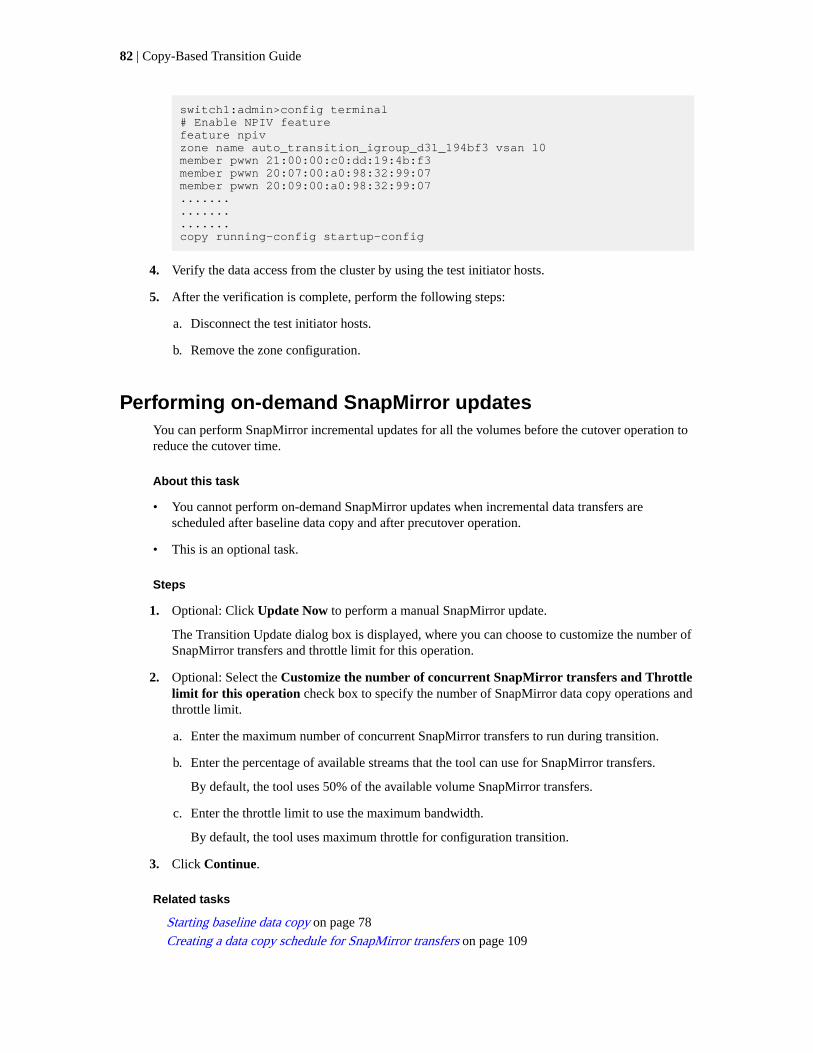
switch1:admin>config terminal# Enable NPIV featurefeature npivzone name auto_transition_igroup_d31_194bf3 vsan 10member pwwn 21:00:00:c0:dd:19:4b:f3member pwwn 20:07:00:a0:98:32:99:07member pwwn 20:09:00:a0:98:32:99:07.....................copy running-config startup-config
4. Verify the data access from the cluster by using the test initiator hosts.
5. After the verification is complete, perform the following steps:
a. Disconnect the test initiator hosts.
b. Remove the zone configuration.
Performing on-demand SnapMirror updatesYou can perform SnapMirror incremental updates for all the volumes before the cutover operation toreduce the cutover time.
About this task
• You cannot perform on-demand SnapMirror updates when incremental data transfers arescheduled after baseline data copy and after precutover operation.
• This is an optional task.
Steps
1. Optional: Click Update Now to perform a manual SnapMirror update.
The Transition Update dialog box is displayed, where you can choose to customize the number ofSnapMirror transfers and throttle limit for this operation.
2. Optional: Select the Customize the number of concurrent SnapMirror transfers and Throttlelimit for this operation check box to specify the number of SnapMirror data copy operations andthrottle limit.
a. Enter the maximum number of concurrent SnapMirror transfers to run during transition.
b. Enter the percentage of available streams that the tool can use for SnapMirror transfers.
By default, the tool uses 50% of the available volume SnapMirror transfers.
c. Enter the throttle limit to use the maximum bandwidth.
By default, the tool uses maximum throttle for configuration transition.
3. Click Continue.
Related tasks
Starting baseline data copy on page 78
Creating a data copy schedule for SnapMirror transfers on page 109
82 | Copy-Based Transition Guide
Completing a transition projectYou can complete a transition by completing the individual projects. Because this operation isdisruptive, you should evaluate when to run it. When transitioning volumes in a SnapMirrorrelationship, the secondary project must be completed before completing the transition of the primaryproject.
About this task
The storage cutover finishes in a few minutes. The time required for the clients to remount the datavaries. The timing of the storage cutover or outage window depends on the following factors:
• Final update
The final update of the data depends on the amount of change in the source data since the lastupdate. Incremental transfers minimize the amount of data that has to be transferred duringcutover.
• Reconnecting clients
If updates are required for each client to connect to the cluster, the number of clients that have tobe updated determines the cutover time.
Outages apply only to the volumes that are being migrated. It is not necessary to shut down the entiresource 7-Mode storage system. Volumes on the source system that are not being migrated can remainonline and accessible.
Steps
1. From the Dashboard, select the project that you want to complete.
2. Manual: Disconnect client access.
3. Click Complete Transition.
a. Optional: If you want to keep the 7-Mode source volumes online after the transition, clear theTake source volumes offline after transition check box.
By default, this option is selected and the source volumes are taken offline.
b. Optional: Select the Customize the number of concurrent SnapMirror transfers andThrottle limit for this operation check box to specify the number of SnapMirror data copyoperations and throttle limit.
A message is displayed with the warning that the cutover operation is disruptive.
c. Click Yes to continue.
After the cutover operation finishes successfully, a confirmation message is displayed.
d. Click OK.
Result
The 7-Mode IP addresses selected for the transition are unconfigured from the 7-Mode storagesystem and the associated LIFs created before the cutover are brought to the administrative up state.The 7-Mode volumes are offline.
After you finish
From the cluster, run the vserver check lif-multitenancy run command to verify that thename servers are reachable using the transitioned LIFs.
Migrating data and configuration from 7-Mode volumes | 83

Note: If you have created a new LIF, users and applications of the transitioned volumes must beremapped to the drives by using the new IP addresses and ports after all the projects have beencompleted.
Related concepts
Guidelines for deciding when to perform cutover on page 65
84 | Copy-Based Transition Guide

Transitioning volumes by using the 7-ModeTransition Tool CLI
The 7-Mode Transition Tool provides commands that enable you to transition 7-Mode volumes. Ifyou have the 7-Mode Transition Tool installed on a Linux system, you must use the CLI to performthe transition.
The tool collects the 7-Mode storage system's volume and IP address information, verifies the 7-Mode configuration, and interacts with the cluster to apply the configuration on the SVM.
Scenarios for selecting volumes in a projectPlanning a project composition and deciding which 7-Mode volumes to transition in a singletransition operation can help in reducing the downtime for applications. Understanding some samplescenarios can help you while creating projects in your environment.
Bidirectional SnapMirror relationship
To transition a bidirectional SnapMirror relationship, you must create different transition projects foreach volume.
For example, as shown in the illustration below, consider a volume SnapMirror relationship thatexists between vf1:vol1 (primary) on system1 and vf2:vol1 (secondary) on system2. Similarly,another volume SnapMirror relationship exists between vf2:vol2 (primary) on system2 and vf1:vol2(secondary) on system1.
vol1 (primary) vol1 (secondary)
vol2 (secondary) vol2 (primary)
7-Mode system (vf1) 7-Mode system (vf2)
You cannot combine the volumes vf1:vol1 and vf1:vol2 in one transition project . Similarly, youcannot combine the volumes vf2:vol1 and vf2:vol2 in one transition project. You must create separatetransition projects for each volume to transition the volume SnapMirror relationship.
Volumes with CIFS configuration
You must group volumes that have CIFS configuration in one project so that all the CIFS-relatedconfiguration is transitioned completely to the SVM.
85
For example, if 10 volumes in a 7-Mode system or a vFiler unit have associated CIFS shares, home-directory search path, and audit configuration, these 10 volumes must be transitioned in one project .This ensures that all the volumes and CIFS configuration are completely applied on the SVM aftertransition.
SnapMirror relationship between a primary volume and multiple secondary volumes
If a SnapMirror relationship exists between a primary volume and multiple secondary volumes and ifall the secondary volumes are on the same 7-Mode controller, you can create a secondary project togroup all the secondary volumes and complete the transition of all secondary volumes in that project .You can then create a primary project to transition the primary volume and complete the SnapMirrortransition.
Transitioning volumes by using the 7-Mode Transition Toolcommand-line interface
You can create transition projects and perform the transition in stages by using the 7-Mode TransitionTool command-line interface.
Steps
1. Creating a transition project on page 86
2. Customizing the transition of 7-Mode configurations by using the CLI on page 89
3. Running prechecks on page 95
4. Starting data copy for a transition project on page 96
5. Applying configurations to ONTAP volumes on page 97
6. Completing the transition on page 98
Creating a transition project
You can create a transition project that identifies the 7-Mode objects to be transitioned and how theymap to the ONTAP objects. While creating the project, the 7-Mode Transition Tool collects and savesthe information about the transition objects. You can use this project information to perform thetransition in stages.
Before you begin
You must have gathered the following information:
• Project type: Possible values are stand-alone, primary, or secondary
• FQDN or IP address of the 7-Mode storage system or the default vFiler unit, if MultiStore islicensed
• Administrative user name and password of the 7-Mode storage system
• List of 7-Mode volumes
• FQDN of the cluster or IP address of the cluster-management LIF
• SVM name
Steps
1. From the Start menu, click All Programs > NetApp 7-Mode Transition Tool > NetApp 7-Mode Transition Tool (CLI) 3.0 to open the 7-Mode Transition Tool command prompt.
86 | Copy-Based Transition Guide
2. Add the user name and password of the systems that are a part of the transition project:
transition credentials add -h host_name -u user_name
host_name is FQDN or IP address of the 7-Mode system or cluster.
user_name is the administrative user name for the system.
Note: You must repeat this step for each storage system that you want to add to the transitionprojects.
Example
7-Mode Transition Tool>transition credentials add -h system1.example.com -u rootEnter password for '[email protected]':
3. Create a transition project:
transition cbt create -p project_name -t project_type -n 7-Mode_system -c data-copy-ipaddress [-f vfiler_name] [-h cluster -v vserver_name
project_name is the name of the transition project.
project_type is the project type. Valid values are standalone, secondary, or primary.
7-Mode_system is the FQDN or IP address of the 7-Mode system.
cluster is the FQDN of the cluster or IP address of the cluster-management LIF.
Note: The host names of your 7-Mode system and cluster must be the same as those you hadprovided while creating the project.
data-copy-ipaddress is the IP address over which data is copied.
vfiler_name is the name of the nondefault vFiler unit.
vserver_name is the name of the SVM.
Note: For a new SVM, you must provide the aggregate name of the root volume of the SVMwith the -g option.
Example
7-Mode Transition Tool>transition cbt create -p sample_project -t standalone -n system1.example.com -n 10.238.55.33 -h cluster1.example.com -v vs2
The transition project moves to the preparation state.
4. Add the 7-Mode volume and ONTAP volume to the project:
transition cbt volumepair add -p project_name -v 7-Mode_volume -cvserver_volume -g aggr_name -t
7-Mode_volume is the 7-Mode volume name.
vserver_volume is the ONTAP volume on the SVM.
Note: You can also add a ONTAP volume for which the baseline transfer has been completed.When you add such a volume in the preparation phase, only incremental transfers areperformed during the data copy phase.
aggr_name is the aggregate on which the ONTAP volume vserver_volume is created duringthe start operation.
Transitioning volumes by using the 7-Mode Transition Tool CLI | 87
-t is used when a volume which is in SnapMirror relationships must be transitioned asstandalone volume.
Note: When a volume is transitioned as standalone volume, SnapMirror relationships are notpreserved during the transition.
For SnapLock Compliance volumes that are in SnapMirror relationship, the transition ofSnapMirror relationships for SnapLock Compliance volumes is not automated by the 7-ModeTransition Tool. All SnapLock Compliance volumes that are in SnapMirror relationship must betransitioned as standalone volumes (by specifying the flag -t) by including the volumes instandalone, primary, or secondary projects. You must then manually perform the SnapMirrorresychronization operation between these volumes after the transition.
See Considerations for transitioning of SnapLock Compliance volumes on page 44
Example
7-Mode Transition Tool>transition cbt volumepair add -p sample_project -v vol1 -c vol1 -g aggr1
5. Optional: Add the IP addresses to be transitioned to the project:
transition cbt lif add -p project_name -i ip-address [-m netmask] [-gdefault-gateway] [-p home_port] [ -n home_node]
To a transition project, you can also add existing IP addresses that are unconfigured or removedfrom the 7-Mode system during storage cutover, and new IP addresses that are not yet configuredon either the 7-Mode or ONTAP.
Note: FC and iSCSI LIFs are not transitioned by the 7-Mode Transition Tool.
Example
7-Mode Transition Tool>transition cbt lif add -p sample_project -i 192.0.2.250 -m 255.255.255.128 -g 192.40.0.1 -p e0a -n cluster1-01
The new IP addresses are configured on the ONTAP system in the up state during the applyconfiguration (precutover) operation.
6. Optional: Follow these steps to add information to the primary and secondary project:
If you want to addinformation about the...
Enter...
Primary 7-Mode system tothe secondary project
transition cbt add-primary-seven-mode-system -pproject_name -h source-host -f management-ipaddress -d data-copy-ipaddress [-mmultipathing-ipaddress]
For more information, see NetApp KB Article 3015030: CBT : How toprovide all the required primary 7-Mode details for a given secondaryproject.
Secondary cluster or SVM tothe primary project
transition cbt add-secondary-cluster-mode-system-p project_name -h c-mode-host-name -v vserver-name
For more information, see the NetApp KB Article 1015871: CBT: Howto add the required secondary cluster details to the primary project
project_name is the name of the transition project.
88 | Copy-Based Transition Guide

source-host is the primary 7-Mode storage system host name or IP address as seen in thesnapmirror status command output of the secondary 7-Mode system.
For considerations about providing the 7-Mode primary system details, see the man pages.
management-ipaddress is the management IP address of the source host.
data-copy-ipaddress is the IP address over which data is copied.
multipathing-ipaddress is the additional IP address that is used for data copy.
c-mode-host-name is the FQDN or IP address of the cluster to which the secondary volumes inthe project have been transitioned.
vserver-name is the name of the SVM hosting the secondary volumes.
7. Create a data copy schedule:
transition cbt schedule add -p project_name -n schedule_name -d days-range -b start-time -e duration -u update-frequency -t available-transfers-percentage -c max-cap-concurrent-transfers -x project-snapmirror-throttle
Example
The following command shows how to add a schedule that uses 100% of available concurrentSnapMirror transfers. However, it does not exceed the 25 concurrent SnapMirror transfers at anypoint of time.
transition schedule add -p sample_project -n dr_active -d 1-5 -b 23:30 -e 03:00 -c 25 -x 200 -u 00:30
8. Optional: View the detailed information about the transition project created:
transition cbt show -p project-name
Customizing the transition of 7-Mode configurations by using the CLI
By default, all 7-Mode configurations are transitioned to ONTAP. You can choose to exclude some orall the volume, NFS, CIFS, SAN, and name services configurations from transition by using the 7-Mode Transition Tool CLI. You can also choose to consolidate the 7-Mode NFS export rules andSnapshot schedules, and reuse an existing NFS export policy and Snapshot policy on the target SVM.
About this task
You must perform this task before the configuration is applied, after which any modification will beignored.
The 7-Mode Transition Tool does not perform prechecks for the configuration that is excluded.
By default, all 7-Mode configurations are selected for transition.
It is a best practice to run the prechecks with all configurations first, and then exclude one or moreconfigurations in the subsequent run of the prechecks. This helps you to understand whichconfigurations are excluded from transition and which prechecks are skipped subsequently.
Choices
• Exclude and verify the configurations:
1. Exclude the configurations:
transition cbt property-set -p project_name -n config_property_name -vtrue
config_property_name is the configuration that you want to exclude.
Transitioning volumes by using the 7-Mode Transition Tool CLI | 89
Configurations that can be excluded from transition on page 90
2. Verify the value of the property that is set for excluding the configuration:
transition cbt property-get -p project_name -n config_property_name
• Consolidate NFS export rules for transition:
◦ Consolidate similar 7-Mode NFS export rules to a single export policy in clustered DataONTAP, which can then be applied to the transitioned volume or qtree:
transition cbt property-set -p project_name -n nfs-consolidate-similiar-7mode-exports -v true
If the nfs-consolidate-similiar-7mode-exports property is set to false, the 7-Mode Transition Tool creates a new NFS export policy in ONTAP for each 7-Mode NFSexport rule.
◦ Reuse an existing NFS export policy on the SVM that matches the export policy that will becreated by the tool, which can be applied to the transitioned volumes or qtrees:
transition cbt property-set -p project_name -n nfs-reuse-matching-svm-export-policies -v true
• Consolidate Snapshot schedules for transition:
◦ Consolidate similar 7-Mode Snapshot schedules to a single Snapshot policy in ONTAP, whichcan then be applied to the transitioned volume:
transition cbt property-set -p project_name -n consolidate-similar-7mode-snapshot-policies -v true
If the consolidate-similar-7mode-snapshot-policies property is set to false, the7-Mode Transition Tool creates a new Snapshot policy in ONTAP for each Snapshot schedule.
◦ Reuse an existing Snapshot policy on the SVM that matches the Snapshot policy that will becreated by the tool, which can be applied to the transitioned volumes:
transition cbt property-set -p project_name -n reuse-matching-svm-snapshot-policies -v true
Configurations that can be excluded from transition
You can customize the configuration transition by excluding some volume-level or SVM-levelconfigurations for NFS, CIFS, SAN, and name services configurations from transition by specifyingthe property name with the transition cbt property-set command of the 7-Mode TransitionTool CLI.
NFS
7-Mode configuration to exclude Property name
Export policies ignore-nfs-exports-transition
NFS options ignore-nfs-options-transition
All NFS configurations ignore-all-nfs-configurations-transition
CIFS
7-Mode configuration to exclude Property name
Local users and groups ignore-local-users-groups-transition
Home directory paths ignore-cifs-home-directory-paths-
transition
90 | Copy-Based Transition Guide
7-Mode configuration to exclude Property name
Symbolic links ignore-cifs-symlinks-transition
Widelinks ignore-cifs-widelinks-transition
Shares and Share ACLs ignore-cifs-shares-and-acls-transition
CIFS options ignore-cifs-options-transition
Name mapping ignore-cifs-name-mapping-transition
Audit configuration ignore-cifs-audit-transition
Preferred domain controller list ignore-cifs-preferred-domain-
controllers-list-transition
All CIFS configurations ignore-all-cifs-configurations-
transition
Name services
7-Mode configuration to exclude Property name
Netgroups ignore-netgroups-transition
UNIX users and groups ignore-unix-users-groups-transition
NIS ignore-nis-transition
DNS ignore-dns-transition
LDAP ignore-ldap-transition
/etc/nsswitch.conf file ignore-nsswitch-transition
LDAP-based user mapping ignore-nmswitch-transition
/etc/hosts files ignore-etc-hosts-transition
All name services configurations ignore-all-nameservices-configurations-
transition
SAN
7-Mode configuration toexclude
Property name
igroup and LUN mapping ignore-igroup-and-lunmapping-transition
All configurations ignore-all-san-configurations-transition
Snapshot schedules
7-Mode configuration toexclude
Property name
Snapshot schedules ignore-snapshot-schedule-transition
Note: If this option is set to true, the 'default' Snapshot policy isapplied to the transitioned volumes.
Transitioning volumes by using the 7-Mode Transition Tool CLI | 91
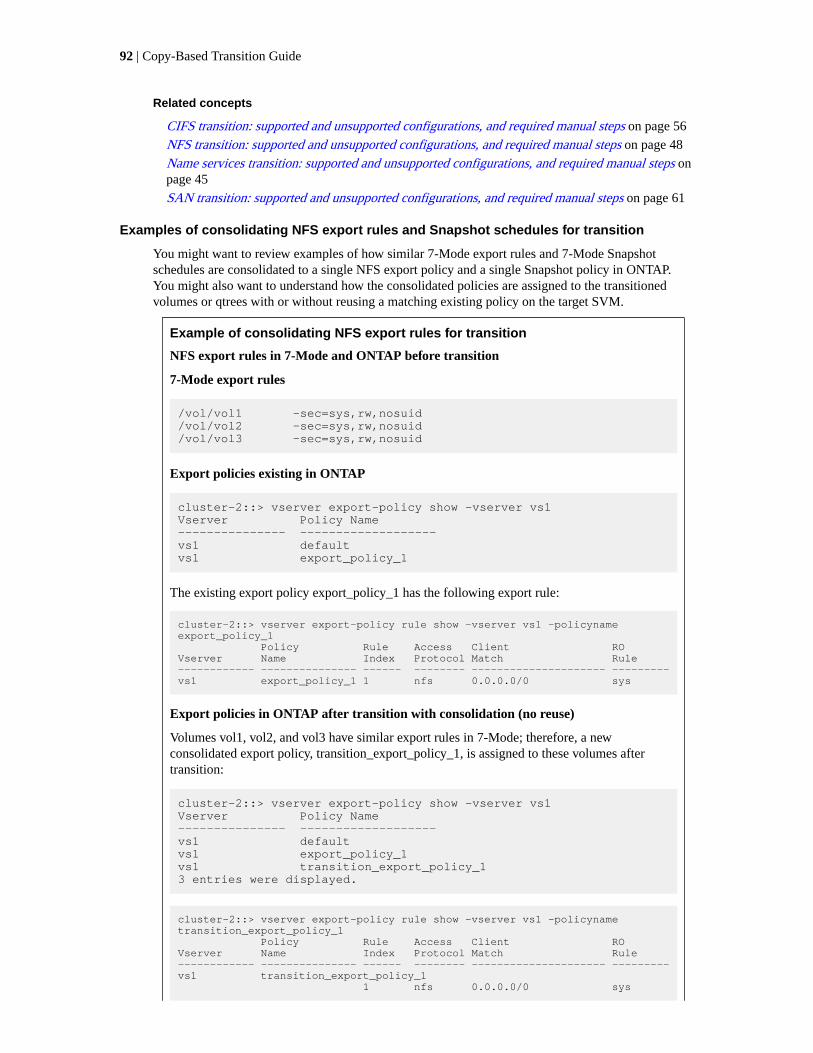
Related concepts
CIFS transition: supported and unsupported configurations, and required manual steps on page 56
NFS transition: supported and unsupported configurations, and required manual steps on page 48
Name services transition: supported and unsupported configurations, and required manual steps onpage 45
SAN transition: supported and unsupported configurations, and required manual steps on page 61
Examples of consolidating NFS export rules and Snapshot schedules for transition
You might want to review examples of how similar 7-Mode export rules and 7-Mode Snapshotschedules are consolidated to a single NFS export policy and a single Snapshot policy in ONTAP.You might also want to understand how the consolidated policies are assigned to the transitionedvolumes or qtrees with or without reusing a matching existing policy on the target SVM.
Example of consolidating NFS export rules for transition
NFS export rules in 7-Mode and ONTAP before transition
7-Mode export rules
/vol/vol1 -sec=sys,rw,nosuid/vol/vol2 -sec=sys,rw,nosuid/vol/vol3 -sec=sys,rw,nosuid
Export policies existing in ONTAP
cluster-2::> vserver export-policy show -vserver vs1Vserver Policy Name--------------- -------------------vs1 defaultvs1 export_policy_1
The existing export policy export_policy_1 has the following export rule:
cluster-2::> vserver export-policy rule show -vserver vs1 -policyname export_policy_1 Policy Rule Access Client ROVserver Name Index Protocol Match Rule------------ --------------- ------ -------- --------------------- ---------vs1 export_policy_1 1 nfs 0.0.0.0/0 sys
Export policies in ONTAP after transition with consolidation (no reuse)
Volumes vol1, vol2, and vol3 have similar export rules in 7-Mode; therefore, a newconsolidated export policy, transition_export_policy_1, is assigned to these volumes aftertransition:
cluster-2::> vserver export-policy show -vserver vs1Vserver Policy Name--------------- -------------------vs1 defaultvs1 export_policy_1vs1 transition_export_policy_13 entries were displayed.
cluster-2::> vserver export-policy rule show -vserver vs1 -policyname transition_export_policy_1 Policy Rule Access Client ROVserver Name Index Protocol Match Rule------------ --------------- ------ -------- --------------------- ---------vs1 transition_export_policy_1 1 nfs 0.0.0.0/0 sys
92 | Copy-Based Transition Guide
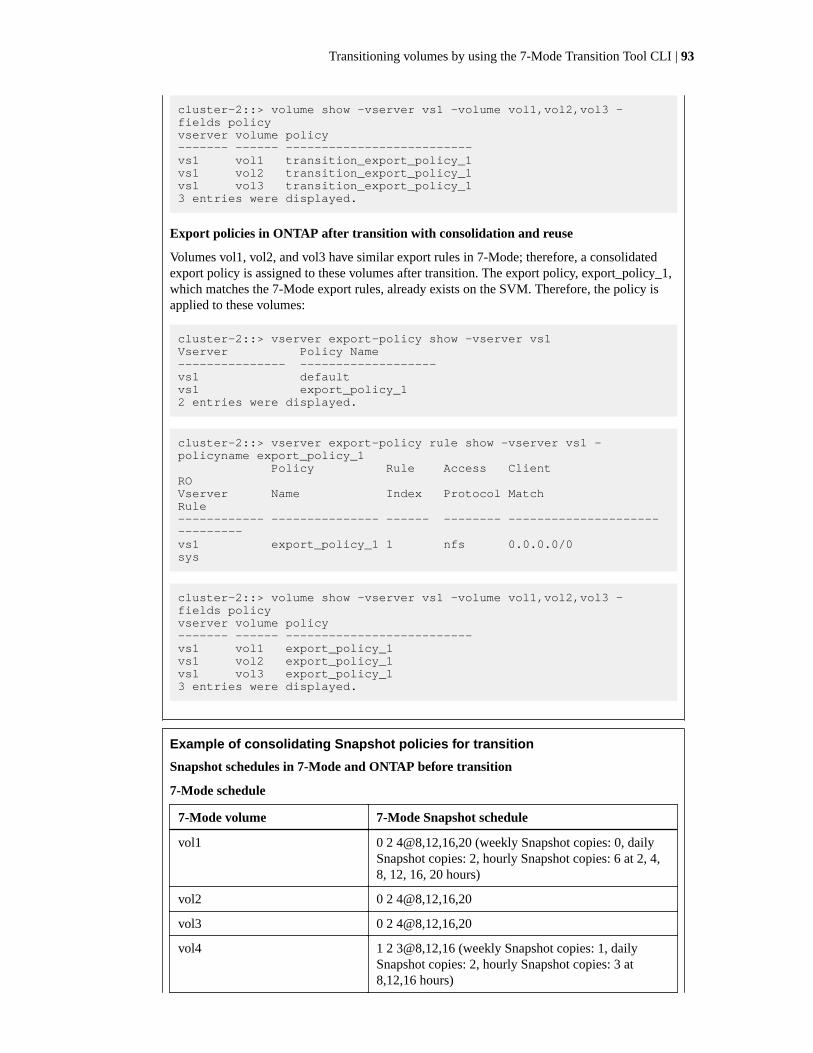
cluster-2::> volume show -vserver vs1 -volume vol1,vol2,vol3 -fields policyvserver volume policy------- ------ --------------------------vs1 vol1 transition_export_policy_1vs1 vol2 transition_export_policy_1vs1 vol3 transition_export_policy_13 entries were displayed.
Export policies in ONTAP after transition with consolidation and reuse
Volumes vol1, vol2, and vol3 have similar export rules in 7-Mode; therefore, a consolidatedexport policy is assigned to these volumes after transition. The export policy, export_policy_1,which matches the 7-Mode export rules, already exists on the SVM. Therefore, the policy isapplied to these volumes:
cluster-2::> vserver export-policy show -vserver vs1Vserver Policy Name--------------- -------------------vs1 defaultvs1 export_policy_12 entries were displayed.
cluster-2::> vserver export-policy rule show -vserver vs1 -policyname export_policy_1 Policy Rule Access Client ROVserver Name Index Protocol Match Rule------------ --------------- ------ -------- --------------------- ---------vs1 export_policy_1 1 nfs 0.0.0.0/0 sys
cluster-2::> volume show -vserver vs1 -volume vol1,vol2,vol3 -fields policyvserver volume policy------- ------ --------------------------vs1 vol1 export_policy_1vs1 vol2 export_policy_1vs1 vol3 export_policy_13 entries were displayed.
Example of consolidating Snapshot policies for transition
Snapshot schedules in 7-Mode and ONTAP before transition
7-Mode schedule
7-Mode volume 7-Mode Snapshot schedule
vol1 0 2 4@8,12,16,20 (weekly Snapshot copies: 0, dailySnapshot copies: 2, hourly Snapshot copies: 6 at 2, 4,8, 12, 16, 20 hours)
vol2 0 2 4@8,12,16,20
vol3 0 2 4@8,12,16,20
vol4 1 2 3@8,12,16 (weekly Snapshot copies: 1, dailySnapshot copies: 2, hourly Snapshot copies: 3 at8,12,16 hours)
Transitioning volumes by using the 7-Mode Transition Tool CLI | 93
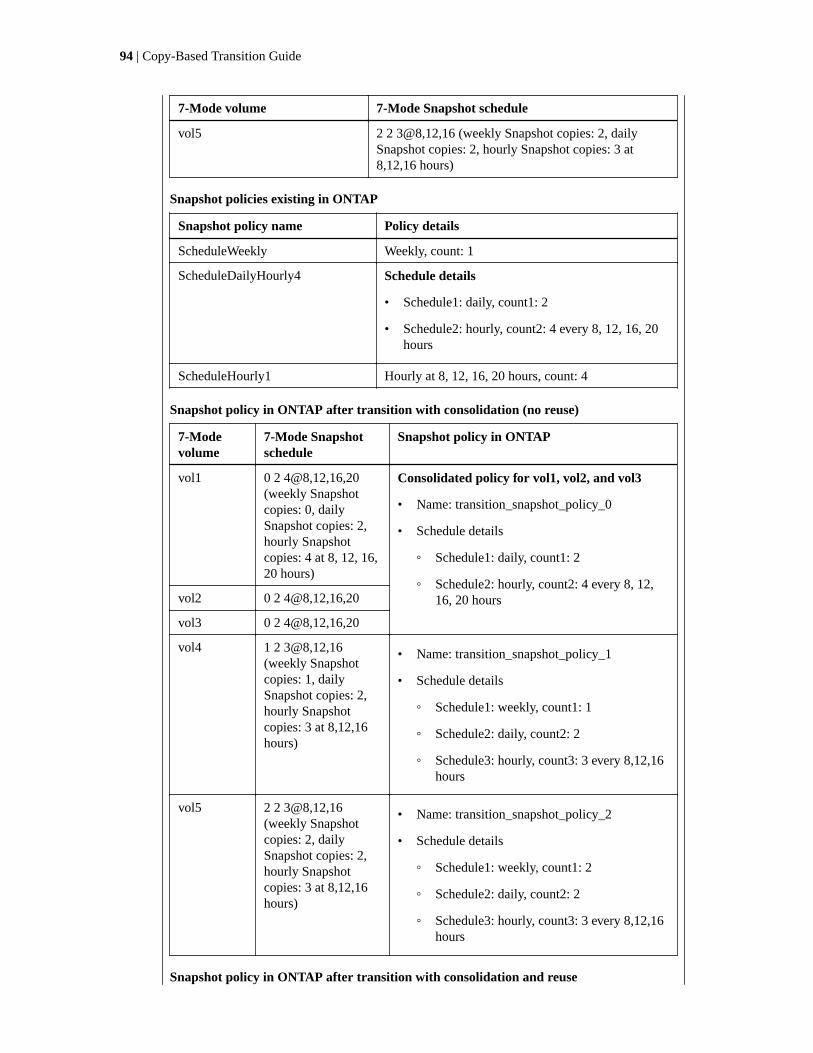
7-Mode volume 7-Mode Snapshot schedule
vol5 2 2 3@8,12,16 (weekly Snapshot copies: 2, dailySnapshot copies: 2, hourly Snapshot copies: 3 at8,12,16 hours)
Snapshot policies existing in ONTAP
Snapshot policy name Policy details
ScheduleWeekly Weekly, count: 1
ScheduleDailyHourly4 Schedule details
• Schedule1: daily, count1: 2
• Schedule2: hourly, count2: 4 every 8, 12, 16, 20hours
ScheduleHourly1 Hourly at 8, 12, 16, 20 hours, count: 4
Snapshot policy in ONTAP after transition with consolidation (no reuse)
7-Modevolume
7-Mode Snapshotschedule
Snapshot policy in ONTAP
vol1 0 2 4@8,12,16,20(weekly Snapshotcopies: 0, dailySnapshot copies: 2,hourly Snapshotcopies: 4 at 8, 12, 16,20 hours)
Consolidated policy for vol1, vol2, and vol3
• Name: transition_snapshot_policy_0
• Schedule details
◦ Schedule1: daily, count1: 2
◦ Schedule2: hourly, count2: 4 every 8, 12,16, 20 hoursvol2 0 2 4@8,12,16,20
vol3 0 2 4@8,12,16,20
vol4 1 2 3@8,12,16(weekly Snapshotcopies: 1, dailySnapshot copies: 2,hourly Snapshotcopies: 3 at 8,12,16hours)
• Name: transition_snapshot_policy_1
• Schedule details
◦ Schedule1: weekly, count1: 1
◦ Schedule2: daily, count2: 2
◦ Schedule3: hourly, count3: 3 every 8,12,16hours
vol5 2 2 3@8,12,16(weekly Snapshotcopies: 2, dailySnapshot copies: 2,hourly Snapshotcopies: 3 at 8,12,16hours)
• Name: transition_snapshot_policy_2
• Schedule details
◦ Schedule1: weekly, count1: 2
◦ Schedule2: daily, count2: 2
◦ Schedule3: hourly, count3: 3 every 8,12,16hours
Snapshot policy in ONTAP after transition with consolidation and reuse
94 | Copy-Based Transition Guide
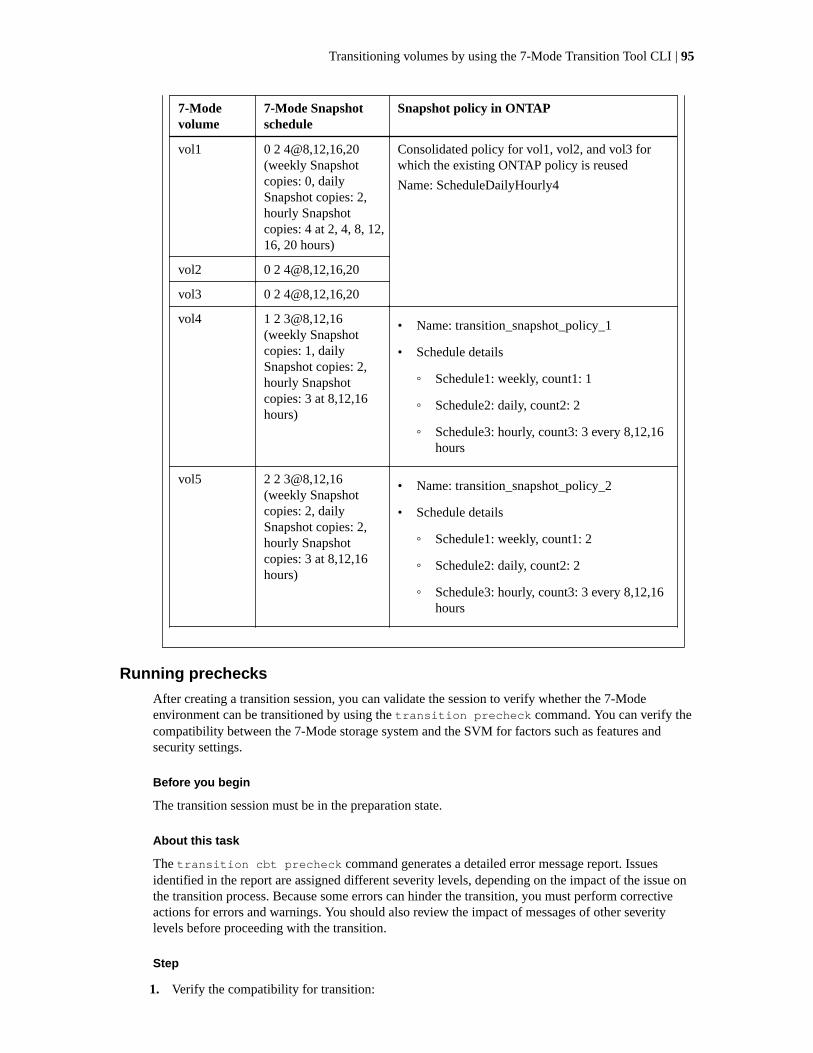
7-Modevolume
7-Mode Snapshotschedule
Snapshot policy in ONTAP
vol1 0 2 4@8,12,16,20(weekly Snapshotcopies: 0, dailySnapshot copies: 2,hourly Snapshotcopies: 4 at 2, 4, 8, 12,16, 20 hours)
Consolidated policy for vol1, vol2, and vol3 forwhich the existing ONTAP policy is reused
Name: ScheduleDailyHourly4
vol2 0 2 4@8,12,16,20
vol3 0 2 4@8,12,16,20
vol4 1 2 3@8,12,16(weekly Snapshotcopies: 1, dailySnapshot copies: 2,hourly Snapshotcopies: 3 at 8,12,16hours)
• Name: transition_snapshot_policy_1
• Schedule details
◦ Schedule1: weekly, count1: 1
◦ Schedule2: daily, count2: 2
◦ Schedule3: hourly, count3: 3 every 8,12,16hours
vol5 2 2 3@8,12,16(weekly Snapshotcopies: 2, dailySnapshot copies: 2,hourly Snapshotcopies: 3 at 8,12,16hours)
• Name: transition_snapshot_policy_2
• Schedule details
◦ Schedule1: weekly, count1: 2
◦ Schedule2: daily, count2: 2
◦ Schedule3: hourly, count3: 3 every 8,12,16hours
Running prechecks
After creating a transition session, you can validate the session to verify whether the 7-Modeenvironment can be transitioned by using the transition precheck command. You can verify thecompatibility between the 7-Mode storage system and the SVM for factors such as features andsecurity settings.
Before you begin
The transition session must be in the preparation state.
About this task
The transition cbt precheck command generates a detailed error message report. Issuesidentified in the report are assigned different severity levels, depending on the impact of the issue onthe transition process. Because some errors can hinder the transition, you must perform correctiveactions for errors and warnings. You should also review the impact of messages of other severitylevels before proceeding with the transition.
Step
1. Verify the compatibility for transition:
Transitioning volumes by using the 7-Mode Transition Tool CLI | 95
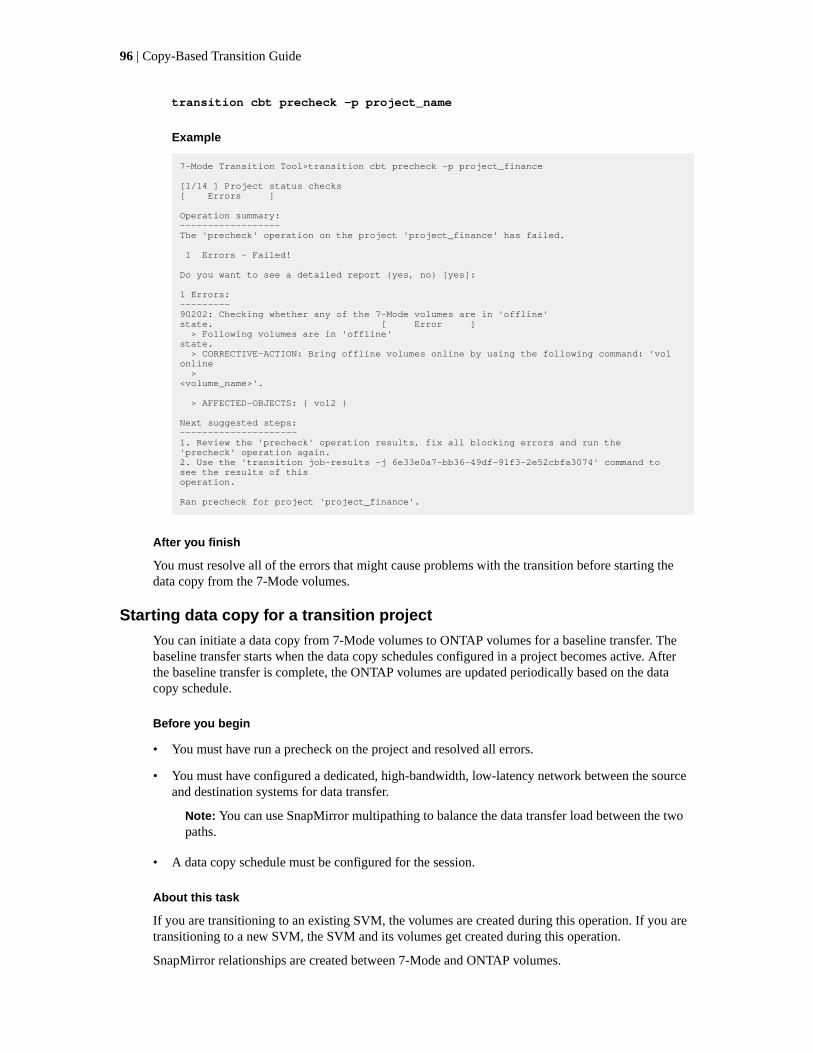
transition cbt precheck -p project_name
Example
7-Mode Transition Tool>transition cbt precheck -p project_finance
[1/14 ] Project status checks [ Errors ]
Operation summary:------------------The 'precheck' operation on the project 'project_finance' has failed.
1 Errors - Failed!
Do you want to see a detailed report {yes, no} [yes]:
1 Errors:---------90202: Checking whether any of the 7-Mode volumes are in 'offline' state. [ Error ] > Following volumes are in 'offline' state. > CORRECTIVE-ACTION: Bring offline volumes online by using the following command: 'vol online > <volume_name>'. > AFFECTED-OBJECTS: { vol2 }
Next suggested steps:---------------------1. Review the 'precheck' operation results, fix all blocking errors and run the 'precheck' operation again.2. Use the 'transition job-results -j 6e33e0a7-bb36-49df-91f3-2e52cbfa3074' command to see the results of thisoperation.
Ran precheck for project 'project_finance'.
After you finish
You must resolve all of the errors that might cause problems with the transition before starting thedata copy from the 7-Mode volumes.
Starting data copy for a transition project
You can initiate a data copy from 7-Mode volumes to ONTAP volumes for a baseline transfer. Thebaseline transfer starts when the data copy schedules configured in a project becomes active. Afterthe baseline transfer is complete, the ONTAP volumes are updated periodically based on the datacopy schedule.
Before you begin
• You must have run a precheck on the project and resolved all errors.
• You must have configured a dedicated, high-bandwidth, low-latency network between the sourceand destination systems for data transfer.
Note: You can use SnapMirror multipathing to balance the data transfer load between the twopaths.
• A data copy schedule must be configured for the session.
About this task
If you are transitioning to an existing SVM, the volumes are created during this operation. If you aretransitioning to a new SVM, the SVM and its volumes get created during this operation.
SnapMirror relationships are created between 7-Mode and ONTAP volumes.
96 | Copy-Based Transition Guide
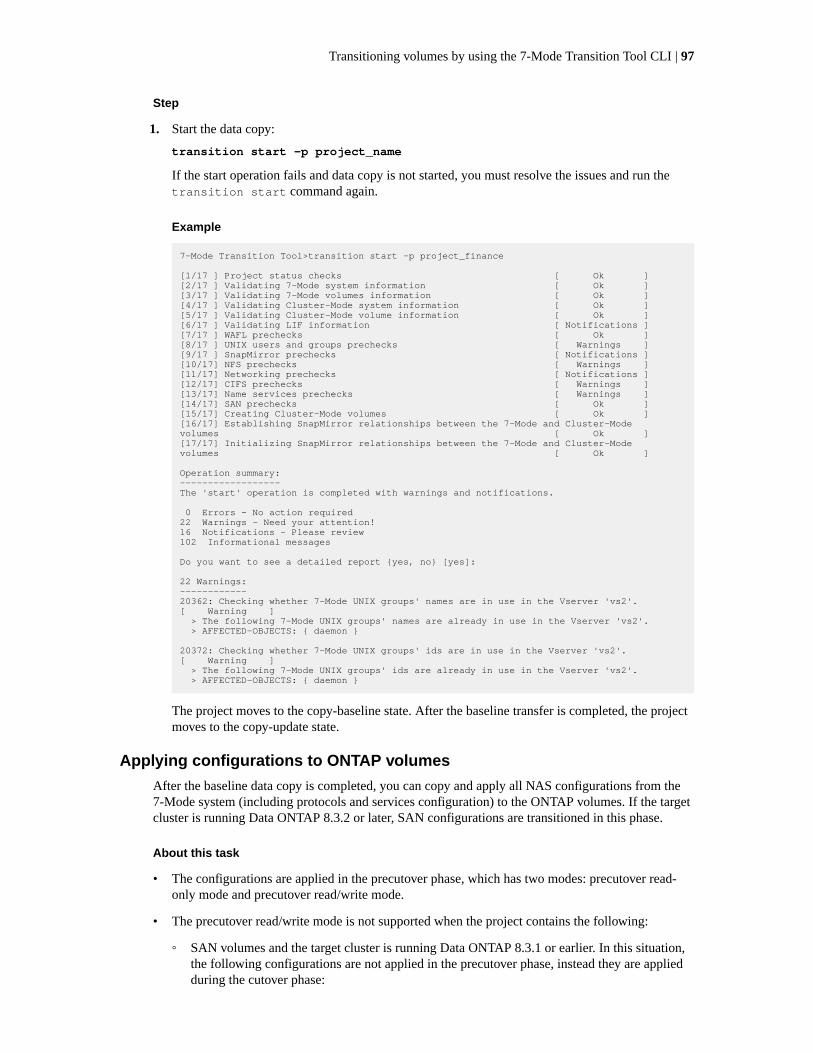
Step
1. Start the data copy:
transition start -p project_name
If the start operation fails and data copy is not started, you must resolve the issues and run thetransition start command again.
Example
7-Mode Transition Tool>transition start -p project_finance
[1/17 ] Project status checks [ Ok ][2/17 ] Validating 7-Mode system information [ Ok ][3/17 ] Validating 7-Mode volumes information [ Ok ][4/17 ] Validating Cluster-Mode system information [ Ok ][5/17 ] Validating Cluster-Mode volume information [ Ok ][6/17 ] Validating LIF information [ Notifications ][7/17 ] WAFL prechecks [ Ok ][8/17 ] UNIX users and groups prechecks [ Warnings ][9/17 ] SnapMirror prechecks [ Notifications ][10/17] NFS prechecks [ Warnings ][11/17] Networking prechecks [ Notifications ][12/17] CIFS prechecks [ Warnings ][13/17] Name services prechecks [ Warnings ][14/17] SAN prechecks [ Ok ][15/17] Creating Cluster-Mode volumes [ Ok ][16/17] Establishing SnapMirror relationships between the 7-Mode and Cluster-Mode volumes [ Ok ][17/17] Initializing SnapMirror relationships between the 7-Mode and Cluster-Mode volumes [ Ok ]
Operation summary:------------------The 'start' operation is completed with warnings and notifications.
0 Errors - No action required22 Warnings - Need your attention!16 Notifications - Please review102 Informational messages
Do you want to see a detailed report {yes, no} [yes]:
22 Warnings:------------20362: Checking whether 7-Mode UNIX groups' names are in use in the Vserver 'vs2'. [ Warning ] > The following 7-Mode UNIX groups' names are already in use in the Vserver 'vs2'. > AFFECTED-OBJECTS: { daemon }
20372: Checking whether 7-Mode UNIX groups' ids are in use in the Vserver 'vs2'. [ Warning ] > The following 7-Mode UNIX groups' ids are already in use in the Vserver 'vs2'. > AFFECTED-OBJECTS: { daemon }
The project moves to the copy-baseline state. After the baseline transfer is completed, the projectmoves to the copy-update state.
Applying configurations to ONTAP volumes
After the baseline data copy is completed, you can copy and apply all NAS configurations from the7-Mode system (including protocols and services configuration) to the ONTAP volumes. If the targetcluster is running Data ONTAP 8.3.2 or later, SAN configurations are transitioned in this phase.
About this task
• The configurations are applied in the precutover phase, which has two modes: precutover read-only mode and precutover read/write mode.
• The precutover read/write mode is not supported when the project contains the following:
◦ SAN volumes and the target cluster is running Data ONTAP 8.3.1 or earlier. In this situation,the following configurations are not applied in the precutover phase, instead they are appliedduring the cutover phase:
Transitioning volumes by using the 7-Mode Transition Tool CLI | 97
⁃ SAN configurations
⁃ Snapshot Schedule configurations
◦ SnapLock Compliance volumes.If the project contains SnapLock Compliance volumes, then the Snapshot Scheduleconfigurations are not applied in the precutover phase, instead these configurations are appliedduring the cutover phase.See Considerations for transitioning of SnapLock Compliance volumes on page 44.
• If the target cluster is running Data ONTAP 8.3.1 or earlier, the read/write mode is not supportedduring precutover if any volume in the project contains LUNs.
• If the target cluster is running Data ONTAP 8.3.1 or earlier and a project contains both SAN andNAS volumes, only NAS configurations are transitioned in the precutover phase, and these NASconfigurations can be tested only in the read-only mode.SAN configurations are transitioned only in the storage cutover phase.
Note: SAN LIFs are not configured.
• If the target cluster is running Data ONTAP 8.3.1 or earlier and the project contains SANvolumes, then Snapshot schedule configuration is not applied during apply configuration(precutover) phase.These configurations are applied during the cutover phase.
• If the target cluster is running Data ONTAP 8.3.1 or earlier and the project contains SANvolumes, then Snapshot schedule configuration is not applied during apply configuration(precutover) phase.These configurations are applied during the cutover phase.
Choices
• Run the transition operation in read-only mode:
transition cbt precutover -p project_name -m ro_test -cmax_cap_concurrent_transfers -b snapmirror_throttle
• Run the transition operation in read/write mode:
1. Apply the configurations to ONTAP:
transition cbt precutover -p project_name -m rw_test -cmax_cap_concurrent_transfers -b snapmirror_throttle
2. Manually test and verify the configurations in ONTAP.
3. Start the resynchronization operation:
transition cbt resync -p project_name
Completing the transition
Because the complete operation is disruptive, you should evaluate when to run it. When transitioningvolumes in a SnapMirror relationship, the secondary project must be completed before completingthe transition of the primary project.
Steps
1. Perform a data copy from the 7-Mode volumes to the ONTAP volumes:
transition cbt update -p project_name -t available-transfers-percentage-c snapmirror-throttlemax-cap-concurrent-transfers -x -r interactive
This helps in reducing the downtime during storage cutover.
98 | Copy-Based Transition Guide

2. Manual: Disconnect client access.
3. Complete the transition process:
transition cbt cutover -p project_name -t available-transfers-percentage-c max-cap-concurrent-transfers -x snapmirror-throttle -r interactive -o[true|false]
By default, the 7-Mode volumes are made offline. To keep the 7-Mode volumes online, set the -ooption to false.
Note: If the cutover is not successful for some reason—for example, the 7-Mode system orcluster is not reachable—you must resolve the issues and run the transition cutovercommand again.
For more information about the commands, see the man pages.
The transition session moves to the cutover state. If the cutover is successful, the session moves tothe completed state.
After you finish
You must perform any post-transition tasks and reconnect the clients to the ONTAP volumes.
Commands for managing transitionYou can use the transition cbt command to manage functions, such as creating, modifying,deleting, and displaying transition projects.
• Commands to manage transition operations on page 99
• Commands to manage volume SnapMirror relationships on page 100
• Commands to manage credentials of Data ONTAP systems on page 101
• Commands to manage the volume pairs in a project on page 101
• Commands to manage LIF details on page 101
• Commands to manage project properties on page 101
• Commands to manage transition jobs on page 101
• Commands to manage transition schedules on page 102
• Command to collect tool logs on page 102
The following option can be used with all commands:
-r no: Disables the interactive nature of the command. By default, this option is enabled.
You can also use the -v option, which enables the verbose mode, with the transition versionand transition cbt menu commands.
Commands to manage transition operations
If you want to... Use this command...
Create a transition project transition cbt create
Add the cluster information to the given project transition cbt add-cluster-info
Modify a transition project transition cbt modify
Transitioning volumes by using the 7-Mode Transition Tool CLI | 99
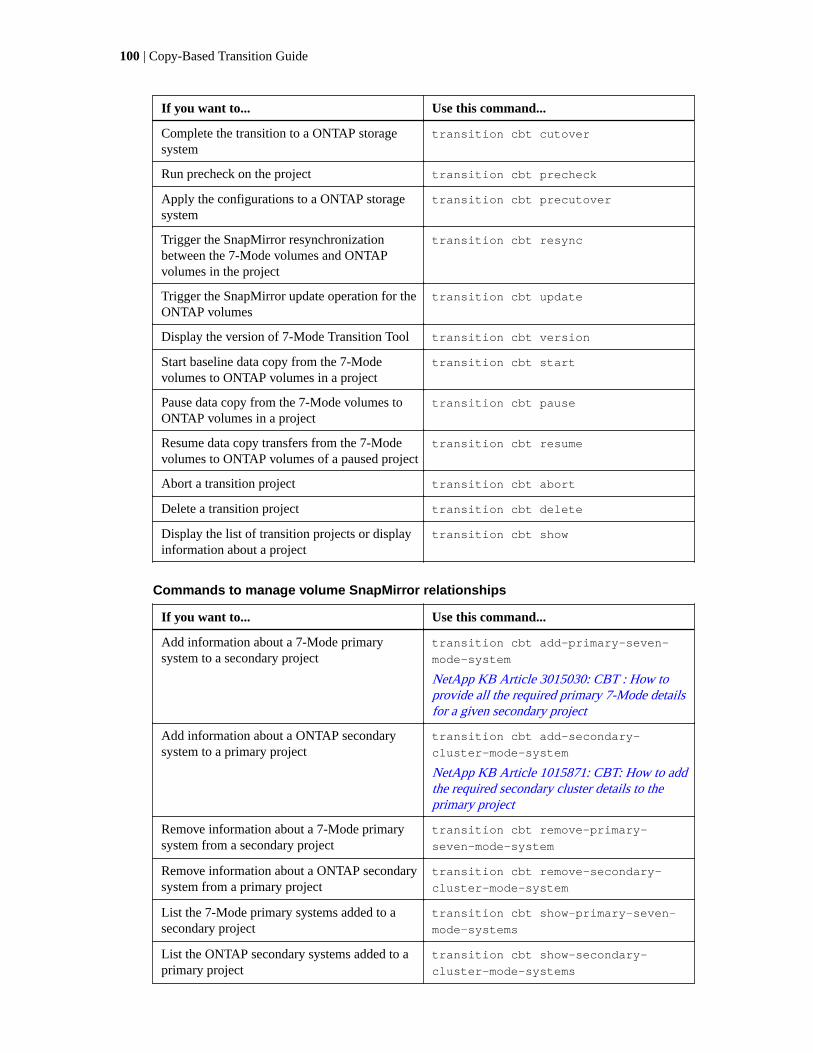
If you want to... Use this command...
Complete the transition to a ONTAP storagesystem
transition cbt cutover
Run precheck on the project transition cbt precheck
Apply the configurations to a ONTAP storagesystem
transition cbt precutover
Trigger the SnapMirror resynchronizationbetween the 7-Mode volumes and ONTAPvolumes in the project
transition cbt resync
Trigger the SnapMirror update operation for theONTAP volumes
transition cbt update
Display the version of 7-Mode Transition Tool transition cbt version
Start baseline data copy from the 7-Modevolumes to ONTAP volumes in a project
transition cbt start
Pause data copy from the 7-Mode volumes toONTAP volumes in a project
transition cbt pause
Resume data copy transfers from the 7-Modevolumes to ONTAP volumes of a paused project
transition cbt resume
Abort a transition project transition cbt abort
Delete a transition project transition cbt delete
Display the list of transition projects or displayinformation about a project
transition cbt show
Commands to manage volume SnapMirror relationships
If you want to... Use this command...
Add information about a 7-Mode primarysystem to a secondary project
transition cbt add-primary-seven-
mode-system
NetApp KB Article 3015030: CBT : How toprovide all the required primary 7-Mode detailsfor a given secondary project
Add information about a ONTAP secondarysystem to a primary project
transition cbt add-secondary-
cluster-mode-system
NetApp KB Article 1015871: CBT: How to addthe required secondary cluster details to theprimary project
Remove information about a 7-Mode primarysystem from a secondary project
transition cbt remove-primary-
seven-mode-system
Remove information about a ONTAP secondarysystem from a primary project
transition cbt remove-secondary-
cluster-mode-system
List the 7-Mode primary systems added to asecondary project
transition cbt show-primary-seven-
mode-systems
List the ONTAP secondary systems added to aprimary project
transition cbt show-secondary-
cluster-mode-systems
100 | Copy-Based Transition Guide
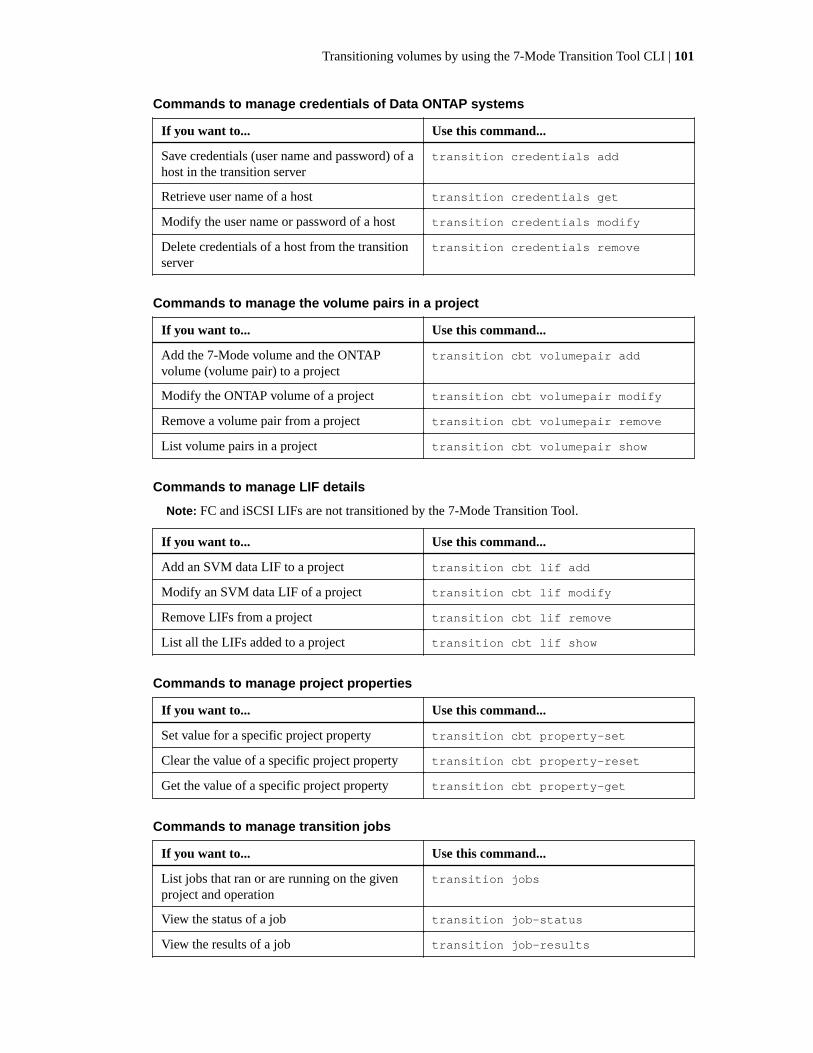
Commands to manage credentials of Data ONTAP systems
If you want to... Use this command...
Save credentials (user name and password) of ahost in the transition server
transition credentials add
Retrieve user name of a host transition credentials get
Modify the user name or password of a host transition credentials modify
Delete credentials of a host from the transitionserver
transition credentials remove
Commands to manage the volume pairs in a project
If you want to... Use this command...
Add the 7-Mode volume and the ONTAPvolume (volume pair) to a project
transition cbt volumepair add
Modify the ONTAP volume of a project transition cbt volumepair modify
Remove a volume pair from a project transition cbt volumepair remove
List volume pairs in a project transition cbt volumepair show
Commands to manage LIF details
Note: FC and iSCSI LIFs are not transitioned by the 7-Mode Transition Tool.
If you want to... Use this command...
Add an SVM data LIF to a project transition cbt lif add
Modify an SVM data LIF of a project transition cbt lif modify
Remove LIFs from a project transition cbt lif remove
List all the LIFs added to a project transition cbt lif show
Commands to manage project properties
If you want to... Use this command...
Set value for a specific project property transition cbt property-set
Clear the value of a specific project property transition cbt property-reset
Get the value of a specific project property transition cbt property-get
Commands to manage transition jobs
If you want to... Use this command...
List jobs that ran or are running on the givenproject and operation
transition jobs
View the status of a job transition job-status
View the results of a job transition job-results
Transitioning volumes by using the 7-Mode Transition Tool CLI | 101
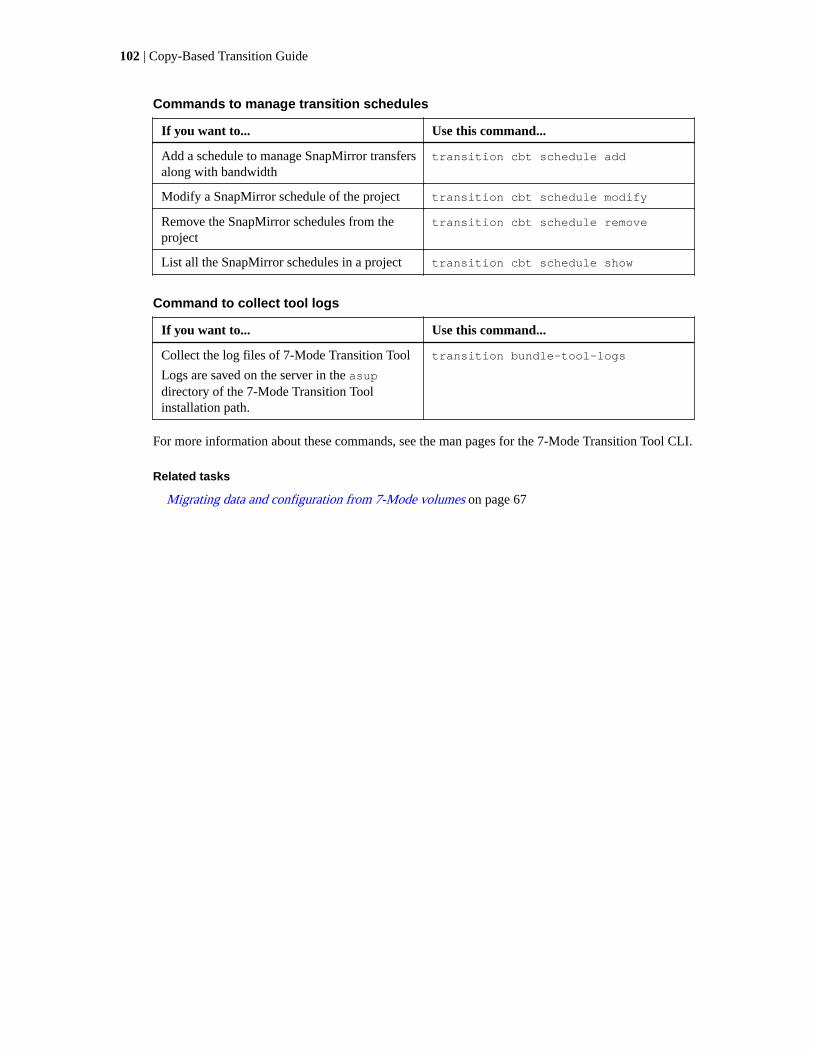
Commands to manage transition schedules
If you want to... Use this command...
Add a schedule to manage SnapMirror transfersalong with bandwidth
transition cbt schedule add
Modify a SnapMirror schedule of the project transition cbt schedule modify
Remove the SnapMirror schedules from theproject
transition cbt schedule remove
List all the SnapMirror schedules in a project transition cbt schedule show
Command to collect tool logs
If you want to... Use this command...
Collect the log files of 7-Mode Transition Tool
Logs are saved on the server in the asupdirectory of the 7-Mode Transition Toolinstallation path.
transition bundle-tool-logs
For more information about these commands, see the man pages for the 7-Mode Transition Tool CLI.
Related tasks
Migrating data and configuration from 7-Mode volumes on page 67
102 | Copy-Based Transition Guide
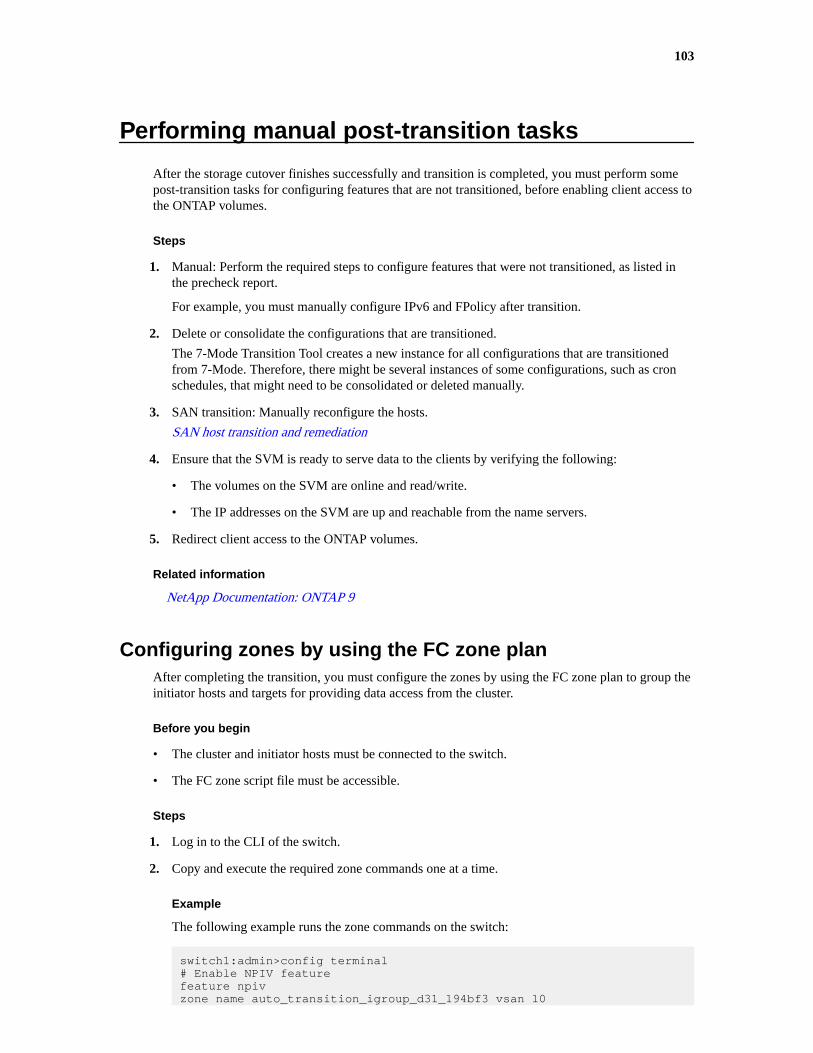
Performing manual post-transition tasks
After the storage cutover finishes successfully and transition is completed, you must perform somepost-transition tasks for configuring features that are not transitioned, before enabling client access tothe ONTAP volumes.
Steps
1. Manual: Perform the required steps to configure features that were not transitioned, as listed inthe precheck report.
For example, you must manually configure IPv6 and FPolicy after transition.
2. Delete or consolidate the configurations that are transitioned.
The 7-Mode Transition Tool creates a new instance for all configurations that are transitionedfrom 7-Mode. Therefore, there might be several instances of some configurations, such as cronschedules, that might need to be consolidated or deleted manually.
3. SAN transition: Manually reconfigure the hosts.
SAN host transition and remediation
4. Ensure that the SVM is ready to serve data to the clients by verifying the following:
• The volumes on the SVM are online and read/write.
• The IP addresses on the SVM are up and reachable from the name servers.
5. Redirect client access to the ONTAP volumes.
Related information
NetApp Documentation: ONTAP 9
Configuring zones by using the FC zone planAfter completing the transition, you must configure the zones by using the FC zone plan to group theinitiator hosts and targets for providing data access from the cluster.
Before you begin
• The cluster and initiator hosts must be connected to the switch.
• The FC zone script file must be accessible.
Steps
1. Log in to the CLI of the switch.
2. Copy and execute the required zone commands one at a time.
Example
The following example runs the zone commands on the switch:
switch1:admin>config terminal# Enable NPIV featurefeature npivzone name auto_transition_igroup_d31_194bf3 vsan 10
103
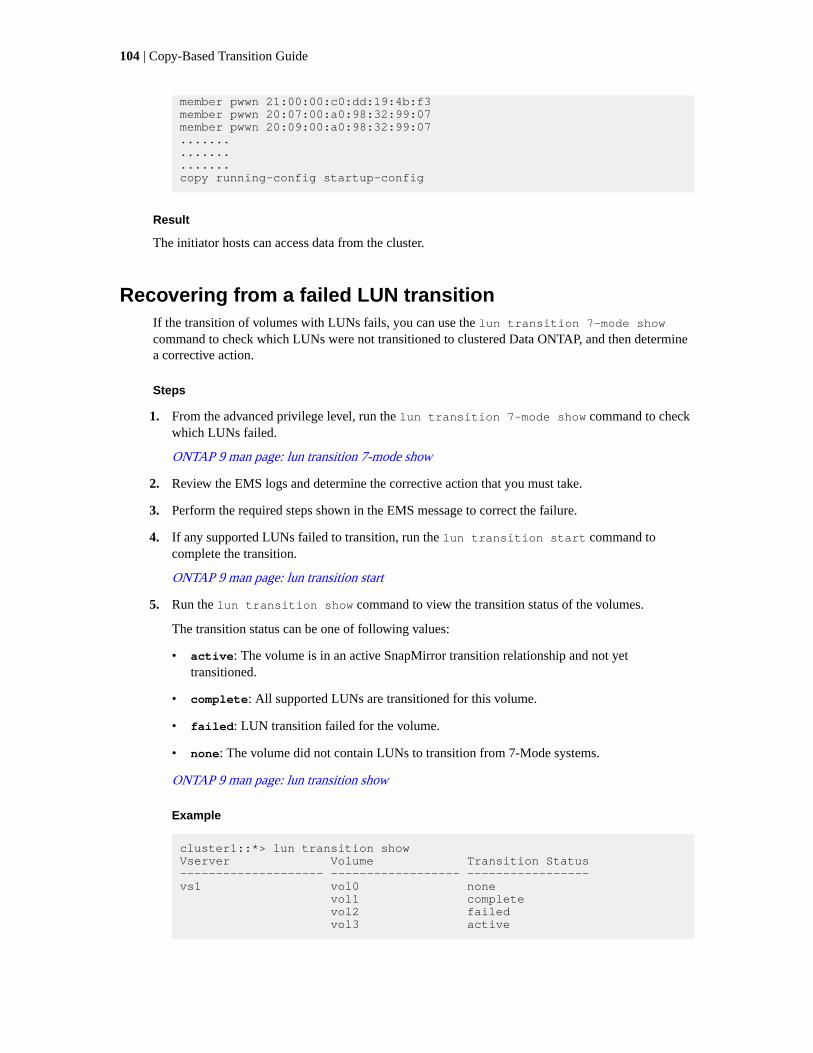
member pwwn 21:00:00:c0:dd:19:4b:f3member pwwn 20:07:00:a0:98:32:99:07member pwwn 20:09:00:a0:98:32:99:07.....................copy running-config startup-config
Result
The initiator hosts can access data from the cluster.
Recovering from a failed LUN transitionIf the transition of volumes with LUNs fails, you can use the lun transition 7-mode showcommand to check which LUNs were not transitioned to clustered Data ONTAP, and then determinea corrective action.
Steps
1. From the advanced privilege level, run the lun transition 7-mode show command to checkwhich LUNs failed.
ONTAP 9 man page: lun transition 7-mode show
2. Review the EMS logs and determine the corrective action that you must take.
3. Perform the required steps shown in the EMS message to correct the failure.
4. If any supported LUNs failed to transition, run the lun transition start command tocomplete the transition.
ONTAP 9 man page: lun transition start
5. Run the lun transition show command to view the transition status of the volumes.
The transition status can be one of following values:
• active: The volume is in an active SnapMirror transition relationship and not yettransitioned.
• complete: All supported LUNs are transitioned for this volume.
• failed: LUN transition failed for the volume.
• none: The volume did not contain LUNs to transition from 7-Mode systems.
ONTAP 9 man page: lun transition show
Example
cluster1::*> lun transition show Vserver Volume Transition Status-------------------- ------------------ -----------------vs1 vol0 none vol1 complete vol2 failed vol3 active
104 | Copy-Based Transition Guide

Viewing transitioned SAN configurationsThe LUN serial numbers and LUN IDs of SAN volumes change after transition. To view thetransitioned SAN configurations, you can generate the mapping of the old LUNs to the newtransitioned LUNs by using the 7-Mode Transition Tool CLI and export the LUN mappinginformation to a .csv file.
Before you begin
Storage cutover must have completed successfully.
Step
1. To generate LUN mapping information, run the following command from the CLI:
transition cbt export lunmap -p project_name -o file_path
Example
C:\Program Files\NetApp\7-Mode Transition Tool>transition cbt export lunmap -s SanWorkLoad -o c:/Libraires/Documents/7-to-C-LUN-MAPPING.csvSuccessfully exported 7 to C LUN mapping for 'SanWorkLoad'
The following example shows a sample LUN mapping file:
7-Mode Storage System,192.168.43.49,vfiler,finance,
cDOT Storage System,192.168.32.97,SVM,finance,
LUN#,Source LUN Path,7-Mode Serial Number,Source Igroups,Source mapping LUN ID,Destination LUN Path,Serial Number,Destination Igroup,Destination mapping LUN IDLUN#1,/vol/vol_SANdataset_sm_0/lun-inventory,dtY5B4tFAaAF,WinGrp,0,/vol/vol_SANdataset_sm_0/lun-inventory,7SQ8p$DQ12rX,WinGrp,0LUN#1,/vol/vol_SANdataset_sm_0/lun-inventory,dtY5B4tFAaAF,WinGrp2,3,/vol/vol_SANdataset_sm_0/lun-inventory,7SQ8p$DQ12rX,WinGrp2,3LUN#1,/vol/vol_SANdataset_sm_0/lun-inventory,dtY5B4tFAaAF,WinGrp3,4,/vol/vol_SANdataset_sm_0/lun-inventory,7SQ8p$DQ12rX,WinGrp3,4LUN#2,/vol/vol_SANdataset_sm_0/lun-payroll,dtY5B4tFAaAC,LnxGrp1,2,/vol/vol_SANdataset_sm_0/lun-payroll,7SQ8p$DQ12rT,LnxGrp1,4LUN#2,/vol/vol_SANdataset_sm_0/lun-payroll,dtY5B4tFAaAC,LnxGrp2,2,/vol/vol_SANdataset_sm_0/lun-payroll,7SQ8p$DQ12rT,LnxGrp2,4
After you finish
You must perform the required post-transition tasks on the host before restoring access to thetransitioned ONTAP volumes.
SAN host transition and remediation
Performing manual post-transition tasks | 105

Limitations with 7-Mode Snapshot copies of LUNs managedby SnapDrive and SnapManager after transition
When transitioning to clustered Data ONTAP 8.3, SnapDrive and SnapManager backup verificationand restore operations fail on the transitioned 7-Mode Snapshot copies. When transitioning toclustered Data ONTAP 8.3.1, SnapManager for Microsoft Exchange Server (SME) backupverification and SnapManager for Hyper-V (SMHV) restore operations of files fail on thetransitioned 7-Mode Snapshot copies.
Depending on the SnapDrive or SnapManager that is used on the host connected to the 7-Modesystem and the Data ONTAP version running on your cluster, 7-Mode Transition Tool displays awarning message for this limitation during precheck.
Note: All SnapDrive and SnapManager backup verification and restore operations are supportedon any newly created Snapshot copies in clustered Data ONTAP.
Workaround for backup and restore operations using SnapDrive and SnapManager inclustered Data ONTAP 8.3
Perform the one of the following actions:
• Retain the 7-Mode systems till the 7-Mode Snapshot copies expire.
You can use the 7-Mode system to restore a file from a LUN in the 7-Mode Snapshot copy andthen migrate it to clustered Data ONTAP, if required.
• Use single file SnapRestore in ONTAP to restore the LUN from a 7-Mode Snapshot copy to theactive file system, and then mount the restored LUN for single file restore.
Workaround for backup and restore operations using SME and SMHV in ONTAP 8.3.1and later
Perform the one of the following actions:
• Verify that the SnapManager backups created in 7-Mode are valid before you perform a storagecutover to ONTAP.
• Create a clone of the volume in ONTAP from the transitioned 7-Mode Snapshot copies, and thenmount the LUN on the cloned volume for backup verification and restore operations.
The best practice is to retain the 7-Mode systems till the 7-Mode Snapshot copies expire.
Related information
NetApp Documentation: SnapManager for Microsoft Exchange Server
NetApp Documentation: SnapManager for Hyper-V
NetApp Documentation: SnapManager for SAP
NetApp Documentation: SnapManager for Oracle
NetApp Documentation: SnapDrive for UNIX
NetApp Documentation: SnapDrive for Windows (current releases)
NetApp Documentation: SnapManager for Microsoft SQL Server
NetApp Documentation: SnapManager for Microsoft SharePoint
106 | Copy-Based Transition Guide
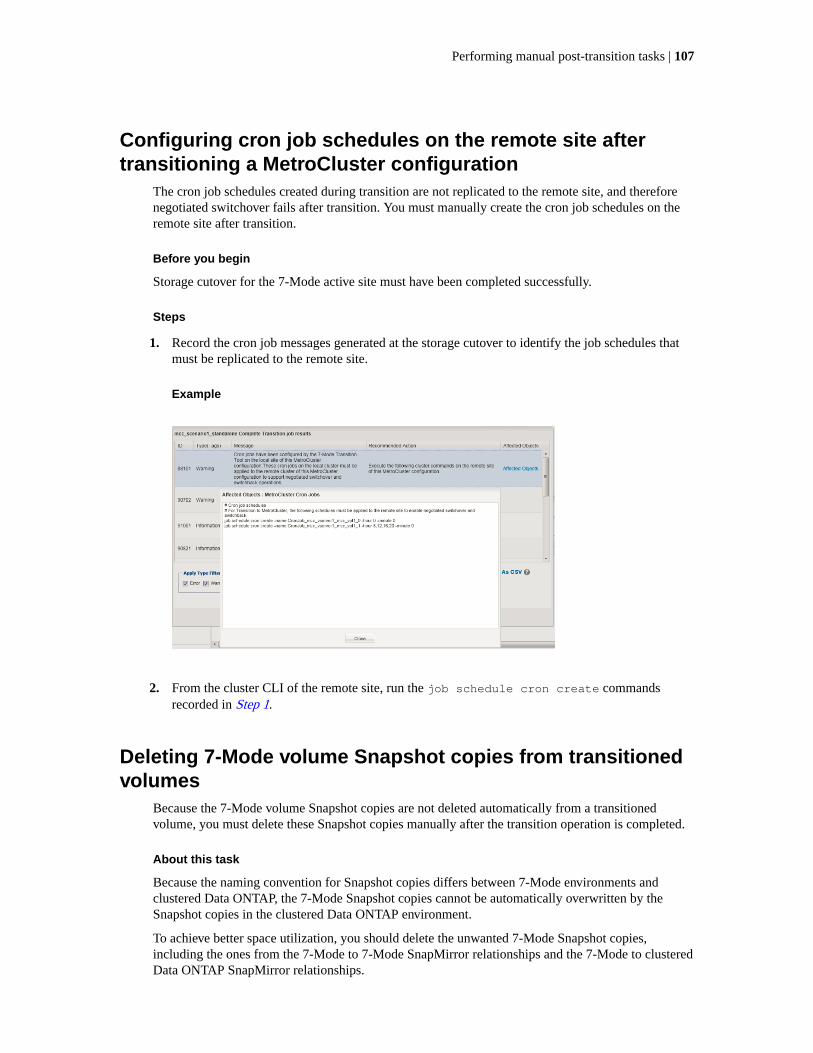
Configuring cron job schedules on the remote site aftertransitioning a MetroCluster configuration
The cron job schedules created during transition are not replicated to the remote site, and thereforenegotiated switchover fails after transition. You must manually create the cron job schedules on theremote site after transition.
Before you begin
Storage cutover for the 7-Mode active site must have been completed successfully.
Steps
1. Record the cron job messages generated at the storage cutover to identify the job schedules thatmust be replicated to the remote site.
Example
2. From the cluster CLI of the remote site, run the job schedule cron create commandsrecorded in Step 1.
Deleting 7-Mode volume Snapshot copies from transitionedvolumes
Because the 7-Mode volume Snapshot copies are not deleted automatically from a transitionedvolume, you must delete these Snapshot copies manually after the transition operation is completed.
About this task
Because the naming convention for Snapshot copies differs between 7-Mode environments andclustered Data ONTAP, the 7-Mode Snapshot copies cannot be automatically overwritten by theSnapshot copies in the clustered Data ONTAP environment.
To achieve better space utilization, you should delete the unwanted 7-Mode Snapshot copies,including the ones from the 7-Mode to 7-Mode SnapMirror relationships and the 7-Mode to clusteredData ONTAP SnapMirror relationships.
Performing manual post-transition tasks | 107
Step
1. After the storage cutover operation is completed, delete the unwanted 7-Mode Snapshot copies:
snap delete -vserver <svm_name> -volume <volume_name> -snapshot<snapshot_name>
Consolidating cron schedules from transitioned volumesThe 7-Mode Transition Tool generates unique schedules per transitioned volume. Because of this, alarge number of cron schedules can be created after the transition, so you need to know how toconsolidate them after transition.
Step
1. Consolidate the cron schedules after transition by using the job schedule cron command.
108 | Copy-Based Transition Guide
Managing a transition project
You can manage transition projects by using the 7-Mode Transition Tool (web interface). You canedit, pause, resume, abort, delete, and run prechecks on a project.
Editing a projectYou can edit a project to add or remove volumes, and to modify the transition configurations.
Before you begin
• You must have created a project.
• You must not have started the project that you want to edit.
About this task
You can edit a project to change the volumes that are selected for transition. You can also edit aproject to change the SVM mapping, volume mapping, and interface mapping, as well as the datacopy schedule. You cannot change the project type or the vFiler unit when editing a project.
Steps
1. From the Dashboard window, select the project that you want to edit.
2. Click Edit Project, and then select the required step from the drop-down list.
3. Complete the wizard to edit your project.
Managing SnapMirror transfers and scheduleIn the data copy phase, the clustered Data ONTAP volumes are updated periodically with the datafrom the 7-Mode volumes based on a data copy schedule. You can create, edit, and delete the datacopy schedule to be used for SnapMirror baseline copy, update, and resynchronization operations.
You can manage the copy operations for all the volumes selected for transition by specifying multipledata copy schedules comprising details such as, start time, duration, update frequency, the number ofconcurrent SnapMirror transfers to run during that schedule, and throttle limit.
You can provide multiple concurrent transfers count and throttle limit for different time periods, suchas weekday, weekend, business hours, non-business hours, DR schedules, and non-DR schedules.
Related tasks
Creating a transition project on page 72
Creating a data copy schedule for SnapMirror transfers
You can create data copy schedules to effectively manage the transition data copy operations for thevolumes in a project. You can also specify the number of concurrent SnapMirror transfers to runduring that schedule to ensure that any replication operation does not fail due to the concurrentSnapMirror transfers reaching the maximum limit.
Before you begin
• The project must be in the preparation, data copy, or apply configuration (precutover) phase.
109
• The 7-Mode Transition Tool service must always be running for the schedules to be effective.
About this task
Note: The data copy schedule is used for SnapMirror baseline copy, update, and resynchronizationoperations.
• You must create at least one data copy schedule for each project.
• You can create a maximum of 7 schedules per project; however, the schedules cannot overlapwithin a project.
For example, you can create customized schedules for business hours and non-business hours, DRhours and non-DR hours, and weekdays and weekends.
Note: If the projects use the same 7-Mode controller or cluster, ensure that the data copyschedules do not overlap across different projects.
• The configured schedules are applied based on the 7-Mode controller's time zone.
• The number of concurrent SnapMirror transfers to use during the schedule is determined at runtime based on the percentage of concurrent SnapMirror streams to use and the maximum limitconfigured.
• The number of concurrent SnapMirror transfers to use during the schedule should be provided insuch a way that the existing 7-Mode DR schedules are not affected because of the tool using theSnapMirror transfers specified with the schedule.
• If the number of concurrent SnapMirror transfers that the tool is using is less than the configurednumber of concurrent SnapMirror transfers to use during the schedule, tool schedules newtransfers to make use of the remaining transfers.
• If the schedule is coming to an end or there is a reduction in number of concurrent SnapMirrortransfers on the 7-Mode storage system, the tool aborts the extra transfers to ensure that it usesonly the configured number of transfers at any point in time.
Note: If a baseline is in progress and Snapshot checkpoint is not yet created, the tool does notabort the transfer but waits for the Snapshot checkpoint to be created before aborting thetransfer.
Steps
1. Create schedules from the Data Copy Schedule page of the Dashboard by clicking EditProject, and then selecting Configure Schedule.
2. Enter a name for the new schedule.
3. In the Recurring Days pane, select the days when the data copy operation should run.
If you want to run the datacopy operations…
Then…
Daily Select Daily.
This is the default value.
Only on certain daysa. Select Select Days.
b. Select the days of the week.
4. In the Time Interval pane, specify the start time, duration, and frequency of the data copyschedule.
110 | Copy-Based Transition Guide
a. Enter the time the data copy operations should start by selecting the hours and minutes fromthe Start Time drop-down list.
Valid values are from 00:00 to 23:30.
b. Enter the time period for which you want the data copy operations to run, select the hours andminutes from the Duration drop-down list.
Note: The duration of a schedule should not exceed a week (167 hours and 30 minutes).
Example
For example, if 20:30 is specified, SnapMirror operations run for next 20 hours and 30minutes from the start time.
c. Select the frequency at which incremental transfers should be done (within the createdschedule duration) after the baseline transfer has been completed by doing one of thefollowing:
• Select the hours and minutes from the Update Frequency drop-down list.
• Select Continuous Updates.
The minimum delay between two consecutive updates will be 5 minutes.
By default, SnapMirror updates run every 30 minutes.
5. In the Parameters for Transition Data Copy Operations pane, enter the SnapMirrorparameters.
a. Specify the maximum number of concurrent SnapMirror transfers that should be used for datacopy by doing one or all of the following:
• Specify the percentage of the available volume SnapMirror transfers that should be usedfor data copy (when schedule is active), by entering the percentage in the MaximumNumber of Concurrent VSM Transfers field.
The available volume SnapMirror transfers is calculated at run time.
Note: The maximum number of concurrent SnapMirror transfers supported on yourplatform is displayed in this pane.
• Specify the maximum number of concurrent volume SnapMirror transfers that can runduring this schedule in the Not Exceeding field.
If you enter both values, the lowest value is used as the number of concurrent transfers.
The number of concurrent transfers to be used for transition is calculated at run time based onthe schedule and the number of configured concurrent transfers.
Example
Your platform supports a maximum of 100 concurrent volume SnapMirror transfers, 60 arecurrently available, and you have specified the following values:
• Percentage of the available volume SnapMirror transfers option is 50%.
The maximum number of concurrent transfers based on the percentage option is 50% of 60= 30.
• Maximum number of concurrent volume SnapMirror transfers option is 25.
In this scenario, the tool sets the maximum number of concurrent volume SnapMirrortransfers to 25, which is the lowest of the two values.
b. Specify the maximum bandwidth in MB/s (throttle) by doing one of the following:
Managing a transition project | 111
If you want to... Then...
Utilize all the available bandwidth Select Maximum.
This is the default value.
Specify the throttle value Enter the value in the Not Exceeding field.
Maximum allowed input value is 4194303.
The throttle value is equally distributed among all the active transfers in the project.
Note: The throttle for each transfer is determined at run time based on the number ofavailable concurrent volume SnapMirror transfers.
Example
If the active schedule is configured with the throttle value of 200 MBps and only 10concurrent transfers are available, each transfer uses 20 MBps bandwidth.
Result
The schedules become effective only when the project is in data copy or apply configuration(precutover) phase.
Example for planning a data copy schedule
Consider a 7-Mode controller that supports 100 concurrent SnapMirror transfers with 75 DRrelationships. The business requirements need SnapMirror operations to run during thefollowing timings:
Days Time Currently usedSnapMirror transfers
Monday to Friday 9:00 a.m. to 5:00 p.m. 50% of available transfers
Monday to Friday 11:30 p.m. to 2:30 a.m. 75 transfers used for DR
Monday to Friday 2:30 a.m. to 9:00 a.m. and
5:00 p.m. to 11:30 p.m.
25% of available transfers
Saturday to Monday 2:30 a.m. (Saturday) to 9:00a.m. (Monday)
10% of available transfers
You can create the following data copy schedules to manage your transition data copyoperations:
Schedule Option Value
peak_hours Days Range Monday to Friday
Start Time 09:30
Duration 8:00
Percentage of maximum number ofconcurrent transfers
50
Maximum number of concurrenttransfers
Throttle (MBps) 100
Update Frequency 0:00
112 | Copy-Based Transition Guide

Schedule Option Value
dr_active Days Range Monday to Friday
Start Time 23:30
Duration 3:00
Percentage of maximum number ofconcurrent transfers
Maximum number of concurrenttransfers
25
Throttle (MBps) 200
Update Frequency 0:30
non_peak_non_dr1 Days Range Monday to Friday
Start Time 17:00
Duration 6:30
Percentage of maximum number ofconcurrent transfers
75
Maximum number of concurrenttransfers
Throttle (MBps) 300
Update Frequency 1:00
non_peak_non_dr2 Days Range Monday to Friday
Start Time 02:30
Duration 6:30
Percentage of maximum number ofconcurrent transfers
75
Maximum number of concurrenttransfers
Throttle (MBps) 300
Update Frequency 1:00
week_ends Days Range Saturday
Start Time 02:30
Duration 53:30
Percentage of maximum number ofconcurrent transfers
90
Maximum number of concurrenttransfers
Throttle (MBps) 500
Update Frequency 2:00
Managing a transition project | 113
Considerations for creating a data copy schedule
The 7-Mode Transition Tool runs a scheduler that checks for the active schedule every 5 minutes.You must be aware of the requirements to make a data copy schedule active. You can manage theSnapMirror transfers effectively by following some best practices when configuring the differentparameters of a data copy schedule.
Requirements to make a data copy schedule active
• The 7-Mode Transition Tool service must be running.
If the 7-Mode Transition Tool service is restarted, the SnapMirror operations are not performeduntil the credentials are added.
• There should be at least one data copy schedule available for SnapMirror data copy operations torun.
If there is no schedule available for a particular time range, the SnapMirror data copy operationsare not performed during that time.
• If the SnapMirror relationships are in the quiesced state, the data copy operations are notperformed.
• The system time of the 7-Mode and the cluster must be synchronized for the incremental transfersto happen according to the data copy schedule.
If the 7-Mode system time is lagging behind the cluster time, the updates are scheduled morefrequently than the specified update frequency. If the 7-Mode system time is ahead of the clustertime, the updates are delayed than the specified update frequency.
Best practices during data copy
To improve SnapMirror replication performance, the source and destination systems should haveoptimum CPU utilization and memory available. Additionally, network traffic that is unrelated to themigration activity should be minimized so that the throughput is maximized and latency is minimizedbetween the source and destination systems.
Priority for data transfers
When scheduling the data copy operations, baseline or resynchronization operations take priorityover the incremental transfers.
When aborting the data copy operations for releasing the SnapMirror transfers, incremental transfersare aborted first, and then baseline or resynchronization operations are aborted.
For incremental transfers, priority is given to the volumes that are lagging more behind the sourcevolume based on the time elapsed from the previous update.
Editing or deleting a data copy schedule for SnapMirror transfers
You can edit or delete data copy schedules that are used for SnapMirror baseline copy, update, andresynchronization operations, if you have other DR schedules configured or modified that require thetransition data copy schedule to be modified.
Before you begin
The project must be in the preparation, data copy, or apply configuration (precutover) phase.
About this task
• After a schedule is edited, it takes up to 5 minutes for it to become effective.
114 | Copy-Based Transition Guide
• If the throttle limit is changed in the schedule when there are active transfers, the new throttlelimit is not applicable for the currently running SnapMirror transfers.
After the current transfer is completed for a particular SnapMirror relationship, a new throttlelimit is considered for the subsequent operations for that SnapMirror relationship.
• If you want the throttle limit to be effective immediately for the current SnapMirror transfers, youmust pause and resume the project.
Steps
1. From the Dashboard, select a project, and then click Configure Schedule.
All the existing schedules for the project are displayed.
You can also edit or delete schedules from the Configure Schedule option.
2. Edit or delete a schedule:
If you want to... Then...
Edit an existing schedule
a. Click .
The Modify Schedule dialog box is displayed.
Note: You can edit the schedule and SnapMirror parameters forthe data copy operations.
b. Make the required changes, and then click Save.
Delete a schedulea. Click .
The schedule is deleted from the pane.
Note: At least one schedule is required for data transfers.Therefore, you should not delete all of the schedules.
Example
The following example illustrates how the throttle limit is applied when there are activeSnapMirror transfers in the project.
Schedule Number of volumesand data copy state
Maximumnumber ofconcurrentSnapMirrortransfers
Throttle limit Throttle used byeach transfer
Beforemodifying
Five volumes waitingfor baseline
Five 500 MBps 100 MBps
Managing a transition project | 115
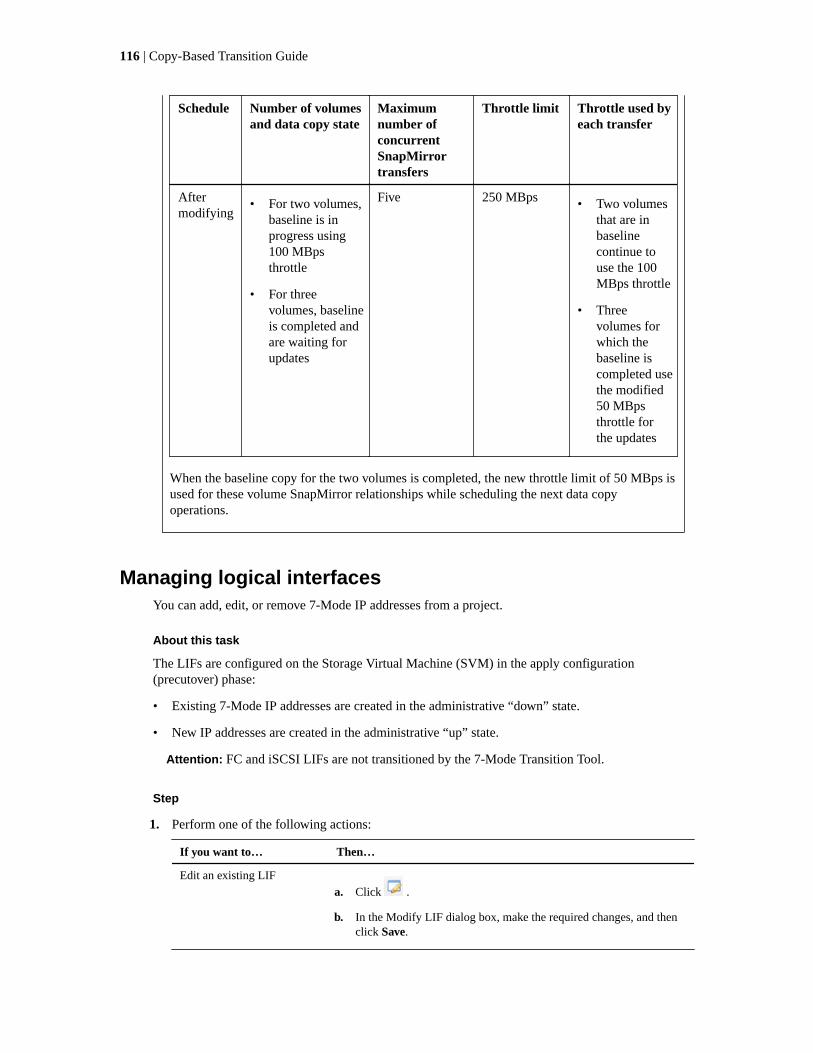
Schedule Number of volumesand data copy state
Maximumnumber ofconcurrentSnapMirrortransfers
Throttle limit Throttle used byeach transfer
Aftermodifying
• For two volumes,baseline is inprogress using100 MBpsthrottle
• For threevolumes, baselineis completed andare waiting forupdates
Five 250 MBps • Two volumesthat are inbaselinecontinue touse the 100MBps throttle
• Threevolumes forwhich thebaseline iscompleted usethe modified50 MBpsthrottle forthe updates
When the baseline copy for the two volumes is completed, the new throttle limit of 50 MBps isused for these volume SnapMirror relationships while scheduling the next data copyoperations.
Managing logical interfacesYou can add, edit, or remove 7-Mode IP addresses from a project.
About this task
The LIFs are configured on the Storage Virtual Machine (SVM) in the apply configuration(precutover) phase:
• Existing 7-Mode IP addresses are created in the administrative “down” state.
• New IP addresses are created in the administrative “up” state.
Attention: FC and iSCSI LIFs are not transitioned by the 7-Mode Transition Tool.
Step
1. Perform one of the following actions:
If you want to… Then…
Edit an existing LIF
a. Click .
b. In the Modify LIF dialog box, make the required changes, and thenclick Save.
116 | Copy-Based Transition Guide
If you want to… Then…
Remove an existing LIFa. Click in the table.
Note: You can remove a LIF only when the project is in thepreparation, baseline data copy, pause, precutover, or update state.However, you cannot remove a LIF if the cutover operation hasfailed.
b. Click Select 7-Mode LIF.
c. Select the 7-Mode IP addresses for transition.
d. Enter the target node and target port details.
e. Click Save.
Add a 7-Mode IP address• Click Select 7-Mode LIF.
• Select the 7-Mode IP addresses for transition.
• Enter the target node and target port details.
• Click Save.
Add a new LIFa. Click Add New LIF below the table.
b. Enter the required values.
c. Click Save.
Removing volumes from a projectYou can remove volumes from a project during the transition process. For example, if the project hasfailed due to a few volumes.
About this task
If a volume is removed when the data copy is in progress, the transfer is not aborted and continuesuntil the operation is completed. The volume is not considered for any further data copy operations.
Steps
1. From the Dashboard window, select a project, and then click Volumes.
All of the existing volumes for the project are displayed.
2. Click .
The volume is removed from the project.
After you finish
The best practice is to delete the ONTAP volumes and release the SnapMirror relationships.
1. From the cluster, delete the ONTAP volumes that were created as part of the transition.
ONTAP 9 commands
2. From the 7-Mode system, release the SnapMirror relationships to the ONTAP volumes.
3. If you abort a volume SnapMirror relationship, perform the following steps:
Managing a transition project | 117
a. Break and delete the SnapMirror relationship between the 7-Mode primary volumes andONTAP secondary volumes.
b. From the primary 7-Mode system, release the SnapMirror relationships to the ONTAPsecondary volumes.
Data ONTAP 8. 2 Commands: Manual Page Reference for 7-Mode, Volume 1
Pausing and resuming a projectYou can pause and resume a project for which data copy has started.
About this task
When you pause a primary project, only the copy operation from the 7-Mode primary volume to thecorresponding clustered Data ONTAP primary volume is paused. The data copy from the 7-Modeprimary volume to the ONTAP secondary volume continues to run according to the schedule. Thisensures continued data protection for the primary volumes.
Steps
1. From Dashboard, select the project that you want to pause.
2. Click Pause.
The data copy operation for all the volumes in the project is stopped.
If the baseline transfer for a volume is in progress and there is no Snapshot copy checkpointcreated for the SnapMirror relationships, the pause operation is ignored for the volume. Wait forthe Snapshot copy checkpoint to be created and run the pause operation again.
3. Click Resume.
The copy operation resumes from the point where it was paused.
Note: The data copy operation is resumed based on the active schedule available at that time.
Related tasks
Starting baseline data copy on page 78
Aborting a projectYou might want to abort a running project, for example, when the performance of the controller orthe cluster is impacted. You can abort a running project from the Dashboard.
About this task
You must consider the following before aborting projects that transition volumes with SnapMirrorrelationships:
• If both projects have been started, aborting one project aborts the associated project.
For example, if you abort a primary project, the secondary project is also aborted.
• If the abort operation fails on the current project, the associated project is not aborted.
• If only one active project is aborted, the start operation on the associated project fails.
• When you abort a primary project, the copy operation from the 7-Mode primary volume to theONTAP secondary volume is not aborted.
118 | Copy-Based Transition Guide

Only the copy operation from the 7-Mode primary volume to the corresponding ONTAP primaryvolume is aborted.
Steps
1. From the Dashboard, select the project that you want to abort.
2. Click Abort.
After you finish
1. From the cluster, delete the ONTAP volumes that were created as part of the transition.
2. From the 7-Mode system, release the SnapMirror relationships to the ONTAP volumes.
3. If you abort a volume SnapMirror relationship, you must do the following:
a. Break and delete the SnapMirror relationship between the 7-Mode primary volumes andONTAP secondary volumes.
b. From the primary 7-Mode system, release the SnapMirror relationships to the ONTAPsecondary volumes.
ONTAP 9 commands
Data ONTAP 8. 2 Commands: Manual Page Reference for 7-Mode, Volume 1
Deleting a projectIf you do not want a project, you can delete it from the Dashboard.
Steps
1. From the Dashboard Projects Groups pane, click the project group to which the projectbelongs.
2. From the Group Summary pane, click Modify, and then click Delete.
You cannot delete a project if the project has failed during the cutover stage.
Managing a transition project | 119
Troubleshooting issues
You need to be aware of some of the common issues with the 7-Mode Transition Tool and the stepsto resolve them.
Downloading transition log filesThe 7-Mode Transition Tool creates log files that provide processing details of the transitionassessment and migration operations run on your system.
Steps
1. Click Logs in the top menu.
2. Click Collect Project Logs to collect logs related to all of the projects.
3. To collect logs for a given projects, locate the projects from the project list, and then clickDownload.
The logs are downloaded as a .zip file, and the folder name is the timestamp.
Related information
NetApp KB Article 1010090: How to upload a file to NetApp
Log files for the 7-Mode Transition ToolThe 7-Mode Transition Tool creates log files that provide processing details of the transitionoperations that have occurred on your system. The log files are located in the logs directory of thepath where 7-Mode Transition Tool is installed.
You can also use the EMS messages related to SnapMirror logs from the 7-Mode system and thecluster to troubleshoot issues.
The following table lists the log files that are related to a particular transition project:
Log file path Contains information about...
project_name/
transition.log
Debug messages that are specific to a project
project_name/zapi-
outbound.log
Output of all the Data ONTAP APIs that are executed by 7-ModeTransition Tool for a particular project
The following table lists the log files that are not related to any particular project:
Log file path Contains information about...
transition-gui.log Entries of all the actions performed by using the web interface
default/audit.log • All the parameters, such as HTTP or HTTPS port and log directorypath, that are used by the tool every time 7-Mode Transition Tool isrun
• All the transition commands that are executed with the outputs
120
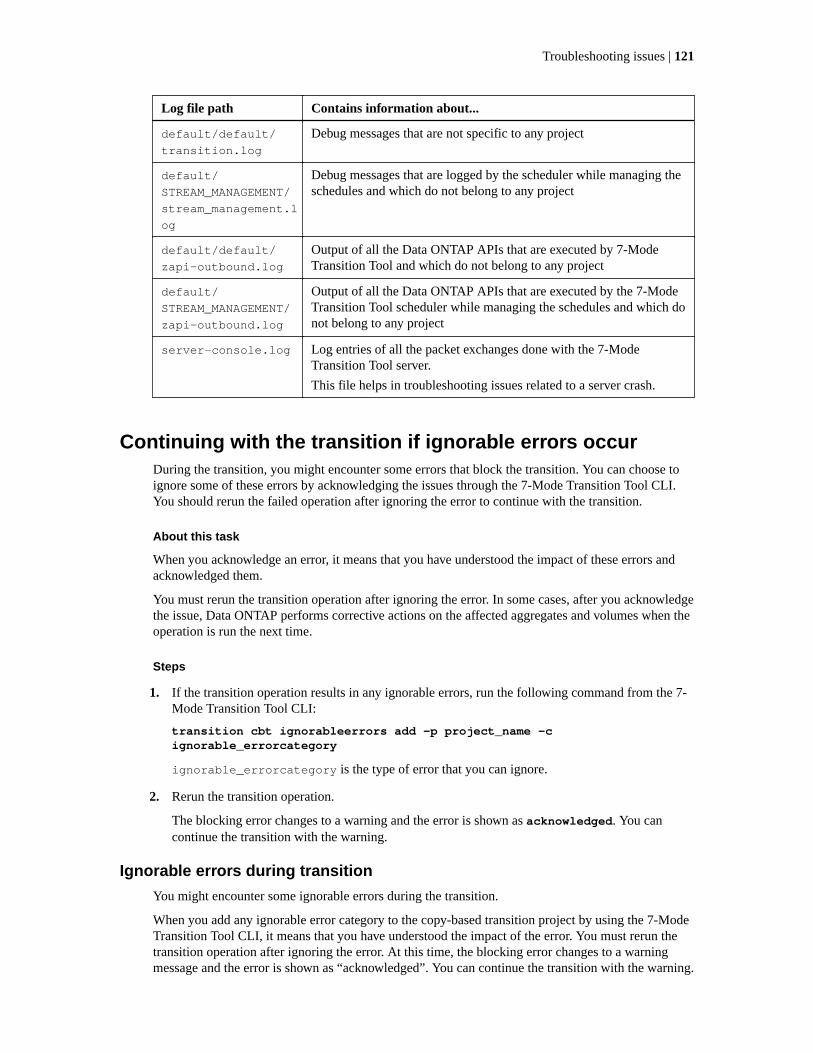
Log file path Contains information about...
default/default/
transition.log
Debug messages that are not specific to any project
default/
STREAM_MANAGEMENT/
stream_management.l
og
Debug messages that are logged by the scheduler while managing theschedules and which do not belong to any project
default/default/
zapi-outbound.log
Output of all the Data ONTAP APIs that are executed by 7-ModeTransition Tool and which do not belong to any project
default/
STREAM_MANAGEMENT/
zapi-outbound.log
Output of all the Data ONTAP APIs that are executed by the 7-ModeTransition Tool scheduler while managing the schedules and which donot belong to any project
server-console.log Log entries of all the packet exchanges done with the 7-ModeTransition Tool server.
This file helps in troubleshooting issues related to a server crash.
Continuing with the transition if ignorable errors occurDuring the transition, you might encounter some errors that block the transition. You can choose toignore some of these errors by acknowledging the issues through the 7-Mode Transition Tool CLI.You should rerun the failed operation after ignoring the error to continue with the transition.
About this task
When you acknowledge an error, it means that you have understood the impact of these errors andacknowledged them.
You must rerun the transition operation after ignoring the error. In some cases, after you acknowledgethe issue, Data ONTAP performs corrective actions on the affected aggregates and volumes when theoperation is run the next time.
Steps
1. If the transition operation results in any ignorable errors, run the following command from the 7-Mode Transition Tool CLI:
transition cbt ignorableerrors add -p project_name -cignorable_errorcategory
ignorable_errorcategory is the type of error that you can ignore.
2. Rerun the transition operation.
The blocking error changes to a warning and the error is shown as acknowledged. You cancontinue the transition with the warning.
Ignorable errors during transition
You might encounter some ignorable errors during the transition.
When you add any ignorable error category to the copy-based transition project by using the 7-ModeTransition Tool CLI, it means that you have understood the impact of the error. You must rerun thetransition operation after ignoring the error. At this time, the blocking error changes to a warningmessage and the error is shown as “acknowledged”. You can continue the transition with the warning.
Troubleshooting issues | 121
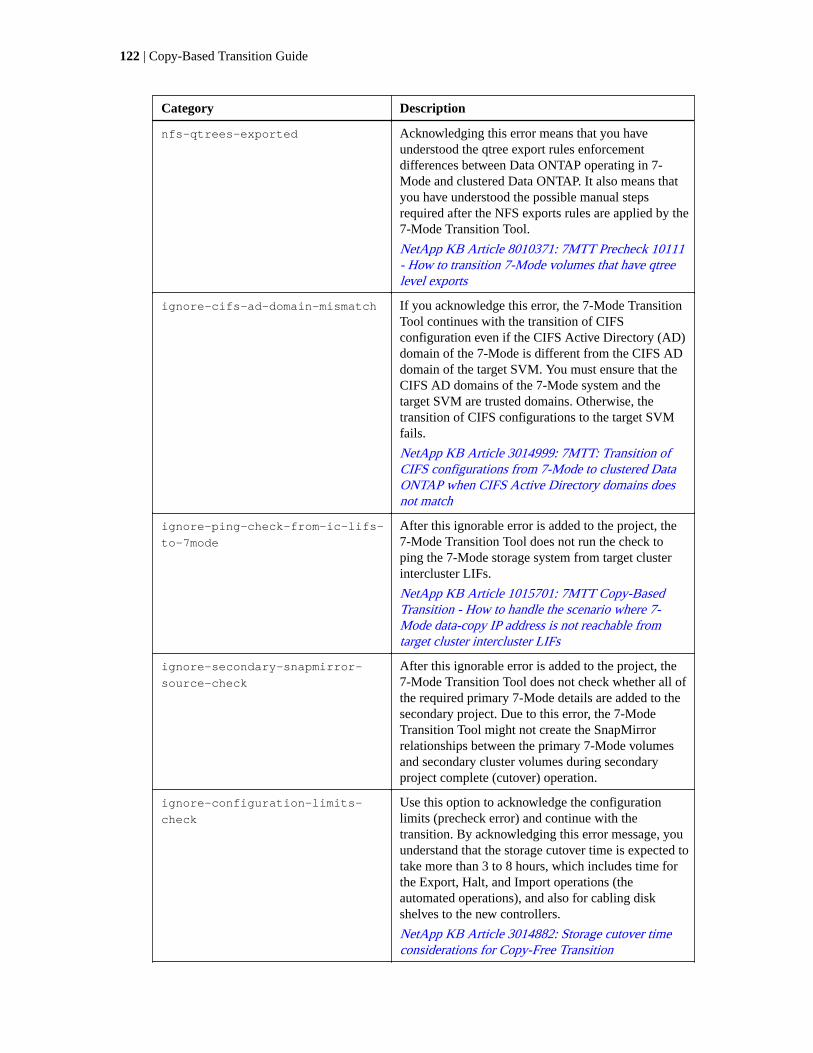
Category Description
nfs-qtrees-exported Acknowledging this error means that you haveunderstood the qtree export rules enforcementdifferences between Data ONTAP operating in 7-Mode and clustered Data ONTAP. It also means thatyou have understood the possible manual stepsrequired after the NFS exports rules are applied by the7-Mode Transition Tool.
NetApp KB Article 8010371: 7MTT Precheck 10111- How to transition 7-Mode volumes that have qtreelevel exports
ignore-cifs-ad-domain-mismatch If you acknowledge this error, the 7-Mode TransitionTool continues with the transition of CIFSconfiguration even if the CIFS Active Directory (AD)domain of the 7-Mode is different from the CIFS ADdomain of the target SVM. You must ensure that theCIFS AD domains of the 7-Mode system and thetarget SVM are trusted domains. Otherwise, thetransition of CIFS configurations to the target SVMfails.
NetApp KB Article 3014999: 7MTT: Transition ofCIFS configurations from 7-Mode to clustered DataONTAP when CIFS Active Directory domains doesnot match
ignore-ping-check-from-ic-lifs-
to-7mode
After this ignorable error is added to the project, the7-Mode Transition Tool does not run the check toping the 7-Mode storage system from target clusterintercluster LIFs.
NetApp KB Article 1015701: 7MTT Copy-BasedTransition - How to handle the scenario where 7-Mode data-copy IP address is not reachable fromtarget cluster intercluster LIFs
ignore-secondary-snapmirror-
source-check
After this ignorable error is added to the project, the7-Mode Transition Tool does not check whether all ofthe required primary 7-Mode details are added to thesecondary project. Due to this error, the 7-ModeTransition Tool might not create the SnapMirrorrelationships between the primary 7-Mode volumesand secondary cluster volumes during secondaryproject complete (cutover) operation.
ignore-configuration-limits-
check
Use this option to acknowledge the configurationlimits (precheck error) and continue with thetransition. By acknowledging this error message, youunderstand that the storage cutover time is expected totake more than 3 to 8 hours, which includes time forthe Export, Halt, and Import operations (theautomated operations), and also for cabling diskshelves to the new controllers.
NetApp KB Article 3014882: Storage cutover timeconsiderations for Copy-Free Transition
122 | Copy-Based Transition Guide
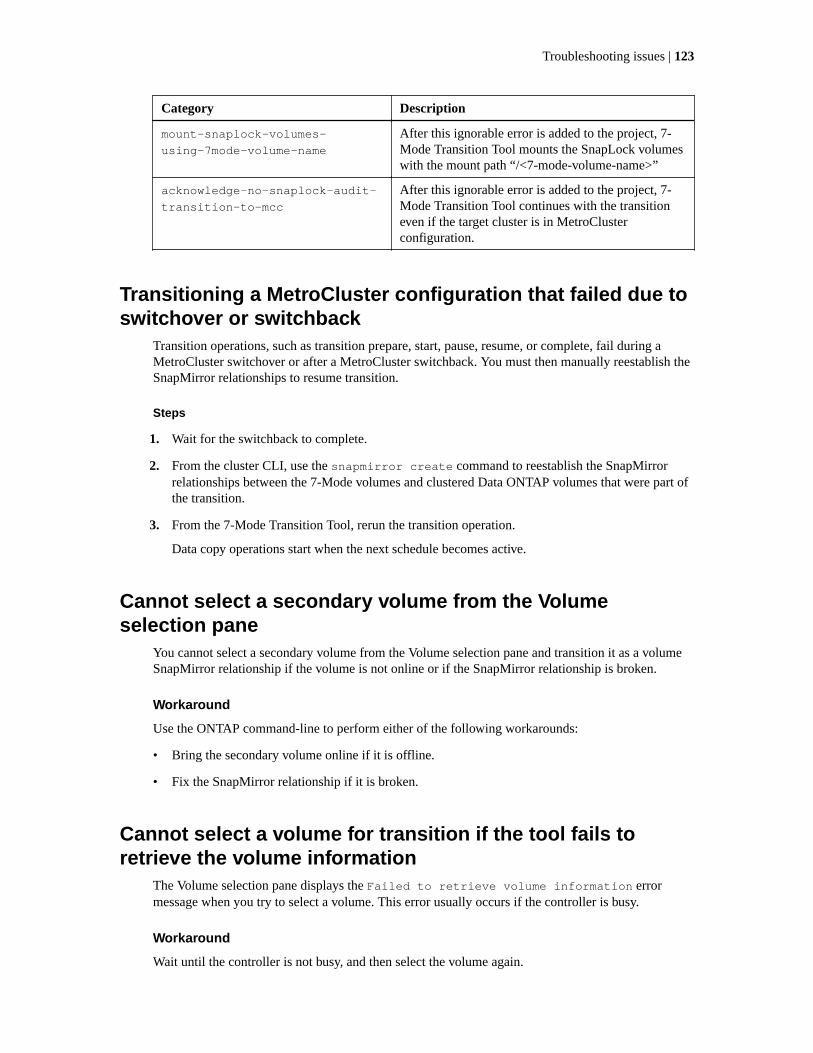
Category Description
mount-snaplock-volumes-
using-7mode-volume-name
After this ignorable error is added to the project, 7-Mode Transition Tool mounts the SnapLock volumeswith the mount path “/<7-mode-volume-name>”
acknowledge-no-snaplock-audit-
transition-to-mcc
After this ignorable error is added to the project, 7-Mode Transition Tool continues with the transitioneven if the target cluster is in MetroClusterconfiguration.
Transitioning a MetroCluster configuration that failed due toswitchover or switchback
Transition operations, such as transition prepare, start, pause, resume, or complete, fail during aMetroCluster switchover or after a MetroCluster switchback. You must then manually reestablish theSnapMirror relationships to resume transition.
Steps
1. Wait for the switchback to complete.
2. From the cluster CLI, use the snapmirror create command to reestablish the SnapMirrorrelationships between the 7-Mode volumes and clustered Data ONTAP volumes that were part ofthe transition.
3. From the 7-Mode Transition Tool, rerun the transition operation.
Data copy operations start when the next schedule becomes active.
Cannot select a secondary volume from the Volumeselection pane
You cannot select a secondary volume from the Volume selection pane and transition it as a volumeSnapMirror relationship if the volume is not online or if the SnapMirror relationship is broken.
Workaround
Use the ONTAP command-line to perform either of the following workarounds:
• Bring the secondary volume online if it is offline.
• Fix the SnapMirror relationship if it is broken.
Cannot select a volume for transition if the tool fails toretrieve the volume information
The Volume selection pane displays the Failed to retrieve volume information errormessage when you try to select a volume. This error usually occurs if the controller is busy.
Workaround
Wait until the controller is not busy, and then select the volume again.
Troubleshooting issues | 123
Cannot proceed from the Volume mapping pane if theselected SVM has no aggregate
The tool displays an error message, SVM does not have aggregate assigned. Pleaseassign some aggregates to the SVM and click on the refresh button, on theVolume mapping pane if the selected SVM has no aggregate other than the root node aggregate.
Workaround
Add an aggregate to the SVM in clustered Data ONTAP.
Compression is not enabled after transition from DataONTAP 7.3.x
If you transition a 32-bit volume on a system running Data ONTAP 7.3.x to a ONTAP volume that isin a 64-bit aggregate, compression is not enabled on the ONTAP volume after the transition.Compression cannot be enabled until the volume is upgraded from 32-bit to 64-bit.
Workaround
1. Wait for the upgrade to finish.
You can use the volume show -fields block-type -volume vol_name command toverify that the block type of the volume changes to 64-bit.
2. Enable compression by using the volume efficiency modify command.
124 | Copy-Based Transition Guide

Copyright information
Copyright © 1994–2017 NetApp, Inc. All rights reserved. Printed in the U.S.
No part of this document covered by copyright may be reproduced in any form or by any means—graphic, electronic, or mechanical, including photocopying, recording, taping, or storage in anelectronic retrieval system—without prior written permission of the copyright owner.
Software derived from copyrighted NetApp material is subject to the following license anddisclaimer:
THIS SOFTWARE IS PROVIDED BY NETAPP "AS IS" AND WITHOUT ANY EXPRESS ORIMPLIED WARRANTIES, INCLUDING, BUT NOT LIMITED TO, THE IMPLIEDWARRANTIES OF MERCHANTABILITY AND FITNESS FOR A PARTICULAR PURPOSE,WHICH ARE HEREBY DISCLAIMED. IN NO EVENT SHALL NETAPP BE LIABLE FOR ANYDIRECT, INDIRECT, INCIDENTAL, SPECIAL, EXEMPLARY, OR CONSEQUENTIALDAMAGES (INCLUDING, BUT NOT LIMITED TO, PROCUREMENT OF SUBSTITUTEGOODS OR SERVICES; LOSS OF USE, DATA, OR PROFITS; OR BUSINESS INTERRUPTION)HOWEVER CAUSED AND ON ANY THEORY OF LIABILITY, WHETHER IN CONTRACT,STRICT LIABILITY, OR TORT (INCLUDING NEGLIGENCE OR OTHERWISE) ARISING INANY WAY OUT OF THE USE OF THIS SOFTWARE, EVEN IF ADVISED OF THEPOSSIBILITY OF SUCH DAMAGE.
NetApp reserves the right to change any products described herein at any time, and without notice.NetApp assumes no responsibility or liability arising from the use of products described herein,except as expressly agreed to in writing by NetApp. The use or purchase of this product does notconvey a license under any patent rights, trademark rights, or any other intellectual property rights ofNetApp.
The product described in this manual may be protected by one or more U.S. patents, foreign patents,or pending applications.
RESTRICTED RIGHTS LEGEND: Use, duplication, or disclosure by the government is subject torestrictions as set forth in subparagraph (c)(1)(ii) of the Rights in Technical Data and ComputerSoftware clause at DFARS 252.277-7103 (October 1988) and FAR 52-227-19 (June 1987).
125

Trademark information
Active IQ, AltaVault, Arch Design, ASUP, AutoSupport, Campaign Express, Clustered Data ONTAP,Customer Fitness, Data ONTAP, DataMotion, Fitness, Flash Accel, Flash Cache, Flash Pool,FlexArray, FlexCache, FlexClone, FlexGroup, FlexPod, FlexScale, FlexShare, FlexVol, FPolicy,Fueled by SolidFire, GetSuccessful, Helix Design, LockVault, Manage ONTAP, MetroCluster,MultiStore, NetApp, NetApp Insight, OnCommand, ONTAP, ONTAPI, RAID DP, RAID-TEC,SANscreen, SANshare, SANtricity, SecureShare, Simplicity, Simulate ONTAP, Snap Creator,SnapCenter, SnapCopy, SnapDrive, SnapIntegrator, SnapLock, SnapManager, SnapMirror,SnapMover, SnapProtect, SnapRestore, Snapshot, SnapValidator, SnapVault, SolidFire, SolidFireHelix, StorageGRID, SyncMirror, Tech OnTap, Unbound Cloud, and WAFL and other names aretrademarks or registered trademarks of NetApp, Inc., in the United States, and/or other countries. Allother brands or products are trademarks or registered trademarks of their respective holders andshould be treated as such. A current list of NetApp trademarks is available on the web.
http://www.netapp.com/us/legal/netapptmlist.aspx
126

How to send comments about documentation andreceive update notifications
You can help us to improve the quality of our documentation by sending us your feedback. You canreceive automatic notification when production-level (GA/FCS) documentation is initially released orimportant changes are made to existing production-level documents.
If you have suggestions for improving this document, send us your comments by email.
To help us direct your comments to the correct division, include in the subject line the product name,version, and operating system.
If you want to be notified automatically when production-level documentation is released orimportant changes are made to existing production-level documents, follow Twitter account@NetAppDoc.
You can also contact us in the following ways:
• NetApp, Inc., 495 East Java Drive, Sunnyvale, CA 94089 U.S.
• Telephone: +1 (408) 822-6000
• Fax: +1 (408) 822-4501
• Support telephone: +1 (888) 463-8277
127
Index
32-bit aggregatesexpanding to the 64-bit format 40
32-bit datapreparing to transition 7-Mode systems 39
32-bit Snapshot copiesfinding and removing, after expanding aggregates to64-bit 41
32-bit volumesfinding and removing, after expanding aggregates to64-bit 41
64-bit aggregatesexpanding 32-bit aggregates to 40finding and removing 32-bit volumes or Snapshotcopies after expanding to 41preparing to expand 32-bit to 64-bit 39
7-Modepreparing for assessment 10preparing for transition 34restrictions for transitioning volumes andconfigurations 33
7-Mode configurationsapplying NAS configurations 79copying 79testing 79verifying 79
7-Mode environmentsdata migration to Data ONTAP 6transitioning volumes and configuration to ONTAP 6
7-Mode IP addressesadding, removing, and editing 116
7-Mode Snapshot copiesdeleting from transitioned volumes 107
7-Mode systemsadding for a transition project 86applying configurations to ONTAP volumes 97preparing volumes and aggregates for copy-basedtransition 38restrictions and corrective action for copy-basedtransition 39
7-Mode systems with 32-bit datapreparing to transition 39
7-Mode transitionconsiderations for IP addresses 36customizing and consolidating 7-Mode NFS exportrules 76
7-Mode Transition Toolconsolidating cron schedules from transitionedvolumes 108creating a project through the CLI 86generating assessment reports by adding systems to12log files 120port requirements 32support for SnapLock volume transitions 44
7-Mode Transition Tool CLIintroduction to managing volume transitions 86transitioning volumes using the 85
7-Mode volumes
Migrating data and configuration from 677MTT
See 7-Mode Transition Tool
A
addingcontrollers and clusters for migration 72LIFs 116
aggregatesexpanding to the 64-bit format 40finding and removing 32-bit volumes or Snapshotcopies after expanding to 64-bit 41restrictions and corrective action for copy- basedtransition 39
applicationssupported versions for transition assessment 10
applying7-Mode configurations 79
assessmentpreparing the 7-Mode system 10when to perform while transitioning 6
assessment executive summaryhow to use for transition 17
assessment limitsmaximum number of controllers and hosts 8
assessment reportsgenerating by adding systems to the 7-ModeTransition Tool 12generating by importing the inventory report XML14
B
baseline data copydata copy from 7-Mode
starting 78starting 78transition phase described 20
best practicesduring data copy 114for data copy 114
bidirectional SnapMirror relationshipshow to transition 85
C
cablingignorable errors that can occur during transition 121
checklistsfor transition preparation 68
CIFSconfigurations that can be excluded from transition90considerations for transitioning local users andgroups 58excluding configurations from transition 89preparing for transition 53
128 | Copy-Based Transition Guide
scenario for transition 85supported and unsupported configurations fortransition 56transition workflow 19
CIFS configurationsprerequisites for transitioning 54
client accesspost-transition tasks before enabling 103volumes in data protection relationship, transition 25
clustersadding 72preparing for transition 36
commands to managecredentials 99jobs 99LIFs 99project properties 99SnapMirror relationships 99transition operations 99transition projects 99volume pairs 99
commentshow to send feedback about documentation 127
commit operationsignorable errors that can occur during transition 121
compatibilityverifying, for transition 95
compressionconsiderations for transition 42
compression disabled after transitionpost-transition issue 124
configurationSnapLock options 45
configuration transition phasetransition of stand-alone volumes 21
configurations7-Mode, applying to ONTAP volumes 97CIFS, supported for transition 56customizing for transition 76supported for FC zone plan 16
configuringzones by using the FC zone planner 60, 81, 103
considerationsfor quotas while transitioning 43for transitioning 7-Mode volumes to ONTAP inMetroCluster configurations 59for transitioning DNS, NIS, and LDAPconfigurations 46for transitioning FlexClone volumes 43for transitioning netgroups and UNIX users andgroups 47for transitioning NFS exports 50for transitioning of 7-Mode SnapLock options 45for transitioning of SnapLock Audit volumes 44for transitioning of SnapLock Compliance volumes44for transitioning of SnapLock Enterprise volumes 44space requirements for transitioning LUNs 63
considerations during 7-Mode volume transitionin nondefault IPspace 36IP addresses 36
considerations for transitioning7-Mode SnapLock options 45
SnapLock Audit volumes 44SnapLock Compliance volumes 44SnapLock Enterprise volumes 44
consolidating examples7-Mode export rules for transition 927-Mode Snapshot schedules 92
continuing the transitionif ignorable errors occur 121
controllersadding 72assessing transition readiness of 11generating assessment reports before transition 12
copy-based transitionignorable errors that can occur during 121ignoring errors and continuing transition 121licenses 31preparing 31preparing 7-Mode aggregates and volumes 38preparing for CIFS transition 53preparing for NFS transition 48preparing network 35preparing SAN 60preparing to transition data protection features 63preparing to transition name services configuration45requirements 31restrictions and corrective action for aggregates andvolumes 39supported ONTAP versions 31transition tool service 31workflow for 19
copy-free transitionignorable errors that can occur during 121
creatinga transition project 86
credentialscommands to manage 99
cron job schedulesconfiguring on the remote site after transitioning aMetroCluster configuration 107
cron schedulesconsolidating from transitioned volumes 108
customizingconfigurations for transition 76
cutoverguidelines for performing 65performing post-transition tasks after 103
cutover phasevolumes in a data protection relationship, transition25
D
dashboardaborting projects 118prechecks 77
data copyconsiderations for scheduling 114initiating 96priority for transfers 114
data copy phasetransition of stand-alone volumes 21
Index | 129
volumes in a data protection relationship, transition25
data copy schedulecreating 109managing 109
data copy schedulesconsiderations for 64creating 86deleting 114editing 114
data copy updatescheduling 109
Data ONTAP7-Mode versions supported for transition assessment10
data protection relationshipspreparing for transition 63supported for transition 63
data resynchronization operationscheduling 109
deduplicationconsiderations for transition 42
deletingLIFs 116SnapMirror transfer schedule 114transition projects 119
disaster recovery configurationssupported and unsupported for transition 63
DNS configurationsconsiderations for transition 46
documentationhow to receive automatic notification of changes to127how to send feedback about 127
downloadingthe log files 120
E
editingLIFs 116
error messagesFailed to retrieve volume information 123
errorscontinuing the transition 121
expandingaggregates to the 64-bit format 40
export rules, 7-Modeexample of consolidating for transition 92
F
failuresrecovering from LUN transition 104
FCtransition workflow 19
FC switchesassessing transition readiness of 11generating assessment reports before transition 12
FC zone plansupported configurations 16
FC zone planner
configuring zones 60, 81configuring zones for post transition 103
FC zone plansgenerating by using the Inventory Collect Tool 15
feedbackhow to send comments about documentation 127
filescollecting the logs 120
FlexClone volumesconsiderations for transition 43
FlexVol volumesfinding and removing 32-bit, after expandingaggregates to 64-bit 41
flowchartscollecting and assessing inventory information forcontrollers and hosts 9
G
generating an FC zone planfor grouping the initiator hosts and targets after themigration 15
givebackimpact on transition 65
groups, localconsiderations for CIFS transition 58
guidelinesfor creating data copy schedules 114
H
hostsassessing transition readiness of 11generating assessment reports before transition 12SAN, preparing for transition 60
hosts, supportedversions for transition assessment 10
I
ifgrpsSee interface groups
ignorable errorsthat can occur during transition 121
import operationsignorable errors that can occur during transition 121
informationhow to send feedback about improvingdocumentation 127
initiator hostsgenerating an FC zone plan for configuring switches15
interface groupspreparing the network for transition 35
inventory informationworkflow for collecting and assessing for controllersand hosts 9
inventory report XMLgenerating an assessment report by importing 14
IP addressesadding for a transition project 86considerations for transition 36
130 | Copy-Based Transition Guide

IPspacespreparing the network for transition 35
iSCSItransition workflow 19
J
jobscommands to manage 99
L
LDAP configurationsconsiderations for transition 46
licensesrequired for copy-based transition 31
LIFsadding, removing, and editing 116commands to manage 99SAN, creating before transition 61
limitationsSnapDrive-managed 7-Mode Snapshot copies 106SnapManager-managed 7-Mode Snapshot copies106
local users and groupsconfigurations that can be excluded from transition90considerations during CIFS transition 58
log files7-Mode Transition Tool 120
logical interfacesSee LIFs
logsdownloading 7-Mode transition Tool logs 120
LUN.vol.proc.fail.no.spacecause and corrective action if transition fails 63
LUNsrecovering from transition failure 104
M
MetroCluster configurationtransitioning after switchback or during switchover123
MetroCluster configuration transitionsconfiguring cron job schedules on the remote siteafter 107
MetroCluster configurationsrequirements and considerations for transitioning 7-Mode volumes to ONTAP 59
migrate volumesconfigure projects 67start baseline copy 67
migratingconfiguration from 7-Mode volumes 67data and configuration from 7-Mode volumes 67data from 7-Mode volumes 67
migrationCIFS workflow 19downloading the log files 120generating an FC zone plan for configuring switches15
NFS workflow 19SAN workflow 19when to perform while transitioning 6
migration phasesapply configuration 20baseline data copy 20preparation 20storage cutover 20
mixed-format volumesfinding and removing after expanding aggregates to64-bit 41
modifyingSnapMirror transfer schedule 114
multiple pathsconsiderations for data copy using 64
N
name servicesconfigurations that can be excluded from transition90preparing for transition 45supported configurations for transition 45
netgroupsconsiderations for transitioning 47excluding configurations from transition 89
network portsrequirements for communicating with the 7-ModeTransition Tool 32
network preparationcopy-based transition 35
NFSconfigurations that can be excluded from transition90preparing for transition 48prerequisites to transition 48supported configurations for transition 48transition workflow 19unsupported configurations for transition 48
NFS export rulesconsolidating for transition 76
NFS exportstransition considerations 50
NIS configurationsconsiderations for transition 46
O
on-demand SnapMirror updatesperforming 82
ONTAPtransitioning data and configuration from a 7-Modeenvironment 6
ONTAP versionssupported for copy-based transition 31
ONTAP volumesapplying 7-Mode configurations 97
operational changeswhen to perform while transitioning 6
overviewtransition 6
Index | 131
P
pausingtransition projects 118
phasesstand-alone volumes, transition 21volumes in data protection relationship, transition 25
phases of transitionvolumes in a data protection relationship 25
planningconfigurations for transition 76when to perform while transitioning 6
policies, exportresuse for transition 76
policies, Snapshotreusefor transition 76
post transition stepstransition of stand-alone volumes 21
post-transitionissues, compression is disabled 124
post-transition limitation7-Mode Snapshot copies of LUNs 106
post-transition tasksconfiguring cron job schedules on the remote siteafter transitioning a MetroCluster configuration 107for configuring features not transitioned 103
precheck operationsignorable errors that can occur during transition 121
precheckserror 78information 78notification 78running 95severity levels 78warning 78
precutovertransition phase described 20
precutover phasevolumes in a data protection relationship, transition25
preparationfor transition, checklist 68transition phase described 20
preparation phasetransition of stand-alone volumes 21volumes in a data protection relationship, transition25
preparing7-Mode system for assessment 107-Mode system for transition 34aggregates and volumes for copy-based transition 38CIFS for copy-based transition 53cluster for transition 36for transition 31name services for copy-based transition 45SAN configurations for transition 60SAN hosts for transition 60to transition 7-Mode systems, 32-bit aggregates 39
preparing for transitioncreating SAN LIFs 61
prerequisitesfor transitioning CIFS configurations 54
primary projects
completing a transition project 83projects
aborting 118editing by adding or removing volumes, or bymodifying the transition configurations 109pausing and resuming 118scenarios for creating 85
projects, transitioninitiating data copy 96
protocolspreparing the 7-Mode system for assessment 10
Q
quotasconsiderations for transition 43
R
recoveringfrom a failed LUN transition 104
removingvolume from project during transition 117
reports, assessmentgenerating by adding systems to the 7-ModeTransition Tool 12
requirements7-Mode system and hosts supported for transitionassessment 107-Mode Transition Tool 32copy-based transition 31for transitioning 7-Mode volumes to ONTAP inMetroCluster configurations 59for transitioning CIFS configurations 54for transitioning NFS configurations 48
restrictionsfor transitioning 7-Mode volumes 33
resumingtransition projects 118
S
SANconfigurations that can be excluded from transition90post-transition task 105post-transition tasks 103
SAN configurationspreparing for transition 60supported for transition 61
SAN hostspreparing for transition 60
SAN LIFscreating, before transition 61
SAN transitionLUN mapping 105space considerations 63
SAN volumesspace requirements for transitioning LUNs 63
schedulescreating for data copy 86guidelines for creating data copy 114
132 | Copy-Based Transition Guide
secondary projectsaborting 118completing a transition project 83
selectingconfigurations for transition 76
SnapLock Audit volumestransitioning 44
SnapLock Compliance volumestransitioning 44
SnapLock Enterprise volumestransitioning 44
SnapLock options configurationtransitioning 45
SnapLock volume transitionssupport for, using the 7-Mode Transition Tool 44
SnapMirror baseline copyscheduling 109
SnapMirror relationshipsadding information for a transition project 86commands to manage 99considerations for transition 64scenario for transition 85supported and unsupported configurations fortransition 63
SnapMirror schedulesmanaging 109
SnapMirror transfer schedulesdeleting 114editing 114
SnapMirror updatesperforming on-demand 82
Snapshot copies7-Mode, post-transition limitation 106finding and removing 32-bit, after expandingaggregates to 64-bit 41
Snapshot policiesreuse for transition 76
Snapshot schedules, 7-Modeexample of consolidating for transition 92
space considerationswhen transitioning SAN volumes 63
stand-alone projectsaborting 118
storage cutovertransition phase described 20
storage efficiencyconsiderations for transition 42
suggestionshow to send feedback about documentation 127
supported configurationsdata protection transition 63for transition 56name services transition 45NFS transition 48SAN transition 61
SVMsconfigurations that can be excluded from transition90
switchbacktransition a MetroCluster configuration 123
switchesFC, assessing transition readiness of 11generating an FC zone plan for configuring 15
switchovertransition a MetroCluster configuration 123
T
takeoverimpact on transition 65
targetsgenerating an FC zone plan for configuring switches15
throttle limitspecifying 109
throttle limitsspecifying 82
transferspriority for 114transition considerations for concurrent SnapMirror64
transitionapplying configurations 97assessing controllers, hosts, and switches are readyfor 11best practices during the different phases of 20CIFS configurations supported for transition 56configurations that can be excluded 90considerations for deduplication and compression 42considerations for FlexClone volumes 43considerations for local users and groups 58considerations for quotas 43considerations for using SnapMirror 64copy-based, preparing 7-Mode aggregates andvolumes 38copy-based, restrictions and corrective action 39creating SAN LIFs before 61downloading the log files 120examples for creating projects 85generating an assessment report by importing theinventory report XML 14generating assessment reports by adding systems tothe 7-Mode Transition Tool 12guidelines for cutover 65how to use the execute summary for assessment 17impact of takeover and giveback 65NFS configuration prerequisites 48NFS, preparing for 48of SnapLock Audit volumes 44of SnapLock Compliance volumes 44of SnapLock Enterprise volumes 44of SnapLock options configuration 45of standalone SnapLock Enterprise volumes 44overview 6performing manual tasks after 103preparation checklist 68preparing CIFS configurations for 53preparing for 31preparing name services for 45preparing the 7-Mode system 34preparing the cluster for 36preparing to transition data protection 63removing volumes from a project 117restrictions for 7-Mode volumes 33severity levels of precheck messages 78stand-alone volumes 21
Index | 133
supported and unsupported name servicesconfigurations 45supported and unsupported NFS configurations 48supported and unsupported SAN configurations 61workflow for collecting and assessing inventoryinformation for controllers and hosts 9
transition assessment7-Mode system and hosts supported for 10
transition complete phasetransition of stand-alone volumes 21
transition configurationsmodifying by editing a project 109
transition considerationsDNS, NIS, and LDAP 46
transition failuresrecovering from a failed LUN 104
transition issuescannot select a secondary volume from the Volumeselection pane 123continuing transition with errors 121Failed to retrieve volume information error message123
transition limitsnumber of volumes in a project 8
transition operationscommands to manage 99
transition prerequisitesCIFS configuration 54
transition projectrunning 67workflow 67
transition projectsadding volumes 72commands to manage 99completing 83configuring LIFs 72configuring logical interfaces 72creating 72, 86deleting 119introduction to managing using the 7-ModeTransition Tool 109pausing 118prechecks,run 77resuming 118starting data copy 96
transition sessionscompleting the transition of the primary project 98verifying compatibility 95
transition terminology7-Mode Transition Tool, to understand the transitionprocess 7
transition terminology related to the 7-Mode TransitionTool
to understand the transition process 7transition, volumes
completing transition of the secondary project 98transitioned volumes
consolidating cron schedules from 108deleting 7-Mode Snapshot copies 107
transitioning7-Mode systems with 32-bit aggregates 39from 7-Mode environments to clustered ONTAP 6MetroCluster configuration that failed 123
netgroups and UNIX users and groups,considerations for 47of SnapLock Audit volumes 44of SnapLock Compliance volumes 44of SnapLock Enterprise volumes 44preparing to transition 39SnapLock options configuration 45
transitioning volumesexcluding CIFS configurations 89excluding CIFS local users and groups 89excluding configurations 89excluding netgroup configurations 89excluding UNIX user and groups 89
transitionsrunning prechecks 77
Twitterhow to receive automatic notification ofdocumentation changes 127
U
UNIX user and groupsexcluding configurations from transition 89
UNIX users and groupsconfigurations that can be excluded from transition90considerations for transitioning 47
unsupported configurationsdata protection transition 63for transition 56name services transition 45NFS transition 48SAN transition 61
updatesperforming on-demand SnapMirror 82
upgradedeciding if upgrade is required before transition 39
users, localconsiderations for CIFS transition 58
V
VLANspreparing the network for transition 35
volume mappingno aggregates assigned 124
volume pairscommands to manage 99
volume SnapMirror relationshipmigrate using the 7-Mode Transition Tool 67
volume SnapMirror relationshipssupported and unsupported configurations fortransition 63
volume transitionsintroduction to managing by using the 7-ModeTransition Tool CLI 86requirements and considerations for 7-Mode toONTAP, in MetroCluster configurations 59using the 7-Mode Transition Tool (CLI) 85
volumesadding 72adding for a transition project 86
134 | Copy-Based Transition Guide
adding or removing by editing a project 109finding and removing 32-bit and mixed-format, afterexpanding aggregates to 64-bit 41finding and removing 32-bit, after expandingaggregates to 64-bit 41LIFs
configuring 72logical interfaces
configuring 72removing from a project during transition 117restrictions and corrective action for copy-basedtransition 39scenarios for selecting them for a project 85space requirements for transitioning LUNs 63transition of SnapLock Audit volumes 44transition of SnapLock Compliance volumes 44transition of SnapLock Enterprise volumes 44
volumes using the 7-Mode Transition Toolnumber of controllers and hosts that can be assessed8
W
web interfacetroubleshooting 120
workflowsCIFS transition 19collecting and assessing inventory information forcontrollers and hosts 9FC transition 19iSCSI transition 19NFS transition 19
Z
zonesconfiguring by using FC zone planner 103configuring by using the FC zone planner 60, 81generating FC zone plan for migration 15supported FC zone plans for migration 16
Index | 135


