
www.ahsay.com
Ahsay Cloud Backup Suite v8
Administrator’s Guide
Ahsay Systems Corporation Limited
25 March 2021

www.ahsay.com
Copyright Notice
© 2021 Ahsay Systems Corporation Limited. All rights reserved.
The use and copying of this product is subject to a license agreement. Any other use is prohibited. No part of this
publication may be reproduced, transmitted, transcribed, stored in a retrieval system or translated into any language in
any form by any means without prior written consent of Ahsay Systems Corporation Limited. Information in this manual is
subject to change without notice and does not represent a commitment on the part of the vendor, Ahsay Systems
Corporation Limited does not warrant that this document is error free. If you find any errors in this document, please report
to Ahsay Systems Corporation Limited in writing.
This product includes software developed by the Apache Software Foundation (http://www.apache.org/).
Trademarks
Ahsay, Ahsay Cloud Backup Suite, Ahsay Online Backup Suite, Ahsay Offsite Backup Server, Ahsay Online Backup
Manager, Ahsay A-Click Backup, Ahsay Replication Server, Ahsay BackupBox Firmware, Ahsay Universal Backup
System and Ahsay NAS Client Utility, Ahsay Mobile are trademarks of Ahsay Systems Corporation Limited.
Amazon S3 is a registered trademark of Amazon Web Services, Inc., or its affiliates.
Apple and Mac OS X, macOS, and iOS are registered trademarks of Apple Computer, Inc.
Dropbox is a registered trademark of Dropbox Inc.
Google Cloud Storage, Google Drive, Google Authenticator, and Android are registered trademarks of Google Inc.
Wasabi Hot Cloud Storage is a registered trademark of Wasabi Technologies Inc.
Backblaze B2 Cloud Storage is a registered trademark of Backblaze Inc.
MariaDB is a registered trademark of MariaDB Corporation AB.
Lotus, Domino, and Notes are registered trademark of IBM Corporation.
Microsoft, Windows, Microsoft Exchange Server, Microsoft SQL Server, Microsoft Hyper-V, Microsoft Azure, One Drive,
One Drive for Business, Microsoft Authenticator, and Microsoft Office 365 are registered trademarks of Microsoft
Corporation.
Oracle and Java are registered trademarks of Oracle and/or its affiliates. Other names may be trademarks of their
respective owners.
Oracle, Oracle 10g, Oracle 11g, Oracle 19c, and MySQL are registered trademarks of Oracle Corporation.
Rackspace and OpenStack are registered trademarks of Rackspace US, Inc.
Red Hat, Red Hat Enterprise Linux, the Shadowman logo and JBoss are registered trademarks of Red Hat, Inc.
www.redhat.com in the U.S. and other countries.
Linux is a registered trademark of Linus Torvalds in the U.S. and other countries.
Ubuntu is a registered trademark of Canonical Ltd.
ShadowProtect is a registered trademark of StorageCraft Technology Corporation.
VMware, ESXi, and vCenter are registered trademarks of VMware, Inc.
All other product names are registered trademarks of their respective owners.
Disclaimer
Ahsay Systems Corporation Limited will not have or accept any liability, obligation or responsibility whatsoever for any
loss, destruction or damage (including without limitation consequential loss, destruction or damage) however arising from
or in respect of any use or misuse of reliance on this document. By reading and following the instructions in this document,
you agree to accept unconditionally the terms of this Disclaimer and as they may be revised and/or amended from time to
time by Ahsay Systems Corporation Limited without prior notice to you.
www.ahsay.com
Revision History
Date Descriptions Type of modification
25 January 2021
Updated system architecture diagram in Ch. 1.2;
Added 2FA steps in Ch. 3.1; Updated screenshots
in Ch. 3.1, 4.2, 4.3, 5, and 6.1.2; Updated 2FA in
Ch. 5.1.6; Updated Authentication in Ch. 5.1.4
and 6.2.1; Added 2FA in Ch. 6.2.3; Added Office
365 in Ch. 10.7; Added Ahsay Mobile Branding in
Ch. 10.8; Added Appendix R
New / Modification
29 January 2021 Added VDDK API changes in Ch. 1.10; Added
mobile app icon in Appendix E
New
5 February 2021 Updated TLS version and added FreeBSD in Ch.
4.1; Updated Mobile Authentication setup in Ch.
5.1.6
New / Modification
11 February 2021 Updated diagram in Ch. 1.2; Removed
AhsayMOB in Ch. 1.4.1, 3.2, 4.3, 9.3.1 and 9.3.2;
Updated screenshots in Ch. 5.1.4, 10.6 and
Appendix D; Updated ACB uninstall icon in
Appendix E
Modification
25 February 2021 Removed AhsayOBM in Ch. 5.1.6; Updated
storage statistics in Ch. 6.2.1;
Modification
25 March 2021 Added TOTP only setup in Ch. 3.1; Added a
requirement for 2FA in Ch. 5.1.6; Added items
included/excluded for storage statistic calculation
in Ch. 6.2.1
Modification
www.ahsay.com
Table of Contents
1 Overview ............................................................................................................. 1
1.1 What is this software? .......................................................................................... 1
1.2 System Architecture ............................................................................................. 2
1.3 Recommendation on Antivirus Exclusion ............................................................. 3
1.4 AhsayCBS System Components ......................................................................... 3
1.4.1 Client Components ................................................................................. 3
1.4.2 Server Components ................................................................................ 7
1.5 Agentless Backup / Restore ................................................................................. 8
1.6 Backup Set Index Handling Process .................................................................. 12
1.7 Backup Set Index Conversion ............................................................................ 13
1.7.1 Index Conversion requirement for client versions (AhsayOBM/AhsayACB) ....................................................................... 14
1.7.2 Index format comparison ...................................................................... 14
1.8 Data Synchronization Check (DSC) ................................................................... 16
1.9 Why should I use AhsayCBS to manage my backup users and system? ........... 17
1.10 VDDK API Changes for pre-v8.5.0.0 upgrade .................................................... 20
2 About this Document ....................................................................................... 21
2.1 What is the purpose of this document? .............................................................. 21
2.2 What should I expect from this document? ........................................................ 21
2.3 Who should read this document? ....................................................................... 21
3 Log in to AhsayCBS Server ............................................................................ 22
3.1 Log in to AhsayCBS Web Management Console ............................................... 22
3.2 Download Client Backup Agents ........................................................................ 32
3.3 Change the Language ....................................................................................... 36
3.4 Invoke Online Help ............................................................................................ 37
4 Managing License ............................................................................................ 39
4.1 Verify License Connectivity ................................................................................ 39
4.2 Manage License Key ......................................................................................... 44
4.3 License Summary and Requirements ................................................................ 47
4.3.1 Upgrade from v6 to v8 .......................................................................... 48
4.3.2 Upgrade from AhsayOBS v6 or AhsayCBS v7 to v8.1.0.0 and above ... 51
4.3.3 Extra License for Replication Server ..................................................... 51
4.3.4 License for Standalone Redirector ........................................................ 51
4.3.5 License Requirements for Software and Modules ................................. 52
4.4 Automatic License Renewal ............................................................................... 52
4.5 License Evaluation Expiry .................................................................................. 53
www.ahsay.com
4.6 Offline License Activation ................................................................................... 53
4.7 License Management Portal .............................................................................. 54
4.8 Active Pool Key ................................................................................................. 55
5 System Settings ............................................................................................... 56
5.1 Basic Backup Server Configuration ................................................................... 56
5.1.1 General ................................................................................................. 56
5.1.2 Email .................................................................................................... 70
5.1.3 Predefined Destinations Tab ................................................................. 71
5.1.4 Administrative Access Tab .................................................................... 79
5.1.5 Languages .......................................................................................... 119
5.1.6 Two-Factor Authentication .................................................................. 121
5.2 Advanced Backup Server Configuration .......................................................... 137
5.2.1 Auto Save ........................................................................................... 137
5.2.2 Proxy .................................................................................................. 143
5.2.3 Logging ............................................................................................... 144
5.2.4 File Explorer ....................................................................................... 146
5.2.5 Runtime Options ................................................................................. 147
6 Managing Backup/Restore ............................................................................ 151
6.1 Backup / Restore Basic Configuration .............................................................. 151
6.1.1 User Home ......................................................................................... 151
6.1.2 Free Trial Options ............................................................................... 153
6.1.3 Backup Data Migration ....................................................................... 155
6.1.4 Run Direct .......................................................................................... 158
6.1.5 Windows Active Directory Integration.................................................. 159
6.2 Manage Users, Groups & Policies Backup Users ........................................... 160
6.2.1 Manage Backup User ......................................................................... 160
6.2.2 Manage User Groups ......................................................................... 230
The default user group.................................................................................... 230
To add backup user to a user group ............................................................... 231
To add a new policy group to a user group ..................................................... 231
6.2.3 Manage Policy Groups ....................................................................... 232
To create a new policy group .......................................................................... 233
To modify a policy group ................................................................................. 234
To delete a policy group ................................................................................. 234
To duplicate a policy group ............................................................................. 235
To configure a policy group ............................................................................ 236
Default Values ................................................................................................ 277
Preempted ...................................................................................................... 299
7 Replication ..................................................................................................... 325
7.1 Overview ......................................................................................................... 325
www.ahsay.com
7.1.1 What is Replication? ........................................................................... 325
7.1.2 What technology is used for Replication? ........................................... 326
7.1.3 Differences between v6 and v8 on Replication ................................... 326
7.1.4 How does Replication Work ................................................................ 327
7.1.5 Replication Scope ............................................................................... 328
7.1.6 Transaction Log Location .................................................................... 332
7.1.7 Replication Order ................................................................................ 332
7.1.8 Benefits of using Replication? ............................................................. 333
7.1.9 Replication of v6 backup sets on AhsayCBS v8 .................................. 338
7.2 Before Getting Started ..................................................................................... 340
7.2.1 Requirements and Best Practices ....................................................... 340
7.3 Deployment Options and Comparison ............................................................. 345
7.3.1 Deployment Method ............................................................................ 345
7.3.2 Comparison between Deployment on AhsayCBS and Cloud Storage . 349
7.3.3 Deployment Combinations of Backup and Replication Servers ........... 351
7.4 Deployment ..................................................................................................... 352
7.4.1 Major Steps to Deploy a Replication Service ...................................... 352
7.4.2 Configuration on the Replication Receiving End ................................. 353
7.4.3 Configuration on the Replication Sending End .................................... 358
7.4.4 Other Replication Settings .................................................................. 363
7.5 Recovery Process Overview ............................................................................ 369
7.6 Recovery Methods ........................................................................................... 371
7.6.1 Method 1 - Rebuild AhsayCBS from Replication ................................. 371
7.6.2 Method 2 - Rebuild from Auto Save .................................................... 373
7.6.3 Method 3 - Startup Replication Server as Backup Server ................... 377
7.7 Extract Data from Replication Destination ........................................................ 382
7.7.1 Getting Started ................................................................................... 382
7.7.2 Extract from AhsayCBS Replication Server ........................................ 384
7.7.3 Extract from a Predefined Destination - Cloud storage ....................... 388
7.7.4 Extract from the FTP/SFTP ................................................................. 390
7.7.5 Extract from the Local/Mapped Drive/Removable Drive ...................... 392
7.7.6 Extract from v6 Replication ................................................................. 393
7.7.7 Extract Snapshot from Retention Area ................................................ 397
7.8 Restore Replication Data ................................................................................. 400
7.8.1 Restore Replication Data to the Backup Server .................................. 400
7.8.2 Restore Raw Data Using AhsayOBM / AhsayACB.............................. 403
8 Configuring Redirector .................................................................................. 405
8.1 Hosting a Redirector ........................................................................................ 407
8.2 Joining Redirector ............................................................................................ 408
8.3 Advanced Setup .............................................................................................. 409
8.3.1 Setup Wild Card Certificate ................................................................. 409
www.ahsay.com
8.3.2 Setup Replication in Redirector Server Group .................................... 409
8.3.3 Multiple Redirector Setup .................................................................... 409
9 Monitoring Activities ..................................................................................... 412
9.1 Set up a Read-only Admin Account for Operators............................................ 412
9.2 Dashboard ....................................................................................................... 414
9.2.1 To Dos ................................................................................................ 414
9.2.2 Overview ............................................................................................ 420
9.2.3 CPU .................................................................................................... 421
9.2.4 Memory .............................................................................................. 422
9.2.5 Storage ............................................................................................... 423
9.2.6 Live Threads ....................................................................................... 424
9.3 Live Activities ................................................................................................... 425
9.3.1 Backup Status .................................................................................... 425
9.3.2 Restore Status .................................................................................... 427
9.3.3 Replication .......................................................................................... 429
9.3.4 Receiver ............................................................................................. 430
9.3.5 Redirection ......................................................................................... 430
9.4 Administration Logs ......................................................................................... 431
9.4.1 SNMP Log .......................................................................................... 431
9.4.2 Message History ................................................................................. 431
9.4.3 Activities Log ...................................................................................... 432
9.4.4 Audit Trails ......................................................................................... 432
9.5 Backup / Restore Logs .................................................................................... 433
9.5.1 Backup Jobs ....................................................................................... 433
9.5.2 Restored Jobs .................................................................................... 433
9.5.3 Backup Errors ..................................................................................... 434
9.5.4 Backup Set Log .................................................................................. 434
9.5.5 Activities Log ...................................................................................... 435
9.6 Replication Log ................................................................................................ 435
9.6.1 Replication Sending ............................................................................ 435
9.6.2 Replication Receiving ......................................................................... 436
9.6.3 Activities Log ...................................................................................... 436
9.7 Redirection Logs .............................................................................................. 437
Enable Third Party Monitoring Tools ............................................................... 437
10 Branding the AhsayCBS ............................................................................... 438
10.1 Prerequisite ..................................................................................................... 438
10.2 Before Getting Started ..................................................................................... 438
10.3 Prepare Branding for AhsayCBS Interface ....................................................... 439
10.4 Prepare Branding for AhsayOBM/AhsayACB ................................................... 444
10.5 Brand the AhsayCBS Interface and AhsayOBM/AhsayACB Installers for your Resellers ......................................................................................................... 461
www.ahsay.com
10.6 Customize Application Name on Cloud Storages ............................................. 463
10.6.1 Request for Permission Pages............................................................ 463
10.6.2 Customize the Folder/Bucket name in Standard Destination .............. 473
10.6.3 Customize the Storage in Predefined Destination ............................... 474
10.7 Office 365 Backup Customization .................................................................... 475
10.8 Ahsay Mobile Branding .................................................................................... 475
10.8.1 Requirements ..................................................................................... 476
10.8.2 Download Redemption Codes for iOS only ......................................... 476
11 API ................................................................................................................... 482
12 Contacting Ahsay .......................................................................................... 483
12.1 Technical Assistance ....................................................................................... 483
12.2 Documentation ................................................................................................ 483
Appendix ............................................................................................................... 484
Appendix A Supported Language Code ................................................................. 484
Appendix B Supported Time Zone .......................................................................... 486
Appendix C Error Code 1011 and 1012 ................................................................... 491
Appendix D Setting up Cloud Storage .................................................................... 492
Appendix E Image Specifications ........................................................................... 520
Appendix F Comparison on Different Replication Setup Environments ............. 565
Appendix G System Job .......................................................................................... 566
Appendix H Daily User Report ................................................................................ 568
Appendix I System Files for Continuous Backup Exclusion ............................... 581
Appendix J Monitoring Activities Log Filter List ................................................... 582
Appendix K Change display format of AhsayCBS web console logs .................. 609
Appendix L How to regain access to your AhsayCBS web management console when you have lost your 2FA registered phone ........................... 611
Appendix M How to migrate AWS S3 Compatible Cloud Storage destination to Wasabi Hot Cloud Storage ............................................................................ 614
Appendix N How to monitor Run on Server backup Java process from an operating system level .................................................................................. 618
Appendix O How to terminate unresponsive Run on Server backup jobs ........... 624
Appendix P Setting the Data Synchronization Check (DSC) ................................ 627
Appendix Q How to create a new app in the Azure Active Directory .................... 628
Appendix R How to setup authenticator app to be able to login to AhsayCBS web console after losing access to authenticator app ............................... 643
www.ahsay.com 1
1 Overview
1.1 What is this software?
AhsayCBS is a web-based centralized management console for backup service administrators
or users to manage backup and restore, and to monitor backup, restore, replication and
redirection activities. Administrators can create backup user accounts, manage group policies,
and keep track of system performance and health.
Administrators can create sub-admin or reseller accounts so that they can manage the backup
users by themselves. In addition, non-admin operator accounts with read only permission can
be created to help backup service administrator to monitor daily backup and restore jobs, as
well as system activities.
To further safeguard the data hosted on the Backup Server, AhsayCBS comes with replication
feature to replicate the backup data offsite to a Replication Server hosted in another site or to
commercial cloud storages such as network storage, FTP/SFTP and common cloud storages
(Google Drive, Dropbox, OneDrive, Amazon S3, Wasabi etc.)

www.ahsay.com 2
1.2 System Architecture
Below is a diagram illustrating the relationship among the AhsayCBS, client components and
server components.
www.ahsay.com 3
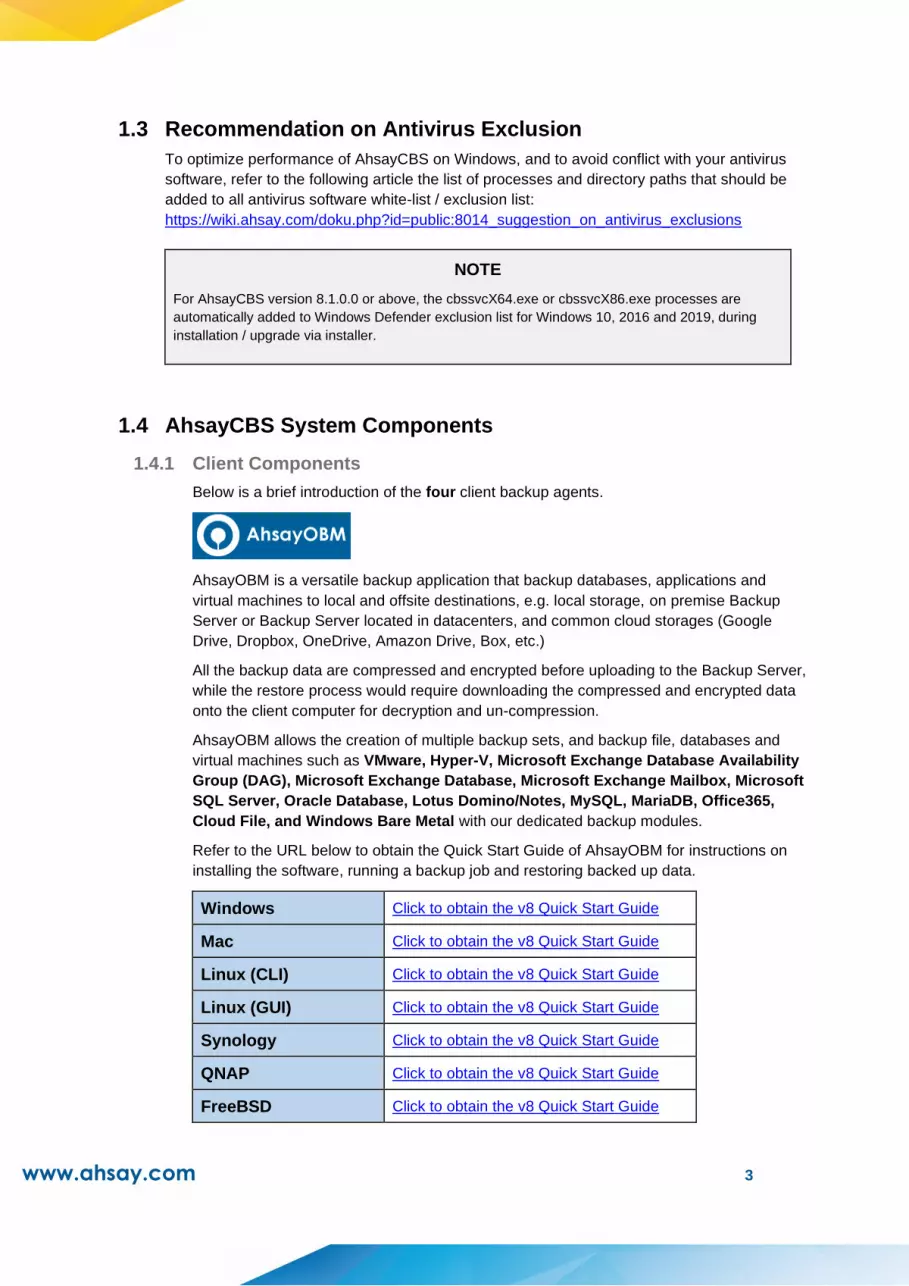
1.3 Recommendation on Antivirus Exclusion
To optimize performance of AhsayCBS on Windows, and to avoid conflict with your antivirus
software, refer to the following article the list of processes and directory paths that should be
added to all antivirus software white-list / exclusion list:
https://wiki.ahsay.com/doku.php?id=public:8014_suggestion_on_antivirus_exclusions
NOTE
For AhsayCBS version 8.1.0.0 or above, the cbssvcX64.exe or cbssvcX86.exe processes are
automatically added to Windows Defender exclusion list for Windows 10, 2016 and 2019, during
installation / upgrade via installer.
1.4 AhsayCBS System Components
1.4.1 Client Components
Below is a brief introduction of the four client backup agents.
AhsayOBM is a versatile backup application that backup databases, applications and
virtual machines to local and offsite destinations, e.g. local storage, on premise Backup
Server or Backup Server located in datacenters, and common cloud storages (Google
Drive, Dropbox, OneDrive, Amazon Drive, Box, etc.)
All the backup data are compressed and encrypted before uploading to the Backup Server,
while the restore process would require downloading the compressed and encrypted data
onto the client computer for decryption and un-compression.
AhsayOBM allows the creation of multiple backup sets, and backup file, databases and
virtual machines such as VMware, Hyper-V, Microsoft Exchange Database Availability
Group (DAG), Microsoft Exchange Database, Microsoft Exchange Mailbox, Microsoft
SQL Server, Oracle Database, Lotus Domino/Notes, MySQL, MariaDB, Office365,
Cloud File, and Windows Bare Metal with our dedicated backup modules.
Refer to the URL below to obtain the Quick Start Guide of AhsayOBM for instructions on
installing the software, running a backup job and restoring backed up data.
Windows Click to obtain the v8 Quick Start Guide
Mac Click to obtain the v8 Quick Start Guide
Linux (CLI) Click to obtain the v8 Quick Start Guide
Linux (GUI) Click to obtain the v8 Quick Start Guide
Synology Click to obtain the v8 Quick Start Guide
QNAP Click to obtain the v8 Quick Start Guide
FreeBSD Click to obtain the v8 Quick Start Guide

www.ahsay.com 4
AhsayACB is an advanced yet easy-to-use desktop and laptop backup software for backing
up files, Cloud files, Windows System backup, IBM Lotus Notes and Office 365 backup to
local and offsite destinations, e.g. local storage, on premise Backup Servers or Backup
Servers located in datacenters, and common cloud storages (Google Drive, Dropbox,
OneDrive, Amazon Drive, Box, etc.)
All the backup data are compressed and encrypted before uploading to the Backup Server,
while the restore process would require downloading the compressed and encrypted data
onto the client computer for encryption and un-compression.
Refer to the URL below to obtain the Quick Start Guide of AhsayACB for instructions on
installing the software, running a backup job and restoring backed up data.
Windows Click to obtain the v8 Quick Start Guide
Mac Click to obtain the v8 Quick Start Guide
Ahsay Mobile is an easy to use backup and restore solution for Android and iOS mobile
devices that backup photos and videos to the local destination of AhsayOBM/AhsayACB,
e.g. hard drive, flash drive and/or network drive. It is capable of backing up photos and
videos that are stored in the mobile device’s internal memory and SD card.
All the backup data are saved in their original unencrypted format, so they can be viewed
directly on the AhsayOBM/AhsayACB machine.
It uses the Mobile Backup Server (MBS) which is a component of the
AhsayOBM/AhsayACB machine that manages the backup and restore of Ahsay Mobile. It
is activated automatically when a mobile device with Ahsay Mobile is successfully
registered for mobile backup with AhsayOBM/AhsayACB. Once activated, it will be
automatically restarted whenever the AhsayOBM/AhsayACB services is restarted or when
the AhsayOBM/AhsayACB machine is rebooted or powered on. The MBS will be
deactivated when all mobile devices have deregistered from the mobile backup setting and
the AhsayOBM/AhsayACB services is restarted.
The MBS will use the following port ranges:
AhsayOBM
TCP Port: 54000 to 54099
UDP Port: 54200 to 54299
AhsaysayACB
TCP Port: 55000 to 55099
UDP Port: 55200 to 55299
www.ahsay.com 5
The default TCP and UDP ports for AhsayOBM are 54000 and 54200, while for AhsayACB
are 55000 and 55200. If these ports are already in use by other applications or services,
then the MBS will automatically acquire another port.
The supported OS versions are the following:
Android v8 or above
iOS v12.0.0 or above
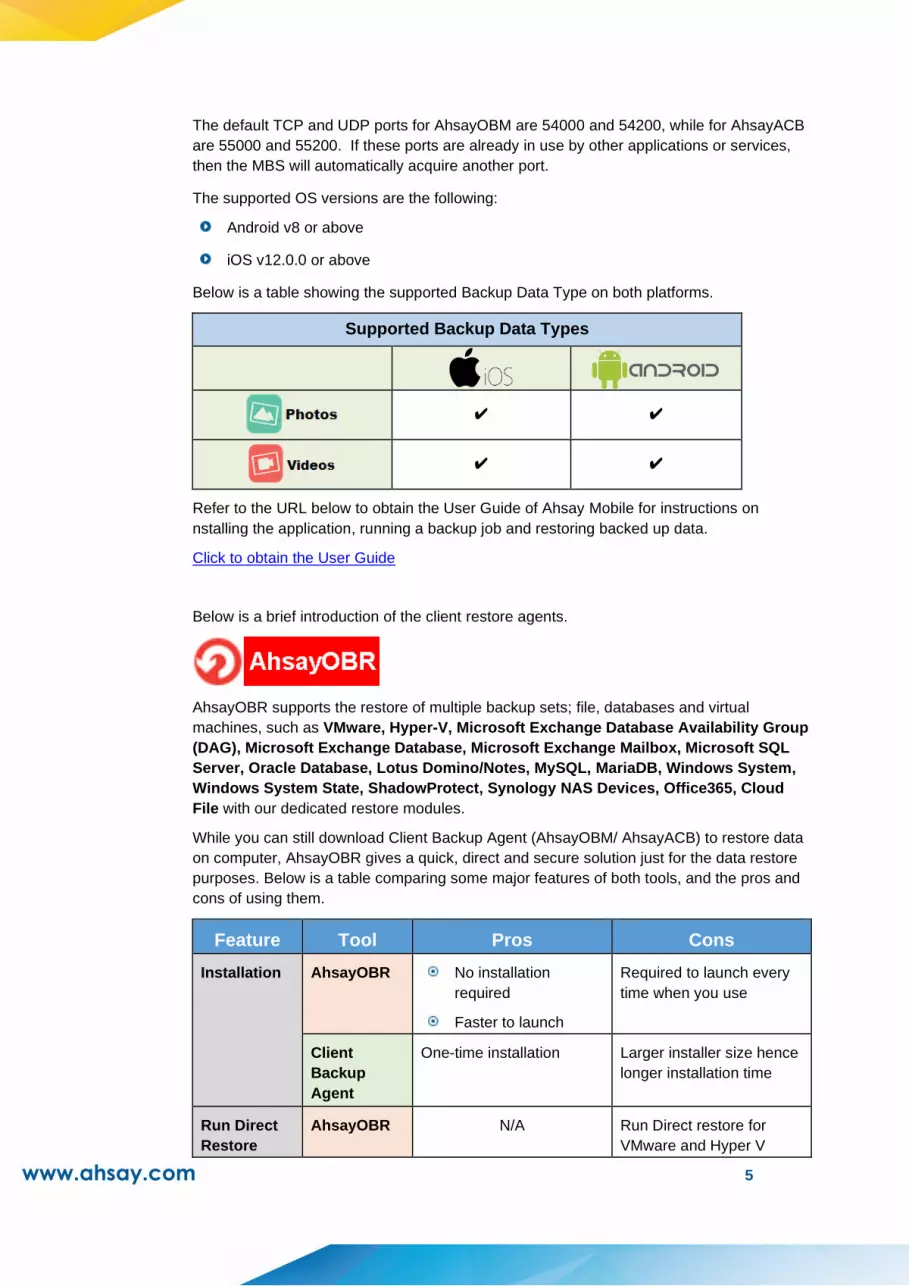
Below is a table showing the supported Backup Data Type on both platforms.
Supported Backup Data Types
✔ ✔
✔ ✔
Refer to the URL below to obtain the User Guide of Ahsay Mobile for instructions on
nstalling the application, running a backup job and restoring backed up data.
Click to obtain the User Guide
Below is a brief introduction of the client restore agents.
AhsayOBR supports the restore of multiple backup sets; file, databases and virtual
machines, such as VMware, Hyper-V, Microsoft Exchange Database Availability Group
(DAG), Microsoft Exchange Database, Microsoft Exchange Mailbox, Microsoft SQL
Server, Oracle Database, Lotus Domino/Notes, MySQL, MariaDB, Windows System,
Windows System State, ShadowProtect, Synology NAS Devices, Office365, Cloud
File with our dedicated restore modules.
While you can still download Client Backup Agent (AhsayOBM/ AhsayACB) to restore data
on computer, AhsayOBR gives a quick, direct and secure solution just for the data restore
purposes. Below is a table comparing some major features of both tools, and the pros and
cons of using them.
Feature Tool Pros Cons
Installation AhsayOBR No installation
required
Faster to launch
Required to launch every
time when you use
Client
Backup
Agent
One-time installation Larger installer size hence
longer installation time
Run Direct
Restore
AhsayOBR N/A Run Direct restore for
VMware and Hyper V

www.ahsay.com 6
servers is NOT supported.
Since AhsayOBR is not a
Client Backup Agent and
therefore NFS is not
bundled along with the
software. NFS is a
mandatory item for
performing Run Direct
restore for VMware and
Hyper-V servers.
Client
Backup
Agent
Support Run Direct restore
for both VMware and
Hyper-V servers.
N/A
OpenDirect
Restore
AhsayOBR OpenDirect restore allows
you to view and download
individual files from a
compressed or image file,
without having to restore
compressed file or image
file first. OpenDirect
restore gives you the
flexibility to restore
selective file(s) quickly, so
it saves you time and effort
to achieve your restore
goal.
To ensure optimal restore
performance, the backup
of the files in an
OpenDirect file backup set
will NOT be encrypted and
compressed, therefore,
you may have to take
these factors in
consideration when
selecting this restore
option.
Client
Backup
Agent
Granular
Restore
AhsayOBR In some cases, you may
only need to restore a few
individual file(s) from the
guest VM, therefore,
granular restore gives you
a fast, convenient, and
flexible tool to restore
selected file(s) from a
guest VM quickly.
To make ensure optimal
restore performance, the
backup of the guest VM
will NOT be encrypted and
compressed, therefore,
you may have to take this
factor in consideration
when using this restore
method.
Client
Backup
Agent
Cross
platform
usage
AhsayOBR Although both tools are available for use on various
platforms, e.g. Windows, Mac, Linux, etc., cross
platform restore is NOT recommended. For example,
files backed up on Windows are not recommended to
restore on a Mac/Linux machine.
Client
Backup
Agent
Compatibility AhsayOBR Support restore of backup
set created on either
AhsayACB / AhsayOBM
N/A
Client
Backup
Agent
N/A Support restore of backup
set created by the same
type of Client Backup
Agent only. E.g. backup
set created on AhsayOBM

www.ahsay.com 7
can only be restored by
AhsayOBM.
Refer to the URL below to obtain the User Guide of AhsayOBR for instructions on installing
the software, running a backup job and restoring backed up data.
Windows Click to obtain the v8 User Guide
Mac Click to obtain the v8 User Guide
Linux (GUI) Click to obtain the v8 User Guide
1.4.2 Server Components
There are three server components: Backup Server, Replication Server, and Redirector.
You can manage these components by logging to AhsayCBS with an admin role account.
The following screen shows the AhsayCBS server components.
Backup Server
The Backup Server is a platform for backup clients to perform backup to its local hard disk,
network storage, FTP/SFTP and common cloud storages such as Google Drive, Dropbox,
OneDrive, Amazon S3, MS Azure, Google Cloud Storage etc.
All the backup jobs, with the exception of File, VMware, and Hyper-V backup sets with
either Run Direct and or Open Direct / Granular feature enabled, are compressed and
encrypted before uploading to the Backup Server, while the restore process would require
downloading the compressed and encrypted data onto the client computer for decryption
and un-compression.
Replication Server
Replication Server offers close to real time replication of the Backup Server (backup server
configuration files, user profiles & backup set settings, and backup data hosted on the
backup server). So that when your production Backup Server is out of service, you can
switch the Replication Server into Backup Server within a short period to reduce potential
downtime of your backup service.
Redirector
With the use of Redirector in conjunction with multiple Backup Server machines, it forms a
cloud backup architecture for servicing as many backup customers as needed with a single
public URL. All backup users will use the single URL as the initial contact server, even
though they reside on different Backup Servers under different URLs. Thus, an online
backup provider can add new Backup Server machines to serve new customers or relocate
existing backup accounts from one Backup Server to another easily without the need for
the existing users to reconfigure the backup server address in AhsayOBM or AhsayACB.
www.ahsay.com 8
1.5 Agentless Backup / Restore
The AhsayCBS agentless backup and restore for Cloud File and Office 365 backup sets does
not require any AhsayOBM/AhsayACB backup agents to be installed on the client machine.
Instead agentless backup and restore jobs are performed by the AhsayCBS server itself.
The following are the functions that can be done using the agentless feature:
Backup of Cloud File and Office 365 backup sets with its own separate Java process with
its own Java memory setting. The Java memory is set at 1GB by default which can be
configured by the system administrator. For more information please refer to this article:
https://wiki.ahsay.com/doku.php?id=public:8096_faq:how_to_change_heap_for_o365_ru
n_on_server_backup
Capability to support a large number of concurrent agentless Cloud File and Office 365
backup jobs.
Restore of Cloud File and Office 365 backup sets.
Restore of VMware ESXi/vCenter backup sets that has been backed up to AhsayCBS.
Both Run Direct and Non Run Direct restore are supported.
Data integrity check, space freeing up and deleting of backup data for Cloud File and
Office 365 are also supported.
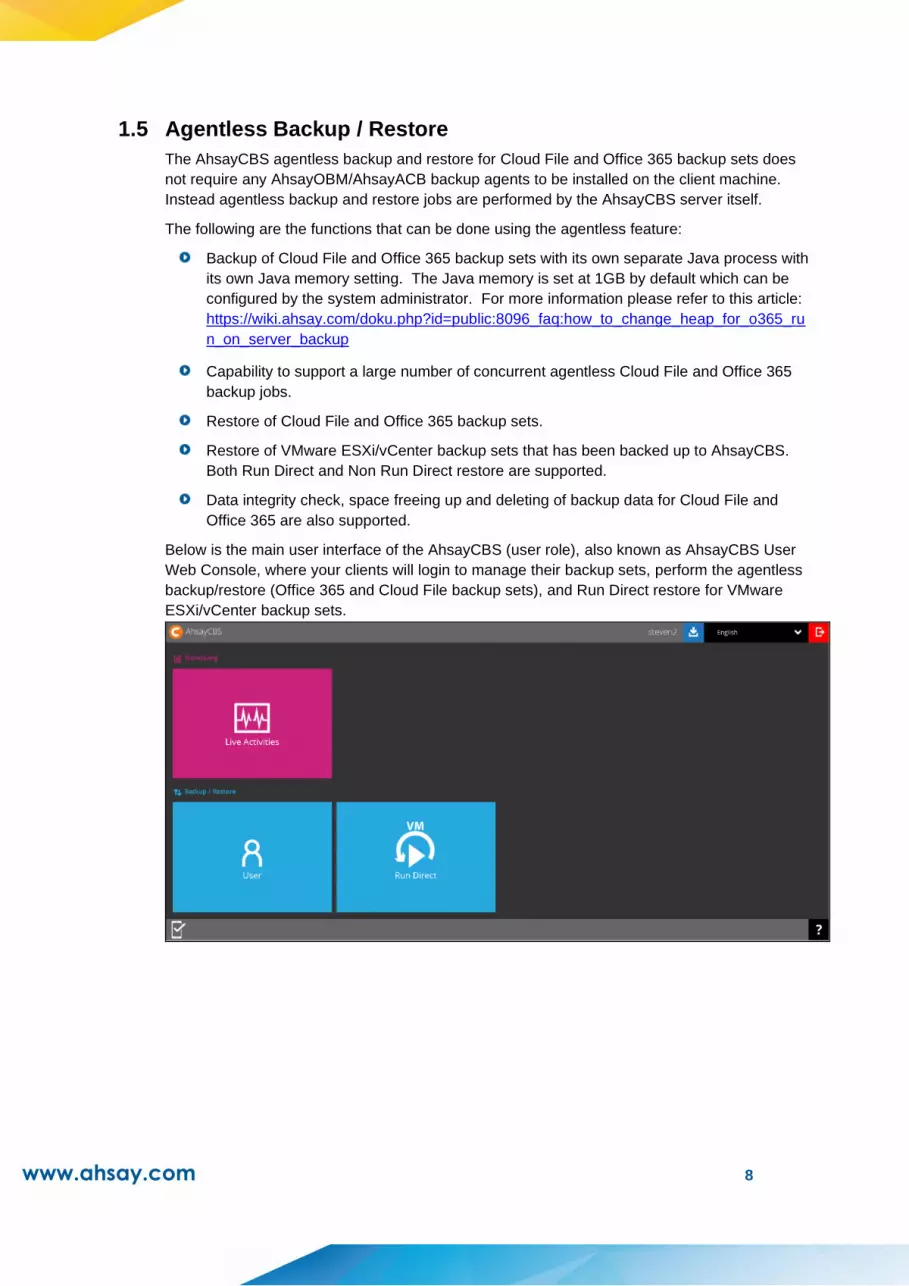
Below is the main user interface of the AhsayCBS (user role), also known as AhsayCBS User
Web Console, where your clients will login to manage their backup sets, perform the agentless
backup/restore (Office 365 and Cloud File backup sets), and Run Direct restore for VMware
ESXi/vCenter backup sets.

www.ahsay.com 9
There are three backup sets that support agentless backup and restore in AhsayCBS v8.3.0.0
or above:
Cloud File Backup and Restore
You can now back up your data stored on Cloud storage (Google Drive, OneDrive,
Dropbox, MS Azure, Google Cloud Storage, Amazon S3 etc) to the AhsayCBS or other
cloud backup destination.
Office 365 Backup and Restore
You can now back up mail objects, OneDrive and SharePoint files from your Office 365
account, and then restore them to your original account or another user under the same
Office 365 account, all on the AhsayCBS without having to install a client backup agent
first.
NOTE
To determine the amount of RAM needed for the AhsayCBS server to run efficiently, it would
depend on the operating system and number of agentless backup jobs that will be processed by
the AhsayCBS Server. A Java heap size of 4GB for the AhsayCBS server would be sufficient. So
to compute for the total amount of RAM needed, for example, if the AhsayCBS server is hosting 20
agentless Office 365 backup job each with 1GB of memory; the AhsayCBS server will need 28GB
of RAM. That is 20GB (for the 20 agentless Office 365 backup jobs) + 4GB (for the Operating
System) + 4 GB (for AhsayCBS service) = 28GB of RAM.
Although based on the estimated 28GB RAM usage, a server with 32GB RAM is sufficient. For an
on-premises server, it is recommended to provision additional RAM to meet unexpected on-going
requirements and future business growth.
Also the Java heap size to be configured should not exceed two-thirds of RAM available to allow
sufficient resources for the operating system. Your server should have RAM to satisfy both
AhsayCBS, your Operating System (~4GB+) and any applications installed on the same server.
Run Direct of VMware vCenter/ESXi VM from AhsayCBS server
You can now perform a Run Direct restore of the VMware vCenter/ESXi VM directly
using the AhsayCBS without the presence of a client backup agent
(AhsayOBM/AhsayACB/ AhsayOBR), if VMware vCenter/ESXi guest VMs are backed up
to AhsayCBS backup destination and Run Direct is enabled.

www.ahsay.com 10
All agentless Office 365 and Cloud File backup sets use a temporary directory location on the
user home for backup and restore.
Each agentless Cloud File backup job requires at least 100 MB of free space for the temporary
files generated during the backup job.
For each agentless Office 365 backup job, the required free space for the temporary files
generated during the backup job depends on two factors:
the number of Office 365 users selected in each backup set, the required free space is
calculated as 300 MB per Office 365 user.
the number of concurrent Office 365 backup jobs running on the AhsayCBS server.
Example:
If an AhsayCBS server has only one backup set with 500 Office 365 users, it will require
150 GB (500 x 300 MB) disk space on the user home drive for the temporary files
generated during the backup job.
If there are multiple Office 365 backup sets running concurrently on AhsayCBS, then the
free space required will be the sum of all the Office 365 users. If they are located on the
same user home drive then the temporary folder on that drive will require 540 GB of free
space for the temporary files generated during the backup job.
Backup set 1 with 200 Office 365 users (200 x 300 MB) = 60 GB
Backup set 2 with 100 Office 365 users (100 x 300 MB) = 30 GB
Backup set 3 with 500 Office 365 users (500 x 300 MB) = 150 GB
Backup set 4 with 1000 Office 365 users (1000 x 300 MB) = 300 GB
The following are the default temporary directory locations for the different operating systems:
in Windows – C:\\Program Files\AhsayCBS\user\%username%\temp (the default path of
the user home)
in Linux/FreeBSD – /usr/local/cbs/user/%username%/temp
in AhsayUBS – /ubs/mnt/esfmfw/obsr/system/obsr/user/%username%/temp
Ensure that the drive where the temporary directory is located has a lot of free space to
accommodate all the agentless Office 365 and Cloud File backup jobs, especially if they will be
running concurrently.

www.ahsay.com 11
Starting with AhsayCBS v8.3.6.0 and above, the default port 8081 is used by AhsayCBS
agentless Office 365 and Cloud File backups on local IP address 127.0.0.1. If the default port
is occupied, then AhsayCBS will automatically acquire the next available free port from 8081 to
9080. This is automatically setup upon installation, so no additional setup is needed to be done.
It is not visible from System Settings > Basic > General > Connectors but can be checked from
the server.xml file which is in the conf folder located in $APPLICATION_HOME\conf.

www.ahsay.com 12
1.6 Backup Set Index Handling Process
A new index system is introduced in AhsayCBS v8.3.0.0 or above to provide better backup
performance and robustness. Below is a flowchart showing the index handling process for
backup jobs.

www.ahsay.com 13
The new index handling process will first list all available index files (index.db) for download
from the current directory, temporary directory and backup job folder which will be arranged by
modified time from latest to oldest. The latest index file will be verified if it is valid and can be
opened. If it can be opened, then it will be used to compile file list for backup. If not, then
proceed to the next index file until a valid one can be found that can be compiled. If there is no
valid index file that can be opened, then DIC job will complete with error.
1.7 Backup Set Index Conversion
For all v7 and pre-v8.3 AhsayOBM/AhsayACB backup sets that were upgraded to v8.3.0.0 or
above, a backup set index conversion process will be performed on the backup set on the first
backup job immediately after the upgrade. Backup set index conversion cannot be disabled.
The old v7 and pre-v8.3 files: index.b2b*, index.xml* and index-s0* will be converted to the new
index file structure: index.db* and backupInfo.db*. Temporary space needed for index
conversion is 200% of the uncompressed index file. You will need 100% for the old index file
and another 100% for the new index file. After the index conversion, for large data index the
new index will be smaller since duplicated information will be grouped. But for small data index,
the new index might be larger since additional information may be included to the new index.
For v6
For v7 and pre-v8.3.0.0

www.ahsay.com 14
Please note that:
You cannot disable the index conversion.
Index conversion process will automatically start during the first backup job after
upgrading AhsayOBM/AhsayACB to v8.3.0.0 or above.
After index conversion the size of the index will be different. For large data index, the
new index will become smaller since duplicate information will be grouped. While for
small data index, the new index may be bigger since additional information may be
included in the new index.
1.7.1 Index Conversion requirement for client versions (AhsayOBM/AhsayACB)
Client Version Index Conversion Needed Data Migration Needed
v6 ✔ ✔
v7 ✔ X
Earlier than v8.3.0.0 ✔ X
v8.3.0.0 or above X X
1.7.2 Index format comparison
Example of the old index format:
The files can be located in
%userhome%/%user%/%backupsetid%/blocks/%timestampfolder%. It will contain these
three (3) files:
index.b2b.{size}.{timestamp}.cgz
index.xml.{size}.{timestamp}.cgz
index-s0.{size}.{timestamp}.cgz

www.ahsay.com 15
Example of the new v8.3 index format:
The files can be located in %userhome%/%user%/%backupsetid%/blocks
index.db.{size}.{timestamp}.cgz
and %userhome%/%user%/%backupsetid%/blocks/%timestampfolder%
backupInfo.db.{size}.{timestamp}.cgz
The size and timestamp are hashed values. To convert to readable date, first convert from
hexadecimal to decimal number. Then to convert the decimal number to a readable date, a
timestamp conversion tool is needed. An example of which is the Epoch Converter.
The v8.3 index conversion process may only take a few minutes for backup sets with a
small number of files. For example: MS SQL Server, MySQL server, MS Exchange
database, Oracle database, VMware, Hyper-V, Windows System State, Windows System
backup, Lotus Domino etc.
NOTE
Please kindly note that for backup sets which could contain large number of files and
folders, the v8.3 index conversion process could take several hours to complete. For
example: File, Cloud File, MS Exchange mail level and Office 365 backup sets. In
some cases, backup sets containing several millions of files/folders could take days to
complete the v8.3 index conversion process. Please take this into consideration
when planning your AhsayOBM/AhsayACB client upgrade to v8.3.0.0 or above.

www.ahsay.com 16
1.8 Data Synchronization Check (DSC)
The Data Synchronization Check (DSC) is only applicable to Office 365 backup, for both agent
based and agentless setup for Office 365 backup sets. To compensate for the significant
increase in backup performance, there is a trade off made by the Change Key API, which skips
the checking of de-selected files in the backup source. Over time, this can result in discrepancy
between the items or files/folders selected in the backup source and those in the backup
destination(s). However, the Change Key API will continue to check for de-selected Office 365
user accounts or Site Collections detected during a backup job and will be automatically moved
to retention area.
To avoid this, it is necessary in some cases to run a Data Synchronication Check (DSC)
periodically, so that it will synchronize the data in the backup source and backup destination(s)
to avoid data build-up and the freeing up of storage quota. The DSC is similar to a regular
Office 365 Change Key API backup job buti with the additional checking and handling of de-
selected files and/or folders in the backup source.
Here are the pros and cons of perfoming the data synchronization check:
Enabled Disabled
Backup time Since data synchronization check
is enabled, it will only run on the
set interval.
For example, the default number
of interval is 60 days.
The backup time for the data
As data synchronization check is
disabled, the backup time will not be
affected.

www.ahsay.com 17
synchronization job will take
longer than the usual backup as it
is checking the de-selected files
and/or folders in the backup
source and data in the backup
destination(s).
Storage Management of storage quota will
be more efficient as it will detect
items that are de-selected and
move it to the retention and will be
removed after it exceeds the
retention policy freeing up the
storage quota.
Management of storage quota will be
less efficient even though files and/or
folders are already de-selected from
the backup source, these files will
remain in the data area of the
backup destination(s).
NOTE
To setup the Data Synchronization Check (DSC), please refer to Appendix P Setting the Data
Synchronization Check.
1.9 Why should I use AhsayCBS to manage my backup users and system?

www.ahsay.com 18
Real-time Status Monitoring
Monitor System Health and Backup/Restore Status, Anytime Anywhere – the AhsayCBS
user interface (UI) has been designed to provide you with a user-friendly and informative view
of various kinds of information you need. Highlighted features including:
A dashboard to view the system usage and performance
Live Activities panel to view real-time status of backup, restore, replication, redirection, etc.
Panels to view all log files of backup, restore, replication and redirection
Flexible Destination Management
Wide range of backup destination options – to offer you with the greatest flexibility of backup
destination, AhsayCBS now supports local drive, mapped network drive, FTP / SFTP server,
and public cloud object storage as the backup destination for storing the backup data.
Below is a full list of the supported cloud storage:
Aliyun
(阿里云) *
Google Drive
Amazon
S3 Wasabi
Cloud
Storage
CTYun
(中国电信天翼云 )*
AWS S3
Compatible
Cloud
Storage
Microsoft
OneDrive for
Business
Rackspace
OpenStack
Microsoft
Azure Dropbox
FTP
SFTP
Microsoft
OneDrive Backblaze
* Available on computers with China or Hong Kong local settings
Cloud backup gives you two major advantages:
Multi-destination Backup for Extra Protection – you can now back up your database,
files or data to both local drive and cloud destination. While local destination backup
gives you the convenience of faster backup and restore as a result of the local
infrastructure, you can take a further step to utilize the cloud backup to give you an extra
layer of protection in the event of a local drive corruption, where you will still be able to
retrieve data from the cloud destination.
Eliminate Hardware Investment – with the increasingly affordable cloud storage cost,
you can deploy on cloud platform and utilize cloud storage as your centralized data
repository, or simply expand your cloud storage as a backup destination without having
to invest on hardware.

www.ahsay.com 19
Instant Replication
Extra layer of data protection – the replication server provides an additional layer of data
protection by providing an offsite backup store for backing up data from either a single or
multiple AhsayCBS servers. The Ahsay replication process is close to real-time and hence this
will reduce the probability of significant data loss in the event of an AhsayCBS outage. The
synchronization process does not require stopping or interrupting any backup operations. As
the replication module will be replicating the backup data using four modes, pending, resync,
replay, and sleep mode.
Furthermore, you have flexibility to select specific user’s backup set from the backup server to
replicate instead of replicating all users and backup sets. The replication speed has been
enhanced by utilizing the multiple thread replication technology.
Refer to the Replication section for further details.
High Scalability
Easy system expansion for your business growth – as your business continues to grow,
you need greater storage and backup capabilities to keep all your data safe and protected. With
AhsayCBS, you can always scale up your backup service. With the program’s built-in
redirection module, you can redirect the extra user traffic to other AhsayCBS servers to
manage your growing volume of data easily.
We understand that expanding backup service could be a difficult situation when you have to
deal with multiple domain servers, a high scalable backup system should make this kind of
transition as seamless as possible to users. Our Redirector is designed to facilitate easy
expansion of your backup service.
Refer to the Configuring Redirector section for further details.
Fully Rebrandable
Rebrand and customize to best cater your clients’ needs – All graphics and wordings in
AhsayCBS are rebrandable and customizable for MSPs. Thus, you can use a rebranded
AhsayCBS to build your branded backup appliance for customers who preferred on-site backup
solution.
Centralized Management Console for Users
Monitor and Manage Backup without Client Backup Agent – our enriched features on the
centralized web console offers users a one-stop location for running and configuring backup
jobs, monitoring backup and restoring activities, and initiating a Run Direct restore.
For further instructions on using the User Web Console, refer to the AhsayCBS User Guide.

www.ahsay.com 20
1.10 VDDK API Changes for pre-v8.5.0.0 upgrade
VMware ESXi/vCenter v6, v6.5, v6.7 and v7 backup sets running in VDDK mode may
encounter issues during backup and restore due to the latest VMware VDDK 7 API
implemented in AhsayOBM v8.3.4.0 to v8.3.6.x. For more details please refer to this link.
Affected existing AhsayOBM version with VDDK 7 API: AhsayOBM v8.3.4.0 to v8.3.6.x
Affected VMware versions: VMware ESXi/vCenter v6, v6.5, v6.7, and v7 backup sets
running in VDDK backup mode
It is highly recommended to immediately upgrade to AhsayOBM 8.5.0.0 or above to fix this
issue. Once AhsayOBM is upgraded to v8.5.0.0 or above, the existing VMware ESXi/vCenter
v6, v6.5, v6.7 and v7 backup jobs will resume running without any further configuration or
intervention needed.
Starting from AhsayOBM v8.5.0.0, Ahsay has decided to temporarily revert to using VDDK 6
API until the VDDK 7 API bug is addressed by VMware.
Until further notice, VDDK 6 API will be used for:
All new installation of AhsayOBM v8.5.0.0 or above
AhsayOBM upgrades from v6, v7 or pre-v8.5.0.0 to v8.5.0.0 or above
www.ahsay.com 21
2 About this Document
2.1 What is the purpose of this document?
This document aims at providing all necessary information for you to work with the AhsayCBS
server at the administrator level to manage backup and restore jobs.
2.2 What should I expect from this document?
After reading through this documentation, you can expect to have sufficient knowledge to
perform all administrative tasks and manage your AhsayCBS server effectively.
2.3 Who should read this document?
This documentation is intended for IT professionals who need to work with AhsayCBS server at
the administrator level.
Where can I get information about System Requirements and Settings for
installing the AhsayCBS?
Before you read through this Administrator’s Guide for information on managing all
administrative tasks on AhsayCBS, you should have the AhsayCBS installed first. Refer
to the Ahsay Cloud Backup Suite Quick Start Guide for instructions on software
installation, system requirements, network, and firewall settings.

www.ahsay.com 22
3 Log in to AhsayCBS Server
3.1 Log in to AhsayCBS Web Management Console
1. Enter the IP address or domain name on a web browser.
https://<IP_Address:port_number/>
2. Enter the system login name and password. The default login credential are:
Login Name: system
Password: system
3. Click the green Login button to login.
Forgot your Password?
If you have forgotten your system or administrator password, please refer to the following article
for instructions. FAQ: How to recover AhsayCBS system account password?
NOTE
Please kindly note that to comply with the new General Data Protection Regulation (GDPR)
requirements, a banner will be displayed stating the organizations cookie policy when processing to
login AhsayCBS server. This will also apply to the AhsayCBS web console. To know more about
this please refer to the Cookie Banner Notification section.

www.ahsay.com 23
4. Only for first time login, starting with v8.3.4.0 and onwards, the user will be asked to
change the password before they can proceed. Enter the new password and confirm
password. Click the Save button.
5. If Two-Factor Authentication is enabled, the following screen will appear. If not, skip to
Step 6.
i. For first time log in this will be the screen displayed. Click to proceed with
setting up 2FA.

www.ahsay.com 24
The next screen that will be displayed will depend on the App Download Page
Settings:
This is the default screen that will be displayed, with instructions to download
the Ahsay Mobile from the App Store / Google Play Store.
While this is the screen that will be displayed for branded application, with
instructions to download the mobile app by entering the URL provided in your
device’s browser or you can also scan the QR code by clicking
link.
Click to proceed.

www.ahsay.com 25
Select the country code and enter your phone number. Click
.
Enter the verification code and click .
Pair the device with the user account. There are two ways to do this:
Using Ahsay Mobile
Using a third-party TOTP Authenticator App
Ahsay Mobile can be configured to support two 2FA modes:
Push Notification and TOTP (default mode)
TOTP only
For Push Notification and TOTP, scan the QR code.

www.ahsay.com 26
This is a sample of the Ahsay Mobile app installed on a mobile device
named “Galaxy A70”.
After successful registration this will be the message displayed.
For TOTP only, click
link.
Scan the QR code. After doing so, the one-time password will be
generated in the Ahsay Mobile. Enter a name and the one-time password
code generated in Ahsay Mobile here and click .
This is a sample of the one-time password code generated in Ahsay
Mobile.

www.ahsay.com 27
After successful registration, this will be the message displayed.
Or
By using a third-party TOTP Authenticator App, click
link.
Either scan the QR code using the third-party authenticator app or enter
the Secret Key in the third-party authenticator app. After doing so, the
one-time password will be generated in the authenticator app. Enter a
name and the one-time password code generated in the third-party
authenticator app here and click .
This is a sample of the one-time password code generated using
Microsoft Authenticator.

www.ahsay.com 28
Click to finish setup.
ii. For subsequent log ins, There are two authentication method to choose from it is
possible to use both methods on the same AhsayOBM/AhsayACB user account:
Ahsay Mobile app
Supports two types of authentication:
Push Notification
TOTP
Can be configured to support two 2FA modes:
Push Notification and TOTP (default mode) or,
TOTP only
Third-party TOTP Authenticator App
(e.g. Authy, Duo, Google)
If Ahsay Mobile app will be used as authenticator, there are two 2FA modes that can
be selected:
Push Notification and TOTP (default mode)
Example of the 2FA alert screen on AhsayCBS after login with correct
username and password.
Push notification is the default 2FA mode. Accept the login request on Ahsay
Mobile to complete the login.
Example of the login request sent to the Ahsay Mobile app.

www.ahsay.com 29
However, if push notification is not working or you prefer to use one-time
password, click the “Authenticate with one-time password” link, then input the
one-time password generated from Ahsay Mobile to complete the login.
TOTP only
Example of the 2FA alert screen on AhsayCBS after login with correct
username and password.
Example of the one-time password generated from Ahsay Mobile to complete
the login.
www.ahsay.com 30
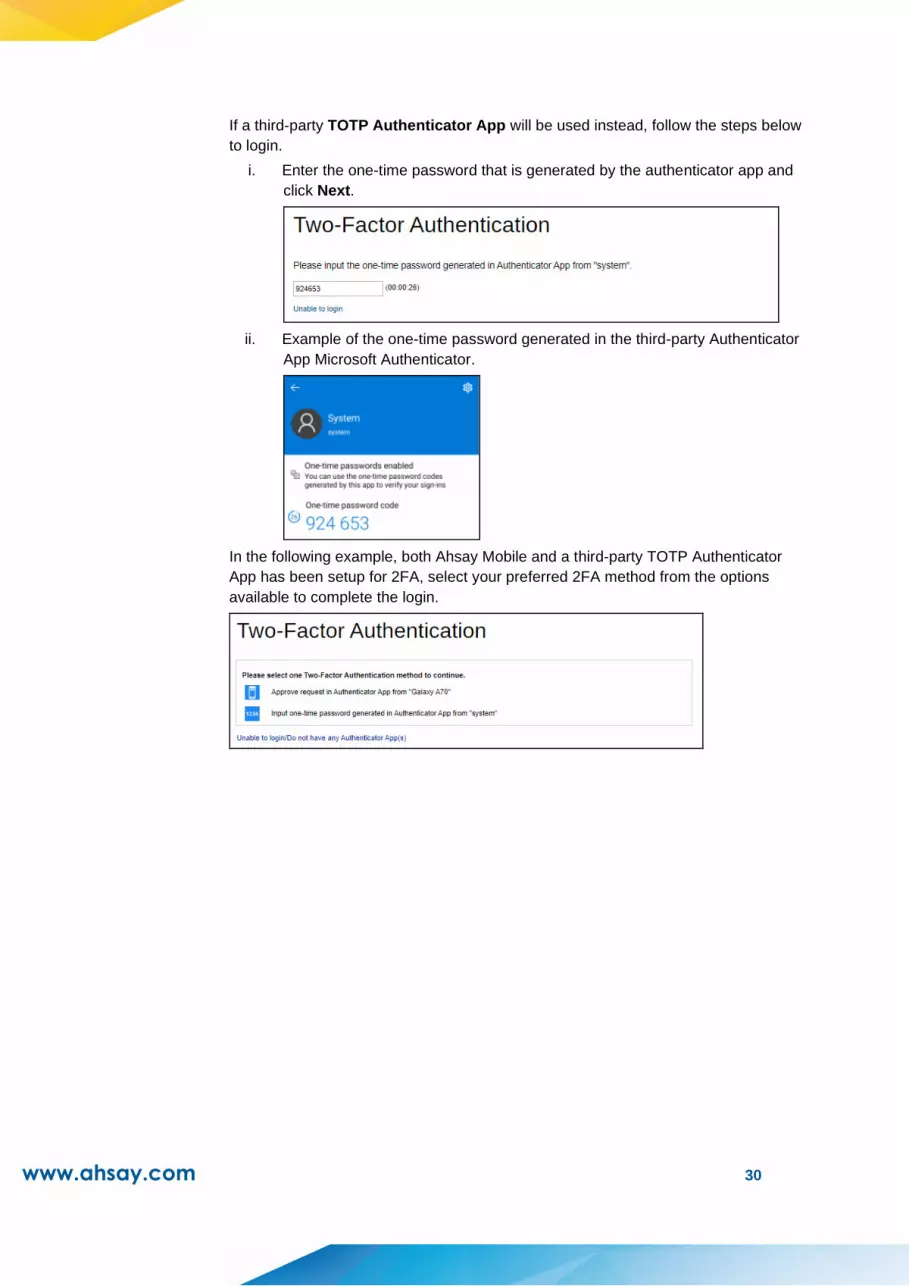
If a third-party TOTP Authenticator App will be used instead, follow the steps below
to login.
i. Enter the one-time password that is generated by the authenticator app and
click Next.
ii. Example of the one-time password generated in the third-party Authenticator
App Microsoft Authenticator.
In the following example, both Ahsay Mobile and a third-party TOTP Authenticator
App has been setup for 2FA, select your preferred 2FA method from the options
available to complete the login.

www.ahsay.com 31
6. The following screen appears with five sections: Monitoring, Backup / Restore,
Replication, Redirection, and System Settings. Each of these sections are described in
detail in later chapters.
www.ahsay.com 32
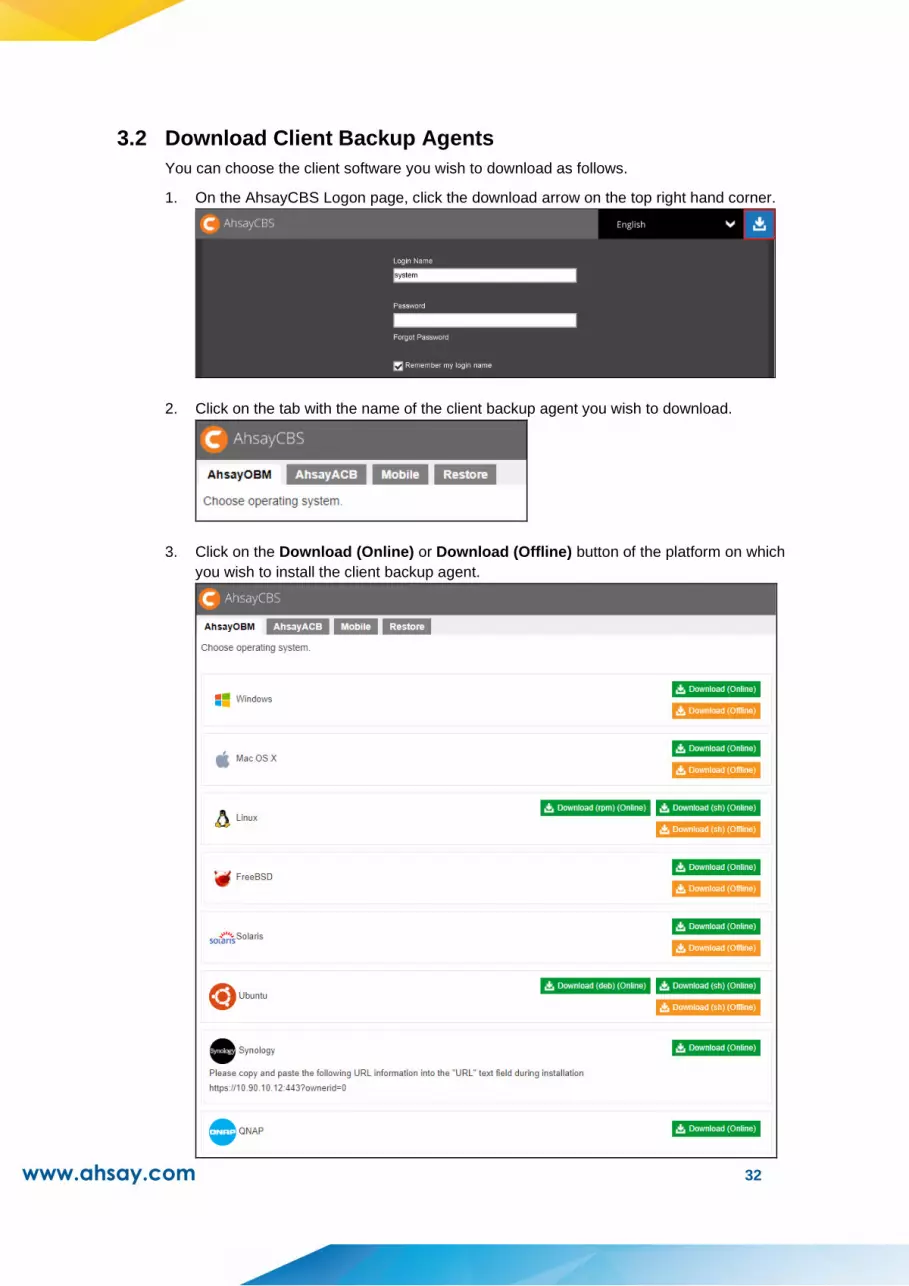
3.2 Download Client Backup Agents
You can choose the client software you wish to download as follows.
1. On the AhsayCBS Logon page, click the download arrow on the top right hand corner.
2. Click on the tab with the name of the client backup agent you wish to download.
3. Click on the Download (Online) or Download (Offline) button of the platform on which
you wish to install the client backup agent.

www.ahsay.com 33
Please kindly note that each time after upgrading AhsayCBS version, it is required to
rebuild the installers. Otherwise, you cannot download the installer and following warning
will prompt.
AhsayCBS support two installation modes, online and offline installation (except for Linux
(rpm), Ubuntu (deb), Synology, QNAP and Ahsay Mobile which supports online installation
only). User can download and run either one of the installers.
www.ahsay.com 34
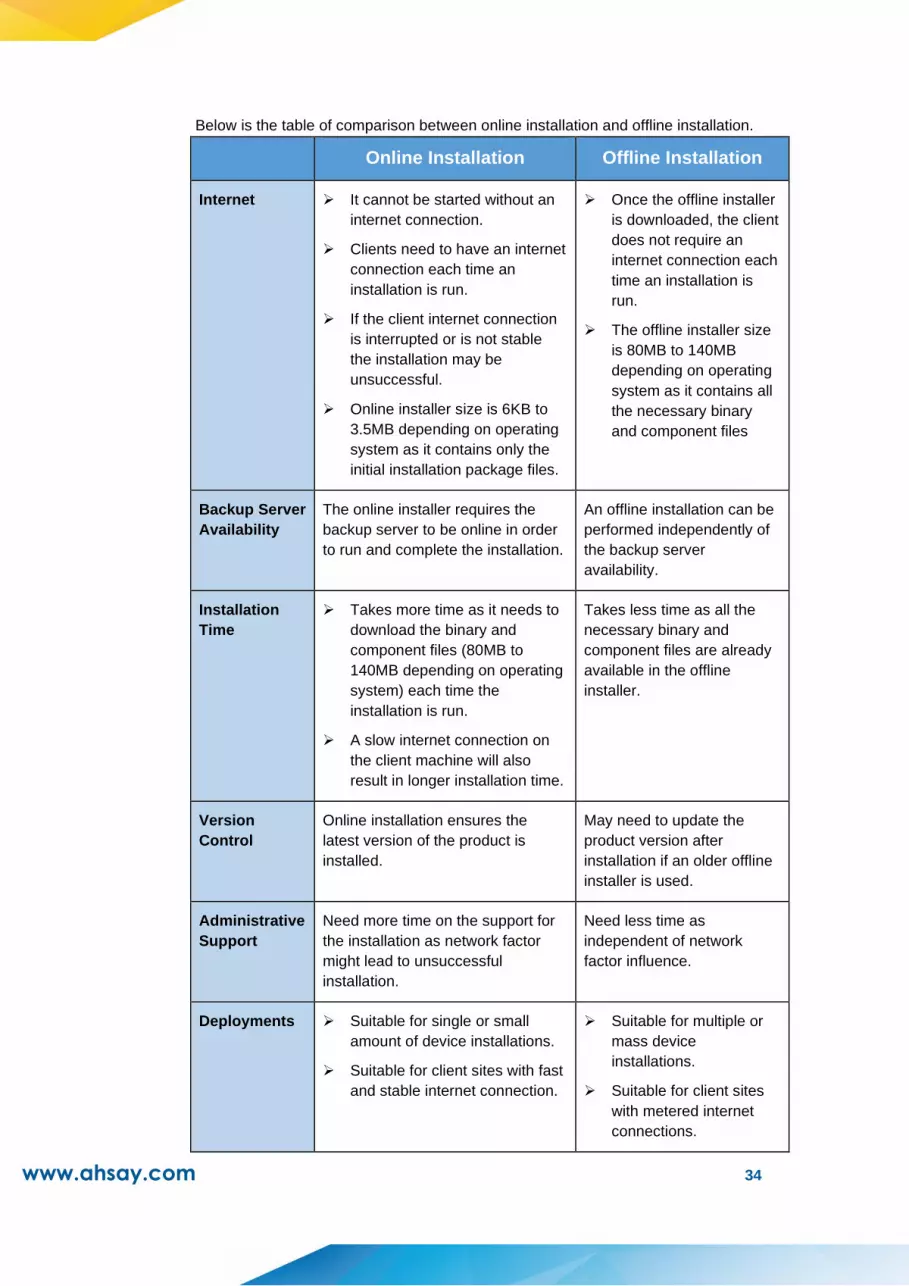
Below is the table of comparison between online installation and offline installation.
Online Installation Offline Installation
Internet ➢ It cannot be started without an
internet connection.
➢ Clients need to have an internet
connection each time an
installation is run.
➢ If the client internet connection
is interrupted or is not stable
the installation may be
unsuccessful.
➢ Online installer size is 6KB to
3.5MB depending on operating
system as it contains only the
initial installation package files.
➢ Once the offline installer
is downloaded, the client
does not require an
internet connection each
time an installation is
run.
➢ The offline installer size
is 80MB to 140MB
depending on operating
system as it contains all
the necessary binary
and component files
Backup Server
Availability
The online installer requires the
backup server to be online in order
to run and complete the installation.
An offline installation can be
performed independently of
the backup server
availability.
Installation
Time
➢ Takes more time as it needs to
download the binary and
component files (80MB to
140MB depending on operating
system) each time the
installation is run.
➢ A slow internet connection on
the client machine will also
result in longer installation time.
Takes less time as all the
necessary binary and
component files are already
available in the offline
installer.
Version
Control
Online installation ensures the
latest version of the product is
installed.
May need to update the
product version after
installation if an older offline
installer is used.
Administrative
Support
Need more time on the support for
the installation as network factor
might lead to unsuccessful
installation.
Need less time as
independent of network
factor influence.
Deployments ➢ Suitable for single or small
amount of device installations.
➢ Suitable for client sites with fast
and stable internet connection.
➢ Suitable for multiple or
mass device
installations.
➢ Suitable for client sites
with metered internet
connections.

www.ahsay.com 35
For instructions regarding installation of the client backup agent, refer to the Client
Components section for the URL to obtain the Quick Start Guide.
NOTE
There will be 2 additional client backup agent tabs visible once you log in using an administrator
account, AhsayCBS and AhsayUBS. The installers will only be available once it is built in
AhsayCBS in System Settings > Basic > Administrative Access tab > %username% > Rebrand
Web Console > Build Installers > Building Targets. To learn more about this, refer to the Branding
for AhsayCBS Interface section.
www.ahsay.com 36
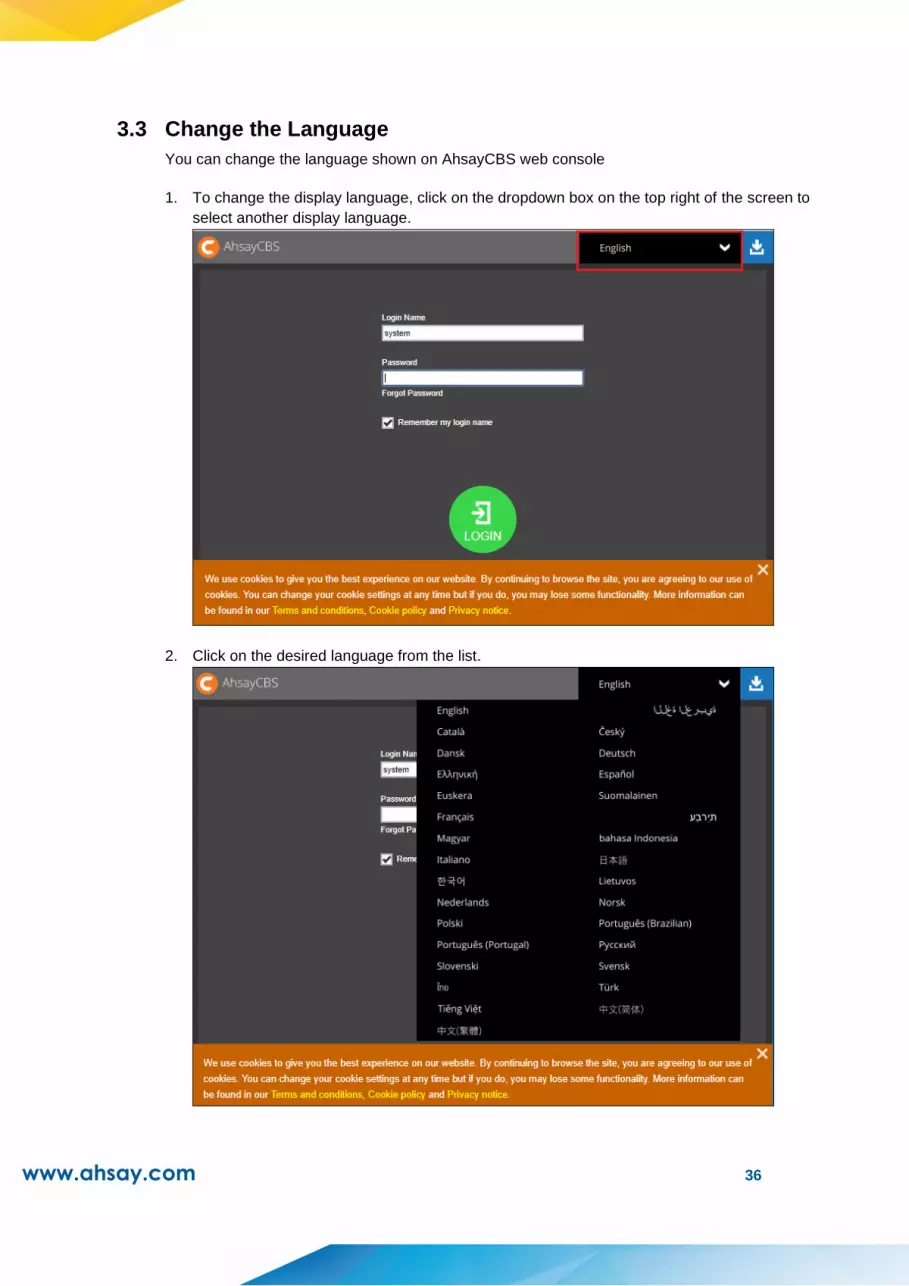
3.3 Change the Language
You can change the language shown on AhsayCBS web console
1. To change the display language, click on the dropdown box on the top right of the screen to
select another display language.
2. Click on the desired language from the list.

www.ahsay.com 37
3.4 Invoke Online Help
You can invoke the online help on most of the pages while navigating the AhsayCBS. The
online help aims at providing instructions on operation on the corresponding page.
1. Click X to shut down the banner.
2. Click on the question mark at the bottom right corner.
www.ahsay.com 38
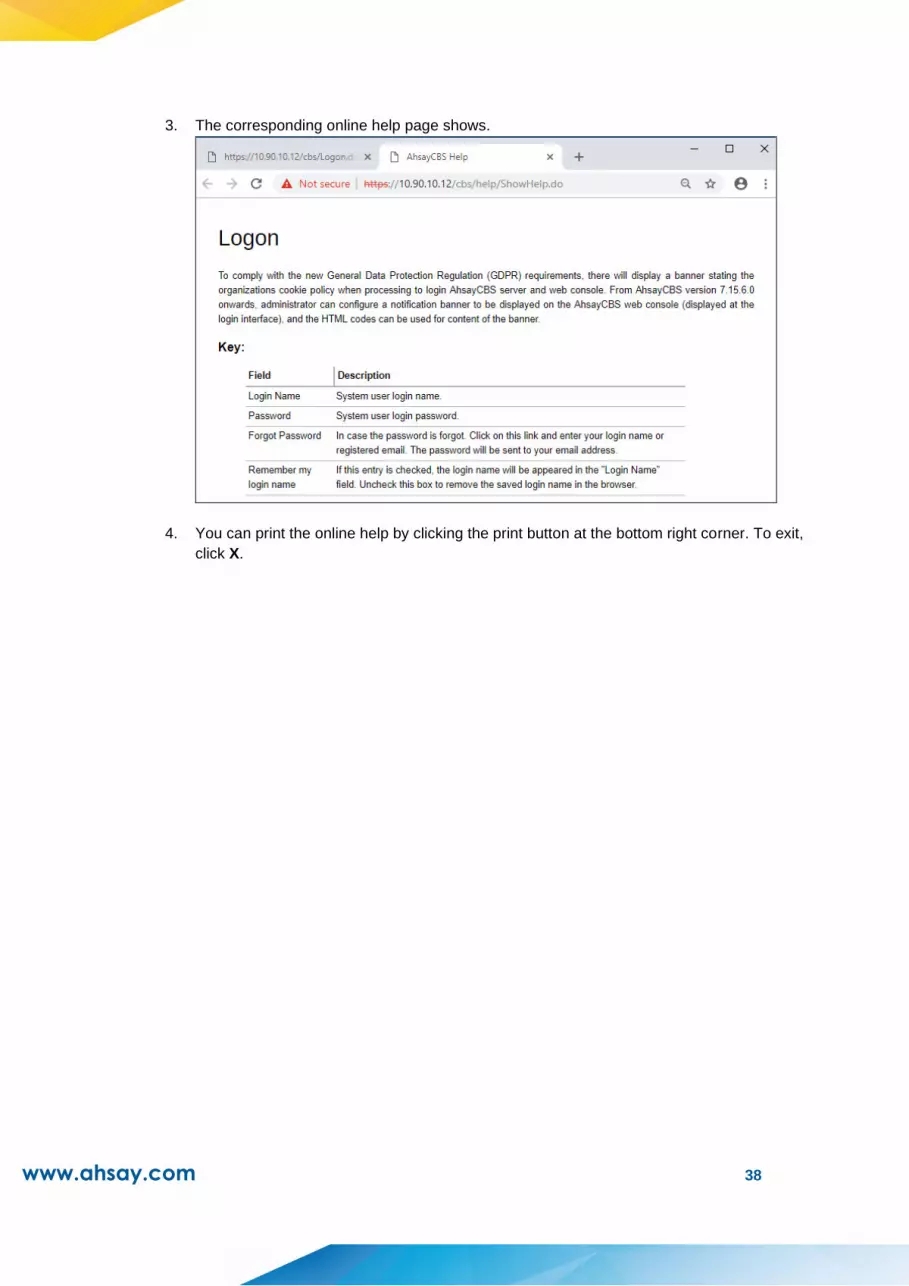
3. The corresponding online help page shows.
4. You can print the online help by clicking the print button at the bottom right corner. To exit,
click X.
www.ahsay.com 39
4 Managing License
4.1 Verify License Connectivity
The AhsayCBS server is required to access the Internet and to connect to the Ahsay License
Server (lic.ahsay.com) using https protocol for license activation, daily license checks, and
license CAL updates. Make sure your firewall settings are configured to allow outbound
connections to lic.ahsay.com via port 443 using TLSv1.2. For more information please refer to
the AhsayCBS Quick Start Guide.
To verify Ahsay license connectivity you can:
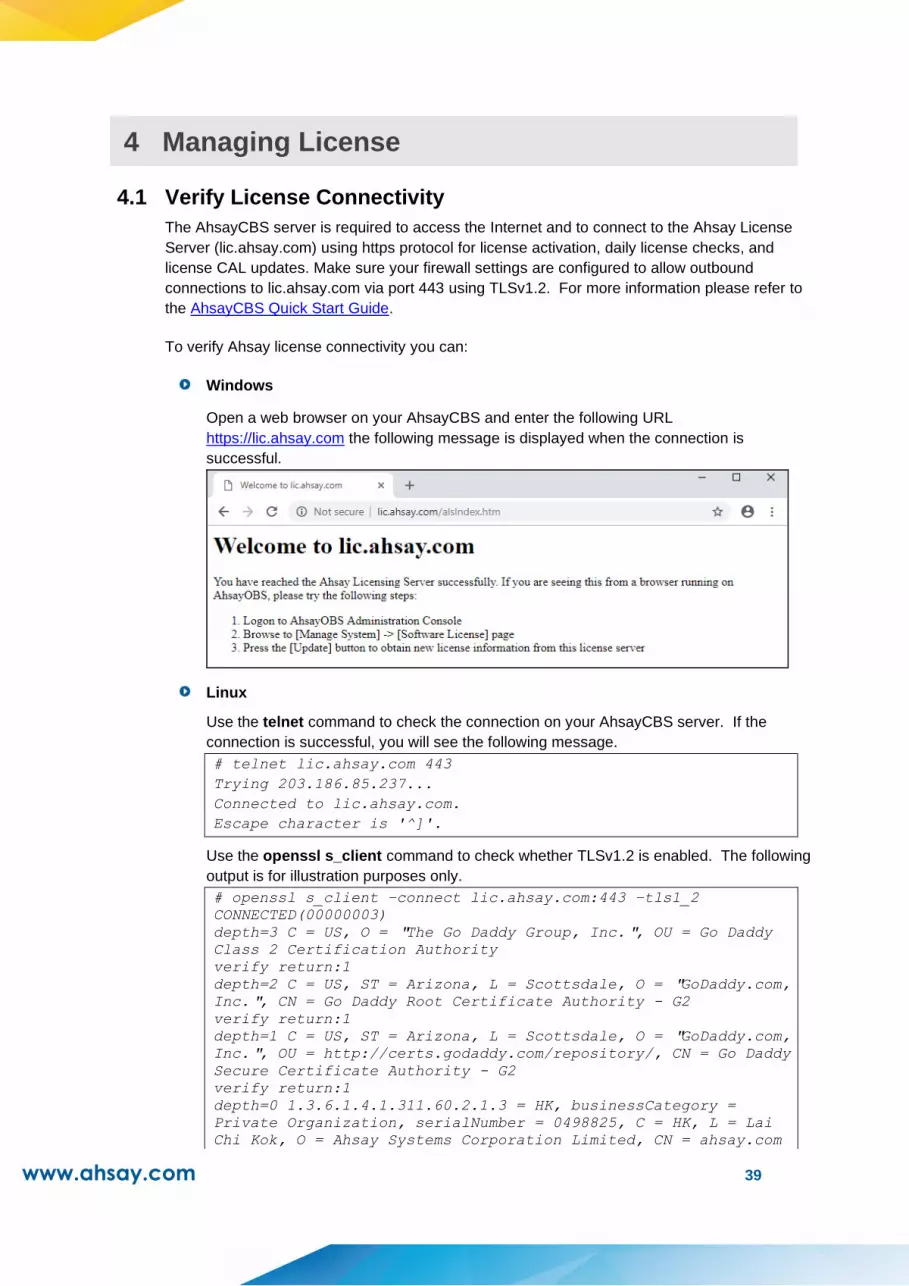
Windows
Open a web browser on your AhsayCBS and enter the following URL
https://lic.ahsay.com the following message is displayed when the connection is
successful.
Linux
Use the telnet command to check the connection on your AhsayCBS server. If the
connection is successful, you will see the following message.
# telnet lic.ahsay.com 443
Trying 203.186.85.237...
Connected to lic.ahsay.com.
Escape character is '^]'.
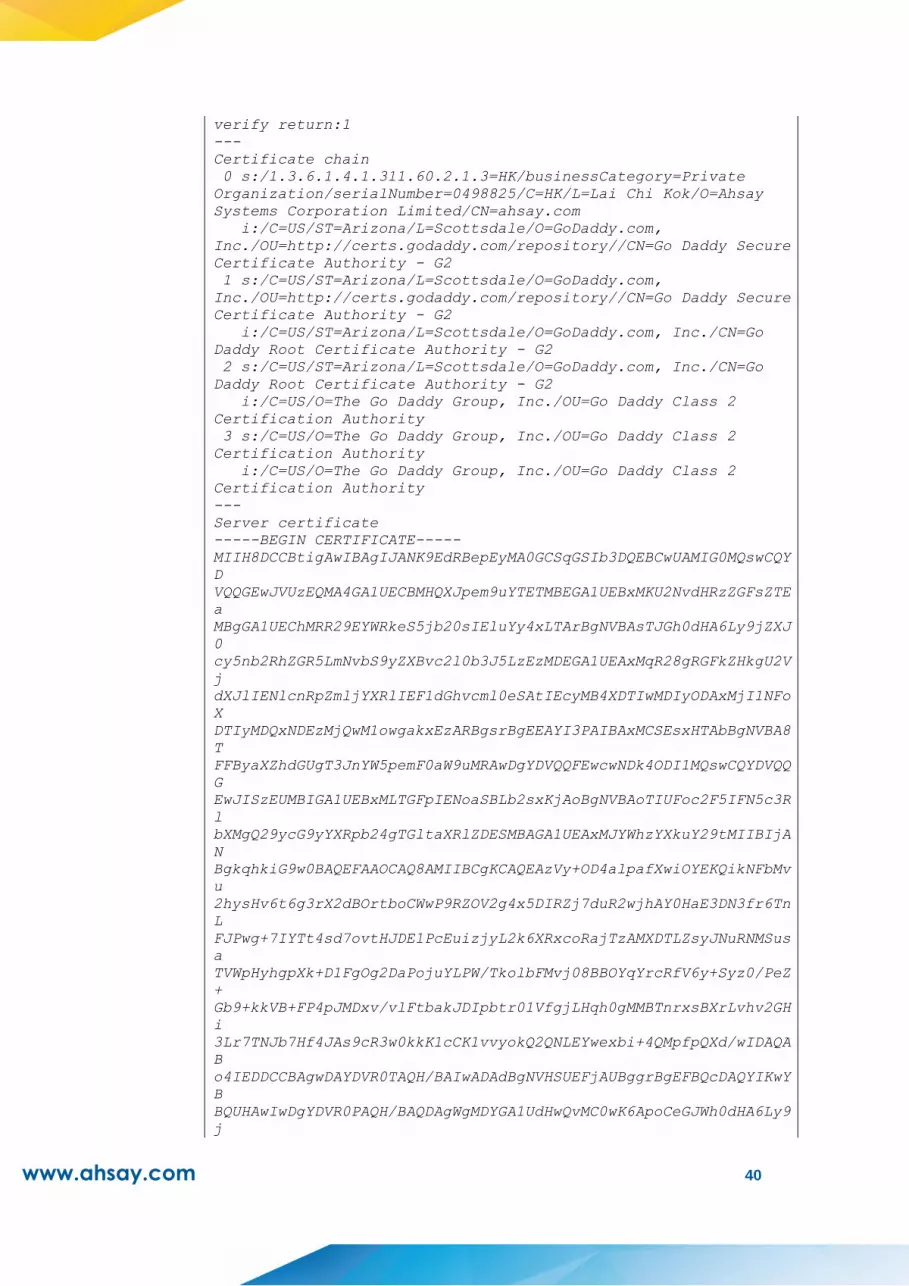
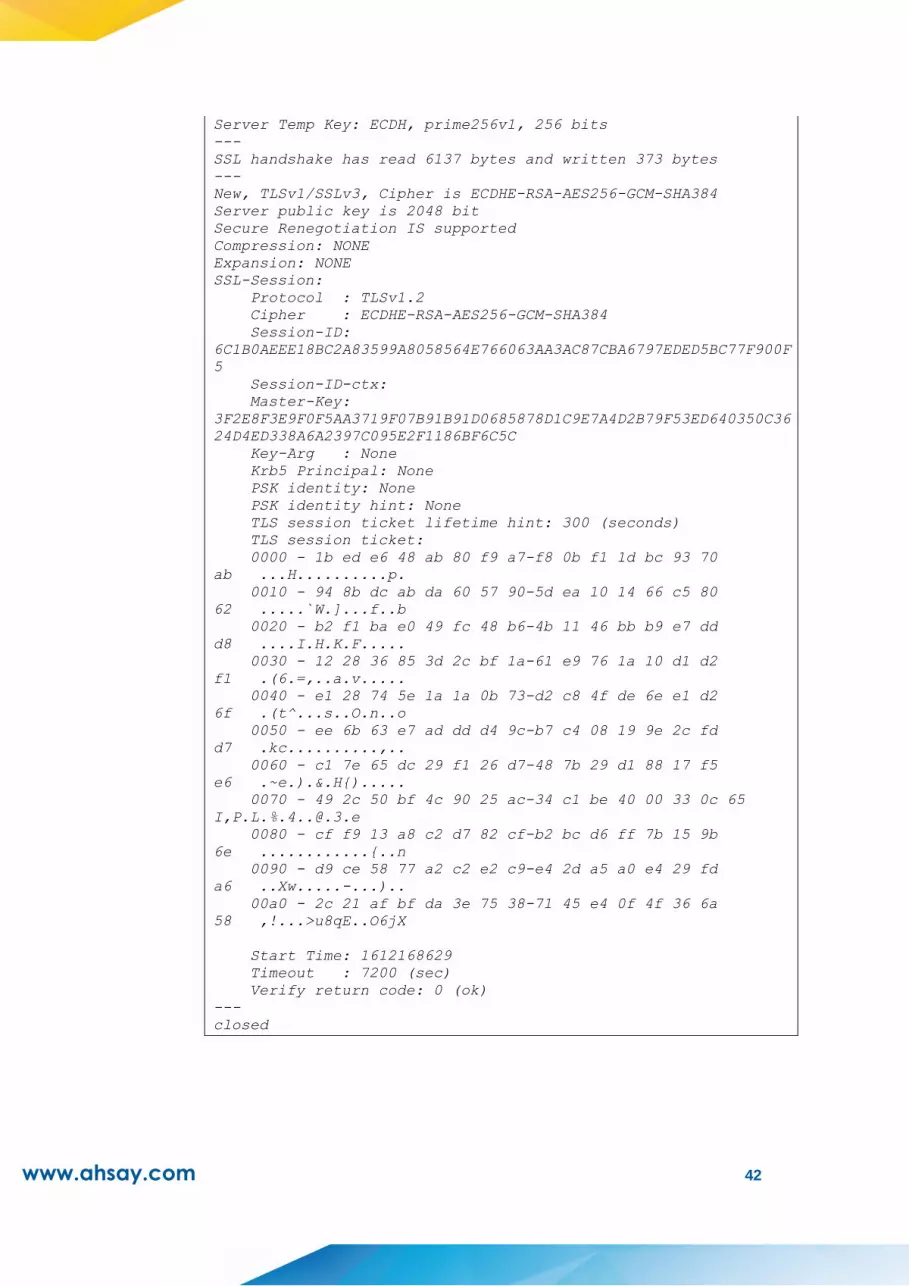
Use the openssl s_client command to check whether TLSv1.2 is enabled. The following
output is for illustration purposes only.
# openssl s_client –connect lic.ahsay.com:443 –tls1_2
CONNECTED(00000003)
depth=3 C = US, O = "The Go Daddy Group, Inc.", OU = Go Daddy
Class 2 Certification Authority
verify return:1
depth=2 C = US, ST = Arizona, L = Scottsdale, O = "GoDaddy.com,
Inc.", CN = Go Daddy Root Certificate Authority - G2
verify return:1
depth=1 C = US, ST = Arizona, L = Scottsdale, O = "GoDaddy.com,
Inc.", OU = http://certs.godaddy.com/repository/, CN = Go Daddy
Secure Certificate Authority - G2
verify return:1
depth=0 1.3.6.1.4.1.311.60.2.1.3 = HK, businessCategory =
Private Organization, serialNumber = 0498825, C = HK, L = Lai
Chi Kok, O = Ahsay Systems Corporation Limited, CN = ahsay.com
www.ahsay.com 40
verify return:1
---
Certificate chain
0 s:/1.3.6.1.4.1.311.60.2.1.3=HK/businessCategory=Private
Organization/serialNumber=0498825/C=HK/L=Lai Chi Kok/O=Ahsay
Systems Corporation Limited/CN=ahsay.com
i:/C=US/ST=Arizona/L=Scottsdale/O=GoDaddy.com,
Inc./OU=http://certs.godaddy.com/repository//CN=Go Daddy Secure
Certificate Authority - G2
1 s:/C=US/ST=Arizona/L=Scottsdale/O=GoDaddy.com,
Inc./OU=http://certs.godaddy.com/repository//CN=Go Daddy Secure
Certificate Authority - G2
i:/C=US/ST=Arizona/L=Scottsdale/O=GoDaddy.com, Inc./CN=Go
Daddy Root Certificate Authority - G2
2 s:/C=US/ST=Arizona/L=Scottsdale/O=GoDaddy.com, Inc./CN=Go
Daddy Root Certificate Authority - G2
i:/C=US/O=The Go Daddy Group, Inc./OU=Go Daddy Class 2
Certification Authority
3 s:/C=US/O=The Go Daddy Group, Inc./OU=Go Daddy Class 2
Certification Authority
i:/C=US/O=The Go Daddy Group, Inc./OU=Go Daddy Class 2
Certification Authority
---
Server certificate
-----BEGIN CERTIFICATE-----
MIIH8DCCBtigAwIBAgIJANK9EdRBepEyMA0GCSqGSIb3DQEBCwUAMIG0MQswCQY
D
VQQGEwJVUzEQMA4GA1UECBMHQXJpem9uYTETMBEGA1UEBxMKU2NvdHRzZGFsZTE
a
MBgGA1UEChMRR29EYWRkeS5jb20sIEluYy4xLTArBgNVBAsTJGh0dHA6Ly9jZXJ
0
cy5nb2RhZGR5LmNvbS9yZXBvc2l0b3J5LzEzMDEGA1UEAxMqR28gRGFkZHkgU2V
j
dXJlIENlcnRpZmljYXRlIEF1dGhvcml0eSAtIEcyMB4XDTIwMDIyODAxMjI1NFo
X
DTIyMDQxNDEzMjQwM1owgakxEzARBgsrBgEEAYI3PAIBAxMCSEsxHTAbBgNVBA8
T
FFByaXZhdGUgT3JnYW5pemF0aW9uMRAwDgYDVQQFEwcwNDk4ODI1MQswCQYDVQQ
G
EwJISzEUMBIGA1UEBxMLTGFpIENoaSBLb2sxKjAoBgNVBAoTIUFoc2F5IFN5c3R
l
bXMgQ29ycG9yYXRpb24gTGltaXRlZDESMBAGA1UEAxMJYWhzYXkuY29tMIIBIjA
N
BgkqhkiG9w0BAQEFAAOCAQ8AMIIBCgKCAQEAzVy+OD4alpafXwiOYEKQikNFbMv
u
2hysHv6t6g3rX2dBOrtboCWwP9RZOV2g4x5DIRZj7duR2wjhAY0HaE3DN3fr6Tn
L
FJPwg+7IYTt4sd7ovtHJDE1PcEuizjyL2k6XRxcoRajTzAMXDTLZsyJNuRNMSus
a
TVWpHyhgpXk+D1FgOg2DaPojuYLPW/TkolbFMvj08BBOYqYrcRfV6y+Syz0/PeZ
+
Gb9+kkVB+FP4pJMDxv/vlFtbakJDIpbtr01VfgjLHqh0gMMBTnrxsBXrLvhv2GH
i
3Lr7TNJb7Hf4JAs9cR3w0kkK1cCK1vvyokQ2QNLEYwexbi+4QMpfpQXd/wIDAQA
B
o4IEDDCCBAgwDAYDVR0TAQH/BAIwADAdBgNVHSUEFjAUBggrBgEFBQcDAQYIKwY
B
BQUHAwIwDgYDVR0PAQH/BAQDAgWgMDYGA1UdHwQvMC0wK6ApoCeGJWh0dHA6Ly9
j

www.ahsay.com 41
cmwuZ29kYWRkeS5jb20vZ2RpZzJzMy0xNS5jcmwwXAYDVR0gBFUwUzBIBgtghkg
B
hv1tAQcXAzA5MDcGCCsGAQUFBwIBFitodHRwOi8vY2VydGlmaWNhdGVzLmdvZGF
k
ZHkuY29tL3JlcG9zaXRvcnkvMAcGBWeBDAEBMHYGCCsGAQUFBwEBBGowaDAkBgg
r
BgEFBQcwAYYYaHR0cDovL29jc3AuZ29kYWRkeS5jb20vMEAGCCsGAQUFBzAChjR
o
dHRwOi8vY2VydGlmaWNhdGVzLmdvZGFkZHkuY29tL3JlcG9zaXRvcnkvZ2RpZzI
u
Y3J0MB8GA1UdIwQYMBaAFEDCvSeOzDSDMKIz1/tss/C0LIDOMIH5BgNVHREEgfE
w
ge6CCWFoc2F5LmNvbYINd3d3LmFoc2F5LmNvbYIPZm9ydW0uYWhzYXkuY29tgg1
s
aWMuYWhzYXkuY29tghB3d3cudWsuYWhzYXkuY29tghVwYXJ0bmVycy11cy5haHN
h
eS5jb22CDnNob3AuYWhzYXkuY29tgg1pZHAuYWhzYXkuY29tgg1wY3AuYWhzYXk
u
Y29tghB3d3cuYWhzYXkuY29tLmNugg1sbXAuYWhzYXkuY29tghVwYXJ0bmVycy1
1
ay5haHNheS5jb22CFXBhcnRuZXJzLmFoc2F5LmNvbS5jboIMa2IuYWhzYXkuY29
t
MB0GA1UdDgQWBBQU/GniKbSMjgEmaqndKdtzS0DqlDCCAX0GCisGAQQB1nkCBAI
E
ggFtBIIBaQFnAHUApLkJkLQYWBSHuxOizGdwCjw1mAT5G9+443fNDsgN3BAAAAF
w
iWO3kgAABAMARjBEAiA+hEdDmd5DpqSzX43y7ri9ByGIyN3cuzzZG+bUbxMeZQI
g
PhPHCcuSpHmdZPdiqzd9dkoFfT1a7mBZgA5X/Qn8sXIAdwDuS723dc5guuFCaR+
r
4Z5mow9+X7By2IMAxHuJeqj9ywAAAXCJY7tKAAAEAwBIMEYCIQDyF8exjOGxWWq
n
WjJsCIMdmhNa5TQP4P7S0eILTZxTQQIhAIsb+1B1r2xKnxyfO/5Gjzozgf71RNd
2
y5j52nS3fjQ5AHUAVhQGmi/XwuzT9eG9RLI+x0Z2ubyZEVzA75SYVdaJ0N0AAAF
w
iWO9ogAABAMARjBEAiBoPXKsSdkni3BlFRpz01zcyW6o+GOGbNKM+3JAFBoFrwI
g
TNKIG8+hkzknLcbhJIJRj8ivOSZxYhYt0wtnfSxKXsIwDQYJKoZIhvcNAQELBQA
D
ggEBAHtl3dePp2Plp8VLRr8xhpHM76K8u1HBBxF/Joucv68vmelCN+1mY7Z7slo
I
0lz4tGBh51DK8gerVKUrSgxFk4W/E5PVc0QMpoK6rr8DpwOGbShjSyfGvkAOOwe
m
tv8L7rEtVIldWS1n+oeDPlLOB92RBxWUhiXt8QE9GpV4pPcKrMgNACkoWQZxDKY
W
JNNhwsTomktzu0sLO0yJFhGGmq1htV/RCx7LJ6gZl7/fLcFtzVrd27elaA+iQhE
b
oCmwZgnijIT49EE6pY0octFYRtEm2GCcq79rAqzVPJnWWaOdbzSwJaurtliCyyZ
+
/7/2hEy9EtpStmAf9KVeUglC76c=
-----END CERTIFICATE-----
subject=/1.3.6.1.4.1.311.60.2.1.3=HK/businessCategory=Private
Organization/serialNumber=0498825/C=HK/L=Lai Chi Kok/O=Ahsay
Systems Corporation Limited/CN=ahsay.com
issuer=/C=US/ST=Arizona/L=Scottsdale/O=GoDaddy.com,
Inc./OU=http://certs.godaddy.com/repository//CN=Go Daddy Secure
Certificate Authority - G2
---
No client certificate CA names sent
www.ahsay.com 42
Server Temp Key: ECDH, prime256v1, 256 bits
---
SSL handshake has read 6137 bytes and written 373 bytes
---
New, TLSv1/SSLv3, Cipher is ECDHE-RSA-AES256-GCM-SHA384
Server public key is 2048 bit
Secure Renegotiation IS supported
Compression: NONE
Expansion: NONE
SSL-Session:
Protocol : TLSv1.2
Cipher : ECDHE-RSA-AES256-GCM-SHA384
Session-ID:
6C1B0AEEE18BC2A83599A8058564E766063AA3AC87CBA6797EDED5BC77F900F
5
Session-ID-ctx:
Master-Key:
3F2E8F3E9F0F5AA3719F07B91B91D0685878D1C9E7A4D2B79F53ED640350C36
24D4ED338A6A2397C095E2F1186BF6C5C
Key-Arg : None
Krb5 Principal: None
PSK identity: None
PSK identity hint: None
TLS session ticket lifetime hint: 300 (seconds)
TLS session ticket:
0000 - 1b ed e6 48 ab 80 f9 a7-f8 0b f1 1d bc 93 70
ab ...H..........p.
0010 - 94 8b dc ab da 60 57 90-5d ea 10 14 66 c5 80
62 .....`W.]...f..b
0020 - b2 f1 ba e0 49 fc 48 b6-4b 11 46 bb b9 e7 dd
d8 ....I.H.K.F.....
0030 - 12 28 36 85 3d 2c bf 1a-61 e9 76 1a 10 d1 d2
f1 .(6.=,..a.v.....
0040 - e1 28 74 5e 1a 1a 0b 73-d2 c8 4f de 6e e1 d2
6f .(t^...s..O.n..o
0050 - ee 6b 63 e7 ad dd d4 9c-b7 c4 08 19 9e 2c fd
d7 .kc..........,..
0060 - c1 7e 65 dc 29 f1 26 d7-48 7b 29 d1 88 17 f5
e6 .~e.).&.H{).....
0070 - 49 2c 50 bf 4c 90 25 ac-34 c1 be 40 00 33 0c 65
I,P.L.%[email protected]
0080 - cf f9 13 a8 c2 d7 82 cf-b2 bc d6 ff 7b 15 9b
6e ............{..n
0090 - d9 ce 58 77 a2 c2 e2 c9-e4 2d a5 a0 e4 29 fd
a6 ..Xw.....-...)..
00a0 - 2c 21 af bf da 3e 75 38-71 45 e4 0f 4f 36 6a
58 ,!...>u8qE..O6jX
Start Time: 1612168629
Timeout : 7200 (sec)
Verify return code: 0 (ok)
---
closed

www.ahsay.com 43
FreeBSD
Use the fetch command to check the connection to the Ahsay license server. If the
connection is successful, you will see the following message.
# fetch https://lic.ahsay.com/alsIndex.htm
alsIndex.htm 100% of 782 B
3336 kBps 00m00s
You also need to open the alsIndex.htm to verify the contents. You can open it by using
a text editor like vi.
# vi alsIndex.htm
<html>^M
<head>^M
<meta http-equiv="Content-Type" content="text/html;
charset=windows-1252">^M
<meta http-equiv="Content-Language" content="en-us">^M
<meta name="GENERATOR" content="Microsoft FrontPage 4.0">^M
<meta name="ProgId" content="FrontPage.Editor.Document">^M
<title>Welcome to lic.ahsay.com</title>^M
</head>^M
<body>^M
<h1>Welcome to lic.ahsay.com</h1>^M
<p>You have reached the Ahsay Licensing Server successfully.
If you are seeing this from a browser running on AhsayOBS,
please try the following steps: </p>^M
<ol>^M
<li>Logon to AhsayOBS Administration Console</li>^M
<li>Browse to [Manage System] -> [Software License]
page</li>^M
<li>Press the [Update] button to obtain new license
information from this license server</li>^M
</ol>^M
^M
</body>^M
</html>^M
NOTE
A single license key can only be used on one machine once it has been activated. If you use the same
license key to activate another installation of AhsayCBS, you will get an error message. You would be
able to run this copy of AhsayCBS for another 14 days. After the 14-day grace period has expired, the
AhsayCBS service will stop working completely. Please contact Ahsay Support for further assistance.

www.ahsay.com 44
4.2 Manage License Key
To manage your AhsayCBS backup server and redirector license keys, do the following:
1. Click the License icon under System Settings from your AhsayCBS web management
console.
2. There are two tabs on the license page. The Backup tab is for backup server license,
while the Redirector tab is for redirector license. You can activate the software on these
tabs.
Please make sure that the AhsayCBS license key is applied on the Backup tab. If you
have purchased a Redirector license key, you need to enter the key in the Redirector tab.
Do NOT enter the AhsayCBS license key on the Redirector tab or vice versa.
3. Enter your Licensee Name and License Key on the Backup server license page. Both
fields are case sensitive. Please enter them exactly as stated in your software receipt.

www.ahsay.com 45
If you are using the evaluation license, you will be able to evaluate the AhsayCBS for
60 days. Just accept the default Licensee Name and License Key on the page to
activate the license.
If you have already purchased a license, copy and paste the licensee name and
license key into the relevant fields to activate the license.
4. If a proxy server is required to access the Internet from AhsayCBS, check the Use Proxy
checkbox. Refer to the Proxy Tab section for information on how to set up the proxy server.
5. Press the Test button under Connection Test section to test the connection with the
license server. You get a dialog box with the testing result. Click OK.
NOTE
After upgrading AhsayCBS to v8.1.0.0. and above, any actions that may lead to quota exceeded will
be blocked, i.e. generate a new backup user, creating a new backup set from AhsayCBS or v6/ v7
AhsayOBM/ AhsayACB, importing users in AhsayCBS, updating license in AhsayCBS, update user,
and so on. If there is any license error, there will be email to alert about the license error.
Below screenshot shows about blocked actions:
➢ Generate a new AhsayOBM user.
➢ Generate a new AhsayACB user.

www.ahsay.com 46
➢ Create a new backup set from AhsayCBS or v6/ v7 AhsayOBM/ AhsayACB.
➢ AhsayCBS license quota assigned for each sub admin user beyond the range between sub
admin user’s current usage and license quota limit.
➢ Update user with max host limit beyond license quota.
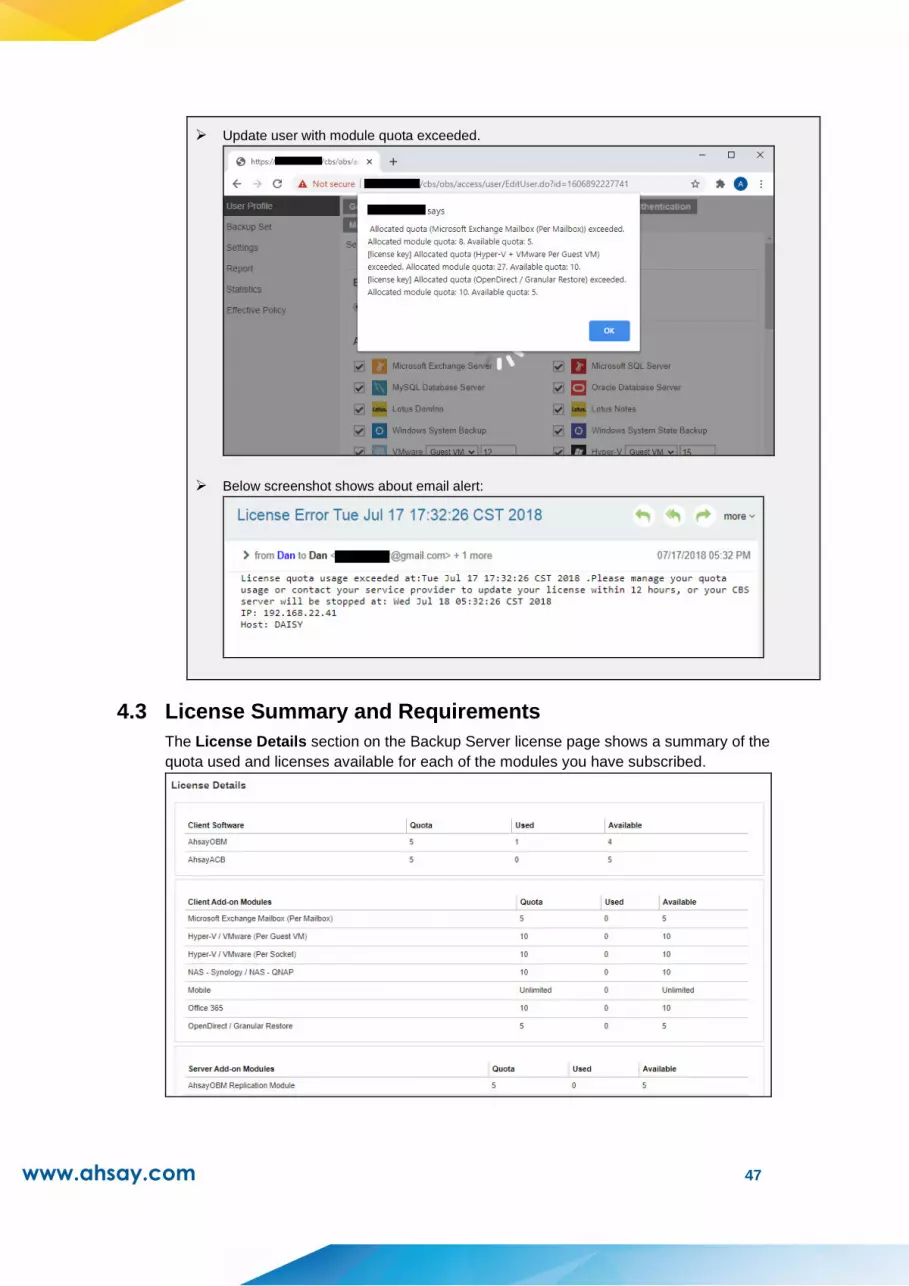
www.ahsay.com 47
➢ Update user with module quota exceeded.
➢ Below screenshot shows about email alert:
4.3 License Summary and Requirements
The License Details section on the Backup Server license page shows a summary of the
quota used and licenses available for each of the modules you have subscribed.

www.ahsay.com 48
Client Software License quota and availability for client backup agents (AhsayOBM
& AhsayACB)
Client Add-on
Modules
License quota and availability for add-on modules for AhsayOBM &
AhsayACB
Click here to view a list of all available add-on modules
Server Add-on
Modules
License quota and availability for server add-on modules, e.g.
Replication module, AhsayUBS, AhsayCBS, etc.
Support
Languages
Supported languages for UI display. The availability of support
languages is subject to your license key.
For license related inquiries, please contact the Sales team at
Ahsay by email at [email protected] or call our International
Sales Hotline +852 3580 8091.
4.3.1 Upgrade from v6 to v8
If you are upgrading from v6, you need to purchase one extra AhsayCBS license module
for each of your existing v6 backup server license. Make sure you have valid maintenance
before you perform the upgrade/migration.
NOTE
If you upgraded AhsayCBS from v6 to v8 without purchasing AhsayCBS module and the quota
exceeded, then there will be a grace period of 60 days to allow sufficient time to resolve the
license related problems.
If you upgraded AhsayCBS from v6 to v8 with purchasing AhsayCBS module and the quota
exceeded, then there will be a grace period of 12 hours for you to manage the quota usage. If
quota usage issue was not solved within the grace period, the server will be stopped after the
grace period. After login to AhsayCBS system console, the web console will redirect to [To Do]
page and the license error will be shown on the top.

www.ahsay.com 49
If there is any license error, there will be email to alert about the license error.
The server stop counter will start in the last hour of grace period. There will be log showing the
process of server stop.
➢ Server stop counter starts.
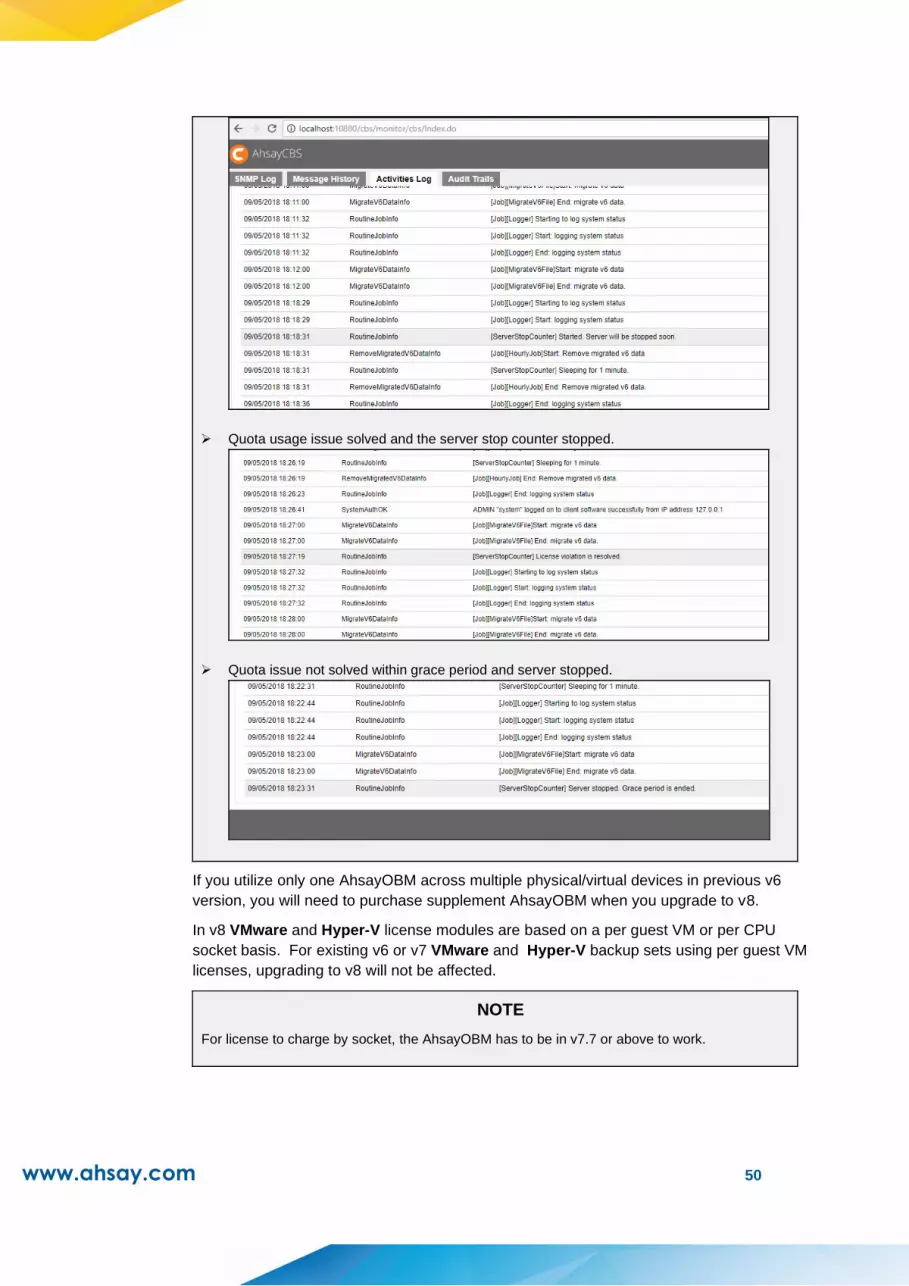
www.ahsay.com 50
➢ Quota usage issue solved and the server stop counter stopped.
➢ Quota issue not solved within grace period and server stopped.
If you utilize only one AhsayOBM across multiple physical/virtual devices in previous v6
version, you will need to purchase supplement AhsayOBM when you upgrade to v8.
In v8 VMware and Hyper-V license modules are based on a per guest VM or per CPU
socket basis. For existing v6 or v7 VMware and Hyper-V backup sets using per guest VM
licenses, upgrading to v8 will not be affected.
NOTE
For license to charge by socket, the AhsayOBM has to be in v7.7 or above to work.
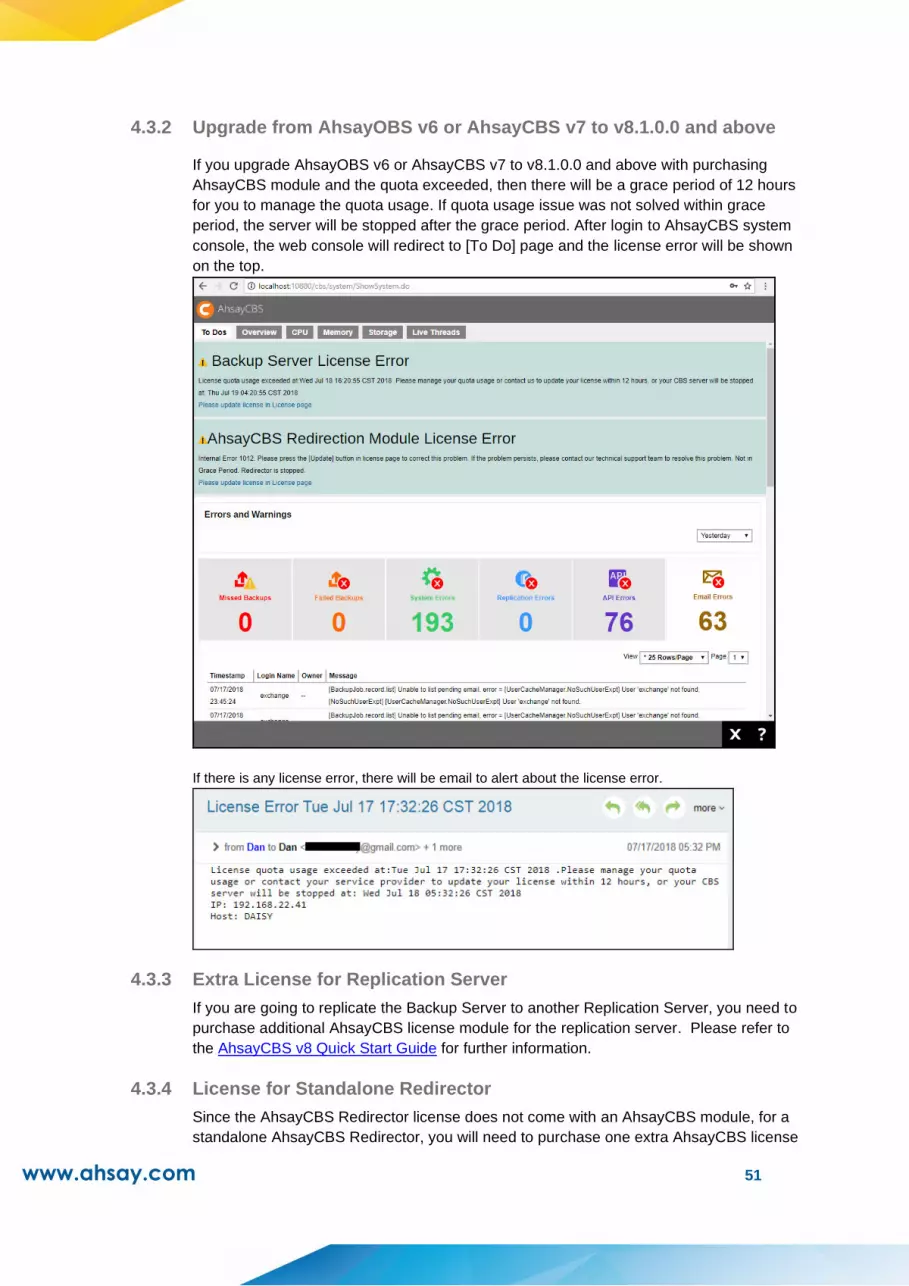
www.ahsay.com 51
4.3.2 Upgrade from AhsayOBS v6 or AhsayCBS v7 to v8.1.0.0 and above
If you upgrade AhsayOBS v6 or AhsayCBS v7 to v8.1.0.0 and above with purchasing
AhsayCBS module and the quota exceeded, then there will be a grace period of 12 hours
for you to manage the quota usage. If quota usage issue was not solved within grace
period, the server will be stopped after the grace period. After login to AhsayCBS system
console, the web console will redirect to [To Do] page and the license error will be shown
on the top.
If there is any license error, there will be email to alert about the license error.
4.3.3 Extra License for Replication Server
If you are going to replicate the Backup Server to another Replication Server, you need to
purchase additional AhsayCBS license module for the replication server. Please refer to
the AhsayCBS v8 Quick Start Guide for further information.
4.3.4 License for Standalone Redirector
Since the AhsayCBS Redirector license does not come with an AhsayCBS module, for a
standalone AhsayCBS Redirector, you will need to purchase one extra AhsayCBS license

www.ahsay.com 52
module with a Backup Server license. Please refer to the AhsayCBS v8 Quick Start Guide
for further information.
4.3.5 License Requirements for Software and Modules
Software
AhsayCBS Per running instance
AhsayOBM Per device to back up
Ahsay Mobile
Per AhsayOBM/AhsayACB account that
needs to back up mobile device.
Ahsay Mobile licenses are free of charge
and each license key has unlimited quota.
AhsayACB Per device to back up
AhsayUBS Per installation
Module
VMware Backup Module Per Guest VM to back up & Per CPU socket
Hyper-V Backup Module Per Guest VM to back up & Per CPU socket
Office 365 Backup Module Per account to back up
MS Exchange Individual Mailbox
Backup Module Per mailbox to back up
OpenDirect / Granular Restore Per backup set
NAS – Synology/NAS - QNAP
Backup Module
Per AhsayOBM account that needs to back
up Synology/QNAP NAS device
Replication Module for AhsayOBM Per device to replicate
Replication Module for AhsayACB Per device to replicate
Redirection module Per device to redirect
For more information about License pricing or license requirements for different
software and modules, refer to the Pricing Details page. To purchase license directly,
visit the Ahsay Shopping Centre site.
4.4 Automatic License Renewal
If the AhsayCBS is under a monthly leasing plan (meter key), the license key will have an
expiry date of 30 days from the current date, the license key is renewed automatically.
In the event of any problems during the license renewal process, i.e. AhsayCBS is not able to
connect to the Ahsay License server, the expired license key will have a grace period of 14
days. AhsayCBS can still function normally using the expired license for an extra 14 days
before the service is automatically shut down. The 14-day grace period is to allow sufficient
time to resolve any license related problems.
For meter key inquiries please contact the Sales team at Ahsay by email at sales-
[email protected] or call our International Sales Hotline +852 3580 8091.
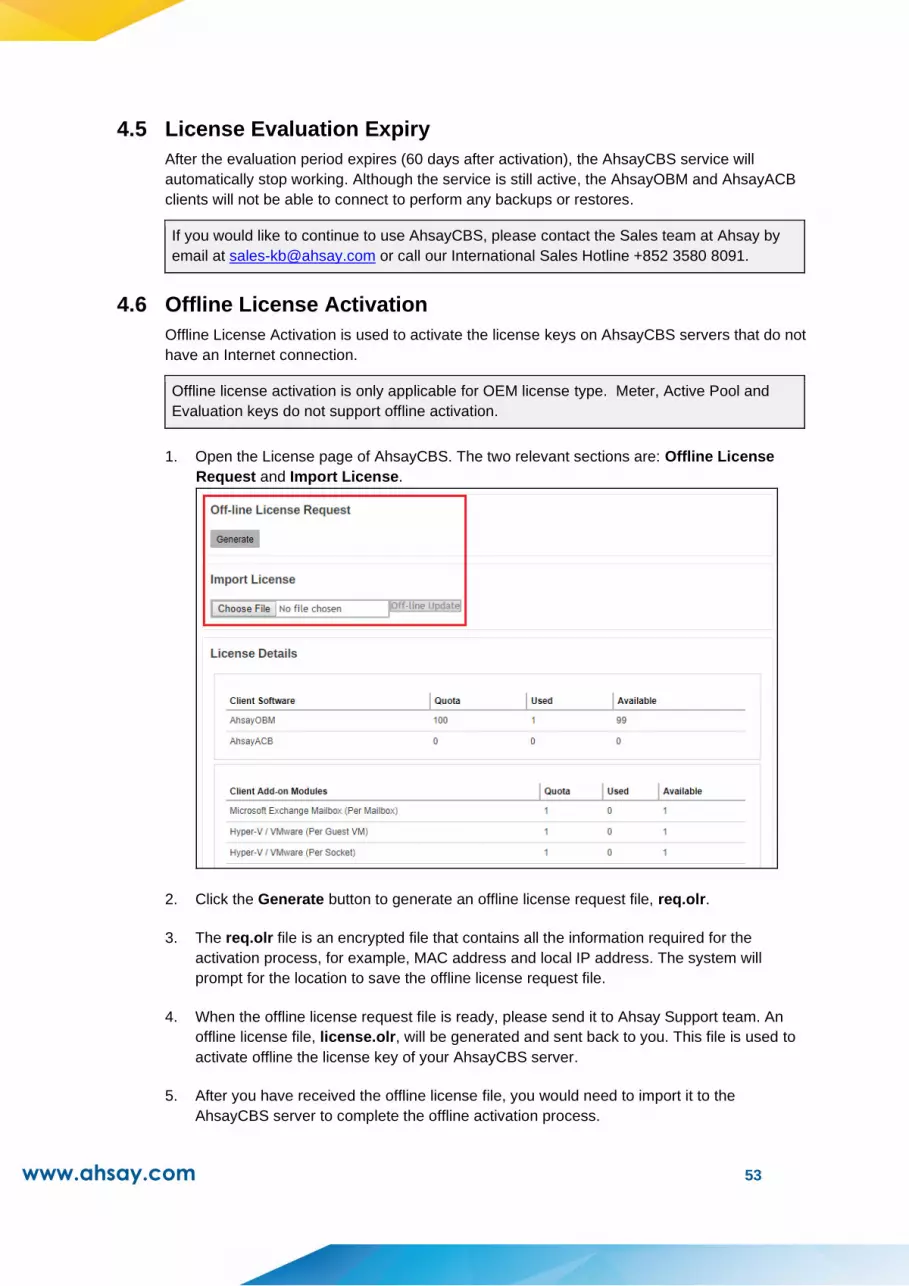
www.ahsay.com 53
4.5 License Evaluation Expiry
After the evaluation period expires (60 days after activation), the AhsayCBS service will
automatically stop working. Although the service is still active, the AhsayOBM and AhsayACB
clients will not be able to connect to perform any backups or restores.
If you would like to continue to use AhsayCBS, please contact the Sales team at Ahsay by
email at [email protected] or call our International Sales Hotline +852 3580 8091.
4.6 Offline License Activation
Offline License Activation is used to activate the license keys on AhsayCBS servers that do not
have an Internet connection.
Offline license activation is only applicable for OEM license type. Meter, Active Pool and
Evaluation keys do not support offline activation.
1. Open the License page of AhsayCBS. The two relevant sections are: Offline License
Request and Import License.
2. Click the Generate button to generate an offline license request file, req.olr.
3. The req.olr file is an encrypted file that contains all the information required for the
activation process, for example, MAC address and local IP address. The system will
prompt for the location to save the offline license request file.
4. When the offline license request file is ready, please send it to Ahsay Support team. An
offline license file, license.olr, will be generated and sent back to you. This file is used to
activate offline the license key of your AhsayCBS server.
5. After you have received the offline license file, you would need to import it to the
AhsayCBS server to complete the offline activation process.
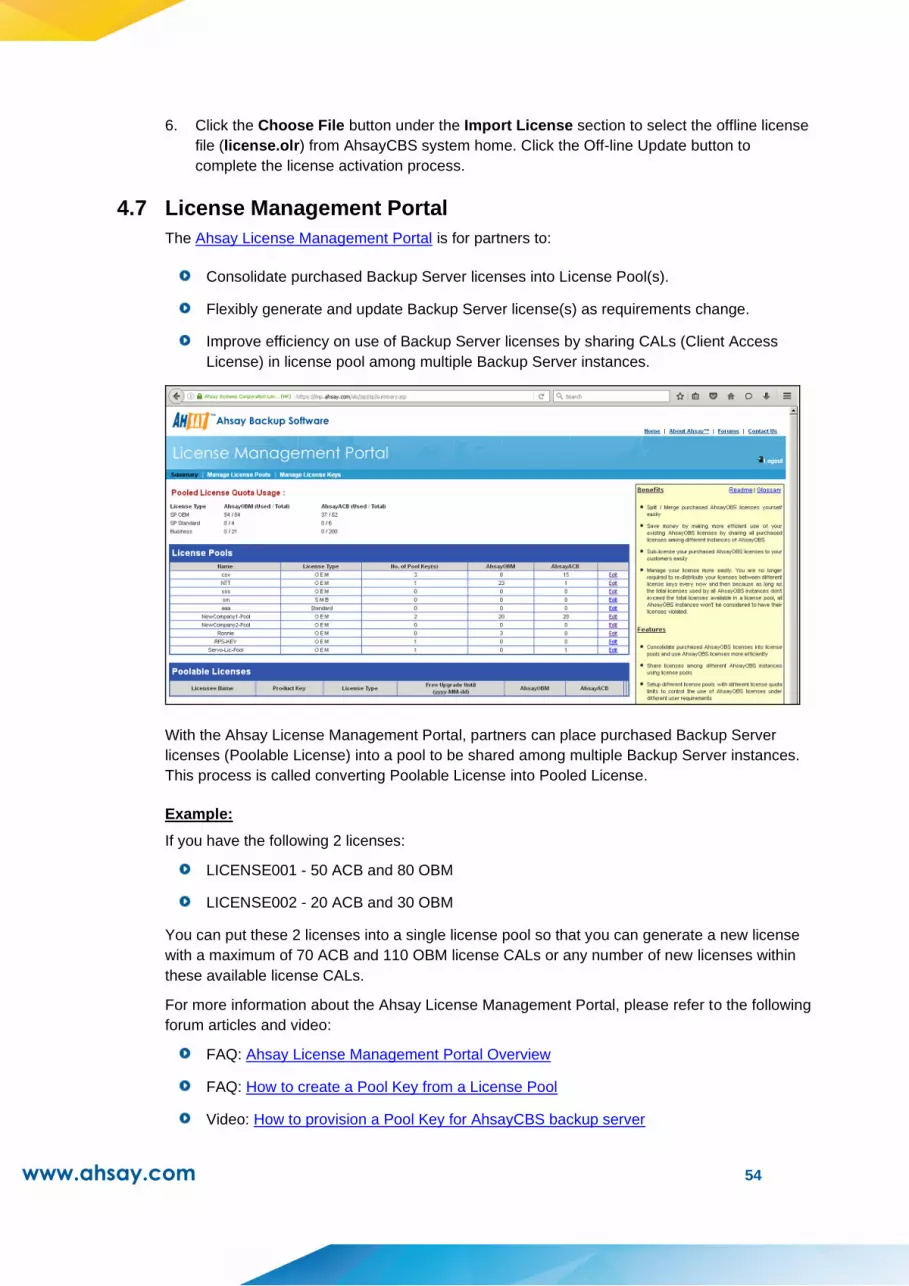
www.ahsay.com 54
6. Click the Choose File button under the Import License section to select the offline license
file (license.olr) from AhsayCBS system home. Click the Off-line Update button to
complete the license activation process.
4.7 License Management Portal
The Ahsay License Management Portal is for partners to:
Consolidate purchased Backup Server licenses into License Pool(s).
Flexibly generate and update Backup Server license(s) as requirements change.
Improve efficiency on use of Backup Server licenses by sharing CALs (Client Access
License) in license pool among multiple Backup Server instances.
With the Ahsay License Management Portal, partners can place purchased Backup Server
licenses (Poolable License) into a pool to be shared among multiple Backup Server instances.
This process is called converting Poolable License into Pooled License.
Example:
If you have the following 2 licenses:
LICENSE001 - 50 ACB and 80 OBM
LICENSE002 - 20 ACB and 30 OBM
You can put these 2 licenses into a single license pool so that you can generate a new license
with a maximum of 70 ACB and 110 OBM license CALs or any number of new licenses within
these available license CALs.
For more information about the Ahsay License Management Portal, please refer to the following
forum articles and video:
FAQ: Ahsay License Management Portal Overview
FAQ: How to create a Pool Key from a License Pool
Video: How to provision a Pool Key for AhsayCBS backup server

www.ahsay.com 55
If you would like to continue to use AhsayCBS, please contact the Sales team at Ahsay by
email at [email protected] or call our International Sales Hotline +852 3580 8091.
4.8 Active Pool Key
After you applied a pool key on your AhsayCBS server, please make sure your AhsayCBS
server has an Internet connection and is able to connect to the Ahsay License Server at
(https://lic.ahsay.com). If AhsayCBS service cannot connect to the Ahsay License Server
after 14 days, the license key will be deactivated and the AhsayCBS service will be
automatically stopped.

www.ahsay.com 56
5 System Settings
5.1 Basic Backup Server Configuration
To manage your AhsayCBS basic backup server configurations, simply click the Basic icon
under System Settings from your AhsayCBS environment.
You can perform the following basic configurations on your Backup Server:
Manage general setup for AhsayCBS
Manage email settings and general email reports
Define destinations to store backup or replication data
Manage Administrator accounts for the MSPs (Managed Service Providers)
Customize languages available to users on AhsayCBS and User Web Console
Configure two-factor authentication
There are 6 tabs under basic server configurations, each of which is described below.
5.1.1 General
The following shows the General tab under System Settings > Basic. It is used for
general setup of AhsayCBS. There are several groups of settings under the General tab,
and they are described below.

www.ahsay.com 57
Host
This is the host name of your AhsayCBS. You can enter the domain name of your
AhsayCBS in the format:
<www.mybackup.com:port_number>
-OR-
<IP:port_number>
IMPORTANT
➢ The “port_number” is only needed for non-conventional ports and can be omitted for the
usual ports, such as 80 and 443.
➢ The host name will be the access link for your users to get access to the AhsayCBS. Since
the host name will be used in various locations, such as inside welcome email as a
reference point for the users to access the AhsayCBS, inside email as a reference link for
the users to recover password, users applying Run Direct restore feature, it is important that
you ensure the host name is accessible by users from external network environment.
System Home
This is the system home location of your AhsayCBS. This path is set to your installation
home by default.
Example: System Home for Windows
Example: System Home for Linux / FreeBSD
Example: System Home for AhsayUBS
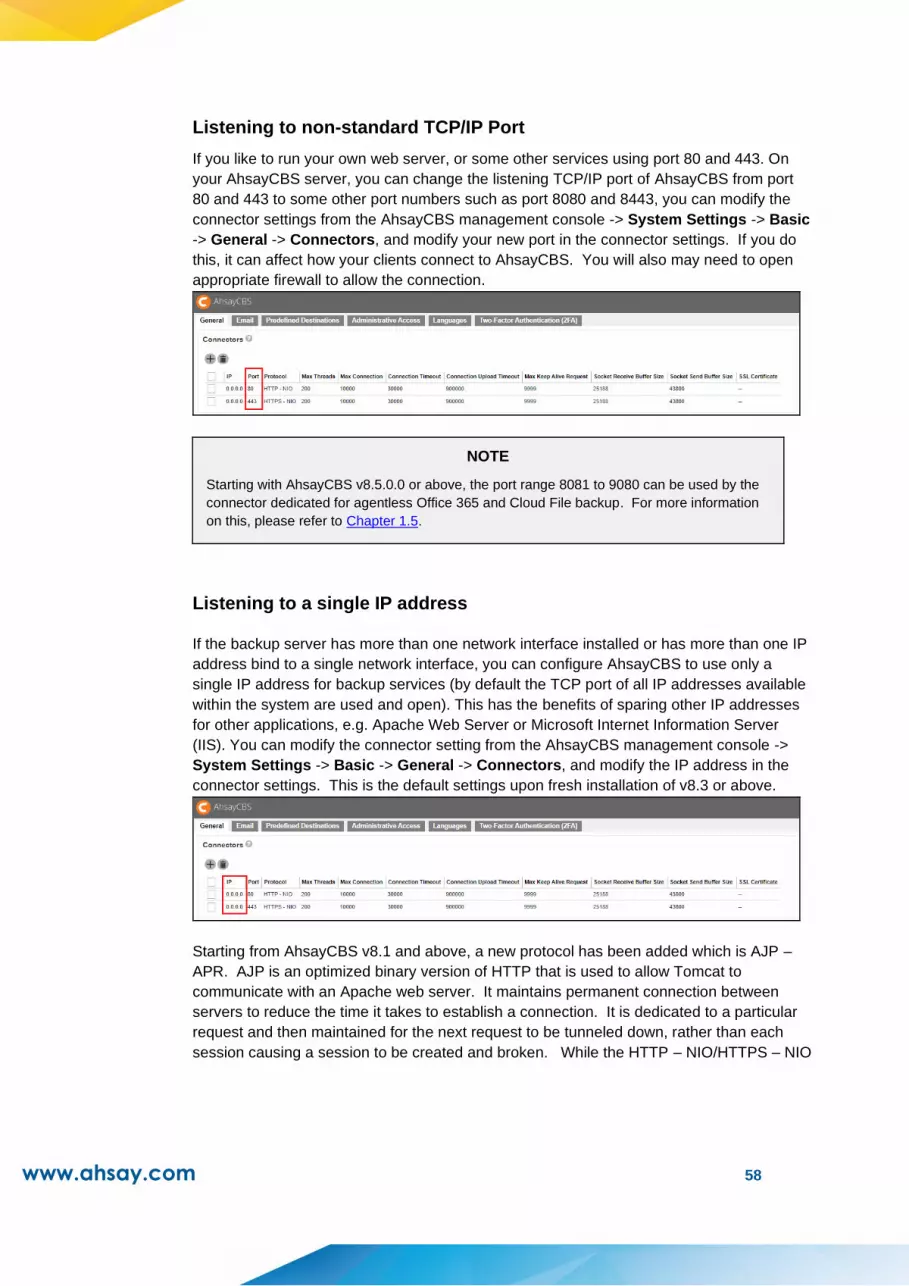
www.ahsay.com 58
Listening to non-standard TCP/IP Port
If you like to run your own web server, or some other services using port 80 and 443. On
your AhsayCBS server, you can change the listening TCP/IP port of AhsayCBS from port
80 and 443 to some other port numbers such as port 8080 and 8443, you can modify the
connector settings from the AhsayCBS management console -> System Settings -> Basic
-> General -> Connectors, and modify your new port in the connector settings. If you do
this, it can affect how your clients connect to AhsayCBS. You will also may need to open
appropriate firewall to allow the connection.
NOTE
Starting with AhsayCBS v8.5.0.0 or above, the port range 8081 to 9080 can be used by the
connector dedicated for agentless Office 365 and Cloud File backup. For more information
on this, please refer to Chapter 1.5.
Listening to a single IP address
If the backup server has more than one network interface installed or has more than one IP
address bind to a single network interface, you can configure AhsayCBS to use only a
single IP address for backup services (by default the TCP port of all IP addresses available
within the system are used and open). This has the benefits of sparing other IP addresses
for other applications, e.g. Apache Web Server or Microsoft Internet Information Server
(IIS). You can modify the connector setting from the AhsayCBS management console ->
System Settings -> Basic -> General -> Connectors, and modify the IP address in the
connector settings. This is the default settings upon fresh installation of v8.3 or above.
Starting from AhsayCBS v8.1 and above, a new protocol has been added which is AJP –
APR. AJP is an optimized binary version of HTTP that is used to allow Tomcat to
communicate with an Apache web server. It maintains permanent connection between
servers to reduce the time it takes to establish a connection. It is dedicated to a particular
request and then maintained for the next request to be tunneled down, rather than each
session causing a session to be created and broken. While the HTTP – NIO/HTTPS – NIO
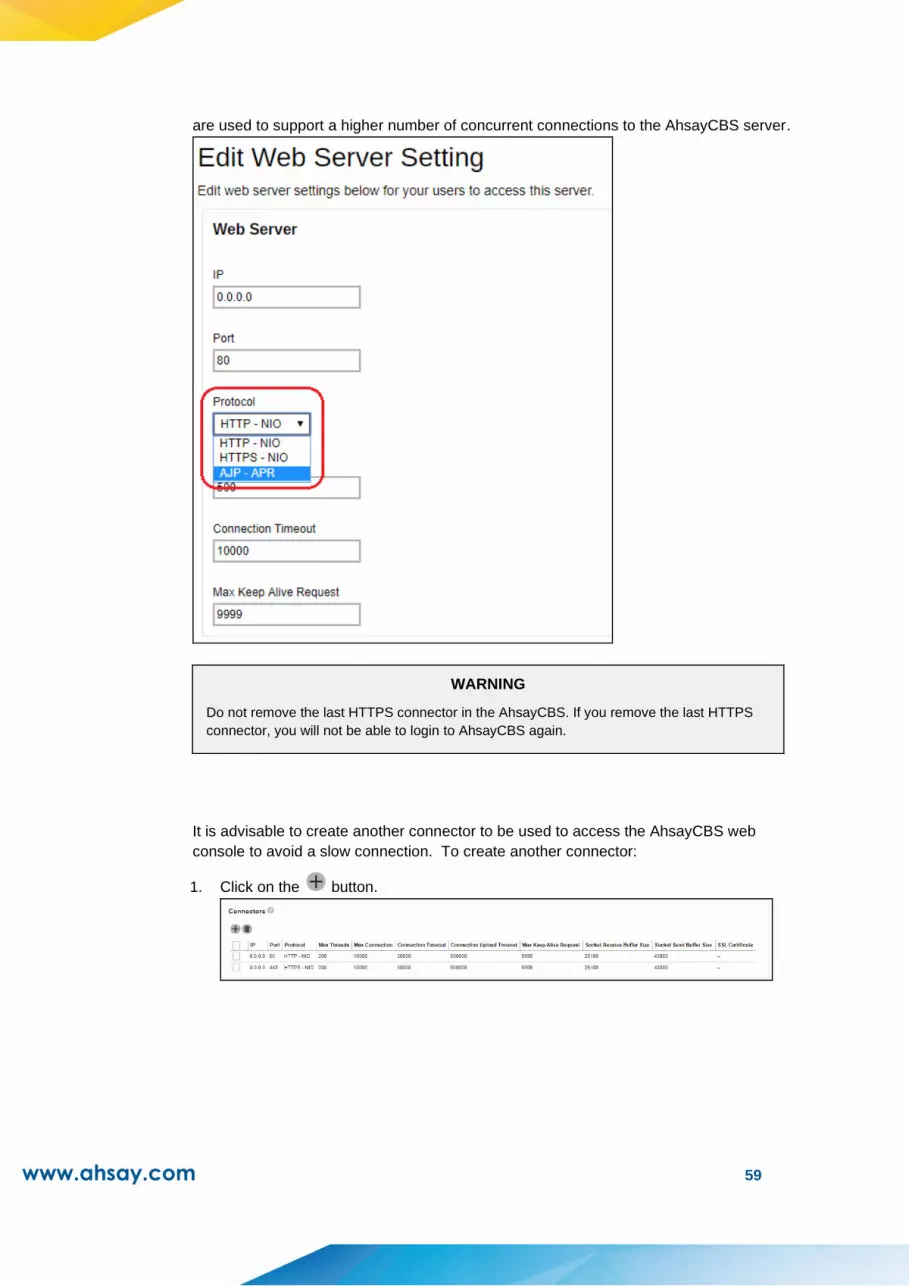
www.ahsay.com 59
are used to support a higher number of concurrent connections to the AhsayCBS server.
WARNING
Do not remove the last HTTPS connector in the AhsayCBS. If you remove the last HTTPS
connector, you will not be able to login to AhsayCBS again.
It is advisable to create another connector to be used to access the AhsayCBS web
console to avoid a slow connection. To create another connector:
1. Click on the button.
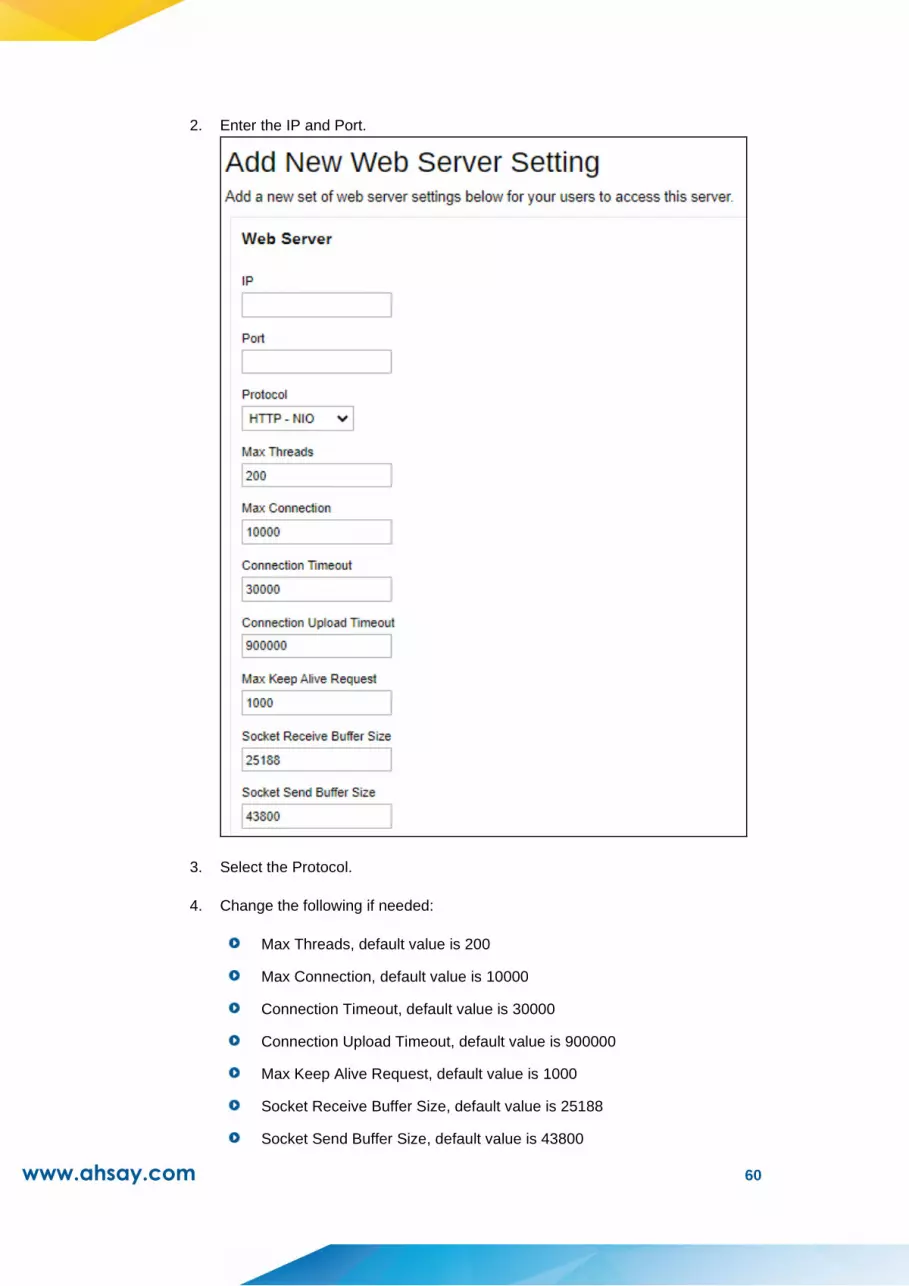
www.ahsay.com 60
2. Enter the IP and Port.
3. Select the Protocol.
4. Change the following if needed:
Max Threads, default value is 200
Max Connection, default value is 10000
Connection Timeout, default value is 30000
Connection Upload Timeout, default value is 900000
Max Keep Alive Request, default value is 1000
Socket Receive Buffer Size, default value is 25188
Socket Send Buffer Size, default value is 43800

www.ahsay.com 61
5. Click OK once done.
6. Click at the bottom right corner to save the settings.
NOTE
It may be advisable to increase the Max Connection to ensure that concurrent
connections will be supported if your backup server runs a lot of concurrent backups
daily, however setting a high value may increase the load on the server and result in
performance issues.
Restricting access to system page by IP address
For better security, you can restrict access to the AhsayCBS management console by IP
addresses. To do so, please add IP restriction in your AhsayCBS management console ->
System Settings -> Advanced -> Runtime Options -> IP Allowed. You can enter a
range of IPs or a specific IP in the IP Allowed settings.
Installing a trusted SSL certificate
Default installation of AhsayCBS enables SSL (Secure Socket Layer) support using a
dummy certificate. For your own security, you are advised to replace the pre-installed
dummy SSL certificate with a secure SSL certificate from a trusted CA (Certificate
Authority). For details please refer to the following article FAQ: Trusted Certificate Authority
(CA) List for version 8.x.
Furthermore, to use Two-Factor Authentication with https protocol, a valid SSL certificate
from a trusted CA must be installed on AhsayCBS. Otherwise, you will have to use http
instead which means all AhsayOBM/AhsayACB users with Two-Factor Authentication
enabled will need to connect using http as well.
Please note that only RSA SSL certificate is supported. To replace the non-secure
dummy SSL certificate with a secure SSL certificate, you need to generate a CSR
(Certificate Signing Request) and submit the CSR to your CA. Please perform the following
in your AhsayCBS.

www.ahsay.com 62
SSL Certificate Installation Service
Let our professional customer service team help you with the SSL certificate purchase and
installation. Click here to visit the Ahsay Shopping Centre for subscription.
1. Navigate to System Settings -> Basic -> General -> SSL certificate, click on .
2. Enter the CSR details, then click the Next button to proceed.
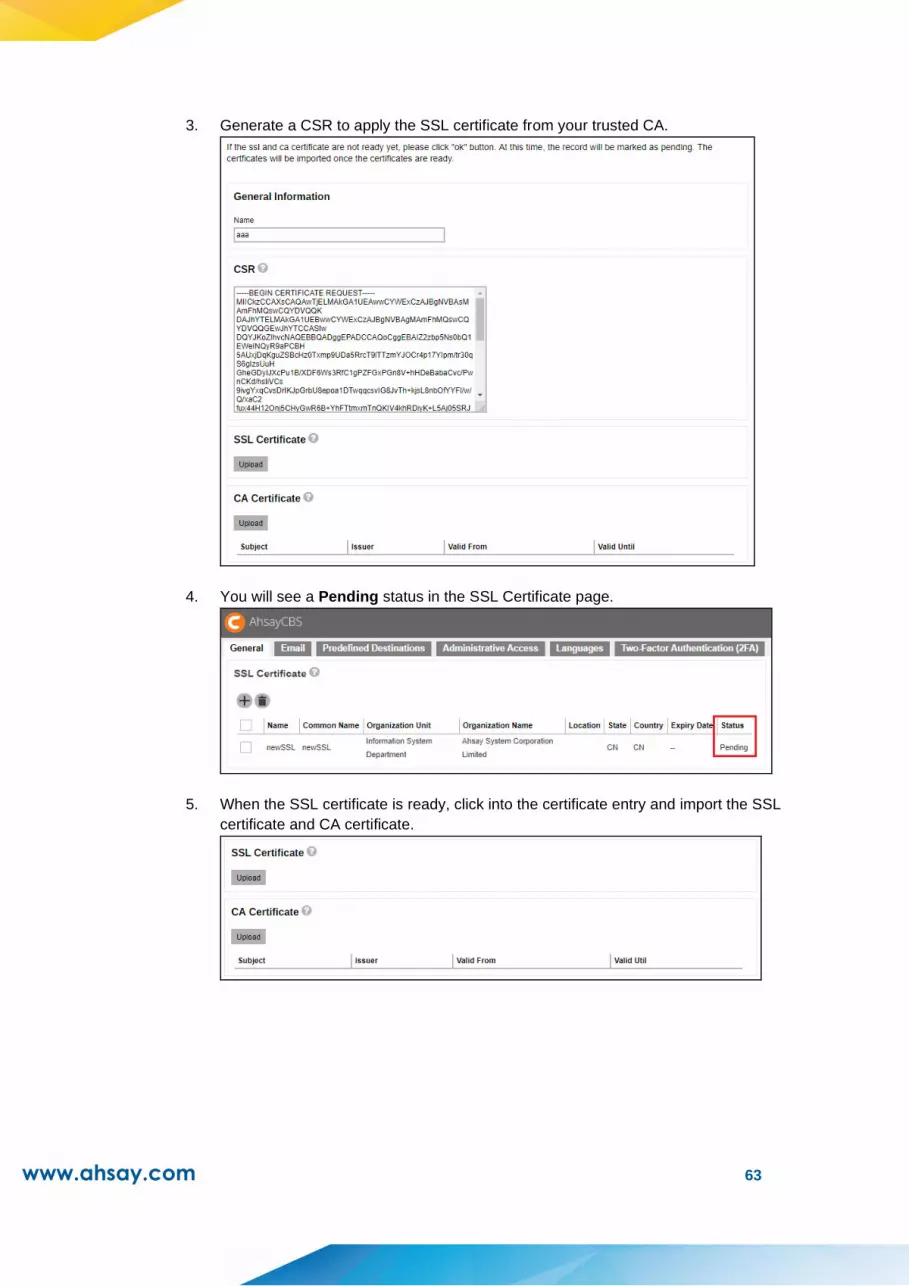
www.ahsay.com 63
3. Generate a CSR to apply the SSL certificate from your trusted CA.
4. You will see a Pending status in the SSL Certificate page.
5. When the SSL certificate is ready, click into the certificate entry and import the SSL
certificate and CA certificate.

www.ahsay.com 64
6. You will be able to see the status of the certificate as Ready and a valid Expiry Date.
7. To apply the SSL certificate to your connector, click into the HTTPS entry.
8. Add the SSL certificate to this connector as shown below.

www.ahsay.com 65
9. Click at the bottom right corner to save the settings.
Renew a trusted SSL certificate
When your SSL certificate is due to expire, you can renew your SSL cert via your CA’s
website. Your CA may ask you to use the existing CSR that you submitted previously or
submit a new CSR.
If you decided to use a new CSR, most likely the information on the old CSR is not up-
to-date. Most CA will not consider this as a renew process and you need to start from
the beginning of a certificate process described in previous section.
If you purchase a renew SSL certificate with the existing CSR, wait for your CA to sign
the renew SSL certificate.
NOTE
The renewal process may be different for different CA. You need to follow your CA’s instruction
on the renewal process.
The import step of a renewed SSL certificate is similar to the installation of a SSL
certificate. Please perform the following in your AhsayCBS.
1. Enter System Settings -> Basic -> General -> SSL certificate.
2. Click into the certificate entry.
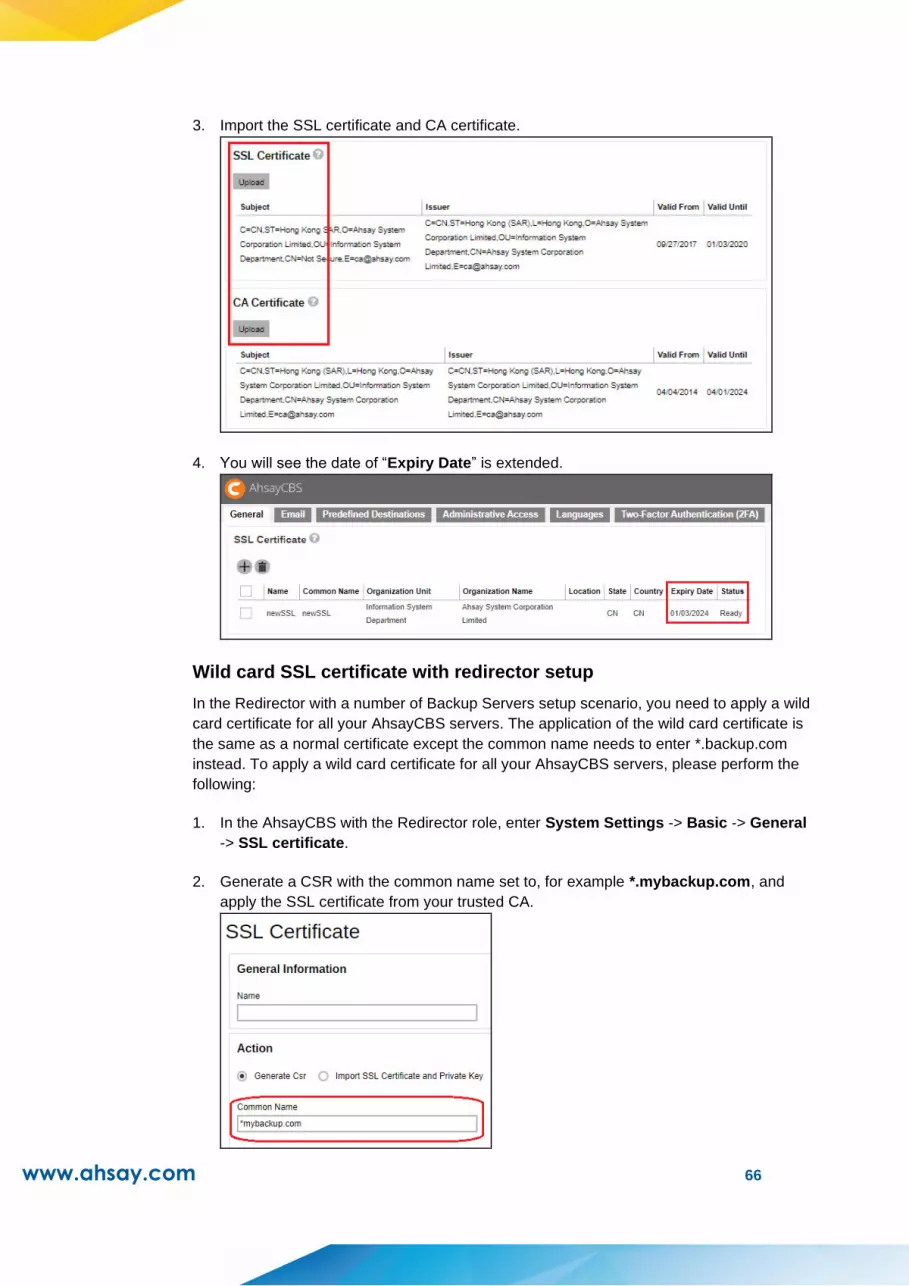
www.ahsay.com 66
3. Import the SSL certificate and CA certificate.
4. You will see the date of “Expiry Date” is extended.
Wild card SSL certificate with redirector setup
In the Redirector with a number of Backup Servers setup scenario, you need to apply a wild
card certificate for all your AhsayCBS servers. The application of the wild card certificate is
the same as a normal certificate except the common name needs to enter *.backup.com
instead. To apply a wild card certificate for all your AhsayCBS servers, please perform the
following:
1. In the AhsayCBS with the Redirector role, enter System Settings -> Basic -> General
-> SSL certificate.
2. Generate a CSR with the common name set to, for example *.mybackup.com, and
apply the SSL certificate from your trusted CA.
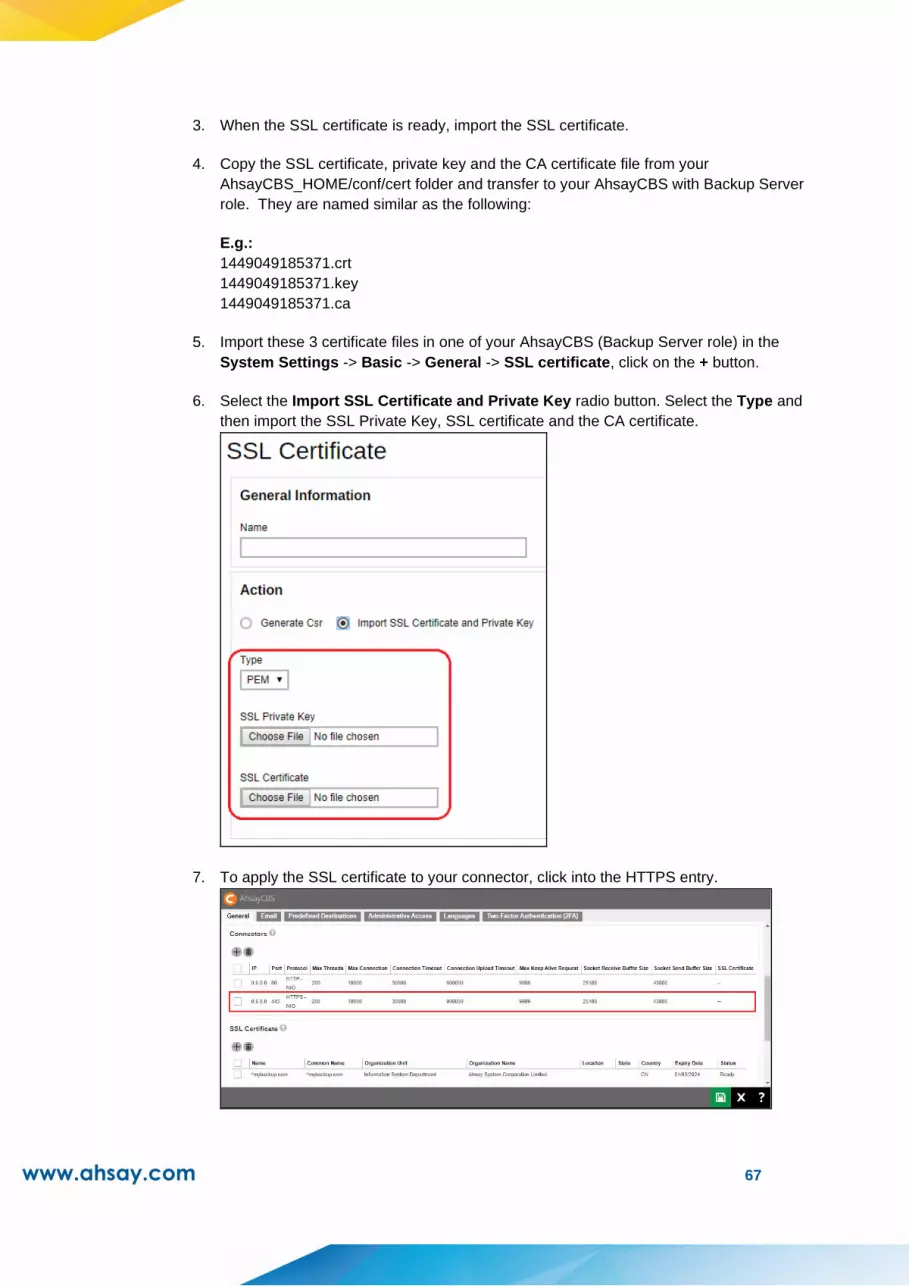
www.ahsay.com 67
3. When the SSL certificate is ready, import the SSL certificate.
4. Copy the SSL certificate, private key and the CA certificate file from your
AhsayCBS_HOME/conf/cert folder and transfer to your AhsayCBS with Backup Server
role. They are named similar as the following:
E.g.:
1449049185371.crt
1449049185371.key
1449049185371.ca
5. Import these 3 certificate files in one of your AhsayCBS (Backup Server role) in the
System Settings -> Basic -> General -> SSL certificate, click on the + button.
6. Select the Import SSL Certificate and Private Key radio button. Select the Type and
then import the SSL Private Key, SSL certificate and the CA certificate.
7. To apply the SSL certificate to your connector, click into the HTTPS entry.

www.ahsay.com 68
8. Add the SSL certificate to this connector.
9. Click at the bottom right corner to save the settings.

www.ahsay.com 69
Cookie Banner Notification
To comply with the new General Data Protection Regulation (GDPR) requirements, there
will display a banner stating the organizations cookie policy when processing to login
AhsayCBS server. This will also apply to the AhsayCBS web console.
Administrator can configure a notification banner to be displayed on the AhsayCBS web
console (displayed at the login interface), and the contents of the banner can be configured
on the AhsayCBS web console. Also, HTML codes can be used for content of the banner.
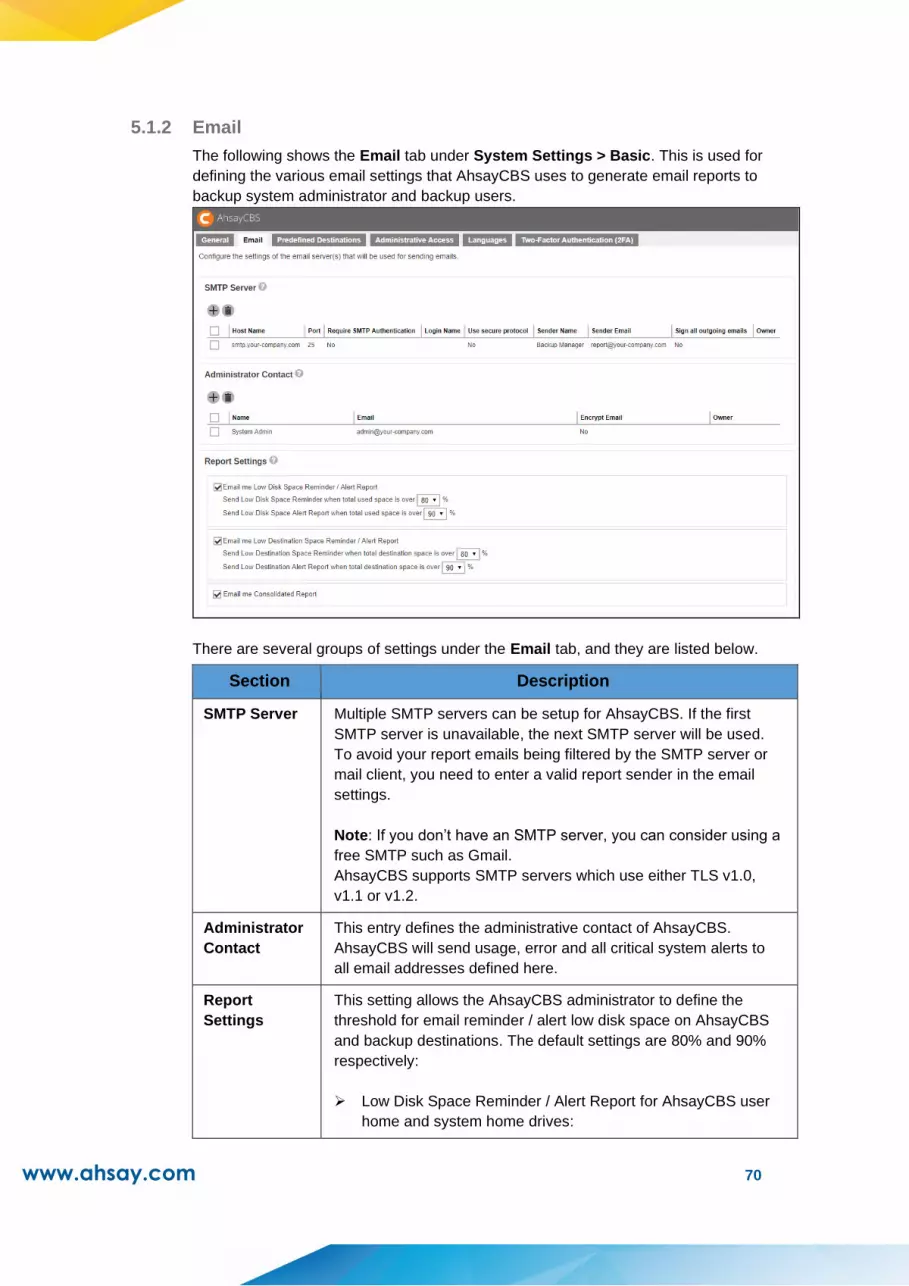
www.ahsay.com 70
5.1.2 Email
The following shows the Email tab under System Settings > Basic. This is used for
defining the various email settings that AhsayCBS uses to generate email reports to
backup system administrator and backup users.
There are several groups of settings under the Email tab, and they are listed below.
Section Description
SMTP Server Multiple SMTP servers can be setup for AhsayCBS. If the first
SMTP server is unavailable, the next SMTP server will be used.
To avoid your report emails being filtered by the SMTP server or
mail client, you need to enter a valid report sender in the email
settings.
Note: If you don’t have an SMTP server, you can consider using a
free SMTP such as Gmail.
AhsayCBS supports SMTP servers which use either TLS v1.0,
v1.1 or v1.2.
Administrator
Contact
This entry defines the administrative contact of AhsayCBS.
AhsayCBS will send usage, error and all critical system alerts to
all email addresses defined here.
Report
Settings
This setting allows the AhsayCBS administrator to define the
threshold for email reminder / alert low disk space on AhsayCBS
and backup destinations. The default settings are 80% and 90%
respectively:
➢ Low Disk Space Reminder / Alert Report for AhsayCBS user
home and system home drives:
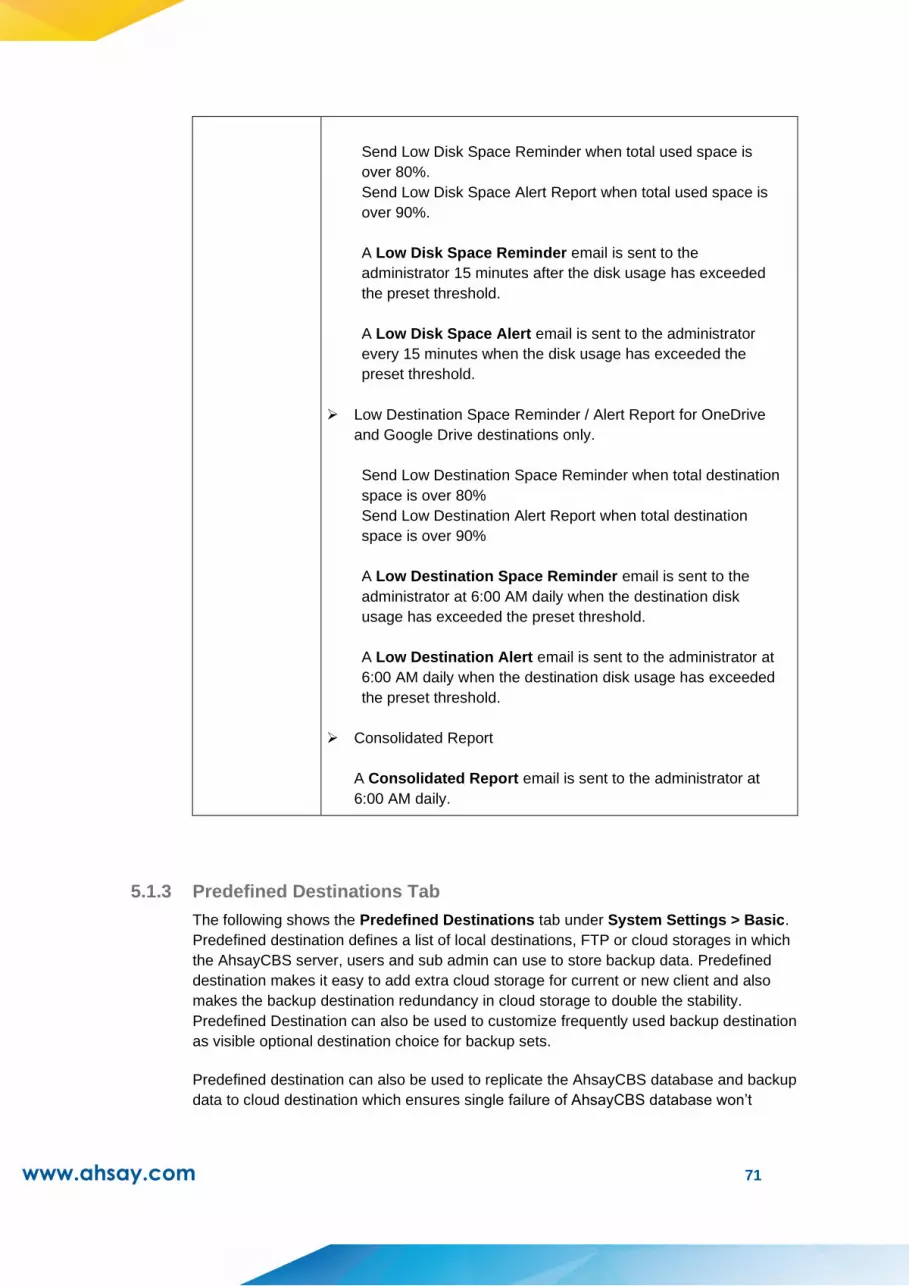
www.ahsay.com 71
Send Low Disk Space Reminder when total used space is
over 80%.
Send Low Disk Space Alert Report when total used space is
over 90%.
A Low Disk Space Reminder email is sent to the
administrator 15 minutes after the disk usage has exceeded
the preset threshold.
A Low Disk Space Alert email is sent to the administrator
every 15 minutes when the disk usage has exceeded the
preset threshold.
➢ Low Destination Space Reminder / Alert Report for OneDrive
and Google Drive destinations only.
Send Low Destination Space Reminder when total destination
space is over 80%
Send Low Destination Alert Report when total destination
space is over 90%
A Low Destination Space Reminder email is sent to the
administrator at 6:00 AM daily when the destination disk
usage has exceeded the preset threshold.
A Low Destination Alert email is sent to the administrator at
6:00 AM daily when the destination disk usage has exceeded
the preset threshold.
➢ Consolidated Report
A Consolidated Report email is sent to the administrator at
6:00 AM daily.
5.1.3 Predefined Destinations Tab
The following shows the Predefined Destinations tab under System Settings > Basic.
Predefined destination defines a list of local destinations, FTP or cloud storages in which
the AhsayCBS server, users and sub admin can use to store backup data. Predefined
destination makes it easy to add extra cloud storage for current or new client and also
makes the backup destination redundancy in cloud storage to double the stability.
Predefined Destination can also be used to customize frequently used backup destination
as visible optional destination choice for backup sets.
Predefined destination can also be used to replicate the AhsayCBS database and backup
data to cloud destination which ensures single failure of AhsayCBS database won’t

www.ahsay.com 72
influence the subsequent backup and restore jobs.
You can set predefined destination on the following destination storage:
Local / Mapped Drive / Network Drive / Removable Drive
阿里云
CTYun Amazon S3
AWS S3 Compatible Cloud Storage Wasabi
Backblaze Google Cloud Storage
Google Drive Microsoft Azure
OneDrive OneDrive for Business
Rackspace Open Stack
Dropbox FTP
SFTP AhsayCBS
AhsayCBS Receiver
NOTE
Admin user can determine the predefined destination available to each Sub Admin type user. You
can refer to the section on Manage System User (System Settings > Basic > Administrative Access
> %system user%> Backup User Settings > Destination) for details.
Set up predefined destination on Local / Mapped Drive / Network Drive
/ Removable Drive
AhsayCBS allows setting a backup destination on local hard drive, mapped drive, network
drive and removable drive. The setup method is similar for the different drives. In the
following example, we show you how to set up a predefined destination for Network Drive.
The steps for other destination storages are similar.
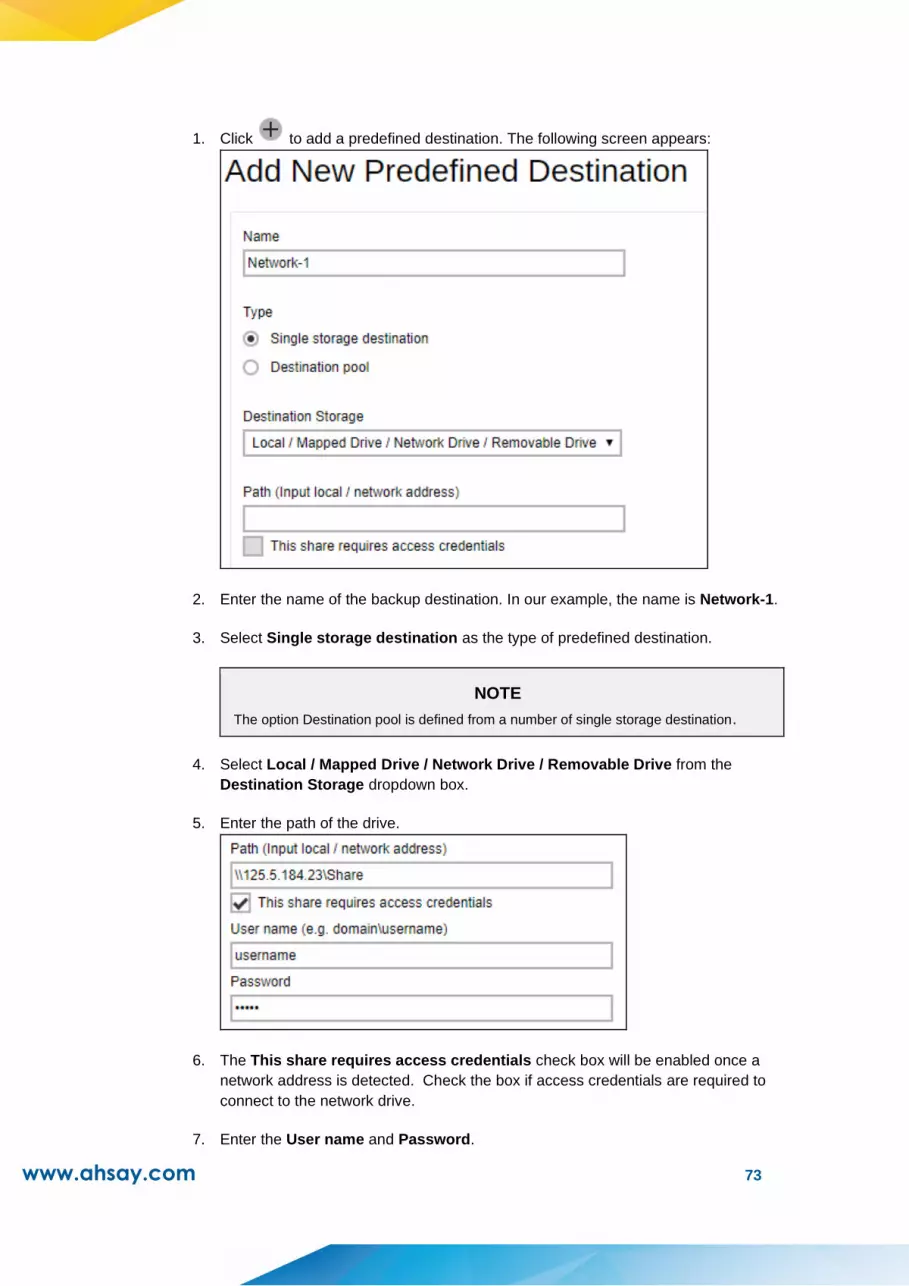
www.ahsay.com 73
1. Click to add a predefined destination. The following screen appears:
2. Enter the name of the backup destination. In our example, the name is Network-1.
3. Select Single storage destination as the type of predefined destination.
NOTE
The option Destination pool is defined from a number of single storage destination.
4. Select Local / Mapped Drive / Network Drive / Removable Drive from the
Destination Storage dropdown box.
5. Enter the path of the drive.
6. The This share requires access credentials check box will be enabled once a
network address is detected. Check the box if access credentials are required to
connect to the network drive.
7. Enter the User name and Password.

www.ahsay.com 74
8. Click to continue.
9. You can see the newly created predefined storage Network-1 appears under the
Predefined Destination page.
10. Click to confirm. When you create a backup set for a user, you will be able to see
the new predefined destination.
Set up predefined destination on cloud storage
AhsayCBS allows setting a backup destination on some common cloud storage, local hard
disk and FTP servers. The setup method is similar on different cloud storage. In the
following example, we show you how to set up a predefined destination for Google Drive.
The steps for other destination storages are similar.
1. Click to add a predefined destination. The following screen appears:
2. Enter the name of the backup destination. In our example, the name is GoogleDrive-1.

www.ahsay.com 75
3. Select Single storage destination as the type of predefined destination.
NOTE
The option Destination pool is defined from a number of single storage destination.
4. Select Google Drive from the Destination Storage dropdown box.
5. If you do not have Google Drive, please click the link Sign up for Google Drive to
create a Google account.
6. Click “Test” to continue. AhsayCBS will forward to Google Drive page.
7. Enter your login credential for Google Drive.

www.ahsay.com 76
8. A browser pops up and Google asks for your permission to access the storage. Click
Allow.
9. On the browser, a code is displayed. Copy this code, then switch to AhsayCBS to paste
the code.
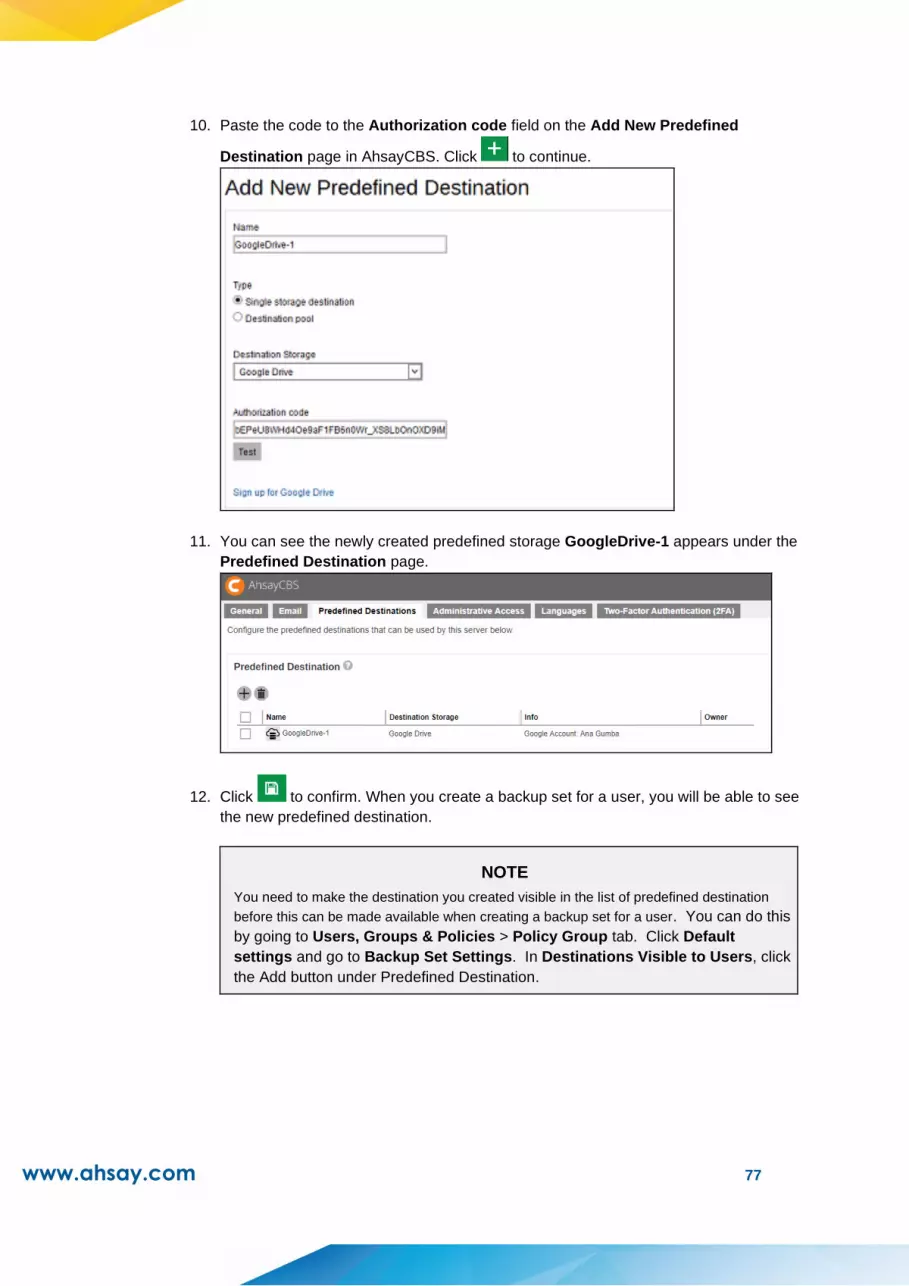
www.ahsay.com 77
10. Paste the code to the Authorization code field on the Add New Predefined
Destination page in AhsayCBS. Click to continue.
11. You can see the newly created predefined storage GoogleDrive-1 appears under the
Predefined Destination page.
12. Click to confirm. When you create a backup set for a user, you will be able to see
the new predefined destination.
NOTE
You need to make the destination you created visible in the list of predefined destination
before this can be made available when creating a backup set for a user. You can do this
by going to Users, Groups & Policies > Policy Group tab. Click Default
settings and go to Backup Set Settings. In Destinations Visible to Users, click
the Add button under Predefined Destination.

www.ahsay.com 78
Check the box beside the predefined destination you just created. Click Add to
continue.
Click Save to save the settings.
For more examples on setting up other cloud storages, refer to Appendix D Setting up
Cloud Storage.
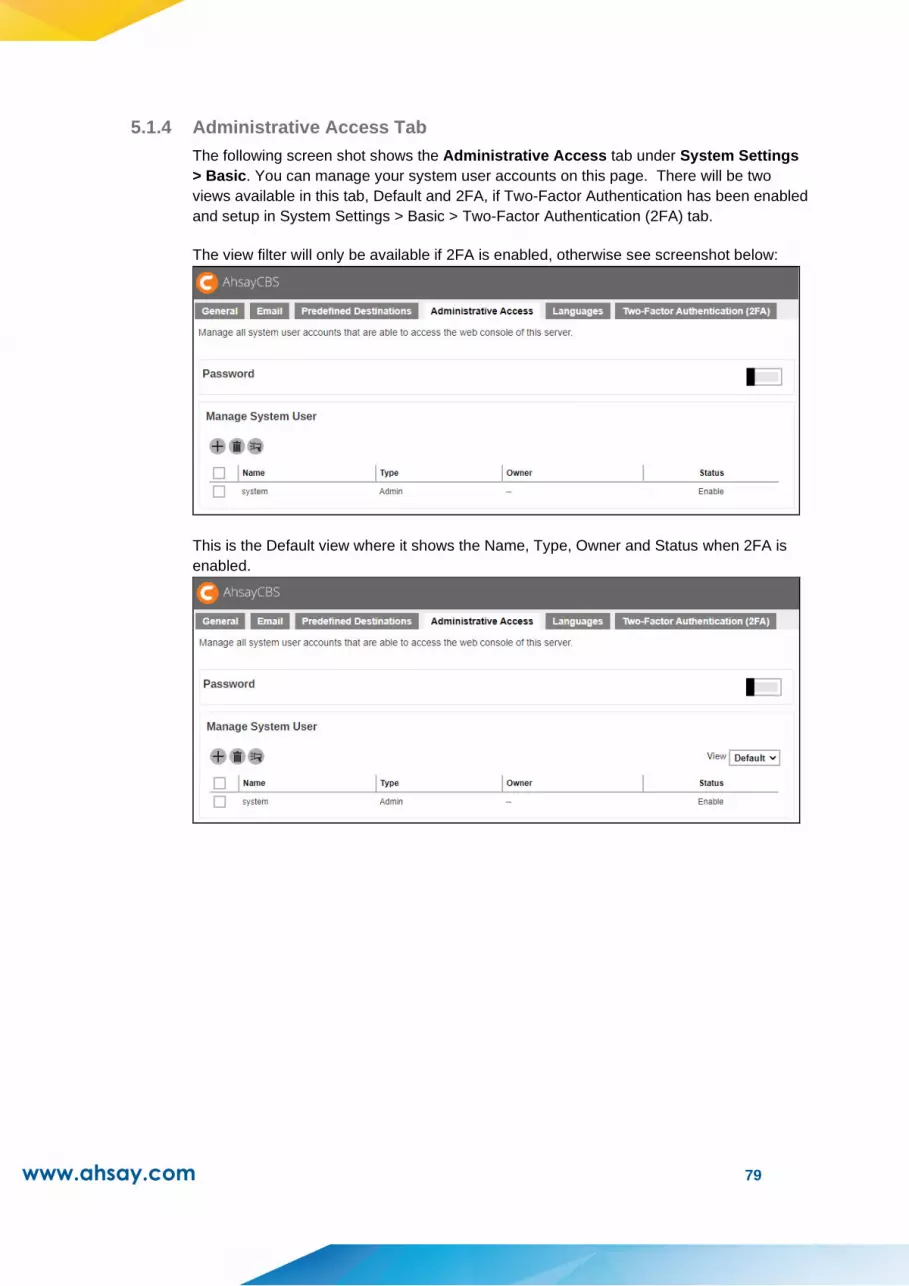
www.ahsay.com 79
5.1.4 Administrative Access Tab
The following screen shot shows the Administrative Access tab under System Settings
> Basic. You can manage your system user accounts on this page. There will be two
views available in this tab, Default and 2FA, if Two-Factor Authentication has been enabled
and setup in System Settings > Basic > Two-Factor Authentication (2FA) tab.
The view filter will only be available if 2FA is enabled, otherwise see screenshot below:
This is the Default view where it shows the Name, Type, Owner and Status when 2FA is
enabled.
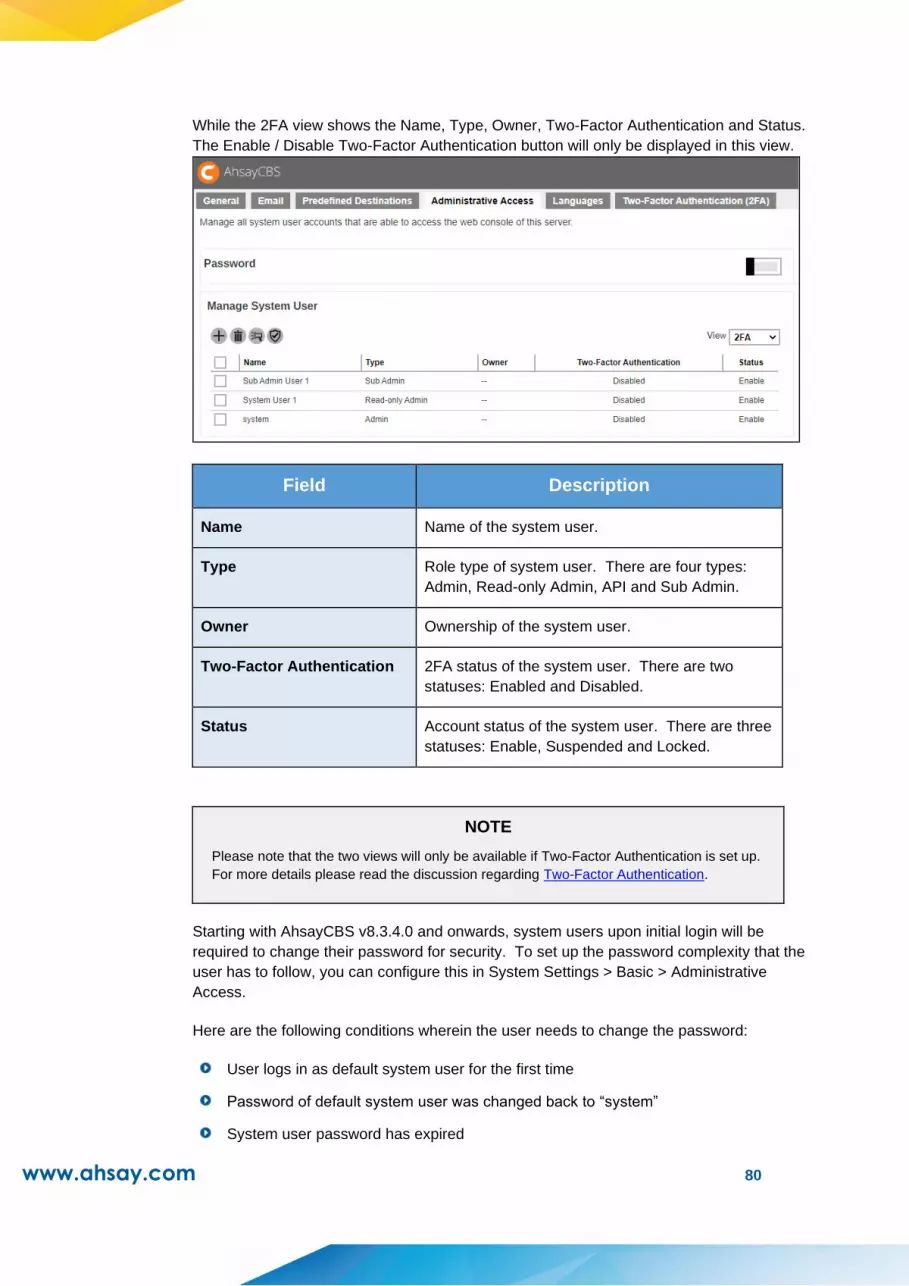
www.ahsay.com 80
While the 2FA view shows the Name, Type, Owner, Two-Factor Authentication and Status.
The Enable / Disable Two-Factor Authentication button will only be displayed in this view.
Field Description
Name Name of the system user.
Type Role type of system user. There are four types:
Admin, Read-only Admin, API and Sub Admin.
Owner Ownership of the system user.
Two-Factor Authentication 2FA status of the system user. There are two
statuses: Enabled and Disabled.
Status Account status of the system user. There are three
statuses: Enable, Suspended and Locked.
NOTE
Please note that the two views will only be available if Two-Factor Authentication is set up.
For more details please read the discussion regarding Two-Factor Authentication.
Starting with AhsayCBS v8.3.4.0 and onwards, system users upon initial login will be
required to change their password for security. To set up the password complexity that the
user has to follow, you can configure this in System Settings > Basic > Administrative
Access.
Here are the following conditions wherein the user needs to change the password:
User logs in as default system user for the first time
Password of default system user was changed back to “system”
System user password has expired

www.ahsay.com 81
Set up password complexity requirement of system user
1. Switch on Password, by default it is switched off. The following screen appears:
2. Select the Password Age, this defines the period of time when the login password of a
sytem user expires. By default, it is set to expire every 90 days. Once it expires,
system user is required to change their password before they can continue using
AhsayCBS.
3. Also configure Enforce password history. By default it is set to remember the last 30
login passwords used by each system user which they cannot use again as a new
password.
4. Select the Complexity Requirements. There are 2 choices:
Default – this is selected by default. You can further customize this by specifying
here what type of characters will be accepted for the new password. If the
password will require numbers, uppercase letters, lowercase letters, the
minimum length of the password and special characters that can be used.
Custom – you can specify the regular expression and/or custom description that
can be used for the new password.
If the criteria set are not met, then the system will not accept the new password.
5. Click once done setting the password complexity requirement.
On daily operation, you may need to assign your operators or administrators to work on
your AhsayCBS. You may have programmers to write API for your applications with the
AhsayCBS. You may also want to hire some resellers so that you can expand your
business. You will need to setup different system users with different role/privileges to work
on the AhsayCBS.

www.ahsay.com 82
Add a new system user
1. Click in the middle of the page to add a new system user. The following screen
appears:
2. Enter the Name of the system user.
3. Enter the Password of the system user. Enter the same password again at the Re-
type Password field.
4. Select the system user type from the Type dropdown Box. There are four types of
system users:
Admin
The Admin role has the same privilege as the built-in system account. For
example, you can assign this account for your administrator(s) to configure or
administer the AhsayCBS for you.
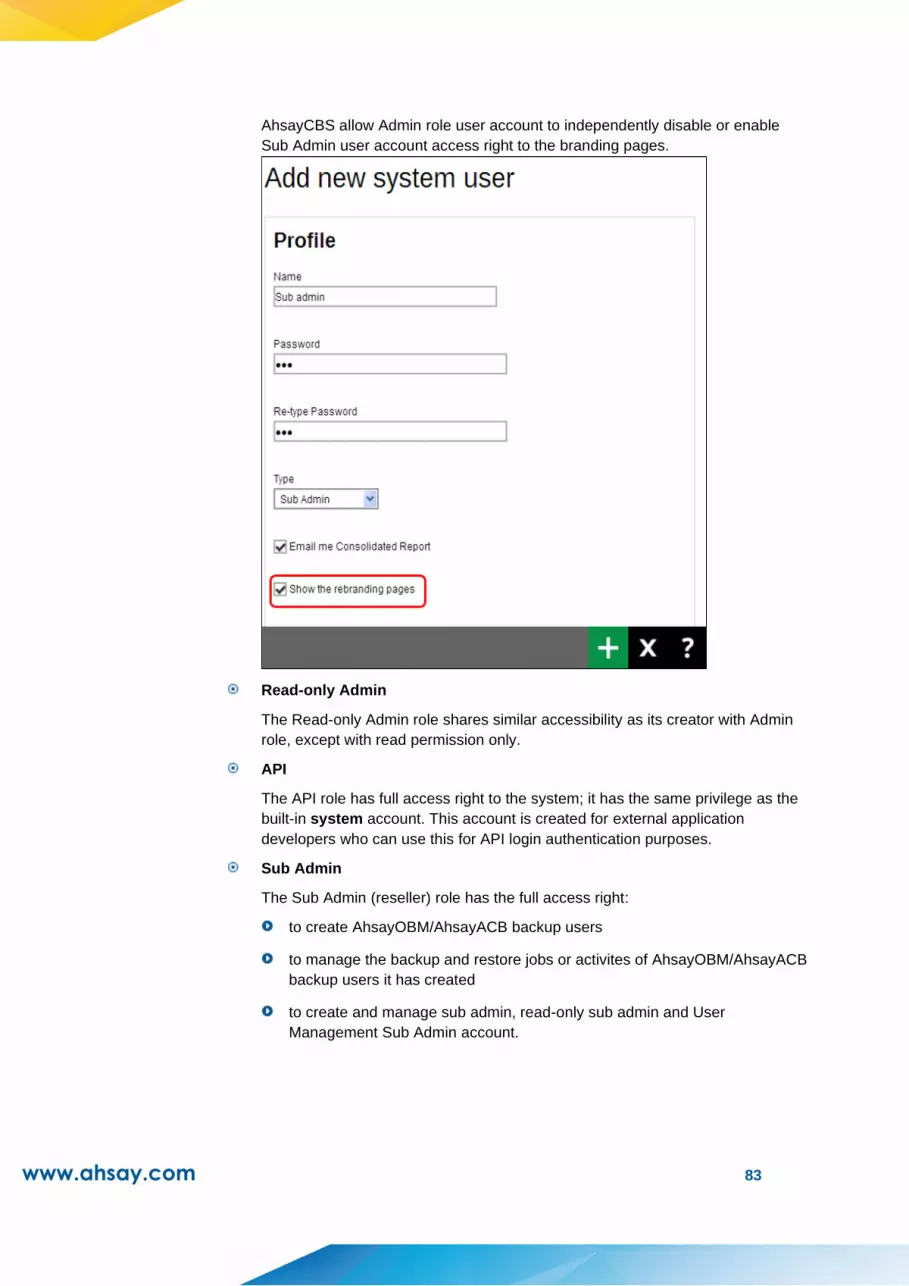
www.ahsay.com 83
AhsayCBS allow Admin role user account to independently disable or enable
Sub Admin user account access right to the branding pages.
Read-only Admin
The Read-only Admin role shares similar accessibility as its creator with Admin
role, except with read permission only.
API
The API role has full access right to the system; it has the same privilege as the
built-in system account. This account is created for external application
developers who can use this for API login authentication purposes.
Sub Admin
The Sub Admin (reseller) role has the full access right:
to create AhsayOBM/AhsayACB backup users
to manage the backup and restore jobs or activites of AhsayOBM/AhsayACB
backup users it has created
to create and manage sub admin, read-only sub admin and User
Management Sub Admin account.

www.ahsay.com 84
By default the following are enabled:
Email me Consolidated Report – this option would email the consolidated
report to the Sub Admin.
Show the rebranding pages – this option would allow the Sub Admin to
access the rebranding pages.
Allow to offer free trial – this option would allow the Sub Admin to offer free
trial to backup users. Even if the “Enable Free Trial Registration” is
unchecked in Backup / Restore > Basic > Free Trial Options, Sub Admin can
still offer Free Trial for their backup users once they enable it after logging in.
Select the Owner. If the Sub Admin was created by the Admin then the Owner is
“—“, if a system user was created by a Sub Admin then the Owner will be the
Sub Admin.
Enter the Host Name that will be used by the Sub Admin.
NOTE
AhsayCBS Sub Admin can share the same hostname as the Admin or MSP. In our
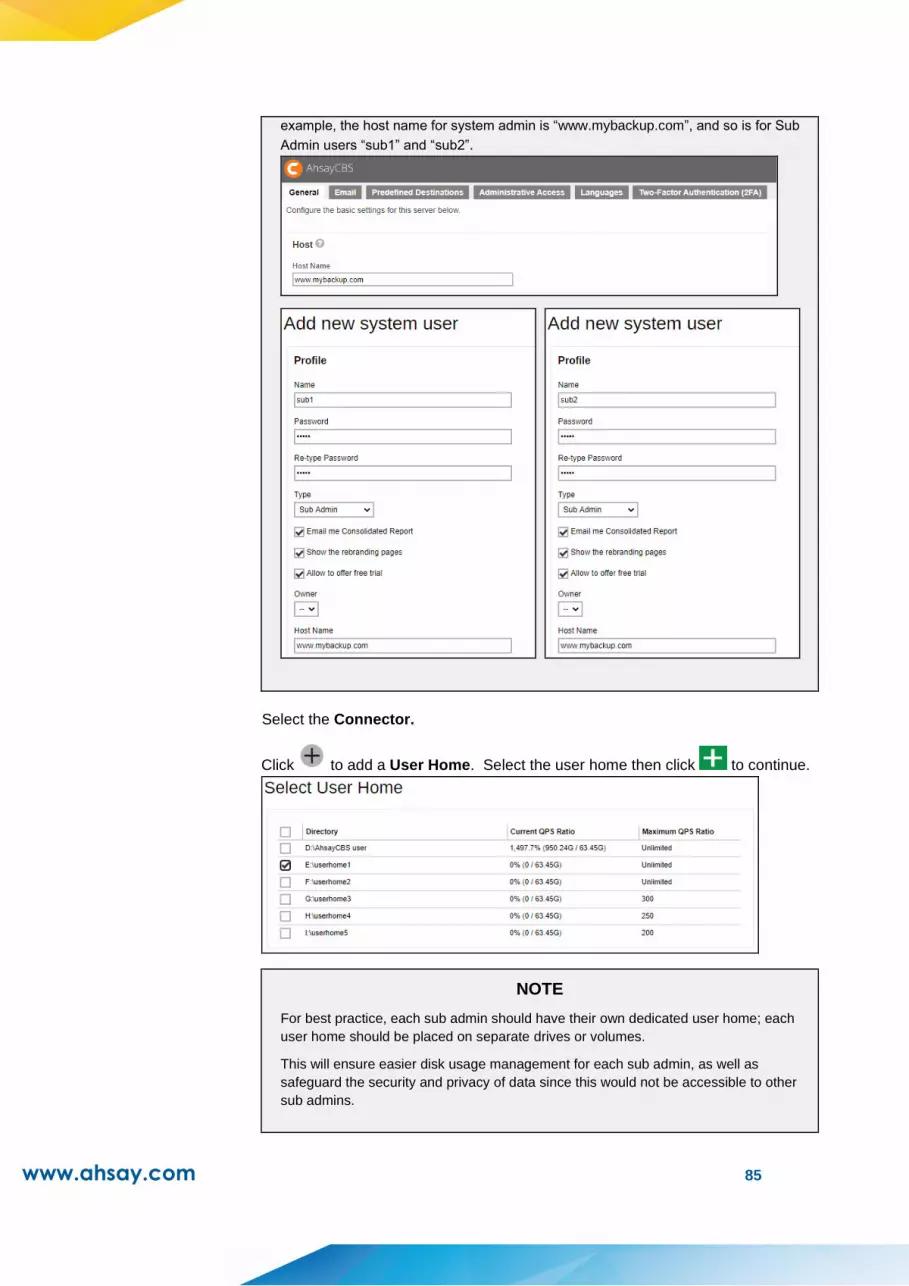
www.ahsay.com 85
example, the host name for system admin is “www.mybackup.com”, and so is for Sub
Admin users “sub1” and “sub2”.
Select the Connector.
Click to add a User Home. Select the user home then click to continue.
NOTE
For best practice, each sub admin should have their own dedicated user home; each
user home should be placed on separate drives or volumes.
This will ensure easier disk usage management for each sub admin, as well as
safeguard the security and privacy of data since this would not be accessible to other
sub admins.

www.ahsay.com 86
Select the destinations that will be available for the Sub Admin to manage. By
default all destinations are included.
NOTE
If each Sub Admin is assigned a mandatory predefined destination which their
customers must use for storing data, then it is recommended to remove all destinations
from the list. This is to prevent the Sub Admin from creating alternative destination for
their customers.
The Destination setting is overridden by the setting under “Backup / Restore > Users,
Groups & Policies > Policy Group > Default Settings > Backup Set Settings >
Destinations Visible to Users”.
For example, OneDrive is not enabled for a user group (Group-1). Even if it is enabled
for sub admin (sub1), backup users under that sub admin (sub1) and user group
(Group-1) will not be able to use OneDrive as a backup destination.
These are the destinations enabled for Group-1
These are the destinations enabled for sub1
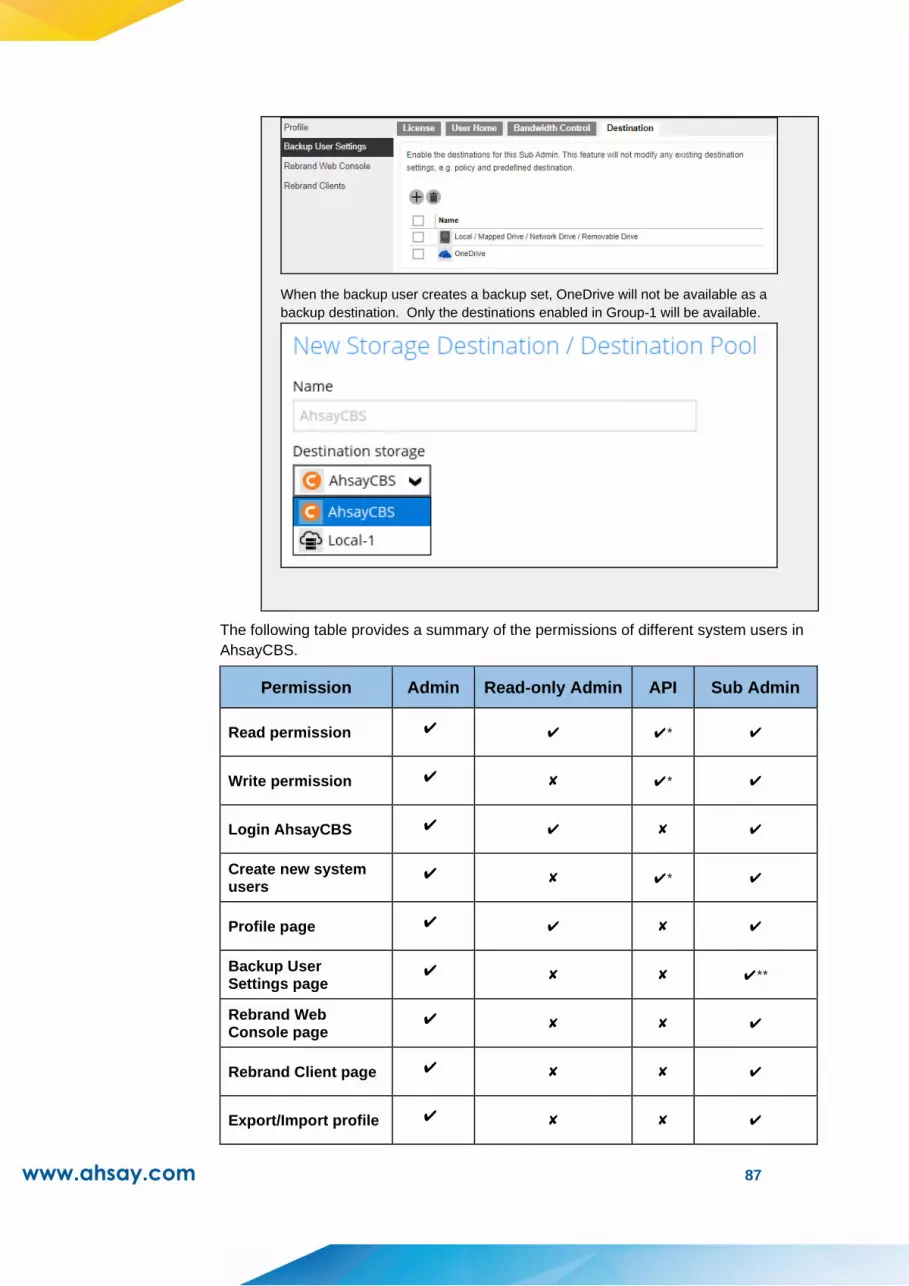
www.ahsay.com 87
When the backup user creates a backup set, OneDrive will not be available as a
backup destination. Only the destinations enabled in Group-1 will be available.
The following table provides a summary of the permissions of different system users in
AhsayCBS.
Permission Admin Read-only Admin API Sub Admin
Read permission ✔ ✔ ✔* ✔
Write permission ✔ ✘ ✔* ✔
Login AhsayCBS ✔ ✔ ✘ ✔
Create new system users
✔ ✘ ✔* ✔
Profile page ✔ ✔ ✘ ✔
Backup User Settings page
✔ ✘ ✘ ✔**
Rebrand Web Console page
✔ ✘ ✘ ✔
Rebrand Client page ✔ ✘ ✘ ✔
Export/Import profile ✔ ✘ ✘ ✔

www.ahsay.com 88
* API role has full access to the AhsayCBS which is similar as the Admin role through the API call, except
login to the AhsayCBS interface.
** Sub Admin role has full access to the settings (except the Backup User Settings page) and users under
this sub admin user only.
5. Click to add. The newly-created system user, System User 1, appears on the
page.
6. Click to confirm.
Managing System User
You can modify the setting of your system user by clicking the system user’s name. You will
see 4 tabs:
Profile Backup User Settings
Rebrand Web Console Rebrand Clients
Each of these 4 tabs are described in detail below.
Profile Tab
The Profile page is available to all Admin, Read-Only Admin, and Sub Admin users
after they login.
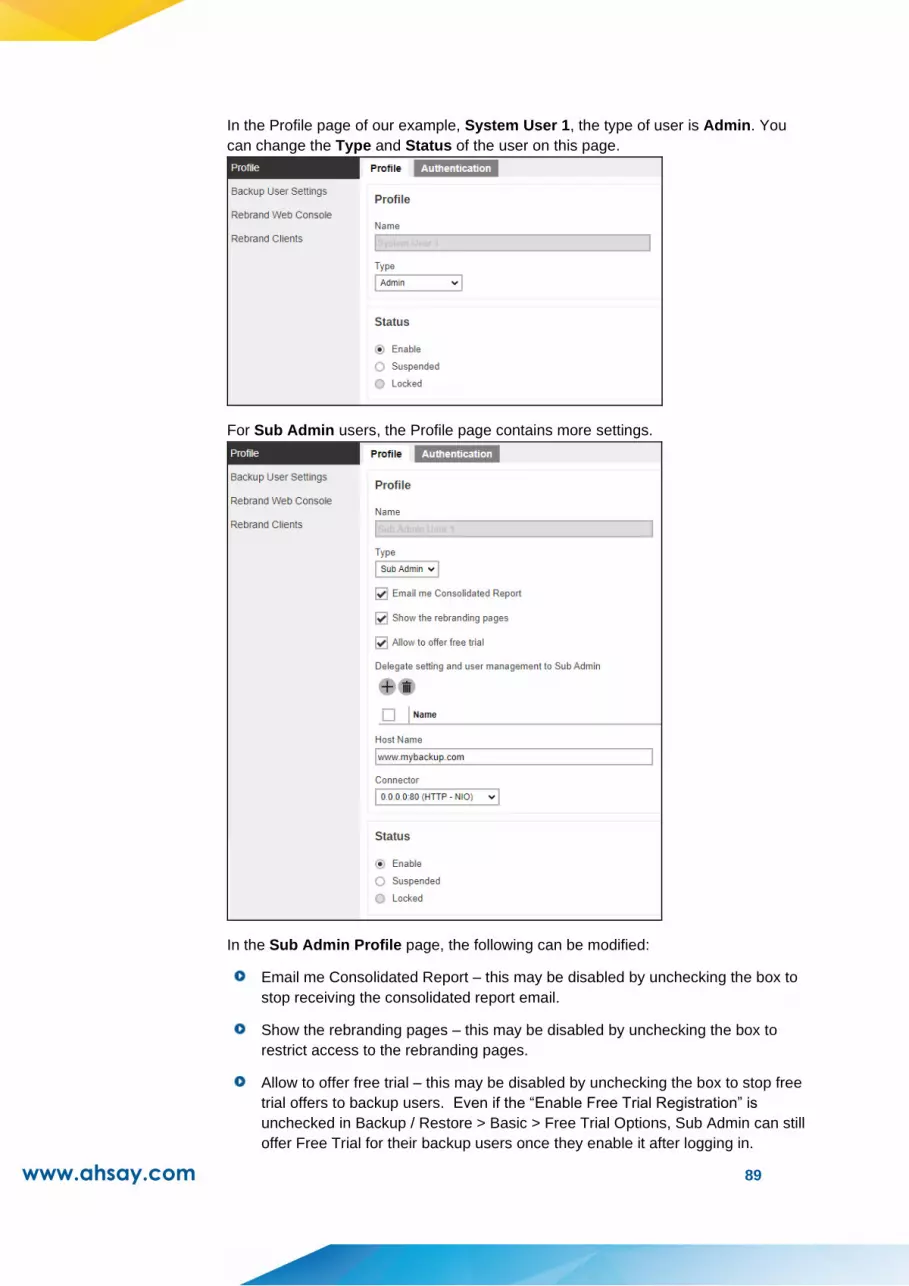
www.ahsay.com 89
In the Profile page of our example, System User 1, the type of user is Admin. You
can change the Type and Status of the user on this page.
For Sub Admin users, the Profile page contains more settings.
In the Sub Admin Profile page, the following can be modified:
Email me Consolidated Report – this may be disabled by unchecking the box to
stop receiving the consolidated report email.
Show the rebranding pages – this may be disabled by unchecking the box to
restrict access to the rebranding pages.
Allow to offer free trial – this may be disabled by unchecking the box to stop free
trial offers to backup users. Even if the “Enable Free Trial Registration” is
unchecked in Backup / Restore > Basic > Free Trial Options, Sub Admin can still
offer Free Trial for their backup users once they enable it after logging in.

www.ahsay.com 90
Delegate setting and user management to Sub Admin – another sub admin can
be added here to be delegated for the sub admin user role. Once delegated they
will be granted management access of the account.
One situation in which this would be useful is when one company takes over or
merges with another company. It would be easier to delegate the sub admin role
so that they can manage all the backup users.
The delegated sub admin will have management access to the following:
o Monitoring
They can monitor the activities like backup and restore status in the Live
Activities page.
Audit trails is available in the Administration Logs.
Backup and restore logs can also be downloaded from the Backup / Restore
Logs page.

www.ahsay.com 91
o Backup / Restore
Settings for free trial options may be modified.
WARNING
The “Remove User <xx> days after registration” setting will also apply to
AhsayOBM/AhsayACB user accounts whose status is changed from PAID to
TRIAL. These user accounts will be automatically removed by AhsayCBS if the
account creation date exceeds the set number of days.
Manage backup user settings, user group and policy group. The backup
user profile settings and subscribed modules may be modified. They are
allowed to create backup sets. They can also view backup/restore reports as
well as usage statistics. They can configure the auto update agent, send
broadcast message to other sub admins, export usage to a csv file and
enable multi-factor authentication.

www.ahsay.com 92
o System Settings
SMTP server and administrator contact may be configured.
Predefined destinations may be added.
Allowed to create a sub admin. The following are the sub admin type that
can be created: Sub Admin, User Management Sub-Admin and Read-only
Sub Admin. For more information on these types please refer to Types of
Sub Admin.
Host Name – this is important as AhsayCBS uses connecting hostname to
determine which branding should be applied on the interface.
Connector – a different connector can be applied for the sub admin. The sub
admin has fewer privileges as the admin user. In our example, the Sub Admin
User 1 account shows a subset of the functions available when the sub admin
logs onto AhsayCBS and even within each subset a sub admin has only access
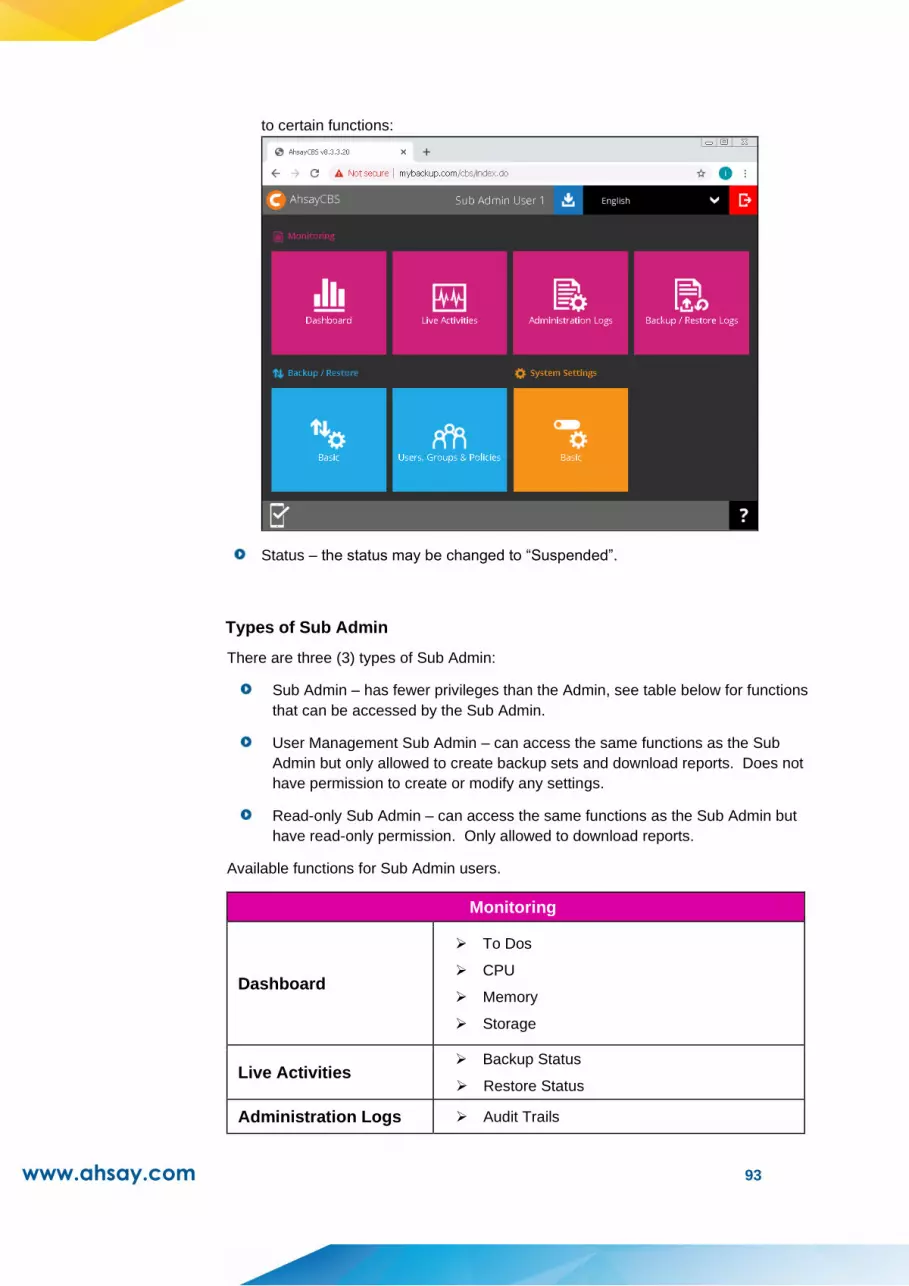
www.ahsay.com 93
to certain functions:
Status – the status may be changed to “Suspended”.
Types of Sub Admin
There are three (3) types of Sub Admin:
Sub Admin – has fewer privileges than the Admin, see table below for functions
that can be accessed by the Sub Admin.
User Management Sub Admin – can access the same functions as the Sub
Admin but only allowed to create backup sets and download reports. Does not
have permission to create or modify any settings.
Read-only Sub Admin – can access the same functions as the Sub Admin but
have read-only permission. Only allowed to download reports.
Available functions for Sub Admin users.
Monitoring
Dashboard
➢ To Dos
➢ CPU
➢ Memory
➢ Storage
Live Activities ➢ Backup Status
➢ Restore Status
Administration Logs ➢ Audit Trails

www.ahsay.com 94
Backup / Restore Logs
➢ Backup Jobs
➢ Restored Jobs
➢ Backup Errors
➢ Backup Set Log
➢ Activities Log
Backup / Restore
Basic (will only be available if “Allow to provide Free Trial offer” is enabled)
➢ Free Trial Options
Users, Groups, & Policies
➢ Backup User
➢ User Group
➢ Policy Group
System Settings
Basic
➢ Predefined Destinations
➢ Administrative Access
The Authentication page is available to all types of users. Password of users may be
reset here, and details of last successful login may be viewed here. However, Two-
Factor Authentication of system users can be set up here only for Admin, Sub Admin
and Read-only Admin users. By default it is not enabled, to switch it on slide the
switch to the right.
To reset the password:
1. Click to reset the password.

www.ahsay.com 95
2. Enter the new password and confirm the password.
3. Click to save.
To add a device:
1. Click to add a device.
2. Download the Ahsay Mobile app by typing the given URL in your mobile
device’s browser or by clicking link to scan
the QR code. Click if mobile app has already been downloaded and to
proceed.

www.ahsay.com 96
3. Select the country code and enter the phone number. Click
.
4. Enter the verification code sent to your mobile device. Click to proceed.
5. Pair the device with the backup account. There are two ways to do this:
Use the Ahsay Mobile app, scan the QR code to pair the device.
Or
Use a third-party TOTP Authenticator App (e.g. Authy, Duo, Google), click
link. Scan
the QR code or enter the Secret Key in the third-party TOTP Authenticator.
Enter the display name and one-time password generated by the Authenticator

www.ahsay.com 97
App and click .
6. Click to continue.
After doing the modifications, click then to save the changes.
For old system user accounts created prior to AhsayCBS v8.5.0.0 with Twilio
Credentials Verification enabled, this will be the screen displayed. By default the
Security Settings is not enabled, to switch it on slide the switch to the right.

www.ahsay.com 98
Click to add a phone number. Select the country code and enter the phone
number of the user where the passcode will be sent and click .
After doing the modifications, click then to save the changes.
Backup User Settings Tab
The Backup User Settings tab is available to admin and sub admin users after they
login, although for sub admin user they have read-only access.
For admin users, only the Bandwidth Control page is available. The admin can limit
the maximum transfer rate that will be used during backup and restore jobs.
To limit the maximum tranfer rate during backup, click the box in front of Max
transfer rate for backup. Enter the value and select the unit of measurement
either Kbit/s, Mbit/s or Gbit/s.
To limit the maximum tranfer rate during restore, click the box in front of Max
transfer rate for backup. Enter the value and select the unit of measurement
either Kbit/s, Mbit/s or Gbit/s

www.ahsay.com 99
For sub admin users, there are more pages available. In the License page, the
system administrator can assign the number of AhsayOBM/AhsayACB CALs and add-
on modules for each sub admin.
NOTE
➢ If the box is unchecked, there is no limit placed on the license quota usage of the Sub
Admin.
For easier license management on the AhsayCBS server, it is recommended to have
clearly defined license quotas for each Sub Admin user.
The number of license quota assigned should not be more than the number of license
available. For example, if the AhsayCBS license key has 2000 Microsoft Exchange
Mailboxes and 1500 have already been (assigned) used, then you can only assign up
to 500 for the Sub Admin.
➢ If the box is checked and the assigned value for the license is more than the quota,
there will be an error message displayed saying that there is not enough license to
assign. For example, the AhsayOBM User box is checked and 10 license is assigned,
but only 5 quota is available.

www.ahsay.com 100
The administrator can assign the number of AhsayOBM/ AhsayACB CALs and add-on
modules to each sub admin user.
Field Description
AhsayOBM User License quota for AhsayOBM users.
AhsayACB User License quota for AhsayACB users.
VMware Guest VM License quota for backing up VMware Guest VMs.
Hyper-V Guest VM License quota for backing up Hyper-V Guest VMs.
VMware Socket (this feature
requires AhsayOBM v7.7 or
above)
License quota for VMware Socket.
Hyper-V Socket (this feature
requires AhsayOBM v7.7 or
above)
License quota for Hyper-V Socket.
Microsoft Exchange Mailbox License quota for backing up Microsoft Exchange
Mailboxes.
Mobile License quota for backing up Mobile devices.
NAS - Synology License quota for backing up Synology NAS
devices.
NAS - QNAP License quota for backing up QNAP NAS devices.
AhsayACB Office 365
Backup
License quota for backing up AhsayACB Office 365
user mailboxes, OneDrive and SharePoint files.
Office 365 Backup License quota for backing up Office 365 user
mailboxes, OneDrive and SharePoint files.
OpenDirect / Granular
Restore
License quota for file-level restore from guest VM
or compressed/image files. Applicable only to File /
Hyper-V / VMware backup sets on Windows
platform.
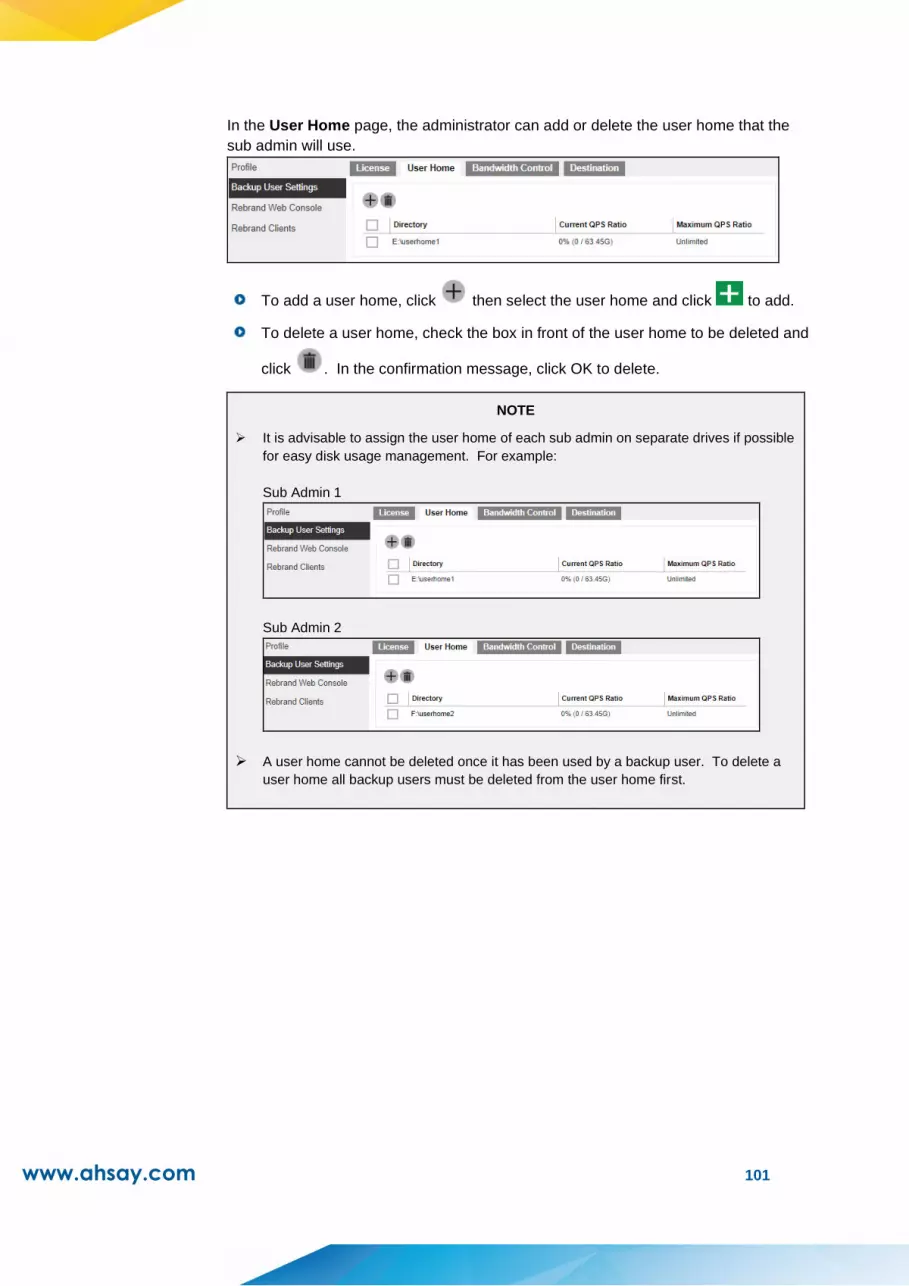
www.ahsay.com 101
In the User Home page, the administrator can add or delete the user home that the
sub admin will use.
To add a user home, click then select the user home and click to add.
To delete a user home, check the box in front of the user home to be deleted and
click . In the confirmation message, click OK to delete.
NOTE
➢ It is advisable to assign the user home of each sub admin on separate drives if possible
for easy disk usage management. For example:
Sub Admin 1
Sub Admin 2
➢ A user home cannot be deleted once it has been used by a backup user. To delete a
user home all backup users must be deleted from the user home first.

www.ahsay.com 102
In the Destination page, the administrator can determine the destination (both
predefined and standard destination) that will be available for the sub admin. This
configuration will not modify any existing destination settings, example: policy and
predefined destination.
To add a destination, click then select the destination and click to add.
To delete a destination, check the box in front of the destination to be deleted
and click . In the confirmation message, click OK to delete.
After doing the modifications, click then to save the changes.
NOTE
➢ The Sub admin has NO authority to modify the Destination option, and the Destination
page is hidden in System Settings > Basic > Administrative Access > %System User% >
Backup User Settings after logging in AhsayCBS using sub admin user account.
➢ If sub admin has created a backup user using the existing allowed destination, the
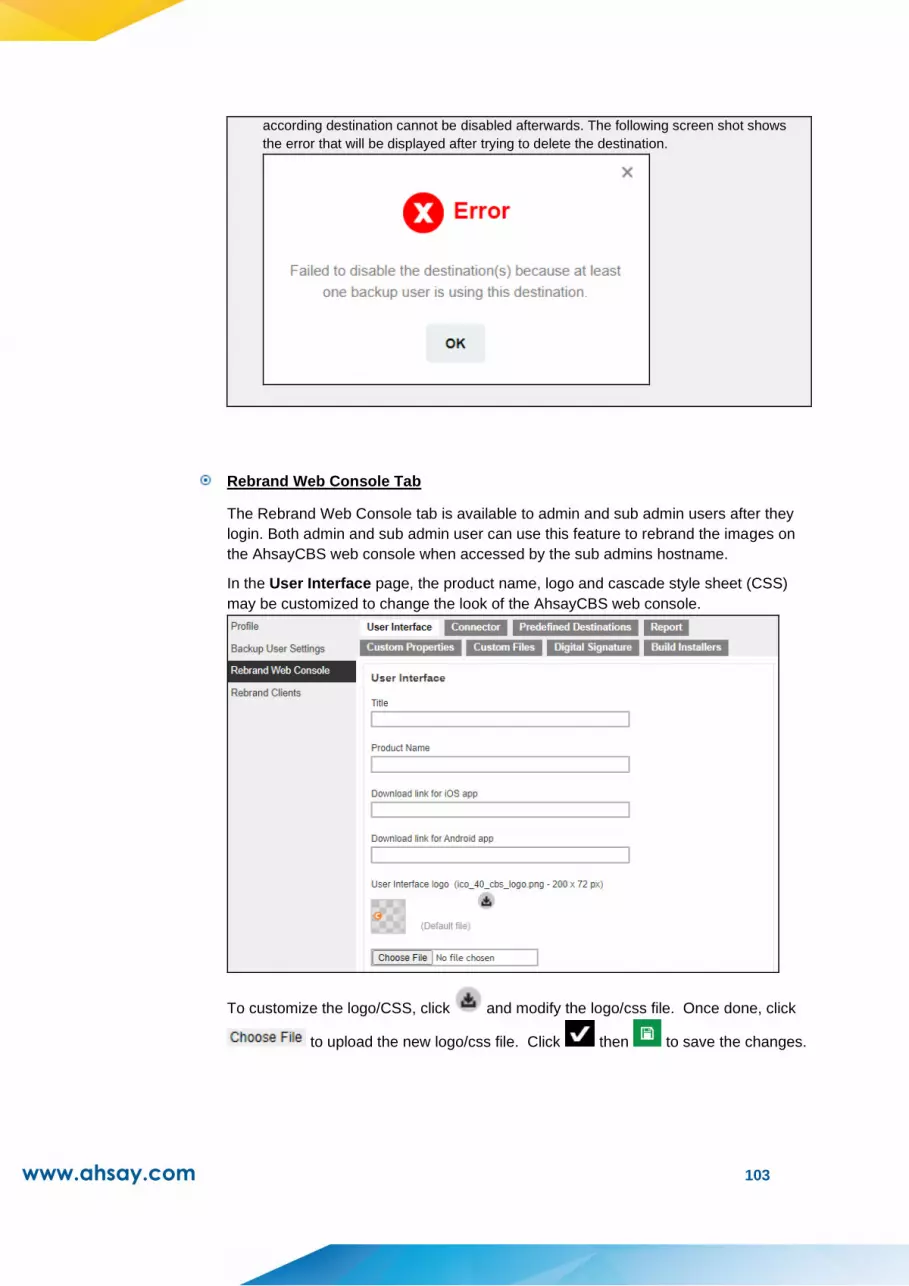
www.ahsay.com 103
according destination cannot be disabled afterwards. The following screen shot shows
the error that will be displayed after trying to delete the destination.
Rebrand Web Console Tab
The Rebrand Web Console tab is available to admin and sub admin users after they
login. Both admin and sub admin user can use this feature to rebrand the images on
the AhsayCBS web console when accessed by the sub admins hostname.
In the User Interface page, the product name, logo and cascade style sheet (CSS)
may be customized to change the look of the AhsayCBS web console.
To customize the logo/CSS, click and modify the logo/css file. Once done, click
to upload the new logo/css file. Click then to save the changes.
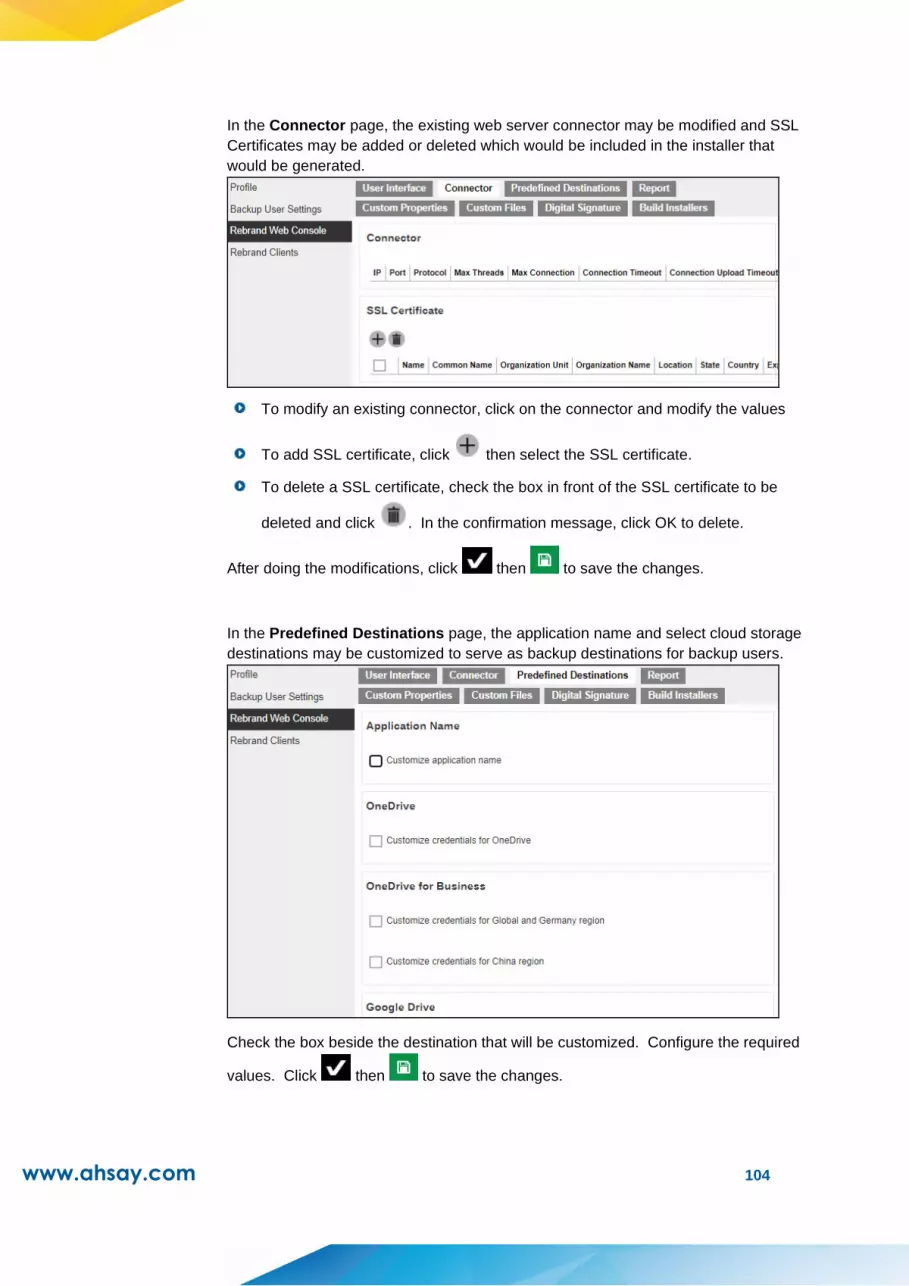
www.ahsay.com 104
In the Connector page, the existing web server connector may be modified and SSL
Certificates may be added or deleted which would be included in the installer that
would be generated.
To modify an existing connector, click on the connector and modify the values
To add SSL certificate, click then select the SSL certificate.
To delete a SSL certificate, check the box in front of the SSL certificate to be
deleted and click . In the confirmation message, click OK to delete.
After doing the modifications, click then to save the changes.
In the Predefined Destinations page, the application name and select cloud storage
destinations may be customized to serve as backup destinations for backup users.
Check the box beside the destination that will be customized. Configure the required
values. Click then to save the changes.
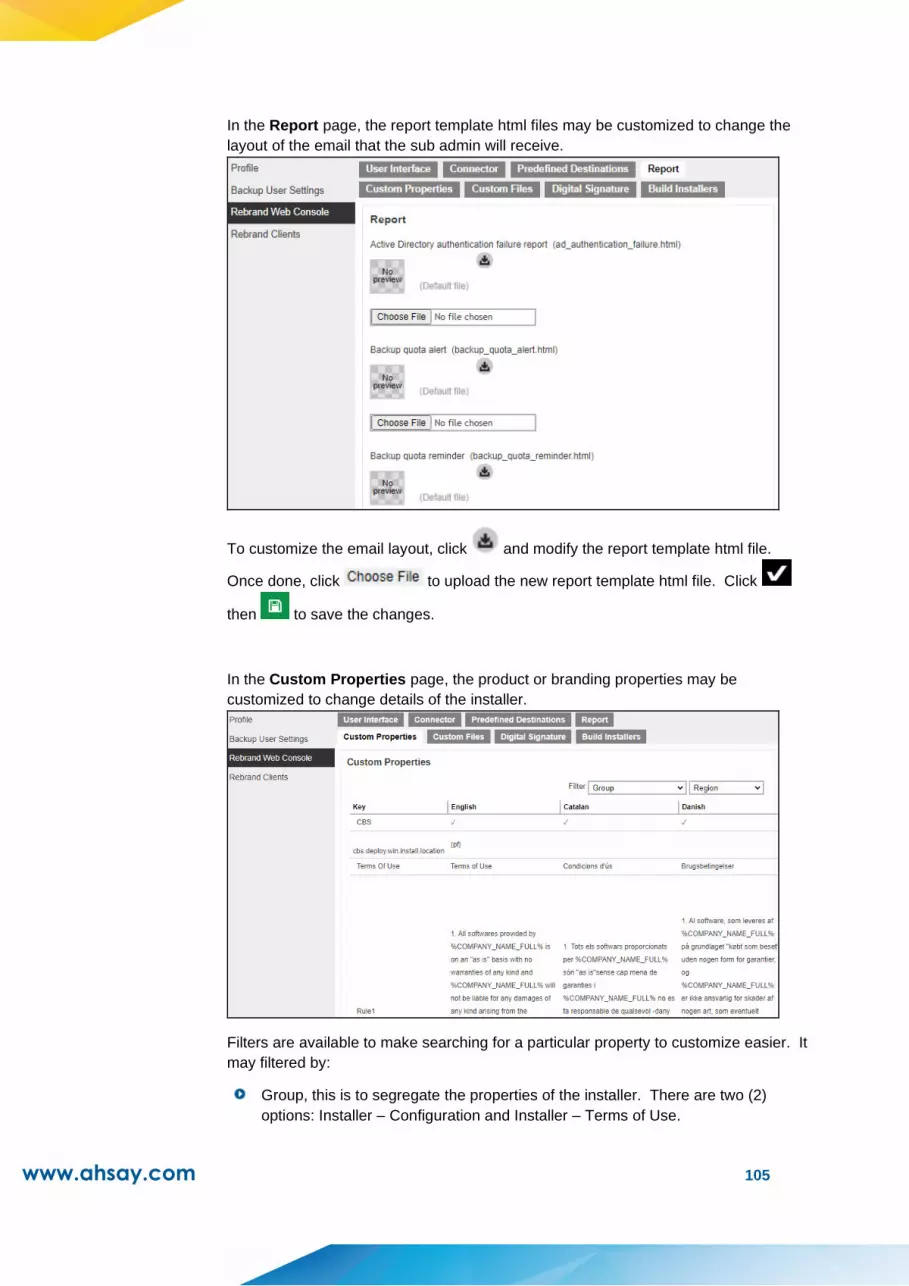
www.ahsay.com 105
In the Report page, the report template html files may be customized to change the
layout of the email that the sub admin will receive.
To customize the email layout, click and modify the report template html file.
Once done, click to upload the new report template html file. Click
then to save the changes.
In the Custom Properties page, the product or branding properties may be
customized to change details of the installer.
Filters are available to make searching for a particular property to customize easier. It
may filtered by:
Group, this is to segregate the properties of the installer. There are two (2)
options: Installer – Configuration and Installer – Terms of Use.

www.ahsay.com 106
Region, this is to segregate by country. There are six (6) options: Western
Europe, Northern Europe, Eastern Europe, Middle East, America and Asia
Pacific.
To customize the branding property, click the property cell to be changed and modify
the value. Click then to save the changes.
In the Custom Files page, the icon and image may be customized to change the look
of AhsayCBS and/or AhsayUBS.
To customize the icon/image, click and modify the icon/image file. Once done,
click to upload the new icon/image file. Click then to save the
changes.
In the Digital Signature page, it will use the digital certificate that is uploaded in
Rebrand Clients > Digital Signature. If a Windows installer with digital signature is
needed to be generated, please refer to the instructions in Rebrand Clients > Digital
Signature.
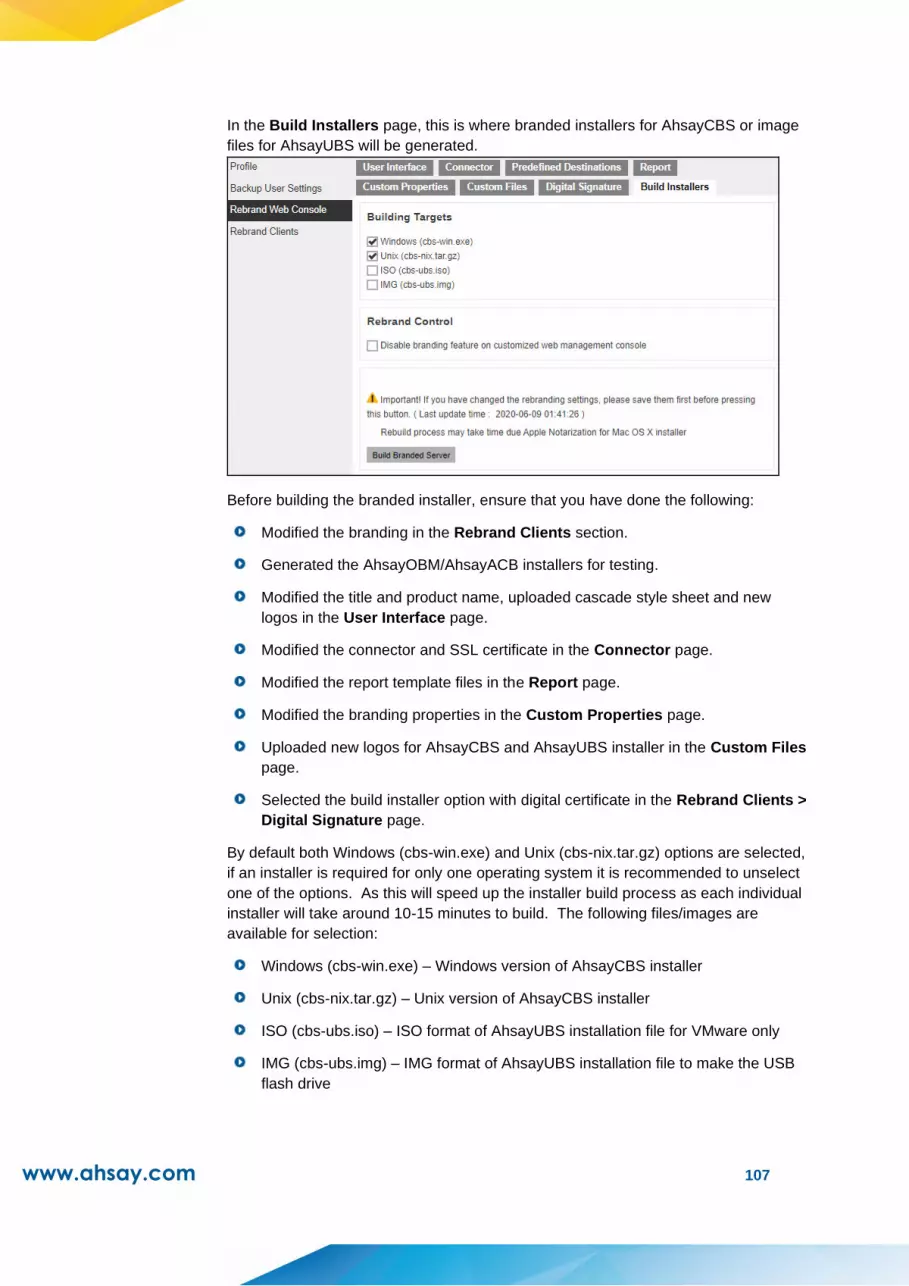
www.ahsay.com 107
In the Build Installers page, this is where branded installers for AhsayCBS or image
files for AhsayUBS will be generated.
Before building the branded installer, ensure that you have done the following:
Modified the branding in the Rebrand Clients section.
Generated the AhsayOBM/AhsayACB installers for testing.
Modified the title and product name, uploaded cascade style sheet and new
logos in the User Interface page.
Modified the connector and SSL certificate in the Connector page.
Modified the report template files in the Report page.
Modified the branding properties in the Custom Properties page.
Uploaded new logos for AhsayCBS and AhsayUBS installer in the Custom Files
page.
Selected the build installer option with digital certificate in the Rebrand Clients >
Digital Signature page.
By default both Windows (cbs-win.exe) and Unix (cbs-nix.tar.gz) options are selected,
if an installer is required for only one operating system it is recommended to unselect
one of the options. As this will speed up the installer build process as each individual
installer will take around 10-15 minutes to build. The following files/images are
available for selection:
Windows (cbs-win.exe) – Windows version of AhsayCBS installer
Unix (cbs-nix.tar.gz) – Unix version of AhsayCBS installer
ISO (cbs-ubs.iso) – ISO format of AhsayUBS installation file for VMware only
IMG (cbs-ubs.img) – IMG format of AhsayUBS installation file to make the USB
flash drive
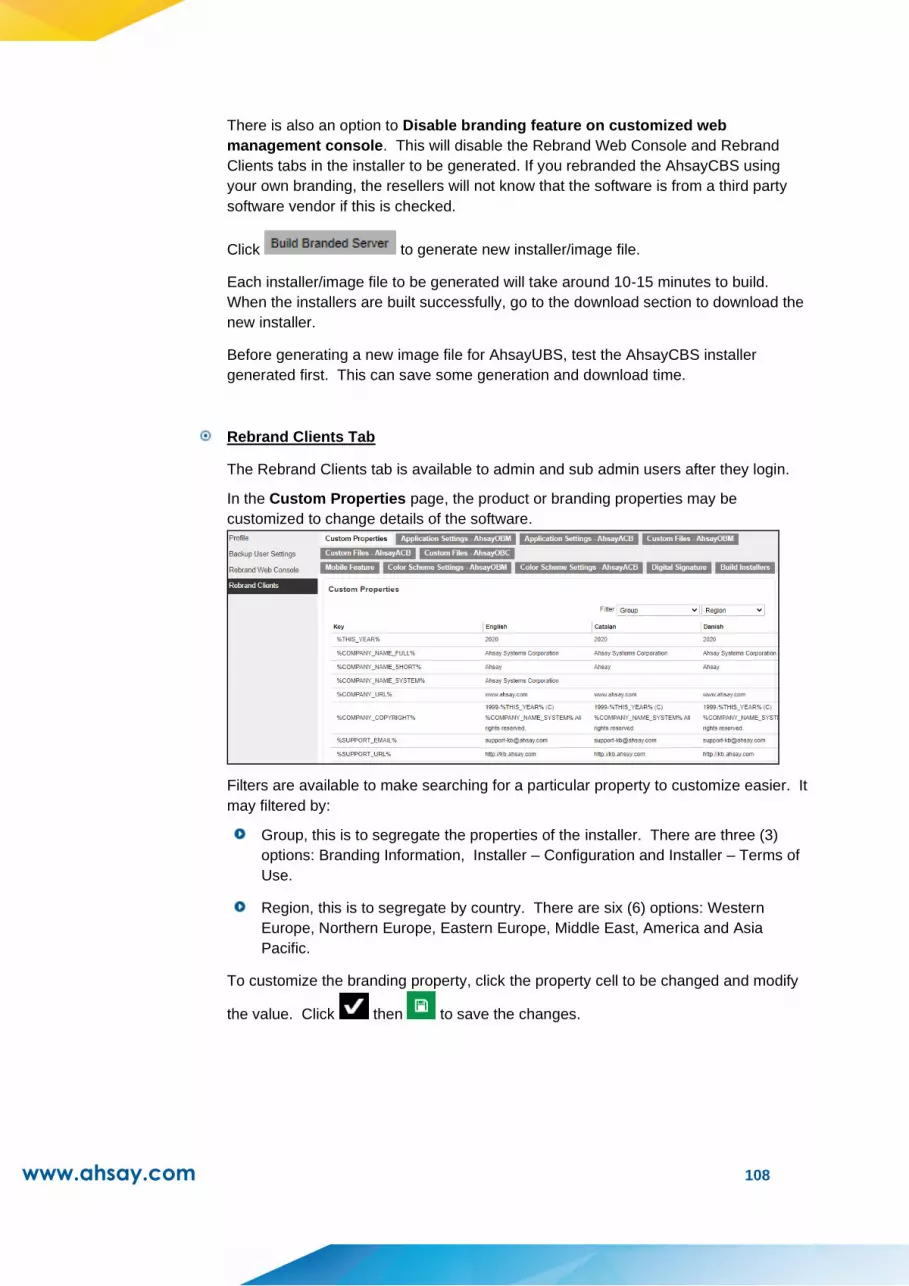
www.ahsay.com 108
There is also an option to Disable branding feature on customized web
management console. This will disable the Rebrand Web Console and Rebrand
Clients tabs in the installer to be generated. If you rebranded the AhsayCBS using
your own branding, the resellers will not know that the software is from a third party
software vendor if this is checked.
Click to generate new installer/image file.
Each installer/image file to be generated will take around 10-15 minutes to build.
When the installers are built successfully, go to the download section to download the
new installer.
Before generating a new image file for AhsayUBS, test the AhsayCBS installer
generated first. This can save some generation and download time.
Rebrand Clients Tab
The Rebrand Clients tab is available to admin and sub admin users after they login.
In the Custom Properties page, the product or branding properties may be
customized to change details of the software.
Filters are available to make searching for a particular property to customize easier. It
may filtered by:
Group, this is to segregate the properties of the installer. There are three (3)
options: Branding Information, Installer – Configuration and Installer – Terms of
Use.
Region, this is to segregate by country. There are six (6) options: Western
Europe, Northern Europe, Eastern Europe, Middle East, America and Asia
Pacific.
To customize the branding property, click the property cell to be changed and modify
the value. Click then to save the changes.

www.ahsay.com 109
In the Application Settings - AhsayOBM page, the backup server, language settings
and GUI related feature for AhsayOBM may be configured.
To configure the backup server setting, enter the backup server IP address or
hostname. Select the backup protocol and backup port.
Select the languages that will be available to the backup user.
Select the GUI feature that will be available, show select language drop down list
and/or show backup server URL.
Click then to save the changes.
In the Application Settings - AhsaayACB page, the backup server, language
settings and GUI related feature for AhsayACB may be configured.
To configure the backup server setting, enter the backup server IP address or
hostname. Select the backup protocol and backup port.
Select the languages that will be available to the backup user.
Select the GUI feature that will be available, show select language drop down list
and/or show backup server URL.
Click then to save the changes.

www.ahsay.com 110
In the Custom Files - AhsayOBM page, the icon and image may be customized to
change the look of AhsayOBM.
To customize the icon/image, click and modify the icon/image file. Once done,
click to upload the new icon/image file. Click then to save the
changes.
In the Custom Files - AhsayACB page, the icon and image may be customized to
change the look of AhsayACB.
To customize the icon/image, click and modify the icon/image file. Once done,
click to upload the new icon/image file. Click then to save the
changes.
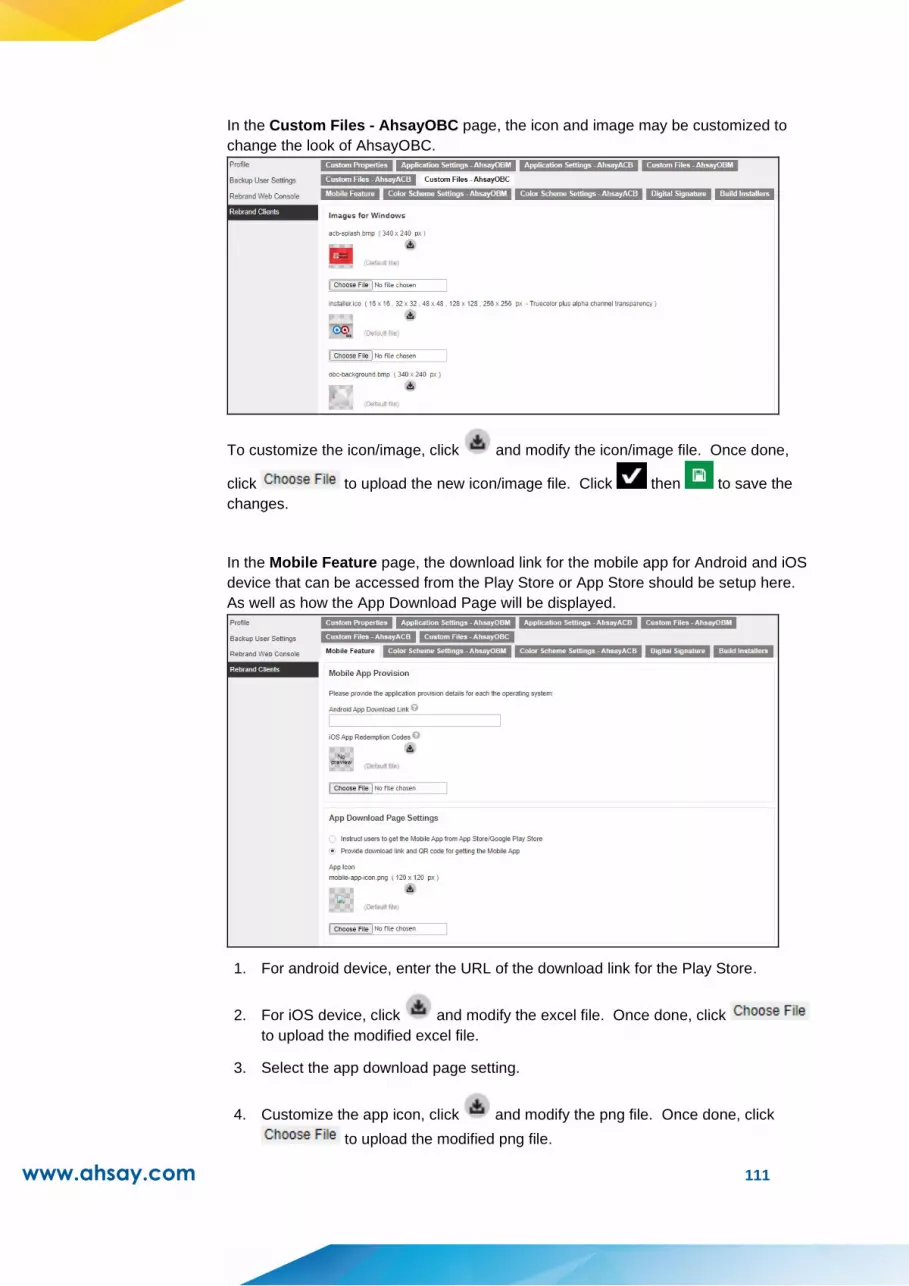
www.ahsay.com 111
In the Custom Files - AhsayOBC page, the icon and image may be customized to
change the look of AhsayOBC.
To customize the icon/image, click and modify the icon/image file. Once done,
click to upload the new icon/image file. Click then to save the
changes.
In the Mobile Feature page, the download link for the mobile app for Android and iOS
device that can be accessed from the Play Store or App Store should be setup here.
As well as how the App Download Page will be displayed.
1. For android device, enter the URL of the download link for the Play Store.
2. For iOS device, click and modify the excel file. Once done, click
to upload the modified excel file.
3. Select the app download page setting.
4. Customize the app icon, click and modify the png file. Once done, click
to upload the modified png file.

www.ahsay.com 112
5. Click then to save the changes.
In the Color Scheme Settings - AhsayOBM page, the color scheme may be
customized to change the look of AhsayOBM.
To customize the color scheme, select either a Predefined Scheme (choose from
Default, Emerald, Rainbow or Ruby) or a Custom Scheme (select a color using the
palette or input the hex color code for each section). Click then to save the
changes.
In the Color Scheme Settings - AhsayACB page, the color scheme may be
customized to change the look of AhsayACB.
To customize the color scheme, select either a Predefined Scheme (choose from
Default, Emerald, Rainbow or Ruby) or a Custom Scheme (select a color using the
palette or input the hex color code for each section). Click then to save the
changes.
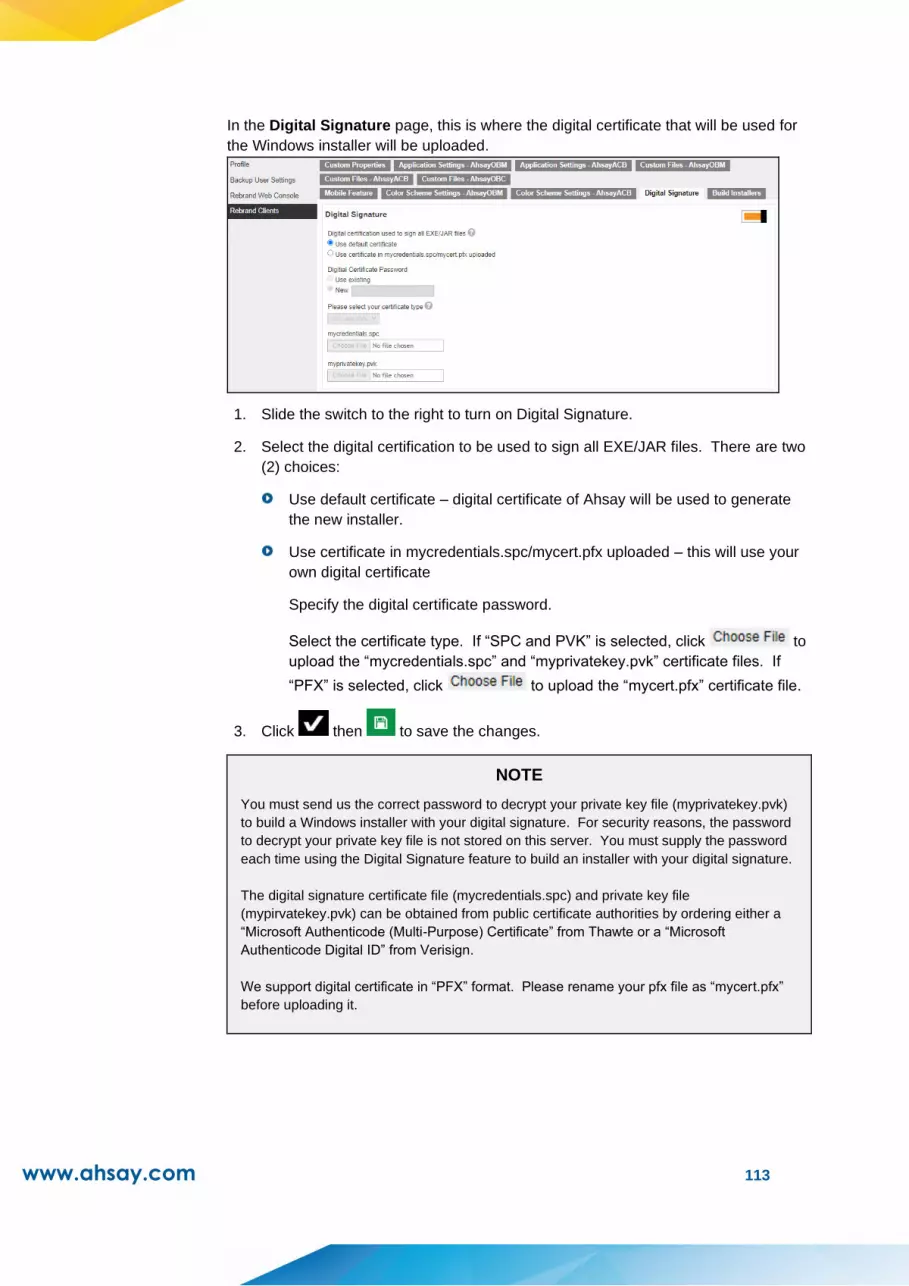
www.ahsay.com 113
In the Digital Signature page, this is where the digital certificate that will be used for
the Windows installer will be uploaded.
1. Slide the switch to the right to turn on Digital Signature.
2. Select the digital certification to be used to sign all EXE/JAR files. There are two
(2) choices:
Use default certificate – digital certificate of Ahsay will be used to generate
the new installer.
Use certificate in mycredentials.spc/mycert.pfx uploaded – this will use your
own digital certificate
Specify the digital certificate password.
Select the certificate type. If “SPC and PVK” is selected, click to
upload the “mycredentials.spc” and “myprivatekey.pvk” certificate files. If
“PFX” is selected, click to upload the “mycert.pfx” certificate file.
3. Click then to save the changes.
NOTE
You must send us the correct password to decrypt your private key file (myprivatekey.pvk)
to build a Windows installer with your digital signature. For security reasons, the password
to decrypt your private key file is not stored on this server. You must supply the password
each time using the Digital Signature feature to build an installer with your digital signature.
The digital signature certificate file (mycredentials.spc) and private key file
(mypirvatekey.pvk) can be obtained from public certificate authorities by ordering either a
“Microsoft Authenticode (Multi-Purpose) Certificate” from Thawte or a “Microsoft
Authenticode Digital ID” from Verisign.
We support digital certificate in “PFX” format. Please rename your pfx file as “mycert.pfx”
before uploading it.
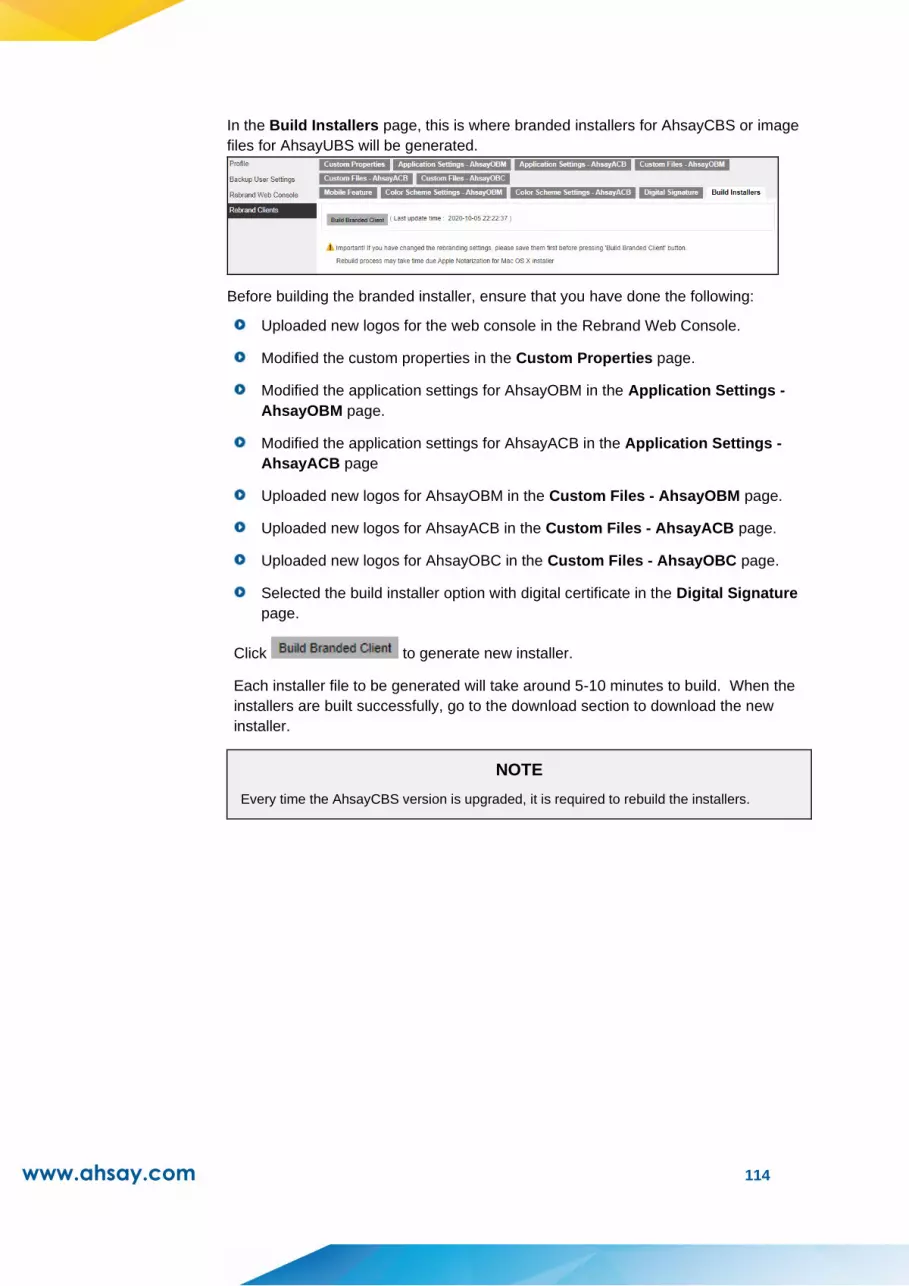
www.ahsay.com 114
In the Build Installers page, this is where branded installers for AhsayCBS or image
files for AhsayUBS will be generated.
Before building the branded installer, ensure that you have done the following:
Uploaded new logos for the web console in the Rebrand Web Console.
Modified the custom properties in the Custom Properties page.
Modified the application settings for AhsayOBM in the Application Settings -
AhsayOBM page.
Modified the application settings for AhsayACB in the Application Settings -
AhsayACB page
Uploaded new logos for AhsayOBM in the Custom Files - AhsayOBM page.
Uploaded new logos for AhsayACB in the Custom Files - AhsayACB page.
Uploaded new logos for AhsayOBC in the Custom Files - AhsayOBC page.
Selected the build installer option with digital certificate in the Digital Signature
page.
Click to generate new installer.
Each installer file to be generated will take around 5-10 minutes to build. When the
installers are built successfully, go to the download section to download the new
installer.
NOTE
Every time the AhsayCBS version is upgraded, it is required to rebuild the installers.

www.ahsay.com 115
Export/Import System Users
The export function can export the branded images, and branded properties that is set in
the Rebrand Web Console and Rebrand Clients into a JSON format file. If you need to
apply the branding to other sub admin users, you may import the branded JSON file back
to the user.
The Import and Export buttons are available to Admin and Sub Admin users only. They
are found at the bottom right corner of the screen.
Import Button
Export Button
Delete a system user
1. Check the box in front of the system user to be deleted.
2. Click , in the message prompt that will appear click to delete the
system user.
3. Click to save.
NOTE
Do not forget to click to save the settings, otherwise the account will not be deleted.
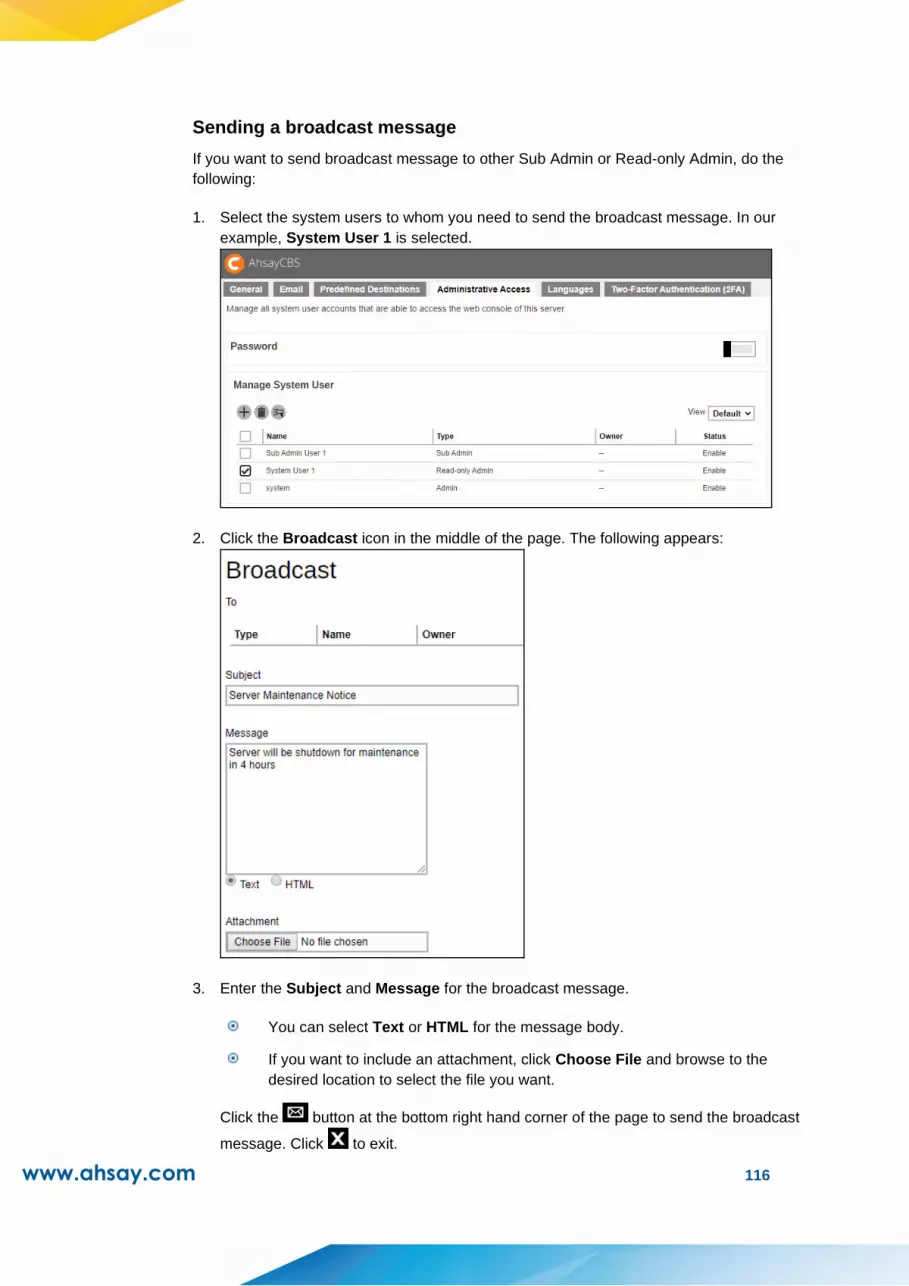
www.ahsay.com 116
Sending a broadcast message
If you want to send broadcast message to other Sub Admin or Read-only Admin, do the
following:
1. Select the system users to whom you need to send the broadcast message. In our
example, System User 1 is selected.
2. Click the Broadcast icon in the middle of the page. The following appears:
3. Enter the Subject and Message for the broadcast message.
You can select Text or HTML for the message body.
If you want to include an attachment, click Choose File and browse to the
desired location to select the file you want.
Click the button at the bottom right hand corner of the page to send the broadcast
message. Click to exit.

www.ahsay.com 117
Enabling two-factor authentication
If you want to enable the two-factor authentication of several system users, do the
following:
1. Select 2FA in the View filter. This option is only available if Two-Factor Authentication
has been enabled and setup in System Settings > Basic > Two-Factor Authentication
(2FA) tab.
2. Select the system user you want to enable 2FA.
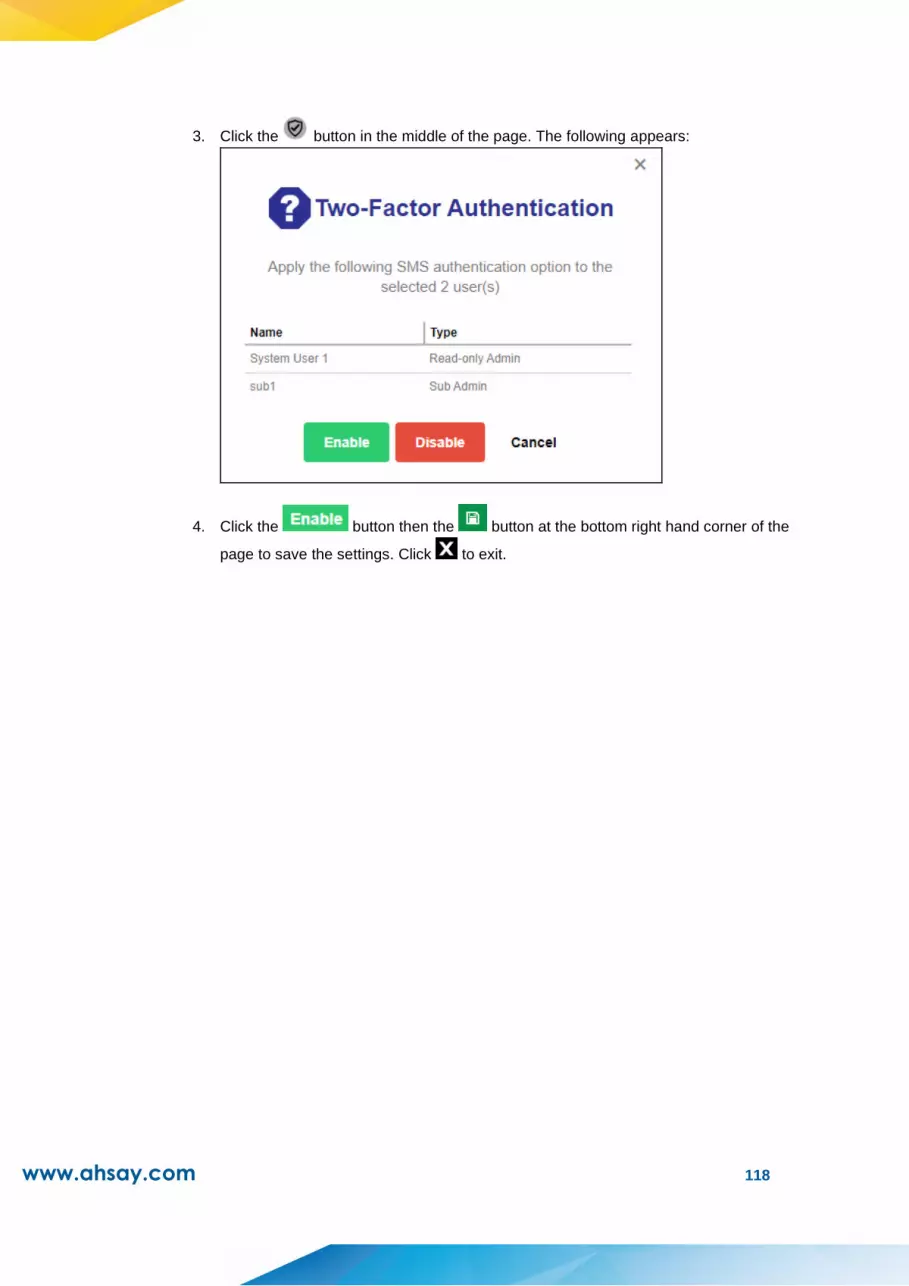
www.ahsay.com 118
3. Click the button in the middle of the page. The following appears:
4. Click the button then the button at the bottom right hand corner of the
page to save the settings. Click to exit.
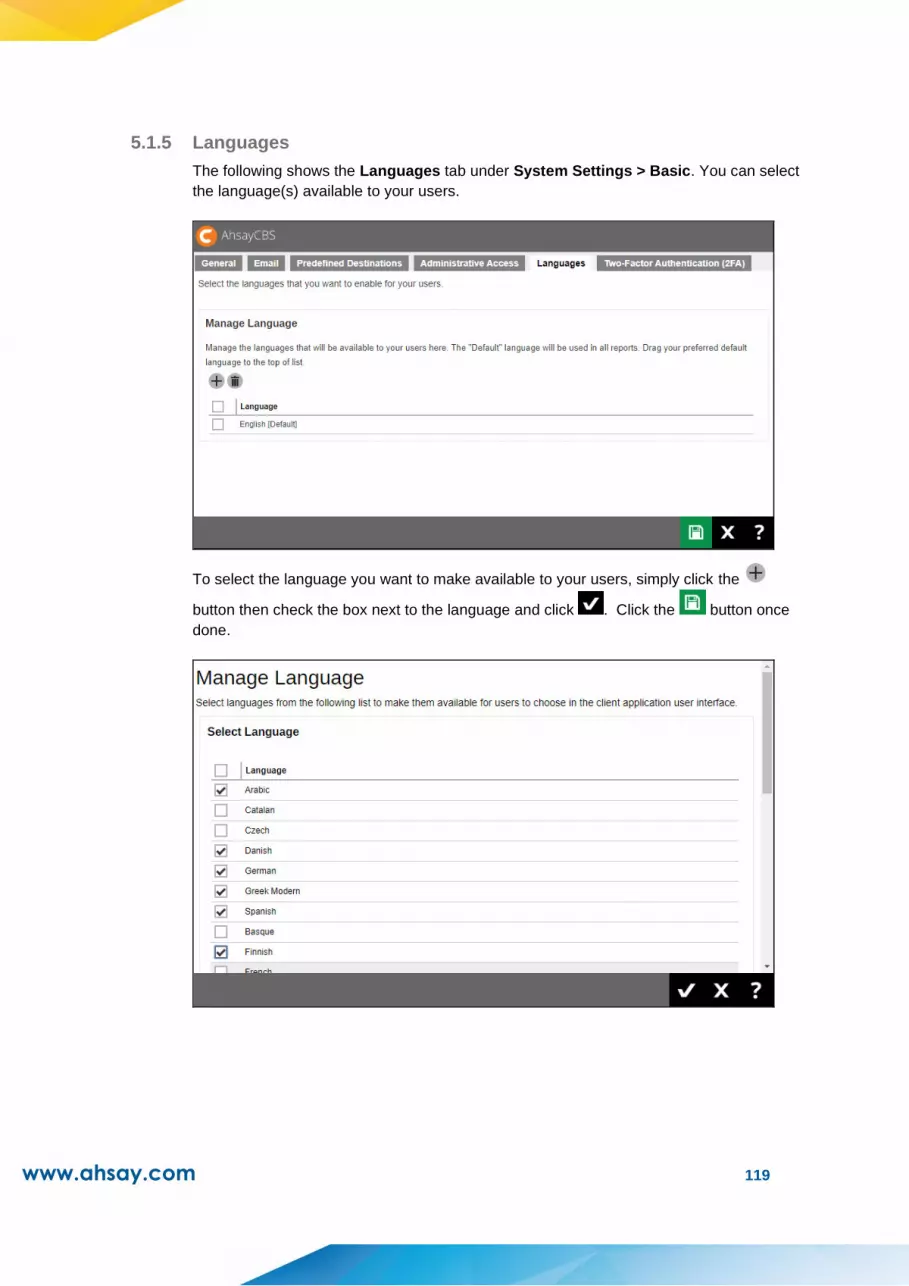
www.ahsay.com 119
5.1.5 Languages
The following shows the Languages tab under System Settings > Basic. You can select
the language(s) available to your users.
To select the language you want to make available to your users, simply click the
button then check the box next to the language and click . Click the button once
done.

www.ahsay.com 120
The available languages are:
English (default)
Arabic Catalan
Czech Danish German
Greek Modern Spanish Basque
Finnish French Hebrew
Hungarian Indonesian Italian
Japanese Korean Lithuanian
Dutch Norwegian Polish
Portuguese (Brazil)
Portuguese (Portugal) Russian
Slovenian Swedish Thai (Western digits)
Turkish Vietnamese Chinese (Simplified)
Chinese (Traditional)
NOTE
To change the default language settings for the AhsayCBS web console, simply drag your
preferred default language to the top of the list.
For newly installed AhsayCBS v8.1, the only language available is English. You need to
manually add the languages that will be made available to your users. See instructions on how
to add languages above.

www.ahsay.com 121
5.1.6 Two-Factor Authentication
For AhsayCBS v8.5.0.0 and onwards, there will be two options available for two-factor
authentication which are the following:
Mobile Authentication
Mobile Authentication feature is introduced to provide two-factor authentication during
login for added security. During login, aside from providing the normal Ahsay
password, an additional step will need to be completed to finish the login steps.
Users have two options once this feature is enabled to complete the login:
Accept the notification request sent to the Ahsay Mobile app or use a time-based
one-time password code.
Provide the time-based one-time password code generated by a third-party
authenticator app. Examples of these apps are Google Authenticator, Microsoft
Authenticator, LastPass Authenticator etc.
Twilio Credentials Verification
This option will only be available to legacy clients who are currently using Twilio
Credentials Verification on AhsayCBS v8.3.0.30 to 8.3.6.x and have upgraded to
AhsayCBS v8.5.0.0 or above. Users of Twilio Credentials Verification may continue
using this on AhsayCBS v8.5.0.0 or above. After the upgrade, settings of Twilio
Credentials Verification will be automatically migrated.
As Twilio Credentials Verification has been replaced with Mobile Authenticaiton
starting from AhsayCBS v8.5.0.0, for users who have not setup Twilio Credentials
Verification in pre-AhsayCBS v8.5.0.0 versions, this option will not be available once
you upgrade to AhsayCBS v8.5.0.0 or above.
For legacy Twilio clients, only one of the options for two-factor authentication may be
enabled. It is not possible to enable both Mobile Authentication and Twilio Credentials
Verification at the same time. Either continue using Twilio Credentials Verification or switch
to Mobile Authentication.
Once the two-factor authentication switch to Mobile Authentication is confirmed, the Twilio
Credentials Verification will be permanently deleted from AhsayCBS and you will no longer
be able to re-enable this feature.
If the “Require Two-Factor Authentication for user logon” is enabled, on the next login on all
AhayOBM/AhsayACB v8.5.0.0 or above clients or AhsayCBS web console, the user will be
required to register a mobile device for the new Mobile Authentication 2FA, otherwise they
will not be allowed to proceed with the login.
NOTE
To enhance security, the recovery email feature for Twilio users has been removed for
AhsayCBS v8.5.0.0 or above.

www.ahsay.com 122
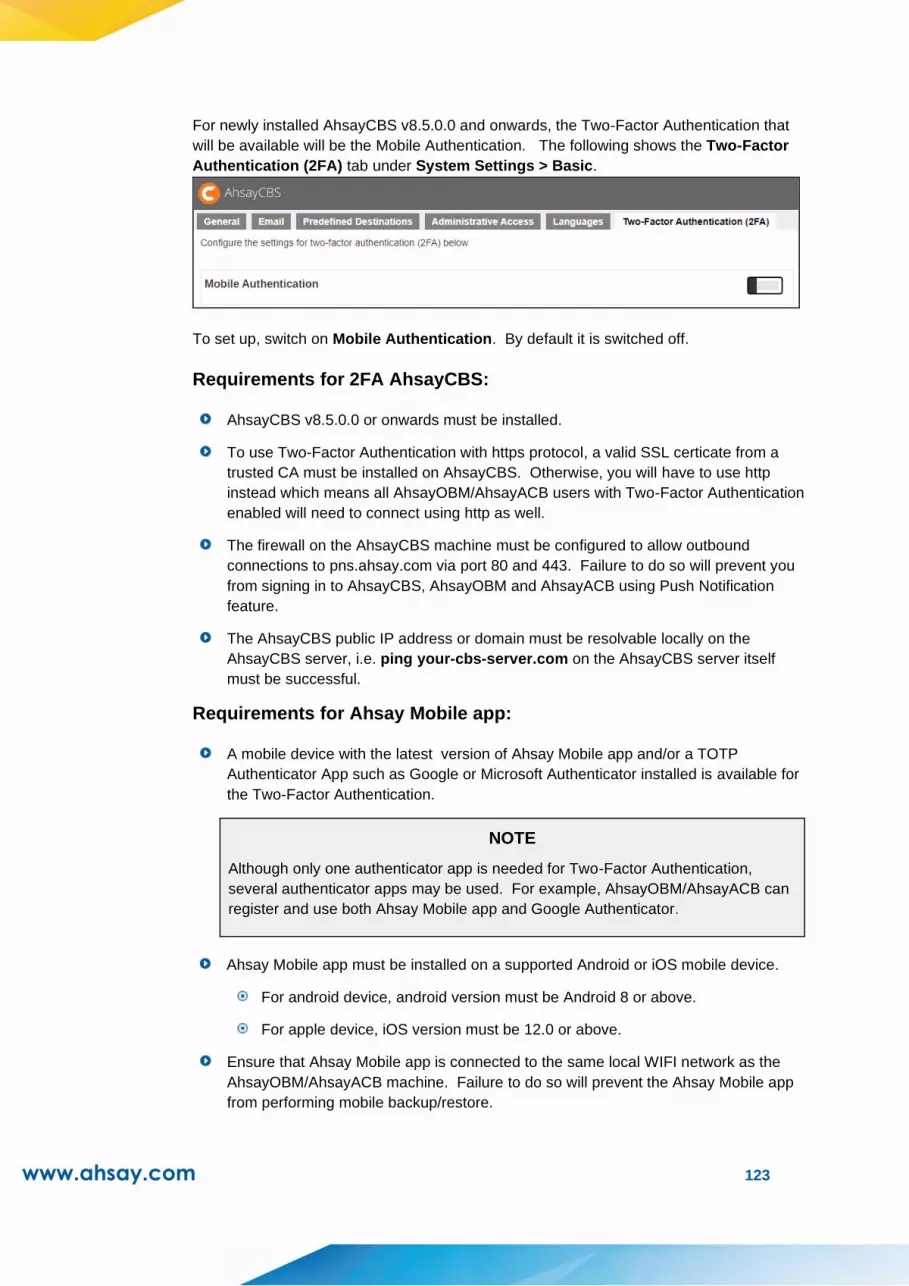
www.ahsay.com 123
For newly installed AhsayCBS v8.5.0.0 and onwards, the Two-Factor Authentication that
will be available will be the Mobile Authentication. The following shows the Two-Factor
Authentication (2FA) tab under System Settings > Basic.
To set up, switch on Mobile Authentication. By default it is switched off.
Requirements for 2FA AhsayCBS:
AhsayCBS v8.5.0.0 or onwards must be installed.
To use Two-Factor Authentication with https protocol, a valid SSL certicate from a
trusted CA must be installed on AhsayCBS. Otherwise, you will have to use http
instead which means all AhsayOBM/AhsayACB users with Two-Factor Authentication
enabled will need to connect using http as well.
The firewall on the AhsayCBS machine must be configured to allow outbound
connections to pns.ahsay.com via port 80 and 443. Failure to do so will prevent you
from signing in to AhsayCBS, AhsayOBM and AhsayACB using Push Notification
feature.
The AhsayCBS public IP address or domain must be resolvable locally on the
AhsayCBS server, i.e. ping your-cbs-server.com on the AhsayCBS server itself
must be successful.
Requirements for Ahsay Mobile app:
A mobile device with the latest version of Ahsay Mobile app and/or a TOTP
Authenticator App such as Google or Microsoft Authenticator installed is available for
the Two-Factor Authentication.
NOTE
Although only one authenticator app is needed for Two-Factor Authentication,
several authenticator apps may be used. For example, AhsayOBM/AhsayACB can
register and use both Ahsay Mobile app and Google Authenticator.
Ahsay Mobile app must be installed on a supported Android or iOS mobile device.
For android device, android version must be Android 8 or above.
For apple device, iOS version must be 12.0 or above.
Ensure that Ahsay Mobile app is connected to the same local WIFI network as the
AhsayOBM/AhsayACB machine. Failure to do so will prevent the Ahsay Mobile app
from performing mobile backup/restore.

www.ahsay.com 124
The Ahsay Mobile app or third-party authenticator app must be registered with
AhsayOBM and AhsayACB.
AhsayOBM and AhsayACB must be connected to the internet.
The mobile device must have a valid mobile service and be able to receive SMS
notifications.
The mobile device must have a functioning camera for scanning QR code to register
2FA.
To use push notification for Two-Factor Authentication with the Ahsay Mobile app, the
mobile device must have an internet connection.
Ensure to Allow Notification on the Ahsay Mobile app for your mobile devices.
Limitations:
Not supported for AhsayCBS API type accounts.
For Replication, both sending and receiving are not covered.
For Redirector, both hosting and joining are not covered,
2FA will not work in AhsayOBM and AhsayACB earlier than v8.5.0.0.
Not supported in AhsayOBM running on Synology and QNAP NAS.
Not supported in Linux CLI and FreeBSD CLI.
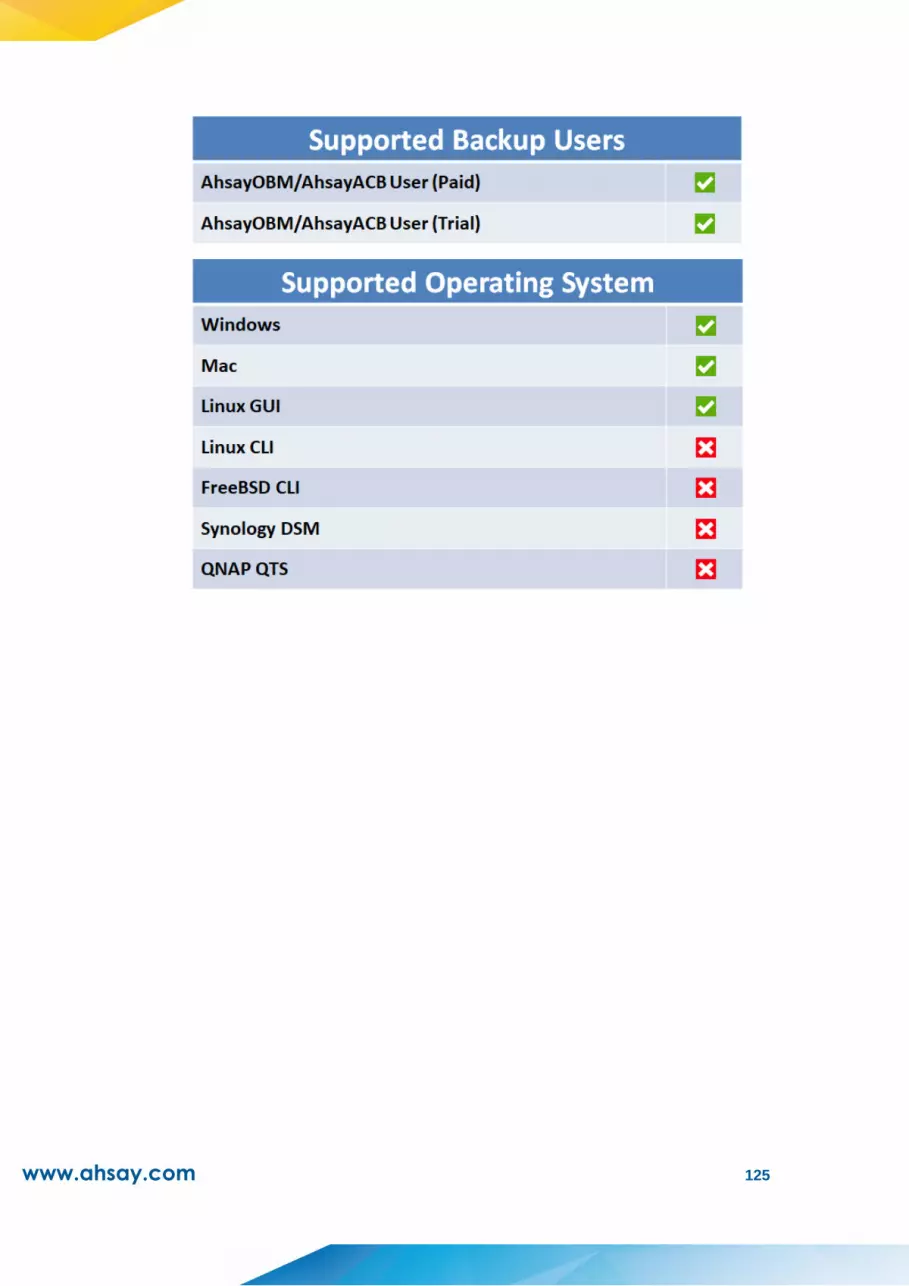
www.ahsay.com 125
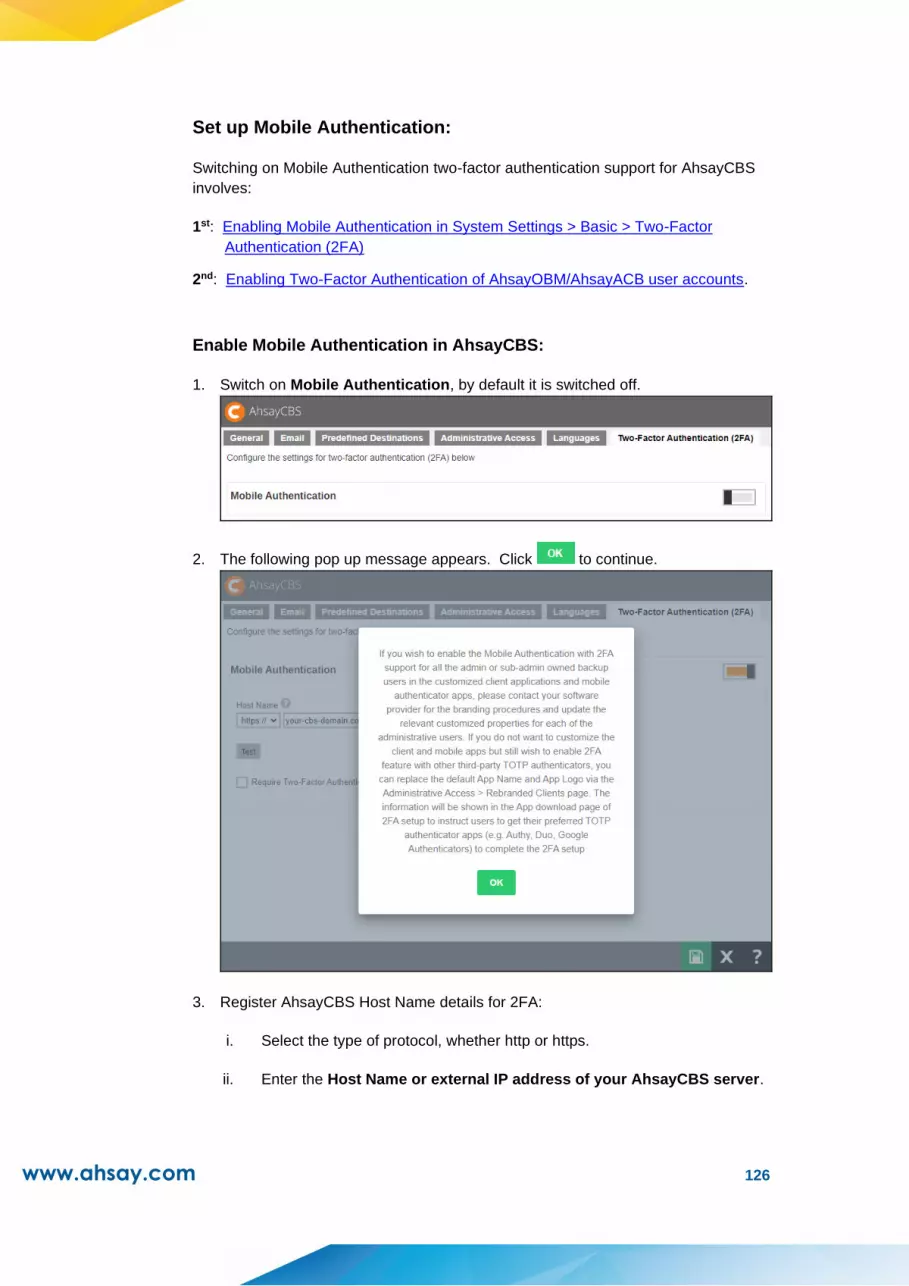
www.ahsay.com 126
Set up Mobile Authentication:
Switching on Mobile Authentication two-factor authentication support for AhsayCBS
involves:
1st: Enabling Mobile Authentication in System Settings > Basic > Two-Factor
Authentication (2FA)
2nd: Enabling Two-Factor Authentication of AhsayOBM/AhsayACB user accounts.
Enable Mobile Authentication in AhsayCBS:
1. Switch on Mobile Authentication, by default it is switched off.
2. The following pop up message appears. Click to continue.
3. Register AhsayCBS Host Name details for 2FA:
i. Select the type of protocol, whether http or https.
ii. Enter the Host Name or external IP address of your AhsayCBS server.

www.ahsay.com 127
NOTE
The host name must be a FQDN (Fully Qualified Domain Name) which consists
of the host name and domain name or an external IP address.
iii. Select the port used by AhsayCBS, for example 80 for http or 443 for https.
Example: https://your-cbs-domain.com
NOTE
To use Two-Factor Authentication with https protocol, a valid SSL certificate from a trusted CA
must be installed on AhsayCBS. Otherwise, you will have to use http instead which means all
AhsayOBM/AhsayACB users with Two-Factor Authentication enabled will need to connect
using http as well.
4. Click on to verify. A confirmation message will be displayed once the verification
is done.
5. Optional: Check the box if it is mandatory for system users to login using two-factor
authentication.
6. Click to save.

www.ahsay.com 128
Enable Two-Factor Authentication of AhsayOBM/AhsayACB user accounts:
There are three ways to enable two-factor authentication of AhsayOBM/AhsayACB users:
The two-factor authentication can be enabled per individual AhsayOBM/AhsayACB
user account. To do this please refer to Managing Backup User > User Profile for
instructions.
It can also be enabled for several AhsayOBM/AhsayACB user accounts at once,
please refer to Manage Backup User > Enable / Disable Two-Factor Authentication for
instructions.
Or be enabled for all AhsayOBM/AhsayACB user accounts which can be done by
enabling Require Two-Factor Authentication for user logon setting in Backup /
Restore > Users, Groups & Policies > Policy Group > %policy name% > User
Settings > Two-Factor Authentication.
Once enabled, on the next login for all AhsayOBM/AhsayACB v8.5.0.0 or above
clients which support Mobile Authentication 2FA or AhsayCBS web console user login,
will be required to register a mobile device for the new Mobile Authentication 2FA.
Otherwise, they will not be allowed to proceed with the login.
Here are examples of the next login in AhsayCBS web console after Require Two-
Factor Authentication for user logon has been enabled.
Depending on the App Download Page Settings, the screen that will be displayed may
be either of the two:
This is the default screen which has instructions to download Ahsay Mobile from the
Apple App Store / Google Play Store.

www.ahsay.com 129
Or
For branded application, this will be the screen, which has instructions to download
the mobile app by entering the URL provided in your device’s browser or you can also
scan the QR code by clicking link.
While these are the examples for AhsayOBM/AhsayACB:
The default screen which has instructions to download Ahsay Mobile from the Apple
App Store / Google Play Store.
Or

www.ahsay.com 130
The branded application screen, which has instructions to download the mobile app by
entering the URL provided in your device’s browser or you can also scan the QR code
by clicking link.
NOTE
Although the 2FA setting have been setup on the AhsayCBS server, you have to enable 2FA for
each AhsayOBM/AhsayACB user account before they can use it. For more information please
refer to Managing Backup User > User Profile. To enable it for several AhsayOBM/AhsayACB
user accounts at once please refer to Manage Backup User > Enable / Disable Two-Factor
Authentication for instructions. To enable it for all AhsayOBM/ACB user accounts please refer
to step 6 above for details. For instructions on how to enable 2FA for AhsayCBS system user
please refer to Enabling two-factor authentication.
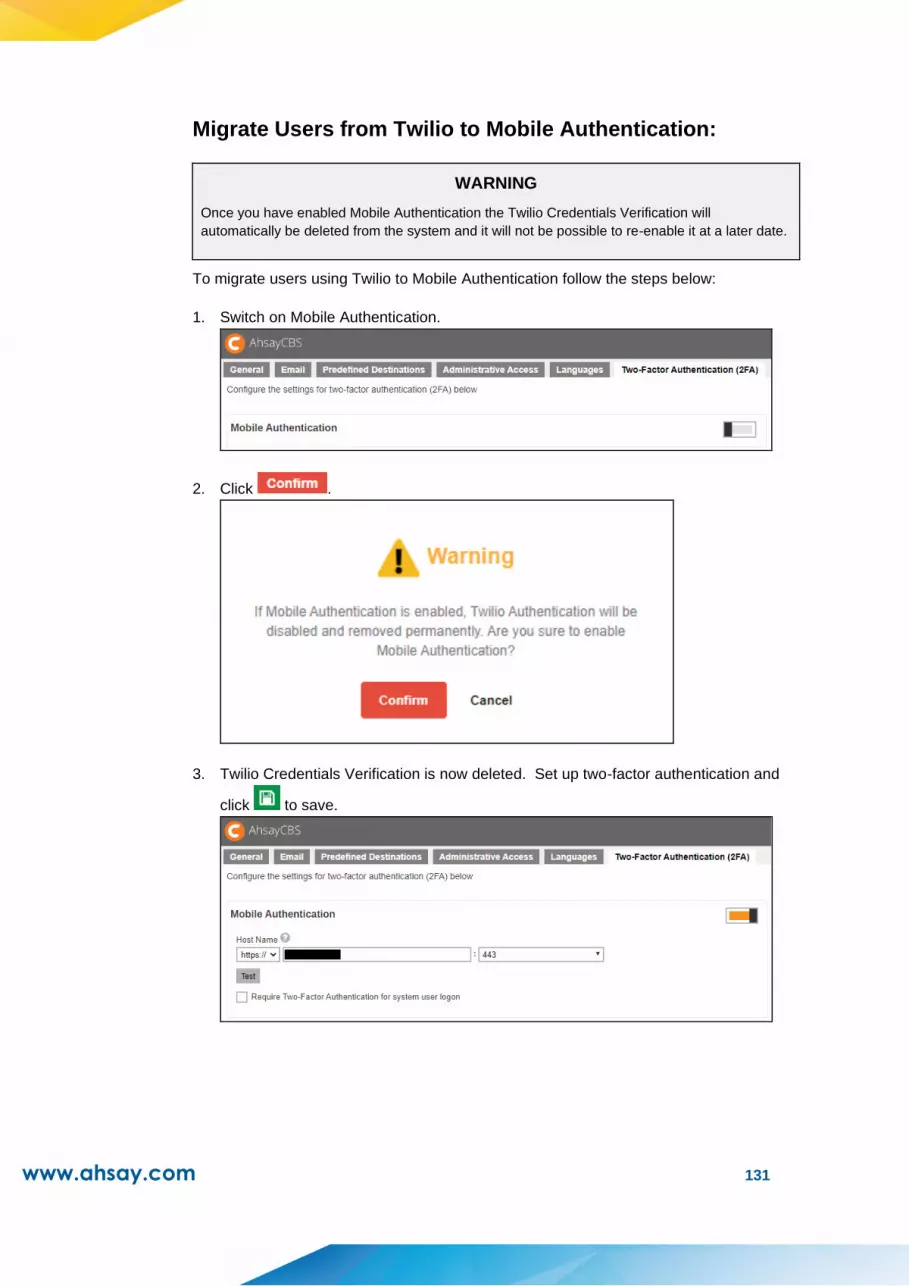
www.ahsay.com 131
Migrate Users from Twilio to Mobile Authentication:
WARNING
Once you have enabled Mobile Authentication the Twilio Credentials Verification will
automatically be deleted from the system and it will not be possible to re-enable it at a later date.
To migrate users using Twilio to Mobile Authentication follow the steps below:
1. Switch on Mobile Authentication.
2. Click .
3. Twilio Credentials Verification is now deleted. Set up two-factor authentication and
click to save.
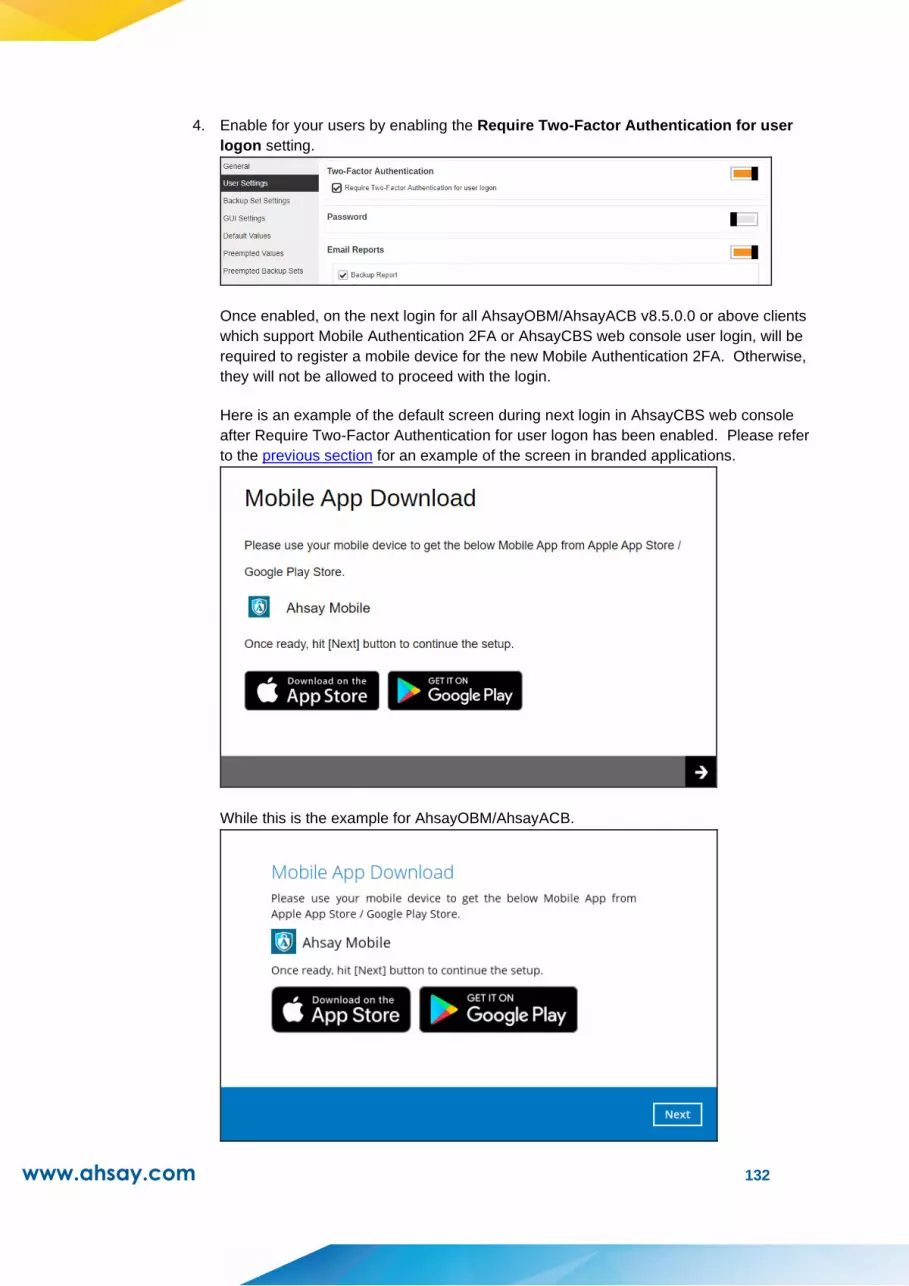
www.ahsay.com 132
4. Enable for your users by enabling the Require Two-Factor Authentication for user
logon setting.
Once enabled, on the next login for all AhsayOBM/AhsayACB v8.5.0.0 or above clients
which support Mobile Authentication 2FA or AhsayCBS web console user login, will be
required to register a mobile device for the new Mobile Authentication 2FA. Otherwise,
they will not be allowed to proceed with the login.
Here is an example of the default screen during next login in AhsayCBS web console
after Require Two-Factor Authentication for user logon has been enabled. Please refer
to the previous section for an example of the screen in branded applications.
While this is the example for AhsayOBM/AhsayACB.
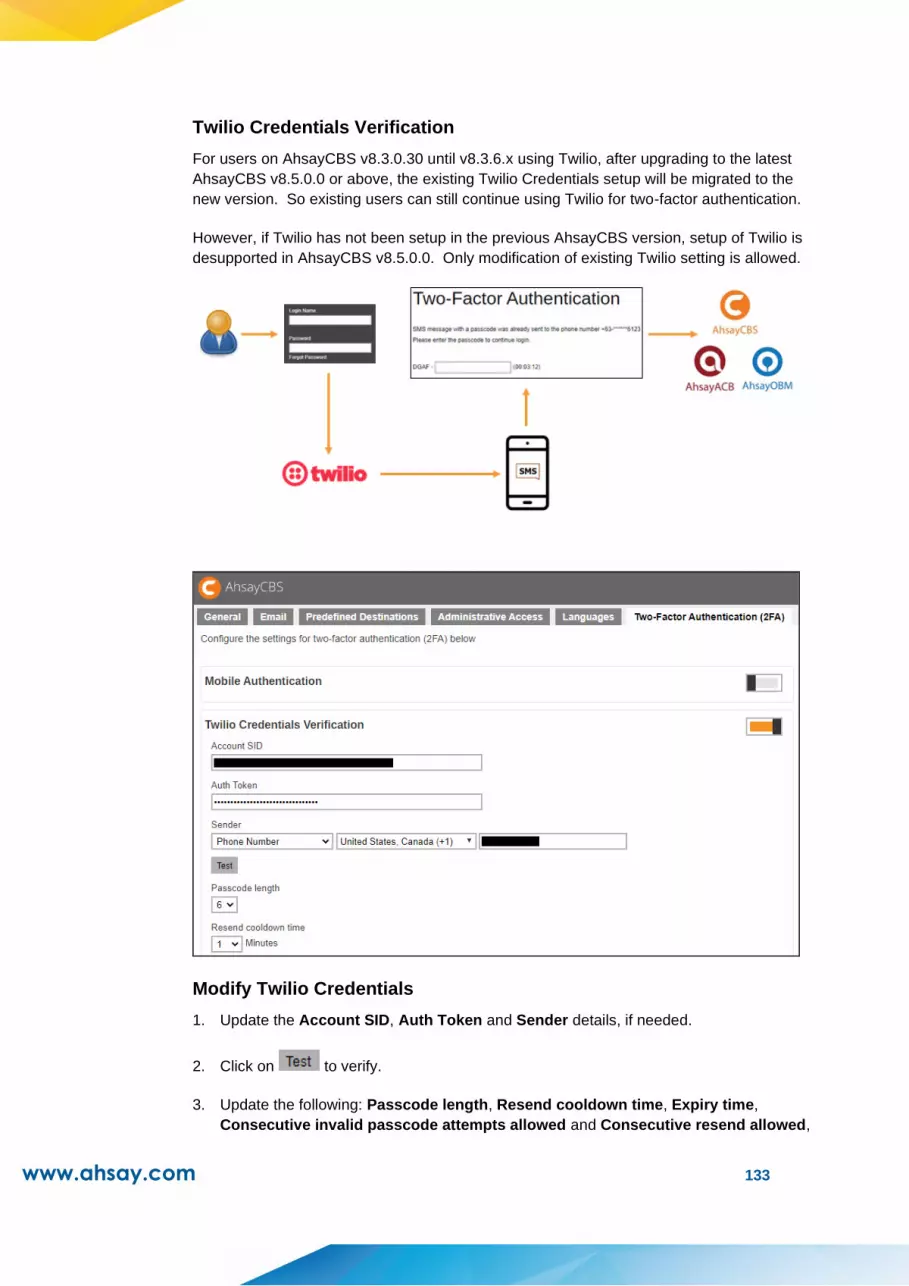
www.ahsay.com 133
Twilio Credentials Verification
For users on AhsayCBS v8.3.0.30 until v8.3.6.x using Twilio, after upgrading to the latest
AhsayCBS v8.5.0.0 or above, the existing Twilio Credentials setup will be migrated to the
new version. So existing users can still continue using Twilio for two-factor authentication.
However, if Twilio has not been setup in the previous AhsayCBS version, setup of Twilio is
desupported in AhsayCBS v8.5.0.0. Only modification of existing Twilio setting is allowed.
Modify Twilio Credentials
1. Update the Account SID, Auth Token and Sender details, if needed.
2. Click on to verify.
3. Update the following: Passcode length, Resend cooldown time, Expiry time,
Consecutive invalid passcode attempts allowed and Consecutive resend allowed,

www.ahsay.com 134
if needed.
4. Check the box if you will allow legacy clients to skip SMS authentication. Legacy
clients are AhsayOBM users who has an old version of AhsayOBM installed who
upgraded to the latest version but has not run any backup yet. If this box is not
checked, the user will be directed to the 2FA page.
5. Click to save.
NOTE
Although the 2FA setting have been setup on the AhsayCBS server, you have to enable 2FA for
each AhsayOBM/AhsayACB user account before they can use it. For more information please
refer to Managing Backup User > User Profile.
WARNING
The Allow legacy client to skip SMS authentication box must be checked if you are using
AhsayOBM/AhsayACB version older than 8.3.0.30 or else you will not be able to log in and your
scheduled and continuous backups will not run. All functions requiring access and authentication
to AhsayCBS will also not work. Like starting a manual backup from the System Tray in
AhsayOBM/AhsayACB in Windows. Running AhsayOBM/AhsayACB batch files in Windows.
Running AhsayOBM scripts in Linux/FreeBSD. Running AhsayOBM/AhsayACB scripts in
MacOS. AhsayCBS server initiated backups on AhsayOBM/AhsayACB. And Auto Upgrade
(AUA) on AhsayOBM/AhsayACB. For more details please refer to Appendix C of the AhsayOBM
Quick Start Guide for Windows and Appendix J of the AhsayOBM Quick Start Guide for Linux
(CLI).

www.ahsay.com 135
WARNING
If you switch on Mobile Authentication or switch off Twilio Credentials Verification, Twilio
Credentials Verification will be deleted from AhsayCBS permanently. It will not be possible to re-
enable Twilio Credentials Verification at a later date.
Here are the warning messages you will receive:
➢ Switch on Mobile Authentication
You will be left with Mobile Authentication only.
➢ Switch off Twilio Credentials Verification
Only a switched off Mobile Authentication will be left.

www.ahsay.com 136

www.ahsay.com 137
5.2 Advanced Backup Server Configuration
To manage your AhsayCBS advanced backup server configurations, simply click the
Advanced icon under System Settings from your AhsayCBS environment.
You can perform the following advanced configurations on your Backup Server:
Restore data that has been automatically saved to Ahsay License Server.
Configure settings for proxy connection
Publish system and error messages to third party monitoring tools
Retrieve system files for troubleshooting
Configure run time options such as Java heap size, thread stack, etc.
There are 5 tabs under the Advanced system settings section, each of which is described
below.
5.2.1 Auto Save
The following shows the Auto Save tab under System Settings > Advanced. Default
setting of Auto Save feature is disabled, you can slide the switch to the right to enable it.
When this feature is enabled, the system will automatically save all the settings in this
server to the Ahsay License Server daily at 6:00AM, so you can restore those settings in
the future when needed.
NOTE
Please kindly note that:
➢ The Auto Save feature is NOT supported for either Evaluation license keys or the expired
license keys. If the license is expired, neither backup nor restore will be supported, and
there will be “LicenseError” in “Monitoring > Backup / Restore Logs > Activities Log”
showing “[disableConfArchival] License maintenance and support period has expired”.
➢ Maximum of 30 snapshots will be created and saved in the Ahsay License Server. When
over 30, the 31st snapshot will overwrite the 1st one. The size limit for each snapshot
uploaded to Ahsay License Server is 50MB, there will be “RoutineJobError” of “The size of
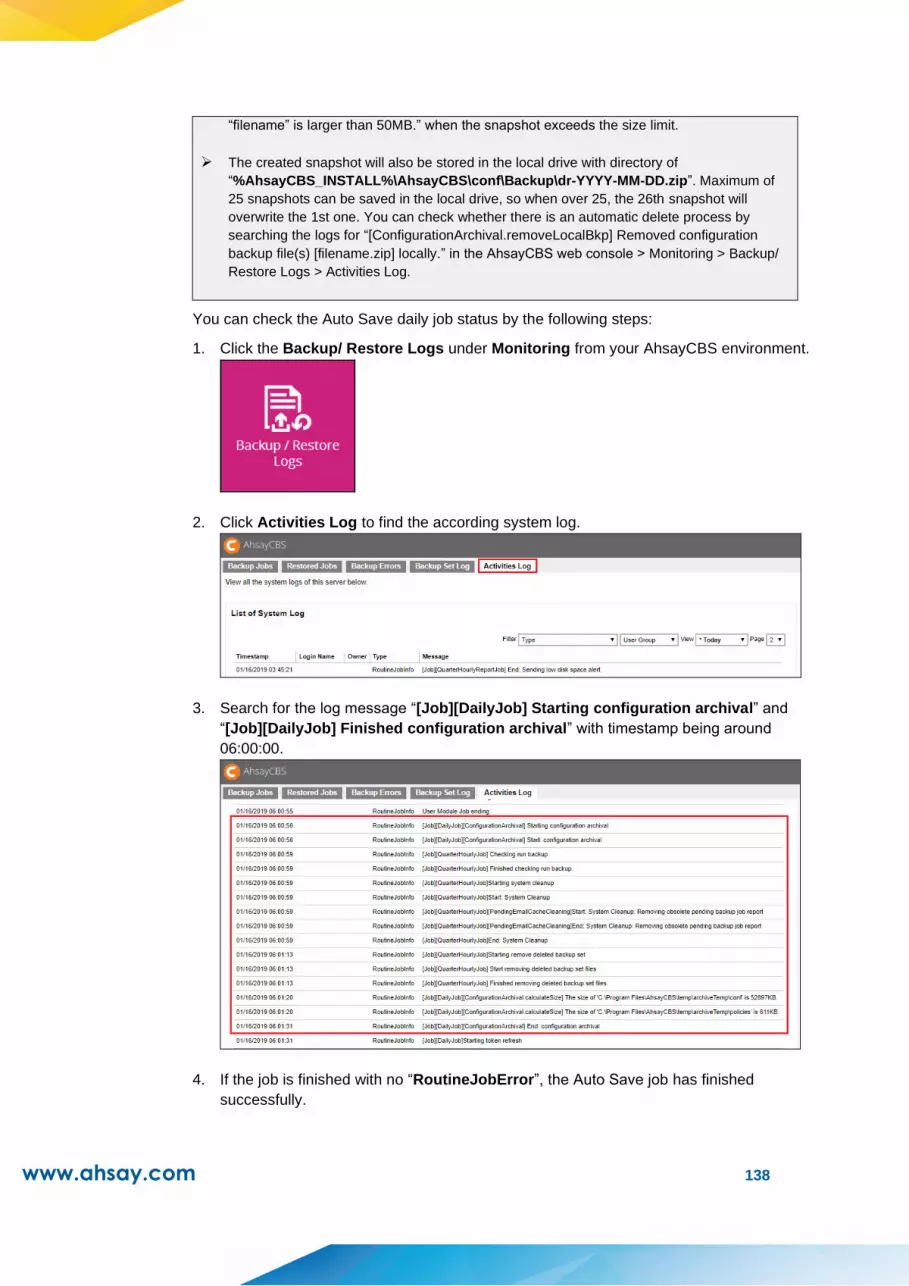
www.ahsay.com 138
“filename” is larger than 50MB.” when the snapshot exceeds the size limit.
➢ The created snapshot will also be stored in the local drive with directory of
“%AhsayCBS_INSTALL%\AhsayCBS\conf\Backup\dr-YYYY-MM-DD.zip”. Maximum of
25 snapshots can be saved in the local drive, so when over 25, the 26th snapshot will
overwrite the 1st one. You can check whether there is an automatic delete process by
searching the logs for “[ConfigurationArchival.removeLocalBkp] Removed configuration
backup file(s) [filename.zip] locally.” in the AhsayCBS web console > Monitoring > Backup/
Restore Logs > Activities Log.
You can check the Auto Save daily job status by the following steps:
1. Click the Backup/ Restore Logs under Monitoring from your AhsayCBS environment.
2. Click Activities Log to find the according system log.
3. Search for the log message “[Job][DailyJob] Starting configuration archival” and
“[Job][DailyJob] Finished configuration archival” with timestamp being around
06:00:00.
4. If the job is finished with no “RoutineJobError”, the Auto Save job has finished
successfully.

www.ahsay.com 139
The following system configuration files will be saved on the cloud daily by the auto save
system job.
Server Configuration
Description Path
Connector setting file /conf/server.xml
CBS option files /conf/afc.opt
/conf/cbs.opt
Runtime setting file /conf/cbssvc.ini
Default certificate files /conf/ca.crt
/conf/ssl.crt
/conf/ssl.key
CBS setting files /conf/cbs.json
Redirector configuration files /conf/lfsConfig.xml
OBS Configuration
Description Path
Backup Server setting files /conf/obs.json
License files /conf/lic.json
/conf/license.xml
CBS/OBS option files /conf/cbs.opt
Autoupdate index /conf/autoUpdate.bdb
Replication configuration files /conf/rpsSend.xml
RPS Configuration
Description Path
Replication configuration files /conf/rps.xml
/conf/rpsRecv.xml
/conf/rps-recv.json
RDR Configuration
Description Path
Redirector configuration files /conf/rdr.xml
/conf/rdr.json
License files /conf/rdr-lic.json
/conf/rdr-license.xml
OBS User Profile
Description Path
Users’ profile /conf/users.xml
Others
Description Path
Branding directory /conf/Branding/*.*
User group definition /system/obs/policies/userGroup.xml
Policy group definition /system/obs/policies/policyList.xml
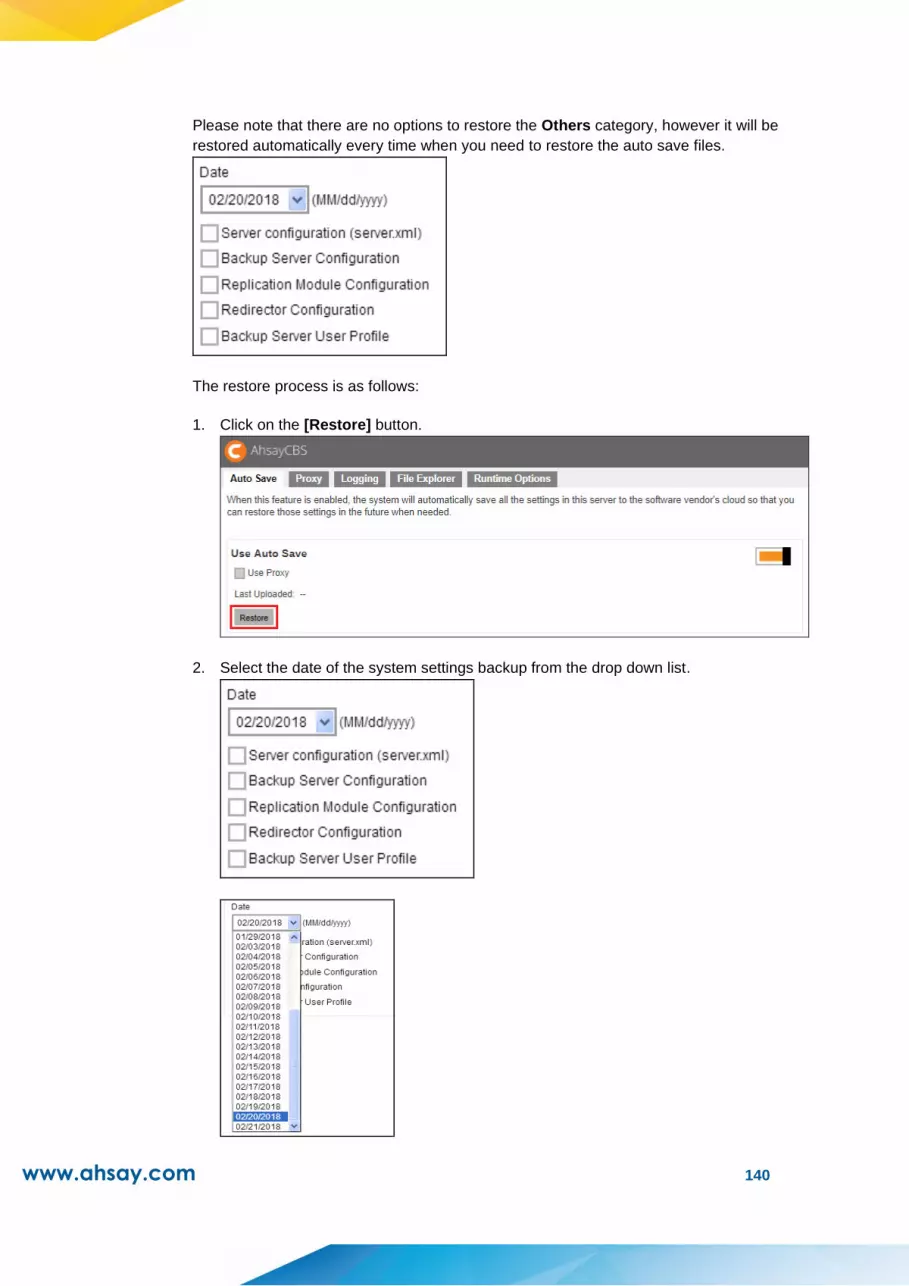
www.ahsay.com 140
Please note that there are no options to restore the Others category, however it will be
restored automatically every time when you need to restore the auto save files.
The restore process is as follows:
1. Click on the [Restore] button.
2. Select the date of the system settings backup from the drop down list.
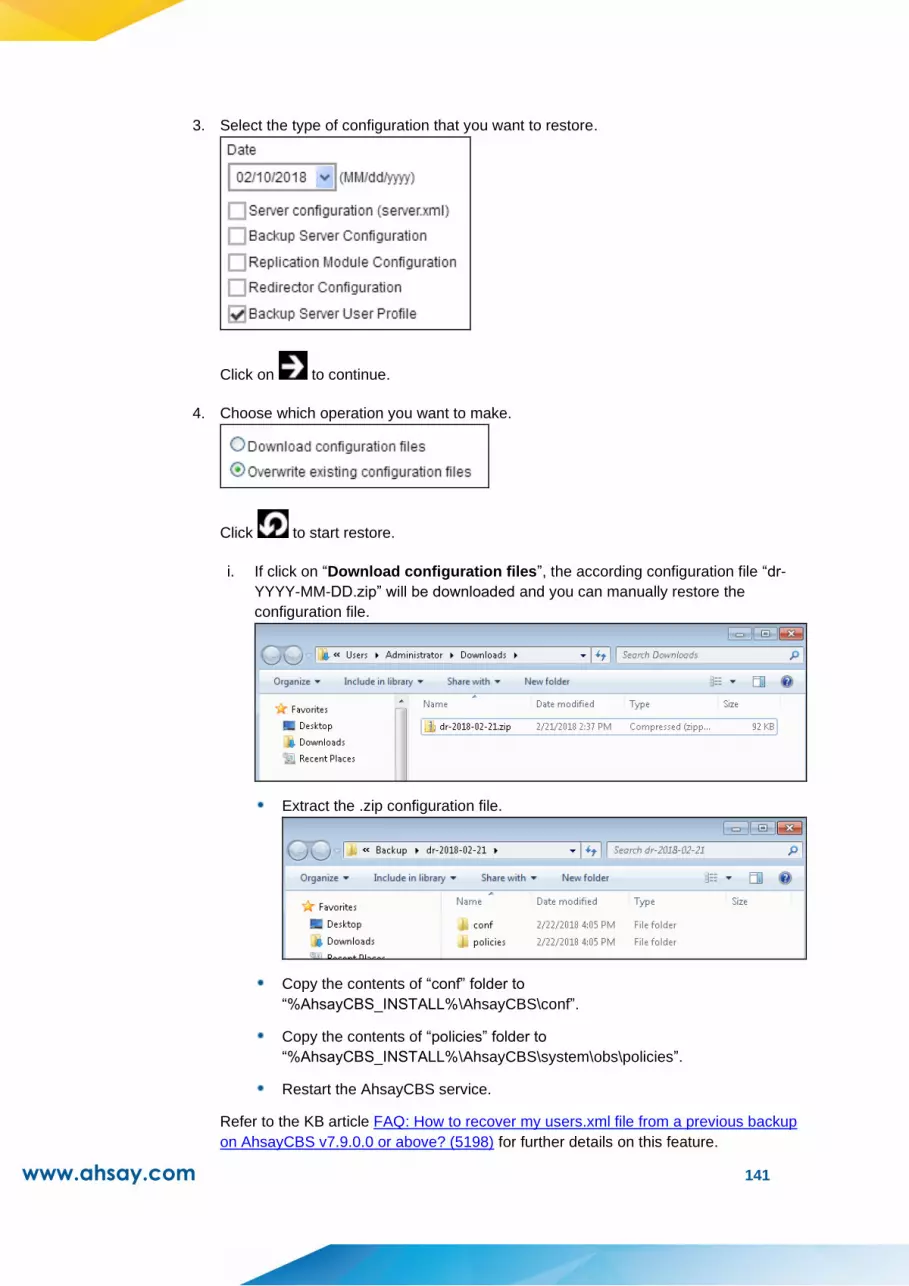
www.ahsay.com 141
3. Select the type of configuration that you want to restore.
Click on to continue.
4. Choose which operation you want to make.
Click to start restore.
i. If click on “Download configuration files”, the according configuration file “dr-
YYYY-MM-DD.zip” will be downloaded and you can manually restore the
configuration file.
Extract the .zip configuration file.
Copy the contents of “conf” folder to
“%AhsayCBS_INSTALL%\AhsayCBS\conf”.
Copy the contents of “policies” folder to
“%AhsayCBS_INSTALL%\AhsayCBS\system\obs\policies”.
Restart the AhsayCBS service.
Refer to the KB article FAQ: How to recover my users.xml file from a previous backup
on AhsayCBS v7.9.0.0 or above? (5198) for further details on this feature.

www.ahsay.com 142
ii. If click on “Overwrite existing configuration files”, the backed up configuration
file will overwrite the existing configuration file.
WARNING
Please kindly note that if Overwrite existing configuration files option is chosen, the
backed up configuration file will automatically overwrite the existing configuration file
and the process cannot be canceled.
After restore process, the interface will skip back to the previous page. Click
and to save and exit.
Click Administration Logs under Monitoring.
Click Activities Log to find the according system log.
Search for the log message “Starting configuration recovery” and
“Finished configuration recovery” with timestamp being starting restore
operation time, which means the restore process is finished successfully.
Restart the AhsayCBS service.
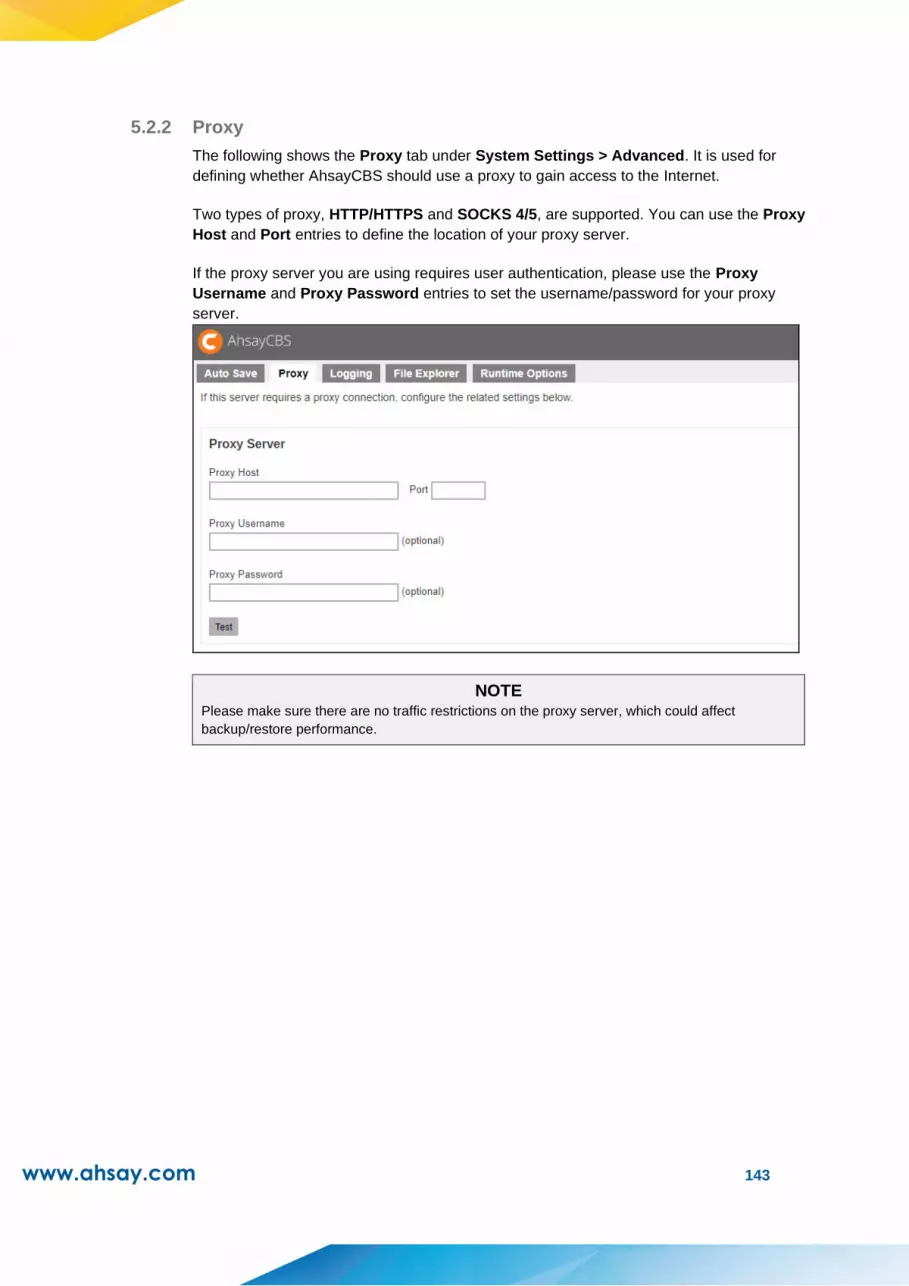
www.ahsay.com 143
5.2.2 Proxy
The following shows the Proxy tab under System Settings > Advanced. It is used for
defining whether AhsayCBS should use a proxy to gain access to the Internet.
Two types of proxy, HTTP/HTTPS and SOCKS 4/5, are supported. You can use the Proxy
Host and Port entries to define the location of your proxy server.
If the proxy server you are using requires user authentication, please use the Proxy
Username and Proxy Password entries to set the username/password for your proxy
server.
NOTE
Please make sure there are no traffic restrictions on the proxy server, which could affect
backup/restore performance.
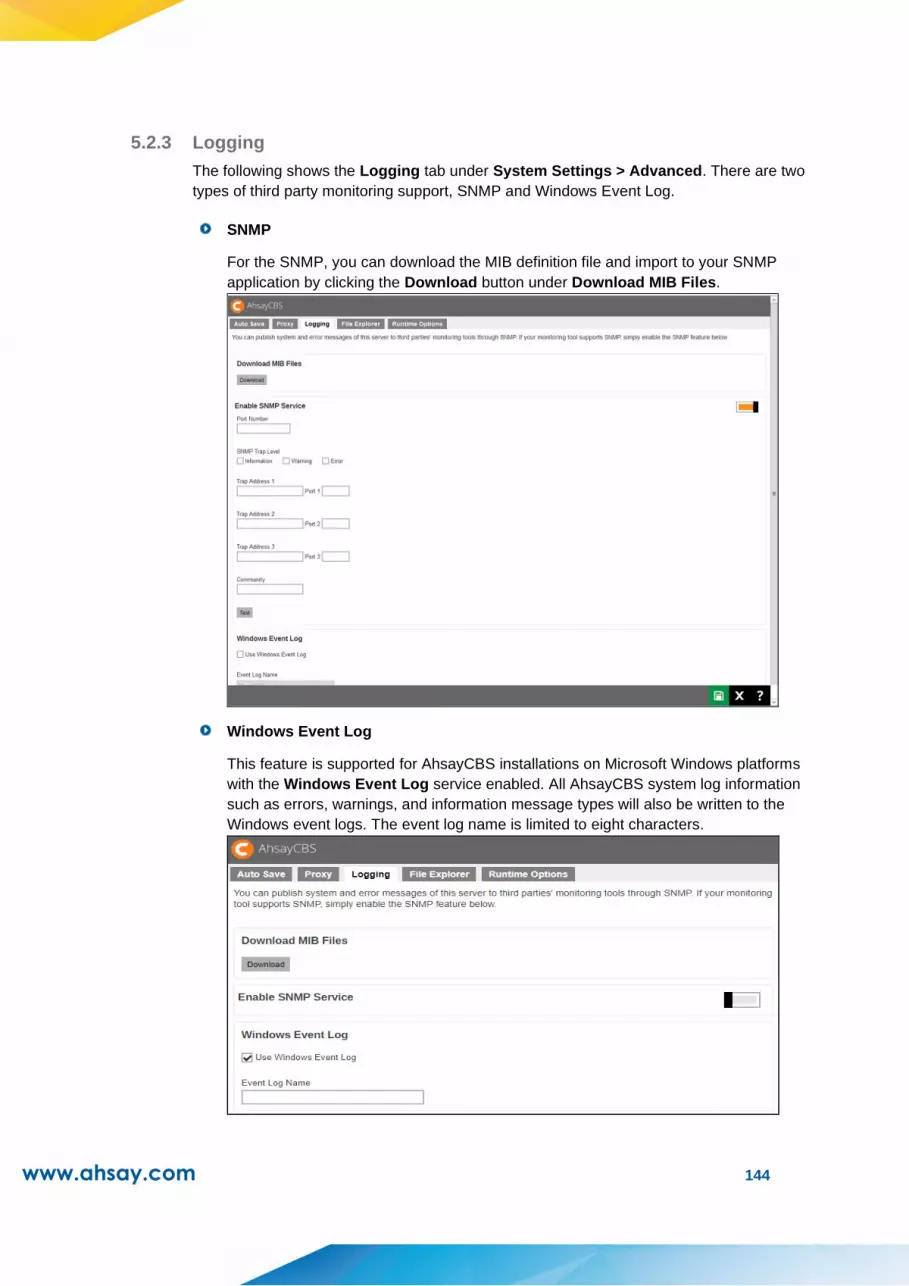
www.ahsay.com 144
5.2.3 Logging
The following shows the Logging tab under System Settings > Advanced. There are two
types of third party monitoring support, SNMP and Windows Event Log.
SNMP
For the SNMP, you can download the MIB definition file and import to your SNMP
application by clicking the Download button under Download MIB Files.
Windows Event Log
This feature is supported for AhsayCBS installations on Microsoft Windows platforms
with the Windows Event Log service enabled. All AhsayCBS system log information
such as errors, warnings, and information message types will also be written to the
Windows event logs. The event log name is limited to eight characters.

www.ahsay.com 145
The backup server’s administrator can view the log entries using the Windows event
viewer.

www.ahsay.com 146
5.2.4 File Explorer
The following shows the File Explorer tab under System Settings > Advanced. If
administrator or support staff needs to retrieve system related files on the AhsayCBS server
for troubleshooting, they can make use of the File Explorer feature to download log or
configuration files from the server without having to login remotely using RDP or SSH.
The File Explorer feature is limited to access files/folder related to AhsayCBS:
AhsayCBS Application Home.
AhsayCBS System Home.
AhsayCBS User Home(s).
All files download via the AhsayCBS File Explorer tab are compressed by default.

www.ahsay.com 147
5.2.5 Runtime Options
The following shows the Runtime Options tab under System Settings > Advanced. It
allows administrators to modify Java options such as Java heap size (maximum and
minimum), thread stack size and IP allowed to access the AhsayCBS management console.
It also has a feature to prevent session hijacking, if enabled, will force the current user
session to be logged out immediately if it detects that the IP address used in the session
has changed from the original IP address used upon log in.
By default the maximum Java heap size is 2048MB, there are no restrictions on IP address
access to AhsayCBS web console and the prevent session hijacking is enabled.
Although for a Windows machine, you can disable this using a local computer to sign in to
AhsayCBS. For Linux/FreeBSD/AhsayUBS machines, follow instructions below on how to
disable prevent session hijiacking.
The following are the installation path of AhsayCBS:
In Linux/FreeBSD the path is /usr/local/cbs.
In AhsayUBS the path is /ubs/mnt/eslsfw/obsr.

www.ahsay.com 148
1. Stop the AhsayCBS service.
# cd /usr/local/cbs/bin
# sh shutdown.sh
2. In your %Application Home%/conf folder, locate the cbs.json file and open it using a
text editor. Change the value of “PreventSessionHijackingEnabled” to false.
# vi /usr/local/cbs/conf/cbs.json
{"MidButtons":[],"Xmx":"2048","PasswordBean":{"MinLength":6,"RegexD
escription":"Numbers (0-9), Uppercase, Lowercase, Minimum length of
6
characters.","AgeOption":"DAYS","History":true,"IncludeMinLength":t
rue,"Type":"DEFAULT","Regex":"^(?=.*?[a-z])(?=.*?[A-Z])(?=.*?[0-
9]).{6,}$","IncludeNumbers":true,"Enable":false,"IncludeLowercase":
true,"IncludeUppercase":true,"Class":"com.ahsay.cbs.obs.policy.user
Settings.EditUserSettingsBean$PasswordBean","Age":90,"IncludeSpecCh
ars":true},"SnmpTrapWarn":false,"SysUsersCol":[],"Destinations":[],
"LastAnnouncement":0,"Classname":"com.ahsay.cbs.system.config.EditC
onfigBean","UseEventLog":false,"SslCertificatesCol":[],"LastAlert":
0,"ArchivalDatesCol":[],"ConfigRecoveryMode":"auto","SnmpStartIp":"
","ReportSettingsBean":{"SendLowDiskSpaceReminderAlertReport":true,
"SendLowDestinationSpaceReminderAlertReport":true,"LowDestinationSp
aceAlertThreshold":90,"LowDestinationSpaceReminderThreshold":80,"Cl
ass":"com.ahsay.cbs.system.config.EditConfigBean$ReportSettingsBean
","LowDiskSpaceAlertThreshold":90,"SendAdministratorConsolidatedRep
ort":true,"LowDiskSpaceReminderThreshold":80,"ThresholdList":[]},"C
onfigRecoveryPath":"/usr/local/cbs/system/obs/dr","EnableConfigReco
very":true,"WebServersCol":[{"FormattedProtocol":"HTTP -
NIO","Ip":"0.0.0.0","SslCertificateId":"","Port":"80","MaxThreads":
"200","EnableProtocolList":true,"MaxConn":"10000","MaxKeepAliveReq"
:"9999","RxBufSize":"25188","ConnUploadTimeout":"900000","ConnTimeo
ut":"10000","DisplayName":"0.0.0.0:80","TxBufSize":"43800","Class":
"com.ahsay.cbs.system.config.EditConfigBean$WebServerBean","Id":0,"
Protocol":"http"},{"FormattedProtocol":"HTTPS -
NIO","Ip":"0.0.0.0","SslCertificateId":"${catalina.base}/conf/ssl.k
ey","Port":"443","MaxThreads":"200","EnableProtocolList":true,"MaxC
onn":"10000","MaxKeepAliveReq":"9999","RxBufSize":"25188","ConnUplo
adTimeout":"900000","ConnTimeout":"10000","DisplayName":"0.0.0.0:44
3","TxBufSize":"43800","Id":1,"Protocol":"https"}],"Xrs":true,"WebS
ervers":[{"FormattedProtocol":"HTTP - NIO", "Ip":"0.0.0.0",
"SslCertificateId":"","Port":"80","MaxThreads":"200","EnableProtoco
lList":true,"MaxConn":"10000","MaxKeepAliveReq":"9999","RxBufSize":
"25188","ConnUploadTimeout":"900000","ConnTimeout":"10000","Display
Name":"0.0.0.0:80","TxBufSize":"43800","Class":"com.ahsay.cbs.syste
m.config.EditConfigBean$WebServerBean","Id":0,"Protocol":"http"},{"
FormattedProtocol":"HTTPS - NIO", "Ip":"0.0.0.0","SslCertificate
Id":"$ {catalina.base}/conf/ssl.key", "Port":"443","MaxThreads":
"200",”EnableProtocolList":true,"MaxConn":"10000","MaxKeepAliveReq"
:"9999","RxBufSize":"25188","ConnUploadTimeout":"900000","ConnTimeo
ut":"10000","DisplayName":"0.0.0.0:443","TxBufSize":"43800","Id":1,
"Protocol":"https"}],"PreventSessionHijackingEnabled":false,"ProxyH
ost":"","LeftButtons":[],"Gdpr":"","SmtpProtocols":[],"RecoveryDate
":"","Rebrand":false,"NewSnmpTrapRecv":{"TrapPort":"","Enable":fals
e,"Host":"","Class":"com.ahsay.cbs.system.config.EditConfigBean$Snm
pTrapRecvBean"},"SystemReportLanguage":"en","Hostname":"","EnableSn
mp":false,"SslCertificates":[],"SmtpServersCol":[],"SysUsers":[],"P
roxyExcludeHostsCol":[],"LastAnnouncementPubDate":0,"SnmpEndIp":"",
www.ahsay.com 149
"NewSmtpServer":{"SmtpTestConnResult":"","SecureProtocol":false,"Po
rt":"","Auth":false,"AuthPwd":"","AuthUser":"","SmtpTestConnTime":"
-1", "Class":"com.ahsay.cbs.system.config.EditConfigBean$Server
Bean","Protocol":"","Url":"","FomattedSmtpTestConnTime":""},"SnmpTr
apInfo":false,"ProxyExcludeHosts":[],"SoftwareUpdateUsername":"","S
nmpTrapRecv3":{"TrapPort":"","Enable":false,"Host":"","Class":"com.
ahsay.cbs.system.config.EditConfigBean$SnmpTrapRecvBean"},"Xss":"38
4","LastArchivalDate":"","Tabs":[],"QnapAvailable":true,"AdminConta
cts":[],"SnmpTrapRecv1":{"TrapPort":"","Enable":false,"Host":"","Cl
ass":"com.ahsay.cbs.system.config.EditConfigBean$SnmpTrapRecvBean"}
,"ProxyType":"HTTP","SnmpTrapRecv2":{"TrapPort":"","Enable":false,"
Host":"","Class":"com.ahsay.cbs.system.config.EditConfigBean$SnmpTr
apRecvBean"},"LastAnnounceBrandedPubDate":0,"AccessibilityListLastM
odified":1593773063342,"SnmpTrapErr":false,"SnmpPort":"161","Allowe
dIPOnServerOptions":[{"Class":"com.ahsay.cbs.system.config.EditConf
igBean$AllowedIPOnServerBean","To":"255.255.255.255","From":"0.0.0.
0"}],"ProxyUsername":"","LangOrderedListCol":[{"Value":"en","Class"
:"java.lang.String"}],"ProxySettings":{"ReadOnly":false,"Priority":
-1,"Port":"","Enabled":false,"Host":"","KeyName":"com.ahsay.obx.
cxp.cloud.ProxySettings","Type":"HTTP","Username":"","AllowMultiple
":false,"Content":"","Class":"com.ahsay.obx.cxp.cloud.ProxySettings
","ID":"","InheritParentAttribs":false,"Password":""},"Mfa":{"Class
":"com.ahsay.cbs.system.config.EditConfigBean$MFA","SmsVerification
":{"TwilioSettings":{"Sender":{"Type":"PHONE","Value":"","Class":"c
om.ahsay.cbs.system.config.EditConfigBean$MFA$Sender"},"AuthToken":
"","Class":"com.ahsay.cbs.system.config.EditConfigBean$MFA$TwilioSe
ttings","AccountSid":""},"ResendCooldownTime":1,"SendAllowed":5,"In
validPasscodeAllowed":5,"Enable":false,"ExpiryTime":5,"PasscodeLeng
th":6,"Class":"com.ahsay.cbs.system.config.EditConfigBean$MFA$SmsVe
rification","AllowLegacyClientToSkip":true}},"AllowedIPOnServerOpti
onsCol":[{"Class":"com.ahsay.cbs.system.config.EditConfigBean$Allow
edIPOnServerBean","To":"255.255.255.255","From":"0.0.0.0"}],"DebugO
ptions":[],"SystemHome":"/usr/local/cbs/system","AdminList":[{"Mobi
leQuota":-1,"Owner":"","BandwidthControlSettings":
{"SysPwd":"ggeRi1mrAu37jPPCb6q6sRyBRlz/VxUgHbso6jqZu0I=","SysUser":
"system","TsUpload":{"Class":"com.ahsay.afc.io.V"},"Upload":{"MaxTr
ansferUnitList":[],"MaxTransferUnit":"K","Enable":false,"Class":"co
m.ahsay.cbs.system.config.accounts.backupUser.EditBandwidthControlS
ettingsBean$BandwidthControlBean","MaxTransfer":100},"TsDownload":{
"Class":"com.ahsay.afc.io.V"},"Download":{"MaxTransferUnitList":[],
"MaxTransferUnit":"K","Enable":false,"Class":"com.ahsay.cbs.system.
config.accounts.backupUser.EditBandwidthControlSettingsBean$Bandwid
thControlBean","MaxTransfer":100},"FormReq":"Y"},"IsQnapAvailable":
true,"SecuritySettings":{"SysPwd":"ggeRi1mrAu37jPPCb6q6sRyBRlz/VxUg
Hbso6jqZu0I=","UserLockSettings":{"Class":"com.ahsay.obx.cxp.obs.Us
erLockSettings","LockedTime":-1,"LastFailureTime":-
1,"LoginFailureCount":0},"SysUser":"system","PhoneList":[],"Enable"
:false,"SendLimitSettings":{"LastSendTime":-1,"SendCount":0,
"Class":"com.ahsay.obx.cxp.obs.SendLimitSettings"},"RecoverySetting
s":{"Token":"","ExpiryTime":-
1,"Class":"com.ahsay.obx.cxp.obs.RecoverySettings"},"FormReq":"Y"},
"PasswordHistory":{"KeyName":"com.ahsay.obx.cxp.cloud.PasswordHisto
ry","ReadOnly":false,"SysPwd":"ggeRi1mrAu37jPPCb6q6sRyBRlz/VxUgHbso
6jqZu0I=","HistoryList":[{"KeyName":"com.ahsay.obx.cxp.cloud.Histor
yBean","ReadOnly":false,"AllowMultiple":true,"Priority":-
1,"Content":"","Class":"com.ahsay.obx.cxp.cloud.HistoryBean","Pwd":
"","InheritParentAttribs":false,"LastDisabledTime":-
1,"Password":"zczJ/8ee3cPzxoeC3Ofo+tiNzYvN7bmDkK++6pC/na6Cqb+i+KWhi

www.ahsay.com 150
6fjneg="},{"KeyName":"com.ahsay.obx.cxp.cloud.HistoryBean","ReadOnl
y":false,"AllowMultiple":true,"Priority":-1,"Content":"","Pwd":"",
"InheritParentAttribs":false,"LastDisabledTime":1593783275176,"Pass
word":"35P0wPfK9fbKx87shfCL69LQ6vDyh7WruruA8pKe/bG6rLWZ+LmS4uqbmeg=
"}],"SysUser":"/usr/local/cbs/conf/cbs.json" [noeol] 1L, 19677C
3. Start the AhsayCBS service.
# cd /usr/local/cbs/bin
# sh startup.sh
IMPORTANT
When editing the maximum heap size for AhsayCBS, ensure that there is sufficient memory
reserved for the operating system.
It is not recommended to set excessively high values for the maximum Java heap size, as
this could result in AhsayCBS performance issues during internal Java VM garbage
collection or memory recycling routines.
For changes in Java heap size setting the AhsayCBS service needs to be restarted before it
becomes effective.

www.ahsay.com 151
6 Managing Backup/Restore
6.1 Backup / Restore Basic Configuration
To manage your AhsayCBS backup/restore basic configurations, simply click the Basic icon
under Backup / Restore from your AhsayCBS environment.
You can perform the following configurations for Backup/Restore:
Configure user home directories.
Configure free trial settings.
Configure backup data migration settings.
Define maximum number of concurrent VMs permitted to be started using Run Direct on
AhsayCBS.
Configure Windows active directory integration settings.
There are 5 tabs under basic backup/restore configurations, each of which is described below.
6.1.1 User Home
The following shows the User Home tab under Backup / Restore > Basic. It is used for
configuring the user home directories for storing all the user data.
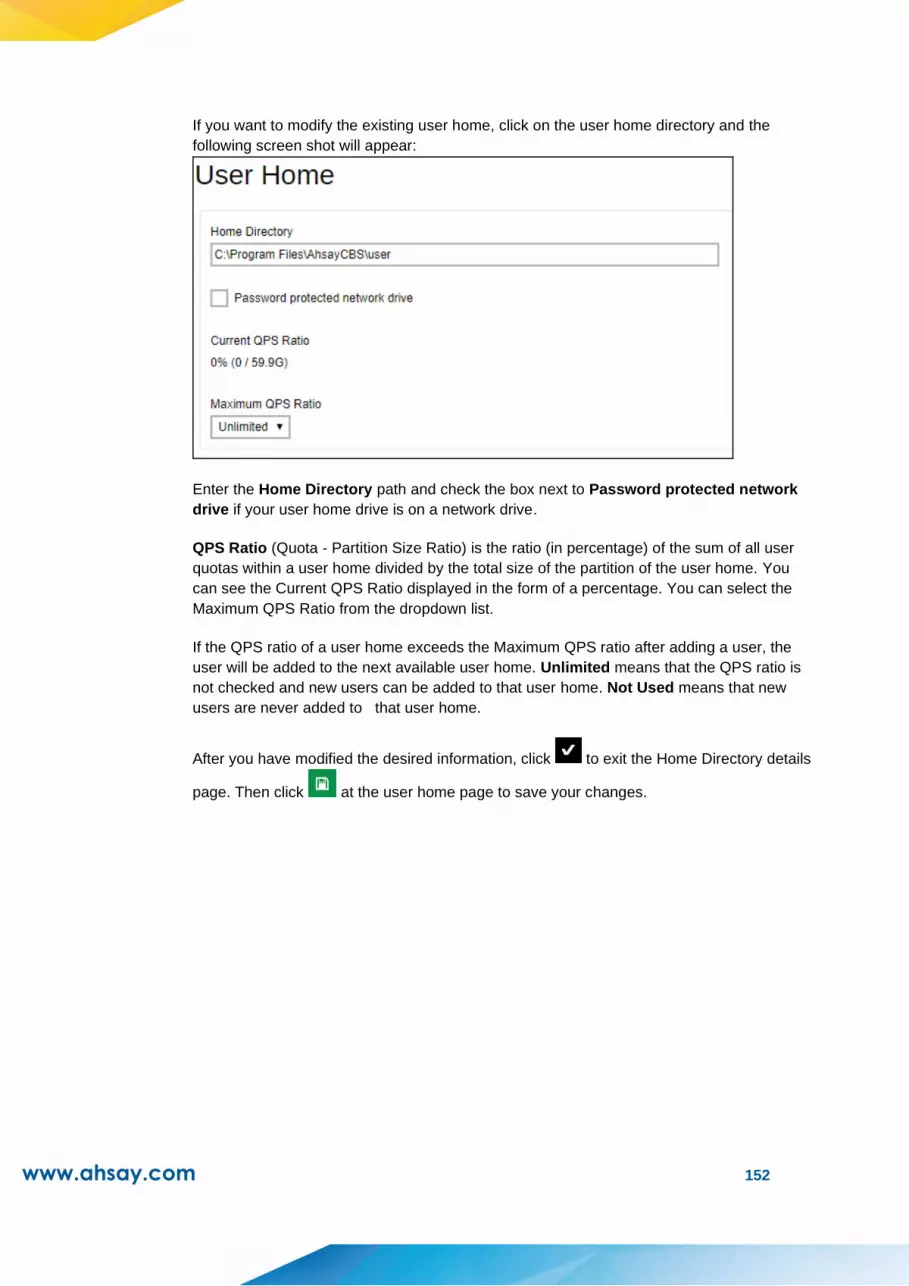
www.ahsay.com 152
If you want to modify the existing user home, click on the user home directory and the
following screen shot will appear:
Enter the Home Directory path and check the box next to Password protected network
drive if your user home drive is on a network drive.
QPS Ratio (Quota - Partition Size Ratio) is the ratio (in percentage) of the sum of all user
quotas within a user home divided by the total size of the partition of the user home. You
can see the Current QPS Ratio displayed in the form of a percentage. You can select the
Maximum QPS Ratio from the dropdown list.
If the QPS ratio of a user home exceeds the Maximum QPS ratio after adding a user, the
user will be added to the next available user home. Unlimited means that the QPS ratio is
not checked and new users can be added to that user home. Not Used means that new
users are never added to that user home.
After you have modified the desired information, click to exit the Home Directory details
page. Then click at the user home page to save your changes.

www.ahsay.com 153
6.1.2 Free Trial Options
The following shows the Free Trial Options tab under Backup / Restore > Basic. It
defines various free trial settings available in AhsayCBS.
Trial users do not count towards the maximum number of users allowed within AhsayCBS
under the paid software license, therefore it is possible to have an unlimited number of trial
users within AhsayCBS. However, each trial user is limited to the quota storage settings for
a period of maximum 90 days.
➢ To allow users to create a trial backup account from AhsayOBM or AhsayACB, please
enable the Enable Free Trial Registration option at the top of the page. If this feature
is unchecked, the option to register for a trial account will not be available to end users.
➢ The Destination and Quota defines the backup destination and maximum backup
storage quota for per destination of trial backup accounts upon registration.
Destination includes predefined and standard destination, and the quota settings for
free trial user account is independent of the quota settings in Group Policy. For the
backup destinations which are not listed under Quota tab, the quota storage assigned
for the destination is unlimited.
➢ The Add-on Modules option defines whether you want to allow trial users to have
different add-on modules.

www.ahsay.com 154
➢ The User will be suspended after <xx> days option under Settings for existing
free trial users defines the number of days after which the trial users will be
suspended. In our example, the period is 30 days, and the maximum value is 90 days.
➢ The Remove User <xx> days after registration option under Settings for existing
free trial users defines whether you want to remove trial backup users for certain
number of days after registration. In our example, you can use this option to tell
AhsayCBS to remove trial backup users from the system automatically after backup
users have registered for 60 days, and the maximum value is 180 days.
WARNING
If a PAID AhsayOBM/AhsayACB user account is changed to TRIAL this could also be
automatically removed by AhsayCBS if the account creation date exceeds the value set in
“Remove User <xx> days after registration”.
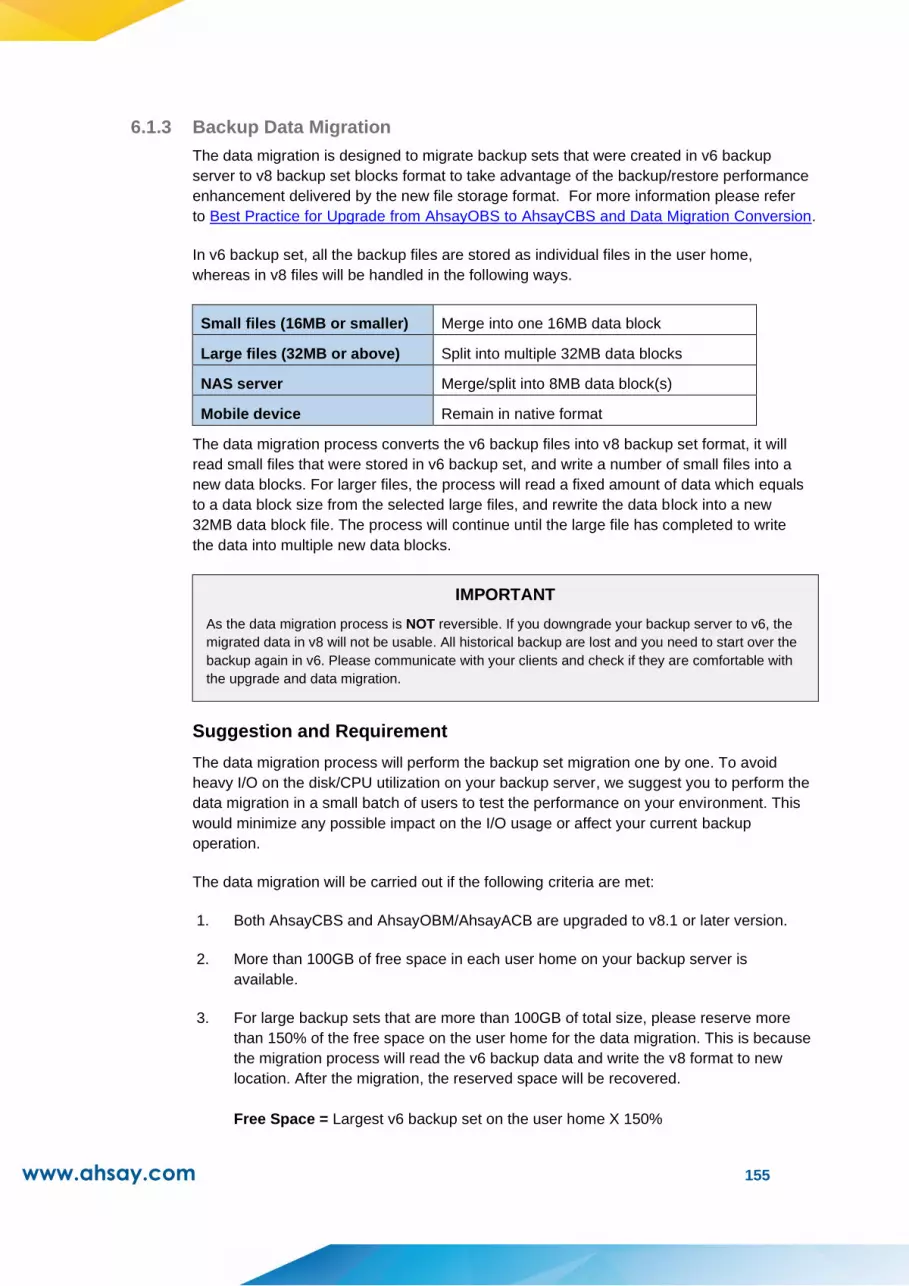
www.ahsay.com 155
6.1.3 Backup Data Migration
The data migration is designed to migrate backup sets that were created in v6 backup
server to v8 backup set blocks format to take advantage of the backup/restore performance
enhancement delivered by the new file storage format. For more information please refer
to Best Practice for Upgrade from AhsayOBS to AhsayCBS and Data Migration Conversion.
In v6 backup set, all the backup files are stored as individual files in the user home,
whereas in v8 files will be handled in the following ways.
Small files (16MB or smaller) Merge into one 16MB data block
Large files (32MB or above) Split into multiple 32MB data blocks
NAS server Merge/split into 8MB data block(s)
Mobile device Remain in native format
The data migration process converts the v6 backup files into v8 backup set format, it will
read small files that were stored in v6 backup set, and write a number of small files into a
new data blocks. For larger files, the process will read a fixed amount of data which equals
to a data block size from the selected large files, and rewrite the data block into a new
32MB data block file. The process will continue until the large file has completed to write
the data into multiple new data blocks.
IMPORTANT
As the data migration process is NOT reversible. If you downgrade your backup server to v6, the
migrated data in v8 will not be usable. All historical backup are lost and you need to start over the
backup again in v6. Please communicate with your clients and check if they are comfortable with
the upgrade and data migration.
Suggestion and Requirement
The data migration process will perform the backup set migration one by one. To avoid
heavy I/O on the disk/CPU utilization on your backup server, we suggest you to perform the
data migration in a small batch of users to test the performance on your environment. This
would minimize any possible impact on the I/O usage or affect your current backup
operation.
The data migration will be carried out if the following criteria are met:
1. Both AhsayCBS and AhsayOBM/AhsayACB are upgraded to v8.1 or later version.
2. More than 100GB of free space in each user home on your backup server is
available.
3. For large backup sets that are more than 100GB of total size, please reserve more
than 150% of the free space on the user home for the data migration. This is because
the migration process will read the v6 backup data and write the v8 format to new
location. After the migration, the reserved space will be recovered.
Free Space = Largest v6 backup set on the user home X 150%

www.ahsay.com 156
For example: If your largest backup set is 150GB backup set, please reserve at least
225GB of free space for the migration.
If these requirements are not met, the data migration will not be started. You may find the
following entry in the [Activities Log] available in your AhsayCBS, [Monitoring] ->
[Administration Logs]
E.g. MigrateV6DataError [Thread][Job][MigrateV6File]Error Migrating v6 data of user ... is
too big to be migrated to ...
By selecting the filter "MigrateV6DataError" from the filter drop down box, you can collect
the errors related to the data migration.
REMINDERS
1. If data replication has been turned on, after the v6 data migrated to the v8 format,
the replication will start to replicate new v8 format backup set to the replication
server or to a predefined destination
2. You may notice that the storage of that user will be doubled for a short period of
time. For example: the replicated v6 backup set is 10GB, after the data migration,
another 10GB will be used for replicating the new v8 format backup set. After the
synchronization is completed, there is a mechanism to clean up the old migrated v6
data automatically.
How to Perform the Data Migration
IMPORTANT
While a backup set is undergoing the data migration process, the following activities
pertaining to that particular backup set CANNOT be performed.
Data Integrity Check Space Freeing Up
Delete Data Delete Backup Set
That being the case, update of the backup set, such as backup schedule, backup
source, destination, etc., is still possible during the data migration process.
1. Upgrade both AhsayCBS and AhsayOBM/AhsayACB to version 8.1 or above.
2. Administrator needs to check if any backup set should be excluded in this data
migration operation. For example, when we need to limit the number of migration in a
small batch of backup sets, we can exclude some of the backup sets from the
interface. Click the “+” icon under the Enable Data Migration section to add the user(s)

www.ahsay.com 157
you wish to exclude from the migration.
3. Click at the bottom right corner to start the migration when you are ready.
4. Once the backup runs on the client machine, the index migration starts on the client
machine. When the index migration finished, the AhsayCBS will arrange the data
migration on the backend.
5. Administrator can check the migration activity through the Monitoring >
Administration Logs > Activities Log.
By selecting the filter "MigrateV6DataInfo" or "MigrateV6DataError" from the filter
drop down box, you can collect the logs related to the data migration.
6. When the data migration completed on a client's backup set. You will see the
following in the activities log.
MigrateV6DataInfo [Thread][Job][MigrateV6File] End: migrate v6
data.
7. On the next backup, that client will use the new index and new migrated data for the
backup operation. This will also trigger the backup server to remove old v6 backup
data.
NOTE
In case the index migration stops for any reason, on the next backup, the index migration
can resume from the last recorded progress.
For backup sets such as Exchange DAG, when one of the node triggered the index
migration when backup runs, all other nodes will wait for the first node to complete the
index migration, and all other nodes will reload the new index file.
During the old v6 backup data removal, the performance on the user home which stores
the v6 backup data could slow down.
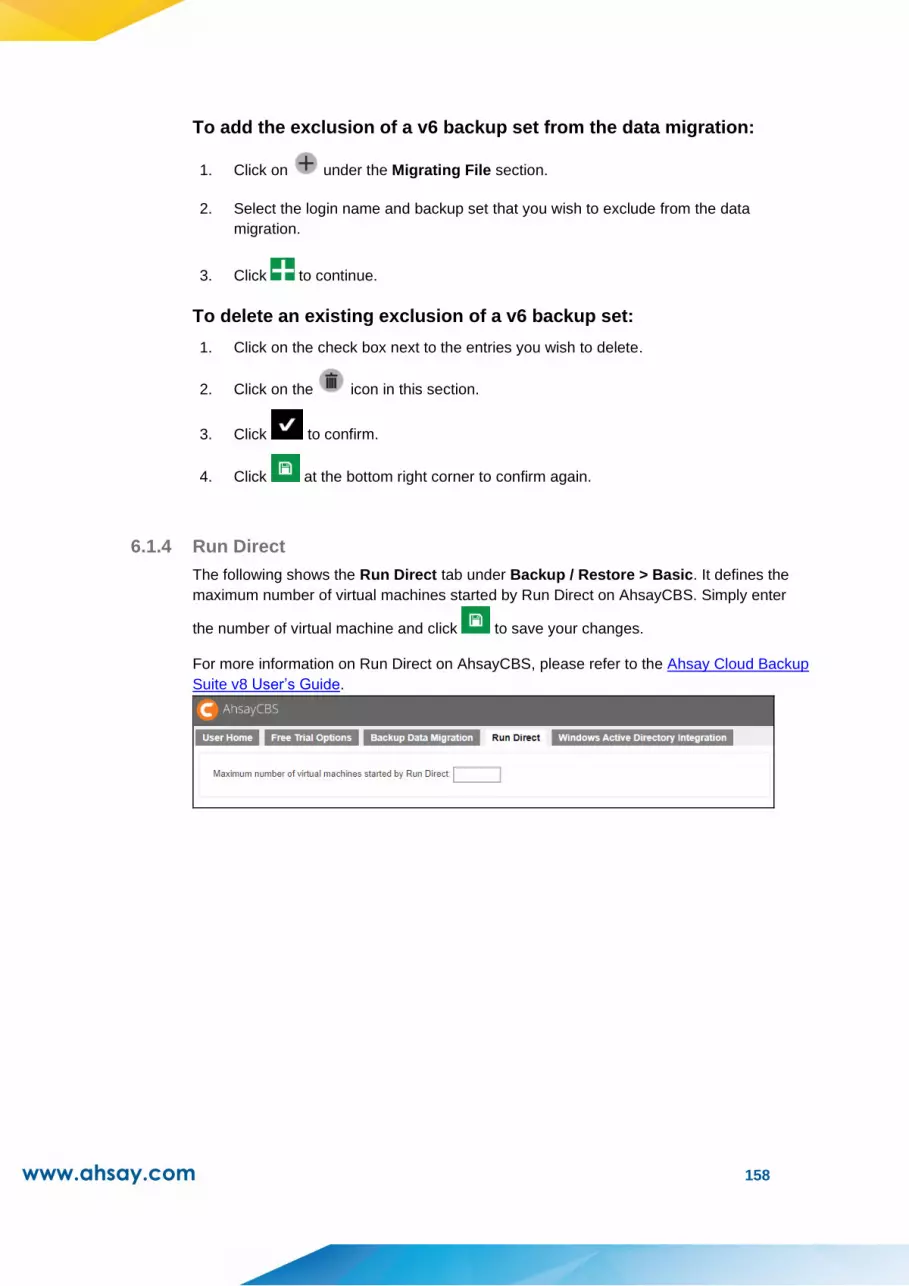
www.ahsay.com 158
To add the exclusion of a v6 backup set from the data migration:
1. Click on under the Migrating File section.
2. Select the login name and backup set that you wish to exclude from the data
migration.
3. Click to continue.
To delete an existing exclusion of a v6 backup set:
1. Click on the check box next to the entries you wish to delete.
2. Click on the icon in this section.
3. Click to confirm.
4. Click at the bottom right corner to confirm again.
6.1.4 Run Direct
The following shows the Run Direct tab under Backup / Restore > Basic. It defines the
maximum number of virtual machines started by Run Direct on AhsayCBS. Simply enter
the number of virtual machine and click to save your changes.
For more information on Run Direct on AhsayCBS, please refer to the Ahsay Cloud Backup
Suite v8 User’s Guide.

www.ahsay.com 159
6.1.5 Windows Active Directory Integration
The following shows the Windows Active Directory Integration tab under Backup /
Restore > Basic.
When this feature is enabled, this means that if an AD is present in the local network, it is
only required to create a user account once in the Windows Active Directory. The same
user account will be used on the AhsayCBS server. This is because AhsayCBS will create
this user account automatically after authenticating this logon using AD.
The user account created will be:
of the type Paid
of backup client AhsayACB (unless the user logon uses AhsayOBM)
If AhsayCBS fails to authenticate a user logon using its own records, a user authentication
will be dispatched to Windows Active Directory automatically.
To enable Windows Active Directory Integration
1. Click the switch on the right to turn on this feature.
2. Enter the Domain name and Domain controller IP of the machine where the active
directory is hosted.
3. Click the button at the bottom of the page to confirm.
NOTE
Please note the following:
1. This is for first time account creation only.
2. Password changes in AD are not reflected to existing AhsayCBS user accounts. Even
if the password was changed in AD, the password to be used in AhsayCBS is the
original password that was set when created, not unless password was reset from
AhsayCBS.
3. Users will also not be deleted in AhsayCBS even if it was deleted from AD, not
unless user was deleted from AhsayCBS.

www.ahsay.com 160
6.2 Manage Users, Groups & Policies Backup Users
To manage your AhsayCBS users, groups, and policies, simply click the Users, Groups &
Policies icon under Backup / Restore from your AhsayCBS environment.
There are 3 tabs under managing users, groups, and policies, each of which is described below.
6.2.1 Manage Backup User
A backup account contains user’s account information, client type, backup modules and
backup set settings, etc. A backup user account can be created by administrator or
registered via the backup client application by the end user as a trial account (if this option
is enabled).
The following screen shows the Backup User tab under Backup / Restore > Users,
Groups & Policies. There are ten (10) functions available here which is discussed further
in their respective chapters:
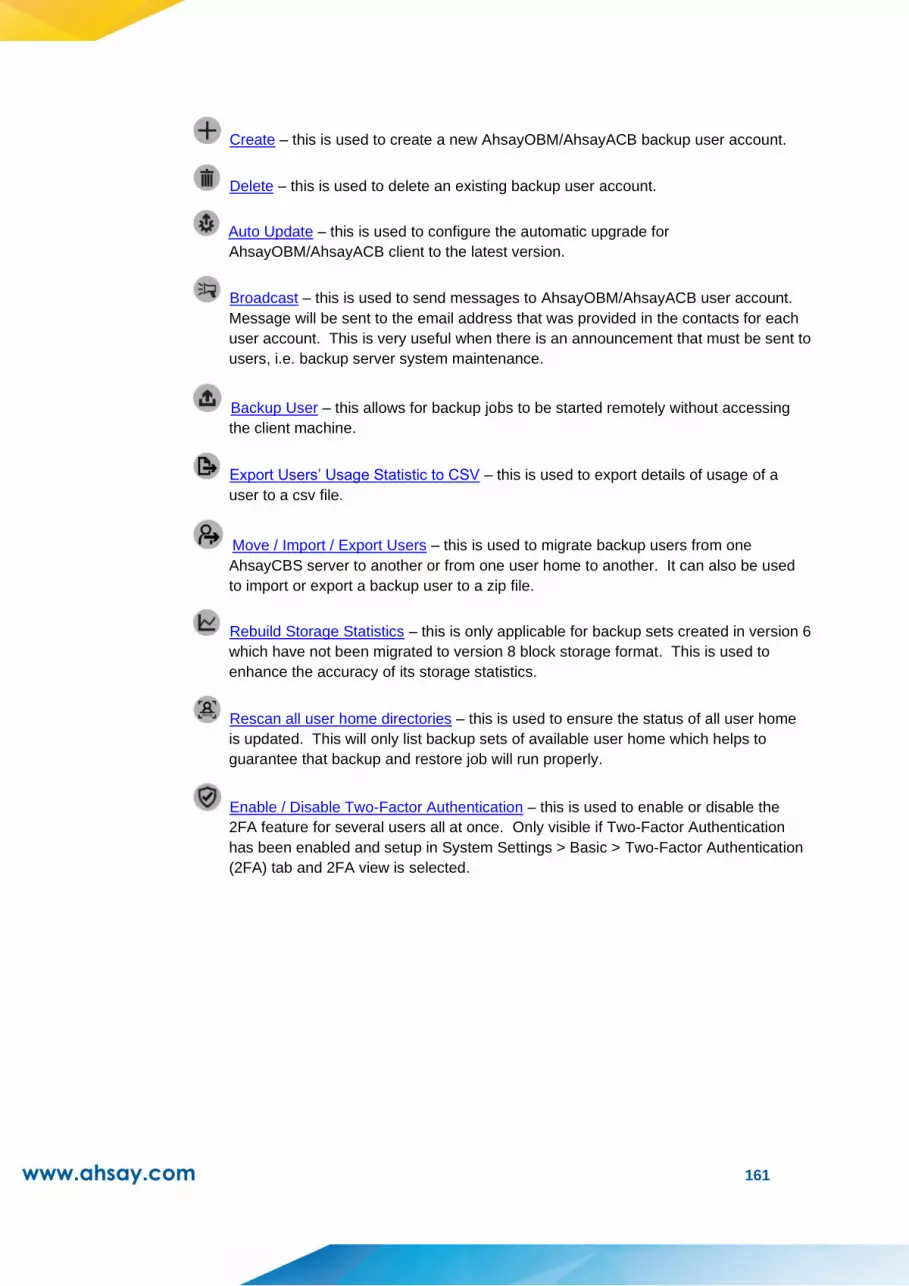
www.ahsay.com 161
Create – this is used to create a new AhsayOBM/AhsayACB backup user account.
Delete – this is used to delete an existing backup user account.
Auto Update – this is used to configure the automatic upgrade for
AhsayOBM/AhsayACB client to the latest version.
Broadcast – this is used to send messages to AhsayOBM/AhsayACB user account.
Message will be sent to the email address that was provided in the contacts for each
user account. This is very useful when there is an announcement that must be sent to
users, i.e. backup server system maintenance.
Backup User – this allows for backup jobs to be started remotely without accessing
the client machine.
Export Users’ Usage Statistic to CSV – this is used to export details of usage of a
user to a csv file.
Move / Import / Export Users – this is used to migrate backup users from one
AhsayCBS server to another or from one user home to another. It can also be used
to import or export a backup user to a zip file.
Rebuild Storage Statistics – this is only applicable for backup sets created in version 6
which have not been migrated to version 8 block storage format. This is used to
enhance the accuracy of its storage statistics.
Rescan all user home directories – this is used to ensure the status of all user home
is updated. This will only list backup sets of available user home which helps to
guarantee that backup and restore job will run properly.
Enable / Disable Two-Factor Authentication – this is used to enable or disable the
2FA feature for several users all at once. Only visible if Two-Factor Authentication
has been enabled and setup in System Settings > Basic > Two-Factor Authentication
(2FA) tab and 2FA view is selected.

www.ahsay.com 162
While there are seven (7) filters that can be used to narrow down the results and change
the displayed information of the backup user:
Client Type – backup users can be filtered based on type, either AhsayOBM or
AhsayACB client. By default, it displays backup users belonging to all client types.
User – backup users can also be filtered based on the first letter of its login name. It
can also be based on subscription type which is Paid or Trial. It can also be based
on status which is Suspended or Locked. Additional criteria are Others and Inactive.
By default, the backup users are displayed alphabetically.
Registration Date – backup users can be filtered based on the date they were
registered. The choices are Today, Last 7 days, Last 30 days and Last 100 days. By
default, it displays all backup users created.
User Group – backup users can be filtered based on the user group it belongs to. By
default, it displays all backup users belonging to all user groups.
Auto Update – backup users can be filtered based on the status of its auto update, if
it is Enabled or Disabled. By default, all backup users are displayed. This is only
available in Default view.
Owner – backup users can be filtered based on the owner of the user account. By
default, all backup users are displayed.
View – the information displayed regarding the backup user may be changed by
changing the view. There are three (3) views available which are Default, Quota and
2FA. The 2FA view is only visible if Two-Factor Authentication has been enabled
and setup in System Settings > Basic > Two-Factor Authentication (2FA) tab. By
default, the Default view is displayed.

www.ahsay.com 163
If AhsayCBS is deployed for internal use, as a system administrator, you need to determine
the following when you create a backup account:
Backup client type, whether it is AhsayOBM or AhsayACB
Backup destination
If you are a Managed Service Provider (MSP) or reseller you may require to take into
consideration the following items when you create a backup user account:
Types of users, whether it is Paid or Trial
Backup client type, whether it is AhsayOBM or AhsayACB. Also the modules
subscribed by the client
The backup destination and the subscribed quota
Create a New Backup User
To create a new backup user, do the following:
1. Click as highlighted below.
2. The Add New User page appears.

www.ahsay.com 164
3. Enter the Login Name, Password, and select the User Group by checking the
desired user group. Click to proceed.
4. Enter the following information that appears on this page.
Field Description
Alias Another name of the backup user.
Home Directory You can select Auto assigned or Manually assigned user
home path. The user backup data will be stored here.
Subscription
Type
There are 2 subscription types: Trial User and Paid User.
Trial users are subject to automatic removal as defined by
the Free Trial Options tab under Backup / Restore >
Basic. The automatic removal option can be disabled.
Suspend At
A scheduled date to suspend this user. For trial users, the
suspension date is based on the settings in the Free Trial
Options tab under Backup / Restore > Basic.
Status
There are 3 types of status for a user account: Enable,
Suspended, and Locked. Under normal circumstances,
administrator may change the Enable or Suspended status
of a user. The Locked status is referring to account lockout
rules that are set inside the policy group, refer to the
Managing Policy Groups section for more details.
For example, if a user has 3 consecutive unsuccessful login
attempts in 10 minutes, the user account will be locked out.
This is the default setting.
Upload
Encryption Key
Once you enabled the encryption recovery option, the
encryption key file is uploaded to the backup server. In case
the user forgot the encryption key, the encryption key can
be recovered using this step Recovering Encryption Key via
AhsayCBS Web Console. The recovered encryption key will
be sent directly to the email address registered on the user
account. Refer to the Encryption key section for further
details.
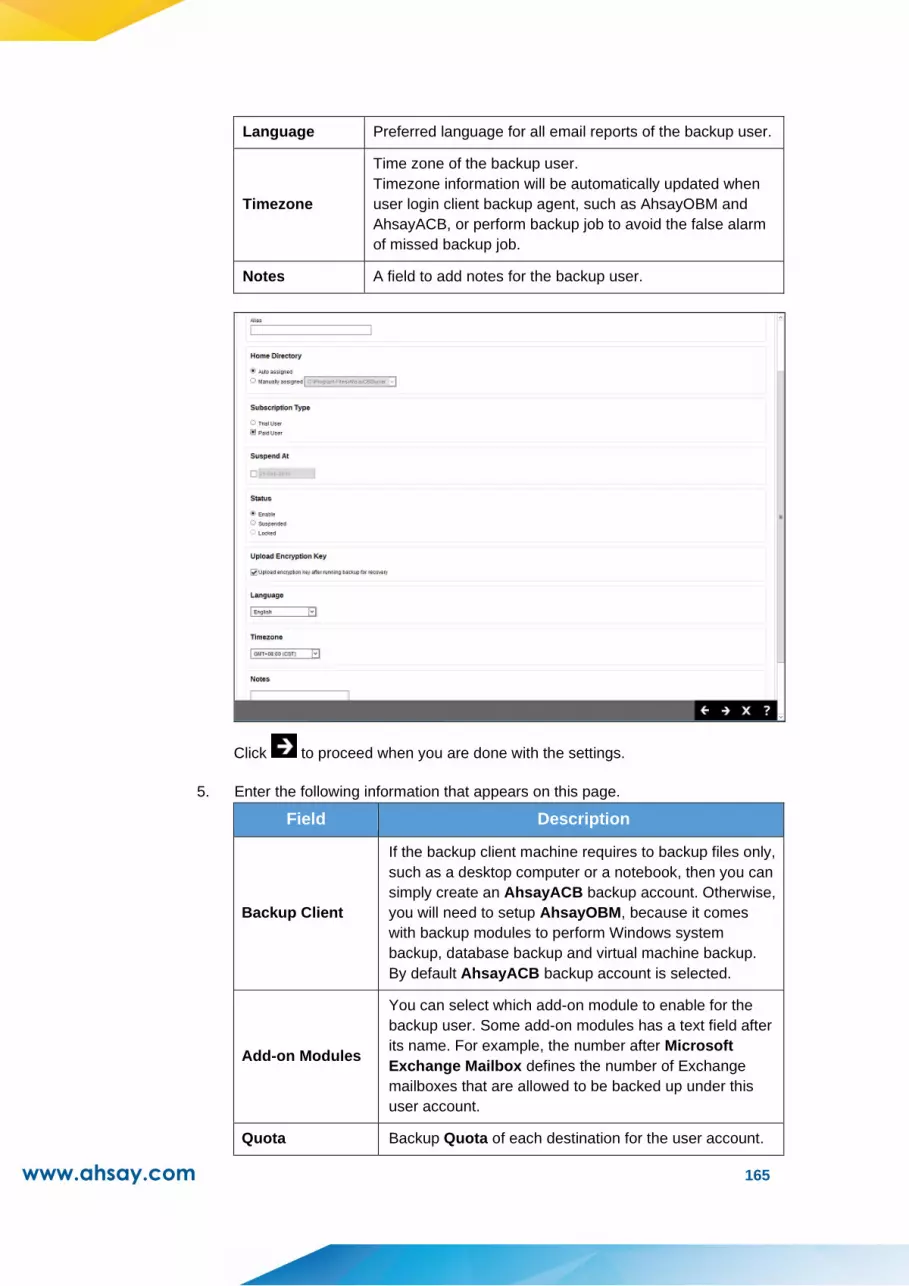
www.ahsay.com 165
Language Preferred language for all email reports of the backup user.
Timezone
Time zone of the backup user.
Timezone information will be automatically updated when
user login client backup agent, such as AhsayOBM and
AhsayACB, or perform backup job to avoid the false alarm
of missed backup job.
Notes A field to add notes for the backup user.
Click to proceed when you are done with the settings.
5. Enter the following information that appears on this page.
Field Description
Backup Client
If the backup client machine requires to backup files only,
such as a desktop computer or a notebook, then you can
simply create an AhsayACB backup account. Otherwise,
you will need to setup AhsayOBM, because it comes
with backup modules to perform Windows system
backup, database backup and virtual machine backup.
By default AhsayACB backup account is selected.
Add-on Modules
You can select which add-on module to enable for the
backup user. Some add-on modules has a text field after
its name. For example, the number after Microsoft
Exchange Mailbox defines the number of Exchange
mailboxes that are allowed to be backed up under this
user account.
Quota Backup Quota of each destination for the user account.
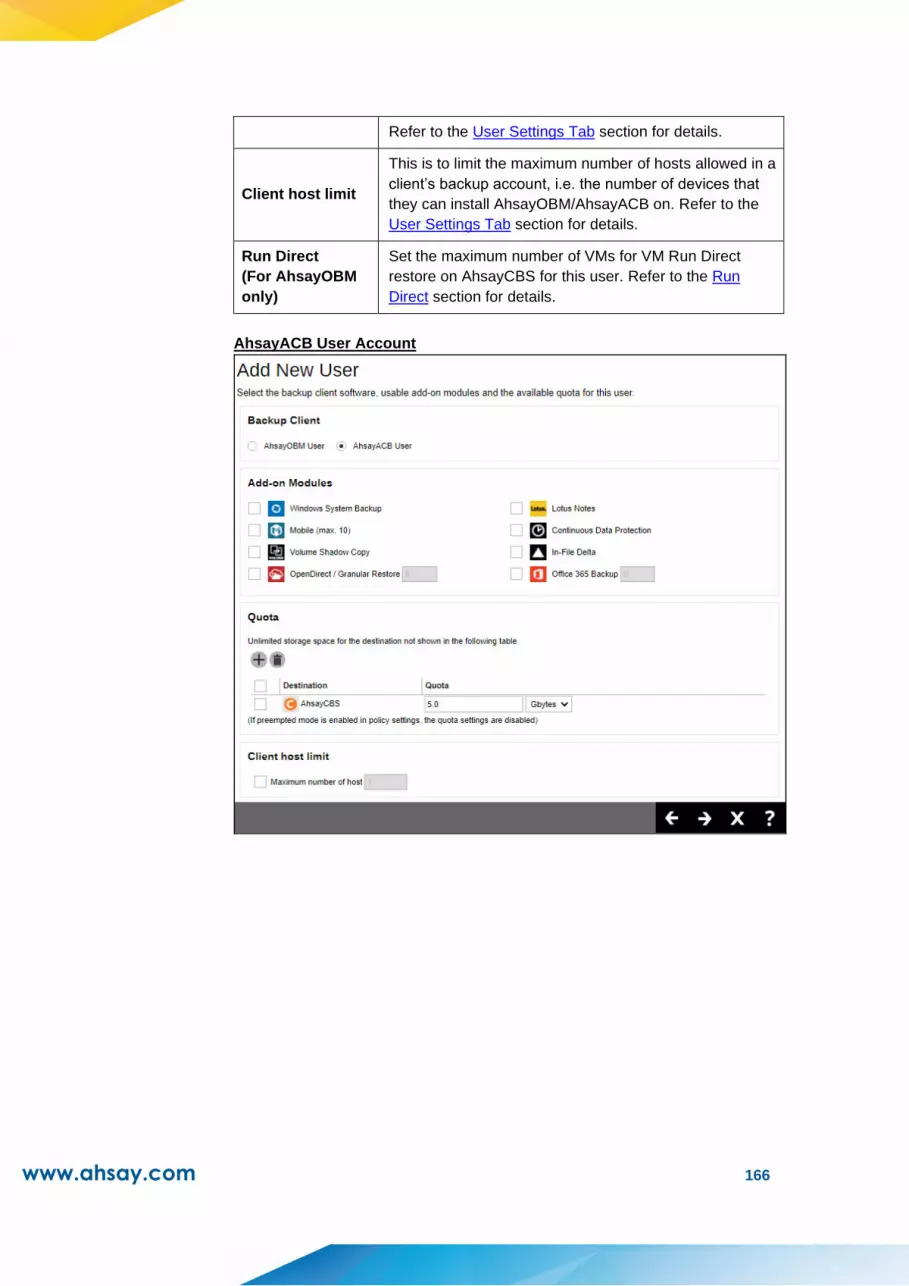
www.ahsay.com 166
Refer to the User Settings Tab section for details.
Client host limit
This is to limit the maximum number of hosts allowed in a
client’s backup account, i.e. the number of devices that
they can install AhsayOBM/AhsayACB on. Refer to the
User Settings Tab section for details.
Run Direct
(For AhsayOBM
only)
Set the maximum number of VMs for VM Run Direct
restore on AhsayCBS for this user. Refer to the Run
Direct section for details.
AhsayACB User Account

www.ahsay.com 167
AhsayOBM User Account
Click at the bottom of the page to proceed when you are done with the settings.
6. This page allows you to add contact person information for this user. Click to add
new contact information.
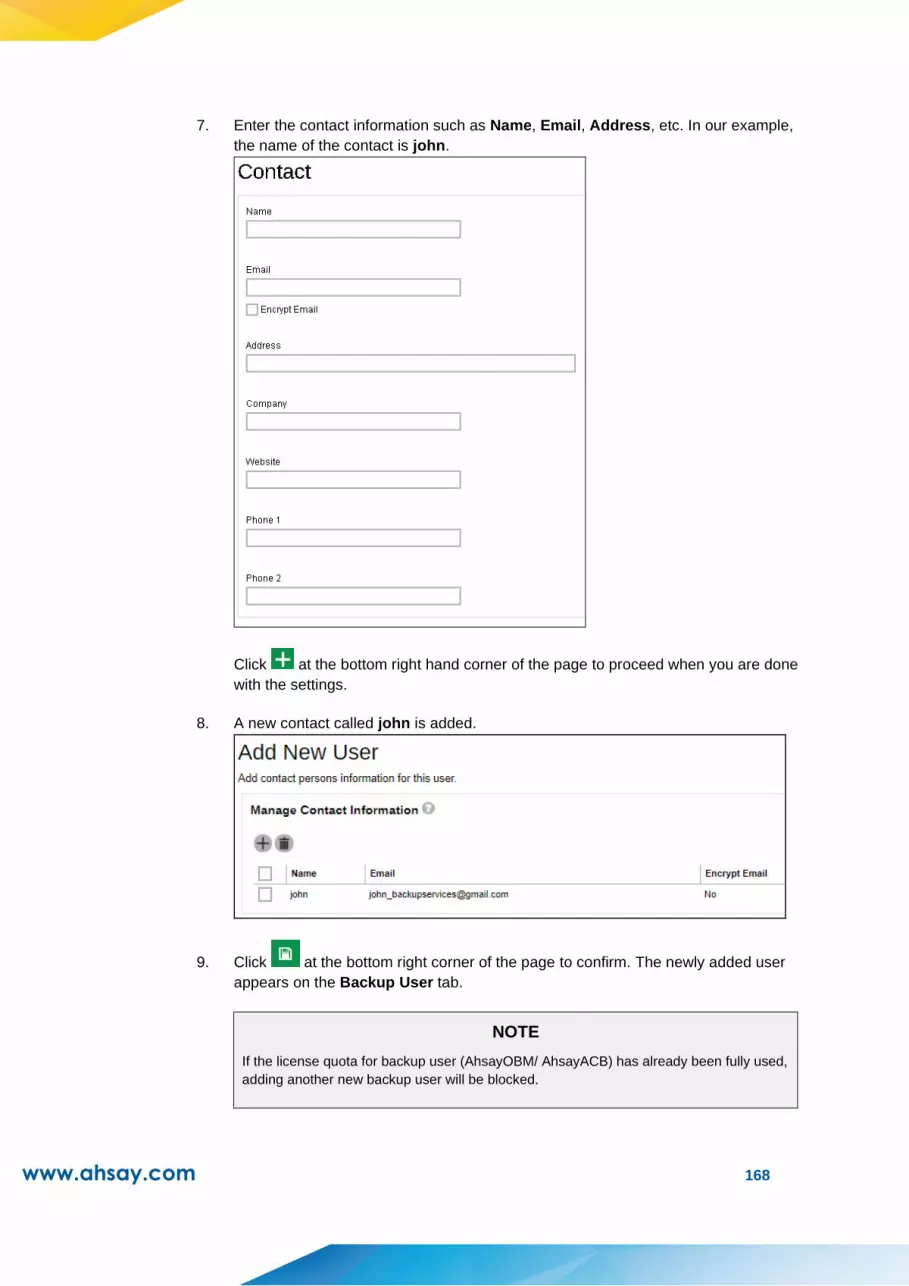
www.ahsay.com 168
7. Enter the contact information such as Name, Email, Address, etc. In our example,
the name of the contact is john.
Click at the bottom right hand corner of the page to proceed when you are done
with the settings.
8. A new contact called john is added.
9. Click at the bottom right corner of the page to confirm. The newly added user
appears on the Backup User tab.
NOTE
If the license quota for backup user (AhsayOBM/ AhsayACB) has already been fully used,
adding another new backup user will be blocked.

www.ahsay.com 169
Delete Backup User
NOTE
Remind clients to uninstall the software (AhsayOBM/AhsayACB) from their device to avoid
receiving failed login reports for deleted accounts. You can use the Broadcast feature before the
account is deleted to inform the client.
To delete an existing user, select the user you want to delete, then click the Delete button
as shown below. You will be prompted to confirm deleting the selected user, click
CONFIRM TO DELETE! to confirm.
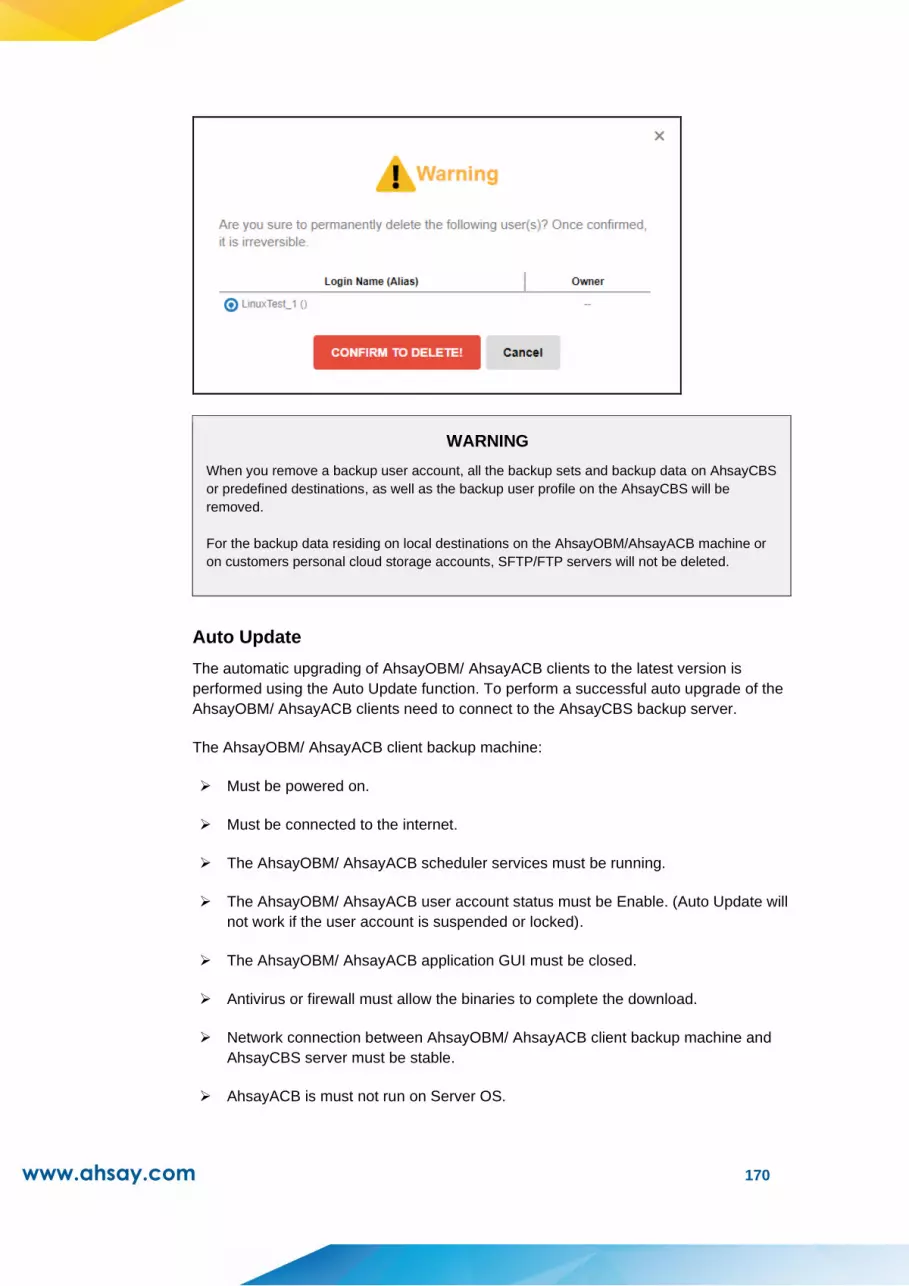
www.ahsay.com 170
WARNING
When you remove a backup user account, all the backup sets and backup data on AhsayCBS
or predefined destinations, as well as the backup user profile on the AhsayCBS will be
removed.
For the backup data residing on local destinations on the AhsayOBM/AhsayACB machine or
on customers personal cloud storage accounts, SFTP/FTP servers will not be deleted.
Auto Update
The automatic upgrading of AhsayOBM/ AhsayACB clients to the latest version is
performed using the Auto Update function. To perform a successful auto upgrade of the
AhsayOBM/ AhsayACB clients need to connect to the AhsayCBS backup server.
The AhsayOBM/ AhsayACB client backup machine:
➢ Must be powered on.
➢ Must be connected to the internet.
➢ The AhsayOBM/ AhsayACB scheduler services must be running.
➢ The AhsayOBM/ AhsayACB user account status must be Enable. (Auto Update will
not work if the user account is suspended or locked).
➢ The AhsayOBM/ AhsayACB application GUI must be closed.
➢ Antivirus or firewall must allow the binaries to complete the download.
➢ Network connection between AhsayOBM/ AhsayACB client backup machine and
AhsayCBS server must be stable.
➢ AhsayACB is must not run on Server OS.

www.ahsay.com 171
➢ For Linux/FreeBSD machines, the GNU C or GLIBC library must be installed, version
must at least be 2.14.
➢ For FreeBSD machines, OpenJDK 8 must be installed.
➢ For Linux/FreeBSD machines, the ‘psmisc’ package which contains the ‘fuser’
components must be installed for Auto Update to work properly.
For every 720 minutes or whenever the backup client service restarts (v8) or the auto
update agent service restarts (v6), AhsayOBM/ AhsayACB will check with your AhsayCBS
for any available updates when a scheduled backup job runs. If any auto update
instructions were found on the AhsayCBS, the update progress will be started.
NOTE
AhsayOBM on Synology and QNAP NAS does not support the Auto Update feature. These
devices will need to be manually updated to the latest AhsayOBM version by downloading the
latest AhsayOBM installer from the AhsayCBS web console and running an installation.
1. To determine if a backup user account has Auto Update enabled, there are two (2)
ways to view this:
One is by using the filter, in the Auto Update filter you can choose between
Enable or Disable. The backup user account will be listed according to the
selected filter criterion. In the example below, the listed backup user accounts
have auto update Disabled.
By selecting a specific account. Select a specific account then click the Auto
Update button.
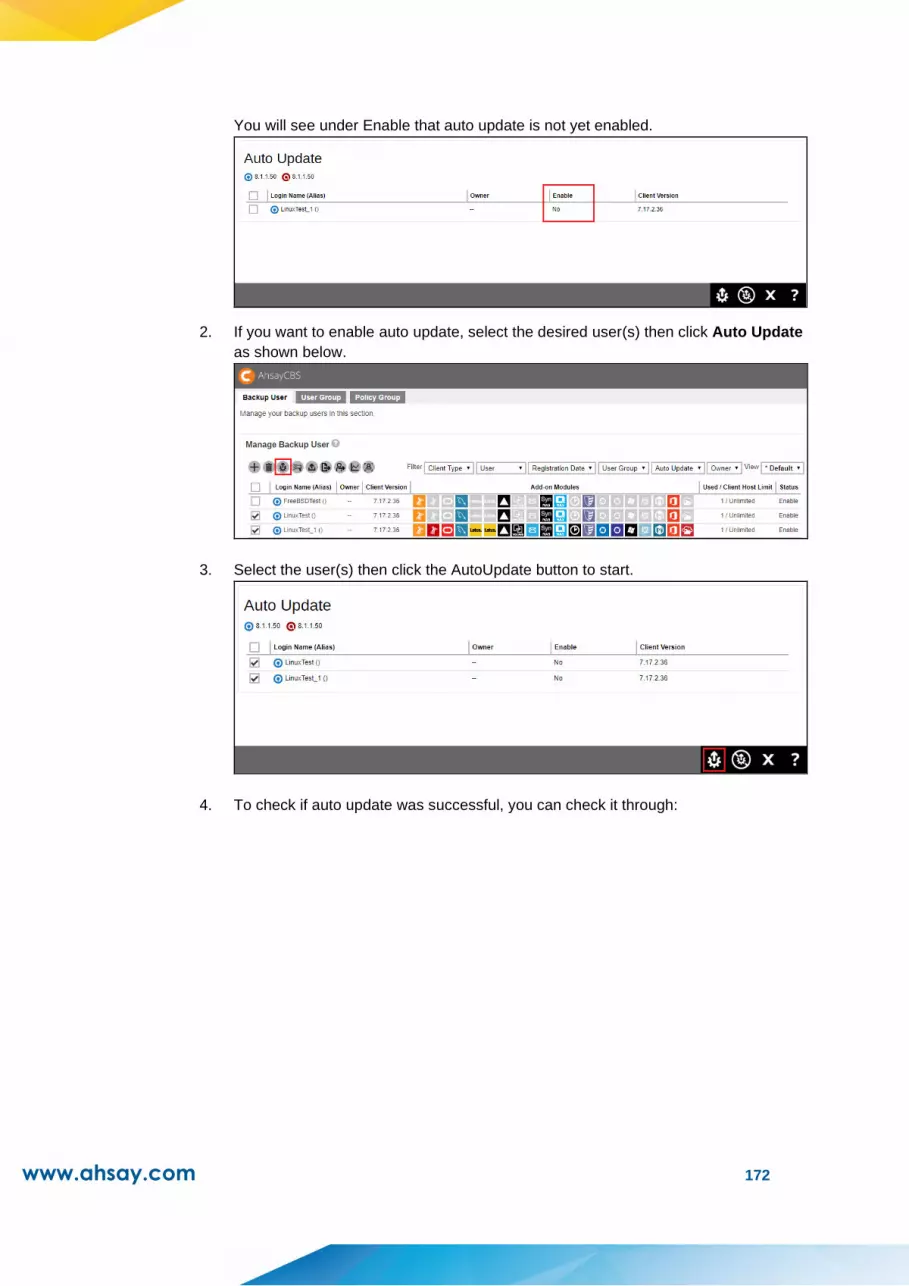
www.ahsay.com 172
You will see under Enable that auto update is not yet enabled.
2. If you want to enable auto update, select the desired user(s) then click Auto Update
as shown below.
3. Select the user(s) then click the AutoUpdate button to start.
4. To check if auto update was successful, you can check it through:

www.ahsay.com 173
The latest backup report
Or on the AhsayCBS web console, Manage Backup User > Login Name,
check the Client Version.

www.ahsay.com 174
Broadcast
After you selected a list of users for broadcast, you will be able to send a broadcast
message to the selected users. This is useful when you need to send announcement such
as server maintenance, applied latest patch or some promotion offers to your users.
1. To broadcast a message to users, select the desired users then click the Broadcast
button as shown below.
2. Edit the broadcast message by entering your subject and message. The message
can be sent in text or html format. You may also include attachments. Once done,
click the Send button at the bottom right corner to send the message.

www.ahsay.com 175
3. Here is an example of a message received in the users’ mailbox:
Using Text with attachment
Using HTML
NOTE
The message will be sent to the email address that was provided in the Contact
Information of the user.

www.ahsay.com 176
Backup User
This feature allows the AhsayCBS server administrator to start a backup job on a client’s
machine remotely without the need to login to the client machine or even if they do not
have access to the client machine. This feature relies on the AhsayOBM/AhsayACB
scheduler service to receive and process the start backup command.
Once a remote backup is triggered on the AhsayCBS web console, the backup job should
be started within 5 minutes, as the AhsayOBM/AhsayACB scheduler on the client machine
will connect to the AhsayCBS server every 5 minutes to retrieve any update information.
When the scheduler connects to the AhsayCBS server, it will receive the start backup
command and start the backup job.
NOTE
Once a backup job has been initiated and has already started running, it cannot be stopped
remotely from AhsayCBS. In this situation the backup job can only be stopped on the actual
machine where AhsayOBM/AhsayACB is installed. However, a backup job which has been
initiated from AhsayCBS but is not yet running on AhsayOBM/AhsayACB, i.e. Pending = Yes,
can be cancelled from AhsayCBS by clicking the Cancel Backup button in the Backup User
screen.
A remotely started backup will work as long as the AhsayOBM/AhsayACB client backup
machine:
➢ Is powered on.
➢ Is connected to the internet.
➢ The AhsayOBM/ AhsayACB scheduler service is running.
➢ The AhsayOBM/ AhsayACB client is connecting to AhsayCBS server using the latest
login credentials.
➢ The backup schedule must be enabled on the related backup set.
➢ No active backup job is running. If there is an active backup running, the received
start backup command will be ignored.
1. Select the desired backup user then click the Backup User button as shown below.

www.ahsay.com 177
2. Select the backup set you would like to start a backup on, and then click the Run
Backup button at the bottom right corner to trigger a backup.
For database backup you need to select the backup type, whether Database or Log
File.
3. The backup will start shortly and you can monitor the progress using the Live
Activities feature. Refer to Backup Status for further details.
You can also check the status of the server if it initiates backup through Manage
Backup User > Login Name > Backup User, check Pending and Status. In the
first screenshot below, after initiating the backup, you can see under the Pending
column that the backup has not started yet and the Status is “OK (no files backup

www.ahsay.com 178
up)”.
Once the start backup command is initiated, you can see under the Pending column
that the backup job is not pending anymore because it has started and its Status will
be changed to “Backup not yet finished”.
NOTE
In cases when the client machine will be turned off for extended amount of time, the backup job
will remain pending until such time the machine is powered on. So, it is advisable to just cancel
the backup job. You can do this by selecting the backup set then clicking the Cancel
Backup button in the Backup User screen.

www.ahsay.com 179
Export Users’ Usage Statistics to CSV File
You can export the usage of your selected user(s) to a CSV (Comma Separated Value) file.
This format can be imported into spreadsheets or other applications for further analysis or
billing purposes.
1. To export usage of users to CSV, select the desired users then click the Export
Users’ Usage Statistics to CSV button as shown below.
2. You will see a .csv file being downloaded.
3. When you open it, it will display the Login Name, Alias, Owner, Usage in bytes and
Quota in bytes.

www.ahsay.com 180
Below is a screenshot of the Statistics Usage Page, you can access this by going to
Backup / Restore > Users, Groups & Policies > Backup User Tab > Login Name >
Statistics:
For LinuxTest
For LinuxTest_1

www.ahsay.com 181
Move/ Import/ Export Users
This function can be used to export users to a zip file and import users from a zip file.
You can also use this function to migrate backup users from one AhsayCBS server to
another AhsayCBS server, or to migrate users from their current user home to another user
home on the same server. This function is limited to system user with admin role.
Select the desired user, and then click the Move/ Import/ Export Users button as shown
below.
The following screen appears:
Move user home to – Export user from a user home to another user home on the
same AhsayCBS server .
Import users to – Import a previously exported user to the selected user home.
Export users to file – Export user profile and backup files to a zip file format.
NOTE
➢ Please schedule a time with the backup user before migrating a user to another user home / to
another AhsayCBS. Ensure that the AhsayOBM / ACB client interface is closed, and that no
backup / restore job is performed during the migration.
➢ It is highly recommended to temporarily suspend the backup user during the export / import
procedure.
➢ It is not supported to import users that belong to AhsayCBS v8.1.0.0 or above to the old version
of AhsayCBS server.

www.ahsay.com 182
Since the migration of a backup user to another user home / AhsayCBS may involve export
of the user profile and backup data, for user with a large amount of backup data, the time
required for the export may take a while. During the export, please do not restart the
AhsayCBS service or the server. In case of power failure or server shutdown, the export of
the user will fail.
Migrate users from one user home in D: drive to another user home in F:
drive within the same AhsayCBS
Assumptions:
The backup users to be moved only have small amount of backup files.
These users are located in D:\u001 to be moved to F:\u001.
Steps:
1. Login to the AhsayCBS and go to Backup/Restore > Users, Groups & Policies.
2. Select the user(s) to be migrated.
3. Click the Move/ Import/ Export Users button.
4. Make sure the radio button of Move user home to is turned on and select the
dropdown box next to it. Choose the F:\u001.
5. Click to proceed.

www.ahsay.com 183
While there are two ways to migrate a user from one AhsayCBS server to another
AhsayCBS server:
Method 1: Export users including the backup files to a zip file.
Method 2: Export the user profile only to a zip file. Then manually copy the backup files
later directly to the destination AhsayCBS server.
Limitations:
Migrating data on cloud storage or pre-defined destination is not supported.
Exporting and importing user profile and large amount of data.
Suggestions:
Perform the export and import procedure for one user at a time, if exporting and
importing user profile and backup files.
Suspend the user during the export and import procedures to ensure that no backup /
restore job is performed during the migration.
If the exported “users.zip” file is not saved to a local destination, ensure that the
network between the AhsayCBS server and the save destination remain stable
throughout the export process.
For best result (performance and stability wise), it is recommended that:
The export and import operation of the backup user is performed directly on the
corresponding AhsayCBS server, or in the same LAN environment.
The exported “users.zip” files are copied directly onto the destination AhsayCBS
server, or a network drive in the same LAN environment.
For backup user with large amount of data, migrate the user by using Method 2.
Perform the user data export at a time when the resource usage is low on the
AhsayCBS server.
Assumptions:
The user to be exported is located on AhsayCBS1, to be moved to AhsayCBS2.
Before importing the user to AhsayCBS2, make sure that there is no backup user
with the same username on AhsayCBS2.
Backup data are stored directly on the AhsayCBS server.
The user should be removed on the original server (e.g. AhsayCBS1) after exporting
the user to the new AhsayCBS server. This is especially important if these
AhsayCBS servers are under the same Redirector setup.
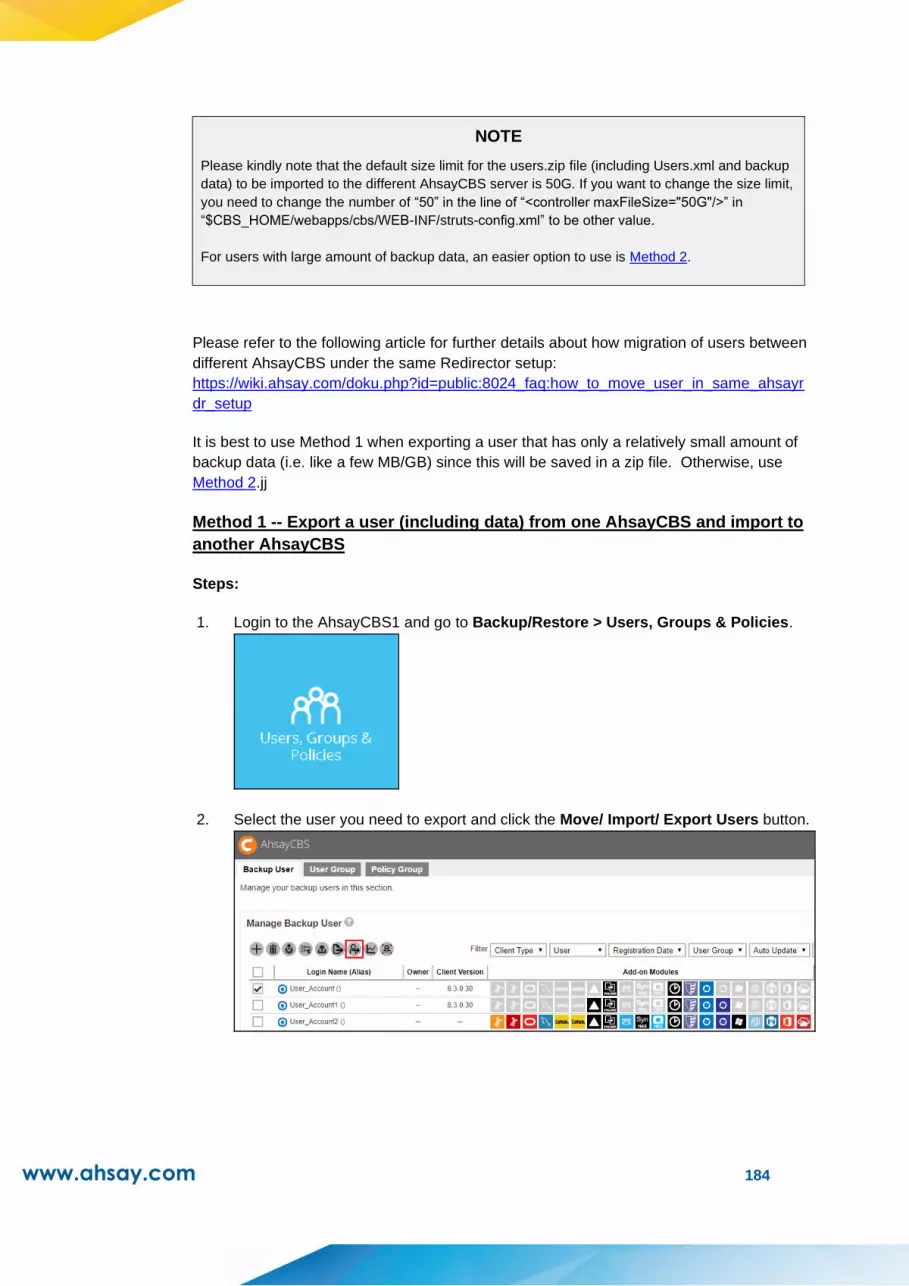
www.ahsay.com 184
NOTE
Please kindly note that the default size limit for the users.zip file (including Users.xml and backup
data) to be imported to the different AhsayCBS server is 50G. If you want to change the size limit,
you need to change the number of “50” in the line of “<controller maxFileSize="50G"/>” in
“$CBS_HOME/webapps/cbs/WEB-INF/struts-config.xml” to be other value.
For users with large amount of backup data, an easier option to use is Method 2.
Please refer to the following article for further details about how migration of users between
different AhsayCBS under the same Redirector setup:
https://wiki.ahsay.com/doku.php?id=public:8024_faq:how_to_move_user_in_same_ahsayr
dr_setup
It is best to use Method 1 when exporting a user that has only a relatively small amount of
backup data (i.e. like a few MB/GB) since this will be saved in a zip file. Otherwise, use
Method 2.jj
Method 1 -- Export a user (including data) from one AhsayCBS and import to
another AhsayCBS
Steps:
1. Login to the AhsayCBS1 and go to Backup/Restore > Users, Groups & Policies.
2. Select the user you need to export and click the Move/ Import/ Export Users button.

www.ahsay.com 185
3. Click on the Export users to file radio button and click on the Include backup files
check box to export the backup user data.
4. Click on to proceed. The system will prompt you to save the file (users.zip) in
your local machine. You need to have enough disk space to save the zip file. If the
user account has large backup sets, it is expected to wait for a long time.
5. After exporting process, click to go back to the Backup User Tab page.
6. Login to the AhsayCBS2 and go to Backup/Restore > Users, Groups & Policies.
7. Click the Move/ Import/ Export Users button.
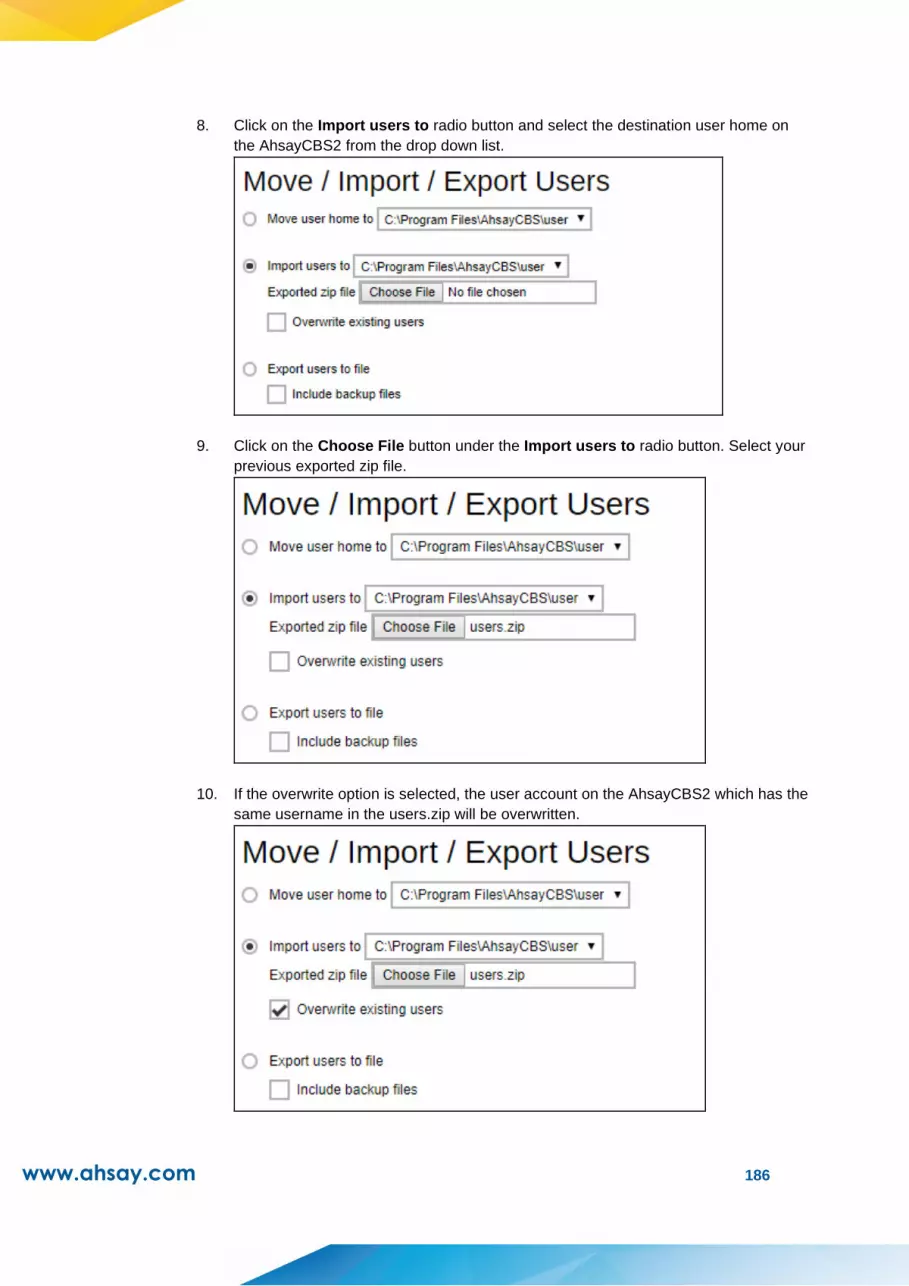
www.ahsay.com 186
8. Click on the Import users to radio button and select the destination user home on
the AhsayCBS2 from the drop down list.
9. Click on the Choose File button under the Import users to radio button. Select your
previous exported zip file.
10. If the overwrite option is selected, the user account on the AhsayCBS2 which has the
same username in the users.zip will be overwritten.

www.ahsay.com 187
11. Click on to proceed.
12. Restart the AhsayCBS service and login to AhsayCBS2 to check the newly imported
user in the Backup User page.
13. After the entire migration process is completed, delete the original backup account on
AhsayCBS1. On the AhsayCBS web console of AhsayCBS1, under Backup User
tab, select the migrated user account and click on the Delete button to delete it.
While it is advisable to use Method 2 when exporting a user which has a large amount of
backup data. In this option only the user profile will be saved in a zip file and the backup
data will be manually transferred to the destination AhsayCBS server.
Method 2 -- Export a user from one AhsayCBS and import to another
AhsayCBS, afterwards manually copy the backup files to the destination
AhsayCBS server
Steps:
1. Login to the AhsayCBS1 and go to Backup/Restore > Users, Groups & Policies.
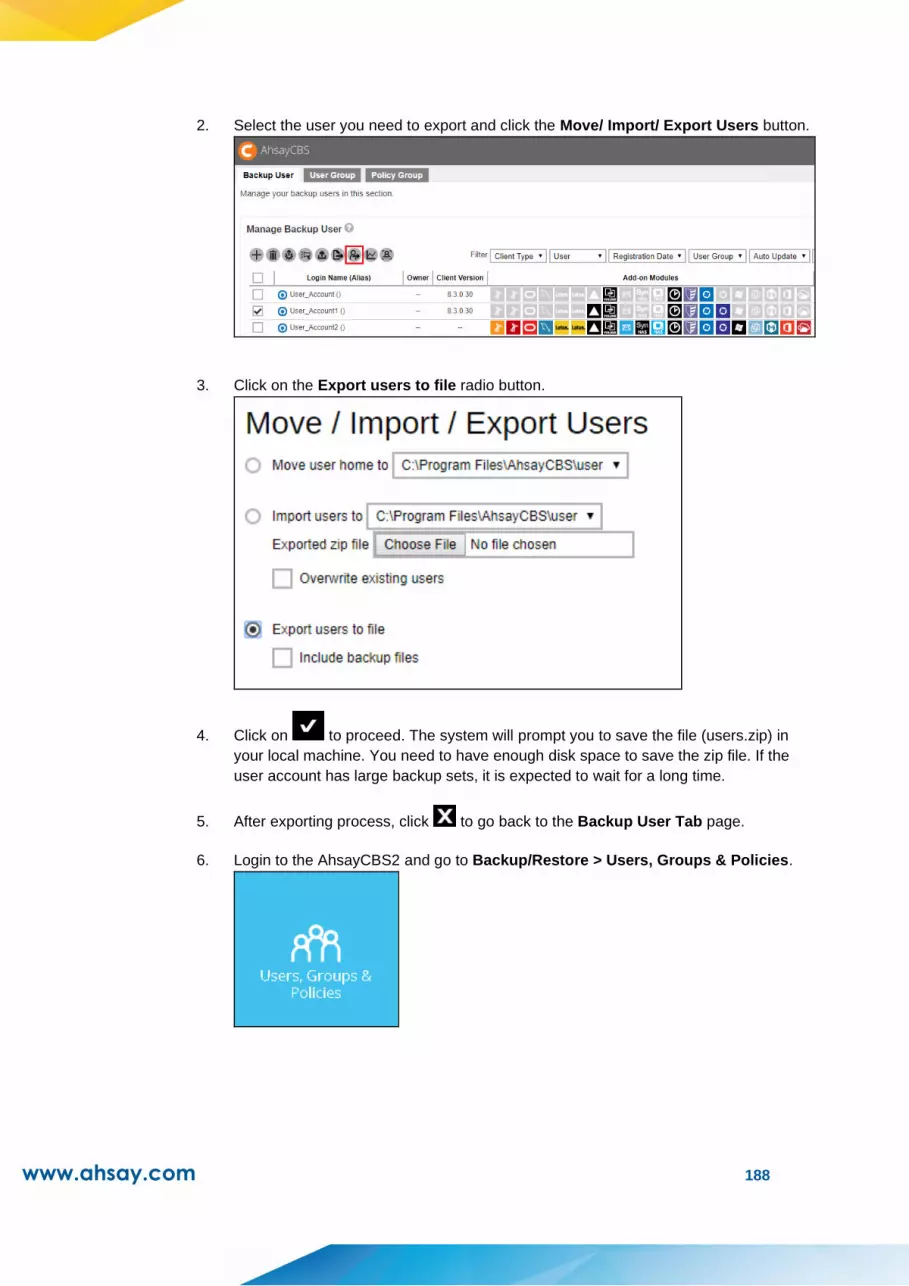
www.ahsay.com 188
2. Select the user you need to export and click the Move/ Import/ Export Users button.
3. Click on the Export users to file radio button.
4. Click on to proceed. The system will prompt you to save the file (users.zip) in
your local machine. You need to have enough disk space to save the zip file. If the
user account has large backup sets, it is expected to wait for a long time.
5. After exporting process, click to go back to the Backup User Tab page.
6. Login to the AhsayCBS2 and go to Backup/Restore > Users, Groups & Policies.

www.ahsay.com 189
7. Click the Move/ Import/ Export Users button.
8. Click on the Import users to radio button and select the destination user home on
the AhsayCBS2 from the drop down list.
9. Click on the Choose File button under the Import users to radio button. Select your
previous exported zip file.

www.ahsay.com 190
10. If the overwrite option is selected, the user account on the AhsayCBS2 which has the
same username in the users.zip will be overwritten.
11. Click on to proceed.
12. Restart the AhsayCBS service and login to AhsayCBS2 to check the newly imported
user in the Backup User page.
13. Go to the source AhsayCBS1 server and copy the backup files then paste to the
destination AhsayCBS2 server. The backup files are located in Program Files/
AhsayCBS/user/%username%. Copy the entire content to the destination
AhsayCBS2 server using the same location.

www.ahsay.com 191
Note: For backup files that has a large amount of data, it is advisable to compress
the files first before copying to the destination AhsayCBS server. Or you may also
use a third party application (i.e. WinSCP) to transfer files.
14. After the entire migration process is completed, delete the original backup account on
AhsayCBS1. On the AhsayCBS web console of AhsayCBS1, under Backup User
tab, select the migrated user account and click on the Delete button to delete it.
Post-migration check:
Check if the user has been copied to the destination AhsayCBS server by going to
Backup / Restore > Users, Groups & Policies > Backup User.
Also check if the backup sets were migrated by clicking on the Backup User Login
Name > Backup Set.
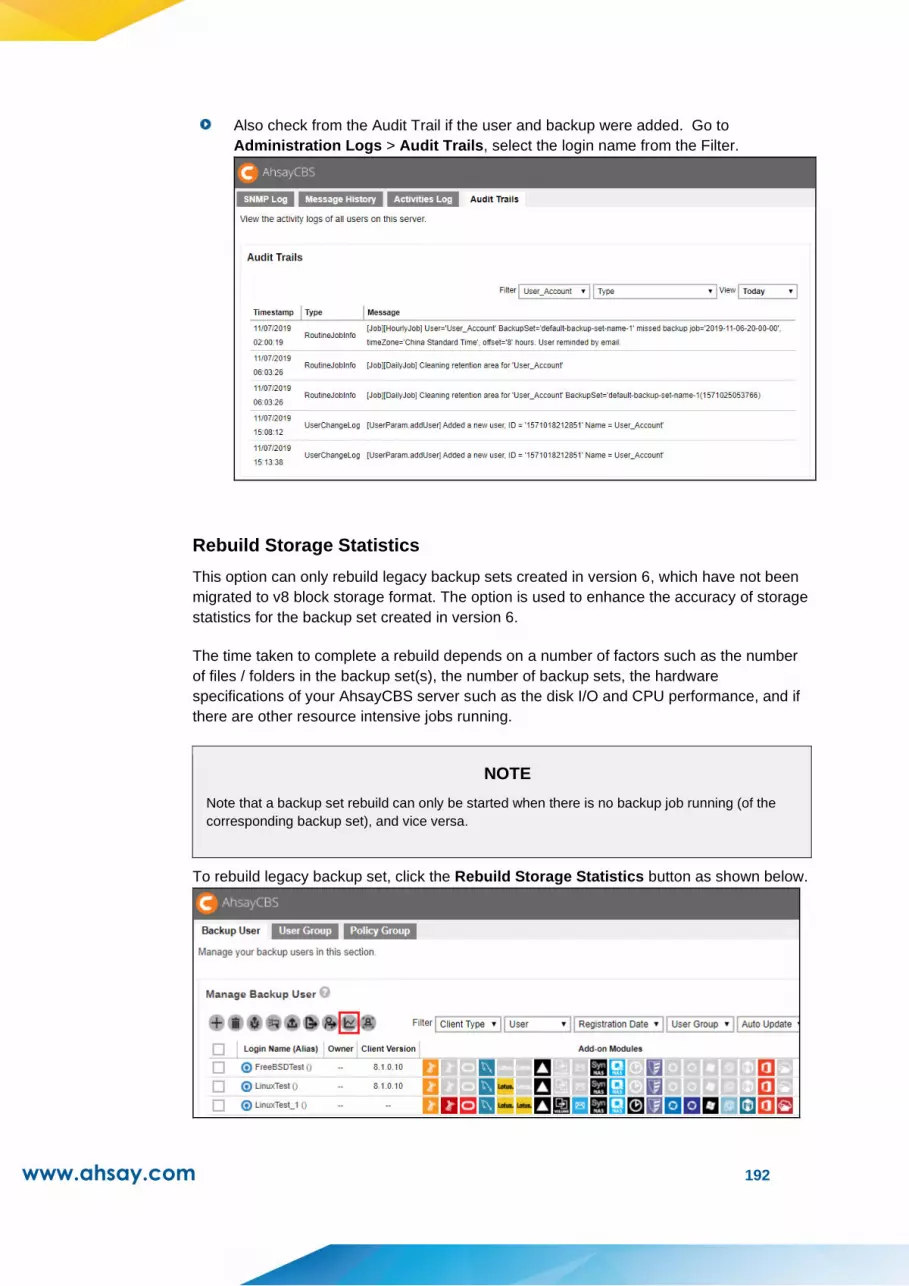
www.ahsay.com 192
Also check from the Audit Trail if the user and backup were added. Go to
Administration Logs > Audit Trails, select the login name from the Filter.
Rebuild Storage Statistics
This option can only rebuild legacy backup sets created in version 6, which have not been
migrated to v8 block storage format. The option is used to enhance the accuracy of storage
statistics for the backup set created in version 6.
The time taken to complete a rebuild depends on a number of factors such as the number
of files / folders in the backup set(s), the number of backup sets, the hardware
specifications of your AhsayCBS server such as the disk I/O and CPU performance, and if
there are other resource intensive jobs running.
NOTE
Note that a backup set rebuild can only be started when there is no backup job running (of the
corresponding backup set), and vice versa.
To rebuild legacy backup set, click the Rebuild Storage Statistics button as shown below.

www.ahsay.com 193
To check the progress or status of the Rebuild Storage Statistics job, go to [Monitoring]>
[Administration Logs]>[Audit Trails], use the Filter “login Name” and select the backup user.
Rescan all user home directories
AhsayCBS added the feature of rescanning all user home directories. The feature ensures
the status of all user home is updated so that the backup sets under available user home
should be shown in the selecting list for Admin user account to exclude while the backup
sets under unavailable user home should not be listed during backup data migration. And
also if the user home is offline, the backup and restore job cannot be run properly, so the
feature helps confirm applying backup and restore job.
The feature will be applied in the following 3 conditions:
1. Startup AhsayCBS service.

www.ahsay.com 194
2. Click on the Rescan all user home directories button, as shown in screen shot.
3. Run routine job (HourlyJob)
If there is user home offline, which may be caused by disk temporary unavailable,
user home directory rename, network drive disconnected or disk corrupted, a
message will pop up as shown in the following screen shot.

www.ahsay.com 195
After clicking into the according user account, Home Directory will be blank.
Enable / Disable Two-Factor Authentication
You can enable or disable the 2FA for several users using this feature. The Enable /
Disable Two-Facto Authentication button will only be available once 2FA is selected in the
View filter. This feature is helpful when you want to enable or disable the 2FA of many
users at once and not do it per backup user. For more information please refer to the Two-
Factor Authentication section.
Select the backup user that you want to enable 2FA. Then click on Enable / Disable Two-
Factor Authentication button.
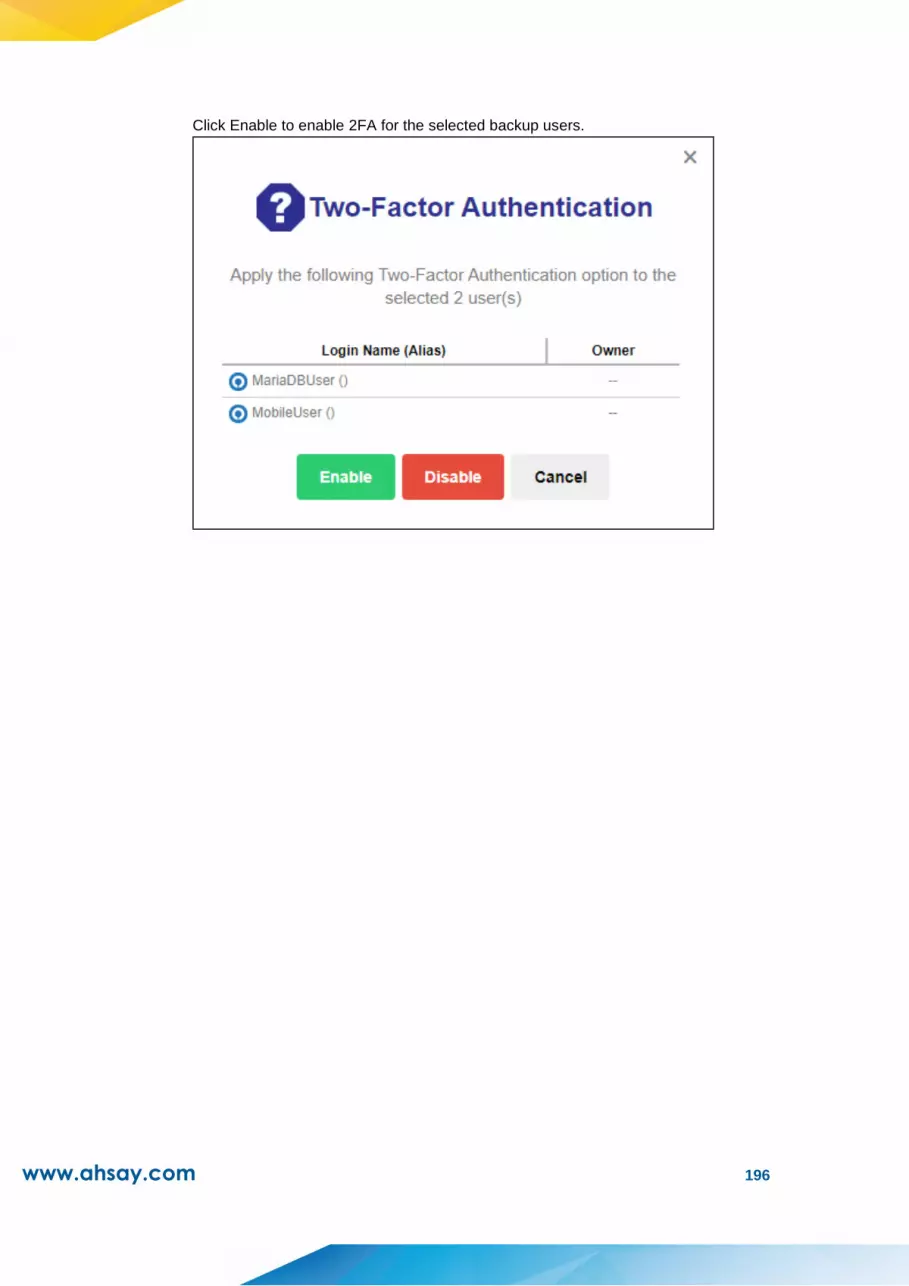
www.ahsay.com 196
Click Enable to enable 2FA for the selected backup users.

www.ahsay.com 197
Managing Backup Users
After you have created a backup user in previous section, you can perform the following
operation for your users such as:
Customize backup users profile settings
Customize subscribed modules
Create backup sets
View backup/restore reports
View usage statistics
Manage the policies applied to a user
Update client software via the auto update agent
Send broadcast message to users
Export usage to a CSV file
Export users
Rebuild storage statistic applicable only for v6 backup sets
Enable two-factor authentication
Accessing the Backup User
Click the login name of the backup user account you want to manage from the Backup
User tab.

www.ahsay.com 198
The backup user account opens. You will see 6 tabs (User Profile, Backup Set, Settings,
Report, Statistics, Effective Policy), each of which is described in detail below.
User Profile
The User Profile tab contains user backup account settings information, subscribed
modules, backup quota, subscription type, contact information, user group information and
security settings. It is located under Users, Groups & Policies > Backup User. It is sub
divided into six tabs, as described below.
➢ General Tab
ID – Machine generated numerical ID of the backup user.
Login Name – Name of the user used for logging in, cannot be modified.
Alias – Update the alias for this user.
Home Directory – path where user backup setting, reports and uploaded
AhsayOBM/AhsayACB client logs are stored, cannot be modified.
Subscription Type – Change the type from Trial User to a Paid User, for
example after a user subscribes to backup service after a trial.

www.ahsay.com 199
Suspend At – Scheduled date to suspend this user’s account.
Status – Suspend or enable locked accounts.
Upload Encryption Key – Enable or disable the “Upload Encryption Key” feature.
Language – Preferred language for all email reports of the backup user.
Timezone – Update the time zone of the backup user.
Notes – Add or update notes about this user, this can be modified by the
administrator or user.
➢ Backup Client Settings Tab
Backup Client - Type of backup user account, AhsayOBM or AhsayACB. In
case you need to change the backup client type, it is better to check if there are
existing backup sets in the backup account. For example, if you have an
AhsayOBM user account with Exchange backup set and you change the account
type to AhsayACB, the Exchange backup set will not be run due to the backup
client type does not match.

www.ahsay.com 200
Add-on Modules – Below is a short summary of the add-on modules available
for both AhsayOBM and AhsayACB
Add-on
Module Reference AhsayOBM AhsayACB
Microsoft
Exchange
Server
Backup and restore of Microsoft
Exchange Server.
Refer to the following link for how to
use Microsoft Exchange Database
Server with AhsayOBM client:
Ahsay Online Backup Manager v8
Microsoft Exchange Database Backup
and Restore Guide
✔ ✘
Microsoft
SQL
Server
Backup and restore of Microsoft SQL
Server.
Refer to the following link for how to
use Microsoft SQL Server with
AhsayOBM client:
Ahsay Online Backup Manager v8
Microsoft SQL Server Backup and
Restore Guide
✔ ✘
MySQL
Database
Server
Backup and restore of MySQL
Database Server.
Refer to the following link for how to
use MySQL Database for the
Windows platform with AhsayOBM
client:
Ahsay Online Backup Manager v8 MySQL
Database Backup and Restore for
Windows
Refer to the following link for how to
use MySQL Database for the Linux
platform with AhsayOBM client:
Ahsay Online Backup Manager v8 MySQL
Database Backup and Restore for Linux
(CLI)
✔ ✘
Oracle
Database
Server
Backup and restore of Oracle
Database Server on Windows and
Linux platforms.
Refer to the following link for how to
use Oracle Database Server for the
Windows platform with AhsayOBM
client:
Ahsay Online Backup Manager v8 Oracle
Database Server Backup and Restore for
Windows
Refer to the following link for how to
use Oracle Database Server for the
Linux platform with AhsayOBM client:
- Ahsay Online Backup Manager v8
✔ ✘
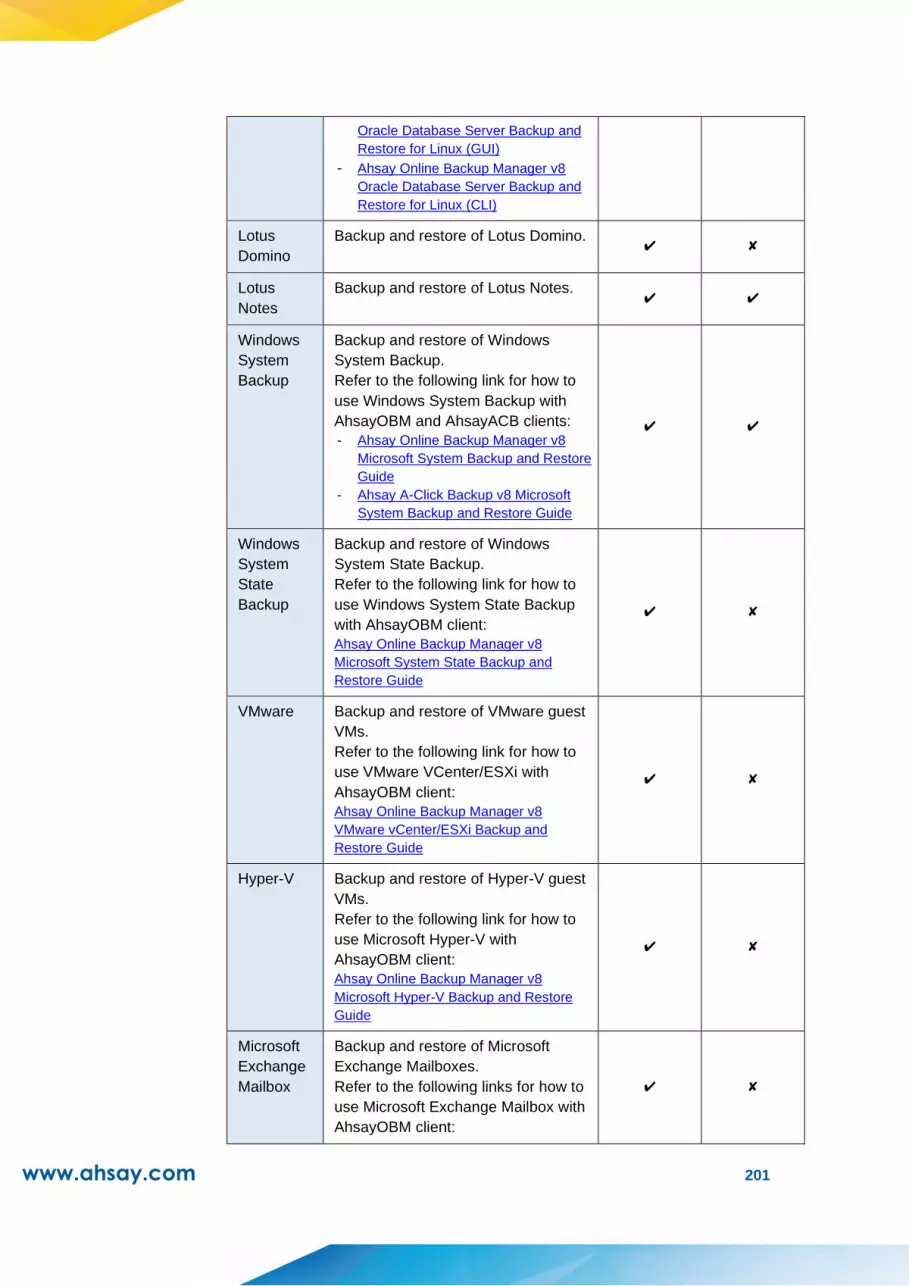
www.ahsay.com 201
Oracle Database Server Backup and
Restore for Linux (GUI)
- Ahsay Online Backup Manager v8
Oracle Database Server Backup and
Restore for Linux (CLI)
Lotus
Domino
Backup and restore of Lotus Domino. ✔ ✘
Lotus
Notes
Backup and restore of Lotus Notes. ✔ ✔
Windows
System
Backup
Backup and restore of Windows
System Backup.
Refer to the following link for how to
use Windows System Backup with
AhsayOBM and AhsayACB clients:
- Ahsay Online Backup Manager v8
Microsoft System Backup and Restore
Guide
- Ahsay A-Click Backup v8 Microsoft
System Backup and Restore Guide
✔ ✔
Windows
System
State
Backup
Backup and restore of Windows
System State Backup.
Refer to the following link for how to
use Windows System State Backup
with AhsayOBM client:
Ahsay Online Backup Manager v8
Microsoft System State Backup and
Restore Guide
✔ ✘
VMware Backup and restore of VMware guest
VMs.
Refer to the following link for how to
use VMware VCenter/ESXi with
AhsayOBM client:
Ahsay Online Backup Manager v8
VMware vCenter/ESXi Backup and
Restore Guide
✔ ✘
Hyper-V Backup and restore of Hyper-V guest
VMs.
Refer to the following link for how to
use Microsoft Hyper-V with
AhsayOBM client:
Ahsay Online Backup Manager v8
Microsoft Hyper-V Backup and Restore
Guide
✔ ✘
Microsoft
Exchange
Mailbox
Backup and restore of Microsoft
Exchange Mailboxes.
Refer to the following links for how to
use Microsoft Exchange Mailbox with
AhsayOBM client:
✔ ✘
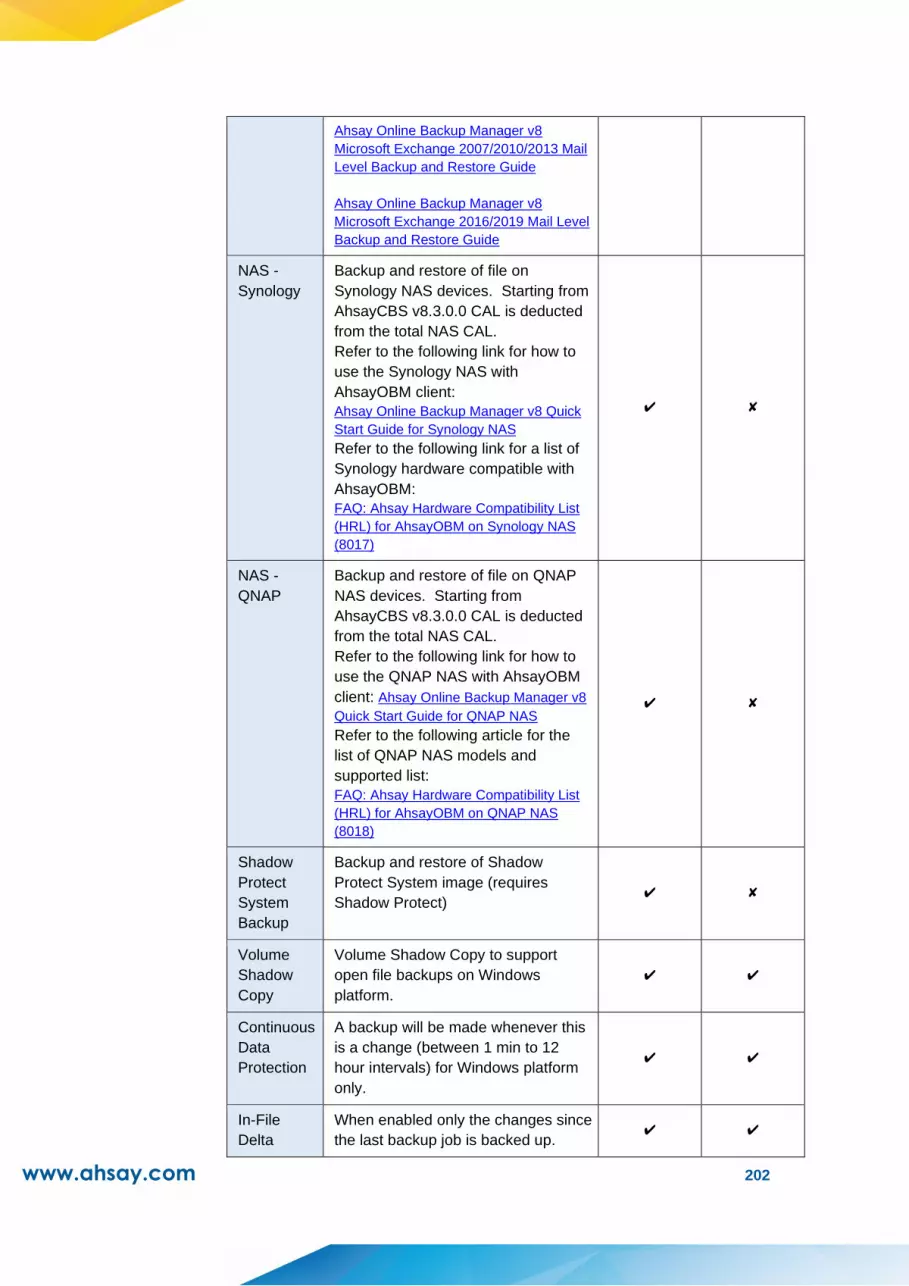
www.ahsay.com 202
Ahsay Online Backup Manager v8
Microsoft Exchange 2007/2010/2013 Mail
Level Backup and Restore Guide
Ahsay Online Backup Manager v8
Microsoft Exchange 2016/2019 Mail Level
Backup and Restore Guide
NAS -
Synology
Backup and restore of file on
Synology NAS devices. Starting from
AhsayCBS v8.3.0.0 CAL is deducted
from the total NAS CAL.
Refer to the following link for how to
use the Synology NAS with
AhsayOBM client:
Ahsay Online Backup Manager v8 Quick
Start Guide for Synology NAS
Refer to the following link for a list of
Synology hardware compatible with
AhsayOBM:
FAQ: Ahsay Hardware Compatibility List
(HRL) for AhsayOBM on Synology NAS
(8017)
✔ ✘
NAS -
QNAP
Backup and restore of file on QNAP
NAS devices. Starting from
AhsayCBS v8.3.0.0 CAL is deducted
from the total NAS CAL.
Refer to the following link for how to
use the QNAP NAS with AhsayOBM
client: Ahsay Online Backup Manager v8
Quick Start Guide for QNAP NAS
Refer to the following article for the
list of QNAP NAS models and
supported list:
FAQ: Ahsay Hardware Compatibility List
(HRL) for AhsayOBM on QNAP NAS
(8018)
✔ ✘
Shadow
Protect
System
Backup
Backup and restore of Shadow
Protect System image (requires
Shadow Protect) ✔ ✘
Volume
Shadow
Copy
Volume Shadow Copy to support
open file backups on Windows
platform.
✔ ✔
Continuous
Data
Protection
A backup will be made whenever this
is a change (between 1 min to 12
hour intervals) for Windows platform
only.
✔ ✔
In-File
Delta
When enabled only the changes since
the last backup job is backed up. ✔ ✔

www.ahsay.com 203
Mobile Backup and restore of Mobile (iOS
and Android)
Refer to the following links for
instructions on using the Ahsay
Mobile for Android and iOS platforms.
Ahsay Mobile User Guide for Android and
iOS
✔ ✔
Office 365 Backup and restore of Office 365
mailboxes, OneDrive and SharePoint
files.
Refer to the following link for
instructions on using the Office 365
with AhsayOBM.
- AhsayOBM v8 User Guide - Office365
Backup & Restore for Windows
- AhsayOBM v8 User Guide - Office365
Backup & Restore for Mac
✔ ✔
OpenDirect
/ Granular
Restore
For OpenDirect and Granular
Restore.
Refer to the following link for
instructions on using OpenDirect /
Granular Restore.
- Ahsay Online Backup Manager v8
Quick Start Guide for Windows
- Ahsay A-Click Backup v8 Quick Start
Guide for Windows
- Ahsay Online Backup Manager v8
Microsoft Hyper-V Backup and
Restore Guide
- Ahsay Online Backup Manager v8
VMware VM Backup and Restore
Guide
✔ ✔
MariaDB
Database
Server
Backup and restore of MariaDB
Database Server.
Refer to the following link for how to
use MariaDB Database Server for the
Windows platform with AhsayOBM
client:
Ahsay Online Backup Manager v8
MariaDB Database Server Backup and
Restore for Windows
Refer to the following link for how to
use MariaDB Database Server for the
Linux platform with AhsayOBM client:
Ahsay Online Backup Manager v8
MariaDB Database Server Backup and
Restore for Linux (CLI)
✔ ✘
NOTE
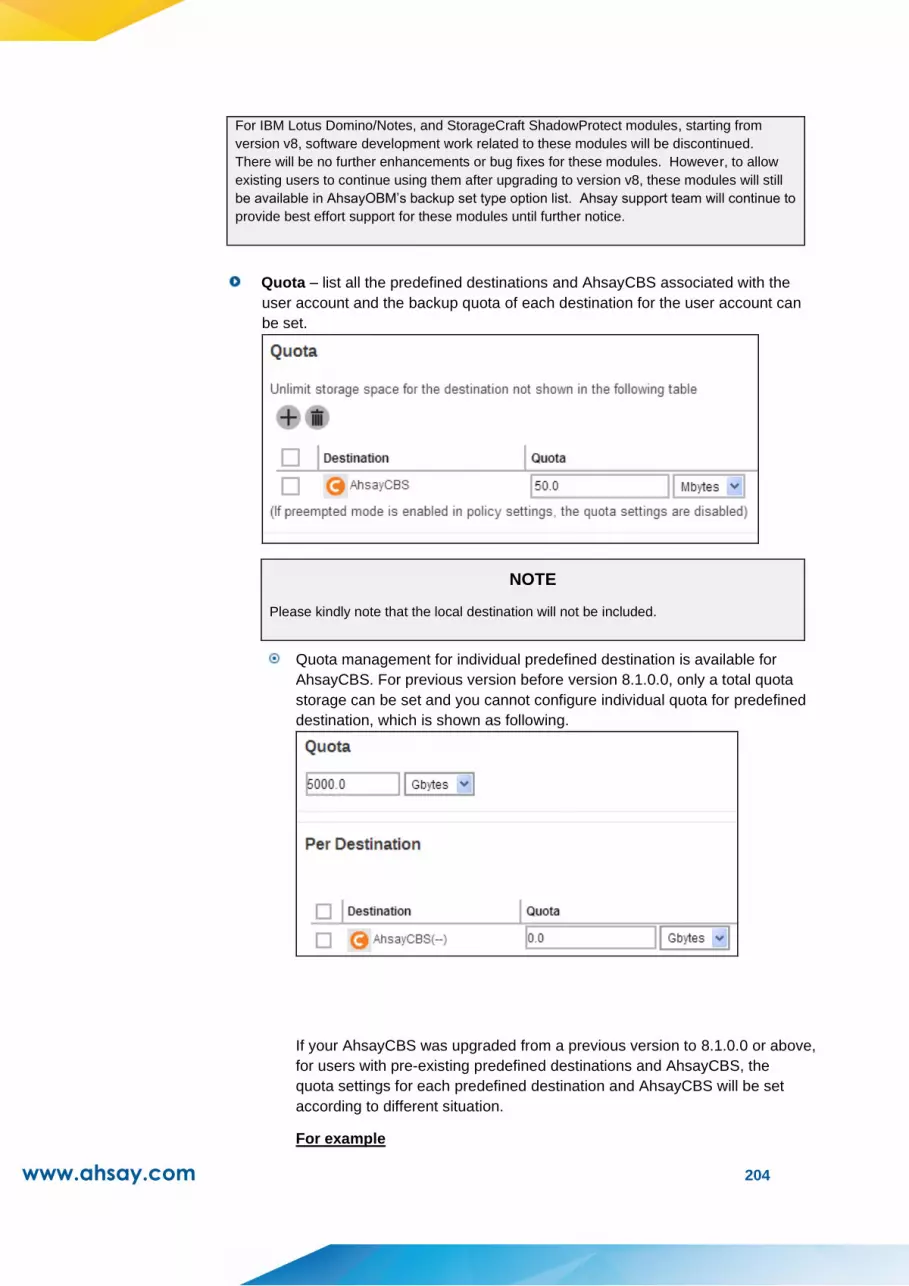
www.ahsay.com 204
For IBM Lotus Domino/Notes, and StorageCraft ShadowProtect modules, starting from
version v8, software development work related to these modules will be discontinued.
There will be no further enhancements or bug fixes for these modules. However, to allow
existing users to continue using them after upgrading to version v8, these modules will still
be available in AhsayOBM’s backup set type option list. Ahsay support team will continue to
provide best effort support for these modules until further notice.
Quota – list all the predefined destinations and AhsayCBS associated with the
user account and the backup quota of each destination for the user account can
be set.
NOTE
Please kindly note that the local destination will not be included.
Quota management for individual predefined destination is available for
AhsayCBS. For previous version before version 8.1.0.0, only a total quota
storage can be set and you cannot configure individual quota for predefined
destination, which is shown as following.
If your AhsayCBS was upgraded from a previous version to 8.1.0.0 or above,
for users with pre-existing predefined destinations and AhsayCBS, the
quota settings for each predefined destination and AhsayCBS will be set
according to different situation.
For example
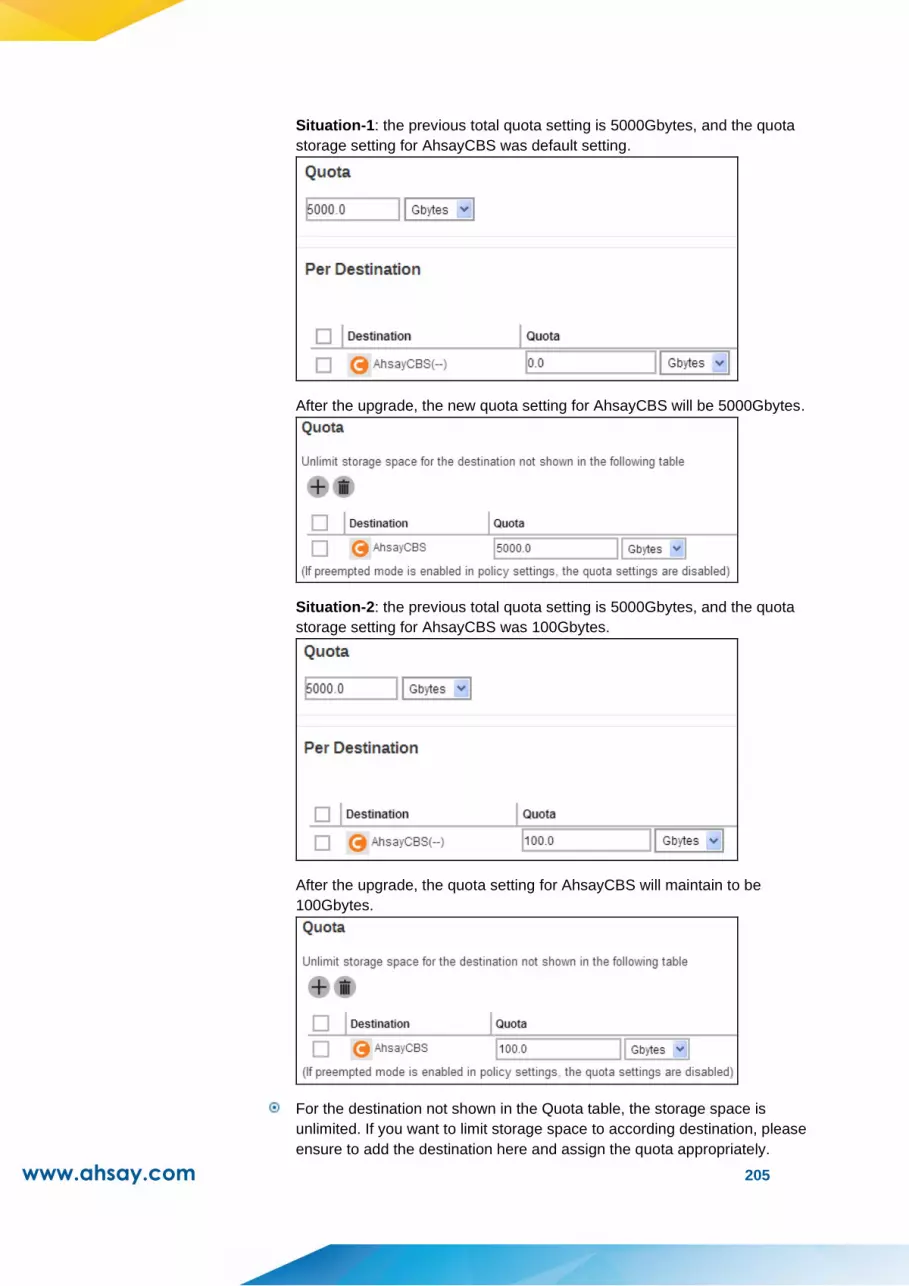
www.ahsay.com 205
Situation-1: the previous total quota setting is 5000Gbytes, and the quota
storage setting for AhsayCBS was default setting.
After the upgrade, the new quota setting for AhsayCBS will be 5000Gbytes.
Situation-2: the previous total quota setting is 5000Gbytes, and the quota
storage setting for AhsayCBS was 100Gbytes.
After the upgrade, the quota setting for AhsayCBS will maintain to be
100Gbytes.
For the destination not shown in the Quota table, the storage space is
unlimited. If you want to limit storage space to according destination, please
ensure to add the destination here and assign the quota appropriately.
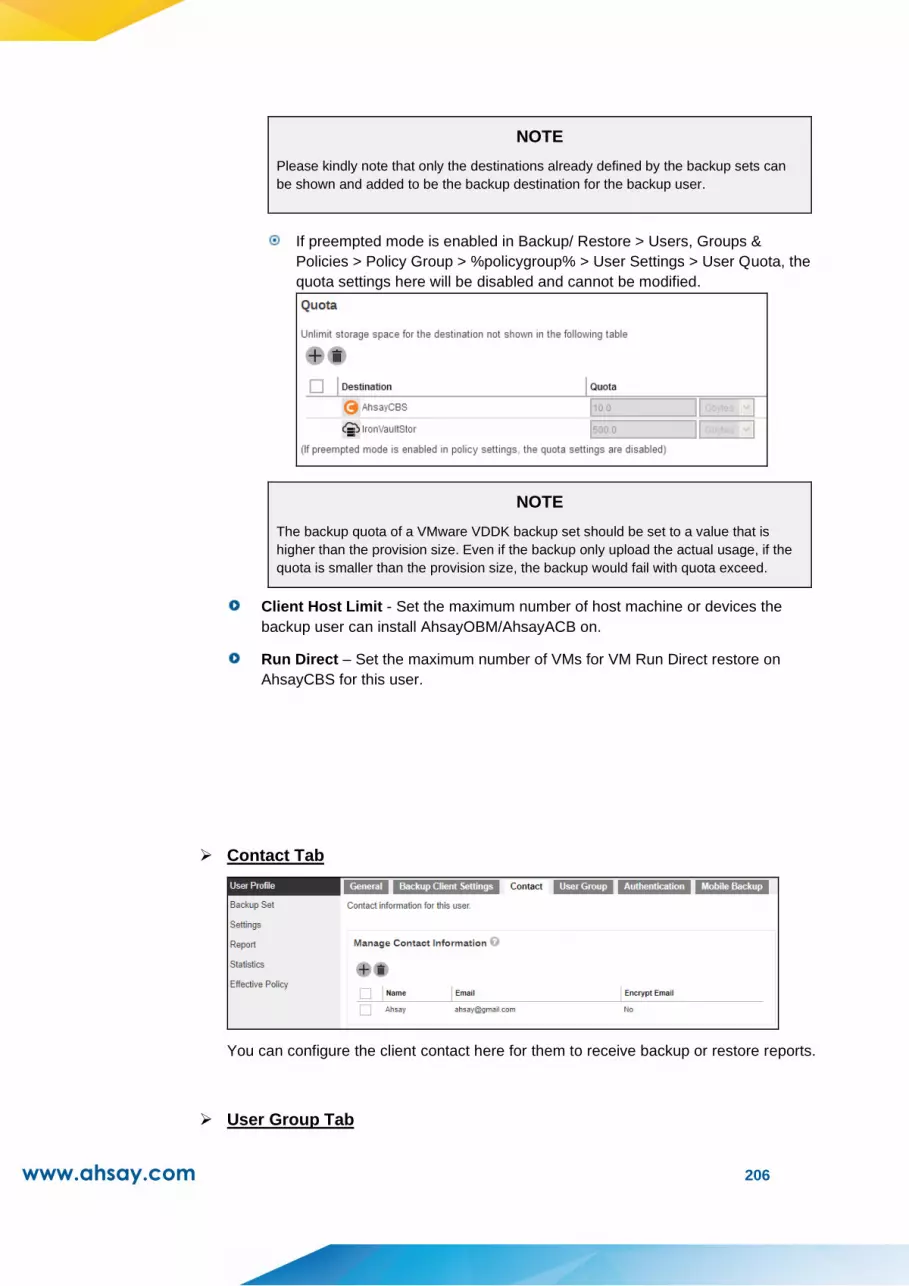
www.ahsay.com 206
NOTE
Please kindly note that only the destinations already defined by the backup sets can
be shown and added to be the backup destination for the backup user.
If preempted mode is enabled in Backup/ Restore > Users, Groups &
Policies > Policy Group > %policygroup% > User Settings > User Quota, the
quota settings here will be disabled and cannot be modified.
NOTE
The backup quota of a VMware VDDK backup set should be set to a value that is
higher than the provision size. Even if the backup only upload the actual usage, if the
quota is smaller than the provision size, the backup would fail with quota exceed.
Client Host Limit - Set the maximum number of host machine or devices the
backup user can install AhsayOBM/AhsayACB on.
Run Direct – Set the maximum number of VMs for VM Run Direct restore on
AhsayCBS for this user.
➢ Contact Tab
You can configure the client contact here for them to receive backup or restore reports.
➢ User Group Tab

www.ahsay.com 207
You can assign the user to an existing/assigned user group. When you drag the user
group with the side button, it will affect the sequence of the policy rules that will apply
to the user.
➢ Authentication Tab
Password – Shows the password of the user in hashed format. The password
can also be reset here in case the user forgot the current password.
1. Click to reset the password.
2. Enter the new password and confirm the password.
3. Click to save.
Two-Factor Authentication – Add another layer of security for the account by
configuring the two-factor authentication here for the user. Aside from the
password, they will be required to approve the login request in the Ahsay Mobile
app or enter the one-time passcode that is generated in the third-party TOTP
Authenticator app.

www.ahsay.com 208
1. Slide the switch to the right to enable Two-Factor Authentication. Then click
to add a device.
2. Download the Ahsay Mobile app by typing the given URL in your mobile
device’s browser or by clicking link to
scan the QR code. Click to proceed.
3. Select the country code and enter the phone number. Click
.

www.ahsay.com 209
4. Enter the verification code sent to your mobile device. Click to
proceed.
5. Pair the device with the backup account. There are two ways to do this:
Use the Ahsay Mobile app, scan the QR code.
Or
Use a third-party TOTP Authenticator App (e.g. Authy, Duo, Google), click
link.
Either scan the QR code or enter the Secret Key in the third-party TOTP
Authenticator. Enter the display name and one time password generated by

www.ahsay.com 210
the authenticator app and click .
6. Once paired this message will be displayed. Click to proceed.
7. The paired device is now included in the list of Registered Mobile Device(s).
Click to save.
NOTE
Please note that the Two-Factor Authentication settings will only be
available if the Two-Facfactor Authentication feature is switched on in
System Settings > Basic > Two-Factor Authentication (2FA). Adding
the device is optional, it will be automatically added once the user’s device
has been paired with the backup user account upon log in. For more
details please read Two-Factor Authentication.
Last Successful Login – It shows the date and time the user last logged in.
Also shows the IP address, browser or application used during log in and mobile
device used in MFA (if enabled). This changes everytime the user logs in.

www.ahsay.com 211
For old backup accounts using Twilio, this will be the screen displayed.
Security Settings – Add another layer of security for the account by configuring
the two-factor authentication here for the user. Aside from the password, they
will be required to enter a passcode that will be sent to them through SMS.
1. Click to add a phone number where the passcode will be sent.
2. Select the Country Code and enter the phone number.
3. Click to save.
NOTE
Please note that the Security Settings will only be available if the Twilio
Credentials Verification is switched on in System Settings > Basic > Two-
Factor Authentication (2FA). Adding the phone number is optional, it will
be automatically added once the user’s phone number has been verified
upon log in. For more details please read Two-Factor Authentication.

www.ahsay.com 212
➢ Mobile Backup Tab
The Mobile Backup tab will only be displayed if the Mobile add-on module is enabled
for the backup account. It will display the name of the mobile device(s) registered for
backup with the corresponding backup destination.

www.ahsay.com 213
Backup Set
This function is used to create backup sets for this user account. In some cases, you may
need to create backup sets first before you install a backup client on the client machine, or
it may be an alternative option for administrator to create/modify a backup set for Linux
users with no graphical interface, or there may be access restrictions for administrator to
access the backup machine again after the backup client installed.
The following shows the Backup Set tab under Users, Groups & Policies > Backup User.
Timezone information will be automatically updated when user login client backup agent,
such as AhsayOBM and AhsayACB, or perform backup job to avoid the false alarm of
missed backup job.
Accessing the Backup Set
Click the backup set name of the user account you want to manage from the Backup Set
tab. It is sub divided into the following tabs:
General Source Backup Schedule
Continuous Backup
Destination In-File Delta
Retention Policy Command Line Tool
Reminder
Bandwidth Control
IP Allowed for Restore
Others

www.ahsay.com 214
Recovering Encryption Key via AhsayCBS Web Console
It is possible to engage the AhsayCBS v8 Encryption Key Recovery Service via the
AhsayCBS web console under the Others menu of this section. Click here for details on
the scope of this professional service.
Required Permission
Only system user with Admin role has the right to access the Recover Encryption Key
feature via AhsayCBS web console.
Required Settings
Encryption key is recoverable only if the following three settings are ENABLED:
The Upload Encryption Key feature in the Encryption Key section under the Users,
Group & Policies > Policy Group > %Policy Group Name % > User Settings menu
which applies to the corresponding backup set.
The Encryption Recovery feature under the Profile > Encryption Recovery menu in
your AhsayOBM or AhsayACB.
The Upload Encryption Key feature under the Users, Group & Policies > Backup
User > %User Name % > User Profile of the backup user requesting for key recovery.
With these three features on, encryption keys will be uploaded to the backup server during
the backup process, so as to make recovery possible.

www.ahsay.com 215
Preparation before Getting Started
Make sure the following items are valid before getting started with the encryption key
recovery process.
Valid login credentials to log on to the Ahsay Shopping Centre.
Valid maintenance. For inquiries about maintenance, please contact our Sales Team
Encryption Key Recovery for Branded AhsayCBS
Background
If your AhsayCBS is branded, the Recover Encryption Key feature is HIDDEN by default. This
measure is enforced to prevent backup users from accessing the Ahsay Shopping Centre
directly after clicking the Recover Encryption Key button under a branding environment.
What is a branded AhsayCBS
Your AhsayCBS is considered “branded” when the following criteria are met:
Under the System Settings > Basic > Administrative Access > %system user% > Rebrand
Web Console > User Interface page in the web management console, if any one of the
following parameters is not empty or not holding default image:
Title Product Name User Interface logo Report logo
AhsayCBS logo AhsayOBM logo AhsayACB logo
Force enable the Recover Encryption Key feature
The Recover Encryption Key button can be forced to show by enabling the debug option as
shown below in the cbs.opt file under the %CBS_INSTALL%\conf folder. This debug option will
make the Recover Encryption Key button visible to backup users even if the AhsayCBS is
branded.
com.ahsay.cbs.system.config.accounts.editSysUserBean.ShowRecoveryEncryptionKeyBt
n.debug=true

www.ahsay.com 216
Recovery Steps
Follow the steps below to submit an encryption key recovery request.
1. Click on the backup set, which you wish to recover the encryption key for, under the
Manage Backup Set section.
2. Navigate to the Others tab.
3. Look for the Encryption sub-section on this page and click on the Recover
Encryption Key button.
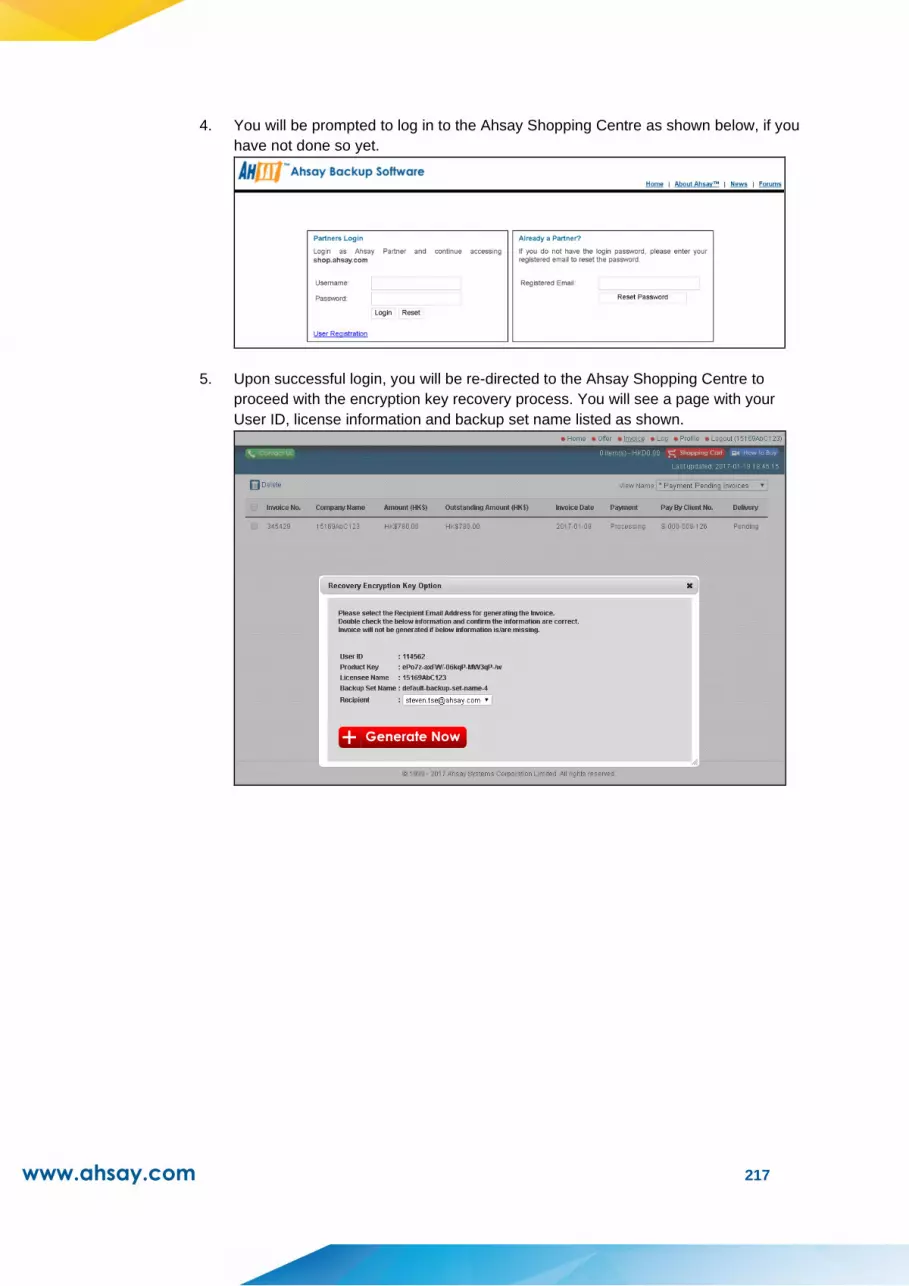
www.ahsay.com 217
4. You will be prompted to log in to the Ahsay Shopping Centre as shown below, if you
have not done so yet.
5. Upon successful login, you will be re-directed to the Ahsay Shopping Centre to
proceed with the encryption key recovery process. You will see a page with your
User ID, license information and backup set name listed as shown.
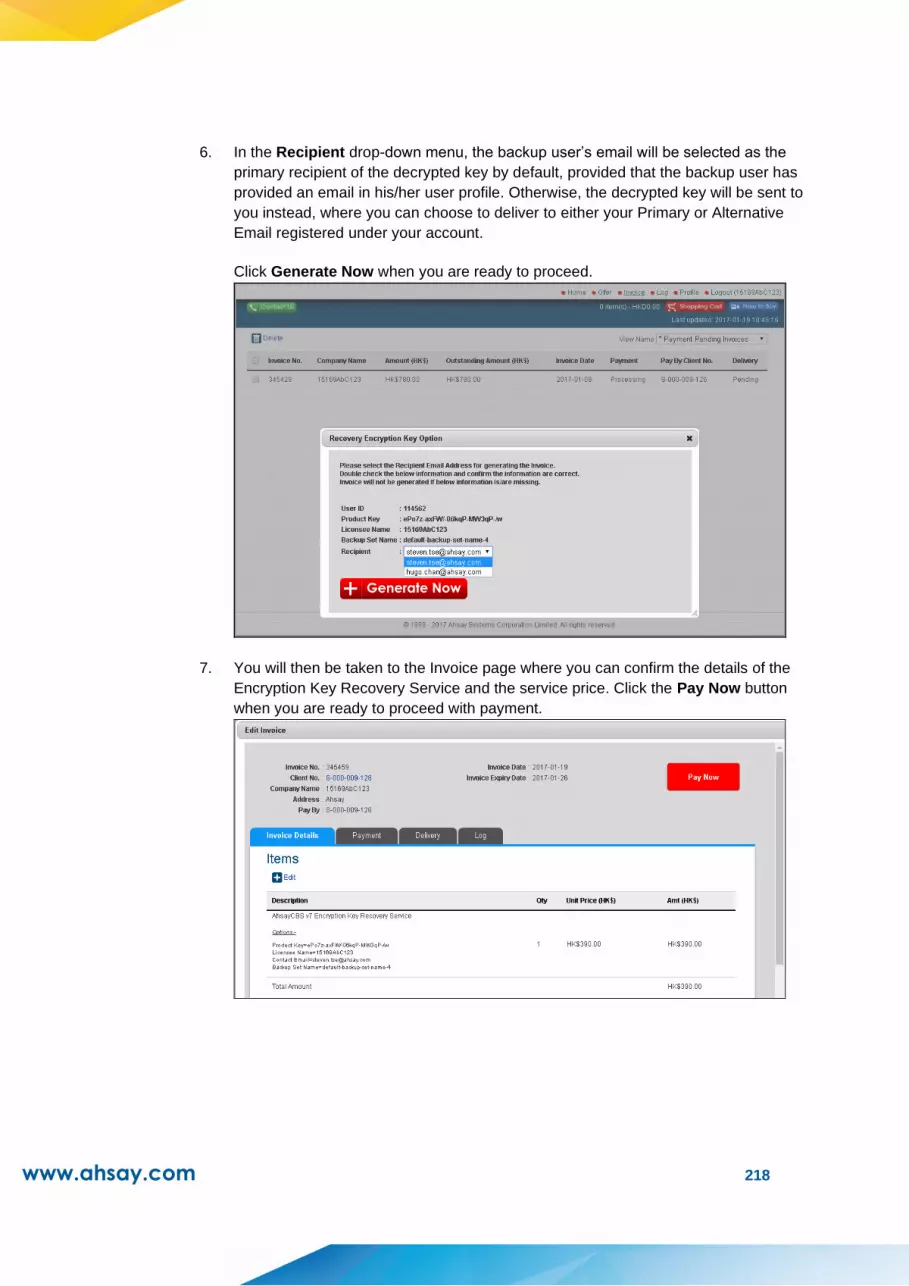
www.ahsay.com 218
6. In the Recipient drop-down menu, the backup user’s email will be selected as the
primary recipient of the decrypted key by default, provided that the backup user has
provided an email in his/her user profile. Otherwise, the decrypted key will be sent to
you instead, where you can choose to deliver to either your Primary or Alternative
Email registered under your account.
Click Generate Now when you are ready to proceed.
7. You will then be taken to the Invoice page where you can confirm the details of the
Encryption Key Recovery Service and the service price. Click the Pay Now button
when you are ready to proceed with payment.
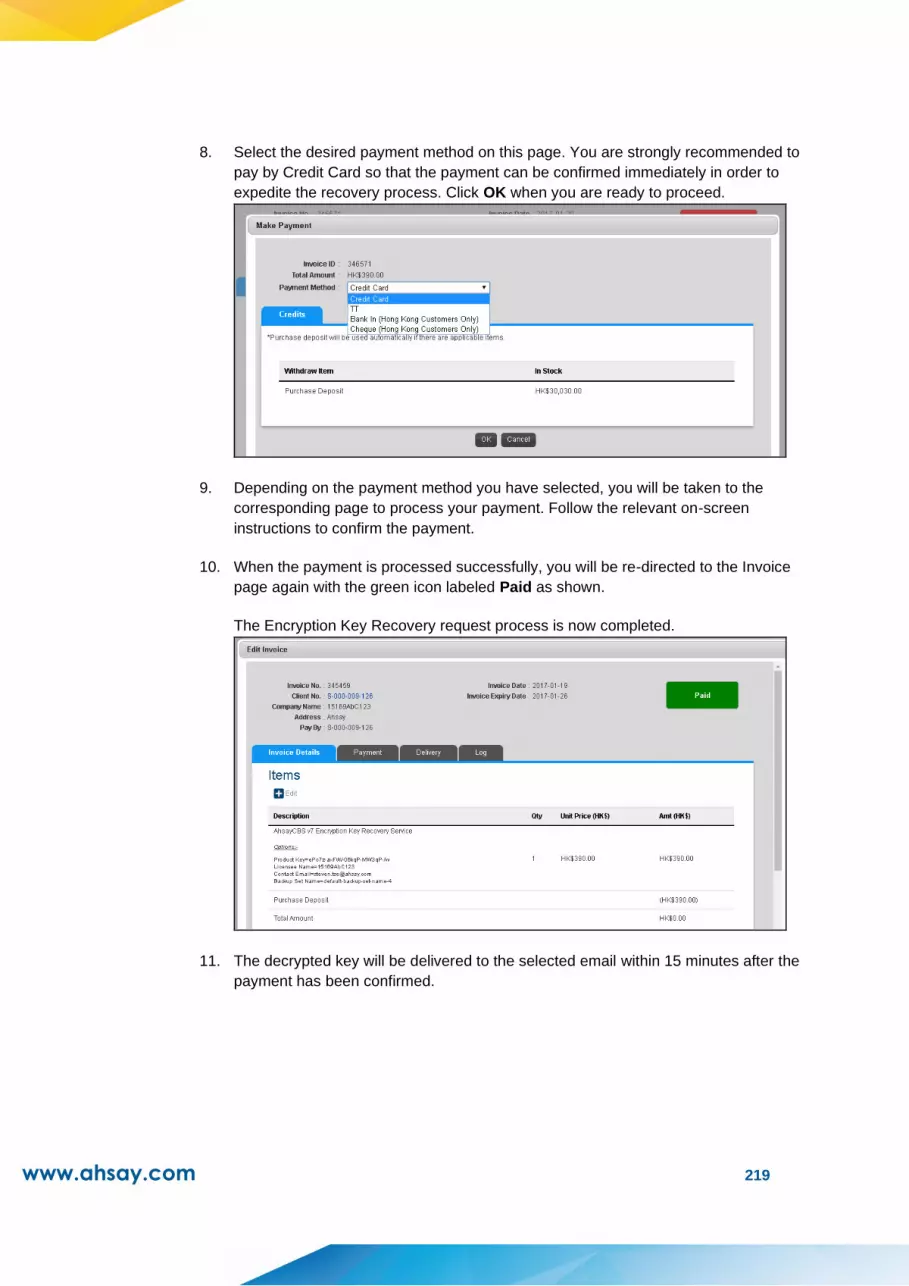
www.ahsay.com 219
8. Select the desired payment method on this page. You are strongly recommended to
pay by Credit Card so that the payment can be confirmed immediately in order to
expedite the recovery process. Click OK when you are ready to proceed.
9. Depending on the payment method you have selected, you will be taken to the
corresponding page to process your payment. Follow the relevant on-screen
instructions to confirm the payment.
10. When the payment is processed successfully, you will be re-directed to the Invoice
page again with the green icon labeled Paid as shown.
The Encryption Key Recovery request process is now completed.
11. The decrypted key will be delivered to the selected email within 15 minutes after the
payment has been confirmed.
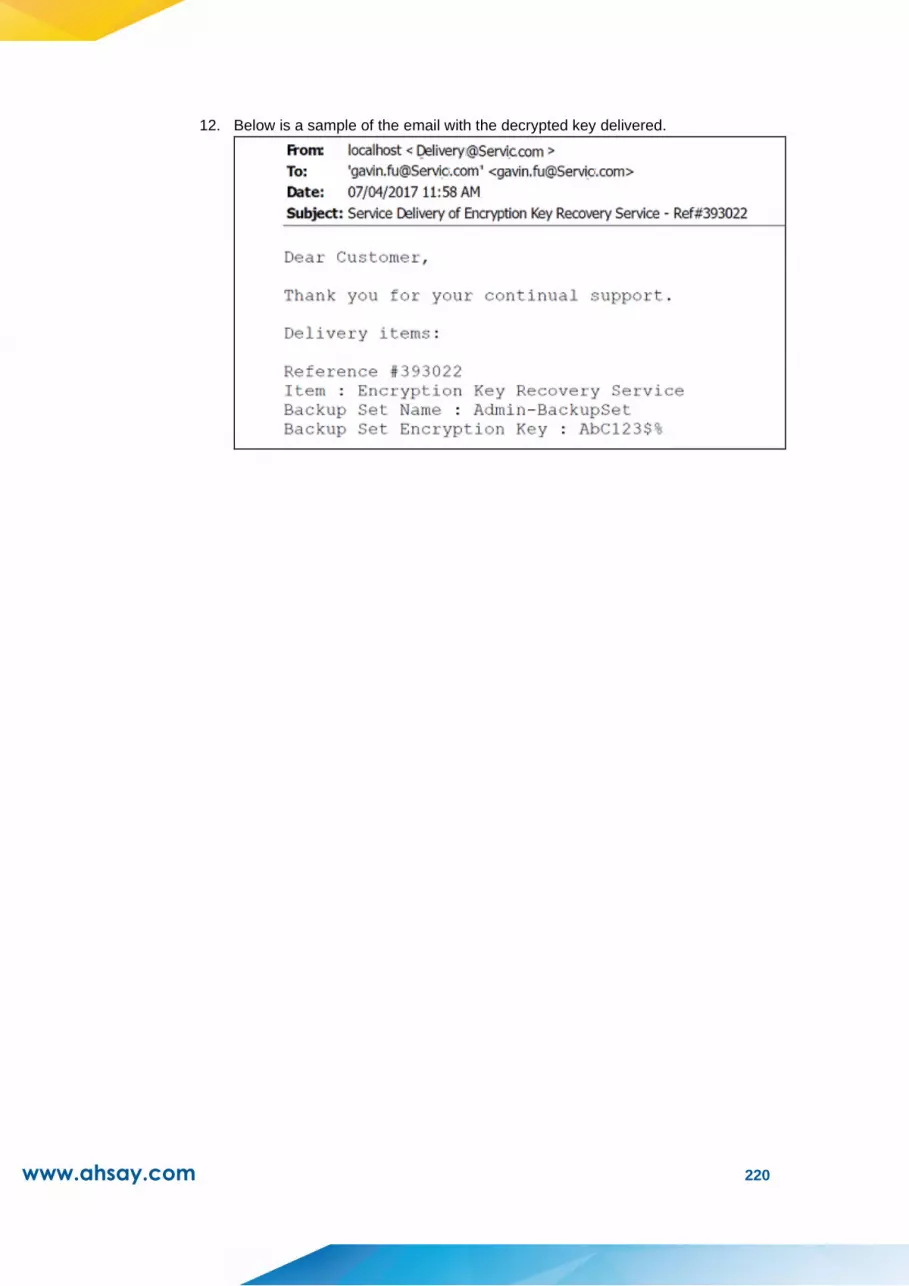
www.ahsay.com 220
12. Below is a sample of the email with the decrypted key delivered.
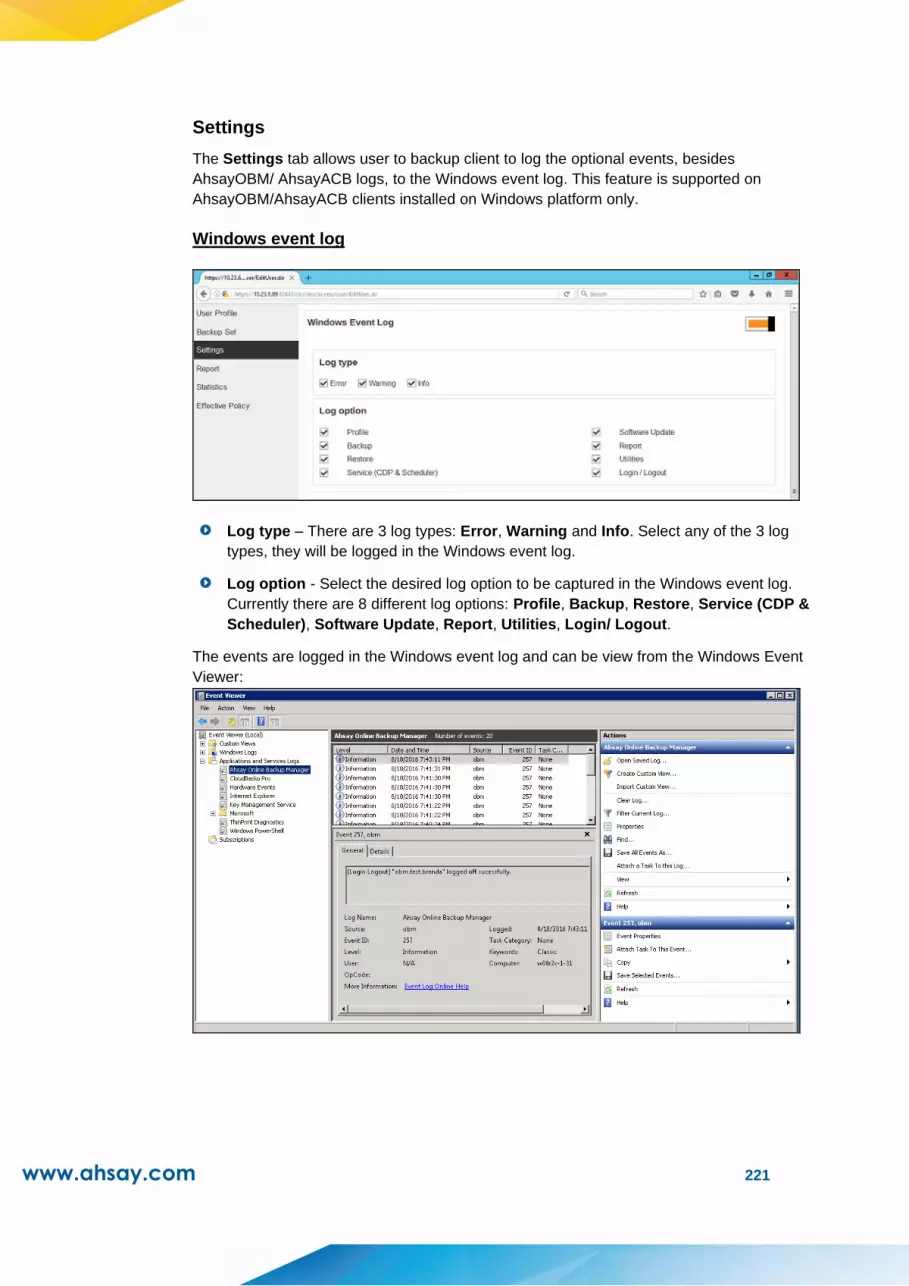
www.ahsay.com 221
Settings
The Settings tab allows user to backup client to log the optional events, besides
AhsayOBM/ AhsayACB logs, to the Windows event log. This feature is supported on
AhsayOBM/AhsayACB clients installed on Windows platform only.
Windows event log
Log type – There are 3 log types: Error, Warning and Info. Select any of the 3 log
types, they will be logged in the Windows event log.
Log option - Select the desired log option to be captured in the Windows event log.
Currently there are 8 different log options: Profile, Backup, Restore, Service (CDP &
Scheduler), Software Update, Report, Utilities, Login/ Logout.
The events are logged in the Windows event log and can be view from the Windows Event
Viewer:
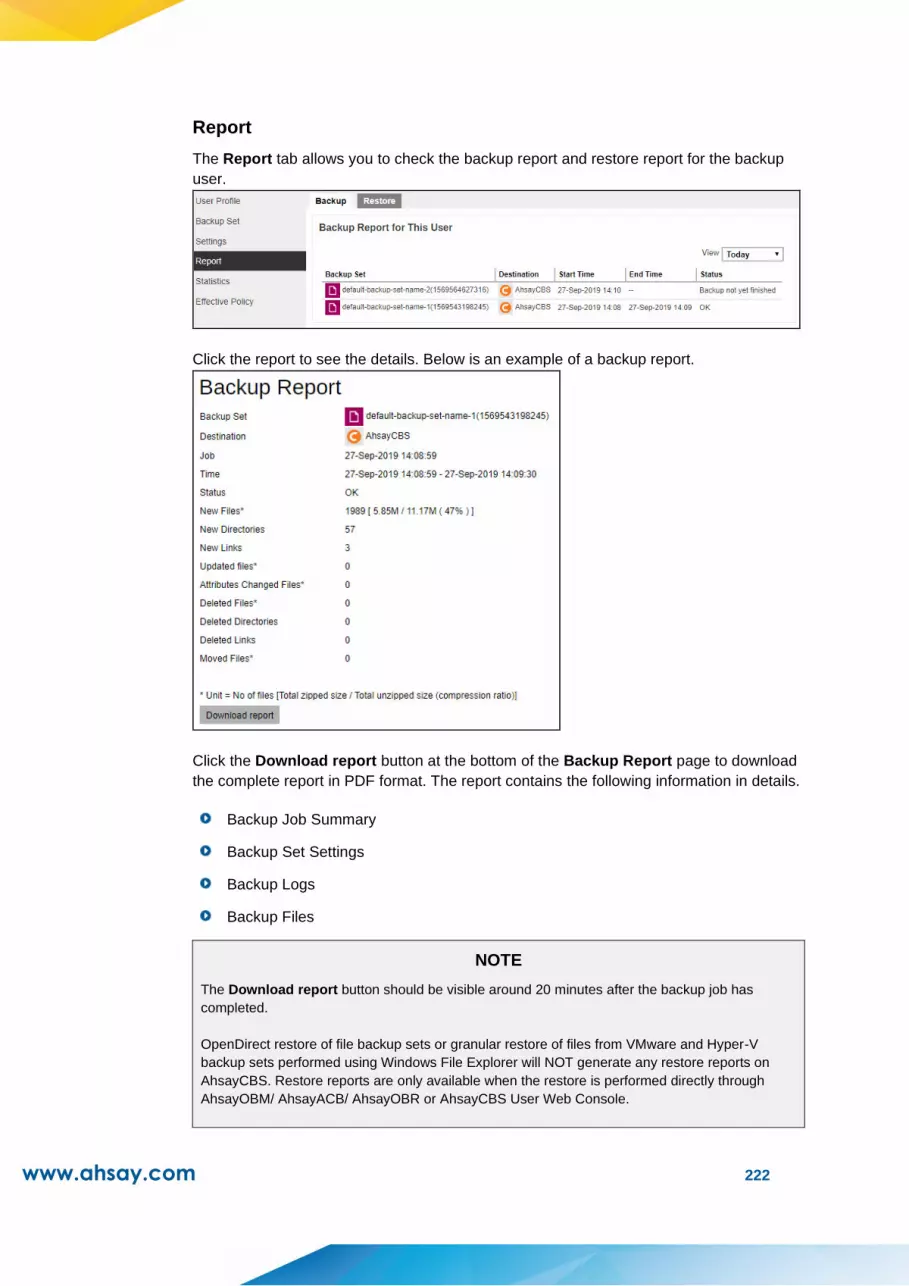
www.ahsay.com 222
Report
The Report tab allows you to check the backup report and restore report for the backup
user.
Click the report to see the details. Below is an example of a backup report.
Click the Download report button at the bottom of the Backup Report page to download
the complete report in PDF format. The report contains the following information in details.
Backup Job Summary
Backup Set Settings
Backup Logs
Backup Files
NOTE
The Download report button should be visible around 20 minutes after the backup job has
completed.
OpenDirect restore of file backup sets or granular restore of files from VMware and Hyper-V
backup sets performed using Windows File Explorer will NOT generate any restore reports on
AhsayCBS. Restore reports are only available when the restore is performed directly through
AhsayOBM/ AhsayACB/ AhsayOBR or AhsayCBS User Web Console.

www.ahsay.com 223
Statistics
The Statistics tab allows you to generate a graph of storage statistics for the user by
modifying a few factors such as the backup destination, backup set and the period of the
backup. The statistics shows the storage capacity of different backup sets on different
dates.
1. Only the restorable files in the data and retention area for each backup set is included
in the calculation of storage statistics.
2. The following items are excluded from the calculation of storage statistics:
Uploaded AhsayOBM/AhsayACB client log files
backup and restore reports in PDF file format
Audit log files
Index files
Therefore, we expect some discrepancy between the storage size reported by AhsayCBS
compared with the storage size of the physical files on disk reported by the operating
system, the size reported on disk will always be larger than reported on the AhsayCBS
storage statistics.
Usage
The following options are configurable for generating statistics in your desirable view.
Select a destination – select the backup destination of your choice
Select a backup set – you can choose a specific backup set or all backup sets
Period – select the period of time during which backups were performed
View – you can choose a view, graph or table
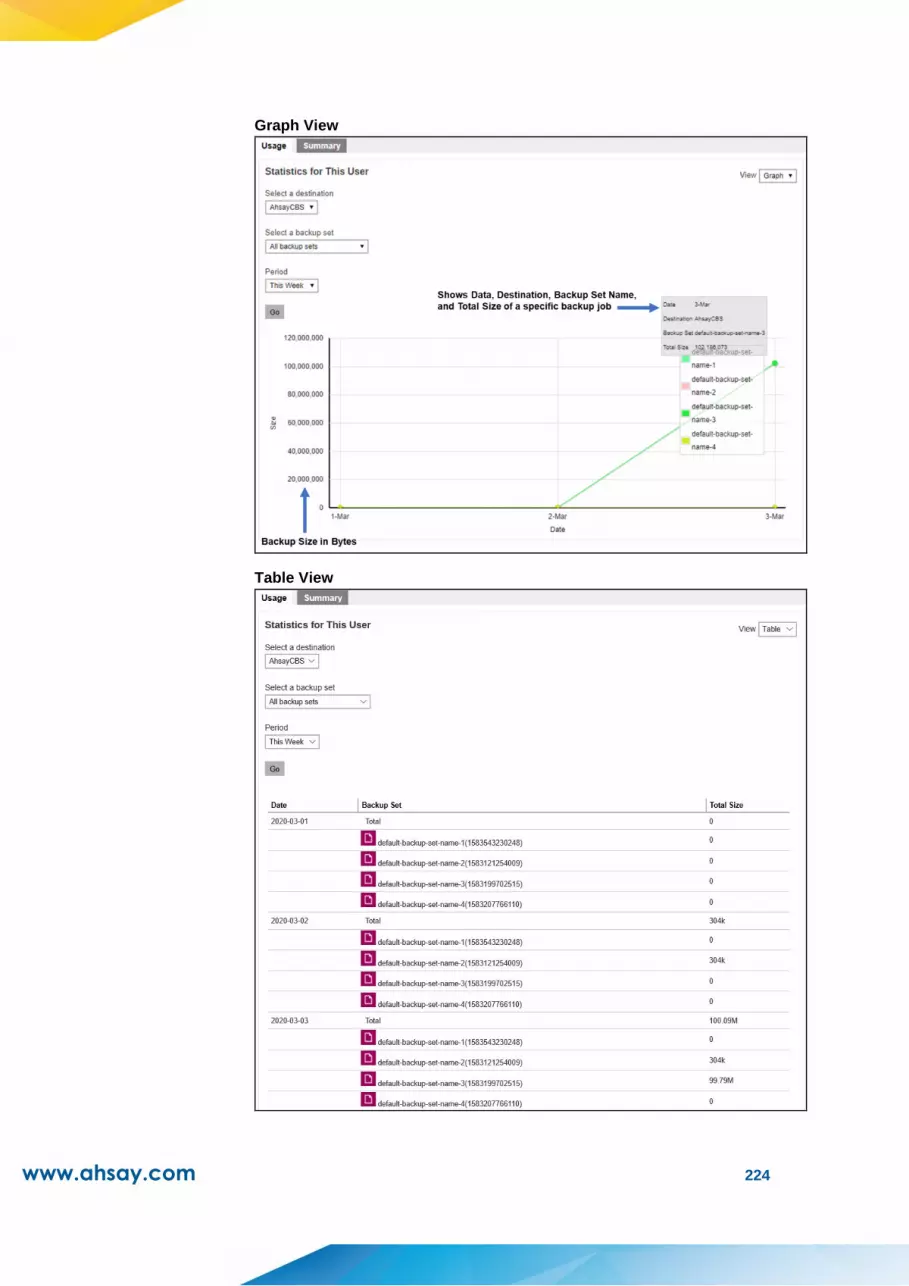
www.ahsay.com 224
Graph View
Table View
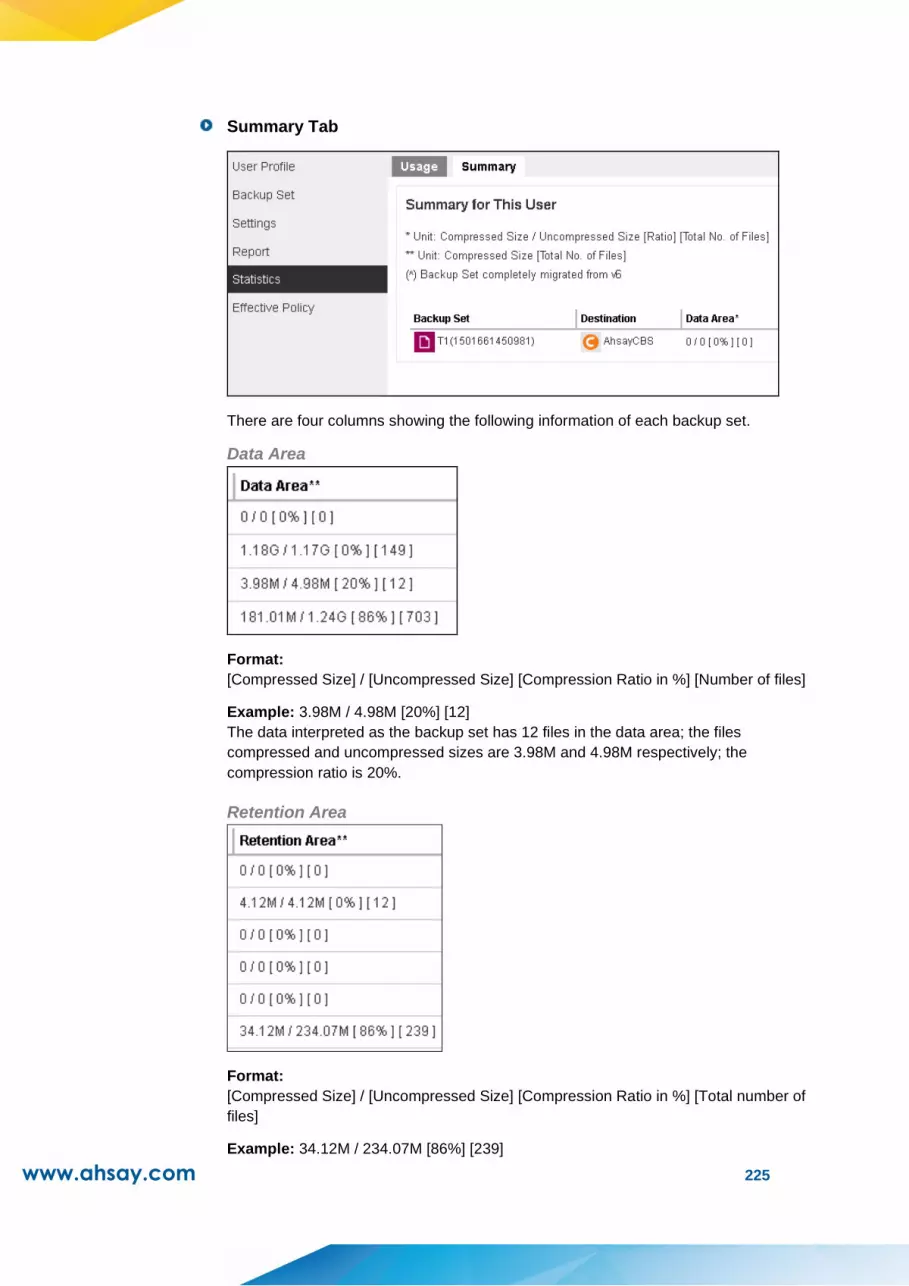
www.ahsay.com 225
Summary Tab
There are four columns showing the following information of each backup set.
Data Area
Format:
[Compressed Size] / [Uncompressed Size] [Compression Ratio in %] [Number of files]
Example: 3.98M / 4.98M [20%] [12]
The data interpreted as the backup set has 12 files in the data area; the files
compressed and uncompressed sizes are 3.98M and 4.98M respectively; the
compression ratio is 20%.
Retention Area
Format:
[Compressed Size] / [Uncompressed Size] [Compression Ratio in %] [Total number of
files]
Example: 34.12M / 234.07M [86%] [239]
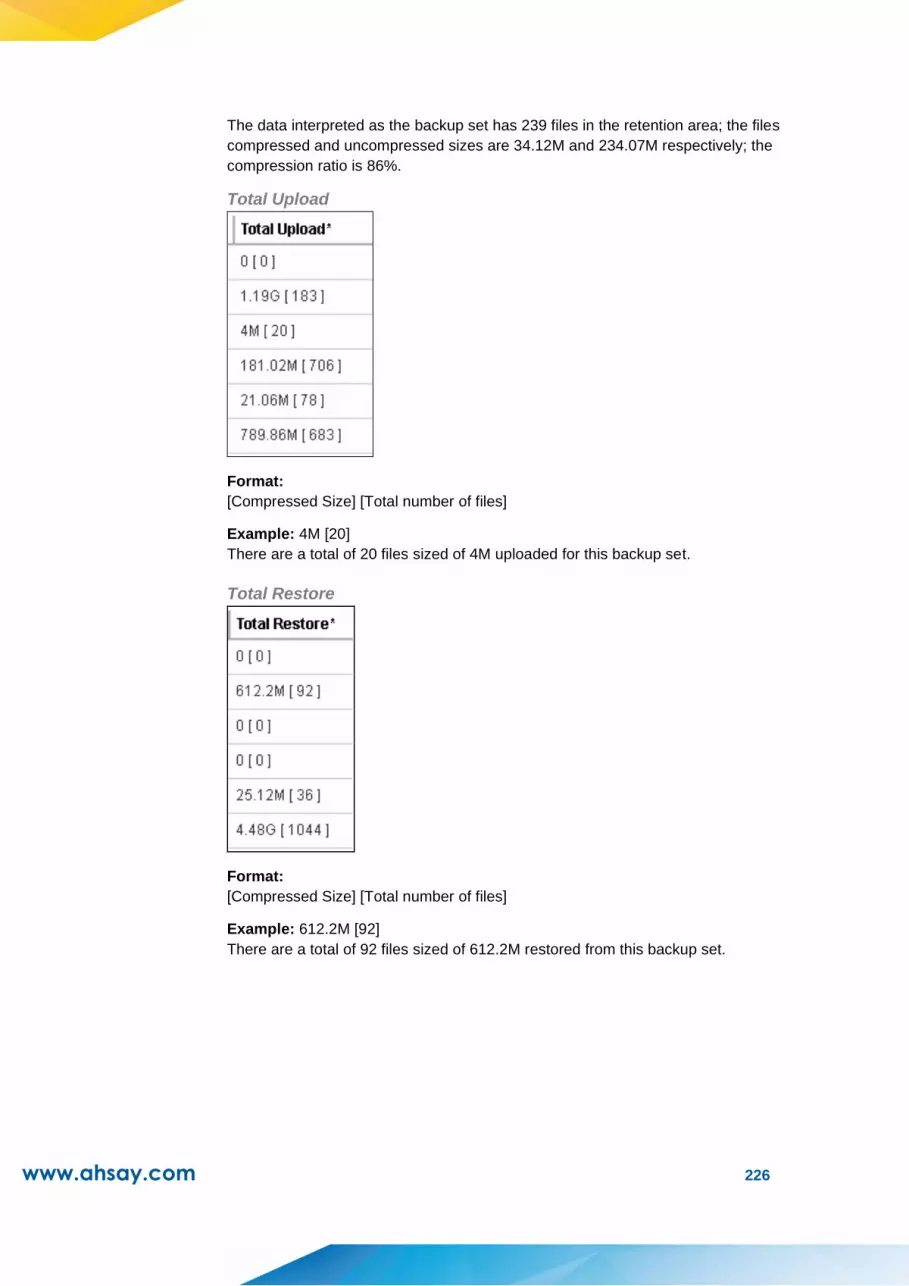
www.ahsay.com 226
The data interpreted as the backup set has 239 files in the retention area; the files
compressed and uncompressed sizes are 34.12M and 234.07M respectively; the
compression ratio is 86%.
Total Upload
Format:
[Compressed Size] [Total number of files]
Example: 4M [20]
There are a total of 20 files sized of 4M uploaded for this backup set.
Total Restore
Format:
[Compressed Size] [Total number of files]
Example: 612.2M [92]
There are a total of 92 files sized of 612.2M restored from this backup set.
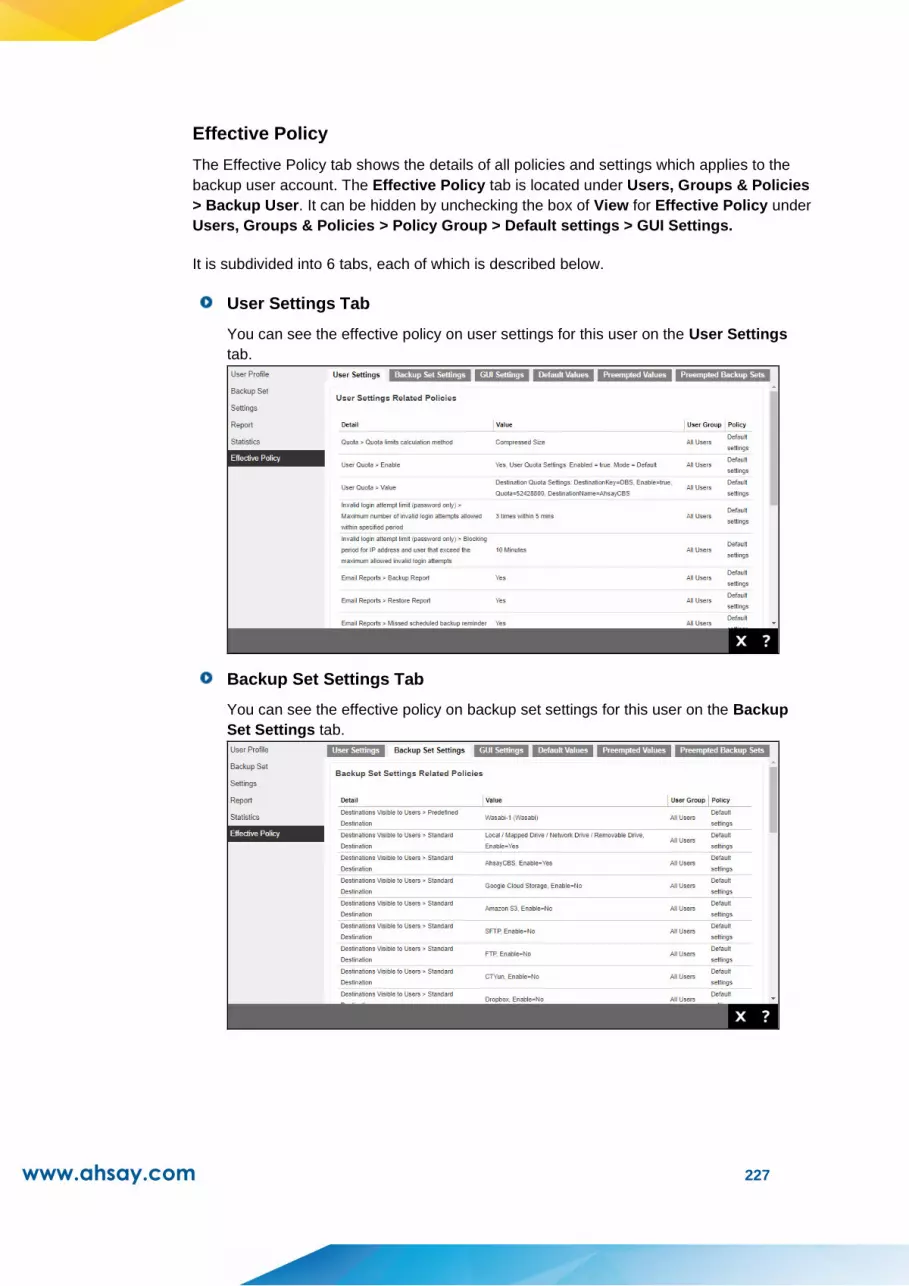
www.ahsay.com 227
Effective Policy
The Effective Policy tab shows the details of all policies and settings which applies to the
backup user account. The Effective Policy tab is located under Users, Groups & Policies
> Backup User. It can be hidden by unchecking the box of View for Effective Policy under
Users, Groups & Policies > Policy Group > Default settings > GUI Settings.
It is subdivided into 6 tabs, each of which is described below.
User Settings Tab
You can see the effective policy on user settings for this user on the User Settings
tab.
Backup Set Settings Tab
You can see the effective policy on backup set settings for this user on the Backup
Set Settings tab.
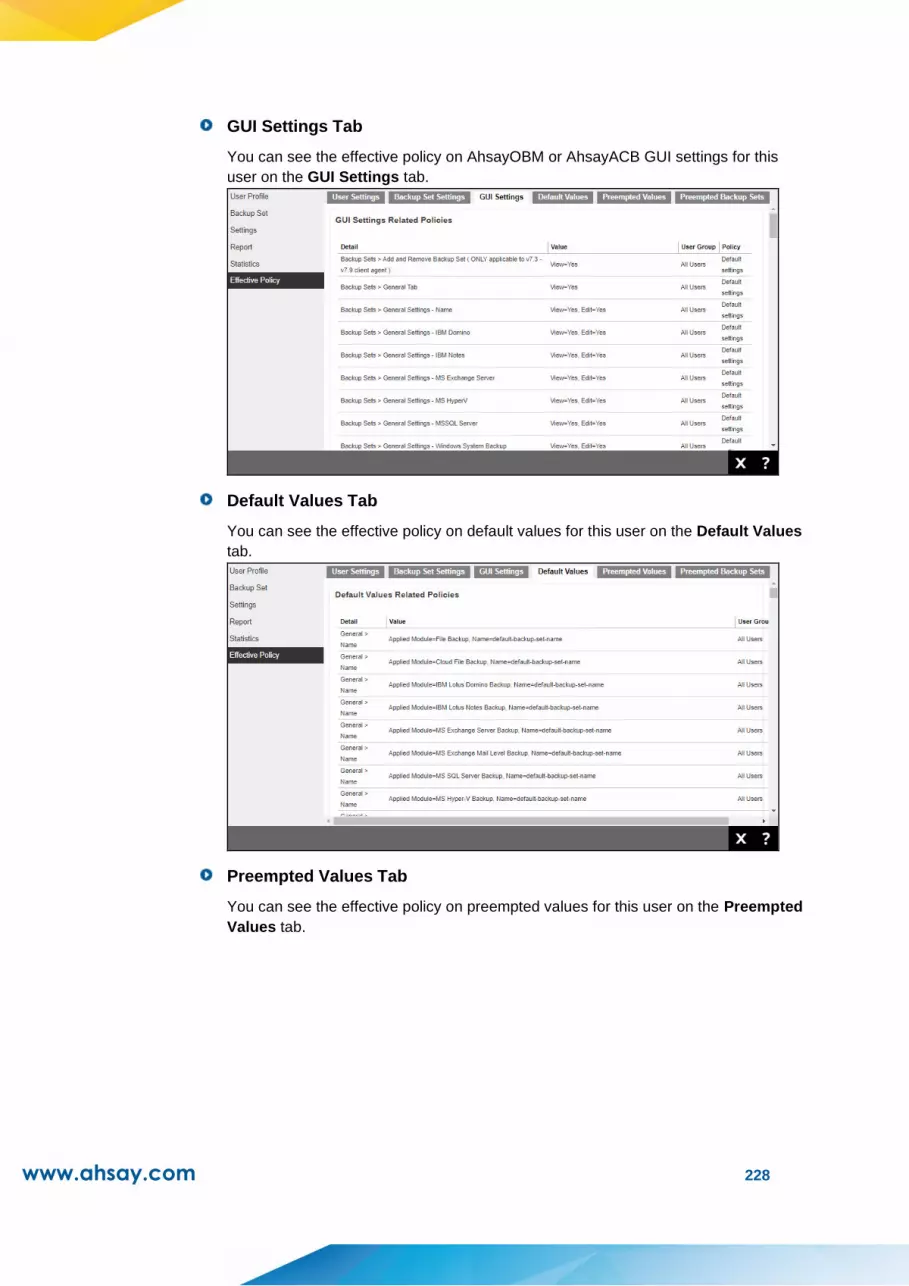
www.ahsay.com 228
GUI Settings Tab
You can see the effective policy on AhsayOBM or AhsayACB GUI settings for this
user on the GUI Settings tab.
Default Values Tab
You can see the effective policy on default values for this user on the Default Values
tab.
Preempted Values Tab
You can see the effective policy on preempted values for this user on the Preempted
Values tab.

www.ahsay.com 229
Preempted Backup Sets Tab
You can see the effective policy on preempted backup sets for this user on the
Preempted Backup Sets tab.

www.ahsay.com 230
6.2.2 Manage User Groups
User Group is used in conjunction with Group Policies (see the next chapter Manage Policy
Groups for details) for governing the behavior of client backup agent and the AhsayCBS.
The following shows the User Group tab under Backup / Restore > Users, Groups &
Policies.
The default user group
By default, the user group named All Users has been created. All backup users will be put
under the All Users user group by default after the user account has been created. When
you click on one of the user groups, you will be able to see the following:
General Information – It shows the information of the user group, ownership, etc.
Assigned User – A list of users assigned to the group.
Assigned Policy – It shows a list of assigned polices to the user group. As the order
of the policy would affect the actual applied to the user group, i.e. the policy on the top
would probably overwrite the policy at the bottom of the list. If you want to arrange the
order of the policies, you can simply drag the policy up and down.
For the All Users user group, it has a predefined policy called Default settings.
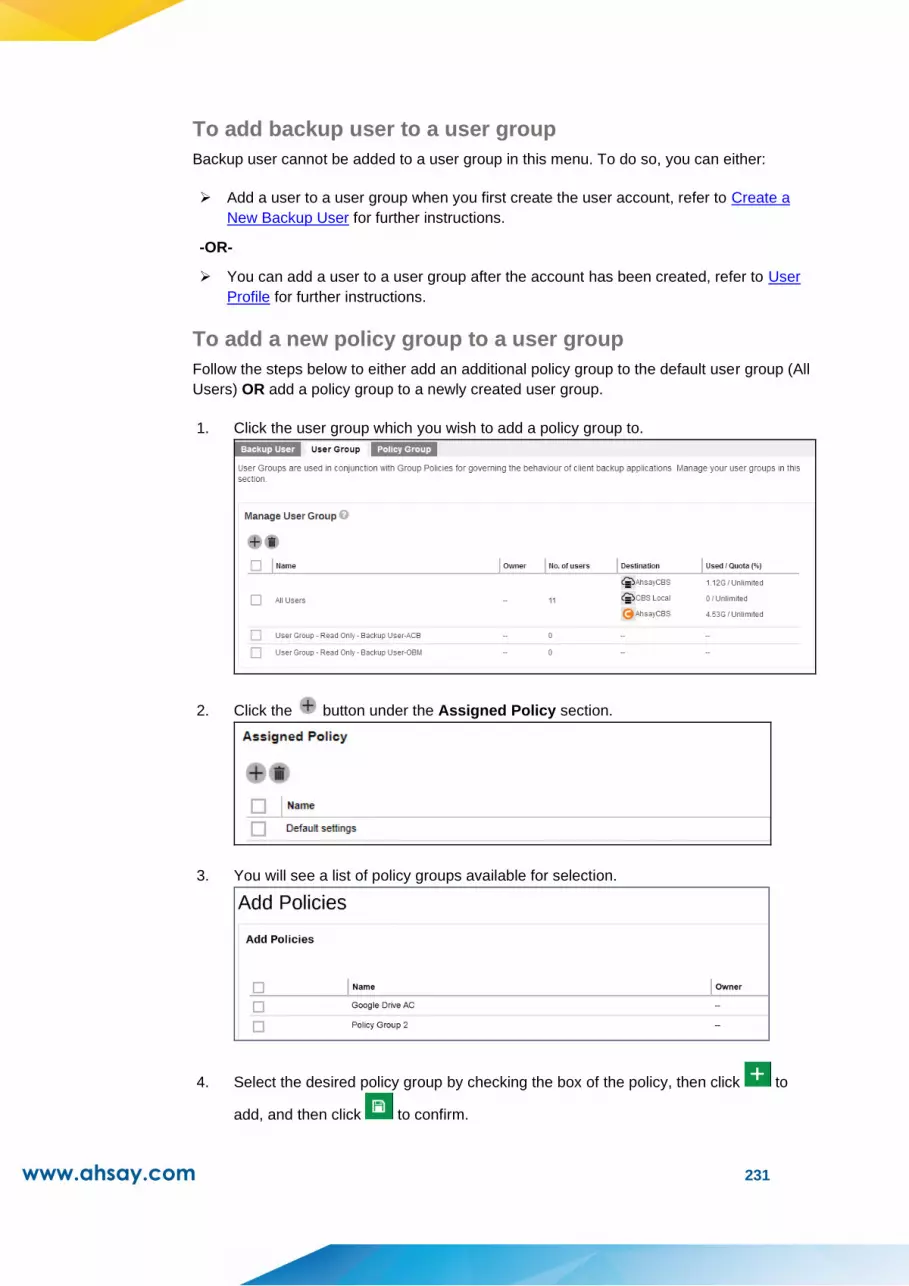
www.ahsay.com 231
To add backup user to a user group
Backup user cannot be added to a user group in this menu. To do so, you can either:
➢ Add a user to a user group when you first create the user account, refer to Create a
New Backup User for further instructions.
-OR-
➢ You can add a user to a user group after the account has been created, refer to User
Profile for further instructions.
To add a new policy group to a user group
Follow the steps below to either add an additional policy group to the default user group (All
Users) OR add a policy group to a newly created user group.
1. Click the user group which you wish to add a policy group to.
2. Click the button under the Assigned Policy section.
3. You will see a list of policy groups available for selection.
4. Select the desired policy group by checking the box of the policy, then click to
add, and then click to confirm.
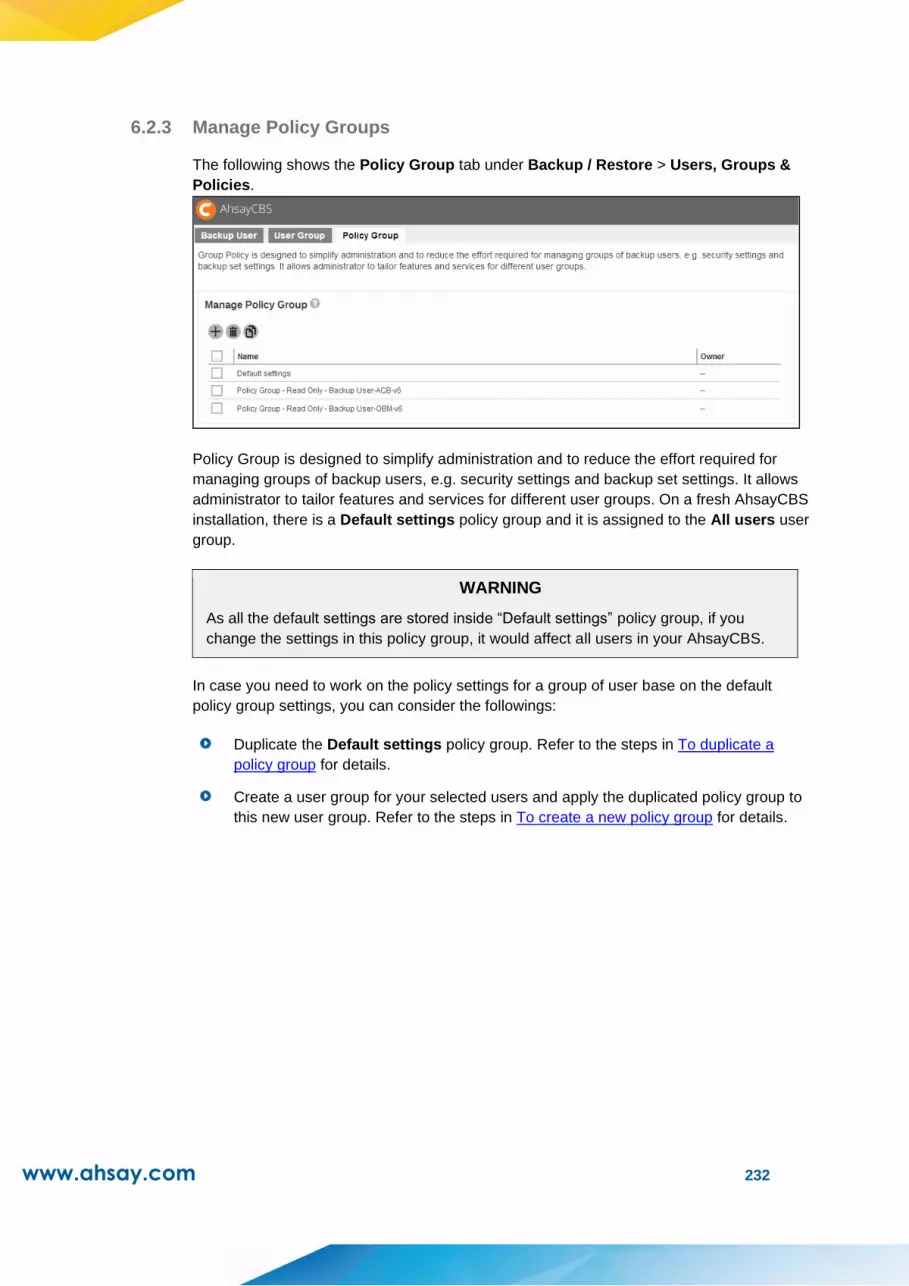
www.ahsay.com 232
6.2.3 Manage Policy Groups
The following shows the Policy Group tab under Backup / Restore > Users, Groups &
Policies.
Policy Group is designed to simplify administration and to reduce the effort required for
managing groups of backup users, e.g. security settings and backup set settings. It allows
administrator to tailor features and services for different user groups. On a fresh AhsayCBS
installation, there is a Default settings policy group and it is assigned to the All users user
group.
WARNING
As all the default settings are stored inside “Default settings” policy group, if you
change the settings in this policy group, it would affect all users in your AhsayCBS.
In case you need to work on the policy settings for a group of user base on the default
policy group settings, you can consider the followings:
Duplicate the Default settings policy group. Refer to the steps in To duplicate a
policy group for details.
Create a user group for your selected users and apply the duplicated policy group to
this new user group. Refer to the steps in To create a new policy group for details.

www.ahsay.com 233
To create a new policy group
Follow the steps below to create a new policy group.
1. Click the button under the Manage Policy Group section.
2. Enter a name for the policy group.
3. Click to confirm.
4. Go back to the Policy Group tab under Backup / Restore > Users, Groups &
Policies, and you should be able to see the policy group name you have just created.
5. Click on the policy group for configuration. The configuration items are subdivided
into 8 sections, each of which is described in the To configure a policy group section
below.
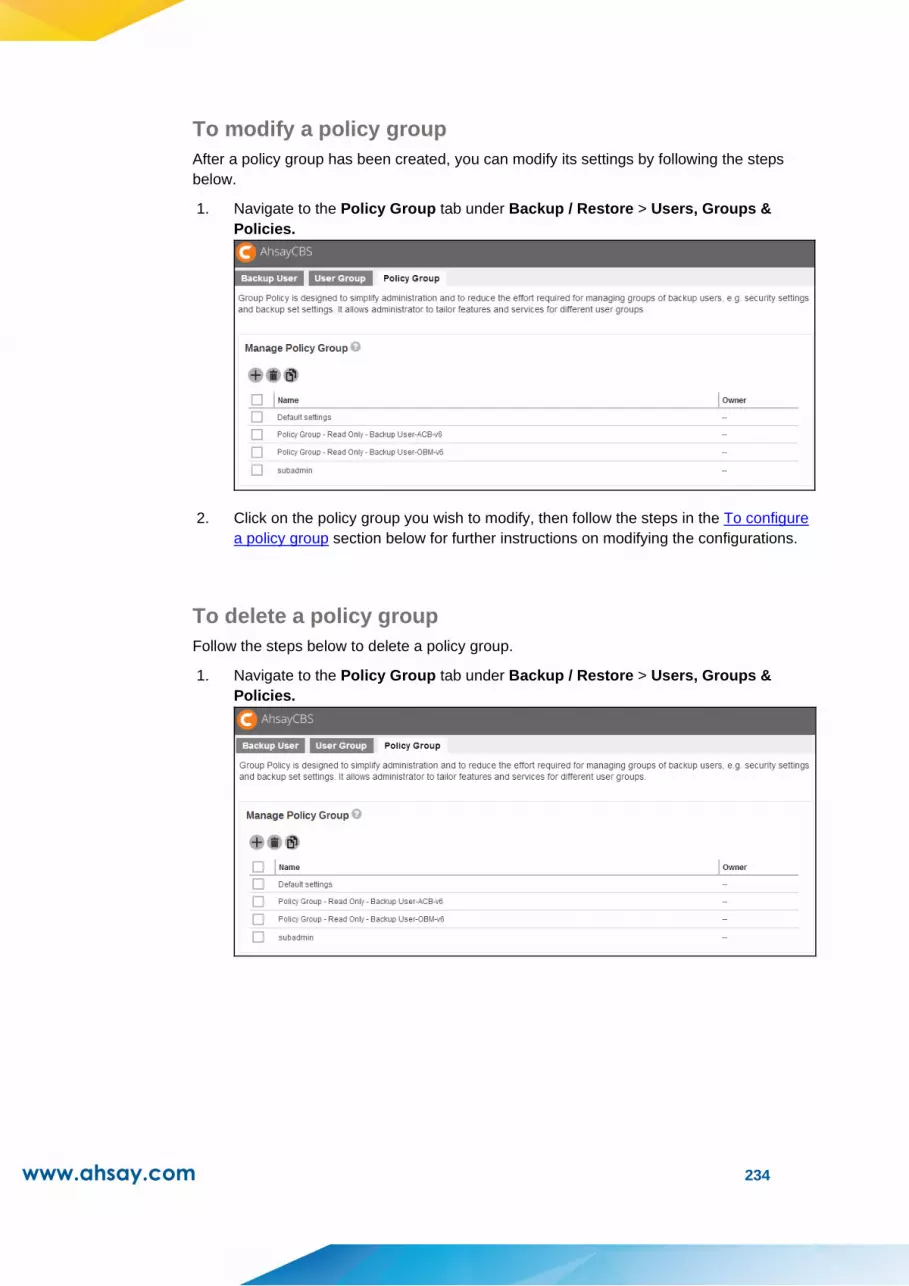
www.ahsay.com 234
To modify a policy group
After a policy group has been created, you can modify its settings by following the steps
below.
1. Navigate to the Policy Group tab under Backup / Restore > Users, Groups &
Policies.
2. Click on the policy group you wish to modify, then follow the steps in the To configure
a policy group section below for further instructions on modifying the configurations.
To delete a policy group
Follow the steps below to delete a policy group.
1. Navigate to the Policy Group tab under Backup / Restore > Users, Groups &
Policies.

www.ahsay.com 235
2. Check the box of the policy group you wish to delete, then click on the button as
highlighted in the screen shot below.
3. Click “OK” to confirm.
To duplicate a policy group
Follow the steps below to duplicate an existing policy group. This is useful when you wish
to apply the same configurations from a policy group to a group of users.
1. Navigate to the Policy Group tab under Backup / Restore > Users, Groups &
Policies.
2. Check the box of the policy group you wish to duplicate, then click on the button
as highlighted in the screen shot below.

www.ahsay.com 236
3. You will immediately see the policy group is being duplicated, with the suffix “Clone
at YYYY-MM-DD HH:MM:SS” in the duplicated group policy’s name.
4. If you need to configure the duplicated policy group, follow the steps in the To
configure a policy group section below for details.
To configure a policy group
General
This is the general settings of the policy group page, and the user group is a list of user
group which is a list of user groups which has applied this policy.

www.ahsay.com 237
Name – the name of the policy group. The name is configurable.
Type – predefined as Backup User
User Group – displays the user group(s) with this policy group applied.
If you have changed the policy group name, click to confirm.
To add backup user to a policy group
Backup users cannot be added to a policy group directly in this setting menu. To do so, you
have to:
Step 1: Add the user to a user group first by following the steps in either case below:
➢ Add a user to a user group when you first create the user account, refer to Create a
New Backup User for further instructions.
-OR-
➢ You can add user a to a user group after the account has been created, refer to User
Profile for further instructions.
Step 2: Assign the desired policy group to the user group by following the steps in To add a
new policy group to a user group.
User Settings
This section allows you to manage user settings such as Quota, Invalid Login Attempt
Limit, Two-Factor Authentication, Password, Email Reports, Encryption Key, Client Host
limit, Run Direct VM Limit and Advertisement.
➢ Quota
Administrators can set a group storage quota to a user group.
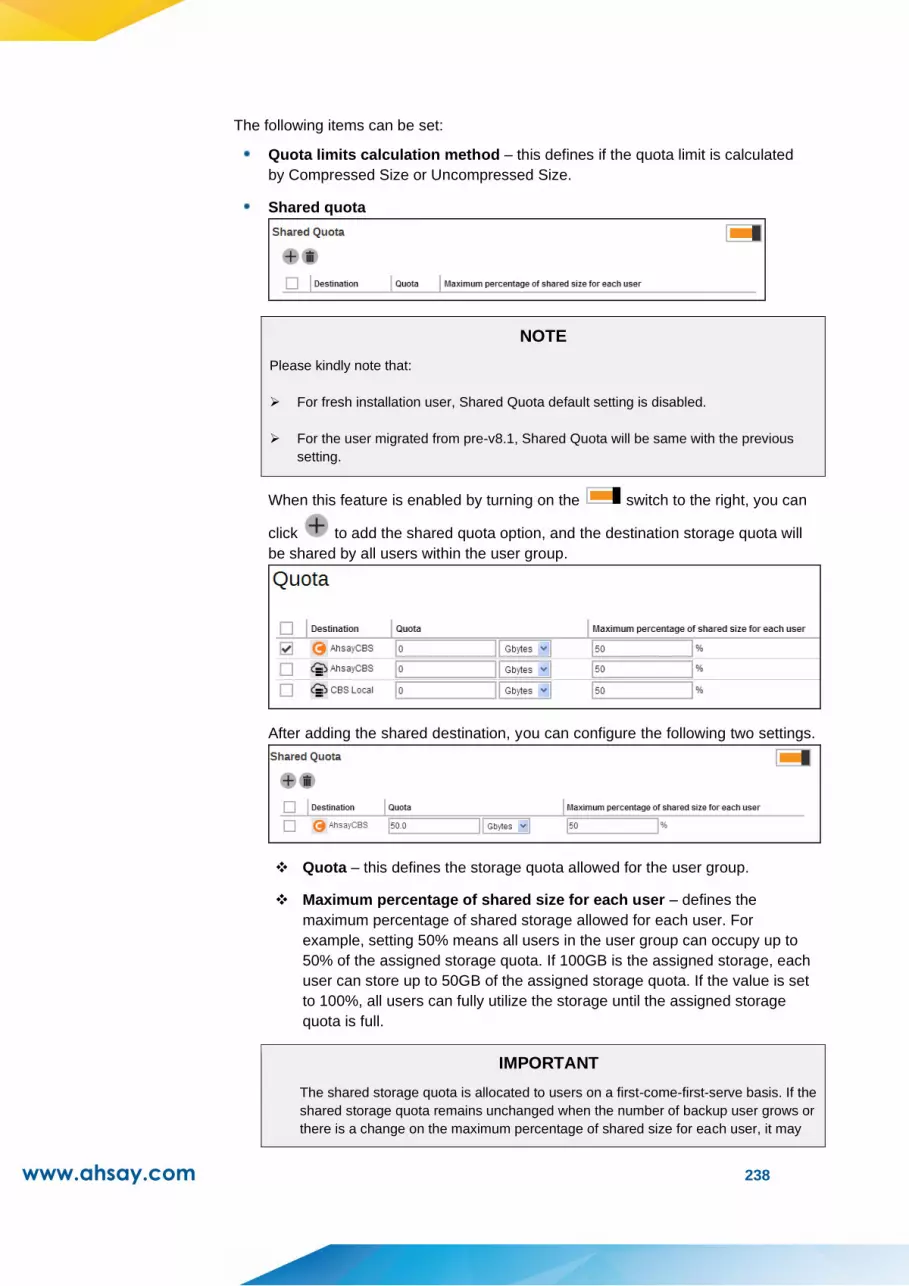
www.ahsay.com 238
The following items can be set:
Quota limits calculation method – this defines if the quota limit is calculated
by Compressed Size or Uncompressed Size.
Shared quota
NOTE
Please kindly note that:
➢ For fresh installation user, Shared Quota default setting is disabled.
➢ For the user migrated from pre-v8.1, Shared Quota will be same with the previous
setting.
When this feature is enabled by turning on the switch to the right, you can
click to add the shared quota option, and the destination storage quota will
be shared by all users within the user group.
After adding the shared destination, you can configure the following two settings.
❖ Quota – this defines the storage quota allowed for the user group.
❖ Maximum percentage of shared size for each user – defines the
maximum percentage of shared storage allowed for each user. For
example, setting 50% means all users in the user group can occupy up to
50% of the assigned storage quota. If 100GB is the assigned storage, each
user can store up to 50GB of the assigned storage quota. If the value is set
to 100%, all users can fully utilize the storage until the assigned storage
quota is full.
IMPORTANT
The shared storage quota is allocated to users on a first-come-first-serve basis. If the
shared storage quota remains unchanged when the number of backup user grows or
there is a change on the maximum percentage of shared size for each user, it may
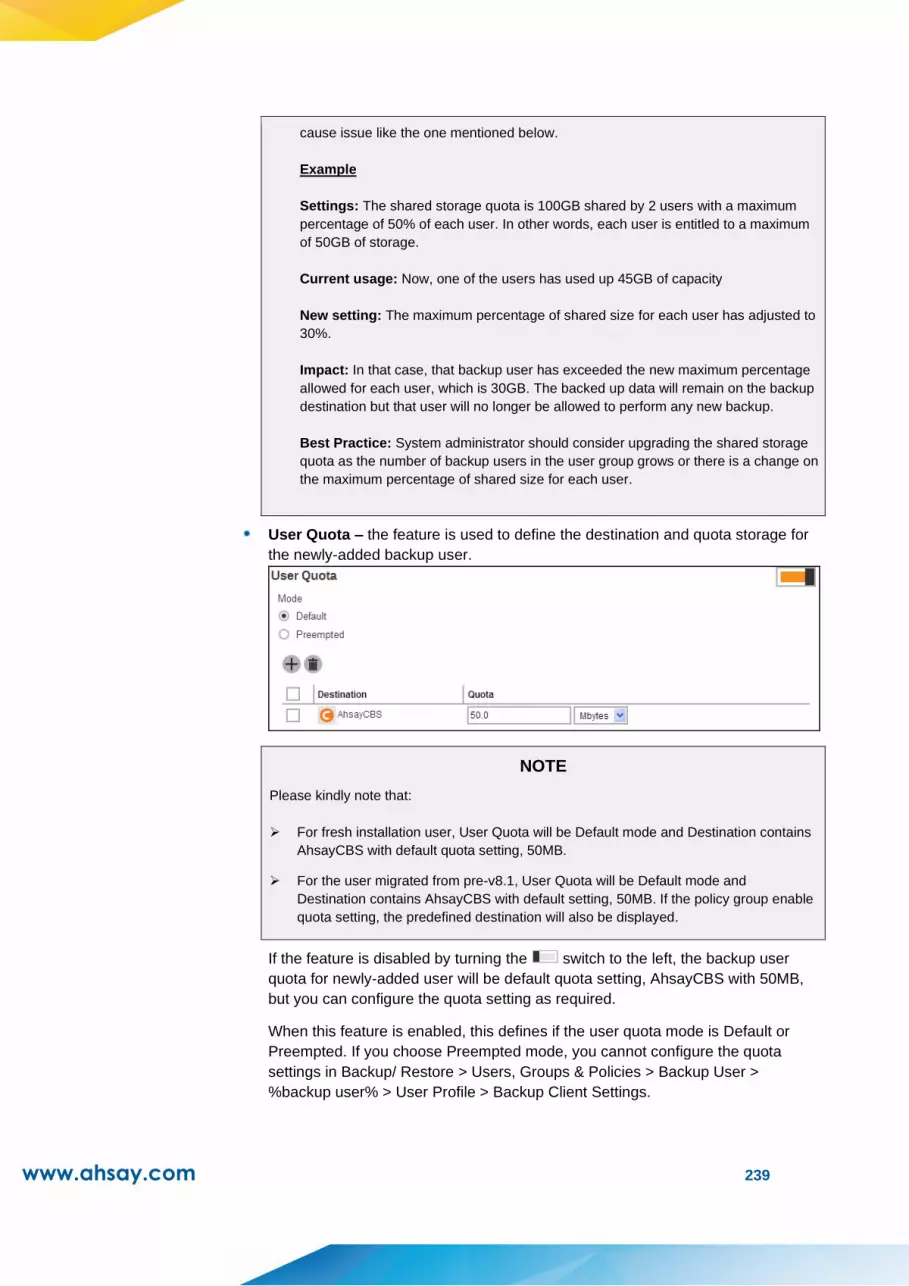
www.ahsay.com 239
cause issue like the one mentioned below.
Example
Settings: The shared storage quota is 100GB shared by 2 users with a maximum
percentage of 50% of each user. In other words, each user is entitled to a maximum
of 50GB of storage.
Current usage: Now, one of the users has used up 45GB of capacity
New setting: The maximum percentage of shared size for each user has adjusted to
30%.
Impact: In that case, that backup user has exceeded the new maximum percentage
allowed for each user, which is 30GB. The backed up data will remain on the backup
destination but that user will no longer be allowed to perform any new backup.
Best Practice: System administrator should consider upgrading the shared storage
quota as the number of backup users in the user group grows or there is a change on
the maximum percentage of shared size for each user.
User Quota – the feature is used to define the destination and quota storage for
the newly-added backup user.
NOTE
Please kindly note that:
➢ For fresh installation user, User Quota will be Default mode and Destination contains
AhsayCBS with default quota setting, 50MB.
➢ For the user migrated from pre-v8.1, User Quota will be Default mode and
Destination contains AhsayCBS with default setting, 50MB. If the policy group enable
quota setting, the predefined destination will also be displayed.
If the feature is disabled by turning the switch to the left, the backup user
quota for newly-added user will be default quota setting, AhsayCBS with 50MB,
but you can configure the quota setting as required.
When this feature is enabled, this defines if the user quota mode is Default or
Preempted. If you choose Preempted mode, you cannot configure the quota
settings in Backup/ Restore > Users, Groups & Policies > Backup User >
%backup user% > User Profile > Backup Client Settings.
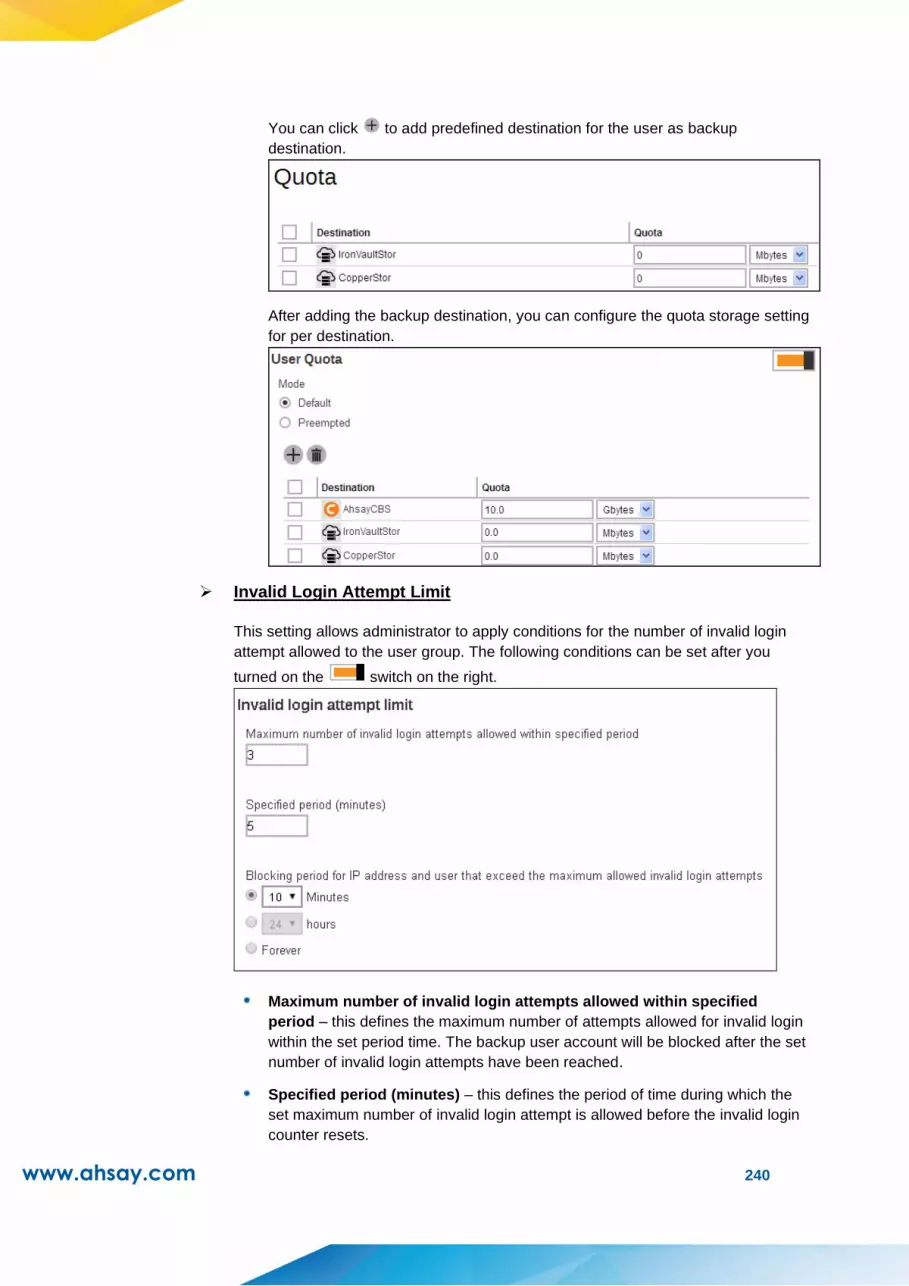
www.ahsay.com 240
You can click to add predefined destination for the user as backup
destination.
After adding the backup destination, you can configure the quota storage setting
for per destination.
➢ Invalid Login Attempt Limit
This setting allows administrator to apply conditions for the number of invalid login
attempt allowed to the user group. The following conditions can be set after you
turned on the switch on the right.
Maximum number of invalid login attempts allowed within specified
period – this defines the maximum number of attempts allowed for invalid login
within the set period time. The backup user account will be blocked after the set
number of invalid login attempts have been reached.
Specified period (minutes) – this defines the period of time during which the
set maximum number of invalid login attempt is allowed before the invalid login
counter resets.

www.ahsay.com 241
Blocking period for IP address and user that exceed the maximum allowed
invalid login attempts – this defines the period of time during when the IP
address and user that has exceeded the invalid login attempts will be blocked
from logging in again.
Example:
If the following settings are applied:
➢ Maximum number of invalid login attempts allowed – 3
➢ Specific period – 5 minutes
➢ Blocking period for IP address and user that exceed the maximum
allowed invalid login attempts – 10 minutes
That means backup user can only enter a maximum of 3 times of invalid login
within 5 minutes since the first attempt. If invalid login is made for the 4th time
within that 5 minutes duration, the user account will be blocked for 10 minutes.
➢ Two-Factor Authentication
Once you enable the two-factor authentication option, users will be required to either
enter a one-time password generated in an authenticator app or accept the log in
request in the Ahsay Mobile app to login to AhsayOBM/AhsayACB v8.5.0.0 or above.
Turn on the switch on the right and then make sure the check box Require
Two-Factor Authentication for user logon is checked for this feature to work.
NOTE
The two-factor authentication option will only be visible if Mobile Authentication is enabled in
System Settings > Basic > Two-Factor Authentication (2FA).
➢ Password
This setting allows administrator to set up the password policy. The following items
can be set after you turned on the switch on the right.

www.ahsay.com 242
Password Age – defines the period of time when the login password of a
backup user account expires. When the set period of time is reached, backup
users will have to change their passwords before they can continue using
AhsayCBS.
Enforce password history (30 passwords remembered) – when this feature
is enabled, the last 30 login passwords of each user are recorded and cannot be
used again when users are changing a new password.
Complexity Requirements – you can customize the complexity requirements
for the password to provide better protection for the users. Under the Default
option, the selected item(s) will be the mandatory element(s) when backup
users create their passwords. While the Custom option, will allow you to specify
the Regular expression and/or Custom Description that can be used to create
their passwords.
➢ Email Reports
This menu allows administrator to select what email reports to be sent to the users of
a user group. Turn on the switch on the right then select the desired email
report(s) to send. By default, almost all email reports are selected after you turn on
this feature except for Email me inactive backup report when my backup set hasn’t
run for this number of days.
The table below lists out all types of email reports, together with explanation on what
the email report is about, when it will be sent, what action backup user should take,
and sample screen shot of the email and report. You can also add email recipients in
the Bcc reports to email section so that the email reports will be sent to them as
well.
NOTE
If the PDF report is too large to be sent through email (>20MB), the PDF attached in the
email will only contains the first 100 pages of original backup report, with the 101st page
showing “Report truncated because it is too big to be sent in email”. Truncating the
attached large report can avoid blocking from some SMTP server caused by email too big
size and help save the capacity of client email box.
If the attached PDF report is truncated, the email will contain the links which point to the full
PDF report download page.
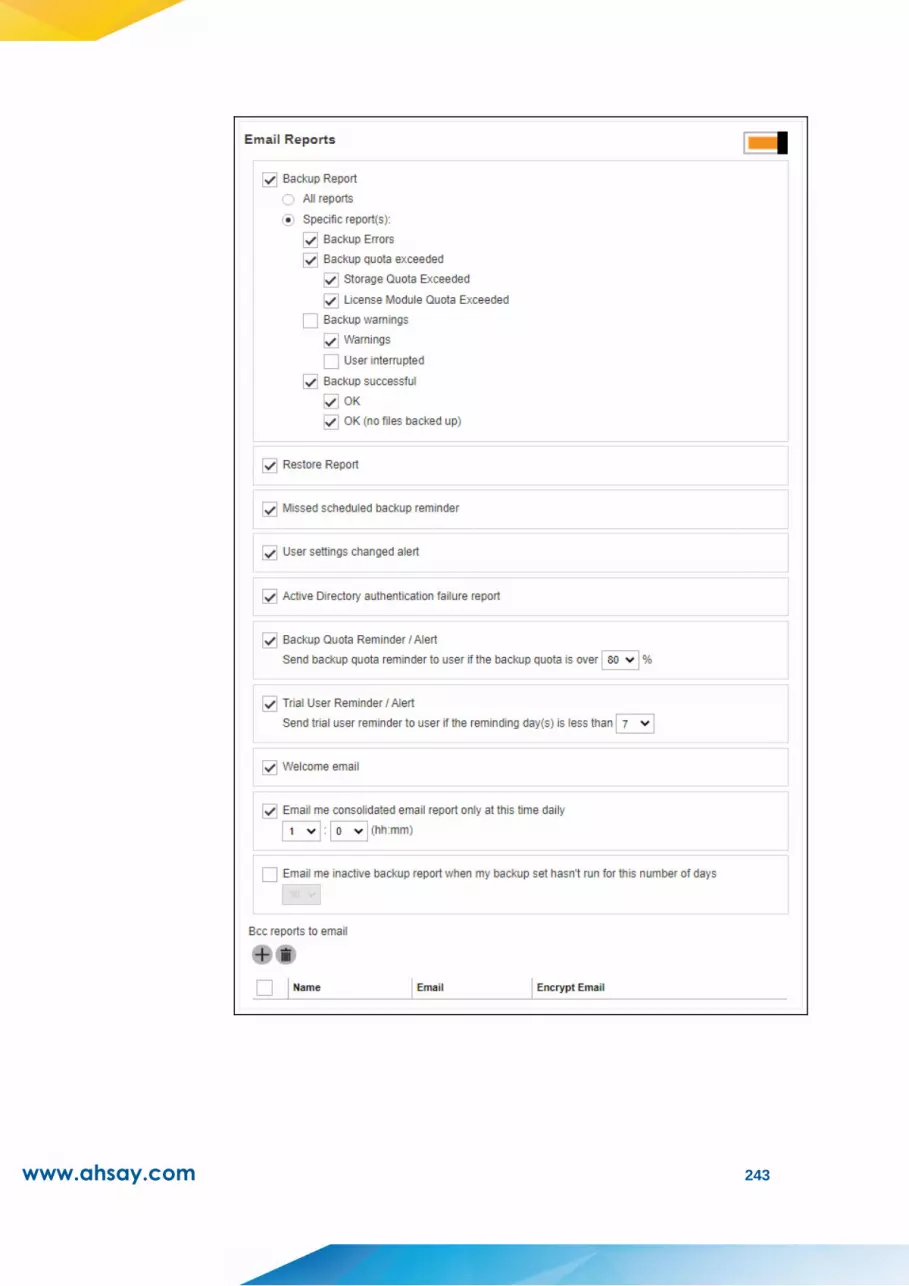
www.ahsay.com 243

www.ahsay.com 244
Backup Report
What is this email about? When will you receive it?
A backup report in PDF format, there is a
choice if it will include all the reports or just
specific reports.
The default setting for new installation is
“All reports”. It will be the same with
upgrades, from v6, v7, pre-8.5.0.0 to
v8.5.0.0 and onwards.
If “All reports” is selected, the following
backup reports will be received: Backup
Errors, Backup Quota Exceeded, Backup
Warnings and Backup Successful.
If “Specific report(s)” is selected, the user
has an option to select specific backup
report(s) that will be sent thru email.
These are organized in four different
categories:
Backup errors – will contain error
encountered during backup.
Backup quota exceeded – there are
two types of report which are storage
quota exceeded and license module
quota exceeded.
Backup warnings – there are two
types which are warnings and if
backup was interrupted by user.
Backup successful – there are two
types which are backup was
successful with files backed up and
the other one is with no files backed
up.
Backup Report is generated and sent to
backup user every 15 mins
(every :00, :15, :30 and :45 of an hour)
*Depending on the backup size and backup
finish time, the actual report sending time may be
longer than 15 mins.
What action should you take?
Download the backup report as attached with the email

www.ahsay.com 245
Email / Report Sample
Email sample:

www.ahsay.com 246
Report sample:
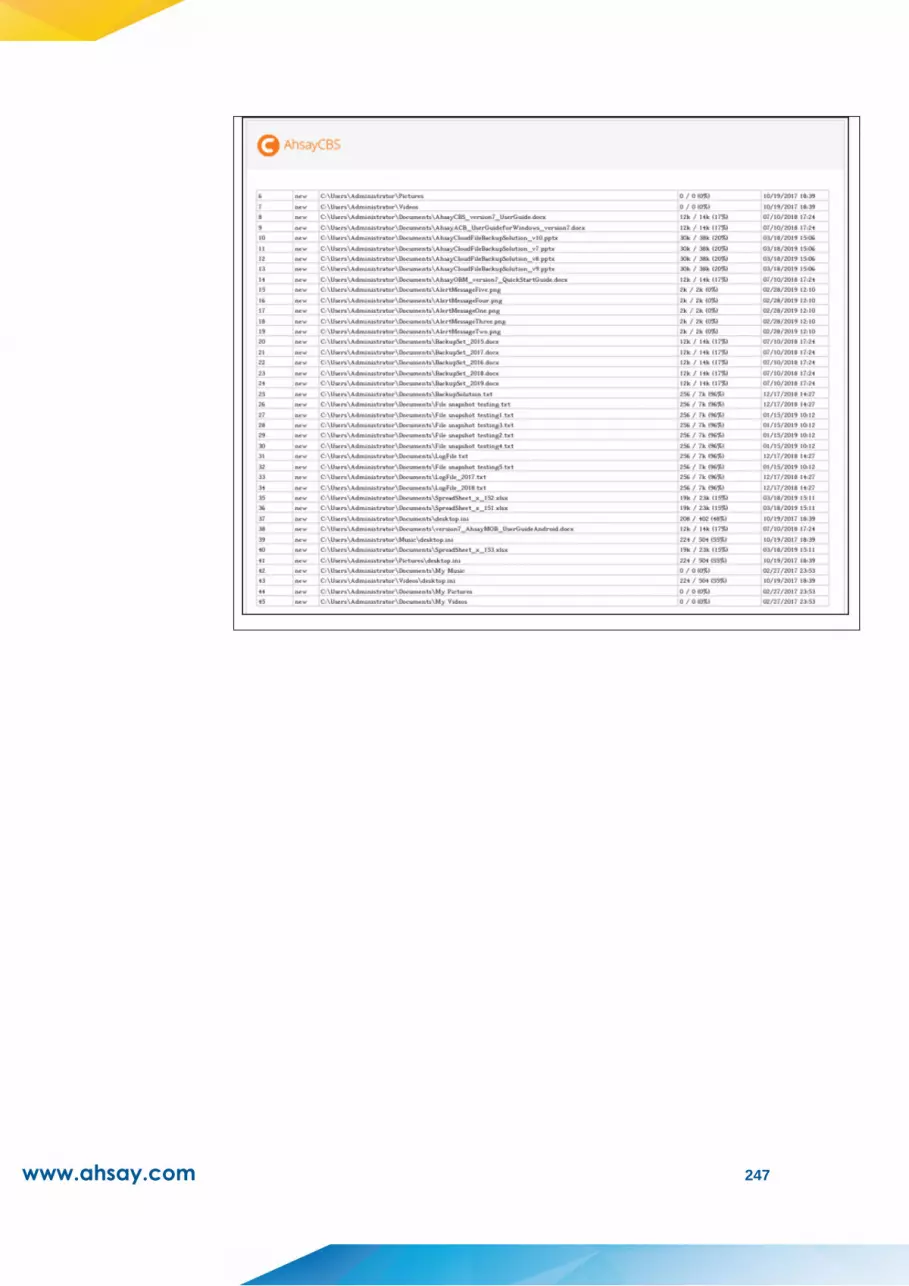
www.ahsay.com 247

www.ahsay.com 248
Restore Report
What is this email about? When will you receive it?
A full report in PDF format, showing the
Restore Job Summary, Restore Logs and
Restore Files
Restore Report is generated and sent to
backup user every 15 mins
(every :00, :15, :30 and :45 of an hour)
*Depending on the restore size and restore finish
time, the actual report sending time may be
longer than 15 mins.
What action should you take?
Download the restore report as attached with the email
Email / Report Sample
Email sample:

www.ahsay.com 249
Report sample:
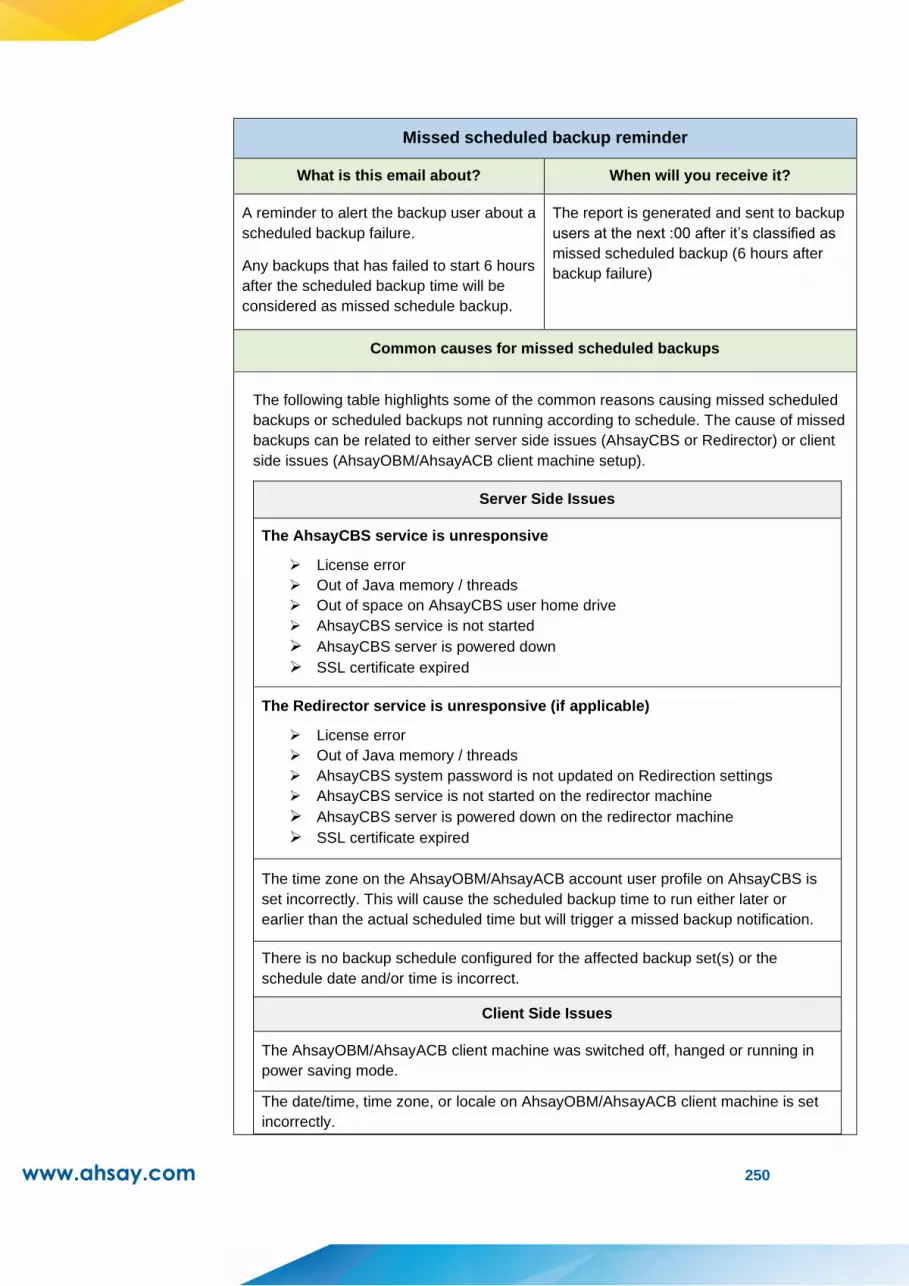
www.ahsay.com 250
Missed scheduled backup reminder
What is this email about? When will you receive it?
A reminder to alert the backup user about a
scheduled backup failure.
Any backups that has failed to start 6 hours
after the scheduled backup time will be
considered as missed schedule backup.
The report is generated and sent to backup
users at the next :00 after it’s classified as
missed scheduled backup (6 hours after
backup failure)
Common causes for missed scheduled backups
The following table highlights some of the common reasons causing missed scheduled
backups or scheduled backups not running according to schedule. The cause of missed
backups can be related to either server side issues (AhsayCBS or Redirector) or client
side issues (AhsayOBM/AhsayACB client machine setup).
Server Side Issues
The AhsayCBS service is unresponsive
➢ License error
➢ Out of Java memory / threads
➢ Out of space on AhsayCBS user home drive
➢ AhsayCBS service is not started
➢ AhsayCBS server is powered down
➢ SSL certificate expired
The Redirector service is unresponsive (if applicable)
➢ License error
➢ Out of Java memory / threads
➢ AhsayCBS system password is not updated on Redirection settings
➢ AhsayCBS service is not started on the redirector machine
➢ AhsayCBS server is powered down on the redirector machine
➢ SSL certificate expired
The time zone on the AhsayOBM/AhsayACB account user profile on AhsayCBS is
set incorrectly. This will cause the scheduled backup time to run either later or
earlier than the actual scheduled time but will trigger a missed backup notification.
There is no backup schedule configured for the affected backup set(s) or the
schedule date and/or time is incorrect.
Client Side Issues
The AhsayOBM/AhsayACB client machine was switched off, hanged or running in
power saving mode.
The date/time, time zone, or locale on AhsayOBM/AhsayACB client machine is set
incorrectly.
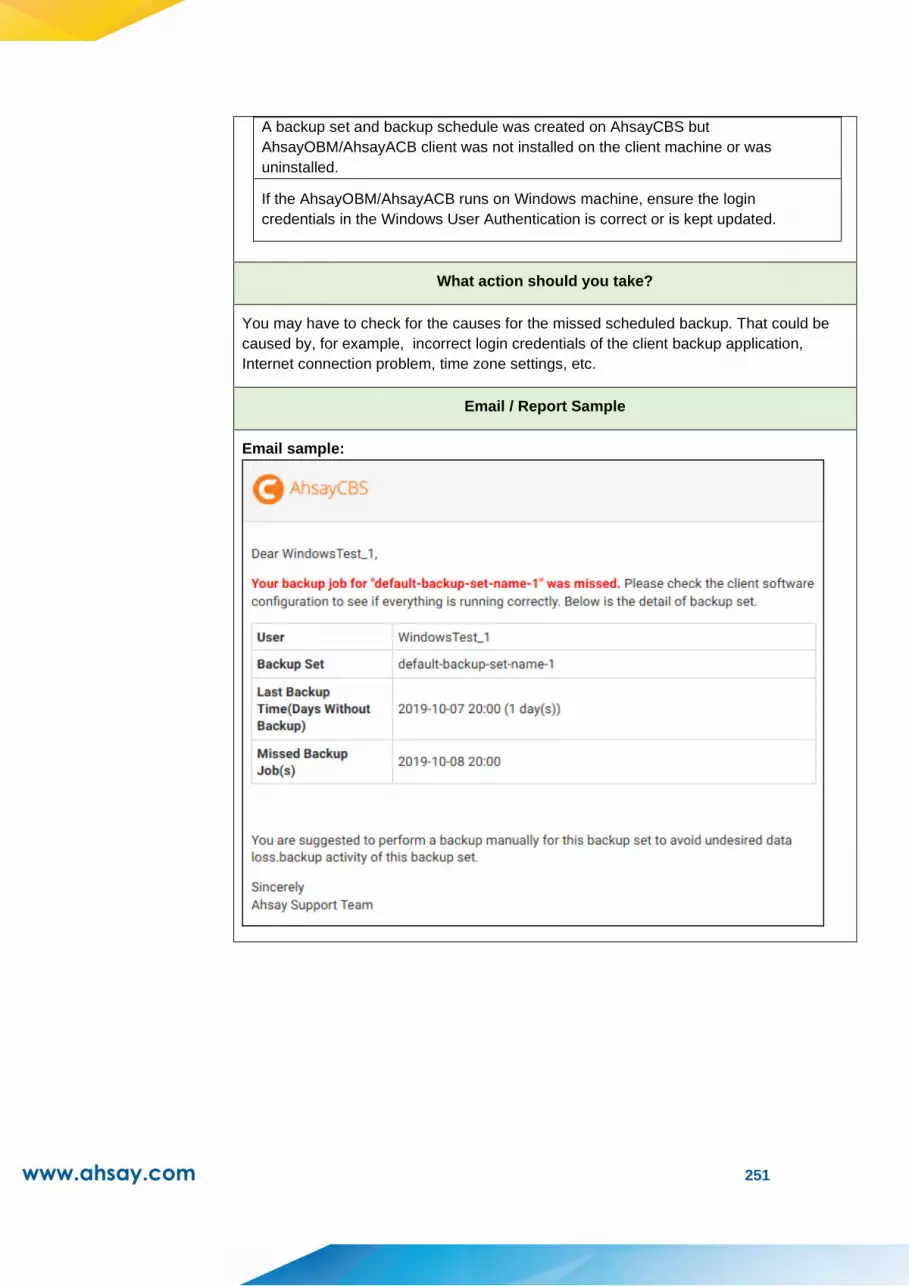
www.ahsay.com 251
A backup set and backup schedule was created on AhsayCBS but
AhsayOBM/AhsayACB client was not installed on the client machine or was
uninstalled.
If the AhsayOBM/AhsayACB runs on Windows machine, ensure the login
credentials in the Windows User Authentication is correct or is kept updated.
What action should you take?
You may have to check for the causes for the missed scheduled backup. That could be
caused by, for example, incorrect login credentials of the client backup application,
Internet connection problem, time zone settings, etc.
Email / Report Sample
Email sample:

www.ahsay.com 252
User settings changed alert
What is this email about? When will you receive it?
A summary report showing the user settings
that have been changed in details, with the old
values and new values of the changed settings
shown.
User Settings Changed Alert Report is
generated and sent to backup user
every 15 mins (every :00, :15, :30
and :45 of an hour)
What action should you take?
The purpose of this email is to allow user to confirm the changes that have made, and
alert user for unauthorized access if they have not made those changes. In the latter
case, user should change their login password and correct the settings as soon as
possible.
Email / Report Sample
Email sample:

www.ahsay.com 253
Active Directory authentication failure report
What is this email about? When will you receive it?
A reminder to alert the backup user about a
backup failure due to the incorrect Active
Directory authentication.
Shortly after the active directory
authentication failure occurred
What action should you take?
Check if the active directory authentication is properly set. If you have changed the login
credentials of the machine running the client backup application, you have to alter the
authentication details as well for the backup to perform. To do so, follow the steps below.
i) Log in to AhsayOBM/AhsayACB.
ii) Click on the Backup Sets icon.
iii) Click on the backup set you would like to alter the authentication details.
iv) Click on the General section.
v) Modify the Password under the Windows User Authentication section.
vi) Click to confirm the change.
Email / Report Sample
Email sample:
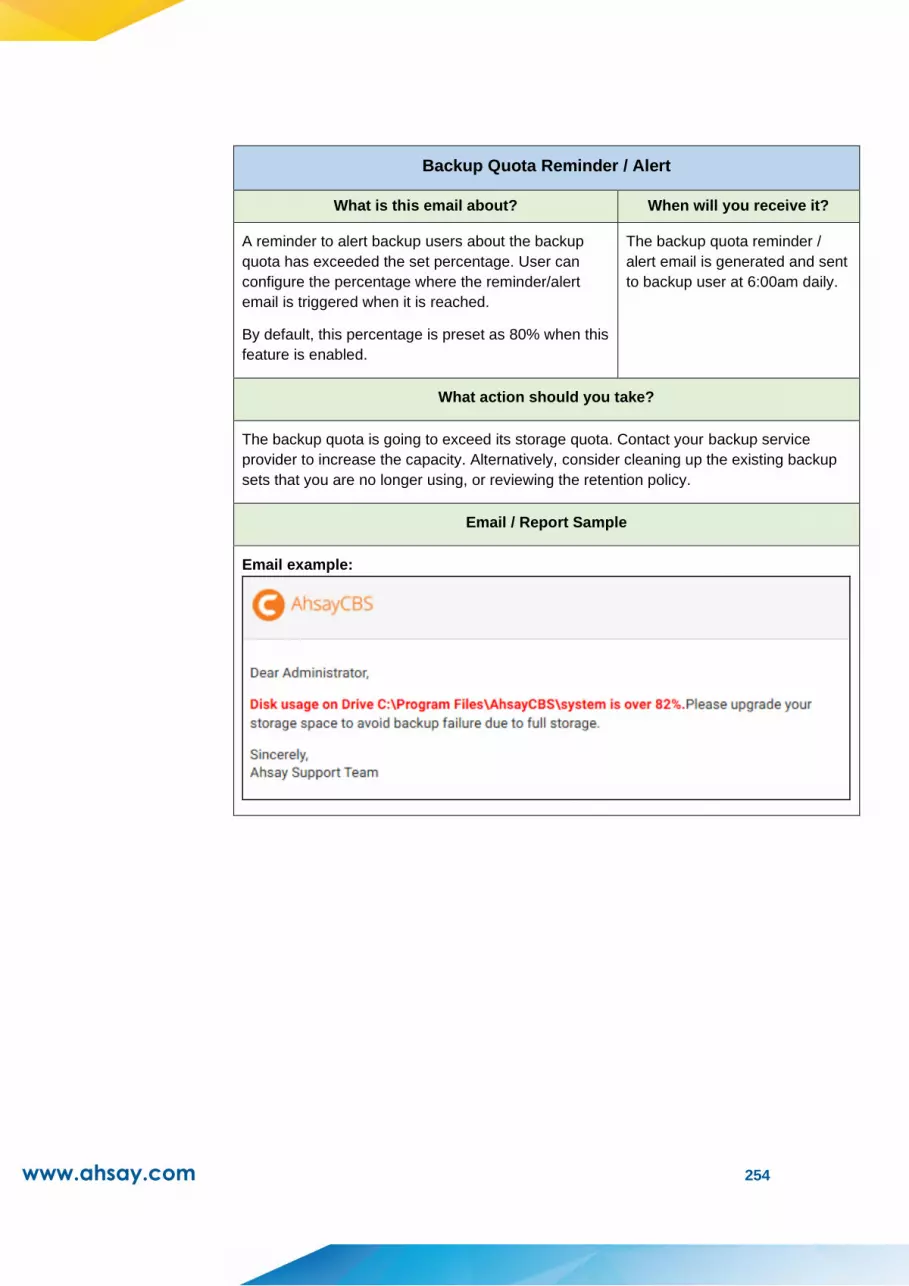
www.ahsay.com 254
Backup Quota Reminder / Alert
What is this email about? When will you receive it?
A reminder to alert backup users about the backup
quota has exceeded the set percentage. User can
configure the percentage where the reminder/alert
email is triggered when it is reached.
By default, this percentage is preset as 80% when this
feature is enabled.
The backup quota reminder /
alert email is generated and sent
to backup user at 6:00am daily.
What action should you take?
The backup quota is going to exceed its storage quota. Contact your backup service
provider to increase the capacity. Alternatively, consider cleaning up the existing backup
sets that you are no longer using, or reviewing the retention policy.
Email / Report Sample
Email example:

www.ahsay.com 255
Trial User Reminder / Alert
What is this email about? When will you receive it?
A reminder to alert trial backup users that their
account is about to expire in the set number of
days.
By default, the preset value of this setting is 7 when
this feature is enabled.
The trial user reminder / alert email
is generated and sent to backup
user at 6:00am daily.
What action should you take?
In order to continue using your account for backup and restore, contact your backup
service provider to subscribe to the paid backup service.
Email / Report Sample
Email sample:
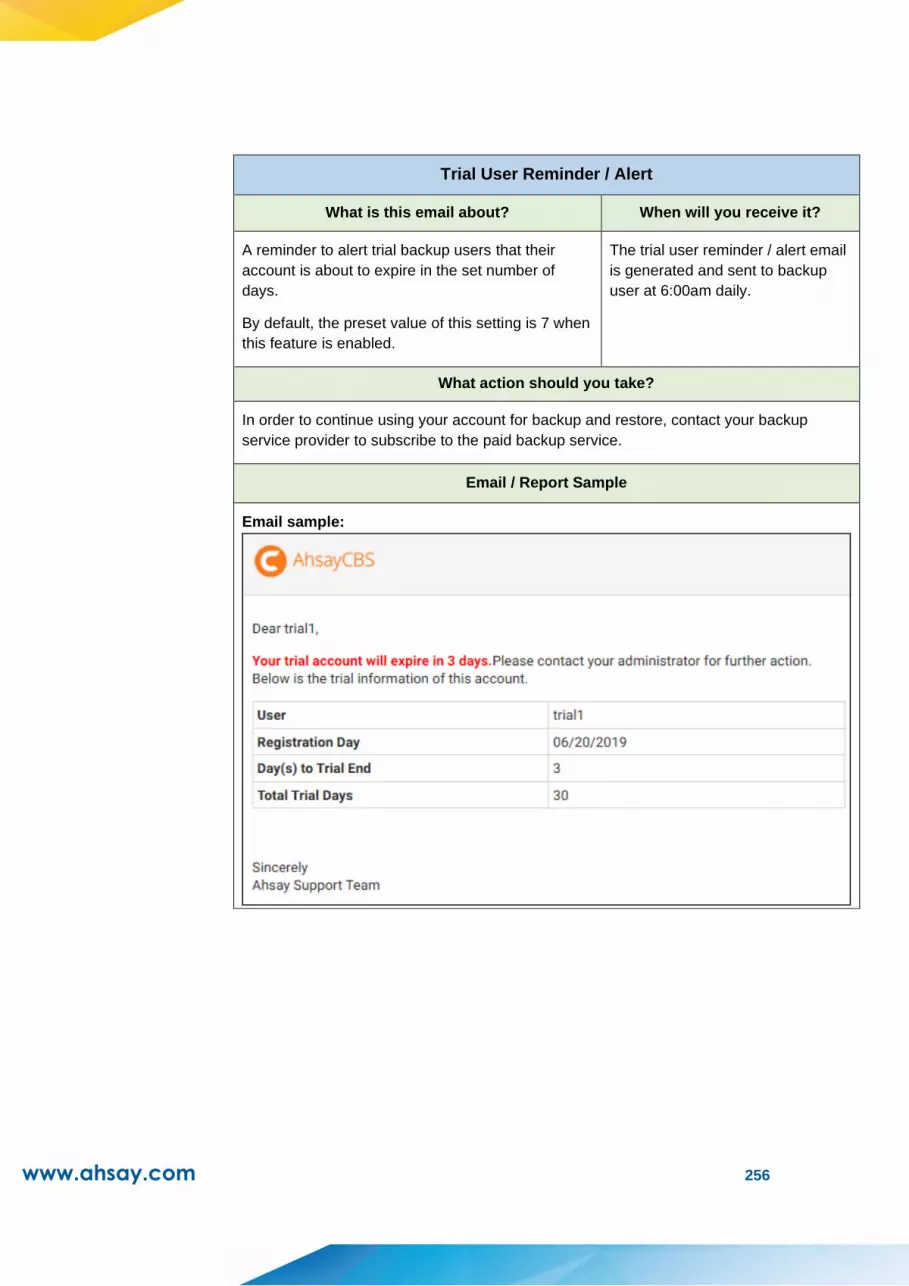
www.ahsay.com 256
Trial User Reminder / Alert
What is this email about? When will you receive it?
A reminder to alert trial backup users that their
account is about to expire in the set number of
days.
By default, the preset value of this setting is 7 when
this feature is enabled.
The trial user reminder / alert email
is generated and sent to backup
user at 6:00am daily.
What action should you take?
In order to continue using your account for backup and restore, contact your backup
service provider to subscribe to the paid backup service.
Email / Report Sample
Email sample:

www.ahsay.com 257
Welcome Email
What is this email about? When will you receive it?
A welcome message generated by the AhsayCBS to
confirm a backup account has been created
Shortly after a Backup User
account has been created
What action should you take?
You can click on the link in the email to download the client backup application if you have
not done so.
Email / Report Sample
Email sample:
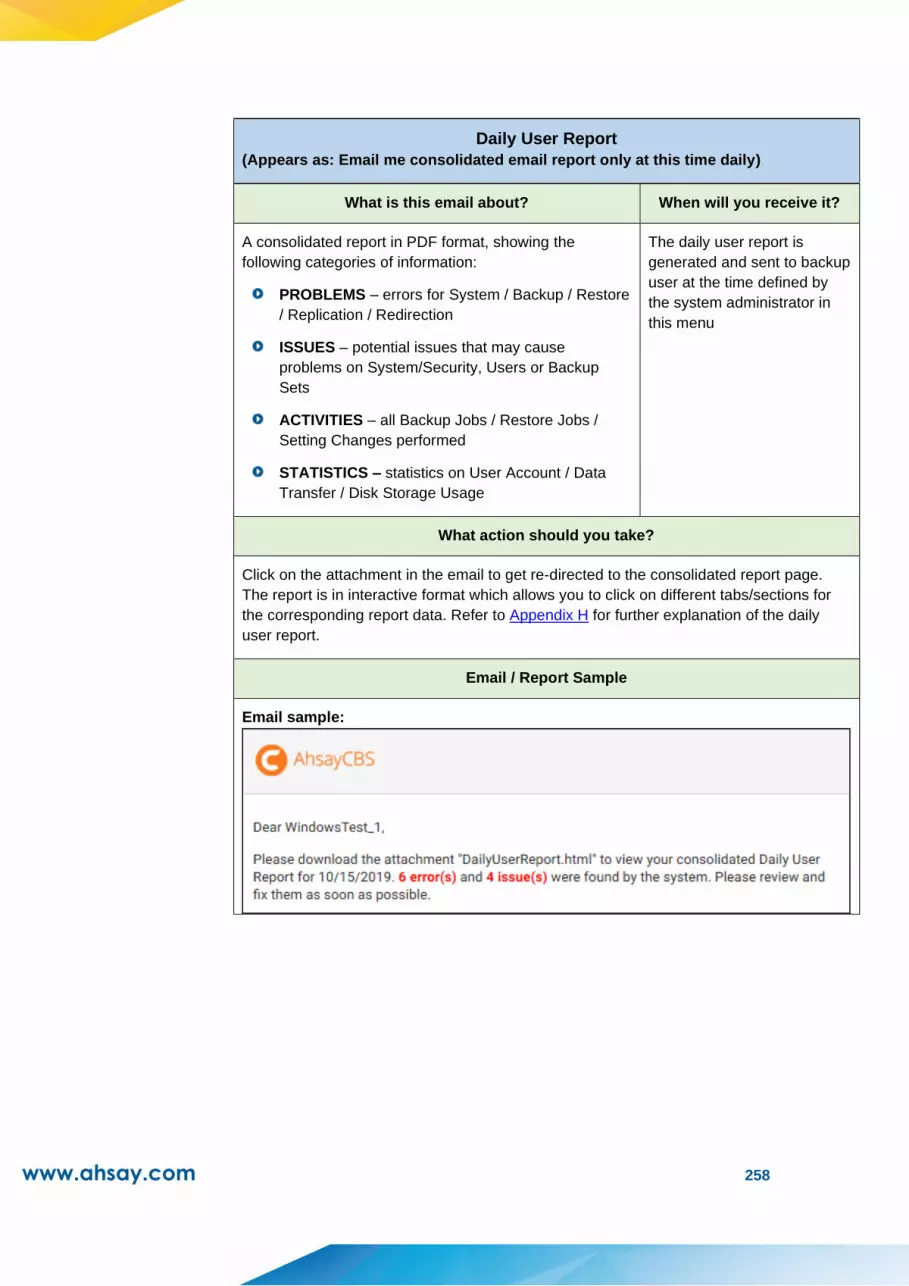
www.ahsay.com 258
Daily User Report
(Appears as: Email me consolidated email report only at this time daily)
What is this email about? When will you receive it?
A consolidated report in PDF format, showing the
following categories of information:
PROBLEMS – errors for System / Backup / Restore
/ Replication / Redirection
ISSUES – potential issues that may cause
problems on System/Security, Users or Backup
Sets
ACTIVITIES – all Backup Jobs / Restore Jobs /
Setting Changes performed
STATISTICS – statistics on User Account / Data
Transfer / Disk Storage Usage
The daily user report is
generated and sent to backup
user at the time defined by
the system administrator in
this menu
What action should you take?
Click on the attachment in the email to get re-directed to the consolidated report page.
The report is in interactive format which allows you to click on different tabs/sections for
the corresponding report data. Refer to Appendix H for further explanation of the daily
user report.
Email / Report Sample
Email sample:
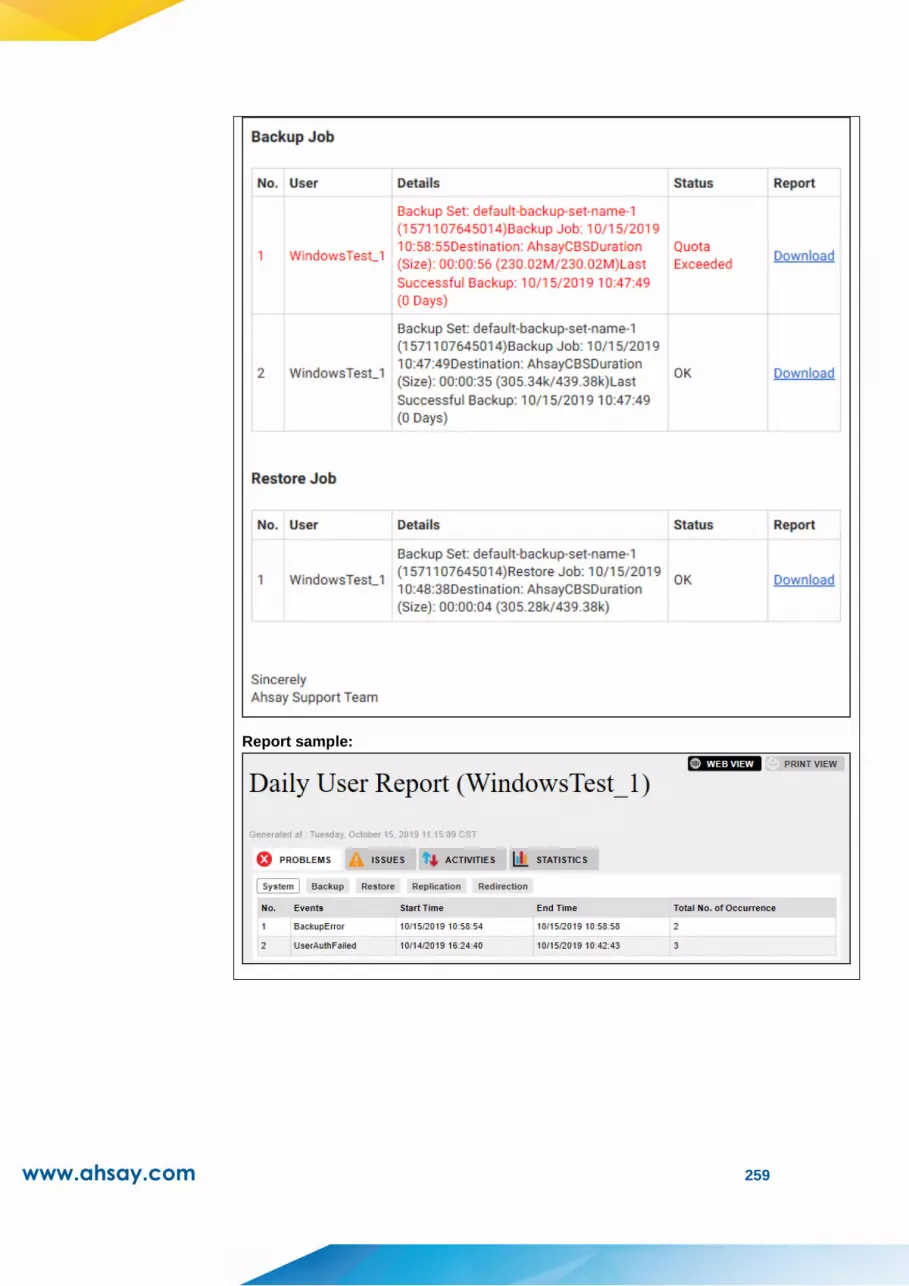
www.ahsay.com 259
Report sample:
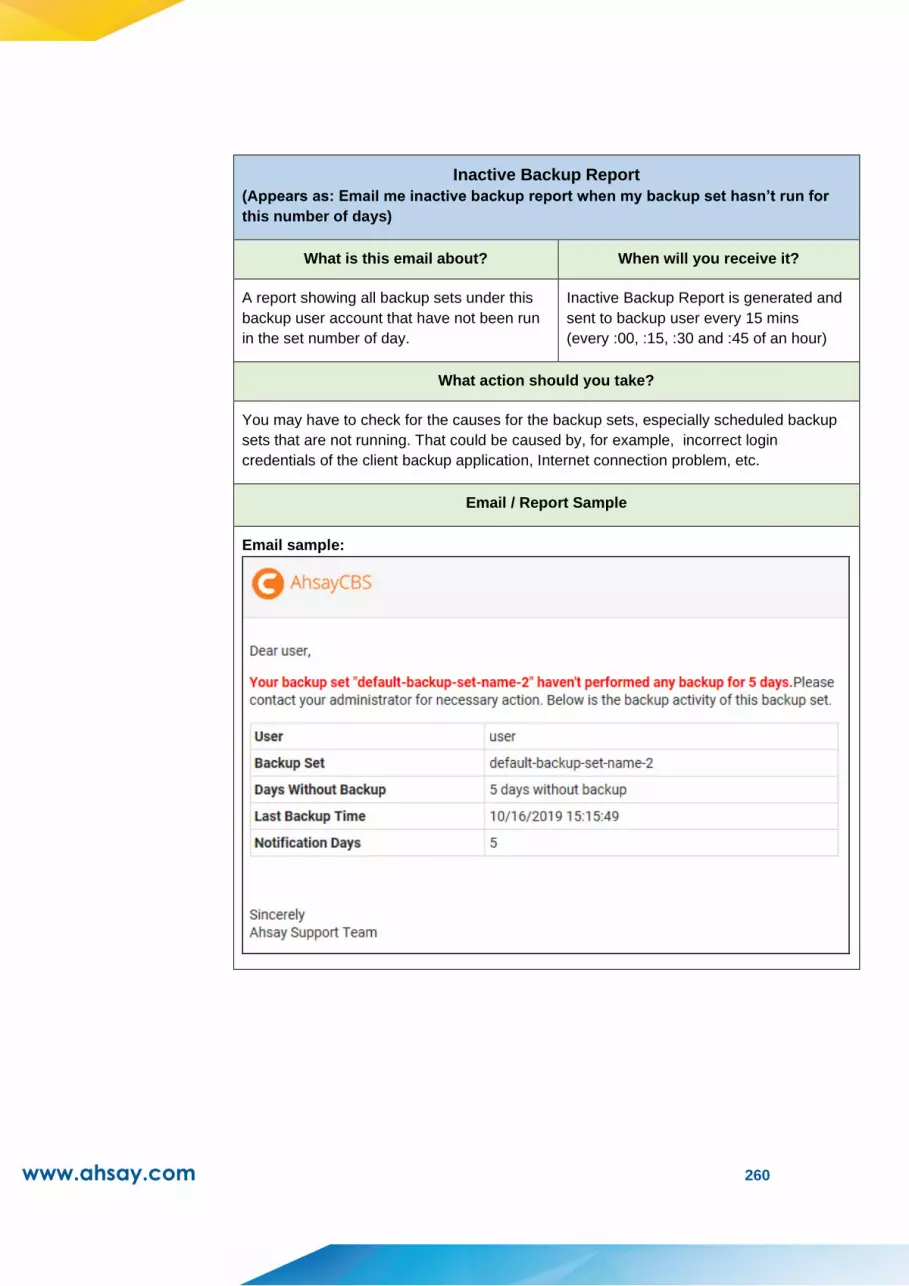
www.ahsay.com 260
Inactive Backup Report
(Appears as: Email me inactive backup report when my backup set hasn’t run for
this number of days)
What is this email about? When will you receive it?
A report showing all backup sets under this
backup user account that have not been run
in the set number of day.
Inactive Backup Report is generated and
sent to backup user every 15 mins
(every :00, :15, :30 and :45 of an hour)
What action should you take?
You may have to check for the causes for the backup sets, especially scheduled backup
sets that are not running. That could be caused by, for example, incorrect login
credentials of the client backup application, Internet connection problem, etc.
Email / Report Sample
Email sample:

www.ahsay.com 261
Bcc reports to email
You can add email recipients in this section so that they will receive a blind carbon
copy (bcc) of the email reports as well.
1. Click the button under the Bcc reports to email section.
2. Enter the name of the recipient, email address and other details if necessary.
If you wish to encrypt the email, check the Encrypt Email box. You will be re-
directed to another page to upload the Digital Certificate. Click the Choose
File button to upload the digital certificate, then click the tick button at the
bottom of the page to confirm.
3. Click when you are done with the settings.
4. Click to confirm the setting.

www.ahsay.com 262
➢ Encryption Key
Once you enabled the encryption recovery option. The encryption key file will be
uploaded to the Backup Server. In case user has forgotten the encryption key, you
can still contact us to recover the key.
Turn on the switch on the right and then make sure the check box Uploaded
encryption key after running backup for recovery is checked for this feature to
work.
It is possible to submit an encryption key recovery request via the AhsayCBS web
console. Refer to the Recovering Encryption Key via AhsayCBS Web Console
section for detailed instructions.
➢ Client Host Limit
Administrator is able to set the maximum number of host machine for a backup users
account.
Turn on the switch on the right and then enter the Maximum number of host
as shown below.
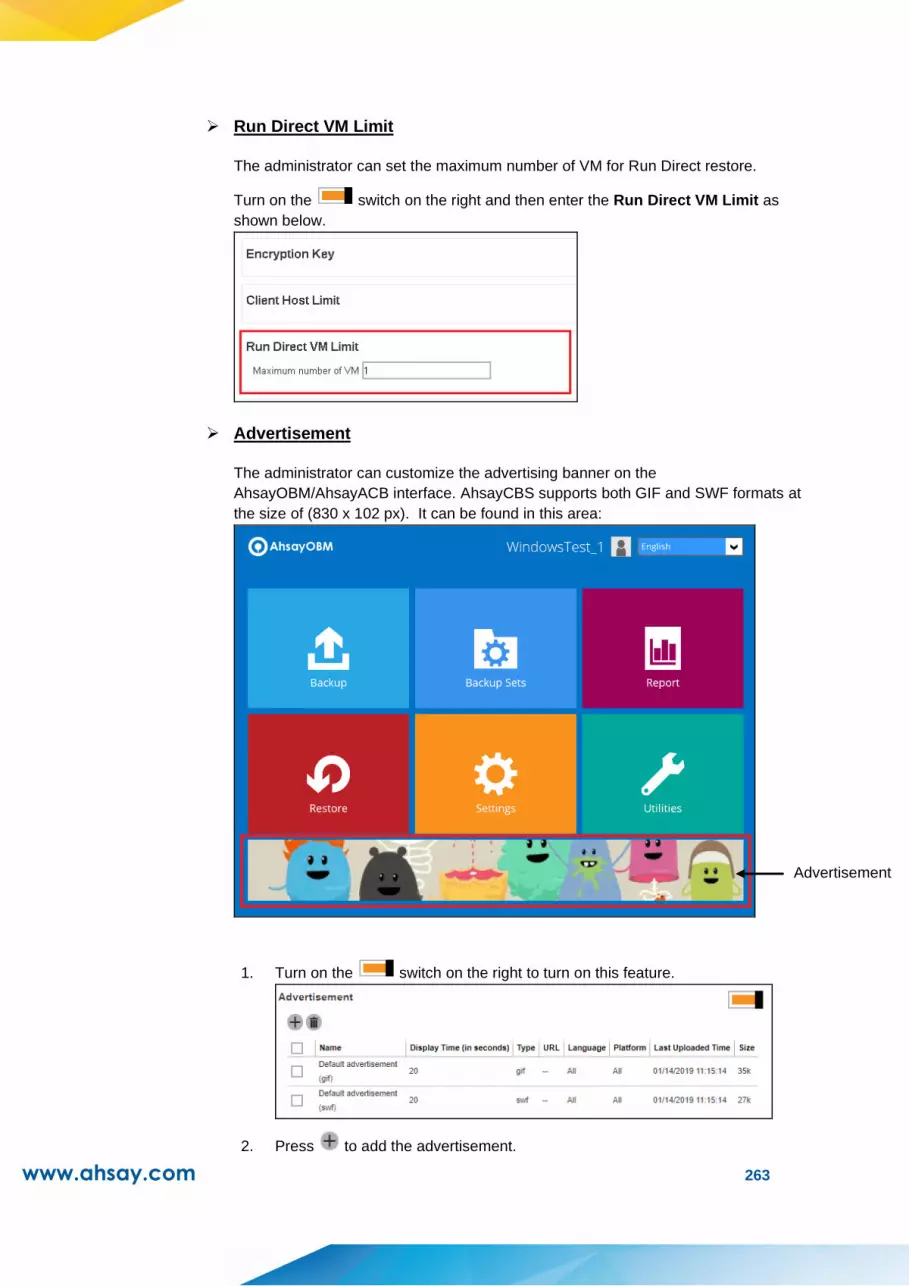
www.ahsay.com 263
➢ Run Direct VM Limit
The administrator can set the maximum number of VM for Run Direct restore.
Turn on the switch on the right and then enter the Run Direct VM Limit as
shown below.
➢ Advertisement
The administrator can customize the advertising banner on the
AhsayOBM/AhsayACB interface. AhsayCBS supports both GIF and SWF formats at
the size of (830 x 102 px). It can be found in this area:
1. Turn on the switch on the right to turn on this feature.
2. Press to add the advertisement.
Advertisement
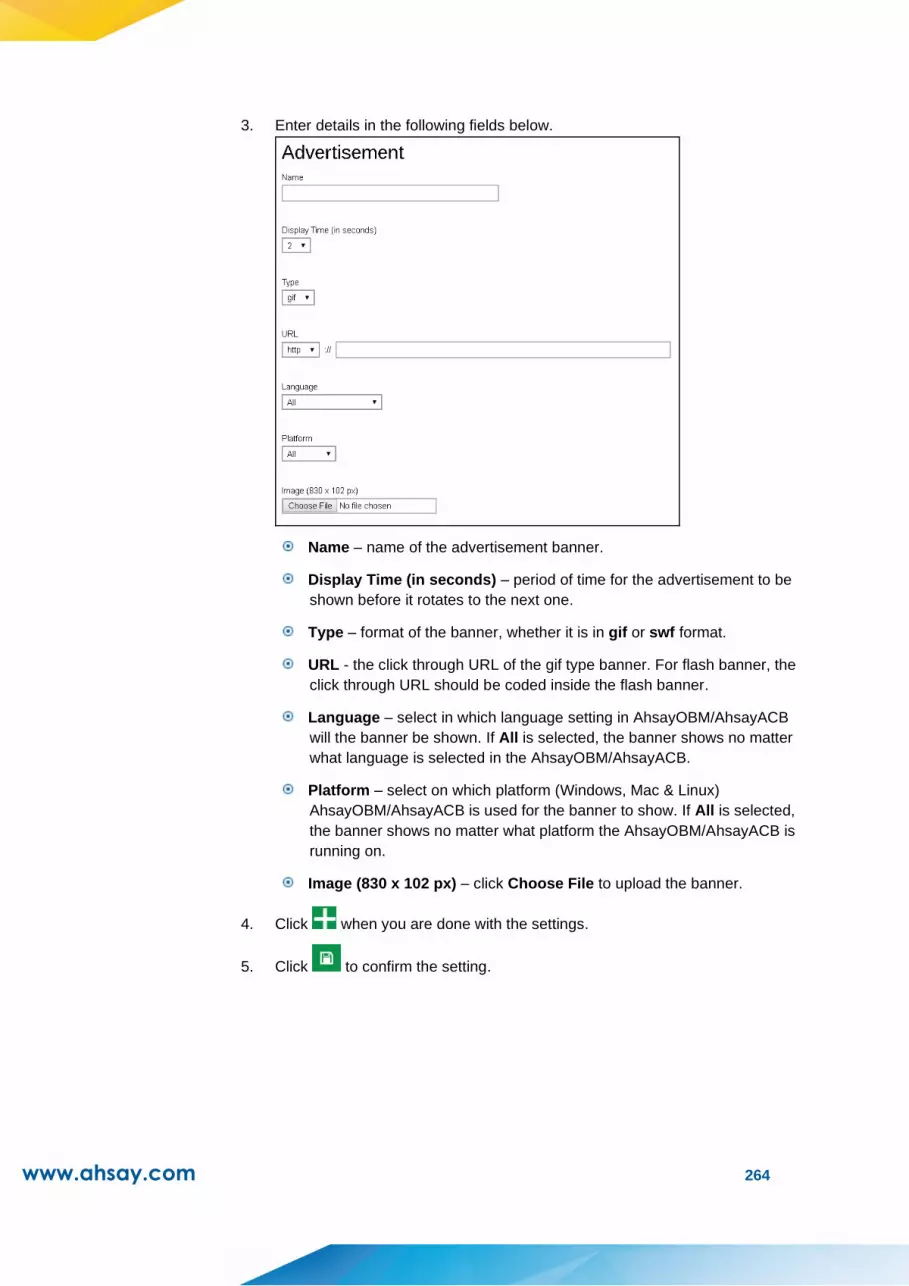
www.ahsay.com 264
3. Enter details in the following fields below.
Name – name of the advertisement banner.
Display Time (in seconds) – period of time for the advertisement to be
shown before it rotates to the next one.
Type – format of the banner, whether it is in gif or swf format.
URL - the click through URL of the gif type banner. For flash banner, the
click through URL should be coded inside the flash banner.
Language – select in which language setting in AhsayOBM/AhsayACB
will the banner be shown. If All is selected, the banner shows no matter
what language is selected in the AhsayOBM/AhsayACB.
Platform – select on which platform (Windows, Mac & Linux)
AhsayOBM/AhsayACB is used for the banner to show. If All is selected,
the banner shows no matter what platform the AhsayOBM/AhsayACB is
running on.
Image (830 x 102 px) – click Choose File to upload the banner.
4. Click when you are done with the settings.
5. Click to confirm the setting.

www.ahsay.com 265
Backup Set Settings
This section allows administrator to set up backup exclusion, backup destination visible to
users, backup set type visible to users, cloud file backup source visible to users and Office
365 backup customization. It has 5 sub-sections.
➢ Exclude Backup File
This menu allows you to set filter to exclude files from performing backup job. This
feature is disabled by default.
Files on mapped drive – files from mapped drive will be excluded from backup
(applicable only to UNC path on Windows platform). Typical UNC path is in the
format of \\drive or IP address\folder name (e.g. \\10.1.0.10\My Documents).
Files larger than – files larger than the defined size will be excluded from
backup
File older than – files created the set period of time ago or before a specific set
date will be excluded from backup
➢ Destinations Visible to Users
There are two kinds of destinations backup users can choose from when creating a
backup set, they are the Predefined Destination and Standard Destination. Only the
destinations selected in this menu will be available for backup users to choose from
when they are creating a backup set. This feature is enabled by default.
Below is a brief explanation on the differences between the Predefined Destination
and Standard Destination.
Predefined Destination vs Standard Destination
Predefined Destination - The predefined destination can be a single storage
destination on the local drive where AhsayCBS is installed, mapped drive, cloud
storage or FTP server, or a destination pool with a mix of storage options
mentioned above. Before you can select a predefined destination in this menu, it
must first be configured under the System Settings > Backup > Predefined
Destinations. Refer to Predefined Destinations Tab and Backup User Settings
Tab for details on configuration.
Standard Destination - Except for the AhsayCBS storage option, all other
storage options under the Standard Destination belong to the backup users,
whether it could be a single storage destination on the mapped drive, cloud
storage or FTP server, or a destination pool with a mix of storage options
mentioned above.
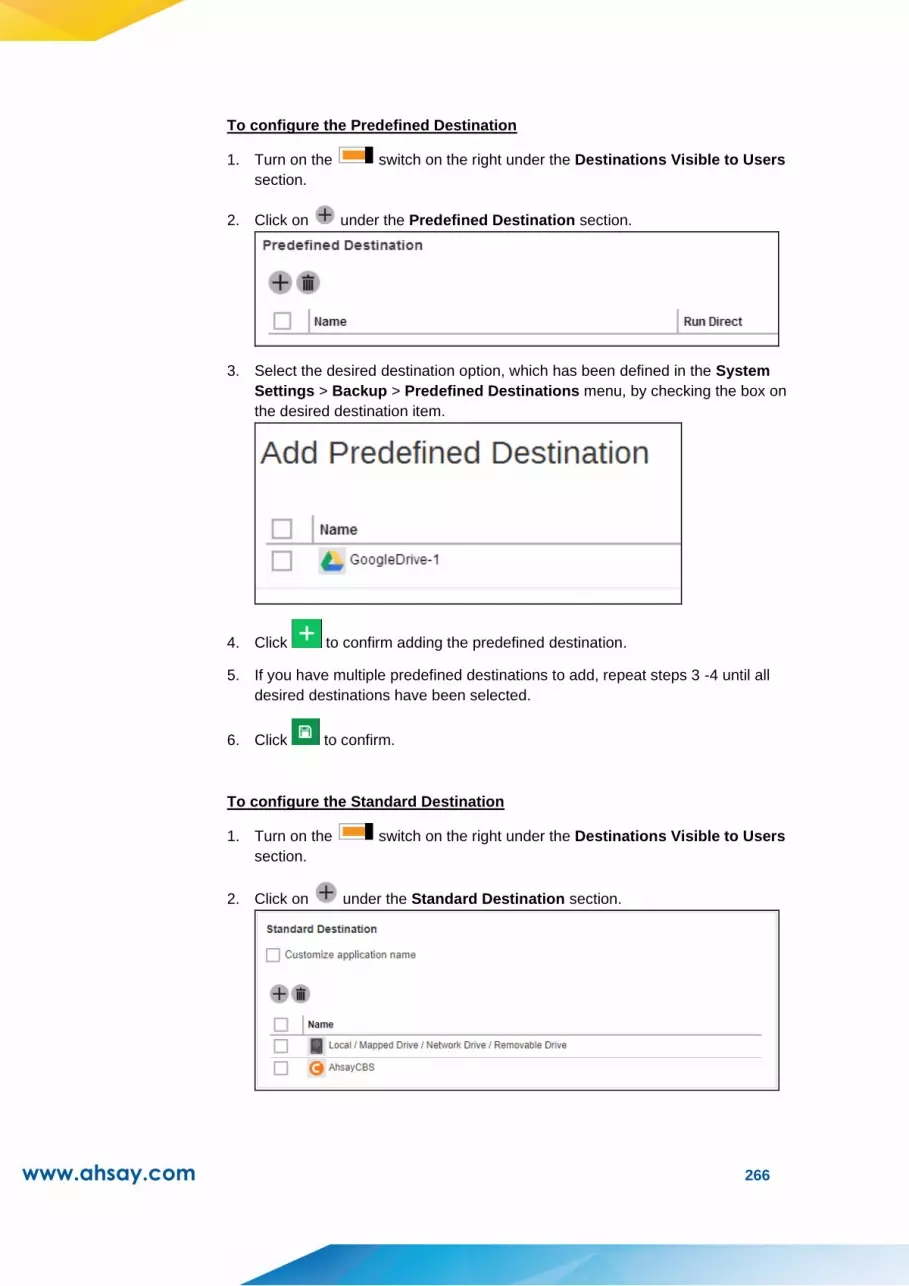
www.ahsay.com 266
To configure the Predefined Destination
1. Turn on the switch on the right under the Destinations Visible to Users
section.
2. Click on under the Predefined Destination section.
3. Select the desired destination option, which has been defined in the System
Settings > Backup > Predefined Destinations menu, by checking the box on
the desired destination item.
4. Click to confirm adding the predefined destination.
5. If you have multiple predefined destinations to add, repeat steps 3 -4 until all
desired destinations have been selected.
6. Click to confirm.
To configure the Standard Destination
1. Turn on the switch on the right under the Destinations Visible to Users
section.
2. Click on under the Standard Destination section.
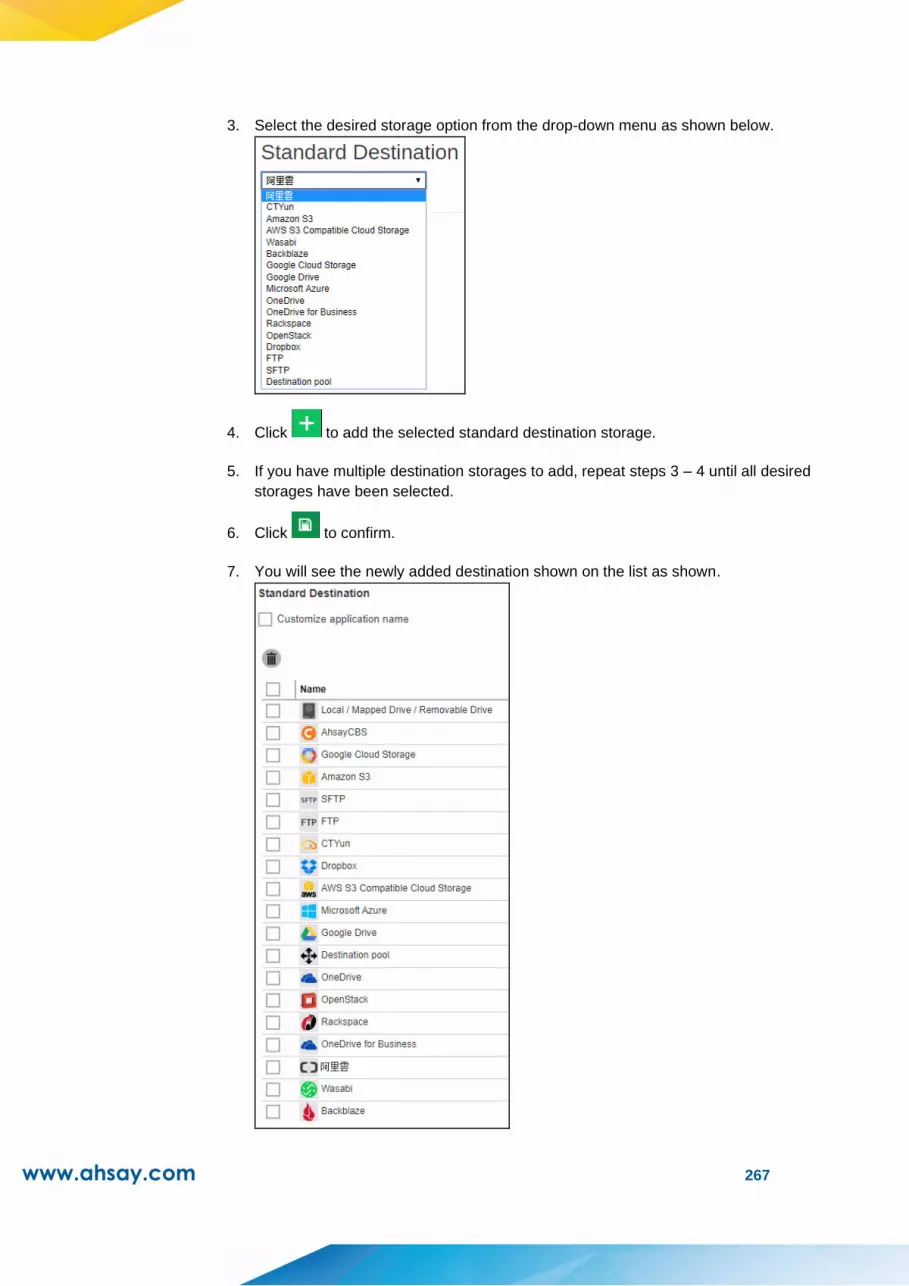
www.ahsay.com 267
3. Select the desired storage option from the drop-down menu as shown below.
4. Click to add the selected standard destination storage.
5. If you have multiple destination storages to add, repeat steps 3 – 4 until all desired
storages have been selected.
6. Click to confirm.
7. You will see the newly added destination shown on the list as shown.

www.ahsay.com 268
NOTE
Please note that by default AhsayCBS and Local / Mapped Drive / Network Drive /
Removable Drive are the destinations already visible to users. The rest of the destinations
must be added individually by the administrator.
➢ Backup Set Types Visible to Users
The AhsayCBS supports a wide range of backup set types for backup and restore.
This menu allows the administrator to select the backup set types to be displayed for
backup users to choose from when they are creating a backup set on AhsayCBS,
AhsayOBM or AhsayACB. This feature is disabled by default.
1. Turn on the switch on the right under the Backup Set Types Visible to
Users section.
2. Click on .
3. Select the Backup Set Type you wish to add from the drop-down menu as shown
below.
4. Click to add the selected backup set type.
5. If you have multiple backup set types to add, repeat steps 3 - 4 until all options
have been selected.

www.ahsay.com 269
6. Click to confirm.
➢ Cloud File Backup Source Visible to Users
This menu allows the administrator to select specific cloud file backup source(s) to be
visible to backup users when they are creating a Cloud File Backup Set. By default,
this feature is on with all cloud file backup sources pre-selected.
1. Turn on the switch on the right under the Cloud File Backup Source
Visible to Users section.
2. Click on .
3. Select the Cloud File Backup Source Visible to Users you wish to add from the
dropdown menu as shown below.
4. Click to add the selected cloud file backup source.
5. If you have multiple cloud file backup source to add, repeat step 3 - 4 until all
options have been added.
6. Click to save.

www.ahsay.com 270
➢ Office 365 Backup Customization
This setting allows the administrator to customize the Authorization code and Admin
consent endpoint screen for Office 365 Global region. By default this feature is turned
off, in which case the default Ahsay branded Office 365 Authorization code and Admin
consent endpoint screens will be displayed.
For example: Ahsay branded Office 365 Authorization code screen
For example: Ahsay Admin consent endpoint screen
NOTE
To support the customization of Azure AD App for Modern App Authentication, an Azure AD
subscription is required, e.g. for Office 365 Apps, Premium P1 and Premium P2 licenses of
Azure AD subscriptions.
As the free version of Azure AD does not support granting Admin consent for the
Exchange/SharePoint related APIs via New App Registration.
Please refer to Microsoft for details of Azure AD subscription plans
https://azure.microsoft.com/en-us/pricing/details/active-directory/
1. Turn on the switch on the right under the Office 365 Backup
Customization section.
2. Select the “Customize credentials for Global region” checkbox.
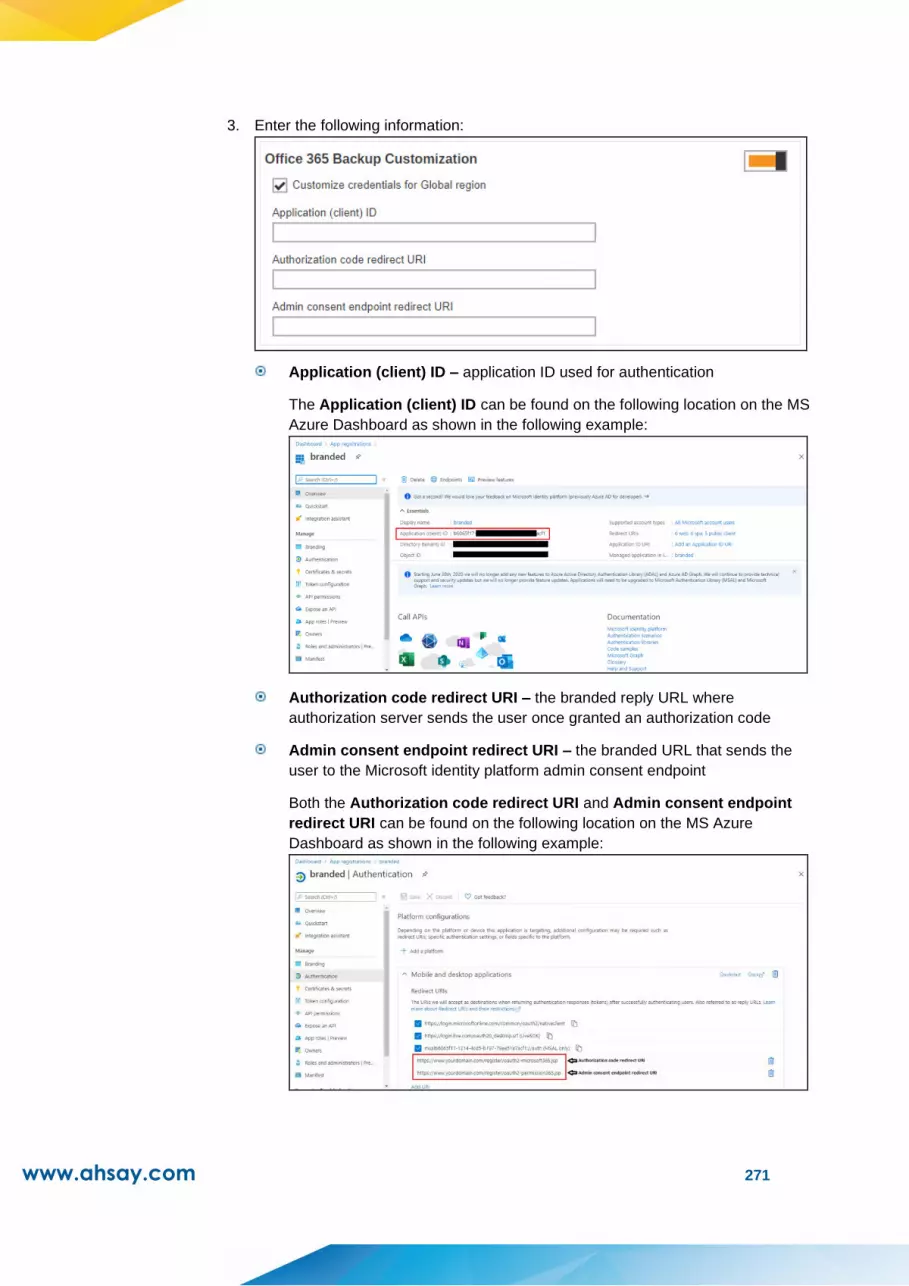
www.ahsay.com 271
3. Enter the following information:
Application (client) ID – application ID used for authentication
The Application (client) ID can be found on the following location on the MS
Azure Dashboard as shown in the following example:
Authorization code redirect URI – the branded reply URL where
authorization server sends the user once granted an authorization code
Admin consent endpoint redirect URI – the branded URL that sends the
user to the Microsoft identity platform admin consent endpoint
Both the Authorization code redirect URI and Admin consent endpoint
redirect URI can be found on the following location on the MS Azure
Dashboard as shown in the following example:
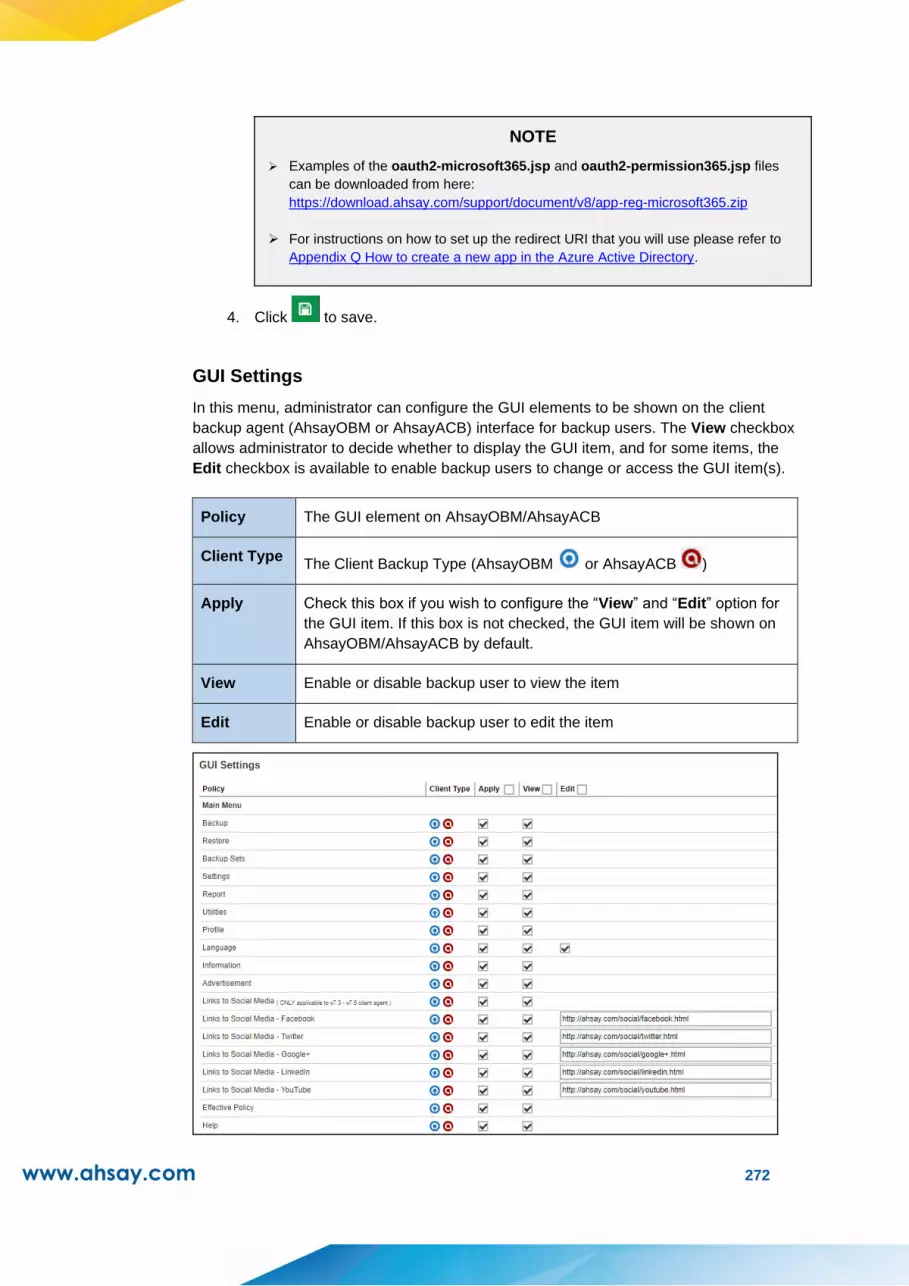
www.ahsay.com 272
NOTE
➢ Examples of the oauth2-microsoft365.jsp and oauth2-permission365.jsp files
can be downloaded from here:
https://download.ahsay.com/support/document/v8/app-reg-microsoft365.zip
➢ For instructions on how to set up the redirect URI that you will use please refer to
Appendix Q How to create a new app in the Azure Active Directory.
4. Click to save.
GUI Settings
In this menu, administrator can configure the GUI elements to be shown on the client
backup agent (AhsayOBM or AhsayACB) interface for backup users. The View checkbox
allows administrator to decide whether to display the GUI item, and for some items, the
Edit checkbox is available to enable backup users to change or access the GUI item(s).
Policy The GUI element on AhsayOBM/AhsayACB
Client Type The Client Backup Type (AhsayOBM or AhsayACB )
Apply Check this box if you wish to configure the “View” and “Edit” option for
the GUI item. If this box is not checked, the GUI item will be shown on
AhsayOBM/AhsayACB by default.
View Enable or disable backup user to view the item
Edit Enable or disable backup user to edit the item
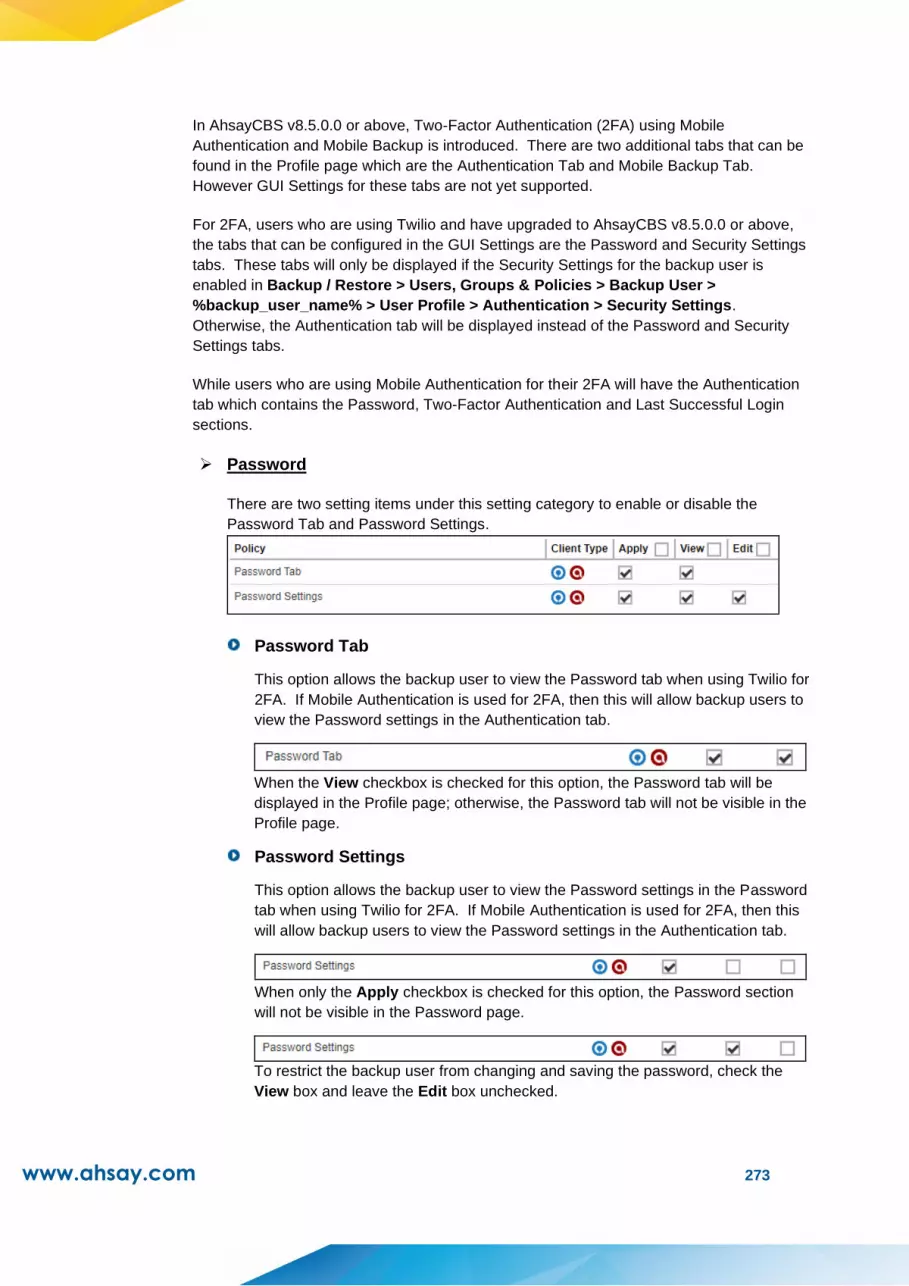
www.ahsay.com 273
In AhsayCBS v8.5.0.0 or above, Two-Factor Authentication (2FA) using Mobile
Authentication and Mobile Backup is introduced. There are two additional tabs that can be
found in the Profile page which are the Authentication Tab and Mobile Backup Tab.
However GUI Settings for these tabs are not yet supported.
For 2FA, users who are using Twilio and have upgraded to AhsayCBS v8.5.0.0 or above,
the tabs that can be configured in the GUI Settings are the Password and Security Settings
tabs. These tabs will only be displayed if the Security Settings for the backup user is
enabled in Backup / Restore > Users, Groups & Policies > Backup User >
%backup_user_name% > User Profile > Authentication > Security Settings.
Otherwise, the Authentication tab will be displayed instead of the Password and Security
Settings tabs.
While users who are using Mobile Authentication for their 2FA will have the Authentication
tab which contains the Password, Two-Factor Authentication and Last Successful Login
sections.
➢ Password
There are two setting items under this setting category to enable or disable the
Password Tab and Password Settings.
Password Tab
This option allows the backup user to view the Password tab when using Twilio for
2FA. If Mobile Authentication is used for 2FA, then this will allow backup users to
view the Password settings in the Authentication tab.
When the View checkbox is checked for this option, the Password tab will be
displayed in the Profile page; otherwise, the Password tab will not be visible in the
Profile page.
Password Settings
This option allows the backup user to view the Password settings in the Password
tab when using Twilio for 2FA. If Mobile Authentication is used for 2FA, then this
will allow backup users to view the Password settings in the Authentication tab.
When only the Apply checkbox is checked for this option, the Password section
will not be visible in the Password page.
To restrict the backup user from changing and saving the password, check the
View box and leave the Edit box unchecked.

www.ahsay.com 274
By checking both the View and Edit checkboxes, backup users can change and
save their password.
We have added additional items under the GUI settings to give you greater flexibility for
customizing the GUI elements on the client backup agent (AhsayOBM & AhsayACB). Refer
to the information below for further details.
➢ New Backup Set Wizard
There are six setting items under this new setting category to enable or disable the
Destination and Encryption Key, OpenDirect and Granular Restore settings when
creating a new backup set using the client backup agent.
New Backup Set Wizard – Destination
You can set to restrict backup users from using the default destination where they
can only view the default destination but cannot change it OR to allow them to
choose the desired backup destination on their own.
To restrict the backup destination WITHOUT letting backup user to change it,
check the View box and leave the Edit box unchecked. With this configuration,
backup users can only view the backup destination that is predefined under the
Users, Group & Policies > Policy Group > Default Values > Destination page,
but cannot alter the backup destination when creating a new backup set using the
client backup agent.
Note: If there is no destination defined in the Default Values menu as mentioned
above, you will not be allowed to configure this setting.
By checking both the View and Edit checkboxes, backup users can choose their
desired backup destination from the choices defined under the Users, Group &
Policies > Policy Group > Backup Set Settings > Standard Destination.
New Backup Set Wizard – Encryption
This setting is used in conjunction with the New Backup Set Wizard –
Enable/Disable and New Backup Set Wizard – Options settings.
When the View checkbox is checked for this option, the encryption key setting
page will be shown when creating a new backup set with a client backup agent,
otherwise, the relevant page will be skipped.

www.ahsay.com 275
New Backup Set Wizard – Encryption – Enable / Disable
In order for this setting to work, the View option for New Backup Set Wizard –
Encryption setting must be turned on.
When you set the View option on and the Edit option off for this setting, the
Encryption Key feature will be turned on by default.
When you set both the View and Edit options on, backup users will be able to
enable or disable this feature on their own.
New Backup Set Wizard – Encryption – Options
This setting allows backup users to choose the Encryption Type among Default,
User Password or Custom.
When you set the View option on and the Edit option off for this setting, the
encryption type will not be configurable and will use the default value defined in
Users, Group & Policies > Policy Group > Default Values > Others >
Encryption.
When you set both the View and Edit options on, backup users will be able to
choose their desired encryption type.
New Backup Set Wizard – OpenDirect
You can set to restrict backup users from enabling the OpenDirect feature OR to
allow them to enable this feature.
To restrict the OpenDirect feature WITHOUT letting backup user to enable it,
check the View box and leave the Edit box unchecked. With this configuration,
backup users can only view OpenDirect but cannot enable it when creating a new
backup set using the client backup agent.
When you set both the View and Edit options on, backup users will be able to
enable OpenDirect.
New Backup Set Wizard – Granular Restore
You can set to restrict backup users from enabling the Granular Restore feature
OR to allow them to enable this feature.
To restrict the Granular Restore feature WITHOUT letting backup user to enable it,
check the View box and leave the Edit box unchecked. With this configuration,
backup users can only view Granular Restore but cannot enable it when creating
a new backup set using the client backup agent.

www.ahsay.com 276
When you set both the View and Edit options on, backup users will be able to
enable Granular Restore.
➢ Help Page
This option allows you to configure whether to show the Help button on the UI of the
client backup agent. The Help button takes you to a set of online help instructions that
correspond to the relevant page in the client backup agent.
➢ Add Contact
This option allows backup users to add Contact information, such as name, email,
address, etc. under the Profile > Contacts page in the client backup agent.
By checking the View checkbox for this option, backup users can configure contact
information on their own.
➢ Remove Contact
This option allows backup users to remove contact information under the Profile >
Contacts page in the client backup agent.
By checking the View checkbox for this option, backup users can remove contact
information on their own in the client backup agent.
➢ Add Backup Set
By enabling the View checkbox of this option, backup users are able to add backup
set using the client backup agent.
➢ Remove Backup Set
By enabling the View checkbox of this option, backup users are able to remove
backup set using the client backup agent.
➢ General Settings - MariaDB
By enabling the View checkbox of this option, backup users are able to view MariaDB.
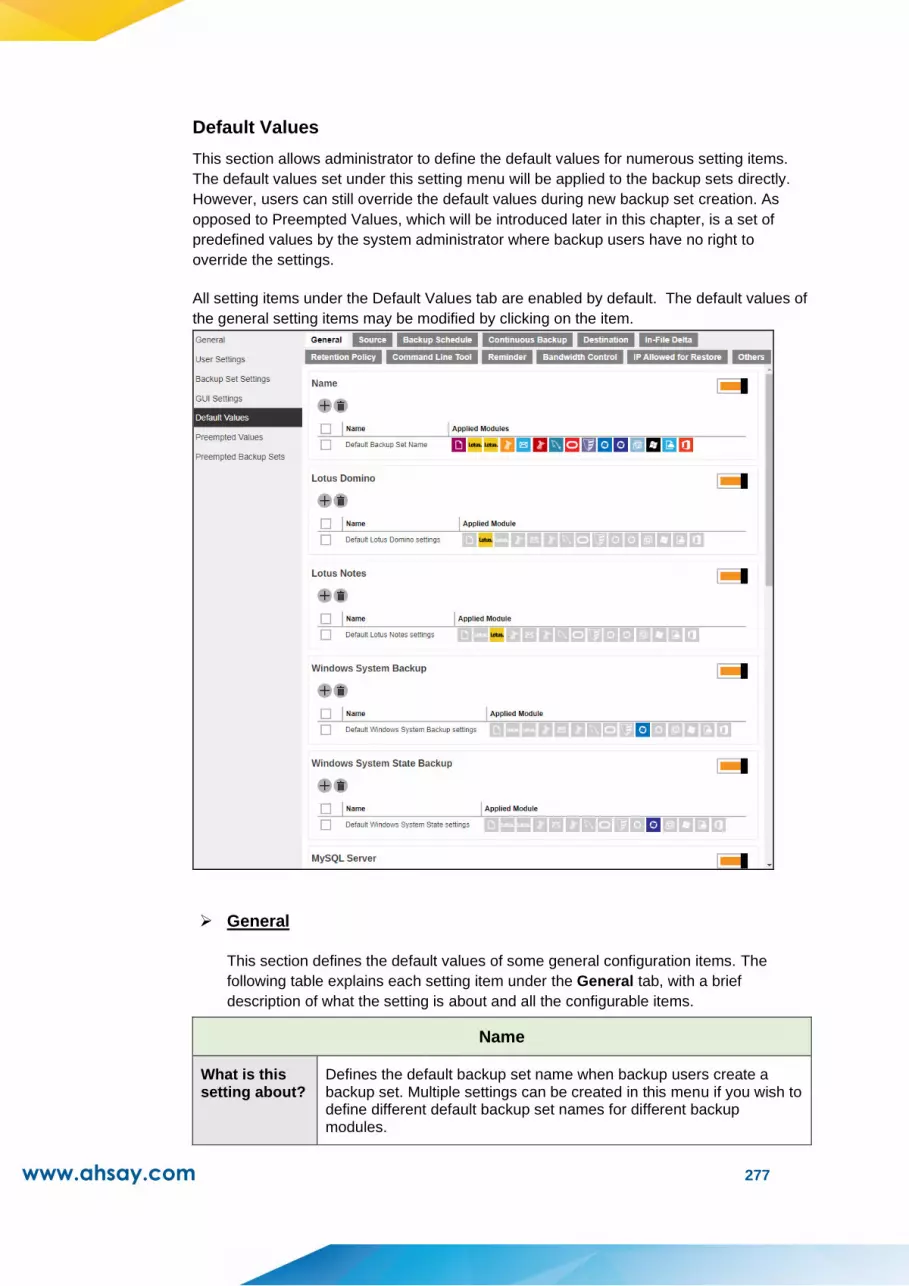
www.ahsay.com 277
Default Values
This section allows administrator to define the default values for numerous setting items.
The default values set under this setting menu will be applied to the backup sets directly.
However, users can still override the default values during new backup set creation. As
opposed to Preempted Values, which will be introduced later in this chapter, is a set of
predefined values by the system administrator where backup users have no right to
override the settings.
All setting items under the Default Values tab are enabled by default. The default values of
the general setting items may be modified by clicking on the item.
➢ General
This section defines the default values of some general configuration items. The
following table explains each setting item under the General tab, with a brief
description of what the setting is about and all the configurable items.
Name
What is this setting about?
Defines the default backup set name when backup users create a backup set. Multiple settings can be created in this menu if you wish to define different default backup set names for different backup modules.
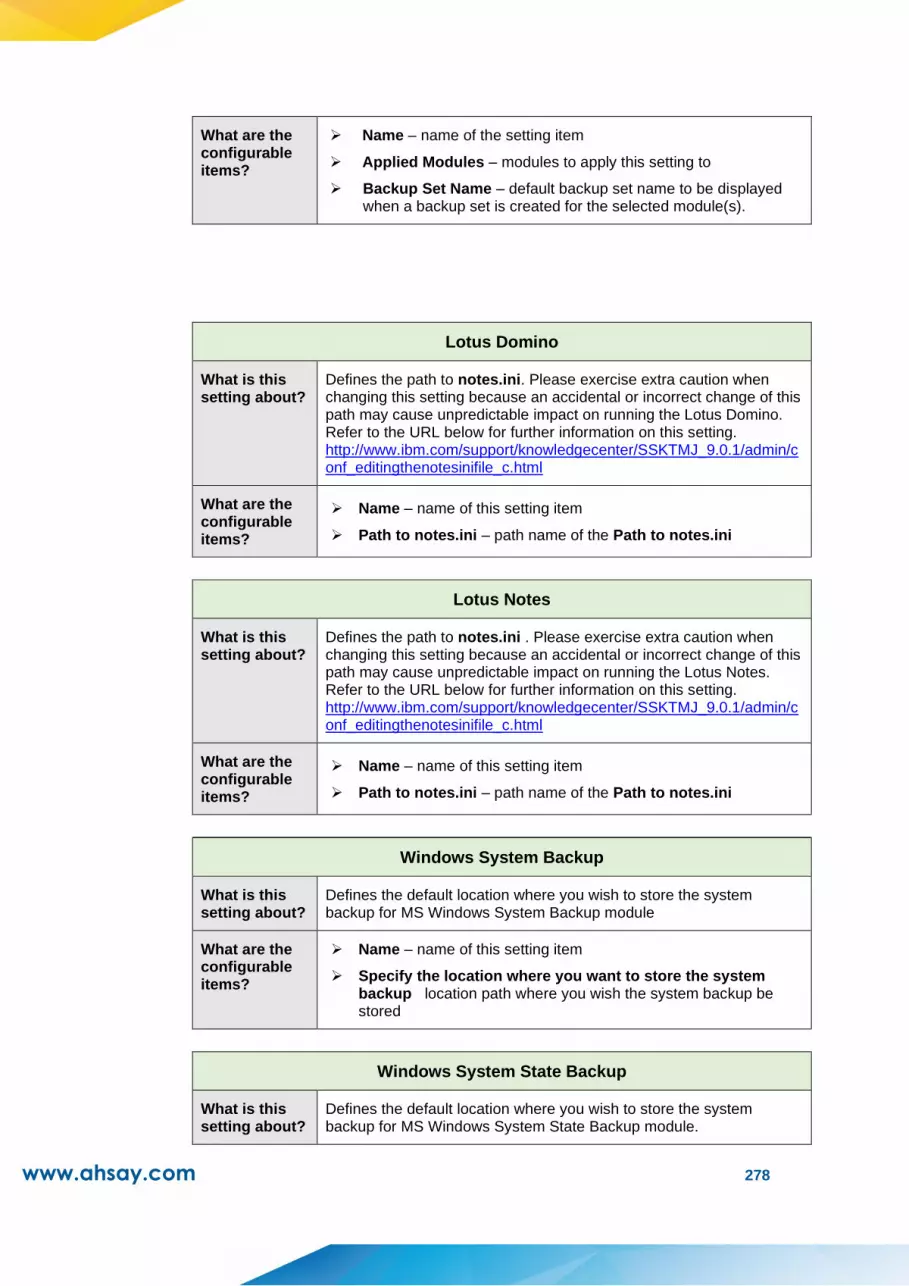
www.ahsay.com 278
What are the configurable items?
➢ Name – name of the setting item
➢ Applied Modules – modules to apply this setting to
➢ Backup Set Name – default backup set name to be displayed when a backup set is created for the selected module(s).
Lotus Domino
What is this setting about?
Defines the path to notes.ini. Please exercise extra caution when changing this setting because an accidental or incorrect change of this path may cause unpredictable impact on running the Lotus Domino. Refer to the URL below for further information on this setting. http://www.ibm.com/support/knowledgecenter/SSKTMJ_9.0.1/admin/conf_editingthenotesinifile_c.html
What are the configurable items?
➢ Name – name of this setting item
➢ Path to notes.ini – path name of the Path to notes.ini
Lotus Notes
What is this setting about?
Defines the path to notes.ini . Please exercise extra caution when changing this setting because an accidental or incorrect change of this path may cause unpredictable impact on running the Lotus Notes. Refer to the URL below for further information on this setting. http://www.ibm.com/support/knowledgecenter/SSKTMJ_9.0.1/admin/conf_editingthenotesinifile_c.html
What are the configurable items?
➢ Name – name of this setting item
➢ Path to notes.ini – path name of the Path to notes.ini
Windows System Backup
What is this setting about?
Defines the default location where you wish to store the system backup for MS Windows System Backup module
What are the configurable items?
➢ Name – name of this setting item
➢ Specify the location where you want to store the system backup location path where you wish the system backup be stored
Windows System State Backup
What is this setting about?
Defines the default location where you wish to store the system backup for MS Windows System State Backup module.

www.ahsay.com 279
What are the configurable items?
➢ Name – name of this setting item
➢ Specify the location where you want to store the system backup location path where you wish the system state backup be stored
MySQL Server
What is this setting about?
Defines the default Login ID, Host name, Port and Path to mysqldump for MySQL server backup module
What are the configurable items?
➢ Name – name of this setting item
➢ Login ID – login ID for accessing the MySQL server
➢ Host – host name of the MySQL server
➢ Port – port number
➢ Path to mysqldump – path name to the mysqldump utility
MariaDBServer
What is this setting about?
Defines the default Login ID, Host name, Port and Path to mysqldump for MariaDB server backup module
What are the configurable items?
➢ Name – name of this setting item
➢ Login ID – login ID for accessing the MariaDB server
➢ Host – host name of the MariaDB server
➢ Port – port number
➢ Path to mysqldump – path name to the mysqldump utility
Oracle Database Server
What is this setting about?
Defines the default Login ID, Host name, Port and SID for Oracle Database Server module
What are the configurable items?
➢ Name – name of this setting item
➢ Login ID – login ID for accessing the Oracle Database server
➢ Host – host name of the Oracle server
➢ Port – port number
➢ SID – the unique identifier to the database instance
VMware Host
What is this setting about?
Defines the default VMware version, host name, port number and SSH port for VMware backup module

www.ahsay.com 280
What are the configurable items?
➢ Name – name of this setting item
➢ Version – VMware version
➢ Host – host name of the VMware host
➢ Port – port number
➢ SSH Port – SSH port number
Shadow Protect
What is this setting about?
Defines the default path to install the Shadow Protect and whether to encrypt the image file in temporary directory.
What are the configurable items?
➢ Name – name of this setting item
➢ Path to StorageCraft ShadowProtect – the path where you installed the ShadowProtect
➢ Encrypt the image file in temporary directory – to enable or disable encryption for image file in the temporary directory where the ShadowProtect image is stored.
Windows User Authentication
What is this setting about?
Defines the default domain name/host name and user name for backup users to enter the Windows User Authentication details. Multiple settings can be created in this menu if you wish to define different default domain name/host name and user name for different modules.
What are the configurable items?
➢ Name – name of this setting item
➢ Applied Modules – modules you wish to apply this default setting to
➢ Domain Name (e.g. ahsay.com) / Host Name – domain name or host name of the Windows login
➢ User name – user name to log in to the backup user’s Windows for backup
➢ Source
This section defines the default backup source values. The following table explains
each setting item under the Source tab, with a brief description of what the setting is
about and all the configurable items.
Shortcut
What is this setting about?
Defines the default common files and folders to be selected when user is creating a backup set for File Backup.
What are the configurable
➢ Name – name of the setting item
➢ Applied Module – modules you wish to apply this default setting
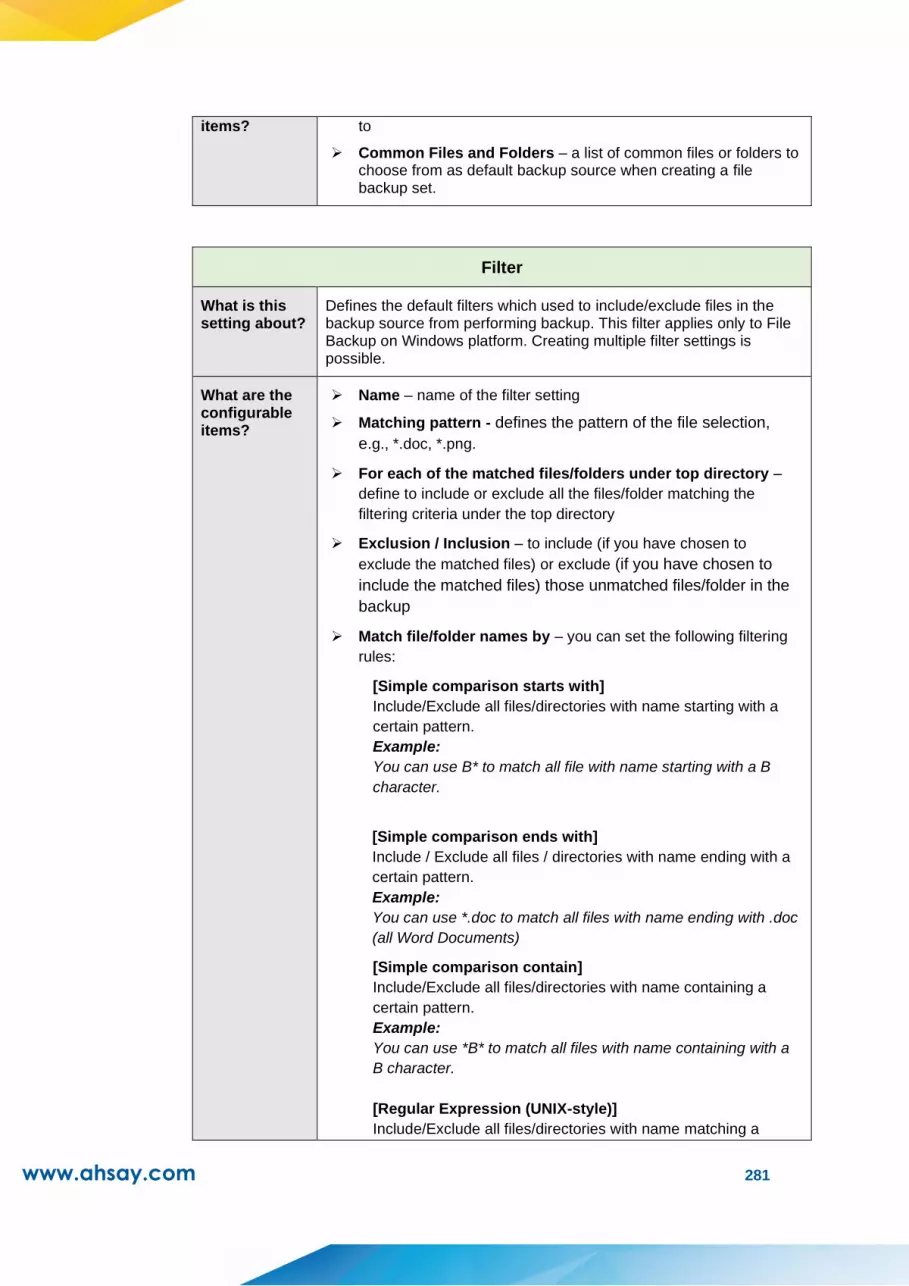
www.ahsay.com 281
items? to
➢ Common Files and Folders – a list of common files or folders to choose from as default backup source when creating a file backup set.
Filter
What is this setting about?
Defines the default filters which used to include/exclude files in the backup source from performing backup. This filter applies only to File Backup on Windows platform. Creating multiple filter settings is possible.
What are the configurable items?
➢ Name – name of the filter setting
➢ Matching pattern - defines the pattern of the file selection,
e.g., *.doc, *.png.
➢ For each of the matched files/folders under top directory –
define to include or exclude all the files/folder matching the
filtering criteria under the top directory
➢ Exclusion / Inclusion – to include (if you have chosen to
exclude the matched files) or exclude (if you have chosen to
include the matched files) those unmatched files/folder in the
backup
➢ Match file/folder names by – you can set the following filtering
rules:
[Simple comparison starts with]
Include/Exclude all files/directories with name starting with a
certain pattern.
Example:
You can use B* to match all file with name starting with a B
character.
[Simple comparison ends with]
Include / Exclude all files / directories with name ending with a
certain pattern.
Example:
You can use *.doc to match all files with name ending with .doc
(all Word Documents)
[Simple comparison contain]
Include/Exclude all files/directories with name containing a
certain pattern.
Example:
You can use *B* to match all files with name containing with a
B character.
[Regular Expression (UNIX-style)]
Include/Exclude all files/directories with name matching a
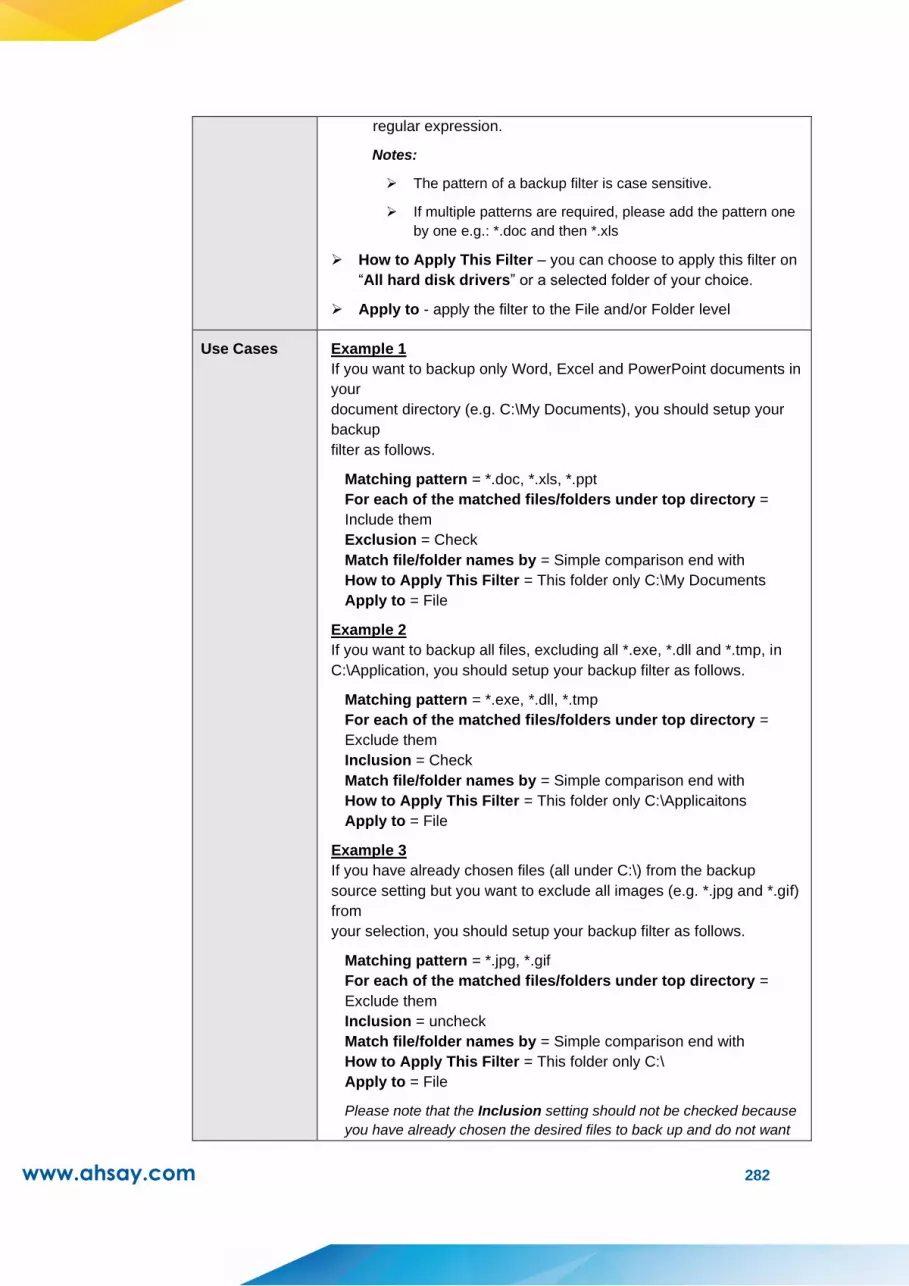
www.ahsay.com 282
regular expression.
Notes:
➢ The pattern of a backup filter is case sensitive.
➢ If multiple patterns are required, please add the pattern one
by one e.g.: *.doc and then *.xls
➢ How to Apply This Filter – you can choose to apply this filter on
“All hard disk drivers” or a selected folder of your choice.
➢ Apply to - apply the filter to the File and/or Folder level
Use Cases Example 1
If you want to backup only Word, Excel and PowerPoint documents in
your
document directory (e.g. C:\My Documents), you should setup your
backup
filter as follows.
Matching pattern = *.doc, *.xls, *.ppt
For each of the matched files/folders under top directory =
Include them
Exclusion = Check
Match file/folder names by = Simple comparison end with
How to Apply This Filter = This folder only C:\My Documents
Apply to = File
Example 2
If you want to backup all files, excluding all *.exe, *.dll and *.tmp, in
C:\Application, you should setup your backup filter as follows.
Matching pattern = *.exe, *.dll, *.tmp
For each of the matched files/folders under top directory =
Exclude them
Inclusion = Check
Match file/folder names by = Simple comparison end with
How to Apply This Filter = This folder only C:\Applicaitons
Apply to = File
Example 3
If you have already chosen files (all under C:\) from the backup
source setting but you want to exclude all images (e.g. *.jpg and *.gif)
from
your selection, you should setup your backup filter as follows.
Matching pattern = *.jpg, *.gif
For each of the matched files/folders under top directory =
Exclude them
Inclusion = uncheck
Match file/folder names by = Simple comparison end with
How to Apply This Filter = This folder only C:\
Apply to = File
Please note that the Inclusion setting should not be checked because
you have already chosen the desired files to back up and do not want
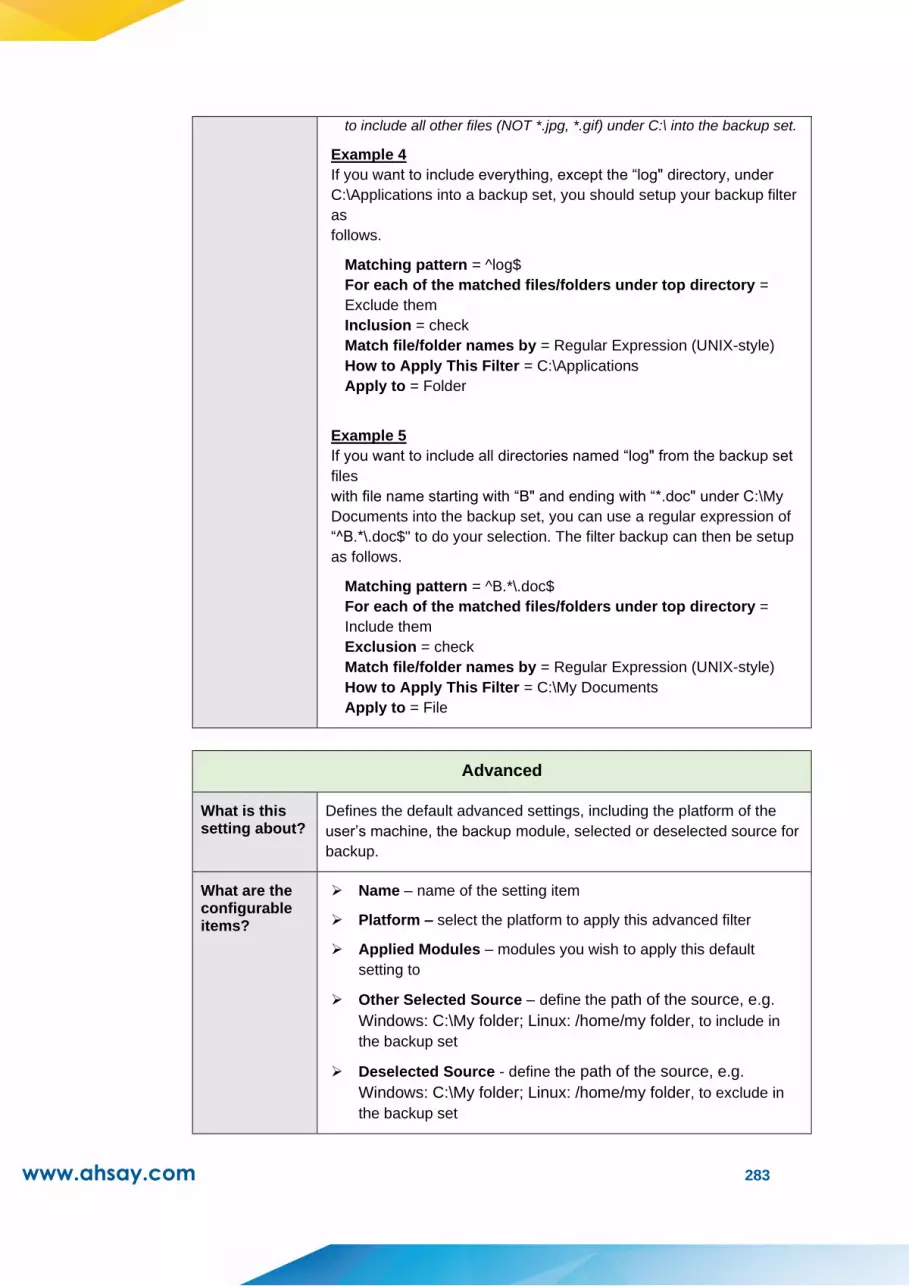
www.ahsay.com 283
to include all other files (NOT *.jpg, *.gif) under C:\ into the backup set.
Example 4
If you want to include everything, except the “log" directory, under
C:\Applications into a backup set, you should setup your backup filter
as
follows.
Matching pattern = ^log$
For each of the matched files/folders under top directory =
Exclude them
Inclusion = check
Match file/folder names by = Regular Expression (UNIX-style)
How to Apply This Filter = C:\Applications
Apply to = Folder
Example 5
If you want to include all directories named “log" from the backup set
files
with file name starting with “B" and ending with “*.doc" under C:\My
Documents into the backup set, you can use a regular expression of
“^B.*\.doc$" to do your selection. The filter backup can then be setup
as follows.
Matching pattern = ^B.*\.doc$
For each of the matched files/folders under top directory =
Include them
Exclusion = check
Match file/folder names by = Regular Expression (UNIX-style)
How to Apply This Filter = C:\My Documents
Apply to = File
Advanced
What is this setting about?
Defines the default advanced settings, including the platform of the
user’s machine, the backup module, selected or deselected source for
backup.
What are the configurable items?
➢ Name – name of the setting item
➢ Platform – select the platform to apply this advanced filter
➢ Applied Modules – modules you wish to apply this default
setting to
➢ Other Selected Source – define the path of the source, e.g.
Windows: C:\My folder; Linux: /home/my folder, to include in
the backup set
➢ Deselected Source - define the path of the source, e.g.
Windows: C:\My folder; Linux: /home/my folder, to exclude in
the backup set
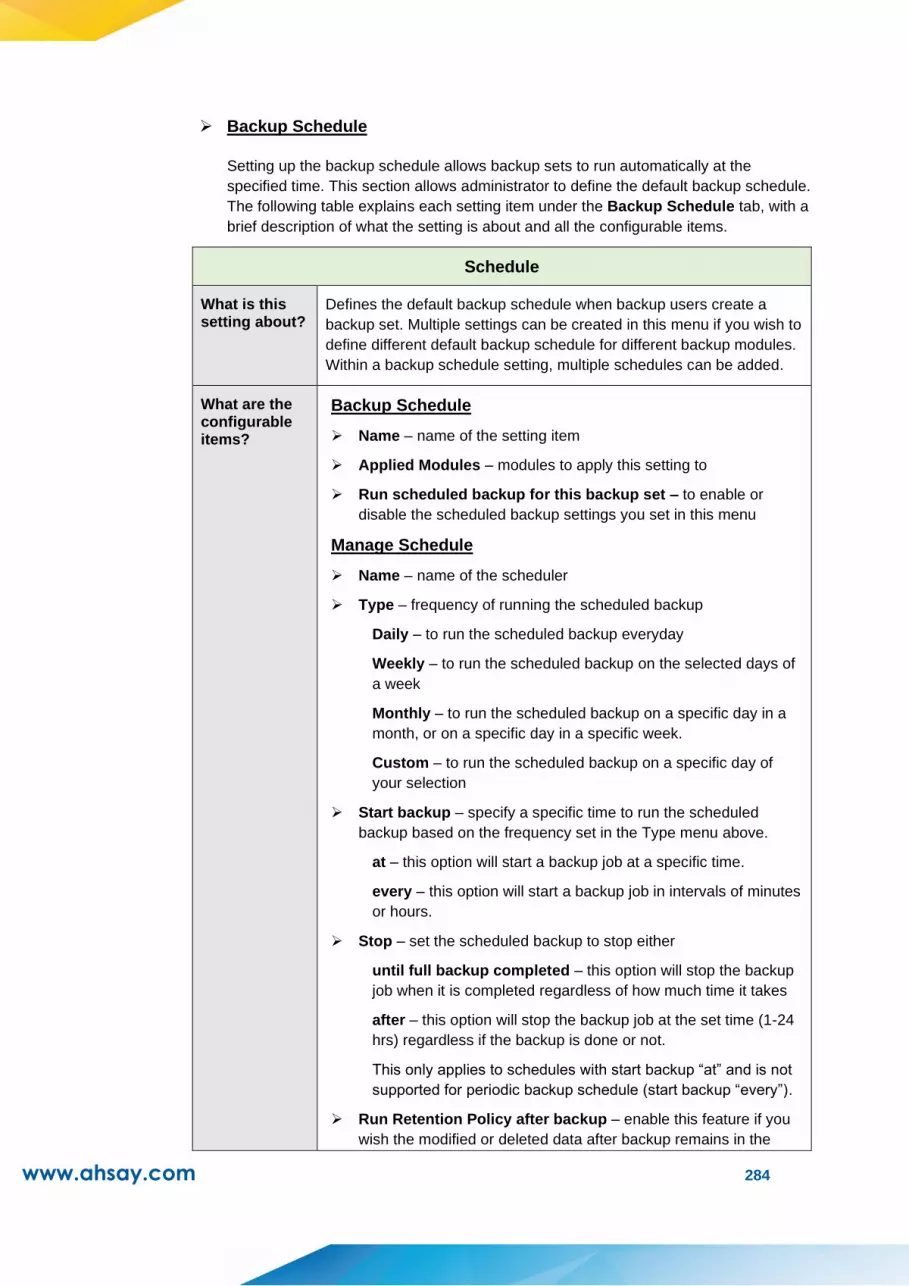
www.ahsay.com 284
➢ Backup Schedule
Setting up the backup schedule allows backup sets to run automatically at the
specified time. This section allows administrator to define the default backup schedule.
The following table explains each setting item under the Backup Schedule tab, with a
brief description of what the setting is about and all the configurable items.
Schedule
What is this setting about?
Defines the default backup schedule when backup users create a
backup set. Multiple settings can be created in this menu if you wish to
define different default backup schedule for different backup modules.
Within a backup schedule setting, multiple schedules can be added.
What are the configurable items?
Backup Schedule
➢ Name – name of the setting item
➢ Applied Modules – modules to apply this setting to
➢ Run scheduled backup for this backup set – to enable or
disable the scheduled backup settings you set in this menu
Manage Schedule
➢ Name – name of the scheduler
➢ Type – frequency of running the scheduled backup
Daily – to run the scheduled backup everyday
Weekly – to run the scheduled backup on the selected days of
a week
Monthly – to run the scheduled backup on a specific day in a
month, or on a specific day in a specific week.
Custom – to run the scheduled backup on a specific day of
your selection
➢ Start backup – specify a specific time to run the scheduled
backup based on the frequency set in the Type menu above.
at – this option will start a backup job at a specific time.
every – this option will start a backup job in intervals of minutes
or hours.
➢ Stop – set the scheduled backup to stop either
until full backup completed – this option will stop the backup
job when it is completed regardless of how much time it takes
after – this option will stop the backup job at the set time (1-24
hrs) regardless if the backup is done or not.
This only applies to schedules with start backup “at” and is not
supported for periodic backup schedule (start backup “every”).
➢ Run Retention Policy after backup – enable this feature if you
wish the modified or deleted data after backup remains in the

www.ahsay.com 285
backup server for the set number of retention day
➢ Continuous Backup
When the Continuous Backup feature is enabled, a backup job will be triggered
whenever a change is made in the backup source. This section allows administrator to
define the default continuous backup settings. The following table explains each
setting item under the Continuous Backup tab, with a brief description of the
available settings and all the configurable items. Continuous Backup is only
available on Windows platform.
IMPORTANT
When setting up the Continuous Backup feature for a backup set, you must run a manual or
scheduled backup job first so that the initial files are uploaded your designated backup destination.
Continuous Backup
What is this setting about?
Defines whether to enable this feature, whether to exclude system
files, frequency of running backup when changes are detected,
configure the maximum file size allowed for backup and configure
filters to exclude files from backup.
What are the configurable items?
Continuous Backup
➢ Name – name of the setting item
➢ Backup whenever a change is made – enable or disable the
continuous backup feature.
➢ Exclude system files – enable this feature if you do not want
to back up system files. Refer to Appendix I for a full list of
system files excluded from the backup set.
➢ How often should the backup run – set the frequency of
running backup when changes are detected.
➢ Only apply to files smaller than – file size that is larger than
the set value will not be backed up.
➢ Run CDP on computers named – define the name of the
computer on which continuous backup will be run.
Exclude Filter
➢ Name - name of the filter setting item
➢ Match file/folder names by – you can set the following
filtering rules:
[Simple comparison starts with]
Include/Exclude all files/directories with name starting with
a certain pattern.

www.ahsay.com 286
Example:
You can use B* to match all file with name starting with a B
character.
[Simple comparison ends with]
Include / Exclude all files / directories with name ending
with a certain pattern.
Example:
You can use *.doc to match all files with name ending with
.doc (all Word Documents)
[Simple comparison contain]
Include/Exclude all files/directories with name containing a
certain pattern.
Example:
You can use *B* to match all files with name containing
with a B character.
[Regular Expression (UNIX-style)]
Include/Exclude all files/directories with name matching a
regular expression.
Notes:
- The pattern of a backup filter is case sensitive.
- If multiple patterns are required, please add the pattern one
by one e.g.: *.doc and then *.xls
➢ Matching pattern - defines the pattern of the file selection,
e.g., *.doc, *.png.
➢ Apply This Filter to all files/folders in – you can choose to
apply this filter on “All selected sources” or a selected folder
of your choice
➢ Apply to - apply the filter to the File and/or Folder level
Use Cases Example 1
If you want to back up all files, except all Word, Excel and PowerPoint
documents, in your document directory (e.g. C:\My Documents), you
should setup your backup filter as follows.
Match file/folder names by = Simple comparison end with
Matching pattern = *.doc, *.xls, *.ppt
Apply this filter to all files/folders in = This folder only C:\My
Documents
Apply to = File
Example 2
If you want to include everything, except the “log" directory, under
C:\Applications into a backup set, you should setup your backup filter
as
follows.
Match file/folder names by = Regular Expression (UNIX-style)
Matching pattern = ^log$

www.ahsay.com 287
Apply this filter to all files/folders in = C:\Applications
Apply to = Folder
Example 3
If you want to exclude all directories named “log" from the backup set
files
with file name starting with “B" and ending with “*.doc" under C:\My
Documents into the backup set, you can use a regular expression of
“^B.*\.doc$" to do your selection. The filter backup can then be setup
as
follows.
Match file/folder names by = Regular Expression (UNIX-style)
Matching pattern = ^B.*\.doc$
Apply this filter to all files/folders in = C:\My Documents
Apply to = File
➢ Destination
This section allows administrator to define the default backup destination for backup
set. The following table explains each setting item under the Destination tab, with a
brief description of what the setting is about and all the configurable items.
Destination
What is this setting about?
Defines the default backup destination when backup users create a
backup set. Multiple settings can be created in this menu if you wish to
define different default destinations for different backup modules.
What are the configurable items?
Destination
➢ Name – name of the setting item
➢ Applied Modules – modules to apply this setting to
➢ Backup Mode – select the files transfer method during backup
Sequential – backup files are sent to the backup destination
one by one, one after another.
Concurrent – multiple files are sent to the backup destination
at the same time
➢ Maximum concurrent backup destinations (only if you have
selected Concurrent as the Backup Mode) – select the
maximum number of files allowed for uploading to the backup
destination
➢ Predefined Destination – select the predefined destination you
have configured in the Predefined Destinations Tab section.
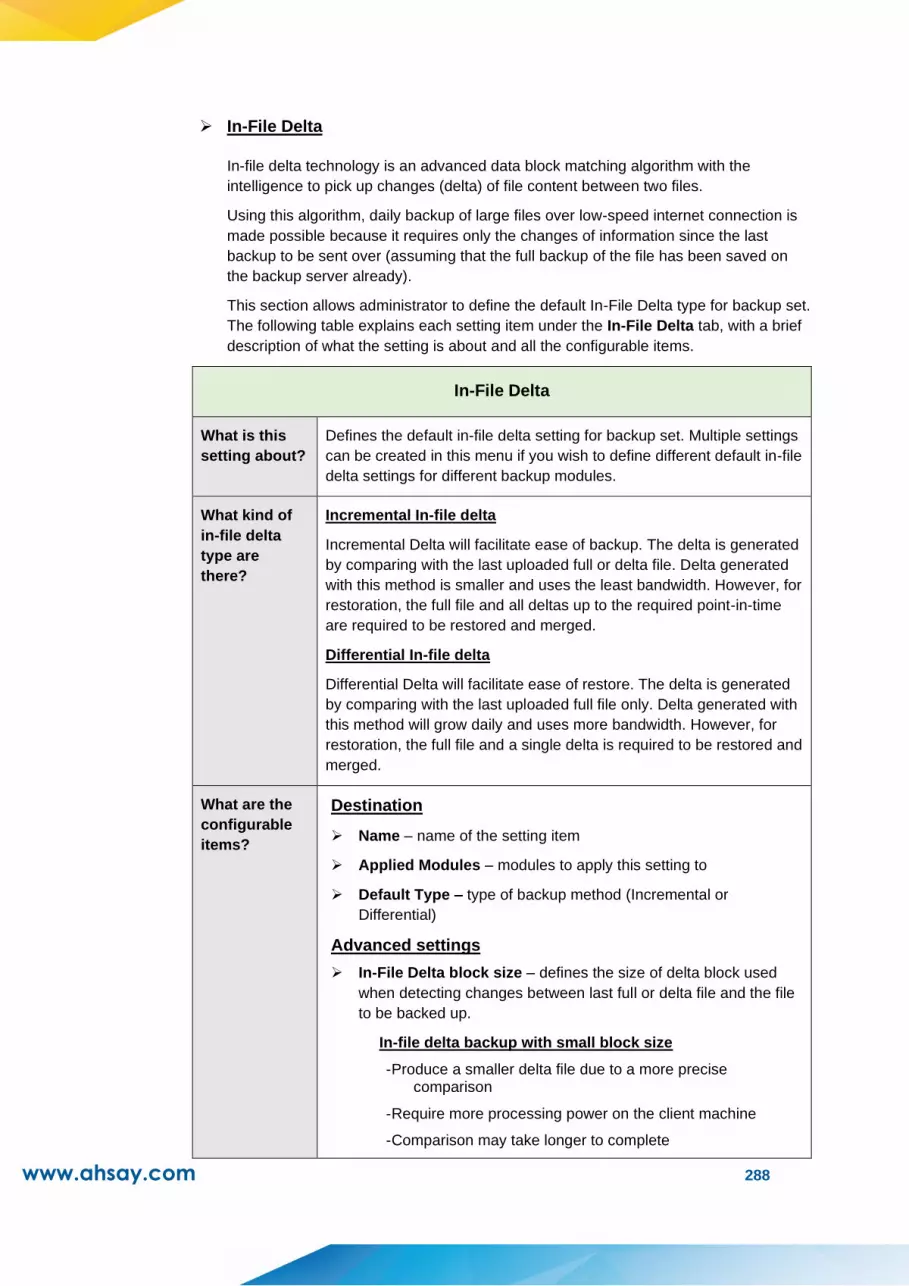
www.ahsay.com 288
➢ In-File Delta
In-file delta technology is an advanced data block matching algorithm with the
intelligence to pick up changes (delta) of file content between two files.
Using this algorithm, daily backup of large files over low-speed internet connection is
made possible because it requires only the changes of information since the last
backup to be sent over (assuming that the full backup of the file has been saved on
the backup server already).
This section allows administrator to define the default In-File Delta type for backup set.
The following table explains each setting item under the In-File Delta tab, with a brief
description of what the setting is about and all the configurable items.
In-File Delta
What is this
setting about?
Defines the default in-file delta setting for backup set. Multiple settings
can be created in this menu if you wish to define different default in-file
delta settings for different backup modules.
What kind of
in-file delta
type are
there?
Incremental In-file delta
Incremental Delta will facilitate ease of backup. The delta is generated
by comparing with the last uploaded full or delta file. Delta generated
with this method is smaller and uses the least bandwidth. However, for
restoration, the full file and all deltas up to the required point-in-time
are required to be restored and merged.
Differential In-file delta
Differential Delta will facilitate ease of restore. The delta is generated
by comparing with the last uploaded full file only. Delta generated with
this method will grow daily and uses more bandwidth. However, for
restoration, the full file and a single delta is required to be restored and
merged.
What are the
configurable
items?
Destination
➢ Name – name of the setting item
➢ Applied Modules – modules to apply this setting to
➢ Default Type – type of backup method (Incremental or
Differential)
Advanced settings
➢ In-File Delta block size – defines the size of delta block used
when detecting changes between last full or delta file and the file
to be backed up.
In-file delta backup with small block size
- Produce a smaller delta file due to a more precise comparison
- Require more processing power on the client machine
- Comparison may take longer to complete

www.ahsay.com 289
- Require more Java memory
In-file delta backup with large block size:
- Produce a larger delta file due to a less precise comparison
- Require less processing power on the client machine
- Comparison will complete faster
- Require less Java memory
For most cases, the default setting Auto will select the optimal
block size for each file (depending on the size of the file).
File size Block size
Smaller than 2GB 4KB
2GB – 8GB 8KB
Larger than 8GB 16KB
➢ Only apply In-File Delta to files larger than – defines the
minimum file size to apply the in-file delta setting. If the size of a
file to be backed up is smaller than the set value, the in-file delta
setting will not apply and the whole file will be uploaded to the
backup server.
It is not necessary to perform In-file delta backup on small files
because backing up the whole file does not take long. Backing up
the whole file instead reduces the time required to restore the file.
➢ Upload full file when either of these conditions is met – a
backup of the full file will be perform if the following condition is
met:
- Number of deltas is over – when the number of delta file
exceeds the set value
- Delta ratio (delta file size / full file size) is over – this
setting is to ensure that a full file backup is performed for
file with significant changes, as it is preferable to upload a
full file instead to reduce the time required to restore the file
➢ Weekly variations for overriding default type – override the
default in-file delta setting in the Default Type field on selected
day(s) of a week
➢ Yearly variations for overriding default type and weekly
variations – override the default in-file delta setting in the
Default Type field as well as the setting in the “Weekly
variations for overriding default type” section on a selected
day in a week based on either of the following selection
- Day of selected months in yearly variations - select a
specific day in a month. On this specified day in the month
defined above will the in-file delta variation setting override
the default value.
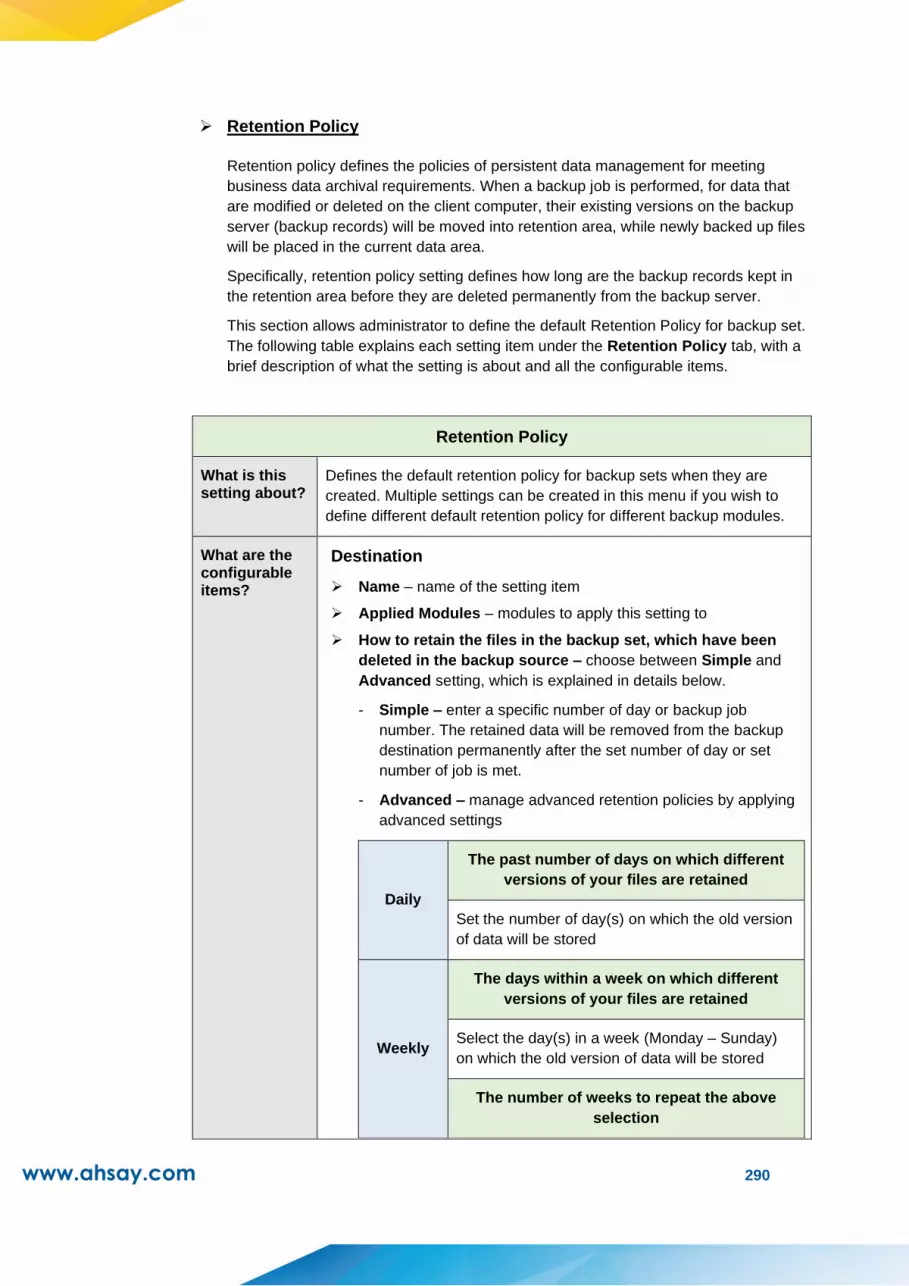
www.ahsay.com 290
➢ Retention Policy
Retention policy defines the policies of persistent data management for meeting
business data archival requirements. When a backup job is performed, for data that
are modified or deleted on the client computer, their existing versions on the backup
server (backup records) will be moved into retention area, while newly backed up files
will be placed in the current data area.
Specifically, retention policy setting defines how long are the backup records kept in
the retention area before they are deleted permanently from the backup server.
This section allows administrator to define the default Retention Policy for backup set.
The following table explains each setting item under the Retention Policy tab, with a
brief description of what the setting is about and all the configurable items.
Retention Policy
What is this setting about?
Defines the default retention policy for backup sets when they are
created. Multiple settings can be created in this menu if you wish to
define different default retention policy for different backup modules.
What are the configurable items?
Destination
➢ Name – name of the setting item
➢ Applied Modules – modules to apply this setting to
➢ How to retain the files in the backup set, which have been
deleted in the backup source – choose between Simple and
Advanced setting, which is explained in details below.
- Simple – enter a specific number of day or backup job
number. The retained data will be removed from the backup
destination permanently after the set number of day or set
number of job is met.
- Advanced – manage advanced retention policies by applying
advanced settings
Daily
The past number of days on which different
versions of your files are retained
Set the number of day(s) on which the old version
of data will be stored
Weekly
The days within a week on which different
versions of your files are retained
Select the day(s) in a week (Monday – Sunday)
on which the old version of data will be stored
The number of weeks to repeat the above
selection

www.ahsay.com 291
Enter the number of week(s) for the above setting
to repeat
Monthly
The days within a month on which different
versions of your files are retained
Select a day in a month on which the old version
of data will be stored. You can either set:
- An exact day (1-31) or
- The (First/Second/Third/Fourth/Last) of
(Monday -Sunday)
The number of months to repeat the above
selection
Enter the number of month(s) for the above
setting to repeat
Quarterly
The day within a quarter on which different
versions of your files are retained
Select a day within a quarter on which the old
version of data will be stored. You can either set:
- An exact day (1-31) or
- The (First/Second/Third/Fourth/Last) of
(Monday -Sunday)
Months of quarter
Select the desired combination of months of quarter
- (January, April, July, October)
- (February, May, August, November)
- (March, June, September, December)
The number of quarters to repeat the above
selection
Enter the number of quarter(s) for the above
setting to repeat
Yearly
The day within a year on which different
versions of your files are retained
Select a day within a year on which the old version of data will be stored. You can set the day by using one of the following methods:
- Select an exact day (1 – 31) in an exact
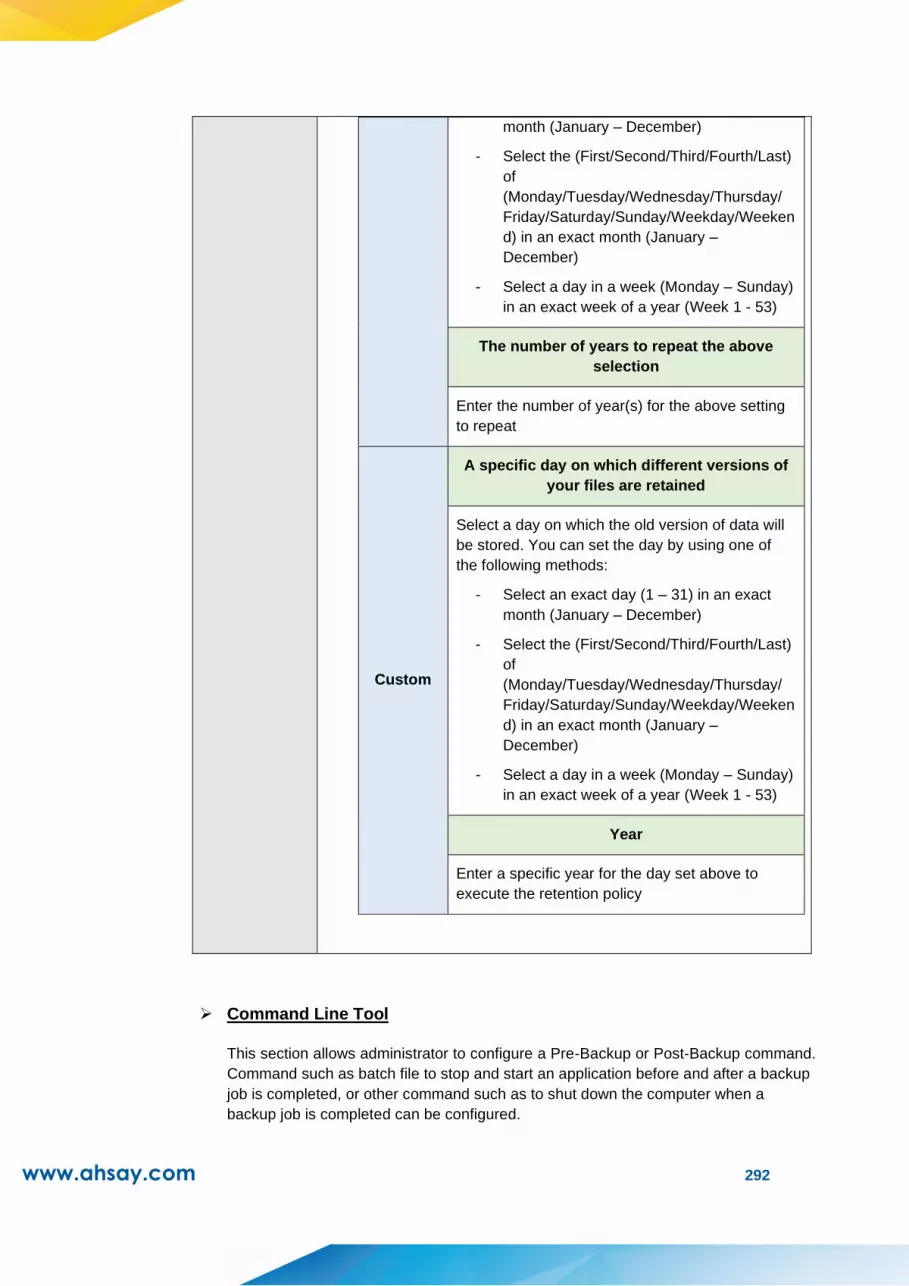
www.ahsay.com 292
month (January – December)
- Select the (First/Second/Third/Fourth/Last)
of
(Monday/Tuesday/Wednesday/Thursday/
Friday/Saturday/Sunday/Weekday/Weeken
d) in an exact month (January –
December)
- Select a day in a week (Monday – Sunday)
in an exact week of a year (Week 1 - 53)
The number of years to repeat the above
selection
Enter the number of year(s) for the above setting
to repeat
Custom
A specific day on which different versions of
your files are retained
Select a day on which the old version of data will
be stored. You can set the day by using one of
the following methods:
- Select an exact day (1 – 31) in an exact
month (January – December)
- Select the (First/Second/Third/Fourth/Last)
of
(Monday/Tuesday/Wednesday/Thursday/
Friday/Saturday/Sunday/Weekday/Weeken
d) in an exact month (January –
December)
- Select a day in a week (Monday – Sunday)
in an exact week of a year (Week 1 - 53)
Year
Enter a specific year for the day set above to
execute the retention policy
➢ Command Line Tool
This section allows administrator to configure a Pre-Backup or Post-Backup command.
Command such as batch file to stop and start an application before and after a backup
job is completed, or other command such as to shut down the computer when a
backup job is completed can be configured.
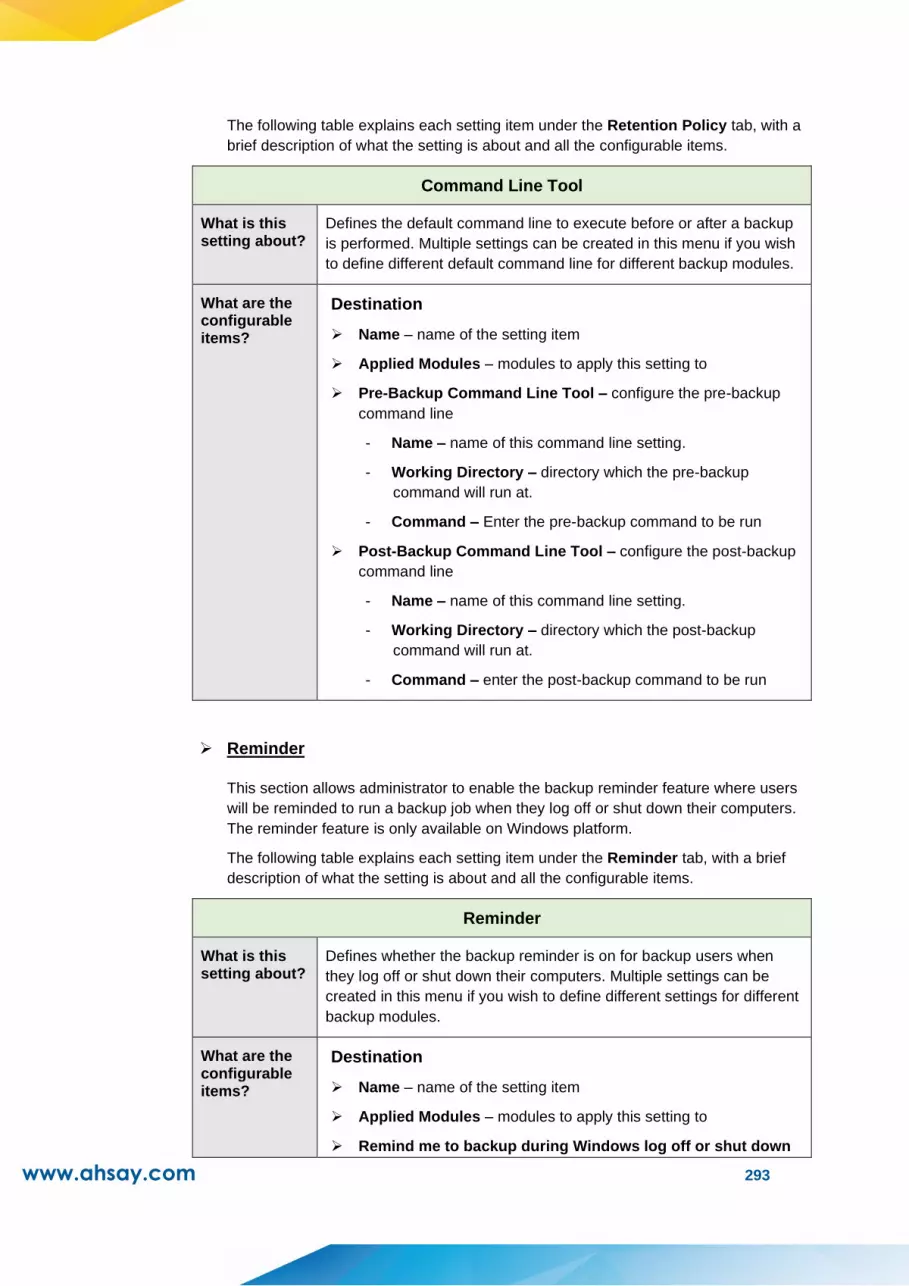
www.ahsay.com 293
The following table explains each setting item under the Retention Policy tab, with a
brief description of what the setting is about and all the configurable items.
Command Line Tool
What is this setting about?
Defines the default command line to execute before or after a backup
is performed. Multiple settings can be created in this menu if you wish
to define different default command line for different backup modules.
What are the configurable items?
Destination
➢ Name – name of the setting item
➢ Applied Modules – modules to apply this setting to
➢ Pre-Backup Command Line Tool – configure the pre-backup
command line
- Name – name of this command line setting.
- Working Directory – directory which the pre-backup
command will run at.
- Command – Enter the pre-backup command to be run
➢ Post-Backup Command Line Tool – configure the post-backup
command line
- Name – name of this command line setting.
- Working Directory – directory which the post-backup
command will run at.
- Command – enter the post-backup command to be run
➢ Reminder
This section allows administrator to enable the backup reminder feature where users
will be reminded to run a backup job when they log off or shut down their computers.
The reminder feature is only available on Windows platform.
The following table explains each setting item under the Reminder tab, with a brief
description of what the setting is about and all the configurable items.
Reminder
What is this setting about?
Defines whether the backup reminder is on for backup users when
they log off or shut down their computers. Multiple settings can be
created in this menu if you wish to define different settings for different
backup modules.
What are the configurable items?
Destination
➢ Name – name of the setting item
➢ Applied Modules – modules to apply this setting to
➢ Remind me to backup during Windows log off or shut down

www.ahsay.com 294
– turn on or off this feature
- Computer name – you can specify the computer’s name for
this reminder to apply on
➢ Bandwidth Control
This section allows administrator to limit the data transfer rate when performing
backup and restore jobs.
NOTE
➢ The actual value will be around +/- 5% of the limit value when the bandwidth control set to
below 32Mb/s. When the bandwidth control set to above 64Mb/s, the gap between actual
value and limit value might be over 5%.
➢ Network stability might influence the transfer rate fluctuation accuracy.
The following table explains each setting item under the Bandwidth Control tab, with
a brief description of what the setting is about and all the configurable items.
Bandwidth Control
What is this setting about?
Defines the default settings on limiting the data transfer rate when
performing backup and restore jobs. Multiple settings can be created
in this menu if you wish to define different settings for different backup
modules.
What are the configurable items?
Destination
➢ Name – name of the setting item
➢ Applied Modules – modules to apply this setting to
➢ Limit the transfer rate when performing backup and restore
tasks – click to turn on or off this feature
- Mode
Independent Each backup and restore job has its
assigned bandwidth
Share
All backup and restore jobs are sharing
the same assigned bandwidth
Note: Share mode does not support
performing backup job on multiple
destinations concurrently.
- Existing bandwidth controls – configure the bandwidth
control details
Name Name of the bandwidth control setting
item

www.ahsay.com 295
Type
Always – apply the bandwidth control
settings at all times
Only within this period – configure a
specific start time and end time on a day
of a week for this bandwidth control
setting to take place
Maximum
transfer rate
Enter the maximum transfer rate allowed,
in the unit of Kbit/s, Mbit/s or Gbit/s.
➢ IP Allowed for Restore
This section allows administrator to define IP ranges that are allowed to perform
restore. The following table explains each setting item under the IP Allowed for
Restore tab, with a brief description of what the setting is about and all the
configurable items.
IP Allowed for Restore
What is this setting about?
Defines the default settings on IP allowed for restore. Multiple settings
can be created in this menu if you wish to define different settings for
different backup modules.
What are the configurable items?
Destination
➢ Name – name of the setting item
➢ Applied Modules – modules to apply this setting to
➢ IP Allowed for Restore– configure the IP ranges allowed for
restore
- From – restore allowed from this IP value
- To - restore allowed up to this IP value
➢ Others
This section allows administrator to configure other default settings. The following
table explains each setting item under the Others tab, with a brief description of what
the setting is about and all the configurable items.
Temporary Directory
What is this setting about?
The temporary directory is used for various purposes, such as storage
of temporary spooled file, remote file list, local file list, temporary delta
file and other files of temporary nature.
Administrator can define the default location of the temporary
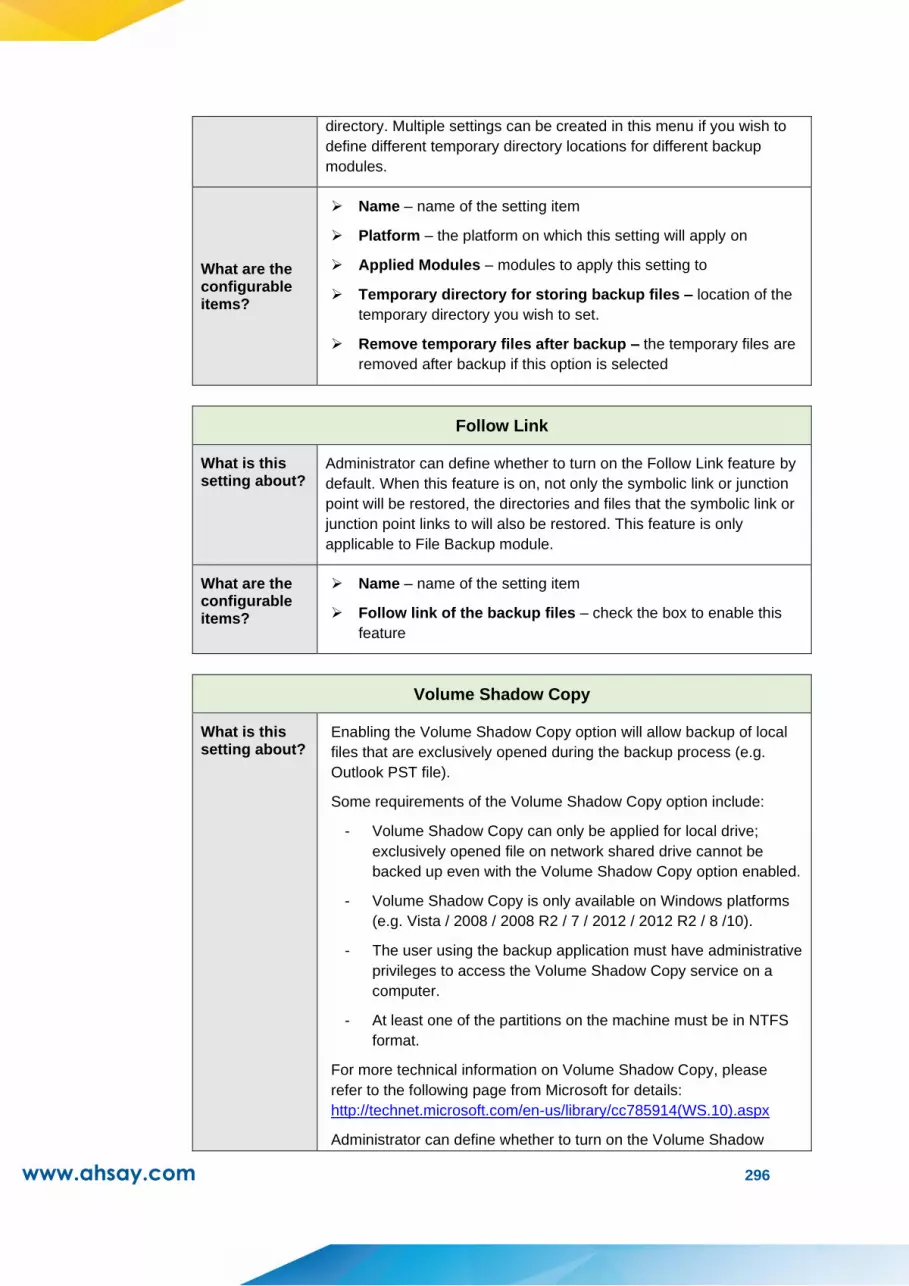
www.ahsay.com 296
directory. Multiple settings can be created in this menu if you wish to
define different temporary directory locations for different backup
modules.
What are the configurable items?
➢ Name – name of the setting item
➢ Platform – the platform on which this setting will apply on
➢ Applied Modules – modules to apply this setting to
➢ Temporary directory for storing backup files – location of the
temporary directory you wish to set.
➢ Remove temporary files after backup – the temporary files are
removed after backup if this option is selected
Follow Link
What is this setting about?
Administrator can define whether to turn on the Follow Link feature by
default. When this feature is on, not only the symbolic link or junction
point will be restored, the directories and files that the symbolic link or
junction point links to will also be restored. This feature is only
applicable to File Backup module.
What are the configurable items?
➢ Name – name of the setting item
➢ Follow link of the backup files – check the box to enable this
feature
Volume Shadow Copy
What is this setting about?
Enabling the Volume Shadow Copy option will allow backup of local
files that are exclusively opened during the backup process (e.g.
Outlook PST file).
Some requirements of the Volume Shadow Copy option include:
- Volume Shadow Copy can only be applied for local drive;
exclusively opened file on network shared drive cannot be
backed up even with the Volume Shadow Copy option enabled.
- Volume Shadow Copy is only available on Windows platforms
(e.g. Vista / 2008 / 2008 R2 / 7 / 2012 / 2012 R2 / 8 /10).
- The user using the backup application must have administrative
privileges to access the Volume Shadow Copy service on a
computer.
- At least one of the partitions on the machine must be in NTFS
format.
For more technical information on Volume Shadow Copy, please
refer to the following page from Microsoft for details:
http://technet.microsoft.com/en-us/library/cc785914(WS.10).aspx
Administrator can define whether to turn on the Volume Shadow

www.ahsay.com 297
Copy feature by default .This feature is only applicable to File Backup
module.
What are the configurable items?
➢ Name – name of the setting item
➢ Enable Windows’ Volume Shadow Copy for open file backup
– check or uncheck to enable or disable this feature
File Permissions
What is this setting about?
By enabling this option, file permissions of the operating system files
will be backed up. File permission defines, for example, the right to
view or change a file by the system owner/group/individual.
Administrator can define whether to turn on the backup of File
Permissions by default .This feature is only applicable to File Backup
module.
What are the configurable items?
➢ Name – name of the setting item
➢ Backup files’ permissions – check the box to enable this
feature
Archived Log Deletion
What is this setting about?
Administrator can define whether the archived log files will be deleted
after backup by default .This feature is only applicable to Oracle
Database Server Backup module.
What are the configurable items?
➢ Name – name of the setting item
➢ Delete the archived logs after backup – turn on or off this
feature
- Delete archived logs that are older than the following
days – set the number of day(s) that the archived logs will be
deleted when exceeding this number
Open Direct
What is this setting about?
Administrator can enable the OpenDirect setting for Windows File
backup sets on AhsayOBM and AhsayCB, to support restore of
selected files/folder within a compressed or images file without the
need to restore the compressed of image file first.
What are the configurable items?
➢ Name – name of the setting item
➢ OpenDirect – enable or disable this feature

www.ahsay.com 298
Granular Restore
What is this setting about?
Administrator can enable the Granular Restore setting for VMware
ESXi/vCenter and Hyper-V guest VM backup sets, to support restore
of selected files/folder within a virtual disk of a guest VM without the
need to restore the guest VM file first.
What are the configurable items?
➢ Name – name of the setting item
➢ Granular Restore – enable or disable this feature
Compressions
What is this setting about?
Compressing data before they are backed up brings faster backup
and restore time and save storage space on the backup destination.
Compression does not apply on Run direct backup sets for Hyper-V
and VMware even this feature is on.
Administrator can define the default compression type for backup set.
Multiple settings can be created in this menu if you wish to define
different default compression types for different backup modules.
What are the configurable items?
➢ Name – name of the setting item
➢ Applied Modules – modules to apply this setting to
➢ Select compression type – type of compression that will be
used during backup
No Compression – no compression of file will be made
Normal – compressed file size is the smallest among all
compression type but will result to high CPU usage
Fast (Compressed size larger than normal) – compressed file
size is larger than the Normal compression type and will result
to lower CPU usage
Fast with optimization for local – compressed file size is
larger than the Fast compression type and will result to lowest
CPU usage
Encryption
What is this setting about?
For better security reason, backup users can choose to encrypt their
backup data with an algorithm, mode and key of their choice.
Encryption does not apply on Run direct backup sets for Hyper-V and
VMware even this feature is on.
Administrator can define the default encryption setting for backup set.
Multiple settings can be created in this menu if you wish to define
different default encryption settings for different backup modules.

www.ahsay.com 299
What are the configurable items?
➢ Name – name of the setting item
➢ Applied Modules – modules to apply this setting to
➢ Encrypt Backup Data – enable or disable this feature
Default (Machine Generated Random) – the system will
randomly generate an encryption key
User Password – the encryption key will be the same as the
login password of your AhsayOBM
Custom – define your own algorithm, encryption key, method
and key length.
Preempted Values
This section allows administrator to define the predefined values for backup users’ backup
sets. The preempted values set under this setting menu will be applied to the backup sets
directly. Backup users can add additional values on top of the preempted values when
creating a backup set but CANNOT remove the preempted values preset by the system
administrator.
All setting items under the Preempted Values tab are disabled by default. Click the
switch on the right of each setting item and then follow the steps below for configuration.
Mode
In all the setting items in the Preempted Values section, there is a Mode setting item that
contains 3 options on how this preempted values are applied to user defined settings.
- Prepend – the preempted values will be applied as the first user defined settings
- Append – the preempted values will be applied as the last user defined settings
- Override – override all user defined settings

www.ahsay.com 300
NOTE
In some preempted value settings, "Override" mode is set as default and cannot be modified,
e.g. Reminder, as administrator should take full control of the policy settings. However, prepend
and append mode are available for some non-administrator related features, such as backup
schedule, where users defined settings can also be considered.
➢ Source
This section defines the preempted backup source values. The following table
explains each setting item under the Source tab, with a brief description of what the
setting is about and all the configurable items.
Filter
What is this setting about?
Defines the default filter mode, filters which used to include/exclude
files in the backup source from performing backup. This filter applies
only to File Backup on Windows platform. Creating multiple filter
settings is possible.
What are the configurable items?
➢ Name – name of the filter setting
➢ Apply filters to the backup source – turn this on to configure
the filters
➢ Matching pattern - defines the pattern of the file selection,
e.g., *.doc, *.png.
➢ For each of the matched files/folders under top directory –
define to include or exclude all the files/folder matching the
filtering criteria under the top directory
➢ Exclusion / Inclusion – to include (if you have chosen to
exclude the matched files) or exclude (if you have chosen to
include the matched files) those unmatched files/folder in the
backup
➢ Match file/folder names by – you can set the following filtering
rules:
[Simple comparison starts with]
Include/Exclude all files/directories with name starting with a
certain pattern.
Example:
You can use B* to match all file with name starting with a B
character.
[Simple comparison ends with]
Include / Exclude all files / directories with name ending with a
certain pattern.
Example:
You can use *.doc to match all files with name ending with .doc

www.ahsay.com 301
(all Word Documents)
[Simple comparison contain]
Include/Exclude all files/directories with name containing a
certain pattern.
Example:
You can use *B* to match all files with name containing with a
B character.
[Regular Expression (UNIX-style)]
Include/Exclude all files/directories with name matching a
regular expression.
Notes:
➢ The pattern of a backup filter is case sensitive.
➢ If multiple patterns are required, please add the pattern one
by one e.g.: *.doc and then *.xls
➢ How to Apply This Filter – you can choose to apply this filter on
“All hard disk drivers” or a selected folder of your choice.
➢ Apply to - apply the filter to the File and/or Folder level
Use Cases Example 1
If you want to backup only Word, Excel and PowerPoint documents in
your
document directory (e.g. C:\My Documents), you should setup your
backup
filter as follows.
Matching pattern = *.doc, *.xls, *.ppt
For each of the matched files/folders under top directory =
Include them
Exclusion = Check
Match file/folder names by = Simple comparison end with
How to Apply This Filter = This folder only C:\My Documents
Apply to = File
Example 2
If you want to backup all files, excluding all *.exe, *.dll and *.tmp, in
C:\Application, you should setup your backup filter as follows.
Matching pattern = *.exe, *.dll, *.tmp
For each of the matched files/folders under top directory =
Exclude them
Inclusion = Check
Match file/folder names by = Simple comparison end with
How to Apply This Filter = This folder only C:\Applicaitons
Apply to = File
Example 3
If you have already chosen files (all under C:\) from the backup
source setting but you want to exclude all images (e.g. *.jpg and *.gif)
from

www.ahsay.com 302
your selection, you should setup your backup filter as follows.
Matching pattern = *.jpg, *.gif
For each of the matched files/folders under top directory =
Exclude them
Inclusion = uncheck
Match file/folder names by = Simple comparison end with
How to Apply This Filter = This folder only C:\
Apply to = File
Please note that the Inclusion setting should not be checked because
you have already chosen the desired files to back up and do not want
to include all other files (NOT *.jpg, *.gif) under C:\ into the backup set.
Example 4
If you want to include everything, except the “log" directory, under
C:\Applications into a backup set, you should setup your backup filter
as
follows.
Matching pattern = ^log$
For each of the matched files/folders under top directory =
Exclude them
Inclusion = check
Match file/folder names by = Regular Expression (UNIX-style)
How to Apply This Filter = C:\Applications
Apply to = Folder
Example 5
If you want to include all directories named “log" from the backup set
files
with file name starting with “B" and ending with “*.doc" under C:\My
Documents into the backup set, you can use a regular expression of
“^B.*\.doc$" to do your selection. The filter backup can then be setup
as
follows.
Matching pattern = ^B.*\.doc$
For each of the matched files/folders under top directory =
Include them
Exclusion = check
Match file/folder names by = Regular Expression (UNIX-style)
How to Apply This Filter = C:\My Documents
Apply to = File
Advanced
What is this setting about?
Defines the default advanced settings for backup source, including
backup mode, other selected source and deselected source.
What are the configurable
➢ Name – name of the setting item
➢ Applied Module – module you wish to apply this default setting
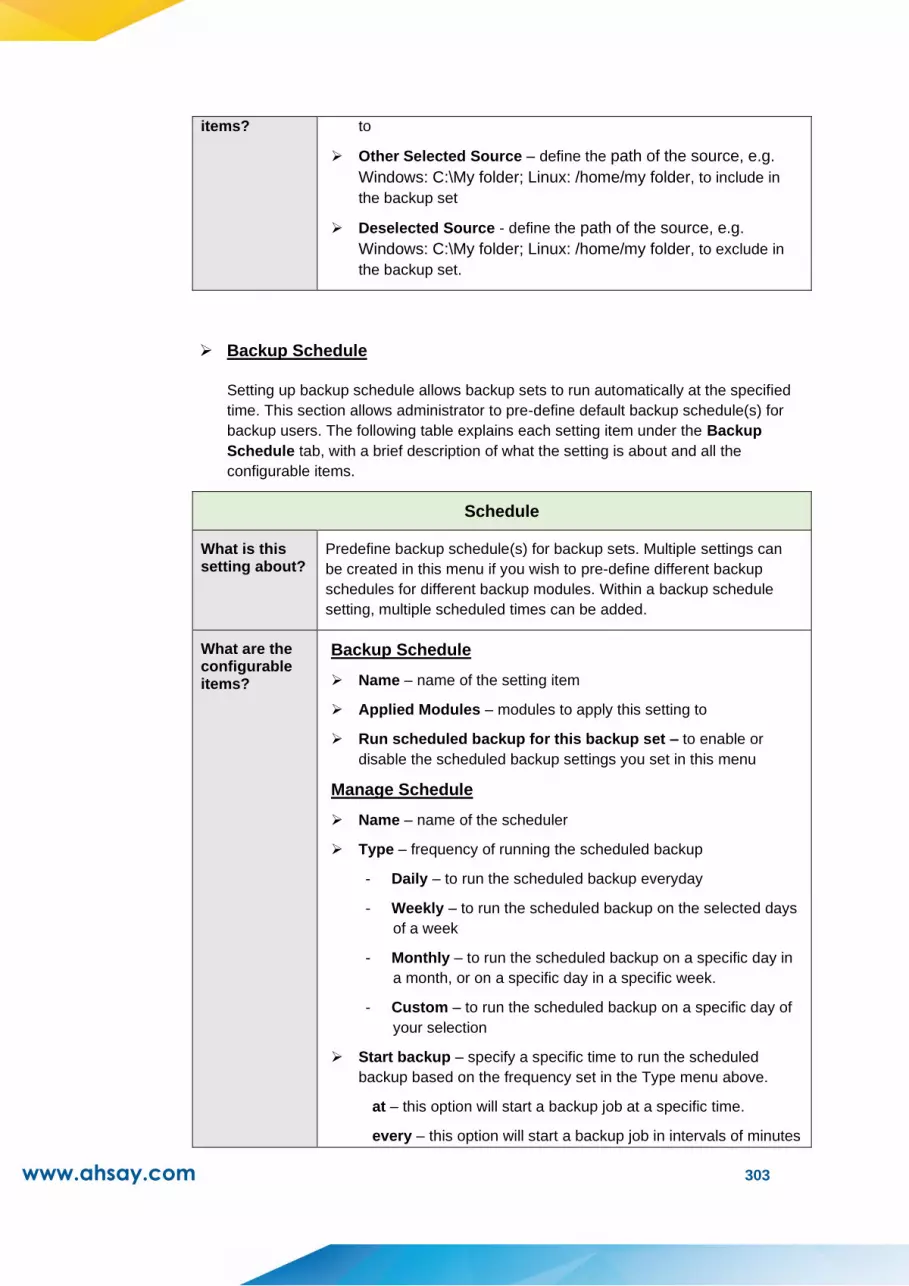
www.ahsay.com 303
items? to
➢ Other Selected Source – define the path of the source, e.g.
Windows: C:\My folder; Linux: /home/my folder, to include in
the backup set
➢ Deselected Source - define the path of the source, e.g.
Windows: C:\My folder; Linux: /home/my folder, to exclude in
the backup set.
➢ Backup Schedule
Setting up backup schedule allows backup sets to run automatically at the specified
time. This section allows administrator to pre-define default backup schedule(s) for
backup users. The following table explains each setting item under the Backup
Schedule tab, with a brief description of what the setting is about and all the
configurable items.
Schedule
What is this setting about?
Predefine backup schedule(s) for backup sets. Multiple settings can
be created in this menu if you wish to pre-define different backup
schedules for different backup modules. Within a backup schedule
setting, multiple scheduled times can be added.
What are the configurable items?
Backup Schedule
➢ Name – name of the setting item
➢ Applied Modules – modules to apply this setting to
➢ Run scheduled backup for this backup set – to enable or
disable the scheduled backup settings you set in this menu
Manage Schedule
➢ Name – name of the scheduler
➢ Type – frequency of running the scheduled backup
- Daily – to run the scheduled backup everyday
- Weekly – to run the scheduled backup on the selected days
of a week
- Monthly – to run the scheduled backup on a specific day in
a month, or on a specific day in a specific week.
- Custom – to run the scheduled backup on a specific day of
your selection
➢ Start backup – specify a specific time to run the scheduled
backup based on the frequency set in the Type menu above.
at – this option will start a backup job at a specific time.
every – this option will start a backup job in intervals of minutes

www.ahsay.com 304
or hours.
➢ Stop – set the scheduled backup to stop either
until full backup completed – this option will stop the backup
job when it is completed regardless of how much time it takes
after – this option will stop the backup job at the set time (1-24
hrs) regardless if the backup is done or not.
This only applies to schedules with start backup “at” and is not
supported for periodic backup schedule (start backup “every”).
➢ Run Retention Policy after backup – enable this feature if you
wish the modified or deleted data after backup remains in the
backup server for the set number of retention day
➢ Continuous Backup
When the Continuous Backup feature is enabled, a backup job will be triggered
whenever a change is made in the backup source. This section allows administrator to
define the default continuous backup settings. The following table explains each
setting item under the Continuous Backup tab, with a brief description of the
available settings and all the configurable items. Continuous Backup is only
available on Windows platform.
IMPORTANT
When setting up the Continuous Backup feature for a backup set, you must run a manual or
scheduled backup job first so that the initial files are uploaded your designated backup destination.
Continuous Backup
What is this setting about?
Predefine the settings and filters to trigger continuous backup,
including to exclude system files, frequency of running backup when
changes are detected, configure the maximum file size allowed for
backup and configure filters to exclude files from backup.
What are the configurable items?
Continuous Backup
➢ Name – name of the setting item
➢ Applied Modules – modules to apply this setting to
➢ Backup whenever a change is made – enable or disable the
continuous backup feature
➢ Exclude system files – enable this feature if you do not want
to back up system files. Refer to Appendix I for a full list of
system files excluded from the backup set.
➢ How often should the backup run – set the frequency of

www.ahsay.com 305
running backup when changes are detected.
➢ Only apply to files smaller than – file size that is larger than
the set value will not be backed up
Exclude Filter
➢ Name - name of the filter setting item
➢ Match file/folder names by – you can set the following
filtering rules:
[Simple comparison starts with]
Include/Exclude all files/directories with name starting with
a certain pattern.
Example:
You can use B* to match all file with name starting with a B
character.
[Simple comparison ends with]
Include / Exclude all files / directories with name ending
with a certain pattern.
Example:
You can use *.doc to match all files with name ending with
.doc (all Word Documents)
[Simple comparison contain]
Include/Exclude all files/directories with name containing a
certain pattern.
Example:
You can use *B* to match all files with name containing
with a B character.
[Regular Expression (UNIX-style)]
Include/Exclude all files/directories with name matching a
regular expression.
Notes:
- The pattern of a backup filter is case sensitive.
- If multiple patterns are required, please add the pattern one
by one e.g.: *.doc and then *.xls
➢ Matching pattern - defines the pattern of the file selection,
e.g., *.doc, *.png.
➢ Apply This Filter to all files/folders in – you can choose to
apply this filter on “All selected sources” or a selected folder
of your choice
➢ Apply to - apply the filter to the File and/or Folder level
Use Cases Example 1
If you want to back up all files, except all Word, Excel and PowerPoint
documents, in your document directory (e.g. C:\My Documents), you
should setup your backup filter as follows.
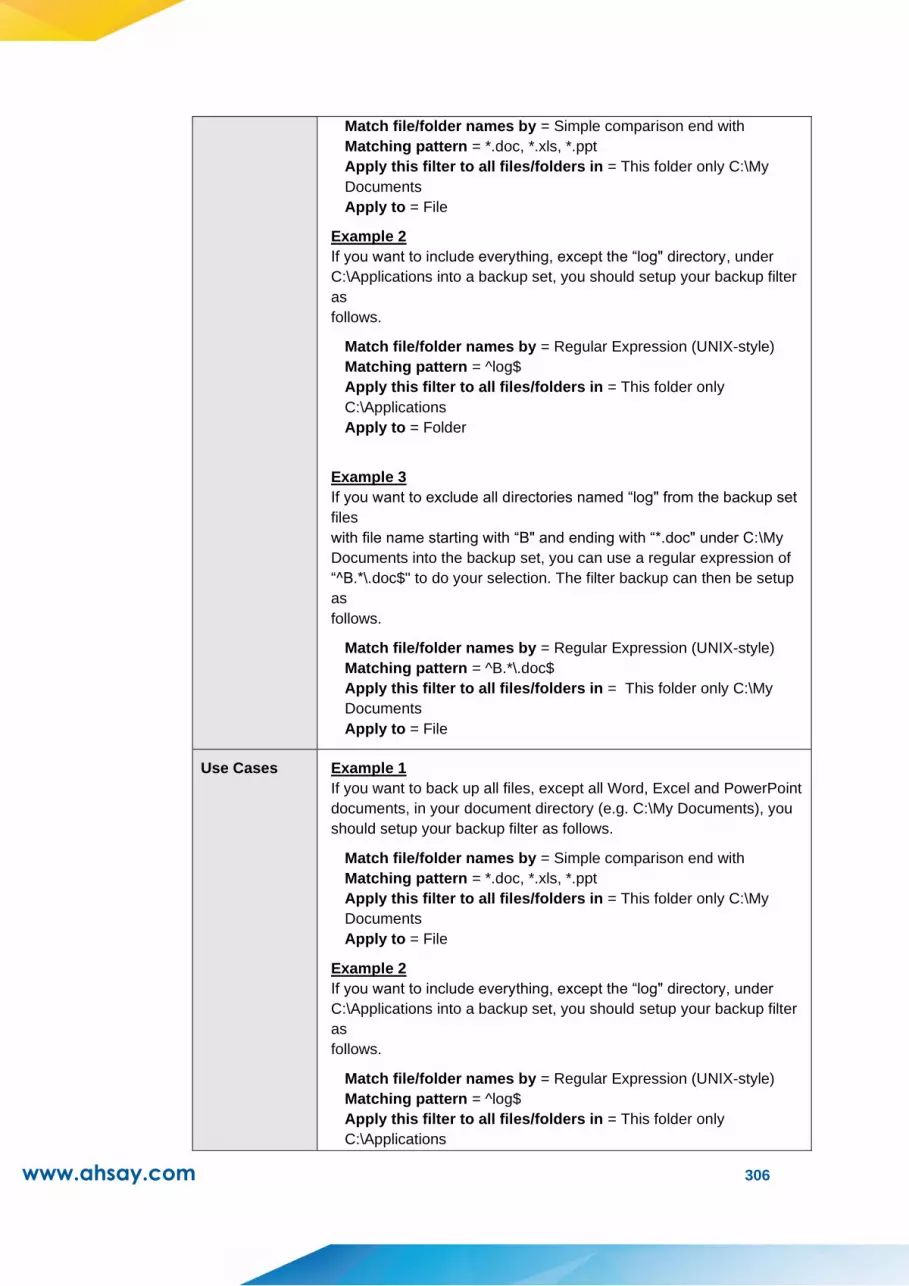
www.ahsay.com 306
Match file/folder names by = Simple comparison end with
Matching pattern = *.doc, *.xls, *.ppt
Apply this filter to all files/folders in = This folder only C:\My
Documents
Apply to = File
Example 2
If you want to include everything, except the “log" directory, under
C:\Applications into a backup set, you should setup your backup filter
as
follows.
Match file/folder names by = Regular Expression (UNIX-style)
Matching pattern = ^log$
Apply this filter to all files/folders in = This folder only
C:\Applications
Apply to = Folder
Example 3
If you want to exclude all directories named “log" from the backup set
files
with file name starting with “B" and ending with “*.doc" under C:\My
Documents into the backup set, you can use a regular expression of
“^B.*\.doc$" to do your selection. The filter backup can then be setup
as
follows.
Match file/folder names by = Regular Expression (UNIX-style)
Matching pattern = ^B.*\.doc$
Apply this filter to all files/folders in = This folder only C:\My
Documents
Apply to = File
Use Cases Example 1
If you want to back up all files, except all Word, Excel and PowerPoint
documents, in your document directory (e.g. C:\My Documents), you
should setup your backup filter as follows.
Match file/folder names by = Simple comparison end with
Matching pattern = *.doc, *.xls, *.ppt
Apply this filter to all files/folders in = This folder only C:\My
Documents
Apply to = File
Example 2
If you want to include everything, except the “log" directory, under
C:\Applications into a backup set, you should setup your backup filter
as
follows.
Match file/folder names by = Regular Expression (UNIX-style)
Matching pattern = ^log$
Apply this filter to all files/folders in = This folder only
C:\Applications

www.ahsay.com 307
Apply to = Folder
Example 3
If you want to exclude all directories named “log" from the backup set
files
with file name starting with “B" and ending with “*.doc" under C:\My
Documents into the backup set, you can use a regular expression of
“^B.*\.doc$" to do your selection. The filter backup can then be setup
as
follows.
Match file/folder names by = Regular Expression (UNIX-style)
Matching pattern = ^B.*\.doc$
Apply this filter to all files/folders in = This folder only C:\My
Documents
Apply to = File
➢ Destination
This section allows administrator to predefine backup destination for backup sets. The
following table explains each setting item under the Destination tab, with a brief
description of what the setting is about and all the configurable items.
Destination
What is this setting about?
Pre-define backup destination when backup users create a backup
set. Multiple settings can be created in this menu if you wish to define
different default destinations for different backup modules.
What are the configurable items?
Destination
➢ Name – name of the setting item
➢ Applied Modules – modules to apply this setting to
➢ Backup Mode – select the files transfer method during backup
- Sequential – backup files are sent to the backup destination
one by one, one after another
- Concurrent – multiple files are sent to the backup destination
at the same time
➢ Maximum concurrent backup destinations (only if you have
selected Concurrent as the Backup Mode) – select the
maximum number of files allowed for uploading to the backup
destination
➢ Predefined Destination – select the predefined destination you
have configured in the Predefined Destinations Tab section.
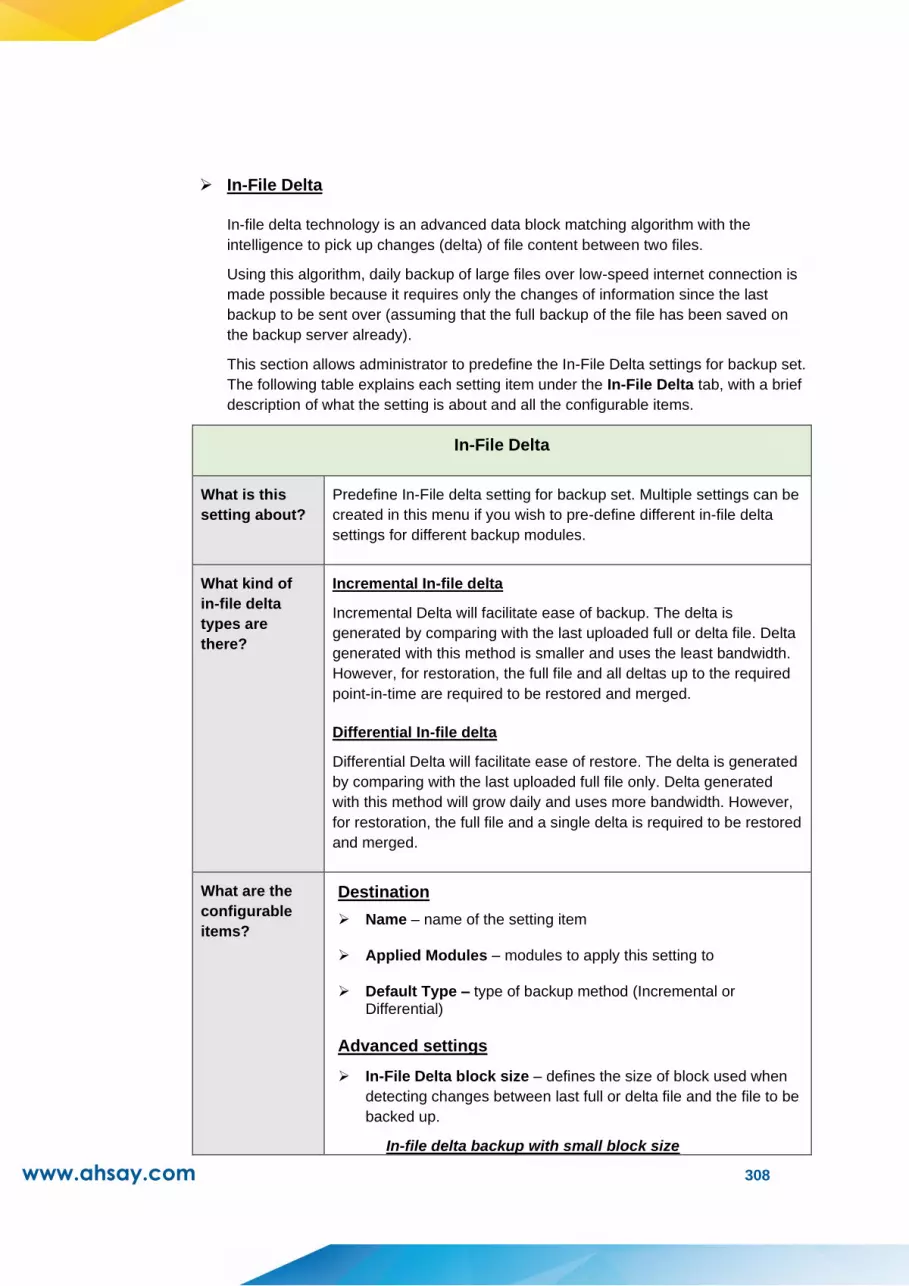
www.ahsay.com 308
➢ In-File Delta
In-file delta technology is an advanced data block matching algorithm with the
intelligence to pick up changes (delta) of file content between two files.
Using this algorithm, daily backup of large files over low-speed internet connection is
made possible because it requires only the changes of information since the last
backup to be sent over (assuming that the full backup of the file has been saved on
the backup server already).
This section allows administrator to predefine the In-File Delta settings for backup set.
The following table explains each setting item under the In-File Delta tab, with a brief
description of what the setting is about and all the configurable items.
In-File Delta
What is this
setting about?
Predefine In-File delta setting for backup set. Multiple settings can be
created in this menu if you wish to pre-define different in-file delta
settings for different backup modules.
What kind of
in-file delta
types are
there?
Incremental In-file delta
Incremental Delta will facilitate ease of backup. The delta is
generated by comparing with the last uploaded full or delta file. Delta
generated with this method is smaller and uses the least bandwidth.
However, for restoration, the full file and all deltas up to the required
point-in-time are required to be restored and merged.
Differential In-file delta
Differential Delta will facilitate ease of restore. The delta is generated
by comparing with the last uploaded full file only. Delta generated
with this method will grow daily and uses more bandwidth. However,
for restoration, the full file and a single delta is required to be restored
and merged.
What are the
configurable
items?
Destination
➢ Name – name of the setting item
➢ Applied Modules – modules to apply this setting to
➢ Default Type – type of backup method (Incremental or Differential)
Advanced settings
➢ In-File Delta block size – defines the size of block used when
detecting changes between last full or delta file and the file to be
backed up.
In-file delta backup with small block size

www.ahsay.com 309
- Produce a smaller delta file due to a more precise comparison
- Require more processing power on the client machine
- Comparison may take longer to complete
- Require more Java memory
In-file delta backup with large block size:
- Produce a larger delta file due to a less precise comparison
- Require less processing power on the client machine
- Comparison will complete faster
- Require less Java memory
For most cases, the default setting Auto will select the
optimal block size for each file (depending on the size of the
file). The Auto setting will set the block size according the
following criteria:
File size Block size
Smaller than 2GB 4KB
2GB – 8GB 8KB
Larger than 8GB 16KB
➢ Only apply In-File Delta to files larger than – defines the
minimum file size a file to apply the in-file delta setting. If the
size of a file to be backed up is smaller than the set value, the
in-file delta setting will not apply and the whole file will be
uploaded to the backup server.
It is not necessary to perform In-file delta backup on small files
because backing up the whole file does not take long. Backing
up the whole file instead reduces the time required to restore the
file.
➢ Upload full file when either of these conditions is met – a
backup of the full file will be perform if the following condition is
met:
- Number of deltas is over – when the number of delta file
exceeds the set value
- Delta ratio (delta file size / full file size) is over – this
setting is to ensure that a full file backup is performed for
file with significant changes, as it is preferable to upload a
full file instead to reduce the time required to restore the
file
➢ Weekly variations for overriding default type – override the
default in-file delta setting in the Default Type field on selected
day(s) of a week
➢ Yearly variations for overriding default type and weekly
variations – override the default in-file delta setting in the
Default Type field as well as the setting in the “Weekly

www.ahsay.com 310
variations for overriding default type” section on a selected
day in a week based on either of the following selection
- Day of selected months in yearly variations - select a
specific day in a month. On this specified day in the month
defined above will the in-file delta variation setting override
the default value.
➢ Retention Policy
Retention policy defines the policies of persistent data management for meeting
business data archival requirements. When a backup job is performed, for data that
are modified or deleted on the client computer, their existing versions on the backup
server (backup records) will be moved into retention area, while newly backed up files
will be placed in the current data area.
Specifically, retention policy setting defines how long are the backup records kept in
the retention area before they are deleted permanently from the backup server.
This section allows administrator to pre-define the Retention Policy for backup set.
The following table explains each setting item under the Retention Policy tab, with a
brief description of what the setting is about and all the configurable items.
Retention Policy
What is this setting about?
Pre-define the retention policy for backup sets when they are created.
Multiple settings can be created in this menu if you wish to define
different default retention policy for different backup modules.
What are the configurable items?
Destination
➢ Name – name of the setting item
➢ Applied Modules – modules to apply this setting to
➢ How to retain the files in the backup set, which have been
deleted in the backup source – choose between Simple and
Advanced setting, which is explained in detail below.
- Simple – enter a specific number of day or backup job
number. The retained data will be removed from the storage
destination permanently after the set number of day or set
number of job is met.
- Advanced – manage advanced retention policies by applying
advanced configurations
Daily
The past number of days on which different
versions of your files are retained
Set the number of day(s) on which the old
version of data will be stored
Weekly The days within a week on which different
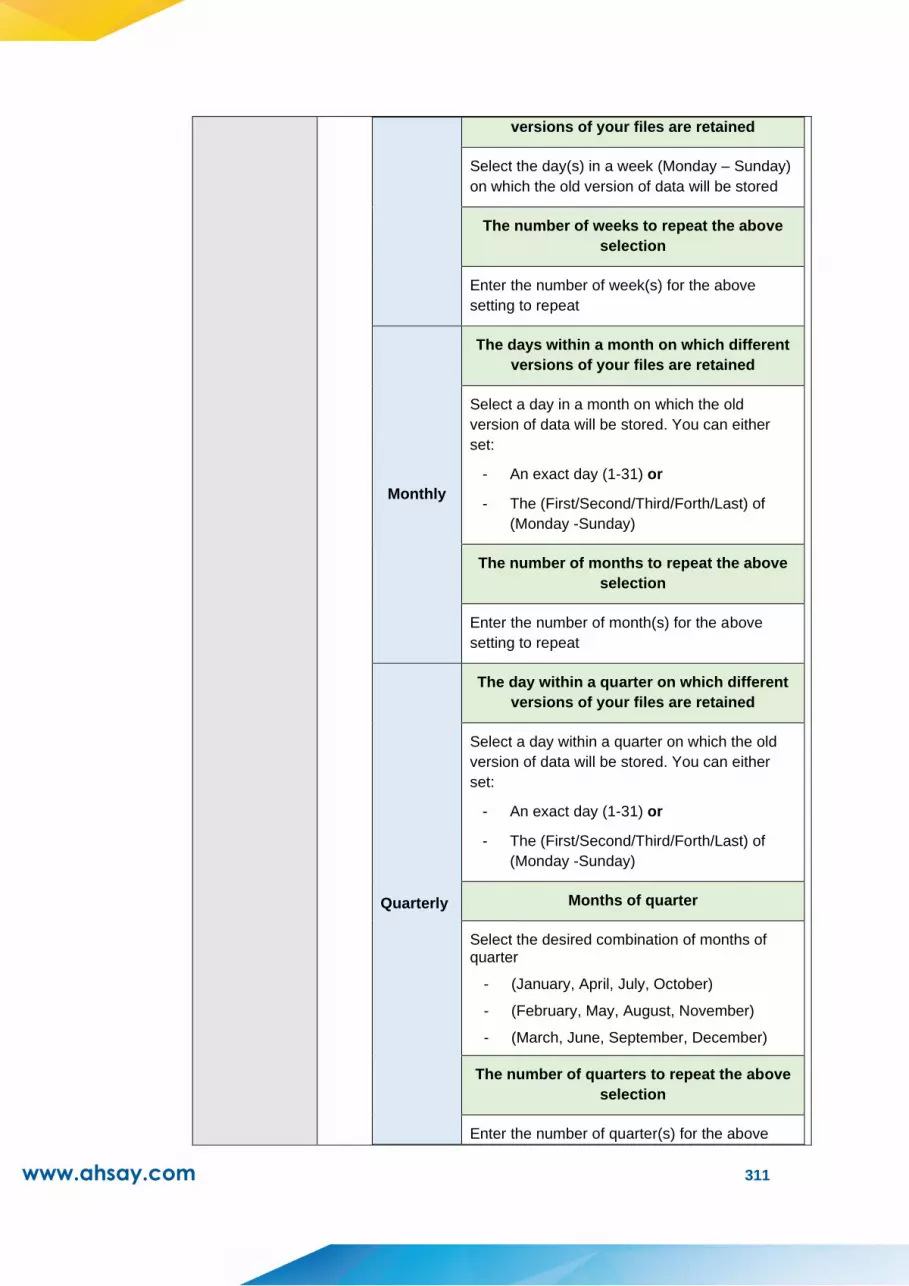
www.ahsay.com 311
versions of your files are retained
Select the day(s) in a week (Monday – Sunday)
on which the old version of data will be stored
The number of weeks to repeat the above
selection
Enter the number of week(s) for the above
setting to repeat
Monthly
The days within a month on which different
versions of your files are retained
Select a day in a month on which the old
version of data will be stored. You can either
set:
- An exact day (1-31) or
- The (First/Second/Third/Forth/Last) of
(Monday -Sunday)
The number of months to repeat the above
selection
Enter the number of month(s) for the above
setting to repeat
Quarterly
The day within a quarter on which different
versions of your files are retained
Select a day within a quarter on which the old
version of data will be stored. You can either
set:
- An exact day (1-31) or
- The (First/Second/Third/Forth/Last) of
(Monday -Sunday)
Months of quarter
Select the desired combination of months of quarter
- (January, April, July, October)
- (February, May, August, November)
- (March, June, September, December)
The number of quarters to repeat the above
selection
Enter the number of quarter(s) for the above

www.ahsay.com 312
setting to repeat
Yearly
The day within a year on which different
versions of your files are retained
Select a day within a year on which the old version of data will be stored. You can set the day by using one of the following methods:
- Select an exact day (1 – 31) in an exact
month (January – December)
- Select the
(First/Second/Third/Forth/Last) of
(Monday/Tuesday/Wednesday/Thursday/
Friday/Saturday/Sunday/Weekday/Week
end) in an exact month (January –
December)
- Select a day in a week (Monday –
Sunday) in an exact week of a year
(Week 1 - 53)
The number of years to repeat the above
selection
Enter the number of year(s) for the above
setting to repeat
Custom
A specific day on which different versions of
your files are retained
Select a day on which the old version of data
will be stored. You can set the day by using one
of the following methods:
- Select an exact day (1 – 31) in an exact
month (January – December)
- Select the
(First/Second/Third/Forth/Last) of
(Monday/Tuesday/Wednesday/Thursday/
Friday/Saturday/Sunday/Weekday/Week
end) in an exact month (January –
December)
- Select a day in a week (Monday –
Sunday) in an exact week of a year
(Week 1 - 53)
Year
Enter a specific year for the day set above to
execute the retention policy
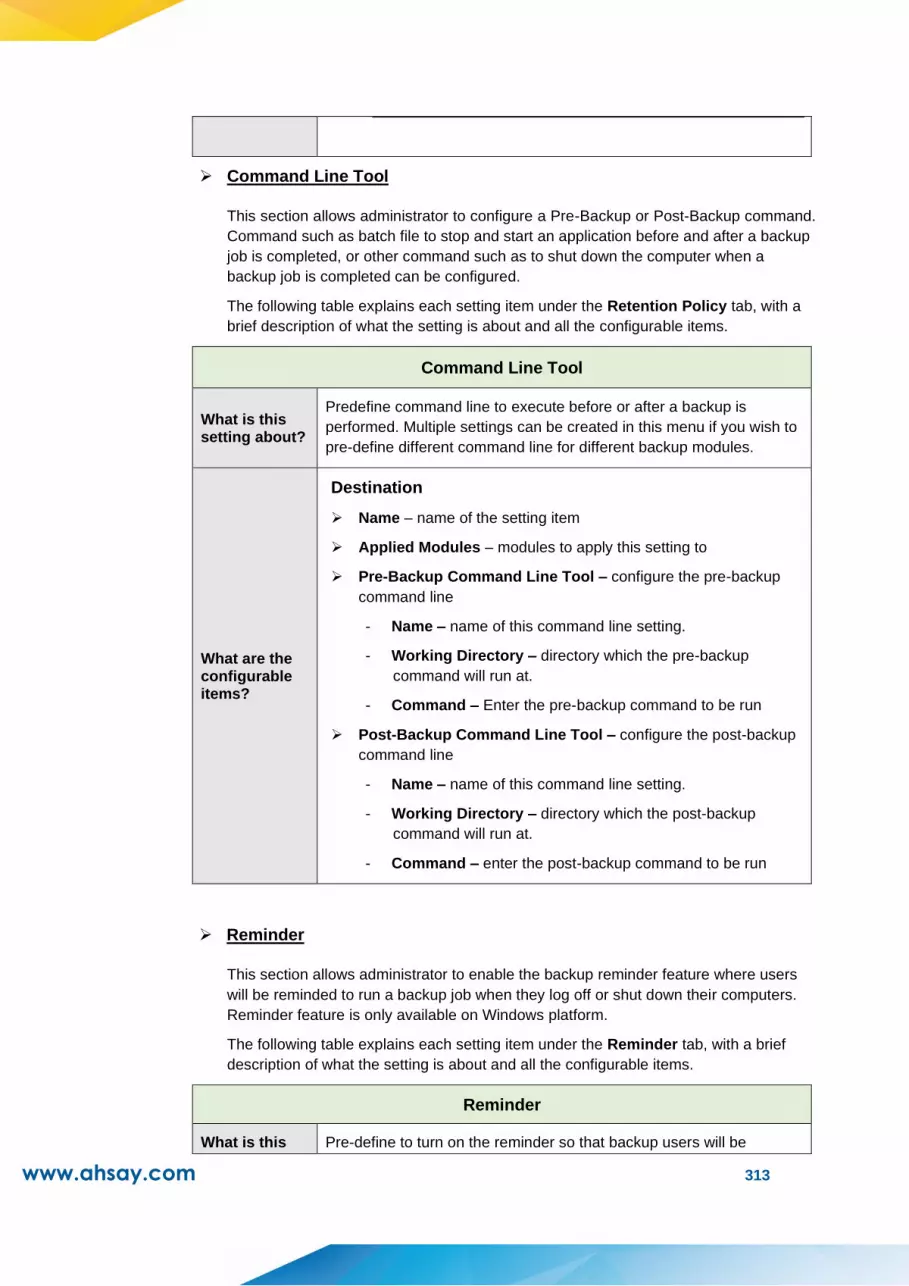
www.ahsay.com 313
➢ Command Line Tool
This section allows administrator to configure a Pre-Backup or Post-Backup command.
Command such as batch file to stop and start an application before and after a backup
job is completed, or other command such as to shut down the computer when a
backup job is completed can be configured.
The following table explains each setting item under the Retention Policy tab, with a
brief description of what the setting is about and all the configurable items.
Command Line Tool
What is this setting about?
Predefine command line to execute before or after a backup is
performed. Multiple settings can be created in this menu if you wish to
pre-define different command line for different backup modules.
What are the configurable items?
Destination
➢ Name – name of the setting item
➢ Applied Modules – modules to apply this setting to
➢ Pre-Backup Command Line Tool – configure the pre-backup
command line
- Name – name of this command line setting.
- Working Directory – directory which the pre-backup
command will run at.
- Command – Enter the pre-backup command to be run
➢ Post-Backup Command Line Tool – configure the post-backup
command line
- Name – name of this command line setting.
- Working Directory – directory which the post-backup
command will run at.
- Command – enter the post-backup command to be run
➢ Reminder
This section allows administrator to enable the backup reminder feature where users
will be reminded to run a backup job when they log off or shut down their computers.
Reminder feature is only available on Windows platform.
The following table explains each setting item under the Reminder tab, with a brief
description of what the setting is about and all the configurable items.
Reminder
What is this Pre-define to turn on the reminder so that backup users will be

www.ahsay.com 314
setting about? reminded to perform backup when they log off or shut down their
computers. Multiple settings can be created in this menu if you wish to
define different settings for different backup modules.
What are the configurable items?
Destination
➢ Name – name of the setting item
➢ Applied Modules – modules to apply this setting to
➢ Remind me to backup during Windows log off or shut down
– turn on or off this feature
- Computer name – you can specify the computer’s name for
this reminder to enable on
➢ Bandwidth Control
This section allows administrator to pre-define the limit for data transfer when
performing backup and restore jobs.
NOTE
➢ The actual value will be around +/- 5% of the limit value when the bandwidth control set to
below 32Mb/s. When the bandwidth control set to above 64Mb/s, the gap between actual
value and limit value might be over 5%.
➢ Network stability might influence the transfer rate fluctuation accuracy.
The following table explains each setting item under the Bandwidth Control tab, with
a brief description of what the setting is about and all the configurable items.
Bandwidth Control
What is this setting about?
Pre-define the settings on limiting the data transfer rate when
performing backup and restore jobs. Multiple settings can be created
in this menu if you wish to pre-define different settings for different
backup modules.
What are the configurable items?
Destination
➢ Name – name of the setting item
➢ Applied Modules – modules to apply this setting to
➢ Limit the transfer rate when performing backup and restore
tasks – click to turn on or off this feature
- Mode
Independent Each backup and restore job has its
assigned bandwidth

www.ahsay.com 315
Share
All backup and restore jobs are sharing
the same assigned bandwidth
Note: Share mode does not support
performing backup job on multiple
destinations concurrently.
- Existing bandwidth controls – configure the bandwidth
control details
Name Name of the bandwidth control setting
item
Type
Always – apply the bandwidth control
settings at all times
Only within this period – configure a
specific start time and end time in a day
of a week for this bandwidth control
setting to take place
Maximum
transfer rate
Enter the maximum transfer rate allowed,
in the unit of Kbit/s, Mbit/s or Gbit/s.
➢ IP Allowed for Restore
This section allows administrator to predefine IP ranges that are allowed to perform
restore. The following table explains each setting item under the IP Allowed for
Restore tab, with a brief description of what the setting is about and all the
configurable items.
IP Allowed for Restore
What is this setting about?
Pre-define the IP allowed for restore. Multiple settings can be created
in this menu if you wish to pre-define different settings for different
backup modules.
What are the configurable items?
Destination
➢ Name – name of the setting item
➢ Applied Modules – modules to apply this setting to
➢ IP Allowed for Restore– configure the IP ranges allowed for
restore
- From – restore allowed from this IP value
- To - restore allowed up to this IP value

www.ahsay.com 316
➢ Others
This section allows administrator to pre-define other configurations for backup sets.
The following table explains each setting item under the Others tab, with a brief
description of what the setting is about and all the configurable items.
Follow Link
What is this setting about?
Administrator can pre-define whether to turn on the Follow Link
feature. When this feature is on, not only the symbolic link or junction
point will be restored, the directories and files that the symbolic link or
junction point links to will also be restored. This feature is only
applicable to File Backup module.
What are the configurable items?
➢ Name – name of the setting item
➢ Follow link of the backup files – check the box to enable this
feature
Volume Shadow Copy
What is this setting about?
Enabling the Volume Shadow Copy option will allow backup of local
files that are exclusively opened during the backup process (e.g.
Outlook PST file).
Some requirements of the Volume Shadow Copy option include:
- Volume Shadow Copy can only be applied for local drive;
exclusively opened file on network shared drive cannot be
backed up even with the Volume Shadow Copy option enabled.
- Volume Shadow Copy is available on Windows platforms (e.g.
Vista / 2008 / 2008 R2 / 2012 / 2012 R2 / 7 / 8 / 10).
- The user using the backup application must have administrative
privileges to access the Volume Shadow Copy service on a
computer.
- At least one of the partitions on the machine must be in NTFS
format.
For more technical information on Volume Shadow Copy, please
refer to the following page from Microsoft for details:
http://technet.microsoft.com/en-us/library/cc785914(WS.10).aspx
Administrator can pre-define whether to turn on the Volume Shadow
Copy feature by default .This feature is only applicable to File Backup
module.
What are the configurable
➢ Name – name of the setting item

www.ahsay.com 317
items? ➢ Enable Windows’ Volume Shadow Copy for open file backup
– check or uncheck to enable or disable this feature
File Permissions
What is this setting about?
By enabling this option, file permissions of the operating system files
will be backed up. File permission defines, for example, the right to
view or change a file by the system owner/group/individual.
Administrator can pre-define whether to turn on the backup of File
Permissions by default .This feature is only applicable to File Backup
module.
What are the configurable items?
➢ Name – name of the setting item
➢ Backup files’ permissions – check or uncheck to enable or
disable this feature
Archived Log Deletion
What is this setting about?
Administrator can pre-define whether the archived log files will be
deleted after backup by default .This feature is only applicable to
Oracle Database Server Backup module.
What are the configurable items?
➢ Name – name of the setting item
➢ Delete the archived logs after backup – turn on or off this
feature
- Delete archived logs that are older than the following
days – set the number of day(s) that the archived logs will
be deleted when exceeding this number
Compressions
What is this setting about?
Compressing data before they are backed up brings faster backup
and restore time and save storage space on the backup destination.
Compression does not apply on Run direct backup sets for Hyper-V
and VMware even this feature is on.
Administrator can pre-define the default compression type for backup
set. Multiple settings can be created in this menu if you wish to define
different default compression types for different backup modules.
What are the configurable items?
➢ Name – name of the setting item
➢ Applied Modules – modules to apply this setting to
➢ Select compression type – type of compression that will be
used during backup.
No Compression – no compression of file will be made

www.ahsay.com 318
Normal – compressed file size is the smallest among all
compression type but will result to high CPU usage
Fast (Compressed size larger than normal) – compressed file
size is larger than the Normal compression type and will result
to lower CPU usage
Fast with optimization for local – compressed file size is
larger than the Fast compression type and will result to lowest
CPU usage
Preempted Backup Sets
This section allows you predefine a backup set that will be run a default backup set for
backup user with this policy group setting. Backup user CANNOT remove this preempted
backup set from their backup job once it is preset by the system administrator.
Create a preempted backup set
Follow the steps below to create a preempted backup set
1. Click under the Preempted Backup Sets section.

www.ahsay.com 319
2. Enter the Name of the new backup set, the Platform on which the backup set will run
on, and select the backup set type from the Type dropdown box. |
The choices for Platform
Windows
Mac
Linux
The choices for backup set types
File Backup IBM Lotus Domino Backup
IBM Lotus Notes Backup MS Exchange Server Backup
MS Exchange Mail Level Backup MS SQL Server Backup
MS Hyper-V Backup MS Windows System Backup
MySQL Backup MariaDB Backup
Oracle Database Server Backup ShadowProtect System Backup
MS Windows System State Backup VMware Backup
In our example, the new backup set is called default-backup-set-name-2 which is a
File Backup type that will be run on Windows.
Click to continue.
3. Specify the backup source for the new backup set. The selection items of this page
varies depending on the backup set type you have chosen. Below is an example of
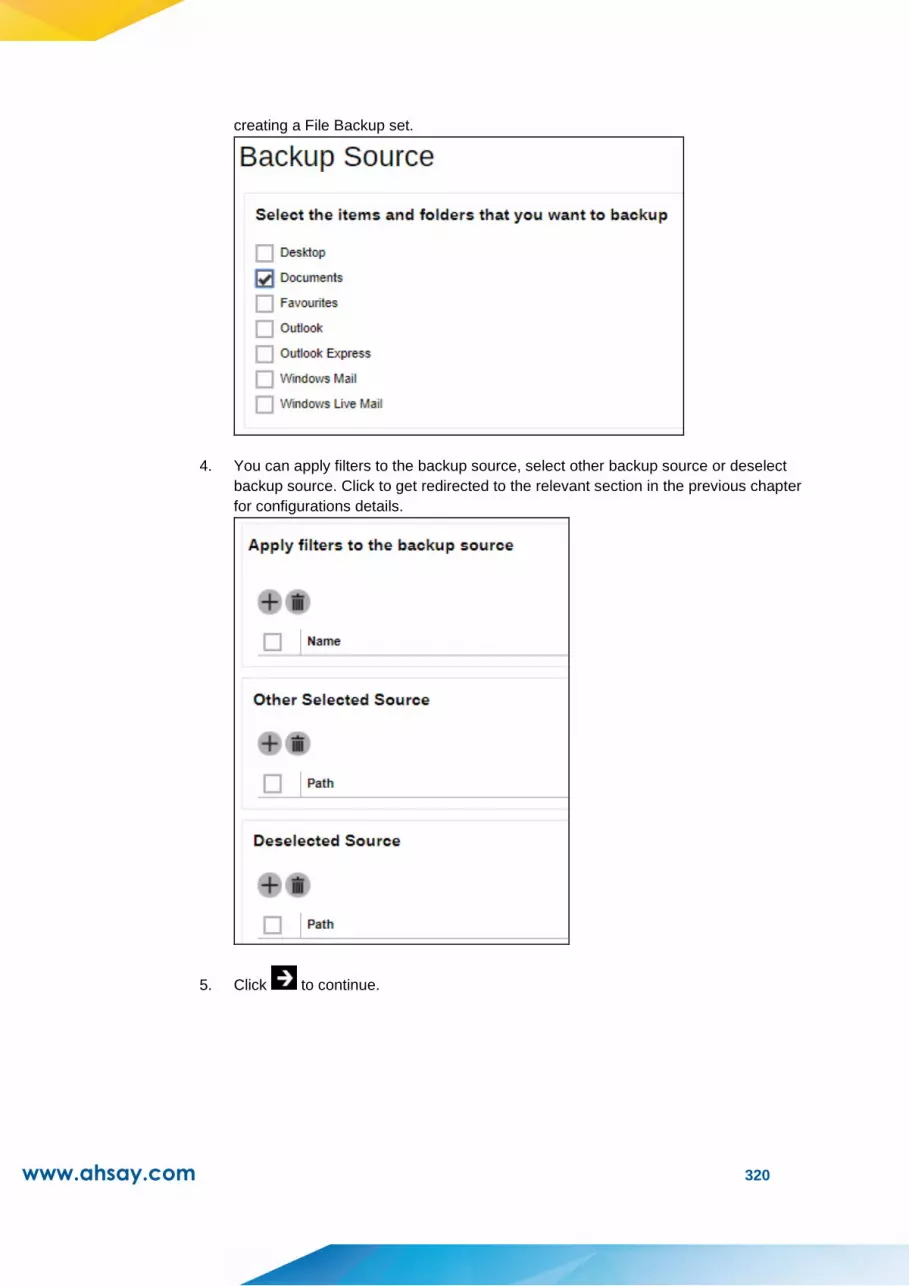
www.ahsay.com 320
creating a File Backup set.
4. You can apply filters to the backup source, select other backup source or deselect
backup source. Click to get redirected to the relevant section in the previous chapter
for configurations details.
5. Click to continue.

www.ahsay.com 321
6. If necessary, add a Backup Schedule for this backup set by sliding the Run
scheduled backup for this backup set option to the right and clicking .
Enter the information of the new backup schedule you want to add. Click to
continue.
Here is an example of a backup set that has a periodic and normal backup
schedule.
Figure 1.1 Figure 1.2
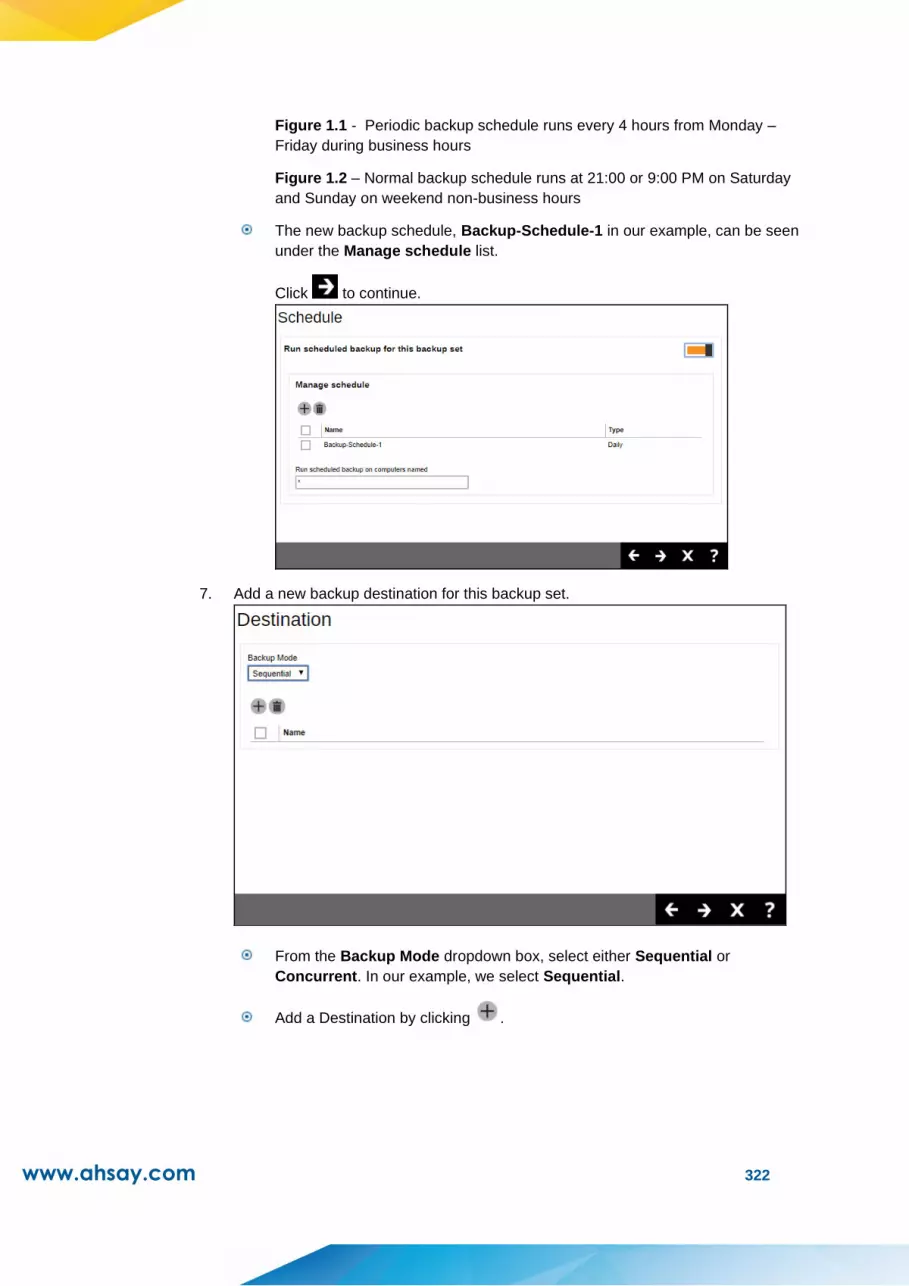
www.ahsay.com 322
Figure 1.1 - Periodic backup schedule runs every 4 hours from Monday –
Friday during business hours
Figure 1.2 – Normal backup schedule runs at 21:00 or 9:00 PM on Saturday
and Sunday on weekend non-business hours
The new backup schedule, Backup-Schedule-1 in our example, can be seen
under the Manage schedule list.
Click to continue.
7. Add a new backup destination for this backup set.
From the Backup Mode dropdown box, select either Sequential or
Concurrent. In our example, we select Sequential.
Add a Destination by clicking .

www.ahsay.com 323
Check the box next to the destination you want, then click to continue.
The new destination, AhsayCBS in our example, can be seen under the
Destination list.
If you would like to add predefined destination, you will have to configure it first
in System Settings > Basic > Predefined Destinations. Make sure to make it
visible to users in Backup / Restore > Users, Groups & Policies > Policy Group
tab > Backup Set Settings.
Click to continue.
8. Select to enable OpenDirect, by default it is already enabled.
9. Enter the Windows User Authentication information. This is needed for backup set
with backup schedule and network shared drive selected as backup source. Enter the
domain name and user name for AhsayOBM to access the network location.

www.ahsay.com 324
10. Click to save.
11. A new backup set called default-backup-set-name-2 is created and can be seen in
the Preempted Backup Sets list.
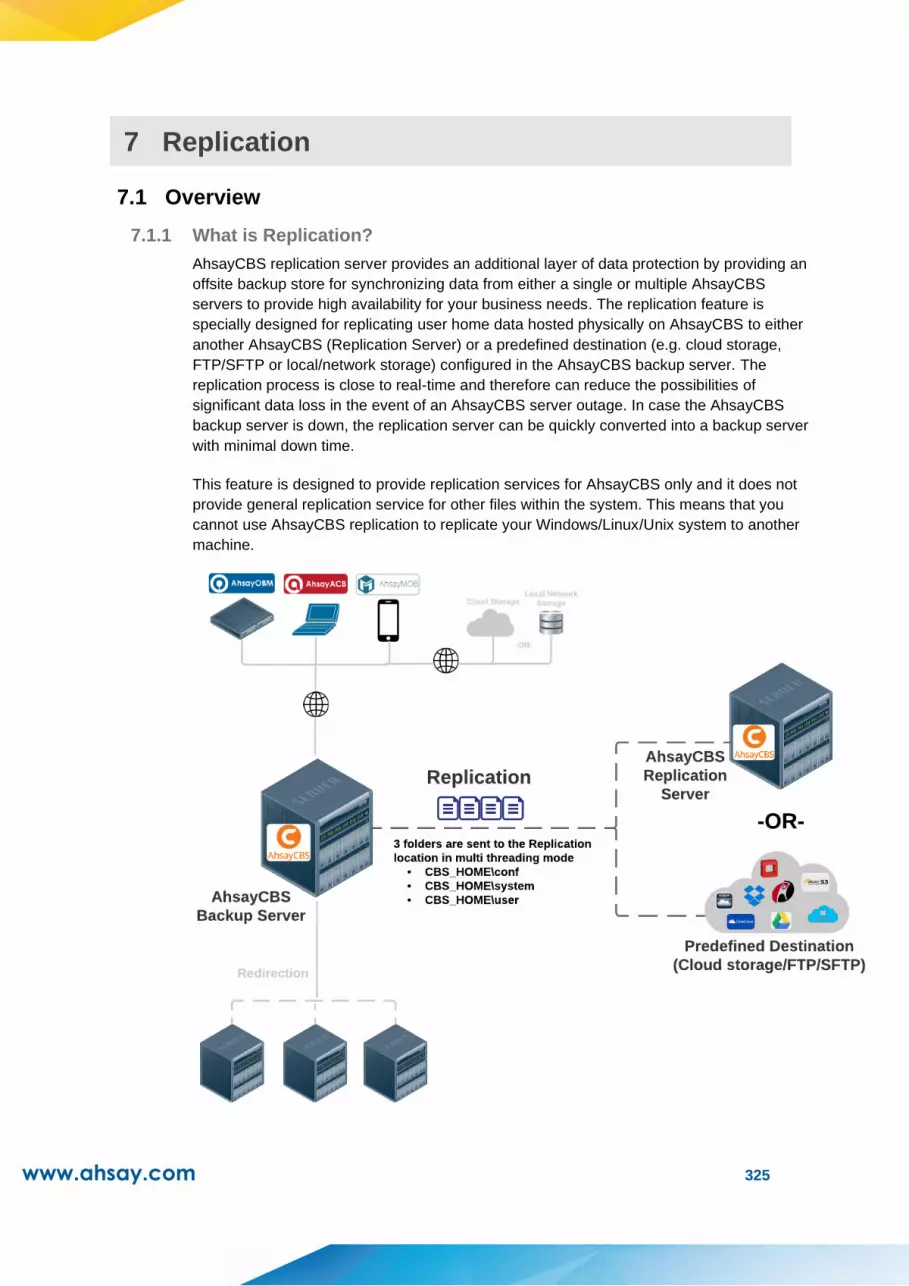
www.ahsay.com 325
7 Replication
7.1 Overview
7.1.1 What is Replication?
AhsayCBS replication server provides an additional layer of data protection by providing an
offsite backup store for synchronizing data from either a single or multiple AhsayCBS
servers to provide high availability for your business needs. The replication feature is
specially designed for replicating user home data hosted physically on AhsayCBS to either
another AhsayCBS (Replication Server) or a predefined destination (e.g. cloud storage,
FTP/SFTP or local/network storage) configured in the AhsayCBS backup server. The
replication process is close to real-time and therefore can reduce the possibilities of
significant data loss in the event of an AhsayCBS server outage. In case the AhsayCBS
backup server is down, the replication server can be quickly converted into a backup server
with minimal down time.
This feature is designed to provide replication services for AhsayCBS only and it does not
provide general replication service for other files within the system. This means that you
cannot use AhsayCBS replication to replicate your Windows/Linux/Unix system to another
machine.

www.ahsay.com 326
7.1.2 What technology is used for Replication?
During the Resync stage of the replication process (refer to How does Replication Work
below for details), snapshot images of users’ backup sets will be created and then sent to
the replication server. By utilizing the snapshot image technology, the data on the backup
server can be replicated in a rather short time and therefore close to real-time replication is
made possible.
By utilizing the multi-threading technology, replication can now be processed faster than
the traditional single thread replication. Refer to Multiple Threads Replication for further
details.
7.1.3 Differences between v6 and v8 on Replication
The replication service has been revamped to empower you with a more reliable and
secure replication experience. The table below explains the major feature differences
between v6 and v8 on replication.
Version 6 Version 8
Multi Threads
Replication
Replication process is
performed over single thread
mode which takes longer time
to complete.
The replication process is
performed over multi threads
mode where multiple backup
sets are sent to the replication
location concurrently. The
number of threads for replication
is also configurable by the
backup user.
Support
Replication to
Cloud Storage
Only replication to AhsayRPS
is possible.
Supports replication to either
another AhsayCBS server or
cloud storage (as defined in the
predefined destination).
Replication Port A dedicated port has to be
defined for replication receiver
to perform replication.
Replication is performed via the
http/https (ports 80 and 443 by
default) defined on AhsayCBS.
No additional ports are required.
Real-time
Monitoring
Progress
Real-time replication progress
cannot be monitored.
The real-time replication
progress of each backup set can
now be monitored on the
AhsayCBS web console.
Replication of
Individual
Backup Sets
Only
User Level - all backup sets
from all backup users must be
replicated when the replication
feature is turned on.
Backup Set Level - replication
of only selected backup sets is
now possible.

www.ahsay.com 327
7.1.4 How does Replication Work
Replication runs in 4 stages, namely Pending, Resync, Replay and Sleep. Refer to the
diagram below for an overview of the replication process.
* For more details on the differences between Transaction Logs Type 1 and Type
2, refer to Transaction Log Location.

www.ahsay.com 328
7.1.5 Replication Scope
The following three folders on the local file system are included in the replication process.
IMPORTANT
1. Please be reminded that ALL 3 folders will be CRITICAL and REQUIRED if you
need to rebuild AhsayCBS from scratch, or to recover system settings.
2. Only user data hosted physically on AhsayCBS will be replicated. Local drive
includes, for example, local hard disk, mapped network drive, removable drive,
external storage device connected to AhsayCBS with UNC path, etc. Certain types of
external storage connection, for example FTP/SFTP, are not regarded as local drive
even if it is connected through LAN, and therefore will not be included for replication.
%CBS_INSTALL%\conf
The table below shows a list of files included in this folder.
Server Configuration
Path Description
/conf/server.xml Connector setting file
/conf/afc.opt
/conf/cbs.opt CBS option files
/conf/cbssvc.ini Runtime setting file
/conf/ca.crt
/conf/ssl.crt
/conf/ssl.key
Default certificate files
/conf/cbs.json CBS setting files
/conf/lfsConfig.xml Redirector configuration files
CBS Configuration
Path Description
/conf/obs.json Backup Server setting files
/conf/lic.json
/conf/license.xml License files
/conf/cbs.opt CBS/OBS option files
/conf/autoUpdate.bdb Autoupdate index
/conf/rpsSend.xml Replication configuration files
/conf/users.xml Users’ profile
RPS Configuration
Path Description
/conf/rps.xml
/conf/rpsRecv.xml
/conf/rps-recv.json
Replication configuration files
RDR Configuration

www.ahsay.com 329
Path Description
/conf/rdr.xml
/conf/rdr.json Redirector configuration files
/conf/rdr-lic.json
/conf/rdr-license.xml License files
Others
Path Description
/conf/Branding/*.* Branding directory
/conf/Backup/*.* Auto Save snapshot file
/conf/certs
Only created after administrator importing a
SSL certificate or generating a new CSR
(Certificate Signing Request)
%CBS_INSTALL%\system
The table below shows a list of files included in this folder.
Group Policy Settings
Path Description
/system/obs/policies/userGroup.xml User group definition
/system/obs/policies/policyList.xml Policy group definition
%USER_HOME%
The table below shows a list of files included in this folder.
CBS User Profile
Path Description
/user/%username%/db
This sub-folder contains files with the following info:
➢ Backup logs of all backup sets
➢ All logs and statistics records of all backup sets
created on different client locations
➢ Records of email notification for
backup/restore/setting change
➢ Restore logs
➢ Monthly storage record of each backup set
➢ Daily activities log
/user/%username%/files
This sub-folder contains info files for all backup sets,
with the following info:
➢ Backup set name
➢ Backup set ID
➢ Backup set type
➢ Version of the client’s machine running the
backup set

www.ahsay.com 330
/user/%username%/pdf This sub-folder contains all backup and restore
reports in pdf format
/user/%username%/
%backup set ID%
This sub-folder contains files with the following info:
➢ Data blocks and index file of all backups
➢ Encryption key file (if uploaded)
➢ Replication snapshots (if applicable)
Coexistence of v6 and v8 Formats Backup Data
When you have enabled replication for v6 backup sets on AhsayCBS v8, the backup data
will be replicated to your replication destination in v6 data format. If, afterwards, a v8
upgrade of the AhsayOBM/AhsayACB is done and backup is performed for those backup
sets, the backup data will be produced and replicated in v8 format. In that case, there will
be two sets of backup data stored for the same backup set in separate locations under the
CBS_HOME\user. The following illustrations show the location where the v6 and v8 format
backup data stored.
➢ V8 format backup data
Backup set ID – unique ID for individual backup set
Data blocks folder
A new folder created every time when a backup is run, indicated by date and time in
the folder name
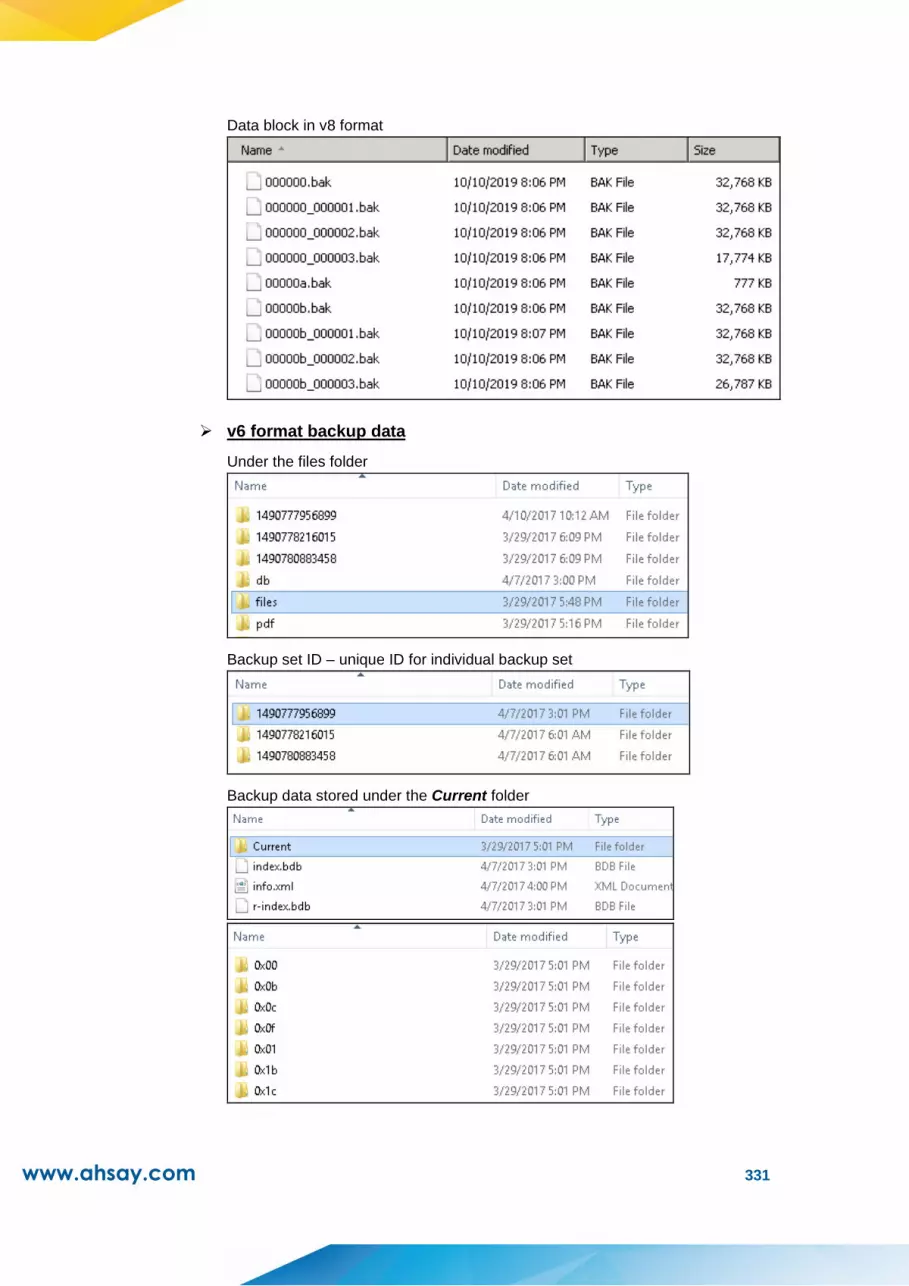
www.ahsay.com 331
Data block in v8 format
➢ v6 format backup data
Under the files folder
Backup set ID – unique ID for individual backup set
Backup data stored under the Current folder

www.ahsay.com 332
NOTE
When data migration for v6 data is completed and AhsayCBS has replicated the v6 backup
data, the v6 data will be deleted from both the backup server and replication server.
7.1.6 Transaction Log Location
Transaction log is a location storing backup data temporarily before they enter the
replication cycle mentioned in How does Replication work.
There are two different kinds of transaction logs which are located separately under the
AhsayCBS folder. Refer to the information below for further elaboration.
Type 1 – transaction log stored in USER HOME
Location
%USER_HOME%/%BACKUP_SET_ID%/rps/{%DELETE_TIME%.%LOG_SEQ%}
What kind of transaction log does it store?
This folder stores the transaction log entries produced during Stage 2 – Resync of the
replication process. In specific, the transaction logs are the changes made on the
backup server during the snapshot capture and replication process are taking place.
This kind of data will only be replicated to the replication location in Stage 3 – Replay.
Type 2 – transaction log stored in SYSTEM HOME
Location
%SYSTEM_HOME%/%USER_ID%/%BACKUP_SET_ID%/rps/replay-XXXXXX.log
What kind of transaction log does it store?
This folder stores the transaction log entries produced in Stage 3 - Replay mode
where it stores data from the backup server pending for replication to the replication
location in the on-going replication process.
7.1.7 Replication Order
Replication is performed in the order of the tiers as shown in the table below.
Tier 1 Backup User Name
Tier 2 Backup Set ID
Tier 3 Name of Folder/Sub-folder
Tier 4 File Name
Within each tier, the order of replication is performed according to the standard defined by
the American Standard Code for Information Interchange (ASCII), refer to
http://www.ascii-code.com/ for details of the order.

www.ahsay.com 333
7.1.8 Benefits of using Replication?
Multiple Threads Replication
1. From AhsayCBS v8.3.6.0 or onwards, the maximum number of replication threads is
determined using the following formula:
Number of concurrent backup set to replicate = Total CPU Cores / 8
For example, an AhsayCBS server with 8 CPU cores will have a maximum of one
concurrent replication thread.
The minimum number of replication thread is 1 while the maximum is 4.
While the maximum number of concurrent files replicated for each backup set =
4.
For example, there are 2 concurrent backup sets to replicate. Then the maximum
number of concurrent files that can be replicated concurrently is 8 (2 backup sets x 4
files per backup set = 8 files).
NOTE
The maximum number of files replicated for each backup set is fixed at 4 and is not user
configurable.
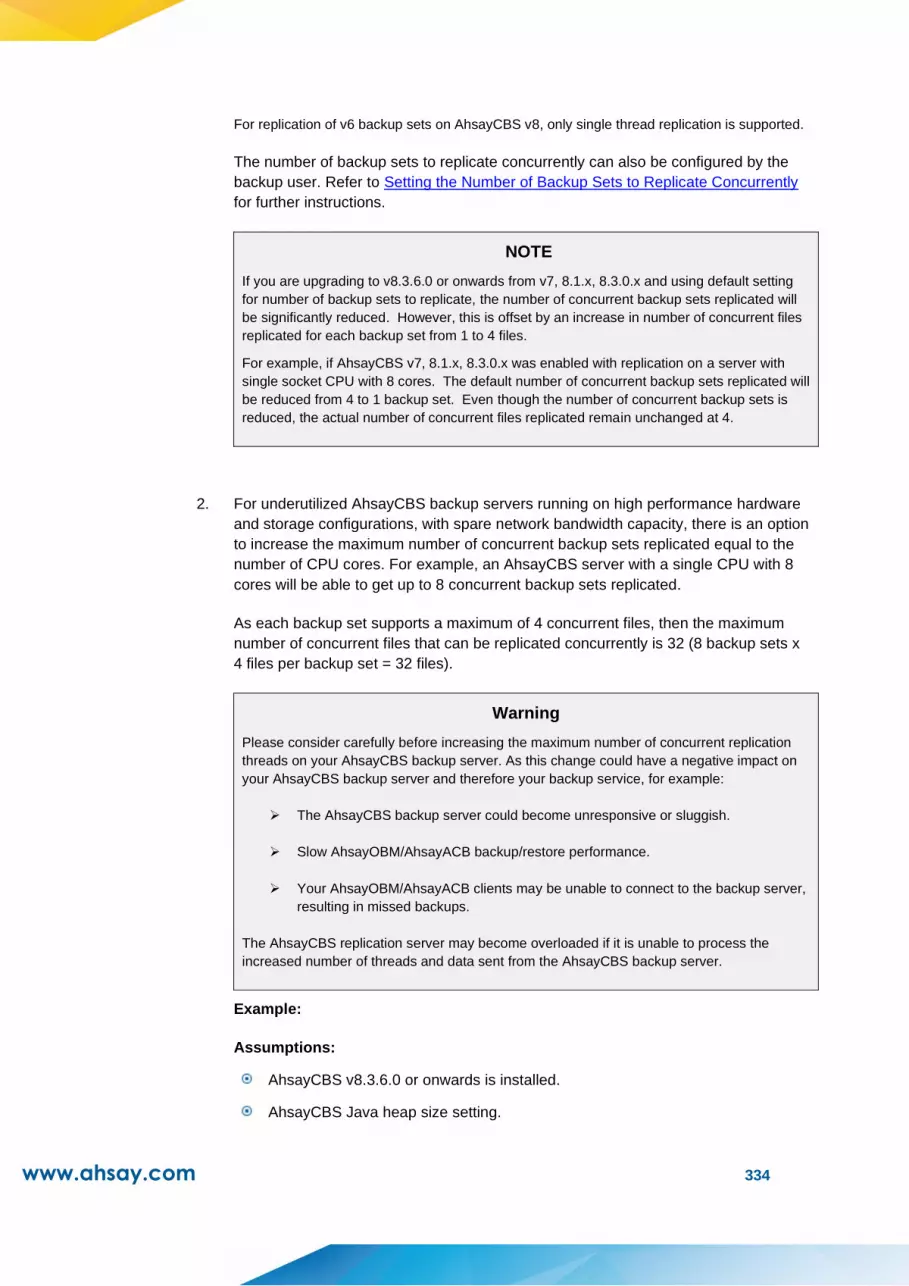
www.ahsay.com 334
For replication of v6 backup sets on AhsayCBS v8, only single thread replication is supported.
The number of backup sets to replicate concurrently can also be configured by the
backup user. Refer to Setting the Number of Backup Sets to Replicate Concurrently
for further instructions.
NOTE
If you are upgrading to v8.3.6.0 or onwards from v7, 8.1.x, 8.3.0.x and using default setting
for number of backup sets to replicate, the number of concurrent backup sets replicated will
be significantly reduced. However, this is offset by an increase in number of concurrent files
replicated for each backup set from 1 to 4 files.
For example, if AhsayCBS v7, 8.1.x, 8.3.0.x was enabled with replication on a server with
single socket CPU with 8 cores. The default number of concurrent backup sets replicated will
be reduced from 4 to 1 backup set. Even though the number of concurrent backup sets is
reduced, the actual number of concurrent files replicated remain unchanged at 4.
2. For underutilized AhsayCBS backup servers running on high performance hardware
and storage configurations, with spare network bandwidth capacity, there is an option
to increase the maximum number of concurrent backup sets replicated equal to the
number of CPU cores. For example, an AhsayCBS server with a single CPU with 8
cores will be able to get up to 8 concurrent backup sets replicated.
As each backup set supports a maximum of 4 concurrent files, then the maximum
number of concurrent files that can be replicated concurrently is 32 (8 backup sets x
4 files per backup set = 32 files).
Warning
Please consider carefully before increasing the maximum number of concurrent replication
threads on your AhsayCBS backup server. As this change could have a negative impact on
your AhsayCBS backup server and therefore your backup service, for example:
➢ The AhsayCBS backup server could become unresponsive or sluggish.
➢ Slow AhsayOBM/AhsayACB backup/restore performance.
➢ Your AhsayOBM/AhsayACB clients may be unable to connect to the backup server,
resulting in missed backups.
The AhsayCBS replication server may become overloaded if it is unable to process the
increased number of threads and data sent from the AhsayCBS backup server.
Example:
Assumptions:
AhsayCBS v8.3.6.0 or onwards is installed.
AhsayCBS Java heap size setting.
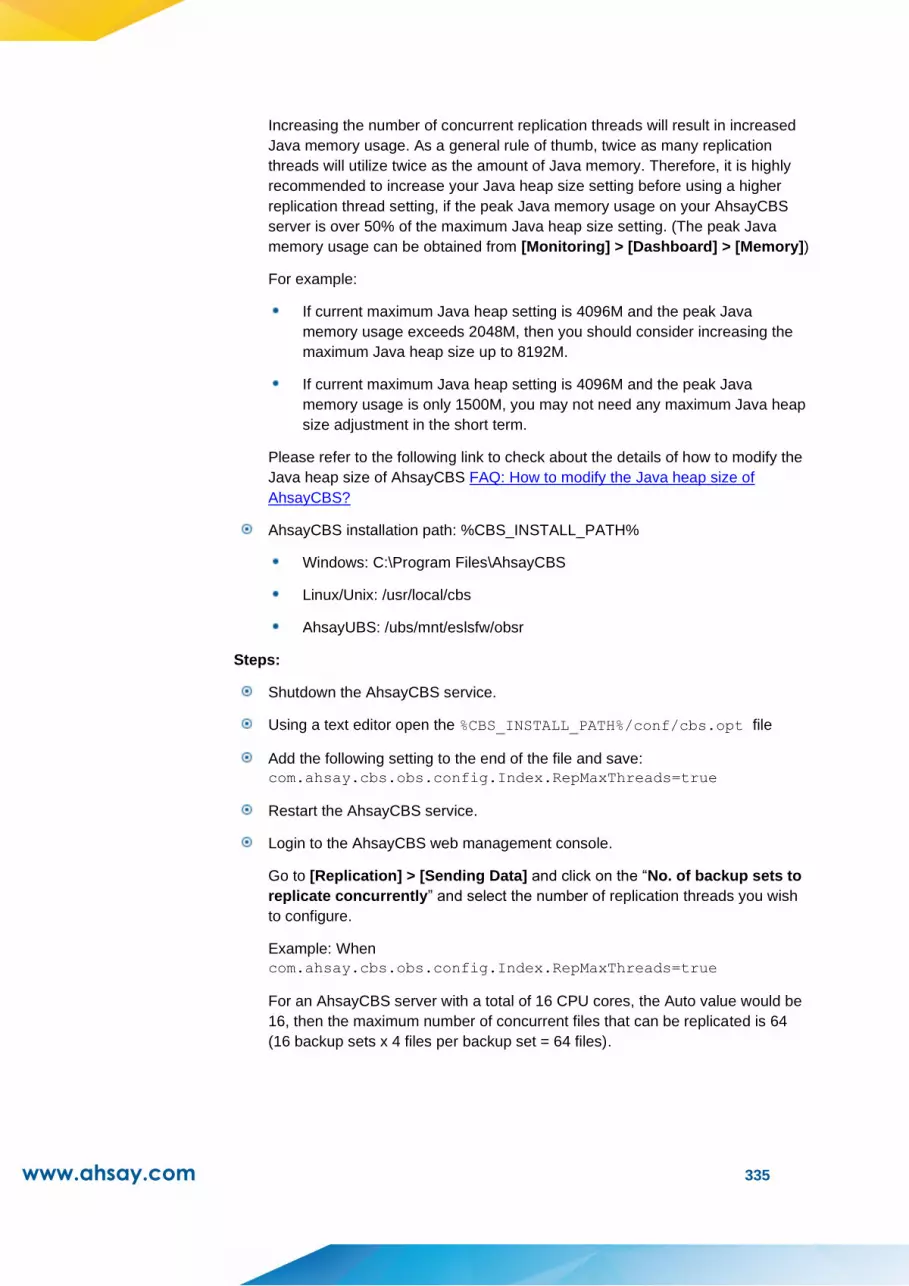
www.ahsay.com 335
Increasing the number of concurrent replication threads will result in increased
Java memory usage. As a general rule of thumb, twice as many replication
threads will utilize twice as the amount of Java memory. Therefore, it is highly
recommended to increase your Java heap size setting before using a higher
replication thread setting, if the peak Java memory usage on your AhsayCBS
server is over 50% of the maximum Java heap size setting. (The peak Java
memory usage can be obtained from [Monitoring] > [Dashboard] > [Memory])
For example:
If current maximum Java heap setting is 4096M and the peak Java
memory usage exceeds 2048M, then you should consider increasing the
maximum Java heap size up to 8192M.
If current maximum Java heap setting is 4096M and the peak Java
memory usage is only 1500M, you may not need any maximum Java heap
size adjustment in the short term.
Please refer to the following link to check about the details of how to modify the
Java heap size of AhsayCBS FAQ: How to modify the Java heap size of
AhsayCBS?
AhsayCBS installation path: %CBS_INSTALL_PATH%
Windows: C:\Program Files\AhsayCBS
Linux/Unix: /usr/local/cbs
AhsayUBS: /ubs/mnt/eslsfw/obsr
Steps:
Shutdown the AhsayCBS service.
Using a text editor open the %CBS_INSTALL_PATH%/conf/cbs.opt file
Add the following setting to the end of the file and save:
com.ahsay.cbs.obs.config.Index.RepMaxThreads=true
Restart the AhsayCBS service.
Login to the AhsayCBS web management console.
Go to [Replication] > [Sending Data] and click on the “No. of backup sets to
replicate concurrently” and select the number of replication threads you wish
to configure.
Example: When
com.ahsay.cbs.obs.config.Index.RepMaxThreads=true
For an AhsayCBS server with a total of 16 CPU cores, the Auto value would be
16, then the maximum number of concurrent files that can be replicated is 64
(16 backup sets x 4 files per backup set = 64 files).

www.ahsay.com 336
Improved System Logs Monitoring
The Replication Logs section in the AhsayCBS console provides a consolidated view of all
replication sending and receiving logs to allow a one-stop monitoring of the replication
activities.
Replication Close to Real-Time
The synchronization process does not require stopping or interrupting any backup/restore
operations. As the replication module will be replicating the backup data in 4 modes,
pending, sleep, resync and replay mode. These 4 modes are used to identify the mode of
the replicating backup.
Pending — backup set pending for replication
Resync — responsible to create a snapshot of the current system configuration and
user backup files
Replay — replay the changes that happened during the resync mode
Sleep — Backup sets that have finished replicating the backup data
When new backup data are available on the backup server, it will arrange into the above
mode of replication which will be replicated to another AhsayCBS (Replication Server) or a
predefined storage immediately. Refer to the How does Replication Work section for further
details on the 4 replication modes.
Replication of Individual Backup Set Only
Instead of replicating all backup sets from all backup users, you now have the flexibility to
select specific user’s backup set(s) from the Backup Server to replicate to either another
Replication Server or a predefined storage.
You can select the desired backup sets for replication when you create a replication
sending account, refer to Configuration on the Replication Sending End for further details.
www.ahsay.com 337
Retention Policy for Replicated Data
When a snapshot of the backup data on the backup server is replicated to the replication
server, the older version of the snapshot will be moved to the retention area for a set period
of time before it will be deleted permanently from the replication server. This feature is
useful in case you have to recover data on the backup server from the past.
This configuration can be set when you create a replication receiver, refer to the Create a
Replication User Account section for further details.
*This feature applies only to replication to AhsayCBS server.
Flexible Deployment Options
The replication service can be deployed in various options, including another AhsayCBS
server, cloud storage, NAS storage connected via FTP/SFTP/local network, etc. It is also
possible for multiple backup servers to replicate data to a single AhsayCBS replication
server.
You can replicate v6 backup sets to a receiver on a v7 or v8 replication server before the
backup sets undergo the data migration process. This new deployment option gives you
greater flexibility to gradually migrate the backup sets in v6 format to v7 or v8 format after
the backup server is upgraded to v7 or v8, while the backup sets in v6 format will still be
replicated to provide you with data protection.
For more details on deployment, refer to the Deployment Options and Comparison section.
Quick Recovery of Backup Sever
The primary purpose of replication is to provide an extra layer of protection to the data on
the backup server in case of disaster like power outage or data corruption. We also
understand that it is critical to keep the data recovery process fast so as to minimize
interruption to your backup services to clients, that is why we have taken another step
forward to simplify the transitioning between replication server and backup server to make
the recovery process as fast and seamless as possible. Refer to the Recovery Method
section for further details.
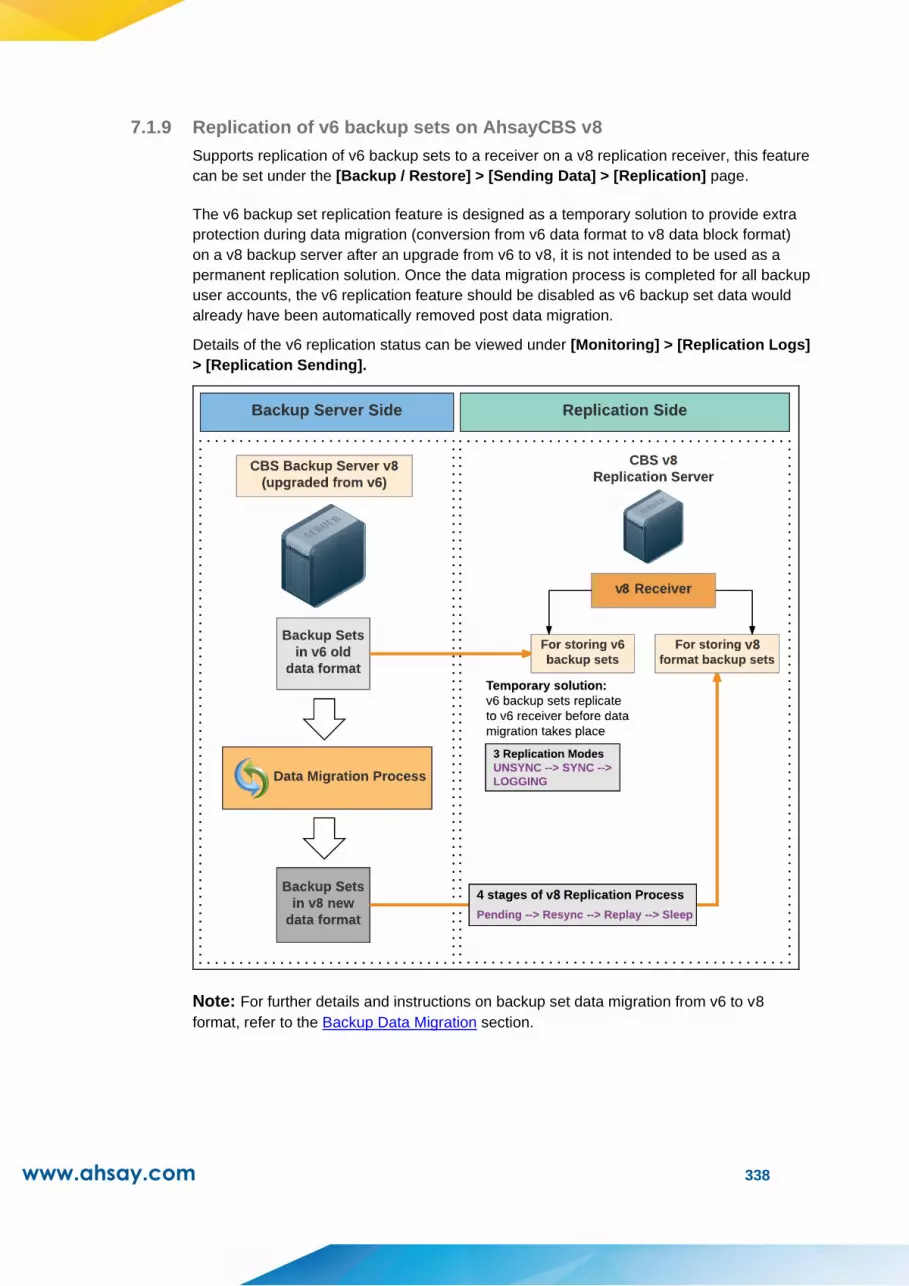
www.ahsay.com 338
7.1.9 Replication of v6 backup sets on AhsayCBS v8
Supports replication of v6 backup sets to a receiver on a v8 replication receiver, this feature
can be set under the [Backup / Restore] > [Sending Data] > [Replication] page.
The v6 backup set replication feature is designed as a temporary solution to provide extra
protection during data migration (conversion from v6 data format to v8 data block format)
on a v8 backup server after an upgrade from v6 to v8, it is not intended to be used as a
permanent replication solution. Once the data migration process is completed for all backup
user accounts, the v6 replication feature should be disabled as v6 backup set data would
already have been automatically removed post data migration.
Details of the v6 replication status can be viewed under [Monitoring] > [Replication Logs]
> [Replication Sending].
Note: For further details and instructions on backup set data migration from v6 to v8
format, refer to the Backup Data Migration section.
www.ahsay.com 339
Requirements
1. Both the AhsayCBS Backup Server (sender) and AhsayCBS Replication Server
(receiver) must be on v8.1 or above.
2. v6 backup set replication must be enabled on both the backup server and replication
server.
3. Replication license modules are required for replication of v6 backup sets.
4. The v8 replication on AhsayCBS must be enabled to another replication server.
5. A separate dedicated replication port (default port 9444) is required.
Limitations
1. v8 replication must be enabled to another AhsayCBS server in order to use the
feature. As replication to predefined destination does not support replication of v6
backup sets.
2. Replication of v6 backup sets is supported using a single thread.
3. Only v6 backup set data found in the %USER_HOME%\%USERNAME%\files folder
will be replicated. The replication of other folders and files are handled by v7
replication process.
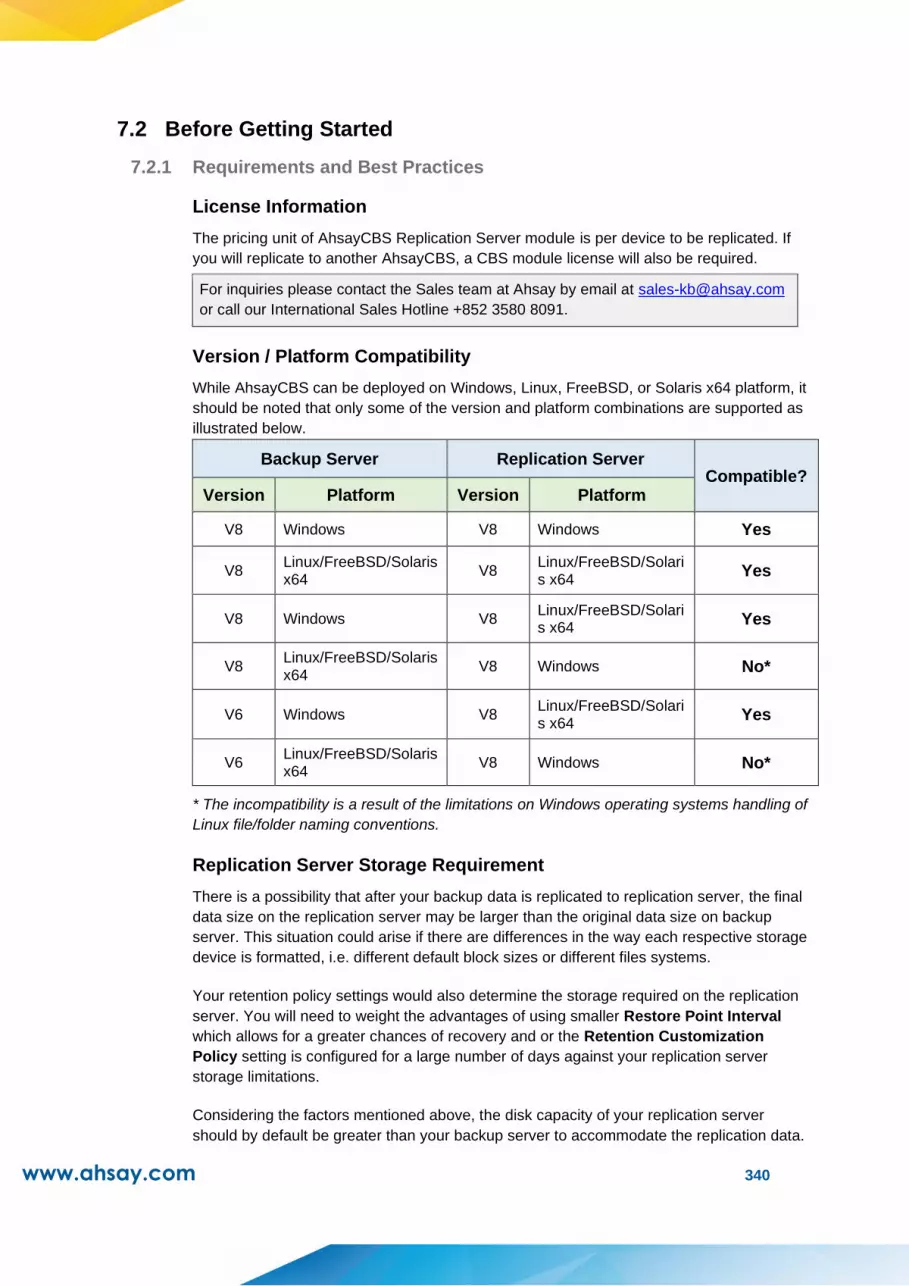
www.ahsay.com 340
7.2 Before Getting Started
7.2.1 Requirements and Best Practices
License Information
The pricing unit of AhsayCBS Replication Server module is per device to be replicated. If
you will replicate to another AhsayCBS, a CBS module license will also be required.
For inquiries please contact the Sales team at Ahsay by email at [email protected]
or call our International Sales Hotline +852 3580 8091.
Version / Platform Compatibility
While AhsayCBS can be deployed on Windows, Linux, FreeBSD, or Solaris x64 platform, it
should be noted that only some of the version and platform combinations are supported as
illustrated below.
Backup Server Replication Server Compatible?
Version Platform Version Platform
V8 Windows V8 Windows Yes
V8 Linux/FreeBSD/Solaris x64
V8 Linux/FreeBSD/Solaris x64
Yes
V8 Windows V8 Linux/FreeBSD/Solaris x64
Yes
V8 Linux/FreeBSD/Solaris x64
V8 Windows No*
V6 Windows V8 Linux/FreeBSD/Solaris x64
Yes
V6 Linux/FreeBSD/Solaris x64
V8 Windows No*
* The incompatibility is a result of the limitations on Windows operating systems handling of
Linux file/folder naming conventions.
Replication Server Storage Requirement
There is a possibility that after your backup data is replicated to replication server, the final
data size on the replication server may be larger than the original data size on backup
server. This situation could arise if there are differences in the way each respective storage
device is formatted, i.e. different default block sizes or different files systems.
Your retention policy settings would also determine the storage required on the replication
server. You will need to weight the advantages of using smaller Restore Point Interval
which allows for a greater chances of recovery and or the Retention Customization
Policy setting is configured for a large number of days against your replication server
storage limitations.
Considering the factors mentioned above, the disk capacity of your replication server
should by default be greater than your backup server to accommodate the replication data.
www.ahsay.com 341
Location of the Replication Server
In terms of disaster recovery situation, the restore media should not be stored or located on
the same premises, and these rules would also depend on different compliances,
regulations or terms with your customers.
Here are some suggestions that you may need to consider:
Set up the AhsayCBS Replication Server in another data center. In case you need to host
the Replication Server with your Backup Server, you may consider hosting it in another
server rack or another server room if possible.
➢ Dedicated Server for Replication
Following are the pros and cons on setting up replication on a dedicated server.
Pros:
Able to switch from Replication Server to Backup Server
Fast in recovery hence small recovery window and short downtime
Able to keep replicated snapshots in retention area in case recovery of data in
past snapshots becomes necessary
Cons:
Relatively more complex setup; requires datacenter hosting and maintenance cost
Relatively expensive to expand storage
Downtime required for regular maintenance and upgrade
Upfront investment in hardware storage
➢ Predefined Destination (Cloud Storage / FTP / SFTP) for Replication
Following are the pros and cons on setting up replication on a predefined destination.
Pros:
Quick setup; low hosting and maintenance cost
Cheaper cost for storage expansion
No upfront hardware investment required
Cons:
To recover the replicated data, it is required to set up new backup server and
restore data from the predefined destination
Slow in recovery hence large recovery window and longer downtime.
For more information and comparison on different replication environment setup,
please refer to the Appendix F.
www.ahsay.com 342
AhsayCBS Replication Partitioning
The AhsayCBS replication module makes heavy use of the User Home directory to
process the snapshots of the backup sets during the Resync stage. During Resync stage,
snapshots of backup sets will be written to the User Home in the form of transactions log
files.
It is not recommended to use the O/S partition or drive as the System Home. If the System
Home folder fills up, this will cause your O/S to become unstable and may even crash your
AhsayCBS server. It is strongly recommended the System Home directory should be
located on a dedicated local drive.
Replication Performance Tuning
The connection speed between the backup server and the replication location (whether it is
an AhsayCBS server or a cloud storage) is typically the primary factor of the replication
performance. However, even with a fast and stable connection between the backup server
and replication location, the replication performance could be affected by the following
factors:
Poor disk I/O on the backup server – when scanning and retrieving data files to be
sent to the replication server.
Poor disk I/O on the replication server – when receiving and committing files to the
receiver home.
Poor disk I/O can be attributed to:
The use of network drives as AhsayCBS user and system homes on the backup
server side
The use of network drives as AhsayCBS receiver home(s) on the replication side.
The use of a single large disk or volume for AhsayCBS user home.
The use of a single large disk or volume for multiple AhsayCBS receiver home(s)
on the replication side.
Slow performing local hard drives or storage devices.
In order to improve overall replication performance, the following is
recommended:
A separate local drive for each AhsayCBS user home on the backup server side
Distributing user accounts across multiple user homes to balance the I/O load
A separate local drive for AhsayCBS system home on the backup server side
A separate local drive for each receiver on the replication side
AhsayCBS Java Heap Size Setting
The machine with the Replication server installed may require more memory for additional
feature such as retention policy to run.
For a replication server with single receiver, a maximum Java heap size setting of at
least 1024M is recommended.
www.ahsay.com 343
For a replication server with multiple receivers, a maximum Java heap size setting of
at least 2048M is recommended.
When setting the maximum Java heap size for the replication server, please ensure this
value does not exceed 2/3 of the RAM on the server, to allow sufficient memory for O/S
processes and operations.
It is not recommended to set excessively high values for the maximum Java heap size, as
this could result in performance issues on the replication server during internal Java VM
garbage collection or memory recycling routines.
Firewall Settings
Since replication is performed via the http/https ports defined on the AhsayCBS backup
server, after you have finished setting up your replication server, please ensure you have
updated your firewall settings to allow network traffic through the those ports, which are
typically port 80 for http and port 443 for https.
Don’t Deploy the Backup and Replication Servers on a Single Machine
It is not recommend to configure and use both services on one single machine because it
will completely defeat the purpose of the replication service as a backup or standby server
for your backup server.
Moreover, the two services will compete for system resources, such as CPU and memory.
This could affect the performance and stability of your backup service.
Dedicated Restore Drive on Replication Server
In order to facilitate a fast restore of snapshots from the retention area on the replication
server, it is recommended the files are not restored to an existing receiver home drive to
avoid affecting replication performance. Your replication server should be configured with a
dedicated disk for restore purposes. Alternatively, an external USB drive can also be used.
Storage Requirement on Replication Server
The amount of space required to keep these replication depends on the amount of data
changed on your Backup Server.
To calculate the amount of storage required for the retention settings, we can base on the
following assumption and formula.
Assumption
There is a 2% data change in the backup server daily.
Formula
Total data storage required = (1+0.02)n x original data size, where n = number of days
of the retention customization policy
For n=30 days, it will be around 1.81 times of the original data size, and 3.28 times if
n=60.

www.ahsay.com 344
Replication Server with Multiple Receivers
If you have configured multiple receivers on your replication server to server more than one
backup servers, it is recommended that each receiver is located on its own individual disk.
The major advantage of this kind of setup is that it will minimize the I/O on each disk and
therefore improve the replication performance.
Replication Using Cross Over Cable
It is not recommended to set up a connection between the backup server and replication
server using a cross over cable. As from our experience this setup will result in connection
and performance issues.
If the backup server and replication server are located on the same site, they should
be connected via a switch.
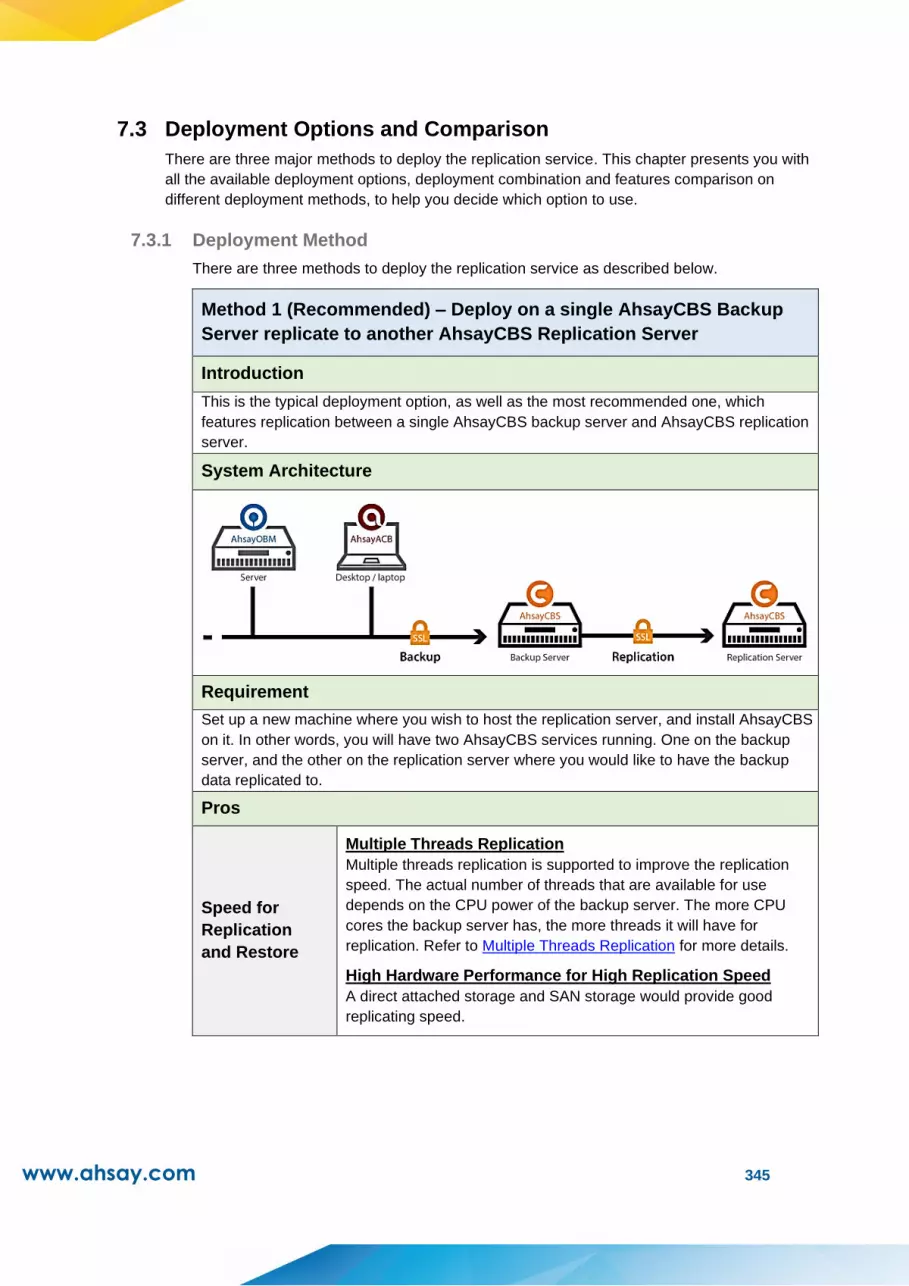
www.ahsay.com 345
7.3 Deployment Options and Comparison
There are three major methods to deploy the replication service. This chapter presents you with
all the available deployment options, deployment combination and features comparison on
different deployment methods, to help you decide which option to use.
7.3.1 Deployment Method
There are three methods to deploy the replication service as described below.
Method 1 (Recommended) – Deploy on a single AhsayCBS Backup
Server replicate to another AhsayCBS Replication Server
Introduction
This is the typical deployment option, as well as the most recommended one, which
features replication between a single AhsayCBS backup server and AhsayCBS replication
server.
System Architecture
Requirement
Set up a new machine where you wish to host the replication server, and install AhsayCBS
on it. In other words, you will have two AhsayCBS services running. One on the backup
server, and the other on the replication server where you would like to have the backup
data replicated to.
Pros
Speed for
Replication
and Restore
Multiple Threads Replication
Multiple threads replication is supported to improve the replication
speed. The actual number of threads that are available for use
depends on the CPU power of the backup server. The more CPU
cores the backup server has, the more threads it will have for
replication. Refer to Multiple Threads Replication for more details.
High Hardware Performance for High Replication Speed
A direct attached storage and SAN storage would provide good
replicating speed.
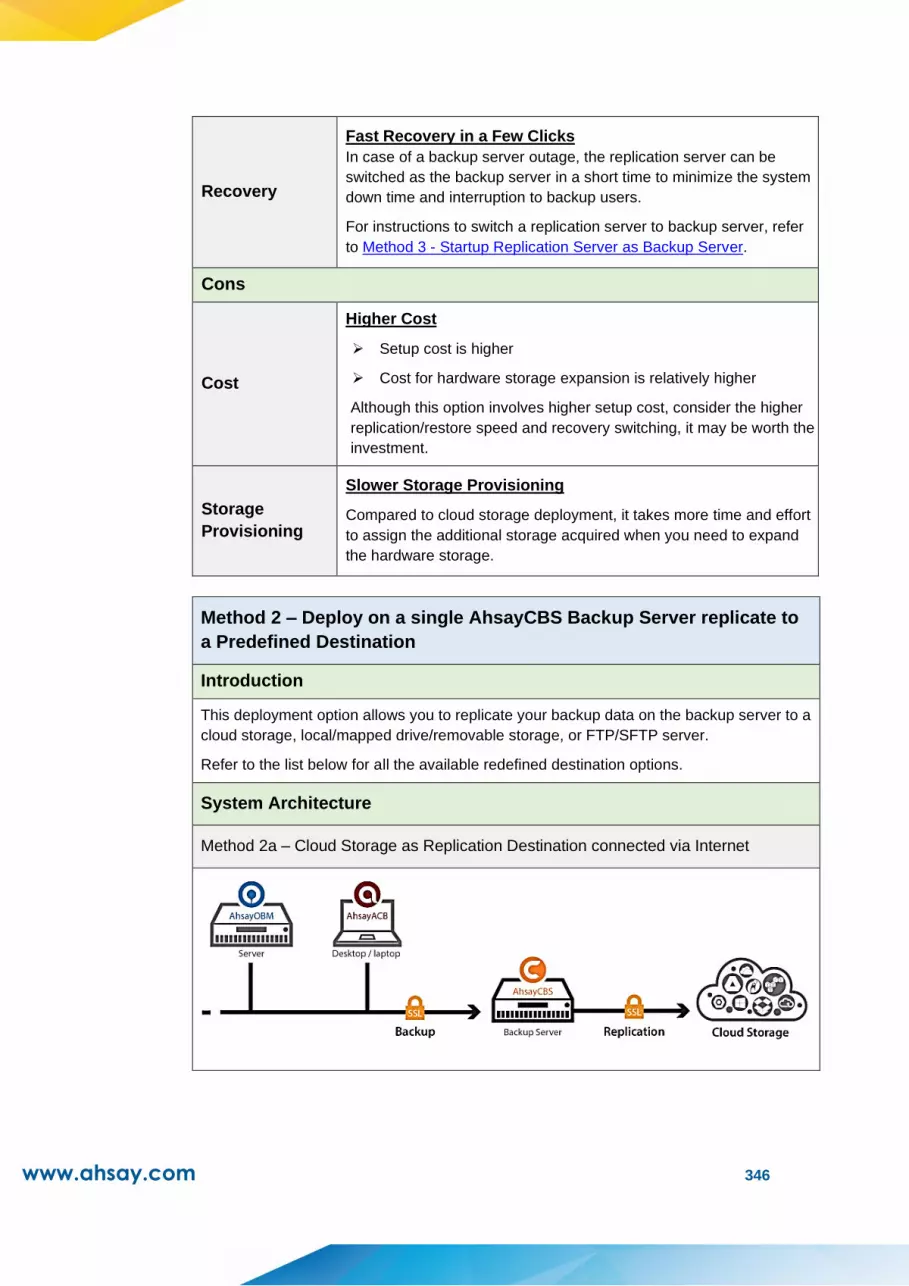
www.ahsay.com 346
Recovery
Fast Recovery in a Few Clicks
In case of a backup server outage, the replication server can be
switched as the backup server in a short time to minimize the system
down time and interruption to backup users.
For instructions to switch a replication server to backup server, refer
to Method 3 - Startup Replication Server as Backup Server.
Cons
Cost
Higher Cost
➢ Setup cost is higher
➢ Cost for hardware storage expansion is relatively higher
Although this option involves higher setup cost, consider the higher
replication/restore speed and recovery switching, it may be worth the
investment.
Storage
Provisioning
Slower Storage Provisioning
Compared to cloud storage deployment, it takes more time and effort
to assign the additional storage acquired when you need to expand
the hardware storage.
Method 2 – Deploy on a single AhsayCBS Backup Server replicate to
a Predefined Destination
Introduction
This deployment option allows you to replicate your backup data on the backup server to a
cloud storage, local/mapped drive/removable storage, or FTP/SFTP server.
Refer to the list below for all the available redefined destination options.
System Architecture
Method 2a – Cloud Storage as Replication Destination connected via Internet

www.ahsay.com 347
Method 2b – NAS Server as Replication Destination connected via FTP/SFTP or local
network
Requirement
First, you need to have cloud storage account, a local/network/removable drive, or a
FTP/SFTP server in place. Then, the predefined destination must have been set under
the System Settings > Predefined Destinations menu so it can be used for the
replication purpose.
Available Predefined Destinations
Aliyun (阿里云) CTYun
(中国电信天翼云 ) Wasabi Amazon S3
Amazon Compatible
Cloud Storage
Google Cloud
Storage Google Drive Microsoft Azure
OneDrive OneDrive for
Business Rackspace OpenStack
Dropbox FTP SFTP
Local / Mapped Drive
/ Network Drive /
Removable Drive
Backblaze
Pros
Multiple
Threads
Replication
Multiple threads replication is supported to improve the replication
speed. The actual number of threads that are available for use
depends on the CPU power of the backup server. The more CPU
cores the backup server has, the more threads it will have for
replication. Refer to Multiple Threads Replication for more details.
Cost
Low Cost
➢ Setup cost is low
➢ Cost for storage expansion, especially on cloud storage, is
relatively cheaper
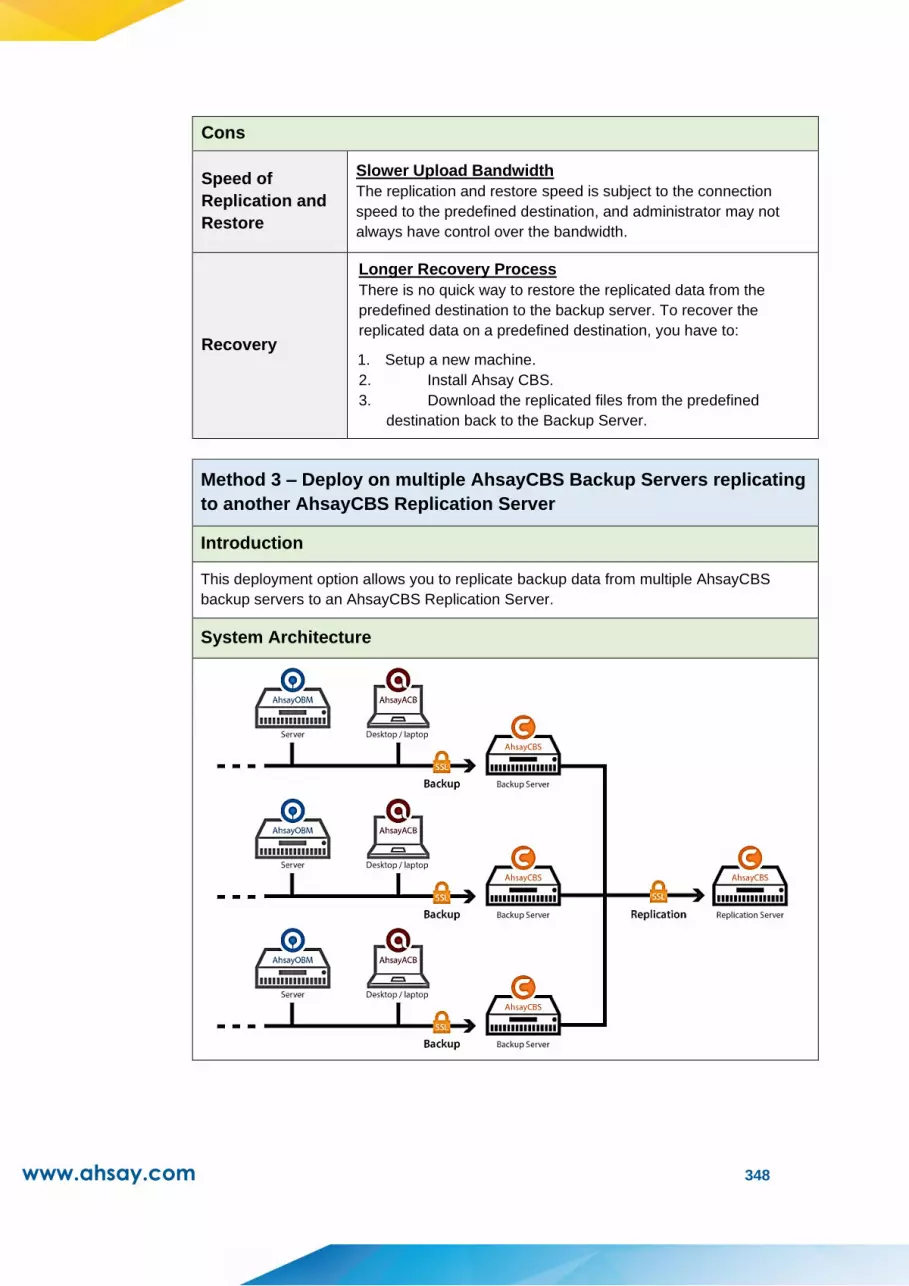
www.ahsay.com 348
Cons
Speed of
Replication and
Restore
Slower Upload Bandwidth
The replication and restore speed is subject to the connection
speed to the predefined destination, and administrator may not
always have control over the bandwidth.
Recovery
Longer Recovery Process
There is no quick way to restore the replicated data from the
predefined destination to the backup server. To recover the
replicated data on a predefined destination, you have to:
1. Setup a new machine.
2. Install Ahsay CBS.
3. Download the replicated files from the predefined
destination back to the Backup Server.
Method 3 – Deploy on multiple AhsayCBS Backup Servers replicating
to another AhsayCBS Replication Server
Introduction
This deployment option allows you to replicate backup data from multiple AhsayCBS
backup servers to an AhsayCBS Replication Server.
System Architecture
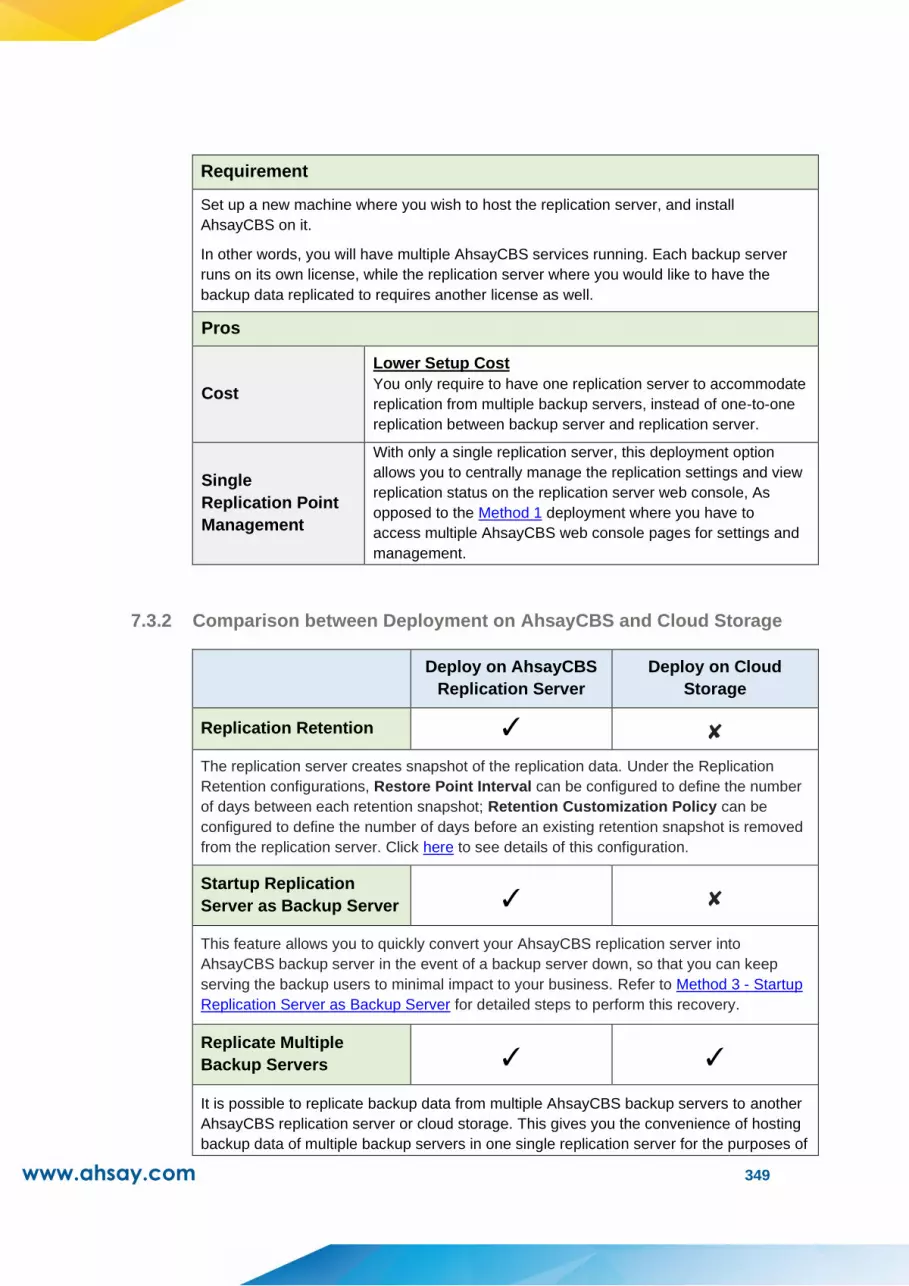
www.ahsay.com 349
Requirement
Set up a new machine where you wish to host the replication server, and install
AhsayCBS on it.
In other words, you will have multiple AhsayCBS services running. Each backup server
runs on its own license, while the replication server where you would like to have the
backup data replicated to requires another license as well.
Pros
Cost
Lower Setup Cost
You only require to have one replication server to accommodate
replication from multiple backup servers, instead of one-to-one
replication between backup server and replication server.
Single
Replication Point
Management
With only a single replication server, this deployment option
allows you to centrally manage the replication settings and view
replication status on the replication server web console, As
opposed to the Method 1 deployment where you have to
access multiple AhsayCBS web console pages for settings and
management.
7.3.2 Comparison between Deployment on AhsayCBS and Cloud Storage
Deploy on AhsayCBS
Replication Server
Deploy on Cloud
Storage
Replication Retention ✓ ✘
The replication server creates snapshot of the replication data. Under the Replication
Retention configurations, Restore Point Interval can be configured to define the number
of days between each retention snapshot; Retention Customization Policy can be
configured to define the number of days before an existing retention snapshot is removed
from the replication server. Click here to see details of this configuration.
Startup Replication
Server as Backup Server ✓ ✘
This feature allows you to quickly convert your AhsayCBS replication server into
AhsayCBS backup server in the event of a backup server down, so that you can keep
serving the backup users to minimal impact to your business. Refer to Method 3 - Startup
Replication Server as Backup Server for detailed steps to perform this recovery.
Replicate Multiple
Backup Servers ✓ ✓
It is possible to replicate backup data from multiple AhsayCBS backup servers to another
AhsayCBS replication server or cloud storage. This gives you the convenience of hosting
backup data of multiple backup servers in one single replication server for the purposes of
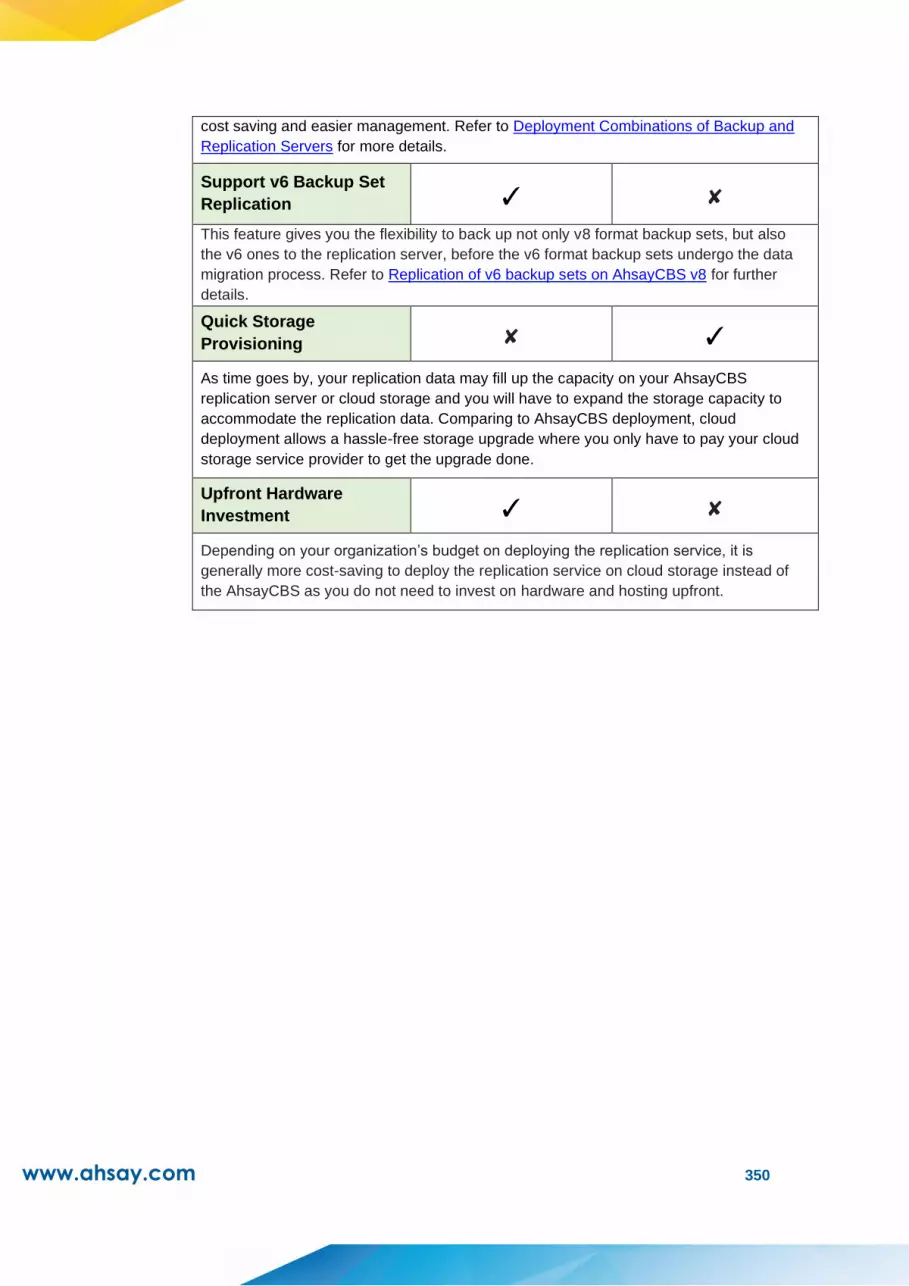
www.ahsay.com 350
cost saving and easier management. Refer to Deployment Combinations of Backup and
Replication Servers for more details.
Support v6 Backup Set
Replication ✓ ✘
This feature gives you the flexibility to back up not only v8 format backup sets, but also
the v6 ones to the replication server, before the v6 format backup sets undergo the data
migration process. Refer to Replication of v6 backup sets on AhsayCBS v8 for further
details.
Quick Storage
Provisioning ✘ ✓
As time goes by, your replication data may fill up the capacity on your AhsayCBS
replication server or cloud storage and you will have to expand the storage capacity to
accommodate the replication data. Comparing to AhsayCBS deployment, cloud
deployment allows a hassle-free storage upgrade where you only have to pay your cloud
storage service provider to get the upgrade done.
Upfront Hardware
Investment ✓ ✘
Depending on your organization’s budget on deploying the replication service, it is
generally more cost-saving to deploy the replication service on cloud storage instead of
the AhsayCBS as you do not need to invest on hardware and hosting upfront.

www.ahsay.com 351
7.3.3 Deployment Combinations of Backup and Replication Servers
It is only possible for a single replication server or cloud storage to host replication data
from multiple backup servers, but not the other way around, i.e. a single backup server
replicating to multiple replication servers or cloud storage destinations. Refer to the
illustration below for details on the possible deployment combinations.
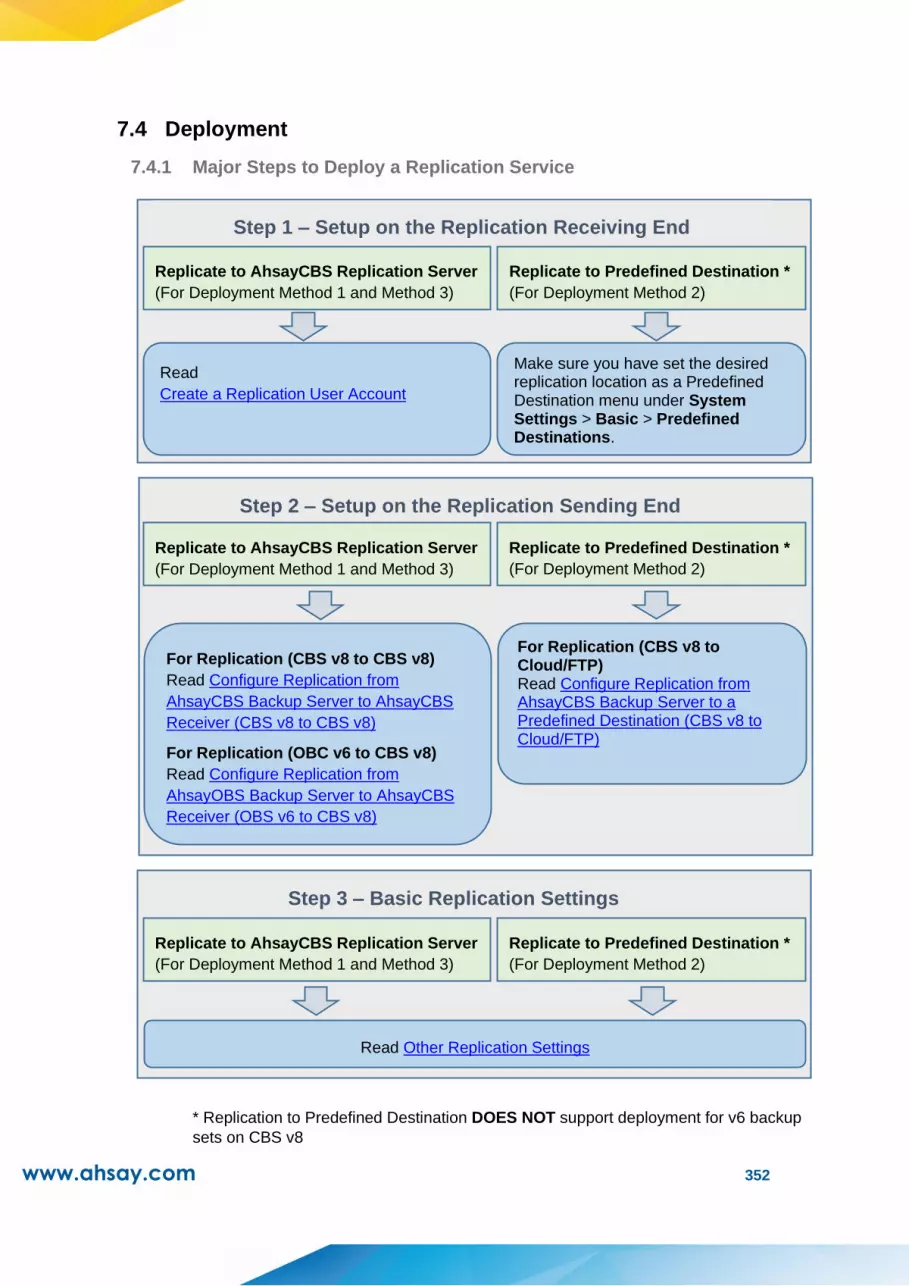
www.ahsay.com 352
7.4 Deployment
7.4.1 Major Steps to Deploy a Replication Service
* Replication to Predefined Destination DOES NOT support deployment for v6 backup
* Replication to Predefined Destination DOES NOT support deployment for v6 backup
sets on CBS v8
Step 1 – Setup on the Replication Receiving End
Replicate to AhsayCBS Replication Server
(For Deployment Method 1 and Method 3)
Replicate to Predefined Destination *
(For Deployment Method 2)
Read
Create a Replication User Account
Make sure you have set the desired replication location as a Predefined Destination menu under System Settings > Basic > Predefined Destinations.
Step 2 – Setup on the Replication Sending End
For Replication (CBS v8 to CBS v8)
Read Configure Replication from
AhsayCBS Backup Server to AhsayCBS
Receiver (CBS v8 to CBS v8)
For Replication (OBC v6 to CBS v8)
Read Configure Replication from
AhsayOBS Backup Server to AhsayCBS
Receiver (OBS v6 to CBS v8)
For Replication (CBS v8 to Cloud/FTP) Read Configure Replication from AhsayCBS Backup Server to a Predefined Destination (CBS v8 to Cloud/FTP)
Replicate to AhsayCBS Replication Server
(For Deployment Method 1 and Method 3)
Replicate to Predefined Destination *
(For Deployment Method 2)
Step 3 – Basic Replication Settings
Read Other Replication Settings
Replicate to AhsayCBS Replication Server
(For Deployment Method 1 and Method 3)
Replicate to Predefined Destination *
(For Deployment Method 2)
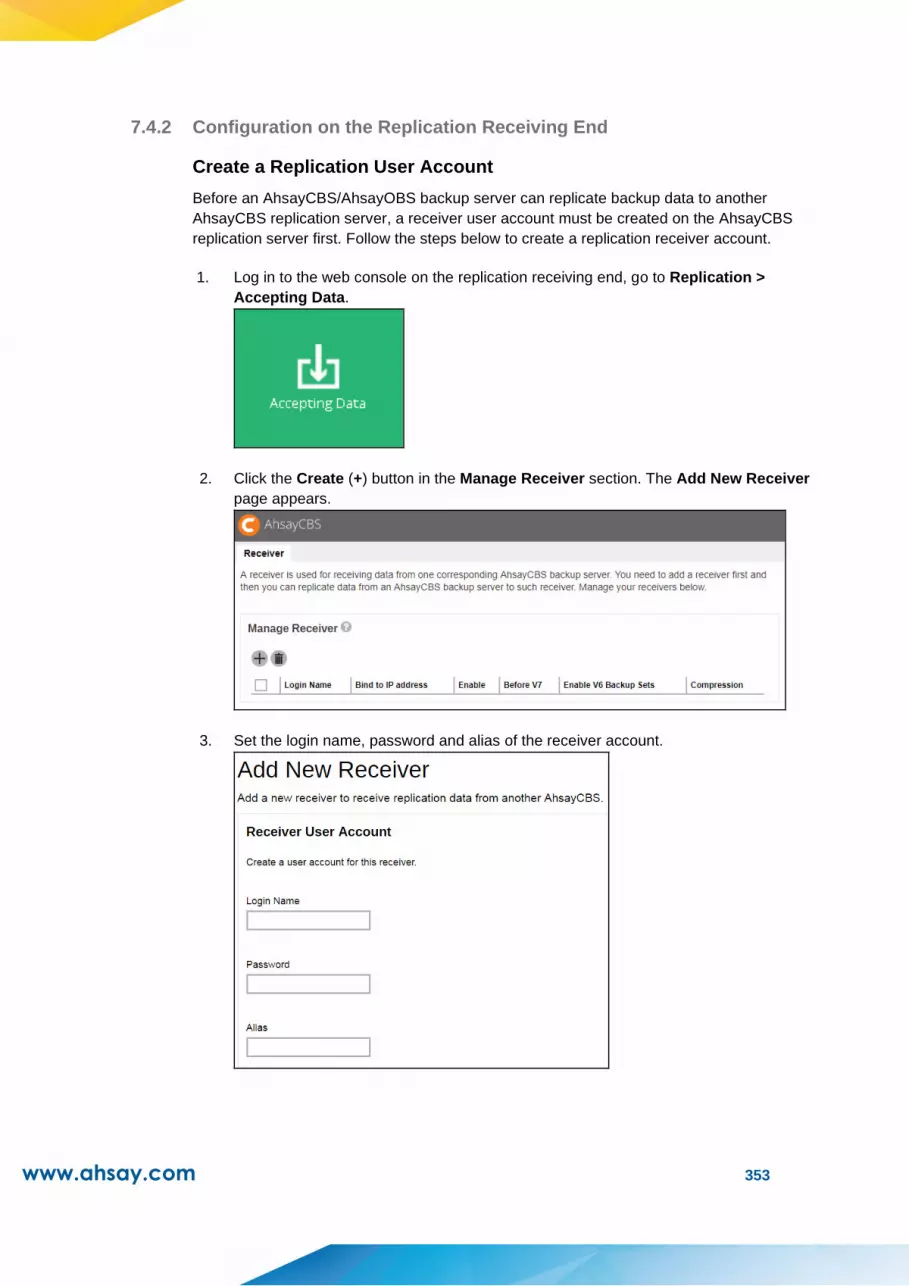
www.ahsay.com 353
7.4.2 Configuration on the Replication Receiving End
Create a Replication User Account
Before an AhsayCBS/AhsayOBS backup server can replicate backup data to another
AhsayCBS replication server, a receiver user account must be created on the AhsayCBS
replication server first. Follow the steps below to create a replication receiver account.
1. Log in to the web console on the replication receiving end, go to Replication >
Accepting Data.
2. Click the Create (+) button in the Manage Receiver section. The Add New Receiver
page appears.
3. Set the login name, password and alias of the receiver account.

www.ahsay.com 354
4. Configure the source backup server host settings, including the http/https protocol,
source backup server host name and port number.
Backup Server Host – IP address / host name of the backup server
Backup Server Version – select the source backup server version.
➢ If you select V7 or above, it means the source backup server is an AhsayCBS
version 8 backup server.
If you have upgraded your backup server to v8 from v6, and still wish to
replicate backup sets in v6 format before they are migrated to v8 format, make
sure you select V7 or above in this menu.
System User – the system user login of the source backup server
System Password - the system user password of the source backup
server
➢ If you select Before 7 as the backup server version, enter the bind to IP address
and the replication port. “0.0.0.0” and “9444” are the default values, you can
assign a specific IP if you have multiple network cards. For multiple backup
servers’ replication, a unique replication port number is required to set, such as
“9444”.

www.ahsay.com 355
5. Switch the Enable V6 Backup Sets Replication on if you will replicate v6 backup
sets to the replication server.
6. Configure the retention settings for the replicated data.
➢ Restore Point Interval – defines the number of days before new snapshot of
the replicated data will be taken and stored in the retention area. A retention
snapshot will be taken only when the following two conditions are met:
There is data received from the backup server
Restore Point Interval has reached
No retention snapshot will be taken if there is no data received, even when the
Restore Point Interval has reached.
➢ Retention Customization Policy – defines the number of days the old
snapshot copies to be retained in the retention area.
7. Click the icon at the bottom right corner to proceed when you are done with
settings.
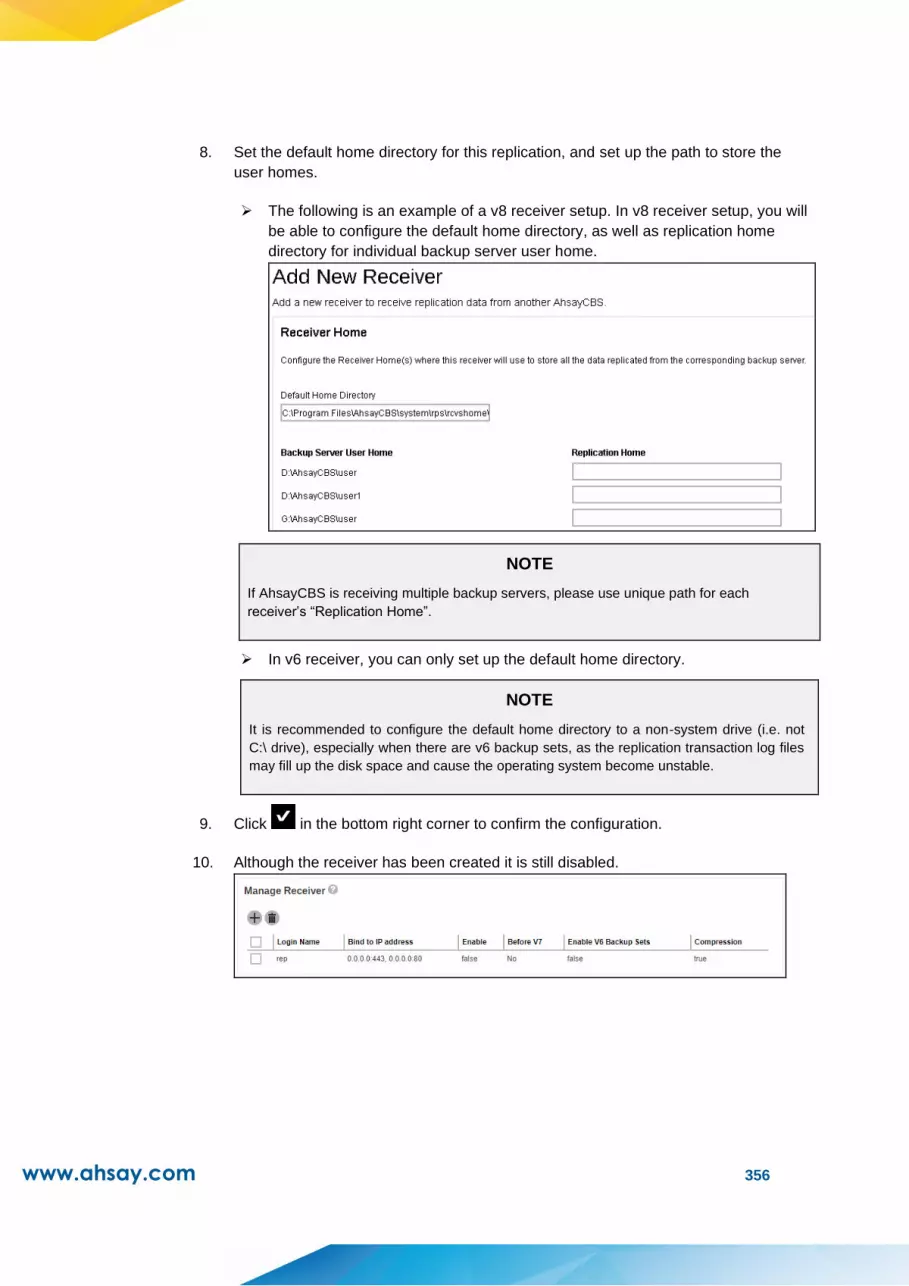
www.ahsay.com 356
8. Set the default home directory for this replication, and set up the path to store the
user homes.
➢ The following is an example of a v8 receiver setup. In v8 receiver setup, you will
be able to configure the default home directory, as well as replication home
directory for individual backup server user home.
NOTE
If AhsayCBS is receiving multiple backup servers, please use unique path for each
receiver’s “Replication Home”.
➢ In v6 receiver, you can only set up the default home directory.
NOTE
It is recommended to configure the default home directory to a non-system drive (i.e. not
C:\ drive), especially when there are v6 backup sets, as the replication transaction log files
may fill up the disk space and cause the operating system become unstable.
9. Click in the bottom right corner to confirm the configuration.
10. Although the receiver has been created it is still disabled.
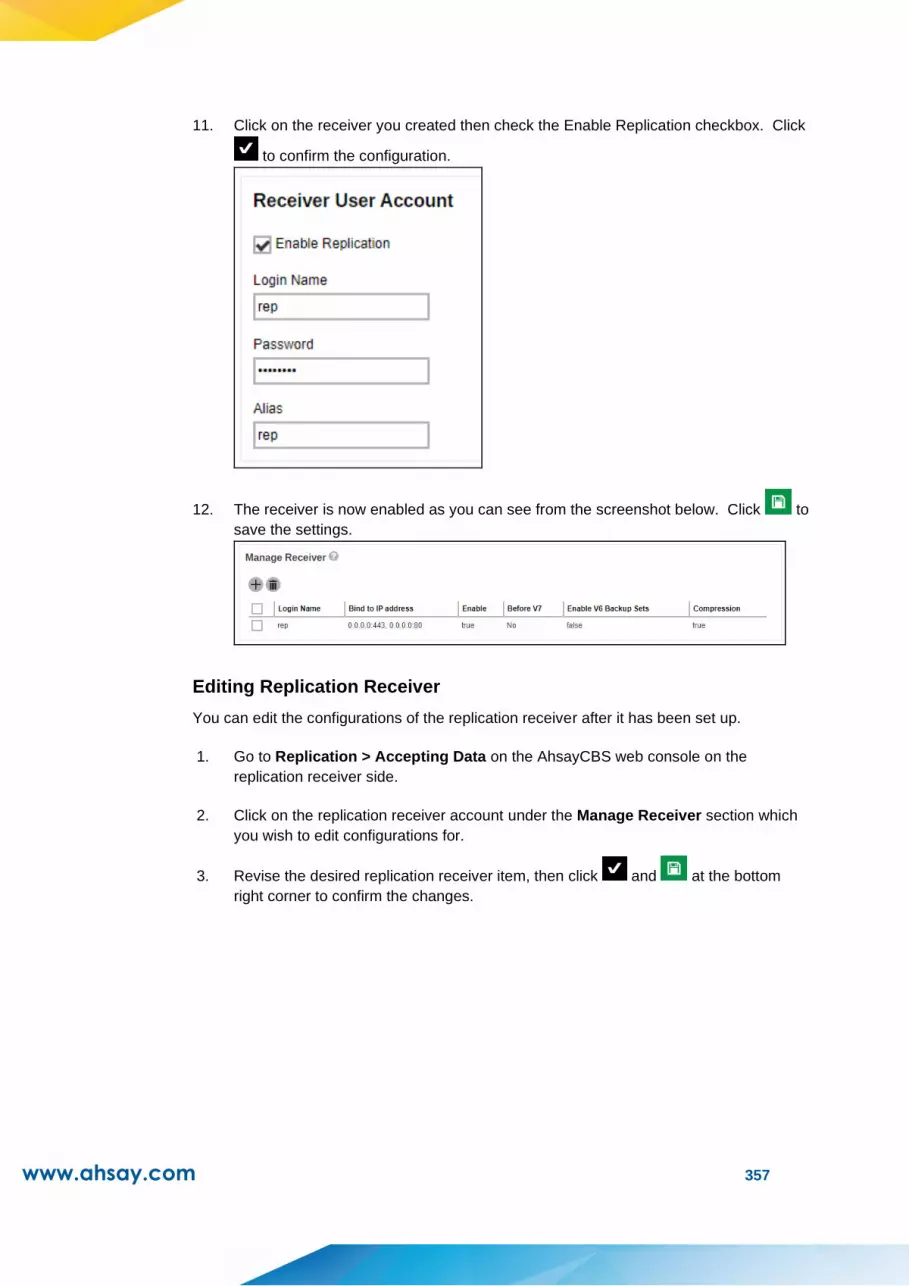
www.ahsay.com 357
11. Click on the receiver you created then check the Enable Replication checkbox. Click
to confirm the configuration.
12. The receiver is now enabled as you can see from the screenshot below. Click to
save the settings.
Editing Replication Receiver
You can edit the configurations of the replication receiver after it has been set up.
1. Go to Replication > Accepting Data on the AhsayCBS web console on the
replication receiver side.
2. Click on the replication receiver account under the Manage Receiver section which
you wish to edit configurations for.
3. Revise the desired replication receiver item, then click and at the bottom
right corner to confirm the changes.
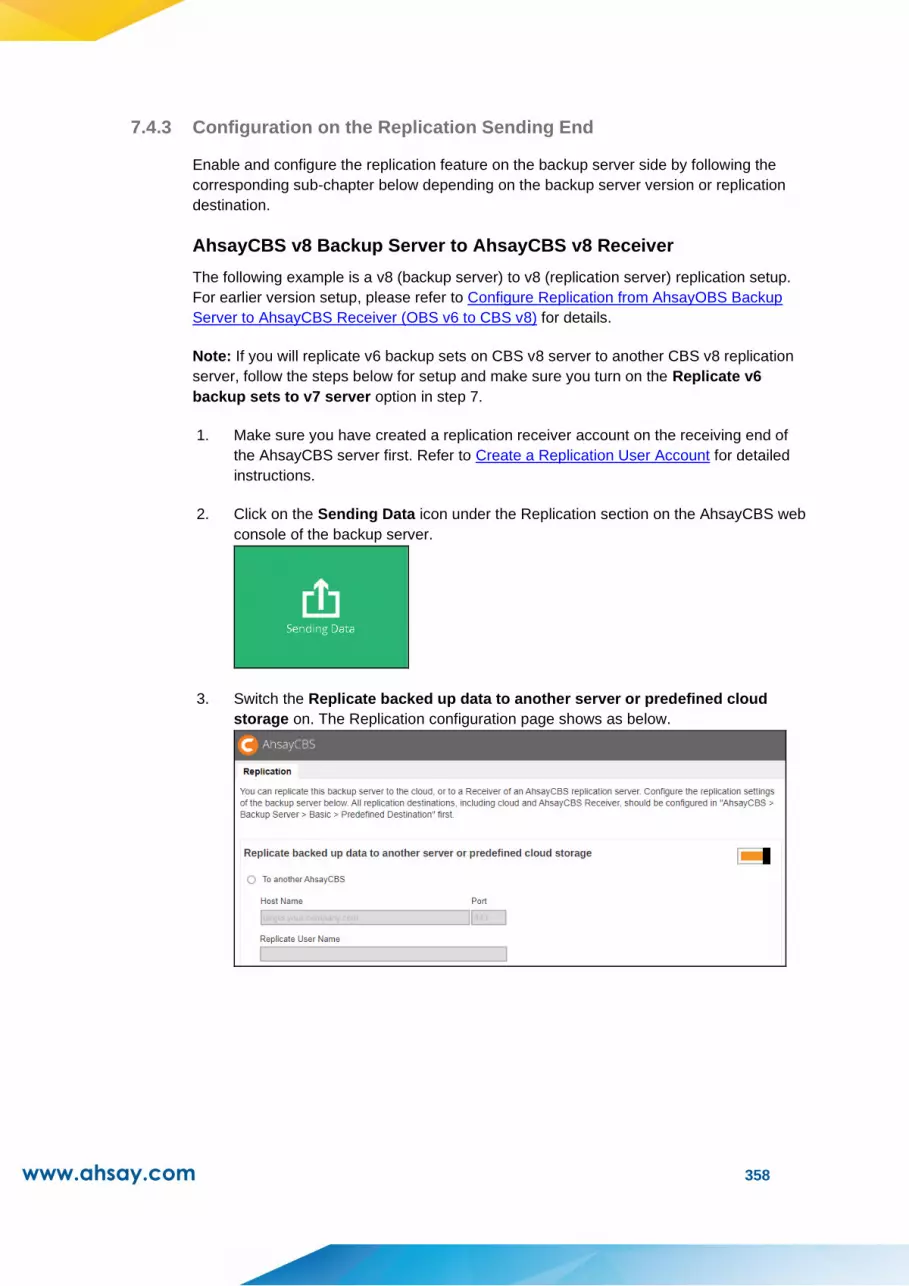
www.ahsay.com 358
7.4.3 Configuration on the Replication Sending End
Enable and configure the replication feature on the backup server side by following the
corresponding sub-chapter below depending on the backup server version or replication
destination.
AhsayCBS v8 Backup Server to AhsayCBS v8 Receiver
The following example is a v8 (backup server) to v8 (replication server) replication setup.
For earlier version setup, please refer to Configure Replication from AhsayOBS Backup
Server to AhsayCBS Receiver (OBS v6 to CBS v8) for details.
Note: If you will replicate v6 backup sets on CBS v8 server to another CBS v8 replication
server, follow the steps below for setup and make sure you turn on the Replicate v6
backup sets to v7 server option in step 7.
1. Make sure you have created a replication receiver account on the receiving end of
the AhsayCBS server first. Refer to Create a Replication User Account for detailed
instructions.
2. Click on the Sending Data icon under the Replication section on the AhsayCBS web
console of the backup server.
3. Switch the Replicate backed up data to another server or predefined cloud
storage on. The Replication configuration page shows as below.
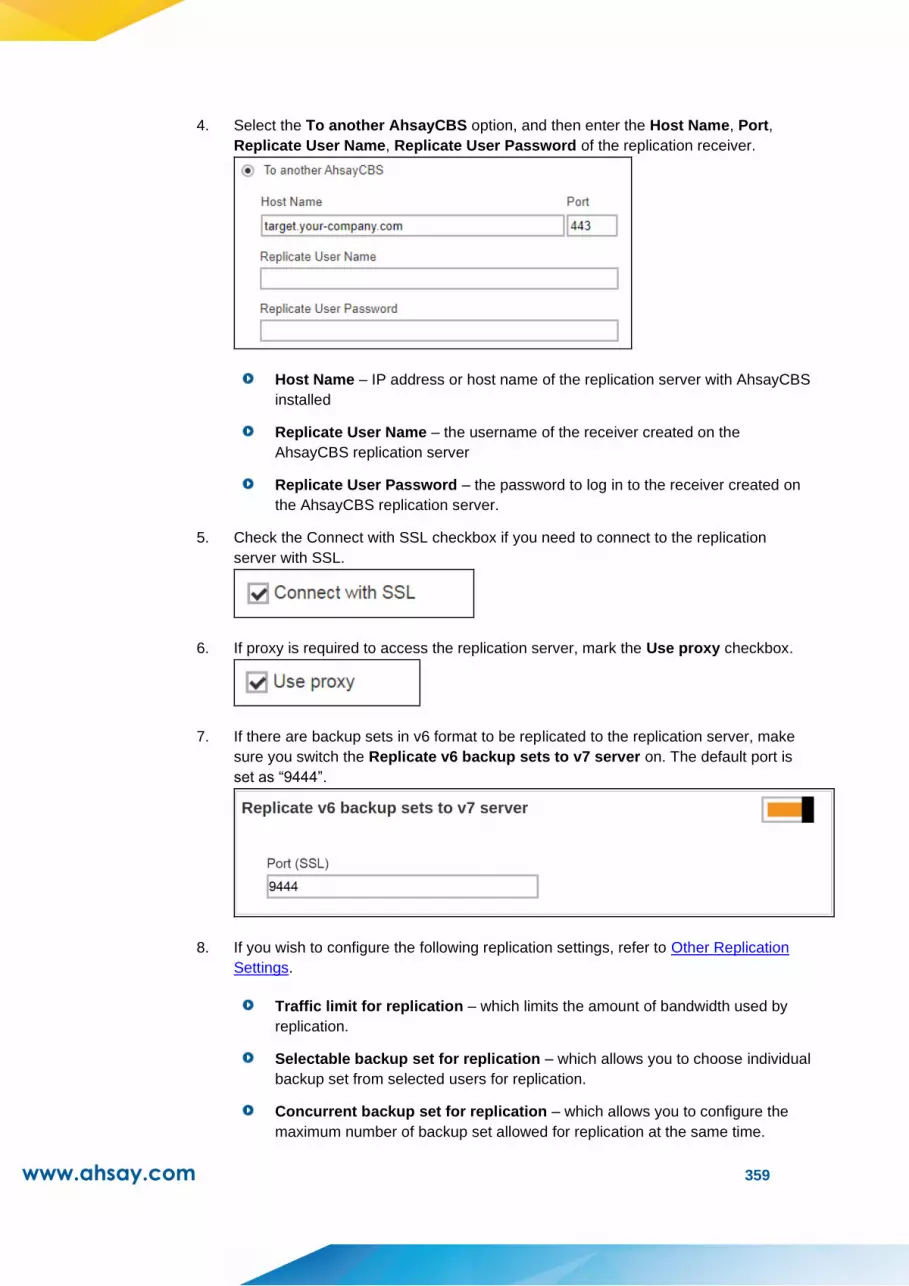
www.ahsay.com 359
4. Select the To another AhsayCBS option, and then enter the Host Name, Port,
Replicate User Name, Replicate User Password of the replication receiver.
Host Name – IP address or host name of the replication server with AhsayCBS
installed
Replicate User Name – the username of the receiver created on the
AhsayCBS replication server
Replicate User Password – the password to log in to the receiver created on
the AhsayCBS replication server.
5. Check the Connect with SSL checkbox if you need to connect to the replication
server with SSL.
6. If proxy is required to access the replication server, mark the Use proxy checkbox.
7. If there are backup sets in v6 format to be replicated to the replication server, make
sure you switch the Replicate v6 backup sets to v7 server on. The default port is
set as “9444”.
8. If you wish to configure the following replication settings, refer to Other Replication
Settings.
Traffic limit for replication – which limits the amount of bandwidth used by
replication.
Selectable backup set for replication – which allows you to choose individual
backup set from selected users for replication.
Concurrent backup set for replication – which allows you to configure the
maximum number of backup set allowed for replication at the same time.

www.ahsay.com 360
Cyclic Redundancy Check (CRC) Checking – which allows you to enable
this checking to run automatically for verifying the integrity of the replicated
data.
9. Click the icon at the bottom right corner to confirm the configuration.
AhsayOBS v6 Backup Server to AhsayCBS v8 Receiver
It is suggested to upgrade your v6 backup server to v8 so that you can enjoy the latest
features provided by the AhsayCBS. If you still wish to continue using the v6 backup server
to replicate to a v8 receiver, follow the steps below for configuration of the v6 backup
server.
1. Make sure you have created a replication receiver account on the receiving end of
the AhsayCBS server first. Refer to Create a Replication User Account for detailed
instructions.
2. In your backup server, navigate to Manage System -> Replication Config, then
enter the username, password, target host and connecting port.
3. Click Update to confirm the settings.
NOTE
The index files stored in the v6 backup server will not be replicated to the AhsayCBS
(Replication Server) nor any cloud storage.
There is no multiple threads replication.
The AhsayCBS replication server cannot be started as a v6 backup server.
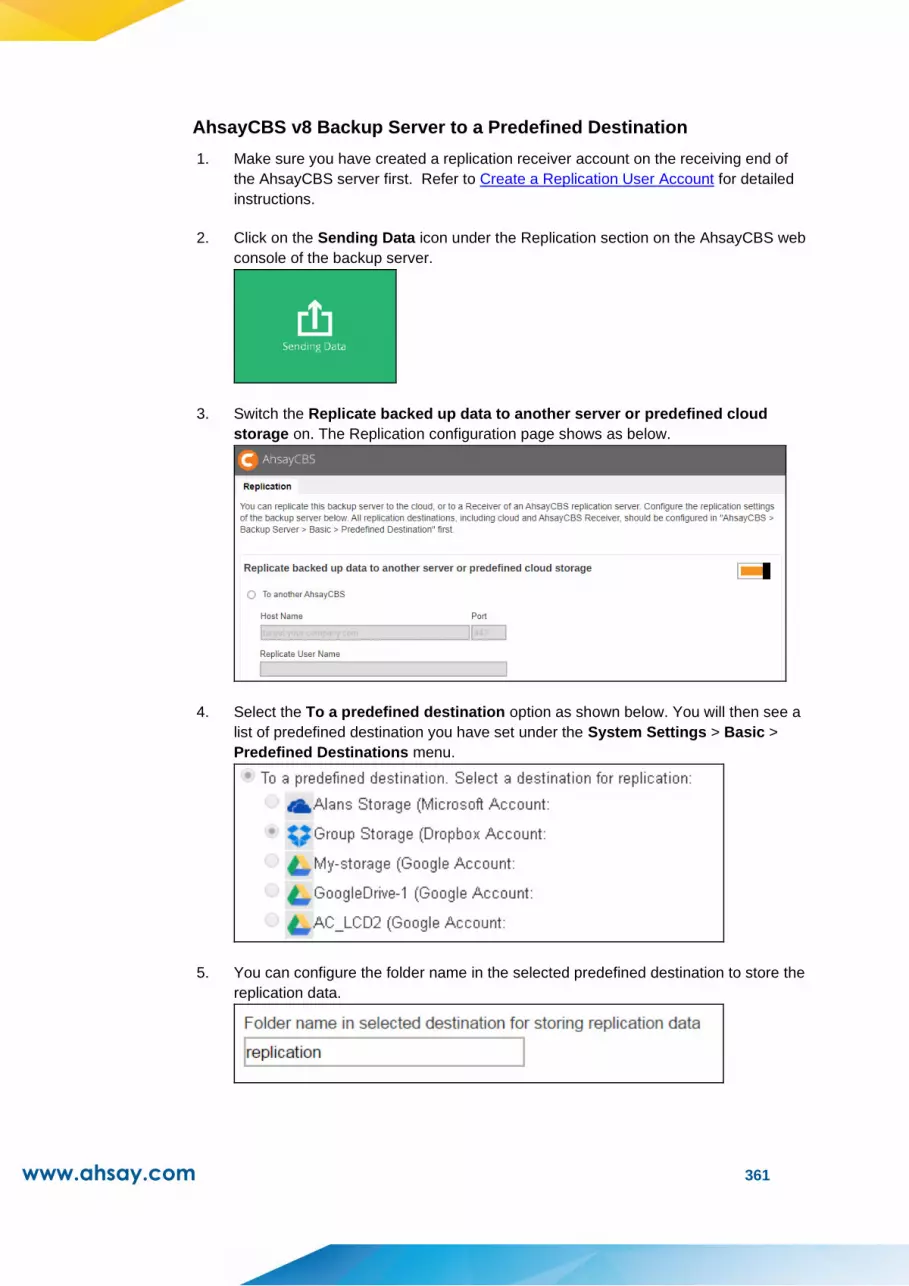
www.ahsay.com 361
AhsayCBS v8 Backup Server to a Predefined Destination
1. Make sure you have created a replication receiver account on the receiving end of
the AhsayCBS server first. Refer to Create a Replication User Account for detailed
instructions.
2. Click on the Sending Data icon under the Replication section on the AhsayCBS web
console of the backup server.
3. Switch the Replicate backed up data to another server or predefined cloud
storage on. The Replication configuration page shows as below.
4. Select the To a predefined destination option as shown below. You will then see a
list of predefined destination you have set under the System Settings > Basic >
Predefined Destinations menu.
5. You can configure the folder name in the selected predefined destination to store the
replication data.

www.ahsay.com 362
6. If proxy is required to access the replication server, mark the Use proxy checkbox.
7. If you wish to configure the following replication settings, refer to Other Replication
Settings.
Traffic limit for replication – which limits the amount of bandwidth used by
replication.
Selectable backup set for replication – which allows you to choose individual
backup set from selected users for replication.
Concurrent backup set for replication – which allows you to configure the
maximum number of backup set allowed for replication at the same time.
Cyclic Redundancy Check (CRC) Checking – which allows you to enable
this checking to run automatically for verifying the integrity of the replicated
data.
8. Click the icon at the bottom right corner to confirm the configuration.
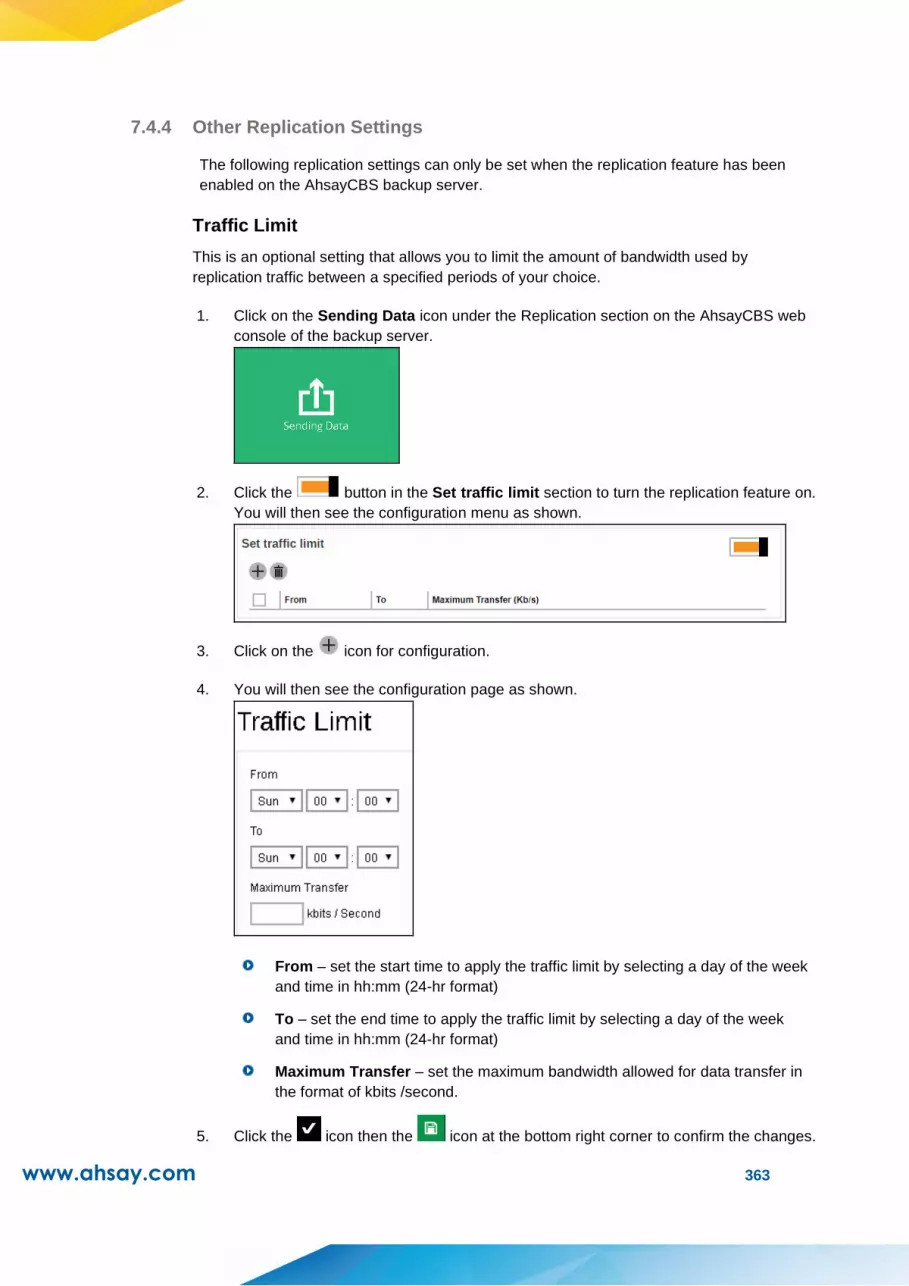
www.ahsay.com 363
7.4.4 Other Replication Settings
The following replication settings can only be set when the replication feature has been
enabled on the AhsayCBS backup server.
Traffic Limit
This is an optional setting that allows you to limit the amount of bandwidth used by
replication traffic between a specified periods of your choice.
1. Click on the Sending Data icon under the Replication section on the AhsayCBS web
console of the backup server.
2. Click the button in the Set traffic limit section to turn the replication feature on.
You will then see the configuration menu as shown.
3. Click on the icon for configuration.
4. You will then see the configuration page as shown.
From – set the start time to apply the traffic limit by selecting a day of the week
and time in hh:mm (24-hr format)
To – set the end time to apply the traffic limit by selecting a day of the week
and time in hh:mm (24-hr format)
Maximum Transfer – set the maximum bandwidth allowed for data transfer in
the format of kbits /second.
5. Click the icon then the icon at the bottom right corner to confirm the changes.
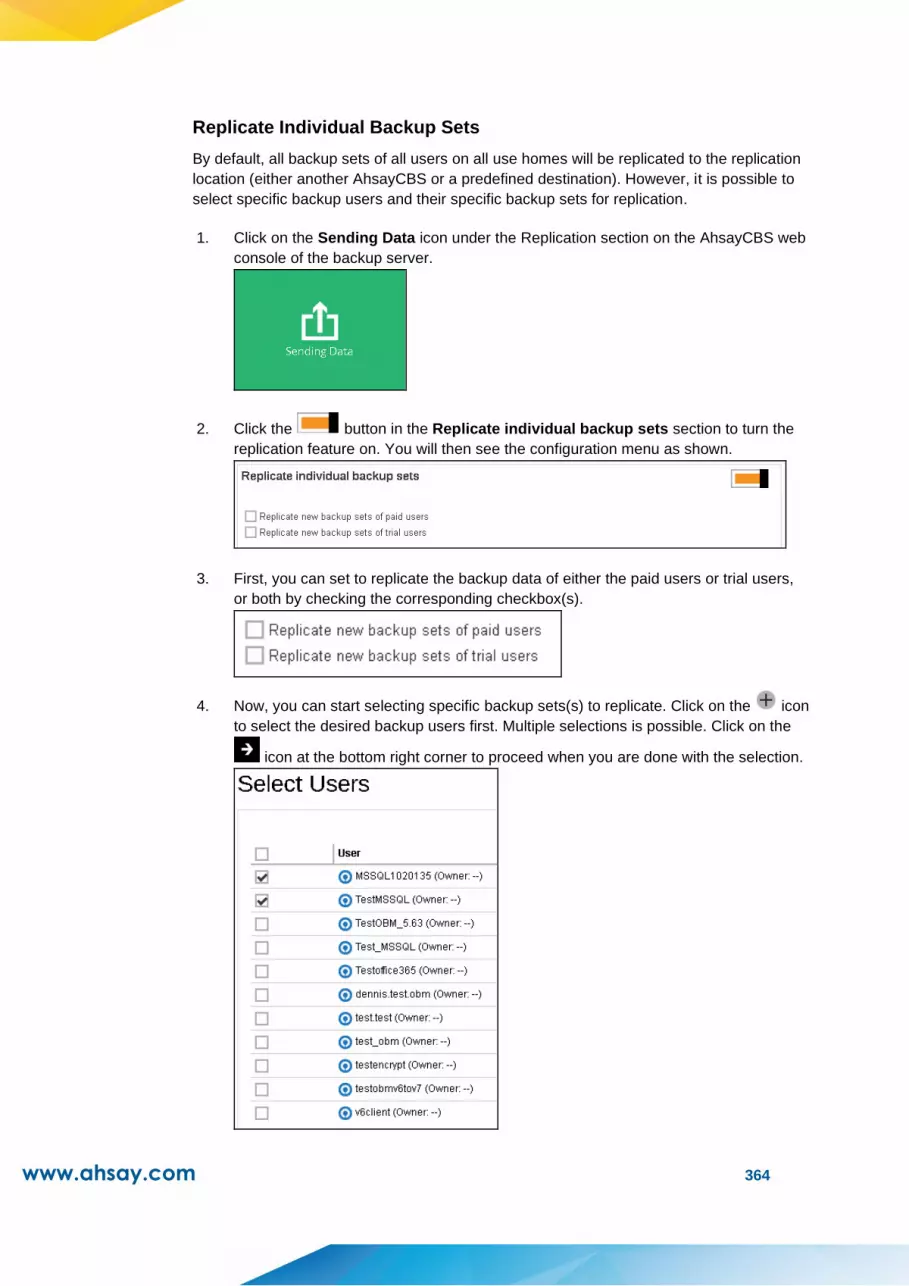
www.ahsay.com 364
Replicate Individual Backup Sets
By default, all backup sets of all users on all use homes will be replicated to the replication
location (either another AhsayCBS or a predefined destination). However, it is possible to
select specific backup users and their specific backup sets for replication.
1. Click on the Sending Data icon under the Replication section on the AhsayCBS web
console of the backup server.
2. Click the button in the Replicate individual backup sets section to turn the
replication feature on. You will then see the configuration menu as shown.
3. First, you can set to replicate the backup data of either the paid users or trial users,
or both by checking the corresponding checkbox(s).
4. Now, you can start selecting specific backup sets(s) to replicate. Click on the icon
to select the desired backup users first. Multiple selections is possible. Click on the
icon at the bottom right corner to proceed when you are done with the selection.
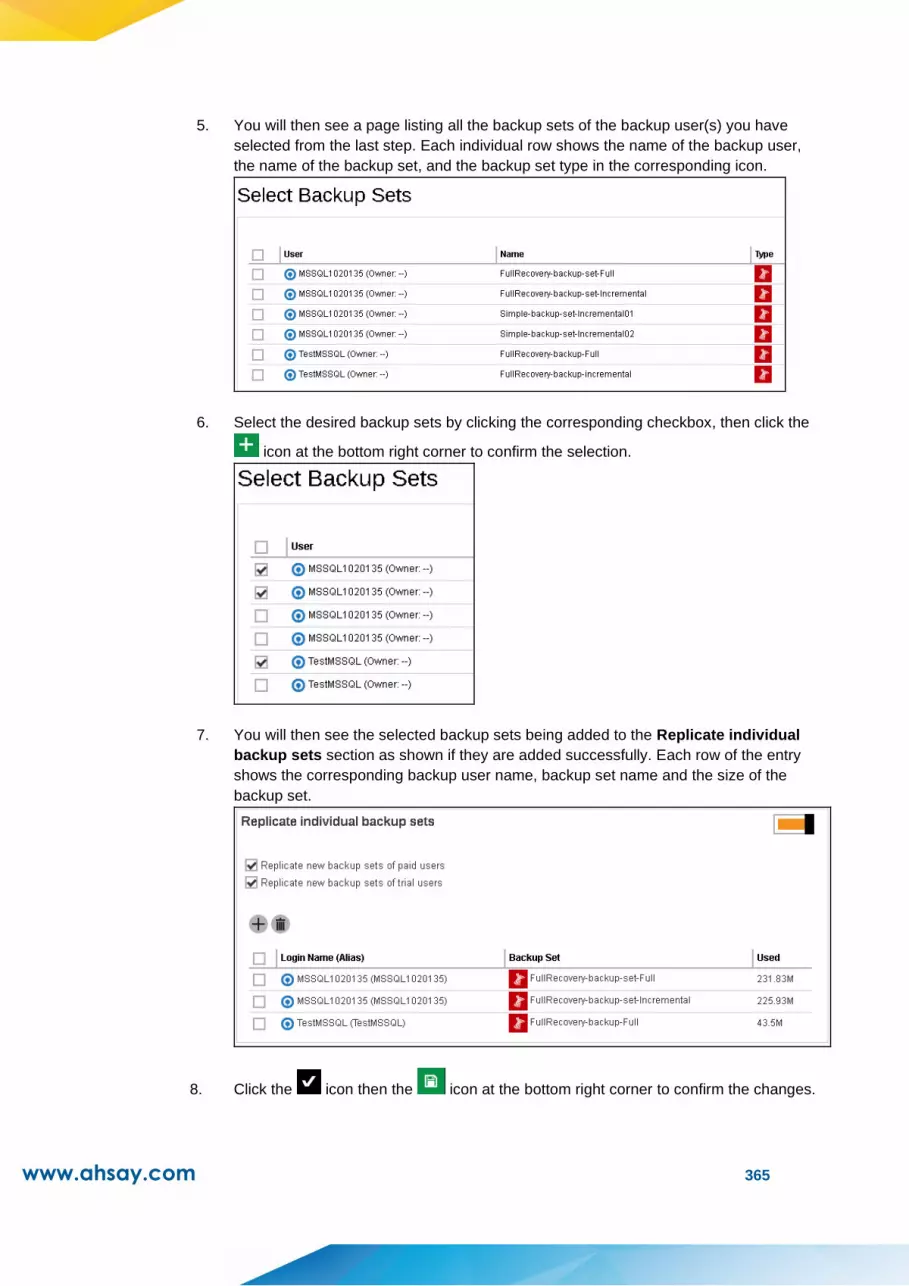
www.ahsay.com 365
5. You will then see a page listing all the backup sets of the backup user(s) you have
selected from the last step. Each individual row shows the name of the backup user,
the name of the backup set, and the backup set type in the corresponding icon.
6. Select the desired backup sets by clicking the corresponding checkbox, then click the
icon at the bottom right corner to confirm the selection.
7. You will then see the selected backup sets being added to the Replicate individual
backup sets section as shown if they are added successfully. Each row of the entry
shows the corresponding backup user name, backup set name and the size of the
backup set.
8. Click the icon then the icon at the bottom right corner to confirm the changes.

www.ahsay.com 366
Setting the Number of Backup Sets to Replicate Concurrently
You are able to change the number of backup sets to replicate concurrently on the
AhsayCBS backup server web console under Replication > Sending Data.
Under the Replicate backed up data to another server or predefined cloud storage section,
there is a drop-down menu for the No. of backup sets to replicate concurrently setting. The
minimum number of backup sets that can be configured to replicate concurrently is 1 while
the maximum is 16.
The default value is Auto, with this setting the number of backup sets to replicate
concurrently is automatically computed. The way this value will be computed depends on
the setting of the maximum threads for replication option which can be added in the
%CBS_INSTALL_PATH%\conf\cbs.opt file.
Here are the two ways that the Auto value will be computed:
If the maximum allowed number of replication threads is enabled
com.ahsay.cbs.obs.config.Index.RepMaxThreads=true
The default (Auto) number of concurrent backup sets = the number of CPU cores
For example, if the AhsayCBS server has a total of 8 CPU cores, then the number of
concurrent backup set to replicate is 8.
NOTE
There is no maximum value for the default (Auto) value, so if the AhsayCBS
server has a total of 64 CPU cores then the Auto value will be 64.
If the maximum allowed number of replication threads is disabled (default)
com.ahsay.cbs.obs.config.Index.RepMaxThreads=false
The default (Auto) number of concurrent backup sets = Total number of CPU cores / 8
For example, if the AhsayCBS server has a total of 8 CPU cores, then the number of
concurrent backup set to replicate is 1.
Another example, if the AhsayCBS server has a total of 16 CPU cores, then the
number of concurrent backup set to replicate is 2.
NOTE
There is a minimum number for the default (Auto) value which is 1. While the
maximum number for the default (Auto) value is 4.

www.ahsay.com 367
You may adjust the concurrent backup set value from the drop-down menu as highlighted
above. In case you find the default setting is too low, the value can be increased to a larger
value. Or if the large value is causing performance issues such as hard disk I/O or high
network bandwidth utilization, it can be decreased to a lower value.
For more information regarding replication threads please refer to this article: FAQ: How do
I increase the number of replication threads on my AhsayCBS backup server to improve
replication speed?
NOTE
The multiple threads feature supports the backup set that is created/converted in V8 format. This
feature does not support users who are still using v6 backup clients, as their backup sets are still
using the legacy v6 backup set data format. Refer to the Backup Data Migration section for further
information on converting backup set format.

www.ahsay.com 368
Cyclic Redundancy Check (CRC) Checking
The Cyclic Redundancy Check (CRC) Checking job will check all new files replicated to
the AhsayCBS receiver since the last CRC job. This checking can be run automatically for
verifying the integrity of the replicated data.
A replication receiver must have been set before you can enable the Cyclic Redundancy
Check (CRC) Checking.
1. Click on the Accepting Data icon under the Replication section on the AhsayCBS
web console of the backup server.
2. Click on the receiver which you wish to enable the CRC checking feature.
3. Scroll to the Cyclic Redundancy Check (CRC) Checking section and switch on the
feature by sliding the icon on the right.
4. The CRC checking is set to run on the second and forth Saturdays of every month by
default. You can configure the time for the checking to run on the specified dates.
5. Click the icon then the icon at the bottom right corner to confirm the changes.
NOTE
Please note that the Cyclic Redundancy Check (CRC) Checking feature option is only
available for backwards compatibility:
➢ AhsayOBS v6 to AhsayCBS v8
It is not supported in replication setups for:
➢ AhsayCBS v8 to AhsayCBS v8
➢ AhsayCBS v7 to AhsayCBS v8

www.ahsay.com 369
7.5 Recovery Process Overview
After you have deployed the replication server, data from the backup server will be replicated to
the replication destination you have selected. In the event of a system down on your backup
server, or you wish to retrieve deleted data from the replication destination, you can recover the
configurations and backup data replicated from the backup server by using any one of the
recovery methods below.
Method 1 – Rebuild AhsayCBS from Replication
Introduction
This recovery method rebuilds the AhsayCBS by extracting AhsayCBS configuration, system
files, user profiles and backup data from the replication destination then restoring it either to
the Backup Server or restoring the raw data alone using a Backup Client Agent (AhsayOBM /
AhsayACB).
Steps
Step 1: Confirm Replication Status by Checking Replication Logs
Step 2: Extract Data from Replication Destination
➢ From AhsayCBS Replication Server
➢ From a Predefined Destination - Cloud storage
➢ From FTP/SFTP
➢ From Local/Mapped Drive/Removable Drive
➢ From v6 Replication
➢ From Snapshot in Retention Area
Step 3: Restore replication data extracted from the previous step using either method below
➢ Restore Data to the Backup Server
-OR-
➢ Restore the Raw Data Alone using a Backup Client Agent
Pros
Selective Backup Set Restore
After extracting the backed up data from the replication destination, you have the flexibility to
restore only the selected backup sets from selected backup users, instead of restoring all
data at once.
Restore as Raw Data
Instead of restoring the backed up data to the backup server, you can only restore the raw
data by using a client backup agent (AhsayOBM / AhsayACB).
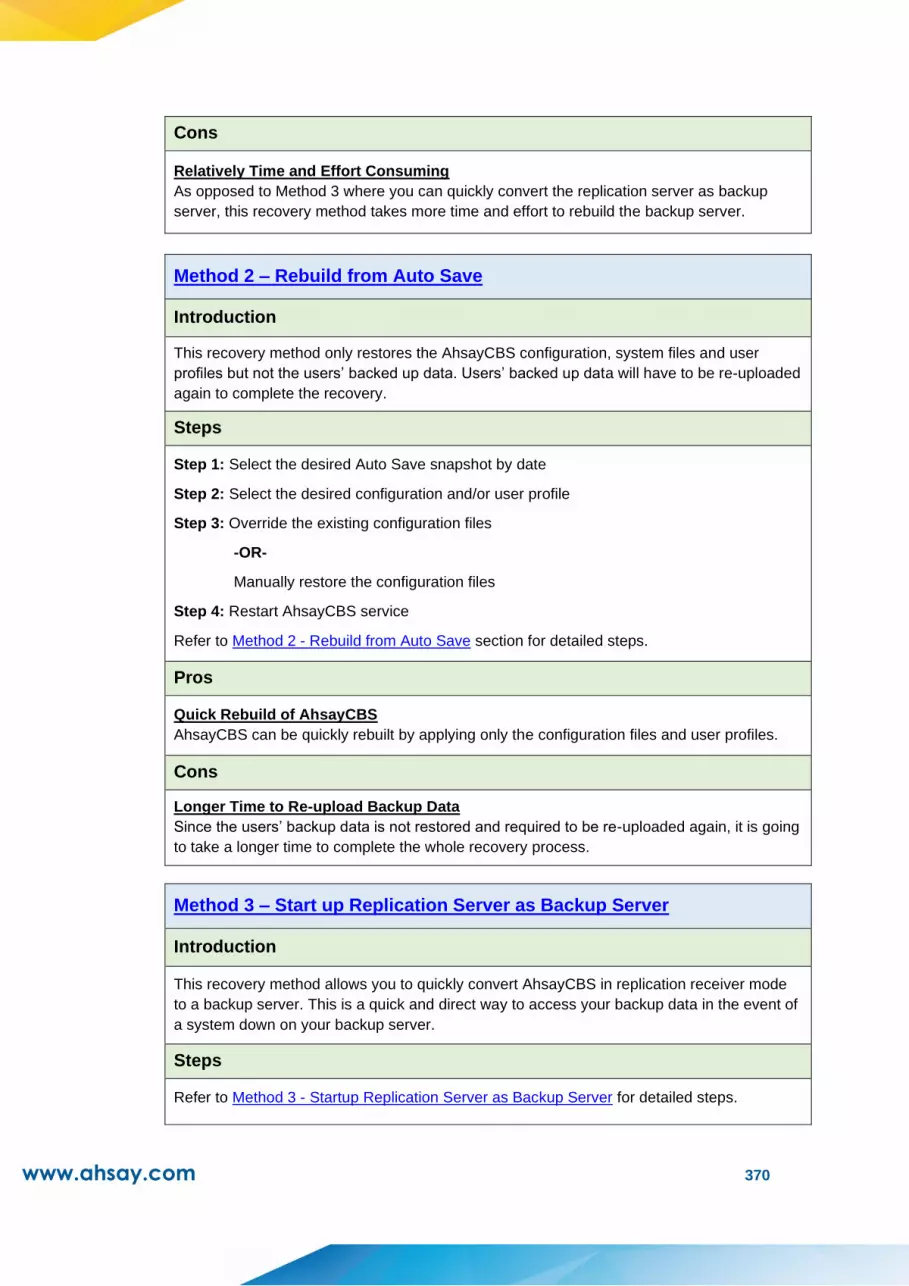
www.ahsay.com 370
Cons
Relatively Time and Effort Consuming
As opposed to Method 3 where you can quickly convert the replication server as backup
server, this recovery method takes more time and effort to rebuild the backup server.
Method 2 – Rebuild from Auto Save
Introduction
This recovery method only restores the AhsayCBS configuration, system files and user
profiles but not the users’ backed up data. Users’ backed up data will have to be re-uploaded
again to complete the recovery.
Steps
Step 1: Select the desired Auto Save snapshot by date
Step 2: Select the desired configuration and/or user profile
Step 3: Override the existing configuration files
-OR-
Manually restore the configuration files
Step 4: Restart AhsayCBS service
Refer to Method 2 - Rebuild from Auto Save section for detailed steps.
Pros
Quick Rebuild of AhsayCBS
AhsayCBS can be quickly rebuilt by applying only the configuration files and user profiles.
Cons
Longer Time to Re-upload Backup Data
Since the users’ backup data is not restored and required to be re-uploaded again, it is going
to take a longer time to complete the whole recovery process.
Method 3 – Start up Replication Server as Backup Server
Introduction
This recovery method allows you to quickly convert AhsayCBS in replication receiver mode
to a backup server. This is a quick and direct way to access your backup data in the event of
a system down on your backup server.
Steps
Refer to Method 3 - Startup Replication Server as Backup Server for detailed steps.
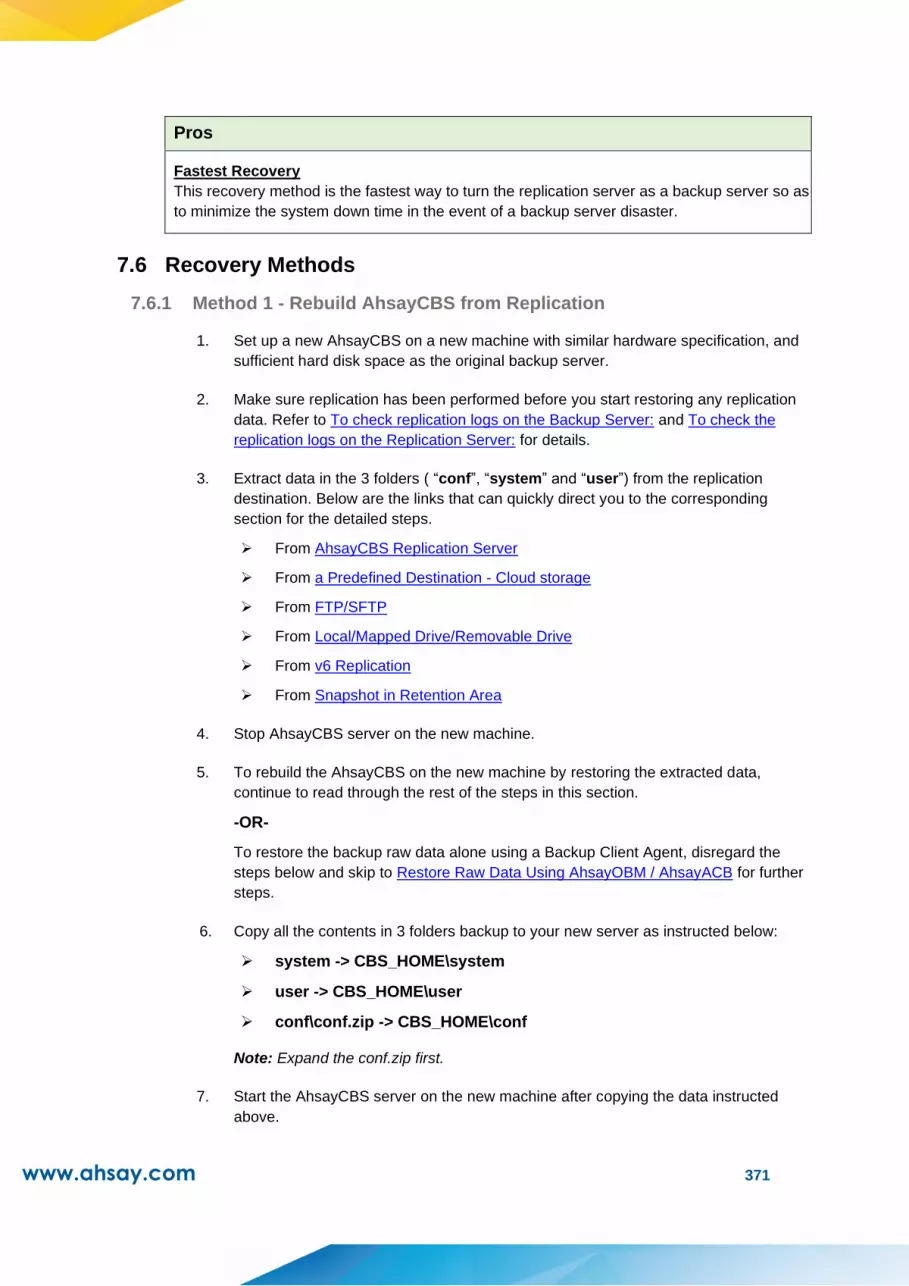
www.ahsay.com 371
Pros
Fastest Recovery
This recovery method is the fastest way to turn the replication server as a backup server so as
to minimize the system down time in the event of a backup server disaster.
7.6 Recovery Methods
7.6.1 Method 1 - Rebuild AhsayCBS from Replication
1. Set up a new AhsayCBS on a new machine with similar hardware specification, and
sufficient hard disk space as the original backup server.
2. Make sure replication has been performed before you start restoring any replication
data. Refer to To check replication logs on the Backup Server: and To check the
replication logs on the Replication Server: for details.
3. Extract data in the 3 folders ( “conf”, “system” and “user”) from the replication
destination. Below are the links that can quickly direct you to the corresponding
section for the detailed steps.
➢ From AhsayCBS Replication Server
➢ From a Predefined Destination - Cloud storage
➢ From FTP/SFTP
➢ From Local/Mapped Drive/Removable Drive
➢ From v6 Replication
➢ From Snapshot in Retention Area
4. Stop AhsayCBS server on the new machine.
5. To rebuild the AhsayCBS on the new machine by restoring the extracted data,
continue to read through the rest of the steps in this section.
-OR-
To restore the backup raw data alone using a Backup Client Agent, disregard the
steps below and skip to Restore Raw Data Using AhsayOBM / AhsayACB for further
steps.
6. Copy all the contents in 3 folders backup to your new server as instructed below:
➢ system -> CBS_HOME\system
➢ user -> CBS_HOME\user
➢ conf\conf.zip -> CBS_HOME\conf
Note: Expand the conf.zip first.
7. Start the AhsayCBS server on the new machine after copying the data instructed
above.
www.ahsay.com 372
8. Logon to the AhsayCBS web management console.
9. You will notice that there is a license error. This is because your AhsayCBS is
running on the new machine with hardware and settings changed. Please contact our
support with your licensee name and license key. We shall relax the license for you.
There is a 14 days grace period before the license deactivates.
Here is a list of suggested items to check after you started up your AhsayCBS.
1. Check SMTP settings in AhsayCBS web console by navigating to System Settings
> Basic > Email.
2. Check all users’ profile, backup and policy group settings in AhsayCBS web console
by navigating to Backup/Restore > Users, Groups & Policies.
3. Check https connection to the AhsayCBS on different browsers (IE, Firefox and
Chrome).
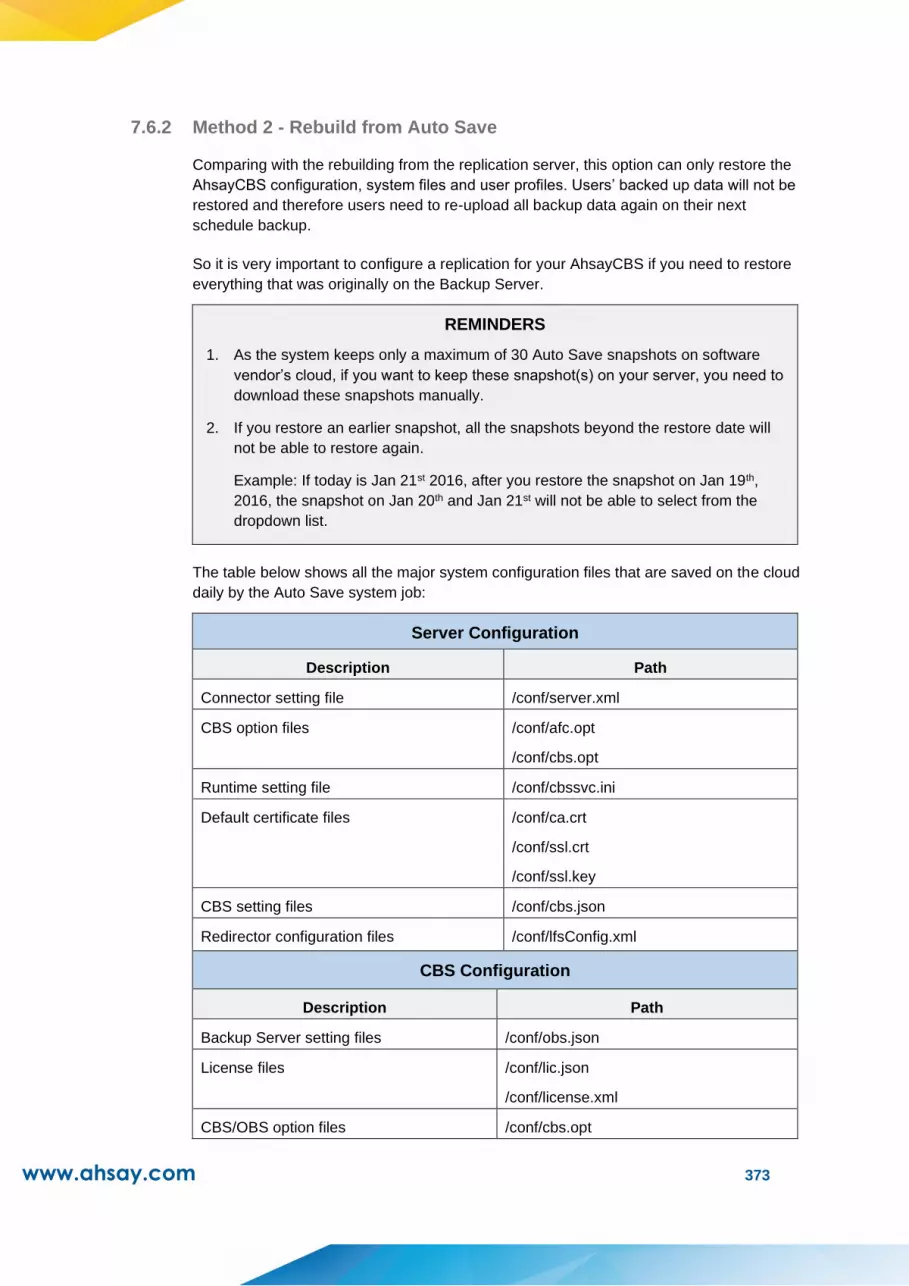
www.ahsay.com 373
7.6.2 Method 2 - Rebuild from Auto Save
Comparing with the rebuilding from the replication server, this option can only restore the
AhsayCBS configuration, system files and user profiles. Users’ backed up data will not be
restored and therefore users need to re-upload all backup data again on their next
schedule backup.
So it is very important to configure a replication for your AhsayCBS if you need to restore
everything that was originally on the Backup Server.
REMINDERS
1. As the system keeps only a maximum of 30 Auto Save snapshots on software
vendor’s cloud, if you want to keep these snapshot(s) on your server, you need to
download these snapshots manually.
2. If you restore an earlier snapshot, all the snapshots beyond the restore date will
not be able to restore again.
Example: If today is Jan 21st 2016, after you restore the snapshot on Jan 19th,
2016, the snapshot on Jan 20th and Jan 21st will not be able to select from the
dropdown list.
The table below shows all the major system configuration files that are saved on the cloud
daily by the Auto Save system job:
Server Configuration
Description Path
Connector setting file /conf/server.xml
CBS option files /conf/afc.opt
/conf/cbs.opt
Runtime setting file /conf/cbssvc.ini
Default certificate files /conf/ca.crt
/conf/ssl.crt
/conf/ssl.key
CBS setting files /conf/cbs.json
Redirector configuration files /conf/lfsConfig.xml
CBS Configuration
Description Path
Backup Server setting files /conf/obs.json
License files /conf/lic.json
/conf/license.xml
CBS/OBS option files /conf/cbs.opt

www.ahsay.com 374
Autoupdate index /conf/autoUpdate.bdb
Replication configuration files /conf/rpsSend.xml
RPS Configuration
Description Path
Replication configuration files /conf/rps.xml
/conf/rpsRecv.xml
/conf/rps-recv.json
RDR Configuration
Description Path
Redirector configuration files /conf/rdr.xml
/conf/rdr.json
License files /conf/rdr-lic.json
/conf/rdr-license.xml
CBS User Profile
Description Path
Users’ profile /conf/users.xml
Others
Description Path
Branding directory /conf/Branding/*.*
User group definition /system/obs/policies/userGroup.xml
Policy group definition /system/obs/policies/policyList.xml
Please note that there are no options to restore the “Others” category, however it will be
restored automatically every time when you need to restore the auto save files.
Steps to restore the Auto Save snapshot
1. Login to AhsayCBS management console, and go to System Settings -> Advanced
-> Auto Save.
2. Turn on the Use Auto Save switch, then click on the Restore button.

www.ahsay.com 375
3. Select the snapshot that you want to restore.
4. Select the items that you need to restore. Select all the items if you need to restore
the configuration exactly on that restore point.
5. Click on the Next button.
6. Select to download the snapshot file or to overwrite the existing configuration.
In this example, we have selected the Overwrite existing configuration files
option.
Skip to the Manual Restore section below if you want to restore the
downloaded file manually.
7. Click on the Restore button if you want to overwrite the existing configuration.
8. Restart the AhsayCBS service, and the configuration will be overwritten.

www.ahsay.com 376
Manual Restore
1. Here is an example of the downloaded configuration file, it is named as dr-YYYY-
MM-DD.zip date format.
2. (Optional) If you need to restore the file manually, you can unzip the 2 folders “conf”
and “policies” into the CBS_HOME\system\recovery. After the restart of the
AhsayCBS service, the configuration will be imported to the AhsayCBS.
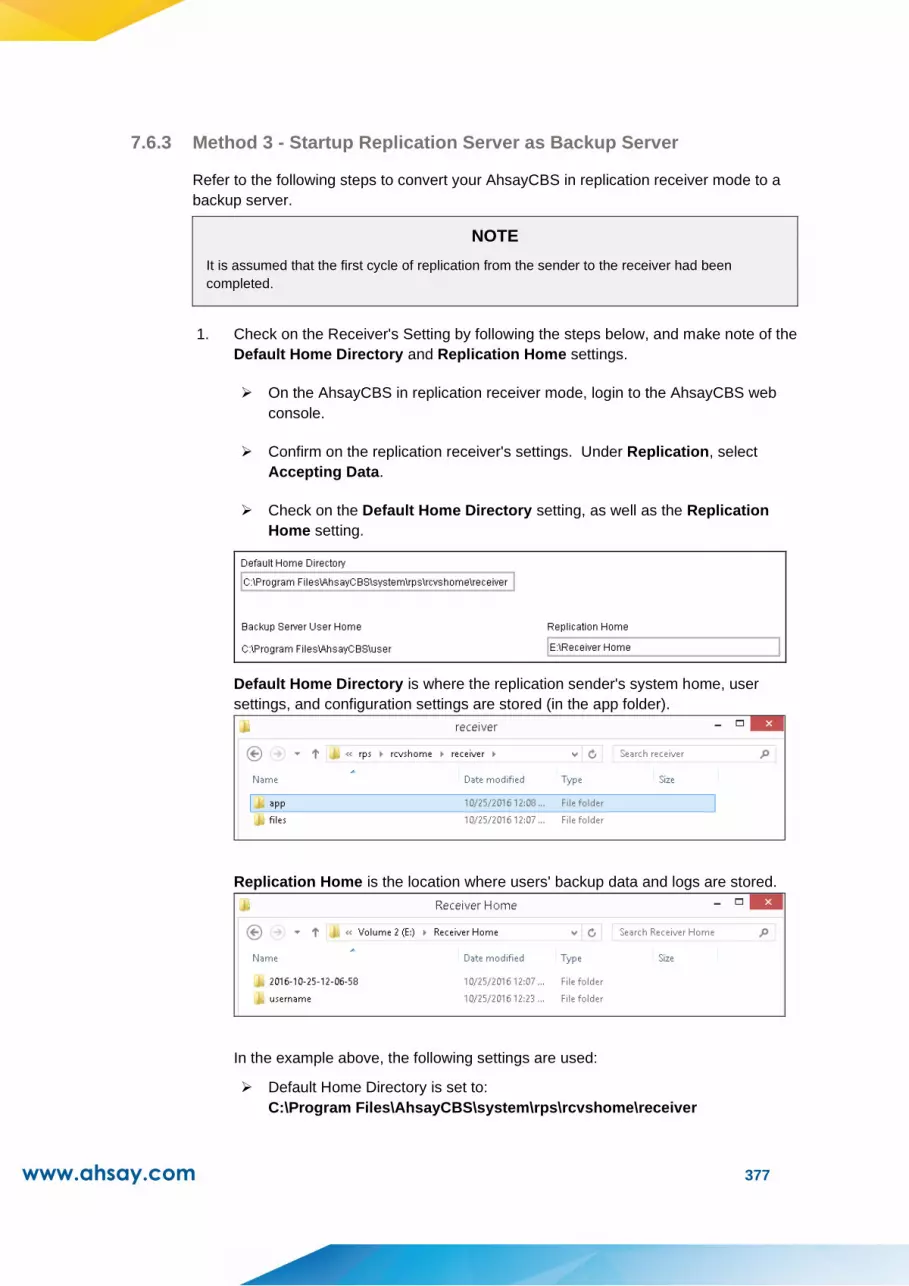
www.ahsay.com 377
7.6.3 Method 3 - Startup Replication Server as Backup Server
Refer to the following steps to convert your AhsayCBS in replication receiver mode to a
backup server.
NOTE
It is assumed that the first cycle of replication from the sender to the receiver had been
completed.
1. Check on the Receiver's Setting by following the steps below, and make note of the
Default Home Directory and Replication Home settings.
➢ On the AhsayCBS in replication receiver mode, login to the AhsayCBS web
console.
➢ Confirm on the replication receiver's settings. Under Replication, select
Accepting Data.
➢ Check on the Default Home Directory setting, as well as the Replication
Home setting.
Default Home Directory is where the replication sender's system home, user
settings, and configuration settings are stored (in the app folder).
Replication Home is the location where users' backup data and logs are stored.
In the example above, the following settings are used:
➢ Default Home Directory is set to:
C:\Program Files\AhsayCBS\system\rps\rcvshome\receiver

www.ahsay.com 378
➢ Replication Home is set to:
E:\Receiver Home
2. Configure the Software License by following the steps below.
➢ On the AhsayCBS in replication receiver mode, login to the AhsayCBS web
console.
➢ Under System Settings, select Licenses, then apply the AhsayCBS license
(the license from the AhsayCBS in backup server mode).
This will ensure that there are sufficient Client Software and Add-on Modules
available to the backup users after the switch.
➢ Press Update, then click .
Ensure that the license information are properly applied by checking the Client
Software and Add-on Modules settings under License Details.
IMPORTANT
Before continuing with the next step, ensure that the license is properly
applied. Failure to do so may result in backup accounts being suspended
and all backup settings being reset.
Also, ensure to shut down the AhsayCBS on the backup server, so that you
are not running two servers with the same AhsayCBS license.
3. Convert the AhsayCBS in Replication Receiver Mode to Backup Server Mode by
following the steps below.
➢ Shutdown the AhsayCBS service.
Note: Shutdown the AhsayCBS and AhsayCBS NFS services.
➢ Copy the replicated system config files to the corresponding location.
Extract the content of the conf.zip file from the Default Home Directory to
the AhsayCBS installation conf folder.
Extract
%Default Home Directory%\app\conf\conf.zip
to
%AhsayCBS Install Home%\*
Using the example in Step 1, extract content of
C:\Program
Files\AhsayCBS\system\rps\rcvshome\receiver\app\conf\conf.zip
to
C:\Program Files\AhsayCBS\conf

www.ahsay.com 379
➢ Copy the replicated system home to the corresponding location by following the
steps below.
Copy the replicated system home from the Default Home Directory to the
AhsayCBS system home folder.
Copy
%Default Home Directory%\app\system\*
to
%AhsayCBS System Home%\*
Using the example in Step 1, copy the content of
C:\Program
Files\AhsayCBS\system\rps\rcvshome\receiver\app\system\*
to
C:\Program Files\AhsayCBS\system

www.ahsay.com 380
NOTE
If you are planning to change the system home location, copy the replicated system
home to the new system home location instead.
➢ Copy the replicated user home to the corresponding location.
Copy the replicated user home from the Replication Home to the
AhsayCBS user home folder.
Copy
%Replication Home%\%username%
to
%AhsayCBS User Home%\*
Important: Do not copy over the folder in YYYY-MM-DD-hh-mm-ss format.
Using the example in Step 1, copy the content of
E:\Receiver Home\*
to
C:\Program Files\AhsayCBS\user
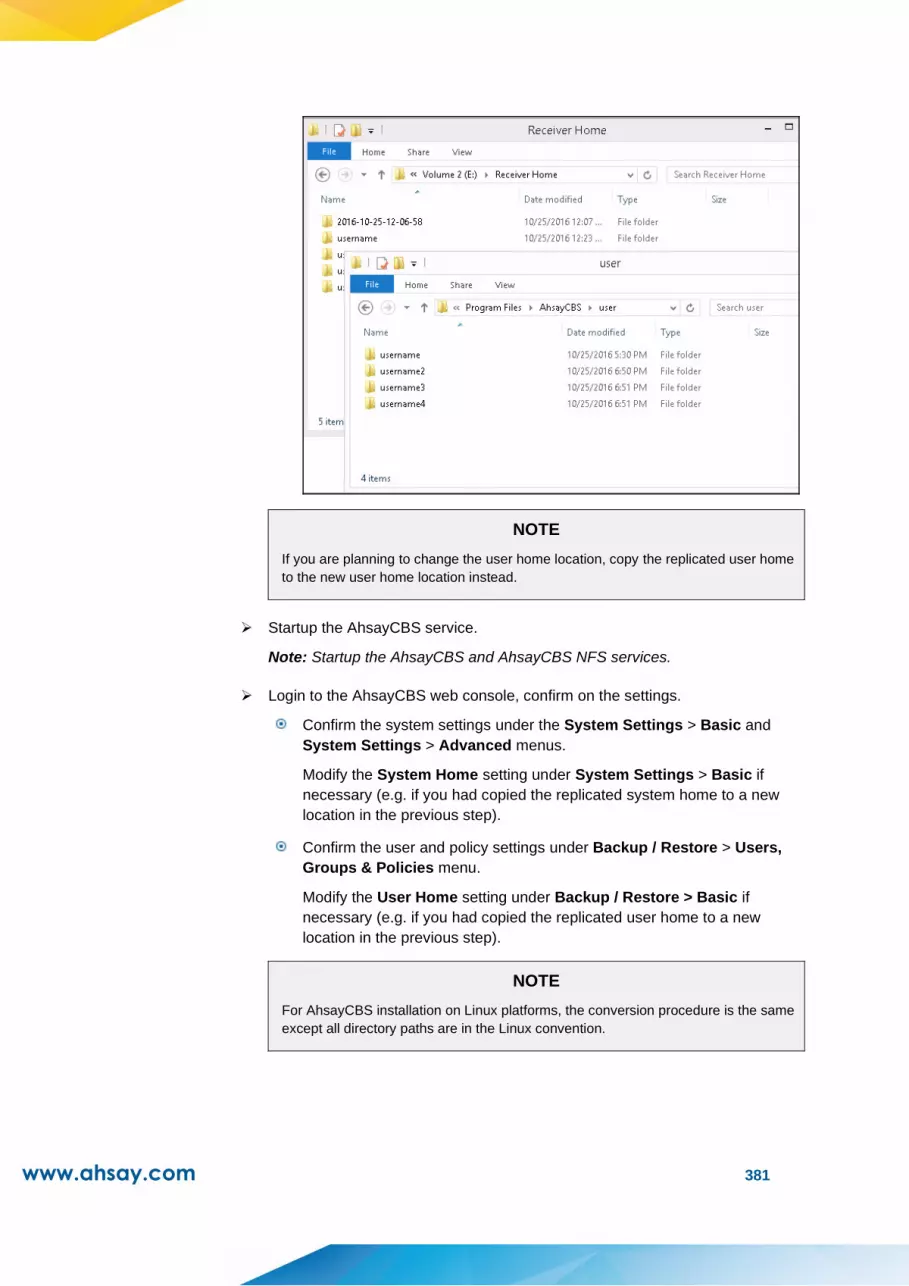
www.ahsay.com 381
NOTE
If you are planning to change the user home location, copy the replicated user home
to the new user home location instead.
➢ Startup the AhsayCBS service.
Note: Startup the AhsayCBS and AhsayCBS NFS services.
➢ Login to the AhsayCBS web console, confirm on the settings.
Confirm the system settings under the System Settings > Basic and
System Settings > Advanced menus.
Modify the System Home setting under System Settings > Basic if
necessary (e.g. if you had copied the replicated system home to a new
location in the previous step).
Confirm the user and policy settings under Backup / Restore > Users,
Groups & Policies menu.
Modify the User Home setting under Backup / Restore > Basic if
necessary (e.g. if you had copied the replicated user home to a new
location in the previous step).
NOTE
For AhsayCBS installation on Linux platforms, the conversion procedure is the same
except all directory paths are in the Linux convention.
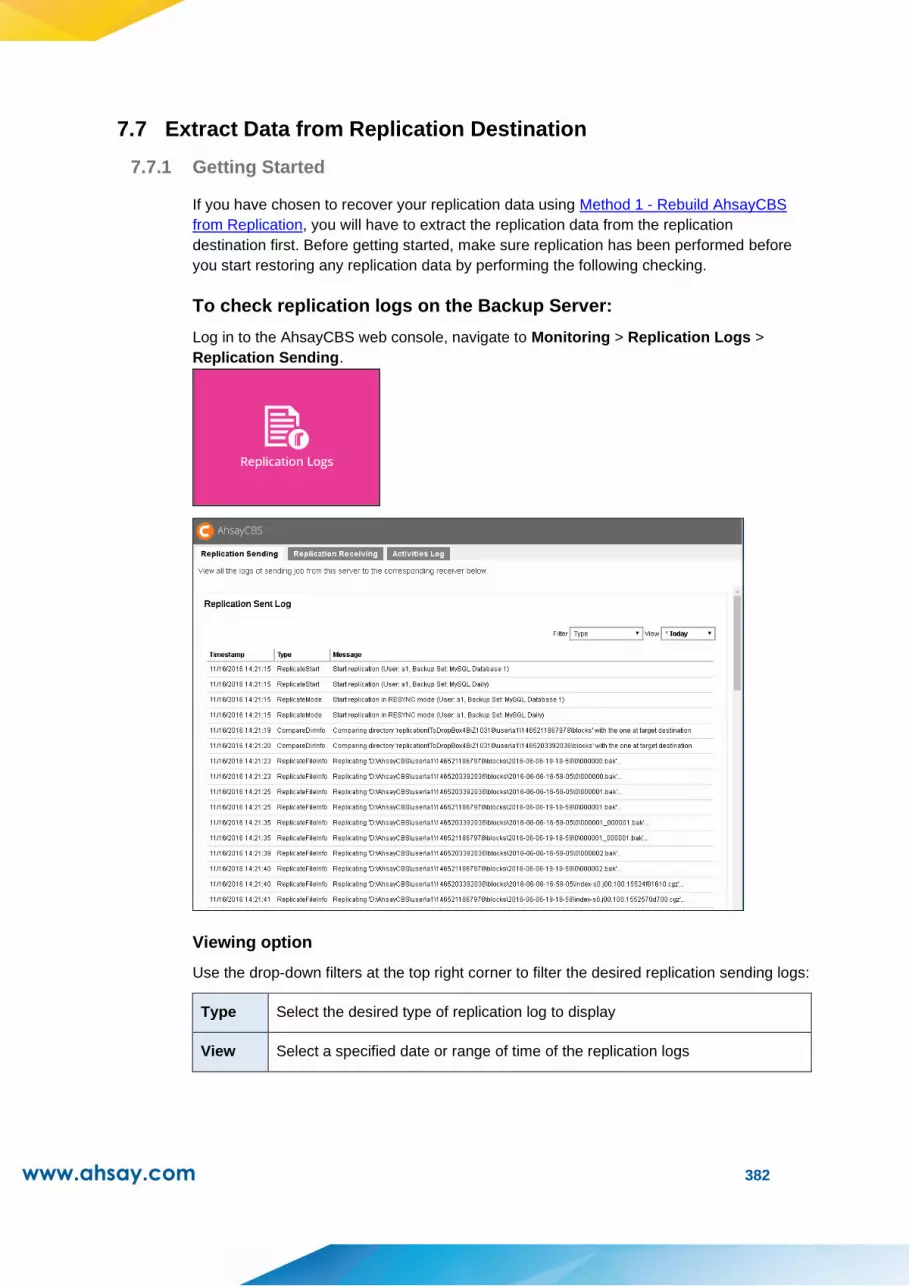
www.ahsay.com 382
7.7 Extract Data from Replication Destination
7.7.1 Getting Started
If you have chosen to recover your replication data using Method 1 - Rebuild AhsayCBS
from Replication, you will have to extract the replication data from the replication
destination first. Before getting started, make sure replication has been performed before
you start restoring any replication data by performing the following checking.
To check replication logs on the Backup Server:
Log in to the AhsayCBS web console, navigate to Monitoring > Replication Logs >
Replication Sending.
Viewing option
Use the drop-down filters at the top right corner to filter the desired replication sending logs:
Type Select the desired type of replication log to display
View Select a specified date or range of time of the replication logs
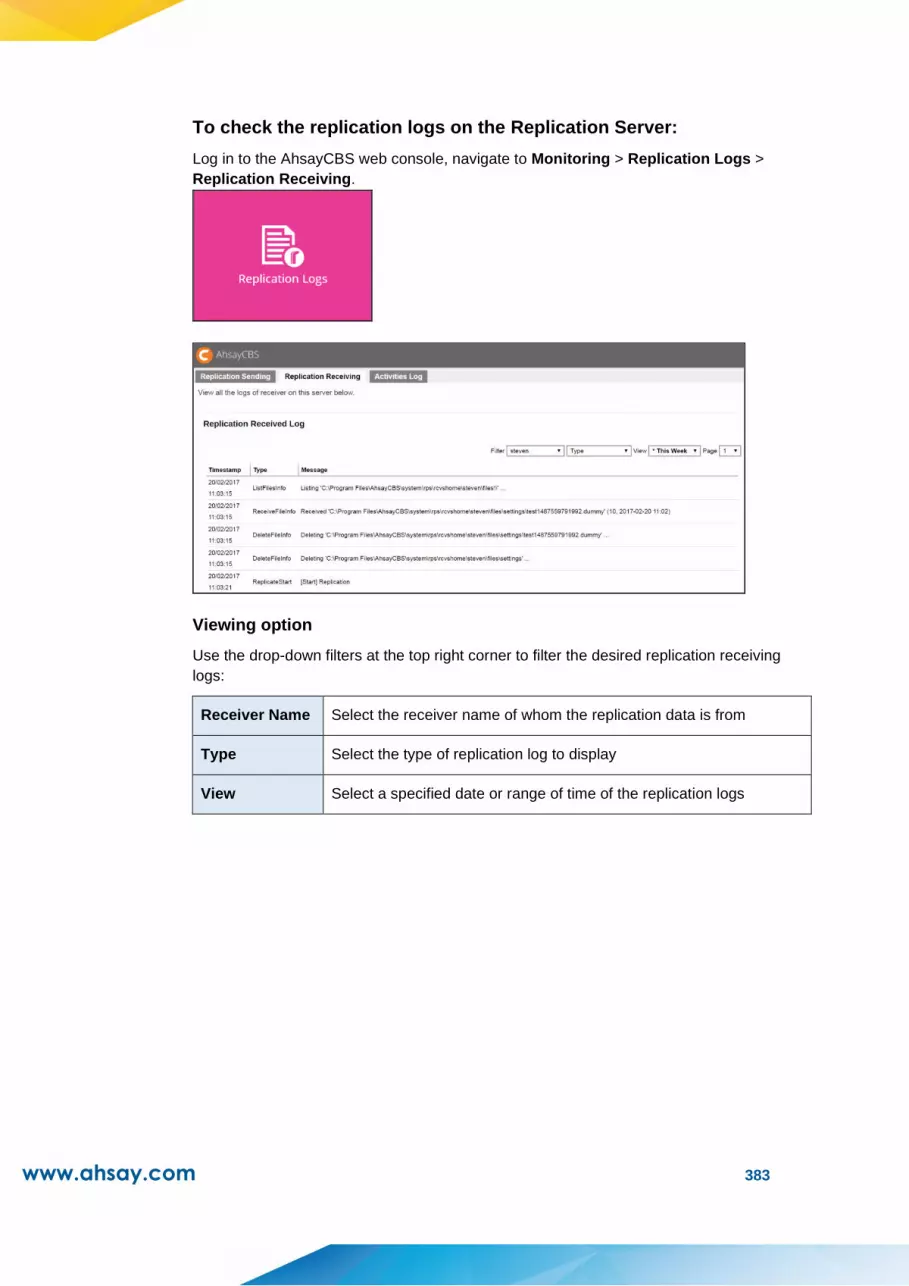
www.ahsay.com 383
To check the replication logs on the Replication Server:
Log in to the AhsayCBS web console, navigate to Monitoring > Replication Logs >
Replication Receiving.
Viewing option
Use the drop-down filters at the top right corner to filter the desired replication receiving
logs:
Receiver Name Select the receiver name of whom the replication data is from
Type Select the type of replication log to display
View Select a specified date or range of time of the replication logs

www.ahsay.com 384
7.7.2 Extract from AhsayCBS Replication Server
1. Follow the steps below to disable the replication service on both the Backup Server
and the Replication Server.
To Disable on the Backup Server Side
i. Click on the Sending Data icon under the Replication section on the
AhsayCBS web console of the backup server.
ii. Click the button in the Replicate individual backup sets section to
turn the replication feature off. You will then see the configuration menu as
shown.
To Disable on the Replication Server Side
i. Click On the replication receiving end, go to Replication > Accepting
Data on the AhsayCBS web console to create a replication user account.
ii. Click on the replication receiver item under the Manage Receiver section
which you wish to turn off.
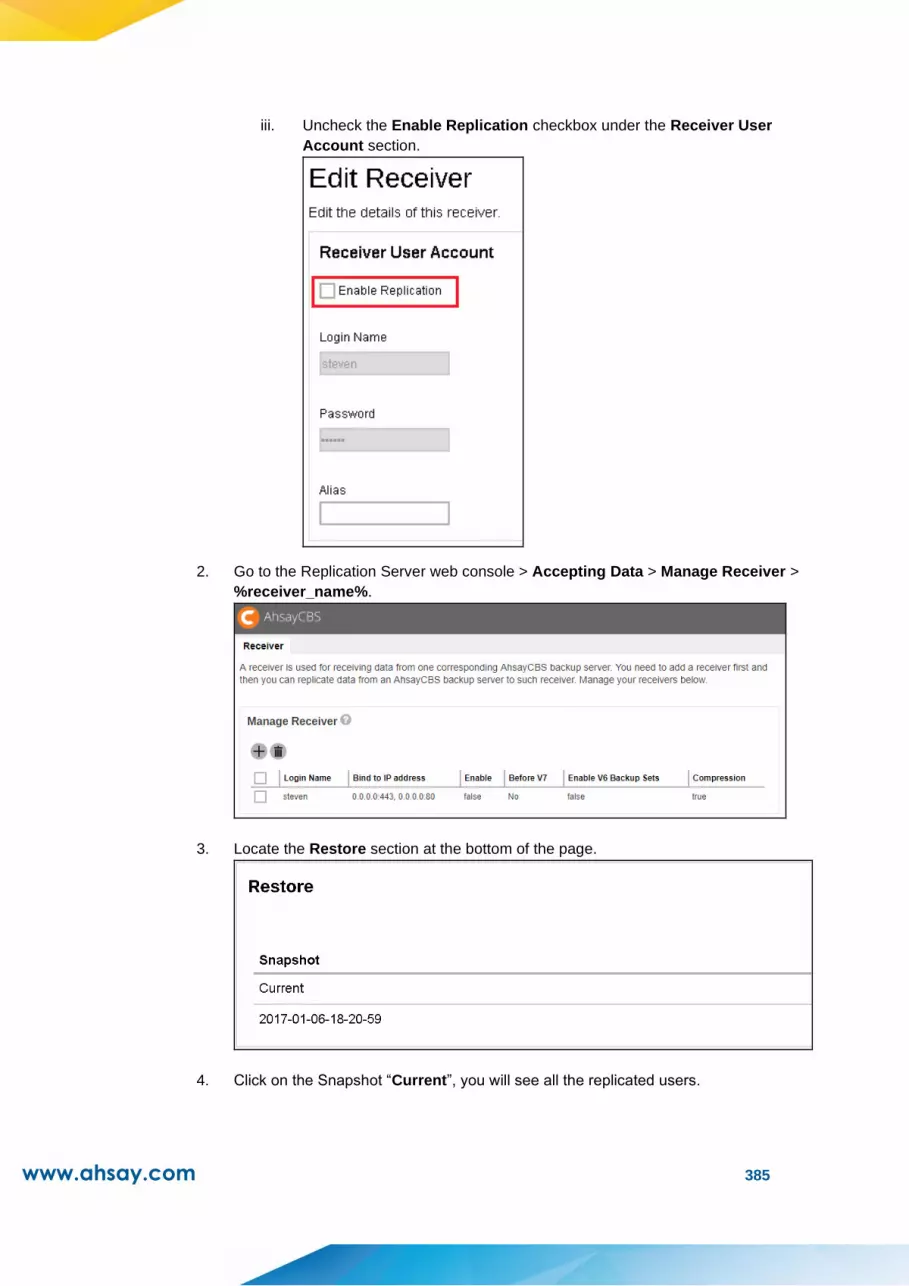
www.ahsay.com 385
iii. Uncheck the Enable Replication checkbox under the Receiver User
Account section.
2. Go to the Replication Server web console > Accepting Data > Manage Receiver >
%receiver_name%.
3. Locate the Restore section at the bottom of the page.
4. Click on the Snapshot “Current”, you will see all the replicated users.

www.ahsay.com 386
5. Select the user(s) that you want to recover, select all if you want to recover all the
users for the Backup Server.
6. Enter the path you want to restore the data to (e.g. D:\Restore).
7. Click the button at the bottom right corner to start the restoration.
8. It will then go back to the Edit Receiver page and you will see the restore progress
under the Restore section.
9. When you see the Finished restoration !! message, the restore is completed.

www.ahsay.com 387
10. The data of the selected users and the server configuration are restored to the
specified restore path on the Replication Server.
You will find folder structure as:
D:\Restore\Retention_Current\system
(It contains “CBS_HOME\conf” and “SYSTEM_HOME”.)
D:\Restore\Retention_Current\users
(It contains user folders.)
11. Copy the whole restored folder “D:\Restore” to a free space on your Backup Server
first, e.g. C:\Desktop.
12. After extracting the replication data, you can follow the instructions in Restore
Replication Data to the Backup Server to restore the replication data to your
AhsayCBS backup server.
-OR-
Refer to the Restore Raw Data Using AhsayOBM / AhsayACB if you wish to recover
the raw data alone without restoring them to AhsayCBS.
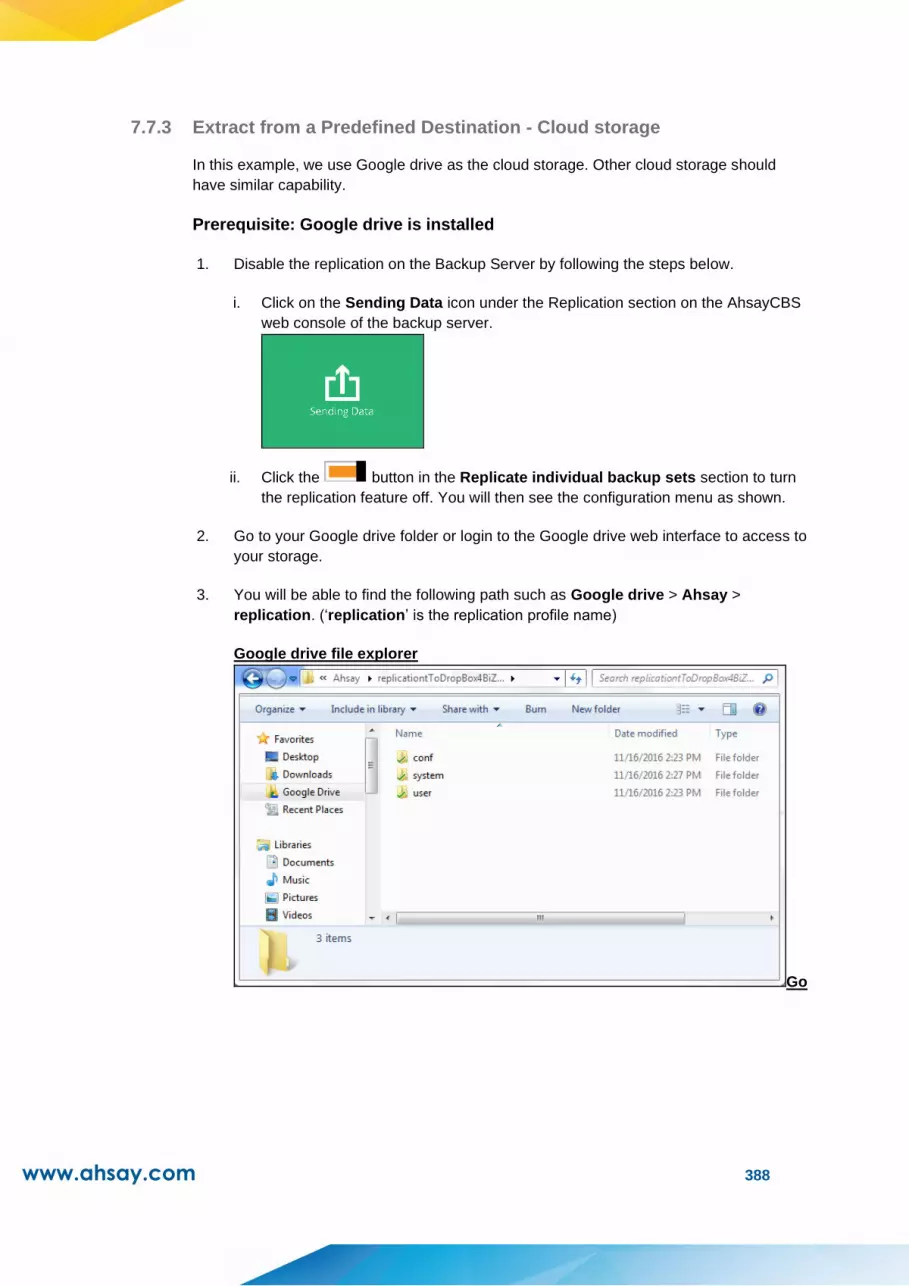
www.ahsay.com 388
7.7.3 Extract from a Predefined Destination - Cloud storage
In this example, we use Google drive as the cloud storage. Other cloud storage should
have similar capability.
Prerequisite: Google drive is installed
1. Disable the replication on the Backup Server by following the steps below.
i. Click on the Sending Data icon under the Replication section on the AhsayCBS
web console of the backup server.
ii. Click the button in the Replicate individual backup sets section to turn
the replication feature off. You will then see the configuration menu as shown.
2. Go to your Google drive folder or login to the Google drive web interface to access to
your storage.
3. You will be able to find the following path such as Google drive > Ahsay >
replication. (‘replication’ is the replication profile name)
Google drive file explorer
Go

www.ahsay.com 389
Google drive web interface
4. You will see the following 3 folders.
conf
system
user
5. You may download all the 3 folders to your local drive if you need to restore all the
files. Select the folder to download according to your requirement.
NOTE
The conf and system folders are AhsayCBS configuration or system related files. The
user folder contains the replicated user folders.
6. After extracting the replication data, you can follow the instructions in Restore
Replication Data to the Backup Server to restore the replication data to your
AhsayCBS backup server.
-OR-
Refer to the Restore Raw Data Using AhsayOBM / AhsayACB if you wish to recover
the raw data alone without restoring them to AhsayCBS.

www.ahsay.com 390
7.7.4 Extract from the FTP/SFTP
In this example, we use SFTP server as an example, the restore method is basically the
same for FTP and SFTP.
Assumption: The WinSCP is installed on the system. Other FTP tools can be
used.
1. Disable the replication on the Backup Server by following the steps below.
i. Click on the Sending Data icon under the Replication section on the AhsayCBS
web console of the backup server.
ii. Click the button in the Replicate individual backup sets section to turn
the replication feature off. You will then see the configuration menu as shown.
2. Login to the WinSCP and locate the replication folder. If the FTP/SFTP server is on
your LAN, you may map the drive on your FTP/SFTP server.
3. You will be able to find the following path such as /sftp_root/Ahsay/replication.
(‘replication’ is the replication profile name)
WinSCP
Mapped the SFTP share folder
www.ahsay.com 391
4. You will see the following 3 folders.
conf
system
user
5. You may download all the 3 folders to your local drive if you need to restore all the
files. Select the folder to download according to your requirement.
NOTE
The conf and system folders are AhsayCBS configuration or system related files. The
user folder contains the replicated user folders.
6. After extracting the replication data, you can follow the instructions in Restore
Replication Data to the Backup Server to restore the replication data to your
AhsayCBS backup server.
-OR-
Refer to the Restore Raw Data Using AhsayOBM / AhsayACB if you wish to recover
the raw data alone without restoring them to AhsayCBS.

www.ahsay.com 392
7.7.5 Extract from the Local/Mapped Drive/Removable Drive
In this example, we use local drive as an example, the restore method is basically the same
for mapped drive and removable drive.
1. Disable the replication on the Backup Server by following the steps below.
i. Click on the Sending Data icon under the Replication section on the AhsayCBS
web console of the backup server.
ii. Click the button in the Replicate individual backup sets section to turn
the replication feature off. You will then see the configuration menu as shown.
2. Open your replication home folder e.g.: E:\rpshome\replication (‘replication’ is the
replication profile name).
3. You will see the following 3 folders.
conf
system
user
4. You may copy all the 3 folders if you need to restore all the files on your AhsayCBS.
Select the folder to download according to your requirement.
NOTE
The conf and system folders are AhsayCBS configuration or system related files. The user
folder contains the replicated user folders.
5. After extracting the replication data, you can follow the instructions in Restore
Replication Data to the Backup Server to restore the replication data to your
AhsayCBS backup server.
-OR-
Refer to the Restore Raw Data Using AhsayOBM / AhsayACB if you wish to recover
the raw data alone without restoring them to AhsayCBS.
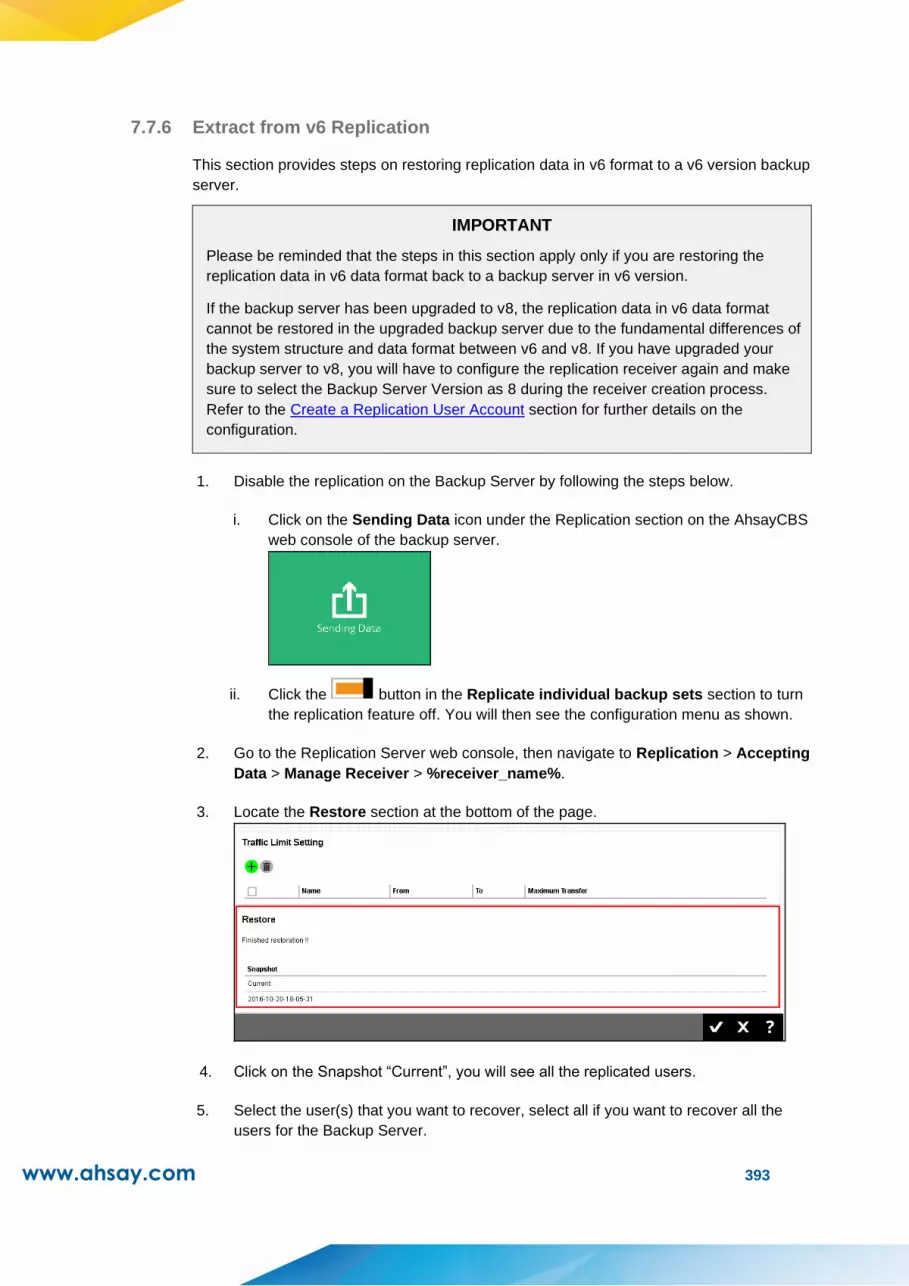
www.ahsay.com 393
7.7.6 Extract from v6 Replication
This section provides steps on restoring replication data in v6 format to a v6 version backup
server.
IMPORTANT
Please be reminded that the steps in this section apply only if you are restoring the
replication data in v6 data format back to a backup server in v6 version.
If the backup server has been upgraded to v8, the replication data in v6 data format
cannot be restored in the upgraded backup server due to the fundamental differences of
the system structure and data format between v6 and v8. If you have upgraded your
backup server to v8, you will have to configure the replication receiver again and make
sure to select the Backup Server Version as 8 during the receiver creation process.
Refer to the Create a Replication User Account section for further details on the
configuration.
1. Disable the replication on the Backup Server by following the steps below.
i. Click on the Sending Data icon under the Replication section on the AhsayCBS
web console of the backup server.
ii. Click the button in the Replicate individual backup sets section to turn
the replication feature off. You will then see the configuration menu as shown.
2. Go to the Replication Server web console, then navigate to Replication > Accepting
Data > Manage Receiver > %receiver_name%.
3. Locate the Restore section at the bottom of the page.
4. Click on the Snapshot “Current”, you will see all the replicated users.
5. Select the user(s) that you want to recover, select all if you want to recover all the
users for the Backup Server.

www.ahsay.com 394
6. Enter the path you want to restore the data to (e.g. F:\v6rps).
7. Click the [Restore] button to start.
8. It will then go back to the “Edit Receiver” page and you will see the restore progress
under the “Restore” section.
9. Once you see the "Finished restoration !!" message, the restore is completed.
10. The data of the selected users and the server configuration are restored to the
restore path on the Replication Server.
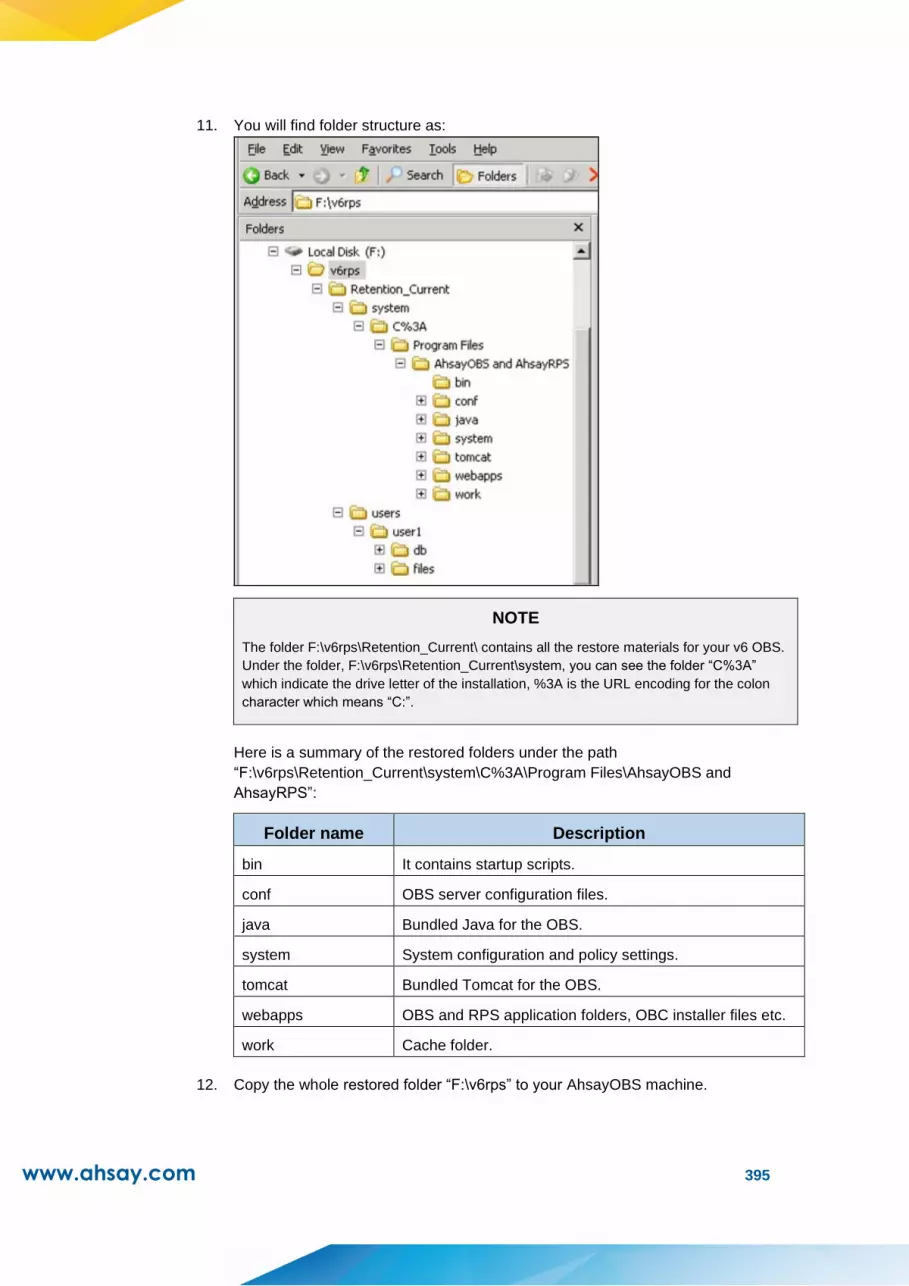
www.ahsay.com 395
11. You will find folder structure as:
NOTE
The folder F:\v6rps\Retention_Current\ contains all the restore materials for your v6 OBS.
Under the folder, F:\v6rps\Retention_Current\system, you can see the folder “C%3A”
which indicate the drive letter of the installation, %3A is the URL encoding for the colon
character which means “C:”.
Here is a summary of the restored folders under the path
“F:\v6rps\Retention_Current\system\C%3A\Program Files\AhsayOBS and
AhsayRPS”:
Folder name Description
bin It contains startup scripts.
conf OBS server configuration files.
java Bundled Java for the OBS.
system System configuration and policy settings.
tomcat Bundled Tomcat for the OBS.
webapps OBS and RPS application folders, OBC installer files etc.
work Cache folder.
12. Copy the whole restored folder “F:\v6rps” to your AhsayOBS machine.

www.ahsay.com 396
13. Locate the OBS installation directory in the OBS machine, conf folder, system folder
and user folder.
In this case, all the 3 folders are located in the same directory. If you have changed
the OBS system home or user home folder, you can check this information in your
OBS Management Console > Manage System > Server Configuration page.
14. After extracting the replication data, you can follow the instructions in Restore
Replication Data to the Backup Server to restore the replication data to your
AhsayCBS backup server.
-OR-
Refer to the Restore Raw Data Using AhsayOBM / AhsayACB if you wish to recover
the raw data alone without restoring them to AhsayCBS.

www.ahsay.com 397
7.7.7 Extract Snapshot from Retention Area
A snapshot of the replicated data is taken and stored in the retention area for a certain
period of time of your configuration. This gives you an extra layer of protection in case you
need to retrieve the old replication data. For details of the retention policy setting, refer to
the Retention Setting under the Create a Replication User Account section.
Follow the instructions below to recover replication data from the retention area.
1. Go to the Replication Server web console > Accepting Data > Manage Receiver >
%receiver_name%.
2. Locate the Restore section at the bottom of the page and you will see the snapshots
that have been captured for your replication data.
3. The past snapshots are named in date and time when it was captured. Click on the
desired snapshot you wish to extract the replication data from.

www.ahsay.com 398
4. Select the user(s) that you want to recover, select all if you want to recover all the
users for the Backup Server.
5. Enter the path you want to restore the data in the retention area (e.g. E:\Retention).
NOTE
Do not restore the retention data to the same folder where you normally store the extracted
replication data so as to avoid any possible confusion.
6. Click the button at the bottom right corner to start the restoration.
7. It will then go back to the Edit Receiver page and you will see the restore progress
under the Restore section.
8. When you see the Finished restoration !! message, the restore is completed.

www.ahsay.com 399
9. The data of the selected users and the server configuration are restored to the
specified restore path on the Replication Server.
You will find folder structure as:
E:\Retention\Retention_YYYY-MM-DD-HH-MM-SS\system
(It contains “CBS_HOME\conf” and “SYSTEM_HOME”.)
E:\Retention\Retention_YYYY-MM-DD-HH-MM-SS\users
(It contains user folders.)
10. Copy the whole restored folder “E:\Retention” to a free space on your Backup Server
first, e.g. C:\Desktop.
11. After extracting the replication data, you can follow the instructions in Restore
Replication Data to the Backup Server to restore the replication data to your
AhsayCBS backup server.
-OR-
Refer to the Restore Raw Data Using AhsayOBM / AhsayACB if you wish to recover
the raw data alone without restoring them to the backup server.
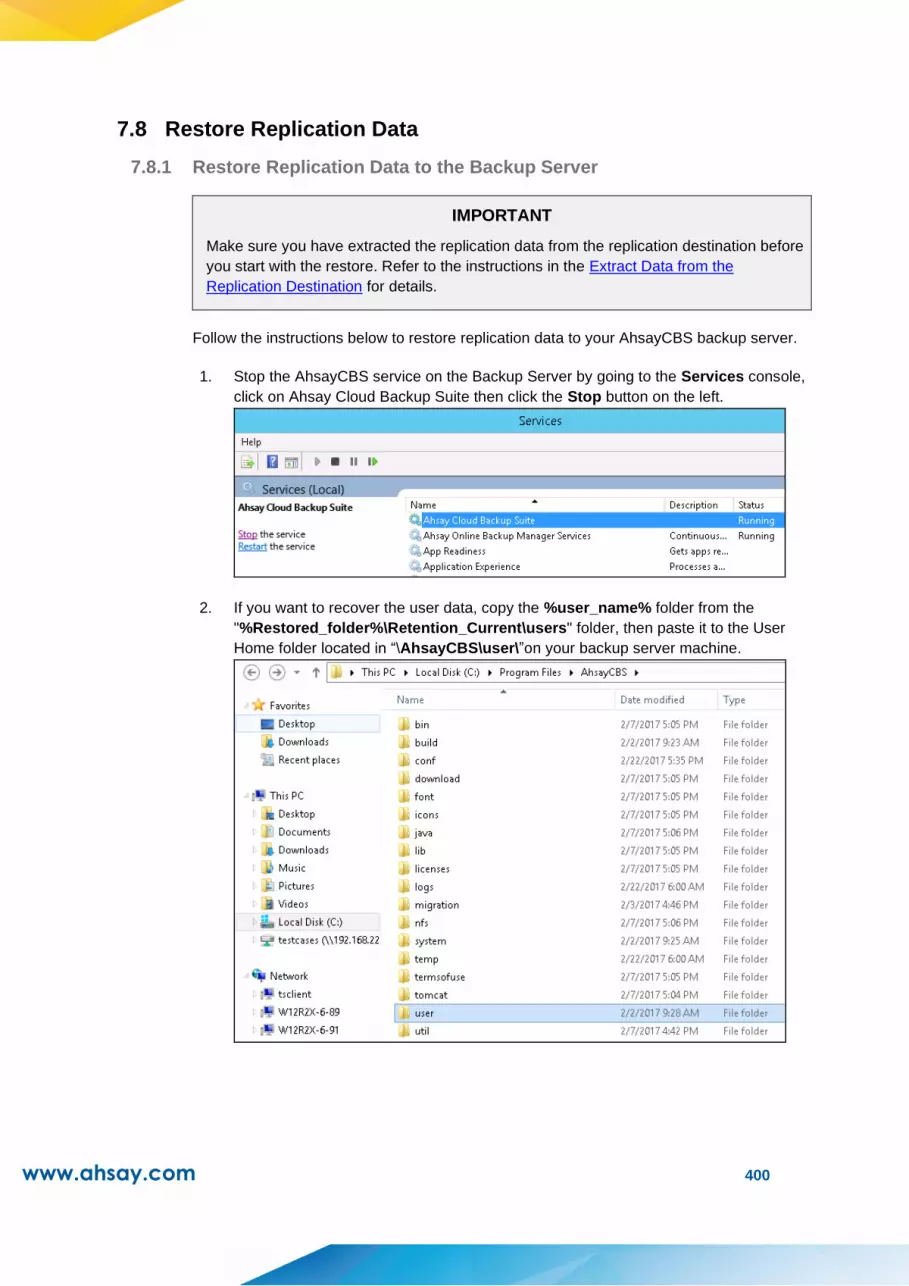
www.ahsay.com 400
7.8 Restore Replication Data
7.8.1 Restore Replication Data to the Backup Server
IMPORTANT
Make sure you have extracted the replication data from the replication destination before
you start with the restore. Refer to the instructions in the Extract Data from the
Replication Destination for details.
Follow the instructions below to restore replication data to your AhsayCBS backup server.
1. Stop the AhsayCBS service on the Backup Server by going to the Services console,
click on Ahsay Cloud Backup Suite then click the Stop button on the left.
2. If you want to recover the user data, copy the %user_name% folder from the
"%Restored_folder%\Retention_Current\users" folder, then paste it to the User
Home folder located in “\AhsayCBS\user\”on your backup server machine.
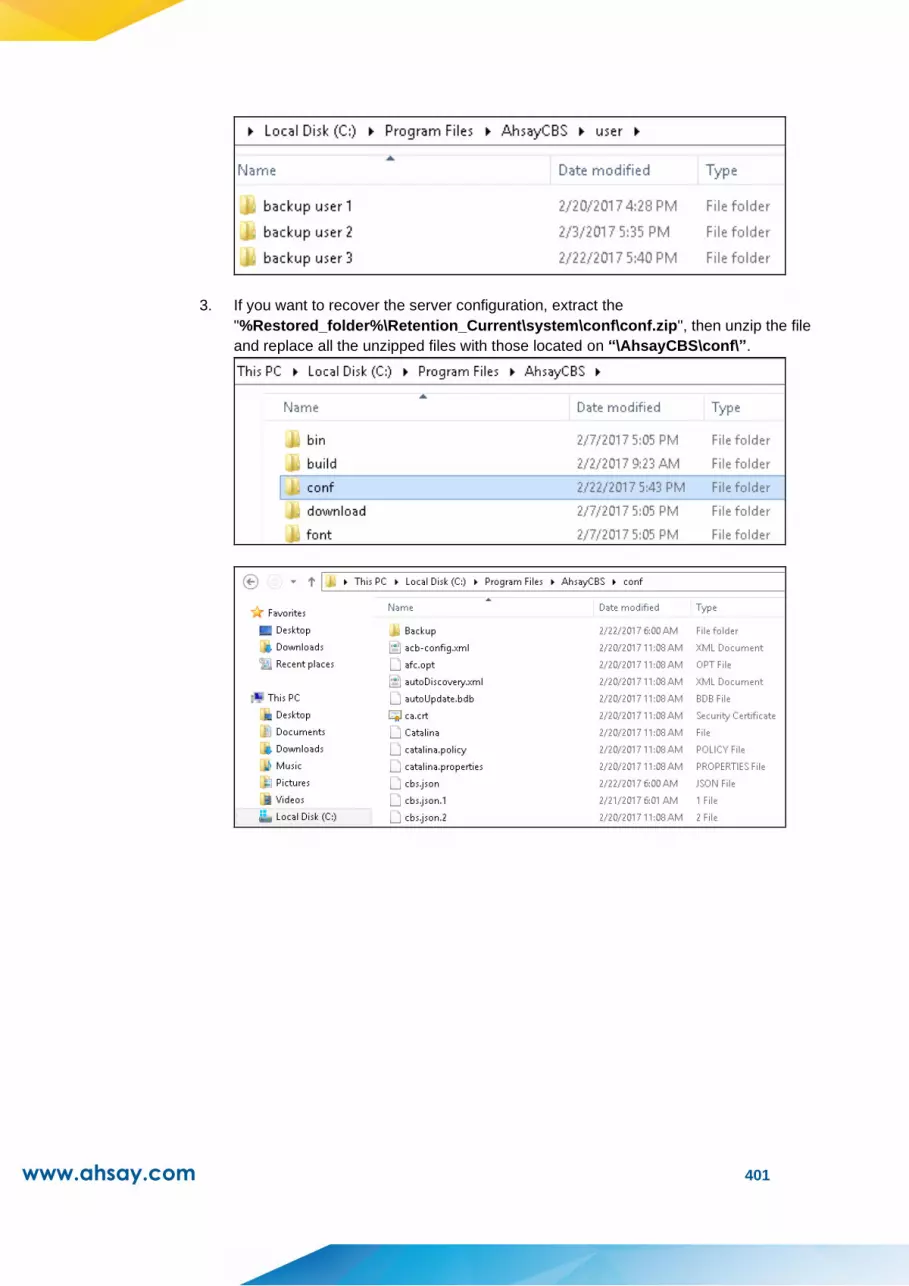
www.ahsay.com 401
3. If you want to recover the server configuration, extract the
"%Restored_folder%\Retention_Current\system\conf\conf.zip", then unzip the file
and replace all the unzipped files with those located on “\AhsayCBS\conf\”.

www.ahsay.com 402
4. If you want to recover the system home, copy the content of the
"%Restored_folder%\Retention_Current\system\system" folder in the restored
folder, then paste it in the system folder located in “AhsayCBS\system\”on your
backup service machine.
5. Restart the AhsayCBS service on the Backup Server by going to the Services
console, click on Ahsay Cloud Backup Suite then click the Start button on the left.
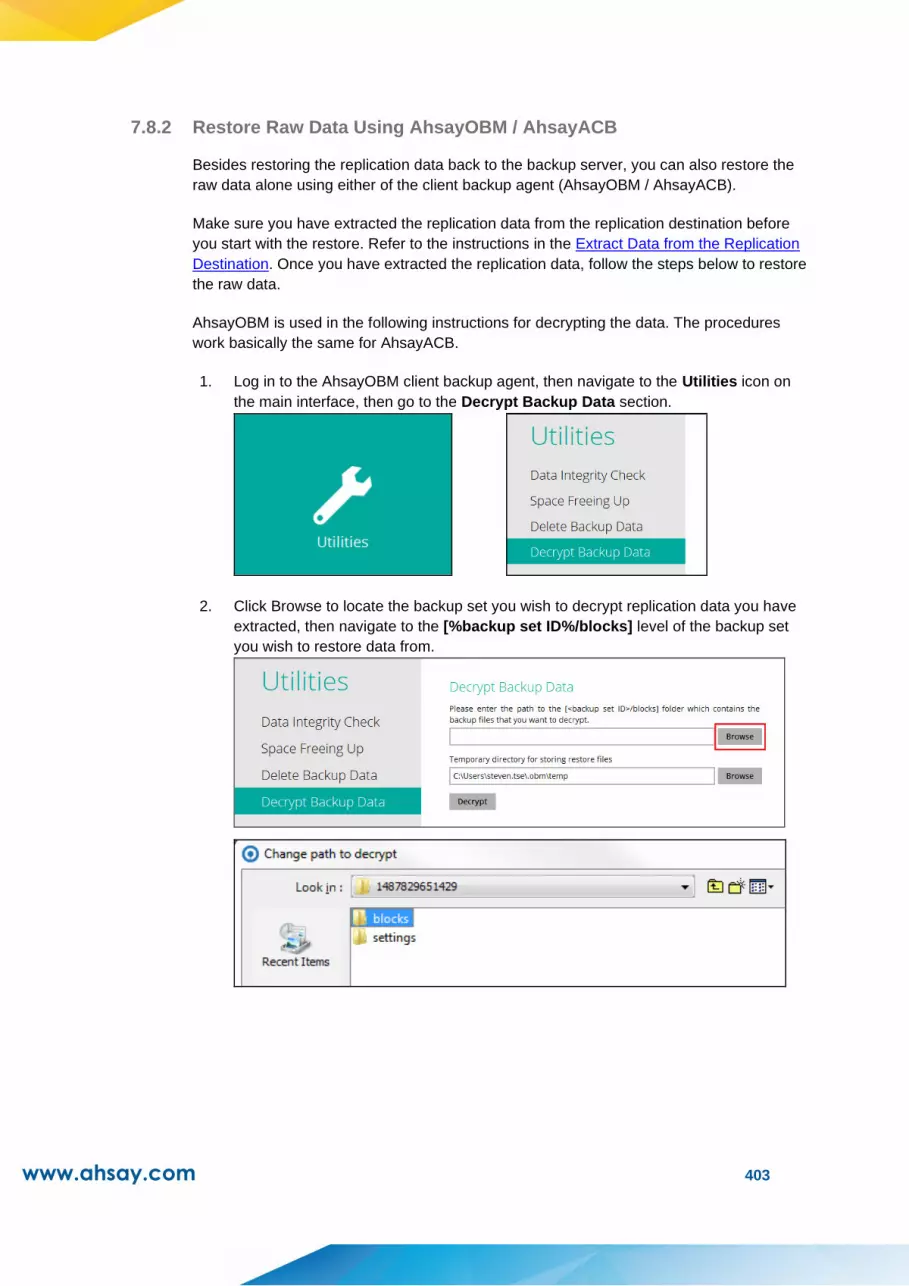
www.ahsay.com 403
7.8.2 Restore Raw Data Using AhsayOBM / AhsayACB
Besides restoring the replication data back to the backup server, you can also restore the
raw data alone using either of the client backup agent (AhsayOBM / AhsayACB).
Make sure you have extracted the replication data from the replication destination before
you start with the restore. Refer to the instructions in the Extract Data from the Replication
Destination. Once you have extracted the replication data, follow the steps below to restore
the raw data.
AhsayOBM is used in the following instructions for decrypting the data. The procedures
work basically the same for AhsayACB.
1. Log in to the AhsayOBM client backup agent, then navigate to the Utilities icon on
the main interface, then go to the Decrypt Backup Data section.
2. Click Browse to locate the backup set you wish to decrypt replication data you have
extracted, then navigate to the [%backup set ID%/blocks] level of the backup set
you wish to restore data from.

www.ahsay.com 404
3. Click Decrypt to proceed.
4. Select the file(s)/folder(s) you wish to restore from the selected source, then click
Next to proceed.
5. Select to restore to the Original location or an alternate location of your choice. Click
Restore to start the decryption process when you are done with the settings.

www.ahsay.com 405
8 Configuring Redirector
As your business keeps growing, the capacity of an AhsayCBS machine may reach its physical limit
such as the I/O, disk space, etc. In that case, you may consider adding a machine to solve the
problem.
A common practice for server administrator will name their server in the following way when a new
server is added for backup service, for example:
server1.mybackup.com
server2.mybackup.com
server3.mybackup.com
:
With mybackup.com being the domain name of the backup service in the above example. This is only
a solution to resolve physical limit of a server but is not flexible to apply into a high scalable backup
system. This is because if a user has hosted in, for example, server1.mybackup.com and later on
wants to add more backup quota, however, only server2.mybackup.com has enough storage for
expansion. In that case, you will need to migrate the user to server2 and your backup users will need
to change the backup server URL from server1 to server2 in the login screen of the client interface to
get access to the new server.
A high scalable backup system should make this kind of transition seamless to users, for example,
you can set up a domain name www.mybackup.com for your client to connect which is able to redirect
users to the correct backup server to backup. Our Redirector is exactly designed to work for this
solution.
By setting up a Redirector Server:
1. All new clients can use the backup URL e.g.: www.mybackup.com when they set up the
backup client interface.
2. Administrator can add backup machines to the Redirector as the number of users grows.

www.ahsay.com 406
The dotted area shows the redirector server group.
server1.mybackup.com
server2.mybackup.com
server3.mybackup.com
:
:
As the CPU utilization for a Redirector Server is low, you can dedicate one of the AhsayCBS as the
redirector host. In the above example, server1.mybackup.com also serves as a redirector host. The
domain name www.mybackup.com is also pointed to this server.
Administrator will require setting up the following in the DNS, for example:
Name Type Value
www.mybackup.com. CNAME server1.mybackup.com.
server1.mybackup.com. A record 192.168.6.101
server2.mybackup.com. A record 192.168.6.102
server3.mybackup.com. A record 192.168.6.103
server4.mybackup.com. A record 192.168.6.104
Notes:
1. The IP address of server1 to server4 are ranged from 192.168.6.101 to 192.168.6.104.
2. The Redirector Server is hosted on the server1.mybackup.com machine.
In the following chapters, we shall guide you to set up a Redirector host, and how to join your
existing servers to this Redirector host.
Limitation
1. Existing users can continue to back up to their existing server, for example,
server2.mybackup.com in the above example. However if they want to use the redirector
feature, they are required to change the connecting host name to e.g.:
www.mybackup.com . The redirector setup can only benefit new users as you will distribute
the URL, i.e. www.mybackup.com to new users, you may not want to bother the existing
users on applying the settings immediately.
2. Administrators need to ensure the same username (case sensitive) has not been used
within the backup servers in the same redirector group. This limitation includes all the
users created by the resellers.
License information
The pricing unit of AhsayCBS Redirection Server module is per device to be redirected.
For meter key inquiries please contact the Sales team at Ahsay by email at [email protected]
or call our International Sales Hotline +852 3580 8091.

www.ahsay.com 407
8.1 Hosting a Redirector
First of all, you need to assign an AhsayCBS to be set up as a Redirector role. In our example,
server1.mybackup.com also serves as a redirector host. The domain name
www.mybackup.com is also pointed to this server.
In the following steps, we will set up the connection channel between the redirector host and
the backup servers. In the AhsayCBS of server1, you need to register your Backup Server(s)
with the Redirector in AhsayCBS management console under Redirection -> Hosting a
Redirector.
1. Add a Backup Server in the Redirector by clicking the Create button, then entering the
login credentials and host name, and the ports of that Backup Server.
2. Repeat the above steps until all the Backup Servers in your environment are registered
with the AhsayCBS with the Redirector role.
Option: You can dedicate one of the AhsayCBS (Backup Server) to host free trial users,
by enabling this feature and assign one of your Backup Servers in the list.
WARNING
Do not update any settings in “Hosting a Redirector” after Ahsay Redirector v6 is upgraded to
AhsayCBS v8, if any AhsayOBM/AhsayACB v6 clients are using the Local Copy feature on any
of the AhsayOBS v6 server(s). Otherwise, all AhsayOBM/AhsayACB v6 backups with Local
Copy enabled will fail to work and the problem cannot be fixed afterwards.
You may only change the settings after:
➢ AhsayOBS v6 is upgraded to AhsayCBS v8.
➢ All AhsayOBM/AhsayACB v6 clients with Backup Set Local Copy feature
enabled hosted on the AhsayCBS v8 are also upgraded to
AhsayOBM/AhsayACB v8.

www.ahsay.com 408
8.2 Joining Redirector
In the following steps, we will set up the connection channel between the redirector host and
the backup servers.
Limitation:
Administrators need to ensure the same user name (case sensitive) has not been used within
the backup servers in the same redirector group, this limitation includes all the users created by
the resellers.
To join your Backup Servers to a Redirector, please enter your AhsayCBS management
console under Redirection -> Joining Redirectors.
Note: Even your redirector is hosted in server1, you still need to perform the following setup.
1. Turn on the Enable high scalability feature button.
2. Enter the protocol, host name, and port number of the Redirector machine.
3. Enter the login credentials to the Redirector machine.
4. Repeat the above steps on all other backup server that needs to join the redirector server.

www.ahsay.com 409
8.3 Advanced Setup
8.3.1 Setup Wild Card Certificate
In the Redirector with a number of Backup Servers setup scenario, you need to apply a wild
card certificate for all your AhsayCBS servers. When you add a new backup server or
Redirector into the redirector server group, you need to apply the wild card certificate to the
new server. This is cost efficient and do not require to purchase a new certificate for a new
server.
8.3.2 Setup Replication in Redirector Server Group
Since the user profile and local user data are hosted on individual Backup Servers, if you
need to setup replication in this environment, you need to setup a dedicated replication
profile for each Backup Server. In our example, 4 dedicated replication profiles are required
to setup.
Note: The replication can be replicated to another replication server or predefined storage.
For more information about the replication setup, please refer to the CONFIGURING
REPLICATION section for details.
8.3.3 Multiple Redirector Setup
The following is an example on setting up a multiple redirector server group. The main
reason is to maintain a high availability redirector.
Assumption and requirement:
In this example, we assumed that you are using a DNS round robin setup, when there is a
request from the Internet, e.g.: www.mybackup.com , it will be able to redirect either to the
first redirector (e.g.: server1.mybackup.com) or second redirector (e.g.:
server2.mybackup.com).
For each Redirector Server, it is required to have its own redirector license key. If you setup
2 Redirector Servers, you will need 2 times of your redirector licenses.

www.ahsay.com 410
Administrator will require setting up the following in the DNS, for example:
Name Type Value
www.mybackup.com. A record 192.168.6.101
www.mybackup.com. A record 192.168.6.102
server1.mybackup.com. A record 192.168.6.101
server2.mybackup.com. A record 192.168.6.102
server3.mybackup.com. A record 192.168.6.103
server4.mybackup.com. A record 192.168.6.104
Notes:
1. The round robin setting is required to redirect the traffic to either
server1.mybackup.com (192.168.6.101) or server2.mybackup.com (192.168.6.102).
2. The IP address of server1 to server4 are ranged from 192.168.6.101 to
192.168.6.104.
3. The Redirector Servers are hosted on the server1.mybackup.com and
server2.mybackup.com machine.

www.ahsay.com 411
When you configure the redirector hosting on the first redirector, which we have described
in the Hosting a Redirector section, same configuration is required to apply on the second
redirector.
Example:
On other backup servers, you need to join the redirector.
Example:

www.ahsay.com 412
9 Monitoring Activities
9.1 Set up a Read-only Admin Account for Operators
For daily monitoring on the AhsayCBS management console, you can assign your
staff/operators with a read-only admin role account. This read-only admin role system account
shares similar accessibility as its creator, except it has read-only permission. This feature is
designed to help you with monitoring on the backup and restore jobs, Live Activities on the
AhsayCBS server, Administration logs and Reporting etc.
Follow the steps below to create a system user with read-only admin role:
1. Click on the Basic icon under the System Settings section on the CBS main page.
2. Navigate to the Administrative Access tab, then click on the button under Manage
System User to create a new system user.
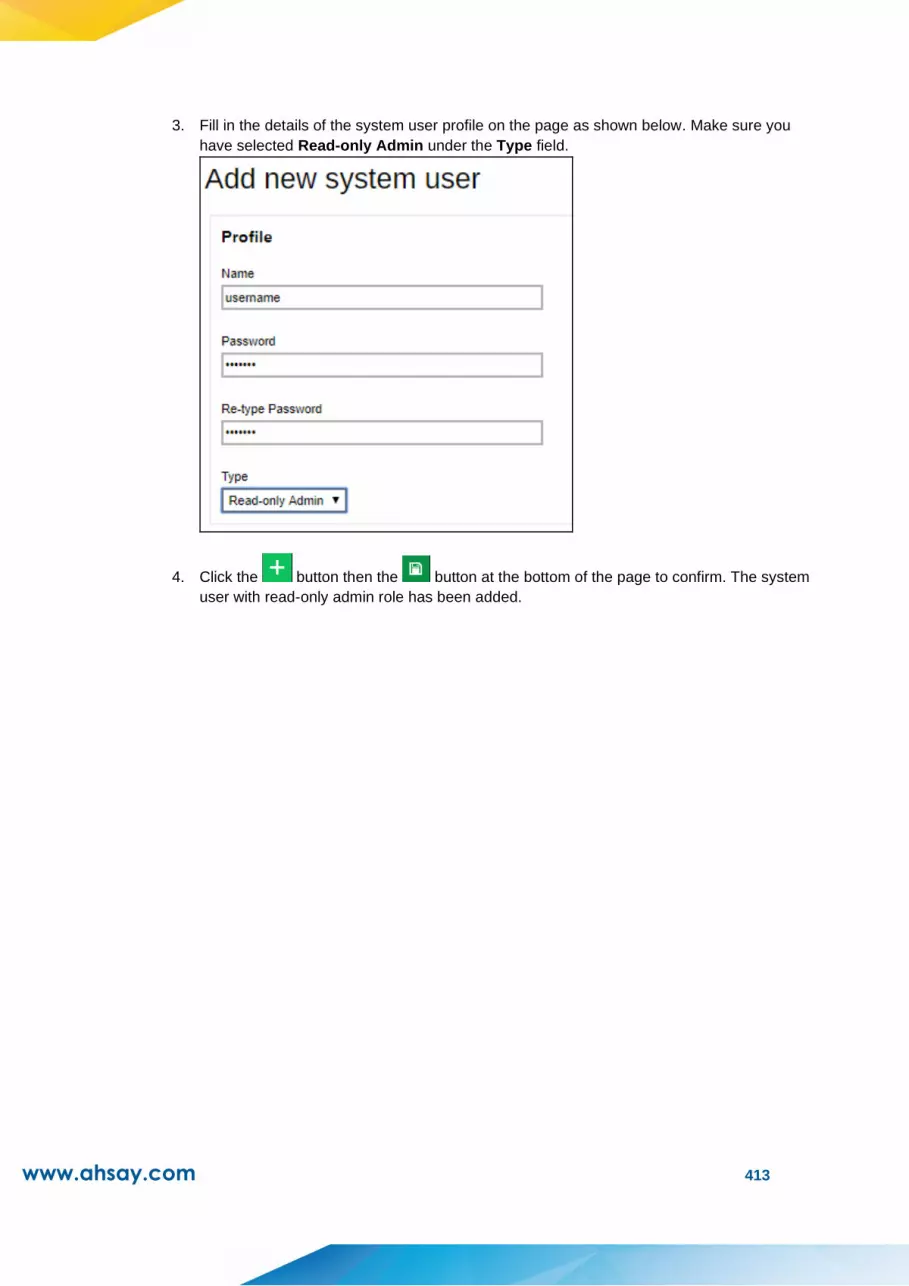
www.ahsay.com 413
3. Fill in the details of the system user profile on the page as shown below. Make sure you
have selected Read-only Admin under the Type field.
4. Click the button then the button at the bottom of the page to confirm. The system
user with read-only admin role has been added.

www.ahsay.com 414
9.2 Dashboard
The dashboard is a one-stop overview providing important information that the system
administrator should have attention to, for example, system errors/warnings, the system health
conditions and real-time activities of the system. With this information, system administrator can
quickly identify the potential issues that might pose threat to the AhsayCBS system and
therefore can react accordingly to fix the issues. Below is a summary of the information that the
dashboard section provides.
9.2.1 To Dos
It contains system announcement, errors and warning such as “Missed Backups”, “Failed
Backups”, “System Errors”, “Replication Errors”, “API Errors” and “Email Errors”.
Administrator or operators can base on these messages to take corresponding actions.

www.ahsay.com 415
Viewing options
Selectable Logs Period
You can select to display the log entries of the errors and warnings from a period of time
you selected. Click the drop-down menu on the right under the Errors and Warnings
section to select the desired period of time.
Besides selecting Today and Yesterday from the above mentioned drop-down menu, you
will see a chart illustrating the number of errors for different types of errors/warning within
the selected period of time.
In the chart below, for example, the vertical axis denotes the number of errors/warnings
while the horizontal axis denotes the date. The lines on the chart in different colors
correspond to the different types of errors/warnings as shown in the number counter below
the chart in their respective colors.

www.ahsay.com 416
Selectable Number of Row per Page
You can also select the number of rows (i.e. the number of entries) to display on each page.
Click on the drop-down menu as shown in the screen shot below to select the desired
setting.
Missed Backups
This page shows all details on all missed backups from all backup users using the
AhsayCBS server. Missed backup refers to backup jobs that failed to run according to the
set backup schedules. Any backup jobs failed to run backup 6 hours after the scheduled
backup time is considered as missed backup.
Login Name Login name of the backup user
Owner Ownership of the backup account
Backup Set Name of the backup set that has missed the scheduled backup
Destination Backup destination of the missed backup
Job Date and time when the backup job was classified as a missed
backup

www.ahsay.com 417
Status Status of the missed backup job
Failed Backups
This page shows all details on all failed backups from all backup users using the
AhsayCBS server. Failed backup refers to backup jobs that are not performed successfully.
The backup failure could be caused by various reasons, such as storage capacity on the
backup destination, Internet connection between the client backup agent and the
AhsayCBS server/backup destination, user interruption during backup, etc.
Login Name Login name of the backup user
Owner Ownership of the backup account
Backup Set Name of the backup set that failed to back up
Destination Backup destination of the failed backup
Job Date and time when the backup job failed to back up
Status Status of the failed backup job
Report Downloadable report in pdf format
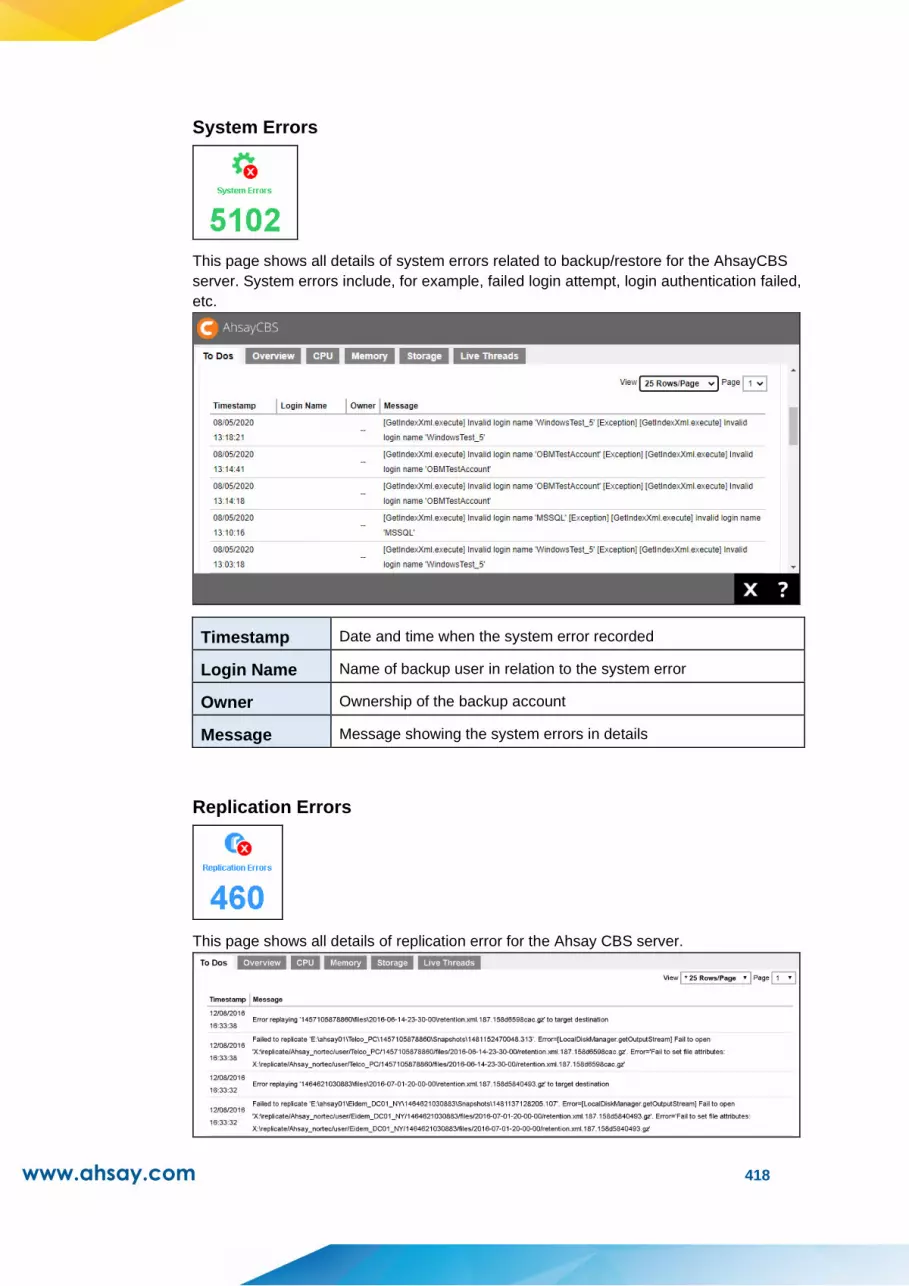
www.ahsay.com 418
System Errors
This page shows all details of system errors related to backup/restore for the AhsayCBS
server. System errors include, for example, failed login attempt, login authentication failed,
etc.
Timestamp Date and time when the system error recorded
Login Name Name of backup user in relation to the system error
Owner Ownership of the backup account
Message Message showing the system errors in details
Replication Errors
This page shows all details of replication error for the Ahsay CBS server.
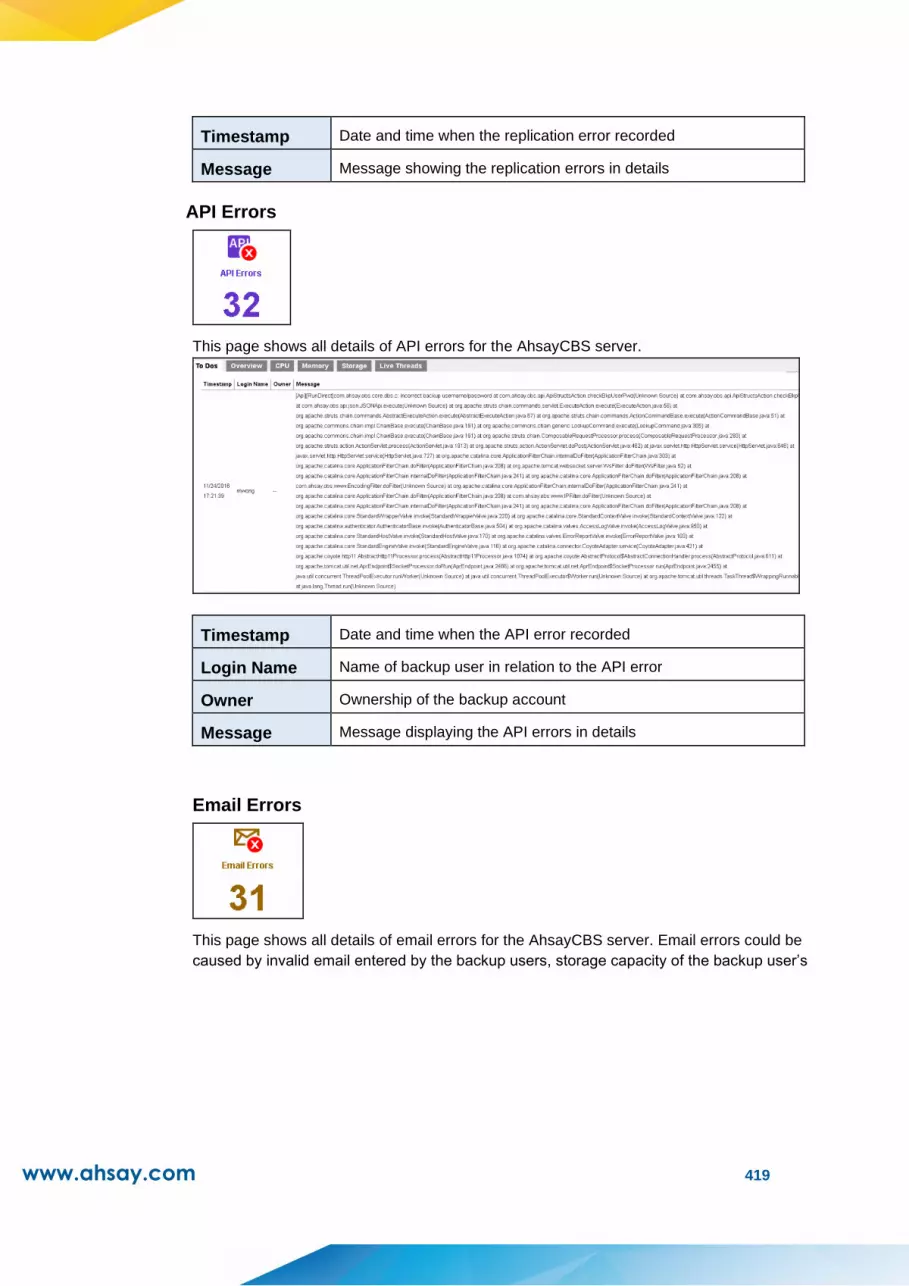
www.ahsay.com 419
Timestamp Date and time when the replication error recorded
Message Message showing the replication errors in details
API Errors
This page shows all details of API errors for the AhsayCBS server.
Timestamp Date and time when the API error recorded
Login Name Name of backup user in relation to the API error
Owner Ownership of the backup account
Message Message displaying the API errors in details
Email Errors
This page shows all details of email errors for the AhsayCBS server. Email errors could be
caused by invalid email entered by the backup users, storage capacity of the backup user’s

www.ahsay.com 420
email account, etc.
Timestamp Date and time when the Email error recorded
Login Name Name of backup user in relation to the Email error
Owner Ownership of the backup account
Message Message displaying the Email errors in details
9.2.2 Overview
This is an overview of the system resource and system settings. These are useful
information for administrator or support staff to collect machine information. This
information include “Java virtual machine”, “Java VM version”, “vendor of the Java”,
“Java version”, “Operating System”, “CPU Architecture”, “Number of Processors”,
“Committed Virtual Memory”, “Physical Memory”, and “Swap Space”.
In addition, a list of system settings such as “VM Arguments”, “Class Path”, “Library
Path”, “Boot Class Path” and “System Properties” are shown for reference.
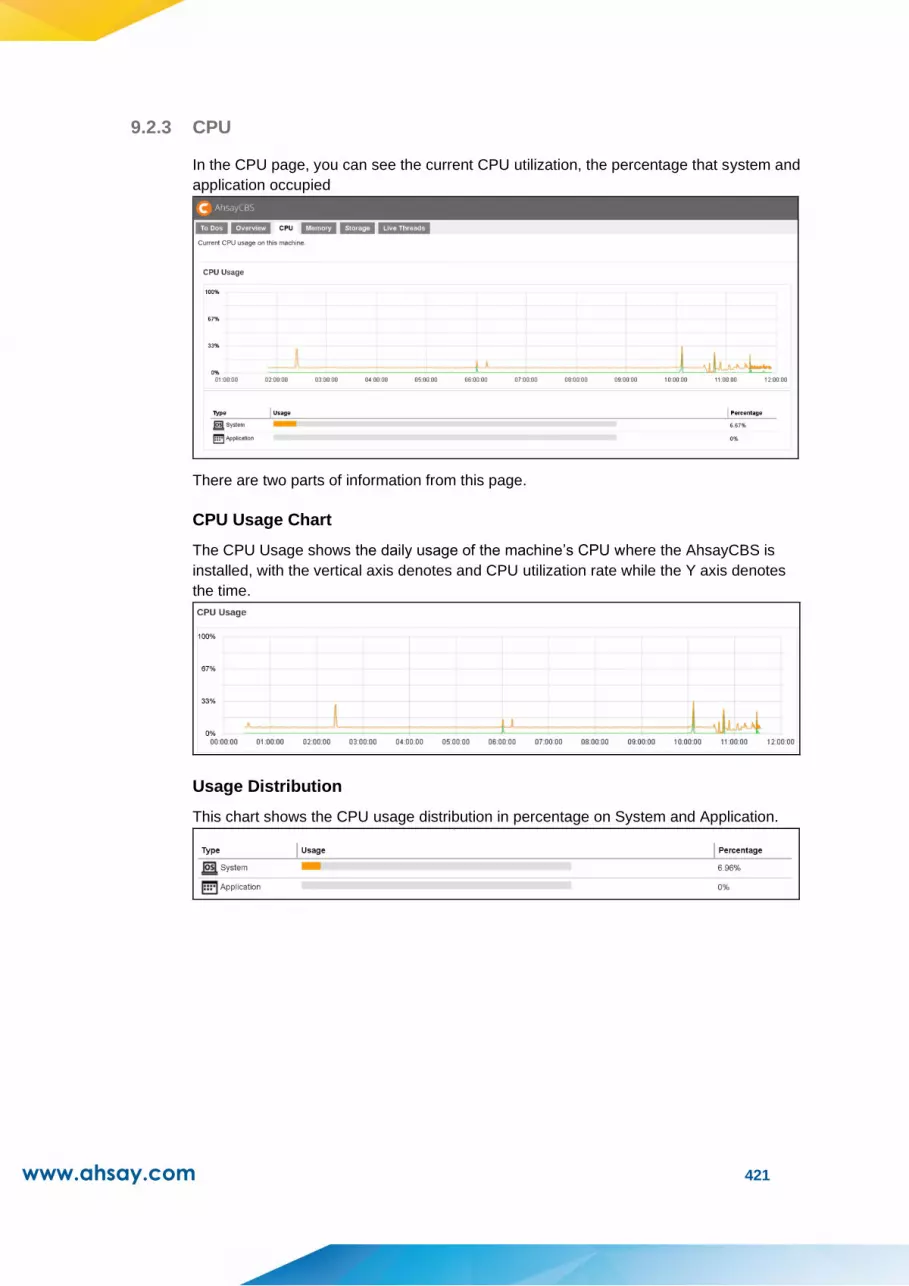
www.ahsay.com 421
9.2.3 CPU
In the CPU page, you can see the current CPU utilization, the percentage that system and
application occupied
There are two parts of information from this page.
CPU Usage Chart
The CPU Usage shows the daily usage of the machine’s CPU where the AhsayCBS is
installed, with the vertical axis denotes and CPU utilization rate while the Y axis denotes
the time.
Usage Distribution
This chart shows the CPU usage distribution in percentage on System and Application.

www.ahsay.com 422
9.2.4 Memory
This is a graphical view of the memory pool/managers usage on this machine.
Heap Size The heap memory is the runtime data area from which the
Java VM allocates memory for all class instances and arrays.
Non Heap Size
Non heap memory includes a method area shared among all
threads and memory required for the internal processing or
optimization for the Java VM.
Par Eden Space
The pool from which memory is initially allocated for most
objects.
Par Survivor Space The pool containing objects that have survived the garbage
collection of the Eden space.
CMS Old Gen The pool containing objects that have existed for some time
in the survivor space.
Code Cache
The HotSpot Java VM also includes a code cache, containing
memory that is used for compilation and storage of native
code.
Metaspace
The pool containing all the reflective data of the virtual
machine itself, such as class and method objects. With Java
VMs that use class data sharing, this generation is divided
into read-only and read-write areas.
Compressed Class
Space This is part of the metaspace.

www.ahsay.com 423
9.2.5 Storage
This is a local storage and predefined destination usage overview.
➢ Disk Usage
Under the Disk Usage section, it shows all the drives on the machine where the
AhsayCBS is installed. You can see the capacity used (Used) and capacity remain
(Free) for each drive.
You can select to view the entries in the Disk Usage section by sorting the Drive Letter
or Free Storage
➢ Predefined Destination Usage
Under the Predefined Destination Usage section, it shows all the predefined
destinations that you have added under the System Settings > Basics >
Predefined Destination.
You can select to view the predefined destination entries by sorting the Destination
Name or Free Storage.

www.ahsay.com 424
9.2.6 Live Threads
This page shows all live threads that are running on this machine.
Live Threads Active process threads
Peak The largest number of live threads record in the above
period
Daemon Threads Threads that are handled in the background
Total Threads Started The total number of started threads
You can use mouse over at any point of the curve to obtain the number of live threads at
the particular time.
If you click on the Details button below the Live Threads icon, you will see a breakdown of
all live threads that are running on this machine. It is shown as thread groups for
developers or administrators reference.
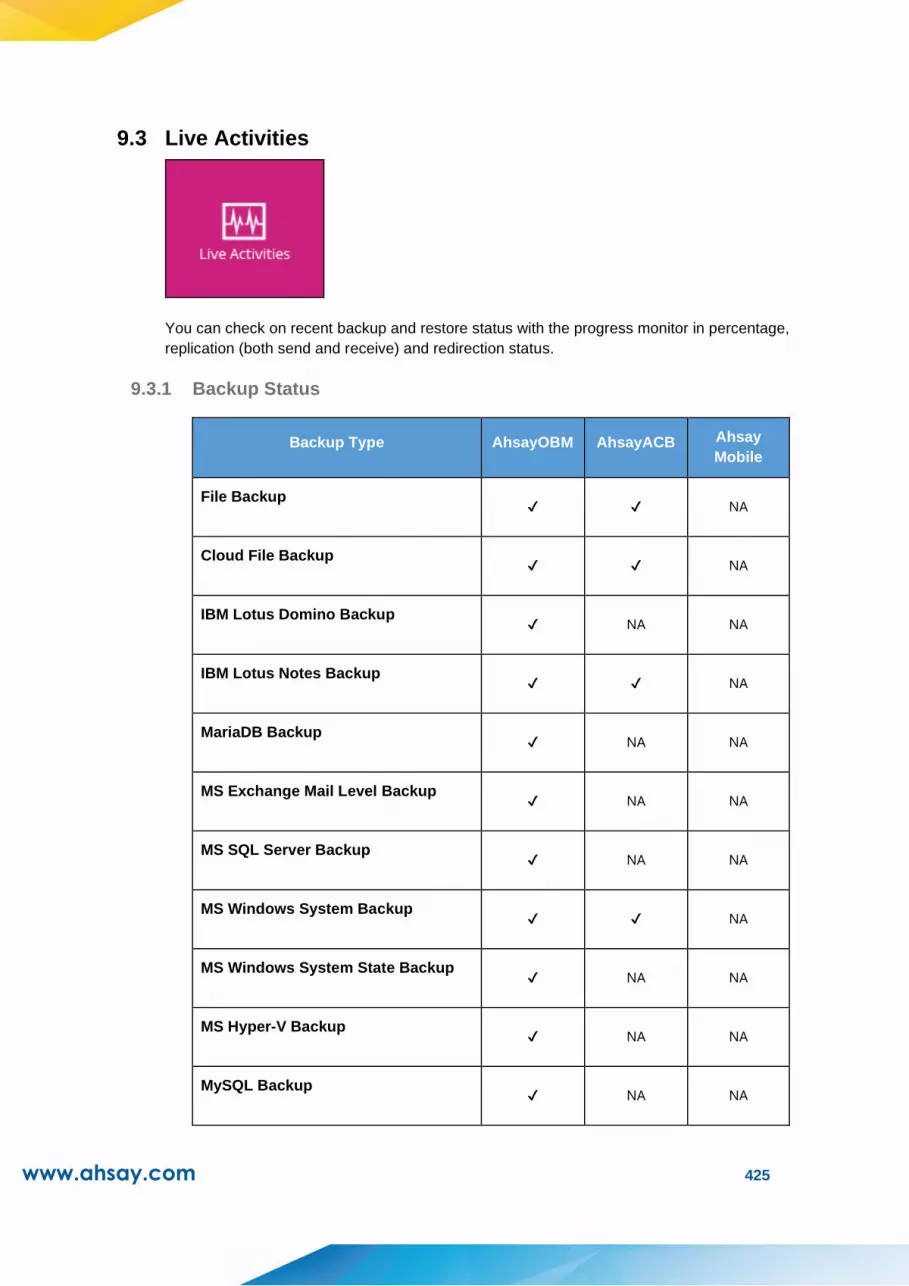
www.ahsay.com 425
9.3 Live Activities
You can check on recent backup and restore status with the progress monitor in percentage,
replication (both send and receive) and redirection status.
9.3.1 Backup Status
Backup Type AhsayOBM AhsayACB Ahsay
Mobile
File Backup ✔ ✔ NA
Cloud File Backup ✔ ✔ NA
IBM Lotus Domino Backup ✔ NA NA
IBM Lotus Notes Backup ✔ ✔ NA
MariaDB Backup ✔ NA NA
MS Exchange Mail Level Backup ✔ NA NA
MS SQL Server Backup ✔ NA NA
MS Windows System Backup ✔ ✔ NA
MS Windows System State Backup ✔ NA NA
MS Hyper-V Backup ✔ NA NA
MySQL Backup ✔ NA NA
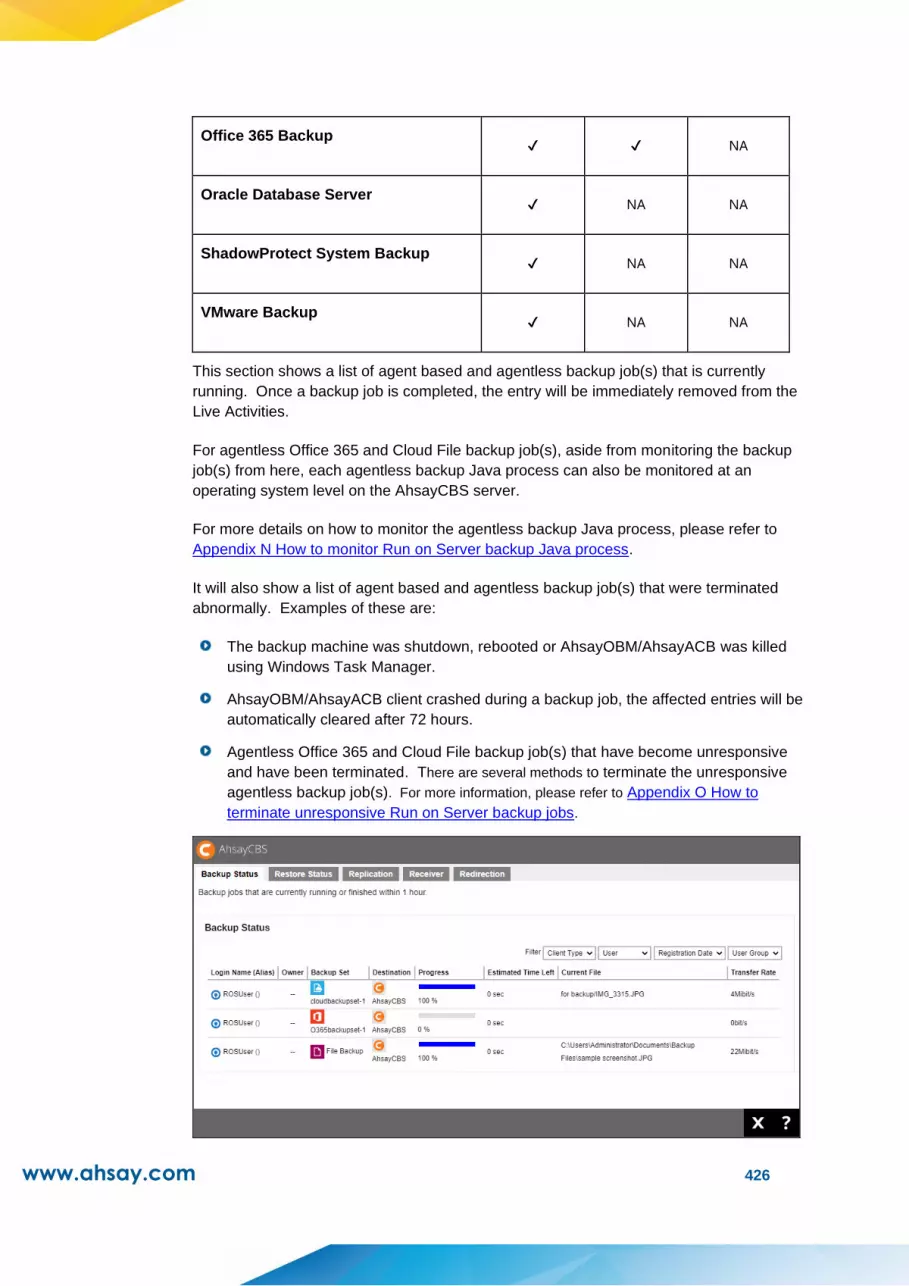
www.ahsay.com 426
Office 365 Backup ✔ ✔ NA
Oracle Database Server ✔ NA NA
ShadowProtect System Backup ✔ NA NA
VMware Backup ✔ NA NA
This section shows a list of agent based and agentless backup job(s) that is currently
running. Once a backup job is completed, the entry will be immediately removed from the
Live Activities.
For agentless Office 365 and Cloud File backup job(s), aside from monitoring the backup
job(s) from here, each agentless backup Java process can also be monitored at an
operating system level on the AhsayCBS server.
For more details on how to monitor the agentless backup Java process, please refer to
Appendix N How to monitor Run on Server backup Java process.
It will also show a list of agent based and agentless backup job(s) that were terminated
abnormally. Examples of these are:
The backup machine was shutdown, rebooted or AhsayOBM/AhsayACB was killed
using Windows Task Manager.
AhsayOBM/AhsayACB client crashed during a backup job, the affected entries will be
automatically cleared after 72 hours.
Agentless Office 365 and Cloud File backup job(s) that have become unresponsive
and have been terminated. There are several methods to terminate the unresponsive
agentless backup job(s). For more information, please refer to Appendix O How to
terminate unresponsive Run on Server backup jobs.

www.ahsay.com 427
9.3.2 Restore Status
Restore Type AhsayOBM AhsayACB AhsayOBR Ahsay
Mobile
File Normal Restore ✔ ✔ ✔ NA
OpenDirect
Restore ✘ ✘ ✘ NA
Cloud File Backup ✔ ✔ ✔ NA
IBM Lotus Domino
Backup ✔ NA ✔ NA
IBM Lotus Notes Backup ✔ ✔ ✔ NA
MariaDB Backup ✔ NA ✔ NA
MS Exchange Server
Backup ✔ NA ✔ NA
MS Exchange Mail Level
Backup ✔ NA ✔ NA
MS SQL Server Backup ✔ NA ✔ NA
MS Windows System
Backup ✔ ✔ ✔ NA
MS Windows System
State Backup ✔ NA ✔ NA
MS
Hyper-V
Normal Restore ✔ NA ✔ NA
Run Direct
Restore ✔ NA ✔ NA
Granular
Restore with
AhsayOBM File
Explorer
✔ NA ✔ NA
Granular
Restore with ✘ NA ✘ NA

www.ahsay.com 428
Windows File
Explorer
MS SQL Server Backup ✔ NA ✔ NA
MySQL Backup ✔ NA ✔ NA
Office 365 Backup ✔ ✔ ✔ NA
Oracle Database Server ✔ NA ✔ NA
ShadowProtect System
Backup ✔ NA ✔ NA
VMware Normal Restore ✔ NA ✔ NA
Run Direct
Restore ✔ NA ✔ NA
Granular
Restore with
AhsayOBM File
Explorer
✔ NA ✔ NA
Granular
Restore with
Windows File
Explorer
✘ NA ✘ NA
This section shows a list of agent based and agentless restore job(s) that is currently
running. Once a restore job is completed the entry will be immediately removed from the
Live Activities. It will also show a list of restore job(s) that were terminated abnormally.
Examples of these are:
The backup machine was shutdown, rebooted or AhsayOBM/AhsayACB was killed
using Windows Task Manager.
AhsayOBM/AhsayACB client crashed during a restore job, the affected entries will be
automatically cleared after 72 hours.

www.ahsay.com 429
NOTE
OpenDirect restore of file backup sets or granular restore from VMware and Hyper-V backup
sets performed using Windows File Explorer will not show up on the [Restore Status] tab in Live
Activities. This only applies to restores performed directly through
AhsayOBM/AhsayACB/AhsayOBR or AhsayCBS User Web Console.
9.3.3 Replication
Here is the replication jobs status from the backup server to the corresponding receiver.
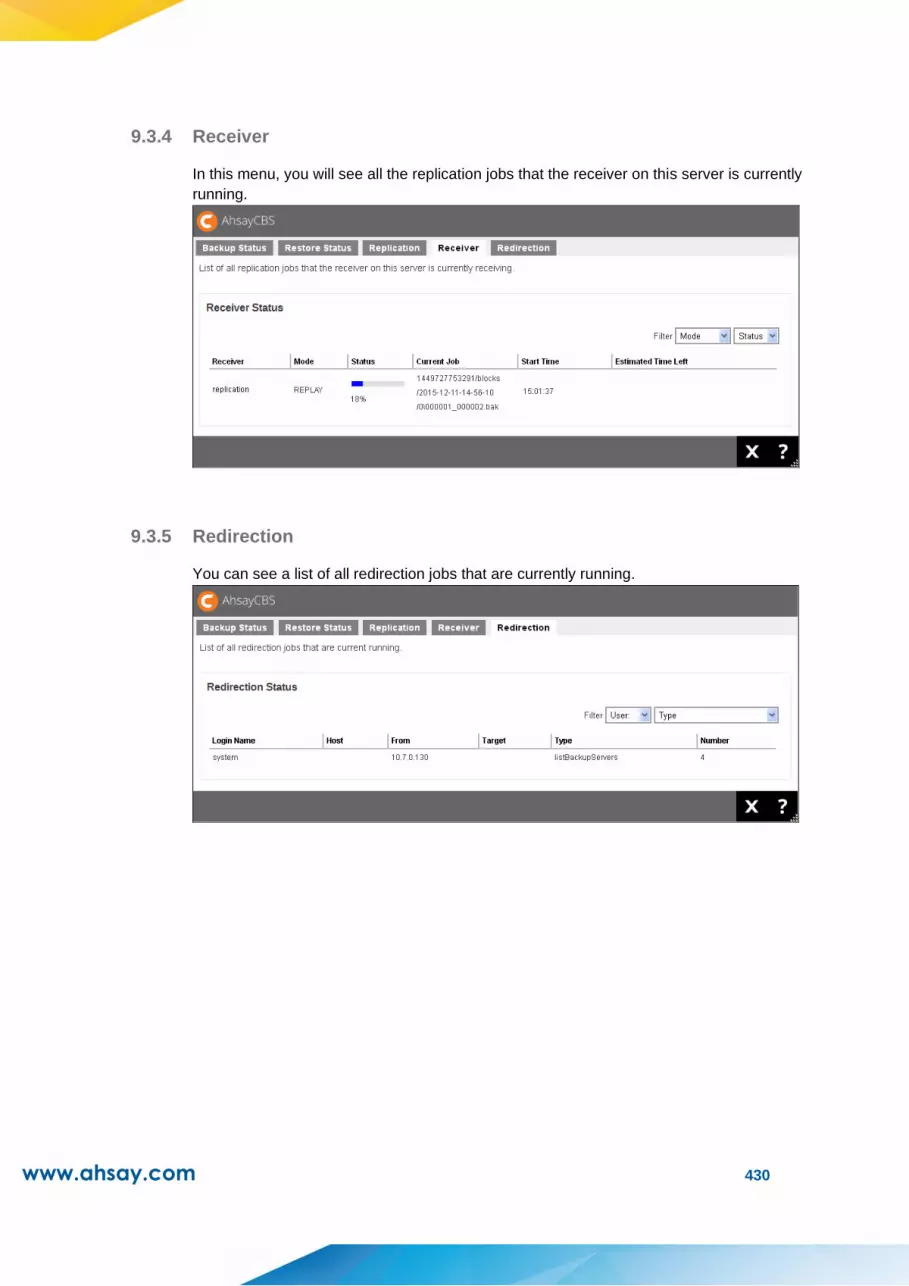
www.ahsay.com 430
9.3.4 Receiver
In this menu, you will see all the replication jobs that the receiver on this server is currently
running.
9.3.5 Redirection
You can see a list of all redirection jobs that are currently running.
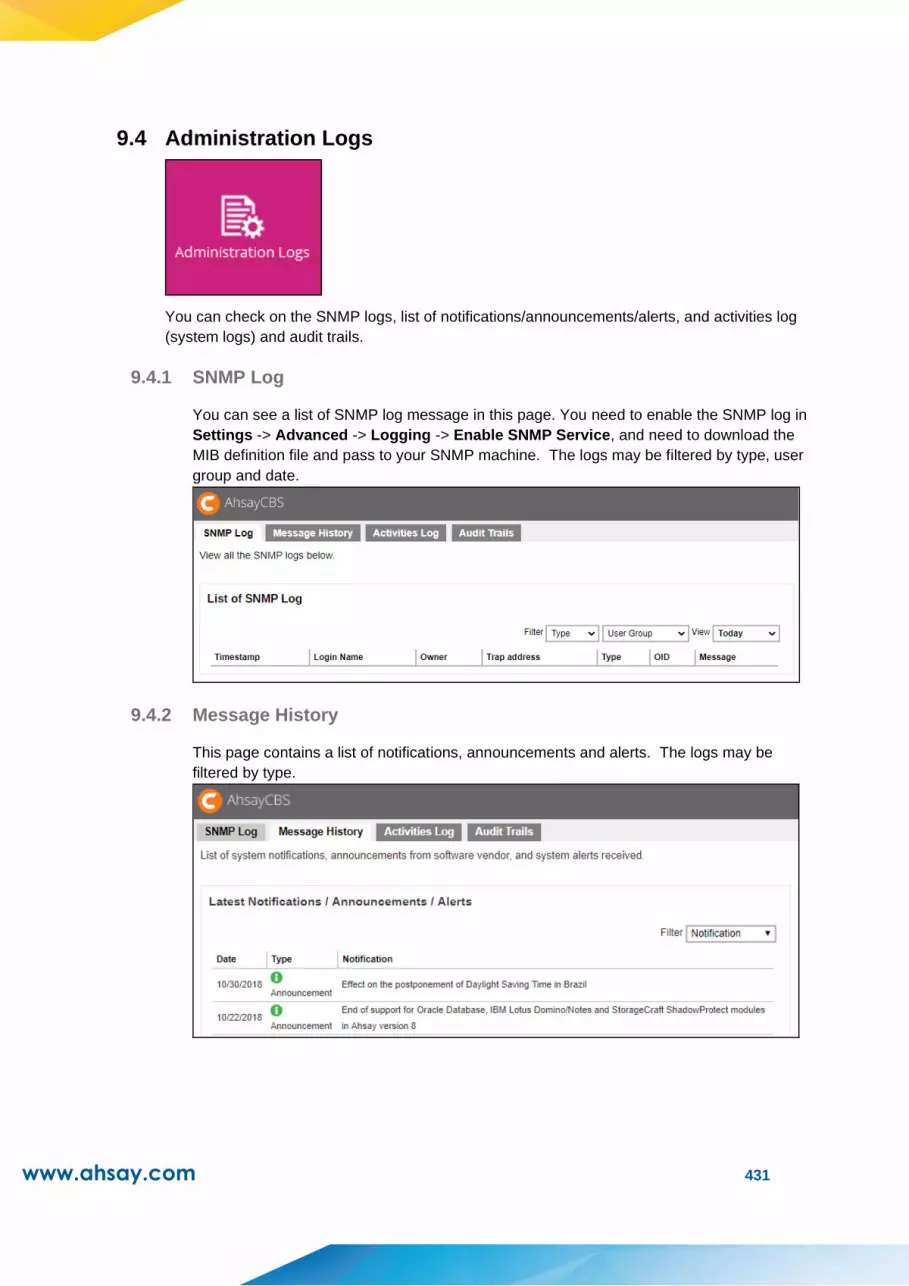
www.ahsay.com 431
9.4 Administration Logs
You can check on the SNMP logs, list of notifications/announcements/alerts, and activities log
(system logs) and audit trails.
9.4.1 SNMP Log
You can see a list of SNMP log message in this page. You need to enable the SNMP log in
Settings -> Advanced -> Logging -> Enable SNMP Service, and need to download the
MIB definition file and pass to your SNMP machine. The logs may be filtered by type, user
group and date.
9.4.2 Message History
This page contains a list of notifications, announcements and alerts. The logs may be
filtered by type.
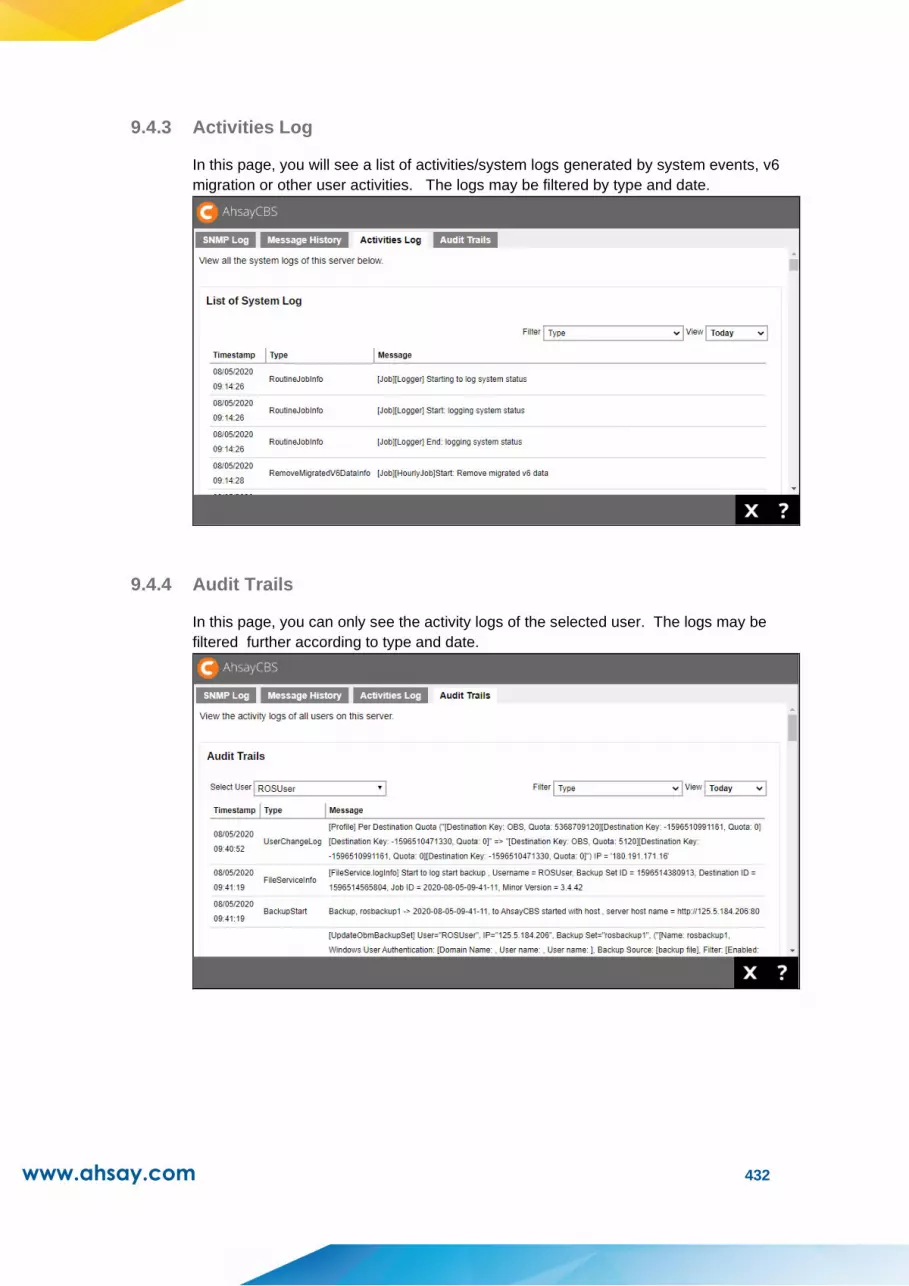
www.ahsay.com 432
9.4.3 Activities Log
In this page, you will see a list of activities/system logs generated by system events, v6
migration or other user activities. The logs may be filtered by type and date.
9.4.4 Audit Trails
In this page, you can only see the activity logs of the selected user. The logs may be
filtered further according to type and date.
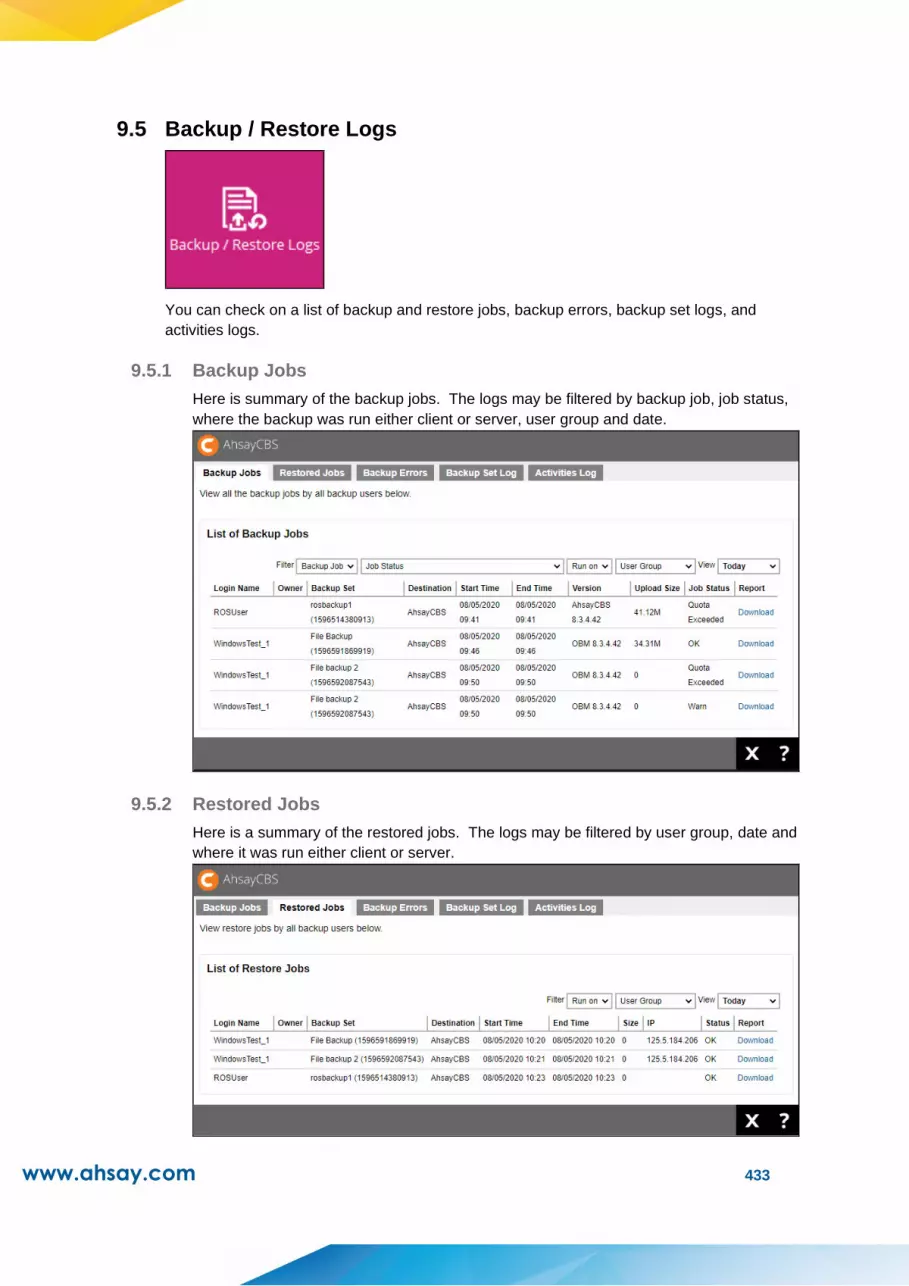
www.ahsay.com 433
9.5 Backup / Restore Logs
You can check on a list of backup and restore jobs, backup errors, backup set logs, and
activities logs.
9.5.1 Backup Jobs
Here is summary of the backup jobs. The logs may be filtered by backup job, job status,
where the backup was run either client or server, user group and date.
9.5.2 Restored Jobs
Here is a summary of the restored jobs. The logs may be filtered by user group, date and
where it was run either client or server.

www.ahsay.com 434
9.5.3 Backup Errors
Here is a summary of the backup errors encountered by all backup users. The logs may be
filtered by user group and date.
9.5.4 Backup Set Log
Here is a summary of backup set logs of all the backup users. The logs may be filtered by
user group.
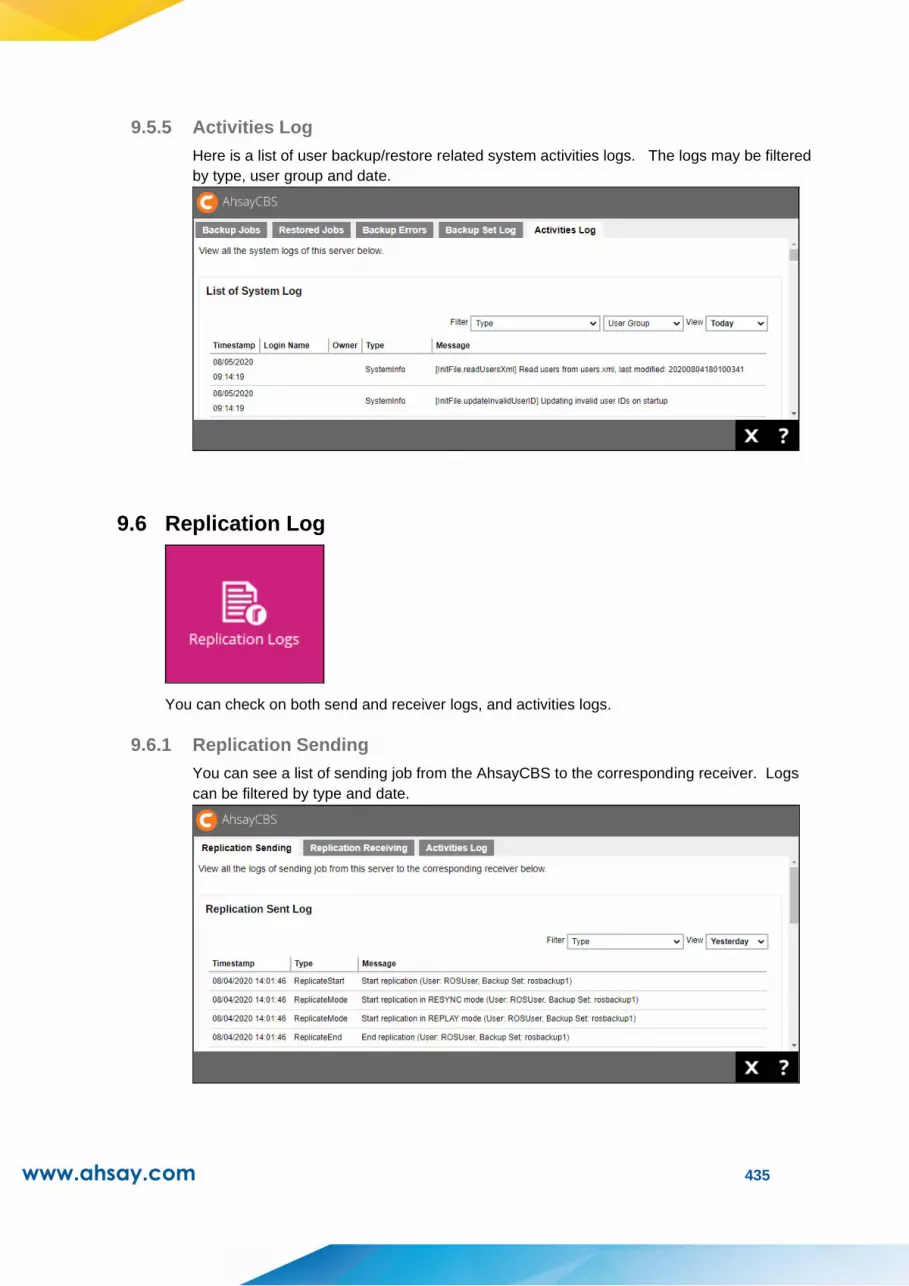
www.ahsay.com 435
9.5.5 Activities Log
Here is a list of user backup/restore related system activities logs. The logs may be filtered
by type, user group and date.
9.6 Replication Log
You can check on both send and receiver logs, and activities logs.
9.6.1 Replication Sending
You can see a list of sending job from the AhsayCBS to the corresponding receiver. Logs
can be filtered by type and date.

www.ahsay.com 436
9.6.2 Replication Receiving
Here is the receiver log on the AhsayCBS. It only shows the logs of the selected receiver.
Logs can be filtered further by type and date.
9.6.3 Activities Log
Here is the page to view all the replication activities log, such as creation of new receiver,
changes in the settings, retention policy job etc.
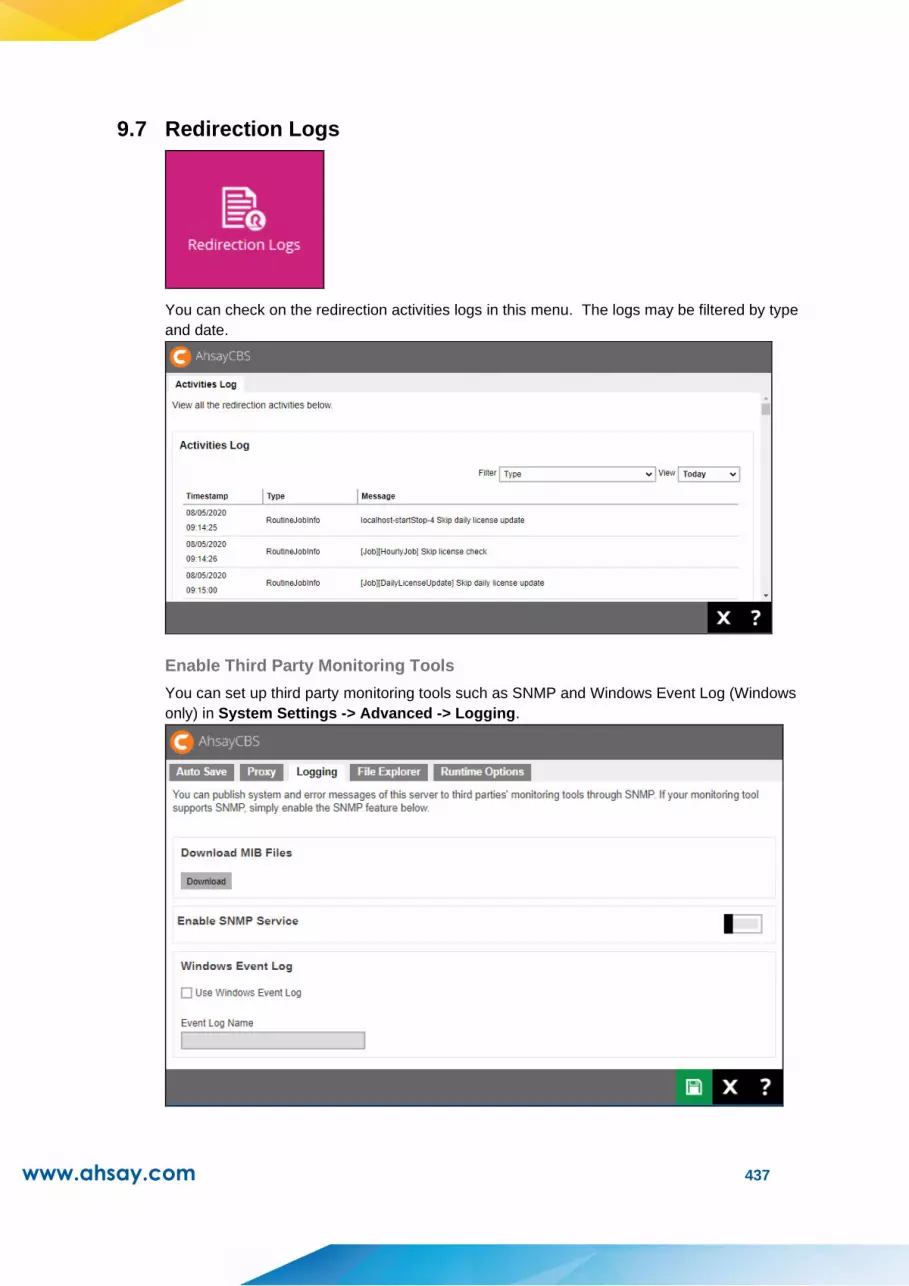
www.ahsay.com 437
9.7 Redirection Logs
You can check on the redirection activities logs in this menu. The logs may be filtered by type
and date.
Enable Third Party Monitoring Tools
You can set up third party monitoring tools such as SNMP and Windows Event Log (Windows
only) in System Settings -> Advanced -> Logging.
www.ahsay.com 438
10 Branding the AhsayCBS
This chapter describes the steps to brand the AhsayCBS/AhsayUBS.
You can brand the AhsayCBS and generate new AhsayCBS installers and AhsayUBS image files
from the AhsayCBS interface.
10.1 Prerequisite
A Rebranding license is required for this feature to work. Evaluation license does not support
this feature. If you do not have a license yet, visit the Ahsay Shopping Centre – Rebranding
page to purchase one.
10.2 Before Getting Started
Here are the suggested steps for you to complete the process.
1. Prepare the logos, properties, application settings and digital signature to be applied in
the Rebrand Clients section, which will be reflected in the Client Backup Agents
(AhsayACB/AhsayOBM).
2. Generate the AhsayOBM/AhsayACB installers for testing.
3. Prepare the logos, properties, cascade style sheet, connector/SSL certificate settings and
customized report templates to be applied in the Rebrand Web Console section, which
will be reflected in the AhsayCBS web console.
4. Generate the AhsayCBS installer for testing.
5. Optional:
AhsayUBS image file generation. Select either 'ISO' or 'IMG' as the format for
image file generation. The image file will be the installation file for the AhsayUBS.
If Office 365 backups are offered, need to prepare the oauth2-microsoft365.jsp
and oauth2-permission365.jsp files, to customize the Authorization code and
Admin consent endpoint screen for Office 365 Global region.
If Two-Factor Authentication and/or mobile backup service is enabled then Ahsay
Mobile app branding is required.
During the initial rollout phases, the branding of Ahsay Mobile app can only be
done by Ahsay, if you are interested in branding the Ahsay mobile app you must
engage our professional services. For more information please refer to Chapter
10.8 Ahsay Mobile Branding.
Ahsay Mobile Branding Service
To engage our professional services for Ahsay Mobile branding, please
contact our sales team at Ahsay by email at [email protected] or call our
International Sales Hotline +852 3580 8091.

www.ahsay.com 439
AhsayUp Upgrade Service
Subscribe to our premium upgrade service to enjoy a smooth and effortless upgrade
experience. Click here to learn more about the AhsayUp Upgrade Service or visit the
Ahsay Shopping Centre directly to subscribe the service.
For the images specifications, please refer to the Appendix E.
10.3 Prepare Branding for AhsayCBS Interface
After you have installed the AhsayCBS, you can upload the graphics and customize the
properties.
1. Login to the AhsayCBS management console as “system” user.
2. Click in System Settings -> Basic -> Administrative Access.
3. Click on the “system” user to brand the AhsayCBS.
If you are testing this feature, please create a sub admin user and test the following steps,
this is because when new installers are generated, the existing installers will be
overwritten with the new ones.
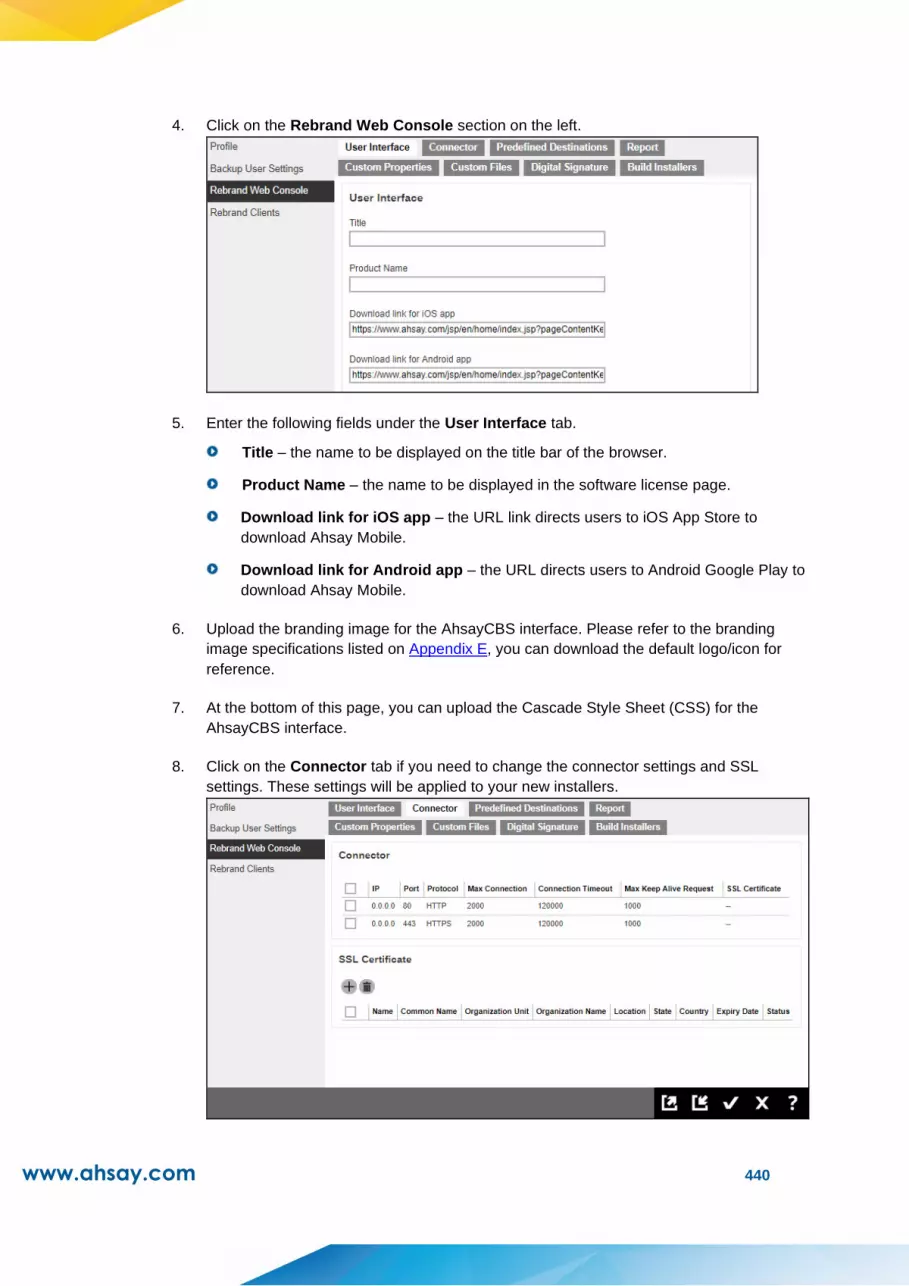
www.ahsay.com 440
4. Click on the Rebrand Web Console section on the left.
5. Enter the following fields under the User Interface tab.
Title – the name to be displayed on the title bar of the browser.
Product Name – the name to be displayed in the software license page.
Download link for iOS app – the URL link directs users to iOS App Store to
download Ahsay Mobile.
Download link for Android app – the URL directs users to Android Google Play to
download Ahsay Mobile.
6. Upload the branding image for the AhsayCBS interface. Please refer to the branding
image specifications listed on Appendix E, you can download the default logo/icon for
reference.
7. At the bottom of this page, you can upload the Cascade Style Sheet (CSS) for the
AhsayCBS interface.
8. Click on the Connector tab if you need to change the connector settings and SSL
settings. These settings will be applied to your new installers.
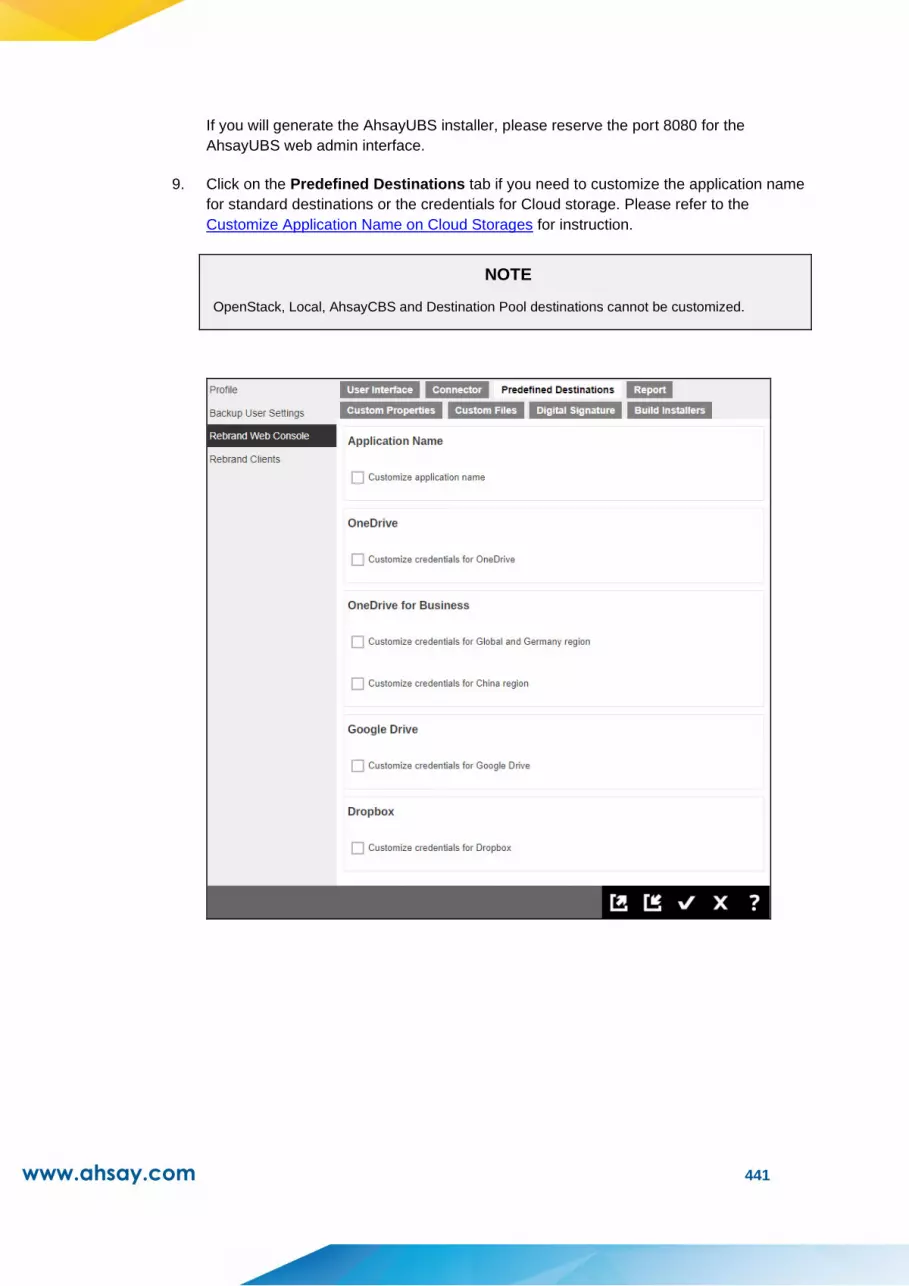
www.ahsay.com 441
If you will generate the AhsayUBS installer, please reserve the port 8080 for the
AhsayUBS web admin interface.
9. Click on the Predefined Destinations tab if you need to customize the application name
for standard destinations or the credentials for Cloud storage. Please refer to the
Customize Application Name on Cloud Storages for instruction.
NOTE
OpenStack, Local, AhsayCBS and Destination Pool destinations cannot be customized.

www.ahsay.com 442
10. Click on the Report tab if you want to modify the HTML template. These templates will be
applied to your new installers.
11. Click on the Custom Properties tab if you want to modify the properties on the
AhsayCBS. These properties will be applied to your new installers.
12. Click on the Custom Files tab. Upload the branding image for the AhsayCBS
installer/AhsayUBS image file. Please refer to the branding image specifications listed on

www.ahsay.com 443
Appendix E, you can download the default logo/icon for reference.
13. If you have uploaded the digital signature in Rebrand Clients > Digital Signature, it will
be applied to your new Windows installer.
14. Click on the Build Installer tab.
NOTE
The new AhsayOBM/AhsayACB will be generated and overwrite your existing installers.
15. Select the installer(s) or image file(s) to generate. You can also select the AhsayUBS
image file generation. Before you use this option, you may test the AhsayCBS installer
generation first, this can save the generation time and download time before you can
finalize your branding work.
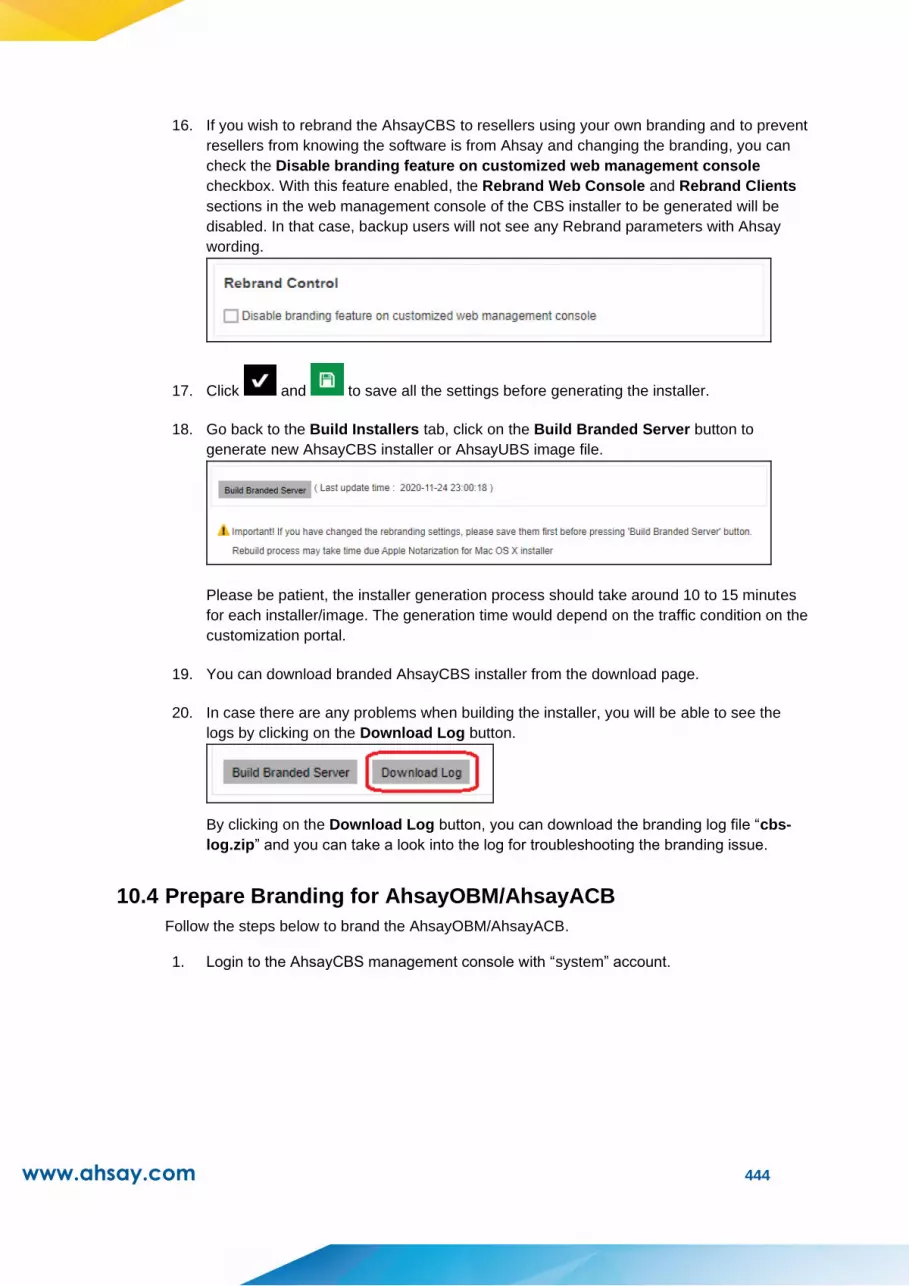
www.ahsay.com 444
16. If you wish to rebrand the AhsayCBS to resellers using your own branding and to prevent
resellers from knowing the software is from Ahsay and changing the branding, you can
check the Disable branding feature on customized web management console
checkbox. With this feature enabled, the Rebrand Web Console and Rebrand Clients
sections in the web management console of the CBS installer to be generated will be
disabled. In that case, backup users will not see any Rebrand parameters with Ahsay
wording.
17. Click and to save all the settings before generating the installer.
18. Go back to the Build Installers tab, click on the Build Branded Server button to
generate new AhsayCBS installer or AhsayUBS image file.
Please be patient, the installer generation process should take around 10 to 15 minutes
for each installer/image. The generation time would depend on the traffic condition on the
customization portal.
19. You can download branded AhsayCBS installer from the download page.
20. In case there are any problems when building the installer, you will be able to see the
logs by clicking on the Download Log button.
By clicking on the Download Log button, you can download the branding log file “cbs-
log.zip” and you can take a look into the log for troubleshooting the branding issue.
10.4 Prepare Branding for AhsayOBM/AhsayACB
Follow the steps below to brand the AhsayOBM/AhsayACB.
1. Login to the AhsayCBS management console with “system” account.
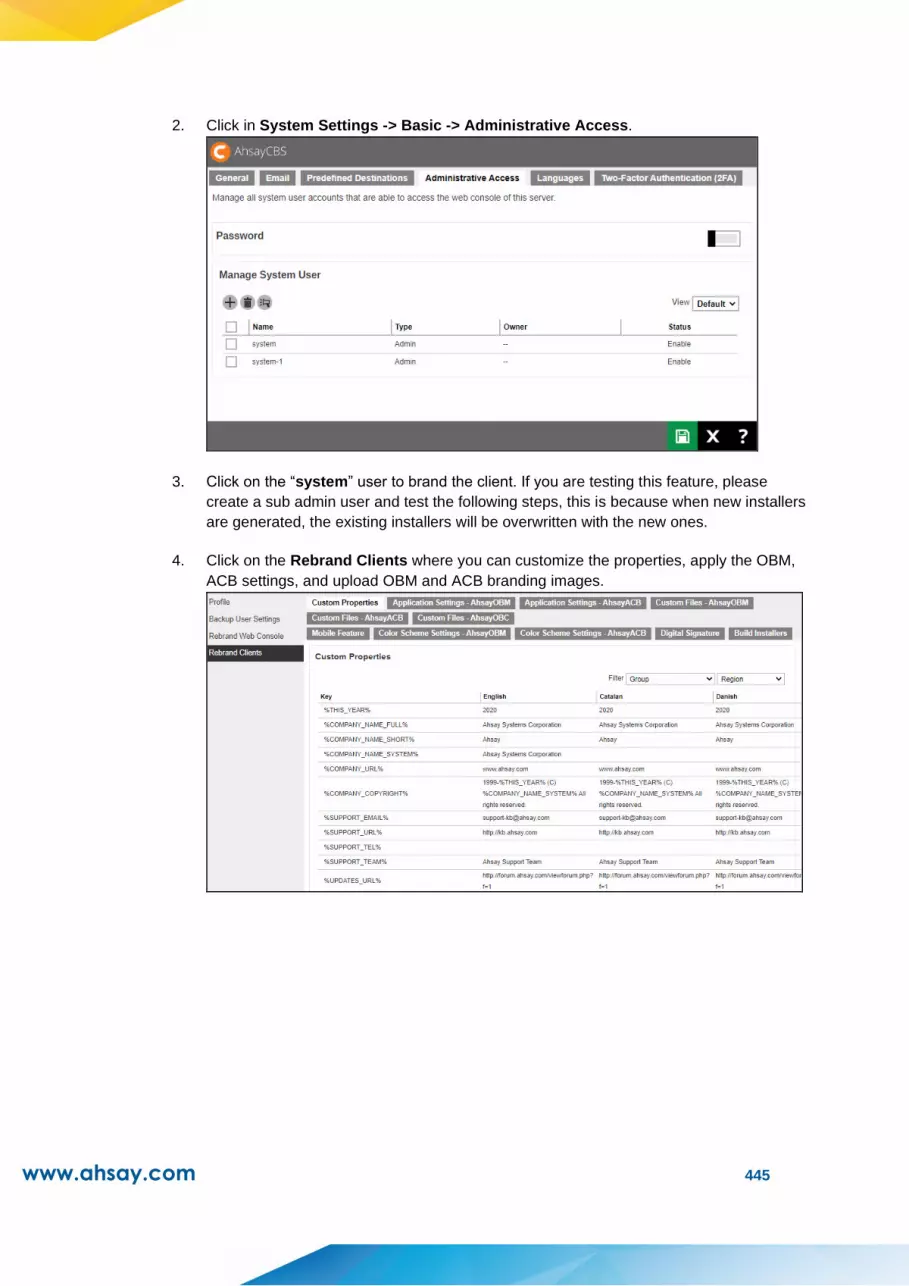
www.ahsay.com 445
2. Click in System Settings -> Basic -> Administrative Access.
3. Click on the “system” user to brand the client. If you are testing this feature, please
create a sub admin user and test the following steps, this is because when new installers
are generated, the existing installers will be overwritten with the new ones.
4. Click on the Rebrand Clients where you can customize the properties, apply the OBM,
ACB settings, and upload OBM and ACB branding images.
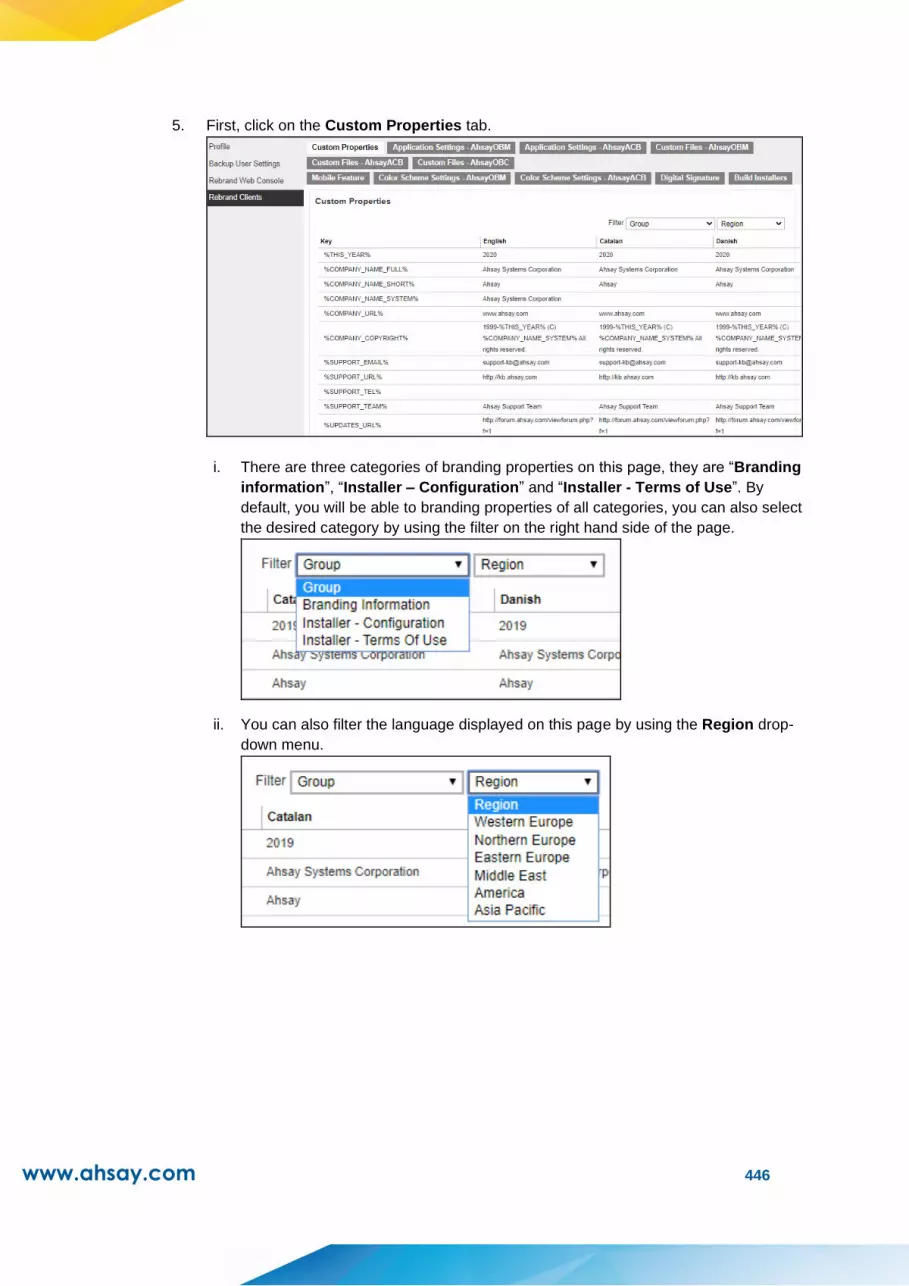
www.ahsay.com 446
5. First, click on the Custom Properties tab.
i. There are three categories of branding properties on this page, they are “Branding
information”, “Installer – Configuration” and “Installer - Terms of Use”. By
default, you will be able to branding properties of all categories, you can also select
the desired category by using the filter on the right hand side of the page.
ii. You can also filter the language displayed on this page by using the Region drop-
down menu.

www.ahsay.com 447
iii. By clicking into each item, you can modify the name of each property in different
languages. Click on at the bottom right corner to continue.
iv. You will be able to see the modified branding properties as shown.
NOTE
AhsayCBS made some constraints for the system properties, which are defined as follow:
Short System Property (%XXX_SHORT_NAME_SYSTEM%)
➢ Accepts alphabet and/or numeric character(s)
General System Property (%XXX_SYSTEM%, except for Short System Property,
%OBM_SYNOLOGY_APP_ID_SYSTEM% and
%SOCIAL_MEDIA_LINK_XXX_SYSTEM%)
➢ Only accept alphabet, numeric and/or space character(s)
%OBM_SYNOLOGY_APP_ID_SYSTEM%
➢ Accepts alphabet, numeric and/or dot character(s)
➢ The length cannot exceed 128 characters
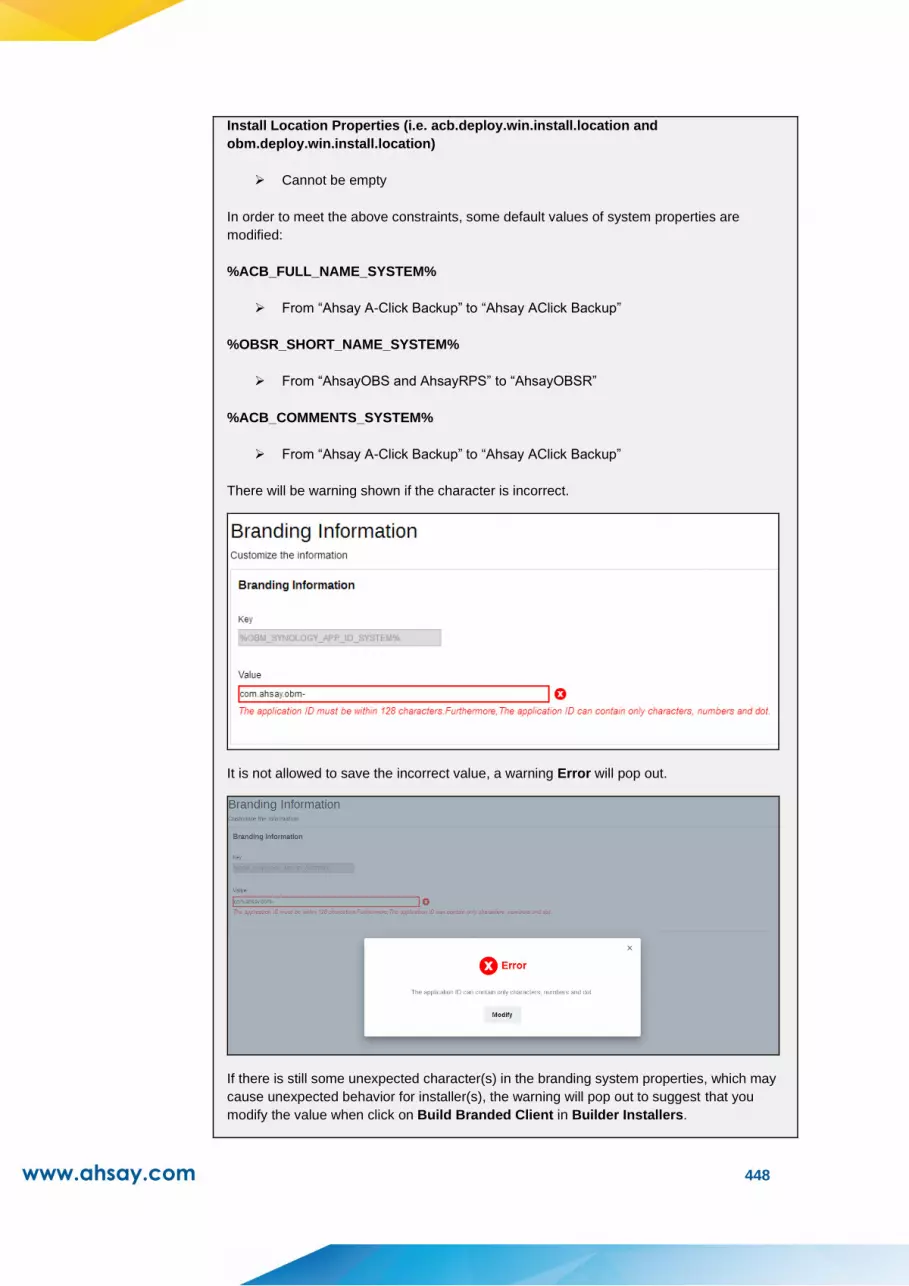
www.ahsay.com 448
Install Location Properties (i.e. acb.deploy.win.install.location and
obm.deploy.win.install.location)
➢ Cannot be empty
In order to meet the above constraints, some default values of system properties are
modified:
%ACB_FULL_NAME_SYSTEM%
➢ From “Ahsay A-Click Backup” to “Ahsay AClick Backup”
%OBSR_SHORT_NAME_SYSTEM%
➢ From “AhsayOBS and AhsayRPS” to “AhsayOBSR”
%ACB_COMMENTS_SYSTEM%
➢ From “Ahsay A-Click Backup” to “Ahsay AClick Backup”
There will be warning shown if the character is incorrect.
It is not allowed to save the incorrect value, a warning Error will pop out.
If there is still some unexpected character(s) in the branding system properties, which may
cause unexpected behavior for installer(s), the warning will pop out to suggest that you
modify the value when click on Build Branded Client in Builder Installers.

www.ahsay.com 449
6. After you completed properties, you can click on the Application Settings – OBM tab.
You can customize the default connection settings, supported languages, and GUI
features such as show backup server URL or select language drop down list.
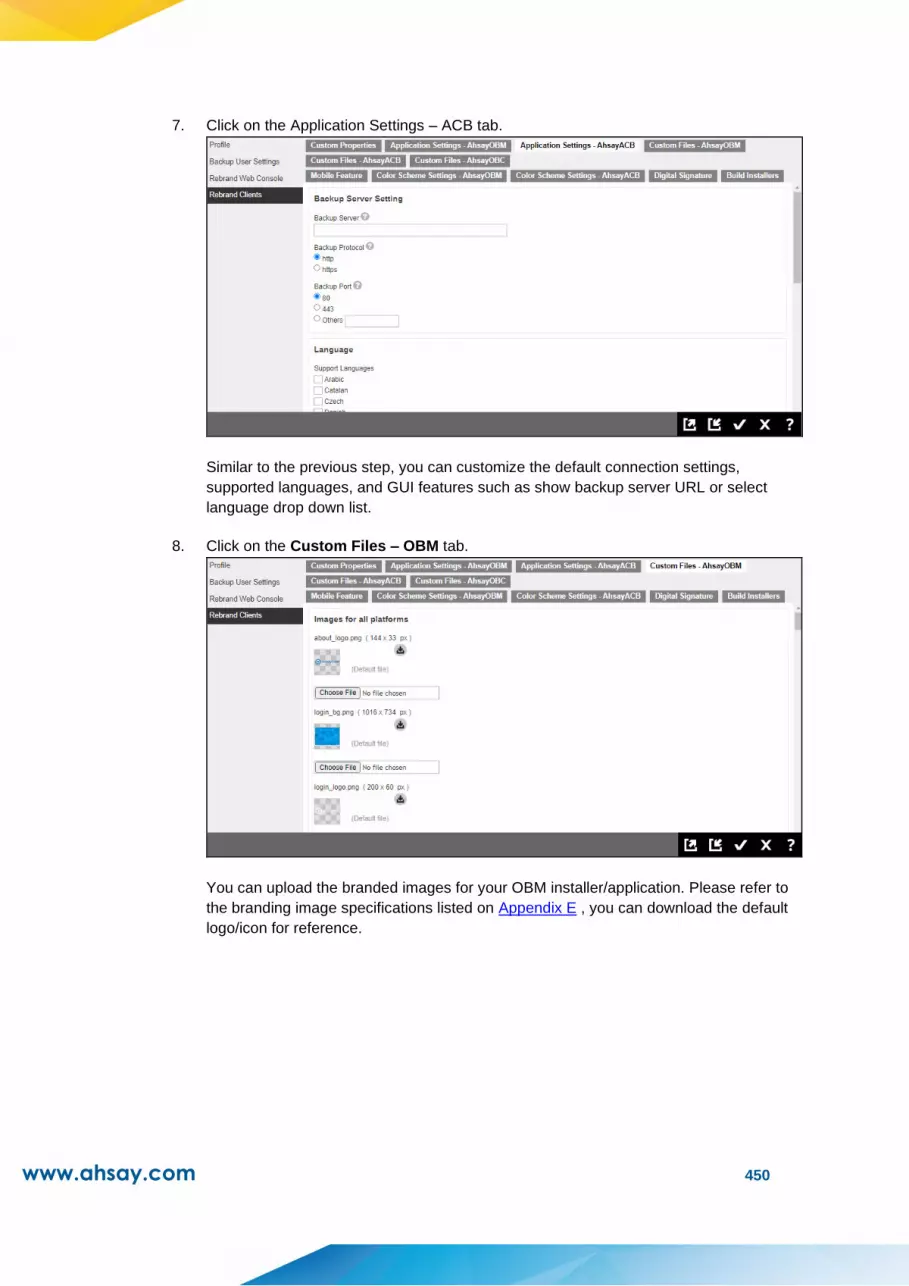
www.ahsay.com 450
7. Click on the Application Settings – ACB tab.
Similar to the previous step, you can customize the default connection settings,
supported languages, and GUI features such as show backup server URL or select
language drop down list.
8. Click on the Custom Files – OBM tab.
You can upload the branded images for your OBM installer/application. Please refer to
the branding image specifications listed on Appendix E , you can download the default
logo/icon for reference.

www.ahsay.com 451
9. Click on the Custom Files – ACB tab.
You can upload the branded images for your ACB installer/application. Please refer to the
branding image specifications listed on Appendix E, you can download the default
logo/icon for reference.
10. Click on the Custom Files – OBC tab.
You can upload the branded images for your OBC installer. Please refer to the branding
image specifications listed on Appendix E, you can download the default logo/icon for
reference.

www.ahsay.com 452
11. Click on the Mobile Feature tab.
You can provide the download link for the Mobile App to be used in the Google Play
Store for android device. While for iOS device, import the excel file containing the Mobile
App Redemption Codes generated from the Custom Apps Section of Apple Business.
You can customize the app download page by uploading the branded image for your app
icon. Also you can select how instructions for downloading is displayed, the default
setting will show the App Store and Google Play icons on AhsayOBM/AhsayACB.
This is a sample of the default download page setting in AhsayOBM:
However, if there is download link provided, then AhsayOBM/AhsayACB will display the
download link instead of the App Store and Google Play icons. This is a sample of the
download page that will be displayed in AhsayOBM if a download link is provided.

www.ahsay.com 453
12. Click on the Color Scheme Settings – OBM tab.
AhsayCBS supports changing the color scheme for backup clients. You can select the
color scheme settings from “Predefined Scheme” or “Custom Scheme”.
i. For Predefined Scheme, you can click on the dropbox to choose from the
predefined options.
ii. For Custom Scheme, you can choose color for each section.

www.ahsay.com 454
The color setting is based on hex color codes and you can either select the color
using the palette or just input the hex color code. Please refer to the following link for
details of hex color code: http://www.color-hex.com/

www.ahsay.com 455
Click on at the bottom right corner to continue.
NOTE
After changing and saving the configuration of Color Scheme Settings – OBM,
administrator can provide available online/ offline installer with according color scheme for
client user to download and run after finishing [Build Installers] > [Build Branded Client]
successfully.
AhsayOBR will follow the same color scheme settings with AhsayOBM.
13. Click on the Color Scheme Settings – ACB tab.
AhsayCBS supports changing the color scheme for backup clients. You can select the
color scheme settings from “Predefined Scheme” or “Custom Scheme”.
i. For Predefined Scheme, you can click on the dropbox to choose from the
predefined options.

www.ahsay.com 456
ii. For Custom Scheme, you can choose color for each section.
The color setting is based on hex color codes and you can either select the color
using the palette or just input the hex color code. Please refer to the following link for
details of hex color code: http://www.color-hex.com/

www.ahsay.com 457

www.ahsay.com 458
Click on at the bottom right corner to continue.
NOTE
After changing and saving the configuration of Color Scheme Settings – ACB, administrator
cannot provide available online/ offline installer with according color scheme for client user to
download and run until [Build Installers] > [Build Branded Client] finished successfully.
14. Optional: Click on the Digital Signature tab if you need to generate your
AhsayOBM/AhsayACB installers with a digital certificate.
NOTE
The digital signature is only supported for AhsayOBM and AhsayACB Windows installers.
i. Switch on the Digital Signature button.

www.ahsay.com 459
ii. You can use the Ahsay default digital certificate by selecting the Use default
certificate.
NOTE
If the default digital signature is used then the AhsayOBM and AhsayACB Windows
installers will show they are signed by Ahsay Systems Corporation Limited.
-OR-
If you prefer to use your own digital certificate, you can select Use certificate in
mycredentials.spc/mycert.pfx uploaded option.
Enter the digital certificate password and select whether you are uploading a “SPC
and PVK” or “PFX” digital certificate, then you can upload your digital certificate file.
15. Click and to save all the settings.
16. Go back to the Build Installers tab and click on the Build Branded Client button.
AhsayCBS will request our customization portal to generate new installers.
Please be patient as the installer generation process should take around 5 to 10 minutes.
The generation time depends on the traffic condition on the customization portal. The
option will be greyed-out. You will be able to see the following message when the
installer generation is completed.
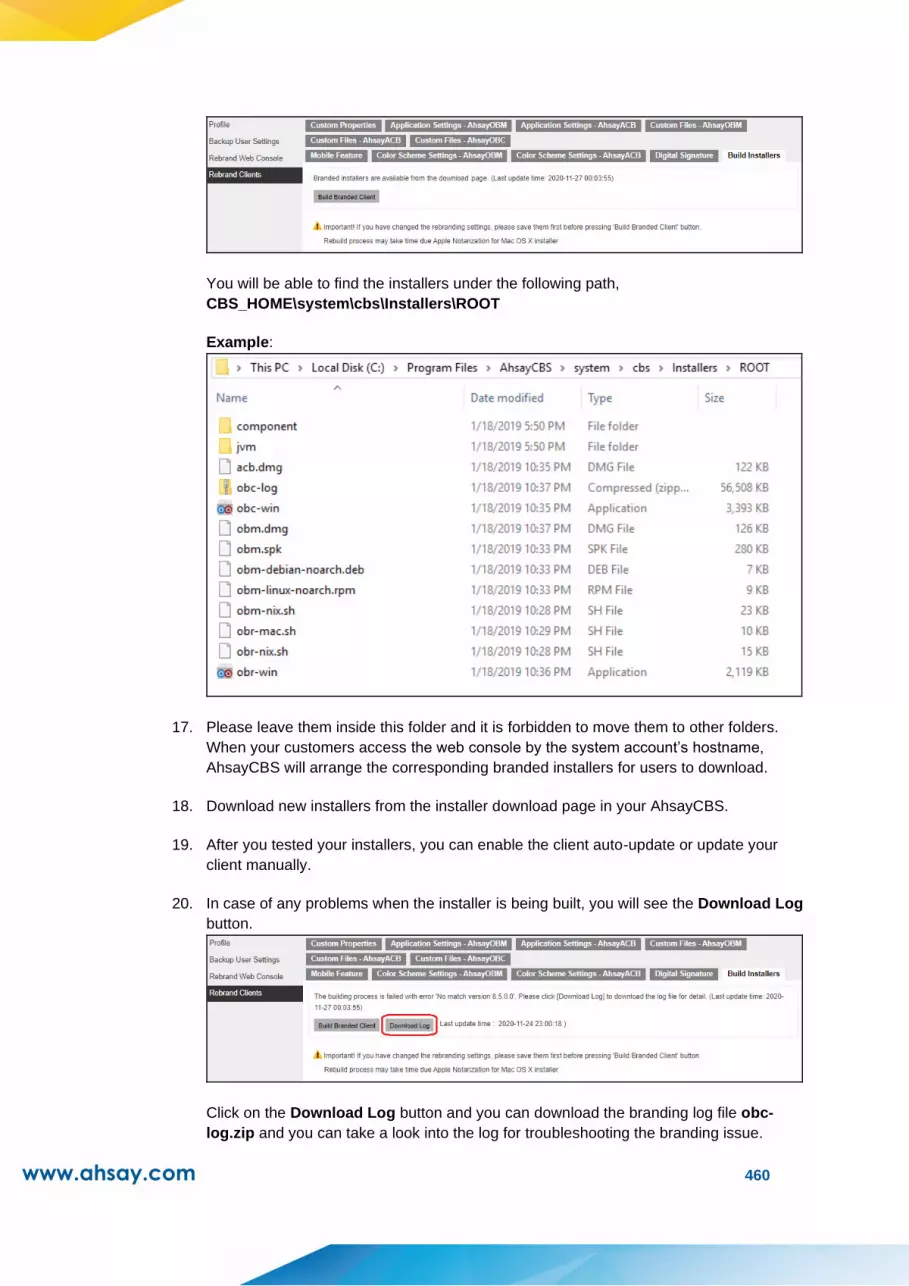
www.ahsay.com 460
You will be able to find the installers under the following path,
CBS_HOME\system\cbs\Installers\ROOT
Example:
17. Please leave them inside this folder and it is forbidden to move them to other folders.
When your customers access the web console by the system account’s hostname,
AhsayCBS will arrange the corresponding branded installers for users to download.
18. Download new installers from the installer download page in your AhsayCBS.
19. After you tested your installers, you can enable the client auto-update or update your
client manually.
20. In case of any problems when the installer is being built, you will see the Download Log
button.
Click on the Download Log button and you can download the branding log file obc-
log.zip and you can take a look into the log for troubleshooting the branding issue.
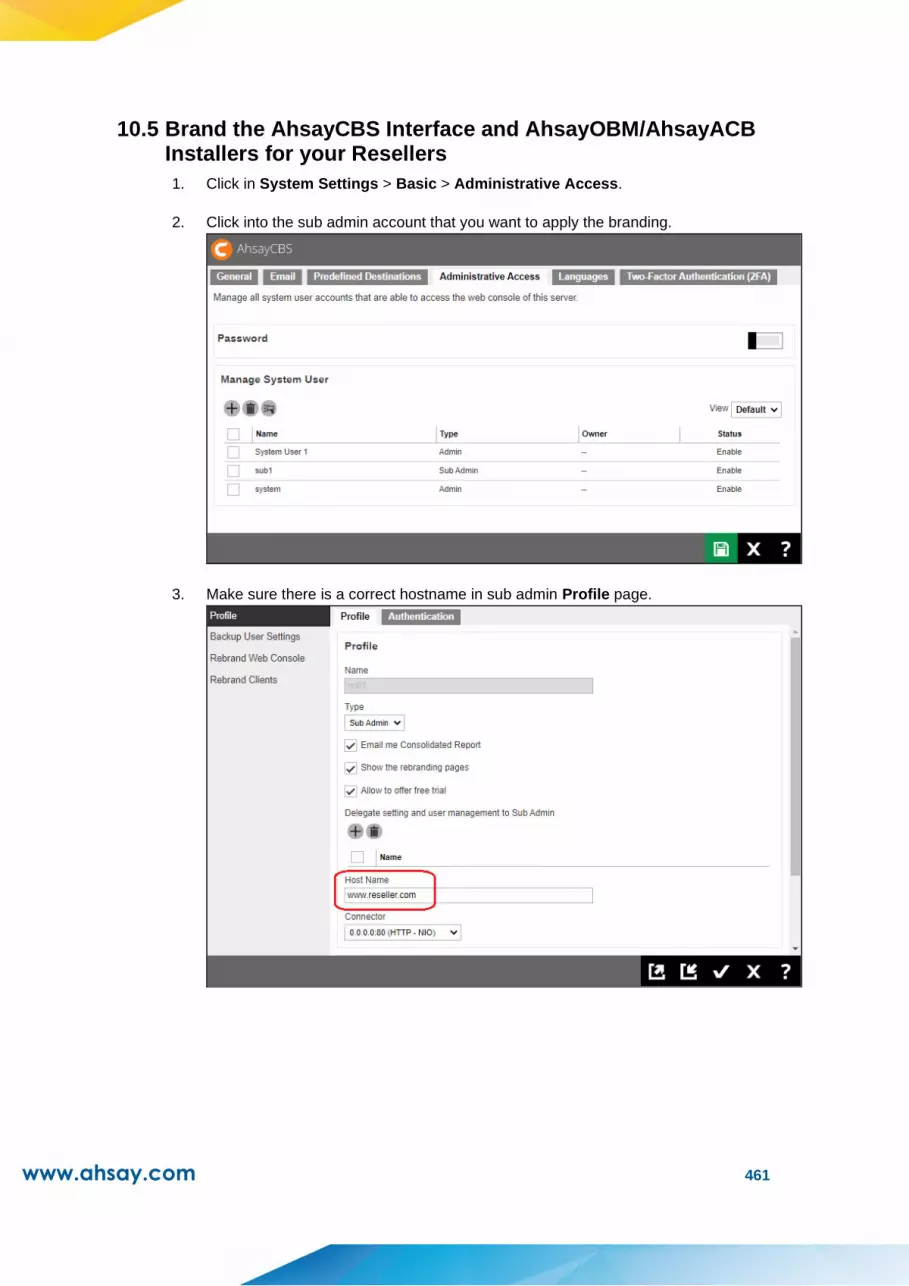
www.ahsay.com 461
10.5 Brand the AhsayCBS Interface and AhsayOBM/AhsayACB Installers for your Resellers
1. Click in System Settings > Basic > Administrative Access.
2. Click into the sub admin account that you want to apply the branding.
3. Make sure there is a correct hostname in sub admin Profile page.

www.ahsay.com 462
4. Please follow the steps in previous chapters to brand their own web console, and rebrand
the AhsayOBM/AhsayACB installers. The branded installers is stored in
CBS_HOME\system\cbs\Installer\%Reseller_ID%
Example:
Please leave them inside this folder and it is forbidden to move them to other folders.
When your reseller’s customer access to the web console by the system account’s
hostname, AhsayCBS will arrange the corresponding branded installers for users to
download.

www.ahsay.com 463
10.6 Customize Application Name on Cloud Storages
10.6.1 Request for Permission Pages
When your client set up the cloud storage on
1. Dropbox
2. Google Drive
3. OneDrive
4. OneDrive for Business
AhsayOBM / ACB would forward an URL through the browser to the cloud storage. The
cloud storage would require your client to login and/or prompt the following page to get
client’s approval for the AhsayOBM / ACB to access the cloud storage.
For example:
Google Drive

www.ahsay.com 464
One Drive
In this request for permission pages, you can see the “Ahsay” logo and the “Ahsay” wording.
You can setup the destination settings in the policy group in your AhsayCBS to customize
the branding.
Preparation
Before you customize the logo and application name on the request for permission page,
you need to collect the following details:
Dropbox
➢ Application key
➢ Application secret
Google Drive
➢ Client ID
➢ Client Secret
OneDrive
➢ Client ID
➢ Client Secret
➢ Native application redirect URI
OneDrive for Business
➢ Client ID
To retrieve the Client ID:
1. Login to the OneDrive for Business portal (Microsoft 365 Admin Center):
http://portal.office.com
2. Select Admin Centers at the bottom of the left panel, then select Azure
Active Directory.
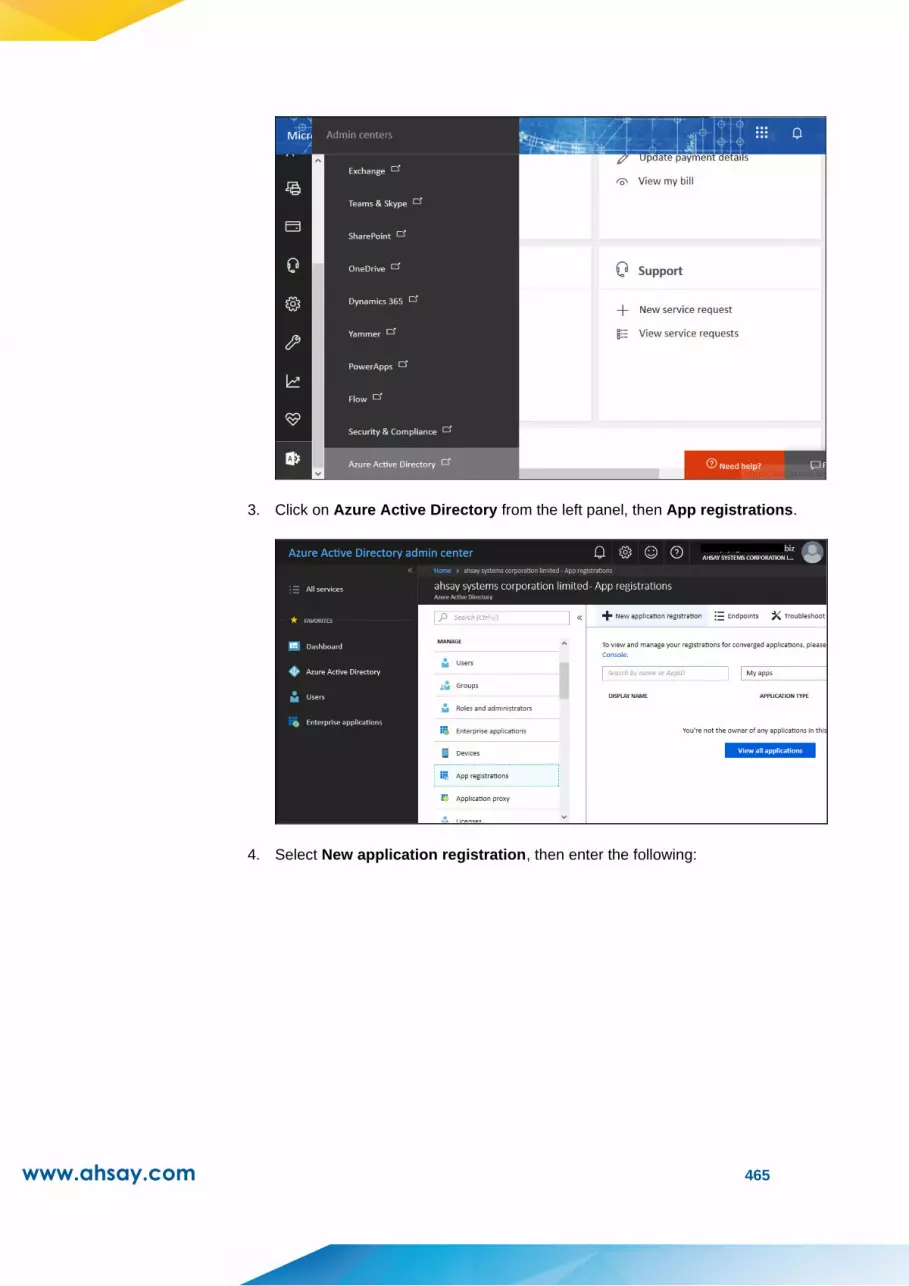
www.ahsay.com 465
3. Click on Azure Active Directory from the left panel, then App registrations.
4. Select New application registration, then enter the following:

www.ahsay.com 466
• Name: Enter a name for your customized application.
• Application type: Select Native.
• Redirect URI: Enter the path to the corresponding .jsp file on the
AhsayCBS server (obtained from the next step), for example:
https://%hostname%/oauth2-office365-sample.jsp
5. Click Create afterward.
6. The Application ID will be displayed, which is the Client ID required for the
OneDrive for Business customization
7. Finally, configure the permission required, select Settings.
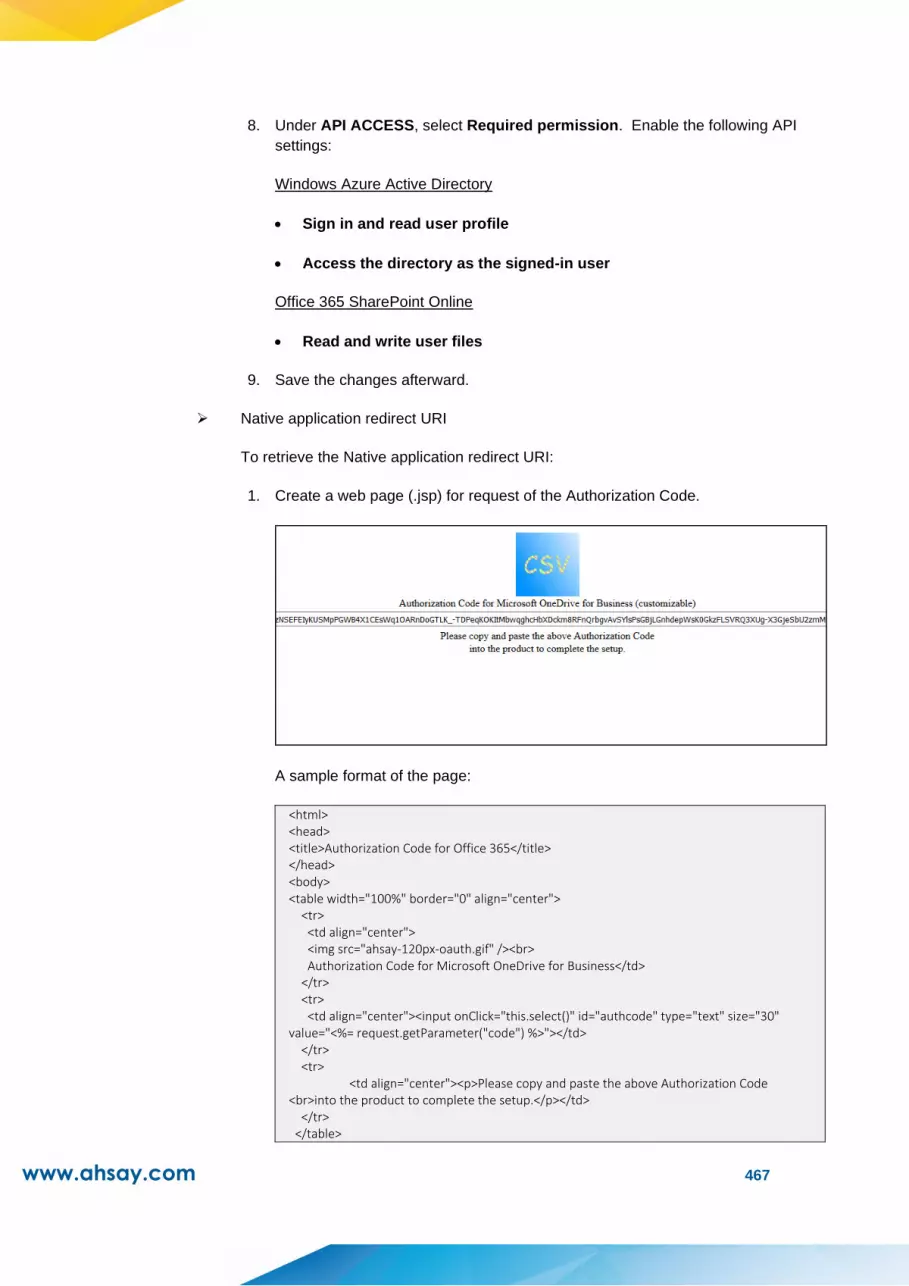
www.ahsay.com 467
8. Under API ACCESS, select Required permission. Enable the following API
settings:
Windows Azure Active Directory
• Sign in and read user profile
• Access the directory as the signed-in user
Office 365 SharePoint Online
• Read and write user files
9. Save the changes afterward.
➢ Native application redirect URI
To retrieve the Native application redirect URI:
1. Create a web page (.jsp) for request of the Authorization Code.
A sample format of the page:
<html> <head> <title>Authorization Code for Office 365</title> </head> <body> <table width="100%" border="0" align="center"> <tr> <td align="center"> <img src="ahsay-120px-oauth.gif" /><br> Authorization Code for Microsoft OneDrive for Business</td> </tr> <tr> <td align="center"><input onClick="this.select()" id="authcode" type="text" size="30" value="<%= request.getParameter("code") %>"></td> </tr> <tr> <td align="center"><p>Please copy and paste the above Authorization Code <br>into the product to complete the setup.</p></td> </tr> </table>

www.ahsay.com 468
</body> </html>
You can obtain a sample jsp file by Clicking Here.
Important:
The line value="<%= request.getParameter("code") %> are used for retrieving /
displaying the authorization code, you must include this on the page.
It is expected that you have basic HTML knowledge to create the authorization
code request page.
2. Once you have created the customized page, copy and place the jsp file to the
AhsayCBS server at:
For CBS on Windows: %CBS_Install_Home%\webapps\ROOT
For CBS on Linux: %CBS_Install_Home%/webapps/ROOT
3. The Native application redirect URI will be:
https://%CBS_hostname%/%customized_page_name%.jsp
Where CBS_hostname is the hostname or IP address of your AhsayCBS
server and customized_page_name is the name of the jsp file.
For example:
https://backup.server.com/oauth2-office365-sample.jsp
The Client ID and Native application redirect URI can now be entered in

www.ahsay.com 469
For other cloud vendors, refer to the following websites for information on how to collect the
required information.
Reference
Dropbox
https://www.dropbox.com/developers/support
Google Drive
https://developers.google.com/drive/v3/web/enable-sdk#enable_the_drive_api
https://auth0.com/docs/connections/social/google
OneDrive and OneDrive for Business
https://dev.onedrive.com/app-registration.htm
Configure the storage
After you have collected the above information from your cloud / developer account, you
can put the relevant information in the policy settings of your AhsayCBS.
1. Navigate to Backup / Restore > Users, Group & Policies, then select the Policy
Group tab.
2. Select the policy group that you want to apply the setting.

www.ahsay.com 470
3. Click into Backup Set Settings tab.
4. Turn on the switch “Destinations Visible to Users”
5. Scroll to the bottom part of “Destinations Visible to Users”
You can select one of the following cloud storage to customize
➢ Dropbox
➢ Google Drive
➢ OneDrive
➢ OneDrive for Business

www.ahsay.com 471
Dropbox
1. Click into Dropbox
2. Enable the “Customize credentials for application” option.
3. Enter the “Application Key”
4. Enter the “Application Secret”
5. Click to continue.
Google Drive
1. Click into Google Drive
2. Enable the “Customize credentials for application”
3. Enter the “Client ID”
4. Enter the “Client Secret”
5. Click to continue.
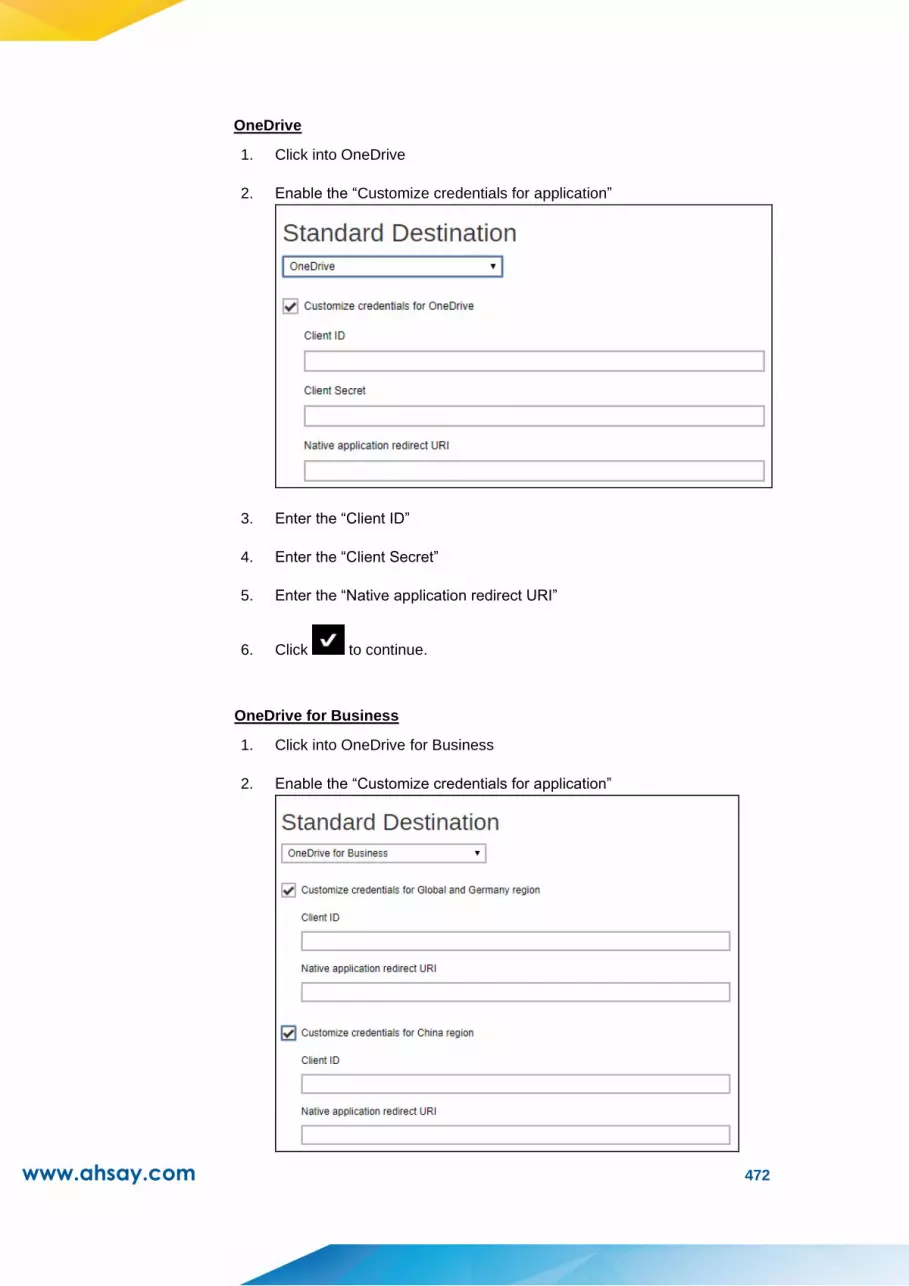
www.ahsay.com 472
OneDrive
1. Click into OneDrive
2. Enable the “Customize credentials for application”
3. Enter the “Client ID”
4. Enter the “Client Secret”
5. Enter the “Native application redirect URI”
6. Click to continue.
OneDrive for Business
1. Click into OneDrive for Business
2. Enable the “Customize credentials for application”
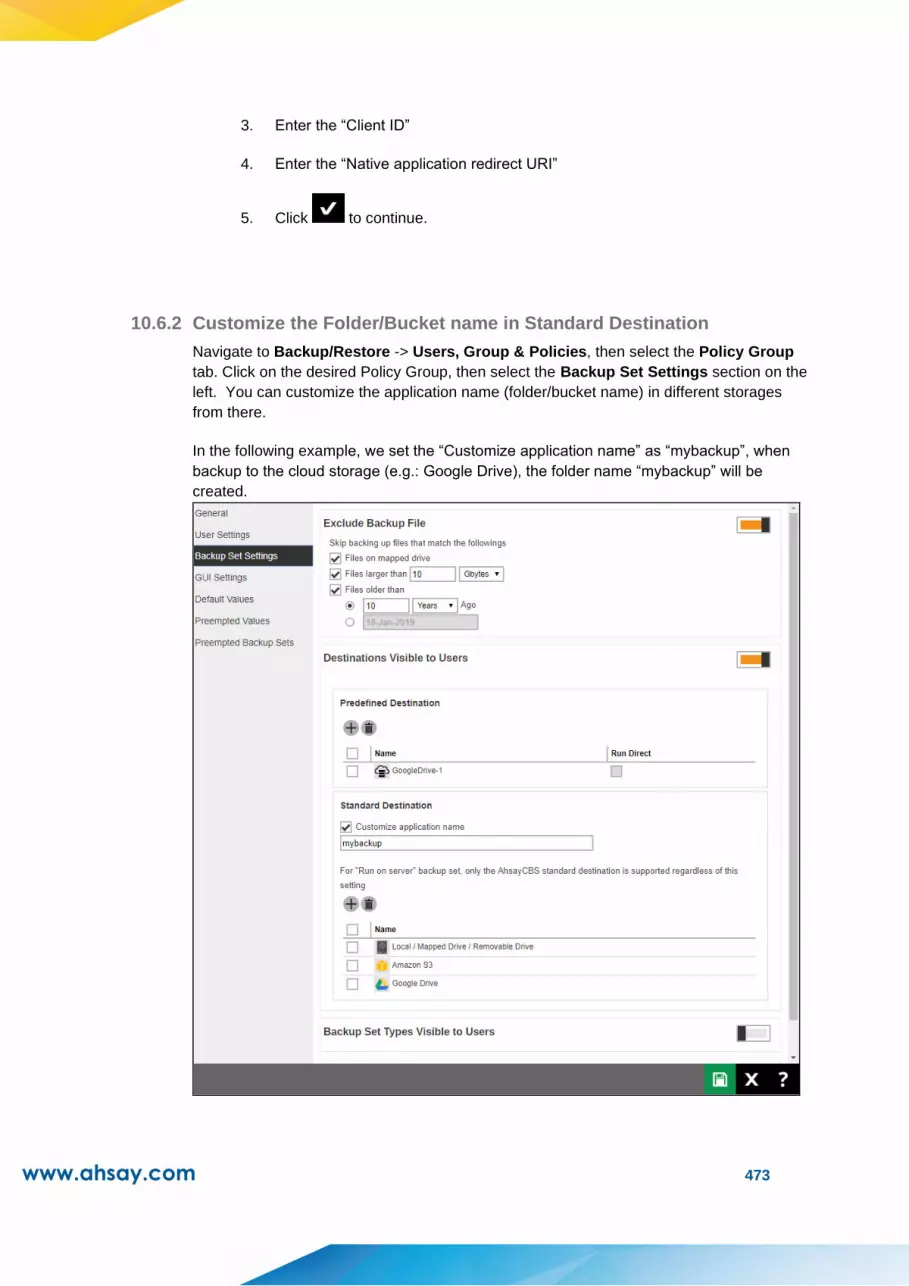
www.ahsay.com 473
3. Enter the “Client ID”
4. Enter the “Native application redirect URI”
5. Click to continue.
10.6.2 Customize the Folder/Bucket name in Standard Destination
Navigate to Backup/Restore -> Users, Group & Policies, then select the Policy Group
tab. Click on the desired Policy Group, then select the Backup Set Settings section on the
left. You can customize the application name (folder/bucket name) in different storages
from there.
In the following example, we set the “Customize application name” as “mybackup”, when
backup to the cloud storage (e.g.: Google Drive), the folder name “mybackup” will be
created.

www.ahsay.com 474
E.g.: Google Drive
10.6.3 Customize the Storage in Predefined Destination

www.ahsay.com 475
Navigate to Backup / Restore > Users, Group & Policies, then select the Policy Group
tab. Click on the desired Policy Group, then select the Backup Set Settings section on the
left. You can add a predefined destination for your clients, and your clients will be able to
select the predefined destination when they create a new backup set.
Example:
NOTE
You need to add a predefined destination in advance, after that you can set the predefined
destination visible to your user group.
10.7 Office 365 Backup Customization
For details on how to customize the Authorization code and Admin consent endpoint screen for
the Office 365 Global region please refer to discussion regarding Office365 Backup
Customization and Appendix Q: How to create a new app in the Azure Active Directory.
10.8 Ahsay Mobile Branding
During the initial rollout phases, the branding of Ahsay Mobile app can only be done by Ahsay,
if you are interested in branding the Ahsay mobile app you must engage our professional
services.
Ahsay Mobile Branding Service
To engage our professional services for Ahsay Mobile branding, please contact our sales
team to obtain a service quotation by email at [email protected] or call our
International Sales Hotline +852 3580 8091.

www.ahsay.com 476
Once the branded mobile application has been completed, it will automatically be available for
download in the Play Store for android mobile devices. However for iOS users, you need to
setup the redemption code in AhsayCBS to provide a download link for your users so they can
be redirected to the App Store to download the mobile application.
10.8.1 Requirements
Once you have settled the Ahsay mobile branding service fee. Please submit the following
materials to enable us to brand your Ahsay Mobile application:
1. Image files and icons with your branding
To customize the look and feel of your mobile application prepare the following:
Application images
Application icons
Splash screen
Colors dictionary
Localization
Adverts
For more information on the specifications needed please refer to the Ahsay Mobile
Image Specifications document.
2. Organisation Information
Organisation ID and Organisation Name for your Apple Business Account
Mobile application description
Keywords to be used for searching the mobile application
Support URL
10.8.2 Download Redemption Codes for iOS only
After the mobile application has been branded by Ahsay you must download the
redemption code from your Apple Business Manager account. Follow the steps below to
setup the download link of iOS for your users.
1. To download the redemption code, log in to your Apple Business Manager.
NOTE
Apple Business Manager supports:
Safari 12 or later on macOC
iPad running iOS 12 or later
Google Chrome 55 or later
Microsoft Edge 18 or later on Windows

www.ahsay.com 477
2. Go to Custom Apps. Select the mobile application that was customized.
3. In the License Type select “Redemption Codes” and enter the Quantity. Click
.
4. Click and save the redemption code in .xls format.
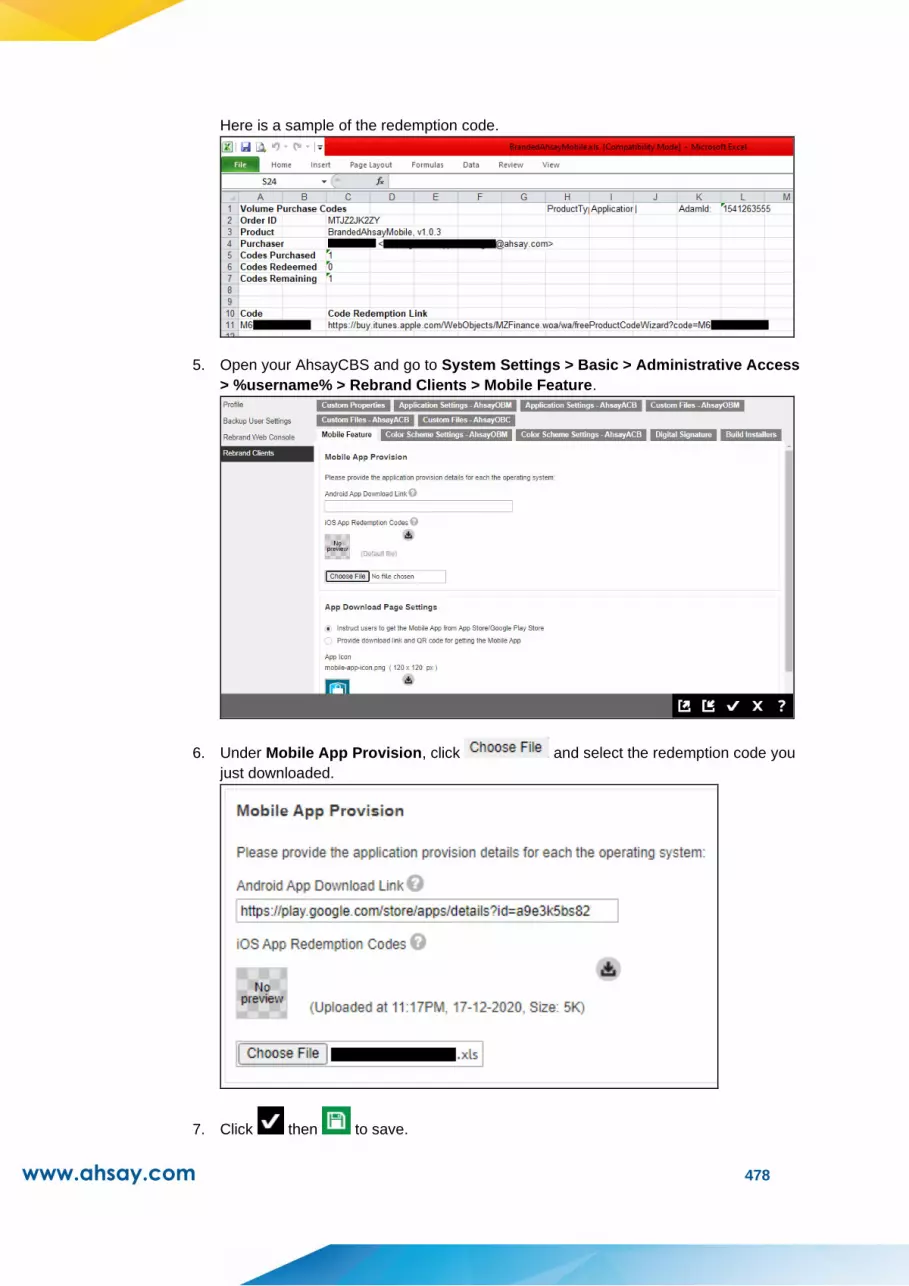
www.ahsay.com 478
Here is a sample of the redemption code.
5. Open your AhsayCBS and go to System Settings > Basic > Administrative Access
> %username% > Rebrand Clients > Mobile Feature.
6. Under Mobile App Provision, click and select the redemption code you
just downloaded.
7. Click then to save.
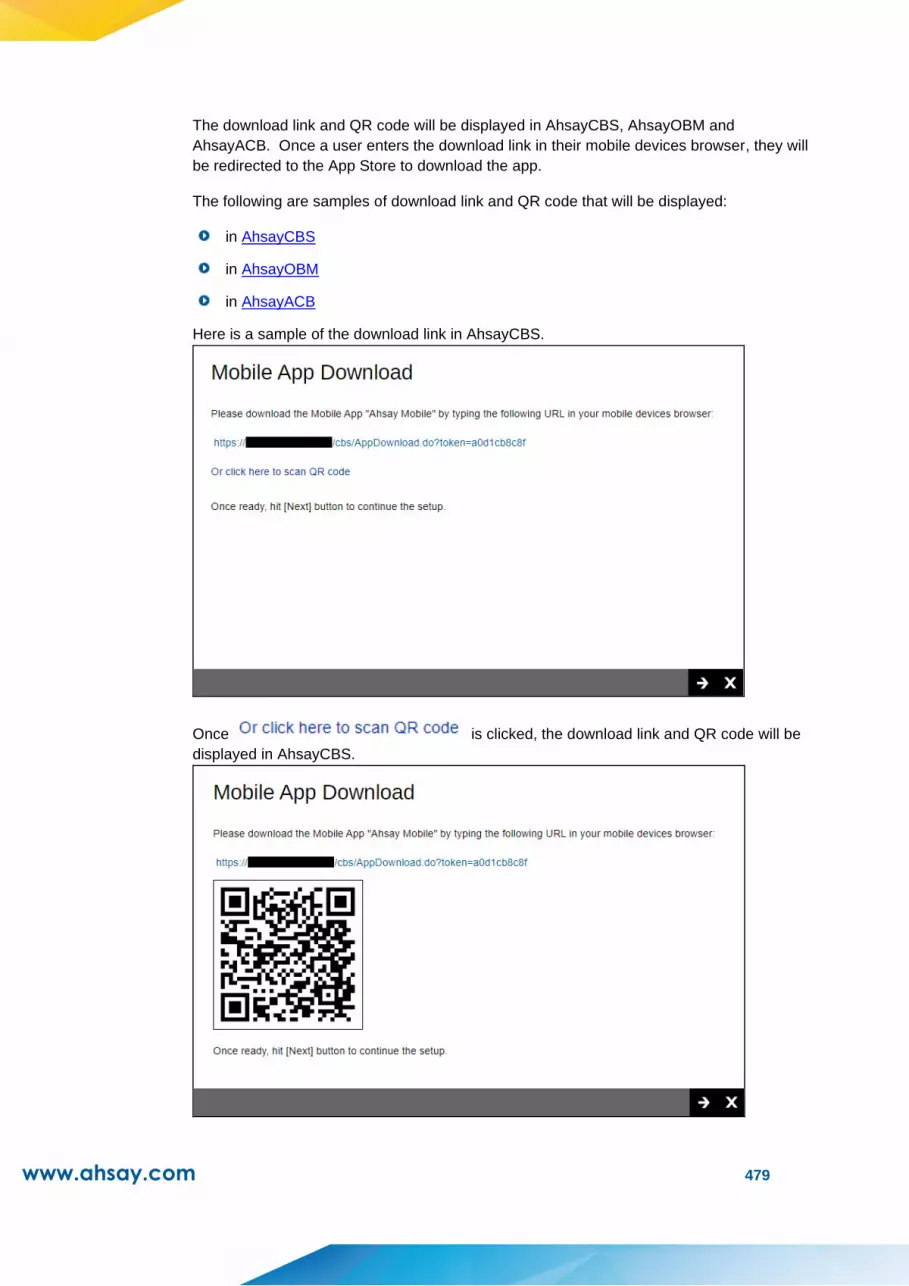
www.ahsay.com 479
The download link and QR code will be displayed in AhsayCBS, AhsayOBM and
AhsayACB. Once a user enters the download link in their mobile devices browser, they will
be redirected to the App Store to download the app.
The following are samples of download link and QR code that will be displayed:
in AhsayCBS
in AhsayOBM
in AhsayACB
Here is a sample of the download link in AhsayCBS.
Once is clicked, the download link and QR code will be
displayed in AhsayCBS.
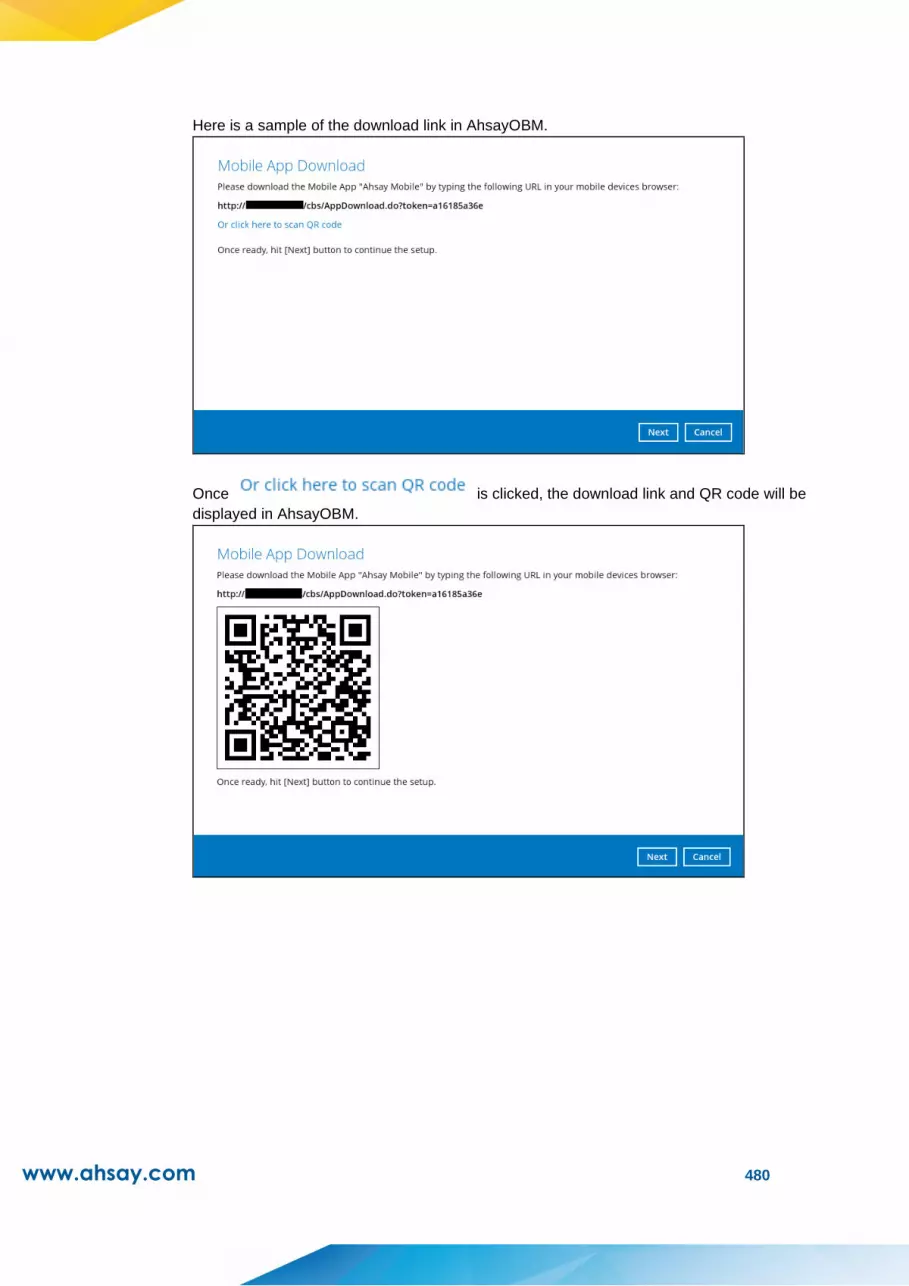
www.ahsay.com 480
Here is a sample of the download link in AhsayOBM.
Once is clicked, the download link and QR code will be
displayed in AhsayOBM.

www.ahsay.com 481
Here is a sample of the download link in AhsayACB.
Once is clicked, the download link and QR code will be
displayed in AhsayACB.
NOTE
Please note that the branded mobile application is not available in the public App Store.

www.ahsay.com 482
11 API
In this release, new APIs (now in JSON format) are introduced in the AhsayCBS, if you have written
API in previous version, please test and modify your API calls on AhsayCBS v8 in your testing
environment first, so that it will not affect your current CRM, billing systems etc. when new AhsayCBS
is upgraded. Please download the AhsayCBS API guide from our website for reference.
www.ahsay.com 483
12 Contacting Ahsay
12.1 Technical Assistance
To contact Ahsay support representatives for technical assistance, visit the Partner Portal:
https://www.ahsay.com/partners/
Also use the Ahsay Wikipedia for resource such as Hardware Compatibility List, Software
Compatibility List, and other product information:
https://wiki.ahsay.com/
12.2 Documentation
Documentations for all Ahsay products are available at:
https://www.ahsay.com/jsp/en/home/index.jsp?pageContentKey=ahsay_downloads_document
ation_guides
You can send us suggestions for improvements or report on issues in the documentation by
contacting us at:
https://www.ahsay.com/partners/
Please specify the specific document title as well as the change required/suggestion when
contacting us.

www.ahsay.com 484
Appendix
Appendix A Supported Language Code
Language Code Language
ar Arabic
ca Catalan
cs Czech
da Danish
de German
el Greek Modern
en English
es Spanish
eu Euskara/Basque
fi Finnish
fr French
iw Hebrew
hu Hungarian
id Indonesian
it Italian
ja Japanese
ko Korean
lt Lithuanian
nl Dutch
no Norwegian
pl Polish
pt_BR Portuguese (Brazil)
pt_PT Portuguese (Portugal)
ro Russian
sl Slovenian
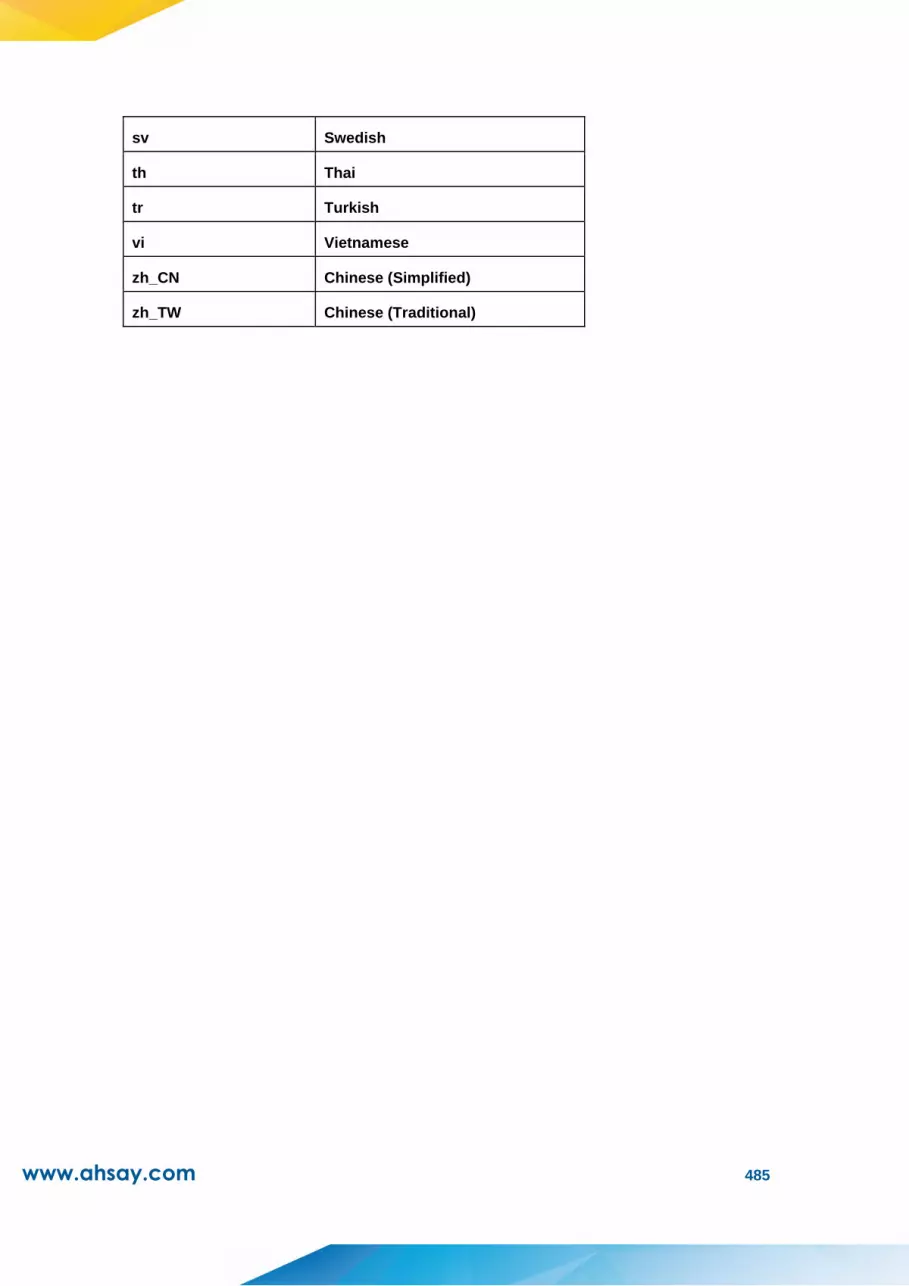
www.ahsay.com 485
sv Swedish
th Thai
tr Turkish
vi Vietnamese
zh_CN Chinese (Simplified)
zh_TW Chinese (Traditional)
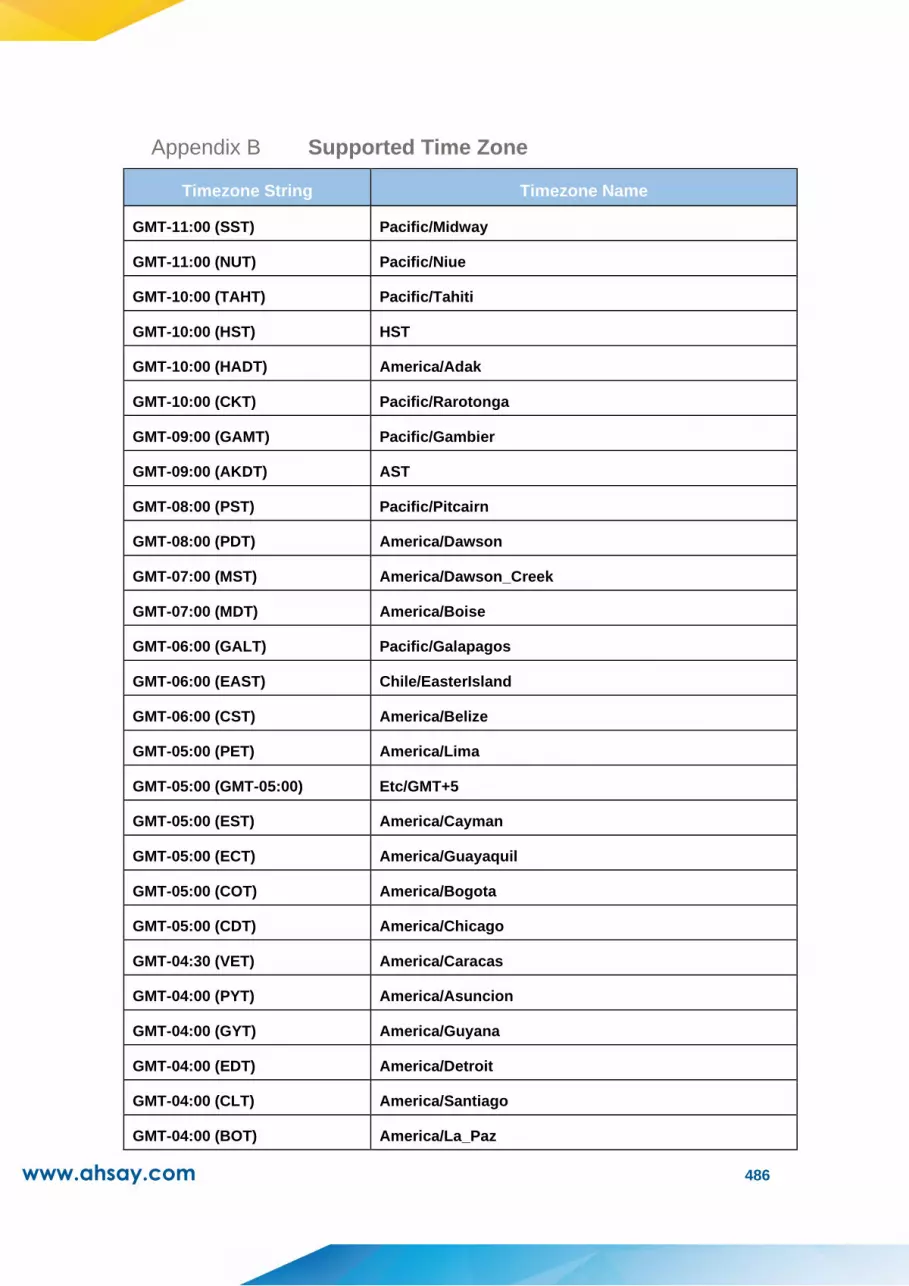
www.ahsay.com 486
Appendix B Supported Time Zone
Timezone String Timezone Name
GMT-11:00 (SST) Pacific/Midway
GMT-11:00 (NUT) Pacific/Niue
GMT-10:00 (TAHT) Pacific/Tahiti
GMT-10:00 (HST) HST
GMT-10:00 (HADT) America/Adak
GMT-10:00 (CKT) Pacific/Rarotonga
GMT-09:00 (GAMT) Pacific/Gambier
GMT-09:00 (AKDT) AST
GMT-08:00 (PST) Pacific/Pitcairn
GMT-08:00 (PDT) America/Dawson
GMT-07:00 (MST) America/Dawson_Creek
GMT-07:00 (MDT) America/Boise
GMT-06:00 (GALT) Pacific/Galapagos
GMT-06:00 (EAST) Chile/EasterIsland
GMT-06:00 (CST) America/Belize
GMT-05:00 (PET) America/Lima
GMT-05:00 (GMT-05:00) Etc/GMT+5
GMT-05:00 (EST) America/Cayman
GMT-05:00 (ECT) America/Guayaquil
GMT-05:00 (COT) America/Bogota
GMT-05:00 (CDT) America/Chicago
GMT-04:30 (VET) America/Caracas
GMT-04:00 (PYT) America/Asuncion
GMT-04:00 (GYT) America/Guyana
GMT-04:00 (EDT) America/Detroit
GMT-04:00 (CLT) America/Santiago
GMT-04:00 (BOT) America/La_Paz
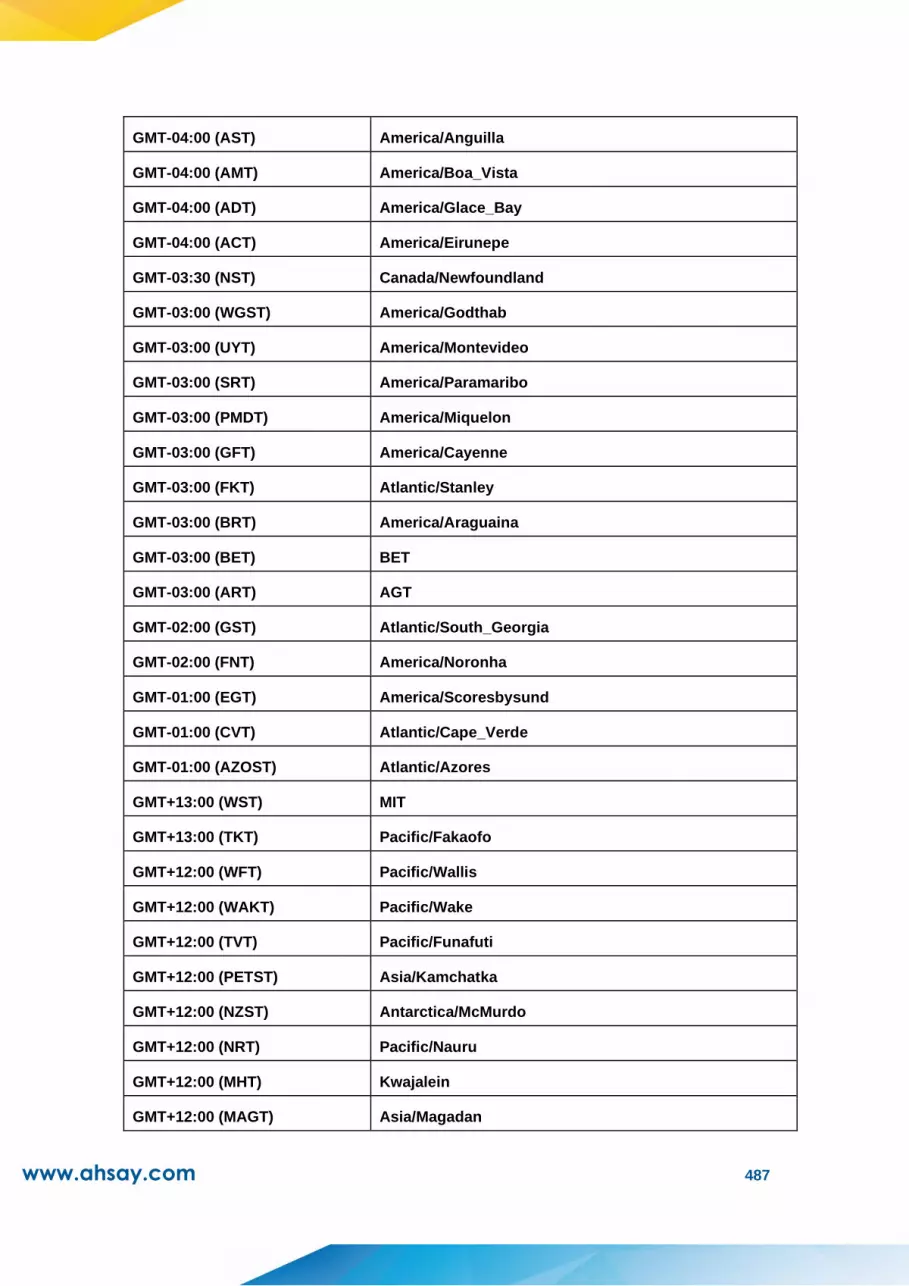
www.ahsay.com 487
GMT-04:00 (AST) America/Anguilla
GMT-04:00 (AMT) America/Boa_Vista
GMT-04:00 (ADT) America/Glace_Bay
GMT-04:00 (ACT) America/Eirunepe
GMT-03:30 (NST) Canada/Newfoundland
GMT-03:00 (WGST) America/Godthab
GMT-03:00 (UYT) America/Montevideo
GMT-03:00 (SRT) America/Paramaribo
GMT-03:00 (PMDT) America/Miquelon
GMT-03:00 (GFT) America/Cayenne
GMT-03:00 (FKT) Atlantic/Stanley
GMT-03:00 (BRT) America/Araguaina
GMT-03:00 (BET) BET
GMT-03:00 (ART) AGT
GMT-02:00 (GST) Atlantic/South_Georgia
GMT-02:00 (FNT) America/Noronha
GMT-01:00 (EGT) America/Scoresbysund
GMT-01:00 (CVT) Atlantic/Cape_Verde
GMT-01:00 (AZOST) Atlantic/Azores
GMT+13:00 (WST) MIT
GMT+13:00 (TKT) Pacific/Fakaofo
GMT+12:00 (WFT) Pacific/Wallis
GMT+12:00 (WAKT) Pacific/Wake
GMT+12:00 (TVT) Pacific/Funafuti
GMT+12:00 (PETST) Asia/Kamchatka
GMT+12:00 (NZST) Antarctica/McMurdo
GMT+12:00 (NRT) Pacific/Nauru
GMT+12:00 (MHT) Kwajalein
GMT+12:00 (MAGT) Asia/Magadan

www.ahsay.com 488
GMT+12:00 (GILT) Pacific/Tarawa
GMT+12:00 (FJT) Pacific/Fiji
GMT+12:00 (ANAST) Asia/Anadyr
GMT+11:00 (VUT) Pacific/Efate
GMT+11:00 (VLAT) Asia/Vladivostok
GMT+11:00 (SBT) Pacific/Guadalcanal
GMT+11:00 (PONT) Pacific/Ponape
GMT+11:00 (NCT) Pacific/Noumea
GMT+11:00 (KOST) Pacific/Kosrae
GMT+10:00 (YAKT) Asia/Yakutsk
GMT+10:00 (TRUT) Pacific/Truk
GMT+10:00 (PGT) Pacific/Port_Moresby
GMT+10:00 (EST) AET
GMT+10:00 (DDUT) Antarctica/DumontDUrville
GMT+10:00 (ChST) Pacific/Guam
GMT+09:30 (CST) Australia/Adelaide
GMT+09:00 (PWT) Pacific/Palau
GMT+09:00 (KST) Asia/Pyongyang
GMT+09:00 (JST) Asia/Tokyo
GMT+09:00 (JAYT) Asia/Jayapura
GMT+09:00 (IRKST) Asia/Irkutsk
GMT+08:00 (WST) Australia/West
GMT+08:00 (ULAT) Asia/Ulaanbaatar
GMT+08:00 (SGT) Asia/Singapore
GMT+08:00 (PHT) Asia/Manila
GMT+08:00 (MYT) Asia/Kuala_Lumpur
GMT+08:00 (KRAT) Asia/Krasnoyarsk
GMT+08:00 (HKT) Asia/Hong_Kong
GMT+08:00 (CST) Asia/Chongqing
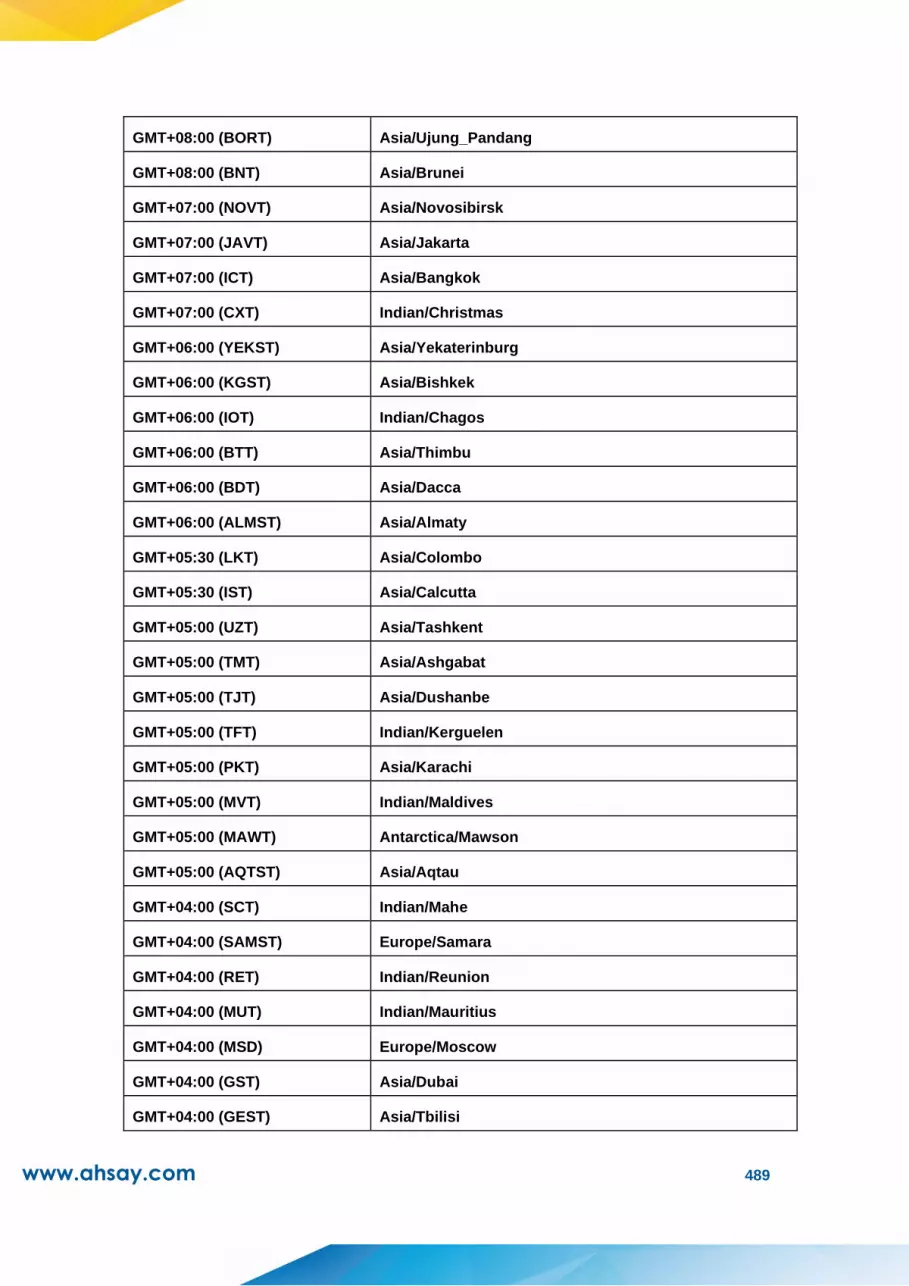
www.ahsay.com 489
GMT+08:00 (BORT) Asia/Ujung_Pandang
GMT+08:00 (BNT) Asia/Brunei
GMT+07:00 (NOVT) Asia/Novosibirsk
GMT+07:00 (JAVT) Asia/Jakarta
GMT+07:00 (ICT) Asia/Bangkok
GMT+07:00 (CXT) Indian/Christmas
GMT+06:00 (YEKST) Asia/Yekaterinburg
GMT+06:00 (KGST) Asia/Bishkek
GMT+06:00 (IOT) Indian/Chagos
GMT+06:00 (BTT) Asia/Thimbu
GMT+06:00 (BDT) Asia/Dacca
GMT+06:00 (ALMST) Asia/Almaty
GMT+05:30 (LKT) Asia/Colombo
GMT+05:30 (IST) Asia/Calcutta
GMT+05:00 (UZT) Asia/Tashkent
GMT+05:00 (TMT) Asia/Ashgabat
GMT+05:00 (TJT) Asia/Dushanbe
GMT+05:00 (TFT) Indian/Kerguelen
GMT+05:00 (PKT) Asia/Karachi
GMT+05:00 (MVT) Indian/Maldives
GMT+05:00 (MAWT) Antarctica/Mawson
GMT+05:00 (AQTST) Asia/Aqtau
GMT+04:00 (SCT) Indian/Mahe
GMT+04:00 (SAMST) Europe/Samara
GMT+04:00 (RET) Indian/Reunion
GMT+04:00 (MUT) Indian/Mauritius
GMT+04:00 (MSD) Europe/Moscow
GMT+04:00 (GST) Asia/Dubai
GMT+04:00 (GEST) Asia/Tbilisi

www.ahsay.com 490
GMT+04:00 (AZST) Asia/Baku
GMT+04:00 (AMST) Asia/Yerevan
GMT+03:30 (IRST) Asia/Tehran
GMT+03:00 (EAT) Africa/Addis_Ababa
GMT+03:00 (AST) Asia/Aden
GMT+03:00 (ADT) Asia/Baghdad
GMT+02:00 (SAST) Africa/Johannesburg
GMT+02:00 (IDT) Asia/Jerusalem
GMT+02:00 (EET) ART
GMT+02:00 (EEST) Asia/Amman
GMT+02:00 (CEST) Africa/Ceuta
GMT+02:00 (CAT) Africa/Blantyre
GMT+01:00 (WAT) Africa/Bangui
GMT+01:00 (CET) Africa/Algiers
GMT+00:00 (WET) Africa/Casablanca
GMT+00:00 (WEST) Atlantic/Canary
GMT+00:00 (UTC) Etc/UCT
GMT+00:00 (IST) Eire
GMT+00:00 (GMT) Africa/Abidjan
GMT+00:00 (BST) Europe/Belfast
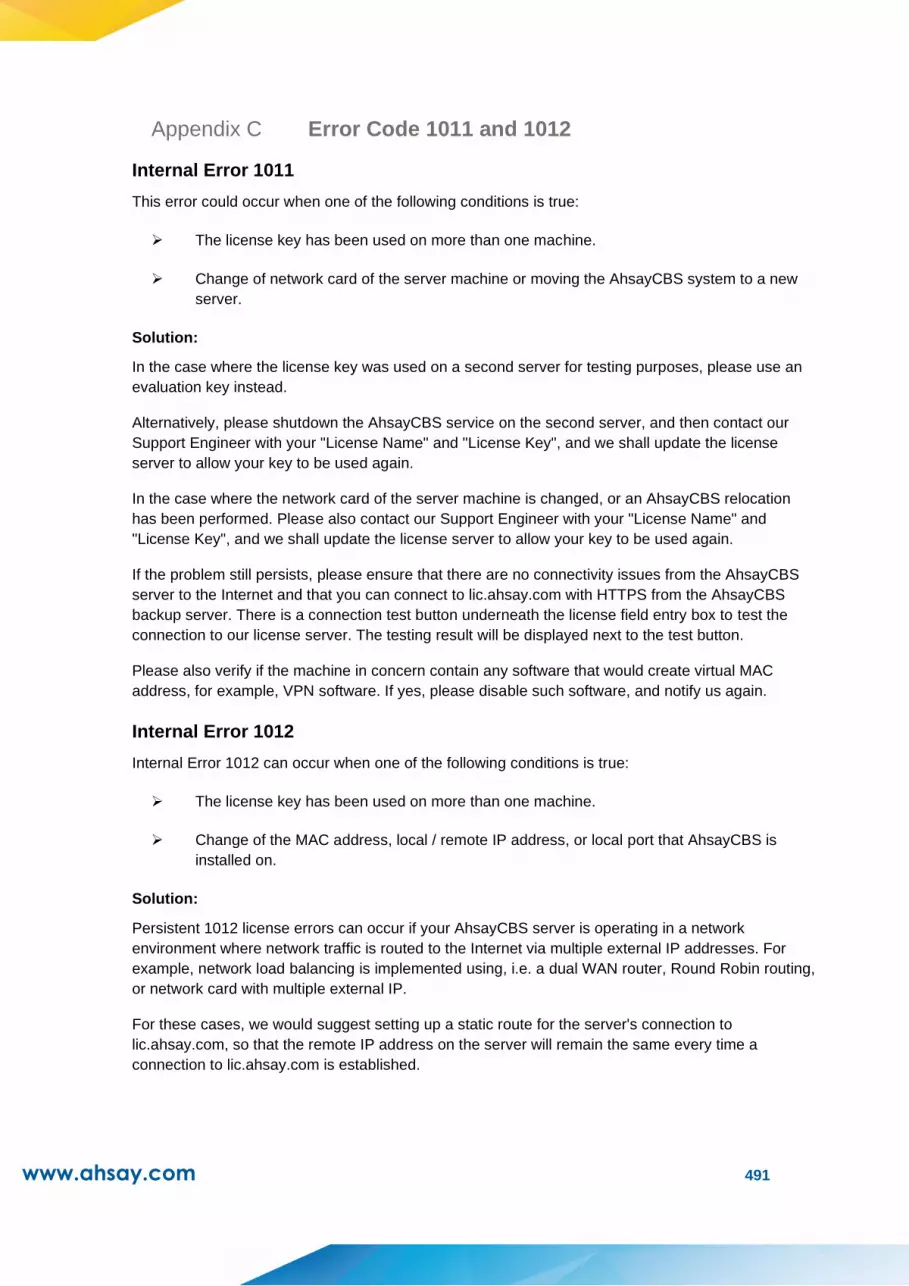
www.ahsay.com 491
Appendix C Error Code 1011 and 1012
Internal Error 1011
This error could occur when one of the following conditions is true:
➢ The license key has been used on more than one machine.
➢ Change of network card of the server machine or moving the AhsayCBS system to a new
server.
Solution:
In the case where the license key was used on a second server for testing purposes, please use an
evaluation key instead.
Alternatively, please shutdown the AhsayCBS service on the second server, and then contact our
Support Engineer with your "License Name" and "License Key", and we shall update the license
server to allow your key to be used again.
In the case where the network card of the server machine is changed, or an AhsayCBS relocation
has been performed. Please also contact our Support Engineer with your "License Name" and
"License Key", and we shall update the license server to allow your key to be used again.
If the problem still persists, please ensure that there are no connectivity issues from the AhsayCBS
server to the Internet and that you can connect to lic.ahsay.com with HTTPS from the AhsayCBS
backup server. There is a connection test button underneath the license field entry box to test the
connection to our license server. The testing result will be displayed next to the test button.
Please also verify if the machine in concern contain any software that would create virtual MAC
address, for example, VPN software. If yes, please disable such software, and notify us again.
Internal Error 1012
Internal Error 1012 can occur when one of the following conditions is true:
➢ The license key has been used on more than one machine.
➢ Change of the MAC address, local / remote IP address, or local port that AhsayCBS is
installed on.
Solution:
Persistent 1012 license errors can occur if your AhsayCBS server is operating in a network
environment where network traffic is routed to the Internet via multiple external IP addresses. For
example, network load balancing is implemented using, i.e. a dual WAN router, Round Robin routing,
or network card with multiple external IP.
For these cases, we would suggest setting up a static route for the server's connection to
lic.ahsay.com, so that the remote IP address on the server will remain the same every time a
connection to lic.ahsay.com is established.
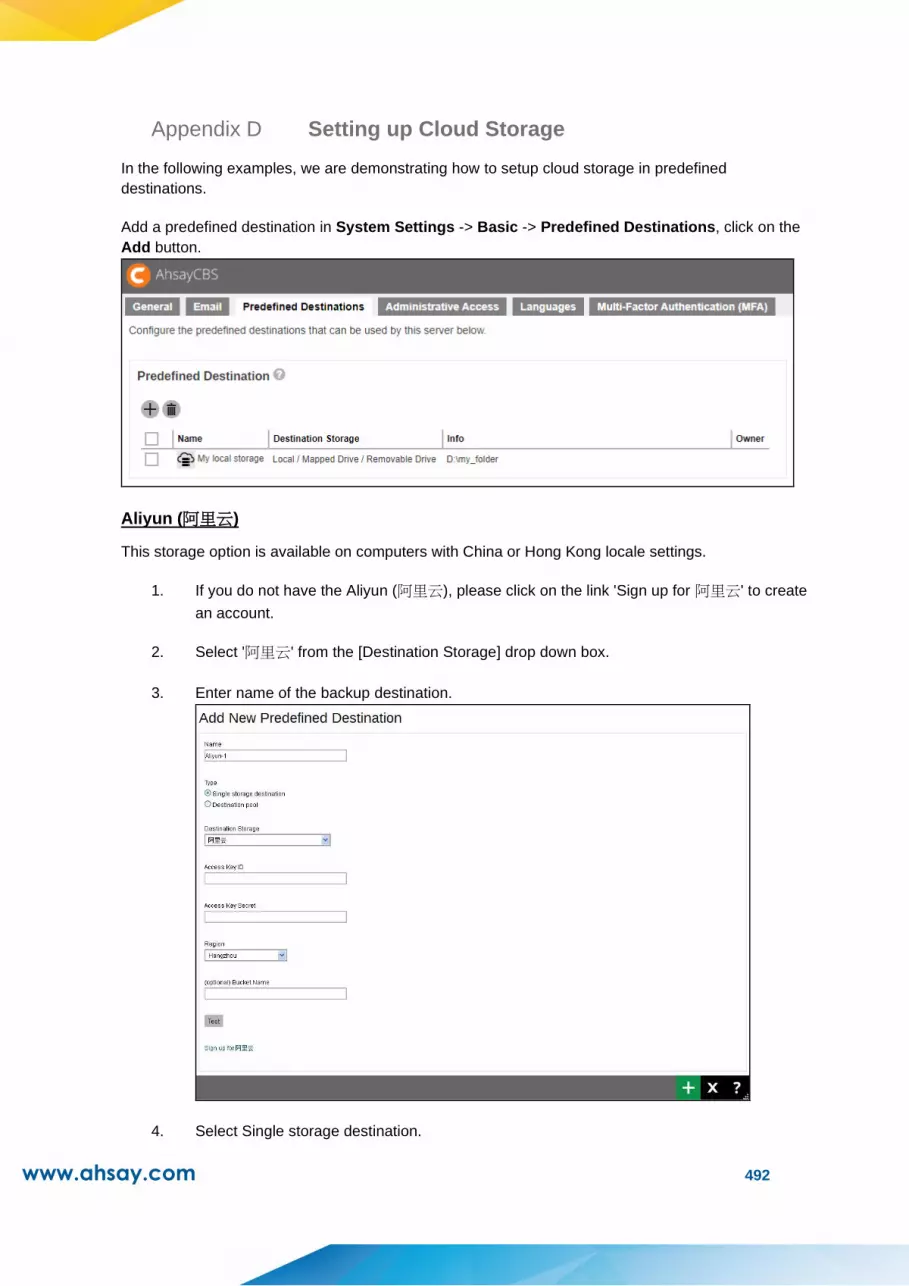
www.ahsay.com 492
Appendix D Setting up Cloud Storage
In the following examples, we are demonstrating how to setup cloud storage in predefined
destinations.
Add a predefined destination in System Settings -> Basic -> Predefined Destinations, click on the
Add button.
Aliyun (阿里云)
This storage option is available on computers with China or Hong Kong locale settings.
1. If you do not have the Aliyun (阿里云), please click on the link 'Sign up for 阿里云' to create
an account.
2. Select '阿里云' from the [Destination Storage] drop down box.
3. Enter name of the backup destination.
4. Select Single storage destination.
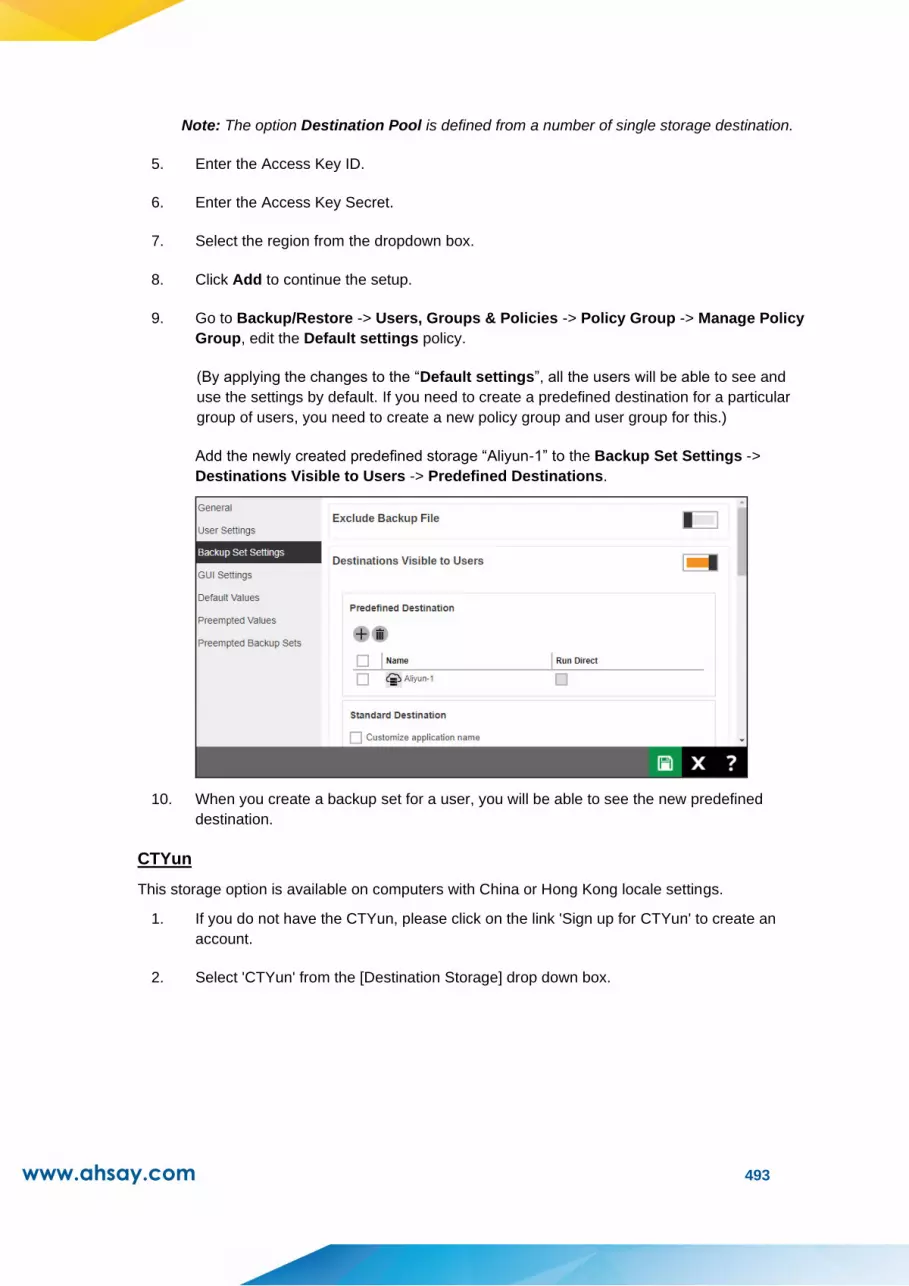
www.ahsay.com 493
Note: The option Destination Pool is defined from a number of single storage destination.
5. Enter the Access Key ID.
6. Enter the Access Key Secret.
7. Select the region from the dropdown box.
8. Click Add to continue the setup.
9. Go to Backup/Restore -> Users, Groups & Policies -> Policy Group -> Manage Policy
Group, edit the Default settings policy.
(By applying the changes to the “Default settings”, all the users will be able to see and
use the settings by default. If you need to create a predefined destination for a particular
group of users, you need to create a new policy group and user group for this.)
Add the newly created predefined storage “Aliyun-1” to the Backup Set Settings ->
Destinations Visible to Users -> Predefined Destinations.
10. When you create a backup set for a user, you will be able to see the new predefined
destination.
CTYun
This storage option is available on computers with China or Hong Kong locale settings.
1. If you do not have the CTYun, please click on the link 'Sign up for CTYun' to create an
account.
2. Select 'CTYun' from the [Destination Storage] drop down box.
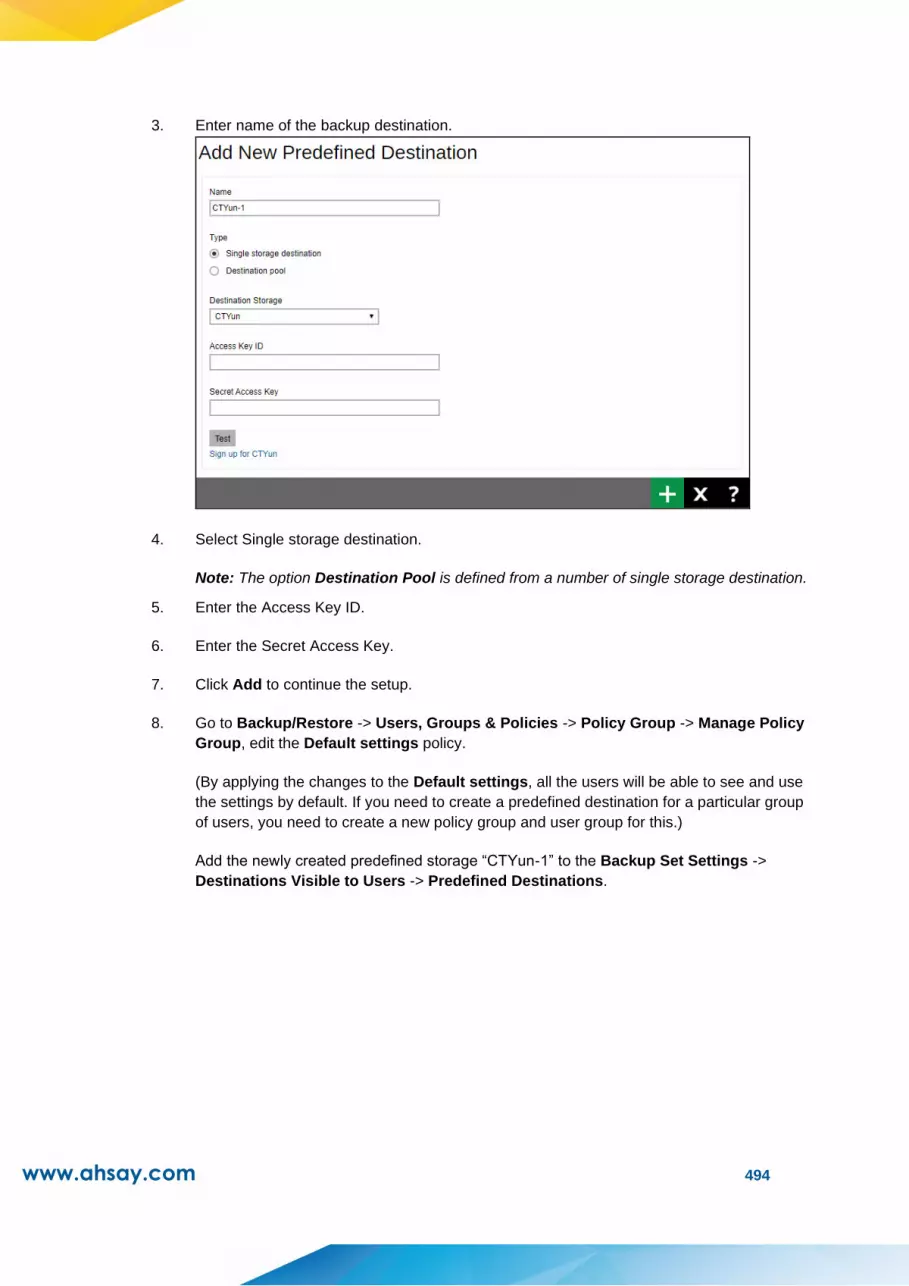
www.ahsay.com 494
3. Enter name of the backup destination.
4. Select Single storage destination.
Note: The option Destination Pool is defined from a number of single storage destination.
5. Enter the Access Key ID.
6. Enter the Secret Access Key.
7. Click Add to continue the setup.
8. Go to Backup/Restore -> Users, Groups & Policies -> Policy Group -> Manage Policy
Group, edit the Default settings policy.
(By applying the changes to the Default settings, all the users will be able to see and use
the settings by default. If you need to create a predefined destination for a particular group
of users, you need to create a new policy group and user group for this.)
Add the newly created predefined storage “CTYun-1” to the Backup Set Settings ->
Destinations Visible to Users -> Predefined Destinations.

www.ahsay.com 495
9. When you create a backup set for a user, you will be able to see the new predefined
destination.
Amazon S3
1. If you do not have the Amazon S3, please click on the link ‘Sign up for Amazon S3’ to
create an account.
2. Select Amazon S3 from the [Destination Storage] drop down box.
Enter name of the backup destination
3. Select Single storage destination.
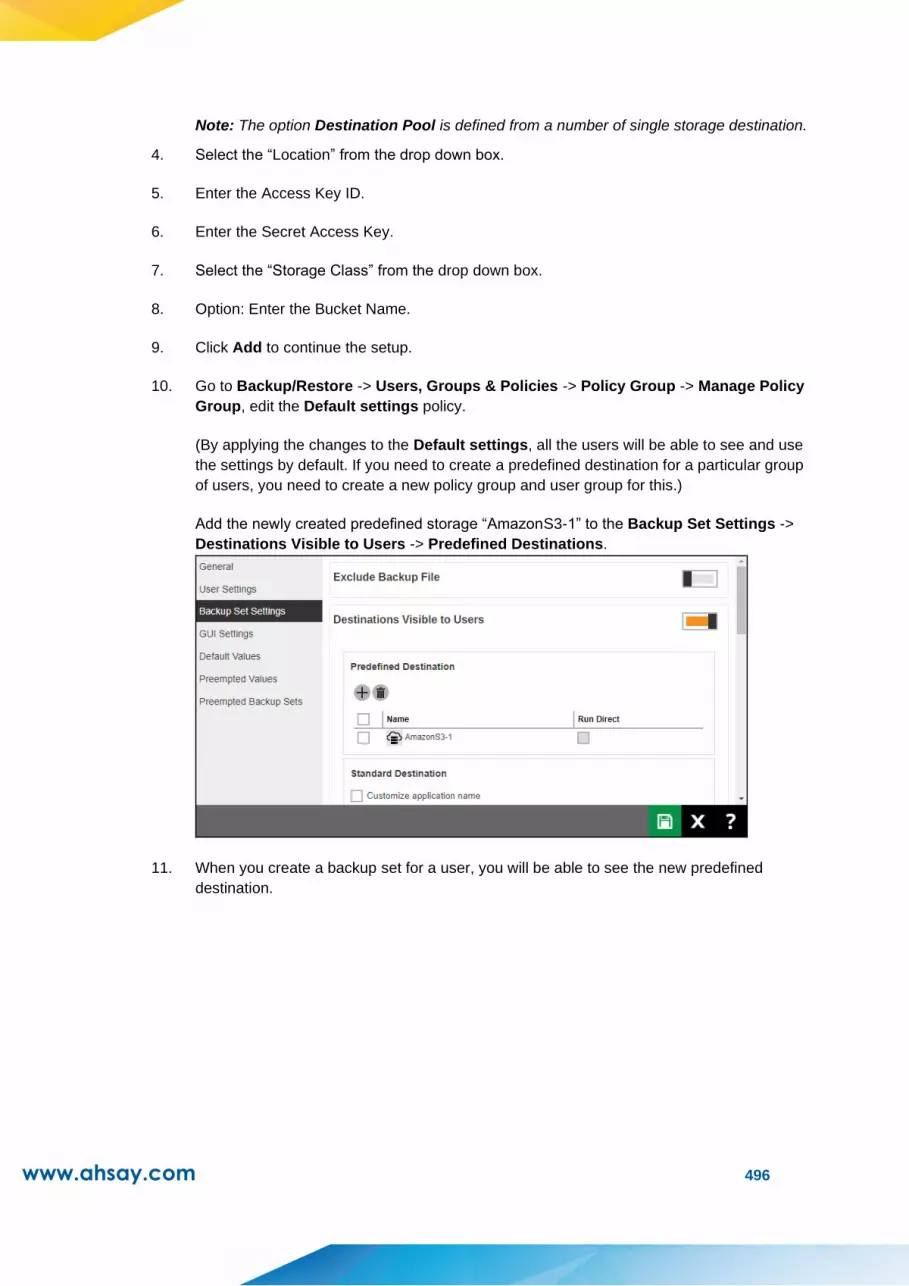
www.ahsay.com 496
Note: The option Destination Pool is defined from a number of single storage destination.
4. Select the “Location” from the drop down box.
5. Enter the Access Key ID.
6. Enter the Secret Access Key.
7. Select the “Storage Class” from the drop down box.
8. Option: Enter the Bucket Name.
9. Click Add to continue the setup.
10. Go to Backup/Restore -> Users, Groups & Policies -> Policy Group -> Manage Policy
Group, edit the Default settings policy.
(By applying the changes to the Default settings, all the users will be able to see and use
the settings by default. If you need to create a predefined destination for a particular group
of users, you need to create a new policy group and user group for this.)
Add the newly created predefined storage “AmazonS3-1” to the Backup Set Settings ->
Destinations Visible to Users -> Predefined Destinations.
11. When you create a backup set for a user, you will be able to see the new predefined
destination.

www.ahsay.com 497
AWS S3 Compatible Cloud Storage
1. Select AWS S3 Compatible Cloud Storage from the [Destination Storage] drop down box.
2. Enter name of the backup destination.
3. Select Single storage destination.
Note: The option Destination Pool is defined from a number of single storage destination.
4. Enter the Host and Port number.
5. Enter the Access Key ID.
6. Enter the Secret Access Key.
7. Enter the Bucket Name for the storage. (You need to create this bucket manually first).
8. Option: Click on the check box [Connect with SSL] if necessary.
9. Click Add to continue the setup.
10. Go to Backup/Restore -> Users, Groups & Policies -> Policy Group -> Manage Policy
Group, edit the Default settings policy.
(By applying the changes to the Default settings, all the users will be able to see and use
the settings by default. If you need to create a predefined destination for a particular group
of users, you need to create a new policy group and user group for this.)
Add the newly created predefined storage “AWSCompatible-1” to the Backup Set
Settings -> Destinations Visible to Users -> Predefined Destinations.

www.ahsay.com 498
11. When you create a backup set for a user, you will be able to see the new predefined
destination.
Wasabi
1. If you do not have a Wasabi account, please click on the link 'Sign up for Wasabi’ to create
an account.
2. Select Wasabi from the [Destination Storage] drop down box.
3. Enter name of the backup destination.

www.ahsay.com 499
4. Select Single storage destination.
Note: The option Destination Pool is defined from a number of single storage destination.
5. Enter the Access Key ID.
6. Enter the Access Key Secret.
7. Select the region from the dropdown box.
8. Option: Enter the Bucket Name.
9. Option: Click on the check box [Connect with SSL] if necessary.
10. Click Add to continue the setup.
11. Go to the Backup/Restore -> Users, Groups & Policies -> Policy Group -> Manage
Policy Group, edit the Default settings policy.
(By applying the changes to the “Default settings”, all the users will be able to see and
use the settings by default. If you need to create a predefined destination for a particular
group of users, you need to create a new policy group and user group for this.)
Add the newly created predefined storage “Wasabi-1” to the Backup Set Settings ->
Destinations Visible to Users -> Predefined Destinations.
12. When you create a backup set for a user, you will be able to see the new predefined
destination.

www.ahsay.com 500
Backblaze
1. If you do not have a Backblaze account, please click on the link 'Sign up for Backblaze’ to
create an account.
2. Select Backblaze from the [Destination Storage] drop down box.
3. Enter name of the backup destination.
4. Select Single storage destination.
Note: The option Destination Pool is defined from a number of single storage destination.
5. Enter the Key ID.
6. Enter the Application Key.
7. Option: Enter the Bucket Name.
8. Click Add to continue the setup.
9. Go to the Backup/Restore -> Users, Groups & Policies -> Policy Group -> Manage
Policy Group, edit the Default settings policy.
(By applying the changes to the “Default settings”, all the users will be able to see and
use the settings by default. If you need to create a predefined destination for a particular
group of users, you need to create a new policy group and user group for this.)
Add the newly created predefined storage “Backblazei-1” to the Backup Set Settings ->
Destinations Visible to Users -> Predefined Destinations.

www.ahsay.com 501
10. When you create a backup set for a user, you will be able to see the new predefined
destination.
Google Cloud Storage
** Before you set up the storage for Google Cloud Storage, please collect the Access Key
and Secret Key from your Google Cloud Storage account first.
1. Go to the Google Developers Console.
2. Click the name of the project you would like to use as your default project.
3. In the left sidebar, click APIs & auth.
4. Find Google Cloud Storage JSON API and make sure it is enabled. When the JSON API is
enabled, the Status will display "ON".
5. Next to the Google Cloud Storage JSON API service, click the settings gear icon.
6. Click Interoperable Access in the left sidebar.
7. Click Generate new key.
8. The access key part of the new developer key is displayed.
9. Click Show to show the secret part of the new developer key.
Now, you can go back to add your predefined destination.
10. If you do not have Google Cloud Storage, please click on the link ‘Sign up for Google
Cloud Storage’ to create an account.
11. Select Google Cloud Storage from the [Destination Storage] drop down box.
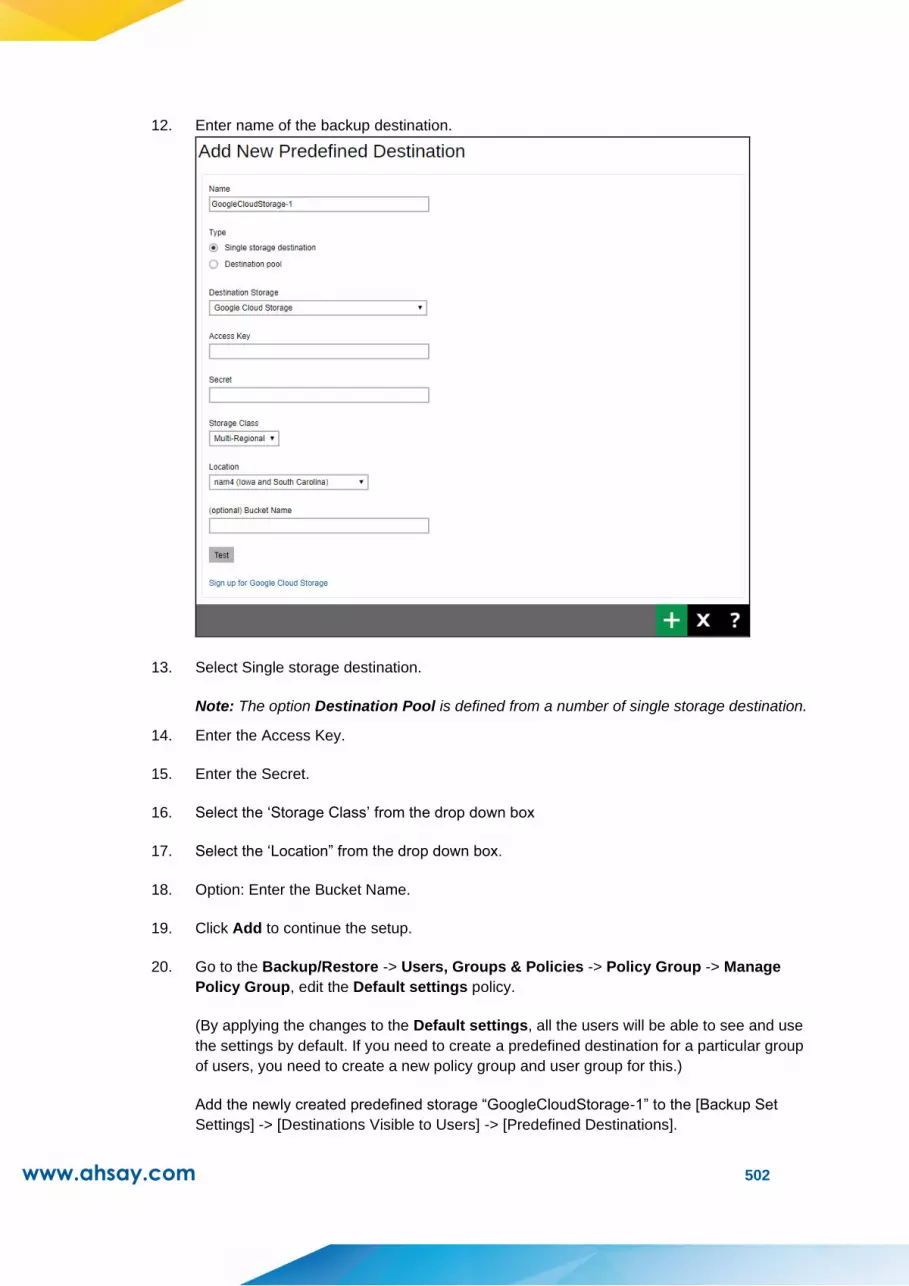
www.ahsay.com 502
12. Enter name of the backup destination.
13. Select Single storage destination.
Note: The option Destination Pool is defined from a number of single storage destination.
14. Enter the Access Key.
15. Enter the Secret.
16. Select the ‘Storage Class’ from the drop down box
17. Select the ‘Location” from the drop down box.
18. Option: Enter the Bucket Name.
19. Click Add to continue the setup.
20. Go to the Backup/Restore -> Users, Groups & Policies -> Policy Group -> Manage
Policy Group, edit the Default settings policy.
(By applying the changes to the Default settings, all the users will be able to see and use
the settings by default. If you need to create a predefined destination for a particular group
of users, you need to create a new policy group and user group for this.)
Add the newly created predefined storage “GoogleCloudStorage-1” to the [Backup Set
Settings] -> [Destinations Visible to Users] -> [Predefined Destinations].

www.ahsay.com 503
21. When you create a backup set for a user, you will be able to see the new predefined
destination.
Google Drive
1. If you do not have Google Drive, please click on the link 'Sign up for Google Drive' to
create an account.
2. Select 'Google Drive' from the [Destination storage] drop down box.
3. Enter name of the backup destination.
4. Select Single storage destination.
Note: The option Destination Pool is defined from a number of single storage destination.
5. Click Add to continue the setup.

www.ahsay.com 504
6. A browser will pop up and Google will ask for your permission to access the storage, click
on "Allow".
7. On the browser, a code is displayed, copy it and paste into the “create predefined
destination” page in the AhsayCBS.
(Sample authentication code)
8. Click Add to continue.

www.ahsay.com 505
9. Go to Backup/Restore -> Users, Groups & Policies -> Policy Group -> Manage Policy
Group, edit the Default settings policy.
(By applying the changes to the Default settings, all the users will be able to see and use
the settings by default. If you need to create a predefined destination for a particular group
of users, you need to create a new policy group and user group for this.)
10. Add the newly created predefined storage “GoogleDrive-1” to the Backup Set Settings ->
Destinations Visible to Users -> Predefined Destinations.
11. When you create a backup set for a user, you will be able to see the new predefined
destination.
Microsoft Azure
** Before you setup the storage for Microsoft Azure, please collect the Storage Account
Name and Access Key from your Microsoft Azure account first.
1. Go to the Microsoft Azure web page.
2. Click the "portal" link at the top of the page.
3. Login to the portal.
4. Click on the "MANAGE ACCESS KEYS" link at the bottom of the page.
5. The "STORAGE ACCOUNT NAME" and "PRIMARY ACCESS KEY" are displayed. The
Storage account name is the same as the node name when you create this Windows
Azure account.
6. Copy the "STORAGE ACCOUNT NAME" and "PRIMARY ACCESS KEY" to your
AhsayOBM application.
(Suggested to copy and paste the name and key to avoid typographical errors.)
Now, you can go back to add your predefined destination.
7. Select ‘Microsoft Azure' from the [Destination Storage] drop down box.

www.ahsay.com 506
Enter name of the backup destination.
8. Select Single storage destination.
Note: The option Destination Pool is defined from a number of single storage destination.
9. Enter the Storage Account Name.
10. Enter the Access Key.
11. Click Add to continue the setup.
12. Go to Backup/Restore -> Users, Groups & Policies -> Policy Group -> Manage Policy
Group, edit the Default settings policy.
(By applying the changes to the Default settings, all the users will be able to see and use
the settings by default. If you need to create a predefined destination for a particular group
of users, you need to create a new policy group and user group for this.)
Add the newly created predefined storage “MicrosoftAzure-1” into the Backup Set
Settings -> Destinations Visible to Users -> Predefined Destinations.

www.ahsay.com 507
13. When you create a backup set for a user, you will be able to see the new predefined
destination.
OneDrive
1. If you do not have the OneDrive, please click on the link 'Sign up for OneDrive' to create an
account.
2. Select 'OneDrive' from the [Destination Storage] drop down box.
Enter name of the backup destination.
3. Select Single storage destination.
Note: The option Destination Pool is defined from a number of single storage destination.
4. Click Add to continue the setup.
5. A browser will popup and a code is displayed, copy it and paste into the “create
predefined destination” page in the AhsayCBS.

www.ahsay.com 508
(Sample authentication code)
6. Click [Add] to continue the setup.
7. Go to the Backup/Restore -> Users, Groups & Policies -> Policy Group -> Manage
Policy Group, edit the Default settings policy.
(By applying the changes to the Default settings, all the users will be able to see and use
the settings by default. If you need to create a predefined destination for a particular group
of users, you need to create a new policy group and user group for this.)
Add the newly created predefined storage “OneDrive-1” to the Backup Set Settings ->
Destinations Visible to Users -> Predefined Destinations.
8. When you create a backup set for a user, you will be able to see the new predefined
destination.
OneDrive for Business
1. If you do not have the OneDrive for Business, please click on the link 'Sign up for OneDrive
for Business' to create an account.
2. Select 'OneDrive' from the [Destination Storage] drop down box.

www.ahsay.com 509
Enter name of the backup destination.
3. Select Single storage destination.
Note: The option Destination Pool is defined from a number of single storage destination.
4. Click Add to continue the setup.
A browser will pop up and Microsoft will ask for your permission to access the storage,
click on "Accept".
5. On the browser, a code is displayed, copy it and paste into the “create predefined
destination” page in the AhsayCBS.

www.ahsay.com 510
(Sample authentication code)
6. Click Add to continue.
7. Go to Backup/Restore -> Users, Groups & Policies -> Policy Group -> Manage Policy
Group, edit the Default settings policy.
(By applying the changes to the Default settings, all the users will be able to see and use
the settings by default. If you need to create a predefined destination for a particular group
of users, you need to create a new policy group and user group for this.)
Add the newly created predefined storage “OneDriveForBusiness-1” to the Backup Set
Settings -> Destinations Visible to Users -> Predefined Destinations.
8. When you create a backup set for a user, you will be able to see the new predefined
destination.
Rackspace
1. If you do not have the Rackspace, please click on the link 'Sign up for Rackspace' to create
an account.
2. Select 'Rackspace' from the [Destination Storage] drop down box.
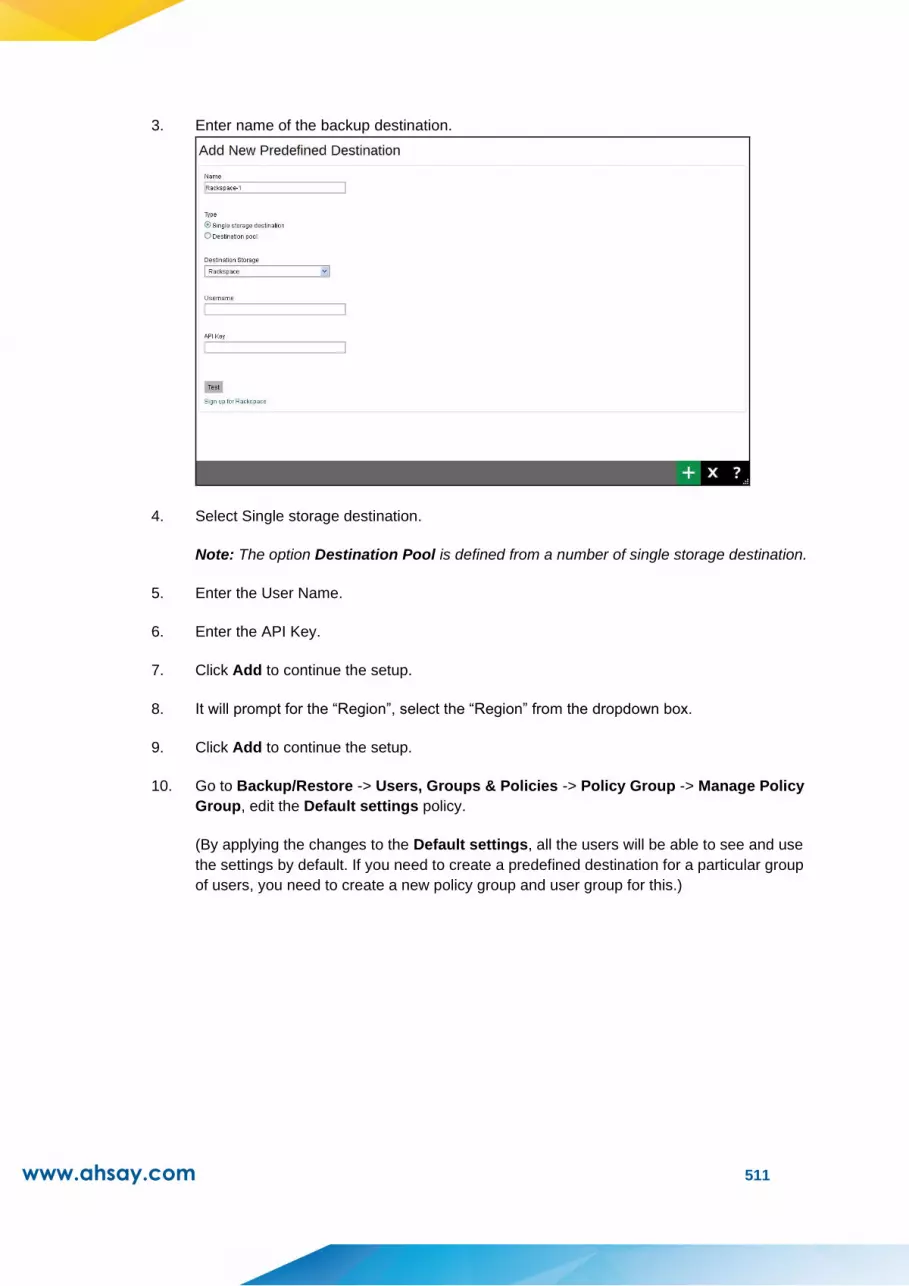
www.ahsay.com 511
3. Enter name of the backup destination.
4. Select Single storage destination.
Note: The option Destination Pool is defined from a number of single storage destination.
5. Enter the User Name.
6. Enter the API Key.
7. Click Add to continue the setup.
8. It will prompt for the “Region”, select the “Region” from the dropdown box.
9. Click Add to continue the setup.
10. Go to Backup/Restore -> Users, Groups & Policies -> Policy Group -> Manage Policy
Group, edit the Default settings policy.
(By applying the changes to the Default settings, all the users will be able to see and use
the settings by default. If you need to create a predefined destination for a particular group
of users, you need to create a new policy group and user group for this.)

www.ahsay.com 512
Add the newly created predefined storage “Rackspace-1” to the Backup Set Settings ->
Destinations Visible to Users -> Predefined Destinations.
11. When you create a backup set for a user, you will be able to see the new predefined
destination.
OpenStack
1. Select 'OpenStack' from the [Destination Storage] drop down box.
2. Enter name of the backup destination.
3. Select Single storage destination.
Note: The option Destination Pool is defined from a number of single storage destination.
4. Enter the Host and Port number.
5. Enter the Username.
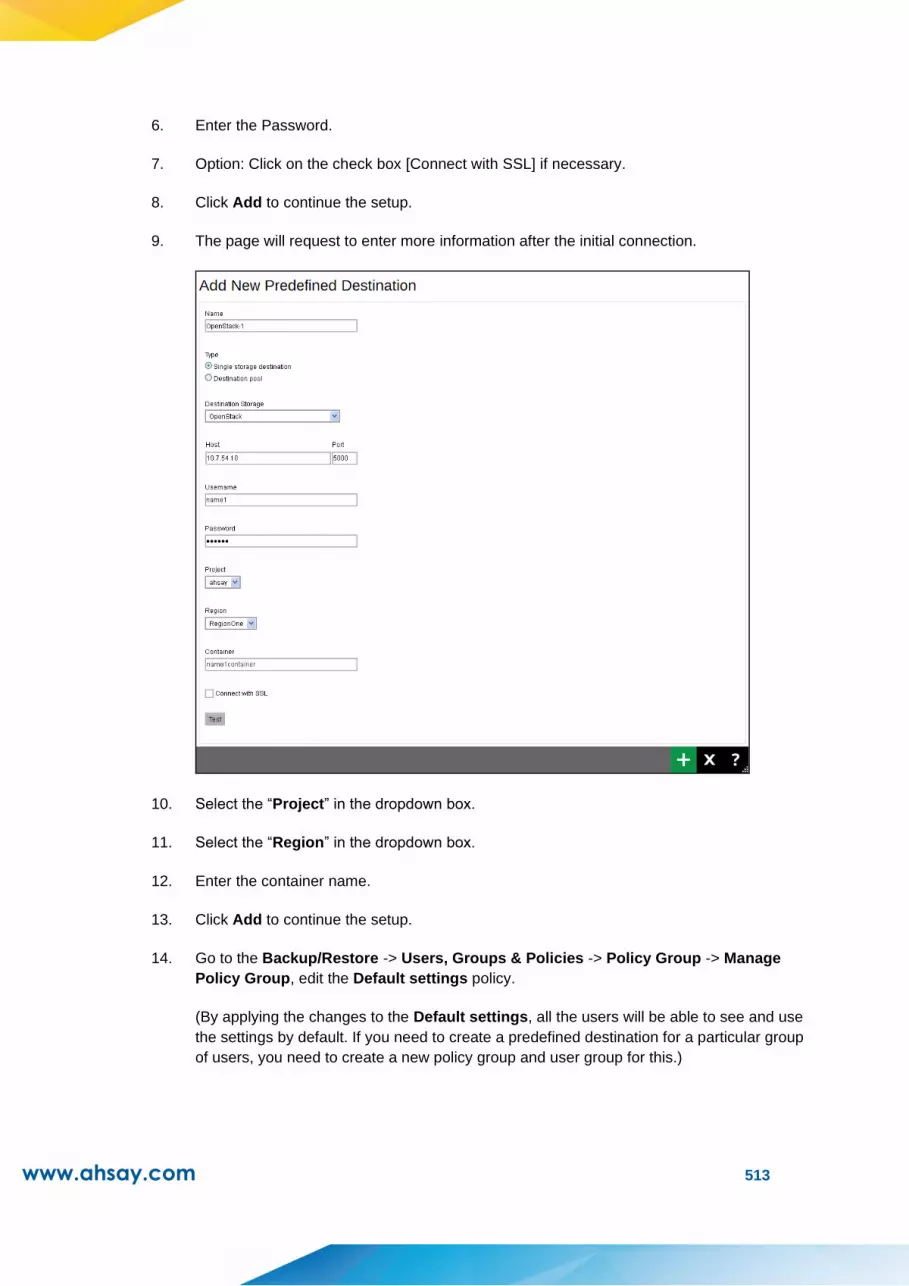
www.ahsay.com 513
6. Enter the Password.
7. Option: Click on the check box [Connect with SSL] if necessary.
8. Click Add to continue the setup.
9. The page will request to enter more information after the initial connection.
10. Select the “Project” in the dropdown box.
11. Select the “Region” in the dropdown box.
12. Enter the container name.
13. Click Add to continue the setup.
14. Go to the Backup/Restore -> Users, Groups & Policies -> Policy Group -> Manage
Policy Group, edit the Default settings policy.
(By applying the changes to the Default settings, all the users will be able to see and use
the settings by default. If you need to create a predefined destination for a particular group
of users, you need to create a new policy group and user group for this.)

www.ahsay.com 514
Add the newly created predefined storage “OpenStack-1” to the Backup Set Settings ->
Destinations Visible to Users -> Predefined Destinations.
15. When you create a backup set for a user, you will be able to see the new predefined
destination.
Dropbox
1. If you do not have the Dropbox, please click on the link 'Sign up for Dropbox' to create an
account.
2. Select 'Dropbox' from the [Destination Storage] drop down box.
Enter name of the backup destination.
3. Select Single storage destination.
Note: The option Destination Pool is defined from a number of single storage destination.
4. Click Add to continue the setup.

www.ahsay.com 515
5. A browser will pop up and Dropbox will ask for your permission to access the storage, click
on "Ahsay”.
On the browser, a code is displayed, copy it and paste into the “create predefined
destination” page in the AhsayCBS.
(Sample authentication code)
6. Click Add to continue the setup.
7. Go to the Backup/Restore -> Users, Groups & Policies -> Policy Group -> Manage
Policy Group, edit the Default settings policy.
(By applying the changes to the “Default settings”, all the users will be able to see and
use the settings by default. If you need to create a predefined destination for a particular
group of users, you need to create a new policy group and user group for this.)
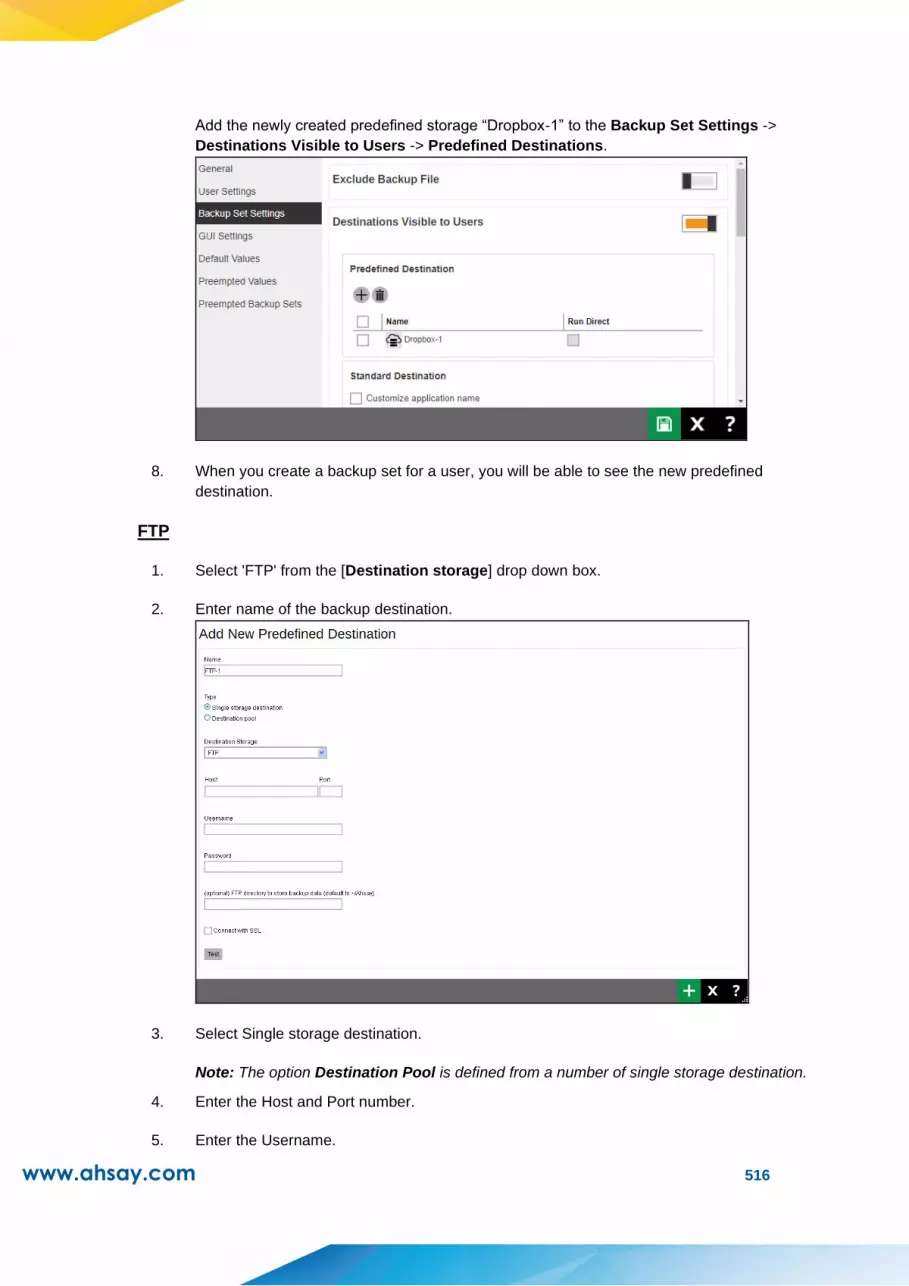
www.ahsay.com 516
Add the newly created predefined storage “Dropbox-1” to the Backup Set Settings ->
Destinations Visible to Users -> Predefined Destinations.
8. When you create a backup set for a user, you will be able to see the new predefined
destination.
FTP
1. Select 'FTP' from the [Destination storage] drop down box.
2. Enter name of the backup destination.
3. Select Single storage destination.
Note: The option Destination Pool is defined from a number of single storage destination.
4. Enter the Host and Port number.
5. Enter the Username.
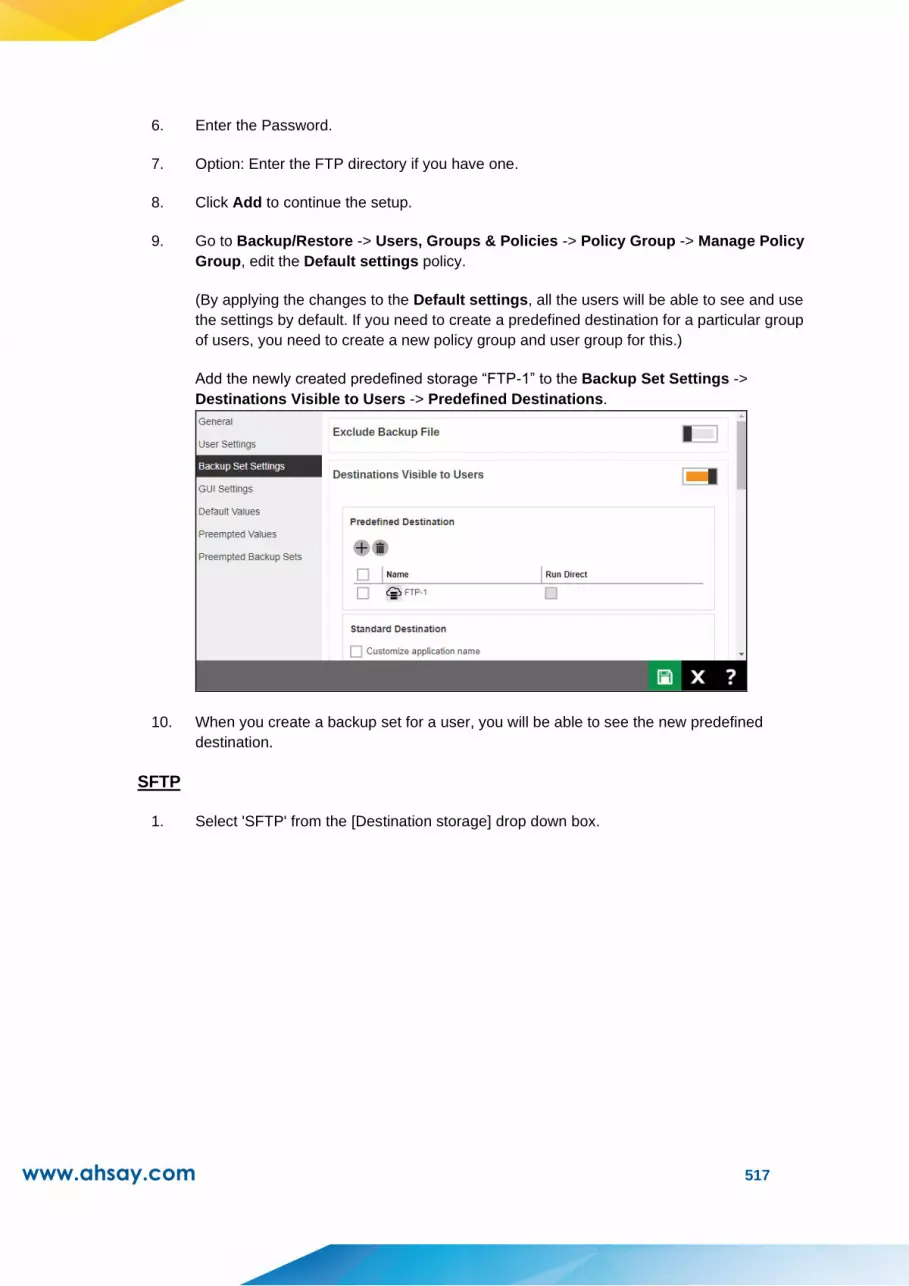
www.ahsay.com 517
6. Enter the Password.
7. Option: Enter the FTP directory if you have one.
8. Click Add to continue the setup.
9. Go to Backup/Restore -> Users, Groups & Policies -> Policy Group -> Manage Policy
Group, edit the Default settings policy.
(By applying the changes to the Default settings, all the users will be able to see and use
the settings by default. If you need to create a predefined destination for a particular group
of users, you need to create a new policy group and user group for this.)
Add the newly created predefined storage “FTP-1” to the Backup Set Settings ->
Destinations Visible to Users -> Predefined Destinations.
10. When you create a backup set for a user, you will be able to see the new predefined
destination.
SFTP
1. Select 'SFTP' from the [Destination storage] drop down box.
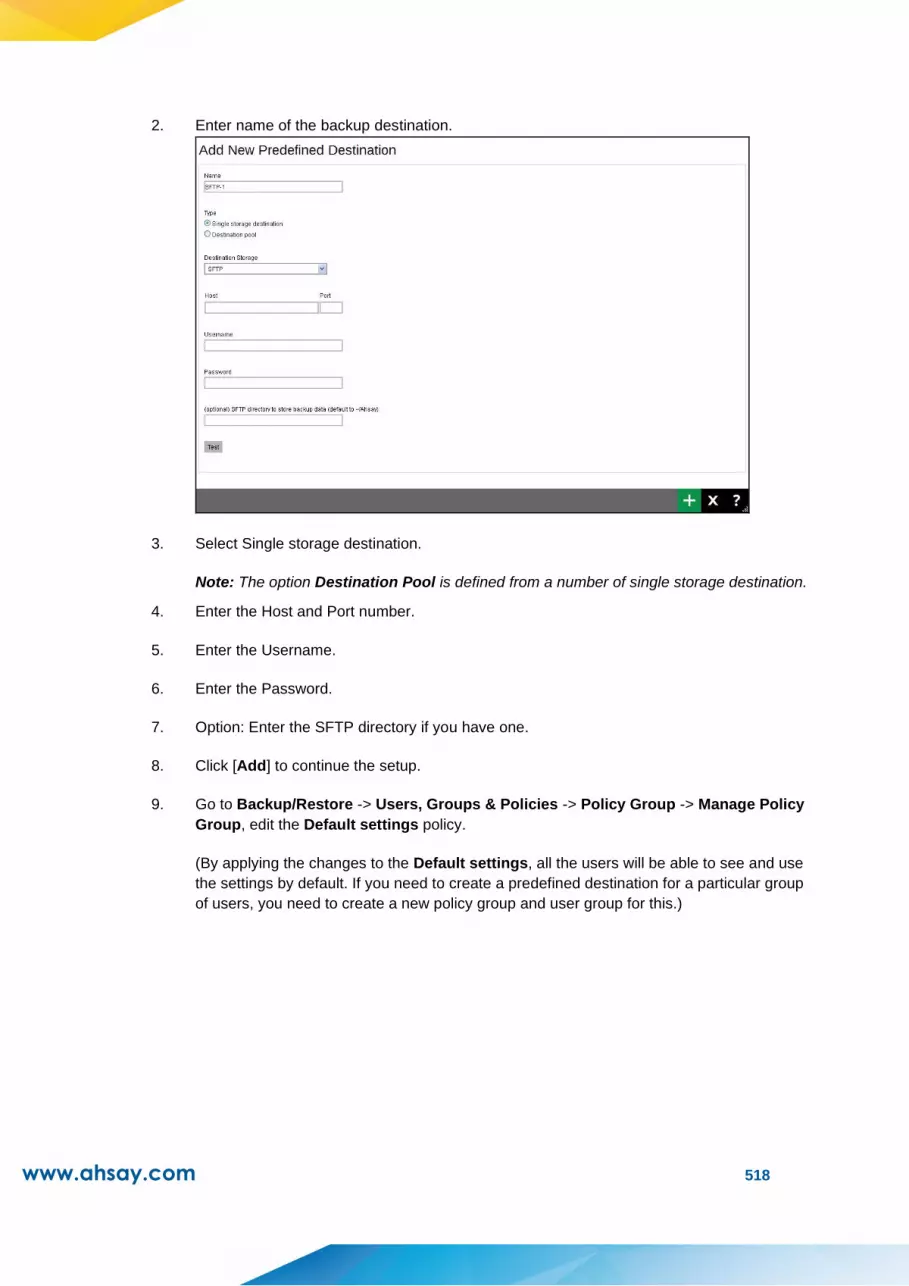
www.ahsay.com 518
2. Enter name of the backup destination.
3. Select Single storage destination.
Note: The option Destination Pool is defined from a number of single storage destination.
4. Enter the Host and Port number.
5. Enter the Username.
6. Enter the Password.
7. Option: Enter the SFTP directory if you have one.
8. Click [Add] to continue the setup.
9. Go to Backup/Restore -> Users, Groups & Policies -> Policy Group -> Manage Policy
Group, edit the Default settings policy.
(By applying the changes to the Default settings, all the users will be able to see and use
the settings by default. If you need to create a predefined destination for a particular group
of users, you need to create a new policy group and user group for this.)
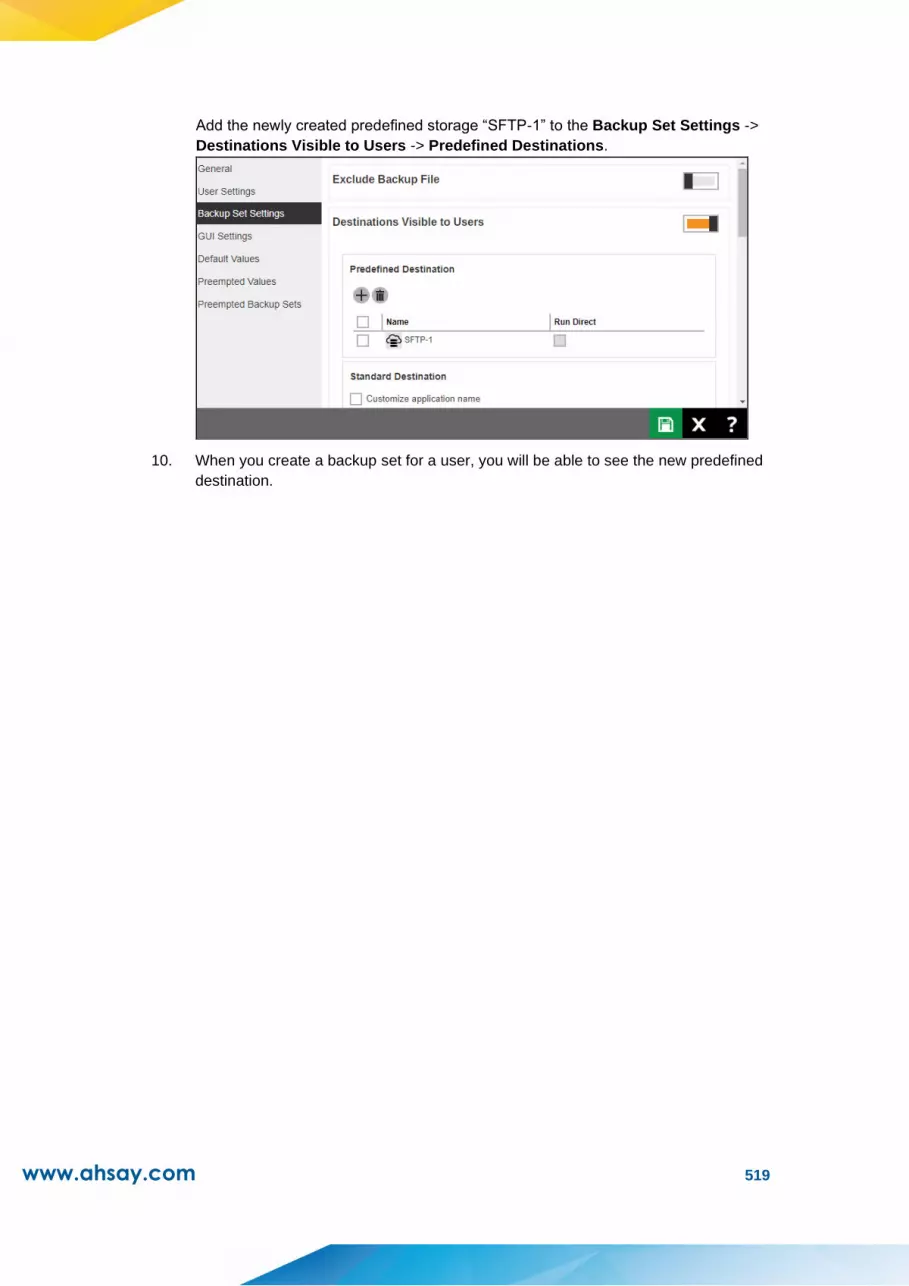
www.ahsay.com 519
Add the newly created predefined storage “SFTP-1” to the Backup Set Settings ->
Destinations Visible to Users -> Predefined Destinations.
10. When you create a backup set for a user, you will be able to see the new predefined
destination.
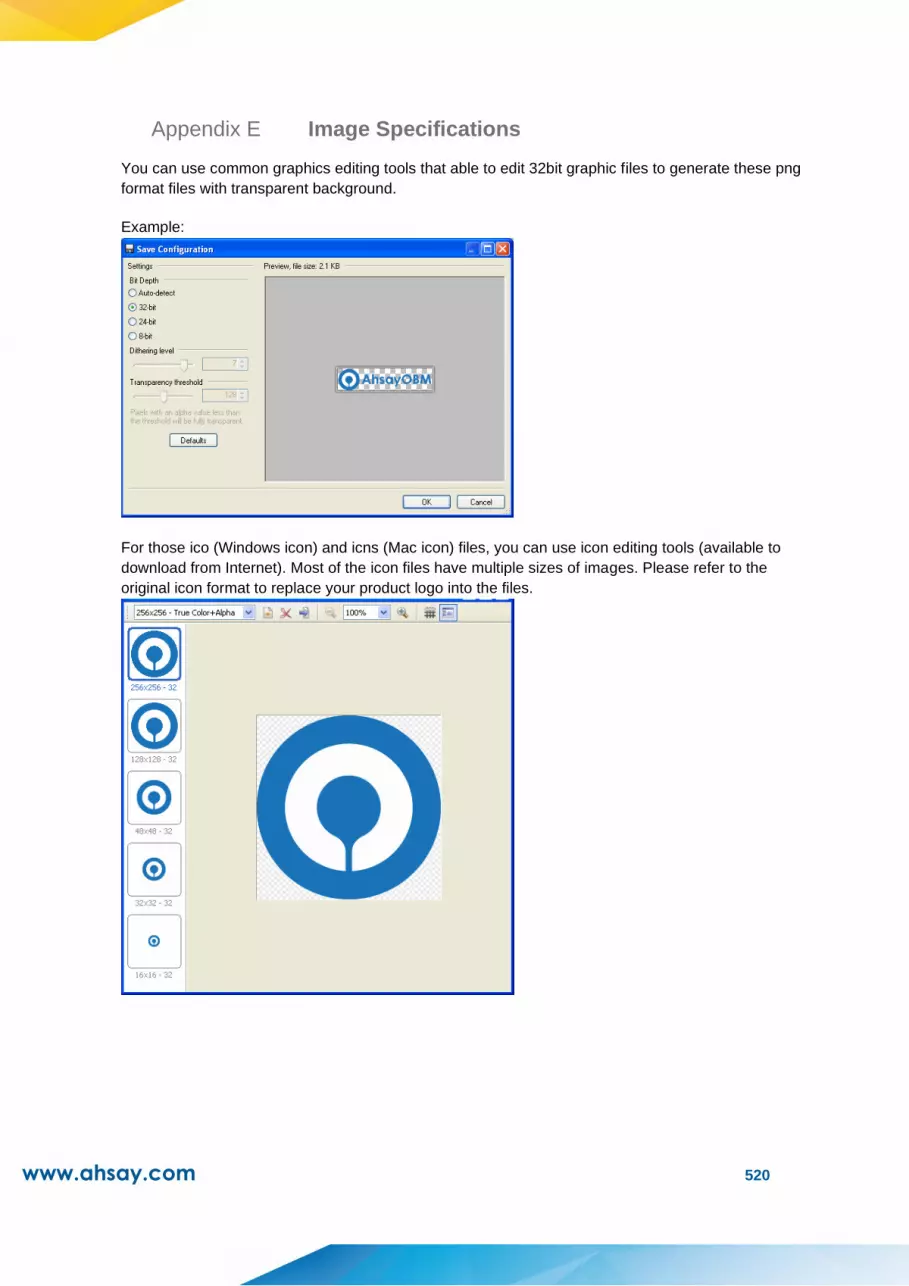
www.ahsay.com 520
Appendix E Image Specifications
You can use common graphics editing tools that able to edit 32bit graphic files to generate these png
format files with transparent background.
Example:
For those ico (Windows icon) and icns (Mac icon) files, you can use icon editing tools (available to
download from Internet). Most of the icon files have multiple sizes of images. Please refer to the
original icon format to replace your product logo into the files.

www.ahsay.com 521
Image specifications for AhsayCBS (web interface, pdf and email report)
File name: ico_40_cbs_logo.png Format: png
Width: 200 px
Height: 72 px This logo has transparent background (checkered
squares) with white text.
File name: default.large.gif Format: gif
Width: 129 px
Height: 40 px This logo has transparent background (checkered
squares).
File name: ico_24_cbs.png Format: png
Width: 24 px
Height: 24 px This logo has transparent background (checkered
squares).
File name: ico_obm_16.png Format: png
Width: 18 px
Height: 18 px This logo has transparent background (checkered
squares).
www.ahsay.com 522
File name: ico_acb_16.png Format: png
Width: 18 px
Height: 18 px This logo has transparent background (checkered
squares).
Image specifications for Ahsay Mobile icon (on web console Mobile App Download page and
Mobile Feature tab)
File name: mobile-app-icon.png Format: png
Width: 120 px
Height: 120 px

www.ahsay.com 523
Image specifications for AhsayCBS (Installation graphics)
Images for Windows (Installation graphics)
File name: aboutBG.bmp Format: Bitmap
Width: 164 px
Height: 337 px
(The size of this graphic is reduced to fit into this document.)
File name: desktop.ico Format: Windows Icon
Width: 256,128,48,32,16px
Height: 256,128,48,32,16px
(True color plus alpha channel
transparency)
This logo has transparent background (checkered
squares).
www.ahsay.com 524
(The sizes of these logos are reduced to fit into this document.)
File name: installer.ico Format: Windows Icon
Width: 256,128,48,32,16px
Height: 256,128,48,32,16px
(True color plus alpha channel
transparency)
This logo has transparent background (checkered
squares).
(The sizes of these logos are reduced to fit into this document.)

www.ahsay.com 525
File name: splash.bmp Format: Bitmap
Width: 340 px
Height: 240 px
(The size of this graphic is reduced to fit into this document.)
File name: restart.ico Format: Windows Icon
Width: 256,128,48,32,16px
Height: 256,128,48,32,16px
(True color plus alpha channel
transparency)
This logo has transparent background (checkered
squares).
(The sizes of these logos are reduced to fit into this document.)
www.ahsay.com 526
File name: small.bmp Format: Bitmap
Width: 55 px
Height: 58 px
File name: start.ico Format: Windows Icon
Width: 256,128,48,32,16px
Height: 256,128,48,32,16px
(True color plus alpha channel
transparency)
This logo has transparent background (checkered
squares).
(The sizes of these logos are reduced to fit into this document.)
File name: stop.ico Format: Windows Icon
Width: 256,128,48,32,16px
Height: 256,128,48,32,16px
(True color plus alpha channel
transparency)
This logo has transparent background (checkered
squares).

www.ahsay.com 527
(The sizes of these logos are reduced to fit into this document.)
File name: uninstall.ico Format: Windows Icon
Width: 256,128,48,32,16px
Height: 256,128,48,32,16px
(True color plus alpha channel
transparency)
This logo has transparent background (checkered
squares).
(The sizes of these logos are reduced to fit into this document.)

www.ahsay.com 528
File name: webAdmin.ico Format: Windows Icon
Width: 256,128,48,32,16px
Height: 256,128,48,32,16px
(True color plus alpha channel
transparency)
This logo has transparent background (checkered
squares).
(The sizes of these logos are reduced to fit into this document.)
Images for AhsayUBS (Installation graphics)
File name: favicon.ico Format: Website Icon
Width: 16 px
Height: 16 px
or
Width: 32 px
Height: 32 px
(True color plus alpha channel
transparency)
This logo has transparent background (checkered
squares).

www.ahsay.com 529
File name: footer.png Format: png
Width: 127 px
Height: 42 px
File name: header_bg.png Format: png
Width: 2400 px
Height: 143 px
(The size of this graphic is reduced to fit into this document.)
File name: header_logo.png Format: png
Width: 524 px
Height: 143 px This logo has transparent background (checkered
squares) with white text.
(The size of this graphic is reduced to fit into this document.)
www.ahsay.com 530
File name: login_bg.png Format: png
Width: 471 px
Height: 340 px
(The size of this graphic is reduced to fit into this document.)
File name: login_logo.png Format: png
Width: 353 px
Height: 140 px This logo has transparent background (checkered
squares) with white text.

www.ahsay.com 531
File name: splash_320x200.bmp Format: Bitmap
Width: 320 px
Height: 200 px
File name: splash_1024x768.bmp Format: Bitmap
Width: 1024 px
Height: 768 px
(The size of this graphic is reduced to fit into this document.)
www.ahsay.com 532
Image specifications for AhsayOBM (Application graphics)
Images for all platforms
File name: about_logo.png Format: png
Width: 144 px
Height: 33 px This logo has transparent background (checkered
squares).
File name: login_bg.png Format: png
Width: 1016 px
Height: 734 px
(The size of this graphic is reduced to fit into this document.)
File name: login_logo.png Format: png
Width: 200 px
Height: 60 px This logo has transparent background (checkered
squares) with white text.

www.ahsay.com 533
File name: logo.png Format: png
Width: 32 px
Height: 32 px This logo has transparent background (checkered
squares).
File name: main_logo.png Format: png
Width: 148 px
Height: 33 px This logo has transparent background (checkered
squares) with white text.
File name: splash.png Format: png
Width: 420 px
Height: 240 px
(The size of this graphic is reduced to fit into this document.)

www.ahsay.com 534
File name: dstn_CBS_24.png Format: png
Width: 24 px
Height: 24 px This logo has transparent background (checkered
squares) with white text.
File name: dstn_CBS_32.png Format: png
Width: 32 px
Height: 32 px This logo has transparent background (checkered
squares) with white text.
File name: dstn_CBS_48.png Format: png
Width: 48 px
Height: 48 px This logo has transparent background (checkered
squares) with white text.
File name: fs16_root_CBS.png Format: png
Width: 16 px
Height: 16 px This logo has transparent background (checkered
squares) with white text.

www.ahsay.com 535
Images for Linux, FreeBSD and Solaris (Application graphics)
File name: desktop.png Format: png
Width: 128 px
Height: 128 px This logo has transparent background (checkered
squares).
Images for Synology (Application graphics)
File name: logo_16.png Format: png
Width: 16 px
Height: 16 px This logo has transparent background (checkered
squares).
File name: logo_32.png Format: png
Width: 32 px
Height: 32 px This logo has transparent background (checkered
squares).
www.ahsay.com 536
File name: logo_72.png Format: png
Width: 72 px
Height: 72 px This logo has transparent background (checkered
squares).
Images for QNAP (Application graphics)
File name: logo_72.png Format: png
Width: 72 px
Height: 72 px This logo has transparent background (checkered
squares).
Images for Windows (System tray)
The following icons icon1.ico, icon2.ico, icon3.ico and icon4.ico will be used in the Windows system
tray. Please arrange them in an animated sequence. The application will arrange the animation
sequence when the backup job is run.
File name: icon1.ico Format: Windows Icon
Width: 16 px
Height: 16 px
(True color plus alpha channel
transparency)
This logo has transparent background (checkered
squares).

www.ahsay.com 537
File name: icon2.ico Format: Windows Icon
Width: 16 px
Height: 16 px
(True color plus alpha channel
transparency)
This logo has transparent background (checkered
squares).
File name: icon3.ico Format: Windows Icon
Width: 16 px
Height: 16 px
(True color plus alpha channel
transparency)
This logo has transparent background (checkered
squares).

www.ahsay.com 538
File name: icon4.ico Format: Windows Icon
Width: 16 px
Height: 16 px
(True color plus alpha channel
transparency)
This logo has transparent background (checkered
squares).
File name: toast.ico Format: Windows Icon
Width: 64 px
Height: 64 px
(True color plus alpha channel
transparency)
This logo has transparent background (checkered
squares).

www.ahsay.com 539
Images for Mac (Application and installation graphics)
File name: desktop.icns Format: Mac Icon
Width: 256,128,48,32,16px
Height: 256,128,48,32,16px
(True color plus alpha channel
transparency)
This logo has transparent background (checkered
squares).
(The sizes of these logos are reduced to fit into this document.)
File name: GenericJavaApp.icns Format: Mac Icon
This logo has transparent background (checkered
squares).

www.ahsay.com 540
Note: These are default Java application icons, they will be displayed when there
are icons missing. This is not directly related the product branding.
File name: installer.icns Format: Mac Icon
Width: 256,128,48,32,16px
Height: 256,128,48,32,16px
(True color plus alpha channel
transparency)
This logo has transparent background (checkered
squares).
(The sizes of these logos are reduced to fit into this document.)

www.ahsay.com 541
File name: Logo.icns Format: Mac Icon
Width: 256,128,48,32,16px
Height: 256,128,48,32,16px
(True color plus alpha channel
transparency)
This logo has transparent background (checkered
squares).
(The sizes of these logos are reduced to fit into this document.)

www.ahsay.com 542
File name: uninstall.icns Format: Mac Icon
Width: 256,128,48,32,16px
Height: 256,128,48,32,16px
(True color plus alpha channel
transparency)
This logo has transparent background (checkered
squares).
(The sizes of these logos are reduced to fit into this document.)
File name: OBMLogo.icns Format: Mac Icon
Width: 256,128,48,32,16px
Height: 256,128,48,32,16px
(True color plus alpha channel
transparency)
This logo has transparent background (checkered
squares).
www.ahsay.com 543
(The sizes of these logos are reduced to fit into this document.)
File name: background.jpg Format: JPEG
Width: 622 px
Height: 420 px
(The size of this graphic is reduced to fit into this document.)
File name: logo.png Format: png
Width: 128 px
Height: 128 px
www.ahsay.com 544
(The size of this graphic is reduced to fit into this document.)
Images for Synology (Installation graphics)
File name: PACKAGE_ICON.PNG Format: png
Width: 72 px
Height: 72 px This logo has transparent background (checkered
squares).
File name: PACKAGE_ICON_120.PNG Format: png
Width: 120 px
Height: 120 px This logo has transparent background (checkered
squares).
File name: PACKAGE_ICON_256.PNG Format: png
Width: 256 px
Height: 256 px This logo has transparent background (checkered
squares).
www.ahsay.com 545
Images for QNAP (Installation graphics)
File name: PACKAGE_ICON_64.GIF Format: gif
Width: 64 px
Height: 64 px
File name: PACKAGE_ICON_64_GRAY.GIF Format: gif
Width: 64 px
Height: 64 px
File name: PACKAGE_ICON_80.GIF Format: gif
Width: 80 px
Height: 80 px
www.ahsay.com 546
Images for Windows (Installation graphics)
File name: aboutBG.bmp Format: Bitmap
Width: 164 px
Height: 337 px
(The size of this graphic is reduced to fit into this document.)
File name: desktop.ico Format: Windows Icon
Width: 256,128,48,32,16px
Height: 256,128,48,32,16px
(True color plus alpha channel
transparency)
This logo has transparent background (checkered
squares).

www.ahsay.com 547
File name: installer.ico Format: Windows Icon
Width: 256,128,48,32,16px
Height: 256,128,48,32,16px
(True color plus alpha channel
transparency)
This logo has transparent background (checkered
squares).
(The sizes of these logos are reduced to fit into this document.)
File name: small.bmp Format: Bitmap
Width: 55 px
Height: 58 px

www.ahsay.com 548
File name: uninstall.ico Format: Windows Icon
Width: 256,128,48,32,16px
Height: 256,128,48,32,16px
(True color plus alpha channel
transparency)
This logo has transparent background (checkered
squares).
(The sizes of these logos are reduced to fit into this document.)

www.ahsay.com 549
Image specifications for AhsayACB (Application graphics)
Images for all platforms
File name: about_logo.png Format: png
Width: 144 px
Height: 33 px This logo has transparent background (checkered
squares).
File name: login_bg.png Format: png
Width: 1016 px
Height: 734 px
(The size of this logo is reduced to fit into this document.)
File name: login_logo.png Format: png
Width: 200 px
Height: 60 px This logo has transparent background (checkered
squares) with white text.

www.ahsay.com 550
File name: logo.png Format: png
Width: 32 px
Height: 32 px This logo has transparent background (checkered
squares).
File name: main_logo.png Format: png
Width: 148 px
Height: 33 px This logo has transparent background (checkered
squares) with white text.
File name: splash.png Format: png
Width: 420 px
Height: 240 px
(The size of this graphic is reduced to fit into this document.)
www.ahsay.com 551
File name: dstn_CBS_24.png Format: png
Width: 24 px
Height: 24 px This logo has transparent background (checkered
squares) with white text.
File name: dstn_CBS_32.png Format: png
Width: 32 px
Height: 32 px This logo has transparent background (checkered
squares) with white text.
File name: dstn_CBS_48.png Format: png
Width: 48 px
Height: 48 px This logo has transparent background (checkered
squares) with white text.
File name: fs16_root_CBS.png Format: png
Width: 16 px
Height: 16 px This logo has transparent background (checkered
squares) with white text.
www.ahsay.com 552
Images for Windows (System tray)
The following icons icon1.ico, icon2.ico, icon3.ico and icon4.ico will be used in the Windows system
tray. Please arrange them in an animated sequence. The application will arrange the animation
sequence when the backup job is run.
File name: icon1.ico Format: Windows Icon
Width: 16 px
Height: 16 px
(True color plus alpha channel
transparency)
This logo has transparent background (checkered
squares).
File name: icon2.ico Format: Windows Icon
Width: 16 px
Height: 16 px
(True color plus alpha channel
transparency)
This logo has transparent background (checkered
squares).

www.ahsay.com 553
File name: icon3.ico Format: Windows Icon
Width: 16 px
Height: 16 px
(True color plus alpha channel
transparency)
This logo has transparent background (checkered
squares).
File name: icon4.ico Format: Windows Icon
Width: 16 px
Height: 16 px
(True color plus alpha channel
transparency)
This logo has transparent background (checkered
squares).
File name: toast.ico Format: Windows Icon
Width: 64 px
Height: 64 px
(True color plus alpha channel
transparency)
This logo has transparent background (checkered
squares).

www.ahsay.com 554
Images for Mac (Application and installation graphics)
File name: desktop.icns Format: Mac Icon
Width: 256,128,48,32,16px
Height: 256,128,48,32,16px
(True color plus alpha channel
transparency)
This logo has transparent background (checkered
squares).
(The sizes of these logos are reduced to fit into this document.)
File name: GenericJavaApp.icns Format: Mac Icon
This logo has transparent background (checkered
squares).
www.ahsay.com 555
Note: These are default Java application icons, they will be displayed when there
are icons missing. This is not directly related the product branding.
File name: installer.icns Format: Mac Icon
Width: 256,128,48,32,16px
Height: 256,128,48,32,16px
(True color plus alpha channel
transparency)
This logo has transparent background (checkered
squares).

www.ahsay.com 556
(The sizes of these logos are reduced to fit into this document.)
File name: Logo.icns Format: Mac Icon
Width: 256,128,48,32,16px
Height: 256,128,48,32,16px
(True color plus alpha channel
transparency)
This logo has transparent background (checkered
squares).
(The sizes of these logos are reduced to fit into this document.)
File name: uninstall.icns Format: Mac Icon
Width: 256,128,48,32,16px
Height: 256,128,48,32,16px
(True color plus alpha channel
transparency)
This logo has transparent background (checkered
squares).
www.ahsay.com 557
(The sizes of these logos are reduced to fit into this document.)
File name: ACBLogo.icns Format: Mac Icon
Width: 256,128,48,32,16px
Height: 256,128,48,32,16px
(True color plus alpha channel
transparency)
This logo has transparent background (checkered
squares).
(The sizes of these logos are reduced to fit into this document.)
File name: background.jpg Format: JPEG
Width: 622 px
Height: 420 px

www.ahsay.com 558
(The size of this graphic is reduced to fit into this document.)
File name: logo.png Format: png
Width: 128 px
Height: 128 px
(The size of this graphic is reduced to fit into this document.)
Images for Windows (Installation graphics)
File name: aboutBG.bmp Format: Bitmap
Width: 164 px
Height: 337 px
www.ahsay.com 559
(The size of this graphic is reduced to fit into this document.)
File name: desktop.ico Format: Windows Icon
Width: 256,128,48,32,16px
Height: 256,128,48,32,16px
(True color plus alpha channel
transparency)
This logo has transparent background (checkered
squares).
(The sizes of these logos are reduced to fit into this document.)
File name: installer.ico Format: Windows Icon
Width: 256,128,48,32,16px
Height: 256,128,48,32,16px
(True color plus alpha channel
transparency)
This logo has transparent background (checkered
squares).
www.ahsay.com 560
(The sizes of these logos are reduced to fit into this document.)
File name: small.bmp Format: Bitmap
Width: 55 px
Height: 58 px
File name: uninstall.ico Format: Windows Icon
Width: 256,128,48,32,16px
Height: 256,128,48,32,16px
(True color plus alpha channel
transparency)
This logo has transparent background (checkered
squares).

www.ahsay.com 561
(The sizes of these logos are reduced to fit into this document.)

www.ahsay.com 562
Image specifications for AhsayOBC (Installation graphics)
Images for Windows
File name: acb-splash.bmp Format: Bitmap
Width: 340 px
Height: 240 px
File name: installer.ico Format: Windows Icon
Width: 256,128,48,32,16px
Height: 256,128,48,32,16px
(True color plus alpha channel
transparency)
This logo has transparent background (checkered
squares).
(The sizes of these logos are reduced to fit into this document.)
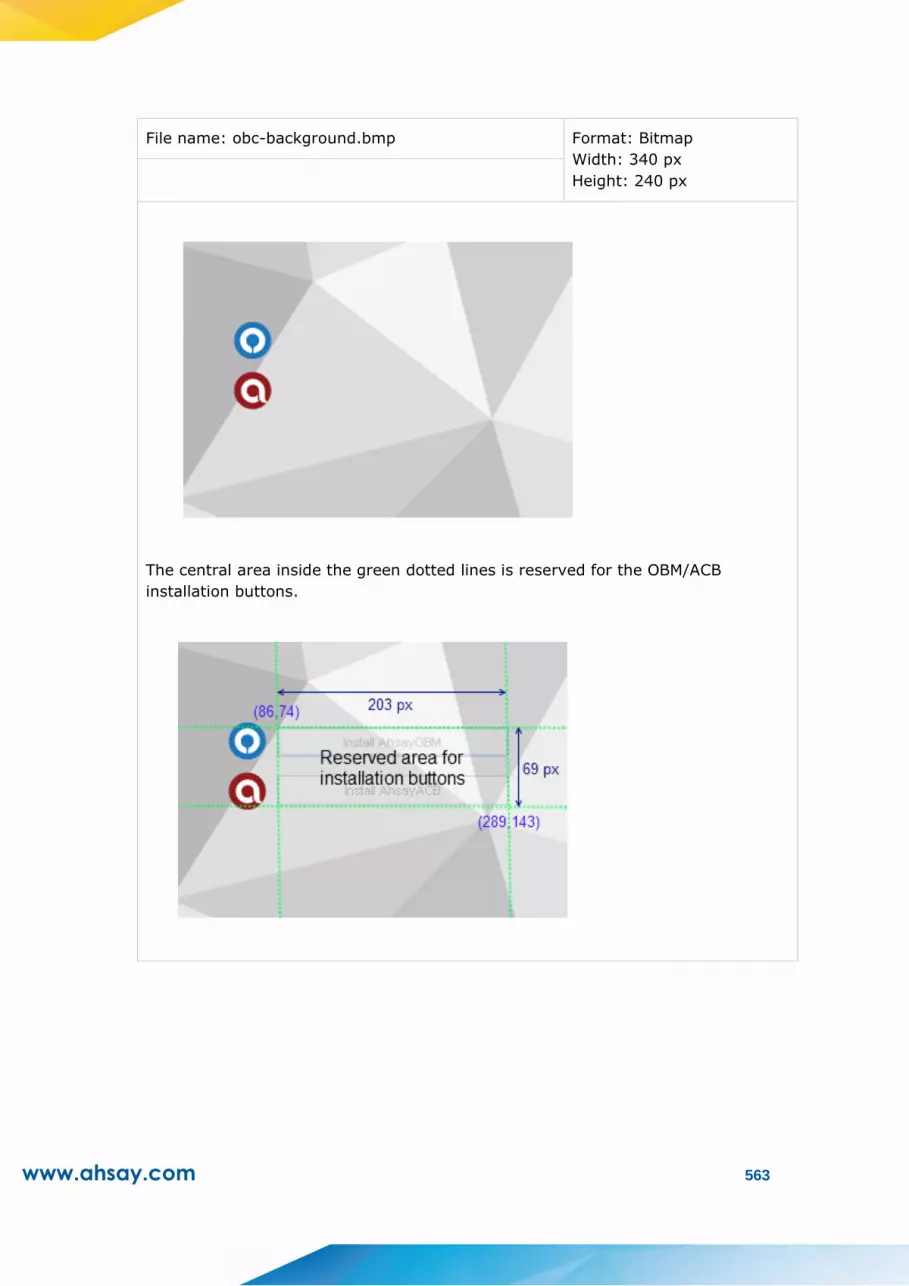
www.ahsay.com 563
File name: obc-background.bmp Format: Bitmap
Width: 340 px
Height: 240 px
The central area inside the green dotted lines is reserved for the OBM/ACB
installation buttons.

www.ahsay.com 564
File name: obc-splash.bmp Format: Bitmap
Width: 340 px
Height: 240 px
File name: obm-splash.bmp Format: Bitmap
Width: 340 px
Height: 240 px

www.ahsay.com 565
Appendix F Comparison on Different Replication Setup Environments
Here is a comparison table of the setup concerns on different replication environment.
Ahsay CBS
(Physical
machine/Cloud)
Ahsay CBS
(Existing VM)
Cloud
(Storage)
FTP/ SFTP
Ahsay CBS
(Physical
machine/Cloud
)
Ahsay CBS
(Existing VM)
Local
FTP/
SFTP
Mapped
Drive
Local/
Removable
Drive
Type of
connection
Internet
LAN N/A
This is the type of connection with the Backup Server, for Internet connection, you may aware on the download
speed which may affect the restore performance.
N/A refers to a direct connection with the Backup Server and the replication storage is not located on the same disk
of the user home.
Cost High
Medium Medium* Low High Medium Low Low Low
The cost is measured in terms of setup, hosting, storage media type and maintenance.
* The cost would be affected if the cloud storage is charged base on bandwidth or amount of access.
Replication
Speed
Medium
Medium Medium Medium Fast Fast Fast Fast Fast
The replication speed over the Internet would mainly depend on the upload bandwidth. The replication speed is
similar as file copying between 2 devices and the number of backup set to replicate. If fast replication is required,
you can consider using the multiple threads replication (v7.7 onwards)
Recovery
Speed
Fast
Fast Slow Slow Fast Fast Fast Fast Fast
This is measured in terms of the Backup Server downtime. The bottleneck is mainly on the Internet bandwidth.
Switch to
Backup Server
Yes
Yes
No
No Yes
Yes
No
No No
Time to switch
over by DNS
Slow **
Slow ** N/A N/A Fast Fast N/A N/A N/A
** The speed would depend on the DNS propagation time.
N/A refers to the device has no such capability and not applicable for the DNS switch over.
Time to switch
over by IP
address
Fast Fast
N/A N/A Fast
Fast N/A N/A N/A
Switch the IP address of the Replication Server to the IP address of the Backup Server, provided that the Backup
Server is down and the IP address will not be used on the Backup Server again.
N/A refers to the device has no such capability and not applicable for the IP switch over.
Offsite
replication
Yes Yes Yes Yes No
No
No No No
Replication
snapshot
By Ahsay
CBS
By Ahsay
CBS
Depends *** No
By Ahsay
CBS
By Ahsay
CBS
No No No
*** Depends on the cloud service provider/setup.

www.ahsay.com 566
Appendix G System Job
Here is a summary of the system jobs on the AhsayCBS. For the daily job, it is scheduled at 06:00,
while others will be performed hourly and quarter-hourly.
Quarter-hourly Job
Job Name Description Email
Low Disk Space
Alert
When the disk space of the user home or system home is
over 80%, email will be sent to administrator. Once the alert
email is sent, email will not be sent within the next hour.
✔
Inactive Backup Set
Report
Email users when backup set has not been run for a number
of days. (The number of days can be set in policy group.)
✔
Settings Change
Report
When user’s profile or backup set settings is changed, Email
will be sent to user.
✔
Restore Job Report Send restore job report to user. ✔
Backup Job Report Send backup job report to user. ✔
Remove Deleted
Backup Set
This job scans removed backup sets from the storage. ✘
Hourly Job
Job Name Description Email
Missed Backup
Report
Email will be sent if scheduled backup job has not been
started after 6 hours.
✔
Remove Migrated
v6 Data
(Version 7.7 or later) When v6 backup data has completely
migrated to v7 format, this job will remove the old v6 backup
data.
✘
License Check License validation check. ✘
Daily Job
Job Name Description Email
Backup Quota
Reminder Report
It will send report to user when the backup quota is over
80% or backup quota is full.
✔
Trial User Reminder
Job
It will send report to trial users when trial users are going to
expire or to those expired trial users.
✔
Low Destination
Space Reminder
It will send disk space reminder email to administrator. It
monitors the local and cloud storages such as Google Drive,
OneDrive and OneDrive for Business.
✔
Configuration Perform AhsayCBS system configuration, user profile, and ✘

www.ahsay.com 567
Archival runtime settings to our cloud.
Remove Trial User Expired trial users will be removed by this job. ✘
Logs Removal
This job removes expired log entries such as backup error,
backup job, CDP backup job, replication log, advertisement
log and system logs etc.
✘
Meter license usage Upload meter license usage to our cloud. ✘
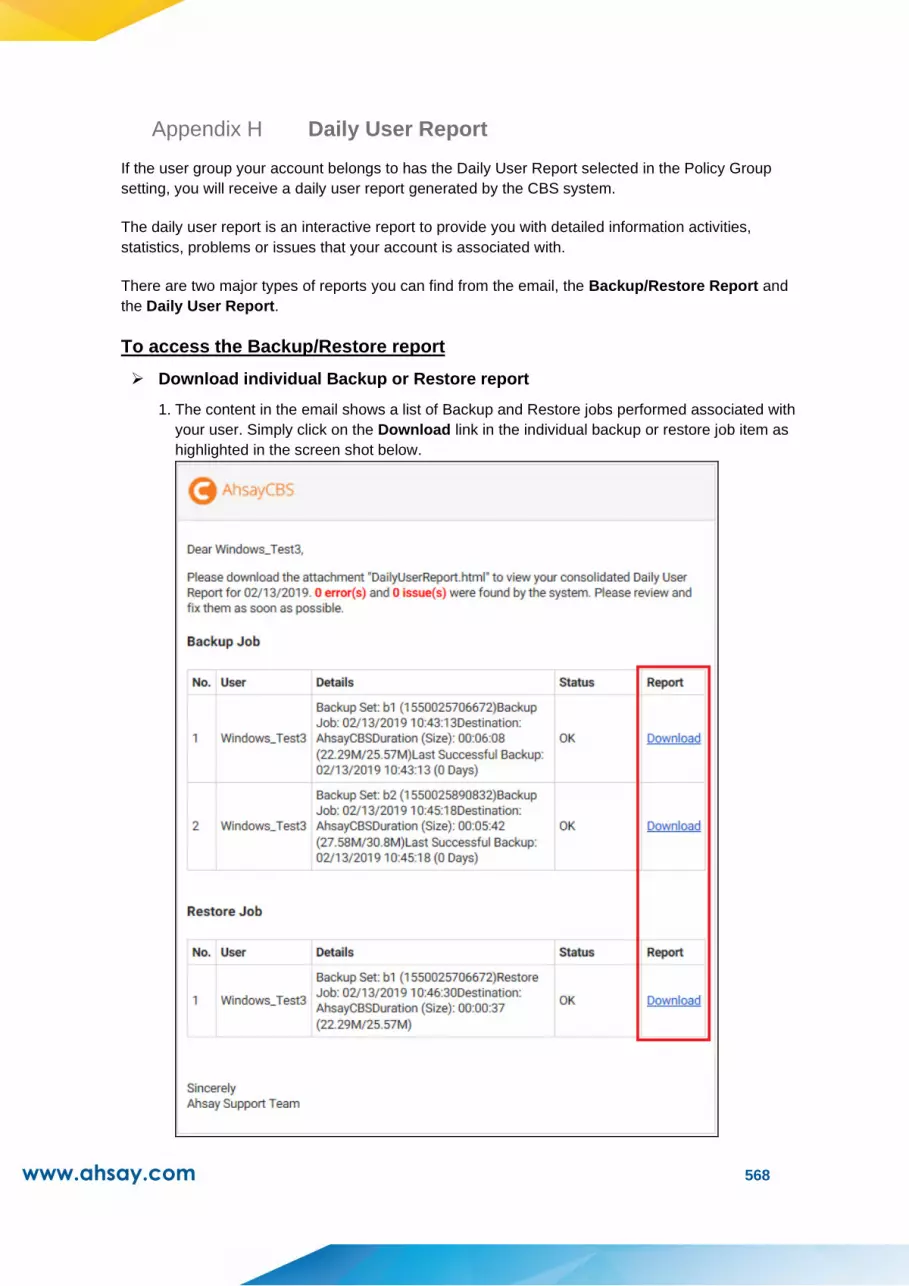
www.ahsay.com 568
Appendix H Daily User Report
If the user group your account belongs to has the Daily User Report selected in the Policy Group
setting, you will receive a daily user report generated by the CBS system.
The daily user report is an interactive report to provide you with detailed information activities,
statistics, problems or issues that your account is associated with.
There are two major types of reports you can find from the email, the Backup/Restore Report and
the Daily User Report.
To access the Backup/Restore report
➢ Download individual Backup or Restore report
1. The content in the email shows a list of Backup and Restore jobs performed associated with
your user. Simply click on the Download link in the individual backup or restore job item as
highlighted in the screen shot below.

www.ahsay.com 569
2. You will be prompted to enter the password of your backup user account as shown below.
Click on the Download button after entering the password.
3. The Backup or Restore report in .zip format will be download.
➢ Download Backup and Restore reports at once
1. All backup reports and restore reports are grouped separate .zip attachments and are named
as BackupReports.zip and RestoreReports.zip respectively.
2. Unzip the downloaded file and you will find all the backup or restore reports.
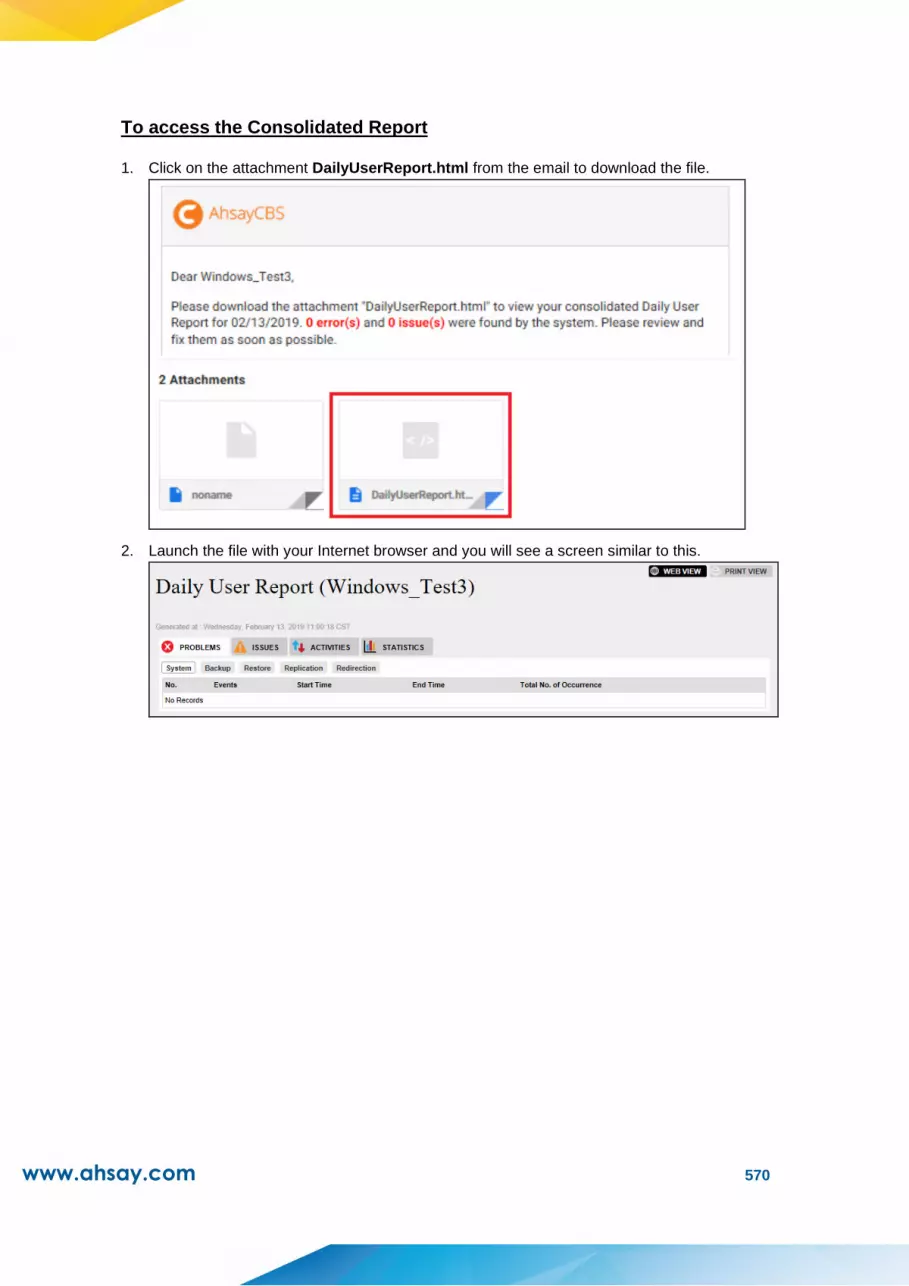
www.ahsay.com 570
To access the Consolidated Report
1. Click on the attachment DailyUserReport.html from the email to download the file.
2. Launch the file with your Internet browser and you will see a screen similar to this.

www.ahsay.com 571
About the Daily User Report
The daily user report has 4 major sections which are PROBLEMS, ISSUES, ACTIVITIES and
STATISTICS.
All unsuccessful activities including system jobs, backup jobs, restore, replication and redirection are
recorded under the PROBLEMS section. There are 5 tabs under this category.
➢ System
This page shows the consolidated data for system job errors with the following details. All same
type of system job error will be grouped as one entry.
No. Sequential number of report item
Events Type of system job error
Start Time Start time of the first occurrence of the particular type of system job error
End Time End time of the last occurrence of the particular type of system job error
Total No. of
Occurrence Number of occurrence of the particular type of system job error
➢ Backup
This page shows all the unsuccessful backup jobs with the following details.
User Name of the backup user
Backup Sets Name of the failed backup set
Start Time Start time of the failed backup job (in backup server’s time zone)
End Time End time of the failed backup job (in backup server’s time zone)

www.ahsay.com 572
Job Status Status of the failed backup job, e.g. Missed Backup
Job@Destinations Backup time in client time zone
Total No. of Errors Total number of backup error for the particular backup set
Last Successful
Backup Time of the last successful backup job for the particular backup set
➢ Restore
This page shows all the unsuccessful restore jobs with the following details.
User Name of the backup user
Backup Sets Name of the failed backup set
Start Time Start time of the failed restore job (in backup server’s time
zone)
End Time End time of the failed restore job (in backup server’s time
zone)
Job Status Status of the failed restore job, e.g. User interrupted
Job@Destinations Restore time in client backup agent’s time zone
Total No. of Errors Total number of restore error for the particular backup set
➢ Replication
This page shows all the unsuccessful replication jobs with the following details.
User Name of the backup user
Backup Sets Name of the backup set failed for replication

www.ahsay.com 573
Timestamp Recorded time of the replication error
Type Type of the replication error
Messages Error message showing details of the replication error
➢ Redirection
This page shows all the unsuccessful redirection jobs with the following details.
Timestamp Recorded time of the redirection error
Events Type of the redirection error
Users Name of user failed for the redirection job
Total No. of Errors Total number of redirection error for the particular user

www.ahsay.com 574
This section shows issues regarding system jobs, backup user account and backup sets that backup
user should be aware of. There are 3 tabs under this category.
➢ System / Security
This page shows the consolidated data for system or security issues with the following details.
Events Type of system / security issues
Users Name of the backup user for the particular type of system/security
issue
Start Time Start time of the first occurrence of the particular type of
system/security issue
End Time End time of the last occurrence of the particular type of
system/security issue
No. of Occurrence Number of occurrence of the particular type of system/security of a
backup user
Remote IP Address IP address where Client Agent Application is installed
User Agent Type of Client Agent Application (AhsayOBM/AhsayACB)
➢ Users
This page shows a list of backup users whose account’s storage quota is 90% or above full.
Events Type of user issue
Type User’s subscription status, whether it is a paid or trial user
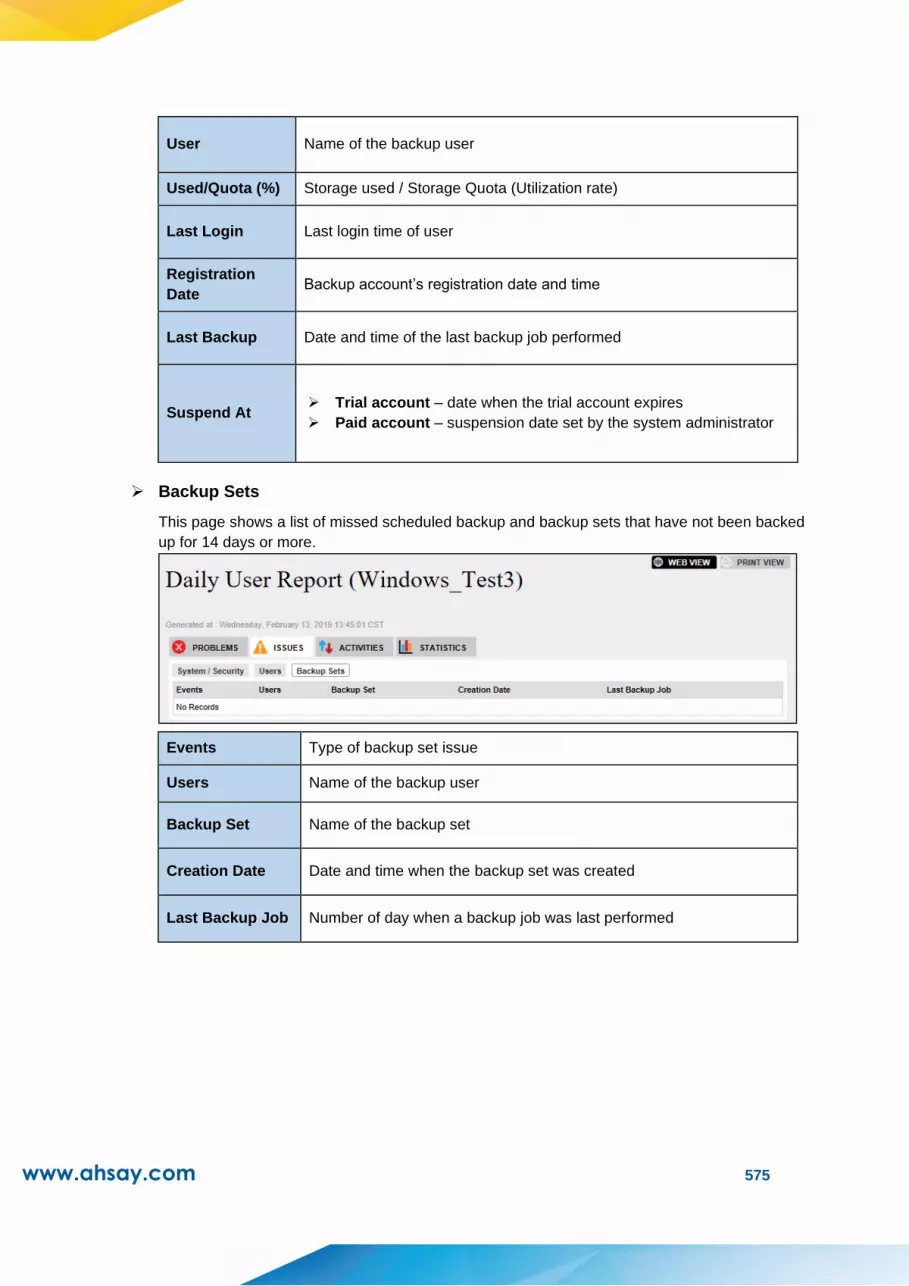
www.ahsay.com 575
User Name of the backup user
Used/Quota (%) Storage used / Storage Quota (Utilization rate)
Last Login Last login time of user
Registration
Date Backup account’s registration date and time
Last Backup Date and time of the last backup job performed
Suspend At ➢ Trial account – date when the trial account expires
➢ Paid account – suspension date set by the system administrator
➢ Backup Sets
This page shows a list of missed scheduled backup and backup sets that have not been backed
up for 14 days or more.
Events Type of backup set issue
Users Name of the backup user
Backup Set Name of the backup set
Creation Date Date and time when the backup set was created
Last Backup Job Number of day when a backup job was last performed
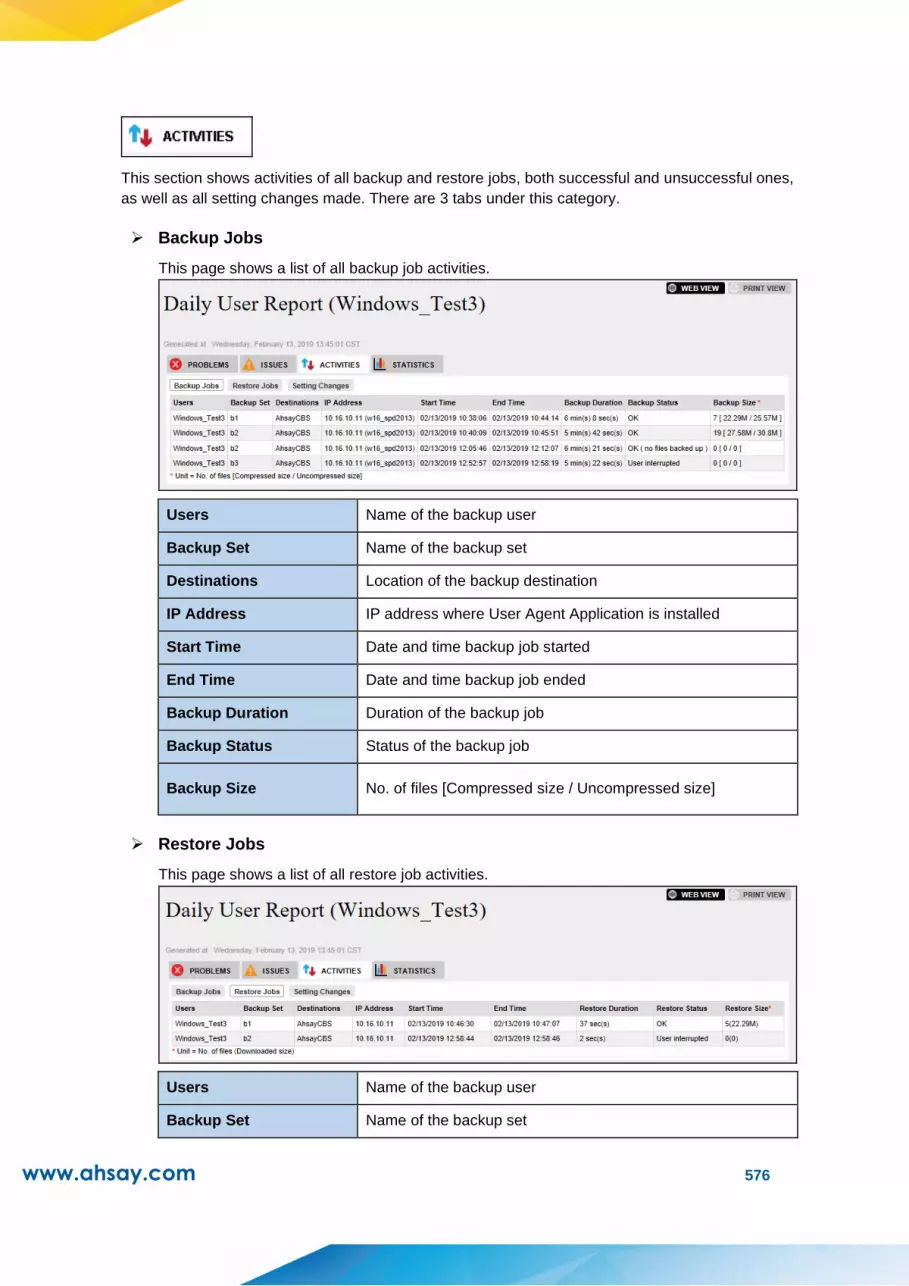
www.ahsay.com 576
This section shows activities of all backup and restore jobs, both successful and unsuccessful ones,
as well as all setting changes made. There are 3 tabs under this category.
➢ Backup Jobs
This page shows a list of all backup job activities.
Users Name of the backup user
Backup Set Name of the backup set
Destinations Location of the backup destination
IP Address IP address where User Agent Application is installed
Start Time Date and time backup job started
End Time Date and time backup job ended
Backup Duration Duration of the backup job
Backup Status Status of the backup job
Backup Size No. of files [Compressed size / Uncompressed size]
➢ Restore Jobs
This page shows a list of all restore job activities.
Users Name of the backup user
Backup Set Name of the backup set

www.ahsay.com 577
Destinations Location of the restore destination
IP Address IP address where User Agent Application is installed
Start Time Date and time restore job started
End Time Date and time restore job ended
Restore Duration Duration of the restore job
Restore Status Status of the restore job
Restore Size Number of files restored (Downloaded size)
➢ Setting Changes
This page shows a list of the settings changed by backup users.
Users Name of the backup user
Field The field that has been changed
Old Value Old Value before the change
New Value New Value after the change
Time of Changes Date and time change was made
IP Address IP Address of the machine which initiated the changes
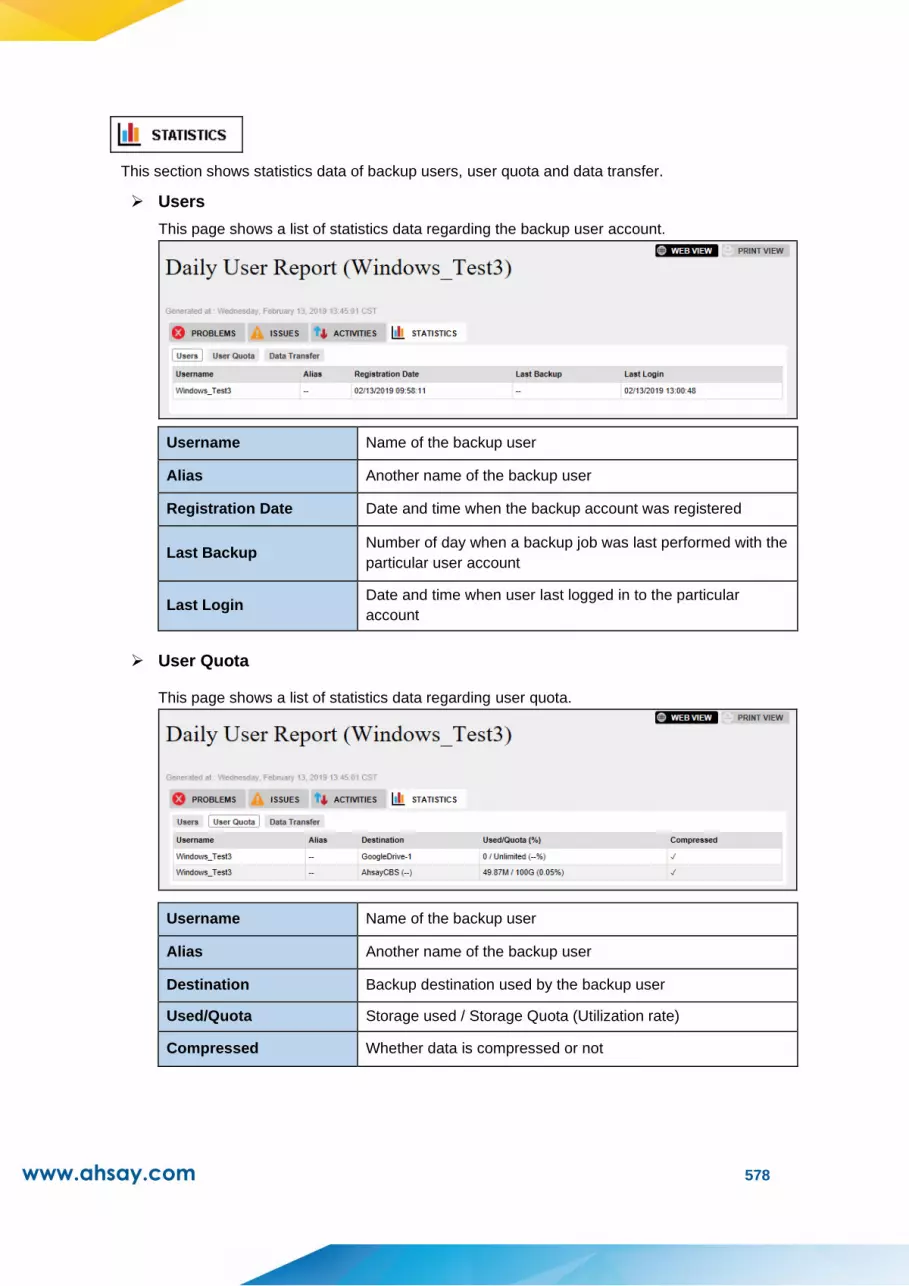
www.ahsay.com 578
This section shows statistics data of backup users, user quota and data transfer.
➢ Users
This page shows a list of statistics data regarding the backup user account.
Username Name of the backup user
Alias Another name of the backup user
Registration Date Date and time when the backup account was registered
Last Backup Number of day when a backup job was last performed with the
particular user account
Last Login Date and time when user last logged in to the particular
account
➢ User Quota
This page shows a list of statistics data regarding user quota.
Username Name of the backup user
Alias Another name of the backup user
Destination Backup destination used by the backup user
Used/Quota Storage used / Storage Quota (Utilization rate)
Compressed Whether data is compressed or not
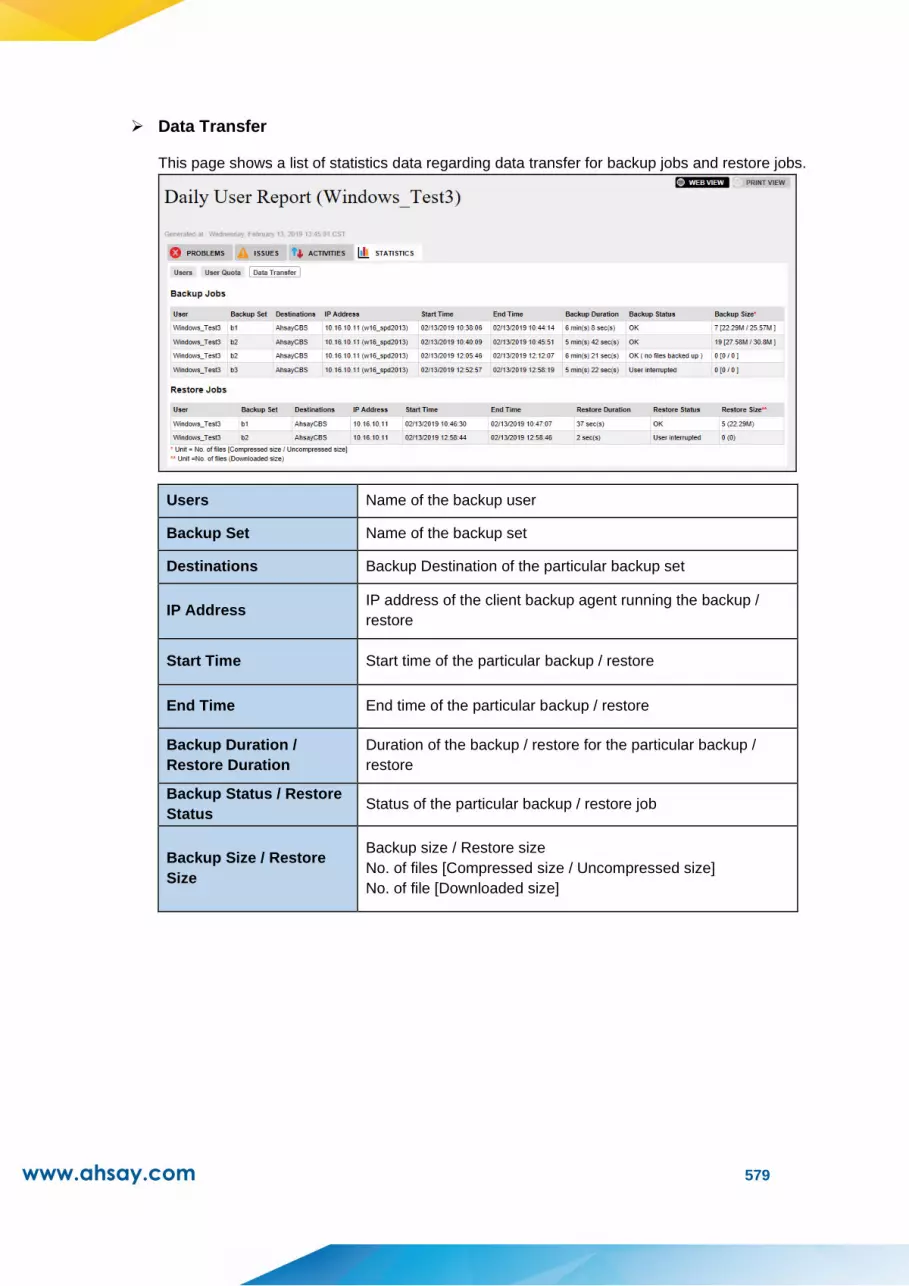
www.ahsay.com 579
➢ Data Transfer
This page shows a list of statistics data regarding data transfer for backup jobs and restore jobs.
Users Name of the backup user
Backup Set Name of the backup set
Destinations Backup Destination of the particular backup set
IP Address IP address of the client backup agent running the backup /
restore
Start Time Start time of the particular backup / restore
End Time End time of the particular backup / restore
Backup Duration /
Restore Duration
Duration of the backup / restore for the particular backup /
restore
Backup Status / Restore
Status Status of the particular backup / restore job
Backup Size / Restore
Size
Backup size / Restore size
No. of files [Compressed size / Uncompressed size]
No. of file [Downloaded size]

www.ahsay.com 580
Daily Report Viewing Option
There are two viewing options for the daily report, namely the WEB VIEW and PRINT VIEW, which
can be altered by click the corresponding icon at the top right corner.
The WEB VIEW is an interactive style report where data is presented under different categories while
user navigates through the report.
The PRINT VIEW is a one-page report listing all the data from the different categories from the WEB
VIEW report.

www.ahsay.com 581
Appendix I System Files for Continuous Backup Exclusion
Below is a full list of system files you choose to exclude from performing the continuous backup.
➢ C:\Program Files
➢ C:\Windows
➢ Pagefile.sys
➢ hiberfil.sys
➢ *.tmp
➢ *.part
➢ System Volume Information
➢ $Recycle.Bin (Vista, 2008/R2, Win7)
➢ RECYCLER(2000, XP, 2003)
➢ RECYCLED
➢ C:\Documents and Settings\All Users\Application Data\Microsoft, C:\ProgramData\Microsoft
➢ C:\Documents and Settings\All Users\Application Data\Kaspersky Lab
➢ C:\Documents and Settings\All Users\Application Data\Symantec
➢ C:\Documents and Settings\All Users\Application Data\Avg7
➢ C:\Documents and Settings\All Users\Application Data\Avg8
➢ C:\Documents and Settings\All Users\Application Data\McAfee
➢ C:\Documents and Settings\All Users\Application Data\McAfee.com
➢ C:\Documents and Settings\All Users\Application Data\Sophos
➢ ntuser.dat ntuser.dat.log
➢ *\AppData\Local\Microsoft\*
➢ *\AppData\Local\Temp\*
➢ *\AppData\Roaming Data\Microsoft\*
➢ *\Local Settings\Application Data\Microsoft\*
➢ *\Local Settings\Temporary Internet Files
➢ *\Local Settings\Temp
➢ *\Local Settings\History
➢ *\LOCALS~1\Temp
➢ *\LOCALS~1\Tempor~1
➢ *\LOCALS~1\History
➢ ~$*.doc
➢ ~$*.ppt
➢ ~$*.xls
➢ ~$*.dot

www.ahsay.com 582
Appendix J Monitoring Activities Log Filter List
Administration Logs
On the AhsayCBS Web Console, click the following icon to see the list of system logs generated by
system events, v6 migration, and other user activities.
Click the Activities Log tab to display the list of system log.
On the log filter, click the drop-down menu to select a filter type that you would like to display.
The following table shows the filter list and their use.
Filter Type Description
Auto Save Config Error Indicates error(s) encountered in the auto save configuration
settings under Advanced > Auto Save on the AhsayCBS Web

www.ahsay.com 583
Console. For further details, refer to Auto Save Settings.
Auto Save Config Info Displays auto save related activities under Advanced > Auto
Save on the AhsayCBS Web Console. For further details, refer to
Auto Save Settings.
Backup Status Error Indicates error(s) on the backup status. To see the progress of
recent backup(s), go to Live Activities > Backup Status tab on
the AhsayCBS Web Console. For further details, refer to Live
Activities (Monitoring Backup Status).
Backup Status Info Indicates any backup related information.
e.g.
• [ClientAbortException] java.io.EOFException:
Unexpected EOF read on the socket, caused by
[EOFException]
To see the progress of recent backup(s), go to Live Activities > Backup Status tab on the AhsayCBS Web Console. For further details, refer to Live Activities (Monitoring Backup Status).
Dashboard Error Indicates information related to the following error(s) and
warning(s):
• Missed backup(s)
• Failed backup(s)
• System error(s)
• Replication error(s)
• API error(s)
• Email error(s)
Detailed error and warning information can be found under
Dashboard > To Dos tab on the AhsayCBS Web Console. For
further details about dashboard, refer to AhsayCBS Dashboard.
Dashboard Info Provides important information that should be monitored by the
system administrator.
e.g.
• System error(s) or warning(s)
• System health conditions
• Real-time activities of the system
For further details about dashboard, refer to AhsayCBS
Dashboard.
Data Integrity Check Error Indicates any error(s) encountered during Data Integrity Check for
Run on Server (Office 365 and Cloud File) backup initiated on the
AhsayCBS Web Console.
e.g.
• Failed to check integrity of destination
"1570697247058". Error: "[p] "
Data Integrity Check Info Shows the Data Integrity Check process for Run on Server (Office
365 and Cloud File) backup initiated on the AhsayCBS Web
Console.
e.g.
• Start data integrity check on backup set
"BackupSet_Cloud(1573527965483)", "GoogleDrive-
1(-1571107249564)", crc enabled, rebuild index
disabled
• Download valid index files from backup job
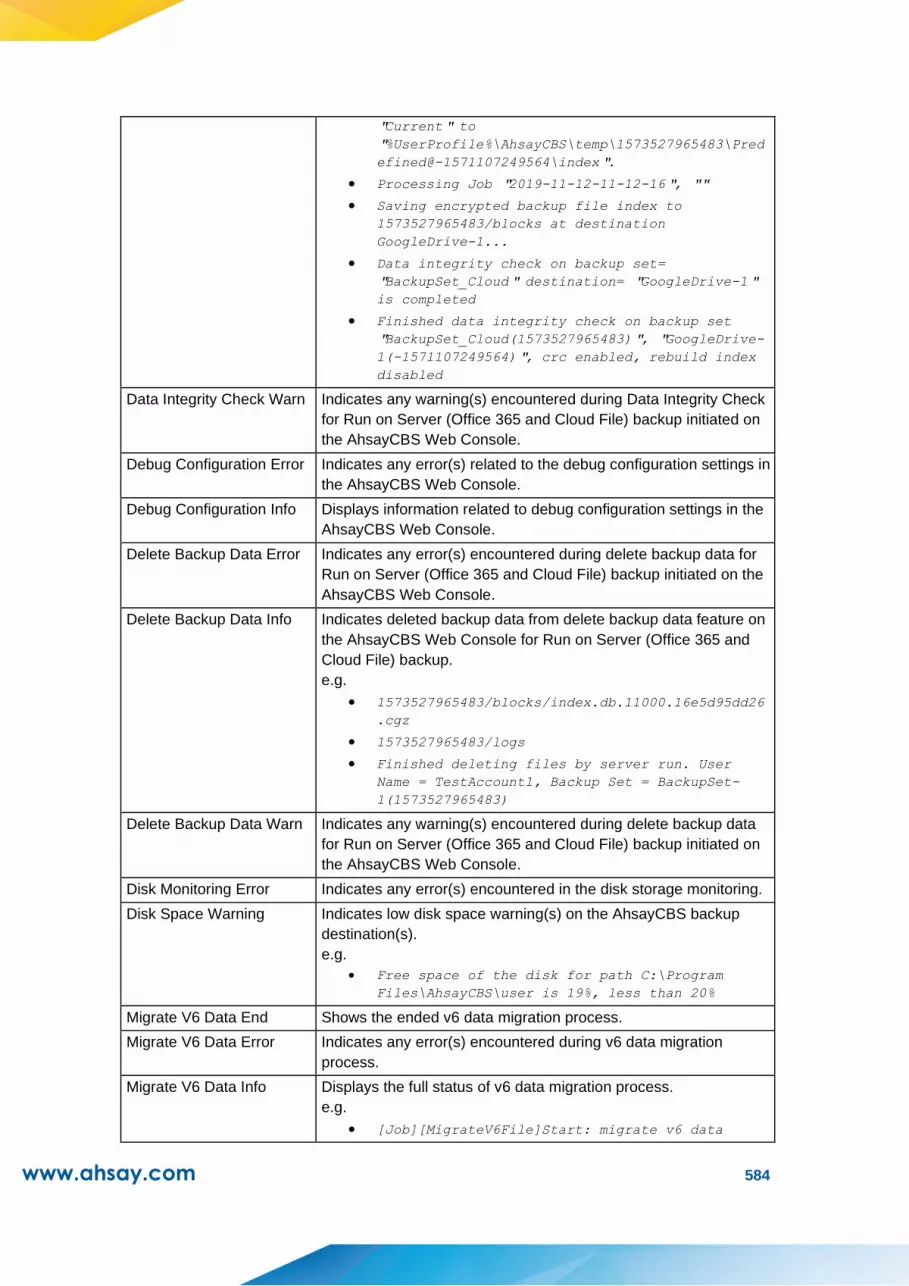
www.ahsay.com 584
"Current" to
"%UserProfile%\AhsayCBS\temp\1573527965483\Pred
efined@-1571107249564\index".
• Processing Job "2019-11-12-11-12-16", ""
• Saving encrypted backup file index to
1573527965483/blocks at destination
GoogleDrive-1...
• Data integrity check on backup set=
"BackupSet_Cloud" destination= "GoogleDrive-1"
is completed
• Finished data integrity check on backup set
"BackupSet_Cloud(1573527965483)", "GoogleDrive-
1(-1571107249564)", crc enabled, rebuild index
disabled
Data Integrity Check Warn Indicates any warning(s) encountered during Data Integrity Check
for Run on Server (Office 365 and Cloud File) backup initiated on
the AhsayCBS Web Console.
Debug Configuration Error Indicates any error(s) related to the debug configuration settings in
the AhsayCBS Web Console.
Debug Configuration Info Displays information related to debug configuration settings in the
AhsayCBS Web Console.
Delete Backup Data Error Indicates any error(s) encountered during delete backup data for
Run on Server (Office 365 and Cloud File) backup initiated on the
AhsayCBS Web Console.
Delete Backup Data Info Indicates deleted backup data from delete backup data feature on
the AhsayCBS Web Console for Run on Server (Office 365 and
Cloud File) backup.
e.g.
• 1573527965483/blocks/index.db.11000.16e5d95dd26
.cgz
• 1573527965483/logs
• Finished deleting files by server run. User
Name = TestAccount1, Backup Set = BackupSet-
1(1573527965483)
Delete Backup Data Warn Indicates any warning(s) encountered during delete backup data
for Run on Server (Office 365 and Cloud File) backup initiated on
the AhsayCBS Web Console.
Disk Monitoring Error Indicates any error(s) encountered in the disk storage monitoring.
Disk Space Warning Indicates low disk space warning(s) on the AhsayCBS backup
destination(s).
e.g.
• Free space of the disk for path C:\Program
Files\AhsayCBS\user is 19%, less than 20%
Migrate V6 Data End Shows the ended v6 data migration process.
Migrate V6 Data Error Indicates any error(s) encountered during v6 data migration
process.
Migrate V6 Data Info Displays the full status of v6 data migration process.
e.g.
• [Job][MigrateV6File]Start: migrate v6 data

www.ahsay.com 585
• [Job][MigrateV6File] End: migrate v6 data.
Migrate V6 Data Start Shows the started v6 data migration process.
Redirection Status Error Indicates error(s) in the redirection job status. To see the list of all
redirection jobs that are currently running, go to Live Activities >
Redirection tab on the AhsayCBS Web Console. For further
details, refer to Live Activities (Monitoring Redirection).
Redirection Status Info Indicates information related to redirection job(s). To see the list of
all redirection jobs that are currently running, go to Live Activities
> Redirection tab on the AhsayCBS Web Console. For further
details, refer to Live Activities (Monitoring Redirection).
Remove Migrated V6 Data
Error
Indicates any error(s) encountered during the process of removing
migrated v6 data.
Remove Migrated V6 Data
Info
Shows the full status of removing migrated v6 data.
e.g.
• [Job][HourlyJob]Start: Remove migrated v6 data
• [Job][HourlyJob] End: Remove migrated v6 data.
Replication Receiver
Status Error
Indicates error(s) in the replication receiving status. To see the
progress of the replication receiving jobs that are currently
running, go to Live Activities > Receiver tab on the AhsayCBS
Web Console. For further details, refer to Live Activities
(Monitoring Replication Receiver).
Replication Receiver
Status Info
Indicates information related to replication receiving job(s). To see
the progress of replication receiving jobs that are currently
running, go to Live Activities > Receiver tab on the AhsayCBS
Web Console. For further details, refer to Live Activities
(Monitoring Replication Receiver).
Replication Sender Status
Error
Indicates error(s) in the replication sending status. To see the
progress of replication sending jobs that are currently running, go
to Live Activities > Replication tab on the AhsayCBS Web
Console.
Replication Sender Status
Info
Indicates information related to replication sending job(s). To see
the progress of replication sending jobs that are currently running,
go to Live Activities > Replication tab on the AhsayCBS Web
Console.
Restore Status Error Indicates error(s) on the restore status. To see the list of restore
jobs that are currently running or finished within 1 hour, go to Live
Activities > Restore Status tab on the AhsayCBS Web Console.
For further details, refer to Live Activities (Monitoring Restore
Status).
Restore Status Info Indicates information related to restore job(s). To see the list of
restore jobs that are currently running or finished within 1 hour, go
to Live Activities > Restore Status tab on the AhsayCBS Web
Console. For further details, refer to Live Activities (Monitoring
Restore Status).
Routine Job Error Indicates error(s) encountered in the start and end of logging
system status.
Routine Job Info Displays the start and end of logging system status.
e.g.
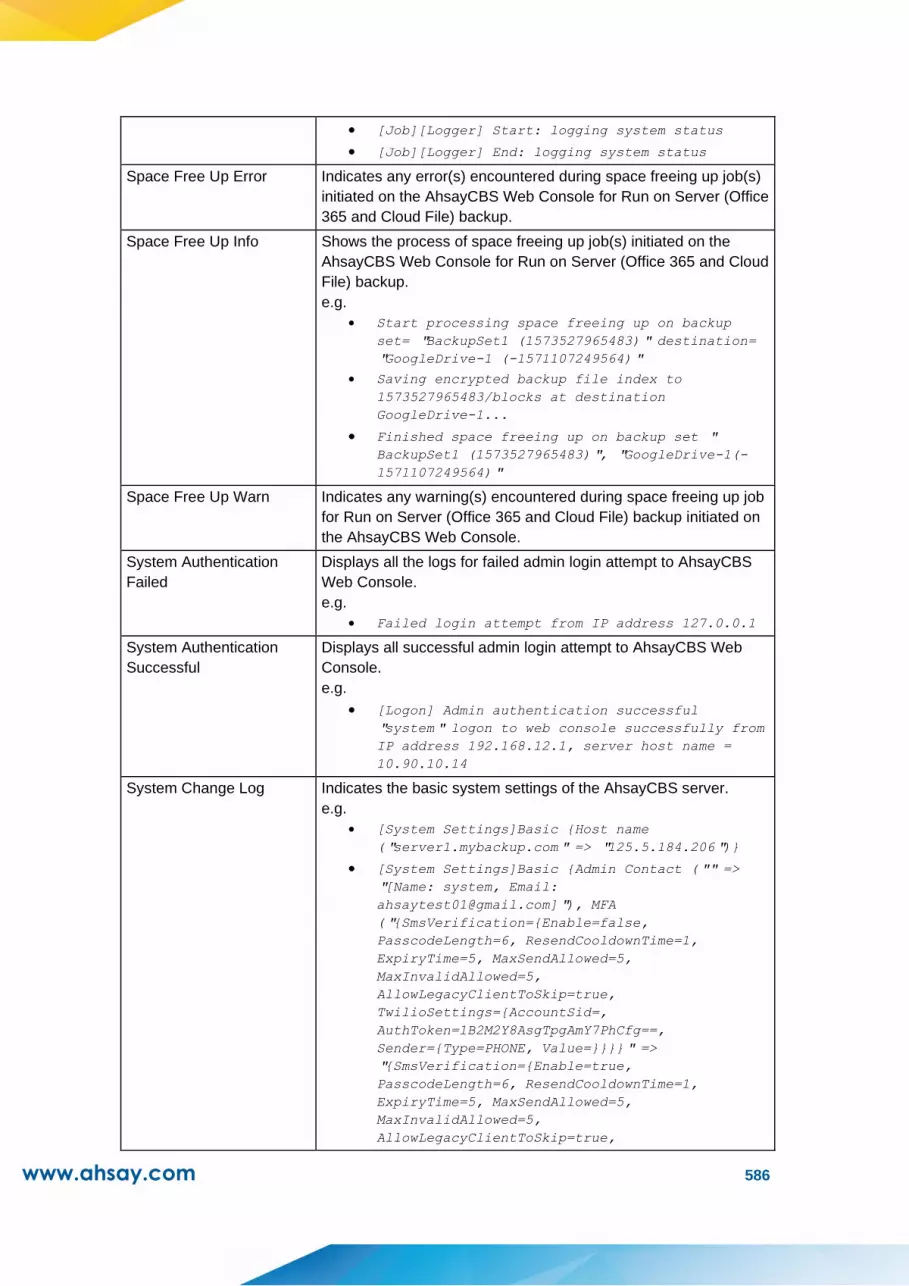
www.ahsay.com 586
• [Job][Logger] Start: logging system status
• [Job][Logger] End: logging system status
Space Free Up Error Indicates any error(s) encountered during space freeing up job(s)
initiated on the AhsayCBS Web Console for Run on Server (Office
365 and Cloud File) backup.
Space Free Up Info Shows the process of space freeing up job(s) initiated on the
AhsayCBS Web Console for Run on Server (Office 365 and Cloud
File) backup.
e.g.
• Start processing space freeing up on backup
set= "BackupSet1 (1573527965483)" destination=
"GoogleDrive-1 (-1571107249564)"
• Saving encrypted backup file index to
1573527965483/blocks at destination
GoogleDrive-1...
• Finished space freeing up on backup set "
BackupSet1 (1573527965483)", "GoogleDrive-1(-
1571107249564)"
Space Free Up Warn Indicates any warning(s) encountered during space freeing up job
for Run on Server (Office 365 and Cloud File) backup initiated on
the AhsayCBS Web Console.
System Authentication
Failed
Displays all the logs for failed admin login attempt to AhsayCBS
Web Console.
e.g.
• Failed login attempt from IP address 127.0.0.1
System Authentication
Successful
Displays all successful admin login attempt to AhsayCBS Web
Console.
e.g.
• [Logon] Admin authentication successful
"system" logon to web console successfully from
IP address 192.168.12.1, server host name =
10.90.10.14
System Change Log Indicates the basic system settings of the AhsayCBS server.
e.g.
• [System Settings]Basic {Host name
("server1.mybackup.com" => "125.5.184.206")}
• [System Settings]Basic {Admin Contact ("" =>
"[Name: system, Email:
[email protected]]"), MFA
("{SmsVerification={Enable=false,
PasscodeLength=6, ResendCooldownTime=1,
ExpiryTime=5, MaxSendAllowed=5,
MaxInvalidAllowed=5,
AllowLegacyClientToSkip=true,
TwilioSettings={AccountSid=,
AuthToken=1B2M2Y8AsgTpgAmY7PhCfg==,
Sender={Type=PHONE, Value=}}}}" =>
"{SmsVerification={Enable=true,
PasscodeLength=6, ResendCooldownTime=1,
ExpiryTime=5, MaxSendAllowed=5,
MaxInvalidAllowed=5,
AllowLegacyClientToSkip=true,

www.ahsay.com 587
TwilioSettings={AccountSid=ACcf6235ffe9c0b66ec7
1230a009c2001b,
AuthToken=eqPH1r/3ZNJJFrSIaxJWUA==,
Sender={Type=PHONE, Value=1-2028997544}}}}")}
System Configuration Error Displays any error(s) encountered in the AhsayCBS system
configuration settings.
e.g.
• [Exception] Failed to delete the connector.
Subadmin: "subadmin1" with hostname:
"mysubadmin.com" is using this connector
"0.0.0.0:80".
System Configuration Info Indicates information related to AhsayCBS system configuration
settings.
System Error Indicates error(s) related to system activities (e.g. failed to export
backup user).
System Status Error Indicates any system status related error(s).
System Status Info Indicates any information on the system status.
User Authentication Failed Displays all the logs for failed user login attempt to AhsayCBS
User Web Console.
e.g.
• [Logon] 'Account_Test1' logon failed.
IP='127.0.0.1'. Reason=User 'AccountTest1' not
found.
User Authentication
Successful
Displays successful user login attempt to AhsayOBM/AhsayACB
client and AhsayCBS User Web Console.
e.g.
For AhsayOBM/AhsayACB client
• [Logon] User authentication successful
"WindowsTestAccount" logon to client software
successfully from IP address 10.16.10.11,
server host name = https://10.16.10.14:443
For AhsayCBS User Web Console
• [Logon] User authentication successful
"TestAccount" logon to web console successfully
from IP address 192.168.12.1, server host name
= 10.90.10.14
To see the list of activities of selected user on the AhsayCBS server, go to the Audit Trails tab.

www.ahsay.com 588
In this page, click the drop-down menu to select a backup account.
After selecting a backup account, click the drop-down menu to select the type of filter that you would
like to display.
The following table shows the filter list and their use.
Filter Type Description
Backup End Displays all ended backup job(s) on the AhsayOBM/AhsayACB client
and AhsayCBS Web Console for Run on Server (Office 365 and Cloud
File) backup.
e.g.
For AhsayOBM/AhsayACB client
• Backup, NewBackup1 -> 2019-11-18-13-41-24, to
AhsayCBS ended with host w2k16R2-std, server host
name = http://10.16.10.14:80
For Run on Server (Office 365 and Cloud File) backup
• Backup, CloudFileBackup -> 2019-11-18-14-31-18, to
GoogleDrive-1 ended with host 172.16.10.14
Backup Error Indicates error(s) encountered during backup job(s) on the
AhsayOBM/AhsayACB client and AhsayCBS Web Console for Run on
Server (Office 365 and Cloud File) backup.

www.ahsay.com 589
e.g.
For AhsayOBM/AhsayACB client
• NewBackup1 -> 2019-11-18-14-46-20: Backup
Interrupted By Quota Exceeded,
http://10.16.10.14:80
For Run on Server (Office 365 and Cloud File) backup
• CloudFileBackup -> 2019-11-20-10-57-28: You have
exceeded your storage quota limit. (39.55M / 2k) ,
null
Backup Info Indicates post-backup information or action(s) initiated by user during
backup.
e.g.
• You have exceeded your storage quota limit. (42.1M
/ 50k)
• User Interrupted
Backup Start Displays all started backup job(s) on the AhsayOBM/AhsayACB client
and AhsayCBS Web Console for Run on Server (Office 365 and Cloud
File) backup.
e.g.
For AhsayOBM/AhsayACB client
• Backup, NewBackup1 -> 2019-11-18-13-41-24, to
AhsayCBS started with host w2k16R2-std, server host
name = http://10.16.10.14:80
For Run on Server (Office 365 and Cloud File) backup
• Backup, CloudFileBackup -> 2019-11-18-14-31-18, to
GoogleDrive-1 started with host
Backup Warn Indicates any warning(s) encountered during backup job(s) on the
AhsayOBM/AhsayACB client and AhsayCBS Web Console for Run on
Server (Office 365 and Cloud File) backup.
File Service Error Indicates error(s) related to backup and/or restore operation(s).
e.g.
• [FileService.checkQuotaExceeded][CloudException.Quo
taExceededExpt] You have exceeded your storage
quota limit. 345k / 2k ( Used / Total Quota )
File Service Info Indicates the following information of the started backup job:
• Backup user
• Backup set ID
• Destination ID
• Job ID (date and time of the started backup)
• Backup client version
e.g.
• [FileService.logInfo] Start to log start backup ,
Username = UserAccount, Backup Set ID =
1574055547862, Destination ID = 1574055674297, Job
ID = 2019-11-18-13-41-24, Minor Version = 3.0.30
Lockout User Indicates backup account(s) with “locked” status on the AhsayCBS
Web Console. Locked backup account(s) can be enabled in Users,
Groups & Policies > Backup User tab > *select user* > User Profile
> General tab > Status.
Profile Service Info Shows logs for updated time zone of the backup set.
e.g.
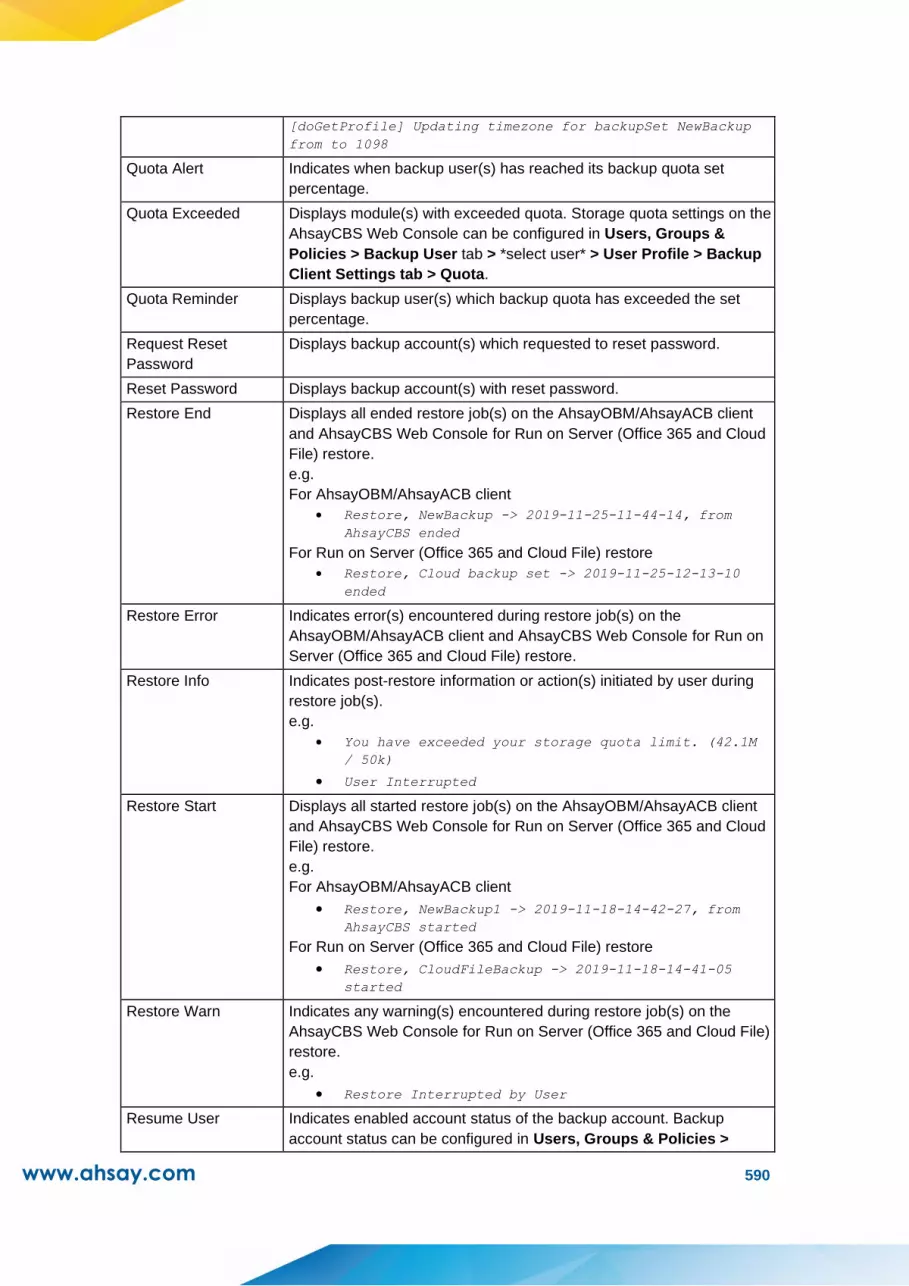
www.ahsay.com 590
[doGetProfile] Updating timezone for backupSet NewBackup
from to 1098
Quota Alert Indicates when backup user(s) has reached its backup quota set
percentage.
Quota Exceeded Displays module(s) with exceeded quota. Storage quota settings on the
AhsayCBS Web Console can be configured in Users, Groups &
Policies > Backup User tab > *select user* > User Profile > Backup
Client Settings tab > Quota.
Quota Reminder Displays backup user(s) which backup quota has exceeded the set
percentage.
Request Reset
Password
Displays backup account(s) which requested to reset password.
Reset Password Displays backup account(s) with reset password.
Restore End Displays all ended restore job(s) on the AhsayOBM/AhsayACB client
and AhsayCBS Web Console for Run on Server (Office 365 and Cloud
File) restore.
e.g.
For AhsayOBM/AhsayACB client
• Restore, NewBackup -> 2019-11-25-11-44-14, from
AhsayCBS ended
For Run on Server (Office 365 and Cloud File) restore
• Restore, Cloud backup set -> 2019-11-25-12-13-10
ended
Restore Error Indicates error(s) encountered during restore job(s) on the
AhsayOBM/AhsayACB client and AhsayCBS Web Console for Run on
Server (Office 365 and Cloud File) restore.
Restore Info Indicates post-restore information or action(s) initiated by user during
restore job(s).
e.g.
• You have exceeded your storage quota limit. (42.1M
/ 50k)
• User Interrupted
Restore Start Displays all started restore job(s) on the AhsayOBM/AhsayACB client
and AhsayCBS Web Console for Run on Server (Office 365 and Cloud
File) restore.
e.g.
For AhsayOBM/AhsayACB client
• Restore, NewBackup1 -> 2019-11-18-14-42-27, from
AhsayCBS started
For Run on Server (Office 365 and Cloud File) restore
• Restore, CloudFileBackup -> 2019-11-18-14-41-05
started
Restore Warn Indicates any warning(s) encountered during restore job(s) on the
AhsayCBS Web Console for Run on Server (Office 365 and Cloud File)
restore.
e.g.
• Restore Interrupted by User
Resume User Indicates enabled account status of the backup account. Backup
account status can be configured in Users, Groups & Policies >
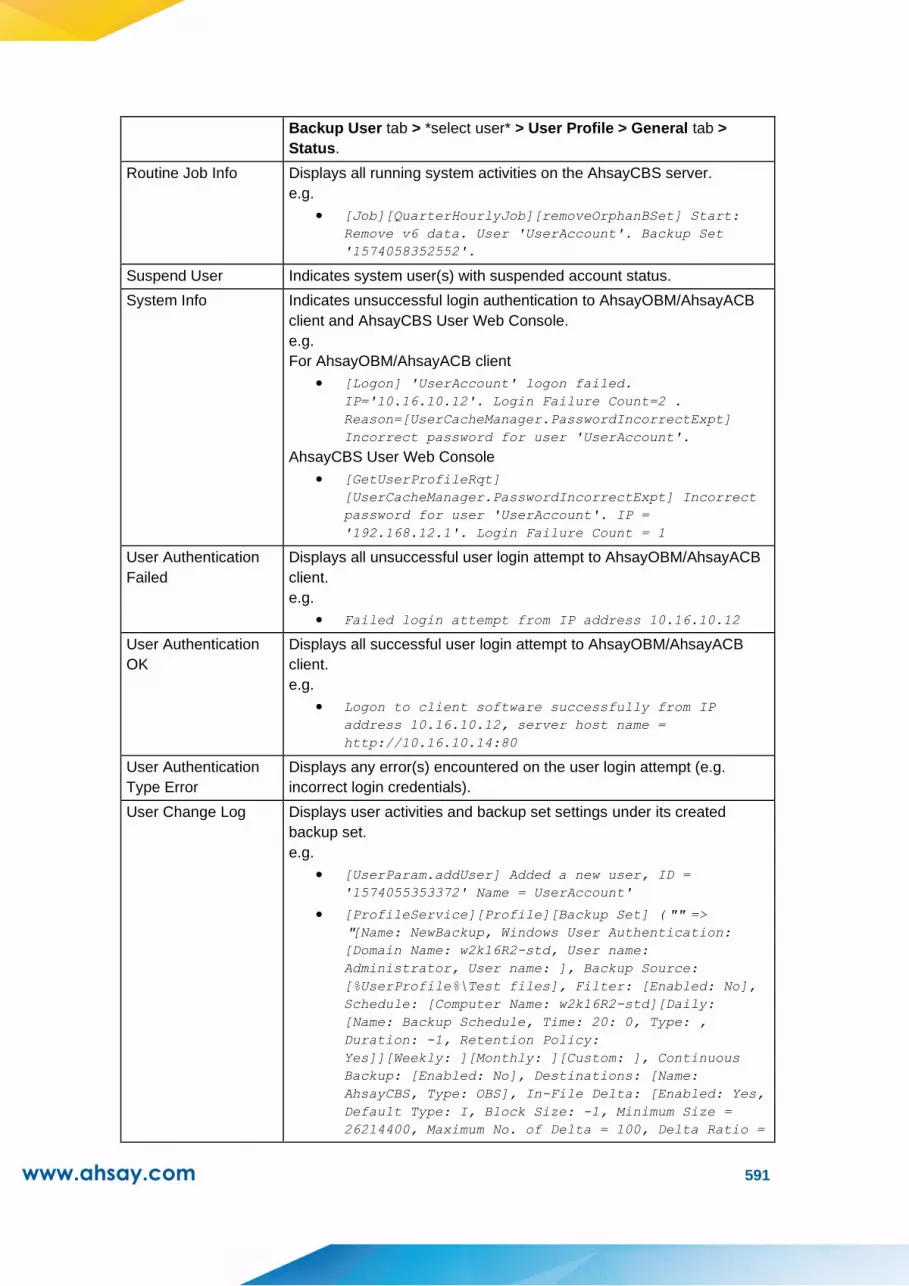
www.ahsay.com 591
Backup User tab > *select user* > User Profile > General tab >
Status.
Routine Job Info Displays all running system activities on the AhsayCBS server.
e.g.
• [Job][QuarterHourlyJob][removeOrphanBSet] Start:
Remove v6 data. User 'UserAccount'. Backup Set
'1574058352552'.
Suspend User Indicates system user(s) with suspended account status.
System Info Indicates unsuccessful login authentication to AhsayOBM/AhsayACB
client and AhsayCBS User Web Console.
e.g.
For AhsayOBM/AhsayACB client
• [Logon] 'UserAccount' logon failed.
IP='10.16.10.12'. Login Failure Count=2 .
Reason=[UserCacheManager.PasswordIncorrectExpt]
Incorrect password for user 'UserAccount'.
AhsayCBS User Web Console
• [GetUserProfileRqt]
[UserCacheManager.PasswordIncorrectExpt] Incorrect
password for user 'UserAccount'. IP =
'192.168.12.1'. Login Failure Count = 1
User Authentication
Failed
Displays all unsuccessful user login attempt to AhsayOBM/AhsayACB
client.
e.g.
• Failed login attempt from IP address 10.16.10.12
User Authentication
OK
Displays all successful user login attempt to AhsayOBM/AhsayACB
client.
e.g.
• Logon to client software successfully from IP
address 10.16.10.12, server host name =
http://10.16.10.14:80
User Authentication
Type Error
Displays any error(s) encountered on the user login attempt (e.g.
incorrect login credentials).
User Change Log Displays user activities and backup set settings under its created
backup set.
e.g.
• [UserParam.addUser] Added a new user, ID =
'1574055353372' Name = UserAccount'
• [ProfileService][Profile][Backup Set] ("" =>
"[Name: NewBackup, Windows User Authentication:
[Domain Name: w2k16R2-std, User name:
Administrator, User name: ], Backup Source:
[%UserProfile%\Test files], Filter: [Enabled: No],
Schedule: [Computer Name: w2k16R2-std][Daily:
[Name: Backup Schedule, Time: 20: 0, Type: ,
Duration: -1, Retention Policy:
Yes]][Weekly: ][Monthly: ][Custom: ], Continuous
Backup: [Enabled: No], Destinations: [Name:
AhsayCBS, Type: OBS], In-File Delta: [Enabled: Yes,
Default Type: I, Block Size: -1, Minimum Size =
26214400, Maximum No. of Delta = 100, Delta Ratio =
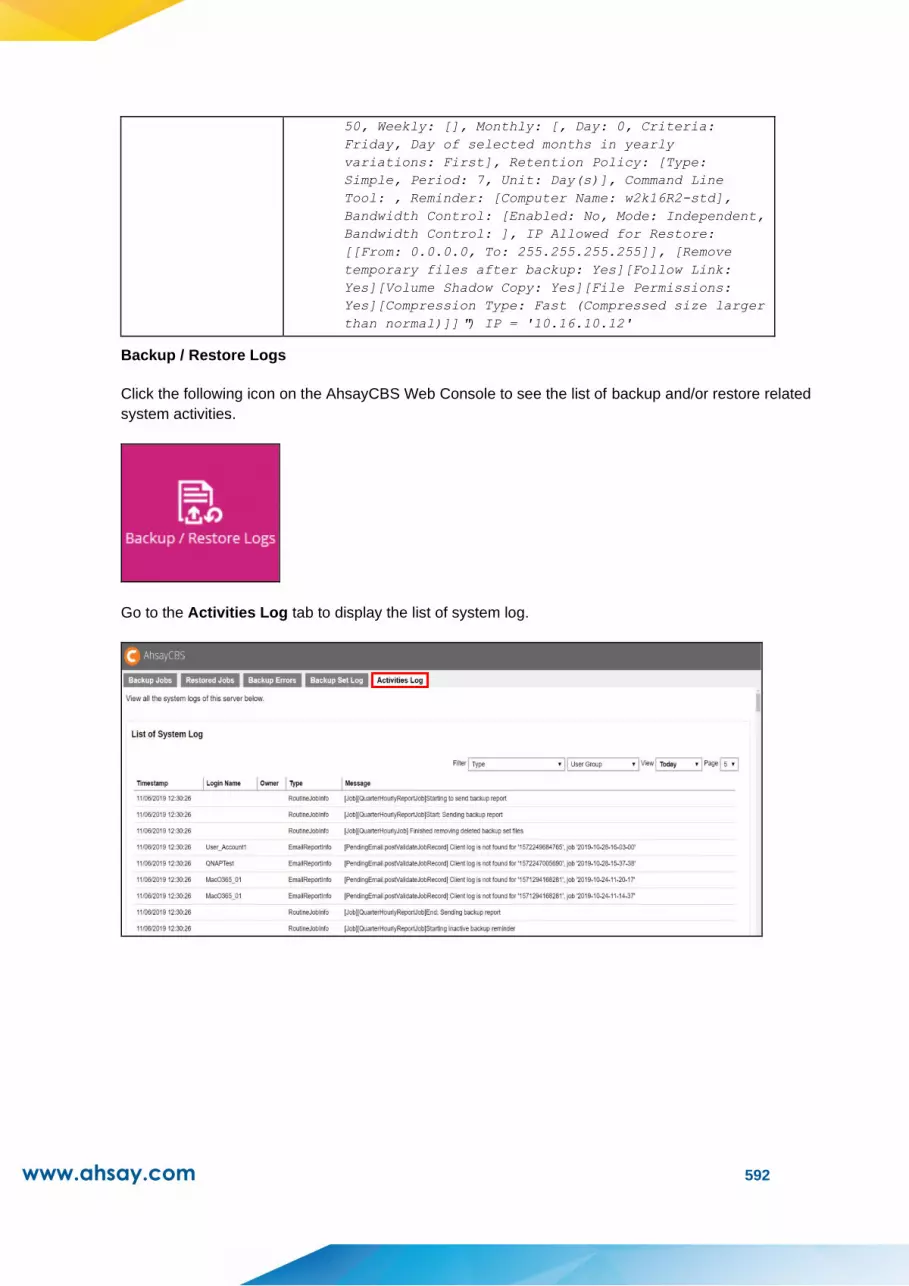
www.ahsay.com 592
50, Weekly: [], Monthly: [, Day: 0, Criteria:
Friday, Day of selected months in yearly
variations: First], Retention Policy: [Type:
Simple, Period: 7, Unit: Day(s)], Command Line
Tool: , Reminder: [Computer Name: w2k16R2-std],
Bandwidth Control: [Enabled: No, Mode: Independent,
Bandwidth Control: ], IP Allowed for Restore:
[[From: 0.0.0.0, To: 255.255.255.255]], [Remove
temporary files after backup: Yes][Follow Link:
Yes][Volume Shadow Copy: Yes][File Permissions:
Yes][Compression Type: Fast (Compressed size larger
than normal)]]") IP = '10.16.10.12'
Backup / Restore Logs
Click the following icon on the AhsayCBS Web Console to see the list of backup and/or restore related
system activities.
Go to the Activities Log tab to display the list of system log.

www.ahsay.com 593
On the user group filter, click the drop-down menu to select a backup account.
On the log filter, click the drop-down menu to select the type of filter that you would like to display.
The following table shows the filter list and their use.
Filter Type Description
API Authentication Failed Displays unsuccessful API login authentication to AhsayCBS
server.
e.g.
• Failed login attempt from IP address
192.168.22.40
API Authentication
Successful
Displays successful API login authentication to AhsayCBS server.
e.g.
• Logon to API from IP address 192.168.22.40
successfully
API Service Error Indicates any API service error(s) encountered on the AhsayCBS
server.
e.g.
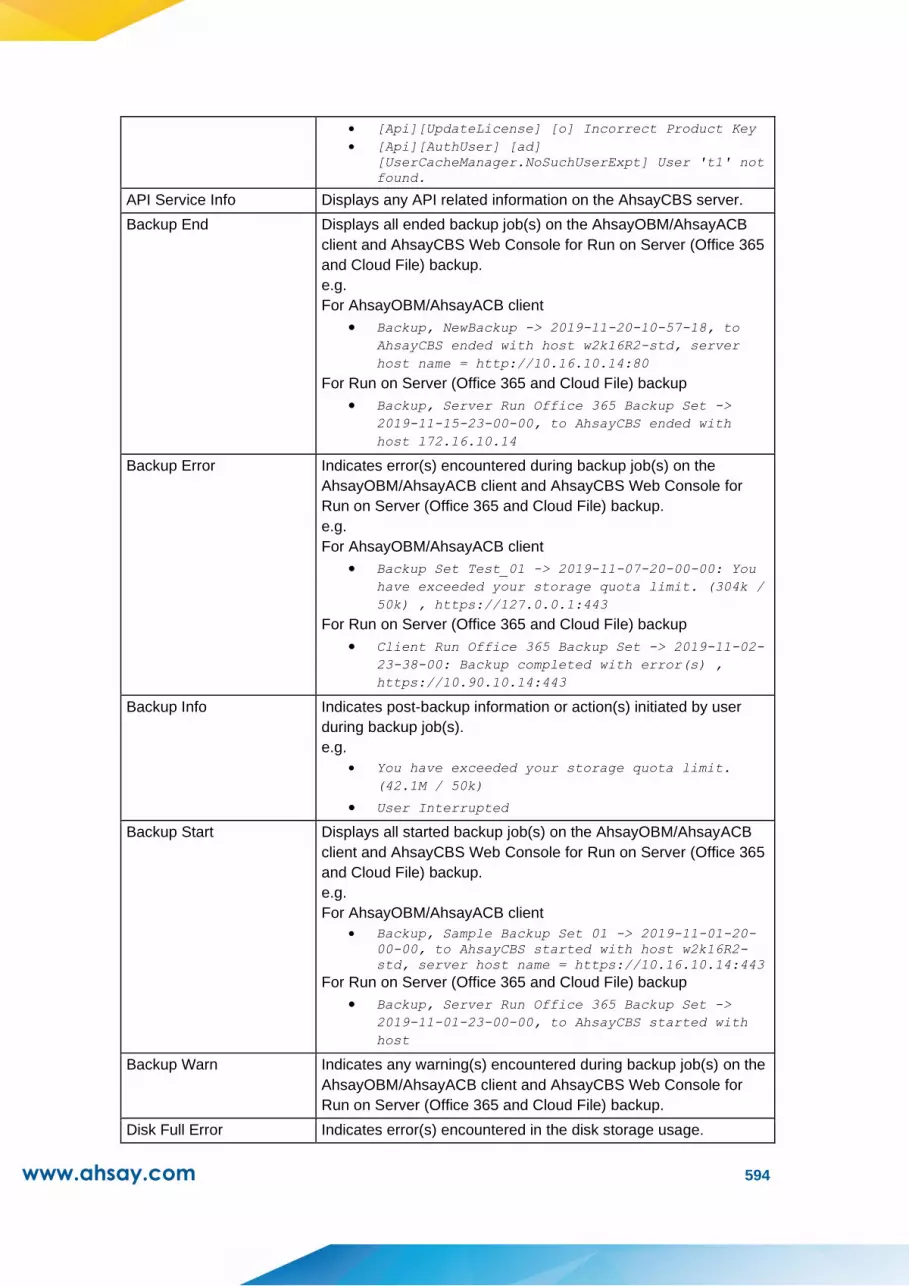
www.ahsay.com 594
• [Api][UpdateLicense] [o] Incorrect Product Key
• [Api][AuthUser] [ad]
[UserCacheManager.NoSuchUserExpt] User 't1' not
found.
API Service Info Displays any API related information on the AhsayCBS server.
Backup End Displays all ended backup job(s) on the AhsayOBM/AhsayACB
client and AhsayCBS Web Console for Run on Server (Office 365
and Cloud File) backup.
e.g.
For AhsayOBM/AhsayACB client
• Backup, NewBackup -> 2019-11-20-10-57-18, to
AhsayCBS ended with host w2k16R2-std, server
host name = http://10.16.10.14:80
For Run on Server (Office 365 and Cloud File) backup
• Backup, Server Run Office 365 Backup Set ->
2019-11-15-23-00-00, to AhsayCBS ended with
host 172.16.10.14
Backup Error Indicates error(s) encountered during backup job(s) on the
AhsayOBM/AhsayACB client and AhsayCBS Web Console for
Run on Server (Office 365 and Cloud File) backup.
e.g.
For AhsayOBM/AhsayACB client
• Backup Set Test_01 -> 2019-11-07-20-00-00: You
have exceeded your storage quota limit. (304k /
50k) , https://127.0.0.1:443
For Run on Server (Office 365 and Cloud File) backup
• Client Run Office 365 Backup Set -> 2019-11-02-
23-38-00: Backup completed with error(s) ,
https://10.90.10.14:443
Backup Info Indicates post-backup information or action(s) initiated by user
during backup job(s).
e.g.
• You have exceeded your storage quota limit.
(42.1M / 50k)
• User Interrupted
Backup Start Displays all started backup job(s) on the AhsayOBM/AhsayACB
client and AhsayCBS Web Console for Run on Server (Office 365
and Cloud File) backup.
e.g.
For AhsayOBM/AhsayACB client
• Backup, Sample Backup Set 01 -> 2019-11-01-20-
00-00, to AhsayCBS started with host w2k16R2-
std, server host name = https://10.16.10.14:443
For Run on Server (Office 365 and Cloud File) backup
• Backup, Server Run Office 365 Backup Set ->
2019-11-01-23-00-00, to AhsayCBS started with
host
Backup Warn Indicates any warning(s) encountered during backup job(s) on the
AhsayOBM/AhsayACB client and AhsayCBS Web Console for
Run on Server (Office 365 and Cloud File) backup.
Disk Full Error Indicates error(s) encountered in the disk storage usage.

www.ahsay.com 595
Email Report Error Indicates failed sending of generated email report to the system
administrator and/or backup user(s).
• [BackupJob.record.list] Unable to list pending
email, error =
[UserCacheManager.NoSuchUserExpt] User
'User_Account1' not found. [ad]
[UserCacheManager.NoSuchUserExpt] User
'User_Account1' not found.
For further details about email settings, refer to Email configuration settings.
Email Report Info Displays email report related information.
e.g.
• [PendingEmail.postValidateJobRecord] Client log
is not found for '1573526959301', job '2019-11-
12-10-52-42'
• [BackupReport.send] Backup report email sent to
[email protected]; Subject: Backup
Report [OK] > qa-w03r2x-0-95-obm > v5-VM95-
mysql55-IC-R4J > Job 2019-12-02-13-00-00; Time
used (milliseconds): 577
• [LicEmailAlert] No SMTP servers configured
• [LowDiskSpaceAlertReport.send] Low disk space
alert email sent to [email protected];
Subject: (80-90%) %UserProfile%\AhsayCBS\system
has reached 85% of its capacity; Time used
(milliseconds): 2435
For further details about email settings, refer to Email configuration settings.
File Service Error Indicates error(s) encountered in the backup client settings.
e.g.
• [FileService.checkQuotaExceeded] [G]
[CloudException.QuotaExceededExpt] You have
exceeded your storage quota limit. 345k / 2k
( Used / Total Quota )
File Service Info Indicates backup account settings and other user activities on the
AhsayCBS server.
e.g.
• [FileService.logInfo] Start to log start
backup , Username = UserAccount, Backup Set ID
= 1574055547862, Destination ID =
1574055674297, Job ID = 2019-11-18-13-41-24,
Minor Version = 3.0.30
• [logEndInfo] :user = UserAccount, BackupSet ID
= 1574058352552, Destination ID = -
1571107249564, sMajorVersion = 8, sMinorVersion
= 3.0.30, Operation = delete
Group Policy Error Indicates any error(s) related to migration of backup accounts or
policy group issue.
Group Policy Info Indicates information related to managing of backup accounts
(e.g. security settings, backup settings).
GUI Configuration Error Indicates error(s) encountered in the GUI configuration settings.
e.g.
• [DbsException.PwdComplexityExpt] Password does
not meet complexity requirements

www.ahsay.com 596
GUI Configuration Info Indicates server connection status of GUI configuration settings.
e.g.
For license server
• [TestLicConn] The license server connection
test is successful.
For backup destination
• [TestDestination] The destination connection
test is successful.
For redirector • [TestRdrConn] The redirector connection test is
successful.
License Error Indicates incorrect or unspecified license key.
e.g.
• [Thread][Job][LicenseExpiryCheck] License
Incorrect - Validation46: Internal Error 1011.
[o] [License.Expt] Unspecified license
exception !
License Info Indicates license key related activities.
e.g.
• Verifying online license, License Name =
'AhsayKorea_NFR04 ', License Key = 'aMoRa-
n82qe-aIB9M-pJVrA-6A'
• Product Key Activation Requesting.
• Product Key Activated.
Lockout User Indicates backup account(s) with “locked” status on the AhsayCBS
Web Console. Locked backup account(s) can be enabled in
Users, Groups & Policies > Backup User tab > *select user* >
User Profile > General tab > Status.
Policy Service Error Indicates any error(s) encountered in the policy service.
Policy Service Info Indicates policy service-related information.
Profile Service Error Indicates “locked/suspended" status of the backup account(s).
e.g.
• [ProfileService.doGetProfile] [ak]
[UserCacheManager.UserLockedExpt] User
'TestAccount1' is locked.
• [ProfileService.doGetProfile] [ai]
[UserCacheManager.SuspendedUserExpt] User
'TestAccount1' is suspended.
Profile Service Info Indicates system activities and/or activities initiated by user on the
AhsayCBS server.
e.g.
• [doGetProfile] Updating timezone for backupSet
BackupSet_1 from to 1098
• [ProfileService.doSendMfaPasscode] Passcode
with prefix 'GFUJ' sent to phone =
+639171234567
Quota Alert Indicates when backup user(s) has reached its backup quota set
percentage.
Quota Exceeded Indicates backup user(s) with exceeded storage quota for
AhsayCBS backup destination(s). Storage quota settings on the
AhsayCBS Web Console can be configured in Users, Groups &
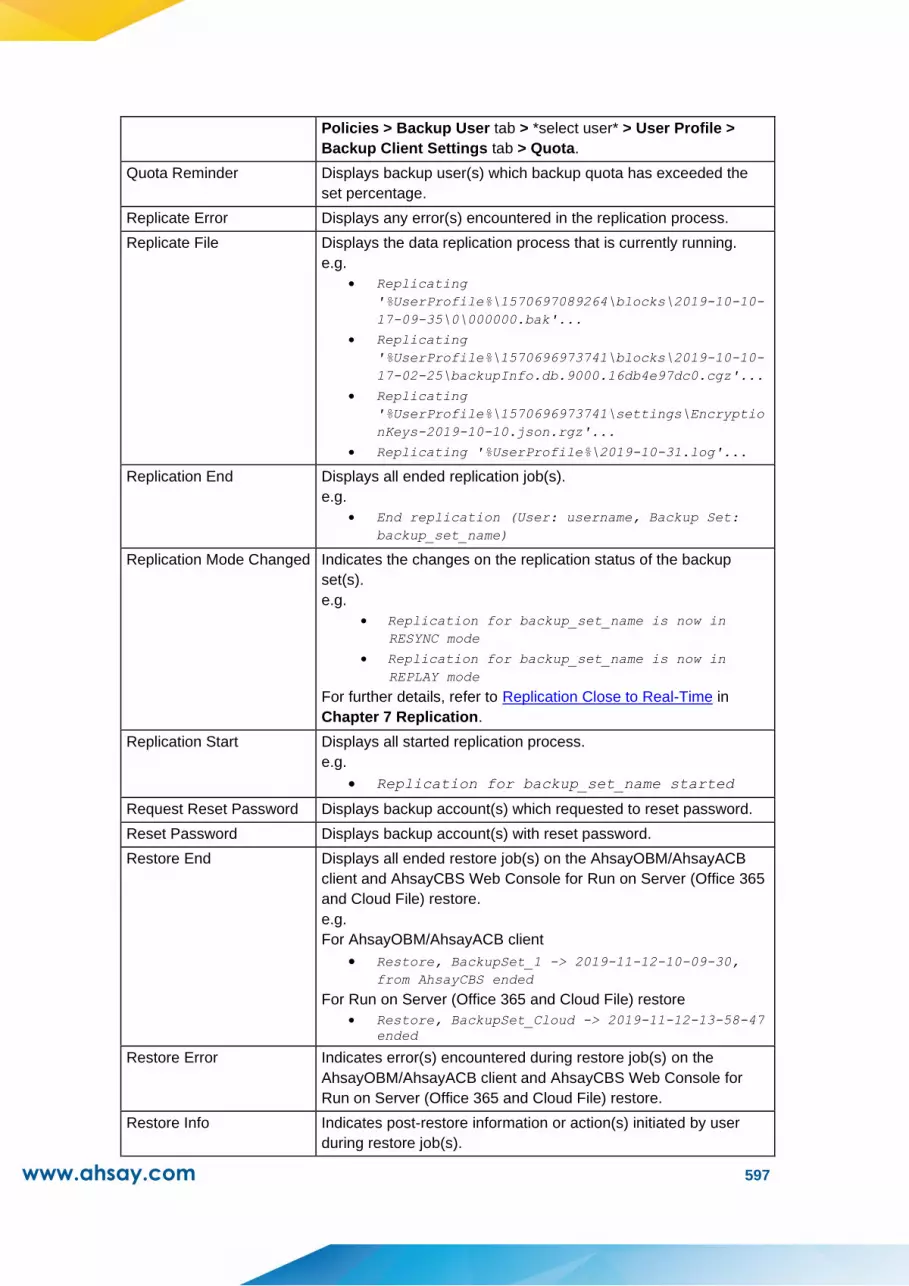
www.ahsay.com 597
Policies > Backup User tab > *select user* > User Profile >
Backup Client Settings tab > Quota.
Quota Reminder Displays backup user(s) which backup quota has exceeded the
set percentage.
Replicate Error Displays any error(s) encountered in the replication process.
Replicate File Displays the data replication process that is currently running.
e.g.
• Replicating
'%UserProfile%\1570697089264\blocks\2019-10-10-
17-09-35\0\000000.bak'...
• Replicating
'%UserProfile%\1570696973741\blocks\2019-10-10-
17-02-25\backupInfo.db.9000.16db4e97dc0.cgz'...
• Replicating
'%UserProfile%\1570696973741\settings\Encryptio
nKeys-2019-10-10.json.rgz'...
• Replicating '%UserProfile%\2019-10-31.log'...
Replication End Displays all ended replication job(s).
e.g.
• End replication (User: username, Backup Set:
backup_set_name)
Replication Mode Changed Indicates the changes on the replication status of the backup
set(s).
e.g.
• Replication for backup_set_name is now in
RESYNC mode
• Replication for backup_set_name is now in
REPLAY mode
For further details, refer to Replication Close to Real-Time in
Chapter 7 Replication.
Replication Start Displays all started replication process.
e.g.
• Replication for backup_set_name started
Request Reset Password Displays backup account(s) which requested to reset password.
Reset Password Displays backup account(s) with reset password.
Restore End Displays all ended restore job(s) on the AhsayOBM/AhsayACB
client and AhsayCBS Web Console for Run on Server (Office 365
and Cloud File) restore.
e.g.
For AhsayOBM/AhsayACB client
• Restore, BackupSet_1 -> 2019-11-12-10-09-30,
from AhsayCBS ended
For Run on Server (Office 365 and Cloud File) restore
• Restore, BackupSet_Cloud -> 2019-11-12-13-58-47
ended
Restore Error Indicates error(s) encountered during restore job(s) on the
AhsayOBM/AhsayACB client and AhsayCBS Web Console for
Run on Server (Office 365 and Cloud File) restore.
Restore Info Indicates post-restore information or action(s) initiated by user
during restore job(s).

www.ahsay.com 598
e.g.
• You have exceeded your storage quota limit.
(42.1M / 50k)
• User Interrupted
Restore Start Displays all started restore job(s) on the AhsayOBM/AhsayACB
client and AhsayCBS Web Console for Run on Server (Office 365
and Cloud File) restore.
Restore Warn Indicates any warning(s) encountered during restore job(s)
initiated on the AhsayCBS Web Console for Run on Server (Office
365 and Cloud File) restore.
e.g.
• Restore Interrupted by User
Resume User Indicates enabled account status of the backup account. Backup
account status can be configured in Users, Groups & Policies >
Backup User tab > *select user* > User Profile > General tab >
Status.
Routine Job Error Indicates any error(s) encountered in the backup and/or restore
job(s).
Routine Job Info Displays all running system activities on the AhsayCBS server for
backup and restore job(s).
e.g.
• [Job][QuarterHourlyReportJob]Start: Sending
backup report
• [Job][QuarterHourlyReportJob]End: Sending
setting change report job
• [Job][QuarterHourlyJob] Finished checking run
backup.
• [Job][ConsolidatedReport] Finished to send
consolidated report.
• [Job][QuarterHourlyJob] Start removing deleted
backup set files
For further details, refer to Appendix G System Job.
Suspend User Indicates system user(s) with suspended account status.
System ChangeLog Displays server configuration settings and other system events
initiated by the system user.
e.g.
• [Server Configuration]RDR {Enabled ("Y" =>
"N"), Host ("125.5.184.206" => ""), Port ("443"
=> ""), Login Name ("system" => ""), Password
("system" => "")}
• [Server Configuration]RDR {Login Name ("system"
=> "apitest"), Password ("system" =>
"abc123$%")}
• [Remove Backup User][Web Console] Removed
backup user "user1" by system user "system"
from IP address "180.232.88.174"
System Error Indicates system related error(s) during backup and/or restore
operation(s).
System Info Displays backup and/or restore related system activities.
e.g.

www.ahsay.com 599
• [TestDestination.checkDuplicatedDestination]
Creating GDrive access info
User Authentication Failed Displays unsuccessful user login attempt to
AhsayOBM/AhsayACB client.
e.g.
• Failed login attempt from IP address
10.16.10.12
User Authentication OK Displays successful user login attempt to AhsayOBM/AhsayACB
client.
e.g.
• Logon to client software successfully from IP
address 10.16.10.12, server host name =
https://10.16.10.14:443
User Authentication Type
Error
Displays any error(s) encountered on the user login attempt (e.g.
incorrect login credentials).
User Change Log Indicates user configuration settings.
• For AhsayOBM/AhsayACB client:
Backup Set Settings
(e.g. Windows User Authentication, Backup Schedule,
Retention Policy)
• For AhsayCBS Web Console
(e.g. Reset password)
V6 Service Error Indicates any error(s) encountered in the v6 service connection.
V6 Service Info Indicates information about v6 service connection.
Replication Logs
Click the following icon on the AhsayCBS Web Console to see the list of replication sending and
receiving logs, and other system activities.
Replication Sending
Click the Replication Sending tab to display the logs for replication sending from the AhsayCBS
server to the corresponding receiver.
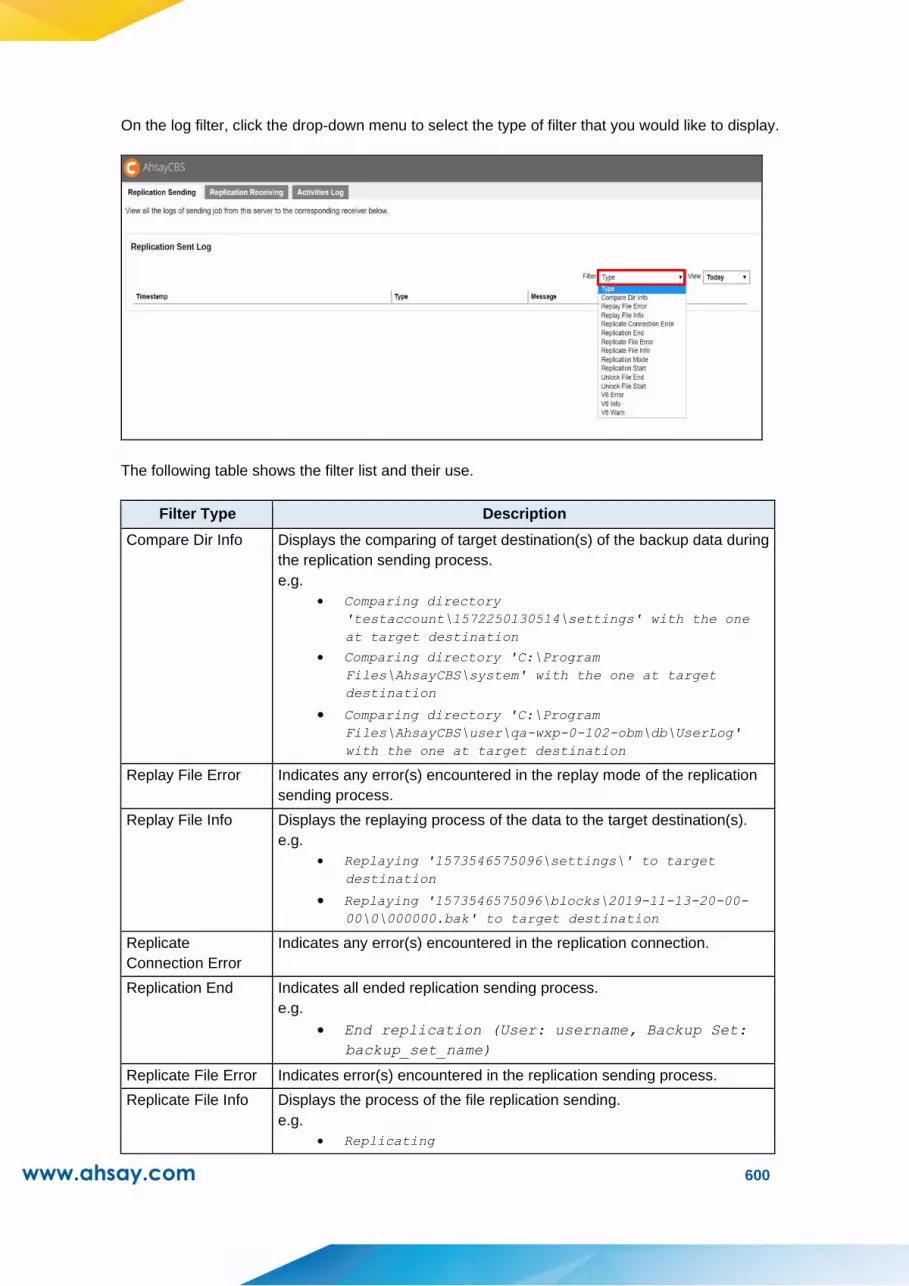
www.ahsay.com 600
On the log filter, click the drop-down menu to select the type of filter that you would like to display.
The following table shows the filter list and their use.
Filter Type Description
Compare Dir Info Displays the comparing of target destination(s) of the backup data during
the replication sending process.
e.g.
• Comparing directory
'testaccount\1572250130514\settings' with the one
at target destination
• Comparing directory 'C:\Program
Files\AhsayCBS\system' with the one at target
destination
• Comparing directory 'C:\Program
Files\AhsayCBS\user\qa-wxp-0-102-obm\db\UserLog'
with the one at target destination
Replay File Error Indicates any error(s) encountered in the replay mode of the replication
sending process.
Replay File Info Displays the replaying process of the data to the target destination(s).
e.g.
• Replaying '1573546575096\settings\' to target
destination
• Replaying '1573546575096\blocks\2019-11-13-20-00-
00\0\000000.bak' to target destination
Replicate
Connection Error
Indicates any error(s) encountered in the replication connection.
Replication End Indicates all ended replication sending process.
e.g.
• End replication (User: username, Backup Set:
backup_set_name)
Replicate File Error Indicates error(s) encountered in the replication sending process.
Replicate File Info Displays the process of the file replication sending.
e.g.
• Replicating

www.ahsay.com 601
'%UserProfile%\user_account\StorageLog\157225324515
2\2019-10.log'...
• Deleting ‘%UserProfile%\user_account\
1572253245152/2019-11.log'...
Replication Mode Shows the process of identifying the replication mode. Replicating
backup data is classified into four (4) modes: Pending, Resync, Replay,
and Sleep.
e.g.
• Start replication in RESYNC mode (User: username,
Backup set: backup_set_name)
• Start replication in REPLAY mode (User: username,
Backup set: backup_set_name)
For further details, refer to Replication Close to Real-Time in Chapter 7
Replication.
Replication Start Displays all the started replication sending process.
e.g.
• Start replication (User: username, Backup Set:
backup_set_name)
Unlock File End Indicates the files locked by the replication process.
Unlock File Start Indicates the unlocked files when there is another valid operation
running (i.e. space free up), which needs to access the files locked by
the replication process.
V6 Error Indicates error(s) encountered in the v6 data during the replication
process.
e.g.
• [SendHandler.connect][Unable to connnect]
[IOException] Reason=[SSLSocketJVM14.getSSLSocket]
Hostname verifying failed. sDNSname='10.16.10.15'
doesn't match any name on the SSL certificate.
Session=[Session-1,
SSL_NULL_WITH_NULL_NULL][IOException]
Reason=[SendHandler.connect][Unable to connnect]
[IOException] Reason=[SSLSocketJVM14.getSSLSocket]
Hostname verifying failed. sDNSname='10.16.10.15'
doesn't match any name on the SSL certificate.
Session=[Session-1, SSL_NULL_WITH_NULL_NULL]
V6 Info Indicates information on the v6 replication sending process.
e.g.
• [Start] Replication
• [MonthlyJob] Resyncing all files again because it
hasn't been run for the past 31 days
• [MonthlyJob] Resyncing all files again
• Sent 0 byte in 190 sec (0 byte/sec)
V6 Warn Indicates any warning(s) encountered in the v6 data during the
replication sending process.
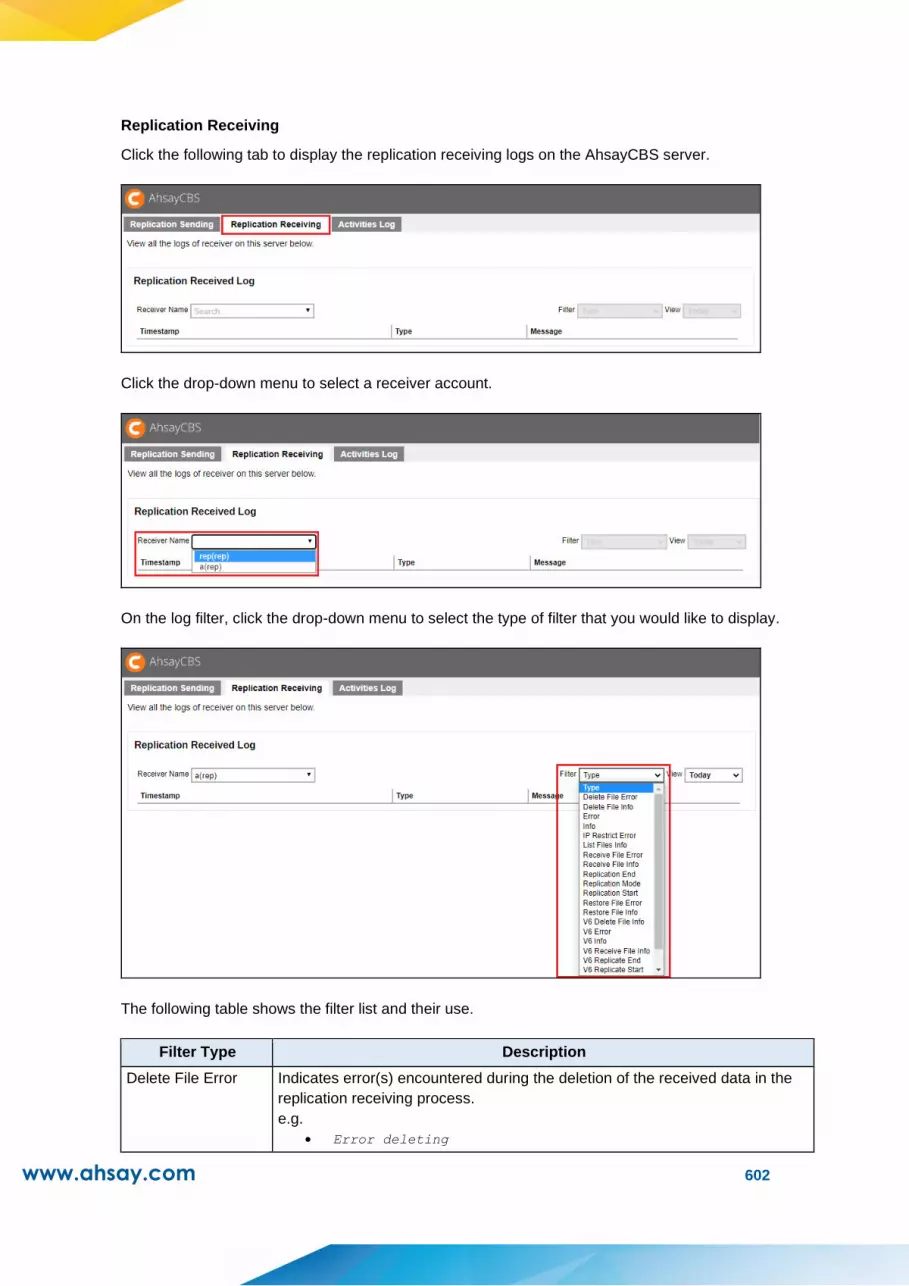
www.ahsay.com 602
Replication Receiving
Click the following tab to display the replication receiving logs on the AhsayCBS server.
Click the drop-down menu to select a receiver account.
On the log filter, click the drop-down menu to select the type of filter that you would like to display.
The following table shows the filter list and their use.
Filter Type Description
Delete File Error Indicates error(s) encountered during the deletion of the received data in the
replication receiving process.
e.g.
• Error deleting

www.ahsay.com 603
‘%UserProfile%\user_account\backup_set_name\backup_set_fo
lder_destination\blocks_folder\0\000000.bak’
Delete File Info Displays the received data that are deleted.
e.g.
• Deleting
‘%UserProfile%\user_account\backup_set_name\backup_set_fo
lder_destination\blocks_folder\0\000000.bak’
Error Indicates any error(s) in the replication receiving process.
Info Indicates any information in the replication receiving process.
IP Restrict Error Indicates any error(s) encountered in the IP restriction to AhsayCBS Web
Console.
List Files Info Shows the listing of the received data from the corresponding backup server.
e.g.
• Listing
‘%UserProfile%\user_account\backup_set_name\backup_set_fo
lder_destination …’
Receive File Error Indicates error(s) encountered in the received data from the corresponding
backup server.
Receive File Info Displays information of the received data (i.e. file path, file size, date and time
of the received data) from the corresponding backup server.
e.g.
• Received
‘%UserProfile%\user_account\backup_set_name\backup_set_fo
lder_destination\blocks_folder\0\000000.bak’ (22.53M,
2019-11-12 15:00)
Replication End Indicates all ended replication receiving process.
e.g.
• End replication (User: username, Backup Set:
backup_set_name)
Replication Mode Displays the full status of the replication mode.
e.g.
• Replication is now in RESYNC mode
• Replication is now in REPLAY mode
For more details about replication modes, refer to How does Replication work?
Replication Start Displays the logs for the started replication receiving process.
e.g.
• [Start] Replication
Restore File Error Indicates any error(s) encountered in the restore file during the replication
receiving process.
Restore File Info Indicates restore file related information in the replication receiving process.
V6 Delete File Info Indicates information about the received v6 data which has been deleted.
V6 Error Indicates error(s) encountered in the replication receiving process.
e.g.
• [2019/11/14 14:38:06][RequestHandler.run] There is not
enough space on the disk
V6 Info Indicates software version of the corresponding v6 backup server and the size
of the received data.
e.g.
• Sender OBS Version: 6.29.0.0

www.ahsay.com 604
• Received 1.72G byte in 153 sec (11.55M byte/sec)
V6 Receive File Info Displays the process of receiving data from the corresponding v6 backup
server.
e.g.
• Receiving '%UserProfile%\user\test-OLD.zip'...
V6 Replicate End Indicates the ended v6 replication receiving process.
V6 Replicate Start Indicates the started v6 replication receiving process.
V6 Warn Indicates any warning(s) encountered in the v6 replication receiving process.
Warn Indicates any warning(s) encountered in the replication process.
Activities Log
Go to the Activities Log to view all the replication related activities on the AhsayCBS server.
On the log filter, click the drop-down menu to select the type of filter that you would like to display.
The following table shows the filter list and their use.
Filter Type Description
API Error Indicates any API related error(s) encountered in the replication process.
e.g.
• UpdateReceiversThrowable='[Error] Parameter Alias is
null/empty!'

www.ahsay.com 605
API Info Indicates API related activities in the replication process.
e.g.
• Removed receiver ‘AhsayCBS_receiver_name’
GUI Configuration Error Indicates any error(s) encountered in the GUI configuration settings.
GUI Configuration Info Indicates information about the GUI configuration settings.
IP Restriction Info Indicates information about the IP restriction to AhsayCBS Web Console.
For further details, refer to Restricting access to system page by IP
address.
IP Restriction Error Indicates any error(s) encountered in the IP restriction to AhsayCBS Web
Console.
Restore Point Error Indicates any restore point related error(s) in the retention settings for the
replicated data.
Restore Point Info Indicates information about the set restore point in the retention settings for
the replicated data.
Retention Policy Error Indicates retention policy related error(s).
Retention Policy Info Shows the process of the retention policy for replicated data.
e.g.
• Cleaning retention area for
‘%UserProfile%\AhsayCBS\user’
• [Job][DailyJob] Finished removing retained files.
System Change Log Indicates replication related activities initiated by system administrator.
e.g.
• Created new receiver 't1'
System Error Indicates system activities error(s) related to the replication process.
System Info Indicates system activities information related to the replication process.
Traffic Limit Error Indicates error(s) related to the configuration of traffic limit for the
replication process.
Traffic Limit Info Indicates the amount of bandwidth used by replication when the traffic limit
setting in Sending Data > Set traffic limit on the AhsayCBS Web Console
is enabled. For further details about traffic limit, refer to Traffic Limit
Configuration.
V6 CRC Checking Error Displays any error(s) encountered in the v6 CRC checking during the
replication process.
V6 CRC Checking Info Displays information about the v6 CRC checking during the replication
process.
V6 Service Error Indicates any error(s) encountered in the v6 service connection during the
replication process.
V6 Service Info Indicates information about v6 service connection in the replication
process.
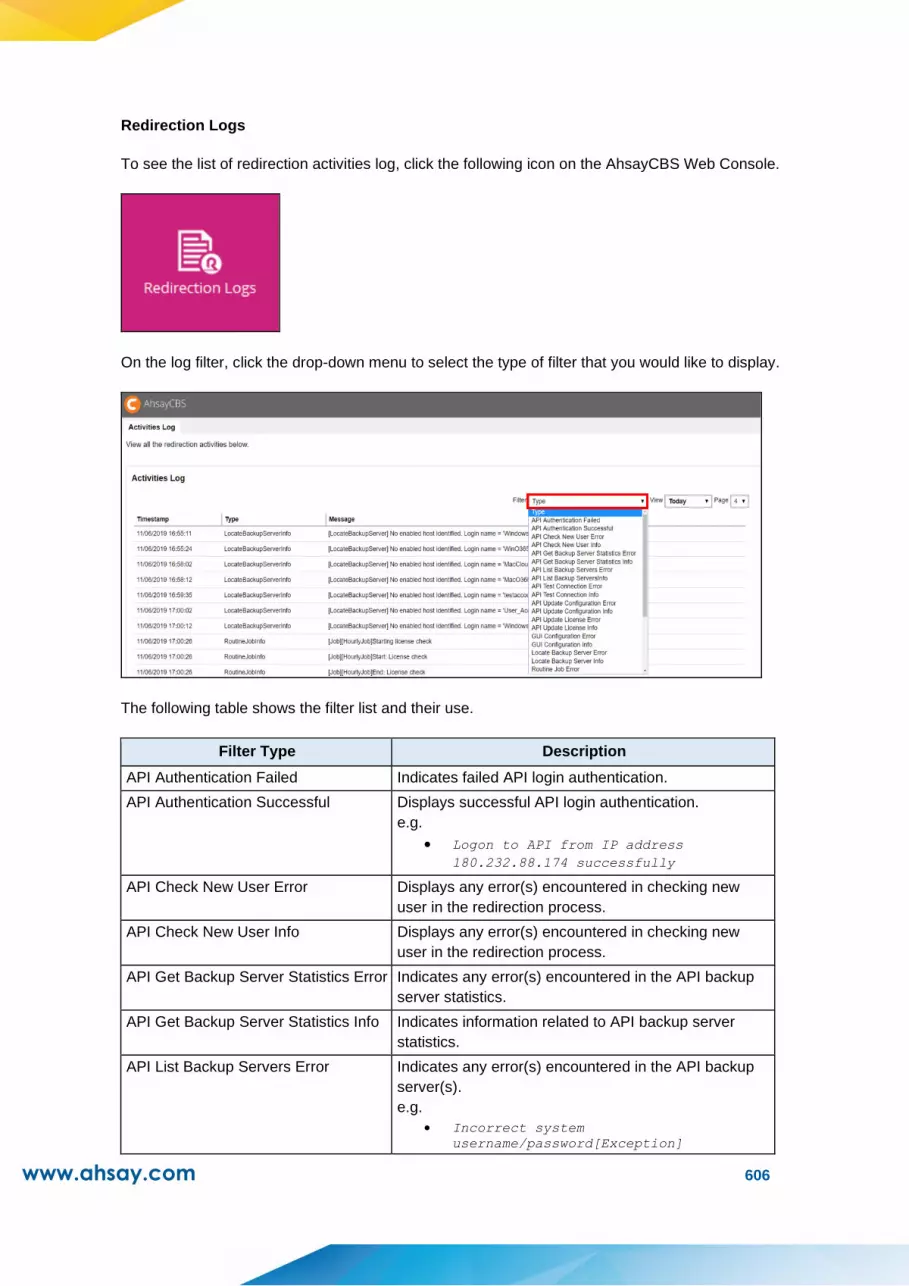
www.ahsay.com 606
Redirection Logs
To see the list of redirection activities log, click the following icon on the AhsayCBS Web Console.
On the log filter, click the drop-down menu to select the type of filter that you would like to display.
The following table shows the filter list and their use.
Filter Type Description
API Authentication Failed Indicates failed API login authentication.
API Authentication Successful Displays successful API login authentication.
e.g.
• Logon to API from IP address
180.232.88.174 successfully
API Check New User Error Displays any error(s) encountered in checking new
user in the redirection process.
API Check New User Info Displays any error(s) encountered in checking new
user in the redirection process.
API Get Backup Server Statistics Error Indicates any error(s) encountered in the API backup
server statistics.
API Get Backup Server Statistics Info Indicates information related to API backup server
statistics.
API List Backup Servers Error Indicates any error(s) encountered in the API backup
server(s).
e.g.
• Incorrect system
username/password[Exception]
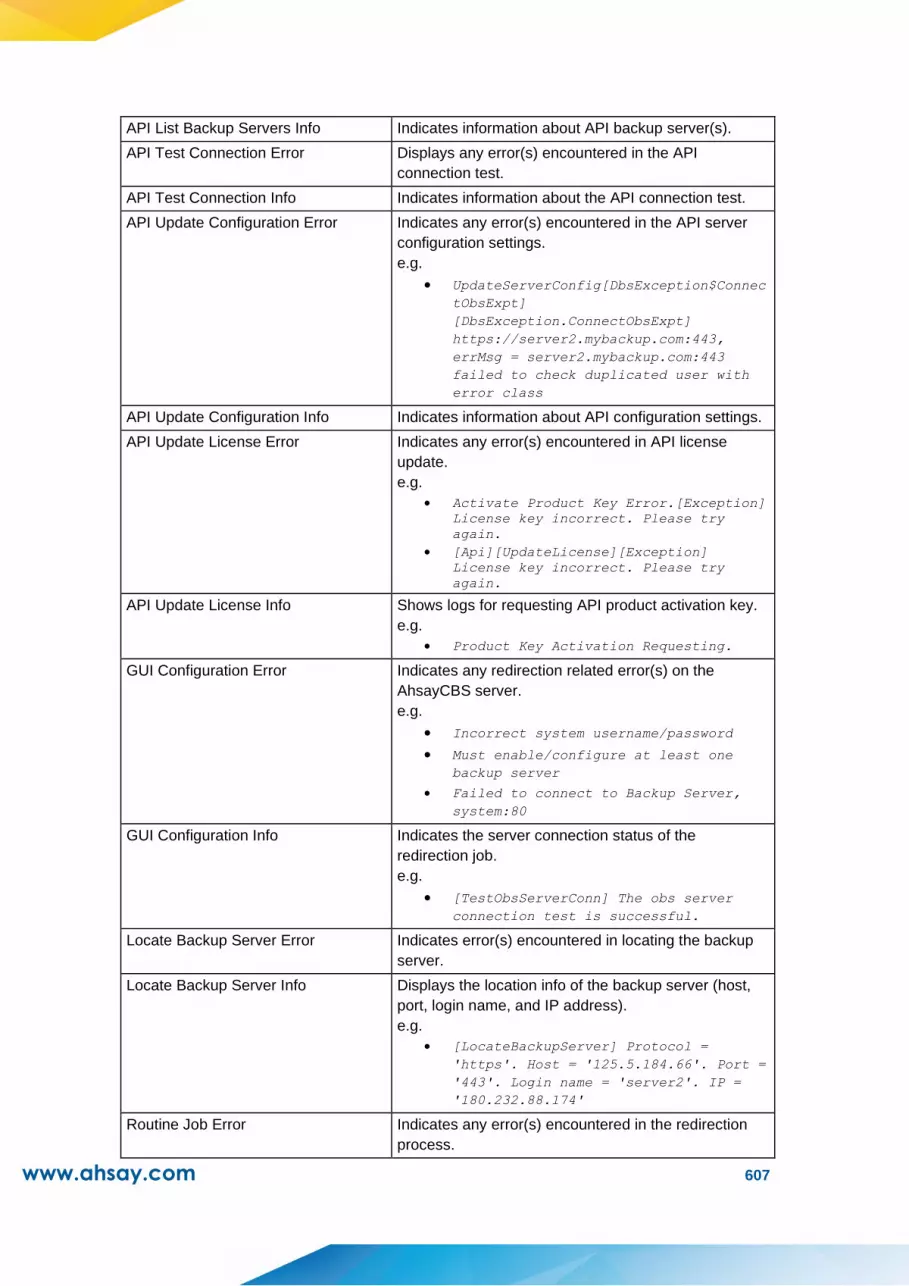
www.ahsay.com 607
API List Backup Servers Info Indicates information about API backup server(s).
API Test Connection Error Displays any error(s) encountered in the API
connection test.
API Test Connection Info Indicates information about the API connection test.
API Update Configuration Error Indicates any error(s) encountered in the API server
configuration settings.
e.g.
• UpdateServerConfig[DbsException$Connec
tObsExpt]
[DbsException.ConnectObsExpt]
https://server2.mybackup.com:443,
errMsg = server2.mybackup.com:443
failed to check duplicated user with
error class
API Update Configuration Info Indicates information about API configuration settings.
API Update License Error Indicates any error(s) encountered in API license
update.
e.g.
• Activate Product Key Error.[Exception]
License key incorrect. Please try
again.
• [Api][UpdateLicense][Exception]
License key incorrect. Please try
again.
API Update License Info Shows logs for requesting API product activation key.
e.g.
• Product Key Activation Requesting.
GUI Configuration Error Indicates any redirection related error(s) on the
AhsayCBS server.
e.g.
• Incorrect system username/password
• Must enable/configure at least one
backup server
• Failed to connect to Backup Server,
system:80
GUI Configuration Info Indicates the server connection status of the
redirection job.
e.g.
• [TestObsServerConn] The obs server
connection test is successful.
Locate Backup Server Error Indicates error(s) encountered in locating the backup
server.
Locate Backup Server Info Displays the location info of the backup server (host,
port, login name, and IP address).
e.g.
• [LocateBackupServer] Protocol =
'https'. Host = '125.5.184.66'. Port =
'443'. Login name = 'server2'. IP =
'180.232.88.174'
Routine Job Error Indicates any error(s) encountered in the redirection
process.

www.ahsay.com 608
Routine Job Info Displays all the license check process for redirection
job(s).
e.g.
• [Job][HourlyJob]Start: License check
• [Job][HourlyJob]End: License check
• [Job][DailyLicenseUpdate]Starting
daily license update
Server Service Error Indicates any error(s) encountered in the AhsayCBS
server service connection.
Server Service Info Indicates information related to AhsayCBS server
service connection.
System Change Log Shows all server configuration settings.
e.g.
• Server Configuration {Backup Server
("" => "[Host: 125.5.184.66, Login
name: system, Password:
VLUwclQO7rj46TQ+cfKBdg==]")}
System Error Indicates error(s) related to redirection process.
e.g.
• [LicenseCheck.checkMultipleRDR][Except
ion] No Authentication from
Server.Throwable='No Authentication
from Server.'
System Info Displays all redirection related system activities on the
AhsayCBS.
e.g.
• [RedirectionStatusCache.removeObsolete
Record] Removing the following user
from redirector cache [apiAuthFailed]
due to inactivity for 30 minutes.
• Instance check starting.
• Instance checking ending.
V6 Locate OBSR Error Indicates any error(s) encountered in the location of
the OBSR server.
V6 Locate OBSR Info Indicates the location information of the OBSR server.
e.g.
• [obc.LocateObsr] Protocol = 'https'.
Host = '10.3.0.101'. Port = '443'.
Login name = 'qa-w03r2x-0-95-obm'. IP
= '10.6.0.12'.
V6 OBC Error Indicates any error(s) encountered in the OBC server
connection (e.g. connection timeout).
V6 OBC Info Indicates information about the OBC server.
NOTE
Some events might take a bit of time (i.e. may take a few minutes) to appear on the AhsayCBS Web
Console system logs.
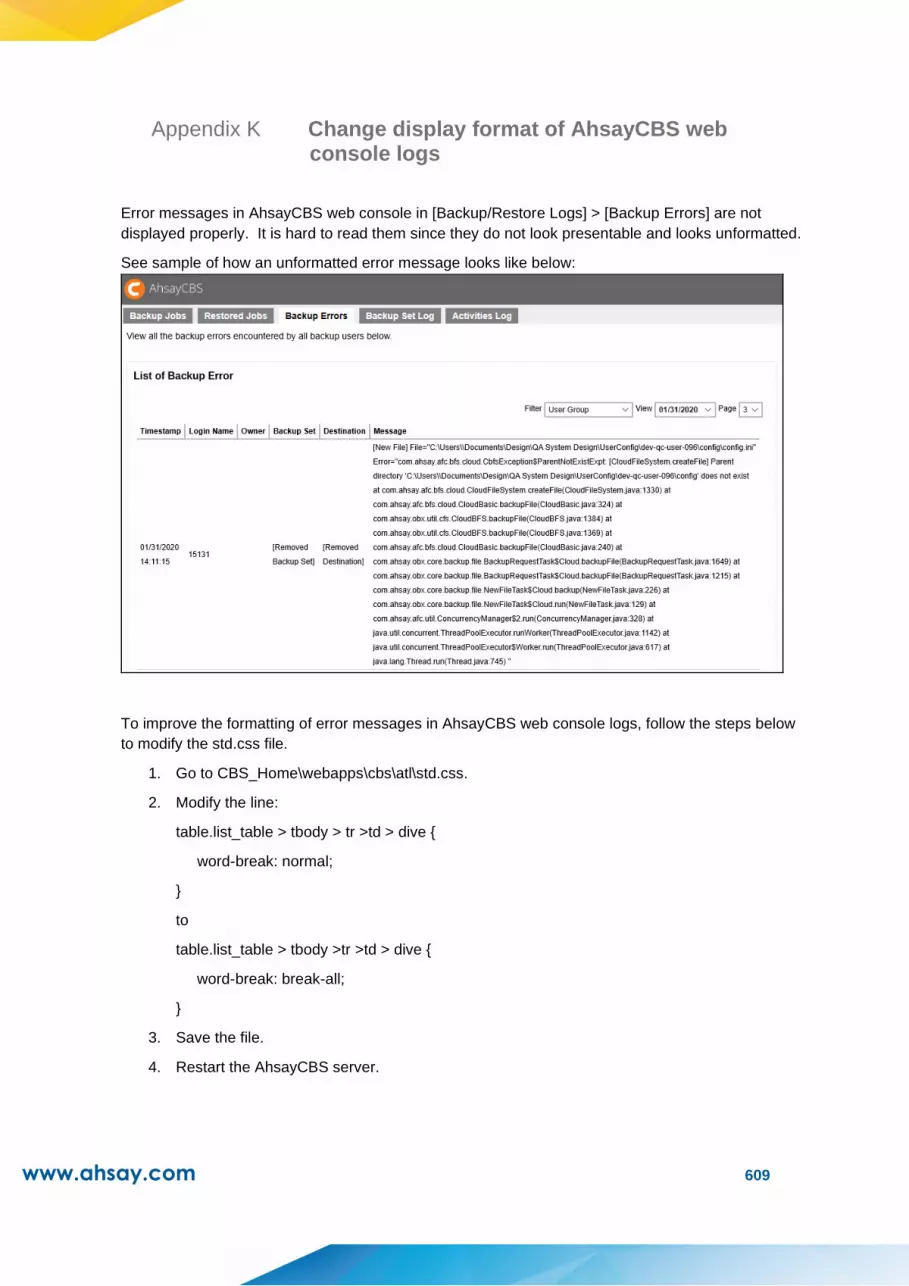
www.ahsay.com 609
Appendix K Change display format of AhsayCBS web console logs
Error messages in AhsayCBS web console in [Backup/Restore Logs] > [Backup Errors] are not
displayed properly. It is hard to read them since they do not look presentable and looks unformatted.
See sample of how an unformatted error message looks like below:
To improve the formatting of error messages in AhsayCBS web console logs, follow the steps below
to modify the std.css file.
1. Go to CBS_Home\webapps\cbs\atl\std.css.
2. Modify the line:
table.list_table > tbody > tr >td > dive {
word-break: normal;
}
to
table.list_table > tbody >tr >td > dive {
word-break: break-all;
}
3. Save the file.
4. Restart the AhsayCBS server.

www.ahsay.com 610
Backup Error logs will look like this once formatting is applied:
For Branded AhsayCBS, aside from modifying the std.css file, follow the instructions below:
1. Login to AhsayCBS.
2. Go to [System Settings] > [Basic] > [Administrative Access] > system user.
3. Select [Rebrand Web Console] > [User Interface] and upload the branded cbs.css file.
4. Click on Save.
5. Re-enter the page and go to [Build Installers] to build the installer.
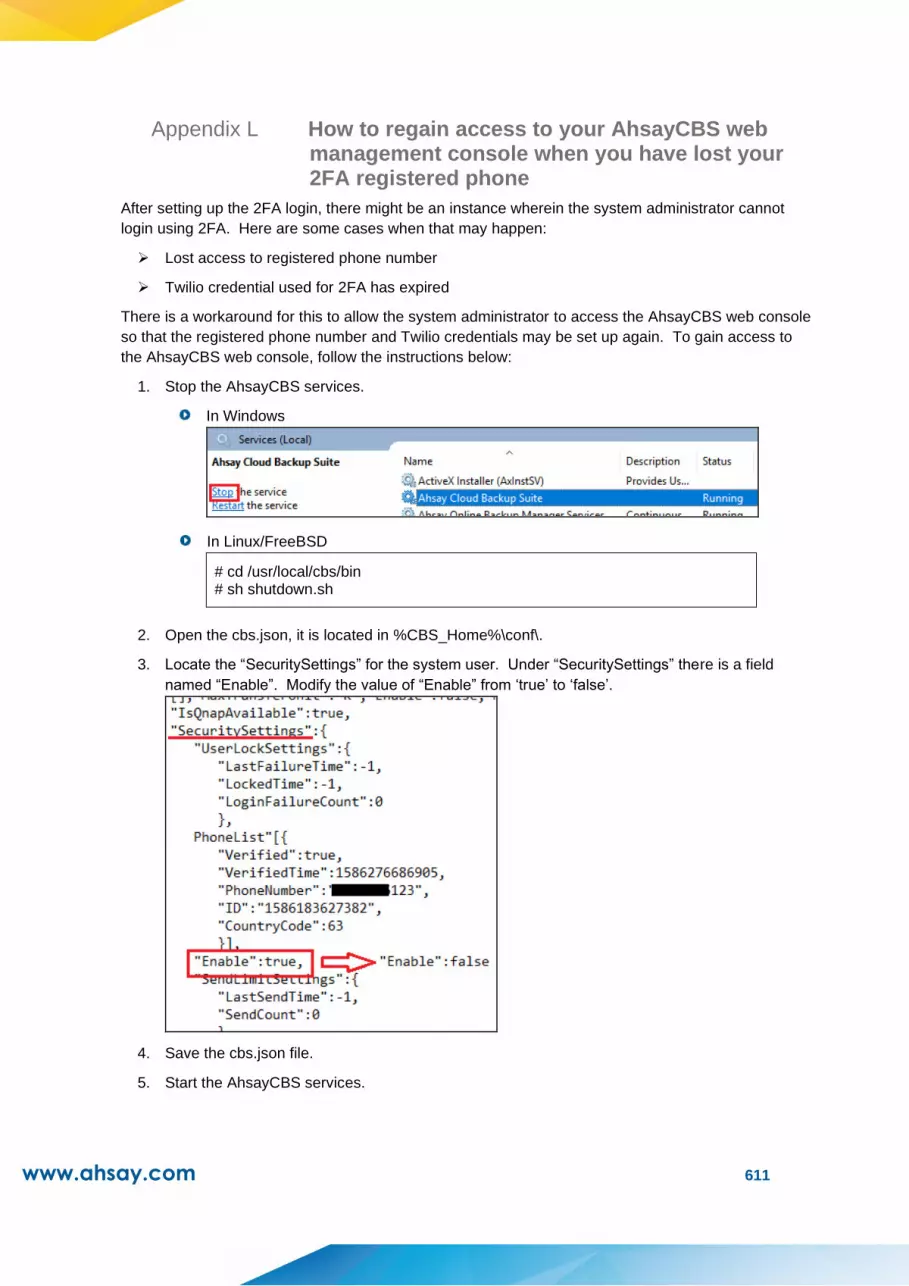
www.ahsay.com 611
Appendix L How to regain access to your AhsayCBS web management console when you have lost your 2FA registered phone
After setting up the 2FA login, there might be an instance wherein the system administrator cannot
login using 2FA. Here are some cases when that may happen:
➢ Lost access to registered phone number
➢ Twilio credential used for 2FA has expired
There is a workaround for this to allow the system administrator to access the AhsayCBS web console
so that the registered phone number and Twilio credentials may be set up again. To gain access to
the AhsayCBS web console, follow the instructions below:
1. Stop the AhsayCBS services.
In Windows
In Linux/FreeBSD
# cd /usr/local/cbs/bin # sh shutdown.sh
2. Open the cbs.json, it is located in %CBS_Home%\conf\.
3. Locate the “SecuritySettings” for the system user. Under “SecuritySettings” there is a field
named “Enable”. Modify the value of “Enable” from ‘true’ to ‘false’.
4. Save the cbs.json file.
5. Start the AhsayCBS services.

www.ahsay.com 612
In Windows
In Linux/FreeBSD
# cd /usr/local/cbs/bin # sh startup.sh
6. Login to AhsayCBS web console, the system administrator should be able to login using the
username and password only, 2FA will not be required.
7. System administrator may now setup the registered phone number and Twilio credentials.
To set up registered phone number
i. Go to System Settings > Basic > Administrative Access > %System_User_Name%
> Authentication. By default Security Settings is off, switch it on by sliding the lever
to the right.
ii. Click on the button. Select the Country Code and enter your phone number
then click .
iii. Click in the succeeding window then to save the registered phone number.
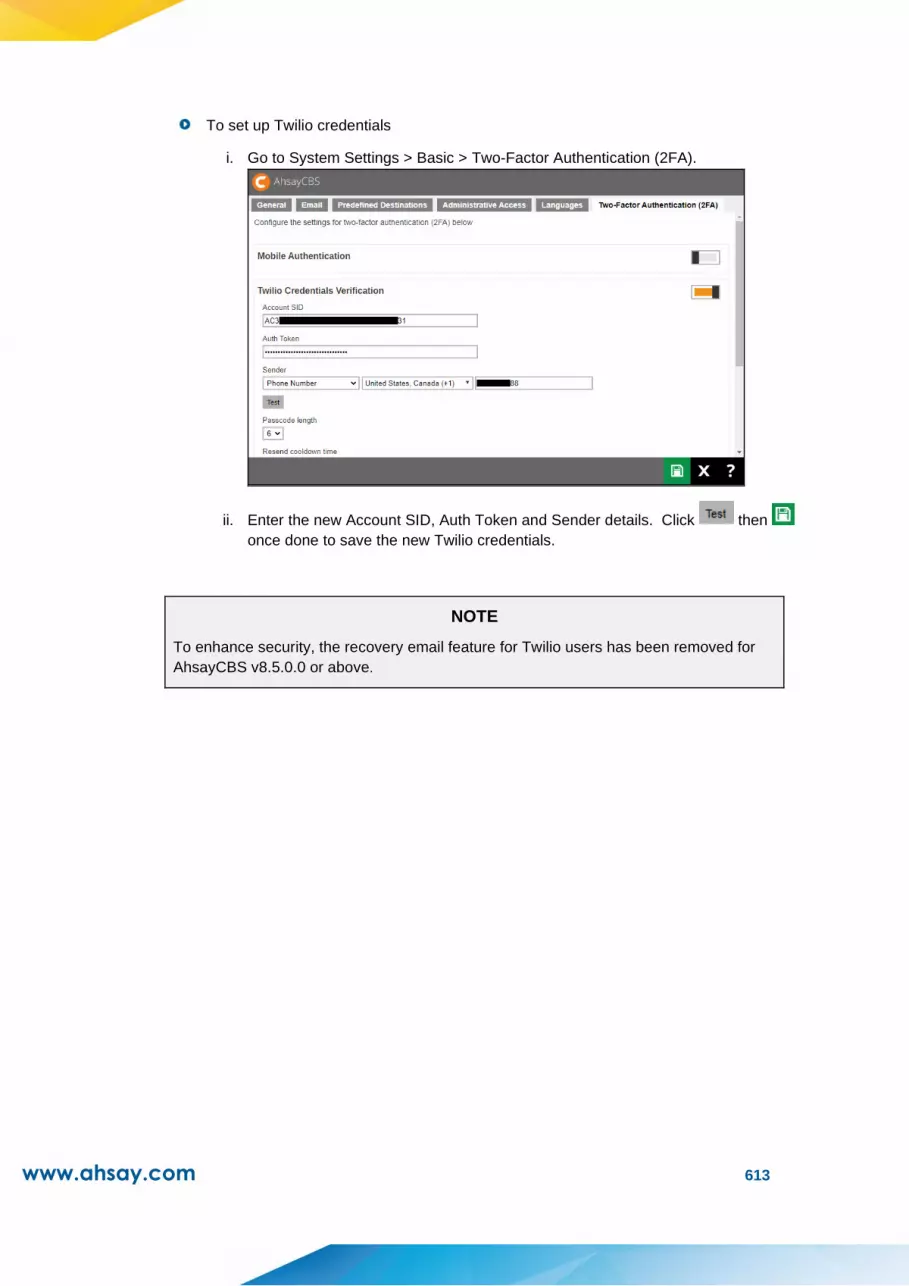
www.ahsay.com 613
To set up Twilio credentials
i. Go to System Settings > Basic > Two-Factor Authentication (2FA).
ii. Enter the new Account SID, Auth Token and Sender details. Click then
once done to save the new Twilio credentials.
NOTE
To enhance security, the recovery email feature for Twilio users has been removed for
AhsayCBS v8.5.0.0 or above.

www.ahsay.com 614
Appendix M How to migrate AWS S3 Compatible Cloud Storage destination to Wasabi Hot Cloud Storage
Before AhsayCBS v8.3.0.30 was released, you may have created a backup set using AWS S3
Compatible Cloud Storage as destination that connects Wasabi Hot Cloud Storage to save backup
sets. After AhsayCBS v8.3.0.30 has been released, you may now change AWS S3 Compatible Cloud
Storage to backup directly to your Wasabi Hot Cloud Storage. To do this follow the steps below:
1. Take note of the destination ID of the existing AWS S3 Compatible Cloud StoragerPredefined
destination that is connecting to Wasabi. To get the destination ID go to System Settings >
Basic > Predefined Destination > %Predefined_Destination_Name%, it is located at the end of
the address bar.
2. In AhsayCBS create a new Wasabi Hot Cloud Storage predefined destination. Also take note
of the destination ID.
i. To create the Wasabi Hot Cloud Storage predefined destination go to System
Settings > Basic > Predefined Destination and click the button.
ii. Provide the following information:
➢ Name – name of the predefined destination
➢ Type – type of destination, whether single storage destination or destination pool, for this select Singel storage destination
➢ Destination Storage – the name of destination storage, in this case select Wasabi
➢ Access Key ID – the access key ID of your Wasabi account
➢ Access Key Secret – the secret access key of your Wasabi account
➢ Region – the region of your bucket in Wasabi
➢ Bucket Name – the name of your bucket in Wasabi, this is optional, if no name is provided a bucket name will be created by AhsayCBS
➢ Connect with SSL – only check this box if you use SSL to connect to the internet

www.ahsay.com 615
iii. Click the button then in the pop up message that will appear. Click the
button to add the predefined destination.

www.ahsay.com 616
iv. Click to save the predefined destination you just created.
3. Stop the AhsayCBS services.
In Windows
In Linux/FreeBSD
# cd /usr/local/cbs/bin # sh shutdown.sh
4. Replace the destination ID of AWS S3 with the destination ID of Wasabi in the following server
text files:
e.g. to
%CBS_Home%\conf\users.xml
%CBS_Home%\system\obs\policies\policyList.xml
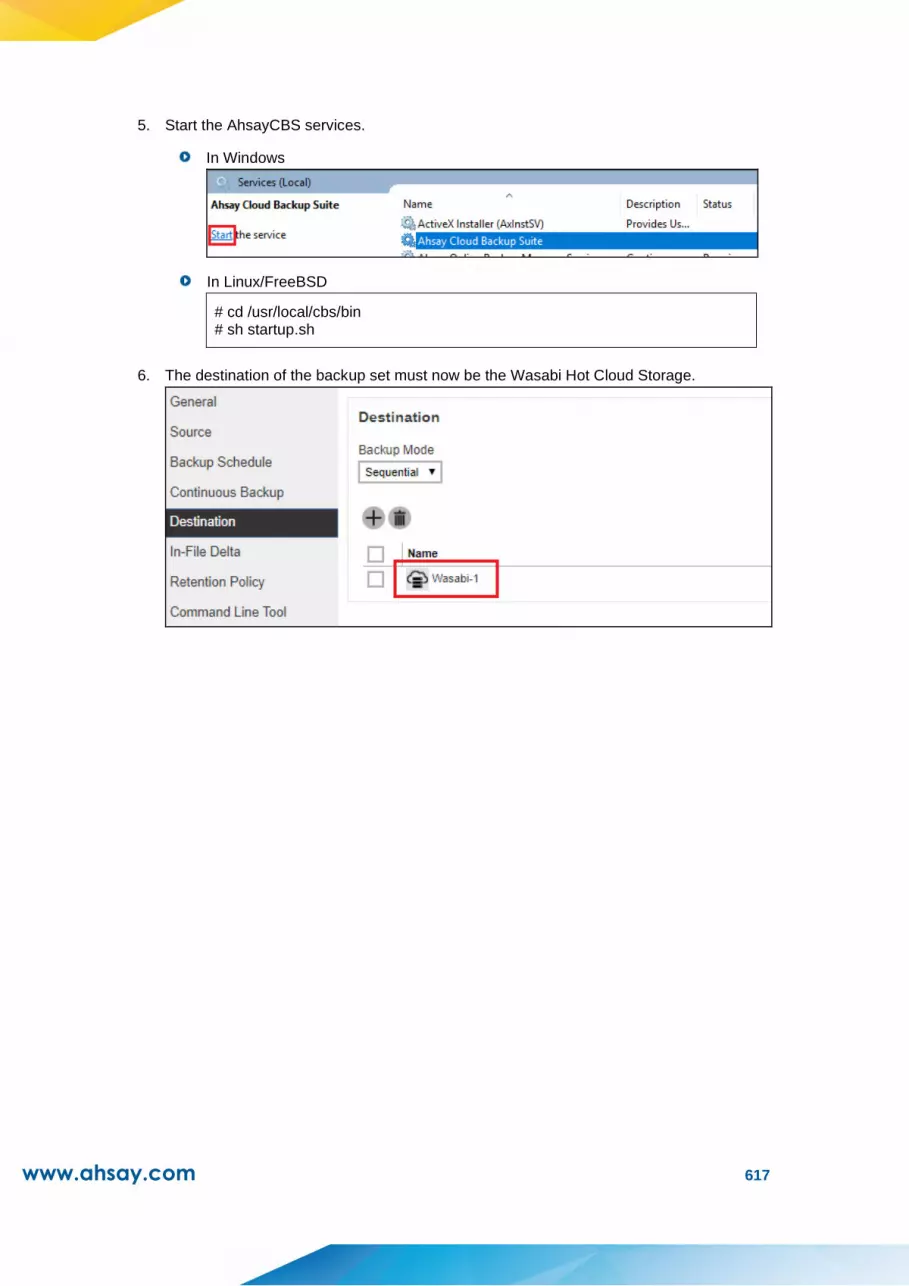
www.ahsay.com 617
5. Start the AhsayCBS services.
In Windows
In Linux/FreeBSD
# cd /usr/local/cbs/bin # sh startup.sh
6. The destination of the backup set must now be the Wasabi Hot Cloud Storage.

www.ahsay.com 618
Appendix N How to monitor Run on Server backup Java process from an operating system level
To monitor the Run on Server backup Java process from an operating system level, the following
commands can be used on the AhsayCBS server.
In AhsayCBS for Windows, the following command can be used to check the Run on Server backup
Java process: wmic process where caption=”java.exe” get commandline.
Each Run on Server backup process starts with the $APPLICATION_HOME path. In the example
below, there are three backup jobs running.
C:\Users\Administrator>wmic process where caption="java.exe" get commandline
"C:\Program Files\AhsayCBS\java\bin\java" -Xms512m -Xmx1024m -
XX:MaxDirectMemorySize=1024m -Dsun.nio.PageAlignDirectMemory=true -Xrs -
Djava.library.path=lib/WinX64 -cp "C:\Program
Files\AhsayCBS\lib\cbs.jar;C:\Program Files\AhsayCBS\lib\*;C:\Program
Files\AhsayCBS\lib;C:\Program Files\AhsayCBS\tomcat\lib\*" -
Dcom.ahsay.obcs.sch.scheduler=false -Dcom.ahsay.obcs.sch.serverinit=false "-
Dcatalina.base=C:\Program Files\AhsayCBS" RunBackupSet "C:\Program
Files\AhsayCBS" 1593767006824 ALL "Cloud File”
QgsSo/AkSjvTlOOVjcF/W9dcqxQKiFnVqI/A9Le/N0u1zfJhC2cJPReetUm29xImsRXNzhxQPMICIB
gMMXzanlAFb9mtmknrvGtkzdbfNAU= I false 2020-07-07-15-54-05 ROSUser
QgsSo/AkSjvTlOOVjcF/W9dcqxQKiFnVqI/A9Le/N0sscTUDZdSAWnOeERkREuIxRdd0cLm1Hi0/5O
vZMzZhDJ3Q/rucQQFR5WBU+KpFgv/3/r2PJx2pmC7XcfJu+cplgczq1qkcb4jTI3AIXqWEoA==
QgsSo/AkSjvTlOOVjcF/W9dcqxQKiFnVqI/A9Le/N0voJhU2PJUcvVdhX9RRqMqfFqf8QvBb5kBYA9
B8rSVDM6XlfsUaZnNNijIkqhDiMJo=
QgsSo/AkSjvTlOOVjcF/W9dcqxQKiFnVqI/A9Le/N0vASWCtVmPYioVybBxBenAD
QgsSo/AkSjvTlOOVjcF/W9dcqxQKiFnVqI/A9Le/N0v1S0NsRs2pazhxGk4KIxvhC0SrP78Dmh7twm
LK6Sf7HA== OBM
"C:\Program Files\AhsayCBS\java\bin\java" -Xms512m -Xmx1024m -
XX:MaxDirectMemorySize=1024m -Dsun.nio.PageAlignDirectMemory=true -Xrs -
Djava.library.path=lib/WinX64 -cp "C:\Program
Files\AhsayCBS\lib\cbs.jar;C:\Program Files\AhsayCBS\lib\*;C:\Program
Files\AhsayCBS\lib;C:\Program Files\AhsayCBS\tomcat\lib\*" -
Dcom.ahsay.obcs.sch.scheduler=false -Dcom.ahsay.obcs.sch.serverinit=false "-
Dcatalina.base=C:\Program Files\AhsayCBS" RunBackupSet "C:\Program
Files\AhsayCBS" 1593765511356 ALL "Office 365 Exchange Online"
QgsSo/AkSjvTlOOVjcF/W9dcqxQKiFnVqI/A9Le/N0u1zfJhC2cJPReetUm29xImsRXNzhxQPMICIB
gMMXzanlAFb9mtmknrvGtkzdbfNAU= I false 2020-07-07-15-54-13 ROSUser
QgsSo/AkSjvTlOOVjcF/W9dcqxQKiFnVqI/A9Le/N0sscTUDZdSAWnOeERkREuIxRdd0cLm1Hi0/5O
vZMzZhDJ3Q/rucQQFR5WBU+KpFgv/3/r2PJx2pmC7XcfJu+cplgczq1qkcb4jTI3AIXqWEoA==
QgsSo/AkSjvTlOOVjcF/W9dcqxQKiFnVqI/A9Le/N0voJhU2PJUcvVdhX9RRqMqfFqf8QvBb5kBYA9
B8rSVDM6XlfsUaZnNNijIkqhDiMJo=
QgsSo/AkSjvTlOOVjcF/W9dcqxQKiFnVqI/A9Le/N0vASWCtVmPYioVybBxBenAD
QgsSo/AkSjvTlOOVjcF/W9dcqxQKiFnVqI/A9Le/N0v1S0NsRs2pazhxGk4KIxvhC0SrP78Dmh7twm
LK6Sf7HA== OBM
"C:\Program Files\AhsayCBS\java\bin\java" -Xms512m -Xmx1024m -
XX:MaxDirectMemorySize=1024m -Dsun.nio.PageAlignDirectMemory=true -Xrs -
Djava.library.path=lib/WinX64 -cp "C:\Program
Files\AhsayCBS\lib\cbs.jar;C:\Program Files\AhsayCBS\lib\*;C:\Program
Files\AhsayCBS\lib;C:\Program Files\AhsayCBS\tomcat\lib\*" -
Dcom.ahsay.obcs.sch.scheduler=false -Dcom.ahsay.obcs.sch.serverinit=false "-
Dcatalina.base=C:\Program Files\AhsayCBS" RunBackupSet "C:\Program
Files\AhsayCBS" 1593765066840 ALL "Cloud File"
QgsSo/AkSjvTlOOVjcF/W9dcqxQKiFnVqI/A9Le/N0u1zfJhC2cJPReetUm29xImsRXNzhxQPMICIB

www.ahsay.com 619
gMMXzanlAFb9mtmknrvGtkzdbfNAU= I false 2020-07-07-15-54-21 ROSUser
QgsSo/AkSjvTlOOVjcF/W9dcqxQKiFnVqI/A9Le/N0sscTUDZdSAWnOeERkREuIxRdd0cLm1Hi0/5O
vZMzZhDJ3Q/rucQQFR5WBU+KpFgv/3/r2PJx2pmC7XcfJu+cplgczq1qkcb4jTI3AIXqWEoA==
QgsSo/AkSjvTlOOVjcF/W9dcqxQKiFnVqI/A9Le/N0voJhU2PJUcvVdhX9RRqMqfFqf8QvBb5kBYA9
B8rSVDM6XlfsUaZnNNijIkqhDiMJo=
QgsSo/AkSjvTlOOVjcF/W9dcqxQKiFnVqI/A9Le/N0vASWCtVmPYioVybBxBenAD
QgsSo/AkSjvTlOOVjcF/W9dcqxQKiFnVqI/A9Le/N0v1S0NsRs2pazhxGk4KIxvhC0SrP78Dmh7twm
LK6Sf7HA== OBM
In AhsayCBS for Linux there are two commands that can be used to check the Run on Server backup
Java process.
You can use the ps -ef|grep RunBackupSet command to list only the Run on Server backup
jobs that are running. To easily identify the backup job that is running, it starts with the username
then the process ID. In the example below, there are three Run on Server backup jobs that are
running.
# ps -ef|grep RunBackupSet
root 6491 6304 17 22:15 pts/3 00:00:03 /usr/local/cbs/java-linux-
x64/bin/java -Xms512m –Xmx1024m -XX:MaxDirectMemorySize=1024m -
Dsun.nio.PageAlignDirectMemory=true -Xrs -
Djava.library.path=/usr/local/cbs/lib/LinX64 -cp
/usr/local/cbs/lib/cbs.jar:/usr/local/cbs/lib/*:/usr/local/cbs/lib:/usr/local
/cbs/tomcat/lib/* -Dcom.ahsay.obcs.sch.scheduler=false -
Dcom.ahsay.obcs.sch.serverinit=false -Dcatalina.base=/usr/local/cbs
RunBackupSet /usr/local/cbs 1593776649249 ALL Cloud File
QgsSo/AkSjvTlOOVjcF/W9dcqxQKiFnVqI/A9Le/N0uvzIAFFlBJq1ZNFwlLKxfODe8gZiYInGbCq
IX/97xW/A== F true 2020-07-03-22-15-42 ROSUser
QgsSo/AkSjvTlOOVjcF/W9dcqxQKiFnVqI/A9Le/N0t9RweXikmaghJq5Aic6cADx3k7FY2lmwUjW
GKgrlxTlqfC6A6I8VTVW5GlSJ/5iOZ2ruA/FXcgG+sGwJLXFBrlAJNvRgI+8c7t8nMukIBAJA==
QgsSo/AkSjvTlOOVjcF/W9dcqxQKiFnVqI/A9Le/N0voJhU2PJUcvVdhX9RRqMqfFqf8QvBb5kBYA
9B8rSVDM6XlfsUaZnNNijIkqhDiMJo=
QgsSo/AkSjvTlOOVjcF/W9dcqxQKiFnVqI/A9Le/N0vASWCtVmPYioVybBxBenAD
QgsSo/AkSjvTlOOVjcF/W9dcqxQKiFnVqI/A9Le/N0v1S0NsRs2pazhxGk4KIxvhC0SrP78Dmh7tw
mLK6Sf7HA== OBM
root 6519 6304 34 22:15 pts/3 00:00:03 /usr/local/cbs/java-linux-
x64/bin/java -Xms512m –Xmx1024m -XX:MaxDirectMemorySize=1024m -
Dsun.nio.PageAlignDirectMemory=true -Xrs -
Djava.library.path=/usr/local/cbs/lib/LinX64 -cp
/usr/local/cbs/lib/cbs.jar:/usr/local/cbs/lib/*:/usr/local/cbs/lib:/usr/local
/cbs/tomcat/lib/* -Dcom.ahsay.obcs.sch.scheduler=false -
Dcom.ahsay.obcs.sch.serverinit=false -Dcatalina.base=/usr/local/cbs
RunBackupSet /usr/local/cbs 1593784149501 ALL Office 365 Exchange Online
QgsSo/AkSjvTlOOVjcF/W9dcqxQKiFnVqI/A9Le/N0uvzIAFFlBJq1ZNFwlLKxfODe8gZiYInGbCq
IX/97xW/A== F false 2020-07-03-22-15-52 ROSUser
QgsSo/AkSjvTlOOVjcF/W9dcqxQKiFnVqI/A9Le/N0t9RweXikmaghJq5Aic6cADx3k7FY2lmwUjW
GKgrlxTlqfC6A6I8VTVW5GlSJ/5iOZ2ruA/FXcgG+sGwJLXFBrlAJNvRgI+8c7t8nMukIBAJA==
QgsSo/AkSjvTlOOVjcF/W9dcqxQKiFnVqI/A9Le/N0voJhU2PJUcvVdhX9RRqMqfFqf8QvBb5kBYA
9B8rSVDM6XlfsUaZnNNijIkqhDiMJo=
QgsSo/AkSjvTlOOVjcF/W9dcqxQKiFnVqI/A9Le/N0vASWCtVmPYioVybBxBenAD
QgsSo/AkSjvTlOOVjcF/W9dcqxQKiFnVqI/A9Le/N0v1S0NsRs2pazhxGk4KIxvhC0SrP78Dmh7tw
mLK6Sf7HA== OBM
root 6549 6304 95 22:15 pts/3 00:00:03 /usr/local/cbs/java-linux-
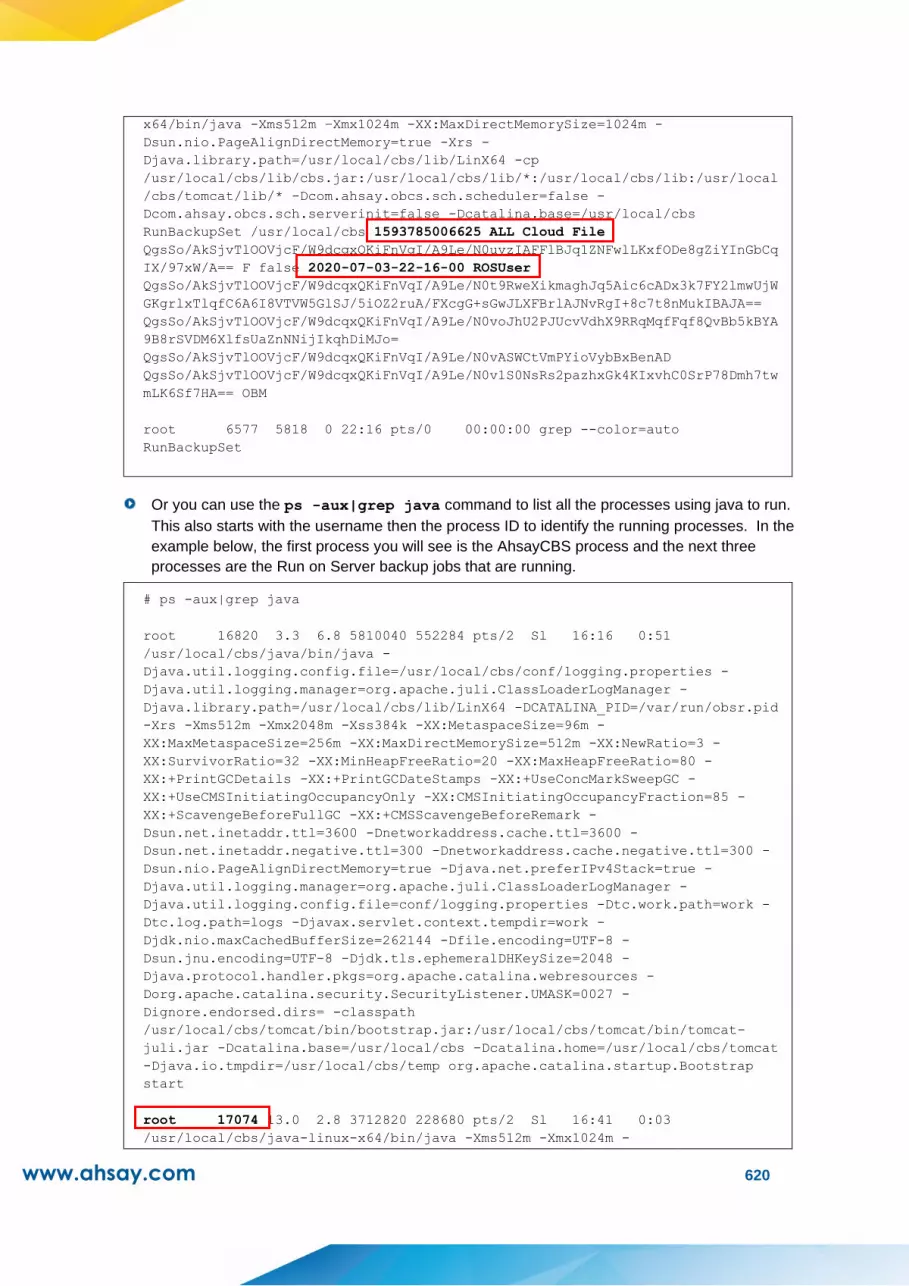
www.ahsay.com 620
x64/bin/java -Xms512m –Xmx1024m -XX:MaxDirectMemorySize=1024m -
Dsun.nio.PageAlignDirectMemory=true -Xrs -
Djava.library.path=/usr/local/cbs/lib/LinX64 -cp
/usr/local/cbs/lib/cbs.jar:/usr/local/cbs/lib/*:/usr/local/cbs/lib:/usr/local
/cbs/tomcat/lib/* -Dcom.ahsay.obcs.sch.scheduler=false -
Dcom.ahsay.obcs.sch.serverinit=false -Dcatalina.base=/usr/local/cbs
RunBackupSet /usr/local/cbs 1593785006625 ALL Cloud File
QgsSo/AkSjvTlOOVjcF/W9dcqxQKiFnVqI/A9Le/N0uvzIAFFlBJq1ZNFwlLKxfODe8gZiYInGbCq
IX/97xW/A== F false 2020-07-03-22-16-00 ROSUser
QgsSo/AkSjvTlOOVjcF/W9dcqxQKiFnVqI/A9Le/N0t9RweXikmaghJq5Aic6cADx3k7FY2lmwUjW
GKgrlxTlqfC6A6I8VTVW5GlSJ/5iOZ2ruA/FXcgG+sGwJLXFBrlAJNvRgI+8c7t8nMukIBAJA==
QgsSo/AkSjvTlOOVjcF/W9dcqxQKiFnVqI/A9Le/N0voJhU2PJUcvVdhX9RRqMqfFqf8QvBb5kBYA
9B8rSVDM6XlfsUaZnNNijIkqhDiMJo=
QgsSo/AkSjvTlOOVjcF/W9dcqxQKiFnVqI/A9Le/N0vASWCtVmPYioVybBxBenAD
QgsSo/AkSjvTlOOVjcF/W9dcqxQKiFnVqI/A9Le/N0v1S0NsRs2pazhxGk4KIxvhC0SrP78Dmh7tw
mLK6Sf7HA== OBM
root 6577 5818 0 22:16 pts/0 00:00:00 grep --color=auto
RunBackupSet
Or you can use the ps -aux|grep java command to list all the processes using java to run.
This also starts with the username then the process ID to identify the running processes. In the
example below, the first process you will see is the AhsayCBS process and the next three
processes are the Run on Server backup jobs that are running.
# ps -aux|grep java
root 16820 3.3 6.8 5810040 552284 pts/2 Sl 16:16 0:51
/usr/local/cbs/java/bin/java -
Djava.util.logging.config.file=/usr/local/cbs/conf/logging.properties -
Djava.util.logging.manager=org.apache.juli.ClassLoaderLogManager -
Djava.library.path=/usr/local/cbs/lib/LinX64 -DCATALINA_PID=/var/run/obsr.pid
-Xrs -Xms512m -Xmx2048m -Xss384k -XX:MetaspaceSize=96m -
XX:MaxMetaspaceSize=256m -XX:MaxDirectMemorySize=512m -XX:NewRatio=3 -
XX:SurvivorRatio=32 -XX:MinHeapFreeRatio=20 -XX:MaxHeapFreeRatio=80 -
XX:+PrintGCDetails -XX:+PrintGCDateStamps -XX:+UseConcMarkSweepGC -
XX:+UseCMSInitiatingOccupancyOnly -XX:CMSInitiatingOccupancyFraction=85 -
XX:+ScavengeBeforeFullGC -XX:+CMSScavengeBeforeRemark -
Dsun.net.inetaddr.ttl=3600 -Dnetworkaddress.cache.ttl=3600 -
Dsun.net.inetaddr.negative.ttl=300 -Dnetworkaddress.cache.negative.ttl=300 -
Dsun.nio.PageAlignDirectMemory=true -Djava.net.preferIPv4Stack=true -
Djava.util.logging.manager=org.apache.juli.ClassLoaderLogManager -
Djava.util.logging.config.file=conf/logging.properties -Dtc.work.path=work -
Dtc.log.path=logs -Djavax.servlet.context.tempdir=work -
Djdk.nio.maxCachedBufferSize=262144 -Dfile.encoding=UTF-8 -
Dsun.jnu.encoding=UTF-8 -Djdk.tls.ephemeralDHKeySize=2048 -
Djava.protocol.handler.pkgs=org.apache.catalina.webresources -
Dorg.apache.catalina.security.SecurityListener.UMASK=0027 -
Dignore.endorsed.dirs= -classpath
/usr/local/cbs/tomcat/bin/bootstrap.jar:/usr/local/cbs/tomcat/bin/tomcat-
juli.jar -Dcatalina.base=/usr/local/cbs -Dcatalina.home=/usr/local/cbs/tomcat
-Djava.io.tmpdir=/usr/local/cbs/temp org.apache.catalina.startup.Bootstrap
start
root 17074 13.0 2.8 3712820 228680 pts/2 Sl 16:41 0:03
/usr/local/cbs/java-linux-x64/bin/java -Xms512m -Xmx1024m -
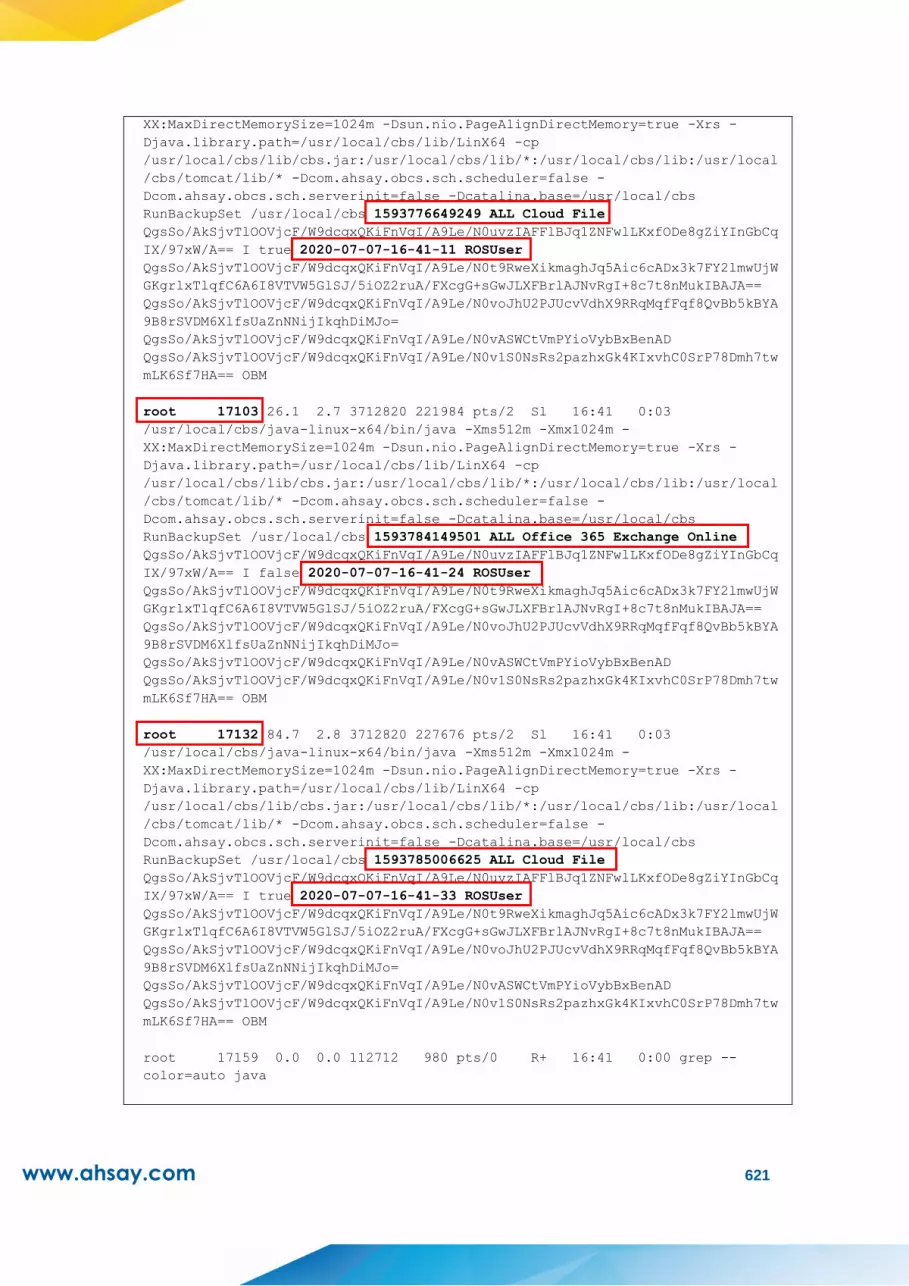
www.ahsay.com 621
XX:MaxDirectMemorySize=1024m -Dsun.nio.PageAlignDirectMemory=true -Xrs -
Djava.library.path=/usr/local/cbs/lib/LinX64 -cp
/usr/local/cbs/lib/cbs.jar:/usr/local/cbs/lib/*:/usr/local/cbs/lib:/usr/local
/cbs/tomcat/lib/* -Dcom.ahsay.obcs.sch.scheduler=false -
Dcom.ahsay.obcs.sch.serverinit=false -Dcatalina.base=/usr/local/cbs
RunBackupSet /usr/local/cbs 1593776649249 ALL Cloud File
QgsSo/AkSjvTlOOVjcF/W9dcqxQKiFnVqI/A9Le/N0uvzIAFFlBJq1ZNFwlLKxfODe8gZiYInGbCq
IX/97xW/A== I true 2020-07-07-16-41-11 ROSUser
QgsSo/AkSjvTlOOVjcF/W9dcqxQKiFnVqI/A9Le/N0t9RweXikmaghJq5Aic6cADx3k7FY2lmwUjW
GKgrlxTlqfC6A6I8VTVW5GlSJ/5iOZ2ruA/FXcgG+sGwJLXFBrlAJNvRgI+8c7t8nMukIBAJA==
QgsSo/AkSjvTlOOVjcF/W9dcqxQKiFnVqI/A9Le/N0voJhU2PJUcvVdhX9RRqMqfFqf8QvBb5kBYA
9B8rSVDM6XlfsUaZnNNijIkqhDiMJo=
QgsSo/AkSjvTlOOVjcF/W9dcqxQKiFnVqI/A9Le/N0vASWCtVmPYioVybBxBenAD
QgsSo/AkSjvTlOOVjcF/W9dcqxQKiFnVqI/A9Le/N0v1S0NsRs2pazhxGk4KIxvhC0SrP78Dmh7tw
mLK6Sf7HA== OBM
root 17103 26.1 2.7 3712820 221984 pts/2 Sl 16:41 0:03
/usr/local/cbs/java-linux-x64/bin/java -Xms512m -Xmx1024m -
XX:MaxDirectMemorySize=1024m -Dsun.nio.PageAlignDirectMemory=true -Xrs -
Djava.library.path=/usr/local/cbs/lib/LinX64 -cp
/usr/local/cbs/lib/cbs.jar:/usr/local/cbs/lib/*:/usr/local/cbs/lib:/usr/local
/cbs/tomcat/lib/* -Dcom.ahsay.obcs.sch.scheduler=false -
Dcom.ahsay.obcs.sch.serverinit=false -Dcatalina.base=/usr/local/cbs
RunBackupSet /usr/local/cbs 1593784149501 ALL Office 365 Exchange Online
QgsSo/AkSjvTlOOVjcF/W9dcqxQKiFnVqI/A9Le/N0uvzIAFFlBJq1ZNFwlLKxfODe8gZiYInGbCq
IX/97xW/A== I false 2020-07-07-16-41-24 ROSUser
QgsSo/AkSjvTlOOVjcF/W9dcqxQKiFnVqI/A9Le/N0t9RweXikmaghJq5Aic6cADx3k7FY2lmwUjW
GKgrlxTlqfC6A6I8VTVW5GlSJ/5iOZ2ruA/FXcgG+sGwJLXFBrlAJNvRgI+8c7t8nMukIBAJA==
QgsSo/AkSjvTlOOVjcF/W9dcqxQKiFnVqI/A9Le/N0voJhU2PJUcvVdhX9RRqMqfFqf8QvBb5kBYA
9B8rSVDM6XlfsUaZnNNijIkqhDiMJo=
QgsSo/AkSjvTlOOVjcF/W9dcqxQKiFnVqI/A9Le/N0vASWCtVmPYioVybBxBenAD
QgsSo/AkSjvTlOOVjcF/W9dcqxQKiFnVqI/A9Le/N0v1S0NsRs2pazhxGk4KIxvhC0SrP78Dmh7tw
mLK6Sf7HA== OBM
root 17132 84.7 2.8 3712820 227676 pts/2 Sl 16:41 0:03
/usr/local/cbs/java-linux-x64/bin/java -Xms512m -Xmx1024m -
XX:MaxDirectMemorySize=1024m -Dsun.nio.PageAlignDirectMemory=true -Xrs -
Djava.library.path=/usr/local/cbs/lib/LinX64 -cp
/usr/local/cbs/lib/cbs.jar:/usr/local/cbs/lib/*:/usr/local/cbs/lib:/usr/local
/cbs/tomcat/lib/* -Dcom.ahsay.obcs.sch.scheduler=false -
Dcom.ahsay.obcs.sch.serverinit=false -Dcatalina.base=/usr/local/cbs
RunBackupSet /usr/local/cbs 1593785006625 ALL Cloud File
QgsSo/AkSjvTlOOVjcF/W9dcqxQKiFnVqI/A9Le/N0uvzIAFFlBJq1ZNFwlLKxfODe8gZiYInGbCq
IX/97xW/A== I true 2020-07-07-16-41-33 ROSUser
QgsSo/AkSjvTlOOVjcF/W9dcqxQKiFnVqI/A9Le/N0t9RweXikmaghJq5Aic6cADx3k7FY2lmwUjW
GKgrlxTlqfC6A6I8VTVW5GlSJ/5iOZ2ruA/FXcgG+sGwJLXFBrlAJNvRgI+8c7t8nMukIBAJA==
QgsSo/AkSjvTlOOVjcF/W9dcqxQKiFnVqI/A9Le/N0voJhU2PJUcvVdhX9RRqMqfFqf8QvBb5kBYA
9B8rSVDM6XlfsUaZnNNijIkqhDiMJo=
QgsSo/AkSjvTlOOVjcF/W9dcqxQKiFnVqI/A9Le/N0vASWCtVmPYioVybBxBenAD
QgsSo/AkSjvTlOOVjcF/W9dcqxQKiFnVqI/A9Le/N0v1S0NsRs2pazhxGk4KIxvhC0SrP78Dmh7tw
mLK6Sf7HA== OBM
root 17159 0.0 0.0 112712 980 pts/0 R+ 16:41 0:00 grep --
color=auto java
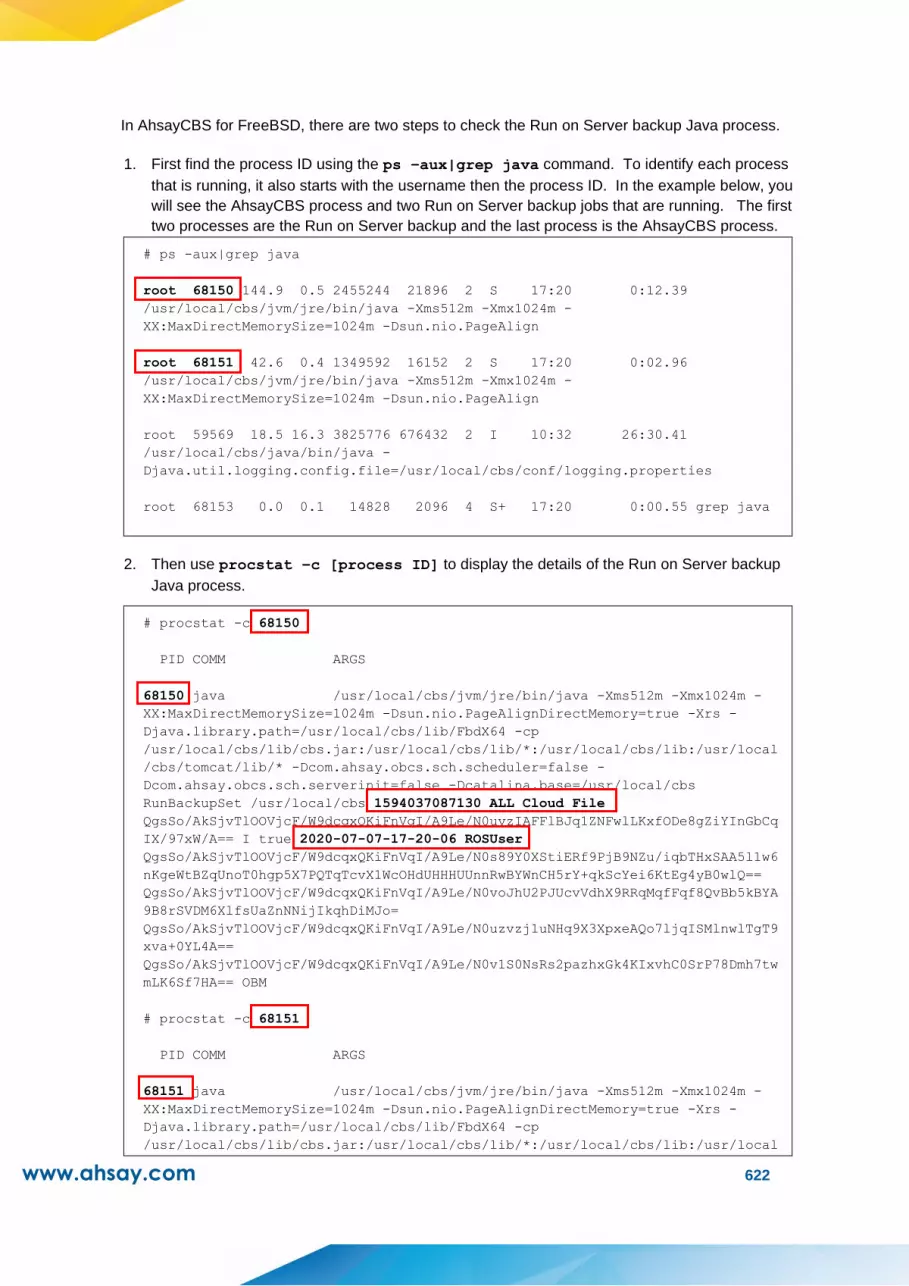
www.ahsay.com 622
In AhsayCBS for FreeBSD, there are two steps to check the Run on Server backup Java process.
1. First find the process ID using the ps –aux|grep java command. To identify each process
that is running, it also starts with the username then the process ID. In the example below, you
will see the AhsayCBS process and two Run on Server backup jobs that are running. The first
two processes are the Run on Server backup and the last process is the AhsayCBS process.
# ps -aux|grep java
root 68150 144.9 0.5 2455244 21896 2 S 17:20 0:12.39
/usr/local/cbs/jvm/jre/bin/java -Xms512m -Xmx1024m -
XX:MaxDirectMemorySize=1024m -Dsun.nio.PageAlign
root 68151 42.6 0.4 1349592 16152 2 S 17:20 0:02.96
/usr/local/cbs/jvm/jre/bin/java -Xms512m -Xmx1024m -
XX:MaxDirectMemorySize=1024m -Dsun.nio.PageAlign
root 59569 18.5 16.3 3825776 676432 2 I 10:32 26:30.41
/usr/local/cbs/java/bin/java -
Djava.util.logging.config.file=/usr/local/cbs/conf/logging.properties
root 68153 0.0 0.1 14828 2096 4 S+ 17:20 0:00.55 grep java
2. Then use procstat –c [process ID] to display the details of the Run on Server backup
Java process.
# procstat -c 68150
PID COMM ARGS
68150 java /usr/local/cbs/jvm/jre/bin/java -Xms512m -Xmx1024m -
XX:MaxDirectMemorySize=1024m -Dsun.nio.PageAlignDirectMemory=true -Xrs -
Djava.library.path=/usr/local/cbs/lib/FbdX64 -cp
/usr/local/cbs/lib/cbs.jar:/usr/local/cbs/lib/*:/usr/local/cbs/lib:/usr/local
/cbs/tomcat/lib/* -Dcom.ahsay.obcs.sch.scheduler=false -
Dcom.ahsay.obcs.sch.serverinit=false -Dcatalina.base=/usr/local/cbs
RunBackupSet /usr/local/cbs 1594037087130 ALL Cloud File
QgsSo/AkSjvTlOOVjcF/W9dcqxQKiFnVqI/A9Le/N0uvzIAFFlBJq1ZNFwlLKxfODe8gZiYInGbCq
IX/97xW/A== I true 2020-07-07-17-20-06 ROSUser
QgsSo/AkSjvTlOOVjcF/W9dcqxQKiFnVqI/A9Le/N0s89Y0XStiERf9PjB9NZu/iqbTHxSAA5l1w6
nKgeWtBZqUnoT0hgp5X7PQTqTcvX1WcOHdUHHHUUnnRwBYWnCH5rY+qkScYei6KtEg4yB0wlQ==
QgsSo/AkSjvTlOOVjcF/W9dcqxQKiFnVqI/A9Le/N0voJhU2PJUcvVdhX9RRqMqfFqf8QvBb5kBYA
9B8rSVDM6XlfsUaZnNNijIkqhDiMJo=
QgsSo/AkSjvTlOOVjcF/W9dcqxQKiFnVqI/A9Le/N0uzvzj1uNHq9X3XpxeAQo7ljqISMlnwlTgT9
xva+0YL4A==
QgsSo/AkSjvTlOOVjcF/W9dcqxQKiFnVqI/A9Le/N0v1S0NsRs2pazhxGk4KIxvhC0SrP78Dmh7tw
mLK6Sf7HA== OBM
# procstat -c 68151
PID COMM ARGS
68151 java /usr/local/cbs/jvm/jre/bin/java -Xms512m -Xmx1024m -
XX:MaxDirectMemorySize=1024m -Dsun.nio.PageAlignDirectMemory=true -Xrs -
Djava.library.path=/usr/local/cbs/lib/FbdX64 -cp
/usr/local/cbs/lib/cbs.jar:/usr/local/cbs/lib/*:/usr/local/cbs/lib:/usr/local

www.ahsay.com 623
/cbs/tomcat/lib/* -Dcom.ahsay.obcs.sch.scheduler=false -
Dcom.ahsay.obcs.sch.serverinit=false -Dcatalina.base=/usr/local/cbs
RunBackupSet /usr/local/cbs 1594037275026 ALL Cloud File
QgsSo/AkSjvTlOOVjcF/W9dcqxQKiFnVqI/A9Le/N0uvzIAFFlBJq1ZNFwlLKxfODe8gZiYInGbCq
IX/97xW/A== I true 2020-07-07-17-20-15 ROSUser
QgsSo/AkSjvTlOOVjcF/W9dcqxQKiFnVqI/A9Le/N0s89Y0XStiERf9PjB9NZu/iqbTHxSAA5l1w6
nKgeWtBZqUnoT0hgp5X7PQTqTcvX1WcOHdUHHHUUnnRwBYWnCH5rY+qkScYei6KtEg4yB0wlQ==
QgsSo/AkSjvTlOOVjcF/W9dcqxQKiFnVqI/A9Le/N0voJhU2PJUcvVdhX9RRqMqfFqf8QvBb5kBYA
9B8rSVDM6XlfsUaZnNNijIkqhDiMJo=
QgsSo/AkSjvTlOOVjcF/W9dcqxQKiFnVqI/A9Le/N0uzvzj1uNHq9X3XpxeAQo7ljqISMlnwlTgT9
xva+0YL4A==
QgsSo/AkSjvTlOOVjcF/W9dcqxQKiFnVqI/A9Le/N0v1S0NsRs2pazhxGk4KIxvhC0SrP78Dmh7tw
mLK6Sf7HA== OBM

www.ahsay.com 624
Appendix O How to terminate unresponsive Run on Server backup jobs
In situations where a Run on Server backup job encounters errors/warnings, becomes unresponsive
or appears to be “stuck”, or even crashes; the following methods can be used to terminate the
problematic backup job.
Terminate a Run on Server backup job in this order:
1. Use the button in AhsayCBS
NOTE
This will only work for manually triggered backup job.
2. Create an empty “stop” file in %USER_HOME%/%user%/ipc/BackupSet/%backup set ID%/ if “running” is found
In AhsayCBS for Windows:
In AhsayCBS for Linux/FreeBSD:
# touch /usr/local/cbs/user/ROSUser/ipc/BackupSet/1593753612991/stop
In AhsayUBS:
# touch /ubs/mnt/esfmfw/obsr/system/obsr/user/jbl/ipc/BackupSet/
1594198116726/stop

www.ahsay.com 625
3. Use the Windows Task Manager to end task or kill in Linux
In AhsayCBS for Windows: Go to the Windows Task Manager, select the backup job (java.exe) that you want to stop and
click .
In AhsayCBS for Linux: Type ps -aux|grep java. Locate the process ID of the backup job (%java home% -Xms%xms% - Xmx%xmx% -XX:MaxDirectMemorySize=1024) that you want to stop. Then use the kill command.
# ps -aux|grep java
root 6491 4.3 2.8 4799704 226524 pts/3 Sl 22:15 0:03
/usr/local/cbs/java-linux-x64/bin/java -Xms512m –Xmx1024m -
XX:MaxDirectMemorySize=1024m -Dsun.nio.PageAlignDirectMemory=true -
Xrs -Djava.library.path=/usr/local/cbs/lib/LinX64 -cp
/usr/local/cbs/lib/cbs.jar:/usr/local/cbs/lib/*:/usr/local/cbs/lib:/u
sr/local/cbs/tomcat/lib/* -Dcom.ahsay.obcs.sch.scheduler=false -
Dcom.ahsay.obcs.sch.serverinit=false -Dcatalina.base=/usr/local/cbs
RunBackupSet /usr/local/cbs 1593776649249 ALL Cloud File
QgsSo/AkSjvTlOOVjcF/W9dcqxQKiFnVqI/A9Le/N0uvzIAFFlBJq1ZNFwlLKxfODe8gZ
iYInGbCqIX/97xW/A== F true 2020-07-03-22-15-42 ROSUser
QgsSo/AkSjvTlOOVjcF/W9dcqxQKiFnVqI/A9Le/N0t9RweXikmaghJq5Aic6cADx3k7F
Y2lmwUjWGKgrlxTlqfC6A6I8VTVW5GlSJ/5iOZ2ruA/FXcgG+sGwJLXFBrlAJNvRgI+8c
7t8nMukIBAJA==
QgsSo/AkSjvTlOOVjcF/W9dcqxQKiFnVqI/A9Le/N0voJhU2PJUcvVdhX9RRqMqfFqf8Q
vBb5kBYA9B8rSVDM6XlfsUaZnNNijIkqhDiMJo=
QgsSo/AkSjvTlOOVjcF/W9dcqxQKiFnVqI/A9Le/N0vASWCtVmPYioVybBxBenAD
QgsSo/AkSjvTlOOVjcF/W9dcqxQKiFnVqI/A9Le/N0v1S0NsRs2pazhxGk4KIxvhC0SrP
78Dmh7twmLK6Sf7HA== OBM
# kill -9 6491

www.ahsay.com 626
In AhsayCBS for FreeBSD: Use the ps -aux|grep java command to locate the process ID of the backup job (%java home% -Xms%xms% - Xmx%xmx% -XX:MaxDirectMemorySize=1024) that you want to stop. Check the details of the Run on Server backup Java process to make sure that you are terminating the correct backup job by using the procstat –c [process ID] command. Then use the kill command.
# ps -aux|grep java
root 68150 144.9 0.5 2455244 21896 2 S 17:20 0:12.39
/usr/local/cbs/jvm/jre/bin/java -Xms512m -Xmx1024m -
XX:MaxDirectMemorySize=1024m -Dsun.nio.PageAlign
# procstat -c 68150
PID COMM ARGS
68150 java /usr/local/cbs/jvm/jre/bin/java -Xms512m -
Xmx1024m -XX:MaxDirectMemorySize=1024m -
Dsun.nio.PageAlignDirectMemory=true -Xrs -
Djava.library.path=/usr/local/cbs/lib/FbdX64 -cp
/usr/local/cbs/lib/cbs.jar:/usr/local/cbs/lib/*:/usr/local/cbs/lib:/u
sr/local/cbs/tomcat/lib/* -Dcom.ahsay.obcs.sch.scheduler=false -
Dcom.ahsay.obcs.sch.serverinit=false -Dcatalina.base=/usr/local/cbs
RunBackupSet /usr/local/cbs 1594037087130 ALL Cloud File
QgsSo/AkSjvTlOOVjcF/W9dcqxQKiFnVqI/A9Le/N0uvzIAFFlBJq1ZNFwlLKxfODe8gZ
iYInGbCqIX/97xW/A== I true 2020-07-07-17-20-06 ROSUser
QgsSo/AkSjvTlOOVjcF/W9dcqxQKiFnVqI/A9Le/N0s89Y0XStiERf9PjB9NZu/iqbTHx
SAA5l1w6nKgeWtBZqUnoT0hgp5X7PQTqTcvX1WcOHdUHHHUUnnRwBYWnCH5rY+qkScYei
6KtEg4yB0wlQ==
QgsSo/AkSjvTlOOVjcF/W9dcqxQKiFnVqI/A9Le/N0voJhU2PJUcvVdhX9RRqMqfFqf8Q
vBb5kBYA9B8rSVDM6XlfsUaZnNNijIkqhDiMJo=
QgsSo/AkSjvTlOOVjcF/W9dcqxQKiFnVqI/A9Le/N0uzvzj1uNHq9X3XpxeAQo7ljqISM
lnwlTgT9xva+0YL4A==
QgsSo/AkSjvTlOOVjcF/W9dcqxQKiFnVqI/A9Le/N0v1S0NsRs2pazhxGk4KIxvhC0SrP
78Dmh7twmLK6Sf7HA== OBM
# kill -9 68150
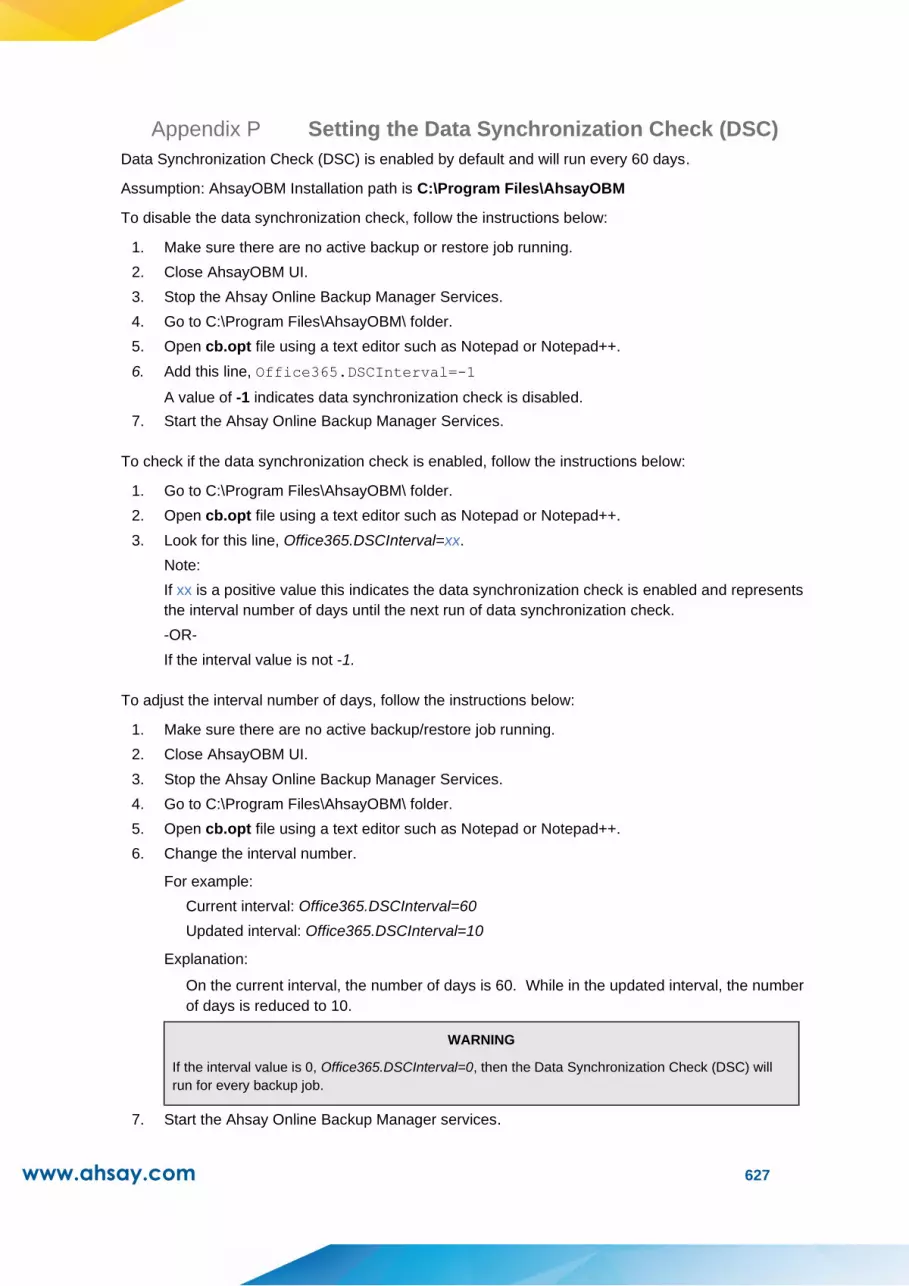
www.ahsay.com 627
Appendix P Setting the Data Synchronization Check (DSC)
Data Synchronization Check (DSC) is enabled by default and will run every 60 days.
Assumption: AhsayOBM Installation path is C:\Program Files\AhsayOBM
To disable the data synchronization check, follow the instructions below:
1. Make sure there are no active backup or restore job running.
2. Close AhsayOBM UI.
3. Stop the Ahsay Online Backup Manager Services.
4. Go to C:\Program Files\AhsayOBM\ folder.
5. Open cb.opt file using a text editor such as Notepad or Notepad++.
6. Add this line, Office365.DSCInterval=-1
A value of -1 indicates data synchronization check is disabled.
7. Start the Ahsay Online Backup Manager Services.
To check if the data synchronization check is enabled, follow the instructions below:
1. Go to C:\Program Files\AhsayOBM\ folder.
2. Open cb.opt file using a text editor such as Notepad or Notepad++.
3. Look for this line, Office365.DSCInterval=xx.
Note:
If xx is a positive value this indicates the data synchronization check is enabled and represents
the interval number of days until the next run of data synchronization check.
-OR-
If the interval value is not -1.
To adjust the interval number of days, follow the instructions below:
1. Make sure there are no active backup/restore job running.
2. Close AhsayOBM UI.
3. Stop the Ahsay Online Backup Manager Services.
4. Go to C:\Program Files\AhsayOBM\ folder.
5. Open cb.opt file using a text editor such as Notepad or Notepad++.
6. Change the interval number.
For example:
Current interval: Office365.DSCInterval=60
Updated interval: Office365.DSCInterval=10
Explanation:
On the current interval, the number of days is 60. While in the updated interval, the number
of days is reduced to 10.
WARNING
If the interval value is 0, Office365.DSCInterval=0, then the Data Synchronization Check (DSC) will
run for every backup job.
7. Start the Ahsay Online Backup Manager services.

www.ahsay.com 628
Appendix Q How to create a new app in the Azure Active Directory
In order to obtain the redirect URI that will be used in your branded pages, a new app must be created
in the Azure Active Directory using the App Registrations.
To support the customization of Azure AD App for Modern App Authentication, an Azure AD
subscription is required, e.g. for Office 365 Apps a Premium P1 and Premium P2 licenses of Azure
AD subscriptions is required. As the free version of Azure AD does not support granting admin
consent for the Exchange/SharePoint related APIs via New App Registration. Please refer to
Microsoft for details of Azure AD subscription plans.
Once you have the required subscription, follow the instructions below on how to do this:
1. Login to Azure AD.
2. On the bottom of the page, click App Registrations.
3. Click New Registration.
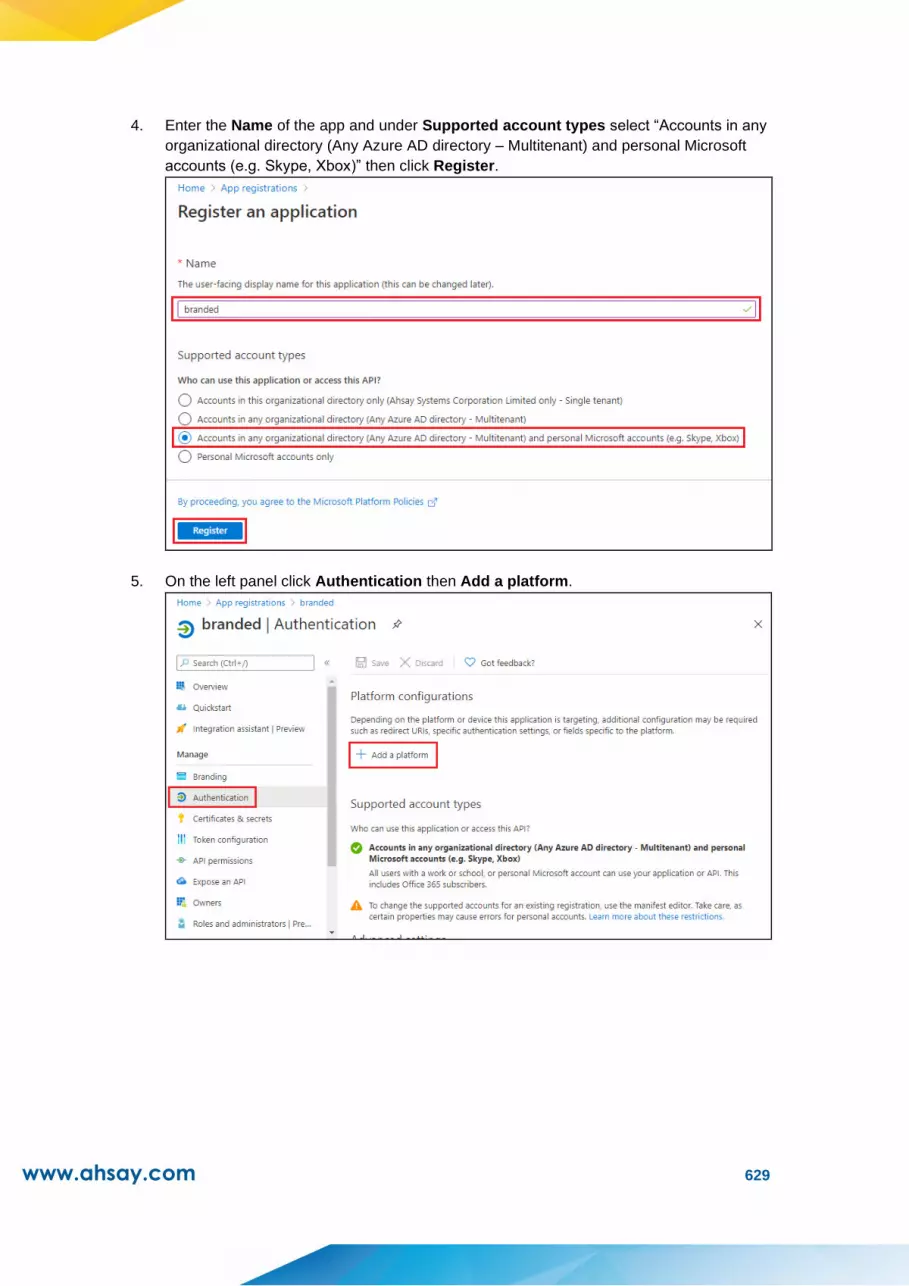
www.ahsay.com 629
4. Enter the Name of the app and under Supported account types select “Accounts in any
organizational directory (Any Azure AD directory – Multitenant) and personal Microsoft
accounts (e.g. Skype, Xbox)” then click Register.
5. On the left panel click Authentication then Add a platform.

www.ahsay.com 630
6. Double click on Mobile and desktop applications.

www.ahsay.com 631
7. Check all three (3) checkboxes and enter the Authorization code redirect customized URI (e.g.
https://www.yourdomain.com/register/oauth2-microsoft365.jsp). Click Configure.
8. Click Add URI and enter the Admin consent endpoint redirect customized URI (e.g.
https://www.yourdomain.com/register/oauth2-permission365.jsp). Click Save.
NOTE
Examples of the oauth2-microsoft365.jsp and oauth2-permission365.jsp files can be downloaded
from here https://download.ahsay.com/support/document/v8/app-reg-microsoft365.zip.
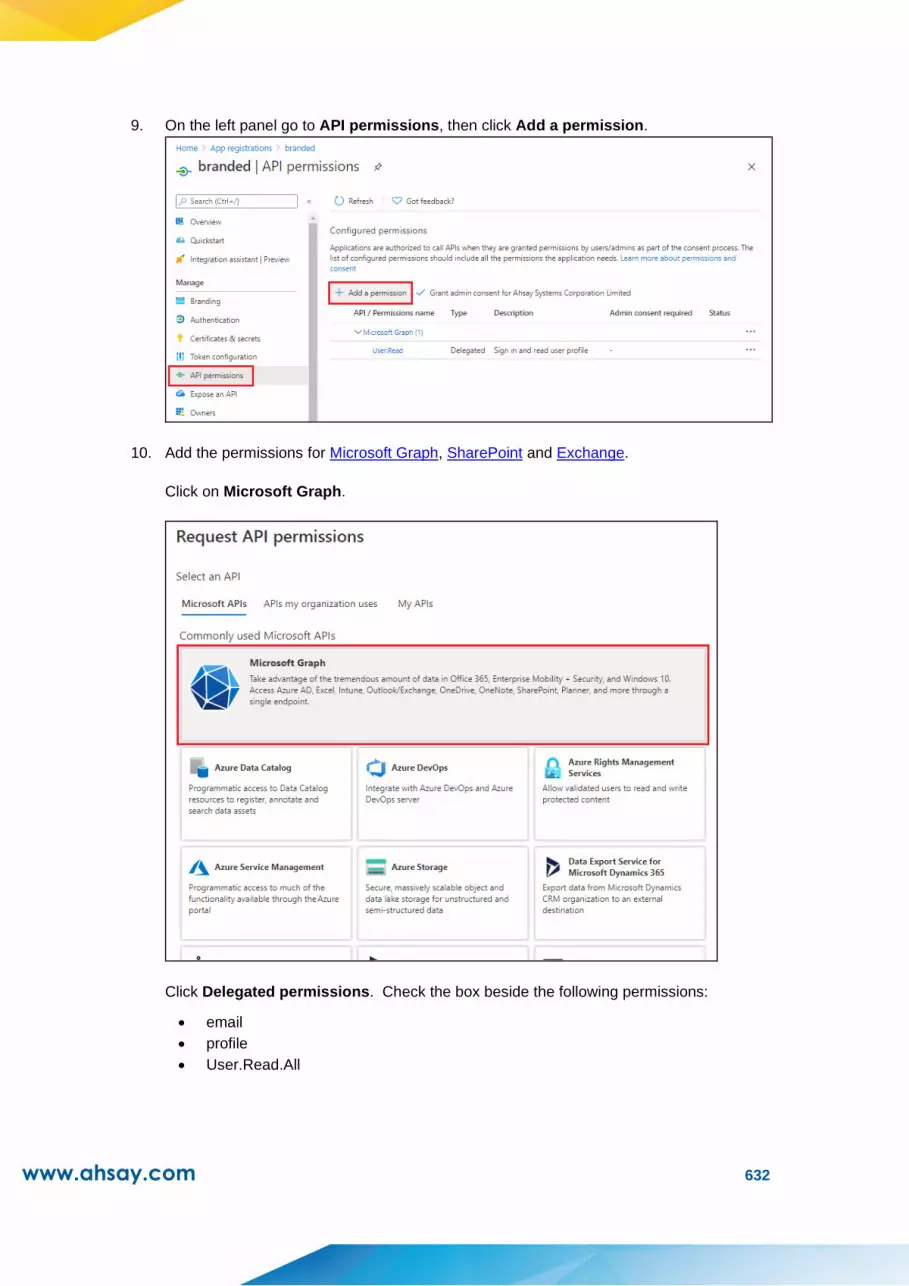
www.ahsay.com 632
9. On the left panel go to API permissions, then click Add a permission.
10. Add the permissions for Microsoft Graph, SharePoint and Exchange.
Click on Microsoft Graph.
Click Delegated permissions. Check the box beside the following permissions:
• profile
• User.Read.All

www.ahsay.com 633
Then go to Application permissions. Check the box beside the following permissions:
• Organization.Read.All
• User.ReadWrite.All
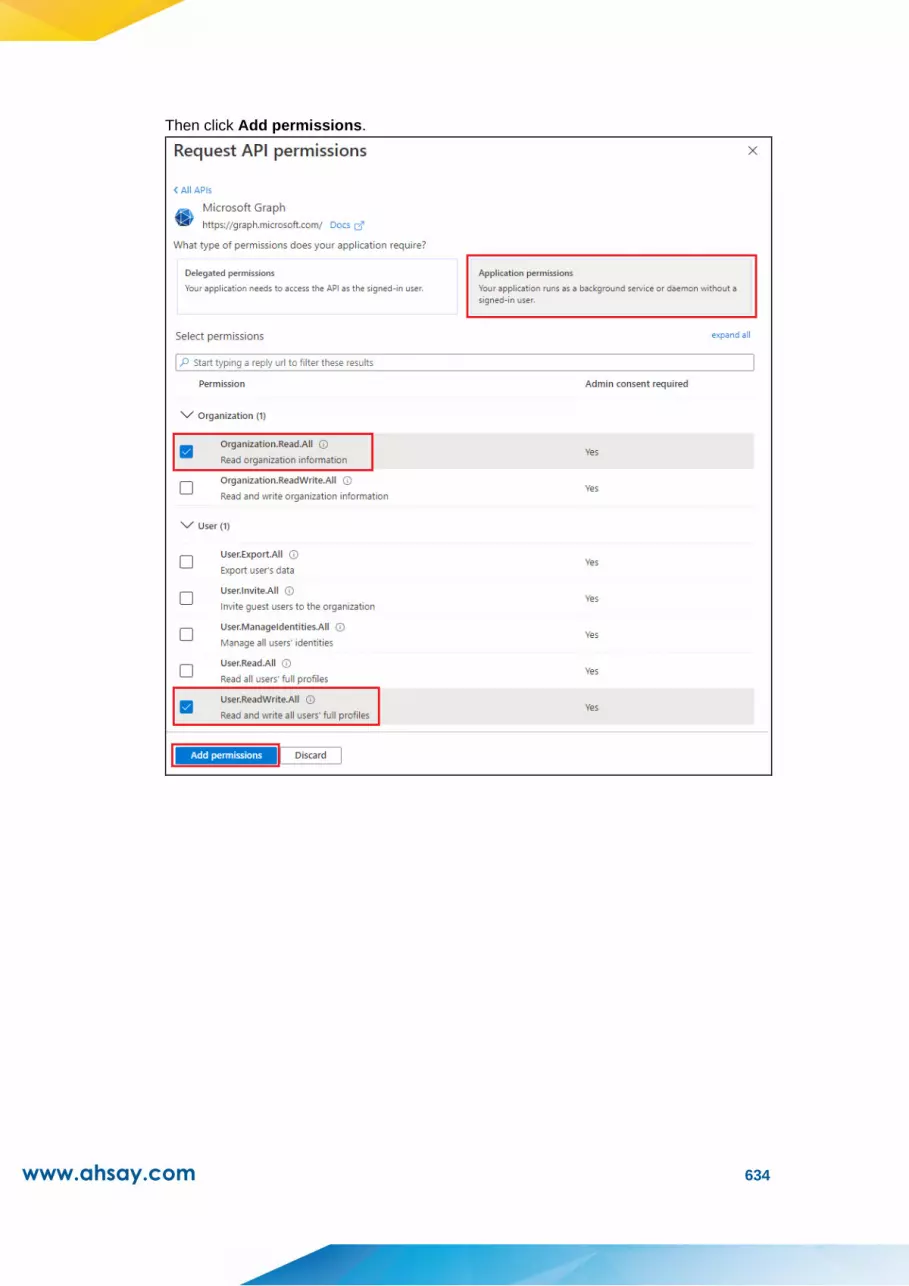
www.ahsay.com 634
Then click Add permissions.
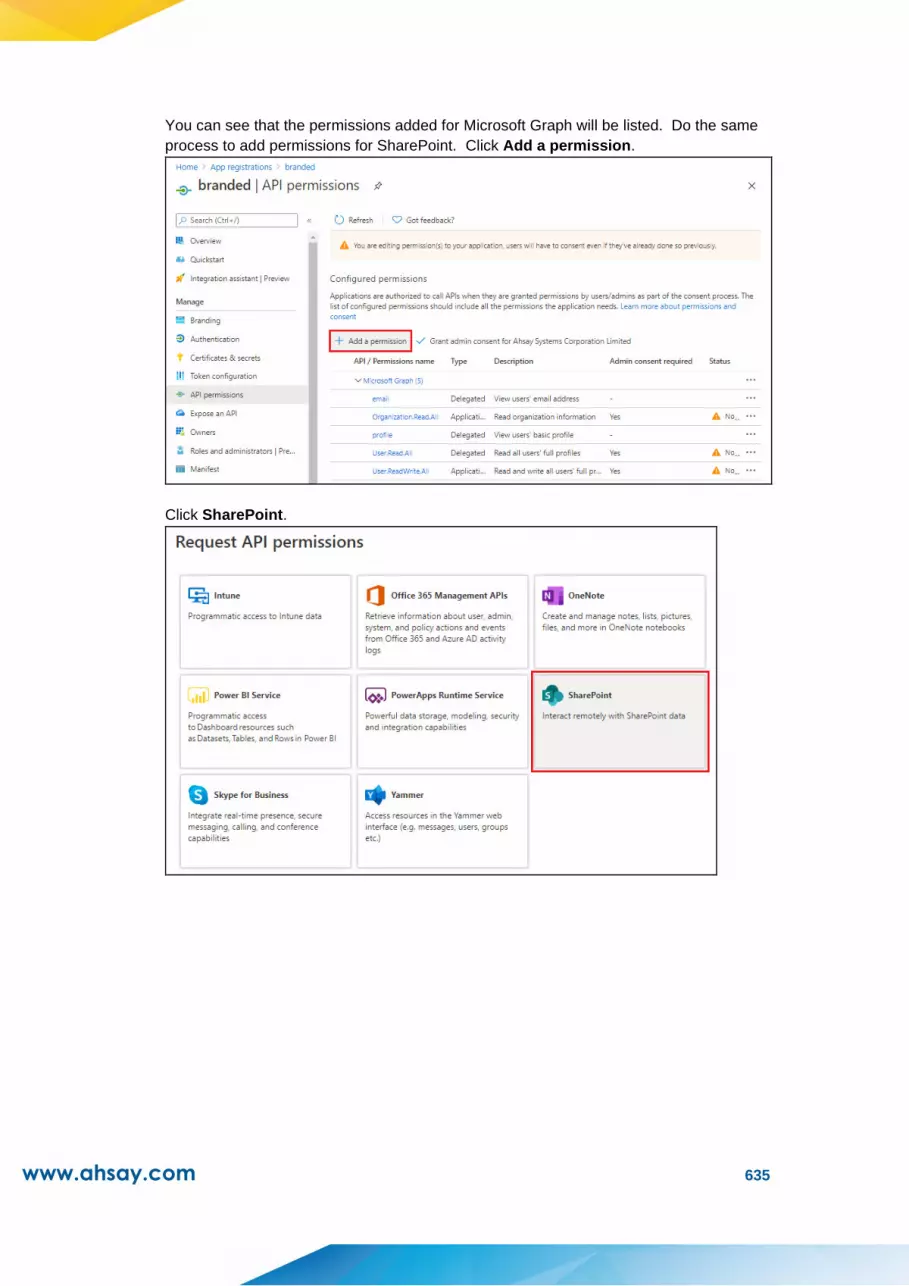
www.ahsay.com 635
You can see that the permissions added for Microsoft Graph will be listed. Do the same
process to add permissions for SharePoint. Click Add a permission.
Click SharePoint.
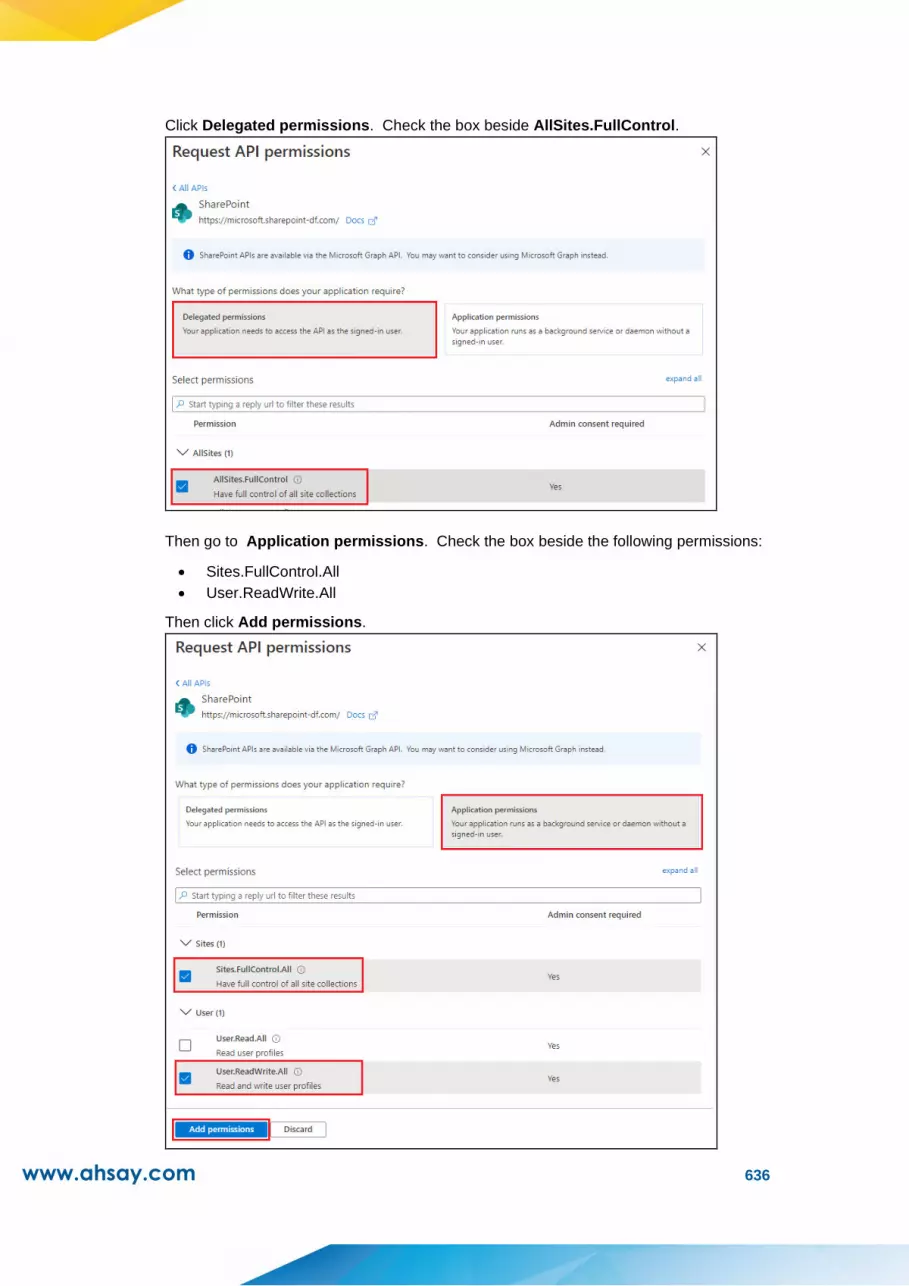
www.ahsay.com 636
Click Delegated permissions. Check the box beside AllSites.FullControl.
Then go to Application permissions. Check the box beside the following permissions:
• Sites.FullControl.All
• User.ReadWrite.All
Then click Add permissions.

www.ahsay.com 637
You can see that the permissions added for SharePoint will be listed. Do the same process to
add permissions for Exchange. Click Add a permission.
Click Exchange.
Click Delegated permissions. Check the box beside the following permissions:
• Calendars.ReadWrite.All
• Contacts.ReadWrite.All
• EWS.AccessAsUser.All
• Group.ReadWrite.All
• Mail.ReadWrite.All
• Notes.ReadWrite
• People.ReadWrite
• Place.Read.All
• Tasks.ReadWrite
• User.Read.All

www.ahsay.com 638

www.ahsay.com 639
Then go to Application permissions. Check the box beside the following permissions:
• full_access_as_app
• Calendars.ReadWrite.All
• Contacts.ReadWrite
• Exchange.ManageAsApp
• MailboxSettings.ReadWrite
• Mail.ReadWrite
• Place.Read.All
• Tasks.ReadWrite
• User.Read.All
Then click Add permissions.

www.ahsay.com 640
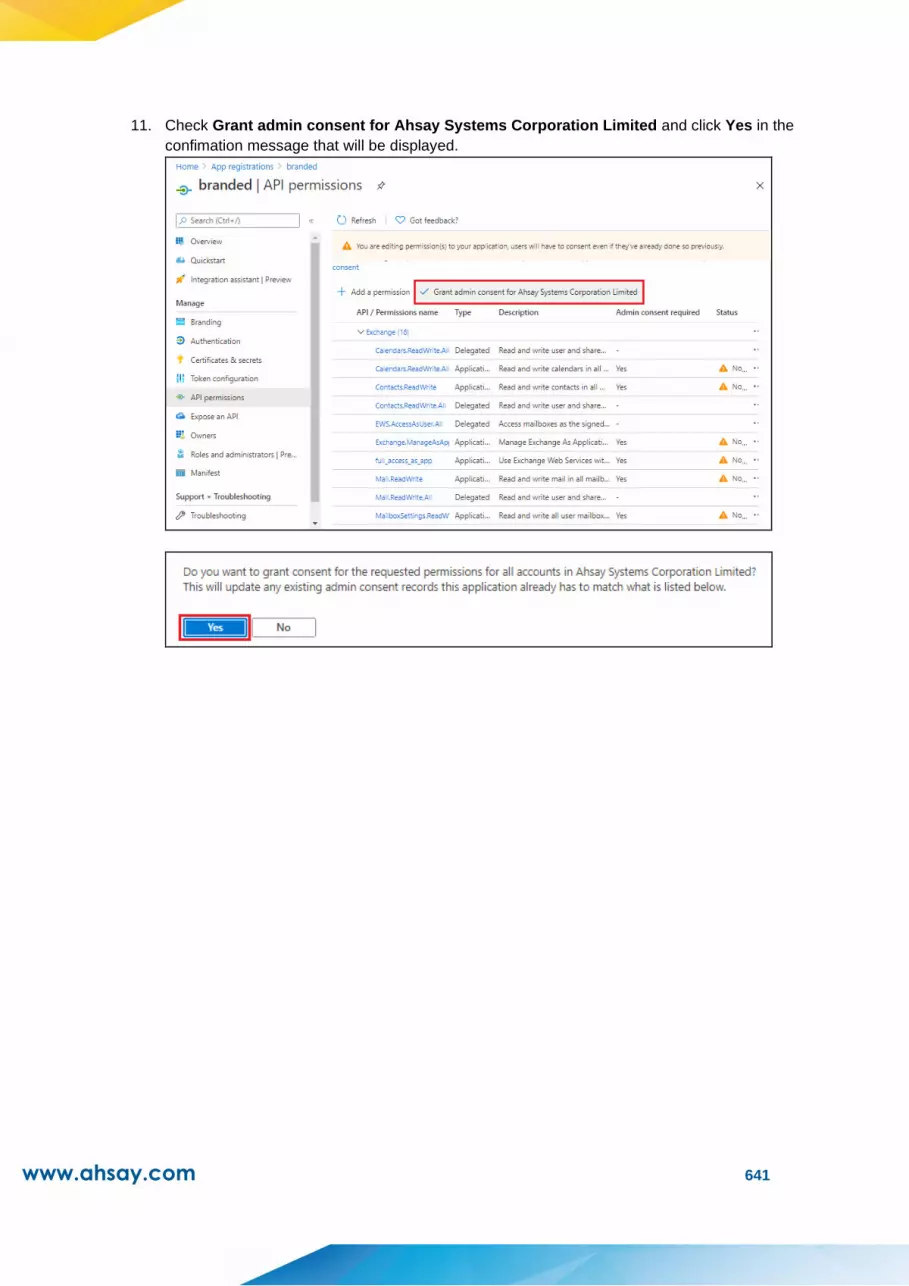
www.ahsay.com 641
11. Check Grant admin consent for Ahsay Systems Corporation Limited and click Yes in the
confimation message that will be displayed.

www.ahsay.com 642
All permissions have now been granted admin consent.

www.ahsay.com 643
Appendix R How to setup authenticator app to be able to login to AhsayCBS web console after losing access to authenticator app
After setting up the Mobile Authentication 2FA login, there might be an instance wherein the system
administrator cannot login using 2FA. Here are some cases when that may happen:
➢ Lost access to registered phone
➢ Lost access to authenticator app
➢ System user was deleted from the authenticator app
Follow the steps below to be able to login again to AhsayCBS web console:
1. Select any method from the list.
2. Click link.
3. Click link.

www.ahsay.com 644
4. Enter the recovery phone number excluding the last 2 digits then click
5. Enter the verification code and click to continue.
6. Click to setup 2FA again.

www.ahsay.com 645
7. Scan the QR code using third-party authenticator app and enter a display name and the one-time
password generated by the third-party authenticator app. Click to continue.
Or
If you want to use Ahsay Mobile click the link and scan the QR code.

www.ahsay.com 646
8. Click to finish the setup and login to AhsayCBS.
9. The main screen is now displayed.


