Download - 2 Day Developer's Guide - Oracle Help Center
Oracle® Database2 Day Developer's Guide
21F32609-01December 2020
Oracle Database 2 Day Developer's Guide, 21
F32609-01
Copyright © 1996, 2020, Oracle and/or its affiliates.
Primary Author: Chuck Murray
Contributors: Eric Belden, Bjorn Engsig, Nancy Greenberg, Pat Huey, Christopher Jones, Sharon Kennedy,Thomas Kyte, Simon Law, Bryn Llewellen, Sheila Moore
This software and related documentation are provided under a license agreement containing restrictions onuse and disclosure and are protected by intellectual property laws. Except as expressly permitted in yourlicense agreement or allowed by law, you may not use, copy, reproduce, translate, broadcast, modify, license,transmit, distribute, exhibit, perform, publish, or display any part, in any form, or by any means. Reverseengineering, disassembly, or decompilation of this software, unless required by law for interoperability, isprohibited.
The information contained herein is subject to change without notice and is not warranted to be error-free. Ifyou find any errors, please report them to us in writing.
If this is software or related documentation that is delivered to the U.S. Government or anyone licensing it onbehalf of the U.S. Government, then the following notice is applicable:
U.S. GOVERNMENT END USERS: Oracle programs (including any operating system, integrated software,any programs embedded, installed or activated on delivered hardware, and modifications of such programs)and Oracle computer documentation or other Oracle data delivered to or accessed by U.S. Governmentend users are "commercial computer software" or "commercial computer software documentation" pursuantto the applicable Federal Acquisition Regulation and agency-specific supplemental regulations. As such,the use, reproduction, duplication, release, display, disclosure, modification, preparation of derivative works,and/or adaptation of i) Oracle programs (including any operating system, integrated software, any programsembedded, installed or activated on delivered hardware, and modifications of such programs), ii) Oraclecomputer documentation and/or iii) other Oracle data, is subject to the rights and limitations specified in thelicense contained in the applicable contract. The terms governing the U.S. Government’s use of Oracle cloudservices are defined by the applicable contract for such services. No other rights are granted to the U.S.Government.
This software or hardware is developed for general use in a variety of information management applications.It is not developed or intended for use in any inherently dangerous applications, including applications thatmay create a risk of personal injury. If you use this software or hardware in dangerous applications, then youshall be responsible to take all appropriate fail-safe, backup, redundancy, and other measures to ensure itssafe use. Oracle Corporation and its affiliates disclaim any liability for any damages caused by use of thissoftware or hardware in dangerous applications.
Oracle and Java are registered trademarks of Oracle and/or its affiliates. Other names may be trademarks oftheir respective owners.
Intel and Intel Inside are trademarks or registered trademarks of Intel Corporation. All SPARC trademarks areused under license and are trademarks or registered trademarks of SPARC International, Inc. AMD, Epyc,and the AMD logo are trademarks or registered trademarks of Advanced Micro Devices. UNIX is a registeredtrademark of The Open Group.
This software or hardware and documentation may provide access to or information about content, products,and services from third parties. Oracle Corporation and its affiliates are not responsible for and expresslydisclaim all warranties of any kind with respect to third-party content, products, and services unless otherwiseset forth in an applicable agreement between you and Oracle. Oracle Corporation and its affiliates will notbe responsible for any loss, costs, or damages incurred due to your access to or use of third-party content,products, or services, except as set forth in an applicable agreement between you and Oracle.

Contents
Preface
Audience xii
Documentation Accessibility xii
Related Documents xii
Conventions xiii
1 Introduction to 2 Day Oracle Database Development
1.1 About This Document 1-1
1.2 About Oracle Database 1-2
1.2.1 About Schema Objects 1-2
1.2.2 About Oracle Database Access 1-3
1.2.2.1 About SQL*Plus 1-3
1.2.2.2 About SQL Developer 1-4
1.2.2.3 About Structured Query Language (SQL) 1-5
1.2.2.4 About Procedural Language/SQL (PL/SQL) 1-5
1.2.2.5 About Other Client Programs, Languages, and Development Tools 1-5
1.3 About Sample Schema HR 1-10
2 Connecting to Oracle Database and Exploring It
2.1 Connecting to Oracle Database from SQL*Plus 2-1
2.2 Connecting to Oracle Database from SQL Developer 2-2
2.3 Connecting to Oracle Database as User HR 2-4
2.3.1 Unlocking the HR Account 2-4
2.3.2 Connecting to Oracle Database as User HR from SQL*Plus 2-5
2.3.3 Connecting to Oracle Database as User HR from SQL Developer 2-6
2.4 Exploring Oracle Database with SQL*Plus 2-6
2.4.1 Viewing HR Schema Objects with SQL*Plus 2-7
2.4.2 Viewing EMPLOYEES Table Properties and Data with SQL*Plus 2-8
2.5 Exploring Oracle Database with SQL Developer 2-9
2.5.1 Tutorial: Viewing HR Schema Objects with SQL Developer 2-9
iii
2.5.2 Tutorial: Viewing EMPLOYEES Table Properties and Data with SQLDeveloper 2-10
2.6 Selecting Table Data 2-11
2.6.1 About Queries 2-11
2.6.2 Running Queries in SQL Developer 2-12
2.6.3 Tutorial: Selecting All Columns of a Table 2-13
2.6.4 Tutorial: Selecting Specific Columns of a Table 2-13
2.6.5 Displaying Selected Columns Under New Headings 2-14
2.6.6 Selecting Data that Satisfies Specified Conditions 2-15
2.6.7 Sorting Selected Data 2-17
2.6.8 Selecting Data from Multiple Tables 2-18
2.6.9 Using Operators and Functions in Queries 2-20
2.6.9.1 Using Arithmetic Operators in Queries 2-20
2.6.9.2 Using Numeric Functions in Queries 2-21
2.6.9.3 Using the Concatenation Operator in Queries 2-22
2.6.9.4 Using Character Functions in Queries 2-22
2.6.9.5 Using Datetime Functions in Queries 2-23
2.6.9.6 Using Conversion Functions in Queries 2-25
2.6.9.7 Using Aggregate Functions in Queries 2-26
2.6.9.8 Using NULL-Related Functions in Queries 2-28
2.6.9.9 Using CASE Expressions in Queries 2-29
2.6.9.10 Using the DECODE Function in Queries 2-31
3 About DML Statements and Transactions
3.1 About Data Manipulation Language (DML) Statements 3-1
3.1.1 About the INSERT Statement 3-1
3.1.2 About the UPDATE Statement 3-4
3.1.3 About the DELETE Statement 3-5
3.2 About Transaction Control Statements 3-5
3.3 Committing Transactions 3-6
3.4 Rolling Back Transactions 3-8
3.5 Setting Savepoints in Transactions 3-10
4 Creating and Managing Schema Objects
4.1 About Data Definition Language (DDL) Statements 4-1
4.2 Creating and Managing Tables 4-1
4.2.1 About SQL Data Types 4-2
4.2.2 Creating Tables 4-2
4.2.2.1 Tutorial: Creating a Table with the Create Table Tool 4-3
4.2.2.2 Creating Tables with the CREATE TABLE Statement 4-4
iv
4.2.3 Ensuring Data Integrity in Tables 4-4
4.2.3.1 About Constraints 4-5
4.2.3.2 Tutorial: Adding Constraints to Existing Tables 4-6
4.2.4 Tutorial: Adding Rows to Tables with the Insert Row Tool 4-10
4.2.5 Tutorial: Changing Data in Tables in the Data Pane 4-12
4.2.6 Tutorial: Deleting Rows from Tables with the Delete Selected Row(s)Tool 4-13
4.2.7 Managing Indexes 4-13
4.2.7.1 Tutorial: Adding an Index with the Create Index Tool 4-14
4.2.7.2 Tutorial: Changing an Index with the Edit Index Tool 4-15
4.2.7.3 Tutorial: Dropping an Index 4-16
4.2.8 Dropping Tables 4-16
4.3 Creating and Managing Views 4-17
4.3.1 Creating Views 4-17
4.3.1.1 Tutorial: Creating a View with the Create View Tool 4-17
4.3.1.2 Creating Views with the CREATE VIEW Statement 4-18
4.3.2 Changing Queries in Views 4-19
4.3.3 Tutorial: Changing View Names with the Rename Tool 4-19
4.3.4 Dropping a View 4-20
4.4 Creating and Managing Sequences 4-20
4.4.1 Tutorial: Creating a Sequence 4-21
4.4.2 Dropping Sequences 4-22
4.5 Creating and Managing Synonyms 4-23
4.5.1 Creating Synonyms 4-23
4.5.2 Dropping Synonyms 4-24
5 Developing Stored Subprograms and Packages
5.1 About Stored Subprograms 5-1
5.2 About Packages 5-2
5.3 About PL/SQL Identifiers 5-3
5.4 About PL/SQL Data Types 5-3
5.5 Creating and Managing Standalone Subprograms 5-4
5.5.1 About Subprogram Structure 5-4
5.5.2 Tutorial: Creating a Standalone Procedure 5-5
5.5.3 Tutorial: Creating a Standalone Function 5-7
5.5.4 Changing Standalone Subprograms 5-9
5.5.5 Tutorial: Testing a Standalone Function 5-10
5.5.6 Dropping Standalone Subprograms 5-11
5.6 Creating and Managing Packages 5-11
5.6.1 About Package Structure 5-12
5.6.2 Tutorial: Creating a Package Specification 5-12
v
5.6.3 Tutorial: Changing a Package Specification 5-13
5.6.4 Tutorial: Creating a Package Body 5-14
5.6.5 Dropping a Package 5-15
5.7 Declaring and Assigning Values to Variables and Constants 5-16
5.7.1 Tutorial: Declaring Variables and Constants in a Subprogram 5-16
5.7.2 Ensuring that Variables, Constants, and Parameters Have Correct DataTypes 5-18
5.7.3 Tutorial: Changing Declarations to Use the %TYPE Attribute 5-19
5.7.4 Assigning Values to Variables 5-20
5.7.4.1 Assigning Values to Variables with the Assignment Operator 5-21
5.7.4.2 Assigning Values to Variables with the SELECT INTO Statement 5-21
5.8 Controlling Program Flow 5-23
5.8.1 About Control Statements 5-23
5.8.2 Using the IF Statement 5-23
5.8.3 Using the CASE Statement 5-24
5.8.4 Using the FOR LOOP Statement 5-26
5.8.5 Using the WHILE LOOP Statement 5-27
5.8.6 Using the Basic LOOP and EXIT WHEN Statements 5-29
5.9 Using Records and Cursors 5-30
5.9.1 About Records 5-31
5.9.2 Tutorial: Declaring a RECORD Type 5-32
5.9.3 Tutorial: Creating and Invoking a Subprogram with a Record Parameter 5-33
5.9.4 About Cursors 5-35
5.9.5 Using a Declared Cursor to Retrieve Result Set Rows One at a Time 5-36
5.9.6 Tutorial: Using a Declared Cursor to Retrieve Result Set Rows One at aTime 5-37
5.9.7 About Cursor Variables 5-38
5.9.8 Using a Cursor Variable to Retrieve Result Set Rows One at a Time 5-39
5.9.9 Tutorial: Using a Cursor Variable to Retrieve Result Set Rows One at aTime 5-40
5.10 Using Associative Arrays 5-43
5.10.1 About Collections 5-43
5.10.2 About Associative Arrays 5-44
5.10.3 Declaring Associative Arrays 5-44
5.10.4 Populating Associative Arrays 5-46
5.10.5 Traversing Dense Associative Arrays 5-47
5.10.6 Traversing Sparse Associative Arrays 5-48
5.11 Handling Exceptions (Runtime Errors) 5-49
5.11.1 About Exceptions and Exception Handlers 5-49
5.11.2 When to Use Exception Handlers 5-50
5.11.3 Handling Predefined Exceptions 5-51
vi
5.11.4 Declaring and Handling User-Defined Exceptions 5-52
6 Using Triggers
6.1 About Triggers 6-1
6.2 Creating Triggers 6-2
6.2.1 About OLD and NEW Pseudorecords 6-3
6.2.2 Tutorial: Creating a Trigger that Logs Table Changes 6-3
6.2.3 Tutorial: Creating a Trigger that Generates a Primary Key for a RowBefore It Is Inserted 6-4
6.2.4 Creating an INSTEAD OF Trigger 6-5
6.2.5 Tutorial: Creating Triggers that Log LOGON and LOGOFF Events 6-6
6.3 Changing Triggers 6-7
6.4 Disabling and Enabling Triggers 6-8
6.4.1 Disabling or Enabling a Single Trigger 6-8
6.4.2 Disabling or Enabling All Triggers on a Single Table 6-8
6.5 About Trigger Compilation and Dependencies 6-9
6.6 Dropping Triggers 6-9
7 Working in a Global Environment
7.1 About Globalization Support Features 7-1
7.1.1 About Language Support 7-1
7.1.2 About Territory Support 7-2
7.1.3 About Date and Time Formats 7-2
7.1.4 About Calendar Formats 7-3
7.1.5 About Numeric and Monetary Formats 7-4
7.1.6 About Linguistic Sorting and String Searching 7-5
7.1.7 About Length Semantics 7-5
7.1.8 About Unicode and SQL National Character Data Types 7-5
7.2 About Initial NLS Parameter Values 7-6
7.3 Viewing NLS Parameter Values 7-7
7.4 Changing NLS Parameter Values 7-8
7.4.1 Changing NLS Parameter Values for All SQL Developer Connections 7-9
7.4.2 Changing NLS Parameter Values for the Current SQL FunctionInvocation 7-9
7.5 About Individual NLS Parameters 7-11
7.5.1 About Locale and the NLS_LANG Parameter 7-11
7.5.2 About the NLS_LANGUAGE Parameter 7-12
7.5.3 About the NLS_TERRITORY Parameter 7-13
7.5.4 About the NLS_DATE_FORMAT Parameter 7-15
7.5.5 About the NLS_DATE_LANGUAGE Parameter 7-17
vii
7.5.6 About NLS_TIMESTAMP_FORMAT andNLS_TIMESTAMP_TZ_FORMAT Parameters 7-18
7.5.7 About the NLS_CALENDAR Parameter 7-19
7.5.8 About the NLS_NUMERIC_CHARACTERS Parameter 7-20
7.5.9 About the NLS_CURRENCY Parameter 7-22
7.5.10 About the NLS_ISO_CURRENCY Parameter 7-23
7.5.11 About the NLS_DUAL_CURRENCY Parameter 7-24
7.5.12 About the NLS_SORT Parameter 7-25
7.5.13 About the NLS_COMP Parameter 7-26
7.5.14 About the NLS_LENGTH_SEMANTICS Parameter 7-28
7.6 Using Unicode in Globalized Applications 7-29
7.6.1 Representing Unicode String Literals in SQL and PL/SQL 7-29
7.6.2 Avoiding Data Loss During Character-Set Conversion 7-30
8 Building Effective Applications
8.1 Building Scalable Applications 8-1
8.1.1 About Scalable Applications 8-1
8.1.2 Using Bind Variables to Improve Scalability 8-1
8.1.3 Using PL/SQL to Improve Scalability 8-4
8.1.3.1 How PL/SQL Minimizes Parsing 8-4
8.1.3.2 About the EXECUTE IMMEDIATE Statement 8-4
8.1.3.3 About OPEN FOR Statements 8-5
8.1.3.4 About the DBMS_SQL Package 8-5
8.1.3.5 About Bulk SQL 8-6
8.1.4 About Concurrency and Scalability 8-8
8.1.4.1 About Sequences and Concurrency 8-9
8.1.4.2 About Latches and Concurrency 8-9
8.1.4.3 About Nonblocking Reads and Writes and Concurrency 8-10
8.1.4.4 About Shared SQL and Concurrency 8-10
8.1.5 Limiting the Number of Concurrent Sessions 8-10
8.1.6 Comparing Programming Techniques with Runstats 8-11
8.1.6.1 About Runstats 8-11
8.1.6.2 Setting Up Runstats 8-11
8.1.6.3 Using Runstats 8-14
8.1.7 Real-World Performance and Data Processing Techniques 8-15
8.1.7.1 About Iterative Data Processing 8-15
8.1.7.2 About Set-Based Processing 8-18
8.2 Recommended Programming Practices 8-19
8.2.1 Use Instrumentation Packages 8-19
8.2.2 Statistics Gathering and Application Tracing 8-20
8.2.3 Use Existing Functionality 8-20
viii
8.2.4 Cover Database Tables with Editioning Views 8-23
8.3 Recommended Security Practices 8-23
9 Developing a Simple Oracle Database Application
9.1 About the Application 9-1
9.1.1 Purpose of the Application 9-1
9.1.2 Structure of the Application 9-1
9.1.2.1 Schema Objects of the Application 9-1
9.1.2.2 Schemas for the Application 9-2
9.1.3 Naming Conventions in the Application 9-3
9.2 Creating the Schemas for the Application 9-4
9.3 Granting Privileges to the Schemas 9-5
9.3.1 Granting Privileges to the app_data Schema 9-6
9.3.2 Granting Privileges to the app_code Schema 9-6
9.3.3 Granting Privileges to the app_admin Schema 9-6
9.3.4 Granting Privileges to the app_user and app_admin_user Schemas 9-7
9.4 Creating the Schema Objects and Loading the Data 9-7
9.4.1 Creating the Tables 9-7
9.4.2 Creating the Editioning Views 9-10
9.4.3 Creating the Triggers 9-10
9.4.3.1 Creating the Trigger to Enforce the First Business Rule 9-11
9.4.3.2 Creating the Trigger to Enforce the Second Business Rule 9-12
9.4.4 Creating the Sequences 9-13
9.4.5 Loading the Data 9-14
9.4.6 Adding the Foreign Key Constraint 9-16
9.4.7 Granting Privileges on the Schema Objects to Users 9-16
9.5 Creating the employees_pkg Package 9-17
9.5.1 Creating the Package Specification for employees_pkg 9-18
9.5.2 Creating the Package Body for employees_pkg 9-19
9.5.3 Tutorial: Showing How the employees_pkg Subprograms Work 9-21
9.5.4 Granting the Execute Privilege to app_user and app_admin_user 9-24
9.5.5 Tutorial: Invoking get_job_history as app_user or app_admin_user 9-25
9.6 Creating the admin_pkg Package 9-25
9.6.1 Creating the Package Specification for admin_pkg 9-26
9.6.2 Creating the Package Body for admin_pkg 9-27
9.6.3 Tutorial: Showing How the admin_pkg Subprograms Work 9-28
9.6.4 Granting the Execute Privilege to app_admin_user 9-30
9.6.5 Tutorial: Invoking add_department as app_admin_user 9-30
ix
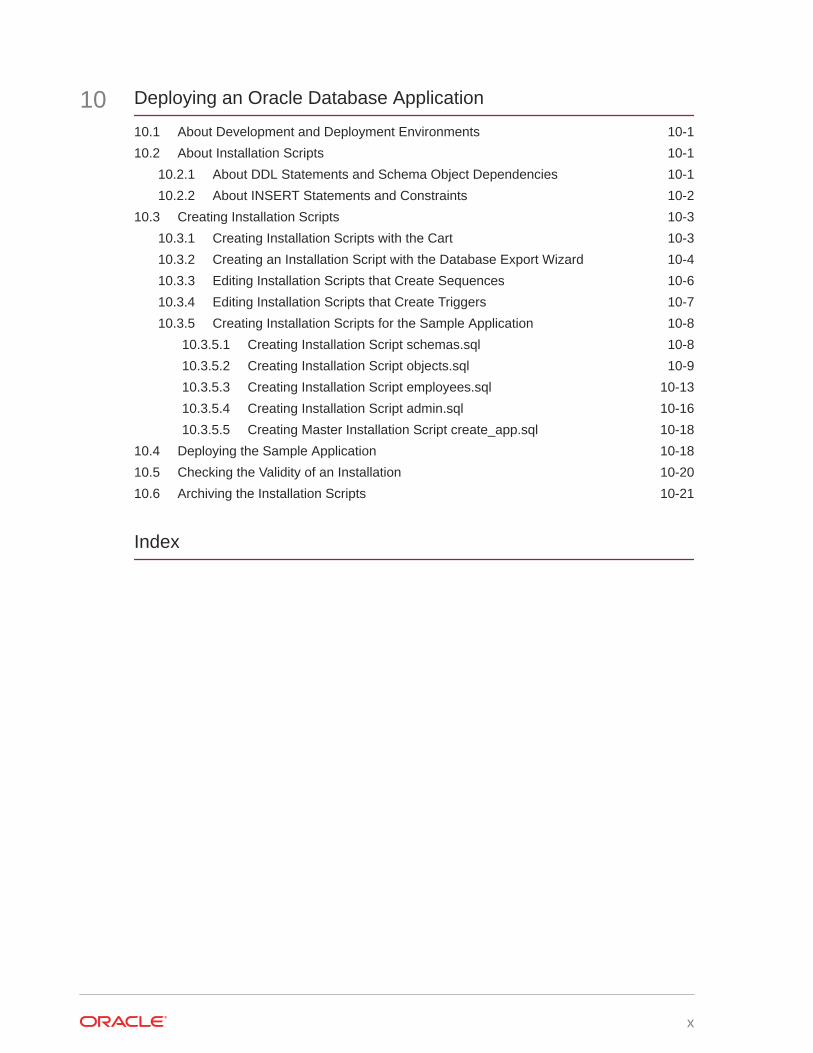
10
Deploying an Oracle Database Application
10.1 About Development and Deployment Environments 10-1
10.2 About Installation Scripts 10-1
10.2.1 About DDL Statements and Schema Object Dependencies 10-1
10.2.2 About INSERT Statements and Constraints 10-2
10.3 Creating Installation Scripts 10-3
10.3.1 Creating Installation Scripts with the Cart 10-3
10.3.2 Creating an Installation Script with the Database Export Wizard 10-4
10.3.3 Editing Installation Scripts that Create Sequences 10-6
10.3.4 Editing Installation Scripts that Create Triggers 10-7
10.3.5 Creating Installation Scripts for the Sample Application 10-8
10.3.5.1 Creating Installation Script schemas.sql 10-8
10.3.5.2 Creating Installation Script objects.sql 10-9
10.3.5.3 Creating Installation Script employees.sql 10-13
10.3.5.4 Creating Installation Script admin.sql 10-16
10.3.5.5 Creating Master Installation Script create_app.sql 10-18
10.4 Deploying the Sample Application 10-18
10.5 Checking the Validity of an Installation 10-20
10.6 Archiving the Installation Scripts 10-21
Index
x
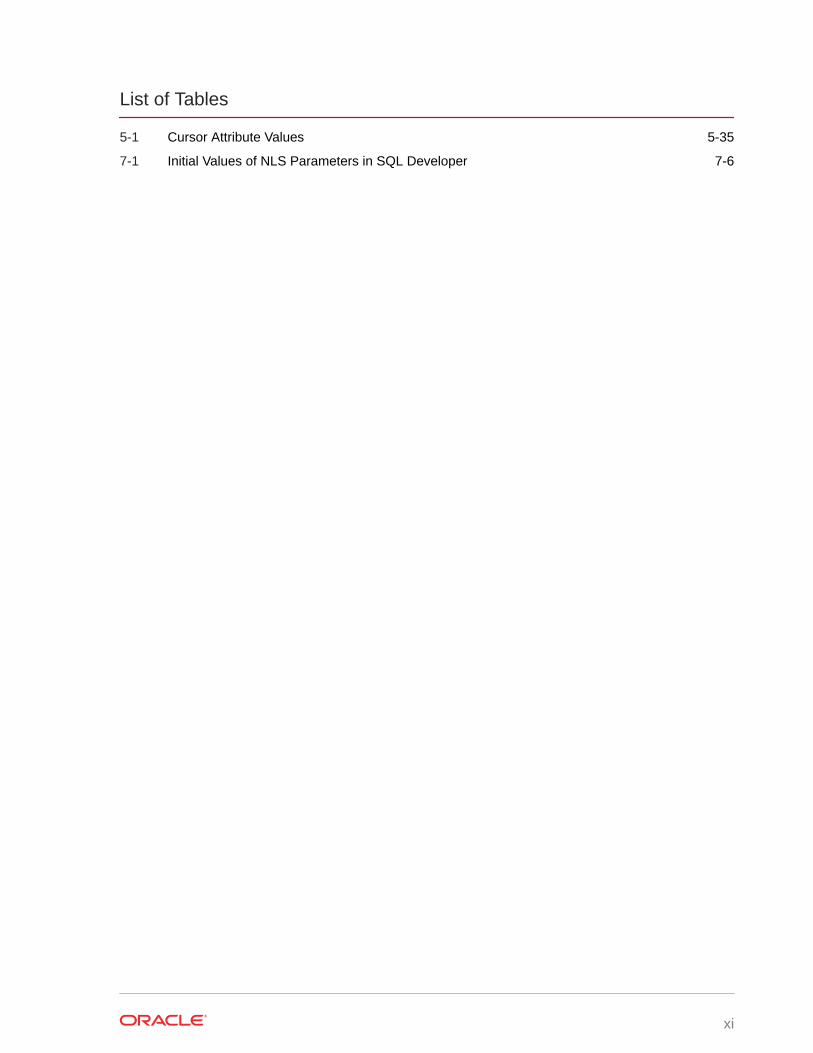
List of Tables
5-1 Cursor Attribute Values 5-35
7-1 Initial Values of NLS Parameters in SQL Developer 7-6
xi
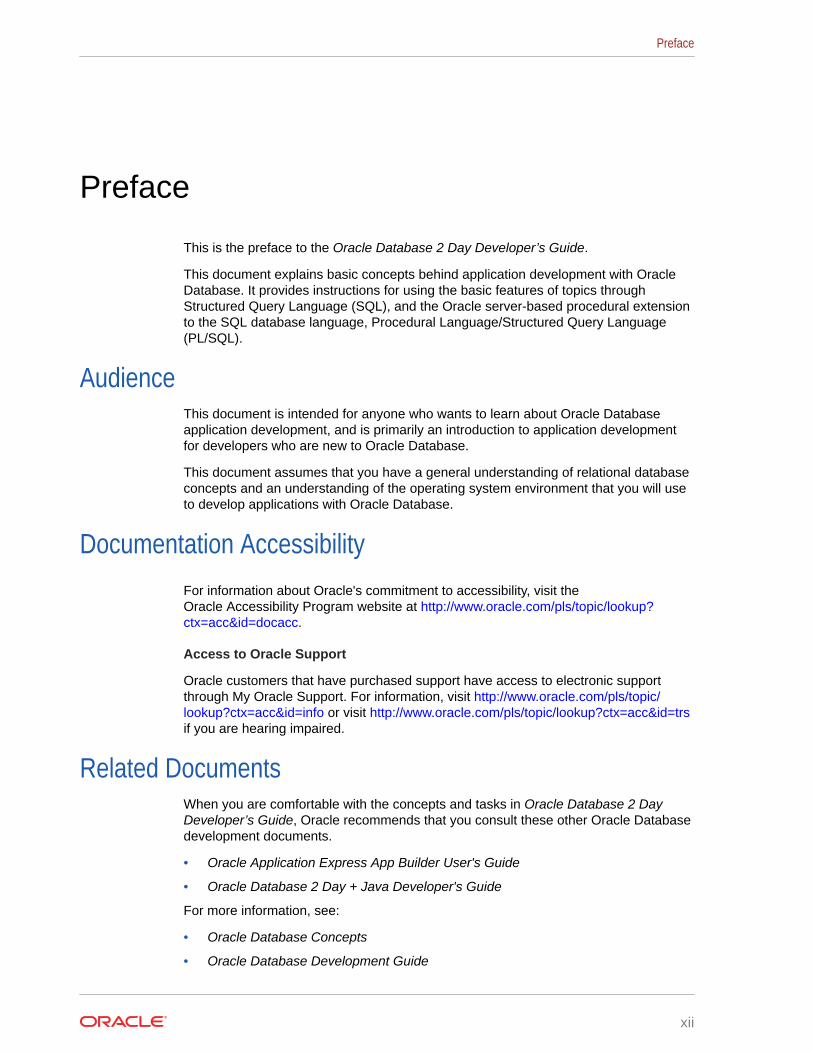
Preface
This is the preface to the Oracle Database 2 Day Developer’s Guide.
This document explains basic concepts behind application development with OracleDatabase. It provides instructions for using the basic features of topics throughStructured Query Language (SQL), and the Oracle server-based procedural extensionto the SQL database language, Procedural Language/Structured Query Language(PL/SQL).
AudienceThis document is intended for anyone who wants to learn about Oracle Databaseapplication development, and is primarily an introduction to application developmentfor developers who are new to Oracle Database.
This document assumes that you have a general understanding of relational databaseconcepts and an understanding of the operating system environment that you will useto develop applications with Oracle Database.
Documentation AccessibilityFor information about Oracle's commitment to accessibility, visit theOracle Accessibility Program website at http://www.oracle.com/pls/topic/lookup?ctx=acc&id=docacc.
Access to Oracle Support
Oracle customers that have purchased support have access to electronic supportthrough My Oracle Support. For information, visit http://www.oracle.com/pls/topic/lookup?ctx=acc&id=info or visit http://www.oracle.com/pls/topic/lookup?ctx=acc&id=trsif you are hearing impaired.
Related DocumentsWhen you are comfortable with the concepts and tasks in Oracle Database 2 DayDeveloper’s Guide, Oracle recommends that you consult these other Oracle Databasedevelopment documents.
• Oracle Application Express App Builder User's Guide
• Oracle Database 2 Day + Java Developer's Guide
For more information, see:
• Oracle Database Concepts
• Oracle Database Development Guide
Preface
xii
• Oracle Database SQL Language Reference
• Oracle Database PL/SQL Language Reference
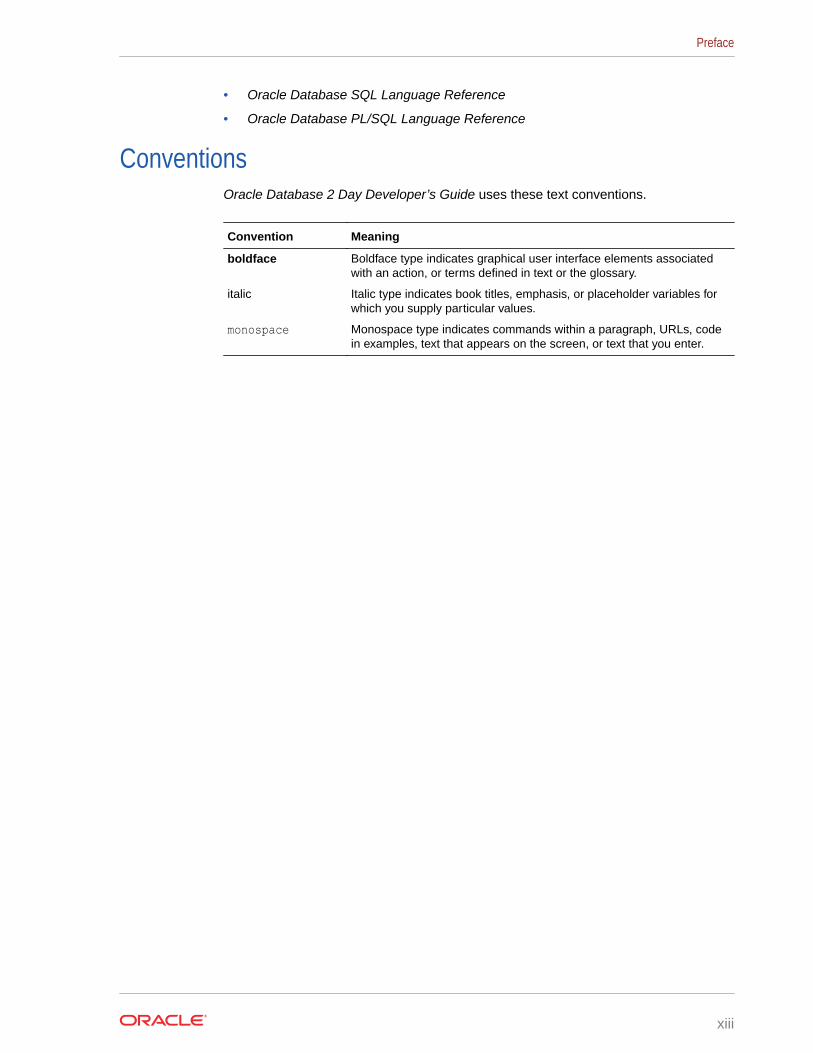
ConventionsOracle Database 2 Day Developer’s Guide uses these text conventions.
Convention Meaning
boldface Boldface type indicates graphical user interface elements associatedwith an action, or terms defined in text or the glossary.
italic Italic type indicates book titles, emphasis, or placeholder variables forwhich you supply particular values.
monospace Monospace type indicates commands within a paragraph, URLs, codein examples, text that appears on the screen, or text that you enter.
Preface
xiii
1Introduction to 2 Day Oracle DatabaseDevelopment
An Oracle Database developer is responsible for creating or maintaining the databasecomponents of an application that uses the Oracle technology stack. Oracle Databasedevelopers either develop applications or convert existing applications to run in theOracle Database environment.
See Also:
Oracle Database Concepts for more information about the duties of OracleDatabase developers
1.1 About This DocumentThis document is the entry into the Oracle Database documentation set for applicationdevelopers.
This document does the following:
• Explains the basic concepts behind development with Oracle Database
• Shows, with tutorials and examples, how to use basic features of SQL andPL/SQL
• Provides references to detailed information about subjects that it introduces
• Shows how to develop and deploy a simple Oracle Database application
Introduction to 2 Day Oracle Database Development (this chapter) describes thereader for whom this document is intended, outlines the organization of this document,introduces important Oracle Database concepts, and describes the sample schemaused in the tutorials and examples in this document.
Connecting to Oracle Database and Exploring It explains how to connect to OracleDatabase, how to view schema objects and the properties and data of OracleDatabase tables, and how to use queries to retrieve data from an Oracle Databasetable.
About DML Statements and Transactions introduces data manipulation language(DML) statements and transactions. DML statements add, change, and delete OracleDatabase table data. A transaction is a sequence of one or more SQL statements thatOracle Database treats as a unit: either all of the statements are performed, or none ofthem are.
Creating and Managing Schema Objects introduces data definition language (DDL)statements, which create, change, and drop schema objects.
1-1
Developing Stored Subprograms and Packages introduces stored subprograms andpackages, which can be used as building blocks for many different databaseapplications.
Using Triggers introduces triggers, which are stored PL/SQL units that automaticallyexecute ("fire") in response to specified events.
Working in a Global Environment introduces globalization support—National LanguageSupport (NLS) parameters and Unicode-related features of SQL and PL/SQL.
Building Effective Applications explains how to build scalable applications and userecommended programming and security practices.
Developing a Simple Oracle Database Application shows how to develop a simpleOracle Database application.
Deploying an Oracle Database Application explains how to deploy an Oracle Databaseapplication—that is, how to install it in one or more environments where other userscan run it—using the application developed in Developing a Simple Oracle DatabaseApplication as an example.
1.2 About Oracle DatabaseOracle Database groups related information into logical structures called schemas.The logical structures contain schema objects.
When you connect to the database by providing your user name and password, youspecify the schema and indicate that you are its owner. In Oracle Database, the username and the name of the schema to which the user connects are the same.
1.2.1 About Schema ObjectsEvery object in an Oracle Database belongs to only one schema, and has a uniquename with that schema.
Some of the objects that schemas can contain are:
• Tables
Tables are the basic units of data storage in Oracle Database. Tables hold alluser-accessible data. Each table contains rows that represent individual datarecords. Rows are composed of columns that represent the fields of the records.
• Indexes
Indexes are optional objects that can improve the performance of data retrievalfrom tables. Indexes are created on one or more columns of a table, and areautomatically maintained in the database.
• Views
You can create a view that combines information from several different tables intoa single presentation. A view can rely on information from both tables and otherviews.
• Sequences
When all records of a table must be distinct, you can use a sequence to generatea serial list of unique integers for numeric columns, each of which represents theID of one record.
Chapter 1About Oracle Database
1-2
• Synonyms
Synonyms are aliases for schema objects. You can use synonyms for security andconvenience; for example, to hide the ownership of an object or to simplify SQLstatements.
• Stored subprograms
Stored subprograms (also called schema-level subprograms) are proceduresand functions that are stored in the database. They can be invoked from clientapplications that access the database.
Triggers are stored subprograms that are automatically run by the database whenspecified events occur in a particular table or view. Triggers can restrict access tospecific data and perform logging.
• Packages
A package is a group of related subprograms, along with the explicit cursors andvariables they use, stored in the database as a unit, for continued use. Like storedsubprograms, package subprograms can be invoked from client applications thataccess the database.
Typically, the objects that an application uses belong to the same schema.
See Also:
• Oracle Database Concepts for a comprehensive introduction to schemaobjects
• Creating and Managing Tables
• Managing Indexes
• Creating and Managing Views
• Creating and Managing Sequences
• Creating and Managing Synonyms
• Developing Stored Subprograms and Packages
• Using Triggers
1.2.2 About Oracle Database AccessYou can access Oracle Database only through a client program, such as SQL*Plus orSQL Developer.
The client program's interface to Oracle Database is Structured Query Language(SQL). Oracle provides an extension to SQL called Procedural Language/SQL (PL/SQL).
1.2.2.1 About SQL*PlusSQL*Plus (pronounced sequel plus) is an interactive and batch query tool that isinstalled with every Oracle Database installation. It has a command-line user interfacethat acts as the client when connecting to the database.
Chapter 1About Oracle Database
1-3
SQL*Plus has its own commands and environment. In the SQL*Plus environment, youcan enter and run SQL*Plus commands, SQL statements, PL/SQL statements, andoperating system commands to perform tasks such as:
• Formatting, performing calculations on, storing, and printing query results
• Examining tables and object definitions
• Developing and running batch scripts
• Performing database administration
You can use SQL*Plus to generate reports interactively, to generate reports as batchprocesses, and to output the results to text file, to screen, or to HTML file for browsingon the Internet. You can generate reports dynamically using the HTML output facility.
You can use SQL*Plus in SQL Developer. For details, see Oracle SQL DeveloperUser's Guide.
See Also:
• "Connecting to Oracle Database from SQL*Plus"
• SQL*Plus User's Guide and Reference for information about SQL*Plus
1.2.2.2 About SQL DeveloperSQL Developer (pronounced sequel developer) is a graphical user interface forOracle Database, that is available in the default installation of Oracle Database and byfree download from the Oracle Technology Network.
SQL Developer serves as a modern integrated development environment (IDE) forSQL and PL/SQL, and provides a graphical interface for managing database objects.You can also create reports, design data models, migrate third-party databases toOracle, REST-enable tables and views, and deploy and manage Oracle REST DataServices. The SQL Worksheet allows you to enter and run SQL statements, PL/SQLstatements, and SQL*Plus commands and scripts.
Note:
SQL Developer often offers several ways to do a task, but this documentdoes not explain every possible way.
See Also:
• "Connecting to Oracle Database from SQL Developer"
• Oracle SQL Developer User's Guide for information about SQLDeveloper
Chapter 1About Oracle Database
1-4
1.2.2.3 About Structured Query Language (SQL)Structured Query Language (SQL) (pronounced sequel) is the set-based, high-level computer language with which all programs and users access data in OracleDatabase.
SQL is a declarative, or nonprocedural, language; that is, it describes what to do,but not how. You specify the desired result set (for example, the names of currentemployees), but not how to get it.
See Also:
• Oracle Database Concepts for a complete overview of SQL
• Oracle Database SQL Language Reference for complete informationabout SQL
1.2.2.4 About Procedural Language/SQL (PL/SQL)Procedural Language/SQL (PL/SQL) (pronounced P L sequel) is a native OracleDatabase extension to SQL. It bridges the gap between declarative and imperativeprogram control by adding procedural elements, such as conditional control and loops.
In PL/SQL, you can declare constants and variables, procedures and functions, typesand variables of those types, and triggers. You can handle exceptions (runtime errors).You can create PL/SQL units—procedures, functions, packages, types, and triggers—that are stored in the database for reuse by applications that use any of the OracleDatabase programmatic interfaces.
The basic unit of a PL/SQL source program is the block, which groups relateddeclarations and statements. A block has an optional declarative part, a requiredexecutable part, and an optional exception-handling part.
See Also:
• Oracle Database Concepts for a complete overview of PL/SQL
• Oracle Database PL/SQL Language Reference for complete informationabout PL/SQL
1.2.2.5 About Other Client Programs, Languages, and Development ToolsSeveral other client programs, languages, and tools are available.
Chapter 1About Oracle Database
1-5
Note:
Some of the products on the preceding list do not ship with Oracle Databaseand must be downloaded separately.
See Also:
• Oracle Database Concepts for more information about tools for OracleDatabase developers
• Oracle Database Development Guide for information about choosing aprogramming environment
1.2.2.5.1 Oracle Application ExpressOracle Application Express is an application development and deployment tool thatenables you to quickly create secure and scalable web applications even if you havelimited previous programming experience. The embedded Application Builder toolassembles an HTML interface or a complete application that uses schema objects,such as tables or stored procedures, into a collection of pages that are linked throughtabs, buttons, or hypertext links.
See Also:
Oracle Application Express App Builder User's Guide for more informationabout Oracle Application Express
1.2.2.5.2 Oracle Java Database Connectivity (JDBC)Oracle Java Database Connectivity (JDBC) is an API that enables Java to sendSQL statements to an object-relational database, such as Oracle Database. OracleDatabase JDBC provides complete support for the JDBC 3.0 and JDBC RowSet(JSR-114) standards, advanced connection caching for both XA and non-XAconnections, exposure of SQL and PL/SQL data types to Java, and fast SQL dataaccess.
See Also:
For more information about JDBC:
• Oracle Database Concepts
• Oracle Database Development Guide
• Oracle Database 2 Day + Java Developer's Guide
Chapter 1About Oracle Database
1-6
1.2.2.5.3 Hypertext Preprocessor (PHP)The Hypertext Preprocessor (PHP) is a powerful interpreted server-side scriptinglanguage for quick web application development. PHP is an open source languagethat is distributed under a BSD-style license. PHP is designed for embedding databaseaccess requests directly into HTML pages.
1.2.2.5.4 Oracle Call Interface (OCI)Oracle Call Interface (OCI) is the native C language API for accessing OracleDatabase directly from C applications.
The OCI Software Development Kit is installed as part of the Oracle Instant Client,which enables you to run applications without installing the standard Oracle client orhaving an ORACLE_HOME. Your applications work without change, using significantly lessdisk space.
See Also:
• Oracle Database Development Guide for more information about OCI
• Oracle Call Interface Programmer's Guide for complete informationabout OCI
1.2.2.5.5 Oracle C++ Call Interface (OCCI)Oracle C++ Call Interface (OCCI) is the native C++ language API for accessing OracleDatabase directly from C++ applications. Like OCI, OCCI supports both relational andobject-oriented programming paradigms.
The OCCI Software Development Kit is also installed as part of the Oracle InstantClient, which enables you to run applications without installing the standard Oracleclient or having an ORACLE_HOME. Your applications work without change, usingsignificantly less disk space.
See Also:
• Oracle Database Development Guide for more information about OCCI
• Oracle C++ Call Interface Programmer's Guide for complete informationabout OCCI
1.2.2.5.6 Open Database Connectivity (ODBC)Open Database Connectivity (ODBC) is a set of database access APIs that connect tothe database, prepare, and then run SQL statements on the database. An applicationthat uses an ODBC driver can access nonuniform data sources, such as spreadsheetsand comma-delimited files.
Chapter 1About Oracle Database
1-7
The Oracle ODBC driver conforms to ODBC 3.51 specifications. It supports all coreAPIs and a subset of Level 1 and Level 2 functions. Microsoft supplies the Drivermanager component for the Windows platform.
Like OCI, OCCI, and JDBC, ODBC is part of the Oracle Instant Client installation.
See Also:
• Oracle Database Concepts
• Oracle Services for Microsoft Transaction Server Developer's Guide forMicrosoft Windows for information about using the Oracle ODBC driverwith Windows
• Oracle Database Administrator's Reference for Linux and UNIX-BasedOperating Systems for information about using Oracle ODBC driver onLinux
1.2.2.5.7 Pro*C/C++ PrecompilerThe Pro*C/C++ precompiler lets you embed SQL statements in a C or C++ source file.The precompiler accepts the source program as input, translates the embedded SQLstatements into standard Oracle runtime library calls, and generates a modified sourceprogram that you can compile, link, and run.
See Also:
• Oracle Database Concepts for more information about Oracleprecompilers
• Oracle Database Development Guide for more information about thePro*C/C++ precompiler
• Pro*C/C++ Programmer's Guide for complete information about thePro*C/C++ precompiler
1.2.2.5.8 Pro*COBOL PrecompilerThe Pro*COBOL precompiler lets you embed SQL statements in a COBOL source file.The precompiler accepts the source program as input, translates the embedded SQLstatements into standard Oracle runtime library calls, and generates a modified sourceprogram that you can compile, link, and run.
Chapter 1About Oracle Database
1-8
See Also:
• Oracle Database Concepts for more information about Oracleprecompilers
• Oracle Database Development Guide for more information about thePro*COBOL precompiler
• Pro*COBOL Programmer's Guide for complete information about thePro*COBOL precompiler
1.2.2.5.9 Microsoft .NET FrameworkThe Microsoft .NET Framework is a multilanguage environment for building, deploying,and running applications and XML web services.
The main components of the Microsoft .NET Framework are:
• Common Language Runtime (CLR)
The Common Language Runtime (CLR) is a language-neutral development andruntime environment that provides services that help manage running applications.
• Framework Class Libraries (FCL)
The Framework Class Libraries (FCL) provide a consistent, object-oriented libraryof prepackaged functionality.
Oracle Data Provider for .NET (ODP.NET)
Oracle Data Provider for .NET (ODP.NET) provides fast and efficient ADO.NET dataaccess from .NET applications to Oracle Database. ODP.NET allows developers totake advantage of advanced Oracle Database functionality that exists in OracleDatabase, including SecureFiles, XML DB, and Advanced Queuing.
Oracle Developer Tools for Visual Studio (ODT)
Oracle Developer Tools for Visual Studio (ODT) is a set of application tools thatintegrate with the Visual Studio environment. These tools provide graphic userinterface access to Oracle functionality, enable the user to perform a wide range ofapplication development tasks, and improve development productivity and ease ofuse. Oracle Developer Tools supports the programming and implementation of .NETstored procedures using Visual Basic, C#, and other .NET languages.
.NET Stored Procedures
Oracle Database Extensions for .NET is a database option for Oracle Database onWindows. It makes it possible to build and run .NET stored procedures or functionswith Oracle Database for Microsoft Windows using Visual Basic .NET or Visual C#.
After building .NET procedures and functions into a .NET assembly, you can deploythem in Oracle Database using the Oracle Deployment Wizard for .NET, a componentof the Oracle Developer Tools for Visual Studio.
Oracle Providers for ASP.NET
Oracle Providers for ASP.NET offer ASP.NET developers an easy way to store statecommon to web applications within Oracle Database. These providers are modeled
Chapter 1About Oracle Database
1-9
on existing Microsoft ASP.NET providers, sharing similar schema and programminginterfaces to provide .NET developers a familiar interface. Oracle supports theMembership, Profile, Role, and other providers.
See Also:
• Oracle Data Provider for .NET Developer's Guide for Microsoft Windows
• Oracle Database Extensions for .NET Developer's Guide for MicrosoftWindows
• Oracle Database Development Guide
1.2.2.5.10 Oracle Provider for OLE DB (OraOLEDB)Oracle Provider for OLE DB (OraOLEDB) is an open standard data accessmethodology that uses a set of Component Object Model (COM) interfaces foraccessing and manipulating different types of data. These interfaces are available fromvarious database providers.
See Also:
Oracle Provider for OLE DB Developer's Guide for Microsoft Windows formore information about OraOLEDB
1.3 About Sample Schema HRThe HR sample schema can be installed with Oracle Database. This schema containsinformation about employees—departments, locations, work histories, and relatedinformation. Like all schemas, HR has tables, views, indexes, procedures, functions,and other attributes. The examples and tutorials in this document use the schema.
See Also:
• Oracle Database Sample Schemas for a complete description of the HRschema
• "Connecting to Oracle Database as User HR" for instructions forconnecting to Oracle Database as the user HR
Chapter 1About Sample Schema HR
1-10
2Connecting to Oracle Database andExploring It
You can connect to Oracle Database only through a client program, such as SQL*Plusor SQL Developer. When connected to the database, you can view schema objects,view the properties and data of Oracle Database tables, and use queries to retrievedata from Oracle Database tables.
After connecting to Oracle Database through a client program, you enter and runcommands in that client program. For details, see the documentation for your clientprogram.
2.1 Connecting to Oracle Database from SQL*PlusSQL*Plus is a client program from which you can access Oracle Database. This topicshows how to start SQL*Plus and connect to Oracle Database.
Note:
For steps 3 and 4 of the following procedure, you need a user name andpassword.
To connect to Oracle Database from SQL*Plus:
1. If you are on a Windows system, display a Windows command prompt.
2. At the command prompt, type sqlplus and then press the key Enter.
3. At the user name prompt, type your user name and then press the key Enter.
4. At the password prompt, type your password and then press the key Enter.
Note:
For security, your password is not visible on your screen.
The system connects you to an Oracle Database instance.
You are in the SQL*Plus environment. At the SQL> prompt, you can enter and runSQL*Plus commands, SQL statements, PL/SQL statements, and operating systemcommands.
To exit SQL*Plus, type exit and press the key Enter.
2-1
Note:
Exiting SQL*Plus ends the SQL*Plus session, but does not shut downthe Oracle Database instance.
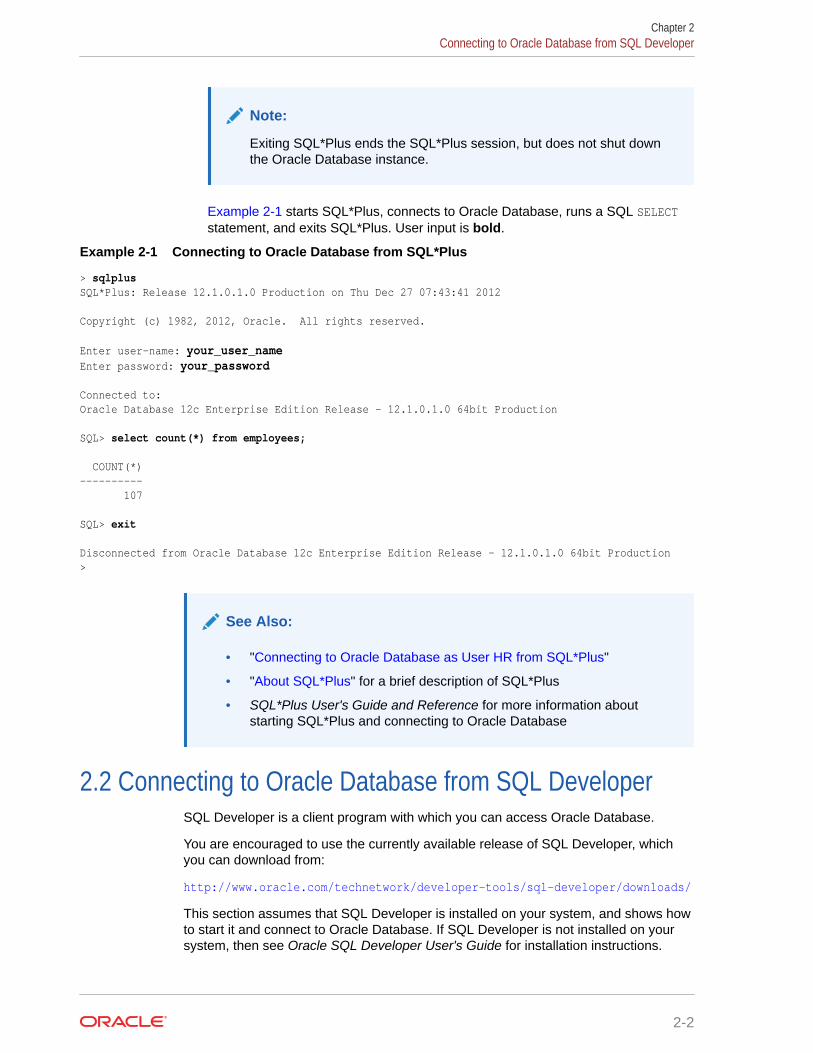
Example 2-1 starts SQL*Plus, connects to Oracle Database, runs a SQL SELECTstatement, and exits SQL*Plus. User input is bold.
Example 2-1 Connecting to Oracle Database from SQL*Plus
> sqlplusSQL*Plus: Release 12.1.0.1.0 Production on Thu Dec 27 07:43:41 2012 Copyright (c) 1982, 2012, Oracle. All rights reserved. Enter user-name: your_user_nameEnter password: your_password Connected to:Oracle Database 12c Enterprise Edition Release - 12.1.0.1.0 64bit Production SQL> select count(*) from employees; COUNT(*)---------- 107 SQL> exit Disconnected from Oracle Database 12c Enterprise Edition Release - 12.1.0.1.0 64bit Production>
See Also:
• "Connecting to Oracle Database as User HR from SQL*Plus"
• "About SQL*Plus" for a brief description of SQL*Plus
• SQL*Plus User's Guide and Reference for more information aboutstarting SQL*Plus and connecting to Oracle Database
2.2 Connecting to Oracle Database from SQL DeveloperSQL Developer is a client program with which you can access Oracle Database.
You are encouraged to use the currently available release of SQL Developer, whichyou can download from:
http://www.oracle.com/technetwork/developer-tools/sql-developer/downloads/
This section assumes that SQL Developer is installed on your system, and shows howto start it and connect to Oracle Database. If SQL Developer is not installed on yoursystem, then see Oracle SQL Developer User's Guide for installation instructions.
Chapter 2Connecting to Oracle Database from SQL Developer
2-2
Note:
For the following procedure:
• If you're using a SQL Developer kit that does not include the JDK, thenthe first time you start SQL Developer on your system, you must providethe path to the Java Development Kit.
• When prompted, you need to enter a user name and password.
To connect to Oracle Database from SQL Developer:
1. Start SQL Developer.
For instructions, see Oracle SQL Developer User's Guide.
If this is the first time you have started SQL Developer on your system, you areprompted to enter the path to the Java Development Kit (JDK) installation (forexample, C:\Program Files\Java\jdk1.8.0_65). Either type the path after theprompt or browse to it, and then press the key Enter.
2. In the Connections frame, click the icon New Connection.
3. In the New/Select Database Connection window:
a. Type the appropriate values in the fields Connection Name, Username, andPassword.
For security, the password characters that you type appear as asterisks.
Near the Password field is the check box Save Password. By default, it isdeselected. Oracle recommends accepting the default.
b. If the Oracle pane is not showing, click the tab Oracle.
c. In the Oracle pane, accept the default values.
(The default values are: Connection Type, Basic; Role, default, Hostname,localhost; Port, 1521; SID option, selected; SID field, xe.)
d. Click the button Test.
The connection is tested. If the connection succeeds, the Status indicatorchanges from blank to Success.
e. If the test succeeded, click the button Connect.
The New/Select Database Connection window closes. The Connections frameshows the connection whose name you entered in the Connection Name fieldin step 3.
You are in the SQL Developer environment.
To exit SQL Developer, select Exit from the File menu.
Chapter 2Connecting to Oracle Database from SQL Developer
2-3
Note:
Exiting SQL Developer ends the SQL Developer session, but does not shutdown the Oracle Database instance. The next time you start SQL Developer,the connection you created using the preceding procedure still exists. SQLDeveloper prompts you for the password that you supplied in step 3 (unlessyou selected the check box Save Password).
See Also:
• "Connecting to Oracle Database as User HR from SQL Developer"
• "About SQL Developer" for a brief description of SQL Developer
• Oracle SQL Developer User's Guide for more information about usingSQL Developer to create connections to Oracle Database
2.3 Connecting to Oracle Database as User HRTo do the tutorials and examples in this document, you must connect to OracleDatabase as the user HR.
The user HR owns the HR sample schema that the examples and tutorials in thisdocument use.
2.3.1 Unlocking the HR AccountYou must unlock the HR account and reset its password before you can connect toOracle Database as the user HR.
By default, when the HR schema is installed, the HR account is locked and itspassword is expired.
Note:
For the following procedure, you need the name and password of a user whohas the ALTER USERsystem privilege.
To unlock the HR account and reset its password:
1. Using SQL*Plus, connect to Oracle Database as a user with the ALTER USERsystem privilege.
2. At the SQL> prompt, unlock the HR account and reset its password:
Chapter 2Connecting to Oracle Database as User HR
2-4
Caution:
Choose a secure password. For guidelines for secure passwords, seeOracle Database Security Guide.
ALTER USER HR ACCOUNT UNLOCK IDENTIFIED BY password;
The system responds:
User altered.
The HR account is unlocked and its password is password.
Now you can connect to Oracle Database as user HR with the password password.
See Also:
• Oracle SQL Developer User's Guide for information about accessingSQL*Plus within SQL Developer
2.3.2 Connecting to Oracle Database as User HR from SQL*PlusYou can use SQL*Plus to connect to Oracle Database as the HR user.
Note:
If the HR account is locked, see "Unlocking the HR Account" and then returnto this section.
To connect to Oracle Database as user HR from SQL*Plus:
Note:
For this task, you need the password for the HR account.
1. If you are connected to Oracle Database, close your current connection.
2. Follow the directions in "Connecting to Oracle Database from SQL*Plus", enteringthe user name HR at step 3 and the password for the HR account at step 4.
You are now connected to Oracle Database as the user HR.
Chapter 2Connecting to Oracle Database as User HR
2-5
See Also:
SQL*Plus User's Guide and Reference for an example of using SQL*Plus tocreate an HR connection
2.3.3 Connecting to Oracle Database as User HR from SQL DeveloperYou can use SQL Developer to connect to Oracle Database as the HR user.
Note:
If the HR account is locked, see "Unlocking the HR Account" and then returnto this section.
To connect to Oracle Database as user HR from SQL Developer:
Note:
For this task, you need the password for the HR account.
Follow the directions in "Connecting to Oracle Database from SQL Developer",entering the following values at steps 3:
• For Connection Name, enter hr_conn.
(You can enter a different name, but the tutorials in this document assume that younamed the connection hr_conn.)
• For Username, enter HR.
• For Password, enter the password for the HR account.
You are now connected to Oracle Database as the user HR.
2.4 Exploring Oracle Database with SQL*PlusIf you are connected to Oracle Database from SQL*Plus as the user HR, you can viewHR schema objects and the properties of the EMPLOYEES table.
Note:
If you are not connected to Oracle Database as user HR from SQL*Plus, see"Connecting to Oracle Database as User HR from SQL*Plus" and then returnto this section.
Chapter 2Exploring Oracle Database with SQL*Plus
2-6
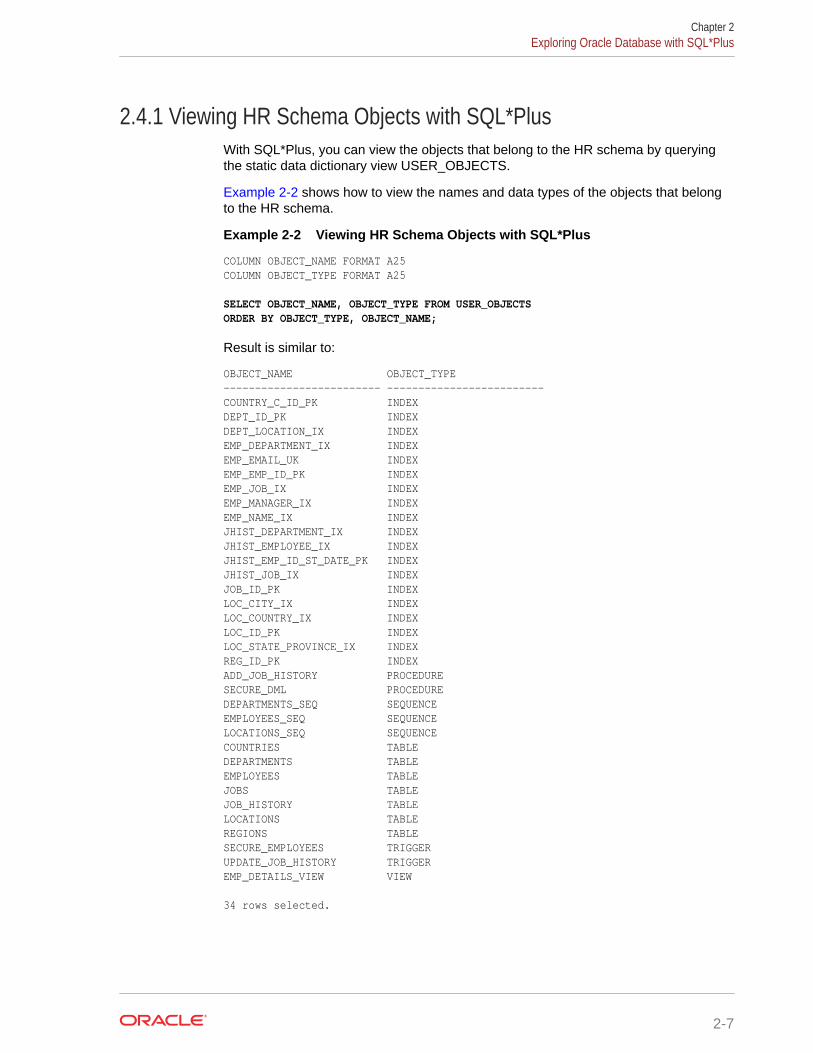
2.4.1 Viewing HR Schema Objects with SQL*PlusWith SQL*Plus, you can view the objects that belong to the HR schema by queryingthe static data dictionary view USER_OBJECTS.
Example 2-2 shows how to view the names and data types of the objects that belongto the HR schema.
Example 2-2 Viewing HR Schema Objects with SQL*Plus
COLUMN OBJECT_NAME FORMAT A25COLUMN OBJECT_TYPE FORMAT A25
SELECT OBJECT_NAME, OBJECT_TYPE FROM USER_OBJECTSORDER BY OBJECT_TYPE, OBJECT_NAME;
Result is similar to:
OBJECT_NAME OBJECT_TYPE------------------------- -------------------------COUNTRY_C_ID_PK INDEXDEPT_ID_PK INDEXDEPT_LOCATION_IX INDEXEMP_DEPARTMENT_IX INDEXEMP_EMAIL_UK INDEXEMP_EMP_ID_PK INDEXEMP_JOB_IX INDEXEMP_MANAGER_IX INDEXEMP_NAME_IX INDEXJHIST_DEPARTMENT_IX INDEXJHIST_EMPLOYEE_IX INDEXJHIST_EMP_ID_ST_DATE_PK INDEXJHIST_JOB_IX INDEXJOB_ID_PK INDEXLOC_CITY_IX INDEXLOC_COUNTRY_IX INDEXLOC_ID_PK INDEXLOC_STATE_PROVINCE_IX INDEXREG_ID_PK INDEXADD_JOB_HISTORY PROCEDURESECURE_DML PROCEDUREDEPARTMENTS_SEQ SEQUENCEEMPLOYEES_SEQ SEQUENCELOCATIONS_SEQ SEQUENCECOUNTRIES TABLEDEPARTMENTS TABLEEMPLOYEES TABLEJOBS TABLEJOB_HISTORY TABLELOCATIONS TABLEREGIONS TABLESECURE_EMPLOYEES TRIGGERUPDATE_JOB_HISTORY TRIGGEREMP_DETAILS_VIEW VIEW 34 rows selected.
Chapter 2Exploring Oracle Database with SQL*Plus
2-7
See Also:
• Oracle Database Reference for information about USER_OBJECTS
• "Selecting Table Data" for information about using queries to view tabledata
• "About Sample Schema HR" for general information about the schemaHR
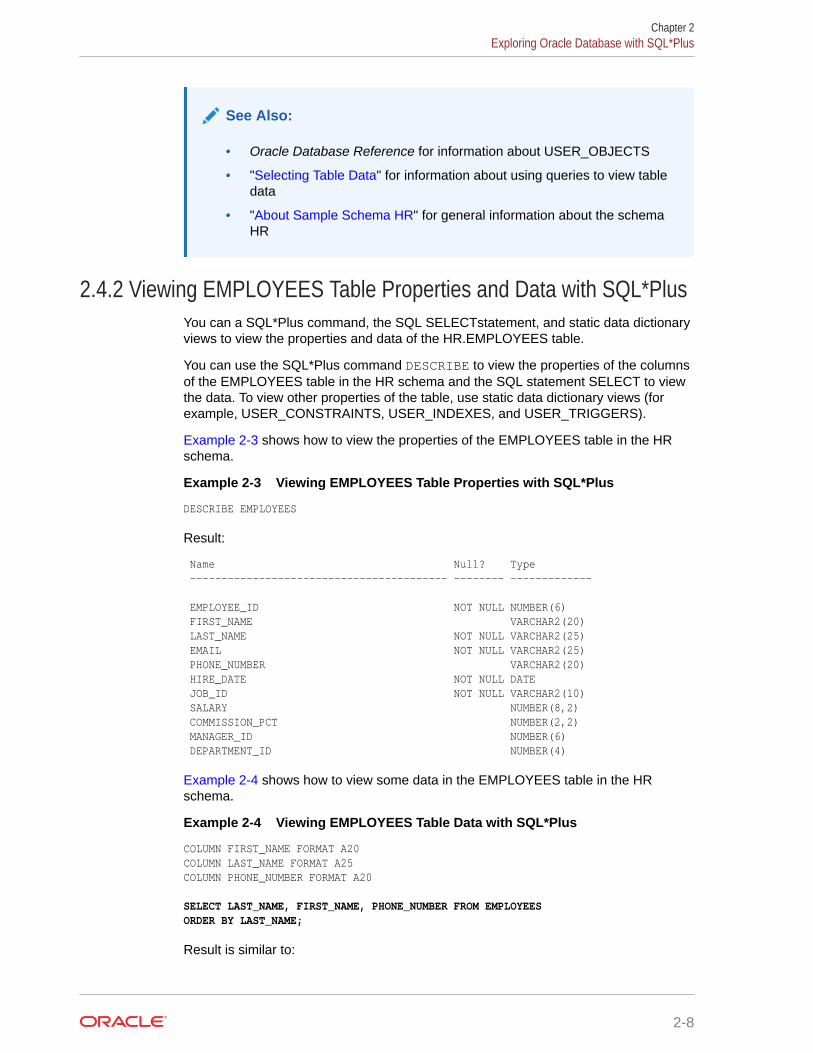
2.4.2 Viewing EMPLOYEES Table Properties and Data with SQL*PlusYou can a SQL*Plus command, the SQL SELECTstatement, and static data dictionaryviews to view the properties and data of the HR.EMPLOYEES table.
You can use the SQL*Plus command DESCRIBE to view the properties of the columnsof the EMPLOYEES table in the HR schema and the SQL statement SELECT to viewthe data. To view other properties of the table, use static data dictionary views (forexample, USER_CONSTRAINTS, USER_INDEXES, and USER_TRIGGERS).
Example 2-3 shows how to view the properties of the EMPLOYEES table in the HRschema.
Example 2-3 Viewing EMPLOYEES Table Properties with SQL*Plus
DESCRIBE EMPLOYEES
Result:
Name Null? Type ----------------------------------------- -------- ------------- EMPLOYEE_ID NOT NULL NUMBER(6) FIRST_NAME VARCHAR2(20) LAST_NAME NOT NULL VARCHAR2(25) EMAIL NOT NULL VARCHAR2(25) PHONE_NUMBER VARCHAR2(20) HIRE_DATE NOT NULL DATE JOB_ID NOT NULL VARCHAR2(10) SALARY NUMBER(8,2) COMMISSION_PCT NUMBER(2,2) MANAGER_ID NUMBER(6) DEPARTMENT_ID NUMBER(4)
Example 2-4 shows how to view some data in the EMPLOYEES table in the HRschema.
Example 2-4 Viewing EMPLOYEES Table Data with SQL*Plus
COLUMN FIRST_NAME FORMAT A20COLUMN LAST_NAME FORMAT A25COLUMN PHONE_NUMBER FORMAT A20
SELECT LAST_NAME, FIRST_NAME, PHONE_NUMBER FROM EMPLOYEESORDER BY LAST_NAME;
Result is similar to:
Chapter 2Exploring Oracle Database with SQL*Plus
2-8
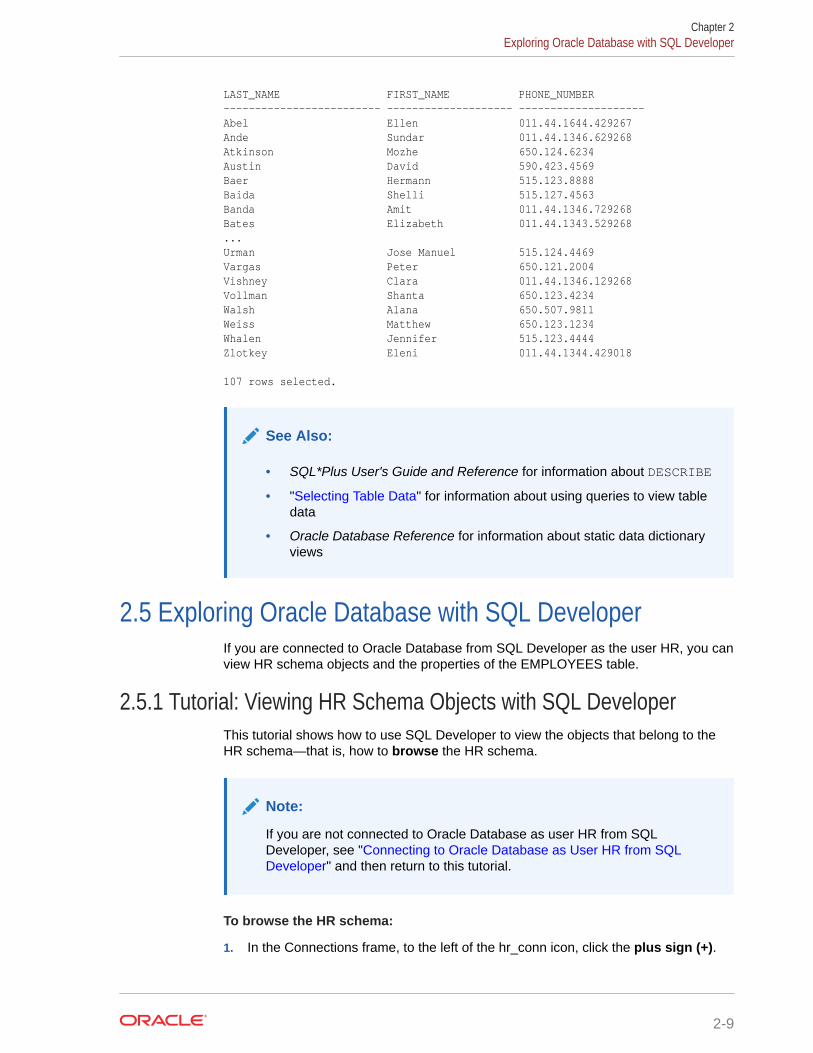
LAST_NAME FIRST_NAME PHONE_NUMBER------------------------- -------------------- --------------------Abel Ellen 011.44.1644.429267Ande Sundar 011.44.1346.629268Atkinson Mozhe 650.124.6234Austin David 590.423.4569Baer Hermann 515.123.8888Baida Shelli 515.127.4563Banda Amit 011.44.1346.729268Bates Elizabeth 011.44.1343.529268...Urman Jose Manuel 515.124.4469Vargas Peter 650.121.2004Vishney Clara 011.44.1346.129268Vollman Shanta 650.123.4234Walsh Alana 650.507.9811Weiss Matthew 650.123.1234Whalen Jennifer 515.123.4444Zlotkey Eleni 011.44.1344.429018 107 rows selected.
See Also:
• SQL*Plus User's Guide and Reference for information about DESCRIBE
• "Selecting Table Data" for information about using queries to view tabledata
• Oracle Database Reference for information about static data dictionaryviews
2.5 Exploring Oracle Database with SQL DeveloperIf you are connected to Oracle Database from SQL Developer as the user HR, you canview HR schema objects and the properties of the EMPLOYEES table.
2.5.1 Tutorial: Viewing HR Schema Objects with SQL DeveloperThis tutorial shows how to use SQL Developer to view the objects that belong to theHR schema—that is, how to browse the HR schema.
Note:
If you are not connected to Oracle Database as user HR from SQLDeveloper, see "Connecting to Oracle Database as User HR from SQLDeveloper" and then return to this tutorial.
To browse the HR schema:
1. In the Connections frame, to the left of the hr_conn icon, click the plus sign (+).
Chapter 2Exploring Oracle Database with SQL Developer
2-9

If you are not connected to the database, the Connection Information windowopens. If you are connected to the database, the hr_conn information expands(see the information that follows "Click OK" in step 2).
2. If the Connection Information window opens:
a. In the User Name field, enter hr.
b. In the Password field, enter the password for the user HR.
c. Click OK.
The hr_conn information expands: The plus sign becomes a minus sign (-), andunder the hr_conn icon, a list of schema object types appears—Tables, Views,Indexes, and so on. (If you click the minus sign, the hr_conn information collapses:The minus sign becomes a plus sign, and the list disappears.)
See Also:
• Oracle SQL Developer User's Guide for more information about the SQLDeveloper user interface
• "About Sample Schema HR" for general information about schema HR
2.5.2 Tutorial: Viewing EMPLOYEES Table Properties and Data withSQL Developer
This tutorial shows how to use SQL Developer to view the properties and data of theEMPLOYEES table in the HR schema.
Note:
If you are not browsing the HR schema, see "Tutorial: Viewing HR SchemaObjects with SQL Developer" and then return to this tutorial.
To view the properties and data of the EMPLOYEES table:
1. In the Connections frame, expand Tables.
Under Tables, a list of the tables in the HR schema appears.
2. Select the table EMPLOYEES.
In the right frame of the Oracle SQL Developer window, in the Columns pane, a listof all columns of this table appears. To the right of each column are its properties—name, data type, and so on. (To see all column properties, move the horizontalscroll bar to the right.)
3. In the right frame, click the tab Data.
The Data pane appears, showing a numbered list of all records in this table. (Tosee more records, move the vertical scroll bar down. To see more columns of therecords, move the horizontal scroll bar to the right.)
Chapter 2Exploring Oracle Database with SQL Developer
2-10
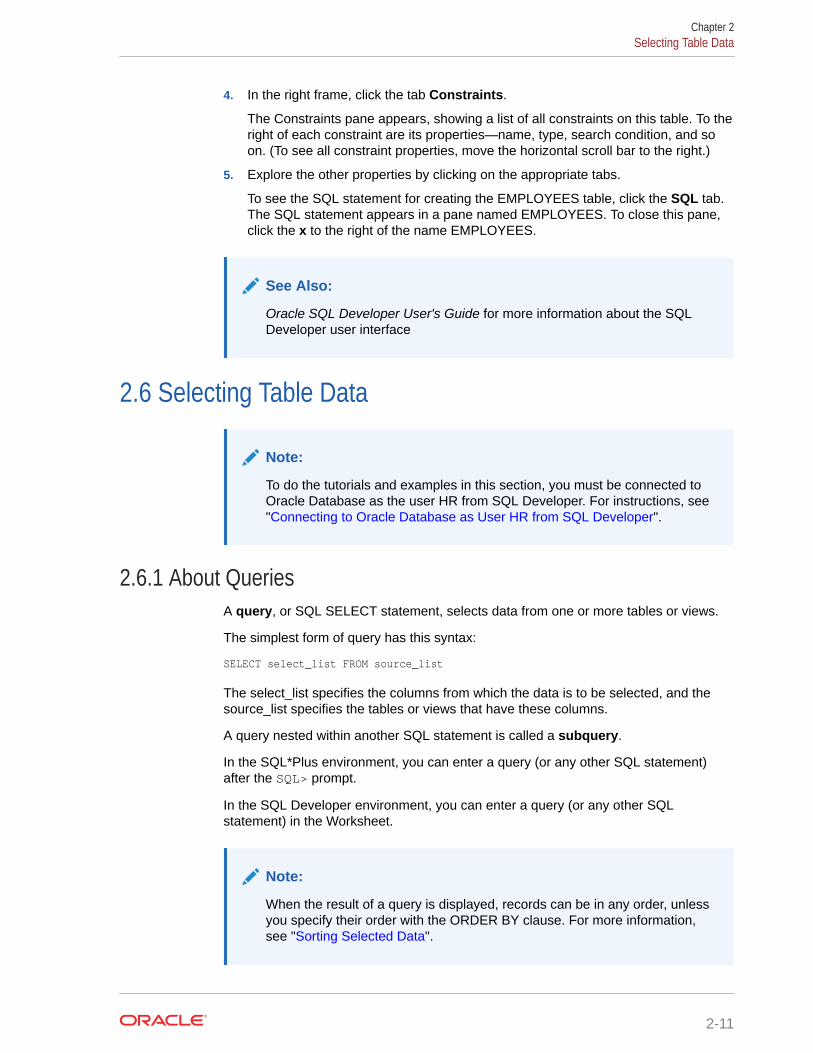
4. In the right frame, click the tab Constraints.
The Constraints pane appears, showing a list of all constraints on this table. To theright of each constraint are its properties—name, type, search condition, and soon. (To see all constraint properties, move the horizontal scroll bar to the right.)
5. Explore the other properties by clicking on the appropriate tabs.
To see the SQL statement for creating the EMPLOYEES table, click the SQL tab.The SQL statement appears in a pane named EMPLOYEES. To close this pane,click the x to the right of the name EMPLOYEES.
See Also:
Oracle SQL Developer User's Guide for more information about the SQLDeveloper user interface
2.6 Selecting Table Data
Note:
To do the tutorials and examples in this section, you must be connected toOracle Database as the user HR from SQL Developer. For instructions, see"Connecting to Oracle Database as User HR from SQL Developer".
2.6.1 About QueriesA query, or SQL SELECT statement, selects data from one or more tables or views.
The simplest form of query has this syntax:
SELECT select_list FROM source_list
The select_list specifies the columns from which the data is to be selected, and thesource_list specifies the tables or views that have these columns.
A query nested within another SQL statement is called a subquery.
In the SQL*Plus environment, you can enter a query (or any other SQL statement)after the SQL> prompt.
In the SQL Developer environment, you can enter a query (or any other SQLstatement) in the Worksheet.
Note:
When the result of a query is displayed, records can be in any order, unlessyou specify their order with the ORDER BY clause. For more information,see "Sorting Selected Data".
Chapter 2Selecting Table Data
2-11
See Also:
• Oracle Database SQL Language Reference for more information aboutqueries and subqueries
• Oracle Database SQL Language Reference for more information aboutthe SELECT statement
• SQL*Plus User's Guide and Reference for more information about theSQL*Plus command line interface
• Oracle SQL Developer User's Guide for information about using theWorksheet in SQL Developer
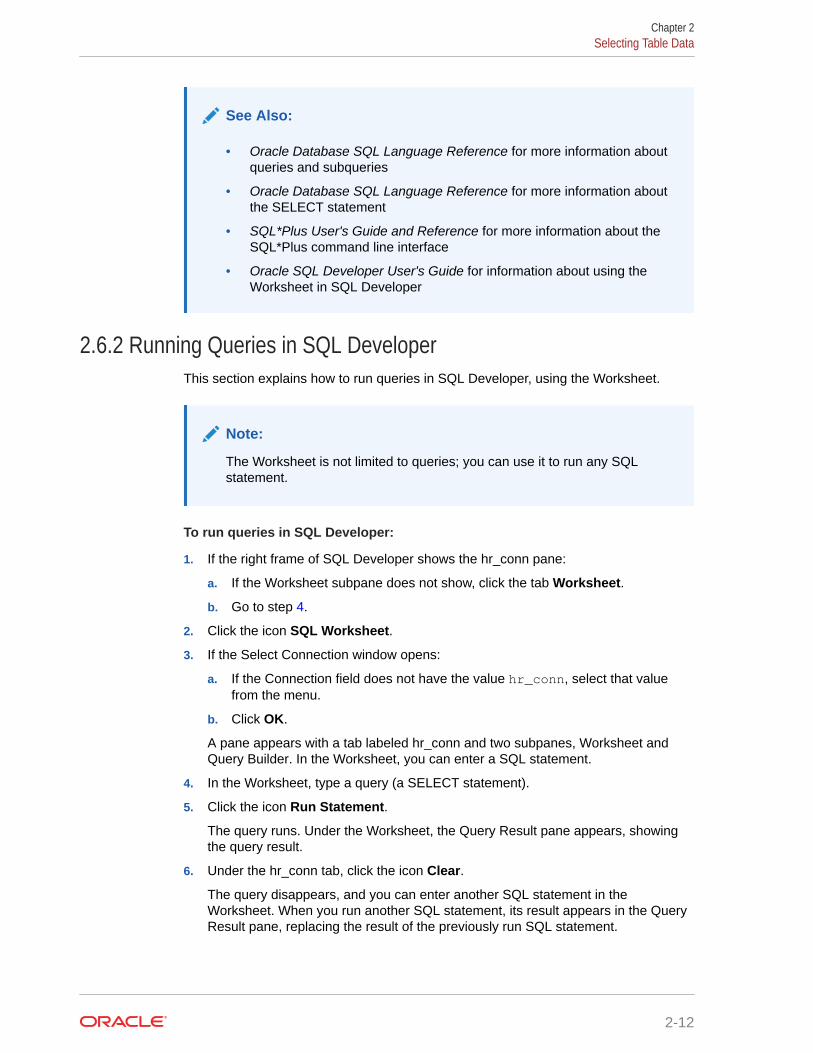
2.6.2 Running Queries in SQL DeveloperThis section explains how to run queries in SQL Developer, using the Worksheet.
Note:
The Worksheet is not limited to queries; you can use it to run any SQLstatement.
To run queries in SQL Developer:
1. If the right frame of SQL Developer shows the hr_conn pane:
a. If the Worksheet subpane does not show, click the tab Worksheet.
b. Go to step 4.
2. Click the icon SQL Worksheet.
3. If the Select Connection window opens:
a. If the Connection field does not have the value hr_conn, select that valuefrom the menu.
b. Click OK.
A pane appears with a tab labeled hr_conn and two subpanes, Worksheet andQuery Builder. In the Worksheet, you can enter a SQL statement.
4. In the Worksheet, type a query (a SELECT statement).
5. Click the icon Run Statement.
The query runs. Under the Worksheet, the Query Result pane appears, showingthe query result.
6. Under the hr_conn tab, click the icon Clear.
The query disappears, and you can enter another SQL statement in theWorksheet. When you run another SQL statement, its result appears in the QueryResult pane, replacing the result of the previously run SQL statement.
Chapter 2Selecting Table Data
2-12
See Also:
Oracle SQL Developer User's Guide for information about using theWorksheet in SQL Developer
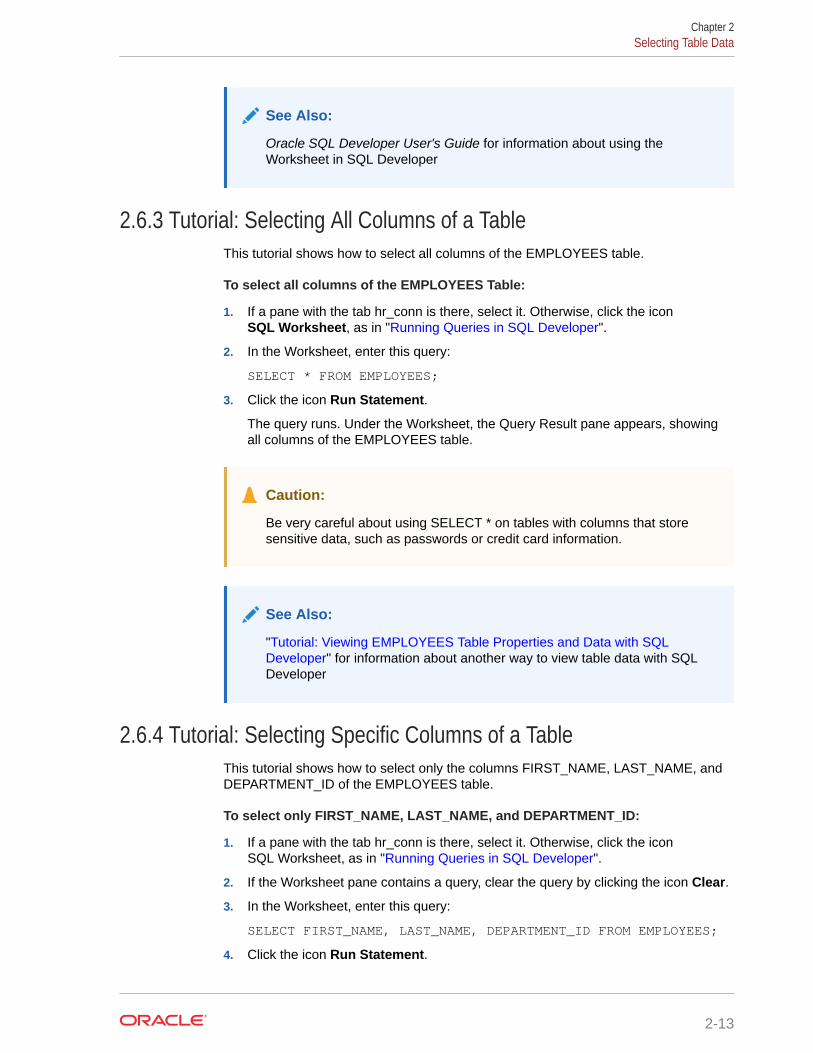
2.6.3 Tutorial: Selecting All Columns of a TableThis tutorial shows how to select all columns of the EMPLOYEES table.
To select all columns of the EMPLOYEES Table:
1. If a pane with the tab hr_conn is there, select it. Otherwise, click the iconSQL Worksheet, as in "Running Queries in SQL Developer".
2. In the Worksheet, enter this query:
SELECT * FROM EMPLOYEES;
3. Click the icon Run Statement.
The query runs. Under the Worksheet, the Query Result pane appears, showingall columns of the EMPLOYEES table.
Caution:
Be very careful about using SELECT * on tables with columns that storesensitive data, such as passwords or credit card information.
See Also:
"Tutorial: Viewing EMPLOYEES Table Properties and Data with SQLDeveloper" for information about another way to view table data with SQLDeveloper
2.6.4 Tutorial: Selecting Specific Columns of a TableThis tutorial shows how to select only the columns FIRST_NAME, LAST_NAME, andDEPARTMENT_ID of the EMPLOYEES table.
To select only FIRST_NAME, LAST_NAME, and DEPARTMENT_ID:
1. If a pane with the tab hr_conn is there, select it. Otherwise, click the iconSQL Worksheet, as in "Running Queries in SQL Developer".
2. If the Worksheet pane contains a query, clear the query by clicking the icon Clear.
3. In the Worksheet, enter this query:
SELECT FIRST_NAME, LAST_NAME, DEPARTMENT_ID FROM EMPLOYEES;
4. Click the icon Run Statement.
Chapter 2Selecting Table Data
2-13
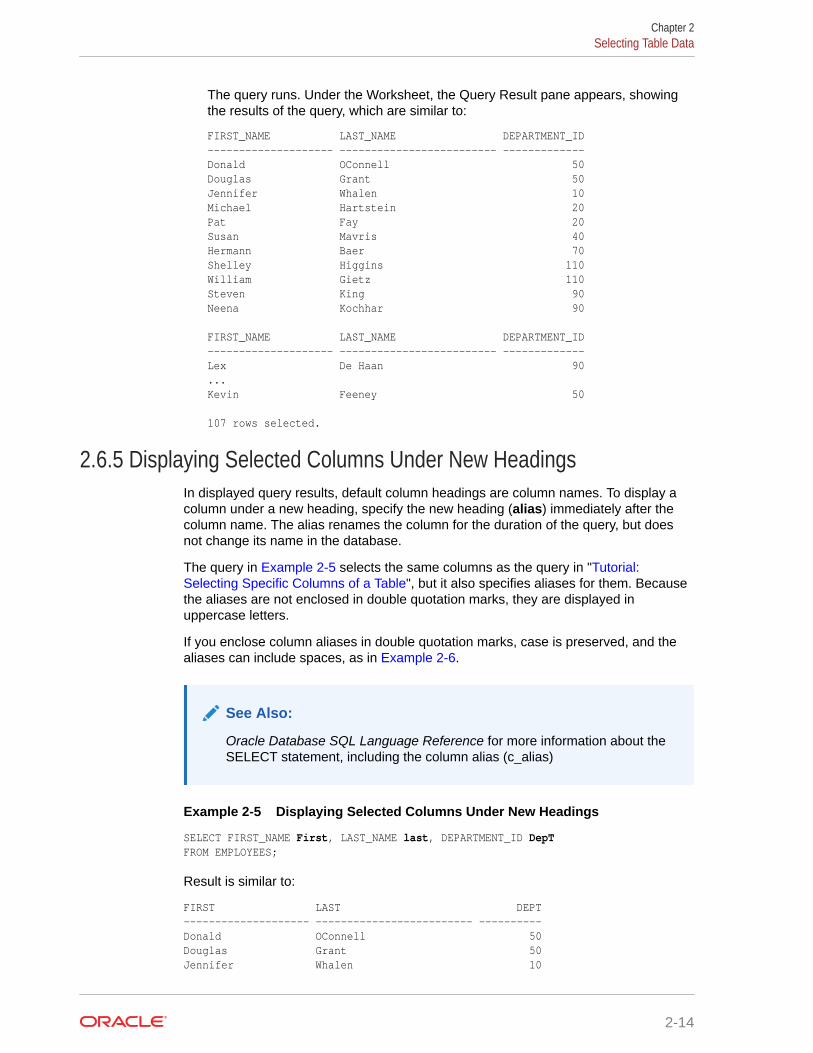
The query runs. Under the Worksheet, the Query Result pane appears, showingthe results of the query, which are similar to:
FIRST_NAME LAST_NAME DEPARTMENT_ID-------------------- ------------------------- -------------Donald OConnell 50Douglas Grant 50Jennifer Whalen 10Michael Hartstein 20Pat Fay 20Susan Mavris 40Hermann Baer 70Shelley Higgins 110William Gietz 110Steven King 90Neena Kochhar 90 FIRST_NAME LAST_NAME DEPARTMENT_ID-------------------- ------------------------- -------------Lex De Haan 90...Kevin Feeney 50 107 rows selected.
2.6.5 Displaying Selected Columns Under New HeadingsIn displayed query results, default column headings are column names. To display acolumn under a new heading, specify the new heading (alias) immediately after thecolumn name. The alias renames the column for the duration of the query, but doesnot change its name in the database.
The query in Example 2-5 selects the same columns as the query in "Tutorial:Selecting Specific Columns of a Table", but it also specifies aliases for them. Becausethe aliases are not enclosed in double quotation marks, they are displayed inuppercase letters.
If you enclose column aliases in double quotation marks, case is preserved, and thealiases can include spaces, as in Example 2-6.
See Also:
Oracle Database SQL Language Reference for more information about theSELECT statement, including the column alias (c_alias)
Example 2-5 Displaying Selected Columns Under New Headings
SELECT FIRST_NAME First, LAST_NAME last, DEPARTMENT_ID DepTFROM EMPLOYEES;
Result is similar to:
FIRST LAST DEPT-------------------- ------------------------- ----------Donald OConnell 50Douglas Grant 50Jennifer Whalen 10
Chapter 2Selecting Table Data
2-14
Michael Hartstein 20Pat Fay 20Susan Mavris 40Hermann Baer 70Shelley Higgins 110William Gietz 110Steven King 90Neena Kochhar 90 FIRST LAST DEPT-------------------- ------------------------- ----------Lex De Haan 90...Kevin Feeney 50 107 rows selected.
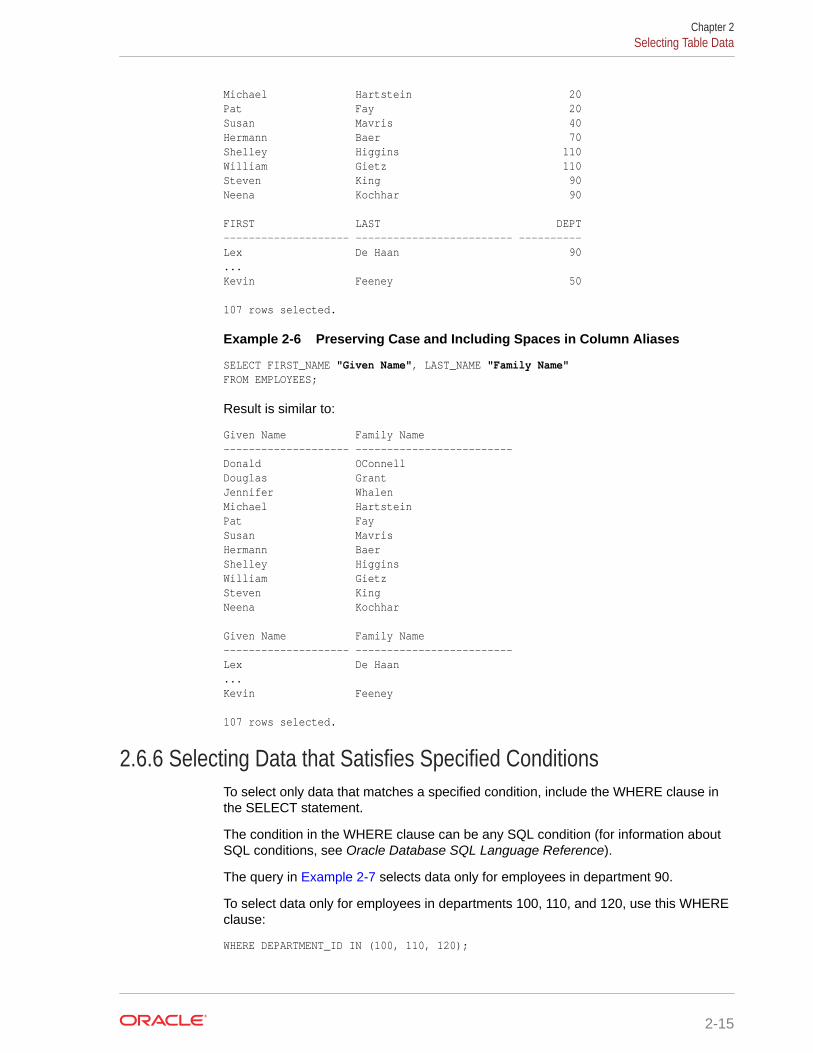
Example 2-6 Preserving Case and Including Spaces in Column Aliases
SELECT FIRST_NAME "Given Name", LAST_NAME "Family Name"FROM EMPLOYEES;
Result is similar to:
Given Name Family Name-------------------- -------------------------Donald OConnellDouglas GrantJennifer WhalenMichael HartsteinPat FaySusan MavrisHermann BaerShelley HigginsWilliam GietzSteven KingNeena Kochhar Given Name Family Name-------------------- -------------------------Lex De Haan...Kevin Feeney 107 rows selected.
2.6.6 Selecting Data that Satisfies Specified ConditionsTo select only data that matches a specified condition, include the WHERE clause inthe SELECT statement.
The condition in the WHERE clause can be any SQL condition (for information aboutSQL conditions, see Oracle Database SQL Language Reference).
The query in Example 2-7 selects data only for employees in department 90.
To select data only for employees in departments 100, 110, and 120, use this WHEREclause:
WHERE DEPARTMENT_ID IN (100, 110, 120);
Chapter 2Selecting Table Data
2-15
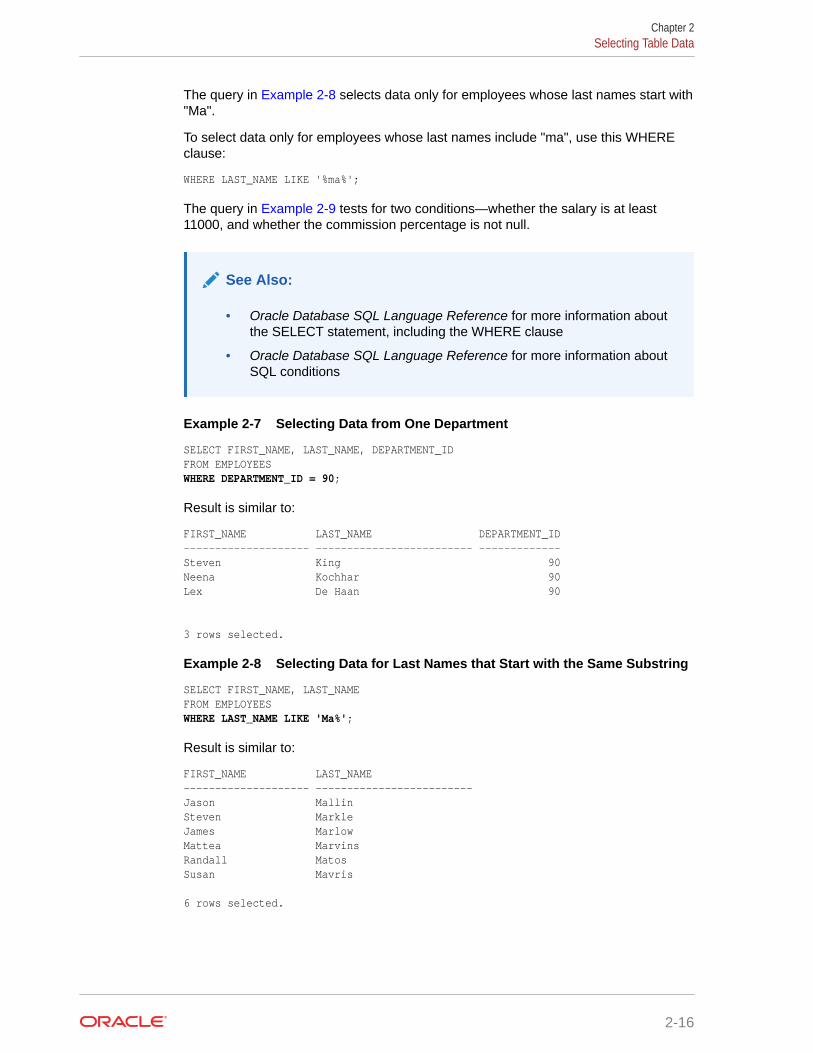
The query in Example 2-8 selects data only for employees whose last names start with"Ma".
To select data only for employees whose last names include "ma", use this WHEREclause:
WHERE LAST_NAME LIKE '%ma%';
The query in Example 2-9 tests for two conditions—whether the salary is at least11000, and whether the commission percentage is not null.
See Also:
• Oracle Database SQL Language Reference for more information aboutthe SELECT statement, including the WHERE clause
• Oracle Database SQL Language Reference for more information aboutSQL conditions
Example 2-7 Selecting Data from One Department
SELECT FIRST_NAME, LAST_NAME, DEPARTMENT_IDFROM EMPLOYEESWHERE DEPARTMENT_ID = 90;
Result is similar to:
FIRST_NAME LAST_NAME DEPARTMENT_ID-------------------- ------------------------- -------------Steven King 90Neena Kochhar 90Lex De Haan 90
3 rows selected.
Example 2-8 Selecting Data for Last Names that Start with the Same Substring
SELECT FIRST_NAME, LAST_NAMEFROM EMPLOYEESWHERE LAST_NAME LIKE 'Ma%';
Result is similar to:
FIRST_NAME LAST_NAME-------------------- -------------------------Jason MallinSteven MarkleJames MarlowMattea MarvinsRandall MatosSusan Mavris 6 rows selected.
Chapter 2Selecting Table Data
2-16
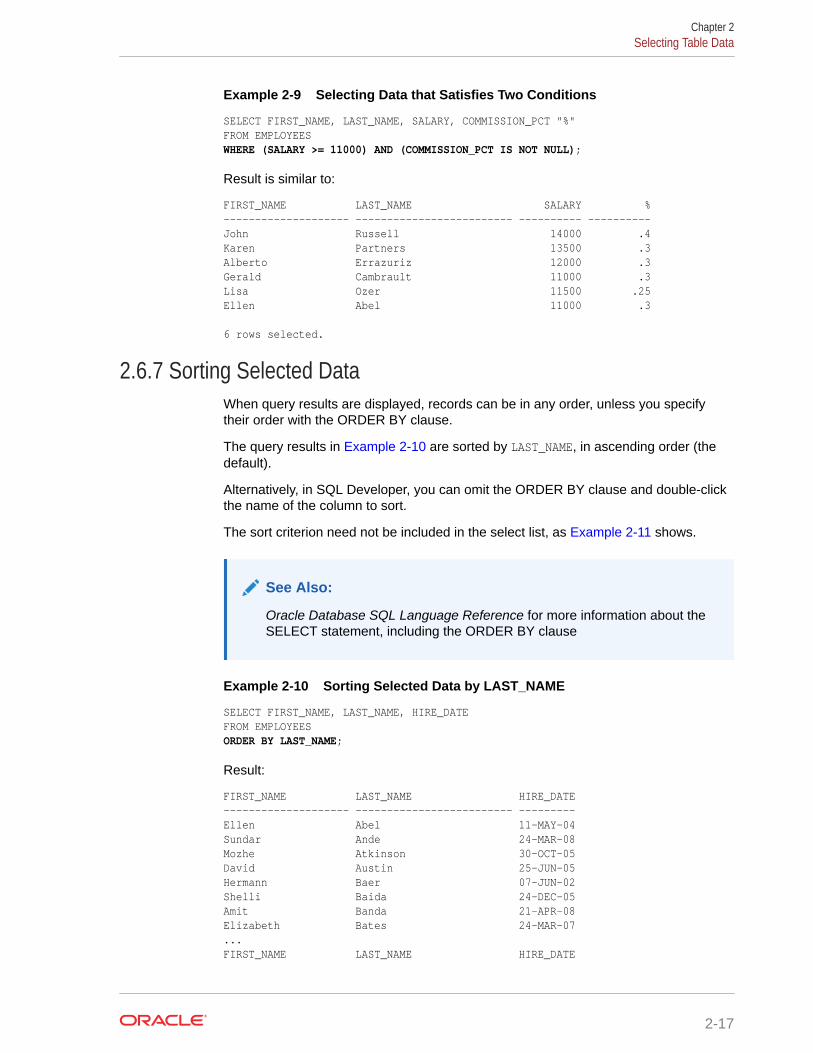
Example 2-9 Selecting Data that Satisfies Two Conditions
SELECT FIRST_NAME, LAST_NAME, SALARY, COMMISSION_PCT "%"FROM EMPLOYEESWHERE (SALARY >= 11000) AND (COMMISSION_PCT IS NOT NULL);
Result is similar to:
FIRST_NAME LAST_NAME SALARY %-------------------- ------------------------- ---------- ----------John Russell 14000 .4Karen Partners 13500 .3Alberto Errazuriz 12000 .3Gerald Cambrault 11000 .3Lisa Ozer 11500 .25Ellen Abel 11000 .3 6 rows selected.
2.6.7 Sorting Selected DataWhen query results are displayed, records can be in any order, unless you specifytheir order with the ORDER BY clause.
The query results in Example 2-10 are sorted by LAST_NAME, in ascending order (thedefault).
Alternatively, in SQL Developer, you can omit the ORDER BY clause and double-clickthe name of the column to sort.
The sort criterion need not be included in the select list, as Example 2-11 shows.
See Also:
Oracle Database SQL Language Reference for more information about theSELECT statement, including the ORDER BY clause
Example 2-10 Sorting Selected Data by LAST_NAME
SELECT FIRST_NAME, LAST_NAME, HIRE_DATEFROM EMPLOYEESORDER BY LAST_NAME;
Result:
FIRST_NAME LAST_NAME HIRE_DATE-------------------- ------------------------- ---------Ellen Abel 11-MAY-04Sundar Ande 24-MAR-08Mozhe Atkinson 30-OCT-05David Austin 25-JUN-05Hermann Baer 07-JUN-02Shelli Baida 24-DEC-05Amit Banda 21-APR-08Elizabeth Bates 24-MAR-07...FIRST_NAME LAST_NAME HIRE_DATE
Chapter 2Selecting Table Data
2-17
-------------------- ------------------------- ---------Jose Manuel Urman 07-MAR-06Peter Vargas 09-JUL-06Clara Vishney 11-NOV-05Shanta Vollman 10-OCT-05Alana Walsh 24-APR-06Matthew Weiss 18-JUL-04Jennifer Whalen 17-SEP-03Eleni Zlotkey 29-JAN-08
107 rows selected
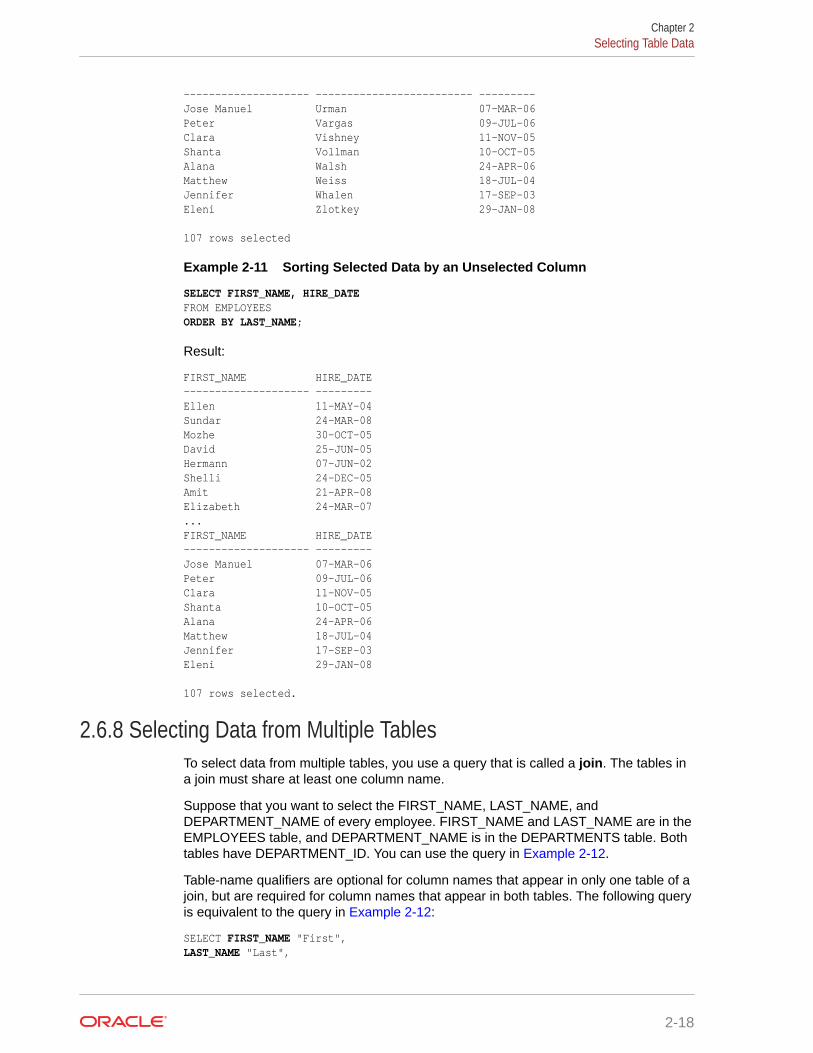
Example 2-11 Sorting Selected Data by an Unselected Column
SELECT FIRST_NAME, HIRE_DATEFROM EMPLOYEESORDER BY LAST_NAME;
Result:
FIRST_NAME HIRE_DATE-------------------- ---------Ellen 11-MAY-04Sundar 24-MAR-08Mozhe 30-OCT-05David 25-JUN-05Hermann 07-JUN-02Shelli 24-DEC-05Amit 21-APR-08Elizabeth 24-MAR-07...FIRST_NAME HIRE_DATE-------------------- ---------Jose Manuel 07-MAR-06Peter 09-JUL-06Clara 11-NOV-05Shanta 10-OCT-05Alana 24-APR-06Matthew 18-JUL-04Jennifer 17-SEP-03Eleni 29-JAN-08 107 rows selected.
2.6.8 Selecting Data from Multiple TablesTo select data from multiple tables, you use a query that is called a join. The tables ina join must share at least one column name.
Suppose that you want to select the FIRST_NAME, LAST_NAME, andDEPARTMENT_NAME of every employee. FIRST_NAME and LAST_NAME are in theEMPLOYEES table, and DEPARTMENT_NAME is in the DEPARTMENTS table. Bothtables have DEPARTMENT_ID. You can use the query in Example 2-12.
Table-name qualifiers are optional for column names that appear in only one table of ajoin, but are required for column names that appear in both tables. The following queryis equivalent to the query in Example 2-12:
SELECT FIRST_NAME "First",LAST_NAME "Last",
Chapter 2Selecting Table Data
2-18
DEPARTMENT_NAME "Dept. Name"FROM EMPLOYEES, DEPARTMENTSWHERE EMPLOYEES.DEPARTMENT_ID = DEPARTMENTS.DEPARTMENT_IDORDER BY DEPARTMENT_NAME, LAST_NAME;
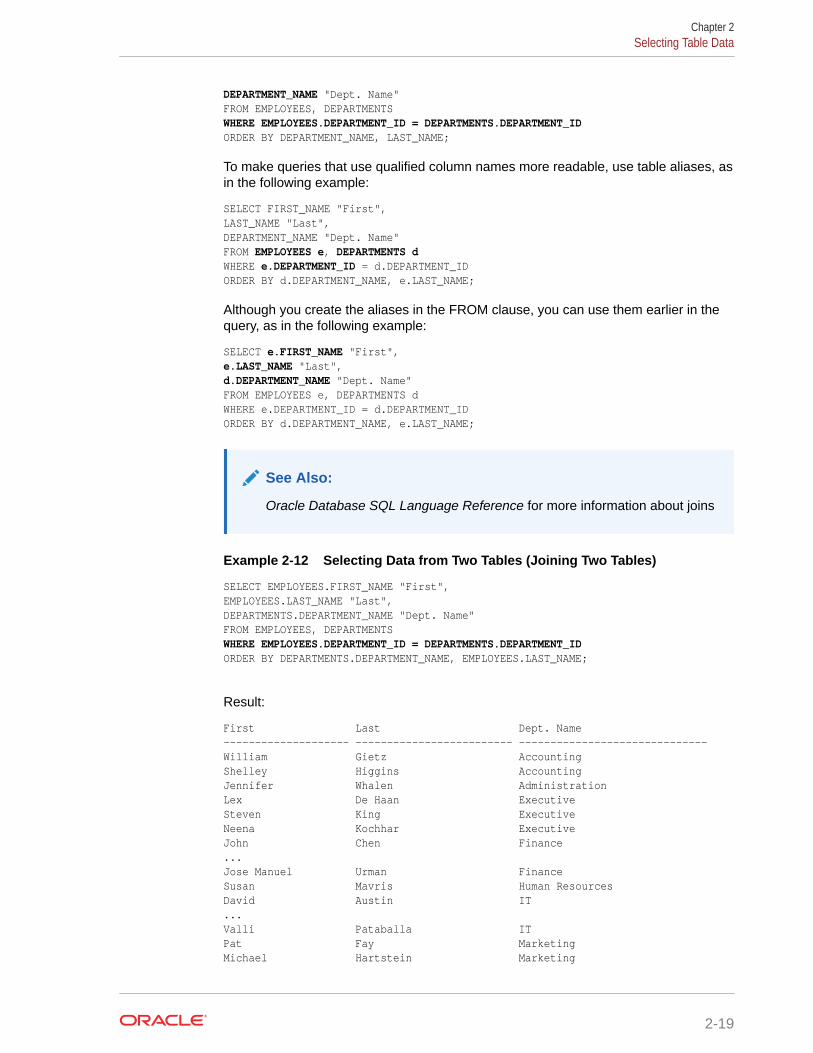
To make queries that use qualified column names more readable, use table aliases, asin the following example:
SELECT FIRST_NAME "First",LAST_NAME "Last",DEPARTMENT_NAME "Dept. Name"FROM EMPLOYEES e, DEPARTMENTS dWHERE e.DEPARTMENT_ID = d.DEPARTMENT_IDORDER BY d.DEPARTMENT_NAME, e.LAST_NAME;
Although you create the aliases in the FROM clause, you can use them earlier in thequery, as in the following example:
SELECT e.FIRST_NAME "First",e.LAST_NAME "Last",d.DEPARTMENT_NAME "Dept. Name"FROM EMPLOYEES e, DEPARTMENTS dWHERE e.DEPARTMENT_ID = d.DEPARTMENT_IDORDER BY d.DEPARTMENT_NAME, e.LAST_NAME;
See Also:
Oracle Database SQL Language Reference for more information about joins
Example 2-12 Selecting Data from Two Tables (Joining Two Tables)
SELECT EMPLOYEES.FIRST_NAME "First",EMPLOYEES.LAST_NAME "Last",DEPARTMENTS.DEPARTMENT_NAME "Dept. Name"FROM EMPLOYEES, DEPARTMENTSWHERE EMPLOYEES.DEPARTMENT_ID = DEPARTMENTS.DEPARTMENT_IDORDER BY DEPARTMENTS.DEPARTMENT_NAME, EMPLOYEES.LAST_NAME;
Result:
First Last Dept. Name -------------------- ------------------------- ------------------------------ William Gietz Accounting Shelley Higgins Accounting Jennifer Whalen Administration Lex De Haan Executive Steven King Executive Neena Kochhar Executive John Chen Finance ...Jose Manuel Urman Finance Susan Mavris Human Resources David Austin IT ...Valli Pataballa IT Pat Fay Marketing Michael Hartstein Marketing
Chapter 2Selecting Table Data
2-19
Hermann Baer Public Relations Shelli Baida Purchasing ...Sigal Tobias Purchasing Ellen Abel Sales ...Eleni Zlotkey Sales Mozhe Atkinson Shipping ...Matthew Weiss Shipping 106 rows selected.
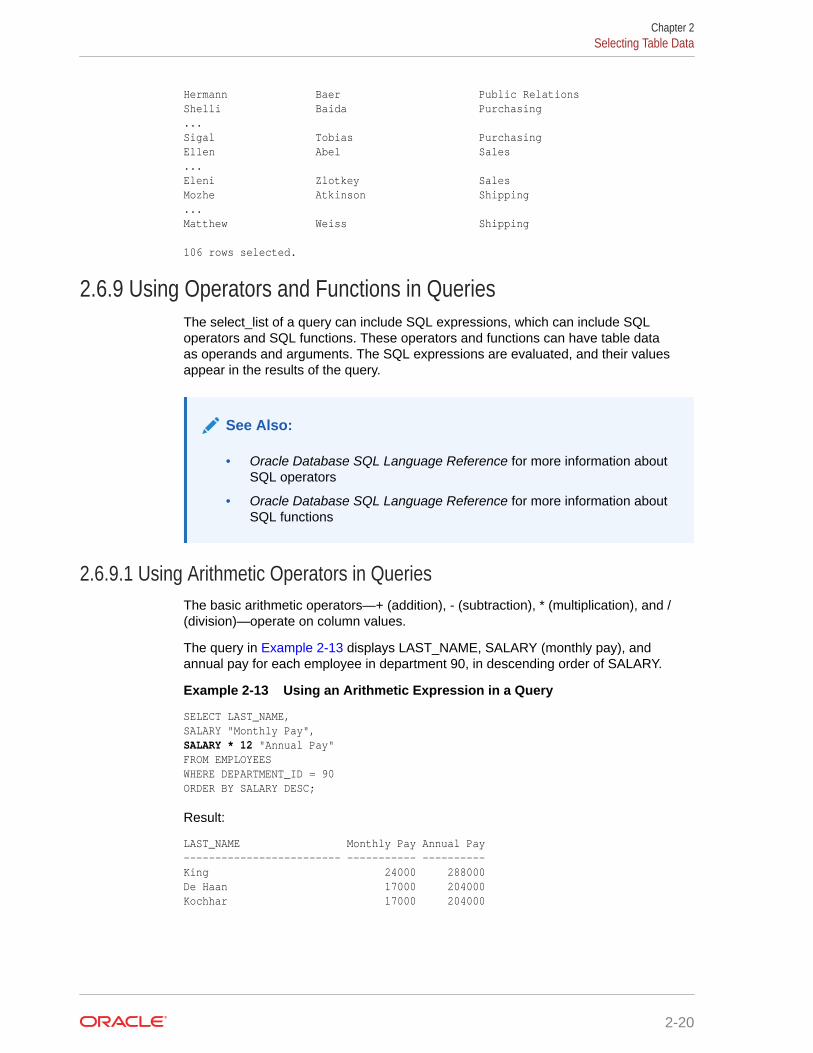
2.6.9 Using Operators and Functions in QueriesThe select_list of a query can include SQL expressions, which can include SQLoperators and SQL functions. These operators and functions can have table dataas operands and arguments. The SQL expressions are evaluated, and their valuesappear in the results of the query.
See Also:
• Oracle Database SQL Language Reference for more information aboutSQL operators
• Oracle Database SQL Language Reference for more information aboutSQL functions
2.6.9.1 Using Arithmetic Operators in QueriesThe basic arithmetic operators—+ (addition), - (subtraction), * (multiplication), and /(division)—operate on column values.
The query in Example 2-13 displays LAST_NAME, SALARY (monthly pay), andannual pay for each employee in department 90, in descending order of SALARY.
Example 2-13 Using an Arithmetic Expression in a Query
SELECT LAST_NAME,SALARY "Monthly Pay",SALARY * 12 "Annual Pay"FROM EMPLOYEESWHERE DEPARTMENT_ID = 90ORDER BY SALARY DESC;
Result:
LAST_NAME Monthly Pay Annual Pay------------------------- ----------- ----------King 24000 288000De Haan 17000 204000Kochhar 17000 204000
Chapter 2Selecting Table Data
2-20
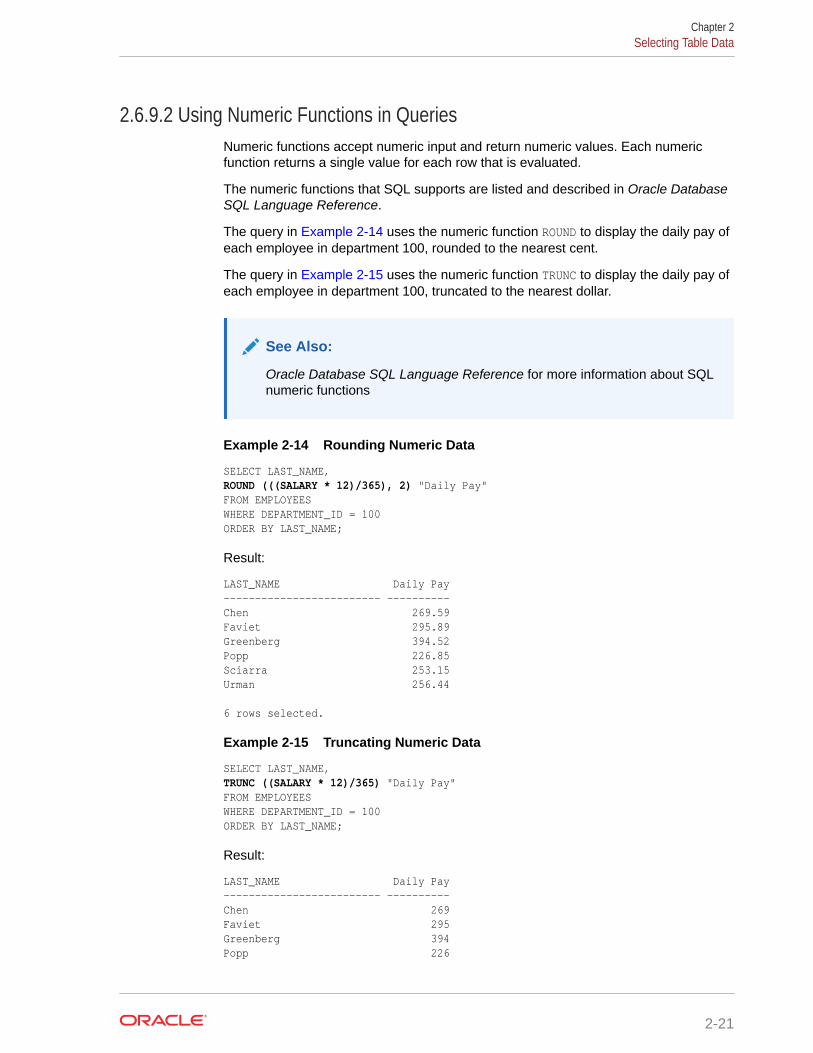
2.6.9.2 Using Numeric Functions in QueriesNumeric functions accept numeric input and return numeric values. Each numericfunction returns a single value for each row that is evaluated.
The numeric functions that SQL supports are listed and described in Oracle DatabaseSQL Language Reference.
The query in Example 2-14 uses the numeric function ROUND to display the daily pay ofeach employee in department 100, rounded to the nearest cent.
The query in Example 2-15 uses the numeric function TRUNC to display the daily pay ofeach employee in department 100, truncated to the nearest dollar.
See Also:
Oracle Database SQL Language Reference for more information about SQLnumeric functions
Example 2-14 Rounding Numeric Data
SELECT LAST_NAME,ROUND (((SALARY * 12)/365), 2) "Daily Pay"FROM EMPLOYEESWHERE DEPARTMENT_ID = 100ORDER BY LAST_NAME;
Result:
LAST_NAME Daily Pay------------------------- ----------Chen 269.59Faviet 295.89Greenberg 394.52Popp 226.85Sciarra 253.15Urman 256.44 6 rows selected.
Example 2-15 Truncating Numeric Data
SELECT LAST_NAME,TRUNC ((SALARY * 12)/365) "Daily Pay"FROM EMPLOYEESWHERE DEPARTMENT_ID = 100ORDER BY LAST_NAME;
Result:
LAST_NAME Daily Pay------------------------- ----------Chen 269Faviet 295Greenberg 394Popp 226
Chapter 2Selecting Table Data
2-21
Sciarra 253Urman 256 6 rows selected.
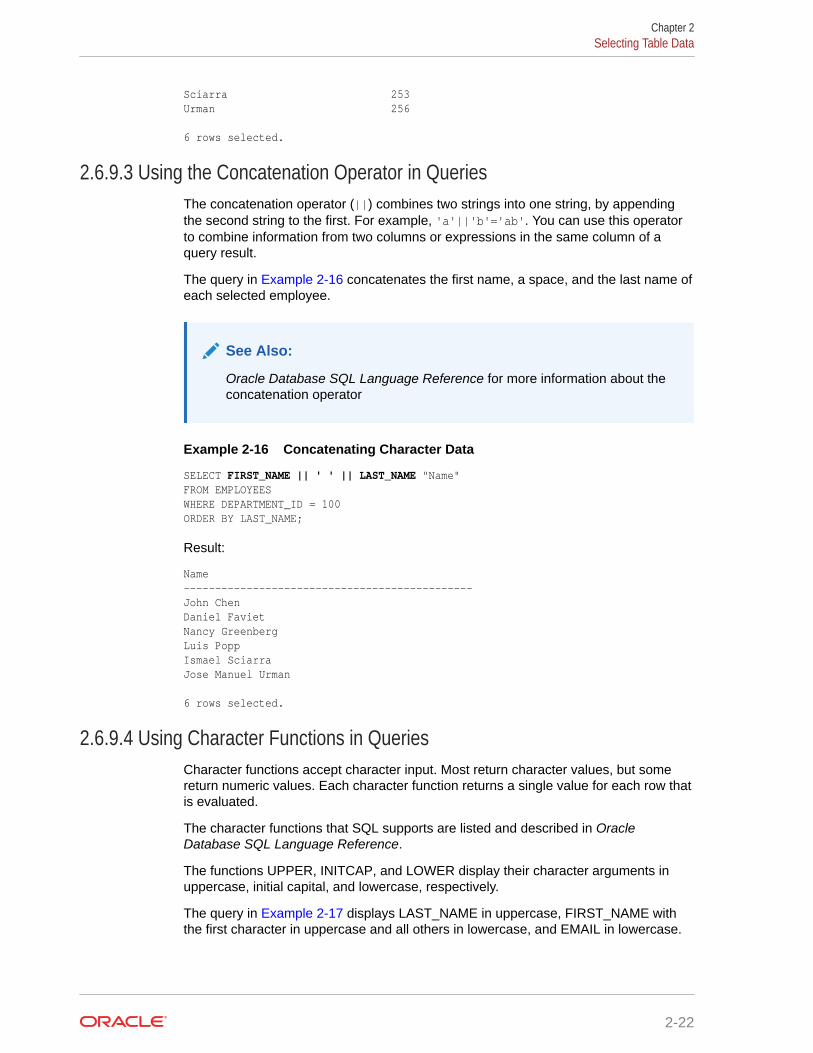
2.6.9.3 Using the Concatenation Operator in QueriesThe concatenation operator (||) combines two strings into one string, by appendingthe second string to the first. For example, 'a'||'b'='ab'. You can use this operatorto combine information from two columns or expressions in the same column of aquery result.
The query in Example 2-16 concatenates the first name, a space, and the last name ofeach selected employee.
See Also:
Oracle Database SQL Language Reference for more information about theconcatenation operator
Example 2-16 Concatenating Character Data
SELECT FIRST_NAME || ' ' || LAST_NAME "Name"FROM EMPLOYEESWHERE DEPARTMENT_ID = 100ORDER BY LAST_NAME;
Result:
Name----------------------------------------------John ChenDaniel FavietNancy GreenbergLuis PoppIsmael SciarraJose Manuel Urman 6 rows selected.
2.6.9.4 Using Character Functions in QueriesCharacter functions accept character input. Most return character values, but somereturn numeric values. Each character function returns a single value for each row thatis evaluated.
The character functions that SQL supports are listed and described in OracleDatabase SQL Language Reference.
The functions UPPER, INITCAP, and LOWER display their character arguments inuppercase, initial capital, and lowercase, respectively.
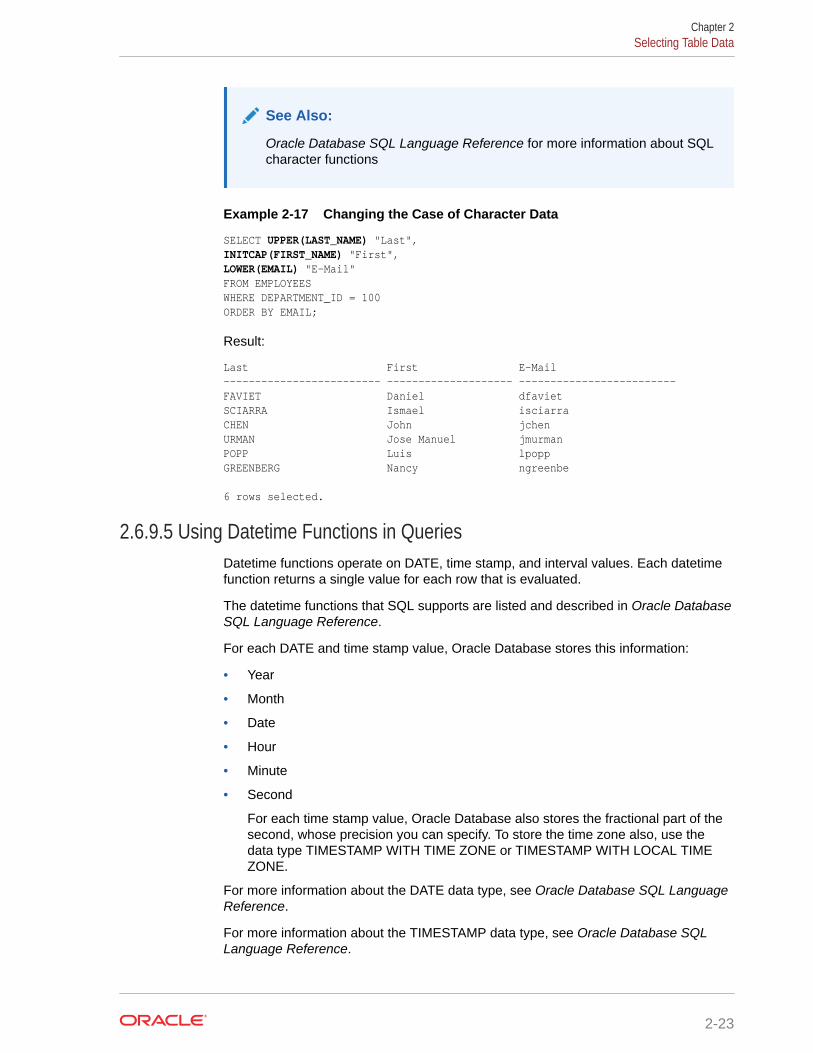
The query in Example 2-17 displays LAST_NAME in uppercase, FIRST_NAME withthe first character in uppercase and all others in lowercase, and EMAIL in lowercase.
Chapter 2Selecting Table Data
2-22
See Also:
Oracle Database SQL Language Reference for more information about SQLcharacter functions
Example 2-17 Changing the Case of Character Data
SELECT UPPER(LAST_NAME) "Last",INITCAP(FIRST_NAME) "First",LOWER(EMAIL) "E-Mail"FROM EMPLOYEESWHERE DEPARTMENT_ID = 100ORDER BY EMAIL;
Result:
Last First E-Mail------------------------- -------------------- -------------------------FAVIET Daniel dfavietSCIARRA Ismael isciarraCHEN John jchenURMAN Jose Manuel jmurmanPOPP Luis lpoppGREENBERG Nancy ngreenbe 6 rows selected.
2.6.9.5 Using Datetime Functions in QueriesDatetime functions operate on DATE, time stamp, and interval values. Each datetimefunction returns a single value for each row that is evaluated.
The datetime functions that SQL supports are listed and described in Oracle DatabaseSQL Language Reference.
For each DATE and time stamp value, Oracle Database stores this information:
• Year
• Month
• Date
• Hour
• Minute
• Second
For each time stamp value, Oracle Database also stores the fractional part of thesecond, whose precision you can specify. To store the time zone also, use thedata type TIMESTAMP WITH TIME ZONE or TIMESTAMP WITH LOCAL TIMEZONE.
For more information about the DATE data type, see Oracle Database SQL LanguageReference.
For more information about the TIMESTAMP data type, see Oracle Database SQLLanguage Reference.
Chapter 2Selecting Table Data
2-23
For information about the other time stamp data types and the interval data types, seeOracle Database SQL Language Reference.
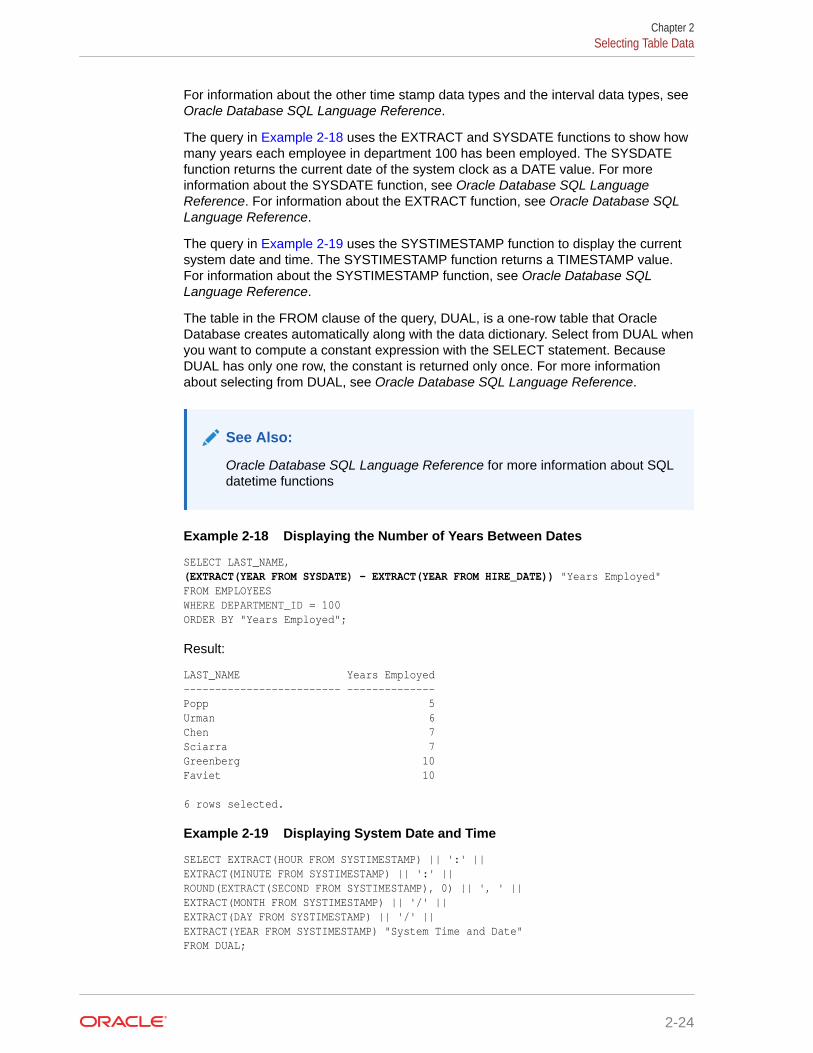
The query in Example 2-18 uses the EXTRACT and SYSDATE functions to show howmany years each employee in department 100 has been employed. The SYSDATEfunction returns the current date of the system clock as a DATE value. For moreinformation about the SYSDATE function, see Oracle Database SQL LanguageReference. For information about the EXTRACT function, see Oracle Database SQLLanguage Reference.
The query in Example 2-19 uses the SYSTIMESTAMP function to display the currentsystem date and time. The SYSTIMESTAMP function returns a TIMESTAMP value.For information about the SYSTIMESTAMP function, see Oracle Database SQLLanguage Reference.
The table in the FROM clause of the query, DUAL, is a one-row table that OracleDatabase creates automatically along with the data dictionary. Select from DUAL whenyou want to compute a constant expression with the SELECT statement. BecauseDUAL has only one row, the constant is returned only once. For more informationabout selecting from DUAL, see Oracle Database SQL Language Reference.
See Also:
Oracle Database SQL Language Reference for more information about SQLdatetime functions
Example 2-18 Displaying the Number of Years Between Dates
SELECT LAST_NAME,(EXTRACT(YEAR FROM SYSDATE) - EXTRACT(YEAR FROM HIRE_DATE)) "Years Employed"FROM EMPLOYEESWHERE DEPARTMENT_ID = 100ORDER BY "Years Employed";
Result:
LAST_NAME Years Employed------------------------- --------------Popp 5Urman 6Chen 7Sciarra 7Greenberg 10Faviet 10 6 rows selected.
Example 2-19 Displaying System Date and Time
SELECT EXTRACT(HOUR FROM SYSTIMESTAMP) || ':' ||EXTRACT(MINUTE FROM SYSTIMESTAMP) || ':' ||ROUND(EXTRACT(SECOND FROM SYSTIMESTAMP), 0) || ', ' ||EXTRACT(MONTH FROM SYSTIMESTAMP) || '/' ||EXTRACT(DAY FROM SYSTIMESTAMP) || '/' ||EXTRACT(YEAR FROM SYSTIMESTAMP) "System Time and Date"FROM DUAL;
Chapter 2Selecting Table Data
2-24
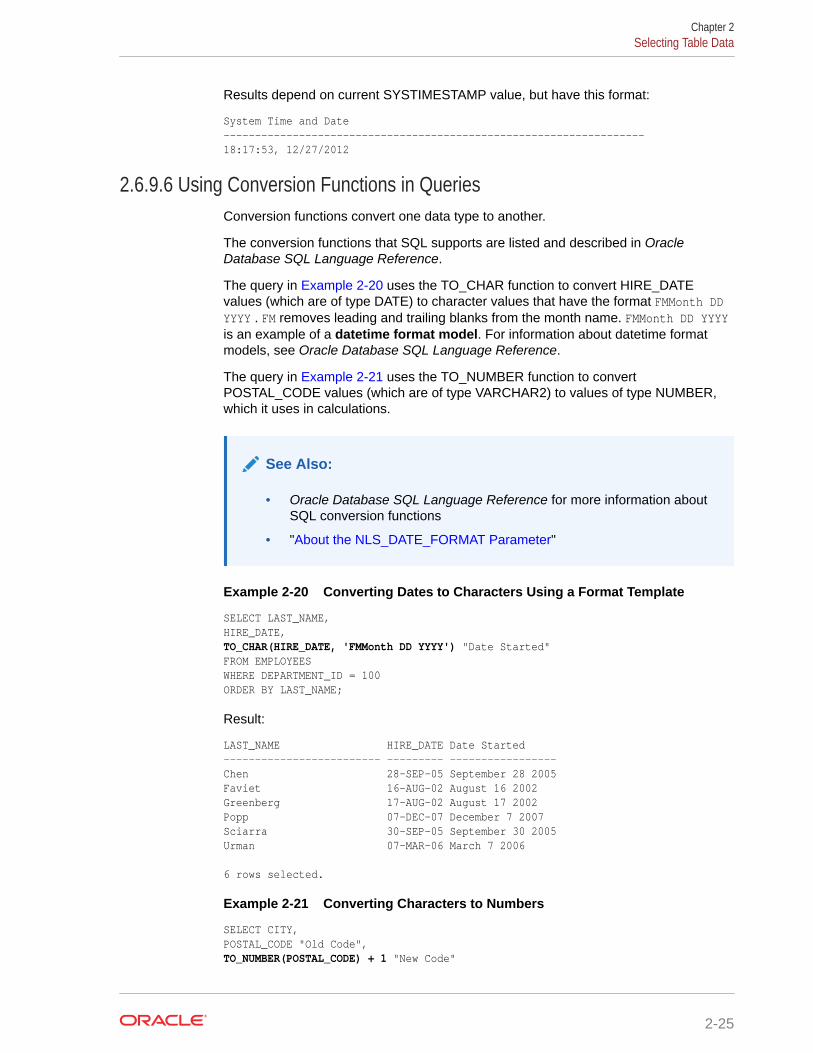
Results depend on current SYSTIMESTAMP value, but have this format:
System Time and Date-------------------------------------------------------------------18:17:53, 12/27/2012
2.6.9.6 Using Conversion Functions in QueriesConversion functions convert one data type to another.
The conversion functions that SQL supports are listed and described in OracleDatabase SQL Language Reference.
The query in Example 2-20 uses the TO_CHAR function to convert HIRE_DATEvalues (which are of type DATE) to character values that have the format FMMonth DDYYYY . FM removes leading and trailing blanks from the month name. FMMonth DD YYYYis an example of a datetime format model. For information about datetime formatmodels, see Oracle Database SQL Language Reference.
The query in Example 2-21 uses the TO_NUMBER function to convertPOSTAL_CODE values (which are of type VARCHAR2) to values of type NUMBER,which it uses in calculations.
See Also:
• Oracle Database SQL Language Reference for more information aboutSQL conversion functions
• "About the NLS_DATE_FORMAT Parameter"
Example 2-20 Converting Dates to Characters Using a Format Template
SELECT LAST_NAME,HIRE_DATE,TO_CHAR(HIRE_DATE, 'FMMonth DD YYYY') "Date Started"FROM EMPLOYEESWHERE DEPARTMENT_ID = 100ORDER BY LAST_NAME;
Result:
LAST_NAME HIRE_DATE Date Started------------------------- --------- -----------------Chen 28-SEP-05 September 28 2005Faviet 16-AUG-02 August 16 2002Greenberg 17-AUG-02 August 17 2002Popp 07-DEC-07 December 7 2007Sciarra 30-SEP-05 September 30 2005Urman 07-MAR-06 March 7 2006 6 rows selected.
Example 2-21 Converting Characters to Numbers
SELECT CITY,POSTAL_CODE "Old Code",TO_NUMBER(POSTAL_CODE) + 1 "New Code"
Chapter 2Selecting Table Data
2-25
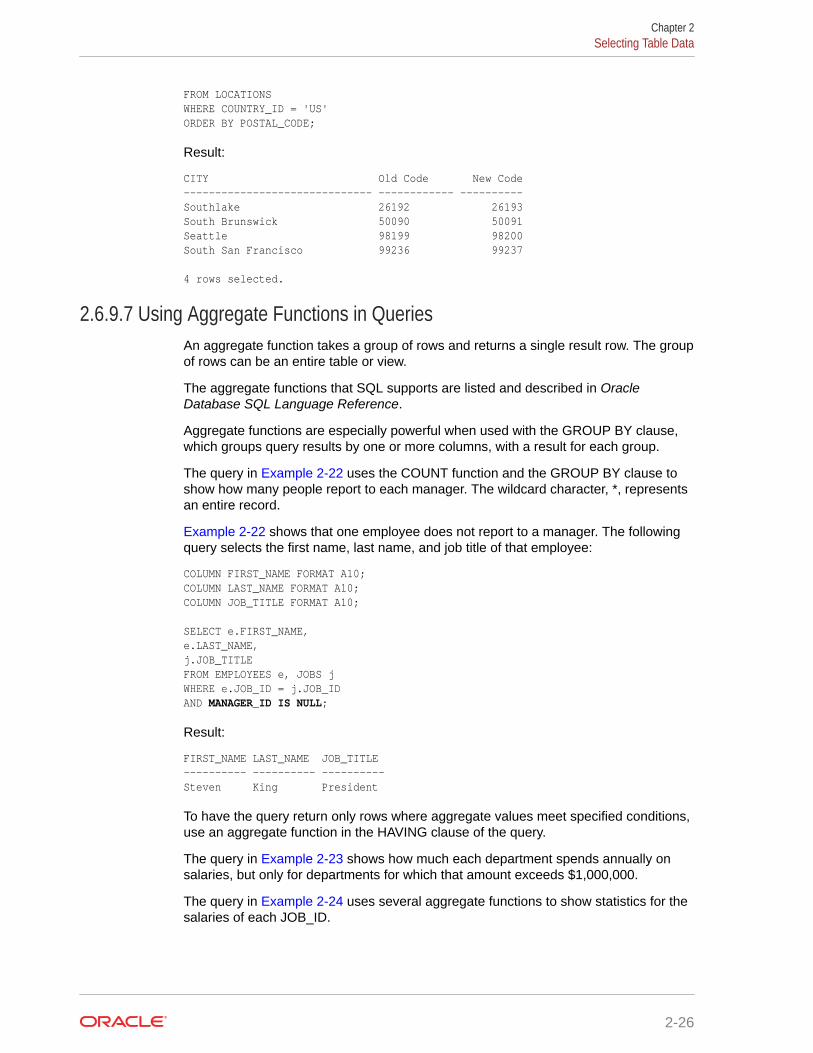
FROM LOCATIONSWHERE COUNTRY_ID = 'US'ORDER BY POSTAL_CODE;
Result:
CITY Old Code New Code------------------------------ ------------ ----------Southlake 26192 26193South Brunswick 50090 50091Seattle 98199 98200South San Francisco 99236 99237 4 rows selected.
2.6.9.7 Using Aggregate Functions in QueriesAn aggregate function takes a group of rows and returns a single result row. The groupof rows can be an entire table or view.
The aggregate functions that SQL supports are listed and described in OracleDatabase SQL Language Reference.
Aggregate functions are especially powerful when used with the GROUP BY clause,which groups query results by one or more columns, with a result for each group.
The query in Example 2-22 uses the COUNT function and the GROUP BY clause toshow how many people report to each manager. The wildcard character, *, representsan entire record.
Example 2-22 shows that one employee does not report to a manager. The followingquery selects the first name, last name, and job title of that employee:
COLUMN FIRST_NAME FORMAT A10;COLUMN LAST_NAME FORMAT A10;COLUMN JOB_TITLE FORMAT A10; SELECT e.FIRST_NAME,e.LAST_NAME,j.JOB_TITLEFROM EMPLOYEES e, JOBS jWHERE e.JOB_ID = j.JOB_IDAND MANAGER_ID IS NULL;
Result:
FIRST_NAME LAST_NAME JOB_TITLE---------- ---------- ----------Steven King President
To have the query return only rows where aggregate values meet specified conditions,use an aggregate function in the HAVING clause of the query.
The query in Example 2-23 shows how much each department spends annually onsalaries, but only for departments for which that amount exceeds $1,000,000.
The query in Example 2-24 uses several aggregate functions to show statistics for thesalaries of each JOB_ID.
Chapter 2Selecting Table Data
2-26
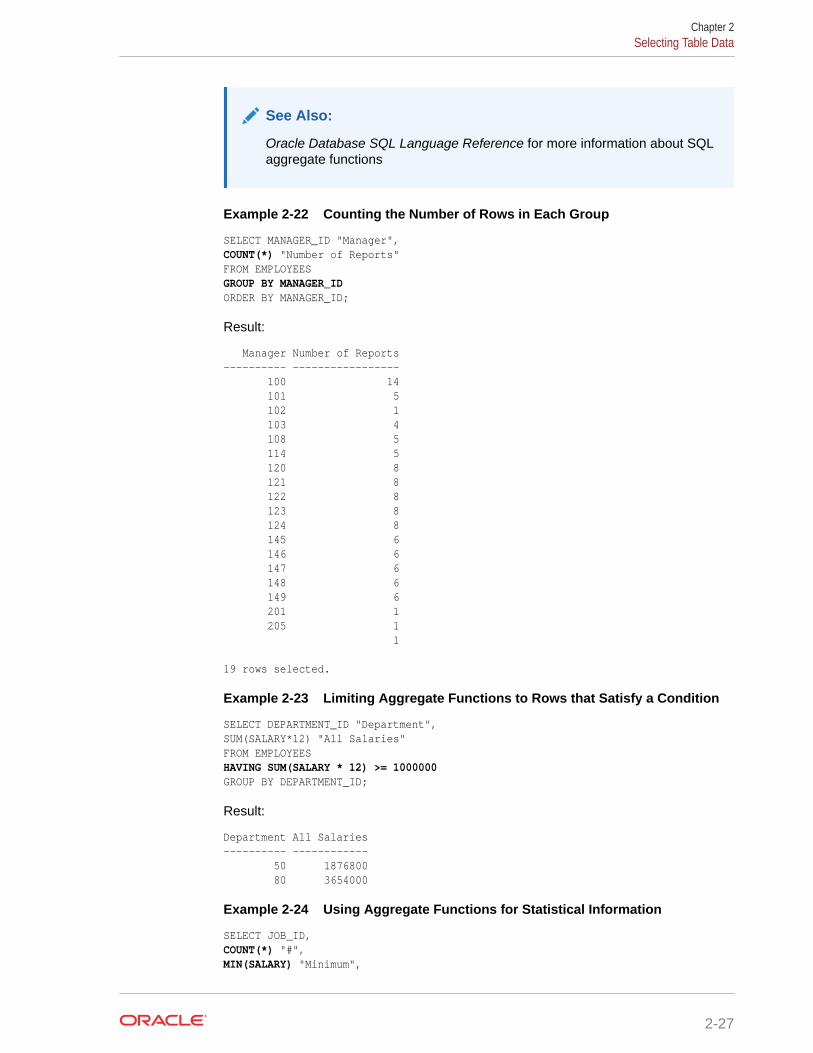
See Also:
Oracle Database SQL Language Reference for more information about SQLaggregate functions
Example 2-22 Counting the Number of Rows in Each Group
SELECT MANAGER_ID "Manager",COUNT(*) "Number of Reports"FROM EMPLOYEESGROUP BY MANAGER_IDORDER BY MANAGER_ID;
Result:
Manager Number of Reports---------- ----------------- 100 14 101 5 102 1 103 4 108 5 114 5 120 8 121 8 122 8 123 8 124 8 145 6 146 6 147 6 148 6 149 6 201 1 205 1 1 19 rows selected.
Example 2-23 Limiting Aggregate Functions to Rows that Satisfy a Condition
SELECT DEPARTMENT_ID "Department",SUM(SALARY*12) "All Salaries"FROM EMPLOYEESHAVING SUM(SALARY * 12) >= 1000000GROUP BY DEPARTMENT_ID;
Result:
Department All Salaries---------- ------------ 50 1876800 80 3654000
Example 2-24 Using Aggregate Functions for Statistical Information
SELECT JOB_ID,COUNT(*) "#",MIN(SALARY) "Minimum",
Chapter 2Selecting Table Data
2-27
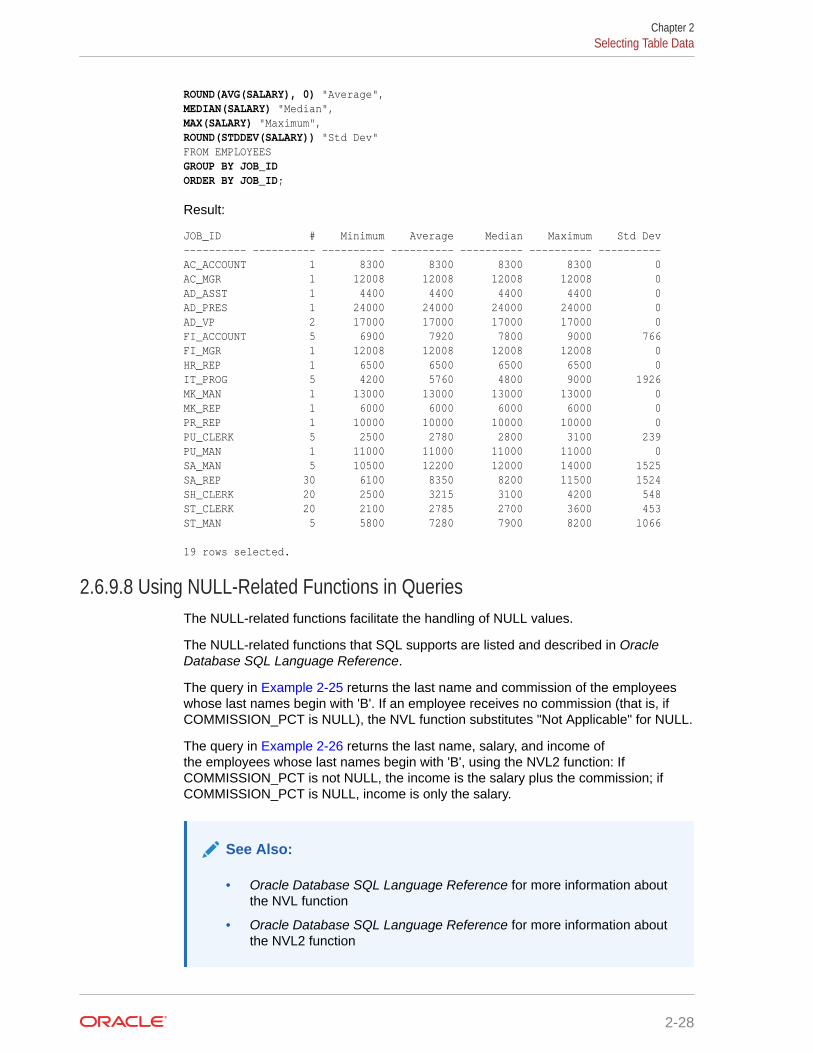
ROUND(AVG(SALARY), 0) "Average",MEDIAN(SALARY) "Median",MAX(SALARY) "Maximum",ROUND(STDDEV(SALARY)) "Std Dev"FROM EMPLOYEESGROUP BY JOB_IDORDER BY JOB_ID;
Result:
JOB_ID # Minimum Average Median Maximum Std Dev---------- ---------- ---------- ---------- ---------- ---------- ----------AC_ACCOUNT 1 8300 8300 8300 8300 0AC_MGR 1 12008 12008 12008 12008 0AD_ASST 1 4400 4400 4400 4400 0AD_PRES 1 24000 24000 24000 24000 0AD_VP 2 17000 17000 17000 17000 0FI_ACCOUNT 5 6900 7920 7800 9000 766FI_MGR 1 12008 12008 12008 12008 0HR_REP 1 6500 6500 6500 6500 0IT_PROG 5 4200 5760 4800 9000 1926MK_MAN 1 13000 13000 13000 13000 0MK_REP 1 6000 6000 6000 6000 0PR_REP 1 10000 10000 10000 10000 0PU_CLERK 5 2500 2780 2800 3100 239PU_MAN 1 11000 11000 11000 11000 0SA_MAN 5 10500 12200 12000 14000 1525SA_REP 30 6100 8350 8200 11500 1524SH_CLERK 20 2500 3215 3100 4200 548ST_CLERK 20 2100 2785 2700 3600 453ST_MAN 5 5800 7280 7900 8200 1066 19 rows selected.
2.6.9.8 Using NULL-Related Functions in QueriesThe NULL-related functions facilitate the handling of NULL values.
The NULL-related functions that SQL supports are listed and described in OracleDatabase SQL Language Reference.
The query in Example 2-25 returns the last name and commission of the employeeswhose last names begin with 'B'. If an employee receives no commission (that is, ifCOMMISSION_PCT is NULL), the NVL function substitutes "Not Applicable" for NULL.
The query in Example 2-26 returns the last name, salary, and income ofthe employees whose last names begin with 'B', using the NVL2 function: IfCOMMISSION_PCT is not NULL, the income is the salary plus the commission; ifCOMMISSION_PCT is NULL, income is only the salary.
See Also:
• Oracle Database SQL Language Reference for more information aboutthe NVL function
• Oracle Database SQL Language Reference for more information aboutthe NVL2 function
Chapter 2Selecting Table Data
2-28
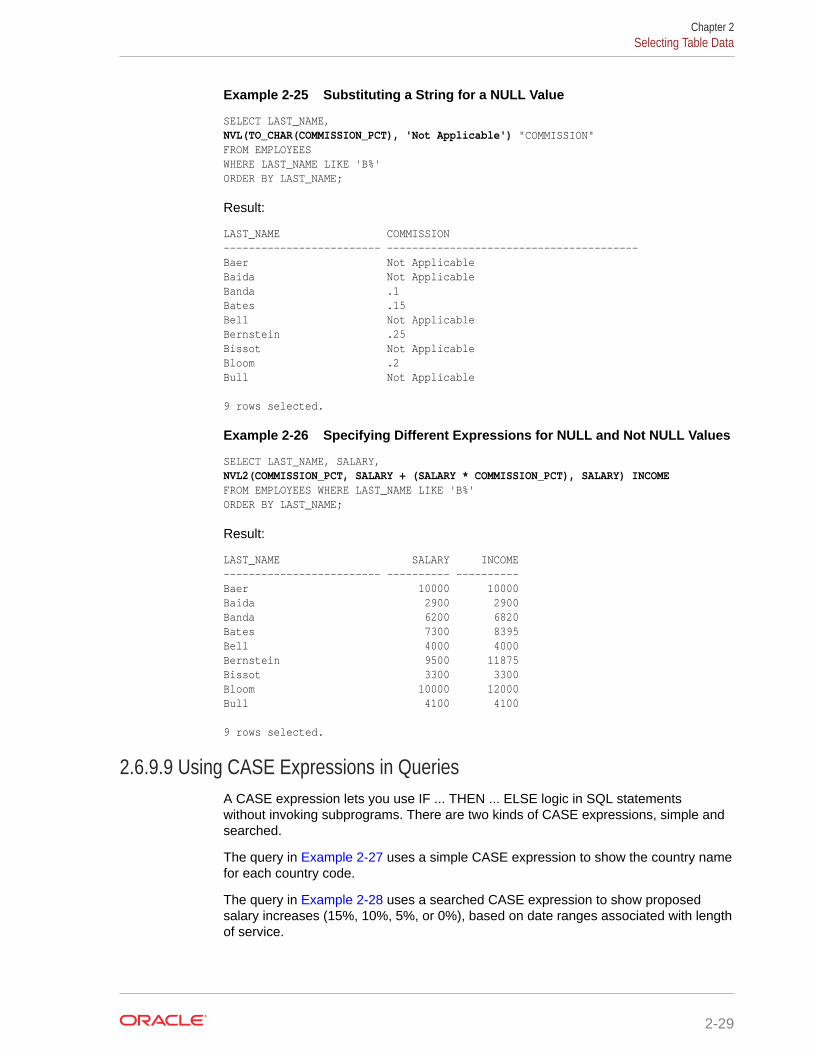
Example 2-25 Substituting a String for a NULL Value
SELECT LAST_NAME,NVL(TO_CHAR(COMMISSION_PCT), 'Not Applicable') "COMMISSION"FROM EMPLOYEESWHERE LAST_NAME LIKE 'B%'ORDER BY LAST_NAME;
Result:
LAST_NAME COMMISSION------------------------- ----------------------------------------Baer Not ApplicableBaida Not ApplicableBanda .1Bates .15Bell Not ApplicableBernstein .25Bissot Not ApplicableBloom .2Bull Not Applicable 9 rows selected.
Example 2-26 Specifying Different Expressions for NULL and Not NULL Values
SELECT LAST_NAME, SALARY,NVL2(COMMISSION_PCT, SALARY + (SALARY * COMMISSION_PCT), SALARY) INCOMEFROM EMPLOYEES WHERE LAST_NAME LIKE 'B%'ORDER BY LAST_NAME;
Result:
LAST_NAME SALARY INCOME------------------------- ---------- ----------Baer 10000 10000Baida 2900 2900Banda 6200 6820Bates 7300 8395Bell 4000 4000Bernstein 9500 11875Bissot 3300 3300Bloom 10000 12000Bull 4100 4100 9 rows selected.
2.6.9.9 Using CASE Expressions in QueriesA CASE expression lets you use IF ... THEN ... ELSE logic in SQL statementswithout invoking subprograms. There are two kinds of CASE expressions, simple andsearched.
The query in Example 2-27 uses a simple CASE expression to show the country namefor each country code.
The query in Example 2-28 uses a searched CASE expression to show proposedsalary increases (15%, 10%, 5%, or 0%), based on date ranges associated with lengthof service.
Chapter 2Selecting Table Data
2-29
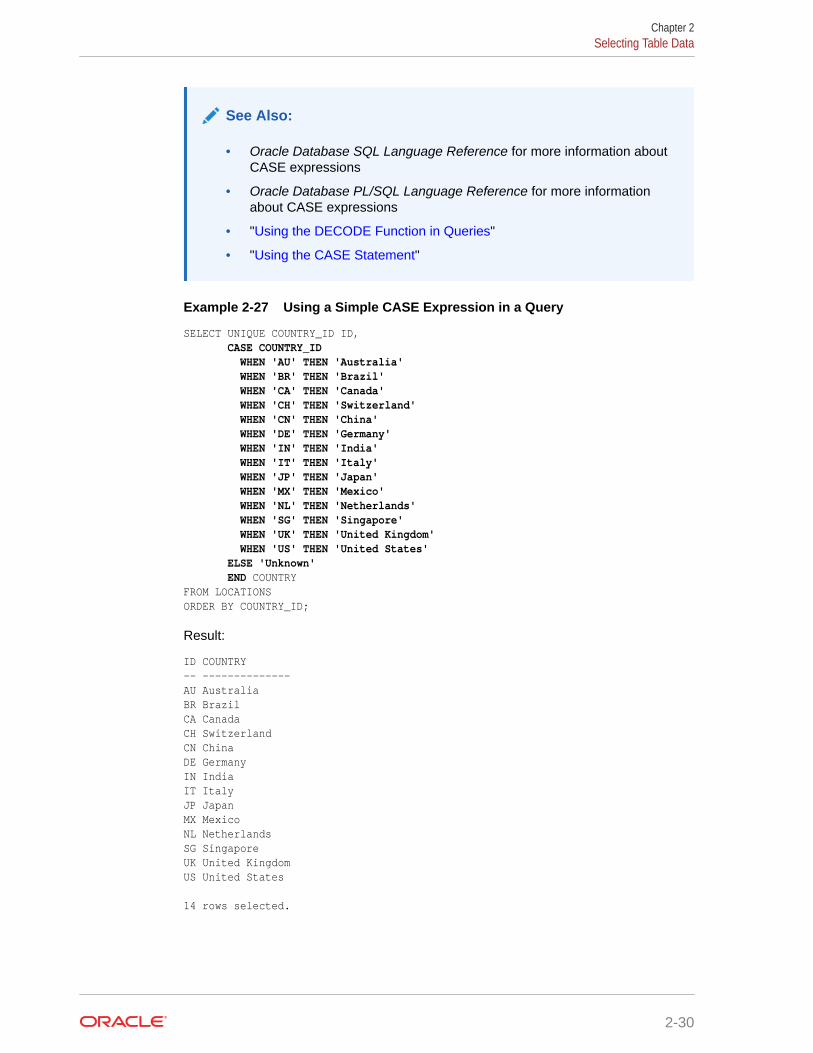
See Also:
• Oracle Database SQL Language Reference for more information aboutCASE expressions
• Oracle Database PL/SQL Language Reference for more informationabout CASE expressions
• "Using the DECODE Function in Queries"
• "Using the CASE Statement"
Example 2-27 Using a Simple CASE Expression in a Query
SELECT UNIQUE COUNTRY_ID ID, CASE COUNTRY_ID WHEN 'AU' THEN 'Australia' WHEN 'BR' THEN 'Brazil' WHEN 'CA' THEN 'Canada' WHEN 'CH' THEN 'Switzerland' WHEN 'CN' THEN 'China' WHEN 'DE' THEN 'Germany' WHEN 'IN' THEN 'India' WHEN 'IT' THEN 'Italy' WHEN 'JP' THEN 'Japan' WHEN 'MX' THEN 'Mexico' WHEN 'NL' THEN 'Netherlands' WHEN 'SG' THEN 'Singapore' WHEN 'UK' THEN 'United Kingdom' WHEN 'US' THEN 'United States' ELSE 'Unknown' END COUNTRYFROM LOCATIONSORDER BY COUNTRY_ID;
Result:
ID COUNTRY-- --------------AU AustraliaBR BrazilCA CanadaCH SwitzerlandCN ChinaDE GermanyIN IndiaIT ItalyJP JapanMX MexicoNL NetherlandsSG SingaporeUK United KingdomUS United States 14 rows selected.
Chapter 2Selecting Table Data
2-30
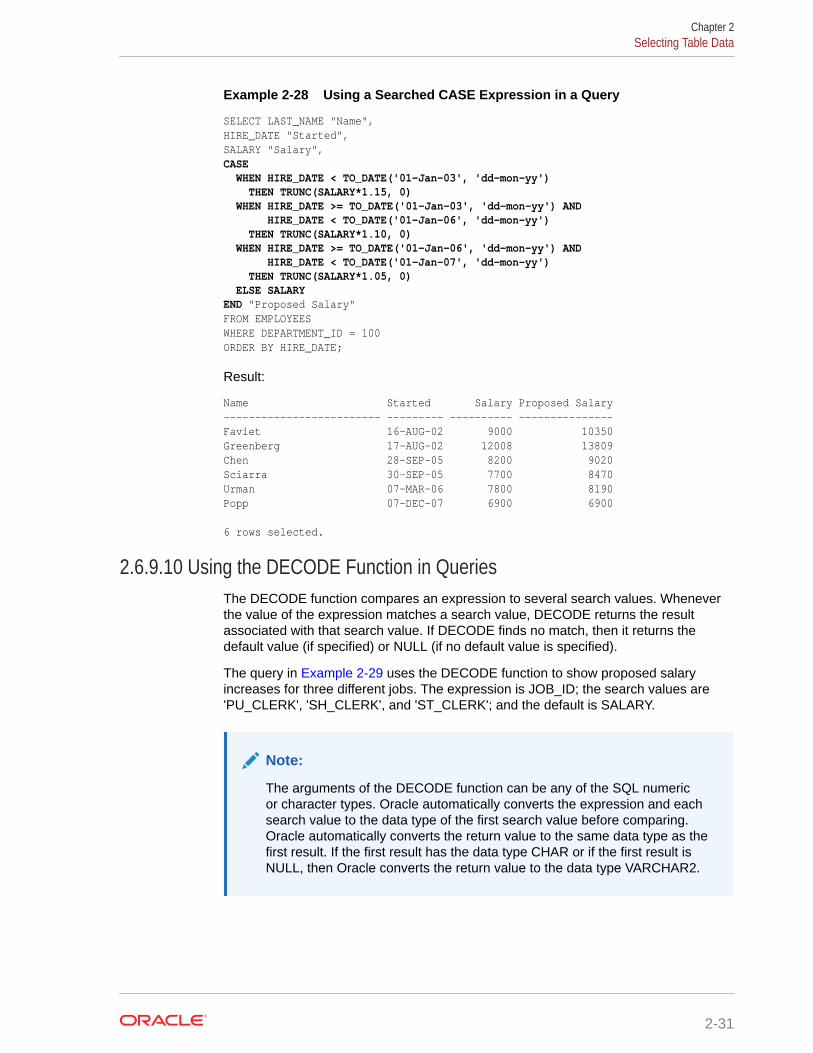
Example 2-28 Using a Searched CASE Expression in a Query
SELECT LAST_NAME "Name",HIRE_DATE "Started",SALARY "Salary",CASE WHEN HIRE_DATE < TO_DATE('01-Jan-03', 'dd-mon-yy') THEN TRUNC(SALARY*1.15, 0) WHEN HIRE_DATE >= TO_DATE('01-Jan-03', 'dd-mon-yy') AND HIRE_DATE < TO_DATE('01-Jan-06', 'dd-mon-yy') THEN TRUNC(SALARY*1.10, 0) WHEN HIRE_DATE >= TO_DATE('01-Jan-06', 'dd-mon-yy') AND HIRE_DATE < TO_DATE('01-Jan-07', 'dd-mon-yy') THEN TRUNC(SALARY*1.05, 0) ELSE SALARYEND "Proposed Salary"FROM EMPLOYEESWHERE DEPARTMENT_ID = 100ORDER BY HIRE_DATE;
Result:
Name Started Salary Proposed Salary------------------------- --------- ---------- ---------------Faviet 16-AUG-02 9000 10350Greenberg 17-AUG-02 12008 13809Chen 28-SEP-05 8200 9020Sciarra 30-SEP-05 7700 8470Urman 07-MAR-06 7800 8190Popp 07-DEC-07 6900 6900
6 rows selected.
2.6.9.10 Using the DECODE Function in QueriesThe DECODE function compares an expression to several search values. Wheneverthe value of the expression matches a search value, DECODE returns the resultassociated with that search value. If DECODE finds no match, then it returns thedefault value (if specified) or NULL (if no default value is specified).
The query in Example 2-29 uses the DECODE function to show proposed salaryincreases for three different jobs. The expression is JOB_ID; the search values are'PU_CLERK', 'SH_CLERK', and 'ST_CLERK'; and the default is SALARY.
Note:
The arguments of the DECODE function can be any of the SQL numericor character types. Oracle automatically converts the expression and eachsearch value to the data type of the first search value before comparing.Oracle automatically converts the return value to the same data type as thefirst result. If the first result has the data type CHAR or if the first result isNULL, then Oracle converts the return value to the data type VARCHAR2.
Chapter 2Selecting Table Data
2-31
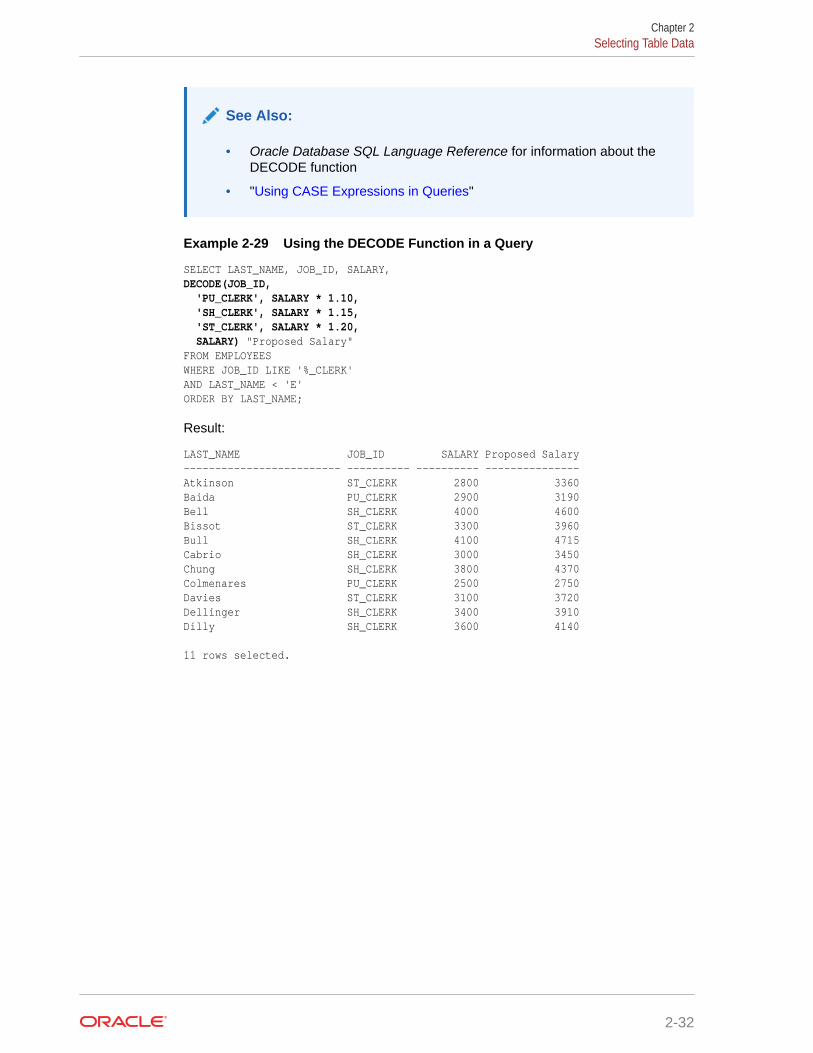
See Also:
• Oracle Database SQL Language Reference for information about theDECODE function
• "Using CASE Expressions in Queries"
Example 2-29 Using the DECODE Function in a Query
SELECT LAST_NAME, JOB_ID, SALARY,DECODE(JOB_ID, 'PU_CLERK', SALARY * 1.10, 'SH_CLERK', SALARY * 1.15, 'ST_CLERK', SALARY * 1.20, SALARY) "Proposed Salary"FROM EMPLOYEESWHERE JOB_ID LIKE '%_CLERK'AND LAST_NAME < 'E'ORDER BY LAST_NAME;
Result:
LAST_NAME JOB_ID SALARY Proposed Salary------------------------- ---------- ---------- ---------------Atkinson ST_CLERK 2800 3360Baida PU_CLERK 2900 3190Bell SH_CLERK 4000 4600Bissot ST_CLERK 3300 3960Bull SH_CLERK 4100 4715Cabrio SH_CLERK 3000 3450Chung SH_CLERK 3800 4370Colmenares PU_CLERK 2500 2750Davies ST_CLERK 3100 3720Dellinger SH_CLERK 3400 3910Dilly SH_CLERK 3600 4140 11 rows selected.
Chapter 2Selecting Table Data
2-32
3About DML Statements and Transactions
Data manipulation language (DML) statements add, change, and delete OracleDatabase table data. A transaction is a sequence of one or more SQL statementsthat Oracle Database treats as a unit: either all of the statements are performed, ornone of them are.
3.1 About Data Manipulation Language (DML) StatementsData manipulation language (DML) statements access and manipulate data inexisting tables.
In the SQL*Plus environment, you can enter a DML statement after the SQL> prompt.
In the SQL Developer environment, you can enter a DML statement in the Worksheet.Alternatively, you can use the SQL Developer Connections frame and tools to accessand manipulate data.
To see the effect of a DML statement in SQL Developer, you might have to select theschema object type of the changed object in the Connections frame and then click theRefresh icon.
The effect of a DML statement is not permanent until you commit the transaction thatincludes it. A transaction is a sequence of SQL statements that Oracle Databasetreats as a unit (it can be a single DML statement). Until a transaction is committed,it can be rolled back (undone). For more information about transactions, see "AboutTransaction Control Statements".
See Also:
Oracle Database SQL Language Reference for more information about DMLstatements
3.1.1 About the INSERT StatementThe INSERT statement inserts rows into an existing table.
The simplest recommended form of the INSERT statement has this syntax:
INSERT INTO table_name (list_of_columns)VALUES (list_of_values);
Every column in list_of_columns must have a valid value in the corresponding positionin list_of_values. Therefore, before you insert a row into a table, you must knowwhat columns the table has, and what their valid values are. To get this informationusing SQL Developer, see "Tutorial: Viewing EMPLOYEES Table Properties and Datawith SQL Developer". To get this information using SQL*Plus, use the DESCRIBEstatement. For example:
3-1
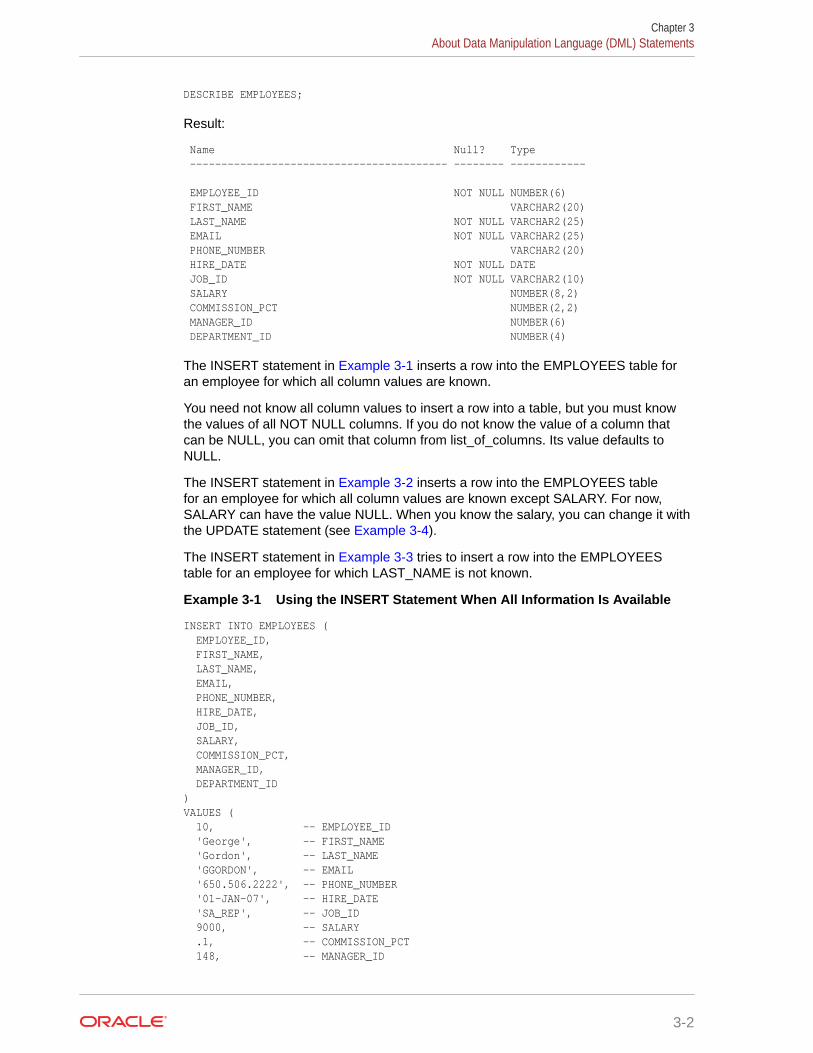
DESCRIBE EMPLOYEES;
Result:
Name Null? Type ----------------------------------------- -------- ------------ EMPLOYEE_ID NOT NULL NUMBER(6) FIRST_NAME VARCHAR2(20) LAST_NAME NOT NULL VARCHAR2(25) EMAIL NOT NULL VARCHAR2(25) PHONE_NUMBER VARCHAR2(20) HIRE_DATE NOT NULL DATE JOB_ID NOT NULL VARCHAR2(10) SALARY NUMBER(8,2) COMMISSION_PCT NUMBER(2,2) MANAGER_ID NUMBER(6) DEPARTMENT_ID NUMBER(4)
The INSERT statement in Example 3-1 inserts a row into the EMPLOYEES table foran employee for which all column values are known.
You need not know all column values to insert a row into a table, but you must knowthe values of all NOT NULL columns. If you do not know the value of a column thatcan be NULL, you can omit that column from list_of_columns. Its value defaults toNULL.
The INSERT statement in Example 3-2 inserts a row into the EMPLOYEES tablefor an employee for which all column values are known except SALARY. For now,SALARY can have the value NULL. When you know the salary, you can change it withthe UPDATE statement (see Example 3-4).
The INSERT statement in Example 3-3 tries to insert a row into the EMPLOYEEStable for an employee for which LAST_NAME is not known.
Example 3-1 Using the INSERT Statement When All Information Is Available
INSERT INTO EMPLOYEES ( EMPLOYEE_ID, FIRST_NAME, LAST_NAME, EMAIL, PHONE_NUMBER, HIRE_DATE, JOB_ID, SALARY, COMMISSION_PCT, MANAGER_ID, DEPARTMENT_ID)VALUES ( 10, -- EMPLOYEE_ID 'George', -- FIRST_NAME 'Gordon', -- LAST_NAME 'GGORDON', -- EMAIL '650.506.2222', -- PHONE_NUMBER '01-JAN-07', -- HIRE_DATE 'SA_REP', -- JOB_ID 9000, -- SALARY .1, -- COMMISSION_PCT 148, -- MANAGER_ID
Chapter 3About Data Manipulation Language (DML) Statements
3-2
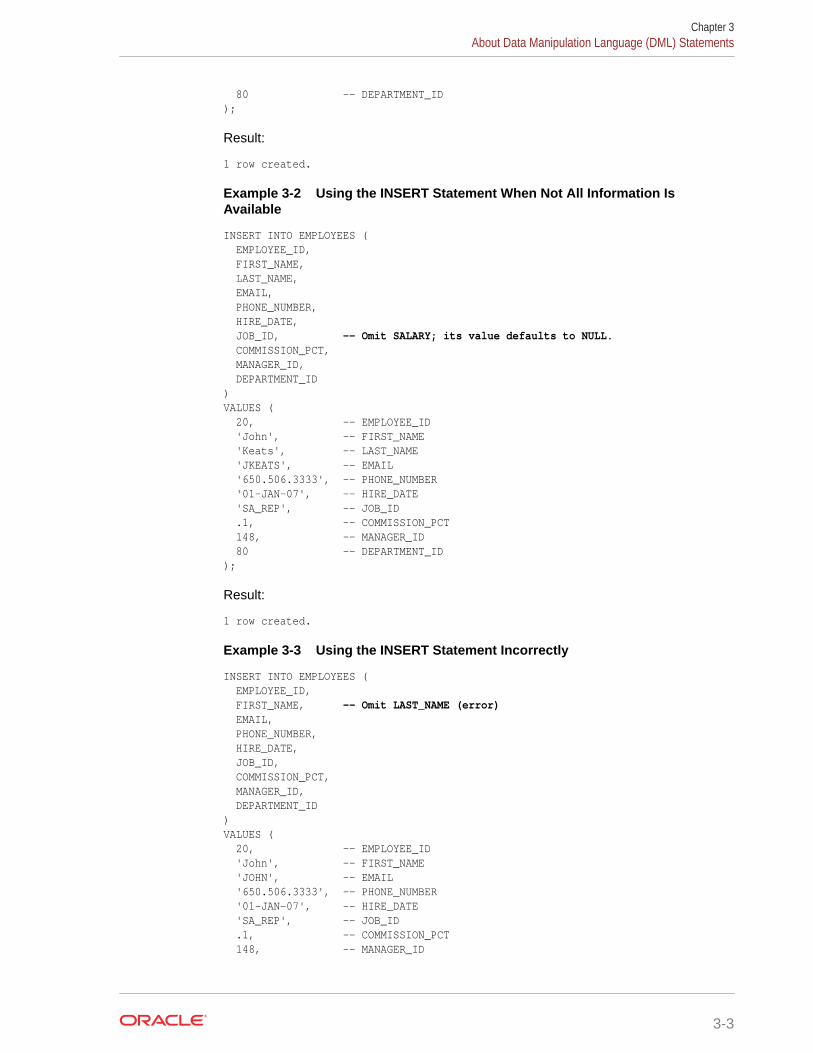
80 -- DEPARTMENT_ID);
Result:
1 row created.
Example 3-2 Using the INSERT Statement When Not All Information IsAvailable
INSERT INTO EMPLOYEES ( EMPLOYEE_ID, FIRST_NAME, LAST_NAME, EMAIL, PHONE_NUMBER, HIRE_DATE, JOB_ID, -- Omit SALARY; its value defaults to NULL. COMMISSION_PCT, MANAGER_ID, DEPARTMENT_ID)VALUES ( 20, -- EMPLOYEE_ID 'John', -- FIRST_NAME 'Keats', -- LAST_NAME 'JKEATS', -- EMAIL '650.506.3333', -- PHONE_NUMBER '01-JAN-07', -- HIRE_DATE 'SA_REP', -- JOB_ID .1, -- COMMISSION_PCT 148, -- MANAGER_ID 80 -- DEPARTMENT_ID);
Result:
1 row created.
Example 3-3 Using the INSERT Statement Incorrectly
INSERT INTO EMPLOYEES ( EMPLOYEE_ID, FIRST_NAME, -- Omit LAST_NAME (error) EMAIL, PHONE_NUMBER, HIRE_DATE, JOB_ID, COMMISSION_PCT, MANAGER_ID, DEPARTMENT_ID)VALUES ( 20, -- EMPLOYEE_ID 'John', -- FIRST_NAME 'JOHN', -- EMAIL '650.506.3333', -- PHONE_NUMBER '01-JAN-07', -- HIRE_DATE 'SA_REP', -- JOB_ID .1, -- COMMISSION_PCT 148, -- MANAGER_ID
Chapter 3About Data Manipulation Language (DML) Statements
3-3
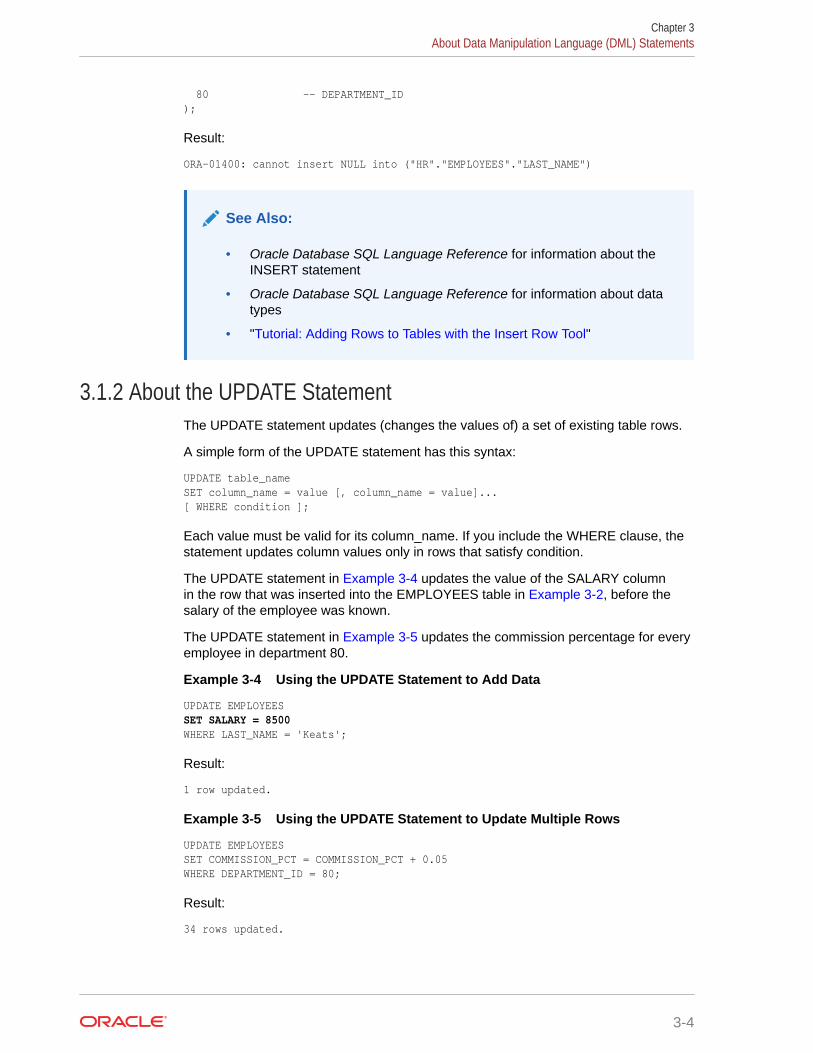
80 -- DEPARTMENT_ID);
Result:
ORA-01400: cannot insert NULL into ("HR"."EMPLOYEES"."LAST_NAME")
See Also:
• Oracle Database SQL Language Reference for information about theINSERT statement
• Oracle Database SQL Language Reference for information about datatypes
• "Tutorial: Adding Rows to Tables with the Insert Row Tool"
3.1.2 About the UPDATE StatementThe UPDATE statement updates (changes the values of) a set of existing table rows.
A simple form of the UPDATE statement has this syntax:
UPDATE table_nameSET column_name = value [, column_name = value]...[ WHERE condition ];
Each value must be valid for its column_name. If you include the WHERE clause, thestatement updates column values only in rows that satisfy condition.
The UPDATE statement in Example 3-4 updates the value of the SALARY columnin the row that was inserted into the EMPLOYEES table in Example 3-2, before thesalary of the employee was known.
The UPDATE statement in Example 3-5 updates the commission percentage for everyemployee in department 80.
Example 3-4 Using the UPDATE Statement to Add Data
UPDATE EMPLOYEESSET SALARY = 8500WHERE LAST_NAME = 'Keats';
Result:
1 row updated.
Example 3-5 Using the UPDATE Statement to Update Multiple Rows
UPDATE EMPLOYEESSET COMMISSION_PCT = COMMISSION_PCT + 0.05WHERE DEPARTMENT_ID = 80;
Result:
34 rows updated.
Chapter 3About Data Manipulation Language (DML) Statements
3-4
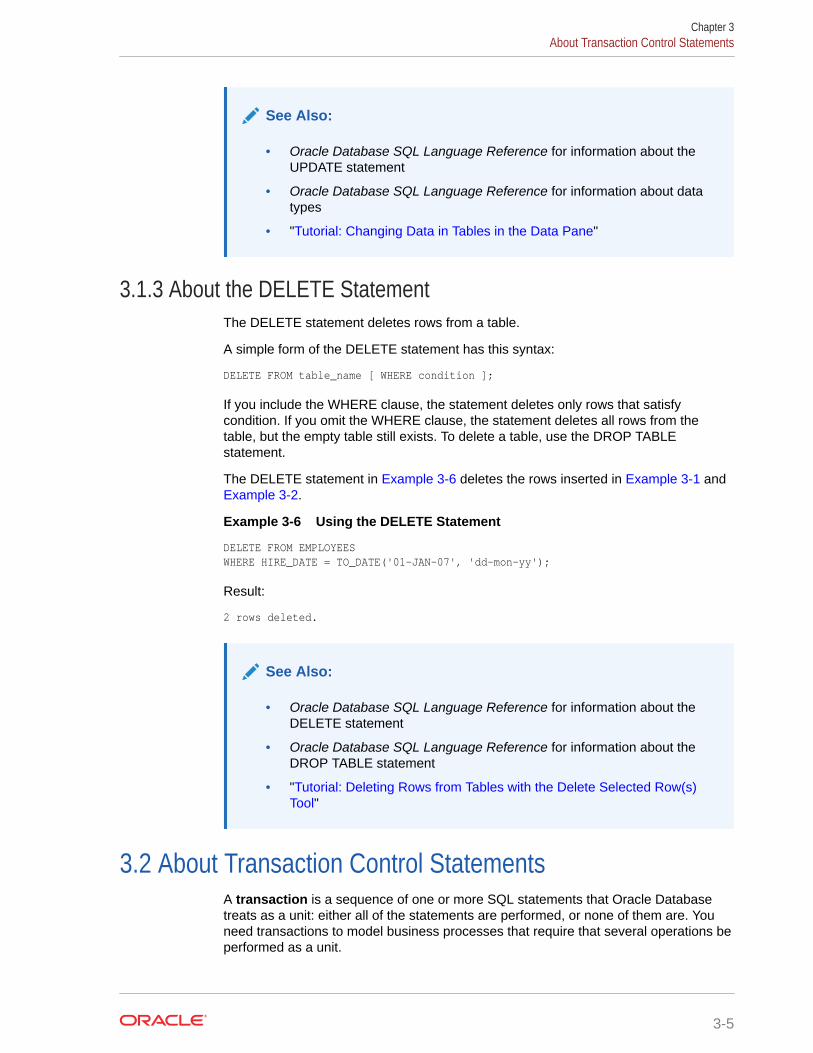
See Also:
• Oracle Database SQL Language Reference for information about theUPDATE statement
• Oracle Database SQL Language Reference for information about datatypes
• "Tutorial: Changing Data in Tables in the Data Pane"
3.1.3 About the DELETE StatementThe DELETE statement deletes rows from a table.
A simple form of the DELETE statement has this syntax:
DELETE FROM table_name [ WHERE condition ];
If you include the WHERE clause, the statement deletes only rows that satisfycondition. If you omit the WHERE clause, the statement deletes all rows from thetable, but the empty table still exists. To delete a table, use the DROP TABLEstatement.
The DELETE statement in Example 3-6 deletes the rows inserted in Example 3-1 andExample 3-2.
Example 3-6 Using the DELETE Statement
DELETE FROM EMPLOYEESWHERE HIRE_DATE = TO_DATE('01-JAN-07', 'dd-mon-yy');
Result:
2 rows deleted.
See Also:
• Oracle Database SQL Language Reference for information about theDELETE statement
• Oracle Database SQL Language Reference for information about theDROP TABLE statement
• "Tutorial: Deleting Rows from Tables with the Delete Selected Row(s)Tool"
3.2 About Transaction Control StatementsA transaction is a sequence of one or more SQL statements that Oracle Databasetreats as a unit: either all of the statements are performed, or none of them are. Youneed transactions to model business processes that require that several operations beperformed as a unit.
Chapter 3About Transaction Control Statements
3-5

For example, when a manager leaves the company, a row must be inserted intothe JOB_HISTORY table to show when the manager left, and for every employeewho reports to that manager, the value of MANAGER_ID must be updated in theEMPLOYEES table. To model this process in an application, you must group theINSERT and UPDATE statements into a single transaction.
The basic transaction control statements are:
• SAVEPOINT, which marks a savepoint in a transaction—a point to which youcan later roll back. Savepoints are optional, and a transaction can have multiplesavepoints.
• COMMIT, which ends the current transaction, makes its changes permanent,erases its savepoints, and releases its locks.
• ROLLBACK, which rolls back (undoes) either the entire current transaction or onlythe changes made after the specified savepoint.
In the SQL*Plus environment, you can enter a transaction control statement after theSQL> prompt.
In the SQL Developer environment, you can enter a transaction control statementin the Worksheet. SQL Developer also has Commit Changes and RollbackChanges icons, which are explained in "Committing Transactions" and "Rolling BackTransactions".
Caution:
If you do not explicitly commit a transaction, and the program terminatesabnormally, then the database automatically rolls back the last uncommittedtransaction.
Oracle recommends that you explicitly end transactions in applicationprograms, by either committing them or rolling them back.
See Also:
• Oracle Database Concepts for more information about transactionmanagement
• Oracle Database SQL Language Reference for more information abouttransaction control statements
3.3 Committing TransactionsCommitting a transaction makes its changes permanent, erases its savepoints, andreleases its locks.
To explicitly commit a transaction, use either the COMMIT statement or (in the SQLDeveloper environment) the Commit Changes icon.
Chapter 3Committing Transactions
3-6
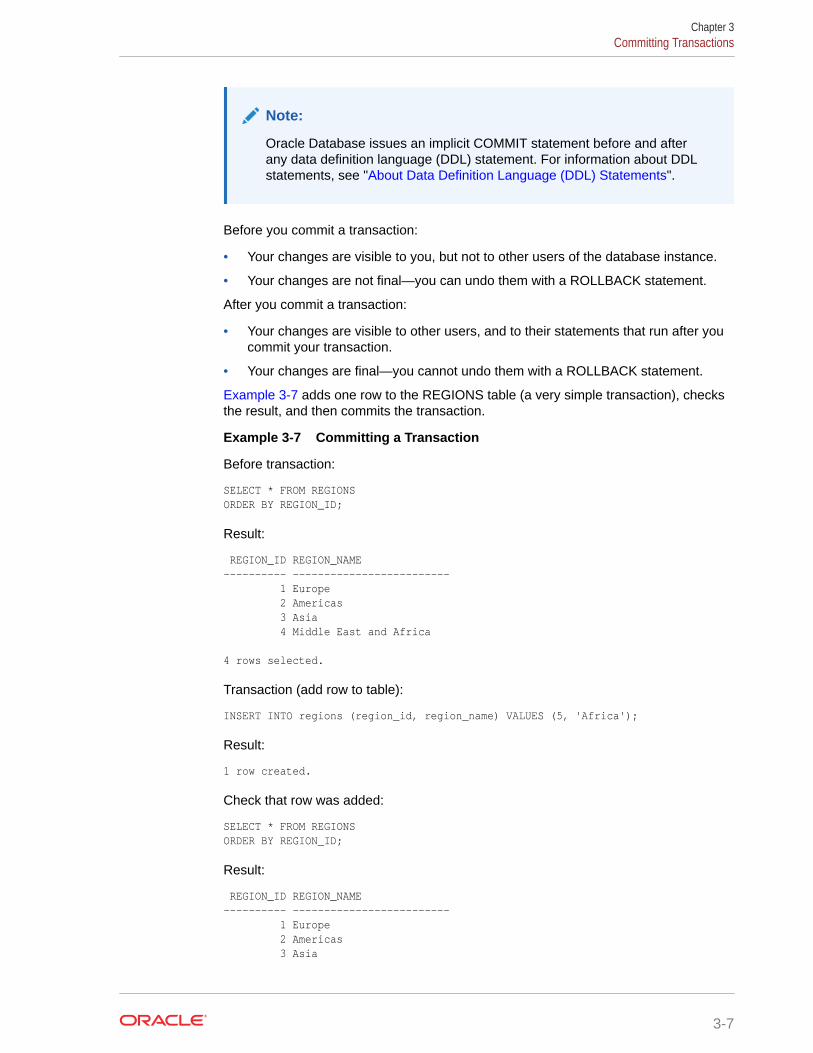
Note:
Oracle Database issues an implicit COMMIT statement before and afterany data definition language (DDL) statement. For information about DDLstatements, see "About Data Definition Language (DDL) Statements".
Before you commit a transaction:
• Your changes are visible to you, but not to other users of the database instance.
• Your changes are not final—you can undo them with a ROLLBACK statement.
After you commit a transaction:
• Your changes are visible to other users, and to their statements that run after youcommit your transaction.
• Your changes are final—you cannot undo them with a ROLLBACK statement.
Example 3-7 adds one row to the REGIONS table (a very simple transaction), checksthe result, and then commits the transaction.
Example 3-7 Committing a Transaction
Before transaction:
SELECT * FROM REGIONSORDER BY REGION_ID;
Result:
REGION_ID REGION_NAME---------- ------------------------- 1 Europe 2 Americas 3 Asia 4 Middle East and Africa 4 rows selected.
Transaction (add row to table):
INSERT INTO regions (region_id, region_name) VALUES (5, 'Africa');
Result:
1 row created.
Check that row was added:
SELECT * FROM REGIONSORDER BY REGION_ID;
Result:
REGION_ID REGION_NAME---------- ------------------------- 1 Europe 2 Americas 3 Asia
Chapter 3Committing Transactions
3-7
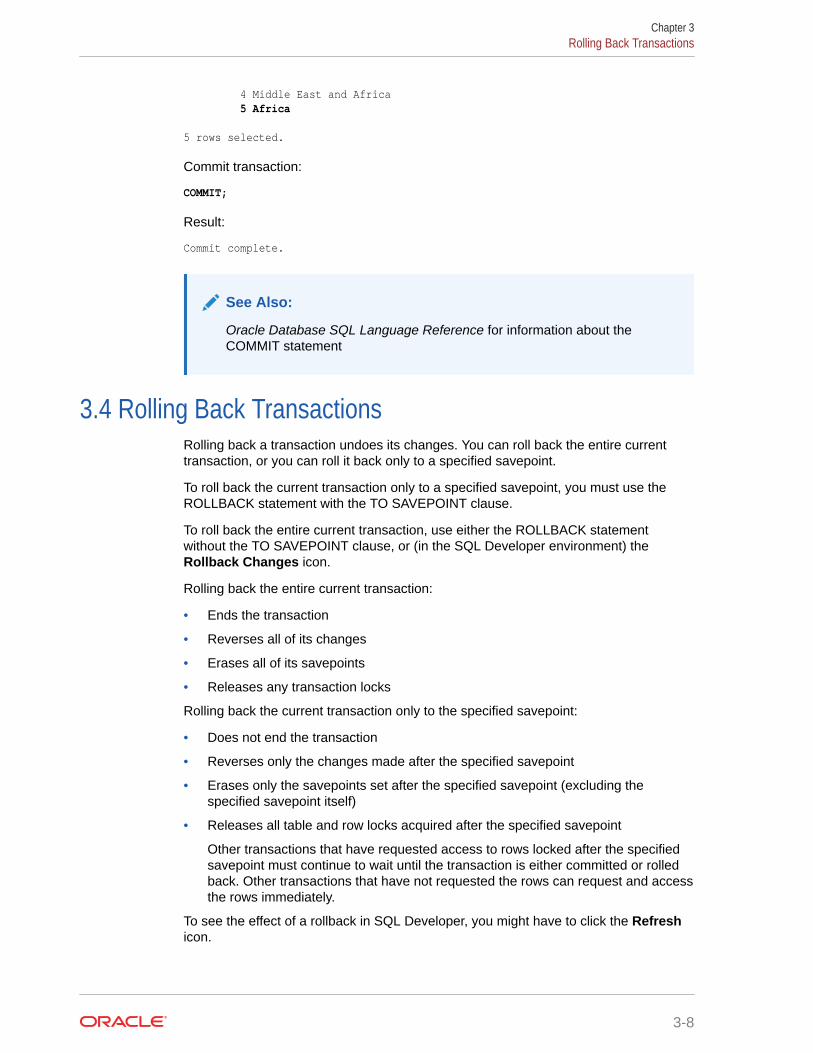
4 Middle East and Africa 5 Africa 5 rows selected.
Commit transaction:
COMMIT;
Result:
Commit complete.
See Also:
Oracle Database SQL Language Reference for information about theCOMMIT statement
3.4 Rolling Back TransactionsRolling back a transaction undoes its changes. You can roll back the entire currenttransaction, or you can roll it back only to a specified savepoint.
To roll back the current transaction only to a specified savepoint, you must use theROLLBACK statement with the TO SAVEPOINT clause.
To roll back the entire current transaction, use either the ROLLBACK statementwithout the TO SAVEPOINT clause, or (in the SQL Developer environment) theRollback Changes icon.
Rolling back the entire current transaction:
• Ends the transaction
• Reverses all of its changes
• Erases all of its savepoints
• Releases any transaction locks
Rolling back the current transaction only to the specified savepoint:
• Does not end the transaction
• Reverses only the changes made after the specified savepoint
• Erases only the savepoints set after the specified savepoint (excluding thespecified savepoint itself)
• Releases all table and row locks acquired after the specified savepoint
Other transactions that have requested access to rows locked after the specifiedsavepoint must continue to wait until the transaction is either committed or rolledback. Other transactions that have not requested the rows can request and accessthe rows immediately.
To see the effect of a rollback in SQL Developer, you might have to click the Refreshicon.
Chapter 3Rolling Back Transactions
3-8
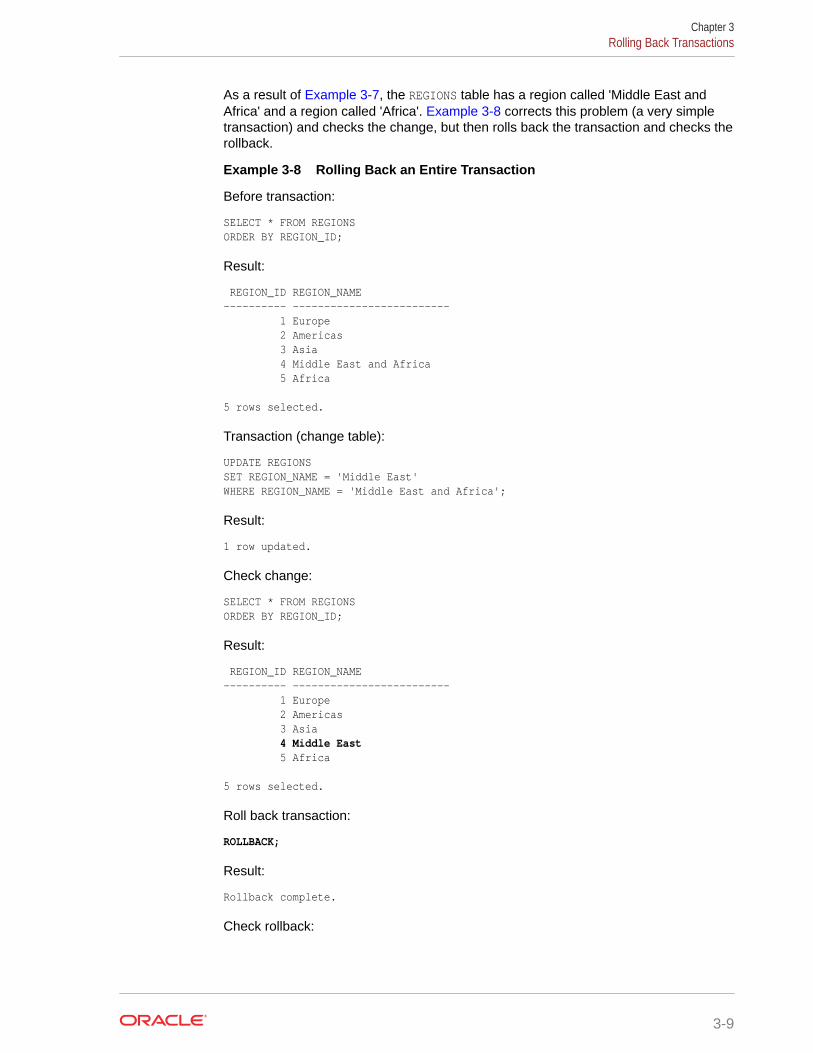
As a result of Example 3-7, the REGIONS table has a region called 'Middle East andAfrica' and a region called 'Africa'. Example 3-8 corrects this problem (a very simpletransaction) and checks the change, but then rolls back the transaction and checks therollback.
Example 3-8 Rolling Back an Entire Transaction
Before transaction:
SELECT * FROM REGIONSORDER BY REGION_ID;
Result:
REGION_ID REGION_NAME---------- ------------------------- 1 Europe 2 Americas 3 Asia 4 Middle East and Africa 5 Africa 5 rows selected.
Transaction (change table):
UPDATE REGIONSSET REGION_NAME = 'Middle East'WHERE REGION_NAME = 'Middle East and Africa';
Result:
1 row updated.
Check change:
SELECT * FROM REGIONSORDER BY REGION_ID;
Result:
REGION_ID REGION_NAME---------- ------------------------- 1 Europe 2 Americas 3 Asia 4 Middle East 5 Africa 5 rows selected.
Roll back transaction:
ROLLBACK;
Result:
Rollback complete.
Check rollback:
Chapter 3Rolling Back Transactions
3-9
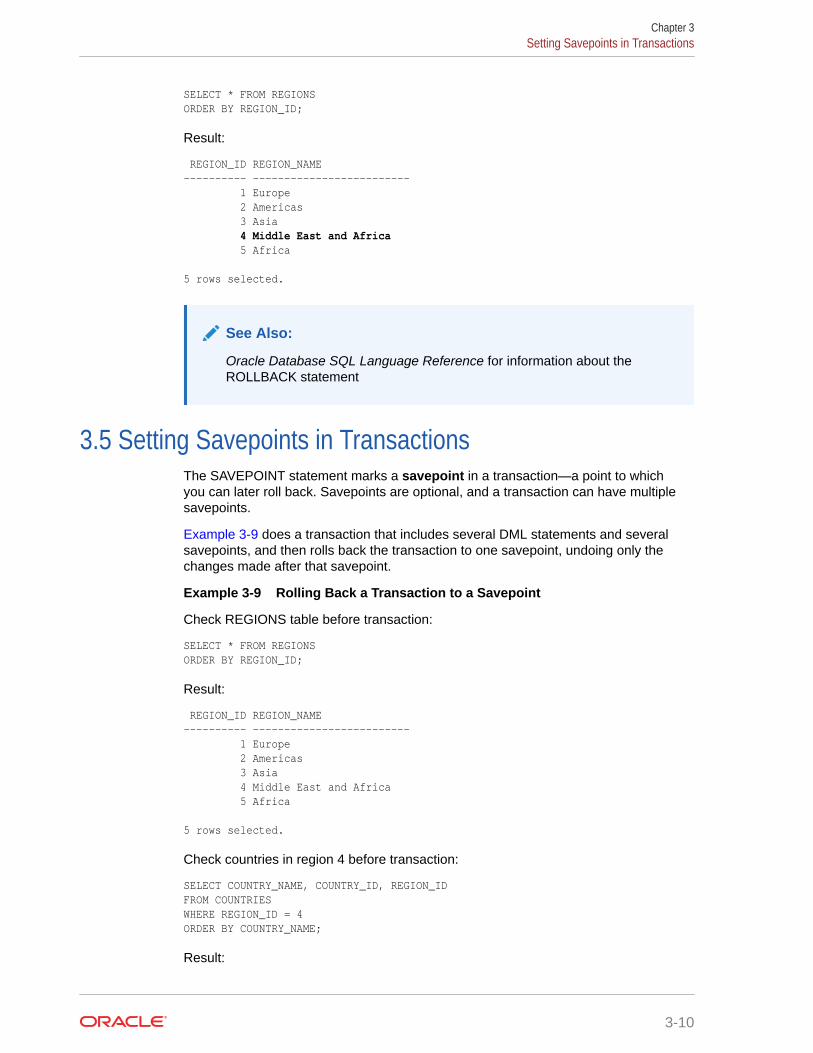
SELECT * FROM REGIONSORDER BY REGION_ID;
Result:
REGION_ID REGION_NAME---------- ------------------------- 1 Europe 2 Americas 3 Asia 4 Middle East and Africa 5 Africa 5 rows selected.
See Also:
Oracle Database SQL Language Reference for information about theROLLBACK statement
3.5 Setting Savepoints in TransactionsThe SAVEPOINT statement marks a savepoint in a transaction—a point to whichyou can later roll back. Savepoints are optional, and a transaction can have multiplesavepoints.
Example 3-9 does a transaction that includes several DML statements and severalsavepoints, and then rolls back the transaction to one savepoint, undoing only thechanges made after that savepoint.
Example 3-9 Rolling Back a Transaction to a Savepoint
Check REGIONS table before transaction:
SELECT * FROM REGIONSORDER BY REGION_ID;
Result:
REGION_ID REGION_NAME---------- ------------------------- 1 Europe 2 Americas 3 Asia 4 Middle East and Africa 5 Africa 5 rows selected.
Check countries in region 4 before transaction:
SELECT COUNTRY_NAME, COUNTRY_ID, REGION_IDFROM COUNTRIESWHERE REGION_ID = 4ORDER BY COUNTRY_NAME;
Result:
Chapter 3Setting Savepoints in Transactions
3-10
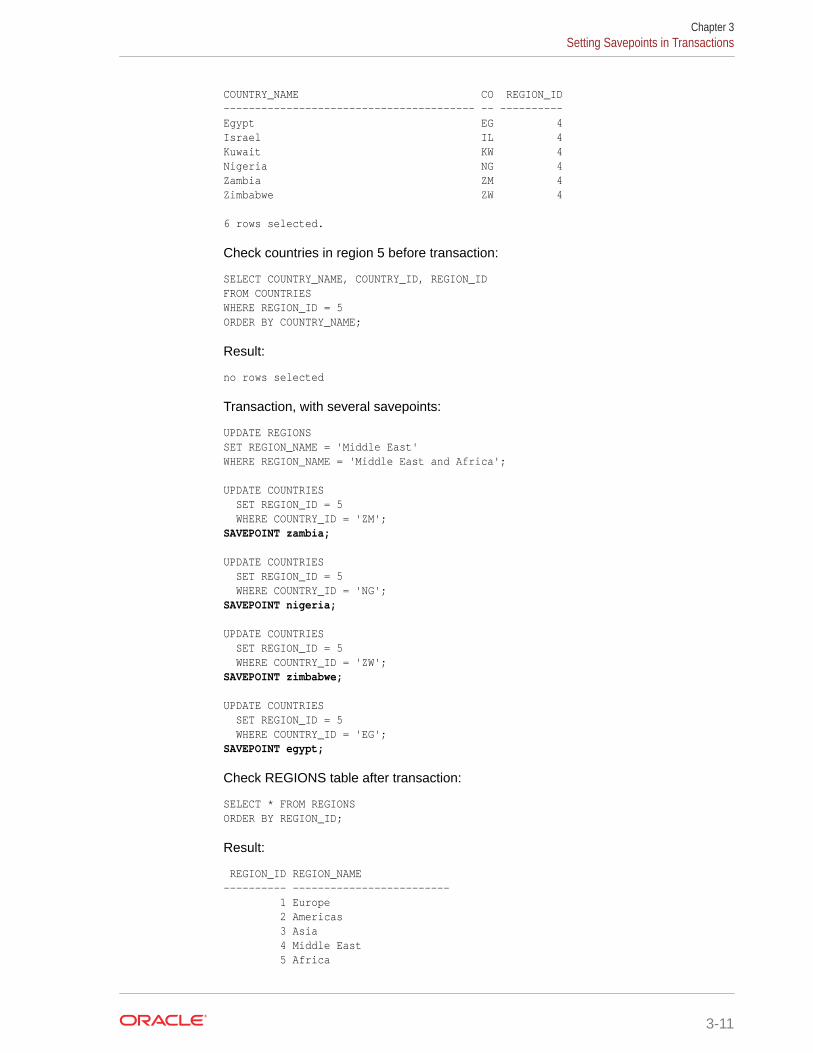
COUNTRY_NAME CO REGION_ID---------------------------------------- -- ----------Egypt EG 4Israel IL 4Kuwait KW 4Nigeria NG 4Zambia ZM 4Zimbabwe ZW 4 6 rows selected.
Check countries in region 5 before transaction:
SELECT COUNTRY_NAME, COUNTRY_ID, REGION_IDFROM COUNTRIESWHERE REGION_ID = 5ORDER BY COUNTRY_NAME;
Result:
no rows selected
Transaction, with several savepoints:
UPDATE REGIONSSET REGION_NAME = 'Middle East'WHERE REGION_NAME = 'Middle East and Africa';
UPDATE COUNTRIES SET REGION_ID = 5 WHERE COUNTRY_ID = 'ZM';SAVEPOINT zambia;
UPDATE COUNTRIES SET REGION_ID = 5 WHERE COUNTRY_ID = 'NG';SAVEPOINT nigeria; UPDATE COUNTRIES SET REGION_ID = 5 WHERE COUNTRY_ID = 'ZW';SAVEPOINT zimbabwe;
UPDATE COUNTRIES SET REGION_ID = 5 WHERE COUNTRY_ID = 'EG';SAVEPOINT egypt;
Check REGIONS table after transaction:
SELECT * FROM REGIONSORDER BY REGION_ID;
Result:
REGION_ID REGION_NAME---------- ------------------------- 1 Europe 2 Americas 3 Asia 4 Middle East 5 Africa
Chapter 3Setting Savepoints in Transactions
3-11
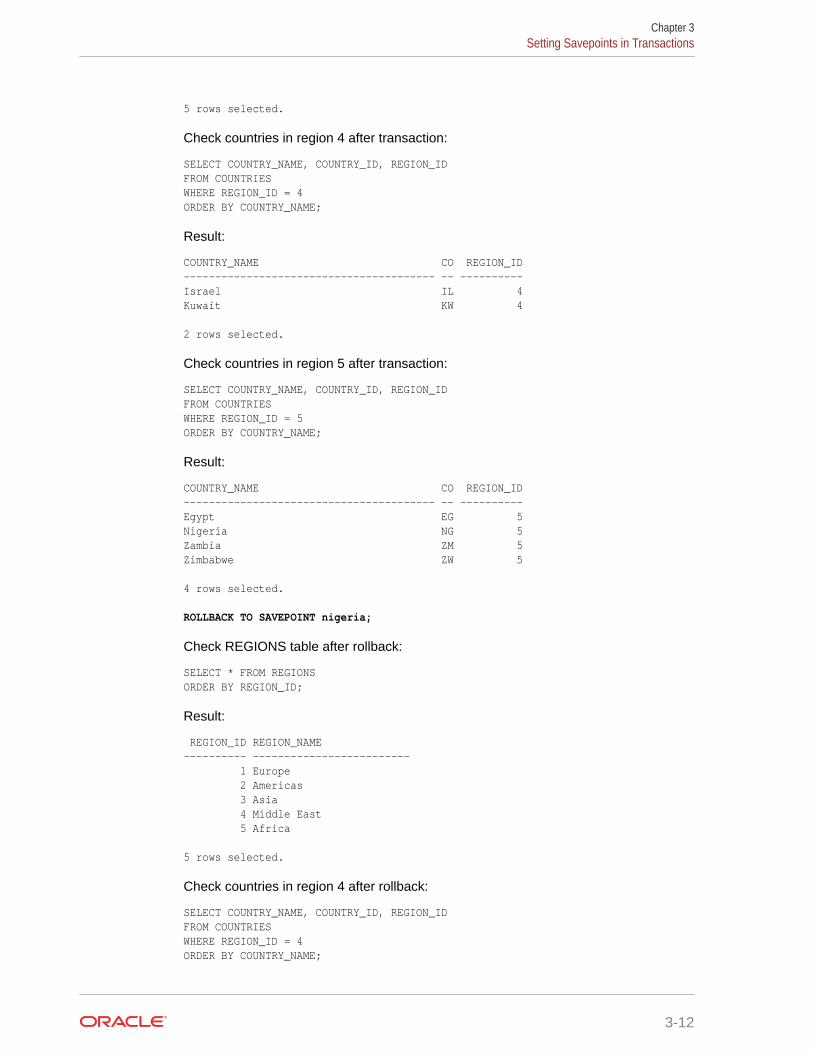
5 rows selected.
Check countries in region 4 after transaction:
SELECT COUNTRY_NAME, COUNTRY_ID, REGION_IDFROM COUNTRIESWHERE REGION_ID = 4ORDER BY COUNTRY_NAME;
Result:
COUNTRY_NAME CO REGION_ID---------------------------------------- -- ----------Israel IL 4Kuwait KW 4 2 rows selected.
Check countries in region 5 after transaction:
SELECT COUNTRY_NAME, COUNTRY_ID, REGION_IDFROM COUNTRIESWHERE REGION_ID = 5ORDER BY COUNTRY_NAME;
Result:
COUNTRY_NAME CO REGION_ID---------------------------------------- -- ----------Egypt EG 5Nigeria NG 5Zambia ZM 5Zimbabwe ZW 5 4 rows selected. ROLLBACK TO SAVEPOINT nigeria;
Check REGIONS table after rollback:
SELECT * FROM REGIONSORDER BY REGION_ID;
Result:
REGION_ID REGION_NAME---------- ------------------------- 1 Europe 2 Americas 3 Asia 4 Middle East 5 Africa 5 rows selected.
Check countries in region 4 after rollback:
SELECT COUNTRY_NAME, COUNTRY_ID, REGION_IDFROM COUNTRIESWHERE REGION_ID = 4ORDER BY COUNTRY_NAME;
Chapter 3Setting Savepoints in Transactions
3-12
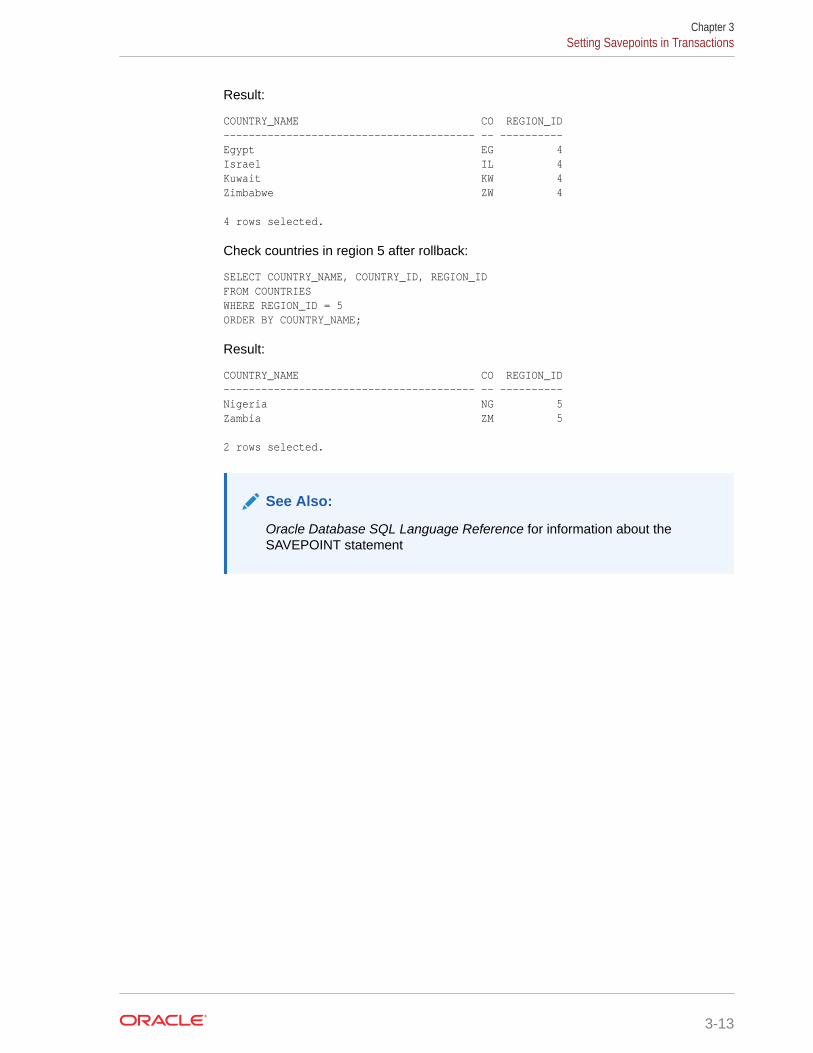
Result:
COUNTRY_NAME CO REGION_ID---------------------------------------- -- ----------Egypt EG 4Israel IL 4Kuwait KW 4Zimbabwe ZW 4 4 rows selected.
Check countries in region 5 after rollback:
SELECT COUNTRY_NAME, COUNTRY_ID, REGION_IDFROM COUNTRIESWHERE REGION_ID = 5ORDER BY COUNTRY_NAME;
Result:
COUNTRY_NAME CO REGION_ID---------------------------------------- -- ----------Nigeria NG 5Zambia ZM 5 2 rows selected.
See Also:
Oracle Database SQL Language Reference for information about theSAVEPOINT statement
Chapter 3Setting Savepoints in Transactions
3-13
4Creating and Managing Schema Objects
To create, change, and drop schema objects, you use data definition language (DDL)statements.
4.1 About Data Definition Language (DDL) StatementsData definition language (DDL) statements create, change, and drop schemaobjects. Before and after a DDL statement, Oracle Database issues an implicitCOMMIT statement; therefore, you cannot roll back a DDL statement.
Note:
When creating schema objects, you must observe the schema object namingrules in Oracle Database SQL Language Reference.
In the SQL*Plus environment, you can enter a DDL statement after the SQL> prompt.
In the SQL Developer environment, you can enter a DDL statement in the Worksheet.Alternatively, you can use SQL Developer tools to create, change, and drop objects.
Some DDL statements that create schema objects have an optional OR REPLACEclause, which allows a statement to replace an existing schema object with anotherthat has the same name and type. When SQL Developer generates code for one ofthese statements, it always includes the OR REPLACE clause.
To see the effect of a DDL statement in SQL Developer, you might have to select theschema object type of the newly created object in the Connections frame and thenclick the Refresh icon.
See Also:
• Oracle Database SQL Language Reference for more information aboutDDL statements
• "Committing Transactions"
4.2 Creating and Managing TablesTables are the basic units of data storage in Oracle Database. Tables hold all user-accessible data. Each table contains rows that represent individual data records. Rowsare composed of columns that represent the fields of the records.
4-1
Note:
To do the tutorials in this document, you must be connected to OracleDatabase as the user HR from SQL Developer.
See Also:
• "Tutorial: Viewing EMPLOYEES Table Properties and Data with SQLDeveloper"
• Oracle SQL Developer User's Guide for a SQL Developer tutorial thatincludes creating and populating tables
• Oracle Database Concepts for general information about tables
4.2.1 About SQL Data TypesWhen you create a table, you must specify the SQL data type for each column, whichdetermines what values the column can contain.
For example, a column of type DATE can contain the value '01-MAY-05', but it cannotcontain the numeric value 2 or the character value 'shoe'. SQL data types fall into twocategories: built-in and user-defined. (PL/SQL has additional data types—see "AboutPL/SQL Data Types".)
See Also:
• Oracle Database SQL Language Reference for a summary of built-inSQL data types
• Oracle Database Concepts for introductions to each of the built-in SQLdata types
• Oracle Database SQL Language Reference for more information aboutuser-defined data types
• "About PL/SQL Data Types"
4.2.2 Creating TablesTo create tables, use either the SQL Developer tool Create Table or the DDLstatement CREATE TABLE.
This section shows how to use both of these ways to create these tables, which willcontain data about employee evaluations:
• PERFORMANCE_PARTS, which contains the categories of employeeperformance that are evaluated and their relative weights
Chapter 4Creating and Managing Tables
4-2
• EVALUATIONS, which contains employee information, evaluation date, job,manager, and department
• SCORES, which contains the scores assigned to each performance category foreach evaluation
These tables appear in many tutorials and examples in this document.
4.2.2.1 Tutorial: Creating a Table with the Create Table ToolThis tutorial shows how to create the PERFORMANCE_PARTS table using the SQLDeveloper tool Create Table.
To create the PERFORMANCE_PARTS table using the Create Table tool:
1. In the Connections frame, expand hr_conn.
2. In the list of schema object types, right-click Tables.
3. In the list of choices, click New Table.
The Create Table window opens, with default values for a new table, which hasonly one row.
4. For Schema, accept the default value, HR.
5. For Name, enter PERFORMANCE_PARTS.
6. In the default row:
• For PK (primary key), accept the default option, deselected.
• For Column Name, enter PERFORMANCE_ID.
• For Type, accept the default value, VARCHAR2.
• For Size, enter 2.
• For Not Null, accept the default option, deselected.
7. Click Add Column.
8. For Column Name, enter NAME.
9. For Type, accept the default value, VARCHAR2.
10. For Size, enter 80.
11. Click Add Column.
12. For Column Name, enter WEIGHT.
13. For Type, select NUMBER from the menu.
14. Click OK.
The table PERFORMANCE_PARTS is created. Its name appears under Tables in theConnections frame.
To see the CREATE TABLE statement for creating this table, selectPERFORMANCE_PARTS and click the tab SQL.
Chapter 4Creating and Managing Tables
4-3
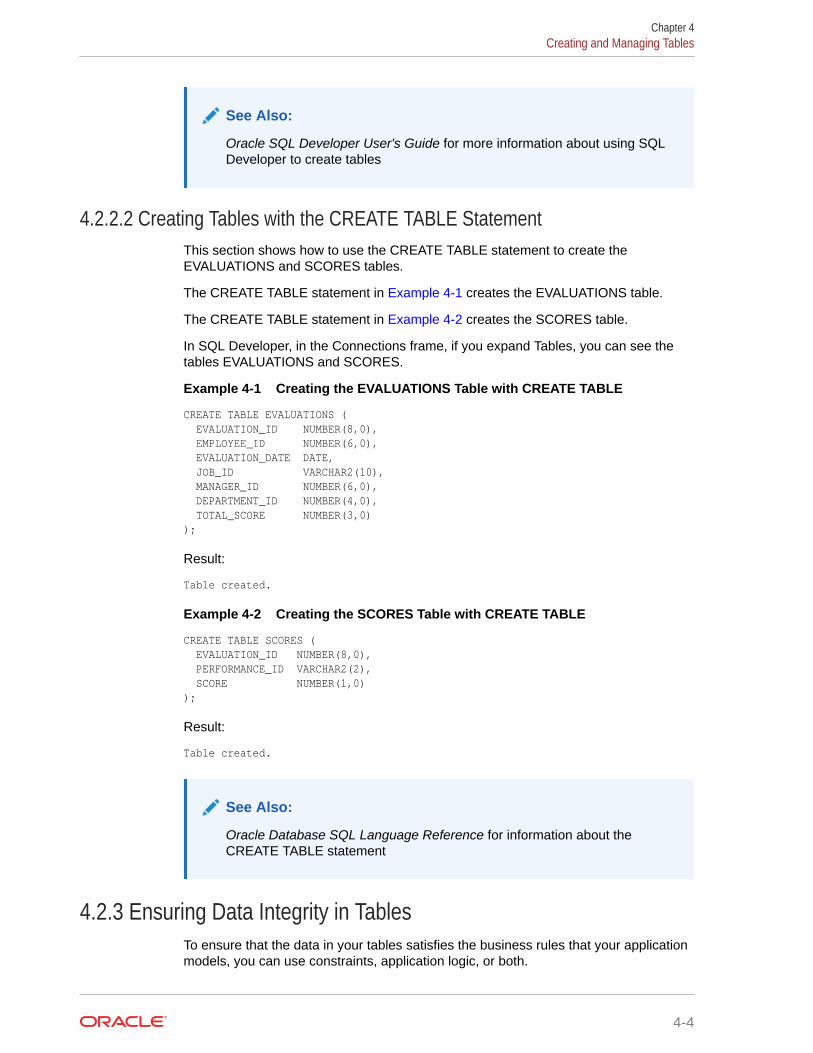
See Also:
Oracle SQL Developer User's Guide for more information about using SQLDeveloper to create tables
4.2.2.2 Creating Tables with the CREATE TABLE StatementThis section shows how to use the CREATE TABLE statement to create theEVALUATIONS and SCORES tables.
The CREATE TABLE statement in Example 4-1 creates the EVALUATIONS table.
The CREATE TABLE statement in Example 4-2 creates the SCORES table.
In SQL Developer, in the Connections frame, if you expand Tables, you can see thetables EVALUATIONS and SCORES.
Example 4-1 Creating the EVALUATIONS Table with CREATE TABLE
CREATE TABLE EVALUATIONS ( EVALUATION_ID NUMBER(8,0), EMPLOYEE_ID NUMBER(6,0), EVALUATION_DATE DATE, JOB_ID VARCHAR2(10), MANAGER_ID NUMBER(6,0), DEPARTMENT_ID NUMBER(4,0), TOTAL_SCORE NUMBER(3,0));
Result:
Table created.
Example 4-2 Creating the SCORES Table with CREATE TABLE
CREATE TABLE SCORES ( EVALUATION_ID NUMBER(8,0), PERFORMANCE_ID VARCHAR2(2), SCORE NUMBER(1,0));
Result:
Table created.
See Also:
Oracle Database SQL Language Reference for information about theCREATE TABLE statement
4.2.3 Ensuring Data Integrity in TablesTo ensure that the data in your tables satisfies the business rules that your applicationmodels, you can use constraints, application logic, or both.
Chapter 4Creating and Managing Tables
4-4
Tip:
Wherever possible, use constraints instead of application logic. OracleDatabase checks that all data obeys constraints much faster than applicationlogic can.
See Also:
• Oracle Database Concepts for additional general information about dataintegrity
• Oracle Database SQL Language Reference for syntactic informationabout constraints
• Oracle Database Development Guide for information about enabling anddisabling constraints
4.2.3.1 About ConstraintsConstraints restrict the values that columns can have. Trying to change the data in away that violates a constraint causes an error and rolls back the change. Trying to adda constraint to a populated table causes an error if existing data violates the constraint.
Constraints can be enabled and disabled. By default, they are created in the enabledstate.
The constraint types are:
• Not Null, which prevents a value from being null
In the EMPLOYEES table, the column LAST_NAME has the NOT NULLconstraint, which enforces the business rule that every employee must have alast name.
• Unique, which prevents multiple rows from having the same value in the samecolumn or combination of columns, but allows some values to be null
In the EMPLOYEES table, the column EMAIL has the UNIQUE constraint, whichenforces the business rule that an employee can have no email address, butcannot have the same email address as another employee.
• Primary Key, which is a combination of NOT NULL and UNIQUE
In the EMPLOYEES table, the column EMPLOYEE_ID has the PRIMARY KEYconstraint, which enforces the business rule that every employee must have aunique employee identification number.
• Foreign Key, which requires values in one table to match values in another table
In the EMPLOYEES table, the column JOB_ID has a FOREIGN KEY constraintthat references the JOBS table, which enforces the business rule that anemployee cannot have a JOB_ID that is not in the JOBS table.
• Check, which requires that a value satisfy a specified condition
Chapter 4Creating and Managing Tables
4-5
The EMPLOYEES table does not have CHECK constraints. However, supposethat EMPLOYEES needs a new column, EMPLOYEE_AGE, and that everyemployee must be at least 18. The constraint CHECK (EMPLOYEE_AGE >= 18)enforces the business rule.
Tip:
Use check constraints only when other constraint types cannot providethe necessary checking.
• REF, which further describes the relationship between a REF column and theobject that it references
A REF column references an object in another object type or in a relational table.
For information about REF constraints, see Oracle Database Concepts.
See Also:
• Oracle Database SQL Language Reference for syntactic informationabout constraints
4.2.3.2 Tutorial: Adding Constraints to Existing TablesThis tutorial shows how to add constraints to existing tables using both SQL Developertools and the ALTER TABLE statement.
To add constraints to existing tables, use either SQL Developer tools or the DDLstatement ALTER TABLE. This topic shows how to use both of these ways to addconstraints to the tables created in "Creating Tables".
This tutorial has several procedures. The first procedure uses the Edit Table tool toadd a Not Null constraint to the NAMES column of the PERFORMANCE_PARTS table. Theremaining procedures show how to use other tools to add constraints; however, youcould add the same constraints using the Edit Table tool.
Note:
After any step of the tutorial, you can view the constraints that a table has:
1. In the Connections frame, select the name of the table.
2. In the right frame, click the tab Constraints.
For more information about viewing table properties and data, see "Tutorial:Viewing EMPLOYEES Table Properties and Data with SQL Developer".
To add a Not Null constraint using the Edit Table tool:
1. In the Connections frame, expand hr_conn.
Chapter 4Creating and Managing Tables
4-6
2. In the list of schema object types, expand Tables.
3. In the list of tables, right-click PERFORMANCE_PARTS.
4. In the list of choices, click Edit.
5. In the Edit Table window, click the column NAME.
6. Select the property Not Null.
7. Click OK.
The Not Null constraint is added to the NAME column of the PERFORMANCE_PARTStable.
The following procedure uses the ALTER TABLE statement to add a Not Nullconstraint to the WEIGHT column of the PERFORMANCE_PARTS table.
To add a Not Null constraint using the ALTER TABLE statement:
1. If a pane with the tab hr_conn is there, select it. Otherwise, click the iconSQL Worksheet, as in "Running Queries in SQL Developer".
2. In the Worksheet pane, type this statement:
ALTER TABLE PERFORMANCE_PARTSMODIFY WEIGHT NOT NULL;
3. Click the icon Run Statement.
The statement runs, adding the Not Null constraint to the WEIGHT column of thePERFORMANCE_PARTS table.
The following procedure uses the Add Unique tool to add a Unique constraint to theSCORES table.
To add a Unique constraint using the Add Unique tool:
1. In the Connections frame, expand hr_conn.
2. In the list of schema object types, expand Tables.
3. In the list of tables, right-click SCORES.
4. In the list of choices, select Constraint.
5. In the list of choices, click Add Unique.
6. In the Add Unique window:
a. For Constraint Name, enter SCORES_EVAL_PERF_UNIQUE.
b. For Column 1, select EVALUATION_ID from the menu.
c. For Column 2, select PERFORMANCE_ID from the menu.
d. Click Apply.
7. In the Confirmation window, click OK.
A unique constraint named SCORES_EVAL_PERF_UNIQUE is added to the SCOREStable.
The following procedure uses the Add Primary Key tool to add a Primary Keyconstraint to the PERFORMANCE_ID column of the PERFORMANCE_PARTS table.
Chapter 4Creating and Managing Tables
4-7
To add a Primary Key constraint using the Add Primary Key tool:
1. In the Connections frame, expand hr_conn.
2. In the list of schema object types, expand Tables.
3. In the list of tables, right-click PERFORMANCE_PARTS.
4. In the list of choices, select Constraint.
5. In the list of choices, click Add Primary Key.
6. In the Add Primary Key window:
a. For Primary Key Name, enter PERF_PERF_ID_PK.
b. For Column 1, select PERFORMANCE_ID from the menu.
c. Click Apply.
7. In the Confirmation window, click OK.
A primary key constraint named PERF_PERF_ID_PK is added to the PERFORMANCE_IDcolumn of the PERFORMANCE_PARTS table.
The following procedure uses the ALTER TABLE statement to add a Primary Keyconstraint to the EVALUATION_ID column of the EVALUATIONS table.
To add a Primary Key constraint using the ALTER TABLE statement:
1. If a pane with the tab hr_conn is there, select it. Otherwise, click the iconSQL Worksheet, as in "Running Queries in SQL Developer".
2. In the Worksheet pane, type this statement:
ALTER TABLE EVALUATIONSADD CONSTRAINT EVAL_EVAL_ID_PK PRIMARY KEY (EVALUATION_ID);
3. Click the icon Run Statement.
The statement runs, adding the Primary Key constraint to the EVALUATION_IDcolumn of the EVALUATIONS table.
The following procedure uses the Add Foreign Key tool to add two Foreign Keyconstraints to the SCORES table.
To add two Foreign Key constraints using the Add Foreign Key tool:
1. In the Connections frame, expand hr_conn.
2. In the list of schema object types, expand Tables.
3. In the list of tables, right-click SCORES.
4. In the list of choices, select Constraint.
5. In the list of choices, click Add Foreign Key.
6. In the Add Foreign Key window:
a. For Constraint Name, enter SCORES_EVAL_FK.
b. For Column Name, select EVALUATION_ID from the menu.
c. For References Table Name, select EVALUATIONS from the menu.
d. For Referencing Column, select EVALUATION_ID from the menu.
Chapter 4Creating and Managing Tables
4-8
e. Click Apply.
7. In the Confirmation window, click OK.
A foreign key constraint named SCORES_EVAL_FK is added to the EVALUTION_IDcolumn of the SCORES table, referencing the EVALUTION_ID column of theEVALUATIONS table.
The following steps add another foreign key constraint to the SCORES table.
8. In the list of tables, right-click SCORES.
9. In the list of tables, select Constraint.
10. In the list of choices, click Add Foreign Key.
The Add Foreign Key window opens.
11. In the Add Foreign Key window:
a. For Constraint Name, enter SCORES_PERF_FK.
b. For Column Name, select PERFORMANCE_ID from the menu.
c. For Reference Table Name, select PERFORMANCE_PARTS from the menu.
d. For Referencing Column, select PERFORMANCE_ID from the menu.
e. Click Apply.
12. In the Confirmation window, click OK.
A foreign key constraint named SCORES_PERF_FK is added to the EVALUTION_IDcolumn of the SCORES table, referencing the EVALUTION_ID column of theEVALUATIONS table.
The following procedure uses the ALTER TABLE statement to add a Foreign Keyconstraint to the EMPLOYEE_ID column of the EVALUATIONS table, referencing theEMPLOYEE_ID column of the EMPLOYEES table.
To add a Foreign Key constraint using the ALTER TABLE statement:
1. If a pane with the tab hr_conn is there, select it. Otherwise, click the iconSQL Worksheet, as in "Running Queries in SQL Developer".
2. In the Worksheet pane, type this statement:
ALTER TABLE EVALUATIONSADD CONSTRAINT EVAL_EMP_ID_FK FOREIGN KEY (EMPLOYEE_ID)REFERENCES EMPLOYEES (EMPLOYEE_ID);
3. Click the icon Run Statement.
The statement runs, adding the Foreign Key constraint to the EMPLOYEE_ID columnof the EVALUATIONS table, referencing the EMPLOYEE_ID column of the EMPLOYEEStable.
The following procedure uses the Add Check tool to add a Check constraint to theSCORES table.
To add a Check constraint using the Add Check tool:
1. In the Connections frame, expand hr_conn.
2. In the list of schema object types, expand Tables.
3. In the list of tables, right-click SCORES.
Chapter 4Creating and Managing Tables
4-9
4. In the list of choices, select Constraint.
5. In the list of choices, click Add Check.
6. In the Add Check window:
a. For Constraint Name, enter SCORE_VALID.
b. For Check Condition, enter score >= 0 and score <+ 9.
c. For Status, accept the default, ENABLE.
d. Click Apply.
7. In the Confirmation window, click OK.
A Check constraint named SCORE_VALID is added to the SCORES table.
See Also:
• Oracle Database SQL Language Reference for more information aboutthe ALTER TABLE statement
• Oracle SQL Developer User's Guide for information about addingconstraints to a table when you create it with SQL Developer
• Oracle Database SQL Language Reference for information about addingconstraints to a table when you create it with the CREATE TABLEstatement
4.2.4 Tutorial: Adding Rows to Tables with the Insert Row ToolThis tutorial shows how to use the Insert Row tool to add six populated rows to thePERFORMANCE_PARTS table.
To add rows to the PERFORMANCE_PARTS table using the Insert Row tool:
1. In the Connections frame, expand hr_conn.
2. In the list of schema object types, expand Tables.
3. In the list of tables, select PERFORMANCE_PARTS.
4. In the right frame, click the tab Data.
The Data pane appears, showing the names of the columns of thePERFORMANCE_PARTS table and no rows.
5. In the Data pane, click the icon Insert Row.
A new row appears, with empty columns. A green border around the row numberindicates that the insertion has not been committed.
6. Click the cell under the column heading PERFORMANCE_ID.
7. Type the value of PERFORMANCE_ID: WM
8. Either press the key Tab or click the cell under the column heading NAME.
9. Type the value of NAME: Workload Management
10. Either press the key Tab or click the cell under the column heading WEIGHT.
Chapter 4Creating and Managing Tables
4-10
11. Type the value of WEIGHT: 0.2
12. Press the key Enter.
13. Add and populate a second row by repeating steps 5 through 12 with thesevalues:
• For PERFORMANCE_ID, type BR.
• For NAME, type Building Relationships.
• For WEIGHT, type 0.2.
14. Add and populate a third row by repeating steps 5 through 12 with these values:
• For PERFORMANCE_ID, type CF.
• For NAME, type Customer Focus.
• For WEIGHT, type 0.2.
15. Add and populate a fourth row by repeating steps 5 through 12 with these values:
• For PERFORMANCE_ID, type CM.
• For NAME, type Communication.
• For WEIGHT, type 0.2.
16. Add and populate a fifth row by repeating steps 5 through 12 with these values:
• For PERFORMANCE_ID, type TW.
• For NAME, type Teamwork.
• For WEIGHT, type 0.2.
17. Add and populate a sixth row by repeating steps 5 through 12, using these values:
• For PERFORMANCE_ID, type RO.
• For NAME, type Results Orientation.
• For WEIGHT, type 0.2.
18. Click the icon Commit Changes.
The green borders around the row numbers disappear.
Under the Data pane is the label Messages - Log.
19. Check the Messages - Log pane for the message Commit Successful.
20. In the Data Pane, check the new rows.
See Also:
"About the INSERT Statement"
Chapter 4Creating and Managing Tables
4-11
4.2.5 Tutorial: Changing Data in Tables in the Data PaneThis tutorial shows how to change three of the WEIGHT values in thePERFORMANCE_PARTS table in the Data pane.
The PERFORMANCE_PARTS table was populated in "Tutorial: Adding Rows toTables with the Insert Row Tool".
To change data in the PERFORMANCE_PARTS table using the Data pane:
1. In the Connections frame, expand hr_conn.
2. In the list of schema object types, expand Tables.
3. In the list of tables, select PERFORMANCE_PARTS.
4. In the right frame, click the tab Data.
5. In the Data Pane, in the row where NAME is "Workload Management":
a. Click the WEIGHT value.
b. Enter the value 0.3.
c. Press the key Enter.
An asterisk appears to the left of the row number to indicate that the changehas not been committed.
6. In the row where NAME is "Building Relationships":
a. Click the WEIGHT value.
b. Enter the value 0.15.
c. Press the key Enter.
An asterisk appears to the left of the row number to indicate that the changehas not been committed.
7. In the row where NAME is "Customer Focus" :
a. Click the WEIGHT value.
b. Enter the value 0.15.
c. Press the key Enter.
An asterisk appears to the left of the row number to indicate that the changehas not been committed.
8. Click the icon Commit Changes.
The asterisks to the left of the row numbers disappear.
9. Under the Data pane, check the Messages - Log pane for the message CommitSuccessful.
10. In the Data Pane, check the new data.
See Also:
"About the UPDATE Statement"
Chapter 4Creating and Managing Tables
4-12
4.2.6 Tutorial: Deleting Rows from Tables with the Delete SelectedRow(s) Tool
This tutorial shows how to use the Delete Selected Row(s) tool to delete a row fromthe PERFORMANCE_PARTS table.
The PERFORMANCE_PARTS table was populated in "Tutorial: Adding Rows toTables with the Insert Row Tool").
To delete row from PERFORMANCE_PARTS using Delete Selected Row(s) tool:
1. In the Connections frame, expand hr_conn.
2. In the list of schema object types, expand Tables.
3. In the list of tables, select PERFORMANCE_PARTS.
4. In the right frame, click the tab Data.
5. In the Data pane, click the row where NAME is "Results Orientation".
6. Click the icon Delete Selected Row(s).
A red border appears around the row number to indicate that the deletion has notbeen committed.
7. Click the icon Commit Changes.
The row is deleted.
8. Under the Data pane, check the Messages - Log pane for the message CommitSuccessful.
Note:
If you delete every row of a table, the empty table still exists. To delete atable, see "Dropping Tables".
See Also:
"About the DELETE Statement"
4.2.7 Managing IndexesYou can create indexes on one or more columns of a table to speed SQL statementexecution on that table. When properly used, indexes are the primary means ofreducing disk input/output (I/O).
When you define a primary key on a table:
• If an existing index starts with the primary key columns, then Oracle Databaseuses that existing index for the primary key. The existing index need not beUnique.
Chapter 4Creating and Managing Tables
4-13
For example, if you define the primary key (A, B), Oracle Database uses theexisting index (A, B, C).
• If no existing index starts with the primary key columns and the constraint isimmediate, then Oracle Database creates a Unique index on the primary key.
• If no existing index starts with the primary key columns and the constraint isdeferrable, then Oracle Database creates a non-Unique index on the primary key.
For example, in "Tutorial: Adding Constraints to Existing Tables", you added aPrimary Key constraint to the EVALUATION_ID column of the EVALUATIONS table.Therefore, if you select the EVALUATIONS table in the SQL Developer Connectionsframe and click the Indexes tab, the Indexes pane shows a Unique index on theEVALUATION_ID column.
See Also:
For more information about indexes:
• Oracle Database Concepts
• Oracle Database Development Guide
4.2.7.1 Tutorial: Adding an Index with the Create Index ToolThis tutorial shows how to use the Create Index tool to add an index to theEVALUATIONS table.
The EVALUATIONS table was created in Example 4-1.
To create an index, use either the SQL Developer tool Create Index or the DDLstatement CREATE INDEX. The equivalent DDL statement is:
CREATE INDEX EVAL_JOB_IXON EVALUATIONS (JOB_ID ASC) NOPARALLEL;
To add an index to the EVALUATIONS table using the Create Index tool:
1. In the Connections frame, expand hr_conn.
2. In the list of schema object types, expand Tables.
3. In the list of tables, right-click EVALUATIONS.
4. In the list of choices, select Index.
5. In the list of choices, select Create Index.
6. In the Create Index window:
a. For Schema, accept the default, HR.
b. For Name, type EVAL_JOB_IX.
c. If the Definition pane does not show, select the tab Definition.
d. In the Definition pane, for Index Type, select Unique from the menu.
e. Click the icon Add Expression.
The Expression EMPLOYEE_ID with Order <Not Specified> appears.
Chapter 4Creating and Managing Tables
4-14
f. Over EMPLOYEE_ID, type JOB_ID.
g. For Order, select ASC (ascending) from the menu.
h. Click OK.
Now the EVALUATIONS table has an index named EVAL_JOB_IX on thecolumn JOB_ID.
See Also:
Oracle Database SQL Language Reference for information about theCREATE INDEXstatement
4.2.7.2 Tutorial: Changing an Index with the Edit Index ToolThis tutorial shows how to use the Edit Index tool to reverse the sort order of the indexEVAL_JOB_IX.
To change an index, use either the SQL Developer tool Edit Index or the DDLstatements DROP INDEX and CREATE INDEX.
The equivalent DDL statements are:
DROP INDEX EVAL_JOB_ID;
CREATE INDEX EVAL_JOB_IXON EVALUATIONS (JOB_ID DESC) NOPARALLEL;
To reverse the sort order of the index EVAL_JOB_IX using the Edit Index tool:
1. In the Connections frame, expand hr_conn.
2. In the list of schema object types, expand Indexes.
3. In the list of indexes, right-click EVAL_JOB_IX.
4. In the list of choices, click Edit.
5. In the Edit Index window, change Order to DESC.
6. Click OK.
7. In the Confirm Replace window, click either Yes or No.
See Also:
Oracle Database SQL Language Reference for information about the ALTERINDEX statement
Chapter 4Creating and Managing Tables
4-15
4.2.7.3 Tutorial: Dropping an IndexThis tutorial shows how to use the Connections frame and Drop tool to drop the indexEVAL_JOB_IX.
To drop an index, use either the SQL Developer Connections frame and Drop tool orthe DDL statement DROP INDEX. The equivalent DDL statement is:
DROP INDEX EVAL_JOB_ID;
To drop the index EVAL_JOB_IX:
1. In the Connections frame, expand hr_conn.
2. In the list of schema object types, expand Indexes.
3. In the list of indexes, right-click EVAL_JOB_IX.
4. In the list of choices, click Drop.
5. In the Drop window, click Apply.
6. In the Confirmation window, click OK.
See Also:
Oracle Database SQL Language Reference for information about the DROPINDEX statement
4.2.8 Dropping TablesTo drop a table, use either the SQL Developer Connections frame and Drop tool, orthe DDL statement DROP TABLE.
Caution:
Do not drop any tables that you created in "Creating Tables"—you need themfor later tutorials. If you want to practice dropping tables, create simple onesand then drop them.
To drop a table using the Drop tool:
1. In the Connections frame, expand hr_conn.
2. In the list of schema object types, expand Tables.
3. In the list of tables, right-click the name of the table to drop.
4. In the list of choices, select Table.
5. In the list of choices, click Drop.
6. In the Drop window, click Apply.
7. In the Confirmation window, click OK.
Chapter 4Creating and Managing Tables
4-16
See Also:
Oracle Database SQL Language Reference for information about thestatement DROP TABLE
4.3 Creating and Managing ViewsA view presents a query result as a table. In most places that you can use a table, youcan use a view. Views are useful when you need frequent access to information that isstored in several different tables.
See Also:
• "Selecting Table Data" for information about queries
• Oracle Database Concepts for additional general information aboutviews
4.3.1 Creating ViewsTo create views, use either the SQL Developer tool Create View or the DDL statementCREATE VIEW.
This topic shows how to use both of these ways to create these views:
• SALESFORCE, which contains the names and salaries of the employees in theSales department
• EMP_LOCATIONS, which contains the names and locations of all employees
This view is used in "Creating an INSTEAD OF Trigger".
See Also:
• Oracle SQL Developer User's Guide for more information about usingSQL Developer to create a view
• Oracle Database SQL Language Reference for more information aboutthe statement CREATE VIEW
4.3.1.1 Tutorial: Creating a View with the Create View ToolThis tutorial shows how to create the SALESFORCE view using the Create View tool.
To create the SALESFORCE view using the Create View tool:
1. In the Connections frame, expand hr_conn.
Chapter 4Creating and Managing Views
4-17

2. In the list of schema object types, right-click Views.
3. In the list of choices, click New View.
The Create View window opens, with default values for a new view.
4. For Schema, accept the default value, HR.
5. For Name, enter SALESFORCE.
6. If the SQL Query pane does not show, click the tab SQL Query.
7. In the SQL Query pane, in the SQL Query field:
• After SELECT, type:
FIRST_NAME || ' ' || LAST_NAME "Name", SALARY*12 "Annual Salary"
• After FROM, type:
EMPLOYEES WHERE DEPARTMENT_ID = 80
8. Click Check Syntax.
9. Under Syntax Results, if the message is not No errors found in SQL, thenreturn to step 7 and correct the syntax errors in the query.
10. Click OK.
The view SALESFORCE is created. To see it, expand Views in the Connectionsframe.
To see the CREATE VIEW statement for creating this view, select its name andclick the tab SQL.
See Also:
Oracle SQL Developer User's Guide for more information about using SQLDeveloper to create views
4.3.1.2 Creating Views with the CREATE VIEW StatementThis example shows how to use the CREATE VIEW statement to create theEMP_LOCATIONS view, which joins four tables.
The CREATE VIEW statement in Example 4-3 creates the EMP_LOCATIONS view,which joins four tables. (For information about joins, see "Selecting Data from MultipleTables".)
Example 4-3 Creating the EMP_LOCATIONS View with CREATE VIEW
CREATE VIEW EMP_LOCATIONS ASSELECT e.EMPLOYEE_ID, e.LAST_NAME || ', ' || e.FIRST_NAME NAME, d.DEPARTMENT_NAME DEPARTMENT, l.CITY CITY, c.COUNTRY_NAME COUNTRYFROM EMPLOYEES e, DEPARTMENTS d, LOCATIONS l, COUNTRIES cWHERE e.DEPARTMENT_ID = d.DEPARTMENT_ID AND d.LOCATION_ID = l.LOCATION_ID AND l.COUNTRY_ID = c.COUNTRY_IDORDER BY LAST_NAME;
Chapter 4Creating and Managing Views
4-18
Result:
View EMP_LOCATIONS created.
See Also:
Oracle Database SQL Language Reference for information about theCREATE VIEW statement
4.3.2 Changing Queries in ViewsTo change the query in a view, use the DDL statement CREATE VIEW with the ORREPLACE clause.
The CREATE OR REPLACE VIEW statement in Example 4-4 changes the query in theSALESFORCE view.
Example 4-4 Changing the Query in the SALESFORCE View
CREATE OR REPLACE VIEW SALESFORCE AS SELECT FIRST_NAME || ' ' || LAST_NAME "Name", SALARY*12 "Annual Salary" FROM EMPLOYEES WHERE DEPARTMENT_ID = 80 OR DEPARTMENT_ID = 20;
Result:
View SALESFORCE created.
See Also:
Oracle Database SQL Language Reference for information about theCREATE VIEW with the OR REPLACE clause
4.3.3 Tutorial: Changing View Names with the Rename ToolThis tutorial shows how to use the Rename tool to change the name of theSALESFORCE view.
To change the name of a view, use either the SQL Developer tool Rename or theRENAME statement. The equivalent DDL statement is:
RENAME SALESFORCE to SALES_MARKETING;
To change the SALESFORCE view using the Rename tool:
1. In the Connections frame, expand hr_conn.
2. In the list of schema object types, expand Views.
3. In the list of views, right-click SALESFORCE.
4. In the list of choices, select Rename.
Chapter 4Creating and Managing Views
4-19
5. In the Rename window, in the New View Name field, type SALES_MARKETING.
6. Click Apply.
7. In the Confirmation window, click OK.
See Also:
Oracle Database SQL Language Reference for information about theRENAME statement
4.3.4 Dropping a ViewTo drop a view, use either the SQL Developer Connections frame and Drop tool or theDDL statement DROP VIEW.
The following ttutorial shows how to use the Connections frame and Drop tool to dropthe view SALES_MARKETING (changed in "Tutorial: Changing View Names with theRename Tool"). The equivalent DDL statement is:
DROP VIEW SALES_MARKETING;
To drop the view SALES_MARKETING using the Drop tool:
1. In the Connections frame, expand hr_conn.
2. In the a list of schema object types, expand Views.
3. In the a list of views, right-click SALES_MARKETING.
4. In the a list of choices, click Drop.
5. In the Drop window, click Apply.
6. In the Confirmation window, click OK.
See Also:
Oracle Database SQL Language Reference for information about the DROPVIEW statement
4.4 Creating and Managing SequencesSequences are schema objects from which you can generate unique sequentialvalues, which are very useful when you need unique primary keys. Sequences areused through the pseudocolumns CURRVAL and NEXTVAL, which return the currentand next values of the sequence, respectively.
After creating a sequence, you must initialize it by using NEXTVAL to get its first value.Only after you initialize a sequence does CURRVAL return its current value.
The HR schema has three sequences: DEPARTMENTS_SEQUENCE,EMPLOYEES_SEQUENCE, and LOCATIONS_SEQUENCE.
Chapter 4Creating and Managing Sequences
4-20

Tip:
When you plan to use a sequence to populate the primary key of a table,give the sequence a name that reflects this purpose. (This topic uses thenaming convention TABLE_NAME_SEQUENCE.)
See Also:
• Oracle Database Concepts for an overview of sequences
• Oracle Database SQL Language Reference for more information aboutthe CURRVAL and NEXTVAL pseudocolumns
• Oracle Database Administrator's Guide for information about managingsequences
• "Editing Installation Scripts that Create Sequences"
• "About Sequences and Concurrency"
4.4.1 Tutorial: Creating a SequenceThis tutorial shows how to use the Create Database Sequence tool to create asequence to use to generate primary keys for the EVALUATIONS table.
The EVALUATIONS table was created in Example 4-1.
To create a sequence, use either the SQL Developer tool Create Sequence or the DDLstatement CREATE SEQUENCE. The equivalent DDL statement is:
CREATE SEQUENCE evaluations_sequenceINCREMENT BY 1START WITH 1 ORDER;
To create EVALUATIONS_SEQUENCE using the Create Database Sequence tool:
1. In the Connections frame, expand hr_conn.
2. In the list of schema object types, right-click Sequences.
3. In the list of choices, click New Sequence.
4. In the Create Sequence window, in the Name field, typeEVALUATIONS_SEQUENCE over the default value "SEQUENCE1".
5. If the Properties pane does not show, click the tab Properties.
6. In the Properties pane:
a. In the field Increment, type 1.
b. In the field Start with, type 1.
c. For the remaining fields, accept the default values.
d. Click OK.
Chapter 4Creating and Managing Sequences
4-21
The sequence EVALUATIONS_SEQUENCE is created. Its name appearsunder Sequences in the Connections frame.
See Also:
• Oracle SQL Developer User's Guide for more information about usingSQL Developer to create a sequence
• Oracle Database SQL Language Reference for information about theCREATE SEQUENCE statement
• "Tutorial: Creating a Trigger that Generates a Primary Key for a RowBefore It Is Inserted" to learn how to create a trigger that insertsthe primary keys created by EVALUATIONS_SEQUENCE into theEVALUATIONS table
4.4.2 Dropping SequencesTo drop a sequence, use either the SQL Developer Connections frame and Drop tool,or the DDL statement DROP SEQUENCE.
This statement drops the sequence EVALUATIONS_SEQUENCE:
DROP SEQUENCE EVALUATIONS_SEQUENCE;
Caution:
Do not drop the sequence EVALUATIONS_SEQUENCE—you need it forExample 5-3. If you want to practice dropping sequences, create others andthen drop them.
To drop a sequence using the Drop tool:
1. In the Connections frame, expand hr_conn.
2. In the list of schema object types, expand Sequences.
3. In the list of sequences, right-click the name of the sequence to drop.
4. In the list of choices, click Drop.
5. In the Drop window, click Apply.
6. In the Confirmation window, click OK.
See Also:
Oracle Database SQL Language Reference for information about the DROPSEQUENCE statement
Chapter 4Creating and Managing Sequences
4-22
4.5 Creating and Managing SynonymsA synonym is an alias for another schema object. Some reasons to use synonyms aresecurity (for example, to hide the owner and location of an object) and convenience.
Examples of convenience are:
• Using a short synonym, such as SALES, for a long object name, such asACME_CO.SALES_DATA
• Using a synonym for a renamed object, instead of changing that object namethroughout the applications that use it
For example, if your application uses a table named DEPARTMENTS, and its namechanges to DIVISIONS, you can create a DEPARTMENTS synonym for that table andcontinue to reference it by its original name.
See Also:
Oracle Database Concepts for additional general information aboutsynonyms
4.5.1 Creating SynonymsTo create a synonym, use either the SQL Developer tool Create Database Synonym orthe DDL statement CREATE SYNONYM .
The following tutorial shows how to use the Create Database Synonym tool to createthe synonym EMP for the EMPLOYEES table. The equivalent DDL statement is:
CREATE SYNONYM EMPL FOR EMPLOYEES;
To create the synonym EMP using the Create Database Synonym tool:
1. In the Connections frame, expand hr_conn.
2. In the list of schema object types, right-click Synonyms.
3. In the list of choices, click New Synonym.
4. In the New Synonym window:
a. In the Synonym Name field, type EMPL.
b. In the Object Owner field, select HR from the menu.
c. In the Object Name field, select EMPLOYEES from the menu.
The synonym refers to a specific schema object; in this case, the tableEMPLOYEES.
d. Click Apply.
5. In the Confirmation window, click OK.
The synonym EMPL is created. To see it, expand Synonyms in the Connectionsframe. You can now use EMPL instead of EMPLOYEES.
Chapter 4Creating and Managing Synonyms
4-23
See Also:
Oracle Database SQL Language Reference for information about theCREATE SYNONYM statement
4.5.2 Dropping SynonymsTo drop a synonym, use either the SQL Developer Connections frame and Drop tool,or the DDL statement DROP SYNONYM.
This statement drops the synonym EMP:
DROP SYNONYM EMP;
To drop a synonym using the Drop tool:
1. In the Connections frame, expand hr_conn.
2. In the list of schema object types, expand Synonyms.
3. In the list of synonyms, right-click the name of the synonym to drop.
4. In the list of choices, click Drop.
5. In the Drop window, click Apply.
6. In the Confirmation window, click OK.
See Also:
Oracle Database SQL Language Reference for information about the DROPSYNONYM statement
Chapter 4Creating and Managing Synonyms
4-24
5Developing Stored Subprograms andPackages
Stored subprograms and packages can be used as building blocks for many differentdatabase applications.
5.1 About Stored SubprogramsA stored subprogram is a subprogram that is stored in the database. Because theyare stored in the database, stored programs can be used as building blocks for manydifferent database applications.
A subprogram is a PL/SQL unit that consists of SQL and PL/SQL statements thatsolve a specific problem or perform a set of related tasks. A subprogram can haveparameters, whose values are supplied by the invoker. A subprogram can be eithera procedure or a function. Typically, you use a procedure to perform an action and afunction to compute and return a value.
Because stored subprograms are stored in the database, stored programs can beused as building blocks for many different database applications. A subprogram that isdeclared within another subprogram, or within an anonymous block, is called a nestedsubprogram or local subprogram. It cannot be invoked from outside the subprogramor block in which it is declared. An anonymous block is a block that is not stored inthe database.
There are two kinds of stored subprograms:
• Standalone subprogram, which is created at schema level
• Package subprogram, which is created inside a package
Standalone subprograms are useful for testing pieces of program logic, but whenyou are sure that they work as intended, Oracle recommends that you put them intopackages.
See Also:
• Oracle Database Concepts for general information about storedsubprograms
• Oracle Database PL/SQL Language Reference for complete informationabout PL/SQL subprograms
5-1
5.2 About PackagesA package is a PL/SQL unit that consists of related subprograms and thedeclared cursors and variables that they use. Oracle recommends that you put yoursubprograms into packages.
Some reasons that Oracle recommends that you put your subprograms into packagesare:
• Packages allow you to hide implementation details from client programs.
Hiding implementation details from client programs is a widely accepted bestpractice. Many Oracle customers follow this practice strictly, allowing clientprograms to access the database only by invoking PL/SQL subprograms. Somecustomers allow client programs to use SELECT statements to retrieve informationfrom database tables, but require them to invoke PL/SQL subprograms for allbusiness functions that change the database.
• Package subprograms must be qualified with package names when invoked fromoutside the package, which ensures that their names will always work wheninvoked from outside the package.
For example, suppose that you developed a schema-level procedure namedCONTINUE before Oracle Database 11g . Oracle Database 11g introducedthe CONTINUE statement. Therefore, if you ported your code to OracleDatabase 11g , it would no longer compile. However, if you had developedyour procedure inside a package, your code would refer to the procedure aspackage_name.CONTINUE, so the code would still compile.
Note:
Oracle Database supplies many PL/SQL packages to extend databasefunctionality and provide PL/SQL access to SQL features. You can use thesupplied packages when creating your applications or for ideas in creatingyour own stored procedures. For information about these packages, seeOracle Database PL/SQL Packages and Types Reference.
See Also:
• Oracle Database Concepts for general information about packages
• Oracle Database PL/SQL Language Reference for more reasons to usepackages
• Oracle Database PL/SQL Language Reference for complete informationabout PL/SQL packages
• Oracle Database PL/SQL Packages and Types Reference for completeinformation about the PL/SQL packages that Oracle provides
Chapter 5About Packages
5-2
5.3 About PL/SQL IdentifiersEvery PL/SQL subprogram, package, parameter, variable, constant, exception, anddeclared cursor has a name, which is a PL/SQL identifier.
The minimum length of an identifier is one character; the maximum length is 30characters. The first character must be a letter, but each later character can be either aletter, numeral, dollar sign ($), underscore (_), or number sign (#). For example, theseare acceptable identifiers:
Xt2phone#credit_limitLastNameoracle$numbermoney$$$treeSN##try_again_
PL/SQL is not case-sensitive for identifiers. For example, PL/SQL considers these tobe the same:
lastnameLastNameLASTNAME
You cannot use a PL/SQL reserved word as an identifier. You can use a PL/SQLkeyword as an identifier, but it is not recommended. For lists of PL/SQL reservedwords and keywords, see Oracle Database PL/SQL Language Reference.
See Also:
• Oracle Database PL/SQL Language Reference for additional generalinformation about PL/SQL identifiers
• Oracle Database PL/SQL Language Reference for additional informationabout PL/SQL naming conventions
• Oracle Database PL/SQL Language Reference for information about thescope and visibility of PL/SQL identifiers
• Oracle Database PL/SQL Language Reference for information how tocollect data on PL/SQL identifiers
• Oracle Database PL/SQL Language Reference for information abouthow PL/SQL resolves identifier names
5.4 About PL/SQL Data TypesEvery PL/SQL constant, variable, subprogram parameter, and function return valuehas a data type that determines its storage format, constraints, valid range of values,and operations that can be performed on it.
Chapter 5About PL/SQL Identifiers
5-3
A PL/SQL data type is either a SQL data type (such as VARCHAR2, NUMBER, orDATE) or a PL/SQL-only data type. The latter include BOOLEAN, RECORD, REFCURSOR, and many predefined subtypes. PL/SQL also lets you define your ownsubtypes.
A subtype is a subset of another data type, which is called its base type. A subtypehas the same valid operations as its base type, but only a subset of its valid values.Subtypes can increase reliability, provide compatibility with ANSI/ISO types, andimprove readability by indicating the intended use of constants and variables.
The predefined numeric subtype PLS_INTEGER is especially useful, because itsoperations use hardware arithmetic, rather than the library arithmetic that its basetype uses.
You cannot use PL/SQL-only data types at schema level (that is, in tables orstandalone subprograms). Therefore, to use these data types in a stored subprogram,you must put them in a package.
See Also:
• Oracle Database PL/SQL Language Reference for general informationabout PL/SQL data types
• Oracle Database PL/SQL Language Reference for information about thePLS_INTEGER data type
• "About SQL Data Types"
5.5 Creating and Managing Standalone SubprogramsYou can create and manage standalone PL/SQL subprograms.
Note:
To do the tutorials in this document, you must be connected to OracleDatabase as the user HR from SQL Developer.
5.5.1 About Subprogram Structure
A subprogram follows PL/SQL block structure; that is, it has:
• Declarative part (optional)
The declarative part contains declarations of types, constants, variables,exceptions, declared cursors, and nested subprograms. These items are local tothe subprogram and cease to exist when the subprogram completes execution.
• Executable part (required)
The executable part contains statements that assign values, control execution,and manipulate data.
Chapter 5Creating and Managing Standalone Subprograms
5-4
• Exception-handling part (optional)
The exception-handling part contains code that handles exceptions (runtimeerrors).
Comments can appear anywhere in PL/SQL code. The PL/SQL compiler ignoresthem. Adding comments to your program promotes readability and aids understanding.A single-line comment starts with a double hyphen (--) and extends to the end ofthe line. A multiline comment starts with a slash and asterisk (/*) and ends with anasterisk and a slash (*/).
The structure of a procedure is:
PROCEDURE name [ ( parameter_list ) ] { IS | AS } [ declarative_part ] BEGIN -- executable part begins statement; [ statement; ]... [ EXCEPTION -- executable part ends, exception-handling part begins] exception_handler; [ exception_handler; ]... ] END; /* exception-handling part ends if it exists; otherwise, executable part ends */
The structure of a function is like that of a procedure, except that it includes a RETURNclause and at least one RETURN statement (and some optional clauses that are beyondthe scope of this document):
FUNCTION name [ ( parameter_list ) ] RETURN data_type [ clauses ] { IS | AS } [ declarative_part ] BEGIN -- executable part begins -- at least one statement must be a RETURN statement statement; [ statement; ]... [ EXCEPTION -- executable part ends, exception-handling part begins] exception_handler; [ exception_handler; ]... ] END; /* exception-handling part ends if it exists; otherwise, executable part ends */
The code that begins with PROCEDURE or FUNCTION and ends before IS or ASis the subprogram signature. The declarative, executable, and exception-handlingparts comprise the subprogram body. The syntax of exception-handler is in "AboutExceptions and Exception Handlers".
See Also:
Oracle Database PL/SQL Language Reference for more information aboutsubprogram parts
5.5.2 Tutorial: Creating a Standalone ProcedureThis tutorial shows how to use the Create Procedure tool to create a standaloneprocedure named ADD_EVALUATION that adds a row to the EVALUATIONS table.
The EVALUATIONS table was created in Example 4-1.
Chapter 5Creating and Managing Standalone Subprograms
5-5
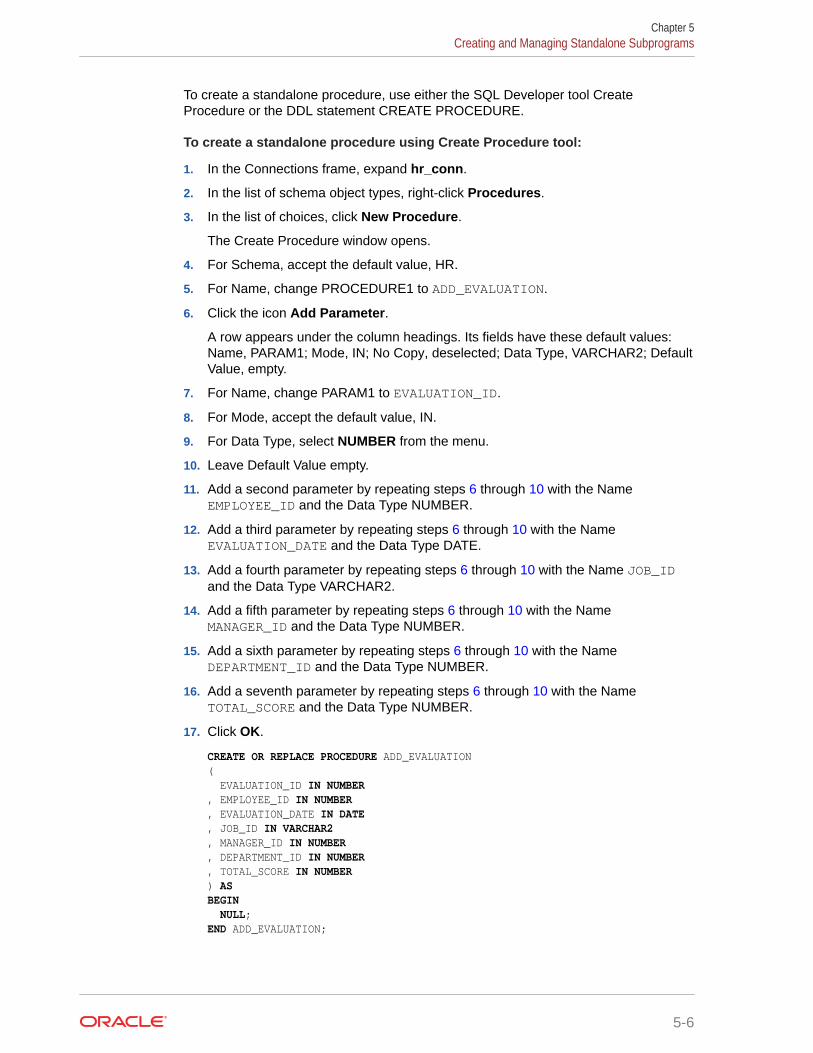
To create a standalone procedure, use either the SQL Developer tool CreateProcedure or the DDL statement CREATE PROCEDURE.
To create a standalone procedure using Create Procedure tool:
1. In the Connections frame, expand hr_conn.
2. In the list of schema object types, right-click Procedures.
3. In the list of choices, click New Procedure.
The Create Procedure window opens.
4. For Schema, accept the default value, HR.
5. For Name, change PROCEDURE1 to ADD_EVALUATION.
6. Click the icon Add Parameter.
A row appears under the column headings. Its fields have these default values:Name, PARAM1; Mode, IN; No Copy, deselected; Data Type, VARCHAR2; DefaultValue, empty.
7. For Name, change PARAM1 to EVALUATION_ID.
8. For Mode, accept the default value, IN.
9. For Data Type, select NUMBER from the menu.
10. Leave Default Value empty.
11. Add a second parameter by repeating steps 6 through 10 with the NameEMPLOYEE_ID and the Data Type NUMBER.
12. Add a third parameter by repeating steps 6 through 10 with the NameEVALUATION_DATE and the Data Type DATE.
13. Add a fourth parameter by repeating steps 6 through 10 with the Name JOB_IDand the Data Type VARCHAR2.
14. Add a fifth parameter by repeating steps 6 through 10 with the NameMANAGER_ID and the Data Type NUMBER.
15. Add a sixth parameter by repeating steps 6 through 10 with the NameDEPARTMENT_ID and the Data Type NUMBER.
16. Add a seventh parameter by repeating steps 6 through 10 with the NameTOTAL_SCORE and the Data Type NUMBER.
17. Click OK.
CREATE OR REPLACE PROCEDURE ADD_EVALUATION( EVALUATION_ID IN NUMBER, EMPLOYEE_ID IN NUMBER, EVALUATION_DATE IN DATE, JOB_ID IN VARCHAR2, MANAGER_ID IN NUMBER, DEPARTMENT_ID IN NUMBER, TOTAL_SCORE IN NUMBER) ASBEGIN NULL;END ADD_EVALUATION;
Chapter 5Creating and Managing Standalone Subprograms
5-6
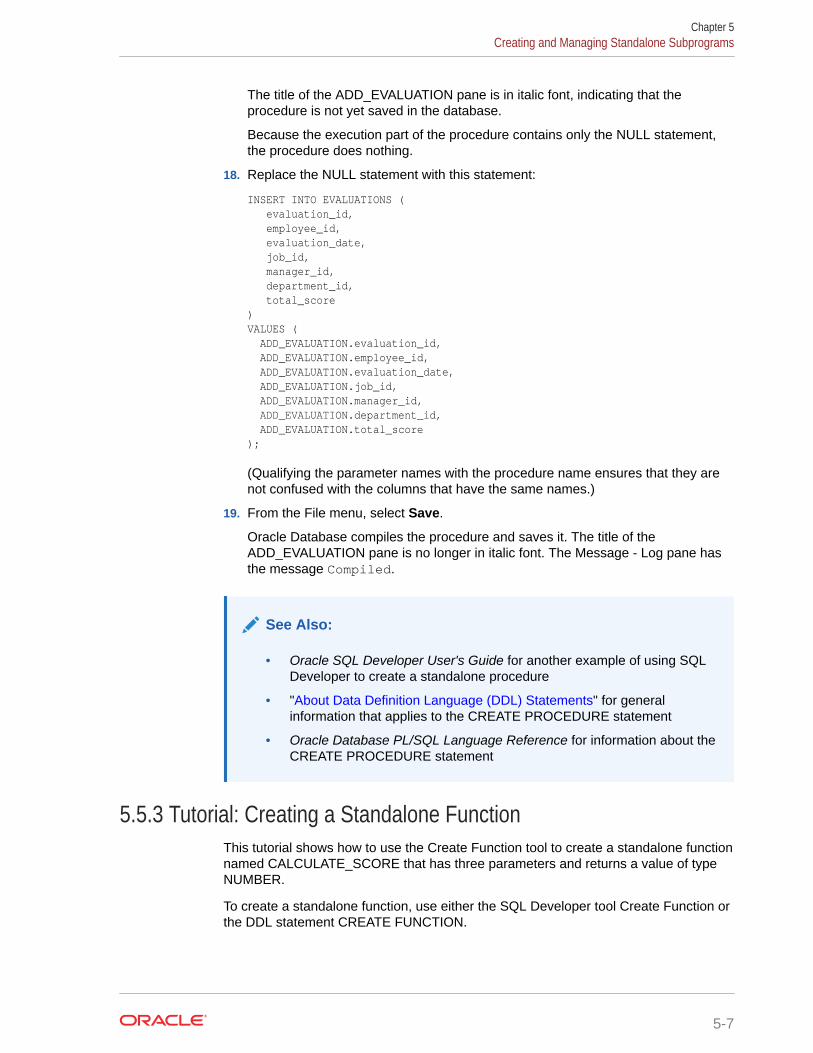
The title of the ADD_EVALUATION pane is in italic font, indicating that theprocedure is not yet saved in the database.
Because the execution part of the procedure contains only the NULL statement,the procedure does nothing.
18. Replace the NULL statement with this statement:
INSERT INTO EVALUATIONS ( evaluation_id, employee_id, evaluation_date, job_id, manager_id, department_id, total_score )VALUES ( ADD_EVALUATION.evaluation_id, ADD_EVALUATION.employee_id, ADD_EVALUATION.evaluation_date, ADD_EVALUATION.job_id, ADD_EVALUATION.manager_id, ADD_EVALUATION.department_id, ADD_EVALUATION.total_score);
(Qualifying the parameter names with the procedure name ensures that they arenot confused with the columns that have the same names.)
19. From the File menu, select Save.
Oracle Database compiles the procedure and saves it. The title of theADD_EVALUATION pane is no longer in italic font. The Message - Log pane hasthe message Compiled.
See Also:
• Oracle SQL Developer User's Guide for another example of using SQLDeveloper to create a standalone procedure
• "About Data Definition Language (DDL) Statements" for generalinformation that applies to the CREATE PROCEDURE statement
• Oracle Database PL/SQL Language Reference for information about theCREATE PROCEDURE statement
5.5.3 Tutorial: Creating a Standalone FunctionThis tutorial shows how to use the Create Function tool to create a standalone functionnamed CALCULATE_SCORE that has three parameters and returns a value of typeNUMBER.
To create a standalone function, use either the SQL Developer tool Create Function orthe DDL statement CREATE FUNCTION.
Chapter 5Creating and Managing Standalone Subprograms
5-7
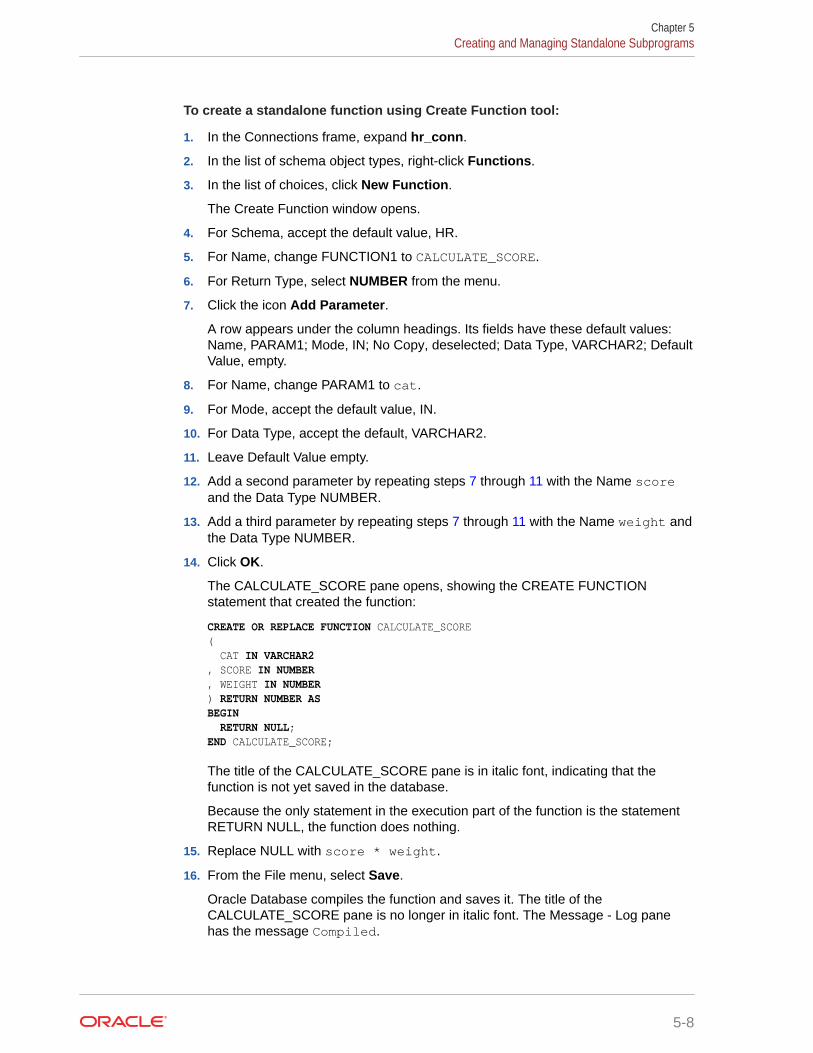
To create a standalone function using Create Function tool:
1. In the Connections frame, expand hr_conn.
2. In the list of schema object types, right-click Functions.
3. In the list of choices, click New Function.
The Create Function window opens.
4. For Schema, accept the default value, HR.
5. For Name, change FUNCTION1 to CALCULATE_SCORE.
6. For Return Type, select NUMBER from the menu.
7. Click the icon Add Parameter.
A row appears under the column headings. Its fields have these default values:Name, PARAM1; Mode, IN; No Copy, deselected; Data Type, VARCHAR2; DefaultValue, empty.
8. For Name, change PARAM1 to cat.
9. For Mode, accept the default value, IN.
10. For Data Type, accept the default, VARCHAR2.
11. Leave Default Value empty.
12. Add a second parameter by repeating steps 7 through 11 with the Name scoreand the Data Type NUMBER.
13. Add a third parameter by repeating steps 7 through 11 with the Name weight andthe Data Type NUMBER.
14. Click OK.
The CALCULATE_SCORE pane opens, showing the CREATE FUNCTIONstatement that created the function:
CREATE OR REPLACE FUNCTION CALCULATE_SCORE( CAT IN VARCHAR2, SCORE IN NUMBER, WEIGHT IN NUMBER) RETURN NUMBER ASBEGIN RETURN NULL;END CALCULATE_SCORE;
The title of the CALCULATE_SCORE pane is in italic font, indicating that thefunction is not yet saved in the database.
Because the only statement in the execution part of the function is the statementRETURN NULL, the function does nothing.
15. Replace NULL with score * weight.
16. From the File menu, select Save.
Oracle Database compiles the function and saves it. The title of theCALCULATE_SCORE pane is no longer in italic font. The Message - Log panehas the message Compiled.
Chapter 5Creating and Managing Standalone Subprograms
5-8
See Also:
• "About Data Definition Language (DDL) Statements" for generalinformation that applies to the CREATE FUNCTION statement
• Oracle Database PL/SQL Language Reference for information about theCREATE FUNCTION statement
5.5.4 Changing Standalone SubprogramsTo change a standalone subprogram, use either the SQL Developer tool Edit or theDDL statement ALTER PROCEDURE or ALTER FUNCTION.
To change a standalone subprogram using the Edit tool:
1. In the Connections frame, expand hr_conn.
2. In the list of schema object types, expand either Functions or Procedures.
A list of functions or procedures appears.
3. Click the function or procedure to change.
To the right of the Connections frame, a frame appears. Its top tab has the nameof the subprogram to change. The Code pane shows the code that created thesubprogram.
The Code pane is in write mode. (Clicking the pencil icon switches the mode fromwrite mode to read only, or the reverse.)
4. In the Code pane, change the code.
The title of the pane changes to italic font, indicating that the change is not yetsaved in the database.
5. From the File menu, select Save.
Oracle Database compiles the subprogram and saves it. The title of the pane is nolonger in italic font. The Message - Log pane has the message Compiled.
See Also:
• "About Data Definition Language (DDL) Statements" for generalinformation that applies to the ALTER PROCEDURE and ALTERFUNCTION statements
• Oracle Database PL/SQL Language Reference for information about theALTER PROCEDURE statement
• Oracle Database PL/SQL Language Reference for information about theALTER FUNCTION statement
Chapter 5Creating and Managing Standalone Subprograms
5-9
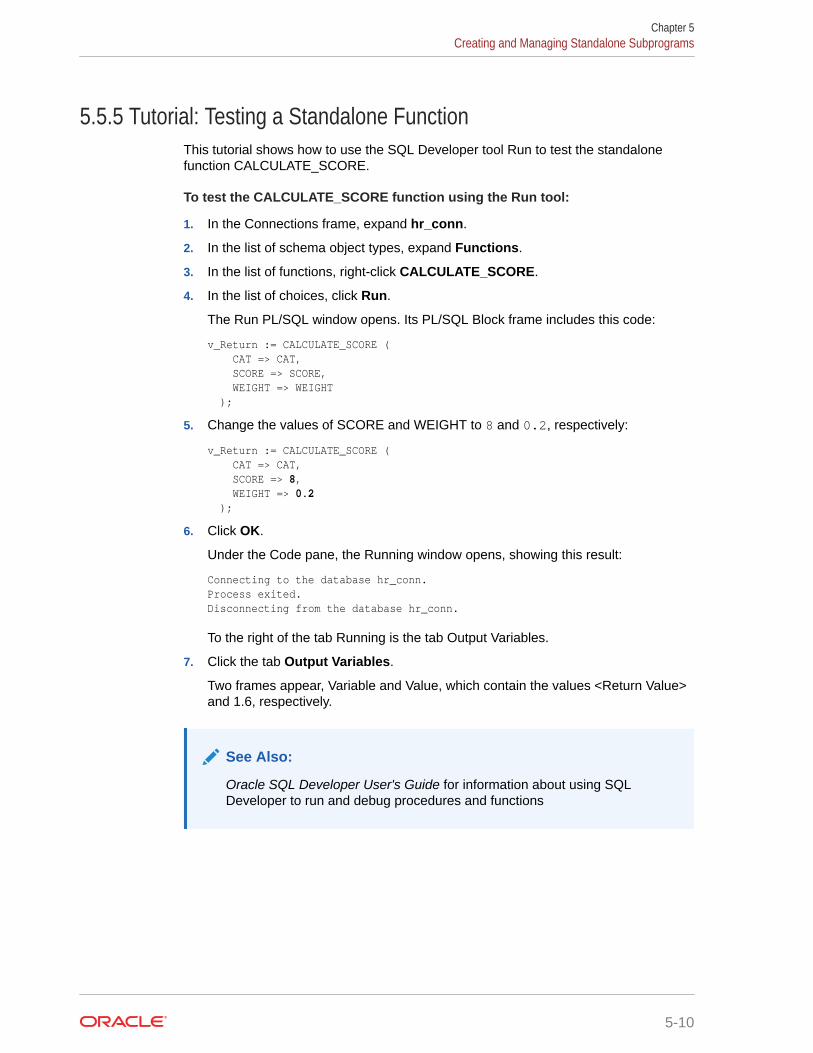
5.5.5 Tutorial: Testing a Standalone FunctionThis tutorial shows how to use the SQL Developer tool Run to test the standalonefunction CALCULATE_SCORE.
To test the CALCULATE_SCORE function using the Run tool:
1. In the Connections frame, expand hr_conn.
2. In the list of schema object types, expand Functions.
3. In the list of functions, right-click CALCULATE_SCORE.
4. In the list of choices, click Run.
The Run PL/SQL window opens. Its PL/SQL Block frame includes this code:
v_Return := CALCULATE_SCORE ( CAT => CAT, SCORE => SCORE, WEIGHT => WEIGHT );
5. Change the values of SCORE and WEIGHT to 8 and 0.2, respectively:
v_Return := CALCULATE_SCORE ( CAT => CAT, SCORE => 8, WEIGHT => 0.2 );
6. Click OK.
Under the Code pane, the Running window opens, showing this result:
Connecting to the database hr_conn.Process exited.Disconnecting from the database hr_conn.
To the right of the tab Running is the tab Output Variables.
7. Click the tab Output Variables.
Two frames appear, Variable and Value, which contain the values <Return Value>and 1.6, respectively.
See Also:
Oracle SQL Developer User's Guide for information about using SQLDeveloper to run and debug procedures and functions
Chapter 5Creating and Managing Standalone Subprograms
5-10
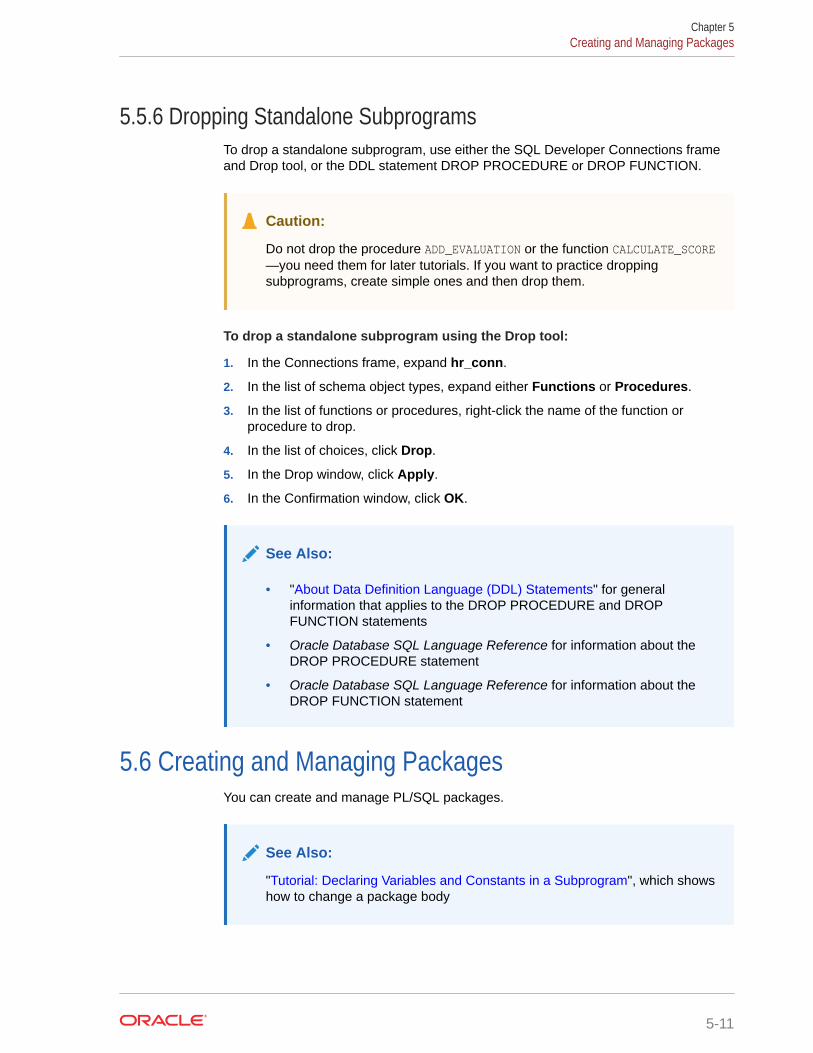
5.5.6 Dropping Standalone SubprogramsTo drop a standalone subprogram, use either the SQL Developer Connections frameand Drop tool, or the DDL statement DROP PROCEDURE or DROP FUNCTION.
Caution:
Do not drop the procedure ADD_EVALUATION or the function CALCULATE_SCORE—you need them for later tutorials. If you want to practice droppingsubprograms, create simple ones and then drop them.
To drop a standalone subprogram using the Drop tool:
1. In the Connections frame, expand hr_conn.
2. In the list of schema object types, expand either Functions or Procedures.
3. In the list of functions or procedures, right-click the name of the function orprocedure to drop.
4. In the list of choices, click Drop.
5. In the Drop window, click Apply.
6. In the Confirmation window, click OK.
See Also:
• "About Data Definition Language (DDL) Statements" for generalinformation that applies to the DROP PROCEDURE and DROPFUNCTION statements
• Oracle Database SQL Language Reference for information about theDROP PROCEDURE statement
• Oracle Database SQL Language Reference for information about theDROP FUNCTION statement
5.6 Creating and Managing PackagesYou can create and manage PL/SQL packages.
See Also:
"Tutorial: Declaring Variables and Constants in a Subprogram", which showshow to change a package body
Chapter 5Creating and Managing Packages
5-11
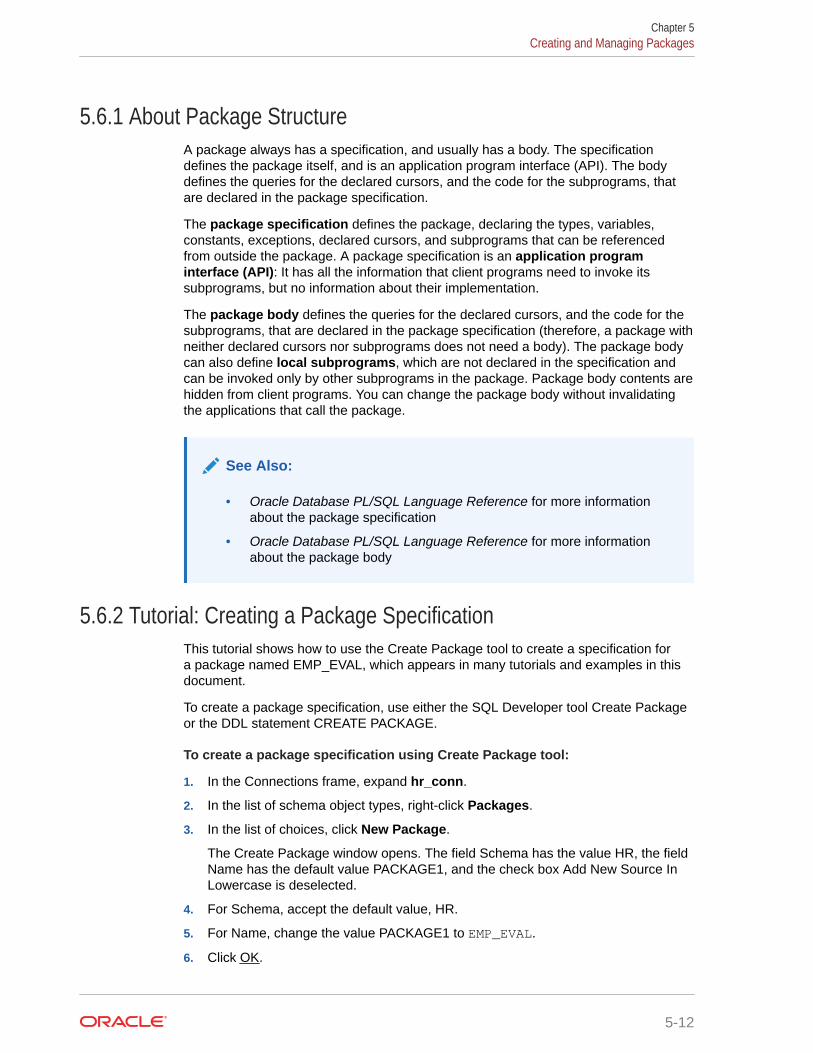
5.6.1 About Package StructureA package always has a specification, and usually has a body. The specificationdefines the package itself, and is an application program interface (API). The bodydefines the queries for the declared cursors, and the code for the subprograms, thatare declared in the package specification.
The package specification defines the package, declaring the types, variables,constants, exceptions, declared cursors, and subprograms that can be referencedfrom outside the package. A package specification is an application programinterface (API): It has all the information that client programs need to invoke itssubprograms, but no information about their implementation.
The package body defines the queries for the declared cursors, and the code for thesubprograms, that are declared in the package specification (therefore, a package withneither declared cursors nor subprograms does not need a body). The package bodycan also define local subprograms, which are not declared in the specification andcan be invoked only by other subprograms in the package. Package body contents arehidden from client programs. You can change the package body without invalidatingthe applications that call the package.
See Also:
• Oracle Database PL/SQL Language Reference for more informationabout the package specification
• Oracle Database PL/SQL Language Reference for more informationabout the package body
5.6.2 Tutorial: Creating a Package SpecificationThis tutorial shows how to use the Create Package tool to create a specification fora package named EMP_EVAL, which appears in many tutorials and examples in thisdocument.
To create a package specification, use either the SQL Developer tool Create Packageor the DDL statement CREATE PACKAGE.
To create a package specification using Create Package tool:
1. In the Connections frame, expand hr_conn.
2. In the list of schema object types, right-click Packages.
3. In the list of choices, click New Package.
The Create Package window opens. The field Schema has the value HR, the fieldName has the default value PACKAGE1, and the check box Add New Source InLowercase is deselected.
4. For Schema, accept the default value, HR.
5. For Name, change the value PACKAGE1 to EMP_EVAL.
6. Click OK.
Chapter 5Creating and Managing Packages
5-12

The EMP_EVAL pane opens, showing the CREATE PACKAGE statement thatcreated the package:
CREATE OR REPLACE PACKAGE emp_eval AS /* TODO enter package declarations (types, exceptions, methods etc) here */ END emp_eval;
The title of the pane is in italic font, indicating that the package is not saved to thedatabase.
7. (Optional) In the CREATE PACKAGE statement, replace the comment withdeclarations.
If you do not do this step now, you can do it later, as in "Tutorial: Changing aPackage Specification".
8. From the File menu, select Save.
Oracle Database compiles the package and saves it. The title of the EMP_EVALpane is no longer in italic font.
See Also:
Oracle Database PL/SQL Language Reference for information about theCREATE PACKAGE statement (for the package specification)
5.6.3 Tutorial: Changing a Package SpecificationThis tutorial shows how to use the Edit tool to change the specification forthe EMP_EVAL package, which appears in many tutorials and examples in thisdocument. Specifically, the tutorial shows how to add declarations for a procedure,EVAL_DEPARTMENT, and a function, CALCULATE_SCORE.
To change a package specification, use either the SQL Developer tool Edit or the DDLstatement CREATE PACKAGE with the OR REPLACE clause.
To change EMP_EVAL package specification using the Edit tool:
1. In the Connections frame, expand hr_conn.
2. In the list of schema object types, expand Packages.
3. In the list of packages, right-click EMP_EVAL.
4. In the list of choices, click Edit.
The EMP_EVAL pane opens, showing the CREATE PACKAGE statement thatcreated the package:
CREATE OR REPLACE PACKAGE emp_eval AS /* TODO enter package declarations (types, exceptions, methods etc) here */ END emp_eval;
The title of the pane is not in italic font, indicating that the package is saved in thedatabase.
Chapter 5Creating and Managing Packages
5-13
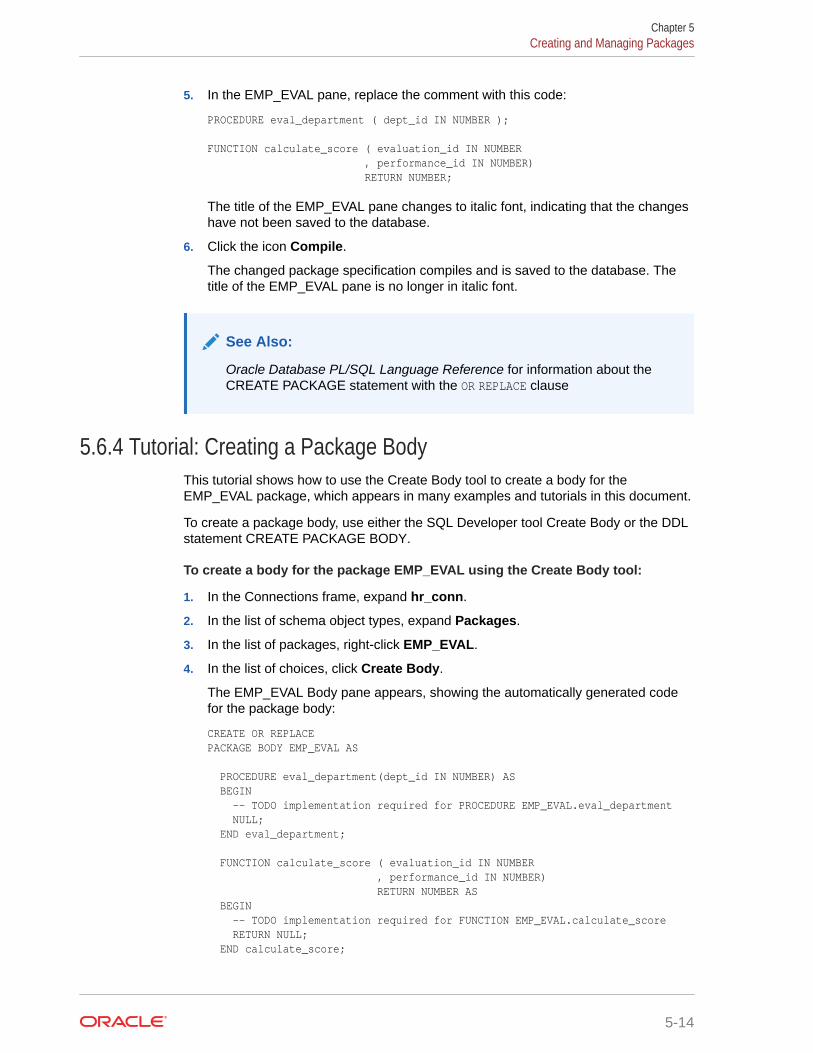
5. In the EMP_EVAL pane, replace the comment with this code:
PROCEDURE eval_department ( dept_id IN NUMBER );
FUNCTION calculate_score ( evaluation_id IN NUMBER , performance_id IN NUMBER) RETURN NUMBER;
The title of the EMP_EVAL pane changes to italic font, indicating that the changeshave not been saved to the database.
6. Click the icon Compile.
The changed package specification compiles and is saved to the database. Thetitle of the EMP_EVAL pane is no longer in italic font.
See Also:
Oracle Database PL/SQL Language Reference for information about theCREATE PACKAGE statement with the OR REPLACE clause
5.6.4 Tutorial: Creating a Package BodyThis tutorial shows how to use the Create Body tool to create a body for theEMP_EVAL package, which appears in many examples and tutorials in this document.
To create a package body, use either the SQL Developer tool Create Body or the DDLstatement CREATE PACKAGE BODY.
To create a body for the package EMP_EVAL using the Create Body tool:
1. In the Connections frame, expand hr_conn.
2. In the list of schema object types, expand Packages.
3. In the list of packages, right-click EMP_EVAL.
4. In the list of choices, click Create Body.
The EMP_EVAL Body pane appears, showing the automatically generated codefor the package body:
CREATE OR REPLACEPACKAGE BODY EMP_EVAL AS PROCEDURE eval_department(dept_id IN NUMBER) AS BEGIN -- TODO implementation required for PROCEDURE EMP_EVAL.eval_department NULL; END eval_department; FUNCTION calculate_score ( evaluation_id IN NUMBER , performance_id IN NUMBER) RETURN NUMBER AS BEGIN -- TODO implementation required for FUNCTION EMP_EVAL.calculate_score RETURN NULL; END calculate_score;
Chapter 5Creating and Managing Packages
5-14
END EMP_EVAL;
The title of the pane is in italic font, indicating that the code is not saved in thedatabase.
5. (Optional) In the CREATE PACKAGE BODY statement:
• Replace the comments with executable statements.
• (Optional) In the executable part of the procedure, either delete NULL orreplace it with an executable statement.
• (Optional) In the executable part of the function, either replace NULL withanother expression.
If you do not do this step now, you can do it later, as in "Tutorial: DeclaringVariables and Constants in a Subprogram".
6. Click the icon Compile.
The changed package body compiles and is saved to the database. The title of theEMP_EVAL Body pane is no longer in italic font.
See Also:
Oracle Database PL/SQL Language Reference for information about theCREATE PACKAGE BODY statement (for the package body)
5.6.5 Dropping a PackageTo drop a package (both specification and body), use either the SQL DeveloperConnections frame and Drop tool, or the DDL statement DROP PACKAGE.
Caution:
Do not drop the package EMP_EVAL—you need it for later tutorials. If youwant to practice dropping packages, create simple ones and then drop them.
To drop a package using the Drop tool:
1. In the Connections frame, expand hr_conn.
2. In the list of schema object types, expand Packages.
A list of packages appears.
3. In the list of packages, right-click the name of the package to drop.
4. In the list of choices, click Drop Package.
5. In the Drop window, click Apply.
6. In the Confirmation window, click OK.
Chapter 5Creating and Managing Packages
5-15
See Also:
Oracle Database PL/SQL Language Reference for information about theDROP PACKAGE statement
5.7 Declaring and Assigning Values to Variables andConstants
A variable or constant declared in a package specification is available to any programthat has access to the package. A variable or constant declared in a package body orsubprogram is local to that package or subprogram. When declaring a constant, youmust assign it an initial value.
One significant advantage that PL/SQL has over SQL is that PL/SQL lets you declareand use variables and constants.
A variable or constant declared in a package specification is available to any programthat has access to the package. A variable or constant declared in a package body orsubprogram is local to that package or subprogram.
A variable holds a value of a particular data type. Your program can change the valueat runtime. A constant holds a value that cannot be changed.
A variable or constant can have any PL/SQL data type. When declaring a variable, youcan assign it an initial value; if you do not, its initial value is NULL. When declaring aconstant, you must assign it an initial value. To assign an initial value to a variable orconstant, use the assignment operator (:=).
Tip:
Declare all values that do not change as constants. This practice optimizesyour compiled code and makes your source code easier to maintain.
See Also:
Oracle Database PL/SQL Language Reference for general information aboutvariables and constants
5.7.1 Tutorial: Declaring Variables and Constants in a SubprogramThis tutorial shows how to use the SQL Developer tool Edit to declare variables andconstants in the EMP_EVAL.CALCULATE_SCORE function. (This tutorial is also anexample of changing a package body.)
The EMP_EVAL.CALCULATE_SCORE function is specified in "Tutorial: Creating aPackage Specification").
Chapter 5Declaring and Assigning Values to Variables and Constants
5-16
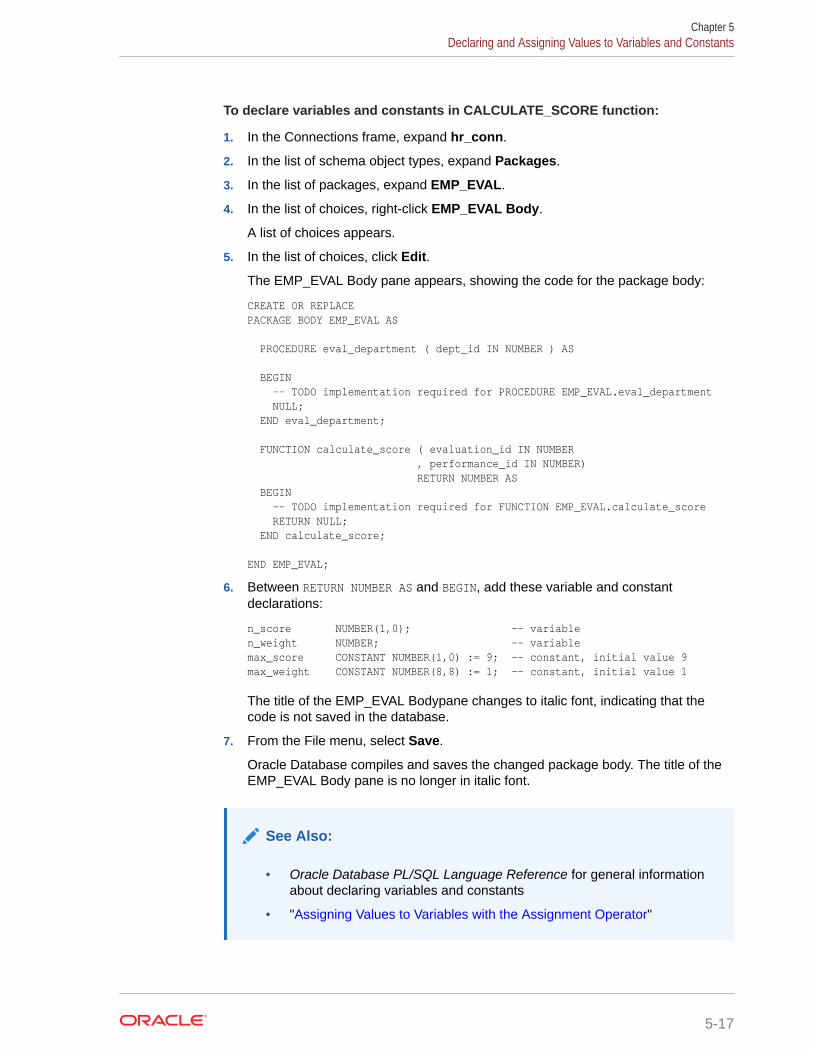
To declare variables and constants in CALCULATE_SCORE function:
1. In the Connections frame, expand hr_conn.
2. In the list of schema object types, expand Packages.
3. In the list of packages, expand EMP_EVAL.
4. In the list of choices, right-click EMP_EVAL Body.
A list of choices appears.
5. In the list of choices, click Edit.
The EMP_EVAL Body pane appears, showing the code for the package body:
CREATE OR REPLACEPACKAGE BODY EMP_EVAL AS PROCEDURE eval_department ( dept_id IN NUMBER ) AS
BEGIN -- TODO implementation required for PROCEDURE EMP_EVAL.eval_department NULL; END eval_department; FUNCTION calculate_score ( evaluation_id IN NUMBER , performance_id IN NUMBER) RETURN NUMBER AS BEGIN -- TODO implementation required for FUNCTION EMP_EVAL.calculate_score RETURN NULL; END calculate_score;
END EMP_EVAL;
6. Between RETURN NUMBER AS and BEGIN, add these variable and constantdeclarations:
n_score NUMBER(1,0); -- variablen_weight NUMBER; -- variablemax_score CONSTANT NUMBER(1,0) := 9; -- constant, initial value 9max_weight CONSTANT NUMBER(8,8) := 1; -- constant, initial value 1
The title of the EMP_EVAL Bodypane changes to italic font, indicating that thecode is not saved in the database.
7. From the File menu, select Save.
Oracle Database compiles and saves the changed package body. The title of theEMP_EVAL Body pane is no longer in italic font.
See Also:
• Oracle Database PL/SQL Language Reference for general informationabout declaring variables and constants
• "Assigning Values to Variables with the Assignment Operator"
Chapter 5Declaring and Assigning Values to Variables and Constants
5-17
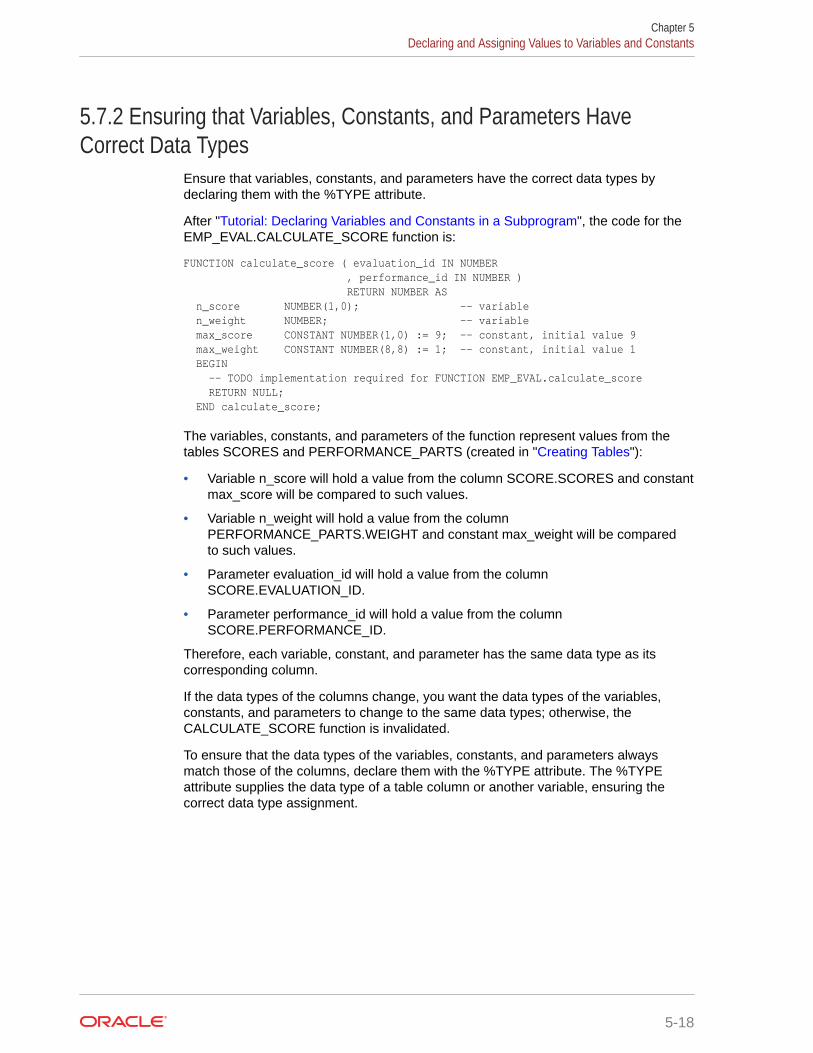
5.7.2 Ensuring that Variables, Constants, and Parameters HaveCorrect Data Types
Ensure that variables, constants, and parameters have the correct data types bydeclaring them with the %TYPE attribute.
After "Tutorial: Declaring Variables and Constants in a Subprogram", the code for theEMP_EVAL.CALCULATE_SCORE function is:
FUNCTION calculate_score ( evaluation_id IN NUMBER , performance_id IN NUMBER ) RETURN NUMBER AS n_score NUMBER(1,0); -- variable n_weight NUMBER; -- variable max_score CONSTANT NUMBER(1,0) := 9; -- constant, initial value 9 max_weight CONSTANT NUMBER(8,8) := 1; -- constant, initial value 1 BEGIN -- TODO implementation required for FUNCTION EMP_EVAL.calculate_score RETURN NULL; END calculate_score;
The variables, constants, and parameters of the function represent values from thetables SCORES and PERFORMANCE_PARTS (created in "Creating Tables"):
• Variable n_score will hold a value from the column SCORE.SCORES and constantmax_score will be compared to such values.
• Variable n_weight will hold a value from the columnPERFORMANCE_PARTS.WEIGHT and constant max_weight will be comparedto such values.
• Parameter evaluation_id will hold a value from the columnSCORE.EVALUATION_ID.
• Parameter performance_id will hold a value from the columnSCORE.PERFORMANCE_ID.
Therefore, each variable, constant, and parameter has the same data type as itscorresponding column.
If the data types of the columns change, you want the data types of the variables,constants, and parameters to change to the same data types; otherwise, theCALCULATE_SCORE function is invalidated.
To ensure that the data types of the variables, constants, and parameters alwaysmatch those of the columns, declare them with the %TYPE attribute. The %TYPEattribute supplies the data type of a table column or another variable, ensuring thecorrect data type assignment.
Chapter 5Declaring and Assigning Values to Variables and Constants
5-18
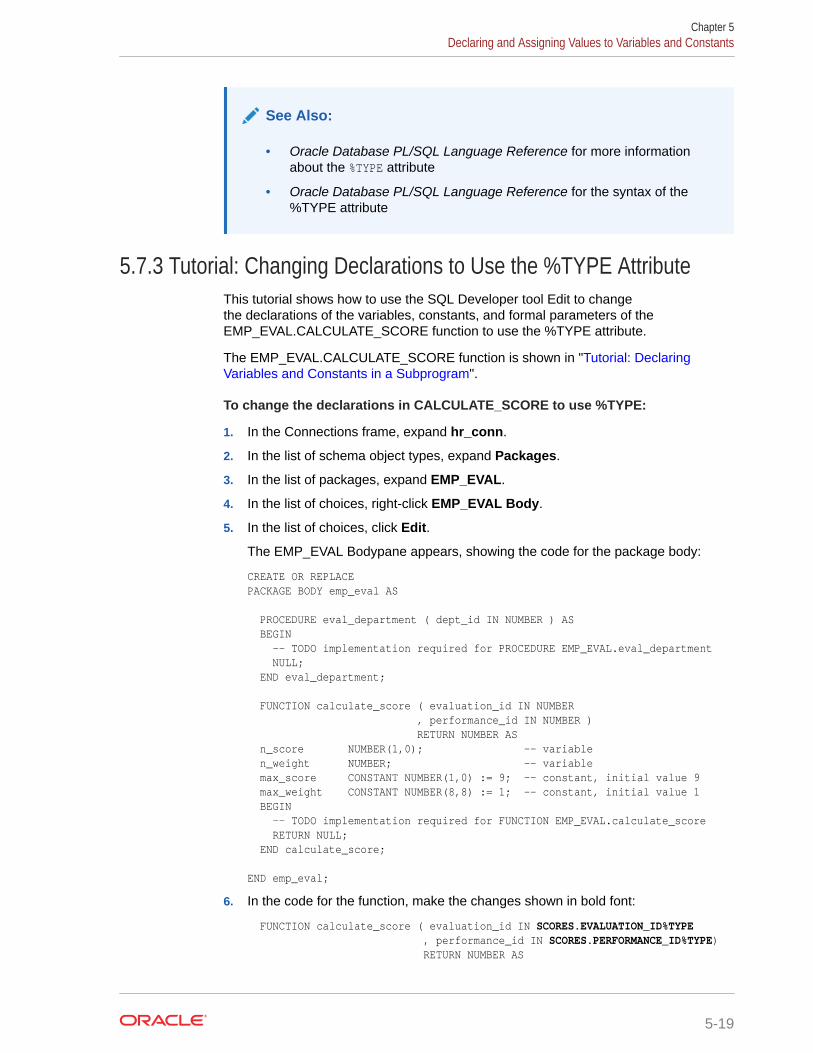
See Also:
• Oracle Database PL/SQL Language Reference for more informationabout the %TYPE attribute
• Oracle Database PL/SQL Language Reference for the syntax of the%TYPE attribute
5.7.3 Tutorial: Changing Declarations to Use the %TYPE AttributeThis tutorial shows how to use the SQL Developer tool Edit to changethe declarations of the variables, constants, and formal parameters of theEMP_EVAL.CALCULATE_SCORE function to use the %TYPE attribute.
The EMP_EVAL.CALCULATE_SCORE function is shown in "Tutorial: DeclaringVariables and Constants in a Subprogram".
To change the declarations in CALCULATE_SCORE to use %TYPE:
1. In the Connections frame, expand hr_conn.
2. In the list of schema object types, expand Packages.
3. In the list of packages, expand EMP_EVAL.
4. In the list of choices, right-click EMP_EVAL Body.
5. In the list of choices, click Edit.
The EMP_EVAL Bodypane appears, showing the code for the package body:
CREATE OR REPLACEPACKAGE BODY emp_eval AS PROCEDURE eval_department ( dept_id IN NUMBER ) AS BEGIN -- TODO implementation required for PROCEDURE EMP_EVAL.eval_department NULL; END eval_department; FUNCTION calculate_score ( evaluation_id IN NUMBER , performance_id IN NUMBER ) RETURN NUMBER AS n_score NUMBER(1,0); -- variable n_weight NUMBER; -- variable max_score CONSTANT NUMBER(1,0) := 9; -- constant, initial value 9 max_weight CONSTANT NUMBER(8,8) := 1; -- constant, initial value 1 BEGIN -- TODO implementation required for FUNCTION EMP_EVAL.calculate_score RETURN NULL; END calculate_score;
END emp_eval;
6. In the code for the function, make the changes shown in bold font:
FUNCTION calculate_score ( evaluation_id IN SCORES.EVALUATION_ID%TYPE , performance_id IN SCORES.PERFORMANCE_ID%TYPE) RETURN NUMBER AS
Chapter 5Declaring and Assigning Values to Variables and Constants
5-19
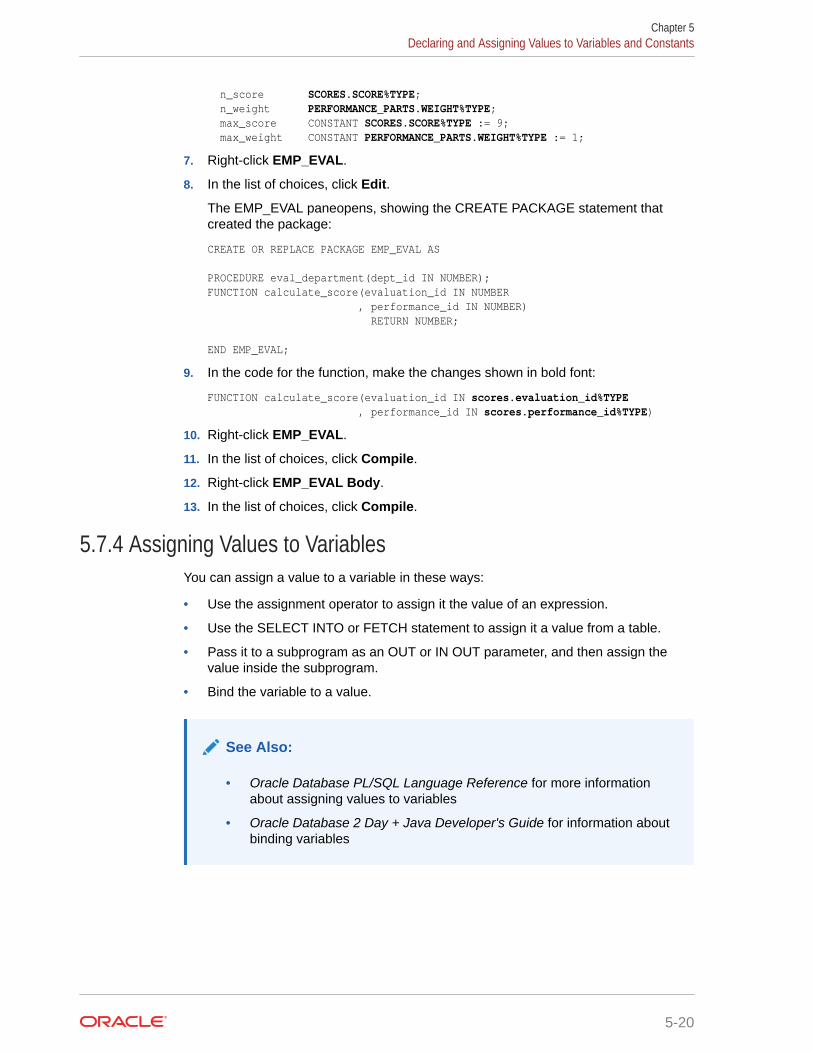
n_score SCORES.SCORE%TYPE; n_weight PERFORMANCE_PARTS.WEIGHT%TYPE; max_score CONSTANT SCORES.SCORE%TYPE := 9; max_weight CONSTANT PERFORMANCE_PARTS.WEIGHT%TYPE := 1;
7. Right-click EMP_EVAL.
8. In the list of choices, click Edit.
The EMP_EVAL paneopens, showing the CREATE PACKAGE statement thatcreated the package:
CREATE OR REPLACE PACKAGE EMP_EVAL AS PROCEDURE eval_department(dept_id IN NUMBER);FUNCTION calculate_score(evaluation_id IN NUMBER , performance_id IN NUMBER) RETURN NUMBER; END EMP_EVAL;
9. In the code for the function, make the changes shown in bold font:
FUNCTION calculate_score(evaluation_id IN scores.evaluation_id%TYPE , performance_id IN scores.performance_id%TYPE)
10. Right-click EMP_EVAL.
11. In the list of choices, click Compile.
12. Right-click EMP_EVAL Body.
13. In the list of choices, click Compile.
5.7.4 Assigning Values to VariablesYou can assign a value to a variable in these ways:
• Use the assignment operator to assign it the value of an expression.
• Use the SELECT INTO or FETCH statement to assign it a value from a table.
• Pass it to a subprogram as an OUT or IN OUT parameter, and then assign thevalue inside the subprogram.
• Bind the variable to a value.
See Also:
• Oracle Database PL/SQL Language Reference for more informationabout assigning values to variables
• Oracle Database 2 Day + Java Developer's Guide for information aboutbinding variables
Chapter 5Declaring and Assigning Values to Variables and Constants
5-20

5.7.4.1 Assigning Values to Variables with the Assignment OperatorWith the assignment operator (:=), you can assign the value of an expression to avariable in either the declarative or executable part of a subprogram.
In the declarative part of a subprogram, you can assign an initial value to a variablewhen you declare it. The syntax is:
variable_name data_type := expression;
In the executable part of a subprogram, you can assign a value to a variable with anassignment statement. The syntax is:
variable_name := expression;
Example 5-1 shows, in bold font, the changes to make to theEMP_EVAL.CALCULATE_SCORE function to add a variable, running_total, anduse it as the return value of the function. The assignment operator appearsin both the declarative and executable parts of the function. (The data typeof running_total must be NUMBER, rather than SCORES.SCORE%TYPE orPERFORMANCE_PARTS.WEIGHT%TYPE, because it holds the product of twoNUMBER values with different precisions and scales.)
See Also:
• Oracle Database PL/SQL Language Reference for variable declarationsyntax
• Oracle Database PL/SQL Language Reference for assignmentstatement syntax
Example 5-1 Assigning Values to a Variable with Assignment Operator
FUNCTION calculate_score(evaluation_id IN SCORES.EVALUATION_ID%TYPE , performance_id IN SCORES.PERFORMANCE_ID%TYPE) RETURN NUMBER AS n_score SCORES.SCORE%TYPE; n_weight PERFORMANCE_PARTS.WEIGHT%TYPE; running_total NUMBER := 0; max_score CONSTANT SCORES.SCORE%TYPE := 9; max_weight CONSTANT PERFORMANCE_PARTS.WEIGHT%TYPE:= 1;BEGIN running_total := max_score * max_weight; RETURN running_total;END calculate_score;
5.7.4.2 Assigning Values to Variables with the SELECT INTO StatementTo use table values in subprograms or packages, you must assign them to variableswith SELECT INTO statements.
Example 5-2 shows, in bold font, the changes to make to theEMP_EVAL.CALCULATE_SCORE function to have it calculate running_total fromtable values.
Chapter 5Declaring and Assigning Values to Variables and Constants
5-21
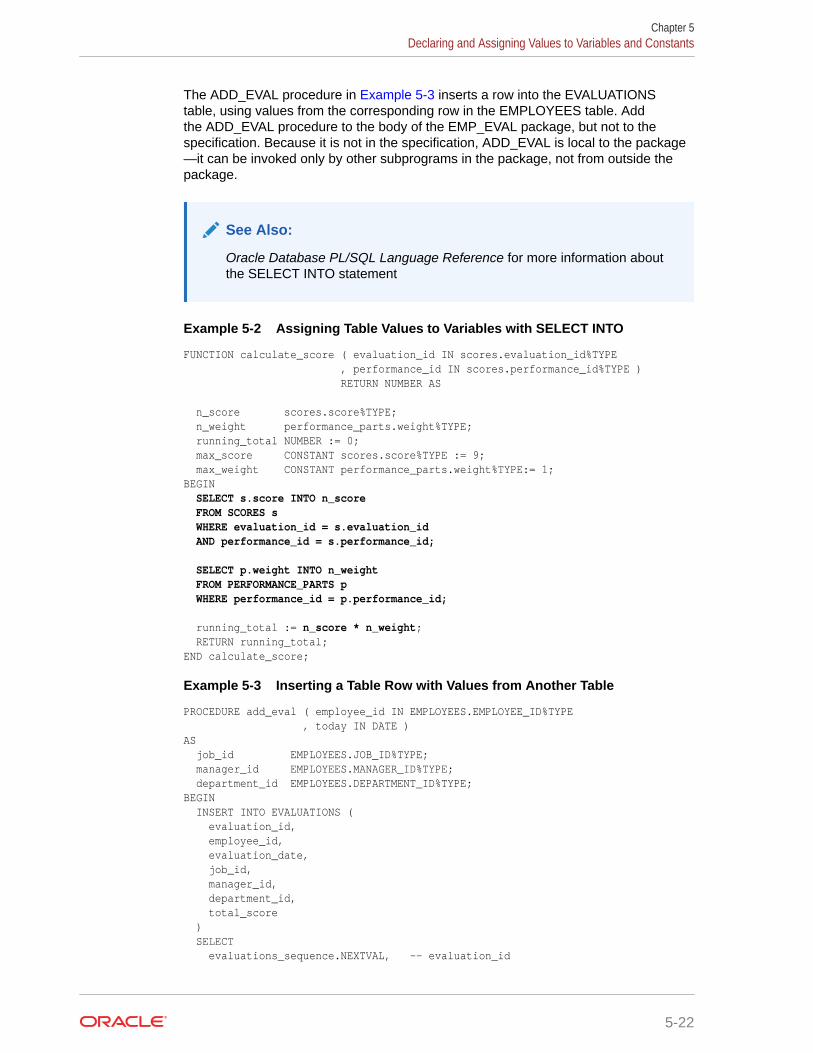
The ADD_EVAL procedure in Example 5-3 inserts a row into the EVALUATIONStable, using values from the corresponding row in the EMPLOYEES table. Addthe ADD_EVAL procedure to the body of the EMP_EVAL package, but not to thespecification. Because it is not in the specification, ADD_EVAL is local to the package—it can be invoked only by other subprograms in the package, not from outside thepackage.
See Also:
Oracle Database PL/SQL Language Reference for more information aboutthe SELECT INTO statement
Example 5-2 Assigning Table Values to Variables with SELECT INTO
FUNCTION calculate_score ( evaluation_id IN scores.evaluation_id%TYPE , performance_id IN scores.performance_id%TYPE ) RETURN NUMBER AS
n_score scores.score%TYPE; n_weight performance_parts.weight%TYPE; running_total NUMBER := 0; max_score CONSTANT scores.score%TYPE := 9; max_weight CONSTANT performance_parts.weight%TYPE:= 1;BEGIN SELECT s.score INTO n_score FROM SCORES s WHERE evaluation_id = s.evaluation_id AND performance_id = s.performance_id;
SELECT p.weight INTO n_weight FROM PERFORMANCE_PARTS p WHERE performance_id = p.performance_id;
running_total := n_score * n_weight; RETURN running_total;END calculate_score;
Example 5-3 Inserting a Table Row with Values from Another Table
PROCEDURE add_eval ( employee_id IN EMPLOYEES.EMPLOYEE_ID%TYPE , today IN DATE )AS job_id EMPLOYEES.JOB_ID%TYPE; manager_id EMPLOYEES.MANAGER_ID%TYPE; department_id EMPLOYEES.DEPARTMENT_ID%TYPE;BEGIN INSERT INTO EVALUATIONS ( evaluation_id, employee_id, evaluation_date, job_id, manager_id, department_id, total_score ) SELECT evaluations_sequence.NEXTVAL, -- evaluation_id
Chapter 5Declaring and Assigning Values to Variables and Constants
5-22
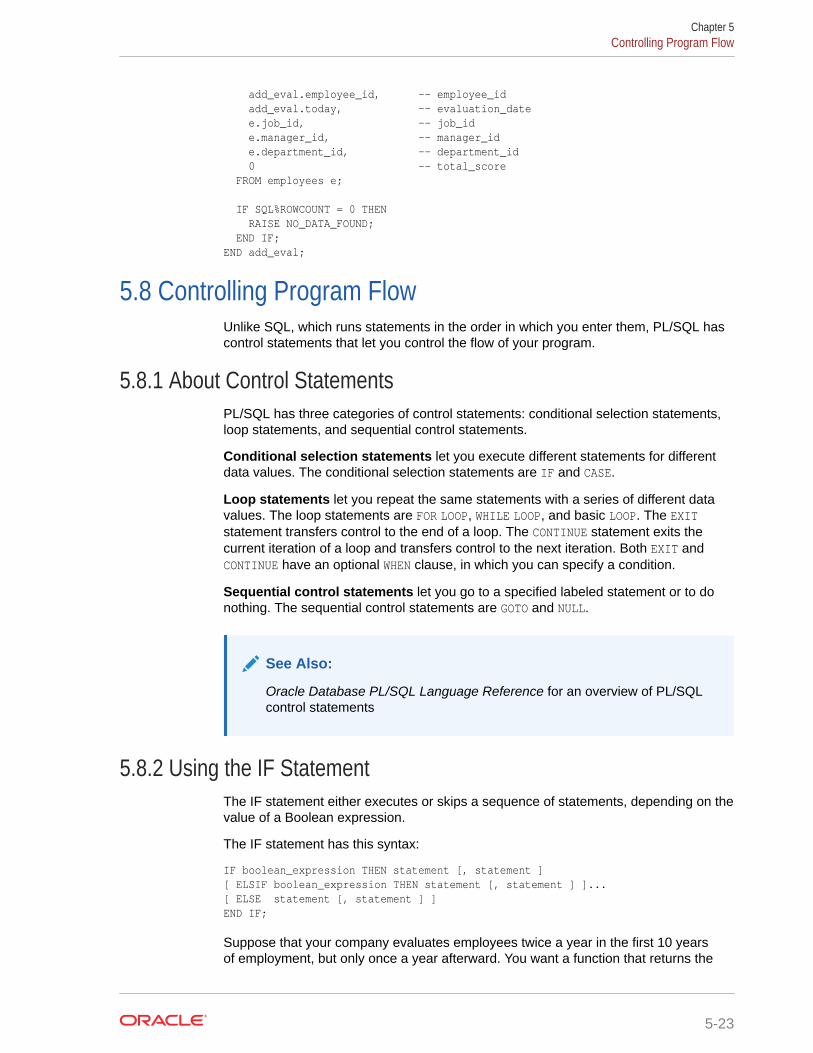
add_eval.employee_id, -- employee_id add_eval.today, -- evaluation_date e.job_id, -- job_id e.manager_id, -- manager_id e.department_id, -- department_id 0 -- total_score FROM employees e;
IF SQL%ROWCOUNT = 0 THEN RAISE NO_DATA_FOUND; END IF;END add_eval;
5.8 Controlling Program FlowUnlike SQL, which runs statements in the order in which you enter them, PL/SQL hascontrol statements that let you control the flow of your program.
5.8.1 About Control StatementsPL/SQL has three categories of control statements: conditional selection statements,loop statements, and sequential control statements.
Conditional selection statements let you execute different statements for differentdata values. The conditional selection statements are IF and CASE.
Loop statements let you repeat the same statements with a series of different datavalues. The loop statements are FOR LOOP, WHILE LOOP, and basic LOOP. The EXITstatement transfers control to the end of a loop. The CONTINUE statement exits thecurrent iteration of a loop and transfers control to the next iteration. Both EXIT andCONTINUE have an optional WHEN clause, in which you can specify a condition.
Sequential control statements let you go to a specified labeled statement or to donothing. The sequential control statements are GOTO and NULL.
See Also:
Oracle Database PL/SQL Language Reference for an overview of PL/SQLcontrol statements
5.8.2 Using the IF StatementThe IF statement either executes or skips a sequence of statements, depending on thevalue of a Boolean expression.
The IF statement has this syntax:
IF boolean_expression THEN statement [, statement ][ ELSIF boolean_expression THEN statement [, statement ] ]...[ ELSE statement [, statement ] ]END IF;
Suppose that your company evaluates employees twice a year in the first 10 yearsof employment, but only once a year afterward. You want a function that returns the
Chapter 5Controlling Program Flow
5-23
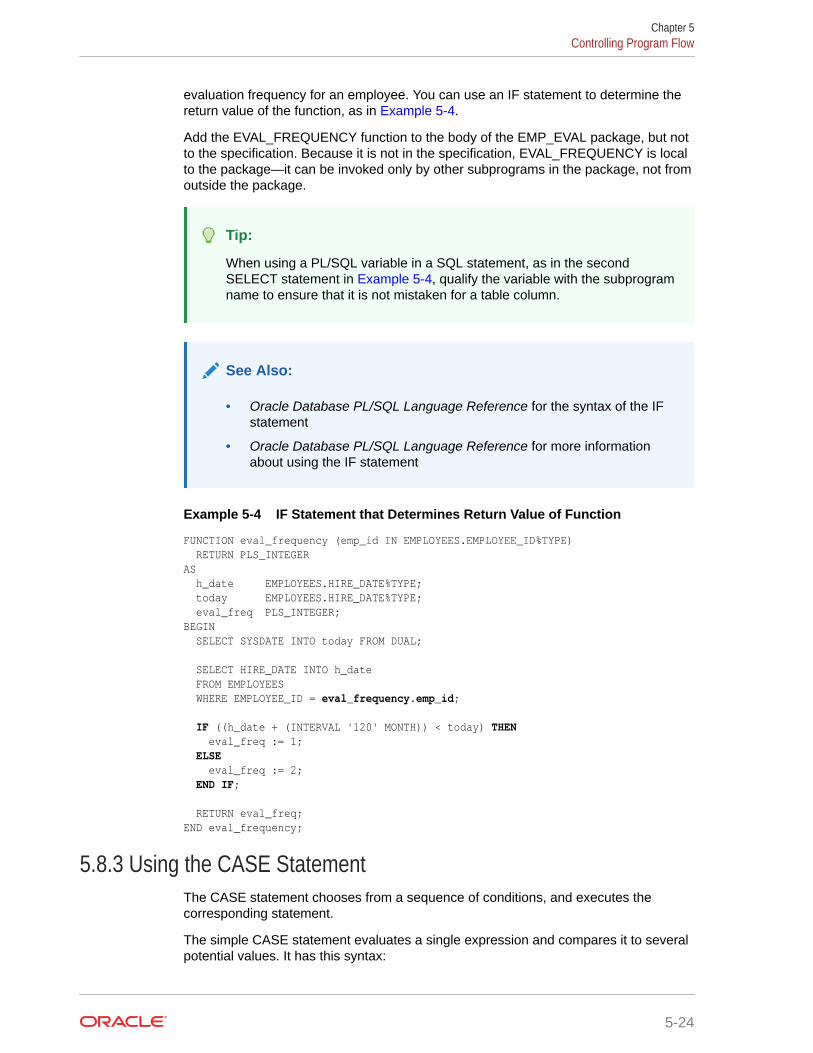
evaluation frequency for an employee. You can use an IF statement to determine thereturn value of the function, as in Example 5-4.
Add the EVAL_FREQUENCY function to the body of the EMP_EVAL package, but notto the specification. Because it is not in the specification, EVAL_FREQUENCY is localto the package—it can be invoked only by other subprograms in the package, not fromoutside the package.
Tip:
When using a PL/SQL variable in a SQL statement, as in the secondSELECT statement in Example 5-4, qualify the variable with the subprogramname to ensure that it is not mistaken for a table column.
See Also:
• Oracle Database PL/SQL Language Reference for the syntax of the IFstatement
• Oracle Database PL/SQL Language Reference for more informationabout using the IF statement
Example 5-4 IF Statement that Determines Return Value of Function
FUNCTION eval_frequency (emp_id IN EMPLOYEES.EMPLOYEE_ID%TYPE) RETURN PLS_INTEGERAS h_date EMPLOYEES.HIRE_DATE%TYPE; today EMPLOYEES.HIRE_DATE%TYPE; eval_freq PLS_INTEGER;BEGIN SELECT SYSDATE INTO today FROM DUAL;
SELECT HIRE_DATE INTO h_date FROM EMPLOYEES WHERE EMPLOYEE_ID = eval_frequency.emp_id;
IF ((h_date + (INTERVAL '120' MONTH)) < today) THEN eval_freq := 1; ELSE eval_freq := 2; END IF;
RETURN eval_freq;END eval_frequency;
5.8.3 Using the CASE StatementThe CASE statement chooses from a sequence of conditions, and executes thecorresponding statement.
The simple CASE statement evaluates a single expression and compares it to severalpotential values. It has this syntax:
Chapter 5Controlling Program Flow
5-24
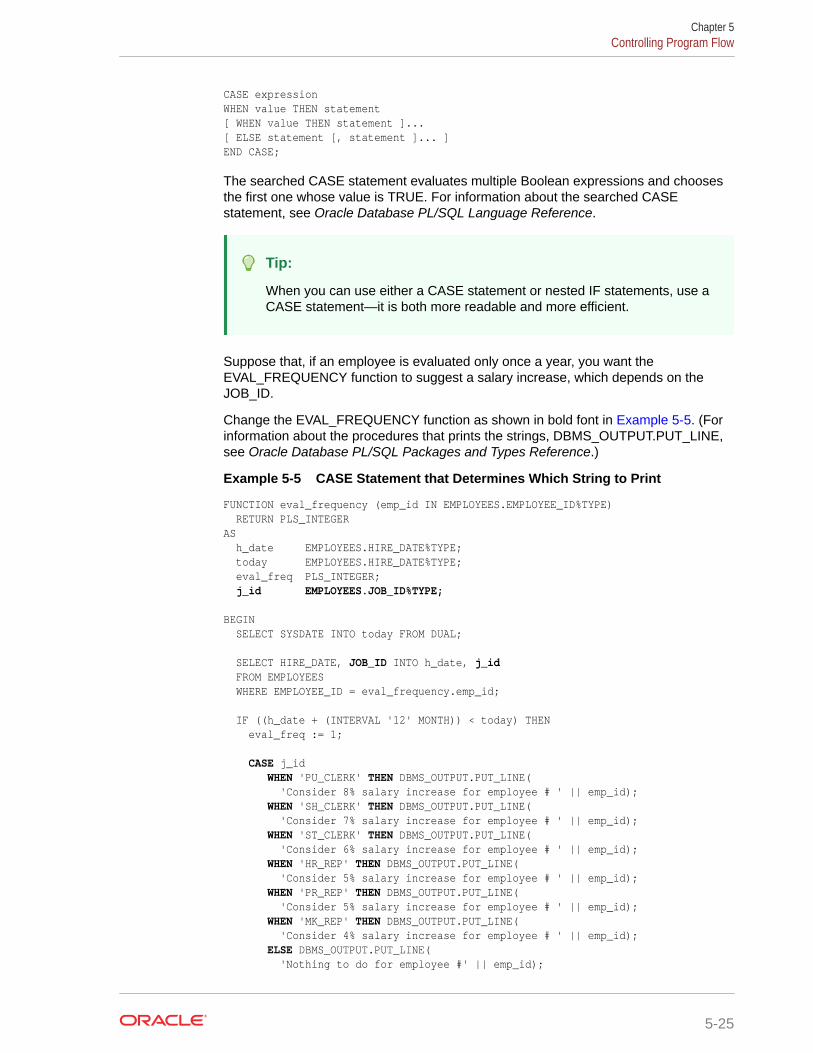
CASE expressionWHEN value THEN statement[ WHEN value THEN statement ]...[ ELSE statement [, statement ]... ]END CASE;
The searched CASE statement evaluates multiple Boolean expressions and choosesthe first one whose value is TRUE. For information about the searched CASEstatement, see Oracle Database PL/SQL Language Reference.
Tip:
When you can use either a CASE statement or nested IF statements, use aCASE statement—it is both more readable and more efficient.
Suppose that, if an employee is evaluated only once a year, you want theEVAL_FREQUENCY function to suggest a salary increase, which depends on theJOB_ID.
Change the EVAL_FREQUENCY function as shown in bold font in Example 5-5. (Forinformation about the procedures that prints the strings, DBMS_OUTPUT.PUT_LINE,see Oracle Database PL/SQL Packages and Types Reference.)
Example 5-5 CASE Statement that Determines Which String to Print
FUNCTION eval_frequency (emp_id IN EMPLOYEES.EMPLOYEE_ID%TYPE) RETURN PLS_INTEGERAS h_date EMPLOYEES.HIRE_DATE%TYPE; today EMPLOYEES.HIRE_DATE%TYPE; eval_freq PLS_INTEGER; j_id EMPLOYEES.JOB_ID%TYPE;
BEGIN SELECT SYSDATE INTO today FROM DUAL;
SELECT HIRE_DATE, JOB_ID INTO h_date, j_id FROM EMPLOYEES WHERE EMPLOYEE_ID = eval_frequency.emp_id;
IF ((h_date + (INTERVAL '12' MONTH)) < today) THEN eval_freq := 1;
CASE j_id WHEN 'PU_CLERK' THEN DBMS_OUTPUT.PUT_LINE( 'Consider 8% salary increase for employee # ' || emp_id); WHEN 'SH_CLERK' THEN DBMS_OUTPUT.PUT_LINE( 'Consider 7% salary increase for employee # ' || emp_id); WHEN 'ST_CLERK' THEN DBMS_OUTPUT.PUT_LINE( 'Consider 6% salary increase for employee # ' || emp_id); WHEN 'HR_REP' THEN DBMS_OUTPUT.PUT_LINE( 'Consider 5% salary increase for employee # ' || emp_id); WHEN 'PR_REP' THEN DBMS_OUTPUT.PUT_LINE( 'Consider 5% salary increase for employee # ' || emp_id); WHEN 'MK_REP' THEN DBMS_OUTPUT.PUT_LINE( 'Consider 4% salary increase for employee # ' || emp_id); ELSE DBMS_OUTPUT.PUT_LINE( 'Nothing to do for employee #' || emp_id);
Chapter 5Controlling Program Flow
5-25
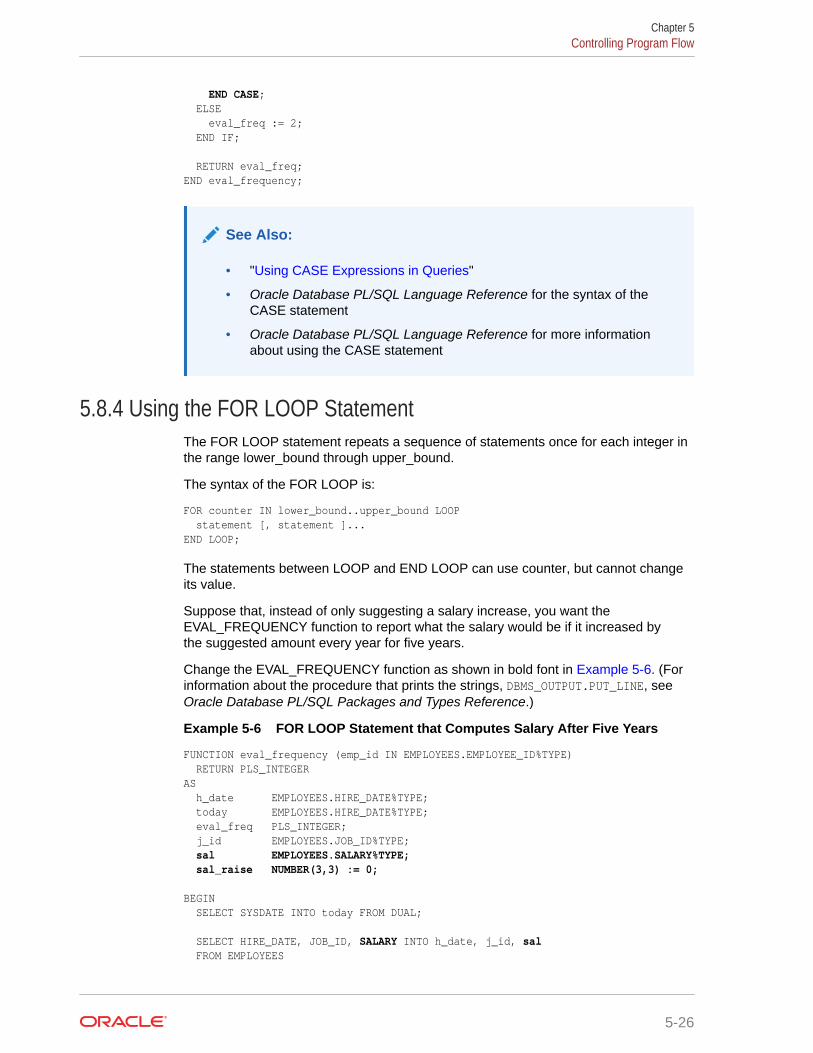
END CASE; ELSE eval_freq := 2; END IF; RETURN eval_freq;END eval_frequency;
See Also:
• "Using CASE Expressions in Queries"
• Oracle Database PL/SQL Language Reference for the syntax of theCASE statement
• Oracle Database PL/SQL Language Reference for more informationabout using the CASE statement
5.8.4 Using the FOR LOOP StatementThe FOR LOOP statement repeats a sequence of statements once for each integer inthe range lower_bound through upper_bound.
The syntax of the FOR LOOP is:
FOR counter IN lower_bound..upper_bound LOOP statement [, statement ]...END LOOP;
The statements between LOOP and END LOOP can use counter, but cannot changeits value.
Suppose that, instead of only suggesting a salary increase, you want theEVAL_FREQUENCY function to report what the salary would be if it increased bythe suggested amount every year for five years.
Change the EVAL_FREQUENCY function as shown in bold font in Example 5-6. (Forinformation about the procedure that prints the strings, DBMS_OUTPUT.PUT_LINE, seeOracle Database PL/SQL Packages and Types Reference.)
Example 5-6 FOR LOOP Statement that Computes Salary After Five Years
FUNCTION eval_frequency (emp_id IN EMPLOYEES.EMPLOYEE_ID%TYPE) RETURN PLS_INTEGERAS h_date EMPLOYEES.HIRE_DATE%TYPE; today EMPLOYEES.HIRE_DATE%TYPE; eval_freq PLS_INTEGER; j_id EMPLOYEES.JOB_ID%TYPE; sal EMPLOYEES.SALARY%TYPE; sal_raise NUMBER(3,3) := 0;
BEGIN SELECT SYSDATE INTO today FROM DUAL;
SELECT HIRE_DATE, JOB_ID, SALARY INTO h_date, j_id, sal FROM EMPLOYEES
Chapter 5Controlling Program Flow
5-26
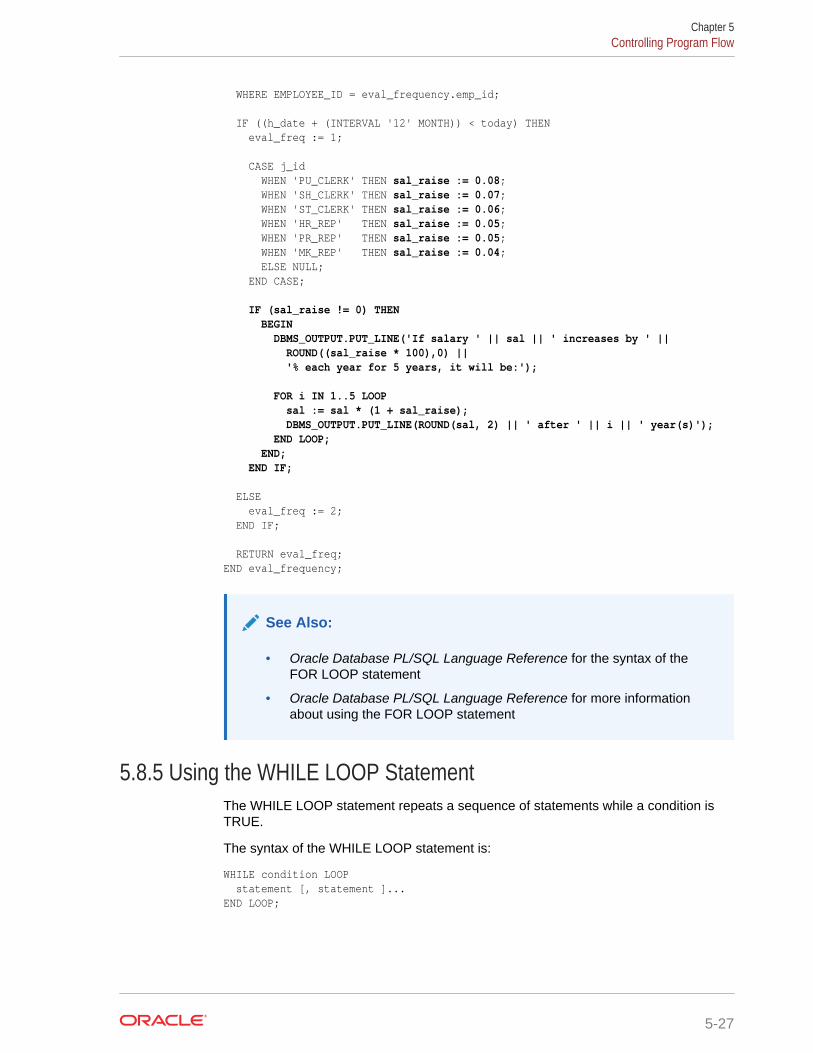
WHERE EMPLOYEE_ID = eval_frequency.emp_id;
IF ((h_date + (INTERVAL '12' MONTH)) < today) THEN eval_freq := 1;
CASE j_id WHEN 'PU_CLERK' THEN sal_raise := 0.08; WHEN 'SH_CLERK' THEN sal_raise := 0.07; WHEN 'ST_CLERK' THEN sal_raise := 0.06; WHEN 'HR_REP' THEN sal_raise := 0.05; WHEN 'PR_REP' THEN sal_raise := 0.05; WHEN 'MK_REP' THEN sal_raise := 0.04; ELSE NULL; END CASE;
IF (sal_raise != 0) THEN BEGIN DBMS_OUTPUT.PUT_LINE('If salary ' || sal || ' increases by ' || ROUND((sal_raise * 100),0) || '% each year for 5 years, it will be:');
FOR i IN 1..5 LOOP sal := sal * (1 + sal_raise); DBMS_OUTPUT.PUT_LINE(ROUND(sal, 2) || ' after ' || i || ' year(s)'); END LOOP; END; END IF;
ELSE eval_freq := 2; END IF;
RETURN eval_freq;END eval_frequency;
See Also:
• Oracle Database PL/SQL Language Reference for the syntax of theFOR LOOP statement
• Oracle Database PL/SQL Language Reference for more informationabout using the FOR LOOP statement
5.8.5 Using the WHILE LOOP StatementThe WHILE LOOP statement repeats a sequence of statements while a condition isTRUE.
The syntax of the WHILE LOOP statement is:
WHILE condition LOOP statement [, statement ]...END LOOP;
Chapter 5Controlling Program Flow
5-27
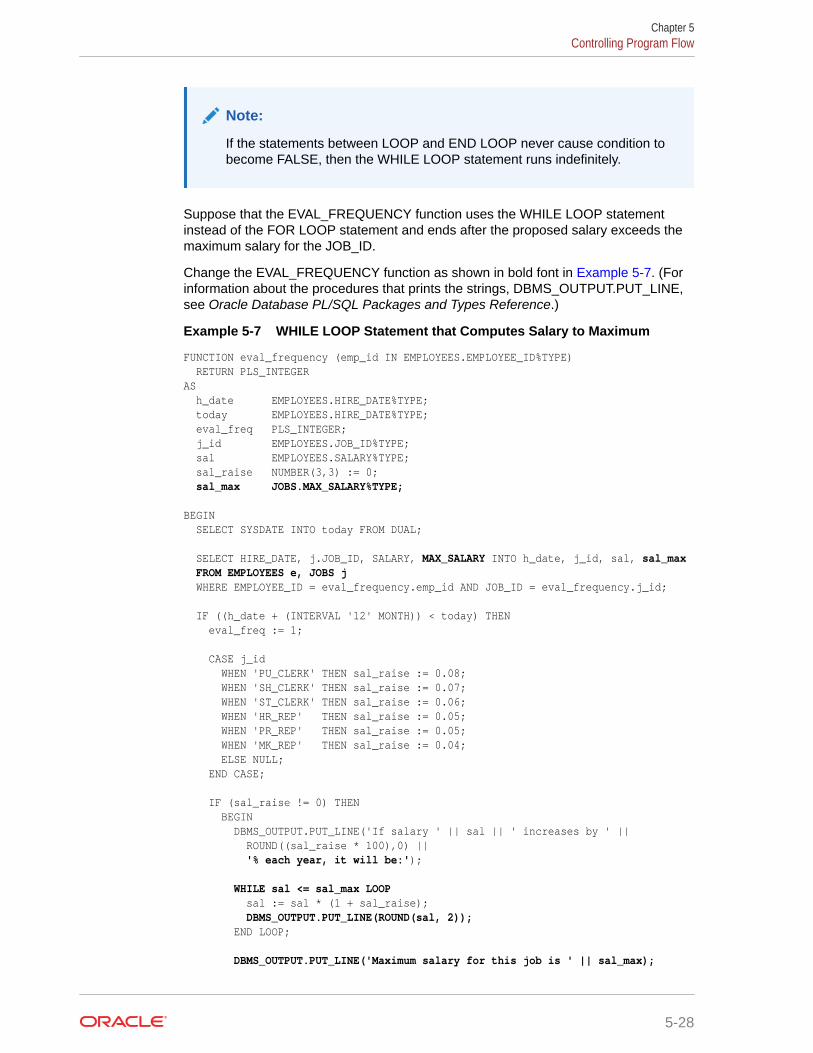
Note:
If the statements between LOOP and END LOOP never cause condition tobecome FALSE, then the WHILE LOOP statement runs indefinitely.
Suppose that the EVAL_FREQUENCY function uses the WHILE LOOP statementinstead of the FOR LOOP statement and ends after the proposed salary exceeds themaximum salary for the JOB_ID.
Change the EVAL_FREQUENCY function as shown in bold font in Example 5-7. (Forinformation about the procedures that prints the strings, DBMS_OUTPUT.PUT_LINE,see Oracle Database PL/SQL Packages and Types Reference.)
Example 5-7 WHILE LOOP Statement that Computes Salary to Maximum
FUNCTION eval_frequency (emp_id IN EMPLOYEES.EMPLOYEE_ID%TYPE) RETURN PLS_INTEGERAS h_date EMPLOYEES.HIRE_DATE%TYPE; today EMPLOYEES.HIRE_DATE%TYPE; eval_freq PLS_INTEGER; j_id EMPLOYEES.JOB_ID%TYPE; sal EMPLOYEES.SALARY%TYPE; sal_raise NUMBER(3,3) := 0; sal_max JOBS.MAX_SALARY%TYPE;
BEGIN SELECT SYSDATE INTO today FROM DUAL;
SELECT HIRE_DATE, j.JOB_ID, SALARY, MAX_SALARY INTO h_date, j_id, sal, sal_max FROM EMPLOYEES e, JOBS j WHERE EMPLOYEE_ID = eval_frequency.emp_id AND JOB_ID = eval_frequency.j_id;
IF ((h_date + (INTERVAL '12' MONTH)) < today) THEN eval_freq := 1;
CASE j_id WHEN 'PU_CLERK' THEN sal_raise := 0.08; WHEN 'SH_CLERK' THEN sal_raise := 0.07; WHEN 'ST_CLERK' THEN sal_raise := 0.06; WHEN 'HR_REP' THEN sal_raise := 0.05; WHEN 'PR_REP' THEN sal_raise := 0.05; WHEN 'MK_REP' THEN sal_raise := 0.04; ELSE NULL; END CASE;
IF (sal_raise != 0) THEN BEGIN DBMS_OUTPUT.PUT_LINE('If salary ' || sal || ' increases by ' || ROUND((sal_raise * 100),0) || '% each year, it will be:');
WHILE sal <= sal_max LOOP sal := sal * (1 + sal_raise); DBMS_OUTPUT.PUT_LINE(ROUND(sal, 2)); END LOOP;
DBMS_OUTPUT.PUT_LINE('Maximum salary for this job is ' || sal_max);
Chapter 5Controlling Program Flow
5-28
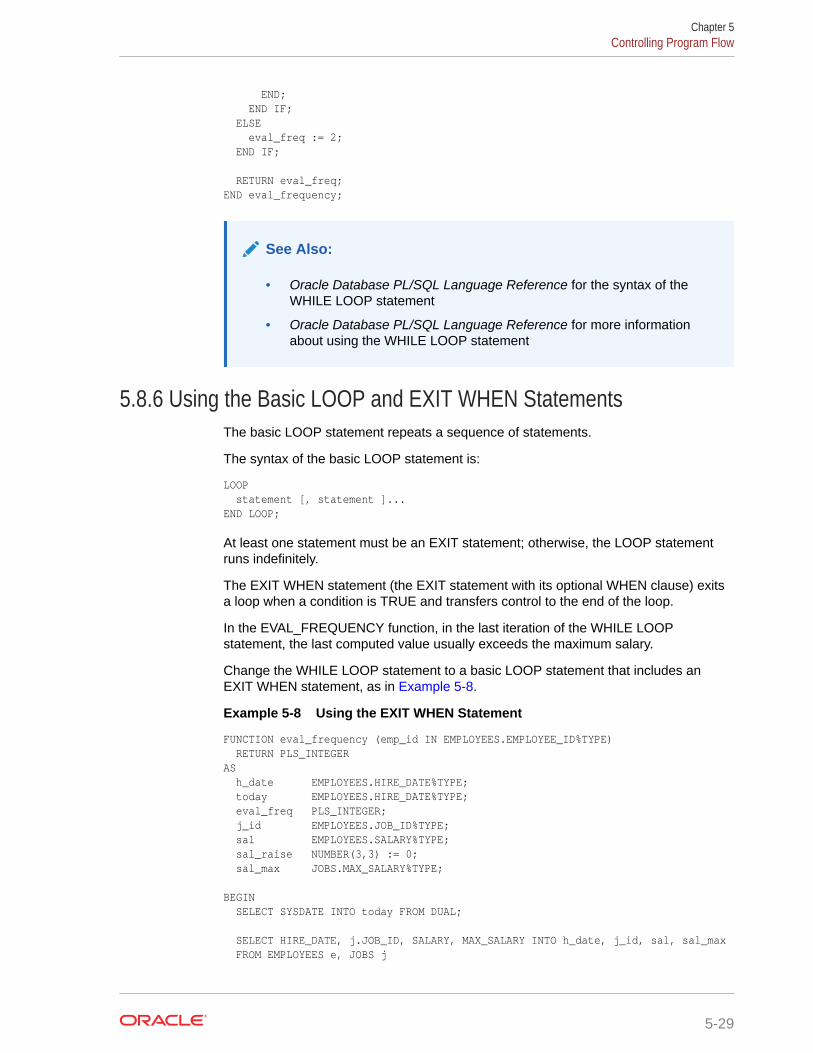
END; END IF; ELSE eval_freq := 2; END IF; RETURN eval_freq;END eval_frequency;
See Also:
• Oracle Database PL/SQL Language Reference for the syntax of theWHILE LOOP statement
• Oracle Database PL/SQL Language Reference for more informationabout using the WHILE LOOP statement
5.8.6 Using the Basic LOOP and EXIT WHEN StatementsThe basic LOOP statement repeats a sequence of statements.
The syntax of the basic LOOP statement is:
LOOP statement [, statement ]...END LOOP;
At least one statement must be an EXIT statement; otherwise, the LOOP statementruns indefinitely.
The EXIT WHEN statement (the EXIT statement with its optional WHEN clause) exitsa loop when a condition is TRUE and transfers control to the end of the loop.
In the EVAL_FREQUENCY function, in the last iteration of the WHILE LOOPstatement, the last computed value usually exceeds the maximum salary.
Change the WHILE LOOP statement to a basic LOOP statement that includes anEXIT WHEN statement, as in Example 5-8.
Example 5-8 Using the EXIT WHEN Statement
FUNCTION eval_frequency (emp_id IN EMPLOYEES.EMPLOYEE_ID%TYPE) RETURN PLS_INTEGERAS h_date EMPLOYEES.HIRE_DATE%TYPE; today EMPLOYEES.HIRE_DATE%TYPE; eval_freq PLS_INTEGER; j_id EMPLOYEES.JOB_ID%TYPE; sal EMPLOYEES.SALARY%TYPE; sal_raise NUMBER(3,3) := 0; sal_max JOBS.MAX_SALARY%TYPE;
BEGIN SELECT SYSDATE INTO today FROM DUAL;
SELECT HIRE_DATE, j.JOB_ID, SALARY, MAX_SALARY INTO h_date, j_id, sal, sal_max FROM EMPLOYEES e, JOBS j
Chapter 5Controlling Program Flow
5-29
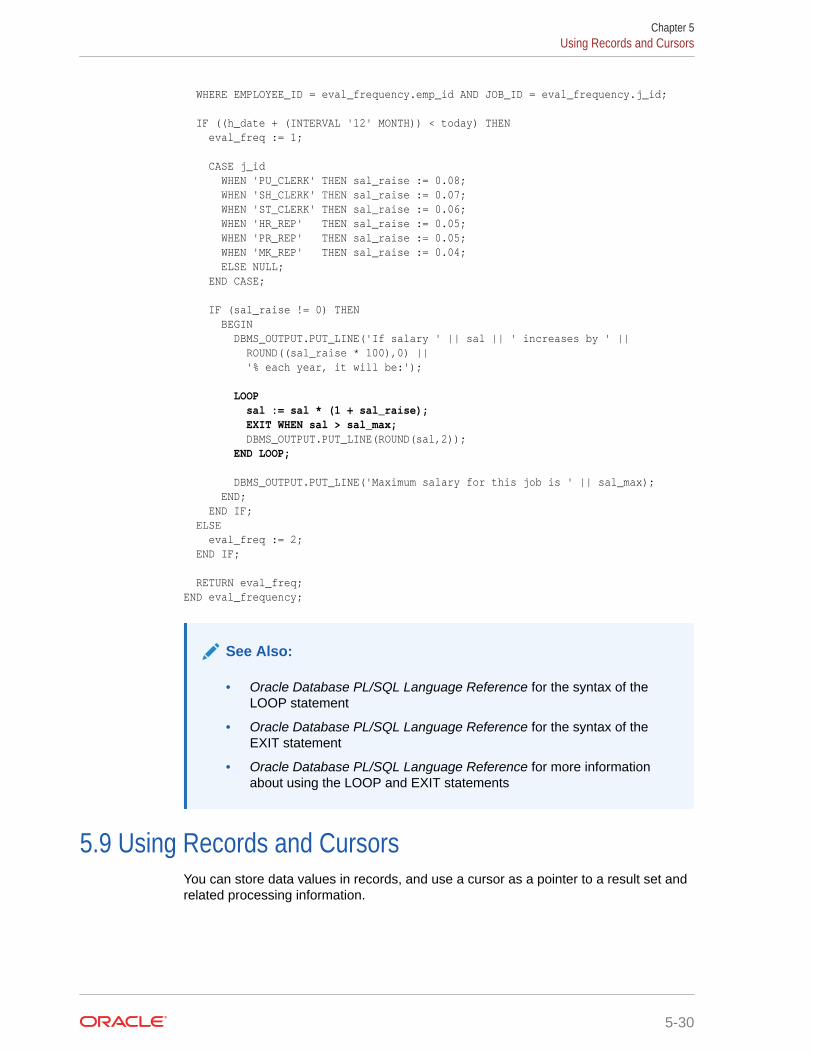
WHERE EMPLOYEE_ID = eval_frequency.emp_id AND JOB_ID = eval_frequency.j_id;
IF ((h_date + (INTERVAL '12' MONTH)) < today) THEN eval_freq := 1;
CASE j_id WHEN 'PU_CLERK' THEN sal_raise := 0.08; WHEN 'SH_CLERK' THEN sal_raise := 0.07; WHEN 'ST_CLERK' THEN sal_raise := 0.06; WHEN 'HR_REP' THEN sal_raise := 0.05; WHEN 'PR_REP' THEN sal_raise := 0.05; WHEN 'MK_REP' THEN sal_raise := 0.04; ELSE NULL; END CASE;
IF (sal_raise != 0) THEN BEGIN DBMS_OUTPUT.PUT_LINE('If salary ' || sal || ' increases by ' || ROUND((sal_raise * 100),0) || '% each year, it will be:');
LOOP sal := sal * (1 + sal_raise); EXIT WHEN sal > sal_max; DBMS_OUTPUT.PUT_LINE(ROUND(sal,2)); END LOOP;
DBMS_OUTPUT.PUT_LINE('Maximum salary for this job is ' || sal_max); END; END IF; ELSE eval_freq := 2; END IF; RETURN eval_freq;END eval_frequency;
See Also:
• Oracle Database PL/SQL Language Reference for the syntax of theLOOP statement
• Oracle Database PL/SQL Language Reference for the syntax of theEXIT statement
• Oracle Database PL/SQL Language Reference for more informationabout using the LOOP and EXIT statements
5.9 Using Records and CursorsYou can store data values in records, and use a cursor as a pointer to a result set andrelated processing information.
Chapter 5Using Records and Cursors
5-30
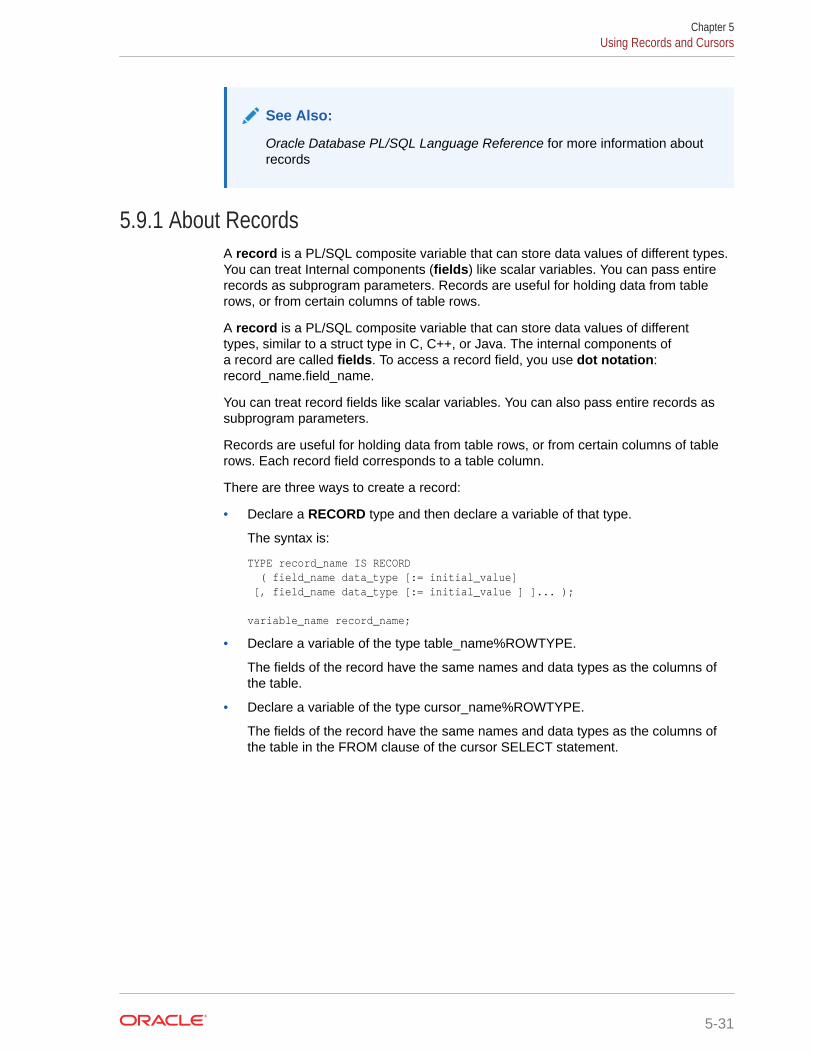
See Also:
Oracle Database PL/SQL Language Reference for more information aboutrecords
5.9.1 About RecordsA record is a PL/SQL composite variable that can store data values of different types.You can treat Internal components (fields) like scalar variables. You can pass entirerecords as subprogram parameters. Records are useful for holding data from tablerows, or from certain columns of table rows.
A record is a PL/SQL composite variable that can store data values of differenttypes, similar to a struct type in C, C++, or Java. The internal components ofa record are called fields. To access a record field, you use dot notation:record_name.field_name.
You can treat record fields like scalar variables. You can also pass entire records assubprogram parameters.
Records are useful for holding data from table rows, or from certain columns of tablerows. Each record field corresponds to a table column.
There are three ways to create a record:
• Declare a RECORD type and then declare a variable of that type.
The syntax is:
TYPE record_name IS RECORD ( field_name data_type [:= initial_value] [, field_name data_type [:= initial_value ] ]... );
variable_name record_name;
• Declare a variable of the type table_name%ROWTYPE.
The fields of the record have the same names and data types as the columns ofthe table.
• Declare a variable of the type cursor_name%ROWTYPE.
The fields of the record have the same names and data types as the columns ofthe table in the FROM clause of the cursor SELECT statement.
Chapter 5Using Records and Cursors
5-31
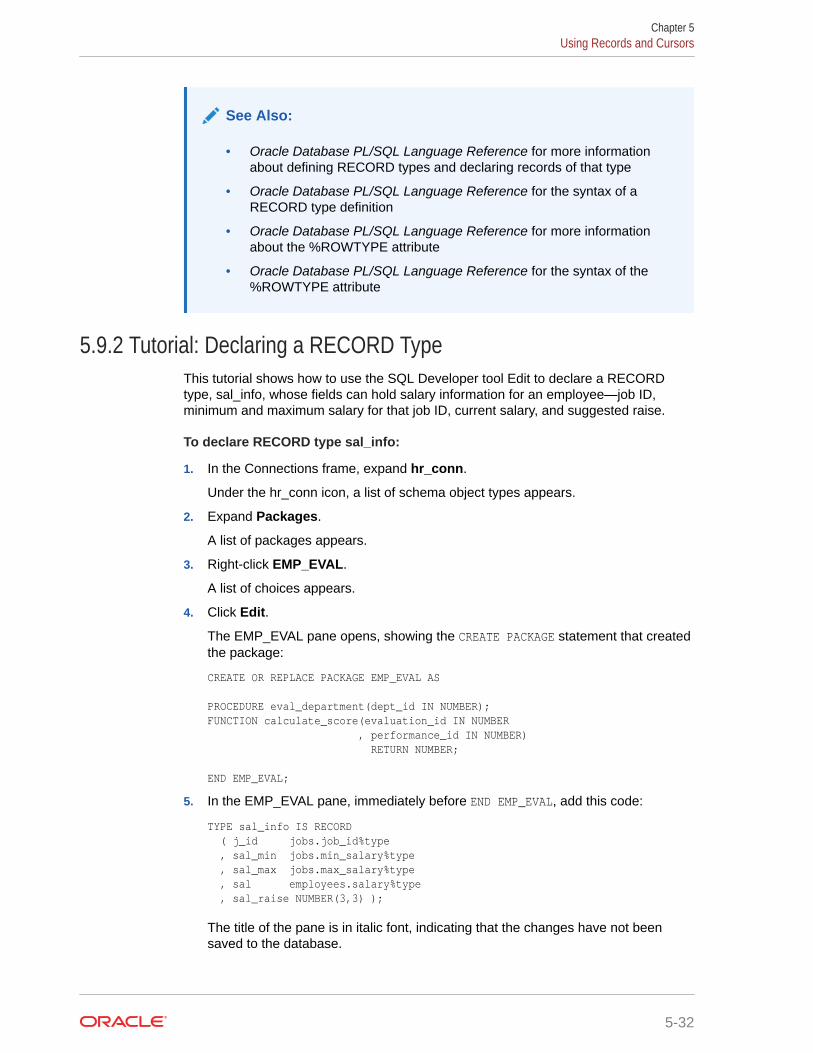
See Also:
• Oracle Database PL/SQL Language Reference for more informationabout defining RECORD types and declaring records of that type
• Oracle Database PL/SQL Language Reference for the syntax of aRECORD type definition
• Oracle Database PL/SQL Language Reference for more informationabout the %ROWTYPE attribute
• Oracle Database PL/SQL Language Reference for the syntax of the%ROWTYPE attribute
5.9.2 Tutorial: Declaring a RECORD TypeThis tutorial shows how to use the SQL Developer tool Edit to declare a RECORDtype, sal_info, whose fields can hold salary information for an employee—job ID,minimum and maximum salary for that job ID, current salary, and suggested raise.
To declare RECORD type sal_info:
1. In the Connections frame, expand hr_conn.
Under the hr_conn icon, a list of schema object types appears.
2. Expand Packages.
A list of packages appears.
3. Right-click EMP_EVAL.
A list of choices appears.
4. Click Edit.
The EMP_EVAL pane opens, showing the CREATE PACKAGE statement that createdthe package:
CREATE OR REPLACE PACKAGE EMP_EVAL AS PROCEDURE eval_department(dept_id IN NUMBER);FUNCTION calculate_score(evaluation_id IN NUMBER , performance_id IN NUMBER) RETURN NUMBER; END EMP_EVAL;
5. In the EMP_EVAL pane, immediately before END EMP_EVAL, add this code:
TYPE sal_info IS RECORD ( j_id jobs.job_id%type , sal_min jobs.min_salary%type , sal_max jobs.max_salary%type , sal employees.salary%type , sal_raise NUMBER(3,3) );
The title of the pane is in italic font, indicating that the changes have not beensaved to the database.
Chapter 5Using Records and Cursors
5-32
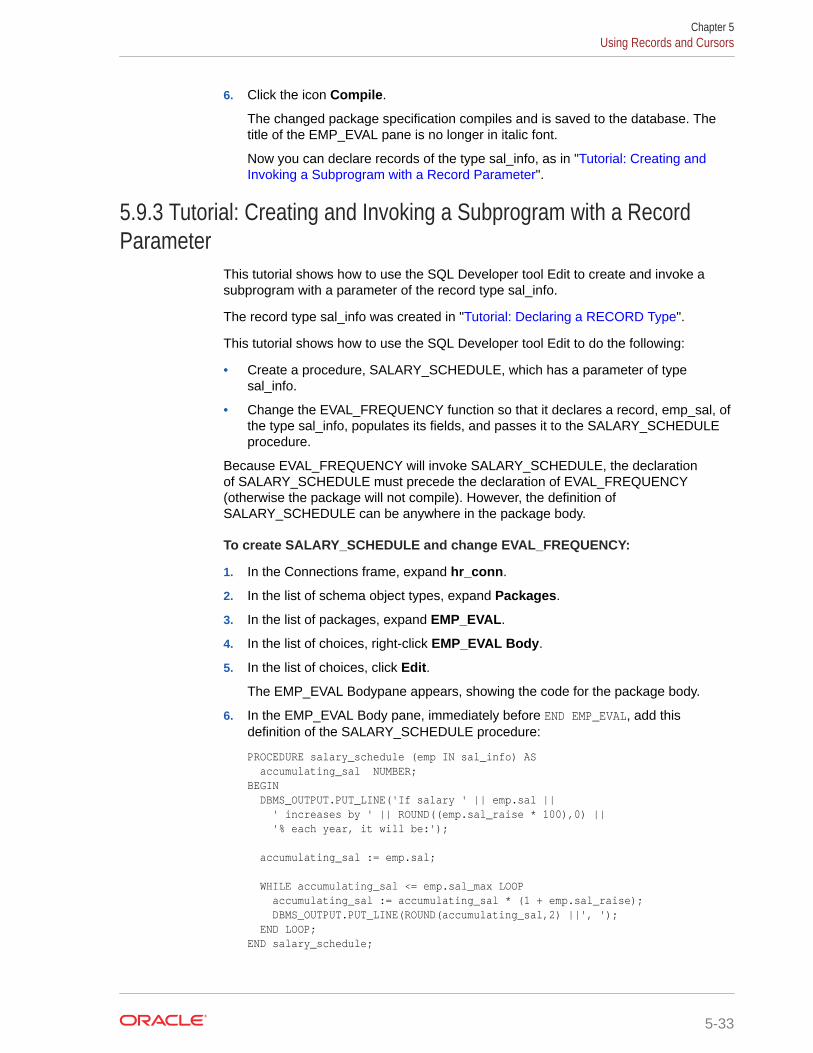
6. Click the icon Compile.
The changed package specification compiles and is saved to the database. Thetitle of the EMP_EVAL pane is no longer in italic font.
Now you can declare records of the type sal_info, as in "Tutorial: Creating andInvoking a Subprogram with a Record Parameter".
5.9.3 Tutorial: Creating and Invoking a Subprogram with a RecordParameter
This tutorial shows how to use the SQL Developer tool Edit to create and invoke asubprogram with a parameter of the record type sal_info.
The record type sal_info was created in "Tutorial: Declaring a RECORD Type".
This tutorial shows how to use the SQL Developer tool Edit to do the following:
• Create a procedure, SALARY_SCHEDULE, which has a parameter of typesal_info.
• Change the EVAL_FREQUENCY function so that it declares a record, emp_sal, ofthe type sal_info, populates its fields, and passes it to the SALARY_SCHEDULEprocedure.
Because EVAL_FREQUENCY will invoke SALARY_SCHEDULE, the declarationof SALARY_SCHEDULE must precede the declaration of EVAL_FREQUENCY(otherwise the package will not compile). However, the definition ofSALARY_SCHEDULE can be anywhere in the package body.
To create SALARY_SCHEDULE and change EVAL_FREQUENCY:
1. In the Connections frame, expand hr_conn.
2. In the list of schema object types, expand Packages.
3. In the list of packages, expand EMP_EVAL.
4. In the list of choices, right-click EMP_EVAL Body.
5. In the list of choices, click Edit.
The EMP_EVAL Bodypane appears, showing the code for the package body.
6. In the EMP_EVAL Body pane, immediately before END EMP_EVAL, add thisdefinition of the SALARY_SCHEDULE procedure:
PROCEDURE salary_schedule (emp IN sal_info) AS accumulating_sal NUMBER;BEGIN DBMS_OUTPUT.PUT_LINE('If salary ' || emp.sal || ' increases by ' || ROUND((emp.sal_raise * 100),0) || '% each year, it will be:');
accumulating_sal := emp.sal;
WHILE accumulating_sal <= emp.sal_max LOOP accumulating_sal := accumulating_sal * (1 + emp.sal_raise); DBMS_OUTPUT.PUT_LINE(ROUND(accumulating_sal,2) ||', '); END LOOP;END salary_schedule;
Chapter 5Using Records and Cursors
5-33

The title of the pane is in italic font, indicating that the changes have not beensaved to the database.
7. In the EMP_EVAL Body pane, enter the code shown in bold font, in this position:
CREATE OR REPLACEPACKAGE BODY EMP_EVAL AS
FUNCTION eval_frequency (emp_id EMPLOYEES.EMPLOYEE_ID%TYPE) RETURN PLS_INTEGER;PROCEDURE salary_schedule(emp IN sal_info);PROCEDURE add_eval(employee_id IN employees.employee_id%type, today IN DATE); PROCEDURE eval_department (dept_id IN NUMBER) AS
8. Edit the EVAL_FREQUENCY function, making the changes shown in bold font:
FUNCTION eval_frequency (emp_id EMPLOYEES.EMPLOYEE_ID%TYPE) RETURN PLS_INTEGERAS h_date EMPLOYEES.HIRE_DATE%TYPE; today EMPLOYEES.HIRE_DATE%TYPE; eval_freq PLS_INTEGER; emp_sal SAL_INFO; -- replaces sal, sal_raise, and sal_max BEGIN SELECT SYSDATE INTO today FROM DUAL; SELECT HIRE_DATE INTO h_date FROM EMPLOYEES WHERE EMPLOYEE_ID = eval_frequency.emp_id; IF ((h_date + (INTERVAL '120' MONTH)) < today) THEN eval_freq := 1; /* populate emp_sal */ SELECT j.JOB_ID, j.MIN_SALARY, j.MAX_SALARY, e.SALARY INTO emp_sal.j_id, emp_sal.sal_min, emp_sal.sal_max, emp_sal.sal FROM EMPLOYEES e, JOBS j WHERE e.EMPLOYEE_ID = eval_frequency.emp_id AND j.JOB_ID = eval_frequency.emp_id; emp_sal.sal_raise := 0; -- default CASE emp_sal.j_id WHEN 'PU_CLERK' THEN emp_sal.sal_raise := 0.08; WHEN 'SH_CLERK' THEN emp_sal.sal_raise := 0.07; WHEN 'ST_CLERK' THEN emp_sal.sal_raise := 0.06; WHEN 'HR_REP' THEN emp_sal.sal_raise := 0.05; WHEN 'PR_REP' THEN emp_sal.sal_raise := 0.05; WHEN 'MK_REP' THEN emp_sal.sal_raise := 0.04; ELSE NULL; END CASE; IF (emp_sal.sal_raise != 0) THEN salary_schedule(emp_sal); END IF; ELSE eval_freq := 2; END IF;
Chapter 5Using Records and Cursors
5-34
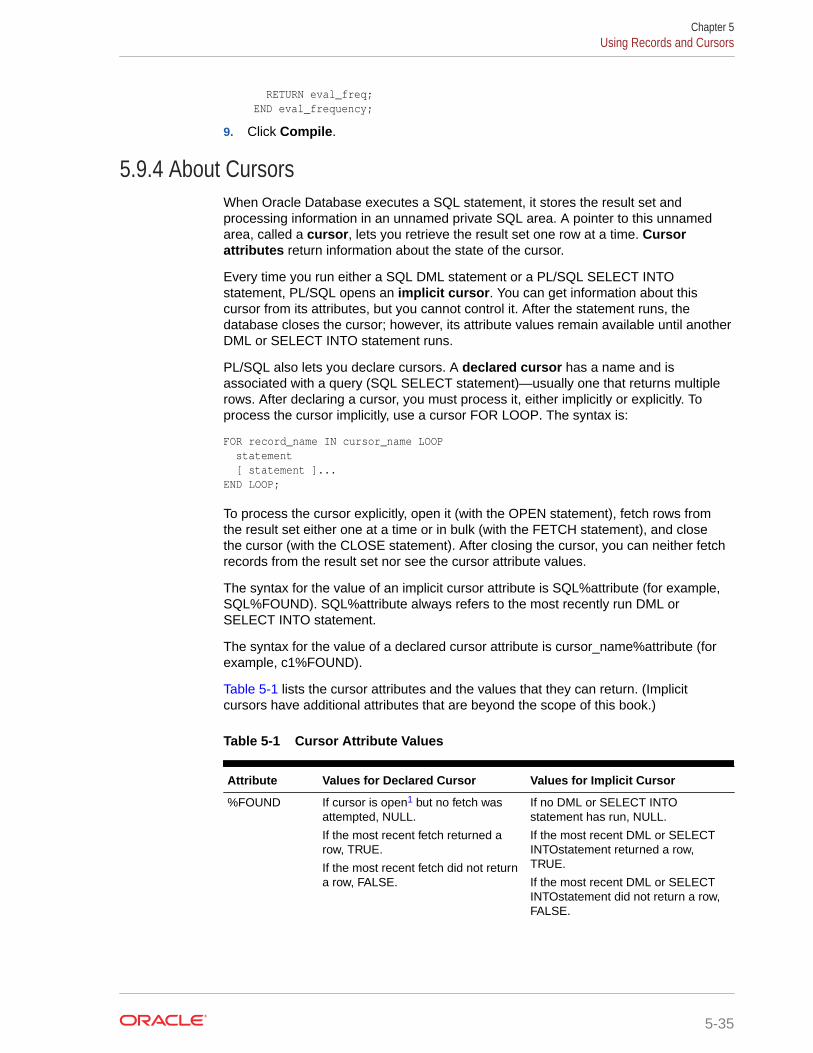
RETURN eval_freq; END eval_frequency;
9. Click Compile.
5.9.4 About CursorsWhen Oracle Database executes a SQL statement, it stores the result set andprocessing information in an unnamed private SQL area. A pointer to this unnamedarea, called a cursor, lets you retrieve the result set one row at a time. Cursorattributes return information about the state of the cursor.
Every time you run either a SQL DML statement or a PL/SQL SELECT INTOstatement, PL/SQL opens an implicit cursor. You can get information about thiscursor from its attributes, but you cannot control it. After the statement runs, thedatabase closes the cursor; however, its attribute values remain available until anotherDML or SELECT INTO statement runs.
PL/SQL also lets you declare cursors. A declared cursor has a name and isassociated with a query (SQL SELECT statement)—usually one that returns multiplerows. After declaring a cursor, you must process it, either implicitly or explicitly. Toprocess the cursor implicitly, use a cursor FOR LOOP. The syntax is:
FOR record_name IN cursor_name LOOP statement [ statement ]...END LOOP;
To process the cursor explicitly, open it (with the OPEN statement), fetch rows fromthe result set either one at a time or in bulk (with the FETCH statement), and closethe cursor (with the CLOSE statement). After closing the cursor, you can neither fetchrecords from the result set nor see the cursor attribute values.
The syntax for the value of an implicit cursor attribute is SQL%attribute (for example,SQL%FOUND). SQL%attribute always refers to the most recently run DML orSELECT INTO statement.
The syntax for the value of a declared cursor attribute is cursor_name%attribute (forexample, c1%FOUND).
Table 5-1 lists the cursor attributes and the values that they can return. (Implicitcursors have additional attributes that are beyond the scope of this book.)
Table 5-1 Cursor Attribute Values
Attribute Values for Declared Cursor Values for Implicit Cursor
%FOUND If cursor is open1 but no fetch wasattempted, NULL.
If the most recent fetch returned arow, TRUE.
If the most recent fetch did not returna row, FALSE.
If no DML or SELECT INTOstatement has run, NULL.
If the most recent DML or SELECTINTOstatement returned a row,TRUE.
If the most recent DML or SELECTINTOstatement did not return a row,FALSE.
Chapter 5Using Records and Cursors
5-35
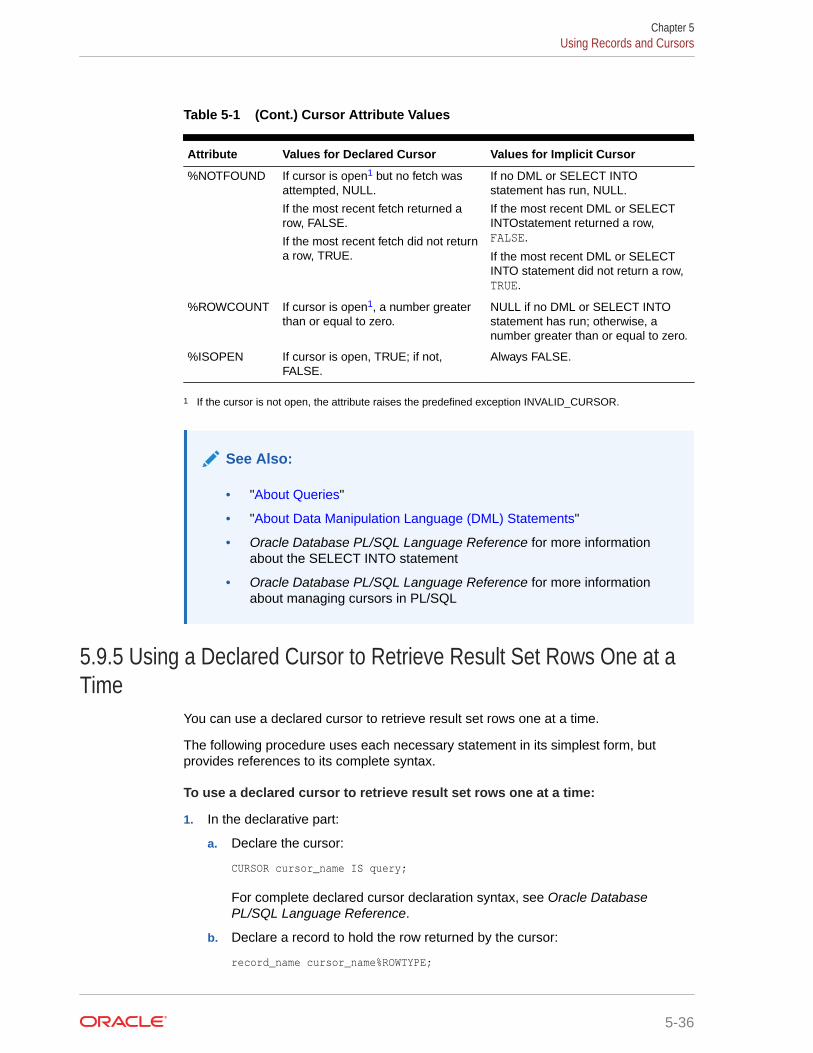
Table 5-1 (Cont.) Cursor Attribute Values
Attribute Values for Declared Cursor Values for Implicit Cursor
%NOTFOUND If cursor is open1 but no fetch wasattempted, NULL.
If the most recent fetch returned arow, FALSE.
If the most recent fetch did not returna row, TRUE.
If no DML or SELECT INTOstatement has run, NULL.
If the most recent DML or SELECTINTOstatement returned a row,FALSE.
If the most recent DML or SELECTINTO statement did not return a row,TRUE.
%ROWCOUNT If cursor is open1, a number greaterthan or equal to zero.
NULL if no DML or SELECT INTOstatement has run; otherwise, anumber greater than or equal to zero.
%ISOPEN If cursor is open, TRUE; if not,FALSE.
Always FALSE.
1 If the cursor is not open, the attribute raises the predefined exception INVALID_CURSOR.
See Also:
• "About Queries"
• "About Data Manipulation Language (DML) Statements"
• Oracle Database PL/SQL Language Reference for more informationabout the SELECT INTO statement
• Oracle Database PL/SQL Language Reference for more informationabout managing cursors in PL/SQL
5.9.5 Using a Declared Cursor to Retrieve Result Set Rows One at aTime
You can use a declared cursor to retrieve result set rows one at a time.
The following procedure uses each necessary statement in its simplest form, butprovides references to its complete syntax.
To use a declared cursor to retrieve result set rows one at a time:
1. In the declarative part:
a. Declare the cursor:
CURSOR cursor_name IS query;
For complete declared cursor declaration syntax, see Oracle DatabasePL/SQL Language Reference.
b. Declare a record to hold the row returned by the cursor:
record_name cursor_name%ROWTYPE;
Chapter 5Using Records and Cursors
5-36
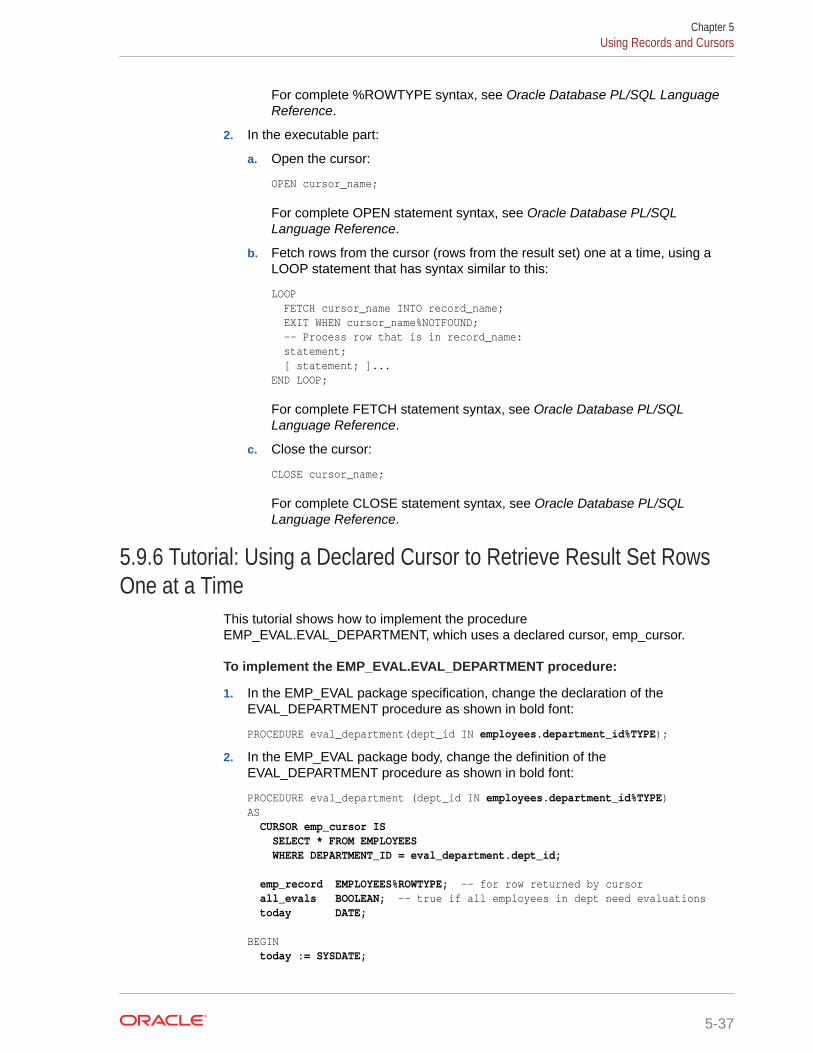
For complete %ROWTYPE syntax, see Oracle Database PL/SQL LanguageReference.
2. In the executable part:
a. Open the cursor:
OPEN cursor_name;
For complete OPEN statement syntax, see Oracle Database PL/SQLLanguage Reference.
b. Fetch rows from the cursor (rows from the result set) one at a time, using aLOOP statement that has syntax similar to this:
LOOP FETCH cursor_name INTO record_name; EXIT WHEN cursor_name%NOTFOUND; -- Process row that is in record_name: statement; [ statement; ]...END LOOP;
For complete FETCH statement syntax, see Oracle Database PL/SQLLanguage Reference.
c. Close the cursor:
CLOSE cursor_name;
For complete CLOSE statement syntax, see Oracle Database PL/SQLLanguage Reference.
5.9.6 Tutorial: Using a Declared Cursor to Retrieve Result Set RowsOne at a Time
This tutorial shows how to implement the procedureEMP_EVAL.EVAL_DEPARTMENT, which uses a declared cursor, emp_cursor.
To implement the EMP_EVAL.EVAL_DEPARTMENT procedure:
1. In the EMP_EVAL package specification, change the declaration of theEVAL_DEPARTMENT procedure as shown in bold font:
PROCEDURE eval_department(dept_id IN employees.department_id%TYPE);
2. In the EMP_EVAL package body, change the definition of theEVAL_DEPARTMENT procedure as shown in bold font:
PROCEDURE eval_department (dept_id IN employees.department_id%TYPE)AS CURSOR emp_cursor IS SELECT * FROM EMPLOYEES WHERE DEPARTMENT_ID = eval_department.dept_id;
emp_record EMPLOYEES%ROWTYPE; -- for row returned by cursor all_evals BOOLEAN; -- true if all employees in dept need evaluations today DATE;
BEGIN today := SYSDATE;
Chapter 5Using Records and Cursors
5-37
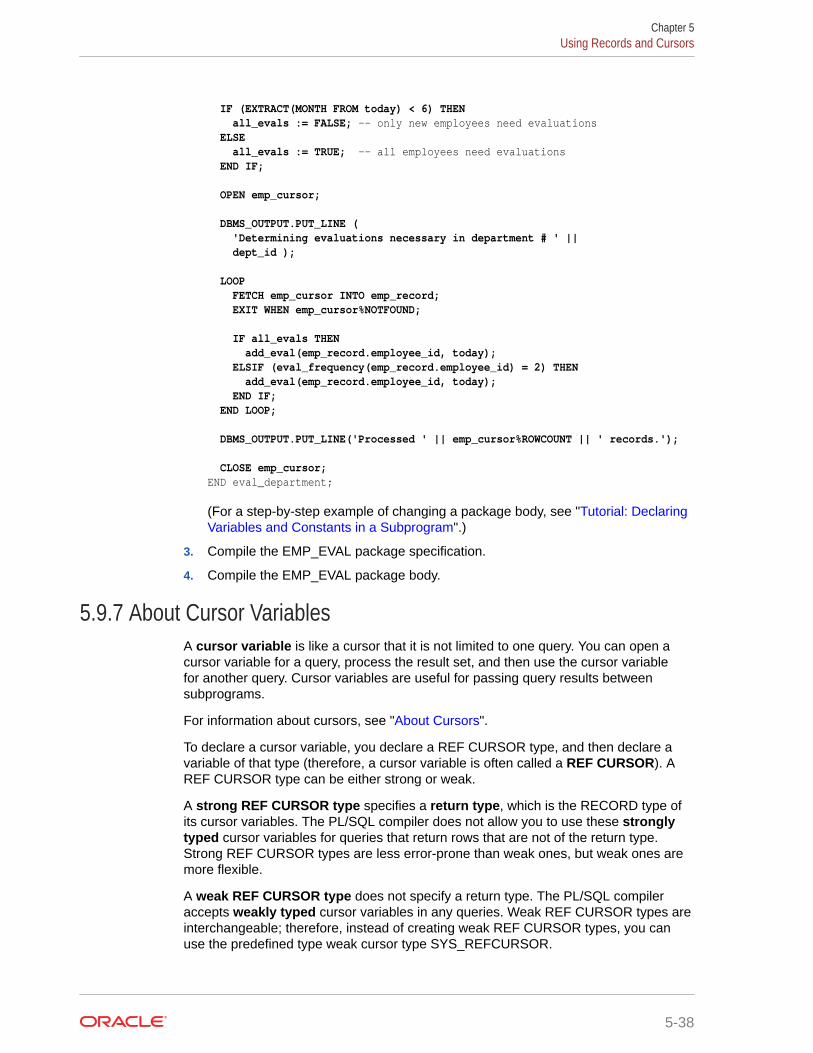
IF (EXTRACT(MONTH FROM today) < 6) THEN all_evals := FALSE; -- only new employees need evaluations ELSE all_evals := TRUE; -- all employees need evaluations END IF;
OPEN emp_cursor;
DBMS_OUTPUT.PUT_LINE ( 'Determining evaluations necessary in department # ' || dept_id );
LOOP FETCH emp_cursor INTO emp_record; EXIT WHEN emp_cursor%NOTFOUND;
IF all_evals THEN add_eval(emp_record.employee_id, today); ELSIF (eval_frequency(emp_record.employee_id) = 2) THEN add_eval(emp_record.employee_id, today); END IF; END LOOP;
DBMS_OUTPUT.PUT_LINE('Processed ' || emp_cursor%ROWCOUNT || ' records.');
CLOSE emp_cursor;END eval_department;
(For a step-by-step example of changing a package body, see "Tutorial: DeclaringVariables and Constants in a Subprogram".)
3. Compile the EMP_EVAL package specification.
4. Compile the EMP_EVAL package body.
5.9.7 About Cursor VariablesA cursor variable is like a cursor that it is not limited to one query. You can open acursor variable for a query, process the result set, and then use the cursor variablefor another query. Cursor variables are useful for passing query results betweensubprograms.
For information about cursors, see "About Cursors".
To declare a cursor variable, you declare a REF CURSOR type, and then declare avariable of that type (therefore, a cursor variable is often called a REF CURSOR). AREF CURSOR type can be either strong or weak.
A strong REF CURSOR type specifies a return type, which is the RECORD type ofits cursor variables. The PL/SQL compiler does not allow you to use these stronglytyped cursor variables for queries that return rows that are not of the return type.Strong REF CURSOR types are less error-prone than weak ones, but weak ones aremore flexible.
A weak REF CURSOR type does not specify a return type. The PL/SQL compileraccepts weakly typed cursor variables in any queries. Weak REF CURSOR types areinterchangeable; therefore, instead of creating weak REF CURSOR types, you canuse the predefined type weak cursor type SYS_REFCURSOR.
Chapter 5Using Records and Cursors
5-38
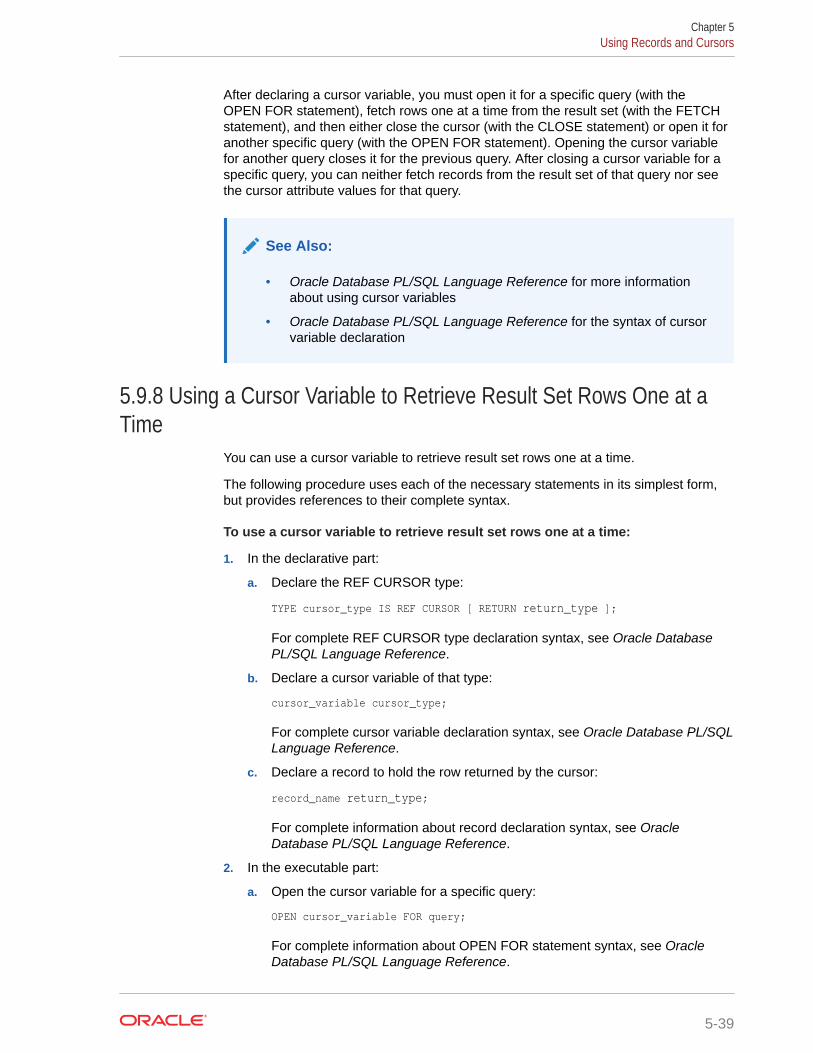
After declaring a cursor variable, you must open it for a specific query (with theOPEN FOR statement), fetch rows one at a time from the result set (with the FETCHstatement), and then either close the cursor (with the CLOSE statement) or open it foranother specific query (with the OPEN FOR statement). Opening the cursor variablefor another query closes it for the previous query. After closing a cursor variable for aspecific query, you can neither fetch records from the result set of that query nor seethe cursor attribute values for that query.
See Also:
• Oracle Database PL/SQL Language Reference for more informationabout using cursor variables
• Oracle Database PL/SQL Language Reference for the syntax of cursorvariable declaration
5.9.8 Using a Cursor Variable to Retrieve Result Set Rows One at aTime
You can use a cursor variable to retrieve result set rows one at a time.
The following procedure uses each of the necessary statements in its simplest form,but provides references to their complete syntax.
To use a cursor variable to retrieve result set rows one at a time:
1. In the declarative part:
a. Declare the REF CURSOR type:
TYPE cursor_type IS REF CURSOR [ RETURN return_type ];
For complete REF CURSOR type declaration syntax, see Oracle DatabasePL/SQL Language Reference.
b. Declare a cursor variable of that type:
cursor_variable cursor_type;
For complete cursor variable declaration syntax, see Oracle Database PL/SQLLanguage Reference.
c. Declare a record to hold the row returned by the cursor:
record_name return_type;
For complete information about record declaration syntax, see OracleDatabase PL/SQL Language Reference.
2. In the executable part:
a. Open the cursor variable for a specific query:
OPEN cursor_variable FOR query;
For complete information about OPEN FOR statement syntax, see OracleDatabase PL/SQL Language Reference.
Chapter 5Using Records and Cursors
5-39
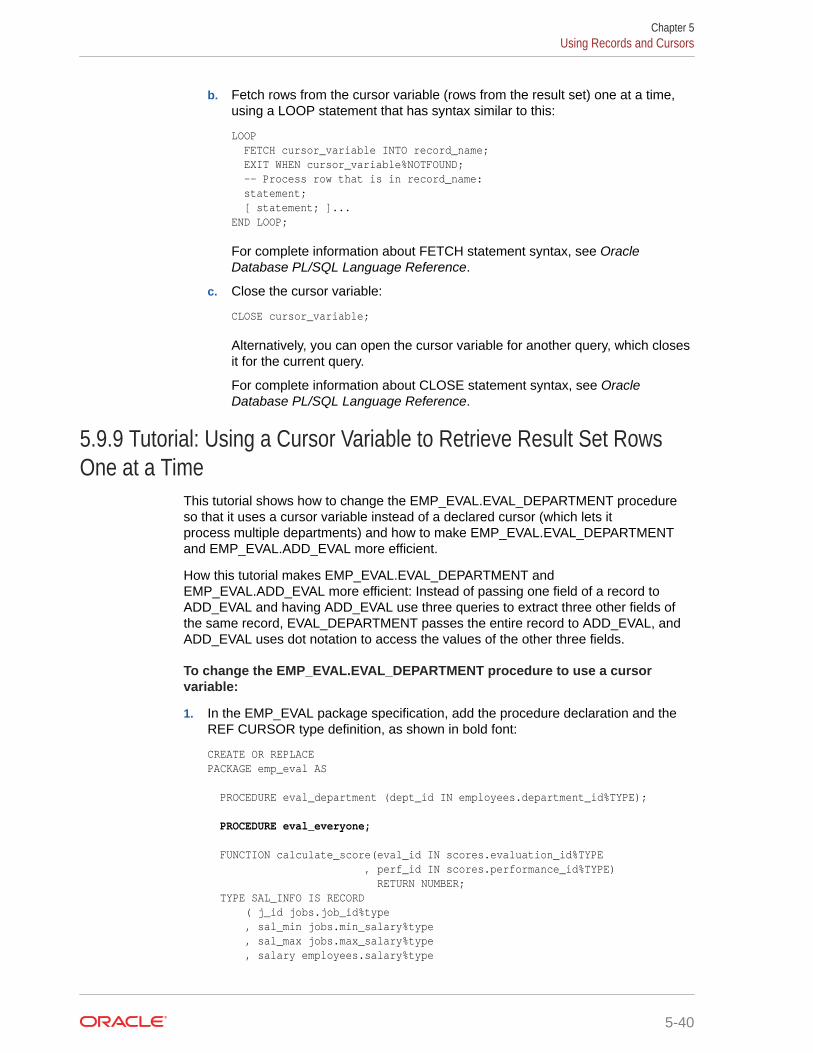
b. Fetch rows from the cursor variable (rows from the result set) one at a time,using a LOOP statement that has syntax similar to this:
LOOP FETCH cursor_variable INTO record_name; EXIT WHEN cursor_variable%NOTFOUND; -- Process row that is in record_name: statement; [ statement; ]...END LOOP;
For complete information about FETCH statement syntax, see OracleDatabase PL/SQL Language Reference.
c. Close the cursor variable:
CLOSE cursor_variable;
Alternatively, you can open the cursor variable for another query, which closesit for the current query.
For complete information about CLOSE statement syntax, see OracleDatabase PL/SQL Language Reference.
5.9.9 Tutorial: Using a Cursor Variable to Retrieve Result Set RowsOne at a Time
This tutorial shows how to change the EMP_EVAL.EVAL_DEPARTMENT procedureso that it uses a cursor variable instead of a declared cursor (which lets itprocess multiple departments) and how to make EMP_EVAL.EVAL_DEPARTMENTand EMP_EVAL.ADD_EVAL more efficient.
How this tutorial makes EMP_EVAL.EVAL_DEPARTMENT andEMP_EVAL.ADD_EVAL more efficient: Instead of passing one field of a record toADD_EVAL and having ADD_EVAL use three queries to extract three other fields ofthe same record, EVAL_DEPARTMENT passes the entire record to ADD_EVAL, andADD_EVAL uses dot notation to access the values of the other three fields.
To change the EMP_EVAL.EVAL_DEPARTMENT procedure to use a cursorvariable:
1. In the EMP_EVAL package specification, add the procedure declaration and theREF CURSOR type definition, as shown in bold font:
CREATE OR REPLACEPACKAGE emp_eval AS
PROCEDURE eval_department (dept_id IN employees.department_id%TYPE);
PROCEDURE eval_everyone;
FUNCTION calculate_score(eval_id IN scores.evaluation_id%TYPE , perf_id IN scores.performance_id%TYPE) RETURN NUMBER; TYPE SAL_INFO IS RECORD ( j_id jobs.job_id%type , sal_min jobs.min_salary%type , sal_max jobs.max_salary%type , salary employees.salary%type
Chapter 5Using Records and Cursors
5-40
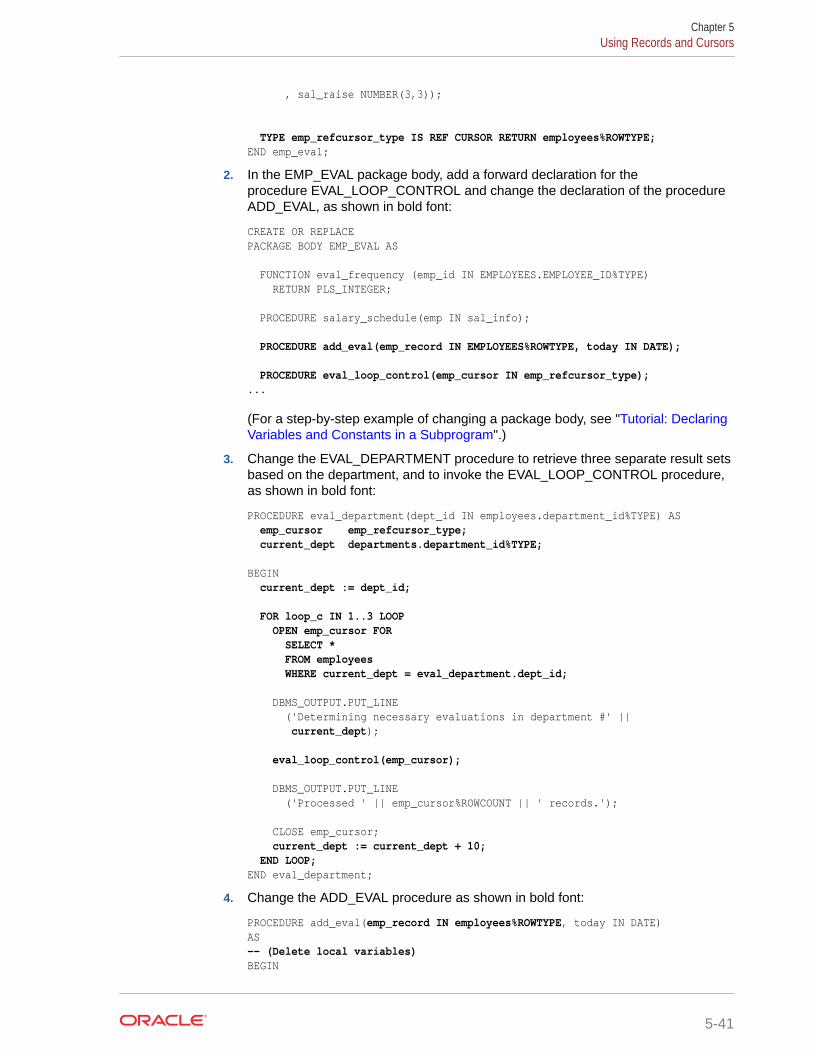
, sal_raise NUMBER(3,3));
TYPE emp_refcursor_type IS REF CURSOR RETURN employees%ROWTYPE;END emp_eval;
2. In the EMP_EVAL package body, add a forward declaration for theprocedure EVAL_LOOP_CONTROL and change the declaration of the procedureADD_EVAL, as shown in bold font:
CREATE OR REPLACEPACKAGE BODY EMP_EVAL AS
FUNCTION eval_frequency (emp_id IN EMPLOYEES.EMPLOYEE_ID%TYPE) RETURN PLS_INTEGER;
PROCEDURE salary_schedule(emp IN sal_info);
PROCEDURE add_eval(emp_record IN EMPLOYEES%ROWTYPE, today IN DATE);
PROCEDURE eval_loop_control(emp_cursor IN emp_refcursor_type);...
(For a step-by-step example of changing a package body, see "Tutorial: DeclaringVariables and Constants in a Subprogram".)
3. Change the EVAL_DEPARTMENT procedure to retrieve three separate result setsbased on the department, and to invoke the EVAL_LOOP_CONTROL procedure,as shown in bold font:
PROCEDURE eval_department(dept_id IN employees.department_id%TYPE) AS emp_cursor emp_refcursor_type; current_dept departments.department_id%TYPE;
BEGIN current_dept := dept_id;
FOR loop_c IN 1..3 LOOP OPEN emp_cursor FOR SELECT * FROM employees WHERE current_dept = eval_department.dept_id;
DBMS_OUTPUT.PUT_LINE ('Determining necessary evaluations in department #' || current_dept);
eval_loop_control(emp_cursor);
DBMS_OUTPUT.PUT_LINE ('Processed ' || emp_cursor%ROWCOUNT || ' records.');
CLOSE emp_cursor; current_dept := current_dept + 10; END LOOP;END eval_department;
4. Change the ADD_EVAL procedure as shown in bold font:
PROCEDURE add_eval(emp_record IN employees%ROWTYPE, today IN DATE)AS-- (Delete local variables)BEGIN
Chapter 5Using Records and Cursors
5-41
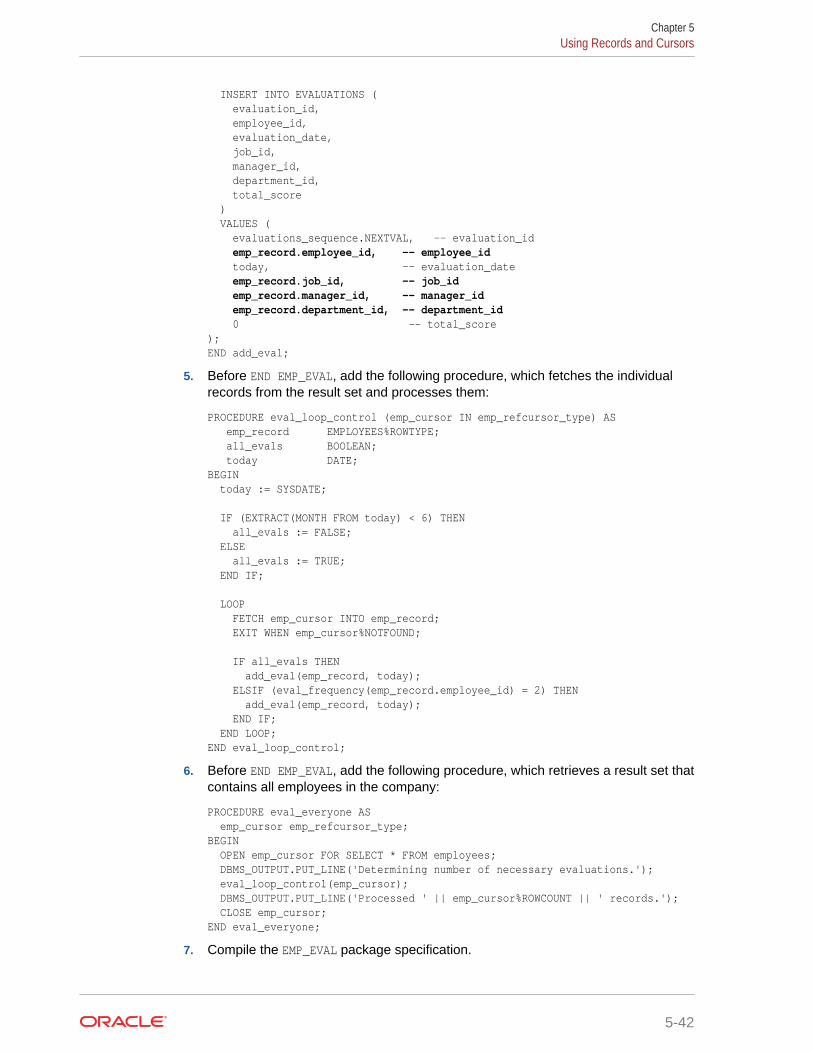
INSERT INTO EVALUATIONS ( evaluation_id, employee_id, evaluation_date, job_id, manager_id, department_id, total_score ) VALUES ( evaluations_sequence.NEXTVAL, -- evaluation_id emp_record.employee_id, -- employee_id today, -- evaluation_date emp_record.job_id, -- job_id emp_record.manager_id, -- manager_id emp_record.department_id, -- department_id 0 -- total_score);END add_eval;
5. Before END EMP_EVAL, add the following procedure, which fetches the individualrecords from the result set and processes them:
PROCEDURE eval_loop_control (emp_cursor IN emp_refcursor_type) AS emp_record EMPLOYEES%ROWTYPE; all_evals BOOLEAN; today DATE;BEGIN today := SYSDATE;
IF (EXTRACT(MONTH FROM today) < 6) THEN all_evals := FALSE; ELSE all_evals := TRUE; END IF;
LOOP FETCH emp_cursor INTO emp_record; EXIT WHEN emp_cursor%NOTFOUND;
IF all_evals THEN add_eval(emp_record, today); ELSIF (eval_frequency(emp_record.employee_id) = 2) THEN add_eval(emp_record, today); END IF; END LOOP;END eval_loop_control;
6. Before END EMP_EVAL, add the following procedure, which retrieves a result set thatcontains all employees in the company:
PROCEDURE eval_everyone AS emp_cursor emp_refcursor_type;BEGIN OPEN emp_cursor FOR SELECT * FROM employees; DBMS_OUTPUT.PUT_LINE('Determining number of necessary evaluations.'); eval_loop_control(emp_cursor); DBMS_OUTPUT.PUT_LINE('Processed ' || emp_cursor%ROWCOUNT || ' records.'); CLOSE emp_cursor;END eval_everyone;
7. Compile the EMP_EVAL package specification.
Chapter 5Using Records and Cursors
5-42
8. Compile the EMP_EVAL package body.
5.10 Using Associative ArraysAn associative array is a type of collection.
See Also:
For more information about collections:
• Oracle Database Concepts
• Oracle Database PL/SQL Language Reference
5.10.1 About CollectionsA collection is a PL/SQL composite variable that stores elements of the same typein a specified order, similar to a one-dimensional array. The internal components of acollection are called elements. Each element has a unique subscript that identifies itsposition in the collection.
To access a collection element, you use subscript notation:collection_name(element_subscript).
You can treat collection elements like scalar variables. You can also passentire collections as subprogram parameters (if neither the sending nor receivingsubprogram is a standalone subprogram).
A collection method is a built-in PL/SQL subprogram that either returns informationabout a collection or operates on a collection. To invoke a collection method, you usedot notation: collection_name.method_name. For example, collection_name.COUNTreturns the number of elements in the collection.
PL/SQL has three types of collections:
• Associative arrays (formerly called "PL/SQL tables" or "index-by tables")
• Nested tables
• Variable arrays (varrays)
This document explains only associative arrays.
See Also:
• Oracle Database PL/SQL Language Reference for more informationabout PL/SQL collection types
• Oracle Database PL/SQL Language Reference for more informationabout collection methods
Chapter 5Using Associative Arrays
5-43
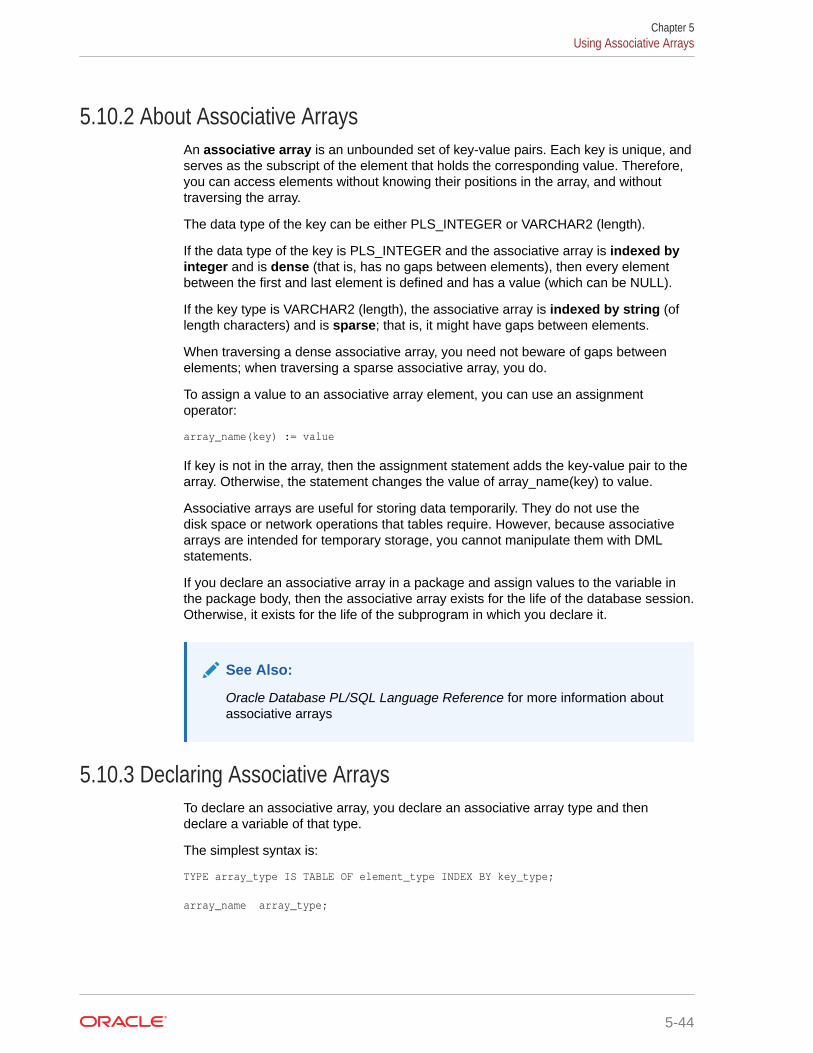
5.10.2 About Associative ArraysAn associative array is an unbounded set of key-value pairs. Each key is unique, andserves as the subscript of the element that holds the corresponding value. Therefore,you can access elements without knowing their positions in the array, and withouttraversing the array.
The data type of the key can be either PLS_INTEGER or VARCHAR2 (length).
If the data type of the key is PLS_INTEGER and the associative array is indexed byinteger and is dense (that is, has no gaps between elements), then every elementbetween the first and last element is defined and has a value (which can be NULL).
If the key type is VARCHAR2 (length), the associative array is indexed by string (oflength characters) and is sparse; that is, it might have gaps between elements.
When traversing a dense associative array, you need not beware of gaps betweenelements; when traversing a sparse associative array, you do.
To assign a value to an associative array element, you can use an assignmentoperator:
array_name(key) := value
If key is not in the array, then the assignment statement adds the key-value pair to thearray. Otherwise, the statement changes the value of array_name(key) to value.
Associative arrays are useful for storing data temporarily. They do not use thedisk space or network operations that tables require. However, because associativearrays are intended for temporary storage, you cannot manipulate them with DMLstatements.
If you declare an associative array in a package and assign values to the variable inthe package body, then the associative array exists for the life of the database session.Otherwise, it exists for the life of the subprogram in which you declare it.
See Also:
Oracle Database PL/SQL Language Reference for more information aboutassociative arrays
5.10.3 Declaring Associative ArraysTo declare an associative array, you declare an associative array type and thendeclare a variable of that type.
The simplest syntax is:
TYPE array_type IS TABLE OF element_type INDEX BY key_type;
array_name array_type;
Chapter 5Using Associative Arrays
5-44
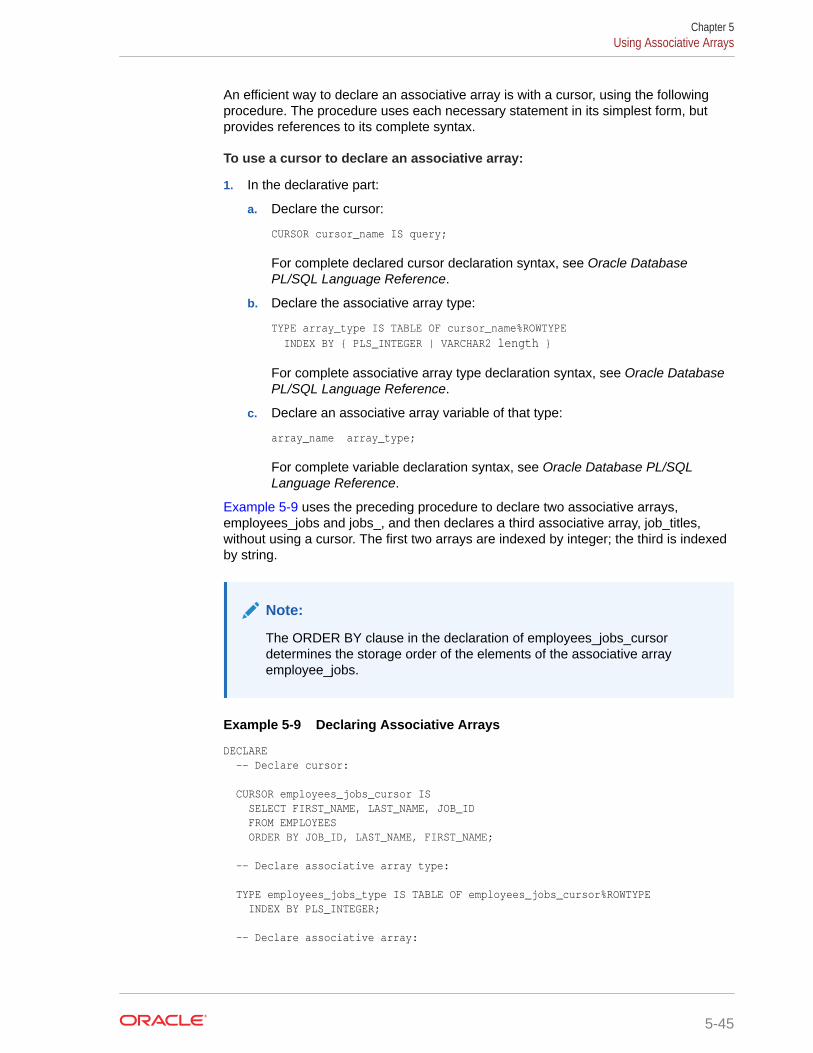
An efficient way to declare an associative array is with a cursor, using the followingprocedure. The procedure uses each necessary statement in its simplest form, butprovides references to its complete syntax.
To use a cursor to declare an associative array:
1. In the declarative part:
a. Declare the cursor:
CURSOR cursor_name IS query;
For complete declared cursor declaration syntax, see Oracle DatabasePL/SQL Language Reference.
b. Declare the associative array type:
TYPE array_type IS TABLE OF cursor_name%ROWTYPE INDEX BY { PLS_INTEGER | VARCHAR2 length }
For complete associative array type declaration syntax, see Oracle DatabasePL/SQL Language Reference.
c. Declare an associative array variable of that type:
array_name array_type;
For complete variable declaration syntax, see Oracle Database PL/SQLLanguage Reference.
Example 5-9 uses the preceding procedure to declare two associative arrays,employees_jobs and jobs_, and then declares a third associative array, job_titles,without using a cursor. The first two arrays are indexed by integer; the third is indexedby string.
Note:
The ORDER BY clause in the declaration of employees_jobs_cursordetermines the storage order of the elements of the associative arrayemployee_jobs.
Example 5-9 Declaring Associative Arrays
DECLARE -- Declare cursor:
CURSOR employees_jobs_cursor IS SELECT FIRST_NAME, LAST_NAME, JOB_ID FROM EMPLOYEES ORDER BY JOB_ID, LAST_NAME, FIRST_NAME;
-- Declare associative array type:
TYPE employees_jobs_type IS TABLE OF employees_jobs_cursor%ROWTYPE INDEX BY PLS_INTEGER;
-- Declare associative array:
Chapter 5Using Associative Arrays
5-45

employees_jobs employees_jobs_type;
-- Use same procedure to declare another associative array:
CURSOR jobs_cursor IS SELECT JOB_ID, JOB_TITLE FROM JOBS;
TYPE jobs_type IS TABLE OF jobs_cursor%ROWTYPE INDEX BY PLS_INTEGER;
jobs_ jobs_type;
-- Declare associative array without using cursor:
TYPE job_titles_type IS TABLE OF JOBS.JOB_TITLE%TYPE INDEX BY JOBS.JOB_ID%TYPE; -- jobs.job_id%type is varchar2(10)
job_titles job_titles_type;
BEGIN NULL;END;/
See Also:
• "About Cursors"
• Oracle Database PL/SQL Language Reference for associative arraydeclaration syntax
5.10.4 Populating Associative ArraysThe most efficient way to populate a dense associative array is usually with a SELECTstatement with a BULK COLLECT INTO clause.
Note:
If a dense associative array is so large that a SELECT statement woulda return a result set too large to fit in memory, then do not use aSELECT statement. Instead, populate the array with a cursor and theFETCH statement with the clauses BULK COLLECT INTO and LIMIT. Forinformation about using the FETCH statement with BULK COLLECT INTOclause, see Oracle Database PL/SQL Language Reference.
You cannot use a SELECT statement to populate a sparse associative array (such asjob_titles in "Declaring Associative Arrays"). Instead, you must use an assignmentstatement inside a loop statement. For information about loop statements, see"Controlling Program Flow".
Chapter 5Using Associative Arrays
5-46
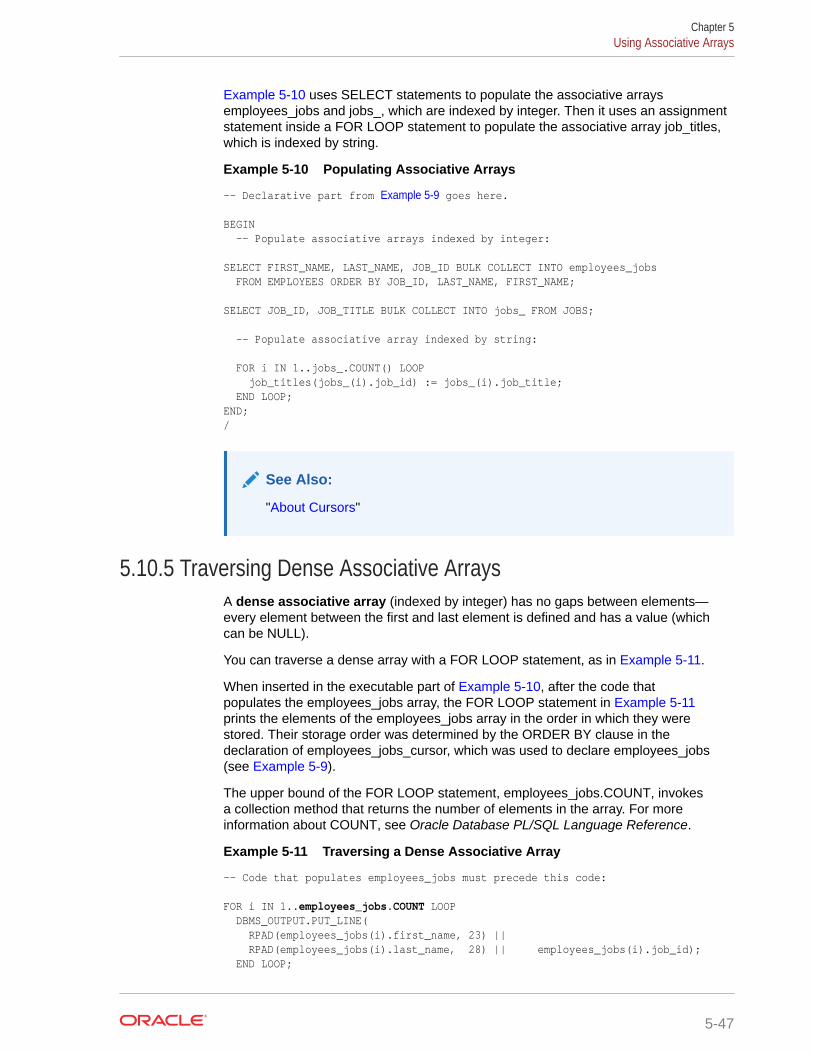
Example 5-10 uses SELECT statements to populate the associative arraysemployees_jobs and jobs_, which are indexed by integer. Then it uses an assignmentstatement inside a FOR LOOP statement to populate the associative array job_titles,which is indexed by string.
Example 5-10 Populating Associative Arrays
-- Declarative part from Example 5-9 goes here.
BEGIN -- Populate associative arrays indexed by integer:
SELECT FIRST_NAME, LAST_NAME, JOB_ID BULK COLLECT INTO employees_jobs FROM EMPLOYEES ORDER BY JOB_ID, LAST_NAME, FIRST_NAME;
SELECT JOB_ID, JOB_TITLE BULK COLLECT INTO jobs_ FROM JOBS;
-- Populate associative array indexed by string:
FOR i IN 1..jobs_.COUNT() LOOP job_titles(jobs_(i).job_id) := jobs_(i).job_title; END LOOP;END;/
See Also:
"About Cursors"
5.10.5 Traversing Dense Associative ArraysA dense associative array (indexed by integer) has no gaps between elements—every element between the first and last element is defined and has a value (whichcan be NULL).
You can traverse a dense array with a FOR LOOP statement, as in Example 5-11.
When inserted in the executable part of Example 5-10, after the code thatpopulates the employees_jobs array, the FOR LOOP statement in Example 5-11prints the elements of the employees_jobs array in the order in which they werestored. Their storage order was determined by the ORDER BY clause in thedeclaration of employees_jobs_cursor, which was used to declare employees_jobs(see Example 5-9).
The upper bound of the FOR LOOP statement, employees_jobs.COUNT, invokesa collection method that returns the number of elements in the array. For moreinformation about COUNT, see Oracle Database PL/SQL Language Reference.
Example 5-11 Traversing a Dense Associative Array
-- Code that populates employees_jobs must precede this code:
FOR i IN 1..employees_jobs.COUNT LOOP DBMS_OUTPUT.PUT_LINE( RPAD(employees_jobs(i).first_name, 23) || RPAD(employees_jobs(i).last_name, 28) || employees_jobs(i).job_id); END LOOP;
Chapter 5Using Associative Arrays
5-47
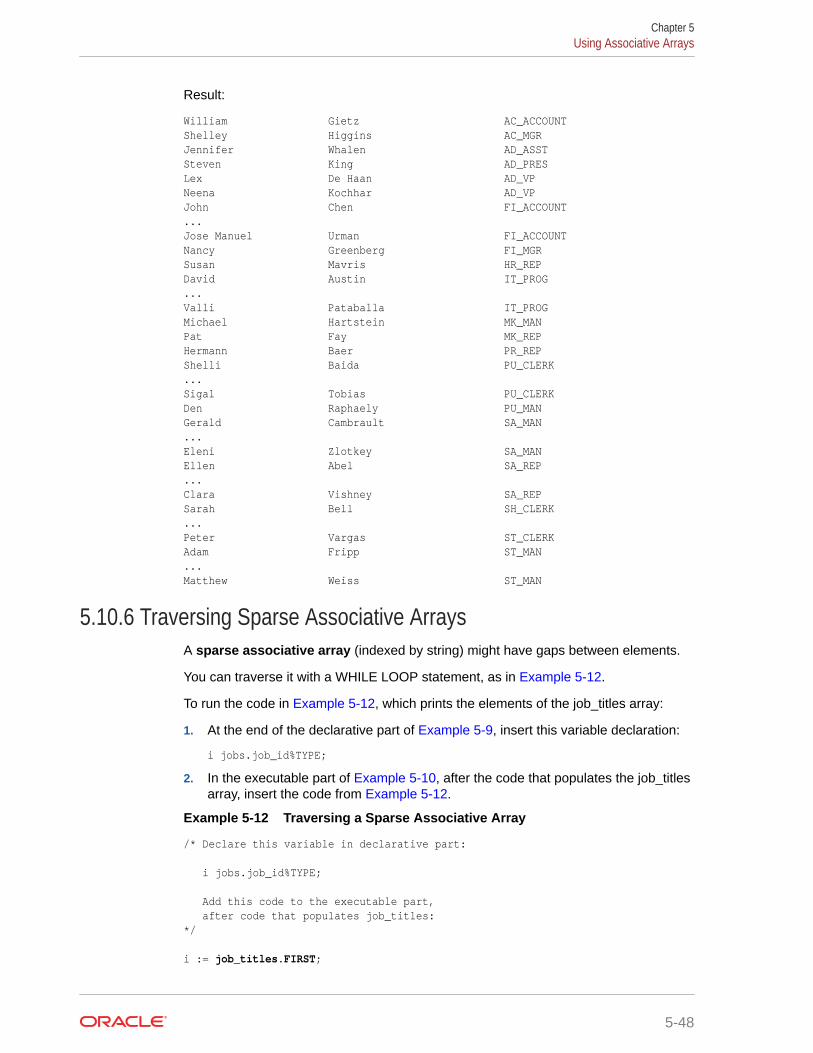
Result:
William Gietz AC_ACCOUNTShelley Higgins AC_MGRJennifer Whalen AD_ASSTSteven King AD_PRESLex De Haan AD_VPNeena Kochhar AD_VPJohn Chen FI_ACCOUNT...Jose Manuel Urman FI_ACCOUNTNancy Greenberg FI_MGRSusan Mavris HR_REPDavid Austin IT_PROG...Valli Pataballa IT_PROGMichael Hartstein MK_MANPat Fay MK_REPHermann Baer PR_REPShelli Baida PU_CLERK...Sigal Tobias PU_CLERKDen Raphaely PU_MANGerald Cambrault SA_MAN...Eleni Zlotkey SA_MANEllen Abel SA_REP...Clara Vishney SA_REPSarah Bell SH_CLERK...Peter Vargas ST_CLERKAdam Fripp ST_MAN...Matthew Weiss ST_MAN
5.10.6 Traversing Sparse Associative ArraysA sparse associative array (indexed by string) might have gaps between elements.
You can traverse it with a WHILE LOOP statement, as in Example 5-12.
To run the code in Example 5-12, which prints the elements of the job_titles array:
1. At the end of the declarative part of Example 5-9, insert this variable declaration:
i jobs.job_id%TYPE;
2. In the executable part of Example 5-10, after the code that populates the job_titlesarray, insert the code from Example 5-12.
Example 5-12 Traversing a Sparse Associative Array
/* Declare this variable in declarative part:
i jobs.job_id%TYPE;
Add this code to the executable part, after code that populates job_titles:*/
i := job_titles.FIRST;
Chapter 5Using Associative Arrays
5-48
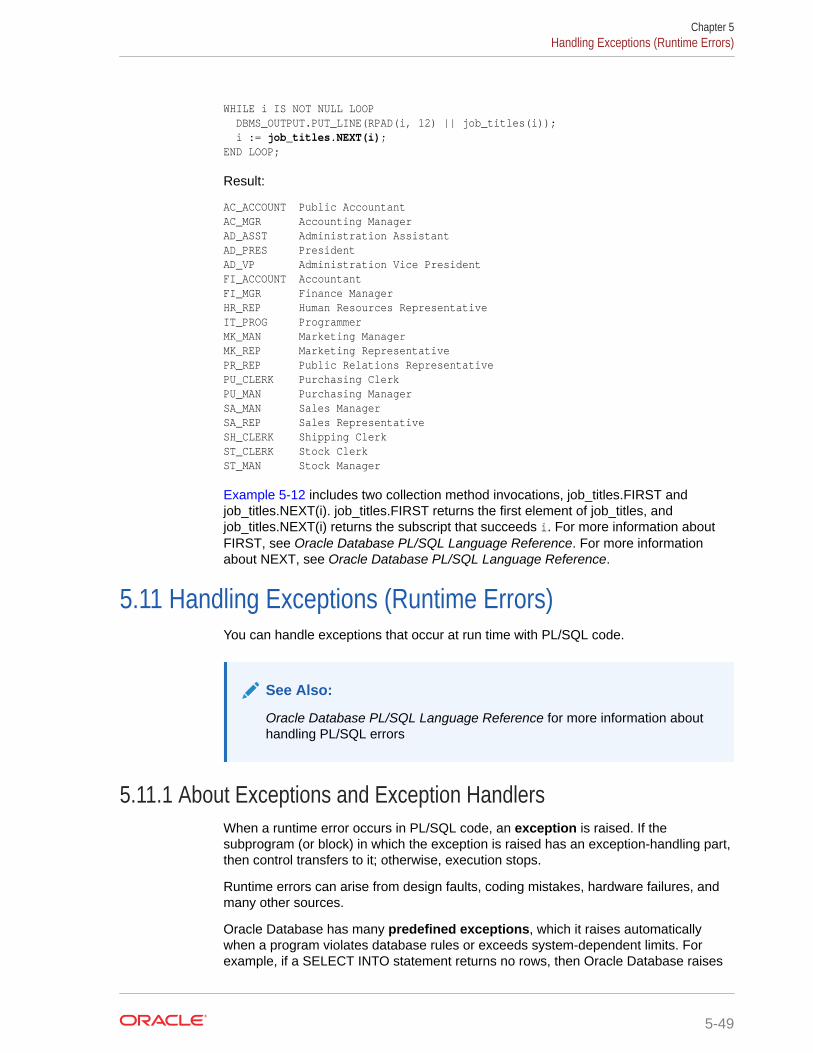
WHILE i IS NOT NULL LOOP DBMS_OUTPUT.PUT_LINE(RPAD(i, 12) || job_titles(i)); i := job_titles.NEXT(i);END LOOP;
Result:
AC_ACCOUNT Public AccountantAC_MGR Accounting ManagerAD_ASST Administration AssistantAD_PRES PresidentAD_VP Administration Vice PresidentFI_ACCOUNT AccountantFI_MGR Finance ManagerHR_REP Human Resources RepresentativeIT_PROG ProgrammerMK_MAN Marketing ManagerMK_REP Marketing RepresentativePR_REP Public Relations RepresentativePU_CLERK Purchasing ClerkPU_MAN Purchasing ManagerSA_MAN Sales ManagerSA_REP Sales RepresentativeSH_CLERK Shipping ClerkST_CLERK Stock ClerkST_MAN Stock Manager
Example 5-12 includes two collection method invocations, job_titles.FIRST andjob_titles.NEXT(i). job_titles.FIRST returns the first element of job_titles, andjob_titles.NEXT(i) returns the subscript that succeeds i. For more information aboutFIRST, see Oracle Database PL/SQL Language Reference. For more informationabout NEXT, see Oracle Database PL/SQL Language Reference.
5.11 Handling Exceptions (Runtime Errors)You can handle exceptions that occur at run time with PL/SQL code.
See Also:
Oracle Database PL/SQL Language Reference for more information abouthandling PL/SQL errors
5.11.1 About Exceptions and Exception HandlersWhen a runtime error occurs in PL/SQL code, an exception is raised. If thesubprogram (or block) in which the exception is raised has an exception-handling part,then control transfers to it; otherwise, execution stops.
Runtime errors can arise from design faults, coding mistakes, hardware failures, andmany other sources.
Oracle Database has many predefined exceptions, which it raises automaticallywhen a program violates database rules or exceeds system-dependent limits. Forexample, if a SELECT INTO statement returns no rows, then Oracle Database raises
Chapter 5Handling Exceptions (Runtime Errors)
5-49
the predefined exception NO_DATA_FOUND. For a summary of predefined PL/SQLexceptions, see Oracle Database PL/SQL Language Reference.
PL/SQL lets you define (declare) your own exceptions. An exception declaration hasthis syntax:
exception_name EXCEPTION;
Unlike a predefined exception, a user-defined exception mustbe raised explicitly, using either the RAISE statement or theDBMS_STANDARD.RAISE_APPLICATION_ERROR. procedure. For example:
IF condition THEN RAISE exception_name;
For information about the DBMS_STANDARD.RAISE_APPLICATION_ERRORprocedure, see Oracle Database PL/SQL Language Reference.
The exception-handling part of a subprogram contains one or more exceptionhandlers. An exception handler has this syntax:
WHEN { exception_name [ OR exception_name ]... | OTHERS } THEN statement; [ statement; ]...
("About Subprogram Structure" shows where to put the exception-handling part of asubprogram.)
A WHEN OTHERS exception handler handles unexpected runtime errors. If used, itmust be last. For example:
EXCEPTION WHEN exception_1 THEN statement; [ statement; ]... WHEN exception_2 OR exception_3 THEN statement; [ statement; ]... WHEN OTHERS THEN statement; [ statement; ]... RAISE; -- Reraise the exception (very important).END;
An alternative to the WHEN OTHERS exception handler is the EXCEPTION_INITpragma, which associates a user-defined exception name with an Oracle Databaseerror number.
See Also:
• Oracle Database PL/SQL Language Reference for more informationabout exception declaration syntax
• Oracle Database PL/SQL Language Reference for more informationabout exception handler syntax
• Oracle Database PL/SQL Language Reference for more informationabout the EXCEPTION_INIT pragma
5.11.2 When to Use Exception HandlersOracle recommends using exception handlers only in these situations.
Chapter 5Handling Exceptions (Runtime Errors)
5-50
• You expect an exception and want to handle it.
For example, you expect that eventually, a SELECT INTO statement willreturn no rows, causing Oracle Database to raise the predefined exceptionNO_DATA_FOUND. You want your subprogram or block to handle that exception(which is not an error) and then continue, as in Example 5-13.
• You must relinquish or close a resource.
For example:
...file := UTL_FILE.OPEN ...BEGIN statement statement]... -- If this code fails for any reason,EXCEPTION WHEN OTHERS THEN UTL_FILE.FCLOSE(file); -- then you want to close the file. RAISE; -- Reraise the exception (very important).END;UTL_FILE.FCLOSE(file);...
• At the top level of the code, you want to log the error.
For example, a client process might issue this block:
BEGIN proc(...);EXCEPTION WHEN OTHERS THEN log_error_using_autonomous_transaction(...); RAISE; -- Reraise the exception (very important).END;/
Alternatively, the standalone subprogram that the client invokes can include thesame exception-handling logic—but only at the top level.
5.11.3 Handling Predefined ExceptionsYou can handle predefined exceptions.
Example 5-13 shows, in bold font, how to change theEMP_EVAL.EVAL_DEPARTMENT procedure to handle the predefined exceptionNO_DATA_FOUND. Make this change and compile the changed procedure. (For anexample of how to change a package body, see "Tutorial: Declaring Variables andConstants in a Subprogram".)
Example 5-13 Handling Predefined Exception NO_DATA_FOUND
PROCEDURE eval_department(dept_id IN employees.department_id%TYPE) AS emp_cursor emp_refcursor_type; current_dept departments.department_id%TYPE;
BEGIN current_dept := dept_id;
FOR loop_c IN 1..3 LOOP OPEN emp_cursor FOR SELECT * FROM employees
Chapter 5Handling Exceptions (Runtime Errors)
5-51
WHERE current_dept = eval_department.dept_id;
DBMS_OUTPUT.PUT_LINE ('Determining necessary evaluations in department #' || current_dept);
eval_loop_control(emp_cursor);
DBMS_OUTPUT.PUT_LINE ('Processed ' || emp_cursor%ROWCOUNT || ' records.');
CLOSE emp_cursor; current_dept := current_dept + 10; END LOOP;EXCEPTION WHEN NO_DATA_FOUND THEN DBMS_OUTPUT.PUT_LINE ('The query did not return a result set');END eval_department;
See Also:
Oracle Database PL/SQL Language Reference for more information aboutpredefined exceptions
5.11.4 Declaring and Handling User-Defined ExceptionsYou can declare and handle user-defined exceptions.
Example 5-14 shows, in bold font, how to change theEMP_EVAL.CALCULATE_SCORE function to declare and handle two user-definedexceptions, wrong_weight and wrong_score. Make this change and compile thechanged function. (For an example of how to change a package body, see "Tutorial:Declaring Variables and Constants in a Subprogram".)
Example 5-14 Handling User-Defined Exceptions
FUNCTION calculate_score ( evaluation_id IN scores.evaluation_id%TYPE , performance_id IN scores.performance_id%TYPE ) RETURN NUMBER AS
weight_wrong EXCEPTION; score_wrong EXCEPTION; n_score scores.score%TYPE; n_weight performance_parts.weight%TYPE; running_total NUMBER := 0; max_score CONSTANT scores.score%TYPE := 9; max_weight CONSTANT performance_parts.weight%TYPE:= 1;BEGIN SELECT s.score INTO n_score FROM SCORES s WHERE evaluation_id = s.evaluation_id AND performance_id = s.performance_id;
SELECT p.weight INTO n_weight FROM PERFORMANCE_PARTS p WHERE performance_id = p.performance_id;
Chapter 5Handling Exceptions (Runtime Errors)
5-52

BEGIN IF (n_weight > max_weight) OR (n_weight < 0) THEN RAISE weight_wrong; END IF; END;
BEGIN IF (n_score > max_score) OR (n_score < 0) THEN RAISE score_wrong; END IF; END;
running_total := n_score * n_weight; RETURN running_total;
EXCEPTION WHEN weight_wrong THEN DBMS_OUTPUT.PUT_LINE( 'The weight of a score must be between 0 and ' || max_weight); RETURN -1; WHEN score_wrong THEN DBMS_OUTPUT.PUT_LINE( 'The score must be between 0 and ' || max_score); RETURN -1;END calculate_score;
See Also:
Oracle Database PL/SQL Language Reference for more information aboutuser-defined exceptions
Chapter 5Handling Exceptions (Runtime Errors)
5-53
6Using Triggers
Triggers are stored PL/SQL units that automatically execute ("fire") in response tospecified events.
6.1 About TriggersA trigger is a PL/SQL unit that is stored in the database and (if it is in the enabledstate) automatically executes ("fires") in response to a specified event.
A trigger has this structure:
TRIGGER trigger_name triggering_event [ trigger_restriction ]BEGIN triggered_action;END;
The trigger_name must be unique for triggers in the schema. A trigger can have thesame name as another kind of object in the schema (for example, a table); however,Oracle recommends using a naming convention that avoids confusion.
If the trigger is in the enabled state, the triggering_event causes the database toexecute the triggered_action if the trigger_restriction is either TRUE or omitted. Thetriggering_event is associated with either a table, a view, a schema, or the database,and it is one of these:
• DML statement (described in "About Data Manipulation Language (DML)Statements")
• DDL statement (described in "About Data Definition Language (DDL) Statements")
• Database operation (SERVERERROR, LOGON, LOGOFF, STARTUP, orSHUTDOWN)
If the trigger is in the disabled state, the triggering_event does not cause the databaseto execute the triggered_action, even if the trigger_restriction is TRUE or omitted.
By default, a trigger is created in the enabled state. You can disable an enabledtrigger, and enable a disabled trigger.
Unlike a subprogram, a trigger cannot be invoked directly. A trigger is invoked onlyby its triggering event, which can be caused by any user or application. You mightbe unaware that a trigger is executing unless it causes an error that is not handledproperly.
A simple trigger can fire at exactly one of these timing points:
• Before the triggering event executes (statement-level BEFORE trigger)
• After the triggering event executes (statement-level AFTER trigger)
• Before each row that the event affects (row-level BEFORE trigger)
6-1
• After each row that the event affects (row-level AFTER trigger)
A compound trigger can fire at multiple timing points. For information aboutcompound triggers, see Oracle Database PL/SQL Language Reference.
An INSTEAD OF trigger is defined on a view, and its triggering event is a DMLstatement. Instead of executing the DML statement, Oracle Database executes theINSTEAD OF trigger. For more information, see "Creating an INSTEAD OF Trigger".
A system trigger is defined on a schema or the database. A trigger defined on aschema fires for each event associated with the owner of the schema (the currentuser). A trigger defined on a database fires for each event associated with all users.
One use of triggers is to enforce business rules that apply to all client applications.For example, suppose that data added to the EMPLOYEES table must have a certainformat, and that many client applications can add data to this table. A trigger onthe table can ensure the proper format of all data added to it. Because the triggerexecutes whenever any client adds data to the table, no client can circumvent therules, and the code that enforces the rules can be stored and maintained only in thetrigger, rather than in every client application. For other uses of triggers, see OracleDatabase PL/SQL Language Reference.
See Also:
Oracle Database PL/SQL Language Reference for complete informationabout triggers
6.2 Creating TriggersTo create triggers, use either the SQL Developer graphical interface or the DDLstatement CREATE TRIGGER.
This section shows how to use both of these ways to create triggers.
By default, a trigger is created in the enabled state. To create a trigger in disabledstate, use the CREATE TRIGGER statement with the DISABLE clause.
Note:
To create triggers, you must have appropriate privileges; however, for thisdiscussion, you do not need this additional information.
Note:
To do the tutorials in this document, you must be connected to OracleDatabase as the user HR from SQL Developer.
Chapter 6Creating Triggers
6-2
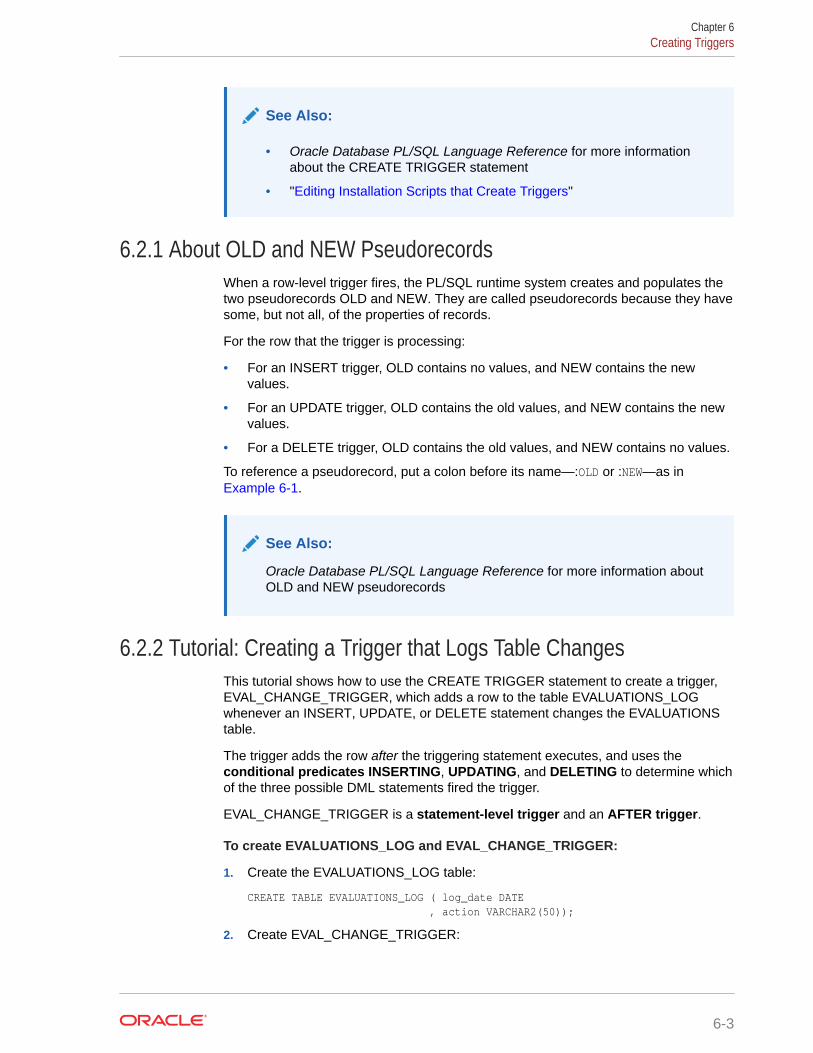
See Also:
• Oracle Database PL/SQL Language Reference for more informationabout the CREATE TRIGGER statement
• "Editing Installation Scripts that Create Triggers"
6.2.1 About OLD and NEW PseudorecordsWhen a row-level trigger fires, the PL/SQL runtime system creates and populates thetwo pseudorecords OLD and NEW. They are called pseudorecords because they havesome, but not all, of the properties of records.
For the row that the trigger is processing:
• For an INSERT trigger, OLD contains no values, and NEW contains the newvalues.
• For an UPDATE trigger, OLD contains the old values, and NEW contains the newvalues.
• For a DELETE trigger, OLD contains the old values, and NEW contains no values.
To reference a pseudorecord, put a colon before its name—:OLD or :NEW—as inExample 6-1.
See Also:
Oracle Database PL/SQL Language Reference for more information aboutOLD and NEW pseudorecords
6.2.2 Tutorial: Creating a Trigger that Logs Table ChangesThis tutorial shows how to use the CREATE TRIGGER statement to create a trigger,EVAL_CHANGE_TRIGGER, which adds a row to the table EVALUATIONS_LOGwhenever an INSERT, UPDATE, or DELETE statement changes the EVALUATIONStable.
The trigger adds the row after the triggering statement executes, and uses theconditional predicates INSERTING, UPDATING, and DELETING to determine whichof the three possible DML statements fired the trigger.
EVAL_CHANGE_TRIGGER is a statement-level trigger and an AFTER trigger.
To create EVALUATIONS_LOG and EVAL_CHANGE_TRIGGER:
1. Create the EVALUATIONS_LOG table:
CREATE TABLE EVALUATIONS_LOG ( log_date DATE , action VARCHAR2(50));
2. Create EVAL_CHANGE_TRIGGER:
Chapter 6Creating Triggers
6-3
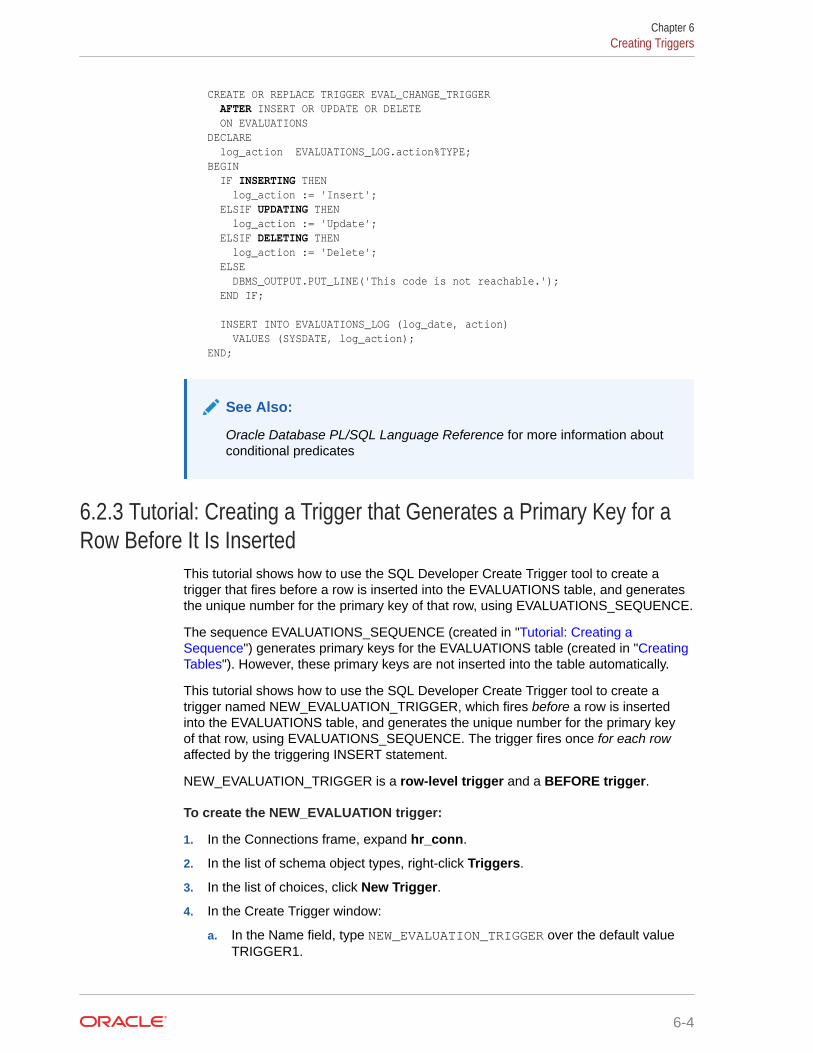
CREATE OR REPLACE TRIGGER EVAL_CHANGE_TRIGGER AFTER INSERT OR UPDATE OR DELETE ON EVALUATIONSDECLARE log_action EVALUATIONS_LOG.action%TYPE;BEGIN IF INSERTING THEN log_action := 'Insert'; ELSIF UPDATING THEN log_action := 'Update'; ELSIF DELETING THEN log_action := 'Delete'; ELSE DBMS_OUTPUT.PUT_LINE('This code is not reachable.'); END IF;
INSERT INTO EVALUATIONS_LOG (log_date, action) VALUES (SYSDATE, log_action);END;
See Also:
Oracle Database PL/SQL Language Reference for more information aboutconditional predicates
6.2.3 Tutorial: Creating a Trigger that Generates a Primary Key for aRow Before It Is Inserted
This tutorial shows how to use the SQL Developer Create Trigger tool to create atrigger that fires before a row is inserted into the EVALUATIONS table, and generatesthe unique number for the primary key of that row, using EVALUATIONS_SEQUENCE.
The sequence EVALUATIONS_SEQUENCE (created in "Tutorial: Creating aSequence") generates primary keys for the EVALUATIONS table (created in "CreatingTables"). However, these primary keys are not inserted into the table automatically.
This tutorial shows how to use the SQL Developer Create Trigger tool to create atrigger named NEW_EVALUATION_TRIGGER, which fires before a row is insertedinto the EVALUATIONS table, and generates the unique number for the primary keyof that row, using EVALUATIONS_SEQUENCE. The trigger fires once for each rowaffected by the triggering INSERT statement.
NEW_EVALUATION_TRIGGER is a row-level trigger and a BEFORE trigger.
To create the NEW_EVALUATION trigger:
1. In the Connections frame, expand hr_conn.
2. In the list of schema object types, right-click Triggers.
3. In the list of choices, click New Trigger.
4. In the Create Trigger window:
a. In the Name field, type NEW_EVALUATION_TRIGGER over the default valueTRIGGER1.
Chapter 6Creating Triggers
6-4
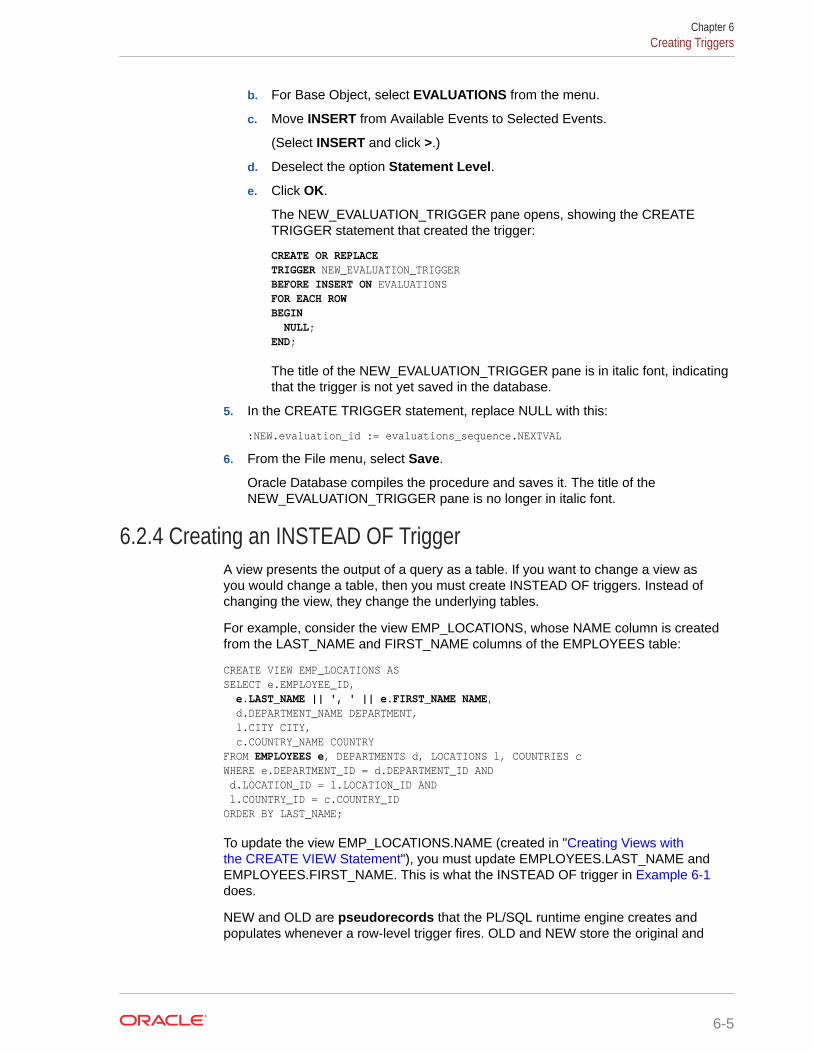
b. For Base Object, select EVALUATIONS from the menu.
c. Move INSERT from Available Events to Selected Events.
(Select INSERT and click >.)
d. Deselect the option Statement Level.
e. Click OK.
The NEW_EVALUATION_TRIGGER pane opens, showing the CREATETRIGGER statement that created the trigger:
CREATE OR REPLACETRIGGER NEW_EVALUATION_TRIGGERBEFORE INSERT ON EVALUATIONSFOR EACH ROWBEGIN NULL;END;
The title of the NEW_EVALUATION_TRIGGER pane is in italic font, indicatingthat the trigger is not yet saved in the database.
5. In the CREATE TRIGGER statement, replace NULL with this:
:NEW.evaluation_id := evaluations_sequence.NEXTVAL
6. From the File menu, select Save.
Oracle Database compiles the procedure and saves it. The title of theNEW_EVALUATION_TRIGGER pane is no longer in italic font.
6.2.4 Creating an INSTEAD OF TriggerA view presents the output of a query as a table. If you want to change a view asyou would change a table, then you must create INSTEAD OF triggers. Instead ofchanging the view, they change the underlying tables.
For example, consider the view EMP_LOCATIONS, whose NAME column is createdfrom the LAST_NAME and FIRST_NAME columns of the EMPLOYEES table:
CREATE VIEW EMP_LOCATIONS ASSELECT e.EMPLOYEE_ID, e.LAST_NAME || ', ' || e.FIRST_NAME NAME, d.DEPARTMENT_NAME DEPARTMENT, l.CITY CITY, c.COUNTRY_NAME COUNTRYFROM EMPLOYEES e, DEPARTMENTS d, LOCATIONS l, COUNTRIES cWHERE e.DEPARTMENT_ID = d.DEPARTMENT_ID AND d.LOCATION_ID = l.LOCATION_ID AND l.COUNTRY_ID = c.COUNTRY_IDORDER BY LAST_NAME;
To update the view EMP_LOCATIONS.NAME (created in "Creating Views withthe CREATE VIEW Statement"), you must update EMPLOYEES.LAST_NAME andEMPLOYEES.FIRST_NAME. This is what the INSTEAD OF trigger in Example 6-1does.
NEW and OLD are pseudorecords that the PL/SQL runtime engine creates andpopulates whenever a row-level trigger fires. OLD and NEW store the original and
Chapter 6Creating Triggers
6-5
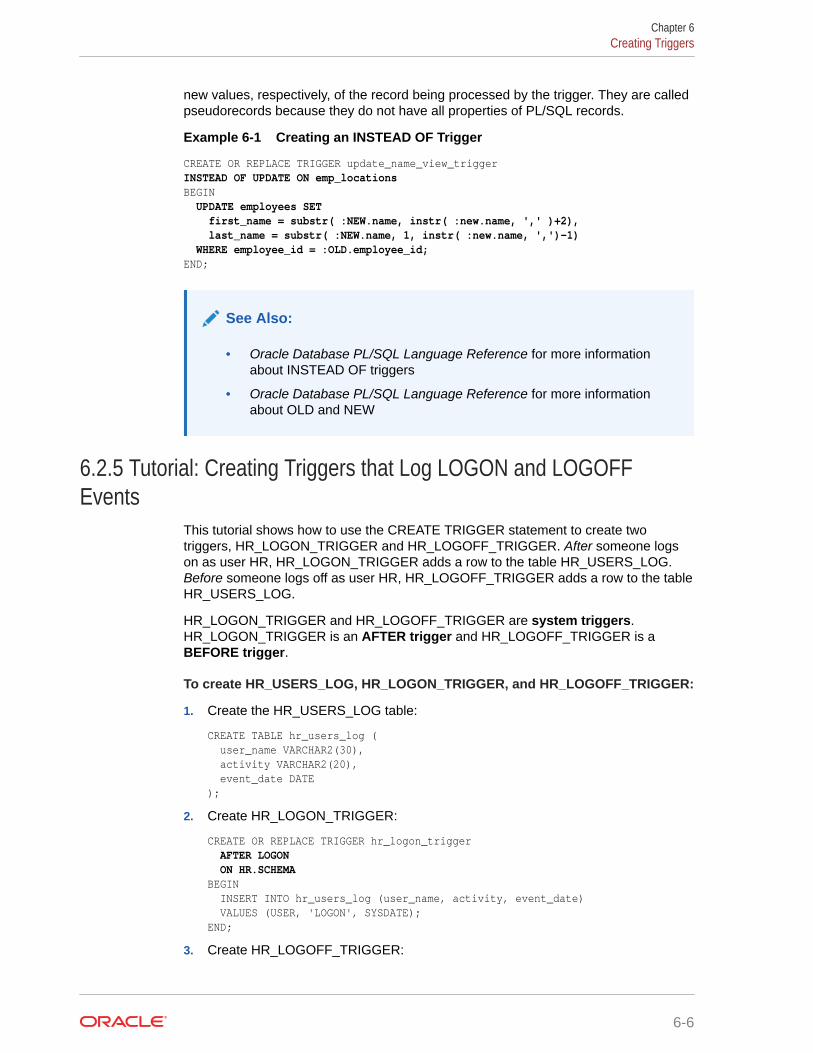
new values, respectively, of the record being processed by the trigger. They are calledpseudorecords because they do not have all properties of PL/SQL records.
Example 6-1 Creating an INSTEAD OF Trigger
CREATE OR REPLACE TRIGGER update_name_view_triggerINSTEAD OF UPDATE ON emp_locationsBEGIN UPDATE employees SET first_name = substr( :NEW.name, instr( :new.name, ',' )+2), last_name = substr( :NEW.name, 1, instr( :new.name, ',')-1) WHERE employee_id = :OLD.employee_id;END;
See Also:
• Oracle Database PL/SQL Language Reference for more informationabout INSTEAD OF triggers
• Oracle Database PL/SQL Language Reference for more informationabout OLD and NEW
6.2.5 Tutorial: Creating Triggers that Log LOGON and LOGOFFEvents
This tutorial shows how to use the CREATE TRIGGER statement to create twotriggers, HR_LOGON_TRIGGER and HR_LOGOFF_TRIGGER. After someone logson as user HR, HR_LOGON_TRIGGER adds a row to the table HR_USERS_LOG.Before someone logs off as user HR, HR_LOGOFF_TRIGGER adds a row to the tableHR_USERS_LOG.
HR_LOGON_TRIGGER and HR_LOGOFF_TRIGGER are system triggers.HR_LOGON_TRIGGER is an AFTER trigger and HR_LOGOFF_TRIGGER is aBEFORE trigger.
To create HR_USERS_LOG, HR_LOGON_TRIGGER, and HR_LOGOFF_TRIGGER:
1. Create the HR_USERS_LOG table:
CREATE TABLE hr_users_log ( user_name VARCHAR2(30), activity VARCHAR2(20), event_date DATE);
2. Create HR_LOGON_TRIGGER:
CREATE OR REPLACE TRIGGER hr_logon_trigger AFTER LOGON ON HR.SCHEMABEGIN INSERT INTO hr_users_log (user_name, activity, event_date) VALUES (USER, 'LOGON', SYSDATE);END;
3. Create HR_LOGOFF_TRIGGER:
Chapter 6Creating Triggers
6-6
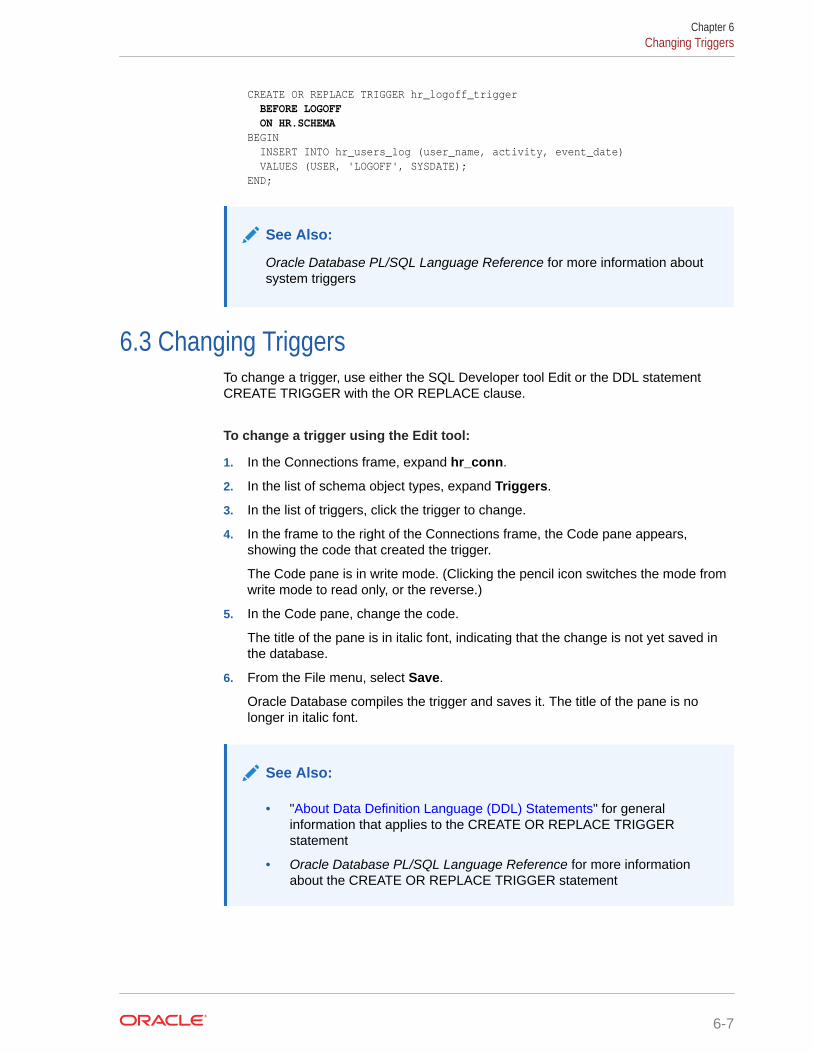
CREATE OR REPLACE TRIGGER hr_logoff_trigger BEFORE LOGOFF ON HR.SCHEMABEGIN INSERT INTO hr_users_log (user_name, activity, event_date) VALUES (USER, 'LOGOFF', SYSDATE);END;
See Also:
Oracle Database PL/SQL Language Reference for more information aboutsystem triggers
6.3 Changing TriggersTo change a trigger, use either the SQL Developer tool Edit or the DDL statementCREATE TRIGGER with the OR REPLACE clause.
To change a trigger using the Edit tool:
1. In the Connections frame, expand hr_conn.
2. In the list of schema object types, expand Triggers.
3. In the list of triggers, click the trigger to change.
4. In the frame to the right of the Connections frame, the Code pane appears,showing the code that created the trigger.
The Code pane is in write mode. (Clicking the pencil icon switches the mode fromwrite mode to read only, or the reverse.)
5. In the Code pane, change the code.
The title of the pane is in italic font, indicating that the change is not yet saved inthe database.
6. From the File menu, select Save.
Oracle Database compiles the trigger and saves it. The title of the pane is nolonger in italic font.
See Also:
• "About Data Definition Language (DDL) Statements" for generalinformation that applies to the CREATE OR REPLACE TRIGGERstatement
• Oracle Database PL/SQL Language Reference for more informationabout the CREATE OR REPLACE TRIGGER statement
Chapter 6Changing Triggers
6-7
6.4 Disabling and Enabling TriggersYou might need to temporarily disable triggers that reference objects that areunavailable, or to upload a large amount of data without the delay that triggers cause(as in a recovery operation). After the referenced objects become available, or youhave finished uploading the data, you can re-enable the triggers.
See Also:
• Oracle Database PL/SQL Language Reference for more informationabout the ALTER TRIGGER statement
• Oracle Database SQL Language Reference for more information aboutthe ALTER TABLE statement
6.4.1 Disabling or Enabling a Single TriggerTo disable or enable a single trigger, use either the Disable Trigger or Enable Triggertool or the ALTER TRIGGER statement with the DISABLE or ENABLE clause.
For example, these statements disable and enable the eval_change_trigger:
ALTER TRIGGER eval_change_trigger DISABLE;ALTER TRIGGER eval_change_trigger ENABLE;
To use the Disable Trigger or Enable Trigger tool:
1. In the Connections frame, expand hr_conn.
2. In the list of schema object types, expand Triggers.
3. In the list of triggers, right-click the desired trigger.
4. In the list of choices, select Disable or Enable.
5. In the Disable or Enable window, click Apply.
6. In the Confirmation window, click OK.
6.4.2 Disabling or Enabling All Triggers on a Single TableTo disable or enable all triggers on a specific table, use either the Disable All Triggersor Enable All Triggers tool or the ALTER TABLE statement with the DISABLE ALLTRIGGERS or ENABLE ALL TRIGGERS clause.
For example, these statements disable and enable all triggers on the evaluationstable:
ALTER TABLE evaluations DISABLE ALL TRIGGERS;ALTER TABLE evaluations ENABLE ALL TRIGGERS;
To use the Disable All Triggers or Enable All Triggers tool:
1. In the Connections frame, expand hr_conn.
Chapter 6Disabling and Enabling Triggers
6-8
2. In the list of schema object types, expand Tables.
3. In the list of tables, right-click the desired table.
4. In the list of choices, select Triggers.
5. In the list of choices, select Disable All or Enable All.
6. In the Disable All or Enable All window, click Apply.
7. In the Confirmation window, click OK.
6.5 About Trigger Compilation and DependenciesCompiled triggers depend on the schema objects on which they are defined. If anobject on which a trigger depends is dropped, or changed such that there is amismatch between the trigger and the object, then the trigger is invalidated.
Running a CREATE TRIGGER statement compiles the trigger being created. If thiscompilation causes an error, then the CREATE TRIGGER statement fails. To see thecompilation errors, use this statement:
SELECT * FROM USER_ERRORS WHERE TYPE = 'TRIGGER';
Compiled triggers depend on the schema objects on which they are defined. Forexample, NEW_EVALUATION_TRIGGER depends on the EVALUATIONS table:
CREATE OR REPLACETRIGGER NEW_EVALUATION_TRIGGERBEFORE INSERT ON EVALUATIONSFOR EACH ROWBEGIN :NEW.evaluation_id := evaluations_seq.NEXTVAL;END;
To see the schema objects on which triggers depend, use this statement:
SELECT * FROM ALL_DEPENDENCIES WHERE TYPE = 'TRIGGER';
If an object on which a trigger depends is dropped, or changed such that there is amismatch between the trigger and the object, then the trigger is invalidated. The nexttime the trigger is invoked, it is recompiled. To recompile a trigger immediately, use theALTER TRIGGER statement with the COMPILE clause. For example:
ALTER TRIGGER NEW_EVALUATION_TRIGGER COMPILE;
See Also:
Oracle Database PL/SQL Language Reference for more information abouttrigger compilation and dependencies
6.6 Dropping TriggersYou must drop a trigger before dropping the objects on which it depends.
To drop a trigger, use either the SQL Developer Connections frame and Drop tool, orthe DDL statement DROP TRIGGER.
Chapter 6About Trigger Compilation and Dependencies
6-9
This statement drops the trigger EVAL_CHANGE_TRIGGER:
DROP TRIGGER EVAL_CHANGE_TRIGGER;
To drop a trigger using the Drop tool:
1. In the Connections frame, expand hr_conn.
2. In the list of schema object types, expand Triggers.
3. In the list of triggers, right-click the name of the trigger to drop.
4. In the list of choices, click Drop Trigger.
5. In the Drop window, click Apply.
6. In the Confirmation window, click y.
See Also:
• "About Data Definition Language (DDL) Statements" for generalinformation that applies to the DROP TRIGGER statement
• Oracle Database PL/SQL Language Reference for information about theDROP TRIGGER statement
Chapter 6Dropping Triggers
6-10
7Working in a Global Environment
Globalization support features enable multilingual applications to run simultaneouslyfrom anywhere in the world. Applications can render the content of the user interface,and process data, using the native language and locale preferences of the user.
7.1 About Globalization Support FeaturesGlobalization support features enable you to develop multilingual applications that canbe run simultaneously from anywhere in the world. An application can render thecontent of the user interface, and process data, using the native language and localepreferences of the user.
Note:
In the past, Oracle called globalization support National Language Support(NLS), but NLS is actually a subset of globalization support. NLS is the abilityto choose a national language and store data using a specific character set.NLS is implemented with NLS parameters.
See Also:
Oracle Database Globalization Support Guide for more information aboutglobalization support features
7.1.1 About Language SupportOracle Database enables you to store, process, and retrieve data in native languages.The languages that can be stored in a database are all languages written in scriptsthat are encoded by Oracle-supported character sets. Through the use of Unicodedatabases and data types, Oracle Database supports most contemporary languages.
Additional support is available for a subset of the languages. The database can,for example, display dates using translated month names, and can sort text dataaccording to cultural conventions.
In this document, the term language support refers to the additional language-dependent functionality, and not to the ability to store text of a specific language.For example, language support includes displaying dates or sorting text according tospecific locales and cultural conventions. Additionally, for some supported languages,Oracle Database provides translated server messages and a translated user interfacefor the database utilities.
7-1
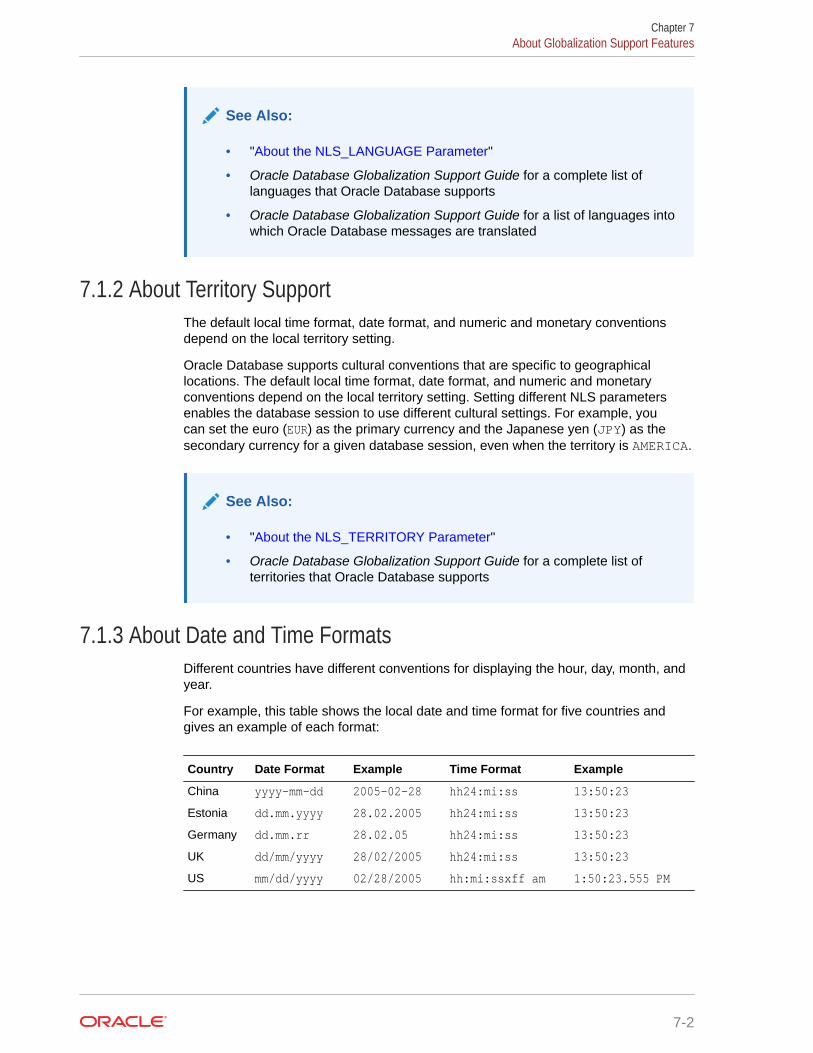
See Also:
• "About the NLS_LANGUAGE Parameter"
• Oracle Database Globalization Support Guide for a complete list oflanguages that Oracle Database supports
• Oracle Database Globalization Support Guide for a list of languages intowhich Oracle Database messages are translated
7.1.2 About Territory SupportThe default local time format, date format, and numeric and monetary conventionsdepend on the local territory setting.
Oracle Database supports cultural conventions that are specific to geographicallocations. The default local time format, date format, and numeric and monetaryconventions depend on the local territory setting. Setting different NLS parametersenables the database session to use different cultural settings. For example, youcan set the euro (EUR) as the primary currency and the Japanese yen (JPY) as thesecondary currency for a given database session, even when the territory is AMERICA.
See Also:
• "About the NLS_TERRITORY Parameter"
• Oracle Database Globalization Support Guide for a complete list ofterritories that Oracle Database supports
7.1.3 About Date and Time FormatsDifferent countries have different conventions for displaying the hour, day, month, andyear.
For example, this table shows the local date and time format for five countries andgives an example of each format:
Country Date Format Example Time Format Example
China yyyy-mm-dd 2005-02-28 hh24:mi:ss 13:50:23
Estonia dd.mm.yyyy 28.02.2005 hh24:mi:ss 13:50:23
Germany dd.mm.rr 28.02.05 hh24:mi:ss 13:50:23
UK dd/mm/yyyy 28/02/2005 hh24:mi:ss 13:50:23
US mm/dd/yyyy 02/28/2005 hh:mi:ssxff am 1:50:23.555 PM
Chapter 7About Globalization Support Features
7-2
See Also:
• "About the NLS_DATE_FORMAT Parameter"
• "About the NLS_DATE_LANGUAGE Parameter"
• "About NLS_TIMESTAMP_FORMAT andNLS_TIMESTAMP_TZ_FORMAT Parameters"
• Oracle Database Globalization Support Guide for information about date/time data types and time zone support
• Oracle Database SQL Language Reference for information about dateand time formats
7.1.4 About Calendar FormatsDifferent countries use different calendars.
Oracle Database stores this calendar information for each territory:
• First day of the week
Sunday in some cultures, Monday in others. Set by the NLS_TERRITORYparameter.
• First week of the calendar year
Some countries use week numbers for scheduling, planning, and bookkeeping.In the ISO standard, this week number can differ from the week number of thecalendar year. For example, 1st Jan 2005 is in ISO week number 53 of 2004. AnISO week starts on Monday and ends on Sunday. To support the ISO standard,Oracle Database provides the IW date format element, which returns the ISOweek number. The first calendar week of the year is set by the NLS_TERRITORYparameter.
• Number of days and months in a year
Oracle Database supports six calendar systems in addition to the Gregoriancalendar, which is the default. These additional calendar systems are:
– Japanese Imperial
Has the same number of months and days as the Gregorian calendar, but theyear starts with the beginning of each Imperial Era.
– ROC Official
Has the same number of months and days as the Gregorian calendar, but theyear starts with the founding of the Republic of China.
– Persian
The first six months have 31 days each, the next five months have 30 dayseach, and the last month has either 29 days or (in leap year) 30 days.
– Thai Buddha uses a Buddhist calendar.
– Arabic Hijrah has 12 months and 354 or 355 days.
– English Hijrah has 12 months and 354 or 355 days.
Chapter 7About Globalization Support Features
7-3
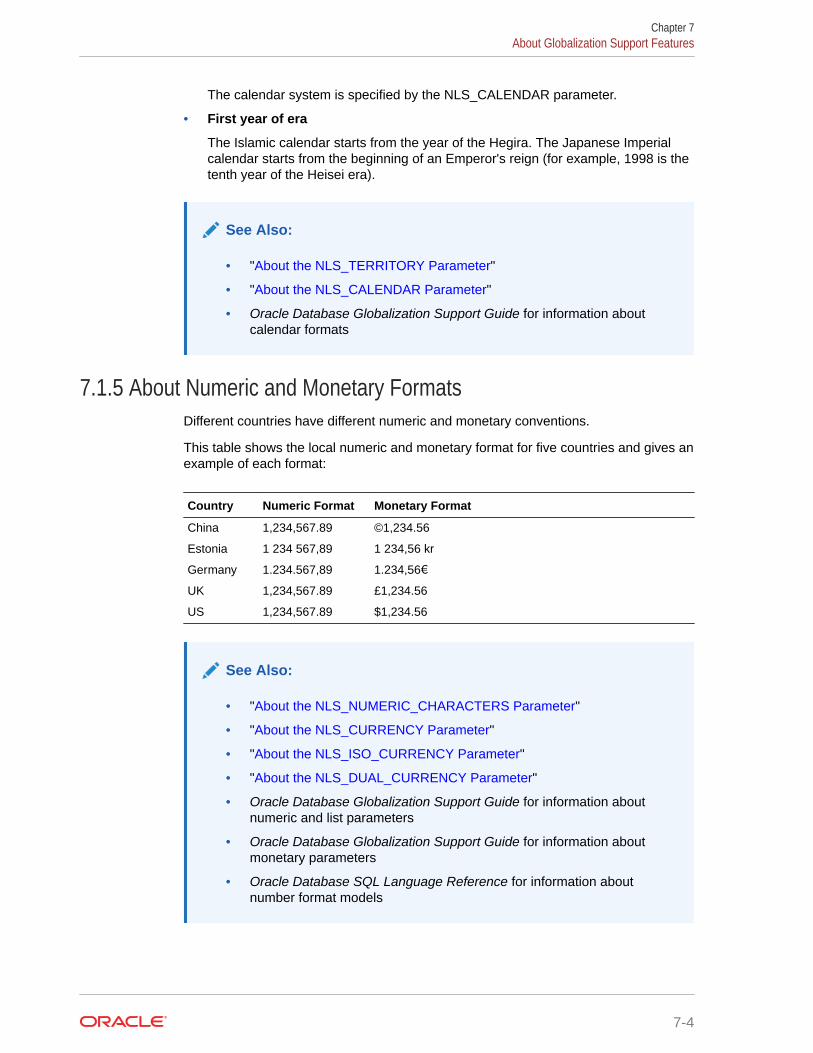
The calendar system is specified by the NLS_CALENDAR parameter.
• First year of era
The Islamic calendar starts from the year of the Hegira. The Japanese Imperialcalendar starts from the beginning of an Emperor's reign (for example, 1998 is thetenth year of the Heisei era).
See Also:
• "About the NLS_TERRITORY Parameter"
• "About the NLS_CALENDAR Parameter"
• Oracle Database Globalization Support Guide for information aboutcalendar formats
7.1.5 About Numeric and Monetary FormatsDifferent countries have different numeric and monetary conventions.
This table shows the local numeric and monetary format for five countries and gives anexample of each format:
Country Numeric Format Monetary Format
China 1,234,567.89 ©1,234.56
Estonia 1 234 567,89 1 234,56 kr
Germany 1.234.567,89 1.234,56€
UK 1,234,567.89 £1,234.56
US 1,234,567.89 $1,234.56
See Also:
• "About the NLS_NUMERIC_CHARACTERS Parameter"
• "About the NLS_CURRENCY Parameter"
• "About the NLS_ISO_CURRENCY Parameter"
• "About the NLS_DUAL_CURRENCY Parameter"
• Oracle Database Globalization Support Guide for information aboutnumeric and list parameters
• Oracle Database Globalization Support Guide for information aboutmonetary parameters
• Oracle Database SQL Language Reference for information aboutnumber format models
Chapter 7About Globalization Support Features
7-4
7.1.6 About Linguistic Sorting and String SearchingDifferent languages have different sort orders (collating sequences). Also, differentcountries or cultures that use the same alphabets sort words differently. For example,in Danish, Æ is after Z, and Y and Ü are considered to be variants of the same letter.
See Also:
• "About the NLS_SORT Parameter"
• "About the NLS_COMP Parameter"
• Oracle Database Globalization Support Guide for more information aboutlinguistic sorting and string searching
7.1.7 About Length SemanticsTo calculate the number of characters in a string, using byte length, you must know thenumber of bytes in each character in the character set.
In single-byte character sets, the number of bytes and the number of characters in astring are the same. In multibyte character sets, a character or code point consists ofone or more bytes. Calculating the number of characters based on byte length can bedifficult in a variable-width character set. Calculating column length in bytes is calledbyte semantics, while measuring column length in characters is called charactersemantics.
Character semantics is useful for specifying the storage requirements for multibytestrings of varying widths. For example, in a Unicode database (AL32UTF8), supposethat you must have a VARCHAR2 column that can store up to five Chinese characterswith five English characters. Using byte semantics, this column requires 15 bytesfor the Chinese characters, which are 3 bytes long, and 5 bytes for the Englishcharacters, which are 1 byte long, for a total of 20 bytes. Using character semantics,the column requires 10 characters.
See Also:
• "About the NLS_LENGTH_SEMANTICS Parameter"
• Oracle Database Globalization Support Guide for information aboutcharacter sets and length semantics
7.1.8 About Unicode and SQL National Character Data TypesUnicode is a character encoding system that defines every character in most ofthe spoken languages in the world. In Unicode, every character has a unique code,regardless of the platform, program, or language.
You can store Unicode characters in an Oracle Database in two ways:
Chapter 7About Globalization Support Features
7-5
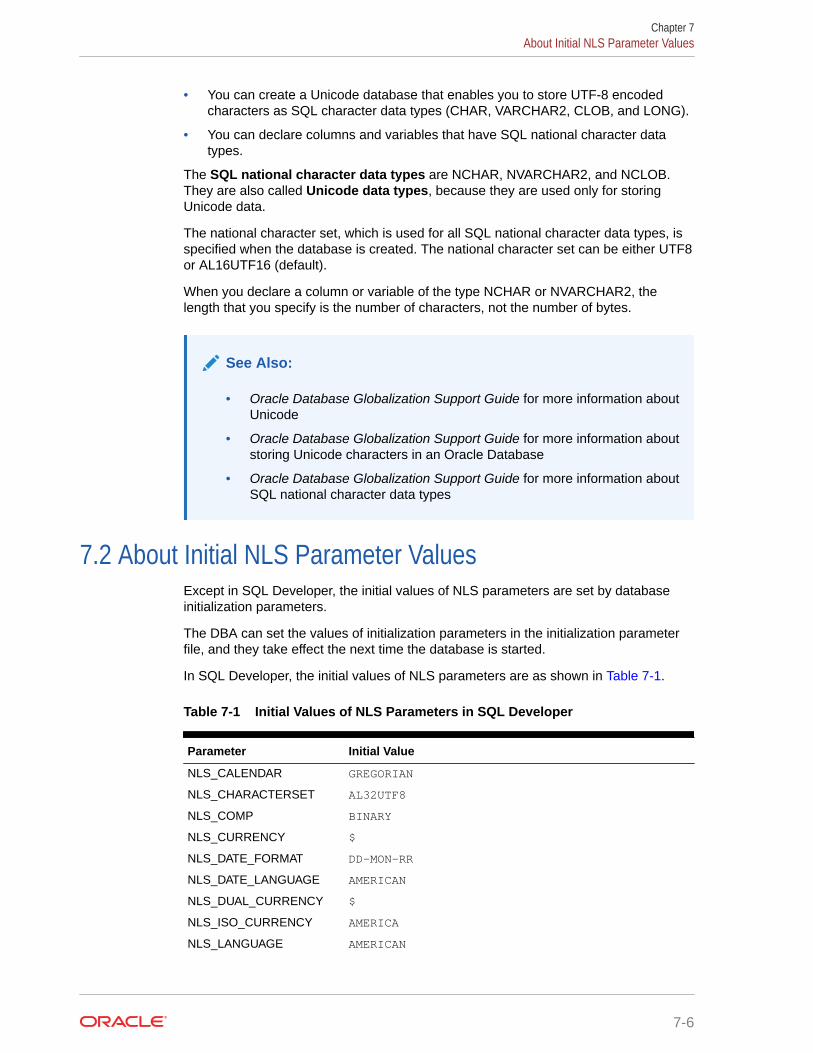
• You can create a Unicode database that enables you to store UTF-8 encodedcharacters as SQL character data types (CHAR, VARCHAR2, CLOB, and LONG).
• You can declare columns and variables that have SQL national character datatypes.
The SQL national character data types are NCHAR, NVARCHAR2, and NCLOB.They are also called Unicode data types, because they are used only for storingUnicode data.
The national character set, which is used for all SQL national character data types, isspecified when the database is created. The national character set can be either UTF8or AL16UTF16 (default).
When you declare a column or variable of the type NCHAR or NVARCHAR2, thelength that you specify is the number of characters, not the number of bytes.
See Also:
• Oracle Database Globalization Support Guide for more information aboutUnicode
• Oracle Database Globalization Support Guide for more information aboutstoring Unicode characters in an Oracle Database
• Oracle Database Globalization Support Guide for more information aboutSQL national character data types
7.2 About Initial NLS Parameter ValuesExcept in SQL Developer, the initial values of NLS parameters are set by databaseinitialization parameters.
The DBA can set the values of initialization parameters in the initialization parameterfile, and they take effect the next time the database is started.
In SQL Developer, the initial values of NLS parameters are as shown in Table 7-1.
Table 7-1 Initial Values of NLS Parameters in SQL Developer
Parameter Initial Value
NLS_CALENDAR GREGORIAN
NLS_CHARACTERSET AL32UTF8
NLS_COMP BINARY
NLS_CURRENCY $
NLS_DATE_FORMAT DD-MON-RR
NLS_DATE_LANGUAGE AMERICAN
NLS_DUAL_CURRENCY $
NLS_ISO_CURRENCY AMERICA
NLS_LANGUAGE AMERICAN
Chapter 7About Initial NLS Parameter Values
7-6
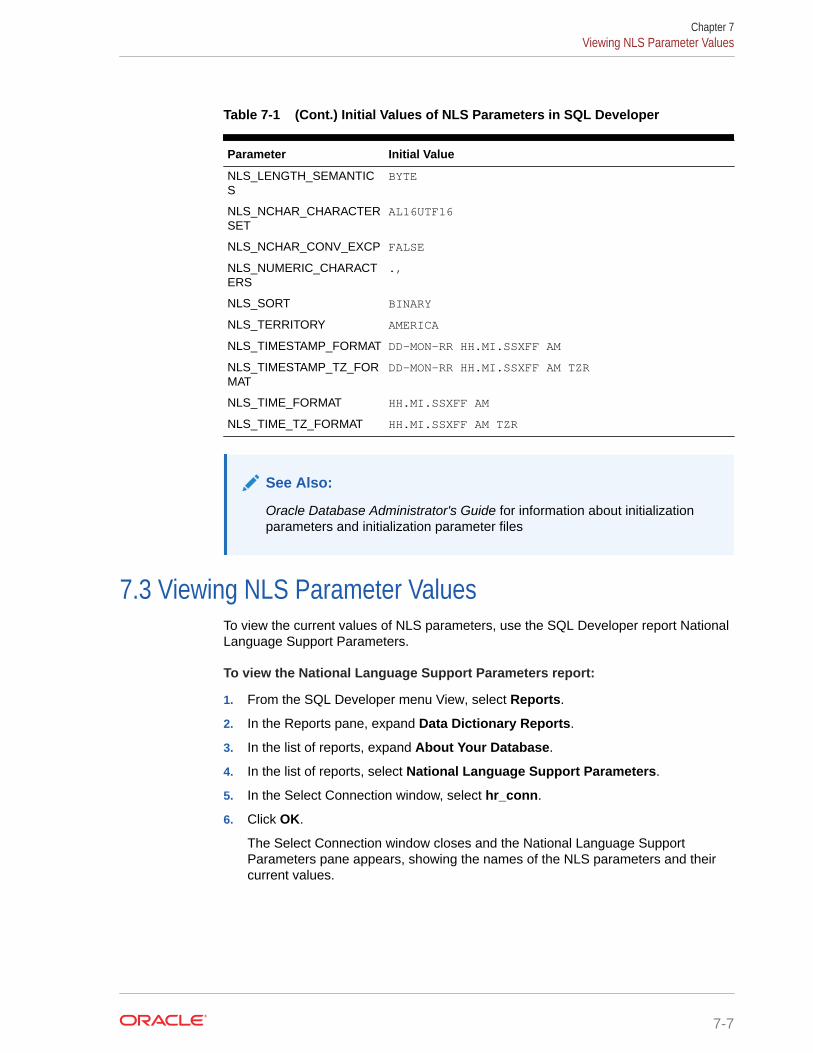
Table 7-1 (Cont.) Initial Values of NLS Parameters in SQL Developer
Parameter Initial Value
NLS_LENGTH_SEMANTICS
BYTE
NLS_NCHAR_CHARACTERSET
AL16UTF16
NLS_NCHAR_CONV_EXCP FALSE
NLS_NUMERIC_CHARACTERS
.,
NLS_SORT BINARY
NLS_TERRITORY AMERICA
NLS_TIMESTAMP_FORMAT DD-MON-RR HH.MI.SSXFF AM
NLS_TIMESTAMP_TZ_FORMAT
DD-MON-RR HH.MI.SSXFF AM TZR
NLS_TIME_FORMAT HH.MI.SSXFF AM
NLS_TIME_TZ_FORMAT HH.MI.SSXFF AM TZR
See Also:
Oracle Database Administrator's Guide for information about initializationparameters and initialization parameter files
7.3 Viewing NLS Parameter ValuesTo view the current values of NLS parameters, use the SQL Developer report NationalLanguage Support Parameters.
To view the National Language Support Parameters report:
1. From the SQL Developer menu View, select Reports.
2. In the Reports pane, expand Data Dictionary Reports.
3. In the list of reports, expand About Your Database.
4. In the list of reports, select National Language Support Parameters.
5. In the Select Connection window, select hr_conn.
6. Click OK.
The Select Connection window closes and the National Language SupportParameters pane appears, showing the names of the NLS parameters and theircurrent values.
Chapter 7Viewing NLS Parameter Values
7-7
See Also:
Oracle SQL Developer User's Guide for more information about SQLDeveloper reports
7.4 Changing NLS Parameter ValuesYou can change the value of one or more NLS parameters in any of these ways.
• Change the values for all SQL Developer connections, current and future.
• On the client, change the settings of the corresponding NLS environmentvariables.
Only on the client, the new values of the NLS environment variables override thevalues of the corresponding NLS parameters.
You can use environment variables to specify locale-dependent behavior forthe client. For example, on a Linux system, this statement sets the value ofthe NLS_SORT environment variable to FRENCH, overriding the value of theNLS_SORT parameter:
% setenv NLS_SORT FRENCH
Note:
Environment variables might be platform-dependent.
• Change the values only for the current session, using an ALTER SESSIONstatement with this syntax:
ALTER SESSION SET parameter_name=parameter_value [ parameter_name=parameter_value ]... ;
Only in the current session, the new values override those set in all of thepreceding ways.
You can use the ALTER SESSION to test your application with the settings fordifferent locales.
• Change the values only for the current SQL function invocation.
Only for the current SQL function invocation, the new values override those set inall of the preceding ways.
See Also:
• Oracle Database SQL Language Reference for more information aboutthe ALTER SESSION statement
• Oracle Database Globalization Support Guide for more information aboutsetting NLS parameters
Chapter 7Changing NLS Parameter Values
7-8
7.4.1 Changing NLS Parameter Values for All SQL DeveloperConnections
You can change the values of NLS parameters for all SQL Developer connections,current and future.
To change National Language Support Parameter values:
1. From the SQL Developer menu Tools, select Preferences.
2. In the Preferences window, in the left frame, expand Database.
3. In the list of database preferences, click NLS.
A list of NLS parameters and their current values appears. The value fields aremenus.
4. From the menu to the right of each parameter whose value you want to change,select the desired value.
5. Click OK.
The NLS parameters now have the values that you specified. To verify thesevalues, see "Viewing NLS Parameter Values".
Note:
If the NLS parameter values do not reflect your changes, click the icon RunReport.
See Also:
Oracle SQL Developer User's Guide for more information about SQLDeveloper preferences
7.4.2 Changing NLS Parameter Values for the Current SQL FunctionInvocation
SQL functions whose behavior depends on the values of NLS parameters arecalled locale-dependent. Some locale-dependent SQL functions have optional NLSparameters.
The local-dependent functions that have optional NLS parameters are:
• TO_CHAR
• TO_DATE
• TO_NUMBER
• NLS_UPPER
Chapter 7Changing NLS Parameter Values
7-9
• NLS_LOWER
• NLS_INITCAP
• NLSSORT
In all of the preceding functions, you can specify these NLS parameters:
• NLS_DATE_LANGUAGE
• NLS_DATE_LANGUAGE
• NLS_NUMERIC_CHARACTERS
• NLS_CURRENCY
• NLS_ISO_CURRENCY
• NLS_DUAL_CURRENCY
• NLS_CALENDAR
• NLS_SORT
In the NLSSORT function, you can also specify these NLS parameters:
• NLS_LANGUAGE
• NLS_TERRITORY
• NLS_DATE_FORMAT
To specify NLS parameters in a function, use this syntax:
'parameter=value' ['parameter=value']...
Suppose that you want NLS_DATE_LANGUAGE to be AMERICAN when this query isevaluated:
SELECT last_name FROM employees WHERE hire_date > '01-JAN-1999';
You can set NLS_DATE_LANGUAGE to AMERICAN before running the query:
ALTER SESSION SET NLS_DATE_LANGUAGE=American;SELECT last_name FROM employees WHERE hire_date > '01-JAN-1999';
Alternatively, you can set NLS_DATE_LANGUAGE to AMERICAN inside thequery, using the locale-dependent SQL function TO_DATE with its optionalNLS_DATE_LANGUAGE parameter:
SELECT last_name FROM employeesWHERE hire_date > TO_DATE('01-JAN-1999', 'DD-MON-YYYY', 'NLS_DATE_LANGUAGE=AMERICAN');
Tip:
Using session default values for NLS parameters in SQL functions usuallyresults in better performance. Therefore, specify optional NLS parameters inlocale-dependent SQL functions only in SQL statements that must not usethe default NLS parameter values.
Chapter 7Changing NLS Parameter Values
7-10
See Also:
Oracle Database Globalization Support Guide for more information aboutlocale-dependent SQL functions with optional NLS parameters
7.5 About Individual NLS ParametersMany individual NLS parameters are available.
See Also:
• Oracle Database Globalization Support Guide for more information aboutsetting up a globalization support environment
• "Changing NLS Parameter Values"
7.5.1 About Locale and the NLS_LANG ParameterA locale is a linguistic and cultural environment in which a system or applicationruns. The simplest way to specify a locale for Oracle Database software is to set theNLS_LANG parameter.
The NLS_LANG parameter sets the default values of the parametersNLS_LANGUAGE and NLS_TERRITORY for both the server session (for example,SQL statement processing) and the client application (for example, display formattingin Oracle Database tools). The NLS_LANG parameter also sets the character set thatthe client application uses for data entered or displayed.
The default value of NLS_LANG is set during database installation. You can use theALTER SESSION statement to change the values of NLS parameters, including thoseset by NLS_LANG, for your session. However, only the client can change the NLSsettings in the client environment.
See Also:
• Oracle Database Globalization Support Guide for more information aboutspecifying a locale with the NLS_LANG parameter
• Oracle Database Globalization Support Guide for information aboutlanguages, territories, character sets, and other locale data supportedby Oracle Database
• "About the NLS_LANGUAGE Parameter"
• "About the NLS_TERRITORY Parameter"
• "Changing NLS Parameter Values"
Chapter 7About Individual NLS Parameters
7-11
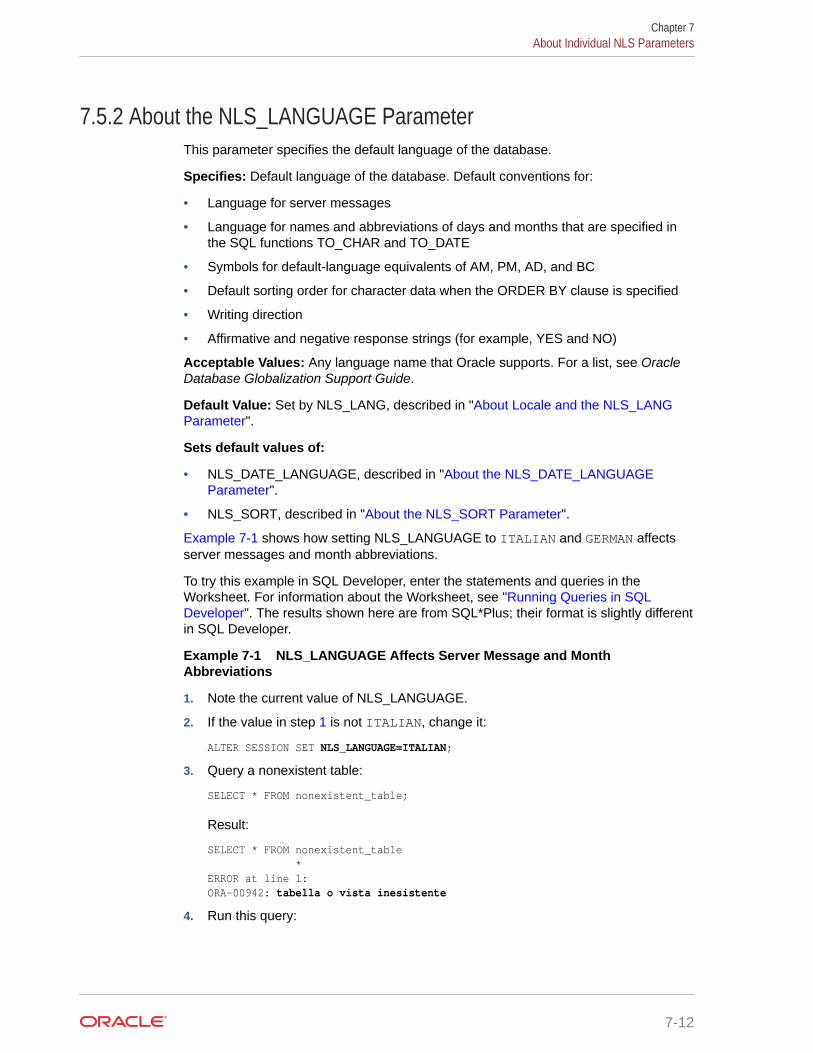
7.5.2 About the NLS_LANGUAGE ParameterThis parameter specifies the default language of the database.
Specifies: Default language of the database. Default conventions for:
• Language for server messages
• Language for names and abbreviations of days and months that are specified inthe SQL functions TO_CHAR and TO_DATE
• Symbols for default-language equivalents of AM, PM, AD, and BC
• Default sorting order for character data when the ORDER BY clause is specified
• Writing direction
• Affirmative and negative response strings (for example, YES and NO)
Acceptable Values: Any language name that Oracle supports. For a list, see OracleDatabase Globalization Support Guide.
Default Value: Set by NLS_LANG, described in "About Locale and the NLS_LANGParameter".
Sets default values of:
• NLS_DATE_LANGUAGE, described in "About the NLS_DATE_LANGUAGEParameter".
• NLS_SORT, described in "About the NLS_SORT Parameter".
Example 7-1 shows how setting NLS_LANGUAGE to ITALIAN and GERMAN affectsserver messages and month abbreviations.
To try this example in SQL Developer, enter the statements and queries in theWorksheet. For information about the Worksheet, see "Running Queries in SQLDeveloper". The results shown here are from SQL*Plus; their format is slightly differentin SQL Developer.
Example 7-1 NLS_LANGUAGE Affects Server Message and MonthAbbreviations
1. Note the current value of NLS_LANGUAGE.
2. If the value in step 1 is not ITALIAN, change it:
ALTER SESSION SET NLS_LANGUAGE=ITALIAN;
3. Query a nonexistent table:
SELECT * FROM nonexistent_table;
Result:
SELECT * FROM nonexistent_table *ERROR at line 1:ORA-00942: tabella o vista inesistente
4. Run this query:
Chapter 7About Individual NLS Parameters
7-12
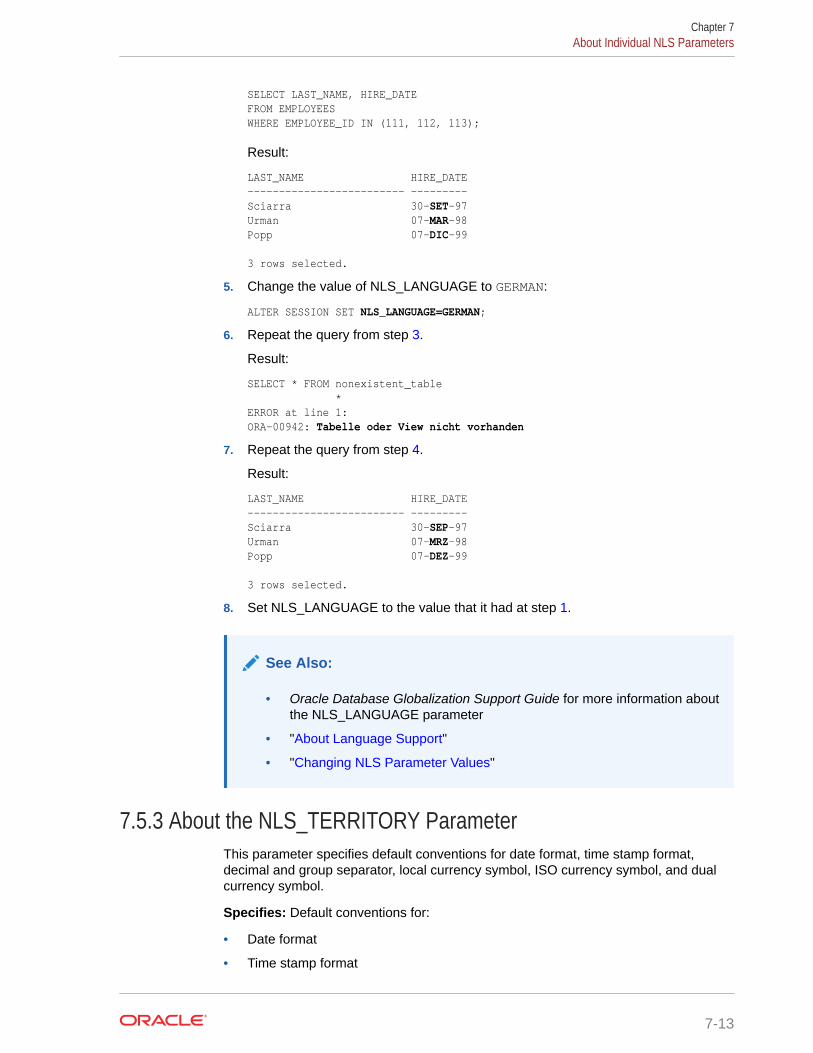
SELECT LAST_NAME, HIRE_DATEFROM EMPLOYEESWHERE EMPLOYEE_ID IN (111, 112, 113);
Result:
LAST_NAME HIRE_DATE------------------------- ---------Sciarra 30-SET-97Urman 07-MAR-98Popp 07-DIC-99 3 rows selected.
5. Change the value of NLS_LANGUAGE to GERMAN:
ALTER SESSION SET NLS_LANGUAGE=GERMAN;
6. Repeat the query from step 3.
Result:
SELECT * FROM nonexistent_table *ERROR at line 1:ORA-00942: Tabelle oder View nicht vorhanden
7. Repeat the query from step 4.
Result:
LAST_NAME HIRE_DATE------------------------- ---------Sciarra 30-SEP-97Urman 07-MRZ-98Popp 07-DEZ-99 3 rows selected.
8. Set NLS_LANGUAGE to the value that it had at step 1.
See Also:
• Oracle Database Globalization Support Guide for more information aboutthe NLS_LANGUAGE parameter
• "About Language Support"
• "Changing NLS Parameter Values"
7.5.3 About the NLS_TERRITORY ParameterThis parameter specifies default conventions for date format, time stamp format,decimal and group separator, local currency symbol, ISO currency symbol, and dualcurrency symbol.
Specifies: Default conventions for:
• Date format
• Time stamp format
Chapter 7About Individual NLS Parameters
7-13
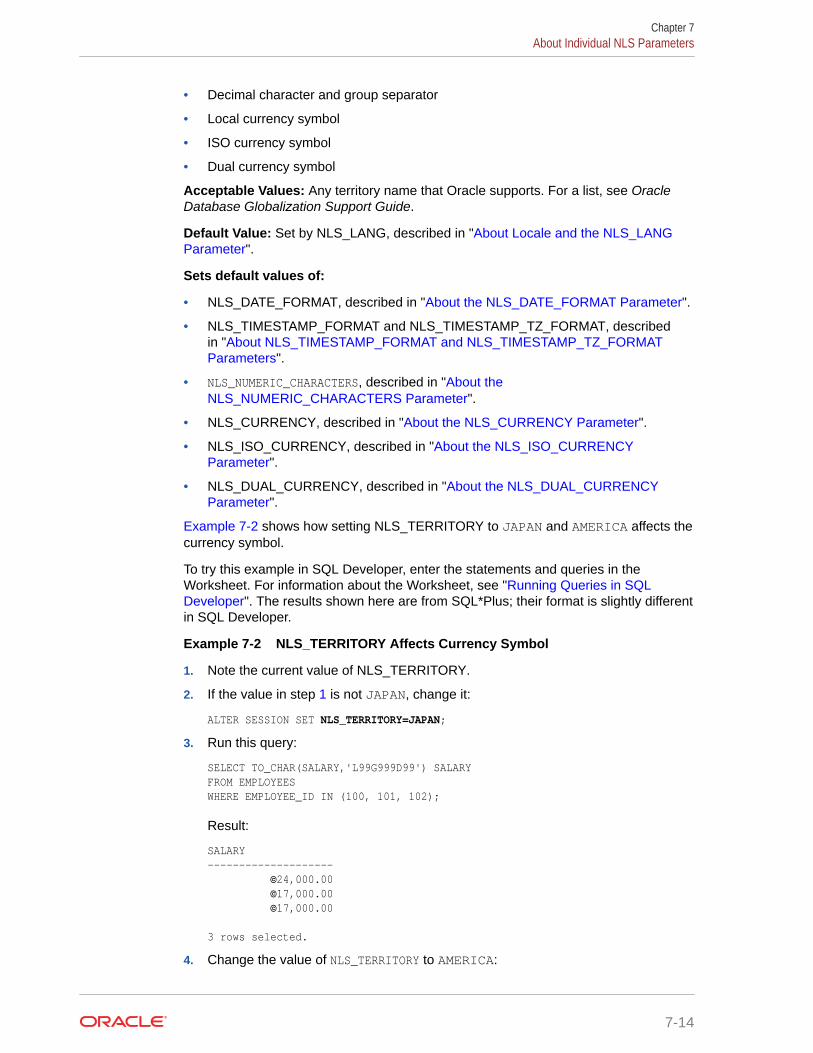
• Decimal character and group separator
• Local currency symbol
• ISO currency symbol
• Dual currency symbol
Acceptable Values: Any territory name that Oracle supports. For a list, see OracleDatabase Globalization Support Guide.
Default Value: Set by NLS_LANG, described in "About Locale and the NLS_LANGParameter".
Sets default values of:
• NLS_DATE_FORMAT, described in "About the NLS_DATE_FORMAT Parameter".
• NLS_TIMESTAMP_FORMAT and NLS_TIMESTAMP_TZ_FORMAT, describedin "About NLS_TIMESTAMP_FORMAT and NLS_TIMESTAMP_TZ_FORMATParameters".
• NLS_NUMERIC_CHARACTERS, described in "About theNLS_NUMERIC_CHARACTERS Parameter".
• NLS_CURRENCY, described in "About the NLS_CURRENCY Parameter".
• NLS_ISO_CURRENCY, described in "About the NLS_ISO_CURRENCYParameter".
• NLS_DUAL_CURRENCY, described in "About the NLS_DUAL_CURRENCYParameter".
Example 7-2 shows how setting NLS_TERRITORY to JAPAN and AMERICA affects thecurrency symbol.
To try this example in SQL Developer, enter the statements and queries in theWorksheet. For information about the Worksheet, see "Running Queries in SQLDeveloper". The results shown here are from SQL*Plus; their format is slightly differentin SQL Developer.
Example 7-2 NLS_TERRITORY Affects Currency Symbol
1. Note the current value of NLS_TERRITORY.
2. If the value in step 1 is not JAPAN, change it:
ALTER SESSION SET NLS_TERRITORY=JAPAN;
3. Run this query:
SELECT TO_CHAR(SALARY,'L99G999D99') SALARYFROM EMPLOYEESWHERE EMPLOYEE_ID IN (100, 101, 102);
Result:
SALARY-------------------- ©24,000.00 ©17,000.00 ©17,000.00 3 rows selected.
4. Change the value of NLS_TERRITORY to AMERICA:
Chapter 7About Individual NLS Parameters
7-14
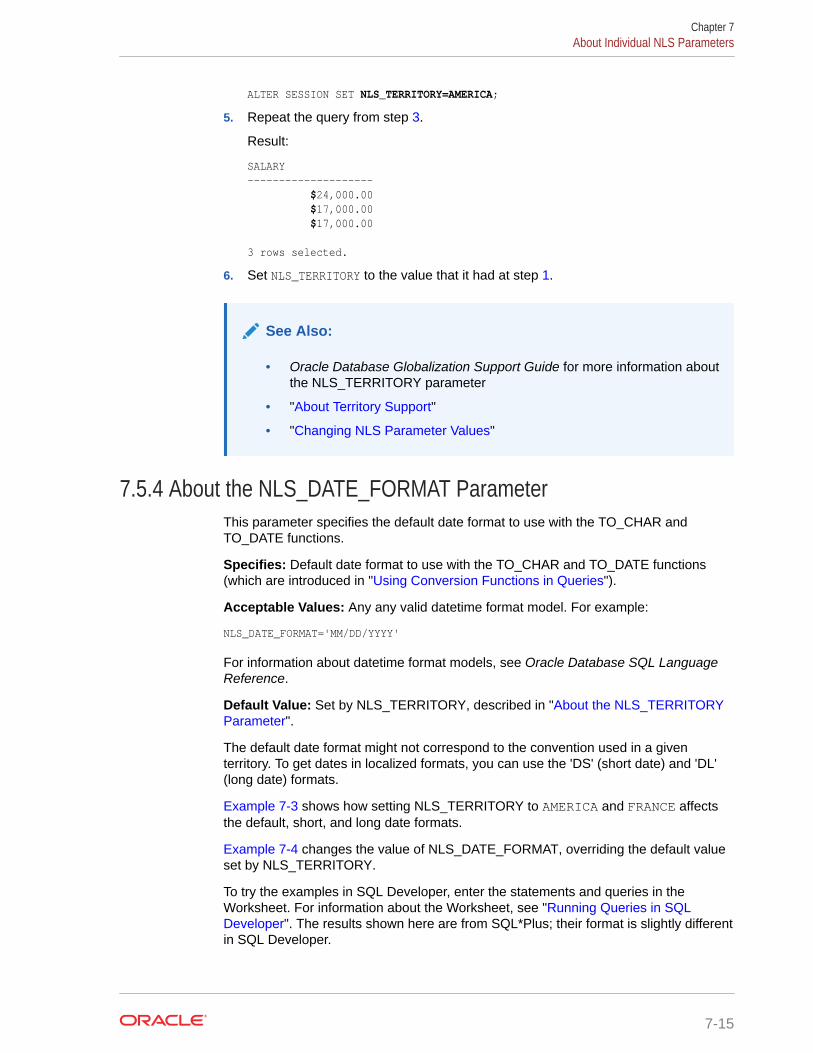
ALTER SESSION SET NLS_TERRITORY=AMERICA;
5. Repeat the query from step 3.
Result:
SALARY-------------------- $24,000.00 $17,000.00 $17,000.00 3 rows selected.
6. Set NLS_TERRITORY to the value that it had at step 1.
See Also:
• Oracle Database Globalization Support Guide for more information aboutthe NLS_TERRITORY parameter
• "About Territory Support"
• "Changing NLS Parameter Values"
7.5.4 About the NLS_DATE_FORMAT ParameterThis parameter specifies the default date format to use with the TO_CHAR andTO_DATE functions.
Specifies: Default date format to use with the TO_CHAR and TO_DATE functions(which are introduced in "Using Conversion Functions in Queries").
Acceptable Values: Any any valid datetime format model. For example:
NLS_DATE_FORMAT='MM/DD/YYYY'
For information about datetime format models, see Oracle Database SQL LanguageReference.
Default Value: Set by NLS_TERRITORY, described in "About the NLS_TERRITORYParameter".
The default date format might not correspond to the convention used in a giventerritory. To get dates in localized formats, you can use the 'DS' (short date) and 'DL'(long date) formats.
Example 7-3 shows how setting NLS_TERRITORY to AMERICA and FRANCE affectsthe default, short, and long date formats.
Example 7-4 changes the value of NLS_DATE_FORMAT, overriding the default valueset by NLS_TERRITORY.
To try the examples in SQL Developer, enter the statements and queries in theWorksheet. For information about the Worksheet, see "Running Queries in SQLDeveloper". The results shown here are from SQL*Plus; their format is slightly differentin SQL Developer.
Chapter 7About Individual NLS Parameters
7-15
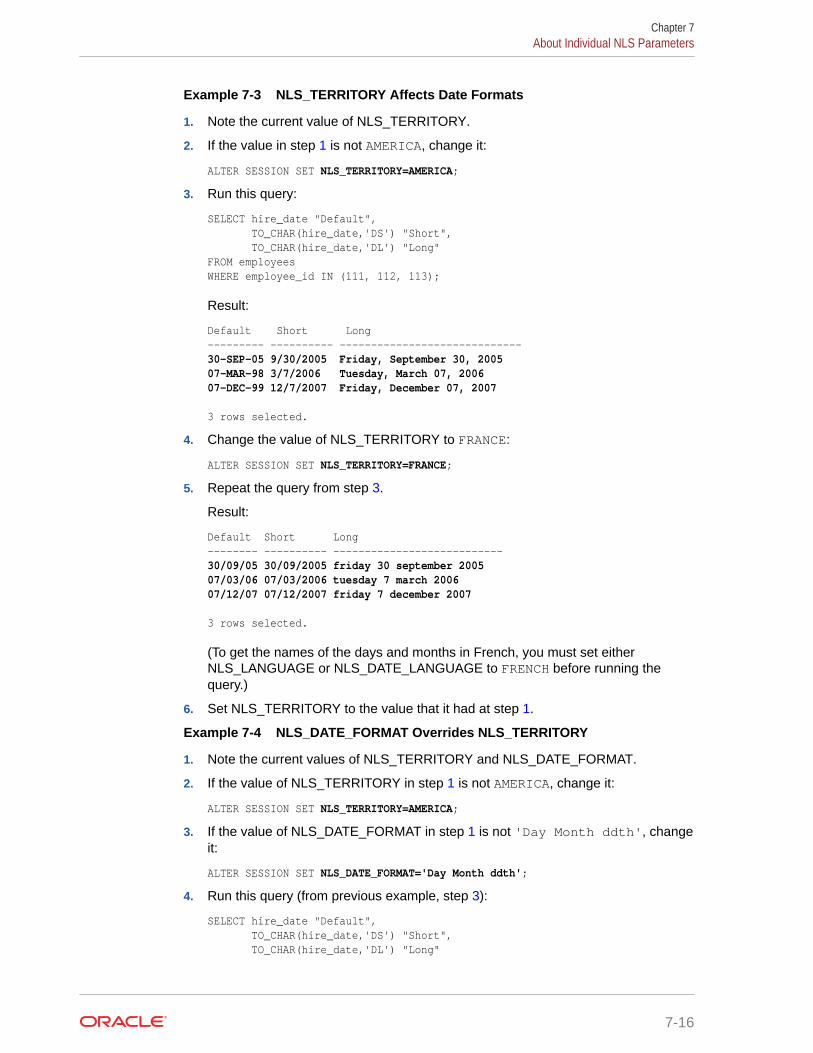
Example 7-3 NLS_TERRITORY Affects Date Formats
1. Note the current value of NLS_TERRITORY.
2. If the value in step 1 is not AMERICA, change it:
ALTER SESSION SET NLS_TERRITORY=AMERICA;
3. Run this query:
SELECT hire_date "Default", TO_CHAR(hire_date,'DS') "Short", TO_CHAR(hire_date,'DL') "Long"FROM employeesWHERE employee_id IN (111, 112, 113);
Result:
Default Short Long--------- ---------- -----------------------------30-SEP-05 9/30/2005 Friday, September 30, 200507-MAR-98 3/7/2006 Tuesday, March 07, 200607-DEC-99 12/7/2007 Friday, December 07, 2007 3 rows selected.
4. Change the value of NLS_TERRITORY to FRANCE:
ALTER SESSION SET NLS_TERRITORY=FRANCE;
5. Repeat the query from step 3.
Result:
Default Short Long-------- ---------- ---------------------------30/09/05 30/09/2005 friday 30 september 200507/03/06 07/03/2006 tuesday 7 march 200607/12/07 07/12/2007 friday 7 december 2007 3 rows selected.
(To get the names of the days and months in French, you must set eitherNLS_LANGUAGE or NLS_DATE_LANGUAGE to FRENCH before running thequery.)
6. Set NLS_TERRITORY to the value that it had at step 1.
Example 7-4 NLS_DATE_FORMAT Overrides NLS_TERRITORY
1. Note the current values of NLS_TERRITORY and NLS_DATE_FORMAT.
2. If the value of NLS_TERRITORY in step 1 is not AMERICA, change it:
ALTER SESSION SET NLS_TERRITORY=AMERICA;
3. If the value of NLS_DATE_FORMAT in step 1 is not 'Day Month ddth', changeit:
ALTER SESSION SET NLS_DATE_FORMAT='Day Month ddth';
4. Run this query (from previous example, step 3):
SELECT hire_date "Default", TO_CHAR(hire_date,'DS') "Short", TO_CHAR(hire_date,'DL') "Long"
Chapter 7About Individual NLS Parameters
7-16
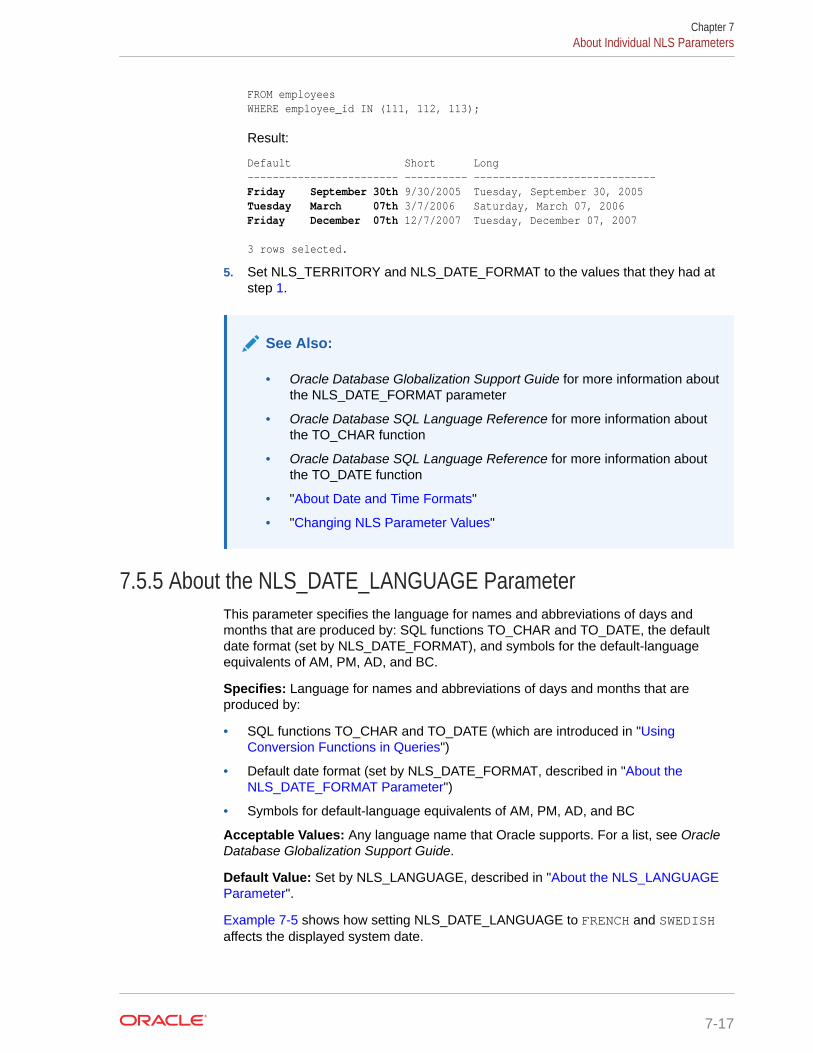
FROM employeesWHERE employee_id IN (111, 112, 113);
Result:
Default Short Long------------------------ ---------- -----------------------------Friday September 30th 9/30/2005 Tuesday, September 30, 2005Tuesday March 07th 3/7/2006 Saturday, March 07, 2006Friday December 07th 12/7/2007 Tuesday, December 07, 2007
3 rows selected.
5. Set NLS_TERRITORY and NLS_DATE_FORMAT to the values that they had atstep 1.
See Also:
• Oracle Database Globalization Support Guide for more information aboutthe NLS_DATE_FORMAT parameter
• Oracle Database SQL Language Reference for more information aboutthe TO_CHAR function
• Oracle Database SQL Language Reference for more information aboutthe TO_DATE function
• "About Date and Time Formats"
• "Changing NLS Parameter Values"
7.5.5 About the NLS_DATE_LANGUAGE ParameterThis parameter specifies the language for names and abbreviations of days andmonths that are produced by: SQL functions TO_CHAR and TO_DATE, the defaultdate format (set by NLS_DATE_FORMAT), and symbols for the default-languageequivalents of AM, PM, AD, and BC.
Specifies: Language for names and abbreviations of days and months that areproduced by:
• SQL functions TO_CHAR and TO_DATE (which are introduced in "UsingConversion Functions in Queries")
• Default date format (set by NLS_DATE_FORMAT, described in "About theNLS_DATE_FORMAT Parameter")
• Symbols for default-language equivalents of AM, PM, AD, and BC
Acceptable Values: Any language name that Oracle supports. For a list, see OracleDatabase Globalization Support Guide.
Default Value: Set by NLS_LANGUAGE, described in "About the NLS_LANGUAGEParameter".
Example 7-5 shows how setting NLS_DATE_LANGUAGE to FRENCH and SWEDISHaffects the displayed system date.
Chapter 7About Individual NLS Parameters
7-17
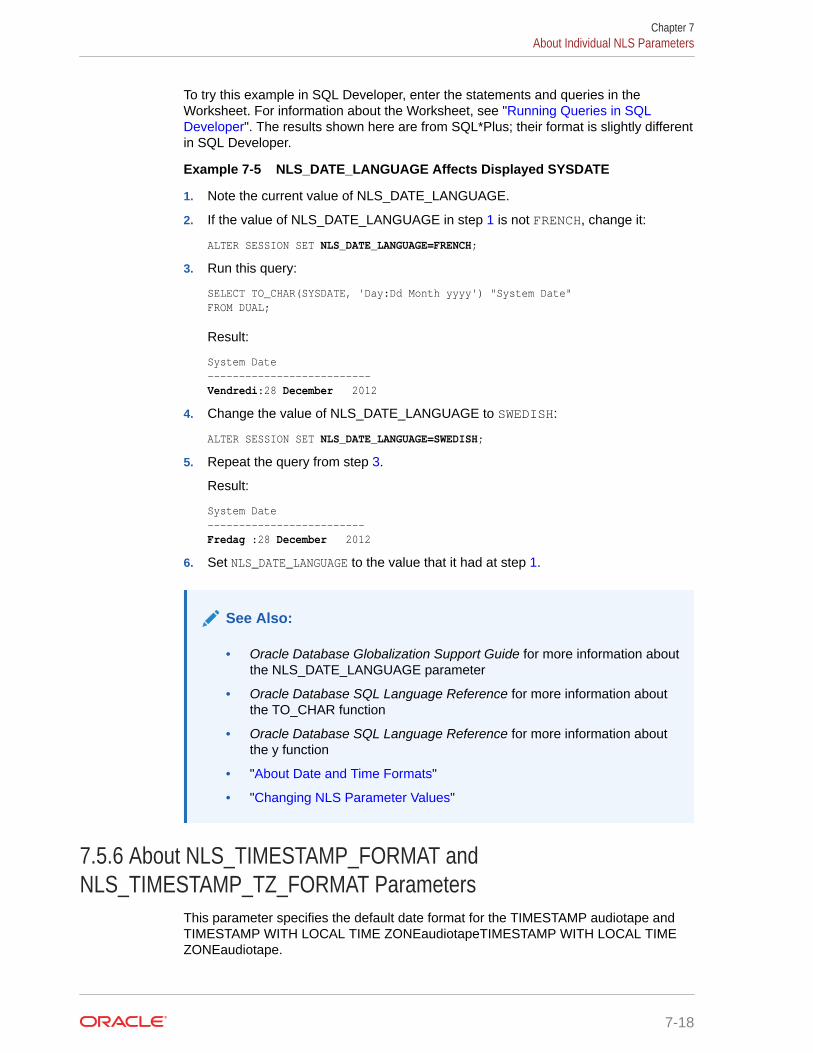
To try this example in SQL Developer, enter the statements and queries in theWorksheet. For information about the Worksheet, see "Running Queries in SQLDeveloper". The results shown here are from SQL*Plus; their format is slightly differentin SQL Developer.
Example 7-5 NLS_DATE_LANGUAGE Affects Displayed SYSDATE
1. Note the current value of NLS_DATE_LANGUAGE.
2. If the value of NLS_DATE_LANGUAGE in step 1 is not FRENCH, change it:
ALTER SESSION SET NLS_DATE_LANGUAGE=FRENCH;
3. Run this query:
SELECT TO_CHAR(SYSDATE, 'Day:Dd Month yyyy') "System Date"FROM DUAL;
Result:
System Date--------------------------Vendredi:28 December 2012
4. Change the value of NLS_DATE_LANGUAGE to SWEDISH:
ALTER SESSION SET NLS_DATE_LANGUAGE=SWEDISH;
5. Repeat the query from step 3.
Result:
System Date-------------------------Fredag :28 December 2012
6. Set NLS_DATE_LANGUAGE to the value that it had at step 1.
See Also:
• Oracle Database Globalization Support Guide for more information aboutthe NLS_DATE_LANGUAGE parameter
• Oracle Database SQL Language Reference for more information aboutthe TO_CHAR function
• Oracle Database SQL Language Reference for more information aboutthe y function
• "About Date and Time Formats"
• "Changing NLS Parameter Values"
7.5.6 About NLS_TIMESTAMP_FORMAT andNLS_TIMESTAMP_TZ_FORMAT Parameters
This parameter specifies the default date format for the TIMESTAMP audiotape andTIMESTAMP WITH LOCAL TIME ZONEaudiotapeTIMESTAMP WITH LOCAL TIMEZONEaudiotape.
Chapter 7About Individual NLS Parameters
7-18
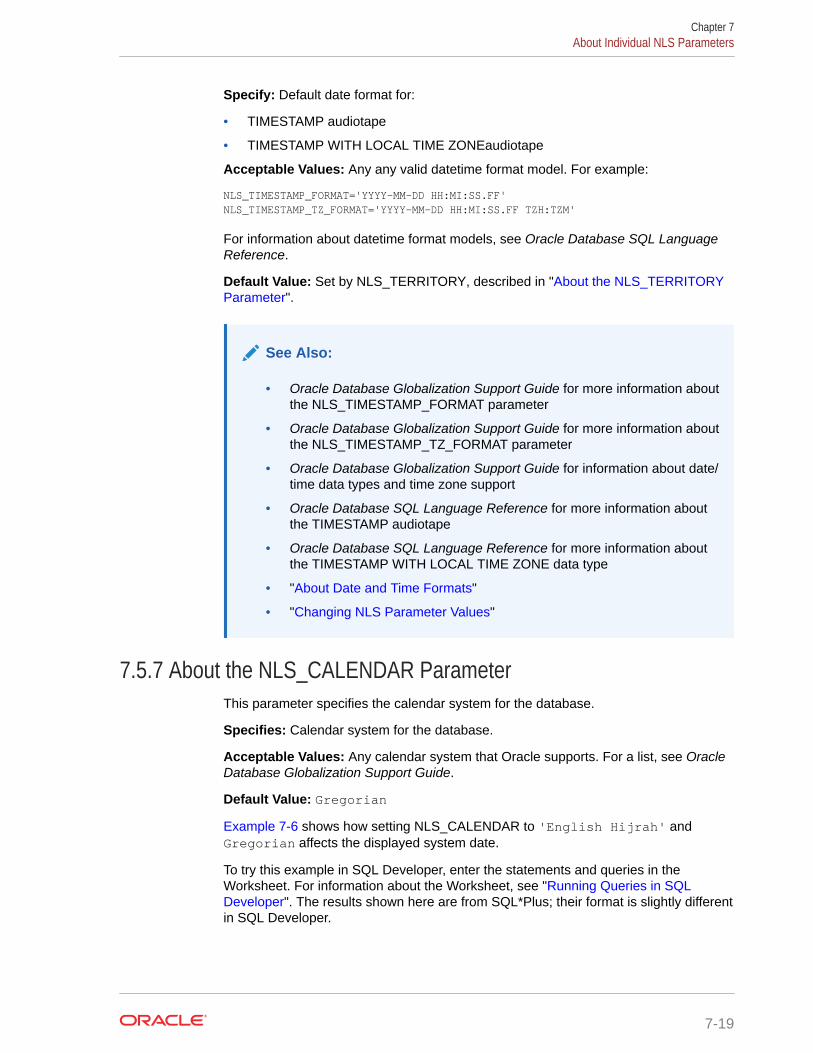
Specify: Default date format for:
• TIMESTAMP audiotape
• TIMESTAMP WITH LOCAL TIME ZONEaudiotape
Acceptable Values: Any any valid datetime format model. For example:
NLS_TIMESTAMP_FORMAT='YYYY-MM-DD HH:MI:SS.FF'NLS_TIMESTAMP_TZ_FORMAT='YYYY-MM-DD HH:MI:SS.FF TZH:TZM'
For information about datetime format models, see Oracle Database SQL LanguageReference.
Default Value: Set by NLS_TERRITORY, described in "About the NLS_TERRITORYParameter".
See Also:
• Oracle Database Globalization Support Guide for more information aboutthe NLS_TIMESTAMP_FORMAT parameter
• Oracle Database Globalization Support Guide for more information aboutthe NLS_TIMESTAMP_TZ_FORMAT parameter
• Oracle Database Globalization Support Guide for information about date/time data types and time zone support
• Oracle Database SQL Language Reference for more information aboutthe TIMESTAMP audiotape
• Oracle Database SQL Language Reference for more information aboutthe TIMESTAMP WITH LOCAL TIME ZONE data type
• "About Date and Time Formats"
• "Changing NLS Parameter Values"
7.5.7 About the NLS_CALENDAR ParameterThis parameter specifies the calendar system for the database.
Specifies: Calendar system for the database.
Acceptable Values: Any calendar system that Oracle supports. For a list, see OracleDatabase Globalization Support Guide.
Default Value: Gregorian
Example 7-6 shows how setting NLS_CALENDAR to 'English Hijrah' andGregorian affects the displayed system date.
To try this example in SQL Developer, enter the statements and queries in theWorksheet. For information about the Worksheet, see "Running Queries in SQLDeveloper". The results shown here are from SQL*Plus; their format is slightly differentin SQL Developer.
Chapter 7About Individual NLS Parameters
7-19
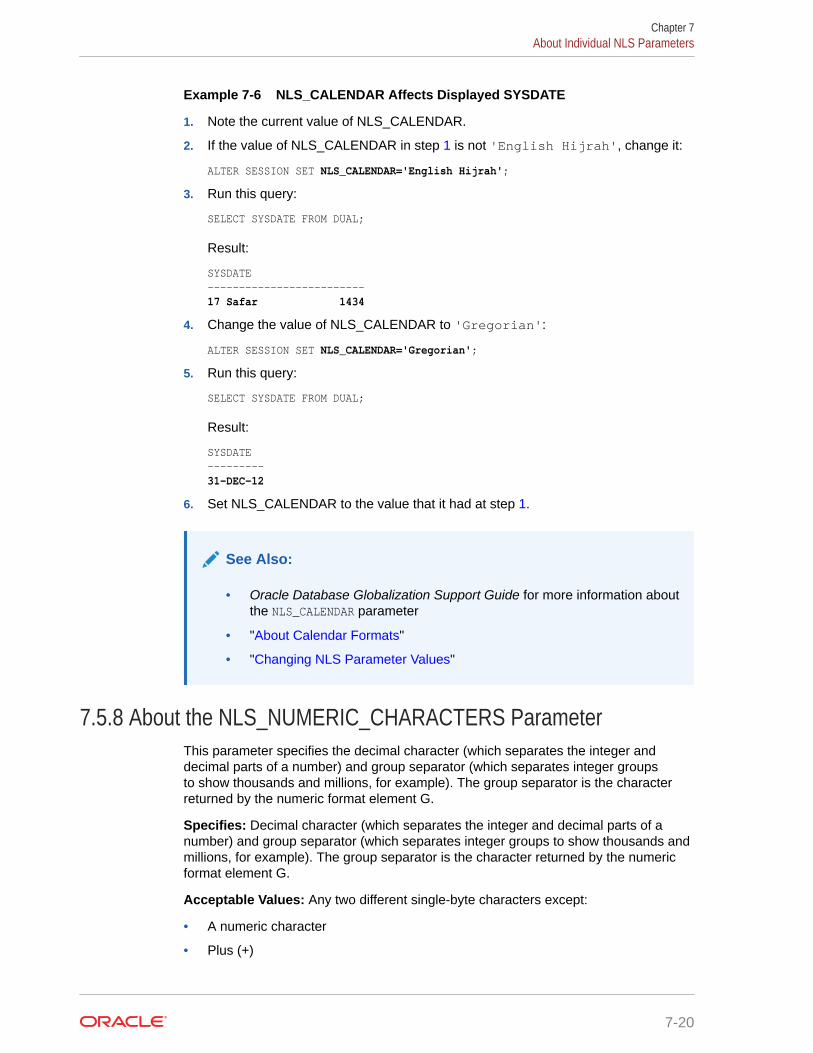
Example 7-6 NLS_CALENDAR Affects Displayed SYSDATE
1. Note the current value of NLS_CALENDAR.
2. If the value of NLS_CALENDAR in step 1 is not 'English Hijrah', change it:
ALTER SESSION SET NLS_CALENDAR='English Hijrah';
3. Run this query:
SELECT SYSDATE FROM DUAL;
Result:
SYSDATE-------------------------17 Safar 1434
4. Change the value of NLS_CALENDAR to 'Gregorian':
ALTER SESSION SET NLS_CALENDAR='Gregorian';
5. Run this query:
SELECT SYSDATE FROM DUAL;
Result:
SYSDATE---------31-DEC-12
6. Set NLS_CALENDAR to the value that it had at step 1.
See Also:
• Oracle Database Globalization Support Guide for more information aboutthe NLS_CALENDAR parameter
• "About Calendar Formats"
• "Changing NLS Parameter Values"
7.5.8 About the NLS_NUMERIC_CHARACTERS ParameterThis parameter specifies the decimal character (which separates the integer anddecimal parts of a number) and group separator (which separates integer groupsto show thousands and millions, for example). The group separator is the characterreturned by the numeric format element G.
Specifies: Decimal character (which separates the integer and decimal parts of anumber) and group separator (which separates integer groups to show thousands andmillions, for example). The group separator is the character returned by the numericformat element G.
Acceptable Values: Any two different single-byte characters except:
• A numeric character
• Plus (+)
Chapter 7About Individual NLS Parameters
7-20
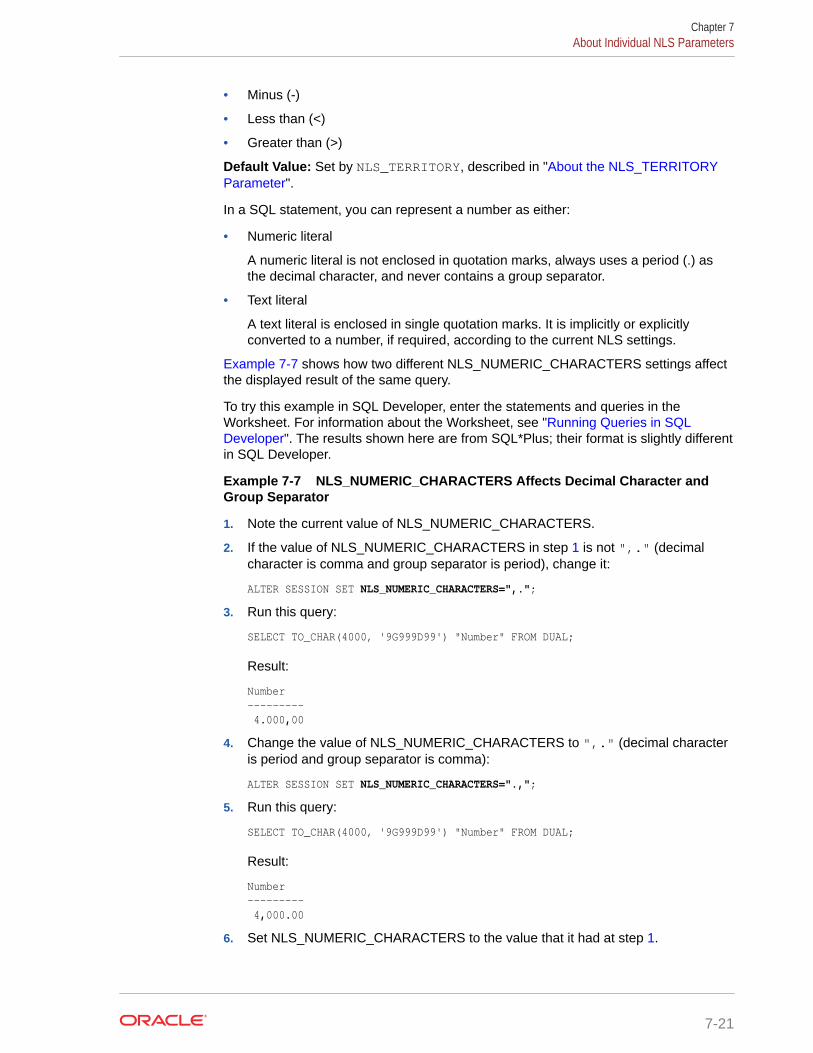
• Minus (-)
• Less than (<)
• Greater than (>)
Default Value: Set by NLS_TERRITORY, described in "About the NLS_TERRITORYParameter".
In a SQL statement, you can represent a number as either:
• Numeric literal
A numeric literal is not enclosed in quotation marks, always uses a period (.) asthe decimal character, and never contains a group separator.
• Text literal
A text literal is enclosed in single quotation marks. It is implicitly or explicitlyconverted to a number, if required, according to the current NLS settings.
Example 7-7 shows how two different NLS_NUMERIC_CHARACTERS settings affectthe displayed result of the same query.
To try this example in SQL Developer, enter the statements and queries in theWorksheet. For information about the Worksheet, see "Running Queries in SQLDeveloper". The results shown here are from SQL*Plus; their format is slightly differentin SQL Developer.
Example 7-7 NLS_NUMERIC_CHARACTERS Affects Decimal Character andGroup Separator
1. Note the current value of NLS_NUMERIC_CHARACTERS.
2. If the value of NLS_NUMERIC_CHARACTERS in step 1 is not ",." (decimalcharacter is comma and group separator is period), change it:
ALTER SESSION SET NLS_NUMERIC_CHARACTERS=",.";
3. Run this query:
SELECT TO_CHAR(4000, '9G999D99') "Number" FROM DUAL;
Result:
Number--------- 4.000,00
4. Change the value of NLS_NUMERIC_CHARACTERS to ",." (decimal characteris period and group separator is comma):
ALTER SESSION SET NLS_NUMERIC_CHARACTERS=".,";
5. Run this query:
SELECT TO_CHAR(4000, '9G999D99') "Number" FROM DUAL;
Result:
Number--------- 4,000.00
6. Set NLS_NUMERIC_CHARACTERS to the value that it had at step 1.
Chapter 7About Individual NLS Parameters
7-21
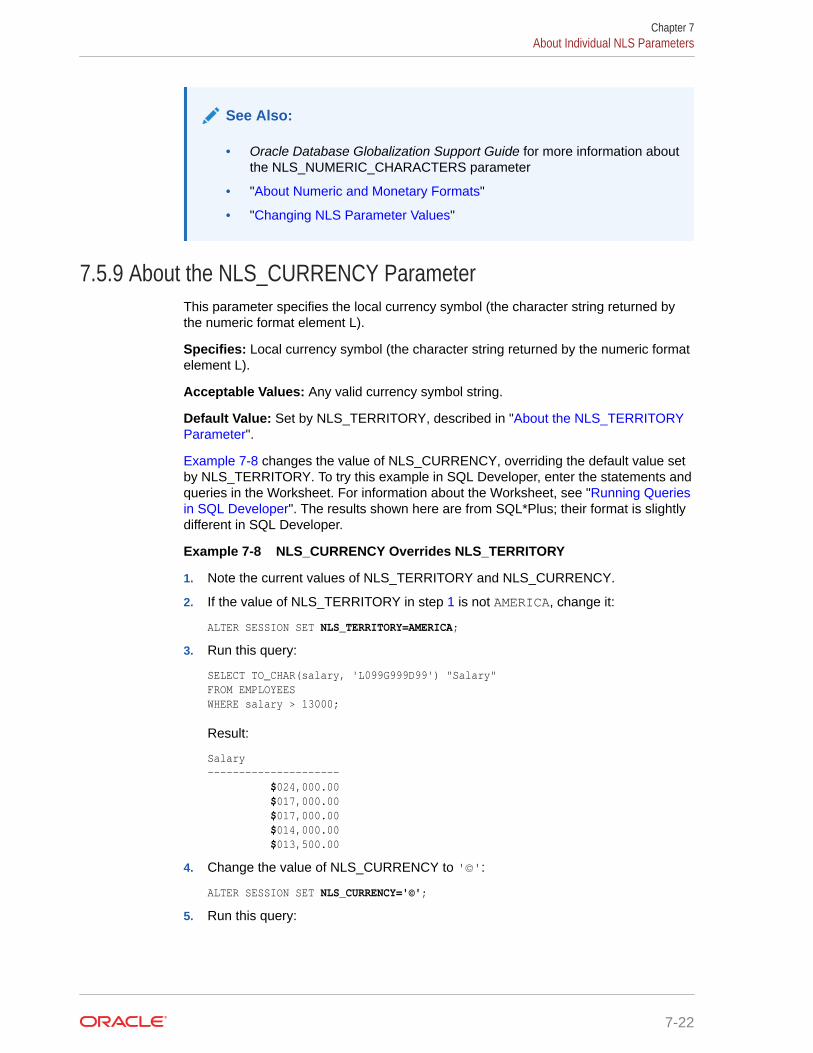
See Also:
• Oracle Database Globalization Support Guide for more information aboutthe NLS_NUMERIC_CHARACTERS parameter
• "About Numeric and Monetary Formats"
• "Changing NLS Parameter Values"
7.5.9 About the NLS_CURRENCY ParameterThis parameter specifies the local currency symbol (the character string returned bythe numeric format element L).
Specifies: Local currency symbol (the character string returned by the numeric formatelement L).
Acceptable Values: Any valid currency symbol string.
Default Value: Set by NLS_TERRITORY, described in "About the NLS_TERRITORYParameter".
Example 7-8 changes the value of NLS_CURRENCY, overriding the default value setby NLS_TERRITORY. To try this example in SQL Developer, enter the statements andqueries in the Worksheet. For information about the Worksheet, see "Running Queriesin SQL Developer". The results shown here are from SQL*Plus; their format is slightlydifferent in SQL Developer.
Example 7-8 NLS_CURRENCY Overrides NLS_TERRITORY
1. Note the current values of NLS_TERRITORY and NLS_CURRENCY.
2. If the value of NLS_TERRITORY in step 1 is not AMERICA, change it:
ALTER SESSION SET NLS_TERRITORY=AMERICA;
3. Run this query:
SELECT TO_CHAR(salary, 'L099G999D99') "Salary"FROM EMPLOYEESWHERE salary > 13000;
Result:
Salary--------------------- $024,000.00 $017,000.00 $017,000.00 $014,000.00 $013,500.00
4. Change the value of NLS_CURRENCY to '©':
ALTER SESSION SET NLS_CURRENCY='©';
5. Run this query:
Chapter 7About Individual NLS Parameters
7-22
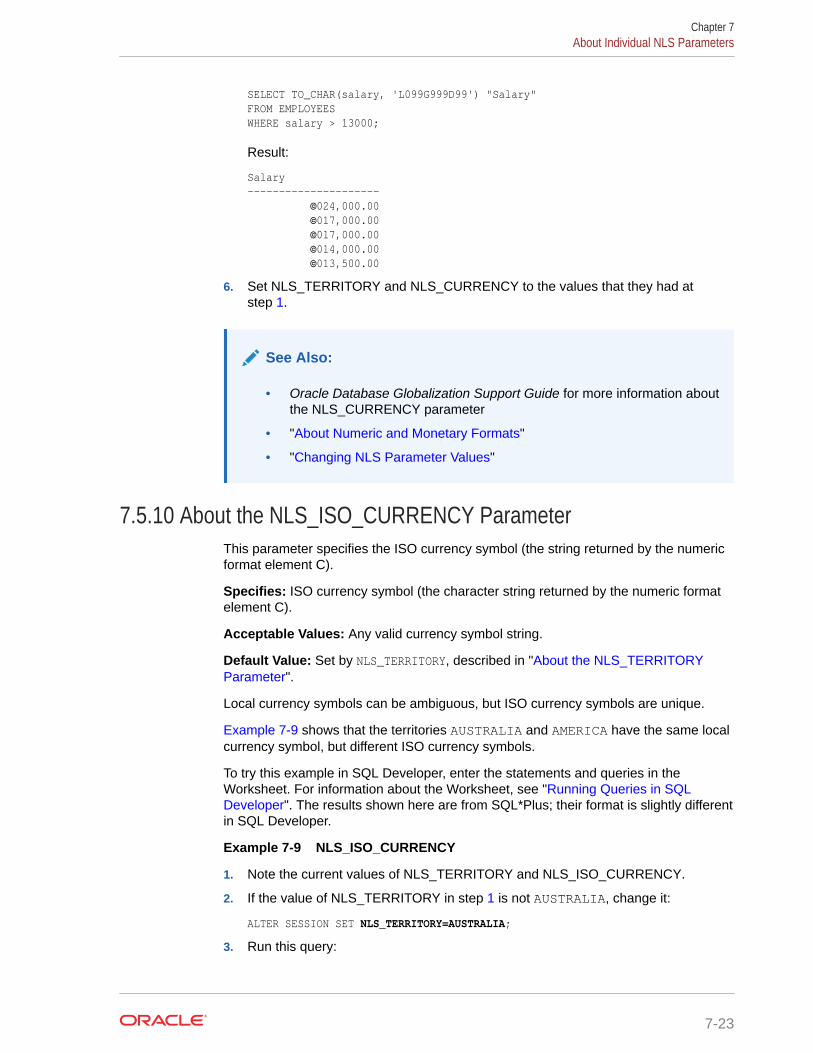
SELECT TO_CHAR(salary, 'L099G999D99') "Salary"FROM EMPLOYEESWHERE salary > 13000;
Result:
Salary--------------------- ©024,000.00 ©017,000.00 ©017,000.00 ©014,000.00 ©013,500.00
6. Set NLS_TERRITORY and NLS_CURRENCY to the values that they had atstep 1.
See Also:
• Oracle Database Globalization Support Guide for more information aboutthe NLS_CURRENCY parameter
• "About Numeric and Monetary Formats"
• "Changing NLS Parameter Values"
7.5.10 About the NLS_ISO_CURRENCY ParameterThis parameter specifies the ISO currency symbol (the string returned by the numericformat element C).
Specifies: ISO currency symbol (the character string returned by the numeric formatelement C).
Acceptable Values: Any valid currency symbol string.
Default Value: Set by NLS_TERRITORY, described in "About the NLS_TERRITORYParameter".
Local currency symbols can be ambiguous, but ISO currency symbols are unique.
Example 7-9 shows that the territories AUSTRALIA and AMERICA have the same localcurrency symbol, but different ISO currency symbols.
To try this example in SQL Developer, enter the statements and queries in theWorksheet. For information about the Worksheet, see "Running Queries in SQLDeveloper". The results shown here are from SQL*Plus; their format is slightly differentin SQL Developer.
Example 7-9 NLS_ISO_CURRENCY
1. Note the current values of NLS_TERRITORY and NLS_ISO_CURRENCY.
2. If the value of NLS_TERRITORY in step 1 is not AUSTRALIA, change it:
ALTER SESSION SET NLS_TERRITORY=AUSTRALIA;
3. Run this query:
Chapter 7About Individual NLS Parameters
7-23
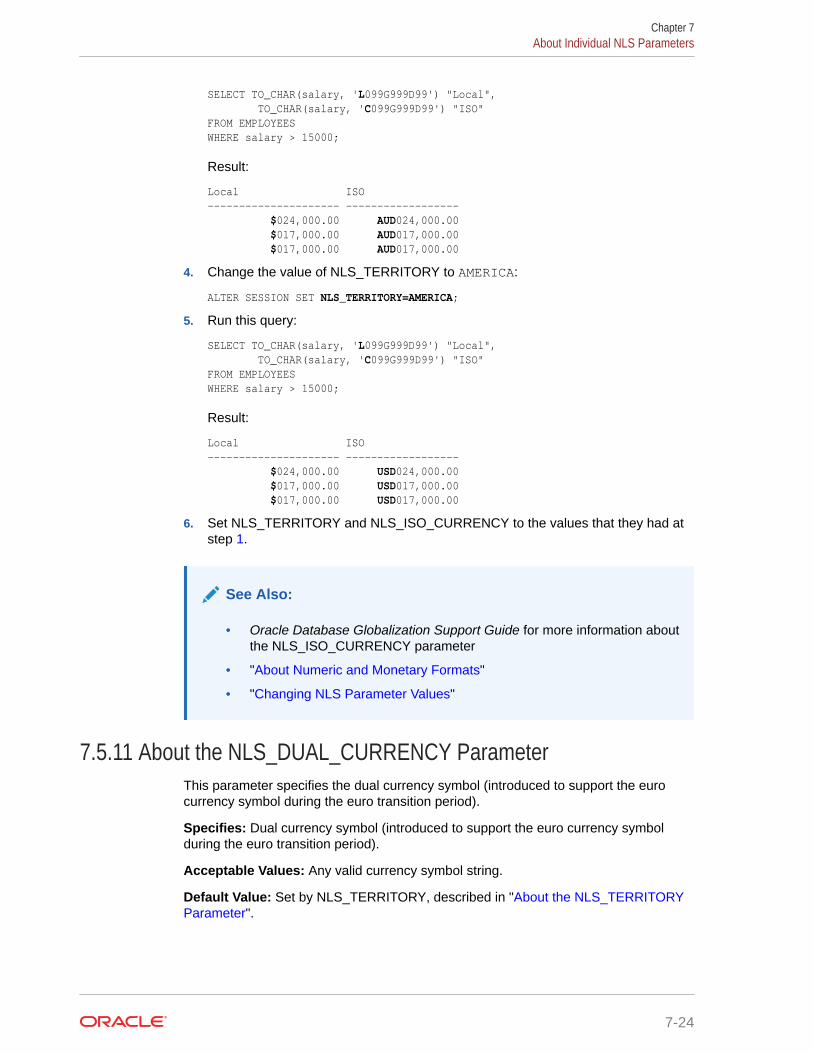
SELECT TO_CHAR(salary, 'L099G999D99') "Local", TO_CHAR(salary, 'C099G999D99') "ISO"FROM EMPLOYEESWHERE salary > 15000;
Result:
Local ISO--------------------- ------------------ $024,000.00 AUD024,000.00 $017,000.00 AUD017,000.00 $017,000.00 AUD017,000.00
4. Change the value of NLS_TERRITORY to AMERICA:
ALTER SESSION SET NLS_TERRITORY=AMERICA;
5. Run this query:
SELECT TO_CHAR(salary, 'L099G999D99') "Local", TO_CHAR(salary, 'C099G999D99') "ISO"FROM EMPLOYEESWHERE salary > 15000;
Result:
Local ISO--------------------- ------------------ $024,000.00 USD024,000.00 $017,000.00 USD017,000.00 $017,000.00 USD017,000.00
6. Set NLS_TERRITORY and NLS_ISO_CURRENCY to the values that they had atstep 1.
See Also:
• Oracle Database Globalization Support Guide for more information aboutthe NLS_ISO_CURRENCY parameter
• "About Numeric and Monetary Formats"
• "Changing NLS Parameter Values"
7.5.11 About the NLS_DUAL_CURRENCY ParameterThis parameter specifies the dual currency symbol (introduced to support the eurocurrency symbol during the euro transition period).
Specifies: Dual currency symbol (introduced to support the euro currency symbolduring the euro transition period).
Acceptable Values: Any valid currency symbol string.
Default Value: Set by NLS_TERRITORY, described in "About the NLS_TERRITORYParameter".
Chapter 7About Individual NLS Parameters
7-24
See Also:
• Oracle Database Globalization Support Guide for more information aboutthe NLS_DUAL_CURRENCY parameter
• "About Numeric and Monetary Formats"
• "Changing NLS Parameter Values"
7.5.12 About the NLS_SORT ParameterThis parameter specifies the linguistic sort order (collating sequence) for queries thathave the ORDER BY clause.
Specifies: Linguistic sort order (collating sequence) for queries that have the ORDERBY clause.
Acceptable Values:
• BINARY
Sort order is based on the binary sequence order of either the database characterset or the national character set, depending on the data type.
• Any linguistic sort name that Oracle supports
Sort order is based on the order of the specified linguistic sort name. The linguisticsort name is usually the same as the language name, but not always. For a listof supported linguistic sort names, see Oracle Database Globalization SupportGuide.
Default Value: Set by NLS_LANGUAGE, described in "About the NLS_LANGUAGEParameter".
Example 7-10 shows how two different NLS_SORT settings affect the displayed resultof the same query. The settings are BINARY and Traditional Spanish (SPANISH_M).Traditional Spanish treats ch, ll, and ñ as letters that follow c, l, and n, respectively.
To try this example in SQL Developer, enter the statements and queries in theWorksheet. For information about the Worksheet, see "Running Queries in SQLDeveloper". The results shown here are from SQL*Plus; their format is slightly differentin SQL Developer.
Case-Insensitive and Accent-Insensitive Sorts
Operations inside Oracle Database are sensitive to the case and the accents ofthe characters. To perform a case-insensitive sort, append _CI to the value of theNLS_SORT parameter (for example, BINARY_CI or GERMAN_CI). To perform a sortthat is both case-insensitive and accent-insensitive, append _AI to the value of theNLS_SORT parameter (for example, BINARY_AI or FRENCH_M_AI).
Example 7-10 NLS_SORT Affects Linguistic Sort Order
1. Create table for Spanish words:
CREATE TABLE temp (name VARCHAR2(15));
2. Populate table with some Spanish words:
Chapter 7About Individual NLS Parameters
7-25
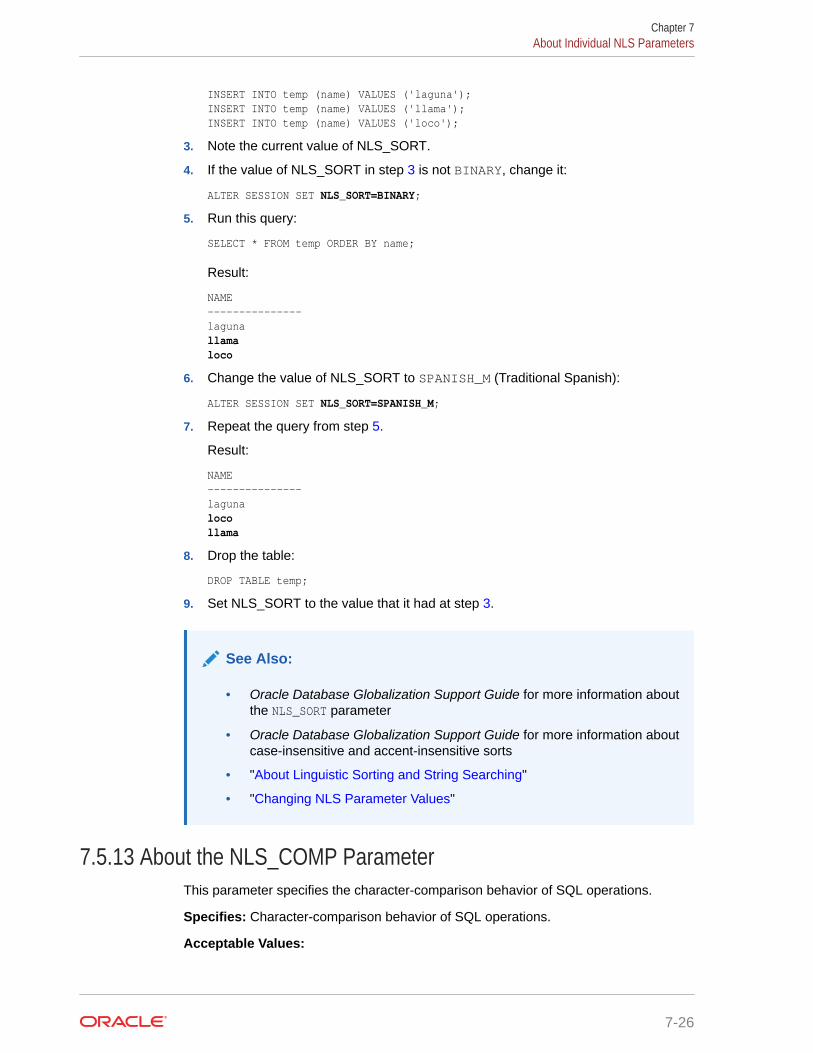
INSERT INTO temp (name) VALUES ('laguna');INSERT INTO temp (name) VALUES ('llama');INSERT INTO temp (name) VALUES ('loco');
3. Note the current value of NLS_SORT.
4. If the value of NLS_SORT in step 3 is not BINARY, change it:
ALTER SESSION SET NLS_SORT=BINARY;
5. Run this query:
SELECT * FROM temp ORDER BY name;
Result:
NAME---------------lagunallamaloco
6. Change the value of NLS_SORT to SPANISH_M (Traditional Spanish):
ALTER SESSION SET NLS_SORT=SPANISH_M;
7. Repeat the query from step 5.
Result:
NAME---------------lagunalocollama
8. Drop the table:
DROP TABLE temp;
9. Set NLS_SORT to the value that it had at step 3.
See Also:
• Oracle Database Globalization Support Guide for more information aboutthe NLS_SORT parameter
• Oracle Database Globalization Support Guide for more information aboutcase-insensitive and accent-insensitive sorts
• "About Linguistic Sorting and String Searching"
• "Changing NLS Parameter Values"
7.5.13 About the NLS_COMP ParameterThis parameter specifies the character-comparison behavior of SQL operations.
Specifies: Character-comparison behavior of SQL operations.
Acceptable Values:
Chapter 7About Individual NLS Parameters
7-26
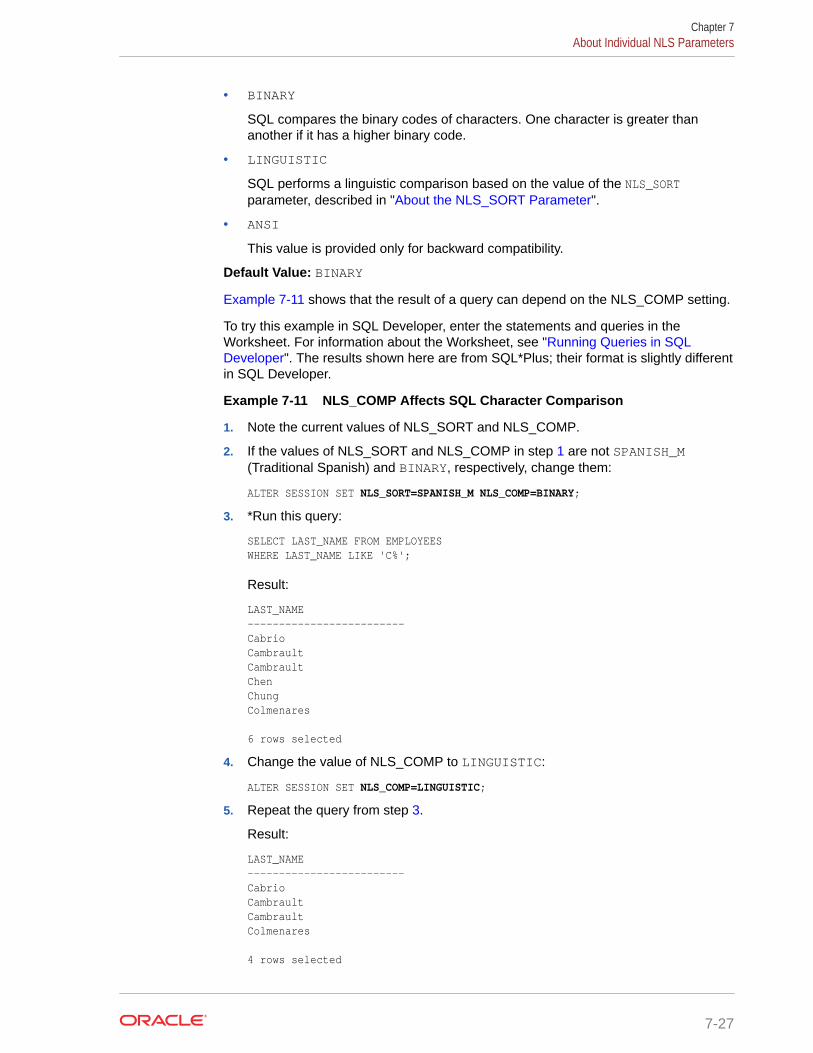
• BINARY
SQL compares the binary codes of characters. One character is greater thananother if it has a higher binary code.
• LINGUISTIC
SQL performs a linguistic comparison based on the value of the NLS_SORTparameter, described in "About the NLS_SORT Parameter".
• ANSI
This value is provided only for backward compatibility.
Default Value: BINARY
Example 7-11 shows that the result of a query can depend on the NLS_COMP setting.
To try this example in SQL Developer, enter the statements and queries in theWorksheet. For information about the Worksheet, see "Running Queries in SQLDeveloper". The results shown here are from SQL*Plus; their format is slightly differentin SQL Developer.
Example 7-11 NLS_COMP Affects SQL Character Comparison
1. Note the current values of NLS_SORT and NLS_COMP.
2. If the values of NLS_SORT and NLS_COMP in step 1 are not SPANISH_M(Traditional Spanish) and BINARY, respectively, change them:
ALTER SESSION SET NLS_SORT=SPANISH_M NLS_COMP=BINARY;
3. *Run this query:
SELECT LAST_NAME FROM EMPLOYEESWHERE LAST_NAME LIKE 'C%';
Result:
LAST_NAME ------------------------- Cabrio Cambrault Cambrault Chen Chung Colmenares 6 rows selected
4. Change the value of NLS_COMP to LINGUISTIC:
ALTER SESSION SET NLS_COMP=LINGUISTIC;
5. Repeat the query from step 3.
Result:
LAST_NAME ------------------------- Cabrio Cambrault Cambrault Colmenares 4 rows selected
Chapter 7About Individual NLS Parameters
7-27
This time, Chen and Chung are not returned because Traditional Spanish treats chas a single character that follows c.
6. Set NLS_SORT and NLS_COMP to the values that they had in step 1.
See Also:
• Oracle Database Globalization Support Guide for more information aboutthe NLS_COMP parameter
• "About Linguistic Sorting and String Searching"
• "Changing NLS Parameter Values"
7.5.14 About the NLS_LENGTH_SEMANTICS ParameterThis parameter specifies the length semantics for columns of the character data typesCHAR, VARCHAR2, and LONG; that is, whether these columns are specified in bytesor in characters. (Applies only to columns that are declared after the parameter is set.)
Specifies: Length semantics for columns of the character data types CHAR,VARCHAR2, and LONG; that is, whether these columns are specified in bytes or incharacters. (Applies only to columns that are declared after the parameter is set.)
Acceptable Values:
• BYTE
New CHAR, VARCHAR2, and LONG columns are specified in bytes.
• CHAR
New CHAR, VARCHAR2, and LONG columns are specified in characters.
Default Value: BYTE
To try this example in SQL Developer, enter the statements and queries in theWorksheet. For information about the Worksheet, see "Running Queries in SQLDeveloper". The results shown here are from SQL*Plus; their format is slightly differentin SQL Developer.
Example 7-12 NLS_LENGTH_SEMANTICS Affects Storage of VARCHAR2Column
1. Note the current values of NLS_LENGTH_SEMANTICS.
2. If the value of NLS_LENGTH_SEMANTICS in step 1 is not BYTE, change it:
ALTER SESSION SET NLS_LENGTH_SEMANTICS=BYTE;
3. Create a table with a VARCHAR2 column:
CREATE TABLE SEMANTICS_BYTE(SOME_DATA VARCHAR2(20));
4. Click the tab Connections.
5. In the Connections frame, expand hr_conn.
6. In the list of schema object types, expand Tables.
7. In the list of tables, select SEMANTICS_BYTE.
Chapter 7About Individual NLS Parameters
7-28
To the right of the Connections frame, the Columns pane shows that for ColumnName SOME_DATA, the Data Type is VARCHAR2(20 BYTE).
8. Change the value of NLS_LENGTH_SEMANTICS to CHAR:
ALTER SESSION SET NLS_LENGTH_SEMANTICS=CHAR;
9. Create another table with a VARCHAR2 column:
CREATE TABLE SEMANTICS_CHAR(SOME_DATA VARCHAR2(20));
10. In the Connections frame, click the Refresh icon.
The list of tables now includes SEMANTICS_CHAR.
11. Select SEMANTICS_CHAR.
The Columns pane shows that for Column Name SOME_DATA, the Data Type isVARCHAR2(20 CHAR).
12. Select SEMANTICS_BYTE again.
The Columns pane shows that for Column Name SOME_DATA, the Data Type isstill VARCHAR2(20 BYTE).
13. Set the value of NLS_LENGTH_SEMANTICS to the value that it had in step 1.
See Also:
• Oracle Database Globalization Support Guide for more information aboutthe NLS_LENGTH_SEMANTICS parameter
• "About Length Semantics"
• "Changing NLS Parameter Values"
7.6 Using Unicode in Globalized ApplicationsYou can insert and retrieve Unicode data. Data is transparently converted among thedatabase and client programs, which ensures that client programs are independent ofthe database character set and national character set.
See Also:
• Oracle Database Globalization Support Guide for more information aboutSQL and PL/SQL programming with Unicode
• Oracle Database Globalization Support Guide for general informationabout programming with Unicode
7.6.1 Representing Unicode String Literals in SQL and PL/SQLThere are three ways to represent a Unicode string literal in SQL or PL/SQL.
The three ways to represent a Unicode string literal in SQL or PL/SQL are:
Chapter 7Using Unicode in Globalized Applications
7-29

• N'string'
Example: N'résumé'.
Limitations: See "Avoiding Data Loss During Character-Set Conversion".
• NCHR(number)
The SQL function NCHR returns the character whose binary equivalent is numberin the national character set. The character returned has data type NVARCHAR2.
Example: NCHR(36) represents $ in the default national character set,AL16UTF16.
Limitations: Portability of the value of NCHR(number) is limited to applicationsthat use the same national character set.
• UNISTR('string')
The SQL function UNISTR converts string to the national character set.
For portability and data preservation, Oracle recommends that string contain onlyASCII characters and Unicode encoding values. A Unicode encoding value hasthe form \xxxx, where xxxx is the hexadecimal value of a character code value inUCS-2 encoding format.Example: UNISTR('G\0061ry') represents 'Gary'
ASCII characters are converted to the database character set and then to thenational character set. Unicode encoding values are converted directly to thenational character set.
See Also:
• Oracle Database Globalization Support Guide for more information aboutUnicode string literals
• Oracle Database SQL Language Reference for more information aboutthe NCHR function
• Oracle Database SQL Language Reference for more information aboutthe UNISTR function
7.6.2 Avoiding Data Loss During Character-Set ConversionAs part of a SQL or PL/SQL statement, a literal (with or without the prefix N) isencoded in the same character set as the rest of the statement. On the client side,the statement is encoded in the client character set, which is determined by theNLS_LANG parameter. On the server side, the statement is encoded in the databasecharacter set.
When the SQL or PL/SQL statement is transferred from the client to the database, itscharacter set is converted accordingly. If the database character set does not containall characters that the client used in the text literals, then data is lost in this conversion.NCHAR string literals are more vulnerable than CHAR text literals, because they aredesigned to be independent of the database character set.
Chapter 7Using Unicode in Globalized Applications
7-30
To avoid data loss in conversion to an incompatible database character set, you canactivate the NCHAR literal replacement functionality. For more information, see OracleDatabase Globalization Support Guide.
Chapter 7Using Unicode in Globalized Applications
7-31
8Building Effective Applications
Effective applications are scalable and use recommended programming and securitypractices.
See Also:
Oracle Database Development Guide for more information about creatingand deploying applications that are optimized for Oracle Database
8.1 Building Scalable ApplicationsDesign your applications to use the same resources, regardless of user populationsand data volumes, and not to overload system resources.
8.1.1 About Scalable ApplicationsA scalable application can process a larger workload with a proportional increase insystem resource usage.
A scalable application can process a larger workload with a proportional increase insystem resource usage. For example, if you double its workload, a scalable applicationuses twice as many system resources.
An unscalable application exhausts a system resource; therefore, if you increase theapplication workload, no more throughput is possible. Unscalable applications result infixed throughputs and poor response times.
Examples of resource exhaustion are:
• Hardware exhaustion
• Table scans in high-volume transactions causing inevitable disk input/output (I/O)shortages
• Excessive network requests causing network and scheduling bottlenecks
• Memory allocation causing paging and swapping
• Excessive process and thread allocation causing operating system thrashing
Design your applications to use the same resources, regardless of user populationsand data volumes, and not to overload system resources.
8.1.2 Using Bind Variables to Improve ScalabilityBind variables, used correctly, let you develop efficient, scalable applications.
8-1
A bind variable is a placeholder in a SQL statement that must be replaced with avalid value or value address for the statement to execute successfully. By using bindvariables, you can write a SQL statement that accepts inputs or parameters at runtime.
Just as a subprogram can have parameters, whose values are supplied by the invoker,a SQL statement can have bind variable placeholders, whose values (called bindvariables) are supplied at runtime. Just as a subprogram is compiled once andthen run many times with different parameters, a SQL statement with bind variableplaceholders is hard parsed once and then soft parsed with different bind variables.
A hard parse, which includes optimization and row source generation, is a very CPU-intensive operation. A soft parse, which skips optimization and row source generationand proceeds straight to execution, is usually much faster than a hard parse of thesame statement. (For an overview of SQL processing, which includes the differencebetween a hard and soft parse, see Oracle Database Concepts.)
Not only is a hard parse a CPU-intensive operation, it is an unscalableoperation, because it cannot be done concurrently with many other operations. Formore information about concurrency and scalability, see "About Concurrency andScalability".
Example 8-1 shows the performance difference between a query without a bindvariable and a semantically equivalent query with a bind variable. The former is slowerand uses many more latches (for information about how latches affect scalability, see"About Latches and Concurrency"). To collect and display performance statistics, theexample uses the Runstats tool, described in "Comparing Programming Techniqueswith Runstats".
Note:
• Example 8-1 shows the performance cost for a single user. As moreusers are added, the cost escalates rapidly.
• The result of Example 8-1 was produced with this setting:
SET SERVEROUTPUT ON FORMAT TRUNCATED
Note:
• Using bind variables instead of string literals is the most effective way tomake your code invulnerable to SQL injection attacks. For details, seeOracle Database PL/SQL Language Reference.
• Bind variables sometimes reduce the efficiency of data warehousingsystems. Because most queries take so long, the optimizer tries toproduce the best plan for each query rather than the best generic query.Using bind variables sometimes forces the optimizer to produce thebest generic query. For information about improving performance in datawarehousing systems, see Oracle Database Data Warehousing Guide.
Chapter 8Building Scalable Applications
8-2
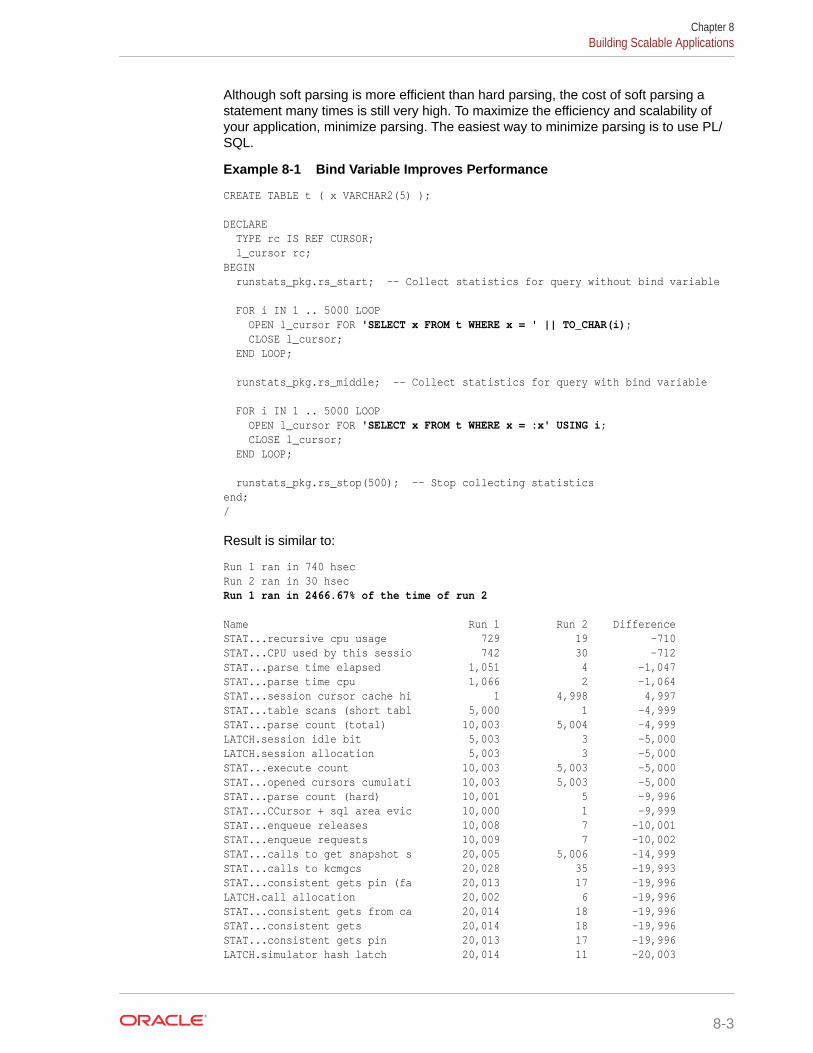
Although soft parsing is more efficient than hard parsing, the cost of soft parsing astatement many times is still very high. To maximize the efficiency and scalability ofyour application, minimize parsing. The easiest way to minimize parsing is to use PL/SQL.
Example 8-1 Bind Variable Improves Performance
CREATE TABLE t ( x VARCHAR2(5) ); DECLARE TYPE rc IS REF CURSOR; l_cursor rc;BEGIN runstats_pkg.rs_start; -- Collect statistics for query without bind variable FOR i IN 1 .. 5000 LOOP OPEN l_cursor FOR 'SELECT x FROM t WHERE x = ' || TO_CHAR(i); CLOSE l_cursor; END LOOP; runstats_pkg.rs_middle; -- Collect statistics for query with bind variable FOR i IN 1 .. 5000 LOOP OPEN l_cursor FOR 'SELECT x FROM t WHERE x = :x' USING i; CLOSE l_cursor; END LOOP; runstats_pkg.rs_stop(500); -- Stop collecting statisticsend;/
Result is similar to:
Run 1 ran in 740 hsecRun 2 ran in 30 hsecRun 1 ran in 2466.67% of the time of run 2
Name Run 1 Run 2 DifferenceSTAT...recursive cpu usage 729 19 -710STAT...CPU used by this sessio 742 30 -712STAT...parse time elapsed 1,051 4 -1,047STAT...parse time cpu 1,066 2 -1,064STAT...session cursor cache hi 1 4,998 4,997STAT...table scans (short tabl 5,000 1 -4,999STAT...parse count (total) 10,003 5,004 -4,999LATCH.session idle bit 5,003 3 -5,000LATCH.session allocation 5,003 3 -5,000STAT...execute count 10,003 5,003 -5,000STAT...opened cursors cumulati 10,003 5,003 -5,000STAT...parse count (hard) 10,001 5 -9,996STAT...CCursor + sql area evic 10,000 1 -9,999STAT...enqueue releases 10,008 7 -10,001STAT...enqueue requests 10,009 7 -10,002STAT...calls to get snapshot s 20,005 5,006 -14,999STAT...calls to kcmgcs 20,028 35 -19,993STAT...consistent gets pin (fa 20,013 17 -19,996LATCH.call allocation 20,002 6 -19,996STAT...consistent gets from ca 20,014 18 -19,996STAT...consistent gets 20,014 18 -19,996STAT...consistent gets pin 20,013 17 -19,996LATCH.simulator hash latch 20,014 11 -20,003
Chapter 8Building Scalable Applications
8-3
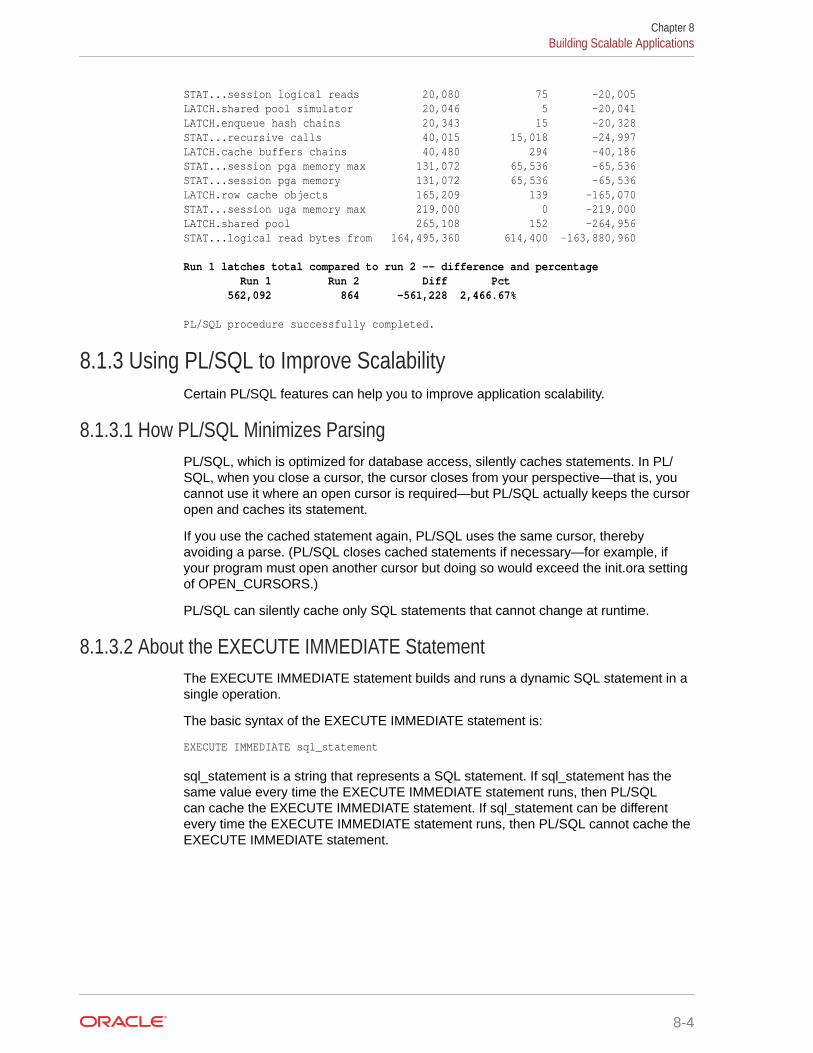
STAT...session logical reads 20,080 75 -20,005LATCH.shared pool simulator 20,046 5 -20,041LATCH.enqueue hash chains 20,343 15 -20,328STAT...recursive calls 40,015 15,018 -24,997LATCH.cache buffers chains 40,480 294 -40,186STAT...session pga memory max 131,072 65,536 -65,536STAT...session pga memory 131,072 65,536 -65,536LATCH.row cache objects 165,209 139 -165,070STAT...session uga memory max 219,000 0 -219,000LATCH.shared pool 265,108 152 -264,956STAT...logical read bytes from 164,495,360 614,400 -163,880,960
Run 1 latches total compared to run 2 -- difference and percentage Run 1 Run 2 Diff Pct 562,092 864 -561,228 2,466.67% PL/SQL procedure successfully completed.
8.1.3 Using PL/SQL to Improve ScalabilityCertain PL/SQL features can help you to improve application scalability.
8.1.3.1 How PL/SQL Minimizes ParsingPL/SQL, which is optimized for database access, silently caches statements. In PL/SQL, when you close a cursor, the cursor closes from your perspective—that is, youcannot use it where an open cursor is required—but PL/SQL actually keeps the cursoropen and caches its statement.
If you use the cached statement again, PL/SQL uses the same cursor, therebyavoiding a parse. (PL/SQL closes cached statements if necessary—for example, ifyour program must open another cursor but doing so would exceed the init.ora settingof OPEN_CURSORS.)
PL/SQL can silently cache only SQL statements that cannot change at runtime.
8.1.3.2 About the EXECUTE IMMEDIATE StatementThe EXECUTE IMMEDIATE statement builds and runs a dynamic SQL statement in asingle operation.
The basic syntax of the EXECUTE IMMEDIATE statement is:
EXECUTE IMMEDIATE sql_statement
sql_statement is a string that represents a SQL statement. If sql_statement has thesame value every time the EXECUTE IMMEDIATE statement runs, then PL/SQLcan cache the EXECUTE IMMEDIATE statement. If sql_statement can be differentevery time the EXECUTE IMMEDIATE statement runs, then PL/SQL cannot cache theEXECUTE IMMEDIATE statement.
Chapter 8Building Scalable Applications
8-4
See Also:
• Oracle Database PL/SQL Language Reference for information aboutEXECUTE IMMEDIATE
• "About the DBMS_SQL Package"
8.1.3.3 About OPEN FOR StatementsThe OPEN FOR statement has the following basic syntax.
The basic syntax of the OPEN FOR statement is:
OPEN cursor_variable FOR query
Your application can open cursor_variable for several different queries before closingit. Because PL/SQL cannot determine the number of different queries until runtime,PL/SQL cannot cache the OPEN FOR statement.
If you do not need to use a cursor variable, then use a declared cursor, for bothbetter performance and ease of programming. For details, see Oracle DatabaseDevelopment Guide.
See Also:
• Oracle Database PL/SQL Language Reference for information aboutOPEN FOR
• "About Cursor Variables"
• "About Cursors"
8.1.3.4 About the DBMS_SQL PackageThe DBMS_SQL package is an API for building, running, and describing dynamicSQL statements. You must use the DBMS_SQL package instead of the EXECUTEIMMEDIATE statement if the PL/SQL compiler cannot determine at compile time thenumber or types of output host variables (select list items) or input bind variables.
The DBMS_SQL package is an API for building, running, and describing dynamicSQL statements. Using the DBMS_SQL package takes more effort than using theEXECUTE IMMEDIATE statement, but you must use the DBMS_SQL package if thePL/SQL compiler cannot determine at compile time the number or types of output hostvariables (select list items) or input bind variables.
Chapter 8Building Scalable Applications
8-5
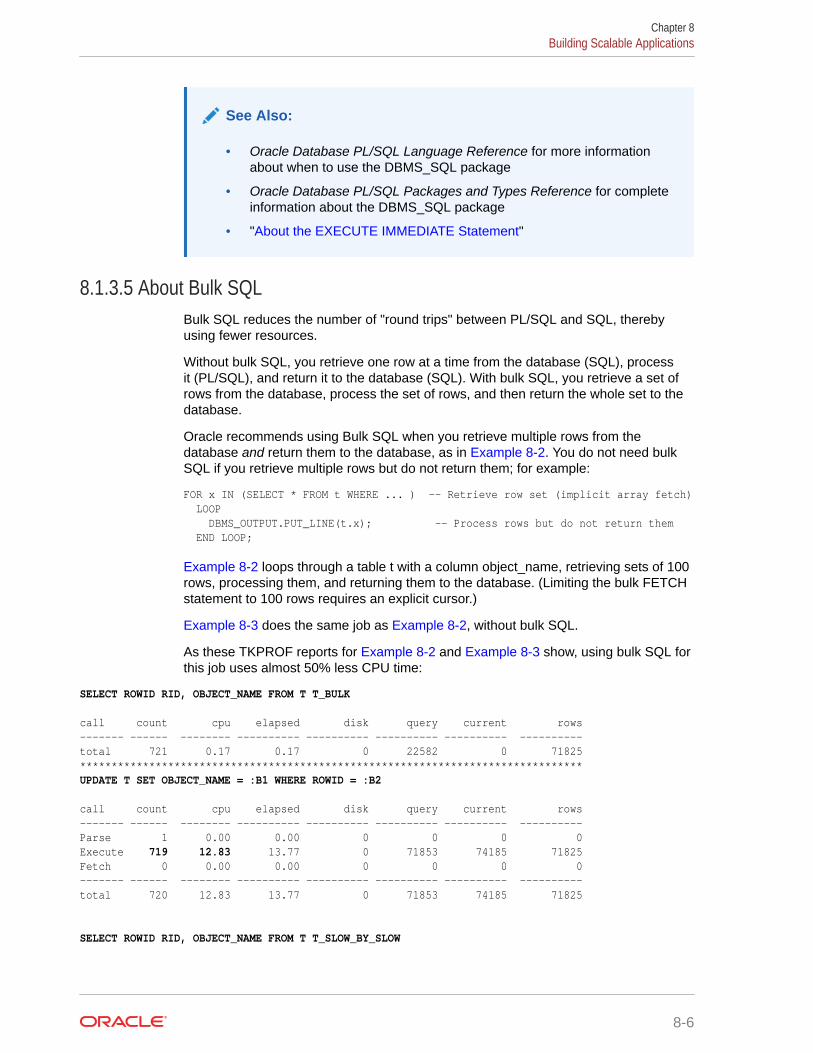
See Also:
• Oracle Database PL/SQL Language Reference for more informationabout when to use the DBMS_SQL package
• Oracle Database PL/SQL Packages and Types Reference for completeinformation about the DBMS_SQL package
• "About the EXECUTE IMMEDIATE Statement"
8.1.3.5 About Bulk SQLBulk SQL reduces the number of "round trips" between PL/SQL and SQL, therebyusing fewer resources.
Without bulk SQL, you retrieve one row at a time from the database (SQL), processit (PL/SQL), and return it to the database (SQL). With bulk SQL, you retrieve a set ofrows from the database, process the set of rows, and then return the whole set to thedatabase.
Oracle recommends using Bulk SQL when you retrieve multiple rows from thedatabase and return them to the database, as in Example 8-2. You do not need bulkSQL if you retrieve multiple rows but do not return them; for example:
FOR x IN (SELECT * FROM t WHERE ... ) -- Retrieve row set (implicit array fetch) LOOP DBMS_OUTPUT.PUT_LINE(t.x); -- Process rows but do not return them END LOOP;
Example 8-2 loops through a table t with a column object_name, retrieving sets of 100rows, processing them, and returning them to the database. (Limiting the bulk FETCHstatement to 100 rows requires an explicit cursor.)
Example 8-3 does the same job as Example 8-2, without bulk SQL.
As these TKPROF reports for Example 8-2 and Example 8-3 show, using bulk SQL forthis job uses almost 50% less CPU time:
SELECT ROWID RID, OBJECT_NAME FROM T T_BULK call count cpu elapsed disk query current rows------- ------ -------- ---------- ---------- ---------- ---------- ----------total 721 0.17 0.17 0 22582 0 71825********************************************************************************UPDATE T SET OBJECT_NAME = :B1 WHERE ROWID = :B2 call count cpu elapsed disk query current rows------- ------ -------- ---------- ---------- ---------- ---------- ----------Parse 1 0.00 0.00 0 0 0 0Execute 719 12.83 13.77 0 71853 74185 71825Fetch 0 0.00 0.00 0 0 0 0------- ------ -------- ---------- ---------- ---------- ---------- ----------total 720 12.83 13.77 0 71853 74185 71825
SELECT ROWID RID, OBJECT_NAME FROM T T_SLOW_BY_SLOW
Chapter 8Building Scalable Applications
8-6
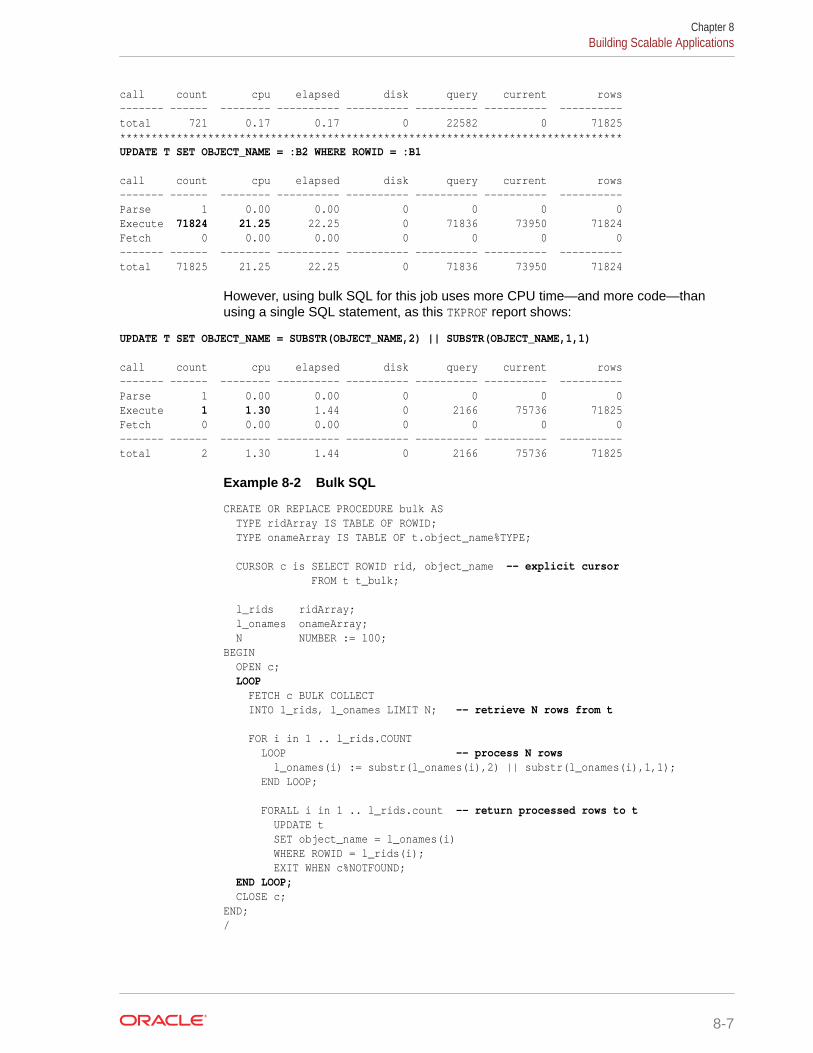
call count cpu elapsed disk query current rows------- ------ -------- ---------- ---------- ---------- ---------- ----------total 721 0.17 0.17 0 22582 0 71825********************************************************************************UPDATE T SET OBJECT_NAME = :B2 WHERE ROWID = :B1 call count cpu elapsed disk query current rows------- ------ -------- ---------- ---------- ---------- ---------- ----------Parse 1 0.00 0.00 0 0 0 0Execute 71824 21.25 22.25 0 71836 73950 71824Fetch 0 0.00 0.00 0 0 0 0------- ------ -------- ---------- ---------- ---------- ---------- ----------total 71825 21.25 22.25 0 71836 73950 71824
However, using bulk SQL for this job uses more CPU time—and more code—thanusing a single SQL statement, as this TKPROF report shows:
UPDATE T SET OBJECT_NAME = SUBSTR(OBJECT_NAME,2) || SUBSTR(OBJECT_NAME,1,1) call count cpu elapsed disk query current rows------- ------ -------- ---------- ---------- ---------- ---------- ----------Parse 1 0.00 0.00 0 0 0 0Execute 1 1.30 1.44 0 2166 75736 71825Fetch 0 0.00 0.00 0 0 0 0------- ------ -------- ---------- ---------- ---------- ---------- ----------total 2 1.30 1.44 0 2166 75736 71825
Example 8-2 Bulk SQL
CREATE OR REPLACE PROCEDURE bulk AS TYPE ridArray IS TABLE OF ROWID; TYPE onameArray IS TABLE OF t.object_name%TYPE; CURSOR c is SELECT ROWID rid, object_name -- explicit cursor FROM t t_bulk; l_rids ridArray; l_onames onameArray; N NUMBER := 100;BEGIN OPEN c; LOOP FETCH c BULK COLLECT INTO l_rids, l_onames LIMIT N; -- retrieve N rows from t
FOR i in 1 .. l_rids.COUNT LOOP -- process N rows l_onames(i) := substr(l_onames(i),2) || substr(l_onames(i),1,1); END LOOP;
FORALL i in 1 .. l_rids.count -- return processed rows to t UPDATE t SET object_name = l_onames(i) WHERE ROWID = l_rids(i); EXIT WHEN c%NOTFOUND; END LOOP; CLOSE c;END;/
Chapter 8Building Scalable Applications
8-7
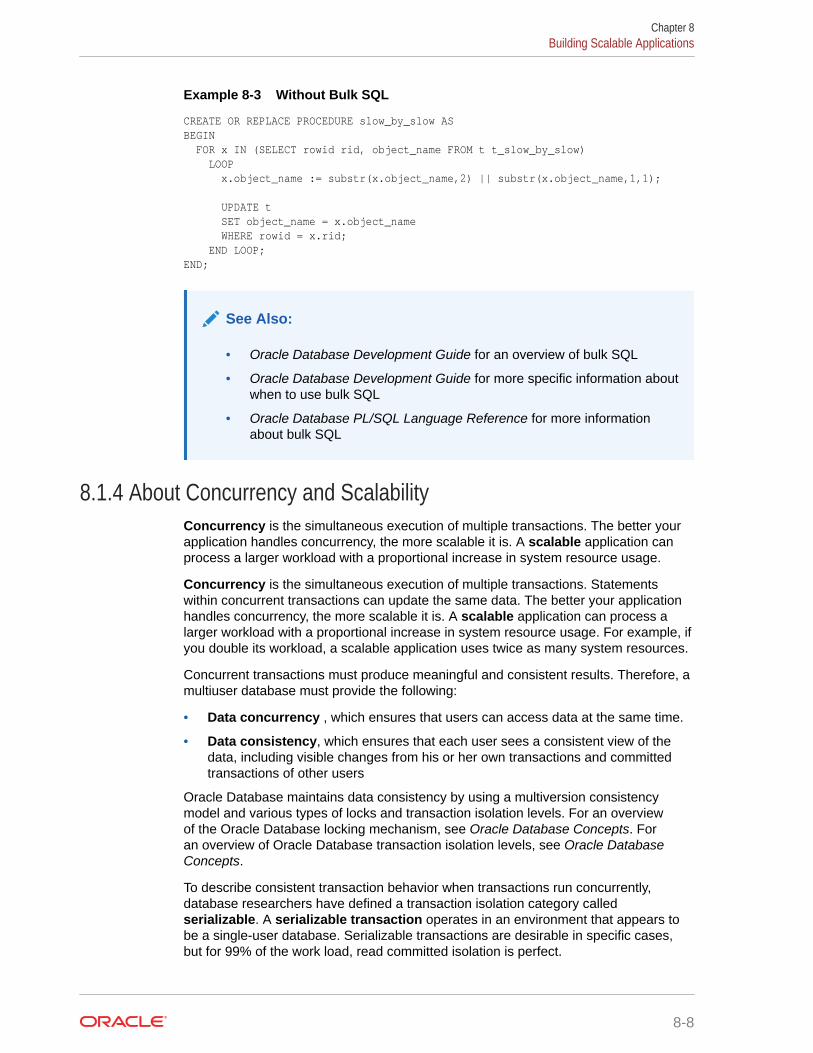
Example 8-3 Without Bulk SQL
CREATE OR REPLACE PROCEDURE slow_by_slow ASBEGIN FOR x IN (SELECT rowid rid, object_name FROM t t_slow_by_slow) LOOP x.object_name := substr(x.object_name,2) || substr(x.object_name,1,1);
UPDATE t SET object_name = x.object_name WHERE rowid = x.rid; END LOOP;END;
See Also:
• Oracle Database Development Guide for an overview of bulk SQL
• Oracle Database Development Guide for more specific information aboutwhen to use bulk SQL
• Oracle Database PL/SQL Language Reference for more informationabout bulk SQL
8.1.4 About Concurrency and ScalabilityConcurrency is the simultaneous execution of multiple transactions. The better yourapplication handles concurrency, the more scalable it is. A scalable application canprocess a larger workload with a proportional increase in system resource usage.
Concurrency is the simultaneous execution of multiple transactions. Statementswithin concurrent transactions can update the same data. The better your applicationhandles concurrency, the more scalable it is. A scalable application can process alarger workload with a proportional increase in system resource usage. For example, ifyou double its workload, a scalable application uses twice as many system resources.
Concurrent transactions must produce meaningful and consistent results. Therefore, amultiuser database must provide the following:
• Data concurrency , which ensures that users can access data at the same time.
• Data consistency, which ensures that each user sees a consistent view of thedata, including visible changes from his or her own transactions and committedtransactions of other users
Oracle Database maintains data consistency by using a multiversion consistencymodel and various types of locks and transaction isolation levels. For an overviewof the Oracle Database locking mechanism, see Oracle Database Concepts. Foran overview of Oracle Database transaction isolation levels, see Oracle DatabaseConcepts.
To describe consistent transaction behavior when transactions run concurrently,database researchers have defined a transaction isolation category calledserializable. A serializable transaction operates in an environment that appears tobe a single-user database. Serializable transactions are desirable in specific cases,but for 99% of the work load, read committed isolation is perfect.
Chapter 8Building Scalable Applications
8-8
Oracle Database has features that improve concurrency and scalability—for example,sequences, latches, nonblocking reads and writes, and shared SQL.
See Also:
Oracle Database Concepts for more information about data concurrency andconsistency
8.1.4.1 About Sequences and ConcurrencySequences eliminate serialization, thereby improving the concurrency and scalabilityof your application.
A sequence is a schema object from which multiple users can generate uniqueintegers, which is very useful when you need unique primary keys.
Without sequences, unique primary key values must be produced programmatically.A user gets a new primary key value by selecting the most recently produced valueand incrementing it. This technique requires a lock during the transaction and causesmultiple users to wait for the next primary key value—that is, the transactions serialize.Sequences eliminate serialization, thereby improving the concurrency and scalabilityof your application.
See Also:
• Oracle Database Concepts for information about concurrent access tosequences
• "Creating and Managing Sequences"
8.1.4.2 About Latches and ConcurrencyAn increase in latches means more concurrency-based waits, and therefore adecrease in scalability.
A latch is a simple, low-level serialization mechanism that coordinates multiuseraccess to shared data structures. Latches protect shared memory resources fromcorruption when accessed by multiple processes.
An increase in latches means more concurrency-based waits, and therefore adecrease in scalability. If you can use either an approach that runs slightly fasterduring development or one that uses fewer latches, use the latter.
Chapter 8Building Scalable Applications
8-9
See Also:
• Oracle Database Concepts for information about latches
• Oracle Database Concepts for information about mutexes, which are likelatches for single objects
8.1.4.3 About Nonblocking Reads and Writes and ConcurrencyIn Oracle Database, nonblocking reads and writes let queries execute concurrentlywith changes to the data they are reading, without blocking or stopping. Nonblockingreads and writes let one session read data while another session is changing thatdata.
8.1.4.4 About Shared SQL and ConcurrencyOracle Database compiles a SQL statement into an executable object once, and thenother sessions can reuse the object for as long as it exists. This Oracle Databasefeature, called shared SQL, lets the database do very resource-intensive operations—compiling and optimizing SQL statements—only once, instead of every time a sessionuses the same SQL statement.
See Also:
Oracle Database Concepts for more information about shared SQL
8.1.5 Limiting the Number of Concurrent SessionsThe more concurrent sessions you have, the more concurrency-based waits you have,and the slower your response time is.
If your computer has n CPU cores, then at most n sessions can really be concurrentlyactive. Each additional "concurrent" session must wait for a CPU core to be availablebefore it can become active. If some waiting sessions are waiting only for I/O, thenincreasing the number of concurrent sessions to slightly more than n might slightlyimprove runtime performance. However, increasing the number of concurrent sessionstoo much will significantly reduce runtime performance.
The SESSIONS initialization parameter determines the maximum number ofconcurrent users in the system. For details, see Oracle Database Reference.
See Also:
http://www.youtube.com/watch?v=xNDnVOCdvQ0 for a video that shows theeffect of reducing the number of concurrent sessions on a computer with 12CPU cores from thousands to 96
Chapter 8Building Scalable Applications
8-10
8.1.6 Comparing Programming Techniques with RunstatsThe Runstats tool lets you compare the performance of two programming techniquesto see which is better.
8.1.6.1 About RunstatsThe Runstats tool lets you compare the performance of two programming techniquesto see which is better.
Runstats measures:
• Elapsed time for each technique in hundredths of seconds (hsec)
• Elapsed time for the first technique as a percentage of that of the secondtechnique
• System statistics for the two techniques (for example, parse calls)
• Latching for the two techniques
Of the preceding measurements, the most important is latching (see "About Latchesand Concurrency").
See Also:
Example 8-1, which uses Runstats
8.1.6.2 Setting Up RunstatsThe Runstats tool is implemented as a package that uses a view and a temporarytable.
Note:
For step 1 of the following procedure, you need the SELECT privilege onthe dynamic performance views V$STATNAME, V$MYSTAT, and V$LATCH.If you cannot get this privilege, then have someone who has the privilegecreate the view in step 1 and grant you the SELECT privilege on it.
To set up the Runstats tool:
1. Create the view that Runstats uses:
CREATE OR REPLACE VIEW statsAS SELECT 'STAT...' || a.name name, b.valueFROM V$STATNAME a, V$MYSTAT bWHERE a.statistic# = b.statistic#UNION ALLSELECT 'LATCH.' || name, getsFROM V$LATCH;
Chapter 8Building Scalable Applications
8-11
2. Create the temporary table that Runstats uses:
DROP TABLE run_stats;
CREATE GLOBAL TEMPORARY TABLE run_stats( runid VARCHAR2(15), name VARCHAR2(80), value INT )ON COMMIT PRESERVE ROWS;
3. Create this package specification:
CREATE OR REPLACE PACKAGE runstats_pkgAS PROCEDURE rs_start; PROCEDURE rs_middle; PROCEDURE rs_stop( p_difference_threshold IN NUMBER DEFAULT 0 );end;/
The parameter p_difference_threshold controls the amount of statisticsand latching data that Runstats displays. Runstats displays data only when thedifference for the two techniques is greater than p_difference_threshold. Bydefault, Runstats displays all data.
4. Create this package body:
CREATE OR REPLACE PACKAGE BODY runstats_pkgAS g_start NUMBER; g_run1 NUMBER; g_run2 NUMBER; PROCEDURE rs_start IS BEGIN DELETE FROM run_stats; INSERT INTO run_stats SELECT 'before', stats.* FROM stats; g_start := DBMS_UTILITY.GET_TIME; END rs_start; PROCEDURE rs_middle IS BEGIN g_run1 := (DBMS_UTILITY.GET_TIME - g_start); INSERT INTO run_stats SELECT 'after 1', stats.* FROM stats; g_start := DBMS_UTILITY.GET_TIME; END rs_middle; PROCEDURE rs_stop( p_difference_threshold IN NUMBER DEFAULT 0 ) IS BEGIN g_run2 := (DBMS_UTILITY.GET_TIME - g_start); DBMS_OUTPUT.PUT_LINE ('Run 1 ran in ' || g_run1 || ' hsec');
Chapter 8Building Scalable Applications
8-12
DBMS_OUTPUT.PUT_LINE ('Run 2 ran in ' || g_run2 || ' hsec'); DBMS_OUTPUT.PUT_LINE ('Run 1 ran in ' || round(g_run1/g_run2*100, 2) || '% of the time of run 2'); DBMS_OUTPUT.PUT_LINE( CHR(9) ); INSERT INTO run_stats SELECT 'after 2', stats.* FROM stats; DBMS_OUTPUT.PUT_LINE ( RPAD( 'Name', 30 ) || LPAD( 'Run 1', 14) || LPAD( 'Run 2', 14) || LPAD( 'Difference', 14) ); FOR x IN ( SELECT RPAD( a.name, 30 ) || TO_CHAR( b.value - a.value, '9,999,999,999' ) || TO_CHAR( c.value - b.value, '9,999,999,999' ) || TO_CHAR( ( (c.value - b.value) - (b.value - a.value)), '9,999,999,999' ) data FROM run_stats a, run_stats b, run_stats c WHERE a.name = b.name AND b.name = c.name AND a.runid = 'before' AND b.runid = 'after 1' AND c.runid = 'after 2' AND (c.value - a.value) > 0 AND abs((c.value - b.value) - (b.value - a.value)) > p_difference_threshold ORDER BY ABS((c.value - b.value) - (b.value - a.value)) ) LOOP DBMS_OUTPUT.PUT_LINE( x.data ); END LOOP; DBMS_OUTPUT.PUT_LINE( CHR(9) ); DBMS_OUTPUT.PUT_LINE( 'Run 1 latches total compared to run 2 -- difference and percentage' ); DBMS_OUTPUT.PUT_LINE ( LPAD( 'Run 1', 14) || LPAD( 'Run 2', 14) || LPAD( 'Diff', 14) || LPAD( 'Pct', 10) ); FOR x IN ( SELECT TO_CHAR( run1, '9,999,999,999' ) || TO_CHAR( run2, '9,999,999,999' ) || TO_CHAR( diff, '9,999,999,999' ) || TO_CHAR( ROUND( g_run1/g_run2*100, 2), '99,999.99' ) || '%' data FROM ( SELECT SUM (b.value - a.value) run1, SUM (c.value - b.value) run2, SUM ( (c.value - b.value) - (b.value - a.value)) diff FROM run_stats a, run_stats b, run_stats c
Chapter 8Building Scalable Applications
8-13
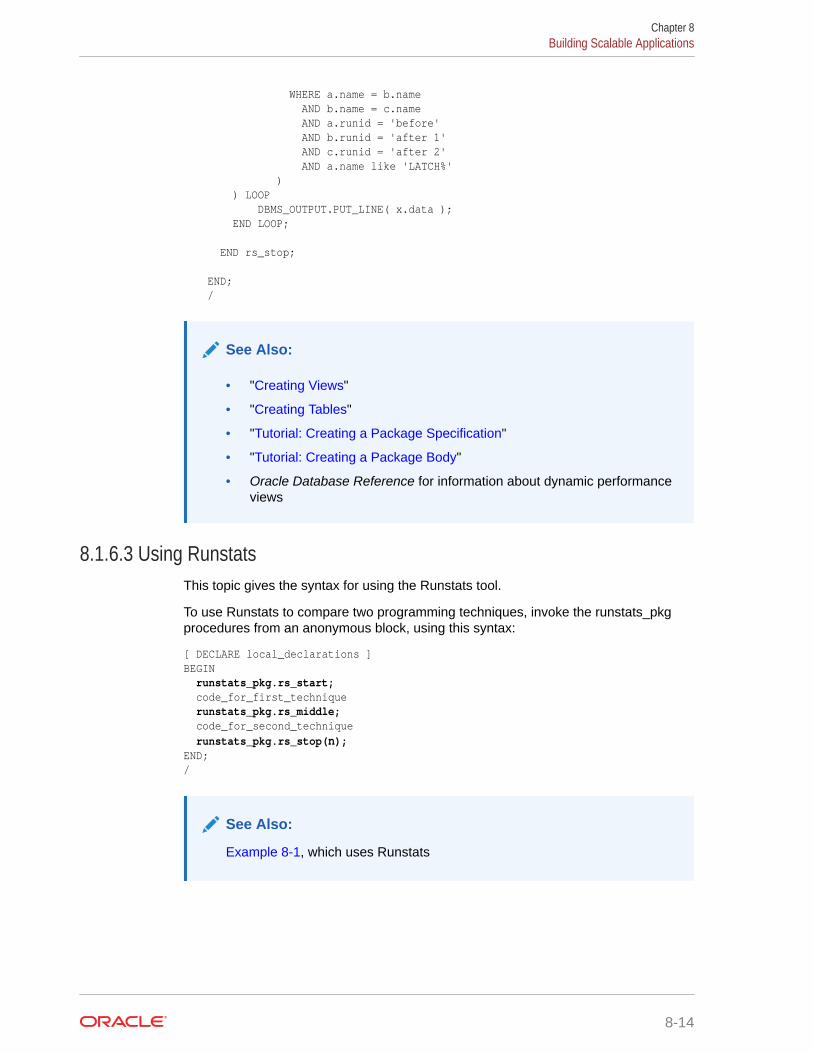
WHERE a.name = b.name AND b.name = c.name AND a.runid = 'before' AND b.runid = 'after 1' AND c.runid = 'after 2' AND a.name like 'LATCH%' ) ) LOOP DBMS_OUTPUT.PUT_LINE( x.data ); END LOOP; END rs_stop; END;/
See Also:
• "Creating Views"
• "Creating Tables"
• "Tutorial: Creating a Package Specification"
• "Tutorial: Creating a Package Body"
• Oracle Database Reference for information about dynamic performanceviews
8.1.6.3 Using RunstatsThis topic gives the syntax for using the Runstats tool.
To use Runstats to compare two programming techniques, invoke the runstats_pkgprocedures from an anonymous block, using this syntax:
[ DECLARE local_declarations ]BEGIN runstats_pkg.rs_start; code_for_first_technique runstats_pkg.rs_middle; code_for_second_technique runstats_pkg.rs_stop(n);END;/
See Also:
Example 8-1, which uses Runstats
Chapter 8Building Scalable Applications
8-14
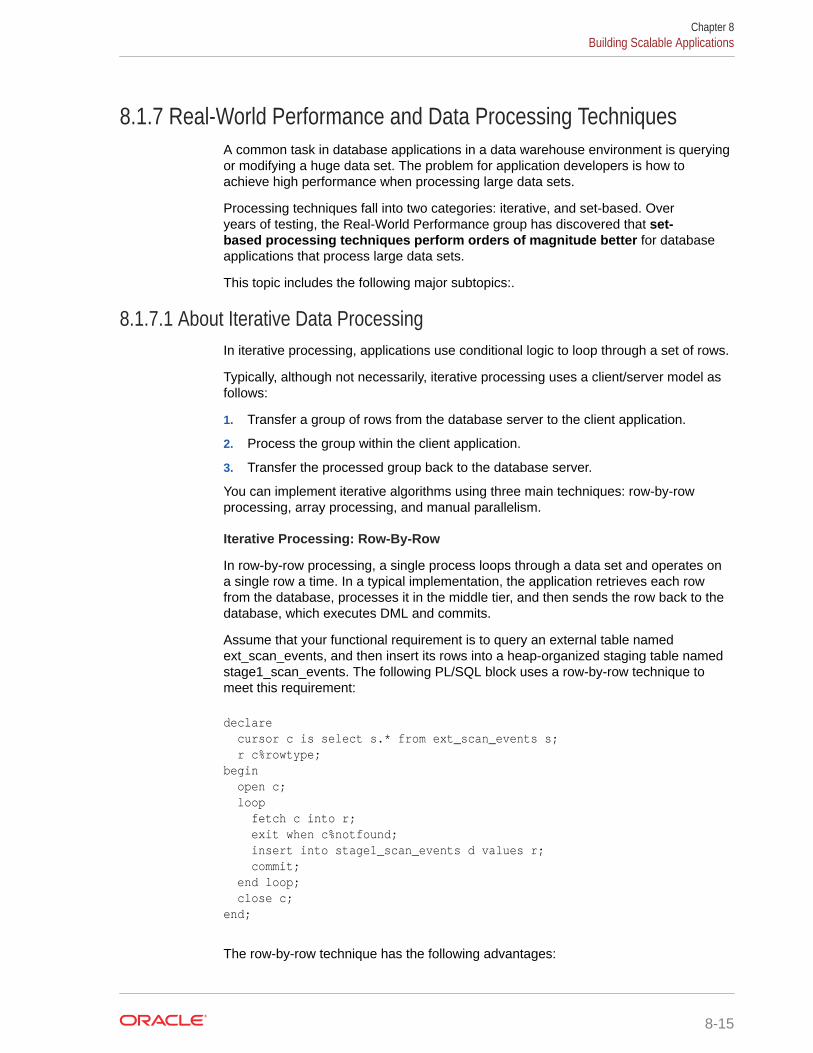
8.1.7 Real-World Performance and Data Processing TechniquesA common task in database applications in a data warehouse environment is queryingor modifying a huge data set. The problem for application developers is how toachieve high performance when processing large data sets.
Processing techniques fall into two categories: iterative, and set-based. Overyears of testing, the Real-World Performance group has discovered that set-based processing techniques perform orders of magnitude better for databaseapplications that process large data sets.
This topic includes the following major subtopics:.
8.1.7.1 About Iterative Data ProcessingIn iterative processing, applications use conditional logic to loop through a set of rows.
Typically, although not necessarily, iterative processing uses a client/server model asfollows:
1. Transfer a group of rows from the database server to the client application.
2. Process the group within the client application.
3. Transfer the processed group back to the database server.
You can implement iterative algorithms using three main techniques: row-by-rowprocessing, array processing, and manual parallelism.
Iterative Processing: Row-By-Row
In row-by-row processing, a single process loops through a data set and operates ona single row a time. In a typical implementation, the application retrieves each rowfrom the database, processes it in the middle tier, and then sends the row back to thedatabase, which executes DML and commits.
Assume that your functional requirement is to query an external table namedext_scan_events, and then insert its rows into a heap-organized staging table namedstage1_scan_events. The following PL/SQL block uses a row-by-row technique tomeet this requirement:
declare cursor c is select s.* from ext_scan_events s; r c%rowtype;begin open c; loop fetch c into r; exit when c%notfound; insert into stage1_scan_events d values r; commit; end loop; close c;end;
The row-by-row technique has the following advantages:
Chapter 8Building Scalable Applications
8-15
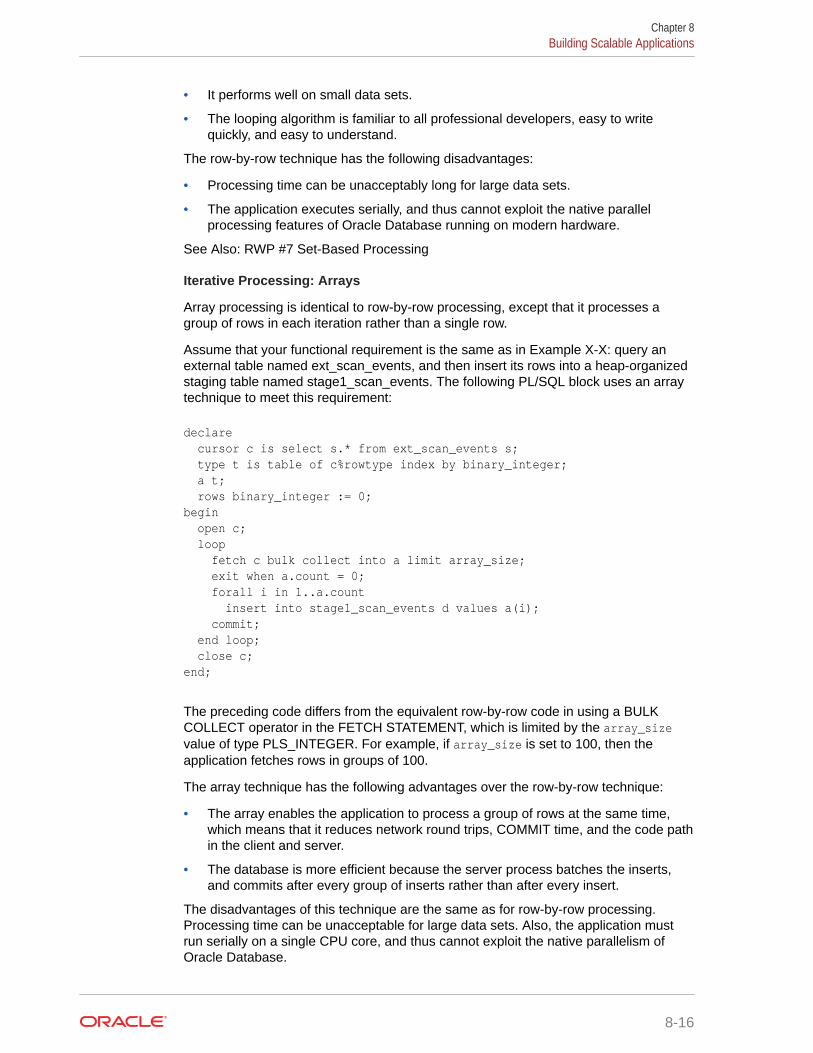
• It performs well on small data sets.
• The looping algorithm is familiar to all professional developers, easy to writequickly, and easy to understand.
The row-by-row technique has the following disadvantages:
• Processing time can be unacceptably long for large data sets.
• The application executes serially, and thus cannot exploit the native parallelprocessing features of Oracle Database running on modern hardware.
See Also: RWP #7 Set-Based Processing
Iterative Processing: Arrays
Array processing is identical to row-by-row processing, except that it processes agroup of rows in each iteration rather than a single row.
Assume that your functional requirement is the same as in Example X-X: query anexternal table named ext_scan_events, and then insert its rows into a heap-organizedstaging table named stage1_scan_events. The following PL/SQL block uses an arraytechnique to meet this requirement:
declare cursor c is select s.* from ext_scan_events s; type t is table of c%rowtype index by binary_integer; a t; rows binary_integer := 0;begin open c; loop fetch c bulk collect into a limit array_size; exit when a.count = 0; forall i in 1..a.count insert into stage1_scan_events d values a(i); commit; end loop; close c;end;
The preceding code differs from the equivalent row-by-row code in using a BULKCOLLECT operator in the FETCH STATEMENT, which is limited by the array_sizevalue of type PLS_INTEGER. For example, if array_size is set to 100, then theapplication fetches rows in groups of 100.
The array technique has the following advantages over the row-by-row technique:
• The array enables the application to process a group of rows at the same time,which means that it reduces network round trips, COMMIT time, and the code pathin the client and server.
• The database is more efficient because the server process batches the inserts,and commits after every group of inserts rather than after every insert.
The disadvantages of this technique are the same as for row-by-row processing.Processing time can be unacceptable for large data sets. Also, the application mustrun serially on a single CPU core, and thus cannot exploit the native parallelism ofOracle Database.
Chapter 8Building Scalable Applications
8-16
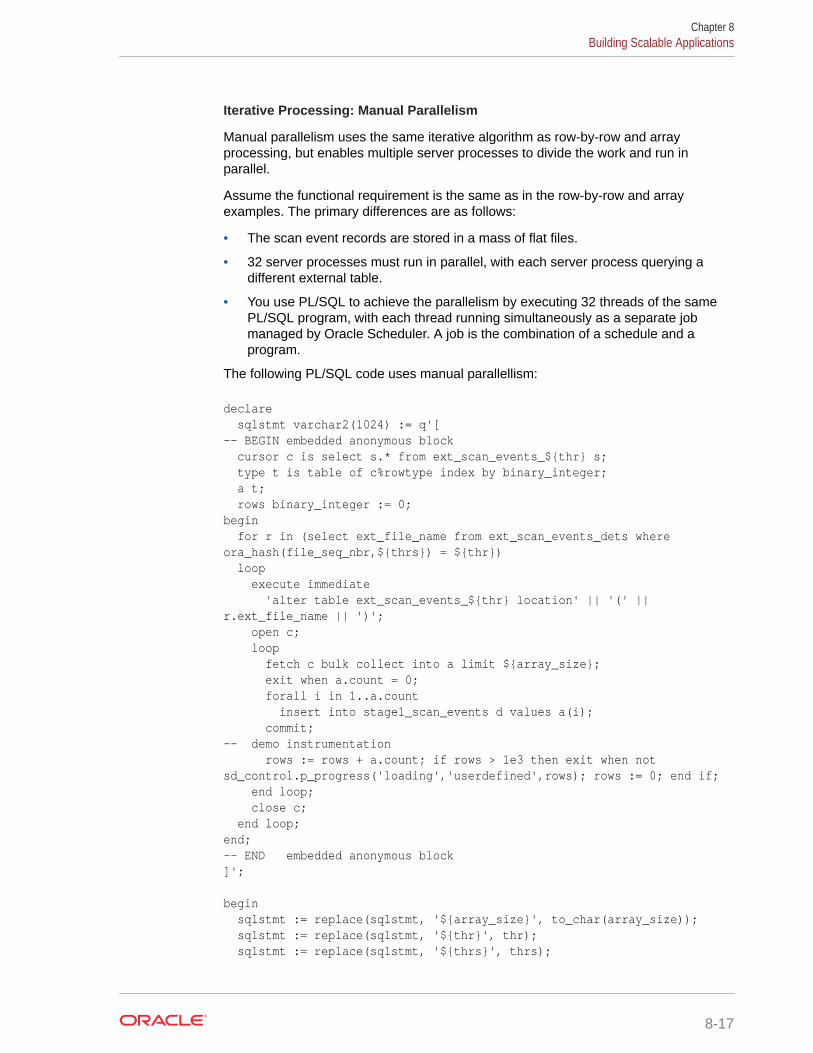
Iterative Processing: Manual Parallelism
Manual parallelism uses the same iterative algorithm as row-by-row and arrayprocessing, but enables multiple server processes to divide the work and run inparallel.
Assume the functional requirement is the same as in the row-by-row and arrayexamples. The primary differences are as follows:
• The scan event records are stored in a mass of flat files.
• 32 server processes must run in parallel, with each server process querying adifferent external table.
• You use PL/SQL to achieve the parallelism by executing 32 threads of the samePL/SQL program, with each thread running simultaneously as a separate jobmanaged by Oracle Scheduler. A job is the combination of a schedule and aprogram.
The following PL/SQL code uses manual parallellism:
declare sqlstmt varchar2(1024) := q'[-- BEGIN embedded anonymous block cursor c is select s.* from ext_scan_events_${thr} s; type t is table of c%rowtype index by binary_integer; a t; rows binary_integer := 0;begin for r in (select ext_file_name from ext_scan_events_dets where ora_hash(file_seq_nbr,${thrs}) = ${thr}) loop execute immediate 'alter table ext_scan_events_${thr} location' || '(' || r.ext_file_name || ')'; open c; loop fetch c bulk collect into a limit ${array_size}; exit when a.count = 0; forall i in 1..a.count insert into stage1_scan_events d values a(i); commit;-- demo instrumentation rows := rows + a.count; if rows > 1e3 then exit when not sd_control.p_progress('loading','userdefined',rows); rows := 0; end if; end loop; close c; end loop;end;-- END embedded anonymous block]';
begin sqlstmt := replace(sqlstmt, '${array_size}', to_char(array_size)); sqlstmt := replace(sqlstmt, '${thr}', thr); sqlstmt := replace(sqlstmt, '${thrs}', thrs);
Chapter 8Building Scalable Applications
8-17
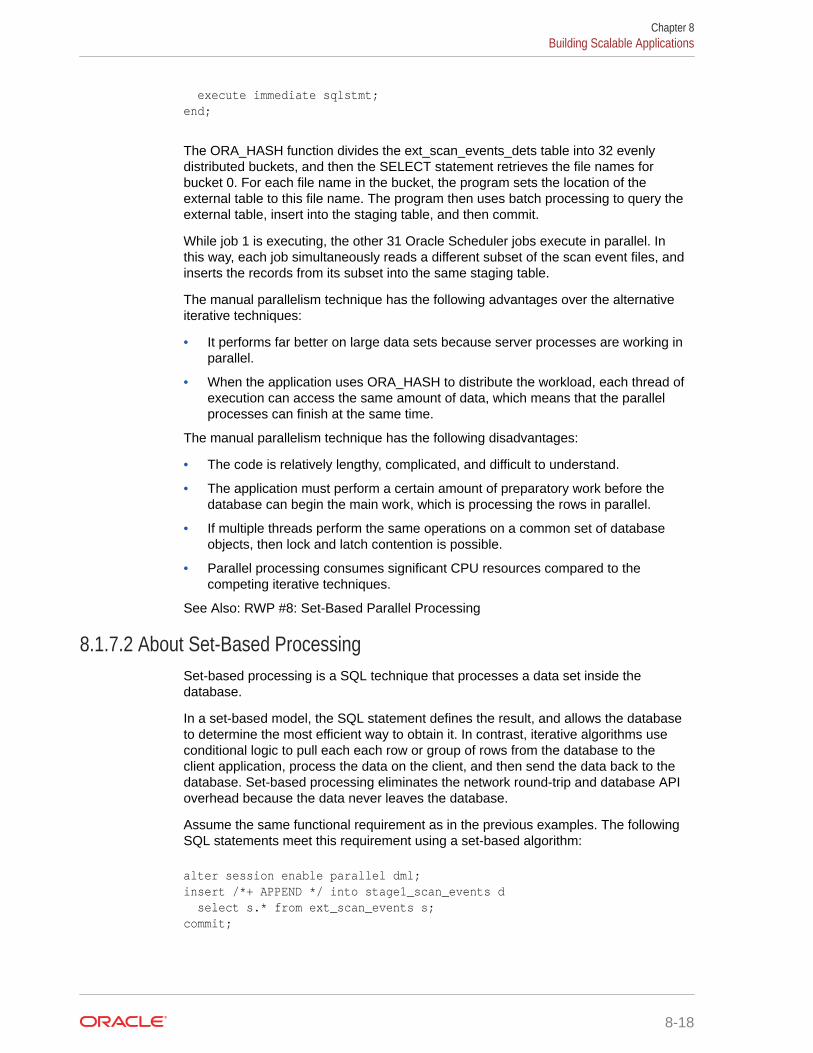
execute immediate sqlstmt;end;
The ORA_HASH function divides the ext_scan_events_dets table into 32 evenlydistributed buckets, and then the SELECT statement retrieves the file names forbucket 0. For each file name in the bucket, the program sets the location of theexternal table to this file name. The program then uses batch processing to query theexternal table, insert into the staging table, and then commit.
While job 1 is executing, the other 31 Oracle Scheduler jobs execute in parallel. Inthis way, each job simultaneously reads a different subset of the scan event files, andinserts the records from its subset into the same staging table.
The manual parallelism technique has the following advantages over the alternativeiterative techniques:
• It performs far better on large data sets because server processes are working inparallel.
• When the application uses ORA_HASH to distribute the workload, each thread ofexecution can access the same amount of data, which means that the parallelprocesses can finish at the same time.
The manual parallelism technique has the following disadvantages:
• The code is relatively lengthy, complicated, and difficult to understand.
• The application must perform a certain amount of preparatory work before thedatabase can begin the main work, which is processing the rows in parallel.
• If multiple threads perform the same operations on a common set of databaseobjects, then lock and latch contention is possible.
• Parallel processing consumes significant CPU resources compared to thecompeting iterative techniques.
See Also: RWP #8: Set-Based Parallel Processing
8.1.7.2 About Set-Based ProcessingSet-based processing is a SQL technique that processes a data set inside thedatabase.
In a set-based model, the SQL statement defines the result, and allows the databaseto determine the most efficient way to obtain it. In contrast, iterative algorithms useconditional logic to pull each each row or group of rows from the database to theclient application, process the data on the client, and then send the data back to thedatabase. Set-based processing eliminates the network round-trip and database APIoverhead because the data never leaves the database.
Assume the same functional requirement as in the previous examples. The followingSQL statements meet this requirement using a set-based algorithm:
alter session enable parallel dml;insert /*+ APPEND */ into stage1_scan_events d select s.* from ext_scan_events s;commit;
Chapter 8Building Scalable Applications
8-18
Because the INSERT statement contains a subquery of the ext_scan_events table, asingle SQL statement reads and writes all rows. Also, the application executes a singleCOMMIT after the database has inserted all rows. In contrast, iterative applicationsexecute a COMMIT after the insert of each row or each group of rows.
The set-based technique has significant advantages over iterative techniques:
• As demonstrated in Real-World Performance demonstrations and classes, theperformance on large data sets is orders of magnitude faster. It is not unusual forthe run time of a program to drop from several hours to several seconds.
• A side-effect of the orders of magnitude increase in processing speed is that DBAscan eliminate long-running and error-prone batch jobs, and innvoate businessprocesses in real time.
• The length of the code is significantly shorter, a short as two or three lines of code,because SQL defines the result and not the access method.
• In contrast to manual parallelism, parallel DML is optimized for performancebecause the database, rather than the application, manages the processes.
• When joining data sets, the database automatically uses highly efficient hash joinsinstead of relatively inefficient application-level loops.
• The APPEND hint forces a direct-path load, which means that the databasecreates no redo and undo, thereby avoiding the waste of I/O and CPU.
Set-based processing does have some potential disadvantages:
• The techniques are unfamiliar to many database developers, so they may be moredifficult.
• Because a set-based model is completely different from an iterative model,changing it requires completely rewriting the source code.
See Also: RWP #7 Set-Based Processing, RWP #8: Set-Based Parallel Processing,RWP #9: Set-Based Processing--Data Deduplication, RWP #10: Set-BasedProcessing--Data Transformations, and RWP #11: Set-Based Processing--DataAggregation
8.2 Recommended Programming PracticesUse the following recommended programming practices.
8.2.1 Use Instrumentation PackagesOracle Database supplies instrumentation packages whose subprograms let yourapplication generate trace information whenever necessary. Using this traceinformation, you can debug your application without a debugger and identify codethat performs badly.
Instrumentation provides your application with considerable functionality; therefore, itis not overhead. Overhead is something that you can remove without losing muchbenefit.
Some instrumentation packages that Oracle Database supplies are:
• DBMS_APPLICATION_INFO, which enables a system administrator to track theperformance of your application by module.
Chapter 8Recommended Programming Practices
8-19
For more information about DBMS_APPLICATION_INFO, see Oracle DatabasePL/SQL Packages and Types Reference.
• DBMS_SESSION, which enables your application to access session informationand set preferences and security levels
For more information about DBMS_SESSION, see Oracle Database PL/SQLPackages and Types Reference.
• UTL_FILE, which enables your application to read and write operating system textfiles
For more information about UTL_FILE, see Oracle Database PL/SQL Packagesand Types Reference.
See Also:
Oracle Database PL/SQL Packages and Types Reference for a summary ofPL/SQL packages that Oracle Database supplies
8.2.2 Statistics Gathering and Application TracingDatabase statistics provide information about the type of load on the database andthe internal and external resources used by the database. To accurately diagnoseperformance problems with the database using ADDM, statistics must be available.
For information about statistics gathering, see Oracle Database 2 Day + PerformanceTuning Guide.
Note:
If Oracle Enterprise Manager is unavailable, then you can gather statisticsusing DBMS_MONITOR subprograms, described in Oracle DatabasePL/SQL Packages and Types Reference.
Oracle Database provides several tracing tools that can help you monitor and analyzeOracle Database applications. For details, see Oracle Database SQL Tuning Guide.
8.2.3 Use Existing FunctionalityAn application that uses existing functionality is easier to develop and maintain thanone that does not, and it also runs faster.
When developing your application, use the existing functionality of your programminglanguage, your operating system, Oracle Database, and the PL/SQL packages andtypes that Oracle Database supplies as much as possible.
Examples of existing functionality that many developers reinvent are:
• Constraints
For introductory information about constraints, see "Ensuring Data Integrity inTables."
Chapter 8Recommended Programming Practices
8-20
• SQL functions (functions that are "built into" SQL)
For information about SQL functions, see Oracle Database SQL LanguageReference.
• Sequences (which can generate unique sequential values)
See "Creating and Managing Sequences".
• Auditing (the monitoring and recording of selected user database actions)
For introductory information about auditing, see Oracle Database Security Guide.
• Replication (the process of copying and maintaining database objects, such astables, in multiple databases that comprise a distributed database system)
For information about replication, see the Oracle GoldenGate documentation..
• Message queuing (how web-based business applications communicate with eachother)
For introductory information about Oracle Database Advanced Queuing (AQ), seeOracle Database Advanced Queuing User's Guide.
• Maintaining a history of record changes
For introductory information about Workspace Manager, see Oracle DatabaseWorkspace Manager Developer's Guide.
In Example 8-4, two concurrent transactions dequeue messages stored in a table(that is, each transaction finds and locks the next unprocessed row of the table).Rather than simply invoking the DBMS_AQ.DEQUEUE procedure (described in OracleDatabase PL/SQL Packages and Types Reference), the example creates a function-based index on the table and then uses that function in each transaction to retrieve therows and display the messages.
The code in Example 8-4 implements a feature similar to a DBMS_AQ.DEQUEUEinvocation but with fewer capabilities. The development time saved by using existingfunctionality (in this case, function-based indexes) can be large.
Example 8-4 Concurrent Dequeuing Transactions
Create table:
DROP TABLE t;CREATE TABLE t ( id NUMBER PRIMARY KEY, processed_flag VARCHAR2(1), payload VARCHAR2(20) );
Create index on table:
CREATE INDEX t_idx ON t( DECODE( processed_flag, 'N', 'N' ) );
Populate table:
INSERT INTO t SELECT r, CASE WHEN MOD(r,2) = 0 THEN 'N' ELSE 'Y' END, 'payload ' || r FROM (SELECT LEVEL r FROM DUAL CONNECT BY LEVEL <= 5);
Show table:
Chapter 8Recommended Programming Practices
8-21

SELECT * FROM t;
Result:
ID P PAYLOAD---------- - -------------------- 1 Y payload 1 2 N payload 2 3 Y payload 3 4 N payload 4 5 Y payload 5 5 rows selected.
First transaction:
DECLARE l_rec t%ROWTYPE; CURSOR c IS SELECT * FROM t WHERE DECODE(processed_flag,'N','N') = 'N' FOR UPDATE SKIP LOCKED;BEGIN OPEN c; FETCH c INTO l_rec; IF ( c%FOUND ) THEN DBMS_OUTPUT.PUT_LINE( 'Got row ' || l_rec.id || ', ' || l_rec.payload ); END IF; CLOSE c;END;/
Result:
Got row 2, payload 2
Concurrent transaction:
DECLARE PRAGMA AUTONOMOUS_TRANSACTION; l_rec t%ROWTYPE; CURSOR c IS SELECT * FROM t WHERE DECODE(processed_flag,'N','N') = 'N' FOR UPDATE SKIP LOCKED;BEGIN OPEN c; FETCH c INTO l_rec; IF ( c%FOUND ) THEN DBMS_OUTPUT.PUT_LINE( 'Got row ' || l_rec.id || ', ' || l_rec.payload ); END IF; CLOSE c;
Chapter 8Recommended Programming Practices
8-22
COMMIT;END;/
Result:
Got row 4, payload 4
See Also:
• Oracle Database New Features Guide (with each release)
• Oracle Database Concepts (with each release)
8.2.4 Cover Database Tables with Editioning ViewsIf your application uses database tables, then cover each one with an editioningview so that you can use edition-based redefinition (EBR) to upgrade the databasecomponent of your application while it is in use, thereby minimizing or eliminatingdown time.
For information about edition-based redefinition, see Oracle Database DevelopmentGuide.
8.3 Recommended Security PracticesWhen granting privileges on the schema objects that comprise your application, usethe principle of least privilege.
That is, users and middle tiers should be given the fewest privileges necessary toperform their actions, to reduce the danger of inadvertent or malicious unauthorizedactivities.
See Also:
"Using Bind Variables to Improve Scalability" for information about using bindvariables instead of string literals, which is the most effective way to makeyour code invulnerable to SQL injection attacks
Chapter 8Recommended Security Practices
8-23
9Developing a Simple Oracle DatabaseApplication
By following the instructions for developing this simple application, you learn thegeneral procedure for developing Oracle Database applications.
9.1 About the ApplicationThe application has the following purpose, structure, and naming conventions.
9.1.1 Purpose of the ApplicationThe application is intended for two kinds of users in a company.
• Typical users (managers of employees)
• Application administrators
Typical users can do the following:
• Get the employees in a given department
• Get the job history for a given employee
• Show general information for a given employee (name, department, job, manager,salary, and so on)
• Change the salary of a given employee
• Change the job of a given employee
Application administrators can do the following:
• Change the ID, title, or salary range of an existing job
• Add a new job
• Change the ID, name, or manager of an existing department
• Add a new department
9.1.2 Structure of the ApplicationThe application uses the following schema objects and schemas.
9.1.2.1 Schema Objects of the ApplicationThe application is composed of these schema objects:
• Four tables, which store data about:
– Jobs
– Departments
9-1
– Employees
– Job history of employees
• Four editioning views, which cover the tables, enabling you to use edition-basedredefinition (EBR) to upgrade the finished application when it is in use
• Two triggers, which enforce business rules
• Two sequences that generate unique primary keys for new departments and newemployees
• Two packages:
– employees_pkg, the application program interface (API) for typical users
– admin_pkg, the API for application administrators
The typical users and application administrators access the application onlythrough its APIs. Therefore, they can change the data only by invoking packagesubprograms.
See Also:
• "About Oracle Database" for information about schema objects
• Oracle Database Development Guide for information about EBR
9.1.2.2 Schemas for the ApplicationFor security, the application uses these five schemas (or users), each of which hasonly the privileges that it needs:
• app_data, who owns all the schema objects except the packages and loads itstables with data from tables in the sample schema HR
The developers who create the packages never work in this schema. Therefore,they cannot accidently alter or drop application schema objects.
• app_code, who owns only the package employees_pkg
The developers of employees_pkg work in this schema.
• app_admin, who owns only the package admin_pkg
The developers of admin_pkg work in this schema.
• app_user, the typical application user, who owns nothing and can only executeemployees_pkg
The middle-tier application server connects to the database in the connection poolas app_user. If this schema is compromised—by a SQL injection bug, for example—the attacker can see and change only what employees_pkg subprograms let itsee and change. The attacker cannot drop tables, escalate privileges, create oralter schema objects, or anything else.
• app_admin_user, an application administrator, who owns nothing and can onlyexecute admin_pkg and employees_pkg
Chapter 9About the Application
9-2
The connection pool for this schema is very small, and only privileged users canaccess it. If this schema is compromised, the attacker can see and change onlywhat admin_pkg and employees_pkg subprograms let it see and change.
Suppose that instead of app_user and app_admin_user, the application had only oneschema that owned nothing and could execute both employees_pkg and admin_pkg.The connection pool for this schema would have to be large enough for both thetypical users and the application administrators. If there were a SQL injection bug inemployees_pkg, a typical user who exploited that bug could access admin_pkg.
Suppose that instead of app_data, app_code, and app_admin, the application hadonly one schema that owned all the schema objects, including the packages.The packages would then have all privileges on the tables, which would be bothunnecessary and undesirable.
For example, suppose that you have an audit trail table, AUDIT_TRAIL. You wantthe developers of employees_pkg to be able to write to AUDIT_TRAIL, but notread or change it. You want the developers of admin_pkg to be able to readAUDIT_TRAIL and write to it, but not change it. If AUDIT_TRAIL, employees_pkg,and admin_pkg belong to the same schema, then the developers of the two packageshave all privileges on AUDIT_TRAIL. However, if AUDIT_TRAIL belongs to app_data,employees_pkg belongs to app_code, and admin_pkg belongs to app_admin, thenyou can connect to the database as app_data and do this:
GRANT INSERT ON AUDIT_TRAIL TO app_code;GRANT INSERT, SELECT ON AUDIT_TRAIL TO app_admin;
See Also:
• "About Oracle Database" for information about schemas
• "About Sample Schema HR" for information about sample schema HR
• "Recommended Security Practices"
9.1.3 Naming Conventions in the ApplicationThe application uses these naming conventions.
Item Name
Table table#
Editioning view for table# table
Trigger on editioning view table table_{a|b}event[_fer] where:
• a identifies an AFTER trigger.• b identifies a BEFORE trigger.• fer identifies a FOR EACH ROW trigger.• event identifies the event that fires the
trigger. For example: i for INSERT, iu forINSERT or UPDATE, d for DELETE.
PRIMARY KEY constraint in table# table_pk
NOT NULL constraint on table#.column table_column_not_null1
UNIQUE constraint on table#.column table_column_unique1
Chapter 9About the Application
9-3
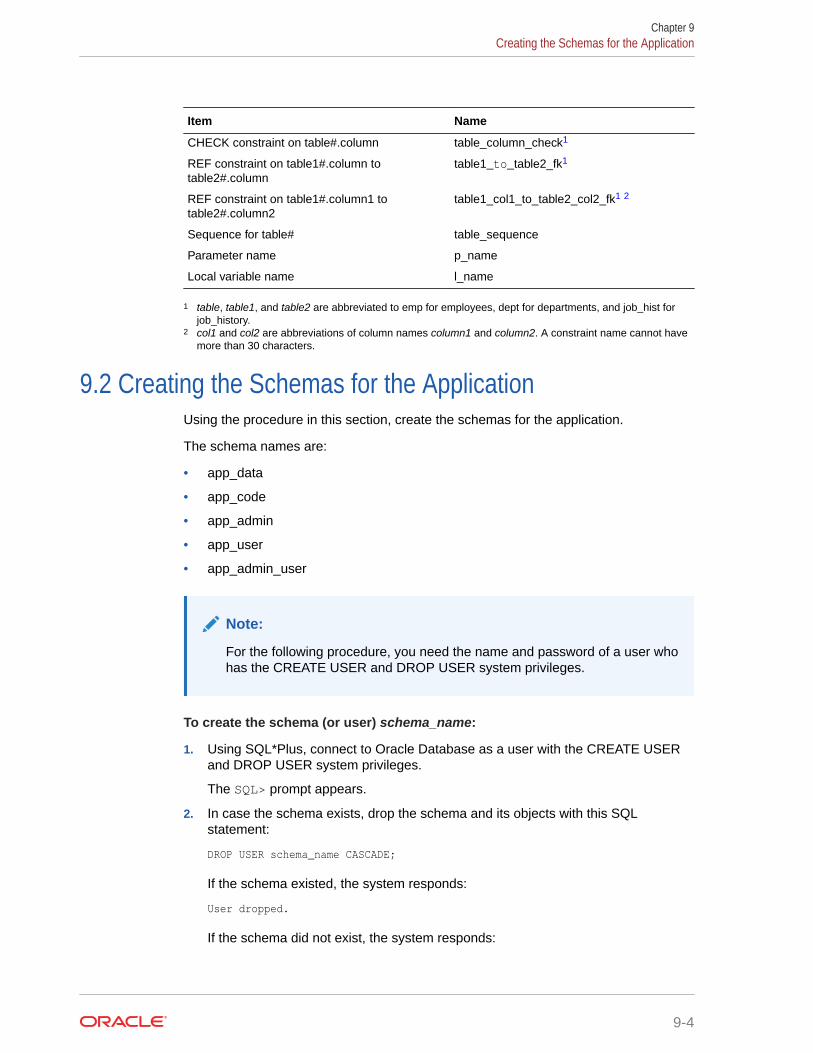
Item Name
CHECK constraint on table#.column table_column_check1
REF constraint on table1#.column totable2#.column
table1_to_table2_fk1
REF constraint on table1#.column1 totable2#.column2
table1_col1_to_table2_col2_fk1 2
Sequence for table# table_sequence
Parameter name p_name
Local variable name l_name
1 table, table1, and table2 are abbreviated to emp for employees, dept for departments, and job_hist forjob_history.
2 col1 and col2 are abbreviations of column names column1 and column2. A constraint name cannot havemore than 30 characters.
9.2 Creating the Schemas for the ApplicationUsing the procedure in this section, create the schemas for the application.
The schema names are:
• app_data
• app_code
• app_admin
• app_user
• app_admin_user
Note:
For the following procedure, you need the name and password of a user whohas the CREATE USER and DROP USER system privileges.
To create the schema (or user) schema_name:
1. Using SQL*Plus, connect to Oracle Database as a user with the CREATE USERand DROP USER system privileges.
The SQL> prompt appears.
2. In case the schema exists, drop the schema and its objects with this SQLstatement:
DROP USER schema_name CASCADE;
If the schema existed, the system responds:
User dropped.
If the schema did not exist, the system responds:
Chapter 9Creating the Schemas for the Application
9-4
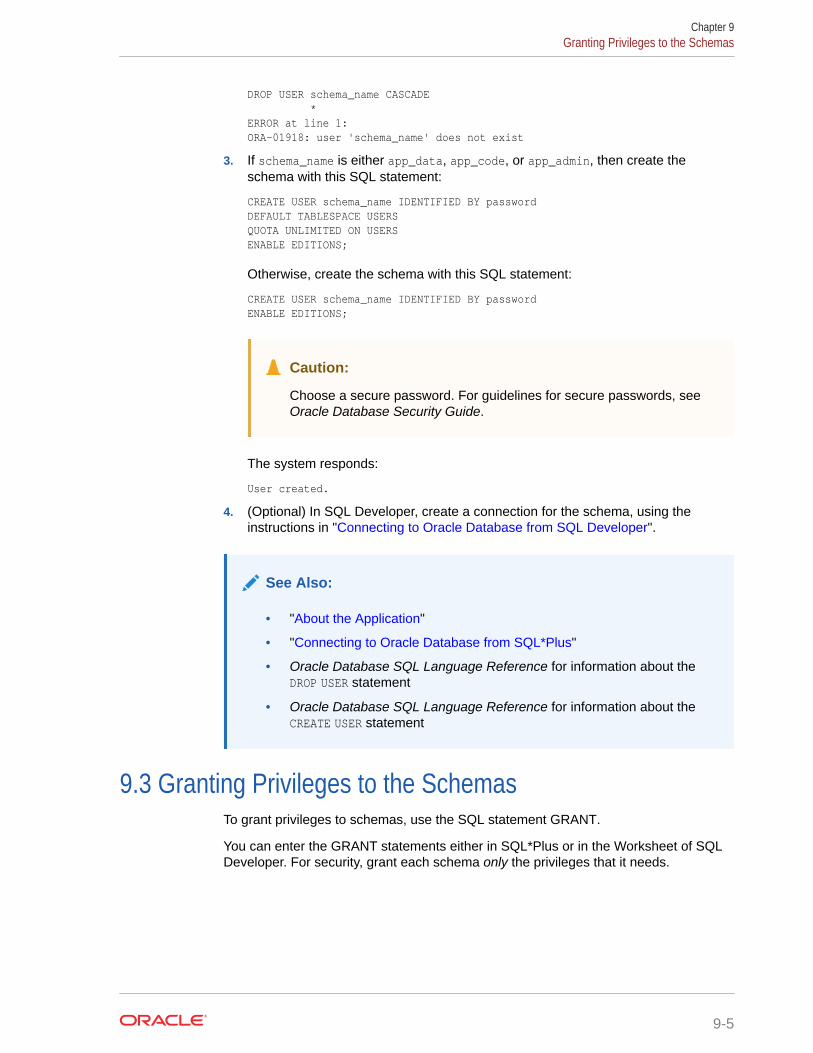
DROP USER schema_name CASCADE *ERROR at line 1:ORA-01918: user 'schema_name' does not exist
3. If schema_name is either app_data, app_code, or app_admin, then create theschema with this SQL statement:
CREATE USER schema_name IDENTIFIED BY passwordDEFAULT TABLESPACE USERSQUOTA UNLIMITED ON USERSENABLE EDITIONS;
Otherwise, create the schema with this SQL statement:
CREATE USER schema_name IDENTIFIED BY passwordENABLE EDITIONS;
Caution:
Choose a secure password. For guidelines for secure passwords, seeOracle Database Security Guide.
The system responds:
User created.
4. (Optional) In SQL Developer, create a connection for the schema, using theinstructions in "Connecting to Oracle Database from SQL Developer".
See Also:
• "About the Application"
• "Connecting to Oracle Database from SQL*Plus"
• Oracle Database SQL Language Reference for information about theDROP USER statement
• Oracle Database SQL Language Reference for information about theCREATE USER statement
9.3 Granting Privileges to the SchemasTo grant privileges to schemas, use the SQL statement GRANT.
You can enter the GRANT statements either in SQL*Plus or in the Worksheet of SQLDeveloper. For security, grant each schema only the privileges that it needs.
Chapter 9Granting Privileges to the Schemas
9-5

See Also:
• "About the Application"
• Oracle Database SQL Language Reference for information about theGRANT statement
9.3.1 Granting Privileges to the app_data SchemaGrant to the app_data schema only the privileges to do the following:
• Connect to Oracle Database:
GRANT CREATE SESSION TO app_data;
• Create the tables, views, triggers, and sequences for the application:
GRANT CREATE TABLE, CREATE VIEW, CREATE TRIGGER, CREATE SEQUENCE TO app_data;
• Load data from four tables in the sample schema HR into its own tables:
GRANT SELECT ON HR.DEPARTMENTS TO app_data;GRANT SELECT ON HR.EMPLOYEES TO app_data;GRANT SELECT ON HR.JOB_HISTORY TO app_data;GRANT SELECT ON HR.JOBS TO app_data;
9.3.2 Granting Privileges to the app_code SchemaGrant to the app_code schema only the privileges to do the following:
• Connect to Oracle Database:
GRANT CREATE SESSION TO app_code;
• Create the package employees_pkg:
GRANT CREATE PROCEDURE TO app_code;
• Create a synonym (for convenience):
GRANT CREATE SYNONYM TO app_code;
9.3.3 Granting Privileges to the app_admin SchemaGrant to the app_admin schema only the privileges to do the following:
• Connect to Oracle Database:
GRANT CREATE SESSION TO app_admin;
• Create the package admin_pkg:
GRANT CREATE PROCEDURE TO app_admin;
• Create a synonym (for convenience):
GRANT CREATE SYNONYM TO app_admin;
Chapter 9Granting Privileges to the Schemas
9-6
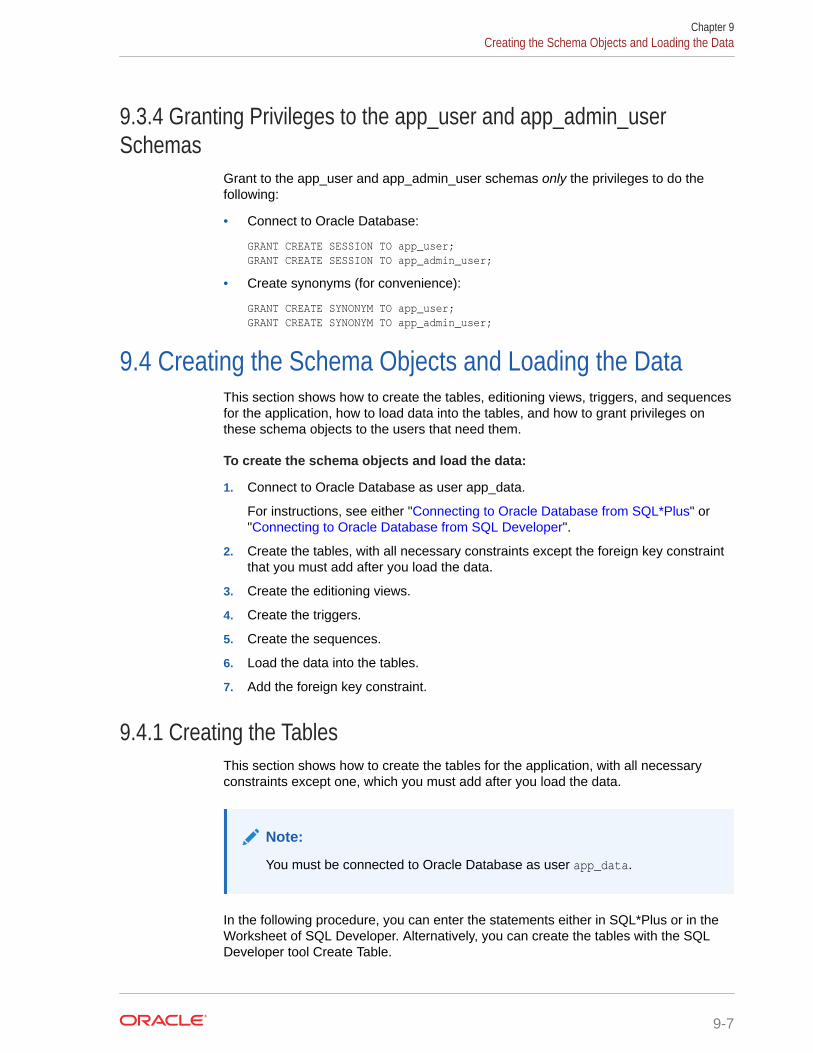
9.3.4 Granting Privileges to the app_user and app_admin_userSchemas
Grant to the app_user and app_admin_user schemas only the privileges to do thefollowing:
• Connect to Oracle Database:
GRANT CREATE SESSION TO app_user;GRANT CREATE SESSION TO app_admin_user;
• Create synonyms (for convenience):
GRANT CREATE SYNONYM TO app_user;GRANT CREATE SYNONYM TO app_admin_user;
9.4 Creating the Schema Objects and Loading the DataThis section shows how to create the tables, editioning views, triggers, and sequencesfor the application, how to load data into the tables, and how to grant privileges onthese schema objects to the users that need them.
To create the schema objects and load the data:
1. Connect to Oracle Database as user app_data.
For instructions, see either "Connecting to Oracle Database from SQL*Plus" or"Connecting to Oracle Database from SQL Developer".
2. Create the tables, with all necessary constraints except the foreign key constraintthat you must add after you load the data.
3. Create the editioning views.
4. Create the triggers.
5. Create the sequences.
6. Load the data into the tables.
7. Add the foreign key constraint.
9.4.1 Creating the TablesThis section shows how to create the tables for the application, with all necessaryconstraints except one, which you must add after you load the data.
Note:
You must be connected to Oracle Database as user app_data.
In the following procedure, you can enter the statements either in SQL*Plus or in theWorksheet of SQL Developer. Alternatively, you can create the tables with the SQLDeveloper tool Create Table.
Chapter 9Creating the Schema Objects and Loading the Data
9-7
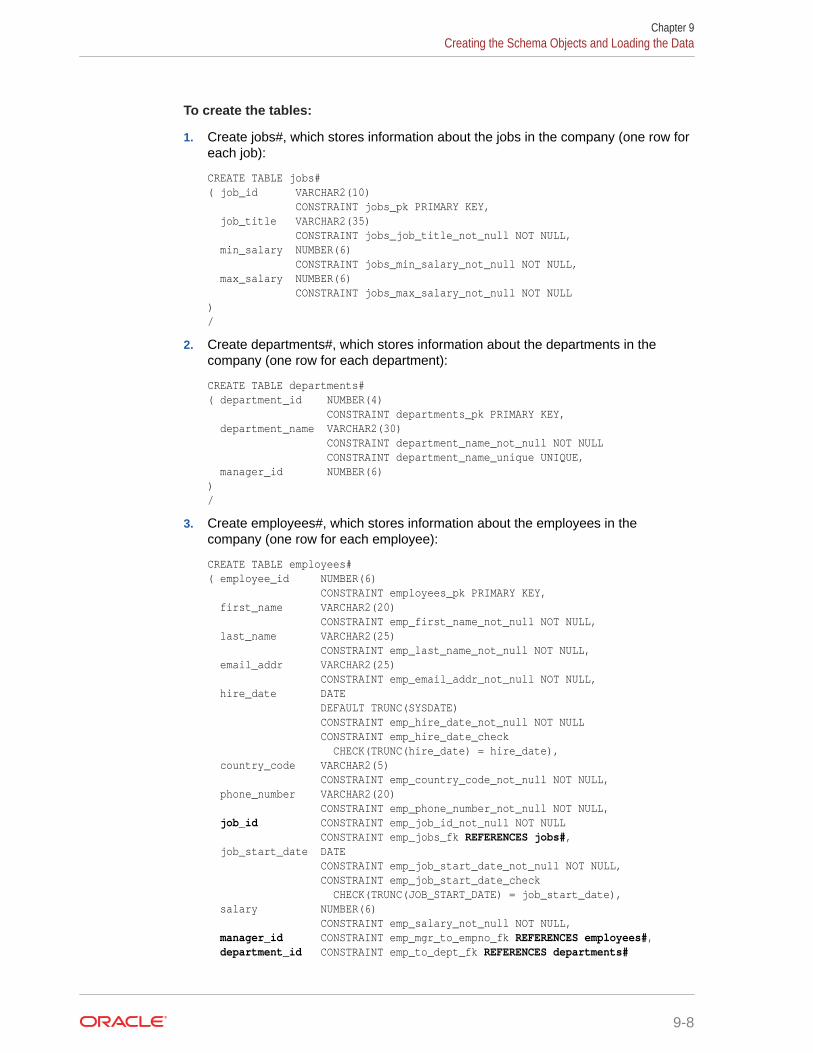
To create the tables:
1. Create jobs#, which stores information about the jobs in the company (one row foreach job):
CREATE TABLE jobs#( job_id VARCHAR2(10) CONSTRAINT jobs_pk PRIMARY KEY, job_title VARCHAR2(35) CONSTRAINT jobs_job_title_not_null NOT NULL, min_salary NUMBER(6) CONSTRAINT jobs_min_salary_not_null NOT NULL, max_salary NUMBER(6) CONSTRAINT jobs_max_salary_not_null NOT NULL)/
2. Create departments#, which stores information about the departments in thecompany (one row for each department):
CREATE TABLE departments#( department_id NUMBER(4) CONSTRAINT departments_pk PRIMARY KEY, department_name VARCHAR2(30) CONSTRAINT department_name_not_null NOT NULL CONSTRAINT department_name_unique UNIQUE, manager_id NUMBER(6))/
3. Create employees#, which stores information about the employees in thecompany (one row for each employee):
CREATE TABLE employees#( employee_id NUMBER(6) CONSTRAINT employees_pk PRIMARY KEY, first_name VARCHAR2(20) CONSTRAINT emp_first_name_not_null NOT NULL, last_name VARCHAR2(25) CONSTRAINT emp_last_name_not_null NOT NULL, email_addr VARCHAR2(25) CONSTRAINT emp_email_addr_not_null NOT NULL, hire_date DATE DEFAULT TRUNC(SYSDATE) CONSTRAINT emp_hire_date_not_null NOT NULL CONSTRAINT emp_hire_date_check CHECK(TRUNC(hire_date) = hire_date), country_code VARCHAR2(5) CONSTRAINT emp_country_code_not_null NOT NULL, phone_number VARCHAR2(20) CONSTRAINT emp_phone_number_not_null NOT NULL, job_id CONSTRAINT emp_job_id_not_null NOT NULL CONSTRAINT emp_jobs_fk REFERENCES jobs#, job_start_date DATE CONSTRAINT emp_job_start_date_not_null NOT NULL, CONSTRAINT emp_job_start_date_check CHECK(TRUNC(JOB_START_DATE) = job_start_date), salary NUMBER(6) CONSTRAINT emp_salary_not_null NOT NULL, manager_id CONSTRAINT emp_mgr_to_empno_fk REFERENCES employees#, department_id CONSTRAINT emp_to_dept_fk REFERENCES departments#
Chapter 9Creating the Schema Objects and Loading the Data
9-8
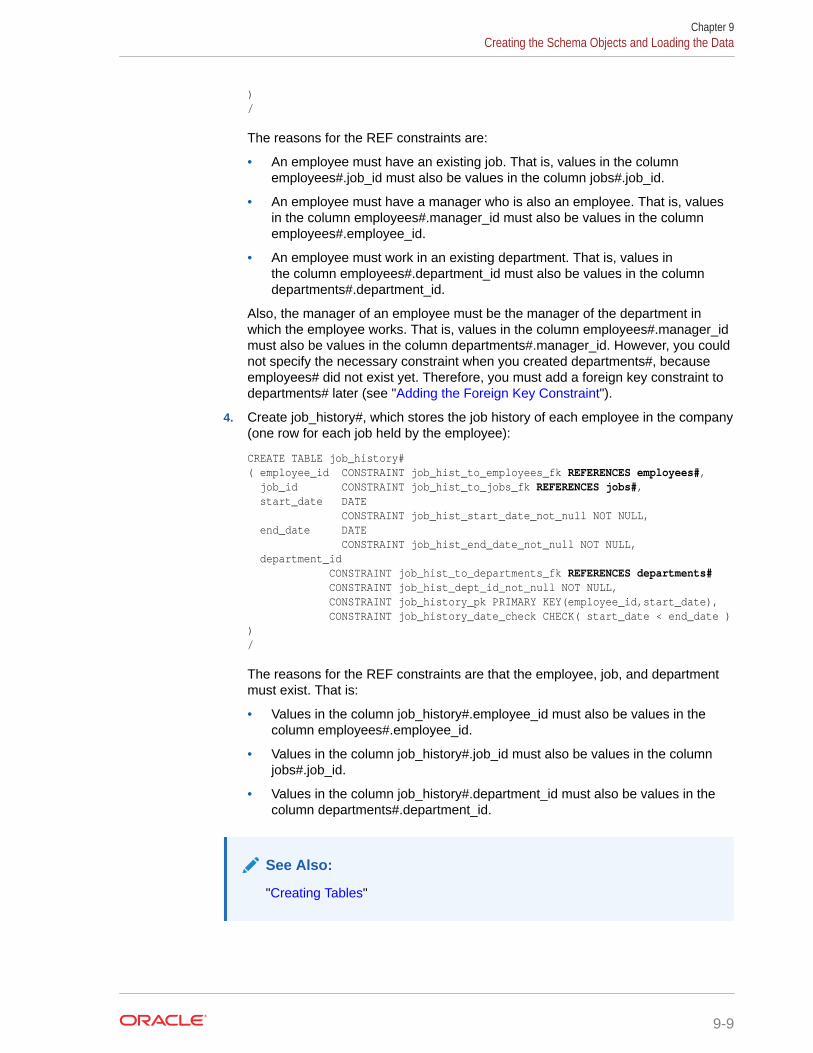
)/
The reasons for the REF constraints are:
• An employee must have an existing job. That is, values in the columnemployees#.job_id must also be values in the column jobs#.job_id.
• An employee must have a manager who is also an employee. That is, valuesin the column employees#.manager_id must also be values in the columnemployees#.employee_id.
• An employee must work in an existing department. That is, values inthe column employees#.department_id must also be values in the columndepartments#.department_id.
Also, the manager of an employee must be the manager of the department inwhich the employee works. That is, values in the column employees#.manager_idmust also be values in the column departments#.manager_id. However, you couldnot specify the necessary constraint when you created departments#, becauseemployees# did not exist yet. Therefore, you must add a foreign key constraint todepartments# later (see "Adding the Foreign Key Constraint").
4. Create job_history#, which stores the job history of each employee in the company(one row for each job held by the employee):
CREATE TABLE job_history#( employee_id CONSTRAINT job_hist_to_employees_fk REFERENCES employees#, job_id CONSTRAINT job_hist_to_jobs_fk REFERENCES jobs#, start_date DATE CONSTRAINT job_hist_start_date_not_null NOT NULL, end_date DATE CONSTRAINT job_hist_end_date_not_null NOT NULL, department_id CONSTRAINT job_hist_to_departments_fk REFERENCES departments# CONSTRAINT job_hist_dept_id_not_null NOT NULL, CONSTRAINT job_history_pk PRIMARY KEY(employee_id,start_date), CONSTRAINT job_history_date_check CHECK( start_date < end_date ))/
The reasons for the REF constraints are that the employee, job, and departmentmust exist. That is:
• Values in the column job_history#.employee_id must also be values in thecolumn employees#.employee_id.
• Values in the column job_history#.job_id must also be values in the columnjobs#.job_id.
• Values in the column job_history#.department_id must also be values in thecolumn departments#.department_id.
See Also:
"Creating Tables"
Chapter 9Creating the Schema Objects and Loading the Data
9-9
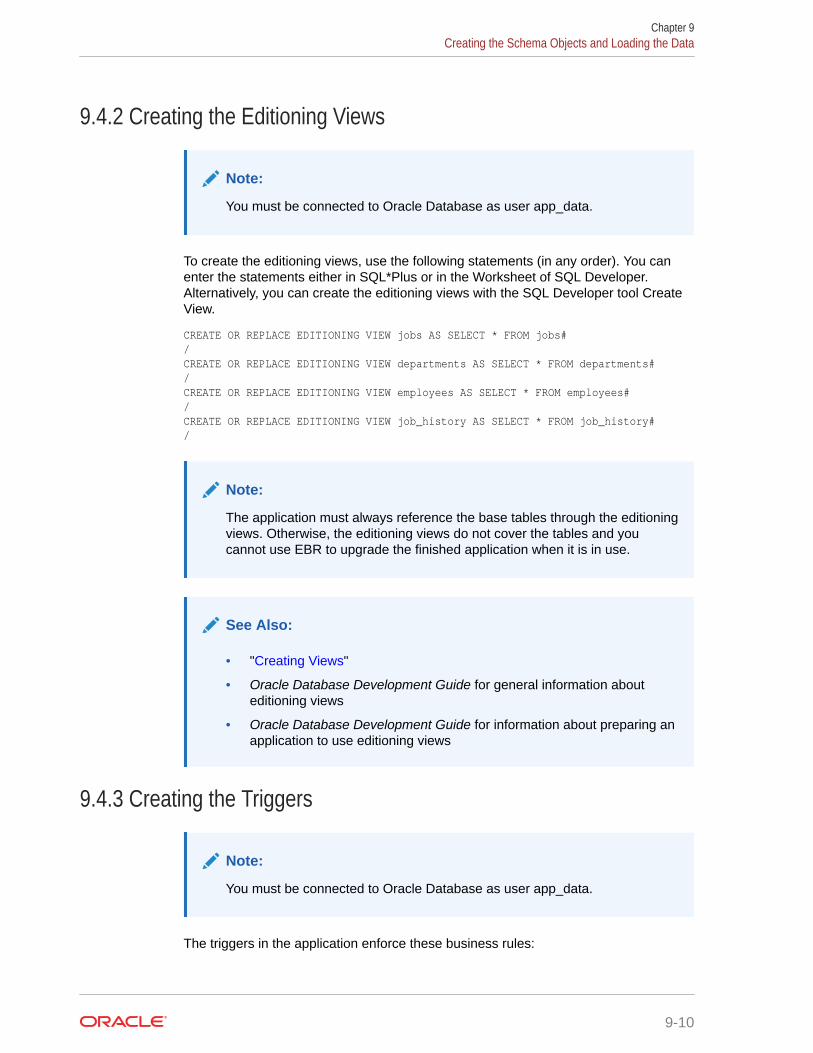
9.4.2 Creating the Editioning Views
Note:
You must be connected to Oracle Database as user app_data.
To create the editioning views, use the following statements (in any order). You canenter the statements either in SQL*Plus or in the Worksheet of SQL Developer.Alternatively, you can create the editioning views with the SQL Developer tool CreateView.
CREATE OR REPLACE EDITIONING VIEW jobs AS SELECT * FROM jobs#/CREATE OR REPLACE EDITIONING VIEW departments AS SELECT * FROM departments#/CREATE OR REPLACE EDITIONING VIEW employees AS SELECT * FROM employees#/CREATE OR REPLACE EDITIONING VIEW job_history AS SELECT * FROM job_history#/
Note:
The application must always reference the base tables through the editioningviews. Otherwise, the editioning views do not cover the tables and youcannot use EBR to upgrade the finished application when it is in use.
See Also:
• "Creating Views"
• Oracle Database Development Guide for general information abouteditioning views
• Oracle Database Development Guide for information about preparing anapplication to use editioning views
9.4.3 Creating the Triggers
Note:
You must be connected to Oracle Database as user app_data.
The triggers in the application enforce these business rules:
Chapter 9Creating the Schema Objects and Loading the Data
9-10
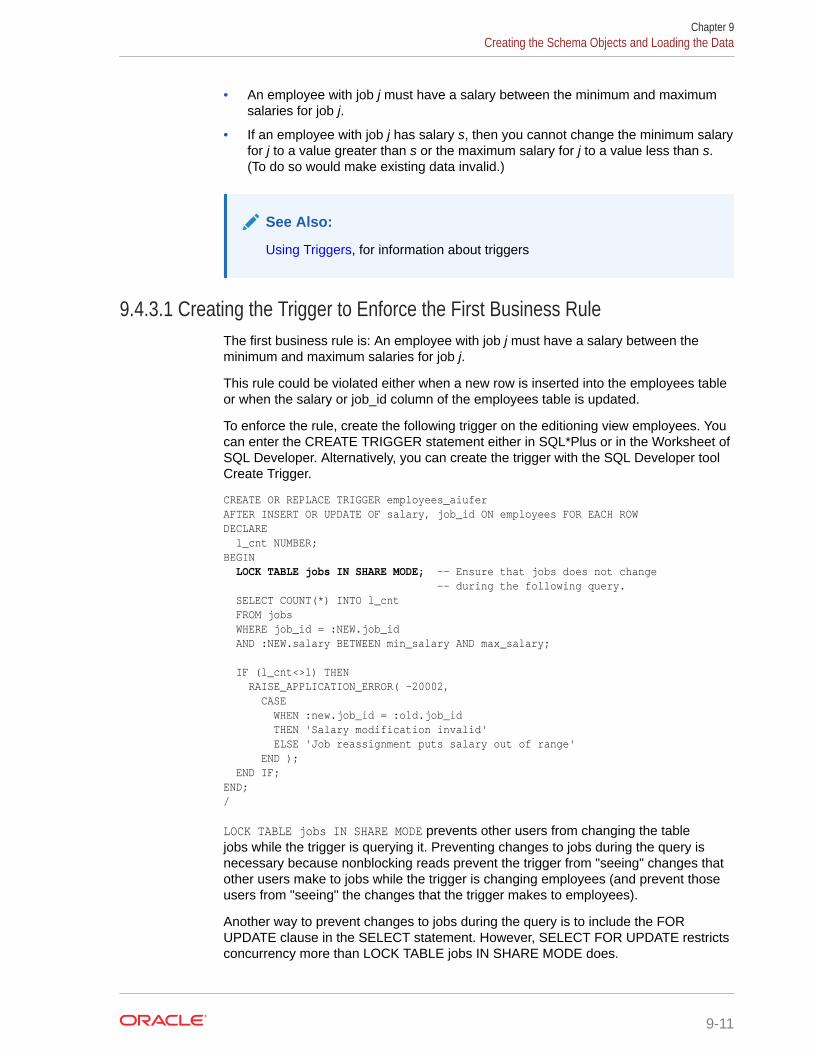
• An employee with job j must have a salary between the minimum and maximumsalaries for job j.
• If an employee with job j has salary s, then you cannot change the minimum salaryfor j to a value greater than s or the maximum salary for j to a value less than s.(To do so would make existing data invalid.)
See Also:
Using Triggers, for information about triggers
9.4.3.1 Creating the Trigger to Enforce the First Business RuleThe first business rule is: An employee with job j must have a salary between theminimum and maximum salaries for job j.
This rule could be violated either when a new row is inserted into the employees tableor when the salary or job_id column of the employees table is updated.
To enforce the rule, create the following trigger on the editioning view employees. Youcan enter the CREATE TRIGGER statement either in SQL*Plus or in the Worksheet ofSQL Developer. Alternatively, you can create the trigger with the SQL Developer toolCreate Trigger.
CREATE OR REPLACE TRIGGER employees_aiuferAFTER INSERT OR UPDATE OF salary, job_id ON employees FOR EACH ROWDECLARE l_cnt NUMBER;BEGIN LOCK TABLE jobs IN SHARE MODE; -- Ensure that jobs does not change -- during the following query. SELECT COUNT(*) INTO l_cnt FROM jobs WHERE job_id = :NEW.job_id AND :NEW.salary BETWEEN min_salary AND max_salary; IF (l_cnt<>1) THEN RAISE_APPLICATION_ERROR( -20002, CASE WHEN :new.job_id = :old.job_id THEN 'Salary modification invalid' ELSE 'Job reassignment puts salary out of range' END ); END IF;END;/
LOCK TABLE jobs IN SHARE MODE prevents other users from changing the tablejobs while the trigger is querying it. Preventing changes to jobs during the query isnecessary because nonblocking reads prevent the trigger from "seeing" changes thatother users make to jobs while the trigger is changing employees (and prevent thoseusers from "seeing" the changes that the trigger makes to employees).
Another way to prevent changes to jobs during the query is to include the FORUPDATE clause in the SELECT statement. However, SELECT FOR UPDATE restrictsconcurrency more than LOCK TABLE jobs IN SHARE MODE does.
Chapter 9Creating the Schema Objects and Loading the Data
9-11

LOCK TABLE jobs IN SHARE MODE prevents other users from changing jobs, but notfrom locking jobs in share mode themselves. Changes to jobs will probably be muchrarer than changes to employees. Therefore, locking jobs in share mode providesmore concurrency than locking a single row of jobs in exclusive mode.
See Also:
• Oracle Database Development Guide for information about lockingtables IN SHARE MODE
• Oracle Database PL/SQL Language Reference for information aboutSELECT FOR UPDATE
• "Creating Triggers"
• "Tutorial: Showing How the employees_pkg Subprograms Work" to seehow the employees_aiufer trigger works
9.4.3.2 Creating the Trigger to Enforce the Second Business RuleThe second business rule is: If an employee with job j has salary s, then you cannotchange the minimum salary for j to a value greater than s or the maximum salary for jto a value less than s. (To do so would make existing data invalid.)
This rule could be violated when the min_salary or max_salary column of the jobstable is updated.
To enforce the rule, create the following trigger on the editioning view jobs. You canenter the CREATE TRIGGER statement either in SQL*Plus or in the Worksheet ofSQL Developer. Alternatively, you can create the trigger with the SQL Developer toolCreate Trigger.
CREATE OR REPLACE TRIGGER jobs_auferAFTER UPDATE OF min_salary, max_salary ON jobs FOR EACH ROWWHEN (NEW.min_salary > OLD.min_salary OR NEW.max_salary < OLD.max_salary)DECLARE l_cnt NUMBER;BEGIN LOCK TABLE employees IN SHARE MODE;
SELECT COUNT(*) INTO l_cnt FROM employees WHERE job_id = :NEW.job_id AND salary NOT BETWEEN :NEW.min_salary and :NEW.max_salary;
IF (l_cnt>0) THEN RAISE_APPLICATION_ERROR( -20001, 'Salary update would violate ' || l_cnt || ' existing employee records' ); END IF;END;/
LOCK TABLE employees IN SHARE MODE prevents other users from changing the tableemployees while the trigger is querying it. Preventing changes to employees duringthe query is necessary because nonblocking reads prevent the trigger from "seeing"
Chapter 9Creating the Schema Objects and Loading the Data
9-12
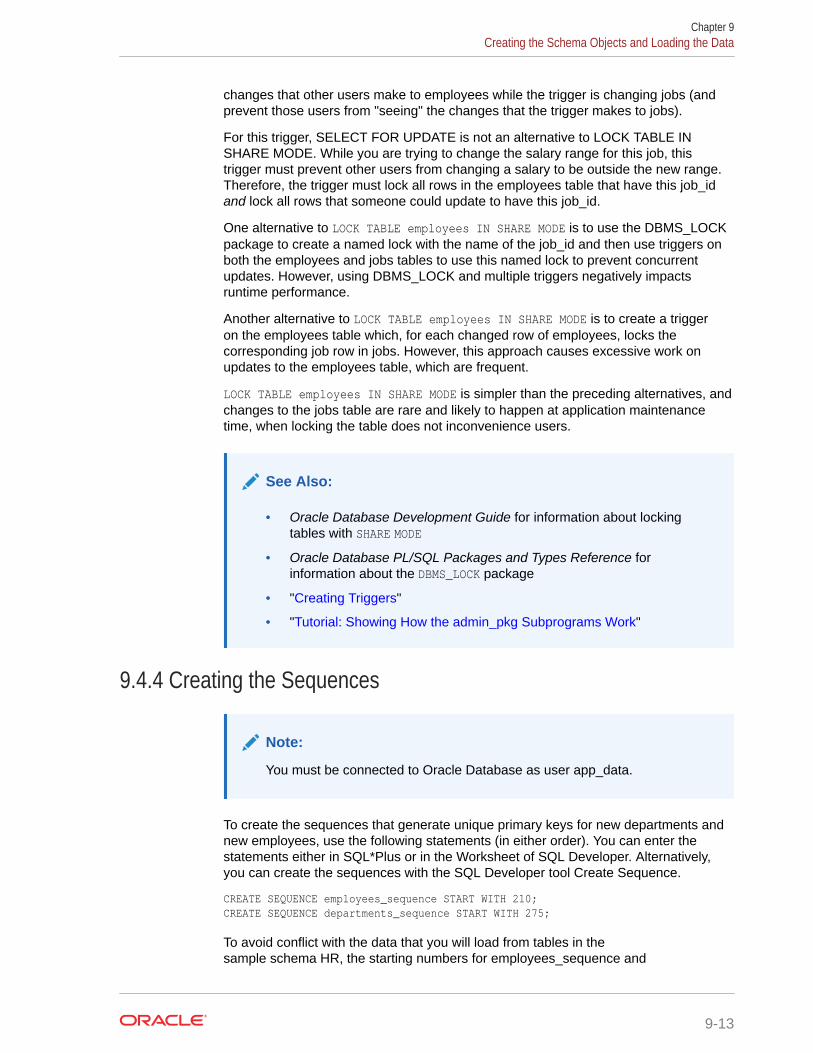
changes that other users make to employees while the trigger is changing jobs (andprevent those users from "seeing" the changes that the trigger makes to jobs).
For this trigger, SELECT FOR UPDATE is not an alternative to LOCK TABLE INSHARE MODE. While you are trying to change the salary range for this job, thistrigger must prevent other users from changing a salary to be outside the new range.Therefore, the trigger must lock all rows in the employees table that have this job_idand lock all rows that someone could update to have this job_id.
One alternative to LOCK TABLE employees IN SHARE MODE is to use the DBMS_LOCKpackage to create a named lock with the name of the job_id and then use triggers onboth the employees and jobs tables to use this named lock to prevent concurrentupdates. However, using DBMS_LOCK and multiple triggers negatively impactsruntime performance.
Another alternative to LOCK TABLE employees IN SHARE MODE is to create a triggeron the employees table which, for each changed row of employees, locks thecorresponding job row in jobs. However, this approach causes excessive work onupdates to the employees table, which are frequent.
LOCK TABLE employees IN SHARE MODE is simpler than the preceding alternatives, andchanges to the jobs table are rare and likely to happen at application maintenancetime, when locking the table does not inconvenience users.
See Also:
• Oracle Database Development Guide for information about lockingtables with SHARE MODE
• Oracle Database PL/SQL Packages and Types Reference forinformation about the DBMS_LOCK package
• "Creating Triggers"
• "Tutorial: Showing How the admin_pkg Subprograms Work"
9.4.4 Creating the Sequences
Note:
You must be connected to Oracle Database as user app_data.
To create the sequences that generate unique primary keys for new departments andnew employees, use the following statements (in either order). You can enter thestatements either in SQL*Plus or in the Worksheet of SQL Developer. Alternatively,you can create the sequences with the SQL Developer tool Create Sequence.
CREATE SEQUENCE employees_sequence START WITH 210;CREATE SEQUENCE departments_sequence START WITH 275;
To avoid conflict with the data that you will load from tables in thesample schema HR, the starting numbers for employees_sequence and
Chapter 9Creating the Schema Objects and Loading the Data
9-13
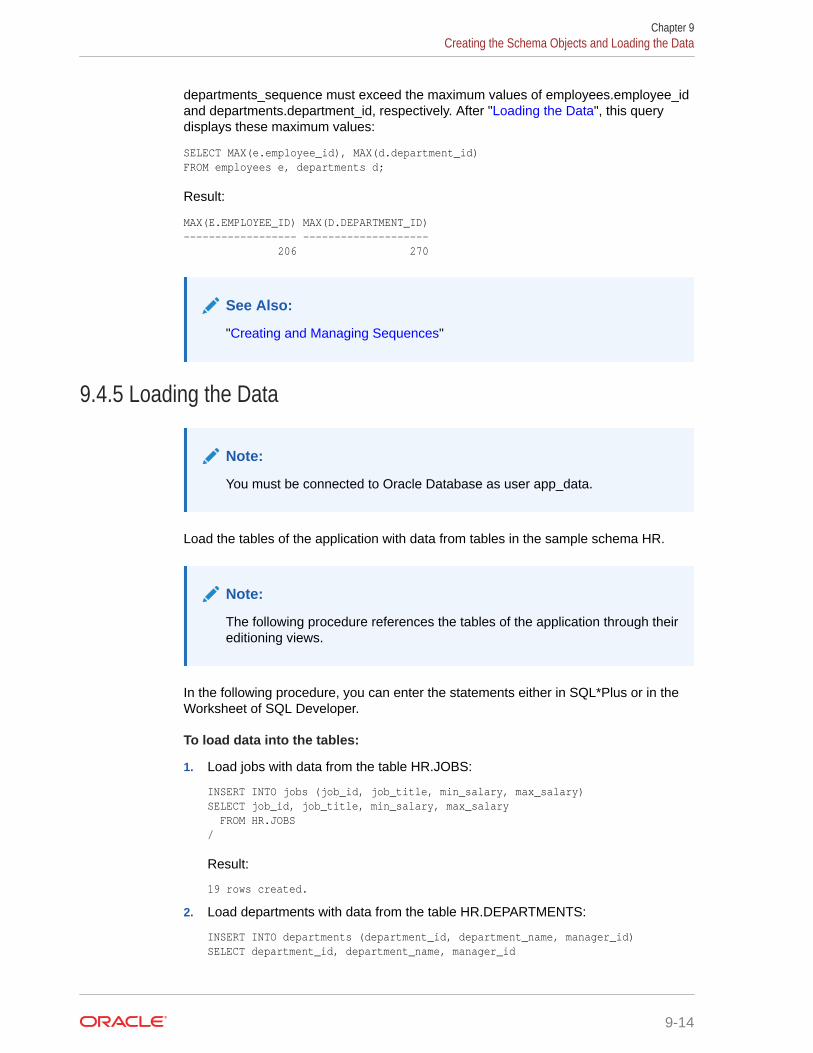
departments_sequence must exceed the maximum values of employees.employee_idand departments.department_id, respectively. After "Loading the Data", this querydisplays these maximum values:
SELECT MAX(e.employee_id), MAX(d.department_id)FROM employees e, departments d;
Result:
MAX(E.EMPLOYEE_ID) MAX(D.DEPARTMENT_ID)------------------ -------------------- 206 270
See Also:
"Creating and Managing Sequences"
9.4.5 Loading the Data
Note:
You must be connected to Oracle Database as user app_data.
Load the tables of the application with data from tables in the sample schema HR.
Note:
The following procedure references the tables of the application through theireditioning views.
In the following procedure, you can enter the statements either in SQL*Plus or in theWorksheet of SQL Developer.
To load data into the tables:
1. Load jobs with data from the table HR.JOBS:
INSERT INTO jobs (job_id, job_title, min_salary, max_salary)SELECT job_id, job_title, min_salary, max_salary FROM HR.JOBS/
Result:
19 rows created.
2. Load departments with data from the table HR.DEPARTMENTS:
INSERT INTO departments (department_id, department_name, manager_id)SELECT department_id, department_name, manager_id
Chapter 9Creating the Schema Objects and Loading the Data
9-14
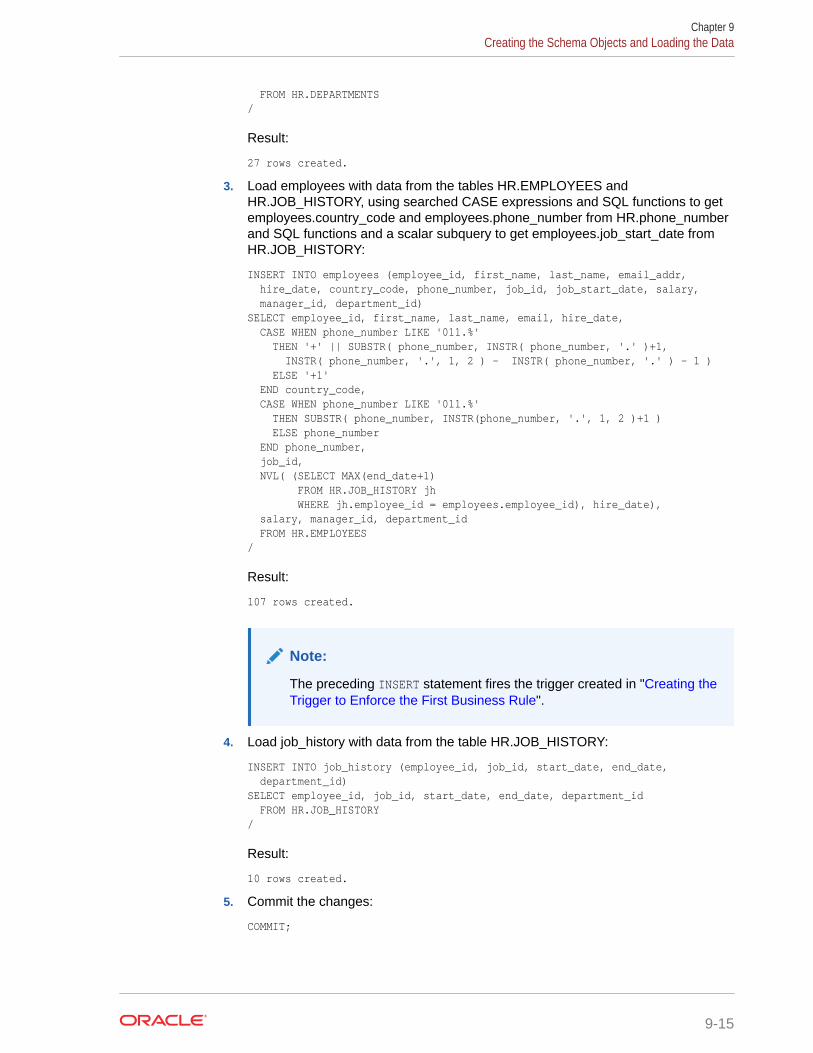
FROM HR.DEPARTMENTS/
Result:
27 rows created.
3. Load employees with data from the tables HR.EMPLOYEES andHR.JOB_HISTORY, using searched CASE expressions and SQL functions to getemployees.country_code and employees.phone_number from HR.phone_numberand SQL functions and a scalar subquery to get employees.job_start_date fromHR.JOB_HISTORY:
INSERT INTO employees (employee_id, first_name, last_name, email_addr, hire_date, country_code, phone_number, job_id, job_start_date, salary, manager_id, department_id)SELECT employee_id, first_name, last_name, email, hire_date, CASE WHEN phone_number LIKE '011.%' THEN '+' || SUBSTR( phone_number, INSTR( phone_number, '.' )+1, INSTR( phone_number, '.', 1, 2 ) - INSTR( phone_number, '.' ) - 1 ) ELSE '+1' END country_code, CASE WHEN phone_number LIKE '011.%' THEN SUBSTR( phone_number, INSTR(phone_number, '.', 1, 2 )+1 ) ELSE phone_number END phone_number, job_id, NVL( (SELECT MAX(end_date+1) FROM HR.JOB_HISTORY jh WHERE jh.employee_id = employees.employee_id), hire_date), salary, manager_id, department_id FROM HR.EMPLOYEES/
Result:
107 rows created.
Note:
The preceding INSERT statement fires the trigger created in "Creating theTrigger to Enforce the First Business Rule".
4. Load job_history with data from the table HR.JOB_HISTORY:
INSERT INTO job_history (employee_id, job_id, start_date, end_date, department_id)SELECT employee_id, job_id, start_date, end_date, department_id FROM HR.JOB_HISTORY/
Result:
10 rows created.
5. Commit the changes:
COMMIT;
Chapter 9Creating the Schema Objects and Loading the Data
9-15
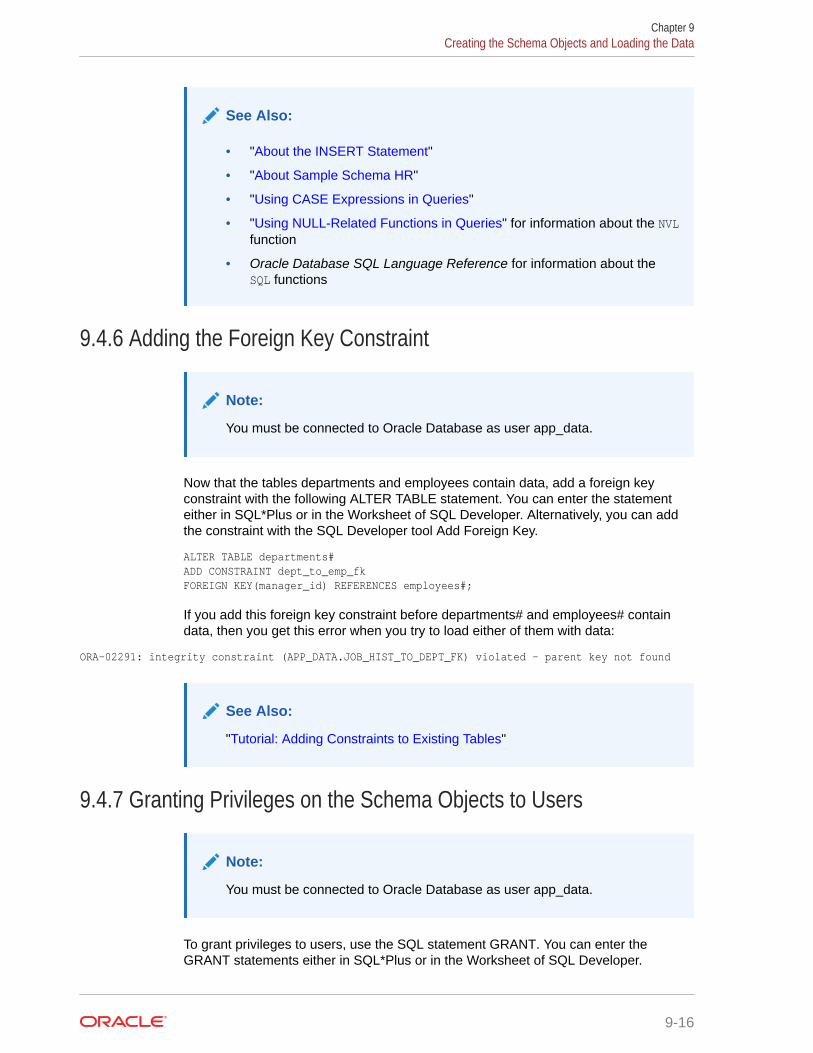
See Also:
• "About the INSERT Statement"
• "About Sample Schema HR"
• "Using CASE Expressions in Queries"
• "Using NULL-Related Functions in Queries" for information about the NVLfunction
• Oracle Database SQL Language Reference for information about theSQL functions
9.4.6 Adding the Foreign Key Constraint
Note:
You must be connected to Oracle Database as user app_data.
Now that the tables departments and employees contain data, add a foreign keyconstraint with the following ALTER TABLE statement. You can enter the statementeither in SQL*Plus or in the Worksheet of SQL Developer. Alternatively, you can addthe constraint with the SQL Developer tool Add Foreign Key.
ALTER TABLE departments#ADD CONSTRAINT dept_to_emp_fkFOREIGN KEY(manager_id) REFERENCES employees#;
If you add this foreign key constraint before departments# and employees# containdata, then you get this error when you try to load either of them with data:
ORA-02291: integrity constraint (APP_DATA.JOB_HIST_TO_DEPT_FK) violated - parent key not found
See Also:
"Tutorial: Adding Constraints to Existing Tables"
9.4.7 Granting Privileges on the Schema Objects to Users
Note:
You must be connected to Oracle Database as user app_data.
To grant privileges to users, use the SQL statement GRANT. You can enter theGRANT statements either in SQL*Plus or in the Worksheet of SQL Developer.
Chapter 9Creating the Schema Objects and Loading the Data
9-16
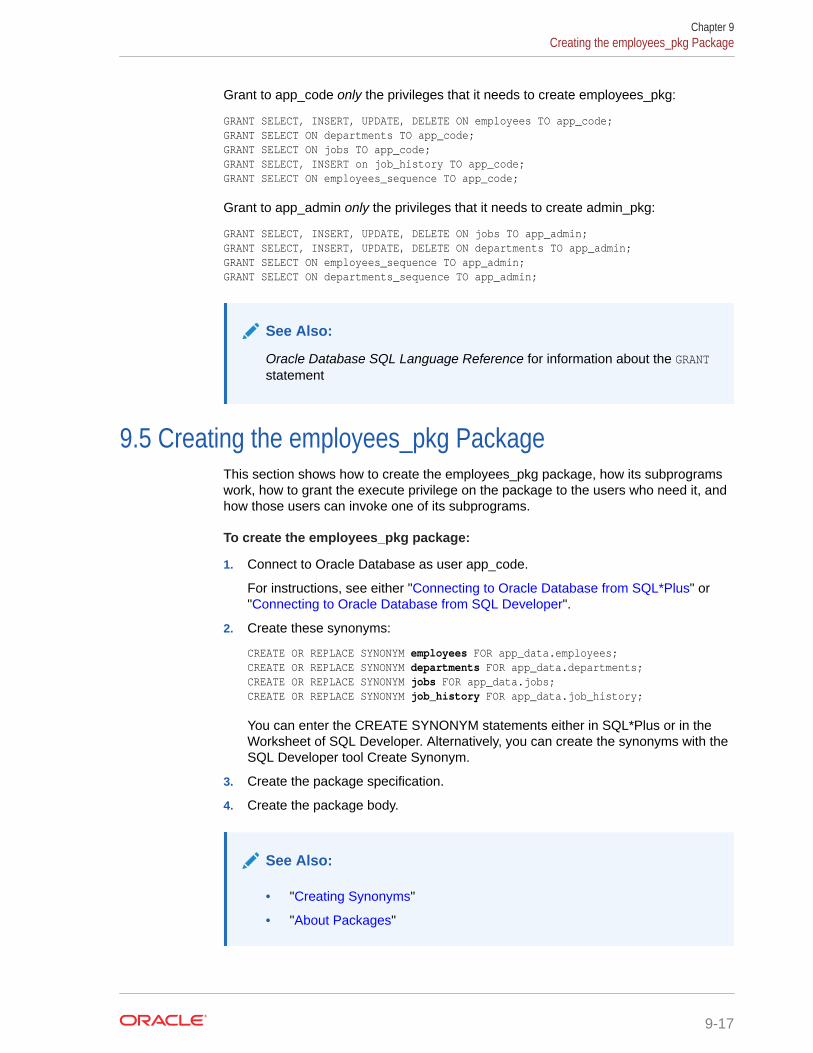
Grant to app_code only the privileges that it needs to create employees_pkg:
GRANT SELECT, INSERT, UPDATE, DELETE ON employees TO app_code;GRANT SELECT ON departments TO app_code;GRANT SELECT ON jobs TO app_code;GRANT SELECT, INSERT on job_history TO app_code;GRANT SELECT ON employees_sequence TO app_code;
Grant to app_admin only the privileges that it needs to create admin_pkg:
GRANT SELECT, INSERT, UPDATE, DELETE ON jobs TO app_admin;GRANT SELECT, INSERT, UPDATE, DELETE ON departments TO app_admin;GRANT SELECT ON employees_sequence TO app_admin;GRANT SELECT ON departments_sequence TO app_admin;
See Also:
Oracle Database SQL Language Reference for information about the GRANTstatement
9.5 Creating the employees_pkg PackageThis section shows how to create the employees_pkg package, how its subprogramswork, how to grant the execute privilege on the package to the users who need it, andhow those users can invoke one of its subprograms.
To create the employees_pkg package:
1. Connect to Oracle Database as user app_code.
For instructions, see either "Connecting to Oracle Database from SQL*Plus" or"Connecting to Oracle Database from SQL Developer".
2. Create these synonyms:
CREATE OR REPLACE SYNONYM employees FOR app_data.employees;CREATE OR REPLACE SYNONYM departments FOR app_data.departments;CREATE OR REPLACE SYNONYM jobs FOR app_data.jobs;CREATE OR REPLACE SYNONYM job_history FOR app_data.job_history;
You can enter the CREATE SYNONYM statements either in SQL*Plus or in theWorksheet of SQL Developer. Alternatively, you can create the synonyms with theSQL Developer tool Create Synonym.
3. Create the package specification.
4. Create the package body.
See Also:
• "Creating Synonyms"
• "About Packages"
Chapter 9Creating the employees_pkg Package
9-17
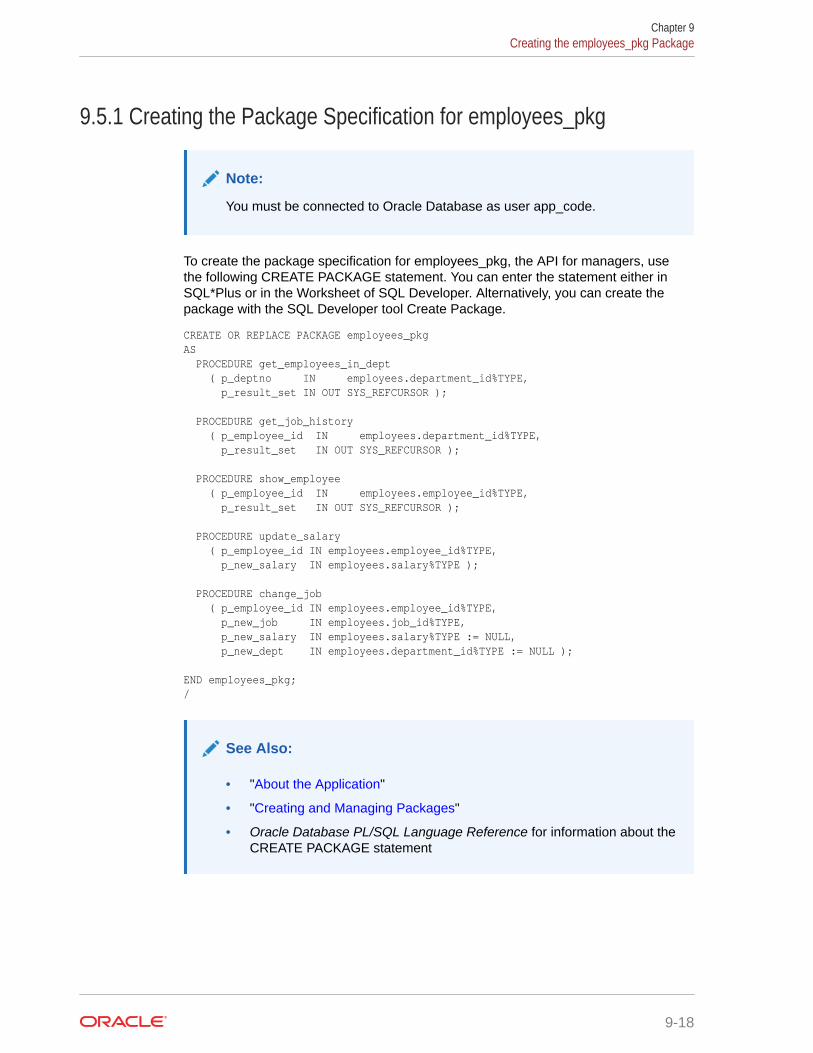
9.5.1 Creating the Package Specification for employees_pkg
Note:
You must be connected to Oracle Database as user app_code.
To create the package specification for employees_pkg, the API for managers, usethe following CREATE PACKAGE statement. You can enter the statement either inSQL*Plus or in the Worksheet of SQL Developer. Alternatively, you can create thepackage with the SQL Developer tool Create Package.
CREATE OR REPLACE PACKAGE employees_pkgAS PROCEDURE get_employees_in_dept ( p_deptno IN employees.department_id%TYPE, p_result_set IN OUT SYS_REFCURSOR ); PROCEDURE get_job_history ( p_employee_id IN employees.department_id%TYPE, p_result_set IN OUT SYS_REFCURSOR ); PROCEDURE show_employee ( p_employee_id IN employees.employee_id%TYPE, p_result_set IN OUT SYS_REFCURSOR ); PROCEDURE update_salary ( p_employee_id IN employees.employee_id%TYPE, p_new_salary IN employees.salary%TYPE ); PROCEDURE change_job ( p_employee_id IN employees.employee_id%TYPE, p_new_job IN employees.job_id%TYPE, p_new_salary IN employees.salary%TYPE := NULL, p_new_dept IN employees.department_id%TYPE := NULL ); END employees_pkg;/
See Also:
• "About the Application"
• "Creating and Managing Packages"
• Oracle Database PL/SQL Language Reference for information about theCREATE PACKAGE statement
Chapter 9Creating the employees_pkg Package
9-18
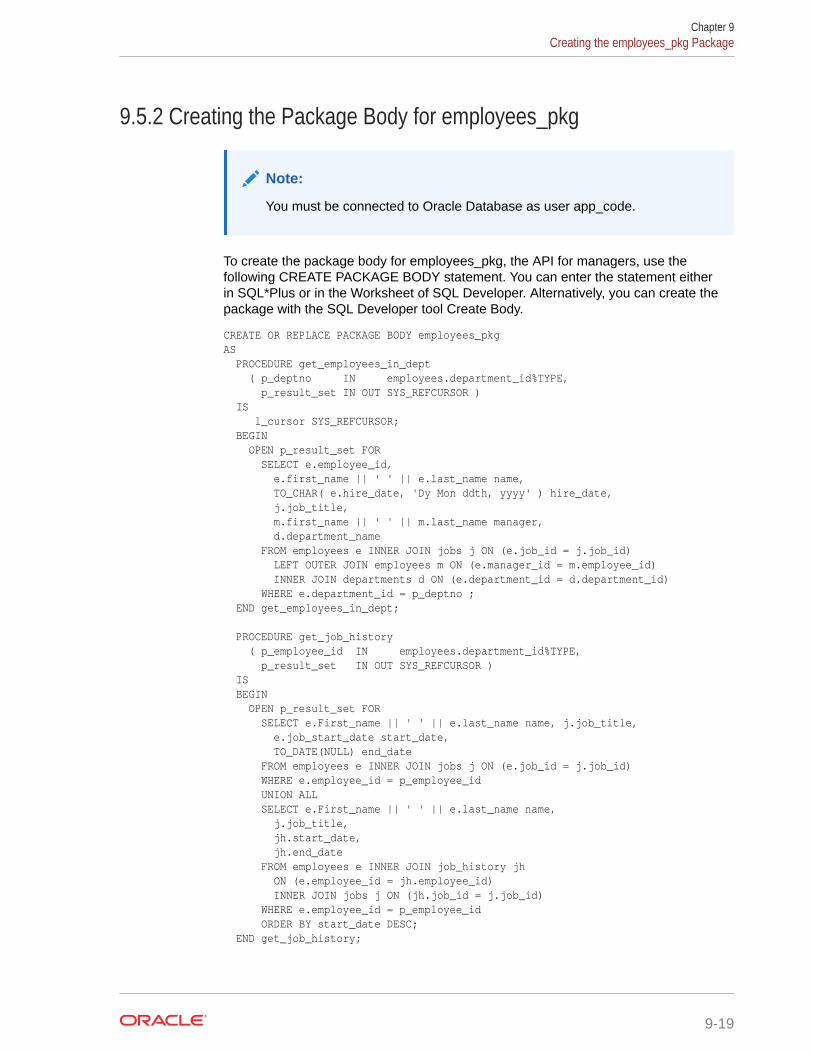
9.5.2 Creating the Package Body for employees_pkg
Note:
You must be connected to Oracle Database as user app_code.
To create the package body for employees_pkg, the API for managers, use thefollowing CREATE PACKAGE BODY statement. You can enter the statement eitherin SQL*Plus or in the Worksheet of SQL Developer. Alternatively, you can create thepackage with the SQL Developer tool Create Body.
CREATE OR REPLACE PACKAGE BODY employees_pkgAS PROCEDURE get_employees_in_dept ( p_deptno IN employees.department_id%TYPE, p_result_set IN OUT SYS_REFCURSOR ) IS l_cursor SYS_REFCURSOR; BEGIN OPEN p_result_set FOR SELECT e.employee_id, e.first_name || ' ' || e.last_name name, TO_CHAR( e.hire_date, 'Dy Mon ddth, yyyy' ) hire_date, j.job_title, m.first_name || ' ' || m.last_name manager, d.department_name FROM employees e INNER JOIN jobs j ON (e.job_id = j.job_id) LEFT OUTER JOIN employees m ON (e.manager_id = m.employee_id) INNER JOIN departments d ON (e.department_id = d.department_id) WHERE e.department_id = p_deptno ; END get_employees_in_dept; PROCEDURE get_job_history ( p_employee_id IN employees.department_id%TYPE, p_result_set IN OUT SYS_REFCURSOR ) IS BEGIN OPEN p_result_set FOR SELECT e.First_name || ' ' || e.last_name name, j.job_title, e.job_start_date start_date, TO_DATE(NULL) end_date FROM employees e INNER JOIN jobs j ON (e.job_id = j.job_id) WHERE e.employee_id = p_employee_id UNION ALL SELECT e.First_name || ' ' || e.last_name name, j.job_title, jh.start_date, jh.end_date FROM employees e INNER JOIN job_history jh ON (e.employee_id = jh.employee_id) INNER JOIN jobs j ON (jh.job_id = j.job_id) WHERE e.employee_id = p_employee_id ORDER BY start_date DESC; END get_job_history;
Chapter 9Creating the employees_pkg Package
9-19
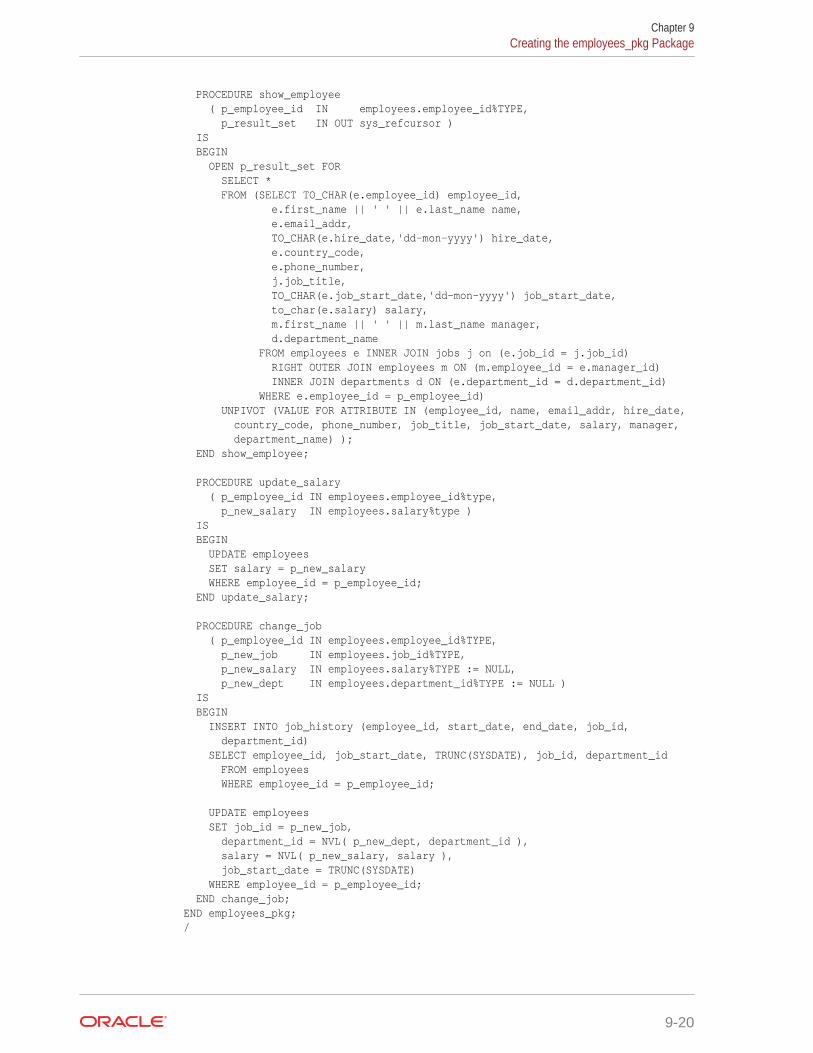
PROCEDURE show_employee ( p_employee_id IN employees.employee_id%TYPE, p_result_set IN OUT sys_refcursor ) IS BEGIN OPEN p_result_set FOR SELECT * FROM (SELECT TO_CHAR(e.employee_id) employee_id, e.first_name || ' ' || e.last_name name, e.email_addr, TO_CHAR(e.hire_date,'dd-mon-yyyy') hire_date, e.country_code, e.phone_number, j.job_title, TO_CHAR(e.job_start_date,'dd-mon-yyyy') job_start_date, to_char(e.salary) salary, m.first_name || ' ' || m.last_name manager, d.department_name FROM employees e INNER JOIN jobs j on (e.job_id = j.job_id) RIGHT OUTER JOIN employees m ON (m.employee_id = e.manager_id) INNER JOIN departments d ON (e.department_id = d.department_id) WHERE e.employee_id = p_employee_id) UNPIVOT (VALUE FOR ATTRIBUTE IN (employee_id, name, email_addr, hire_date, country_code, phone_number, job_title, job_start_date, salary, manager, department_name) ); END show_employee; PROCEDURE update_salary ( p_employee_id IN employees.employee_id%type, p_new_salary IN employees.salary%type ) IS BEGIN UPDATE employees SET salary = p_new_salary WHERE employee_id = p_employee_id; END update_salary; PROCEDURE change_job ( p_employee_id IN employees.employee_id%TYPE, p_new_job IN employees.job_id%TYPE, p_new_salary IN employees.salary%TYPE := NULL, p_new_dept IN employees.department_id%TYPE := NULL ) IS BEGIN INSERT INTO job_history (employee_id, start_date, end_date, job_id, department_id) SELECT employee_id, job_start_date, TRUNC(SYSDATE), job_id, department_id FROM employees WHERE employee_id = p_employee_id; UPDATE employees SET job_id = p_new_job, department_id = NVL( p_new_dept, department_id ), salary = NVL( p_new_salary, salary ), job_start_date = TRUNC(SYSDATE) WHERE employee_id = p_employee_id; END change_job;END employees_pkg;/
Chapter 9Creating the employees_pkg Package
9-20
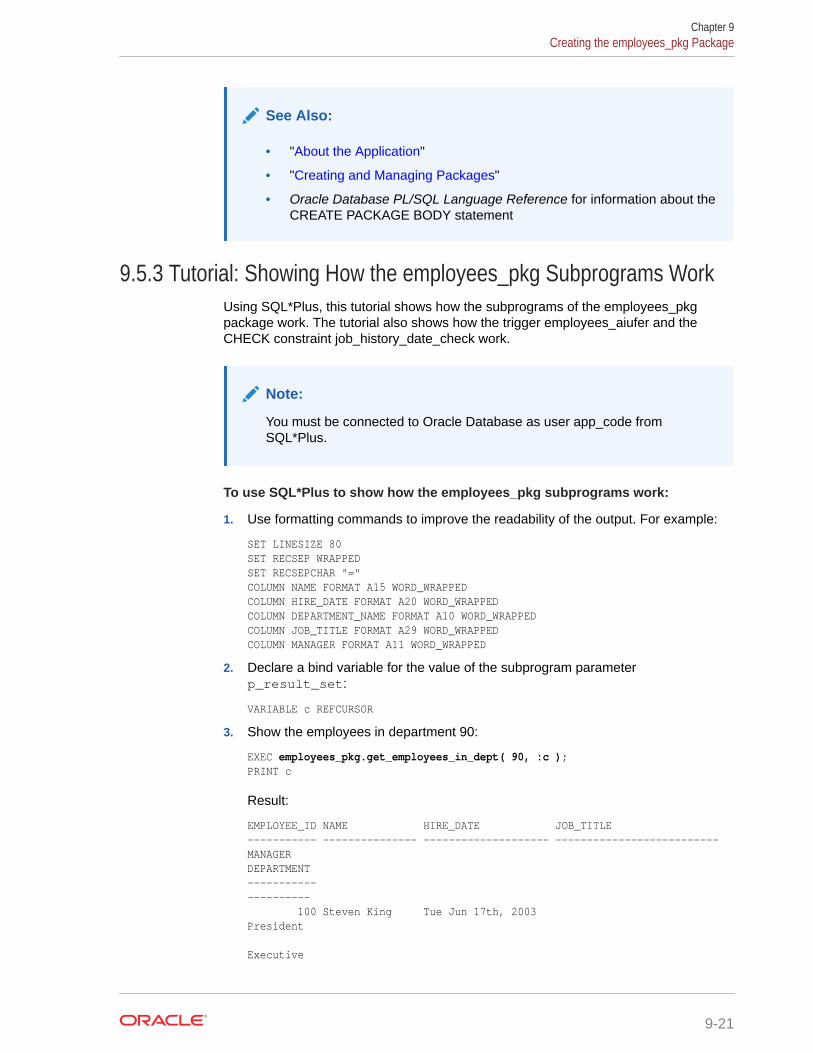
See Also:
• "About the Application"
• "Creating and Managing Packages"
• Oracle Database PL/SQL Language Reference for information about theCREATE PACKAGE BODY statement
9.5.3 Tutorial: Showing How the employees_pkg Subprograms WorkUsing SQL*Plus, this tutorial shows how the subprograms of the employees_pkgpackage work. The tutorial also shows how the trigger employees_aiufer and theCHECK constraint job_history_date_check work.
Note:
You must be connected to Oracle Database as user app_code fromSQL*Plus.
To use SQL*Plus to show how the employees_pkg subprograms work:
1. Use formatting commands to improve the readability of the output. For example:
SET LINESIZE 80SET RECSEP WRAPPEDSET RECSEPCHAR "="COLUMN NAME FORMAT A15 WORD_WRAPPEDCOLUMN HIRE_DATE FORMAT A20 WORD_WRAPPEDCOLUMN DEPARTMENT_NAME FORMAT A10 WORD_WRAPPEDCOLUMN JOB_TITLE FORMAT A29 WORD_WRAPPEDCOLUMN MANAGER FORMAT A11 WORD_WRAPPED
2. Declare a bind variable for the value of the subprogram parameterp_result_set:
VARIABLE c REFCURSOR
3. Show the employees in department 90:
EXEC employees_pkg.get_employees_in_dept( 90, :c );PRINT c
Result:
EMPLOYEE_ID NAME HIRE_DATE JOB_TITLE ----------- --------------- -------------------- --------------------------MANAGER DEPARTMENT ----------- ---------- 100 Steven King Tue Jun 17th, 2003 President Executive
Chapter 9Creating the employees_pkg Package
9-21
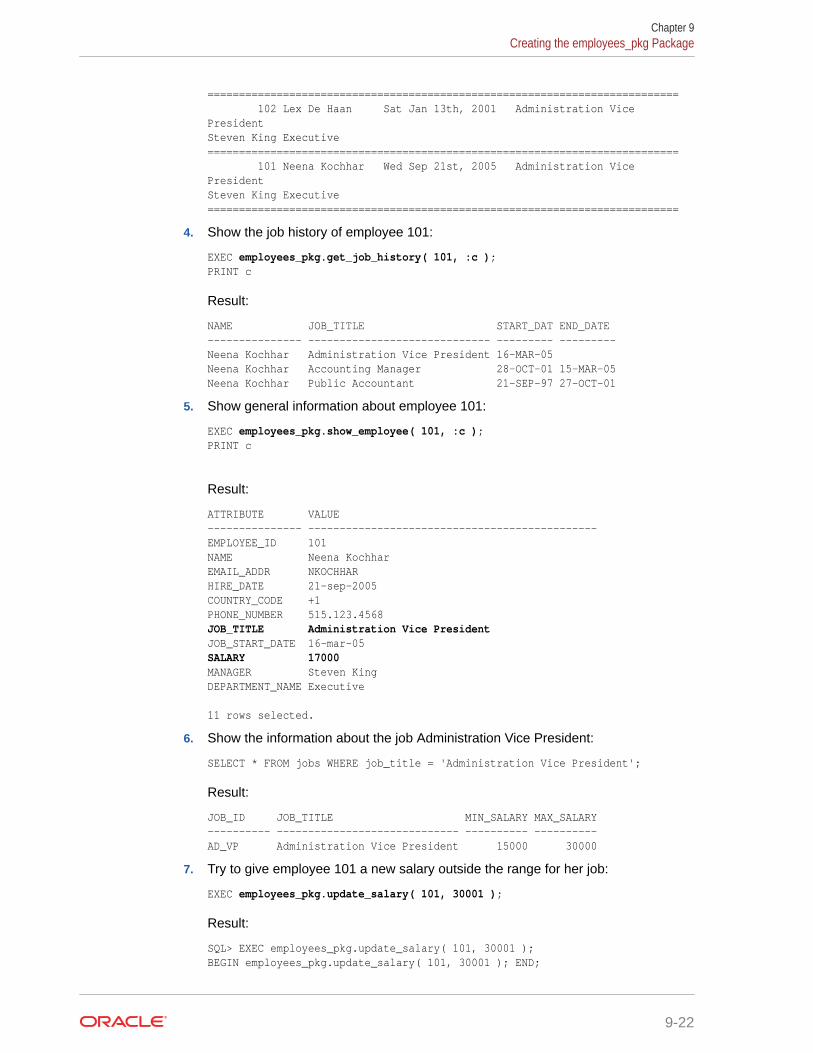
=========================================================================== 102 Lex De Haan Sat Jan 13th, 2001 Administration Vice President Steven King Executive =========================================================================== 101 Neena Kochhar Wed Sep 21st, 2005 Administration Vice President Steven King Executive ===========================================================================
4. Show the job history of employee 101:
EXEC employees_pkg.get_job_history( 101, :c );PRINT c
Result:
NAME JOB_TITLE START_DAT END_DATE--------------- ----------------------------- --------- ---------Neena Kochhar Administration Vice President 16-MAR-05 Neena Kochhar Accounting Manager 28-OCT-01 15-MAR-05Neena Kochhar Public Accountant 21-SEP-97 27-OCT-01
5. Show general information about employee 101:
EXEC employees_pkg.show_employee( 101, :c );PRINT c
Result:
ATTRIBUTE VALUE--------------- ----------------------------------------------EMPLOYEE_ID 101NAME Neena KochharEMAIL_ADDR NKOCHHARHIRE_DATE 21-sep-2005COUNTRY_CODE +1PHONE_NUMBER 515.123.4568JOB_TITLE Administration Vice PresidentJOB_START_DATE 16-mar-05SALARY 17000MANAGER Steven KingDEPARTMENT_NAME Executive 11 rows selected.
6. Show the information about the job Administration Vice President:
SELECT * FROM jobs WHERE job_title = 'Administration Vice President';
Result:
JOB_ID JOB_TITLE MIN_SALARY MAX_SALARY---------- ----------------------------- ---------- ----------AD_VP Administration Vice President 15000 30000
7. Try to give employee 101 a new salary outside the range for her job:
EXEC employees_pkg.update_salary( 101, 30001 );
Result:
SQL> EXEC employees_pkg.update_salary( 101, 30001 );BEGIN employees_pkg.update_salary( 101, 30001 ); END;
Chapter 9Creating the employees_pkg Package
9-22

*ERROR at line 1:ORA-20002: Salary modification invalidORA-06512: at "APP_DATA.EMPLOYEES_AIUFER", line 13ORA-04088: error during execution of trigger 'APP_DATA.EMPLOYEES_AIUFER'ORA-06512: at "APP_CODE.EMPLOYEES_PKG", line 77ORA-06512: at line 1
8. Give employee 101 a new salary inside the range for her job and show generalinformation about her again:
EXEC employees_pkg.update_salary( 101, 18000 );EXEC employees_pkg.show_employee( 101, :c );PRINT c
Result:
ATTRIBUTE VALUE--------------- ----------------------------------------------EMPLOYEE_ID 101NAME Neena KochharEMAIL_ADDR NKOCHHARHIRE_DATE 21-sep-2005COUNTRY_CODE +1PHONE_NUMBER 515.123.4568JOB_TITLE Administration Vice PresidentJOB_START_DATE 16-mar-05SALARY 18000MANAGER Steven KingDEPARTMENT_NAME Executive 11 rows selected.
9. Change the job of employee 101 to her current job with a lower salary:
EXEC employees_pkg.change_job( 101, 'AD_VP', 17500, 90 );
Result:
SQL> exec employees_pkg.change_job( 101, 'AD_VP', 17500, 90 );BEGIN employees_pkg.change_job( 101, 'AD_VP', 17500, 80 ); END; *ERROR at line 1:ORA-02290: check constraint (APP_DATA.JOB_HISTORY_DATE_CHECK) violatedORA-06512: at "APP_CODE.EMPLOYEES_PKG", line 101 ORA-06512: at line 1
10. Show information about the employee. (Note that the salary was not changed bythe statement in the preceding step; it is 18000, not 17500.)
exec employees_pkg.show_employee( 101, :c );print c
Result:
ATTRIBUTE VALUE--------------- ----------------------------------------------EMPLOYEE_ID 101NAME Neena KochharEMAIL_ADDR NKOCHHARHIRE_DATE 21-sep-2005COUNTRY_CODE +1
Chapter 9Creating the employees_pkg Package
9-23
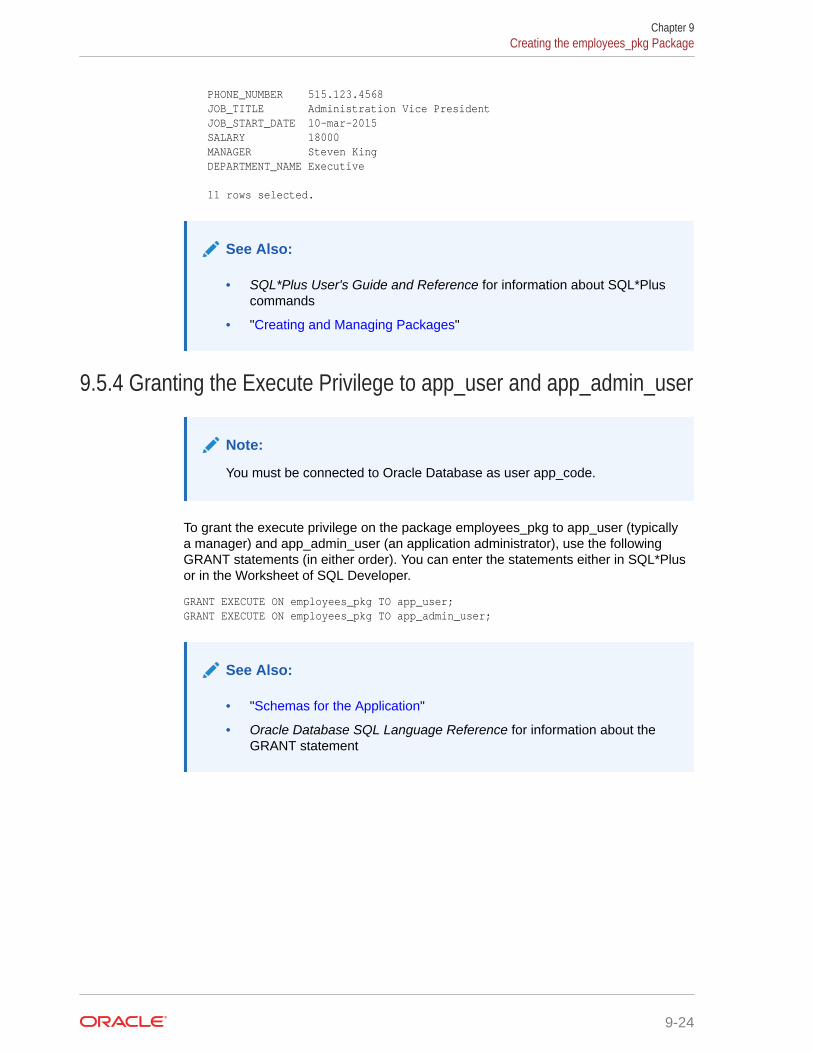
PHONE_NUMBER 515.123.4568JOB_TITLE Administration Vice PresidentJOB_START_DATE 10-mar-2015SALARY 18000MANAGER Steven KingDEPARTMENT_NAME Executive
11 rows selected.
See Also:
• SQL*Plus User's Guide and Reference for information about SQL*Pluscommands
• "Creating and Managing Packages"
9.5.4 Granting the Execute Privilege to app_user and app_admin_user
Note:
You must be connected to Oracle Database as user app_code.
To grant the execute privilege on the package employees_pkg to app_user (typicallya manager) and app_admin_user (an application administrator), use the followingGRANT statements (in either order). You can enter the statements either in SQL*Plusor in the Worksheet of SQL Developer.
GRANT EXECUTE ON employees_pkg TO app_user;GRANT EXECUTE ON employees_pkg TO app_admin_user;
See Also:
• "Schemas for the Application"
• Oracle Database SQL Language Reference for information about theGRANT statement
Chapter 9Creating the employees_pkg Package
9-24
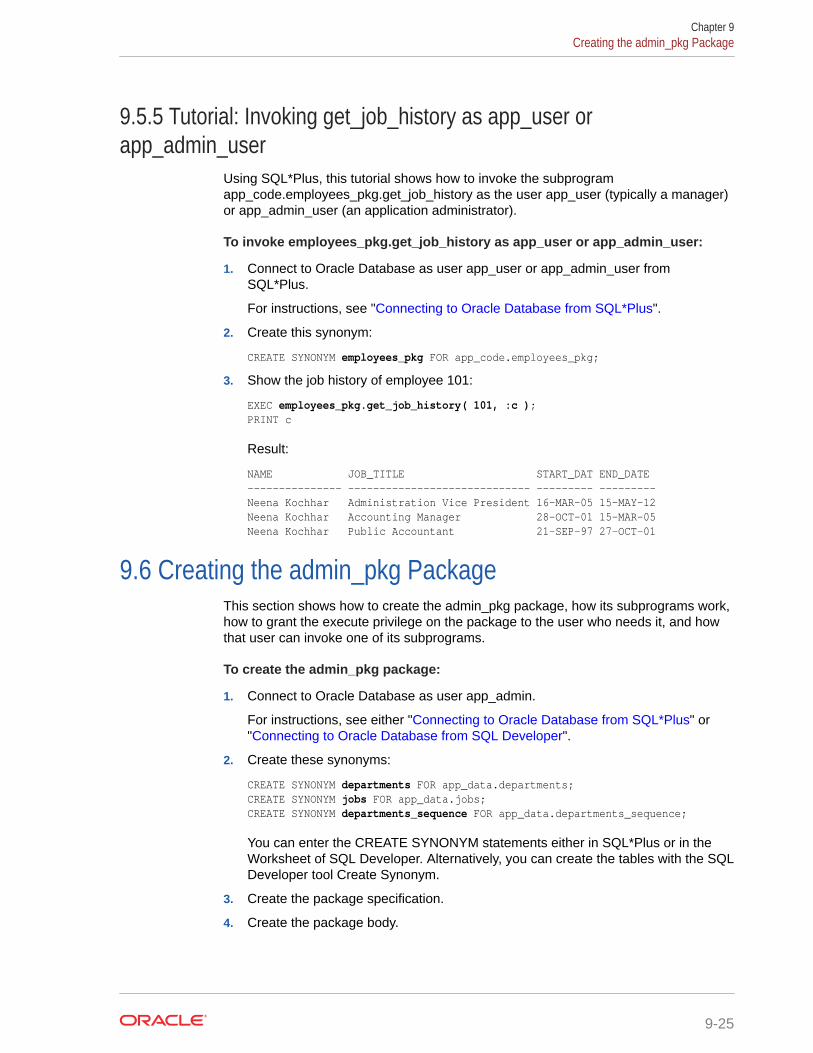
9.5.5 Tutorial: Invoking get_job_history as app_user orapp_admin_user
Using SQL*Plus, this tutorial shows how to invoke the subprogramapp_code.employees_pkg.get_job_history as the user app_user (typically a manager)or app_admin_user (an application administrator).
To invoke employees_pkg.get_job_history as app_user or app_admin_user:
1. Connect to Oracle Database as user app_user or app_admin_user fromSQL*Plus.
For instructions, see "Connecting to Oracle Database from SQL*Plus".
2. Create this synonym:
CREATE SYNONYM employees_pkg FOR app_code.employees_pkg;
3. Show the job history of employee 101:
EXEC employees_pkg.get_job_history( 101, :c );PRINT c
Result:
NAME JOB_TITLE START_DAT END_DATE--------------- ----------------------------- --------- ---------Neena Kochhar Administration Vice President 16-MAR-05 15-MAY-12Neena Kochhar Accounting Manager 28-OCT-01 15-MAR-05Neena Kochhar Public Accountant 21-SEP-97 27-OCT-01
9.6 Creating the admin_pkg PackageThis section shows how to create the admin_pkg package, how its subprograms work,how to grant the execute privilege on the package to the user who needs it, and howthat user can invoke one of its subprograms.
To create the admin_pkg package:
1. Connect to Oracle Database as user app_admin.
For instructions, see either "Connecting to Oracle Database from SQL*Plus" or"Connecting to Oracle Database from SQL Developer".
2. Create these synonyms:
CREATE SYNONYM departments FOR app_data.departments;CREATE SYNONYM jobs FOR app_data.jobs;CREATE SYNONYM departments_sequence FOR app_data.departments_sequence;
You can enter the CREATE SYNONYM statements either in SQL*Plus or in theWorksheet of SQL Developer. Alternatively, you can create the tables with the SQLDeveloper tool Create Synonym.
3. Create the package specification.
4. Create the package body.
Chapter 9Creating the admin_pkg Package
9-25
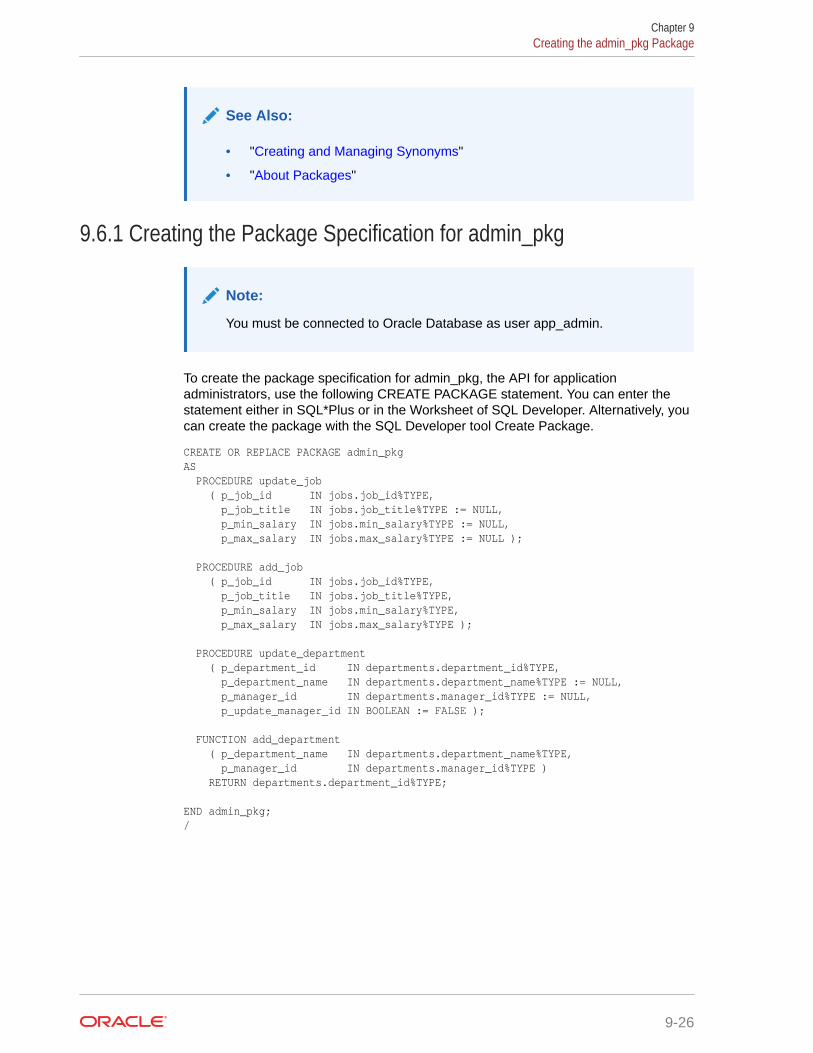
See Also:
• "Creating and Managing Synonyms"
• "About Packages"
9.6.1 Creating the Package Specification for admin_pkg
Note:
You must be connected to Oracle Database as user app_admin.
To create the package specification for admin_pkg, the API for applicationadministrators, use the following CREATE PACKAGE statement. You can enter thestatement either in SQL*Plus or in the Worksheet of SQL Developer. Alternatively, youcan create the package with the SQL Developer tool Create Package.
CREATE OR REPLACE PACKAGE admin_pkgAS PROCEDURE update_job ( p_job_id IN jobs.job_id%TYPE, p_job_title IN jobs.job_title%TYPE := NULL, p_min_salary IN jobs.min_salary%TYPE := NULL, p_max_salary IN jobs.max_salary%TYPE := NULL );
PROCEDURE add_job ( p_job_id IN jobs.job_id%TYPE, p_job_title IN jobs.job_title%TYPE, p_min_salary IN jobs.min_salary%TYPE, p_max_salary IN jobs.max_salary%TYPE );
PROCEDURE update_department ( p_department_id IN departments.department_id%TYPE, p_department_name IN departments.department_name%TYPE := NULL, p_manager_id IN departments.manager_id%TYPE := NULL, p_update_manager_id IN BOOLEAN := FALSE );
FUNCTION add_department ( p_department_name IN departments.department_name%TYPE, p_manager_id IN departments.manager_id%TYPE ) RETURN departments.department_id%TYPE;
END admin_pkg;/
Chapter 9Creating the admin_pkg Package
9-26
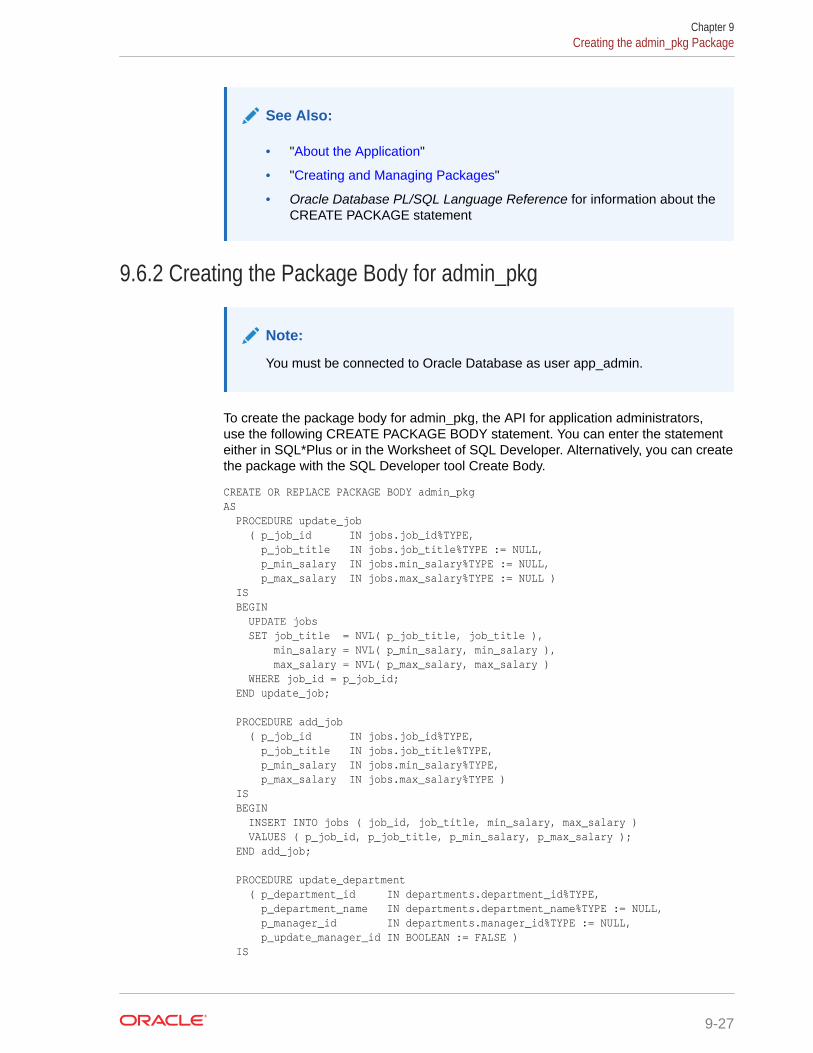
See Also:
• "About the Application"
• "Creating and Managing Packages"
• Oracle Database PL/SQL Language Reference for information about theCREATE PACKAGE statement
9.6.2 Creating the Package Body for admin_pkg
Note:
You must be connected to Oracle Database as user app_admin.
To create the package body for admin_pkg, the API for application administrators,use the following CREATE PACKAGE BODY statement. You can enter the statementeither in SQL*Plus or in the Worksheet of SQL Developer. Alternatively, you can createthe package with the SQL Developer tool Create Body.
CREATE OR REPLACE PACKAGE BODY admin_pkgAS PROCEDURE update_job ( p_job_id IN jobs.job_id%TYPE, p_job_title IN jobs.job_title%TYPE := NULL, p_min_salary IN jobs.min_salary%TYPE := NULL, p_max_salary IN jobs.max_salary%TYPE := NULL ) IS BEGIN UPDATE jobs SET job_title = NVL( p_job_title, job_title ), min_salary = NVL( p_min_salary, min_salary ), max_salary = NVL( p_max_salary, max_salary ) WHERE job_id = p_job_id; END update_job;
PROCEDURE add_job ( p_job_id IN jobs.job_id%TYPE, p_job_title IN jobs.job_title%TYPE, p_min_salary IN jobs.min_salary%TYPE, p_max_salary IN jobs.max_salary%TYPE ) IS BEGIN INSERT INTO jobs ( job_id, job_title, min_salary, max_salary ) VALUES ( p_job_id, p_job_title, p_min_salary, p_max_salary ); END add_job;
PROCEDURE update_department ( p_department_id IN departments.department_id%TYPE, p_department_name IN departments.department_name%TYPE := NULL, p_manager_id IN departments.manager_id%TYPE := NULL, p_update_manager_id IN BOOLEAN := FALSE ) IS
Chapter 9Creating the admin_pkg Package
9-27
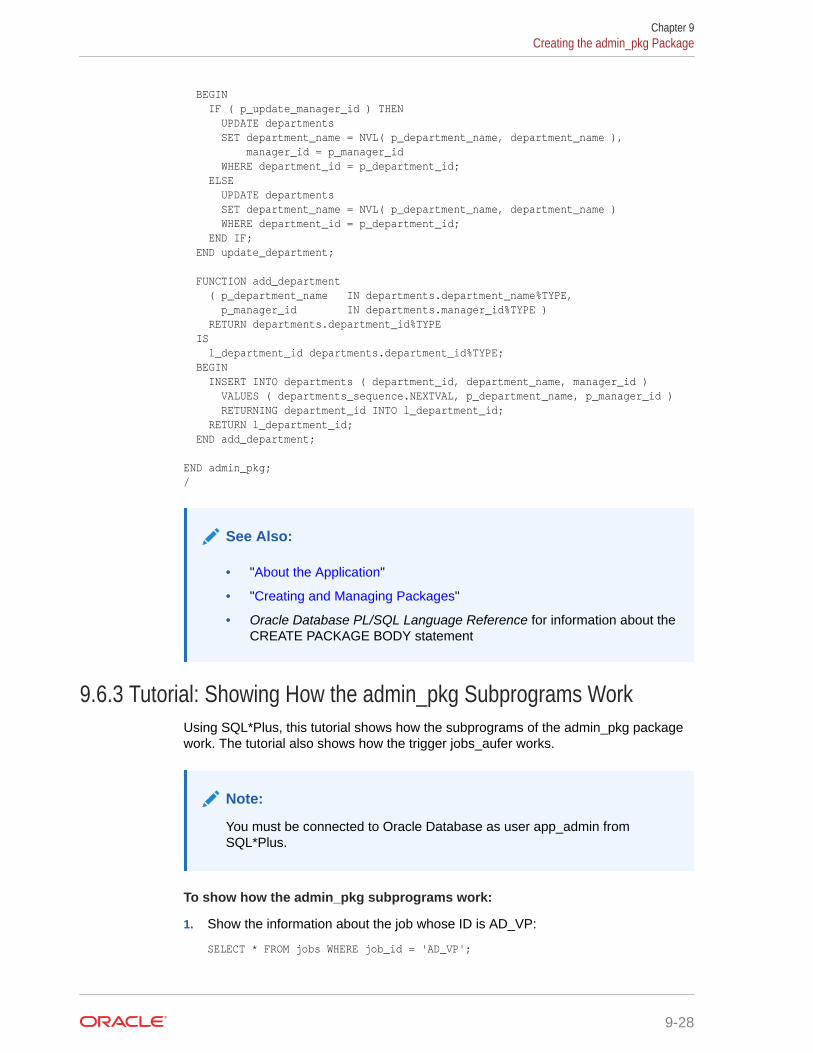
BEGIN IF ( p_update_manager_id ) THEN UPDATE departments SET department_name = NVL( p_department_name, department_name ), manager_id = p_manager_id WHERE department_id = p_department_id; ELSE UPDATE departments SET department_name = NVL( p_department_name, department_name ) WHERE department_id = p_department_id; END IF; END update_department;
FUNCTION add_department ( p_department_name IN departments.department_name%TYPE, p_manager_id IN departments.manager_id%TYPE ) RETURN departments.department_id%TYPE IS l_department_id departments.department_id%TYPE; BEGIN INSERT INTO departments ( department_id, department_name, manager_id ) VALUES ( departments_sequence.NEXTVAL, p_department_name, p_manager_id ) RETURNING department_id INTO l_department_id; RETURN l_department_id; END add_department;
END admin_pkg;/
See Also:
• "About the Application"
• "Creating and Managing Packages"
• Oracle Database PL/SQL Language Reference for information about theCREATE PACKAGE BODY statement
9.6.3 Tutorial: Showing How the admin_pkg Subprograms WorkUsing SQL*Plus, this tutorial shows how the subprograms of the admin_pkg packagework. The tutorial also shows how the trigger jobs_aufer works.
Note:
You must be connected to Oracle Database as user app_admin fromSQL*Plus.
To show how the admin_pkg subprograms work:
1. Show the information about the job whose ID is AD_VP:
SELECT * FROM jobs WHERE job_id = 'AD_VP';
Chapter 9Creating the admin_pkg Package
9-28
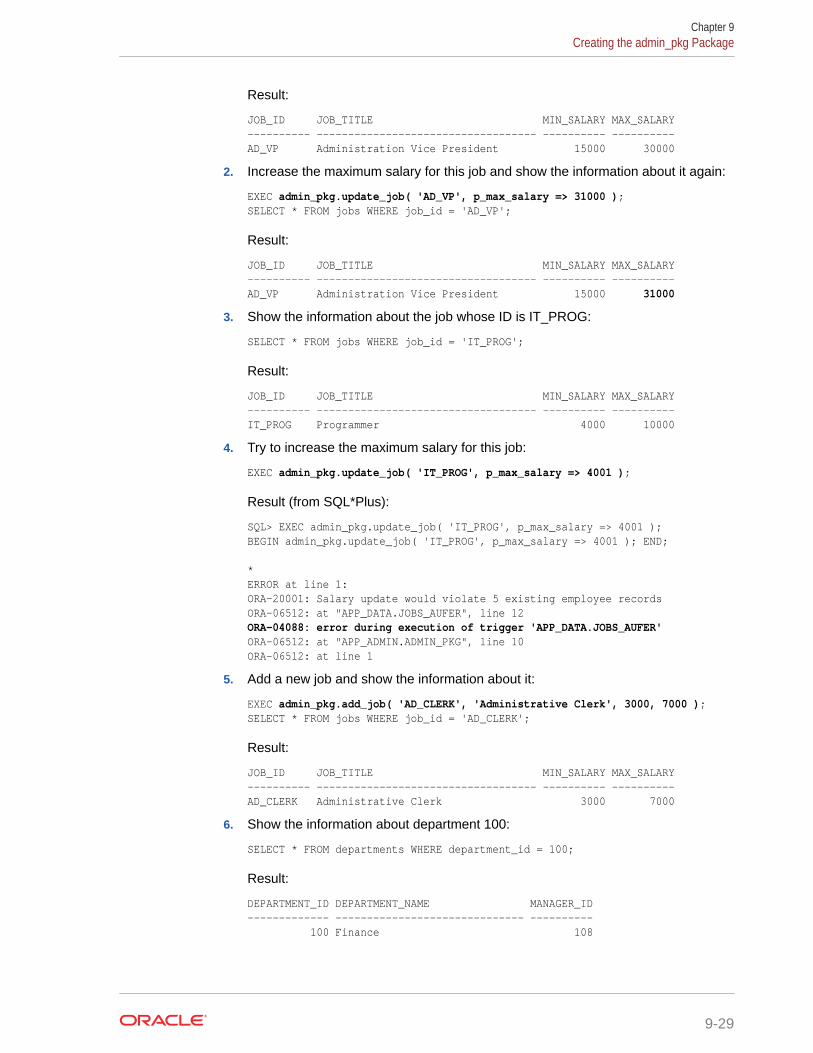
Result:
JOB_ID JOB_TITLE MIN_SALARY MAX_SALARY---------- ----------------------------------- ---------- ----------AD_VP Administration Vice President 15000 30000
2. Increase the maximum salary for this job and show the information about it again:
EXEC admin_pkg.update_job( 'AD_VP', p_max_salary => 31000 );SELECT * FROM jobs WHERE job_id = 'AD_VP';
Result:
JOB_ID JOB_TITLE MIN_SALARY MAX_SALARY---------- ----------------------------------- ---------- ----------AD_VP Administration Vice President 15000 31000
3. Show the information about the job whose ID is IT_PROG:
SELECT * FROM jobs WHERE job_id = 'IT_PROG';
Result:
JOB_ID JOB_TITLE MIN_SALARY MAX_SALARY---------- ----------------------------------- ---------- ----------IT_PROG Programmer 4000 10000
4. Try to increase the maximum salary for this job:
EXEC admin_pkg.update_job( 'IT_PROG', p_max_salary => 4001 );
Result (from SQL*Plus):
SQL> EXEC admin_pkg.update_job( 'IT_PROG', p_max_salary => 4001 );BEGIN admin_pkg.update_job( 'IT_PROG', p_max_salary => 4001 ); END; *ERROR at line 1:ORA-20001: Salary update would violate 5 existing employee recordsORA-06512: at "APP_DATA.JOBS_AUFER", line 12ORA-04088: error during execution of trigger 'APP_DATA.JOBS_AUFER'ORA-06512: at "APP_ADMIN.ADMIN_PKG", line 10ORA-06512: at line 1
5. Add a new job and show the information about it:
EXEC admin_pkg.add_job( 'AD_CLERK', 'Administrative Clerk', 3000, 7000 );SELECT * FROM jobs WHERE job_id = 'AD_CLERK';
Result:
JOB_ID JOB_TITLE MIN_SALARY MAX_SALARY---------- ----------------------------------- ---------- ----------AD_CLERK Administrative Clerk 3000 7000
6. Show the information about department 100:
SELECT * FROM departments WHERE department_id = 100;
Result:
DEPARTMENT_ID DEPARTMENT_NAME MANAGER_ID------------- ------------------------------ ---------- 100 Finance 108
Chapter 9Creating the admin_pkg Package
9-29

7. Change the name and manager of department 100 and show the informationabout it:
EXEC admin_pkg.update_department( 100, 'Financial Services' );EXEC admin_pkg.update_department( 100, p_manager_id => 111, p_update_manager_id => true );SELECT * FROM departments WHERE department_id = 100;
Result:
DEPARTMENT_ID DEPARTMENT_NAME MANAGER_ID------------- ------------------------------ ---------- 100 Financial Services 111
See Also:
"Creating and Managing Packages"
9.6.4 Granting the Execute Privilege to app_admin_user
Note:
You must be connected to Oracle Database as user app_admin.
To grant the execute privilege on the package admin_pkg to app_admin_user (anapplication administrator), use the following GRANT statement. You can enter thestatement either in SQL*Plus or in the Worksheet of SQL Developer.
GRANT EXECUTE ON admin_pkg TO app_admin_user;
See Also:
• "Schemas for the Application"
• Oracle Database SQL Language Reference for information about theGRANT statement
9.6.5 Tutorial: Invoking add_department as app_admin_userUsing SQL*Plus, this tutorial shows how to invoke the functionapp_admin.admin_pkg.add_department as the user app_admin_user (an applicationadministrator) and then see the information about the new department.
To invoke admin_pkg.add_department as app_admin_user:
1. Connect to Oracle Database as user app_admin_user from SQL*Plus.
For instructions, see "Connecting to Oracle Database from SQL*Plus".
Chapter 9Creating the admin_pkg Package
9-30
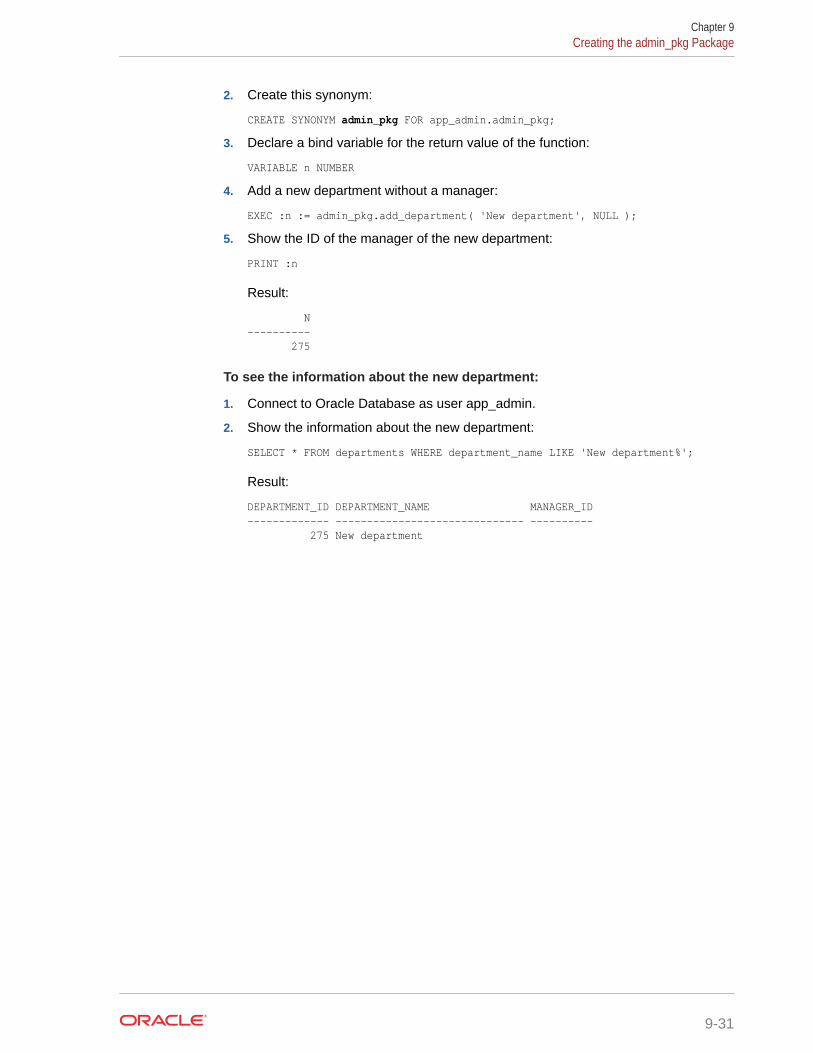
2. Create this synonym:
CREATE SYNONYM admin_pkg FOR app_admin.admin_pkg;
3. Declare a bind variable for the return value of the function:
VARIABLE n NUMBER
4. Add a new department without a manager:
EXEC :n := admin_pkg.add_department( 'New department', NULL );
5. Show the ID of the manager of the new department:
PRINT :n
Result:
N---------- 275
To see the information about the new department:
1. Connect to Oracle Database as user app_admin.
2. Show the information about the new department:
SELECT * FROM departments WHERE department_name LIKE 'New department%';
Result:
DEPARTMENT_ID DEPARTMENT_NAME MANAGER_ID------------- ------------------------------ ---------- 275 New department
Chapter 9Creating the admin_pkg Package
9-31
10Deploying an Oracle Database Application
After you develop your application, you can install it on other databases, calleddeployment environments, where other users can run it.
10.1 About Development and Deployment EnvironmentsThe database on which you develop your application is called the developmentenvironment. After developing your application, you can install it on other databases,called deployment environments, where other users can run it.
The first deployment environment is the test environment. In the test environment,you can thoroughly test the functionality of the application, determine whether itis structured correctly, and fix any problems before deploying it in the productionenvironment.
You might also deploy your application to an education environment, either before orafter deploying it to the production environment. An education environment provides aplace for users to practice running the application without affecting other environments.
If the desired deployment environments do not exist in your organization, you cancreate them.
10.2 About Installation ScriptsAn installation script can either have all the SQL statements needed to create theapplication or it can be a master script that runs other scripts.
A script is a series of SQL statements in a file whose name ends with .sql (forexample, create_app.sql). When you run a script in a client program such as SQL*Plusor SQL Developer, the SQL statements run in the order in which they appear in thescript. A script whose SQL statements create an application is called an installationscript.
To deploy an application, you run one or more installation scripts in the deploymentenvironment. For a new application, you must create the installation scripts. For anolder application, the installation scripts might exist, but if they do not, you can createthem.
10.2.1 About DDL Statements and Schema Object DependenciesAn installation script contains DDL statements that create schema objects and,optionally, INSERT statements that load data into tables that DDL statements create.To create installation scripts correctly, and to run multiple installation scripts in thecorrect order, you must understand the dependencies between the schema objects ofyour application.
10-1
If the definition of object A references object B, then A depends on B. Therefore, youmust create B before you create A. Otherwise, the statement that creates B either failsor creates B in an invalid state, depending on the object type.
For a complex application, the order for creating the objects is rarely obvious. Usually,you must consult the database designer or a diagram of the design.
See Also:
• Oracle Database Development Guide for more information aboutschema object dependencies
• "About Data Definition Language (DDL) Statements"
10.2.2 About INSERT Statements and ConstraintsWhen you run an installation script that contains INSERT statements, you mustdetermine whether constraints could be violated when data from source tables (in thedevelopment environment) is inserted into new tables in the deployment environment.
For each source table in your application, you must determine whether any constraintscould be violated when their data is inserted in the new table. If so, you mustfirst disable those constraints, then insert the data, and then try to re-enable theconstraints. If a data item violates a constraint, then you cannot re-enable thatconstraint until you correct the data item.
If you are simply inserting lookup data in correct order (as in "Loading the Data"), thenconstraints are not violated. Therefore, you do not need to disable them first.
If you are inserting data from an outside source (such as a file, spreadsheet, orolder application), or from many tables that have much dependent data, disable theconstraints before inserting the data.
Some possible ways to disable and re-enable the constraints are:
• Using SQL Developer, disable and re-enable the constraints one at a time:
1. In the Connections frame, select the appropriate table.
2. In the pane labeled with table name, select the subtab Constraints.
3. In the list of all constraints on the table, change ENABLED to DISABLED (or thereverse).
• Edit the installation script, adding SQL statements that disable and re-enable eachconstraint.
• Create a SQL script with SQL statements that disable and enable each constraint.
• Find the constraints in the Oracle Database data dictionary, and create a SQLscript with the SQL statements to disable and enable each constraint.
For example, to find and enable the constraints used in the EVALUATIONS,PERFORMANCE_PARTS, and SCORES tables from "Creating Tables", enterthese statements in the Worksheet:
SELECT 'ALTER TABLE '|| TABLE_NAME || ' DISABLE CONSTRAINT '|| CONSTRAINT_NAME ||';'
Chapter 10About Installation Scripts
10-2
FROM user_constraints WHERE table_name IN ('EVALUATIONS','PERFORMANCE_PARTS','SCORES'); SELECT 'ALTER TABLE '|| TABLE_NAME || ' ENABLE CONSTRAINT '|| CONSTRAINT_NAME ||';' FROM user_constraints WHERE table_name IN ('EVALUATIONS','PERFORMANCE_PARTS','SCORES');
See Also:
• "About the INSERT Statement"
• "Ensuring Data Integrity in Tables"
10.3 Creating Installation ScriptsYou can create installation scripts in SQL Developer or a text editor.
If an installation script needs only DDL and INSERT statements, then you can createit with either SQL Developer or any text editor. In SQL Developer, you can use eitherthe Cart or the Database Export wizard. Oracle recommends the Cart for installationscripts that you expect to run in multiple deployment environments and the DatabaseExport wizard for installation scripts that you expect to run in only one deploymentenvironment.
If an installation script needs SQL statements that are neither DDL nor INSERTstatements, then you must create it with a text editor.
This section explains how to create installation scripts with the Cart and the DatabaseExport wizard, when and how to edit installation scripts that create sequences andtriggers, and how create installation scripts for the application in Developing a SimpleOracle Database Application ("the sample application").
10.3.1 Creating Installation Scripts with the CartThe SQL Developer Cart is a convenient tool for deploying Oracle Database objectsfrom one or more database connections to a destination connection.
You drag and drop objects from the navigator frame into the Cart window, specify thedesired options, and click the Export Cart icon to display the Export Objects dialogbox. After you complete the information in that dialog box, SQL Developer createsa .zip file containing scripts (including a master script) to create the objects in theschema of a desired destination connection.
To create installation scripts with the Cart:
1. In the SQL Developer window, click the menu View.
2. From the View menu, select Cart.
The Cart window opens. The Export Cart icon is inactive (gray).
Chapter 10Creating Installation Scripts
10-3
Tip:
In the Cart window, for information about Cart user preferences, pressthe key F1.
3. In the Connections frame, select the schema objects that you want the installationscript to create and drag them into the Cart window.
In The Cart window, the Export Cart icon is now active (not gray).
4. For each Selected Object of type TABLE, if you want the installation script toexport data, then select the option Data.
5. Click Export Cart.
6. In the Export Objects dialog box, enter the desired values in the fields.
For information about these fields, see Oracle SQL Developer User's Guide.
7. Click Apply.
SQL Developer creates a .zip file containing scripts (including a master script) tocreate the objects in the schema of a desired destination connection.
8. In the master script and the scripts that it runs, check that:
• Referenced objects are created before their dependent objects.
• Tables are created before data is inserted into them.
If the installation scripts create sequences, see "Editing Installation Scripts thatCreate Sequences".
If the installation scripts create triggers, see "Editing Installation Scripts that CreateSequences".
If necessary, edit the installation files in the Worksheet or any text editor.
See Also:
Oracle SQL Developer User's Guide for more information about the Cart
10.3.2 Creating an Installation Script with the Database Export WizardTo create an installation script in SQL Developer with the Database Export wizard,you specify the name of the installation script, the objects and data to export, and thedesired options, and the wizard generates an installation script.
Note:
In the following procedure, you might have to enlarge the SQL Developerwindows to see all fields and options.
Chapter 10Creating Installation Scripts
10-4
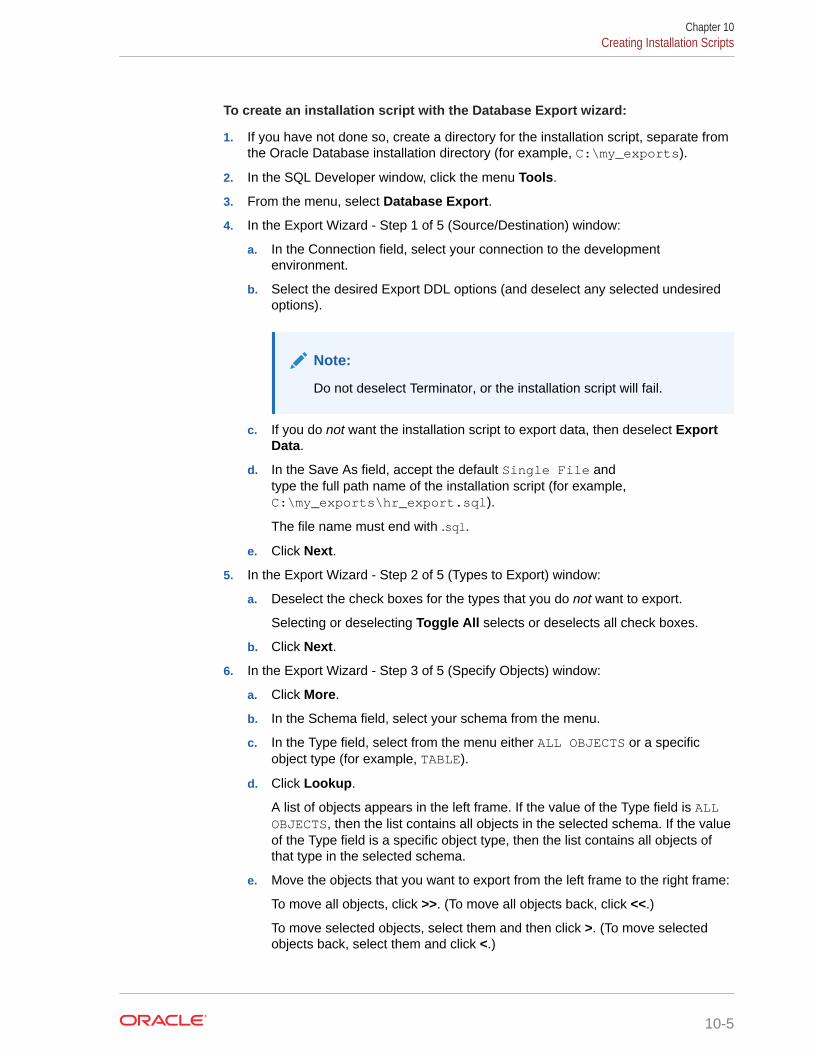
To create an installation script with the Database Export wizard:
1. If you have not done so, create a directory for the installation script, separate fromthe Oracle Database installation directory (for example, C:\my_exports).
2. In the SQL Developer window, click the menu Tools.
3. From the menu, select Database Export.
4. In the Export Wizard - Step 1 of 5 (Source/Destination) window:
a. In the Connection field, select your connection to the developmentenvironment.
b. Select the desired Export DDL options (and deselect any selected undesiredoptions).
Note:
Do not deselect Terminator, or the installation script will fail.
c. If you do not want the installation script to export data, then deselect ExportData.
d. In the Save As field, accept the default Single File andtype the full path name of the installation script (for example,C:\my_exports\hr_export.sql).
The file name must end with .sql.
e. Click Next.
5. In the Export Wizard - Step 2 of 5 (Types to Export) window:
a. Deselect the check boxes for the types that you do not want to export.
Selecting or deselecting Toggle All selects or deselects all check boxes.
b. Click Next.
6. In the Export Wizard - Step 3 of 5 (Specify Objects) window:
a. Click More.
b. In the Schema field, select your schema from the menu.
c. In the Type field, select from the menu either ALL OBJECTS or a specificobject type (for example, TABLE).
d. Click Lookup.
A list of objects appears in the left frame. If the value of the Type field is ALLOBJECTS, then the list contains all objects in the selected schema. If the valueof the Type field is a specific object type, then the list contains all objects ofthat type in the selected schema.
e. Move the objects that you want to export from the left frame to the right frame:
To move all objects, click >>. (To move all objects back, click <<.)
To move selected objects, select them and then click >. (To move selectedobjects back, select them and click <.)
Chapter 10Creating Installation Scripts
10-5
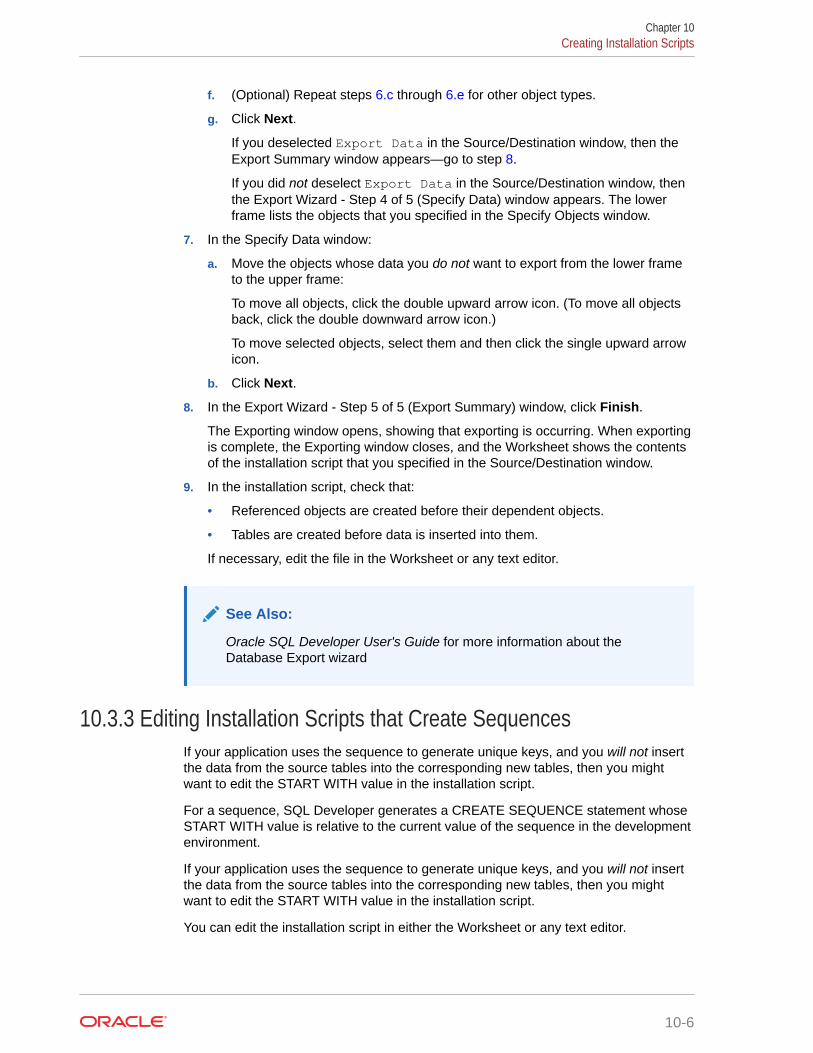
f. (Optional) Repeat steps 6.c through 6.e for other object types.
g. Click Next.
If you deselected Export Data in the Source/Destination window, then theExport Summary window appears—go to step 8.
If you did not deselect Export Data in the Source/Destination window, thenthe Export Wizard - Step 4 of 5 (Specify Data) window appears. The lowerframe lists the objects that you specified in the Specify Objects window.
7. In the Specify Data window:
a. Move the objects whose data you do not want to export from the lower frameto the upper frame:
To move all objects, click the double upward arrow icon. (To move all objectsback, click the double downward arrow icon.)
To move selected objects, select them and then click the single upward arrowicon.
b. Click Next.
8. In the Export Wizard - Step 5 of 5 (Export Summary) window, click Finish.
The Exporting window opens, showing that exporting is occurring. When exportingis complete, the Exporting window closes, and the Worksheet shows the contentsof the installation script that you specified in the Source/Destination window.
9. In the installation script, check that:
• Referenced objects are created before their dependent objects.
• Tables are created before data is inserted into them.
If necessary, edit the file in the Worksheet or any text editor.
See Also:
Oracle SQL Developer User's Guide for more information about theDatabase Export wizard
10.3.3 Editing Installation Scripts that Create SequencesIf your application uses the sequence to generate unique keys, and you will not insertthe data from the source tables into the corresponding new tables, then you mightwant to edit the START WITH value in the installation script.
For a sequence, SQL Developer generates a CREATE SEQUENCE statement whoseSTART WITH value is relative to the current value of the sequence in the developmentenvironment.
If your application uses the sequence to generate unique keys, and you will not insertthe data from the source tables into the corresponding new tables, then you mightwant to edit the START WITH value in the installation script.
You can edit the installation script in either the Worksheet or any text editor.
Chapter 10Creating Installation Scripts
10-6
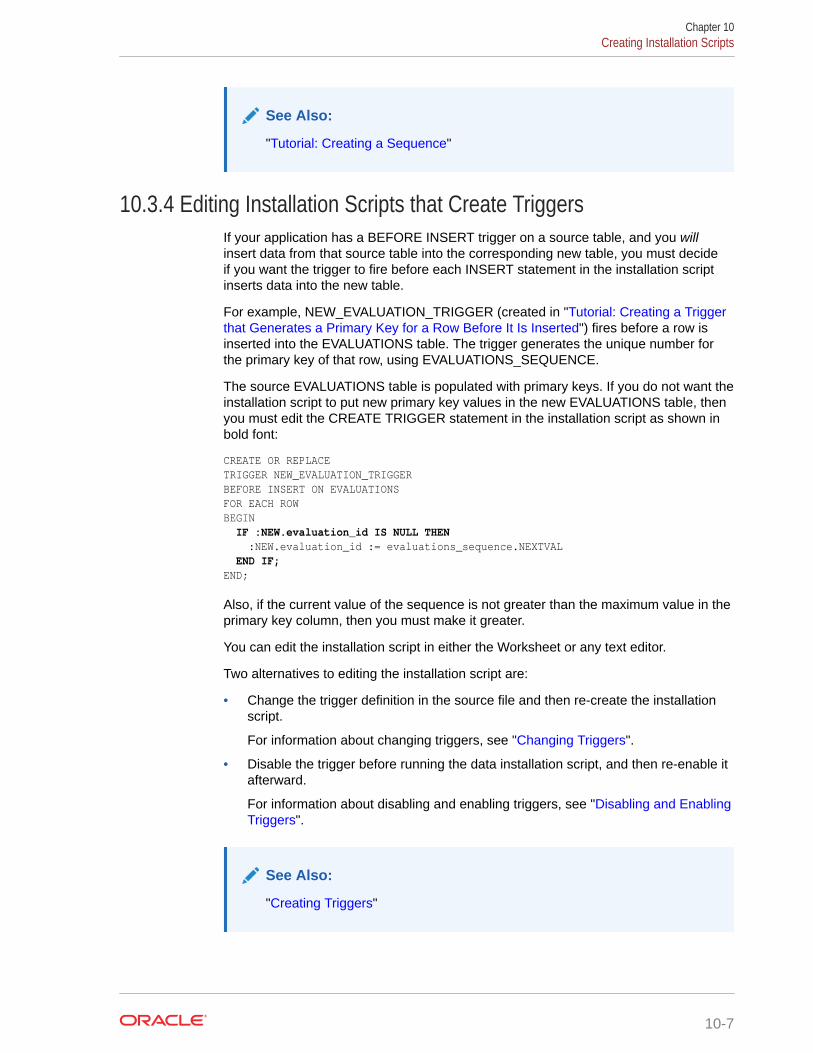
See Also:
"Tutorial: Creating a Sequence"
10.3.4 Editing Installation Scripts that Create TriggersIf your application has a BEFORE INSERT trigger on a source table, and you willinsert data from that source table into the corresponding new table, you must decideif you want the trigger to fire before each INSERT statement in the installation scriptinserts data into the new table.
For example, NEW_EVALUATION_TRIGGER (created in "Tutorial: Creating a Triggerthat Generates a Primary Key for a Row Before It Is Inserted") fires before a row isinserted into the EVALUATIONS table. The trigger generates the unique number forthe primary key of that row, using EVALUATIONS_SEQUENCE.
The source EVALUATIONS table is populated with primary keys. If you do not want theinstallation script to put new primary key values in the new EVALUATIONS table, thenyou must edit the CREATE TRIGGER statement in the installation script as shown inbold font:
CREATE OR REPLACETRIGGER NEW_EVALUATION_TRIGGERBEFORE INSERT ON EVALUATIONSFOR EACH ROWBEGIN IF :NEW.evaluation_id IS NULL THEN :NEW.evaluation_id := evaluations_sequence.NEXTVAL END IF;END;
Also, if the current value of the sequence is not greater than the maximum value in theprimary key column, then you must make it greater.
You can edit the installation script in either the Worksheet or any text editor.
Two alternatives to editing the installation script are:
• Change the trigger definition in the source file and then re-create the installationscript.
For information about changing triggers, see "Changing Triggers".
• Disable the trigger before running the data installation script, and then re-enable itafterward.
For information about disabling and enabling triggers, see "Disabling and EnablingTriggers".
See Also:
"Creating Triggers"
Chapter 10Creating Installation Scripts
10-7
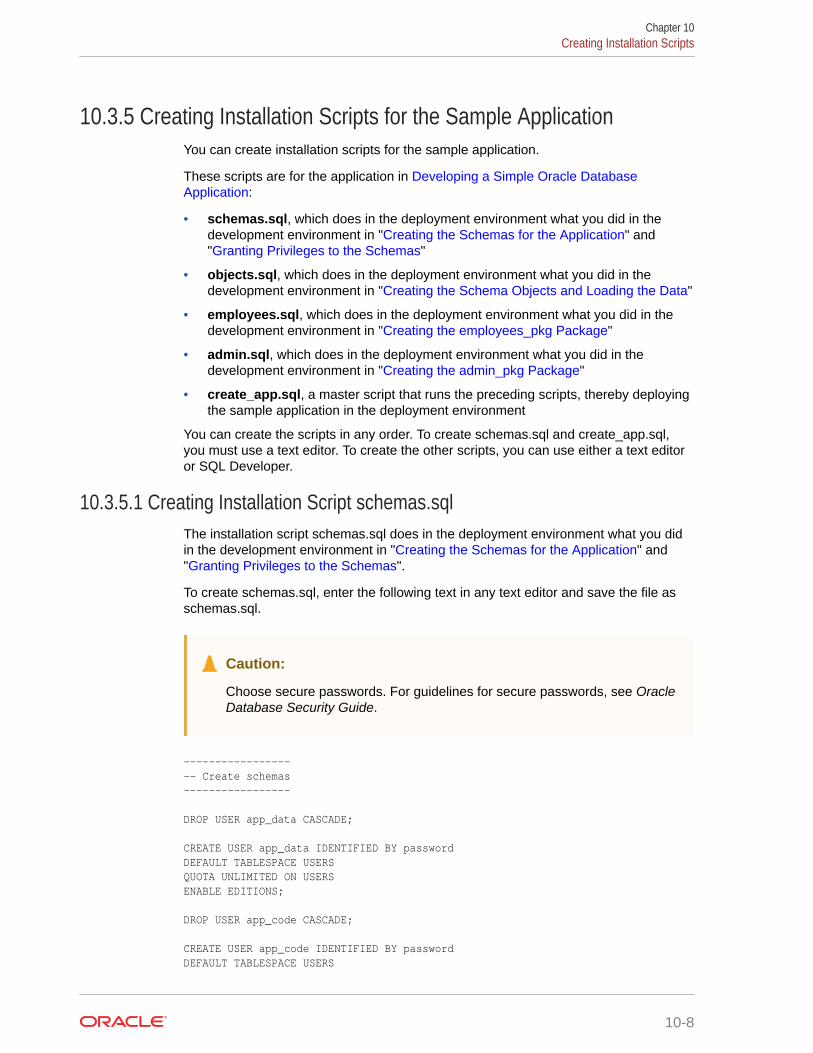
10.3.5 Creating Installation Scripts for the Sample ApplicationYou can create installation scripts for the sample application.
These scripts are for the application in Developing a Simple Oracle DatabaseApplication:
• schemas.sql, which does in the deployment environment what you did in thedevelopment environment in "Creating the Schemas for the Application" and"Granting Privileges to the Schemas"
• objects.sql, which does in the deployment environment what you did in thedevelopment environment in "Creating the Schema Objects and Loading the Data"
• employees.sql, which does in the deployment environment what you did in thedevelopment environment in "Creating the employees_pkg Package"
• admin.sql, which does in the deployment environment what you did in thedevelopment environment in "Creating the admin_pkg Package"
• create_app.sql, a master script that runs the preceding scripts, thereby deployingthe sample application in the deployment environment
You can create the scripts in any order. To create schemas.sql and create_app.sql,you must use a text editor. To create the other scripts, you can use either a text editoror SQL Developer.
10.3.5.1 Creating Installation Script schemas.sqlThe installation script schemas.sql does in the deployment environment what you didin the development environment in "Creating the Schemas for the Application" and"Granting Privileges to the Schemas".
To create schemas.sql, enter the following text in any text editor and save the file asschemas.sql.
Caution:
Choose secure passwords. For guidelines for secure passwords, see OracleDatabase Security Guide.
------------------- Create schemas----------------- DROP USER app_data CASCADE; CREATE USER app_data IDENTIFIED BY passwordDEFAULT TABLESPACE USERSQUOTA UNLIMITED ON USERSENABLE EDITIONS; DROP USER app_code CASCADE; CREATE USER app_code IDENTIFIED BY passwordDEFAULT TABLESPACE USERS
Chapter 10Creating Installation Scripts
10-8
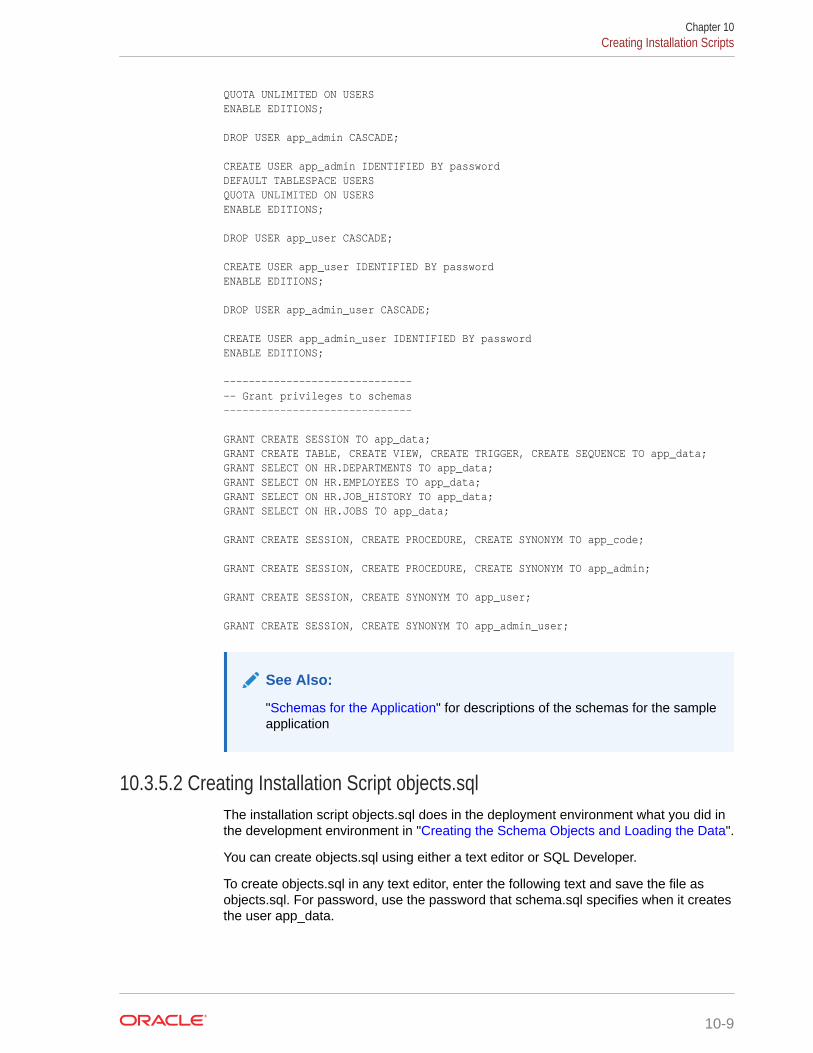
QUOTA UNLIMITED ON USERSENABLE EDITIONS; DROP USER app_admin CASCADE; CREATE USER app_admin IDENTIFIED BY passwordDEFAULT TABLESPACE USERSQUOTA UNLIMITED ON USERSENABLE EDITIONS; DROP USER app_user CASCADE; CREATE USER app_user IDENTIFIED BY passwordENABLE EDITIONS; DROP USER app_admin_user CASCADE; CREATE USER app_admin_user IDENTIFIED BY passwordENABLE EDITIONS; -------------------------------- Grant privileges to schemas------------------------------ GRANT CREATE SESSION TO app_data;GRANT CREATE TABLE, CREATE VIEW, CREATE TRIGGER, CREATE SEQUENCE TO app_data;GRANT SELECT ON HR.DEPARTMENTS TO app_data;GRANT SELECT ON HR.EMPLOYEES TO app_data;GRANT SELECT ON HR.JOB_HISTORY TO app_data;GRANT SELECT ON HR.JOBS TO app_data; GRANT CREATE SESSION, CREATE PROCEDURE, CREATE SYNONYM TO app_code; GRANT CREATE SESSION, CREATE PROCEDURE, CREATE SYNONYM TO app_admin; GRANT CREATE SESSION, CREATE SYNONYM TO app_user; GRANT CREATE SESSION, CREATE SYNONYM TO app_admin_user;
See Also:
"Schemas for the Application" for descriptions of the schemas for the sampleapplication
10.3.5.2 Creating Installation Script objects.sqlThe installation script objects.sql does in the deployment environment what you did inthe development environment in "Creating the Schema Objects and Loading the Data".
You can create objects.sql using either a text editor or SQL Developer.
To create objects.sql in any text editor, enter the following text and save the file asobjects.sql. For password, use the password that schema.sql specifies when it createsthe user app_data.
Chapter 10Creating Installation Scripts
10-9
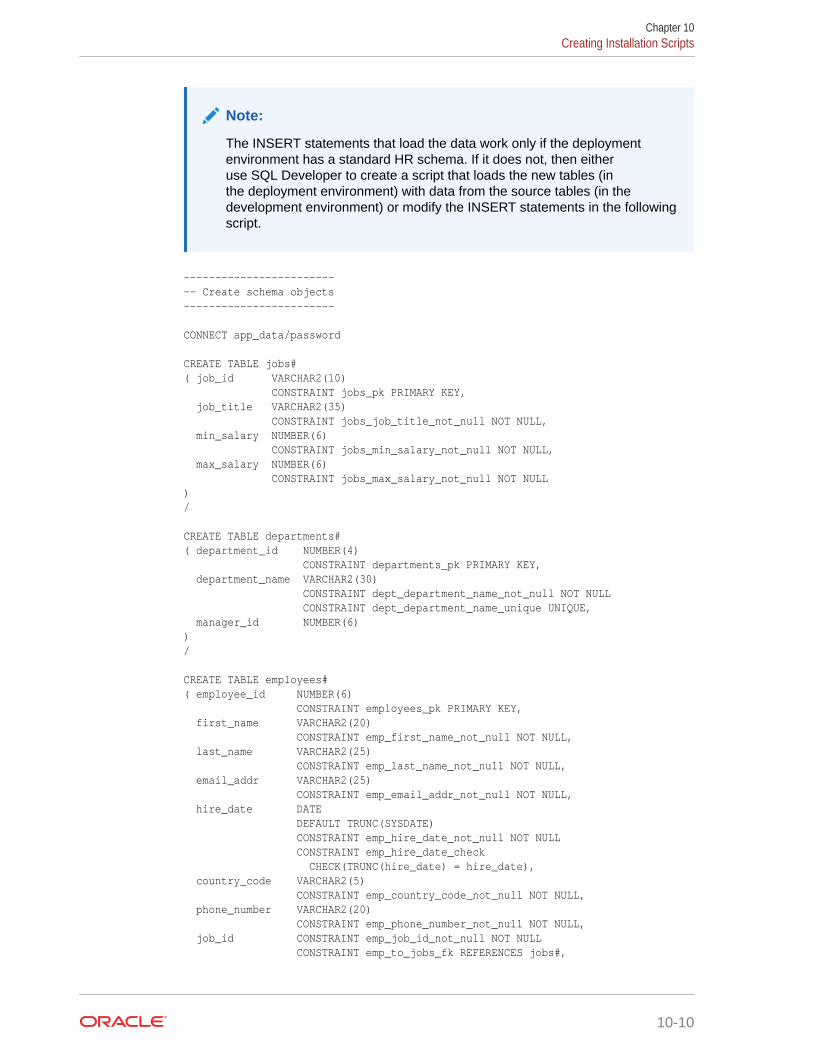
Note:
The INSERT statements that load the data work only if the deploymentenvironment has a standard HR schema. If it does not, then eitheruse SQL Developer to create a script that loads the new tables (inthe deployment environment) with data from the source tables (in thedevelopment environment) or modify the INSERT statements in the followingscript.
-------------------------- Create schema objects------------------------ CONNECT app_data/password CREATE TABLE jobs#( job_id VARCHAR2(10) CONSTRAINT jobs_pk PRIMARY KEY, job_title VARCHAR2(35) CONSTRAINT jobs_job_title_not_null NOT NULL, min_salary NUMBER(6) CONSTRAINT jobs_min_salary_not_null NOT NULL, max_salary NUMBER(6) CONSTRAINT jobs_max_salary_not_null NOT NULL)/ CREATE TABLE departments#( department_id NUMBER(4) CONSTRAINT departments_pk PRIMARY KEY, department_name VARCHAR2(30) CONSTRAINT dept_department_name_not_null NOT NULL CONSTRAINT dept_department_name_unique UNIQUE, manager_id NUMBER(6) )/ CREATE TABLE employees#( employee_id NUMBER(6) CONSTRAINT employees_pk PRIMARY KEY, first_name VARCHAR2(20) CONSTRAINT emp_first_name_not_null NOT NULL, last_name VARCHAR2(25) CONSTRAINT emp_last_name_not_null NOT NULL, email_addr VARCHAR2(25) CONSTRAINT emp_email_addr_not_null NOT NULL, hire_date DATE DEFAULT TRUNC(SYSDATE) CONSTRAINT emp_hire_date_not_null NOT NULL CONSTRAINT emp_hire_date_check CHECK(TRUNC(hire_date) = hire_date), country_code VARCHAR2(5) CONSTRAINT emp_country_code_not_null NOT NULL, phone_number VARCHAR2(20) CONSTRAINT emp_phone_number_not_null NOT NULL, job_id CONSTRAINT emp_job_id_not_null NOT NULL CONSTRAINT emp_to_jobs_fk REFERENCES jobs#,
Chapter 10Creating Installation Scripts
10-10
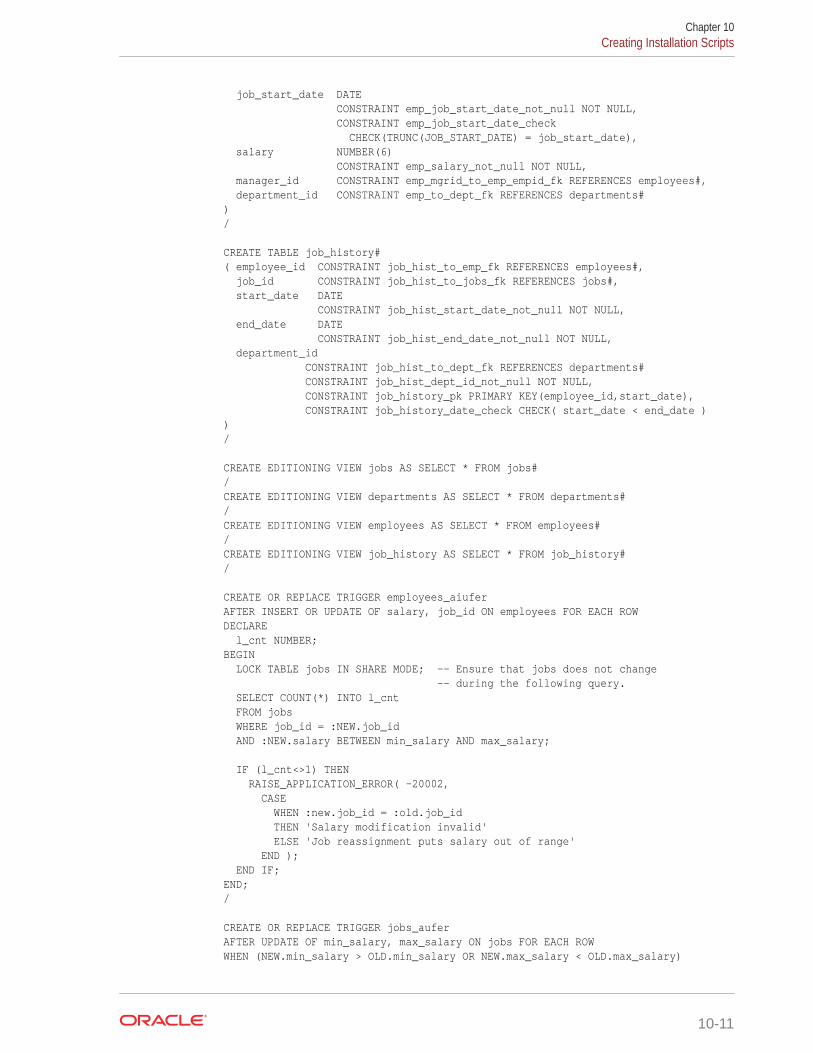
job_start_date DATE CONSTRAINT emp_job_start_date_not_null NOT NULL, CONSTRAINT emp_job_start_date_check CHECK(TRUNC(JOB_START_DATE) = job_start_date), salary NUMBER(6) CONSTRAINT emp_salary_not_null NOT NULL, manager_id CONSTRAINT emp_mgrid_to_emp_empid_fk REFERENCES employees#, department_id CONSTRAINT emp_to_dept_fk REFERENCES departments#)/ CREATE TABLE job_history#( employee_id CONSTRAINT job_hist_to_emp_fk REFERENCES employees#, job_id CONSTRAINT job_hist_to_jobs_fk REFERENCES jobs#, start_date DATE CONSTRAINT job_hist_start_date_not_null NOT NULL, end_date DATE CONSTRAINT job_hist_end_date_not_null NOT NULL, department_id CONSTRAINT job_hist_to_dept_fk REFERENCES departments# CONSTRAINT job_hist_dept_id_not_null NOT NULL, CONSTRAINT job_history_pk PRIMARY KEY(employee_id,start_date), CONSTRAINT job_history_date_check CHECK( start_date < end_date ))/ CREATE EDITIONING VIEW jobs AS SELECT * FROM jobs#/CREATE EDITIONING VIEW departments AS SELECT * FROM departments#/CREATE EDITIONING VIEW employees AS SELECT * FROM employees#/CREATE EDITIONING VIEW job_history AS SELECT * FROM job_history#/ CREATE OR REPLACE TRIGGER employees_aiuferAFTER INSERT OR UPDATE OF salary, job_id ON employees FOR EACH ROWDECLARE l_cnt NUMBER;BEGIN LOCK TABLE jobs IN SHARE MODE; -- Ensure that jobs does not change -- during the following query. SELECT COUNT(*) INTO l_cnt FROM jobs WHERE job_id = :NEW.job_id AND :NEW.salary BETWEEN min_salary AND max_salary; IF (l_cnt<>1) THEN RAISE_APPLICATION_ERROR( -20002, CASE WHEN :new.job_id = :old.job_id THEN 'Salary modification invalid' ELSE 'Job reassignment puts salary out of range' END ); END IF;END;/ CREATE OR REPLACE TRIGGER jobs_auferAFTER UPDATE OF min_salary, max_salary ON jobs FOR EACH ROWWHEN (NEW.min_salary > OLD.min_salary OR NEW.max_salary < OLD.max_salary)
Chapter 10Creating Installation Scripts
10-11

DECLARE l_cnt NUMBER;BEGIN LOCK TABLE employees IN SHARE MODE; SELECT COUNT(*) INTO l_cnt FROM employees WHERE job_id = :NEW.job_id AND salary NOT BETWEEN :NEW.min_salary and :NEW.max_salary; IF (l_cnt>0) THEN RAISE_APPLICATION_ERROR( -20001, 'Salary update would violate ' || l_cnt || ' existing employee records' ); END IF;END;/ CREATE SEQUENCE employees_sequence START WITH 210;CREATE SEQUENCE departments_sequence START WITH 275; -------------- Load data------------ INSERT INTO jobs (job_id, job_title, min_salary, max_salary)SELECT job_id, job_title, min_salary, max_salary FROM HR.JOBS/ INSERT INTO departments (department_id, department_name, manager_id)SELECT department_id, department_name, manager_id FROM HR.DEPARTMENTS/ INSERT INTO employees (employee_id, first_name, last_name, email_addr, hire_date, country_code, phone_number, job_id, job_start_date, salary, manager_id, department_id)SELECT employee_id, first_name, last_name, email, hire_date, CASE WHEN phone_number LIKE '011.%' THEN '+' || SUBSTR( phone_number, INSTR( phone_number, '.' )+1, INSTR( phone_number, '.', 1, 2 ) - INSTR( phone_number, '.' ) - 1 ) ELSE '+1' END country_code, CASE WHEN phone_number LIKE '011.%' THEN SUBSTR( phone_number, INSTR(phone_number, '.', 1, 2 )+1 ) ELSE phone_number END phone_number, job_id, NVL( (SELECT MAX(end_date+1) FROM HR.JOB_HISTORY jh WHERE jh.employee_id = employees.employee_id), hire_date), salary, manager_id, department_id FROM HR.EMPLOYEES/ INSERT INTO job_history (employee_id, job_id, start_date, end_date, department_id)SELECT employee_id, job_id, start_date, end_date, department_id FROM HR.JOB_HISTORY/
Chapter 10Creating Installation Scripts
10-12
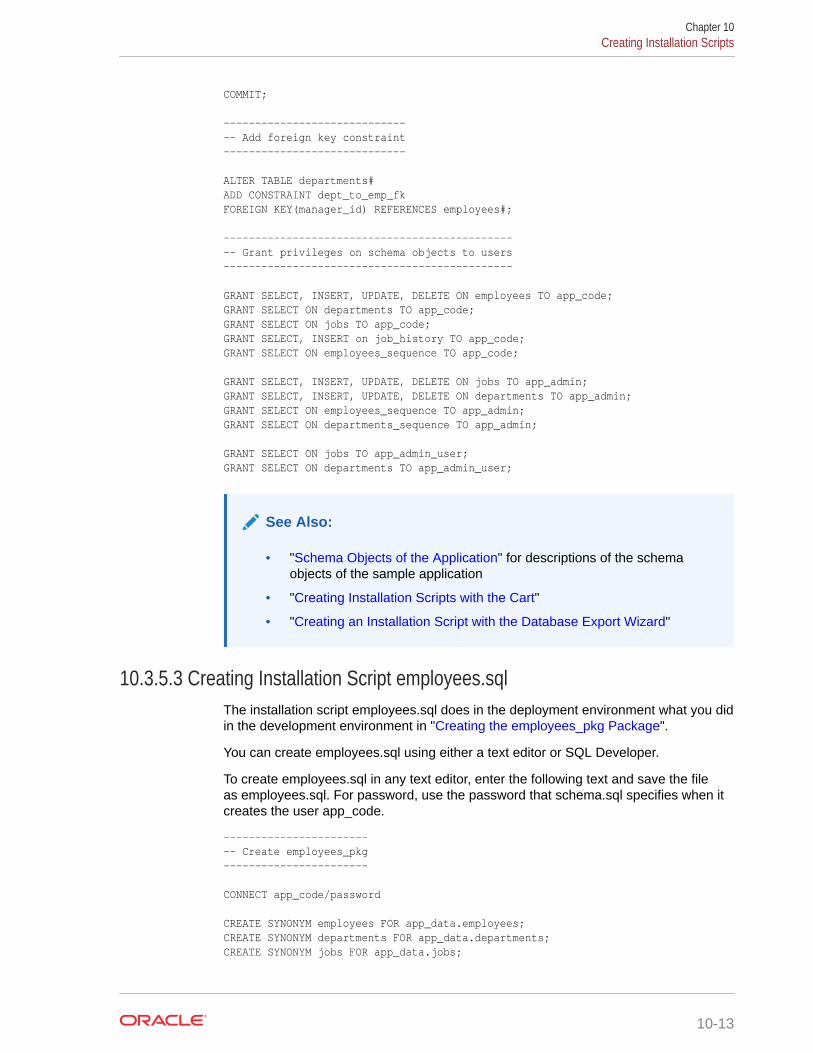
COMMIT; ------------------------------- Add foreign key constraint----------------------------- ALTER TABLE departments#ADD CONSTRAINT dept_to_emp_fkFOREIGN KEY(manager_id) REFERENCES employees#; ------------------------------------------------ Grant privileges on schema objects to users---------------------------------------------- GRANT SELECT, INSERT, UPDATE, DELETE ON employees TO app_code;GRANT SELECT ON departments TO app_code;GRANT SELECT ON jobs TO app_code;GRANT SELECT, INSERT on job_history TO app_code;GRANT SELECT ON employees_sequence TO app_code; GRANT SELECT, INSERT, UPDATE, DELETE ON jobs TO app_admin;GRANT SELECT, INSERT, UPDATE, DELETE ON departments TO app_admin;GRANT SELECT ON employees_sequence TO app_admin;GRANT SELECT ON departments_sequence TO app_admin; GRANT SELECT ON jobs TO app_admin_user;GRANT SELECT ON departments TO app_admin_user;
See Also:
• "Schema Objects of the Application" for descriptions of the schemaobjects of the sample application
• "Creating Installation Scripts with the Cart"
• "Creating an Installation Script with the Database Export Wizard"
10.3.5.3 Creating Installation Script employees.sqlThe installation script employees.sql does in the deployment environment what you didin the development environment in "Creating the employees_pkg Package".
You can create employees.sql using either a text editor or SQL Developer.
To create employees.sql in any text editor, enter the following text and save the fileas employees.sql. For password, use the password that schema.sql specifies when itcreates the user app_code.
------------------------- Create employees_pkg----------------------- CONNECT app_code/password CREATE SYNONYM employees FOR app_data.employees;CREATE SYNONYM departments FOR app_data.departments;CREATE SYNONYM jobs FOR app_data.jobs;
Chapter 10Creating Installation Scripts
10-13
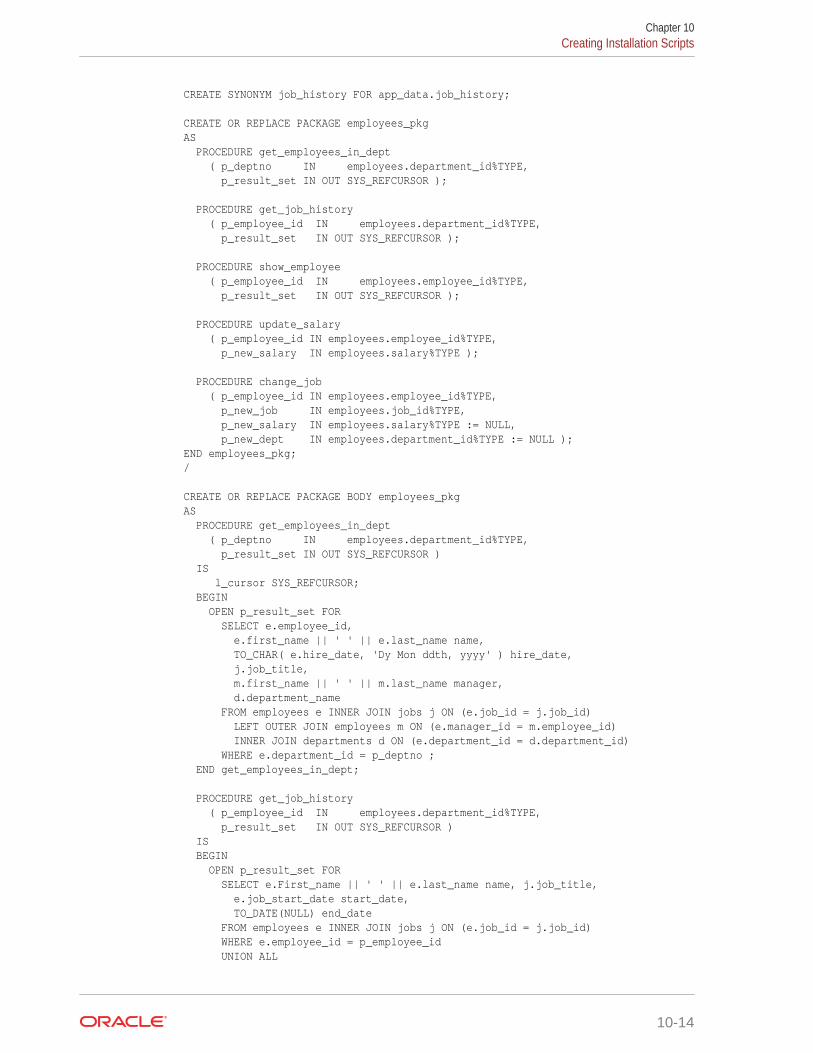
CREATE SYNONYM job_history FOR app_data.job_history; CREATE OR REPLACE PACKAGE employees_pkgAS PROCEDURE get_employees_in_dept ( p_deptno IN employees.department_id%TYPE, p_result_set IN OUT SYS_REFCURSOR ); PROCEDURE get_job_history ( p_employee_id IN employees.department_id%TYPE, p_result_set IN OUT SYS_REFCURSOR ); PROCEDURE show_employee ( p_employee_id IN employees.employee_id%TYPE, p_result_set IN OUT SYS_REFCURSOR ); PROCEDURE update_salary ( p_employee_id IN employees.employee_id%TYPE, p_new_salary IN employees.salary%TYPE ); PROCEDURE change_job ( p_employee_id IN employees.employee_id%TYPE, p_new_job IN employees.job_id%TYPE, p_new_salary IN employees.salary%TYPE := NULL, p_new_dept IN employees.department_id%TYPE := NULL );END employees_pkg;/ CREATE OR REPLACE PACKAGE BODY employees_pkgAS PROCEDURE get_employees_in_dept ( p_deptno IN employees.department_id%TYPE, p_result_set IN OUT SYS_REFCURSOR ) IS l_cursor SYS_REFCURSOR; BEGIN OPEN p_result_set FOR SELECT e.employee_id, e.first_name || ' ' || e.last_name name, TO_CHAR( e.hire_date, 'Dy Mon ddth, yyyy' ) hire_date, j.job_title, m.first_name || ' ' || m.last_name manager, d.department_name FROM employees e INNER JOIN jobs j ON (e.job_id = j.job_id) LEFT OUTER JOIN employees m ON (e.manager_id = m.employee_id) INNER JOIN departments d ON (e.department_id = d.department_id) WHERE e.department_id = p_deptno ; END get_employees_in_dept; PROCEDURE get_job_history ( p_employee_id IN employees.department_id%TYPE, p_result_set IN OUT SYS_REFCURSOR ) IS BEGIN OPEN p_result_set FOR SELECT e.First_name || ' ' || e.last_name name, j.job_title, e.job_start_date start_date, TO_DATE(NULL) end_date FROM employees e INNER JOIN jobs j ON (e.job_id = j.job_id) WHERE e.employee_id = p_employee_id UNION ALL
Chapter 10Creating Installation Scripts
10-14

SELECT e.First_name || ' ' || e.last_name name, j.job_title, jh.start_date, jh.end_date FROM employees e INNER JOIN job_history jh ON (e.employee_id = jh.employee_id) INNER JOIN jobs j ON (jh.job_id = j.job_id) WHERE e.employee_id = p_employee_id ORDER BY start_date DESC; END get_job_history; PROCEDURE show_employee ( p_employee_id IN employees.employee_id%TYPE, p_result_set IN OUT sys_refcursor ) IS BEGIN OPEN p_result_set FOR SELECT * FROM (SELECT TO_CHAR(e.employee_id) employee_id, e.first_name || ' ' || e.last_name name, e.email_addr, TO_CHAR(e.hire_date,'dd-mon-yyyy') hire_date, e.country_code, e.phone_number, j.job_title, TO_CHAR(e.job_start_date,'dd-mon-yyyy') job_start_date, to_char(e.salary) salary, m.first_name || ' ' || m.last_name manager, d.department_name FROM employees e INNER JOIN jobs j on (e.job_id = j.job_id) RIGHT OUTER JOIN employees m ON (m.employee_id = e.manager_id) INNER JOIN departments d ON (e.department_id = d.department_id) WHERE e.employee_id = p_employee_id) UNPIVOT (VALUE FOR ATTRIBUTE IN (employee_id, name, email_addr, hire_date, country_code, phone_number, job_title, job_start_date, salary, manager, department_name) ); END show_employee; PROCEDURE update_salary ( p_employee_id IN employees.employee_id%type, p_new_salary IN employees.salary%type ) IS BEGIN UPDATE employees SET salary = p_new_salary WHERE employee_id = p_employee_id; END update_salary; PROCEDURE change_job ( p_employee_id IN employees.employee_id%TYPE, p_new_job IN employees.job_id%TYPE, p_new_salary IN employees.salary%TYPE := NULL, p_new_dept IN employees.department_id%TYPE := NULL ) IS BEGIN INSERT INTO job_history (employee_id, start_date, end_date, job_id, department_id) SELECT employee_id, job_start_date, TRUNC(SYSDATE), job_id, department_id FROM employees WHERE employee_id = p_employee_id;
Chapter 10Creating Installation Scripts
10-15
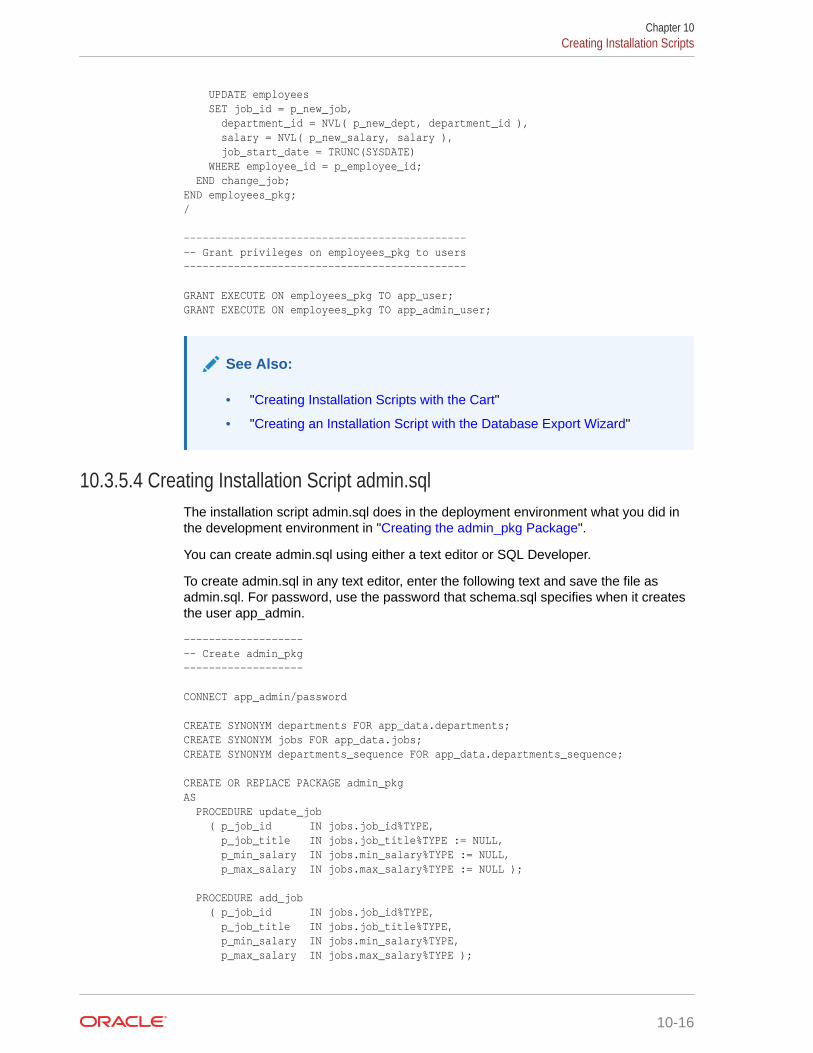
UPDATE employees SET job_id = p_new_job, department_id = NVL( p_new_dept, department_id ), salary = NVL( p_new_salary, salary ), job_start_date = TRUNC(SYSDATE) WHERE employee_id = p_employee_id; END change_job;END employees_pkg;/ ----------------------------------------------- Grant privileges on employees_pkg to users--------------------------------------------- GRANT EXECUTE ON employees_pkg TO app_user;GRANT EXECUTE ON employees_pkg TO app_admin_user;
See Also:
• "Creating Installation Scripts with the Cart"
• "Creating an Installation Script with the Database Export Wizard"
10.3.5.4 Creating Installation Script admin.sqlThe installation script admin.sql does in the deployment environment what you did inthe development environment in "Creating the admin_pkg Package".
You can create admin.sql using either a text editor or SQL Developer.
To create admin.sql in any text editor, enter the following text and save the file asadmin.sql. For password, use the password that schema.sql specifies when it createsthe user app_admin.
--------------------- Create admin_pkg------------------- CONNECT app_admin/password CREATE SYNONYM departments FOR app_data.departments;CREATE SYNONYM jobs FOR app_data.jobs;CREATE SYNONYM departments_sequence FOR app_data.departments_sequence; CREATE OR REPLACE PACKAGE admin_pkgAS PROCEDURE update_job ( p_job_id IN jobs.job_id%TYPE, p_job_title IN jobs.job_title%TYPE := NULL, p_min_salary IN jobs.min_salary%TYPE := NULL, p_max_salary IN jobs.max_salary%TYPE := NULL ); PROCEDURE add_job ( p_job_id IN jobs.job_id%TYPE, p_job_title IN jobs.job_title%TYPE, p_min_salary IN jobs.min_salary%TYPE, p_max_salary IN jobs.max_salary%TYPE );
Chapter 10Creating Installation Scripts
10-16
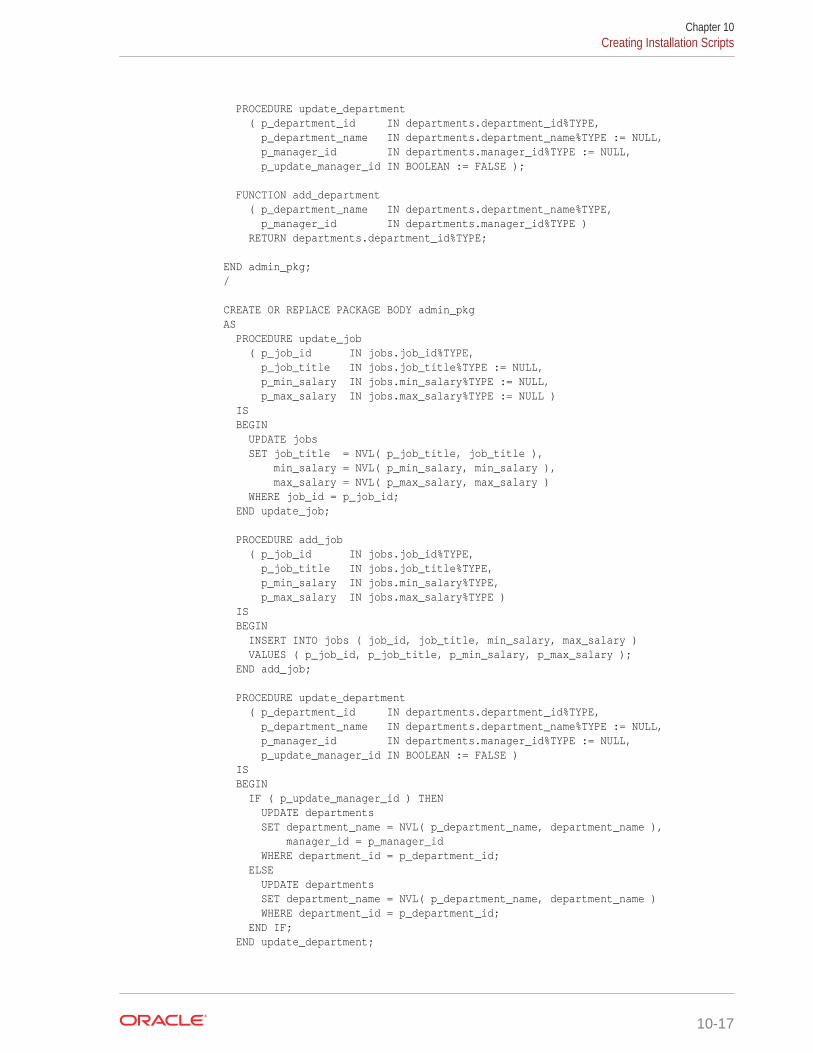
PROCEDURE update_department ( p_department_id IN departments.department_id%TYPE, p_department_name IN departments.department_name%TYPE := NULL, p_manager_id IN departments.manager_id%TYPE := NULL, p_update_manager_id IN BOOLEAN := FALSE ); FUNCTION add_department ( p_department_name IN departments.department_name%TYPE, p_manager_id IN departments.manager_id%TYPE ) RETURN departments.department_id%TYPE; END admin_pkg;/ CREATE OR REPLACE PACKAGE BODY admin_pkgAS PROCEDURE update_job ( p_job_id IN jobs.job_id%TYPE, p_job_title IN jobs.job_title%TYPE := NULL, p_min_salary IN jobs.min_salary%TYPE := NULL, p_max_salary IN jobs.max_salary%TYPE := NULL ) IS BEGIN UPDATE jobs SET job_title = NVL( p_job_title, job_title ), min_salary = NVL( p_min_salary, min_salary ), max_salary = NVL( p_max_salary, max_salary ) WHERE job_id = p_job_id; END update_job; PROCEDURE add_job ( p_job_id IN jobs.job_id%TYPE, p_job_title IN jobs.job_title%TYPE, p_min_salary IN jobs.min_salary%TYPE, p_max_salary IN jobs.max_salary%TYPE ) IS BEGIN INSERT INTO jobs ( job_id, job_title, min_salary, max_salary ) VALUES ( p_job_id, p_job_title, p_min_salary, p_max_salary ); END add_job; PROCEDURE update_department ( p_department_id IN departments.department_id%TYPE, p_department_name IN departments.department_name%TYPE := NULL, p_manager_id IN departments.manager_id%TYPE := NULL, p_update_manager_id IN BOOLEAN := FALSE ) IS BEGIN IF ( p_update_manager_id ) THEN UPDATE departments SET department_name = NVL( p_department_name, department_name ), manager_id = p_manager_id WHERE department_id = p_department_id; ELSE UPDATE departments SET department_name = NVL( p_department_name, department_name ) WHERE department_id = p_department_id; END IF; END update_department;
Chapter 10Creating Installation Scripts
10-17
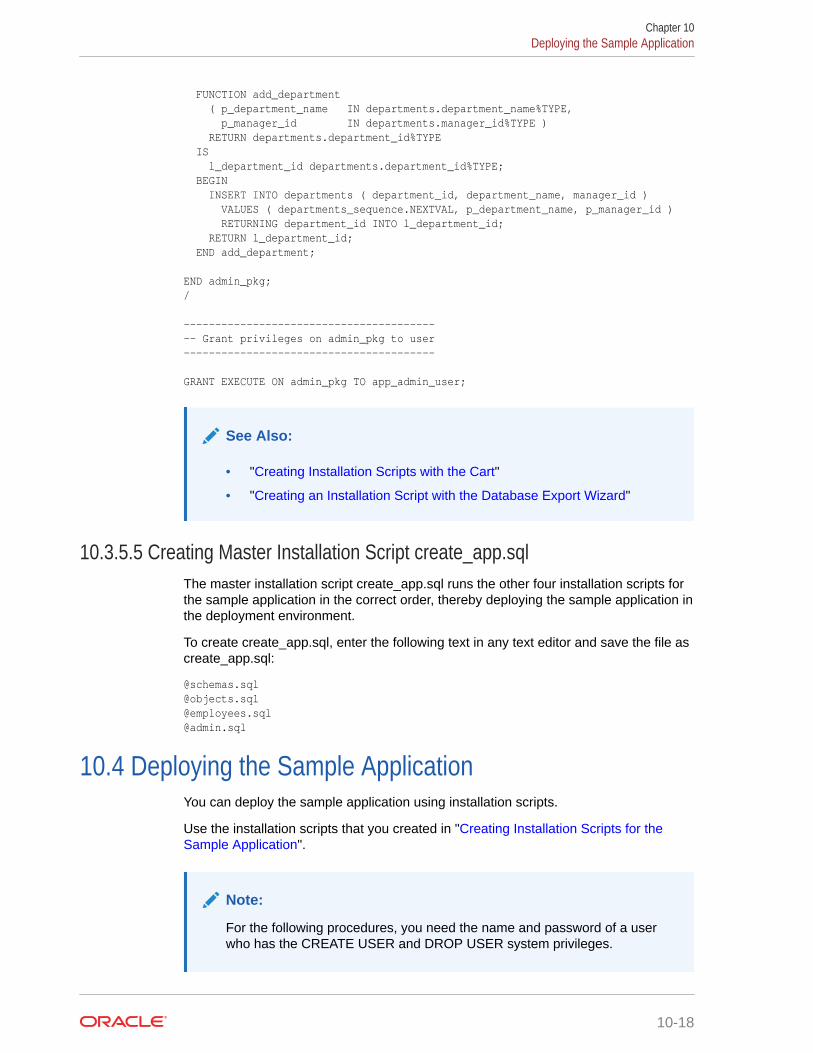
FUNCTION add_department ( p_department_name IN departments.department_name%TYPE, p_manager_id IN departments.manager_id%TYPE ) RETURN departments.department_id%TYPE IS l_department_id departments.department_id%TYPE; BEGIN INSERT INTO departments ( department_id, department_name, manager_id ) VALUES ( departments_sequence.NEXTVAL, p_department_name, p_manager_id ) RETURNING department_id INTO l_department_id; RETURN l_department_id; END add_department; END admin_pkg;/ ------------------------------------------ Grant privileges on admin_pkg to user---------------------------------------- GRANT EXECUTE ON admin_pkg TO app_admin_user;
See Also:
• "Creating Installation Scripts with the Cart"
• "Creating an Installation Script with the Database Export Wizard"
10.3.5.5 Creating Master Installation Script create_app.sqlThe master installation script create_app.sql runs the other four installation scripts forthe sample application in the correct order, thereby deploying the sample application inthe deployment environment.
To create create_app.sql, enter the following text in any text editor and save the file ascreate_app.sql:
@[email protected]@[email protected]
10.4 Deploying the Sample ApplicationYou can deploy the sample application using installation scripts.
Use the installation scripts that you created in "Creating Installation Scripts for theSample Application".
Note:
For the following procedures, you need the name and password of a userwho has the CREATE USER and DROP USER system privileges.
Chapter 10Deploying the Sample Application
10-18

To deploy the sample application using SQL*Plus:
1. Copy the installation scripts that you created in "Creating Installation Scripts for theSample Application" to the deployment environment.
2. In the deployment environment, connect to Oracle Database as a user with theCREATE USER and DROP USER system privileges.
3. At the SQL> prompt, run the master installation script:
@create_app.sql
The master installation script runs the other four installation scripts for the sampleapplication in the correct order, thereby deploying the sample application in thedeployment environment.
To deploy the sample application using SQL Developer:
1. If necessary, create a connection to the deployment environment.
For Connection Name, enter a name that is not the name of the connection to thedevelopment environment.
2. Copy the installation scripts that you created in "Creating Installation Scripts for theSample Application" to the deployment environment.
3. Connect to Oracle Database as a user with the CREATE USER and DROP USERsystem privileges in the deployment environment.
A new pane appears. On its tab is the name of the connection to the deploymentenvironment. The pane has two subpanes, Worksheet and Query Builder.
4. In the Worksheet pane, type the command for running the master installationscript:
@create_app.sql
5. Click the icon Run Script.
The master installation script runs the other four installation scripts for the sampleapplication in the correct order, thereby deploying the sample application in thedeployment environment. The output appears in the Script Output pane, under theWorksheet pane.
In the Connections frame, if you expand the connection to the deploymentenvironment, and then expand the type of each object that the sample applicationuses, you see the objects of the sample application.
See Also:
• SQL*Plus User's Guide and Reference for more information about usingscripts in SQL*Plus
• Oracle SQL Developer User's Guide for more information about runningscripts in SQL Developer
Chapter 10Deploying the Sample Application
10-19
10.5 Checking the Validity of an InstallationAfter installing your application in a deployment environment, you can check its validityusing SQL Developer.
• In the Connections frame:
1. Expand the connection to the deployment environment.
2. Examine the definitions of the new objects.
• In the Reports pane:
1. Expand Data Dictionary Reports.
A list of data dictionary reports appears.
2. Expand All Objects.
A list of objects reports appears.
3. Select All Objects.
The Select Connection window appears.
4. In the Connection field, select from the menu the connection to thedeployment environment.
5. Click OK.
6. In the Enter Bind Values window, select either Owner or Object Name.
7. Click Apply.
The message Displaying Resultsshows, followed by the results.
For each object, this report lists the Owner, Object Type, Object Name, Status(Valid or Invalid), Date Created, and Last DDL. Last DDL is the date of the lastDDL operation that affected the object.
8. In the Reports pane, select Invalid Objects.
9. In the Enter Bind Values window, click Apply.
For each object whose Status is Invalid, this report lists the Owner, ObjectType, and Object Name.
See Also:
Oracle SQL Developer User's Guide for more information about SQLDeveloper reports
Chapter 10Checking the Validity of an Installation
10-20
10.6 Archiving the Installation ScriptsAfter you verify that the installation of your application is valid, Oracle recommendsthat you archive your installation scripts in a source code control system.
Before doing so, add comments to each file, documenting its creation date andpurpose. If you ever must deploy the same application to another environment, youcan use these archived files.
See Also:
Oracle Database Utilities for information about Oracle Data Pump, whichenables very high-speed movement of data and metadata from onedatabase to another
Chapter 10Archiving the Installation Scripts
10-21
Index
Symbols.NET assembly, 1-9.NET stored procedure, 1-9%FOUND cursor attribute, 5-35%ISOPEN cursor attribute, 5-35%NOTFOUND cursor attribute, 5-35%ROWCOUNT cursor attribute, 5-35%ROWTYPE attribute, 5-31%TYPE attribute
purpose of, 5-18tutorial for, 5-19
Aaccent-insensitive sort, 7-25accessing Oracle Database, 1-3
See also connecting to Oracle DatabaseAdd Check tool, 4-6Add Foreign Key tool, 4-6Add Primary Key tool, 4-6Add Unique tool, 4-6AFTER trigger, 6-1
statement-level example, 6-3system example, 6-6
aggregate conversion function in query, 2-26alias, 4-23
for column, 2-14for table, 2-18
See also synonymALTER FUNCTION statement, 5-9ALTER PROCEDURE statement, 5-9ALTER TABLE statement
adding constraint withForeign Key, 4-6Not Null, 4-6Primary Key, 4-6
changing trigger status with, 6-8ALTER TRIGGER statement
changing trigger status with, 6-8recompiling trigger with, 6-9
anonymous block, 5-1application program interface (API), 5-12archiving installation script, 10-21arithmetic operator in query, 2-20
arrayassociative
See associative array, 5-44variable, 5-43
ASP.NET, 1-9assignment operator, 5-21
assigning initial value to constant with, 5-16assigning value to associative array element
with, 5-44assigning value to variable with, 5-21
associative array, 5-43, 5-44declaring, 5-44dense, 5-44indexed by integer, 5-44indexed by string, 5-44populating, 5-46sparse, 5-44traversing
dense, 5-47sparse, 5-48
attribute%ROWTYPE, 5-31%TYPE
purpose of, 5-18tutorial for, 5-19
cursorSee cursor attribute, 5-35
Bbase type, 5-3basic LOOP statement, 5-29BEFORE trigger, 6-1
row-level example, 6-4system example, 6-6
bind variable, 8-1block
anonymous, 5-1parts of, 1-5
body of subprogram, 5-4browsing HR sample schema, 2-9built-in data type, 4-2BULK COLLECT INTO clause, 5-46bulk SQL, 8-6byte semantics, 7-5
Index-1
CC numeric format element, 7-23calendar format, 7-3Cart, 10-3CASE expression in query, 2-29case sensitivity
in PL/SQL identifiers, 5-3in sort, 7-25
CASE statement, 5-24character function in query, 2-22character semantics, 7-5character set
conversion and data loss, 7-30length semantics and, 7-5
Check Constraint, 4-5adding with Add Check tool, 4-6
checking validity of installation, 10-20CLR (Common Language Runtime), 1-9collapsing displayed information in SQL
Developer, 2-9collating sequence, 7-5collection, 5-43collection method, 5-43
COUNT, 5-47FIRST, 5-48invoking, 5-43NEXT, 5-48
columnalias for, 2-14new heading for, 2-14qualifying name of, 2-18relationship to field, 1-2selecting specific one in table, 2-13
comment in PL/SQL code, 5-4Commit Changes icon, 3-6COMMIT statement
explicit, 3-6implicit, 3-6
committing transactionexplicitly, 3-6implicitly, 3-6
Common Language Runtime (CLR), 1-9comparing programming methods, 8-11composite variable
collection, 5-43record, 5-31
compound trigger, 6-1concatenation operator in query, 2-22concurrency, 8-8concurrent sessions, 8-10conditional predicate, 6-3conditional selection statement, 5-23
CASE, 5-24IF, 5-23
connecting to Oracle Database, 1-3as user HR, 2-4from SQL Developer, 2-2from SQL*Plus, 2-1
constant, 5-16declaring, 5-16ensuring correct data type of, 5-18in package body, 5-16in package specification, 5-16local, 5-16
constraint, 4-5adding to table
with ALTER TABLE statement, 4-6with Edit Table tool, 4-6
application deployment and, 10-2enabled or disabled, 4-5types of, 4-5viewing, 2-10
controlling program flow, 5-23conversion function in query, 2-25COUNT collection method, 5-47Create Body tool, 5-14Create Database Synonym tool, 4-23CREATE FUNCTION statement, 5-7Create Function tool, 5-7CREATE INDEX statement
changing index with, 4-15creating index with, 4-14
Create Index tool, 4-14CREATE PACKAGE BODY statement, 5-14CREATE PACKAGE statement
changing package specification with, 5-13creating package specification with, 5-12
Create Package tool, 5-12CREATE PROCEDURE statement, 5-5Create Procedure tool, 5-5CREATE SEQUENCE statement, 4-21
in installation script, 10-6Create Sequence tool, 4-21CREATE SYNONYM statement, 4-23CREATE TABLE statement, 4-4Create Table tool, 4-3CREATE TRIGGER statement
changing trigger with, 6-7creating trigger with, 6-2
Create Trigger tool, 6-2CREATE VIEW statement
changing query in view with, 4-19creating view with, 4-18
Create View tool, 4-17creation script
See installation scriptCURRVAL pseudocolumn, 4-20cursor, 5-35
declared, 5-35
Index
Index-2
cursor (continued)declaring associative array with, 5-44implicit, 5-35populating associative array with, 5-46
cursor attribute, 5-35%FOUND, 5-35%ISOPEN, 5-35%NOTFOUND, 5-35%ROWCOUNT, 5-35possible values of, 5-35syntax for value of, 5-35
cursor variable, 5-38disadvantages of, 8-5retrieving result set rows one at a time with
procedure, 5-39tutorial, 5-40
Ddata concurrency, 8-8data consistency, 8-8data definition language statement
See DDL statementdata integrity
See constraintdata loss during character-set conversion, 7-30data manipulation language statement
See DML statementData pane, 4-12data type
base, 5-3built-in, 4-2of associative array key, 5-44of constant, 5-3of function return value, 5-3of subprogram parameter, 5-3of table column, 4-2of variable, 5-3PL/SQL, 5-3SQL, 4-2SQL national character, 7-5subtype of, 5-3Unicode, 7-5user-defined, 4-2
Database Export wizard, 10-4database initialization parameter, 7-6date format, 7-2datetime format model, 2-25datetime function in query, 2-23DBMS_APPLICATION_INFO package, 8-19DBMS_OUTPUT.PUT_LINE procedure, 5-24DBMS_SESSION package, 8-19DBMS_SQL package, 8-5DBMS_STANDARD.RAISE_APPLICATION_ERR
OR procedure, 5-49
DDL statement, 4-1as triggering event, 6-1
decimal character, 7-20declarative language, 1-5declarative part
of block, 1-5of subprogram, 5-4
declared cursor, 5-35advantages over cursor variable, 8-5retrieving result set rows one at a time with,
5-36DECODE function in query, 2-31Delete Selected Row(s) tool, 4-13DELETE statement, 3-5DELETING conditional predicate, 6-3deleting entire table, 4-16deleting row from table
with Delete Selected Row(s) tool, 4-13with DELETE statement, 3-5
dense associative array, 5-44populating, 5-46traversing, 5-47
dependencies between schema objectsinstallation and, 10-1trigger compilation and, 6-9
deploying application, 10-1deployment environment, 10-1development environment, 10-1
choice of, 1-5disabled trigger, 6-1disabling triggers, 6-8
all triggers in table, 6-8in installation script, 10-7
DL (long date) format, 7-15DML statement, 3-1
as triggering event, 6-1associative arrays and, 5-44implicit cursor for, 5-35
dot notationfor accessing record field, 5-31for invoking collection method, 5-43
DROP FUNCTION statement, 5-11DROP INDEX statement, 4-15, 4-16DROP PACKAGE statement, 5-15DROP PROCEDURE statement, 5-11DROP SEQUENCE statement, 4-22DROP SYNONYM statement, 4-24DROP TABLE statement, 4-16Drop tool
for index, 4-16for package, 5-15for sequence, 4-22for synonym, 4-24, 5-11for table, 4-16for trigger, 6-9
Index
Index-3
Drop tool (continued)for view, 4-20
DROP TRIGGER statement, 6-9DROP VIEW statement, 4-20DS (short date) format, 7-15DUAL table, 2-23
EEdit Index tool, 4-15Edit Table tool, 4-6Edit tool
changing standalone subprogram with, 5-9changing trigger with, 6-7
editioning view, 8-23in sample application, 9-10
education environment, 10-1enabled trigger, 6-1enabling triggers, 6-8
all triggers in table, 6-8in installation script, 10-7
ending transactionby committing, 3-6by rolling back, 3-8
ensuring data integrity, 4-4environment variables, 7-8error
See exceptionexception handler syntax, 5-49exception handling, 5-49
for predefined exception, 5-51EXCEPTION_INIT pragma, 5-49exception-handling part
of block, 1-5of subprogram, 5-4
executable partof block, 1-5of subprogram, 5-4
EXECUTE IMMEDIATE statement, 8-4exhaustion of resources, 8-1EXIT WHEN statement, 5-29expanding displayed information in SQL
Developer, 2-9exploring Oracle Database
with SQL Developer, 2-9with SQL*Plus, 2-6
expression in query, 2-20
FFCL (Framework Class Libraries), 1-9FETCH statement
explicit cursor and, 5-35populating dense associative array with, 5-46
fetching results one row at a time, 5-35
field, 5-31relationship to column, 1-2
FIRST collection method, 5-48FOR LOOP statement, 5-26Foreign Key constraint, 4-5
addingto sample application, 9-16with Add Foreign Key tool, 4-6with ALTER TABLE statement, 4-6
formatcalendar, 7-3date, 7-2datetime model, 2-25monetary, 7-4time, 7-2
Framework Class Libraries (FCL), 1-9function, 1-2, 5-1
in query, 2-20locale-dependent SQL, 7-9statistical, 2-26structure of, 5-4
See also subprogram
GG numeric format element, 7-20globalization support features, 7-1
See also NLS parametersgroup separator in number, 7-20grouping query results, 2-26
Hhard parse, 8-1HR sample schema, 1-10
browsing, 2-9unlocking, 2-4
Hypertext Preprocessor (PHP), 1-7
Iidentifier, 5-3IF statement, 5-23implicit COMMIT statement, 3-6implicit cursor, 5-35index, 1-2
adding, 4-14changing, 4-15dropping, 4-16implicitly created, 4-13
index-by tableSee associative array
initial value of constant or variable, 5-16initialization parameter, 7-6Insert Row tool, 4-10
Index
Index-4
INSERT statement, 3-1, 9-14in sample application, 9-14
INSERTING conditional predicate, 6-3installation script, 10-1
archiving, 10-21creating, 10-3disabling and re-enabling triggers in, 10-7editing CREATE SEQUENCE statement in,
10-6INSTEAD OF trigger, 6-1
example, 6-5instrumentation package, 8-19integrity constraint
See constraintintersecting tables, 2-18invalidated trigger, 6-9iterative data processing, 8-15IW date format element, 7-3
JJDBC (Oracle Java Database Connectivity), 1-6joining tables, 2-18
Kkey-value pair
See associative array
LL numeric format element, 7-22language support, 7-1latch, 8-9length semantics, 7-5linguistic sorting and string searching, 7-5loading data
See INSERT statementlocal constant, 5-16local subprogram, 5-1
in anonymous block, 5-1in another subprogram, 5-1in package, 5-12
local variable, 5-16locale, 7-11locale-dependent SQL function, 7-9logical table
See viewlong date (DL) format, 7-15loop statement, 5-23
basic LOOP, 5-29exiting early, 5-29FOR LOOP, 5-26populating associative array with, 5-46WHILE LOOP, 5-27
Mmaster script
See installation scriptmethod, 5-43Microsoft .NET Framework, 1-9Microsoft Visual Studio, 1-9monetary format, 7-4multiline comment in PL/SQL code, 5-4multilingual applications, 7-1
Nnaming convention
for sequences, 4-20in sample application, 9-3
national character set, 7-5National Language Support (NLS), 7-1National Language Support (NLS) parameters
See NLS parametersnative language support, 7-1NCHAR literal replacement, 7-30nested subprogram
See local subprogramnested table, 5-43NEW pseudorecord, 6-3NEXT collection method, 5-48NEXTVAL pseudocolumn, 4-20NLS (National Language Support), 7-1NLS environment variables, 7-8NLS parameters, 7-1
of locale-dependent SQL functions, 7-9values of
changing, 7-8initial, 7-6viewing, 7-7
what they are, 7-1NLS_CALENDAR parameter, 7-19NLS_COMP parameter, 7-26NLS_CURRENCY parameter, 7-22NLS_DATE_FORMAT parameter, 7-15NLS_DATE_LANGUAGE parameter, 7-17NLS_DUAL_CURRENCY parameter, 7-24NLS_ISO_CURRENCY parameter, 7-23NLS_LANG parameter, 7-11NLS_LANGUAGE parameter, 7-12NLS_LENGTH_SEMANTICS parameter, 7-28NLS_NUMERIC_CHARACTERS parameter,
7-20NLS_SORT parameter, 7-25NLS_TERRITORY parameter, 7-13NLS_TIMESTAMP_FORMAT parameter, 7-18nonblocking reads and writes, 8-10nonprocedural language, 1-5
Index
Index-5
Not Null constraint, 4-5adding
with ALTER TABLE statement, 4-6with Edit Table tool, 4-6
numeric formatelements
C, 7-23G, 7-20L, 7-22
in different countries, 7-4numeric function in query, 2-21NVL function, 2-28NVL2 function, 2-28
Oobjects
See schema objectOCCI (Oracle C++ Call Interface), 1-7OCI (Oracle Call Interface), 1-7ODBC (Open Database Connectivity), 1-7ODP.NET, 1-9ODT (Oracle Developer Tools for Visual Studio),
1-9OLD pseudorecord, 6-3Open Database Connectivity (ODBC), 1-7OPEN FOR statement, 8-5OR REPLACE clause in DDL statement, 4-1Oracle Application Express, 1-6Oracle C++ Call Interface (OCCI), 1-7Oracle Call Interface (OCI), 1-7Oracle Database Extensions for .NET, 1-9Oracle Deployment Wizard for .NET, 1-9Oracle Developer Tools for Visual Studio, 1-9Oracle Java Database Connectivity (JDBC), 1-6Oracle Provider for OLE DB (OraOLEDB), 1-10Oracle Providers for ASP.NET, 1-9OraOLEDB (Oracle Provider for OLE DB), 1-10ORDER BY clause of SELECT statement, 2-17
Ppackage, 5-2
dropping, 5-15in sample application
admin_pkg, 9-25employees_pkg, 9-17
instrumentation, 8-19reasons to use, 5-2structure of, 5-12
package body, 5-12changing, 5-16creating, 5-14
package specification, 5-12changing, 5-13
package specification (continued)creating, 5-12
package subprogram, 5-1parameter
See subprogram parameterparse, 8-1PHP (Hypertext Preprocessor), 1-7PL/SQL block
anonymous, 5-1parts of, 1-5
PL/SQL data type, 5-3PL/SQL identifier, 5-3PL/SQL language, 1-5
scalability and, 8-4PL/SQL table
See associative arrayPL/SQL unit, 1-5PLS_INTEGER data type, 5-3precompiler
Pro*C/C++, 1-8Pro*COBOL, 1-8
predefined exception, 5-49handling, 5-51
Primary Key constraint, 4-5adding
with Add Primary Key tool, 4-6with ALTER TABLE statement, 4-6
private SQL area, 5-35privileges
for schemas of sample application, 9-5for users of sample application
on admin_pkg, 9-25on employees_pkg, 9-24, 9-30on schema objects, 9-16
security and, 8-23Pro*C/C++ precompiler, 1-8Pro*COBOL precompiler, 1-8Procedural Language/SQL (PL/SQL) language,
1-5procedure, 1-2, 5-1
structure of, 5-4See also subprogram
production environment, 10-1program flow control, 5-23programming practices, recommended, 8-19pseudorecord, 6-3
Qqualifying column names, 2-18query
function in, 2-20grouping results by column, 2-26improving readability of, 2-18operator in, 2-20
Index
Index-6
query (continued)simple, 2-11SQL expression in, 2-20stored
See view, 4-17
RRAISE statement, 5-49RAISE_APPLICATION_ERROR procedure, 5-49Real-World Performance, 8-15recommended programming practices, 8-19record, 5-31
creating, 5-31creating type for, 5-32relationship to row, 1-2
reducing disk input/output (I/O), 4-13REF constraint, 4-5REF CURSOR type, 5-38REF CURSOR variable
See cursor variableRefresh icon
DDL statements and, 4-1DML statements and, 3-1rolling back transactions and, 3-8
RENAME statement, 4-19Rename tool, 4-19resetting password of HR account, 2-4resource exhaustion, 8-1retrieving results one row at a time, 5-35RETURN clause of function, 5-4RETURN statement, 5-4return type
of cursor variable, 5-38of function, 5-3of REF CURSOR type, 5-38
reversing transaction, 3-8Rollback Changes icon, 3-8ROLLBACK statement, 3-8rolling back transaction, 3-8row
addingwith Insert Row tool, 4-10with INSERT statement, 3-1
relationship to record, 1-2row-level trigger, 6-1
example, 6-4pseudorecords and, 6-3
Run tool, 5-10Runstats tool, 8-11runtime error
See exception
Ssample application
deploying, 10-18developing, 9-1
sample schema HRSee HR sample schema
SAVEPOINT statement, 3-10scalable application, 8-1schema, 1-2
in sample applicationcreating, 9-4description of, 9-2privileges for, 9-5
schema object, 1-2creating and managing, 4-1dependent
installation and, 10-1trigger compilation and, 6-9
in sample applicationcreating, 9-7description of, 9-1
schema-level subprogramSee standalone subprogram
scriptSee installation script
searched CASE expression, 2-29searched CASE statement, 5-24security
bind variables and, 8-1in sample application, 9-2privileges and, 8-23
SELECT INTO statement, 5-21assigning value to variable with, 5-21implicit cursor for, 5-35
See also assignment operatorSELECT statement
ORDER BY clause of, 2-17simple, 2-11WHERE clause of, 2-15
selecting table dataand sorting it, 2-17that matches specified conditions, 2-15
semanticsbyte, 7-5character, 7-5length, 7-5
sequence, 4-20creating, 4-21
for sample application, 9-13dropping, 4-22improving data concurrency with, 8-9in installation script, 10-6
sequential control statement, 5-23serializable transaction, 8-8
Index
Index-7
set-based processing, 8-18setting savepoints in transaction, 3-10shared SQL, 8-10short date (DS) format, 7-15signature of subprogram, 5-4simple CASE expression, 2-29simple CASE statement, 5-24simple trigger, 6-1single-line comment in PL/SQL code, 5-4soft parse, 8-1sorting
accent-insensitive, 7-25case-insensitive, 7-25linguistic, 7-5selected data, 2-17
sparse associative array, 5-44populating, 5-46traversing, 5-48
SQL cursor (implicit cursor), 5-35SQL data type, 4-2SQL Developer, 1-4
collapsing displayed information in, 2-9connecting to Oracle Database from, 2-2
as user HR, 2-6expanding displayed information in, 2-9exploring database with, 2-9initial values of NLS parameters in, 7-6
SQL expression in query, 2-20SQL injection attack, 8-1SQL language, 1-5SQL national data types, 7-5SQL*Plus, 1-3
connecting to Oracle Database from, 2-1as user HR, 2-5
exploring database with, 2-6standalone subprogram, 1-2, 5-1
changing, 5-9creating
function, 5-7procedure, 5-5
dropping, 5-11statement-level trigger, 6-1
example, 6-3statistical function, 2-26statistics
for comparing programming techniques, 8-11for database, 8-20
stored querySee view
stored subprogram, 5-1strong REF CURSOR type, 5-38strongly typed cursor variable, 5-38struct type
See recordStructured Query Language (SQL), 1-5
subprogram, 1-2, 5-1body of, 5-4local
See local subprogram, 5-1nested
See local subprogram, 5-1package, 5-1parameter of
See subprogram parameter, 5-1parts of, 5-4schema-level
See standalone subprogram, 1-2signature of, 5-4standalone
See standalone subprogram, 1-2stored, 5-1structure of, 5-4
subprogram parameter, 5-1collection as, 5-43cursor variable as, 5-38ensuring correct data type of, 5-18record as, 5-31
subquery, 2-11subscript notation, 5-43subtype, 5-3synonym, 4-23
creating, 4-23dropping, 4-24
See also aliasSYS_REFCURSOR predefined type, 5-38SYSDATE function, 2-23system trigger, 6-1
example, 6-6SYSTIMESTAMP function, 2-23
Ttable, 4-1
adding constraint towith ALTER TABLE statement, 4-6with Edit Table tool, 4-6
adding row towith Insert Row tool, 4-10with INSERT statement, 3-1
alias for, 2-18changing data in
in Data pane, 4-12with UPDATE statement, 3-4
creating, 4-2for sample application, 9-7
deleting row fromwith Delete Selected Row(s) tool, 4-13with DELETE statement, 3-5
dropping, 4-16ensuring data integrity in, 4-4
Index
Index-8

table (continued)index on
See index, 4-13logical
See view, 4-17selecting data from
and sorting it, 2-17that matches specified conditions, 2-15
selecting specific columns of, 2-13viewing properties and data of
with SQL Developer, 2-10with SQL*Plus, 2-8
virtualSee view, 4-17
territory support, 7-2test environment, 10-1time format, 7-2timing point of trigger, 6-1transaction, 3-5
committingexplicitly, 3-6implicitly, 3-6
endingby committing, 3-6by rolling back, 3-8
rolling back, 3-8serializable, 8-8setting savepoints in, 3-10visibility of, 3-6
transaction control statement, 3-5trigger, 6-1
AFTER, 6-1statement-level example, 6-3system example, 6-6
BEFORE, 6-1row-level example, 6-4system example, 6-6
changing, 6-7compiling, 6-9compound, 6-1creating, 6-2
for sample application, 9-10disabled, 6-1disabling, 6-8
in installation script, 10-7dropping, 6-9enabled, 6-1enabling, 6-8
in installation script, 10-7INSTEAD OF, 6-1
example, 6-5invalidated, 6-9on view, 6-5recompiling, 6-9
trigger (continued)row-level, 6-1
example, 6-4pseudorecords and, 6-3
simple, 6-1statement-level, 6-1
example, 6-3system, 6-1
example, 6-6timing point of, 6-1
Uundoing transaction, 3-8Unicode, 7-5
data types for, 7-5string literals in, 7-29
Unique constraint, 4-5adding with Add Unique tool, 4-6
unlocking HR account, 2-4unscalable application, 8-1UPDATE statement, 3-4UPDATING conditional predicate, 6-3user-defined data type, 4-2user-defined exception, 5-49UTL_FILE package, 8-19
Vvalidity of installation, 10-20variable, 5-16
assigning value towith assignment operator, 5-21with SELECT INTO statement, 5-21
compositecollection, 5-43record, 5-31
cursorSee cursor variable, 5-38
declaring, 5-16ensuring correct data type of, 5-18in package body, 5-16in package specification, 5-16local, 5-16
variable array (varray), 5-43view, 4-17
changing name of, 4-19changing query in, 4-19creating, 4-17
for sample application, 9-10dropping, 4-20trigger on, 6-5
viewing table properties and datawith SQL Developer, 2-10with SQL*Plus, 2-8
Index
Index-9
virtual tableSee view
visibility of transaction, 3-6Visual Studio, 1-9
Wwarehousing system, 8-1
weak REF CURSOR type, 5-38WHEN OTHERS exception handler, 5-49WHERE clause of SELECT statement, 2-15WHILE LOOP statement, 5-27
Index
Index-10


