field service procedure – 400mhz modems, vsat · field service procedure – 400mhz modems, vsat...
TRANSCRIPT


Field Service Procedure – 400MHz Modems, VSAT
Page 1 of 10
Document No 135273 Rev B
Copyright © Sea Tel, Inc 2011 - The information contained in this document is proprietary to Sea Tel, Inc.. This document may not be reproduced or distributed in any form without prior written consent of Sea Tel, Inc.
1. Brief Summary: Troubleshooting document for diagnosing a communications a fault with and replacing the 400MHz Modems.
2. Checklist:
Verify LED Status
Query Modem Signal Strengths
Troubleshoot Communications Path
3. Theory of Operation: RS‐422 Pedestal communications from the DAC‐2202 are modulated into a frequency by the base 400MHz modem and diplexed with the L‐Band receive signal. The communications frequency will then be demodulated by the pedestal 400MHz modem and converted back into RS‐422 before being sent to the PCU. Radio M&C signals (RS‐232, RS‐422, or RS‐485) can also be multiplexed along with the pedestal communications to interface with the SSPB.
Both ADE and BDE modems are self calibrating and allowing for query commands to be sent and received for troubleshooting communication faults. The ADE 400MHz Modem PCB will also output tone and voltage commands based on the tracking display settings of the DAC to switch between the frequency ranges of the Swedish Microwave quad band LNB. This document will run through the function of the modems, troubleshooting, configuring the modem PCB and the procedure for replacing a defective modem.
4. 400MHz Modem LED Indicators: For diagnostic purposes, the 400MHz FSK Modem Assemblies have an LED Indicator (located on the bottom left hand side of the Enclosure for BDE modems and directly underneath the Rotary Joint port on the 09 Series PCU). By observing the amount of amber colored flashes during power up, the modems configuration may be established. You can also verify the communications link between above decks and below decks modems themselves. Refer to the below list for an explanation of the different LED states.
Upon power up, the modems’ LED will flash amber. The number of flashes indicates the dash number configuration of the modem. Refer to the configuration on page 8 of this document for the appropriate dash number configuration for your modem assembly.
Solid green indicates dual channel communications lock between modems (i.e. there is enough signal being received to establish communications).
Red and Green alternating LEDs indicates a single channel failure (i.e. there is low RSSI signal strength on one channel).
A flashing Red LED indicates no communication between both modems (2 failed channels), (i.e. there is low RSSI signal strength on both channels).
Solid RED ‐ Modem fault detection, Hardware or software failure of the modem.
Solid ORANGE ‐ Software update to the Modem in progress.

Field Service Procedure – 400MHz Modems, VSAT
Page 2 of 10
Document No 135273 Rev B
Copyright © Sea Tel, Inc 2011 - The information contained in this document is proprietary to Sea Tel, Inc.. This document may not be reproduced or distributed in any form without prior written consent of Sea Tel, Inc.
Below Decks Modem Assembly Above Decks Modem (Located in the PCU Assembly)
LED Illuminated Green
LED Illuminated Red
5. 400MHz Modem Queries: The 400MHz modem assemblies facilitate the use of line‐based commands via the ACU’s front panel, the internal HTML page, or using remote diagnostic software such as DacRemP and ProgTerm. The use of these commands will aid in troubleshooting communication failures between the above decks and below decks modems. Listed below are the available commands:
Field Service Procedure – 400MHz Modems, VSAT
Page 3 of 10
Document No 135273 Rev B
Copyright © Sea Tel, Inc 2011 - The information contained in this document is proprietary to Sea Tel, Inc.. This document may not be reproduced or distributed in any form without prior written consent of Sea Tel, Inc.
6. Modem Query Methods: The following text provides instruction on how to submit modem queries using any one of four different methods as listed below. These instructions assume that the operator have a clear understanding of Menu navigation and entry via the Antenna Control Unit front panel, or connection requirements for using remote diagnostic software, and/or the internal HTML page of the ACU. Refer to the appropriate manual text if further instruction on wiring connections or button pushing is required.
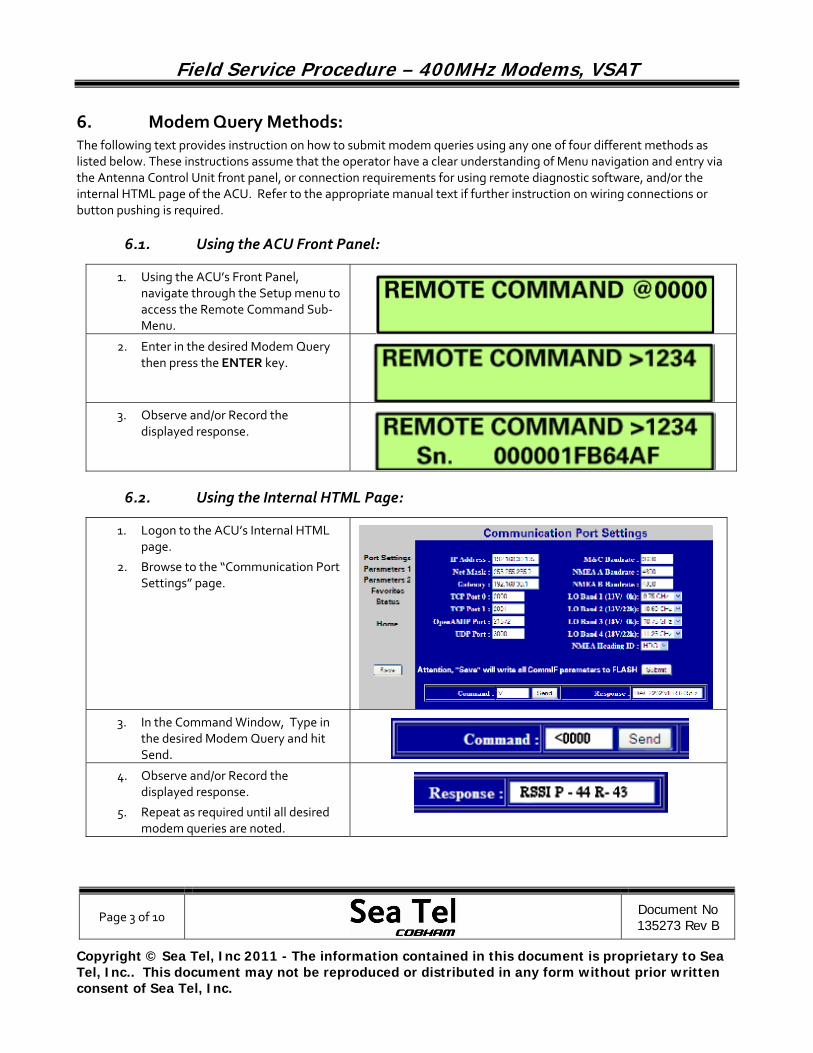
6.1. Using the ACU Front Panel:
1. Using the ACU’s Front Panel, navigate through the Setup menu to access the Remote Command Sub‐Menu.
2. Enter in the desired Modem Query then press the ENTER key.
3. Observe and/or Record the
displayed response.
6.2. Using the Internal HTML Page:
1. Logon to the ACU’s Internal HTML page.
2. Browse to the “Communication Port Settings” page.
3. In the Command Window, Type in
the desired Modem Query and hit Send.
4. Observe and/or Record the displayed response.
5. Repeat as required until all desired modem queries are noted.
Field Service Procedure – 400MHz Modems, VSAT
Page 4 of 10
Document No 135273 Rev B
Copyright © Sea Tel, Inc 2011 - The information contained in this document is proprietary to Sea Tel, Inc.. This document may not be reproduced or distributed in any form without prior written consent of Sea Tel, Inc.
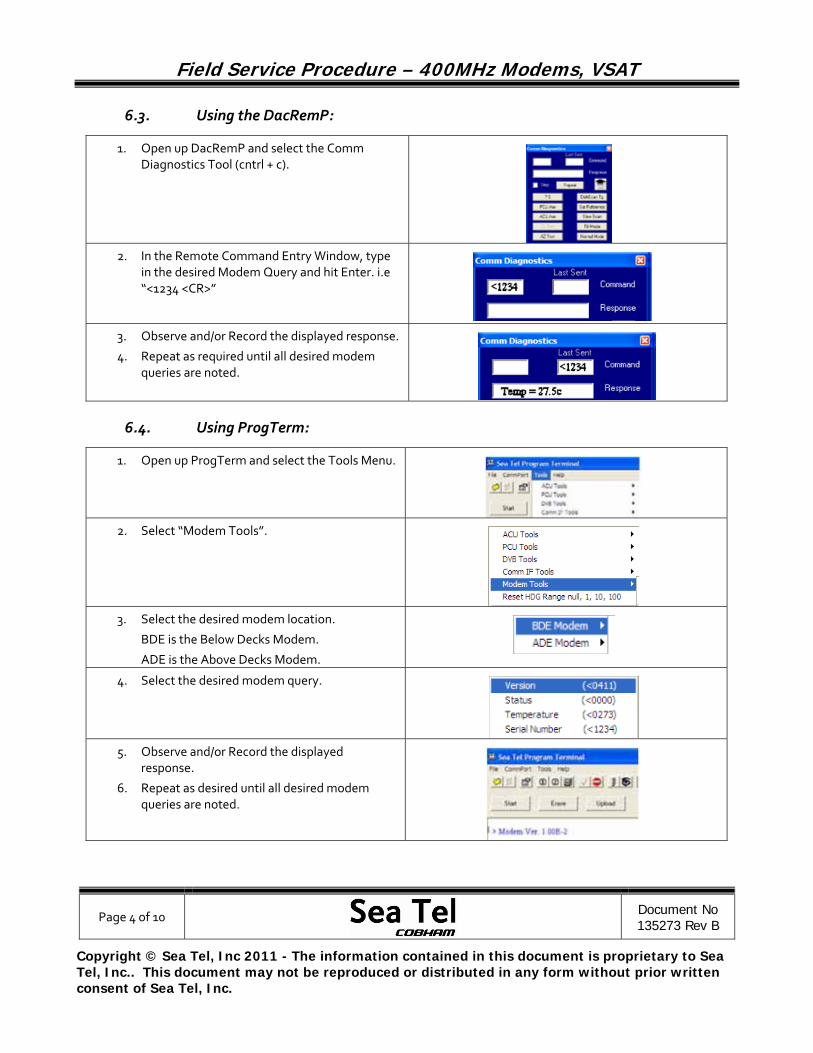
6.3. Using the DacRemP:
1. Open up DacRemP and select the Comm Diagnostics Tool (cntrl + c).
2. In the Remote Command Entry Window, type
in the desired Modem Query and hit Enter. i.e “<1234 <CR>”
3. Observe and/or Record the displayed response.
4. Repeat as required until all desired modem queries are noted.
6.4. Using ProgTerm:
1. Open up ProgTerm and select the Tools Menu.
2. Select “Modem Tools”.
3. Select the desired modem location.
BDE is the Below Decks Modem.
ADE is the Above Decks Modem.
4. Select the desired modem query.
5. Observe and/or Record the displayed
response.
6. Repeat as desired until all desired modem queries are noted.

Field Service Procedure – 400MHz Modems, VSAT
Page 5 of 10
Document No 135273 Rev B
Copyright © Sea Tel, Inc 2011 - The information contained in this document is proprietary to Sea Tel, Inc.. This document may not be reproduced or distributed in any form without prior written consent of Sea Tel, Inc.
7. 400MHz Modem Fault Diagnostic Procedure:
7.1. Query the ADE and BDE modems:
1. Issue “<0000” and “>0000” queries to the ADE and BDE modems and record the responses.
ADE (>0000)______________ BDE (<0000)______________
2. Compare your recorded responses to the list below to determine which modem fault(s) (if any) are present.
3. Use the appropriate text following the failure table for a list of possible failures attributed to the failure type established.
7.2. Tools Suggested:
Laptop or PC w/ an available comport and diagnostic software installed
ProgTerm Ver. 1.35 or Later
DacRemP Ver. 0.20 or Later
9 pin Serial cable
Straight thru (1‐1 Pin out) For Serial Based Connections
CAT5 Cross‐over cable Required for IP based connections (HTML, DacRemP IP)
Serial Loopback Connector
Build a Loop Back Test Adapter by Shorting Pin 1 to Pin 8 and Shorting Pin 2 to Pin 3 on a female DB9(S) connector.
SMA “T” splitter or N type “T” splitter Or equivalent cabling
Spectrum Analyzer Capable of handling 100KHz up to 3GHz and up to 48VDC
Field Service Procedure – 400MHz Modems, VSAT
Page 6 of 10
Document No 135273 Rev B
Copyright © Sea Tel, Inc 2011 - The information contained in this document is proprietary to Sea Tel, Inc.. This document may not be reproduced or distributed in any form without prior written consent of Sea Tel, Inc.
8. Failure Table: Diagnostics from the above table, section: 7.1.
8.1. None.
No communication failures between ADE and BDE modems.
8.2. Receive IF Path.
The Following points of failures assumes LED illumination on both modems.
1. Modem Configuration.
Verify BDE modem and ADE modem are properly configured (jumper block settings).
2. Coax Cable failure
Verify continuity on the below coaxes, repair or replace as required.
a. BDE Modem connector bracket (Base Rack Panel Assembly)
b. (CFE) BDE to ADE Rx IF (Base Rack Panel to radome Connector Bracket)
c. Rx N to SMA Adapter (Located on connector bracket at radome base)
d. SMA to SMA (From connector bracket to bottom the bottom side of the rotary joint)
e. SMA to SMA (From top side rotary joint to PCU/ADE Modem
3. Rotary Joint (Receive channel).
Verify continuity on the receive channel for its entire 360 degree range of motion. Replace rotary joint if any sector of it has failed.
8.3. BDE/ADE No Response.
The Following points of failures assumes LED illumination on both modems.
1. Modem Configuration
Verify BDE modem and ADE modem are properly configured (jumper block settings).
2. ACU to BDE modem interface cable failure
Verify harness continuity. Repair or replace as required
3. ACU Antenna Port Failure
Install an RS232 Loopback connector** on Antenna Port of the ACU. Enter an “n0999” Remote Command and verify that it echoes back on the bottom line of the display.
1. If loop back works, BDE Modem failure or ACU to BDE Interface cable failure.
2. If loop back does not work, ACU failure.
8.4. ADE No Response 1 (assumes LED illumination on both modems).
1. Modem Configuration
Verify BDE modem and ADE modem are properly configured (jumper block settings).
Install Spectrum Analyzer in line with the Rx IF coax path.
1. If 465.0MHz Transmit Beacon is present, the fault is the BDE modem.
2. If 465.0MHz Transmit Beacon is NOT present fault is with the ADE modem.
Field Service Procedure – 400MHz Modems, VSAT
Page 7 of 10
Document No 135273 Rev B
Copyright © Sea Tel, Inc 2011 - The information contained in this document is proprietary to Sea Tel, Inc.. This document may not be reproduced or distributed in any form without prior written consent of Sea Tel, Inc.
8.5. ADE No Response 2.
1. ADE Modem Configuration
Verify the ADE modem is properly configured (jumper block settings).
2. Coax Cable failure
Verify continuity on the items listed below, repair or replace as required.
a. Base Modem to connector bracket (Base Rack Panel Assembly)
b. (CFE) BDE to ADE Rx (LMR‐400)
c. Rx N to SMA Adapter (Connector bracket at radome base)
d. SMA to SMA connector bracket to bottom side rotary joint
e. SMA to SMA top side rotary joint to PCU/ADE Modem
3. Rotary Joint (Receive channel)
Verify continuity on the receive channel for its entire 360 degree range of motion. Replace rotary joint if any sector of it has failed.
8.6. BDE Receive Or ADE Transmit (PED M&C).
1. BDE Modem Rx Port Failure (Not receiving at 465.0MHz) or
2. ADE Modem Tx Port Failure (Not transmitting at 465.0MHz)
Install Spectrum Analyzer in line with the Rx IF coax path.
1. If 465.0MHz Transmit Beacon is present, the fault is the BDE modem.
2. If 465.0MHz Transmit Beacon is NOT present fault is with the ADE modem.
8.7. BDE Transmit Or ADE Receive (PED M&C).
1. BDE Modem Tx Port Failure (Not transmitting at 452.5MHz) or
2. ADE Modem Rx Port Failure (Not receiving at 452.50MHz)
Install Spectrum Analyzer in line with the Rx IF coax path.
1. If 452.5MHz Transmit Beacon is present, the fault is the BDE modem.
2. If 452.5MHz Transmit Beacon is NOT present, the fault is with the ADE modem.
8.8. BDE Receive or ADE Transmit (RF M&C).
1. BDE Modem Rx Port Failure (Not receiving at 460.0MHz) or
2. ADE Modem Tx Port Failure (Not transmitting at 460.0MHz)
Install Spectrum Analyzer in line with the Rx IF coax path.
1. If 465.0MHz Transmit Beacon in present, the fault is the BDE modem.
2. If 465.0MHz Transmit Beacon is NOT present, the fault is with the ADE modem.

Field Service Procedure – 400MHz Modems, VSAT
Page 8 of 10
Document No 135273 Rev B
Copyright © Sea Tel, Inc 2011 - The information contained in this document is proprietary to Sea Tel, Inc.. This document may not be reproduced or distributed in any form without prior written consent of Sea Tel, Inc.
8.9. BDE Transmit Or ADE Receive (Radio M&C).
1. BDE Modem Tx Port Failure (Not transmitting at 447.5MHz) or
2. ADE Modem Rx Port Failure (Not receiving at 447.5MHz)
Install Spectrum Analyzer in line with the Rx IF coax path.
1. If 465.0MHz Transmit Beacon in present, the fault is the BDE modem.
If 465.0MHz Transmit Beacon is NOT present, the fault is with the ADE modem.
9. 400MHz Modem PCB Configuration: The 400MHz modem PCB has a jumper block (located component side of PCB) that is used to configure it for Above Decks or Below Decks operation as well as to configure its’ serial communications protocol (RS232, RS422, or RS485). So a single PCB can be configured to operate in above or below decks.
Verify the configuration of the defective modem installed on your antenna for the correct configuration. (Standard RS232 configurations for the XX09, XX10 and XX97B VSAT systems use ‐1 in the above decks and ‐2 in the below decks).
Jumper Block Location
Field Service Procedure – 400MHz Modems, VSAT
Page 9 of 10
Document No 135273 Rev B
Copyright © Sea Tel, Inc 2011 - The information contained in this document is proprietary to Sea Tel, Inc.. This document may not be reproduced or distributed in any form without prior written consent of Sea Tel, Inc.
10. Replacing the ADE 400MHZ Modem PCB:
10.1. Tools.
#1 Phillips Screwdriver
5/16” (8mm) Wrench/Spanner
Loctite 242
10.2. Procedure.
Procedure for replacing the XX09 and XX10 ADE 400MHz Modem PCB, Sea Tel kit part number: 135349 (modem PCB part number: 129099‐1).
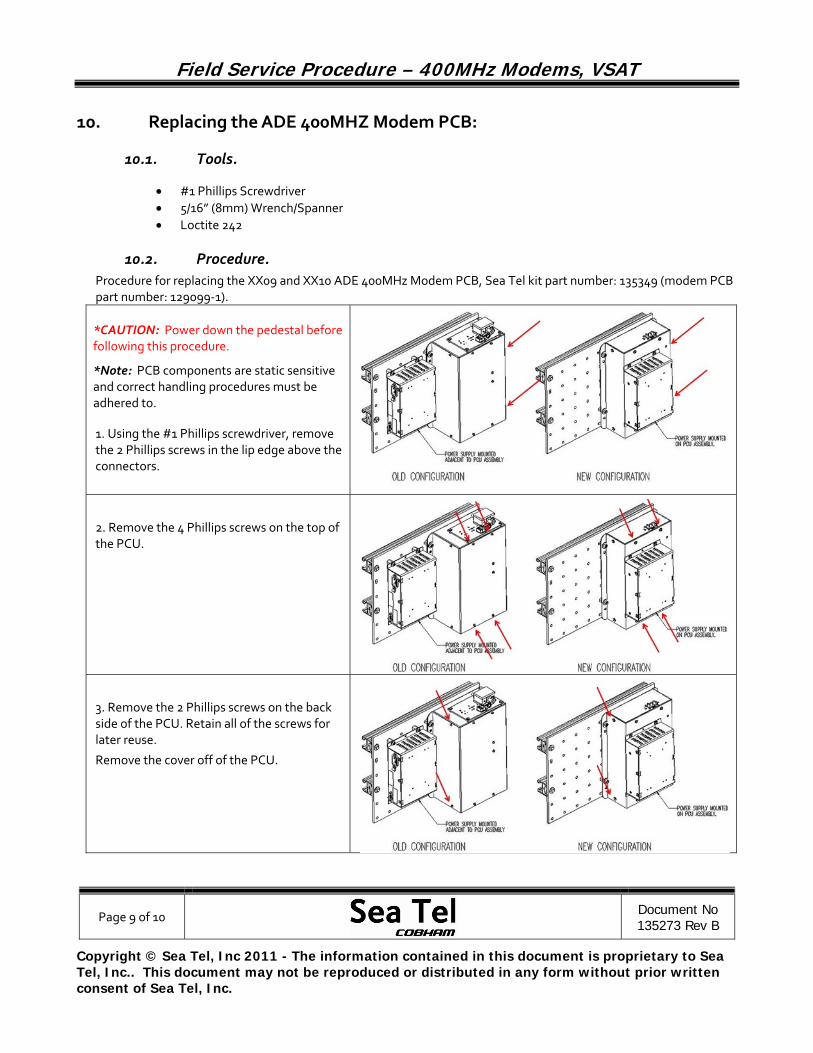
*CAUTION: Power down the pedestal before following this procedure.
*Note: PCB components are static sensitive and correct handling procedures must be adhered to.
1. Using the #1 Phillips screwdriver, remove the 2 Phillips screws in the lip edge above the connectors.
2. Remove the 4 Phillips screws on the top of the PCU.
3. Remove the 2 Phillips screws on the back side of the PCU. Retain all of the screws for later reuse.
Remove the cover off of the PCU.
Field Service Procedure – 400MHz Modems, VSAT
Page 10 of 10
Document No 135273 Rev B
Copyright © Sea Tel, Inc 2011 - The information contained in this document is proprietary to Sea Tel, Inc.. This document may not be reproduced or distributed in any form without prior written consent of Sea Tel, Inc.
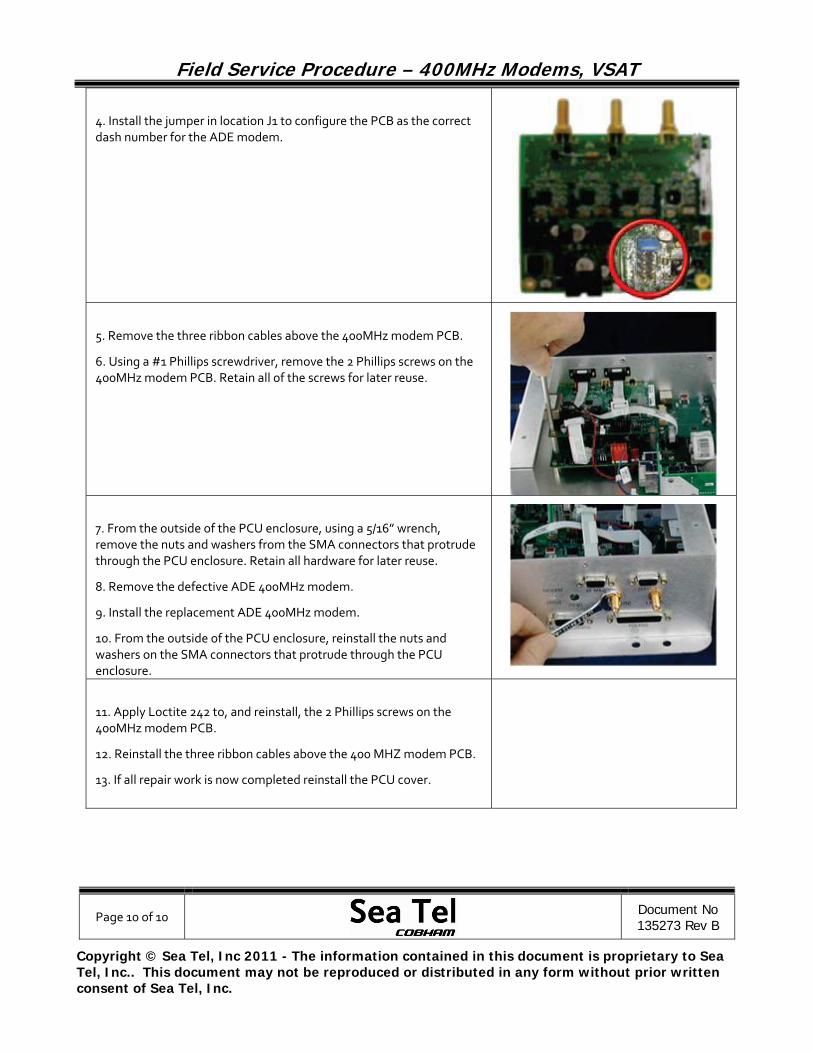
4. Install the jumper in location J1 to configure the PCB as the correct dash number for the ADE modem.
5. Remove the three ribbon cables above the 400MHz modem PCB.
6. Using a #1 Phillips screwdriver, remove the 2 Phillips screws on the 400MHz modem PCB. Retain all of the screws for later reuse.
7. From the outside of the PCU enclosure, using a 5/16” wrench, remove the nuts and washers from the SMA connectors that protrude through the PCU enclosure. Retain all hardware for later reuse.
8. Remove the defective ADE 400MHz modem.
9. Install the replacement ADE 400MHz modem.
10. From the outside of the PCU enclosure, reinstall the nuts and washers on the SMA connectors that protrude through the PCU enclosure.
11. Apply Loctite 242 to, and reinstall, the 2 Phillips screws on the 400MHz modem PCB.
12. Reinstall the three ribbon cables above the 400 MHZ modem PCB.
13. If all repair work is now completed reinstall the PCU cover.