feature overview/summary - mva onboardingmva-onboarding.azurewebsites.net/files/policheck.docx ·...
TRANSCRIPT

PoliCheck Scanning of Microsoft Content ROLE Name (Alias)Compliance Manager Kari Boston (karibo)
Compliance Lead Maria Little (lulittle)
BET Management Sponsor Rick Grindley (rickgrin)
Version Date Author Description of change
1.0 Jul 1, 2014 Maria Little Initial version
2.0 Sept 1, 2015 Maria Little Policheck Update to 5.7
3.0 August 12, 2016 Elise Morrison Policheck Update to 5.7.1
Feature Overview/SummaryThis document explains the process by which MS FTE, vendors, or subsidiary publishers will perform compliance scans of MS Lex Content. This is not intended to be an engineering spec of the compliance tool. When the term MS FTE/vendor is used it is to encompass all Microsoft employee PjMs, PE’s, all vendor PjMs, subsidiary publishers and any other publishers of MS LeX content.
Microsoft Policheck PolicyPoliCheck is a mandatory tool used to ensure that all Microsoft corporate standards and guidelines are met. It must be executed on all customer facing components before the course is released to the public. It is also recommended that you run PoliCheck on all documents, presentations, and so on if they are Microsoft internally public.
Vendors are able to run PoliCheck on components. All vendors are able to interpret the results with the exception of vendors in some locations in China. Vendors in those locations in China must submit the results back to an MS FTE to triage the PoliCheck results. All other vendors may triage the results themselves.
MS LeX Policheck PolicyIn LeX, you are required to run Policheck on all public-facing content components such as PowerPoint decks, Word documents, text documents, assessments, and so on. Each MS FTE/vendor will run PoliCheck on courses that they are responsible for. A subsidiary publisher will run PoliCheck on subsidiary courses. The MS FTE/vendor, subsidiary publisher, or assigned vendor is required to run PoliCheck on all public facing content and examine the results to ensure that legitimate Severity 1 and 2 issues do not exist. Questionable Sev 1 or Sev 2 issues should will be escalated to LeX Compliance Lead or [email protected] .
1

Special RequirementsAny FTE or vendor working remotely must be RAS’d in in order to run PoliCheck. If you are working remotely and are not RAS’d in and attempt to run PoliCheck, you will receive an error message. You may also log into Policheck with a live ID through this URL: https://policheck.azurewebsites.net/DownloadPolicheck.aspx. If you are not approved for access, it will walk you through the steps to acquire access to Policheck. There are location restrictions in viewing certain information in policheck, you may view the restricted areas by accessing Policheck information on GPWeb.
Compliance Workflow for ContentMS FTEs/vendors should follow their product schedule and run a PoliCheck scan on are ALL COMPONENTS that are public facing. These include, but are not limited to:
PowerPoint slides (modules) Assessments (Word docs) PDFs Closed Captions (text .txt files)
a) Please note that .ppt, .doc, .xls and .txt files are supported by Policheck. If you have another type of file, please contact [email protected] to see if the type of file you are attempting to scan is supported by the tool.
How to Install and Run PoliCheck 1. Install PoliCheck onto your desktop from here:
https://policheck.azurewebsites.net/DownloadPolicheck.aspx
2. For ease of use, it is suggested that you add two folders to your desktop:a) PoliCheck Files to Scan b) Policheck Scan Results
3. After you install PoliCheck, two programs will be installed on your computer. PoliCheck 5.7.1 (current version, but may change) and Policheck 5.7.1 for SOM. Please only use Policheck 5.7.1 and NOT Policheck 5.7.1 for SOM. The Icon and folders should look like this:
4. Copy all the source files to be scanned and put them in the PoliCheck Files to Scan folder on your desktop.
5. Open the Policheck tool that is installed on your computer. A new window will open up that looks like this:
2

6. Start a new task.
a) Select the Task drop down menu in the upper left corner of the window and select “New” from the drop down.
b) A new window will open up. “File Scan” should already be selected as the default. Click OK.
3

NOTE: After you have created a task it will be saved in your task list and you can “modify” it for your next Policheck scan.
7. The “Task Settings” window will open and look like this:
8. The window will open to the Step 1 Define Task tab. In the Task Name field, you may give your task any name you want or leave it to the default. Typically you will see tasks set up by language.
4

9. In the Target section, ensure that Folder is selected and browse to the path where you put your files to be scanned in the Policheck Files to Scan folder.
10. In the Save Result To section browse to the path where you want the file results to appear (this should be the PoliCheck Files to Scan folder on your desktop). Ensure at the end of the address string you have the course number and .xls at the end so you will recognize your results and it will be in Excel format.
If you select the browse button you may name your file any name you want. Typically you will name the file for the content you are scanning.
11. Ensure that Include Subdirectories is selected as well as code comment reporting. Click Next to go to Step 2 Select Language tab.
12. On the Step 2 Select Language Tab leave the Term Source as Sql Term DB.
5

13. In the Term Tables section of the tab click the select Language button.
6

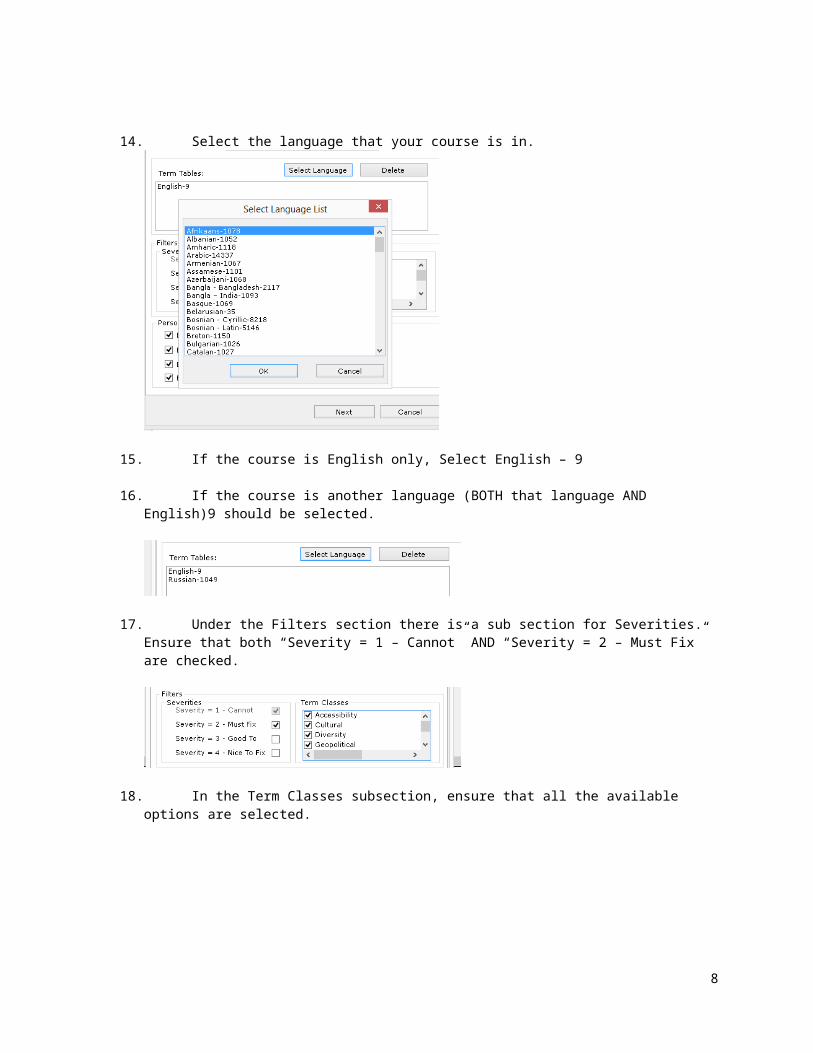
14. Select the language that your course is in.
15. If the course is English only, Select English – 9
16. If the course is another language (BOTH that language AND English)9 should be selected.
17. Under the Filters section there is a sub section for Severities. Ensure that both “Severity = 1 – Cannot” AND “Severity = 2 – Must Fix” are checked.
18. In the Term Classes subsection, ensure that all the available options are selected.
19. In the Personal Exclusions Section all the available options should be selected.
20. Click Next to take you to the Step 3: Advanced Tab:
7
21. Leave all default settings (File Type Settings should have Default File selected and the Exclusion Rules Database should have the Default Rules DB selected). Select “Start the task immediately” and click OK.
22. Highlight your task again and right click.
23. In the drop down menu that appears select Start.
24. Most likely (but not always) a window will appear stating that the task has already been run and would you like to restart it? If the window appears, click Yes.
8

25. The task will then start and you will wait until the message in the lower left corner of the Policheck window states your task name and : Scan Completed.
26. Above the Scan Completed message is an area that says Issues. This is how many
issues appeared in the files you scanned.
9

27. You may now view the results in the Policheck tool or close the Policheck tool and go to the Policheck Scan Results folder on your desktop and open the Excel file that contains the PoliCheck results.
28. Triage the results. View each and every issue and determine if it is a false positive or in reality a Sev 1 or Sev 2 issue that must be fixed.
a) Results in Policheck Window:
10

b) Results in Excel – Go into your Policheck Scan Results folder and click on the name of the file you just ran. It will open an excel spreadsheet.
c) The spreadsheet created by the PoliCheck tool will look like this:
11

29. You may now triage the results in the Policheck tool or close the Policheck tool and
go to the Policheck Scan Results folder on the desktop and open the Excel file of your results. FTE/vendor reviews Geopolitical Scan for sensitive terms and takes one or more of the following actions:
If legitimate Sev 1 PoliCheck terms are found, terms must be replaced before
any release (beta or final). Please note your action on the excel spreadsheet with your alias. (Example in screenshot below columns J and K)
If legitimate Sev 2 PoliCheck terms are found, terms should be fixed before any release (beta or final), but fixes may be postponed if there is sufficient business justification (excessive cost in budget or excessive delay to schedule). Please note your action on the Excel spreadsheet with your alias in the next column (Column K below)
If there is a question if a Sev 1 or Sev 2 item listed is a false positive, please contact the [email protected] alias.
If the Sev 1 or Sev 2 terms are false positives, please indicate that with the words “False Positive” on the spreadsheet followed by your alias.
Your final spreadsheet should look like the following with an action and alias for each item listed:
30. The PjM or vendor then copies the Excel file from the Policheck Scan Results folder and posts them to the TFS or SharePoint site where all the other files are kept for that particular course, book, or content.
31. Delete any files you copied into the PoliCheck to be Scanned folder and the PoliCheck Results folder so that you have a clean slate to work from for your next scan.
Triage Workflow for CoursewareYou must view each result individually within its context to verify if it is or is not a positive result. PoliCheck will identify both positive and “false positive” results. Positive results are results that are used in offensive context while false positive results are terms that are not used in offensive context. False positives should be reviewed to confirm context and all positives should be fixed.
It is important to note that a term may not be offensive to you personally, but in certain context it may be offensive to other cultures or languages. PoliCheck represents the opinion of Microsoft and not the opinion of each individual.
Any questions related to resolving Sev 1 or Sev 2 issues (including exception requests) can be directed to the LeX compliance team at [email protected]. Our SLA is a 24 hour response to your email with either a definitive answer/guidance on the term in question or it will inform you we need to consult with our corporate counterparts or term subject matter expert to assist with the answer to your question.
12

How to Add a file type to PoliCheck Policheck supports many different file types. You can specifically check if your file is supported by clicking on the “Options” and then selecting File Type Settings. A window will open up looking like this:
Check for your file and close the window if you find it.
The Geopolitical Severity Code Rating Scale - The GeoPol team uses a rating system to indicate the severity of geopolitical risk.
Rating Description Risk to Company Impact on Product Group
Sev 0 Emergency Critical : A post-ship crisis with risk of legal or physical harm to Microsoft employees, vendors, partners, or facilities. Issue escalated to appropriate crisis response teams.
Critical : Product recalled, removed from the web, or immediate fix issued.Report an Incident . Contact [email protected]. They will team with PR, LCA, and GeoPol to issue appropriate public response.
Sev 1 Cannot High : Serious legal or High : Ship-stop. Issue must be
13

Ship regulatory risk in any market. (Consult your LCA representative and GeoPol for guidance on minimizing legal and regulatory risks).
Reputational damage, image, credibility and/or financial risk company-wide.
fixed prior to release.For web content or services that have already been deployed, the issue must be fixed or removed immediately.
Where legal risk may be involved, the appropriate LCA contact must first approve any exception or solution. Exceptions to permit a release with a Sev 1 issue will require management approval, potentially going up to the VP level.
Sev 2 Must Fix Medium : Significant image, credibility or financial risk in one or more markets.
Medium: Issue must be fixed prior to release or at the first opportunity, depending on cost and release or update schedule.
Exceptions to permit a release with a positive Sev 2 issue will require management approval, potentially going up to the VP level. Contact the LeX [email protected] for assistance with Exception requests.
Sev 3 Good to Fix Low : Potential risk to competitiveness of product.Low-medium image, credibility or financial risk in one or more markets.May conflict with Microsoft’s corporate values.
Low : Some risk. Best practice would be to alter or remove the risky item or issue in consultation with the LeX Global Readiness teammailto:[email protected] or GeoPol .
Have a plan in place to change or remove the image, text, feature, etc. should negative publicity arise.
The product group assumes the risk of releasing the product, feature, or content.
14

Additional knowledge of MS Corporate Global Readiness policies that include the PoliCheck policy requirement, can be gained by taking the Introduction to Global Readiness online class (25 min self-paced) located at: http://learningcentral/Training/CoursePlayer.aspx?courseId=190102 .
15