fb’s power editor for beginners - living the online...
TRANSCRIPT
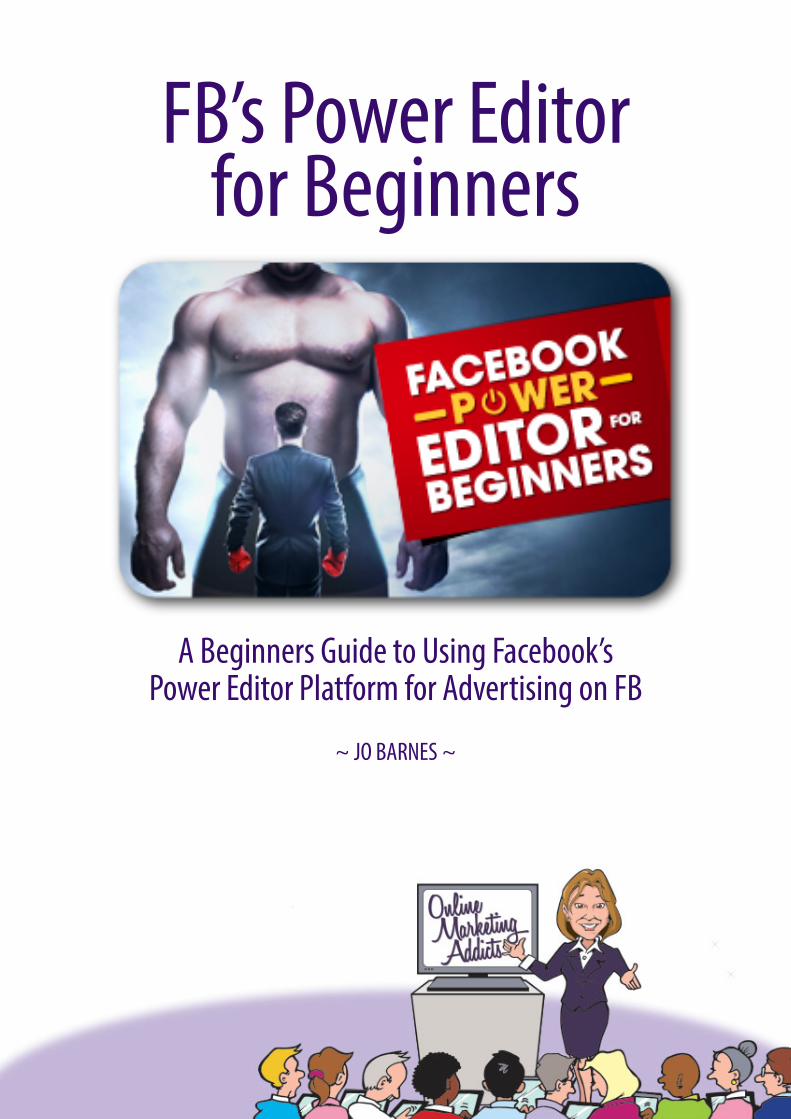
FB’s Power Editor for Beginners
A Beginners Guide to Using Facebook’s Power Editor Platform for Advertising on FB
~ JO BARNES ~
CONTENTS
.......................................................................................................................Introduction 3
...........................................................................Chapter 1 - Accessing the Power Editor 3
............................................................................................Chapter 2 - Account Settings 6
.........................................................................................................Chapter 3 - Ad Tools 9
....................................................................................Chapter 4 - Creating a Campaign 12
........................................................................................................Chapter 5 - Ad Sets 15
................................................................Chapter 5 - Creating an Advert - The Creative 17
........Chapter 6 - Creating a Basic Page Post Ad That Increases Traffic to Your Website 23
..............................................................Chapter 7 - Creating an Advert - The Audience 31
.........................................................................Chapter 8 - Creating an Advert - Pricing 37
................................................................................Chapter 9 - Managing Your Adverts 40
...................................................................................Chapter 10 - Conversion Tracking 44
.......................................................................................Chapter 11 - Custom Audience 48
..................................................................................Chapter 12 - Saved Target Groups 55
.....................................................................................Chapter 13 - Unpublished Posts 58
................................................................................................Chapter 14 - Split Testing 62
....................................................................................................Chapter 15 - Reporting 65
..........................................................................................................................Summary 72
................................................................................Copyright, Licensing and Liabilities. 75
.....................................................................................................Disclaimer of Warranty 75
........................................................................................................Limitation of Liability 75
.....................................................................................Interpretation of above Sections 75
Introduction
Hello there! Welcome to Power Editor for Beginners. Over the next few pages I am going to walk you through the fundamentals of using the Power Editor to run your Facebook advertising campaigns.
The first thing you may be wondering, is what are the benefits of using the Power Editor over the normal Facebook Advertising platform and the answer is easy. It is quite simply far more versatile than the basic platform.
From within the power editor you can easily create multiple campaigns, multiple ads, custom audiences, saved target groups, duplicate campaigns, bulk import images & campaigns and much more.
Don’t worry if you don’t yet understand any of those terms, you sure will by the time you have finished reading through this guide.
So without further ado, let’s crack on....
Chapter 1 - Accessing the Power Editor
Ok so quick warning, when you first login, the power editor looks complicated, but I can assure you it's really not once you understand what each of the elements are.
There are a couple of ways you can access the power editor.
The fastest and easiest way is simply to go to www.facebook.com/ads/manage/powereditor. That will take you straight there.Please note the Power Editor was originally created to only work with google chrome, so I suggest you use chrome when accessing and using it to ensure it does everything you need it to.
Another way to access if you happen to be logged into Facebook and surfing about, is to click the small down arrow at the very top right hand side of your Facebook account and click on ‘Manage Ads’.
3 www.onlinemarketingaddicts.com
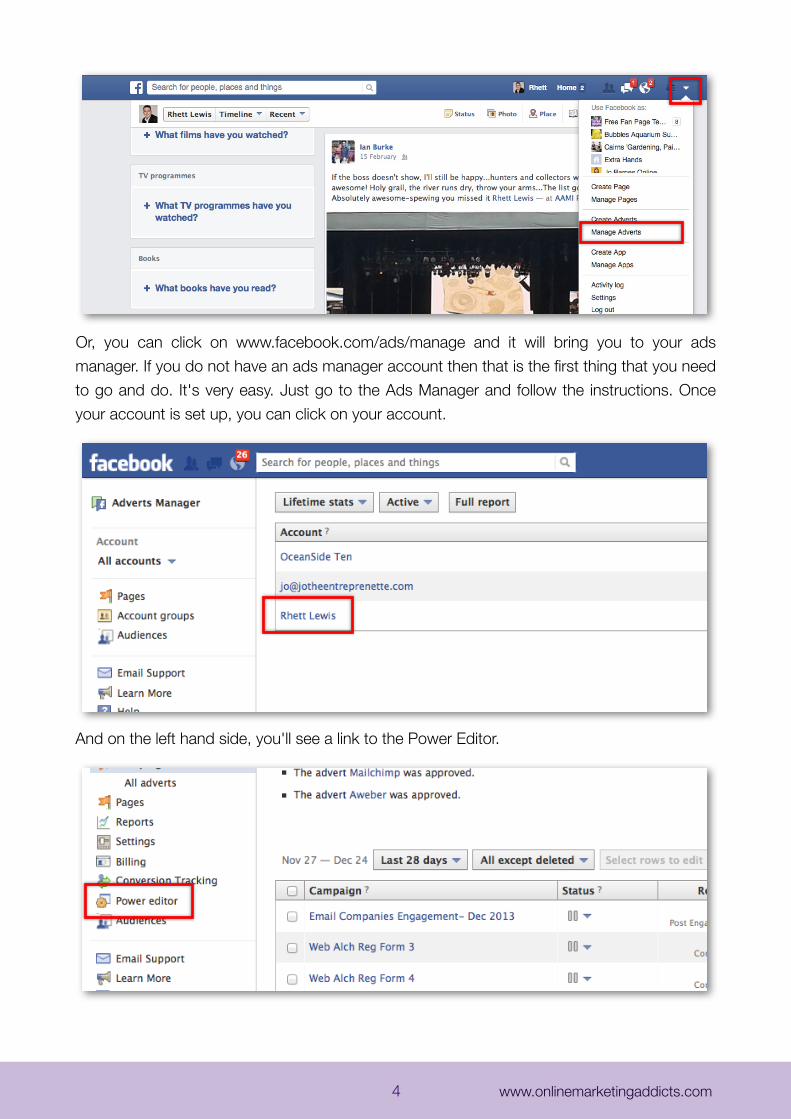
Or, you can click on www.facebook.com/ads/manage and it will bring you to your ads manager. If you do not have an ads manager account then that is the first thing that you need to go and do. It's very easy. Just go to the Ads Manager and follow the instructions. Once your account is set up, you can click on your account.
And on the left hand side, you'll see a link to the Power Editor.
4 www.onlinemarketingaddicts.com
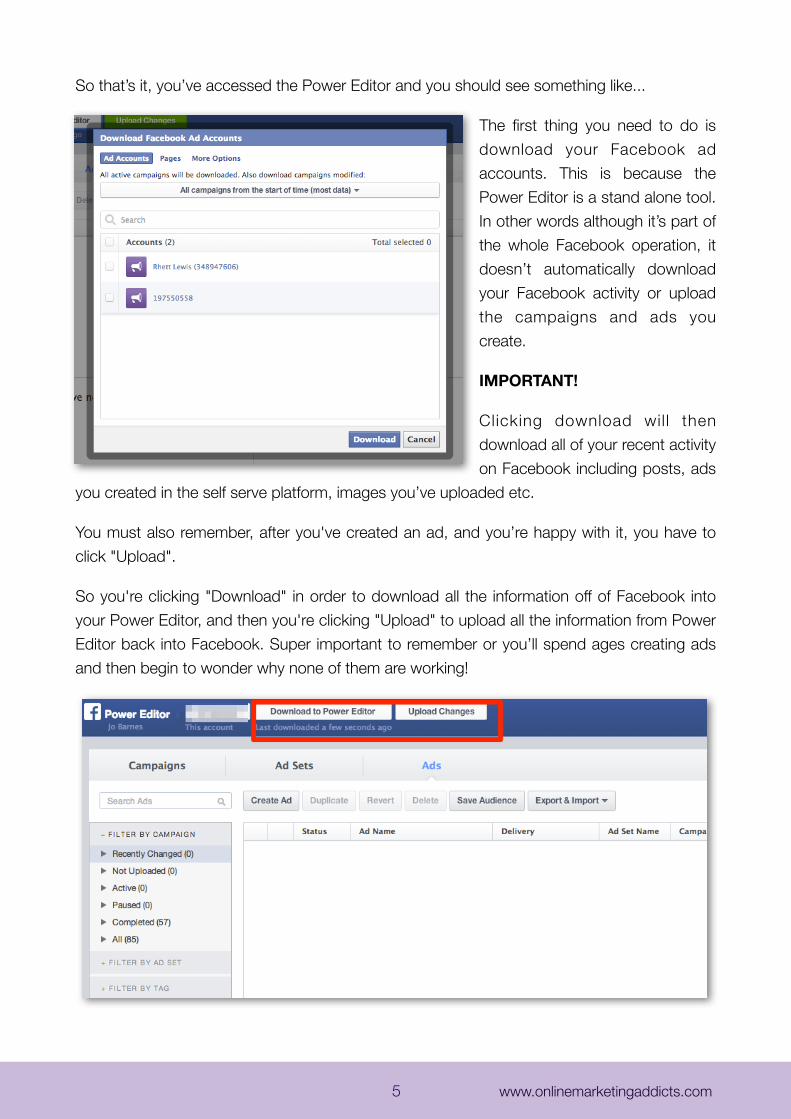
So that’s it, you’ve accessed the Power Editor and you should see something like...
The first thing you need to do is download your Facebook ad accounts. This is because the Power Editor is a stand alone tool. In other words although it’s part of the whole Facebook operation, it doesn’t automatically download your Facebook activity or upload the campaigns and ads you create.
IMPORTANT!
Clicking download wil l then download all of your recent activity on Facebook including posts, ads
you created in the self serve platform, images you’ve uploaded etc.
You must also remember, after you've created an ad, and you’re happy with it, you have to click "Upload".
So you're clicking "Download" in order to download all the information off of Facebook into your Power Editor, and then you're clicking "Upload" to upload all the information from Power Editor back into Facebook. Super important to remember or you’ll spend ages creating ads and then begin to wonder why none of them are working!
5 www.onlinemarketingaddicts.com
Chapter 2 - Account Settings
So now you’ve accessed the power editor let’s have a look at some of the main settings.
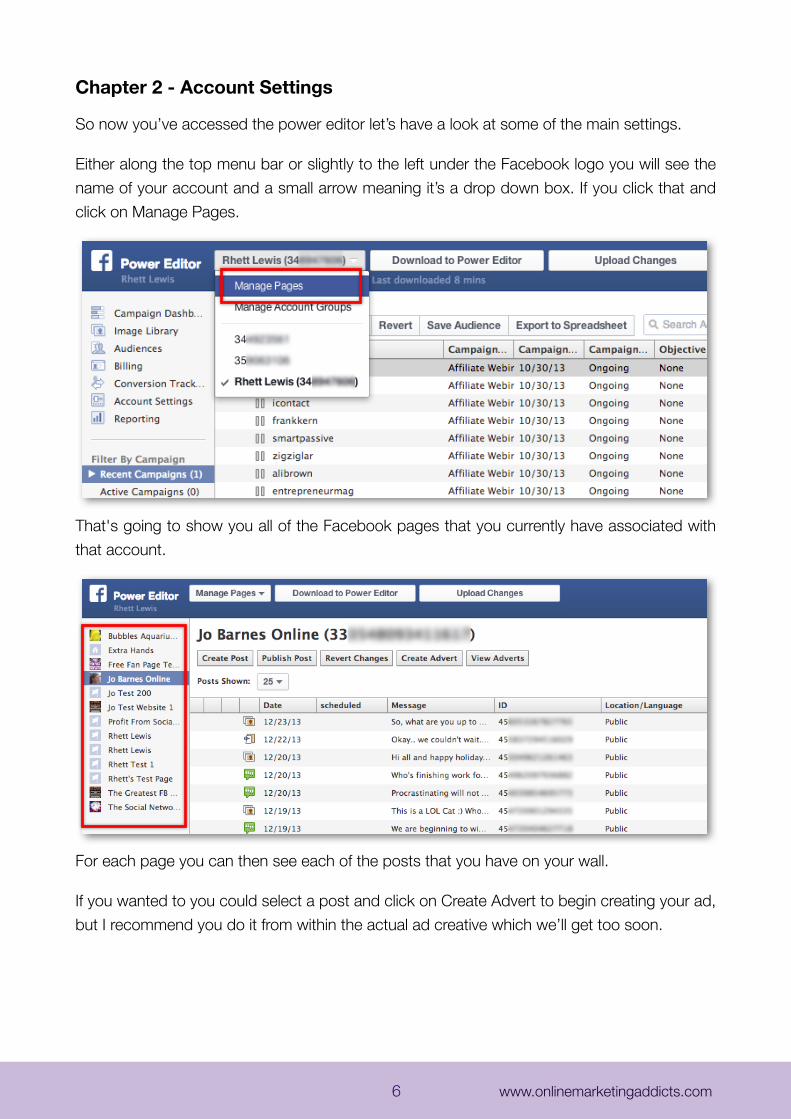
Either along the top menu bar or slightly to the left under the Facebook logo you will see the name of your account and a small arrow meaning it’s a drop down box. If you click that and click on Manage Pages.
That's going to show you all of the Facebook pages that you currently have associated with that account.
For each page you can then see each of the posts that you have on your wall.
If you wanted to you could select a post and click on Create Advert to begin creating your ad, but I recommend you do it from within the actual ad creative which we’ll get too soon.
6 www.onlinemarketingaddicts.com
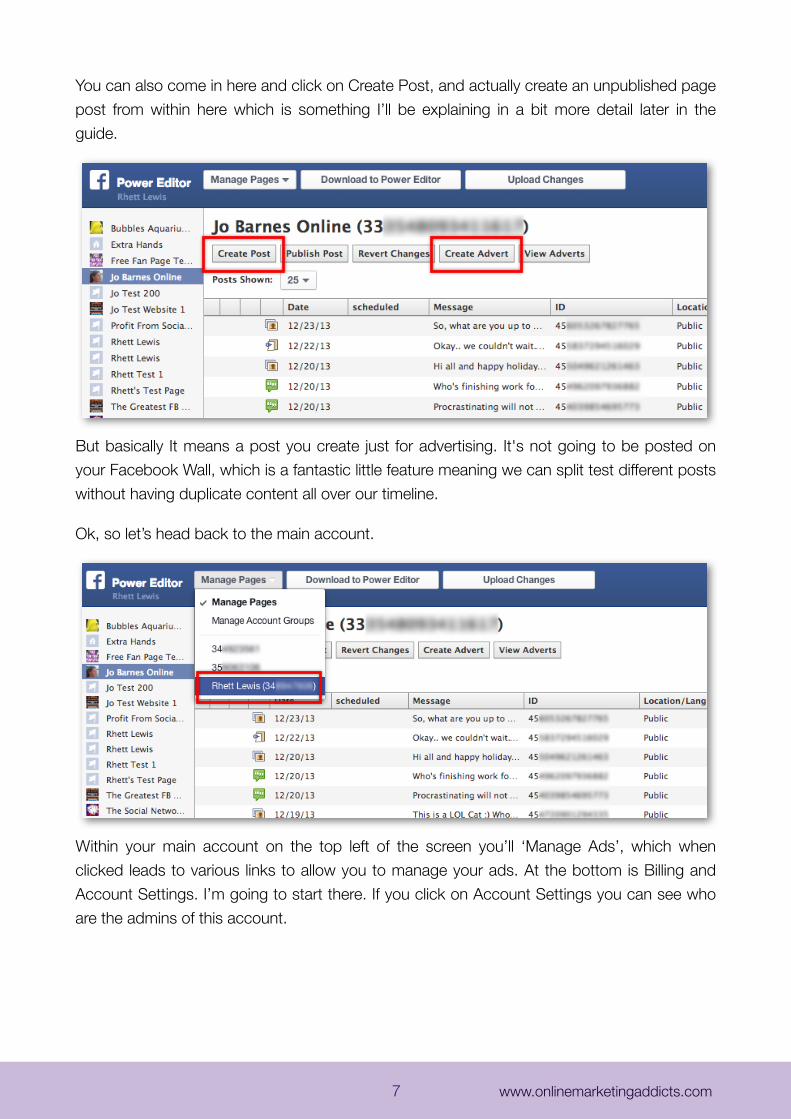
You can also come in here and click on Create Post, and actually create an unpublished page post from within here which is something I’ll be explaining in a bit more detail later in the guide.
But basically It means a post you create just for advertising. It's not going to be posted on your Facebook Wall, which is a fantastic little feature meaning we can split test different posts without having duplicate content all over our timeline.
Ok, so let’s head back to the main account.
Within your main account on the top left of the screen you’ll ‘Manage Ads’, which when clicked leads to various links to allow you to manage your ads. At the bottom is Billing and Account Settings. I’m going to start there. If you click on Account Settings you can see who are the admins of this account.
7 www.onlinemarketingaddicts.com
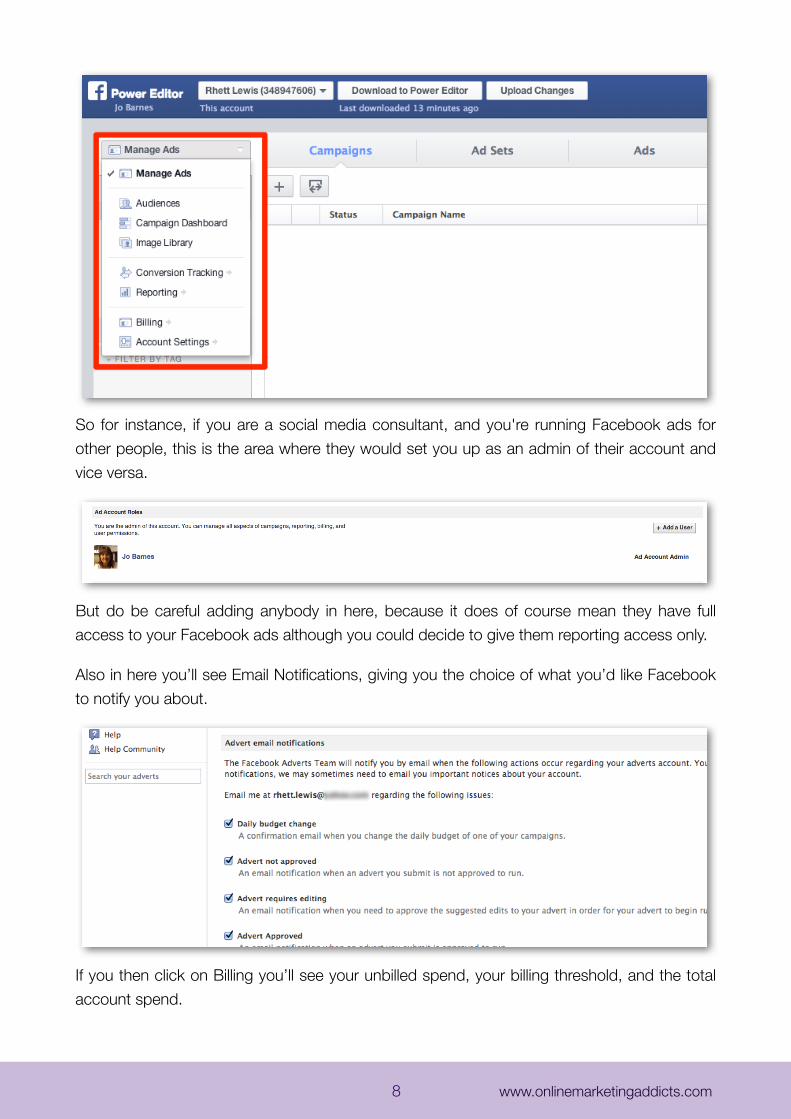
So for instance, if you are a social media consultant, and you're running Facebook ads for other people, this is the area where they would set you up as an admin of their account and vice versa.
But do be careful adding anybody in here, because it does of course mean they have full access to your Facebook ads although you could decide to give them reporting access only.
Also in here you’ll see Email Notifications, giving you the choice of what you’d like Facebook to notify you about.
If you then click on Billing you’ll see your unbilled spend, your billing threshold, and the total account spend.
8 www.onlinemarketingaddicts.com
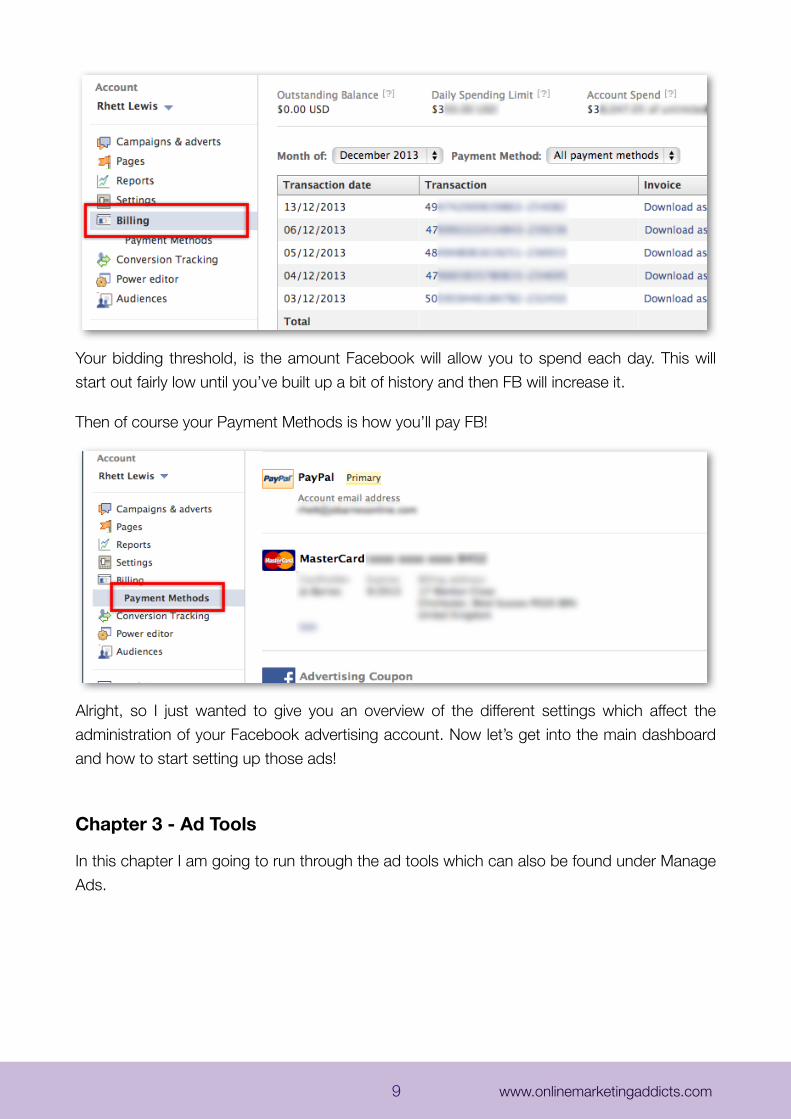
Your bidding threshold, is the amount Facebook will allow you to spend each day. This will start out fairly low until you’ve built up a bit of history and then FB will increase it.
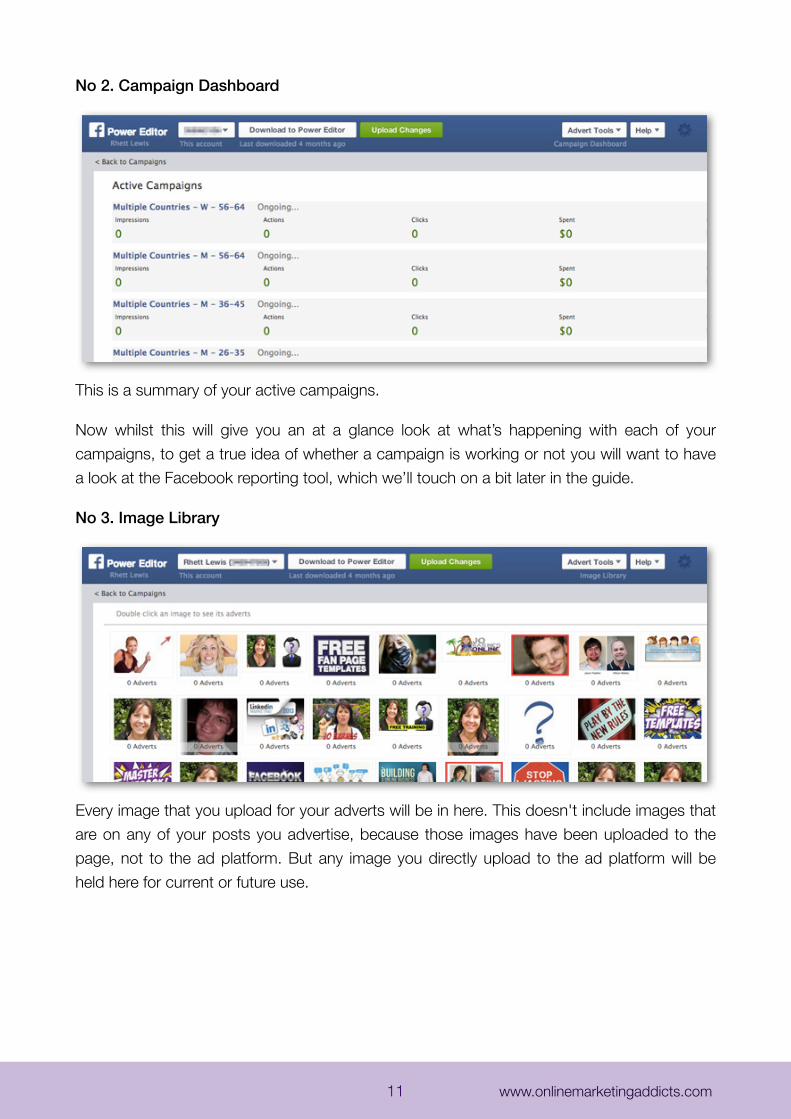
Then of course your Payment Methods is how you’ll pay FB!
Alright, so I just wanted to give you an overview of the different settings which affect the administration of your Facebook advertising account. Now let’s get into the main dashboard and how to start setting up those ads!
Chapter 3 - Ad Tools
In this chapter I am going to run through the ad tools which can also be found under Manage Ads.
9 www.onlinemarketingaddicts.com

No 1. Audiences
This is where we will create Custom Audiences, Saved Target Groups & Lookalike Audiences. A very handy little tool indeed!
A Custom Audience is made up of either exported email addresses from your email account, so you can target people who have subscribed to your list, or a list of Facebook ID’s, phone numbers or mobile advertiser id’s.
A Saved Target Group is a saved version of an audience you selected when creating an ad. Meaning you only have to select all the countries, age, location, gender etc once, then you can save the audience, use it for other ads and simply change one or two details. A HUGE time saver!
We will be looking at these in greater detail as we go through the guide.
10 www.onlinemarketingaddicts.com
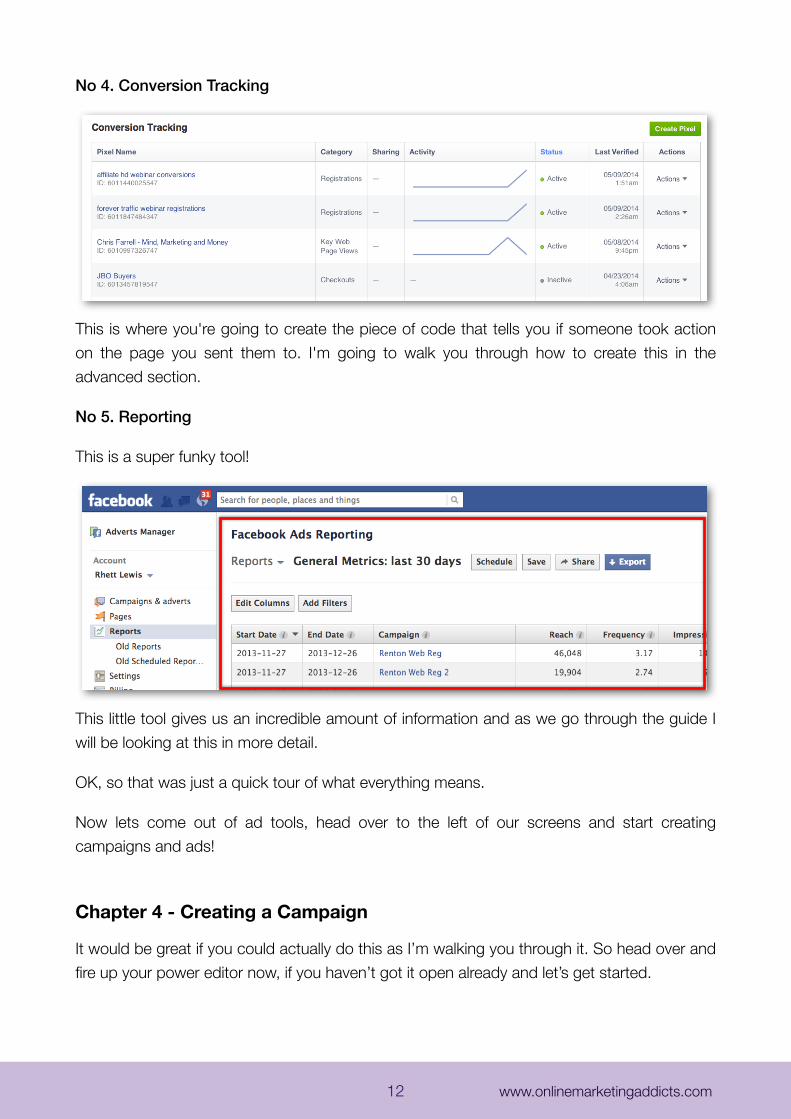
No 2. Campaign Dashboard
This is a summary of your active campaigns.
Now whilst this will give you an at a glance look at what’s happening with each of your campaigns, to get a true idea of whether a campaign is working or not you will want to have a look at the Facebook reporting tool, which we’ll touch on a bit later in the guide.
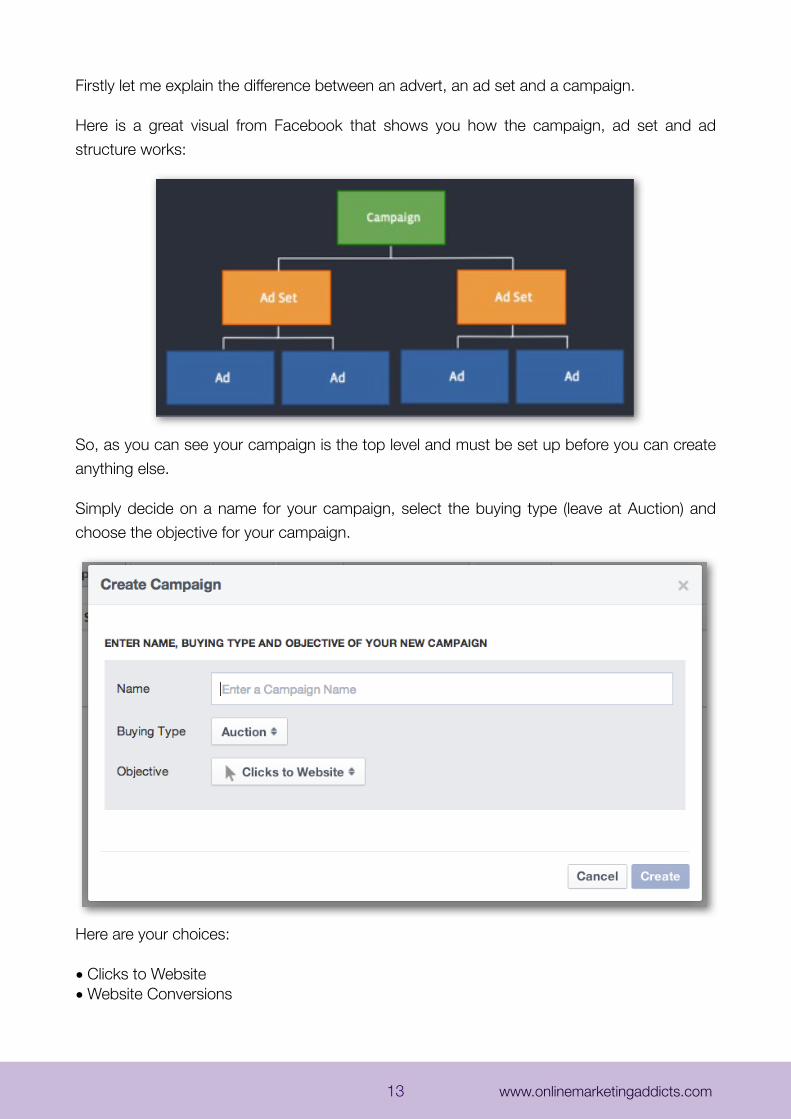
No 3. Image Library
Every image that you upload for your adverts will be in here. This doesn't include images that are on any of your posts you advertise, because those images have been uploaded to the page, not to the ad platform. But any image you directly upload to the ad platform will be held here for current or future use.
11 www.onlinemarketingaddicts.com
No 4. Conversion Tracking
This is where you're going to create the piece of code that tells you if someone took action on the page you sent them to. I'm going to walk you through how to create this in the advanced section.
No 5. Reporting
This is a super funky tool!
This little tool gives us an incredible amount of information and as we go through the guide I will be looking at this in more detail.
OK, so that was just a quick tour of what everything means.
Now lets come out of ad tools, head over to the left of our screens and start creating campaigns and ads!
Chapter 4 - Creating a Campaign
It would be great if you could actually do this as I’m walking you through it. So head over and fire up your power editor now, if you haven’t got it open already and let’s get started.
12 www.onlinemarketingaddicts.com
Firstly let me explain the difference between an advert, an ad set and a campaign.
Here is a great visual from Facebook that shows you how the campaign, ad set and ad structure works:
So, as you can see your campaign is the top level and must be set up before you can create anything else.
Simply decide on a name for your campaign, select the buying type (leave at Auction) and choose the objective for your campaign.
Here are your choices:
• Clicks to Website• Website Conversions
13 www.onlinemarketingaddicts.com
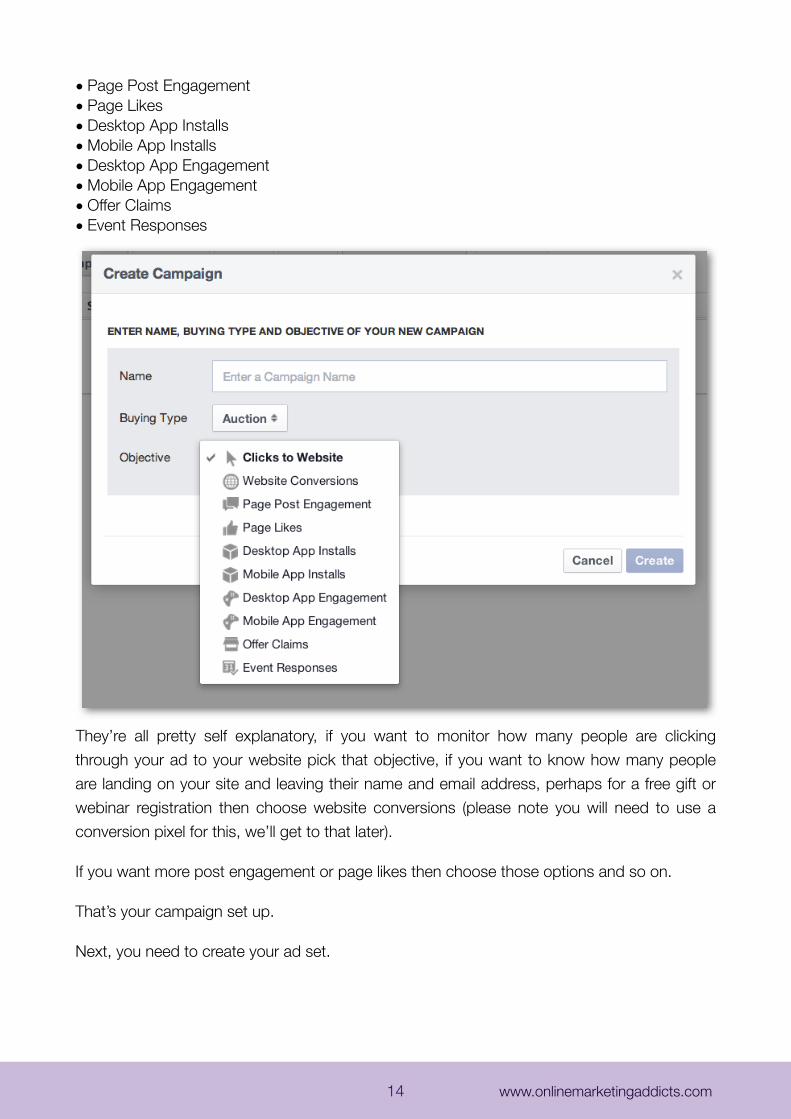
• Page Post Engagement• Page Likes• Desktop App Installs• Mobile App Installs• Desktop App Engagement• Mobile App Engagement• Offer Claims• Event Responses
They’re all pretty self explanatory, if you want to monitor how many people are clicking through your ad to your website pick that objective, if you want to know how many people are landing on your site and leaving their name and email address, perhaps for a free gift or webinar registration then choose website conversions (please note you will need to use a conversion pixel for this, we’ll get to that later).
If you want more post engagement or page likes then choose those options and so on.
That’s your campaign set up.
Next, you need to create your ad set.
14 www.onlinemarketingaddicts.com
Chapter 5 - Ad Sets
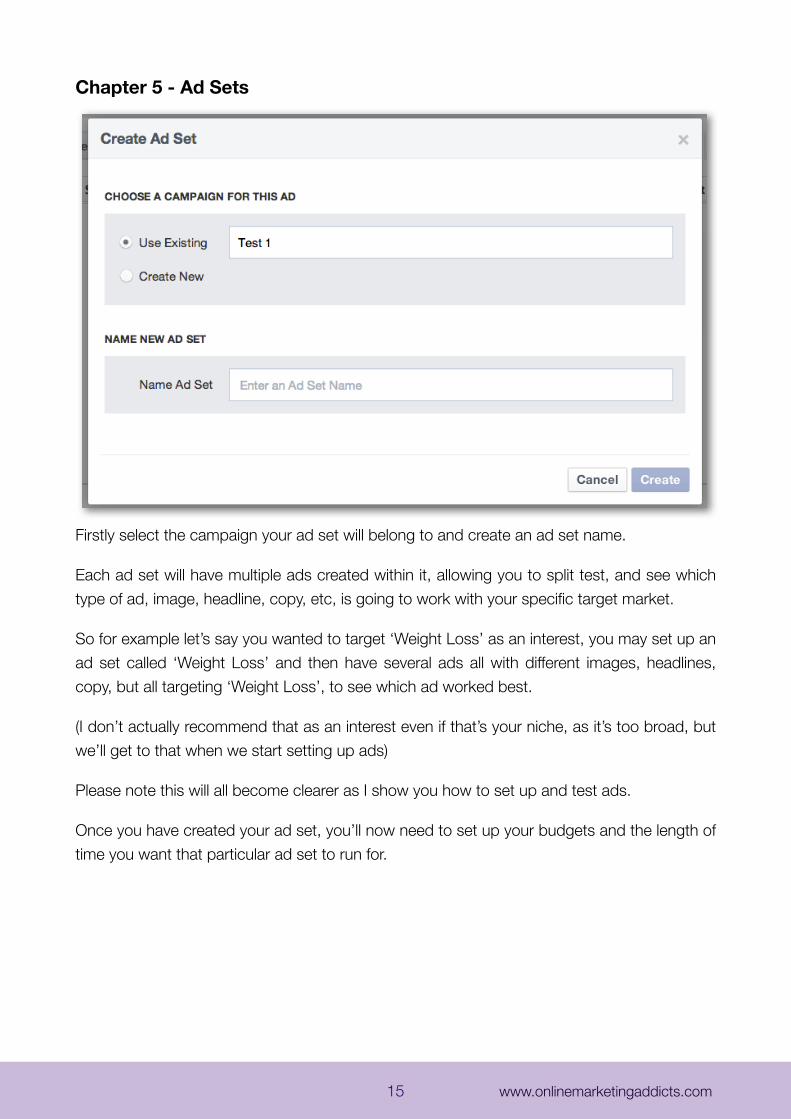
Firstly select the campaign your ad set will belong to and create an ad set name.
Each ad set will have multiple ads created within it, allowing you to split test, and see which type of ad, image, headline, copy, etc, is going to work with your specific target market.
So for example let’s say you wanted to target ‘Weight Loss’ as an interest, you may set up an ad set called ‘Weight Loss’ and then have several ads all with different images, headlines, copy, but all targeting ‘Weight Loss’, to see which ad worked best.
(I don’t actually recommend that as an interest even if that’s your niche, as it’s too broad, but we’ll get to that when we start setting up ads)
Please note this will all become clearer as I show you how to set up and test ads.
Once you have created your ad set, you’ll now need to set up your budgets and the length of time you want that particular ad set to run for.
15 www.onlinemarketingaddicts.com
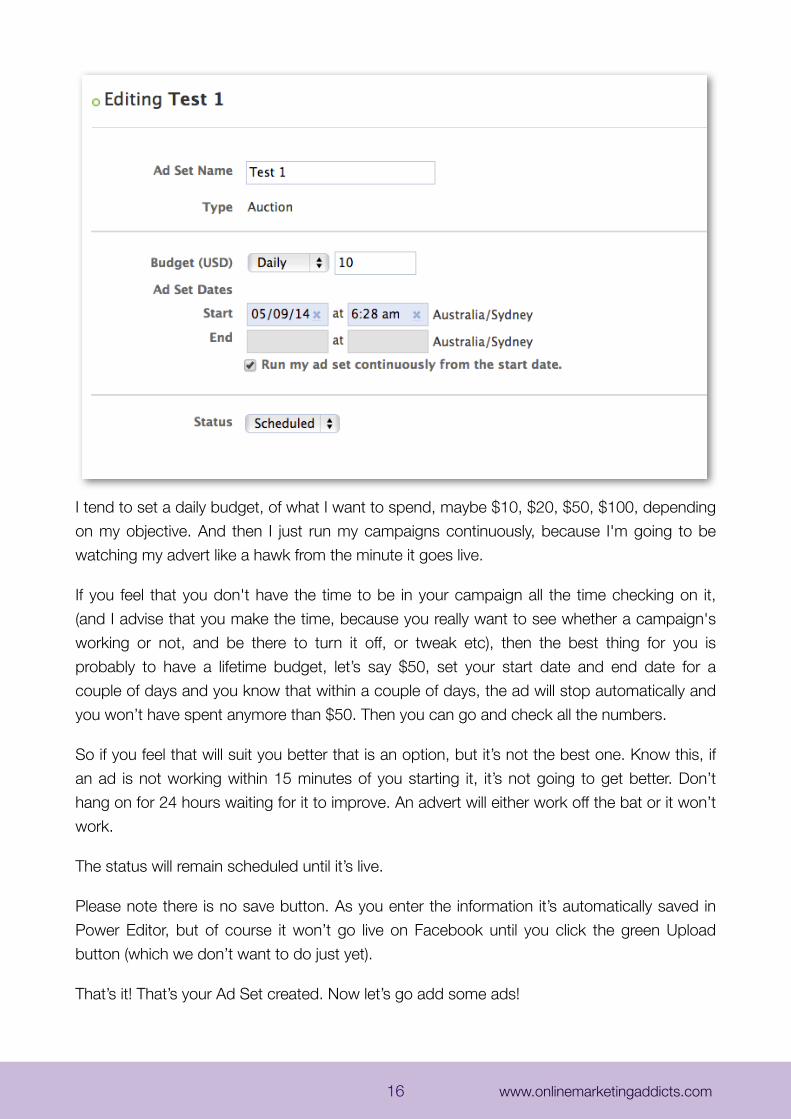
I tend to set a daily budget, of what I want to spend, maybe $10, $20, $50, $100, depending on my objective. And then I just run my campaigns continuously, because I'm going to be watching my advert like a hawk from the minute it goes live.
If you feel that you don't have the time to be in your campaign all the time checking on it, (and I advise that you make the time, because you really want to see whether a campaign's working or not, and be there to turn it off, or tweak etc), then the best thing for you is probably to have a lifetime budget, let’s say $50, set your start date and end date for a couple of days and you know that within a couple of days, the ad will stop automatically and you won’t have spent anymore than $50. Then you can go and check all the numbers.
So if you feel that will suit you better that is an option, but it’s not the best one. Know this, if an ad is not working within 15 minutes of you starting it, it’s not going to get better. Don’t hang on for 24 hours waiting for it to improve. An advert will either work off the bat or it won’t work.
The status will remain scheduled until it’s live.
Please note there is no save button. As you enter the information it’s automatically saved in Power Editor, but of course it won’t go live on Facebook until you click the green Upload button (which we don’t want to do just yet).
That’s it! That’s your Ad Set created. Now let’s go add some ads!
16 www.onlinemarketingaddicts.com
Chapter 5 - Creating an Advert - The Creative
So my objective with this chapter is to show you how to create the simplest and easiest ad possible to get you started.
I’m going to run through what everything means so that you have a general understanding, but if you would like more in depth training on the varying ads you can create, plus creating compelling headlines, images, copy, split testing, how to use precise targeting etc, then I do recommend you purchase my Facebook Domination course which not only gives you comprehensive ads training, but also a total Facebook experience including how to use pages, your profile, groups, creating communities, sales funnels. Basically everything and anything to do with using Facebook to grow your business.
You can see further details here - Facebook Domination
But for now, let’s create an ad!
Firstly click on the Ads button, then click on ‘Create Ad’ on the top left of this screen.
17 www.onlinemarketingaddicts.com
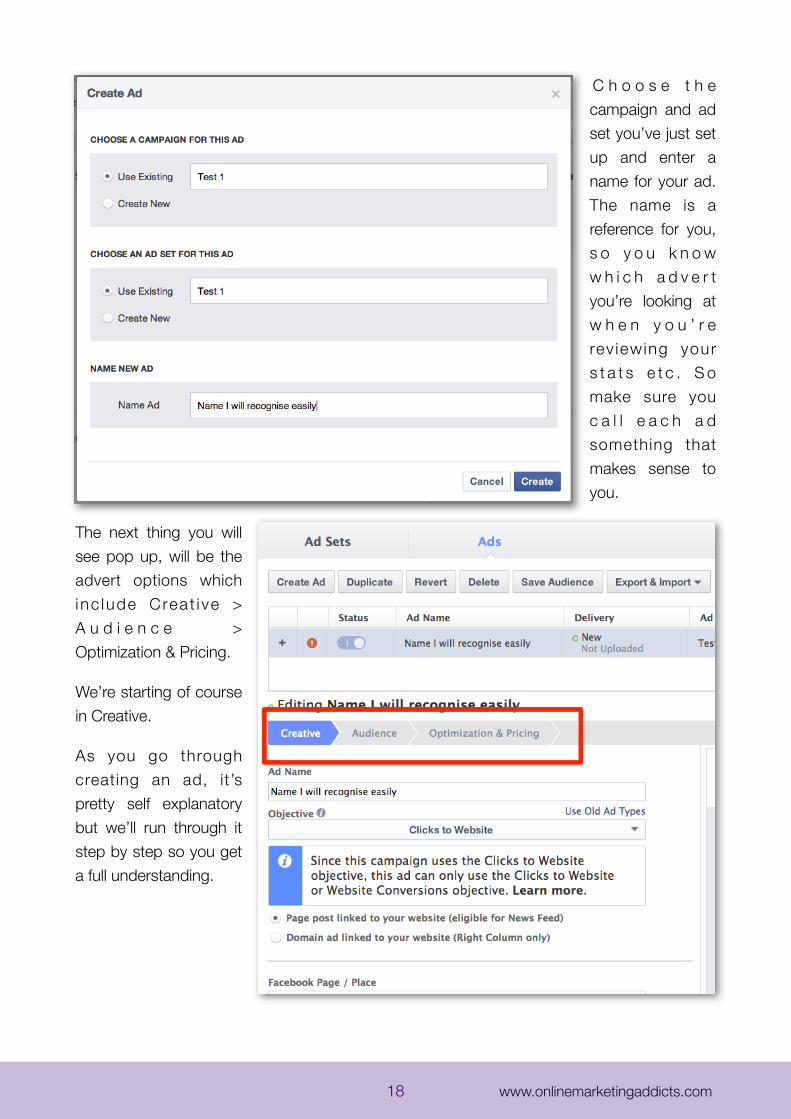
C h o o s e t h e campaign and ad set you’ve just set up and enter a name for your ad. The name is a reference for you, s o y o u k n o w w h i c h a d v e r t you’re looking at w h e n y o u ’ r e rev iewing your s t a t s e t c . S o make sure you c a l l e a c h a d something that makes sense to you.
The next thing you will see pop up, will be the advert options which i nc lude Crea t i ve > A u d i e n c e > Optimization & Pricing.
We’re starting of course in Creative.
As you go through creating an ad, it’s pretty self explanatory but we’ll run through it step by step so you get a full understanding.
18 www.onlinemarketingaddicts.com
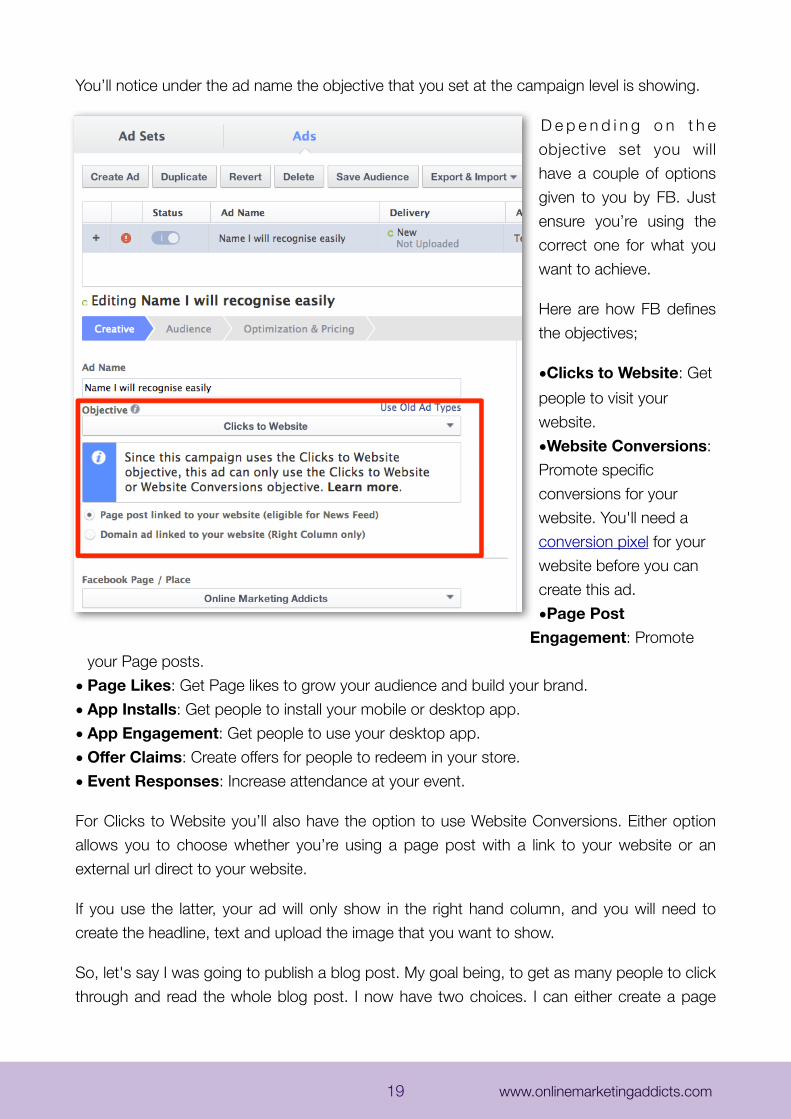
You’ll notice under the ad name the objective that you set at the campaign level is showing.
D e p e n d i n g o n t h e objective set you will have a couple of options given to you by FB. Just ensure you’re using the correct one for what you want to achieve.
Here are how FB defines the objectives;
•Clicks to Website: Get people to visit your website.•Website Conversions: Promote specific conversions for your website. You'll need a conversion pixel for your website before you can create this ad.•Page Post
Engagement: Promote your Page posts.
• Page Likes: Get Page likes to grow your audience and build your brand.• App Installs: Get people to install your mobile or desktop app.• App Engagement: Get people to use your desktop app.• Offer Claims: Create offers for people to redeem in your store.• Event Responses: Increase attendance at your event.
For Clicks to Website you’ll also have the option to use Website Conversions. Either option allows you to choose whether you’re using a page post with a link to your website or an external url direct to your website.
If you use the latter, your ad will only show in the right hand column, and you will need to create the headline, text and upload the image that you want to show.
So, let's say I was going to publish a blog post. My goal being, to get as many people to click through and read the whole blog post. I now have two choices. I can either create a page
19 www.onlinemarketingaddicts.com
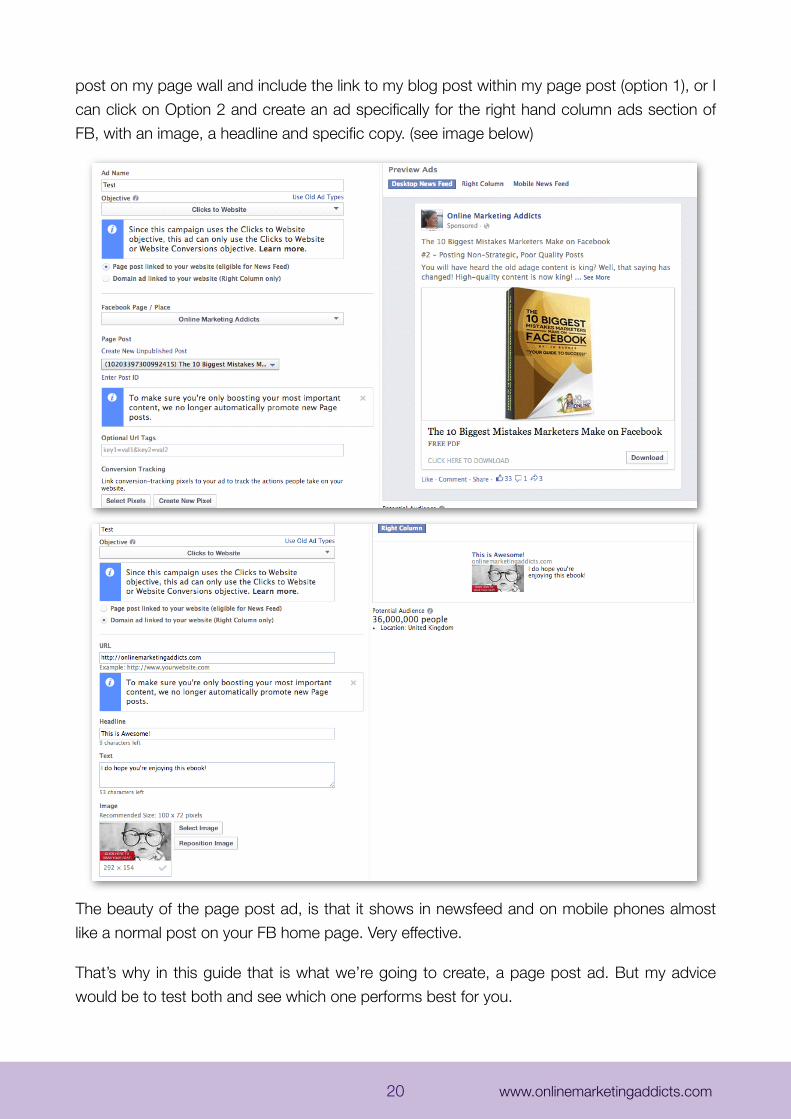
post on my page wall and include the link to my blog post within my page post (option 1), or I can click on Option 2 and create an ad specifically for the right hand column ads section of FB, with an image, a headline and specific copy. (see image below)
The beauty of the page post ad, is that it shows in newsfeed and on mobile phones almost like a normal post on your FB home page. Very effective.
That’s why in this guide that is what we’re going to create, a page post ad. But my advice would be to test both and see which one performs best for you.
20 www.onlinemarketingaddicts.com
But before we get into creating your page post ad, let’s just have a quick look at some of the other option based on objectives.
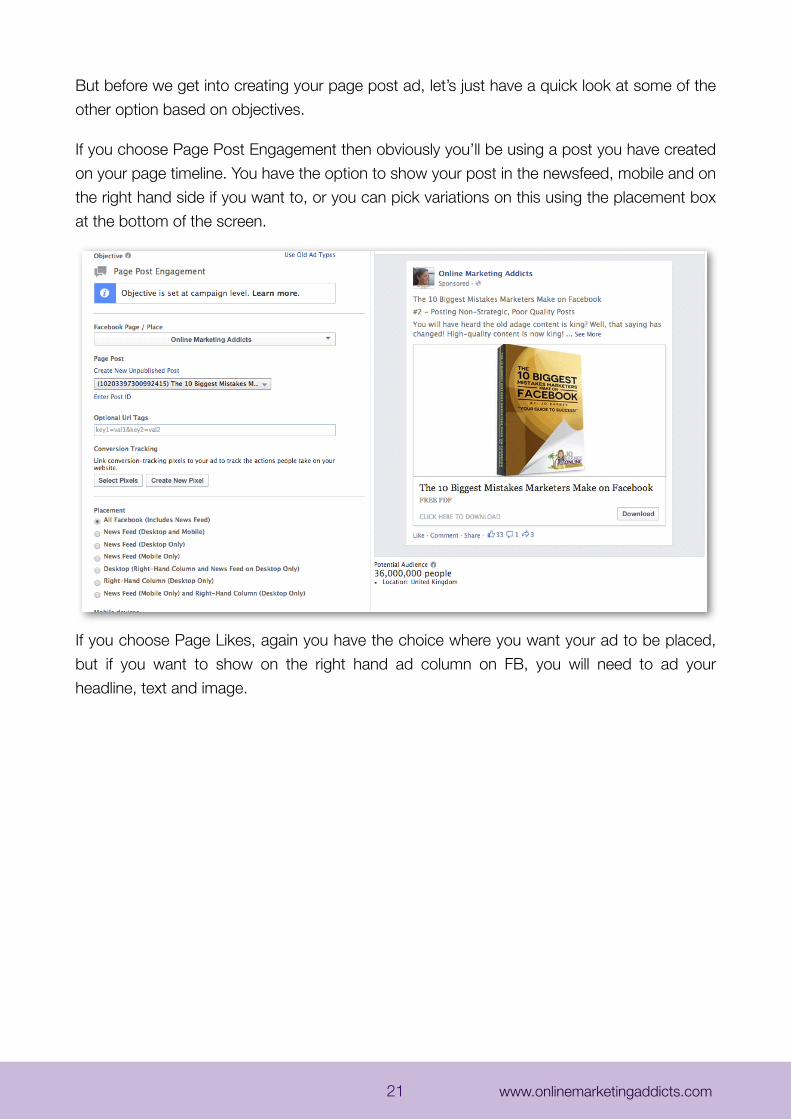
If you choose Page Post Engagement then obviously you’ll be using a post you have created on your page timeline. You have the option to show your post in the newsfeed, mobile and on the right hand side if you want to, or you can pick variations on this using the placement box at the bottom of the screen.
If you choose Page Likes, again you have the choice where you want your ad to be placed, but if you want to show on the right hand ad column on FB, you will need to ad your headline, text and image.
21 www.onlinemarketingaddicts.com

Also within page likes you have the option of deciding where people will go when they click on the ad.
If you click on the dropdown box under Landing View, you can choose where they’ll land, so if you have a specific tab that you’d like them to go to, here’s where you can set that.
It’s pretty much the same for app installs, app engagement, offer claims etc. If you actually go
22 www.onlinemarketingaddicts.com
through each one and click on the different options then you can see exactly what is shown to the viewer and / or if you need to add any more information etc.
The most important thing to remember when creating your ads and considering the objectives is to ensure the ad you create is relevant to the objective. For instance if your goal is to get more page likes, there’s no point in setting up an ad for page post engagement and being disappointed you didn’t get many page likes.
If your objective is website clicks then make sure you’re encouraging people to click! Use the objectives as pointers on how to set your ad up.
OK, let’s set up the easiest ad possible!
Chapter 6 - Creating a Basic Page Post Ad That Increases Traffic to Your Website
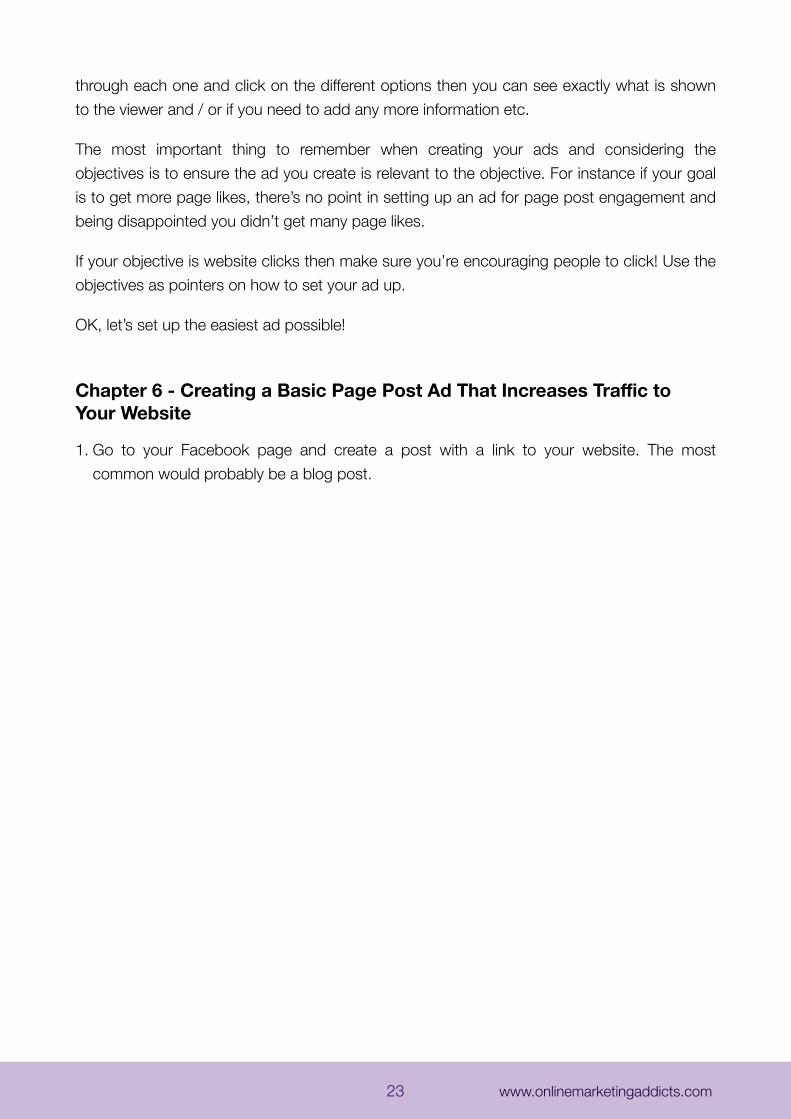
1. Go to your Facebook page and create a post with a link to your website. The most common would probably be a blog post.
23 www.onlinemarketingaddicts.com
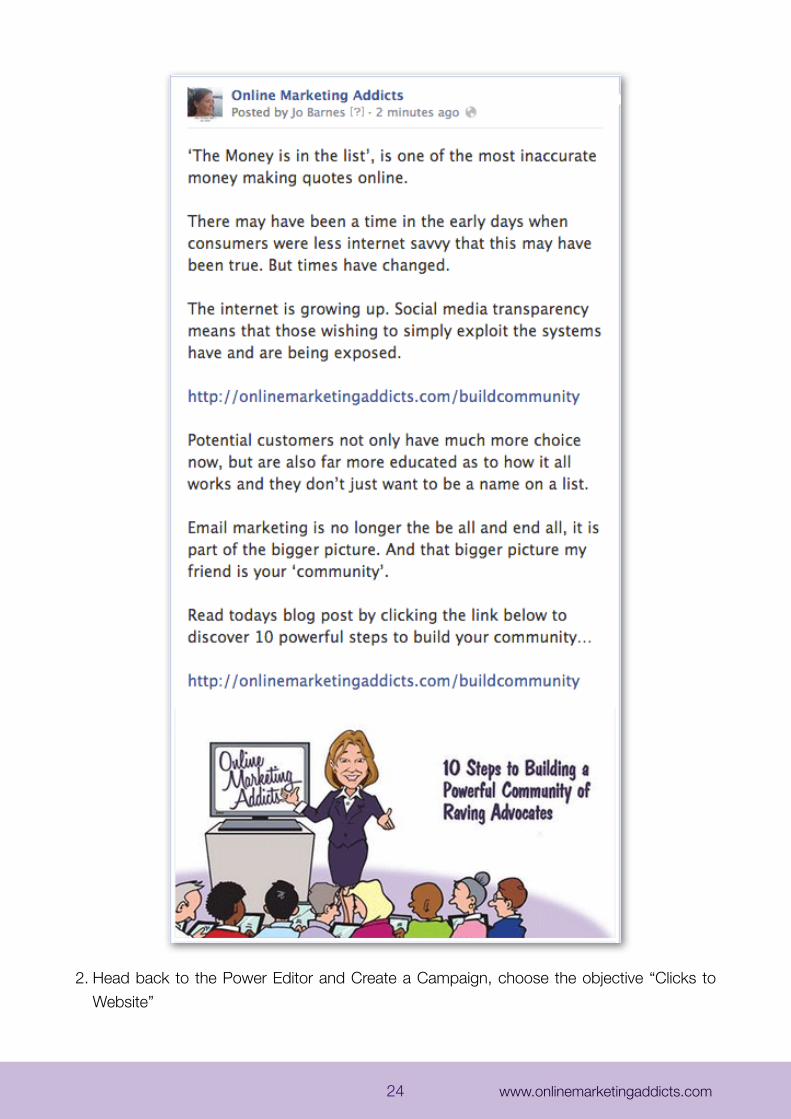
2. Head back to the Power Editor and Create a Campaign, choose the objective “Clicks to Website”
24 www.onlinemarketingaddicts.com
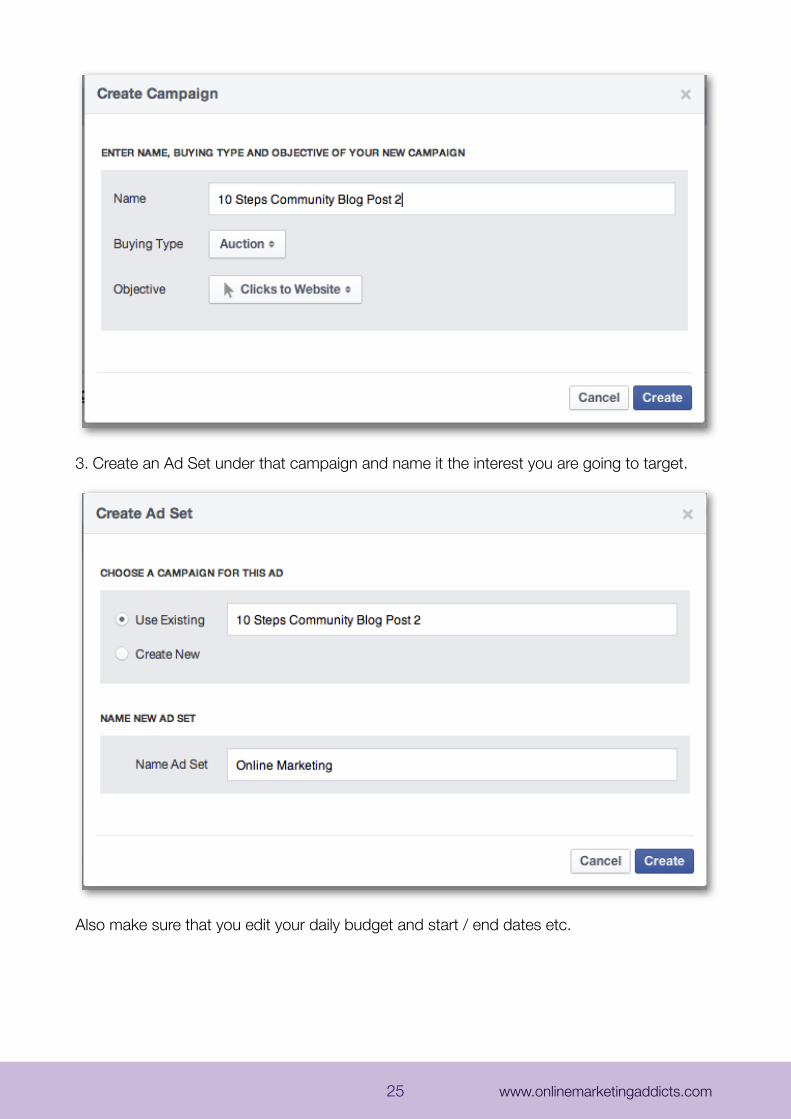
3. Create an Ad Set under that campaign and name it the interest you are going to target.
Also make sure that you edit your daily budget and start / end dates etc.
25 www.onlinemarketingaddicts.com
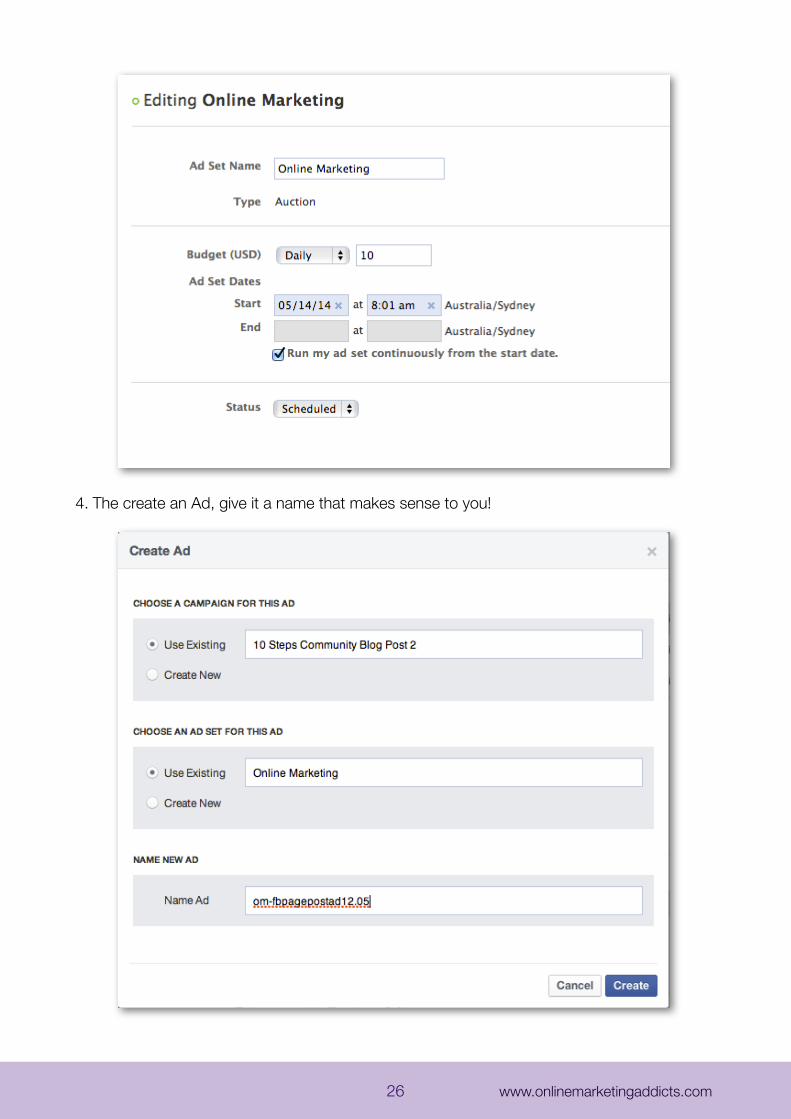
4. The create an Ad, give it a name that makes sense to you!
26 www.onlinemarketingaddicts.com
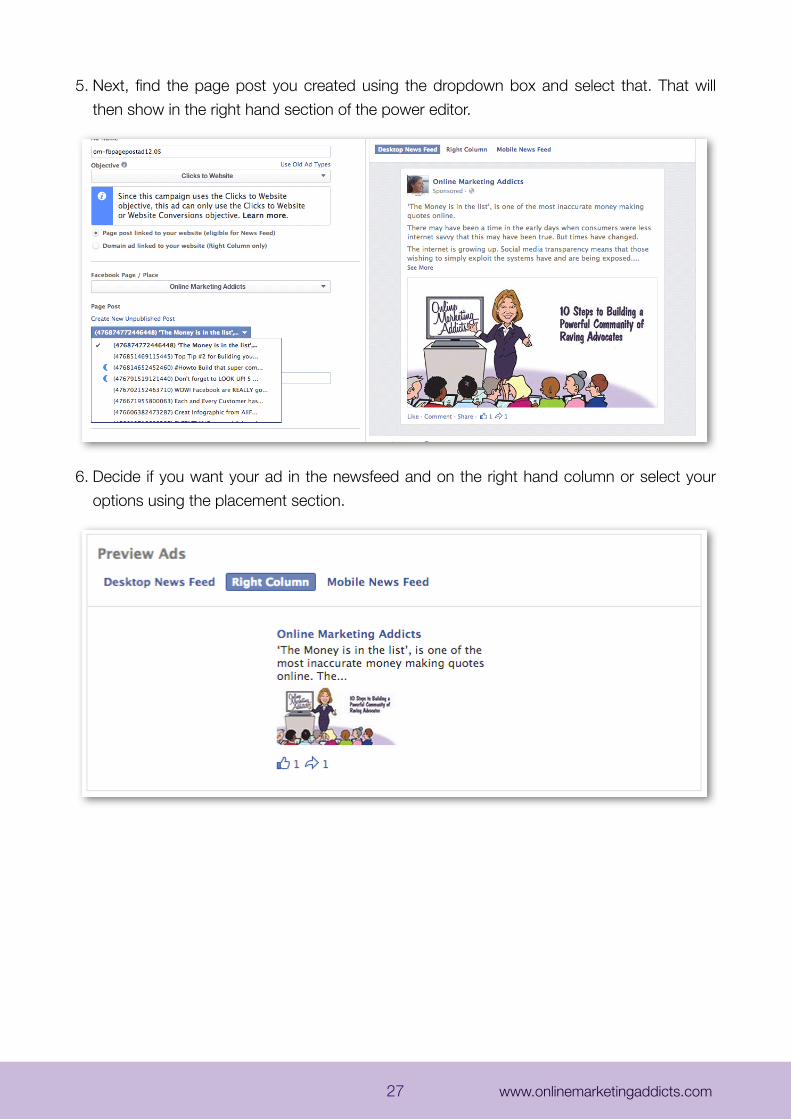
5. Next, find the page post you created using the dropdown box and select that. That will then show in the right hand section of the power editor.
6. Decide if you want your ad in the newsfeed and on the right hand column or select your options using the placement section.
27 www.onlinemarketingaddicts.com
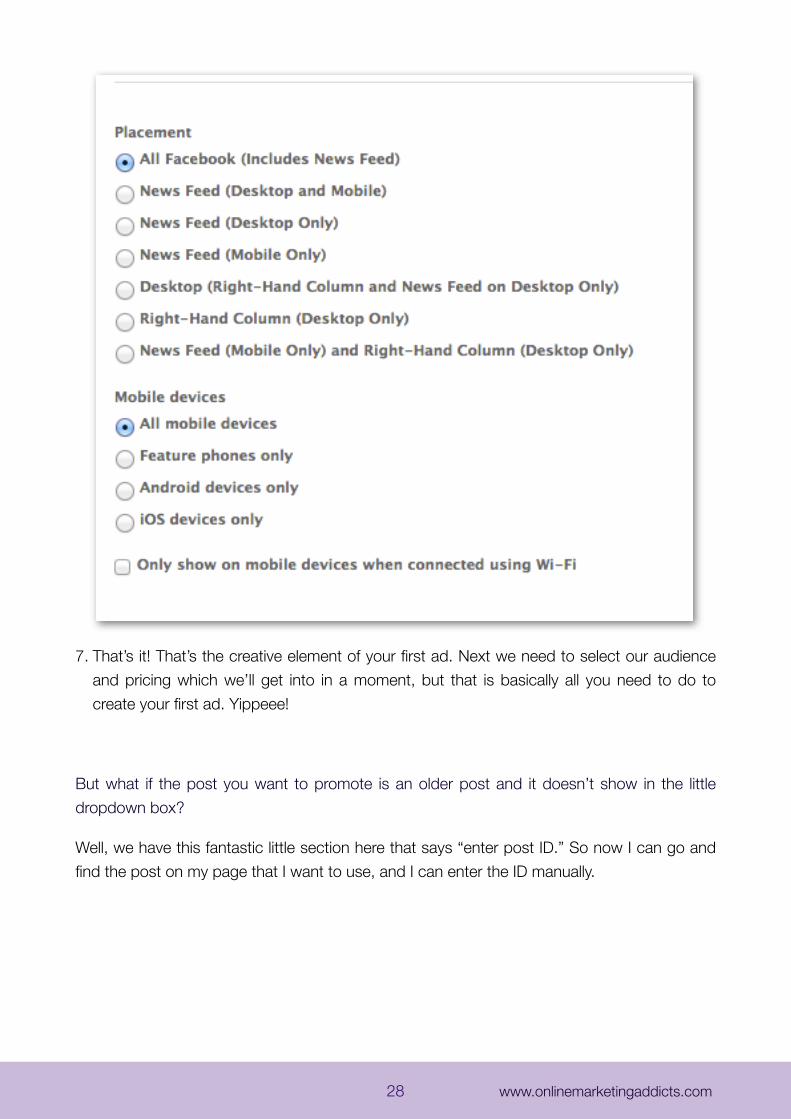
7. That’s it! That’s the creative element of your first ad. Next we need to select our audience and pricing which we’ll get into in a moment, but that is basically all you need to do to create your first ad. Yippeee!
But what if the post you want to promote is an older post and it doesn’t show in the little dropdown box?
Well, we have this fantastic little section here that says “enter post ID.” So now I can go and find the post on my page that I want to use, and I can enter the ID manually.
28 www.onlinemarketingaddicts.com
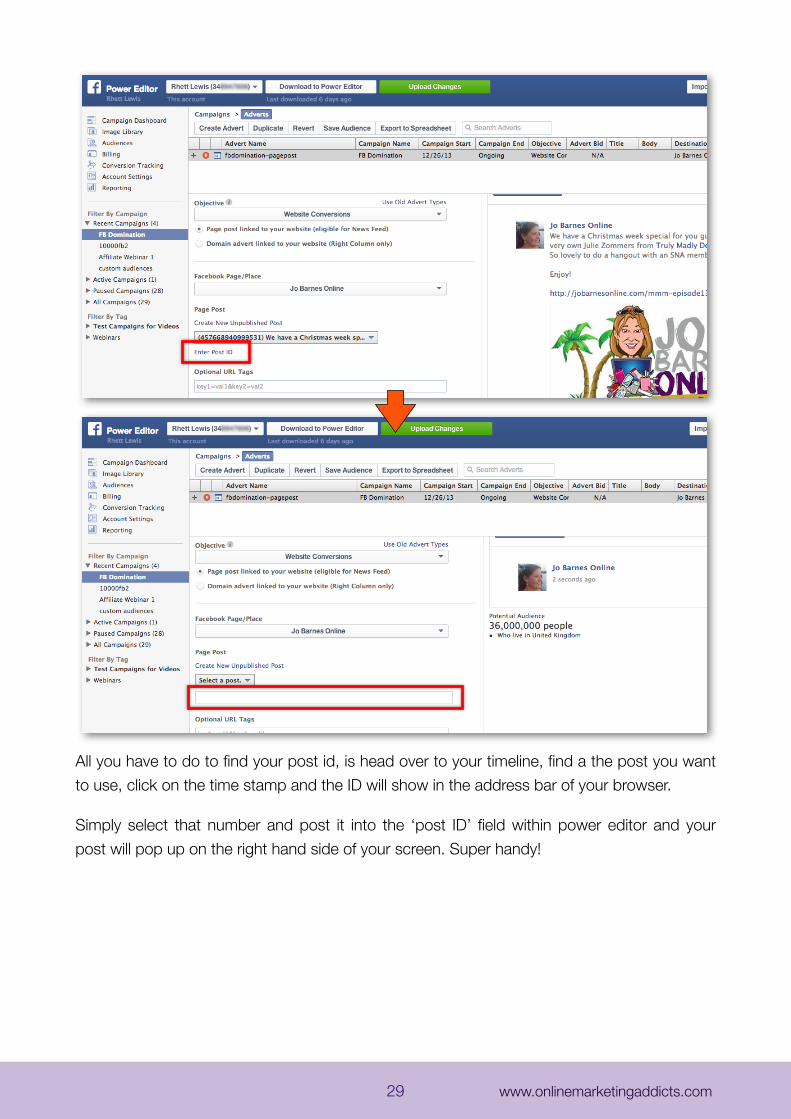
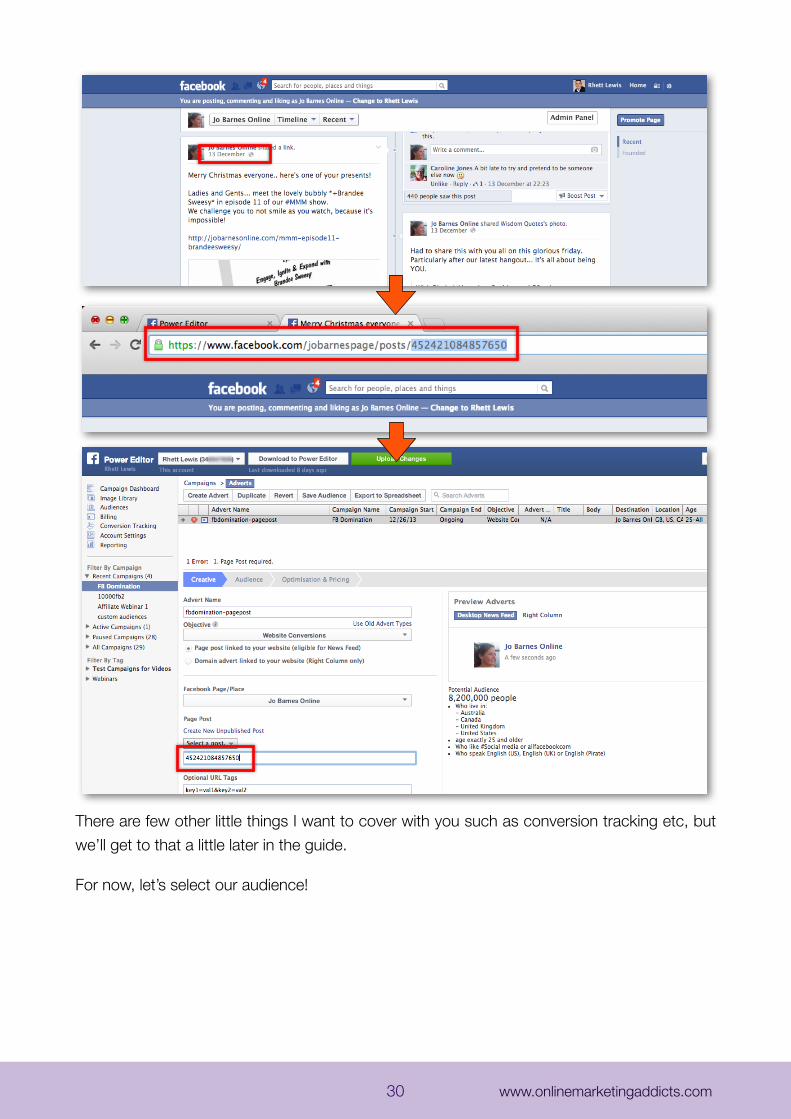
All you have to do to find your post id, is head over to your timeline, find a the post you want to use, click on the time stamp and the ID will show in the address bar of your browser.
Simply select that number and post it into the ‘post ID’ field within power editor and your post will pop up on the right hand side of your screen. Super handy!
29 www.onlinemarketingaddicts.com
There are few other little things I want to cover with you such as conversion tracking etc, but we’ll get to that a little later in the guide.
For now, let’s select our audience!
30 www.onlinemarketingaddicts.com
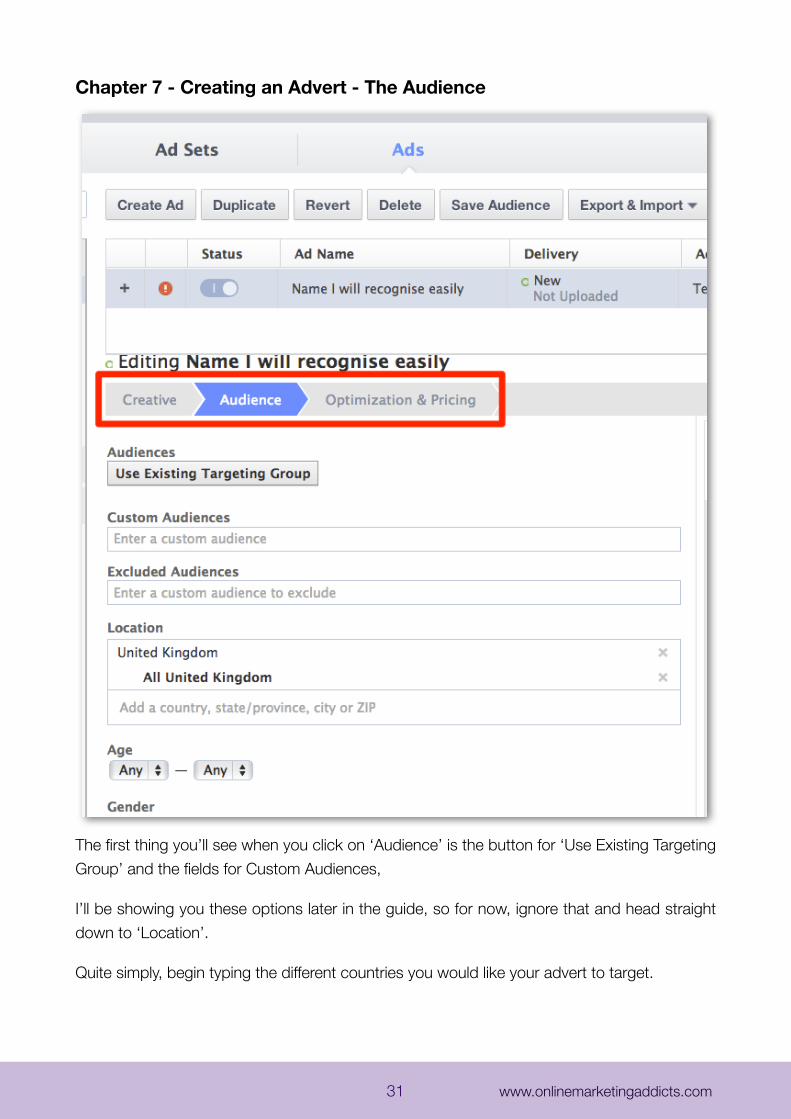
Chapter 7 - Creating an Advert - The Audience
The first thing you’ll see when you click on ‘Audience’ is the button for ‘Use Existing Targeting Group’ and the fields for Custom Audiences,
I’ll be showing you these options later in the guide, so for now, ignore that and head straight down to ‘Location’.
Quite simply, begin typing the different countries you would like your advert to target.
31 www.onlinemarketingaddicts.com
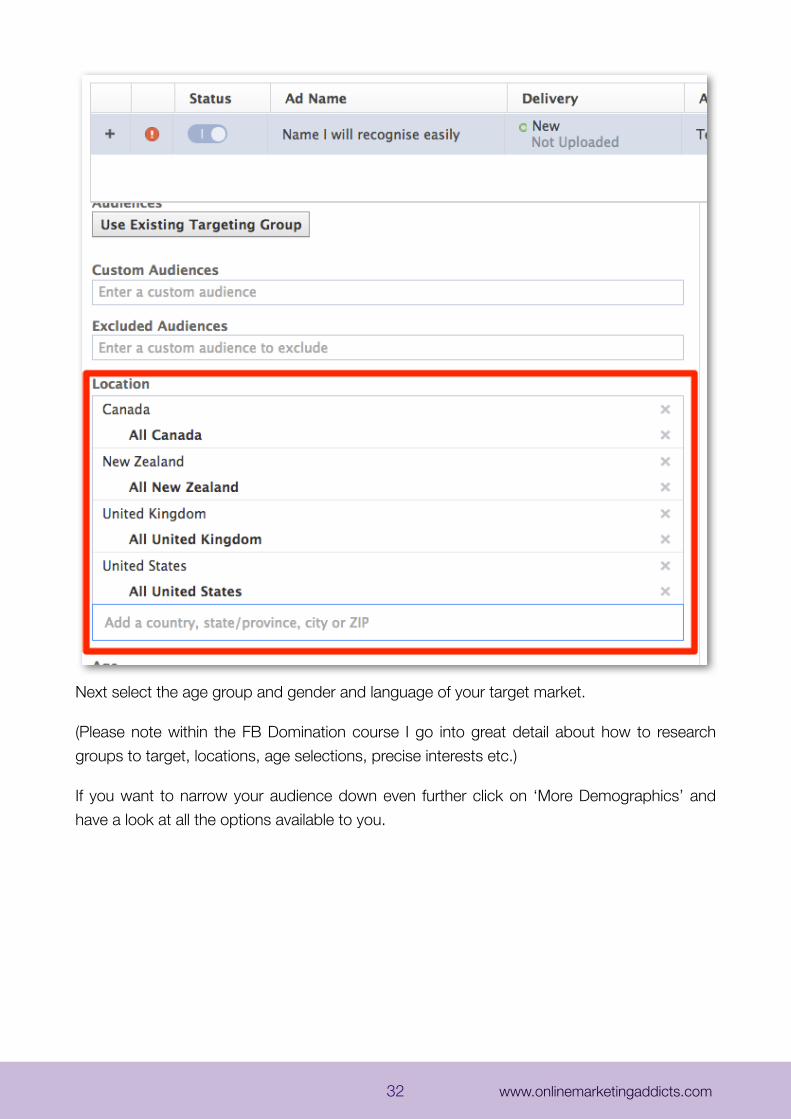
Next select the age group and gender and language of your target market.
(Please note within the FB Domination course I go into great detail about how to research groups to target, locations, age selections, precise interests etc.)
If you want to narrow your audience down even further click on ‘More Demographics’ and have a look at all the options available to you.
32 www.onlinemarketingaddicts.com
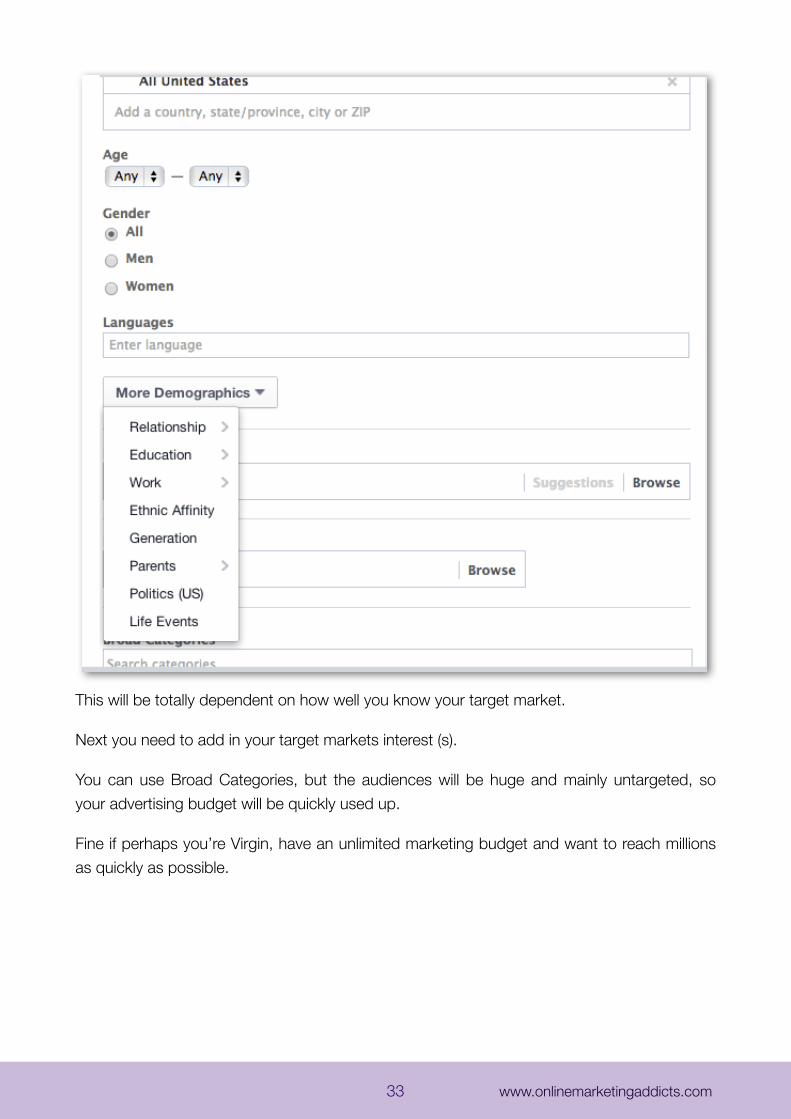
This will be totally dependent on how well you know your target market.
Next you need to add in your target markets interest (s).
You can use Broad Categories, but the audiences will be huge and mainly untargeted, so your advertising budget will be quickly used up.
Fine if perhaps you’re Virgin, have an unlimited marketing budget and want to reach millions as quickly as possible.
33 www.onlinemarketingaddicts.com
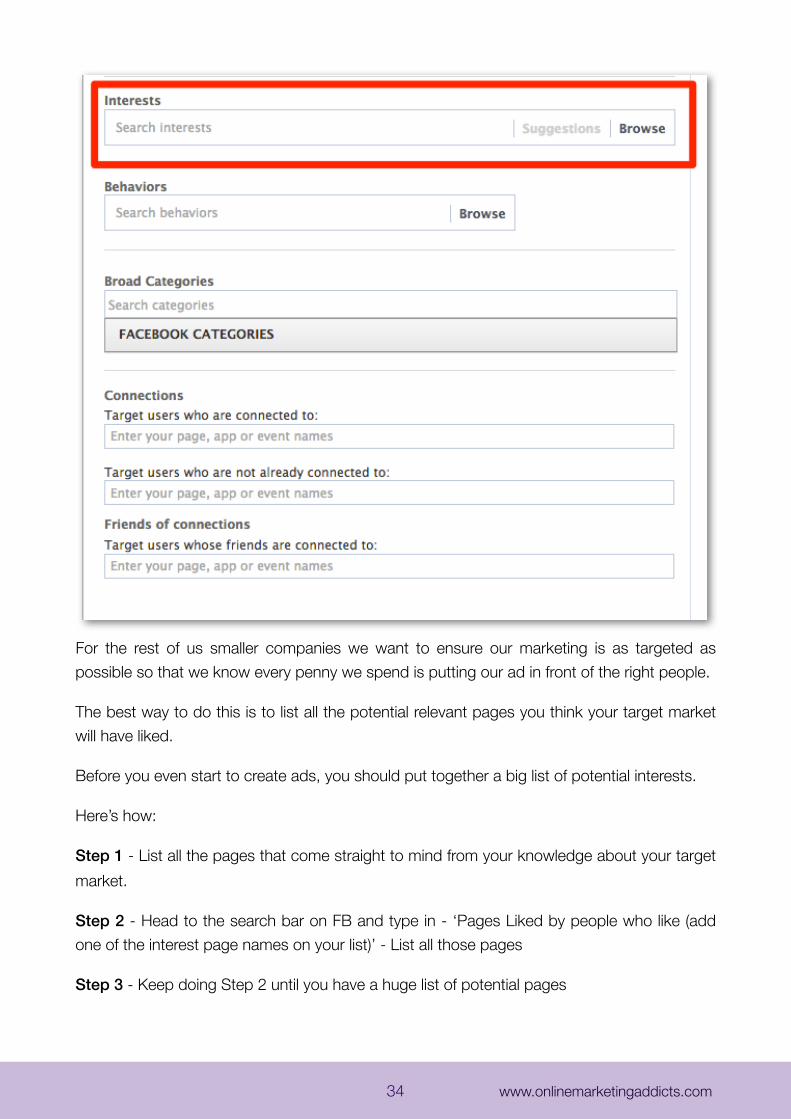
For the rest of us smaller companies we want to ensure our marketing is as targeted as possible so that we know every penny we spend is putting our ad in front of the right people.
The best way to do this is to list all the potential relevant pages you think your target market will have liked.
Before you even start to create ads, you should put together a big list of potential interests.
Here’s how:
Step 1 - List all the pages that come straight to mind from your knowledge about your target market.
Step 2 - Head to the search bar on FB and type in - ‘Pages Liked by people who like (add one of the interest page names on your list)’ - List all those pages
Step 3 - Keep doing Step 2 until you have a huge list of potential pages
34 www.onlinemarketingaddicts.com
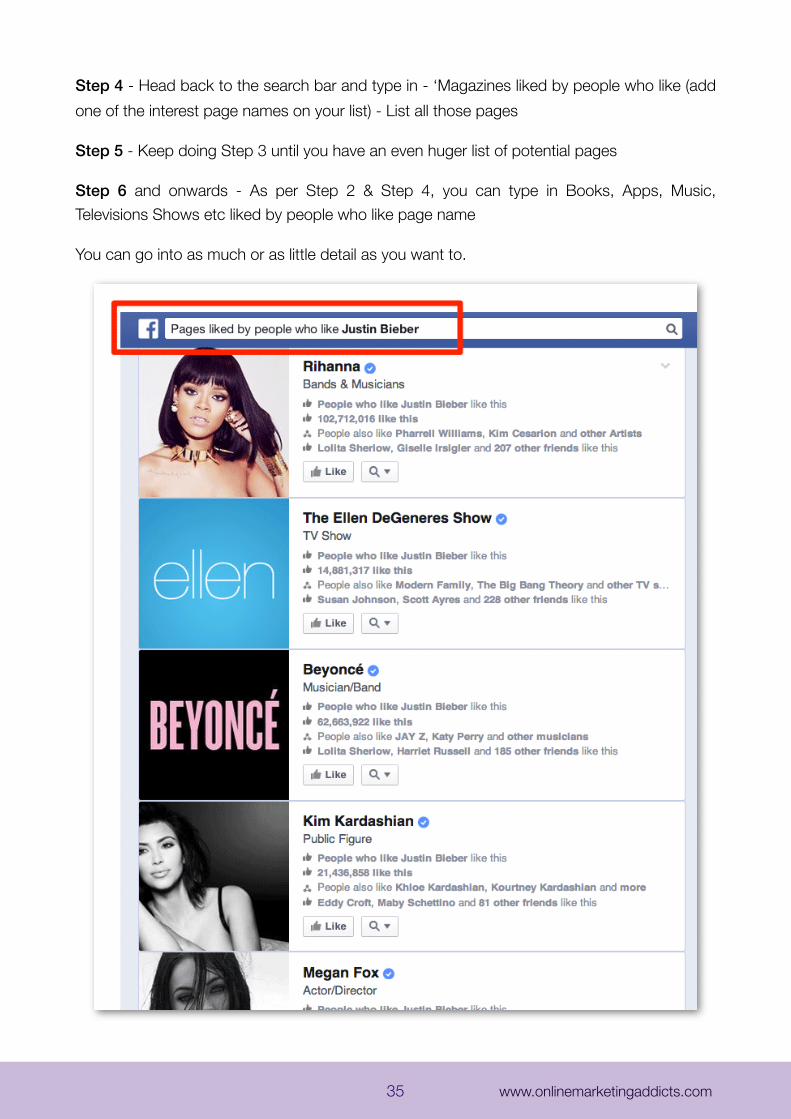
Step 4 - Head back to the search bar and type in - ‘Magazines liked by people who like (add one of the interest page names on your list) - List all those pages
Step 5 - Keep doing Step 3 until you have an even huger list of potential pages
Step 6 and onwards - As per Step 2 & Step 4, you can type in Books, Apps, Music, Televisions Shows etc liked by people who like page name
You can go into as much or as little detail as you want to.
35 www.onlinemarketingaddicts.com
When you head back to power editor and begin to enter the page names please note a couple of things:
1. Use one interest at a time.
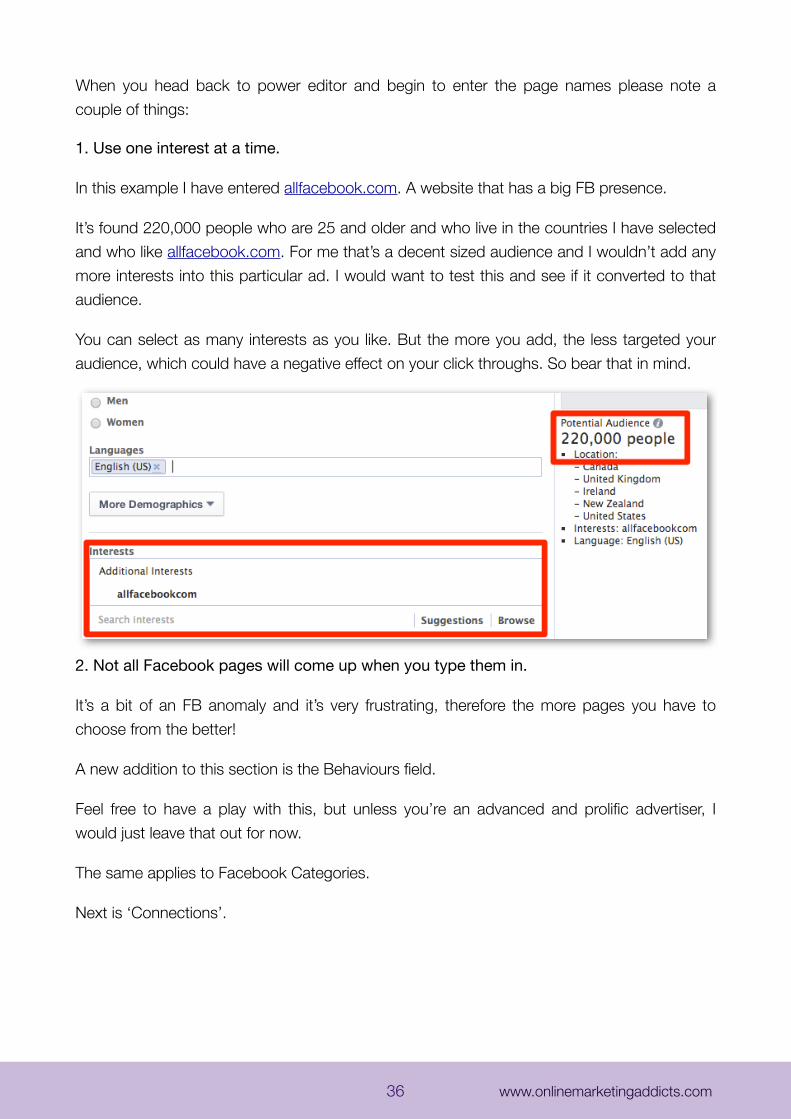
In this example I have entered allfacebook.com. A website that has a big FB presence.
It’s found 220,000 people who are 25 and older and who live in the countries I have selected and who like allfacebook.com. For me that’s a decent sized audience and I wouldn’t add any more interests into this particular ad. I would want to test this and see if it converted to that audience.
You can select as many interests as you like. But the more you add, the less targeted your audience, which could have a negative effect on your click throughs. So bear that in mind.
2. Not all Facebook pages will come up when you type them in.
It’s a bit of an FB anomaly and it’s very frustrating, therefore the more pages you have to choose from the better!
A new addition to this section is the Behaviours field.
Feel free to have a play with this, but unless you’re an advanced and prolific advertiser, I would just leave that out for now.
The same applies to Facebook Categories.
Next is ‘Connections’.
36 www.onlinemarketingaddicts.com
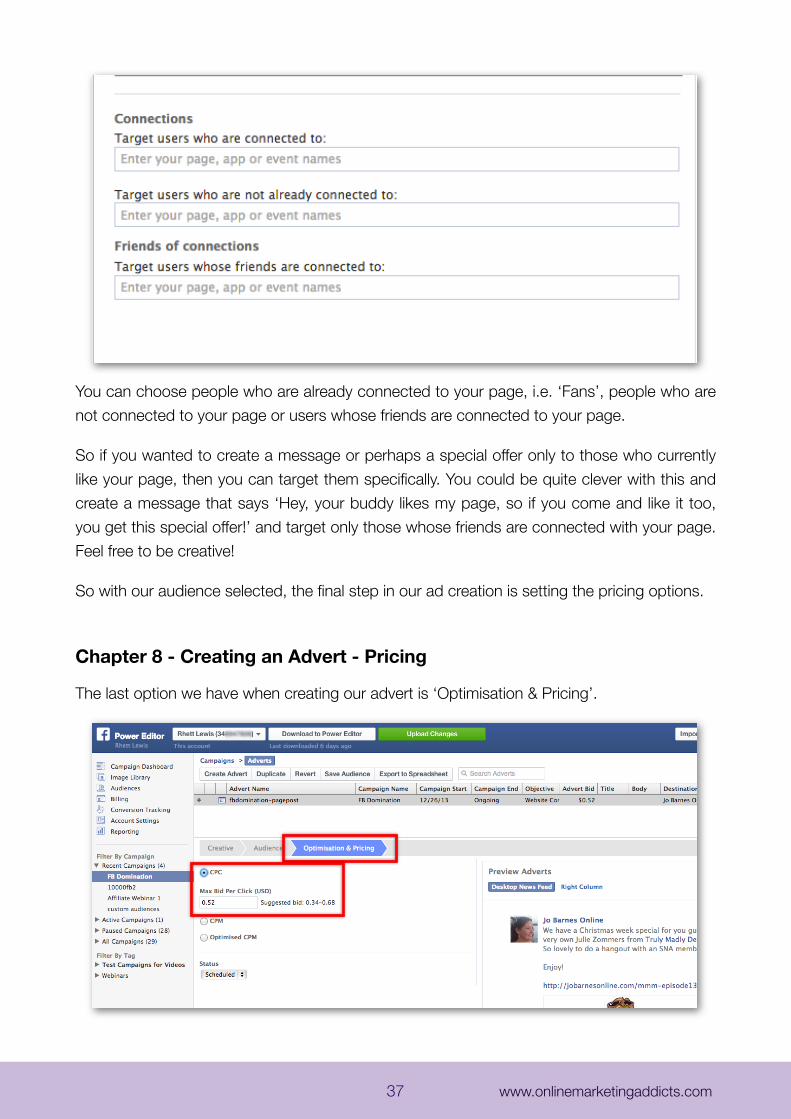
You can choose people who are already connected to your page, i.e. ‘Fans’, people who are not connected to your page or users whose friends are connected to your page.
So if you wanted to create a message or perhaps a special offer only to those who currently like your page, then you can target them specifically. You could be quite clever with this and create a message that says ‘Hey, your buddy likes my page, so if you come and like it too, you get this special offer!’ and target only those whose friends are connected with your page. Feel free to be creative!
So with our audience selected, the final step in our ad creation is setting the pricing options.
Chapter 8 - Creating an Advert - Pricing
The last option we have when creating our advert is ‘Optimisation & Pricing’.
37 www.onlinemarketingaddicts.com

Within Optimisation & Pricing, you have three options;
• CPC• CPM• Optimised CPM
CPC means cost per click. It's similar to the way PPC advertising works on Google. You’re basically telling Facebook that you’ll pay a price for each click that your ad gets.
No matter the action that’s taken after someone clicks, you will pay a set price per click.
CPM literally stands for ‘cost per mille’ (mille is Latin for thousand), so cost per thousand impressions. In other words, you will pay a price for every 1000 times your advert is viewed.
Optimised CPM has it’s own set of options.
Firstly you can let Facebook take care of it by clicking on ‘Use default bids (recommended)’
This means that Facebook will set a bid price for you (based on your budget), to ‘enable your advert to be shown to the most target audiences’ (Facebooks words).
38 www.onlinemarketingaddicts.com
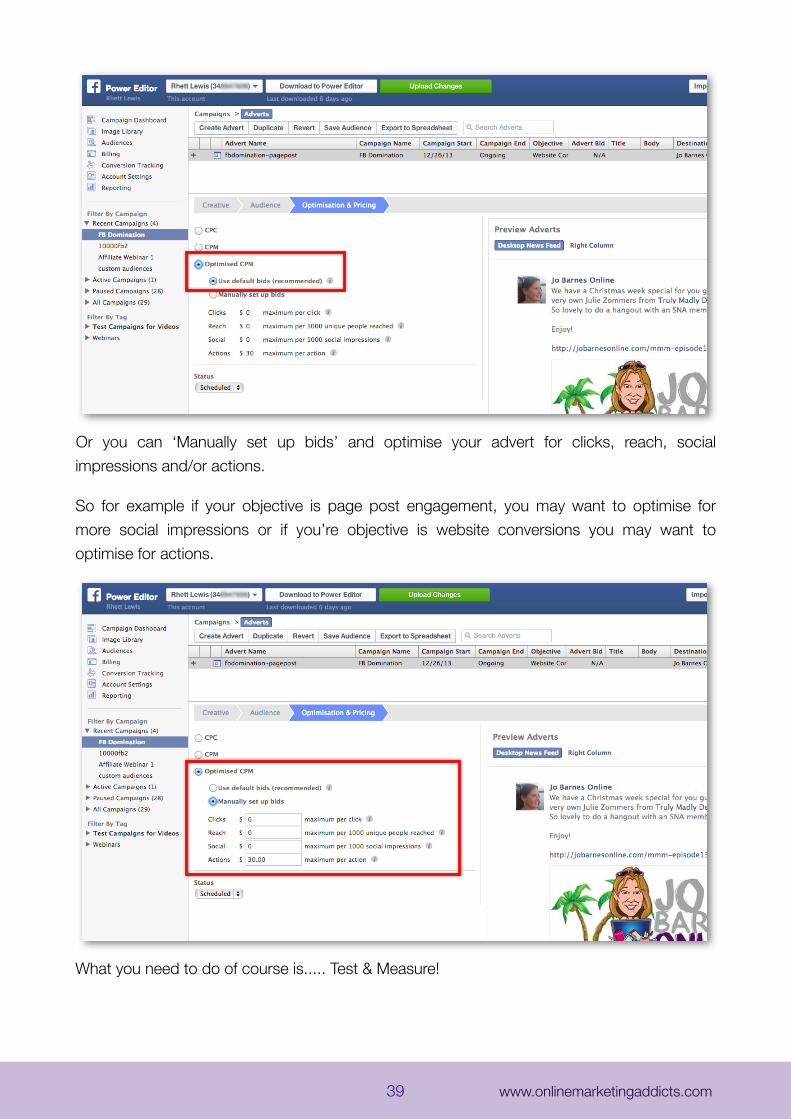
Or you can ‘Manually set up bids’ and optimise your advert for clicks, reach, social impressions and/or actions.
So for example if your objective is page post engagement, you may want to optimise for more social impressions or if you’re objective is website conversions you may want to optimise for actions.
What you need to do of course is..... Test & Measure!
39 www.onlinemarketingaddicts.com
Try them out. For example you could set up 3 ads all completely the same, except one is CPC, the second is CPM and the third is Optimised CPM and then see which one gives you the best results.
I have to say recently, I have had my best results with the optimised CPM and leaving it up to FB. So I’m tending to use that more often at the moment. But my results may be totally different from yours, so do try all of them.
CONGRATULATIONS! That’s your advert all set up! The only thing left to do is to click the Upload Changes button and sit back and wait for Facebook to approve your ad!
If your advert is not approved, it means that somewhere along the lines it does not meet Facebooks guidelines, which you can see here - https://www.facebook.com/ad_guidelines.php
Please remember to look at your advert AND where people land after they have clicked your advert. If FB don’t like the landing page, your advert will not be approved.
Ok so now we have you up and running with actually creating ads, let’s have a look at some more tips and tricks to make using the Power Editor, quicker, easier and more effectively!
Chapter 9 - Managing Your Adverts
In this chapter I want to show you five super cool things you can do to manage and speed up creating ads and campaigns.
1. Duplicating Ads & Campaigns
2. Activating and Deactivating Ads
3. Bulk Importing Ads & Photos
4. Laying Out Your Page
1. Firstly, whether you’re in the campaign screen, the ad set screen or the ad screen you’ll see a button with 2 overlapping boxes next to the + button.
40 www.onlinemarketingaddicts.com
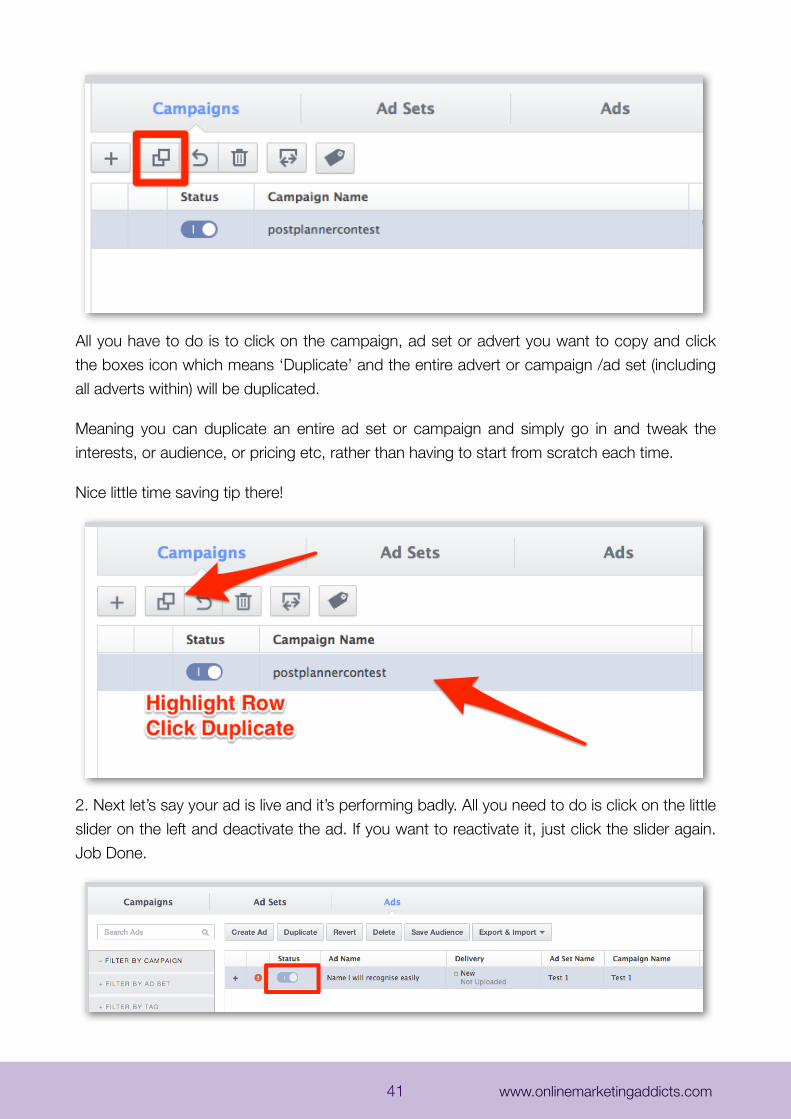
All you have to do is to click on the campaign, ad set or advert you want to copy and click the boxes icon which means ‘Duplicate’ and the entire advert or campaign /ad set (including all adverts within) will be duplicated.
Meaning you can duplicate an entire ad set or campaign and simply go in and tweak the interests, or audience, or pricing etc, rather than having to start from scratch each time.
Nice little time saving tip there!
2. Next let’s say your ad is live and it’s performing badly. All you need to do is click on the little slider on the left and deactivate the ad. If you want to reactivate it, just click the slider again. Job Done.
41 www.onlinemarketingaddicts.com
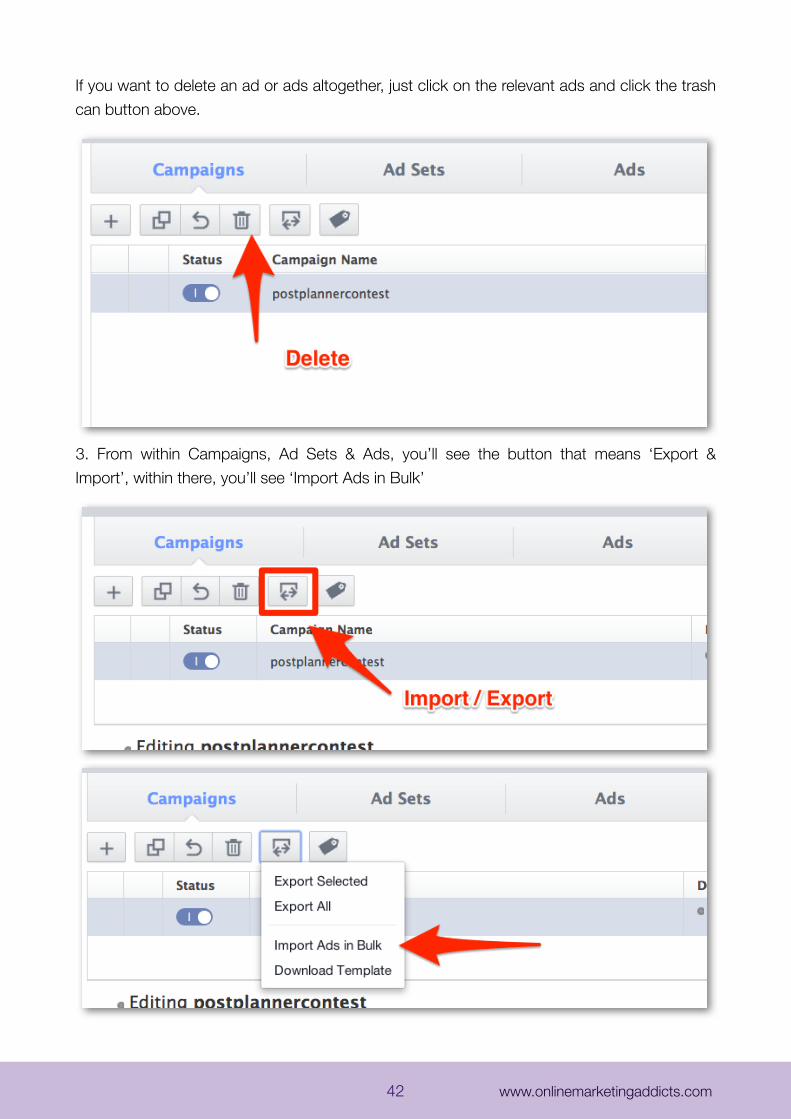
If you want to delete an ad or ads altogether, just click on the relevant ads and click the trash can button above.
3. From within Campaigns, Ad Sets & Ads, you’ll see the button that means ‘Export & Import’, within there, you’ll see ‘Import Ads in Bulk’
42 www.onlinemarketingaddicts.com
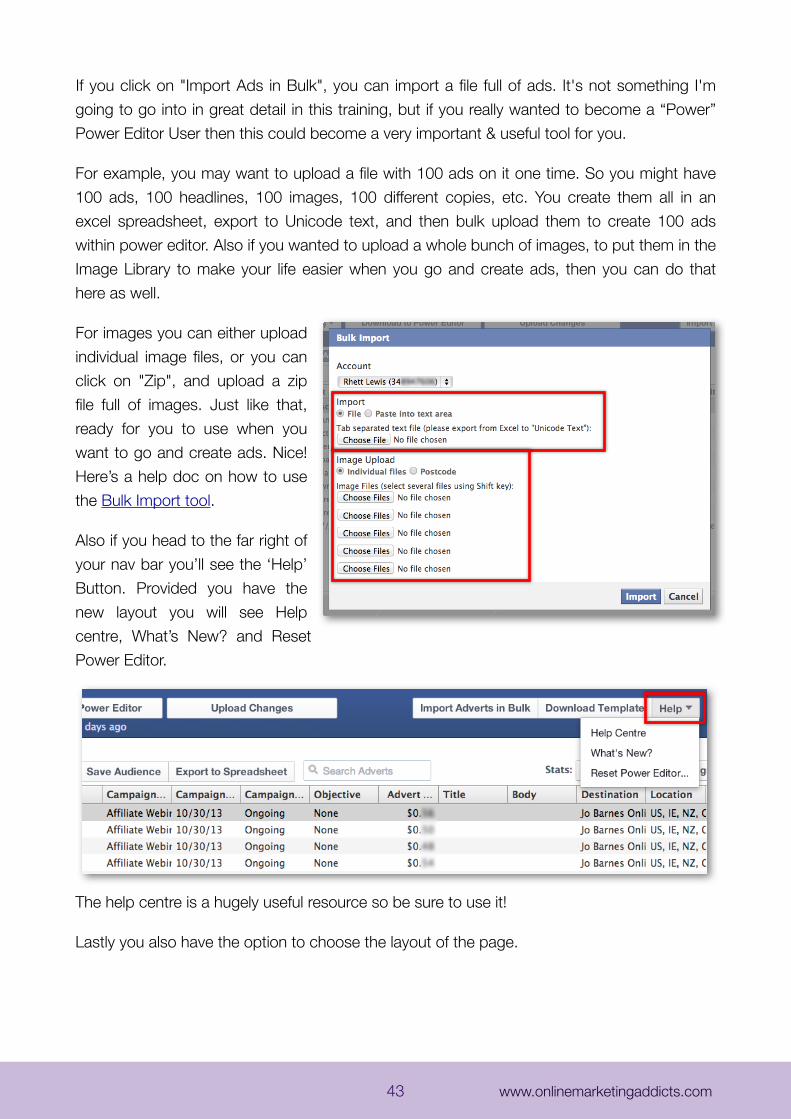
If you click on "Import Ads in Bulk", you can import a file full of ads. It's not something I'm going to go into in great detail in this training, but if you really wanted to become a “Power” Power Editor User then this could become a very important & useful tool for you.
For example, you may want to upload a file with 100 ads on it one time. So you might have 100 ads, 100 headlines, 100 images, 100 different copies, etc. You create them all in an excel spreadsheet, export to Unicode text, and then bulk upload them to create 100 ads within power editor. Also if you wanted to upload a whole bunch of images, to put them in the Image Library to make your life easier when you go and create ads, then you can do that here as well.
For images you can either upload individual image files, or you can click on "Zip", and upload a zip file full of images. Just like that, ready for you to use when you want to go and create ads. Nice! Here’s a help doc on how to use the Bulk Import tool.
Also if you head to the far right of your nav bar you’ll see the ‘Help’ Button. Provided you have the new layout you will see Help centre, What’s New? and Reset Power Editor.
The help centre is a hugely useful resource so be sure to use it!
Lastly you also have the option to choose the layout of the page.
43 www.onlinemarketingaddicts.com

Over on the far right of either your Ad Sets or Ads you will see List Settings. This dictates what stats you actually see on your screen when you click on campaigns or ads.
When you click on List Settings a box will pop up giving you the option of what you would like to see on your screen.
You can change the settings / view for your Ad Columns, your Ad Set columns and your audiences screens.
So, that little "List Settings" button is a super handy little tool, to manage the amount of information you see on your screen. Remembering of course that a lot of the stats you’ll need, you’ll get while you're running your ad from the "Ad Reporting" tool itself.
Now let’s take a look at how to set up conversion tracking. This is actually lot easier than you may think!
Chapter 10 - Conversion Tracking
Conversion tracking is used when your objective is to see how many people take action when they reach your webpage. In other words the ‘Website Conversion’ objective.
So let’s say you create a post on your timeline about a new PDF you’re releasing and the link goes to an optin / squeeze page asking for the visitors name and email address. Ideally what
44 www.onlinemarketingaddicts.com
you want to be able to track is how many people reached that page from your Facebook ad and how many then left their details.
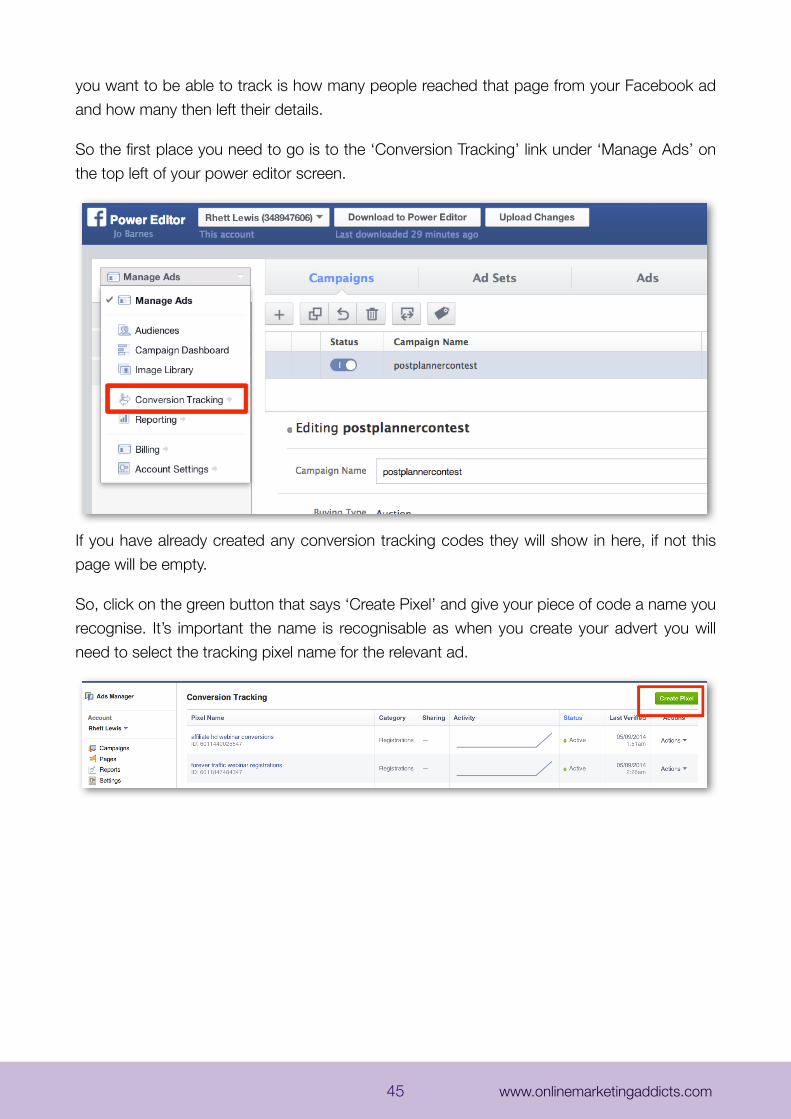
So the first place you need to go is to the ‘Conversion Tracking’ link under ‘Manage Ads’ on the top left of your power editor screen.
If you have already created any conversion tracking codes they will show in here, if not this page will be empty.
So, click on the green button that says ‘Create Pixel’ and give your piece of code a name you recognise. It’s important the name is recognisable as when you create your advert you will need to select the tracking pixel name for the relevant ad.
45 www.onlinemarketingaddicts.com
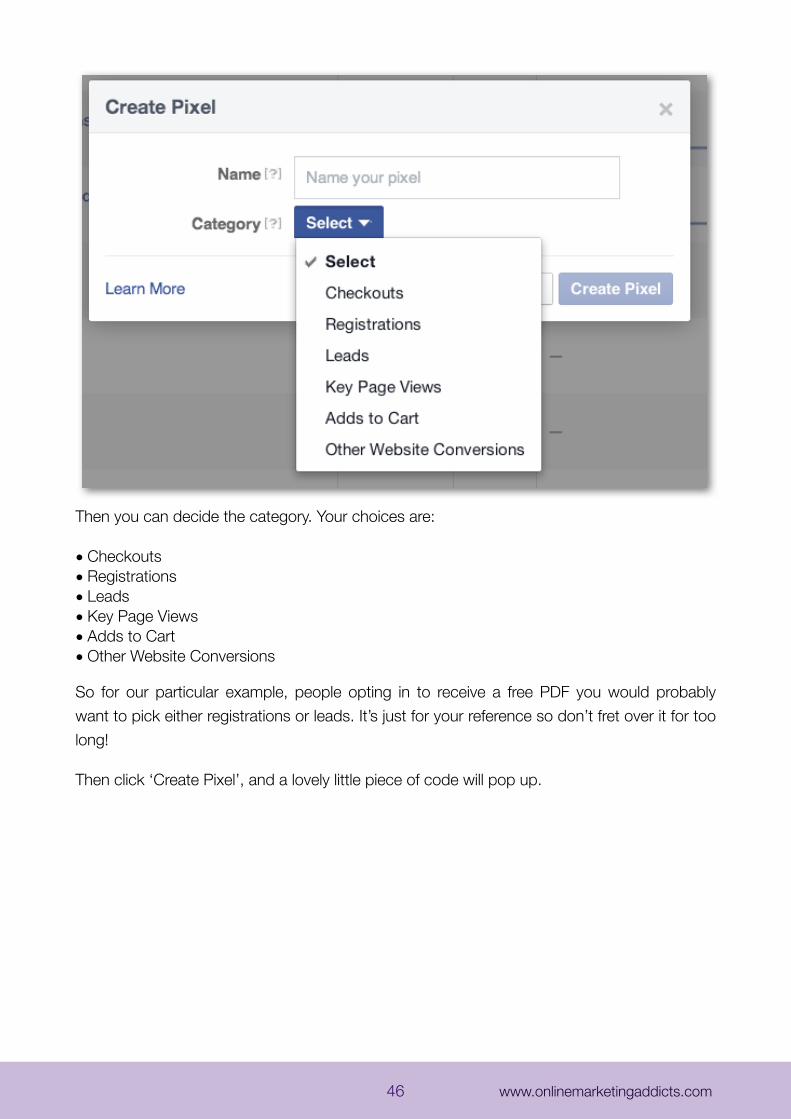
Then you can decide the category. Your choices are:
• Checkouts• Registrations• Leads• Key Page Views• Adds to Cart• Other Website Conversions
So for our particular example, people opting in to receive a free PDF you would probably want to pick either registrations or leads. It’s just for your reference so don’t fret over it for too long!
Then click ‘Create Pixel’, and a lovely little piece of code will pop up.
46 www.onlinemarketingaddicts.com
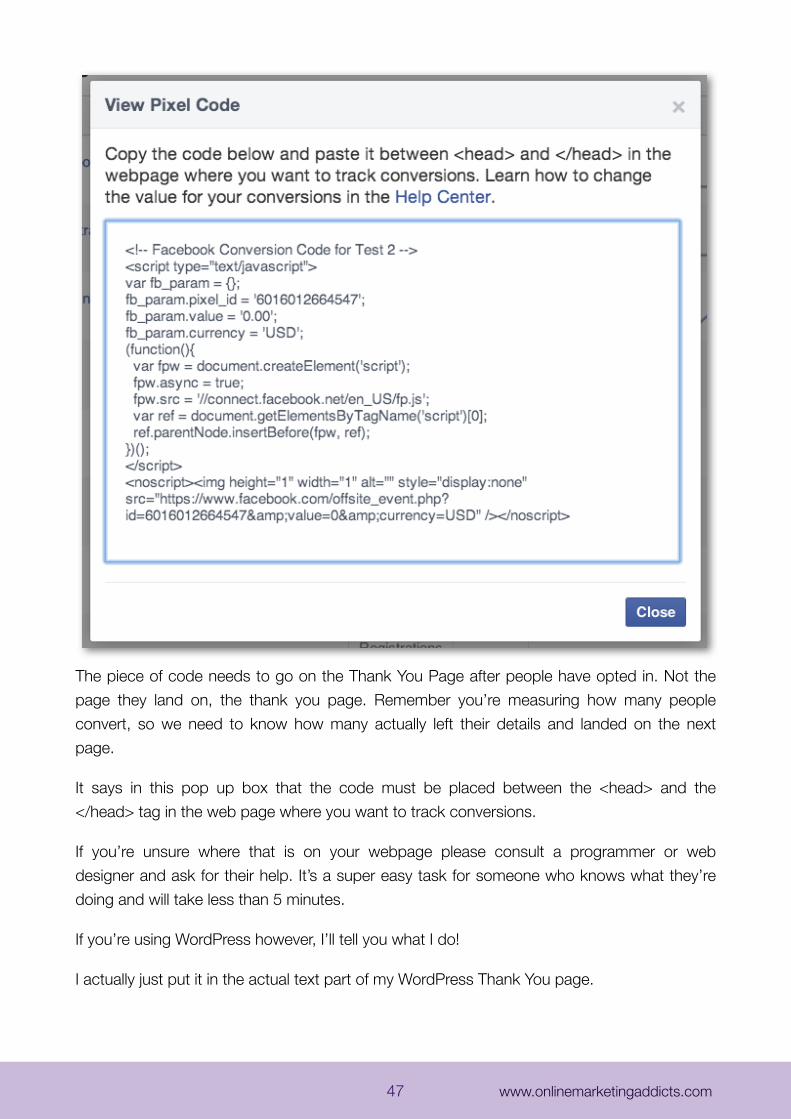
The piece of code needs to go on the Thank You Page after people have opted in. Not the page they land on, the thank you page. Remember you’re measuring how many people convert, so we need to know how many actually left their details and landed on the next page.
It says in this pop up box that the code must be placed between the <head> and the </head> tag in the web page where you want to track conversions.
If you’re unsure where that is on your webpage please consult a programmer or web designer and ask for their help. It’s a super easy task for someone who knows what they’re doing and will take less than 5 minutes.
If you’re using WordPress however, I’ll tell you what I do!
I actually just put it in the actual text part of my WordPress Thank You page.
47 www.onlinemarketingaddicts.com
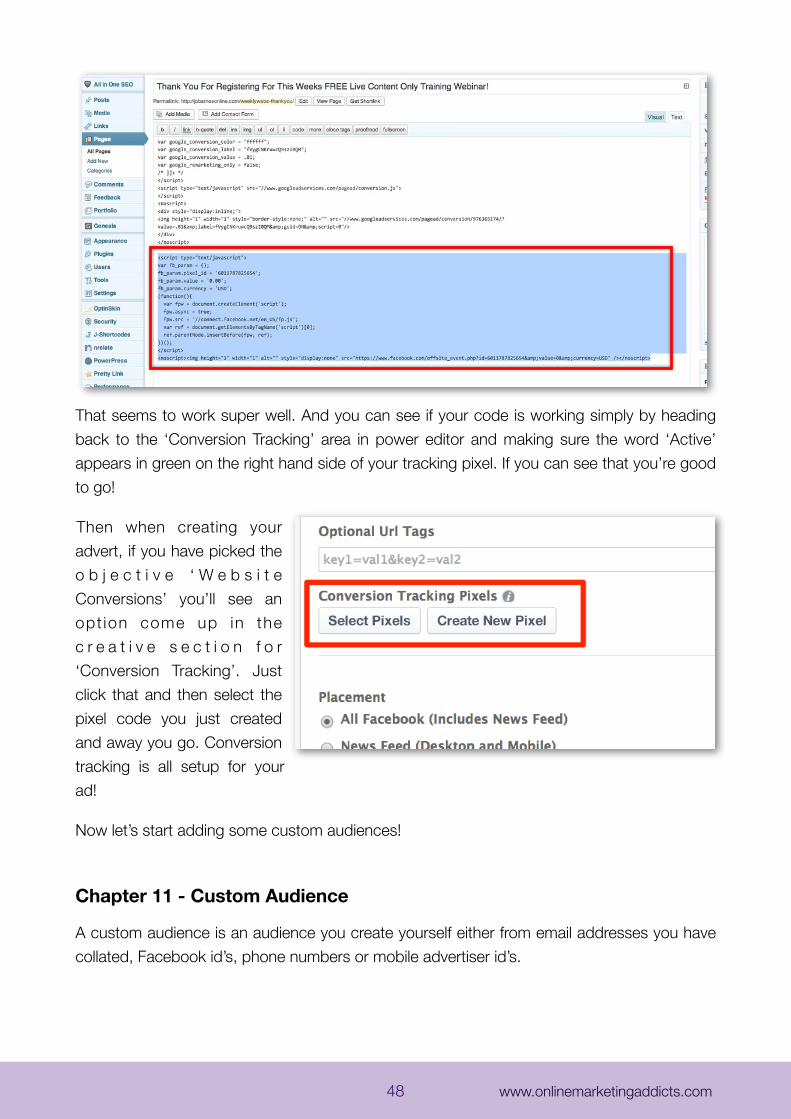
That seems to work super well. And you can see if your code is working simply by heading back to the ‘Conversion Tracking’ area in power editor and making sure the word ‘Active’ appears in green on the right hand side of your tracking pixel. If you can see that you’re good to go!
Then when creating your advert, if you have picked the o b j e c t i v e ‘ W e b s i t e Conversions’ you’ll see an opt ion come up in the c r e a t i v e s e c t i o n f o r ‘Conversion Tracking’. Just click that and then select the pixel code you just created and away you go. Conversion tracking is all setup for your ad!
Now let’s start adding some custom audiences!
Chapter 11 - Custom Audience
A custom audience is an audience you create yourself either from email addresses you have collated, Facebook id’s, phone numbers or mobile advertiser id’s.
48 www.onlinemarketingaddicts.com
Once you feed any of this information into Facebook it goes looking for all the people who have a Facebook account with any of these details associated to it.
This is an amazing tool and is super effective. If you have an email list and maybe only have a 20% open rate, you could effectively feed all those email addresses into a custom audience and reach the other 80% via Facebook ads.
It’s an alternative way of reaching people who have already said yes I’m interested in your information, but who perhaps have disconnected with you for whatever reason via your emails.
You can also very easily re-target people who have visited your website or specific pages on your website simply by adding some code to your site.
This is an incredibly powerful feature. Imagine you have promoted a blog post on your site. Then shortly afterwards you promote a webinar or a new offer. Someone is far more likely to click on an ad if they have already visited your site or had some dealing with you and consequently recognise your brand.
There are all sorts of psychological reasons as to why retargeting is so effective that I’m not going to get into here, just know that it works!
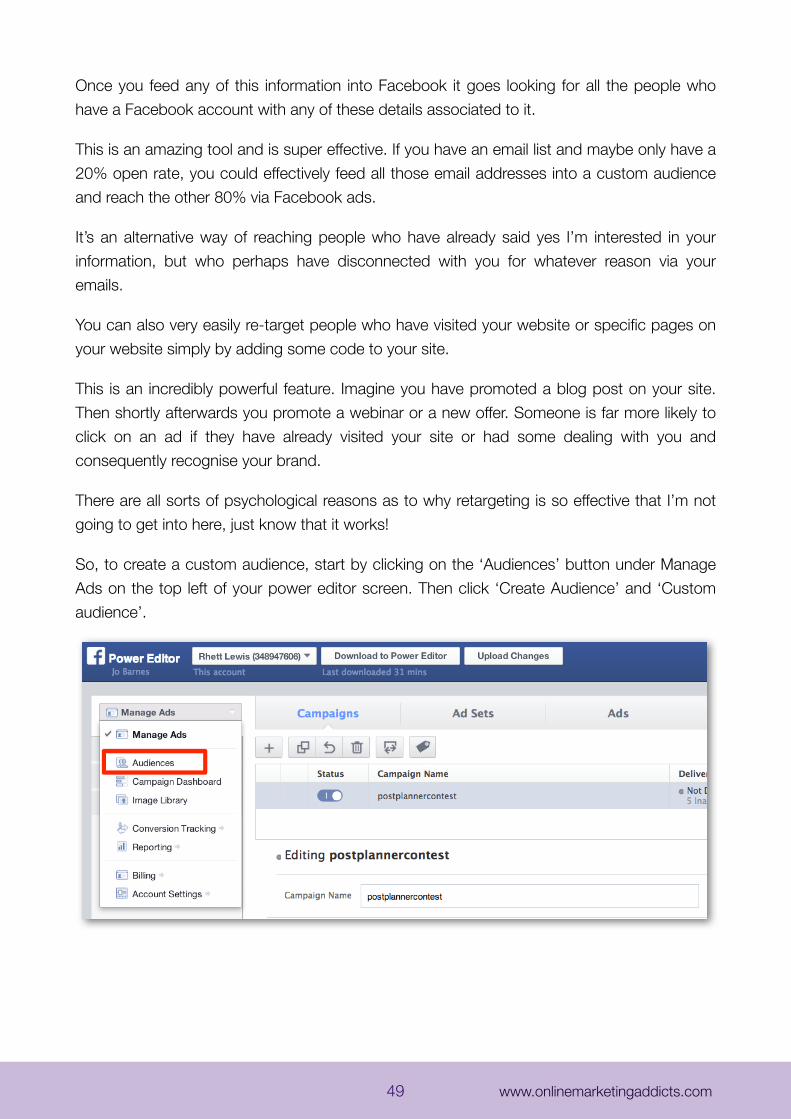
So, to create a custom audience, start by clicking on the ‘Audiences’ button under Manage Ads on the top left of your power editor screen. Then click ‘Create Audience’ and ‘Custom audience’.
49 www.onlinemarketingaddicts.com
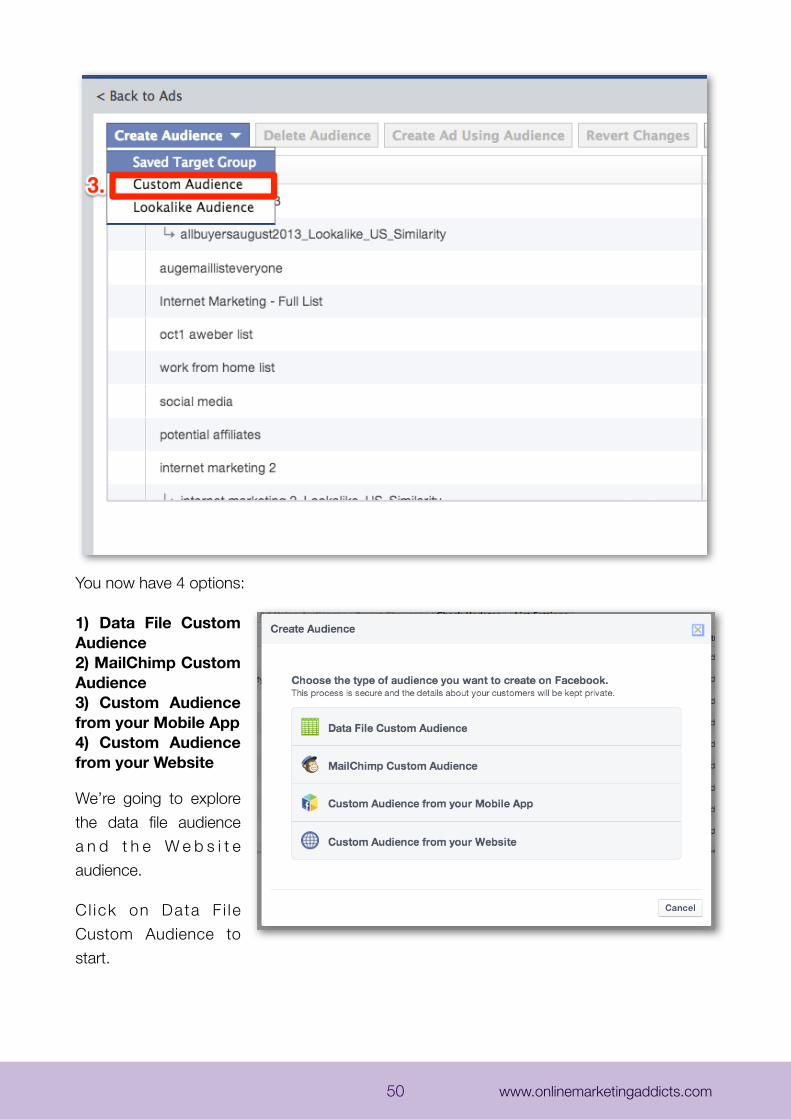
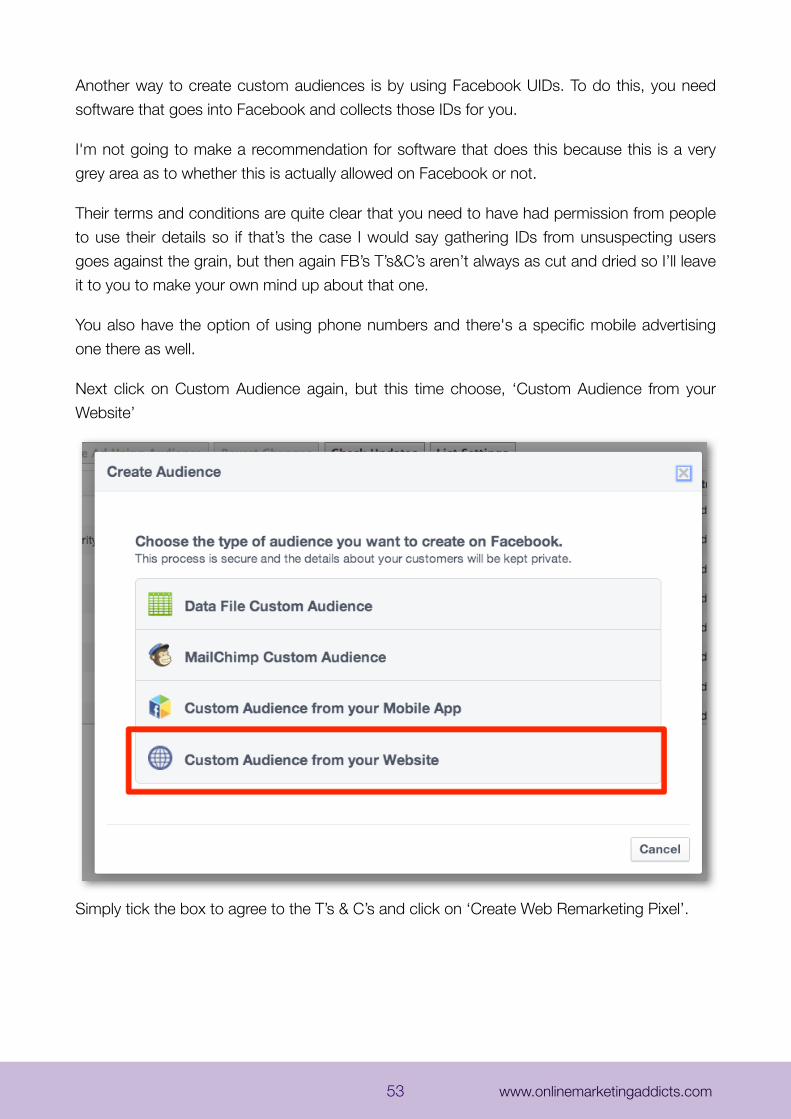
You now have 4 options:
1) Data File Custom Audience2) MailChimp Custom Audience3) Custom Audience from your Mobile App4) Custom Audience from your Website
We’re going to explore the data file audience a n d t h e W e b s i t e audience.
C l ick on Data F i le Custom Audience to start.
50 www.onlinemarketingaddicts.com
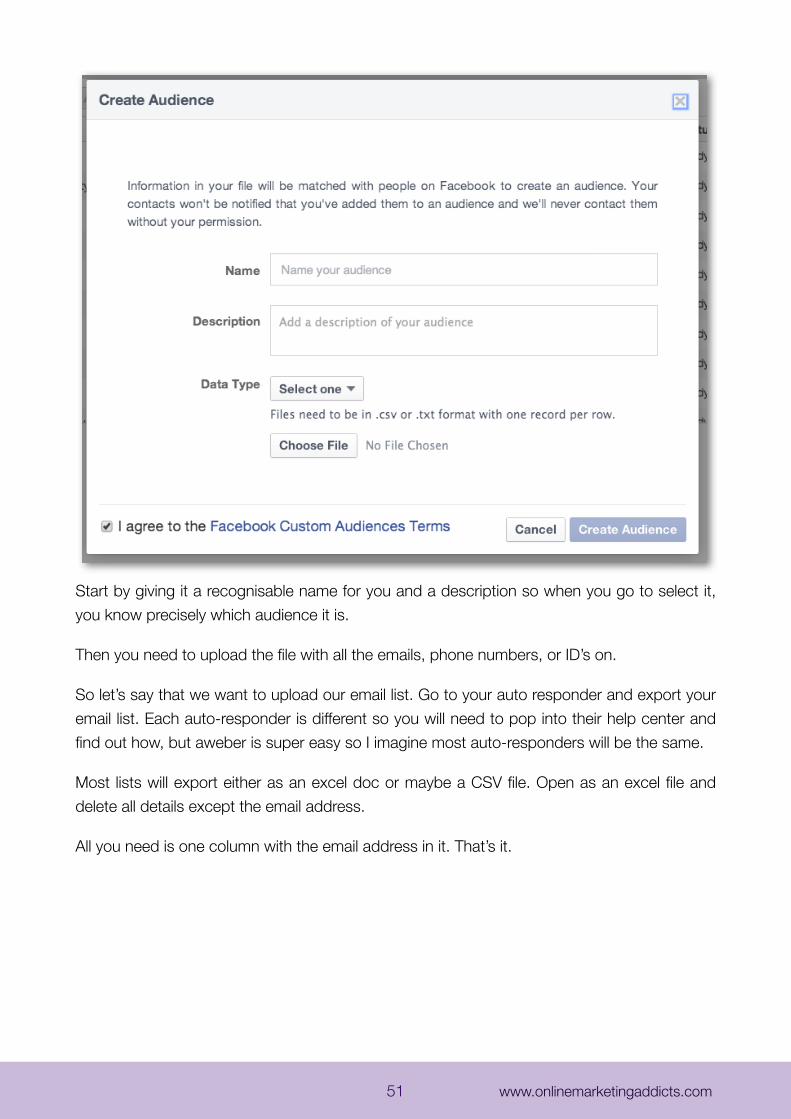
Start by giving it a recognisable name for you and a description so when you go to select it, you know precisely which audience it is.
Then you need to upload the file with all the emails, phone numbers, or ID’s on.
So let’s say that we want to upload our email list. Go to your auto responder and export your email list. Each auto-responder is different so you will need to pop into their help center and find out how, but aweber is super easy so I imagine most auto-responders will be the same.
Most lists will export either as an excel doc or maybe a CSV file. Open as an excel file and delete all details except the email address.
All you need is one column with the email address in it. That’s it.
51 www.onlinemarketingaddicts.com
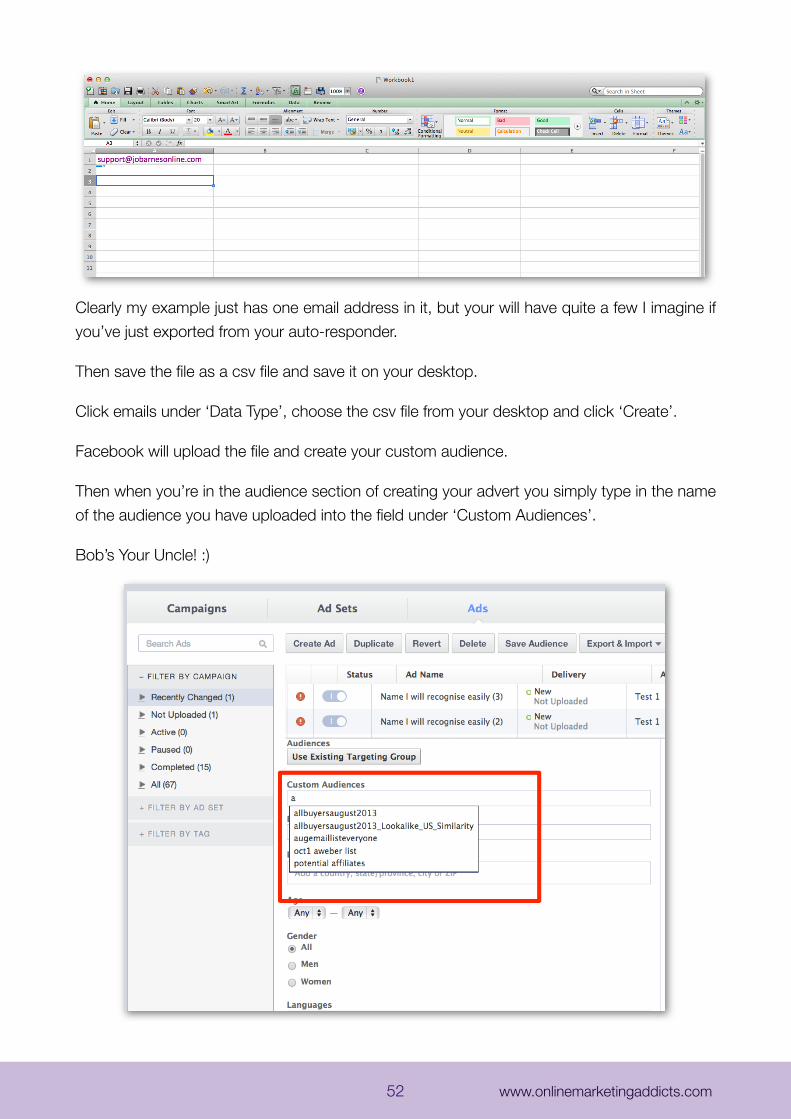
Clearly my example just has one email address in it, but your will have quite a few I imagine if you’ve just exported from your auto-responder.
Then save the file as a csv file and save it on your desktop.
Click emails under ‘Data Type’, choose the csv file from your desktop and click ‘Create’.
Facebook will upload the file and create your custom audience.
Then when you’re in the audience section of creating your advert you simply type in the name of the audience you have uploaded into the field under ‘Custom Audiences’.
Bob’s Your Uncle! :)
52 www.onlinemarketingaddicts.com
Another way to create custom audiences is by using Facebook UIDs. To do this, you need software that goes into Facebook and collects those IDs for you.
I'm not going to make a recommendation for software that does this because this is a very grey area as to whether this is actually allowed on Facebook or not.
Their terms and conditions are quite clear that you need to have had permission from people to use their details so if that’s the case I would say gathering IDs from unsuspecting users goes against the grain, but then again FB’s T’s&C’s aren’t always as cut and dried so I’ll leave it to you to make your own mind up about that one.
You also have the option of using phone numbers and there's a specific mobile advertising one there as well.
Next click on Custom Audience again, but this time choose, ‘Custom Audience from your Website’
Simply tick the box to agree to the T’s & C’s and click on ‘Create Web Remarketing Pixel’.
53 www.onlinemarketingaddicts.com
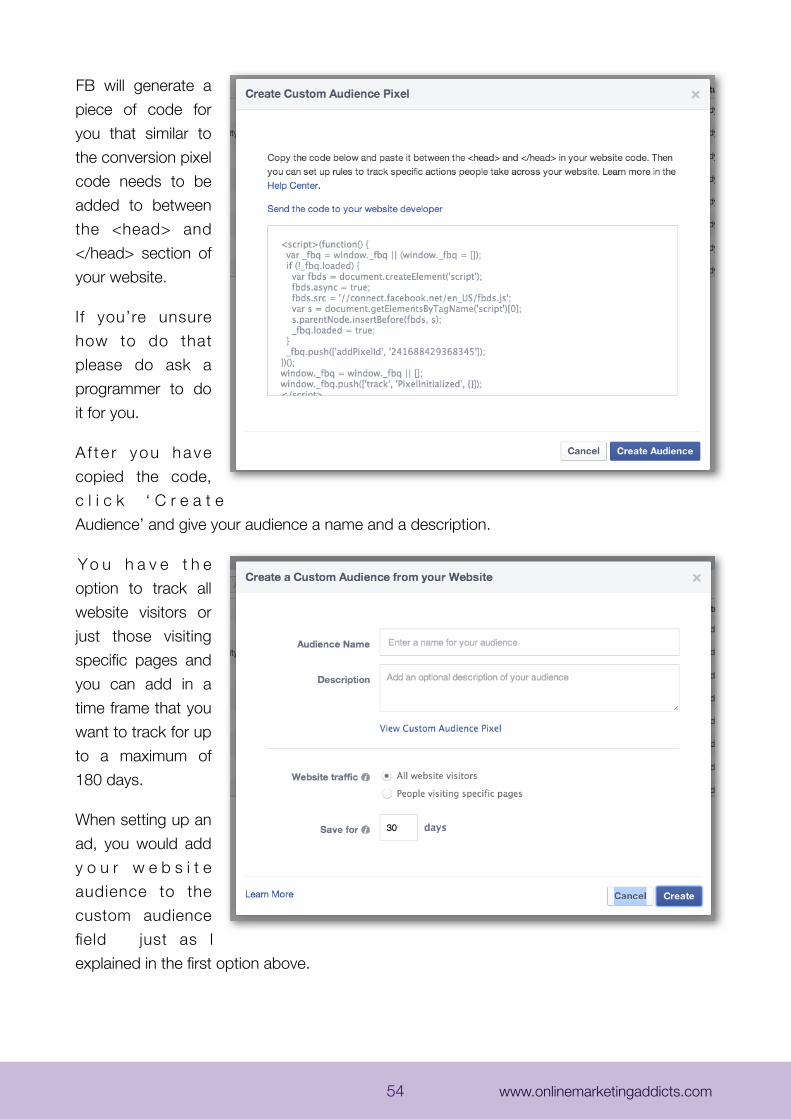
FB will generate a piece of code for you that similar to the conversion pixel code needs to be added to between the <head> and </head> section of your website.
If you’re unsure how to do that please do ask a programmer to do it for you.
A f t e r you have copied the code, c l i c k ‘ C r e a t e Audience’ and give your audience a name and a description.
Yo u h a v e t h e option to track all website visitors or just those visiting specific pages and you can add in a time frame that you want to track for up to a maximum of 180 days.
When setting up an ad, you would add y o u r w e b s i t e audience to the custom audience field just as I explained in the first option above.
54 www.onlinemarketingaddicts.com

If you would like further information on website custom audiences, here is a help sheet from Facebook - https://developers.facebook.com/docs/ads-for-websites/website-custom-audiences/getting-started
When you click on Create Audience you’ll notice there is also an option to Create a ‘Saved Target Group’ & a ‘Lookalike Audience’ . Let’s look at that next.
Chapter 12 - Saved Target Groups
This is a fabby little time saving tool. This feature allows you to save audiences you have created when building your adverts and use them again in other adverts you create.
So as with Custom Audiences, click on ‘Audiences’, then ‘Create Audience’, but this time click on ‘Saved Target Group’
Give it a name, then go ahead and create an audience as you would if you were building an ad.
Add in your location, age, gender, interests, relationships status, language, education etc.
55 www.onlinemarketingaddicts.com
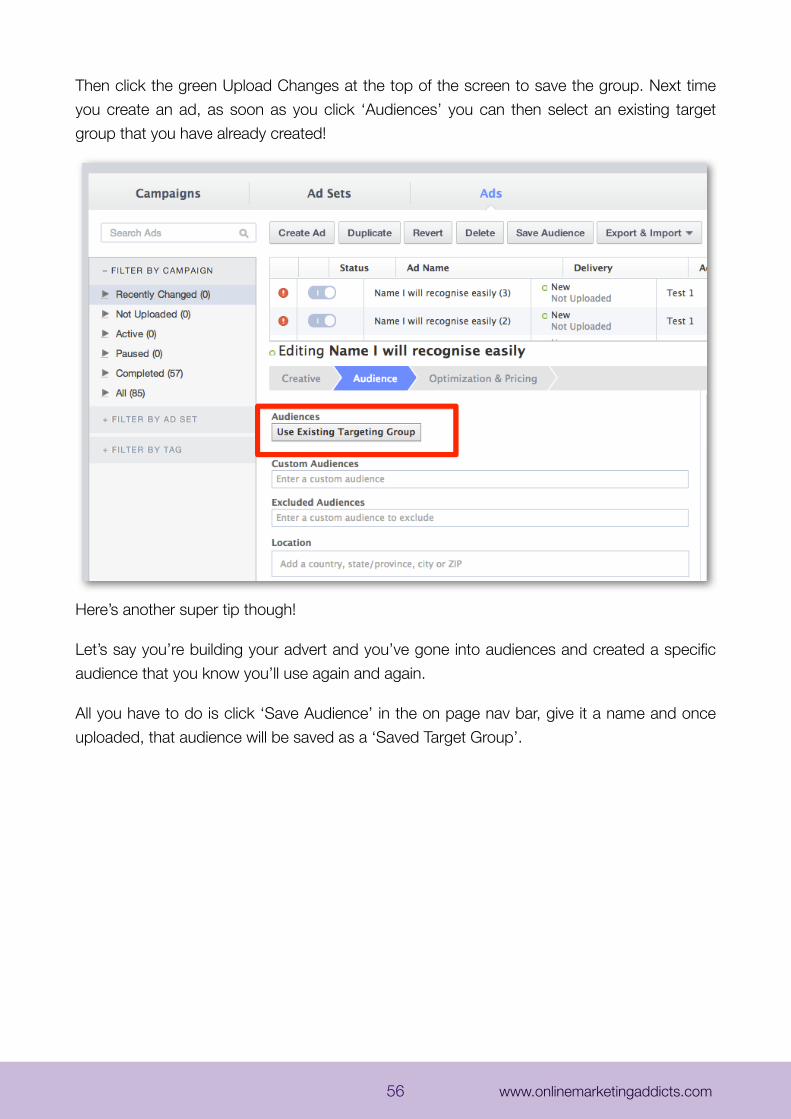
Then click the green Upload Changes at the top of the screen to save the group. Next time you create an ad, as soon as you click ‘Audiences’ you can then select an existing target group that you have already created!
Here’s another super tip though!
Let’s say you’re building your advert and you’ve gone into audiences and created a specific audience that you know you’ll use again and again.
All you have to do is click ‘Save Audience’ in the on page nav bar, give it a name and once uploaded, that audience will be saved as a ‘Saved Target Group’.
56 www.onlinemarketingaddicts.com
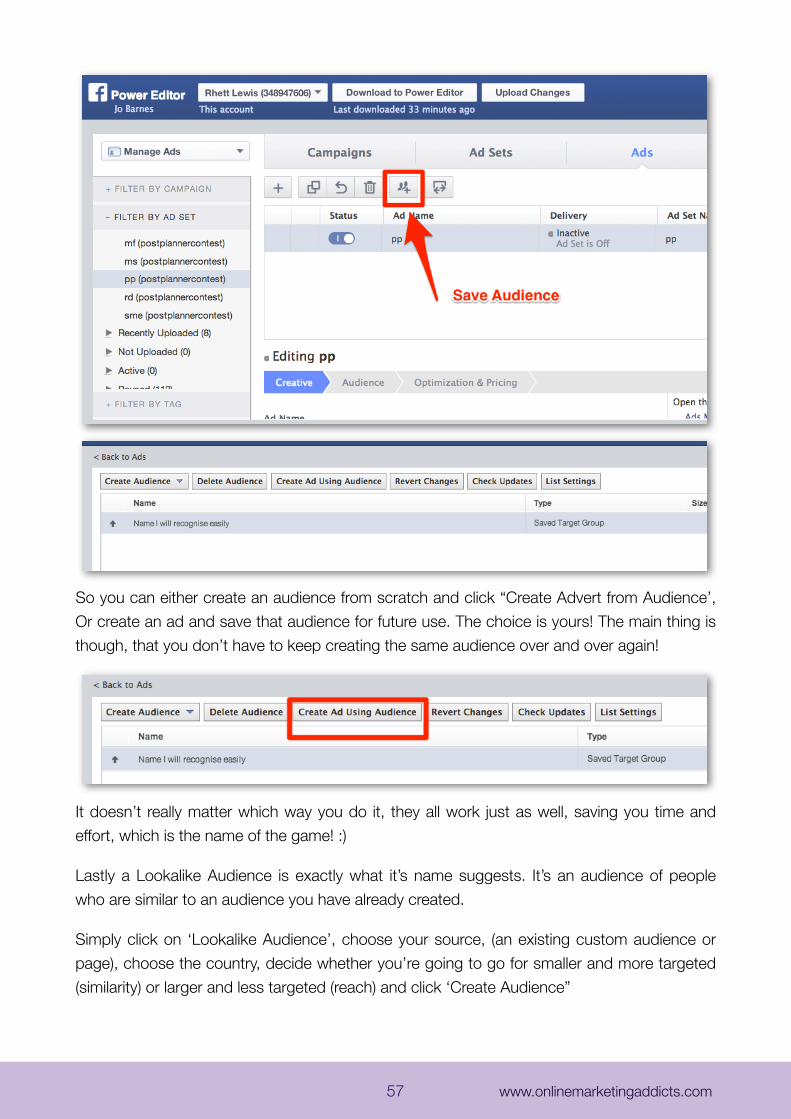
So you can either create an audience from scratch and click “Create Advert from Audience’, Or create an ad and save that audience for future use. The choice is yours! The main thing is though, that you don’t have to keep creating the same audience over and over again!
It doesn’t really matter which way you do it, they all work just as well, saving you time and effort, which is the name of the game! :)
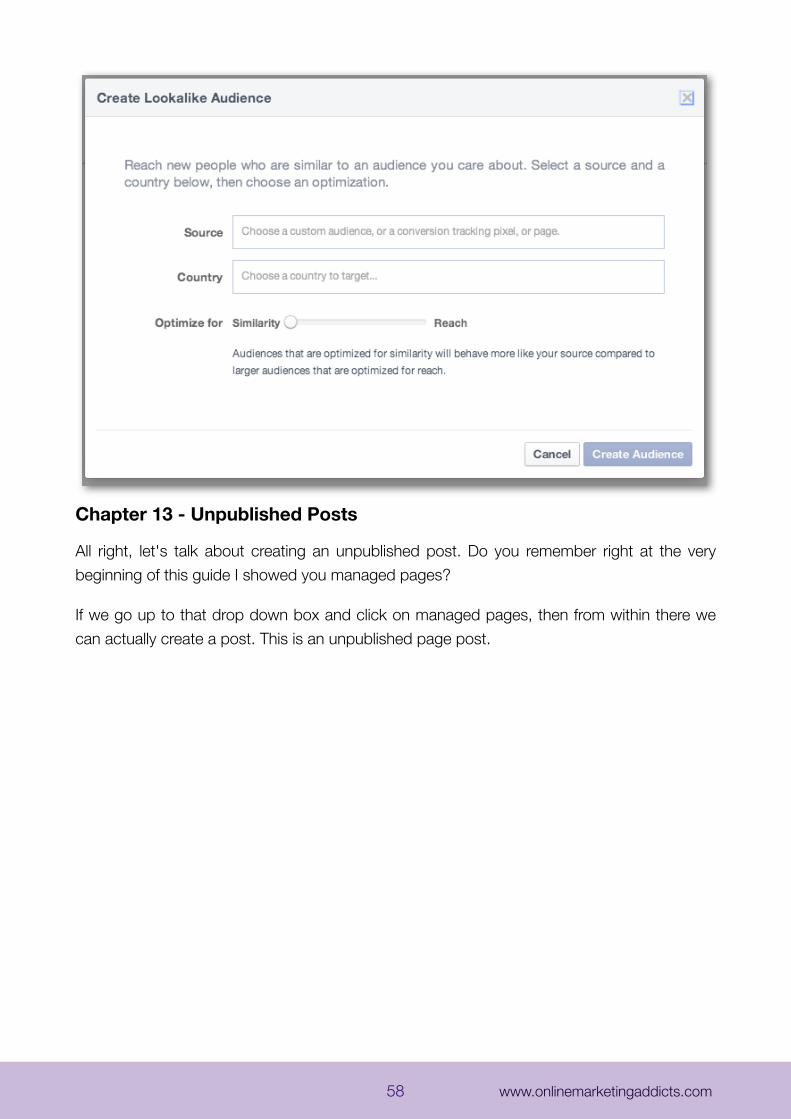
Lastly a Lookalike Audience is exactly what it’s name suggests. It’s an audience of people who are similar to an audience you have already created.
Simply click on ‘Lookalike Audience’, choose your source, (an existing custom audience or page), choose the country, decide whether you’re going to go for smaller and more targeted (similarity) or larger and less targeted (reach) and click ‘Create Audience”
57 www.onlinemarketingaddicts.com
Chapter 13 - Unpublished Posts
All right, let's talk about creating an unpublished post. Do you remember right at the very beginning of this guide I showed you managed pages?
If we go up to that drop down box and click on managed pages, then from within there we can actually create a post. This is an unpublished page post.
58 www.onlinemarketingaddicts.com
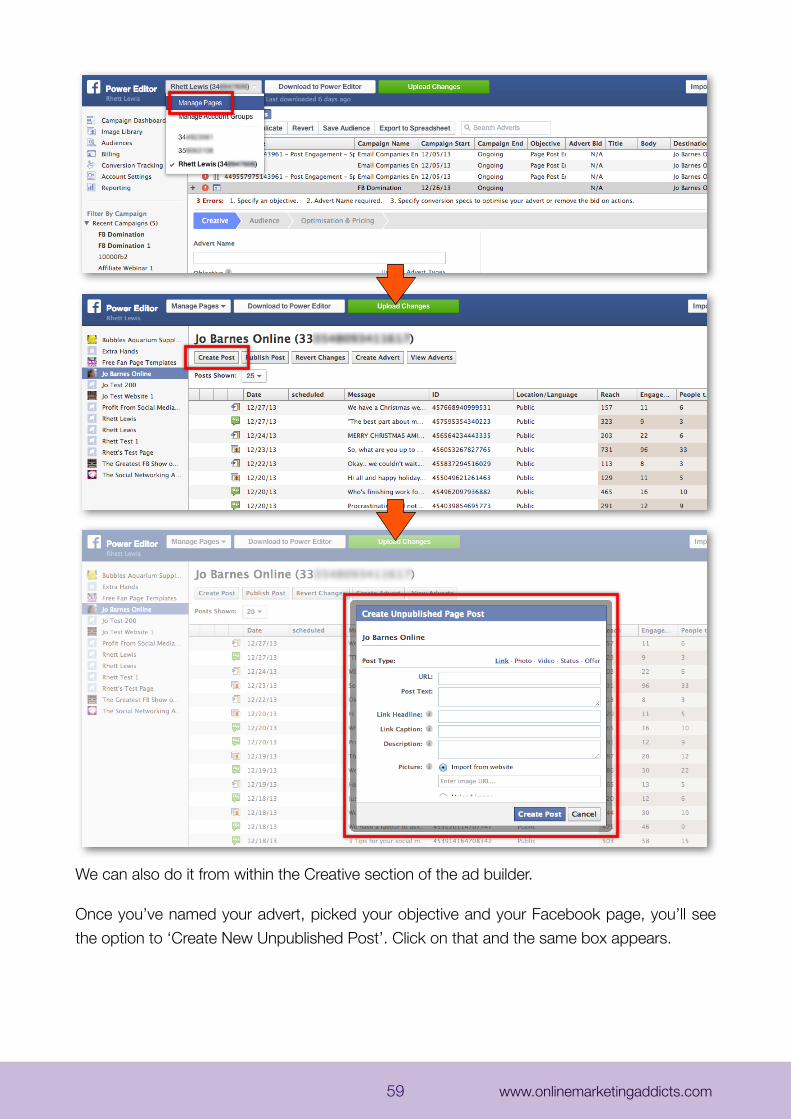
We can also do it from within the Creative section of the ad builder.
Once you’ve named your advert, picked your objective and your Facebook page, you’ll see the option to ‘Create New Unpublished Post’. Click on that and the same box appears.
59 www.onlinemarketingaddicts.com
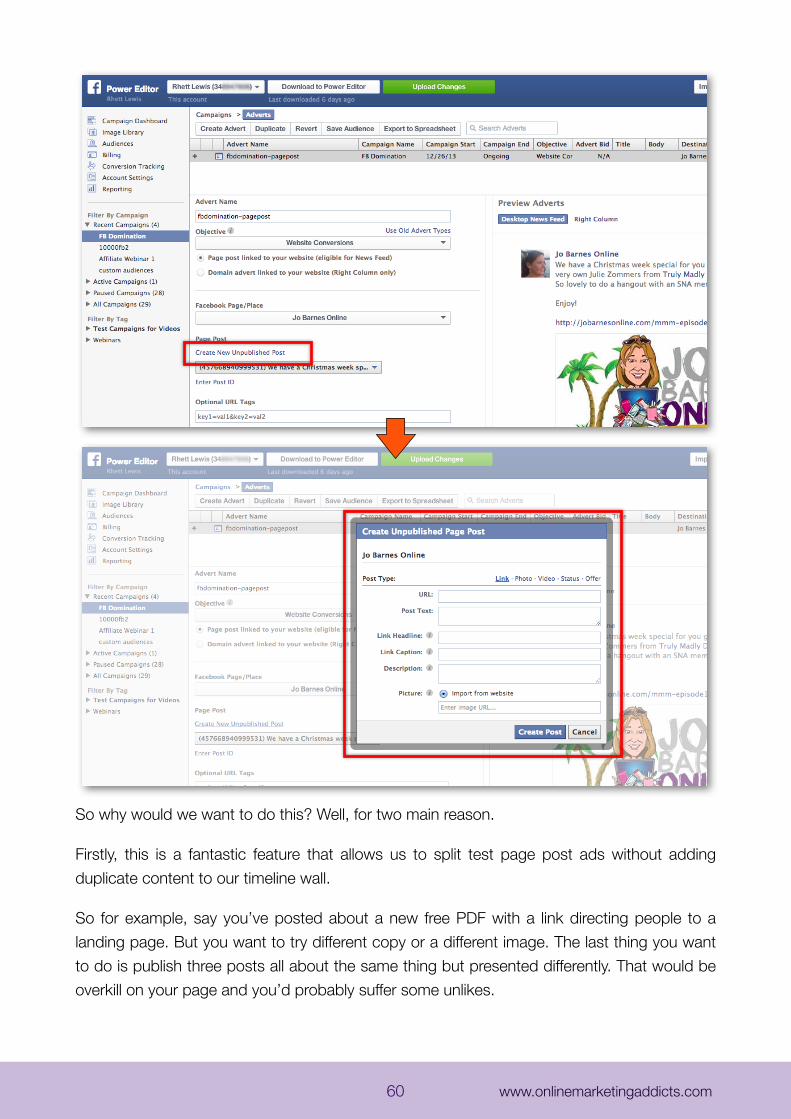
So why would we want to do this? Well, for two main reason.
Firstly, this is a fantastic feature that allows us to split test page post ads without adding duplicate content to our timeline wall.
So for example, say you’ve posted about a new free PDF with a link directing people to a landing page. But you want to try different copy or a different image. The last thing you want to do is publish three posts all about the same thing but presented differently. That would be overkill on your page and you’d probably suffer some unlikes.
60 www.onlinemarketingaddicts.com
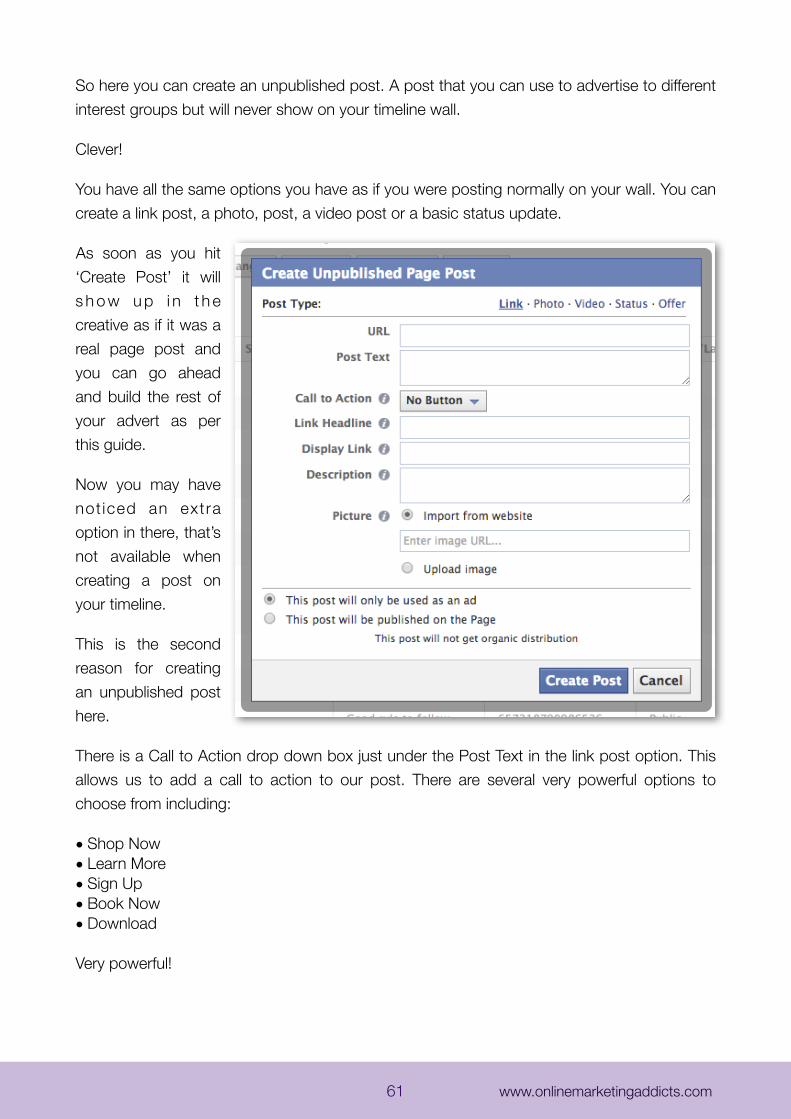
So here you can create an unpublished post. A post that you can use to advertise to different interest groups but will never show on your timeline wall.
Clever!
You have all the same options you have as if you were posting normally on your wall. You can create a link post, a photo, post, a video post or a basic status update.
As soon as you hit ‘Create Post’ it will s h o w u p i n t h e creative as if it was a real page post and you can go ahead and build the rest of your advert as per this guide.
Now you may have not iced an extra option in there, that’s not available when creating a post on your timeline.
This is the second reason for creating an unpublished post here.
There is a Call to Action drop down box just under the Post Text in the link post option. This allows us to add a call to action to our post. There are several very powerful options to choose from including:
• Shop Now• Learn More• Sign Up• Book Now• Download
Very powerful!
61 www.onlinemarketingaddicts.com
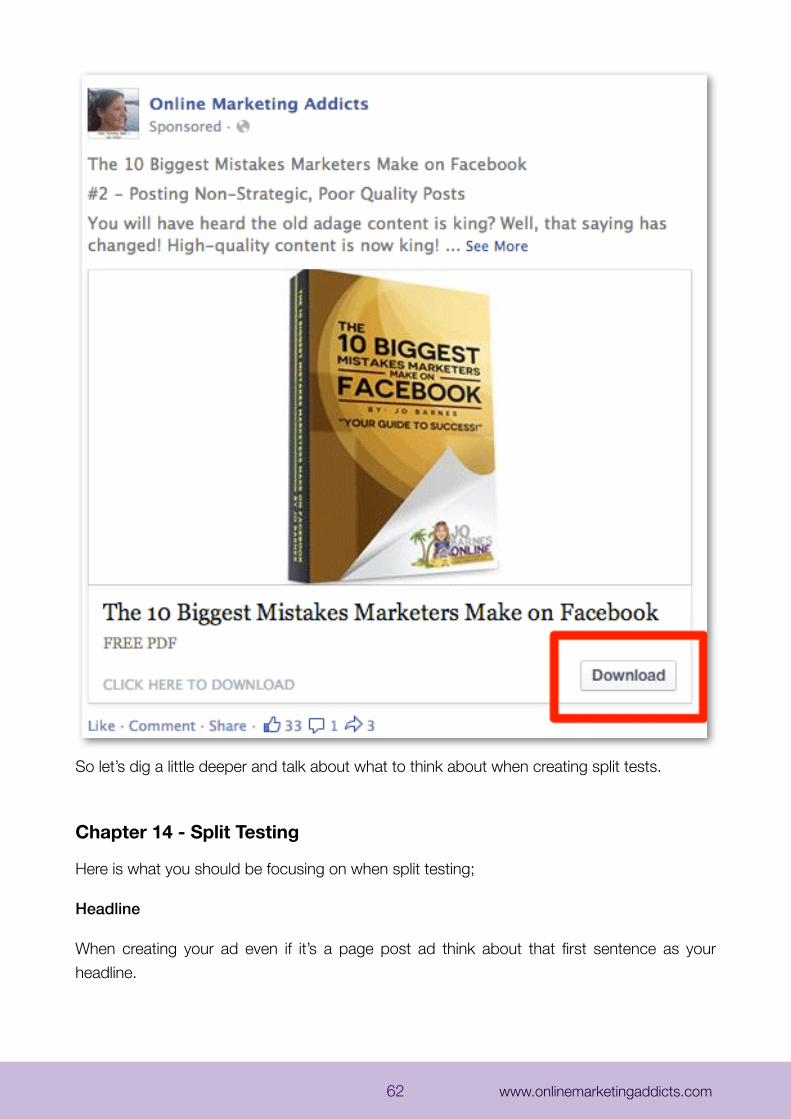
So let’s dig a little deeper and talk about what to think about when creating split tests.
Chapter 14 - Split Testing
Here is what you should be focusing on when split testing;
Headline
When creating your ad even if it’s a page post ad think about that first sentence as your headline.
62 www.onlinemarketingaddicts.com
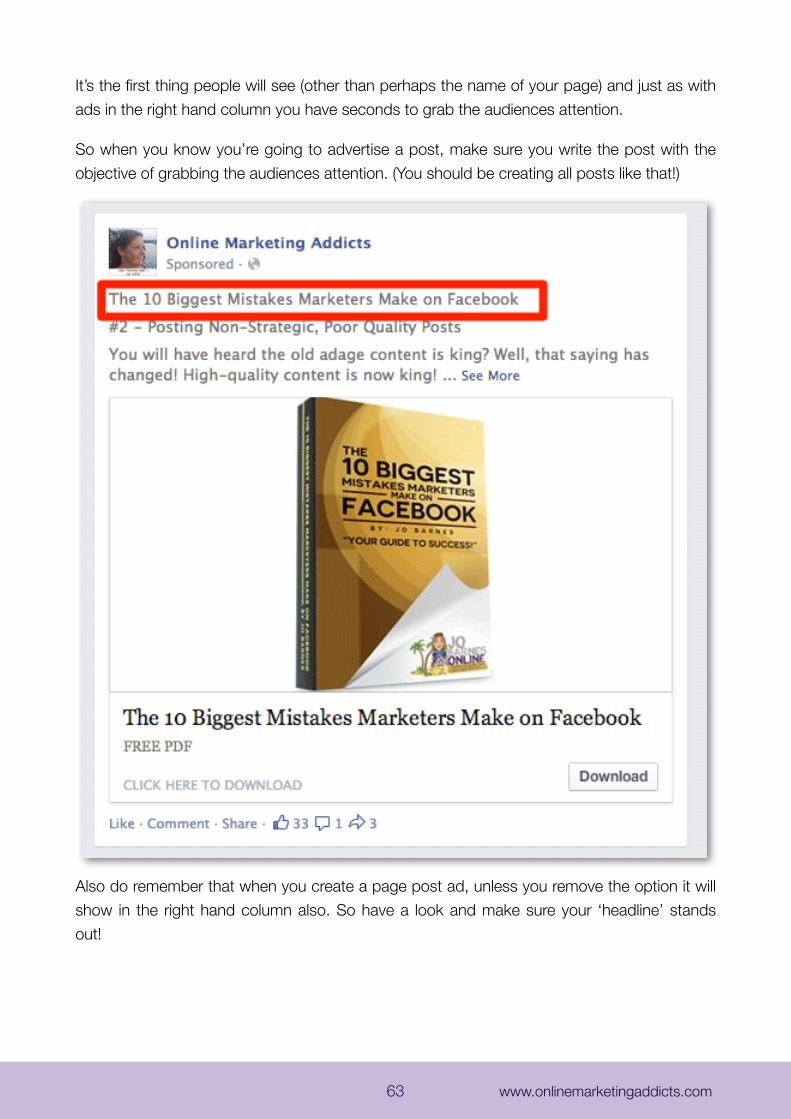
It’s the first thing people will see (other than perhaps the name of your page) and just as with ads in the right hand column you have seconds to grab the audiences attention.
So when you know you’re going to advertise a post, make sure you write the post with the objective of grabbing the audiences attention. (You should be creating all posts like that!)
Also do remember that when you create a page post ad, unless you remove the option it will show in the right hand column also. So have a look and make sure your ‘headline’ stands out!
63 www.onlinemarketingaddicts.com
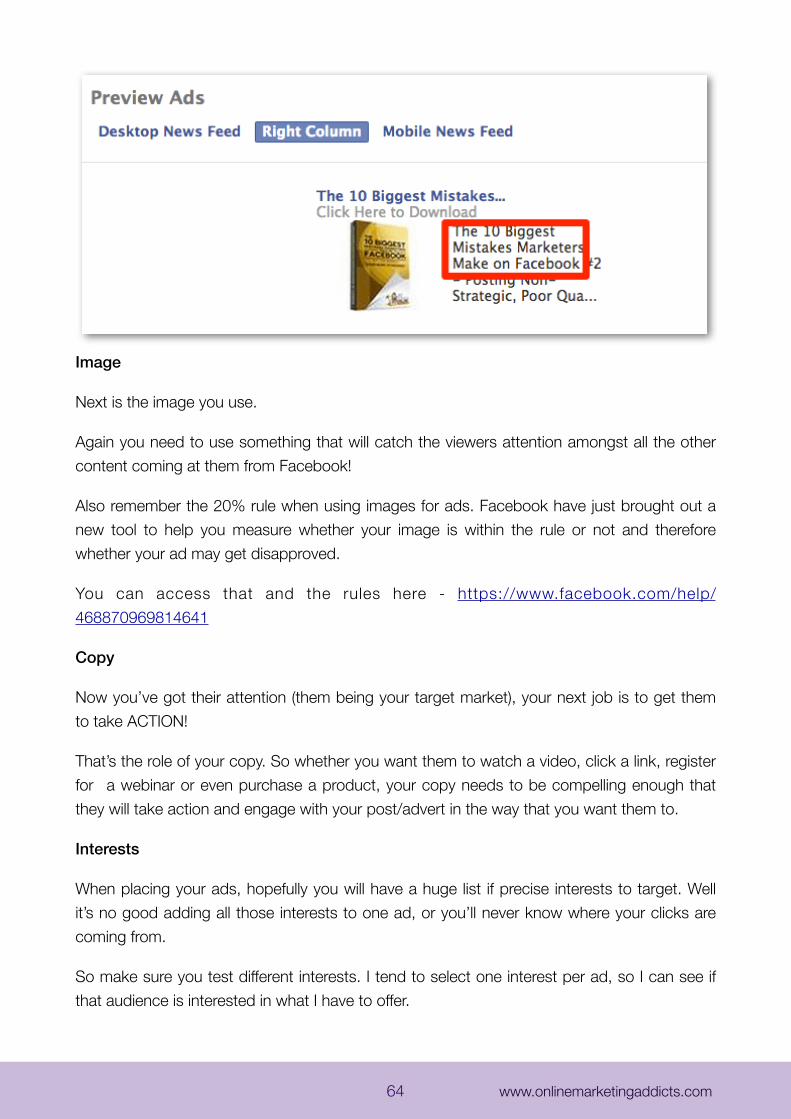
Image
Next is the image you use.
Again you need to use something that will catch the viewers attention amongst all the other content coming at them from Facebook!
Also remember the 20% rule when using images for ads. Facebook have just brought out a new tool to help you measure whether your image is within the rule or not and therefore whether your ad may get disapproved.
You can access that and the rules here - https://www.facebook.com/help/468870969814641
Copy
Now you’ve got their attention (them being your target market), your next job is to get them to take ACTION!
That’s the role of your copy. So whether you want them to watch a video, click a link, register for a webinar or even purchase a product, your copy needs to be compelling enough that they will take action and engage with your post/advert in the way that you want them to.
Interests
When placing your ads, hopefully you will have a huge list if precise interests to target. Well it’s no good adding all those interests to one ad, or you’ll never know where your clicks are coming from.
So make sure you test different interests. I tend to select one interest per ad, so I can see if that audience is interested in what I have to offer.
64 www.onlinemarketingaddicts.com
Pricing
Lastly when split testing, you want to try the different pricing options to see which works best in your niche.
So you may have a campaign with 3 ads that are all the same other than the pricing options. You may choose cpc for one, cpm for another and optimised cpm for the third so that you can see straight away which option is outperforming the others.
An example of how you might run a split test is to set up a campaign and create say 5 adverts that are all exactly the same.
The only difference being the interests for each ad.
You may then create another campaign and again create 5 adverts all the same apart from the image is different for each one.
You could do the same for headlines, copy, pricing etc. It’s entirely up to you how you want to run your split tests. The key however is to do them as it’s only by testing & measuring that you will begin to see the best results.
Now you may be wondering about testing different ages, location, gender etc, but with FB’s new reporting tool there is no need. It gives you all the information you need to get a fantastic demographic of who is clicking on your ads!
Let me show you how that works!
Chapter 15 - Reporting
To get to the reporting tool, you need to click the ‘Reporting’ button under ‘Manage Ads’ on the top left hand side of your screen.
65 www.onlinemarketingaddicts.com
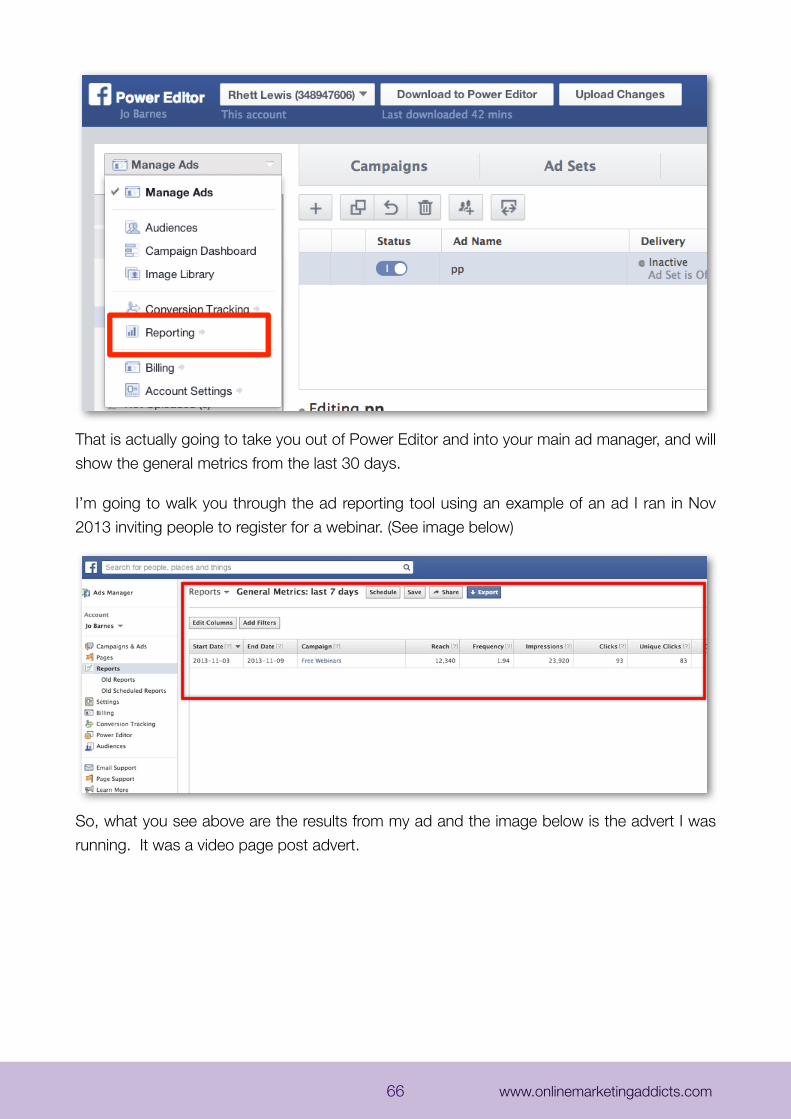
That is actually going to take you out of Power Editor and into your main ad manager, and will show the general metrics from the last 30 days.
I’m going to walk you through the ad reporting tool using an example of an ad I ran in Nov 2013 inviting people to register for a webinar. (See image below)
So, what you see above are the results from my ad and the image below is the advert I was running. It was a video page post advert.
66 www.onlinemarketingaddicts.com
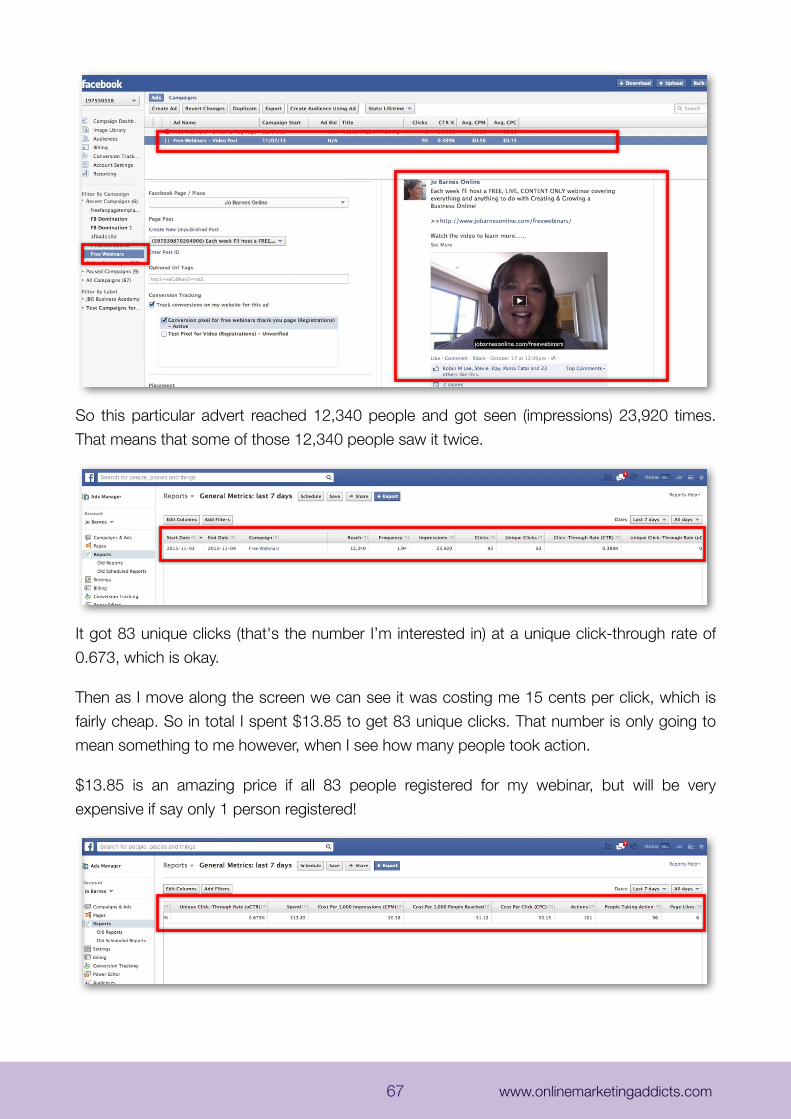
So this particular advert reached 12,340 people and got seen (impressions) 23,920 times. That means that some of those 12,340 people saw it twice.
It got 83 unique clicks (that's the number I’m interested in) at a unique click-through rate of 0.673, which is okay.
Then as I move along the screen we can see it was costing me 15 cents per click, which is fairly cheap. So in total I spent $13.85 to get 83 unique clicks. That number is only going to mean something to me however, when I see how many people took action.
$13.85 is an amazing price if all 83 people registered for my webinar, but will be very expensive if say only 1 person registered!
67 www.onlinemarketingaddicts.com
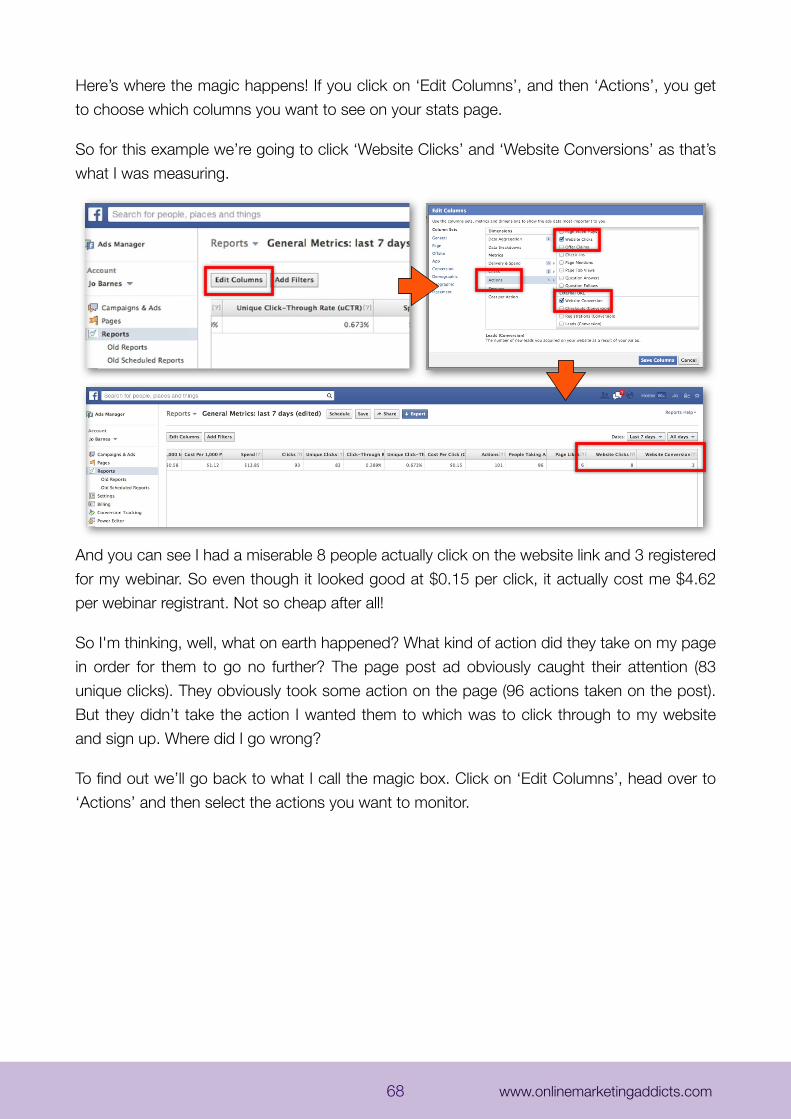
Here’s where the magic happens! If you click on ‘Edit Columns’, and then ‘Actions’, you get to choose which columns you want to see on your stats page.
So for this example we’re going to click ‘Website Clicks’ and ‘Website Conversions’ as that’s what I was measuring.
And you can see I had a miserable 8 people actually click on the website link and 3 registered for my webinar. So even though it looked good at $0.15 per click, it actually cost me $4.62 per webinar registrant. Not so cheap after all!
So I'm thinking, well, what on earth happened? What kind of action did they take on my page in order for them to go no further? The page post ad obviously caught their attention (83 unique clicks). They obviously took some action on the page (96 actions taken on the post). But they didn’t take the action I wanted them to which was to click through to my website and sign up. Where did I go wrong?
To find out we’ll go back to what I call the magic box. Click on ‘Edit Columns’, head over to ‘Actions’ and then select the actions you want to monitor.
68 www.onlinemarketingaddicts.com
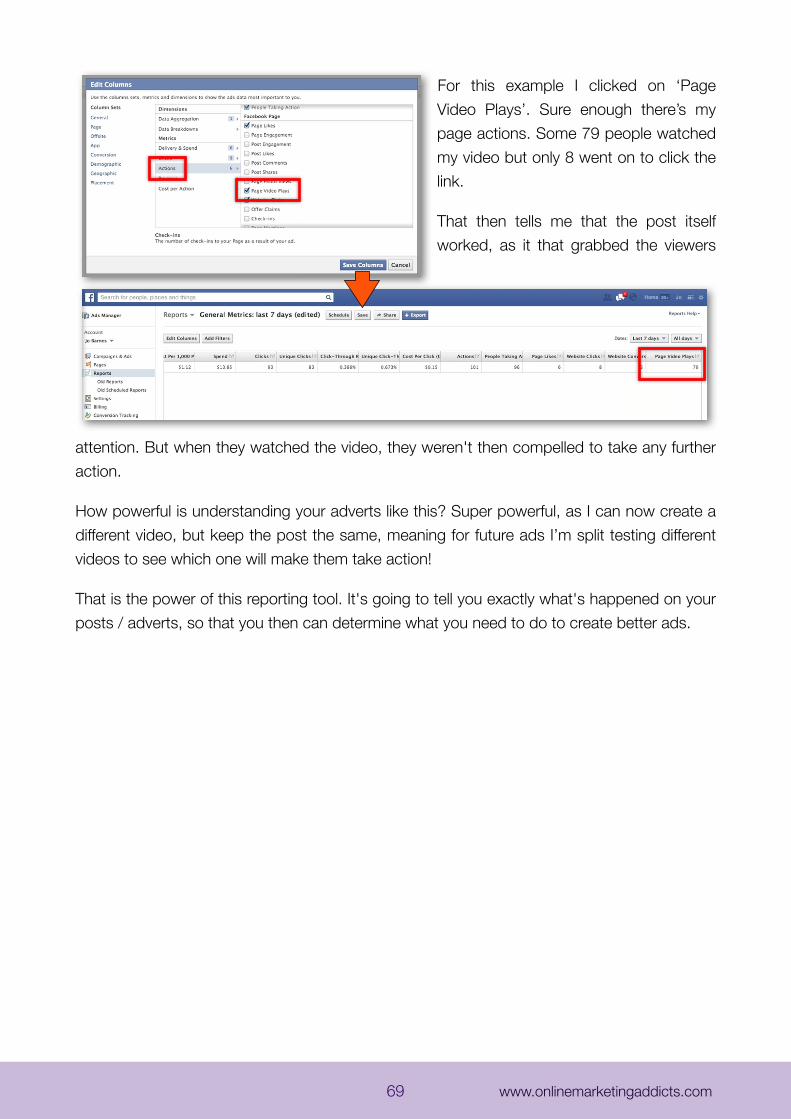
For this example I clicked on ‘Page Video Plays’. Sure enough there’s my page actions. Some 79 people watched my video but only 8 went on to click the link.
That then tells me that the post itself worked, as it that grabbed the viewers
attention. But when they watched the video, they weren't then compelled to take any further action.
How powerful is understanding your adverts like this? Super powerful, as I can now create a different video, but keep the post the same, meaning for future ads I’m split testing different videos to see which one will make them take action!
That is the power of this reporting tool. It's going to tell you exactly what's happened on your posts / adverts, so that you then can determine what you need to do to create better ads.
69 www.onlinemarketingaddicts.com
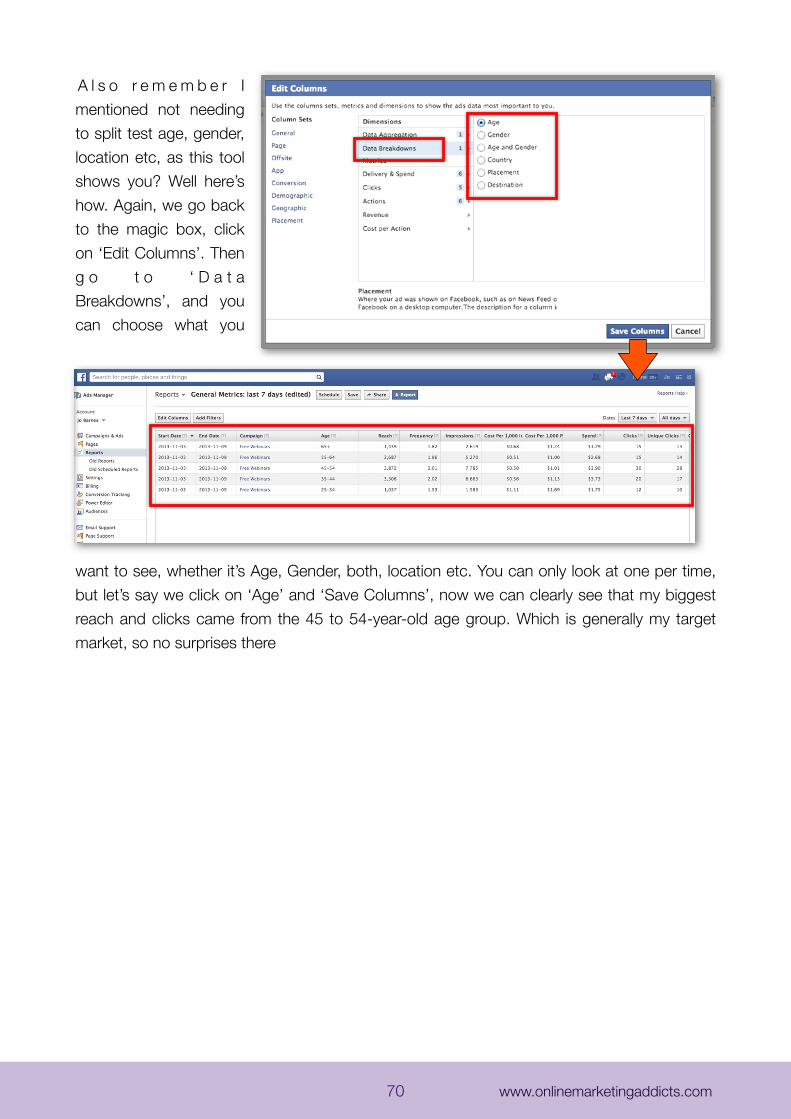
A l s o r e m e m b e r I mentioned not needing to split test age, gender, location etc, as this tool shows you? Well here’s how. Again, we go back to the magic box, click on ‘Edit Columns’. Then g o t o ‘ D a t a Breakdowns’, and you can choose what you
want to see, whether it’s Age, Gender, both, location etc. You can only look at one per time, but let’s say we click on ‘Age’ and ‘Save Columns’, now we can clearly see that my biggest reach and clicks came from the 45 to 54-year-old age group. Which is generally my target market, so no surprises there
70 www.onlinemarketingaddicts.com
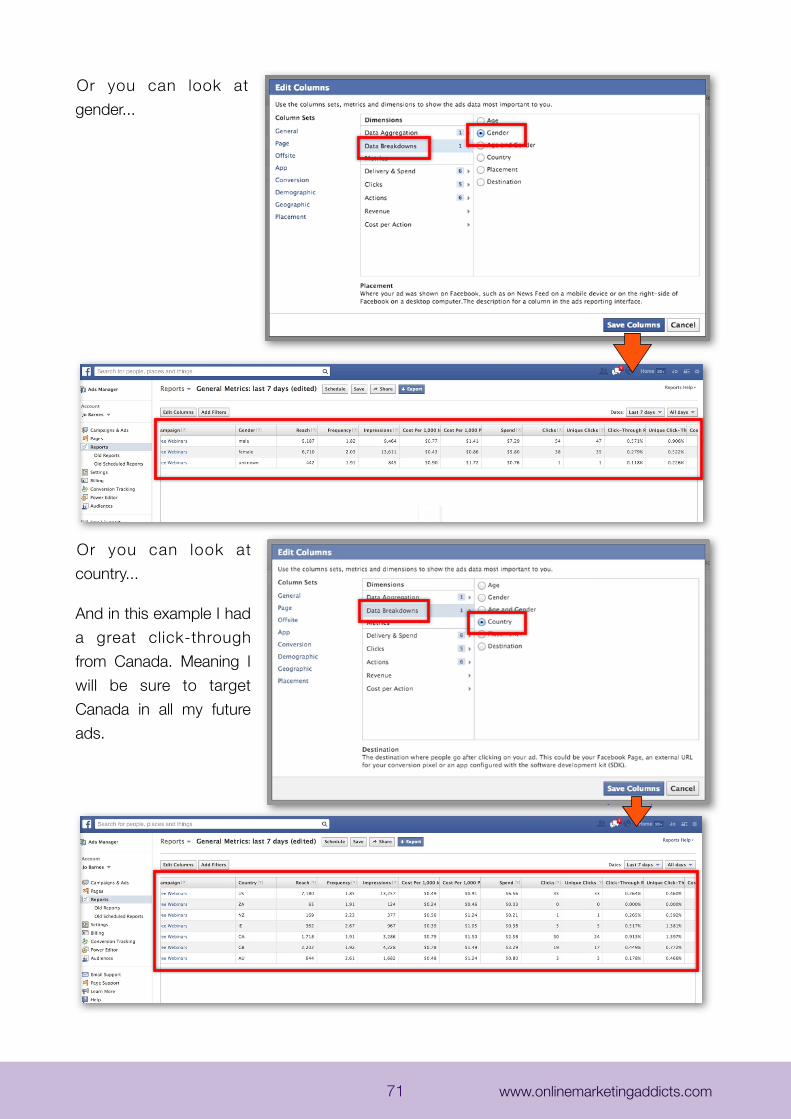
Or you can look at gender...
Or you can look at country...
And in this example I had a great click-through from Canada. Meaning I will be sure to target Canada in all my future ads.
71 www.onlinemarketingaddicts.com
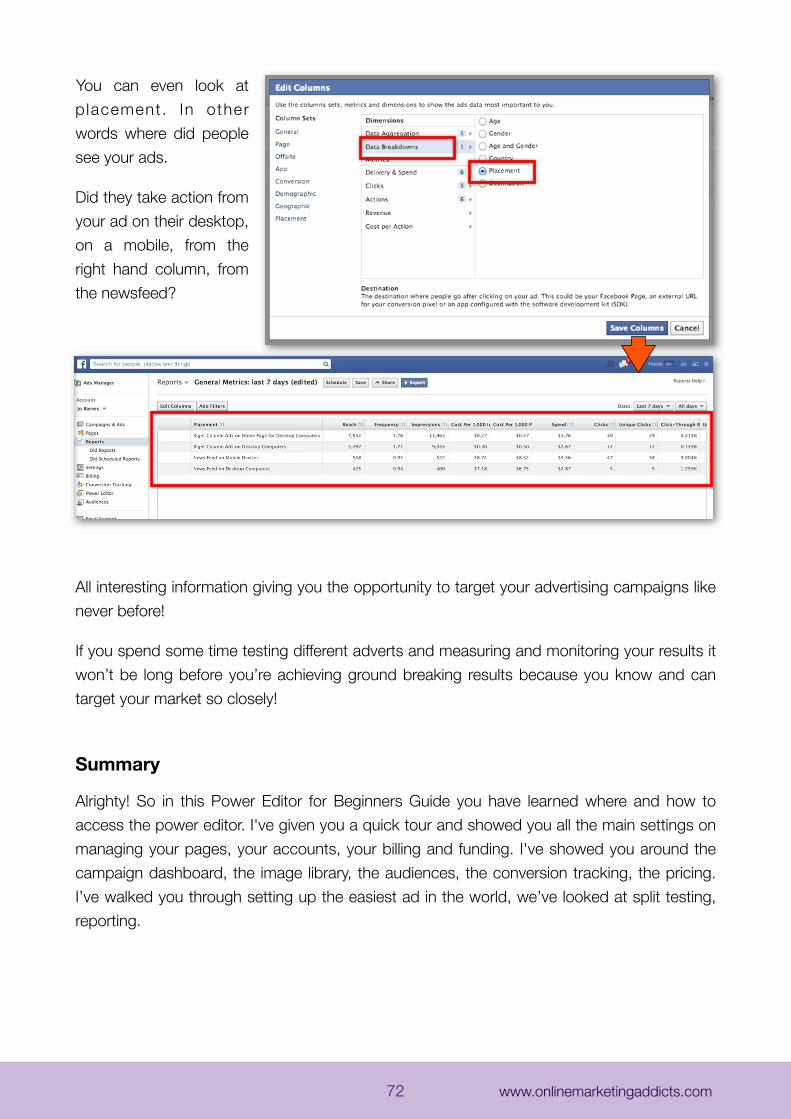
You can even look at p lacement. In other words where did people see your ads.
Did they take action from your ad on their desktop, on a mobile, from the right hand column, from the newsfeed?
All interesting information giving you the opportunity to target your advertising campaigns like never before!
If you spend some time testing different adverts and measuring and monitoring your results it won’t be long before you’re achieving ground breaking results because you know and can target your market so closely!
Summary
Alrighty! So in this Power Editor for Beginners Guide you have learned where and how to access the power editor. I've given you a quick tour and showed you all the main settings on managing your pages, your accounts, your billing and funding. I've showed you around the campaign dashboard, the image library, the audiences, the conversion tracking, the pricing. I’ve walked you through setting up the easiest ad in the world, we’ve looked at split testing, reporting.
72 www.onlinemarketingaddicts.com
I've also told you that it's super important that you absolutely MUST, as soon as you boot the power editor up, hit that download button in order to get everything downloaded off of Facebook and updated on your screen.
Then of course when you’re ready to go live hit that upload button to make sure that everything is uploaded onto Facebook.
I've also shown you how to use the bulk import tool and the list settings to arrange your screen. We also went through in quite some detail all the different things that you need to do to create your campaign, to create your ad creative, what to do with your audience, what to do with optimization and pricing, and everything you need to know to create fantastic adverts.
We then talked about managing your ads and making the creation of campaigns and adverts quicker and easier plus much much more......
It’s been a fairly intensive guide and I congratulate you for going through the whole document and following along.
I do now hope that you have a much better idea of what the power editor is and how to use it to create powerful and targeted advertising campaigns.
Whatever you do, don’t let this information just sit and gather dust now. Get out there and begin testing & measuring.
If anybody tells you that you can slap up a couple of ads and have instant success, then as much as I don’t want to be the bearer of bad news, if that happened you’d be extremely lucky!
Most of the time with Facebook advertising it really is about trial and error, trial and error, trial and error.
So go and get started and let me know how you get on! If you have any questions please don’t hesitate to contact us on our helpdesk or over on our facebook page.
Also if you would like more in depth video training on all of these aspects and more then check out my Facebook Domination Course.
As a purchaser of this guide you do get an instant 20% off of the advertised price. Simply click on the Add to Cart button and insert the code you received in the email with this guide and the discount will be instantly applied!
Click Here for Further Details of Facebook Domination.
73 www.onlinemarketingaddicts.com
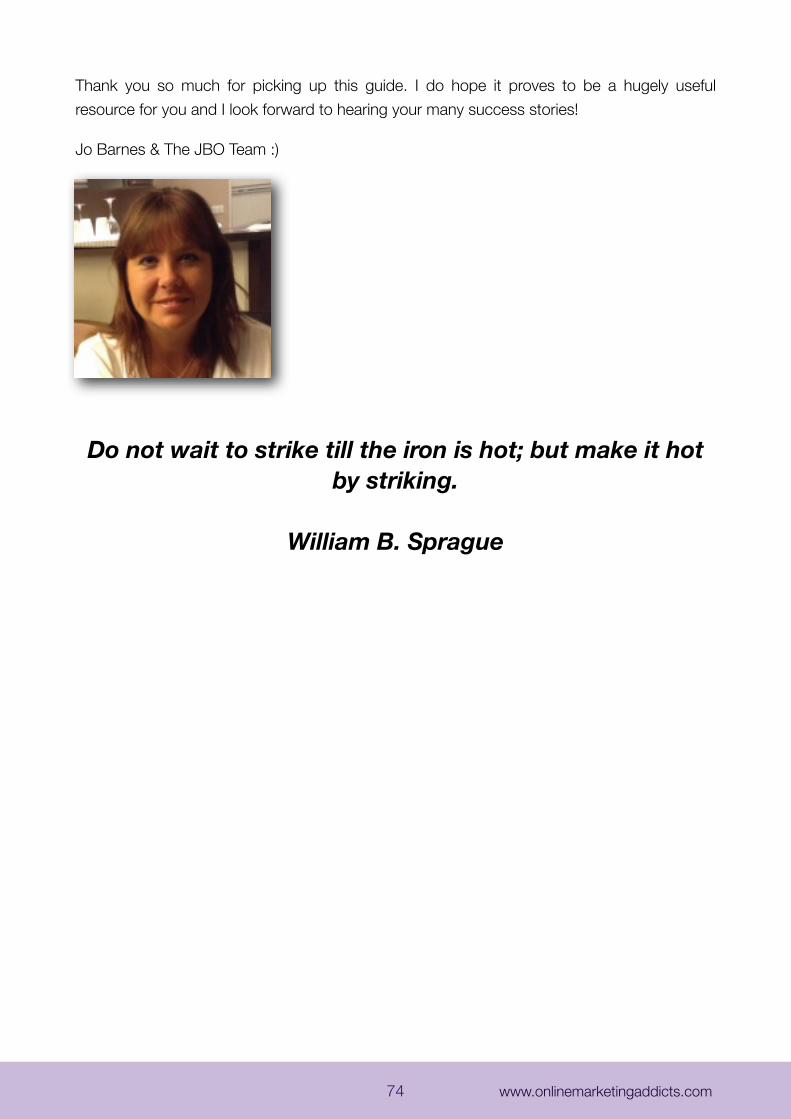
Thank you so much for picking up this guide. I do hope it proves to be a hugely useful resource for you and I look forward to hearing your many success stories!
Jo Barnes & The JBO Team :)
Do not wait to strike till the iron is hot; but make it hot by striking.
William B. Sprague
74 www.onlinemarketingaddicts.com
Copyright, Licensing and Liabilities.
Copyright ©2013,2014 Jo Barnes Online. http://www.jobarnesonline.com/
Everyone is permitted to copy and distribute verbatim copies of this document, but changing it is not allowed without the express permission of Jo Barnes Online.
All copyrights by respective companies are fully acknowledged.
Disclaimer of WarrantyTHERE IS NO WARRANTY FOR ANY PROGRAMS OR DOCUMENTATION, TO THE EXTENT PERMITTED BY APPLICABLE LAW. EXCEPT WHEN OTHERWISE STATED IN WRITING THE COPYRIGHT HOLDERS AND/OR OTHER PARTIES PROVIDE THE PROGRAM “AS IS” WITHOUT WARRANTY OF ANY KIND, EITHER EXPRESSED OR IMPLIED, INCLUDING, BUT NOT LIMITED TO, THE IMPLIED WARRANTIES OF MERCHANTABILITY AND FITNESS FOR A PARTICULAR PURPOSE. THE ENTIRE RISK AS TO THE QUALITY AND PERFORMANCE OF THE PROGRAM IS WITH YOU. SHOULD THE PROGRAM PROVE DEFECTIVE, YOU ASSUME THE COST OF ALL NECESSARY SERVICING, REPAIR OR CORRECTION.
Limitation of LiabilityIN NO EVENT UNLESS REQUIRED BY APPLICABLE LAW OR AGREED TO IN WRITING WILL ANY COPYRIGHT HOLDER, OR ANY OTHER PARTY WHO MODIFIES AND/OR CONVEYS THE PROGRAM AS PERMITTED ABOVE, BE LIABLE TO YOU FOR DAMAGES, INCLUDING ANY GENERAL, SPECIAL, INCIDENTAL OR CONSEQUENTIAL DAMAGES ARISING OUT OF THE USE OR INABILITY TO USE THE PROGRAM (INCLUDING BUT NOT LIMITED TO LOSS OF DATA OR DATA BEING RENDERED INACCURATE OR LOSSES SUSTAINED BY YOU OR THIRD PARTIES OR A FAILURE OF THE PROGRAM TO OPERATE WITH ANY OTHER PROGRAMS), EVEN IF SUCH HOLDER OR OTHER PARTY HAS BEEN ADVISED OF THE POSSIBILITY OF SUCH DAMAGES.
Interpretation of above SectionsIf the disclaimer of warranty and limitation of liability provided above cannot be given local legal effect according to their terms, reviewing courts shall apply local law that most closely approximates an abs olute waiver of all civil liability in connection with the Program or information contained in the documentation, unless a warranty or assumption of liability accompanies a copy of the Program or documentation in return for a fee.
Version 1.00 January 2014, Edited and Published by Jo Barnes of Jo Barnes Online
75 www.onlinemarketingaddicts.com