fast 4.3+ user guide - university of saskatchewan note: these settings will apply only to your user...
TRANSCRIPT

FAST 4.3+ User Guide
Last Updated: May-18
Contents Introduction to Navigation & Basic Tips ............................................................................................. 2
FAST Finance Home Page ............................................................................................................. 2
To access your reports (previously “statements”) ............................................................................ 5
Function-Based Filter options ........................................................................................................ 7
Understanding FAST Filter Options ................................................................................................ 8
Understanding the Filter Options Page ......................................................................................... 10
Understanding your Report’s Data ............................................................................................... 11
Report Navigation ..................................................................................................................... 12
Pinned Reports ............................................................................................................................ 16
Advanced Options ........................................................................................................................ 19
Report Scheduler ...................................................................................................................... 21
Virtual Columns ........................................................................................................................ 22
Guide to Graphing Set-Up ............................................................................................................. 27
http://www.usask.ca/fsd/colleges_depts_research/unifi/unifi_manual.php Support: [email protected] | 306-966-8783

FAST 4.3+ Finance Reporting User Guide
Page 2 of 35
Introduction to Navigation & Basic Tips FAST Finance Home Page Welcome to FAST Finance Reporting! The following document will provide you with tips and tricks to get you up and running quickly and easily!
The FAST Tab Strip:
You can make one of the tabs your own personal “default” when opening your FAST Finance Landing Page. Just click to lock the lock!
The newly redesigned Tab Strip will persist on every page within FAST. You can now quickly and easily access any tab or any FAST application from any page you are working on.
http://www.usask.ca/fsd/colleges_depts_research/unifi/unifi_manual.php Support: [email protected] | 306-966-8783

FAST 4.3+ Finance Reporting User Guide
Page 3 of 35
It will change from unlocked to locked indicating it is now your personal default; the unlocked icon is also removed from the other tabs.
If you change your mind, just click the icon and change your selection as often as you want!
Remember: you can select a different default Tab for your FAST Portal Home Page and for each application within FAST. This will give you quick and easy access to the features and pages in FAST that you use the most often!
Use the “hamburger” button to expand or contract the Tab Strip on the page.
“locked”
http://www.usask.ca/fsd/colleges_depts_research/unifi/unifi_manual.php Support: [email protected] | 306-966-8783

FAST 4.3+ Finance Reporting User Guide
Page 4 of 35
Legend of commonly used Functions and Tabs:
Use various Filter Options to narrow and refine your query
View results from the selected options – this is your dataset output
Open online information about the reporting pages
Select the + More tab to access other tabs and features on your page
Open and manage your Pinned Reports
Update or manage your Pinned Report
Change and manage advanced options for your report columns
Create a graph for a visual representation of your report data
Click to execute or “run” your report
Click to clear all filter options on your Filter Options Tab AND Click to clear your Application Info Tab and re-set the page to default status
Save as a Pinned Report
Click either to export your data to PDF or Excel Formats
You have selected a report as a “favourite” in your Pinned Reports library
Hamburger button – used to expand or contract your Tab Strip
Training Videos
My Schedule Tab – Calendar Control to review your scheduled Pinned Reports
http://www.usask.ca/fsd/colleges_depts_research/unifi/unifi_manual.php Support: [email protected] | 306-966-8783

FAST 4.3+ Finance Reporting User Guide
Page 5 of 35
To access your reports (previously “statements”) To access your main reports, you can select a menu option from the choices on the top of the page to provide a higher level of detail and data summary without having to drill down.
Each level is summarized (by default) at a different level in your Chart of Accounts.
Remember the default summary can always be modified either before or after you execute your report!
http://www.usask.ca/fsd/colleges_depts_research/unifi/unifi_manual.php Support: [email protected] | 306-966-8783

FAST 4.3+ Finance Reporting User Guide
Page 6 of 35
If you prefer, from your Application Info Tab, just click Enter! This will produce a summarized report of all accounts you have access to based on your own Fund/Orgn security in Banner.
Using the Search Functionality:
Alternatively you can choose to refine your data before executing the report. This is important if you have Master Fund/Orgn security or access to a large number of FOAPALs. To refine your data, simply type in the necessary combination of Fund/Orgn/Acct, etc., select a Report Type, a Fiscal Period and then hit Enter.
Using the search button, can drill down through the hierarchy to find the parent or child records that relate to the search you are trying to execute. If in doubt, selecting the parent code will also bring back all codes that roll up to it, based on your user ID fund/orgn security.
http://www.usask.ca/fsd/colleges_depts_research/unifi/unifi_manual.php Support: [email protected] | 306-966-8783

FAST 4.3+ Finance Reporting User Guide
Page 7 of 35
Function-Based Filter options
Using the Function key to build a query allows you to avoid hard-coding a point in time in your queries and allows for date-based queries such as “current” Fiscal period or “last” Fiscal period. This is especially important as you begin to create Pinned Reports. These reports will update dynamically without the need to modify your fiscal period.
http://www.usask.ca/fsd/colleges_depts_research/unifi/unifi_manual.php Support: [email protected] | 306-966-8783

FAST 4.3+ Finance Reporting User Guide
Page 8 of 35
Understanding FAST Filter Options There are several different filter option controls and you can use them to minimize, filter and refine the data in your report. It is usually best practice to refine your results in some way so that the data you produce is manageable and targets your intended query. However you also do not want to add too many filters or you run the risk of missing key data.
The types of filter options used for a report depend on the type of data being collected. You can, in most cases, select multiple filter options including Fund, Orgn and Acct codes but also fund/acct type:
http://www.usask.ca/fsd/colleges_depts_research/unifi/unifi_manual.php Support: [email protected] | 306-966-8783

FAST 4.3+ Finance Reporting User Guide
Page 9 of 35
Here are examples of the filter controls used in various reporting pages:
Date Combo Box: Multi-Search Box (you can choose one or more):
Drop-down Search (you can choose only one):
Multi-Select List – includes drop-down options (you can select one or more):
Search Box (select one code only): Operator drop-down list:
Dynamic Function Button: Include or Exclude from query: Search using a date range:
http://www.usask.ca/fsd/colleges_depts_research/unifi/unifi_manual.php Support: [email protected] | 306-966-8783

FAST 4.3+ Finance Reporting User Guide
Page 10 of 35
Understanding the Filter Options Page
http://www.usask.ca/fsd/colleges_depts_research/unifi/unifi_manual.php Support: [email protected] | 306-966-8783

FAST 4.3+ Finance Reporting User Guide
Page 11 of 35
Understanding your Report’s Data
http://www.usask.ca/fsd/colleges_depts_research/unifi/unifi_manual.php Support: [email protected] | 306-966-8783

FAST 4.3+ Finance Reporting User Guide
Page 12 of 35
Report Navigation
You can also customize and modify the sort order and make changes such as displaying the data by Acct or by Orgn rather than by Fund. In the deeper levels of the GL Hierarchy you can also display (as shown) to order by Fund, then by Orgn, or any other combination of sorting options:
Use this as your “Back” button.
Produces a list of reports run today; use as a shortcut to re-run as
needed.
Click on any blue field to drill down to more detail.
Use this drop-down box to quickly navigate between levels of the hierarchy; “1”=8000, “8”=1XXX.
Change from Current Year to another report display.
http://www.usask.ca/fsd/colleges_depts_research/unifi/unifi_manual.php Support: [email protected] | 306-966-8783

FAST 4.3+ Finance Reporting User Guide
Page 13 of 35
Options to Customize your Report Data:
After you select your filter options and run your report, the results page opens. There are several things you can do right on the page to customize and display the data on the reporting page:
To resize column width: Place your cursor between the two headers and drag the column divider to the desired width. This is helpful if the text is cut off in the cell space provided:
To move column order: Simply drag & drop the column to wherever you’d like it to display!
http://www.usask.ca/fsd/colleges_depts_research/unifi/unifi_manual.php Support: [email protected] | 306-966-8783

FAST 4.3+ Finance Reporting User Guide
Page 14 of 35
Customize your Filter Options:
While saving reports as “Pinned Reports” is the only way to save all settings and filter options, you can customize each individual query page by selecting individual filters as YOUR default for THIS report.
Please note: these settings will apply only to your User ID profile for the selected report.
To change or delete: To remove this saved setting, you can click the at any time.
http://www.usask.ca/fsd/colleges_depts_research/unifi/unifi_manual.php Support: [email protected] | 306-966-8783

FAST 4.3+ Finance Reporting User Guide
Page 15 of 35
Customize each column by clicking on the Column Header to do the following:
http://www.usask.ca/fsd/colleges_depts_research/unifi/unifi_manual.php Support: [email protected] | 306-966-8783

FAST 4.3+ Finance Reporting User Guide
Page 16 of 35
Pinned Reports Pinned Reports (completely separate from Crystal Reports) are very powerful and very useful tools and allow you to save your reports that you use the most frequently in an easy to find location so that you will not have to re-create and format the report each time you run it. Saving the report as a Pinned Report will allow you to re-execute the report with a single click and all filter options, advanced features and other modifications will remain intact!
When you pin a report to your Favorites, it is pinned to your profile in an easy to access place.
Your pinned reports will not be visible to others; this is for your own personal use unless you save them as “public”.
1. Personal or Private Pinned Reports: You create them and only you can see/run/modify/delete them.
2. Group Pinned Reports: Currently not in use. A Group Administrator created them and assigned them to a Group that you belong to. You can see/run them but only a Group Administrator can modify/delete them.
3. Public Pinned Reports: An Administrator created them and added them to the Public Pinned Reports library. Everyone with access to FAST Finance Reporting can see and run them based on each users’ unique Fund/Orgn security. You can see/run/save them, but only an Administrator can modify/delete them.
http://www.usask.ca/fsd/colleges_depts_research/unifi/unifi_manual.php Support: [email protected] | 306-966-8783

FAST 4.3+ Finance Reporting User Guide
Page 17 of 35
To create or modify a Pinned Report, you will use one of the following buttons:
The Pinned Report button will provide you with two options:
The “Update” button acts as a “save” button and over-writes the existing Pinned Report with the new content. You will still be prompted to save; this allow you to change the title if necessary.
Please note: You can only update pinned reports that you created; you cannot update a Public or Group pinned report that you did not build. In these cases, you will see only a “Save As” button.
The “Create New” button acts as a “save as” and will save the content as a NEW Pinned Report.
Remember: Tagging your report as a “Favorite” on your Pinned Reports Tab will mean it is always available to you with a single click!
http://www.usask.ca/fsd/colleges_depts_research/unifi/unifi_manual.php Support: [email protected] | 306-966-8783

FAST 4.3+ Finance Reporting User Guide
Page 18 of 35
Here are a few scenarios to consider when using Pinned Reports in your day-to-day workflow:
Scenario Solution
You use the same filter and/or advanced options on a daily basis
Save it as a Pinned Report and mark as a Favorite for quick and easy access
You only want specific employees to see a report Create a group role and assign the Pinned Report to that group only
You want all employees to be able to see and run the report
Make the report Public – Fund/Orgn security will still be enforced!
You want a visual representation of the data Create a graph from the report data, save it, and then add the graph to your Dashboard
You need to email a report link with confidential information to someone who rarely uses the system
Pin the report, save as private, and then email the Execute link only. Alternatively, you could email the PDF or Excel output
You want to view the updated results of your Pinned Report every Monday morning when you get to work
Save it as a Pinned Report; use the Report Scheduler to schedule an automated delivery to your inbox every Monday morning
You need to deliver a report to the Dean of each Faculty at the end of each Fiscal Period illustrating current actuals to budget totals
Save it as a Group Pinned Report; use the Admin Report Scheduler to deliver this to each member of the group on the last day of each Fiscal Period
http://www.usask.ca/fsd/colleges_depts_research/unifi/unifi_manual.php Support: [email protected] | 306-966-8783

FAST 4.3+ Finance Reporting User Guide
Page 19 of 35
Advanced Options Some extra tips to take your FAST Finance Reports to the next level!
Across the top of each reporting page, locate the Advanced Options Tab:
You will find a variety of additional features that you can use to customize your report.
Please note: what you see depends on your User ID roles in the application and on which advanced features have been enabled at your institution and for this reporting page.
In some cases, your Advanced Options Tab may be under the + More menu:
NOTE: The order and placement of your Tabs can be customized by User for each or all reports in FAST! Check out the short video called “How Do I Edit my Tabs” for a quick demo!
http://www.usask.ca/fsd/colleges_depts_research/unifi/unifi_manual.php Support: [email protected] | 306-966-8783

FAST 4.3+ Finance Reporting User Guide
Page 20 of 35
The Advanced Options Tab:
This tab allows you to turn on or off your report columns, use Grouping Functions, apply or modify sort order and also re-arrange columns before re-executing your report.
Review of Pinned Reports
Pinned Reports are very powerful and very useful tools and allow you to save your reports that you use the most frequently in an easy to find location so that you will not have to re-create and format the report each time you run it. Saving the report as a Pinned Report will allow you to re-execute the report with a single click and all filter options, advanced features and other modifications will remain intact!
Your pinned reports will not be visible to others; this is for your own personal use unless you save them as “public”.
To create or modify a Pinned Report, you will use one of the following buttons:
http://www.usask.ca/fsd/colleges_depts_research/unifi/unifi_manual.php Support: [email protected] | 306-966-8783

FAST 4.3+ Finance Reporting User Guide
Page 21 of 35
The Pinned Report button will provide you with two options:
The “Update” button acts as a “save” button and over-writes the existing Pinned Report with the new content. You will still be prompted to save; this allow you to change the title if necessary.
Please note: You can only update pinned reports that you created; you cannot update a Public or Group pinned report that you did not build. In these cases, you will see only a “Save As” button.
The “Create New” button acts as a “save as” and will save the content as a NEW Pinned Report.
Report Scheduler If you would like your Pinned Report to deliver to your inbox at a regularly scheduled interval, use the Report Scheduler tool to set this up!
http://www.usask.ca/fsd/colleges_depts_research/unifi/unifi_manual.php Support: [email protected] | 306-966-8783

FAST 4.3+ Finance Reporting User Guide
Page 22 of 35
Then select your schedule criteria including frequency, day and time, start and end date and format!
You can then review your scheduled pinned reports in your own personal calendar control using the My Schedule tab – find it along your Tab Strip!
Virtual Columns Once you have run a report, you also have the ability to create new custom columns called Virtual Columns. This allows you the flexibility to include formulas or additional calculated fields in your report data.
Please also check out the numerous Training Videos on the topic of Virtual Columns for more detailed help, tips & tricks:
http://www.usask.ca/fsd/colleges_depts_research/unifi/unifi_manual.php Support: [email protected] | 306-966-8783

FAST 4.3+ Finance Reporting User Guide
Page 23 of 35
To use this feature, run any FAST Finance report and then find the small gear button on the toolbar:
Select the gear button and you will have 2 choices: add or manage
http://www.usask.ca/fsd/colleges_depts_research/unifi/unifi_manual.php Support: [email protected] | 306-966-8783

FAST 4.3+ Finance Reporting User Guide
Page 24 of 35
To create a new, personal Virtual Column, select the + Add button. A worksheet will open with several options:
http://www.usask.ca/fsd/colleges_depts_research/unifi/unifi_manual.php Support: [email protected] | 306-966-8783

FAST 4.3+ Finance Reporting User Guide
Page 25 of 35
Title: Create a title for your new column
Width: Column width in pixels
Sort Order: Columns will display from left to right, sorted from lowest to highest; select a column sort order where you would like to see your new column displayed
Format: Select (optional) a cell format; for example: date, currency, number, percentage
Alignment: options are left, right or centre aligned.
Calculate Footer Total: Available on calculated formulas only
Formula: Create a formula or equation by either keying directly into the data entry block OR use the drop-downs for help.
Available to all users? This option will only be visible if you are an application administrator. Otherwise, all columns are for your own personal use only.
Click SAVE to test your formula! If the formula is valid, the report will re-load and the new column will exist and be ready to work with:
To manage or delete your Virtual Column:
Click the gear button and select Manage
http://www.usask.ca/fsd/colleges_depts_research/unifi/unifi_manual.php Support: [email protected] | 306-966-8783

FAST 4.3+ Finance Reporting User Guide
Page 26 of 35
From here you can delete or return to the worksheet to make edits:
OR, you can also access the same worksheet using the column header for all private Virtual Columns:
Remember that these columns will now be available for your User ID only and you can incorporate them into your Pinned Reports and all other FAST functionality. You can create as many as you need and organize them on each report.
http://www.usask.ca/fsd/colleges_depts_research/unifi/unifi_manual.php Support: [email protected] | 306-966-8783

FAST 4.3+ Finance Reporting User Guide
Page 27 of 35
Guide to Graphing Set-Up Graphing can be a great way to visually render or interpret your report data. It is important to remember that not all data will make sense as a graph but it can be a very powerful and interactive tool in many cases.
FAST Dashboards can be used within each FAST application to help organize and simplify your workflow and keep track of your various charts, graphs and grids.
There are few key steps involved to create your own Dashboards, to prepare your data for graphing and then to create your own charts as either pie charts, bar charts or line charts. Finally, you can add the graph to your Dashboard to make it available with a single click.
Step 1: Create one or more personal Dashboards
In any FAST application, access your Dashboard Tab using the Tab Strip
You can actually create as many Dashboards as you need for the different tasks you need to accomplish.
To create your first Dashboard, simply create a Dashboard Name and click Save. If you have access to the Group Dashboard functionality (Administrators only), you can also choose to assign this Dashboard to one or more groups.
Once you click Save, your Dashboard will display as “empty” until you manually add graphs to it.
http://www.usask.ca/fsd/colleges_depts_research/unifi/unifi_manual.php Support: [email protected] | 306-966-8783

FAST 4.3+ Finance Reporting User Guide
Page 28 of 35
Click Manage Dashboard:
You will see two dashboard graphing libraries: Private and Public.
Much like the Pinned Reports libraries, Private graphs are those that you have built and saved; no-one else can see or run these graphs. The Public graphs have been saved to the Public library and made available for all end users within the application. Drill-down on the + button to open either of these libraries.
NOTE: The ability to create and save Public Pinned Reports and Graphs is limited by Role and may not be used at your institution.
When you have made your selection, click Display Dashboard to save your changes:
http://www.usask.ca/fsd/colleges_depts_research/unifi/unifi_manual.php Support: [email protected] | 306-966-8783

FAST 4.3+ Finance Reporting User Guide
Page 29 of 35
STEP 2: Prepping your reporting data for graphing
An important step in the graphing process is to evaluate your report data and decide what subset of that data you would like to use for your graph. In some instances, the best way to do this is using the Advanced Options Tab.
Run a FAST report and once your data has executed, click the Advanced Options Tab to refine your results.
You can either de-select columns individually OR click the Select No Columns button to de-select all. Re-select only those columns you wish to include in your graph.
Grouping: The use of the Group Function is key for this step. If you leave this function disabled, it will simply produce a list of records, rather than a count of records and you will be unable to clearly graph this data; remember that your “Y” value must be numeric.
Re-execute your report to review the output. If you are satisfied, you are ready to create your graph.
http://www.usask.ca/fsd/colleges_depts_research/unifi/unifi_manual.php Support: [email protected] | 306-966-8783

FAST 4.3+ Finance Reporting User Guide
Page 30 of 35
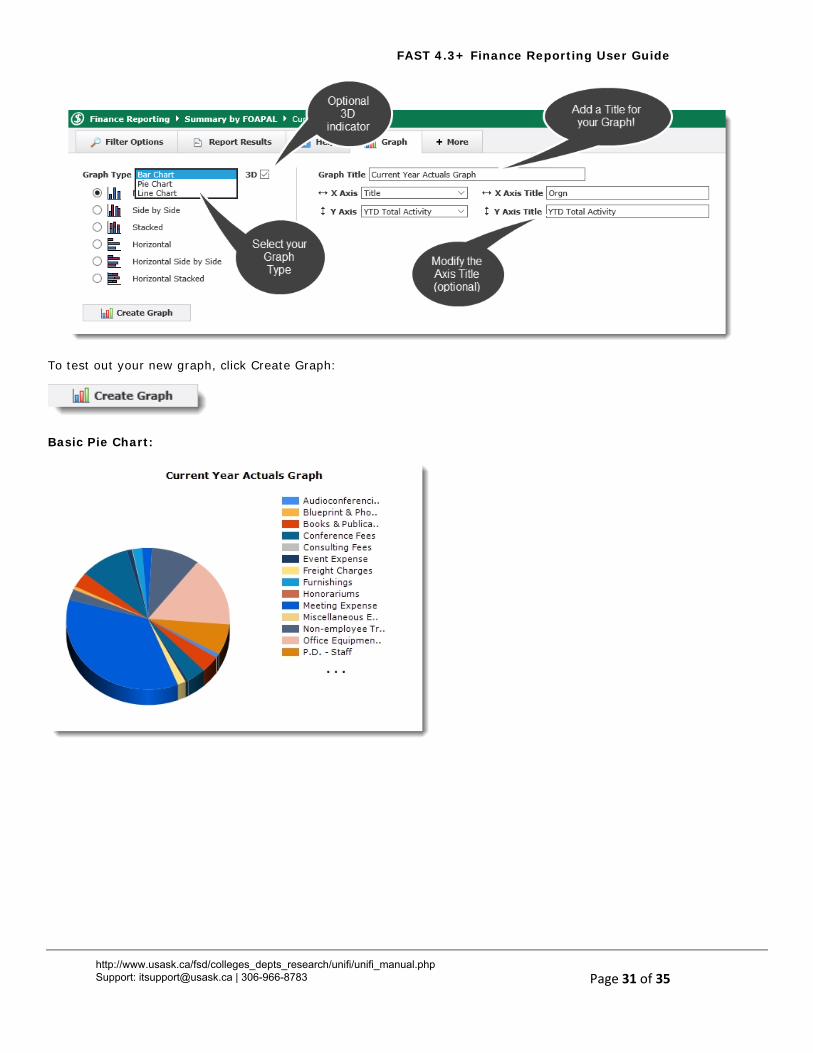
Optional: Depending on the report, you may choose to pre-assign your initial X and Y Axis values from the report results page. To do so, simply click on the Column Header and make your selection from the toolbar:
STEP 3: Graphing
To create your graph, locate the Graph Tab along the top of your report OR in the + More Tab:
If you chose to pre-assign your initial X and Y Axis values, these will be populated in the X and Y Axis fields. If not, simply make your selection from the drop-down menu.
NOTE: These drop-down menus now contain only those fields you have included using the Advanced Options Tab. If you have forgotten to include a value, simply return to Advanced Options, select it, and re-execute your report before continuing on to the next step.
http://www.usask.ca/fsd/colleges_depts_research/unifi/unifi_manual.php Support: [email protected] | 306-966-8783
FAST 4.3+ Finance Reporting User Guide
Page 31 of 35
To test out your new graph, click Create Graph:
Basic Pie Chart:
http://www.usask.ca/fsd/colleges_depts_research/unifi/unifi_manual.php Support: [email protected] | 306-966-8783
FAST 4.3+ Finance Reporting User Guide
Page 32 of 35
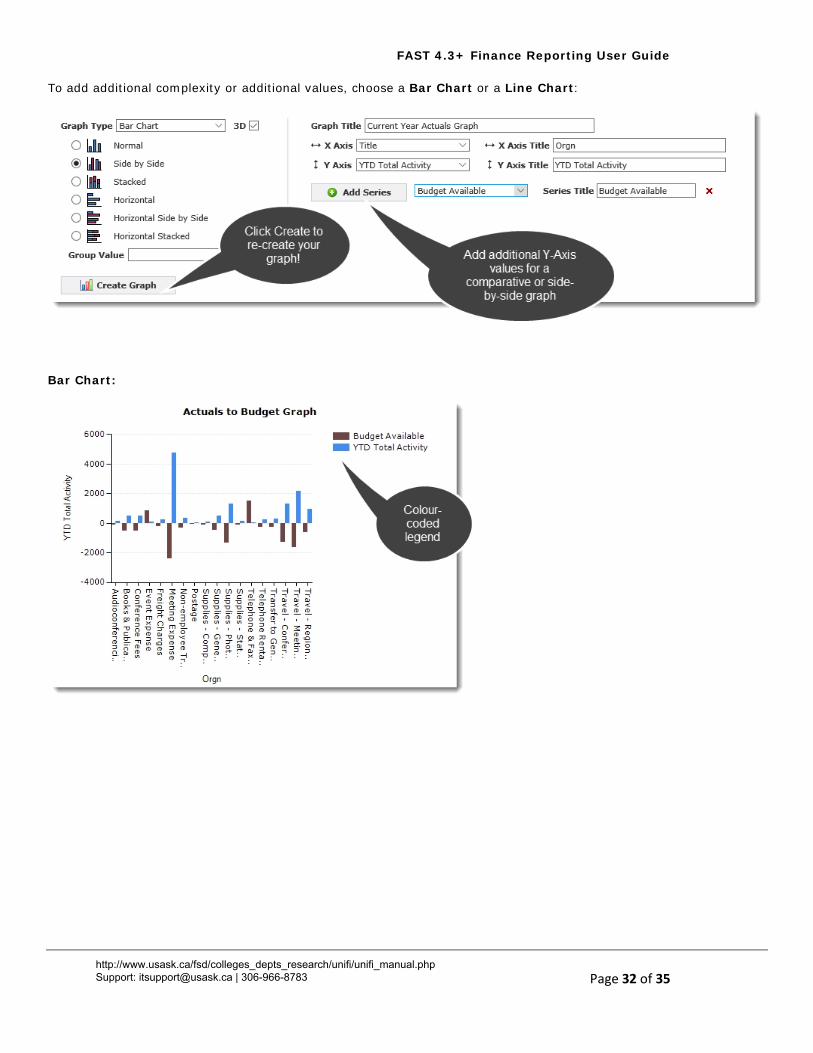
To add additional complexity or additional values, choose a Bar Chart or a Line Chart:
Bar Chart:
http://www.usask.ca/fsd/colleges_depts_research/unifi/unifi_manual.php Support: [email protected] | 306-966-8783

FAST 4.3+ Finance Reporting User Guide
Page 33 of 35
Line Chart:
To save your Graph, you must save it as a Graph and a Pinned Report; this is completed in one step:
http://www.usask.ca/fsd/colleges_depts_research/unifi/unifi_manual.php Support: [email protected] | 306-966-8783
FAST 4.3+ Finance Reporting User Guide
Page 34 of 35
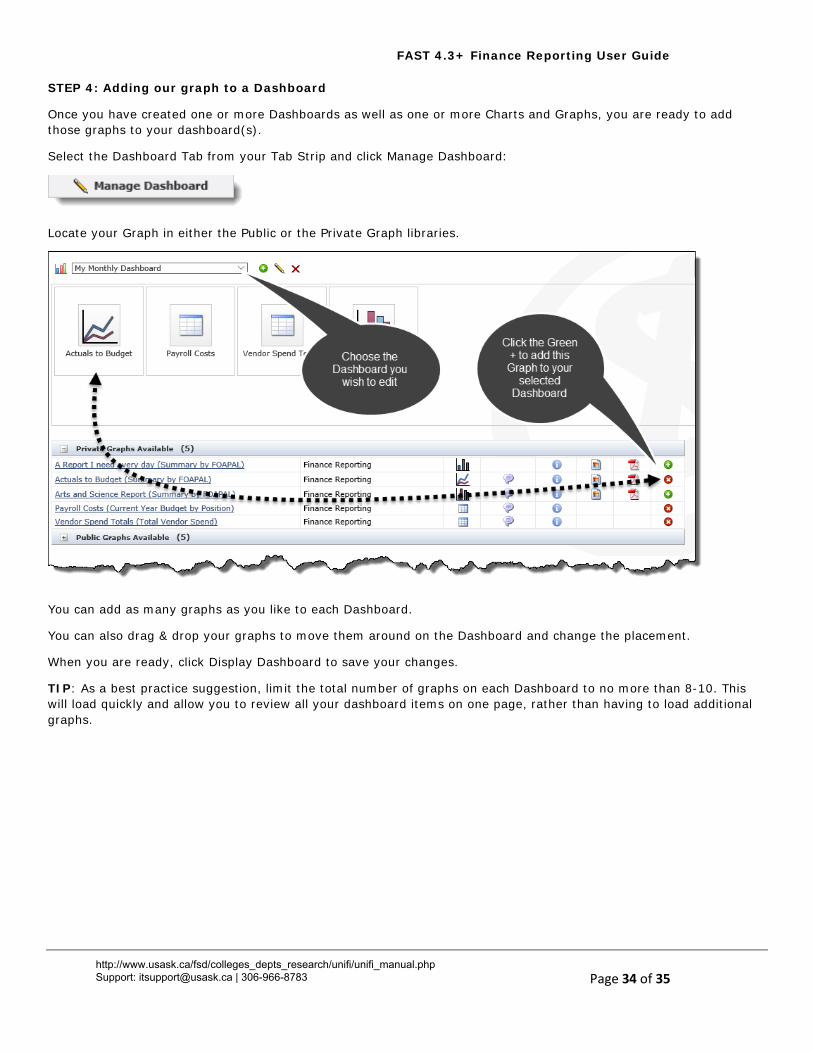
STEP 4: Adding our graph to a Dashboard
Once you have created one or more Dashboards as well as one or more Charts and Graphs, you are ready to add those graphs to your dashboard(s).
Select the Dashboard Tab from your Tab Strip and click Manage Dashboard:
Locate your Graph in either the Public or the Private Graph libraries.
You can add as many graphs as you like to each Dashboard.
You can also drag & drop your graphs to move them around on the Dashboard and change the placement.
When you are ready, click Display Dashboard to save your changes.
TIP: As a best practice suggestion, limit the total number of graphs on each Dashboard to no more than 8-10. This will load quickly and allow you to review all your dashboard items on one page, rather than having to load additional graphs.
http://www.usask.ca/fsd/colleges_depts_research/unifi/unifi_manual.php Support: [email protected] | 306-966-8783

FAST 4.3+ Finance Reporting User Guide
Page 35 of 35
Your Dashboard is also now an interactive tool to be used to validate or review your data. To use the interactive features, you can do one of the following:
1. Click on the PDF button to download graph to a printer or email friendly PDF format 2. Click on the hyperlinked title which will execute the Pinned Report on which this graph is based 3. Click on any section of your graph to drill-down to the subset of data contained in that core data and review
the supporting detail.
http://www.usask.ca/fsd/colleges_depts_research/unifi/unifi_manual.php Support: [email protected] | 306-966-8783