fao tcp/ 3404 users’guide ... -...
TRANSCRIPT

FAO TCP/ 3404
USERS’GUIDE
Malaman’s software March 2017

Malaman is the software designed specifically to complete animal identification and traceability in the Kyrgyz Republic.
This user’s guide is made to help the field users and the officials to deal with basic tasks, to be done by numeric means. It is designed to be used during the training sessions (projected), as well as a reminder afterwards (printed version), this is why it is structured in “how to” chapters.
In this version of the guide, some screens are still in English or partially in English, because translation is not complete for now.
Introduction
2

1. Authentication and homepage2. Identification 3. Health management4. Animal profile5. Movements traceability6. Administration
Content
3

4
1. Authentication of the users and homepage
How to :
• Login on web application• Login on mobile application• Use the home page• Use the “quicksearch” module

Authentication into Malaman web :
• Use any recent computer, connected to internet with a
bandwidth > 0,3 Mbps (if the bandwidth is lower you will
experiment very slow pace).
• Use Chrome browser : in order to get the best compliance
and user experience. If necessary, download this browser at
https://www.google.ru/chrome/browser/desktop/
• Connect to Malaman system by typing this address:
http://aits-kyrgyz.senoe.com
• Define this login page as a bookmark, in order to find it
quickly afterwards.
5
1. Authentication and homepage- How to log in ?
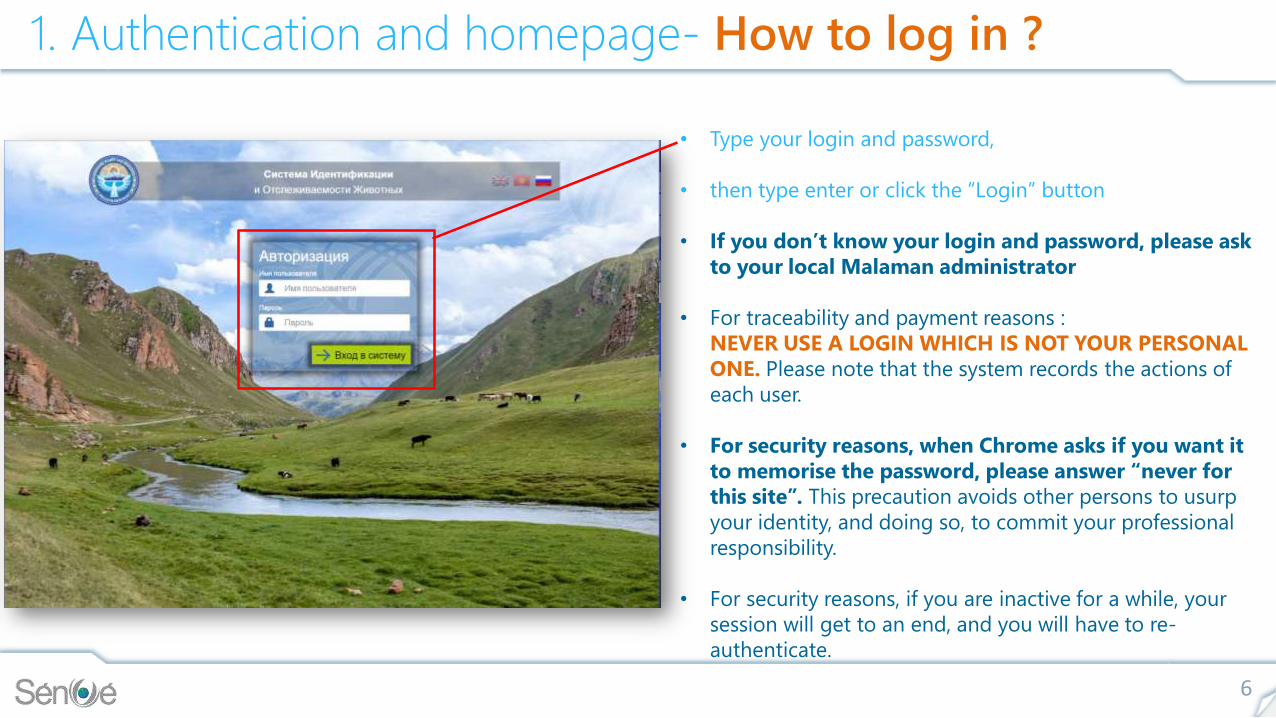
• Type your login and password,
• then type enter or click the “Login” button
• If you don’t know your login and password, please ask
to your local Malaman administrator
• For traceability and payment reasons :
NEVER USE A LOGIN WHICH IS NOT YOUR PERSONAL
ONE. Please note that the system records the actions of
each user.
• For security reasons, when Chrome asks if you want it
to memorise the password, please answer “never for
this site”. This precaution avoids other persons to usurp
your identity, and doing so, to commit your professional
responsibility.
• For security reasons, if you are inactive for a while, your
session will get to an end, and you will have to re-
authenticate.
6
1. Authentication and homepage- How to log in ?

On Malaman Mobile :
• Download last application version at http://aits-
kyrgyz.senoe.com/AITS.apk and install it on your mobile
• Type your login and password,
• Then click the “Login” button
• If you don’t know your login and password, ask to your
local Malaman administrator
• For traceability and payment reasons : NEVER USE A
LOGIN WHICH IS NOT YOUR PERSONAL LOGIN. Please
note that the system records the actions of each user.
7
1. Authentication and homepage- How to log in ?
8
1. Authentication and homepage- How to use the home?
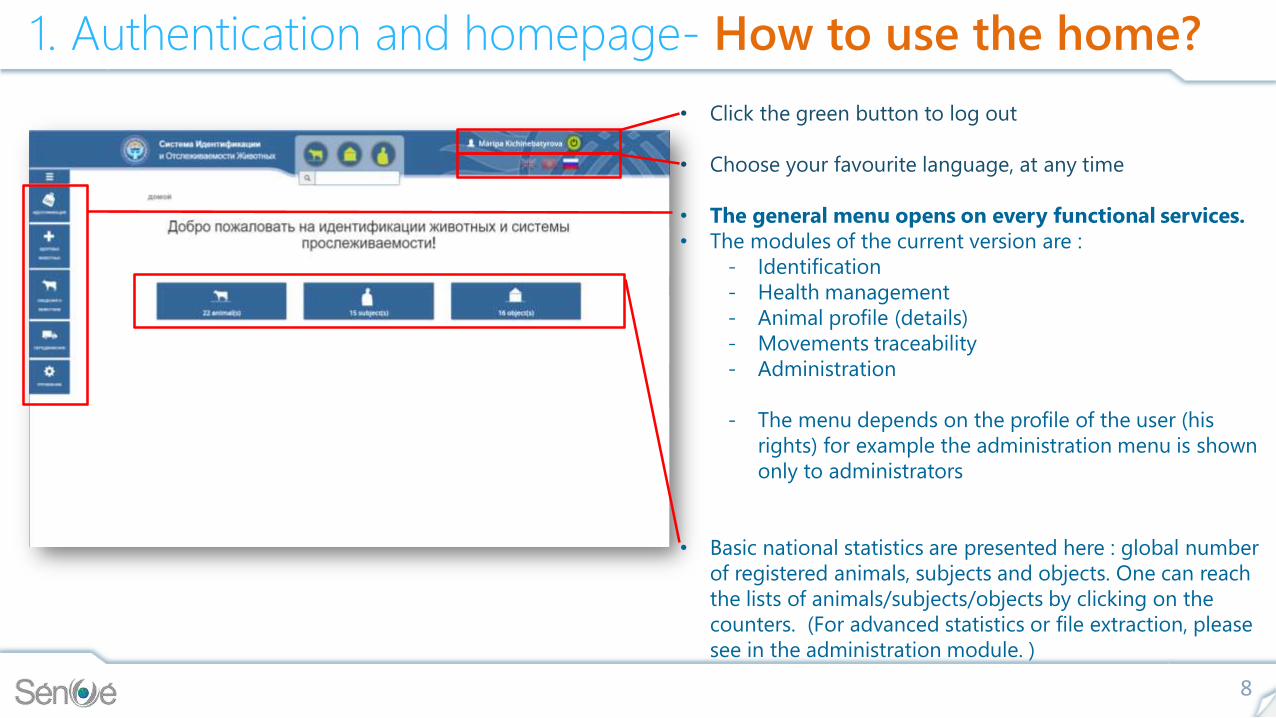
• Click the green button to log out
• Choose your favourite language, at any time
• The general menu opens on every functional services.
• The modules of the current version are :
- Identification
- Health management
- Animal profile (details)
- Movements traceability
- Administration
- The menu depends on the profile of the user (his
rights) for example the administration menu is shown
only to administrators
• Basic national statistics are presented here : global number
of registered animals, subjects and objects. One can reach
the lists of animals/subjects/objects by clicking on the
counters. (For advanced statistics or file extraction, please
see in the administration module. )

On Malaman Mobile :
• The homepage shows for
• A search button for searching subject, object or animal
• 5 quick buttons for :
o Registration of a new subject
o Registration of a new object
o Registration of a new animal
o Scan passport’s QR code
o And synchronisation of the device : this last button allows the user to
transfer data from the central database to his local database (on the
phone) and reverse. When clicking on this button, he actualises both
data bases :
✓ The new data he has captured are transferred to the central
database
✓ The new information captured by other people on the web are
transferred to his mobile application (for his zone only).
o Synchronise your app AT LEAST once a week to minimise the risk of
data loss.
9
1. Authentication and homepage- How to use the home?

On Malaman Mobile :
• The general menu is always accessible via the “burger”
icon :
• When there is an arrow to the right it means that other
services are available.
• The settings are available here, in particular the choice of
language
10
1. Authentication and homepage- How to use the home ?

11
1. Authentication and homepage- How to use the quicksearch ?
• The quicksearch component is made to :
• Open quickly the list of animals/objects/subjects by
clicking merely on the pictograms
• Find quickly an element when the user knows the
identifier of it :
• An animal, ex : KG0000000300 +
• An object, ex : 00000004 +
• A subject, ex : 13579098765432 +
12
1. Authentication and homepage- How to use the quicksearch ?
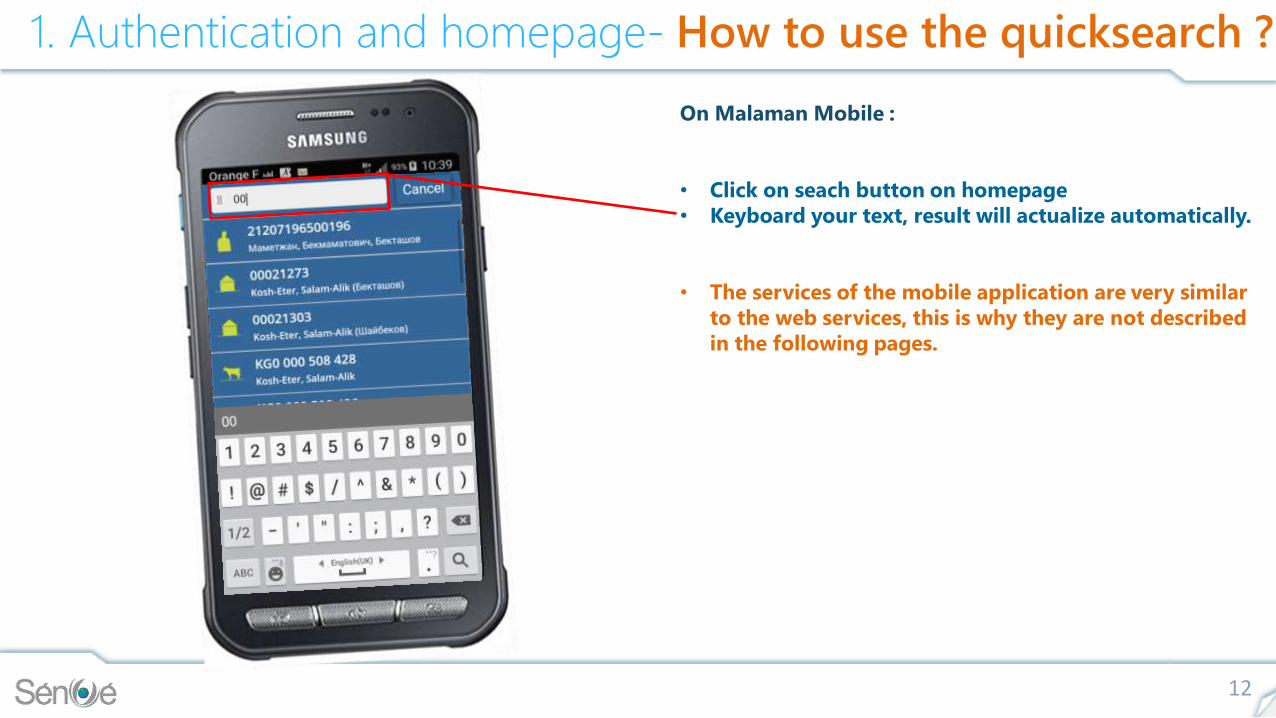
On Malaman Mobile :
• Click on seach button on homepage
• Keyboard your text, result will actualize automatically.
• The services of the mobile application are very similar
to the web services, this is why they are not described
in the following pages.

13
2. Identification module
How to :
• Register a new subject• Display the subjects list and details• Reminder of the data model• Register a new object• Display the objects list and details• Order ear tags• Register a new animal• Display the inventory of animals

14
2. Identification- How to register a new subject (1/3)?
• First capture the date of the paper registration and pick
the name of the registrar who registered this subject (for
direct registration on mobile, please see next section) The
user (typist) is not necessary the registrar who registered
the subject (on paper in this case) we need both
information : who registered on paper + who captured
the data in the system
• The INN number is compulsory (14 digits)
o The type : the subject could be an individual or a
society
o His last name, first name, and middle name in order
to distinguish homonyms
o Don’t capture the end of activity if he is still active

15
2. Identification- How to register a new subject (2/3) ?
• The screen shows up step by step, when the data entered
are correct
• The Address block is made for specifying the place where
the SUBJECT lives (not his animals !)
• Ayl Amak and village are automatically proposed
identical to the previous registration, unless the user
uncheck the checkbox below.
• The address field is a detail for the exact place, in the
considered village, of course, for postal concern.

16
2. Identification- How to register a new subject (3/3)?
• The membership is the necessary link between the subjects
and their pasture committees and their vets. These fields
have to be completed if the subject belongs to the
clientele of a vet, or is a user of a pasture land managed by
a pasture committee. Then, when the vet or the pasture
committee will use Malaman, they will find their own list of
subjects linked to them (by this membership)
• Memberships : 2 memberships or more, (button +)
• Tick this check box to save time if you are capturing a
series of several subjects in the same area.
• When you validate, a green message appears, unless
data are not correct. In this case, non-correct box
becomes red.

• Menu : Identification – Subjects – Subjects list
• This functionality displays the list of the identified subjects of the region accessible to the current user
• Filters : select what you want and then click « Search »
• The rayon is mandatory for performance reasons and to avoid enormous lists
• By default the list displays only active subjects of the selected area
• If you search the subjects responding to a particular name, you can type some letters the last name of subject (this is a filter by “contents”)
• If the filters are not correct a message is displayed: saying « No result to display »
• Excel export of the list (non depending on filters)• Print the subject identification document• The actions are available on the right : details or
suppression (only if free of links with animals)• The selection ticks are available on the left
17
2. Identification- How to display the subjects list ?

Print or CTRL+P
18
2. Identification- How to print the subjects cards ?
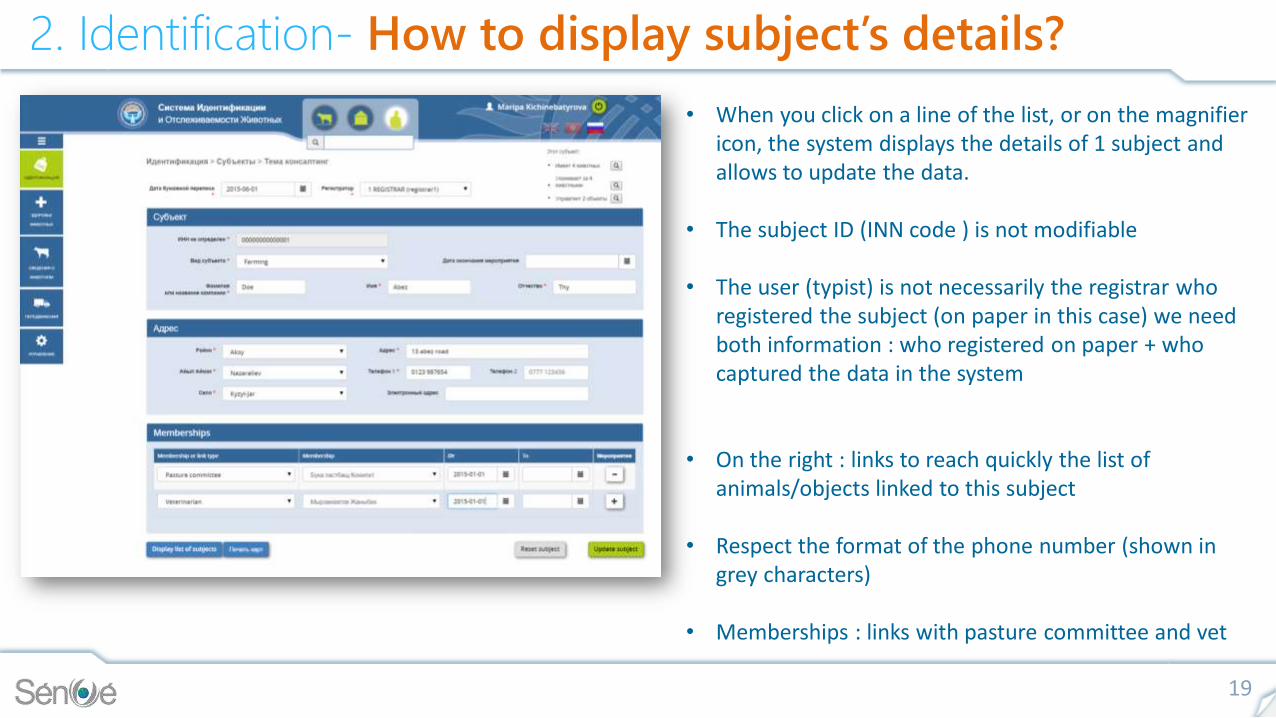
• When you click on a line of the list, or on the magnifier icon, the system displays the details of 1 subject and allows to update the data.
• The subject ID (INN code ) is not modifiable
• The user (typist) is not necessarily the registrar who registered the subject (on paper in this case) we need both information : who registered on paper + who captured the data in the system
• On the right : links to reach quickly the list of animals/objects linked to this subject
• Respect the format of the phone number (shown in grey characters)
• Memberships : links with pasture committee and vet
19
2. Identification- How to display subject’s details?

Village 3 Ayl Amak t BAyl Amak A
Ayl Amak C
Premises
Owner Keeper
owns keeps
lives in
Legend
Village 2
Village 1
Always remember that :
1. The subject has to be registered before all
2. Then the object has to be created, because it’s « contact » is a (registered) subject
3. The animals have to be created afterwards, each animal :
• lives in an object
• Is kept by a keeper
• Is owned by an owner
20
2. Identification- Reminder of the data model
21
2. Identification- How to register a new object (1/2) ?
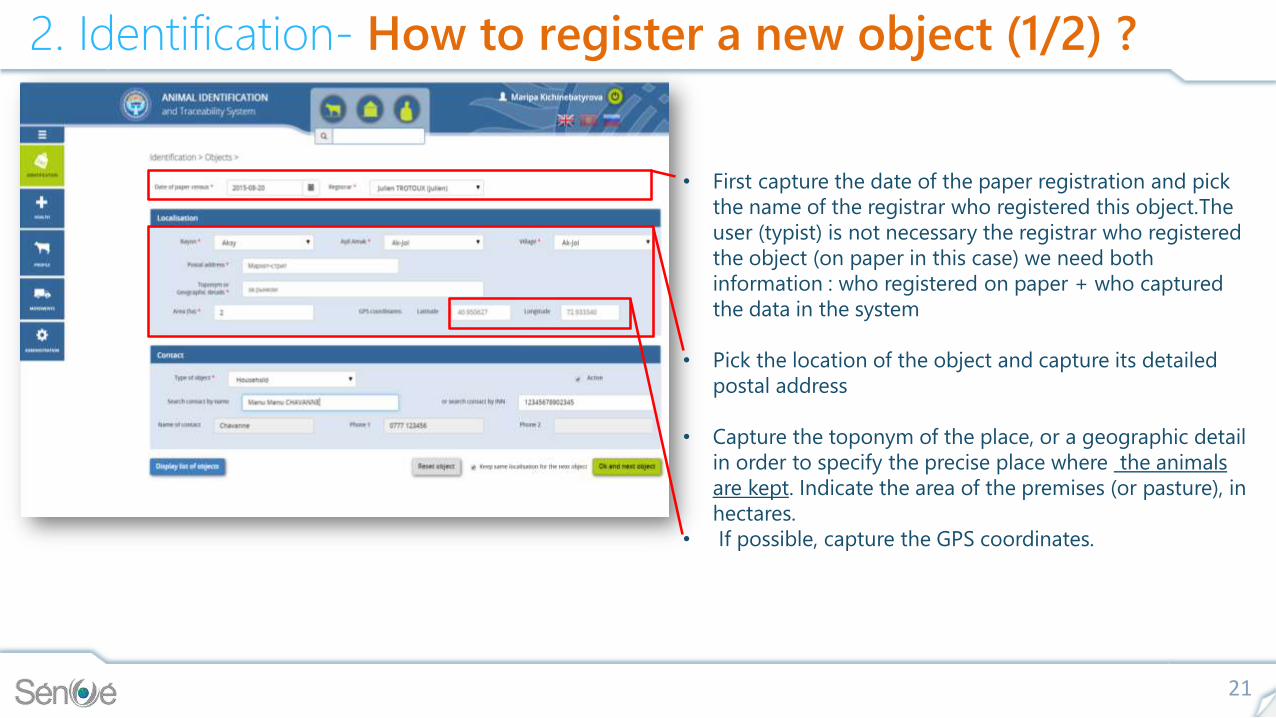
• First capture the date of the paper registration and pick
the name of the registrar who registered this object.The
user (typist) is not necessary the registrar who registered
the object (on paper in this case) we need both
information : who registered on paper + who captured
the data in the system
• Pick the location of the object and capture its detailed
postal address
• Capture the toponym of the place, or a geographic detail
in order to specify the precise place where the animals
are kept. Indicate the area of the premises (or pasture), in
hectares.
• If possible, capture the GPS coordinates.

22
2. Identification- How to register a new object (2/2) ?
• Pick the corresponding type of object : Remember that
the object is the epidemiological unit where the animals
are mixed up. For example it is useless to create several
objects in a hamlet if the animals live together in this
area.
• Pick a contact for this object : the person who to contact
in case of trouble on the object. This person is
necessarily identified as a subject, but is not necessarily
the keeper of (all) the animals living here. For example if
the object is a group of pastures, its contact could be
the president of the pasture committee. Naturally, in
case the object is a household, then the contact is also
the keeper of the animals.
• To find easily the contact (in the subject list) you can
type 3 or 4 letters of his last name. You can also type his
identifier (INN)
• In order to save time, tick the check box if you are
capturing a series of objects in the same area, the
system will keep the location automatically.

• Menu : Identification – Objects – List of objects
• This functionality displays the list of the identified objects
of the region accessible to the current user
• Filters : select what you want and then click « Search »
• The rayon is mandatory for performance reasons and
to avoid enormous lists
• By default the list displays only active objects
• You can type 3 or for characters of the last name of
contact (filter by “contents”)
• If the filters are not correct a message is displayed:
saying « No result to display »
• Excel export of the list (non depending on filters)
• The actions are available on the right : details or
suppression (only if free of links with animals)
• Quick link to the inventory of the selected object
23
2. Identification- How to display objects list ?

24
2. Identification- How to display object details?
• Access via the list of objects : click the magnifier icon on
the right side of the selected object
• This functionality displays the details of the selected
object, and you can modify the data
• On the top, right side of the screen is displayed the
number of animals currently living in this object, it is also
a shortcut to the inventory of animals.
1
2
3
4
5
25
2. Identification- How to order ear tags?
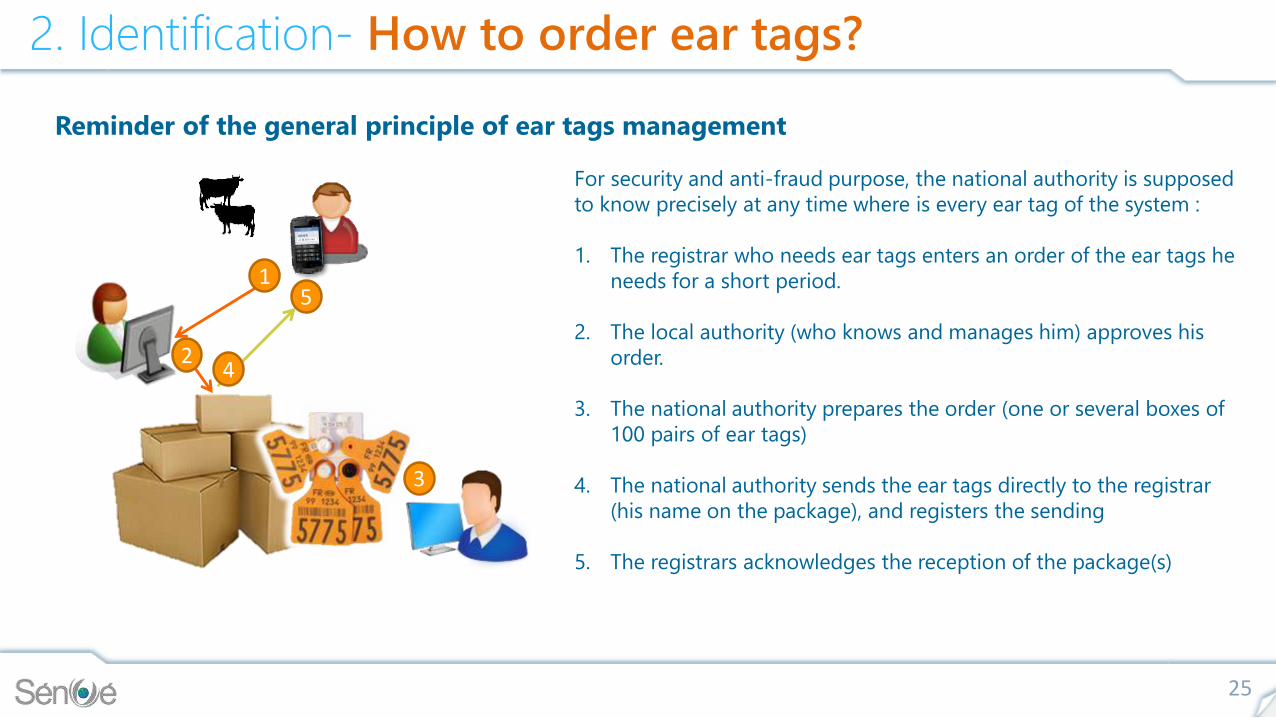
Reminder of the general principle of ear tags management
For security and anti-fraud purpose, the national authority is supposed
to know precisely at any time where is every ear tag of the system :
1. The registrar who needs ear tags enters an order of the ear tags he
needs for a short period.
2. The local authority (who knows and manages him) approves his
order.
3. The national authority prepares the order (one or several boxes of
100 pairs of ear tags)
4. The national authority sends the ear tags directly to the registrar
(his name on the package), and registers the sending
5. The registrars acknowledges the reception of the package(s)
26
2. Identification- How to order ear tags (1/2)?
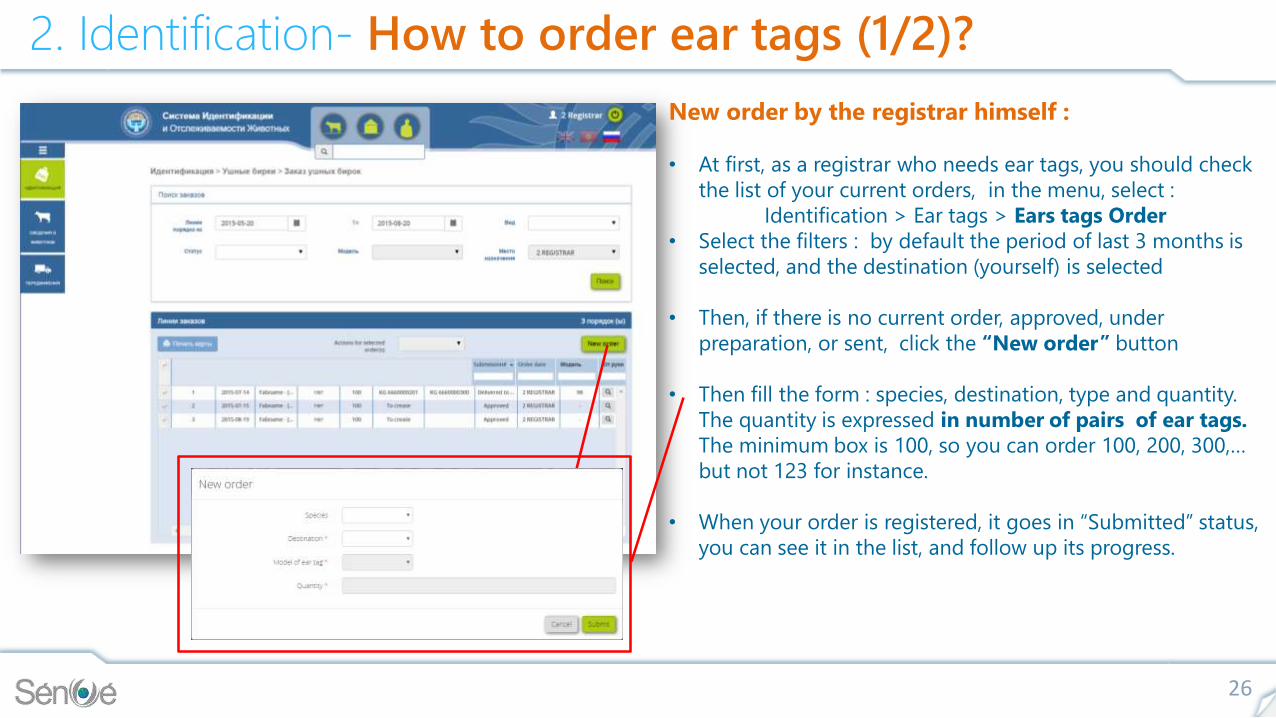
New order by the registrar himself :
• At first, as a registrar who needs ear tags, you should check
the list of your current orders, in the menu, select :
Identification > Ear tags > Ears tags Order
• Select the filters : by default the period of last 3 months is
selected, and the destination (yourself) is selected
• Then, if there is no current order, approved, under
preparation, or sent, click the “New order” button
• Then fill the form : species, destination, type and quantity.
The quantity is expressed in number of pairs of ear tags.
The minimum box is 100, so you can order 100, 200, 300,…
but not 123 for instance.
• When your order is registered, it goes in “Submitted” status,
you can see it in the list, and follow up its progress.

27
2. Identification- How to order ear tags (2/2)?
Approval by the local authority
• Now, the local authority is in charge of approving (or not)
the orders submitted by the local registrars. Select the
“Submitted” status to display the orders to be approved,
and then click the Search button.
• Then, select the orders that are OK (avoid duplicates for
instance), and select the “Approve” line in the action list.
• The status of this order is now “Delivered to registrar”.
• At this moment, the registrar can use these ear tags on
animal. When the registrar uses the ear tags that belongs to
his packages, the stock is decremented.

28
2. Identification- How to display the ear tags stock ?
• Filters : choose model and species.
• The lines of stocks are displayed, with the number of
available pairs of ear tags, calculated from the delivery
minus the used ear tags.
• By this screen, the authorities can display the current stocks
of every registrars.

Ear tag’s history
• If an ear tag is lost before tagging by the registrar, or
broken when tagging , the registrar must declare that
this ear tag is not anymore available. This screen is
made for this purpose.
• At first, capture the identifier of the ear tag : for
example KG 6660000206
• The screen displays all the steps of the “life” of this ear
tag.
• Then if broken or lost before tagging, declare it by
clicking the button “Register new status”, and choose
the proper status.
• Note : If ever a package is lost, it is to be declared not
here but in the « Ear tags orders” screen
29
2. Identification- How to declare lost or broken eartags ?
30
2. Identification- How to register a new animal (1/3) ?
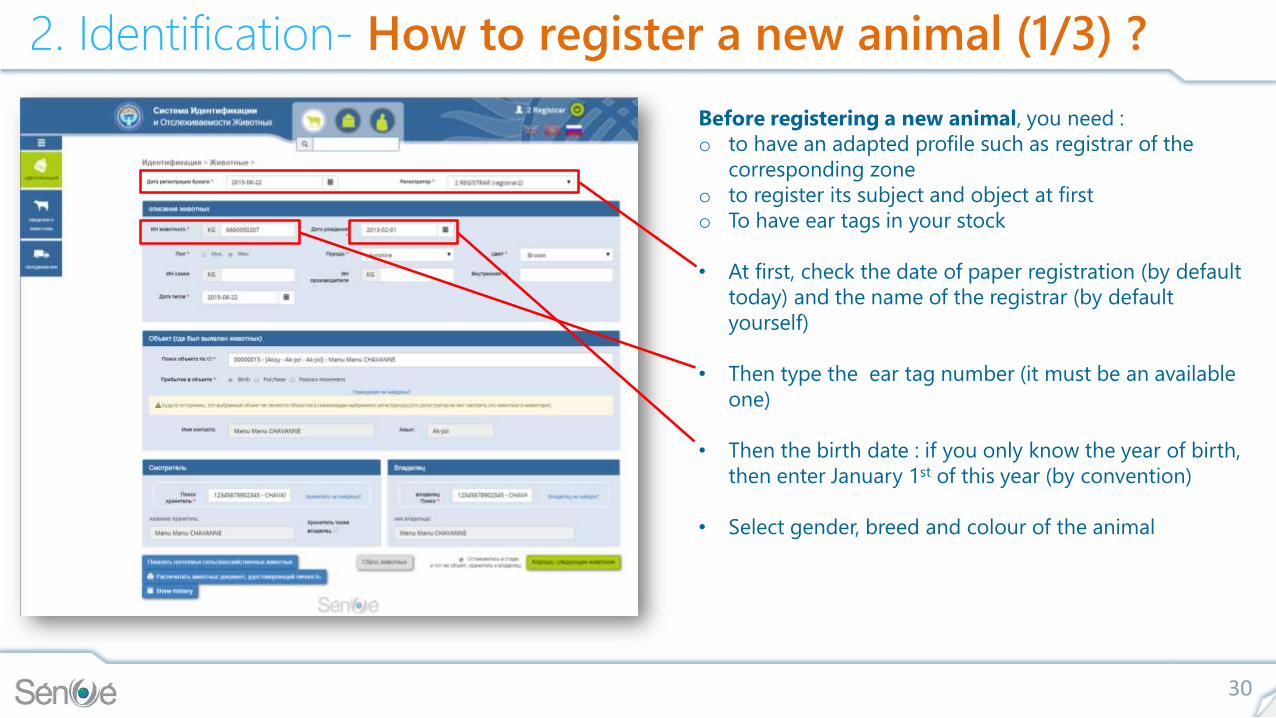
Before registering a new animal, you need :
o to have an adapted profile such as registrar of the
corresponding zone
o to register its subject and object at first
o To have ear tags in your stock
• At first, check the date of paper registration (by default
today) and the name of the registrar (by default
yourself)
• Then type the ear tag number (it must be an available
one)
• Then the birth date : if you only know the year of birth,
then enter January 1st of this year (by convention)
• Select gender, breed and colour of the animal

31
2. Identification- How to register a new animal (2/3) ?
• Dam ID = identifier of the mother of the animal :
though it is not mandatory for the moment, you should
type it in any case where you know it, in order to
start a genealogical knowledge of the herd, for genetic
amelioration concern. Idem for Sire Id.
• Internal number : if the animals are already tagged in
the object, please put the former number of ear tag, in
order to create a correspondence in the data base
• The date of tagging is generally equal to the date of
registration (except when retagging)
• Type 2 or 3 letters of the name of the contact of the
object and pick the right one in the list, control that the
location is correct.

32
2. Identification- How to register a new animal (3/3) ?
• Type 2 or 3 letters of the name of the keeper, and pick it
in the list of subjects
• If the keeper is also the owner of the animal, then tick
the checkbox (the owner is completed automatically)
• If the owner is a different person, then type the
beginning of his name and pick him from the list
• In order to save time, before validating, tick this check
box if you are entering a series of animals in the same
object.

This screen displays the list of the animals of a
chosen area :
Filters, choose what list you want to display :
• At maximum all the animals of 1 species in 1 rayon
• An Ayil Amak and possibly a village
• An object
• A keeper or an owner
• Present at one date (generally today)
And click the “Search” button.
On the top of the list you have access to :
• Export of the full list of animals in an excel file
• Print the ID cards of the selected animals (faster than
individual printing)
• Access to creation of a new animal
In the obtained list you have :
• Sub-filters at the header of each column, to refine your
result, of order the list by different data
• Access to detail of an animal (and modification)
• Access to the retagging function
33
2. Identification- How to display the inventory of animals ?

34
2. Identification- How to display animal details ?
In this screen you can display the details of an
animal and its history of movements:
Access to the screen by selecting an animal in the
inventory.
Basically it is similar to the registration screen, and you can
modify it’s description if necessary, click ’Update animal”
and then print a new ID card.
You cannot change its object or keeper/owner (see the
chapter about movements)
You can show the history of movements of the animal, for
example to understand and check its traceability.
You can navigate back to the list of animals.

35
3. Health module
How to :
• Prepare a prophylaxis campaign• Register a prophylaxis campaign done • Register a new health event for an individual animal• Register a new health event for a flock of animals • Display the list of events and confirm planned events• Capture the analysis results• Capture the status of the objects

36
3. Health- How to prepare a prophylaxis campaign (1/2) ?
Access to the screen by the menu :
Health> Events> New events for a flock
The general idea is that the health authorities will
prepare the action of field veterinarians by selecting
population of certain animals and capturing prophylactic
operation to be performed on them, in the future.
These events are then “planned”. They will be “done” by
the vets in the same screen, later on.
• Filters : select for example the female cattle aged from 0
to 9 month in the Ayil Amak of Ak-Jol.
• You can order of filter the obtained list by the headers of
the comumns
• Select all the obtained animals (you can except some of
them if necessary)
• Then click on the blue button, go for creating the event(s)
37
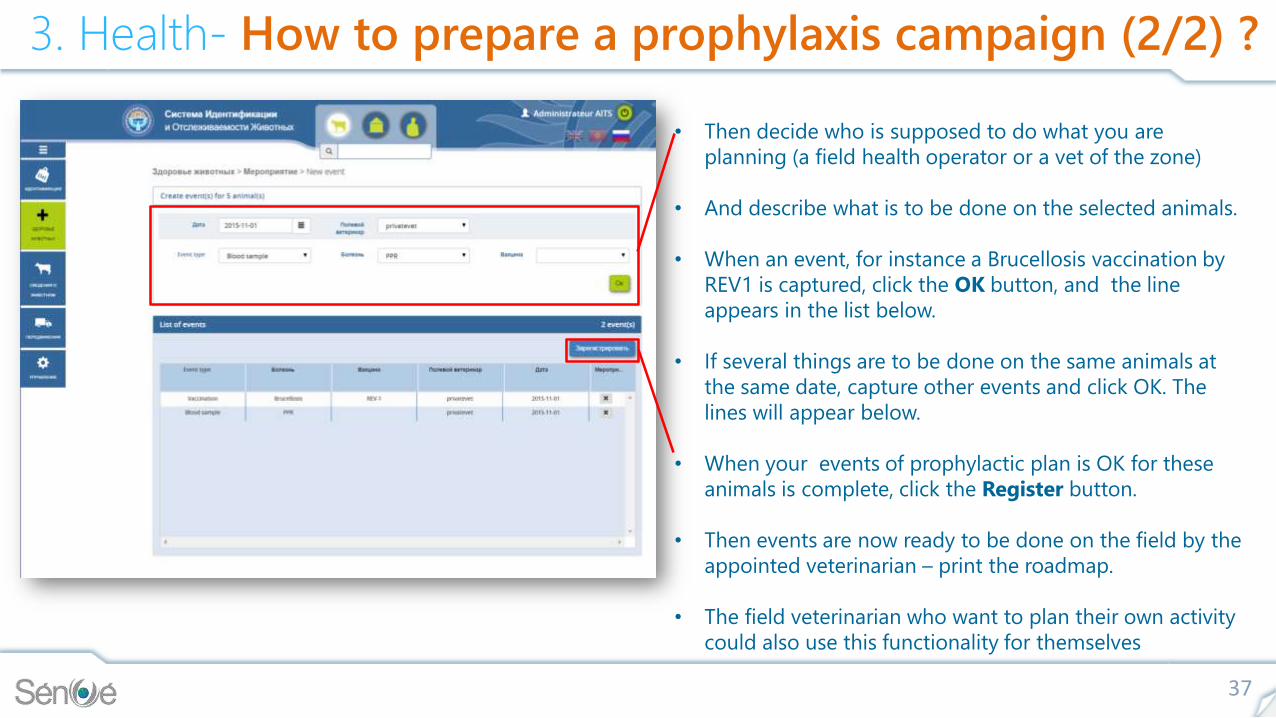
3. Health- How to prepare a prophylaxis campaign (2/2) ?
• Then decide who is supposed to do what you are
planning (a field health operator or a vet of the zone)
• And describe what is to be done on the selected animals.
• When an event, for instance a Brucellosis vaccination by
REV1 is captured, click the OK button, and the line
appears in the list below.
• If several things are to be done on the same animals at
the same date, capture other events and click OK. The
lines will appear below.
• When your events of prophylactic plan is OK for these
animals is complete, click the Register button.
• Then events are now ready to be done on the field by the
appointed veterinarian – print the roadmap.
• The field veterinarian who want to plan their own activity
could also use this functionality for themselves

38
3. Health- How to register a prophylaxis campaign done ?
• Go to : Health > Events> List of events
• Filter the animals concerned and their planned events (by
the zone, gender, age, the health field operator, and the
period. Tick the “planned” checkbox.
• You obtain the list of planned events
• Select all the animals of the list
• Unselect the exceptions (for example animals who were
not present during the operation)
• Tick the “done” box.
• Indicate the real date of events and register : the events
are now considered as “done”.

39
3. Health- How to register a new event for a flock (1/2) ?
A health event can be
• planned or
• Done
so it can be registered in the
• future or
• in the past.
• Filters : select the flock you want : here for example this is
the whole herd of one object. It could be a selection
based on zone, age, or gender.
• Then you obtain the corresponding list, you can select all
the animals or make exceptions for any reason.
• Click the blue button to go for event creation for these
animals.

40
3. Health- How to register a new event for a flock (2/2) ?
• Then choose the date of the event for this flock
• And pick the type of event, the disease, and possibly the
medicine used (or to be used)
• When you click OK the line appears below. You can
create several lines if there are several medicines for
example.
• Click the blue button to register the event
• If the date is :
- in the future, then the event status will be “planned”
- in the past, then the event status will be “done”
Note : Health field operators don’t have the same privileges
as health authorities: they can enter events in the past, but
not in the future, since they are not in position to decide for
prophylaxis.
41
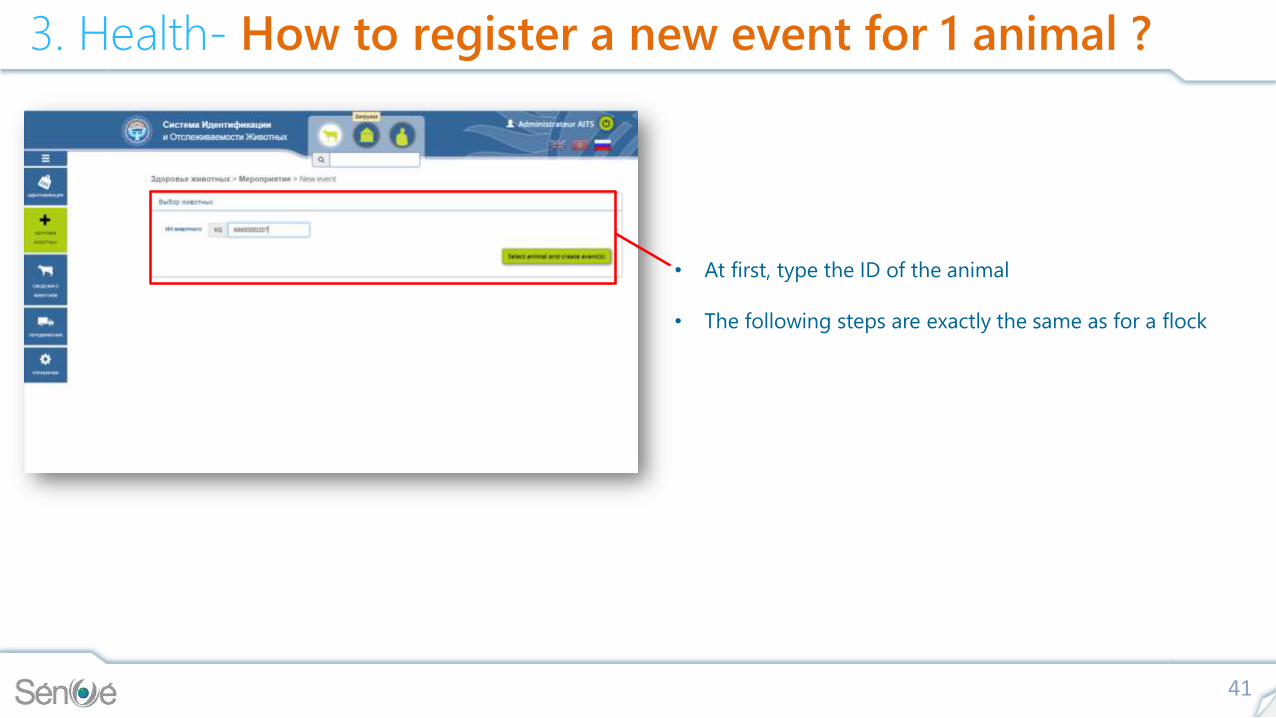
3. Health- How to register a new event for 1 animal ?
• At first, type the ID of the animal
• The following steps are exactly the same as for a flock
42
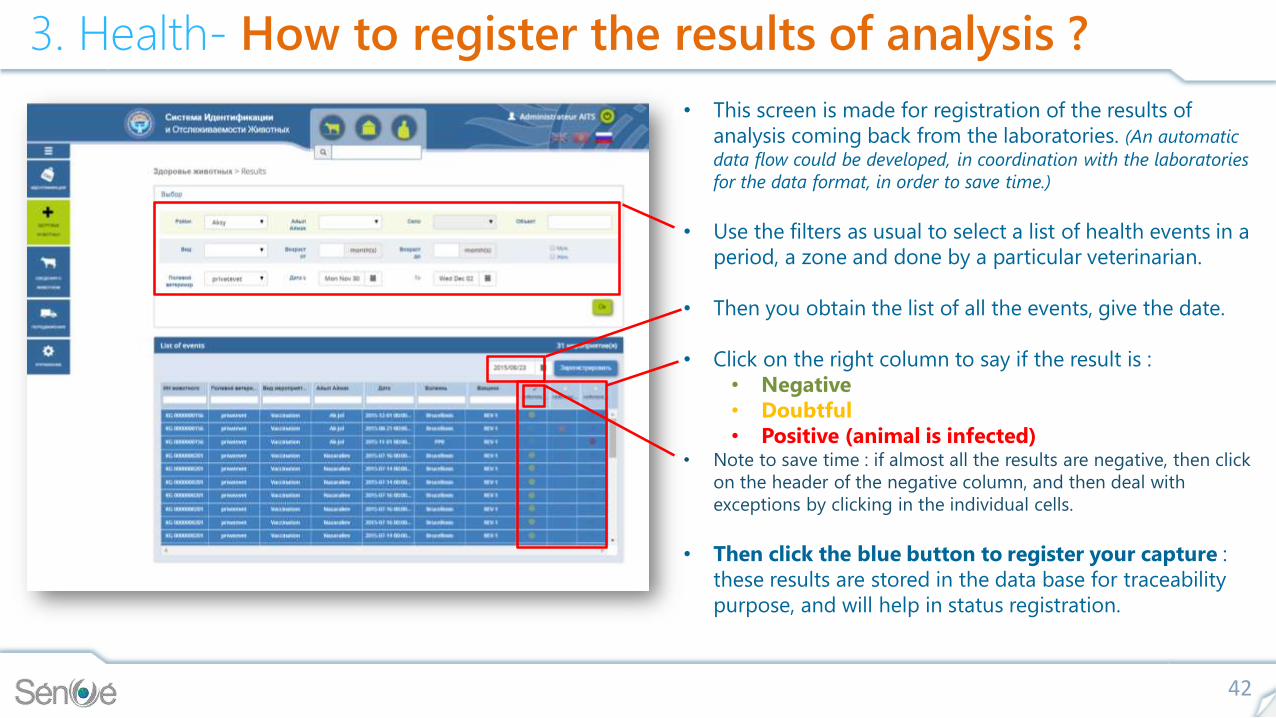
3. Health- How to register the results of analysis ?
• This screen is made for registration of the results of
analysis coming back from the laboratories. (An automatic
data flow could be developed, in coordination with the laboratories
for the data format, in order to save time.)
• Use the filters as usual to select a list of health events in a
period, a zone and done by a particular veterinarian.
• Then you obtain the list of all the events, give the date.
• Click on the right column to say if the result is :
• Negative
• Doubtful
• Positive (animal is infected)• Note to save time : if almost all the results are negative, then click
on the header of the negative column, and then deal with
exceptions by clicking in the individual cells.
• Then click the blue button to register your capture :
these results are stored in the data base for traceability
purpose, and will help in status registration.

43
3. Health- How to capture health status (1/2)?
• Reminder : the object is the epidemiological unit of the
system.
• The status of each object is to be decided by the health
authorities, according to the analysis results and
outbreaks that occurred in the object and in the
surrounding zone (village, Ayil Amak)
• Once the authorities have captured the analysis results
and outbreaks of a zone, for one disease, they will display
the results of the little zone :
• in the list of events
• and/or in the list of analysis results
and then decide if each concerned object should be
considered :
• as free of the concerned disease
• or as infected by the concerned disease.
• Actualisation will be necessary : for example an object
could be considered free of one particular disease 1 year
after the last positive result found in his herd.

44
3. Health- How to capture health status (2/2)?
• Once the authorities have consulted the list of events and
analysis results, they will :
• Select a geographic zone, a species and a disease,
• They will obtain the list of the objects and their current
status :
• They will tick the column “ Free” or “Infected” for the
considered disease, according to their scientific
considerations.
• This information will combine with previous registered
status information, and the result for each object will be a
calculated general status :
• - Free of any disease (green)
• - Infected by non critical disease(s) (yellow)
• - Infected by critical disease (red)
• A red status leads to an ban of any departure of
animals from the concerned object.

45
4. Animal Profile
How to display :
• Identity • Health profile• History of movements
46
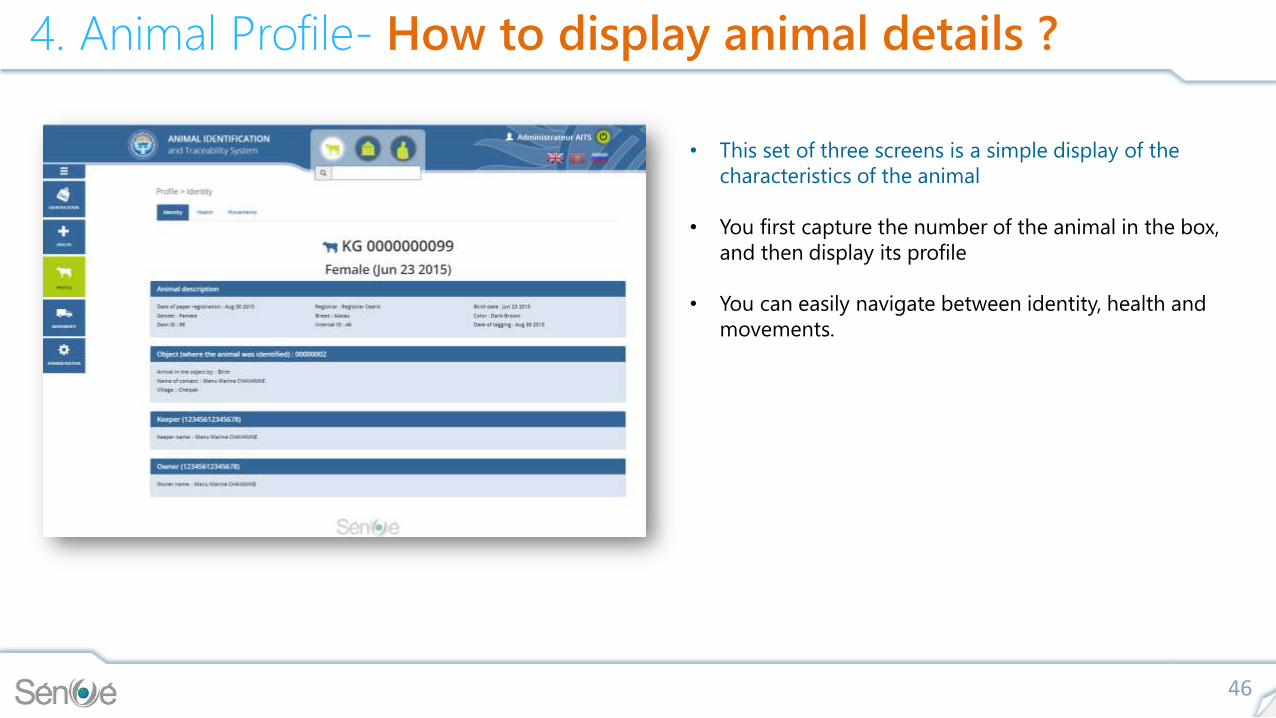
4. Animal Profile- How to display animal details ?
• This set of three screens is a simple display of the
characteristics of the animal
• You first capture the number of the animal in the box,
and then display its profile
• You can easily navigate between identity, health and
movements.
47
5. Movement traceability module
How to :
• Authorise a departure of animals from an object• Capture an arrival of animals to an object• Update the inventory of an object• Display the history of movements
48
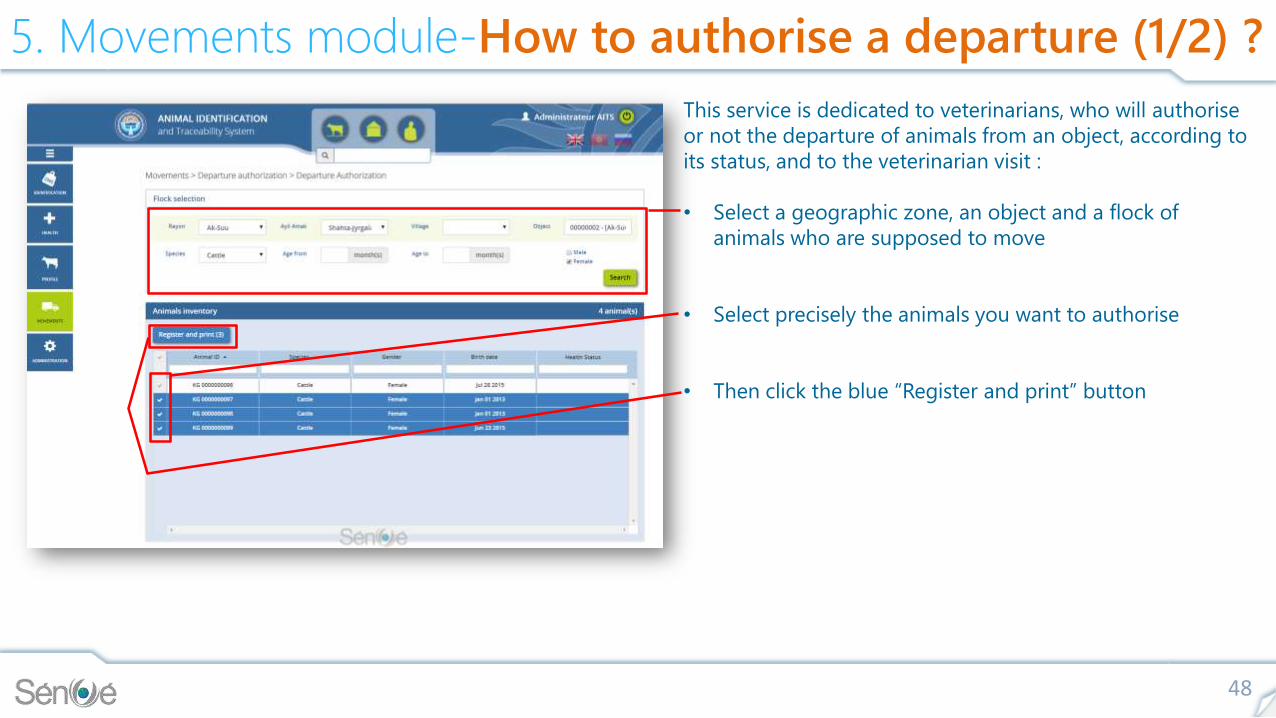
5. Movements module-How to authorise a departure (1/2) ?
This service is dedicated to veterinarians, who will authorise
or not the departure of animals from an object, according to
its status, and to the veterinarian visit :
• Select a geographic zone, an object and a flock of
animals who are supposed to move
• Select precisely the animals you want to authorise
• Then click the blue “Register and print” button

49
5. Movements module-How to authorise a departure (2/2) ?
You will obtain the PDF form of departure authorisation. This
document is to be kept by the keeper when moving his
animals, and by his client afterwards.
This is the document used by the authorities to control
whether the animals found in a market or on the road are
authorised to move or not.
For control purpose : the list of movements of a single
animal displays also the authorisations of departure.
This document is to be used also at the moment of the
arrival capture.

50
5. Movements module-How to capture an arrival ?
Normally, the arriving animals have been first authorised for
departure. In this case, use this screen to register this arrival.
In case of non-authorised movement, the arrival will be
registered in the inventory update screen.
The normal arrival is to be captured by the veterinarian,
when he controls the animals arriving in the object.
The keeper is supposed to present the departure
authorisation paper, that he received from the previous
keeper of the animals.
• This authorisation have a unique number
• Capture this code to obtain the list of animals, and then
select the animal that arrived indeed in the destination
object, the id of this object and the date of arrival.
• After validation, the animal belong to the inventory of
the new object.
51
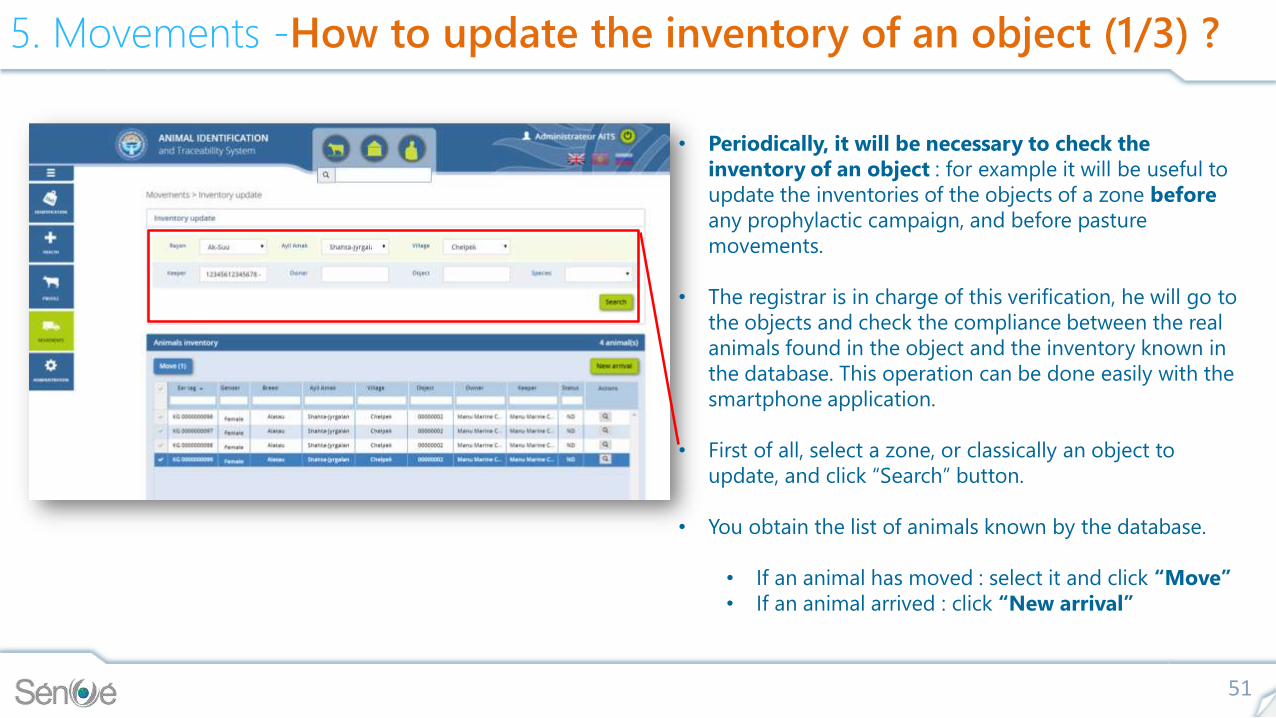
5. Movements -How to update the inventory of an object (1/3) ?
• Periodically, it will be necessary to check the
inventory of an object : for example it will be useful to
update the inventories of the objects of a zone before
any prophylactic campaign, and before pasture
movements.
• The registrar is in charge of this verification, he will go to
the objects and check the compliance between the real
animals found in the object and the inventory known in
the database. This operation can be done easily with the
smartphone application.
• First of all, select a zone, or classically an object to
update, and click “Search” button.
• You obtain the list of animals known by the database.
• If an animal has moved : select it and click “Move”
• If an animal arrived : click “New arrival”

52
• “Move”
• You can select one or several animals provided that they
moved for the same cause at the same date.
• Select the cause and the date and click “OK”
• The animals are then put out of the inventory of the
object. Whenever the destination is known and checked
by the registrar, he can independantly capture the entry
of these animals in the destination object.
5. Movements -How to update the inventory of an object (2/3) ?
53
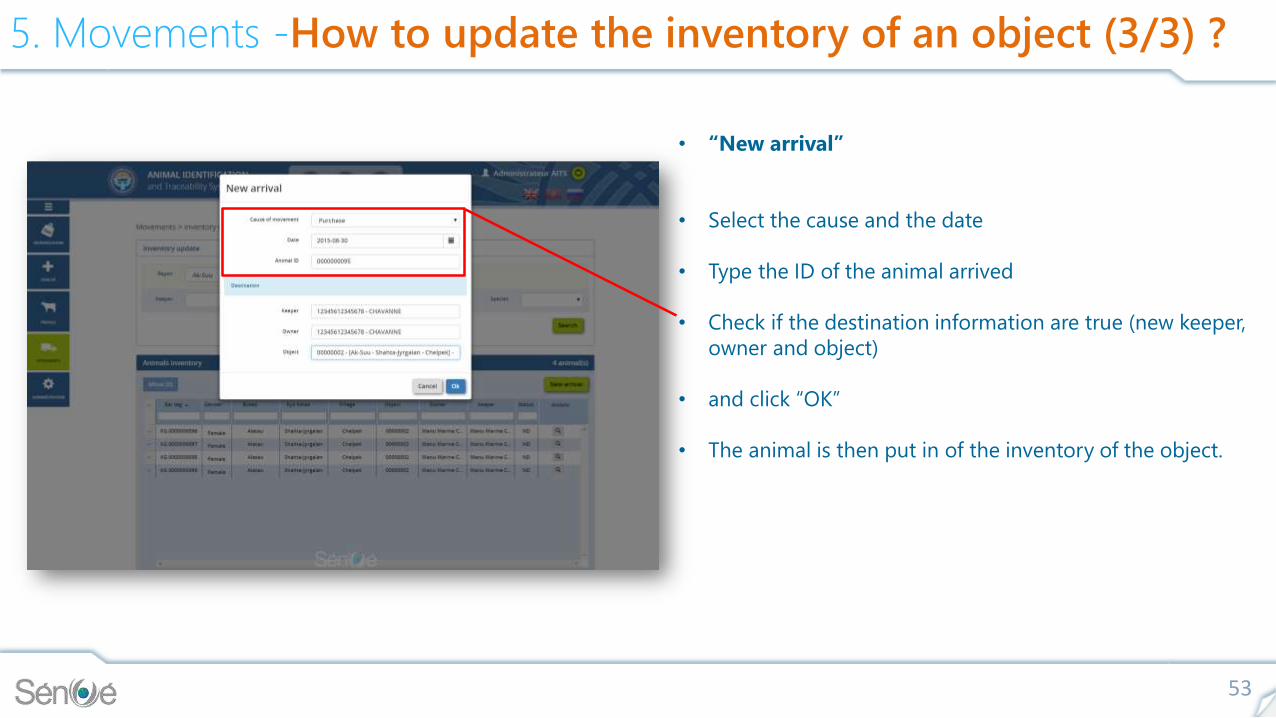
• “New arrival”
• Select the cause and the date
• Type the ID of the animal arrived
• Check if the destination information are true (new keeper,
owner and object)
• and click “OK”
• The animal is then put in of the inventory of the object.
5. Movements -How to update the inventory of an object (3/3) ?

54
• This screen is designed to display the history of
movements for a single animal, of for an object, a
keeper or an owner, or a zone.
• Select your criteria, such as zone, object, species and age,
and you will obtain the list of movements of this
selection. It is not a list of animals : one animal can
appear several time if it moved several times.
5. Movements -How to display the history of movements ?

55
How to :
• Administer the users and profiles• Display the dashboards• Extract data from the base
6. Administration

56
6. Administration -How to administer the users (1/2) ?
• At first, you can obtain a filtered list of the users of
your perimeter (Rayon or all Republic)
• Select the profile (registrar, vet, etc…)
• You can select the role : the role is an element of the
profile, the right to access to 1 item.
• In the list you can click on the magnifier icon to obtain
the detail of the selected user.
• You can modify his zone by clicking on Rayon/Ayil Amak
and Village checkboxes.
• You can choose a profile for him (registrar, health
authority, private vet,…)
• You can chose detailed roles to customise his profile.
Doing this beware of consequences, you would better
contact Senoe before to get advice on this operation.
57
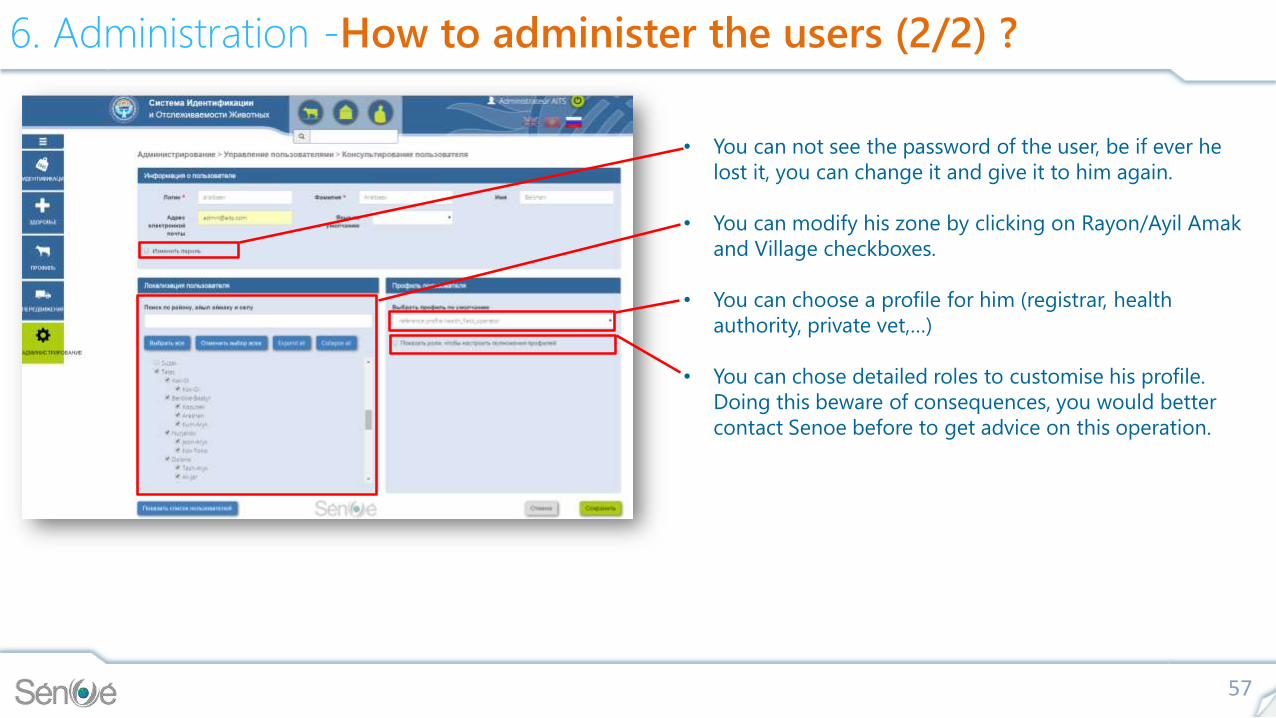
6. Administration -How to administer the users (2/2) ?
• You can not see the password of the user, be if ever he
lost it, you can change it and give it to him again.
• You can modify his zone by clicking on Rayon/Ayil Amak
and Village checkboxes.
• You can choose a profile for him (registrar, health
authority, private vet,…)
• You can chose detailed roles to customise his profile.
Doing this beware of consequences, you would better
contact Senoe before to get advice on this operation.

58
6. Administration -How to display the dashboards ?
• The purpose of this service called “dashboard” is to quickly
provide simple and updated statistics from the data
comprised in the reference database.
• The calculation of these data doesn’t change, it is fixed in
the system, so that they are always exact and comparable
from one month to the other.
• Select your monthly indicator among :
• Number of animals (present on the 1st of each month)
• Number of objects (present on the 1st of each month)
• Number of subjects (present on the 1st of each month)
• Number of movements occurred during each month
• Number of retagging occurred during each month
• Chose your detailed criteria, such as detail by rayon or by
type, and obtain directly the graphics below. Copy and paste
screenshots if you want to present these fifures to other
people.

59
6. Administration -How to extract data from the base ?
• At any time the administrators of a Rayon or of the
country can obtain updated datasets from the database :
• Click on the set you need, and your browser will
download the demanded file.
• The purpose of such extractions is a matter of flexibility :
it is to provide the administrators with files that they
could use easily for their own needs, such as customised
lists or printings.
• To go further : an MS Access database could be
developed manually by the AITS Unit engineers,
according to their needs : especially fine tuned statistics
or reports. When they need to refresh thje data of it,
they could simply re-import excel files in this Access
base.

Conclusion
60
Animal Identification and traceability is a
great opportunity for the Kyrgyz livestock
sector to thrive and to generate
• new incomes for farmers by the means
of export.
• A better food security for all.
Senoe commits itself to help the managers
and users of the system to reach these
challenging goals.