fabrication guide cover - squarespace · 3 lg hi-macs fabrication guide registration we thank you...
TRANSCRIPT

LG HI-MACSFabrication Guide

1
FOREWORD
This manual has been created to provide clear, simple and authoritative instructions with regards
to the techniques to be used for the successful fabrication of LG HI-MACS®.
It is the intention of this manual to provide the most effective and time efficient methods:
1. Fabrication procedures for the authorised Fabricator/Installer
2. Manufacturing instructions to be applied by LG Chem Ltd to support the warranty program.
It is important that you take into account that the techniques listed in this manual have been
designed to optimise the performance of LG HI-MACS according to its chemical formulation and
exclusive performance.
It is impossible to cover all the existing fabrication techniques in this manual. However, we have
described and explained the basic elements of fabrication which comply to our LG Chem Ltd
warranty program.
The Fabrication Guide does not intend to replace any testing you may need to conduct to
determine the suitability of our products for your particular purposes and needs.
LG Chem Ltd assumes no intent nor responsibility for the end-use of the instructions and
techniques mentioned in the Fabrication Guide on other products.
How to use this manual
The Fabrication Guide is organised into sections, each section covering a major element of
LG HI-MACS fabrication.
Within each section you will find defined divisions covering each aspect of the mentioned subject.
For easy reference a comprehensive index is included at the beginning of the Fabrication Guide.
FOR
EW
OR
D
August 2007

2
CONTENTS
REGISTRATION . . . . . . . . . . . . . . . . . . . . . . . . . . . . . . . . . . . . . . . . . . . . . . . . . . . . . . . . . . . . . . . . . . . . . 3
INTRODUCTION . . . . . . . . . . . . . . . . . . . . . . . . . . . . . . . . . . . . . . . . . . . . . . . . . . . . . . . . . . . . . . . . . . . . 4
LIMITED WARRANTY . . . . . . . . . . . . . . . . . . . . . . . . . . . . . . . . . . . . . . . . . . . . . . . . . . . . . . . . . . . . . . . . 5
SAFETY . . . . . . . . . . . . . . . . . . . . . . . . . . . . . . . . . . . . . . . . . . . . . . . . . . . . . . . . . . . . . . . . . . . . . . . . . . . 7
INSPECTION, STORAGE & HANDLING . . . . . . . . . . . . . . . . . . . . . . . . . . . . . . . . . . . . . . . . . . . . . . . . 12
GENERAL SHEET GOODS INFORMATION . . . . . . . . . . . . . . . . . . . . . . . . . . . . . . . . . . . . . . . . . . . . . 15
GENERAL SINK INFORMATION . . . . . . . . . . . . . . . . . . . . . . . . . . . . . . . . . . . . . . . . . . . . . . . . . . . . . . 19
ADHESIVE . . . . . . . . . . . . . . . . . . . . . . . . . . . . . . . . . . . . . . . . . . . . . . . . . . . . . . . . . . . . . . . . . . . . . . . . . 20
SHOP TOOLING . . . . . . . . . . . . . . . . . . . . . . . . . . . . . . . . . . . . . . . . . . . . . . . . . . . . . . . . . . . . . . . . . . . 24
GENERAL FABRICATION PRINCIPLES . . . . . . . . . . . . . . . . . . . . . . . . . . . . . . . . . . . . . . . . . . . . . . . . 30
SINK MOUNTING OPTIONS . . . . . . . . . . . . . . . . . . . . . . . . . . . . . . . . . . . . . . . . . . . . . . . . . . . . . . . . . 46
THERMOFORMING . . . . . . . . . . . . . . . . . . . . . . . . . . . . . . . . . . . . . . . . . . . . . . . . . . . . . . . . . . . . . . . . . 51
EXPANSION & CONTRACTION . . . . . . . . . . . . . . . . . . . . . . . . . . . . . . . . . . . . . . . . . . . . . . . . . . . . . . . 52
FINISH CONSIDERATIONS . . . . . . . . . . . . . . . . . . . . . . . . . . . . . . . . . . . . . . . . . . . . . . . . . . . . . . . . . . 53
INSTALLATION OVERVIEW . . . . . . . . . . . . . . . . . . . . . . . . . . . . . . . . . . . . . . . . . . . . . . . . . . . . . . . . . . 56
CONSUMER CLEANING, CARE & REPAIR . . . . . . . . . . . . . . . . . . . . . . . . . . . . . . . . . . . . . . . . . . . . . 58
TROUBLESHOOTING . . . . . . . . . . . . . . . . . . . . . . . . . . . . . . . . . . . . . . . . . . . . . . . . . . . . . . . . . . . . . . . 60
REPAIRS . . . . . . . . . . . . . . . . . . . . . . . . . . . . . . . . . . . . . . . . . . . . . . . . . . . . . . . . . . . . . . . . . . . . . . . . . . 61
CO
NTE
NTS
August 2007

3
LG HI-MACS FABRICATION GUIDE REGISTRATION
We thank you for being a LG HI-MACS partner and will continue to strive to keep you informed of
fabrication guide changes. Please fill out the information below and send it to the Head Office
address listed so we can send any updates that are necessary.
Date:
Company Name:
Contact Name:
Address:
Postcode:
Local Distributor:
Head Office
Gunnersen Pty LtdABN 35 004 051 003
112 Salmon Street
Port Melbourne VIC 3207
Telephone (03) 9647 9911
Facsimile (03) 9647 9997
Branches
Adelaide (08) 8359 1660
Brisbane (07) 3277 6188
Cairns (07) 4035 3955
Newcastle 1800 451 115
Perth (08) 9356 9911
Sydney (02) 9725 2300
Townsville (07) 4779 0877
Auckland 0800 448 663
www.gunnersens.com.au
RE
GIS
TRATIO
N
August 2007

4
INTRODUCTION
LG Chem Ltd as part of a global leading company, LG Group, has the vision of exceeding
customer expectations through advanced technologies and innovative solutions. LG HI-MACS is
one of those products. Creating a safe work environment is the most important goal in the
markets where LG HI-MACS is distributed and manufactured.
We in LG HI-MACS follow the same level of consciousness. Many different tools are used to
manufacture, fabricate and install LG HI-MACS. Following those simple safety rules will help
prevent any accident.
As a LG HI-MACS Fabricator/Installer, we ask and strongly recommend that you as well would
apply those safety rules as well as fabrication and installation guidelines.
LG HI-MACS is the ideal choice for a wide range of applications including vanity tops, show trays
and walls, furniture, kitchen work surfaces, shop fitting in commercial – and residential
environments – anything your imagination can think of!
LG HI-MACS has a natural look and feel that evokes quality and strength and durabililty valued by
consumers, architects and designers alike. Offering endless freedom, it can be sculpted into
unique shapes and features from the simple to the sophisticated.
INTR
OD
UC
TION
August 2007

5
10-YEAR LIMITED WARRANTY
Congratulations on your new purchase of LG HI-MACS solid surface product. LG Chem expressly
warrants that it will repair or replace this product, free of charge if it fails due to any manufacturing
defect in materials or workmanship during the first 10 years after initial installation.
The warranty shall not apply to damage caused by
1. Failure to follow procedures recommended in the Fabrication Guide for transportation, storage,
handling, fabrication, or maintenance;
2. Physical abuse, accidents or misuse;
3. Exposure to excessive heat;
4. Failure of any adhesive, caulk, or other accessory or failure of filled joints or seams; or
5. Faulty or improper installation.
This warranty is extended only to the original purchaser and may not be transferred or assigned. A
purchase receipt or other proof of date of original purchase will be required before warranty
service is rendered.
LG Chem’s obligation is limited solely to the repair or replacement of the products purchased
hereunder, including reasonable and necessary labour charges.
No other express or implied warranties of merchantability or fitness for a particular purpose are
made by this warranty except for those expressly provided herein. Under no circumstances shall
LG Chem be liable for any loss or damage arising from the purchase, use or inability to use this
product, or for any special, indirect, incidental or consequential damages.
This warranty entitles the purchaser to specific legal rights. Other rights may also be available,
which may vary from state to state. Some states do not permit the exclusion or limitation of
implied warranties or of incidental or consequential damages, so the above limitation or exclusion
may not apply to you. To know what your legal rights are, consult your local or state consumer
affairs office or your state’s Attorney General.
To obtain service under this warranty, please contact the source from which you purchased your
LG HI-MACS product. If the problem is not handled to your satisfaction, please contact LG Chem
directly by writing or calling your nearest LG office or distributor.
Please include your name, address, description of the problem, and the phrase “LG HI-MACS
solid surface product. 10 years limited warranty” in all correspondence. LG Chem will respond to
all enquiries within 30 days.
LIMITE
D W
AR
RA
NTY
August 2007

6
Sample warranty card
For care and maintenance kits, or procedures for the consumer benefit from the fabricator, please
contact your local distributor.
To obtain service under this warranty, please contact the source from which you purchased your
LG HI-MACS product. If the problem is not handled to your satisfaction, please contact our
representative directly by writing to or calling:
Gunnersen Pty Ltd
112 Salmon Street
Port Melbourne VIC 3207
Telephone (03) 9647 9911
Facsimile (03) 9647 9997
LIMITE
D W
AR
RA
NTY
August 2007

7
SAFETY GUIDELINES
1. For your own safety, read the LG HI-MACS Fabrication Guide before operating the
different tools.
2. Wear closed-toed shoes or boots whenever possible. LG HI-MACS sheets are heavy and are
heavier when fabricated into a monolithic counter top for installation. If such a top is dropped
on a foot, serious injury is likely to occur.
3. Always use eye protection with side shielding. Dust, particles, and routing materials can get
into the eye and irritate or damage the eye. Your eyes are extremely delicate and sensitive to
shop conditions. Unprotected exposure to such dangers can result in serious injury or
blindness.
4. When handling sheets, workers should use leather work gloves to reduce the wear and tear to
your hands and fingers. Additionally, the edges of the LG HI-MACS sheets can be sharp and
you may cut yourself. Leather work gloves also offer you a better grip on the sheets when
moving or carrying them throughout the shop.
5. While working with seaming adhesive or inlay materials, latex or rubber gloves will limit the
exposure of the adhesive material to bare skin. Should the skin come in contact with the
adhesive or catalyst, thoroughly wash it clean using warm soap and water. If it comes in
contact with the eyes, flush eyes immediately with water and seek medical attention.
6. It is recommended to provide hearing protection when working around shop machinery and
shop power tools. The decibel level of most machinery and power tools can exceed the safe
limits of 85 decibels for an extended period of time, typically 8 hours. If in doubt as to your
respective shop noise limits, please have your shop tested. Exceeding these limits can
damage your hearing, resulting in hearing loss over time.
7. The dust from cutting and fabricating LG HI-MACS is non-toxic and otherwise referred to as
nuisance dust. Regardless, routing, sawing, cutting, and sanding over a long period of time
can result in irritation to the eyes, skin, and respiratory system. Thus, it is extremely important
to establish adequate ventilation and dust collection equipment to prevent the dust levels from
exceeding permissible levels of 15mg/m3. Additional precautionary measures will include
disposable dust masks and approved respirators. If the eyes are irritated by the dust, flush
them for a period of 15 minutes with cool fresh water.
8. Adhesive items have an element of combustibility. Make certain to keep the work areas well
ventilated and do not allow it to be put in contact with heat, sparks or flames.
9. Wear or consider the use of other protective clothing and equipment as necessary. Review
your shop and actions being performed in your facility to ensure that you have the necessary
protection and that safety requirements are being met or exceeded. The added precautionary
dollars spent will far benefit the cost of loss or injury to yourself or an employee.
10. Reference your local OH&S guidelines for additional Local, State and Federal Safety
Guidelines.
SA
FETY
August 2007

8
SAFETY CHECKLIST
Employee protection
• Adequate first aid supplies
• Protective dust masks, eye and ear protection provided or required
• Safety shoes required
• Protective work and/or latex gloves provided or required
• Policy on no jewelry, bracelets or chains while fabricating
• No smoking in work areas
• Policy on limited bare skin exposure to adhesive materials
• M.S.D.S. sheets reviewed and understood by all employees
Exits and passage
• Entrance and Exit passage ways are not obstructed and are visibly displayed
• Fire doors are clear from blockage. i.e. Security chains, etc.
Fire plan
• Explosion proof cabinets for solvents and chemicals
• Adequate cold storage for seaming materials (refrigerator)
• Limited smoking areas and strict enforcement policy
• Properly specified fire suppression or extinguisher system including sprinklers
• Inspection of fire equipment on a regular basis
• Fire evacuation plan and responsibility assignments
General & housekeeping
• Designate and clearly mark smoking as well as non-smoking areas
• Maintenance of ventilation and dust extraction equipment including routinely cleaning/replacing
filters, keep work tables and floors clean, swept and orderly
• Designate a tool crib for hand tools, bits and supplies to maintain production efficiency
Environmental standards
• Remove or contain dust by all means possible on equipment accessories and systems
• Designate a special place for disposal of hazardous chemicals, waste seam adhesive, etc.
• Establish a policy of not disposing liquids, adhesives or chemicals in common trash unless
catalysed. Rags with chemicals should be cared for so as not to create fire hazard.
• Sweepings of dust and extractions of dust and particles should be placed in a covered
receptacle
• If you vent your dust collectors outside, seek permission necessary to do so
SA
FETY
August 2007

9
SAFETY CHECKLIST
Mechanical care and hazard containment
• Minimise obstructions on floor
• Clearly mark or label movable equipment and accessories
• Avoid operating equipment with dull blades and bits
• Purchase proper equipment for the job and routine production of LG HI-MACS
• Mark moving or rotating parts of shop equipment
• Make certain to eliminate slip factors on the floor surfaces, and thoroughly wipe up spills
to eliminate accidental slips and falls.
• Install safety mechanisms on power equipment for emergency shut offs
• Make certain proper lighting is installed in the shop environment and maintain bulbs to
maximise performance of the fixtures and shop visibility during operation
Electrical matters
• Install proper electrical service requirements for specified shop equipment
• Clearly mark and identify shop circuits on electrical panel
• Maintain electrical breakers and panels
• Make certain all equipment cords and electrical extension cords are in perfect working order
and are free from defects, frays, and bare wiring that could result in a shock or short. Make
certain electrical cords are rolled and outlets are clean and operational. Any defect should be
serviced and replaced immediately upon notice of deficiency.
• Portable electrical hand tools are double-grounded, ground fault equipped, and/or
double-insulated
• Make sure junction boxes and wiring are to code and are covered and closed
• Lighting is adequate for working conditions and maintained
• Emergency shut down switch is installed and operational (master and individual)
Note:
For shops also fabricating a stone, water must be isolated to keep from encroaching on the solid
surfacing operation. Water barriers must be installed and visibly marked for worker awareness.
SA
FETY
August 2007

10
1. Chemical Product & Manufacturer’s Information
a. Chemical Product Name LG HI-MACSb. Usage Countertops, other solid surface applicationsc. Chemical Type Acrylic Solid Surfaced. Manufacturer LG Chem, Ltd., LG Twin Towers, 20 Yoido-dong, Youngdungpo-gu, Seoul 150-721, Koreae. In Case of Emergency Chemtel: (800) 255-3924
2. Ingredients
Name CAS Number % by Weight TLV/PEL LC50/LD50
Alumina trihydrate 21645-51-2 52-62 15 mg/m3 OSHA PEL; Not available10 mg/m3 ACGIH TLV
Butyl acrylate-methyl methacrylate 25852-37-3 30-50 Not available Not availableCopolymer colourants Not available 1-5 Not available Not available
3. Health Hazard Data
The product is a solid sheet of varying colour and, as such, has no health hazards associated with it. However, dust generatedfrom cutting, sanding, or routing may cause mechanical irritation to the skin, eyes and respiratory tract.a. Eyes: Dust generated during fabrication may irritate eyes.b. Skin: Any sharp edges will cut or abrade the skin. Dust generated by fabrication may cause skin sensitisation.
(Methyl Methacrylate has been shown to cause allergic responses at high concentrations.)c. Respiratory Tract: Dust generated during fabrication may cause irritation to respiratory tract, characterised by sneezing
and coughing. May cause headache in case of long term exposure.
4. First Aid Measures
a. Eye Contact: Upon contact with nuisance dust particles, flush eyes immediately with large amounts of water for a minimum of 15 minutes. Seek medical attention.
b. Skin Contact: Not expected to be a problem. May cause skin sensitisation. Gently and thoroughly wash the contaminated skin with running water and non-abrasive soap. If irritation persists, seek medical attention.
c. Inhalation: Repeated or prolonged inhalation of dust may lead to chronic respiratory irritation. Allow the victim to rest in a well ventilated area. Oxygen may be administered if breathing is difficult. Seek medical attention.
d. Ingestion: Not applicable.
5. Fire and Explosion Data
a. Flammability: Non-flammableb. Flash Point: Not availablec. Auto-Ignition Temperature: Not availabled. Products of Combustion: Some metallic oxides.e. Fire Hazards in Presence of Various Substances: Non-flammable in presence of shocks, heat, oxidizing materials,
reducing materials, combustible materials, organic materials, metals, acids, alkalis and moisture
f. Explosion Hazards in Presence of Various Substances: Not considered as a risk of explosiong. Fire Fighting Media: SMALL FIRE: use DRY chemicals, COO, water spray or foam
LARGE FIRE: use water spray, fog, or foam.DO NOT use water jet
6. Spill Procedures & Waste Disposal
a. Small Spill: Use appropriate tools to put the spilled solid in a convenient wastedisposal container
b. Large Spill: No additional informationc. Waste Disposal: Use appropriate tools to put the spilled solid in a convenient waste
disposal container
7. Handling, Storage & Transport
a. Handling: Do not breathe dust. If user operations generate dust, use ventilation to keep airborne contaminates below the exposure limit
b. Storage: No specific storage is required. Be sure that it is not necessary to strain to reach materials, and that shelves are not overloaded
c. DOT/TDG Classification: Not a DOT controlled material
August 2007
MSDS(Material Safety Data Sheet)
LG HI-MACSAcrylic Solid Surface
LG Solid Source, LLC8009 W. Olive Peoria, AZ 85345(866) LG HI-MACS

11
8. Special Protection Information
a. Eye: Safety glassesb. Hands: Gloves to protect against cuts and abrasions are highly recommendedc. Respirator: Wear appropriate respirator when ventilation is inadequate (NIOSH
approved) because of generated dust
9. Physical & Chemical Properties
a. Appearance Solidb. Odor Odorlessc. pH Not applicabled. Specific Gravity 1.75e. Evaporation Rate Not availablef. Vapor Pressure Not availableg. Solubility in Water Insolubleh. Solubility in Solvents Insoluble in methanol, diethyl ether, n-octanol, acetone
10. Stability & Reactivity Data
a. Stability: The product is stableb. Chemical Instability/Materials to Avoid: Not considered to be reactive according to our databasec. Corrosivity: Not considered to be corrosive for metals and glass according
to our databased. Hazardous Decomposition: Not availablee. Hazardous Polymerization: Yes
11. Potential Chronic Health Effects
The product is NOT toxic to blood, kidneys, lungs, the nervous system, the reproductive system, liver, or mucous membranes.a. Chronic Effects: Not availableb. Mutagenic Effects: Not availablec. Teratogenic Effects: Not available
12. Ecological Information
a. Ecotoxicity: Not availableb. BODS and COD: Not availablec. Toxicity of the Products of Biodegradation: Not available
13. Federal Regulations
a. TSCA (Toxic Substance Control Act): All components of this product are listed on the TSCA inventoryb. HMIS (Hazardous Material Information System): Health Hazard: 1
Fire Hazard: 0Reactivity: 0Personal Protection: A
c. National Fire Protection Association (USA):
Hazard Rating: 4 = Extreme, 3 = High, 2 = Moderate, 1 = Slight, 0 = Minimal (Insignificant)
14. Other Information
The data contained in this MSDS and recommendations presented herein are based upon information considered to beaccurate, as of this date. However, The Premium Solid Source, L.L.C. makes no guarantee or warranty, either expressed orimplied, of the completeness of this data and recommendations, and assumes no liability in connection with any use of thisinformation.
August 2007
MSDS(Material Safety Data Sheet)
LG HI-MACSAcrylic Solid Surface
Fire Hazard
Health Reactivity
Specific Hazard
LG Solid Source, LLC8009 W. Olive Peoria, AZ 85345(866) LG HI-MACS

12
INSPECTION, STORAGE & HANDLING
Quality control
LG Chem is continuously improving its manufacturing processes and controls to offer the highest
quality of sheets.
Before using or fabricating LG HI-MACS sheets, we strongly recommend you to proceed to visual
inspection for defects and colour match.
Each sheet has a printed number on the side. Please report this number for any complaint. This
allows LG Chem to go back into the manufacturing process to improve our material constantly.
Example:
sheet no.: LG HI-MACS® Arctic White 1 3 D E 009
LG = manufacturer name
HI-MACS® = product name
Arctic White = colour of the sheet
1 = production line no. 1 (2; 3; 4)
3 = year of production: 2003
D = month: April (A = January; B = February; C = March;
D = April; …; L = December)
E = day: 15th (1 = 1st; 2 = 2nd; 3 = 3rd; 4 = 4th;…;10 = 10th;
A = 11th; B = 12th; C = 13th; D = 14th;…;
U = 31st)
From day 11th to day 31st,each day corresponds
to a letter (A to U)
009 = running no. (001; 002; 003;…)
Storage of sheets
• LG HI-MACS sheets should be stored flat or in approved horizontal racks. If temporarily stored,
place sheeting on a completely flat floor or non-damaged transportation pallet. Vertical storage
should be limited to an “A” frame designation to eliminate the possibility of warping.
• Storage of LG HI-MACS outdoors should be limited to time and temperature. The range of
temperature should be 15-25ºC and not in direct sunlight. Direct sunlight and environmental
pollutants may discolour the sheet and temper the peel coat over time. Additionally, the
temperature of the sheet and time needed to equalise in outside to inside temperature of the
fabrication shop may vary. When using sheets that have been stored outdoors, note that
adhesive reaction time and bond may vary.
INS
PE
CTIO
N, S
TOR
AG
E &
HA
ND
LING
August 2007

13
INSPECTION, STORAGE & HANDLING
Sheet inspection
Prior to cutting full sheets please check for visible defects. Make sure that there is no:
• Length warp. If the warp is greater than 1.5 mm per metre
(Fig. 1), contact your LG HI-MACS supplier for inspection
and product replacement if necessary.
• “Smile” warp. If the sheet deflects on the edges to the
shape of a smile (Fig. 2) and if the warp is greater than 1.5
mm per metre (Fig. 2), contact your LG HI-MACS supplier
for inspection and product replacement if necessary.
• “Frown” warp. If the sheet deflects on the edges to the
shape of a frown (Fig. 3) and if the warp is greater than 1.5
mm per metre (Fig. 3), contact your LG HI-MACS supplier
for inspection and product replacement if necessary.
Make sure that sheets are:
• Free from chipped or broken edges
• Free from tapered edges Fig. 4
• Free from pinholes ( max. 10 per ø 50mm)
Make sure that sheets:
• Do not show any colour inconsistency
• Have an even distribution of particles
• Are protected on the face side with a poly coating film.
Should you have any concerns over the quality of LG HI-MACS products please call your
local representative.
INS
PE
CTIO
N, S
TOR
AG
E &
HA
ND
LING
August 2007
1000 mm
1.5 mm
Fig. 1: Level surface
760 mm
1.5 mm
Fig. 2: Warping (smile)
760 mm
1.5 mm
Fig. 3: Warping (frown)
Fig. 4: Tapered edges or fall off
Specification for flatness
Solids and pearls colours
≤1.5 mm*
over760 mm
Small chip coloursSands
Large chip coloursQuartz and granite
* Warp of the sheet should not exceed 1.5 mm

14
INSPECTION, STORAGE & HANDLING
LG HI-MACS temperature conditioning
• After your LG HI-MACS materials are delivered and before you begin fabricating, especially if
the temperature is very cold, allow about two hours for the LG HI-MACS to acclimate to more
temperate shop and fabrication conditions. Optimum condition minimums are 70ºF or 21ºC.
Temperatures less than that will result in longer cure times of the adhesives. If your shop is not
heated for winter conditions, it may become difficult to fabricate if at or near freezing.
Storage of adhesive
• Adhesive should be stored in a refrigerator or temperature controlled environment in a
temperature range of 8-15ºC. The shelf life and effectiveness of the non-catalysed adhesive is
less stable and will decompose at a greater rate if stored in the heat. This may compromise
your installation and strength of seams. It should also be noted that the warmer the shop
environment, the shorter the set-up time. The cooler the shop, the more time you will have to
work with the materials before set up.
Handling of sheets manually
• Safety is the main precursor to fabrication and movement of materials. Workers should wear
leather work gloves for better grip and ease on wear and tear on the hands and fingers. Two
workers should tip the sheet along the width from horizontal to vertical. The sheet should then
be transported to the fabrication area vertically with the edge of the long ends of the sheets
parallel to the ground (See Figure 1).
• A forklift is an essential tool for a safe work environment. A
forklift is an efficient method and must be used when
moving or transporting multiple sheets. It is best suited to
have a forklift that has adequate capacity to move an entire
skid of material at once (approximately 1 tonne) on
12 mm materials.
INS
PE
CTIO
N, S
TOR
AG
E &
HA
ND
LING
August 2007
Figure 1

15
EXPLANATION OF PRODUCTS
• Product name: LG HI-MACS
• Manufactured and sold by: LG Chemical, Ltd.
• Materials: MMA, various particulates and resins
• Nature and shape: Non-porous sheet
• General properties:
GE
NE
RA
L SH
EE
T GO
OD
S IN
FOR
MATIO
N
August 2007
Series SeriesThickness (mm/inch)
Width (mm/inch)
Length (mm/inch)
Weight (Kg/lbs)
LG HI-MACS
SOLID6mm 1⁄4"12mm 1⁄2"
912/36760/30
2490/98.03680/145
21.19/46.760.69/133.8
SAND6mm 1⁄4"12mm 1⁄2"
912/36760/30
2490/98.03680/145
19.98/44.057.22/126.1
PEARL6mm 1⁄4"12mm 1⁄2"
912/36760/30
2490/98.03680/145
19.98/44.057.22/126.1
QUARTZ6mm 1⁄4"12mm 1⁄2"
912/36760/30
2490/98.03680/145
20.10/44.357.57/126.9
GRANITE6mm 1⁄4"12mm 1⁄2"
912/36760/30
2490/98.03680/145
20.10/44.357.57/126.9
VOLCANICS 12mm 1⁄2" 760/30 3680/145 57.57/126.9

16
RESISTANCE TO POLLUTION
GE
NE
RA
L SH
EE
T GO
OD
S IN
FOR
MATIO
N
August 2007
Pollutant
Washing Material
WaterHouseholdDetergent
Abrasive Cleaner
Sand Paper
Water-based magic (Black) •
Oil-based magic (Black) X X •
Crayon (Black) ▲ •
Crayon (Red) ▲ ▲ •
Cooking oil •
Coffee •
Tea •
Whiskey •
Milk •
Juice •
Curry ▲ ▲ •
Margarine ▲ •
Lotion •
Ketchup •
10% Iodine liquid ▲ ▲ •
Lipstick ▲ •
Cigarette burn X X X •
Dye X X •
Decision: • (Completely removed) ▲ (Faint mark remains) X (Cannot be removed)

17
RESISTANCE TO POLLUTION
GE
NE
RA
L SH
EE
T GO
OD
S IN
FOR
MATIO
N
August 2007
ItemResult
TestMethodChemical and Concentration
ChemicalResistance
after 24 hours
Conc. Hydrochloric acid No effect
KS M3007-95
20%(v/v) Hydrochloric acid No effect
Conc. Nitric acid Light marking with smooth surface
20%(v/v) Nitric acid No effect
20%(v/v) Sulphoric acid No effect
60% (v/v) Perchloric acid No effect
85% (v/v) Phosphoric acid No effect
17% (v/v) Phosphoric acid No effect
17% (v/v) Phosphoric acid No effect
30% (m/v) Photassium Hydroxide No effect
Ammonia No effect
Acetone No effect
Bleach (NaOCI, Household) No effect
3% (v/v) Hydrogen Peroxide No effect
3.5% aq Iodine No effect
Bromine (Sat aq) No effect
5% (v/v) Silver Nitrate No effect
1% (v/v) Silver Nitrate No effect
Lead Acetate (Sat aq) No effect

18
HEAVY METALS (Content of Toxic Substance)
GE
NE
RA
L SH
EE
T GO
OD
S IN
FOR
MATIO
N
August 2007
ItemStandard Test
ResultKorea USA Europe Result
Lead (Pb) 90 Under 90 Under 90 Under 10 Under
Total MethodICP Analysis
Method
Antimony (Sb) 60 Under 60 Under 60 Under 10 Under
Arsenic (As) 25 Under 25 Under 25 Under 5 Under
Barium (Ba) 500 Under 1000 Under 1000 Under 410 Under
Cadmium (Cd) 50 Under 50 Under 50 Under 20 Under
Chrome (Cr) 25 Under 25 Under 25 Under 10 Under
Mercury (Hg) 25 Under 25 Under 25 Under 5 Under
Seranium (Se) 500 Under 500 Under 500 Under 25 Under
Unit: ppm
Item Test Method Result
Heavy Metal (Pb)Colour of test liquid should not be thicker than that of comparable standard liquid
Suitable to Standard
KMn04 consumption Under 10 mg/L 5 mg/L
Evaporation residue (4% acetic acid)
Under 30 mg/L 5 mg/L
Pigment Should not be detected Suitable to Standard
Penot Should not be detected Suitable to Standard
FormaldehydeLight absorption degree of test liquid should
not be thicker than that of standard liquidSuitable to Standard
SANITATION
• Test Method: In accordance with the "standard in device, vessel, and package" Notice No. 95-47.
• Test Conditions: 60 ± 2°C, 30 minutes.

19
LG HI-MACS DECOBOWL
LG HI-MACS offers a complete line of vanity and kitchen sinks. These models are all easily
seamed to the LG HI-MACS countertop you are creating and will provide a beautiful smooth,
clean and well designed countertop or vanity.
GE
NE
RA
L SIN
K IN
FOR
MATIO
N
August 2007
497
240
259 10
8
105
459
500
446
497
962
447
199
469
132
414
86
578
440
779
873
438
805 446
446
500
564
383
79
464
191
KAW01 KAW02
KAW03 KAW04
KAW05 KAW06
KDW01 KCW01
YAW01 YAW02
ø189 ø189
ø117ø115
ø115
ø115
ø115ø115 ø115
ø68 ø68
Please enquire at your nearest Gunnersen branch for further details on lead times and minimum quantities.

20
ADHESIVE CHARACTERISTICS
Be sure to use an adhesive colour selection chart to review the properly coded adhesive for
respective LG HI-MACS sheet colour selected. It is important to “adhere” to the recommendations
set forth by LG HI-MACS. This will ensure proper colour match and the finished glue lines.
• Bulk adhesive cartridges typically provide 12 metres of seaming.
• Normal cure time is about 40 minutes in 70ºF, 21ºC. If hotter, your working time is greatly
reduced and, if cooler, your working time is greatly enhanced. Consider this as you begin
assembly. You do not want to get too far ahead of yourself if it is warm. You will end up with
a mess.
• Remember to consider scuff-sanding joints for better bonding using 60 grit sand paper.
• Before applying the adhesive, clean all areas being bonded with denatured alcohol and a clean
white rag. Be sure to look for dirt, pencil marks, and oily fingerprints on all bonding surfaces
and remove them.
• Assemble the cartridge in the seaming gun with a fresh disposable mixing tip. After each use,
remove and replace this tip. The adhesive in the tip will set up just as the seams do on your
materials. To ensure the best bond, remember to keep up the maintenance of your mixing tip.
If you are finished gluing for the day, you can leave the tip on and place it in your storage
refrigerator. The next time you use it you only need to change the tip.
• As you get ready to apply adhesive and begin assembly of your LG HI-MACS top, remember
to purge the tip. This is done by squeezing out a bead of approximately the length of the tip.
This ensures trapped air has worked itself from the mixing tip and that the catalyst and
adhesive have properly mixed and are ready.
AD
HE
SIV
E
August 2007

21
ADHESIVE COLOUR RANGE
AD
HE
SIV
E
August 2007
SOLID
LG HI-MACS ADHESIVE
NO COLOUR NO COLOUR
S01 SATIN WHITE H01 SATIN WHITE
S02 ALMOND H04 PEANUT
S05 * GRAY H03 GRAY
S06 ARCTIC WHITE H02 A-WHITE
S09 CREAM H20 CREAM
S22 * BLACK H07 BLACK
S25 * FIERY RED H18 RED
S26 * BANANA H17 BANANA
S27 * ORANGE H19 ORANGE
S28 ALPINE WHITE H16 ALPINE WHITE
PERNA
P01 PERNA WHITE H21 PERNA WHITE
P04 * PERNA BLACK H07 BLACK
P05 * PERNA CHARCOAL H25 P-CHARCOAL
VOLCANICS
VA-01 SANTA ANA H03 GRAY
VB-01 MERAPI H07 BLACK
VE-01 TAMBORA H20 CREAM
VL-01 CALDERA H10 BLUE
VR-01 PACAYA H18 RED
VW-01 GEMINI H02 A-WHITE
VE-02 MIKENO H44 MIKENO
VN-02 LATTE H39 LATTE
VB-02 CIMA H45 V/BLACK
VN-03 HEKLA H46 HEKLA
* From the International Range of LG HI-MACS colours.Please enquire at your nearest Gunnersen branch for further details on colours, lead times and minimum quantities.

22
ADHESIVE COLOUR RANGE
AD
HE
SIV
E
August 2007
VOLCANICS NATURAL
LG HI-MACS ADHESIVE
NO COLOUR NO COLOUR
VE22 COLIMA H20 CREAM
VA21 * PINNACLES H03 GRAY
VA22 FROSTY H03 GRAY
VA23 VESUVIO H03 GRAY
VB21 TAOS H48 TAOS
VE21 LATTETUDE, Y/STONE H04 PEANUT
VE23 * MAYON H06 PINK
VL21 SANTORINI H10 BLUE
VN21 * CAMEROON H05 APRICOT
VN22 DOMINICA H46 HEKLA
VN24 KOHALA H50 KOHALA
VR21 STELLER H47 STELLER
VE-24 CASERA H04 PEANUT
VL-22 * MEREA H21 P/WHITE
VG-23 * MARIN H03 GRAY
GRANITE
G01 DESERT SAND H04 PEANUT
G02 * GRAY SAND H03 GRAY
G03 * STRAWBERRY SAND H06 PINK
G04 WHITE QUARTZ H01 SATIN WHITE
G05 WHITE GRANITE H03 GRAY
G06 * ROSE QUARTZ H06 PINK
G07 PLATINUM GRANITE H03 GRAY
G08 ALMOND PEARL H04 PEANUT
G09 * BLACK SAND H07 BLACK
G10 BLACK PEARL H07 BLACK
G15 * MIDNIGHT PEARL H10 BLUE
G17 GRAY GRANITE H03 GRAY
* From the International Range of LG HI-MACS colours.Please enquire at your nearest Gunnersen branch for further details on colours, lead times and minimum quantities.

23
ADHESIVE COLOUR RANGE
AD
HE
SIV
E
August 2007
GRANITE CONT.
LG HI-MACS ADHESIVE
NO COLOUR NO COLOUR
G18 * ROSE GRANITE H06 PINK
G19 * NATURAL QUARTZ H04 PEANUT
G23 NATURAL GRANITE H03 GRAY
G26 * APPLE GREEN SAND H11 SAGE GREEN
G29 * TERRA QUARTZ H05 APRICOT
G30 * IVORY QUARTZ H04 PEANUT
G31 BLACK GRANITE H07 BLACK
G32 * STEEL SAND H03 GRAY
G33 AZTEC QUARTZ H04 PEANUT
G34 ARCTIC GRANITE H02 A-WHITE
G36 * IMPERIAL H06 PINK
G38 SEA OAT QUARTZ H04 PEANUT
G39 * AZURE QUARTZ H03 GRAY
G40 * CELEBRATION GRANITE H07 BLACK
G41 * CONFETTI QUARTZ H01 SATIN WHITE
G42 VENETIAN SAND H26 SAND BROWN
G43 * VERDE QUARTZ H08 GREEN
G44 * SEA FOAM QUARTZ H11 SAGE GREEN
G47 * BLACK BIRD H07 BLACK
G48 BEACH SAND H04 PEANUT
G50 TAPIOCA PEARL H36 SILVER
G58 MOONSCAPE QUARTZ H04 PEANUT
G59 * SPICED JAVA SAND H14 SEPHIA
G62 * OREGANO SAND H13 OLIVE YELLOW
G63 ALLSPICE QUARTZ H14 SEPHIA
G65 TUNDRA QUARTZ H02 A-WHITE
G68 * VANILLA WHITE H01 SATIN WHITE
G74 * MOCHA GRANITE H37 MOCHA
* From the International Range of LG HI-MACS colours.Please enquire at your nearest Gunnersen branch for further details on colours, lead times and minimum quantities.

24
THE “BASIC” LG HI-MACS SHOP
Saws and blades
LG HI-MACS recommends a minimum 5 HP (3.75 kW) motor for a table saw in order to produce
the precision and high-quality cuts necessary. This minimum heavy duty standard also makes the
processing of LG HI-MACS sheets faster and easier. The basic requirement list for the respective
saws and blades are as follows:
• 3,000 to 4,000 RPM
• 10” (254 mm) or 12” (305 mm) capability on saw and applicable blades
• Dust collection system by machine or integrated shop system
• Adjustable, accurate ripping fence
• Strong infeed & outfeed tables
• 10” (254 mm) or 12” (305 mm) mitre/chop saw with infeed and outfeed tables
Blade specifications for cutting LG HI-MACS should consider the following:
• Triple chip ground for consistent tooth configurations and geometry
• 80 plus tooth minimum in a 10” (254 mm) blade diameter
• 96 plus tooth minimum in a 12” (305 mm) blade diameter
• C-4 hardness carbide tooth
• A rake of -5 Degrees to +10 Degrees
• Routine schedule of blade change out
• Secure a reliable sharpening service or vendor
SH
OP
TOO
LING
August 2007
5°
15°0.3°
5°
15°0.3°
45°

25
THE “BASIC” LG HI-MACS SHOP
Routers and bits
LG HI-MACS would like to convey that a higher power rating of equipment will result in more
precise cuts and a higher quality fabrication. This is especially evident and important when large
amounts of material must be removed. You must remember that solid surfacing materials are very
abrasive and the fine dust can quickly damage electronic control contacts and bearings. Try to
invest in routers with dust extraction/collection devices, or provide good air flow and dust
collection through other means. Also, it is important to have spare bearings, templates, bushings,
and a variety of router bases adaptable to multiple task operations. The following are a few of our
recommendations:
• 3 HP (2.25 kW) Router. This is a must-have piece of equipment for through cuts, profiles and
general fabrication. The power and RPM speed minimise chipping and provide precision high
quality cuts
• 1-1⁄2 HP (1.13 kW) Router for minor trimming, clean up and detail cuts/fabrication.
• Variable speed option on the routers for large bits with large diameter cutters. It should be
noted that for plunge, straight line cuts, variable speed controls are not necessary.
The router bit industry is unregulated, and you often get what you pay for. When considering
router bits for your collection, please remember to look for the minimum standard of 1⁄2” (13 mm)
shank and a C-3 (minimum) or C-4 (recommended) carbide. Each of the many router bit
manufacturers can provide specifications and details.
Belt sanders and jig saws
The use of each of the aforementioned is to be extremely regulated in your shop. A belt sander is
frequently used in a shop or on the job site to assist with irregular shapes, edges and profiles. Like
the jig saw, it must be limited in use and scope of service. Do not use a belt sander to level a
surface or sand down a field seam. The heat generated from the belt sander may warp, crack,
or fail the top or seam. Again, restrain from typical use and use only in a minor, ancillary fashion.
Sanding and sanders
The process of fabrication has a great deal to do with sanding. Good sanding/finishing takes a
great deal of skill and time. It is a representation of the final product and in a job should represent
20 percent on a matte finish; 30 percent to a satin finish; and as much as 40 percent to a gloss
finish. For this reason, quality procedures need to be put in place, and quality training, sanders,
and papers must be used.
SH
OP
TOO
LING
August 2007

26
THE “BASIC” LG HI-MACS SHOP
Electric sanders
An electric sander is a typical staple for the field. Often times, mobile compressors are not able to
provide adequate performance to run the air sander to the specification standards.
Electric sanding equipment continues to make improvements and is still viable for the fabricator to
own. Increased diameter options and efficient dust collection systems assist the fabricator, while
minimising dust in the home or field environment.
Sandpaper
The advances in sanding systems by manufacturers have been impressive. Standards for sanding
solid surfaces as an industry continue to be of fabricator choice and manufacturing
recommendations only.
There are many sanding options, but there are a few key features to consider when looking for
good sandpaper. They include:
• Aluminum oxide abrasive
• Strong or heavy backing paper
• Calibration of grit or particle grading such as 3M’s micron paper
Suggested sandpaper and sanding belt manufacturers include:
A routine procedure on specific
recommendations by LG HI-MACS will outline
how to accomplish a Matte, Satin or Gloss
finish later in the fabrication manual. Refer to
the finishing section of this manual for the
details.
SH
OP
TOO
LING
August 2007
Sandpapers Sanding belts
3M® 3M®
Norton® Sungold®
Crossen® Klingspor®
Mirka®
Sun Gold®
Trizact®
Conventional Micron
150 100
180 80
220 60
320 40
400 30
600 15
1200 9
Grit/Micron equivalencies

27
THE “BASIC” LG HI-MACS SHOP
Clamps
A “Basic” fabrication shop will need 500 to 1000 hand-spring clamps in order to work on multiple
projects at one time and to provide the installation crew with their requirements. Specifically, you
will need one clamp placed every 50 mm along the leading edge of the build-up/profile edge
perimeter. Typical 50 mm clamps are common, but 75 mm clamps are necessary on build-ups
60 mm to 75 mm.
Additional clamps are necessary and helpful in the fabrication of large LG HI-MACS jobs. Sliding
bar clamps are the logical choice for adhering larger surface areas and are especially helpful on
inside corners. You should look for the following features when purchasing sliding bar clamps:
• Steel with plastic or wood jaws
• Steel with steel jaws and protective surface clamps to mitigate marring
• Adjustment screws or quick release mechanisms
Additional shop supply recommendations:
• Hole saws
• Variable speed polisher with buffing pads (stop to 3000 RPM)
• Hot glue gun
• Bulk adhesive gun
• Caulking gun
• Good metal straight edges, 4’ (1.2 m), 8’ (2.4 m), 12’ (3.7 m) and inside corner Radius edge
• Squares and levels
• Tape measures
• Templates and guides
• Sanding blocks, both right angle and straight
• Horizontal storage racks for LG HI-MACS sheet goods
• Refrigerator for adhesive storage
• Small welder for fabrication of metal support substructure members
• Hammers, wrenches, awls, pencils and utility knives
• Screwdrivers and pliers/channel locks
• Shop vacuum broom and dust pan
• Extension cords
SH
OP
TOO
LING
August 2007

28
THE “BASIC” LG HI-MACS SHOP
Required shop supplies
• Work benches or fabrication tables
• Disposable dust masks and gloves
• Heat tape and packing tape
• Denatured alcohol
• White cotton or terry cloth rags
• Paper toweling
• Safety goggles or glasses and ear protection
• ScotchBrite pads
• Silicone caulking
• A MSDS sheet
Suggested substructure materials:
• 25 mm square steel tubing
• 12 mm and 19 mm structural grade plywood
• 75 mm and 100 mm solid hardwood as necessary
Suggested template materials:
• 3 mm MDF
SH
OP
TOO
LING
August 2007

29
THE “ADVANCED” LG HI-MACS SHOP
The aforementioned recommendations and suggestions for the “Basic” LG HI-MACS shop are
prerequisites to the “Advanced” LG HI-MACS shop considerations. In the “Advanced” format, high
output, production, and efficiency is the focus. For this reason, the “Advanced” shop should have
more sophisticated equipment than the “Basic” shop.
The vertical panel saw is a key consideration. High-quality panel saws require substantial
investments, but offer the benefit of single-person operation & high speed cutting with extremely
accurate results. Vertical panel saws do this more so than some of the best table saws.
Dust collection, ventilation and extraction system and/or tables
LG HI-MACS fabrication produces a nuisance dust. Dust collection systems provide a cleaner
working environment and lead to an extended tool life. It also is necessary to keep up with OH&S
compliance levels at high production capacities.
Forklift
This equipment is essential to the secure moving of LG HI-MACS’ materials into the shop
environment from the delivery truck without incurring damages and exposures to injury. It adds to
the level of protection of LG HI-MACS and creates a better work environment.
Engineered work tables and benches
The “stationing” of such tables will heighten efficiencies of production. These tables/stations
provide flexible accessibility to electrical power and air connections for hand tools. It also ensures
a calibrated work surface.
Cantilevered storage racks
These storage racks improve access to LG HI-MACS materials by heightening efficiency and
safety standards within the shop environment.
C.N.C/V grooving machinery
This machinery processes the materials efficiently and quickly on large jobs. It offers the consistent
ability to manufacture components while maximising material yields.
Digital Template systems
Digital Templating offers the ability to take a digital picture of the field conditions and calibrate it to
perfect the accuracy of the dimensions of the LG HI-MACS top. It is then downloaded to the
waiting CNC where the fabrication process begins and the materials are cut. This is all
accomplished without traditional templates and before the estimator returns from the field to
the shop.
SH
OP
TOO
LING
August 2007

30
GENERAL FABRICATION PRINCIPLES
This manual is intended to provide the minimum standards of successful fabrication. As such,
short cuts to these minimum prescribed methods will not be accepted and will void product
warranty outlined in the limitation of warranties and liabilities section of this manual.
LG HI-MACS layout
Before cutting the sheets you have ordered and received from your LG HI-MACS distributor,
calculate the number, lengths, widths and elevation to double check the amount of material you
will need to finish the entire project. If you calculate too closely, you may create yield problems
and dye lot concerns if more material must be ordered.
You must also remember to consider cutouts, splashback materials and buildup strips. As you
look at all of these factors consider the cutout sizes and locations, substructure requirements,
seam locations, possible inlay issues and specialty fabrication, such as a cove splashback or
thermoformed surface requirement.
Material review
• Place materials on the work benches. Inspect dye lots and run numbers.
• Remove peel coat and inspect for colour variation, match and defects.
• Review cuts and dry fit seams when applicable before cutting! Remember that this is a review
and inspection process. Wet the edges between sheets to be seamed to help determine
colour match.
• Review all safety and shop procedures before cutting and machining the LG HI-MACS
sheet materials.
GE
NE
RA
L FAB
RIC
ATION
PR
INC
IPLE
S
August 2007

31
GENERAL FABRICATION PRINCIPLES
Job planning
Successful installation relies on accurate job planning, especially around kitchen appliances.
• Never place seams around cut-outs. Fig.1.
• Never position a seam over dishwashers or heat producing
appliances.
• Keep seams away from internal corners, minimum distance
of 50 mm. Fig.2.
• Wherever possible reinforce all seams. (Fig. 3) with a strip of
12 mm LG HI-MACS of at least a width of 50 mm and
angled to 45° both long edges. Insure the strip covers the
whole seam with spread adhesive over the complete
surface of the strip. Clean seam from underneath smooth.
• Inspect the site and check for anything that could interfere
with fabricated elements.
• Check for unevenness in the wall. Fig.4.
GE
NE
RA
L FAB
RIC
ATION
PR
INC
IPLE
S
August 2007
Figure 1
50 mm
Figure 2
50 mm
45° 45°
Figure 3
Figure 4

32
GENERAL FABRICATION PRINCIPLES
Cutting and staging overview
• Remember to avoid handling materials alone. Use two people to move the sheet into position
for cutting.
• Cut the LG HI-MACS sheet materials for your job specifications. If you are using a table saw,
make sure it has out feed supports. If using a vertical panel saw, remember to watch for errant
materials after cutting.
• Place cut materials on your workbench and create the 1⁄2” (13 mm) inside corner with the
appropriate router and template. Remember that a 1⁄2” (13 mm) bit creates only a 1⁄4”
(6 mm) radius.
• Stage your components and assemblies on a flat, rigid plane surface. If using more than one
bench to stage your project, make certain these benches are of the same height! Your
supporting work tables should have supports every 600 mm. This will ensure a flat and safe
working area as you assemble your tops.
• Save any extra materials or out falls for buildup strips, cutting boards and repair materials.
Remember to leave a good size piece of colour matched material at the jobsite in case of
repair. A good spot to place this is under the sink cabinet. Pre-drill two holes in the material at
your shop. During installation, place a screw into the drilled holes and position the piece to the
side wall of the cabinet.
Cutout optimising
When making a cutout, remember to make them larger than the recommendations provided by
the manufacturer. The recommendation is a 1⁄4” (6 mm) gap around the countertop cutout and a
1/8” (3 mm) around the sink cutout. Do not make them too large.
Seam locations and cutout positioning
• Keep seams 50 mm from any inside or outside corners and 50 mm from any cutout for stove,
sink or other consideration of cutout.
• When having to layout and fabricate a countertop, remember to maintain the seam 50 mm
from the inside corners.
GE
NE
RA
L FAB
RIC
ATION
PR
INC
IPLE
S
August 2007

33
GENERAL FABRICATION PRINCIPLES
Substructure
LG HI-MACS needs to be supported. Depending on the application, the following materials for
support can be recommended:
• Steel/stainless steel profiles
• Aluminum/aluminum profiles
• Moisture resistant wooden sheets of MDF, Plywood or particle board
For application as a kitchen counter top, a frame substructure is strongly recommended. Fig.1.
A full underlayment can but should not be used.
Adjust all substructures with elastic
silicone or with an permanent elastic
PU adhesive to the back of the
LG HI-MACS sheet, preferably in
dots with a maximum distance of
approximately 100 mm.
Wooden strips should have a width
of ca. 80 mm.
Rebate for reinforcement strips to be
foreseen.
Prepping
• Though it is typically not necessary with acrylics to scuff-sand all surfaces to be bonded, it is a
good practice and is recommended. It will increase the strength of the bond. When performing
this procedure, use 60 grit sandpaper. Remember, as a general requirement to clean the scuff-
sanded areas and any joints or seams with denatured alcohol prior to final seam preparation
and execution.
• As a general rule, use clean, white, lint- free rags (cloth or paper) and avoid rags with any
colour dyes. The dyes mixed with the denatured alcohol could contaminate the joints and
seams.
Seams
Traditionally, solid seams are the hardest and leave the least amount for error. It is very important
when seaming solids that you thoroughly clean the seams and prepare a precise mirror cut.
Seaming with matrix colours, whether it be Sands, Pearls, Quartz or Granite series LG HI-MACS,
are more forgiving, by virtue of the many colours of particulate.
GE
NE
RA
L FAB
RIC
ATION
PR
INC
IPLE
S
August 2007
Bonded with silicone dots
Bonded with silicone dots
LG HI-MACS sheet(counter top)
~ 600
~ 80
Figure 1

34
GENERAL FABRICATION PRINCIPLES
Using the following procedures will ensure a great seam
• Industry standards suggest that two acceptable methods will ensure a great seam.
1. Mirror cut the two pieces to be seamed together and
do so at the same time. This is performed by setting a
straight edge in place on one of the pieces to be
seamed and also clamping down the two pieces to
be seamed. Maintain a gap approximately 6 mm
greater than the shank of the bit. It will take
approximately 3 mm off each of the pieces that will be
seamed. A square base router will help the accuracy.
With one controlled pass of the router, you will make
these two “mirror” edges simultaneously. The two
pieces will fit together exactly.
2. The other method is to do the exact same procedure,
but use a wavy bit instead of a standard plunge bit.
Using a wavy bit suggests a greater surface area for
bonding.
• You can also achieve extremely accurate cuts by using C.N.C., Vertical Panel Saws, or Auto
“V” Groovers.
• If you scuff-sand the edges with a right angle block
and 60 grit sand paper, you will ensure a greater
bonding surface than if you do not.
• Make sure to clean the joining edges with denatured
alcohol and a clean white rag.
• Apply a strip of box tape or packing tape to the
underside of the area to be joined, half on each side
of the two pieces. This will create a bridge. Leave
about 3 mm between pieces before applying the tape.
GE
NE
RA
L FAB
RIC
ATION
PR
INC
IPLE
S
August 2007
Sand paper
Sand paper
3 mm
Tape

35
GENERAL FABRICATION PRINCIPLES
Clamping tips
• Remember clamping pressures. You do not want to use excessive pressure. If you do, you will
create a dry seam. This is when you squeeze all the glue from the seam joint.
• Clamp pressures should be tight enough to allow a bead of adhesive to squeeze out.
• The adhesive will shrink slightly, so do not completely clean off the joint of excess adhesive.
• Look for glue voids and air pockets. Take care of this before the seam adhesive sets up.
• Inspect the seam to ensure a tight fit.
• Let the adhesive cure for a minimum of 40 minutes in normal conditions or until hard to your
fingernail touch.
• Remove the excess adhesive by “Leveling” the seam with a router with a set of skis and a
small leveling bit. Do not use a belt sander to perform this operation. Excessive heat will
weaken the integrity or fail the seam all together.
• Finish sanding all surfaces to specified finish.
Reinforcement typical standards
• Seam reinforcement materials should be comprised of 1⁄2” (13 mm) LG HI-MACS materials.
• The reinforcement must be continuous along the entire seam. This 75 mm reinforcement strip
must be beveled to 45 degrees and sanded smooth to reduce the stress riser.
• Avoid stress risers. A stress riser is a sharp or rough cut or corner that weakens over time as
the top expands and contracts. This weakening effect will eventually fail the top and a crack in
the countertop will occur.
• Locate reinforced seams where full support is available. Reinforcements can sometimes get in
the way of the overall support structure.
• Keep the nearest edge of the seam support a minimum of 50 mm from inside corners.
Note:
Do not place a seam over a dishwasher.
Do not place a seam through a sink.
GE
NE
RA
L FAB
RIC
ATION
PR
INC
IPLE
S
August 2007

36
GENERAL FABRICATION PRINCIPLES
• Attach scrap material or wooden blocks with
quick-drying glue or hot melt adhesive.
• Apply the adhesive.
• Use clamping device to tighten seam.
(Do not over tighten; will cause “dry seam”).
• Remove clamps and blocks after adhesivehashardened.
• LG HI-MACS requires a minimum 25 mm
radius on all drop edge inside corners.
(Diagram indicates recommended build-up).
GE
NE
RA
L FAB
RIC
ATION
PR
INC
IPLE
S
August 2007
50 mmminimum
50 mmminimum
25 mm minimum
Bottom view

37
Edge build-up overview
LG HI-MACS has the unique ability of providing the machining ability for fabricators to exercise
their design creativity when creating edges. With the multitude of bits available to the fabricators
and terrific adhesives, there are almost endless lists of edge considerations. The fabricator skill
level will come into play when considering the level of sophisticated or complicated edge ideas.
The fabricator’s skill level also comes into play in making inconspicuous joints also paramount to
the high quality of an edge simple or complicated.
Edge build-ups are typically 38 mm and occasionally 50 mm thick. Aprons for commercial work
are a minimum of 75 mm with a typical being between 150 mm and 200 mm.
GE
NE
RA
L FAB
RIC
ATION
PR
INC
IPLE
S
August 2007
Roundover Ogee
Chamfer Bullnose
Drop Chamfer Concave
Simple
Drop Roundover Drop Ogee
Drop Bullnose Inset
Double Chamfer Cloverleaf
Complex

38
Drop edges and build-downs
• Drop edges applied to sheets of LG HI-MACS can create a
multitude of design possibilities.
• One of the easiest ways to produce a drop edge is to
simply stack layers of LG HI-MACS on the underside of the
sheet. Fig.1.
• Start by cutting strips which are slightly oversized and sand
the underside with 120 grit paper. Clean with denatured
alcohol and white cloth.
• Apply a sufficient amount of LG HI-MACS Joint -Adhesive to
each of the strips and smooth out using a wooden or
plastic spatula.
• Attach ‘A’ style spring clamps every 70 mm to 80 mm and
allow to cure (45 min/+20°C). Ensure that, once the clamps
have been applied, a reasonable amount of adhesive is
forced out from the joins. Fig. 2.
• Once fully cured, trim the edge square by using a table
circular saw, then machine the required profile using a
portable hand router or spindle moulder. Fig. 3.
• Drop edges can sometimes be applied on edge, primarily
for deeper build-downs. The best way to achieve this detail
is to first rebate the underside of the sheet to a depth of
approx. 2 mm. Fig.4.
• The rebate serves two functions, firstly it increases the bond
strength and secondly it minimises the effect of uneven
particle distribution.
• As you would normally do, sand both the internal edges of
the rebate and the corresponding edges of the build-down
with 150/180 grit paper, cleaned with denatured alcohol
with a white cloth.
• Apply a sufficient amount of adhesive and clamp edge in
position with screw clamps set at 70 mm – 80 mm apart.
Fig.5.
• Ensure that beads of adhesive are formed at both the
internal and external edge of the joint. Fig.5. Once fully
cured trim the overhang using a portable hand router, use a
straight cutter with Nylon bearing attachment.
GE
NE
RA
L FAB
RIC
ATION
PR
INC
IPLE
S
August 2007
Figure 1
Figure 2
Figure 3
Figure 4
Figure 5

39
• It is possible to create curved build-downs to shaped
counters, simply by thermoforming the edges prior to
bonding. Please refer to page 53 for thermoforming
techniques (but more time intensive and profile limited).
• For internal/external corners, thermoforming will provide one
solution, alternatively simply stack up and bond sheets of
LG HI-MACS at theses corners and machine using a
portable hand router.
• When it comes to a ‘waterfall’ end, the top sheet will need
to be rebated while the edge will need grooving. Fig. 6.
• Ensure that the connection between the rebate and the
grove is neither too tight nor too slack. Fig.7.
• Clamp the section together using sash clamps and allow
the adhesive to fully cure.
• Machine the two edges using a purpose made router tool
with a Nylon bearing, working from the top edge. Fig.7.
GE
NE
RA
L FAB
RIC
ATION
PR
INC
IPLE
S
August 2007
Figure 6
Figure 7
40
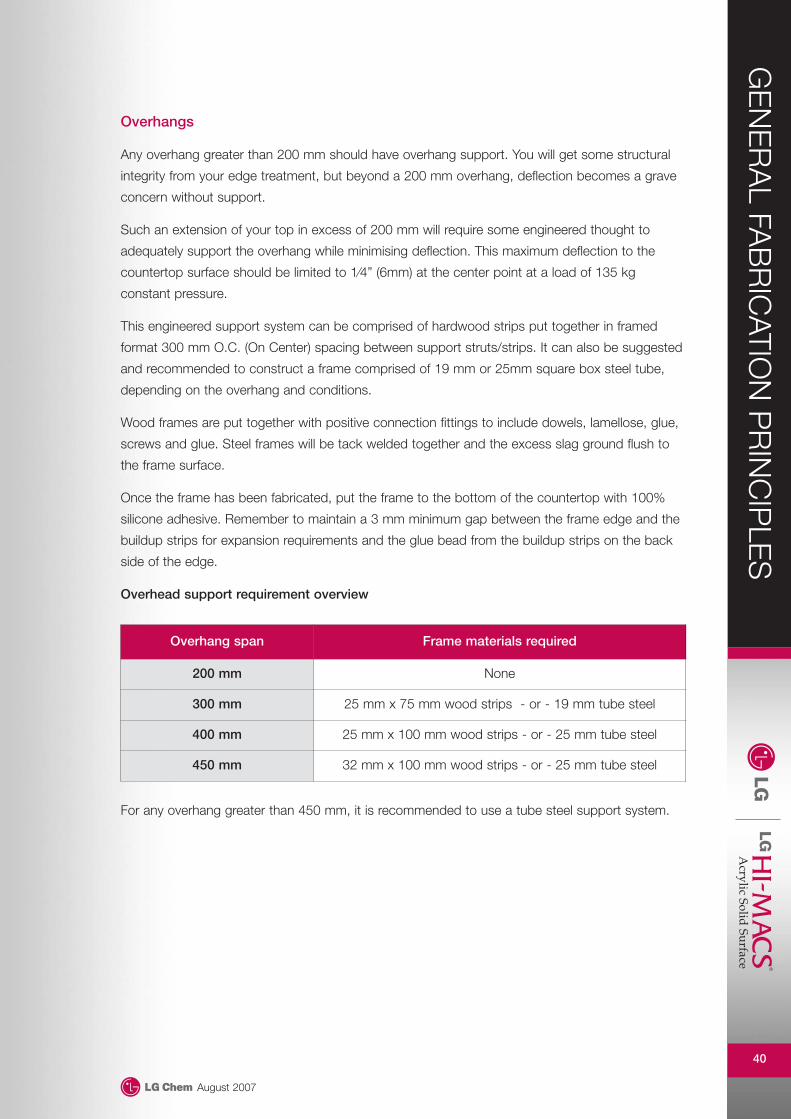
Overhangs
Any overhang greater than 200 mm should have overhang support. You will get some structural
integrity from your edge treatment, but beyond a 200 mm overhang, deflection becomes a grave
concern without support.
Such an extension of your top in excess of 200 mm will require some engineered thought to
adequately support the overhang while minimising deflection. This maximum deflection to the
countertop surface should be limited to 1⁄4” (6mm) at the center point at a load of 135 kg
constant pressure.
This engineered support system can be comprised of hardwood strips put together in framed
format 300 mm O.C. (On Center) spacing between support struts/strips. It can also be suggested
and recommended to construct a frame comprised of 19 mm or 25mm square box steel tube,
depending on the overhang and conditions.
Wood frames are put together with positive connection fittings to include dowels, lamellose, glue,
screws and glue. Steel frames will be tack welded together and the excess slag ground flush to
the frame surface.
Once the frame has been fabricated, put the frame to the bottom of the countertop with 100%
silicone adhesive. Remember to maintain a 3 mm minimum gap between the frame edge and the
buildup strips for expansion requirements and the glue bead from the buildup strips on the back
side of the edge.
Overhead support requirement overview
For any overhang greater than 450 mm, it is recommended to use a tube steel support system.
GE
NE
RA
L FAB
RIC
ATION
PR
INC
IPLE
S
August 2007
Overhang span Frame materials required
200 mm None
300 mm 25 mm x 75 mm wood strips - or - 19 mm tube steel
400 mm 25 mm x 100 mm wood strips - or - 25 mm tube steel
450 mm 32 mm x 100 mm wood strips - or - 25 mm tube steel

41
Overhangs & typical expectations of LG HI-MACS
To avoid failure in an overhang, remember to always allow 1/3 of the width to overhang while two
thirds of the width should be supported. If this rule cannot be followed, you must install corbel
brackets on the overhang for necessary support. When doing so, do not screw the brackets
directly into the LG HI-MACS material. Rather, install a piece
of hardwood in your perimeter support or lattice support
network and use screws or fasteners that will not surpass
the thickness of the wood. When using metal, use silicone
between junction points. A full substrate on a overhang with
a web support over the cabinets is an acceptable method
of support.
Splashback
For installation of splashback materials from 50 mm – 100 mm, follow the provisions:
• Cut the splash from the same materials as were used on the countertop production when
necessary.
• Prepare the strip by sanding and edge-profiling, if required before installing.
• Dry fit the splash materials to ensure all joints and edges are tight.
• Scribe the splashback to the wall or countertop if necessary.
• Install the splashback materials with 100% silicone adhesive. Place dabs of silicone every
100 mm – 150 mm on the back side of the splash materials that will come in contact with the
wall. Prior to setting the splash into position, run a thin bead of clear or colour matched
silicone on the back surface edge of the countertop where the splash will rest.
• Put the splash material in place and remove excess silicone squeezed from the joints and finish
caulking operation.
Full height splashback
The same steps and procedures are used when installing full height splashback materials with a
few exceptions:
• If using full height splash in either 1⁄4” (6 mm) or 1⁄2” (13 mm) LG HI-MACS materials,
remember to allow a 1/8” (3 mm) gap below the upper cabinets for expansion.
• Make cuts with only a router and maintain a 1⁄2” (13 mm) minimum radius on all inside
corners.
• Adhere to wall with silicone – never use panel adhesive.
GE
NE
RA
L FAB
RIC
ATION
PR
INC
IPLE
S
August 2007

42
Coved splashback overview
Cove splashbacks are fabricated in the shop. Specialty routers, tools and procedures are
necessary to successfully fabricate a coved splashback. It should be noted, however, that
standard solid surfacing routers and saws can help create a superior quality splashback, providing
the fabricator is skillful and patient. The most important thing to note is the time necessary to
create a coved splash, which typically reflects in the cost to your customer. This cost varies
depending on shop equipment, frequency and proficiency with cove operations and the time
necessary for finish sanding.
• In order to make a cove splashback, it is recommended to rabbit into the backside of the
counter deck in 25 mm from the back edge of the counter deck. This notch should be
approximately 3 mm at a minimum depth. This will create a pocket for a LG HI-MACS 25 mm
square cove strip to be placed into.
• Cut two 25 mm x 12 mm thick pieces of LG HI-MACS and glue them to the counter deck in
the notch (Rabbit) you have created. You will need to prep the materials with denatured alcohol
and a clean white rag on the deck and strips. Place the adhesive thoroughly in the deck notch
and place the first strip flat into the rabbit created. (Place the 25 mm strip in the 25 mm rabbit
flat on the edge using the 12 mm thickness). Once the first strip is put in place, apply adhesive
to the top of the first strip and place the second strip on top in a horizontal stack method as
used in edge build-ups. Place the spring clamps into position using the clamping procedures
outlined in this manual.
• After the adhesive has dried from the strips, it is time to cut the splashback material you wish
to incorporate into the top. This splashback can be standard, full height or a custom height
selected by the customer. Remember, the full height splash is much more difficult to control as
you fabricate it in place and in the transportation and installation process.
• As you apply the desired splashback strip, remember to thoroughly clean the edge you wish to
apply adhesive to. Put the adhesive to the back face of the top strip you adhered earlier and
place the strip on the glue line. Use bar or pipe clamps to hold the splash in place as the
adhesive dries, and remember to use a square to adjust pressures so that the splashback will
remain straight and at a right angle from the countertop surface.
• Once this has dried, you will want to remove the excess material with a cove router. The depth
and arc angle of the cut should be tangent to both the deck and splashback.
• The balance of this operation is sanding the cove you have created. There are power sanders
that have been developed, but some hand-sanding will be required for the best results and
quality of finish.
• Use the same procedure and steps to create the inside corner cove on an “L” shaped return
on the countertop. Another method is to create an inside corner cove block that is
prefabricated. It can then be bonded to the inside corner, which is finished in the same
manner.
GE
NE
RA
L FAB
RIC
ATION
PR
INC
IPLE
S
August 2007

43
• On coved splash (Type A) the cove
strip assembly must be recessed into
the deck 3 mm to eliminate “feather” at
glue line.
• Cutting
Cut the product to the required
dimension.
• Adhesion
Attach as shown depending on the
type of splashback.
• Router processing
Use coving router to complete cove.
• Sand after processing
GE
NE
RA
L FAB
RIC
ATION
PR
INC
IPLE
S
August 2007
Recessed into deck
For splashback
For top
For apron
Adhesive Silicone
Router processing(coving router)
Removesilicone
Splashback(round type)
Splashback(perpendicular)

44
Countertop cutouts
Countertops and heat generating appliance applications remain the greatest challenge to Solid
Surfacing. The heat generated in various manufacturers of these appliances constantly challenge
the performance limits of solid surfacing materials. Fabrication techniques have improved over
time and a lot has been learned to avoid most failures in such conditions. It remains true that solid
surfacing can take the heat, but must have an outlet for venting or dispersion in order to keep the
temperature under critical performance limits.
Basic principles in fabricating and creating a countertop cutout
PLEASE NOTE THAT DEVIATIONS FROM THESE FABRICATION PRACTICES WILL RESULT
IN VOIDING THE PRODUCT WARRANTY!
• Only use a router to cut out the countertop.
• Make certain you ease the top and bottom of the cutout with a 1/8” (3 mm) roundover.
• After rounding the cutout profile, remember to finish sand any chatter smooth to 150 Grit.
• Make sure to make the cutout as large as possible, being ever mindful that it must still have
the ability to properly support the cook top.
• Create a 13 mm radius at all inside corners.
• Apply a minimum of 1 layer of heat conductive foil tape (preferably two or three layers as
illustrated below) to the edge of the cutout. Place these layers so that the first layer of tape
rests on the entire flange of the countertop. You can carefully trim any excess tape after final
installation.
• As you apply the second and third layer of tape, remember to fan them out like fins. This will
increase the surface area for the heat to travel, and this increased surface area will also assist
in faster dissipation of trapped heat. Thus, keeping the LG HI-MACS at heat tolerances and
void of failure possibilities. Remember to maximise the exposure to circulating air!
GE
NE
RA
L FAB
RIC
ATION
PR
INC
IPLE
S
August 2007
Edge of cutout (profile view)

45
Fabrication recommendations to ensure a high performance level in cooktops
Some manufacturers or specific models of countertops are notoriously known to fail in solid
surfacing applications and have no prior success. If you have known a model or manufacturer as
being successful, these steps can be considered as optional. If you do not know or have history
using a specific model or manufacturer of countertop model or manufacturer, opt to use these
techniques.
• Increase the inside corner radius to 32-38 mm if possible. Keep the corner enlargements all
symmetrical. As a part of this radius and inside corners, inset the inside corners with a router.
This enlargement should be made 75 mm from the centerline of each corner radius point.
• Apply a thermal barrier tape under the aluminum conductive foil heat tape. Thermal barrier
tape will insulate the countertop from heat caused by the countertop flange or firewall box. 3M
makes such a tape. It is approximately 1 mm thick. If this is difficult to find, look for a heat tape
substitute that contains ceramic materials.
• Provide ventilation to the cabinet containing the cooktop by using a vent and fan system to
help carry the heat away from the countertop material. Ensure positive convection currents for
the fan to be installed so as to remove and not collect additional heat. It may also require
cutting or venting the cabinet walls if the fire box walls are too close to the cabinet and
preclude air flow.
Reinforcing and subassembly techniques to ensure high performance level in cooktops
The most common method used in fabrication today is the Underdeck Corner Block. The
Underdeck Corner Block method is very successful in dealing with the amount of heat generated
by the cooktop.
Underdeck corner block method
• A corner block is placed at each corner of the radius cut cooktop cutout and should be
installed just after the cut out is routed. These blocks are placed on the underside of the sheet
and will be adhered or bonded to the cooktop. Do not ease the cutout or finish sanding the
chatter until these blocks have been installed.
• 4 blocks are prepared by using outfalls of LG HI-MACS 12 mm sheet materials. These blocks
should be a typically 150 mm squares.
• Once the blocks have been cut, make sure you bevel or chamfer the edge to 45 degrees and
round the square corners to eliminate the chance of creating a stress riser. Scuff-sand and
clean the surface area of the blocks and bottom of the sheet to be bonded.
• Place adhesive on the block thoroughly and position the block so that a 75 mm x 75 mm
surface area of the block, extend from the routed cooktop cutout. Clamp in place until dry.
• Now trim the excess material from the blocks on the inside of the cooktop and any extensions
or protrusions in the front or back edges of the deck.
• Ease the top and bottom of the cutout and support block materials with a router and finish
sand the chatter to a 150 Grit finish.
• Apply the three layers of heat tape as previously described.
GE
NE
RA
L FAB
RIC
ATION
PR
INC
IPLE
S
August 2007

46
SINK MOUNTING OPTIONS
You can either bevel mount or undermount your LG HI-MACS sink or vanity to your LG HI-MACS
countertop or vanity to create a monolithic appearance smooth to the touch and crisp and clean
to the appearance.
Mounting sinks from dissimilar materials
The most typical dissimilar sink or vanity will be comprised of Stainless Steel, Porcelain, Cast Iron,
Ceramic or Glass. These sinks can be top mount, self rimming or undermount.
When top mounting
• Cut the opening in the countertop approximately 25 mm larger in length and width than the
sink is to be mounted. Make this cutout with a router only! This opening should then be
sanded to remove chatter to a smooth finish.
• Apply a 1⁄4” (6mm) bead of 100% silicone to the bottom edge of the self rimming sink flange
and also to the edge of the routed cutout.
• Position the sink into the cutout so that the flange rests on the deck. Make certain to install
the clips or clamps supplied, but remember not to screw anything directly into or onto the
LG HI-MACS materials. Use a wooden block or shim block when necessary.
When undermounting sinks from dissimilar materials
• Make a template if one is not provided of the required size for the cutout.
• Sand and finish the routed edges and chatter to provide a smooth surface.
• Invert or flip your LG HI-MACS countertop. Make certain your bench is flat and level.
• Leave enough room at the back of the countertop for the faucet assembly, edge build-up
splashback, and respective sink flange.
• Apply a 1⁄4” (6 mm) bead of 100% silicone to the top of the sink flange and to the bottom of
the LG HI-MACS counter top at the flange perimeter edge.
• Position the sink equally around the cutout and install sink clips or clamps supplied, but
remember not to screw anything directly into or onto the LG HI-MACS materials. Use a
wooded block or shim block when necessary.
GE
NE
RA
L SIN
K M
OU
NTIN
G O
PTIO
NS
August 2007

47
Mounting LG HI-MACS sinks and bowls to LG HI-MACS sheet materials
Seam mount and undermount
• A seam mount in solid surfacing is gluing the top of the sink flange with adhesive to the
bottom of LG HI-MACS sheet materials. For this reason, all typical bonding steps are
performed on an inverted or flipped sheet, thus exposing the bottom of your countertop.
• Most fabricators will perform all steps in an inverted fashion, with the exception of final
trimming with the router and finish sanding.
• It may be helpful to make sure you have a work table/bench that is open or wide enough in
the center to flip the top into once the sink is installed for final trimming and finishing. Such a
table/bench will provide proper support all around the sink and countertop.
• Mark the center location of the bottom of the sheet where the sink will also be centered in the
sink base cabinet. Use an auger to scribe these marks.
• Once you dry fit the bowl into final position, use the same auger to draw an outline around
the sink/bowl.
• Completely sand and then clean the surface of the sink flange and the area on the bottom of
the sheet inside the auger outline that will have adhesive placed on it.
• Place the sink/bowl back into position inside your auger outline.
• Attach blocks made of wood or scrap LG HI-MACS material with hot melt glue against the
outside edge of the flange. Once the glue has dried the sink will remain in position.
• At this point you can place a bead of adhesive on the flange of the sink or bowl and on the
auger outline on the sheet.
• Place the bowl inside the positioning blocks and attach clamps or weights to ensure adequate
and equal pressures as the adhesive is setting up. Depending on the bowl, it may be
necessary or required to install sink clips or brackets to aid in the sink support. It can be noted
that if you notch the positioning blocks to produce an “L” block, you can create you own
support bracket.
• Once the adhesive is dry, carefully flip the top upright. Place your router in the center of the
bowl and plunge an approximate 25 mm hole through the sheet. Make sure you now put a
bearing guide on the bit and follow the perimeter of the bowl as a guide. The bearing will follow
it and the excess cutout material will be removed.
• Change your bit to a finish profile bit with a bearing guide and finish routing the final profile to
the deck and bowl. It can be a smooth transition appearing as a monolithic top and bowl or a
small bullnose to provide a transition lip.
GE
NE
RA
L SIN
K M
OU
NTIN
G O
PTIO
NS
August 2007

48
Mounting LG HI-MACS sinks and bowls to LG HI-MACS sheet materials
Lavatory bowls (undermount type)
• Mark the center of product to install the
bowl.
• Take the bowl and mark its circumference
with auger. (Pencil or marker not
recommended).
• Completely clean surface around
circumference with denatured alcohol.
• Attach blocks as shown with quick-drying
or hot melt adhesive in order to prevent the
bowl from moving.
GE
NE
RA
L SIN
K M
OU
NTIN
G O
PTIO
NS
August 2007
Auger
Bowl
Cloth
Fixed scrap plate
Step 1
Step 2
Step 3
Step 4

49
Mounting LG HI-MACS sinks and bowls to LG HI-MACS sheet materials
Lavatory bowls (undermount type)
• Lightly sand the flange part of bowl with
sand paper.
• Apply denatured alcohol and clean
the flange.
• Plunge a hole near the center of where the
bowl is to be mounted, using router.
• Apply the adhesive to the bowl flange.
GE
NE
RA
L SIN
K M
OU
NTIN
G O
PTIO
NS
August 2007
Sand paper
Cloth
Drill
Exclusive adhesive
Step 5
Step 6
Step 7
Step 8

50
Mounting LG HI-MACS sinks and bowls to LG HI-MACS sheet materials
Lavatory bowls (undermount type)
• Place and attach the bowl as shown.
• Attach with clamps until the adhesive has
hardened.
• Remove clamps after adhesive has
hardened. Turn assembly over and route
sink hole as shown.
• Various shapes are obtainable according
to bit selection.
GE
NE
RA
L SIN
K M
OU
NTIN
G O
PTIO
NS
August 2007
Clamp
Step 9
Step 10
Step 11
Step 12
(A) (B) (C)

51
THERMOFORMING
CAUTION: The Volcanics® series is not thermoformable!
Templating
• Template to the shape required using plywood or MDF.
Thermoforming process per thickness of product
Note
1. Peel off the protective sheet, which is attached to the surface of product.
2. Be careful that the oven temperature does not exceed 200ºC.
3. Heat 10 ~ 20 minutes, or more if you need the product with minimum curve R.
4. Please note with caution that a whitening effect can be generated on the surface of the product if
the temperature is too high or the heating is prolonged.
Cooling
• Never take out the product from the template before the temperature reaches 80ºC. The
shape of product is maintained at temperatures below 80ºC, even if the product is not
supported by the template.
THE
RM
OFO
RM
ING
August 2007
Thickness of product 6 mm 12 mm
Oven temperature (°C) 160 ~ 180 160 ~ 180
Heating time (minute) 20 40
Minimum curve radius (mm) R=50 R=75
Thickness of product 6 mm 12 mm
Cooling time (minute) 10 ~ 20 20 ~ 40

52
EXPANSION & CONTRACTION
Sufficient space should be given to compensate for expansion or contraction at the time of
installation since this product may expand or contract depending on the temperature.
Allow 1 mm per metre for expansion and contraction.
EXPA
NS
ION
& C
ON
TRA
CTIO
N
August 2007

53
FINISH CONSIDERATIONS
LG HI-MACS sheet materials are factory sanded prior to peel coat application. The result of this
superior quality factory finish offer fabricators less final sanding time in the shop or on the jobsite.
Sanding is a very important part of the fabrication process. Finish considerations can make or
break the aesthetic value of your surface. Be very sure to sell a finish that is right for the colour
and lifestyle of the customer. Do not oversell the performance of a specific finish, especially in a
darker colour selection and in a satin or gloss finish selection. Be forthright, in clearly expressing
the performance of a finish option.
The sanding and finishing process can also be the most time consuming and frustrating
experience to the fabricator in the process of fabrication. LG HI-MACS would like to simplify the
process as you take your countertop finish from a standard matte to satin to high gloss finish.
Additionally, it can be confusing to the fabricator because of the multitude of sanding equipment,
systems and sand paper companies available to the fabricator.
As you decide the best equipment and sanding papers to incorporate into your fabrication
process, remember to purchase good quality sanding equipment and sandpapers.
• Make sure to remove excess adhesives with a surfacing router equipped with a system of
skis. Avoid use of a belt sander as it generates a great deal of heat and can fail a seam.
Furthermore, the belt sanding equipment is very aggressive and can remove material quickly.
That being said you can create more problems for your countertop fabrication if more material
is removed than is supposed to be. You want to maintain control in the sanding process. It is
the final step of showcasing your work.
• An important step in the process of sanding is to thoroughly clean the top between steps or
grit changes. You can do so with a spray bottle of water or preferably denatured alcohol and a
clean white rag. Cleaning off sanding dust between steps allow for a more consistent and high
quality finish.
• Apply equal pressure and overlapping coverage in both directions of the top. For example, left
to right and front to back. Complete one direction before starting the other.
• Change or clean your sandpaper as you sand as it will get loaded and become less efficient.
As you get to a more detailed finish the sandpapers will load more quickly. If care is not taken
to keep the sandpaper loading to a minimum, it will impair your ability to achieve a high quality,
consistent finish. In a gloss situation, you may never achieve it.
FINIS
H C
ON
SID
ER
ATION
S
August 2007

54
Matte finish
• To achieve a matte finish, you can either use a grit or a micron system. Remember the
numbering system or grades of papers between grit and micron systems are opposite to
one another.
• First, use a 120 Grit or 100 micron abrasive. Once this step has been completed, remember to
clean the top and switch papers to a 180 or 220 Grit or 60 Micron paper.
• Finally, clean the top once again and surface the top with a Scotchbrite pad.
• If you are working with a dark or black colour, you may have to add an additional third step in
sanding. This will require a 320-400 Grit or 30 micron paper. If this is done, you will then want
to clean the top and then surface the top with a Ultra Fine Scotchbrite pad.
Satin finish
• If you wish to achieve a satin finish follow the same steps expressed to achieve a Matte Finish
on a dark colour. Use a 120 Grit/IOO Micron, then switch to a 180-220 Grit/60 Micron.
Remember to clean the top between steps.
Next
• You will want sand the top using 320-400 Grit/30 Micron paper. Clean the top.
• Finally, you will surface the top with a Ultra Fine Scotchbrite pad. Clean the top once again and
examine the final finish.
FINIS
H C
ON
SID
ER
ATION
S
August 2007

55
Gloss finish
• Follow the steps to the Satin Finish specification, but do not use the pad yet. As you reach the
320-400 Grit/30 Micron step, you will need to add a few additional steps.
Next
• Sand the top using 600-900 Grit/15 Micron paper. Thoroughly clean the top. Remember to
check the loading of your paper during the process and replace it frequently as necessary to
maintain a consistent finish.
Next – polishing procedures
• Remember to note that HI-Gloss finishes on dark colours are not recommended in high traffic
areas, as the finish will show wear very quickly and require constant maintenance.
• Remember the polisher will build a lot of heat as you buff the surface with the polishing
compounds. Maintain moderate consistent pressure to prevent overheating of the top and
burnishing of the gloss finish.
• Use a 10” (254 mm) variable speed polisher. Black and Decker offers a few models that can
maintain 2500 RPM’s and 8-10 amps of power.
• Install a 3M Buff Adapter to the polishing equipment. This is important so as not to allow the
arbor to damage the surface in the polishing process.
• You must now install a white 3M Super Duty 2 + 2 Pad to the polisher assembly.
• Apply 3M Marine Paste Compound to the top. This paste is abrasive and will remove swirls to
30 Micron. You may need to repeat this step. Keep the buffer moving in a controlled fashion
across the countertop and then from front to back across the countertop.
• Clean all compound residue from the polished surface. You can do so by reversing the white
pad. Then clean the top with denatured alcohol and a clean soft white rag.
• Take off the White 3M Super Duty 2 + 2 Pad and replace it with a Yellow 3M Super Buff
Polishing Pad.
• Apply 3M “Finesse-It” Polishing Material to the countertop. Remove any remaining swirls to
produce a high gloss surface.
• Clean all polishing residue from the polished surface. You can reverse the Yellow Pad to
remove any residue left behind from this step.
FINIS
H C
ON
SID
ER
ATION
S
August 2007

56
INSTALLATION OVERVIEW
Substructure, reinforcements, supports, splashbacks and field seams are installed at the
customer’s jobsite. Before leaving your shop, carefully clean the fabricated materials and
remove as much of the dust as possible. You want to minimise the dust and mess in the
customer’s house.
Transporting pre-fabricated materials
• Do not try to load or unload the materials by yourself.
• Use gloves
• Plan for adequate manpower at the jobsite.
• Wrap all corners and surfaces with bubble pack, cardboard or foam.
• Secure the countertop materials in the vehicle or vehicle racks. The top should be in a full
vertical or fully supported horizontal position.
• Remember not to complete cutouts, and brace these partial cutouts for the drive to the
customer jobsite.
• Allow the materials to reach room temperature before fabricating and installing. You should
allow up to 2 hours if temperature differential is dramatic. During this time the materials will
expand or contract depending on the circumstances.
• Seam materials work best in a temperature range of 60ºF (15ºC) to 90ºF (32ºC).
Substructures
• As previously mentioned in this manual, do not to apply solid substrates, especially around
heat generating appliances in the installation. Wood and related wood products do not
conduct or dissipate heat produced by heat generating appliances.
• If the cabinet has full dust covers, it is recommended to remove at least one half of the cover
prior to top installation.
• You can use a full substrate with approved wood or wood product materials on furniture, table
tops or related service counters, provided that no heat generation is present to accentuate the
expansion and contraction properties of the top.
• Remember that the cabinets must be leveled and shimmed where necessary to 1.5 mm
tolerances prior to countertop final installation.
• Apply perimeter support strips to the cabinet surfaces. You will need to install center support
stringer materials across the cabinets for support. These support strips can be nailed with a
finish nail or screwed into place provided the head is below the surface of the wood support
that will come in contact with the LG HI-MACS countertop deck.
• Place stringer/support strips 300 mm apart.
• After the support system is installed and leveled, you will be ready to begin installation of the
LG HI-MACS top.
• Use 100% silicone adhesive to bond LG HI-MACS surfacing materials to dissimilar materials
such as wood, steel, aluminum, etc. Do not use Liquid Nails or similar panel adhesives. The
purpose of the silicone is to allow the top to “breathe” and expand/contract as it needs to.
Silicone allows for this to take place. Panel adhesive restricts this motion resulting in failure to
the top and voiding the warranty.
INS
TALLATIO
N O
VE
RV
IEW
August 2007

57
INSTALLATION OVERVIEW
Key reminders to a successful installation
• Keep seams 80 mm from inside or outside corners.
• Leave 50 mm between the seams and sink, countertop cutouts or seam above dishwasher.
• Use proper substrate materials. Avoid particle or MDF board.
• Support all overhangs over 200 mm
• Create sharp, accurate seams and tight glue lines. Not too tight. You want to ensure the
adhesive is not all squeezed out.
• Apply seam adhesive evenly and thoroughly so that all seaming surface areas are
properly covered.
• Allow the seam adhesive to completely cure before finishing the sanding. Avoid the belt sander
in this exercise.
• When finish sanding, apply even and equal pressure as well as controlled motion as the
surface area of the top is covered on an x and y plane. Change sand papers as necessary to
ensure an even finish. Loading occurs more frequently as you use finer sand paper grits.
• Use 100% silicone adhesive.
Post-installation overview
The fabricators that pay close attention to details and quality throughout the fabrication process
ensure their customer’s satisfaction and minimise costly call backs while maximising the
relationship for future work and/or referrals from the customer.
Establish a procedure of good will after the job is completed by providing them with the following
information and reassurances.
• Review the quality check list of your fabrication with the customer. They will get a chance to
appreciate the craftsmanship and care you put into their top.
• Leave a warranty card for the customer to fill out and send in for registration.
• Review care, maintenance, and longevity procedures with the customer.
• Provide the customer with and review the “Care and Maintenance” kit. Review commonly used
products they should incorporate into their own care and maintenance program.
• Review maintenance procedures and your recommendations for the installation and finish they
have chosen.
• Describe the dangers of placing hot pots, pans, etc on the countertop. Also, review the
negative effects of heat generating issues in sinks dishwashers and countertops.
• Leave colour-matched materials in a trivet or cutting board or fixed colour match materials
below the sink on the cabinet wall and stress their importance.
• Contact the customer after a month or two to see if they have any questions or concerns.
• Provide your company sticker or label to the inside cabinet door or inside cabinet wall below
the sink for future maintenance or top refinishing or questions relating to their top. Sometimes
this is helpful, especially after the original customer has moved.
INS
TALLATIO
N O
VE
RV
IEW
August 2007

58
CONSUMER CLEANING, CARE & REPAIR
LG HI-MACS solid surfaces are stain resistant, finished component products ideal for kitchen
countertops, vanity tops, and other surfaces subject to the hazards of moisture and heavy wear.
Even the most pristine areas won’t succumb to coffee, ink, or other stains. No special cleaning
products are needed to keep LG HI-MACS looking beautiful day in and day out.
While LG HI-MACS is extremely tough and durable, like any other fine material it can be damaged
if abused or mistreated. Reviewing these care and cleaning instructions can assist you in
understanding how easy it is to care for your new LG HI-MACS surface and how you can prevent
more severe damage that may require special repairs. With a little knowledge, you can enjoy the
elegance and beauty of LG HI-MACS for years to come.
Normal cleaning
LG HI-MACS is non-porous, so it can be wiped clean with a damp cloth or sponge and mild
detergents or general purpose cleaners. If you have a matte finish, abrasive cleaners like Ajax®
may also be used. Periodically it may also be helpful to go over the entire surface in a circular
motion with an abrasive cleaner or wet Scotch Brite® pad to maintain a uniform appearance.
Care
Do not place hot pans directly from the burner or oven on the LG HI-MACS surface. Even though
LG HI-MACS can withstand sustained temperatures up to 105ºC, prolonged or extreme heat
could cause yellowing. A trivet should always be used under heated appliances, such as crock
pots, electric frying pans, etc.
Although minor cuts and scratches in LG HI-MACS can be repaired, deep cuts will require the
services of a professional.
Strong acids such as those found in drain, toilet bowl, and oven cleaners should be used
cautiously around HI-MACS. If these items are accidentally spilled, wipe them up at once. Some
of these items, when left on the surface, may cause whitening, which can be difficult to remove.
CO
NS
UM
ER
CLE
AN
ING
,CA
RE
& R
EPA
IR
August 2007

59
CONSUMER CLEANING, CARE & REPAIR
Spills and stains
While most everyday spills can be removed with the cleaning techniques listed, some troublesome
spills and stains such as food dye, tea, and fruit drinks may require more aggressive cleaning.
These items can be removed with full strength bleach followed by a general cleanser.
Note:
Bleach should only come in contact with the surface for two to five minutes. On a matte
finish, if you prefer, you can scrub with an abrasive cleaner. Even nail polish can be
removed from LG HI-MACS with nail polish remover or an abrasive cleanser.
Cigarettes
While LG HI-MACS will not bum, should a lighted cigarette accidentally come in contact with the
surface, it could leave a nicotine stain or scorch mark. Either of these can be removed by cleaning
with an abrasive cleanser or buffing in a circular motion with a Scotch Brite® pad.
Repairing scratches
For removing superficial scratches, rub in a circular motion with a wet Scotch Brite® buffing pad
until the scratches are removed. Clean thoroughly with soap and water and let dry.
Note:
Deep scratches can be removed by carefully sanding lightly with 120 grit sandpaper
followed by 220 and 320 grit sandpaper. Then rub the surface with a wet Scotch Brite® pad
in a circular motion to restore the finish. For added protection, or if any additional luster is
desired, after the surface is dry, apply a non-wax polish cleaner or other recommended
surface dressing and wipe with a clean, dry cloth. Wipe dry using another cloth.
CO
NS
UM
ER
CLE
AN
ING
,CA
RE
& R
EPA
IR
August 2007

60
TROUBLESHOOTING
TRO
UB
LES
HO
OTIN
G
August 2007
Problem Cause
Adhesive or bond failure
a.) Failure to scuff, sand or clean joint before bonding.
b.) Improper support of deck or overhang seams.
c.) Improper mixing of seam kit or dry catalyst tube.
d.) Expired or old adhesive
Cracking a.) LG HI-MACS countertop fabricated with stress riser.
b.) Failure to radius inside corner at least 1⁄2” (13 mm)
c.) Failure to install tops on level plane surface.
d.) Failure to use heat tape at countertop cutout.
e.) Failure to reinforce countertops, cutouts and seams.
f.) Failure to allow a 1 mm gap every 1 metre for expansion.
g.) Failure to use silicone adhesive on dissimilar materials.
h.) Failure to cover all bonding surfaces with adhesive.
Discoloured seams a.) Failure to use clean; white, lint free rags.
b.) Failure to clean joints with denatured alcohol before adhering.
Uneven surface finish
a.) Use of a belt sander on countertop surface.
b.) Failure to use appropriate grit abrasive on sand paper
c.) Sanding on one spot too long.
d.) Failure to control x & y motion of sander equally.
Warping a.) Failure to fabricate and install countertop on level, plane surface.
b.) Failure to store received materials properly as prescribed.
c.) Failure to add 1 mm gap for expansion every 1 metre
d.) Failure to use heat tape on countertop cutouts.

61
REPAIRS
One of the main advantages of LG HI-MACS, is that the surfaces can be repaired in the event of
an accident. Depending on the type of damage, a number of solutions can be used.
Scratches• For scratches, it may well be possible to sand them out
with Scotch Brite pads, abrasive creams or even abrasive
papers.
Small indentations• With small indentation marks it is possible to drill out the
affected area and fill the hole with LG HI-MACS colour
matched adhesive. Be sure to over fill the hole and try to
eliminate any air pockets prior to curing. Once cured the
adhesive can be sanded down in the normal way, however,
the repaired area will need to be blended in with the existing
work surface.
Larger areas of damage• For larger areas of damage, particularly with the Granites
and Sands, a plug repair is a possible alternative solution.
Fig. 1.
Major damage• For major damage, regarding cracks or burn marks, a
12 mm triangular piece of LG HI-MACS (same thickness as
installed) will need to be fitted. Make a template as shown
in Fig 2, and clamp it to the surface around the damaged
area. Machine out the section using a portable hand router.
Using the same template cut another section from an off-
cut of colour matched LG HI-MACS piece or better if
the piece is from the same sheet to minimise any colour
difference. Bond the triangular spare piece with LG
HI-MACS adhesive and reinforce the underside. Fig. 3.
Broken seams• To repair a broken seam, first machine a ‘V’ groove down
the entire length of the crack. Cut a square section of
matching LG HI-MACS so that when turned through 90°,
it fits the groove. Fig. 4. Apply LG HI-MACS adhesive into
groove and push the square section home until sufficient
adhesive is forced upwards. Once fully cured sand down
the new section as normal. Ensure that the seam has a
reinforcement beneath prior to completion.
Always leave sink or bowl cutout in your drawer for repair.
RE
PAIR
S
August 2007
Figure 1
Figure 2
Figure 3
Figure 4