fab intelligent control - maxthermo.com.tw
TRANSCRIPT

��������
I
�����
Thank you for purchasing the FAB Intelligent Controls Series (FAB) products
of our company. We recommend that you take some time to read this manual,
before putting the FAB products in to service. The FAB has, amongst many
features, the advantage being able to be operated off line to prove in service
performance before being commissioned into service. When you read the manual
you will find many more advantageous properties of the products, it will greatly
simplify the operation of FAB for you.
FAB is a type of intelligent control, which uses function blocks for program-
ming. Function blocks enable the control functions of a PLC to be achieved
without the need for large number of instructions and complicated programming.
When several function blocks are linked together in a specific way, relatively
complicated control functions can be implemented. The programming can be
carried out in a logical, speedy and verifiable manner. Programming can be imple-
mented using a removable LCD liquid crystal display panel or by use of a com-
puter. The latter approach is recommended for more complicated control schemes.
FAB has a very wide range of applications. It can be used for the automation
of an extensive range of electrical and mechanical equipment. Flow control, build-
ing automation and many other fields. The implementation of FAB provides for
automation of very many aspects of day-to-day life from home through to the
commercial, manufacturing, mining, utility and service sectors of the economy.
This manual will describe in detail the functional characteristics and operating
methods for FAB, its’ ancillary components and associated Quick II and FAB
Scada operating software.
Notes:
Our company reserves the right to make changes in design for improvement FAB
Intelligent Controls Series without notification.
Any comments directed towards the improvement in the quality of this manualwill be appreciated.
�����
FAB Intelligent Control
�����
������������� ��
������� ��������������������������������������������������
�����������������������������������������������������������
��� ��� �����������������������������������������!��"�!
II

��������
FAB HARDWARE
A. IMPORTANT APPLICATION NOTES......................................................2B. SAFETY GUIDE............................................................................................3
Chapter I Brief Introduction to FAB
1.1 Structure of FAB...........................................................................................4
1.2 Specifications and models...........................................................................5
1.3 Features of FAB............................................................................................6
Chapter II Installation and connections of FAB
2.1 Installation.....................................................................................................10
2.1.1. Installation methods..............................................................................10
2.1.2 Dimensions.............................................................................................11
2.2 Wiring of FAB..............................................................................................12
2.2.1 Connection of power supply.................................................................12
2.2.2 Connecting FAB inputs.........................................................................12
2.2.3 Connecting FAB outputs......................................................................14
2.2.4 Connecting FAB network......................................................................16
Chapter III General Description of Function Blocks
3.1 General function block (GF).......................................................................17
3.1.1 AND..........................................................................................................18
3.1.2 OR ............................................................................................................19
3.1.3 NOT...........................................................................................................19
3.1.4 NAND.......................................................................................................20
III

FAB Intelligent Control
3.1.5 NOR.........................................................................................................21
3.1.6 XOR.........................................................................................................21
3.2 Special function blocks (SF)......................................................................22
3.2.1 DPR...........................................................................................................24
3.2.2 DDR.........................................................................................................25
3.2.3 PLR...........................................................................................................26
3.2.4 CW.............................................................................................................27
3.2.5 RS.............................................................................................................33
3.2.6 CPG..............................................................................................................34
3.2.7 RPR..........................................................................................................35
3.2.8 UCN.........................................................................................................37
3.2.9 DCN...........................................................................................................38
3.2.10 MPLR......................................................................................................38
3.2.11 TEL FAB...............................................................................................39
3.2.12 PLAY.......................................................................................................41
3.2.13 MR..........................................................................................................42
3.2.14 COMP....................................................................................................43
Chapter IV Programming operation on FAB panel
4.1 Display status of FAB................................................................................46
4.2 Confirm password ......................................................................................46
4.3 Function ......................................................................................................47
4.3.1 Editor ......................................................................................................48
4.3.1.1 Edit PRG ..............................................................................................48
4.3.1.2 Insert FB.................................................................................................55
IV

��������
4.3.1.3 Delete FB...............................................................................................56
4.3.1.4 Clear Prg................................................................................................57
4.3.2 FAB/Rom ................................................................................................57
4.3.2.1 Read program from FAB(Rom FAB)..............................................58
4.3.3 SET...........................................................................................................58
4.4 Edit FAB function program.........................................................................59
4.4.1 Programming rules.................................................................................59
4.4.2 Middle relay............................................................................................60
4.4.3 Edit program...........................................................................................61
Chapter V Remote programming and monitoring
5.1 Remote programming and monitoring via a MODEM...........................72
5.2 Two connection methods for FAB remote
programming and monitoring.................................................................73
5.2.1 Connect MODEM by means of AF-C232 and AF-M232...................73
5.2.2 Connect MODEM by means of AF-MUL..........................................73
Chapter VI Voice Module
6.1 The structure of the voice module:............................................................75
6.2 Connection of AF-MUL and FAB.............................................................76
6.3 Guide for using the voice multifunction block........................................76
6.4 Recording.......................................................................................................79
6.5 Sound broadcasting.....................................................................................81
6.6 Telephone remote control function...........................................................81
V

FAB Intelligent Control
6.7 Automatically dial function......................................................................82
6.8 Example for using the voice module for control and security..............82
Chapter VII Technical specifications
7.1 General technical specifications.................................................................85
7.2 AF-10MR-A / AF-20MR-A.........................................................................86
7.3 AF-10MT-D / AF-20MT-D...........................................................................87
7.4 AF-10MR-D / AF-20MR-D.........................................................................88
7.5 Telephone number receiving , transmitting and voice blocks............89
Chapter VIII Application
8.1 Bell control of schools or factories...........................................................91
8.2 The illumination of multifunction switch in stairs, halls etc.................93
8.3 Automatic gate control requirements.......................................................94
8.4 Ventilation system.......................................................................................95
8.5 Control requirements for neon lamp control system..............................96
8.6 Illumination system for display windows................................................98
8.7 Application of FAB in building management..........................................99
8.8 Application of FAB in a voltage diode counting
and packing assembly line........................................................................101
Chapter VIIII Quality Guarantee
Quality guarantee, warranty period and warranty range...........................103
VI

��������
QUICKII: PROGRAMMING SOFTWARE OF FAB
Chapter I Brief Introduction to QUICKII
1.1 Operating interface....................................................................................107
1.2 Two types of editing windows.................................................................108
1.2.1 FAB logical diagram editing window................................................108
1.2.2 Simulation window...............................................................................109
1.3 Main functions...........................................................................................110
1.3.1 Editing function....................................................................................110
1.3.2 Simulation operation function...........................................................111
1.3.3 Real-time monitoring..............................................................................111
1.3.4 Communication with FAB....................................................................111
1.3.4.1 Local FAB communication................................................................ 111
1.3.4.2 Remote FAB communication............................................................111
Chapter II Installation and uninstallation
2.1 Installation of Quick II.............................................................................112
2.2 Uninstallation ..............................................................................................117
Chapter III Operation Instructions and Block Library
3.1 Function Instructions................................................................................119
3.1.1 File.........................................................................................................119
3.1.2 Controller..............................................................................................120
3.1.3 Communication....................................................................................120
3.1.4 Display..................................................................................................121
VII
FAB Intelligent Control
3.1.5 Options:................................................................................................122
3.1.6 Help:......................................................................................................122
3.1.7 Edit:...........................................................................................................123
3.1.8 Search:...................................................................................................124
3.1.9 Image Library:........................................................................................124
3.1.10 FAB operation....................................................................................125
3.1.11 Windows.............................................................................................125
3.2 Tool Bar............................................................................................................126
3.2.1 Standard Tool Bar...............................................................................126
3.2.2 Control Tool Bar..................................................................................127
3.2.3 Draw Tool Bar for Field Simulation Graph........................................127
3.3 Block Library...............................................................................................128
3.3.1 Block Library Operation......................................................................128
3.3.2 Block classification................................................................................129
3.3.3 Setup of block property.......................................................................129
3.3.3.1 General Property...............................................................................129
3.3.3.2 Setup of Special Property ..............................................................130
Chapter IV Basic operations
4.1 Open File.....................................................................................................140
4.1.1 Open a new file.....................................................................................140
4.1.2 Open an existing file .............................................................................142
4.2 Edit Function Diagram Program...............................................................143
VIII

��������
4.2.1 Place block.............................................................................................143
4.2.2 Edit block properties...........................................................................146
4.2.3 Link.......................................................................................................148
4.2.4 Move the link or block:........................................................................151
4.2.5 Delete block or link...............................................................................151
4.2.6 Simulation operation .............................................................................151
4.2.7 Save and Print .....................................................................................152
4.2.8 Write/Read: ...........................................................................................154
4.3 Plot Field Simulation Graph.......................................................................157
4.3.1 Plot with Draw Icons:.............................................................................157
4.3.2 Insert Graph File directly........................................................................158
IX
FAB Intelligent Control
FAB-SCADA SOFTWARE
Chapter 1 Introduction to FAB-SCADA System
1.1 General Introduction.................................................................................161
1.2 Network Structure of FAB........................................................................161
1.2.1 Network of RS485 Buses...................................................................162 1.2.2 Network System for Remote Control via a Modem.......................162
1.3 More detailed Introduction to the FAB-Scada System........................163
Chapter 2 Installation of FAB-Scada System
Chapter 3 Operation Instructions and Quick icons
3.1 Instructions and Icons in the Control Interface...................................168
3.1.1 System (Operation Instructions for System Management)..........168
3.1.2 Monitor (Operation Instructions for Monitor Setup)....................168
3.1.3 User (Users Management Instructions)..........................................169
3.1.4 Query (Query Instructions of the System).....................................169
3.1.5 Report...................................................................................................170
3.1.6 Tools.....................................................................................................170
3.1.7 Help.......................................................................................................170
3.2 Operation Instructions and Quick icons
in the Drawing Interface.........................................................................171
3.2.1 File (Files management)......................................................................171
3.2.2 Edit........................................................................................................171
3.2.3 Tools.....................................................................................................172
3.2.4 Help.......................................................................................................172
X

��������
Chapter 4 Build a Supervisory Control System
4.1 Station design............................................................................................173
4.2 Add/Delete FAB........................................................................................175
4.3 Define the FAB I/O Port............................................................................177
4.4 Drawing Monitoring Interface.................................................................183
4.4.1 Operation Instruments In Drawing Interface...................................183
4.4.2 Drawing Tools......................................................................................184
4.4.3 Drawing the Monitoring Diagram.....................................................186
4.4.3.1 Page Setting.......................................................................................186
4.4.3.2 Draw the Monitor Diagram..............................................................187
4.4.3.3 Analyse the Communicating State.................................................196
Chapter 5 User Management
5.1 Modify Manager Name.............................................................................197
5.2 User Management......................................................................................197
5.2.1 Append.................................................................................................198
5.2.2 Delete.....................................................................................................198
5.2.3 Modify the Password..........................................................................198
5.2.4 Query the User Information...............................................................199
5.3 User Login..................................................................................................199
5.4 User Logout................................................................................................200
5.5 Explanations for User Authorities...........................................................200
Chapter 6 System Configuration
6.1 Set FAB Time..............................................................................................201
6.2 Print...............................................................................................................201
6.3 Deploy.........................................................................................................202
XI
FAB Intelligent Control
Chapter 7 Data Query
7.1 Data Query..................................................................................................204
7.2 Back-up the Data Base..............................................................................206
Chapter 8 Report
8.1 Create a Report...........................................................................................208
8.2 Browse.........................................................................................................213
XII

1
�������������� ��������� ������
FAB HARDWARE
MANUAL

2
FAB Intelligent Control
A.IMPORTANT APPLICATION NOTES:
1. The AF-C232 and LCD board, when a FAB is powered, must not be plugged
in or disconnected.
2. The default password for FAB is 0001.
3. The default address for FAB is 000.
4. When programming a FAB using the LCD panel, the output of two function
blocks must not be connected to one point, except for the CW function block.
For example:
The above way is wrong, and the correct way is as follows:
I1
I2
I3
M1
M2
Q1
I1
I2
I3
M1
Q1

3
�������������� ��������� ������
This manual contains the precautions necessary for ensure your
personal safety as well as for protection of the products and the
connected equipment. These precautions are highlighted with a tri-
angle WARNING symbol in this manual and are marked according
to the danger levels as following:
Danger
It indicates that if appropriate precautions are not taken, serious
incidents of personal injury or death, significant damage and loss of
property will be caused.
Caution
It indicates that if appropriate precautions are not taken, incidents
of personal injury, damage or some loss of property will be caused.
Note
Indicates that particular attention is required to all published in-
formation related to the use or disposal of products. Also in specific
parts of documentation
Warning
Only suitably qualified personnel are allowed to operate and de-
bug the products. Qualified personnel are specified as those persons
who carry out commissioning, grounding and apply the appropriate
identification to the circuits, equipment and systems according to the
available safety practices and standards.
Note
Only when this product is transported and stored with care, then
assembled, installed, operated and maintained in accordance with
the documentation, can it carry out its’ designed functions properly
and reliably.
B.
SAFETY GUIDE:
�������
4
FAB Intelligent Control
Chapter I Brief Introduction to FAB
FAB intelligent controller is a new type of programmable controller. Itis programmed by the use of a Function Block Diagram. The programmingof FAB is simpler and easier to learn than the programming of aconventional PLC, that uses ladder diagrams and associatedinstructions. The design concept, for the FAB series of products, includesa removable LCD panel. The program can be written directly into the FABusing this LCD panel. After programming the LCD panel can be retained orremoved and replaced with a cover. The cost to the user can be reducedby multiple use of the LCD panel. The use of a computer isrecommended for more complex control schemes.
Products within the FAB series are very compact and light in weight.FAB intelligent controls series can be used for both local and remotecontrol, communication, networking and monitoring. FAB series can realizetelephone-control, voice alarm and information, automatic dialing usingthe associated AF-MUL unit. FAB is widely used in many fields of industry,
commerce, mining, agriculture, home automation etc.
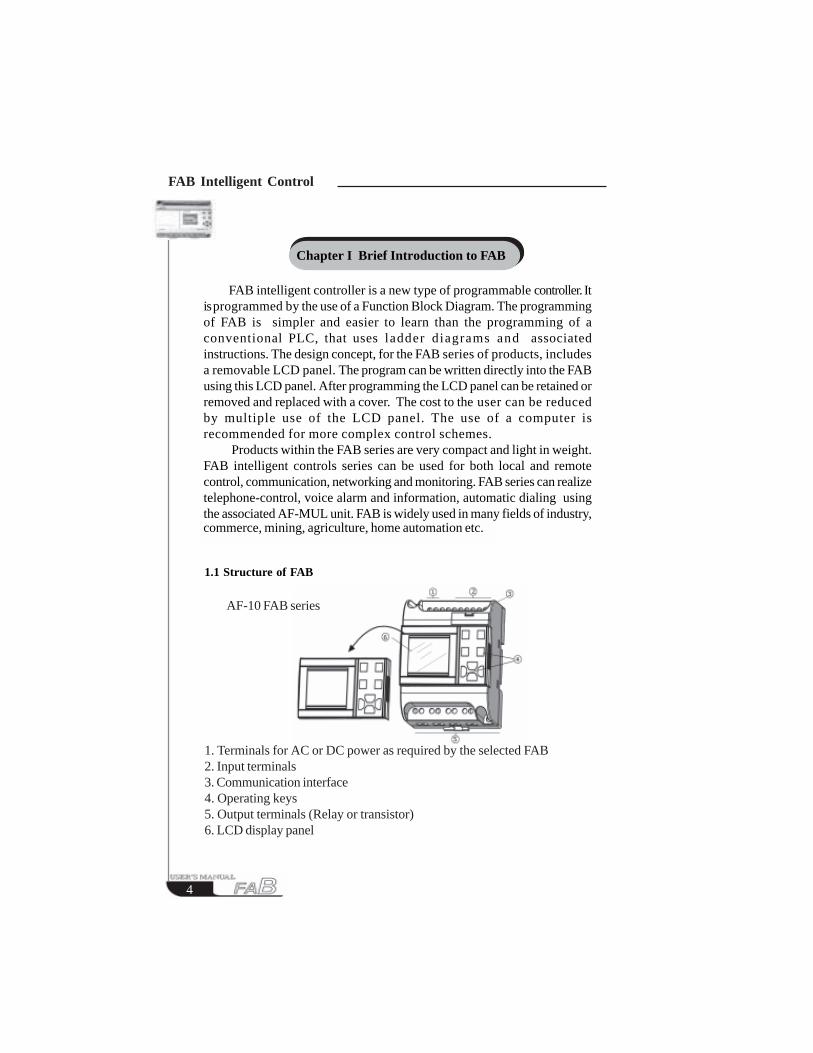
1. Terminals for AC or DC power as required by the selected FAB2. Input terminals3. Communication interface4. Operating keys5. Output terminals (Relay or transistor)6. LCD display panel
1.1 Structure of FAB
AF-10 FAB series
commerce, mining, agriculture, home automation etc.

5
�������������� ��������� ������
1. Terminals for AC or DCpower, as required bythe selected FAB
2. Input terminals
3. Communication interface
4. Operating keys
5. Output terminals (Output
of relays or transistors)
6. LCD display panel
AF-10MR-A AC 100V-240V 6 points AC digital 4 points
input relay output
AF-10MR-E AC/DC 12-24V 6 points AC/DC digital 4 points
input relay output
AF-10MT-E DC 12-24V 6 points AC/DC digital 4 points
input transistor output
AF-10MR-D DC 12-24V 6 points DC analog 4 points
input relay output
AF-10MT-D DC 12-24V 6 points DC analog 4 points
input transistor output
AF-20MR-A AC 100V-240V 12 points AC digital 8 points
input relay output
AF-20MR-E AC/DC 12-24V 12 points AC/DC digital 8 points
input relay output
AF-20 FAB series
1.2 Specifications and models
Type No Power Input Output
6
1 2 3
4
5

6
FAB Intelligent Control
1.3 Features of FAB
1. Removable programming panel with Liquid Crystal Display There is an operating panel with LCD display on the front side of FAB.
You can use the operating keys on this panel to edit directly the controlprogram for FAB. Moreover, this LCD display panel is removable, and itcan be set up according to your needs. When needed it can be plugged in.When not needed it can be removed and replaced with a front cover,
Caution
The LCD display panel shall be plugged in or removed only after AC or DC powerhas been turned off.
AF-20MT-E DC 12/24V 12 points AC/DC 8 points
digital input transistor output
AF-20MR-D DC 12-24V 12 points DC 8 points
analog input relay output
AF-20MT-D DC 12-24V 12 points DC 8 points
analog input transistor output
AF-LCD
AF-C232
AF-C485
AF-P485
AF-M232
AF-MUL
AF-MUL-D
QUICK II
FAB-Scada
Type No Power Input Output
FAB removable LCD panel.
Interface between AF-M232 and FAB
Interface between FAB and RS485 bus
Interface between computer and RS485 bus.
Adapter between MODEM and AF-MUL or AF-C232
Voice alarm, telephone control and dial automation.
DC type voice module
FAB programming software
SCADA software

7
�������������� ��������� ������
2. Well featured and compact design If you are thinking of improving the application of your equipment,
FAB provides very many features. FAB is very compact, 90mm x 71mm x58mm ( AF-10 Series) and 90mm x 126mm x 58mm( AF-20 Series)
3. With the function blocks used for programming, the program storage capacityof FAB is large. The control functions of FAB can be implemented only withfunction blocks incorporated into a function block diagram. The same levelof control implemented by a conventional PLC would require a much largerand more detailed program. When several function blocks are linked togetherin a specific way, then relatively complicated control functions can beimplemented. FAB has a storage capacity of programs for up to 127function blocks, there is a large application resource to satisfy the requirementsfor complicated control. A program, when downloaded into FAB will neverbe lost as FAB does not rely on a battery for the memory function.
4. QUICK II: programming software. The control program can be downloaded directly, with the use of the
LCD panel, into a FAB unit. With more complicated control schemes the useof an ancillary computer, loaded with QUICK II software, is recommended.The control program can then be written into the memory of the FAB.QUICK II is a very friendly human-machine interface programming software.It can edit the function diagrams and also can analogously run the writtenprogram. It provides an off-line testing function to the user. This featureovercomes much of the possible inconveniences normally experienced withon-line testing and commissioning. The system can be proven before being put intoactual service. QUICK II will not only guide you to implement the editingof the control programs, but will also perform the real-time monitoring forthe field environment and the operational conditions of FAB.
5. Real-time clock function FAB intelligent controls Series have an instant real-time recording
function. FAB can execute the operations according to the planned schedule.Up to 127 different time intervals can be set, it is very suitable for systemswhich require time control.
6. Analog input and transmission In addition to receiving a switching input, FAB can also receive the

8
FAB Intelligent Control
analog input to implement the control of temperature, humidity, pressure,flow, level unit, etc., and transmit them remotely to a computer for monitoring.
7. To implement the remote programming and the supervision and controlof data acquisition through MODEM.
When you need to implement programming, write and modify programsfor FAB controls from a remote location it is necessary to connect FAB toMODEM through a touch telephone. With this connection it is possible toperform data acquisition and real-time supervision and control from a remotelocation.
8. Security cipher code functionFAB is provided with protection for the programs downloaded into it.
A security cipher code can be set before programs are written. The programscan then only be modified after the correct cipher code is entered.
9. Telephone functionFAB is equipped with telephone and voice function blocks. It is possible
to dial directly through a telephone line after the required telephonenumber has been preset. FAB can be dialed automatically, when theconditions are satisfied so as to implement advice or alarm functions.Moreover, FAB can also receive remote signals transmitted through a telephoneline in order to control the terminal equipment.
Note: It is necessary to configure AF-MUL multifunctional voice block for the implementation of telephone function and voice function.
10. Voice functionFAB can provide voice recording and broadcasting back functions for
the automatic control industry, creating intelligent controls which can giveaudible voice outputs, both locally and through remote speakers.
11. Networking function FAB has a networking function. It can link up to 255 FABs to make up
a network to implement the instant supervision and control from a commoncomputer.

9
�������������� ��������� ������
12. FAB-Scada monitoring and control functions.FAB Scada software provides for the monitoring and control functions of a
group of FABs
13. Middle relay feature.With the addition of the middle relay more complicated control schemes can
be developed.

10
FAB Intelligent Control
2.1 Installation
2.1.1. Installation method
FAB is small and it is suitable for fitting inside panels or machinery within its’
specification criteria. The installation of FAB is quite simple:
1. Use a standard DIN rail for installation of FAB as shown in Fig. 2.1.
2. Use the two diagonal clearance holes on FAB for direct mounting.
Fig. 2.1 Use standard DIN rail for installation of FAB
The LCD panel of FAB is readily removed by partially withdrawing it from
the FAB, as illustrated, using a spade tipped screwdriver. The LCD panel can
then be readily fully withdrawn manually.
Caution:
Do not remove the LCD panel whilst the FAB is powered, otherwise
the FAB and LCD panel may be damaged and endanger the personal safety of the
user.
Fig. 2.1 Remove LCD panel as instructed
Chapter II Installation and wiring of FAB
DIN rail

11
���������������� ����
������������������������� � ��������
2.1.2 Dimensions
Fig 2.3 AF-10 FAB Series installation dimensions (Unit: mm)
Fig 2.3 AF-20 FAB Series installation dimensions (Unit: mm)

12
FAB Intelligent Control
2.2 Wiring of FAB
A screwdriver with a spade tip width of 3mm is used for the wiring of
FABs. The maximum cross sections of the wires that can be inserted into the
terminals are determined according to the following sizes:
2.2.1 Connection of power supply
1 For AF-10MR-A and AF-20MR-A FABs, the rated power supply
requirement is 100-240VAC, 50/60HZ.
2. For AF-10MT-E, AF-10MR-D, AF-10MT-D, AF-20MT-E , AF-20MR-
D, AF-20MT-D) FABs,the rated power supply requirement is 12-24V DC
3. For AF-10MR-E and AF-20MR-E the rated power supply requirements are
12-24V AC or 12-24V DC.
The power connection for FABs is as shown in the following drawings:
2.2.2 Connecting FAB inputs
The input to FAB can be either digital, such as on/off switches etc., or
analog, such as pressure, temperature, humidity, flow, etc. The specific
requirements are as follows:
1 x 2.5mm2
2 x 1.5mm2
Fig 2.5 AC Type Fig 2.6 DC and AC/DC Type

13
���������������� ����
������������������������� � ��������
Switch status 0 <40VAC <5VDC <5VDC
Input current <0.24mA <1.5mA <1.5mA
Switch status 1 >=80VAC >=10VDC >=10VDC
Input current Typical 0.24mA Typical 3mA Typical 3mA
Note: For AF-10MR-D, AF-10MT-D, AF-20MR-D and AF-20MT-D that canreceive analog input, analog can be input though all input interfaces (I1-I6 orI1-Ic). They can be set to analog input or digital input as either may be used inthe program. They will be recognized as analog inputs when the input terminalis connected with an AN function block, and they will be recognized as digitalinputs when the input terminal is not connected with an AN function block. Youneed to set analog inputs first when you use FAB-Scada software for supervision.
The analog inputs require 0V ~ +10V voltage signals. These aredivided equally in 0.1V increments. In programming, all the block parametersrelated to the analog inputs are based on the minimum increment of 0.1V. Theycan be recognized as digital input when the input voltage is more than 10.0Vand cannot be recognised as an analog input.
For the digital input off , when the switch status changes from 0 to 1,the time of Status 1 must be greater than 50ms, and when the switch statuschanges from 1 to 0, the time of Status 0 also must be greater than 50ms.
Type
Demand
AF-10MR-A
AF-20MR-A
AF-10MR-DAF-10MT-EAF-10MT-DAF-20MR-DAF-20MT-EAF-20MT-D
Proximity switch
type with direct
input
2lines3lines4lines
2lines3lines4lines
When the close current ofa glow lamp is less than orequal to 0.2mA, it can beconnected directly, andwhen the close current ofa glow lamp is greater than0.2mA, the glow lampshould be connectedthrough a relay or an addi-tional N-type drive.
Switchwith glowlamp
I1~I6/I1~Icreceivable analogvalue
AF-10MR-E
AF-20MR-E
2lines3lines4lines
14
FAB Intelligent Control
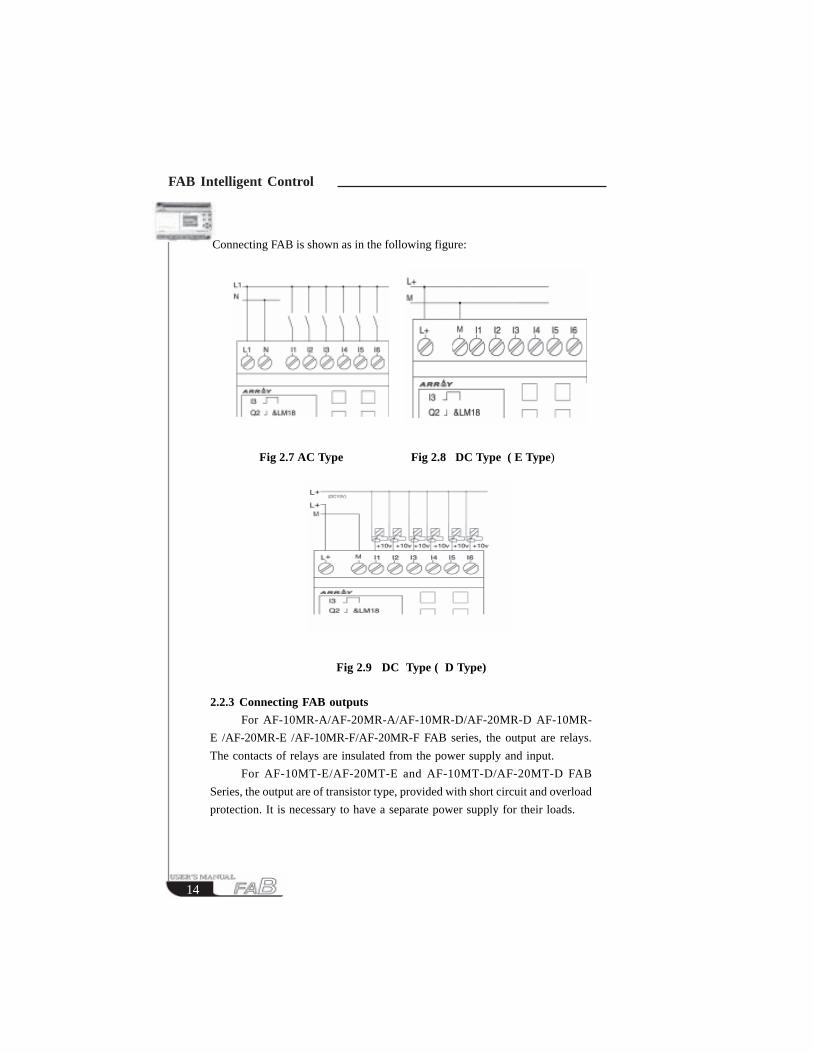
Connecting FAB is shown as in the following figure:
Fig 2.7 AC Type Fig 2.8 DC Type ( E Type)
Fig 2.9 DC Type ( D Type)
2.2.3 Connecting FAB outputs
For AF-10MR-A/AF-20MR-A/AF-10MR-D/AF-20MR-D AF-10MR-
E /AF-20MR-E /AF-10MR-F/AF-20MR-F FAB series, the output are relays.
The contacts of relays are insulated from the power supply and input.
For AF-10MT-E/AF-20MT-E and AF-10MT-D/AF-20MT-D FAB
Series, the output are of transistor type, provided with short circuit and overload
protection. It is necessary to have a separate power supply for their loads.

15
���������������� ����
������������������������� � ��������
1. Requirement for the relay output
Various loads such as lamp, fluorescent tube, motor, contactor, etc., can
be connected to the outputs of FABs. The max. ON output current that can
be supplied by FAB, is 10A for the resistance load and 2A for the inductive
load. The connection is in accordance with the following figure 2.10:
Fig 2.10 Relay Output
2. Requirement for the electronic transistor output
The load connected to FAB must have the following characteristics:
The maximum switch current cannot exceed 2A
when the switch is ON (Q=1), the maximum current is 2A.
The connection is in accordance with the following figure 2.1:
Fig. 2.1 Transistor Output
Note: M line should be connected to M of FAB Power supply, and the load should be directly connected the L+ 1 , and the load current should be DC .
Indicating Lamp

16
FAB Intelligent Control
2.2.4 Connecting FAB network
Note: One PC can be connected with up to 255 FABs. Please set addresses
respectively for each FAB. The address range is 000~254.
Fig. 2.12 Connecting method
}485 Power Bus
}485 Message BusAB
+_
�������
��� ��
AF-C485AF-C485.....AF-C485AF-C485
FAB1 FAB2 FAB3 FAB4
.........

17
����������������� �������������
����������������������������������������������
Series Connection
of NO contacts
Parallel connection
of NO contacts
Phase inverter
Chapter III General Description of Function Blocks
FAB series adopts the programming method with the use of function blocks.
20 function blocks are configured in total, and each block can achieve a specific
control function independently, e.g. time-delay ON, time-delay OFF, setting switch
time, counter function, etc. As several blocks are linked up in a specific way
relatively complicated control functions can be realised. Programming with function
blocks is simpler and better appreciated than the conventional PLC instruction
programming.
The following types of operator for FAB function blocks are available for options:
1. Options of input port: I1 - IC (Input port), Q1- Q8 (Output port), Moo-M126
(middle relay), HI (High potential status), LO (Low potential status), X (no
input connection), P0 - P9 (Telephone two-tone pulse)
2. Options for output port: Q1 ~ Q8 (output port), Moo~M126 (intermediate
relay).
3.1 General function block (GF)There are 6 general function blocks in total as listed in the following table:
Table 1: General function blocks
Line diagram FAB function block Function
AND
OR
NOT

18
FAB Intelligent Control
Dual commutator contact XOR
Parallel connection of
NC contacts
Serial connection of
NC contacts
NAND
NOR
3.1.1 AND
This function block is called as AND, because only when all of I1, I2 and I3 are
all in statues 1, the status of Output Q will be 1 (i.e. the output is closed).
Logical frame of AND.
Serial connection of a certain
number of NO contacts is shown
in the line diagram as follow:
The symbol of AND is as shown
in the follows:
I1 I2 I3
I1
I2 Q
I3
I1 I2 I3 Q0 0 0 00 0 1 00 1 0 00 1 1 01 0 0 01 0 1 01 1 0 01 1 1 1

19
����������������� �������������
����������������������������������������������
3.1.2 OR
This function block is called as OR, because the status for at least one of inputs I1
or I2 or I3 is 1 (i.e. close), then output Q is 1.
Logical frame of OR”:
3.1.3 NOT
This function block is called NOT, because the input status is 0, Output Q is 1,
and vice versa. In other words, NOT is the phase inverter for the input point.
I1
I2
I3
I1
I2 Q
I3
Parallel connection of a certain number of NO contacts, is shown in the
electrical line diagram as follows:
I1 I2 I3 Q0 0 0 0
0 0 1 1
0 1 0 1
0 1 1 1
1 0 0 1
1 0 1 1
1 1 0 1
1 1 1 1
The phase inverter is indicated in
the line diagram as follows:
The phase inverter is called as NOT
in FAB, its symbol is as follows:
I1 Q
I1

20
FAB Intelligent Control
Logical frame of NOT:
3.1.4 NAND
This function block is called NAND, because only when all I1, I2 and I3 are all in
status 1 (i.e. close), its Output Q is in status 0.
Logical frame of AND”:
I1 Q
0 1
1 0
Parallel connection of certain number
of NC contacts, which is shown in the
electrical line diagram as follows:
The symbol of NAND in FAB is
shown as follows:
I1
I2 Q
I3
I1
I2
I3
I1 I2 I3 Q
0 0 0 1
0 0 1 1
0 1 0 1
0 1 1 1
1 0 0 1
1 0 1 1
1 1 0 1
1 1 1 0

21
����������������� �������������
����������������������������������������������
3.1.5 NOR
Only when all the input of NOR function blocks are at a low potential (status 0),
the output will be closed (status 1). If any input is at high potential (status 1), the
output will be open (status 0).
Logical frame of NOR:
3.1.6 XOR
Parallel connection of a certain
number of NC contacts, which is
shown in the line diagram as follows:
The symbol of NOR in FAB is
shown as follows:
I1 I2 I3
I1
I2 Q
I3
I1 I2 I3 Q0 0 0 1
0 0 1 0
0 1 0 0
0 1 1 0
1 0 0 0
1 0 1 0
1 1 0 0
1 1 1 0
As shown in the line diagram, the
two commutator contacts for XOR
are connected in serial as follows:
In FAB, the symbol of NOR is
shown as follows:
I1 I2
I1
I2Q

22
FAB Intelligent Control
When the status of input are not the same, the output status of XOR is 1.
When the status of input are the same, the output status of XOR is 0.
Logical frame of XOR.
3.2 Special function blocks (SF)
Function Representation Graphic
DPR (ON time delay)
DDR (OFF time delay)
PLR (Pulse relay)
CW (Clock switch)
RS (RS relay)
I1 I2 Q
0 0 0
0 1 1
1 0 1
1 1 0

23
����������������� �������������
����������������������������������������������
CPG (Clock pulse
generator)
RPR (Hold ON time-
delay relay)
UCN (Up-counter)
DCN (Down- counter)
MPLR (Single pulse
time relay)
TEL (Telephone
dialing block)
AN (analog input
block)
PLAY( Broadcast voice
section & Selector switch
blocks)
MR (Recording voice
section& Selector switch)

24
FAB Intelligent Control
3.2.1 DPR
Line diagram/Symbol in FAB Pin Description
Time Sequence Frame:
Description:
When the status of TRG input changes from 0 to 1, the time-delay timer starts
timing. If Input TRG holds status 1 for a sufficiently long time, the output will be
changed to 1 after the time T has elapsed. There is a time delay between the input
turning ON and the output turning On , that is why the ON time-delay is so called.
When the input TRG is Status 0, the output will reset to status 0.
This function is applicable to override vibrations of switches, delayed start -up of
motor, delayed turning-on of lights, etc.
The assignment range for T is 0.01- 99.99, and the time units can be set respectively
to hour (H), minute (M) and second (S). Its time accurately can reach 0.5/00 S.
After TRG is triggered, the time
delay timer starts timing. (If TRG
stops triggering during the timing
of timer, the timer will terminate
the timing).
After time T, the output is on (the
output signal changes from 0 to 1).
If there is still trigger signal, when
time T is up, the output will be on.
input
TRG
Parameter
T
Output Q
TRG
Q
T T T

25
����������������� �������������
����������������������������������������������
3.2.2 DDRLine diagram/Symbol in FAB Pin Description
Time Sequence Frame:
Description :When Input TRG is Status 1, Output Q is changed at once to Status 1. WhenInput TRG is changed from 1 to 0 (when the descending edge comes), the internaltime delay timer of FAB is activated and Output Q is still remained in Status 1.When the set time T is up, Output Q becomes 0 and the timer is reset l .If Input TRG changes from Status 1 to Status 0 again, the timer is activated again.Before the set time T is up, the timer and output can be reset via R (Reset) input.
Turn on the time of the time-delayoff relay ,when the input TRG(trigger) is at the descending edge(changing from 1 to 0)
The timer of disconnecting time-delay relay is reset via R (ResetInput), and Output Q is set to 0. (Rhas higher priority to TRG).
The output is disconnected (the Qstatus is changed from 1 to 0)when the time T elapses .
Input TRG is activated then theoutput is turned on (Q=1) and iskept ON until it is reset when theset time T is up.
Input TRG
Input R
Parameter
T
Output
Q
T T
TRG
R
Q

26
FAB Intelligent Control
This function is applicable to the lighting of staircase, the control of barriers in a car
park, the control of a water throttling valve, etc.
The assignment range of T is 0.01 ~ 99.99, and the time units can be set respectively
to hour (H), minute (M) and second (S). Its time accuracy can reach 0.5% S.
3.2.3 PLR
Line diagram/Symbol in FAB Pin Description
Time Sequence Frame:
Description :
Every time the trigger input TRG changes from status 0 to Status 1, the status of
Output Q will change accordingly (The status of Q will be reversed).
Reset Q to Status 0 via Input R.
After the power is ON or OFF, the pulse relay is reset and Output Q changes to 0.
Trigger input (TRG) makes
the output On and Off
The output Q is reset via R
(Reset input) (Q=0, R has a
higher priority to TRG).
Every time TRG changes from
0 to 1, the status of Q will be
changed (i.e. from Status 0 to
Statues 1 or vice versa).
Input TRG
Input R
Output Q
TRG
R
Q

27
����������������� �������������
����������������������������������������������
This function can be applied to the lighting of corridors and staircases, and the start/
stop of motor with a single push-button, etc.
3.2.4 CW
FAB has clock switches for 127 time intervals.
Live diagram/symbol Pin Description
Notes regarding the time sw:
1. When the date system is selected for the timing of a time switch.
For the same output channel, up to 127 time switches can be set, and these switches
must be put in order according to the time sequence, e.g.
On: May 1st, 2000 9:00
Off: May 2nd, 2000 8:00
On: Aug 2nd, 2000 10:00
Off: Aug. 2nd, 2000 19:00
The above arrangement is correct, while the below arrangement is wrong:
On: May 1st, 2000 19:00
Off: May 1st, 2000 18:00
On: Apr 2nd, 2000 8:00
Off: Apr. 2nd, 2000 5:00
Set the switch time of the output.Output switch time setting. ON (T1)is the time setting for output to beginturning on. OFF (T1) is the time set-
ting for output to begin turning off.
Options of date system of week system.D for the date system and W is for the
week system.
If one of the parameterized time intervals
is ON, the output is ON.
ON/OFF
Parameter
D/W
Output Q
Q1
Q2

28
FAB Intelligent Control
During the time setting of the time switch, if two time-points (on and off), are set
the output is on in the time interval before the time, the output maintains the former
status, and after the off time the output is off.
2. The range of T1 and T2
You can set T1, T2 anytime from 00:00:00 to 23:59:59. If you set T1 or T2 at
24:00:00, it means that you have not set the ON time or OFF time. (If you set T1
to 24:00:00, it means that you haven’t set ON time).
On the basis of this, we can set some special time intervals which haven’t been set
in the selected items by using Inter-relays and Logic interlock. Such as that there is
no item of the following.
6:00 on Monday ,ON and 8:00 on Tuesday, OFF
How can we get the logic result of the above on the FAB panel?
Firstly: you should select MO ,and set it as follows.
Secondly: you should select TU, and set it as following.
Then, it can let Q1 switch on at 6:00 on Monday and switch off at 8:00 on
Tuesday.
6:00
24:00Q1
Q1 24:00
8:00
This setting means no OFF time (24.00)
has been set
This setting means no ON time (24.00)
has been set.
D/W
D/W
Note: You can set time directly as follows when you use QuickII Software.
ON MO :6:00
OFF TU :8:00

29
����������������� �������������
����������������������������������������������
In the time setting for the time switches, if 2 time setting points for ON/OFF are
set, the output is ON status only in this time interval, and the output keeps the
original status when it is before the ON time, and the output is OFF status when
it is after the OFF time.
It can directly be changed into the above logic from a computer and transmitted to
FAB and is inaccessible to the user
3. If only ON time or OFF time is set, the changes of output status are as follows:
Setting condition Time Output status
4. When the week system is selected for the timing of time switches:
The interval from Monday to Sunday is defined as a circle (MO is the start point,
and SU is the end point). In one time interval, it is not allowed to set the start point
after the end point. It is OK to flow the Sequence of MO, TU, WE, TH, FR, SA,
SU,
The following definition should be noted.
For example, ON : 5:00 every Sunday
OFF: 8:00 every Monday
Below ON time Keeping the original status
ON status
Below OFF time Keeping the original status
OFF status
Greater than and
equal to ON time
Greater than and
equal to OFF time
only ON time
only OFF time

30
FAB Intelligent Control
As for the case that OFF time is set without ON time, e.g. it is set to be OFF at 5:00
from Monday to Thursday, and FAB can turn OFF the output after 5:00 everyday
from MO ~ TH, as to when it is going to be ON, it depends on other factors (the
original status will be maintained for Friday, Saturday and Sunday).
5. Whether the date system or the week system is selected, the time intervals for
the time of the same date should be arranged in chronological order, for example:
Notes:
MO: Monday MO-SU : every day from Monday to Sunday
TU : Tuesday MO-TH : every day from Monday to Thursday
WE : Wednesday MO-FR : every day from Monday to Friday
TH : Thursday MO-SA : every day from Monday to Saturday
FR : Friday FR-SU : every day from Friday to Saturday
SA : Saturday SA-SU : every day from Saturday to Sunday
SU : Sunday
It can be programmed by three blocks as follows:
D/WMO 8:00
24:00M00
D/WSU 24:00
5:00M00
Q1M0 1

31
����������������� �������������
����������������������������������������������
May 1st, 2000 9:00 ON
11:00 OFF
12:00 ON
17:00 OFF
May 1st, 2000 9:00 ON
11:00 OFF
May 1st 8:00 ON
8:30 OFF
MO 9:00 ON
11:00 OFF
15:00 ON
18:00 OFF
MO 9:00 ON
11:00 OFF
6:30 ON
8:30 OFF
Q1(ERROR)
FAB will turn OFF the out-
put from 9:00 to 11:00.
Q1(ERROR)
FAB will turn OFF the out-
put from 9:00 to 11:00.
Q1 (OK)
Note: this phenomenon follows the principle of the later command surpass-
ing the former command.

32
FAB Intelligent Control
6. When the week system is selected, if ON is set at 8:00 and Off is set at 9:00 of
MO~ TH, FR, SR and SU will maintain the former status the D selection will be
neglected by FAB i.e.., the original ON status will be kept as ON and the original
OFF status will be kept as OFF.
7. When you program by using the LCD panel, having selected Week system, it is
only necessary to set T1 and T2, and it is meaningless to set D . It is necessary to
set D when you have selected Day system. D is the setting of data, T1 is the setting
of ON time, and T2 is the setting of OFF time.
8. Clock hold circuit
For FAB, when there is a power failure or a power is cut off, the internal clock
will continue to run. The time that FAB can maintain the internal clock to run
depends on the temperature, when the temperature of the FAB is 25 degrees C, the
clock can continue normal operation for more than 100 hours.
9. Conflict between time intervals
When using the time intervals to set the ON/OFF time for the clock, the clock
switch will make the output ON at the ON time unless it has already been ON, and
the clock switch will make the output OFF at the OFF time unless it has already
been OFF.
10. Accuracy of RT clock
The accuracy of RT clock can reach 1s. A requirement with a duration less than
one minute can be done by using one function block in FAB. This function is
applicable to the control related to time, e.g. ringing bell for classes in school, work
in factories, timed start-up and shutdown of machines, etc.

33
����������������� �������������
����������������������������������������������
3.2.5 RS
Line diagram/Symbol in FAB Pin Description
Set Output Q to 1 via Input S (Set).
S port can receive two-tone signal
input such as P0~P9 phone signals.
Set Output Q to 0 via Input R (Re-
set). If S and R are 1 at the same
time, the Output Q is 0 (with R
having a priority to s).
When S is input, Q is ON and held
ON, and will not be reset until In-
put R is set.
Input S
Input R
Output Q
Switch characteristics
RS relay is a simple trigger. The output value depends on the input status and the
original output status. The following list of true values is used to describe the logic
relations:
S R Q REMARK
0 0 Status remain to the original value
0 1 0 Reset
1 0 1 Set
1 1 0 Reset (having a priority to Set)
Note: P0-P9 represent the 0-9 buttons of the telephone. RS function
block has the function to receive a two-tone signal. You can use the RS
function block to receive telephone signal and control the external
equipment.

34
FAB Intelligent Control
3.2.6 CPG
Line diagram/ Symbol in FAB Pin Description
Make clock pulse generator ON andOFF via Input EN (Enable).
Make Output Q be 0 via Input R (Re-set).
T is the time length of output to be
ON and OFF.
Every time EN changes from 0 to 1, the
internal timer begins to time, and when
Time T is up, the output is 1. If EN is
held on 1, timing can be started again,
and when Time T is up again, the out-
put is 0. The cycle operation is contin-
ued in this way until EN is 0 and Out-
put Q is 0. When R is 1, then the output
Q is 0. And when R changes from 1 to 0
and EN is 1, all the initial status of Q
changing from 0 to 1 will start its cy-
cling changed.
Input EN
Input R
Output Q
Parameter T
Time sequence frame is as follows:
T T T
EN
R
Q

35
����������������� �������������
����������������������������������������������
Notes:
Use Parameter T to set ON/OFF time. The assignment range of T is 0.01 ~ 99.99,
and the time units can be set respectively to hour (H), minute (M) and second (S).
The time accuracy can reach 0.5 Second.
Input EN ( Enable) enables the clock pulse generator to work. Output Q of clock
pulse generator will flip-flop the status every time the time T elapses, and cycle
operation is continued in this way until Input EN (Enable) is 0. The clock pulse
generator then stops operation and Output Q is 0.
This function is applicable to generated pulse automatically and to switch ON/OFF
automatically.
3.2.7 RPR
Line diagram / Symbol in FAB Pin Description
Timer for ON time delay isstarted via Input TRG (Trigger).
Timer for ON time delay is reset
to ON via Input R, and make Out-
put Q is 0 (The priority of R is
higher than that of TRG).
After TRG is triggered and thetime T elapses, the output is ON.
After time delay T elapses, theoutput is ON.
Input TRG
Input R
Parameter T
Output Q
RPR

36
FAB Intelligent Control
Notes:
If the status of Input TRG changes from 0 to 1, the internal timer will be activated.
When time T is up, Output Q becomes 1 and then the input TRG coming again has
no effect on output Q .Only when Input R becomes 1 again Output Q and Timer T
will be reset to 0.
This function is applicable to the locations where the time-delay ON and hold ON
status are required.
The assignment range for T is 0.01 - 99.99, and the time units can be set respectively
to hour (H), minute (M) and second (S). Its time accuracy can reach
0.5 /00 second.
TRG
R
QT T
Time Sequence Frame:

37
����������������� �������������
����������������������������������������������
3.2.8 UCNLine diagram/symbol in FAB Pin Description
Time Sequence Frame:
Note: This function is applicable to the locations where counting is required.
Input R has priority to other input,
When it inputs resetting signal, the
counter is reset to 0 and cut put Q is
reset simultaneously
When CNT counting is input, the counter
only counts the leading edge triggering
(the status changes from 0 to 1), i.e. ev-
ery time the leading edge is triggering,
the counter will increase by 1.
When the internal counting value is
greater or equal to Parameter PAR, Out-
put Q is 1 The assignment of counter is 0
~ 999999.
When the counting value has been
reached, Output Q is On.
R
Input CNT
Output Q
Parameter PAR
CNT
R
Q

38
FAB Intelligent Control
3.2.9 DCN
Line diagram/Symbol in FAB Pin Description
Note: This function is applicable to the locations where the counting is required.
3.2.10 MPLR (Single-pulse time relay)
Line diagram/Symbol in FAB Pin Description
R has a priority to other input, when R
inputs reset signal, the counter is reset to
0 and output Q rests simultaneously.
When CNT counting is input, the counter
will only count the front edge triggering
(the status changes from 0 to 1), i.e. ev-
ery time the leading edge is triggering, the
counter is decreased by 1.
When the internal parameter is decreased
to 0, Output Q is 1. The assignment of
counter is 0 ~ 999999.
When the counting value is 0, Output Q
is On.
Input R
I n p u tCNT
Output Q
ParameterPAR
Trigger the input to activate the single-pulse time relay. When the leading edge ofTRG comes, a pulse with a duration of Tis output.
Reset the single-pulse time relay. When Ris 1, Output Q becomes 0.
The assignment of the pulse duration set-ting is 0.01 ~ 99.99 (second, minute, hour).The time accuracy can reach 0.5 second.
Every time TRG changes from 0 to 1, Qoutputs a pulse with a duration of T.
Input TRG
Input R
Parameter T
Output Q
39
����������������� �������������
����������������������������������������������
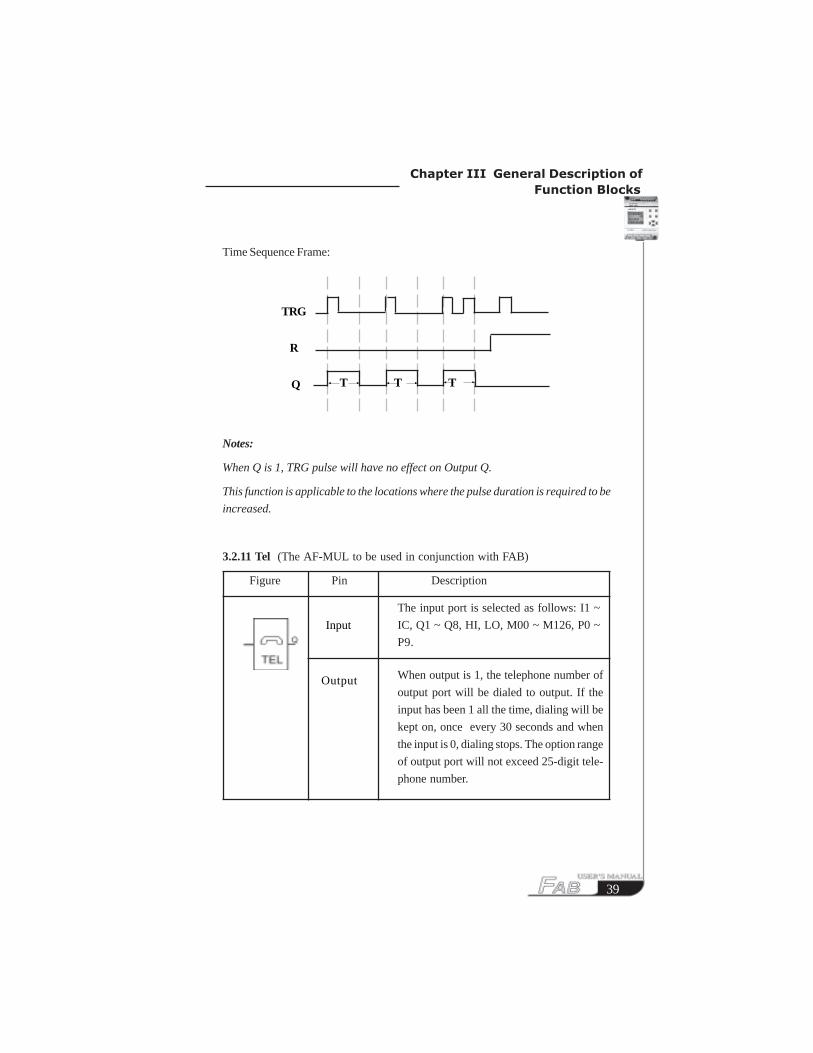
T T T
Time Sequence Frame:
Notes:
When Q is 1, TRG pulse will have no effect on Output Q.
This function is applicable to the locations where the pulse duration is required to be
increased.
3.2.11 Tel (The AF-MUL to be used in conjunction with FAB)
Figure Pin Description
TRG
R
Q
The input port is selected as follows: I1 ~
IC, Q1 ~ Q8, HI, LO, M00 ~ M126, P0 ~
P9.
When output is 1, the telephone number of
output port will be dialed to output. If the
input has been 1 all the time, dialing will be
kept on, once every 30 seconds and when
the input is 0, dialing stops. The option range
of output port will not exceed 25-digit tele-
phone number.
Input
Output

40
FAB Intelligent Control
Note:
The function of telephone blocks are mainly dialing, output, alarm, etc. This
block is used together with the locking-up relay (RS relay) function block . It can be
used to not only receive the coming call signals to control the terminal equipment,
but also dial to output the alarm under certain conditions. Presentation on how to
implement it is made as follows:
a. The basic circuit for controlling periphery devices by incoming call is shown
as the following diagram:
This control requires the presetting of the telephone two-tone signal (P0 ~ P9) to
drive RS relay during the programming of FAB, the periphery devices is driven by
the output of RS relay, so when FAB receives P0 ~ P9 signals of an incoming call,
it is possible to control the peripheral devices.
Step 1: Use the external telephone to dial the telephone number of the telephones
connected to FAB, connecting FAB then there appears the voice prompt:
please enter the password.
Step 2: Enter the password of the FAB correctly, and there appears the voice
prompt: please enter the information code.
Step 3: Dial P0 - P9 control signals to control the output of FAB. RS block input
has telephone two-tone pulse signals P0 - P9, during programming, the
input of RS needs to be set to P0 - P9, so as to implement the control function
of the telephone function block.
When I1 is ON and I2 is OFF again, the second section can then be input. (It is
called accumulated input).
This function should be applied to the locations where the voice prompt is re-
quired. It is necessary to first make a recording.
41
����������������� �������������
����������������������������������������������
b. Telephone alarm: When the input signal of this function block is 1, start to dial
automatically the preset number.
After the telephone lines and power supply lines of FAB and AF-MUL are con-
nected, dial the number of the telephone that is connected with FAB. When you
have got through, you will hear: please input password. Now input the password
for programming through the telephone number keyboard and please do not forget
to start with *. When the password has been properly input, please input * and 0,
you will hear the prompt voice: electrical appliance is switched on. Relay Q1 will
be on at the same time. If * and 9 are input, you will hear: electrical appliance is
switched off. Relay Q1 will be off. The prompt voices for switch-on and switch-
off will continue for 5 seconds.
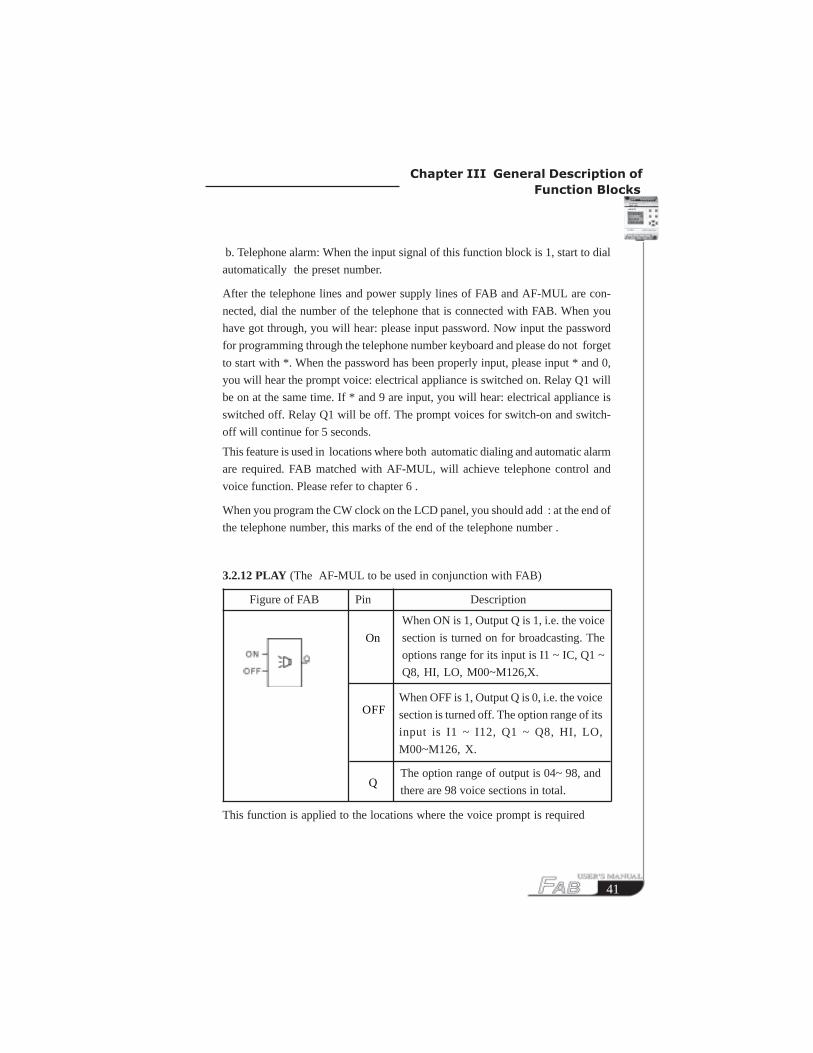
3.2.12 PLAY (The AF-MUL to be used in conjunction with FAB)
Figure of FAB Pin Description
This function is applied to the locations where the voice prompt is required
This feature is used in locations where both automatic dialing and automatic alarm
are required. FAB matched with AF-MUL, will achieve telephone control and
voice function. Please refer to chapter 6 .
When you program the CW clock on the LCD panel, you should add : at the end of
the telephone number, this marks of the end of the telephone number .
When ON is 1, Output Q is 1, i.e. the voice
section is turned on for broadcasting. The
options range for its input is I1 ~ IC, Q1 ~
Q8, HI, LO, M00~M126,X.
When OFF is 1, Output Q is 0, i.e. the voice
section is turned off. The option range of its
input is I1 ~ I12, Q1 ~ Q8, HI, LO,
M00~M126, X.
The option range of output is 04~ 98, and
there are 98 voice sections in total.
On
OFF
Q

42
FAB Intelligent Control
3.2.13 MR (The AF-MUL to be used in conjunction with FAB)
Figure of FAB Pin Description
When ON is 1, record the voice sections.
The option range of the input is I1 - IC,
Q1 - Q8, HI, LO, M00~M126, X.
When OFF is 1, recording is completed,
turn off the switch for recording voice
sections. The option range of this input
is I1 ~ IC, Q1 ~ Q8, HI, LO, M00~M126,
X.
The options for the output port are 01 ~
09. Please note that: when the output is
selected as 99, it does not represent to
record the 99th voice section but that to
clear all the voice sections, therefore, care
should be taken for using .
ON
OFF
Q
Notes:
Please refer to chapter 6 to learn how to record your voice.
When making a recording, the recording should be performed in an order of 01 - 98
and the process should not be interrupted , that is to say, it is not allowed to record
the third section after the first section is recorded. (If the same block is used, the
sections can be accumulated automatically as long as the conditions change) e.g. I1
- ON, I2 - OFF and Q=01, the first section is input at the beginning when I1 is ON
and I2 is OFF. When I1 is Off and I2 is ON, the first section is turned off.

43
����������������� �������������
����������������������������������������������
3.2.14 COMP
Figure in FAB pin notes in FAB
Notes:
Only AF-10MR-D, AF-10MT-D, AF-20MR-D, AF-20MT-D type FABs have this
function.
This function is used in the input function block for analog quantity.
Operation of AN function block
The comparison function of AN block is comparison between input 1 and input3.
Such as when you select input 2 as >, it means that when input 1>input 3, Q will be
0. When input1<input3, Q will be 1
Example1 : Input 1 =I1 Input 3=050 Input 2= >, Q=Q1
If I1>5.0V,then Q1will be ON
If I1<5.0V, then Q1 will be OFF
Example 2: Input 1=I1 Input3=I2 Input 2= < ,Output=Q2
If I1<I2, then Q2 will be ON
If I1>I2 , then Q2 will be OFF.
comparative input port 1, with 0.0~10.0, I1~ICto be selected.
comparative input port 2, with 0.0~10.0,I1~IC to be selected.
Function selection <=,>=,>,<,=,=
with conditions available, output Q is 1 andits selection range is Q1~Q8, M00~M126.Remarks: It may be compared with��,��,< , >, = ,�.
Input 1
Input 2
Input 3
OutputQ
Input1
Input2
Input 3
Output 1

44
FAB Intelligent Control

45
������������� ������ ������������������������
Chapter IV Programming operation on FAB panel
There are two methods of programming for FAB, one is to complete editing of thefunction diagram directly on the operation LCD panel using the keys, while theother is to do the same on the computer using the programming software QUICKII . The latter procedure is recommended for more complex control schemes.Programming for FAB can be completed with either of the two methods. ThisChapter will describe in detail how to use the operation LCD panel to edit theFunction Block Diagram Program and the programming method using QUICK IIwill be covered in detail in the second part of this manual. As shown in the following figure, the operation LCD board is a simple man-
machine interface and the program editing operation will be completed through
the 8 keys on the right: , , , , , , , .
The following rules shall be observed for programming operation on this panel:
1. When the cursor appears as an under line, it may be moved:
Move the cursor along the lines with , , and keys;
Press the OK key to confirm selection of the input/output connection or the
function block;
Press ESC key to exit the programming input.
2. When the cursor appears as >, the input/output or function block may be
selected:
Select the input/output or function block with and keys;
Press OK key to confirm the selection;
Press ESC key to return to the previous step.

46
FAB Intelligent Control
4.1 Display status of FAB
Connect FAB (Fig. 4.1) to the power supply with the method as described in
Chapter II. After the power supply is switched on, the LCD panel displays a
frame (Fig. 4.2) , which is the Status Display Frame:
the upper line I contains the status values of inputs 1 ~ 6
the lower line Q contains the status values of outputs 1 ~ 4
(in which * indicates ON, i.e. status 1, indicates OFF, i.e. status 0.)
Fig. 4.2 Status Display Frame
4.2 Confirm password
Pressing ESC and OK simultaneously at the Status Display Frame as shown in
Fig. 4.2, the user can enter the Confirm Password Frame, as shown in Fig. 4.4.
Now it is necessary to input the password value for FAB. The cursor stays at
the highest digit of the password, where you can change the digit value (0~9)
with the and keys (when you initially press or key, the
password value is 0).
Fig. 4.1
I: SAQ: * 12:26:58
47
������������� ������ ������������������������
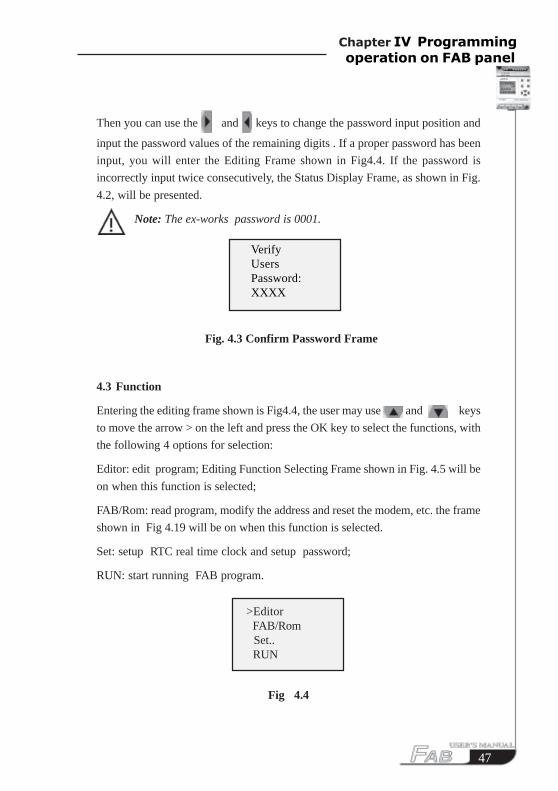
Then you can use the and keys to change the password input position and
input the password values of the remaining digits . If a proper password has been
input, you will enter the Editing Frame shown in Fig4.4. If the password is
incorrectly input twice consecutively, the Status Display Frame, as shown in Fig.
4.2, will be presented.
Note: The ex-works password is 0001.
Fig. 4.3 Confirm Password Frame
4.3 Function
Entering the editing frame shown is Fig4.4, the user may use and keys
to move the arrow > on the left and press the OK key to select the functions, with
the following 4 options for selection:
Editor: edit program; Editing Function Selecting Frame shown in Fig. 4.5 will be
on when this function is selected;
FAB/Rom: read program, modify the address and reset the modem, etc. the frame
shown in Fig 4.19 will be on when this function is selected.
Set: setup RTC real time clock and setup password;
RUN: start running FAB program.
Fig 4.4
VerifyUsersPassword:XXXX
>Editor FAB/Rom Set.. RUN

48
FAB Intelligent Control
4.3.1 Editor
When this function key is selected, FAB will enter the Editing Function Selecting
Frame as shown in Fig. 4.5. The user may use and keys to move the arrow
> on the left and press OK to select the functions.
Edit PRG: Input a function block (consult 4.2.1.1);
Insert FB: Insert a function block into the existing program (consult 4.2.1.2);
Delete FB: Delete a function block from the existing program (consult 4.2.1.3);
Clear PRG: Delete all program block.
Fig. 4.5 Editing-function Selecting Frame
4.3.1.1 Edit PRG
The Edit PRG Menu Frame is as shown in Fig. 4.6 and the function blocks are to
be selected under this menu.
Select Function Blocks:
The user may use the and keys to move the arrow > on the left to select
the function blocks. Press OK to select a function block, the Function Block
Setting Frame shown in Fig. 4.7 will be on (please refer to Chapter III Specification
of function Blocks). This menu includes the following function blocks: AND,
NAND, OR, NOR, XOR, NOT, RS, UCN, DCN, PLR, MPLR, CPG, RPR, DPR,
DDR, CW, TEL, PLAY, MR, ANALOG (D type).
>Edit Prg
Insert FB
Delete FB
Clear Prg
49
������������� ������ ������������������������
>AND
NAND
OR
NOR
NOT
XOR
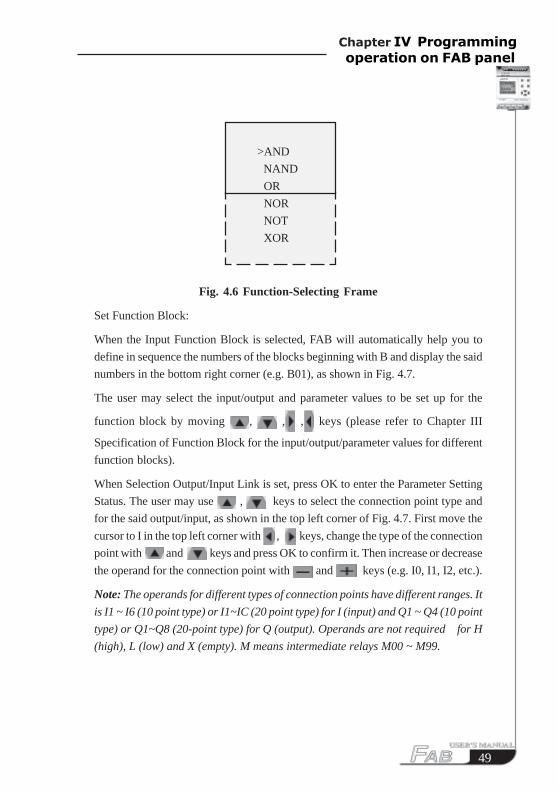
Fig. 4.6 Function-Selecting Frame
Set Function Block:
When the Input Function Block is selected, FAB will automatically help you to
define in sequence the numbers of the blocks beginning with B and display the said
numbers in the bottom right corner (e.g. B01), as shown in Fig. 4.7.
The user may select the input/output and parameter values to be set up for the
function block by moving , , , keys (please refer to Chapter III
Specification of Function Block for the input/output/parameter values for different
function blocks).
When Selection Output/Input Link is set, press OK to enter the Parameter Setting
Status. The user may use , keys to select the connection point type and
for the said output/input, as shown in the top left corner of Fig. 4.7. First move the
cursor to I in the top left corner with , keys, change the type of the connection
point with and keys and press OK to confirm it. Then increase or decrease
the operand for the connection point with and keys (e.g. I0, I1, I2, etc.).
Note: The operands for different types of connection points have different ranges. It
is I1 ~ I6 (10 point type) or I1~IC (20 point type) for I (input) and Q1 ~ Q4 (10 point
type) or Q1~Q8 (20-point type) for Q (output). Operands are not required for H
(high), L (low) and X (empty). M means intermediate relays M00 ~ M99.

50
FAB Intelligent Control
Fig. 4.7 Setting the parameter of function blocks
Described above is the set up of basic function blocks. It is also necessary to
explain the setup of the operands for some special function blocks in the following.
1. Function blocks with timing function
Function blocks with timers include:
DPR: Delay putting Relay CPG: Clock Pulse Generator
DDR: Delay Disconnection Relay RPR: Retentive On Relay
MPLR: Mono-pulse Relay Pulse Relay CW: Clock Switch
PLR: Pulse Relay
When parameter T is set, the following frame will be on the LCD panel
Fig. 4.8
The line 1: Block number and timing mark
The line 2: time units— HOU (Hour) , MIN (Minute), SEC (second)
The line 3: Setting whole number of time (00-99)
The line 4: Setting decimal of time (00-99)
B02: Time00: Unit00: Int00: m
I0
B01
51
������������� ������ ������������������������
2. Function blocks with counting function include:
UCN: Up Counter
DCN: Down Counter.
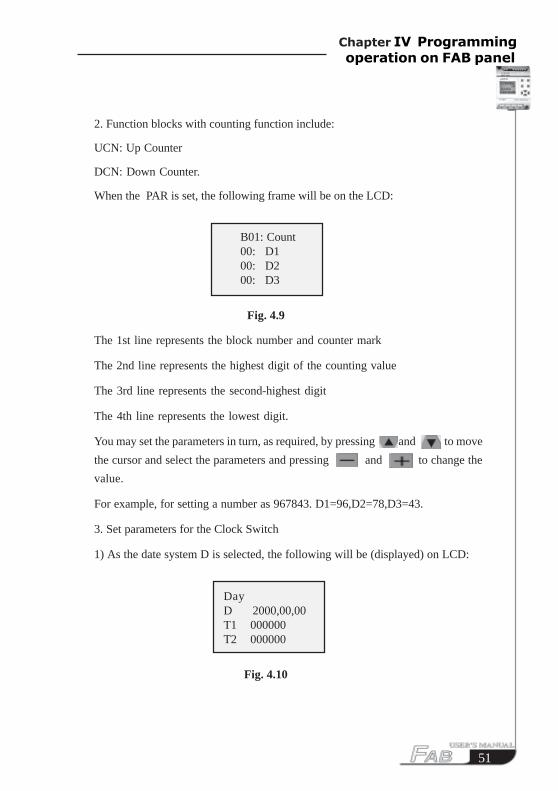
When the PAR is set, the following frame will be on the LCD:
Fig. 4.9
The 1st line represents the block number and counter mark
The 2nd line represents the highest digit of the counting value
The 3rd line represents the second-highest digit
The 4th line represents the lowest digit.
You may set the parameters in turn, as required, by pressing and to move
the cursor and select the parameters and pressing and to change the
value.
For example, for setting a number as 967843. D1=96,D2=78,D3=43.
3. Set parameters for the Clock Switch
1) As the date system D is selected, the following will be (displayed) on LCD:
Fig. 4.10
B01: Count00: D100: D200: D3
DayD 2000,00,00T1 000000T2 000000
52
FAB Intelligent Control
The 1st line represents the date system
The 2nd line represents year, month and day
The 3rd line represents the output ON time (T1).
The 4th line represents the output OFF time (T1).
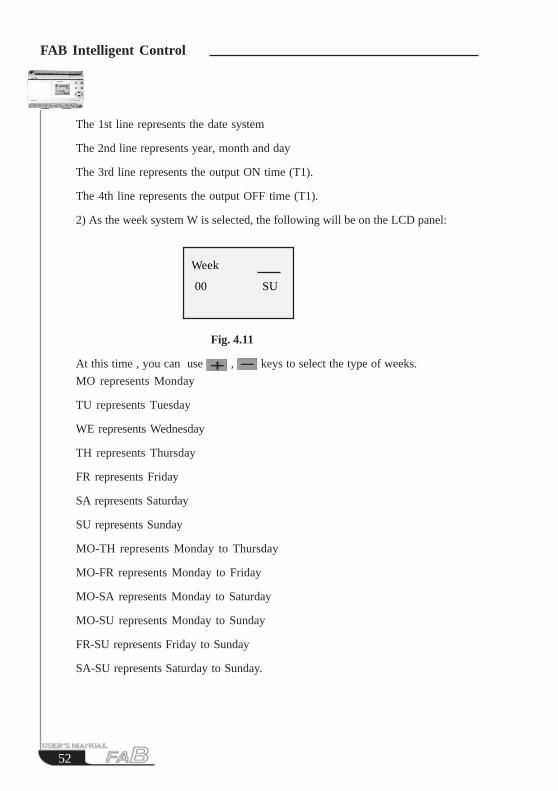
2) As the week system W is selected, the following will be on the LCD panel:
Fig. 4.11
At this time , you can use , keys to select the type of weeks.
MO represents Monday
TU represents Tuesday
WE represents Wednesday
TH represents Thursday
FR represents Friday
SA represents Saturday
SU represents Sunday
MO-TH represents Monday to Thursday
MO-FR represents Monday to Friday
MO-SA represents Monday to Saturday
MO-SU represents Monday to Sunday
FR-SU represents Friday to Sunday
SA-SU represents Saturday to Sunday.
Week
00 SU

53
������������� ������ ������������������������
After selecting the week system press the ESC key, you will then be able to select
the timing and the following will be displayed on LCD:
Fig. 4.12
The first line represents the week system
The second line represents year, month and day
The third line represents the output-ON time
The forth line represents the output-OFF time.
Note: You only need set T1, T2, and need not set D when you select
the week system the set data will be neglected by the system
4. Set the Telephone Block
When the Telephone Block is selected, the following will be displayed on LCD
panel. Set the input on the left of the block first, move the cursor to the output on
the right and press OK.
Fig. 4.13
WeekD 2000,00,00T1 000000T2 000000

54
FAB Intelligent Control
After OK key is pressed, the following will be on the LCD panel:
Fig. 4.14
Press , , , keys to move the cursor and select the digits of the
telephone up to a 25-digit number and press , to change the value and
set each digit of the telephone number in turn. After the number is set, move the
cursor to the last digit of the set number and press to exit .
when you complete setting the telephone number, you must add :
marking the end of the number.
Phone Code
0000000000
0000000000
00000
5. Set the AN block
AN block is as follows
Input 1: I and K are available input.
(1) That the I is selected, it represents this port is connected to FABs -input, whose
range is I1~I6 (AF-10 series), and I1~IC (AF-20 series). The operation on the LCD
panel is the same as general I. That K is selected represents that digital value,
whose range is 000~100 which represents voltage 0~10.0V. The first two digits
represent integer , the last digit represent the decimal part.
Input1
Input2
Input3

55
������������� ������ ������������������������
(2) When input 1 is K or I, press OK to confirm and then to press and
to change the digital value. Finally press OK to confirm.
Input 2: It represent s function selection, There are 5 comparison functions which
can be selected >,<, <=,>=,= Select by using , and then press OK to
confirm.
Input 3: It is the same as Input 1.
4.3.1.2 Insert FB
This function can be used to insert a function block into a scheduled block posi-
tion. The operating process is as follows:
1. Press OK at >Insert FB in the Editor Frame, thus the inserting status is entered,
as shown in Fig. 4.15.
Fig. 4.15 Insert Function Block
2. 000 shown in the above frame is the original value, Press or to select the
block number and then press OK to confirm. The range of inserted block numbers
is from 001 to the maximum number of the current program If the selected number
is not in this range, pressing OK will not be effective and it will return to the original
status to let you select a block number in a suitable range. If you want to give up
inserting a block, please press to exit. If you are not clear about the maximum
number in the program ,you can use ROM-FAB in FAB/ROM to read the program
and get the number.
3 If you select a right number in the above step and press OK to confirm the
number, then machine will affect your operation and function block codes (eg.
AND, OR, NOT, RS, TEL,...etc.)will appear for your selection.
Insert:
000

56
FAB Intelligent Control
Note: If you do not go on selecting but exit, FAB will copy a function block the same
block number as the old one. But if you are in the editing step, you can exit only
when you finish setting all of the terminals as. You can then delete the block by
using Delete FB.
4.3.1.3 Delete FB
This function can be used to delete any function block. The operating process is as
follows:
1. Press OK at >Delete FB in the Editor Frame, thus the deleting status is entered,
as shown in Fig. 4.16.
Fig. 4.16 Delete Function Block
2. 000 shown in the above frame is the original value. Press and to select
the block No. and then press OK. The range of block number for Delete FB is from
001 to the maximum number of the current program. If the selected number is not
in this range, pressing OK will not be effective and it will return to the original
status to let you select a block number in a suitable range. If you want to discon-
tinue the deleting operation, please press to exit. If you are not clear about the
maximum number in the program you can use FAB-ROM in FAB/Rom to read the
program and get the number.
3. If you have select a correct block number , press OK, FAB will display as
follows. It means the selected block has been deleted.
Delete: 000

57
������������� ������ ������������������������
4.3.1.4 Clear Prg
This function can be used to delete all of the existing programs in FAB.
1. In the EDIT frame, Select >clear Prg and press OK, then the following frame will
appear .
Fig. 4.18 Clear Prg
1. The above frame will last 2~3 seconds, then it will be automatically be on
function block selection frame. The old program will have been cleared and you can
program again
4.3.2 FAB/Rom
There are three options in Select FAB/Rom Frame, as shown in Fig. 4.17.
Fig. 4.19
>FAB( XXXX )
Rom
FAB
FAB
Addr
Modem
>Clear prg
Wait
>Editor
FAB/Rom
Set..
RUN

58
FAB Intelligent Control
4.3.2.1 Read program from FAB (Rom>FAB)
1. Select Rom FAB in FAB/ROM, and press OK, the follow frame will appear.
Fig. 4.20
2. Press in the state shown in Fig 4.20, then the program will be read, block by
block (in sequence as B01,B02....)
FAB (XXXX): (The series No. of FAB system service)
Rom FAB: read the program from FAB
FAB-Addr: view or modify FAB address
MODEM: initialize MODEM.
4.3.3 SET (set password and time)
The SET Frame is shown in Fig. 4.20. A password and real time clock can be set
for the edited FAB function program via this SET Frame. When you want to
modify the control function, the said password shall be properly input before the
editing modification status can be entered (note: the ex-factory password of FAB is
0001). This function is the password lock function of FAB.
Fig. 4.21 Set Password Frame
10:49:042000/06/21Day SU5678
Set Real Time Clock (hour: minute: second)Set Date (year: month: date)Set WeekdaySet password
Rom FABWait

59
������������� ������ ������������������������
Note: If you did not read the FAB’s existing program when you edit the
program and enter into the editor frame for programming, then it will begin from
B01 block. If you want to save the existing program, you should read the program
from ROM
FAB and then edit it from editor PRG.
4.4 Edit FAB function program
During editing of FAB function program, special attention need be paid to Some
programming rules, the application of the mid-relays and how to use FAB’s opera-
tion key panel with LCD to edit the FAB function program.
4.4.1 Programming rules
Rule 1: Before the circuit is input, the complete circuit diagram shall be made on
a drawing with the necessary intermediate relays (M) marked, or the FAB cir-
cuit diagram shall be drawn directly with QUICK II, and then adjust the series No.
of the blocks according to Rule 2 and Rule 3.
Rule 2: The input of circuit is always from input to output, with the cause first and
result next. The block sequence number of the cause block must be smaller than
that of the result block. The block numbers that have no cause relationship with
each other are irrelevant.
Example:
Fig. 4.22
�I1 I2 I3
(M02)
Cause block B03 Result block B04

60
FAB Intelligent Control
Rule 3: In a program path, an output may be connected to the lead input (for
number transfer), but the block with a smaller sequence number shall be used as
the lead input (cause block) and the one with a greater sequence number shall be
the result block. If the user desires for contrary cause and result blocks it is only
necessary to adjust the block sequence numbers.
Rule 4: One output may be connected to multiple inputs, but multiple outputs
cannot be connected to one input.
Rule 5: At power-on and initialization of FAB (at the instant of power-on), the
intermediate relay (M) and output port (Q) are all in logical 0 status. Their later
status will be determined by the program.
Rule 6: It is not allowed to connect two outputs with are end. Such as the following
the above is prohibited except for CW block
4.4.2 Middle relay
In FAB programming, the middle is a very important bridge in FAB programming,
this is the intermediate relay. The intermediate relay of FAB is similar to that in the
relay control system. They can store some intermediate status and then transfer it
to a block requiring this status for input. Use of intermediate relays has two
advantages:
1. The output terminal of the previous block can be used as the input signal for
different blocks;
2. When a block is inserted or deleted, the original logical relation can be retained.
The basic functions of the intermediate relay are as shown in the following figure:
�B01
B02
�I1
I2
�I1
I2
M00
M00

61
������������� ������ ������������������������
I1
I2
B01
M01
I3I4 I 5
B02B03
M01
Q1
Fig. 4.23
on the above figure, the output status of B01 may not only be used directly as the
input of B02 block, but also be stored by M01 and then used as the input of B03.
4.4.3 Edit program
Take the stair lighting system for an example, with the following control require-
ments: 1. When the switch button is pressed, the light will be turned on and kept
normally on; 2. When the sound sensing switch is on, the light will be turned on and
kept on for 2 minutes.
The Function Block Diagram for the said control function is as follows:
Fig. 4.24
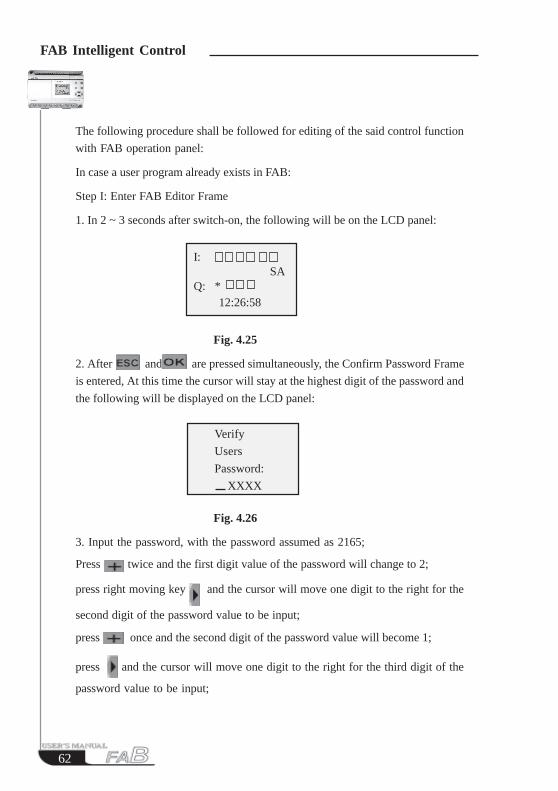
62
FAB Intelligent Control
The following procedure shall be followed for editing of the said control function
with FAB operation panel:
In case a user program already exists in FAB:
Step I: Enter FAB Editor Frame
1. In 2 ~ 3 seconds after switch-on, the following will be on the LCD panel:
Fig. 4.25
2. After and are pressed simultaneously, the Confirm Password Frame
is entered, At this time the cursor will stay at the highest digit of the password and
the following will be displayed on the LCD panel:
Fig. 4.26
3. Input the password, with the password assumed as 2165;
Press twice and the first digit value of the password will change to 2;
press right moving key and the cursor will move one digit to the right for the
second digit of the password value to be input;
press once and the second digit of the password value will become 1;
press and the cursor will move one digit to the right for the third digit of the
password value to be input;
I: SAQ: * 12:26:58
Verify
Users
Password:
XXXX

63
������������� ������ ������������������������
press 6 times and the third digit of the password value will become 6;
press and the cursor will move one digit to the right for the last digit of the
password value to be inputted;
press 5 times and the last digit of the password value will become 5.
After the password is completely input, the following will be displayed on the
LCD panel:
Fig. 4.27
4. Press to enter the Select Editing Function Selection Frame, with the
selection mark > staying at Editor function. The following is displayed on the LCD
panel:
Fig. 4.28
Step 2: Edit Function Diagram
1. Press to select Editor and the Function Block Selection List is entered.
The following is displayed on the LCD panel:
Verify
Users
Password:
2165
>Editor
FAB/Rom
Set..
RUN

64
FAB Intelligent Control
2. Select and set the first function block:
Move > to the position of RS relay with and press OK to enter the Function
Block Set Status, when the cursor is at the highest input Link. The following will
be on LCD panel:
Fig. 4.30
Press and the Set Parameter R link input status will be entered. Now I will
appear at R link. If you do not want to select I, you may press to select Q and
press it again to select H and may continue with the same until M. It means that
the user may select any parameter among I, Q, H, L, C, P and M by pressing .
After I is selected, the following will be on the LCD panel:
Fig. 4.31
>AND
NAND
OR
NOR
NOT
XOR
>RS
Fig.4.29
���
R
S���
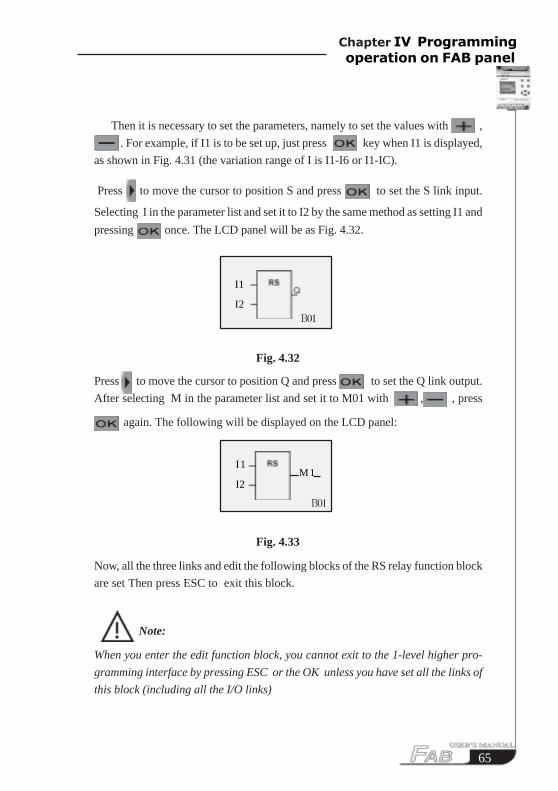
65
������������� ������ ������������������������
Then it is necessary to set the parameters, namely to set the values with ,
. . For example, if I1 is to be set up, just press key when I1 is displayed,
as shown in Fig. 4.31 (the variation range of I is I1-I6 or I1-IC).
Press to move the cursor to position S and press to set the S link input.
Selecting I in the parameter list and set it to I2 by the same method as setting I1 and
pressing once. The LCD panel will be as Fig. 4.32.
Fig. 4.32
Press to move the cursor to position Q and press to set the Q link output.
After selecting M in the parameter list and set it to M01 with , , press
again. The following will be displayed on the LCD panel:
Fig. 4.33
Now, all the three links and edit the following blocks of the RS relay function block
are set Then press ESC to exit this block.
Note:
When you enter the edit function block, you cannot exit to the 1-level higher pro-
gramming interface by pressing ESC or the OK unless you have set all the links of
this block (including all the I/O links)
I1
I2���
I1
I2M1
���

66
FAB Intelligent Control
3. Select and set the second function block
Press to return to the Function Block Selection List Frame and select the
second function block.
Move > to the position of DDR function block and press . Now you can set
the parameters for the function block. The following will be on the LCD panel:
Fig. 4.34
Press to enter Set Trg Pin Parameter Status. Select I in the parameter list with
, and press . Then set Trg to I3 with , . The following will
be displayed on the LCD panel:
Fig. 4.35
Press to move the cursor to position R and press to set the r input
parameter . After selecting ¡°OK¡± in the parameter list, press to set the
parameter X. The following will be displayed on the LCD panel:
B02
B02

67
������������� ������ ������������������������
Fig. 4.36
Press to move the cursor to position T and press to enter the Set
Timer Frame. The following will be displayed on the LCD panel:
Fig. 4.37
Press to enter the Time Unit Selection Status. Now the options can be
changed with , . When min in” appears, press to set the time unit
as minute. The following will be displayed on the LCD panel:
Fig. 4.38
Press to set the time integer digit and use , to change the value. Set
it as 02.
Press to set the time decimal digit and use , to change the value. Set
it as 00. Now the time is set to 2 minutes. Press and then press ESC to exit.
B02
B02: Time
Hou: Unit
02: Int
00: m
B02: Time
Min: Unit
02: Int
00: m

68
FAB Intelligent Control
Press to move the cursor to position Q, press . Set Q as M02 and then
press again. The following will be on the LCD panel:
Fig. 4.39
Select and setup the third function block
Press to return to the Function Block Selection List Frame and select the third
function block.
Move >to the position of OR function block and press . Now you can set the
parameters for the third function block. The following will be displayed on the
LCD panel:
Fig. 4.40
Press to enter the first input parameter set status. Select parameter M with
, and set the parameter value with , . When M01 appears,
press and the first parameter will be set to M1. The following will be on the
LCD panel:
Fig. 4.41
B03
B03
M01
B02
M02

69
������������� ������ ������������������������
Press to move the cursor to the second input parameter and press
Now the second input parameter can be set. After selecting X with , and
pressing , the said input is set to X. The following will be displayed on the
LCD panel:
Fig. 4.42
Move the cursor to the third input link and press After selecting M in the
parameter list, press and set the said input to M2 with , . The
following will be on the LCD panel:
Fig. 4.43
B03
���
���
B03
���
���
Move the cursor to the output link with and press . After selecting Q in
the parameter list, press and set the said output link as Q1 with , .
The following will be displayed on the LCD panel:
Fig. 4.44
B03
���
���
���
Q01

70
FAB Intelligent Control
Now all the three function blocks required for editing of this function diagram are
selected and set, which means that the Function Diagram is completely edited.
Step III: Run
1. After Set up II is finished, press twice consecutively to return to the
Select Function Selection. The following will be displayed on the LCD panel:
Fig. 4.45
2. Move> to RUN and press . The following will be on the LCD panel:
>Editor
FAB/Rom
Set..
RUN
Fig. 4.46
3. It means that the program is now written into FAB and can be run according tothe new program.
Notes:
How to read and modify the current program.
Press ESC and OK simultaneously to enter the password frame, and then enter the
correct password, and then press OK.
Select FAB/ROM and press OK
Select ROM -FAB, and then press OK
Press and to select and read the function block, and press OK to confirm and
to make the modification.
* * * *
* S A

71
������������� ������ ������������������������

72
FAB Intelligent Control
Chapter V Remote programming and monitoring
5.1 Remote programming and monitoring via a MODEM
FAB can realise ultra-remote programming and monitoring function through a
MODEM. If you need to program or monitor a FAB on a work site kilometers
away or even between two cities, this function of FAB will satisfy your require-
ment.
After the connection of FAB, AF-C232 (or AF-MUL), AF-M232 and MO-
DEM (refer to 5.2 for details of the connection diagram), switch on the power and
the MODEM will automatically complete the initialization. If the MODEM is not
initialized, you may press OK on the MODEM menu under FAB/ROM of the
LCD programming interface to initialise it.
Connect the MODEM to a computer provided with QUICK II or FAB-SCADA
software and make a connection with FAB by dialing the telephone connected to
FAB through the computer. Remote programming and monitoring can now be
carried out.
Note: AF-M232 is a standard product.
AF-M232 is a standard DB9 DB9 connection.
The Cable Connection Diagram for AF-M232 is as follows:
12
34
5
67
89 1
23
45
67
89
connect to
FAB side
connected to
MODEM side

73
������������������ ������ �������������������������������������������
5.2 Two connection methods for FAB remote programming and monitoring
5.2.1 Connect MODEM by means of AF-C232 and AF-M232
For connecting with this method, you will need the following parts: AF-C232 and
AF-M232. The connection diagram is as follows:
5.2.2 Connect MODEM by means of AF-MUL
If you have the AF-MUL telephone and voice multifunction block, it is not neces-
sary to have the AF-C232 part. The connection diagram is as follows:

74
FAB Intelligent Control

75
������������ ��������
Voice alarm function, telephone control function and dialing automatically func-
tion are very important functions of FAB. To realize these functions, we should
match FAB with the AF-MUL telephone and voice multifunction block.
6.1 The structure of the voice module:
Fig 6.1 Structure of AF-MUL
1. Socket of telephone crystal plug
2. Power terminals (AC100-240V) or (DC12-24V)
3. Connecting Port with FAB
4. Power indicator
5. Recording indicator
6. Recording Microphone
7. Volume control l (controls the volume of AF-MUL Speaker)
8. Terminal port for external speaker (it can be connected to an externally powered-
speaker to amplify the voice, the volume is not controlled by 7 (Volume control)
9. Communication Port: Connected with the computer to monitor or program the
FAB or Connected with a MODEM via M232 part to remote monitor FAB (the
same function with AF-C232 part).
Chapter VI Voice Module

76
FAB Intelligent Control
6.2 Connection between AF-MUL and FAB.
Connect the power to the AF-MUL and FAB and then plug the telephone connec-
tor into the TEL socket . Connect the AF-MUL and FAB by using the special
connection. (Please use the link connection provided forming part of the AF-MUL
supply). As figure 6.2 shows.
For convenient installation there is a DIN rail clamp on the bottom of the AF-
MUL. Both AF-MUL and DAB can be readily installed on a common DIN rail.
Telephone line
Link connection
Fig 6.2 Connection Between FAB and AF-MUL
Note: (Before recording or amending the voice messages, you should use a 232
cable for the communication between computer and AF-MUL telephone and voice
multifunction block (FAB and AF-MUL) as shown in above diagram.
6.3 Guide for using the voice multifunction block
1. The first four sections (section 0, section 1, section 2, section 3, are for the voice
system, users can not record the four sections randomly.
Section 0, is the prompt voice for confirming the user status , It will be broadcast
only when the AF-MUL system number has been dialed.
Section 1, is the prompt voice for confirming the input of this section and it can not
be broadcast without using the correct password .It will be broadcast when
the correct password is input. Normal broadcasting can be carried out
with this section.
Section 2, is the prompt voice for the wrong password .It will be broadcast when
the wrong password is used. Normal broadcasting can be carried out with
this section.

77
������������ ��������
Section 3: is the prompt voice for dialing to a connected telephone. It will be
broadcast when the FAB dials a connected telephone. Normal broadcast-
ing can be carried out with this section.
2. The usage of the four special sections.
For example: users can use four message sections as follows.
(1) Record section O as Please enter the password for confirmation
Record the 1st section as correct password. You can then carry out the next step.
Record the 2nd section as wrong password. You can then re enter the password.
Record the 3rd section as Alarm You can then enter the password and carry out the
real time control.”
(2) When a user dials the FAB system number, AF-MUL will answer the telephone
automatically and broadcast -please enter the password for confirmation, then
the user enters the password.
A. If the entered password is correct, FAB system will then broadcast-correct
password-please do the next step to control. Then the user can control the
equipment by use of the telephone.
B. If the entered password is not correct the FAB system will broadcast-wrong
password , please re-enter. The FAB system will then broadcast the section 0
message repeatedly.
(3) When the FAB voice system dials a preset telephone number, it will broadcast
the preset message such as the 4th section Gas leakage alarm together with the
3rd section Alarm, please enter the password to control.
A. When user enters the correct password, the voice system will broadcasts the 1st
message and then will broadcast the 4th message repeatedly. At this time the
user can real-time control the equipment by use of the telephone.
B. When the user enters a wrong password, the voice system will broadcast the 2nd
message-wrong password, please re-enter, The voice system will then broad-
cast the 3rd message and 4th message repeatedly.

78
FAB Intelligent Control
Notes:
A. When a connected telephone is dialed by the FAB voice system, if there is no
answer or a password is not input within 40 seconds of the connection the FAB
voice system will stop dialing and cease to broadcast the voice message. The
FAB voice system will then redial automatically every 20 seconds.
B. User must enter a * before entering the password. The broadcasting will then
stop and the user should enter a four-digit password within nine seconds. If the
user fails to enter the password, the FAB voice system will rebroadcast the
prompt voice. The user must then enter * first and then enter the password, if the
user needs to enter the password again the procedure needs to be repeated..
C. When the user has entered the correct password, the voice system will broadcast
the 1st section-correct password-please do the next operation. The user can
then carry out the following operation. If the password is wrong, the voice
system will broadcast the 2nd message-wrong password -please re-enter. The
user can only enter the wrong password twice. If the user enters the wrong
password for the third time, FAB will hang up the telephone and stop broadcast-
ing. The FAB will then return to the main system. If the alarm status still exists,
the voice system will dial automatically, for alarm purposes, every 20 seconds.
D. When the alarm status exists, FAB will broadcast the alarm voice repeatedly
every 20 seconds, it can be stopped by the use of the control function within the
program.
E. When the broadcast has stopped the user should enter the four-digit password
within nine seconds. If the user fails to enter the correct password, the FAB voice
system will rebroadcasting the prompt voice. The user must then enter * first
and then the four digit password within nine seconds after the broadcast has
ceased.
F. After FAB has dialled out if the user does not switch-off the alarm ON/OFF
switch via the anti-control function i.e, the cause for alarm is not corrected the
FAB will dial, for alarm purposes, automatically every 20 seconds.

79
������������ ��������
6.4 Recording
The recording function of AF-MUL is similar to a voice message telephone or
recording machine. Then, how to record? The FAB provides a record function MR
block. The method for using the MR block is as follows
When ON is 1 and OFF is 0, begin the voice recording.
When ON is 0 and OFF is 1, stop the voice recording.
The recording range of output Q is from 0 to 98 messages and the inputting of voice
messages must be sequential.
Notes:
The user shall record messages in a progressive sequence from 0 to 99. The
sequence cannot be changed. For example, it is not possible to record the third
message after the first message. The user should record the third message after the
second message and so on.
Message 0 (base section) is for prompt words. When the user dials the voice
module, the user will hear the base section prompt voice message. This voice
message through the telephone is not controlled by the play function.
When output Q is 99 , it does not mean that the user can record the 99th message.
Q 99 is used to wipe away all of the recorded messages. Output Q 99 is similar to
the delete button of recording machine. The user must delete all originally recorded
messages within the AF-MUL before commencing a new set of voice recordings.
Example: The user wants to record voice messages as follows:
The 0 base section message-Please enter the password.
The First section message-correct password, please enter the message code.
The Second section message-wrong password, please re-enter again.
The third section message-emergency, please enter password to control
The Fourth section message- Whatever message four is.
And so on to the system needs.
The voice message recording operation of is as follows:
1. As shown in Fig 6.4 , connect the AF-MUL and FAB, connect switch k1
between L and I1, connect k2 between L and I2, connect k3 between L and I3 and
connect k4 between L and I4.

80
FAB Intelligent Control
Fig 6.3 Fig 6.4
2. Switch on the power of FAB and AF-MUL, Write the two function blocks
program in FAB when they run.
3. Run the FAB and close the switch k1 one second and open it, then close switch
k2, one second and open it, then the original recording of FAB is deleted.
4. Close k3 for one second and open it, the user will see that the red recording
indicator light of the AF-MUL is on, user to say-Please enter the password
into MIC of the AF-MUL, then close k4 for a second and then open it.
Now the user will hear the recorded voice-Please enter the password. The
voice message is broadcast by the AF-MUL and proves that 0, the base
section voice message has been recorded in the AF-MUL.
5. Close k3 for one second and then reopen it, the user should then close k3 again for
one second again. When the red recording indicator light is on, user to say
the second section voice message into MIC of the AF-MUL. This will
complete the second section voice recording.
6. Repeat 5 above for additional voice messages until all sequential voice recordings
have been completed.
����
������
�

81
������������ ��������
6.5 Sound broadcasting
Write the sound playing FB into the FAB and set up the property. Set up the
relevant broadcasting voice section, section 04 and section 08, as follows:
When the program has been written into FAB, and the FAB run, turn on the
switch K1 for one second then turn it off. At this time you will hear-the
fourth section voice, then turn on the switch K2 for one second then turn
it off and the broadcast will be closed.
Turn on the switch K3 for one second and turn it off, you will hear -the eighth
section-you recorded voice. Turn on the switch K4 and then turn off, the
sound will be closed.
Notes: If the two broadcasting function blocks are both actioned, the function
block with bigger number will be broadcast, which follows the principle -
the later-command takes precedence over the earlier command.
6.6 Telephone remote control function
If the user wants to control distant equipment by mobile telephone or touch
dial telephone, the user should connect FAB to AF-MUL, as shown in
figure 6.2. Because FAB has an RS block which can be driven by the
double-tone information. Signal (P0-P9), the user only needs to write the
program with an RS block in FAB and it will work.
For example, if you want to let the P3 button control the Q2 of FAB, the user
should write the following program into FAB beforehand. The AF-MUL
broadcasts firstly a prompt voice (that is the recorded ground message)
when the user dials the telephone number connected to an AF-MUL
����
������������������������������
�� RS Q
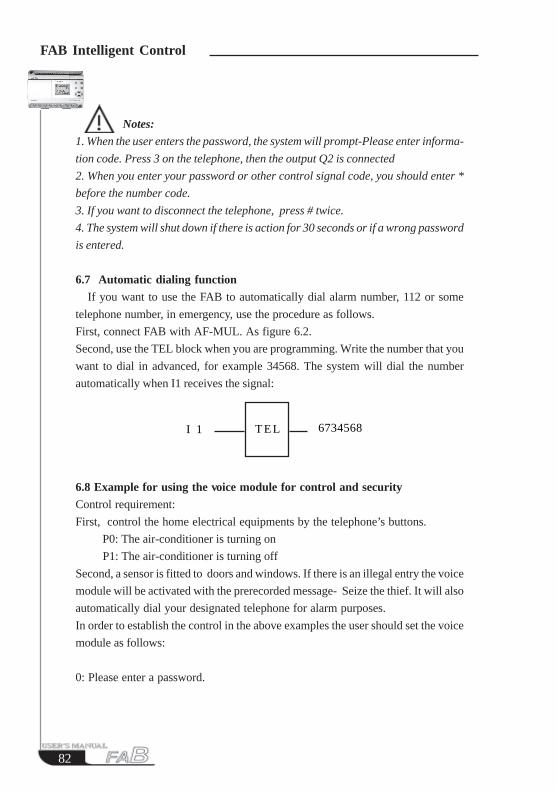
82
FAB Intelligent Control
Notes:
1. When the user enters the password, the system will prompt-Please enter informa-
tion code. Press 3 on the telephone, then the output Q2 is connected
2. When you enter your password or other control signal code, you should enter *
before the number code.
3. If you want to disconnect the telephone, press # twice.
4. The system will shut down if there is action for 30 seconds or if a wrong password
is entered.
6.7 Automatic dialing function If you want to use the FAB to automatically dial alarm number, 112 or some
telephone number, in emergency, use the procedure as follows.
First, connect FAB with AF-MUL. As figure 6.2.
Second, use the TEL block when you are programming. Write the number that you
want to dial in advanced, for example 34568. The system will dial the number
automatically when I1 receives the signal:
6.8 Example for using the voice module for control and securityControl requirement:
First, control the home electrical equipments by the telephone’s buttons.
P0: The air-conditioner is turning on
P1: The air-conditioner is turning off
Second, a sensor is fitted to doors and windows. If there is an illegal entry the voice
module will be activated with the prerecorded message- Seize the thief. It will also
automatically dial your designated telephone for alarm purposes.
In order to establish the control in the above examples the user should set the voice
module as follows:
0: Please enter a password.
6734568T E LI 1

83
������������ ��������
1: Correct password, please enter control information code.
2: Wrong password. Please enter again.
3. Emergency, please enter the password and control message.
4: Turn on the air-conditioning.
5: Turn off the air-conditioning.
The first step: refer to section 6.3, record the above six voice messages.
The second step: connect I0 with the doors and windows sensors.
The third step: edit program as follow.
The user will now have completed the connection and installation of FAB, AF-
MUL and ancillary parts. The voice recording and programming will also have been
completed.
When the user dials the number which the AF-MUL is programmed to connect to
the user will hear-Please enter password. The user should enter * and then the
correct password.
� ��
��
��
��
����
����
� ��
��
��
��
����
��
��
��
���
� �� ��
� ��
���
� ��
��
���
���
��
���
� ��
���
�� �
��
��
�������
��
����
� ��
��� �����
(the fourthsection voice)
(the fifthsection voice)

84
FAB Intelligent Control
Then the user will hear the prerecorded message-Please enter the control informa-
tion password, and should then enter * 0. The user will then hear- Turn on the air
conditioner. The air-conditioning will be simultaneously turned on. Similarly the
user could enter * 1. The user will then hear-Turn off the air conditioner. The air
conditioning will then be simultaneously turned off. Subject to the extent of the
programming if the user enters * 3 the user will hear-Turn on the hot water heater.
The hot water heater is simultaneously turned on. When the user enters * 4 the user
will hear-Turn off the hot water heater. The hot water heater is simultaneously
turned off. If switch I1 is activated, the prerecorded voice message-Seize the thief-
will be broadcast and the preset telephone number dialled for remote alarm.
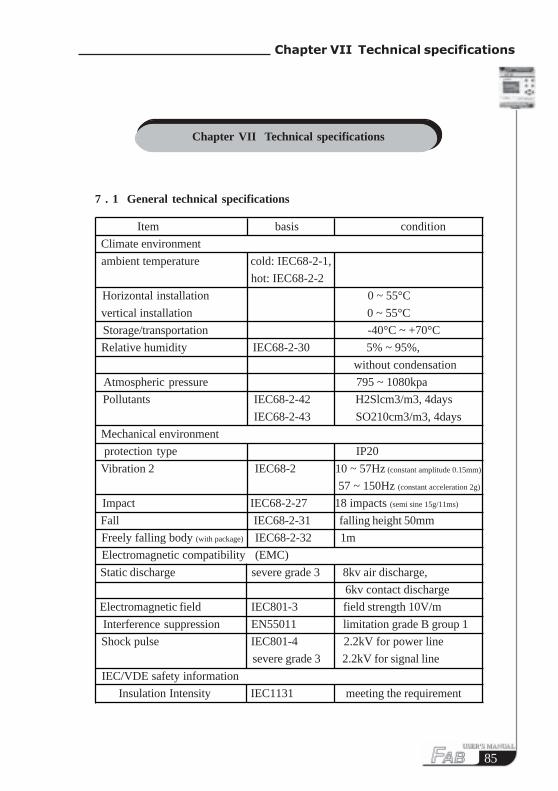
85
�������������� ����������������� �
Chapter VII Technical specifications
7 . 1 General technical specifications
Item basis condition
Climate environment
ambient temperature cold: IEC68-2-1,
hot: IEC68-2-2
Horizontal installation 0 ~ 55°C
vertical installation 0 ~ 55°C
Storage/transportation -40°C ~ +70°C
Relative humidity IEC68-2-30 5% ~ 95%,
without condensation
Atmospheric pressure 795 ~ 1080kpa
Pollutants IEC68-2-42 H2Slcm3/m3, 4days
IEC68-2-43 SO210cm3/m3, 4days
Mechanical environment
protection type IP20
Vibration 2 IEC68-2 10 ~ 57Hz (constant amplitude 0.15mm)
57 ~ 150Hz (constant acceleration 2g)
Impact IEC68-2-27 18 impacts (semi sine 15g/11ms)
Fall IEC68-2-31 falling height 50mm
Freely falling body (with package) IEC68-2-32 1m
Electromagnetic compatibility (EMC)
Static discharge severe grade 3 8kv air discharge,
6kv contact discharge
Electromagnetic field IEC801-3 field strength 10V/m
Interference suppression EN55011 limitation grade B group 1
Shock pulse IEC801-4 2.2kV for power line
severe grade 3 2.2kV for signal line
IEC/VDE safety information
Insulation Intensity IEC1131 meeting the requirement
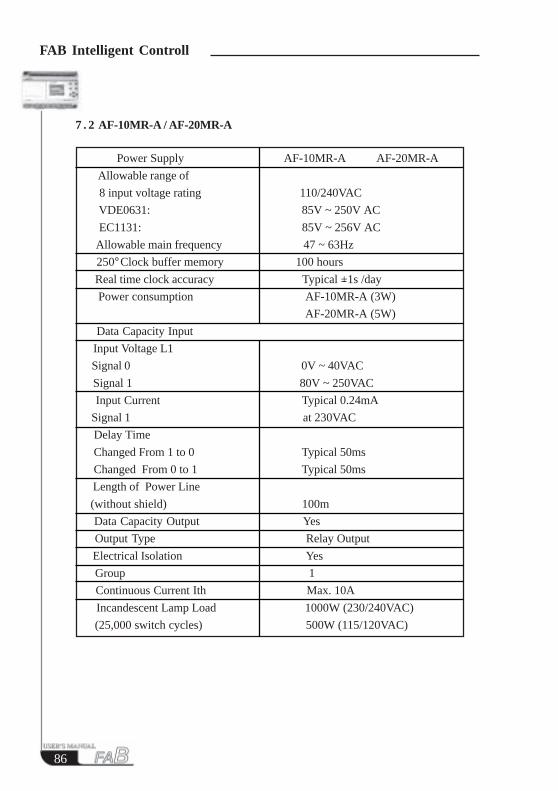
86
FAB Intelligent Controll
7 . 2 AF-10MR-A / AF-20MR-A
Power Supply AF-10MR-A AF-20MR-A
Allowable range of
8 input voltage rating 110/240VAC
VDE0631: 85V ~ 250V AC
EC1131: 85V ~ 256V AC
Allowable main frequency 47 ~ 63Hz
250°Clock buffer memory 100 hours
Real time clock accuracy Typical +1s /day
Power consumption AF-10MR-A (3W)
AF-20MR-A (5W)
Data Capacity Input
Input Voltage L1
Signal 0 0V ~ 40VAC
Signal 1 80V ~ 250VAC
Input Current Typical 0.24mA
Signal 1 at 230VAC
Delay Time
Changed From 1 to 0 Typical 50ms
Changed From 0 to 1 Typical 50ms
Length of Power Line
(without shield) 100m
Data Capacity Output Yes
Output Type Relay Output
Electrical Isolation Yes
Group 1
Continuous Current Ith Max. 10A
Incandescent Lamp Load 1000W (230/240VAC)
(25,000 switch cycles) 500W (115/120VAC)

87
�������������� ����������������� �
Fluorescent Light Tube With Electrical Controller 10 x 58W (230/240VAC)
(25,000 Switch Cycles)
Fluorescent Light Tube With Regular Compensation 1 x 58W (230/240VAC)
(25,000 Switch Cycles)
Fluorescent Light Tube Without Compensation 10 x 58W (230/240 VAC)
(25,000 Switch Cycles)
Short Circuit Protection cos 1 Power Supply Protection
B16 600A
Short Circuit Protection cos 0.5 ~ 0.7 Power Supply Protection
B16 900A
Output Relay Protection Max. 20A
Feature B16
Switch Frequency
Machine 10Hz
Resistor Load / Lamp Load 2Hz
Induced Load 0.5Hz
7 . 3 AF-10MT-D / AF-20MT-D
Power supply
Input Voltage 24VDC
Rating 20.4V ~ 28.8VDC
Allowable Range
24VDC Power Consumption (Output Full Load) Typical 1.23A
Digital value input Typical 0.6W
Data Capacity Input
Input Voltage (24VDC) 24VDC
Rating 24VDC
Signal 0 <5.0V DC
Signal 1 >15.0VDC

88
FAB Intelligent Controll
Input Current for Signal 1 Typical 3mA
Delay Time
Changed from 1 to 0 Typical 50ms
Changed from 0 to 1 Typical 50ms
Length of Power Line (Without Shield) 100m
Data Capacity Output
Output Type Crystal Tube Current Source
Output Voltage <=80VDC
Output Current Max. 0.3A
Short Circuit Protection and
Overload Protection Yes
Short Circuit Current Limit Approximately 1A
Rating Reduction Rating is Not Reduced in the
Whole Temperature Range
7 . 4 AF-10MR-D AF-20MR-D
Power Supply
Input Voltage
Rating 24V DC
Allowable Range 20.4 ~ 28.8VDC
Power Consumption of Typical 1.5W
AF-10MR-D / AF-20MR-D at 24VDC
Data Capacity Input
Input Voltage 24VDC
Rating 24VDC
Signal 0 <5.0V DC
Signal 1 >15.0V DC
Input Current for Signal 1 Typical 3mA
Delay Time Changing from 1 to 0 Typical 50ms
Changing from 0 to 1 Typical 50ms

89
�������������� ����������������� �
Length of power line (Without Shield) 100m
Data Capacity Output Digital Value Output
Output Type Relay Output
Electrical Isolation Yes
Group 1
Continuous Current Ith Max. 10A
Incandescent Lamp Load 1000W
(25,000 switch cycles)
Fluorescent Light Tube with Electrical Controller 10 x 58W
(25,000 switch cycles)
Fluorescent Light Tube with Regular 1 x 58W
Compensation(25,000 switch cycles)
Fluorescent Light Tube without 10 x 58W
Compensation(25,000 switch cycles)
Short Circuit Protection cos 1 Power Supply Protection
B16, 600A
Short Circuit Protection cos 0.5 ~ 0.7 Power Supply Protection
B16, 900A
Parallel connected Output for increased Power Not Allowed
Output Relay Protection Max. 20A Feature B16
Switch Frequency
Mechanical 10Hz
Resistor Load/Lamp Load 2Hz
Induced Load 0.5Hz
7 . 5 Telephone number receiving, transmitting and voice blocks
Index Conformity
Automatic Receive CCITT-DTMF
Automatic transmit CCITT-DTMF
Voice Record and Play Max. 98 segments,
Each with Arbitrary Time (4min, 8min)

90
FAB Intelligent Controll

91
�������������� ��� ��
Chapter VIII Application
FAB has a very wide application range. In order to let the user consider the
wide application potential for FAB and the convenience brought about by it’s
use, we will show some common and representative control schemes herein.
After the user has read these application examples it will be clear how simple it
is to use FAB to establish automatic control requirements, especially in a system
requiring time control and in the automatic control of intelligent living quarters
etc.
8 . 1 Bell control for schools, factories and the like
Control requirements:
Monday to Friday: 6:00:00 to 12:00:00 AM, the bell shall ring once every hour
for 10 seconds; 14:00:00 to 17:00:00 PM, the bell shall ring once every hour for
10 seconds.
Saturday and Sunday: 8:00:00 to 12:00:00 AM, the bell shall ring once every 2
hours for 10 seconds; 13:00:00 to 17:00:00 PM, the bell shall ring once every 2
hours for 10 seconds.
Action required:
to realize the above control, the control of 11 time intervals from Mon to Fri and
6 time intervals on Sat and Sun is necessary. In the relay control used in the past,
a lot of time-delayed relays are needed and the line connection is quite compli-
cated. Using FAB, all these will become very simple. Please refer to the function
diagram for realisation of the control, as shown in the following figure. There is
only one line section for its required external connection, which means that you
can realise the timing control of the school bell only by connecting one output of
FAB directly to the bell. The program diagram is as follows:

92
FAB Intelligent Control
B03
Q1
When FAB is used for the above control, it is very simple both in the
connection of the external line and in editing the program. When QUICK II
programming software is used for editing the control program, it is only
necessary to set two time switch blocks.
The set of FB is as follows:
M2
B01
B02X
M1
B01
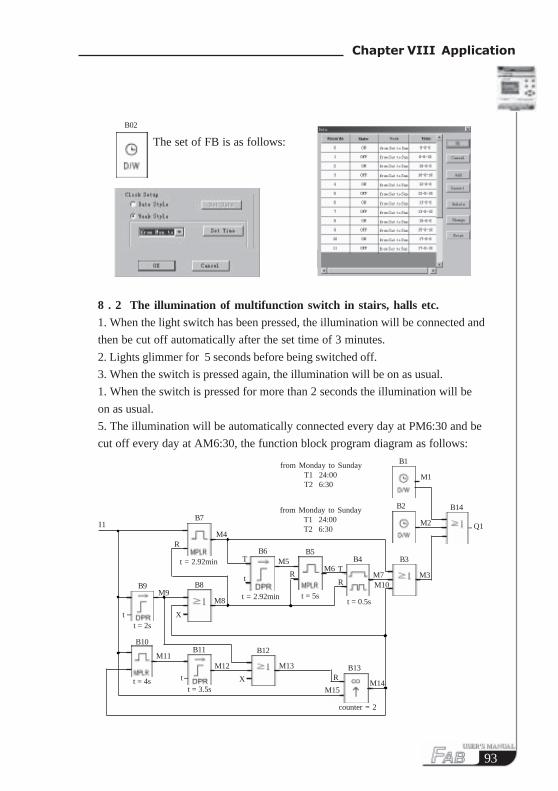
93
�������������� ��� ��
The set of FB is as follows:
8 . 2 The illumination of multifunction switch in stairs, halls etc.1. When the light switch has been pressed, the illumination will be connected and
then be cut off automatically after the set time of 3 minutes.
2. Lights glimmer for 5 seconds before being switched off.
3. When the switch is pressed again, the illumination will be on as usual.
1. When the switch is pressed for more than 2 seconds the illumination will be
on as usual.
5. The illumination will be automatically connected every day at PM6:30 and be
cut off every day at AM6:30, the function block program diagram as follows:
B02
t = 2.92min
B10
M11
X
B6M5T
t
M4I1
R
t = 2.92minM8
B8B9M9
t t = 2s
t = 4s
B11
M12
t X
B12
t = 3.5s
counter = 2
R
t = 5st = 0.5s
Q1
M1
B3
B2
B1from Monday to Sunday T1 24:00 T2 6:30
from Monday to Sunday T1 24:00 T2 6:30
M2
B14
M7
B4B5
TM6R
M13
M10
M15M14
R
B7
B13
M3

94
FAB Intelligent Control
8 . 3 Automatic gate control requirements: 1. Opening and closing of the gate shall be controlled by the guard in the control
room.
2. Normally the gate shall be opened or closed completely, but the opening and
closing action can be interrupted at any time.
3. The alarm lamp shall begin to flash when the gate acts and shall keep flashing
as long as the gate continues to move.
4. A pressure damper shall be provided so that the gate can be automatically
opened when it touches a person or an article.
The Function Block Program Diagram is as follows:
Note:
Q1 shall be connected to the flashing lamp;
Q2 the gate-open motor contactor;
Q3 to the gate-close motor contactor;
I1 to gate-open switch; I2 to the gate-open switch; I3 to the stop switch; I4 to the
gate-open limit switch; I5 to the gate-close limit switch; and I6 to the safety pres-
sure damper.
I5X
M6 M7
B1 B2
Q1
B3
Q3
Q2
I2
B6
B4
B7
B10
B9
B5
B8
t =0.5s t = 0.5s
I1I6
I6 I3
I3I4
M1 M2
M3
M5
M4
R MPLR
I1
I2
X
X
R
S
R
S
R
S
M8
B12
X
X
Q1
M9
B13
X
X
Q2
M10
B11
X
X
Q3

95
�������������� ��� ��
8 . 4 Ventilation systemRequirements: The ventilation system shall be able to send fresh air into theroom and to exhaust the waste gas out of the room;
1. Waste gas exhaust unit and fresh air forced-draft unit shall be installed in the
room.
2. The ventilation system shall be controlled by the control monitor.
3. No over atmospheric pressure is allowed in the room at any time.
4. The fresh air forced-draft unit can not be put into service until the flow
monitor indicates that the waste gas exhaust unit is in normal operation.
5. In case of any fault in the ventilation system, the alarm lamp shall be on.
The Function Block Program Diagram is as follows:
Note:
Q1 shall be connected to the contactor of waste gas exhaust unit;
Q2 to the contactor of the fresh air forced-draft unit;
Q3 to the fault alarm lamp;
I1 to the activate exhaust switch;
I2 to the stop exhaust switch;
I3 to the waste gas flow monitor;
I4 to the fresh air flow monitor.
XX
X
t = 0.5s
B1
Q1I3
B3
M1
B4
M1
X
M2 Q2X
X
B2
B5
B7
M5
X
M6
B8
B9 B6
Q3M7
M4
B10
B11
M8
X
M9
B12
B13
B14
t =2s
t =2s
t =2s
I1
I2
I3

96
FAB Intelligent Control
8 . 5 Control requirements for neon lamp control system:1. Display mode, for example: FAB series Welcomes You !
1 . 1 Displaying FAB
1 . 2 Displaying FAB SERIES
1 . 3 Displaying Welcomes You!”
1 . 4 Displaying FAB series Welcomes You
1 . 5 Displaying Welcomes You!
1 . 6 Displaying Fab series
1 . 7 Cycling 1.1 ~ 1.6
2. Control requirements
1) The neon lamp shall be automatically turned on at 18:00 and off at 24:00
every day.
2) The control can be switched over with the manual/automatic/off selection
switch.
Manual: The neon lamp control system can be activated through the manual
switch -at any time.
Automatic: The neon lamp control system can be automatically activated when
the clock switch or light sensitive switch triggers the output.
Off: The neon lamp system shall be switched off as the manual/automatic/off
selection switch is pressed twice and switched on as it is pressed for the third time.
3) The light sensitive switch shall be provided to complement the time switch
so that the lamp will be automatically turned on when the light is weak and off
when thelight is sufficient.
4) Rain detector: On a rainy day, the neon lamp system shall be automatically
switched off.
5) Over (under) voltage detector: The system will be automatically switched
off when the operating voltage of the neon lamp is too high or too low.
3. Input/output assignment
I1 rain detector.
I2 over (under) voltage detector.
I3 light sensitive switch.
I4 manual/ automatic/off selection switch.

97
�������������� ��� ��
Q1 to be connected to the enable terminal of segment;
Q2 to the enable terminal of Electronics segment;
Q3 to the enable terminal of Welcome You! segment.
Following is the Function Block Program Diagram:
M19
tt
M27M28
tM9
M13
B23B10B2
Q1
B33M26
t = 20sB32
M33
M21M30
M31
B11M3M18
M14
B14
M15
M10M20
I1I2
Monday to Sunday
18:00-24:00B16
I2
I1M4
B1
M4M12
B3B5
M5
M2M10
I9
t = 10sB24
t
M21M22
M33
t
t = 10sB28
M29
Q3
Q2
M27
M28
M30
B25B29
B26
B27
B37
B30
B31
B35
t = 20st = 30s
t = 30st = 10s
t = 10st = 50s
t = 1s
t = 10s
M21
t M33t
M23
M21
t M33t
M24
M21
t
M25
M33
t
M25
M32M31
Monday to Sunday
0:00-10:00B7
M8
B13
M1B6
M12I3
M4 M2
M12M11
B4
M19
B22
M20
M9
t
B20t = 1s
M16M17
M10M18
B18
M10
I4
B9Counter=1
B21t = 1sB15
M6
tM10M6
B36
M5
t
t = 1sB19
M17
Counter=2B8
M15
M6M13
M13
t
t = 1sB17
M15
B12
M28M27M29

98
FAB Intelligent Control
8 . 6 Illumination system for display windowsControl requirements:
1. Basic lighting for the display period:
a) Time:
Monday to Friday 8:00~22:00;
On Saturday 8:00~24:00;
On Sunday 9:00~20:00;
b) Automatic off: the basic lighting can be automatically turned off whilst
maintaining minimum illumination and display lighting.
2 . Additional requirements for night lighting :
a) Time:
Monday to Friday light sensitive switch is triggered at 22:00 ;
On Saturday light sensitive switch is triggered at 24:00;
On Sunday light sensitive switch is triggered at 20:00 ;
b) Light sensitive switch triggering/ automatic off: can automatically turn off
the minimum illumination and the display lamps when it is on and can also
automatically turn on the minimum illumination and display lighting when it is
off.
3. Minimum illumination and display lighting in non-display period:
a) The minimum illumination and the display lighting shall be maintained and
shall be automatically turned on when the shopping period ends and the basic
lighting and night lighting are turned off.
4. Test switch:
All lamp groups can be tested when the test switch is pressed.

99
�������������� ��� ��
Note:
I1 shall be connected to the light sensitive switch;
I2 to the auto/manual selection switch;
I3 to the test switch;
Q1 to the basic lighting in display period;
Q2 to the night additional lighting within display period;
Q3 to the minimum illumination maintaining during non-display period;
Q4 to the projection light for special commodities in non-display period.
8 . 7 Application of FAB in building management
Control requirements:
1. Automatic reading of various meters: the watt-hour meter, water meter and gas
meter can be read automatically;
Q1
Q2
Q3
Q4
B1
B2
B3
B4
B5
B6
B7
B8B9
B10
B11
B12
M1
M2
M3
M4
M6
M7
M9M8
I2
I2
I2
I1
I1
I3
I3
I3
X
X X
X
On Sunday
8:00-20:00On Saturday
8:00-24:00
Monday to Friday
8:00-22:00

100
FAB Intelligent Control
2 . Fire protection and anti burglar functions can be realized;
3 . Start and stop of relevant electrical appliances can be controlled.
FAB can flexibly satisfy the automatic building control requirements and can
realize central monitor and control in sephisticated intelligent living quarter.
1) FAB central control communication connection
2) Assignment of FAB input/output points.
I1 shall be connected to the temperature sensor and Q0 shall be connected to
the air conditioner so that the air conditioner is controlled by the temperature;
I2 shall be connected to the smoke and fire detector for alarm of fire;
I3 shall be connected to the gas delecting sensor,
A
B
AF-C485
Fabn
COMPUTER
AF-P485
}485Power Bus
}485Signal bus
AF-C485 AF-C485 AF-C485
Fab2 Fab3 Fab4
AF-C485
Fab1

101
�������������� ��� ��
Q1 shall be connected to the ventilation equipment and Q2 shall be connected to
the alarm so that the ventilation equipment is controlled by the air status;
I4 shall be connected to the door/window sensor activating the alarm
I5 shall be connected to the water meter, while I6 shall be connected to the
watthour meter.
8 . 8 Application of FAB in a voltage diode counting and packing assembly line
The PC Assembly Line Central Control System Diagram is as follows:
A
B
AF-C485
Fabn
COMPUTER
AF-P485
}485Power Bus
}485Signal bus
AF-C485 AF-C485 AF-C485
Fab2 Fab3 Fab4
AF-C485
Fab1
500v-Resisting
Assembly Line
80v-Resisting
Assembly Line
2000v-Resisting
Assembly Line
1500v-Resisting
Assembly Line
1000v-Resisting
Assembly Line

102
FAB Intelligent Control
Control requirements and configuration:
1. Control of 2000V withstand voltage counting flow line, to be completed byFAB1
1) I5 is used for counting the diodes entering the flow line (automatically givingthe sum of the diodes to be tested);
2) I6 is used for counting of diodes with 2000V withstand voltage;
3) Q1 is used for labeling of diodes with acceptable withstand voltage;
4) Q2 is used for enclosing of diodes already labeled;
5) If the counting value of I6 is multiples of 1000, Q3 will be switched on tostart the packing equipment;
6) Diodes that can not withstand 2000V voltage shall be transferred to 1500Vflow line.
2. Control shall be completed by FAB2 for 1500V withstand voltage flow line, byFAB3 for 1000V withstand voltage flow line, by FAB4 for 500V withstand voltageflow line and by FAB5 for 80V withstand voltage flow line. The control requirements and configuration are the same as mentioned above.
3. Monitoring of all FABis can be realized by installation of monitoring softwareFAB-SCADA on PC. Each FAB answers through bus 485 the instructions fromPC,including diode counting and input/output (I/O) status of FAB; PC will displayeachacquired FAB data on the screen and can provide data storage and inquiry func-tions, to allow prompt analysis of the counting of different withstand voltagediodes.
103
������������ �������������
Quality
Guarantee
Warranty
Period
Warranty
Range
The product has been strictly tested for quality before delivery
from our plant and it complies with (as appropriate) all product
requirements listed in this manual. When properly installed it will
work in accordance with its’ specifications.
This product is warranted against defects in material and manufac-
turing for a period of one year from the date of delivery.
During the warranty period, we shall be responsible for neces-
sary repairs or replacement, as long as the product is proven to be
inherently defective.
During the above mentioned Warranty Period, if the product is fails
to perform in accordance with its’ specifications and has not been
misused it shall be delivered to a service centre, which we
authorizes, for free repair. We reserves the right to repair or
replace the product in accordance with it’s discretion. In the event of
product replacement the buyer will be informed and shall be re-
sponsible for reloading software, unless agreed otherwise.
The buyer shall pay the shipping charge for delivery to the
service centre and the service centre will repair or replace
the product and deliver it to the buyer free of charge.
The above warranty does not include the following circumstances.
1. Improper installation testing or operation
2. Misuse
3. Damage caused by unauthorized dismantling of the product
4. Damage to consumable parts such as rubber cover, buttons,
batteries, relays etc.
Chapter VIIII Quality Guarantee

105
������������� ��������� ����
QuickII SOFTWARE
MANUAL

106
FAB Intelligent Controller
��� ��������������������������������
Quick II is a programming software for a FAB controller (FAB), it is required to
carry out programming and simulation on a computer. It can implement the
preparation of a control program (function diagram) for FAB. It can also simulate
the operation of the edited program and display the operation in a clear manner.
The latter feature enables the accuracy of the edited program to be confirmed.
QuickII can execute both short-distance and remote communication of FAB, and
write an edited program into the EEPROM of the FAB.

107
������������� ��������� ����
In order to obtain a quick and initial understanding of Quick II we will, from this
chapter forward, make a comprehensive introduction to Quick II with the help of
visual pictures.
1 . 1 Operating interfaceThe operating interface of Quick II is friendly and all of its operations can be
completed by clicking the mouse. By clicking Start>Programs>Quick II in the
Windows taskbar, you can enter the main interface of Quick II, as shown in Fig. 1.2
Fig. 1 . 1 Set up Quick II
�������������������� ��������� ����

108
FAB Intelligent Controller
Fig. 1 . 2 Main Interface of Quick II
For Quick II, the operating methods of pull-down Instruction Tools and Quick
icons are adopted. All function blocks are directly distributed in the window. Using
a mouse with Windows operation, you can perform; creating and editing, simula-
tion running and monitoring of a FAB program quickly.
1 . 2 Two types of editing windowsClick NEW, then set the controller type and simulation type depending on require-
ments. Select a file name for storing in the computer. Two cascaded editing win-
dows, the Logical Diagram Editing window and Field Simulation Graph Editing
window, will appear in the window. You may select either one for editing purposes.
1 . 2 . 1 FAB Logical Diagram Editing window FAB Logical Diagram Editing window is as shown in Fig. 1.3. In this editing
window, you can click the desired block in the block library on the left to draw the
Logical Function Diagram and set the block property. After the function diagram is
completed, simulation can be run in this window and the program can be down-
loaded to FAB.

109
������������� ��������� ����
Fig. 1 . 3 FAB Logical Diagram Editing window
1 . 2 . 2 Simulation windowQuick II has two types of simulation window, the Standard Simulation window
and the Simple Simulation window. The Standard Simulation (Graph editing) win-
dow is as shown in Fig.1.4. In this editing window, you can design the Field
Simulation Graph with Draw, using the built in drawing tools, on the top of the
editing window, based on the field device. The said Field Simulation Graph editing
window is used to conform with the Function Diagram. When the Function Dia-
gram and Field Simulation Graph are completed, you may activate simulation to
execute real-time simulation of the field devices on the controlled site. The Simple
simulation window is as shown in Fig.1.5, through which you can easily view the
result of FAB operation.

110
FAB Intelligent Controller
Fig. 1 . 5 Simple Simulation window
Fig. 1 . 4 Standard Simulation window
1 . 3 Main functions1 . 3 . 1 Editing function
The main function of Quick II is programming for FAB. By using the Logical
Function Editing window of Quick II, you can create and edit your desired FAB
programs using various function blocks of FAB and can also perform file opera-
tions such as save, print, etc.
111
������������� ��������� ����
1 . 3 . 2 Simulation operation function
After the program is edited, you can view the program operation result on the
computer and conveniently check if the said program meets your control require-
ments. Here Quick II provides you with a completely new off-line test function,
through which you can debug the program without installing the FAB on site. With
this function, many inconvenience of the site test can be avoided.
1 . 3 . 3 Real-time monitoringQuick II has a Real-Time Monitoring window. You can view the process of the
control system and the running conditions of all FABs and control remote FABs,
by connecting the FAB communication port to the computer you can view the
process of the control system.
1 . 3 . 4 Communication with FAB 1 . 3 . 4 . 1 Local FAB communication.Through use of an RS-232 communication port, communication between the FAB
and a computer can be realized, allowing for easily downloading programs from the
computer to FAB and uploading programs from FAB to the computer. Monitoring
of operation conditions and controlling of FAB can also be carried out.
1 . 3 . 4 . 2 Remote FAB communicationIn certain applications several sets of equipments may be located at disparate
distances and far from each other. When frequent or urgent modification are needed,
caused by unexpected events, during FAB operation, the problems can be easily
solved by just connecting FAB to the telephone line through a modem.

112
FAB Intelligent Controller
Chapter II Installation and uninstallation
2 . 1 Installation of Quick II
The installation of Quick II is very simple. A prompt dialogue box will appear
automatically and you will complete the installation smoothly on the computer
under its’ guidance. The main steps are as follows:
1. Insert the CD-ROM with Quick II into the CD Drive and Installation Guidance
will appear automatically. Select Install>Quick II. The dialogue box, as shown
in figure 2.1, will appear. Then wait for installation instructions.
Fig 2 . 1 Installation-Guidance window
2. Enter the Installation window of Quick II, as shown in the figure 2.2.
Fig 2 . 2 Installation-Introduction window

113
����������������� ����
������������������������ ������� �
If you click NEXT to enter the next step of installation, the User Name and
Computer Name will be displayed, as shown in Fig. 2.3, and you can modify them.
If you click CANCEL, the installation program will be terminated.
Fig 2 . 3 User Name Setting Window
3. Enter the Set Installation Path Setting dialogue Box, as shown in Fig.2.4. By
clicking BROWSE, you can modify the current installation path (the original
installation path is C:\ Program Files\Quick II) to your desired installation
path:
If you click NEXT, it will enter the next step of installation and enter the
Setup Type window for selecting installation type, as shown in Fig.2.5. Installa-
tion Type selecting window
If you click BACK, the previous installation window will appear, as shown in
Fig.2.3.
If you click CANCEL, the installation program will be terminated.

114
FAB Intelligent Controller
Fig 2 . 4 Installation Path Selection window4. Enter Setup Type window, as shown in Fig.2.5 and select your desired installa-
tion type.
If the Typical option is selected, the Quick II normal program will be installed.
If the Compact option is selected, the Quick II basic program will be installed.
If the Custom option is selected, the user will be allowed to select the Quick II
program components.
Fig 2 . 5 Installation Type Selection window
Note: Selection of Typical option is recommended.

115
����������������� ����
������������������������ ������� �
5. If the Custom option is selected, it will enter Select Components window, as
shown in Fig.2.6. Select and click the element you want to install, I will then
appear in the corresponding box and the said element is selected and after being
clicked again, it is cancelled (default of Quick II is to install all components when
setup is completed).
Click NEXT to enter the next step of installation and the Setup Program Set
Name dialogue box will appear, as shown in Fig.2.7.
Click BACK, the previous installation dialogue box will be displayed, as shown
in Fig.2.5.
Click CANCEL, the installation program will be terminated.
Fig 2 . 6 Installation Components Selection window
6. Set your desired program set name on the Set Up Program Set Name window as
shown in Fig.2.7 . When setup is completed:
Click NEXT, installation of the program components will start, as shown in
Fig.2.8.
Click BACK, the previous Selection window will be displayed to, as shown in
Fig.2.6.
Click CANCEL and the installation program will be terminated.

116
FAB Intelligent Controller
Fig 2 . 7 Program Folder Selection window
7. The installation program proceeds to the automated installation procedure.
Click CANCEL if you want to terminate now.
Fig 2 . 8 Quick II Installation window
8. When the automated installation process is completed, the Setup Finished Win-
dow appears, as shown in Fig.2.9. Click FINISH to complete the installation
process.
Fig 2 . 9 Setup Finished window

117
����������������� ����
������������������������ ������� �
2 . 2 UninstallationThere are two ways for the uninstallation of Quick II:
1. Remove from the program:
Under the Windows taskbar, click >start >program> and select the said
program folder.
Click UNINSTALL under the said program folder with the left mouse button, as
shown in Fig. 2.10;
When a Confirm Uninstall dialogue box appears, click Yes.
When a Remove Window, as shown in Fig. 2.11, appears, removal can be done.
Fig 2 . 10 Uninstall window
This uninstallation method is more convenient for the users.
2. Remove from the console:
2.l Under the Windows window, double click My Computer then open the
Control panel, select Add/Remove Program on the Console Component and the
Add/Remove Program dialogue box appears.

118
FAB Intelligent Controller
2.4 After selecting the Quick II program folder in the said dialogue
box, click Add/Remove Program and a dialogue box appears asking if you want to
remove the program. Click Yes and the Remove window, as shown in Fig.2.10,
appears.
2.5 Click OK to complete the removal and then close the Add/Remove Pro-
gram window.
Fig 2 . 1 1 Remove window of Quick II

119
���������������� � �������� �
������������������������������ ���������������
3 . 1 Function Instructions
When Quick II is used to edit FAB programs, some basic operations including files
management, opening and closing of the Tool Bar and Status Bar access to Help
information are completed by using pull-down menu under File, Controller, Com-
munication, View, Option and Help. The Instruction Function list of.
Quick II is characterized by its flexibility and variation according to the main
selection. It can be changed according to the current operation for convenience of
your specific operations.
3 . 1 . 1 File
The instruction is mainly used for file management, including creation, opening,
saving and printing of files.
Fig 3.1 File Instructions Menu
Chapter III Operation Instructions and Block Library
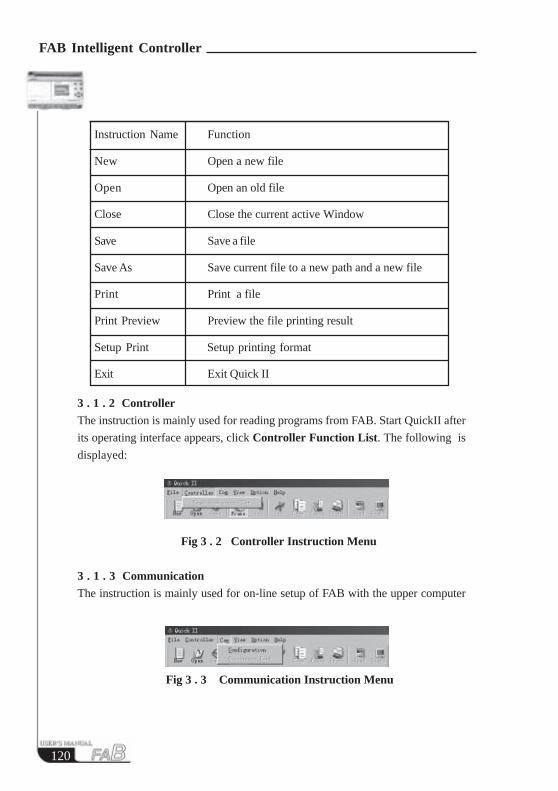
120
FAB Intelligent Controller
Instruction Name Function
New Open a new file
Open Open an old file
Close Close the current active Window
Save Save a file
Save As Save current file to a new path and a new file
Print Print a file
Print Preview Preview the file printing result
Setup Print Setup printing format
Exit Exit Quick II
3 . 1 . 2 ControllerThe instruction is mainly used for reading programs from FAB. Start QuickII after
its operating interface appears, click Controller Function List. The following is
displayed:
Fig 3 . 2 Controller Instruction Menu
3 . 1 . 3 CommunicationThe instruction is mainly used for on-line setup of FAB with the upper computer
Fig 3 . 3 Communication Instruction Menu

121
���������������� � �������� �
������������������������������ ���������������
l. Configure communication: selection of communication mode and setup of com-
munication port.
2. Stop communication: when it is not necessary for FAB to communicate with the
upper computer, click this option to stop communication.
3 . 1 . 4 Display
This instruction is mainly used for selection of the opening/closing of the Field
Simulation Graph window and Logical Diagram window as well as selection of
various Tool Bars.
Fig 3 . 4 Display Instruction Menu
Instruction name Function
Close Simulation View Close Field Simulation View window
Open Simulation View Open Field Simulation View window
Close Logical View Close Logical View window
Open Logical View Open Logical View window
Standard Tool Bar Select Standard Tool Bar
Controller Tool Bar Select Controller Tool Bar
Draw Tool Bar Select Simulation view Tool Bar
Accessories Tool Bar Select Block Library Tool Bar
Status Bar Select Status Bar
Size zoom: Zoom in or zoom out the window

122
FAB Intelligent Controller
3 . 1 . 5 Options:
Fig 3 . 5 Options Instruction Menu
3.1.6 Help:
Fig 3 . 6 Access Help for Instruction Menu
Instruction Function
Set Wire Colour Setup block on-line colour
Set Valid Regin Base ColourSetup Function Diagram
significant draw zone colour
Set Grid Colour Setup Function Diagram grid point colour
Setup Frame Windows BK-colour Setup Window background colour
Setup Line Mode Setup block on-line types
Change FAB Time Modify FAB time
Change FAB Address Setup FAB address
Setup Password Setup programming
Get FAB Address Get FAB Address
Set Toolbar Mode Set Toolbar Mode
Modify Output Status Modify Output Status

123
���������������� � �������� �
������������������������������ ���������������
Contents: Contents and details of help.
Search by subjects: Index of keywords.
Use help: Instructions to help functions.
About Quick II: Brief introduction to FAB.
3 . 1 . 7 Edit
Fig 3 . 7 Edit Instruction Menu
Undo: Undo the previous step operation and support consecutive operations.
Redo: Recover the contents undone by the previous step of operation and
support consecutive operations.
Cut: Cut the contents in the area highlighted with the cursor.
Copy: Copy the contents highlighted with the cursor.
Paste: Paste the contents cut or copied.
Delete: Delete various graphic components.
Select all: Select all the contents in the current window editing box and setup the
label.

124
FAB Intelligent Controller
3 . 1 . 8 SearchThis instruction is mainly used for finding blocks in the function diagram that meet
certain conditions.
Fig 3 . 8 Search Instruction Menu
Search by Label: find according to the comments for the blocks.
Search by Signal No: find according to the block number.
3 . 1 . 9 Image Library
This function is mainly used for providing various types of icons for you to plot
the Field Simulation Graph.
Fig 3 . 9 Image Library Instruction Menu
Liquid: storage Tank Icon.
Pointer: indicator Icon.
Flash Text: flashing Text Icon.
Flash line: streamline Icon.
Curve: curve Icon.

125
���������������� � �������� �
������������������������������ ���������������
3 . 1 . 10 FAB operation
Fig 3 . 10 Operation Instruction Menu
Instruction name Function
PC FAB write the program edited on the computer to FAB
FAB PC read the program existing in FAB to the computer
Diagnosis of FAB detect the status of FAB
Simulation simulate FAB run
Drive FAB start/stop FAB
Read FAB Parameters upload FAB parameters
Write FAB Parameters download FAB parameters
3 . 1 . 11 Windows
This instruction is mainly used for the arranging of multiple opening windows.
When more than two windows are opened, they can be arranged with this instruc-
tion;
Fig 3 . 11 Windows Instruction Menu

126
FAB Intelligent Controller
Cascade: Cascade sub-lists.
Tile: Display sub-lists in parallel.
Arrange: Arrange the sub-lists in the form of icons.
3 . 2 Tool Bar
After the Tool Bar is activated, the icon buttons of the Tool Bar will appear in
the Edit window. You can use these icons directly without trying to locate them
in the Function List. Tool Bar will let you complete your editing and drawing
work faster and better.
3 . 2 . 1 Standard Tool Bar
New Copy
Open Paste
Save Print
Read Program from FAB Block Link
Block Library Display Start Simulation
Cut X X
Standard
Tool Bar

127
���������������� � �������� �
������������������������������ ���������������
3 . 2 . 2 Control Tool Bar
3 . 2 . 3 Draw Tool Bar for Field Simulation GraphBy means of this Draw Bar, you can plot your system control site flow chart
according to your actual control requirements and then you can view the operation
conditions of all of the FABs during the said control process via communication
with the FABs.
Control
Tool Bar
Write Program to FAB
Stop running FAB
Diagnose FAB System
Information.
Run FAB
Monitor FAB
running status
Standard
Tool Bar
Cancel Selection
Draw Straight Line
Draw Square
Draw Round Corner Square
Draw Circle
Draw Arbitrary Graph
Input Text
Insert Picture
Insert Animation
Draw Bend

128
FAB Intelligent Controller
3.3 Block Library
Fig 3 . 12 Block Library
Separating various kinds of blocks: LOG represents logical blocks, which will be
displayed when the button is clicked with the mouse. FUN represents the special
function blocks, which will be displayed when the button is clicked. IN represents
the input blocks, which will be displayed when the button is clicked. OUT repre-
sents the output blocks, which will be displayed when the button is clicked. Please
refer to Chapter IV for details of different blocks.
3 . 3 . 1 Block Library Operation1. Click LOG, FUN, IN, OUT used for selecting block types under the Block
Library , and corresponding blocks will be displayed in the Block Library Frame.
2. Move the cursor to the desired block and select it by clicking on it.
3. Click the corresponding editing function block in the Edit window and the
selected block will be placed in the Logical Function Diagram.

129
���������������� � �������� �
������������������������������ ���������������
3 . 3 . 2 Block classificationThe blocks are classified into four types: Logical Block, Function Block, Input
Block and Output Block. The Input and Output blocks are only used to graphically
represent the input and output ends of FAB, without any actual functions. The key
parts are the Logical Block and Function Block, the combination of which realizes
several types of FAB control.
3 . 3 . 3 Setup of block property
It is necessary to setup the properties of the blocks in the plotting of logical
diagrams. The block properties are divided into General property and Special
property.
3 . 3 . 3 . 1 General Property
Fig 3 . 13 Setup of General property
The settings of General property mainly include:
l. Comment: for filling of a comment string, no more than 20 characters.
2. Middle Relay: for setting of the Intermediate Relay connected with the current
block. If the Intermediate Relay is set up, the other blocks can no longer use this
Intermediate Relay, which means that usage of a middle Relay is unique. The
parameter values of the middle Relay range from 0 ~ 126, totally amounting to
127.

130
FAB Intelligent Controller
3. Special Input: X represents empty, HI represents high potential and LO
represents low potential. When the input is X, this terminal allows connection
with a lead from another block. When the input is HI, no lead from any other block
can be connected to this terminal and its status is always at high level. When the
input is LO, this terminal allows connection with no lead from any other block and
its status is always at low level.
3 . 3 . 3 . 2 Setup of Special Properties
Among the blocks of FAB, there are some special blocks that have special proper-
ties, including RS Relay Block, D/W Clock Switch, TEL Block, Broadcasting Play
Block and Voice Recording Block. Setup of the properties of different special
blocks is described as follows respectively.
1. Blocks with timers
All of the blocks with timers, such as MPLR, DPR, DDR, CPG, RPR and so on,
have timing function. Their Block properties Setup dialogue box is as shown in
Fig.3.14:
Fig 3.14 Setting properties for blocks with Timers
Time type: Three units, namely second, minute and hour, are available for selec-
tion;
Input time: Input the value for timing, and the time can be accurate to 0.01 second.
The properties of General Blocks shall be referred to for other settings.

131
���������������� � �������� �
������������������������������ ���������������
2. Blocks with counters
Blocks with counters include UCN and DCN, whose Properties Setup dialogue
box is as shown in Fig. 3.15:
Fig. 3 . 15 Setting Properties for Blocks with CountersNumber of counts: setup of the number of the counters, in the range of 1-999,999.
The properties of General Blocks shall be referred to for other settings.
3. Properties of RS relay
The dialogue box of RS relay properties setting is as shown in fig. 3.16.
Fig. 3.16 Setting Properties for RS Relay
Special input: Please refer to general properties for X, HI and LO. P0 ~ P9 indicate
the tone dial impulse input of 0 ~ 9 digit buttons on the telephone set.
Please refer to general properties for other settings.

132
FAB Intelligent Controller
4. Property of TEL Block
The dialogue box is as shown in Fig. 3.17:
Phone code: Telephone number used for dial-up is keyed in here. The *, # functions
of the telephone are not supported. The length of the telephone number shall not
be greater than 25 digits. Please refer to general properties for other settings.
Fig 3 . 17 Setting TEL Block Property
5. Properties of CW Clock Switch Block
The Setup dialogue box is as shown in Fig.3.18.
Clock setup: In this setting, the status of output can be regularly changed. Two
options, Date style and Week style, are provided to meet the particular
requirements of users.
Fig 3 . 18 Setting CW Clock Switch Block Properties

133
���������������� � �������� �
������������������������������ ���������������
If Week Style is selected , and Set Time is clicked, the frame of setting time will be
on and you can set up to 127 intervals for the time switch. Please note that you should
set the time according to a time sequence. You can set a time point for CW block in
QuickII very easily. Please see the following figure 3.
In Fig. 3.19, there are some items such as Number, Start Week Time.
Fig. 3 . 19 Setting Clock Mode
Time setting operations
Add: When you need to add a time, click ADD and a dialogue box will appear,
as shown in Fig.3.20. Select the switch state ON/OFF and set the switch
time. Then click OK and a time record is added.
Note: They must be set in a time sequence.
Insert: When you need to insert a time in the existing time setting combination, please
click INSERT and a dialogue box will appear, as shown in Fig.3.20. Select the
switch status ON/OFF and set the switch time. Then click OK and a time record
is inserted.

134
FAB Intelligent Controller
Fig. 3 . 20 Setting Time
Delete: When you want to delete a time, put the cursor on the said time record and
click CANCEL. When the Confirm Cancel frame appears, click OK to cancel the
said time record.
Modify: When you want to modify a time, put the cursor on the said time record
and click MODIFY. As a time setting frame, similar to that shown in Fig.3.20 appears,
reset the time, click OK and the said time record is modified.
Print: When you want to print your set time on paper then click PRINT.
If DATE STYLE is selected, click SETUP DATE. As the Setup Date frame
appears, the date and time can be set, as shown in Fig. 3.21.
Fig. 3 . 21 Setting Block Property for CW Clock

135
���������������� � �������� �
������������������������������ ���������������
You can key in a new time or make changes through the keyboard in this box.
Number, State, Date and Time item are set in the Setup Time box shown in Fig.
3.21.
The time setting operations are as follows:
Add: When you need to add a time, please click ADD and a dialogue box will appear, as
shown in Fig. 3.21. Select the switch state ON/OFF and set the date and time of switch.
Then click OK and a time record is added.
Fig 3.22 Add A Time Record
It should be pointed out that Quick II provides you with the best date setting
method. You will have a permanent calendar chart appear, as shown in Fig. 3.22,
only by clicking once the Page Down arrow on the right of the Date box. You
may select whatever date you want to set on this permanent calendar and click
OK to complete setting of the date. Therefore FAB can realize real-time control
without any limitation.
Insert: When you need to insert a time in the existing time setup combination
please put the cursor on the said time, click INSERT and a dialogue box will
appear, as shown in Fig. 3.21. Select the switch status ON/OFF and set the
time and date of switch. Then click OK to finish the setup.
Delete: When you want to cancel a time, put the cursor on the said time record
and click CANCEL. As the Confirm Cancel frame appears,

136
FAB Intelligent Controller
Click OK to delete the time record.
Modify: When you want to modify a time, put the cursor on the said time record
and click MODIFY. As a time setting frame, similar to that shown in
Fig. 3.22, appears, reset the state, date and time, then click OK and the said time
record is modified.
Print: When you want to print your set time on paper, what you need to do is
simply click PRINT.
Notes:
(1) The time is arranged in an order from earlier to later and the time sequence
shall be considered for adding or modifying any time record, for example: AM
9:00, AM 11:00, PM 3:00, PM 6:00, etc.
(2) In the case of multiple records, the said block will be divided into multiple
blocks when it is written to FAB and you can view the number of blocks used by the
current program in the State Bar of the Function Graph Edit Window.
(3) If the first time is set ON and the second time is set OFF , the two times share
one common block, if two consecutive times are both set to ON or OFF, each of
them should occupy a separate block.
6. Properties of Voice broadcasting and Recording Blocks
The Setup Properties dialogue box of Voice Broadcasting Block and Voice Record
Block is as shown in Fig. 3.21. Setting Output: Set the ports for voice broadcasting
and recording. The port here is a memory space oriented at voice storage. There
1 ~ 98 such ports in total. In addition, there is a No. 99 port (for record block),
whose function is to clear all of the voice contents in No. 0 ~ 98 ports, so please be
careful when using it.
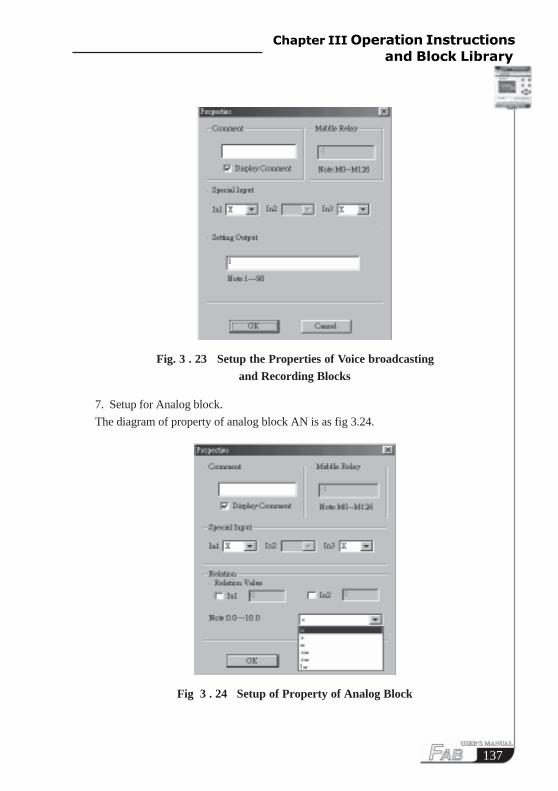
137
���������������� � �������� �
������������������������������ ���������������
Fig. 3 . 23 Setup the Properties of Voice broadcasting and Recording Blocks
7. Setup for Analog block.
The diagram of property of analog block AN is as fig 3.24.
Fig 3 . 24 Setup of Property of Analog Block
138
FAB Intelligent Controller
The explanation of option listed in Fig 3.24 is as follows:
(1) comment: Users can add letters of explanation in this bar.
(2) Special input: HI, LO ,X, LM.
If X has been selected, this said port can be connected to Input port.
If LM has been selected, it means that this said port can be set to a fixed digital
value. Please refer to (3) to know how to set the value.
(3) Relation Value
The range of LM is 0.0~10.0.
(4) Relation
It provides <,>,=,>=,<=,= 6 options. And this comparison block is for the
comparison between input 1 and input 3.
For example.
When < has been selected,
if input 1<input 3, then Q=1. if input 1>input3, then Q=0.

139
������������ �������� ���
Chapter IV Basic operations
This chapter introduces to you how to use Quick II to edit the Logical Function
Diagram Program and draw the Field Environment Control Diagram, how to use it
to simulate operation of the edited program and how to make the computer commu-
nicate with FAB so as to complete the writing of the program to FAB.
If you want to make a Function Diagram Program, you should first open a new
empty file and put all the blocks required for satisfying the control requirements
into the Edit Box. Then set the properties of different function blocks and link them
up with lines according to their logical control relations, thus completing a Logical
Function Diagram. Moreover, in order to help the user to find out if the edited
function diagram can achieve the expected control effects, Quick II provides the
user with a direct simulation function. You can run the simulation function either
directly on the Function Diagram or on the Field Simulation Graph. In both cases,
the detailed result of FAB running in accordance with the program can be observed,
in the following, we will introduce QuickII with an example.
Example: using FAB to compose a multifunction switch for a staircase lighting
system.
Control requirements:
1. Lighting is turned on upon pressing of the switch and automatically
turned off after one minute.
2. Lighting flashes 5 seconds before automatically turning off.
3. Lighting is turned on upon twice pressing of the switch and maintained
constantly on.
4. Lighting is turned off when the switch is pressed for 2 seconds and more.
5. Lighting is automatically turned on at 18:30 and off at 06:30 every day.

140
FAB Intelligent Controller
4 . 1 Open File
4 . 1 . 1 Open a new fileOperating method
1. To open a new file, click NEW option under the Function List file or the icon
in the Tool Bar, as shown in Fig. 4.1.
Fig. 4 . 1. Open a new file
2. Now a dialogue box will appear, as shown in Fig. 4.2:
Fig. 4 . 2. Options box for controller type
In the above figure, controller type options are provided in the left box and you can
select your desired FAB type by clicking on it.
c.6 input 4 output: FAB with 6 input and 4 output
d.12 input 8 output: FAB with 12 input and 8 output
In the above figure, Simulation type options are provided in the right box and you
can select your desired simulation type and click on it.
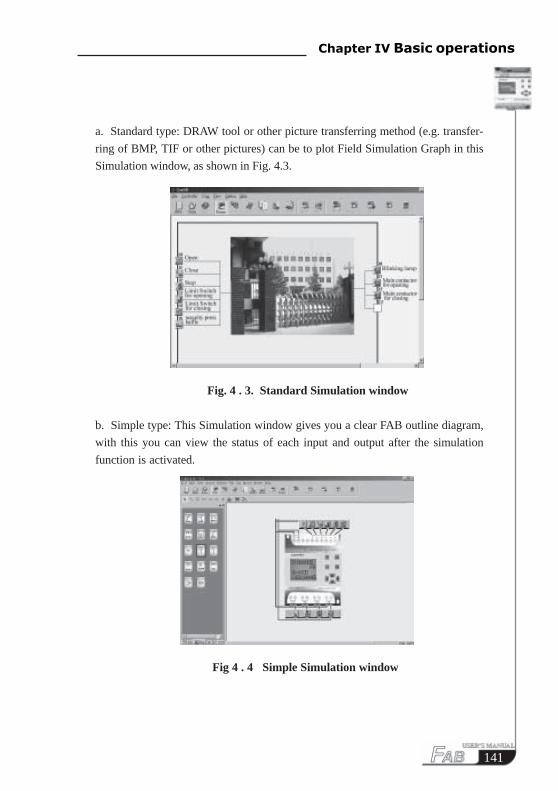
141
������������ �������� ���
a. Standard type: DRAW tool or other picture transferring method (e.g. transfer-
ring of BMP, TIF or other pictures) can be to plot Field Simulation Graph in this
Simulation window, as shown in Fig. 4.3.
Fig. 4 . 3. Standard Simulation window
b. Simple type: This Simulation window gives you a clear FAB outline diagram,
with this you can view the status of each input and output after the simulation
function is activated.
Fig 4 . 4 Simple Simulation window

142
FAB Intelligent Controller
3.(1). When the controller type and emulation type are selected, click OKto open a new group of Function Diagram
Editing window and Control Field Simulation Graph Editing window, as
shown in Fig.4.5.
Fig. 4 . 5. Editing Window for new file
4 . 1 . 2 Open an existing file
Operating methods:
1. To open a file, click the OPEN option under the Function List or the icon on
the Tool Bar with the left mouse button, as shown in Fig. 4.6.
Fig. 4 . 6 open an existing file
2. Click to open the dialogue box, as shown in Fig 4.7

143
������������ �������� ���
Fig. 4 . 7 Open an existing field dialogue box
3. Click the file to be opened and then the click OPEN and the file opens. You can
execute modification, print or other operations of the file.
4 . 2 Edit Function Diagram Program
4 . 2 . 1 Place blocks
Fig. 4 . 8 Place blocks
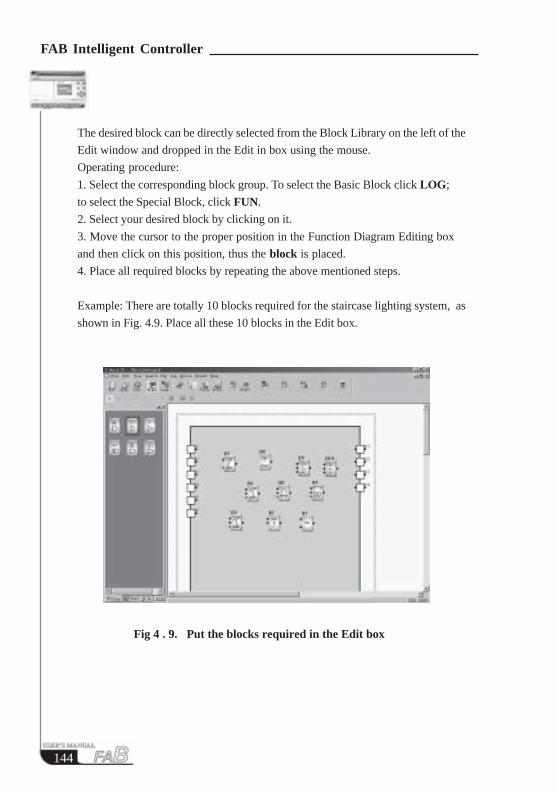
144
FAB Intelligent Controller
The desired block can be directly selected from the Block Library on the left of the
Edit window and dropped in the Edit in box using the mouse.
Operating procedure:
1. Select the corresponding block group. To select the Basic Block click LOG;
to select the Special Block, click FUN.
2. Select your desired block by clicking on it.
3. Move the cursor to the proper position in the Function Diagram Editing box
and then click on this position, thus the block is placed.
4. Place all required blocks by repeating the above mentioned steps.
Example: There are totally 10 blocks required for the staircase lighting system, as
shown in Fig. 4.9. Place all these 10 blocks in the Edit box.
Fig 4 . 9. Put the blocks required in the Edit box
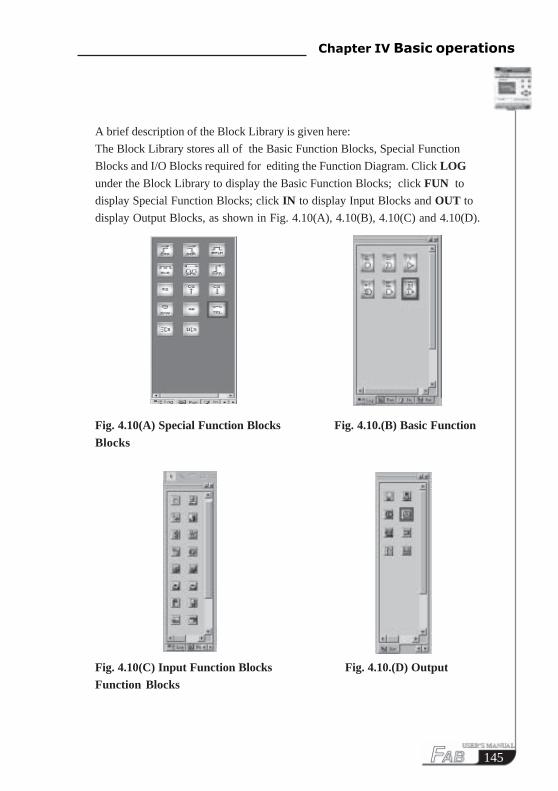
145
������������ �������� ���
A brief description of the Block Library is given here:
The Block Library stores all of the Basic Function Blocks, Special Function
Blocks and I/O Blocks required for editing the Function Diagram. Click LOG
under the Block Library to display the Basic Function Blocks; click FUN to
display Special Function Blocks; click IN to display Input Blocks and OUT to
display Output Blocks, as shown in Fig. 4.10(A), 4.10(B), 4.10(C) and 4.10(D).
Fig. 4.10(A) Special Function Blocks Fig. 4.10.(B) Basic Function
Blocks
Fig. 4.10(C) Input Function Blocks Fig. 4.10.(D) OutputFunction Blocks

146
FAB Intelligent Controller
The graphs in the In Library and Out Library are only for you to select the input
and output devices corresponding to the actual equipment, as shown in Fig. 4.8, so
that the simulation run will have a more straight forward feeling, without any actual
logical operation function.
Fig 4 . 11. Usage of Input and Output Function Blocks
Note: The graphs in the In Library can only be placed in the Input Ports but not in
the Output Ports; and vice versa, the graphs in the Out Library cannot be place in
the Input Ports.
4 . 2 . 2 Edit block properties:
Different blocks have different properties, which may be set according to the
control requirements.
Operating methods:
1. Select a function block in the Function Diagram Editing box and click on it. An
Edit Function List appears, as shown in Fig. 4.12. Then select Properties in the
function list. Or you may double click the said function block directly.

147
������������ �������� ���
Fig. 4 . 12. Operation Menu of Blocks
2. A Setup Properties dialogue box appears, as shown in Fig. 4.13. Set the at-
tributes according to your requirements.
Fig. 4 . 13 Dialogue box for setting block attributes
Comment: for filling in Comment String, no more than 20 characters.
Middle Relay: for setting the Middle Relay connected with the current block (the
value range of the Middle Relay is 0 ~ 126).
Special Input: special input, in which X is empty, HI is high proportion and Lo is
low proportion.

148
FAB Intelligent Controller
3. Click OK to complete the setup.
4. Set the properties of all blocks by repeating the above operating steps.
Note: Different blocks have different properties setup, especially the Special Func-
tion blocks. Please refer to Chapter III, Section 3.4 for details.
4 . 2 . 3 Link: After the blocks required for plotting the whole Function Diagram are placed
and their properties are setup, it is necessary to establish links according to the
logical control relations so as to make a complete function diagram. This software
provides two link modes, i.e. automatic link and manual link.
Operating method
1. Click the Set line mode option under the Option Function List with the left
mouse button and then click the Auto or Manual in the sub-option, as shown in
Fig. 4.14. The default mode is automatic link mode.
Fig. 4 . 14 Select the link mode
2. After the link mode is set up, click the icon and the cursor changes to the
shape of a pen, i.e. into the link status.
3 a. With automatic link selected in the first step, as the cursor is moved to the I/
O ports of the blocks, its shape will change into a +, indicating that an end pointcan be determined through clicking the mouse. Now click the output ports (orinput ports) of a block, requiring a link, then move to the input ports (or output
ports) of the next block and click, thus the link is automatically established by the
system.

149
������������ �������� ���
When the shape of the mouse cursor changes into +, click on it. This method is
suitable for the case in which the program is simple and the number of blocks is
small.
Fig 4 . 15 Link the line between blocks
3 b. Whether you select the manual link or automatic link in the first step, you
can link the line as follows. Move the cursor to the start point of the connect
line (it means that any input or output of a block), its shape will change into a +
click and move the cursor to another point, and click again. At the ends of the
lines, there will appear mark numbers, such as L5, L6 and so on, as shown in Fig
4.16.
Fig 4 . 16

150
FAB Intelligent Controller
The operation is as follows:
Move the cursor to the mark number which needs change, click on it, Fig 4.17
will be shown. Select the change the line number, then Fig 4.18 will be shown. And
you can modify the mark number in Fig 4.18.
Fig 4 . 17 Change line No
Fig 4 . 18 Modify number
3 c. If the manual link is selected in the first step, click the output port of the
former block, moving the mouse cursor according to your desired path, click at
turning, thus forming a turning point, and go on moving the mouse cursor to the
input port of the next block. And the link line can be set in the similar way.
4. Click again and the link state will be cancelled.
151
������������ �������� ���
4 . 2 . 4 Move the link or block: In case that there are a lot of links and blocks in your Function Diagram the
diagram may be difficult to read due to so many crisscrossing lines, you can move
some of the links or blocks to make the diagram tidy and easier to read.
Operating method:
1. Click the link or block to be moved and it will turn to a red colour.
2. Put the cursor on the link or block to be moved and drag it to the proper
position.
3. Click again to complete the move.
4. Move all of the links and blocks that need to be moved with the same method
to make the whole function diagram tidy and clear.
4 . 2 . 5 Delete block or linkWhen you want to delete unnecessary blocks or wrong links, the
operation steps are as follows:
1. Select the link or block to be deleted.
2. Press the Delete key on the keyboard, or click the right mouse button and
select the Delete option, thus the link or block is deleted.
4 . 2 . 6 Simulation operationQuick II has an Simulation Run Function in addition to the editing of function
diagram. When programming is completed, the Simulation Run Function may be
activated for checking if the program meets your control requirements.
The operating method is as follows:
1. To activate simulation, Click the Simulation option under Instruction FAB
Operation Menu and then click Start, as shown in Fig. 4.19, or directly click the
icon in the Tool Bar. Now you can see the result of program running through the
input and output status in the frame, as shown in Fig. 4.20.

152
FAB Intelligent Controller
Fig. 4 . 19. Start the Simulation Instruction
2. Please observe that your programs are running properly.
3. Click again to terminate the simulation function.
Fig. 4 . 20. The Simulation operation of FAB Program
In the above Simulation Graph, you can see the ON or OFF status of all inputs and
outputs, as well as the input status and the current status of timing and counting of
all blocks. So you can easily judge through this Simulation Function if the edited
program meets the control requirements.
4.2.7 Save and printOperating methods for files saving:
1. To save a program, click Save or Save as under the Function List with the left
mouse button, as shown in Fig. 4.21, or click the icon on the Tool Bar;

153
������������ �������� ���
2. The next dialogue box appears, as shown in Fig. 4.22, in which you can set the
path and file name for save;
3. Click Save or Save as and save is completed.
Fig. 4 . 21. Save file
Fig. 4 . 22 Save the dialogue box
Operating methods for printing files:
1. Click the Print option under the File Menu.
2. A dialogue box appears, as shown in Fig. 4.23. Set your print requirements
according to the prompt given on the frame.
3. Click OK.
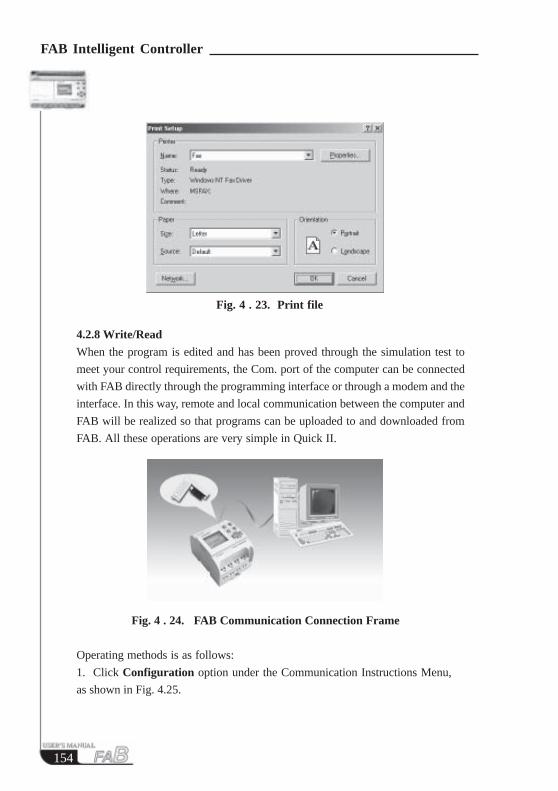
154
FAB Intelligent Controller
Fig. 4 . 23. Print file
4.2.8 Write/Read
When the program is edited and has been proved through the simulation test to
meet your control requirements, the Com. port of the computer can be connected
with FAB directly through the programming interface or through a modem and the
interface. In this way, remote and local communication between the computer and
FAB will be realized so that programs can be uploaded to and downloaded from
FAB. All these operations are very simple in Quick II.
Fig. 4 . 24. FAB Communication Connection Frame
Operating methods is as follows:
1. Click Configuration option under the Communication Instructions Menu,
as shown in Fig. 4.25.

155
������������ �������� ���
Fig. 4.2: Communication Configuration
2. A dialogue box appears, as shown in Fig. 4.26.
Fig. 4 . 26. Communication Configuration
3. Fill in the FAB address.
4. Setup the connection mode:
1) For download, select modem mode by clicking on Modem.
(Note: the modem here is the modem already installed in your Windows) and
select the telephone number for dial-up.
2) For local writing, select Serial Port and then the Serial Port selection by
clicking on it to prepare the com port.
3) Click OK to complete the setup.
4) If the communication link is still not established, a Prompt window will pop up
for you to reselect another modem or communication port

156
FAB Intelligent Controller
5. Write/Read
1) Click PC FAB or the FAB PC option under the FAB Operation Menu, as shown
in Fig. 4.27. A Confirm Password window will appear, as shown in Fig. 4.28.
Fig 4 . 27 Write/Read
Fig. 4 . 28. Password Confirm
Notes:
1. The communication setup must be completed before communication can be estab-
lished between the computer and FAB so as to complete the upload/download of the
program.
2. During download from computer to FAB, if Run After Write At Once is selected,
FAB will run the program,, after download, at once. If the option of not running at
once is selected, or when the power supply to hardware is lost and then reconnected,
click RUN under FAB, and FAB will start the program execution.

157
������������ �������� ���
4.3 Plot Field Simulation GraphWhen the Standard Simulation Edit Window of Quick II is in activated status, you
can directly draw in the Edit box using the icons in the Draw Bar or insert BMP or
animation Picture using BMP or Animation in the Tool Bar. This makes Quick II
more convenient for you and you can easily draw a desired Field Simulation Graph
with it. If the Draw Bar is not displayed, it can be selected from the Instructions
Function List.
Fig 4 . 29 Draw Bar in Simulation Frame
4.3.1 Plot with Draw Icons:Operating method:
1. Click the Draw icon corresponding to the field environment in the Draw Bar:
2. Move the cursor into the Editing box, hold the left mouse button down and
drag the mouse to make the graph in the desired nature and size;
3. Click to fix the graph;
4. If it is necessary to move a graph or change its shape and size, select the
graph to be changed and drag the mouse cursor to move the graph or click the
boundary of the graph to zoom it.
straight line icon square icon
circle icon polygon icon
bend icon draw icon
rounded corner
square icon
The icons may be
added with comments
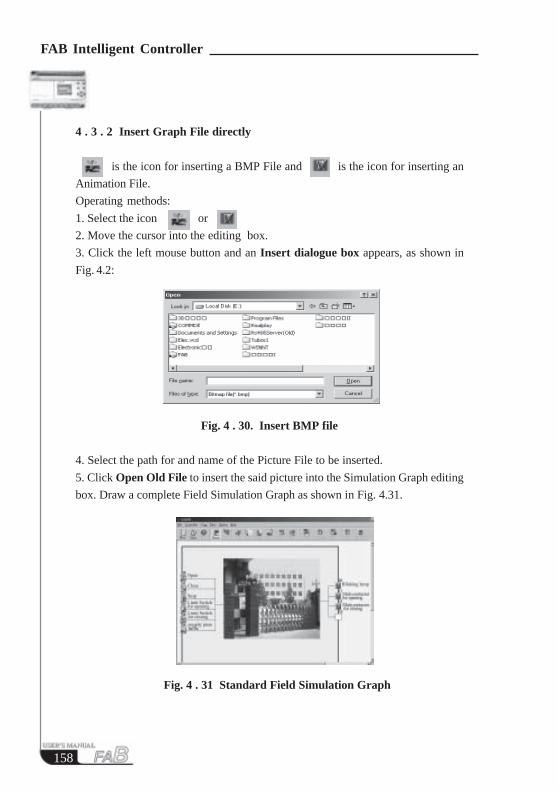
158
FAB Intelligent Controller
4 . 3 . 2 Insert Graph File directly
is the icon for inserting a BMP File and is the icon for inserting an
Animation File.
Operating methods:
1. Select the icon or
2. Move the cursor into the editing box.
3. Click the left mouse button and an Insert dialogue box appears, as shown in
Fig. 4.2:
Fig. 4 . 30. Insert BMP file
4. Select the path for and name of the Picture File to be inserted.
5. Click Open Old File to insert the said picture into the Simulation Graph editing
box. Draw a complete Field Simulation Graph as shown in Fig. 4.31.
Fig. 4 . 31 Standard Field Simulation Graph

159
������������ �������� ���