f5 101 lab mesos marathon documentation
TRANSCRIPT

F5 101 Lab Mesos MarathonDocumentation
Release 0.1
Nicolas Menant
May 20, 2017


Getting Started
1 Introduction 11.1 Introduction . . . . . . . . . . . . . . . . . . . . . . . . . . . . . . . . . . . . . . . . . . . . . . . 11.2 Intro to Mesos / Marathon . . . . . . . . . . . . . . . . . . . . . . . . . . . . . . . . . . . . . . . . 21.3 Lab Setup . . . . . . . . . . . . . . . . . . . . . . . . . . . . . . . . . . . . . . . . . . . . . . . . . 51.4 Connecting to UDF . . . . . . . . . . . . . . . . . . . . . . . . . . . . . . . . . . . . . . . . . . . . 61.5 Automated Deployment . . . . . . . . . . . . . . . . . . . . . . . . . . . . . . . . . . . . . . . . . 71.6 Overview of F5® Container Connector (CC) . . . . . . . . . . . . . . . . . . . . . . . . . . . . . . 91.7 Container Connector(CC) Setup . . . . . . . . . . . . . . . . . . . . . . . . . . . . . . . . . . . . . 101.8 Container Connector - Marathon BIG-IP Controller Usage . . . . . . . . . . . . . . . . . . . . . . . 141.9 F5 ASP and F5 Marathon ASP Controller . . . . . . . . . . . . . . . . . . . . . . . . . . . . . . . . 191.10 ASP and Marathon ASP Controller setup . . . . . . . . . . . . . . . . . . . . . . . . . . . . . . . . 211.11 ASP and Marathon ASP Controller Usage . . . . . . . . . . . . . . . . . . . . . . . . . . . . . . . . 231.12 F5 Application Service Proxy deployment review . . . . . . . . . . . . . . . . . . . . . . . . . . . . 261.13 Install Mesos and Marathon . . . . . . . . . . . . . . . . . . . . . . . . . . . . . . . . . . . . . . . 301.14 Setup Zookeeper . . . . . . . . . . . . . . . . . . . . . . . . . . . . . . . . . . . . . . . . . . . . . 311.15 Setup Mesos . . . . . . . . . . . . . . . . . . . . . . . . . . . . . . . . . . . . . . . . . . . . . . . 311.16 Setup Marathon . . . . . . . . . . . . . . . . . . . . . . . . . . . . . . . . . . . . . . . . . . . . . 321.17 Start your services . . . . . . . . . . . . . . . . . . . . . . . . . . . . . . . . . . . . . . . . . . . . 321.18 Install Mesos . . . . . . . . . . . . . . . . . . . . . . . . . . . . . . . . . . . . . . . . . . . . . . . 361.19 Setup Zookeeper . . . . . . . . . . . . . . . . . . . . . . . . . . . . . . . . . . . . . . . . . . . . . 371.20 Setup Mesos . . . . . . . . . . . . . . . . . . . . . . . . . . . . . . . . . . . . . . . . . . . . . . . 371.21 Start your services . . . . . . . . . . . . . . . . . . . . . . . . . . . . . . . . . . . . . . . . . . . . 391.22 Test your setup . . . . . . . . . . . . . . . . . . . . . . . . . . . . . . . . . . . . . . . . . . . . . . 391.23 Setup Mesos-DNS . . . . . . . . . . . . . . . . . . . . . . . . . . . . . . . . . . . . . . . . . . . . 441.24 Test Mesos DNS . . . . . . . . . . . . . . . . . . . . . . . . . . . . . . . . . . . . . . . . . . . . . 471.25 Install and Setup Ansible . . . . . . . . . . . . . . . . . . . . . . . . . . . . . . . . . . . . . . . . . 491.26 Install Mesos / Marathon with Ansible . . . . . . . . . . . . . . . . . . . . . . . . . . . . . . . . . 511.27 Ansible playbook settings . . . . . . . . . . . . . . . . . . . . . . . . . . . . . . . . . . . . . . . . 51
i

ii

CHAPTER 1
Introduction
The purpose of this lab is to give you more visibility on
• Overview of Mesos and Marathon and their key components
• Install Mesos and Marathon with 3 masters and 2 agents
• How to launch application from Marathon
• How to install Mesos-DNS for service discovery
• How to setup and install F5 solutions for Mesos / Marathon environment
The F5 Marathon Container Integration consists of the F5 Marathon BIG-IP Controller, the F5 Application ServiceProxy (ASP), and the F5 Marathon ASP Controller.
The F5 Marathon BIG-IP Controller configures a BIG-IP to expose applications in a Mesos cluster as BIG-IP virtualservers, serving North-South traffic.
The F5 Application Service Proxy provides load balancing and telemetry for containerized applications, serving East-West traffic. The F5 Marathon ASP Controller deploys ASP instances ‘on-demand’ for Marathon Applications.
The official F5 documentation is available here: F5 Marathon Container Integration
You can either setup the whole F5 solutions yourself or use some scripts to automatically deploy everthing
We also provide some ansible playbooks if you need to setup a Mesos/Marathon env.
We consider that you have a valid UDF access to do this lab. If not, you may review the pre-requisites about our labsetup and howto to build your own
Contents:
Introduction
The purpose of this lab is to give you more visibility on
• Overview of Mesos and Marathon and their key components
1
F5 101 Lab Mesos Marathon Documentation, Release 0.1
• Install Mesos and Marathon with 3 masters and 2 agents
• How to launch application from Marathon
• How to install Mesos-DNS for service discovery
• How to setup and install F5 solutions for Mesos / Marathon environment
The F5 Marathon Container Integration consists of the F5 Marathon BIG-IP Controller, the F5 Application ServiceProxy (ASP), and the F5 Marathon ASP Controller.
The F5 Marathon BIG-IP Controller configures a BIG-IP to expose applications in a Mesos cluster as BIG-IP virtualservers, serving North-South traffic.
The F5 Application Service Proxy provides load balancing and telemetry for containerized applications, serving East-West traffic. The F5 Marathon ASP Controller deploys ASP instances ‘on-demand’ for Marathon Applications.
The official F5 documentation is available here: F5 Mesos Marathon Integration
We consider that you have a valid UDF access to do this lab. If not, you may review the pre-requisites about our labsetup .
Some ansible playbooks are provided also to do the same deployment in an automated way (standalone - allinonedeployment, cluster deployment): Install and Setup Ansible
Intro to Mesos / Marathon
Before working on the installation itself, you need to understand the different components involved in this setup:
• Master / Agent functions
• The different components involved in the Master / Agent architecture
• How High availability is achieved
• Marathon overview
Mesos Architecture
This is an extract from Mesos Architecture
2 Chapter 1. Introduction

F5 101 Lab Mesos Marathon Documentation, Release 0.1
Some of the involved components:
• Master: aggregates resource offers from all agent nodes and provides them to registered frameworks.
• Agent: runs a discrete Mesos task on behalf of a framework. It is an agent instance registered with the Mesosmaster. The synonym of agent node is worker or slave node. You can have private or public agent nodes.Agent daemon can run on the same component than the master daemon. This is useful when you need a smallenvironment for testing
• Framework: “Applications” running on Mesos. It is composed of a scheduler, which registers with the masterto receive resource offers, and one or more executors, which launches tasks on slaves. Examples of Mesosframeworks include Marathon, Chronos and Hadoop
• Offer: a list of a agent’s available CPU and memory resources. All agents send offers to the master, and themaster provides offers to registered frameworks
• Executors: launched on agent nodes to run tasks for a service.
• Task: a unit of work that is scheduled by a framework, and is executed on an agent node. A task can be anythingfrom a bash command or script, to an SQL query, to a Hadoop job, a docker image
• Apache ZooKeeper: software that is used to coordinate the master nodes and achieve High availability
• Service discovery: When your app is up and running, you need a way to send traffic to it, from other applicationson the same cluster, and from external clients.
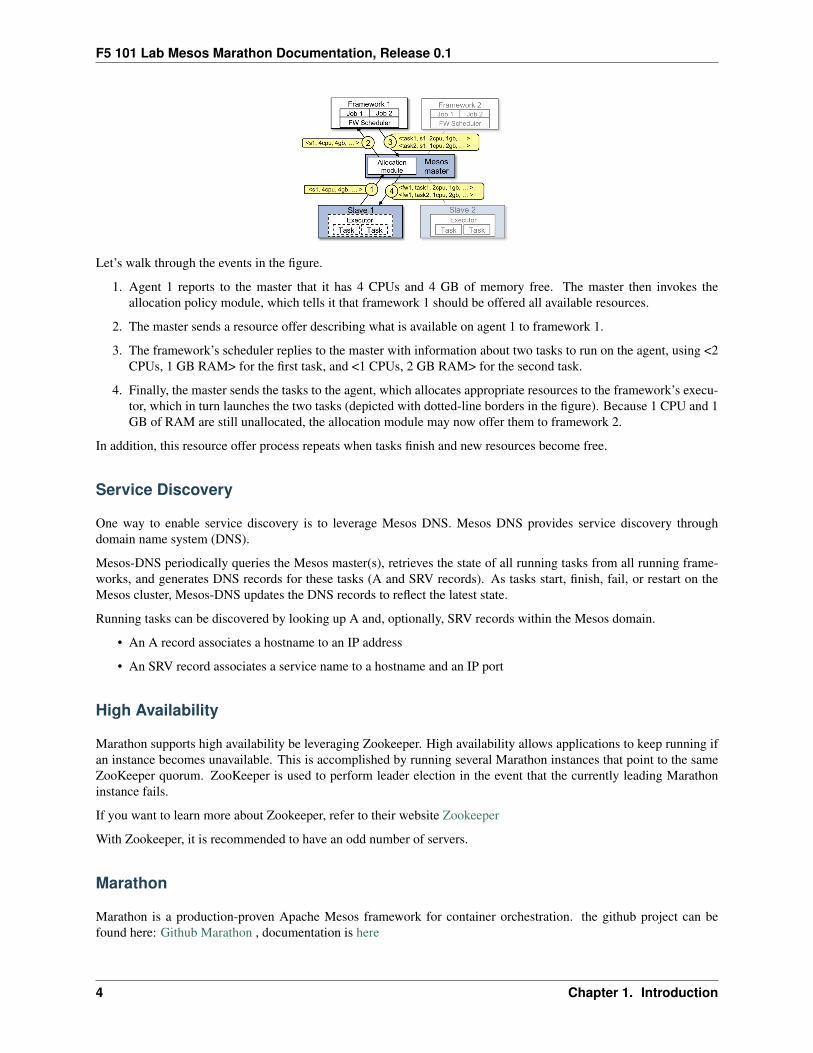
Example of resource offer
This is an extract from Apache Mesos website Mesos Architecture
1.2. Intro to Mesos / Marathon 3
F5 101 Lab Mesos Marathon Documentation, Release 0.1
Let’s walk through the events in the figure.
1. Agent 1 reports to the master that it has 4 CPUs and 4 GB of memory free. The master then invokes theallocation policy module, which tells it that framework 1 should be offered all available resources.
2. The master sends a resource offer describing what is available on agent 1 to framework 1.
3. The framework’s scheduler replies to the master with information about two tasks to run on the agent, using <2CPUs, 1 GB RAM> for the first task, and <1 CPUs, 2 GB RAM> for the second task.
4. Finally, the master sends the tasks to the agent, which allocates appropriate resources to the framework’s execu-tor, which in turn launches the two tasks (depicted with dotted-line borders in the figure). Because 1 CPU and 1GB of RAM are still unallocated, the allocation module may now offer them to framework 2.
In addition, this resource offer process repeats when tasks finish and new resources become free.
Service Discovery
One way to enable service discovery is to leverage Mesos DNS. Mesos DNS provides service discovery throughdomain name system (DNS).
Mesos-DNS periodically queries the Mesos master(s), retrieves the state of all running tasks from all running frame-works, and generates DNS records for these tasks (A and SRV records). As tasks start, finish, fail, or restart on theMesos cluster, Mesos-DNS updates the DNS records to reflect the latest state.
Running tasks can be discovered by looking up A and, optionally, SRV records within the Mesos domain.
• An A record associates a hostname to an IP address
• An SRV record associates a service name to a hostname and an IP port
High Availability
Marathon supports high availability be leveraging Zookeeper. High availability allows applications to keep running ifan instance becomes unavailable. This is accomplished by running several Marathon instances that point to the sameZooKeeper quorum. ZooKeeper is used to perform leader election in the event that the currently leading Marathoninstance fails.
If you want to learn more about Zookeeper, refer to their website Zookeeper
With Zookeeper, it is recommended to have an odd number of servers.
Marathon
Marathon is a production-proven Apache Mesos framework for container orchestration. the github project can befound here: Github Marathon , documentation is here
4 Chapter 1. Introduction

F5 101 Lab Mesos Marathon Documentation, Release 0.1
Marathon is a framework for Mesos that is designed to launch long-running applications, and, in Mesosphere, servesas a replacement for a traditional init system. It has many features that simplify running applications in a clusteredenvironment, such as high-availability, application health checks, ... It adds its scaling and self-healing capabilities tothe Mesosphere feature set.
Marathon can be used to start other Mesos frameworks, and it can also launch any process that can be started in theregular shell. As it is designed for long-running applications, it will ensure that applications it has launched willcontinue running, even if the slave node(s) they are running on fails.
Main features
1. High Availability. Marathon runs as an active/passive cluster with leader election for 100% uptime.
2. Multiple container runtimes. Marathon has first-class support for both Mesos containers (using cgroups) andDocker.
3. Stateful apps. Marathon can bind persistent storage volumes to your application. You can run databases likeMySQL and Postgres, and have storage accounted for by Mesos.
4. UI.
5. Constraints. e.g. Only one instance of an application per rack, node, etc.
6. Service Discovery & Load Balancing. Several methods available.
7. Health Checks. Evaluate your application’s health using HTTP or TCP checks.
8. Event Subscription. Supply an HTTP endpoint to receive notifications - for example to integrate with an externalload balancer.
9. Metrics. Query them at /metrics in JSON format or push them to systems like graphite, statsd and Datadog.
10. Complete REST API for easy integration and scriptability.
Lab Setup
Here is the setup we will leverage to either create a new environment or to connect to an existing environment (F5UDF)
In the existing environment, here is the setup you’ll get:
Hostname AWS Mgt IP Mesos Network Login / PasswordMaster 1 10.1.1.4 10.1.10.11 ssh: ubuntu/<your key> - su : root/defaultMaster 2 10.1.1.5 10.1.10.12 ssh: ubuntu/<your key> - su : root/defaultMaster 3 10.1.1.6 10.1.10.13 ssh: ubuntu/<your key> - su : root/defaultAgent 1 10.1.1.7 10.1.10.51 ssh: ubuntu/<your key> - su : root/defaultAgent 2 10.1.1.8 10.1.10.52 ssh: ubuntu/<your key> - su : root/defaultWindows Jumpbox 10.1.1.9 10.1.10.50 administrator / ibKvT4w=AaBIG-IP 10.1.1.10 10.1.10.60 admin/admin
In case you don’t use UDF, here are a few things to know that could be useful (if you want to reproduce this in anotherenvironment)
Here are the different things to take into accounts during this installation guide:
• We use Ubuntu xenial in this UDF blueprint
• We updated on all the nodes the /etc/hosts file so that each node is reachable via its name
1.3. Lab Setup 5

F5 101 Lab Mesos Marathon Documentation, Release 0.1
Example of our hosts fileuser@master1:~$ cat /etc/hosts127.0.0.1 localhost10.1.10.1 ip-10-1-1-4 master1 master1.my-lab10.1.10.2 ip-10-1-1-5 master2 master2.my-lab10.1.10.3 ip-10-1-1-6 master3 master3.my-lab10.1.10.51 ip-10-1-1-7 slave1 slave1.my-lab10.1.10.52 ip-10-1-1-8 slave2 slave2.my-lab
• On master1, we created some ssh keys for user that we copied on all the nodes. This way you can use master1to connect to all nodes without authentication
• we enabled user to do sudo commands without authentication (needed to use ansible with this user). This wasdone via the visudo command to specify that we allow passwordless sudo command for this user (here is athread talking about how to do it: visudo)
Connecting to UDF
We consider that you have access to UDF for the different labs
Create your environment
If you want to setup your own Mesos environment, you need to create your own deployment reflecting what has beenexplained in the previous section. Please go to the Cluster setup guide to do this: Install Mesos and Marathon
Start your environment
Connect to UDF and go to blueprint.
Select the relevant blueprint: find the ‘[Mesos/Marathon] how to Demo/Setup ASP and CC’ blueprint and deploy it
Access your environment
If you deployed the existing blueprint mentioned above; Once your environment is started, find the ‘Jumpbox’ com-ponent under ‘Components’ and launch RDP (in the ACCESS menu)
Click on the shortcut that got downloaded and it should open your RDP session. The credentials to use are adminis-trator/ibKvT4w=Aa
Warning: For MAC user, it is recommended to use Microsoft Remote Desktop. You may not be able to accessyour jumpbox otherwise. It is available in the App store (FREE).
6 Chapter 1. Introduction
F5 101 Lab Mesos Marathon Documentation, Release 0.1
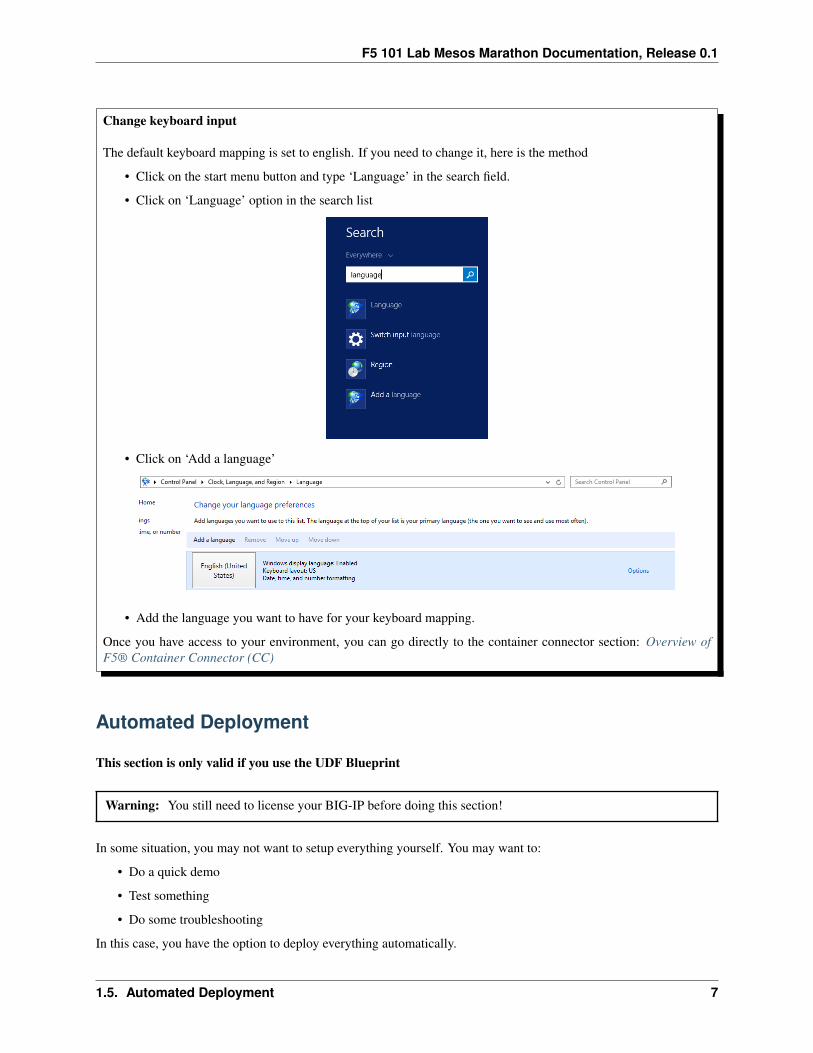
Change keyboard input
The default keyboard mapping is set to english. If you need to change it, here is the method
• Click on the start menu button and type ‘Language’ in the search field.
• Click on ‘Language’ option in the search list
• Click on ‘Add a language’
• Add the language you want to have for your keyboard mapping.
Once you have access to your environment, you can go directly to the container connector section: Overview ofF5® Container Connector (CC)
Automated Deployment
This section is only valid if you use the UDF Blueprint
Warning: You still need to license your BIG-IP before doing this section!
In some situation, you may not want to setup everything yourself. You may want to:
• Do a quick demo
• Test something
• Do some troubleshooting
In this case, you have the option to deploy everything automatically.
1.5. Automated Deployment 7

F5 101 Lab Mesos Marathon Documentation, Release 0.1
On the Desktop of the Jumpbox, you have two different batch scripts:
• Automatic-deployment-f5-demo.bat
• Delete-f5-demo.bat
Those two files will call a POSTMAN collection via newman to process it automatically.
Automatic-deployment-f5-demo.bat will do the following:
1. Setup the mesos partition on the BIG-IP
2. Deploy the F5 container connector. Here it will deploy automatically version 1.0.0 that is the validated versionfor this environment (retrieved from docker hub)
3. Deploy a frontend application that will push some configuration on the F5 BIG-IP
4. Deploy the F5 ASP controller for Marathon. Here it will deploy automatically version 1.0.0 that is the validatedversion for this environment (retrieved from docker hub)
5. Deploy a backend application that will be fronted by ASP. Here it will deploy automatically version 1.0.0 thatis the validated version for this environment. We don’t retrieve it from docker hub since it is only available instore.docker.com that requires you to sign up for it. To be able to automate this piece, we have already retrievedit and pushed it in our registry
Delete-f5-demo will simply remove everything that was done previously
If you want to check that everything has been deployed successfully, you can simply connect to the Marathon UI tosee if everything is in a running state: http://10.1.10.11:8080
8 Chapter 1. Introduction

F5 101 Lab Mesos Marathon Documentation, Release 0.1
Note: It takes some time for mesos-dns to be updated with your ASP information. So you may have some issues atfirst when you click on the “backend link” on the frontend web page (10.1.10.80). Wait a little if you see the followingpage before retrying
Overview of F5® Container Connector (CC)
Overview
F5 Container connector in Mesos / Marathon is called: F5 Marathon BIG-IP Controller.
The F5 Marathon BIG-IP Controller is a container-based Marathon Application – marathon-bigip-ctlr. You can launchthe F5 Marathon BIG-IP Controller in Marathon via the Marathon REST API or the Marathon Web Interface.
The marathon-bigip-ctlr watches the Marathon API for special “F5 Application Labels” that tell it:
• what Application we want it to manage
• how we want to configure the BIG-IP for that specific Application.
You can manage BIG-IP objects directly, or deploy iApps, with the F5 Marathon BIG-IP Controller.
1.6. Overview of F5® Container Connector (CC) 9

F5 101 Lab Mesos Marathon Documentation, Release 0.1
Architecture
In Marathon, you can associate labels with Application tasks for tracking/reporting purposes. F5 has developed a set ofcustom “F5 Application Labels” as a way notify the F5 Marathon BIG-IP Controller and F5 Marathon ASP Controllerthat they have work to do.
When the F5 Marathon BIG-IP Controller discovers Applications with new or updated F5 Application Labels, itdynamically creates iApps or virtual servers, pools, pool members, and HTTP health monitors for each of the Appli-cation’s tasks.
If you want to have more details about the F5 Application Labels, you may go to the F5 official documentation here:F5 Marathon BIG-IP Controller
Before being able to use the Container Connecter, you need to handle some prerequisites
Prerequisites
• You must have a fully active/licensed BIG-IP
• A BIG-IP partition needs to be setup for the Container connector. You need to have access to a user with theright privileges
• You need a user with administrative access to this partition
• Your Mesos / Marathon environment must be up and running already
Container Connector(CC) Setup
the official Container Connector documentation is here: Install the F5 Marathon BIG-IP Controller
In a Mesos / Marathon environment, the name of the product is Marathon BIG-IP controller.
10 Chapter 1. Introduction
F5 101 Lab Mesos Marathon Documentation, Release 0.1
BIG-IP setup
To use F5 Container connector / Marathon BIG-IP Controller, you’ll need a BIG-IP up and running first.
In the UDF blueprint, you should have a BIG-IP available at the following URL: https://10.1.10.60.
Warning: if you use UDF, it’s recommended to connect to your BIG-IP from the RDP session instead of goingdirectly to it from the UDF portal and TMUI option
Connect to your BIG-IP and check it is active and licensed. Its login and password are: admin/admin
Note: if your BIG-IP has no license or its license expired, renew the license. You just need a LTM VE license for thislab. No specific add-ons are required
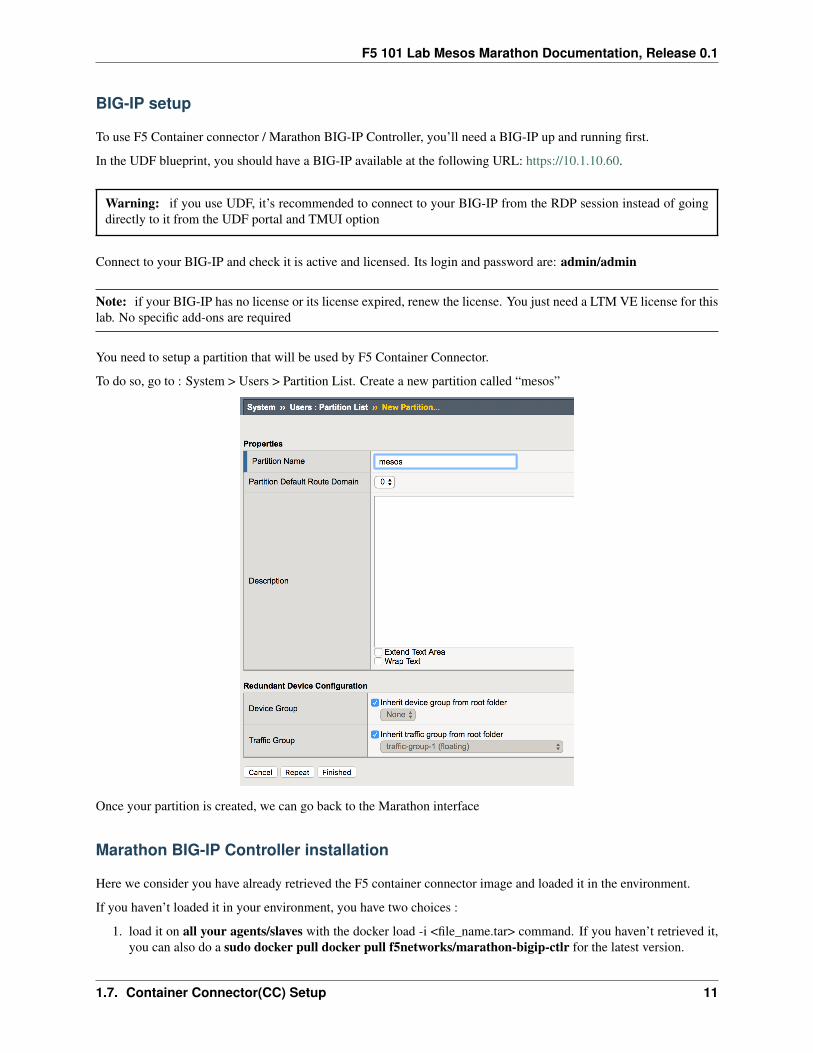
You need to setup a partition that will be used by F5 Container Connector.
To do so, go to : System > Users > Partition List. Create a new partition called “mesos”
Once your partition is created, we can go back to the Marathon interface
Marathon BIG-IP Controller installation
Here we consider you have already retrieved the F5 container connector image and loaded it in the environment.
If you haven’t loaded it in your environment, you have two choices :
1. load it on all your agents/slaves with the docker load -i <file_name.tar> command. If you haven’t retrieved it,you can also do a sudo docker pull docker pull f5networks/marathon-bigip-ctlr for the latest version.
1.7. Container Connector(CC) Setup 11

F5 101 Lab Mesos Marathon Documentation, Release 0.1
2. load it on a system and push it into your registry if needed.
To deploy our Marathon BIG-IP Controller, we need to either use Marathon UI or use the Marathon REST API.
• Connect to the Marathon UI on http://10.1.10.11:8080 and click on “Create Application”.
• Click on “JSON mode”
Note: If you use the UDF blueprint, Chrome in the Jumpbox has a bookmark to access Marathon.
Use the following JSON config
{"id": "f5/marathon-bigip-ctlr","cpus": 0.5,"mem": 64.0,"instances": 1,"container": {"type": "DOCKER","docker": {
"image": "f5networks/marathon-bigip-ctlr:1.0.0","network": "BRIDGE"
}},"env": {"MARATHON_URL": "http://10.1.10.11:8080",
"F5_CC_PARTITIONS": "mesos","F5_CC_BIGIP_HOSTNAME": "10.1.10.60","F5_CC_BIGIP_USERNAME": "admin","F5_CC_BIGIP_PASSWORD": "admin"
}}
Note:
• If you don’t use the UDF blueprint, you need to update the field image with the appropriate path to your image.
• If your Mesos environment use authentication , here is a link explaining how to handle authentication with theMarathon BIG-IP Controller: Set up authentication to your secure DC/OS cluster
Troubleshooting
If you need to check the Marathon BIG-IP Controller you can do the following:
1. Check the logs
2. Connect to the container
To check the logs, you need to identify where is the Controller running. In Marathon UI:
1. Click on Applications
2. Click on the f5 folder
3. Click on marathon-bigip-ctlr
you should see something like this :
12 Chapter 1. Introduction

F5 101 Lab Mesos Marathon Documentation, Release 0.1
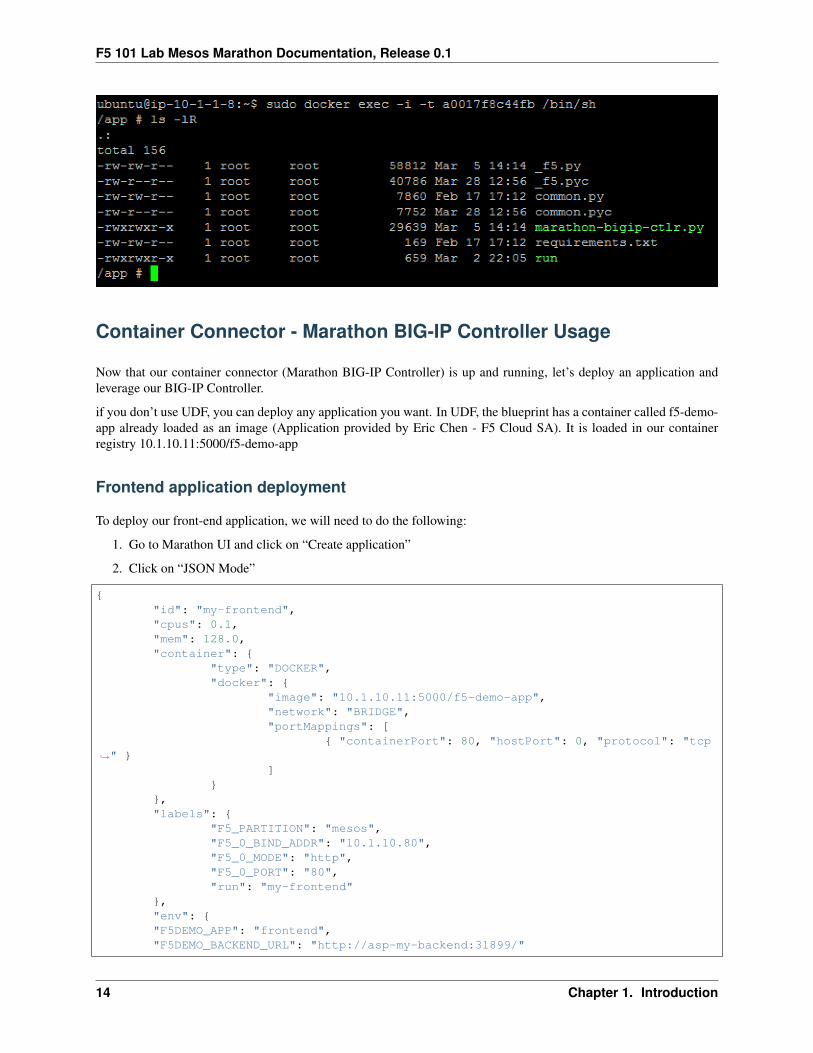
Here we can see that the Controller is running on slave2. Connect via SSH to slave2 and run the following commands
sudo docker ps
This command will give us the ID of our Controller container ID, here it is : a0017f8c44fb. We need this ID for thenext few commands
To check the logs of our Controller:
sudo docker logs a0017f8c44fb
To connect to our container with a Shell:
sudo docker exec -i -t a0017f8c44fb /bin/sh
1.7. Container Connector(CC) Setup 13
F5 101 Lab Mesos Marathon Documentation, Release 0.1
Container Connector - Marathon BIG-IP Controller Usage
Now that our container connector (Marathon BIG-IP Controller) is up and running, let’s deploy an application andleverage our BIG-IP Controller.
if you don’t use UDF, you can deploy any application you want. In UDF, the blueprint has a container called f5-demo-app already loaded as an image (Application provided by Eric Chen - F5 Cloud SA). It is loaded in our containerregistry 10.1.10.11:5000/f5-demo-app
Frontend application deployment
To deploy our front-end application, we will need to do the following:
1. Go to Marathon UI and click on “Create application”
2. Click on “JSON Mode”
{"id": "my-frontend","cpus": 0.1,"mem": 128.0,"container": {
"type": "DOCKER","docker": {
"image": "10.1.10.11:5000/f5-demo-app","network": "BRIDGE","portMappings": [
{ "containerPort": 80, "hostPort": 0, "protocol": "tcp→˓" }
]}
},"labels": {
"F5_PARTITION": "mesos","F5_0_BIND_ADDR": "10.1.10.80","F5_0_MODE": "http","F5_0_PORT": "80","run": "my-frontend"
},"env": {"F5DEMO_APP": "frontend","F5DEMO_BACKEND_URL": "http://asp-my-backend:31899/"
14 Chapter 1. Introduction
F5 101 Lab Mesos Marathon Documentation, Release 0.1
},"healthChecks": [{
"protocol": "HTTP","portIndex": 0,"path": "/","gracePeriodSeconds": 5,"intervalSeconds": 20,"maxConsecutiveFailures": 3
}]
}
3.. Click on “Create Application”
Note: Here we specified a few things:
1. The involved BIG-IP configuration (Partition, VS IP, VS Port)
2. The Marathon health check for this app. The BIG-IP will replicate those health checks
3. We didn’t specified how many instances of this application we want so it will deploy a single instance
Wait for your application to be successfully deployed and be in a running state.
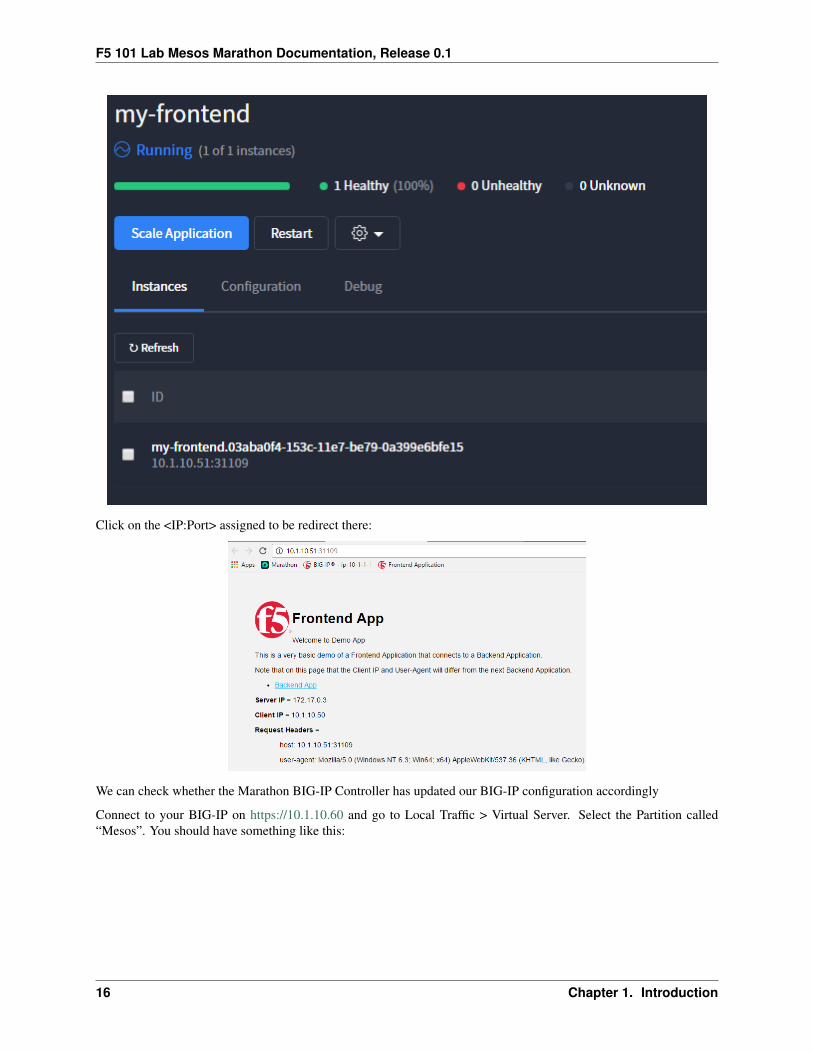
Click on “my-frontend”. Here you will see the instance deployed and how to access it (here it’s 10.1.10.51:31109 -you may have something else)
1.8. Container Connector - Marathon BIG-IP Controller Usage 15
F5 101 Lab Mesos Marathon Documentation, Release 0.1
Click on the <IP:Port> assigned to be redirect there:
We can check whether the Marathon BIG-IP Controller has updated our BIG-IP configuration accordingly
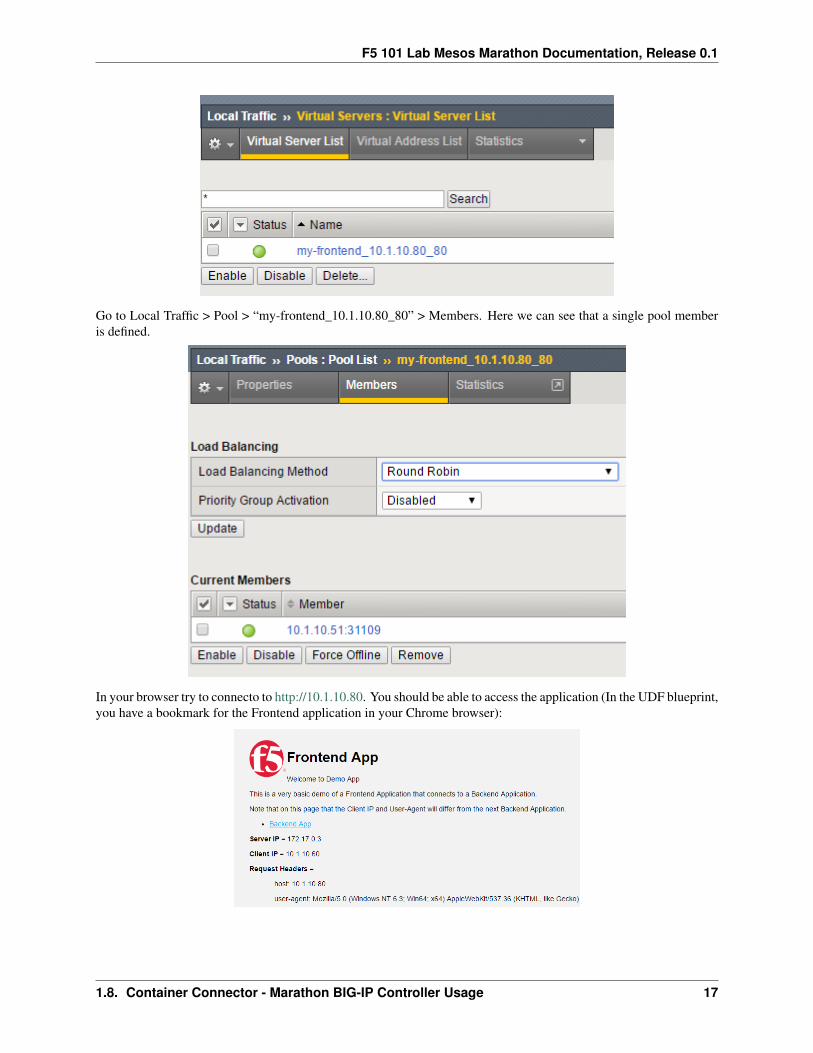
Connect to your BIG-IP on https://10.1.10.60 and go to Local Traffic > Virtual Server. Select the Partition called“Mesos”. You should have something like this:
16 Chapter 1. Introduction
F5 101 Lab Mesos Marathon Documentation, Release 0.1
Go to Local Traffic > Pool > “my-frontend_10.1.10.80_80” > Members. Here we can see that a single pool memberis defined.
In your browser try to connecto to http://10.1.10.80. You should be able to access the application (In the UDF blueprint,you have a bookmark for the Frontend application in your Chrome browser):
1.8. Container Connector - Marathon BIG-IP Controller Usage 17
F5 101 Lab Mesos Marathon Documentation, Release 0.1
Note: if you try to click on the link “Backend App”, it will fail. This is expected (Proxy Error)
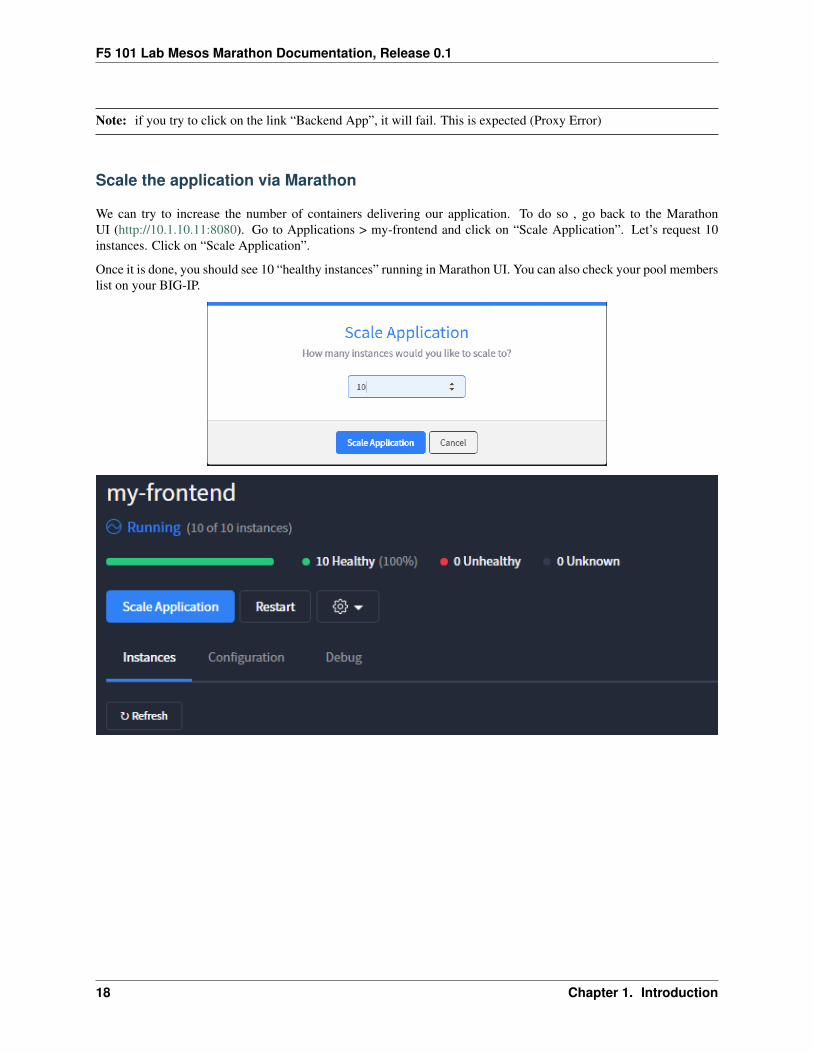
Scale the application via Marathon
We can try to increase the number of containers delivering our application. To do so , go back to the MarathonUI (http://10.1.10.11:8080). Go to Applications > my-frontend and click on “Scale Application”. Let’s request 10instances. Click on “Scale Application”.
Once it is done, you should see 10 “healthy instances” running in Marathon UI. You can also check your pool memberslist on your BIG-IP.
18 Chapter 1. Introduction

F5 101 Lab Mesos Marathon Documentation, Release 0.1
As we can see, the Marathon BIG-IP Controller is adapting the pool members setup based on the number of instancesdelivering this application automatically.
Scale back the application to 1 to save ressources for the next labs
F5 ASP and F5 Marathon ASP Controller
Overview
The F5 Application Service Proxy provides load balancing and telemetry for containerized applications, serving East-West traffic. The F5 Marathon ASP Controller deploys ASP instances ‘on-demand’ for Marathon Applications.
1.9. F5 ASP and F5 Marathon ASP Controller 19

F5 101 Lab Mesos Marathon Documentation, Release 0.1
The F5 Application Service Proxy (ASP) provides container-to-container load balancing, traffic visibility, and inlineprogrammability for applications. Its light form factor allows for rapid deployment in datacenters and across cloud ser-vices. The ASP integrates with container environment management and orchestration systems and enables applicationdelivery service automation.
its documentation is available here: F5 Application Services Proxy
The F5 Marathon ASP Controller – called marathon-asp-ctlr – deploys the F5 Application Service Proxy. Like theF5 Marathon BIG-IP Controller, the F5 Marathon ASP Controller watches the Marathon API for Apps defined witha specific set of labels. When it finds an Application configured with the asp: enable label, it launches an instanceof the F5 Application Service Proxy to front the App and creates a virtual server on the F5 Application ServiceProxy instance. The F5 Marathon ASP Controller maintains an address in the F5 Application Service Proxy poolconfiguration for each of an Application’s tasks.
The F5 Marathon ASP Controller App definition contains a set of default Marathon ASP configuration labels. Theseconfigurations – set in the “env” (or, “Environment”, in the Web UI) section of the marathon-asp-ctlr App definition– apply to each ASP instance the marathon-asp-ctlr launches. The F5 Marathon ASP Controller also has a set of“override” labels. When you add these labels to the definition for an Application you want the ASP to proxy, they takeprecedence over the default marathon-asp-ctlr settings.
By default, the marathon-asp-ctlr starts one (1) F5 Application Service Proxy instance per application. You canoverride this setting using the ASP_COUNT_PER_APP F5 application label.
The F5 Application Service Proxy collects traffic statistics for the Applications it load balances; these stats are eitherlogged locally or sent to an external analytics application. You can set the location and type of the analytics applicationusing the ASP_DEFAULT_STATS_URL label.
Apache Mesos DNS and ASP Discovery
Each F5 Application Service Proxy instance is discoverable via an Apache Mesos DNS SRV query, which returns itsIP address, port, and protocol. By convention, the DNS name of an F5 Application Service Proxy instance for anApplication is “<ASP_ENABLE_LABLE>-<application name>.<domain name>”.
20 Chapter 1. Introduction

F5 101 Lab Mesos Marathon Documentation, Release 0.1
For example:
ASP_ENABLE_LABEL: ASP +Application name: “app1” +Domain name: “marathon.mesos” =
ASP DNS name: “ASP-app1.marathon.mesos”
ASP and Marathon ASP Controller setup
To use ASP, we will need setup first the F5 Marathon ASP Controller.
The first step will be to load the relevant F5 container images into our system. if you use the UDF blueprint, it’salready done in our private registry (10.1.10.11:5000). You can also retrieve the version we use with the followingcommand: sudo docker pull f5networks/marathon-asp-ctlr:1.0.0
the official F5 ASP documentation is here: Install the F5 Kubernetes Application Service Proxy and Deploy the F5Application Service Proxy with the F5 Kubernetes Prox
Deploy F5 Marathon ASP Controller
To deploy the ASP Controller, connect to the Marathon UI and click on “Create Application”, switch to “JSON Mode”
Copy/Paste the following JSON blob:
{"id": "f5/marathon-asp-ctlr","cpus": 0.5,"mem": 128,"instances": 1,"container": {
"type": "DOCKER","docker": {"image": "f5networks/marathon-asp-ctlr:1.0.0","network": "BRIDGE","forcePullImage": true,"privileged": false,"portMappings": []
},"volumes": []
},"env": {
"MARATHON_URL": "http://10.1.10.11:8080","ASP_DEFAULT_CONTAINER": "10.1.10.11:5000/asp:v1.0.0","ASP_ENABLE_LABEL": "asp","ASP_DEFAULT_CPU": "0.2","ASP_DEFAULT_MEM": "128","ASP_DEFAULT_LOG_LEVEL": "debug","ASP_DEFAULT_STATS_FLUSH_INTERVAL": "10000"
}}
A few things to consider:
1.10. ASP and Marathon ASP Controller setup 21

F5 101 Lab Mesos Marathon Documentation, Release 0.1
1. if you don’t use the UDF blueprint, update the image attribute and ASP_DEFAULT_CONTAINER attributeswith the relevant images in your environment
2. You can see that we specified the resources that will be assigned to ASP
3. You have the capabilities to have ASP send logs to a remote solution like Splunk
Warning: When using Marathon, you cannot use UPPERCASE for the application ID. Otherwise the applicationdeployment will fail
Check deployment
you can check the deployment of your container the same way that we check the deployment of the F5 MarathonBIG-IP Controller:
1. Via the Marathon UI, go to Application > f5 > marathon-asp-ctlr and check the agent used to deploy the con-troller
2. Connect to the relevant agent
3. Use sudo docker ps to identify the container ID and run sudo docker logs <container ID>
In this example, we can see that the ASP Controller container was deployed on 10.1.10.51
22 Chapter 1. Introduction
F5 101 Lab Mesos Marathon Documentation, Release 0.1
ASP and Marathon ASP Controller Usage
The F5 Marathon ASP Controller instance has been deployed. Now we need to test our setup. To do so, we will setupa backend application that will be reached by the frontend application.
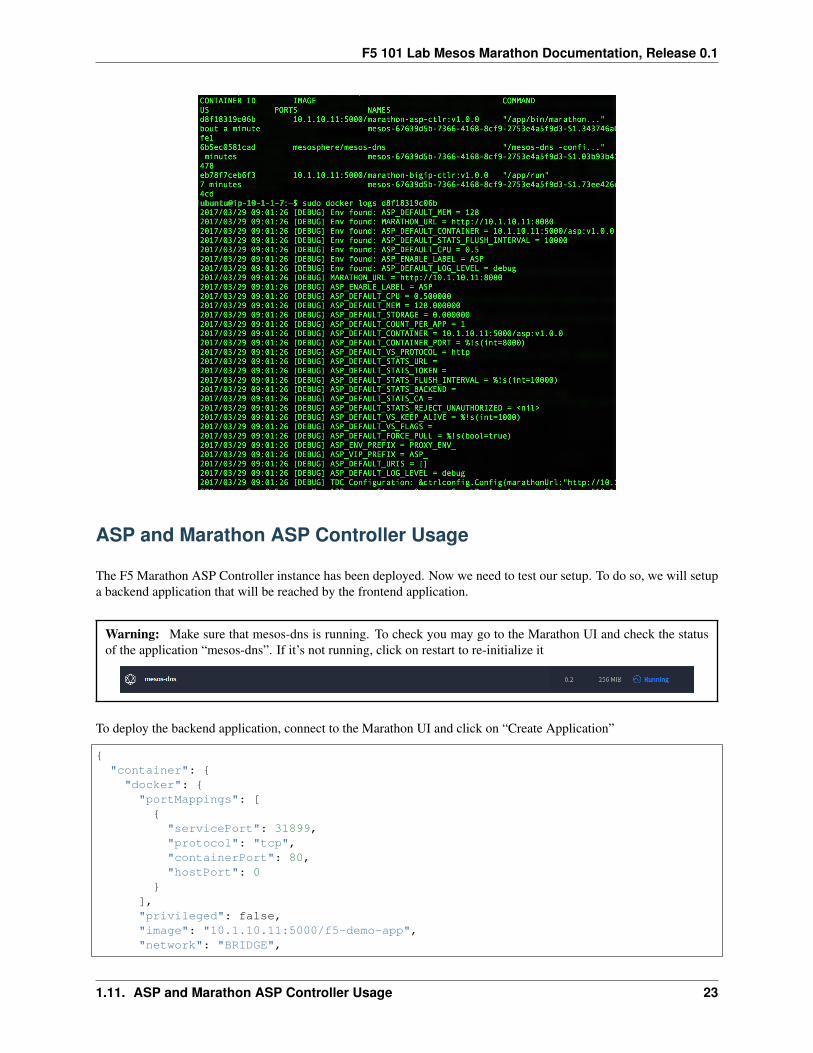
Warning: Make sure that mesos-dns is running. To check you may go to the Marathon UI and check the statusof the application “mesos-dns”. If it’s not running, click on restart to re-initialize it
To deploy the backend application, connect to the Marathon UI and click on “Create Application”
{"container": {"docker": {
"portMappings": [{"servicePort": 31899,"protocol": "tcp","containerPort": 80,"hostPort": 0
}],"privileged": false,"image": "10.1.10.11:5000/f5-demo-app","network": "BRIDGE",
1.11. ASP and Marathon ASP Controller Usage 23

F5 101 Lab Mesos Marathon Documentation, Release 0.1
"forcePullImage": true},"type": "DOCKER","volumes": []
},"mem": 128,"labels": {"asp": "enable","ASP_COUNT_PER_APP": "2"
},"env": {
"F5DEMO_APP": "backend"},"cpus": 0.25,"instances": 1,"upgradeStrategy": {"maximumOverCapacity": 1,"minimumHealthCapacity": 1
},"id": "my-backend"
}
You should see the following applications be created:
1. Your “my-backend” application
2. Another application created with 2 instances called : asp-my-backend. This is your ASP instances deployed infront of your application. You can see that 2 instances were deployed (done via the ASP_COUNT_PER_APPlabel)
To test your ASP instances, go to the Marathon UI > Application > asp-my-backend. Here you will see that 2 instancesare deployed, click on the link specified for each of them:
24 Chapter 1. Introduction

F5 101 Lab Mesos Marathon Documentation, Release 0.1
If you are connected to the backend instances, it works as expected:
Note: Notice that the user-agent is your browser’s agent as expected.
Now that our backend is deployed and fronted successfully by ASP, we should try to access it from the frontendapplication.
Go back to your frontend application on http://10.1.10.80. On this page you have a link to the backend, click on it.
You should see something like this:
1.11. ASP and Marathon ASP Controller Usage 25

F5 101 Lab Mesos Marathon Documentation, Release 0.1
On this page you may see the following information:
1. host header: the host is asp-my-backend. This is the DNS name for our cluster of ASP instances.
2. user-agent: We can see that the request came from the frontend application
3. x-forwarded-for: the request was coming from the BIG-IP (it does SNAT)
F5 Application Service Proxy deployment review
We have successfully deployed our F5 North-South (Marathon BIG-IP Controller) and F5 East-West solutions (Ap-plication Service Proxy and Marathon ASP Controller)
How does the Frontend has been able to go automatically through our ASP instances to access the backend application.
Here are the different key things we did to make it happen:
1. When we deployed our frontend application, we specified a label called: “F5DEMO_BACKEND_URL” withthe value “http://asp-my-backend:31899/”. This was explaining to our frontend application where the “BackendApp” link on the page should be redirected to: Frontend application deployment.
2. When we deployed our backend application, we specified the following information: “servicePort” set to thevalue 31899. This information was to say to ASP on which port it should be listening to load balance the traffic::ref:‘backend_definition.
3. The last thing is how does our frontend connect to the ASP(s) that is dynamically generated ? this is done byleveraging mesos-dns.
Every application that gets created in marathon will have automatically a DNS name setup in mesos-dns. it will havethe following format : <application id>.maraton.mesos
to test it, we can try a few queries against our mesos dns. Connect to either Agent1 or Agent2 (their DNS nameserveris mesos-dns)
nslookup> my-frontend.marathon.mesosServer: 10.1.10.51Address: 10.1.10.51#53
Name: my-frontend.marathon.mesosAddress: 10.1.10.51
26 Chapter 1. Introduction
F5 101 Lab Mesos Marathon Documentation, Release 0.1
> my-backend.marathon.mesosServer: 10.1.10.51Address: 10.1.10.51#53
Name: my-backend.marathon.mesosAddress: 10.1.10.51
> asp-my-backend.marathon.mesosServer: 10.1.10.51Address: 10.1.10.51#53
Name: asp-my-backend.marathon.mesosAddress: 10.1.10.52Name: asp-my-backend.marathon.mesosAddress: 10.1.10.51
Here we can see that our asp instances also have a DNS name that we can resolve. This is this hostname we specifiedwhen we started our frontend application with the backend link.
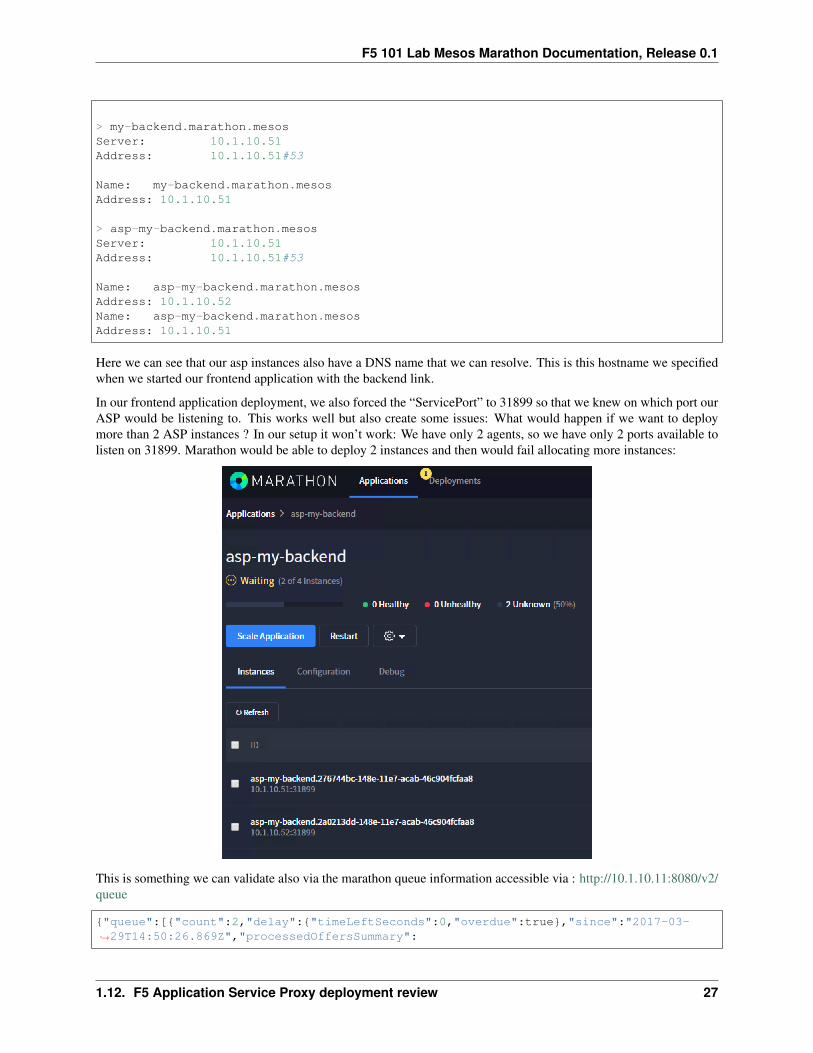
In our frontend application deployment, we also forced the “ServicePort” to 31899 so that we knew on which port ourASP would be listening to. This works well but also create some issues: What would happen if we want to deploymore than 2 ASP instances ? In our setup it won’t work: We have only 2 agents, so we have only 2 ports available tolisten on 31899. Marathon would be able to deploy 2 instances and then would fail allocating more instances:
This is something we can validate also via the marathon queue information accessible via : http://10.1.10.11:8080/v2/queue
{"queue":[{"count":2,"delay":{"timeLeftSeconds":0,"overdue":true},"since":"2017-03-→˓29T14:50:26.869Z","processedOffersSummary":
1.12. F5 Application Service Proxy deployment review 27

F5 101 Lab Mesos Marathon Documentation, Release 0.1
{"processedOffersCount":8,"unusedOffersCount":6,"lastUnusedOfferAt":"2017-03-→˓29T14:50:36.805Z","lastUsedOfferAt":"2017-03-29T14:50:31.788Z","rejectSummaryLastOffers":[{"reason":"UnfulfilledRole","declined":0,"processed":2},{"reason":"UnfulfilledConstraint","declined":0,"processed":2},{"reason":"NoCorrespondingReservationFound","declined":0,"processed":2},{"reason":"InsufficientCpus","declined":0,"processed":2},{"reason":"InsufficientMemory","declined":0,"processed":2},{"reason":"InsufficientDisk","declined":0,"processed":2},{"reason":"InsufficientGpus","declined":0,"processed":2},
//THIS IS THE ISSUE{"reason":"InsufficientPorts","declined":2,"processed":2}],
"rejectSummaryLaunchAttempt":[{"reason":"UnfulfilledRole","declined":0,"processed":8},{"reason":"UnfulfilledConstraint","declined":0,"processed":8},{"reason":→˓"NoCorrespondingReservationFound","declined":0,"processed":8},{"reason":→˓"InsufficientCpus","declined":0,"processed":8},{"reason":"InsufficientMemory",→˓"declined":0,"processed":8},{"reason":"InsufficientDisk","declined":0,"processed":8}→˓,{"reason":"InsufficientGpus","declined":0,"processed":8},{"reason":→˓"InsufficientPorts","declined":6,"processed":8}]},"app":{"id":"/asp-my-backend",→˓"backoffFactor":1.15,"backoffSeconds":1,"container":{"type":"DOCKER","docker":{→˓"forcePullImage":true,"image":"10.1.10.11:5000/asp:v1.0.0","network":"BRIDGE",→˓"parameters":[],"portMappings":[{"containerPort":8000,"hostPort":31899,"labels":{},→˓"protocol":"tcp","servicePort":10004}],"privileged":false},"volumes":[]},"cpus":0.2,→˓"disk":0,"env":{"APP_NAME":"my-backend","ASP_CONFIG":"{\"global\":{\"console-log-→˓level\":\"debug\"},\"orchestration\":{\"marathon\":{\"uri\":\"http://10.1.10.→˓11:8080\"}},\"stats\":{\"flush-interval\":10000},\"virtual-servers\":[{\→˓"destination\":{\"address\":\"0.0.0.0\",\"port\":31899},\"service-name\":\"/my-→˓backend\",\"ip-protocol\":\"http\",\"load-balancing-mode\":\"round-robin\",\"keep-→˓alive-msecs\":1000,\"flags\":{}}]}"},"executor":"","instances":4,"labels":{"asp-for→˓":"/my-backend"},"maxLaunchDelaySeconds":3600,"mem":128,"gpus":0,"portDefinitions":[→˓{"port":10004,"name":"default","protocol":"tcp"}],"requirePorts":false,→˓"upgradeStrategy":{"maximumOverCapacity":1,"minimumHealthCapacity":1},"version":→˓"2017-03-29T14:50:26.803Z","versionInfo":{"lastScalingAt":"2017-03-29T14:50:26.803Z→˓","lastConfigChangeAt":"2017-03-29T14:50:26.803Z"},"killSelection":"YOUNGEST_FIRST",→˓"unreachableStrategy":{"inactiveAfterSeconds":300,"expungeAfterSeconds":600}}}]}
Here we can see that the issue is related to port allocation.
How can we bypass this kind of restriction ? by leveraging even more mesos-dns with SRV records. Let’s try to do afew more things around mesos-dns:
$ dig _asp-my-backend._tcp.marathon.mesos SRV
; <<>> DiG 9.10.3-P4-Ubuntu <<>> _asp-my-backend._tcp.marathon.mesos SRV;; global options: +cmd;; Got answer:;; ->>HEADER<<- opcode: QUERY, status: NOERROR, id: 13155;; flags: qr aa rd ra; QUERY: 1, ANSWER: 2, AUTHORITY: 0, ADDITIONAL: 2
;; QUESTION SECTION:;_asp-my-backend._tcp.marathon.mesos. IN SRV
;; ANSWER SECTION:_asp-my-backend._tcp.marathon.mesos. 60 IN SRV 0 0 31899 asp-my-backend-igyz4-s1.→˓marathon.mesos.
28 Chapter 1. Introduction

F5 101 Lab Mesos Marathon Documentation, Release 0.1
_asp-my-backend._tcp.marathon.mesos. 60 IN SRV 0 0 31899 asp-my-backend-yiyxj-s0.→˓marathon.mesos.
;; ADDITIONAL SECTION:asp-my-backend-igyz4-s1.marathon.mesos. 60 IN A 10.1.10.51asp-my-backend-yiyxj-s0.marathon.mesos. 60 IN A 10.1.10.52
;; Query time: 0 msec;; SERVER: 10.1.10.51#53(10.1.10.51);; WHEN: Wed Mar 29 14:57:43 UTC 2017;; MSG SIZE rcvd: 173
Here you can see that we got two SRV records for our DNS name asp-my-backend. If we review the related hostname:
$ dig asp-my-backend-igyz4-s1.marathon.mesos
; <<>> DiG 9.10.3-P4-Ubuntu <<>> asp-my-backend-igyz4-s1.marathon.mesos;; global options: +cmd;; Got answer:;; ->>HEADER<<- opcode: QUERY, status: NOERROR, id: 41191;; flags: qr aa rd ra; QUERY: 1, ANSWER: 1, AUTHORITY: 0, ADDITIONAL: 0
;; QUESTION SECTION:;asp-my-backend-igyz4-s1.marathon.mesos. IN A
;; ANSWER SECTION:asp-my-backend-igyz4-s1.marathon.mesos. 60 IN A 10.1.10.51
;; Query time: 0 msec;; SERVER: 10.1.10.51#53(10.1.10.51);; WHEN: Wed Mar 29 14:58:27 UTC 2017;; MSG SIZE rcvd: 72
$ dig asp-my-backend-yiyxj-s0.marathon.mesos
; <<>> DiG 9.10.3-P4-Ubuntu <<>> asp-my-backend-yiyxj-s0.marathon.mesos;; global options: +cmd;; Got answer:;; ->>HEADER<<- opcode: QUERY, status: NOERROR, id: 29183;; flags: qr aa rd ra; QUERY: 1, ANSWER: 1, AUTHORITY: 0, ADDITIONAL: 0
;; QUESTION SECTION:;asp-my-backend-yiyxj-s0.marathon.mesos. IN A
;; ANSWER SECTION:asp-my-backend-yiyxj-s0.marathon.mesos. 60 IN A 10.1.10.52
;; Query time: 0 msec;; SERVER: 10.1.10.51#53(10.1.10.51);; WHEN: Wed Mar 29 14:58:39 UTC 2017;; MSG SIZE rcvd: 72
So by leveraging the SRV records, we can avoid facing port restrictions
1.12. F5 Application Service Proxy deployment review 29

F5 101 Lab Mesos Marathon Documentation, Release 0.1
Install Mesos and Marathon
All the steps mentioned below are to be done on ALL THE MASTERS
• Master1
• Master2
• Master3
Update the system
Before doing anything related to this exercise, we need to make sure that the system is up to date.
sudo apt-get -y update
Once this is done, we need to install the required packages to execute the mesos and marathon processes.
sudo apt-get install -y openjdk-8-jdk
sudo apt-get install -y build-essential python-dev libcurl4-nss-dev libsasl2-dev→˓libsasl2-modules maven libapr1-dev libsvn-dev unzip
Install Mesos and Marathon
Now we need to let apt-get have access to the relevant repo (based on our distro name : ubuntu and our version: xenial)
Do the following commands:
#retrieve the keysudo apt-key adv --keyserver keyserver.ubuntu.com --recv E56151BF
#this command identify the distro: ie ubuntu (a line starting with # is a comment, don→˓'t execute)DISTRO=$(lsb_release -is | tr '[:upper:]' '[:lower:]')
#this command will identify the version for the distro. For example #xenial ubuntu→˓version)CODENAME=$(lsb_release -cs)
#create a new repo to have access to mesosphere packages related to this distro/→˓releaseprintf "deb http://repos.mesosphere.io/${DISTRO} ${CODENAME} main" | sudo tee /etc/→˓apt/sources.list.d/mesosphere.list
#Update our local package cache to have access to mesosphere packagessudo apt-get -y update
Finally we can install mesos and marathon on our masters
sudo apt-get install -y mesos marathon
30 Chapter 1. Introduction

F5 101 Lab Mesos Marathon Documentation, Release 0.1
Setup Zookeeper
Need to point zookeeper to our 3 master instances. This is done in the file /etc/mesos/zk
2181 is zookeeper’s default port.
On all masters, we need to setup a unique ID per zookeeper instance:
• Master1: 1
• Master2: 2
• Master3: 3
to do so we need to do the following:
1. Update /etc/zookeeper/conf/myid to 1, 2 or 3 depending on the master
2. setup zookeeper config file on each master
3. Change the quorum value to reflect our cluster size. It should be set over 50% of the nb of master instances sohere it should be 2
# On master1printf 1 | sudo tee /etc/zookeeper/conf/myid
printf "tickTime=2000\ndataDir=/var/lib/→˓zookeeper\nclientPort=2181\ninitLimit=10\nsyncLimit=5\nserver.1=10.1.10.→˓1:2888:3888\nserver.2=10.1.10.2:2888:3888\nserver.3=10.1.10.3:2888:3888" | sudo tee→˓/etc/zookeeper/conf/zoo.cfg
printf 2 | sudo tee /etc/mesos-master/quorum
# On master2printf 2 | sudo tee /etc/zookeeper/conf/myid
printf "tickTime=2000\ndataDir=/var/lib/→˓zookeeper\nclientPort=2181\ninitLimit=10\nsyncLimit=5\nserver.1=10.1.10.→˓1:2888:3888\nserver.2=10.1.10.2:2888:3888\nserver.3=10.1.10.3:2888:3888" | sudo tee→˓/etc/zookeeper/conf/zoo.cfg
printf 2 | sudo tee /etc/mesos-master/quorum
# On master3printf 3 | sudo tee /etc/zookeeper/conf/myid
printf "tickTime=2000\ndataDir=/var/lib/→˓zookeeper\nclientPort=2181\ninitLimit=10\nsyncLimit=5\nserver.1=10.1.10.→˓1:2888:3888\nserver.2=10.1.10.2:2888:3888\nserver.3=10.1.10.3:2888:3888" | sudo tee→˓/etc/zookeeper/conf/zoo.cfg
echo 2 | sudo tee /etc/mesos-master/quorum
Setup Mesos
On each master we need to setup the following files with the relevant information:
• /etc/mesos-master/ip
1.14. Setup Zookeeper 31

F5 101 Lab Mesos Marathon Documentation, Release 0.1
• /etc/mesos-master/hostname (specify the IP address of your node)
• /etc/mesos/zk (to have zookeeper handle HA for mesos)
# On master1printf "10.1.10.1" | sudo tee /etc/mesos-master/ipprintf "10.1.10.1" | sudo tee /etc/mesos-master/hostnameprintf "zk://10.1.10.1:2181,10.1.10.2:2181,10.1.10.3:2181/mesos" | sudo tee /etc/→˓mesos/zk
# On master2printf "10.1.10.2" | sudo tee /etc/mesos-master/ipprintf "10.1.10.2" | sudo tee /etc/mesos-master/hostnameprintf "zk://10.1.10.1:2181,10.1.10.2:2181,10.1.10.3:2181/mesos" | sudo tee /etc/→˓mesos/zk
# On master3printf "10.1.10.3" | sudo tee /etc/mesos-master/ipprintf "10.1.10.2" | sudo tee /etc/mesos-master/hostnameprintf "zk://10.1.10.1:2181,10.1.10.2:2181,10.1.10.3:2181/mesos" | sudo tee /etc/→˓mesos/zk
Setup Marathon
We need to create the marathon directory structure on each master
sudo mkdir -p /etc/marathon/conf
sudo cp /etc/mesos-master/hostname /etc/marathon/conf
We need to specify the zookeeper masters that marathon will connect to (for information and things like scheduling).We can copy the previous file we setup for mesos
sudo cp /etc/mesos/zk /etc/marathon/conf/master
We also need to have marathon store its own state in zookeper (since it runs on all three masters).
Create a file /etc/marathon/conf/zk and put the following into it:
printf "zk://10.1.10.1:2181,10.1.10.2:2181,10.1.10.3:2181/marathon" | sudo tee /etc/→˓marathon/conf/zk
Start your services
When you install mesos, the master and slave services are enabled (called mesos-master and mesos-slave). Here, wewant our master to focus on this tasks so we need to disable the slave service.
Do this on all the master nodes:
sudo systemctl stop mesos-slaveprintf manual | sudo tee /etc/init/mesos-slave.override
We need to restart our zookeeper process and start mesos-master and marathon on all master nodes:
32 Chapter 1. Introduction

F5 101 Lab Mesos Marathon Documentation, Release 0.1
sudo systemctl restart zookeeper
sudo systemctl enable mesos-master
sudo systemctl start mesos-master
sudo systemctl enable marathon
sudo systemctl start marathon
We can validate that it works by connecting to mesos and marathon. Mesos runs on port 5050 (http) while marathonruns on port 8080.
Mesos:
Marathon:
1.17. Start your services 33

F5 101 Lab Mesos Marathon Documentation, Release 0.1
if you want to check whether the service started as expected, you can use the following commands:
sudo systemctl status mesos-master
sudo systemctl status marathon
you should see something like this:
34 Chapter 1. Introduction
F5 101 Lab Mesos Marathon Documentation, Release 0.1
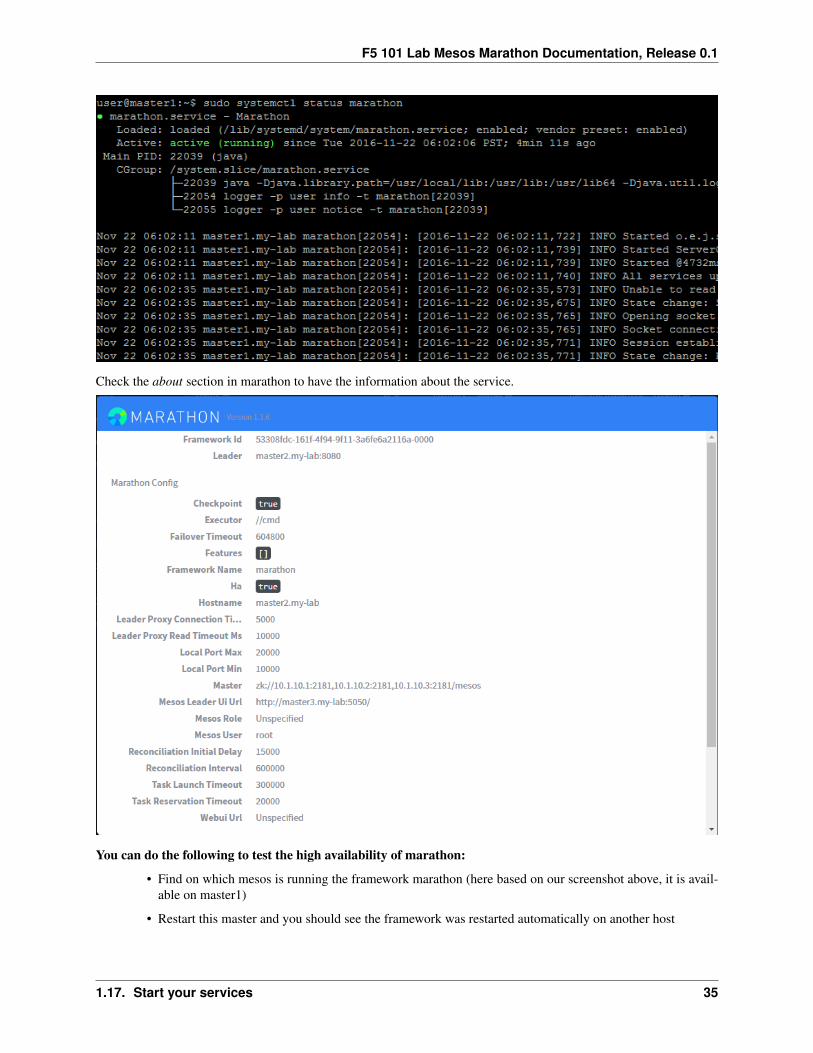
Check the about section in marathon to have the information about the service.
You can do the following to test the high availability of marathon:
• Find on which mesos is running the framework marathon (here based on our screenshot above, it is avail-able on master1)
• Restart this master and you should see the framework was restarted automatically on another host
1.17. Start your services 35

F5 101 Lab Mesos Marathon Documentation, Release 0.1
Install Mesos
All the steps mentioned below are to be done on ALL THE AGENTS
• Slave1
• Slave2
Update the system
Before doing anything related to this exercise, we need to make sure that the system is up to date.
sudo apt-get -y update
Once this is done, we need to install the required packages to execute the mesos and marathon processes.
sudo apt-get install -y openjdk-8-jdk
sudo apt-get install -y build-essential python-dev libcurl4-nss-dev libsasl2-dev→˓libsasl2-modules maven libapr1-dev libsvn-dev unzip
Install Mesos
Now we need to let apt-get have access to the relevant repo (based on our distro name : ubuntu and our version: xenial)
Do the following commands:
36 Chapter 1. Introduction

F5 101 Lab Mesos Marathon Documentation, Release 0.1
#retrieve the keysudo apt-key adv --keyserver keyserver.ubuntu.com --recv E56151BF
#this command identify the distro: ie ubuntu (a line starting with # is a comment, don→˓'t execute)DISTRO=$(lsb_release -is | tr '[:upper:]' '[:lower:]')
#this command will identify the version for the distro. For example #xenial ubuntu→˓version)CODENAME=$(lsb_release -cs)
#create a new repo to have access to mesosphere packages related to this distro/→˓releaseprintf "deb http://repos.mesosphere.io/${DISTRO} ${CODENAME} main" | sudo tee /etc/→˓apt/sources.list.d/mesosphere.list
#Update our local package cache to have access to mesosphere packagessudo apt-get -y update
Finally we can install mesos on our agents
sudo apt-get install -y mesos
Setup Zookeeper
We need to point our agent to our 3 master instances. This is how the agent(s) will find the master(s). This is done viathe file /etc/mesos/zk
2181 is zookeeper’s default port.
Do this on all your agents
printf "zk://10.1.10.1:2181,10.1.10.2:2181,10.1.10.3:2181/mesos" | sudo tee /etc/→˓mesos/zk
Setup Mesos
Configure Mesos
We need to provide IP / hostname information to the mesos slave system (as we did for mesos master)
On each agent, run the following commands:
#On slave1:printf "10.1.20.51" | sudo tee /etc/mesos-slave/ipprintf "slave1.my-lab" | sudo tee /etc/mesos-slave/hostname
#On slave2:printf "10.1.20.52" | sudo tee /etc/mesos-slave/ipprintf "slave2.my-lab" | sudo tee /etc/mesos-slave/hostname
1.19. Setup Zookeeper 37

F5 101 Lab Mesos Marathon Documentation, Release 0.1
Install and setup docker
We have to install docker-engine on the agents to be able to run docker containers
on each agent, do the following:
sudo apt-key adv --keyserver hkp://ha.pool.sks-keyservers.net:80 --recv-keys→˓58118E89F3A912897C070ADBF76221572C52609D
printf "deb https://apt.dockerproject.org/repo ubuntu-xenial main" | sudo tee /etc/→˓apt/sources.list.d/docker.list
sudo apt-get update
#For Ubuntu Trusty, Wily, and Xenial, it’s recommended to install the linux-image-→˓extra-* kernel packages. The linux-image-extra-* packages allows you use the aufs→˓storage driver.
sudo apt-get install -y linux-image-extra-$(uname -r) linux-image-extra-virtual
sudo apt-get install -y docker-engine
Once this is done, docker should be up and running already.
To test that it was launched successfully, you may use the command on one or all the agents
sudo docker run --rm hello-world
This will download a test image automatically and launch it. You should have things appearing on your terminal. Onceit is done, the container will stop automatically and be deleted (done by the –rm parameter)
We need to allow mesos and docker containers in mesos. Execute the following commands on all agents
printf 'docker,mesos' | sudo tee /etc/mesos-slave/containerizers
38 Chapter 1. Introduction

F5 101 Lab Mesos Marathon Documentation, Release 0.1
#Increase the timeout to 10 min so that we have enough time to download any needed→˓docker imageprintf '10mins' | sudo tee /etc/mesos-slave/executor_registration_timeout
Start your services
We need to make sure that zookeeper and mesos-master don’t run on those agents. Do this on all agents:
sudo systemctl stop zookeeperprintf manual | sudo tee /etc/init/zookeeper.override
sudo systemctl stop mesos-masterprintf manual | sudo tee /etc/init/mesos.master.override
We enable/start the agent process called mesos-slave
sudo systemctl enable mesos-slavesudo systemctl start mesos-slave
Check on one of your master with mesos interface (port 5050) if your agents registered successfully. You should seeboth slave1 and slave2 in the agent page
Test your setup
Launch a command
Connect to Marathon through one of the master (:8080) and launch an application
1. Click on create application
2. ID: Test
1.21. Start your services 39

F5 101 Lab Mesos Marathon Documentation, Release 0.1
CPU: 0.1 Memory : 32M Command: echo Test; sleep 10
3. Click on Create Application
Once it runs, if you connect to the mesos framework, you should see more and more completed tasks. Name of thetask should be “Test” (our ID).
If you let it run for a while, you’ll see more and more “Completed Tasks”. You can see that the Host being selected torun those tasks is not always the same.
40 Chapter 1. Introduction

F5 101 Lab Mesos Marathon Documentation, Release 0.1
Go Back to Marathon, click on our application test and click on the setting button and select destroy to remove it.
1.22. Test your setup 41
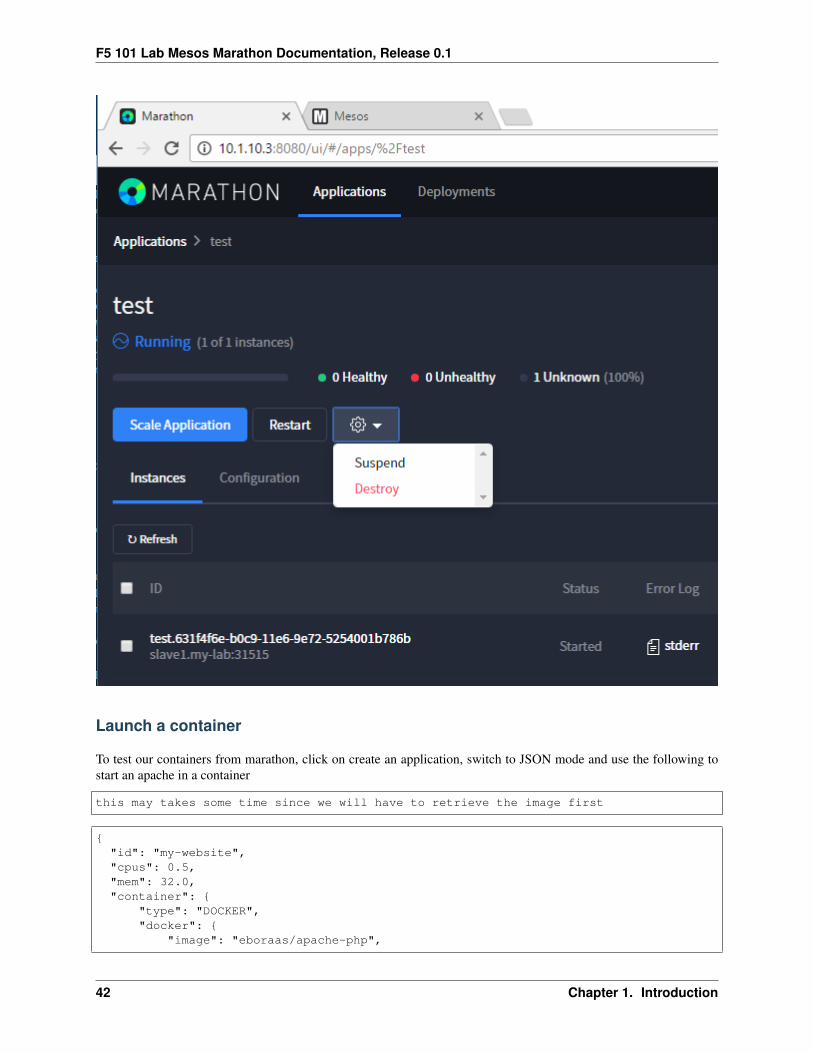
F5 101 Lab Mesos Marathon Documentation, Release 0.1
Launch a container
To test our containers from marathon, click on create an application, switch to JSON mode and use the following tostart an apache in a container
this may takes some time since we will have to retrieve the image first
{"id": "my-website","cpus": 0.5,"mem": 32.0,"container": {
"type": "DOCKER","docker": {
"image": "eboraas/apache-php",
42 Chapter 1. Introduction

F5 101 Lab Mesos Marathon Documentation, Release 0.1
"network": "BRIDGE","portMappings": [
{ "containerPort": 80, "hostPort": 0 }]
}}
}
It may take some time to switch from “Deploying” to “Running”. Once it’s in a “Running” state, check the port usedby the container and try to access it (slave IP:port)
Click on your application and here you’ll see the port associated to your instance (here it is 31755) and on which hostit run (here slave1 - 10.1.20.51)
1.22. Test your setup 43
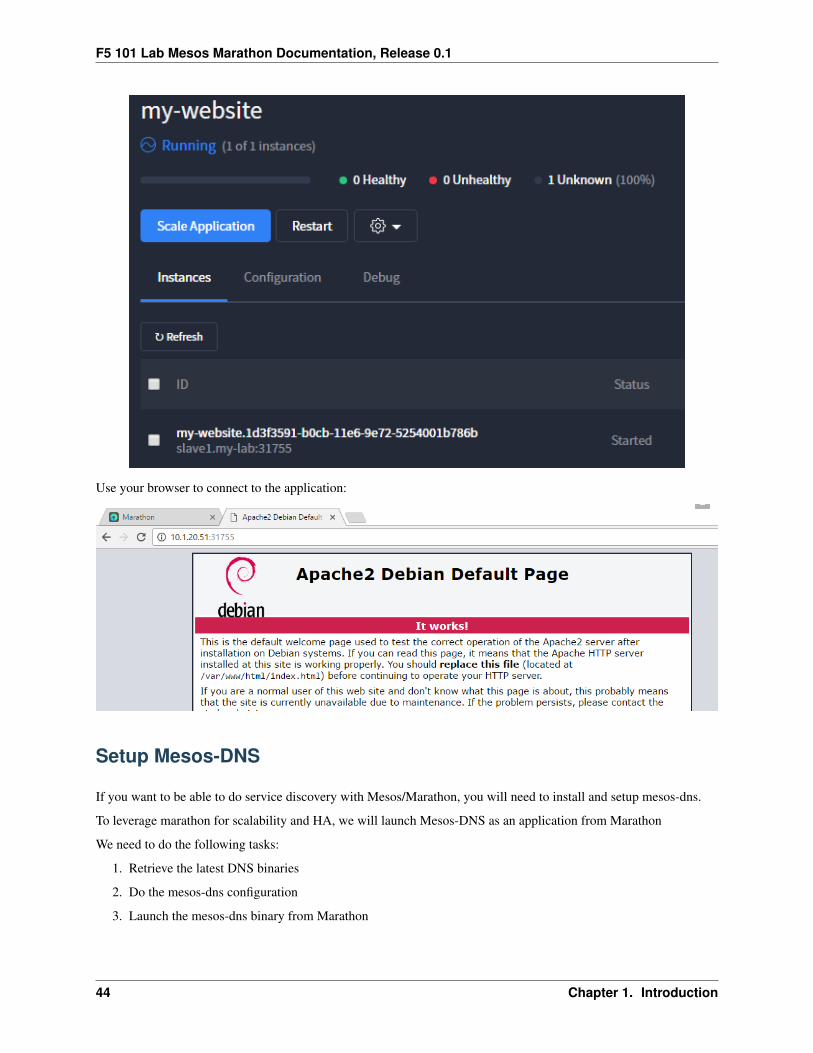
F5 101 Lab Mesos Marathon Documentation, Release 0.1
Use your browser to connect to the application:
Setup Mesos-DNS
If you want to be able to do service discovery with Mesos/Marathon, you will need to install and setup mesos-dns.
To leverage marathon for scalability and HA, we will launch Mesos-DNS as an application from Marathon
We need to do the following tasks:
1. Retrieve the latest DNS binaries
2. Do the mesos-dns configuration
3. Launch the mesos-dns binary from Marathon
44 Chapter 1. Introduction

F5 101 Lab Mesos Marathon Documentation, Release 0.1
In this setup, we will setup mesos dns on SLAVE1 (we force mesos dns app to start on slave1 in Marathon - 10.1.10.51in the UDF blueprint)
To retrieve the binary, go to Mesos DNS releases and select the latest version. In this blueprint we retrieved thefollowing binary: Mesos DNS release v0.6.0
Connect on slave1 and do the following:
curl -L https://github.com/mesosphere/mesos-dns/releases/download/v0.6.0/mesos-dns-v0.→˓6.0-linux-amd64 -O
sudo mkdir /etc/mesos-dns
Create a file in /etc/mesos-dns/ called config.json
sudo vi /etc/mesos-dns/config.json
{"zk": "zk://10.1.10.1:2181,10.1.10.2:2181,10.1.10.3:2181/mesos","masters": ["10.1.10.1:5050", "10.1.10.2:5050", "10.1.10.3:5050"],"refreshSeconds": 60,"ttl": 60,"domain": "mesos","port": 53,"resolvers": ["8.8.8.8"],"timeout": 5,"httpon": true,"dnson": true,"httpport": 8123,"externalon": true,"SOAMname": "ns1.mesos","SOARname": "root.ns1.mesos","SOARefresh": 60,"SOARetry": 600,"SOAExpire": 86400,"SOAMinttl": 60,"IPSources": ["mesos", "host"]}
Now setup the binary in a proper location:
sudo mkdir /usr/local/mesos-dns
sudo mv ./mesos-dns-v0.6.0-linux-amd64 /usr/local/mesos-dns/mesos-dns
sudo chmod +x /usr/local/mesos-dns/mesos-dns
if you want to test your setup you can do the following:
sudo /usr/local/mesos-dns/mesos-dns -config /etc/mesos-dns/config.json -v 10
This will start your mesos-dns app and you can test it.
1.23. Setup Mesos-DNS 45

F5 101 Lab Mesos Marathon Documentation, Release 0.1
you can now test your dns setup:
$ nslookup
> server 10.1.10.51Default server: 10.1.10.51Address: 10.1.10.51#53
> www.google.frServer: 10.1.10.51address: 10.1.10.51#53
Non-authoritative answer:Name: www.google.frAddress: 172.217.3.163
> master1.mesosServer: 10.1.10.51Address: 10.1.10.51#53
Name: master1.mesosAddress: 10.1.10.11
launch the mesos-dns image in marathon. Connect to marathon, click on Create an application and enable json mode
{"cmd": "/usr/local/mesos-dns/mesos-dns -config=/etc/mesos-dns/config.json -
→˓v=10","cpus": 0.2,"mem": 256,"id": "mesos-dns","instances": 1,"constraints": [["hostname", "CLUSTER", "10.1.10.51"]]
}
Last thing is to update /etc/resolv.conf on all slaves/agents: we add our mesos dns into our /etc/resolv.conf file
sudo sed -i '1s/^/nameserver 10.1.20.51\n/' /etc/resolv.conf
46 Chapter 1. Introduction
F5 101 Lab Mesos Marathon Documentation, Release 0.1
Note: If you have deployed your instances in a cloud like AWS, it is likely that you’ll lose your DNS setup after areboot. If you want to make your changes persist, you need to update /etc/dhcp/dhclient.conf to supersede the dhcpsetup. More information here: Static DNS server in a EC2 instance
Test Mesos DNS
to test our Mesos DNS setup, we will start a new application and check if it automatically gets a DNS name.
Start a new app in marathon:
{"id": "app-test-dns","cpus": 0.5,"mem": 32.0,"container": {"type": "DOCKER","docker": {
"image": "eboraas/apache-php","network": "BRIDGE","portMappings": [
{ "containerPort": 80, "hostPort": 0 }]
}}
}
Once it’s running, go to one of your slaves and run ping app-test-dns.marathon.mesos. It should work
1.24. Test Mesos DNS 47

F5 101 Lab Mesos Marathon Documentation, Release 0.1
If you don’t try to ping from Slave1 or slave2, make sure that your client reach our mesos-dns server first (10.1.20.51)
48 Chapter 1. Introduction
F5 101 Lab Mesos Marathon Documentation, Release 0.1
Install and Setup Ansible
The first thing to do is to connect to master1. You can see how to access your environment Connecting to UDF
Warning: Install and setup have already been done.
• In the cluster blueprint, it has been done on master1.
• In the standalone blueprint, it has been done on the mesos node
The section below is for your information. You may go straight here Install Mesos / Marathon with Ansible
Install Ansible
You can use the following commands to install Ansible.
Connect to master1 and run the following commands:
sudo apt-get update -y
sudo apt-get install -y software-properties-common
sudo apt-add-repository ppa:ansible/ansible -y
sudo apt-get update && sudo apt-get install ansible -y
You also need to make sure that all Mesos/Marathon have python installed (v2.7) or you may have MODULE FAIL-URE when ansible will try to run commands on the remote host
Do this on all your mesos/marathon components (master/slave)
sudo apt -y update && sudo apt install -y python-minimal
Setup Ansible
Enable the following options in /etc/ansible/ansible.cfg (you need to use sudo)
• inventory: specify which file contains the nodes available to ansible
• become_user: allow to specify which user we impersonate when using become
• host_key_checking: means that we bypass the security host check when connecting via ssh
inventory = /etc/ansible/hosts
become_user=root
host_key_checking = False
/etc/ansible/hosts is used to list the nodes that are available to ansible. You can group them. In the example below, wecreated 3 different groups:
• masters: nodes to be setup with Mesos and the Zookeeper services
• slaves: nodes to be setup with Mesos as agents/slaves
• marathon: nodes to be setup with Marathon
1.25. Install and Setup Ansible 49

F5 101 Lab Mesos Marathon Documentation, Release 0.1
• local: to run specific command on the Ansible controller
regarding the variables assignement: the strings after each hostname create specific variables related to this host only:
• zoo_myid is used to specify a variable value for each host when ansible runs a playbook against this node
• mesos_interface is used to specify which local interface/IP should be used for the mesos installation
/etc/ansible/hosts file (you need to be sudo to manage this file) for the cluster mode
[masters]master1.my-lab zoo_myid=1 mesos_interface=10.1.10.1master2.my-lab zoo_myid=2 mesos_interface=10.1.10.2master3.my-lab zoo_myid=3 mesos_interface=10.1.10.3
[slaves]slave1.my-lab mesos_interface=10.1.20.51slave2.my-lab mesos_interface=10.1.20.52
[marathon]master1.my-labmaster2.my-labmaster3.my-lab
[local]localhost
/etc/ansible/hosts file for the standalone mode
[standalone]mesos mesos_interface=10.1.10.1
If you want to use ansible to setup Mesos / Marathon in another environment, you need to make sure you did thefollowing first:
1. Update /etc/hosts so that the host name specified in /etc/ansible/hosts can be resolved
2. Create a key for the user (ssh-keygen) and copy it to all the nodes mentioned in /etc/ansible/hosts (ssh-id-copy -you must also run this command locally!)that will launch the ansible command so that no password is requestedwhen doing ssh command by ansible
3. make sure that this user doesn’t have to type its password when doing sudo command ( here is a thread talkingabout how to do it: visudo)
Test Ansible
We can test that ansible and the hosts file are setup properly by running a command against all hosts:
ansible all -a "hostname"
This will run the hostname command on all nodes.
You should have an output like this:
50 Chapter 1. Introduction

F5 101 Lab Mesos Marathon Documentation, Release 0.1
Install Mesos / Marathon with Ansible
We will use the following github repo to retrieve the needed ansible playbook: https://github.com/nmenant/101-lab-Mesos-Marathon
We will install the playbooks on master1 but need to install git first.
You need to use git to retrieve the repo. It’s already installed on master1 (Cluster UDF blueprint) and mesos node(Standalone UDF blueprint). If it’s not already installed in your env, run this command to install git:
sudo apt-get install -y git
create a specific directory to clone the github repo (here we consider that your user is called “user”):
mkdir /home/user/github_repo
cd /home/user/github_repo
clone the github repo:
git clone https://github.com/nmenant/101-lab-Mesos-Marathon
cd 101-lab-Mesos-Marathon/ansible/playbooks
to run the ansible playbooks and setup the environment as explained in the step by step guide (cluster):
ansible-playbook site.yml --extra-vars "install_mode=cluster"
if you want to deploy Mesos and Marathon in standalone:
ansible-playbook site.yml --extra-vars "install_mode=standalone"
Ansible playbook settings
If you don’t use the UDF environment but your own, you may have to update a few settings in the playbook for thecluster deployment.
1.26. Install Mesos / Marathon with Ansible 51
F5 101 Lab Mesos Marathon Documentation, Release 0.1
Warning: If you don’t use the cluster blueprint, you’ll need to update a few files to make it fit your environmentdepending on the environment.
Here is the list of files to update:
• /etc/ansible/hosts to specify the relevant nodes that the playbook has to setup - this is already set properly inthe UDF standalone and cluster deployment*
• ansible/playbooks/groups_var/slaves/slaves_variables - The slaves directory load variable(s) that will be as-signed to all the nodes in the group “slaves” (in your /etc/ansible/hosts file). You need to update this file tospecify the relevant interfaces to your agents. This is not needed in the UDF standalone deployment andalready setup properly in the UDF cluster deployment
• ansible/playbooks/groups_var/masters/masters_variables - the masters directory load variable(s) that will beassigned to all the nodes in the group “masters” (in your /etc/ansible/hosts file). You need to update this file tospecify the relevant interfaces to your agents. **You need to update this for the UDF blueprint deployment.
52 Chapter 1. Introduction