exterior door set - right handed - amazon web services · 1. referring to the ... diamond hub in...
TRANSCRIPT

bezel collar
bezel washer
lock cylinder
lock body
exterior trim plate
cylinder lock screw
split spindle - flat half
split spindle - tabbed half
interior trim plate
set screws
spindle
thumb turn
Appearance of trim varies by model
Appearance of trim varies by model
Outside
Inside
1. Referring to the template, cut mortise into door edge for the lock body.
2. As specified on template, mark and drill holes.
3. Install lock body into the door and secure with two supplied Phillips wood screws.
4. Place the exterior trim components into position and mark location of all mounting holes.
5. Drill pilot holes.
6. Install the exterior trim plate and handle assembly using supplied wood screws.
7. Install the self-adjusting bezel collar and bezel washer onto the lock cylinder.
8. Back out slotted cylinder lock screw as much as possible.
9. Install the lock cylinder by turning it clockwise into the threaded bore in the mortise lock. Turn until tight, then back o� one full rotation. Turn further counter-clockwise so that R is straight up.
Note: A small pocket at front right is required.
Note: Some holes go entirely through the door and some do not!
Note: The spindle will protrude through the far side of the mortise lock so there must be a mortised area to accommodate it, as shown on template.
11. From the interior side of the door, install the split spindle into the bore in the mortise lock. First install the tabbed half of the split spindle, then the flat half.
12. Place the interior trim plate into position and mark position of mounting holes.
13. Drill pilot holes.
10. Secure the cylinder by tightening the cylinder lock screw.
Note: If needed, rotate thumb turn so that sha� is aligned to diamond hub in the lock body as you install the plate.
Note: The doorknob should fit closely to the collar on the doorplate but with a small amount of play so that the doorknob does not bind when turned.
To complete installation, proceed to instructions for installing jamb-side components.
14. Install the interior trim plate using supplied wood screws.
15. Install the interior doorknob by turning it clockwise onto the spindle.
16. Secure knob by tightening the set screws. Align knob on spindle so that set screws seat in groves in spindle.
17. Install the trim plate on the mortise lock using the two supplied flat head machine screws.
Z1135
2550 N.W. Nicolai Street, Portland Oregon 97210 Customer Service: (888) 401-1900 rejuvenation.com
Z1135
2550 N.W. Nicolai Street, Portland Oregon 97210 Customer Service: (888) 401-1900 rejuvenation.com
i n s t a l l a t i o n i n s t r u c t i o n s
advanced carpenter Exterior Door Set - Right Handed
i n s t a l l a t i o n i n s t r u c t i o n s
skill level
toolbox
Exterior Door Set - Right Handed
vertical space as page layout allows
color use:
for outside printed docs- use Pantone 470U for header and high lighting
for on-demand printed docs - no color
for multi-page docs:
create individual PDFs
place in folder named to indicate doc ID and page count
saving instructions:
save as PDF
type X1A-2001
compatibility: acrobat 6
select trim marks ONLY if to be printed outside
do NOT use trim marks for print on demand docs
save at:
S:\Installation Instructions
File working docs and native files S:\home\TimW\installation instructions
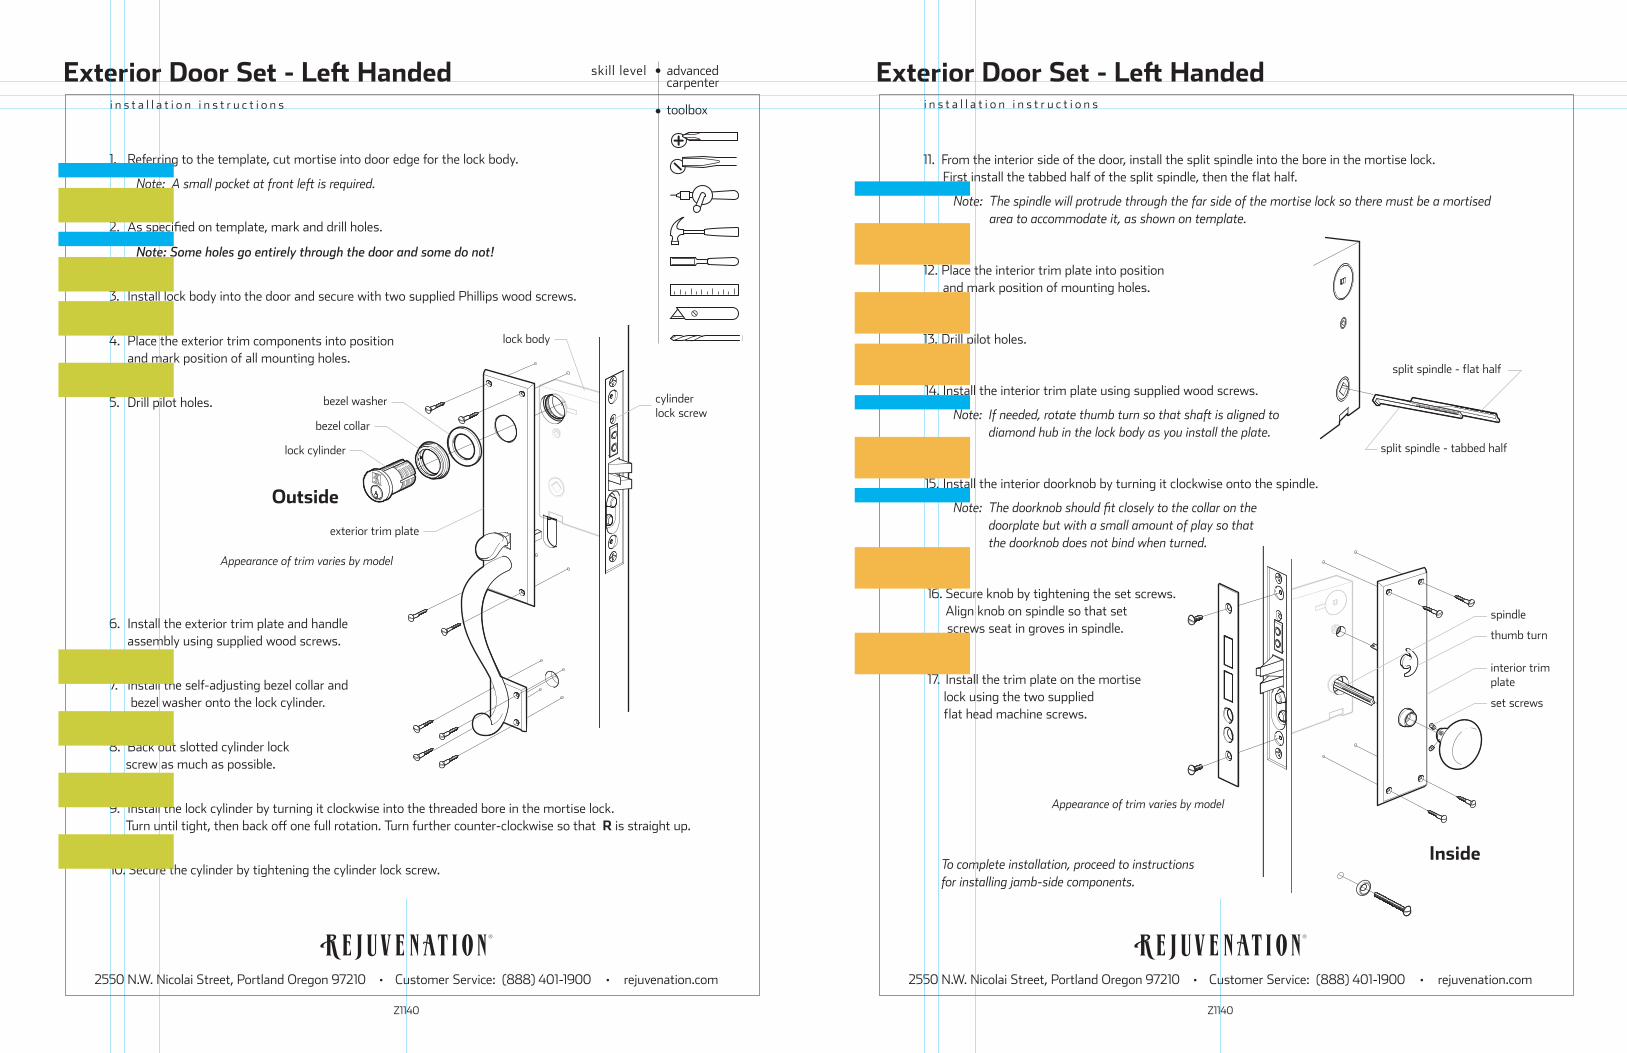
bezel collar
bezel washer
lock cylinder
lock body
exterior trim plate
cylinderlock screw
split spindle - flat half
split spindle - tabbed half
interior trim plate
set screws
spindle
thumb turn
Appearance of trim varies by model
Appearance of trim varies by model
Outside
Inside
1. Referring to the template, cut mortise into door edge for the lock body.
2. As specified on template, mark and drill holes.
3. Install lock body into the door and secure with two supplied Phillips wood screws.
4. Place the exterior trim components into position and mark position of all mounting holes.
5. Drill pilot holes.
6. Install the exterior trim plate and handle assembly using supplied wood screws.
7. Install the self-adjusting bezel collar and bezel washer onto the lock cylinder.
8. Back out slotted cylinder lock screw as much as possible.
9. Install the lock cylinder by turning it clockwise into the threaded bore in the mortise lock. Turn until tight, then back o� one full rotation. Turn further counter-clockwise so that R is straight up.
Note: A small pocket at front le� is required.
Note: Some holes go entirely through the door and some do not!
Note: The spindle will protrude through the far side of the mortise lock so there must be a mortised area to accommodate it, as shown on template.
11. From the interior side of the door, install the split spindle into the bore in the mortise lock. First install the tabbed half of the split spindle, then the flat half.
12. Place the interior trim plate into position and mark position of mounting holes.
13. Drill pilot holes.
Note: If needed, rotate thumb turn so that sha� is aligned to diamond hub in the lock body as you install the plate.
Note: The doorknob should fit closely to the collar on the doorplate but with a small amount of play so that the doorknob does not bind when turned.
To complete installation, proceed to instructions for installing jamb-side components.
14. Install the interior trim plate using supplied wood screws.
15. Install the interior doorknob by turning it clockwise onto the spindle.
16. Secure knob by tightening the set screws. Align knob on spindle so that set screws seat in groves in spindle.
17. Install the trim plate on the mortise lock using the two supplied flat head machine screws.
10. Secure the cylinder by tightening the cylinder lock screw.
Z1140
2550 N.W. Nicolai Street, Portland Oregon 97210 Customer Service: (888) 401-1900 rejuvenation.com
Z1140
2550 N.W. Nicolai Street, Portland Oregon 97210 Customer Service: (888) 401-1900 rejuvenation.com
i n s t a l l a t i o n i n s t r u c t i o n s
advanced carpenter Exterior Door Set - Le� Handed
i n s t a l l a t i o n i n s t r u c t i o n s
skill level
toolbox
Exterior Door Set - Le� Handed
vertical space as page layout allows
color use:
for outside printed docs- use Pantone 470U for header and high lighting
for on-demand printed docs - no color
for multi-page docs:
create individual PDFs
place in folder named to indicate doc ID and page count
saving instructions:
save as PDF
type X1A-2001
compatibility: acrobat 6
select trim marks ONLY if to be printed outside
do NOT use trim marks for print on demand docs
save at:
S:\Installation Instructions
File working docs and native files S:\home\TimW\installation instructions

strike plate
dust box
security strike
mortise
deadbolt
latch
1. To transfer the proper position to the door jamb, mark the mortise lock by rubbing graphite, crayon or lipstick onto the latch and deadbolt of the mortise lock.
2. Close the door and turn the thumb-turn to actuate the deadbolt a few times.
3. Based on the resulting markings, position the strike plate so that the dead bolt will be centered in the strike opening - in both vertical and horizontal directions.
4. Trace the outline of the strike plate onto the jamb. Include tongue, rectangular cut-outs and mounting holes.
5. Mortise a deep pocket for the dust box, and a shallow pocket for the strike face and security strike.
6. Use the security strike as a template to mark the two o�-center mounting holes. Arrow should point to the doorstop.
7. Drill pilot holes for the security strike and for the strike plate.
8. Mount the security strike using two supplied long phillips head screws.
9. Fit the dust box into place with the strike plate over it, and secure with two supplied screws.
The screws should extend into the door framing.
Proceed with installing jamb side parts a�er door set is installed in door.
Z1152
2550 N.W. Nicolai Street, Portland Oregon 97210 Customer Service: (888) 401-1900 rejuvenation.com
advanced carpenter Exterior Door Set - Jamb Side Parts
i n s t a l l a t i o n i n s t r u c t i o n s
skill level
toolbox
vertical space as page layout allows
color use:
for outside printed docs- use Pantone 470U for header and high lighting
for on-demand printed docs - no color
for multi-page docs:
create individual PDFs
place in folder named to indicate doc ID and page count
saving instructions:
save as PDF
type X1A-2001
compatibility: acrobat 6
select trim marks ONLY if to be printed outside
do NOT use trim marks for print on demand docs
save at:
S:\Installation Instructions
File working docs and native files S:\home\TimW\installation instructions