expert review examination of the cardiovascular … expert review examination of the cardiovascular...
TRANSCRIPT
26
Expert Review Examination of the Cardiovascular System Hannah Tharmalingam1 and Jeremy Dwight2 ……………………………………………………………………………………………………………………………………..
The Journal of Clinical Examination 2010 (10): 26-40 Abstract Examination of the cardiovascular system is an important skill for medical students and doctors. This article presents a comprehensive overview of the examination of the cardiovascular system in a format consistent with The Principles of Clinical Examination [1]. The paper also describes the signs of common and important cardiovascular diseases and, based on a review of the literature, the precision and accuracy of these signs is discussed.Word Count: 4659 (excluding tables, legends and references). Key words: cardiovascular system, clinical examination. Address for correspondence: [email protected] Author affiliations: 1 Hannah Tharmalingam - Foundation Year One Doctor, Ealing Hospital, London. 2 Jeremy Dwight - Consultant Cardiologist, John Radcliffe Hospital, Oxford.. …………………………………………………………………………………………………………………………………….. Literature Review The following textbooks of physical examination were searched:
Clinical Examination: A Systematic Guide to Physical Diagnosis [2]
Evidence-Based Physical Diagnosis [3]
Macleod’s Clinical Examination [4]
A search of the PubMed database was carried out using the MeSH terms ‘cardiovascular system’, ‘valvular heart diseases’, ‘heart failure’, ‘aortic dissection’ and ‘cardiac tamponade’ without exploding the terms. This search was combined with the terms ‘clinical examination’ or ‘diagnostic tests’. The aforementioned cardiovascular disease terms were entered into the clinical queries feature and a narrow, specific search was carried out, first under ‘diagnosis’ then ‘clinical prediction guides’. The JAMA Rational Clinical Examination [5] series and Evidence-Based Medicine Online [6] were searched using the terms ‘cardiovascular disease’ and ‘clinical examination’. Selection criteria were relevant papers written in English available through Oxford University e-resources. Introduction The examination of the cardiovascular system is important in the acutely unwell patient and in the medically stable patient. The focus of this article is
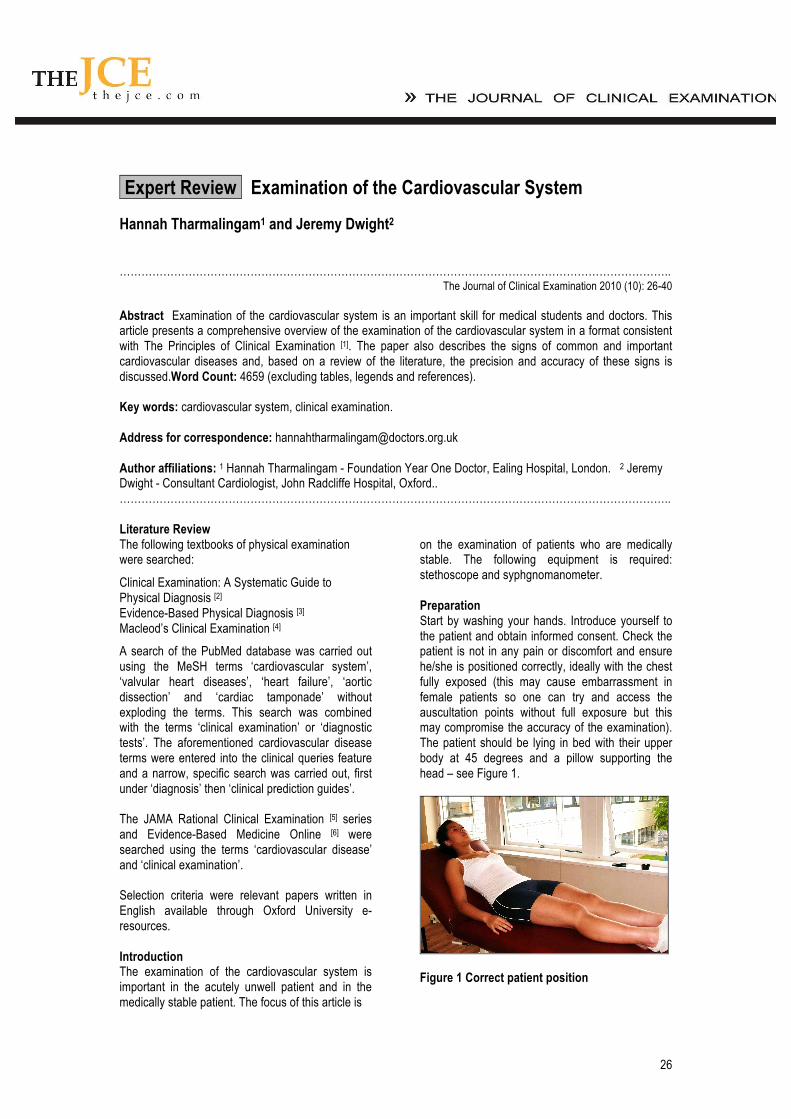
on the examination of patients who are medically stable. The following equipment is required: stethoscope and syphgnomanometer. Preparation Start by washing your hands. Introduce yourself to the patient and obtain informed consent. Check the patient is not in any pain or discomfort and ensure he/she is positioned correctly, ideally with the chest fully exposed (this may cause embarrassment in female patients so one can try and access the auscultation points without full exposure but this may compromise the accuracy of the examination). The patient should be lying in bed with their upper body at 45 degrees and a pillow supporting the head – see Figure 1.
Figure 1 Correct patient position

27
General Inspection Begin the examination at the end of the bed with an inspection of the patient’s general condition and their surroundings. Explain to the patient what you are doing to avoid embarrassment. Although each anatomical area will be examined in detail later in the examination it is important to note signs such as dyspnoea, pallor or cyanosis which may be detectable at this stage. Note any medical equipment attached to the patient or in his/her vicinity.
The Hands Move to the left-hand side of the bed (the patients’ right side) and examine the patient’s hands. Begin by inspecting the finger nails for splinter haemorrhages and clubbing. Splinter haemorrhages are reddish-brown linear haemorrhages lying parallel to the long axis of the nail. They are a sign of previous trauma or infective endocarditis.
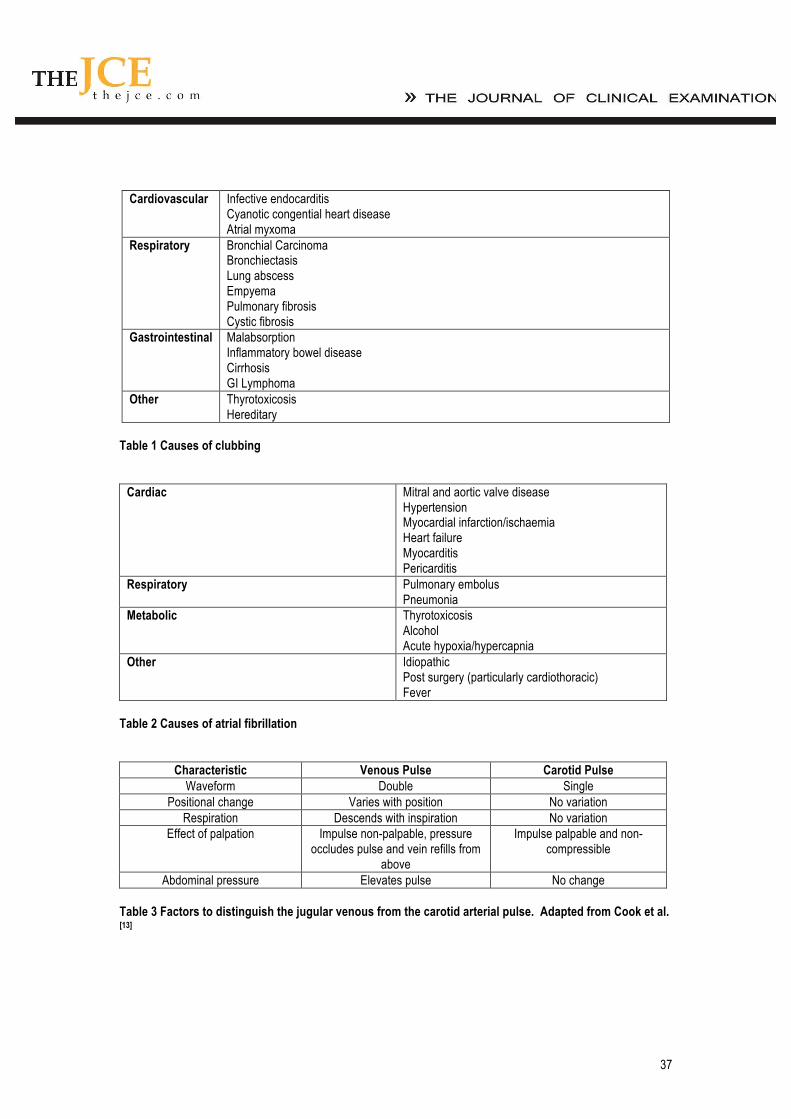
Clubbing is an enlargement of the soft tissue of the distal phalanges resulting in an exaggerated nail curvature, nail-fold bogginess and an angle of greater than 180° between the nail and nail-fold [7] – see Figure 2. Examine each of the fingers of each hand for these signs. Clubbing is an important sign but evidence suggests that it has poor precision – see Evidence Box 1. Shamroth’s sign may be a more reliable way to diagnose clubbing. Try to elicit Shamroth’s sign by asking the patient to curl the fingers of both hands towards the palms and then bring their hands together so the nails and distal interphalangeal joints of the two middle fingers touch – see Figure 3. If clubbing is absent there should be a diamond shaped gap between the two nails. The loss of this gap is Shamroth’s sign and is an indicator of clubbing. Clubbing also occurs in the toe-nails but the toes are not routinely examined as part of the examination of the cardiovascular system.The causes of clubbing are listed in Table 1.
Figure 2 Finger clubbing (www.cancergrace.org)
Figure 3 Examining for Shamroth’s sign when looking for clubbing Examine the dorsum of the hands. Inspect along the extensor tendons for cholesterol deposits called xanthomata. These are irregularly-shaped, yellowish nodules on the skin. Then ask the patient to turn their hands over and examine the finger pulps for painful, red, raised nodules known as Osler nodes and the palms for flat, red macules known as Janeway lesions. These are both highly specific signs of infective endocarditis but they tend to present in the later stages of the disease and so are not commonly seen in the developed world. Note the temperature of the hands and the colour of the skin. Assess the patient’s peripheral perfusion by squeezing the fingertip firmly for five seconds then letting go and recording the time taken for normal colour to return. This is the capillary refill time and should be less than three seconds. A delay indicates poor perfusion of the extremities which may be caused by hypovolaemia, hypothermia, peripheral vascular disease or just cool peripheries (with associated vasoconstriction). The Radial Pulse Palpate the right radial pulse by placing the tips of your index, middle and ring fingers over the radial artery, usually situated just medial to the radius. You should assess the rate, the rhythm and the character of the pulse. Establish the rate in beats per minute by counting the number of beats over a 15 second period and multiplying by four. The normal resting heart rate should be between 60 and 100 beats per minute. Then analyse the rhythm of the pulse and decide if it is regular, irregularly irregular, or regularly irregular. A regular pulse is at a constant frequency with a constant interval between the beats. If it is
28
not of a constant frequency it is irregular. Irregular pulses are conventionally divided into ‘regularly irregular’ and ‘irregularly irregular’. A regularly irregular pulse has a repeating pattern – for example two beats close together, then a gap and then another two beats close together. If there is no repeating pattern and the beats seem to arise randomly then the pulse is said to be irregularly irregular. A correlation of pulse character and underlying cardiac rhythm is beyond the scope of this article but one of the most common abnormalities of pulse rhythm is atrial fibrillation (AF) which gives an irregularly irregular pulse. The causes of AF are given in Table 2.
The character of the radial pulse should also be assessed, although it is more accurate to do this in large volume central pulses such as the carotids. A ‘slow-rising’ pulse has a delayed up-stroke and occurs in aortic stenosis. A pulse is described as ‘bounding’ if it has an increased up-stroke and down-stroke. This may be a sign of CO2 retention. A ‘jerky’ pulse is characteristic of hypertrophic cardiomyopathy, but this is unlikely to be detected peripherally.
Proceed to palpate both radial pulses simultaneously to detect any inequality in timing. This is known as radio-radial delay and is a sign of aortic coarctation. Check for inequality in the strength of the radial pulses. Strength inequality of arm pulses has been shown to be a highly sensitive sign in diagnosing aortic dissection [8] – see Evidence Box 2.
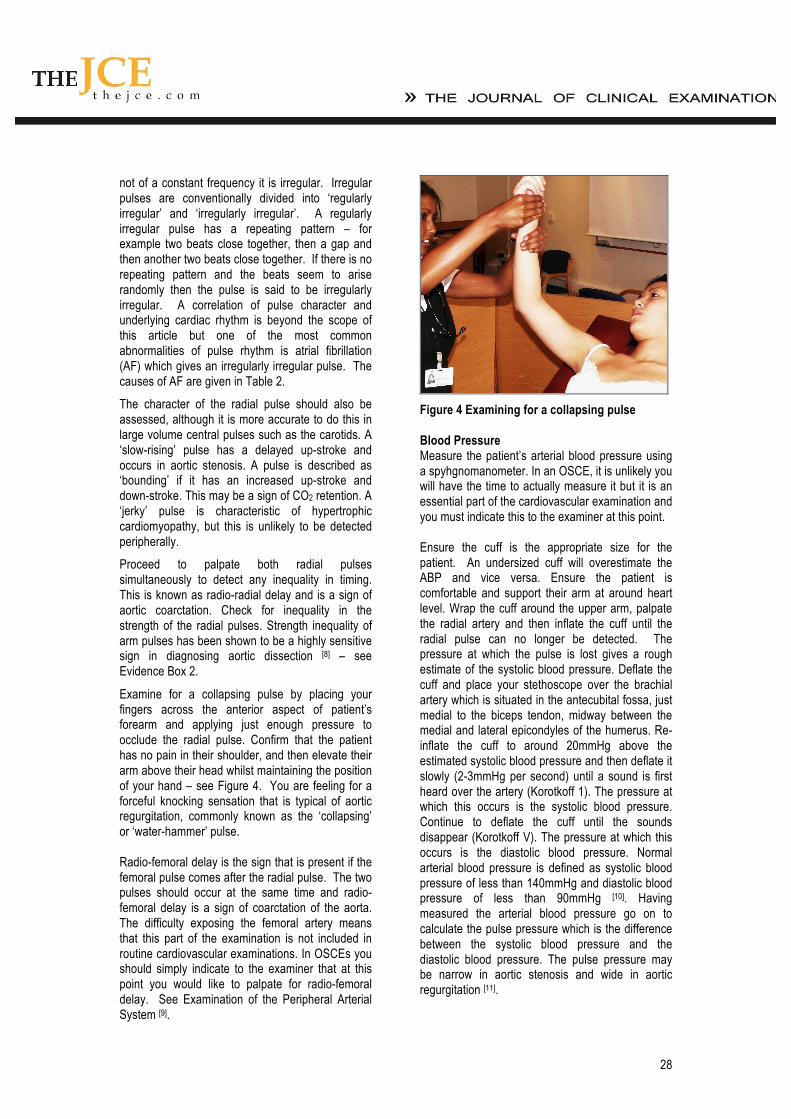
Examine for a collapsing pulse by placing your fingers across the anterior aspect of patient’s forearm and applying just enough pressure to occlude the radial pulse. Confirm that the patient has no pain in their shoulder, and then elevate their arm above their head whilst maintaining the position of your hand – see Figure 4. You are feeling for a forceful knocking sensation that is typical of aortic regurgitation, commonly known as the ‘collapsing’ or ‘water-hammer’ pulse. Radio-femoral delay is the sign that is present if the femoral pulse comes after the radial pulse. The two pulses should occur at the same time and radio-femoral delay is a sign of coarctation of the aorta. The difficulty exposing the femoral artery means that this part of the examination is not included in routine cardiovascular examinations. In OSCEs you should simply indicate to the examiner that at this point you would like to palpate for radio-femoral delay. See Examination of the Peripheral Arterial System [9].
Figure 4 Examining for a collapsing pulse Blood Pressure Measure the patient’s arterial blood pressure using a spyhgnomanometer. In an OSCE, it is unlikely you will have the time to actually measure it but it is an essential part of the cardiovascular examination and you must indicate this to the examiner at this point. Ensure the cuff is the appropriate size for the patient. An undersized cuff will overestimate the ABP and vice versa. Ensure the patient is comfortable and support their arm at around heart level. Wrap the cuff around the upper arm, palpate the radial artery and then inflate the cuff until the radial pulse can no longer be detected. The pressure at which the pulse is lost gives a rough estimate of the systolic blood pressure. Deflate the cuff and place your stethoscope over the brachial artery which is situated in the antecubital fossa, just medial to the biceps tendon, midway between the medial and lateral epicondyles of the humerus. Re-inflate the cuff to around 20mmHg above the estimated systolic blood pressure and then deflate it slowly (2-3mmHg per second) until a sound is first heard over the artery (Korotkoff 1). The pressure at which this occurs is the systolic blood pressure. Continue to deflate the cuff until the sounds disappear (Korotkoff V). The pressure at which this occurs is the diastolic blood pressure. Normal arterial blood pressure is defined as systolic blood pressure of less than 140mmHg and diastolic blood pressure of less than 90mmHg [10]. Having measured the arterial blood pressure go on to calculate the pulse pressure which is the difference between the systolic blood pressure and the diastolic blood pressure. The pulse pressure may be narrow in aortic stenosis and wide in aortic regurgitation [11].

29
Postural Blood Pressure A full examination of the cardiovascular system should include lying and standing blood pressure to see if there is a postural drop in blood pressure. But this should not be done at this stage in a medical school examination because there is not sufficient time. Simply indicate to the examiner that you would like to perform it and mention it again at the end of your examination. To measure the postural blood pressure, position the patient lying supine, wait two minutes then measure the blood pressure as described above. Then stand the patient up, wait a further minute and repeat the blood pressure reading [12]. A postural drop in blood pressure is defined as a fall on standing of greater than 15mmHg in systolic BP or 10mmHg diastolic [2]. Face, Eyes and Mouth Look around the eyes for yellow cholesterol deposits known as xanthelasma. These are sharply demarcated, yellow plaques, usually around 1-2mm and most commonly found on the upper and lower eyelids. Examine the iris for senile arcus, a grey or white arc visible around the cornea. These are signs of hyperlipidaemia. Ask the patient to look up, and retract the lower eyelid to inspect for conjunctival pallor which is a sign of anaemia. Use a pen-torch to examine the inside of the mouth. Inspect below the tongue and the lips for central cyanosis, a blue discolouration of the skin and mucous membranes as a result of hypoxia. Inspect the mucosa for petechiae which can be caused by infective endocarditis and note the patient’s dental hygiene. Poor dental hygiene is a risk factor for infective endocarditis. The Neck Examination of the neck includes assessment of the jugular pulse and the carotid pulse. The Jugular Venous Pulse The jugular venous pulse (JVP) provides an estimate of the central venous pressure (CVP) and hence the patient’s volume status and heart function [11]. Although it is an important part of the examination, clinical assessment of CVP using the JVP has poor sensitivity – see Evidence Box 3 and Examination of Hydration Status [12]. To assess the JVP, ask the patient to turn their head to the left and extend their neck directly backwards – see Figure 5. It may be helpful to gently move the patient’s head into the correct position.
Figure 5 Positioning of the neck for assessment of the JVP First measure the height of the JVPs highest point in centimetres. This is the vertical height above the sternal angle at which a pulsation is observed in the internal jugular vein. It is very important that the patient is positioned at 45° because this angle directly influences the height of the JVP for any given CVP. Look for the JVP along the course of the vein which travels from the earlobe, down the neck and into the chest, between the two heads of sternocleidomastoid. A JVP of greater than 4cm is said to be elevated [13]. It may be difficult to distinguish the JVP from the carotid pulse but there are a number of differentiating features that will help you make the distinction – see Table 3. Make an assessment of the waveform of the JVP. Figure 1 of Levick & Dwight [11] shows the normal waveform. Simultaneously palpating the contralateral carotid may help you in identifying its different components [11]. The a-wave coincides with the first heart sound and precedes the carotid pulse. The most common abnormalities of the JVP waveform are described in Table 4. Go on to try and elicit the abdominojugular reflex. Ensure the patient has no abdominal pain and press firmly on their right upper quadrant for 15-30 seconds and inspect the JVP. A sustained increase of 4cm or greater throughout the compression is a sign of right ventricular failure – see Evidence Box 4.

30
Ask the patient to breathe slowly through the mouth, then look for the presence of Kussmaul’s sign, a paradoxical increase in the JVP with inspiration [4]. This can occur in any condition where right ventricular filling is restricted such as constrictive pericarditis or cardiac tamponade. The Carotid Pulse Palpate the carotid artery, medial to the sternocleidomastoid, paying particular attention to its character and volume, as well as the rate and rhythm – see Figure 6. Palpate each side in turn, never simultaneously as this may compromise the cerebral blood supply.
Figure 6 Palpating the carotid pulse The Praecordium Table 5 shows the key characteristics of the most important heart valve abnormalities. Inspect Begin by inspecting for scars. Look at the midline of the chest for a median sternotomy scar which would indicate previous valve surgery or a coronary artery by-pass graft. Examine the mid-axillary lines for a lateral thoracotomy scar indicating previous thoracic surgery. Look under the clavicles for a cardiac pacemaker or defibrillator. Look for visible cardiac impulses. Palpate Palpate the apex beat first. The apex beat is defined as the most lateral and inferior point on the chest wall at which a cardiac impulse can be felt. To locate it, identify the sternal angle found at the
junction of the sternum and second rib, move your fingers laterally and inferiorly to the second intercostal space, then count down the intercostal spaces in the midclavicular line. The apex beat should be situated in the fifth intercostal space along the midclavicular line (Figure 7). If the apex beat is impalpable here, move inferiorly and laterally. Displacement of the apex in this direction suggests cardiomegaly.
Figure 7 Palpating the apex beat Go on to assess the character of the apex beat. Decide if it is normal, pressure-overloaded or volume-overloaded. A pressure-overloaded apex is heaving, sustained and forceful, and develops as a result of aortic stenosis or hypertension. A volume-overloaded apex is diffuse and displaced laterally and/or inferiorly. This may be a feature of aortic or mitral regurgitation, dilated cardiomyopathy or ventricular damage due to ischaemic heart disease. A ‘tapping’ apex beat is a palpable first heart sound and a sign of mitral stenosis. A ‘double impulse’ apex (two beats per cardiac cycle) is a sign of hypertrophic cardiomyopathy. Place the heel of your hand over the lower left sternal edge and feel for a right ventricular heave as a push against your hand. This is a sign of right ventricular hypertrophy (Figure 8). Then feel for thrills (see Table 8 and Figure 9) by systematically placing the flat of your hand over the apex (mitral valve area), lower left sternal edge (tricuspid valve area), right 2nd intercostal space (aortic valve area)
31
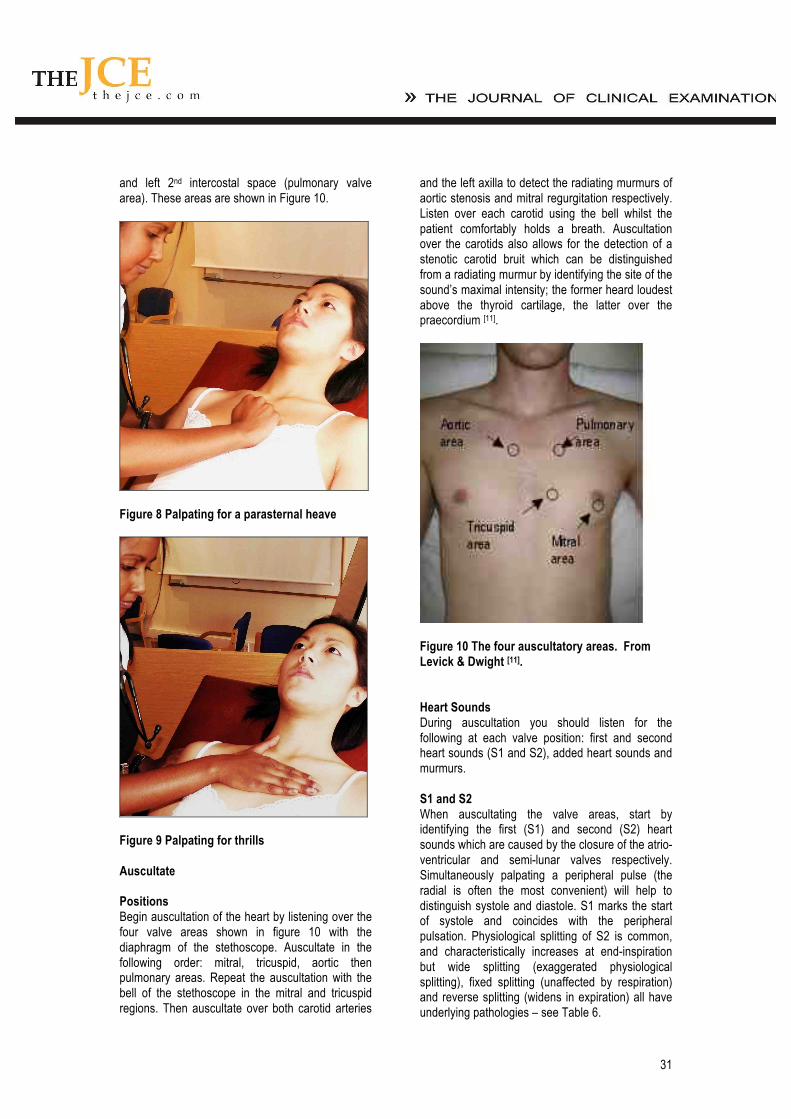
and left 2nd intercostal space (pulmonary valve area). These areas are shown in Figure 10.
Figure 8 Palpating for a parasternal heave
Figure 9 Palpating for thrills Auscultate Positions Begin auscultation of the heart by listening over the four valve areas shown in figure 10 with the diaphragm of the stethoscope. Auscultate in the following order: mitral, tricuspid, aortic then pulmonary areas. Repeat the auscultation with the bell of the stethoscope in the mitral and tricuspid regions. Then auscultate over both carotid arteries
and the left axilla to detect the radiating murmurs of aortic stenosis and mitral regurgitation respectively. Listen over each carotid using the bell whilst the patient comfortably holds a breath. Auscultation over the carotids also allows for the detection of a stenotic carotid bruit which can be distinguished from a radiating murmur by identifying the site of the sound’s maximal intensity; the former heard loudest above the thyroid cartilage, the latter over the praecordium [11].
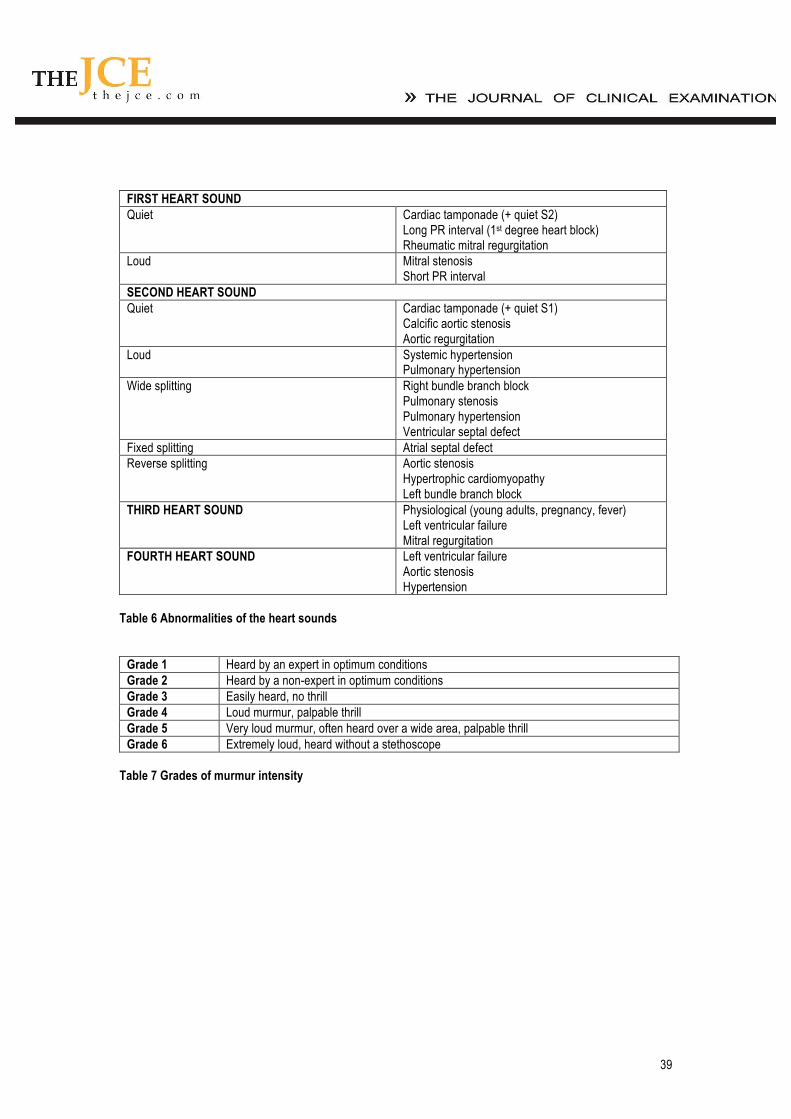
Figure 10 The four auscultatory areas. From Levick & Dwight [11]. Heart Sounds During auscultation you should listen for the following at each valve position: first and second heart sounds (S1 and S2), added heart sounds and murmurs. S1 and S2 When auscultating the valve areas, start by identifying the first (S1) and second (S2) heart sounds which are caused by the closure of the atrio-ventricular and semi-lunar valves respectively. Simultaneously palpating a peripheral pulse (the radial is often the most convenient) will help to distinguish systole and diastole. S1 marks the start of systole and coincides with the peripheral pulsation. Physiological splitting of S2 is common, and characteristically increases at end-inspiration but wide splitting (exaggerated physiological splitting), fixed splitting (unaffected by respiration) and reverse splitting (widens in expiration) all have underlying pathologies – see Table 6.
32
Added Sounds Now listen between S1 and S2 for added heart sounds. The 3rd heart sound (S3) is a low-pitched extra heart sound that occurs in early diastole, just after S2, and is best heard over the apex. It produces a ‘gallop’ rhythm often compared to the cadence of the word ‘Kentucky’ with the syllables ‘ken’, ‘tuc’ and ‘ky’ representing S1, S2 and S3 respectively. The presence of the third heart sound may indicate left ventricular failure, mitral regurgitation or high output cardiac states, but it can be physiological in the young. Listen for a fourth heart sound (S4), which is slightly higher-pitched and occurs in late-diastole, immediately before S1. It produces a ‘gallop’ rhythm often compared to the cadence of the word ‘Tennessee’ with the syllables ‘ten’, ‘nes’ and ‘see’ representing S4, S1 and S2 respectively. A fourth heart sound is indicative of a poorly compliant ventricle and is always pathological, associated with aortic stenosis, hypertension and left ventricular failure. Go on to auscultate for other abnormal sounds. First, listen for an ejection click, a high-pitched ringing sound heard in early systole shortly after S1. This is a feature of aortic or pulmonary stenosis and is thought to be caused by the sudden opening of the deformed valve. Listen for a mid-systolic click, a sound most often associated with mitral valve prolapse which may be accompanied by a late systolic murmur. Listen in early diastole for an opening snap heard in mitral stenosis. This is best heard over the lower left sternal edge and is caused by the rapid opening of a stenosed but pliable mitral valve under high left atrial pressure. Finally, listen throughout the cardiac cycle for the ‘walking on snow’ sound of a pericardial friction rub, caused by pericarditis. Murmurs Murmurs should be considered in terms of timing, site of greatest intensity, character, loudness, and radiation [2]. The intensity of a murmur does not really help in assessing the severity of the valve lesion, but a change in intensity may be of importance [4]. Murmur intensity can be quantified using Levine’s grading system, as shown in Table 7. Of all the features of a murmur, its timing is most important diagnostically [14]. The differential diagnosis of the variously timed murmurs is shown in Table 8. The reliability of characteristic murmurs in diagnosing valvular heart disease appears to vary significantly between the different abnormalities (Evidence Box 5).
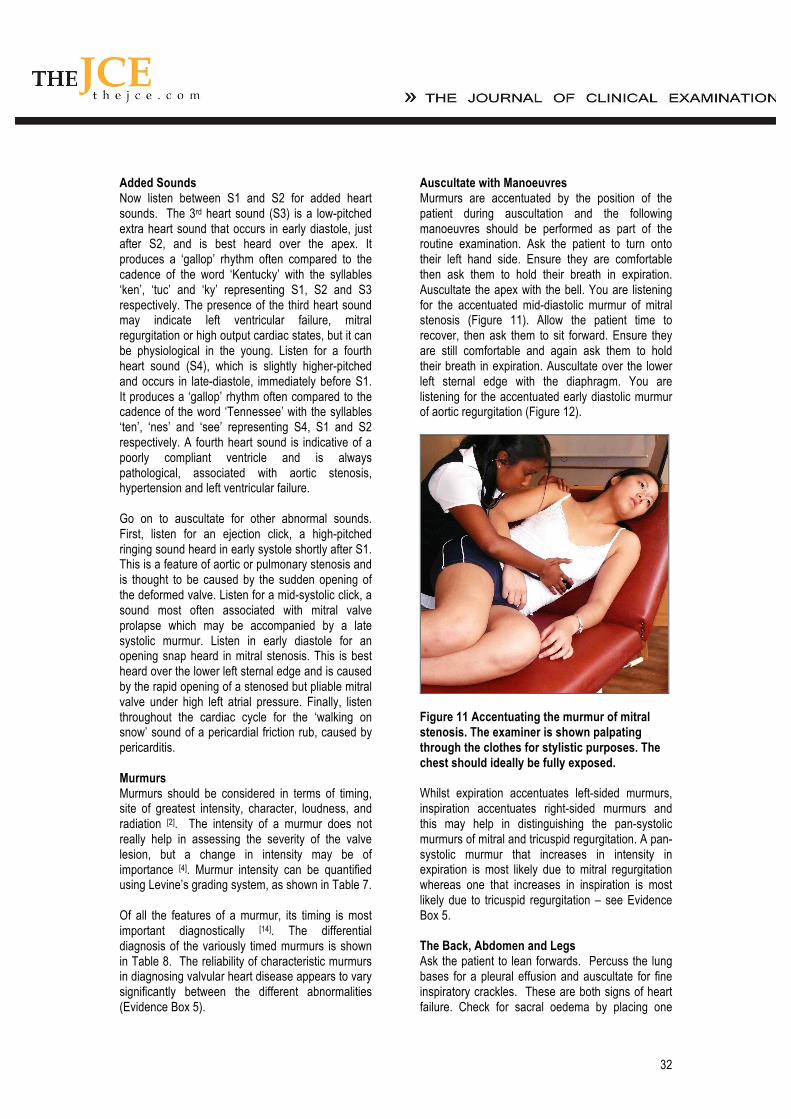
Auscultate with Manoeuvres Murmurs are accentuated by the position of the patient during auscultation and the following manoeuvres should be performed as part of the routine examination. Ask the patient to turn onto their left hand side. Ensure they are comfortable then ask them to hold their breath in expiration. Auscultate the apex with the bell. You are listening for the accentuated mid-diastolic murmur of mitral stenosis (Figure 11). Allow the patient time to recover, then ask them to sit forward. Ensure they are still comfortable and again ask them to hold their breath in expiration. Auscultate over the lower left sternal edge with the diaphragm. You are listening for the accentuated early diastolic murmur of aortic regurgitation (Figure 12).
Figure 11 Accentuating the murmur of mitral stenosis. The examiner is shown palpating through the clothes for stylistic purposes. The chest should ideally be fully exposed. Whilst expiration accentuates left-sided murmurs, inspiration accentuates right-sided murmurs and this may help in distinguishing the pan-systolic murmurs of mitral and tricuspid regurgitation. A pan-systolic murmur that increases in intensity in expiration is most likely due to mitral regurgitation whereas one that increases in inspiration is most likely due to tricuspid regurgitation – see Evidence Box 5. The Back, Abdomen and Legs Ask the patient to lean forwards. Percuss the lung bases for a pleural effusion and auscultate for fine inspiratory crackles. These are both signs of heart failure. Check for sacral oedema by placing one

33
finger firmly on the sacrum for ten seconds and observing for the persistence of an indentation after release. Examine the ankles for pedal oedema by placing one finger firmly on the ankle for ten seconds and observing for the persistence of an indentation after release. If present, repeat the procedure at regular points on the legs moving upwards towards the knees. Note the point on the leg to which the oedema extends.
Figure 12 Accentuating the murmur of aortic regurgitation Completing the Examination Thank the patient for their cooperation, help them back into comfortable posture and wash your hands. Give the patient some privacy to redress. In an OSCE you should finish by addressing the examiner. Reiterate the manouevres you mentioned during the examination but did not perform. These will include examination of the toenails, examining for radio-femoral delay, and measuring postural blood pressure. You should also indicate your desire to examine the peripheral pulses as detailed in the Examination of the Peripheral Arterial System [9] and to examine the abdomen for an abdominal aortic aneurysm and an enlarged liver (heart failure). Go on to explain the special tests and bedside investigations you would like to undertake, as detailed below.
Special Tests Pulsus paradoxus is usually defined as an inspiratory decline in systolic BP that exceeds 10mmHg, but a more appropriate threshold may be 12mmHg which has been shown to be the upper 95% confidence interval for an inspiratory drop in normal individuals [15]. It occurs in 98% of patients with cardiac tamponade [3] and is a highly sensitive and specific sign in identifying the condition in those with known pericardial effusions – see Evidence Box 7. One should therefore always check for pulsus paradoxus in patients with suspected pericardial disease and you should indicate this to the examiner [3]. To measure pulsus paradoxus, begin by measuring the BP as described but on hearing the first Korotkoff sound, prevent further deflation of the cuff. In patients with paradox, the sounds are intermittent with respiration. Note this pressure then continue to deflate the cuff until sounds are heard throughout the respiratory cycle. The amount of paradox in mmHg is the difference between the pressure at this point and the initial measurement [11]. Bedside Investigations Routine ‘observations’ or ‘vital signs’ are an essential part of the examination of the cardiovascular system. You have already calculated the heart rate and BP. You also need to know the respiratory rate, the oxygen saturations and the temperature of the patient. Bedside tests which may be indicated include the electrocardiogram and urinalysis. Acknowledgements With thanks to Amelia Ng and Mickhaiel Barrow for assistance in obtaining the images. Conflicting Interests None References 1 Jopling H. Principles of Clinical Examination. The Journal of Clinical Examination. 2006;1:2-6
2 Talley NJ, O’Connor S. Clinical Examination, 5th Edition. Churchill Livingstone
3 McGee S. Evidence-based physical diagnosis, 2nd Edition. Saunders
4 Douglas G, Nicol F, Robertson C. Macleod's Clinical Examination, 11th Edition. Churchill Livingstone
5 http://jama.ama-assn.org/search.dt

34
6 http://ebm.bmj.com/
7 Myers KA, Farquhar DR. The Rational Clinical Examination. Does this patient have clubbing? JAMA. 2001;18;286(3):341-7
8 Klompas M. The Rational Clinical Examination. Does this patient have an acute thoracic aortic dissection? JAMA. 2002;287(17)2262-72
9 Ayre K, Handa A. Examination of the peripheral arterial system. The Journal of Clinical Examination 2008;8:49-61
10 Joint National Committee. The fifth report of the Joint National Committee on Detection, Evaluation and Treatment of High Blood Pressure (JNC V). Arch Intern Med. 1993;153(2):154-183
11 Levick C, Dwight J. Examination of the cardiovascular system. The Journal of Clinical Examination 2007;3:8-14
12 Doolittle H, Sainsbury M. Examination of hydration status. The Journal of Clinical Examination 2008;7:9-19
13 Cook DJ, Simel DL. The Rational Clinical Examination. Does this patient have abnormal central venous pressure? JAMA. 1996;275(8)630-634
14 Etchells EE, Bell C, Robb K. The Rational Clinical Examination. Does this patient have an abnormal systolic murmur? JAMA. 1997;277(7):564-71
15 Curtiss EI, Reddy PS, Uretsky BF, Cecchetti AA. Pulsus paradox: definition and relation to severity of cardiac tamponade. Am Heart J. 1988;115:391-8
16 Pyke DA. Finger clubbing. Lancet. 1954;2(6834):352-4
17 Spiteri MA, Cook DG, Clarke SW. Reliability of eliciting physical signs in examination of the chest. Lancet. 1988;1(8590):873-5
18 Smyllie HC, Blendis LM, Armitage P. Observer disagreement in physical signs of the respiratory system. Lancet. 1965;2(7409):412-13
19 Von Kodolitsch Y, Schwartz AG, Nienaber CA. et al. Clinical prediction of acute aortic dissection. Arch Intern Med. 2000;160(19)2977-82
20 Cook DJ. The clinical assessment of central venous pressure. Am J Med Sci. 1990;299(3):175-8
21 Eisenberg PR, Jaffe AS, Schuster DP. Clinical evaluation compared to pulmonary artery catheterization in the hemodynamic assessment of critically ill patients. Crit Care Med. 1984;12(7):549-53
22 McGee SR. Physical examination of venous pressure: a critical review. Am Heart J. 1998;136(1):6-9
23 Marantz PR, Kaplan MC, Alderman MH et al. Clinical diagnosis of congestive heart failure in patients with acute dyspnea. Chest. 1990;97(4):776-81
24 Choudhry NK, Etchells EE. The Rational Clinical Examination. Does this patient have aortic regurgitation? JAMA. 1999;281(23):2231-8
25 Etchells EE, Glenns V, Shadowitz S, Bell C, Siu S. A bedside clinical prediction rule for detecting moderate or severe aortic stenosis. J Gen Intern Med. 1998;13(10):699-704
26 Gibbs CR Watson RD, Singh SP, Lip GY. Management of pericardial effusion by drainage: a survey of 10 years' experience in a city centre general hospital serving a multiracial population. Postgrad Med. 2000;76:809-13
27 Roy CL Minor MA, Brookhart MA, Choudhry NK. The Rational Clinical Examination. Does this patient with a pericardial effusion have cardiac tamponade? JAMA. 2007;297(16):1810-8
35
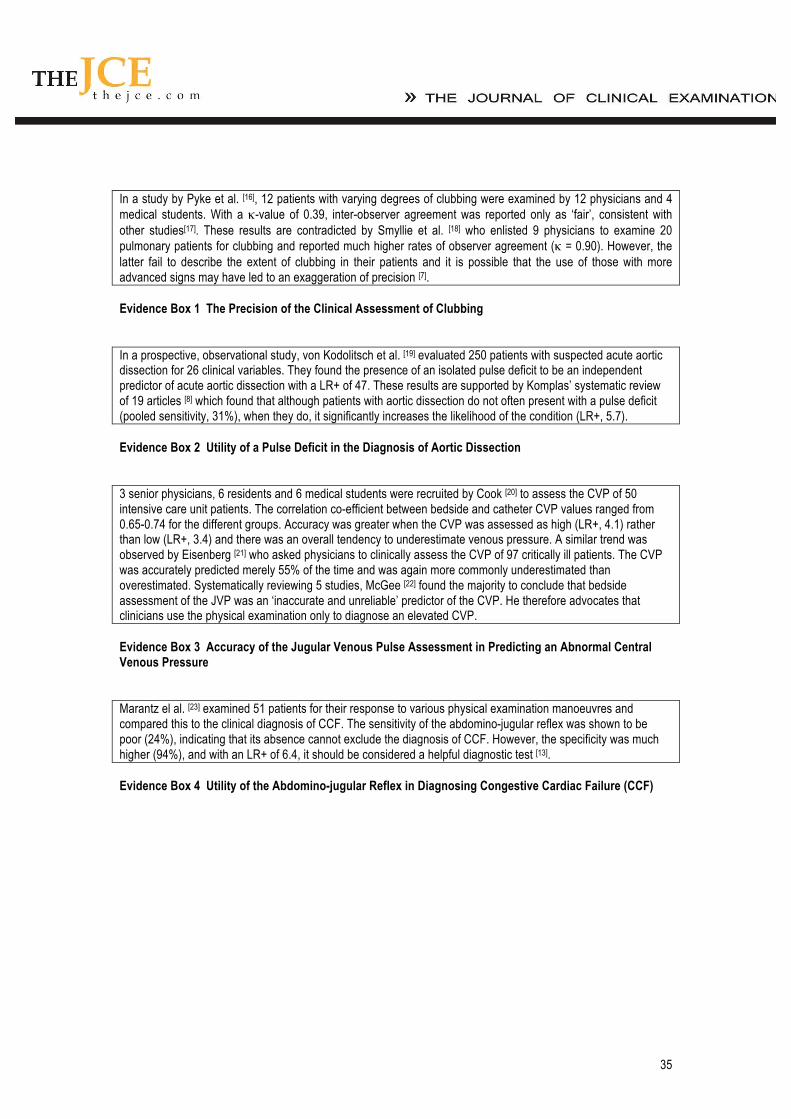
In a study by Pyke et al. [16], 12 patients with varying degrees of clubbing were examined by 12 physicians and 4 medical students. With a !-value of 0.39, inter-observer agreement was reported only as ‘fair’, consistent with other studies[17]. These results are contradicted by Smyllie et al. [18] who enlisted 9 physicians to examine 20 pulmonary patients for clubbing and reported much higher rates of observer agreement (! = 0.90). However, the latter fail to describe the extent of clubbing in their patients and it is possible that the use of those with more advanced signs may have led to an exaggeration of precision [7]. Evidence Box 1 The Precision of the Clinical Assessment of Clubbing In a prospective, observational study, von Kodolitsch et al. [19] evaluated 250 patients with suspected acute aortic dissection for 26 clinical variables. They found the presence of an isolated pulse deficit to be an independent predictor of acute aortic dissection with a LR+ of 47. These results are supported by Komplas’ systematic review of 19 articles [8] which found that although patients with aortic dissection do not often present with a pulse deficit (pooled sensitivity, 31%), when they do, it significantly increases the likelihood of the condition (LR+, 5.7). Evidence Box 2 Utility of a Pulse Deficit in the Diagnosis of Aortic Dissection 3 senior physicians, 6 residents and 6 medical students were recruited by Cook [20] to assess the CVP of 50 intensive care unit patients. The correlation co-efficient between bedside and catheter CVP values ranged from 0.65-0.74 for the different groups. Accuracy was greater when the CVP was assessed as high (LR+, 4.1) rather than low (LR+, 3.4) and there was an overall tendency to underestimate venous pressure. A similar trend was observed by Eisenberg [21] who asked physicians to clinically assess the CVP of 97 critically ill patients. The CVP was accurately predicted merely 55% of the time and was again more commonly underestimated than overestimated. Systematically reviewing 5 studies, McGee [22] found the majority to conclude that bedside assessment of the JVP was an ‘inaccurate and unreliable’ predictor of the CVP. He therefore advocates that clinicians use the physical examination only to diagnose an elevated CVP. Evidence Box 3 Accuracy of the Jugular Venous Pulse Assessment in Predicting an Abnormal Central Venous Pressure Marantz el al. [23] examined 51 patients for their response to various physical examination manoeuvres and compared this to the clinical diagnosis of CCF. The sensitivity of the abdomino-jugular reflex was shown to be poor (24%), indicating that its absence cannot exclude the diagnosis of CCF. However, the specificity was much higher (94%), and with an LR+ of 6.4, it should be considered a helpful diagnostic test [13]. Evidence Box 4 Utility of the Abdomino-jugular Reflex in Diagnosing Congestive Cardiac Failure (CCF)

36
The systematic reviews of Etchells [14] and Choudhry [24] looking respectively at the accuracy of systolic and diastolic murmurs in diagnosing valvular heart disease revealed the following results:
Characteristic systolic murmur LR+ LR- Aortic stenosis Mitral regurgitation Tricuspid regurgitation
2.4-2.6 3.6-3.9
10.1
0 0.12-0.34
0.41
Characteristic diastolic murmur LR+ LR- Aortic regurgitation Mitral stenosis Pulmonary regurgitation
8.8-32 No data given
17
0.2-0.3 No data given
0.9
To aid in distinguishing the pan-systolic murmurs of tricuspid and mitral regurgitation, an increase in murmur intensity with inspiration was shown to be highly diagnostic of the right-sided lesion (LR+, !; LR-, 0.2). Evidence box 5 Utility of a Characteristic Murmur in Diagnosing Common Valvular Abnormalities The cross-sectional study of Etchells et al. [25] saw 2 general physicians examine 123 patients for signs of aortic stenosis (AS). Prospective evaluation of the findings resulting in the following prediction rule: The absence of murmur radiation to the right clavicle rules out AS (LR-, 0.10) whilst the presence of 3-4 associated features, namely a slow-rising carotid pulse, a low-volume carotid pulse, a soft S2, and maximal murmur intensity over the aortic area rules in AS (LR+, 40). It should be noted that the 95% CI to rule in AS was very wide (6.6-239), suggesting a lack of certainty in this arm of the prediction rule. Whilst this is acknowledged by the authors, they argue that it is of little clinical importance as should the physical examination rule in AS, an echocardiogram would always be requested, minimizing any adverse consequences of a false-positive examination [25]. Evidence Box 6 Clinical Prediction Rule for Detecting Moderate-Severe Aortic Stenosis In a prospective, cohort study by Curtiss et al. [15] 65 patients with known pericardial effusion were examined for suspected tamponade. They found the presence of a pulsus paradox greater than 12mmHg to have a sensitivity of 98% and specificity of 83% in the diagnosis of tamponade, equating to a LR+ of 5.9 and LR- of 0.03. These results are supported by the more recent study of Gibbs et al. [26] who conducted a retrospective chart review of patients with pericardial effusion. They found that a pulsus paradox of greater than 10mmHg had a PPV of 100% and NPV of 55% in patients with echocardiographic evidence of cardiac tamponade. This led the authors to conclude that ‘pulsus paradox was the single most reliable physical sign of tamponade’. However, they do acknowledge that it is not specific for tamponade, noting that atrial septal defect, aortic regurgitation and uraemia-induced left ventricular dysfunction are all conditions in which tamponade may occur in the absence of a paradoxical pulse. Moreover, both studies reviewed patients with known pericardial effusion. There is minimal evidence looking at the diagnostic accuracy of the clinical examination for cardiac tamponade in patients not already suspected to have the condition[16]. Evidence Box 7 Utility of pulsus paradox in the diagnosis of cardiac tamponade
37
Cardiovascular Infective endocarditis
Cyanotic congential heart disease Atrial myxoma
Respiratory Bronchial Carcinoma Bronchiectasis Lung abscess Empyema Pulmonary fibrosis Cystic fibrosis
Gastrointestinal Malabsorption Inflammatory bowel disease Cirrhosis GI Lymphoma
Other Thyrotoxicosis Hereditary
Table 1 Causes of clubbing
Cardiac Mitral and aortic valve disease Hypertension Myocardial infarction/ischaemia Heart failure Myocarditis Pericarditis
Respiratory Pulmonary embolus Pneumonia
Metabolic Thyrotoxicosis Alcohol Acute hypoxia/hypercapnia
Other Idiopathic Post surgery (particularly cardiothoracic) Fever
Table 2 Causes of atrial fibrillation
Characteristic Venous Pulse Carotid Pulse Waveform Double Single
Positional change Varies with position No variation Respiration Descends with inspiration No variation
Effect of palpation Impulse non-palpable, pressure occludes pulse and vein refills from
above
Impulse palpable and non-compressible
Abdominal pressure Elevates pulse No change Table 3 Factors to distinguish the jugular venous from the carotid arterial pulse. Adapted from Cook et al. [13]

38
Waveform Cause Cannon (irregular, large) a waves Complete heart block Absent a waves Atrial fibrillation Dominant v waves Tricuspid regurgitation Prominent x descent Acute cardiac tamponade
Constrictive pericarditis Absent x descent Atrial fibrillation Sharp y descent Severe tricuspid regurgitation
Constrictive pericarditis Slow y descent Tricuspid stenosis
Right atrial myxoma Table 4 Abnormalities of the waveform of the jugular venous pulsation
Condition Pulse Apex beat Heart sounds
Murmur timing
Murmur site
Murmur radiation
Periph- eral
features Aortic stenosis Slow-rising,
small volume Pressure loaded
A2 , 4+ Ejection systolic
Aortic area
Carotids Narrow pulse pressure
Mitral regurgitation
+/- Atrial fibrillation
Volume loaded
P2 , 3+ Pan-systolic
Apex Axilla RV Heave
Aortic regurgitation
Collapsing, large volume
Volume loaded
A2 , 3+ Early diastolic
Lower left sternal edge
Apex if severe
Wide pulse pressure
Mitral stenosis Small volume, +/- atrial fibrillation
Tapping S1 , P2 , opening snap
Mid-late diastolic
Apex Axilla Malar flush, RV heave
Tricuspid regurgitation
Normal Normal Normal Pan-systolic
Tricuspid area
Nil Raised JVP, ascites, Peripheraloedema, pulsatile liver
Table 5 Clinical Findings in the Common Valvular Abnormalities. Adapted from Levick & Dwight [11] RV, right ventricle; JVP, jugular venous pulse.
39
FIRST HEART SOUND Quiet Cardiac tamponade (+ quiet S2)
Long PR interval (1st degree heart block) Rheumatic mitral regurgitation
Loud Mitral stenosis Short PR interval
SECOND HEART SOUND Quiet Cardiac tamponade (+ quiet S1)
Calcific aortic stenosis Aortic regurgitation
Loud Systemic hypertension Pulmonary hypertension
Wide splitting Right bundle branch block Pulmonary stenosis Pulmonary hypertension Ventricular septal defect
Fixed splitting Atrial septal defect Reverse splitting Aortic stenosis
Hypertrophic cardiomyopathy Left bundle branch block
THIRD HEART SOUND Physiological (young adults, pregnancy, fever) Left ventricular failure Mitral regurgitation
FOURTH HEART SOUND Left ventricular failure Aortic stenosis Hypertension
Table 6 Abnormalities of the heart sounds
Grade 1 Heard by an expert in optimum conditions Grade 2 Heard by a non-expert in optimum conditions Grade 3 Easily heard, no thrill Grade 4 Loud murmur, palpable thrill Grade 5 Very loud murmur, often heard over a wide area, palpable thrill Grade 6 Extremely loud, heard without a stethoscope
Table 7 Grades of murmur intensity

40
SYSTOLIC MURMURS Ejection systolic Flow (thyrotoxicosis, pregnancy, anaemia,)
Aortic stenosis Pulmonary stenosis Aortic coarctation Hypertrophic cardiomyopathy
Pan systolic Mitral regurgitation Ventricular septal defect Tricuspid regurgitation
Late systolic Mitral valve prolapse Early systolic Acute severe mitral regurgitation DIASTOLIC MURMURS Early diastolic Aortic regurgitation
Pulmonary regurgitation Mid-late diastolic Mitral stenosis
Austin Flint Table 8 Differential diagnosis of differently timed murmurs (Adapted from Levick & Dwight [11])