exp 62” plus laminator owner’s manual rev 01 · exp 62” plus laminator owner’s manual rev...
TRANSCRIPT

EXP 62” Plus Laminator Owner’s Manual
REV 01
MADE IN U.S.A.
Laminator.com www.laminator.com

- 1 -
EXP 62” Plus Laminator Table of Contents About the Manual……………………………………………………………………………………………………. 1 Safety Precautions…………………………………………………………………………………………………….. 1-2 Finding a Work Area……………………………………………………………………………………………….. 3 Unpacking Your Laminator…………………………………………………………………………………….. 3 Loading Film……………………………………………………………………………………………………………….. 4 Operation Instructions for Release Liner Rewind (optional)………………………… 5 Tension…………………………………………………………………………………………………………………………. 6 Setting Roller Temperature…………………………………………………………………………………… 6 Control Panel Left Diagram…………………………………………………………………………………… 7 Control Panel Right Diagram………………………………………………………………………………… 8 Nip Adjusters Diagram……………………………………………………………………………………………. 9 Mounting Using a SuperStick® Pouch Mounting System……………………………. 10 Mounting and Laminating Using a SuperStick® Pouch Board…………………. 11 Encapsulating with a SuperStick® Flexible Pouch or Release Board….…. 12 Cleaning Your EXP 62” Plus Laminator………………………….............................................. 13 Specifications … ………………………………………………………………………………………………………… 13 Trouble Shooting………………………………………………………………………………………………………. 14 Warranty…………………………………………………..………………………………………………………………….. 15 Webbing Diagrams………………………………………………………………………………………………….. 16-19
Laminator.com www.laminator.com

- 2 -
About this Manual: READ ME FIRST! This manual contains all the information you need to properly unpack, operate and maintain your Laminator. Before unpacking your laminator we suggest you read and follow the manual step by step. It contains essential information about each and every facet of your laminator. Pay special attention to the work environment and safety precautions necessary for your laminating unit. Please pay special attention to particular notes and caution statements. These comments alert you to information that we feel essential to operator Safety and damage prevention to the laminator. Copyright Information: IMPORTANT: This manual is copyright protected by D&K Group Inc.. in accordance with the laws and requirements of the United States Government. Any reproduction of this manual, in part or in full, without the written permission of D&K Group Inc.. constitutes a violation of the U.S. copyright laws and is subject to prosecution.
Safety Precautions WARNING: Please review the following safety precautions before unpacking your new laminator.
Use care in unpacking and lifting the laminator. Keep laminator level when lifting or moving. Laminator weighs approximately 500 pounds.
Consider work area. A cluttered work space can lead to accidents. The laminator should be placed on a level sturdy surface. Do not attempt to operate the laminator in damp or wet environments. Do not operate electrical devices in the presence of flammable liquids, solvents or in gaseous/explosive atmospheres. Keep work area well lit. Allow sufficient access to front and back of machine. See the manual for additional work space requirements.
Respect feed rollers. Keep hands away from feed rollers and any other moving parts. Turn drive switch OFF before attempting to clear film wraparounds or jams. Use auto-matic reverse to clear film. Do not wear any loose clothing, ties, jewelry, etc., which can be caught by feed rollers and draw any body part into the machine.
Laminator.com www.laminator.com

- 3 -
Safety Precautions
Do not operate laminator with any panels or guards removed. Panels and guards protect operators from such moving parts as the drive chain and sprockets, roller ends, etc.
Turn the power switch OFF before walking away or leaving the laminator unattended.
Before lifting or moving laminator, turn power switch OFF, unplug unit and allow to cool to room temperature. Remove film rolls before lifting or moving machine. Film is easy to rethread, see the section in this manual.
Keep children away. Make sure visitors are kept well back from an operating laminator.
Do not abuse electrical cord. Never pull cord to disconnect it from a receptacle. Do not allow cord to contact heat, oil or sharp edges. Do not cut off or otherwise bypass the grounding prong on the plug.
If an extension cord is necessary be sure it is properly rated and of the same wire gauge or smaller as the laminator cord. Capacity of the cord must prevent loss of power and overheating. Before using, inspect extension cord for any damage, including loose or exposed wires, broken fittings, damaged insulation, etc.
For service on your laminator call D&K Group Inc.. Use only D&K Group Inc.’s parts for service or replacement. Failure to use D&K Group Inc.’s parts could void manufacturer’s warranty.
Use common sense. Be cautious when operating your laminator. Do not operate laminator when you are tired or your reactions are impaired in any way.
Do not allow anyone to operate the laminator who has not received proper instruction and has not read the safety instructions
Laminator.com www.laminator.com

- 4 -
Find a Work Area A separate work station is required to house your laminator. Ample room is necessary to access the laminator from all 4 sides. If the laminator is back against a wall, the laminating film may back up and jam the equipment. Your laminator must be on a stable, level surface. Tools necessary to set up your laminator include cutting shears and any adhesive tape. For future service or maintenance, an assortment of Allen wrenches, a flat head screwdriver and a Phillips head screwdriver are necessary.
Unpacking Your Laminator The shipping carton contains: 1 Laminator 1 Top Supply Mandrel 1 Bottom Supply Mandrel 1 Release Liner Rewind Mandrel 1 Feed Table 1 Operating Handbook Be sure to save the shipping carton . . . Should your laminator ever need to be returned for service, the foam-filled carton ensures safe transit. NOTE: Each laminator is test run after it is assembled. Your laminator may have a piece of test film in the rollers when you receive it. If so, before threading, remove the test film by turning the drive switch to “ON”. The test film will exit the laminator.
Laminator.com www.laminator.com

- 5 -
Loading Film Step 1: The laminator should be preheated before loading laminating film. To heat the machine see page 6 “Setting Roller Temperature”. Step 2: When the laminator is heating, the rollers should be turning to heat the rubber rollers evenly. Therefore, turn the drive switch to the forward position and rotate the speed control knob until the rollers are moving slowly. Heat approximately 15 minutes. NOTE: Do not apply excessive force to the ends of the mandrel (i.e. with a hammer). Force will cause damage. Film rolls must be centered on supply mandrels. If rolls are not aligned, hot adhesive will be deposited on the heated rubber rollers, necessitating a cleaning operation. 3” Core Poly out Film Choose your laminating film. For encapsulating, both types of film should be of the same size, type and thickness. Take the bottom supply mandrel and insert it into the roll of film. Place the lower mandrel on the laminator. Take the top supply mandrel and insert it into the desired roll of film and place it on the laminator as illustrated above. Follow the same steps to load the top supply mandrel. NOTE: When loading your laminating film, check for film splices. These rolls will be clearly marked. Splices are not common but are unavoidable. If you find a splice, place that film roll on the top position so the splice can be monitored carefully. When the splice is ready to come through the laminator, turn the drive off, and rotate the roll of film by hand so the film is very loose. Turn the drive switch again and allow the splice to run through. If necessary, keep turning the roll of film to keep it slack until the splice is out. Step 3: Thread the top roll of film under the idler roller. Pull the film down so that the film’s lead edge is below the lower roller. Next thread the bottom roll of film under the lower idler bar pulling film upward until it is even with the top roller shoe and parallel side to side with the top roll of film. “Tack” it to the top film edge, this creates a film “Web”. NOTE: Use caution when threading film around rollers. Step 4: Loosen tension on both rolls of laminating film. Turn on the “Drive” switch and using the threading board – push the film web into the laminating rolls. This process will push the web into the pull rolls and exit. Take extra care to ensure that the film exits between the rear rollers. Your laminator is now loaded. Remove the threading board and save for your next use. NOTE: Slowly run the laminator while threading to help maintain control. NOTE: Create your own threading board from a piece of poster board 12”x 60”
Laminator.com www.laminator.com

- 6 -
Operation Instructions for Release Liner Rewind (optional) This laminator is equipped with the features necessary to allow the use of pressure sensitive film with release for single side lamination. The Release Liner Rewind will remove the release from the film and wind the waste onto an empty core, which can then be disposed. The pressure sensitive film should be mounted on the upper supply roll and threaded under the idler shaft. An empty film core should be mounted on the Waste Rewind mandrel, and the mandrel mounted onto the laminator. A section of scrap media that is at least as wide as the film in use should be started into the front rollers of the laminator. Separate the release from the film for a length of about 6 inches, and mount the exposed portion of the film to the media that has been started into the machine. Bring the end of the release under and up to the Waste Rewind mandrel, and tape the release to the spare core that has been installed to the mandrel. The Waste Rewind mandrel may be rotated by hand to assist in the start up. Slowly advance the motor of the laminator guiding the film and media to the rear rollers, while insuring the release is firmly attached to the Waste Rewind core. The separation point for the film and release should be between the idler shaft and the point were the film contacts the heat shoe. The separation point can be adjusted by the tension knob on the Waste Rewind drive shaft. If the separation point is past the point were the film contacts the heat shoe, tighten the tension knob slowly until the separation point moves towards the idler shaft. If the separation point approaches the Waste Rewind mandrel or the idler shaft, loosen the tension knob slowly until the separation moves towards the heat shoe. The tension setting should need very little adjustment once set, but should be monitored during operation. Once the separation point is set, lamination is performed normally. Care should be taken to minimize the gap between successive pieces of media being laminated so that the adhesive from the film is in contact with the lower roll as little as possible.
Laminator.com www.laminator.com

- 7 -
Tension To adjust tension for upper and lower film rolls, the laminator must be loaded and heated. Remove the feed tray. Loosen both tension control knobs by turning counterclockwise until there is no tension on upper or lower film roll. Film should pull freely. Turn the drive switch “ON.” As film runs through it will appear wrinkled and bubbly. Gradually increase tension on both rolls, by turning knobs clockwise, until film is smooth on heated rollers. Once film is smooth, stop tightening knobs. NOTE: For best results, reset tension with EACH new pair of film rolls. NOTE: As the film roll supply becomes low it is necessary to decrease tension on the rolls. Reset at approximately the last 1/3 to 1/4 of a roll. NOTE: Too little tension on the top or bottom roll causes vertical or diagonal streaks in the film as it passes around the heated rollers. NOTE: If the laminator’s speed is set too fast when using thicker films, wrinkling and bubbling may occur. WARNING: Excessive tension will lead to increased wear and tear on the laminator. Once the laminator is loaded, heated and tension adjusted – reinstall the feed tray.
Setting Roller Temperature (See Figure 1 and Figure 2 on pg 7) 1. Press “SEL” green button 2. Adjust temperature up or down using the up arrow or down arrow. 3. Press “SEL” green button again to activate temperature.
Laminator.com www.laminator.com
- 8 -
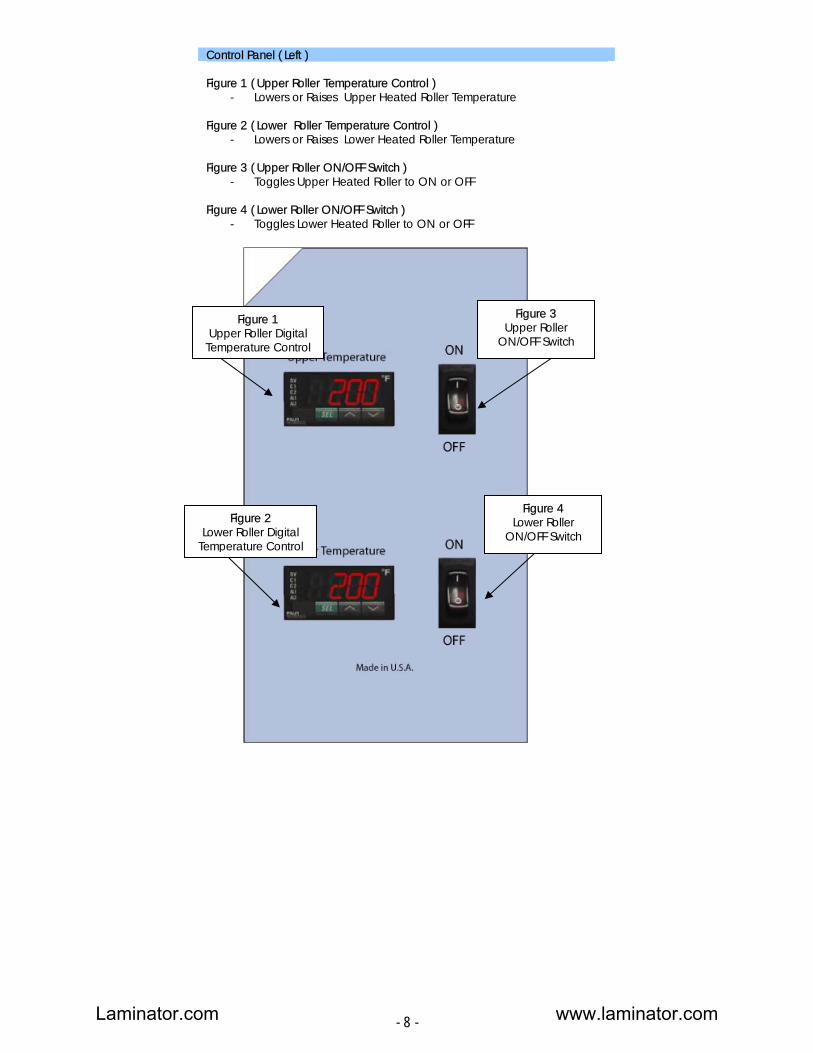
Control Panel ( Left ) Figure 1 ( Upper Roller Temperature Control )
- Lowers or Raises Upper Heated Roller Temperature Figure 2 ( Lower Roller Temperature Control )
- Lowers or Raises Lower Heated Roller Temperature
Figure 3 ( Upper Roller ON/OFF Switch ) - Toggles Upper Heated Roller to ON or OFF
Figure 4 ( Lower Roller ON/OFF Switch )
- Toggles Lower Heated Roller to ON or OFF
Figure 1 Upper Roller Digital Temperature Control
Figure 2 Lower Roller Digital
Temperature Control
Figure 3 Upper Roller
ON/OFF Switch
Figure 4 Lower Roller
ON/OFF Switch
Laminator.com www.laminator.com

- 9 -
Control Panel ( Right ) Figure 1 ( Motor Switch )
- Toggles Laminator Rollers to Forward or Reverse Figure 2 ( Fans Switch )
- Toggles Laminator fans to ON or OFF Figure 3 ( Speed Control Knob )
- Adjusts the speed of the laminator’s heated rollers - Measured in feet per minute ( FPM )
Note: To Reverse the direction of lamination, switch the Motor & Fan Switches to “reverse” position
Figure 2 Fans Switch (ON/OFF)
Figure 1 Motor Switch
(Forward/Reverse)
Figure 3 Speed Control
Laminator.com www.laminator.com

- 10 -
Nip Adjusters The Nip Adjusters are Located on the left hand side of the laminator and are operated from front and rear of the machine. The Nip Adjusters are used to adjust the height of the rollers. To Operate the Nip Adjusters:
Grasp it with your left hand and pull out approximately 1/4” Once the Nip Adjusters have disengaged from the stop, they may be
rotated forward or backward (clockwise or counter-clockwise, as viewed from the left hand side of the unit).
To Set the Height of the Rollers:
Continue to rotate the Nip Adjusters until the desired measurement corresponds with the indicator of the knob.
Select the measurement that indicates the thickness of the material you will be using with the machine.
Release the Nip Adjusters so that it moves back to the right and clicks into place, this will set the rollers for use.
The measurements on the Nip Adjusters, ½”, ¼” (6mm), 3/16” (5mm), 1/8” (3mm) and 1/16” (1.5mm) correspond to board thickness’.
For additional pressure, stop Nip Adjusters between indicated thicknesses.
There is also a fully closed stop, 0” (0mm) for encapsulating applications. For additional pressure when rollers are closed, pull knob out & rotate
counter clockwise to increase pressure.
Note: Do not apply additional pressure to rear (Pull) Rollers Rear Pull Rollers operate best with minimal pressure.
Laminator.com www.laminator.com

- 11 -
Mounting using SuperStick Pouch Mounting System Step One Insert your print into the SuperStick Mounting & Laminating Pouch.
Step Two Place the SuperStick Pouch on the surface of virtually any rigid substrate or foam board – NO ADHESIVE NECESSARY!
Step Three Pass the SuperStick pouch and board combination through the heated roll laminator. It comes out done!
Step Four Display your finished product. That’s it!
Laminator.com www.laminator.com
- 12 -
Mounting and Laminating using a SuperStick® pouch board: 1. Refer to the instruction sheet packed with each box of SuperStick® pouch boards for specific instructions on mounting/laminating with a SuperStick® board. 2. Also, refer to the instruction sheet for information on Compatible Media, Process Conditions, and Technical Information. 3. A SuperStick® Pouch Board consists of a foam mounting board with a piece of film on top. The film is sealed to the board along one side of the shorter sides. 4. Carefully examine the board, determine which edge is sealed. There is a 1/8” tape edge on the sealed end. 5. Starting at one of the corners opposite the sealed edge, gently lift and peel back the film. Care should be taken not to break the sealed hinge. 6. Center the image to be laminated on the board and lay the film back over it. 7. Cover your print with the cover sheet packed in each box as marked. This is required on thick papers to prevent adhesive from sticking to the rolls. 8. Set the control knob to the correct setting that matches the pouch board thickness. 9. Slowly insert the pouch board into the inlet opening. Ensure that the pouch board will enter centered and straight. A gentle push may be required to start the board into the machine. Hold the edges of the pouch board until it is engaged and the laminator begins pulling on its own. 10. The pouch board will feed through the laminator and automatically exit at the rear of the unit. 11. Support board as it exits the machine to keep heated board from curling down. 12. THE POUCH BOARD WILL BE HOT! Allow it to lie flat while cooling. 13. If there is any dirt or adhesive on the surface of the board, it can be removed by dampening a lint free cloth with Poly-Off and wiping the surface.
Laminator.com www.laminator.com

- 13 -
Encapsulating with a SuperStick® Flexible Pouch using a SuperStick® Sled or release board: 1. Refer to the instruction sheet packed with each box of SuperStick® Flexible pouches for specific instructions on encapsulating. 2. Also, refer to the instruction sheet for information on Compatible Media, Process Conditions, and Technical Information. 3. The Flexible Pouch consists of two pieces of film that are hinged at one end, along a short side. Separate the two pieces starting at the end opposite the hinge. Take care not to break the hinged seal. 4. Insert the article to be laminated in the pouch so there is at least a 1/8” (3mm) border around each of the sides. This ensures that moisture never reaches the image. 5. Place the pouch with the image on the release carrier board included with the flexible pouches or SuperStick® sled carrier. The SuperStick® sled is carrier board to assist in the handling of large Flexible Pouches. It is made of materials that will not damage or cause excessive wear to the EXP 62” Plus Laminators.) Smooth out any wrinkles with the side of the hand or a soft, flexible squeegee. 6. Better results may be achieved by taping the leading edge of the pouch to the sled using masking tape. 7. Adjust the Control Knob to the 3/16” setting for the SuperStick® Sled or 1/16” for the release carrier board to accommodate its thickness. Be sure that the heat is on, the middle LED indicator is on and the bottom LED is constantly on. 8. Slowly insert the sled or release carrier board with the Flexible Pouch on top into the inlet opening. Ensure that the sled or release board is centered and straight. A gentle push may be required to start the sled or release board into the machine. Hold the edge of the sled or release board until it is engaged and the laminator begins pulling it on its own. 9. The sled or release board will feed through the laminator and automatically exit at the rear of the machine. 10. THE SLED or RELEASE BOARD WILL BE HOT! Allow it to lie flat and cool before removing the tape. If there is any dirt or adhesive on the surface of the board, it can be removed by dampening a lint free cloth with ISO Propyl Alcohol (IPA) and wiping the surface.
Laminator.com www.laminator.com
- 14 -
Cleaning Your EXP 62” Plus Laminator The laminator may be cleaned with a lint free cloth, lightly dampened with a mild soap and water solution. Do not use spray-on cleaners. Do not immerse any part of the laminator in water or other liquids.
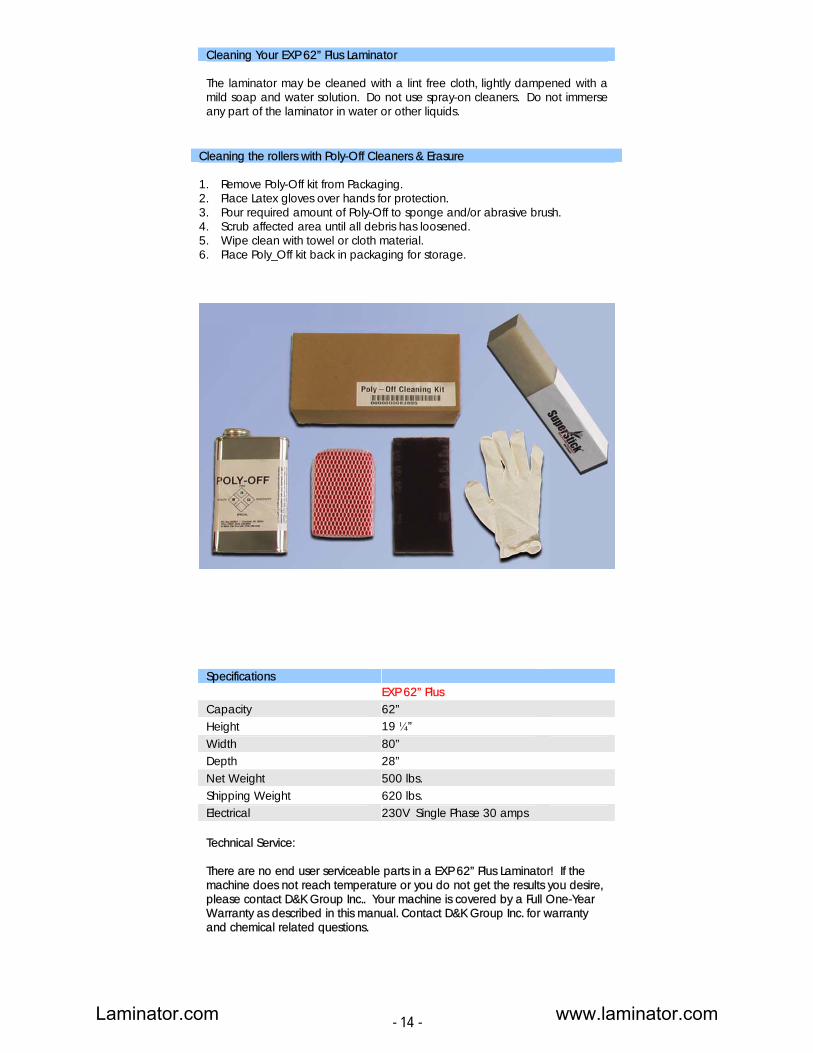
Cleaning the rollers with Poly-Off Cleaners & Erasure 1. Remove Poly-Off kit from Packaging. 2. Place Latex gloves over hands for protection. 3. Pour required amount of Poly-Off to sponge and/or abrasive brush. 4. Scrub affected area until all debris has loosened. 5. Wipe clean with towel or cloth material. 6. Place Poly_Off kit back in packaging for storage.
Specifications EXP 62” Plus Capacity 62” Height 19 ¼” Width 80” Depth 28” Net Weight 500 lbs. Shipping Weight 620 lbs. Electrical 230V Single Phase 30 amps Technical Service: There are no end user serviceable parts in a EXP 62” Plus Laminator! If the machine does not reach temperature or you do not get the results you desire, please contact D&K Group Inc.. Your machine is covered by a Full One-Year Warranty as described in this manual. Contact D&K Group Inc. for warranty and chemical related questions.
Laminator.com www.laminator.com

- 15 -
Trouble Shooting TROUBLE SHOOTING COMMON EXAMPLES OF POOR LAMINATING . . . and their causes. A. FILM NOT BONDING TO SUBJECT OR TO ITSELF AT SEALED EDGES Causes: 1. The heat (on either or both rollers) is set too low. 2. Film tension is too tight. 3. Bottom roll of film is threaded incorrectly. 4. The pressure setting is not correct. B. WRINKLES OR IRREGULAR WAVES RUNNING ACROSS THE LAMINATED WEB (PERPENDICULAR TO THE EDGE) Causes: 1. The heat set is too high. 2. Not enough tension on the supply mandrels. (Large, irregular waves). 3. Too much tension on the supply mandrels. (Small, fine wrinkles - “orange peel” effect). 4. The rubber laminating rollers are not clean. 5. The pressure adjustment for the laminating and pull rollers is out of adjustment. C. STRETCH LINES RUNNING WITH WEB (PARALLEL TO THE EDGE) Causes: 1. Too much tension on the supply mandrels. 2. The heat is set too high on either or both heated rollers. 3. The heating rollers are not clean. D. BLISTERS ON SURFACE OF SUBJECT OR ALONG EDGE OF SUBJECT Causes: 1. The heat is set too high on either or both heated rollers. 2. Excessive moisture in the paper being laminated. (If inks are not dry, this may also cause blisters). For high moisture content substrates, use D&K’s low temperature films with a bonding temperature of 185 - 190F 3. The rubber laminating rollers are not clean, or are damaged.
Trouble Shooting (Continued) E. CURLING OF THE FINISHED LAMINATION Causes: 1. Unbalanced tension on the supply rolls. Too much tension on the top supply roll will cause the web to curl up. Too much tension on the bottom roll will cause a downward curl in the web. 2. Bottom roll of film has been threaded incorrectly. 3. Heat is unbalanced in the top or bottom heated rollers. If the subject curls up, there is too much heat in the top roller. If it curls down, there is too much heat on the bottom roller. F. WRINKLING AROUND EDGE OF LAMINATED ITEM Causes: 1. Item to be laminated is too thick or not enough adhesive in type of film being used. Possible Solutions: a. Loosen tension b. Use thicker film (Higher adhesive content) c. Flush cut item
Laminator.com www.laminator.com

- 16 -
Terms & Conditions D&K Group, Inc., warrants to the original consumer purchaser that each new EXP 62” Plus Laminator which proves defective in materials or workmanship within the applicable warranty period will be repaired or, at our option, replaced without charge upon its return as outlined below. The applicable warranty shall be one year from date of purchase with 3 months limited warranty on the rollers. “Original consumer purchaser” means the purchaser who first purchased the product covered by this warranty other than for purpose of resale. Liability for breach of any warranty express or implied shall be limited to the repair or replacement, at D&K Group, Inc., option, of the defective item. D&K Group, Inc. shall not be liable for damages arising out of, or in connection with the use or performance of any SuperStick® product. Any implied warranty shall be limited in duration to the duration of this warranty. Some states do not allow limitations on how long an implied warranty lasts for the exclusion or limitation of consequential damages, so the above limitation may not apply to you. There are no consumer serviceable parts in the EXP 62” Plus Laminator. If you require service under this Warranty, contact D&K Group Inc. to obtain Return Authorization (RA), pack the product in its original packaging (or request the same from Technical Service when requesting the RA), and include a description of the malfunction and proof of date of purchase. Technical Service will arrange to have a technician contact your for onsite service. The Warranty extends to and is enforceable only by the original consumer purchaser, and only for the period which the product remains in the possession of the original equipment purchaser. This Warranty does not cover any defect or malfunction due to the use of faulty non- EXP 62” Plus Laminator materials, unreasonable use or abuse of the machine, or failure to provide reasonable and necessary maintenance. This Warranty gives you specific legal rights and you may have other rights, which vary, from state to state.
Laminator.com www.laminator.com

- 17 -
Webbing Diagrams 1. Encapsulating
2. Mounting & Laminating Print to pre-coated board
Laminator.com www.laminator.com

- 18 -
Webbing Diagrams (continued) 3. One Step Decal
4. Two Step Decal
Laminator.com www.laminator.com

- 19 -
Webbing Diagrams (continued) 5. Pre-Coating Boards
6. Mounting Decal Print
Laminator.com www.laminator.com

- 20 -
Webbing Diagrams (continued) 7. Laminating with PSA and release liner
Laminator.com www.laminator.com