examview® pro testmaker user guide
TRANSCRIPT

1
Table of ContentsTo the Teacher . . . . . . . . . . . . . . . . . . . . . . . . . . . . . . . . . . . . . . . . . . . . . . . . . . . . . .2
Question Information . . . . . . . . . . . . . . . . . . . . . . . . . . . . . . . . . . . . . . . . . . . . . . . . .2
Site License . . . . . . . . . . . . . . . . . . . . . . . . . . . . . . . . . . . . . . . . . . . . . . . . . . . . . . . .2
Software Support Hotline . . . . . . . . . . . . . . . . . . . . . . . . . . . . . . . . . . . . . . . . . . . . . .2
Section 1—Introduction . . . . . . . . . . . . . . . . . . . . . . . . . . . . . . . . . . . . . . . . . . . . . . . . . . . . . . . . . . . . .3
Section 2—Installation and Startup Instructions . . . . . . . . . . . . . . . . . . . . . . . . . . . . . . . . . . . . . .4
System Requirements . . . . . . . . . . . . . . . . . . . . . . . . . . . . . . . . . . . . . . . . . . . . . . . . .4
Windows . . . . . . . . . . . . . . . . . . . . . . . . . . . . . . . . . . . . . . . . . . . . . . . . . . . . . . . .4
Macintosh . . . . . . . . . . . . . . . . . . . . . . . . . . . . . . . . . . . . . . . . . . . . . . . . . . . . . . .4
Installation Instructions . . . . . . . . . . . . . . . . . . . . . . . . . . . . . . . . . . . . . . . . . . . . . . .4
Windows . . . . . . . . . . . . . . . . . . . . . . . . . . . . . . . . . . . . . . . . . . . . . . . . . . . . . . . .4
Macintosh . . . . . . . . . . . . . . . . . . . . . . . . . . . . . . . . . . . . . . . . . . . . . . . . . . . . . . .5
Getting Started . . . . . . . . . . . . . . . . . . . . . . . . . . . . . . . . . . . . . . . . . . . . . . . . . . . . . .6
Startup Instructions . . . . . . . . . . . . . . . . . . . . . . . . . . . . . . . . . . . . . . . . . . . . . . . .6
Using the Help System . . . . . . . . . . . . . . . . . . . . . . . . . . . . . . . . . . . . . . . . . . . . . .6
Test Builder . . . . . . . . . . . . . . . . . . . . . . . . . . . . . . . . . . . . . . . . . . . . . . . . . . . . . .7
Creating a New Test . . . . . . . . . . . . . . . . . . . . . . . . . . . . . . . . . . . . . . . . . . . . . . . .8
Question Bank Editor . . . . . . . . . . . . . . . . . . . . . . . . . . . . . . . . . . . . . . . . . . . . . . .9
Online Testing (Stand-Alone/LAN-Based vs. Internet) . . . . . . . . . . . . . . . . . . . . . . .10
Section 3—Online (Stand-Alone/LAN-Based) Training . . . . . . . . . . . . . . . . . . . . .11
Online (Stand-Alone/LAN-Based) Testing Overview . . . . . . . . . . . . . . . . . . . . . . . . . .11
Creating an Online (Stand-Alone/LAN-Based) Test . . . . . . . . . . . . . . . . . . . . . . . . . . .12
Installing the Test Player . . . . . . . . . . . . . . . . . . . . . . . . . . . . . . . . . . . . . . . . . . . . . .14
Windows . . . . . . . . . . . . . . . . . . . . . . . . . . . . . . . . . . . . . . . . . . . . . . . . . . . . . . .14
Macintosh . . . . . . . . . . . . . . . . . . . . . . . . . . . . . . . . . . . . . . . . . . . . . . . . . . . . . .14
Installing the Test Player at Home . . . . . . . . . . . . . . . . . . . . . . . . . . . . . . . . . . . . .15
Taking an Online (Stand-Alone/LAN-Based) Test . . . . . . . . . . . . . . . . . . . . . . . . . . . .15
Viewing Online (Stand-Alone/LAN-Based) Results . . . . . . . . . . . . . . . . . . . . . . . . . . .16
Section 4—Internet Testing . . . . . . . . . . . . . . . . . . . . . . . . . . . . . . . . 17
Internet Testing FAQs . . . . . . . . . . . . . . . . . . . . . . . . . . . . . . . . . . . . . . . . . . . . . . . .17
Using the Internet Test-Hosting Service . . . . . . . . . . . . . . . . . . . . . . . . . . . . . . . . . .18
Registering for the Internet Test-Hosting Service . . . . . . . . . . . . . . . . . . . . . . . . .18
Publishing a Test/Study Guide to the ExamView Web Site . . . . . . . . . . . . . . . . . . .18
Taking a Test/Study Guide Online at www.evtestcenter.com . . . . . . . . . . . . . . . . .20
Reviewing Student Results and Managing Tests . . . . . . . . . . . . . . . . . . . . . . . . . . .22
Publishing Tests to Your Own Web Site . . . . . . . . . . . . . . . . . . . . . . . . . . . . . . . . . . .23
Saving an Internet Test/Study Guide to Your Hard Drive . . . . . . . . . . . . . . . . . . . .23
Posting a Test to Your Own Internet/Intranet Server . . . . . . . . . . . . . . . . . . . . . . .24
Taking a Test or Study Guide Using the Internet . . . . . . . . . . . . . . . . . . . . . . . . . .25
Receiving Student Results via E-mail . . . . . . . . . . . . . . . . . . . . . . . . . . . . . . . . . . .26
ExamView® Pro Testmaker User Guide

2
To the TeacherThe ExamView® Pro Testmaker question banks contain questions covering all units, chapters,and sections of your textbook.The questions are in a variety of formats and may includemultiple choice, true/false, matching, completion, short answer, or essay questions.Testmakergives you the freedom and flexibility to create tests that reflect the areas you’ve emphasized inyour teaching and to evaluate your students’ understanding of the material they read.
QUESTION INFORMATIONThe questions in ExamView may be correlated to question information that enables you totailor your tests to the needs and abilities of your students.This question information includesdifficulty level, reference, text objective, and topic.When creating a test, you can select yourquestions based on the criteria provided.This information depends on your particulartextbook. For more details, refer to the Readme.txt file provided with your software, ifavailable.
SITE LICENSEExamView® software is provided to instructors who have adopted certain specified textbooksor other learning materials for use in the classes they teach. ExamView is licensed to you onlyon the condition that: (1) you have adopted and continued to use the specified text in yourclass; AND (2) you accept all of the terms contained in the license agreement that appearsduring the installation process.Your installation and use of the software constitutes youracceptance of these terms in their entirety.
SOFTWARE SUPPORT HOTLINEShould you have difficulty setting up or running the program, contact the Software SupportCenter at Glencoe Publishing between 8:00 A.M. and 6:00 P.M. eastern time. The toll-freenumber is 1-800-437-3715. You may also send specific questions via the Internet using thefollowing e-mail address: [email protected]

3 3
SECTION 1 — INTRODUCTION
This user’s guide accompanies a test generator program called ExamView® Pro–an application that enables you to quickly create printed tests, Internet tests, and computer (LAN-based) tests. You can enter your own questions and customize the appearance of the tests you create. The ExamView test generator program offers many unique features. Using the QuickTest wizard, for example, you are guided step-by-step through the process of building a test. Numerous options are included that allow you to customize the content and appearance of the tests you create.
As you work with the ExamView test generator, you may use the following features:
• a “wizard” to guide you through the steps to create a test in less than five minutes • five methods to select test questions
– random selection – from a list – while viewing questions – by criteria (difficulty code, objective, topic, etc.–if available) – all questions
• the capability to edit questions or to add an unlimited number of questions
• online (Internet-based) testing – create a test that students can take on the Internet using a browser – receive instant feedback via email – create online study guides with student feedback for incorrect responses
• Internet test-hosting * – instantly publish a test to the ExamView website – manage tests online – allow students to access tests from one convenient location – receive detailed reports – download results to your gradebook or spreadsheet
• online (LAN-based) testing – allow anyone or selected students to take a test on your local area network – create online study guides with student feedback for incorrect responses – incorporate multimedia links (movies and audio) – export student results to a gradebook or spreadsheet
• a sophisticated word processor – streamlined question entry with spell checker – tabs, fonts, symbols, foreign characters, and text styles – tables with borders and shading – full-featured equation editor – comprehensive graphing tool – pictures or other graphics within a question, answer, or narrative
• numerous test layout and printing options – scramble the choices in multiple choice questions – print multiple versions of the same test with corresponding answer keys – print an answer key strip for easier test grading – format the test to match a predefined format, such as a particular state test layout, with a single click
• dynamic questions (algorithms) – create dynamic questions for any subject area – algorithms allow infinite customization of a question using mathematical definitions – use built-in feature to build dynamic math content from simple addition to calculus – dynamic features are fully integrated with ExamView’s equation editor and graphing tool
• link groups of questions to common narratives * The Internet test-hosting service must be purchased separately. Visit www.examview.com to learn more.

4
SECTION 2 — INSTALLATION AND STARTUP INSTRUCTIONS The ExamView test generator software is provided on a CD-ROM. The disc includes the program and all of the questions for the corresponding textbook. The ExamView Test Player, which can be used by your students to take online (computerized or LAN-based) tests, is also included.
Before you can use the test generator, you must install it on your hard drive. The system requirements, installation instructions, and startup procedures are provided below.
SYSTEM REQUIREMENTS
To use the ExamView test generator or the online test player, your computer must meet or exceed the following minimum hardware requirements:
Windows • IBM PC (or 100% compatible) computer • Pentium 120 MHz microprocessor (or higher) • Windows 98, Windows Me, Windows 2000, Windows XP (or a more recent version) • color monitor (VGA-compatible) • CD-ROM drive • hard drive with at least 10 MB space available • 16 MB available memory (32 MB memory recommended) • an Internet connection to access the Internet test-hosting features
Macintosh • PowerPC processor, 120 MHz computer • System 8.6, System 9.2, or OS X (10.2 and higher) • color monitor (VGA-compatible) • CD-ROM drive • hard drive with at least 20 MB space available • 16 MB available memory (32 MB memory recommended) • an Internet connection to access the Internet test-hosting features
INSTALLATION INSTRUCTIONS
Follow these steps to install the ExamView test generator software. The setup program will automatically install everything you need to use ExamView. Note: A separate test player setup program is also included for your convenience. [See Online (LAN-based) Testing on page 9 for more information.]
Windows Step 1 Turn on your computer. Step 2 Insert the ExamView disc into the CD-ROM drive. Step 3 Click the Start button on the Taskbar and choose the Run option.

5 5
Step 4 Use the drive letter that corresponds to the CD-ROM drive on your computer (e.g., d:\setup.exe). The setup program, however, may be located in a subfolder on the CD-ROM if the ExamView software is included on the disc with other resources. In which case, click the Browse button in the Run dialog box to locate the setup program (e.g., d:\evpro\setup.exe). Step 5 Follow the prompts on the screen to complete the installation process. Step 6 Remove the installation disc when you finish.
Macintosh Step 1 Turn on your computer. Step 2 Insert the ExamView installation disc into your CD-ROM drive. Step 3 Open the installer window, if necessary. Step 4 Double-click the installation icon to start the program. Step 5 Follow the prompts on the screen to complete the installation process. Step 6 Remove the installation disc when you finish.

6
GETTING STARTED
After you complete the installation process, follow these instructions to start the ExamView test generator software. This section also explains the options used to create a test and edit a question bank.
Startup Instructions Step 1 Turn on the computer. Step 2 Windows: Click the Start button on the Taskbar. Highlight the Programs menu and locate the ExamView Pro Test Generator folder. Select the ExamView Pro option to start the software. Macintosh: Locate and open the ExamView folder. Double-click the ExamView Pro program icon. Step 3 The first time you run the software, you will be prompted to enter your name, school/institution name, and city/state. You are now ready to begin using the ExamView software. Step 4 Each time you start ExamView, the Startup menu appears. Choose one of the options shown in Figure 1. Note: All of the figures shown in this user’s guide are taken from the Windows software. Except for a few minor differences, the Macintosh screens are identical. Step 5 Use ExamView to create a test or edit questions in a question bank.
ExamView includes three components: Test Builder, Question Bank Editor, and Test Player. The Test Builder includes options to create, edit, print, and save tests. The Question Bank Editor lets you create or edit question banks. The Test Player is a separate program that your students can use to take online (LAN-based) tests/study guides.
Figure 1 – ExamView Startup Menu Using The Help System Whenever you need assistance using ExamView, access the extensive help system. Click the Help button or choose the Help Topics option from the Help menu to access step-by-step instructions from more than 150 help topics. If you experience any difficulties while you are working with the software, you may want to review the troubleshooting tips in the user-friendly help system.
7 ExamView Pro EV-5
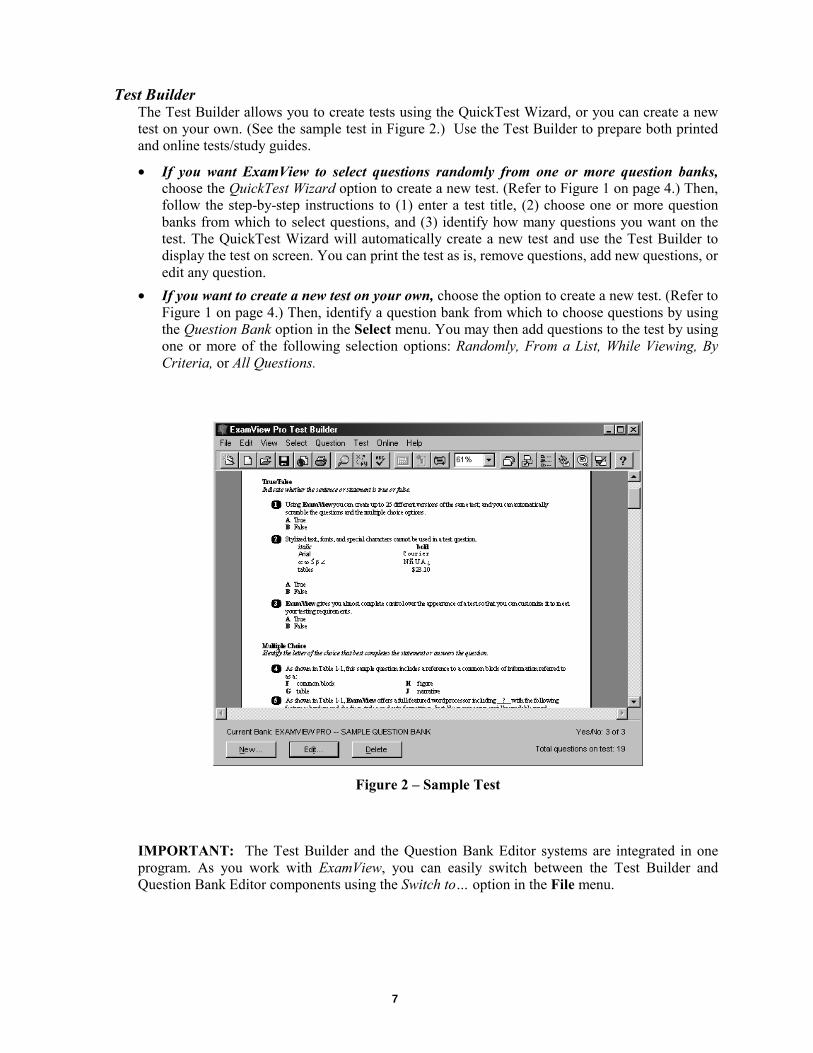
Test Builder
The Test Builder allows you to create tests using the QuickTest Wizard, or you can create a new test on your own. (See the sample test in Figure 2.) Use the Test Builder to prepare both printed and online tests/study guides.
• If you want ExamView to select questions randomly from one or more question banks, choose the QuickTest Wizard option to create a new test. (Refer to Figure 1 on page 4.) Then, follow the step-by-step instructions to (1) enter a test title, (2) choose one or more question banks from which to select questions, and (3) identify how many questions you want on the test. The QuickTest Wizard will automatically create a new test and use the Test Builder to display the test on screen. You can print the test as is, remove questions, add new questions, or edit any question.
• If you want to create a new test on your own, choose the option to create a new test. (Refer to Figure 1 on page 4.) Then, identify a question bank from which to choose questions by using the Question Bank option in the Select menu. You may then add questions to the test by using one or more of the following selection options: Randomly, From a List, While Viewing, By Criteria, or All Questions.
Figure 2 – Sample Test
IMPORTANT: The Test Builder and the Question Bank Editor systems are integrated in one program. As you work with ExamView, you can easily switch between the Test Builder and Question Bank Editor components using the Switch to… option in the File menu.
8
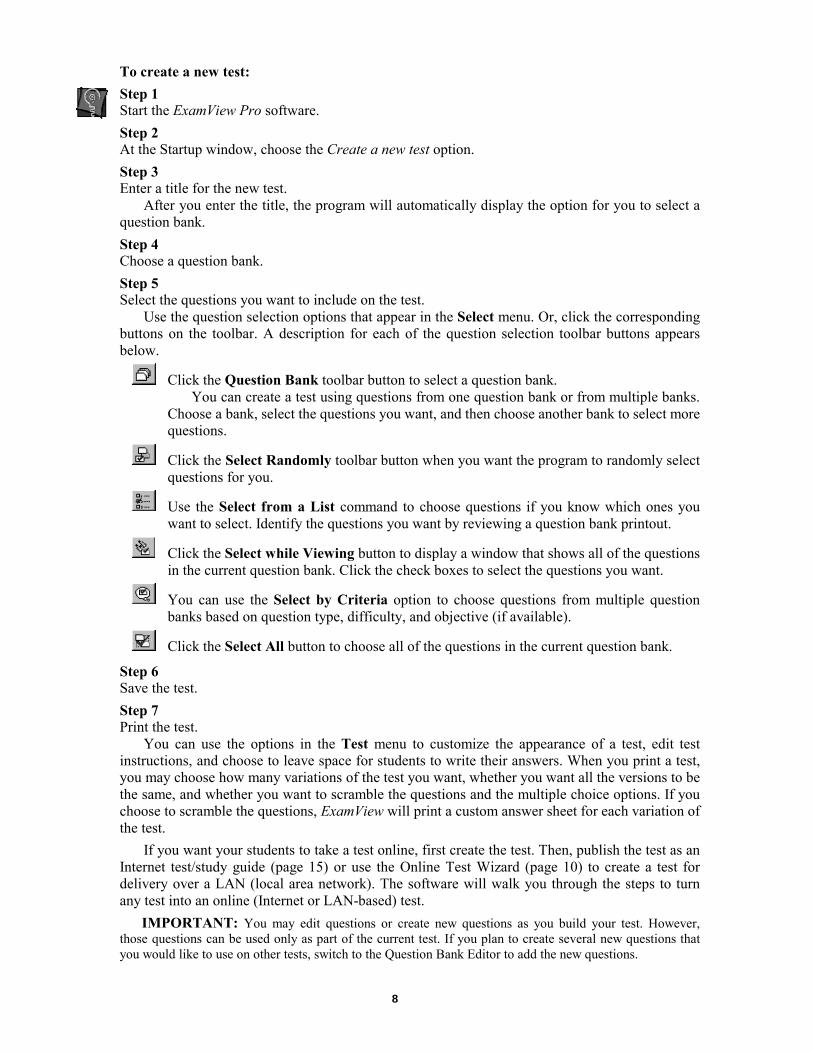
To create a new test: Step 1 Start the ExamView Pro software. Step 2 At the Startup window, choose the Create a new test option. Step 3 Enter a title for the new test. After you enter the title, the program will automatically display the option for you to select a question bank. Step 4 Choose a question bank. Step 5 Select the questions you want to include on the test. Use the question selection options that appear in the Select menu. Or, click the corresponding buttons on the toolbar. A description for each of the question selection toolbar buttons appears below.
Click the Question Bank toolbar button to select a question bank. You can create a test using questions from one question bank or from multiple banks.
Choose a bank, select the questions you want, and then choose another bank to select more questions.
Click the Select Randomly toolbar button when you want the program to randomly select questions for you.
Use the Select from a List command to choose questions if you know which ones you want to select. Identify the questions you want by reviewing a question bank printout.
Click the Select while Viewing button to display a window that shows all of the questions in the current question bank. Click the check boxes to select the questions you want.
You can use the Select by Criteria option to choose questions from multiple question banks based on question type, difficulty, and objective (if available).
Click the Select All button to choose all of the questions in the current question bank.
Step 6 Save the test. Step 7 Print the test. You can use the options in the Test menu to customize the appearance of a test, edit test instructions, and choose to leave space for students to write their answers. When you print a test, you may choose how many variations of the test you want, whether you want all the versions to be the same, and whether you want to scramble the questions and the multiple choice options. If you choose to scramble the questions, ExamView will print a custom answer sheet for each variation of the test. If you want your students to take a test online, first create the test. Then, publish the test as an Internet test/study guide (page 15) or use the Online Test Wizard (page 10) to create a test for delivery over a LAN (local area network). The software will walk you through the steps to turn any test into an online (Internet or LAN-based) test. IMPORTANT: You may edit questions or create new questions as you build your test. However, those questions can be used only as part of the current test. If you plan to create several new questions that you would like to use on other tests, switch to the Question Bank Editor to add the new questions.

9 ExamView Pro EV-7
Question Bank Editor The Question Bank Editor allows you to edit questions in an existing publisher-supplied question bank or to create your own new question banks. Always use the Question Bank Editor if you want to change a question permanently in an existing question bank. If you want to make a change that applies only to a particular test, create a new question or edit that question in the Test Builder.
A question bank may include up to 250 questions in a variety of formats including multiple choice, true/false, modified true/false, completion, yes/no, matching, problem, essay, short answer, bimodal, case, and numeric response. You can include the following information for each question: difficulty code, reference, text objective, state objectives, topic, and notes.
Step 1 Start the ExamView Pro software. Step 2 At the Startup window as illustrated in Figure 1 on page 4, choose to Create a new question bank or Open an existing question bank. If you are working in the Test Builder, click the File menu and choose Switch to Question Bank Editor to edit or create a new question bank. Step 3 Click the New button to create a new question or click the Edit button to modify an existing question. Both of these buttons appear at the bottom of the Question Bank Editor window. (See Figure 3.)
You may add new questions or edit questions in a question bank by using the built-in word processor. The word processor includes many features commonly found in commercially available word processing applications. These features include the following: fonts, styles, tables, paragraph formatting, ruler controls, spell checking, an equation editor, tabs, indents, and justification. Step 4 Save your work. Then, exit the program or switch back to the Test Builder.
Figure 3 – Question Bank Editor

10
Online Testing (LAN-based vs. Internet) The ExamView software allows you to create paper tests and online tests. The program provides two distinct online testing options: LAN-based testing and Internet testing. The option you choose depends on your particular testing needs. You can choose either option to administer online tests and study guides. The LAN-based testing option is designed to work on a local area network server. That is, you can copy the test/study guide along with the Test Player software onto your local area network. Then students can take the test at computers connected to your server. To take a LAN-based test, you must provide access for your students to the Test Player program included with the ExamView software. The Test Player is a separate program that lets your students take a test/study guide at a computer. You can store the Test Player program and the test on a local area network for easy access by your students. The Internet testing option provides a computerized testing solution for delivering tests via the Internet or an Intranet. This option is great for distance learning environments or simply to make a sample test/study guide available to students at home. Students do not need any other program (unlike the LAN-based option). When your students take a test, the results are automatically sent to you via email. You can publish an Internet test to your own website, to a publisher’s website, or you can use the ExamView Internet test-hosting service. If you subscribe to the ExamView test-hosting service, you can publish a test directly to the Internet with just a few simple steps. Students will have immediate access to the tests that you publish and you can get detailed reports. For more information on the Internet test-hosting service, visit our website at www.examview.com.
11 ExamView Pro EV-9
SECTION 3 — ONLINE (LAN-BASED) TESTING Online testing features are seamlessly integrated into the ExamView software. If you want to take advantage of these capabilities, simply create a test and then use the Online Test Wizard to set up the testing parameters. Students can then take the test at the computer using the Test Player program. IMPORTANT: If you want to prepare a test/study guide for delivery via the Internet, use the Publish Internet Test option as described on page 16.
ExamView includes many features that let you customize an online (LAN-based) test. You can create a test for a specific class, or you can prepare a study guide for anyone to take. Using the Online Test Wizard, you can schedule a test or allow it to be taken anytime. As your students work on a test, ExamView will scramble the question order, provide feedback for incorrect responses, and display a timer if you selected any of these options.
ONLINE (LAN-BASED) TESTING OVERVIEW
Refer to the steps below for an overview of the online (LAN-based) testing process. Specific instructions for creating a test, taking a test, and viewing results are provided on the following pages. Step 1 Talk with your network administrator to help you set up a location (folder) on your local area network where you can install the Test Player software and copy your tests/study guides. Make sure that the administrator gives you and your students full access to the designated folders on the server. You may also want your network administrator to install the Test Player software. Step 2 Create a test/study guide, and then use the Online Test Wizard to set up the online (LAN-based) test. Save your work and exit the ExamView software. Step 3 Transfer the test/study guide file [e.g., chapter1.tst (Windows) or Chapter 1 (Macintosh)] and any accompanying multimedia files from your computer to the local area network server. Copy the files from your hard drive to the folder set up by your network administrator. You need only copy the test file unless you linked an audio or video segment to one or more questions. Step 4 Instruct your students to complete the test/study guide. Students must have access to a computer connected to the local area network on which the Test Player and test/study guide are stored. Step 5 After all students finish taking the test, copy the test/study guide file back to your hard drive. It is recommended that you copy the test to a different location from the original test file. The test file, itself, contains all of the students’ results. Note: If you set up a class roster, the test file will contain item analysis information and the results for each student. If you did not set up a roster, no results are recorded so you do not have to complete this step or the next. Step 6 Start the ExamView Pro software and open the test file to view your students’ results.

12
CREATING AN ONLINE (LAN-BASED) TEST
Follow the steps shown below to create an online (LAN-based) test or study guide. Depending on the options you set, you can create a test or study guide. Before you begin, make sure that you installed the ExamView test generator and test player software. Note: See the next section (page 12) for instructions to set up the test player. (See page 15 for Internet testing features.) Step 1 Start the ExamView Pro software. Step 2 Create or open a test/study guide.
Select the questions you want to include on the test. You can include any of the following types: True/False, Multiple Choice, Yes/No, Numeric Response, Completion, and Matching. Step 3 Select the Online Test Wizard option from the Online menu.
ExamView presents step-by-step instructions to help you prepare the online test/study guide. (See Figure 4.) Read the instructions provided and complete each step. Note: Click the Help button if you need more assistance.
Figure 4 – Online Test Wizard (Step 1)
Step 4 Click the Finish button after you complete the last step using the Online Test Wizard. As you can see in Figure 5 on page 11, ExamView shows a summary that describes the settings for the online test.
Step 5 Save the test/study guide to a location where your students can easily access it. For example, save it in the same location where you installed the Test Player program.
It is recommended that you save the test/study guide to a location on a network server where students have read/write access. The Test Player will store all of your students’ results (if you entered a class roster) in the test file itself. You can copy the test to individual computers, but this configuration takes more time to gather the results.

13 ExamView Pro EV-11
Figure 5 – Online Test Wizard (Summary)
Step 6 If you included multimedia links in any of the questions, copy those files to the same location where you saved the test/study guide.
If the multimedia files are on a CD-ROM or DVD disc, you may leave them on the disc, but provide this information to your students. To play one of these links, students will have to specify the location of the multimedia file. NOTES: • Use the Test Preferences and Class Roster options in the Online menu if you want to make
any changes to the test parameters. These two options let you change any of the settings you selected using the Online Test Wizard.
• You must close the test before your students can access it with the Test Player. • If you set up a class roster for a test/study guide, you cannot modify the test (e.g., edit a
question, change the order, etc.) once any student has taken it unless you clear the results first. • Provide your students with the Test Player setup program and a copy of the test/study guide if
you want them to take it at home.

14
INSTALLING THE TEST PLAYER
Follow the instructions provided here to install the Test Player program for your students. You may copy the Test Player to a network (recommended), install it on individual computers, or provide it on a floppy disk for your students to take home.
Even if you have a network, you can install the Test Player on individual computers. Students will still be able to access tests/study guides you store on a local area network.
ExamView Test Player Installation Windows
Step 1 Turn on your computer. Step 2 Insert the ExamView disc into your CD-ROM drive. Step 3 Click the Start button on the Taskbar and choose the Run option. Step 4 Use the drive letter that corresponds to the CD-ROM drive (e.g., d:\evplayer\setup). Step 5 When prompted for a location to install the program, select a folder (e.g., x:\programs\evplayer for network installations or c:\evplayer on your local hard drive). Step 6 For local area network (LAN) installations, complete the following steps at each workstation: • Click the Start button and choose Taskbar from the Settings menu. • Click the Start Menu Programs tab and click Add. • Type the location and program name for the Test Player software, or use the Browse button to
enter this information (e.g., x:\programs\evplayer\evplayer.exe). • Proceed to the next screen and add a new folder (e.g., ExamView Test Player). • Enter ExamView Test Player as the shortcut name and then click the Finish button. Repeat Steps 1–5 if you plan to install the software at each computer instead of installing the program once on your network.
Macintosh Step 1 Turn on your computer. Step 2 Insert the ExamView installation disc into your CD-ROM drive. Step 3 Open the installer window, if necessary. Step 4 Double-click the installation icon to start the program. Note: The installation program is configured to copy the test player to a new folder on your hard drive. You can, however, change this location. For example, you can select a location on your network server.

15 ExamView Pro EV-13
Step 5 When prompted for a location to install the program, select a folder on your local area network that is accessible to all students. If you are installing the software on a stand-alone computer, choose a location on the hard drive. Step 6 At each workstation, enable file sharing and program linking if you installed the application on your network server. For stand-alone computers, repeat Steps 1–5.
Installing the Test Player at Home You can give your students the Test Player software to take home. Copy the setup file in the evplayer folder onto a floppy disk. Students should follow Steps 1-5 to install the software on their computer. When students take a test home, they should copy it into the same folder as the Test Player program.
TAKING AN ONLINE (LAN-BASED) TEST
Make sure that you have properly installed the ExamView Test Player software and copied the test/study guide to a location easily accessible to your students. If you linked multimedia files to any of the questions, it is recommended that you copy those files to the same folder as the test/study guide.
If you created a test with a class roster, students must correctly enter their IDs to be able to take the test/study guide. Provide this information to your students, if necessary. Note: If you do not want to track student scores, you should set up a test to allow anyone to take it. Step 1 Start the ExamView Player software. Step 2 Enter your name and ID. (See Figure 6.)
Figure 6 – Online Test/Study Guide Registration

16
Step 3 Select a test/study guide. (See Figure 7.)
If no tests (or study guides) appear in the list, click the Folder button to identify where the tests are located. Step 4 (Optional) Enter a password, if prompted. Step 5 Review the summary information and click Start when you are ready to begin. Step 6 Answer all of the questions and click the End button when you finish.
Verify that you want to end the test. If you do not answer all of the questions in one session, you will not be able to resume the test at a later time.
Figure 7 – Online Test/Study Guide Selection
Step 7 Review the test report. Step 8 Click New Test to take another test or click Exit to quit the program.
VIEWING ONLINE (LAN-BASED) RESULTS
If you set up a test with a class roster (instead of allowing anyone to access a test/study guide), the ExamView Test Player will automatically collect the results for each student. The program saves this information in the test/study guide file itself. Step 1 Start the ExamView Pro software and open the online test/study guide that your students have already taken. Step 2 Choose View Test Results from the Online menu. Step 3 Review the results, item-by-item analysis, and statistics reports. Step 4 Choose Export Test Results if you want to export the scores to your favorite gradebook program or spreadsheet application.

17 17
SECTION 4 — INTERNET TESTING ExamView lets you easily create Internet tests and study guides. Build a test and then simply choose the Publish Internet Test option. You can choose to post tests to your own website, to a publisher’s website (if available), or directly to the ExamView website. (Visit us at www.examview.com to learn more about subscribing to the Internet test-hosting service.) With the ExamView Internet test-hosting feature, you can publish a test or study guide directly to the ExamView website. Simply create a test and then follow the easy step-by-step instructions to publish it to the Internet. It’s that simple! You can manage tests online, view reports, and download results. Students access your tests from one convenient location. If you do not use the ExamView test-hosting service, you can manually post tests/study guides to your own website. If you create a test, your students’ results are sent to you via email automatically. Or, you can create a study guide that your students can use to review various topics at their own pace. ExamView also allows you to can also post tests directly to a publisher’s website. Contact your publisher’s sales representative to check the availability of this option.
INTERNET TESTING FAQ
Review the FAQ (frequently asked questions) below for more information on the Internet test-hosting features available to ExamView users. What are the advantages to using the Internet test-hosting feature? (1) Publishing an Internet test to your own website and setting up links can be quite challenging. With the Internet test-hosting feature, the process is completely automated. In minutes, you can post a test to the Internet. (2) When you post tests/study guides to your own website, only a few options are available. Using the ExamView test-hosting service, you have many more options available such as setting up a class roster and viewing detailed item analysis reports. How do you register for the test-hosting service? Visit our website at www.examview.com to learn how to register. Before you can post tests/study guides, you must sign up to obtain a valid instructor ID and a password. Is there an additional charge for the Internet test-hosting service? Yes, there is an additional yearly subscription charge to use this service. If you received the ExamView software from a publisher, you may be eligible for a discount or a free trial membership. (See our website for current prices and special promotions.) Do you have to use the Internet test-hosting service? No, using the test-hosting service is not required. The Publish Internet Test feature includes an option to save an Internet test/study guide to a local hard drive. Then, you can manually post it to your own website. Why aren’t the same features available for tests posted to my own website? To offer the numerous Internet test-hosting features, we have developed many programs and databases that are stored on our servers. If you post to your own server or website, these programs are not available.
IMPORTANT: Your students must use a browser such as Netscape 4.0/Internet Explorer 4.0 (or a more recent version) that supports cascading style sheets (CSS1) and JavaScript. To post tests or study guides for delivery via the Internet, you must have your own access to an Internet server.
18
USING THE EXAMVIEW INTERNET TEST-HOSTING SERVICE Using the ExamView test generator software, you can publish tests directly to the ExamView website if you have signed up for the test-hosting service. With a few simple steps, you can publish tests and study guides directly to the Internet. Refer to the following instructions to register for the Internet test-hosting service, create a test, publish a test to the Internet, take tests online, manage tests, and view student results.
Register for the Internet Test-Hosting Service
Step 1 Launch your web browser and go to www.examview.com. Step 2 Go to the Instructor Center to register for the test-hosting service. Follow the instructions provided at the website to sign up. Record the instructor ID and password assigned to you. You will need this information to publish a test or study guide to the ExamView website. When you choose to publish a test, you will be prompted to enter this information. Step 3 Quit the browser.
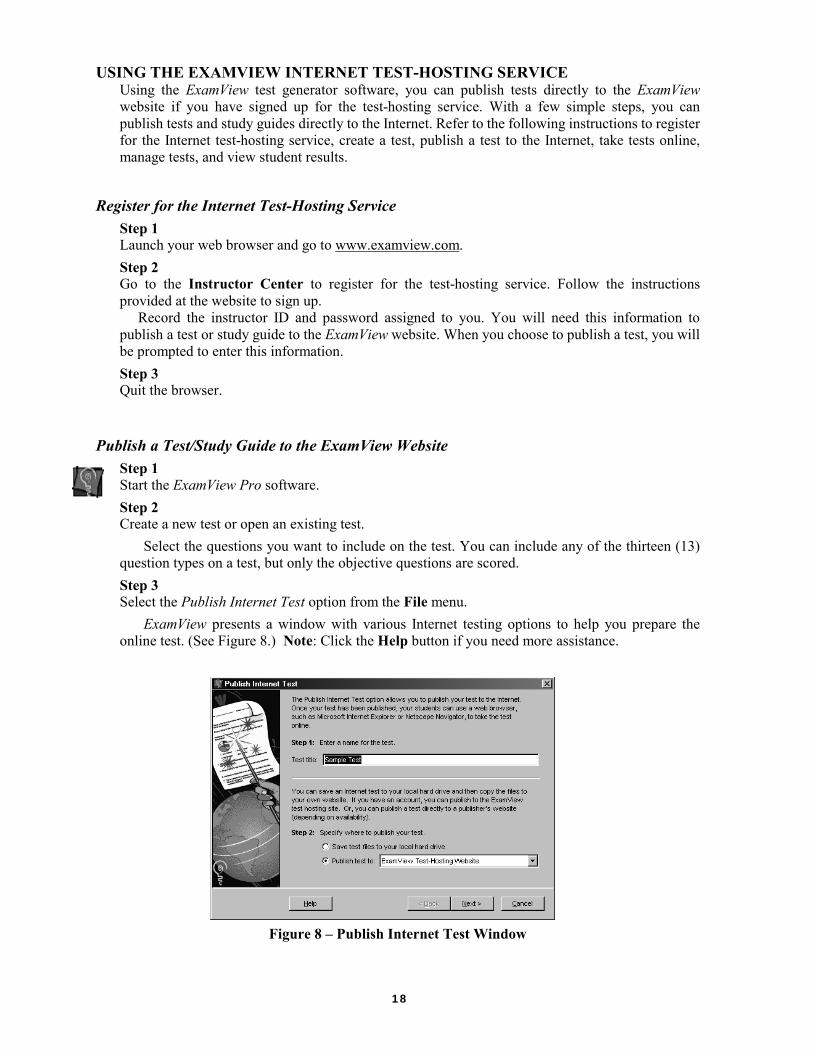
Publish a Test/Study Guide to the ExamView Website
Step 1 Start the ExamView Pro software. Step 2 Create a new test or open an existing test.
Select the questions you want to include on the test. You can include any of the thirteen (13) question types on a test, but only the objective questions are scored. Step 3 Select the Publish Internet Test option from the File menu.
ExamView presents a window with various Internet testing options to help you prepare the online test. (See Figure 8.) Note: Click the Help button if you need more assistance.
Figure 8 – Publish Internet Test Window
19 ExamView Pro EV-17
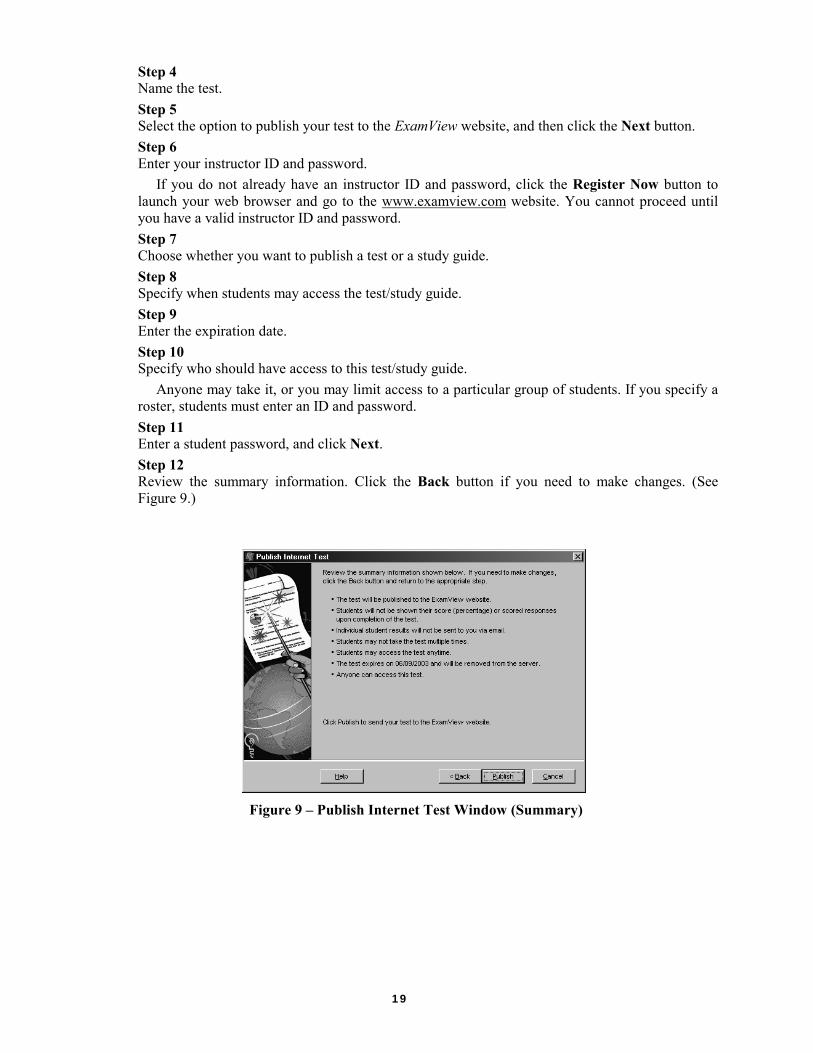
Step 4 Name the test. Step 5 Select the option to publish your test to the ExamView website, and then click the Next button. Step 6 Enter your instructor ID and password. If you do not already have an instructor ID and password, click the Register Now button to launch your web browser and go to the www.examview.com website. You cannot proceed until you have a valid instructor ID and password. Step 7 Choose whether you want to publish a test or a study guide. Step 8 Specify when students may access the test/study guide. Step 9 Enter the expiration date. Step 10 Specify who should have access to this test/study guide. Anyone may take it, or you may limit access to a particular group of students. If you specify a roster, students must enter an ID and password. Step 11 Enter a student password, and click Next. Step 12 Review the summary information. Click the Back button if you need to make changes. (See Figure 9.)
Figure 9 – Publish Internet Test Window (Summary)

20
Step 13 Click the Publish button when you are ready to post the test/study guide to the ExamView website. The program automatically connects to the Internet and posts the test/study guide to the ExamView server. Access the instructor options on the ExamView website (www.examview.com) to preview a test, change selected parameters, or view results. If you need to edit or delete questions, you must change the test locally and then publish a new version. Note: An Internet connection is required to publish a test/study guide. Step 14 Print a copy of the test/study guide for your records, create another test, or exit the software if you are finished.
Take a Test/Study Guide Online at www.evtestcenter.com Once you publish a test/study guide to the ExamView server, anyone in the world can access it if you provide him or her with your instructor ID and the appropriate password. (IMPORTANT: Do not give students your password, just your ID.) Provide the instructions below to your students so that they can take the test or study guide. Note: You must use a browser such as Netscape 4.0/Internet Explorer 4.0 (or a more recent version) that supports cascading style sheets level 1 (CSS1) and JavaScript. An active Internet connection is also required.
To take a test: Step 1 Start your web browser. Step 2 Go to the URL: www.evtestcenter.com. Step 3 Enter your instructor’s ID code. (See Figure 10.) Upon entering a valid instructor code, you will see a list of tests your instructor has published. Step 4 Select a test.
Figure 10 – Test Center Login (www.evtestcenter.com)

21
Figure 11 – Sample Internet Test
Step 5 Enter your name (if requested), student ID, and student password. Contact your instructor if you have not been assigned a student ID or you do not have a student password. Step 6 Review the test and respond to all of the questions. (See the sample test in Figure 11.) If you need help while working with a test, click the Help button shown at the bottom of the test. Click the browser's Back button to return to the test. Step 7 When you complete the test, review the entire test and then click the Grade & Submit button located at the bottom of the test. Your results will be emailed to your instructor. Depending on the test settings, you may be notified of your results immediately. To complete a study guide: Step 1 Start your web browser. Step 2 Go to the URL: www.evtestcenter.com. Step 3 Enter your instructor’s ID. You will see a list of study guides and tests your instructor has published. Step 4 Select a study guide. Step 5 Enter your name (if requested), student ID, and password. Contact your instructor if you have not been assigned a student ID or you do not have a password.

22
Step 6 Review the study guide and answer all of the questions. If you need help while working with a study guide, click the Help button shown at the bottom of the screen. Click the browser's Back button to return to the study guide. Step 7 When you complete the study guide, review your responses and then click the Check Your Work button located at the bottom of the study guide. Your work is scored and you will see whether you answered each question correctly or incorrectly. No results are sent to your instructor. Step 8 Click the Reset button to erase all of your responses if you want to start over.
Review Student Results and Manage Tests When your students complete an Internet test, their results are automatically stored on the server so that you can easily access this information. If you chose to receive results via email, you will also receive the following information for each student: (1) student name and ID, (2) raw score and percentage score for objective-based questions, and (3) responses for each question (objective and open-ended questions). At the ExamView website, you may also change test-setup options, preview tests, download student results, and view your account information.
Step 1 Start your web browser. Step 2 Go to the URL: www.examview.com and access the Instructor Center. Step 3 Log in using your instructor ID and password to view the main menu options. (See Figure 12.)
Figure 12 – ExamView Website (Instructor Center)

23 ExamView Pro EV-21
PUBLISHING TESTS TO YOUR OWN WEBSITE If you choose not to sign up for the ExamView test-hosting service, you can still publish tests/study guides to your own website. You must save the test/study guide to your hard drive, upload the files to your website, and then provide access to your students. Refer to the following sections for step-by-step instructions.
Save an Internet Test/Study Guide to Your Hard Drive
Follow the steps shown below to create an Internet test/study guide and save it to your hard drive. Before you begin, make sure that you installed the ExamView test generator software. Step 1 Start the ExamView Pro software. Step 2 Create a new test or open an existing test.
Select the questions you want to include on the test. You can include any of the thirteen (13) question types on a test, but only the objective questions will be graded. Step 3 Select the Publish Internet Test option from the File menu.
ExamView presents a window with various Internet testing options to help you prepare the online test. (See Figure 13.) Note: Click the Help button if you need more assistance. Step 4 Name the test. Step 5 Select the option to save the test files to your local hard drive, and then click the Next button. Step 6 Choose whether you want to publish a test or a study guide. Step 7 Review the summary information. Make changes, if necessary.
Figure 13 – Publish Internet Test Window

24
Step 8 Click the Save button to save the test/study guide files. When you choose to save an Internet test to your local hard drive, ExamView creates an HTML file and an accompanying folder with all of the necessary image files. This makes it easier for you to post the files to a web server. If, for example, you enter a path such as c:\examview\tests\chapter1 (Windows) or HD:ExamView:Tests:Chapter1 (Macintosh), the software will create a file called chapter1.htm and a new folder called chapter1_files with all of the required picture files. (See the illustration below.)
Step 9 Post the test/study guide to a server to make it available to your students. (See the next section for instructions for posting a test to a server.) Step 10 Once you post a test, you should verify that students can access it. You may also want to try the "Grade & Submit" feature for tests to make sure that the results are emailed to the correct address.
Note: When you create a test, ExamView encrypts the answer information so that a student cannot see the answers in the HTML page source. While this does help to prevent cheating, there is no foolproof method in an unsupervised environment.
Post a Test to Your Own Internet/Intranet Server Once you save a test/study guide formatted for the Internet, you must post all of the related files to a location on a server that your students can access. You can post the files to a local area network, Intranet server, or an Internet server. You must have an Internet connection for students to be able to submit test results. (This is not required for a study guide.) Note: Posting to a server can be a complex process. The specific steps will vary depending on the hardware and software configuration of your server. If you are not familiar with the required steps, contact your network administrator for assistance. Step 1 Start an FTP program or other utility that allows you to copy files from your hard drive to an Internet/Intranet server. Step 2 Log in to your server. Step 3 Create a new folder on your server to hold the test/study guide files. Step 4 Copy the HTML file and the accompanying folder to a location on your server that your students can access.
25 25
When you choose to save an Internet test to your hard drive, ExamView creates an HTML file and an accompanying folder with all of the necessary image files. This makes it easier for you to post the files to a web server.
IMPORTANT: By default, all of the file names are lowercase. Do not change the case since these files are referenced in the HTML document. You must copy the HTML file and the accompanying folder as is. Do not copy the HTML file into the corresponding folder. (See the illustration below.)
Step 5 Log off the server, if necessary. Step 6 Record the URL for the test/study guide HTML document or set up a link to the test.
Take a Test or Study Guide Using the Internet Once you post a test on a server, anyone in the world can access the test if you provide him or her with the Web (URL) address. Follow the instructions provided below to take a test or study guide. Note: You must use a browser such as Netscape 4.0/Internet Explorer 4.0 (or a more recent version) that supports cascading style sheets level 1 (CSS1) and JavaScript. An active Internet connection is required to submit test results.
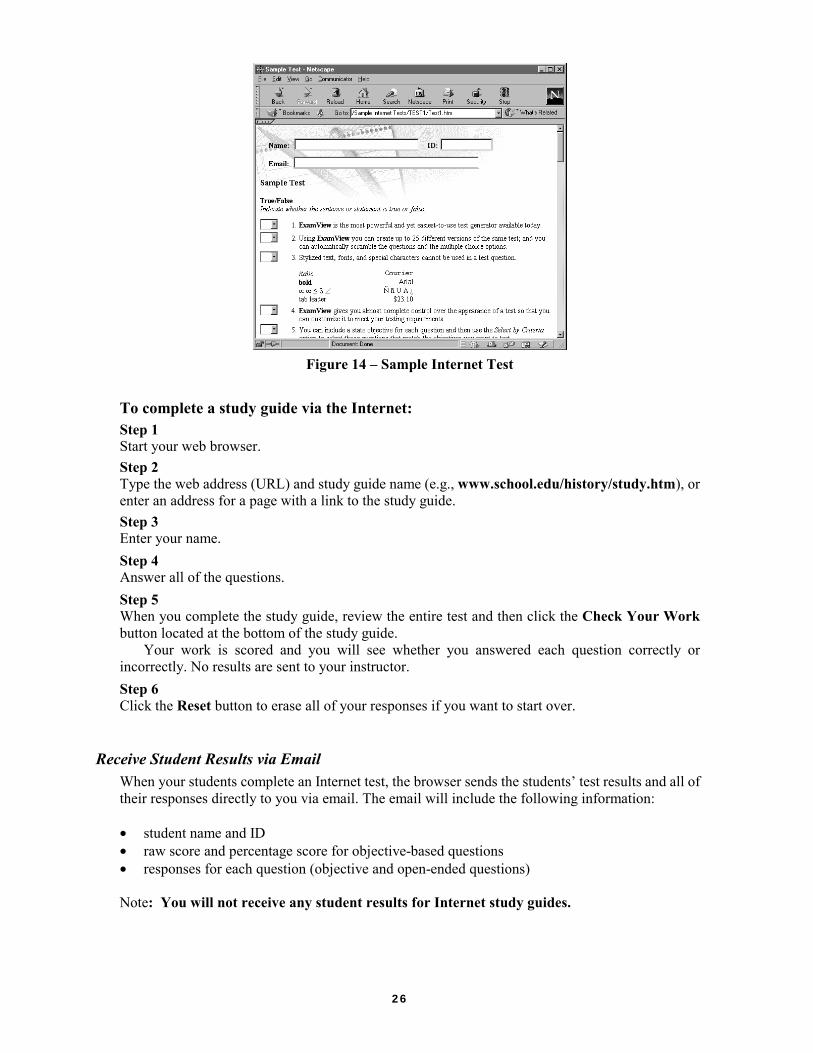
To take a test via the Internet: Step 1 Start your web browser. Step 2 Type the web address (URL) and test name (e.g., www.school.edu/economics/test1.htm), or enter an address for a page with a link to the test. (See the sample test in Figure 14.) If the test is located on a local area network, use the open page command in the browser to open the test. Step 3 Enter your name, student ID, and email address (optional). Step 4 Answer all of the questions. If you need help while working with a test, click the Help button shown at the bottom of the test. Click the browser's Back button to return to the test. Step 5 When you complete the test, review your responses and then click the Grade & Submit button located at the bottom of the screen.
26
Figure 14 – Sample Internet Test
To complete a study guide via the Internet: Step 1 Start your web browser. Step 2 Type the web address (URL) and study guide name (e.g., www.school.edu/history/study.htm), or enter an address for a page with a link to the study guide. Step 3 Enter your name. Step 4 Answer all of the questions. Step 5 When you complete the study guide, review the entire test and then click the Check Your Work button located at the bottom of the study guide. Your work is scored and you will see whether you answered each question correctly or incorrectly. No results are sent to your instructor. Step 6 Click the Reset button to erase all of your responses if you want to start over.
Receive Student Results via Email When your students complete an Internet test, the browser sends the students’ test results and all of their responses directly to you via email. The email will include the following information: • student name and ID • raw score and percentage score for objective-based questions • responses for each question (objective and open-ended questions)
Note: You will not receive any student results for Internet study guides.

27 27
USING A PUBLISHER’S TEST-HOSTING SERVICE Using the ExamView test generator software, you can publish tests directly to a publisher’s website if you have signed up for their test-hosting service. Check with your sales representative or the publisher’s website to determine if this service is offered by your publisher.
Register for the Publisher Test-Hosting Service
Before you can post a test to a publisher’s website, you must obtain an instructor ID and a password. Contact your publisher directly to register. Check with your sales representative or the publisher’s website for more details.
Publish a Test to a Publisher’s Website
Step 1 Start the ExamView Pro software. Step 2 Create a new test or open an existing test.
Select the questions you want to include on the test. You can include any of the thirteen (13) question types on a test, but only the objective questions are scored. Step 3 Select the Publish Internet Test option from the File menu.
ExamView presents a window with various Internet testing options to help you prepare the online test. (See Figure 15.) Note: Click the Help button if you need more assistance. Step 4 Name the test. Step 5 Select your publisher from the Publish test to: drop-down list to publish your test to the publisher’s website, and then click the Next button. Step 6 Enter your instructor ID and password. If you do not already have an instructor ID and password, contact your publisher or sales representative. You cannot proceed until you have a valid instructor ID and password. Step 7 Review the summary information. Click the Back button if you need to make changes. Step 8 Click the Publish button when you are ready to post the test to the publisher’s website. The program automatically connects to the Internet and posts the test guide to the publisher’s server. Note: An Internet connection is required to publish a test. Step 9 Print a copy of the test for your records, create another test, or exit the software if you are finished.