exam note: lgj€¦ · ijl> open a presentation, click the new window button in the window...
TRANSCRIPT

"-----~- -
PoWERPOINT 2010 EXAM REFERENCE
Objectives: 1. Managing the PowerPoint environment 2. Creating a slide presentation 3. Working with graphical and multimedia
elements 4. Creating charts and tables 5. Applying transitions and animations 6. Col laborating on presentations 7. Preparing presentations for delivery
8. Delivering presentations
PoWERPOINT OBJECTIVE 1: MANAGING THE
PoWERPOINT ENVIRONMENT
ADJUST VIEWS
Adjust Views by Usinq the Ribbon
Ribbon Method "" Click the View tab, then click the Normal, Slide Sorter, Notes
Page, or Reading View button in the Presentation Views group
to switch to the presentation view that meets your needs
OR "" Cl ick the View tab, then click the Slide Master, Handout
Master, or Notes Master button in the Master Views ~roup to
switch to the master view that meets your needs
Note: To fit the slide in the current view window, you click the Fit to Window button in the Zoom group to adjust the size of the slide.
Adjust Views by Usinq Status Bar Commands
Shortcut Method "" Click the Normal button ~l, Slide Sorter button ~.
Reading View button [etl], or Slide Show button ~ on the status bar to switch to Normal, Slide Sorter, Reading, or Slide
Show view, respectively
OR "" From Norm al view. press and hold [Shift] , then click the Normal
button Lrnl on the status bar to switch to Slide Master view "" From Slide Sorter view, press and hold [Shift]. then click
the Slide Sorter button ~g] on the status bar to sw itch to
llandout Master view
} Getting Started with PowerPoint 2010 259
Note: To adjust the size of the slide to f it in the current vie.w window, you click the Fit slide to current window button LGJ
MANIPULATE THE POWERPOINT WINDOW
Work with Mult iple Presentation Wi ndows f Simultaneously
Ribbon Method
"" Open two or more presentations, then click the View tab "" Click Arrange All in the Window group to show each
PowerPoint window side by side on the screen
OR
"" Click Cascade in the Window group to show each PowcrPoint wlndow overlapped in Restore Down view
OR
IJl> Open a presentation, click the New Window button in the Window group, then click Arrange All or Cascade in the Window group to work with mu ltiple "versions of the same presentation
Note: PowerPoint assigns the number "1" to the original presentation name in the title bar, and numbers each presentation .i n a new window "2," "3," and so on.
OR
"" Cl ick the Switch Windows button in the Window group, then click the presentation you want to view
CONFIGURE THE QU ICK ACCESS TOOLBAR
Show the Quick Access Toolbar (QAT) Below the Ribbon
Shortcut Method
"" Right-cl ick any tab or Quick Access toolbar button "" Click Show Quick Access Toolbar Below the Ribbon
CONFIGURE POWERPOINT FILE OPTIONS
Use PowerPoint Proofmq Ribbon Method
"" Click the File tab to open Backstage view, then click the __. Options button to display the PowerPoint Options dialog box
"" Click Proofing in the left p<~nc
,v01 .. oJ ()\)rJ'?
-51\f(\ ...) e-Yi 0
.p1!

260 Microsoft PowerPoint 2010 Exam Reference
.,. In the When correcting spelling in PowcrPoint section or the right pane, click the Check spelling as you type check box. Use contextual spelling check box, or Hide spelling errors check box to insert a check mark to turn on those features
.,. Click OK to close the PowerPoint Options dialog box
OR .,. Click the Review tab, then click the Spelling button in the
Proofing group to open the Spelling dialog box .,. Click the Options button to open the PowcrPoint Options dialog
box, then follow the steps in bullets 2-4 in the Usc PowerPoint · Proofing Ribbon Method
Shortcut Method .,. Press [Ait][F4] , click the Options button to open the
PowcrPoint Options dia log box, then follow the steps in bullets 2- 4 in the Use PowerPoint Prooling Ribbon Method
se Power Point Save Options AJOT ~ t C>f'-.)
Ribbon Method $1\M &\J'T ~T' / .,. Click the File tab to open Backstage view, then click Options to "
display the PowcrPoint Options dia log box .,. Click Save in the left pane .,. In the Save presentations section, click the Save AutoRecover
information every check box to turn the feature on or off, then type or use the up and down arrows to select the number of minutes that PowerPoint automatica lly saves the presentation, choose whether to keep the last autosaved version of a file if you close without saving, or change the location where the AutoRccover fi les are saved
.,. In the Ofninc editing options for document management server files section, choose where to save checked-out fil es and the server drafts location on your computer
.,. In the File merge options section, choose whether or not to show detailed merged changes when a merge occurs
.,. In the Preserve lideli ty section. click the Embed fonts in the file check box to turn the feature on or ofT, then choose whether to embed some or all characters used in the presentation
5EVEnAL QUBTIDrVS o-rJ D o/Y'\ ~1:1) cJlJ T fJ I 5
QJl511cr0 \.
Getting Started with PowerPoint 2010 261
POWERPOINT OBJECTIVE 2: CREATING A SLIDE
PRESENTATION I NO'T DCYvt OI'J SAN1 Bv r o..v 'r-t=;S;r- . CONSTRUCT AND EDIT PHOTO ALBUMS '
Add Captions to a Picture .__.. Ribbon Method
.,. For a new photo album, click the Insert tab, click the Photo Album list arrow in the ln1ages group. then click New Photo Album .,
.,. In the Photo Album dialog box, insert pictures, click the Picture layout list arrow in the Album Layout section, then <_:lick a layout
OR
.,. .For an existing photo album, click the Insert tab, click the Photo Album list arrow in the Images group, then click Edit Photo Album
.,. In 1 he Album Content section, click (he Caption below ALL picture check box to select it
.,. For a new album, cli ck Create, or for an existing album, click Update
Ribbon Method
. .,. For a new photo album, click the Insert tab, click the Photo Album list arrow in the Images group, then click New Photo Album
.,. For an existing photo album, click the Insert tab, click the Photo Album list arrow in the Images group, then click Edit Photo Album
.,. In the Photo Album dialog box or the Edit Photo Album dialog box, insert pictures, then click the New Text Box button
.,. For a new album, click Create, or for an existing album, click Update
.,. Click the slide containing the text box. click the text box, select the text, then type the text that meets you r needs
Insert Images in Black and White Ribbon Method
.,. hn a new photo album. click the Insert tab, click the Photo Album list arrow in the Images group. click New Photo Album, lhen inseri pictures

26 2 Microsoft PowerPoint 2 010 Exam Reference
.,.. For an existing photo album, click the Insert tab, click the Photo Album list arrow in the Images group, then click Edit Photo Album
.,.. Click the ALL pictures black and white check box
.,.. For a new album, click Create, or ror an existing album, click Update
Reorder Pictures in an Album
Ribbon Method .,.. For a new photo album, click the Insert tab, then click the
Photo Album list arrow in the Images group .,.. Click New Photo Album, then insert pictures .,.. For an existing photo album, click the Insert tab, click the
Photo Album list arrow in the Images group, then click Edit Photo Album
.,.. Click a picture in the Pictures in album section, then click the Move up button [2] or the Move down button 0 to change
its slide order .,.. For a new album, click Create, or ror an existing album,
click Update
............ Adjust Image: Rotation
Ribbon Method .,.. For a new photo album, click the Insert tab, then click the
Photo Album list arrow in the Images group .,.. Click New Photo Album, then insert pictures .,.. For an existing photo album, click the Insert tab, click the
Photo Album list arrow in the Images group, then click Edit Photo Album
.,.. Click a picture in the Pictures in album section, then click the Rotate left button ~ or the Rotate right button ~ to
rotate the picture .,.. For a new album, click Create, or ror an existing album,
click Update
Adjust Image: Brightness
Ribbon Method .,. For a new photo album, cl ick the Insert tab, then click the
Photo Album list arrow in the Images group .,. Click New Photo Album, then insert pictures .,.. For an existing photo album, click the Insert tab, click the
Photo Album list arrow in the Images group, then click Edit Photo Album
Getting Started with PowerPoint 2010 263
.,.. Click a picture in the Pictures in album section, then click the Increase brightness button [;D or the Decrease brightness button [i] to adjust the brightness or the picture
.,.. For a new album, click Create, or for an existing album, click Update
Adjust Image: Contrast Ribbon Method
.,.. For a new photo album, click the Insert tab, then click the Photo Album list arrow in the Images group
.,.. Click New Photo Album, then inseri pictures .,.. For an existing photo album, click the Insert tab, click the
Photo Album list arrow in the Images group, then click Edit Photo Album
II' Click a picture in U1e Pictures in album section, then click the .;. Increase contrast button ~or the Decrease contrast
button ~ to adjust th e lightest and darkest parts of the pictu re .,.. For a new album, click Create, or for an existi ng album,
click Update
APPLY SLIDE SIZE AND ORIENTATION SETTINGS
Set Up a Custom Size lf. Ribbon Method
.,.. Click the Design tab, then click the Page Setup arrow in the Page Setup group
.,.. In the Page Setup dialog box, click the Slides sized for list arrow, then click Custom
Note: To see all the choices in the list box, you scroll to the bottom of the list.
.,.. Type a number or use the up and down arrows to select a width and height and the number of sl ides to include, then click OK
Change the Orientation Ribbon Method
.,.. Click the Design tab, then cl ick the Page Setup button in the Page Setup group
.,.. In the Page Setup dialog box , click the Portrait option button or the Landscape option button in the Slides or Notes, handouts & outline section to change the orientation or those elements
... Click OK
I
266 Microsoft PowerPoint 2010 Exam Reference
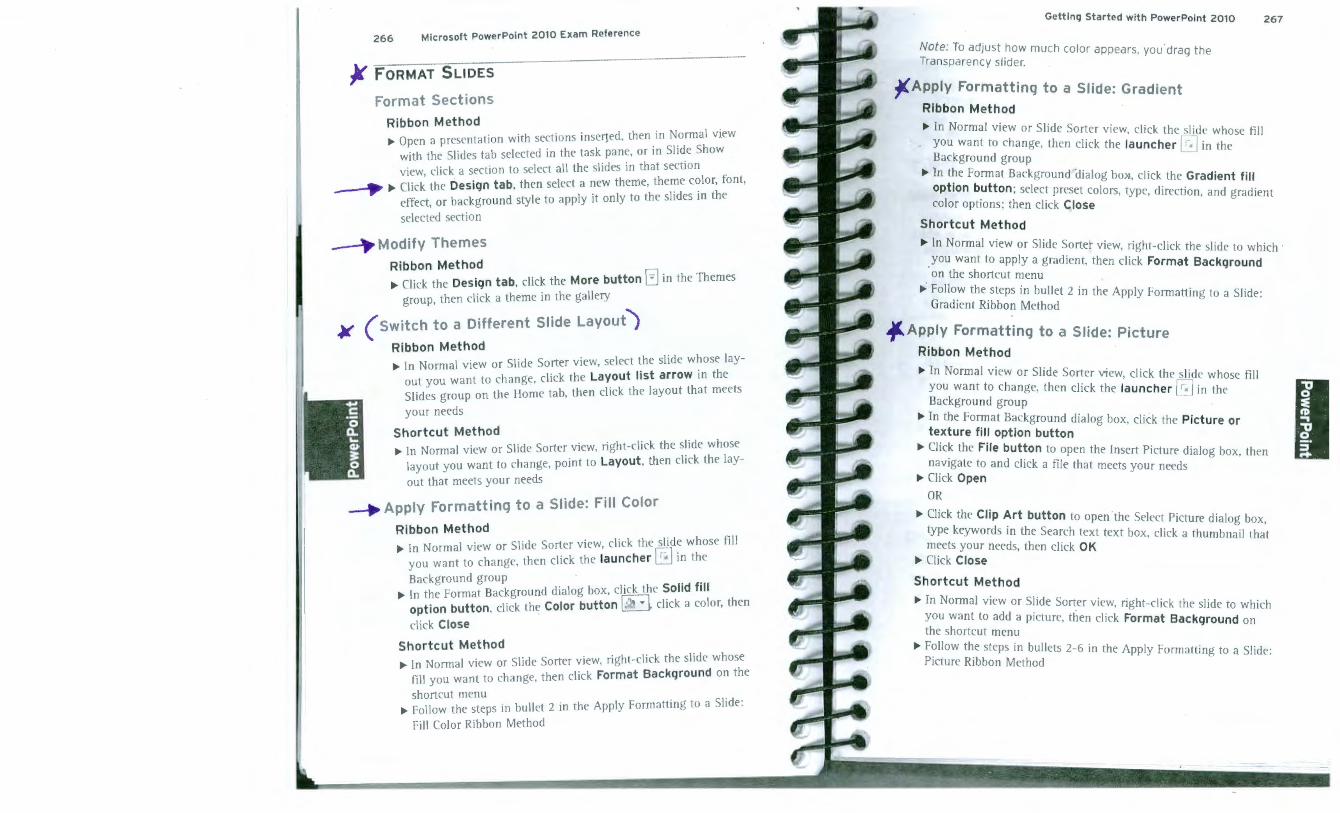
~ F ORM AT SLIDES
Format Sect ions Ribbon Method ,.. Open a presentation with sections insericd, then in Normal view
with the Slides tab selected in the task pane, or in Slide Show view, cl ick a section to select all the slides in that section
- ~ ,.. Click the Design tab, then select a new theme, theme color, font, effect, or background style to apply it only to the slides in the
selected section
____. Modify Themes Ribbon Method ,.. Click the Design tab, click the More button 0 in the Themes
group, then click a theme in the gall ery
¥ ( Switch to a Different Slide Layout)
Ribbon Method ,.. In No rmal view or Slide Sorter view, select the slide whose lay
out you want to change, d ick the Layout list arrow in the Slides group on the Home tab, then click the layout that meets
yo ur needs
Shortcut Method ,.. In No rmal view or Slide Sorter view, ri ght-cl ick the slide whose
layout you want to change, point to Layout, then click the lay-
out th at meets your needs
__. Apply Formatt inq to a Slide: Fill Color
Ribbon Method ,.. In No rm al view or Slide Sorter view, cli ck the slide whose fill
you want to change, then click the launcher [;] in the
Background group ,.. In the Format Background dialog box, click the Solid fill
option button, click the Color button I ~ ·J, click a color, then
click Close
Shortcut Method ,.. In Normal view or Slide Sorter view, ri ght-click the slide whose
fi ll you wan t to change, then click Format Background on the
shortcut menu ,.. Fo ll ow the steps in bullet 2 in the Apply Formatti ng to a Slide:
Fi ll Co lor Ribbon Method
Gett ing St arted with PowerPoint 2010 267
Note: To adj ust how much color appears, you ' drag the Transparency s lide r.
~Apply Formattinq to a Slide: Gradient Ribbon Method
,.. In Normal view or Slide So1ier view, click the sli de whose fi ll you want to change, then cli ck the launcher Q in the Backgrou nd group
,.. In the Format Background dialog box, click the Gradient fill option button; select preset co lors, type, direction, and gradient color options; then click Close
Shortcut Method
,.. In Normal view or Slide Sorter view, ri ght-cl ick the slide to which · you want to apply a gradient, then click Format Background on the shortcut menu
,.. Follow the steps in bullet 2 in the Apply Formatting to a Sl ide: Gradient Ribbon Method
~Apply Formattinq to a Slide: Picture Ribbon Method
,.. In Normal view or Slide Sorter view, click the sli de whose fil l you want to change, then cli ck the launcher Q in the •• Background group .
,.. In the Format Background di alog box, click the Picture or • texture fill option button •
,.. Click the File button to open the Insert Picture dialog box , then navigate to and click a fil e that meets your needs
,.. Click Open
OR
,.. Click lhe Clip Art button to open the Select Picture di alog box, type keywords in the Sea rch text text box, click a thumbnail that meets your needs, then cl ick OK
,.. Click Close
Shortcut Met hod
,.. In Normal view or Slide Sorter view, right-c lick the slide to which you want to add a pictu re, tli en cl ick Format Background on the shortcut menu
,.. Follow the steps in bu ll ets 2-6 in the Apply Formatti ng to a Slide: Picture Ribbo n Method

26 8 Microsoft PowerPoint 2010 Exam Reference
Appl" formattinq to a Slide: Texture
Ribbon Method .,. In No rm al view or Slide Sorter view. cli ck the slide whose fill
you wa nt to change, then cli ck th e launcher [] in the
Background group .,. In the Fo rm at Background di alog box . cli ck the Picture or
texture fill option button .,. Cli ck the Texture list arrow, click a texture, then select tiling
and transparency options .,. Click Close
Shortcut Method .,. In Normal view or Slide Sorter view, right-click the slide to which
you wa nt to add a texture, then click Format Background on
the shortcut menu .,. Follow the steps in bull ets 2- 4 in the Apply Formatti ng to a
Slide: Texture Ribbon Method
pply Formatting to a Slide: Pattern
Ribbon Method .,. ln Normal view or Slide Sorter view, click the slide whose fill
you want to change, then cli ck the launcher D in the
Background grou p .,. In the Format Background di alog box, cli ck the Patt ern fill
opt ion button, then cl ick a pattern .,. Cli ck Close
Shortcut Method .,. In No rmal view or Slide Sotter view, right-click the slide to which
you wa nt to add a pattern, then cl ick Format Background on
the shortcut menu .,. Fo ll ow the steps in bullets 2- 3 in the Apply Formatting to a
Slide: Pattern Ribbon Method
Note: To change a pa ttern's fo reground or background color, yo u click the Foreground Co lor li st arrow [g or the Background Color li st arrow~. then click a co lor.
./( Set Up Slide Footers Ribbon Method .,. Click the Insert tab, then click the Header & Footer button in
the Tex t group .,. In the Header and Foo ter di alog box, cli ck options for date and
time, slide number, and tex t that will appear in the foote r .,. Cli ck Apply or Apply All
\
Getting Started wit h PowerPoint 2010 269
Shortcut Method
.,. Press [Ait][VJ[H] to open the I leader and Foo ter dia log box
.,. Follow the steps in bullels 2-3 in the Set Up Slide Footers l~ i bbo n McU1od
Note: To prevent the foo ter from a ppea ring on the ti tle s lide, yo u click the Don't show on tit le s lide check box .
ENTER AND FORMAT TEXT
~Use Text Effects Ribbon Method
.,. Enter and select text, cli ck the Drawing Tools Format tab, click Text Effects in the WordArt Styles group , point to an effect, click an effec t sty le, or click the WordArt Styles More button I] in th e WordA ti Styles group, then cli ck a sty le fro m the gallery
OR
.,. Enter and select text, cli ck the Drawing Tools Format tab, then click the launcher 0 in the WordArt Styles group to open the Format Tex t Effects dia log box
.,. Click an effect (Shadow, Reflections, Glow and Soft Edges, 3-D Format, or 3-D Rotation) in the left pane, th en set options assoc iated with the selected style
.,. Click Close
Shortcut Method
.,. Enter and select text, ri ght-click the tex t, th en click Format Text Effect s on the shoticut menu
.,. Jn the Format Tex t Effects dia log box, follow the steps in bu ll ets 2-3 in the Use Tex t Effects Ribbon Method
Chanqe Text Format: Indentation Ribbon Met hod .,. Select the tex t
.,. Click the View tab, then dick the Ruler check box in the Show group to display the Rul er if it is not already displayed
.,. Drag the indent markers on the Ru ler to adjust the position of the text on the line
Shortcut Method .,. Select the text
.,. Ri ght-click the tex t in the tex t box, then click Paragraph on the shortcut menu
I

270 Microsoft PowerPoint 2010 Exam Reference
.,. In the Pa ragraph dialog box, type a va lue in the Befo re tex t tex t box or use the up and down arrows to adjust the amount or indentation in the Indenta ti on section
.,. Click the Special list arrow, click an option (First line or I ranging), then adjust the number in the By text box as necessary
... Cli ck OK ,
Change Text Format: Alignment Ribbon Method
.,. Select the tex t
.,. Use the appropriate button or keyboa rd sh01tcut li sted in Table PPT-4 to align tex t to meet yo ur needs
Shortcut Method
.,. Select the tex t
.,. Ri ght-click the text box, then click Paragraph on the shortcu t menu
.,. In the Paragraph di alog box, click the Alignment arrow in the General section
.,. Click OK
Table PPT-4 Text Ali gnment Buttons and Keyboard Shortcuts
Align Tex t Right
Justi fy*
* not included on the Mini toolbar
Change Text Format: Line Spacing Ribbon Method
[Ctri][R]
.,. Select the tex t
.,. Click the Line Spacing button ~~ in the Paragraph group on the Home ta b. then click a line spacing option in the list
OR
.,. Select the tex t
\
Getting Started with PowerPoint 2010 271
.,. Click the Line Spacing button l!~ ·l in the Paragraph group on the Home tab, then click Line Spacing Options
.,. In the Paragraph dialog box, type a value in the Before and After text boxes or use the up and down arrows to adjust the amount of spacing in the Spacing section
.,. Click the Line Spacing list arrow, select the spacing option (Exactly or Mu ltiple), then adjust the number in the At text box to meet yo ur needs
... Click OK
Shortcut Method
.,. Right-click the text, then click Paragraph on the shortcut menu OR
... Select the text, then cli ck the launcher lJ in the Para graph · group on the Home tab
.,. Foll ow the steps in bullets 3-5 in the second Change Text Format: Line Spacing Ribbon Method
Change Text Format: Direction Ribbon Method
.,. Select the text
.,. Cli ck the Text Direction button IJJiH in the Paragraph group on the Home tab, then click a direction option in the list OR
.,. Select the text
.,. Click the Text Direct ion button IT!~ ~ in the Paragraph group on the Home tab, then click More Options
.,. In the Fonnat Text Effects di alog box, click the Text direction list arrow, then click a direction option in the list
.,. Cl ick Close
-1' Change t he Formatting of Bulleted and Numbered Lists
Ribbon Method
I .,. Select the bulleted or numbered list, then click the Bullets list.-
arrow 1::: Tl or Numbering list arrow [;::::: ·I in the Paragraph group on the Home tab
.,. Click Bullets and Numbering at the bo ttom of th e ga lle1y to open the Bullets and Numbering di alog box
.,. For a bulleted list, click a bullet style on the Bulleted tab to change the bullet style
.,. Adjust the va lue in the Size tex t box to change the bull et size

272 Microsoft PowerPoint 2010 Exam Reference
~ Click the Color button (;: · ]. then cl ick a color to change the
bullet color ~ Click the Picture button, select a picture in the Picture Bullet di alog box, then click OK to create a picture bullet
~ For a numbered list. click the Numbered tab, then cli ck a
number style ~ Adj ust the va lue in the Size text box to change the number size ~ Click the Color button ~ ·], then cli ck a color to change the
number co lor ~ Cli ck OK
Shortcut Method ~ Select and ri ght-click the bullctcd or numbered list, point to
Bullets or Numbering, respecti vely, on the sh01icut menu, then
cli ck Bullets and Numbering ~ Fo llow the steps in bullets 3- 6 in the Change the Formatting of
Bull cted and Numbered Lists Ribbon Method
-~,.• Enter Text in a Placeholder Text Box
Ribbon Method ~ Click the Layout button in the Slides group on the Home tab,
then select any slide layout except Blank ~ Click the placeholder text box, then type the text that meets
your needs
Shortcut Method ~ Right-click a slide in the Slides tab in the task pane, point to
Layout, then click any slide layout except Blank ~ Foll ow the steps in bul let 2 in the Enter Tex t in a Placeholder
Text Box Ribbon Method
--~· Convert Text to SmartArt
-Jf. Ribbon Method ~ Click anyw here in the tex t object, then click the Convert to
SmartArt button in the Paragraph group on the Home tab ~ Click a graph ic sty le in the ga ll ery or click More SmartArt
Graphics to open the Choose a SmartAti Graphic dialog box
~ Click a graphic style, then click OK
Shortcut Method ~ Right-cl ick anywhere in the text object, then click Convert to
SmartArt on the shortcut menu ~ Follow the steps in bullets 2- 3 in the Convert Text to SmartA rt
Ribbon Method
Gett ing Start ed with PowerPoint 2010 273
Copy and Paste Text ~ -Ribbon Method
~ Select the tex t you wa nt to copy, then cli ck the Copy button 1-;J] in the Clipboa rd group on the Home ta b
~ Position the insertion point whqe you wa nt to paste the tex t. then click the Paste button [ j in the Clipboa rd group on the Home tab
Shortcut Method
~ Sel ec t and ri ght-click the tex t yo u wa nt to copy, then cl ick Copy on the shortcut menu
~ Pos iti on the insetiion point where you want to paste the tex t, right-click, then cl ick Paste on the shortcut menu
·OR
~ Se l ect the tex t you wa nt to copy, then pres~ [Ctri][C] ~ Pos itio n the inseti ion point where you wa nt to paste the tex t,
then press [Ctrl] [V]
Use Paste Spec1al Ribbon Method
~ Select the text or object you want to copy, then click the Copy button ~ or the Cut button [JJ in the Clipboard grou p on the •• Home tab
~ Cli ck in the new location in .the presentation where yo u want to , paste the tex t or object •
~ Cli ck the Paste list arrow I ] in the Clipboard group on the Home tab
~ Cli ck Paste Special ~In the Paste Specia l dialog box, select the Paste Special option
that meets yo ur needs .' ~ Click OK
Shortcut Method
~ Sel ect and ri ght-cl ick the tex t or object you wa nt to copy, then click Cut or Copy on the shoticut menu
~ Fo ll ow the steps in bu ll ets 2- 6 in the Use Paste Special Ribbon Method
OR
,... Select the tex t or object you wa nt to copy, then press [Ctri][X] to cut or [Ctri][C] to copy the se lected tex t or object
~ Press [Ctri][Ait][V] to open the P;Jstc Special dialog box ~ Select the Paste Special options in the Paste Special di alog box
that meet your needs ~Click OK

274 Microsoft PowerPoint 2010 Exam Reference
--~~ Use the Format Painter Ribbon Method
.,.. Select the text or object whose attributes you want to copy, then click the Format Painter button [2] in the Clipboard group on the I lome tab .
.,.. Loca te the destination text or object, then cl ick the text or object to apply the formatting
Shortcut Method
.,.. Select the text or object whose attributes you want to copy
.,.. Ri ght-click the text or object, then click the Format Painter button [ -Z] on the Mini toolbar
.,.. Locate the destination text or object, then click the text or object to apply the formatting
FORMAT T EXT BOXES
"'IIIo... Apply Formatting to a Text Box: fill Color Ribbon Method
~,
.,.. Select the text box j{ .,.. Click the Drawing Tools Format tab, cl ick the Shape Fill list
arrow in the Shape Styles group, then cl ick a color
OR .,.. Select the text box .,.. Click the Drawing Tools Format tab, then click the launcher l J in the Sha pe Styles group to open the Format Shape dialog box
.,.. Click Fill in the left pane if .it is not already selected, then select co lor and transparency options to meet your needs
.,.. Click Close
Shortcut Met hod
.,.. Select the text box
.,.. Right-click the text box, tl1en click Format Shape on the shortcut menu to open the Format Shape di alog box
.,.. Follow the steps in bullets 3-4 in the seco nd Apply Formatting to a Text Box: Fill Color Ribbon Method
Apply Formatting to a Text Box: Gradient Ribbon Method .,.. Select the text box
""-) ~~
Getting Started with PowerPoint 2010 275
.,.. Cl ick the Drawing Too.ls Format tab, click the Shape Fill list arrow in the Shape Styles group, point to Gradient, then select a variation or click More Gradients to open the Format Shape dialog box
.,.. In the Format Shape dia log box, click Fill in the left pane if it is not selected, click the Gradient Fill option button, then click preset colors, type, di rection, and grad ient co lor options
.,.. Click Close
OR
.,.. Select the text box
.... Click the Drawing Tools Format tab, then click the launcher n in the Shape Styles group to open the Format Shape dia log box
.,.. Foll ow the steps in bu llets 3-4 in the Apply Formatting to a Text Box: Gradient Ribbon Method
Shortcut Method
.,.. Select the text bqx
.,.. Right-click the text box, then click Format Shape on the shortcut menu to open the Format Shape dialog box
.,.. Follow the steps in bull ets 3-4 in the Apply Formatting to a Text Box: Gradient Ribbon Method
Apply Formatting to a Text Box: Picture Ribbon Method
.,.. Select the text box
.,.. Click the Drawing Tools Format tab, click the Shape Fill list arrow in the Shape Styles group, then cl ick Picture on the menu
.,.. In the Insert Picture dialog box, navigate to the fi le that meets your needs, then click the fi le
.,.. Click Insert
Apply Formatting to a Text Box: Texture Ribbon Method
.,.. Select the text box
.,.. Click the Drawing Tools Format tab, click the Shape rill list arrow in the Shape Styles group, point to Texture, then se lect a tex ture or cli ck More Textures to open the Format Shape dia log box
.,.. In the Format Shape dia log box, click Fill in the left pane if it is not already selected, click the Picture or texture fill option button, click the Texture list arrow, click a texture, then select ti ling and transparency options

278 Microsoft PowerPoint 2010 Exam Reference
.,.. Click the Drawing Tools Format tab, click the More button 0 in the Shape Styles group, then click a style in the gall ery
Change the Shape of a Text Box
Ribbon Method .,.. Select the lex t box .,.. Cli ck the Drawing Tools Format tab, click the Edit Shape list
arrow in the Insert Shapes group, point to Change Shapes, then
click a shape
Apply Effects
Ribbon Method
.,.. Select the text box
.,.. Cli ck the Drawing Tools Format tab, click the Shape Effects list arrow in the Shape Styles group, point to an effect, then click the effect style OR
.,.. Click the Drawing Tools Format tab, then cl ick the launcher Q in the Shape Styles group to open the Format Shape dialog box
.,.. In the Formal Shape dialog box, cli ck an effect (Shadow, Reflections, Glow and Soft Edges, 3-D Format, or 3-D Rotation) in the left pane, then set options associated with that effect
.,.. Cli ck Close
Shortcut Method .,.. Right-click the text box, then click Format Shape on the short
cut menu II> In the Format Text Effects dialog box, click an effect (Shadow,
Reflections, Glow and Soft Edges, 3-D Formal, or 3-D Rotation) in the left pane, then set options associated with that effect
.,.. Click Close
Set the Alignment
Ribbon Method .,.. Select the text box .,.. Click the Drawing Tools Format tab, cl ick the Align button in
the Arrange group, then click an alignment option
- ~ Create Columns in a Text Box Ribbon Method
.,.. Select the text box
Getting Started with Pow~rPoint 2010 279
J!.. .,.. Click the Drawing Tools Format tab, then click the launcher Q in the Shape Styles group to open the Format Shape dialog box
Jf. .,.. In the Format Shape dia log box, click Text Box in the left pane, then click the Columns button
II> In the Columns dialog box, enter a value in the Number text box or use the up and down arrows to set the number of co lumns
.,.. Enter a value in the Spacing text box or use the up and down arrows to set the space between co lum ns
"" Click OK .,.. Click Close
Shortcut Method
.,.. Right-click the text box, then click Format Shape on the shoticut menu
.,.. Follow the steps in bullets 2-7 in the Create Columns in a Text Box Ribbon Method
Set Internal Margins Ribbon Method
.,.. Select the text box
.,.. Click the Drawing Tools Format tab, then click the launcher ~ in the Shape Styles group to open the Format Shape dialog box
.,.. In the Format Shape dialog box, click Text Box in the left pane, then enter values in the Left, Right, Top, and Bottom text boxes or use the up and down arrows to set the internal margi ns
.,.. Click Close
Shortcut Method
.,.. Right-click the text box, then click Format Shape on the shoticut menu
.,.. Follow the steps in bullets 2- 4 in the Set In ternal Margins Ribbon Method
Set the Current Text Box Formatting as the Default for New Text Boxes
Shortcut Method
.,.. Right-click the text box, then click Set as Default Text Box on the shortcut men u
Adjust Text in a Text Box: Wrap Ribbon Method
.,.. Select the text box

- ·--
II
286 Microsoft PowerPoint 2010 Exam Reference
Table PPT-6 Inserting Hyperl inks Using the Insert Hyperli nk Dialog Box
Another document or Web page
Another · place in the document
A new document
An e-mail address
Click Existing File or Web. Page, navigate to the drive and fo lder that meet your needs, click the file name in the list, then click OK
OR
Click the Address text box, type the URL, then click OK
Note: Make sure you are connected to the Internet to successfu lly fol low this link.
Click Place in This Document, select a location in the Select a place in this document list, then click OK
Click Create New Document, name the document, verifY the drive and folder, choose to edit it now or later, then click OK
Click E-mail Address, type the address and any other text to disp lay, then click OK
M ANIPULATE IMAGES 4 -Apply Color Adjustments
Ribbon Method
..,. Click the picture whose co lor you want to adjust
..,. Click the Color list arrow in the Adjust group on the Picture Tools Format tab, then make the appropriate selections using Table PPT-7 as a reference
More Variations
Set Transparent Co lor
Opens a menu of theme and standard co lors, and a link to the Colors dialog box
Removes pixels based on a single color you select in the image
(continued)
Getting Started with Powe~Point 2010 287
Table PPT-7 Color Adju stment Options (continued)
Picture Color Options:
Opens Picture Color options in the Format Picture dialog box, where you can fine-tune the color
• Color Saturation
Adjusts the intensity of the color
• Color Tone Adjusts the color temperatu re by increasing or decreasing the coolness (blue) or warmness (orange)
• Recolor Converts the color to graysca le, .black and white, sepia, and color hues
1 Apply Image Corrections: Sharpen ~ ... Ribbon Method ·
..,. Click the picture whose image you wa.nt to sharpen
Note: You can sharpen a picture but not a clip art image.
NOT .fi?o) SJVf'l f!::;J T (ltV
e,.ep:il fl cA'f f,P.
~'T
..,. Click the Corrections list arrow in the Adjust group on the Picture Tools Format tab
..,. Click the Sharpen: 25% thumbnail or the Sharpen: 50% thumbnail in the Sharpen and Soften section to sharpen edges of pixels in the picture OR
..,. Click Picture Corrections Options beneath the thumbnails to open the Format Picture dialog box, click the Presets list arrow in the Sharpen and Soften section, cl ick the Sharpen: 25% thumbnail or the Sharpen: 50% thumbnail, then drag the Soften Sharpen slider to a positive percentage to the right
..,. Click Close
~Apply Image Corrections: Soften Ribbon Method
..,. Click the picture whose image you want to soften
Note: You can soften a picture but not a clip art image.
..,. Click the Corrections list arrow in the Adjust group on the Picture Tools Format tab

, .. 288 Microsoft PowerPoint 2010 Exam Reference
II> Click the Soften: 50% thumbnail or the Soften: 25% thumbnail in the Sharpen and Soften section to bl ur edges of pixels in the picture OR
11> Click Picture Corrections Options beneath the thumbnails to open the Format Picture dialog box, click the Sharpen and Soften Presets list arrow in the Sharpen and Soften section, r.r' click the Soften: 50% thumbnail or the Soften: 25%
cJ..., thumbnail, then drag the Soften Sharpen slider to a negative _.) ) percentage to the left
(:l t!'"' 11> Click Close
' ~ jlJ' ¥ Apply Image Corrections: Brightness ~~ ({' Ribbon Method
~stf 6, II> Click .the picture or d ip art image whose brightness you want lY ,_.f? to ac!Just ~ \ II> Click the Corrections list arrow in the Adj ust group on the
Picture Tools Format lab
II> Click a thumbnail in the Brightness and Contrast section to adj ust the brightness of pixels in the picture OR
II> Click Picture Corrections Options beneath the thumbnai ls to open the Format Picture dialog box, click the Brightness and Contrast Presets list arrow in the Brightness and Contrast section, click a thumbnail, then drag the Brightness slider to the percentage that meets your needs
11> Click Close
~ Apply Image Corrections: Contrast Ribbon Method
II> Click the picture or d ip art image whose contrast you want to adjust
11> Click the Corrections list arrow in the Adjust group on the Picture Tools Format tab
II> Click a thumbnail in the Brightness and Contrast section to adjust the contrast of pixels in the picture OR
II> Click Picture Corrections Options beneath the thumbnai ls to open the Format Picture dialog box, dick the Brightness and Contrast Presets list arrow, click a thumbnail, then drag the Contrast slider to the percentage that meets your needs
11> Click Close
Getting Started with PowerPoint 2010
~Add Artistic Effects to an Image Ribbon Method
289
II> Click the picture to which you want to apply an artistic effect
Note: You ca n add artistic effec ts to a picture but not to a clip art image.
II> Click the Artistic Effects list arrow in the Adjust group on the Picture Tools Format la b
II> Click a thumbnail to apply that artist ic effect OR
II> Follow the steps in bullets 1-3 in the Add Artistic Effects to an Image Ri bbon Method to apply an artistic effect, d ick the Artistic Effects list arrow in the Adj ust gtoup on the Picture Tools Format tab, then d ick Artistic Effects Options to open the Format Picture dia log box
II> Be sure Artistic Effects is selected in the left pane, click the Artistic Effects list arrow, d ick a thum bnail , then drag each slider to the setting that meets your needs
11> Click Close
>(.. Remove a Background Ribbon Method
II> Click the picture or d ip art image whose background you want to remove
11> Click the Remove Background button in the Adj ust group on the Picture Tools Format tab
II> Resize the selection marquee as needed II> Click the Mark Areas to Keep button, Mark Areas to
Remove button, or Delete Mark button in the Refine group to adj ust the selection to meet your needs
II> Click the Discard All Changes button to cancel the background remova l or dick the Keep Changes button in the Close group to accept cha nges to the selected areas
Crop a Picture
Ribbon Method
II> Click the pictu re you want to crop II> Click the Picture Tools Format tab, then cl ick the Crop
button in the Size group
II> Place the pointer over a corner or side cropping handle, resize the picture to meet yo ur needs, then press [Esc] or click a blank part of the slide

-= 292 Microsoft PowerPoint 2010 Exam Reference
II> Click the launcher fJ in the Drawing group on the I lome tab or the Shape Styles group on the Drawing Tools Format tab to open the Format Shape dialog box
II> Fol low the steps in bullets 2- 4 in the second Change the Fill Color or Texture Ribbon Method
Shortcut Method
II> Right-click the WordArt or shape, then click Format Shape on the sh01icut menu
II> Follow the steps in bullets 2-4 in the second Change the Fi ll Color or Texture Ribbon Method
Change the WordArt
Ribbon Method
II> Click the WordArt you want to change, then click the Drawing Tools Format tab
II> Cli ck the More button c::J in the WordArt Styles group, then click a new WordA1i style in the ga ll ery
Convert WordArt to Smart Art
Ribbon Method
II> Cli ck the WordArt you want to convert
11> Click the Convert to SmartArt Graphic button l::i,'H in the Paragraph group on the Home tab, then click a SmartA1t graph ic or cli ck More SmartArt Graphics, cli ck a Sma rt.Art graph ic in the Choose a SmarlArl graph ic dialog box, then click OK
~MANIPULATE SMART ART
Add and Remove Shapes
Ribbon Method
II> Click the SmartArt Tools Desiqn tab, then click a shape or object in the SmartArt graphic where you want to add or remove a shape
II> To add a shape, click the Add Shape list arrow in the Create Graphic group, then click an option to select the type of Sma1tArt graphic and location fo r the new shape that meets your needs
II> To delete a shape, select the SmartArt graphic shape in the Smart.Art graphic, then press [Delete]
OR
Getting Started with PowerPoint 2010 293
II> To add a shape rrom the Text pane, click Text Pane in the Create Graphic group on the Sma1tArt Tools Design lab to open the text pane if it is not open, move the pointer to the end of the text where you want to add the shape, then press [Enter] ; to delete a shape, select the text yo u wa nt to delete, then press [Delete]
Shortcut Method
II> To add a shape, light-click the S)llartArt graphic shape in the SmartArt graphic, then point to Add Shape on the shortcut menu
II> Click an option to select the type or SmartA1t grap hic and location for the new shape that meets yo ur needs
II> To delete a shape, right-click the SmartArt graphic shape in the Sma1tArt graphic, then click Cut on the sh01tcut menu
Note: You ca n also se lec t a shape and press [De lete).
Chang-e SmartArt Styles -""'..,..,__ __
Ribbon Method
II> Select the SmartArt graphic whose style yo u want to change
II> Click the SmartArt Tools Desiqn tab, cli ck the SmartArt Styles More button Q in the SmartArt Styles group, then cli ck a style from the ga llety
Note: To cha nge theme colors, you click the Change Colors button in the Smart Art Styl es group.
Change the SmartArt Layout .._ -
Ribbon Method
II> Select the Sma1iA1i gra phic whose layo ut you want to change
II> Click the SmartArt Tools Desiqn tab, click the Layouts More button G in the Layouts group, then click a layout from the ga llery; or click More Layouts, click a SmartArt layout in the Choose a Sma1tA1t graphic dia log box. then click OK
Shortcut Method
II> Right-cli ck the SmartArt graphic, cl ick Chanqe Layout on the shortcut menu, click a SmartArt layout in the Choose a SmartArt graphic dia log box, then click OK
Reorder Shapes • ..,......__. __
Ribbon Method
II> Select the SmartA1t graphic shape you want to reorder

306 Microsoft PowerPoint 2010 Exam Reference
Apply a Border Ribbon Method ~ Click the chart to which you want to apply a border ~ Click the Chart Tools Format tab, ciLck the Shape Outline
button in the Shape Styles group, then click a color and set bor-
der options
Add Hyperlinks
Ribbon Method ~ Click the chart to which you wa nt to add a hyperlink ~ Click the Insert tab, then click the Hyperlink button in the
Lin ks group ~ In the Insert Hyperlink dialog box, use the options listed in
Table PPT -6 (page 286) to create the hyper! ink, then click OK
POWERPOINT OBJECTIVE 5: APPLYING
TRANSITIONS AND ANIMATIONS
j.. APPLY BuiLT-IN AND CusToM ANIMATIONS
Use More Entrance .......... --
Ribbon Method ~ Click the object to which you wa nt to apply an entrance effect ~ Click the Animations tab, click the More button 0 in the
Animation group, then click More Entrance Effects in
the gallery ~ ln the Change Entrance Effect dialog box, click an entrance
effect, then click OK
Use More Emphasis ..._ -
Ribbon Method ~ Click the object to wh ich you want to apply an emphasis effect ~Click the Animations tab, click the More button 0 in the
Animation group, then click More Emphasis Effects in
the gallery ~ In the Change Emphasis Effect dialog box, click an emphasis
effect, then click OK
Use More Exit Effects 4-- -Ribbon Method ~ Click the object to which you want to apply an exit effect
Getting Started with Power-Poi nt 2010 307
~ Click the Animations tab, click the More button [j in the Animation group, then click More Exit Effects in the ga ll e1y
~ In the Change Exit Effect dia log box, click an exit effect, then click OK
Use More Motion Effects """' .... L-
Ribbon Method ~ Click the object to which you want to app ly a motion
path effect ~ Click the Animations tab, cl ick the More button 0 in the
Animation group, then click More Motion Paths in the gall ery ~ ln the Change Motion Path dialog box, click a.motion path, then
click OK
~ APPLY EFFECT AND PATH OPTIONS
Set Timing Ribbon Method IJo Click the animated object whose timing you want to set ~ Click the Animations tab ~ Enter a value in the Duration text box in the Timing group or use
the up and down arrows to set the length of the an imation ~ Enter a value in the Delay text box in the Timing group or use
the up and down arrows to set how long of a pause before the animation plays
OR ~ Cli ck the animated object whose timing you want to set ~ Cli ck the Animations tab, then click .the Animation Pane
button in the Advanced Animatio n group to open the A11imation Pane
~ Click the Animated object list arrow, click Timing in the lis t, set timing options on the Timing tab of the animation dialog box for the selected animation, then click OK OR
~ Click the animated object whose timing you want to set ~ Click the Animations tab, then click the launcher Q in the
Animation group to open the animation dialog box for the selected animation
IJo Follow the steps in bullet 3 in the second Set Timing Ribbon Method
j

30 8 Microsoft PowerPoint 2010 Exam Reference
__. Set Start Options
Ribbon Method ~ Cli ck. the animated object whose options you want to set ~ Click. the Animations t ab, cl ick. the Start list arrow in the
Timing group, then click On Click, With Previous, or After Previous to set when the animation starts to play
OR ~ Click the animated object whose timing you want to set ~ Click the Animations t ab, then click the Animation Pane
button in the Advanced Animation group to open the
Animation Pane ~ Click the Animated object list arrow, click Timinq, then click
Start on Click, Start With Previous, or Start After
Previous on the menu
OR ~ Click the animated object whose timing you want to set ~ Click the Animations tab, then click the Animation Pane
button in the Advanced Animation group to open the
Animation Pane ~ Click the Animated object list arrow, click Timinq, click. the
Start list arrow on the Tim ing tab of the animation dialog box for the selected animation, select an option, then click OK
OR ~ Click the animated object whose liming you want to set_ ~ Click the Animation s t ab, then click the launcher 0 in the
Animation group to open the animation dialog box for the
selected animation ~ Follow the steps in bullet 3 in the third Set Timing Ribbon Method
MANIPULATE ANIMATION S
- ~ Change the Direction of the Animation
Ribbon Method ~ Click the animated object whose direction you want to change
~ Click the Animations tab ~ Click the Effect Options button in the Animation group, then
click a di rection option
OR ~ Click the animated object whose direction you want to change ~ Cl i c k the Animations tab, then click the Animation Pane
button in the Advanced Animation group to open the
Animation Pane
Getting Started with PowerPoint 2010 30 9
~ Click U1e Animated object list arrow, click Effect Options, click the Direction list arrow on the Timing tab of the animation text box, select an option, then click OK
Note: Depending on the selected animation, you can also adjust the direction on the Effects tab in the animation dialog box for the se lected animation.
Attach a Sound to an Animation Ribbon Method ·
~ Click the animated object to which you want to attach a sound ~ Click lhe Animations tab, then dick the Animation Pane
button in the Advanced Animation group to open the Animation Pane
~ Click the Animated object list arrow, click Effect Options, cl ick the Sound list arrow on the Effect lab of the animation text box, click a sound, then click OK
Note: To add a sound from a file, scro ll down the Sound list. click Other Sound, navigate to the drive and fo lder in the Add Audio dialog box that meet your needs, click the sound file you want to use, then click Open.
Use the Animation Painter Ribbon Method
~ C l ick the animated object whose animation you want to apply to another object
~ Click the Animations tab, then click the Animation Painter button in the Advanced Animation group
~ Click the slide containing the object you want to animate, position the Animation Painter pointer ~ 1: over the object, then cl ick the mouse
Reorder Animation Ribbon Method
~ Click the slide containi ng two or- more animated objects you want to reo rder
~ Click the Animations tab, select the animated object you want to reorder, then click the Move Earlier button or Move Later button in the Timing group
OR
~ Click the slide containing two or more animated objects yo u wa nt to reorder

30 8 Microsoft PowerPoint 2010 Exam Reference
~ Set Start Options Ribbon Method .,. Click the animated object whose options you want to set .,. Cli ck the Animations tab, click the Start list arrow in the
Timing group, then click On Click, With Previous, or After Previous to set when the animation starts to play
OR .,. Click the animated object whose timing you want to set .,. Click the Animations tab, then cl ick the Animation Pane
button in the Advanced Animation group to open the
Animation Pane .,. Cl ick the Animated object list arrow, click Timinq, then click
St art on Click, Start With Previous, or Start After
Previous on the menu
OR .,. Click the an imated object whose timing you want to set .,. Click the Animations tab, then click the Animation Pane
button in the Advanced An imation group to open the
Animation Pane .,. Click the Animated object list arrow, click Timinq, click the
Start list arrow on the Timing tab or the animation dia log box for the selected animation, select an option, then click OK
OR .,. Click the animated object whose timing you want to set_ .,. Click the Animation s tab, then click the launcher 0 in the
Animation group to open the animation dialog box for the
selected animation .,. Follow the steps in bullet 3 in the third Set Timing Ribbon Method
MANIPULATE ANIMATIONS
- ~ Change the Direction of the Animation
Ribbon Method .,. Cli ck the an imated object whose direction you want to change
.,. Click the Animations tab
.,. Click the Effect Options button in the Animation group, then
click a direction option
OR .,. Click the animated object whose direction you want to change .,. Click the Animations tab, then cli ck the Animation Pane
button in the Advanced Animation gro up to open the
Animation Pane
Getting Started with PowerPoint 2010 309
.,. Click the Animated object list arrow, click Effect Options, click the Direction list arrow on the Tim ing tab of the animation text box, select an option, then click OK
Note: Depending on the selected an imation, you can also adjust the direction on the Effects tab in the anima t ion dialog box for the se lected an imation.
Attach a Sound to an Animation Ribbon Method
.,. Cli ck the animated object to which you want to attach a sound
.,. Click the Animations tab, then click the Animation Pane button in the Advanced Animation group to open the An imation Pane
.,. Click the Animated object list arrow, click Effect Options, cl ick the Sound list arrow on the Effect tab of the anima ti on text box, click a sound, then click OK
Note: To add a sound from a file, scroll down the Sound li st, click Other Sound, navigate to the drive and fo lder in the Add Audio dialog box that meet you r need s, click the sound f ile you wa nt to use, t hen click Open .
Use the Animation Painter Ribbon Method
.,. Click the animated object whose animation you want to apply to another object
.,. Click the Animations tab, then click the Animat ion Painter button in the Advanced Animation group
.,. Click the slide containing the object you want to animate, position the Animation Painter pointer ~}) over the object, then cl ick the mouse
Reorder Animation Ribbon Method
.,. Click the slide containing two or· more animated objects you want to reo rder
.,. Click the Animations tab, select the animated object you wa nt to reo rder, then cl ick the Move Earlier button or Move Later button in the Timing group
OR .,. Click the slide containing two or more animated objects you want
to reorder

310 Microsoft PowerPoint 2010 Exam Reference
..,. Click the Animations tab, then click the Animation Pane button in the Advanced Animati on group
..,. In the Animation Pane, click an animation in the pane
..,. Click the Re-Order Up button [f) or Re-Order Down button (!] at the bottom or the Animation Pal']e
Select Text Options
Ribbon Method ..,. Cl ick the animated text object whose options you want to select ..,. Cli ck the Animations tab, then click the Animation Pane
button in the Advanced Animation group to open the
Animation Pane ..,. Click the Animated object list arrow, click Effect Options,
then click the Text Animation tab in the animation text box ..,. Click the Group text list arrow, click an option, then click Close
-JC APPLY AND MODIFY TRANSITIONS
BETWEEN SLIDES
Modify a Transition Effect
Ribbon Method ..,. Click the slide with a transition you want to modify ..,. Click the Transitions tab ..,. Click the Effect Options button in the Transition to This Slide
group, then click a direction option
Add a Sound to a Transition
Ribbon Method ..,. Click the slide with a tTansition to which you want to add a sound
..,. Cli ck the Transitions tab ..,. Click the Sound list arrow in the Timing group, then click a sound
Note: To add a sound from a fil e, scroll down the Sound list, click Other Sound, navigate to the drive and folder in the Add Audio dialog box that meet your needs. click the sound fil e you want to
use, then click Open.
'f Modify Transition Duration
Ribbon Method ..,. Cli ck the slide with a transition whose duration you want
to modify ..,. Click the Transitions tab ..,. Enter a va lue in the Duration text box in the Timing group or use
the up and dow n arrows to set the length or the transition
Getting Started with PowerPoint 2010
~ Set Up Manual or Automatically Timed Advance Opt ions
Ribbon Method
..,. Cl ick the slide with a transition whose timing you wa nt to advance
..,. Cl ick the Transitions tab
..,. Click the On Mouse Click check box to set the slide to move manually by mouse click
311
..,. Click the After check box, then use the up and down arrows to set the amount of time before the presentation moves automatically to the next slide
POWERPOINT OBJECTIVE 6: COLLABORATING ON
PRESENTATIONS
MANAGE COMMENTS IN PRESENTATIONS
Insert and Edit Comments
Ribbon Method
..,. Click the slide or object to which the comment applies
..,. Click the Review tab, click the New Comment button in the Comments group, then type in the comment balloon that opens
..,. Click the Edit Comments button in the Comments group to move to and open a comment, then ed it its contents to meet your needs
Shortcut Method
..,. Right-click an existing comment thumbnail, then click Insert Comment on the shortcut menu
..,. Type in the comment balloon that opens
..,. Double-click a comment balloon to open the comment balloon and edit its contents; or ri ght-click a comment balloon, click Edit Comment on the shortcut menu, then edit its contents
Show or Hide Markup
Ribbon Method
..,. Click the slide that contains a co mment
..,. If the comments arc not visible, cli ck the Review tab, then click the Show Markup button in the Comments group
..,. Click the Previous button or Next button in the Comments group as needed
I
316 Microsoft PowerPoint 2010 Exam Reference
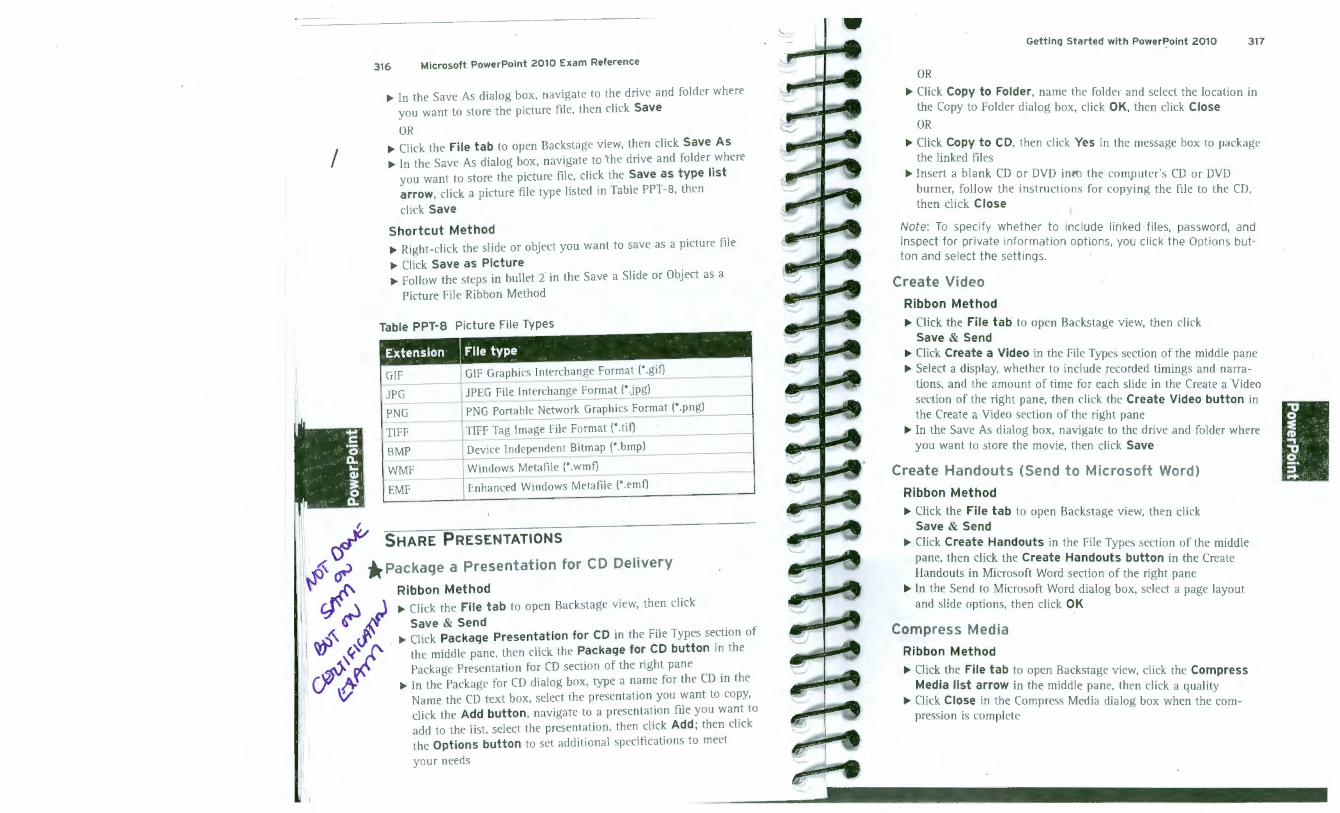
.,. In the Save As dialog box, nav igate to the drive and folder where
you want to store the picture fil e, then click Save
OR .,. Click the File tab to open Backstage view, then click Save As .,. In the Save As dialog box, navigate to 'the drive an d folder where
you want to sto re the picture file, click the Save as type li st arrow, click a picture file type listed in Table PPT -8, then
click Save
Shortcut Method .,. Right-click the sli de or object you want to save as a pi ctu re 111 e
.,. Click Save as Picture
.,. Foll ow the steps in bullet 2 in the Save a Sli de or Object as a
Picture File Ribbon Method
Table PPT-8 Picture File Types
EMF Enhanced Windows Metafile (*.emf)
' ;· _;)</ SHARE PRESENTATIONS I (} ~~~ ~ * Package a Presentation for CD Delivery
~ Ribbon Method
I' CJ' ,~.'\j( .,. Click the File tab to open Backstage view, then click ~ Save & Send , ~~ f "" Click Package Presentation for CD in the Fi le Types section of
1 \(( the middle pa ne, then click the Package for CD button in the -•~ Package Presentation for CD section of the right pane
1 (Y ~ .,. In the Package for CD dialog box, type a name for the CD in the Name the CD text box, select the presentation you want to co py, click the Add button, navigate to a presentation file you want to add to the list, select the presentation, then click Add ; then cl ick the Options button to set additional specifications to meet
your needs
" • Gett ing Started with Powerf:'oint 2010 317
OR
.,. Click Copy to Folder, name the foldel' and select the location in the Copy to Folder dialog box, cli ck OK, then click Close
OR
.,. Click Copy to CD, then click Yes in the message box to package the li nked files
.,. Insert a blank CD or DVD into the computer's CD or DVD burner, follow the instructions for copying the fi le to the CD, then click Close
Note: To specify whether to inc lude linked fil es, password, a nd inspect for priva te information opti ons, you click th e Options button a nd se lect the settings .
Create Video
Ribbon Method
.,. Click the File tab to open Backstage view, then cli ck Save & Send
.,. Click Create a Video in the File Types secti on of the middle pane
.,. Select a displ ay, whether to include recorded timings and narrations, and the amount of time for each slide in the Create a Video section of the right pane, then click the Create Video button in the Create a Video section of the right pane ·
.,. In the Save As dialog box, navigate to the drive and folder where you want to store the movie, then dick Save
Create Handouts (Send to Microsoft Word)
Ribbon Method
.,. Click the File tab to open Backstage v iew, then cli ck Save & Send
.,. Click Create Handouts in the Fil e Types section of the middl e pane, then click the Create Handouts button in the Create Handouts in Microsoft Word section of the right pane
.,. In the Send to Microsoft Word dia log box, select a page layout and slide options, then click OK
Compress Media
Ribbon Method
.,. Click the File tab to open Backstage v iew, click the Compress Media list arrow in the middle pane, then click a qua lity
.,. Click Close in the Compress Media dialog box when the compression is complete

318 Microsoft PowerPoint 2010 Exam Reference
PRINT PRESENTATIONS
Adjust Print Settings
Ribbon Method ~ Click the File tab to open Backstage view, then click Print ~ Select options in the Settings section to meet your needs, click
Printer Properties to set printer settings, then click the
Print button
PROTECT PRESENTATIONS
Set a Password
Ribbon Method ~ Click the File tab to open Backstage view, then click Info if it is
not selected ~ Click the Protect Presentation list arrow in the middle pa ne,
then cl ick Encrypt with Password ~ In the Encrypt Document dialog box, type the password in the
Password text box, click OK, retype the password in the Reenter
Password text box, then cl ick OK
Change a Password
Ribbon Method ~ Open a presentation containing a password, type the password as
requested, click the File tab to open Backstage view, then click
Info if it is not selected ~ Click the Protect Presentation list arrow in the middle pane,
then click Encrypt with Password ~ In the Encrypt Document dialog box, type the new password in
the Password text box, click OK, retype the new password in the Reenter Password text box in the Confirm Password dialog box ,
then click OK
'itMark a Presentation as Final
Ribbon Method ~ Open a presentation containing a password, click the File tab to
open Backstage view, then click Info if it is not selected ~ Click the Protect Presentation list arrow in the midd le pane,
then cl ick Mark as Final ~ Click OK in the message box to mark the presentation as final,
th en click OK in the message box to acknowledge that the pre-
sentation has been marked as final
Getting Started with PowerPoint 2 010 319
Note: To edit a presentation marked as final, cli ck Edit Anyway on the go ld message bar above the s lide that appears in Normal view.
POWERPOINT OBJECTIVE 8: DELIVERING
PRESENTATIONS
APPLY PRESENTATION TooLs
Add Pen and Highlighter Annotat ions ¥ Ribbon Method
~ Click the Slide Show button ~. on the status bar to switch to Slide Show view
~ Right-click the slide to wh ich you wa nt to add a pen or highlighter an notation, point to Pointer Options, then cl ick Pen or Highlighter
~ Press an d hold the left mouse button, then annotate the slide
Change the Ink Color
Ribbon Method
~ Click the Slide Show button ~ on the status bar to switch to Slide Show view
~Right-click the slide to which you want to add a pen or highlighter annotation, point to Pointer Options, point to Ink Color, then click a color
Erase an Annotation
Ribbon Method
~ Click the Slide Show button [2] on the status bar to switch to Slide Show view
~ Right-cli ck the sl ide to which you want to add a pen or highlighter annotation, point to Pointer Options, then click Eraser or Erase All Ink on Slide to erase pottions or all of the ink, respectively
Discard Annotat ions Upon Closing Ribbon Method
~ Click the Slide Show button [2] on the status bar to switch to Slide Show view
~ Move to the end of the slide show, then click to exit ~ Cli ck Discard in the message box to not retain the annotations

320 Microsoft PowerPoint 2010 Exam Reference
Retain Annotations Upon Closing
Ribbon Method
.,.. Cli ck the Slide Show button ~ on the status bar to sw itch to Slide Show vi ew
... Move to the end of the slide show, then, cl ick to ex it
.,.. Click Keep in the message box to retai n the annota tions
SET UP SLIDE SHOWS
it- Set Up a Slide Show
Ribbon Method
.,.. Click the Slide Show tab, then click the Set Up Slide Show button in the Set Up group
.,.. Spec ify the options that meet your needs in the Set Up Show dialog box, using Table PPT-9 as a guide
... Click OK
Advance slides
Mul tiple monitors
Choose whether the show will be delivered by a speaker or browsed by an individual in a window or at a kiosk
--- ---Select whether to loop co ntinuously; to show with or without narration or anim ation; and pen and laser po in ter color
Spec ify whether to show all or selected slides
Choose to proceed through slides manually or using timings
Set show to run on one or multi ple monito rs using Presenter view, usc thumbnail s to select slides, preview text, see Speaker notes in large r form at, and run other progra ms that you don't wa nt the aud ience to sec during the presentation
Play Narrations
Ribbon Method
.,.. Cli ck the Slide Show tab, then click the Play Narrations check box in the Set Up group to select the box if it is not already checked
Getting Started with PowerPoint 2010 321
Set Up Presenter View Ribbon Method
.,.. Click the Slide Show tab, then click the User Presenter View check box in the Monito rs group
.,.. Cli ck the Show On list arrow, then select which moni tor to usc as the one on which the audience will see the presentation
.,.. Cl ick the Start button fJ on the Windows taskbar
.,.. Click Control Panel, then click Adjust screen resolution in the Appearance and Personalization sec tion
.,.. Click the Multiple display list arrow, click Extend these displays, then click OK
Use Timings
Ribbon Method
.,.. Click the Slide Show tab, then click the Use Timings check box in the Set Up group OR
.,.. Click the Set Up Slide Show button,.click the Using timings, if present option button in the Ad va nce slides section to select it, then cli ck OK
Show Media Cont rols Ribbon Method
.,.. Cli ck the Slide Show tab, then cl ick the Show Media Controls check box in the Set Up group
Broadcast Presentations ~ Ribbon Method
.,.. Click the Slide Show tab, then click the Broadcast Slide Show button in the Start Slide Show group
.,.. Click Start Broadcast, type your Windows Live ID credentials in the Windows Security dialog box, then click OK
.,.. In the Broadcast Slide Show dialog box, click Send in Email to open a new message window containing the link to the broadcast, where you can invite peo ple to the broadcast
.,.. Add e-mail addresses, then click Send OR
.,.. Click the File tab to open Backstage view, then cli ck Save & Send
.,.. Click Broadcast Slide Show in the middle pane, then click the Broadcast Slide Show button in the right pane

,.
\
II
322 Microsoft PowerPoint 2010 Exam Reference
ll> Follow the steps in bullets 2-4 in the Broadcast Presentations Ribbon Method
't Create a Custom Slide Show Ribbon Method
' 11> Cl ick the Slide Show tab, click the Custom Slide Show list
arrow in the Start Slide Show group, then click Custom Shows ll> In the Custom Shows dialog box, click New II> In the Define Custom Show dia log box, click the Slide show
name text box, then type a name for the custom slide show ll> Click each slide in the Sli des in presentation section that you
want in the custom show
Note: To select more than one slide, press and ho ld [ctrl), then click each slide you want to add to the custom presentat ion.
11> Click Add to add the slide(s) or select a slide in the Slides in custom show list and click Remove to remove the sli de, then click OK
Note: To reorder slides in a custom presentation, se lect a slide, then click the Reorder Up button [i] or the Reo rder Down but ton ~ in the Define Custom Show dia log box.
ll> Click OK to close the Define Custom Show dia log box II> Click Close
it"5ET PRESENTATION TIMING
Rehearse Timings
Ribbon Method
II> Go to the first slide in the presentation, U1en click the Slide Show tab
II> Click the Rehearse Timings button in the Set Up group
Note: The sl ide show begins to run, and as the Reco rding toolbar opens and times the slide, give your audio presentation for the first slide.
ll> Click the Next button on the Recording toolbar ll> Click the Repeat button to repeat a slide, then click Resume
recording when you are ready to rehearse that slide again ll> Click the Pause button to pause the presentation and stop the
clock, then click Resume recording when you are ready to rehearse that slide again
ll> Click the Close button to stop reco rding, then foll ow the steps in bullet 3 in the Keep Timing Ribbon Method on the next page
Keep Timing Ribbon Method
Getting Started with PowerPoint 2010 323
ll> Follow the steps in bul lets 1-5 in the Rehearse Timings Ribbon Method
ll> Continue advancing through to the end of the presentation II> Click the Close button ~ on the Rehea rsa l toolba r, then click
Yes in the Microsoft PowerPoint message box to keep the slide timings, or click No to use other t imings or try again
Adjust a Slide's Timing 'f Ribbon Method
II> Select the sli de whose timing you want to set II> Click the Transitions tab, then enter a value in the After text
box or use the up and down arrows to adjust the amount of time the slide is visible
RECORD PRESENTATIONS
Start Recording from the Beginning of a Slide Show Ribbon Method
II> Click the Slide Show tab, then cli ck the Record Slide Show list arrow in the Set Up group
ll> Click Start Recording from Beginning of a Slide Show II> Click the Slide and animation timings check box or the
Narrations and laser pointer check box to either set those timings manua lly or to record narration and /or the lase r pointer
ll> Cl ick the Slide Show tab, click Start Recording from the Current Slide of the Slide Show
II> Follow the steps in bullets 1-5 in the Rehea rse Timings Ribbon Method
II> Click the Close button 1:8] on the Recording too lbar
Not e: To clear timing or narration on the cu rrent slide or all s li des, you cli ck the Record Slide list arrow in the Set Up group on the Sli de Show tab, point to Clear, the.n click an option.
Start Recording from the Current Slide of the Slide Show
Ribbon Method
ll> Click the Slide Show tab, then click the slide from which you want to start recording, then cl ick the Record Slide Show list arrow in the Set Up group
ll> Click Start Recording from Current Slide