exact software, north america macola enterprise suite (es ... es demo scrip1.pdf · exact software,...
TRANSCRIPT

Exact Software, North America Macola Enterprise Suite (ES) Sales Demo Script
Version 2.0 June 6, 2002
333 E.Center St. P.O. Box 1824 Marion, OH 43301-1824 sales: 800.468.0834 tel: 740.382.5999 fax: 740.382.0239
www.exactsoftware.com

Macola Enterprise Suite (ES) Sales Demo Script
Last Updated:Friday, June 07, 2002 Page 2 Version 1.0
Objective: • Familiarize the user with new demo data and highlight areas best suited to explain the product initiatives - - technology innovation, performance, and user
friendliness. • Provide internal sales people and our channel partners with a demonstration script that will aid in building a demo. • Provide a sales presentation for new and existing sites upgrading to Macola ES sites focusing on the first ‘sizzle demo’ of the back-office covering technology,
financial, distribution, and manufacturing. • Use the new demo data (X-treme Cylces Company) that has been developed for Macola ES and this script to prepare for the detailed demo. Prerequisites: Be sure to complete the following list of prerequisites. Completing the set up items is essential to a successful demo. • For the best performance, please follow the script as closely as possible. Remember, throughout the beta release cycle code is still under development. Straying
from the demo script could result in unfavorable software behavior. • Be sure you have run the Productupdater.exe and installed Macola ES. Be sure you have created a Demo company. • Create a Cost Center – Go to Setup/Company/Settings. From the Standard tab on Company data screen, click on the Search button next to the Cost center field.
Enter a new cost center on the fly. Use Human Resource ID 1 and leave the language fields blank. Save the new record. • Before beginning, create a blank document, title it Outdoor Adventures Outlet.doc and save it to a location where you can easily retrieve it. This is for showing
the document attachment fields on page 8-9. • Set up the banking import and export file directories.
1) Go to Setup/Company/Settings/Electronic Banking. 2) In the Import Directory and Export Directory fields, create and save Banking Import and Banking Export directories to some location you can easily remember. 3) Click the Advanced button at the bottom of the screen. 4) Under the Payment category, make sure the Journalize payments field is NOT selected. 5) Click Save and then exit the application.
• Set up your demo human resources table. These settings cannot be updated when creating the demo company. You must manually set them prior to running the demo. 1) Go to PR&HRM/Human Resources/Maintain. This displays a list of employees in the demo company. 2) Select your employee record (this should be the record that has the Human Resource ID “1”) and click open. (Demo data has been set up to work with the user number 1 - this defaults to the user who installed Macola ES and created the demo company. 3) Click Edit.
• 4) From the Person tab, complete the following fields (using search and selecting available demo data): Title, Date of Birth, Cost Center, and Start Date. 5) Go to the Financial Tab, in the Payment Limit field, enter a dollar amount. This is the amount the employee is authorized to enter when creating a bank file. 6) Click Save and then Close to exit.

Macola Enterprise Suite (ES) Sales Demo Script
Last Updated:Friday, June 07, 2002 Page 3 Version 1.0
• Review and be familiar with the Demo Data Sheet located on page 143 to be sure you are familiar with the data Duration: 1.5 hours

Macola Enterprise Suite (ES) Sales Demo Script
Last Updated:Friday, June 07, 2002 Page 4 Version 1.0
Exact Software Overview
PowerPoint (15 min)
Corporate Overview • Partner Profile • Exact Macola Company & Global Presence • Strengths and Differentiators • Awards and Strategic Partnerships • Back-office and front-office solution Overview
System Wide Innovation • SQL Server • Integrated Security • Panel menu & Role bar • Internet Update process • Designer • Searches & search customization • Tool Tips Executive Reporting • Exporting to Excel • Integrated Crystal Reports • Excel Add-In
Accounting Functionality Highlights • General Ledger Search/Info and Cards • Accounts Receivable Reconciliation Report • Accounts Payable Voucher Entry and PO matching • Accounts Payable Payment Selection Distribution Functionality Highlights • Pricing Matrix • RMA Processing • Credit Management • Serial Lot Trace • Vendor Contracts
Manufacturing Functionality Highlights • Visual Resource • Shop Order View into Material and Labor usage • On-line Material Issues • Shop Packet Report • Job View for planned and actual costs • Production Order Creation
Technology Innovation & User
Friendliness (20 min)
Financial Accounting Functionality
Highlights (15 min)
Executive Reporting
(10 min)
Distribution Functionality
Highlights (15 min)
Manufacturing Functionality
Highlights (15 min)

Macola Enterprise Suite (ES) Sales Demo Script
Last Updated:Friday, June 07, 2002 Page 5 Version 1.0
Technology Innovation & User Friendliness – Overview
Exact Macola's e-Business solution provides a wealth of tools to improve your experience with the business software. Innovative technologies and standard Microsoft technologies are used.
Microsoft SQL Server: Macola ES is developed and optimized for Microsoft SQL Server 2000 databases. This has become an industry standard for the mid-market due to its ease of use, system administration, scalability (ability to add users and applications without losing performance), and e-business infrastructure ‘out-of-the-box’. Integrated Security: I am sure everyone has experienced logging into your workstation, sometimes again into e-mail, and then AGAIN into a back-office accounting and manufacturing system. With Macola ES you don’t have to anymore. We use integrated security as every user is a Microsoft System user - you log in once and get to all the applications including Macola ES.
Show: Launch Macola ES and point out that you did not have to login because Macola ES uses integrated security. Menu: (Panels Menu) This menu provides easy access to all commonly used daily applications. It takes fewer mouse clicks to get to the application you want to use. The role bar is used to group functions for specific processes. For users who are moving from Progression to Macola ES and are used to PWE, they can choose the Explorer menu under View/Menu style.
Show: 1. Show the Panels Menu once you launch into a Macola ES company.
Select OE & RMA and show that all functions can be accessed with one mouse click.
2. Discuss less commonly used settings are grouped in the ‘Setup’ menu. 3. Discuss ‘Role Menu’ by right mouse click on group General and
adding a ‘role bar’/group for ‘Cycle Count’ on the left. Then ‘drag’n’drop’ applications from Inventory Management/Inventory Counts.
Easy Installation and Updating: Installation and update process is very simple. We have replaced the multi-install intensive routine of previous versions with one easy process. You install and update over the Internet (CD and network installation processes follow the same approach and are optionally available - Internet installation/updating recommended) Show: 1. Click on the Update button at the top of the Panels menu and explain
that this screen is the same for a new install as well as an update (though for new installs you have to launch ProductUpdater.exe). The system is completely installed at the end of this process. Full download over the Internet approx. one hour over a T-1 and approx. 5 min from a network install. (Close the screen. Do not run the update).
The circled toolbar item is the Update icon – click it for online updates.

Macola Enterprise Suite (ES) Sales Demo Script
Last Updated:Friday, June 07, 2002 Page 6 Version 1.0
Flexible Browse and Searches: Using Macola ES’ Search engine you can look up information quickly. You can add columns that are not displayed to these searches. Any new field that you add becomes another filter criteria for your searches. By merely double clicking on a column you can sort the search display by that column. This type of searching power is useful when you have incomplete data or limited information. Searches and transactional list boxes are color coded (shaded) for easy reading. These colors can be easily controlled and maintained by the individual user if desired. Colors on your screen enhance your experience with the system, instead of looking at a ‘boring’ gray screen.
Show: 1. Launch Items from Inventory Management. Show the alternating colors
that can be user controlled. 2. In the Item Description field, type in ‘G’ for GLOVES. The first item
description starting with GLOVES is now brought up in the list and highlighted.
3. Double click on Item Description and show how the list sorts by that column. The user can do this for any column.
4. It gets even better. Right mouse click on the columns and show how you can add other columns from the list.
5. Add Selling UOM
Notice that you now have 3 filters instead of the two. Selling UOM has been added as a new filter. Any field added to the search will also be added as a filter (up to 6 columns). Show how these searches are cumulative (i.e) that you can search using a combination of the various fields. To illustrate this, key in ‘EA’ for each in the selling UOM filter field and activate the Search button. Then key in ‘G’ (i.e) looking for items starting with the letter G and activate the Search button. You will see a shorter list. Last key in the letter ‘K’ in the description and you will end up with one item – kid gloves. Easy to Navigate Screens: Information on the screens is meaningfully grouped into TABS to get to the information you need quickly. You can also get to most of your related data from the same screen. This is not only during the setup of the various packages, but also transactional information. This also facilitates ease of use, navigation and simplifies the menu, so you don’t have a lot of clutter that you are used to in typical menus.

Macola Enterprise Suite (ES) Sales Demo Script
Last Updated:Friday, June 07, 2002 Page 7 Version 1.0
Show: 1. Select Distribution/Inventory Management/Items. 2. Select item BOLT and click Open to display the item record. Discuss the
TABs. 3. Launch the Item Location Button to demonstrate accessing item related
data from one place. 4. Select the Report Button at the right hand corner of your screen and
discuss the drop down as the area for lists, views, and other transactional data related to the item or Master data
Designer: Some Macola ES screens (at this time, some of the Financials cannot) can be tailored for a user or groups of users to meet needs without incurring the cost of custom programming. The names of fields can be changed. Fields can be resized, moved and deleted. Hidden fields can also be added to screens.
Show: 1. Change a Field literal via Designer by doing the following. From the
Items Master Data Screen, select Item BOLT, hit ‘Esc’ to bring focus on item number field, click on the designer icon (icon circled above).
2. Right mouse click on a literal and select Text. The Term Browser appears.
3. Select the Enter Custom Text field. 4. In the English Text field, enter Product Class and click OK Tool Tips and Edit Icon: Have you ever been frustrated when you are stopped on a required field and the system will not let you proceed to the next field. You do not know what data you should put in the required field so you are just stuck – you cannot move on. If you have ever been in that situation, you will like this. If you do not enter data into a required field in Macola ES the field turns RED. You can continue on entering data and if you try to save, Macola ES
This circled section shows the Designer button, which allows users to customize the screen. This screen shot displays a screen in designer mode.
Macola Enterprise Suite (ES) Sales Demo Script
Last Updated:Friday, June 07, 2002 Page 8 Version 1.0
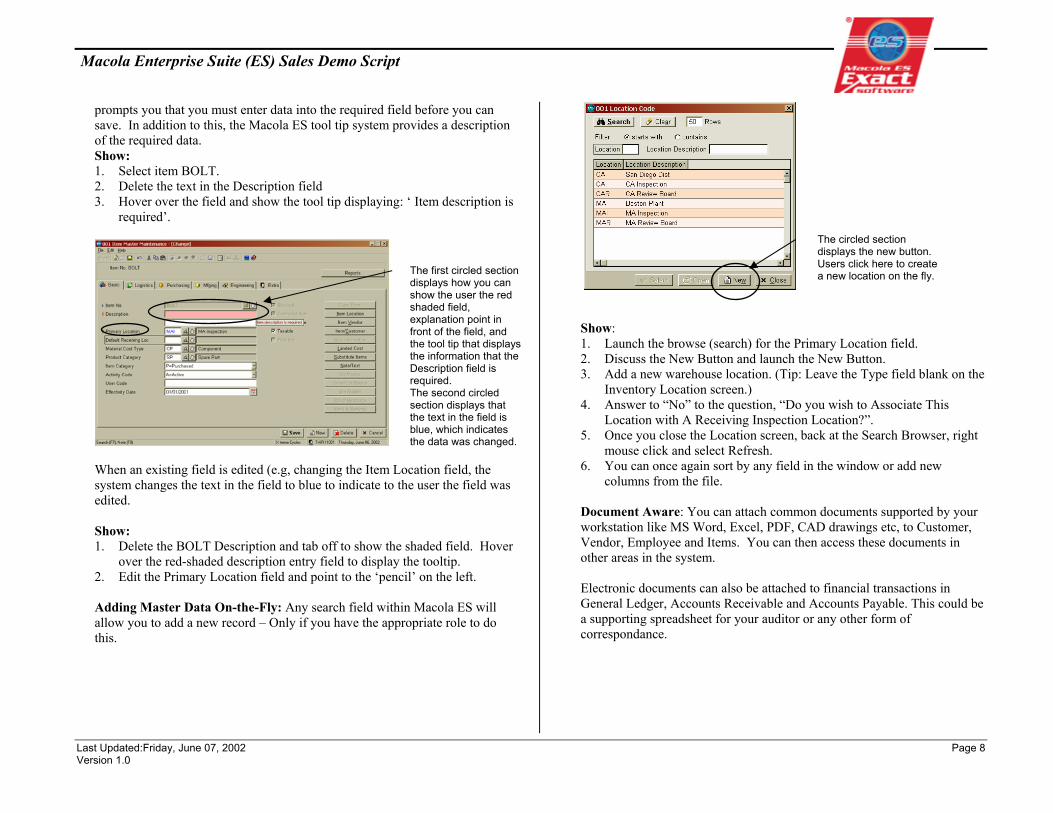
prompts you that you must enter data into the required field before you can save. In addition to this, the Macola ES tool tip system provides a description of the required data. Show: 1. Select item BOLT. 2. Delete the text in the Description field 3. Hover over the field and show the tool tip displaying: ‘ Item description is
required’.
When an existing field is edited (e.g, changing the Item Location field, the system changes the text in the field to blue to indicate to the user the field was edited. Show: 1. Delete the BOLT Description and tab off to show the shaded field. Hover
over the red-shaded description entry field to display the tooltip. 2. Edit the Primary Location field and point to the ‘pencil’ on the left. Adding Master Data On-the-Fly: Any search field within Macola ES will allow you to add a new record – Only if you have the appropriate role to do this.
Show: 1. Launch the browse (search) for the Primary Location field. 2. Discuss the New Button and launch the New Button. 3. Add a new warehouse location. (Tip: Leave the Type field blank on the
Inventory Location screen.) 4. Answer to “No” to the question, “Do you wish to Associate This
Location with A Receiving Inspection Location?”. 5. Once you close the Location screen, back at the Search Browser, right
mouse click and select Refresh. 6. You can once again sort by any field in the window or add new
columns from the file.
Document Aware: You can attach common documents supported by your workstation like MS Word, Excel, PDF, CAD drawings etc, to Customer, Vendor, Employee and Items. You can then access these documents in other areas in the system. Electronic documents can also be attached to financial transactions in General Ledger, Accounts Receivable and Accounts Payable. This could be a supporting spreadsheet for your auditor or any other form of correspondance.
The first circled section displays how you can show the user the red shaded field, explanation point in front of the field, and the tool tip that displays the information that the Description field is required. The second circled section displays that the text in the field is blue, which indicates the data was changed.
The circled section displays the new button. Users click here to create a new location on the fly.

Macola Enterprise Suite (ES) Sales Demo Script
Last Updated:Friday, June 07, 2002 Page 9 Version 1.0
Show: 1. Prior to running these steps, be sure you have created a blank document as
requested in the Prerequisites section of this document. You will use this document in the demo steps below.
2. Select Accounts receivable/Customer 3. Select customer 901 - Outdoor Adventure Outlet click on the attachment
tab. This opens the Attachment screen. 4. Use the Browse button to search for the document you created. Enter a
Description such as Credit (Customer Expense) and click Save. This attaches the document to the customer.
5. Next show how you can attach a document to a transaction.
6 Select View/Accounts Receivable card 7 Select Customer 901 and click Display. 8 Highlight the first transaction and Click the Attachment button to show
you can attach documents to financial transactions as well
The attachment tab displays the documents that are attached to the customer.

Macola Enterprise Suite (ES) Sales Demo Script
Last Updated:Friday, June 07, 2002 Page 10 Version 1.0
Drill Down Inquiry Logic: Drill down inquiry logic resides throughout Macola ES. You can drill down from high-level information into the supporting and originating transactions. This is evident across all packages.
Show: 1. Select Views/accounts Receivable cards 2. Select customer 901 and click display 3. Select the third transaction with ref. no 115 and click on Invoice 4. Select Fork from list of items and double click on Fork 5. Click on the Serial/Lot button to show the Serial numbers used.
Executive Reporting: Exact Macola provides a number of Executive overviews and other analysis reports of Macola ES data in Microsoft Excel. You don’t have to worry about database connections or cutting and pasting these overviews into a spreadsheet - this is automatic when you run these reports.
Show:
1. Select Financial/Accounts Receivable/Chart/Receivables. 2. Take the defaults in the criteria fields and then select a Pie graph for
display. In addition to the graph being generated discuss that all the relevant data in the Excel spread sheet is also available for use in an Excel Pivot table for further analysis.
3. Click on the worksheet tabs (Graph, Table, Data, Range) to show the data that is available.
Select this Transactions
Click on the Serial/Lot button

Macola Enterprise Suite (ES) Sales Demo Script
Last Updated:Friday, June 07, 2002 Page 11 Version 1.0
Note: As the data required to run this graph is time sensitive, your graph may have variations in the amounts in the aging buckets. Aging of open items is calculated based on the system date and the resulting chart will differ based on your system date. Financial Statements generated in Excel: Standard templates are available for the typical financial statement (e.g.) balance sheet, P&L, Trial Balance with your General Ledger. Similar to the graph example we just saw, Macola ES information is presented in a Microsoft Excel spreadsheet.
Crystal Reports are Optimized for Performance: A number of Macola ES reports were developed using Crystal 8.5. In addition to the filter criteria that they provide, these reports, in a number of cases, provide multiple sort options within the same report. These reports are optimized for the SQL Server database and provide you with the performance you need.
Show: 1. Select Manufacturing/Production Order Processing/Reports/Production
Schedule. 2. Discuss the crisp layout of these reports. Excel Add-In: Macola ES’ Excel add-in allows you to create financial statements as well as extract data from ANY one of the Macola ES tables. This is not limited to the financial side of the product.

Macola Enterprise Suite (ES) Sales Demo Script
Last Updated:Friday, June 07, 2002 Page 12 Version 1.0
Show: 1. Select Financial/General Ledger/Excel Add-In. 2. Select Macola Enterprise Suite off the Excel Tool bar. 3. Choose the Report/Table Data Option. 4. Change company from DEFAULT to the ‘Demo Company’. 5. In the Table field select the I/M Inventory Location File. 6. ‘Click’ on the ‘Insert Column’ field and add a couple of fields beginning with
‘QUANTITY’. 7. Click OK to generate the selected data from the Macola ES database into
Microsoft Excel. Once the data is in Excel, you explain that this data can be analyzed further.

Macola Enterprise Suite (ES) Sales Demo Script
Last Updated:Friday, June 07, 2002 Page 13 Version 1.0
Financial Accounting Functionality – Overview
The Macola ES Financial Accounting solution is the financial backbone for the complete e-business solution. The accounting solution provides comprehensive functionality and seamless integration with drill downs to relevant operational packages to provide quick and easy access to all financial information. Single Transaction Table for General Ledger: Financial transactions from all packages including operational and manufacturing are processed on-line and stored in one large transaction table. This facilitates very quick financial reporting in real time. It also stores rich information about transactions made in reference to customers, vendors, employees, and items, making this information available quickly even in General Ledger.
Show: 1. Select General Ledger/View/Search/General Ledger and accept the
defaults and select account number 1040. 2. Click on Search. This will allow you to list all financial transactions
against that account. 3. Point out the filter criteria for Customers, Vendors, Journal and Resource. Accounts Receivable Interactive Customer Balance List: This financial application allows users to very easily look at customer balances in a summary format and then interactively drill into the details. Once you are in the details (cards) you can edit the transaction for any adjustments and even attach documents as we discussed previously. Show:
1. Select Accounts Receivable /View/Accounts Receivable Balance List
2. Accept the defaults and click Display. 3. Select Customer 901 and click Card.
4. Drilling down into a customer account, you have a number of interactive tools to adjust the transaction if you so desire. 5. Click Close to close the Card and return to the Balance list.

Macola Enterprise Suite (ES) Sales Demo Script
Last Updated:Friday, June 07, 2002 Page 14 Version 1.0
6. Back at the Customer Accounts balance list, discuss the summary Aging
View that is presented with total days aged.
7. Discuss that by clicking the ‘Export’ button they can export this
information into an Excel spreadsheet.
Accounts Payable Unlimited Contacts by Vendor: Each vendor can have a primary contact and an unlimited number of additional contacts with detailed contact information. This vendor and contact information is the same information that is shared by the fully browser-based front-office product e-Synergy.
Show: 1. Select Accounts Payable/Vendors. 2. Select Vendor 901 and go to the address Tab. Discuss list of addresses and
contacts. 3. Double click on a contact and see the details.
Accounts Payable and Voucher Entry PO Match: During entry of Accounts Payable Invoices Macola ES can electronically match your purchase order and receiving information. You can get to the details of the receivers for your items as well as your landed costs.
Show: 1. Select Accounts Payable/Entries/Enter Transactions menu. 2. Create a new batch ID called DEMO 3. Click F5 for the next available voucher number and select Vendor 100. 4. Accept all defaults and enter an invoice number of 123. 5. In the P/O field, select Purchase Order number 45. 6. In the Amount field, enter $40,100.00 7. Tab through the PO number field to the receiver field 8. Click on the Receiver Lookup button and select inquiry by Order. 9. Tab through the fields. This is where you can match to multiple PO or
receivers. This electronic three-way match will identify any differences between the vendor invoice and the original purchase order that was sent to the vendor. Any variance can be distributed to specific accounts.
Macola Enterprise Suite (ES) Sales Demo Script
Last Updated:Friday, June 07, 2002 Page 15 Version 1.0
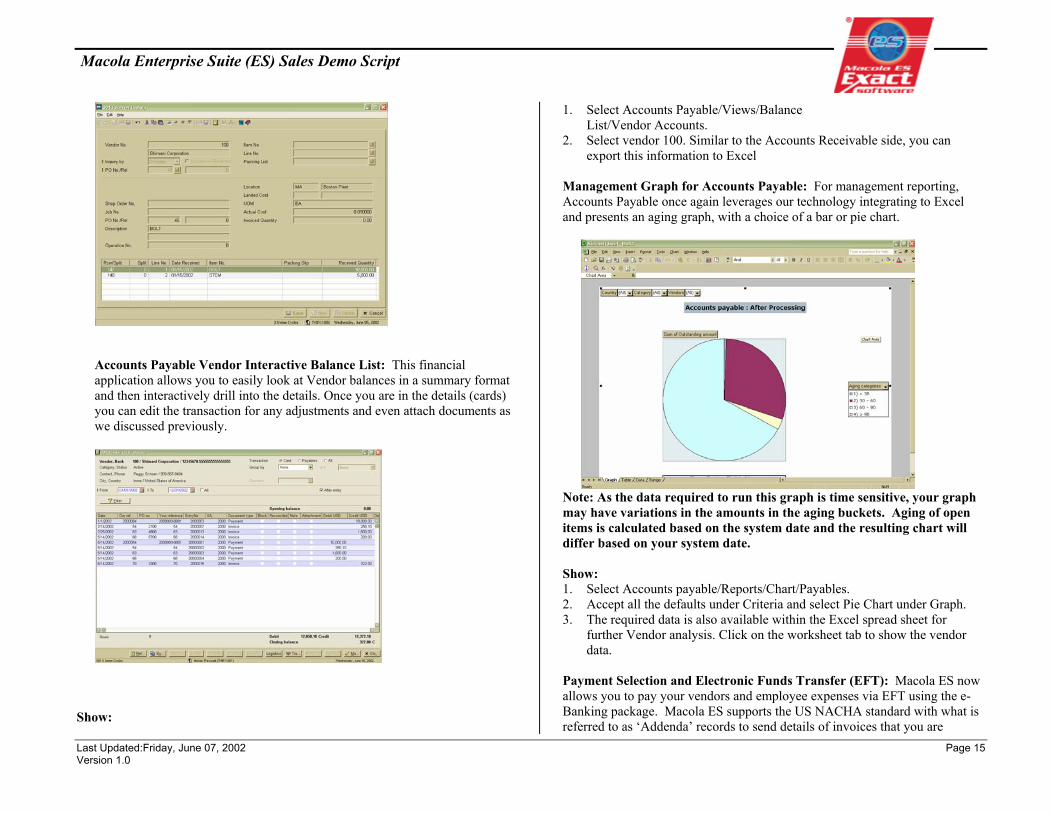
Accounts Payable Vendor Interactive Balance List: This financial application allows you to easily look at Vendor balances in a summary format and then interactively drill into the details. Once you are in the details (cards) you can edit the transaction for any adjustments and even attach documents as we discussed previously.
Show:
1. Select Accounts Payable/Views/Balance List/Vendor Accounts.
2. Select vendor 100. Similar to the Accounts Receivable side, you can export this information to Excel
Management Graph for Accounts Payable: For management reporting, Accounts Payable once again leverages our technology integrating to Excel and presents an aging graph, with a choice of a bar or pie chart.
Note: As the data required to run this graph is time sensitive, your graph may have variations in the amounts in the aging buckets. Aging of open items is calculated based on the system date and the resulting chart will differ based on your system date. Show: 1. Select Accounts payable/Reports/Chart/Payables. 2. Accept all the defaults under Criteria and select Pie Chart under Graph. 3. The required data is also available within the Excel spread sheet for
further Vendor analysis. Click on the worksheet tab to show the vendor data.
Payment Selection and Electronic Funds Transfer (EFT): Macola ES now allows you to pay your vendors and employee expenses via EFT using the e-Banking package. Macola ES supports the US NACHA standard with what is referred to as ‘Addenda’ records to send details of invoices that you are

Macola Enterprise Suite (ES) Sales Demo Script
Last Updated:Friday, June 07, 2002 Page 16 Version 1.0
paying. The e-Banking package also has the capability to receive an electronic file back from the Bank (very few banks in the US today can support a return file) Show: Note: Before starting these steps, be sure you have satisfied the Prerequisites as defined on page 2 of this document. Failure to set up the defaults necessary to run this e-banking demonstration will result in unfavorable software behavior. 1. Select Financials/Bank/Payments/Accounts payable. 2. Open this and you will see items that need paid in this batch. You will notice
that the transactions are in the upper list box. 3. Once you select a transaction and click on the ‘Pay’ button, that transaction is
marked to send via a bank transaction file to the bank. 4. Click Close. Next show how to create the bank export file. 5. Select Bank/Create/Process/Authorize/Process. 6. Select the payment that is open and click Create bank file. 7. Macola ES creates the export file and displays a report in a Preview window.
The preview document contains the location of the file and the transaction specifics pertinent to the transaction. You can print a hard copy for your records or click Close.

Macola Enterprise Suite (ES) Sales Demo Script
Last Updated:Friday, June 07, 2002 Page 17 Version 1.0
Distribution Functionality Highlights Overview
The Macola ES Distribution solution meets the needs of expanding businesses with superior inventory control, accurate customer order processing, and efficient procurement functions. Macola ES advanced materials management helps organizations run more effectively by automating business processes and managing quality, product cost, and material usage issues.
Pricing Matrix: The Order Entry package includes a powerful price code application, based on a series of price break tables. Pricing can be based on eight different types of scenarios. Macola ES automatically calculates the customer’s price during order entry to eliminate errors and save time.
Show: 1. Select OE & RMA/Entries/Price Codes. 2. Pull down the Code Type list and pause to show the different pricing
options. 3. Using the next record Arrow button, slowly scroll through the different
pricing options already set up. 4. Choose pricing option 1.
5. Tab through the fields. Pause on the start date. Click on the view price code record to show the various price code records for a particular item.
Sales Order Entry: The Macola ES sales order entry process provides you will all kinds of options and access to information to support your sales process.
Show: 1. Select OE & RMA/Entries/Enter Sales Orders. 2. Select order number 69. This will bring the order in change mode. 3. Explain the single screen entry. 4. Double-click on a line item and explain the buttons accessible to the
user during sales order entry. 5. Highlight item Frame and double-click and then click on the Loc/Qty
button to show the item quantity and locations. 6. Show Super Kit functionality Return Material Authorization (RMA): The Macola ES RMA applications track items that are returned by your customers, and the

Macola Enterprise Suite (ES) Sales Demo Script
Last Updated:Friday, June 07, 2002 Page 18 Version 1.0
replacement items that need to be sent. Return Material Authorization also tracks the credits that were offered in return for the items. The RMA entry screen holds pertinent information, including follow up, and expected receipt dates. This screen can automatically create a credit memo and a re-shipment of items. Several RMA reports exist to help track incoming and outgoing merchandise. Return Material reports will identify return reasons so users can pinpoint issues that need to be rectified.
Show: 1. Select OE & RMA /RMA/Enter RMAs. 2. Using the Next Record Arrow button accept the next RMA record. 3. Tab down into the Line Item. Pause on this screen. 4. Click on cancel. Explain that the message is asking if you want to create
credit-memo/update reshipment of items. Answer “No” to the question. Credit Management: Customer Orders can automatically be put on hold or warn order entry personnel when an issue such as an overdue account or exceeded credit limit occurs. The Macola ES online credit options are user defined and flexible. Reports and additional applications assist with your credit management process.
Show: 1. Select Setup/Distribution/Order Entry/Order Entry Setup and go to the
bottom of the 1st page. 2. Show the Credit management options in the credit limit section.
Serial/Lot Trace: Serial/Lot visual trace gives you an easy and visual representation to track serial and lot items from procurement to manufacture to shipment.

Macola Enterprise Suite (ES) Sales Demo Script
Last Updated:Friday, June 07, 2002 Page 19 Version 1.0
Show:
1. Select BOM & Inventory/View/Serial/ Lot/ Serial/lot Visual Trace. 2. Enter FRAMEASSYL in the item number field. 3. Click search from the Serial/Lot number field and select third entry from
the list source = O and PO = 61
4. Click on the button. 5. Click on the + sign next to FORK to expand the list. Vendor Contracts: Macola ES stores critical vendor contract information, such as the vendor part numbers, negotiated quantities, lead times, and pricing. Manufacturer’s information can also be stored. Macola ES will ensure that your purchase orders are within the terms of your vendor contract. This is especially useful when the person entering purchase orders may not be the person who negotiated the contract. Show: 1. Select Distribution/Purchase order/Maintain Item vendors. 2. From within the list box, double-click on FORK. 3. Tab into the vendor Item number field, pause for a few seconds before
clicking on the Contract tab.
Close Pos: One of the strong points of Macola ES is its user friendliness. Closing Pos cannot be made anymore simpler in a system. Show:
1. Select Purchase Orders/Process/Close Range of Pos. 2. Click in the list box to bring up all orders. 3. Randomly double click orders to show how easy this is 4. Cancel out and don’t process or save changes.

Macola Enterprise Suite (ES) Sales Demo Script
Last Updated:Friday, June 07, 2002 Page 20 Version 1.0
Macola Enterprise Suite (ES) Sales Demo Script
Last Updated:Friday, June 07, 2002 Page 21 Version 1.0
1. Manufacturing Functionality Highlights Overview
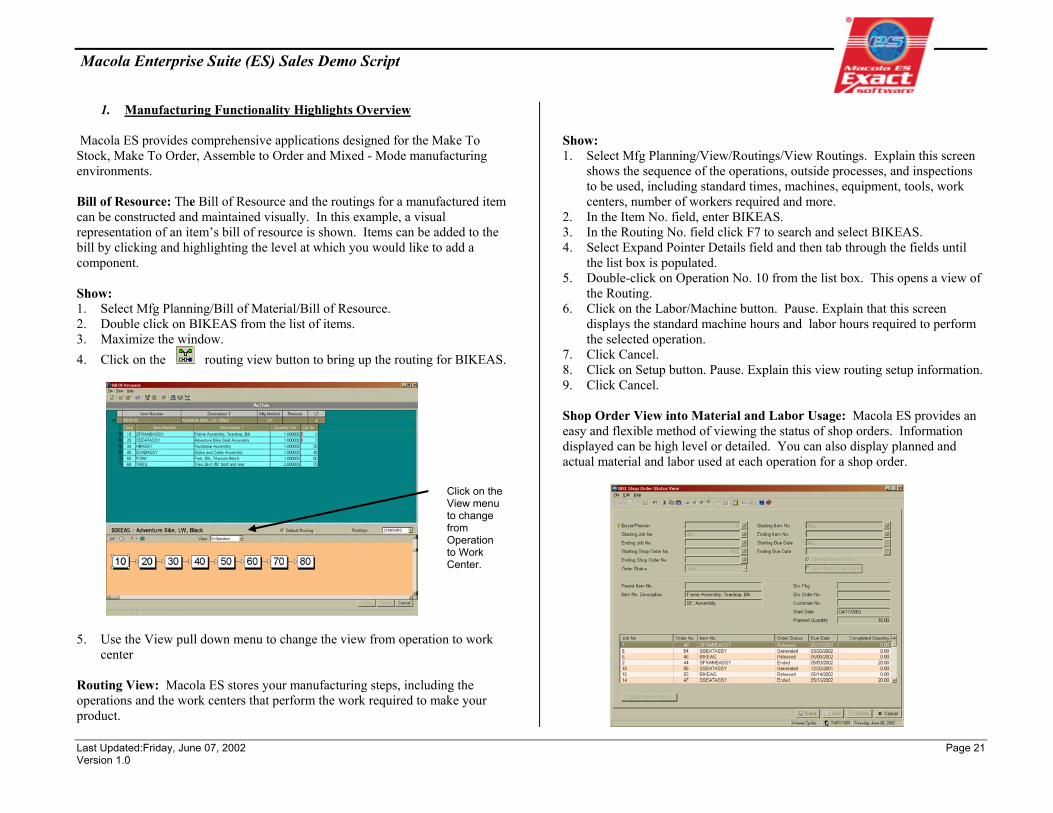
Macola ES provides comprehensive applications designed for the Make To Stock, Make To Order, Assemble to Order and Mixed - Mode manufacturing environments. Bill of Resource: The Bill of Resource and the routings for a manufactured item can be constructed and maintained visually. In this example, a visual representation of an item’s bill of resource is shown. Items can be added to the bill by clicking and highlighting the level at which you would like to add a component. Show: 1. Select Mfg Planning/Bill of Material/Bill of Resource. 2. Double click on BIKEAS from the list of items. 3. Maximize the window. 4. Click on the routing view button to bring up the routing for BIKEAS.
5. Use the View pull down menu to change the view from operation to work center
Routing View: Macola ES stores your manufacturing steps, including the operations and the work centers that perform the work required to make your product.
Show: 1. Select Mfg Planning/View/Routings/View Routings. Explain this screen
shows the sequence of the operations, outside processes, and inspections to be used, including standard times, machines, equipment, tools, work centers, number of workers required and more.
2. In the Item No. field, enter BIKEAS. 3. In the Routing No. field click F7 to search and select BIKEAS. 4. Select Expand Pointer Details field and then tab through the fields until
the list box is populated. 5. Double-click on Operation No. 10 from the list box. This opens a view of
the Routing. 6. Click on the Labor/Machine button. Pause. Explain that this screen
displays the standard machine hours and labor hours required to perform the selected operation.
7. Click Cancel. 8. Click on Setup button. Pause. Explain this view routing setup information. 9. Click Cancel. Shop Order View into Material and Labor Usage: Macola ES provides an easy and flexible method of viewing the status of shop orders. Information displayed can be high level or detailed. You can also display planned and actual material and labor used at each operation for a shop order.
Click on the View menu to change from Operation to Work Center.

Macola Enterprise Suite (ES) Sales Demo Script
Last Updated:Friday, June 07, 2002 Page 22 Version 1.0
Show: 1. Select Manufacturing Execution /View/Shop Floor/Shop Order Status. 2. Tab through the range criteria fields and accept all defaults. 3. Click into the list box area, pause, then click on the first line item. 4. Pause in the Shop Order info. screen. 5. Click on the Operation button, and pause. Explain that this view displays
basic productive operation information and you can drill down to view labor transactions, material transactions, setup information, or notes tied to a shop order operation. (At this time, the demo data does not allow you to drill down further off this screen.) Click Cancel.
6. Click on the Material button and pause. Explain that this view displays material records for a shop order. This screen can be used to drill down into Material Issue, Return, Allocation, Reject, Shortage, Substitution, or PO Line information tied to the material record. (At this time, the demo data does not allow you to drill down further off this screen.)
7. Click Cancel and then cancel all the way out of the screens. On Line Material Issues: To maintain the greatest accuracy possible in your inventory files, Macola ES updates inventory quantity figures on line. Material can be issued to your shop orders at your discretion, or automatically. Material substitutions can also exist. Show: 1. Select Manufacturing Execution/Shop floor/Material Transactions/Online
Picking. 2. In the Shop Order no. field, enter order number 45 and tab through and select
the Backflush Mtl field. 3. Click tab until the List Box is populated. 4. Click the list box area.
5. Explain that users can use this application to issue components to a shop order, based on the allocated planned quantity for that order. They can also use this application to substitute component items as needed. The shop order must be released and may not be allocated. When running the application, Macola ES prompts users to enter a shop order. Macola ES then displays the components required to manufacture the parent item on the shop order. When an item is selected, Macola ES displays related information about it. The list of components lets users specify the quantities of each component to issue to the shop order. Users can select backflushed as well as non-backflushed material. Issuing components using this process is in addition to the issue transactions that Macola ES makes automatically when the backflushing feature is in use and component items are marked as backflushed components in the product structure of the parent item.
Shop Packet: The Macola ES Shop Packet report tracks a shop order as it progresses through the shop. It contains the entire routing of the order and all the associated details printed in order by operation number. Show: 1. Select Manufacturing Execution /Shop Floor/Shop Documents/Shop
Packet. 2. Accept all defaults and click Start.
Macola Enterprise Suite (ES) Sales Demo Script
Last Updated:Friday, June 07, 2002 Page 23 Version 1.0
Job View for Planned and Actual Costs: Macola ES tracks planned versus actual costs. Variances can be traced back to the material, outside processing, scrap, reject, and labor. Several cost analysis reports exist, in addition to the one screen shown. High-level information regarding planned versus actual costs is displayed. More detailed information regarding variances is available with one click. Show: 1. Select Manufacturing Execution /View/Manufacturing Cost Status to open
the Job Status view. 2. Once open, click into the list box area. 3. Pause, and then double click on the first job. 4. Pause and then exit completely out of the screens.
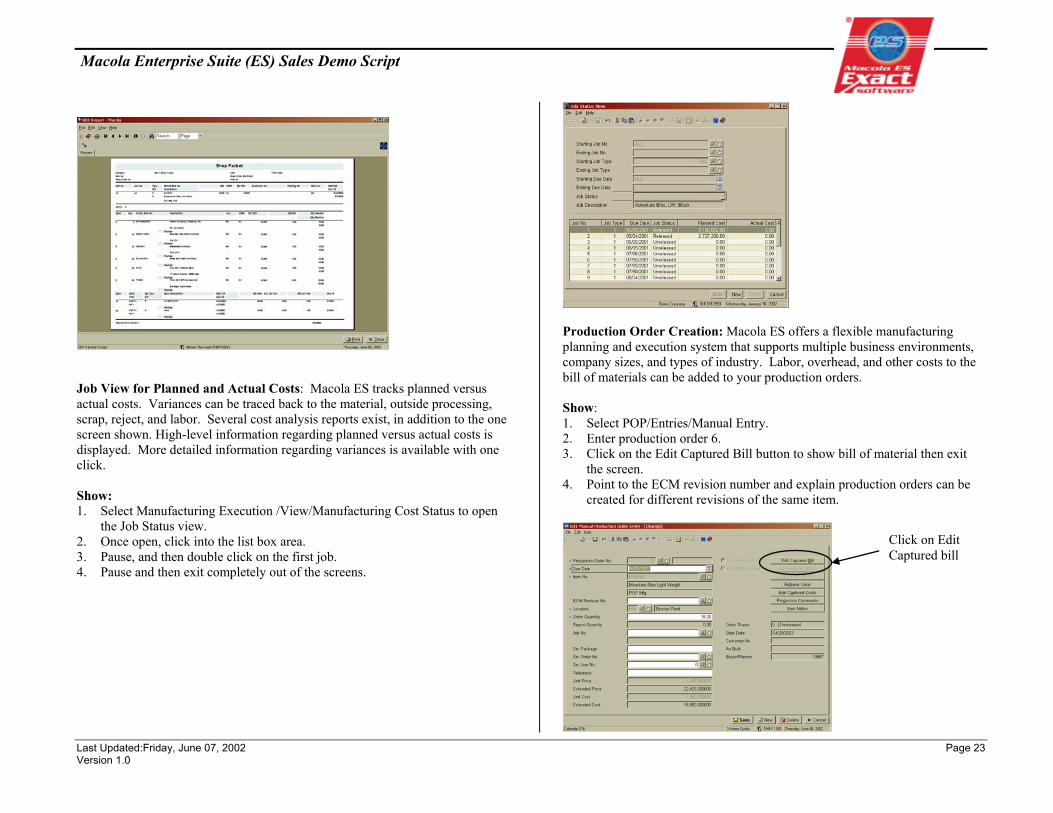
Production Order Creation: Macola ES offers a flexible manufacturing planning and execution system that supports multiple business environments, company sizes, and types of industry. Labor, overhead, and other costs to the bill of materials can be added to your production orders. Show: 1. Select POP/Entries/Manual Entry. 2. Enter production order 6. 3. Click on the Edit Captured Bill button to show bill of material then exit
the screen. 4. Point to the ECM revision number and explain production orders can be
created for different revisions of the same item.
Click on Edit Captured bill

Macola Enterprise Suite (ES) Sales Demo Script
Last Updated:Friday, June 07, 2002 Page 24 Version 1.0
Demo Data Cheat Sheet
The following will help you identify the appropriate item numbers that you will need to demonstrate Macola ES effectively. Order Entry (use Customer 100) Item No Feature BIKEMP Manufactured in POP, Not S/L BIKEAS Manufactured in SF, Not S/L BOLT Purchased, Not S/L, No R/I WREPKIT Kit FRAMEASSY Manufactured, Serialized FRAMEASSYL Manufactured, Lotted FORKSP Purchased Serialized HELMETLB Purchased Lotted BIKEOF F/O made in OE BIKEPF F/O made in PP/PULL BIKESF F/O made in SF/PULL STEM Purchased, Bin Item Purchase Order (Use Vendor 100) Item No Feature BOLT Stocked, Not Serialized/Lotted, No R/I CLAMP Stocked, Not Serialized/Lotted, No R/I FORK Lotted, R/I, Requires Approved Vendor FORKSP Serialized FRAME Stocked, Not Serialized/Lotted, No R/I HELMETLB Lotted ORING Stocked, Not Serialized/Lotted, No R/I Production Order Processing Item No Feature BIKEMP Stocked, Not Serialized/Lotted FRAMEASSY Serialized FRAMEASSYL Lotted Shop Floor Control Item No Feature BIKEAS Stocked, Not Serialized/Lotted
Serialized Component