evolution payroll user guide - payrollpartners.com · evolution payroll® user guide . evolution...
TRANSCRIPT

Evolution Payroll® User Guide

Evolution Payroll - Getting Started
AsureSoftware 9/20/2017 2

Evolution Payroll - Getting Started
AsureSoftware 9/20/2017 3
Copyright 2017 by Asure Software. All rights reserved. Printed in USA. This manual, and the software described in this manual, is copyrighted. No part of this manual or the described
software may be copied, reproduced, translated, stored in a retrieval system, or transmitted in any form or by any means, electronic, mechanical, photocopying, recording, or otherwise without the prior written consent of Asure
Software. Any other reproduction in any form without the permission of Asure Software is prohibited.

Evolution Payroll - Getting Started
AsureSoftware 9/20/2017 4
Evolution Payroll - Getting Started .................................................................................................................................. 8
System Requirements ............................................................................................................................................... 8
Screen Resolution .............................................................................................................................................. 8
Internet Browser ............................................................................................................................................... 8
Third Party Browser Extensions ........................................................................................................................ 8
Security Settings ....................................................................................................................................................... 9
User or Group Security Rights ........................................................................................................................... 9
D/B/D/T Level Security Restrictions ................................................................................................................ 10
Logging into Evolution Payroll ................................................................................................................................ 11
The Dashboard............................................................................................................................................................... 15
Header .................................................................................................................................................................... 15
Menu Bar ................................................................................................................................................................ 16
Payroll Today .......................................................................................................................................................... 16
Agenda .................................................................................................................................................................... 16
Published Reports ................................................................................................................................................... 17
Analysis ................................................................................................................................................................... 17
Navigating Evolution Payroll .......................................................................................................................................... 20
Client and Company Selector ................................................................................................................................. 20
Hot Keys .................................................................................................................................................................. 23
New Terminology ................................................................................................................................................... 23
The Menu Bar ................................................................................................................................................................ 25
The Company Menu ...................................................................................................................................................... 26
The Employees Menu .................................................................................................................................................... 31
Security Settings ..................................................................................................................................................... 31
Adding New Employees .......................................................................................................................................... 33
Employees – Basics screen .............................................................................................................................. 34
Employees – Personal screen .......................................................................................................................... 35
Employees – Labor Defaults screen ................................................................................................................ 35
Employees – ACA screen ................................................................................................................................. 36
Employees – Pay screen .................................................................................................................................. 37
Employees – Federal screen ............................................................................................................................ 39
Employees – State screen ............................................................................................................................... 40
Employees – Local screen ................................................................................................................................ 40
Employees – Child Support screen .................................................................................................................. 41
Employees – Direct Deposit screen ................................................................................................................. 41
Employees – Scheduled E/Ds screen ............................................................................................................... 42

Evolution Payroll - Getting Started
AsureSoftware 9/20/2017 5
Employees – Delivery screen ........................................................................................................................... 46
Effective Dating Dynamic Fields ............................................................................................................................. 53
Security Settings ..................................................................................................................................................... 53
Editing information ......................................................................................................................................... 54
Deleting an Effective Date Record:.................................................................................................................. 55
Deleting an Employee ............................................................................................................................................. 55
Employees Menu - Appendix ......................................................................................................................................... 56
The Payrolls Menu ......................................................................................................................................................... 81
Security Settings ..................................................................................................................................................... 81
The Payrolls Menu .................................................................................................................................................. 84
Creating a Scheduled Payroll .................................................................................................................................. 86
Creating an Unscheduled Payroll ........................................................................................................................... 93
Check Batch Settings screen ............................................................................................................................ 94
Payrolls - Batch Checks Screen ........................................................................................................................ 95
Manual Tax screen .......................................................................................................................................... 99
Fed Overrides screen ....................................................................................................................................... 99
State .............................................................................................................................................................. 100
Overrides screen ........................................................................................................................................... 100
Local .............................................................................................................................................................. 100
Overrides screen ........................................................................................................................................... 100
Payroll – Options screen ................................................................................................................................ 101
Payroll – Review screen ................................................................................................................................. 101
Calculation Results screen ............................................................................................................................. 102
Pre-Processing and Submitting the Payroll .......................................................................................................... 102
Editing / Completing a Payroll .............................................................................................................................. 104
Viewing the Results Screen .................................................................................................................................. 104
Security Settings ............................................................................................................................................ 104
Copying a Payroll .................................................................................................................................................. 107
Copying a payroll in Card view ...................................................................................................................... 107
Copying a Payroll in Table view ..................................................................................................................... 107
Adding Additional Checks .............................................................................................................................. 108
Adding Check Lines ............................................................................................................................................... 109
Refreshing Scheduled E/Ds for Individual Checks ................................................................................................ 110
Refreshing Scheduled E/Ds for Batches ............................................................................................................... 110
Blocking Scheduled E/Ds from a Payroll ............................................................................................................... 111
Manual Checks ..................................................................................................................................................... 111
Creating a new batch..................................................................................................................................... 111

Evolution Payroll - Getting Started
AsureSoftware 9/20/2017 6
Adding to an existing batch ........................................................................................................................... 112
Creating Third Party Checks ................................................................................................................................. 113
Creating Third Party Checks in a new batch .................................................................................................. 113
Adding Third Party Checks to an existing batch ............................................................................................ 116
Voiding Checks ..................................................................................................................................................... 117
Voiding a check by creating a new payroll .................................................................................................... 118
Voiding a check by editing a waiting payroll ................................................................................................. 120
Deleting Batches ................................................................................................................................................... 121
Redistributing Labor Allocation ............................................................................................................................ 121
Time Clock Imports ............................................................................................................................................... 123
The Payrolls Menu - Appendix ..................................................................................................................................... 124
Payrolls - Check Batch Settings screen .......................................................................................................... 124
Payrolls - Payroll Settings screen ................................................................................................................... 125
Payrolls - Batch Checks Screen ...................................................................................................................... 125
Payrolls - Add Checks screen ......................................................................................................................... 125
Payrolls – Manual Tax screen ........................................................................................................................ 128
Payrolls – Fed Overrides screen .................................................................................................................... 128
Payrolls – State Overrides screen .................................................................................................................. 129
Payrolls – Options screen .............................................................................................................................. 129
Payrolls – Review screen ............................................................................................................................... 132
Payrolls - Time Clock Import tab ................................................................................................................... 132
Payrolls – Calculation Results screen ............................................................................................................ 133
The Reports Menu ....................................................................................................................................................... 137
Defined Reports .................................................................................................................................................... 137
Published Reports ................................................................................................................................................. 141
Ad Hoc Reporting ......................................................................................................................................................... 142
Security Settings ............................................................................................................................................ 142
Setting up the Report .................................................................................................................................... 142
Adding a New Ad Hoc Report ............................................................................................................................... 143
Editing an Existing Ad Hoc Report ........................................................................................................................ 144
Running an Ad Hoc Report ................................................................................................................................... 145
Ad Hoc Report Restrictions................................................................................................................................... 146
The Reports Menu - Appendix ..................................................................................................................................... 147
Reports – Defined Reports ............................................................................................................................ 147
Reports – Published Reports ......................................................................................................................... 148
The Task Queue ........................................................................................................................................................... 149
Viewing/Downloading Reports ............................................................................................................................. 151

Evolution Payroll - Getting Started
AsureSoftware 9/20/2017 7
This page was intentionally left blank

Evolution Payroll - Getting Started
AsureSoftware 9/20/2017 8
Evolution Payroll - Getting Started Evolution Payroll is a dynamic Payroll, HR, and Tax Management system developed by payroll and HR service bureau veterans for the Human Capital Management (HCM) industry. It is a Web-based application that facilitates remote client tasks such as adding new employees, existing employee maintenance, managing and processing payrolls, running reports and more, via the Internet using a Web browser.
System Requirements You must be using Evolution Classic version 16.47 or higher to use the Ad Hoc Reporting features. If you are a SaaS customer, these upgrades will be done for you.
Screen Resolution
The Optimum Resolution for Evolution Payroll use is 1920 x 1080. Evolution Payroll is designed to fit most screens and screen resolutions by using a Responsive Web Design (RWD), which allows the components within the application to be moved and resized based on screen size and resolution. The minimum supported resolution is 1360 x 768.
Internet Browser
Evolution Payroll is designed to leverage the features of the most current browser versions. For the best possible experience, we recommend using one of the browsers listed below.
Browser Supported Version
Internet Explorer 10.0+
Firefox 28.0+
Chrome 33.0+
Safari 7.0+
Third Party Browser Extensions
Important! The use of third party browser extensions is prohibited when using Evolution Payroll. See the table below to learn how to disable extensions for your browser.
Browser Instructions for disabling extensions
Google Chrome
1. Click the menu button in the toolbar. 2. Select Settings. 3. Click Extensions in the far left. 4. On the screen that opens, deselect any checkboxes that are marked
5. Restart the browser.
Mozilla / Firefox
1. Click the menu button in the toolbar.

Evolution Payroll - Getting Started
AsureSoftware 9/20/2017 9
Browser Instructions for disabling extensions
2. Select Add-ons. 3. Click Extensions in the far left. 4. Select the Add-on/Extension you wish to remove.
5. Click the button. 6. Restart the browser.
Internet Explorer 1. Click the settings button in the toolbar. 2. Select Manage Add-ons 3. Select Toolbars and Extensions in the far left. 4. The Manage Add-ons screen opens. 5. Select an add-on in the grid, and click the Disable button if available. 6. Restart the browser.
Safari 1. Go to the Safari menu. 2. Select Extensions 3. Select an extension from the list 4. Deselect the Enable checkbox. 5. Restart the browser
Security Settings Access to Evolution Payroll is granted in Evolution. Users may be granted access to as many or as few menus and functions in Evolution Payroll as the service bureau determines appropriate.
User or Group Security Rights
Additional settings specify whether individual users have full access, read-only access, or no access.
1. Go to the Admin - Security – Users (or Groups) screen, and select the user.
2. Click the Details tab - User Rights button.
• Modify settings by right-clicking the green plus sign / red minus sign, and selecting Enabled or Disabled.
• Click the small plus signs (far left) to open a menu "tree". Everything can be selected individually to give or remove permissions to users.
3. Click the black plus sign next to Employee to open related topics
4. Right-click the item to be changed from standard group rights
Note: each item must be selected individually.
Enabled - the selected item is visible in the Edit Employee section of the Employees screens in Evolution Payroll. The user can Add/Edit and Delete Information.
Read-Only - the selected item is visible in Employees screens in Evolution Payroll. The Add button is disabled, and Edit and Delete are not functional for that item.
Disabled - the selected item is not visible in the Employees screens in Evolution Payroll.

Evolution Payroll - Getting Started
AsureSoftware 9/20/2017 10
D/B/D/T Level Security Restrictions
The Organization (D/B/D/T) Level Security in Evolution Payroll is controlled by the D/B/D/T level restrictions set in Evolution Classic, on the Admin – Security – Users – DBDT tab for the user’s profile. Those settings affect three areas in Evolution Payroll:
1. Employees will not be visible to a user if s/he is part of a D/B/D/T level to which the user does not have permission to view.
2. The D/B/D/T level will not be available for selection throughout the application if the user does not have permission to view it.
3. Checks will not be visible to a user if they belong to an employee who belongs to a D/B/D/T level that is blocked from the user.
Note: Pay Rates will also be hidden as part of the employee belonging to a D/B/D/T level that is blocked.

Evolution Payroll - Getting Started
AsureSoftware 9/20/2017 11
Logging into Evolution Payroll Evolution Payroll uses the Enhanced Security Level setting from the SB Admin – Service Bureau - Flags & Settings tab in Evolution. Currently there are three levels of enhanced security to choose from. The table below highlights the levels and their requirements.
In addition to establishing the level of enhanced security, other security considerations must be set on this screen.
Password Duration - how often passwords are required to be changed
Minimum Password Length - minimum number of characters the password must contain
Enforce Mixed Password - new passwords must contain at least one alpha, one numeric, and one special character
Send Screenshot with Error – the system automatically sends a screen print when an error message is received.
• Requires only a password to login
• Users must set up three questions / answers
• Forgot password functionality is available
• 3 invalid login attempts will lock the account (forcing the user to answer the security questions)
• 3 invalid answers to the general security questions will block the account
Low
• Requires a password to login
• Users must set up three questions / answers
• The user is asked to define two Extra Security Questions / Answers in extended login
• Forgot password functionality is available
• 3 invalid login attempts will lock the account (forcing the user to answer security questions)
• 3 invalid answers to security questions will block the account
Medium
•
• Requires a password to login
• Users must set up three questions / answers
• The user is asked to define two Extra Security Questions / Answers in extended login
• Forgot password functionality is not available
• 3 invalid login attempts will block the account
High

Evolution Payroll - Getting Started
AsureSoftware 9/20/2017 12
Once security requirements have been established in Evolution,
1. Open a Web browser and enter the URL provided by iSystems.
The first time a use logs in, enter the Username and Password assigned to them by the service bureau.
2. Click Sign In.
Result: a pop-up box opens regarding setting up security questions.
3. Click OK.
4. Select Questions 1, 2, and 3 from the dropdown lists and provide answers to the questions.
5. Click Submit.
6. If the Enhanced Security field in Evolution has either a medium or high value, the user will be prompted to create and answer two additional security questions, which will be asked each time the user logs in.
Result: The Dashboard opens.

Evolution Payroll - Getting Started
AsureSoftware 9/20/2017 13
Forgotten Password
If the user forgets their password, click I forgot my password on the login screen.
• A new screen opens requiring the user to enter their username and click Submit.
Once submitted, three security questions displayed on the screen must be answered to continue.
Note: If a user answers any of the security questions incorrectly three times, s/he will get a message that the account is blocked, and instruct them to contact their service bureau.
After answering all three security questions, the user clicks the Submit button.
• A new screen opens, on which the user is to set up a new password.
• The user enters and confirms the new password, and clicks the Set Password button.
• The main Login screen opens, where the username and new password are entered.
Result: The Evolution Payroll Dashboard opens.
Note: If an account becomes blocked and is then unblocked by Admin, user must redefine questions/answers upon next login.
Evolution Payroll - Getting Started
AsureSoftware 9/20/2017 14
Terms of Use
Service bureaus can define the Terms of Use for their internal and external users. These Terms of Use are presented when users first log in, after the Terms of User are entered (or changed) on the SB Admin - Service Bureau - Terms of Use tab.
When users log in and see the Terms of Use, they must accept the terms to use Evolution Payroll. Once accepted, the Terms of Use are not presented again unless a change is made by the service bureau to the terms. To accept the Terms of Use, click the Accept button.
• New users are presented with the Terms of Use after the user has selected three security questions and answers.
• Existing users will see the Terms of Use upon initial login or if the Terms of Use have changed.
Note: If the service bureau has not entered anything in the Terms of Use tab, nothing needs to be accepted by the users.
When the user accepts, the Dashboard screen opens.

The Dashboard
AsureSoftware 9/20/2017 15
The Dashboard Information on the Evolution Payroll Dashboard is laid out in sections, or tiles, from which users can navigate to the information selected. Dashboard functionality is covered in more detail later in this guide.
Header In the Header at the top of the screen, far left, is the company’s logo. The center section displays up to five Announcements/Messages selected by the company. Click the numbers to view one of the five messages.
The clients and companies are selected from the dropdown lists in the upper right corner of the screen. When the Dashboard first opens, the default client shown is the one with the lowest Internal Client Number. The client and company fields are accessible in every screen within Evolution Payroll (see screen print below.)
Note: When a different Client/Company is selected, regardless of the menu in which the user is working, the user is automatically returned to the Dashboard screen.

The Dashboard
AsureSoftware 9/20/2017 16
Menu Bar Use the Menu Bar on the left-hand side of the screen to navigate within Evolution Payroll, similarly to the Menu Bar in Evolution. Menu Items are selected from the main screens of each menu. Each menu is covered in more detail later in this Guide.
Payroll Today The Payroll Today tile offers a snapshot of payrolls scheduled around the time of the viewing. The payrolls listed are links that, when clicked, take you to the Batch Settings screen for the payroll selected. Normally the first payroll is the most recently run prior to current day. The next are payrolls scheduled to go out on the current day or in the very near future. The status for each payroll is shown to the right of the payrolls.
The symbols across the center of the tile are described in the table below and indicate delivery status, currently a feature of VMR, of those payrolls listed below. To view this section, the company must be set up with VMR.
Symbol Description
Check date of the payrolls listed below
Processed date of the payrolls listed below
Packaged date of the payrolls listed below
In Transit date of the payrolls listed below
Date Delivered of the payrolls listed below
Agenda The agenda functions similarly to the User Scheduler, and is available to the user only. It keeps a calendar of all scheduled tasks. Agenda users must have User Scheduler security rights established in Evolution to access the Agenda in Evolution Payroll.

The Dashboard
AsureSoftware 9/20/2017 17
Published Reports The Published Reports tile lists the 10 most recently run reports published to the company through VMR in Evolution. Each report link when clicked, brings the user to the “Published Reports” screen in the application, showing a preview of the report results.
Analysis The tile on the bottom right of the Dashboard screen displays a graphical representation of the Cover Letter Report
(S193) and Tax Report for Payroll (S247) reports. Users can click the left or right arrow to scroll to the next view.
The Analysis tile always shows data for the last processed payroll and is updated when next payroll is processed. For the graphs to be displayed, the reports must be properly configured to display on the dashboard.
The Cover Letter (RW) (S193) displays as an inverted pyramid showing the actual dollar amounts in the payroll. At the top of the chart is a breakdown of the payroll that the chart represents.

The Dashboard
AsureSoftware 9/20/2017 18
The Tax Report for Payroll (S247) displays as a Pie Chart showing the amounts of the taxes as well as the Net Payroll amount for the payroll for which the report was generated.
Setting company reports to show on the Dashboard
1. In Evolution, go to Reports – Setup Reports.
2. Select the company from the list on the left-hand side of the screen and click the Details tab.
3. Click the Plus sign to add a new record.
4. Select the report to be added.
5. Update the Print Frequency, Priority to Print, and Number of Copies as needed
6. Select the option to Display on Dashboard.

AsureSoftware 9/20/2017 19
Note: Print Frequency must be set to Every Pay to be updated on the Dashboard each time a payroll is processed. Number of copies must be set to 1 or more.

Navigating Evolution Payroll
AsureSoftware 9/20/2017 20
Navigating Evolution Payroll Navigate within Evolution Payroll using buttons, symbols, or by clicking within the fields themselves. When adding information, press the TAB key to advance to each of the applicable fields in the order in which they should be completed. When tabbing, the next screen will open when the TAB key is pressed in the last field on the screen.
Client and Company Selector Select the client and company from the dropdown menus in the upper right corner of the screen to view company-specific information. To navigate to the topic and screens desired from the Dashboard, users can
1. Click the Menus, or
2. Click the Tile titles
The Employee Menu
After clicking the Employee menu, click the active button (the button that is not grayed-out) in the Header to access the additional menu items within the Employee menu.

Navigating Evolution Payroll
AsureSoftware 9/20/2017 21
Example: the following screen opens when the user clicks the Employees menu. This is the Table View. Click the active button to access the Form View, which lists the menu items within the Employee menu.
Tables
Several screens in Evolution Payroll are formatted as tables, which come with their own unique navigating functionality. The first screen to open in the Employees menu is displayed in table format:
There are several additional tools that can be used when navigating with tables.
Navigating Evolution Payroll
AsureSoftware 9/20/2017 22
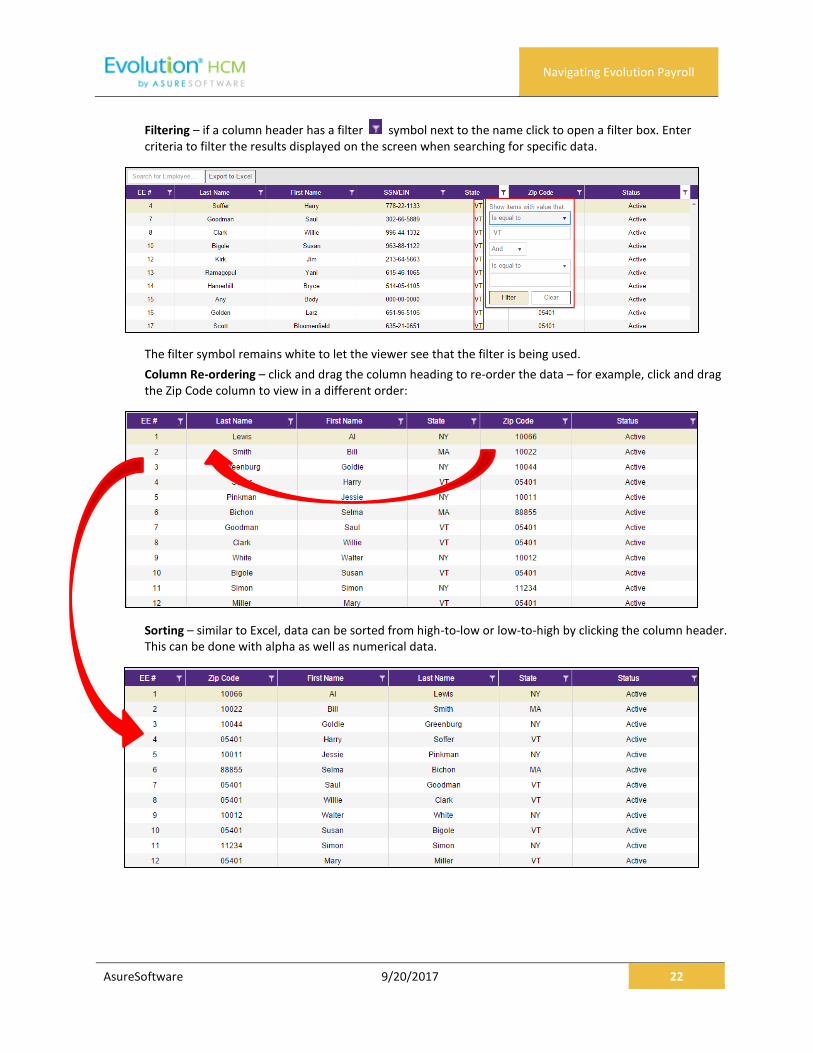
Filtering – if a column header has a filter symbol next to the name click to open a filter box. Enter criteria to filter the results displayed on the screen when searching for specific data.
The filter symbol remains white to let the viewer see that the filter is being used.
Column Re-ordering – click and drag the column heading to re-order the data – for example, click and drag the Zip Code column to view in a different order:
Sorting – similar to Excel, data can be sorted from high-to-low or low-to-high by clicking the column header. This can be done with alpha as well as numerical data.

Navigating Evolution Payroll
AsureSoftware 9/20/2017 23
Hot Keys A series of Hot Keys have been developed to enable quicker navigation. There are several key combinations that perform the same function with different results, depending upon the menu the user is in. The table below identifies the Keyboard Hot Keys currently available.
Keyboard Key/s Description
Press the ALT key + N Add new employee / Add new payroll
Press the CTRL key + S Save employee / Save payroll
Press the CTRL key + E Export grid to Excel (this only works in Grid view)
Press ALT + Insert Insert / add a record (row) into a table (instead of clicking the Add button.)
Press ALT + Delete Delete record (row) from a table (instead of clicking the Delete button.)
Press the ALT key + the Right Arrow key Scroll right to next employee record or check line
Press the ALT key + the Left Arrow key Scroll left to previous employee record or check line
New Terminology There is new terminology used throughout Evolution Payroll that warrants introduction. The table below explains the new terminology that you will see in this document as well as in the application.
Name Example Description
Menu Bar
Colored blocks on the left-hand side of the screens that correspond to a menu. Click the menus to be brought to the main screen of the menu selected.

Navigating Evolution Payroll
AsureSoftware 9/20/2017 24
Menu Items
Within some of the menus (Company and Employee) there is a sub-menu on the left side of the screen with menu items that pertain to the topics of those menu items. Our example is from the Employees menu.
Sections
Many of the screens in the application are divided into sections. These sections have headings that separate the information pertaining to the sections.
Flyout tabs
There are two types of tabs you will see in the application: Those at the far right-hand side of the screen, and those along the top of the screen. The instructions within this guide will be explicit to direct you to the right tab.

The Menu Bar
AsureSoftware 9/20/2017 25
The Menu Bar The Menu Bar contains many of the same menus as are in Evolution, based on security rights the user has been given. Note that the list of Menu Items within each menu are color-coded to match the menu selected, indicating in which menu the user is currently working.
Company information, including settings and rules established by the company can be viewed in the Company menu. The fields’ values are taken from corresponding fields in Evolution. The data in the Company menu is currently read-only however it can be edited in Evolution.
Information on the Evolution Payroll Dashboard is laid out in sections, or tiles, from which users can navigate to the information selected.
Employee information can be viewed, added, and edited in the Employees menu.
Payrolls are processed quickly and easily through Evolution Payroll. The first screen in the Payrolls Menu is the Payroll Timeline, displaying coupon or card-like views of scheduled payrolls.
The Reports menu lets the user see reports that have been published to Evolution Payroll from VMR, as well as process additional reports as needed.

The Company Menu
AsureSoftware 9/20/2017 26
The Company Menu Company information, including settings and rules established by the company can be viewed in the Company menu. The fields’ values are taken from corresponding fields in Evolution. The data in the Company menu is currently read-only however it can be edited in Evolution.
Company – Basics screen
The first screen that opens when the Company menu is accessed is the Company – Basics screen. Note the additional Company menu items on the left-hand side of the screen.
Company – Organization Levels screen
The Company - Organization Levels screen displays the Division, Branch, Department, and Team organization level-specific information, if applicable, for this company. Each company level (previously known as D/B/D/T in Evolution) may have their own payroll bank accounts. When a level is selected on the left, a Payroll Bank Account number, Tax Bank Account number, Billing Bank Account number, and Direct Deposit Account number display on the right, if applicable.

The Company Menu
AsureSoftware 9/20/2017 27
The section on the left-hand side of the screen displays the organization level setup (Division, Branch, Department, and Team).
• Click a level to view information specific to that organization level in the panel on the right.
Company - E/D Codes Screen
The Company - E/D Codes screen displays a list of the E/D Codes created and used by the company.
Company – States Screen
The Company – States screen shows the states in which the company is set up to do business.

The Company Menu
AsureSoftware 9/20/2017 28
Appendix – Company Menu
Company Basics screen
Field / Button Description
Name The company name.
DBA Company name if the company is doing business as a name other than the name above.
Address 1 First address line of company address.
Address 2 Second address line of company address.
City City name of company address.
State Company state.
Zip Code Company zip code.
Phone Main phone number for company.
Fax Main fax number for company.
Legal Address section If the company has a legal name and address different from the address listed above, enter it in this section.
Name Legal company name, if different.
Address 1 Legal address first line, if different.
Address 2 Legal address second line, if different.
City Legal address city, if different
State Legal state address, if different.
Zip Code Legal zip code, if different.
Company Code This must be alpha or numeric, up to 9 characters, and must be unique to this company.
EIN The Employer Identification Number (EIN) for the company.
Customer Service Team Name of the Customer Service Team.
Customer Service Representative Name of the Customer Service Representative.
Email Email address of the Customer Service Representative.
Bank Accounts section
Payroll The payroll bank account number.
Tax The tax bank account number.
Workers’ Compensation The Workers’ Compensation bank account number.

The Company Menu
AsureSoftware 9/20/2017 29
Field / Button Description
Billing The billing bank account number.
Direct Deposit The direct deposit bank account number.
Company – Organization Levels screen Company – States Screen
Field / Button Description
Number The number of the organization level displayed.
Description The description of the organization level displayed.
Home State The home state of the organization level displayed.
Override EE Rate # The employee rate number override, if applicable.
Override Pay Rate The pay rate amount if applicable.
Payroll Bank Account # Payroll bank account number for the organization level displayed.
Tax Rate Account # Tax rate account number for the organization level displayed.
Billing Bank Account # Billing bank account number for the organization level displayed.
DD Bank Account # Direct deposit account number for the organization level displayed.
Code Assigned at the System level, these are the E/D Codes the company has selected to use.
Description Description of the E/D Code
Rate Rate at which the earning or deduction is added or subtracted
Rate # Rate Number for the rate that translates to the employees’ rate number
OT Rate Rate at which overtime is applied
Default section
Start Date Default Start Date for all company employees with this set up as a Scheduled E/D. Can be changed at the Employee level.
Amount Default Amount for all company employees with this set up as a Scheduled E/D. Can be changed at the Employee level.
Rate Default Rate for all company employees with this set up as a Scheduled E/D. Can be changed at the Employee level.

The Company Menu
AsureSoftware 9/20/2017 30
Company – States Screen
Field / Button Description
Description The state name.
Code The state code.
EIN The Employer Identification Number.
SDI EIN Employer Identification number used when paying State Disability Insurance in the state
State Tax Exempt Whether the company is exempt from paying state tax in this state.
SUI Exempt Whether the company is exempt from paying SUI for this state.
SUI Rates section State Unemployment Insurance rates that the company pays based on the states in which it is set up to do business.
Tax Name The SUI tax name.
Rate The rate of the SUI tax.
Local Rates section Local rates that the company pays based on the states in which it is set up to do business.
Tax Name Name of the local tax
Rate The local tax rate.

The Employees Menu
AsureSoftware 9/20/2017 31
The Employees Menu Employees can be added, edited and viewed in the Employees menu in Evolution Payroll. When navigating, it is recommended that you use the TAB key to move from field to field (TAB + SHIFT key to move to a previous field). Upon reaching the last field on a screen, click the TAB key to progress to the next screen, and continue entering information.
Security Settings Security settings must be set to enable Dynamic field editing.
1. Go to the Admin – Security – Users.
2. Select the user from the list.
3. Click the Details tab.
4. Click the User Rights button.
5. Click the Functions button.
6. Enable the following rights:
• Ability to update as of another date
• Ability to change tax exemptions
7. Click Save.
The following is the first screen that opens when the Employees menu is accessed. The default for this screen is to show only employees with a status of Active.
The Employees Menu
AsureSoftware 9/20/2017 32
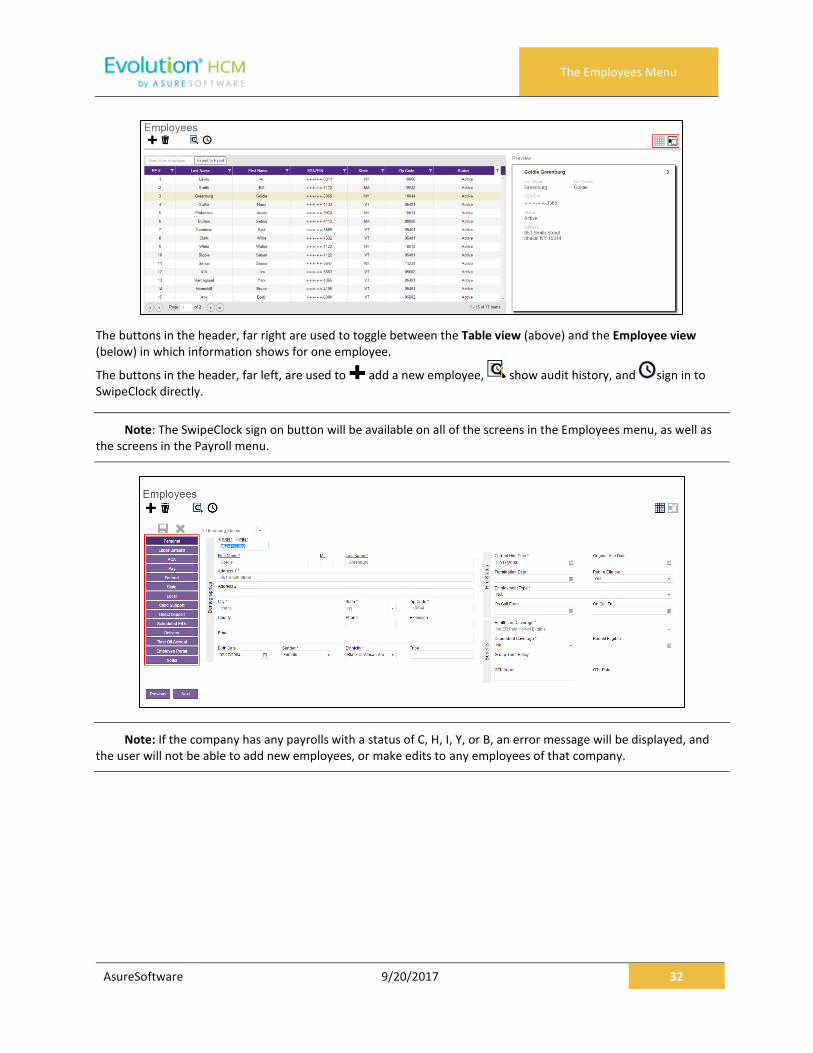
The buttons in the header, far right are used to toggle between the Table view (above) and the Employee view (below) in which information shows for one employee.
The buttons in the header, far left, are used to add a new employee, show audit history, and sign in to SwipeClock directly.
Note: The SwipeClock sign on button will be available on all of the screens in the Employees menu, as well as the screens in the Payroll menu.
Note: If the company has any payrolls with a status of C, H, I, Y, or B, an error message will be displayed, and the user will not be able to add new employees, or make edits to any employees of that company.

The Employees Menu
AsureSoftware 9/20/2017 33
Adding New Employees To add a new employee in Evolution Payroll,
1. Select and open the client and company from the dropdown list above the heading on the right-hand side of the screen.
2. Click the Employees Menu to open.
If there are employees already set up with this company, they appear in the list on the screen.
Note: Employee SSNs are masked in the Grid View except for the last four digits.
3. Click the large plus sign in the heading to create a new record
Result: The Add Employee box opens.
4. Select the Add Method Advanced (Basic is the default) if the information on the Basics screen is not detailed enough for the new employee.
Note: The option of selecting Basic or Advanced is available only if the security function “Apply EE Quick Entry in WebClient” is disabled.
5. Select whether the Tax ID is a SSN or EIN and enter the Social Security Number or Employer Identification Number.
6. Click Check ID.
If the Social Security Number or EIN is already in the system, the Employees – Basics screen opens with the existing demographic information already copied into the new employee fields.

The Employees Menu
AsureSoftware 9/20/2017 34
Note: if the Advanced Add Method was selected, the Employees – Personal screen opens.
Employees – Basics screen
The Employees – Basics screen is displayed only when creating a new employee, when the Basic method is selected. The Basics screen contains the most common fields used when entering an employee, including multiple pay rates and organizational levels. When using the Basic method, only the information on the Basics screen is required to save the employee. Additional Employees Menu items are available on the left-hand side of the screen if needed. If the sections on the Basics screen do not provide enough detail about the employee, users may select the Advanced method in the Add Employee dialog box.
Note: Users must have the same security access as when using the Employee – Employee – EE Entry tab in Evolution.
Note: Fields with names with an asterisk (*) are required.
1. Complete the required and applicable fields on the Employee – Basics screen. For detailed information about the fields on this screen, refer to the Employees - Basics Screen section in the Appendix at the end of this chapter.
2. Press the TAB key or click the Next button when you complete entering information on this screen.
Result: From this screen, the Employees – Local screen opens.

The Employees Menu
AsureSoftware 9/20/2017 35
Employees – Personal screen
If more detailed information is needed than the Basics screen provides, select the Advanced method on the Add Employee dialog box. Note the additional Employee Menu items on the left-hand side of the screen.
Important! When creating a new employee using the Advanced screens, you must progress to the Local Menu Item (if applicable; if there are no locals for the new employee, you must progress to the State Menu Item) before the new employee can be saved. If you exit before that, the new employee information that was entered is lost.
3. Complete the required and applicable fields. For detailed information about the fields on this screen, refer to the Employees – Personal screen in the Appendix at the end of this chapter.
4. Press the TAB key or click the Next button when you complete entering information on this screen.
Result: The Employees – Labor Defaults screen opens
Employees – Labor Defaults screen
1. Complete the required and applicable fields. For detailed information about the fields on this screen, refer to the Employees – Labor Defaults screen section in the Appendix at the end of this chapter.
2. Press the TAB key or click the Next button when you complete entering information on this screen.
Result: The Employees – Pay screen opens.

The Employees Menu
AsureSoftware 9/20/2017 36
Employees – ACA screen
The ACA screen in Evolution Payroll contains the same fields as the ACA tab in Evolution Classic, located on the Employee – Employee – screen.
1. Complete the required and applicable fields. For detailed information about the fields on this screen, refer to the Employees – ACA screen section in the Employee Menu Fields module.
2. Press the TAB key or click the Next button when you complete entering information on this screen.
Result: The Employees – ACA History screen opens.
Employees – ACA History screen
The Employees - ACA History screen lets the user view and update coverage information for employees.
The Employees Menu
AsureSoftware 9/20/2017 37
Select the year for which historical information is needed, and click within the month line in the requiring changing. A dropdown list opens with the applicable codes. Once a code is selected, the subsequent months are changed to match the new Code. The screen also displays the Company default Initial Measurement Period and Stability Period, and employee Hire Date and Date of Birth. That information cannot be edited here.
1. Complete the required and applicable fields. For detailed information about the fields on this screen, refer to the Employees – ACA History screen section in the Employee Menu Fields module.
2. Press the TAB key or click the Next button when you complete entering information on this screen.
Result: The Employees – Pay screen opens.
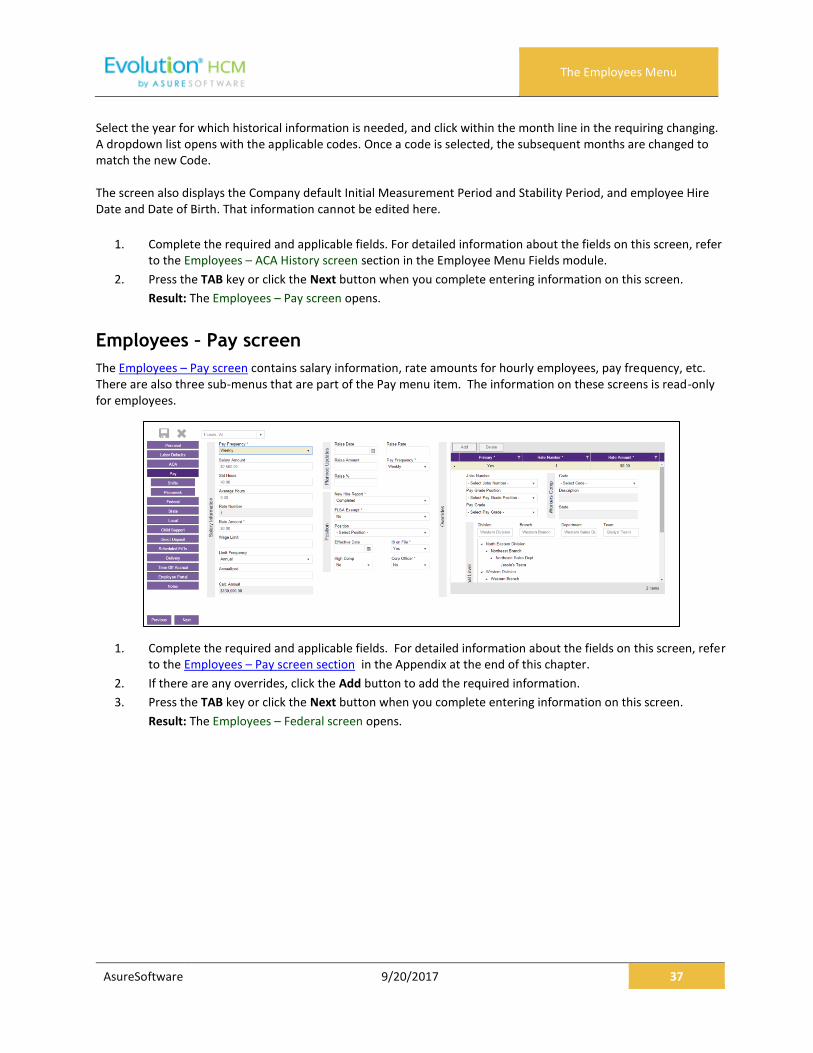
Employees – Pay screen
The Employees – Pay screen contains salary information, rate amounts for hourly employees, pay frequency, etc. There are also three sub-menus that are part of the Pay menu item. The information on these screens is read-only for employees.
1. Complete the required and applicable fields. For detailed information about the fields on this screen, refer to the Employees – Pay screen section in the Appendix at the end of this chapter.
2. If there are any overrides, click the Add button to add the required information.
3. Press the TAB key or click the Next button when you complete entering information on this screen.
Result: The Employees – Federal screen opens.

The Employees Menu
AsureSoftware 9/20/2017 38
Shifts Sub-menu
Shifts must be already created in Evolution, after which they can be applied to employees in Evolution Payroll. Some employees may be assigned multiple shifts.
Note: Users must have Employee – Shifts menu access set up in Evolution to be able to create and apply shifts.
1. Complete the required and applicable fields. For detailed information about the fields on this screen, refer to the Employees – Pay screen - Shifts section in the Appendix at the end of this chapter.
2. Press the TAB key or click the Next button when you complete entering information on this screen.
Result: The Employees – Piecework screen opens.
Piecework Sub-menu
The Piecework screen is where piecework items are set up and to employees. Before these can be applied to employees, the piecework items must be set up in Evolution at the Client level.
Users must have Employee – Piecework menu access set up in Evolution to be able to create and apply piecework.

The Employees Menu
AsureSoftware 9/20/2017 39
1. Complete the required and applicable fields. For detailed information about the fields on this screen, refer to the Employees - Pay Screen - Piecework section in the Appendix at the end of this chapter.
2. Press the TAB key or click the Next button when you complete entering information on this screen.
Result: The Employees – Auto Labor Dist screen opens.
Auto Labor Distribution Sub-menu
The Auto Labor Distribution screen is where employees’ time and pay rates are set up and applied, based on the D/B/D/T levels employees work.
Note: Users must have Employee – Auto Labor Distribution menu access set up in Evolution to be able to create and apply Auto Labor Distribution.
1. Complete the required and applicable fields. For detailed information about the fields on this screen, refer to the Employees – Pay screen - ALD section in the Appendix at the end of this chapter.
2. Press the TAB key or click the Next button when you complete entering information on this screen.
Employees – Federal screen The Employees – Federal screen contains settings and statuses of federal tax information.

The Employees Menu
AsureSoftware 9/20/2017 40
1. Complete the required and applicable fields. For detailed information about the fields on this screen, refer to the Employees – Federal screen section in the Appendix at the end of this chapter.
2. Press the TAB key or click the Next button when you complete entering information on this screen.
Result: The Employees – State screen opens.
Employees – State screen
The Employees – State screen is where state tax information can be added, deleted and viewed.
Click the small arrow(s) at the far left of the line on the information bar to minimize or maximize the state information. Users may also double-click the small arrow(s) to expand the information.
3. Complete the required and applicable fields. For detailed information about the fields on this screen, refer to the Employees – State screen section in the Appendix at the end of this chapter.
4. Click the Add button to add another state as needed, or click the Delete button to delete a state from the employee’s record.
5. Press the TAB key or click the Next button when you complete entering information on this screen.
Result: The Employees – Local screen opens.
Employees – Local screen
When creating a new employee in Evolution Payroll, the local taxes will either be set up automatically, the user will
be prompted to attach local taxes, or local taxes will have to be added as part of the employee setup.
On the Company - Taxes - Local Tax - Details tab in Evolution Classic,
• If the Auto-create on New Hire field is set to Yes, local taxes are automatically applied to new employees of that company. Note that it does not apply to existing employees or rehires.
• If the Auto-create on New Hire field is set to No, no local taxes will be attached to new employees of that
company. Users will need to manually add the local taxes when creating new employees in Evolution
Payroll.
• If the Auto-create on New Hire field is set to Ask for any local taxes in Evolution Classic – a screen opens in Evolution Payroll, prompting the user to apply that local tax.
1. Click the Add button to add another local as needed, or click the Delete button to delete a local (if, for example, the employee moved) from the employee’s record.

The Employees Menu
AsureSoftware 9/20/2017 41
2. For detailed information about the fields on this screen, refer to the Employees – Local screen section in the Appendix at the end of this chapter.
3. Click Save at the top of the Menu bar on the left-hand side of the screen when you have completed entering information on this screen.
4. Click the Next button
Result: The Employees – Child Support screen opens.
Employees – Child Support screen
If the employee owes Child Support, the Child Support case information is displayed on this screen.
1. Click the Add button to add a Child Support case as needed, or click the Delete button to delete a case. For detailed information about the fields on this screen, refer to the Employees – Child Support screen section in the Appendix at the end of this chapter.
2. Click Save when you have completed entering information on this screen.
3. Press the TAB key or click the Next button.
Result: The Employees – Direct Deposit screen opens.
Employees – Direct Deposit screen
Users can add, delete, and view direct deposit information.
1. Click the Add button to add new direct deposit information as needed, or click the Delete button to delete a direct deposit setup. For detailed information about the fields on this screen, refer to the Employees – Direct Deposit screen section in the Appendix at the end of this chapter.

The Employees Menu
AsureSoftware 9/20/2017 42
2. Click Save when you have completed entering information on this screen.
3. Press the TAB key or click the Next button.
Result: The Employees – Scheduled E/Ds screen opens.
Employees – Scheduled E/Ds screen
Scheduled E/Ds can be automatically set up for new employees if they are Auto Enlisted in Evolution Classic. To Auto Create Scheduled E/Ds
1. Go to the Client – E/Ds – Scheduled Defaults screen.
2. Select Yes in the Auto Enlist on New Hire field.
This setting only applies to new employees being created (not existing employees or re-hired employees). Note that the setting for the auto-creation of Scheduled E/Ds for new hires is at the Client level, as this is where Scheduled E/Ds are set up. Users can add, delete, and view Scheduled E/Ds on the Employee menu – Scheduled E/Ds screen.
• Click the small arrow(s) at the far left of the line on the information bar to minimize or maximize the state information. Users may also double-click the small arrow(s) to expand the information.

The Employees Menu
AsureSoftware 9/20/2017 43
Scheduled E/Ds are earnings and deductions that are scheduled to be processed automatically with every payroll. E/D Codes are separated into three categories - Earning Codes, Deduction Codes, and Memo Codes. The table below identifies some of the most common E/D Codes that are and those that are not considered Scheduled E/Ds.

The Employees Menu
AsureSoftware 9/20/2017 44
E/D Code Type E/D Code Type Scheduled E/Ds?
Benefits/Deductions Health Insurance; Dental Insurance; EE 401(k) contributions, EE 401(k) catch-up contributions, Flexible Spending Accounts, Dependent Care
Yes
Memo Codes (money that is set aside by the employer for the employee)
401(k) match, ER paid insurance contributions
Yes
Direct Deposits Employee bank accounts Yes
Agency-paid Child support, garnishments, tax levies
Yes
Static Earnings Auto allowance, severance pay Yes
Loan Payments 401(k) loans, company loans Yes
Salary No
Hourly No
Sick No
Vacation No
Paid Time Off No
Bonuses No
To set up employee-level Scheduled E/Ds
1. Click the Add button to add a Scheduled E/D, or click the Delete button to delete a Scheduled E/D from the employee’s record. For detailed information about the fields on this screen, refer to the Employees - Scheduled E/Ds screen in the Appendix at the end of this chapter.
* After a selection is made in the Send to field, an additional field opens below, depending upon the selection:

The Employees Menu
AsureSoftware 9/20/2017 45
• Agency - when Agency is selected in the Send To field, a dropdown field opens below, where the user
selects the Agency.
• Client / Company – When Client / Company is selected
• Direct Deposit - when Direct Deposit is selected in the Send To field, a dropdown field opens below, where the user selects an account number, or clicks the plus sign to add a new account number.
2. Click the Schedule tab when this screen is complete. Complete all of the applicable fields.
3. Click the Limits tab when this screen is complete. Complete all of the applicable fields.

The Employees Menu
AsureSoftware 9/20/2017 46
4. Click the Thresholds tab when this screen is complete. Complete all of the applicable fields.
5. Click Save when you have completed entering information on this screen.
6. Press the TAB key or click the Next button.
Result: The Employees – Delivery screen opens.
Employees – Delivery screen
Delivery information for all of the employees’ payroll and tax forms is listed on the Delivery menu screen.
1. Click in the applicable fields to add new delivery information as needed. For detailed information about the fields on this screen, refer to the Employees – Delivery screen section Employees – Delivery screen section in the Appendix at the end of this chapter.
2. Verify that the Primary Address information is correct.
3. Enter VMR overrides if applicable.
Enter a Payroll Override Address if applicable.
5. Click Save when you have completed entering information on this screen.
6. Press the TAB key or click the Next button.
Result: The Employees – Time off Accrual screen opens.

The Employees Menu
AsureSoftware 9/20/2017 47
Employees – Time off Accrual screen
Depending upon your role / permissions, you may not see this menu-item. The Time off Accrual screen displays a balance of unused paid time off, as well as used and accrued time off.
Note: the Time off Accrual menu item may not be displayed in the list, depending upon the company settings that determine whether to make TOA available to employees.
1. Click the Add button to add a new Time off Accrual plan as needed, or click the Delete button to delete a TOA. For detailed information about the fields on this screen, refer to the Employees – Time off Accrual screen section in the Appendix at the end of this chapter.
2. Select the Type of TOA being added.
3. Tab over to the Accrued tab and enter the amount the employee has accrued. A window opens requesting a reason for the adjustment. Enter a reason > click OK.
Result: the Balance fills in.
4. Enter a Used amount if applicable.
5. Complete the following fields.
6. Click Save when you have completed entering information on this screen.
7. Press the TAB key or click the Next button.
Result: The Employees – Notes screen opens.
Employees – Employee Portal
The Employee Portal screen contains the same fields as are on the Employee – Employee – Self Serve tab in Evolution Classic. For detailed information about the fields on this screen, refer to the Employees – Employee Portal screen section in the Appendix at the end of this chapter.
Note: When creating a new employee using the Basic employee entry method, the Employee Portal tab does not appear as a choice in the Employee menu.

The Employees Menu
AsureSoftware 9/20/2017 48
Unblock Account Button
If a user incorrectly answers their pre-defined validation questions in Evolution Payroll three times, their account is blocked. A user with access must unblock the account using this button. A pop-up box opens with a temporary password to be provided to the user. Once they log in using the temporary password, they are prompted to establish a new password and to select new validation questions and their answers.
Group Assignments section
Group Assignments are implemented at the Company level. Access Groups can be created and assigned ESS Managers in this section.
Available Groups - ESS Groups with a Personal Info or Time off Group Type, these groups are created on the Company- Benefits - ESS Group Assignment - Group Assignment tab in Evolution Classic.
Assigned Groups - groups to which this employee is assigned as a member.
Select the corresponding checkbox to assign or remove employees to/from various groups.
Employees – Notes screen
Payroll Notes
Notes entered here can be viewed by the payroll processor, or other internal colleagues. The information does not appear “publicly” and cannot be viewed by the employees.
General Notes
General notes about the employee and payrolls are stored with the employee data and can also be viewed in the Payroll menu in the Notes flyout tab on the Employees – Payrolls - Payroll View screen.

The Employees Menu
AsureSoftware 9/20/2017 49
Employees – Check Calculator Shortcut Button
Check Calculator
The Check Calculator Shortcut button opens the Check Calculator screen on which non-payroll employee checks can be calculated from Gross-to-Net or Net-to-Gross. Once the check has been calculated, it can be sent to an existing payroll batch for processing, or a new payroll / batch can be created for processing the check.
1. Select the Employee Number or name from the dropdown list.
2. Check the Net Amount checkbox if calculating a Net Amount to Gross.
3. Enter the Net Amount in the field that opens when selected.
4. Click the Add / Delete buttons to add or delete earnings or deductions to or from the check.
5. Click the Calculate button.
6. Click the Federal tab.

The Employees Menu
AsureSoftware 9/20/2017 50
7. Click in the applicable fields to make changes, blocks, or overrides. For detailed information about the fields on this screen, refer to the Employees – Check Calculator screen section in the Appendix at the end of this chapter.
8. Click the State tab.
9. Click in the applicable fields to make changes, blocks, or to add an override.
10. Click the SUI tab.
11. Click in the applicable fields to make a change or to add an override.
12. Click the Local tab.

The Employees Menu
AsureSoftware 9/20/2017 51
13. Click in the applicable fields to block a local tax, or to add an override.
14. Click the Options tab.
15. If this is to be a Manual check, a check number is required.
16. Select all applicable fields.
17. Click the Send to Payroll button to send the check to a payroll batch for processing.
18. Select the payroll in which to include the check for processing.
Audit History
To audit an employee’s record in Evolution Payroll, click the Show Audit History button in the header.
Result: the highlighted employee’s audit history is displayed listing
• Change Date - date/s any changes were made – this is the default sorting order.
• Operation performed
• Field changed

The Employees Menu
AsureSoftware 9/20/2017 52
• Old Value
• New Value, and
• User who made the change.
Note: The Security Function “Display User Name in Audit” must be enabled for the user to see the name in the audit history of the user who made the change. If this function is not enabled, the UserID is displayed without the name.
Click the button on the far-right side of the header to export a CSV file to Excel, if applicable.
The information can be filtered by clicking the Filter symbol in the column header by which the user would like to sort/filter.

The Employees Menu
AsureSoftware 9/20/2017 53
Effective Dating Dynamic Fields Dynamic fields are dependent upon the dates they were entered or changed. Effective dating enables service bureaus and their clients to edit and audit changes to dynamic fields in Evolution Payroll.
Security Settings Security settings must be set to enable Dynamic field editing.
1. Go to the Admin – Security – Users.
2. Select the user from the list.
3. Click the Details tab.
4. Click the User Rights button.
5. Click the Functions button.
6. Enable the following rights:
• Ability to update as of another date
• Ability to change tax exemptions
7. Click Save.
Fields that can be effective dated have labels displayed as a hyperlink – Example , which can be clicked to view the dates any changes to that field became effective.

The Employees Menu
AsureSoftware 9/20/2017 54
Click the name field label to view additional information about change effective dates.
Editing information
To edit dynamic fields,
1. Click the Edit Effective Period(s) button (available on screens that support dynamic fields.)
Result: The Effective Periods screen opens.
2. Click the Add button.
3. Change the Begin Effective Date.
4. Make other changes as applicable.
5. Click Save.
The Employees Menu
AsureSoftware 9/20/2017 55
Deleting an Effective Date Record:
1. Click the Field hyperlink to display the Effective Periods screen for the applicable field.
2. Highlight the row to be deleted.
3. Click the Delete button.
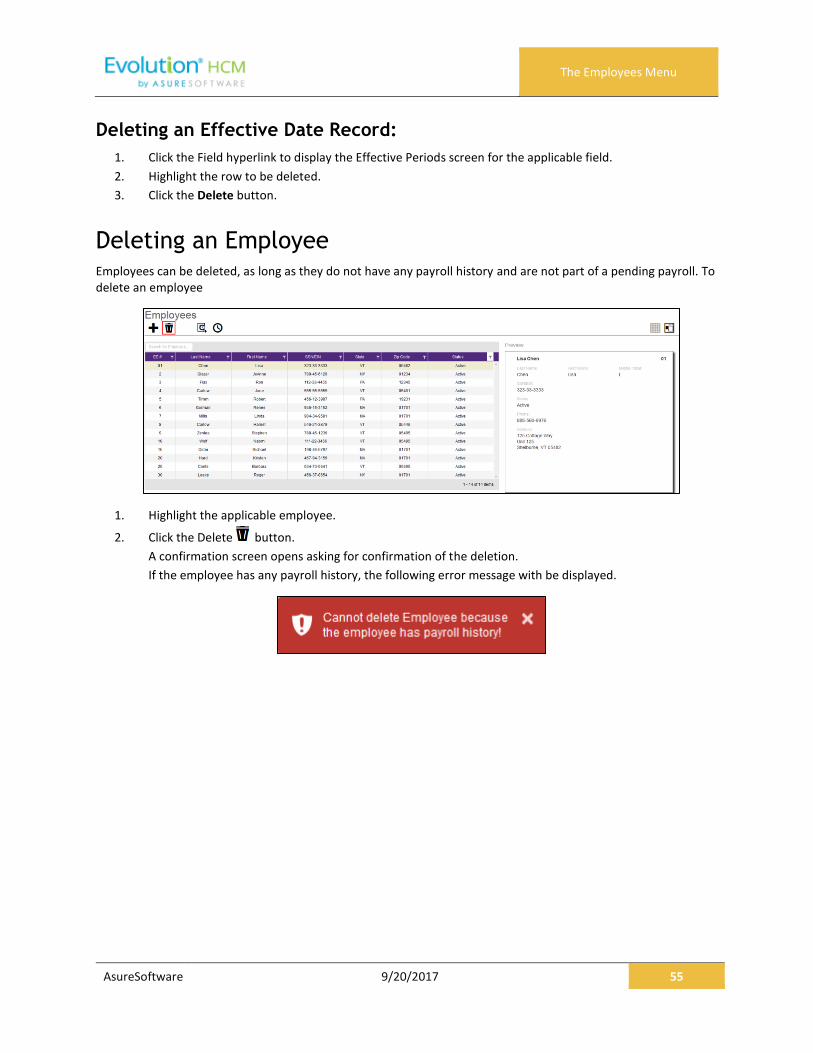
Deleting an Employee Employees can be deleted, as long as they do not have any payroll history and are not part of a pending payroll. To delete an employee
1. Highlight the applicable employee.
2. Click the Delete button.
A confirmation screen opens asking for confirmation of the deletion.
If the employee has any payroll history, the following error message with be displayed.

Employees Menu - Appendix
AsureSoftware 9/20/2017 56
Employees Menu - Appendix
Employees – Basics screen
Field / Button Description
SSN This is the employee’s Social Security Number or Employee Identification Number.
EE Code (EE Number) must be alpha or numeric, up to 9 characters, and unique to the employee.
Employee Type Select W-2 or 1099
First Name The employee’s first name
MI The employee’s middle initial
Last Name The employee’s last name
Address 1 The first line of the employee’s address.
Address 2 The second line of the employee’s address.
City The city name of the employee’s address
State The state name of the employee’s address
Zip Code The employee’s zip code
County The county in which the employee lives
Phone The employee’s phone number
Email Address Employee’s email contact information
Birth Date Birth date
Gender Gender
Ethnicity Required
Tribe Required. If American Indian is chosen, enter the Tribe name in the adjacent field.
Benefits section
ACA Status This may be automatically filled for new employees with the default ACA Status set up on the Company - General - Company Info - ACA tab, used to determine whether the employees are to be included in the full-time eligibility determination.
Healthcare Coverage The employee’s coverage status
Dependent Coverage If the employee is eligible, the coverage, if any, available for dependents

Employees Menu - Appendix
AsureSoftware 9/20/2017 57
Benefit Eligible Date on which the employee becomes eligible to receive benefits.

Employees Menu - Appendix
AsureSoftware 9/20/2017 58
Field / Button Description
Status section
Status Select the employment status from the dropdown list.
Current Hire Date Date employee was hired
Organization Level Organization level at which the employee works if the company is set up using Divisions, Branches, Departments, and Teams.
Employment Type Select the Employment Type from the dropdown list
Workers’ Compensation Workers’ Comp Code assigned to the Job associated with the claim if applicable.
Job Job associated with the Workers’ Comp Code selected.
Pay section
Frequency How often the employee’s paycheck is processed.
Salary Amount Salary earned per pay period
Rate 1 The primary rate number
Rate 2 The second rate number if the employee has two positions with the company doing two different jobs.
Rate 3 The third rate number if the employee has three positions with the company doing three different jobs.
Taxation section
Fed Marital Status Marital status for federal tax purposes
Fed Exemptions Number of exemptions for the employee
State Marital Status Marital status for state tax purposes
State Exemptions Number of state exemptions for the employee
State State to which the employee pays taxes
SDI State to which the employer pays Disability taxes on behalf of the employee.
SUI State to which the employer pays Unemployment taxes on behalf of the employee.

Employees Menu - Appendix
AsureSoftware 9/20/2017 59
Field / Button Description
VMR section
Payroll Check Mailbox Select the mailbox for the employee as needed to override the company settings.
EE Report Mailbox
EE Electronic Return Mailbox
2nd EE Report Mailbox
Employees – Personal screen
Field / Button Description
SSN Required before any other information is entered, this is the employee’s Social Security Number or Employee Identification Number.
EE Code (EE Number) must be alpha or numeric, up to 9 characters, and unique to the employee.
Employee Type Select W-2 or 1099
First Name The employee’s first name
MI The employee’s middle initial
Last Name The employee’s last name
Address 1 The first line of the employee’s address.
Address 2 The second line of the employee’s address.
City The city name of the employee’s address
State The state name of the employee’s address
Zip Code The employee’s zip code
County The county in which the employee lives
Phone The employee’s phone number
Email Address Employee’s email contact information
Birth Date Date of birth
Gender Gender
Ethnicity Required
Tribe Required. If American Indian is chosen, enter the Tribe name in the adjacent field.

Employees Menu - Appendix
AsureSoftware 9/20/2017 60
Field / Button Description
Hire Status section
Status Select the employee’s Status from the dropdown list.
Current Hire Date Enter if this is a rehire
Original Hire Date This may be the same or different from the Current Hire Date if the employee is a rehire.
Termination Date Date of termination if applicable.
Rehire Eligible Is the employee eligible for rehire?
Employment Type Select the Employment Type from the dropdown list
On Call From Date from which the employee is on call, if applicable.
On Call To Date until which the employee is on call, if applicable.
Benefits section
ACA Status This may be automatically filled for new employees with the default ACA Status based on company setup, used to determine whether the employees are to be included in the full-time eligibility determination.
Healthcare Coverage The employee’s coverage status – applicable in Vermont only.
Dependent Coverage If the employee is eligible, the coverage, if any, available for dependents
Benefit Eligible Date on which the employee becomes eligible to receive benefits.
Group Term Policy Total amount of employees' Group Term Life (GTL) policy.
GTL Hours Number of hours worked annually by hourly employees. GTL Policy amount is calculated by multiplying the entered number of hours by the employees' primary pay rate.
GTL Rate Rate used to calculate the GTL amount for salaried employees. GTL amount is calculated by multiplying the employees' salary by the rate entered. Example, enter 2 as the rate; the GTL policy amount is calculated by multiplying 2 times the employees' salary.

Employees Menu - Appendix
AsureSoftware 9/20/2017 61
Employees – Labor Defaults screen
Field / Button Description
Salary Information section
Workers’ Compensation Workers’ Comp Code assigned to the Job associated with the claim.
Job Job set up by the company.
Pay Group Select the pay group.
General Ledger Tag Enter if the company is using General Ledger.
Reporting section
Tipped Directly If any of the employee’s wages were from being tipped directly, click the link to establish an effective date, if applicable.
Ignore FICA on Cleanup Payroll If at any time, the FICA is to be ignored for an employee when running a cleanup payroll, click the link to establish an effective date, if applicable.
Combine Returns on this EE If at any time, returns are to be combined for this employee, click the link to establish an effective date, if applicable.
Generate Second Check Default is No. Select Yes to generate a second check for the employee for reporting purposes.
Deductions to take First Select the deductions to be taken first, if applicable.
Second Check Template In the case of the generation of a second check, select the second check’s template, if applicable.
Include in Analytics Default is Yes. Change to No if the information for this employee is not to be included in the Analytics module, if applicable.
Employees - ACA Screen
Field / Button Description
ACA section
ACA Status Select the appropriate status of the employee based on average hours worked.
• New Hire - Used before status is determined through initial measurement period.
• Full-Time - A new employee who works an average of 30 hours or more per week or 130 hours per month.
• Part-Time - A new employee who is reasonably expected at the employee's start date not to be a full-time employee (and who is not a variable hour employee or a seasonal employee). Works less than 30 hours a week or 130 hours per month, on average.
• Does Not Apply - Employees to whom the ACA Status does not apply.

Employees Menu - Appendix
AsureSoftware 9/20/2017 62
Field / Button Description
ACA section
• Volunteers
• Student Workers
• Members of Religious Orders
• Variable Hour - A new employee who, at the start of employment, the employer cannot in good faith determine whether the individual is expected to average 30 hours of service per week or 130 hours per month during an initial measurement period.
• Seasonal - A worker who performs labor or services on a seasonal basis, including (but not limited to) seasonal farm workers and retail workers employed exclusively during holiday seasons.
• Seasonal < 120 days - A worker who performs labor or services on a seasonal basis, but does not exceed 120 days of service in a calendar year.
• Full-Time Ongoing - An employee who works an average of 30 hours or more per week and has completed the initial measurement and stability periods.
• Part-Time Ongoing - An employee who works less than 30 hours a week or 130 hours per month, on average and has already completed their initial measurement and stability periods.
• Seasonal Ongoing - A worker who performs labor or services on a seasonal basis, including (but not limited to) seasonal farm workers and retail workers employed exclusively during holiday seasons. Has already completed initial measurement and stability periods.
ACA Coverage Offer This field defaults to what is set on the Company ACA tab. If a change is made to the ACA Coverage Code in the grid below, it will display that code in the month that was selected until it is changed
ACA Benefit Select the name of the benefit that will be used to determine the Lowest Cost Benefit for this employee.
ACA Policy Origin Select the appropriate option for this employee for use on the 1095-B – Line 8.
Benefits Eligible Yes or No. Is this employee eligible for benefits.
Reporting section
Form on File Yes or No. Is there a consent form on file for the employee to allow electronic publishing of the 1095 form(s)?
ACA Format Select the form format that will be created for the employee. None, Both, or Paper

Employees Menu - Appendix
AsureSoftware 9/20/2017 63
Field / Button Description
ACA section
Form Type New employees are assigned the default field that is assigned at the Company level. This can be overridden using this field.
• Right-click and select Copy to… to copy to other employees.
ACA Standard Hours This field is used for special Time off Accrual setups that use the normal Standard Hours field. Use the ACA Standard Hours field to override the hours that show on the ACA Reports.
ACA Relief Code This field defaults to what is set on the Company ACA tab. If a change is made to the ACA Relief Code in the grid below, it will display that code in the month that was selected until it is changed
Lowest Cost Benefit Select the Lowest Cost Benefit to be used on the 1095-C.
Employees - ACA History Screen
Field / Button Description
View Coverage For Select the year for which information is being requested.
Month Each month of the year selected
ACA Coverage Offer Assigns a default Offer of Coverage Code identifying standard health care coverage offered to employees, when an employee is created in Evolution.
ACA Relief Code Relief Code, to describe transition relief as defined by the Affordable Care Act that may be applicable to the employer, when an employee is created in Evolution. If a change is made to the ACA Coverage Code in the grid, it will display that code in the subsequent months
Initial Measurement Period Default Initial Measurement Period assigned at the company level in Evolution.
Stability Period Default Stability Period assigned at the company level in Evolution.
Date of Birth Taken from the employee information when new employees are added to the company.
Hire Date Taken from the employee information when new employees are added to the company.

Employees Menu - Appendix
AsureSoftware 9/20/2017 64
Employees - Pay Screen
Field / Button Description
Salary Information section
Pay Frequency How often the employee’s paycheck is processed.
Salary Amount Salary earned per pay period (salaried employees only)
Standard Hours Number of hours the employee is expected to work (this may be left blank for salaried employees working a 40-hour week.)
Average Hours Average hours the employee works – this field is system-calculated and is not editable.
Rate Number The rate number if not the primary rate – this is read only.
Rate Amount The rate for the rate number above.
Wage Limit Wage limit used for Workers’ Comp billing and impounds
Limit Frequency If there is a wage limit, to what period is the limit applied?
Annualized If there is a wage limit for a period other than annual, what is the annualized total amount of the limit?
Calc Annual The system automatically calculates the annualized salary or pay based on the value in Salary Amount times pay frequency or the value in Rate Amount times the pay frequency times standard hours.
Planned Updates section The following fields are informational only, and do not affect pay amounts now or in the future.
Raise Date The date a future raise takes effect.
Raise Amount The potential amount of the future raise. Use this for salaried or hourly employees. If there is a value in this field, leave the Raise Rate field empty.
Raise % The potential percentage of the future raise. Use this for salaried or hourly employees.
Raise Rate The hourly rate of the potential raise.
Pay Frequency The frequency the employee will be paid after the future raise.
Position section These fields in this section used to be on the Positions screen.

Employees Menu - Appendix
AsureSoftware 9/20/2017 65
Field / Button Description
New Hire Report Required field Pending - select this option any time prior to the employee’s first payroll, after which time it is automatically updated to Complete. Completed - if the service bureau is using new hire reporting services, the employee has been reported as a new hire Completed by Predecessor - the employee was reported as a new hire by another service bureau
If an employee's status has changed from another code back to active, when the changes are saved, a message asks if this is a rehire.
No - system saves the employee record and doesn't ask any more questions Yes - system changes the New Hire flag to Pending and opens the Rehire Wizard. The Wizard includes a series of employee screens for the user to verify the employee's set-up for pay rate, states, locals, TOA, Scheduled E/D's, and direct deposits. The Wizard only displays screens applicable to the employee.
FLSA Exempt Is the employee exempt from minimum wage and overtime pay under the Fair Labor Standards Act?
Position Employee’s work position at the company, set up on the Company – Benefits – HR Positions screen.
Effective Date Date the employee’s position became effective
High Comp Is the employee highly compensated?
I-9 on File The employee’s form I-9 is on file
Corporate Officer Is the employee a corporate officer?
Overrides section
Add / Delete buttons Click to add a pay rate or delete a pay rate that is no longer applicable.
Primary column heading Select NO, if this is not the employee’s primary wage at the company.
Rate Number column heading If a standard wage, the new line should have a Rate Number of 2 or more.
Rate Amount column heading Enter the amount of the new rate.
Overrides – Job section
Jobs Number Number identifying the job that the employee has at the company. Overrides what was set up on the Employee – Pay Rates screen.
Pay Grade Position Position the employee holds in the pay grade at the company. Overrides what was set up on the Employee – Pay Rates screen.
Pay Grade Pay Grade in which the employee’s position falls. Overrides what was set up on the Employee – Pay Rates screen.

Employees Menu - Appendix
AsureSoftware 9/20/2017 66
Piecework Sub-menu
Field / Button Description
Add Click to add a new item to the piecework.
Delete Click to delete a piecework item.
Piece column heading Click in the blank line created by clicking the Add button. The piece is listed in the dropdown list.
Rate Amt Rate for the piece. The rate is listed in the dropdown list
Rate Qty The rate quantity is pulled from Evolution, where it was originally set up at the Client level.
Auto Labor Distribution Sub-menu
Field / Button Description
Labor Distribution Options Defaults to Distribute Both - method used to distribute employee’s labor for unions. They may be distributed for earnings, taxes, deductions, all, or none, and must be used in conjunction with the Auto Labor Distribution E/D Group field.
Auto Labor Distribution E/D Group E/D Group used to distribute the employees' labor.
Allocation section
Add Click to create a new record
Delete Click to delete an entry
Percentage Percentage of the employee’s pay attributed to that organizational level
Organizational Level Name of the organizational level for which the employee works
Job Title of the job worked in the level
WC Code Workers’ Comp code associated with that job

Employees Menu - Appendix
AsureSoftware 9/20/2017 67
Employees – Federal screen
Field / Button Description
Marital Status Marital status for federal tax purposes
Exemptions Number of exemptions for the employee
Tax Type Additional or override tax amount.
Value Based on the tax type, the corresponding value.
FUI Rate Credit The amount by which to override a FUI Rate Credit, if applicable.
Override Fed Minimum Wage Value used to override the Federal Minimum Wage rate used in payroll for minimum wage makeup calculations.
• If a value is entered, the amount is used as the rate for minimum wage makeup calculations.
• The value may be overridden if a State Minimum Wage override is entered on the Employee - States - Overrides tab. In that case, Evolution uses that rate in the calculation.
• If both fields are populated, the Federal Override is used in the
calculations for all states attached to the employee that do not have overrides set up. Otherwise, the state override rate is used.
• If no overrides are entered, standard system logic is applied in the calculation (taking the higher of the Federal or State Minimum Wage rate at the system level). Right-click on the field and select 'Copy To...' to copy the information.
EE Tax Statuses section The default values in this section are dependent upon whether the employee is W-2 or 1099.
Federal Tax Status This is the employees’ tax status. Select from the dropdown list whether the employee’s tax is to be included, blocked or exempted.
OASDI Exempt Whether or not the employee is exempt from paying OASDI
Medicare Exempt Whether or not the employee is exempt from paying Medicare
ER Tax Statuses section The default values in this section are dependent upon whether the employee is W-2 or 1099.
FUI Exempt Whether or not the employer is exempt from paying FUI for this employee
OASDI Exempt Whether or not the employer is exempt from paying OASDI for this employee
Medicare Exempt Whether or not the employer is exempt from paying Medicare for this employee

Employees Menu - Appendix
AsureSoftware 9/20/2017 68

Employees Menu - Appendix
AsureSoftware 9/20/2017 69
Field / Button Description
W-2 Form section
Type Type of tax form being filed if not W-2; select from the dropdown list.
Residential State State for which tax forms are being filed as the employees’ residence.
First Name Legal name for whom all tax forms will be prepared – complete only if different from the information on the Basics tab.
Middle Name
Last Name
Name Suffix
W-2 Settings section
Deceased Status is designated on the Form W-2 as deceased
Statutory Employee Status is designated on the Form W-2 as statutory
Legal Rep Is there a Legal Rep designated on the Form W-2?
Deferred Comp Are these earnings designated as deferred compensation on the Form W-2?
Pension Are these earnings from a Pension plan?
1099-R section
Distribution Code If a pension distribution was taken, this is the distribution code reported on the 1099-R.
Tax Amount Determined Was there a tax amount determined and reported on the 1099-R?
Total Was the distribution a total distribution of all assets in the pension plan?
Pension Plan The type of pension plan reported on the 1099-R

Employees Menu - Appendix
AsureSoftware 9/20/2017 70
Employees – State screen
Field / Button Description
County County within the state selected
Salary Type Select the salary type for the employee, if applicable
Calc SUI Taxable 1099 Wages checkbox
If selected, the SUI taxable wages for this employee are calculated for the state.
Work at Home For PA only.
Tax Code This is a generic code and can be used to add details needed for returns.
Reciprocation section
Method Reciprocal method – select from the dropdown list.
State Select the state with whom the residential state has the reciprocal agreement – the states listed are those the company sets up to do business with.
Amount / Percentage Amount required to reciprocate; used based on Reciprocation Method.
EE Tax Status section
Employees – State screen Employees – State screen
State Tax Employees’ state tax status. Select from the dropdown list whether the employee’s tax is to be included, blocked or exempted.
SDI Exempt Whether or not the employee is exempt from SDI
SUI Exempt Whether or not the employee is exempt from SUI
ER Tax Status section
SDI Exempt Whether or not the employer is exempt from paying SDI for this employee
SUI Exempt Whether or not the employer is exempt from paying SUI for this employee
Overrides section
Tax Type Tax type to be overridden
Amount / Percentage Amount of the override
Minimum Wage Does the override revert to minimum wage?

Employees Menu - Appendix
AsureSoftware 9/20/2017 71
Employees – Local screen
Field / Button Description
Column Headings
Local Local tax added at the Company level
State State in which the local agency resides
County County in which the local agency resides
Local Type Employee or employer tax
Tax Rate Tax rate entered at the system level for the local tax
Misc Amount The amount used to adjust the percentage of state taxes when that calculation method is used.
Tax Code Used only if an additional tax code is necessary
Active Whether or not the local tax is currently active.
Tax Status Should the local be included, blocked, or is it exempt?
Deduct Behavior Should the tax be always deducted, never deducted, or are there no overrides?
Work Address Location PA only.
Overrides section
Pre-tax Deductions Does the taxable wage base used to calculate local taxes include pre-tax deductions?
Tax Type Tax type of the overridden tax, if any
% of Taxable Wages The percentage of taxable wages used to calculate local taxes.
Tax Value If an Override Tax Type is entered, this field is required.
Employees – Child Support screen
Field / Button Description
Priority Priority in order of all Scheduled E/Ds – Child Support usually has number 1 priority over all other E/Ds.
Case # Case number assigned by the Child Support agency
State Origin The state in which the Child Support Order originated.
Medical Eligible This field is pre-filled from the Healthcare Coverage field value on the Employees – Basics screen.
Agency Child Support Agency responsible for collecting the money for payment.

Employees Menu - Appendix
AsureSoftware 9/20/2017 72
Field / Button Description
Arrears Change to Yes if Child Support payments are in arrears on this case.
FIPS Five-digit Federal Information Processing Standard (FIPS) code (FIPS 6-4) that identifies counties and county equivalents in the United States.
Custom Field If the company has established a custom field to help with tracking.
Employees – Direct Deposit screen
Field / Button Description
ABA# Routing number identifying the financial institution
Bank Account# Number of the account to which deposits are made
Account Type Type of account to which deposits are made
Branch Identifier Bank Identifier used when transferring money and wiring money
Addenda Additional information (if any) to be added to the direct deposit instructions
In Pre-Note Is the direct deposit within the period of validating the account credentials?
Form on File Tracks whether or not there is a Direct Deposit Authorization form on file
Allow Hyphens Yes means hyphens are allowable characters in the bank account number.
Employees - Scheduled E/Ds screen
Field / Button Description
Basic tab
Code E/D Codes assigned at the system level – select from the dropdown list
Description Entered automatically when the E/D Code is selected.
Priority Priority to process the Scheduled E/D (Child Support E/Ds are always Priority 1)
Calculation Link Select an E/D Group that the Scheduled E/D belongs to (if applicable)
Calculate Using Select which calculation method will be used to calculate payroll deductions for the Scheduled E/D. There are three options:
1. Use the calculation method that has been defined for the E/D 2. Use the calculation method defined at the Company Benefit
level

Employees Menu - Appendix
AsureSoftware 9/20/2017 73
Field / Button Description
3. Use the calculation method defined at the Employee Benefit level
Calculation Method Method used to calculate deductions from payrolls. Select the method from the dropdown list. Amount $ - If the Calculation Method selected is a fixed dollar amount enter that amount. Amount % - If the Calculation Method selected is based on a percentage enter the percentage amount.
E/D Group Select an E/D Group if the Scheduled E/D is included in an E/D Group.
Note: Earnings must be set up as a member of an E/D Group, which simplifies the calculation of earnings such as 401(k)s.
Always Pay / Deduct Offers flexibility to override E/D, similar to Blocking Week 1 - 5
All payrolls - earnings are paid whether or not there are earned wages for the employee; deductions are tracked to be taken from the next payroll. Current Payrolls - the E/D is applied to the current the payroll whether or not there are earned wages for the employee. If deduction exceeds amount in check the amount is not tracked to be made up later. If there are insufficient earnings for the deduction, the Scheduled E/D is processed based on the selection in the Deductions to Zero field. No - if the employee has no wages in a payroll cycle, the system does not pay/deduct the E/D, nor is it tracked it to be made up later.
Important: to ensure that the remainder of the deduction is taken out of a subsequent pay cycle, the Make Up Deducts Shortfall field on the Client - E/Ds - Details tab must be set to Yes.
Deductions to Zero Defaults to the Deductions to Zero Default field on the Client - E/Ds - Scheduled Defaults tab. It can be overridden here by E/D, by employee, and instructs how much of a deduction should be taken if there is not enough to take the entire amount. This does not turn Shortfall / Deduction not Taken makeup on or off. It only tells the system whether or not to take partial amounts for deductions.
Yes - the entire amount is deducted, until the check is zero. If there is shortfall it may be either a portion of or the total amount of the Scheduled E/D. No - a deduction is taken only when there are sufficient funds to take the whole deduction. If there are insufficient wages, the created shortfall is always the total amount of the Scheduled E/D. If there is a pre-existing shortfall, it takes the shortfall amount only when there are sufficient wages to take the whole amount. When there is a deduction and a pre-existing shortfall, and there are sufficient wages to take the shortfall but not all of the deduction, Evolution takes the shortfall, but not the deduction.

Employees Menu - Appendix
AsureSoftware 9/20/2017 74
Field / Button Description
Deduct Whole Check Value selected defaults based on the setting applied on the Client - E/Ds - Scheduled Defaults tab
Yes - deducts the net check (use for direct deposits)
No - deducts a portion of the check
Send To* Select Agency or Client, Company, or Direct Deposit
Reference to Display on Check If being sent to Agency or Client/Company on behalf of the employee…
Schedule tab All payment schedule-related information is on this screen.
Starting Starting date for the scheduled deduction
Ending Ending date for the scheduled deduction
Affects section
Payrolls affected Identify which payrolls are affected by the deduction
Frequency How often the deduction of the Scheduled E/D occurs.
Blocks section
Block Based On If there are blocks on any of the payroll weeks identify whether it is custom defined or being blocked to keep the deduction at four weeks per month.
Weeks Blocked Identify which, if any, week(s) is blocked from having the deduction taken

Employees Menu - Appendix
AsureSoftware 9/20/2017 75
Field / Button Description
Limits tab
E/D Group E/D Group to which the minimum Scheduled E/D belongs (same as Minimum E/D Group field on the Employee – Scheduled E/Ds – Advanced tab)
Pay Period % Minimum percentage (if the deduction is quoted as a percentage) to be taken per pay period.
Pay Period $ Minimum dollar amount (if the deduction is quoted as an amount) to be taken per pay period.
EE Annual $ Maximum dollar amount the employee is allowed to contribute per year
Client Annual $ Maximum dollar amount the client can contribute per year for the employee
Maximum Averages section
Amount E/D Group This information is used for special Union dues calculations.
Hours E/D Group
Hourly Rate
Thresholds tab
Action These fields refer to the goal amounts at which deductions stop – the same information entered on the Employee – Scheduled E/Ds Advanced tab in Evolution. Remaining
Balance Taken
Amount $
Thresholds section
E/D Group

Employees Menu - Appendix
AsureSoftware 9/20/2017 76
Employees - Delivery screen
Field / Button Description
Primary Address section The information, set up when the employee is first entered into the system is pre-filled in this section. This address is where W-2 Forms will be sent. Edits may be made on this screen by entering data over what is already there.
VMR section Whenever an employee is set up with a VMR mailbox, select the VMR mailboxes of the employee if different than the company’s default mailbox.
Payroll Check Mailbox Whatever names the company has given their mailboxes are listed. To override the company setup for VMR, select the Mailbox Group here.
EE Report Mailbox
EE Electronic Return Mailbox
2nd EE Report Mailbox
Password for VMR Deliveries VMR Password
Payroll Override Address section Address to send payroll checks for the employee if they are going to a different address than the W-2.
Employees – Time off Accrual screen
Field / Button Description
Active Whether or not the TOA plan is currently active for the employee
Type What type of TOA plan it is – PTO, Sick, Vacation, etc…
Balance Tab over to the Accrued field to enter first. The balance will fill in automatically, after which, enter time used and the balance will be adjusted.
Used How much of the accrued time has been used
Accrued Enter manually
Effective Date Date the Accrued amount begins
Accrual Max Maximum set by the company that an employee can earn in a pre-defined period
Rate Rate at which the time off accrues per pay period
Rollover Type If the company plan allows for a rollover, on which type of accrual is rollover allowed?
Rollover Date Date on which rollover occurs

Employees Menu - Appendix
AsureSoftware 9/20/2017 77
Employees – Employee Portal screen
Depending upon your role / permissions set up in Evolution Classic, this menu-item may not be visible.
Field / Button Description
Access Section For access to the Employee Portal, the Access Level for EE Info must be Read Only or Full Access. The Time Off and Benefits Access Levels work independently.
EE Info No - employees will not see any of their personal information in the Employee Portal
Read-only - employees can view their payroll information but will not be able to request edits in the Employee Portal
Full Access - employees can see and request edits to their payroll and W-4 information.
Time Off No - employees do not see any of their time off information in the Employee Portal
Read-only - employees can view their time off information but will not be able to request edits in the Employee Portal
Full Access - employees can see and request edits to their time off information
Benefits No - employees do not see any of their benefits information in the Employee Portal
Read-only - employees can view their benefits information but will not be able to make elections in the Employee Portal
Full Access - employees can see and request edits to their benefits elections in the Employee Portal (during Open Enrollment and/or a Qualifying Event Enrollment.)
User Name The employees’ user name in the Employee Portal.
Password The employees’ password in the Employee Portal.
Unblock Account button If a user’s Evolution Payroll account is blocked because they incorrectly answered their security questions three times, a user with access can unblock the account using this button.
Group Assignments section Pre-filled based on the setup in Evolution Classic on the Company - Benefits - ESS Group Assignment screen.
Name Name of the group/s to which the employee has been assigned.
Type Type of group/s to which the employee has been assigned. (Pre-filled based on the setup in Evolution Classic.
Assigned checkbox Designates whether the employee is assigned to the group.
Settings section
Forms on file Are the annual return forms on file?

Employees Menu - Appendix
AsureSoftware 9/20/2017 78
Field / Button Description
Email Email address for account notifications
Format Format of the returns; electronic, paper, or both
Benefits Email Email address for benefits notifications
Employees – Notes screen
Field / Button Description
Payroll Notes Notes entered here can be viewed by the payroll processor, or other internal colleagues. The information does not appear "publicly" and cannot be viewed by the employees.
General Notes General notes about the employee and payrolls are stored with the employee data and can also be viewed in the Payroll menu in the Notes flyout tab on the Employees – Payrolls - Payroll View screen.
Employees – Check Calculator Shortcut Button
Field / Button Description
EE Code/Name Select the Employee Number or name from the dropdown list.
Net Amount checkbox Select if calculating a Net Amount to Gross – user will be required to enter the Net Amount in a field that is displayed when selected.
Net Amount Net amount of the check being calculated if Net Amount checkbox is selected.
Calculate button Click to calculate the Net or Gross amount.
Send to Payroll button Click to send the check to a payroll batch for processing.
Add / Delete buttons Use to add or delete earnings or deductions to or from the check.
Federal tab
Marital Status This information is pre-filled using the settings established in Evolution Classic.
Exemptions
Tax Frequency
Tax at Supplemental Rate Select if there are supplemental wages requiring the employee to be taxed at a supplemental rate.
Blocks section
Federal Tax Select to block Federal tax from being deducted from this check.
Employee Overrides Select to block any employee overrides from being included in this check.

Employees Menu - Appendix
AsureSoftware 9/20/2017 79
Field / Button Description
Additional Values Select to block any additional values from being deducted from this check.
EE OASDI Select to block the EE OASDI from being deducted from this check.
EE Medicare Select to block the EE Medicare from being deducted from this check.
EE EIC Select to block the EE EIC from being deducted from this check.
Overrides section
Fed Type Complete if there are any overrides to add to this check.
OASDI
Medicare
EIC
Backup Withholding
State tab
Marital Status This information is pre-filled using the settings established in Evolution Classic.
Exemptions
Tax at Supplemental Rate Select if there are supplemental wages requiring the employee to be taxed at a supplemental rate.
Blocks section
Regular tax Select to block any of these from being deducted from the check.
Additional tax
SUI
SDI
Overrides section
State Type Select if any type of state tax should be overridden.
SUI tab
Amount Enter an override amount if applicable for the state highlighted in the left (if more than one is listed)
Local tab
Block this Local Tax Select to block the selected local tax from being deducted from the check.
Overrides section

Employees Menu - Appendix
AsureSoftware 9/20/2017 80
Field / Button Description
Amount Enter an override amount if applicable for the local highlighted in the left.
Make this a Manual Check Select to create a Manual check.
Enter Check # This is a required field if Manual Check is selected.
Update Year to Date Totals (Disable YTD)
Select to keep YTD totals from appearing on the employees’ check stubs.
Update Tax & Deduction Shortages (Disable Shortfalls)
Select to keep shortages from appearing on the employees’ check stubs.
Lock Calculations for this Check Select to use the reviewed information when the payroll processes. Results are available on the Manual Tax tab.

The Payrolls Menu
AsureSoftware 9/20/2017 81
The Payrolls Menu Payrolls are processed quickly and easily through Evolution Payroll. This section covers creating both scheduled and unscheduled payrolls. Each will be discussed in detail.
Security Settings The following security settings must be enabled for a user to submit a payroll in Evolution Payroll. If the Payroll Menu options in Evolution Classic are disabled, the Payroll Menu button is not displayed as a menu option on the Evolution Payroll dashboard.
1. Go to the Admin – Security – Users.
2. Select the user from the list.
3. Click the Details tab.
4. Click the User Rights button.
5. Click the Menu button.
6. Enable the Payroll menu as well as
• Batch - If this is disabled, in Evolution Payroll:
o The Payroll – Batches screen is not displayed to the user.
o The Payroll – Summary View screen is not displayed to the user.
o The Payroll – Summary Detail View screen is not displayed to the user.
o The Payroll – Detail View screen is accessible to the user.
o The Block E/Ds button is disabled.
o Users can still View or Edit payrolls.
o Symbols for View / Edit will be displayed in the Payroll Card and Grid View.
• Check - If this is disabled, in Evolution Payroll:
o The Payroll – Detail View screen is accessible to the user.
o The Payroll – Summary Detail View screen is not displayed to the user.
o The Payroll – Summary View screen is not displayed to the user.
o Users can still View or Edit payrolls.
o Symbols for View / Edit will be displayed in the Payroll Card and Grid View.
• Payroll - If this is disabled, in Evolution Payroll:
o The Payroll Menu button is not displayed as a menu option on the Evolution Payroll dashboard.
o The information in the Payroll Today section on the Evolution Payroll dashboard will be read-only (no hyperlinks).
Note: If the Payroll – Batch AND Payroll – Check Security Rights are disabled, in Evolution Payroll:
• Users can view the Payroll Card and Grid Views.
• Users can create a new payroll (+ sign at top left of screen).
• Users can create/start a scheduled payroll (+ sign in the card).
• After creating or starting a Payroll, users will not see any batch or check details.
o The Batches and Check icon screens are disabled.
o The Totals and Finish icon screens are enabled.
o The Block E/Ds icon is enabled.

The Payrolls Menu
AsureSoftware 9/20/2017 82
7. Click Save.
8. Click the Functions button.
9. Enable the following rights:
• “Ability to directly process payrolls”
• “Ability to mark payrolls as completed”
• “Ability to submit payrolls”

The Payrolls Menu
AsureSoftware 9/20/2017 83
10. Click Save.
Security settings for blocking options
There are four items that can be blocked from payrolls – ACH, Billing, Liabilities, and Deposits - both on the Payroll Settings screen, and the Payroll Finish screen. An additional security setting must be enabled for a user to have the ability to block these from the payroll.
1. Go to the Admin – Security – Users.
2. Select the user from the list.
3. Click the Details tab.
4. Click the User Rights button.
5. Click the Functions button.
6. Enable “Payroll wizard including deposit/liability, billing, and ACH block options”
7. Click Save.

The Payrolls Menu
AsureSoftware 9/20/2017 84
The Payrolls Menu The first screen in the Payrolls Menu is the Payroll Timeline, displaying coupon- or card-like views of scheduled payrolls. There are eight statuses you may see represented on the Timeline screen described in the table below.
Status Description
Scheduled payrolls that are not due to be processed yet.
Scheduled payrolls that did not get processed as scheduled.
Payroll was started but not submitted
Payroll was submitted to the service bureau for review.
Payroll was submitted to the service bureau for processing.
Payroll has been processed.
Payroll has been backdated
Payroll requires manager approval prior to processing.
Click the symbol in the header to change to a Table view of recent payrolls.
Several symbols are visible on various screens in the Payrolls menu, described in the table that follows.
Symbol Description
View – visible only on processed payrolls, click to view details of the payroll including batches, check lines, etc.
Copy – visible on processed payrolls only, enabling them to be copied for processing.
Payroll Results – click to view details about payrolls with a status of Processed (P) and Void (V).

The Payrolls Menu
AsureSoftware 9/20/2017 85
Symbol Description
Edit – visible on payrolls that have been started, but not processed. Click to make changes, add a new batch, filter the information differently, or add new checks.
Add – click to add a new batch to scheduled payrolls, or to add a new payroll.
Delete – click to delete previous changes. Also, to delete a batch.
Cancel Changes – click to cancel changes made to a screen or payroll.
On the Check Batches screen – clicking takes the user to the Check Batch Settings screen for the batch selected.
On the Check Batch Settings screen – clicking takes the user back to the Check Batches screen.
On the Check Batch Settings screen – clicking takes the user to the Check Batch Settings Table View screen listing the company employees.
On the Payroll Timeline screen – changes the view to a Table view from the Card view.
On the Payroll Timeline screen – changes the view to the Card view from the Table view.
On the bottom right of the Batch checks screen – click to open a list of E/D Codes to create additional columns on the checks list.
There are four symbols on the right-hand side of the Header that visually let the user know where they are in the Payroll process. These can also be clicked to go to specific screens in the process.
Symbol Description
Batches – this button is active (green) while batches are being created. To view batch information after they have been created, click this button.
Checks - this button is active (green) while checks are being created. To view, add or edit checks after they have been created, click this button.
Payroll calculations - click a payroll to view or edit. Click to calculate totals when checks have been added or deleted from batches.
Process Payroll - this button is active (green) while payrolls are being finished and submitted for review or processing.

The Payrolls Menu
AsureSoftware 9/20/2017 86
Creating a Scheduled Payroll The Payrolls – Timeline screen is the first screen to open after clicking the Payroll menu. To create a payroll in Evolution Payroll,
1. Click the Payrolls menu.
2. Click the large plus sign in the Header to create a new payroll.
Result: The Check Batch Settings screen opens.
Note: Payroll notes and general notes created in the Employees menu can be viewed in the Payrolls menu by clicking the Payroll Notes flyout tab on the far right-hand side of the screens. This flyout tab is available on most screens within the Payroll menu.
Check Batch Settings Screen
1. Complete the required and applicable fields. For detailed information about the fields on this screen, refer to the Payrolls – Check Batch Settings Screen section in the Appendix at the end of this chapter.
2. Select the items to include in the payroll in the Include section.
3. Complete required and applicable fields in the Time Clock Import Options section.

The Payrolls Menu
AsureSoftware 9/20/2017 87
4. Click the Create Checks button.
5. Click OK in the window that confirms the checks have been created.
Result: The Batch Checks Screen opens.
Batch Checks Screen
This screen offers three different viewing options, based upon the level of detail required by the user. The view is selected from the dropdown list in the far right of the Navigation Bar. For detailed information about the fields on this screen, refer to refer to the Payrolls - Batch Checks Screen section in the Appendix at the end of this chapter.
Summary View
Default view, this is the check entry screen, on which the user can add checks and edit information for employee checks. The first five columns are read only. The columns that follow can be edited, as well as having columns added and subtracted.
• To add or edit a column
1. Click within the column to edit of the check being modified.
2. Once finished click Save in the Header.
• To add a check for employees
1. Click the Add Check button in the Navigation bar.
Result: The Add Checks screen opens.
2. Select the Check Type being created.
3. Select the employee(s) for whom to create a check.
4. Click the Create Check(s) for Selected EEs button.
• To add additional E/D Codes as columns, click in the bottom right-hand corner of the screen, and select the E/D Codes from the list.

The Payrolls Menu
AsureSoftware 9/20/2017 88
Summary Detail View
The Summary Detail View provides a more detailed view of the Summary screen, listing each check and its details.
• To add a check for employees
1. Click the Add Check button in the Navigation bar.
Result: The Add Checks screen opens.
2. Select the Check Type being created.
3. Select the employee(s) for whom to create a check.
4. Click the Create Check(s) for Selected EEs button.
• To add a Check Line click the Add Check Line button.
• To add additional columns, click in the bottom right-hand corner of the screen, and select the desired column(s) from the list.

The Payrolls Menu
AsureSoftware 9/20/2017 89
5. Select an E/D Code from the dropdown list.
6. Click Save in the Header.
Detail View
The Detail view provides the most detailed view of each check, and offers editing capabilities, as well as the ability to add (or delete) additional E/D Codes to the checks.
1. Complete the required and applicable fields on this screen as well as on the Labor Defaults and Local Tax Overrides tabs. For detailed information about the fields on these screens, refer to refer to the Payrolls – Check Lines Screen section in the Appendix at the end of this chapter.
2. Click the Payroll – Manual Tax menu item.
3. Press the TAB key or click the Next button when you complete entering information on this screen.
Manual Tax screen
Click the Manual Tax tab to override a tax for the check if applicable. The information on this screen is the same as is on the Payrolls > Check > Manual Tax tab in Evolution. For detailed information about this screen, refer to the Payrolls – Manual Tax screen in the Appendix at the end of this chapter.

The Payrolls Menu
AsureSoftware 9/20/2017 90
1. Complete the applicable fields
2. Click the Payroll – Fed Overrides tab.
Fed Overrides screen
Click the Fed Overrides tab to block or override Federal taxes. Information on this screen is the same information as is found on the Payrolls – Check – Tax Overrides tab in Evolution. The State and Local tabs require the same information, regarding the state or local taxes for the employee. For detailed information about this screen, refer to the Payrolls – Fed Overrides screen section in the Appendix at the end of this chapter.
1. Complete the applicable fields. For detailed information about the fields on this screen, refer to page 89 in this document.
2. Click the Payroll – State Overrides tab.

The Payrolls Menu
AsureSoftware 9/20/2017 91
State Overrides screen
1. Complete the applicable fields. For detailed information about the fields on this screen, refer to the Payrolls – State Overrides screen in the Appendix at the end of this chapter.
2. Click the Payroll – Local Overrides tab.
Local Overrides screen
3. Complete the applicable fields.
4. Click the Payroll – Options tab.
Payroll – Options screen
Click the Payrolls –Options tab to block scheduled earnings and deductions on employee checks. The information on this screen can be found mostly on the Payroll – Check – General tab.
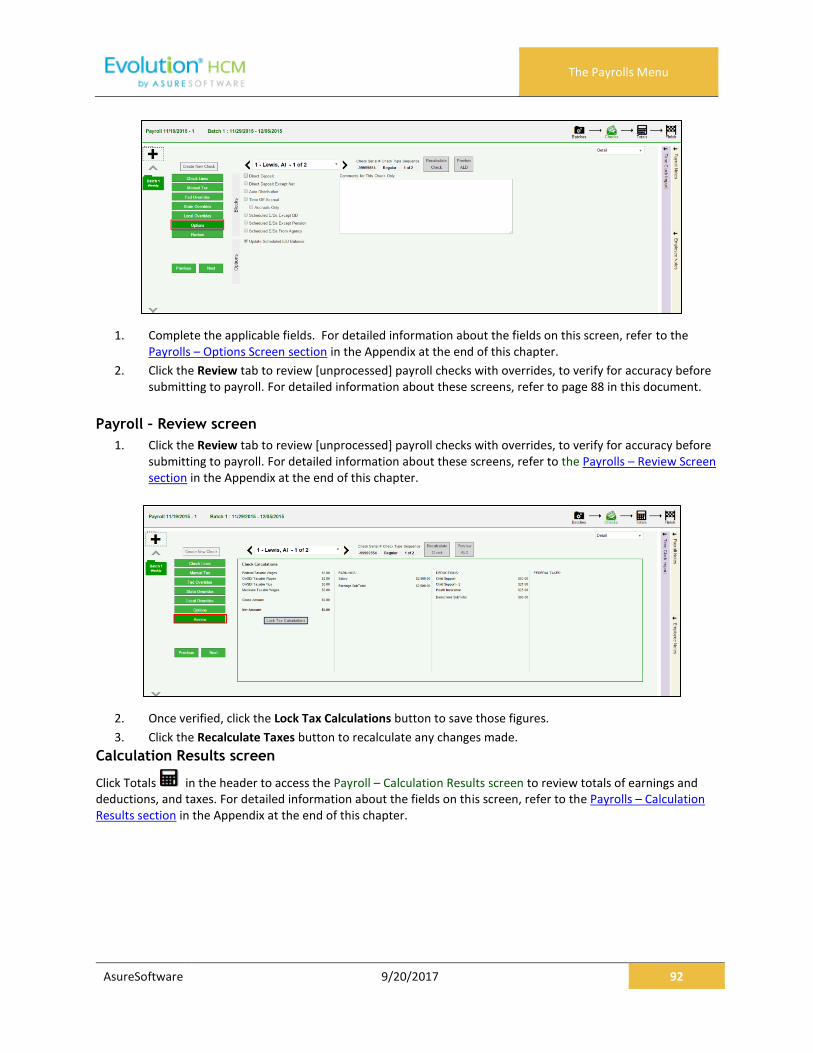
The Payrolls Menu
AsureSoftware 9/20/2017 92
1. Complete the applicable fields. For detailed information about the fields on this screen, refer to the Payrolls – Options Screen section in the Appendix at the end of this chapter.
2. Click the Review tab to review [unprocessed] payroll checks with overrides, to verify for accuracy before submitting to payroll. For detailed information about these screens, refer to page 88 in this document.
Payroll – Review screen
1. Click the Review tab to review [unprocessed] payroll checks with overrides, to verify for accuracy before submitting to payroll. For detailed information about these screens, refer to the Payrolls – Review Screen section in the Appendix at the end of this chapter.
2. Once verified, click the Lock Tax Calculations button to save those figures.
3. Click the Recalculate Taxes button to recalculate any changes made.
Calculation Results screen
Click Totals in the header to access the Payroll – Calculation Results screen to review totals of earnings and deductions, and taxes. For detailed information about the fields on this screen, refer to the Payrolls – Calculation Results section in the Appendix at the end of this chapter.

The Payrolls Menu
AsureSoftware 9/20/2017 93
Note: if something needs to be edited, click the symbol in the header which brings you back to the Batch screen.
Creating an Unscheduled Payroll To create a payroll that is not scheduled based on the calendar settings,
1. Click the Payrolls menu, which brings you to the Payroll Timeline screen.

The Payrolls Menu
AsureSoftware 9/20/2017 94
2. Click the large plus sign in the heading.
Result: The Payroll Settings screen opens.
3. Complete the required and applicable fields. For detailed information about the fields on this screen, refer to the Payrolls – Payroll Settings screen section in the Appendix at the end of this chapter.
4. Click Save in the header on the left.
Result: A status of is displayed in the header on the left.
5. Click in the upper right-hand corner of the Payroll Settings screen.
6. Click the large plus sign behind where the Payroll Settings screen was, to continue.
Result: The Check Batch Settings screen opens.
Check Batch Settings screen
1. Complete the required and applicable fields. For detailed information about the fields on this screen, refer to the Payrolls – Check Batch Settings screen section in the Appendix at the end of this chapter.
2. Select the items to include in the payroll in the Include section.
3. Complete required and applicable fields in the Time Clock Import Options section.

The Payrolls Menu
AsureSoftware 9/20/2017 95
4. Click the Create Checks button.
5. Click OK in the window that confirms the checks have been created.
Result: The Batch Checks Screen opens.
Payrolls - Batch Checks Screen
This screen offers three different viewing options, based upon the level of detail required by the user. The view is selected from the dropdown list in the far right of the Navigation Bar. For detailed information about the fields on this screen, refer to the Payrolls – Batch Checks screen section in the Appendix at the end of this chapter.
Summary View
Default view, this is the check entry screen, on which the user can add checks and edit information for employee checks. The first five columns are read only. The columns that follow can be edited, as well as having columns added and subtracted.
• To add or edit a column
1. Click within the column to edit of the check being modified.
2. Once finished click Save in the Header.
• To add a check for employees
1. Click the Add Check button in the Navigation bar.
Result: The Add Checks screen opens.
2. Select the Check Type being created.

The Payrolls Menu
AsureSoftware 9/20/2017 96
3. Select the employee(s) for whom to create a check.
4. Click the Create Check(s) for Selected EEs button.
Result: The Batch Checks screen reopens with the new check(s) listed.
• To add additional E/D Codes to the grid as columns, click in the bottom right-hand corner of the Batch Checks Screen.
Result: The following screen opens listing Available Columns - E/Ds available to add to the grid, and a list of the Current Columns - the E/Ds currently listed as column headings in the grid.
• To add E/Ds to the grid, select it/them in the Available Columns list on the left-hand side of the screen, and drag to the Current Columns list on the right.
• To remove columns from the grid, click the E/Ds in the Current Columns list and drag them to the Available Columns list on the left.
• Click Apply.
Summary Detail View
The Summary Detail View provides a more detailed view of the Summary screen, listing each check and its details.

The Payrolls Menu
AsureSoftware 9/20/2017 97
• To add a check for employees
1. Click the Add Check button in the Navigation bar.
Result: The Add Checks screen opens.
2. Select the Check Type being created.
3. Select the employee(s) for whom to create a check.
4. Click the Create Check(s) for Selected EEs button.
• To add a Check Line click the Add Check Line button.
5. Select an E/D Code from the dropdown list.
6. Click Save in the Header.
• To add additional E/D Codes to the grid as columns, click in the bottom right-hand corner of the Batch Checks Screen.
Result: The following screen opens listing Available Columns - E/Ds available to add to the grid, and a list of the Current Columns - the E/Ds currently listed as column headings in the grid.

The Payrolls Menu
AsureSoftware 9/20/2017 98
• To add E/Ds to the grid, select it/them in the Available Columns list on the left-hand side of the screen, and drag to the Current Columns list on the right.
• To remove columns from the grid, click the E/Ds in the Current Columns list and drag them to the Available Columns list on the left.
• Click Apply.
Detail View
The Detail view provides the most detailed view of each check, and offers editing capabilities, as well as the ability to add (or delete) additional E/D Codes to the checks.
1. Complete the required and applicable fields on this screen as well as on the Labor Defaults and Local Tax Overrides tabs. For detailed information about the fields on this screen, refer to the pages beginning at the Payrolls – Batch Checks screen section in the Appendix at the end of this chapter.
2. Click the Payroll – Manual Tax menu item.
3. Press the TAB key or click the Next button when you complete entering information on this screen.

The Payrolls Menu
AsureSoftware 9/20/2017 99
Manual Tax screen
Click the Manual Tax tab to override a tax for the check if applicable. The information on this screen is the same as is on the Payrolls > Check > Manual Tax tab in Evolution. For detailed information about this screen, refer the Payrolls – Manual Tax screen section in the Appendix at the end of this chapter.
1. Complete the applicable fields
2. Click the Payroll – Fed Overrides tab.
Fed Overrides screen
Click the Fed Overrides tab to block or override Federal taxes. Information on this screen is the same information as is found on the Payrolls – Check – Tax Overrides tab in Evolution. The State and Local tabs require the same information, regarding the state or local taxes for the employee. For detailed information about this screen, refer the Payrolls – Fed Overrides screen section in the Appendix at the end of this chapter.
1. Complete the applicable fields. For detailed information about the fields on this screen, refer to page 89 in this document.
2. Click the Payroll – State Overrides tab.
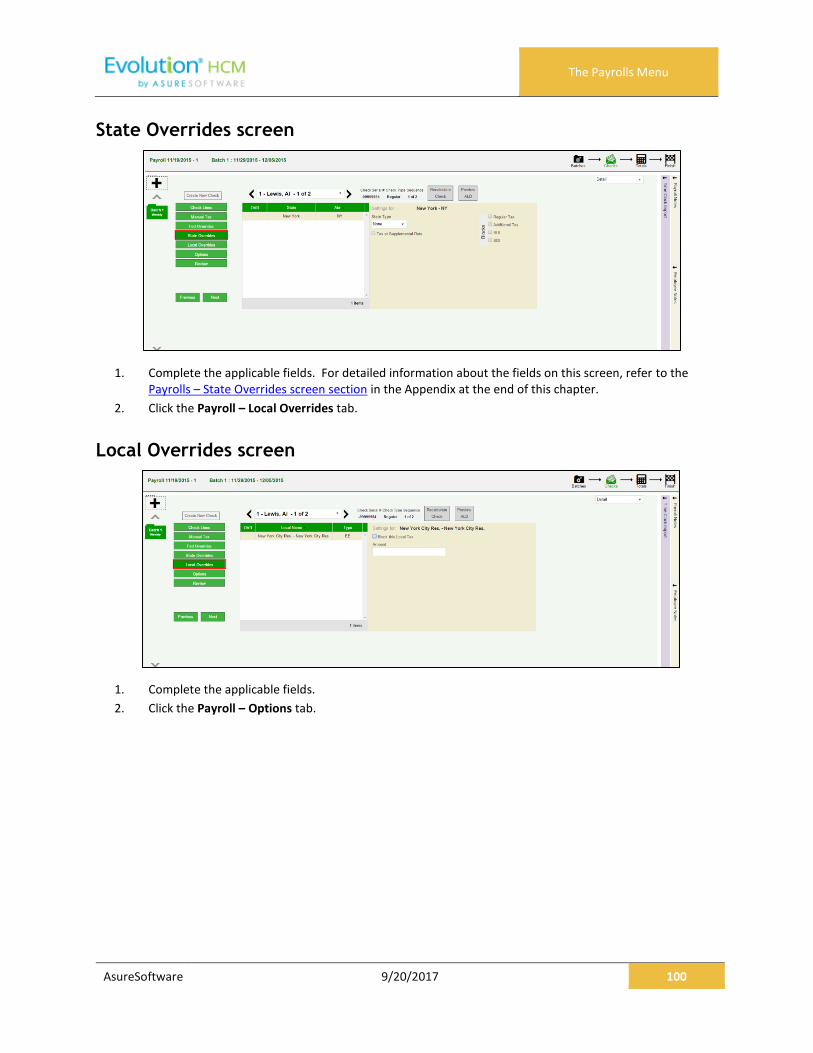
The Payrolls Menu
AsureSoftware 9/20/2017 100
State Overrides screen
1. Complete the applicable fields. For detailed information about the fields on this screen, refer to the Payrolls – State Overrides screen section in the Appendix at the end of this chapter.
2. Click the Payroll – Local Overrides tab.
Local Overrides screen
1. Complete the applicable fields.
2. Click the Payroll – Options tab.

The Payrolls Menu
AsureSoftware 9/20/2017 101
Payroll – Options screen
Click the Payrolls –Options tab to block scheduled earnings and deductions on employee checks. The information on this screen can be found mostly on the Payroll – Check – General tab.
1. Complete the applicable fields. For detailed information about the fields on this screen, refer to the Payrolls – Options screen section in the Appendix at the end of this chapter.
2. Click the Review tab to review [unprocessed] payroll checks with overrides, to verify for accuracy before submitting to payroll.
Payroll – Review screen
1. Click the Review tab to review [unprocessed] payroll checks with overrides, to verify for accuracy before submitting to payroll. For detailed information about these screens, refer to the Payrolls – Review screen section in the Appendix at the end of this chapter.
2. Once verified, click the Lock Tax Calculations button to save those figures.
3. Click the Recalculate Taxes button to recalculate any changes made.

The Payrolls Menu
AsureSoftware 9/20/2017 102
Calculation Results screen
Click Totals in the header to access the Payroll – Calculation Results screen to review totals of earnings and deductions, and taxes. For detailed information about the fields on this screen, refer to the Payrolls – Calculation Results screen in the Appendix at the end of this chapter.
Note: if something needs to be edited, click the symbol in the header which brings you back to the Batch screen.
Pre-Processing and Submitting the Payroll Prior to submitting the payroll, we recommend pre-processing the payroll as we do in Evolution.
When you click Calculate to the left of the screen name the Status changes from Pending to Pre-Processing, and a message is created in the upper right corner of the screen advising that the task was added to the queue (lower left-hand corner as is in Evolution).
Result: The Status changes back to Pending once the Pre-Processing is complete.

The Payrolls Menu
AsureSoftware 9/20/2017 103
4. Finally, click Finish in the header.
Result: The Submittal Options screen opens.
Important! The blocking of ACH, Billing, Deposits are controlled by the Security function “Payroll Wizard Including Deposit/Liability, Billing, and ACH Block Options”. To keep users from the ability to block those items, be certain this function is DISABLED in the Security Settings!
5. Add final Submittal Options.
6. Click Submit Payroll or Process Payroll, depending on the arrangement with the client.
Submit Payroll – The Status of the payroll is changed to Submitted until the payroll is processed by the service bureau; at which time the Status will change to Processed.
Process Payroll – The payroll is processed directly, and the Status will change to Processed, rather than being submitted for processing at the service bureau. (Additional security rights are required, and are described at the beginning of this section.)
Note: The Manager Approval requirements established in Evolution Classic apply in Evolution Payroll. If a payroll requires manager approval, the payroll goes into the Approve Payroll queue in the Evolution Classic Operations tab. If a payroll does not require manager approval, the payroll goes into the Process Payroll queue in the Evolution Classic Operations tab.

The Payrolls Menu
AsureSoftware 9/20/2017 104
Editing / Completing a Payroll
Payrolls with a status of Past Due or Pending are the only payrolls that can be edited, and have an Edit symbol in the lower right-hand corner of the coupon. To edit a payroll,
1. Go to the Payroll – Payroll Timeline screen.
2. Click the Edit symbol on the payroll to be edited.
Result: The Batch Checks screen opens.
3. Make all necessary edits and process the payroll.
Viewing the Results Screen
Security Settings
The following security settings must be enabled in Evolution Classic for a user to have access to the full features on the Results screen.
1. Go to the Admin – Security – Users screen.
2. Select the user from the list.
3. Click the Details tab.
4. Click the Functions button.
5. Enable the following functions:
a. Ability to reprint payroll reports.
b. Ability to reprint processed payroll checks
c. Ability to reprint processed misc checks.
Note: If a specific item is disabled for a user (Payroll Checks, Misc Checks, Reports (including invoice) – the corresponding checkbox on the Results screen will be disabled and the text “(No Access)” below it.
Users can view payroll results if a payroll has a Processed (P) or Void (V) status. To view,
1. Click the Results symbol in the lower right corner of a payroll card in the Card View of the Payroll Timeline screen OR
2. Select a payroll from the Grid View, and click the Results symbol in the header.
Result: The Results screen opens.

The Payrolls Menu
AsureSoftware 9/20/2017 105
The Results screen includes the following
• Date and time the payroll was processed
• Any blocks applied to the payroll while setting it up
• Comments entered for the payroll processors
• On Premise Printing - users can reprint reports, invoices, payroll checks, or miscellaneous checks from the Results screen. Users can select one or more individual payroll and/or miscellaneous checks to reprint.
• Send to – reprinted reports, invoices and/or checks can be sent through the Task Queue or via VMR if applicable. Select the location from the dropdown list.
Reprinting Reports and Invoices
1. In the Items section of the Results screen, select the checkbox(es) next to the items to be reprinted.
2. Select the applicable options for the reports and/or invoices being reprinted.
a. Don’t print banking info
b. Don’t print background
c. Don’t use VMR settings (this option displays only when the user selects Send to: Task Queue; it does not appear when the user selects Send to: Virtual Mailroom.)
3. Time-off balances can be shown as of the Current Day or as of a Historical Date, using the dropdown field.
4. Click the Send button to send to the location specified in the Send to field. Note that the user is not printing directly to a printer.

The Payrolls Menu
AsureSoftware 9/20/2017 106
Reprinting Payroll Checks
Users can select one or more individual payroll checks to reprint. To do this,
1. Select Payroll Checks in the Items section of the Results screen.
2. When the user selects Payroll Checks, the Selected: All link is displayed, signifying that the system is applying the default, which is to select all Payroll Checks.
3. Select the payroll check stock for printing the checks from the Payroll Check Stock dropdown on the right side of the screen.
4. To select a specific payroll check(s) to reprint, rather than all checks, click the Selected: All link.
Result: The Payroll Checks screen opens, where specific checks are selected for reprinting.
5. Select the checkboxes for the checks to be reprinted.
6. Click the Select button.
7. Select the applicable options for the reports and/or invoices being reprinted.
a. Don’t print banking info
b. Don’t print background
c. Don’t use VMR settings
8. Time-off balances can be shown as of the Current Day or as of a Historical Date, using the dropdown field.
9. Click the Send button to send to the location specified in the Send to field. Note that the user is not printing directly to a printer.
Reprinting Misc Checks
Users can select one or more individual miscellaneous checks to reprint. To do this,
1. Select the Misc Checks option in the Items section of the Results screen.
2. Result: The Selected: None link appears below signifying that the system is applying the default: no Misc checks are selected – Note that this is the opposite of the behavior with the Payroll Checks option.
3. Select the payroll check stock for printing the checks from the Payroll Check Stock dropdown on the right side of the screen.

The Payrolls Menu
AsureSoftware 9/20/2017 107
4. To select a specific miscellaneous check(s) to reprint, rather than all checks, click the Selected: All link.
5. Select the checkboxes for the checks to be reprinted.
6. Click the Select button.
7. Select the applicable options for the checks being reprinted.
a. Do not print banking info
b. Do not print background
c. Do not use VMR settings
8. Time-off balances can be shown as of the Current Day or as of a Historical Date, using the dropdown field.
9. Click the Send button to send to the location specified in the Send to field. Note that the user is not printing directly to a printer.
Copying a Payroll Payrolls can be copied directly from the Payroll Timeline screen (in either the Payroll Table view or the Payroll Card view) in Evolution Payroll. Note that void checks, or a voided check, will not be copied by the system.
Copying a payroll in Card view
1. Click the Payrolls menu on the left-hand side of the screen.
Result: The Payroll Timeline screen is displayed in Card view.
2. Click the Copy Payroll symbol in the bottom right corner of the Payroll Card to be copied
3. A confirmation message is displayed: “Any voids or manual checks in the original payroll will be ignored. Are you sure you want to copy this payroll.”
4. Click Yes.
Result: The selected payroll is copied. The run number for the new copied payroll is automatically incremented by 1 from the highest current payroll run number.
Copying a Payroll in Table view
1. Go to the Payroll Timeline screen

The Payrolls Menu
AsureSoftware 9/20/2017 108
2. Click the Table view symbol in the header.
3. Select a payroll (row) on the screen that you want to copy.
• The Copy Payroll symbol is not displayed if a payroll with a status of Void or Not Started is selected.
• You cannot copy a processed setup-run.
• Payrolls with a status of Submitted or On Hold can be copied.
4. Click the Copy Payroll symbol in the top left of the header
Adding Additional Checks
To add additional checks to a payroll,
1. Go to the Payroll – Payroll Timeline screen.
2. Click the Edit symbol on the payroll to be edited.
Result: The Batch Checks screen opens.
3. Click the Add Check button in the Navigation bar.
Result: The Add Checks screen opens.

The Payrolls Menu
AsureSoftware 9/20/2017 109
4. Select the Check Type being created.
5. Select the employee(s) for whom to create a check.
6. Click the Create Check(s) for Selected EEs button.
Result: The Batch Checks screen reopens with the new check(s) listed.
Adding Check Lines 1. Go to the Payroll – Payroll Timeline screen.
2. Click the Edit symbol on the payroll to be edited.
Result: The Batch Checks screen opens.
3. Change the view from Summary to Summary Detail.
4. Click the Add Check Line button.
5. Select an E/D Code from the dropdown list.
6. Click Save in the Header.
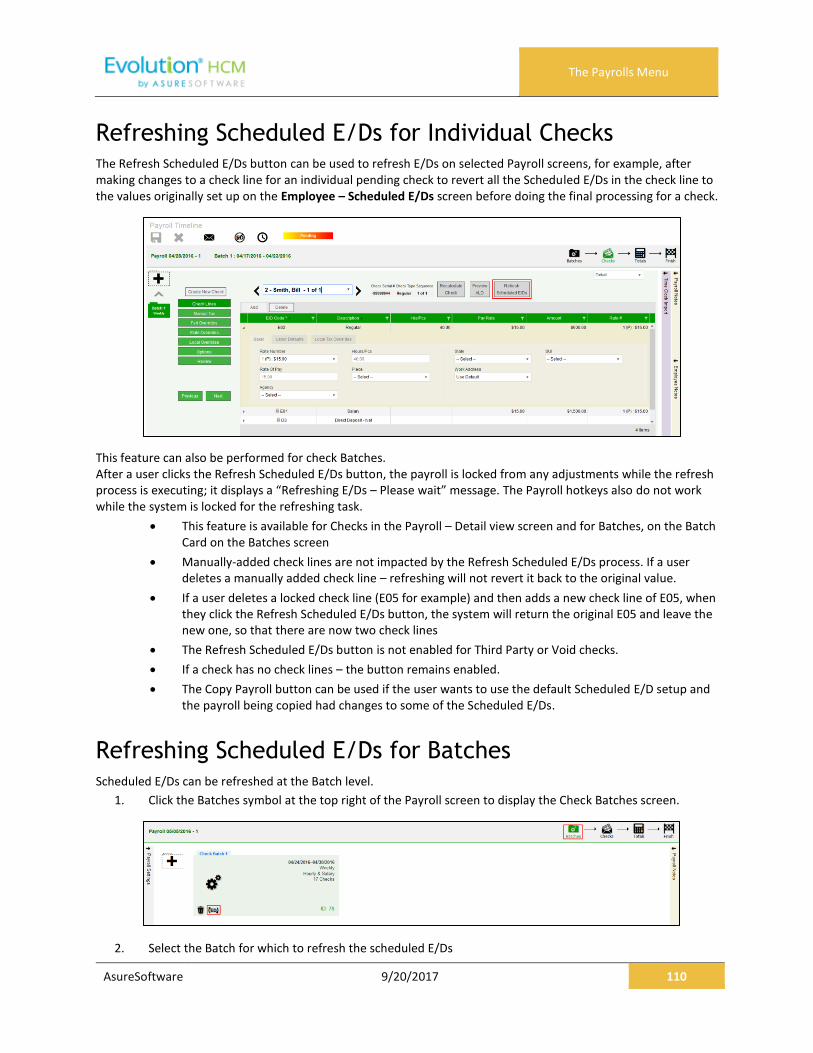
The Payrolls Menu
AsureSoftware 9/20/2017 110
Refreshing Scheduled E/Ds for Individual Checks The Refresh Scheduled E/Ds button can be used to refresh E/Ds on selected Payroll screens, for example, after making changes to a check line for an individual pending check to revert all the Scheduled E/Ds in the check line to the values originally set up on the Employee – Scheduled E/Ds screen before doing the final processing for a check.
This feature can also be performed for check Batches. After a user clicks the Refresh Scheduled E/Ds button, the payroll is locked from any adjustments while the refresh process is executing; it displays a “Refreshing E/Ds – Please wait” message. The Payroll hotkeys also do not work while the system is locked for the refreshing task.
• This feature is available for Checks in the Payroll – Detail view screen and for Batches, on the Batch Card on the Batches screen
• Manually-added check lines are not impacted by the Refresh Scheduled E/Ds process. If a user deletes a manually added check line – refreshing will not revert it back to the original value.
• If a user deletes a locked check line (E05 for example) and then adds a new check line of E05, when they click the Refresh Scheduled E/Ds button, the system will return the original E05 and leave the new one, so that there are now two check lines
• The Refresh Scheduled E/Ds button is not enabled for Third Party or Void checks.
• If a check has no check lines – the button remains enabled.
• The Copy Payroll button can be used if the user wants to use the default Scheduled E/D setup and the payroll being copied had changes to some of the Scheduled E/Ds.
Refreshing Scheduled E/Ds for Batches Scheduled E/Ds can be refreshed at the Batch level.
1. Click the Batches symbol at the top right of the Payroll screen to display the Check Batches screen.
2. Select the Batch for which to refresh the scheduled E/Ds

The Payrolls Menu
AsureSoftware 9/20/2017 111
3. Click Refresh the E/Ds symbol for this Batch
Blocking Scheduled E/Ds from a Payroll One or more Scheduled E/Ds can be blocked from a specific payroll.
1. Go to the Payroll – Payroll Timeline screen.
2. Click the Table view symbol in the header.
3. Select a payroll and click the Block Scheduled E/Ds symbol in the top left of the header
Result: The Block Scheduled E/Ds screen is displayed.
4. Select all the Scheduled E/Ds to block from the payroll.
5. Select which batches from which the Scheduled E/Ds should be blocked.
6. Click Apply
Result: The system displays a confirmation message “Are you sure you want to block the Scheduled E/Ds from the selected Batches? The selected batches will be refreshed and any previously applied blocks will be overwritten.
7. Click Yes.
Result: The system displays a screen asking if you want to include Manual Checks.
8. Click Yes to include manual checks or No.
• If Yes, the system performs the Block Scheduled E/Ds function including refreshing the Scheduled E/Ds for all (regular and manual) checks.
• If No, the system performs the Block Scheduled E/Ds function for regular checks only and excludes manual checks.
Note that this is a difference/improvement over Evolution Classic where if there were manual checks there were two Block Scheduled E/D buttons – Block Scheduled E/Ds & Block Scheduled E/Ds with manual.
Manual Checks Users can create manual checks to be added to a payroll when creating a batch, or to an existing batch.
Creating a new batch
1. On the Payroll Timeline screen select a payroll with a status of Pending by clicking the Edit symbol.
2. Click the Plus sign on the Batch Checks screen to create a new batch.
Result: the Check Batch Settings screen opens.

The Payrolls Menu
AsureSoftware 9/20/2017 112
3. Complete the required and applicable fields, making sure to select Manual from the Check Types dropdown list.
4. A new field Update Scheduled E/Ds Balance, is displayed with a default value of Yes. Leave it as is, or change to No if applicable.
5. Click the Create Checks button and proceed as normal when running a payroll.
Adding to an existing batch
1. On the Payroll Timeline screen select a payroll with a status of Pending by clicking the Edit symbol.
2. Click on a batch that has already been created.
3. Click the Add Check button in the Navigation bar.
Result: The Add Checks screen opens.
4. Select Manual from the Check Types dropdown list.
5. Select the employees in the checkboxes who are to receive a manual check.
6. Click Select EEs
Result: A Confirmation screen opens listing the check(s) to be created.
7. Click in the Check# column and give the check(s) a number.
8. Click the Create Check(s) for Selected EEs button.

The Payrolls Menu
AsureSoftware 9/20/2017 113
Result: The Batch Checks screen opens listing all checks in the batch. In the Type column, the Manual check is listed with an “M”.
9. Click the Create Checks button
10. Continue the payroll process as usual.
Notes
• Manual checks do not inherit salary/standard hours but do inherit payroll defaults
• Rate of pay/rate number is not applied automatically.
• Users must enter hours/rate and perform calculation to populate amount (does not calculate automatically).
• Scheduled E/D amounts like Child Support should accept entered amounts.
• No EP, EO or EQ hours or amounts in manual checks.
Creating Third Party Checks Users can create third party checks to be added to a payroll when creating a batch, or added to an existing batch. The difference in process is basically the same as creating a Manual check.
Creating Third Party Checks in a new batch
1. On the Payroll Timeline screen select a payroll with a status of Pending by clicking the Edit symbol.
2. Click the Plus sign on the Batch Checks screen to create a new batch.
Result: the Payroll Settings screen opens.

The Payrolls Menu
AsureSoftware 9/20/2017 114
3. Select the Employee(s) to receive 3rd Party Checks
Result: A Check Batch Settings screen opens, showing the employee selected to receive the check.
4. Select any additional employees if applicable and click the Done button.
5. Select the Check Type 3rd Party from the dropdown list on the Payroll Settings screen.
6. Complete the additional applicable fields.
7. Click the Create Checks button.
Result: the Batch Checks screen opens.
8. Select the batch just created to view the employee(s) selected
9. Click the Add Check button in the Navigation bar.
Result: The Add Checks screen opens.
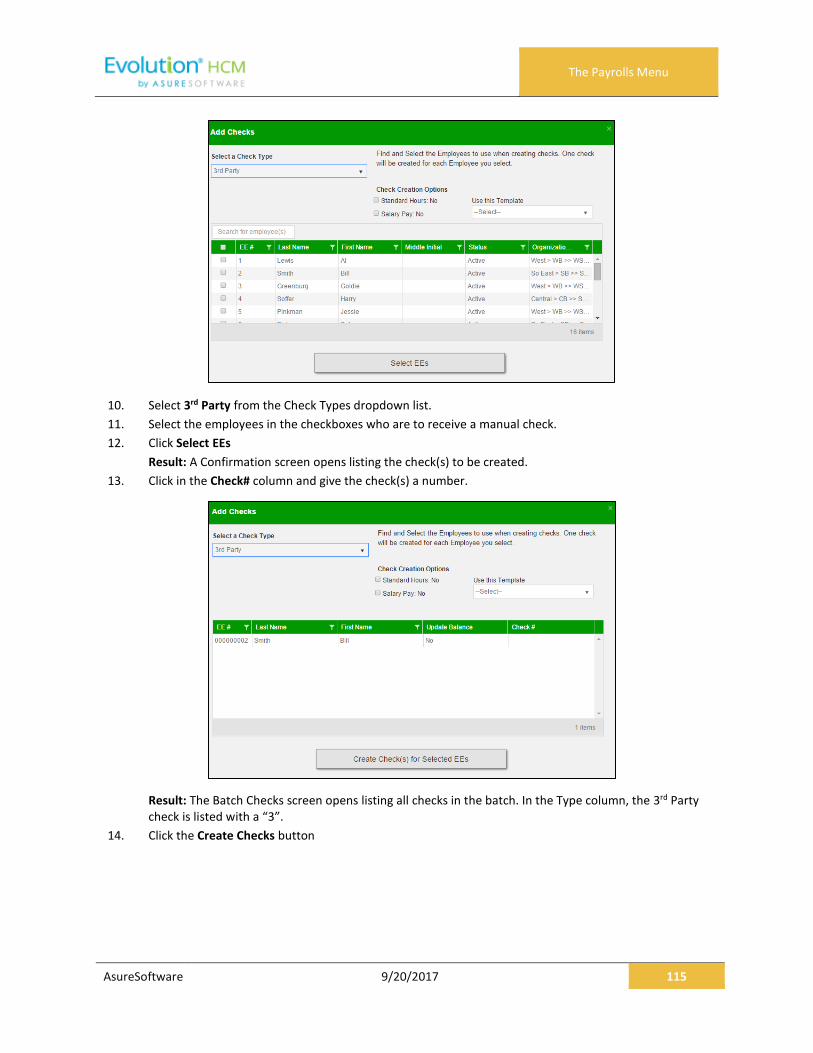
The Payrolls Menu
AsureSoftware 9/20/2017 115
10. Select 3rd Party from the Check Types dropdown list.
11. Select the employees in the checkboxes who are to receive a manual check.
12. Click Select EEs
Result: A Confirmation screen opens listing the check(s) to be created.
13. Click in the Check# column and give the check(s) a number.
Result: The Batch Checks screen opens listing all checks in the batch. In the Type column, the 3rd Party check is listed with a “3”.
14. Click the Create Checks button

The Payrolls Menu
AsureSoftware 9/20/2017 116
15. Click the Check Calculation button if desired, or process the payroll as usual.
Adding Third Party Checks to an existing batch
1. On the Payroll Timeline screen select a payroll with a status of Pending by clicking the Edit symbol.
2. Click on a batch that has already been created.
3. Click the Add Check button in the Navigation bar.
Result: The Add Checks screen opens.
4. Select 3rd Party from the Check Types dropdown list.
5. Select the employees in the checkboxes who are to receive a manual check.
6. Click Select EEs
Result: A Confirmation screen opens listing the check(s) to be created.
7. Click in the Check# column and give the check(s) a number.

The Payrolls Menu
AsureSoftware 9/20/2017 117
Result: The Batch Checks screen opens listing all checks in the batch. In the Type column, the Manual check is listed with a “3”.
8. Click the Create Checks button
9. Continue the payroll process as usual.
Notes
• Only E/D Code types associated with 3rd Party Sick Pay are available for selection
EP - Short term 3rd Party Sick
EO - Long term 3rd Party Sick
EQ - Non-taxable 3rd Party Sick
• Third Party checks do not inherit salary/standard hours
• Rate of pay/rate number is not applied automatically.
• Users must enter hours/rate and perform calculation to populate amount (does not calculate automatically).
Voiding Checks In addition to the security rights required to work on payrolls, the following must also be enabled for the user to be able to void checks:
• Ability to Void Checks
• Ability to Void Checks from Previous Quarter (not recommended!)
Users can void individual checks via the Payroll menu, either by creating a new payroll, or by editing a waiting payroll. The first step in voiding a check is finding the check to void.

The Payrolls Menu
AsureSoftware 9/20/2017 118
Voiding a check by creating a new payroll
1. Click the Payrolls menu, bringing you to the Payroll Timeline screen.
2. Click the large plus sign in the heading to create a new (unscheduled) payroll.
Result: The Payroll Settings screen opens.
3. Complete the required and applicable fields.
4. Click Save in the header on the left.
5. Click in the upper right-hand corner of the Payroll Settings screen.
6. Click the large plus sign behind where the Payroll Settings screen was, to continue.
Result: The Check Batch Settings screen opens.
7. Complete the required fields and click Create Checks.

The Payrolls Menu
AsureSoftware 9/20/2017 119
8. Click the Add Check button in the Navigation bar.
Result: The Add Checks screen opens.
9. Select Void for the Check Type.
10. Enter search criteria to find the check to void
11. Click the Find button.
Result: The system searches company payrolls for the current year, displaying a list of checks that fit the criteria selected.
Warning: it is not recommended that checks from previous quarters be voided.
12. Highlight the check line to be voided.
13. Click Create Void Check for Selected Check.
Result: user is brought back to the Batch Checks Screen. The Check Type for the voided check is now V and the selected check is highlighted.

The Payrolls Menu
AsureSoftware 9/20/2017 120
Note: Voided checks are read only and cannot be adjusted.
14. Process the payroll as if it were any other payroll.
Voiding a check by editing a waiting payroll
1. On the Payroll Timeline screen select a payroll with a status of Pending by clicking the Edit button.
2. Click on a batch that has already been created.
3. Click Batches in the upper right-hand corner of the header, opening the Check Batch Settings screen.
4. Click the Add Check button in the Navigation bar.
Result: The Add Checks screen opens.
5. Select Void for the Check Type.
6. Enter search criteria to find the check to void
7. Click the Find button to display a list of checks that fit the criteria selected.
8. Highlight the check line to be voided.
9. Click Create Void Check for Selected Check.
10. Result: user is brought back to the Batch Checks Screen. The Check Type for the voided check is now V and the selected check is highlighted.

The Payrolls Menu
AsureSoftware 9/20/2017 121
Note: Voided checks are read only and cannot be adjusted.
11. Process the payroll as usual.
Deleting Batches 1. From the Payroll Timeline screen, select a Pending payroll in which at least one batch was created and click
the Edit symbol.
Result: the Batch Checks Screen opens.
2. Click in the upper right corner.
3. If there is more than one batch created, select the batch to be deleted.
4. Click Delete in the left-hand corner of the Check Batch.
Result: a message will open asking if you are sure you want to delete this batch > click Yes.
The batch is deleted, and the batch sequence number is updated accordingly.
Redistributing Labor Allocation After a payroll has been processed the labor allocation sometimes needs adjustment for reporting purposes. Evolution Payroll supports the redistribute labor allocation process similarly to the Redistribute D/B/D/T process in Evolution Classic. To redistribute labor allocation in Evolution Payroll,
1. Go to the Payrolls – Payroll Timeline screen.
2. Click the Table View button on the far right-hand side of the header.
3. Highlight the processed payroll that requires adjustment from the grid and click the View symbol on the far left-hand side of the header.
4. Select the Detail view from the dropdown list.

The Payrolls Menu
AsureSoftware 9/20/2017 122
5. Click the Redistribute Allocation button.
Note: To have access to the Redistribute Allocation button and its functionality, you must be running Evolution Classic version 16.36 or higher.
Result: The Redistribute Allocations screen is displayed for the selected E/D Code. Users can modify the existing labor allocations or add a new allocation.
6. Click the Add button to change the allocation by selecting from the dropdown field that opens. Original allocations can be modified but not removed.
7. Click Apply to save changes.

The Payrolls Menu
AsureSoftware 9/20/2017 123
Time Clock Imports The functionality of time clock imports in Evolution Payroll is the same as the time clock import functionality in Evolution Classic.
1. Begin by following the initial steps to create either a scheduled or unscheduled payroll.
2. Time clock import parameters are on the Check Batch Settings screen.
3. Once the required and applicable fields are completed on the left-hand side of the screen, complete the fields on the right regarding the time clock import file.
Field / Button Description
Time Clock Source File Select the file from which the data is being imported
File Format Select the format of the import file
Date Field Format Select the format of the date fields in the import file…mm/dd/yyyy, etc.
Employee Synchronization Select how the employees are grouped in the import file – by name, employee number, etc.…
Organizational Synchronization Select the organizational level if using D/B/D/Ts
Job Codes Select whether job codes will be imported with the data
Apply Org Level Select if keeping the organization level used in the import file
4. Click the Create Checks button.
Result: A log file is created displaying successful and/or unsuccessful

The Payrolls Menu - Appendix
AsureSoftware 9/20/2017 124
The Payrolls Menu - Appendix
Payrolls - Check Batch Settings screen
Field / Button Description
Creation Options section
Start Date The beginning of the Payroll Batch period
End Date The end of the Payroll Batch period
Frequency The Payroll frequency
Employee Types The employee types to include in the payroll
Employee Filter – Select EEs Click to select specific employees to include in the payroll
Template The Payroll Template to use for this payroll, if any.
Checks per EE The number of checks per employee
Check Types The type of checks for this payroll
Include section
Standard hours Select to use Standard Hours in the payroll
Salary Pay Select to use Salary Pay in the payroll
Payroll Defaults Select to use Payroll Defaults in the payroll
Time Off Requests Select to use Time Off Requests in the payroll
Time Clock Import Options section
Time Clock Source File The source file of time clock data being used for the payroll.
File Format The format of the source file
Date Field Format The format of the date in the source file.
Employee Synchronization Method by which employees are synced (EE Number, Last Name, and First Name).
Organizational Synchronization Level of D/B/D/Ts used for the company.
Job Codes Whether or not Job Codes are used in the imported file.
Employee Pay rates Whether or not Employee Pay Rates are used in the imported file.
Scheduled E/Ds Whether or not Scheduled E/Ds are refreshed in the imported data.
Scheduled E/Ds on Additional Checks
Rule on allowing Scheduled E/Ds on Additional Check.
Create Check button Begins the process of creating payroll checks.

The Payrolls Menu - Appendix
AsureSoftware 9/20/2017 125
Payrolls - Payroll Settings screen
Field / Button Description
Check Date The check date of the payroll
Run Number Defaults to the next available number for payrolls processed on the date. If no payrolls processed or created for this date, the Run defaults to “1”
Calendar options Choose whether to add a new payroll date, change a payroll date, or ignore the payroll calendar. Defaults to Ignore when selected.
Payroll Type The type of payroll to be processed
Blocks Select each item to be blocked on this payroll
Actual Call In Date The date the payroll was called in
Time Off Accrual Select to allow Time Off Accrual to show in the payroll
Accruals Only Select to allow the payroll to Accrue time off, but not use show in the payroll.
Payroll Check Comment The text to be displayed on checks.
Payrolls - Batch Checks Screen
Field / Button Description
Create New Check Click to create a new check for the employee
Add button Click to add a new check line to the employee’s check
Delete button Click to delete a check line from the employee’s check
Payrolls - Add Checks screen
Field / Button Description
Check Types Type of check being added to the payroll
Use this Template Select a template to use if applicable
Standard Hours: Yes checkbox Select if checks for regular hours are being added
Salary Pay: Yes checkbox Select if checks for salaried hours are being added
Create Check(s) for Selected EEs button
Click to create check(s) for the selected employees

The Payrolls Menu - Appendix
AsureSoftware 9/20/2017 126
Payrolls - Check Lines – Basics tab
Field / Button Description
E/D Code column heading Earning or deduction for which an addition or subtraction is made
Description column heading Description of the E/D Code added
Hrs/pcs column heading Number of hours or pieces for which the earning or deduction represents
Rate of Pay column heading Pay rate (if applicable) for hours added
Amount column heading Dollar amount of the earning or deduction being added
Rate # column heading Pay rate number if the employee has more than one job/pay rate at the company
Basic tab
Rate Number The primary rate number is #1. Others are subsequent numbers if the employee has two or three different positions with the company
Rate of Pay Hourly pay rate for the rate number entered
Agency Agency name if this is an agency check
Hours/Pieces Number of hours or pieces the employee is expected to work/produce per pay period
Piece Identify the piece if the employee is doing piecework
State State in which the employee is employed
Work Address Work address of the company
SUI SUI amount the company pays per employee

The Payrolls Menu - Appendix
AsureSoftware 9/20/2017 127
Payrolls - Check Lines – Labor Defaults tab
Field / Button Description
Labor Defaults tab
Division Enter the Organization Level(s) with which the employee is associated
Branch Enter the Organization Level(s) with which the employee is associated
Department Enter the Organization Level(s) with which the employee is associated
Team Enter the Organization Level(s) with which the employee is associated
Job Code Job associated with the Workers’ Comp Code selected. Click the plus sign to add a new Job Code, as long as the user’s security is set up.
Shift Shift the employee works
Line Item Begin Date Beginning date of the override
Workers’ Compensation Workers’ Comp Code assigned to the Job associated with the claim.
Line Item End Date End date for including the override
Payrolls - Check Lines – Local Tax Overrides tab
Field / Button Description
Local Tax Overrides tab
Local Name Name of the local tax
Exclude Whether or not to exclude local tax from the check

The Payrolls Menu - Appendix
AsureSoftware 9/20/2017 128
Payrolls – Manual Tax screen
Field / Button Description
Add States button Click to add states to override that are not already displayed. States displayed are what was set up on the Employee – States – Employee screen.
Add Locals button Click to add locals to override that are not already displayed. Locals displayed are what was set up on the Employee – Locals – Employee screen in Evolution.
Description Name of the tax
Amount Dollar amount of the tax (only two decimal places allowed)
Options section
Calculate Override Taxes checkbox Default is selected
Reciprocate SUI checkbox Default is selected
Disable Shortfalls checkbox Default is unselected
Note: *If all of the state / local taxes are already listed in the table, these buttons are disabled.
Payrolls – Fed Overrides screen
Field / Button Description
Federal Type Type of federal tax to override
Tax Frequency Frequency of tax payments
Tax at Supplemental Rate Supplemental rate, if applicable
Amount Dollar or percentage amount of the tax
Blocks
Additional tax Block the supplemental tax
EE OASDI Block the employee OASDI
EE Medicare Block the employee Medicare
EE EIC Block the employee Earned Income Credit
ER OASDI Block the employer OASDI
ER Medicare Block the employer Medicare

The Payrolls Menu - Appendix
AsureSoftware 9/20/2017 129
Payrolls – State Overrides screen
Field / Button Description
State State for which there is an override.
Abr State abbreviation
State Type Is the override for regular tax or additional
Amount Dollar or percentage amount of the tax override
Blocks
Regular Tax Is there a regular tax to block
Additional tax Is there an additional tax to block
SUI Is SUI being blocked
SDI Is SDI being blocked
Payrolls – Options screen
Field / Button Description
Blocks section
Direct Deposit Block all direct deposits
Direct Deposit Except Net Block direct deposits except net checks

The Payrolls Menu - Appendix
AsureSoftware 9/20/2017 130
Field / Button Description
Auto Distribution Block Auto Labor Distributions
Time off Accrual Block Time Off Accrual information from displaying on the check stubs
Accruals Only Block Time Off Accrual information, but just accruals

The Payrolls Menu - Appendix
AsureSoftware 9/20/2017 131
Field / Button Description
Scheduled E/Ds Except Direct Deposit Block all Scheduled E/Ds except direct deposit
Scheduled E/Ds Except Pension Block all Scheduled E/Ds except those for retirement plans
Scheduled E/Ds from Agency Block all Scheduled E/Ds from agency checks
Options section

The Payrolls Menu - Appendix
AsureSoftware 9/20/2017 132
Field / Button Description
Update Scheduled E/D Balance Select to update the Scheduled E/Ds balance after all blocks are added
Payrolls – Review screen
Field / Button Description
Lock Tax Calculations button Click to save any changes made to the information before the payroll processes.
Payrolls - Time Clock Import tab
Field / Button Description
Time Clock Source File Identifies the source file of time clock data being used for the payroll.
File Format Format of the source file
Date Field Format Format of the date in the source file
Employee Synchronization Method by which employees are synced (EE Number, Last Name, and First Name)
Organizational Synchronization Level of D/B/D/Ts used for the company
Job Codes Whether or not job codes are used in the imported file
Employee Pay Rates Whether or not employee pay rates are used in the imported file.
Scheduled E/Ds Whether or not Scheduled E/Ds are refreshed in the imported data.

The Payrolls Menu - Appendix
AsureSoftware 9/20/2017 133
Field / Button Description
Schedule E/Ds on Additional Checks
Rule on allowing Scheduled E/Ds on additional checks.
Import button Begins the process of importing the time clock data.
Payrolls – Calculation Results screen

The Payrolls Menu - Appendix
AsureSoftware 9/20/2017 134
Field / Button Description
E/D Code Scheduled earning or deduction code used in the payroll
Description Describes the E/D code
Hrs. /Pcs. Hours or Pieces if applicable
Pay Rate Rate amount for the E/D
Amount Total amount added or subtracted for the E/D

The Payrolls Menu - Appendix
AsureSoftware 9/20/2017 135
Taxes Section This section has information displayed only if the payroll status is Processed. If the status is Completed, the Taxes section will be blank.
Description Lists the taxable wages and taxes totals

The Payrolls Menu - Appendix
AsureSoftware 9/20/2017 136
Amount Lists the total amounts of taxable wages and taxes
Count The number of checks included in the total amounts of taxable wages and taxes

The Reports Menu
AsureSoftware 9/20/2017 137
The Reports Menu The Reports menu lets the user see reports that have been published to Evolution Payroll from VMR, as well as process additional reports as needed. There are two report types identified that we refer to:
• Defined Reports , and
• Published Reports.
Defined Reports are reports that can be generated from Evolution Payroll on demand. Published reports are reports that are generated in Evolution and sent to Evolution Payroll using VMR.
Defined Reports Defined reports are the Company level reports that can be generated by the user on demand in Evolution Payroll. These reports must be set up for the company in Evolution on the Reports – Setup Reports screen. Refer to the Appendix at the end of this chapter for a list of available reports that can be generated in Evolution Payroll.
1. Select the report from the table on the left-hand side of the screen.
2. Click the Configure Report button to establish or edit the parameters for the report selected.
Result: The Report Generation screen opens.

The Reports Menu
AsureSoftware 9/20/2017 138
3. Click the tabs above the grid to access the report parameters. Each report can be filtered by Payroll, Employee (EE), and Organization Level (Org). Parameters on each tab are specific to the report that is being generated.
4. Click the Reports List button to return to the previous page listing the Defined Reports.
Users can search for a specific report by using the Search for Report tool at the top of the table, or by using the filters as described in the Navigation section of this document.

The Reports Menu
AsureSoftware 9/20/2017 139
To generate a report from the Defined Reports screen:
1. Select the report from the list of the Reports.
2. Click the Configure Report button.
3. On the Payroll Filter tab select the Starting Date and Ending Date to filter the payrolls to a specific date range (optional), or use the Include dropdown list to select from displaying All Payrolls or Processed Payrolls only.
4. Click Apply to return a list of payrolls based on the filters selected.
5. Select the payroll(s) for which to run the report.
Note: Users must select at least one payroll to be able to select other filters and parameters or generate the report.
6. Click the EE Filter tab to select or deselect employees from the report.
7. Click the Org Filter tab to filter by organization (D/B/D/T) level
8. Click the Misc. Options tab to update parameters specific to this report.
This screen offers instructions for running the report, as well as grouping and sorting methods to choose from.
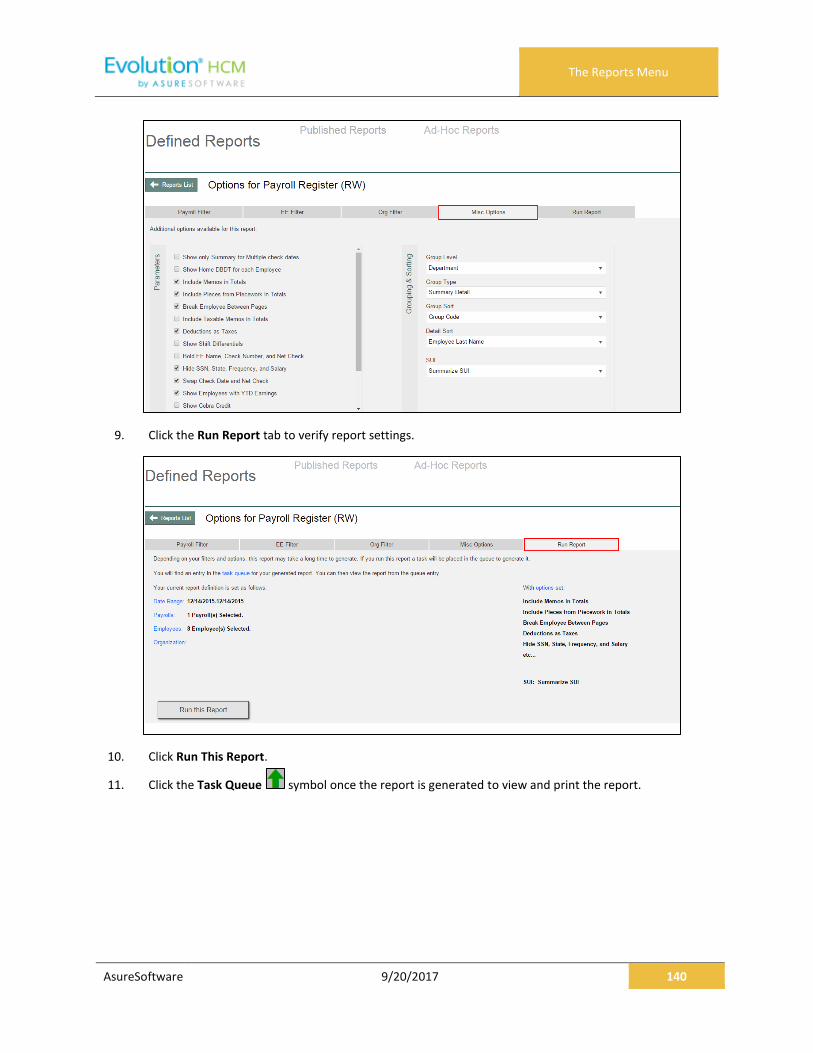
The Reports Menu
AsureSoftware 9/20/2017 140
9. Click the Run Report tab to verify report settings.
10. Click Run This Report.
11. Click the Task Queue symbol once the report is generated to view and print the report.

The Reports Menu
AsureSoftware 9/20/2017 141
Published Reports The Published Reports screen offers access to reports, tax returns and ASCII files generated in Evolution Classic and sent through the Virtual Mail Room (VMR) to Evolution Payroll. To display a preview of a Published Report,
1. Click the Reports Menu to open.
2. Result: The Published Reports screen opens.
3. Select a payroll and the report for which to view a preview.
To preview, save, or print a published report,
1. Check the box in the left-hand column of the table to select the report(s) to be viewed, saved, or printed.
2. Click the Preview Report button to open a full-sized preview on a new screen.
3. Use the Resizing tools in the preview window, to zoom in or out to preview the report.
If more than one report is selected, use the arrows at the bottom of the Preview window to navigate between reports.
4. Click Save at the top of the Preview window to save the report(s) to your hard drive and/or to open the report you are currently working on.
Result: The report(s) will be saved to your device.
5. Print as normal from the File menu in the Windows Menu bar.
6. Click the Reports List button to return to the screen listing the Published Reports.

The Reports Menu
AsureSoftware 9/20/2017 142
Ad Hoc Reporting Evolution Payroll contains an Ad Hoc Reporting feature, similar to Evolution Classic. Users can add a new Ad Hoc report, edit an existing Ad Hoc report, and run an Ad Hoc report. Ad Hoc reports are executed at the user’s discretion and can be customized. Capabilities include:
• Adding / removing columns
• Defining column headers and captions
• Filtering on any field (not just those in the visible columns)
• Grouping by fields
• Completing selected summary tasks in grouping such as Count, Sum of Integer Values
• Creating calculations based on columns in the reports
• Exporting the report results to Microsoft Excel
Similar to Evolution Classic there are three general categories of Ad Hoc Reports:
• Ad Hoc - Payroll (S1132)
• Ad Hoc - Employee (S1134)
• Ad Hoc - Company (S1153)
These reports serve as templates can be selected and used as a base Ad Hoc report to which modifications can be made and saved with a new report name.
Security Settings
Users must be granted security rights access to Ad Hoc reports in Evolution Classic to use Ad Hoc reports in Evolution Payroll.
1. Go to SB Admin - Security - SB Templates.
2. Select the template used.
3. Scroll down to Reports, and click the small plus sign to the left.
4. Verify there is a green plus sign to the left of Ad Hoc Reports. If there is a red minus sign, right-click on the
Minus-sign and select Enabled.
Setting up the Report The report must be added at the Service Bureau level, so it is available at the report level in Evolution Classic.
1. Go to the Bureau - Company Default Reports - Details tab. 2. Click the plus sign in the toolbar to create a new record. 3. Select System in the Level field dropdown list. 4. Select the report to be added in the Report field dropdown list.
5. Click the check mark and the commit button in the toolbar to post and commit changes

The Reports Menu
AsureSoftware 9/20/2017 143
Adding a New Ad Hoc Report
1. Click the Reports menu to open.
Result: The Published Reports screen opens.
2. Click Ad Hoc Reports in the header.
There are three standard Ad Hoc Report templates (Company, Employee, and Payroll) listed on the screen.
3. Click the large plus sign in the header.
4. Enter a Report Name for the new report.
5. Select a template on which to base the new report (the default template is Company).
6. Click the Configure Report button.

The Reports Menu
AsureSoftware 9/20/2017 144
7. Click the buttons at the bottom of the screen to add or delete columns, or to move columns up or down.
8. Click Add Fields to add a column to the table.
a. The column properties on the right-hand side of the screen become active.
b. Enter the information about the column being added.
c. Select the column values to define the information that will be populated in the columns.
9. Click Apply Changes or Cancel Changes at the bottom of the Column properties sections.
The tabs contain parameters to set for generating the report. The number of tabs available is dependent upon the type of report selected.
10. Click the Sorting tab to set additional parameters for the report.
11. Click the Save or Cancel symbol in the header when finished.
Editing an Existing Ad Hoc Report 1. Click the Reports menu to open.
Result: The Published Reports screen opens.
2. Click Ad Hoc Reports in the header.
3. Select the Ad Hoc report from the list that is to be edited.
4. Click Edit Report.
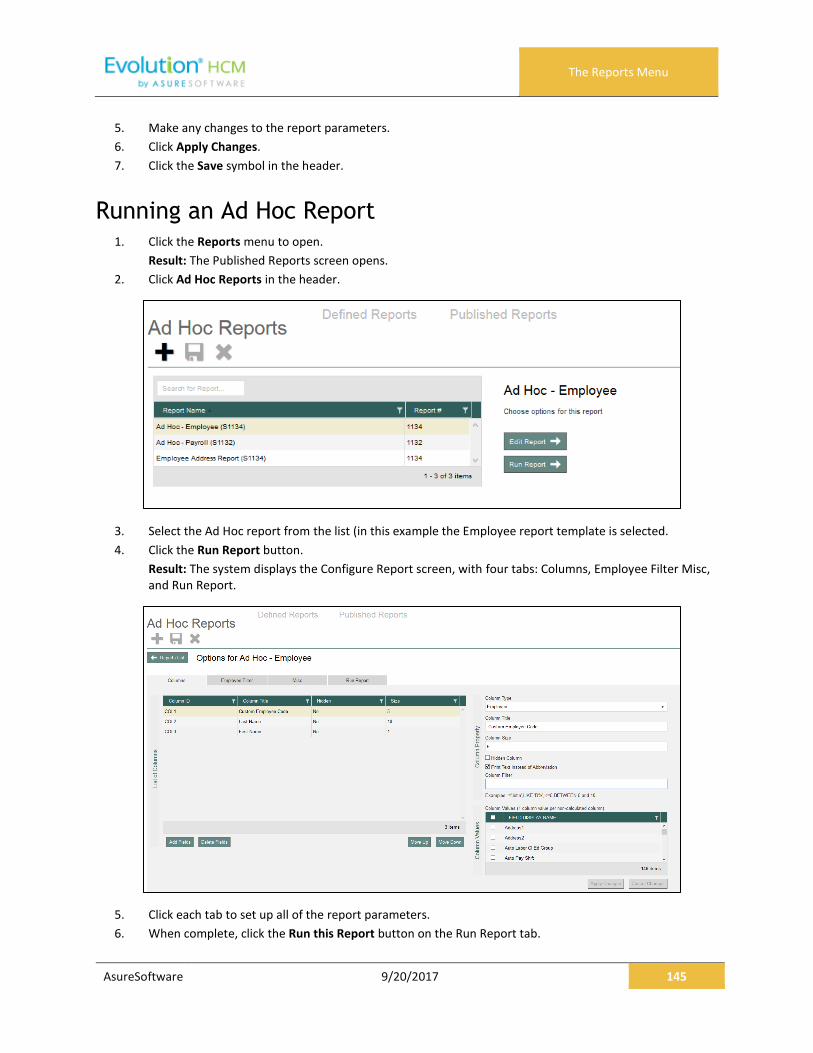
The Reports Menu
AsureSoftware 9/20/2017 145
5. Make any changes to the report parameters.
6. Click Apply Changes.
7. Click the Save symbol in the header.
Running an Ad Hoc Report 1. Click the Reports menu to open.
Result: The Published Reports screen opens.
2. Click Ad Hoc Reports in the header.
3. Select the Ad Hoc report from the list (in this example the Employee report template is selected.
4. Click the Run Report button.
Result: The system displays the Configure Report screen, with four tabs: Columns, Employee Filter Misc, and Run Report.
5. Click each tab to set up all of the report parameters.
6. When complete, click the Run this Report button on the Run Report tab.

The Reports Menu
AsureSoftware 9/20/2017 146
Result: The system displays a confirmation message at the top right of the screen that your report task has been added to the queue.
7. Open the Task Queue to view or print the report from the Task Queue once the Ad Hoc report is generated.
Note: To create the report in Excel, save the file as an ASCII format and then convert it to Excel.
Ad Hoc Report Restrictions Note the following restrictions concerning Ad Hoc reports:
• Report orientation is landscape only with a maximum of 133 bytes or characters.
• Reports may contain as many columns as can fit into a horizontal row of 133 characters.
Note: If a field is added that extends the row length beyond 133 characters, the report may or may not execute. If it executes, truncation of all data beyond the 133rd character will take place.
• There is no word or column auto-wrap to the next line
• The Output ASCII File Name and Add to Existing File features are not active
• The Duplexing check box is active. If selected, and the printer supports duplex printing, output will be printed on both.

The Reports Menu - Appendix
AsureSoftware 9/20/2017 147
The Reports Menu - Appendix
Reports – Defined Reports
Report
401(K) Report (S215)
ACA Eligibility Analysis Report (S2713)
ACA FTE Report (S2711)
ACA Rule Of Parity Test Report (S2834)
ACA Status Audit Report (S3085)
Birthday Report (S457)
Certified Payroll Report (S518)
Check Reconciliation Report (S214)
Check Stub Detail Report (S2590)
Compensation Detail Report (S601)
Cover Letter Report (S193)
Cover Letter With Tax Report (S1082)
Direct Deposit Report (S211)
Employee Audit Report (S1075)
Employee Change Listing Report (S539)
Employee Change Listing Report (New) (S1075)
Employee HR Date Report (S457)
Employee Profiles Report (S263)
GL Export Report (S348)
General Ledger Report (S183)
HR Alert (S759)
HR EEO-1 Report (S455)
HR EEO-1 Section D Employment Data Report (S1537)
HR EEO-4 Headcount Report (S566)
HR EEO Ethnic ID Report (S467)
Report
HR EEO Standard Report (S450)
HR Emergency Listing by Emergency
Contact Report (S452)
HR Employee Review Report (S850)
HR Mailing Labels (S449)
HR OSHA 300 Report (S462)
HR OSHA 300A Report (S567)
HR OSHA 301 Report (S451)
HR OSHA Injury Report By Cost (465)
HR OSHA Injury Report by Home Dept. (S453)
HR OSHA Report By Body Part Code (S466)
HR OSHA Report by Injury Code (S464)
HR OSHA Report By Status (S568)
HR Personnel Report (S463)
HR Veterans Report (S714)
HR Workers Compensation Code Report (S454)
Inactive Employees Report (S2731)
Individual Earnings Report (S431)
Input Worksheet (S351)
Job Costing Report (S229)
Labor Distribution Report (New) (S1077)
New Hire Pending Report (S292)
New Job Costing Report (S554)
Payroll Register Report (S109)
Period Summary Report (S404)

The Reports Menu - Appendix
AsureSoftware 9/20/2017 148
Report
Personnel Register (S344)
Portrait Input Worksheet (S262)
Tax Notices Report (S341)
Tax Report for Payroll (S247)
Taxable Wages for Payroll Report (S236)
Report
Time Off Register Report with Hours (S920)
Workers’ Compensation Report (S217)
For information about the parameters for particular reports, refer to the specific report document in WebHelp.
Reports – Published Reports
Column Name Description Example
Check Date The date of the payroll from which the report was generated. For Tax Returns, this is the last date entered on the tax return screen when tax returns are processed.
1/20/2015 – Check Date
12/31/2014 – Tax Return Date
Run # The payroll run from which the report was created. Tax Returns will show a run number of 0
1, 2, 3, etc… 0
Check Period The batch period of the payroll for which this report was generated. Tax Returns will not display a batch period.
1/10/2014 – 1/16/2015
Report # The Evolution report number for this report. S193, S257, S356, etc….
Report Name The name of the report or tax return. Cover Letter, SUI Tax Wages by Quarter, etc…
Type The type of document displayed Report, Tax Return

The Task Queue
AsureSoftware 9/20/2017 149
The Task Queue The Task Queue contains all tasks for the current user. Tasks marked as read remain in the Task Queue for three (3) days before they are automatically deleted by the system. Unread tasks remain in the Task Queue for 10 days before they are automatically deleted by the system. ACH files and tax payments remain in the Task Queue for 10 days, whether they have been viewed or not. The Task Queue has a table view listing of tasks – similar to the Task View in Evolution, which you can use to display report results or more details about each task. The Task Queue can be viewed from the Dashboard using the two navigation methods shown in the Navigating Evolution Payroll section of this document, or by clicking the arrow in the bottom left-hand corner of any screen in the application.

The Task Queue
AsureSoftware 9/20/2017 150
To review the report results, select a task (row) in the Navigation Panel on the left-hand side of the screen. The report results appear in the Preview pane in the right. In the screen above, the Preview Pane shows a preview of The Cover Letter Report (S193). The Status shows as Finished Successfully in the Navigation Panel. If a task finished with exceptions, those can also be viewed in the Preview section below the task list.

The Task Queue
AsureSoftware 9/20/2017 151
Click Hide in the upper right-hand corner of the screen to close the Task Queue and return to the previous screen.
Note: a task might return any of the following tabs, which are only shown if applicable to the specific task: Results / Exceptions / Warnings / Messages / Notes / Log.
Click Save to save a local copy of the Results / Exceptions / Warnings / Messages / Notes / Log. * Saving can only be applied to the active tab.
Viewing/Downloading Reports Users can view multiple reports that were run as part of processing the payroll, which enables the user to download all reports, as a group, in a zipped file format.