evo enclosures
DESCRIPTION
Photo by John Jackson Text and Photos by Installer Institute Staff location for the boxes was the rear left and right corners of the trunk. We started the enclosures by cutting out the bot- tom of each box at the same time to ensure the boxes were exactly the same size. 02 We super-glued all the pieces of wood together and created a rough shape of the box. We then cut wood rings 206 PERFORMANCE AUTO & SOUND – WWW.PASMAG.COM 04 05 03 11 12 Evo VIII Subwoofer EnclosuresTRANSCRIPT

he Mitsubishi Evolution VIII we dubbed Crazy 8 back in our July 2006 issue features plenty of cus-
tom work and we’re bringing you all these tech pieces to prove it. This marks the sixth install-ment and we’ve still got more to come. Here, the Installer Institute guys tackle custom subwoofer enclosures in the trunk. We’ll let them guide you through what they know best.
The sub enclosures are the most important part of the install because they will determine the location of everything else being installed into the trunk. For this part of the install we had some pretty big obstacles to overcome, including the Cusco strut bar that stretches across the back of the seat. We scratched our heads, wondering what we could do with the install to make it cos-metically look good and still perform its function. After going over all the equipment we were going to install into the trunk, the next challenge be-came to make the trunk look open and not clut-tered. We also didn’t want to cover the strut bar because it matched the exterior of the car and looked great.
T
Text and Photos by Installer Institute Staff
01Ph
oto
by J
ohn
Jack
son
02
Evo VIII Subwoofer Enclosures
01 Step one was to find a location and start to create the sub enclosures. Almost right away we decided to make pan-els to cover the enclosures instead of doing finishing work to the enclosures and somehow integrating them into the vehicle. This allowed us to build a rough-looking enclosure that formed to the metal contours of the trunk. The mounting
location for the boxes was the rear left and right corners of the trunk. We started the enclosures by cutting out the bot-tom of each box at the same time to ensure the boxes were exactly the same size. 02 We super-glued all the pieces of wood together and created a rough shape of the box. We then cut wood rings
for the subs to fit in. Again, super glue was used to hold the rings in place. It is important that when deciding the location of the speaker ring that it be done inside the vehicle you are working on, and in our case we also needed to make sure the trunk lid will still close.
PERFORMANCE AUTO & SOUND – WWW.PASMAG.COM206
Install Inst sub enclose 9.02.in1 1Install Inst sub enclose 9.02.in1 1 4/3/07 9:29:29 AM4/3/07 9:29:29 AM
03
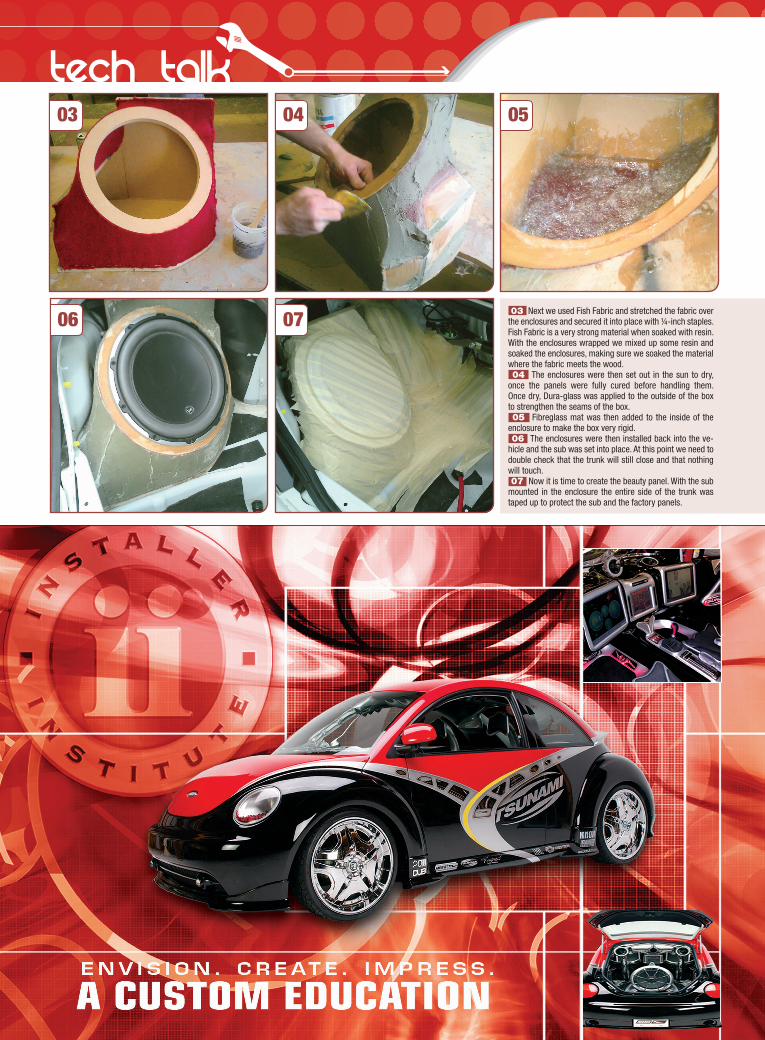
03 Next we used Fish Fabric and stretched the fabric over the enclosures and secured it into place with ¼-inch staples. Fish Fabric is a very strong material when soaked with resin. With the enclosures wrapped we mixed up some resin and soaked the enclosures, making sure we soaked the material where the fabric meets the wood. 04 The enclosures were then set out in the sun to dry, once the panels were fully cured before handling them. Once dry, Dura-glass was applied to the outside of the box to strengthen the seams of the box. 05 Fibreglass mat was then added to the inside of the enclosure to make the box very rigid. 06 The enclosures were then installed back into the ve-hicle and the sub was set into place. At this point we need to double check that the trunk will still close and that nothing will touch. 07 Now it is time to create the beauty panel. With the sub mounted in the enclosure the entire side of the trunk was taped up to protect the sub and the factory panels.
04 05
06 07
Install Inst sub enclose 9.02.in2 2Install Inst sub enclose 9.02.in2 2 4/3/07 9:29:49 AM4/3/07 9:29:49 AM

Evo VIII Subwoofer Enclosures
08 The next step was to create a wood ring to go around the sub that would compensate for the Fish grill that we were going to be installing later. Next, strips of wood were used to build a frame of the basic shape of the beauty panel. We also had to create a ring to go around the Cusco strut bar; by creating this ring we were going to use the strut bar to hold the beauty panel in place. It is very important that all the strips of wood are duplicated before installing so the panel on the other side is identical. 09 Grill cloth was then stretched over the entire panel and covered in resin. At this stage of the build we added some small fibreglass strands into the resin to help with the strength of the panel. 10 Once the panel dried, fibreglass mat was applied and the panel was left to dry. 11 With the panel dry, Dura-glass was applied… 12 …the panel was removed and sanded with 40-grit sand-paper, and body filler was applied to make the panel smooth.
08 09 10
11 12
Install Inst sub enclose 9.02.in3 3Install Inst sub enclose 9.02.in3 3 4/3/07 9:30:02 AM4/3/07 9:30:02 AM
April2007.indd 1 3/19/07 12:38:28 AM
Evo VIII Subwoofer Enclosures
13 14 15
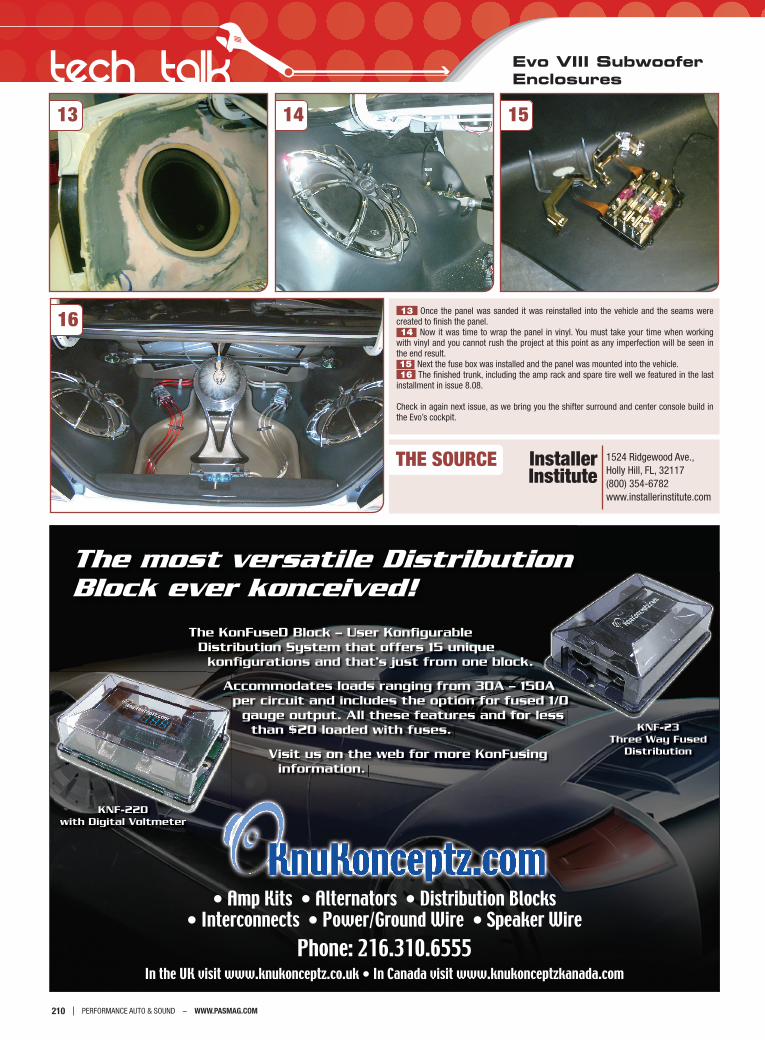
16 13 Once the panel was sanded it was reinstalled into the vehicle and the seams were created to finish the panel. 14 Now it was time to wrap the panel in vinyl. You must take your time when working with vinyl and you cannot rush the project at this point as any imperfection will be seen in the end result. 15 Next the fuse box was installed and the panel was mounted into the vehicle. 16 The finished trunk, including the amp rack and spare tire well we featured in the last installment in issue 8.08.
Check in again next issue, as we bring you the shifter surround and center console build in the Evo’s cockpit.
THE SOURCE 1524 Ridgewood Ave., Holly Hill, FL, 32117(800) 354-6782www.installerinstitute.com
Installer Institute
PERFORMANCE AUTO & SOUND – WWW.PASMAG.COM210
Install Inst sub enclose 9.02.in4 4Install Inst sub enclose 9.02.in4 4 4/3/07 9:30:20 AM4/3/07 9:30:20 AM