evo 300 user manual - labo · pdf fileevo 300 is a registered trade mark of labotech...
TRANSCRIPT

eVO 300Slit Lamp
User’s Guide

8126200-795 User manual eVO 300 Issue 1.1
Printed on March 20162
eVO 300 is a registered Trade Mark of Labotech Microscopes India Pvt. Ltd.
Labomed is the registered Trade Mark of Labo America Inc.
All other trade marks are property of their respective owners.
The information contained in this document was accurate at time of publication. Specification subject to change without notice. Labotech and Labo America Inc. reserves the right to make change in the product described in this manual without notice and without incorporating those changes in any products already sold.
ISO 9001/13485 Certified - LABOMED products are designed and manufactured under quality process meeting ISO 9001/13485 requirements.
No parts of this publication may be reproduced, stored in the retrieval system, or transmitted inn any form or by any means, electronic, mechanical, recording, or otherwise without the prior written permission of LABOTECH.
Caution: Federal law restrict this device to sale by or on the order of a licensed physician. Rx only.

8126200-795 User manual eVO 300 3
Table of ContentsWarnings and Cautions. ...................................................................................4Symbol Information . .........................................................................................6Introduction .......................................................................................................7Indications for Use. ...........................................................................................7Contraindications . ............................................................................................7Setup . ...............................................................................................................8Parts Identification. ...........................................................................................8eVO 300 Package Contents. ............................................................................8Accessories.......................................................................................................8Unpacking & Installation. ..................................................................................9Application of Input Power. 11Disconnection of Input Power. 11Setup Of Camera.............................................................................................12Instructions for Use . .......................................................................................13
Operation ........................................................................................................13
Slit Length .......................................................................................................14
Filter Dial.........................................................................................................14
Slit Rotation. ...................................................................................................14
Cleaning & Maintenance . ...............................................................................15External Cleaning. ..........................................................................................15Forehead / Chinrest Preparation . ..................................................................15Cleaning the Glide Plate. ................................................................................15Changing the Halogen Bulb............................................................................15
Changing the LED...........................................................................................16Fuse Replacement . ........................................................................................17
Replacement of Chinrest Light Indicator. ........................................................17Troubleshooting . ............................................................................................18
Chart of Common Errors . .........................................................................18Specifications..................................................................................................19
Disposal ..........................................................................................................20Software Revision . .........................................................................................20Guidance Tables .............................................................................................21Warranty .........................................................................................................25
Issue 1.1 Printed on March 2016

Warnings & Cautions
Labo America Inc. (LABOMED) is not responsible for the safety and reliability of this instrument when:
Assembly, disassembly, repair, or modification is made by unauthorized dealer or persons. Instrument is not used inn accordance with this User’s Guide.
WARNING: AN INSTRUCTION THAT DRAWS ATTENTION TO RISK OF INJURY OR DEATH.
WARNING: UNITED STATES FEDERAL LAW AND EUROPEAN REGULATIONS REQUIRE T H A T T H I S DEVICE BE PURCHASED ONLY BY A PHYSICIAN OR A PERSON ACTING ON BEHALF OF A PHYSICIAN.
WARNING: THIS INSTRUMENT SHOULD BE USED IN STRICT ACCORDANCE WITH THE INSTRUCTIONS OUTLINED IN THE USER’S GUIDE. THE SAFETY OF THE OPERATOR AND THE PERFORMANCE OF THE INSTRUMENT CANNOT BE GUARANTEED IF USED IN A MANNER NOT SPECIFIED BY LABOMED .
WARNING: DO NOT REPAIR OR SERVICE THIS INSTRUMENT WITHOUT AUTHORIZATION FROM THE MANUFACTURER. ANY REPAIR OR SERVICE TO THIS INSTRUMENT MUST BE PERFORMED BY EXPERIENCED PERSONNEL OR DEALERS WHO ARE TRAINED BY LABOMED OR SERIOUS INJURY TO THE OPERATOR OR PATIENT MAY OCCUR.
WARNING: MODIFICATION TO THIS INSTRUMENT ARE NOT ALLOWED. ANY MODIFICATION TO THIS UNIT MUST BE AUTHORIZED BY LABOMED OR SERIOUS INJURY TO THE OPERATOR OR PATIENT MAY OCCUR.
WARNING: IF THIS INSTRUMENT IS MODIFIED, APPROPRIATE INSPECTION AND TESTING MUST BE CONDUCTED TO ENSURE CONTINUED SAFE USE OF THIS INSTRUMENT.
WARNING: TO AVOID RISK OF ELECTRIC SHOCK, THIS EQUIPMENT MUST ONLY BE CONNECTED TO A SUPPLY MAINS WITH PROTECTIVE EARTH OR DAMAGE TO THIS INSTRUMENT AND/OR INJURY TO THE OPERATOR OR PATIENT MAY OCCUR.
WARNING: ENSURE THAT THE VOLTAGE APPLIED TO THE UNIT IS THE SAME AS THE VOLTAGE THAT IS INDICATED ON THE DATA PLATE OR DAMAGE TO THE UNIT MAY OCCUR.
WARNING: THIS INSTRUMENT MUST BE PLUGGED INTO AN OUTLET WITH AN EARTH GROUND. DO NOT REMOVE OR DEFEAT THE EARTH GROUND CONNECTION ON POWER INPUT CONNECTOR OR THE UNIT’S POWER CORD OF THIS INSTRUMENT OF DAMAGE TO IT AND/OR INJURY TO THE OPERATOR OR PATIENT MAY OCCUR.
WARNING: THE EQUIPMENT OR SYSTEM SHOULD NOT BE USED ADJACENT TO OR STACKED WITH OTHER EQUIPMENT AND THAT IF ADJACENT OR STACKED USE IS NECESSARY, THE EQUIPMENT OR SYSTEM SHOULD BE OBSERVED TO VERIFY NORMAL OPERATION IN THE CONFIGURATION IN WHICH IT WILL BE USED.
WARNING: THIS INSTRUMENT IS NOT SUITABLE FOR USE IN THE PREFERENCE OF FLAMMABLE ANESTHETIC MIXTURES, SUCH AS OXYGEN OR NITROUS OXIDE.
WARNING: BECAUSE PROLONGED INTENSE LIGHT EXPOSURE CAN DAMAGE THE RETINA, THE USE OF THE DEVICE OR OCULAR EXAMINATION SHOULD NOT BE UNNECESSARILY PROLONGED, AND THE BRIGHTNESS SETTING SHOULD NOT EXCEED WHAT IS NEEDED TO PROVIDE CLEAR VISUALIZATION OF THE TARGET STRUCTURES. THIS DEVICE SHOULD BE USED WITH FILTERS THAT ELIMINATE UV RADIATION9 (<420 NM) AND, WHENEVER POSSIBLE, FILTERS THAT ELIMINATE SHORT-WAVELENGTH BLUE LIGHT (<420 NM).
WARNING: THE USE OF ACCESSORIES OR CABLES OTHER THAN THOSE SPECIFIED, WITH THE EXCEPTION OF THOSE SOLD BY THE MANUFACTURER AS REPLACEMENT PARTS FOR THE INTERNAL COMPONENTS, MAY RESULT IN INCREASED EMISSIONS OR DECREASED IMMUNITY OF THE EQUIPMENT OR SYSTEM.
8126200-795 User manual eVO 300 4 Issue 1.1
Printed on March 2016

8126200- 795 User manual eVO 300 5
Warnings & Cautions (continued)
CAUTION: AN INSTRUMENT THAT DRAWS ATTENTION TO THE RISK OF DAMAGE TO THE PRODUCT
CAUTION: THE INTERNAL CIRCUITRY OF THE INSTRUMENT CONTAINS ELECTROSTATIC DISCHARGE SENSITIVE DEVICES (ESDS) THAT MAY BE SENSITIVE TO STATIC CHARGES PRODUCED BY THE HUMAN BODY. DO NOT REMOVE THE COVERS WITHOUT TAKING PROPER ESDS PRECAUTIONS.
CAUTION: DO NOT USE SOLVENT OR STRONG CLEANING SOLUTIONS ON ANY PART OF THIS INSTRUMENT AS DAMAGE TO THE UNIT MAY OCCUR. SEE MAINTENANCE SECTION FOR DETAILED CLEANING INSTRUCTION.
CAUTION: MEDICAL ELECTRONIC EQUIPMENT NEEDS SPECIAL PRECAUTIONS REGARDING EMC AND NEEDS TO BE INSTALLED AND PUT INTO SERVICE ACCORDING TO THE EMC INFORMATION PROVIDED IN THE ACCOMPANYING DOCUMENTS.
CAUTION: PORTABLE AND MOBILE RF COMMUNICATIONS EQUIPMENT CAN AFFECT MEDICAL ELECTRICAL EQUIPMENT.
CAUTION: THIS INSTRUMENT IS NOT TO BE USED NEAR HIGH-FREQUENCY EMITTING SURGICAL EQUIPMENT.
CAUTION: THIS INSTRUMENT IS NOT INTENDED TO BE CONNECTED TO EQUIPMENT OUTSIDE THE CONTROL OF LABOMED OR MUST BE TESTED TO AN APPLICABLE IEC OR ISO STANDARDS.
Issue 1.1 Printed on March 2016

8126200-795 User manual eVO 300 6
Symbol Information
Symbol Information
The following symbols appear on the instrument:
2013
REF
S/N
Caution symbol indicating important operating and maintenance instructions that are included in this User’s Guide
Type B Applied Part
Alternating Current Power
Protective Earth
Connection ON/OFF
Date of Manufacture
Catalog Number
Serial Number
Waste of Electrical and Electric Equipment
Compliance of medical device directive 93/42/EEC
Accompanying Documents must be consulted
Authorized Representative in European Community
Fragile Contents in Shipping Container - Handle with Care
Keep Dry - Package shall be kept away from rain.
This Way Up - Indicates correct upright position of package.
RxOnly U.S. Federal law restricts this device to sale by or on the order of a physician.
Issue 1.1 Printed on March 2016

8126200-795 User manual eVO 300 7
Introduction
Indication for use
Contradictions
None.
Congratulations on your purchase of the eVO 300 Slit Lamp.
This User’s guide is designed as a training and reference manual for the operation and maintenance of the instrument. We recommended that you read it carefully prior to use and follow the instructions to ensure optimum performance of your new instrument. Properly trained eye care professionals such as ophthalmologists, optometrists, opticians and eye care technicians should operate this instruments.
Please retain this manual for future reference and to share with other uses. Additional copies can be obtained from your authorized LABOMED dealer or frm the LABOMED Customer Service Department at:
Tel: (510)445-1257 Fax: (510)991-9862 Email: [email protected]
The eVO 300 Slit Lamp is an AC-powered slit lamp biomicroscope that is intended for use in examining the anterior segment, from the corneal epithelium to the posterior capsule. It is used to aid in the diagnosis of disease or trauma, which affect the structural properties of the anterior segment of the eye.
Issue 1.1 Printed on March 2016
8126200-795 User manual eVO 300 8
Setup
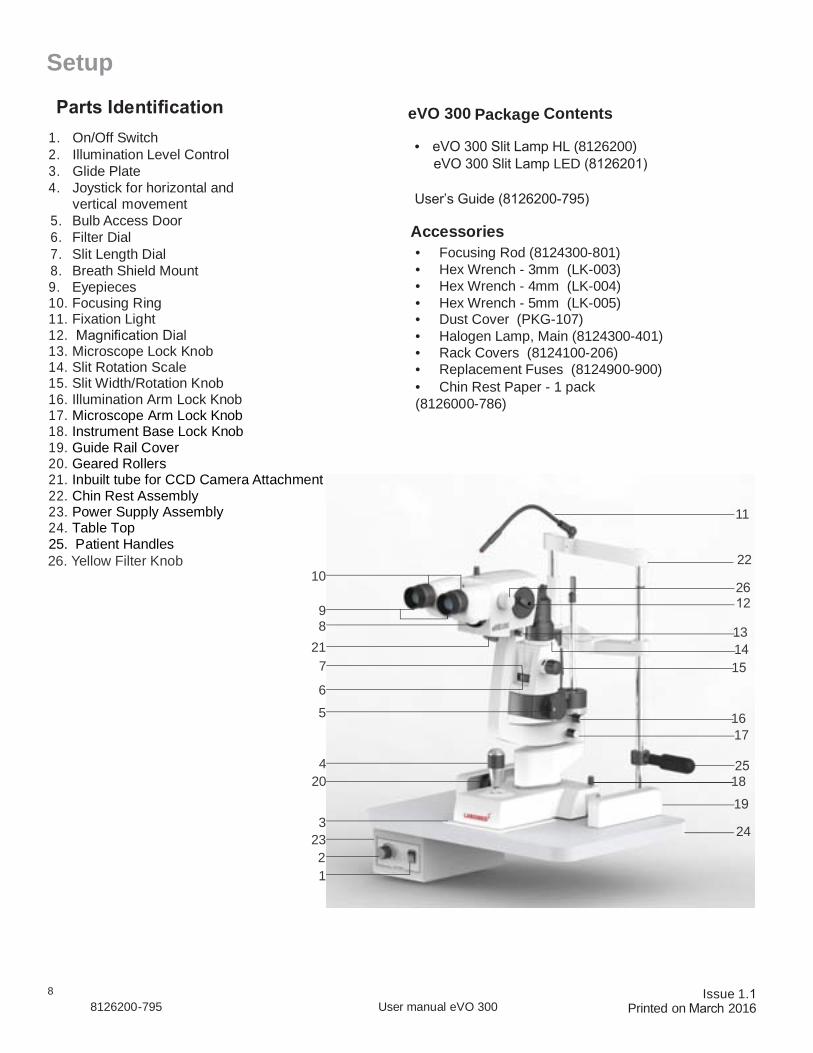
Parts Identification 1. On/Off Switch2. Illumination Level Control3. Glide Plate4. Joystick for horizontal and
vertical movement
eVO 300 Package Contents
• eVO 300 Slit Lamp HL (8126200)eVO 300 Slit Lamp LED (8126201)
User’s Guide (8126200-795)
5. Bulb Access Door6. Filter Dial7. Slit Length Dial8. Breath Shield Mount9. Eyepieces10. Focusing Ring11. Fixation Light12. Magnification Dial13. Microscope Lock Knob14. Slit Rotation Scale15. Slit Width/Rotation Knob16. Illumination Arm Lock Knob17. Microscope Arm Lock Knob18. Instrument Base Lock Knob19. Guide Rail Cover20. Geared Rollers21. Inbuilt tube for CCD Camera Attachment22. Chin Rest Assembly23. Power Supply Assembly24. Table Top25. Patient Handles
Accessories• Focusing Rod (8124300-801)• Hex Wrench - 3mm (LK-003)• Hex Wrench - 4mm (LK-004)• Hex Wrench - 5mm (LK-005)• Dust Cover (PKG-107)• Halogen Lamp, Main (8124300-401)• Rack Covers (8124100-206)• Replacement Fuses (8124900-900)• Chin Rest Paper - 1 pack(8126000-786)
26. Yellow Filter Knob
12
233
204
5
6
7
89
10
11
22
13
1617
18
24
21
2612
25
1415
19
Issue 1.1 Printed on March 2016

8126200-795 User manual eVO 300 9
Setup (continued)
Unpacking and Installation
-continued-
Figure-1 Table Top and Electronics
Figure-2 Chin Rest Assembly
Ground Screw
Ground Wire Figure-3 Chin Rest Ground
Screw
Figure-4 Chin Rest Attaching Screw
1. Open the outside shipping box and remove the three (3) inner boxes.
2. Remove the user’s guide and read it.
3. Open the box with the Table Top and Electronicsin it. Refer to Figure-1
4. Remove the Table Top from the box and install the Table Top onto the instrument stand or table, and secure it in. Place as indicated in the user guide for the stand.
5. Open the box with the chin rest assembly andremove it. Refer to Figure-2.
6. Using the 3mm Hex Wrench, connect the Ground Wire from the Power Supply to the Chin Rest Assembly using the Ground Screw provided (torque to 7.8 N.m). Refer to Figure-3.
7. Using the 5mm Hex Wrench, remove the two Screw from the button of the Table Top and attach the Chin Rest Assembly to the Table Top using these screws. Refer to Figure-4
Issue 1.1 Printed on March 2016

8126200-795 User manual eVO 300 10
Setup (continued)
Unpacking and Installation (continued)Chin Rest
Wire Base Lamp Wire
8. Attach the Fixation Light Wire from the ChinRest Assembly into the connector on the backof the Power Supply Assembly. Refer toFigure-5.
9. Open the box with the Microscope Assembly.Remove the Microscope Assembly, Slit lampAssembly, and Accessories. Refer to Figure-6.
10. Install the Slit Lamp Assembly onto the tracks ofthe Table Top and slide the Guide Rail Coversaround the tracks. Refer to Figure-7.
11. Attach the Base Lamp Wire to the back of thePower Supply Assembly. Refer to Figure-5.
12. Using the 4mm Hex Wrench, adjust the PatientHandles by loosening the Allen Cap screws that are securing them to the Chinrest Posts. Slidethe Patient Handles up or down to the desiredheight, and secure them in place by tighteningthe Allen Cap Screws. Refer to Figure-8.
Figure-5 Connections
Slit Lamp
Microscope
Accessories
Figure-6 Microscope, Base, Accessories
Slide
Figure-7 Install Base
Move Handles Up or Down
Allen Cap Screw
Figure- 8 Adjusting Patient Handle Height
Issue 1.1 Printed on March 2016

8126200-795 User manual eVO 300 11
Setup (continued)
Unpacking and Installation (continued)
13. Install the Microscope Assembly onto the top ofthe Arm by sliding it into position, making sure it is up against the stop. Then, tighten the Lock Knob located on the right side of the Microscope Assembly. Refer to Figure-9.
Note: Do not adjust the microscope stop knob behind the base of the microscope, or the vertex distance will cause misalignment of
Microscope Assembly
Turn Counterclockwise
Lock Knob
Slide
focus and require re-calibration of the slit lamp assembly.
Figure -9 Install Microscope
14. Remove the accessories and store them in anappropriate place so that when they are neededthey will be available. Refer to Figure-10.
Application of Input Power Power Cord
Dust Cover
Focusing Rod
Chin Paper
WARNING: CARE MUST BE TAKEN TO ARRANGE THE CABLES FOR THE ACCESSORIES SUCH THAT THEY DO NOT PRESENT A TRIPPING HAZARD TO THE EXAMINER OR A DANGER TO THE PATIENT.
WARNING: POSITION THIS INSTRUMENT SO THAT IT
Wrenches Guide Rails Replacement
Bulb IS NOT DIFFICULT TO OPERATE THE DISCONNECTION DEVICE (PLUG).
1. After the unit is in its secure location, apply thecorrect input voltage to the instrument using thePower Cord from the Accessory Tray.
Figure -10 Accessories
ON/OFF Switch
Note: The power inlet is located on the backside ofthe Power Supply Assembly.
2. Press down on the “ |”located on the ON/OFFSwitch. Refer to Figure-11.
Note: The ON/OFF Switch will illuminate green whenthere is power to the unit. When the ON/OFF Switch is set to off, the green light will turn off.
Disconnection of Input Power
Figure-11 Power Supply Assembly
1. At any time, the power switch can be set to OFF.The unit does not have a power down sequence.To terminate operation of this instrument, pressthe ON / OFF switch to the OFF position (O).
2. If this instrument is intended to be OFF for anextended period of time, it can be disconnectedfrom power by detaching the power cord from thereceptacle.
Issue 1.1 Printed on March 2016

Setup (continued)
Unpacking and Installation (continued)
Set Up of Camera (CCD / HD CCD Camera)
1. Remove the Check Nut from the Inlet Tube for CCD Camerashown as (A)., Refer Figure. 12.
2. Fix the Lens Adapter by rotating it Clock wise to the Inlet Tubefor Camera shown as (B)., Refer Figure. 13.
3. Remove the Dust Cover from the Camera and fix the Cameraby rotating it clockwise into the Lens Adapter. Shown as (C).,Refer Figure. 14.
4. Plug in the video cable into the Analog video Connector.Shown as (E)., Refer Figure. 15.
5. Plug in the Power Connector into the Camera Power inlet.Shown as (F)., Refer Figure. 15.
6. Connect the Video Cable into The TV/LED Video in Port toLive streaming.
Note: To Align the Image on Camera with Image in Eye Piece.
1. Losened the Groove Allen Screw by using 1.6mm Allen Key.Shown as (D). Refer image 14.
2. Rotate the Camera to allign the image on camera, once setthen tighten the Groove Allen Screw.
A
Figure 12
B
Figure 13
Figure 14
C
D
E
Figure 15
F
8126200-795 User manual eVO 300
12 Issue 1.1 Printed on March 2016

8126200-795 User manual eVO 300 13
Height
Lock
Instructions for Use
Operation 1. Turn on the power using the On/Off switch located
on the front of the power supply. Brightness canbe adjusted by rotating the illumination level knob.
Projected Slit
Note: The maximum position is for intermittent use only. Continuous use will shorten lamp life.
2. Insert the Focusing Rod in the pivot post of theinstrument body to make rough IPD and focusadjustments.
3. Position the light onto the flat surface of theFocusing Rod and adjust the pupillary distanceand focus of the eyepieces to suit the needs of theoperator. Refer to Figure-12.
4. Using the Slit Width Knobs, adjust the projectedslit so that the thinnest slit is shown on theFocusing Rod. Refer to Figures 12 and 15.
Note: The thinnest line will allow for greater accuracy.
5. Remove the Focusing Rod.6. To position a patient, adjust the chinrest height
by turning the Chinrest Elevation Handle on thepost of the Chin Rest Assembly until the patient’scanthus is in line with the canthus mark on thechin rest post. Refer to Figure-13.
7. Microscope elevation is adjusted by rotating theJoystick and observing the slit image through theMicroscope Assembly until the slit is centered onthe patient's cornea. Refer to Figure-14.
8. Move the slit lamp with the Joystick held firmlyand slightly angled toward the patient, until the slitappears sharply on the cornea.
Note: The accuracy of this rough adjustment should be checked by the naked eye. The fine adjustment is performed while observing the slit through the microscope.
Figure-12 Focus on Slit
Canthus Mark
Chinrest Elevation Handle
Figure-13 Adjust Patient Height
Adjust Lamp Base
Figure-14 Adjust Height
9. Tilt the Joystick, which is now held lightly at itsupper end, until the slit appears sharply at thedepth of the eye which is to be observed.
10. The horizontal motion of the base can be lockedby tightening the Base Locking Screw. Refer toFigure-14.
Note: Lock the base whenever the lamp is not in use.
Slit Width/Rotation
Knob
11. The slit width can be adjusted by rotating theSlit Width/Rotation Knob on either side of theinstrument. Refer to Figure-15. Figure-15 Adjust Slit Width
Issue 1.1 Printed on March 2016

8126200-795 User manual eVO 300 14
Instructions for Use (continued)
Operation (continued)
12. The angle between the illumination system and themicroscope can be varied between 0° and 90° toeither the left or to the right. Refer to Figure-16.
13. The illumination angle is indicated on the Scale ofthe slit lamp arm. Refer to Figure-17.
14. Magnification is altered by rotating theMagnification Dial on the Microscope Assembly.Refer to Figure-16.
Slit Length The slit length is adjusted by rotating the Slit Length Dial. The dial has five stops for adjustments. They are 0.6, 5.8, 9, 13.5 mm diameter and continuous 1.5 to 12.0mm. They index into place. Refer to Figure-18.
Filter Dial The Filter Dial has four positions that index into place, and are color coded to indicate the active filter. Refer to Figure-18. The color coded index stops are as follows:
Blue dot = Cobalt Blue Red dot = Heat Absorbing White dot = Open Green dot = Red-free
Magnification Dial
Figure-16 Illumination Angle
Figure-17 Illumination Angle Scale
Slit Rotation Slit rotation is achieved by grasping the Slit Width/Rotation Knob and twisting the slit body to the left or right. The degree of rotation is indicated by the Slit Rotation Scale above the slit body. Refer to Figure-19.
Filter Dial
Slit Length Dial
Figure-18 Filters and Slit Length
Slit Rotation Scale
Figure-19 Slit Rotation Scale Issue 1.1
Printed on March 2016

8126200-795 User manual eVO 300 15
Cleaning & Maintenance WARNING: RISK OF ELECTRIC SHOCK. ALWAYSDISCONNECT THE POWER CORD FROM THE WALL AND THE INSTRUMENT BEFORE PERFORMING ANYOF THE FOLLOWING CARE AND MAINTENANCEPROCEDURES.
External Cleaning Clean the external surfaces of this instrument using a Clean, soft cloth moistened with a mild detergent solution (1 cc of liquid dish soap to one liter of clean, filtered water (filtered below 5 microns). Refer to Figure-20.
Forehead / Chinrest Preparation For hygienic reasons, wipe the forehead rest with an alcohol wipe and change the chin rest papers aftereach patient.
Figure-20 Cleaning Main Unit
Cleaning the Guide Plate If the Guide Plate is dirty it may cause a rough feeling when maneuvering the base of the slit lamp. Clean the Guide Plate with a soft cloth lightly dampened with a mild soap and water solution.
Changing the Halogen Bulb WARNING: NEVER REMOVE A BULB THAT HAS RECENTLY BEEN IN USE AS IT WILL BE VERY HOT. WAIT UNTIL IT HAS COOLED AND USE GLOVES OR A THICK CLOTH WHEN HANDLING ANY HALOGEN BULB.
WARNING: NEVER TOUCH A HALOGEN BULB WITH BARE HANDS AS FINGERPRINTS WILL SHORTEN THE BULB LIFE.
Figure-21 Bulb Holder
Figure-22 Retaining Clamp
Note: Position the Bulb so the Cut Out in the metalcollar of the Bulb lines up with the Notch in the lamp housing. Refer to Figure-24.
7. Move the Retaining Calmp back into its originalposition. Refer to Figure-22.
8. Close the bulb door.
Figure-23 Bulb
Place the bulb holder back on the position9.
Retaining spring
Retaining Spring Rotated
Bulb Holder
Bulb Holder
Metal Pins
Retaining Clamp Screw
Bulb
1. Remove input power to the instrument.2. Open the bulb door and pull out the bulb holder by
pulling the metal pins on the holder. Refer Figure 21.3. Swing the retaining clamp from the bulb by loosen
the screw. Refer Figure 22.4. Pull the bulb from the unit and replace the bulb with
the correct bulb as indicated in the specicationssection of the manual.
Issue 1.1 Printed on March 2016

Cleaning & Maintenance
Changing The LED(For LED illumination only)
WARNING: NEVER REMOVE A LED THAT HAS RECENTLY BEENIN USE AS IT MAY BE VERY HOT. WAIT UNTIL IT IS COOLED.
WARNING: NEVER TOUCH A LED WITH BARE HANDS ASFINGERPRINTS WILL SHORTEN THE LED LIFE.
1. Remove input power to the instrument.
2. Remove the Circlip by using circlip plier. shown as ‘’A’’Refer Figure 24.
3. Lift up the illumination housing carefully.
4. Remove the Lamp Cover by unscrewing the Four Screwsby using screwdriver shown as ‘’B’’. Refer Figure 25.
5. Unscrew the two M3 allen screws to disassemble theHeat Sink by using 2.5 Allen wrench shown as ‘’C’’. ReferImage 26.
6. Unscrew the LED from Heat Sink by unscrewing the TwoScrews shown as ‘’D’’. Refer to Figure 27.
7. Replace New LED and follow Reverse to completeassembly.
A
B
Figure 24
Figure 25
Figure 26
8126200-795 User manual eVO 300
C
D
Figure 27
16Issue 1.1 Printed on March 2016

8126200-795 User manual eVO 300 17
Cleaning & Maintenance (continued)
Fuse Replacement Replace the fuses in the Power Input Module with the fuses indicated in the Specifications section of this manual.
1. Remove input power to the instrument.2. Press down on the top tab in the middle of the
Power Input Module to release the Fuse Holder,and gently pull out the Fuse Holder by gripping thetwo small tabs. Refer to Figures 25 and 26.
3. Open the Door to the Fuse Holder by pulling itdown. Refer to Figure-25.
Note: The Fuses will pop up when the door is open, making removal easier.
Pull Out
Tabs
Figure-25 Pull Out
Fuses
4. Install new fuses into the Fuse Holder that isindicated in the Specification section of thismanual.
5. Install the Fuse Holder by closing the door, andpushing the Fuse Holder back until it snaps intoplace.
Open Door
Figure-26 Open Fuse Door
Notch Cut Out
Figure-24 Notches
Replacement of Chin Rest Light indicator
1. Unscrew the LED cap refer Fig. 30.
2. Pull out the defective LED and replace with new LED Refer
Fig. 30 a. Thread in the LED cap back.
Note: if New LED does not light up after switching on.remove it and re-fix after changing its polarity.
Figure 27 a Changing Target Light LED
Figure 27 Changing Target Light LED
LED Cap
Pull LED Bulb with tweaser
Issue 1.1 Printed on March 2016

8126200-795 User manual eVO 300 18
Troubleshooting The following chart outlines some common issues with the eVO 300 Slit Lamp and some steps you can take to correct the issue. If problems persist, please contact the LABOMED as listed in the Introductionsection of this manual.
Chart of Common Errors
ISSUE PROBABLE CAUSE POSSIBLE SOLUTION
Lamp won’t turn on.
Incorrect input power supplied tothe eVO 300 Slit Lamp.
Check the outlet to ensure proper power is being supplied.
Defective Power Cord. Replace the Power Cord. Bulb may be blown out. Replace Bulb. Defective Power Supply. Replace the Power Supply.
Slit Lamp won’t move. Rubber stopper may be attached under the joystick. Remove the rubber stopper.
Base Lock Screw may be tightened. Loosen the Base Lock Screw.
Rough base movement.
Rubber stopper may be attached under the joystick. Remove the rubber stopper.
Bearings may be damaged. Replace the base.Shaft may be damaged. Replace the base.
Fixation light does not light up.
Fixation Light Harness not plugged into the Power Supply Assembly.
Ensure the Fixation Light Harness is properly seated in the Power Supply Assembly.
Defective Power Supply. Replace the Power Supply.
Light too dim. Incorrect wattage for bulb being used. Replace with the proper Bulb.
Bulb not installed properly. Check bulb and ensure notch lines up with bulb housing.
Double slit visible in microscope.
Microscope not focused on focusing rod before use.
Install focusing rod and check to ensure microscope is focused on it.
Bulb not installed properly. Check bulb and ensure notch lines up with bulb housing.
The following is a checklist of items that need to be assessed in order to determine if the eVO 300 Slit Lamp requires servicing.
• Check the outside of the slit lamp for any damage or missing components.• Inspect the power cord for damage.• Test the lamp by turning the lamp on and turning the light all the way to it’s brightest setting, and all
the way down to its lowest setting.• Check to ensure all switches are functioning properly.• Check the Filters by cycling through all the options.• Check the Slit Wheel by cycling through all the options.• Check the base movement.
Issue 1.1 Printed on March 2016

8126200-795 User manual eVO 300 19
Specifications Catalog Number 8126200-795
Physical Dimensions Size: Weight, unpacked: 23.0 lbs. (10.4 Kg)
Height: 19.8 in. (50.2 cm) Weight, packed: 52 lbs (23.64 Kg) Width: 10.5 in. (26.7 cm) Depth: 14.0 in. (35.6 cm)
Electrical Voltage: 100-240V AC Power Input: Max 56-73vA Frequency: 50/60 Hz Fuses: T 1.6A L 250V Halogen Bulb: (6V, 20 W), LED 5 Watt
Operational Conditions Environmental: 70°C The environmental conditions are as follows: Operating:
-20°CTemperature: 10° C (50° F) to 35° C (95° F) Relative Humidity: 30% to 75% 80% Atmospheric Pressure: 80 kPa (23.6 in. Hg) to
106 kPa (31.3 in. Hg) Transportation & Storage: 10%
Temperature : 20° C (-4° F) to +70° C (158° F). 106 kPa Relative Humidity: 10% to 80% (non-condensing) Atmospheric Pressure: 50 kPa (14.8 in. Hg) to
106 kPa (31.3 in. Hg) 50 kPa
Exposure to extreme temperature conditions indicated above must not exceed 15 weeks.
Microscope
Mag Change
Eyepiece
Mag Ratio IPD Range
Diopter Adjustment
Slit Illumination
Slit Width
Slit Length
Slit Apertures
Slit Rotation
Filters
Galilean
5 Step Drum Rotation
12.5X
6.5X, 10X, 16X, 25X, 40X
48.5 - 77 mm
+/- 5 mm
6v 20W Halogen / LED 5 Watt
0 – 13.5 mm
0 – 13.5 mm
0.6, 5.8, 9, 13.5 mm and continuous 1.5 to 12.0 mm
0° - 180°
Red Free, Heat Absorbing, Cobalt Blue
Issue 1.1 Printed on March 2016

8126200-795 User manual eVO 300
Specifications (continued)
Movement Ranges
Longitudinal (In/Out) 100mm
Lateral (Left/Right) 107mm
vertical (Up/Down) 30mm
Chinrest Range 80mm
Table Dimensions 18 1/2" x 12 10/16" (465 mm x 316 mm)
Disposal This product does not generate any environmentally hazardous residues. At the end of its product life, follow your local laws and ordinances regarding the proper disposal of this equipment.
Software Revision There is no software installed in this unit.
Due to a policy of continuous development, we reserve the right to change specifications without notice.
20
Issue 1.1 Printed on March 2016

8126200-795 User manual eVO 300
Guidance Tables
Table 201 – Guidance and Manufacturer’s Declaration
Electromagnetic Emissions All Equipment and Systems
Guidance and Manufacturer’s Declaration – Electromagnetic Emissions
The eVO 300 is intended for use in the electromagnetic environment specified below. The customer or user of the eVO 300 should ensure that it is used in such an environment.
Emissions Test Compliance Electromagnetic Environment - Guidance -
RF Emissions CISPR 11
Group 1 Class A
The eVO 300 uses RF energy only for its internal function. Therefore, its RF emissions are very low and are not likely to cause any interference in nearby electronic equipment.
Harmonics IEC 61000-3-2 Class A The eVO 300 is suitable for use in all
establishments, other than domestic, and those directly connected to the public low-voltage power network that supplies buildings used for domestic purposes.
Flicker IEC 61000-3-3 Complies
21Issue 1.1 Printed on March 2016

8126200-795 User manual eVO 300 22
Guidance Tables (continued)
Table 202 – Guidance and Manufacturer’s Declaration
Electromagnetic Immunity All Equipment and Systems
Guidance and Manufacturer’s Declaration – Electromagnetic Immunity
The eVO 300 is intended for use in electromagnetic environment specified below. The customer or user of the eVO 300 should ensure that it is used in such an environment.
Immunity Test
IEC 60601Test Level
ComplianceLevel
Electromagnetic Environment - Guidance
ESD IEC 61000-4-2
±6kv Contact±8kv Air
±6kv Contact±8kv Air
Floors should be wood, concrete or ceramic tile. If floors are synthetic, the R/H should be at least 30%.
EFT IEC 61000-4-4
±2kv Mains±1kv I/Os
±2kv Mains±1kv I/Os
Mains power quality should be that of a typical commercial or hospital environment.
Surge IEC 61000-4-5
±1kv Differential±2kv Common
±1kv Differential±2kv Common
Mains power quality should be that of a typical commercial or hospital environment.
voltage Dips/Dropout IEC 61000-4-11
>95% Dipfor 0.5 Cycle60% Dip for 5 Cycles 30% Dip for 25 Cycles >95% Dipfor 5 Seconds
>95% Dipfor 0.5 Cycle 60% Dip for 5 Cycles 30% Dip for 25 Cycles >95% Dipfor 5 Seconds
Mains power quality should be that of a typical commercial or hospital environment. If the user of the eVO 300 requires continued operation during power mains interruptions, it is recom- mended that the eVO 300 be powered from an uninterruptible power supply or battery.
Power Frequency 50/60Hz Magnetic Field IEC 61000-4-8
3A/m 3A/m Power frequency magnetic fields should be that of a typical commercial or hospital environment.
Issue 1.1 Printed on March 2016

8126200-795 User manual eVO 300
Guidance Tables (continued)
Table 204 – Guidance and Manufacturer’s Declaration
Electromagnetic Immunity Equipment and Systems that are NOT Life-supporting
Guidance and Manufacturer’s Declaration – Electromagnetic Immunity
The eVO 300 is intended for use in the electromagnetic environment specified below. The customer or user of the should ensure that it is used in such an environment.
Immunity Test
IEC 60601Test Level
ComplianceLevel
Electromagnetic Environment - Guidance
Conducted RF IEC 61000-4-6
3 vrms 150 kHz to 80 MHz
(v1) = 3 vrms Portable and mobile RF communications equipment should be used no closer to any part of the eVO 300, including cables, than the recommended separation distance calculated from the equation applicable to the frequency of the transmitter.
Recommended Separation Distance:
d=(3.5/v1)(Sqrt P)
d=(3.5/E1)(Sqrt P) 80 to 800 MHz
d=(7/E1)(Sqrt P) 800 MHz to 2.5 GHz
Where P is the max output power rating ofthe transmitter in watts (W) according to the transmitter manufacturer and d is the recom- mended separation distance in meters (m).
Field strengths from fixed RF transmitters, as determined by an electromagnetic site survey, should be less than the compliance levels in each frequency range.
Interference may occur in the vicinity of equipment marked with the following symbol .
Radiated RF IEC 61000-4-3
80 MHz to 2.5 GHz @ 3V/m
(E1) = 3 v/m
Note 1: At 80 MHz and 800 MHz, the higher frequency range applies.
Note 2: These guidelines may not apply in all situations. Electromagnetic propagation is affected by absorption and reflection from structures objects and people.
* Field strengths from fixed transmitters, such as base stations for radio (cellular/cordless) telephones and land mobile radios, amateur radio, AM and FM radio broadcast and Tv broadcast cannot be predicted theoretically with accuracy. To assess the electromagnetic environment due to fixed RF transmitters, an electromagneticsite survey should be considered. The measured field strength in the location in which the ME Equipment orME System should be observed to verify normal operation. If abnormal performance is observed, additionalmeasures may be necessary, such as re-orienting or relocating the ME Equipment or ME System.
* Over the frequency range 150 kHz to 80 MHz, field strengths should be less then [V1] V/m.
eVO 300
23
Issue 1.1 Printed on March 2016

8126200-795 User manual eVO 300 24
Guidance Tables (continued)
Table 206 – Recommended Separation Distances betweenPortable and Mobile RF Communications Equipment and the eVO 300 forME Equipment and ME Systems that are NOT Life-supporting.
Guidance and Manufacturer’s Declaration - Electromagnetic Immunity
Recommended Separation Distances for between Portable and Mobile RF Communications Equipment and the eVO 300
The eVO 300 is intended for use in the electromagnetic environment in which radiated RF disturbances are controlled. The customer or user of the eVO 300 can help prevent electromagnetic interference by maintaining a minimum distance between portable and mobileRF Communications Equipment (transmitters) and the eVO 300 as recommended below, according to the maximum output power of the communications equipment.
Max Output Power of Transmitter
(W)
Separation (m) 150kHz to 80 MHz
d=(3.5/v1)(Sqrt P)
Separation (m) 80 to 800 MHz d=(3.5/E1)(Sqrt P)
Separation (m) 800MHz to 2.5GHz
d=(7/E1)(Sqrt P)0.01 0.1166 0.1166 0.23330.1 0.3689 0.3689 0.73781 1.1666 1.1666 2.333310 3.6893 3.6893 7.3786100 11.6666 11.6666 23.3333
For transmitters rated at a maximum output power not listed above, the recommended separation distance (d) in meters (m) can be estimated using the equation applicable to the frequency of the transmitter, where P is the maximum output power rating of the transmitter in watts (w) according to the transmitter manufacturer. Note 1: At 80 MHz and 800 MHz, the separation distance for the higher frequency range applies. Note 2: These guidelines may not apply in all situations. Electromagnetic propagation is affected by absorption
and reflection from structures, objects, and people.
Issue 1.1 Printed on March 2016

8126200-795 User manual eVO 300 25
Warranty This product is warranted by Labo America Inc. against defective material and workmanship under normal use for a period of one year from the date of invoice to the original purchaser. (An authorized dealer shall not be considered an original purchaser). Under this warranty, Labo America Inc. sole obligation is to repair or replace the defective part or product at Labotech/Laomed discretion.
This warranty applies to new products and does not apply to a product that has been tampered with, altered in any way, misused, damaged by accident or negligence, or which has had the serial number removed, altered or effaced. Nor shall this warranty be extended to a product installed or operated in a manner not in accordance with the applicable LABOMED instruction manual, nor to a product which has been sold, serviced, installed or repaired other than by a Labo America Inc. factory or authorized LABOMED Dealer.
Lamps, bulbs, charts, cards and other expendable items are not covered by this warranty.
All claims under this warranty must be in writing and directed to the LABOMED factory, or authorized instrument dealer making the original sale and must be accompanied by a copy of the purchaser’s invoice.
This warranty is in lieu of all other warranties implied or expressed. All implied warranties of merchantability or fitness for a particular use are hereby disclaimed. No representative or other person is authorized to make any other obligations for a LABOMED product. Labotech/Labomed shall not be liable for any special, incidental, or consequent damages for any negligence, breach of warranty, strict liability or any other damages resulting from or relating to design, manufacture, sale, use or handling of the product.
PATENT WARRANTY If notified promptly in writing of any action brought against the purchaser based on a claim that the instrument infringes a U.S. Patent, Labo America Inc. will defend such action at its expense and will pay costs and damages awarded in any such action, provided that Labo America Inc. shall have sole control of the defense of any such action with information and assistance (at Labo America Inc. expense) for such defense, and of all negotiation for the settlement and compromise thereof.
PRODUCT CHANGES Labo America Inc. reserves the right to make changes in design or to make additions to or improvements in its products without obligation to add such to products previously manufactured.
CLAIMS FOR SHORTAGES We use extreme care in selection, checking, rechecking and packing to eliminate the possibility of error. Ifany shipping errors are discovered: 1. Carefully go through the packing materials to be sure nothing was inadvertently overlooked when the
unit was unpacked.2. Call the dealer you purchased the product from and report the shortage. The materials are packed at
the factory and none should be missing if the box has never been opened.3. Claims must be filed within 30 days of purchase.
CLAIMS FOR DAMAGES IN TRANSIT Our shipping responsibility ceases with the safe delivery in good condition to the transportation company.Claims for loss or damage in transit should be made promptly and directly to the transportation company.
If, upon delivery, the outside of the packing case shows evidence of rough handling or damage, the transportation company’s agent should be requested to make a “Received in Bad Order” notation on the delivery receipt. If within 48 hours of delivery, concealed damage is noted upon unpacking the shipment and no exterior evidence of rough handling is apparent, the transportation company should be requested tomake out a “Bad Order” report. This procedure is necessary in order for the dealer to maintain the right ofrecovery from the carrier.
Issue 1.1 Printed on March 2016

Labo America Inc. 920 Auburn Court
Fremont, CA 94538 USA
Phone: 510-445-1257 Fax: 510-991-9862
Email: [email protected] www.laboamerica.com
8126200-795
Issue 1.1
March, 2016
Labomed Europe b.v.
T.a.v.: Cor TreureEssebaan 52,
2908 LK Capelle aan den Ijssel THE NETHERLANDS
Phone: +31-10-458-4222, Fax: +31-10-450-8251
ISO-9001/13485 Registered