escape retro payroll process - scoe
TRANSCRIPT
ESCAPE RETRO PAYROLL
PROCESS September 2020
Marie White
Escape Version 20.03

1 | P a g e
TABLE OF CONTENTS
1. Retroactive Pay Notification Form
2. Retro Payroll Setup Considerations
3. Creating a Retro Payroll in Escape
• Method 1 - Salary Schedule Method • Method 2 - Percentage Method • Method 3 – Cancel Assignment Method
4. Retiree and Reduced Work Load Employee Retro Setup
• STRS Retiree Retro Payroll Setup • PERS Retiree Retro Payroll Setup • STRS Reduced Work Load Retro Payroll Setup
5. Balancing a Retro Payroll
6. How to Unpost a Retro Payroll Batch
7. What’s new in the Retro with 20.3 Version of Escape!!

2 | P a g e
Retroactive Pay Notification Form 1. Purpose
a) Notify SCOE that the District is planning or has already approved to increase an existing Salary Schedule with the intent to retro back to a prior pay period.
b) Notify SCOE that the District is planning on or has already approved a One-Time Bonus or Off-Schedule payment to employees.
c) Allow Districts and SCOE the ability to support each other in implementing and setting up a retro in the Escape Software System.
d) Allow SCOE Retirement Techs to assist the District to review that Retirement is reporting.
e) Submitting the Retroactive Pay Notification Form allows both the District and County Office to review, prepare and pay the employees in a timely manner.
2. Procedure
a) Prior to creating or paying a retro, bonus or off-schedule complete the Retroactive Pay Notification Form by email to the [email protected].
b) Please remember it is always the districts responsibility to make sure that they follow internal practices and procedures. SCOE IT and SCOE Retirement Techs are available to provide support and recommendations only.
c) Hyperlink to the Retroactive Notification Form: https://www.scoe.org/files/Retroactive_Pay_Notification_-_fillable.pdf

3 | P a g e
EXAMPLE FORM
Retro Payroll Setup Considerations

4 | P a g e
Escape Retro Payroll Basics: • Permission based: This activity is ONLY available to Pay Managers and above. • Retro dates are based upon Pay Cycle Period End Dates, NOT pay Date. • Retro lines for less than .2 cents are ignored. • Only the Addons entered in the Addon field will be included in the Retro.
There are three methods to create a Retro using the Retro Payroll Process: 1. Salary Schedule Method
a) Board Approved NEW Salary Schedule that is retro to a prior pay period. b) End the original salary schedule.
Salary Schedule End Date should be the end of the month date of the last regular pay period. Copy, and update as per Board Approved Agreement (MOU, CBA) Salary Cells must match exactly with the Board Approved Salary Matrix Salary Schedule Begin Date should be the first day of the month after the last regular pay period.
c) Salary Schedule Override Date Enter a date if the salary schedule can be used in payroll calculations for pay prior to the begin date. For example, if the salary schedule has a begin date of January 1, but an override date of July 1, this salary schedule will be used for retroactive payrolls and assignments backdated prior to January 1
d) Salary Schedule Retro Retro flag in the salary schedule must also be set to YES in order for that salary schedule to be included in the retro.
e) The Hourly/Daily and Salary Basis fields from the Calendar can affect which salary schedule rate the system will use to calculate positional pay and what rate conversion is used.
2. Percentage Method
a) Does not use a Salary Schedule to compute the assignment and/or addon retro. b) Uses a percentage to compute the assignment and/or addon retro.

5 | P a g e
3. Cancel Assignment Method
a) Use this method when Salary Schedule naming convention does not remain the same, or cells have changed from the original Salary Schedule. Best Practice Recommendation: Always try to keep the same name, and cell format when creating a new Salary Schedule. To avoid and prevent error and removing the need to manually update each employee record.
b) Use this method when you have a Reduced Workload assignment, or Retiree. This will allow the system to calculate and process their retro efficiently. Removes and prevents possible errors in retirement reporting and calculating retro earnings.
Editing Retro Payrolls • If you want to make changes on the Retro Calculation Request tab or have changed, set
up and want your changes included, you must use the Return to Open task. • You can edit retro lines in the Computed status. • You cannot edit lines in a Posted status, but items can be edited in the Adjust
Payroll activity if the pay date has not been submitted.

6 | P a g e
Creating a Retro Payroll in Escape
Defining a Salary Schedule Retro Payroll - Method 1 Step 1: Go to HR – Payroll – Retro Payroll
Step 2: Select NEW from the Task Bar
Step 3: Define the pay setup in Retro Information - Section 1 – Retro Criteria The first tab of the Retro Payroll activity must be filled out to start the process. The fields on this tab can only be edited when the retro is in the Open status.
Earnings From - Enter the “Start” date for the retro.
Earnings Thru - Enter the “End” date for the retro.
Active Employees Only – Enter “No” to include ALL employees with pay detail during the earnings from/thru dates indicated.
Bargaining Unit – Select the BU for which this retro applies.
Salary Schedule Effective Date – Enter the Effective Date for the New Salary Schedule.
Salary Schedule Retro Enabled Only – This field works in conjunction with the Salary Schedule Effective Date and the Retro flag in the salary
Defines the prior pay periods to be included in the Retro
7 | P a g e
schedule. If left blank it will retro regardless of Salary Schedule Retro Enabled setup.
Include Assignments – Defaults to “Yes”. If you select any addons (next field) and set the Include Assignments flag to “Yes” you will get assignments and addons included in the retro calculation.
Addons – Use the lookup to select the addon(s) that you want to include in the retro.
Comment – Enter a comment for this retro. Recommended.
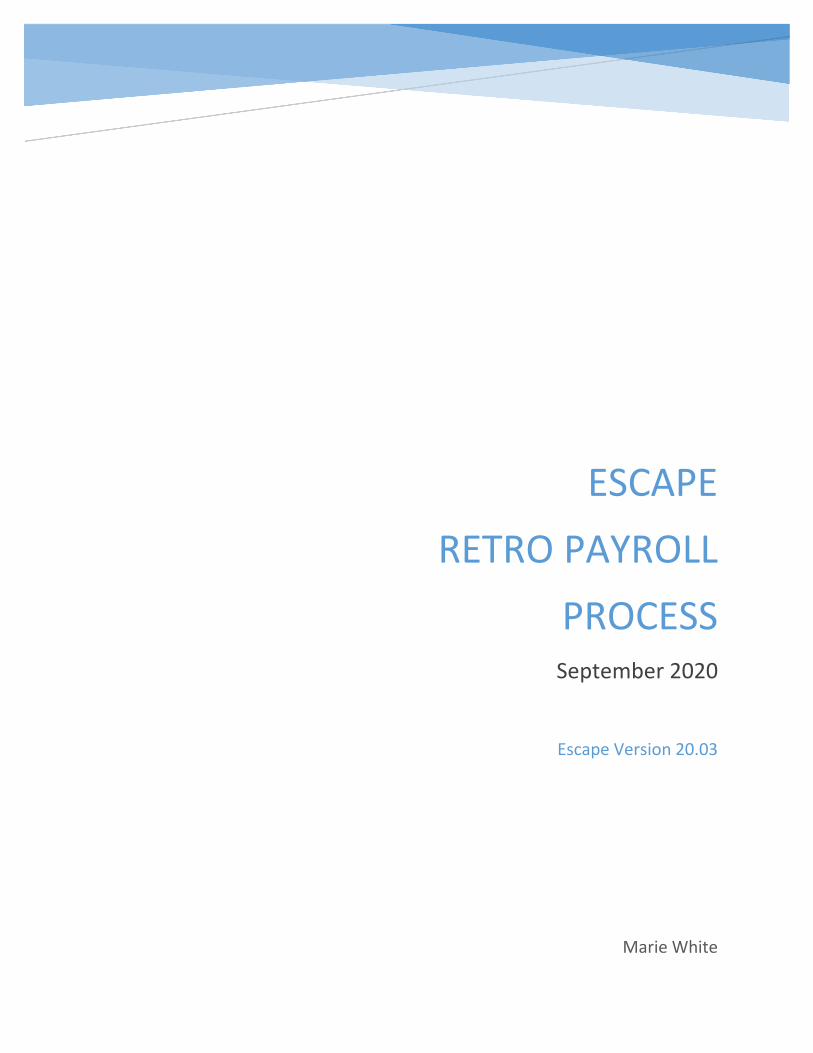
Step 4: Define the posting criteria in Request Information - Section 2 – Posting Criteria The software uses the information you enter to determine how to create and when to pay the retro. ALL fields are required!
Payroll Adjustment Description – Enter the description of this retro. The description will print on the employee’s paycheck, up to 20 characters only.
Use Primary Pay Cycles – Enter “Yes” to use the employee’s primary pay cycle for the retro adjustment amount to appear.
Pay Date – Enter the actual pay date for the retro. In other words, enter the date on which the retro will be paid, regardless of the pay cycle period. It will capture everyone in the BU because you entered “Yes” in the Use Primary Pay Cycle field.
Fiscal Year - Defaults to current Fiscal Year. Field is open if needed to point to a prior fiscal year, if necessary.
Pay Cycle – The pay cycle/period here is to ensure everyone is included. Recommendation: Enter in a 12 month pay cycle (example: CL2J or CE2J).
Pay Period – Enter or select the pay period for the Retro to process.

8 | P a g e
Step 5: Save/Close to save the Retro Information. Step 6: Re-Open the Retro.
Select Tasks from the tool Bar.
Select Compute Retro from the Drop Down Menu.
The system will compute the retro lines and close the retro.
Step 7: Re-Open the Retro to begin the Review Process. Go to the Retro Pay Lines Tab

9 | P a g e
Here is a list of recommended items that need review.
1 - Verify all employees listed are reporting and calculating as expected. Are your employee listed as expected, is anyone missing? Research and determine the reason an employee might be missing from the list. Are they in a terminated employment status? Do they have an active pay cycle? Do they belong to two Bargaining Units? Is the Bargaining unit selected their primary assignment? EXAMPLE 1 -

10 | P a g e
2 - Are there any Retirees, or Reduced Work Load employees listed? Cancel their pay lines listed in the retro, Retirees or RWL employees are entitled to the retro pay but their pay lines cannot process using the Retro Payroll Process.
EXAMPLE 2 -
*Paying a Retro to a Retiree and RWL Employee Section on page 17 of this guide.
3 - Are there negative pay lines indicated on the retro?
Cancel ALL negative pay lines. They cannot process using the Retro Payroll Process. They will create Retirement errors that will hold up retirement reporting submissions for the entire District. Go to the negative Retro Pay Line and update the Cancelled Column Cell to “Yes”. Find the positive Retro Pay Line for the same Pay Period and Deduct the Negative from the Retro Amt listed on the positive line. Enter in the new amount in the Ovr Retro Amt Column. EXAMPLE 3 –

11 | P a g e
4 - Is the salary schedule Hourly or Monthly? Verify that it is reporting accurately? If an employee has a (173) Monthly PERS Schedule indicated, and the salary schedule is actually (400) hourly. You will need to override the Pay Rate Column, and the PERS Rate and PERS Schedule Columns to reflect accurately.
• Go to HR/Payroll – Employment – Employee Management – Retirement Tab to review the employee’s retirement record. Does it have the correct Work Schedule entered? If not update the record to reflect correctly for future pay rolls. This will allow their retirement to report accurately..
If the retirement record of the employee reflects correctly, is it the Calendar Setup?
• Go to HR/Payroll – Setup – Assignment – Calendars and review the Hourly/Daily Field. Hourly/Daily – Defaults to “No”.
NO PERS Work Schedule Updated with the correct work schedule
If the flag is set to “No”, the retirement reporting pay rate defaults to monthly, regardless of how the salary schedule is set up.

12 | P a g e
Step 8: Save/Close once all your lines have been Reviewed, Cancelled, Overridden and Updated.
Step 9: Re-Open the Retro to begin the Review Process. Go to the Tasks Button and use the Drop down Menu. Step 10: Select Post Retro, the Retro Batch will close. Re-Open the Retro Batch to Submit, this will post the Retro to Adjust Pay Step 11: Go to Adjust Pay to review the Batch Posted as expected.
Recommended: Districts should review and balance Adjust Pay to ensure accuracy.

13 | P a g e
Defining a Percentage Retro Payroll - Method 2 Step 1: Go to HR – Payroll – Retro Payroll
Step 2: Select NEW from the Task Bar
Step 3: Define the pay setup in Retro Information - Section 1 – Retro Criteria The first tab of the Retro Payroll activity must be filled out to start the process. The fields on this tab can only be edited when the retro is in the Open status.
Earnings From - Enter the “Start” date for the retro.
Earnings Thru - Enter the “End” date for the retro.
Active Employees Only – Enter “No” to include ALL employees with pay detail during the earnings from/thru dates indicated.
Bargaining Unit – Select the BU for which this retro applies.
Percent – Enter in the Board Approved Percentage. This will not use a Salary Schedule to calculate. It will use the percent entered.
Defines the prior pay periods to be included in the Retro

14 | P a g e
Include Assignments – Defaults to “Yes”. If you select any addons (next field) and set the Include Assignments flag to “Yes”, you will get assignments and addons included in the retro calculation.
Addons – Use the lookup to select the addon(s) that you want to include in the retro. The selected addons will increase based upon the percent entered in the Percent field.
Comment – Enter a comment for this retro. Recommended.
Step 4: Define the posting criteria in Request Information - Section 2 – Posting Criteria The software uses the information you enter to determine how to create and when to pay the retro. ALL fields are required!
Payroll Adjustment Description – Enter the description of this retro. The description will print on the employee’s paycheck, up to 20 characters only.
Use Primary Pay Cycles – Enter “Yes” to use the employee’s primary pay cycle for the retro adjustment amount to appear.
Pay Date – Enter the actual pay date for the retro. In other words, enter the date on which the retro will be paid, regardless of the pay cycle period. It will capture everyone in the BU because you entered “Yes” in the Use Primary Pay Cycle field.
Fiscal Year - Defaults to current Fiscal Year. Field is open if needed to point to a prior fiscal year, if necessary.
Pay Cycle – The pay cycle/period here is to ensure everyone is included. Recommendation: Enter in a 12 month pay cycle (example: CL2J or CE2J).
Pay Period – Enter or select the pay period for the Retro to process.
Step 5: Save/Close to save the Retro Information.

15 | P a g e
Step 6: Re-Open the Retro.
Select Tasks from the tool Bar.
Select Compute Retro from the Drop Down Menu.
The system will compute the retro lines and close the retro.
Start the review process.
Here is a list of recommended items that need review.
1 - Verify all employees listed are reporting and calculating as expected. Are your employee listed as expected, is anyone missing? Research and determine the reason an employee might be missing from the list. Are they in a terminated employment status? Do they have an active pay cycle? Do they belong to two Bargaining Units? Is the Bargaining unit selected their primary assignment?

16 | P a g e
2 - Are there any Retirees, or Reduced Work Load employees listed? Cancel their pay lines listed in the retro, Retirees or RWL employees are entitled to the retro pay but their pay lines cannot process using the Retro Payroll Process.
EXAMPLE 2 -
*Paying a Retro to a Retiree and RWL Employee Section of this guide.
3 - Are there negative pay lines indicated on the retro? Cancel ALL negative pay lines. They cannot process using the Retro Payroll Process. They will create Retirement errors that will hold up retirement reporting submissions for the entire District. Go to the negative Retro Pay Line and update the Cancelled Column Cell to “Yes”. Find the positive Retro Pay Line for the same Pay Period and Deduct the Negative from the Retro Amt listed on the positive line. Enter in the new amount in the Ovr Retro Amt Column. Reference EXAMPLE 5 for Cancelled Assignments. EXAMPLE 3 –

17 | P a g e
4 - Is the salary schedule Hourly or Monthly? Verify that it is reporting accurately?
If an employee has a (173) Monthly PERS Schedule indicated, and the salary schedule is actually (400) hourly. You will need to override the Pay Rate Column, and the PERS Rate and PERS Schedule Columns to reflect accurately. Remember to go to the Employee’s retirement record and update for future pay rolls. This will allow them to be reported accurately, and eliminate the need for SCOE Retirement Technician to make manual adjustments to Employee Retirement Records, and avoid possible reporting errors.

18 | P a g e
5 - Review Employee’s with Assignments that have been cancelled in prior pay periods?
This can cause overpayments and need review in the Retro Pay Lines. The district will need to determine which line is the correct line and cancel the negative and the old assignment lines created by the cancelled assignment.
EXAMPLE 5 -
Step 8: Save/Close once all your lines have been Reviewed, Cancelled, Overridden and
Updated. Step 9: Re-Open the Retro to begin the Review Process. Go to the Tasks Button and use the Drop down Menu. Step 10: Select Post Retro, the Retro Batch will close. Re-Open the Retro Batch to Submit, this will post the Retro to Adjust Pay Step 11: Go to Adjust Pay to review the Batch Posted as expected.
Recommended: Districts should review and balance Adjust Pay to ensure accuracy.
These Dates need to be updated to reflect the
correct Pay Period
Override Dates s/b: 10/31/19 9/30/19 8/30/19

19 | P a g e
Cancel Assignment - Method 3 Method 3 will update the employees assignment record and calculate the retro in adjust pay for the employee. This method will ONLY work with a Salary Schedule Change (Salary Schedule Name Change, Cell Changes), Reduced Work Load Employee or Retiree.
Step 1: Go to HR – Payroll- Employment – Employee Management Open the Employees Record
Cancel Assignment Example
District has decided to change the name of their Salary Schedule in Escape. You cannot use the Retro Payroll Process using the Salary Schedule Method 1. You will need to manually update each employee who is affected by this change. Old Salary Schedule was named: 2CNEW, the district changed it to 2CLASS.

20 | P a g e
Step 2: Go to the Assignment Tab of the Employee
Step 3: Go to the Cancelled Field: Enter “Yes” Save/Close
Step 4: Copy the Cancelled Assignment
Step 5: Open the Copied Assignment Line Go to Section 1 – Assignment Information Enter in the EXACT same Begin Date and End Date as original assignment.
Step 6: Go to Section 1 – Additional Assignment Information Update the Salary Schedule Field to reflect the new Salary Schedule Name Save/Close

21 | P a g e
Step 7: Go to HR/Payroll – Payroll – Adjust Payroll Enter the Employee Id Number to review her Current and Future Payrolls Select Go
Exact Same Dates
Enter New
Salary Schedule
Name
The assignment with the CURR Status has a Salary Amount, and indicates the next open payroll 9/1/20. The assignment with the CNCL Status does not have a Salary Amount and indicates it was Paid Job Thru 8/31/20 (the last regular payroll).
Retro on 9/30 and Monthly Increase Oct-June

22 | P a g e
Step 8: Open the 9/30/20 Adjust Payroll Line Review the Adjust Pay Assignment Tab
Assignment Cancel and Assignment Catch Up

23 | P a g e
STRS Retiree Retro Earnings Setup Method 1: Use the Retro Cancel Assignment Method 3 *Recommended
Page 19 of this document.
Method 2: Manually enter the Retro in Adjust Pay • Go to HR/Payroll – Payroll – Adjust Pay • Open the Pay Period you are paying the Retro • Go to the Addon Tab
- Enter RTRO Addon
- Enter Rate 1 Amount (Retro Total Amount)
- Effective Date (Retro Pay Period)
- Enter Description
- Enter Position # (this will use Acct Code)
- Save/Close • Review to ensure there are no errors.
• If more than one pay period, remember to update Section 3 – Retirement in the Addon line to reflect the correct pay periods.
REMINDER:
Update ALL Retiree Lines in the Retro Payroll Process Cancelled Column flag with a “Yes”.

24 | P a g e
PERS Retiree Retro Earnings Setup
Method 1: Use the Retro Cancel Assignment Method 3 *Recommended
Page 19 of this document.
Method 2: Manually enter the Retro in Adjust Pay • Go to HR/Payroll – Payroll – Adjust Pay • Open the Pay Period you are paying the Retro • Go to the Addon Tab
- Enter RTRO Addon When entering in a RTRO for a PERS Member you must use the UNITS on Hourly Employees. This will ensure proper retirement reporting. Example: Jane Doe is entitled to a total retro of 20.96 for 8/31/20 Payroll. Her new pay rate is 21.72. Determine the units to enter in the RTRO Addon to pay her correctly. Calculate the units based upon the new pay rate and enter in the units with the new pay rate to calculate and report the retro correctly.
- Enter in the Units (How many Hours if Hourly. or Days is Daily) - Enter Rate 1 Amount (New Pay Rate Amount)
- Effective Date (Retro Pay Period)
- Enter Description
- Enter Position # (this will use Acct Code)
- Save/Close
REMINDER:
Update ALL Retiree Lines in the Retro Payroll Process Cancelled Column flag with a “Yes”.

25 | P a g e
STRS Reduced Work Load Retro Earnings Setup Method 1: Use the Retro Cancel Assignment Method 3
*Recommended and easiest setup. Let the system do the work for you!
Method 2: Use the following Retro Pay Worksheet/Template to calculate
Step 1 - Go to STRS Retirement System and print out the Employee’s Retirement Page for the Retro Pay Periods.
Or –
Review each Escape payroll snapshot for each prior pay period.
Step 2 - Use the Template (below) to calculate and manually enter in the correct pay rate and retro amount into Escape.
• How to determine the PAY RATE for a RWL Retro to ensure proper reporting:
o Calculate the Difference between the OLD and the NEW Monthly Pay Rate
o Multiply the Amount by the Number of Pay Periods (Months) affected by the Retro
IMPORTANT:
CANCEL ALL Retro Pay Lines in the Retro Payroll batch, Update ALL RWL Lines to “Yes”.
CANCEL
STRS Assignment Code 36

26 | P a g e
• How to determine the EARNINGS for a RWL Retro to ensure proper reporting:
o Calculate the Difference between the OLD and NEW MONTHLY earnings. o Multiply that amount by the number of Pay Periods (Months) affected by
the Retro
EXAMPLE 1 –
Minnie Mouse

27 | P a g e
EXAMPLE 1 – Escape Retirement Setup

28 | P a g e
EXAMPLE 1 – Escape Retirement Snapshot
Recommendation:
Submit helpdesk request for the SCOE Retirement Technician to review prior to payroll submissions. They can assist and review the setup and retirement reporting are correct. This eliminates the possibility of misreporting errors.

29 | P a g e
EXAMPLE 2 from STRS Handbook –

30 | P a g e
Tips n Tricks on Balancing your Retro Payroll
Method 1: Export the Retro Pay Lines Batch to Excel
Step 1 - Go to HR/Payroll – Payroll – Retro Payroll
Step 2 - Open the Retro Payroll Batch
Step 3 - Go to the Retro Pay Lines Tab
Step 4 - Click on any Retro Pay Line, the system will now display the Export option
Step 5 - Select Export, the system will export your Retro Pay Lines to Excel
Step 6 - Open your Excel Spreadsheet
Step 7 - Insert a Column next to the Retro Amt Column
Step 8 - Enter a Column Header, then a formula
Example = 2%*Paid Amt Column
Step 8 - Copy/Filter the Formula down your Column to compare your manual calculation to the Retro Amt listed.

31 | P a g e
Method 2: Calculate and Balance Each Employee Confirm the Retro is calculating and reporting as expected.
Step 1 - Create Outside Retro Balance Sheet Template
(Alternatively, submit a request for a template from the SCOE Helpdesk)
Calculate using the EE Assignment Information Determine their old pay rate, and earnings prior to retro based on Salary Schedule and Calendar
Determine their new pay rate, and earnings after the retro
Determine the amount owed in the current pay period for the retro pay periods.
Compare to Escape calculation
• Review Assignment • Review Adjust Pay • Review Adjust Pay Snapshot
Outside Retro Balance Sheet - EXAMPLES EXAMPLE 1 -

32 | P a g e
33 | P a g e
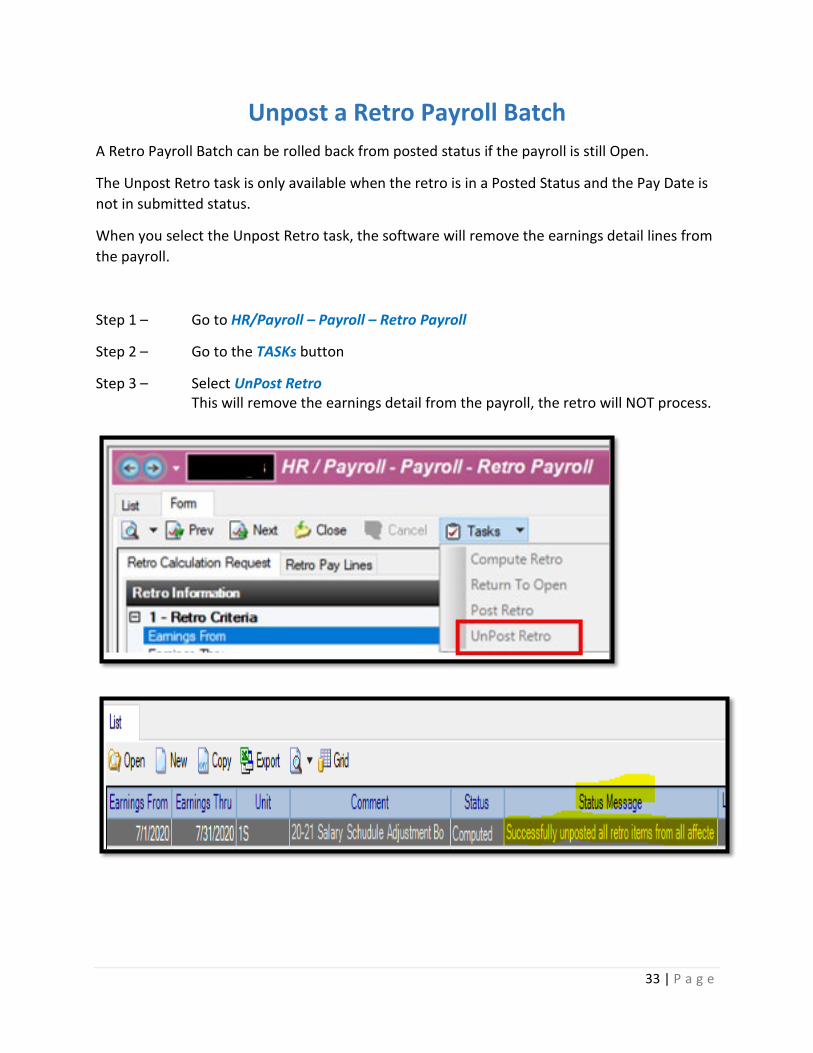
Unpost a Retro Payroll Batch A Retro Payroll Batch can be rolled back from posted status if the payroll is still Open.
The Unpost Retro task is only available when the retro is in a Posted Status and the Pay Date is not in submitted status.
When you select the Unpost Retro task, the software will remove the earnings detail lines from the payroll.
Step 1 – Go to HR/Payroll – Payroll – Retro Payroll
Step 2 – Go to the TASKs button
Step 3 – Select UnPost Retro This will remove the earnings detail from the payroll, the retro will NOT process.

34 | P a g e
New Escape Release 20.3 – STRS Retro Payroll Changes
HR/Payroll Payroll Retro Payroll
19659 Update Payroll Retro to support STRS Pension Project changes
Completed 07/24/20
In the 20.03 Release Escape added the STRS Pension Project Fields in HR/Payroll-Payroll-Retro Payroll. These fields are editable in the Retro Payroll Lines.
Here are the new STRS Pension Project Columns and Menu drop downs. They will automatically convert the data in the retro based upon current setup in the employees earnings record and retirement tab.

35 | P a g e
Here are the individual choices available in the drop down menu for each of these columns: SCL = STRS Classification Codes SEP – STRS Expected Periods
SBH = Open for Editing otherwise system generated. SET = STRS Earnings Type STB = STRS Time Base

36 | P a g e