esab online user manual - esab latvia · copyright esab 2011 page 8 of 30 after entering all...
TRANSCRIPT
ESAB Online User Manual
Document Control:
Document Version 2.2
Release Date August‐2012
Language English
Supported Internet Browsers:
Internet Explorer version 7 and higher (recommended IE version 8)
Mozilla Firefox
Google Chrome
Other supporting applications that you need:
Microsoft Excel version 2003 or higher
Abode Acrobat PDF reader
Copyright © 2011 ESAB. All rights reserved. Neither this document nor any part of it may be copied or reproduced in any form or by any means or
translated into other languages without the prior consent of ESAB. The information contained in this document is subject to change
without the obligation to notify any person of such revision or changes. ESAB makes no commitment to keep the information contained
herein up to date.

Copyright ESAB 2011 Page 2 of 30
TABLE OF CONTENTS
1. LAUNCH ........................................................................................................................................................................... 3
2. LOGIN .............................................................................................................................................................................. 4
3. HOME .............................................................................................................................................................................. 6
4. ORDER ............................................................................................................................................................................. 7
4.1. ORDER > CREATE ORDER ......................................................................................................................................... 7
4.2. ORDER > ORDER HISTORY ..................................................................................................................................... 14
4.3. ORDER > BOOK PRINT ........................................................................................................................................... 15
4.4. COPY EXISTING ORDER .......................................................................................................................................... 15
4.5. UPLOAD ORDERS FROM EXCEL ............................................................................................................................. 16
4.6. USING OWN ITEM NUMBERS ................................................................................................................................ 17
4.7. PRODUCT > SEARCH .............................................................................................................................................. 21
4.8. PRODUCTS > PRICE & STOCK ................................................................................................................................. 22
4.9. PRODUCTS > PRICE BOOKS ................................................................................................................................... 23
4.10. PRODUCTS > PROMOTIONS .............................................................................................................................. 23
4.11. APPLICABLE CHARGES ....................................................................................................................................... 23
4.12. TERMS & CONDITIONS ...................................................................................................................................... 23
5. LINKS ............................................................................................................................................................................. 25
5.1. NEWS ..................................................................................................................................................................... 25
5.2. LINKS ..................................................................................................................................................................... 25
6. TEST CERTFICATES ......................................................................................................................................................... 26
7. SUPPORT ....................................................................................................................................................................... 27
7.1. FAQ ........................................................................................................................................................................ 27
7.2. USER MANUAL ...................................................................................................................................................... 27
8. YOUR PROFILE ............................................................................................................................................................... 28
8.1. CHANGE PASSWORD ............................................................................................................................................. 28
9. CONTACT US .................................................................................................................................................................. 29
10. ABBREVIATIONS & GLOSSARY ................................................................................................................................... 30

Copyright ESAB 2011 Page 3 of 30
1. LAUNCH
This is the launch page of ESAB Online website. From here you need to select your specific country and language before you can login. You can either click on the world map to select your Region & Country alternatively, click on the Regions listed on the left hand side (only Europe is activated in this version) Then select the language on the left hand side and click Login.
Note: If you click on “Remember my choice next time”, then country and language selection will be saved thereafter and you will go to directly to the “Login” page.

Copyright ESAB 2011 Page 4 of 30
2. LOGIN
After clicking on the “Login” button from the previous “launch” page (after selecting country & language), you will be directed to this “Login” page.
You must enter your User ID and Password to Login.
Note:
Password is case sensitive.
Your User ID is validated based on the country selected in the launch page. If you have wrongly selected the country in the launch page, click on the “launch Page” link to go back to the launch page and select the appropriate country you are registered in.
3 consecutive login failure attempts will disable your User ID.
Your session will be timed out, in the event of non activity for 1 hour on any page and you will be re‐directed to the “Launch” page.
If you are a new user click, the New User link and complete the New User Registration Request form . The form will be sent to the administrator and you will be contacted once your new login is set up.
Should any of the following scenarios arise click on “Contact administrator” link
If you do not remember your User ID and/or Password
If your User ID has been disabled

Copyright ESAB 2011 Page 5 of 30
Clicking on the “contact us” link will open up your default setup mail (e.g. Microsoft Outlook) with our administrator’s email id, to which you can mail your login issue details.

Copyright ESAB 2011 Page 6 of 30
3. HOME
Upon successful login, you will be directed first to the ESAB Online Home Page.
Your Customer number and name will be displayed on top left hand side and your User ID on the top right hand side.
The home page contains some “Quick Links” on the left hand side navigation, whereby you can directly move into some specific sections.
Other than “Home”, there are 5 major top navigation menus (Order, Links, Support, Profile and Contact Us). Each category is explained in the following sections.
Remember to read through our “Privacy & Legal” link, on the footer on all pages, before you proceed.

Copyright ESAB 2011 Page 7 of 30
4. ORDER
Clicking on the top menu “Order” or via Quick Links from Home page will open the first section under “Order”: Create Order.
4.1. ORDER > CREATE ORDER
Order creation is divided into 3 simple steps: Step‐1: Create Order, wherein order header information are entered, Step‐2: Add Items, where items are added and lastly Step‐3: Order Confirmation.
Note: Should you not complete all the 3 Steps in sequence, if you click on any other navigation tabs, if you log out, if your session gets timed‐out due to non‐activity or if you lose your internet connection, the order will be treated as an unconfirmed order and will be cancelled by ESAB Customer Services.
STEP‐1: CREATE ORDER
Your Order No.: Enter here your order number. This input is mandatory.
Note: We recommend that you do not use the same “Your Order Number” used in earlier orders you have placed you will see a soft warning message if the order number has been used before however, you can still proceed with the order if you wish.
Req Delivery Date: This is the requested delivery date for the whole order. By default this date will be set as the next working day date. You can select any working day (Mon to Fri) date from the next working day date from the calendar by clicking on the Calendar button beside.
Note: Holidays falling on working days (Mon to Fri) are not considered in this version. So, please be careful not to select the requested delivery date which fall on holiday dates.
Delivery Address: This is the delivery address where you want the shipment to be delivered to. All delivery addresses of the customer are available on the selection drop‐down from where you can select your required delivery address. Upon selecting a particular delivery address from the drop‐down selection, the selected delivery address will be displayed in the “Delivery Address” section.
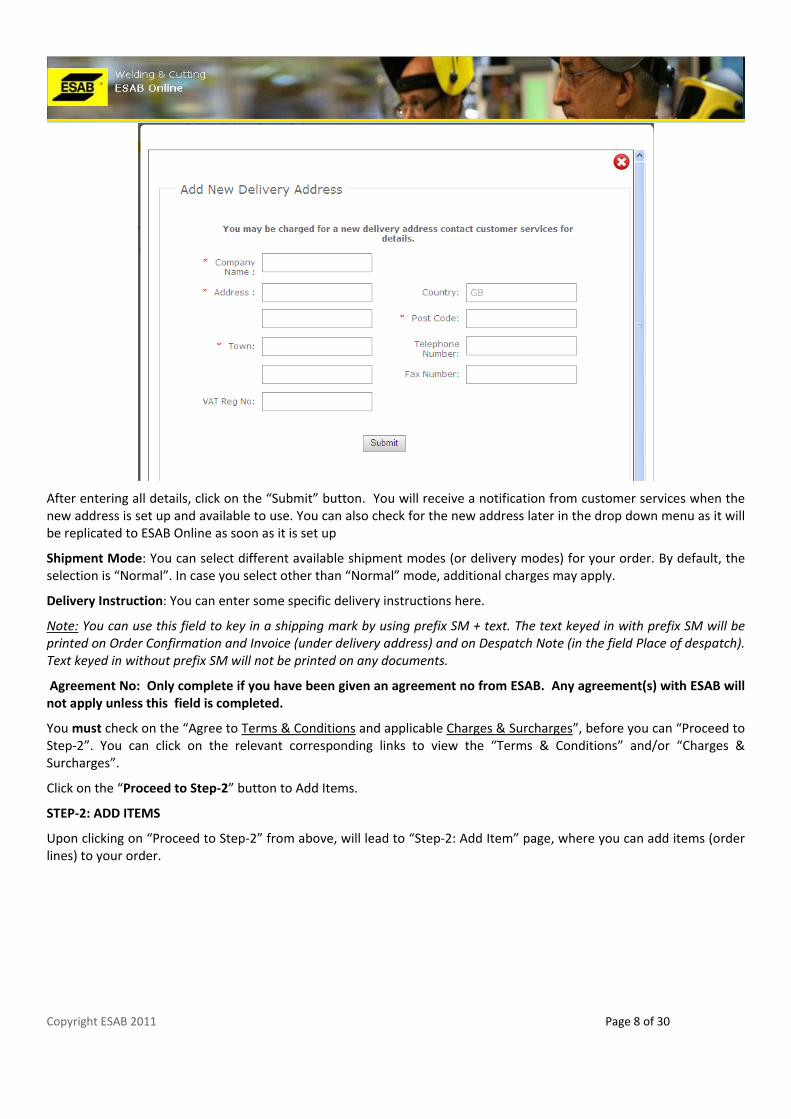
New Delivery Address: Click on the “New” link to request creation of new delivery address. This will open up a pop‐upwindow where you are required to fill in all the necessary details of the new delivery address.
Copyright ESAB 2011 Page 8 of 30
After entering all details, click on the “Submit” button. You will receive a notification from customer services when the new address is set up and available to use. You can also check for the new address later in the drop down menu as it will be replicated to ESAB Online as soon as it is set up
Shipment Mode: You can select different available shipment modes (or delivery modes) for your order. By default, the selection is “Normal”. In case you select other than “Normal” mode, additional charges may apply.
Delivery Instruction: You can enter some specific delivery instructions here.
Note: You can use this field to key in a shipping mark by using prefix SM + text. The text keyed in with prefix SM will be printed on Order Confirmation and Invoice (under delivery address) and on Despatch Note (in the field Place of despatch). Text keyed in without prefix SM will not be printed on any documents.
Agreement No: Only complete if you have been given an agreement no from ESAB. Any agreement(s) with ESAB will not apply unless this field is completed.
You must check on the “Agree to Terms & Conditions and applicable Charges & Surcharges”, before you can “Proceed to Step‐2”. You can click on the relevant corresponding links to view the “Terms & Conditions” and/or “Charges & Surcharges”.
Click on the “Proceed to Step‐2” button to Add Items.
STEP‐2: ADD ITEMS
Upon clicking on “Proceed to Step‐2” from above, will lead to “Step‐2: Add Item” page, where you can add items (order lines) to your order.

Copyright ESAB 2011 Page 9 of 30
Item Number: You can either directly enter the Item Number or you can click on the “magnifying glass icon” beside to search the Item Number. This is a mandatory input/selection.
Item Search: Clicking on the “magnifying glass” icon opens up a pop‐up window enabling you to search the item number. By default all items applicable to the customer are displayed.

Copyright ESAB 2011 Page 10 of 30
Search results are displayed with Item Number, Item Name, MOQ (Minimum Order Quantity), IOQ (Incremental Order Quantity or Order Multiple), Pallet Qty and Basic UOM (Unit of Measurement). MOQ, IOQ and Pallet Quantities are displayed in Item’s Basic UOM.
Pagination: Default number of search records displayed per page is 10 (you can increase it to 20 or 50 records per page). You can move forward page by page by selecting the next page icon or jump directly to a page by entering the page number or you can go to the last page by clicking on the last page icon . Similarly, you can move backwards, either page by page by clicking previous page icon or move back directly to a specific page number or move back to the first page by clicking on the first page icon .
Note: vertical scroll will be applied in case you select number of records per page more than 10.
You can search items by multiple ways:
In case you know some part of Item Number: select “Item No” in the “Search by” drop‐down, then enter the part of item number that you know and then click “Search”. In case you know some part of item name: select “Item Name” in the “Search by” drop‐down, then enter the part of Item name that you know and then click “Search”. This will display you all the item numbers matching your search criteria.
Note: the search text input is not case‐sensitive.
You can further refine your search by clicking “Refine Search”. This will open up additional search criteria on Category and Group. You can select Category from the drop‐down list and/or Group from the drop‐down list and then click “Refine”. Note that the “Refine Search” works in combination with the above simple search: In case you have entered some part of item number or item name and then also selected Category and/or Group in the Refine Search section, the search results will be displayed considering all the criteria.
Note: In case you are changing search criteria, please ensure you are in the first page (no.1) in pagination.

Copyright ESAB 2011 Page 11 of 30
Once you have found your item, click on the radio‐button before the Item Number and click “Add”
Product Info: Every item number has a hyperlink to detail Product Information. Click on the item number and this will open the following pop‐up window, displaying detail information about the Product.
An item can have multiple Alternate UOMs (Unit of Measurements) and their conversions into Item’s Basic UOM are displayed in tabular format under “Alternate UOMs”.
Convert: You can enter any quantity with alternate UOM and click “Convert” to convert the quantity into item’s basic UOM.
Click on “Back to Search” link on top left, to go back to your item search window. Click on icon , on top right corner, to close all pop‐up windows and this will lead you back to “Add Item” page.
Quantity: After selecting/entering Item Number, enter the quantity. There is a drop‐down selection of UOM, beside the Quantity input field, where you can select your order quantity UOM. By default, the UOM will be selected as Item’s Basic UOM. However, you can change the UOM by selecting any of the available item’s alternate UOM from the drop‐down selection.
Note: In case you are entering your order quantity in item’s Alt UOM, be careful of the conversion factor as you must enter the quantity in exact conversion multiple of /divisible by item’s basic UOM (refer to Product Info pop‐up window above for the same), else you will get an error message. Furthermore, be careful in entering order quantity having decimal places, as depending on the Item and the UOM, allowed maximum number of decimal places may be restricted and in that case you will get an Error message in case order quantity decimal places exceeds the allowable limit.
Click here to Close – will lead back to Add Item page

Copyright ESAB 2011 Page 12 of 30
Price & Discounts Display: After selecting/entering item number; Item’s list price per UOM, Discount % and Net price per UOM are displayed below the Quantity input field.
Note: Discount % and Net Price displayed on Item Number selection is for Unit Quantity and may change after entering Quantity, as for some Items you may get better Discount % and Net Price/UOM based on higher Order Quantity.
Req Del Date: This is the requested delivery date for the Add Item line. By default, this date will be the as selected in “Step‐1: Create Order” page. However, you can select another date for the Add Item line, by clicking on the Calendar button beside.
Special Instruction: This input is for entering any special instruction on the Add Item line. Note: You can use this field to key in a line reference by using prefix LR + text. The text keyed in with prefix LR will be printed on Order Confirmation, Invoice and Despatch Note. In case you enter any text without using prefix LR, nothing will be printed on documents and your order will be placed on hold whilst ESAB review.
Alternative items: A notification will be displayed if there are any alternative items are available.
Add: Click “Add” button to add the Item.
Note: You may get any of the following warning messages:
In case Item selected is non‐stocked tem
In case order quantity (converted into Basic UOM in case Alt UOM) is less than MOQ of the item
In case order quantity (converted into Basic UOM in case Alt UOM) is not in multiple of IOQ of the item
In case any Special Instruction entered. Note: In case you change the order quantity and/or UOM, the “Add” button will be disabled for few seconds to retrieve the prices & discounts based on the new order quantity. Please wait till they are displayed again and the “Add” button is enabled back again, before you click on the button. You can either correct the warning messages or you can ignore them by clicking “Add” button again.
After an item is added, the vertical scroll bar will automatically move down, to display the added Item in “Order Lines Added” result grid. You can go on adding other items in similar way, as explained above.
Note: Maximum 999 Order lines can be added to an order.
Order Lines Added: Every order lines added are displayed in the result grid, with “Ln #” (Line No), “Item #” (Item No), “Name” (Item Name), “Disc” (Discount %), “Net Prc” (Net Price/UOM), “Qty” (Order Quantity), “UOM” (Order Qty UOM), “Amount” (Line Amount), “Req.Del.” (Requested Delivery Date for the Line), “Est.Del.” (Estimated Delivery Date) and “Spc.Instr.” (Special Instruction).
Pagination: Similar to “Item Search” pop‐up window, by default only 10 records (order lines added) per page are displayed. You can change the records per page to 20 or 50. In case of records crossing more than 1 page, you can move forward or backward to the page result, in similar way as earlier explained in above “Item Search” section.
Below the added order lines, Totals and Charges are displayed.
Note: All amounts are displayed in the currency of the customer (displayed above the added order lines result grid).
Update Order Line: Click on the update icon to update/edit an already added order line. You can update only quantity (in the same UOM as it was originally entered) and Special Instruction fields.
After updating Quantity and/or Special Instruction, click on “Update” button.
Note:

Copyright ESAB 2011 Page 13 of 30
You cannot change the original UOM or Requested Delivery Date on update of an order line. In case that is required, you will need to delete the original line and add a new order line.
You may get the same warning messages, as explained above in “Add” section. You can either correct them or ignore them, by clicking “Update” button again.
Delete Added Order Line: Click the delete icon against an added order line to delete. You will be asked to confirm whether you want to delete the line. If you click OK, the line will be deleted.
Note:
Line number (which is the primary identifier of order line) will not change on delete. For Example: If you delete line No. 2 out of 3 order lines, after delete you will have Line No.1 and Line No.3.
You cannot delete any order line, after the order has been confirmed (by clicking the button “Confirm”).
Cancel Order: Click on the “Cancel Order” button should you wish to cancel the whole order. You will be asked to confirm whether you want to cancel the order. If you click OK, the complete order will be cancelled, you will get a confirmation message and you will re‐directed to “Step‐1: Create Order page” for creating another order.
Confirm: Click on the “Confirm” button to confirm the order you have entered. This will lead you to Step‐3: Confirmation page. If you need to make any changes to the order once you have confirmed it please contact customer services.
STEP‐3: CONFIRMATION
Upon clicking on “Confirm” from above “Step‐2: Add Item” page, will lead to last step of order creation: “Step‐3:
Confirmation” page. Our order number together with Order Status (On Hold / Under Process) will be displayed.
You can click on the Print link/icon to print the order you have placed. You can click on “Create Another Order”,
which will re‐direct you to “Step‐1: Create Order” page to create a new order.

Copyright ESAB 2011 Page 14 of 30
4.2. ORDER > ORDER HISTORY
You can reach “Order History” page, either by clicking “Order > History” on the left navigation menu or via quick links from Home Page.
Note:
In case of “On Hold” Orders, all order lines will always be on “On Hold” status. Unconfirmed or cancelled orders
are never displayed here.
Order Date Range: You can search your orders by order dates (order date is the date on which order was placed)
Search by: You can search your Order either by Your Order Number or by Our Order Number. Based on the selection
(“Your Order Number” / “Our Order Number”), enter part of full the order number and click on “Search” button and it
will display your order.
Result Pagination (moving across result pages and/or changing records to displayed per page) functionality is same as in
above “Item Search” or “Added Order Lines”.
Order Detail: Every order number (Our Order Number) will have a hyperlink. Clicking on the same will lead you to a
following pop‐up window displaying all the order details.
You can click on the Print link/icon to print the order. Please click on icon to close the window.

Copyright ESAB 2011 Page 15 of 30
4.3. ORDER > BOOK PRINT
Click on “Book Print” sub‐menu under “Order” menu on the left navigation menu. This will display all your outstanding
open orders. There are options to save the order book to pdf and to print.
4.4. COPY EXISTING ORDER
Orders appearing in the Order History can be copied and a new order placed. Locate the order you want to copy and
click the corresponding Copy Order icon.
This will take you to step 1 create order where you can complete the create order details and click proceed to step 2.
Then the copy order screen will be displayed and you can check all the items you wish to copy to your new order and
then click Add. You will then have the opportunity to add any further items to the order or edit the quantities before
confirming the order.

Copyright ESAB 2011 Page 16 of 30
4.5. UPLOAD ORDERS FROM EXCEL
Orders can be uploaded from an Excel spreadsheet, versions 2003 onwards are supported. Go to Create Order screen
and complete the initial information and then proceed to step 2 Add Items. Click on the Excel Upload button to start the
process. Click on Download Excel template and open the spreadsheet.
Complete the spreadsheet with item number/your item number, quantity, unit of measure, requested delivery date and
any special instructions. Save your spreadsheet and then click Choose File, locate the saved file and then click Upload.
In order to use your item number you need to have previously loaded your item numbers into the ESAB Online system.
If you choose to upload by your item numbers you need to change the “Uploaded Items By:” drop down box to Your
Item Numbers. This is covered in section 4.4 Using own item numbers.
Should there be any errors uploading the file, a link called Errors in Excel will appear and this link can be clicked to view
the errors. Validated lines have already been added to your order so you may choose to just add the errored line
manually or you may choose to amend the Excel. You will need to remove the successfully loaded lines and just correct
the errored lines. Once you have corrected the file you need to click the Choose File to select your file and then you

Copyright ESAB 2011 Page 17 of 30
need to click Upload to reload the file. If the file has all been successuly uploaded you will see message “Order Lines
Added” and you will see the orders lines added on the order.
4.6. USING OWN ITEM NUMBERS
In order to be able use your own item numbers in ESAB Online you need to load your item numbers into our system. Go
to the ORDER tab > Product menu > Your Item No. Click Upload New and then download the Excel template.

Copyright ESAB 2011 Page 18 of 30
Complete the spreadsheet and then save the file on your computer. Our Item Number is ESAB items number. Next click
Choose Files and locate your saved file. Click Upload to upload your item numbers. You will see the message Records
validated if all the records are acceptable. It takes approximately 30 minutes for the upload to complete and you will
not be able to view or use your item numbers until then.

Copyright ESAB 2011 Page 19 of 30
Should there be errors then the errors can be viewed by clicking on the Errors in Excel File.

Copyright ESAB 2011 Page 20 of 30
Once your item numbers have uploaded into the system they can be seen in the Order tab > Product menu and Your
item No page. Once uploaded you can use your item numbers in the order entry, product search and price enquiry
screens. Your item number can be edited by clicking the Update item on the required item line. Any item number will
take 24 hours before it is reflected in the ESAB Online system.

Copyright ESAB 2011 Page 21 of 30
4.7. PRODUCT > SEARCH
Click on “Search” sub‐menu under “Product” on the left navigation and this will lead you to adhoc searching of item numbers that you can buy.
This is similar to Item Search pop‐up window from “Add Item” page explained above in section 4.1. All the functionalities
for searching item are same as in “Search Item” pop‐up under above section 4.1.

Copyright ESAB 2011 Page 22 of 30
4.8. PRODUCTS > PRICE & STOCK
Click on “Price & Stock” sub‐menu under “Product” on the left navigation and this will lead you to Price & Stock Enquiry. Item No: Enter the Item Number or select Item Number by searching (click on the magnifying glass beside). Click on “Get
Price” button and it will display List Price/UOM, Discount % and Net Price/UOM. This will be for Unit (1) Quantity.
Quantity: This is an optional input. For some items, you may get better Discount % and Net Price/UOM based on higher
Quantity. You can enter Quantity either in Item’s Basic UOM (UOM default selection) or in item’s Alt UOM (by selecting
Alternate UOM from the drop‐down beside).
Click on “Get Price” button and it will display List Price/UOM, Discount %,Net Price/UOM and stock availability.

Copyright ESAB 2011 Page 23 of 30
4.9. PRODUCTS > PRICE BOOKS
Click on “Price Books” sub‐menu under “Product” on the left navigation and this will lead you to Price Books. Price Books links are displayed together with their “Date“(valid from date).
Price Books are country dependent
4.10. PRODUCTS > PROMOTIONS
Click on “Promotions” sub‐menu under “Product” on the left navigation and this will lead you to available Promotions going on. Promotion links are displayed together with their “Date“(valid from date).
Clink on any of the Promotion link and it will open the same in PDF in another window.
4.11. APPLICABLE CHARGES
Click on “Applicable Charges” on the left navigation. The same can be also seen on a pop‐up window, if you click on the link “Applicable Charges & Surcharges” from “Step‐1: Create Order” page (Section 4.1).
4.12. TERMS & CONDITIONS
Click on “Terms and Conditions” menu on the left navigation and this will display our terms and conditions on pop‐up window. They can be also seen if you click the link from “Step‐1: Create Order” page (Section 4.1).

Copyright ESAB 2011 Page 24 of 30
Please scroll down and read the “Terms and Conditions” in full. Please read through this in full, before clicking “Agree to
Terms & Conditions and applicable Charges & Surcharges” on “Step‐1: Create Order” page, as it is mandatory before you
can proceed to “Step‐2: Add Items” page.

Copyright ESAB 2011 Page 25 of 30
5. LINKS
Click on “LINKS” top navigation menu. This has two sections: “News” and “Links” on the left navigation.
5.1. NEWS
Click on “News” on the left navigation and this will display all recent news links.
Clink on any of the news links and it will open the same in PDF in another window.
5.2. LINKS
Click on “Links” on the left navigation and this will display all other links.
Clinking on any of the links will open the same in another window.
Copyright ESAB 2011 Page 26 of 30
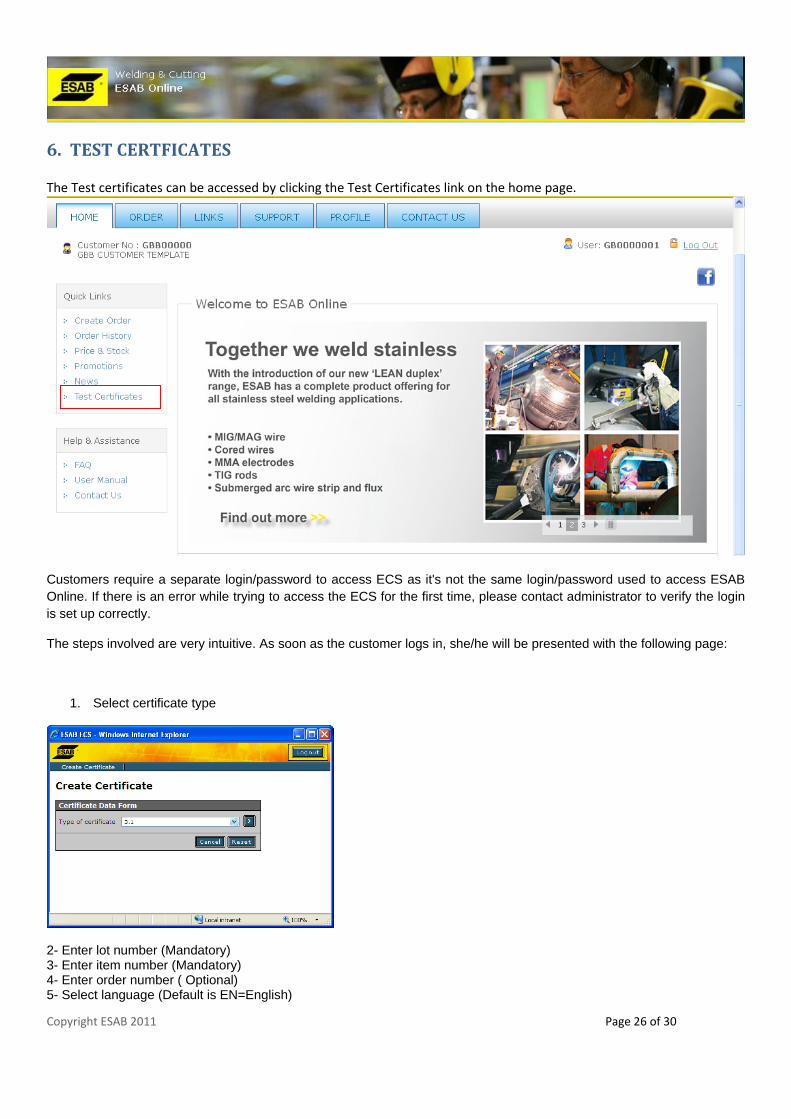
6. TEST CERTFICATES
The Test certificates can be accessed by clicking the Test Certificates link on the home page.
Customers require a separate login/password to access ECS as it's not the same login/password used to access ESAB Online. If there is an error while trying to access the ECS for the first time, please contact administrator to verify the login is set up correctly.
The steps involved are very intuitive. As soon as the customer logs in, she/he will be presented with the following page:
1. Select certificate type
2- Enter lot number (Mandatory) 3- Enter item number (Mandatory) 4- Enter order number ( Optional) 5- Select language (Default is EN=English)

Copyright ESAB 2011 Page 27 of 30
6- Press "Create"
After clicking 'create' another page opens on which you have to click a link to open the certificate as pdf file.
7. SUPPORT
Click on “SUPPORT” top navigation menu. This has two sections: “FAQ” and “User Manual” on the left navigation.
7.1. FAQ
Click on “FAQ” on the left navigation and this will display all FAQ.
7.2. USER MANUAL
Click on “User Manual” on the left navigation and this will open this User Manual in PDF in another window.

Copyright ESAB 2011 Page 28 of 30
8. YOUR PROFILE
Click on “PROFILE” top navigation menu. This will display your basic user profile Information.
8.1. CHANGE PASSWORD
You can change your password from the PROFILE tab and Change password menu. Type in your old password and then
your new password twice. The password needs to be in accordance with the password guidelines given to be changed.

Copyright ESAB 2011 Page 29 of 30
9. CONTACT US
Click on “CONTACT US” top navigation menu and it will all our contact details.
Contact Us are country dependent

Copyright ESAB 2011 Page 30 of 30
10. ABBREVIATIONS & GLOSSARY
Customer Number Every user is associated with one of our customer. Orders will be placed on customer
Your Order Number Your order number
Requested Delivery Date This is the date that you are requesting for delivery of your order/order line. You can request only a next working day date (Mon‐Fri). Note: Holidays are not considered; hence you need to take care of the same in selecting the same.
Delivery Address Delivery address is the address where you want your order to be delivered to. In case you do not select any delivery address, the delivery address will be that of the customer’s main delivery address. case you are not able find your required delivery address, please select the “New” link to request for new delivery address.
Shipment Mode This is the mode of order delivery requested by you
Delivery Instruction This is special delivery instruction you may request on your order delivery. In case you enter any delivery instruction on your order, the order will be placed on hold whilst ESAB reviews the same.
Category Item is classified broadly into one of the multiple defined categories (like electrode, flux, equipment, etc.). This helps in refine searching an item number.
Group Item is sub‐classified into one of the multiple defined groups (like Alloy Electrode, Non‐Alloy Electrode, MIG/MAG, etc). This helps in refine searching an Item number
UOM Unit of measurement. Every item number has one basic UOM.
Alt UOM Alternate unit of measurement. Item can have multiple alternate UOMs, each with own conversion method (multiple of / divisible by) conversion factor into basic UOM.
MOQ Minimum order quantity in item’s basic UOM. In case order line quantity (converted into item’s basic UOM in case alt UOM selected) is less than item’s MOQ, your order will be placed on hold whilst ESAB reviews the details.
IOQ Incremental order quantity in item’s basic UOM. In case order line quantity (converted in item’s basic UOM in case alt UOM selected) is not in multiple item’s IOQ, your order will be placed on hold whilst ESAB reviews the details.
Pallet Pallet quantity in item’s basic UOM. This is only for information.
List Price Item’s list price (in your currency) per UOM
Discount % Total discount percentage (rounded up to 2 decimals). Note: for some item, you may get better discounts on higher order quantity
Net Price Item’s net price (in your currency) per UOM = List price less discounts
Special Instruction This is special instruction you may request on your order line. In case you enter any special instruction on any order line, the order will be placed on hold whilst ESAB reviews the details.
Estimated Delivery Date This the estimated delivery date on any order line, based on our stock availability and planning
<END>