epg123 installation and user's guideepg123.garyan2.net/downloads/epg123_guide.pdf · epg123...
TRANSCRIPT

EPG123 Installation and User's Guide
©2018 by GaRyan2
http://epg123.garyan2.net
Version 1.2.0
21 May 2018

EPG123 Installation and User's Guide
Version 1.2.0 Page i
Table of Contents
Introduction ................................................................................................................................................................1
Acknowledgements ....................................................................................................................................................1
Installation ..................................................................................................................................................................2
Requirements .........................................................................................................................................................2
Warnings .................................................................................................................................................................2
Software .................................................................................................................................................................2
Step 1 – Clean Start ................................................................................................................................................3
Step 2 – TV Setup ....................................................................................................................................................4
Step 3 – Setup and Execute EPG123.......................................................................................................................5
Transfer Recording Requests from Backup ............................................................................................................9
Manual Importing and Matching......................................................................................................................... 11
Final Step – Create a Scheduled Task .................................................................................................................. 12
Custom Configurations/Tools .................................................................................................................................. 13
Additional OTA Configuration ............................................................................................................................. 13
Include Station Logos .......................................................................................................................................... 13
Download Station Logos ...................................................................................................................................... 13
Rebuild Database ................................................................................................................................................. 14
Backup Current WMC Configuration ................................................................................................................... 14
Restore Previous WMC Configuration ................................................................................................................. 14
Command Line Arguments .................................................................................................................................. 14
Tweak WMC Guide and Features ........................................................................................................................ 15
EPG123 Installation and User's Guide
Version 1.2.0 Page 1
Introduction
For many Windows Media Center TV users, July 2015 was not a good month. Microsoft changed their provider of
guide data from the highly stable and reliable Zap2it (Tribune), to the almost amateurish Rovi (Rovi Corp). To be
fair to Rovi, the data provided by them to Microsoft is probably fine, but the execution of the transfer and the
continuing struggles has been amazingly disappointing.
EPG123 was created to not only compensate for the lacking guide information, but to also relieve the user from
relying on Microsoft and/or Rovi to fill their guide with accurate information. The guide information downloaded
by EPG123 is provided by Gracenote (Tribune) via servers maintained by Schedules Direct. EPG123 delivers that
highly stable and reliable data that is expected to even include some customization. Most importantly, though, it
provides the user with some control over their own destiny for TV watching and recording.
Acknowledgements
This project was born out of frustration and desperation following the transfer from Zap2it to Rovi. It could never
have made it as far as it has without the involvement of a lot of WMC enthusiasts and users at The Green Button
(http://www.thegreenbutton.tv). Many of the improvements and features were born of their experiences and
suggestions. There was also quite a bit of technical support provided by Schedules Direct to ensure the EPG123
client/server interaction was optimal.
This product has met the approved application requirements of being free and/or use an OSI-approved Open Source license that does not violate the Schedules Direct Terms of Use or Subscriber Agreement. http://schedulesdirect.org
This product uses the TMDb API but is not endorsed or certified by TMDb. http://www.themoviedb.org
This product uses TheTVDB API. All series, season, episode, and actor images and overview text are the property of the submitter and are available to non-commercial projects under the CC 3.0 Non-Commercial Attribution license. http://www.thetvdb.com
This product uses the Newtonsoft Json.NET library and is granted permission, free of charge, per the MIT License. http://www.newtonsoft.com/json

EPG123 Installation and User's Guide
Version 1.2.0 Page 2
Installation
Requirements
• Membership to Schedules Direct (http://schedulesdirect.org)
• Windows 7/8/8.1 version of Windows Media Center
• .NET Framework 3.5 and 4.0 minimum
• 1GB hard drive space (typically much less)
• Internet connection
• 15 - 30 minutes to perform a basic installation
Warnings Though EPG123 has demonstrated the capability to coexist with Microsoft/Rovi guide data, it is nonetheless
recommended to begin with a clean start by performing Step 1. The existence of the Rovi data has the potential
to override the guide data (low risk) as well as cause channels to completely disappear (medium risk). The data
also introduces some strange behavior in the Movie Guide and category searches.
Performing this procedure will come at some cost.
• All guide customization will be lost (callsigns, channel numbers, favorite lineups, logos, ...)
• Some or All of the scheduled recording requests may be lost. Users in the US with Rovi guide data will be
able to recover most, if not all, of their previous recording requests.
Software Download the latest version of EPG123 from http://epg123.garyan2.net and execute the setup file. The setup will
install the appropriate software, shortcuts, uninstall file, and configure any registry entries necessary to
successfully use EPG123 to provide guide data to your Windows Media Centers.
NOTE If performing an upgrade from a previous version of EPG123, it is only necessary to run the setup file. No further action is required.

EPG123 Installation and User's Guide
Version 1.2.0 Page 3
Step 1 – Clean Start This step creates a backup of the current WMC tuner configurations, guide subscriptions, and scheduled
recordings in the [epg123]\backup folder. The contents of the C:\ProgramData\Microsoft\eHome folder is
deleted to remove all traces of the previous EPG database. If a Hauppauge Colossus HD PVR software tuner is
installed, the software tuner configuration files located in C:\ProgramData\Hauppauge\MediaCenterService are
deleted as well.
1. Start the EPG123 Client program.
2. In the Client Configuration & Actions group, click the [Client Setup] button.
3. Click the [Step 1: Clean Start] button and wait for it to complete.
NOTE This step can take some amount of time depending on the speed of the HTPC as well as how active the hard drive is at the time. When the backup has completed, and the new database has been prepared, the [Step 1: Clean Start] button will turn green and the [Step 2: TV Setup] button will be available to continue with the next step.

EPG123 Installation and User's Guide
Version 1.2.0 Page 4
Step 2 – TV Setup To prevent MS/Rovi from corrupting the guide, it is necessary to deny the Program Guide Terms of Service.
1. Click the [Step 2: TV Setup] button.
2. Respond ‘Yes’ or ‘No’ to the Increase Tuner Limits prompt. This limit increase is only necessary if there
are currently more than 4 tuners for any tuner type (ATSC, Digital Cable, ClearQAM, etc).
3. Select [live tv setup] on the TV menu strip.
4. Proceed with TV setup as normal until the 'Program Guide Terms of Service' screen. Select the ‘I do not
agree’ radio button and click [Next].
5. Click the [OK] button on the warning prompt and proceed with the setup until complete.
NOTE For CableCARD™ users, the activation and pairing of the card with the tuner remains valid even after performing Step 1. For all the setup pages related to activating the CableCARD™, just select the (Yes) bubbles and click the [Next] buttons to proceed. It will not be necessary to contact your cable provider to re-activate the card.
6. For those with Over-the-Air (OTA) tuners, some additional setup may be required. Refer to Additional
OTA Configuration on page 13.
7. Close Windows Media Center.

EPG123 Installation and User's Guide
Version 1.2.0 Page 5
Step 3 – Setup and Execute EPG123 A Schedules Direct account needs to be established prior to this step. There is no configuration to perform on
their website which only manages the XML server; EPG123 uses the JSON server.
1. Click the [Step 3: Configure] button to open the EPG123 Configuration program.
2. Enter the Login Name and Password of the Schedules Direct account to be used and click the [Login]
button.
Subscribe Lineups to Account
3. If there are no lineups associated with the account, the 'Subscribed Lineups' window will be presented
automatically. If there are already lineups associated with the account and changes are desired, click the
[Lineups] button below the [Login] button. Otherwise, proceed to step 9.
4. Click the [Add New] control button to bring up the 'Lineup Search' window.
5. Select the Country and enter the Postal Code of the lineups to search for and click the [Fetch] button.
6. Double-Click the desired lineup to add from the fetch results.
7. Repeat steps 4 - 6 as necessary to subscribe to as many as 4 lineups.
WARNING Schedules Direct limits the number of lineup additions to a maximum of 6 in any 24-hour period. Ensure the desired lineups are subscribed to within that limitation.
8. Click the [Apply & Exit] button on the 'Subscribed Lineups' window.

EPG123 Installation and User's Guide
Version 1.2.0 Page 6
Select Stations to Download
9. For each subscribed lineup in the tabbed panel, select the desired stations to download guide information
for by checking the box next to the station call sign.
NOTE Stations that are common within and between lineups are linked. This means that if a station is selected for download in one lineup, it will also be selected in the other lineup(s). The same is true when a station is de-selected.
ANOTHER NOTE Be aware of stations assigned to the same channel number. Sometimes a provider will list both SD and HD stations on the same channel. For the most accurate guide, only select the station that is appropriate to your specific source.
10. Ensure each lineup is included in the guide download. The selection will be identified by both the green
bubble on the toolstrip and the checkmark by the ‘Include’ menu item.
Select Customization Options
11. In the Configuration panel, set the parameters according to the desired usage and outcome.

EPG123 Installation and User's Guide
Version 1.2.0 Page 7
Prefix episode title with season and episode numbers; Prefix episode description with season and episode numbers;
Append episode description with season and episode numbers; Allow NEW flag to override Original Air Date;
Include station logos from Schedules Direct; Use 2x3 posters for series images instead of 4x3 (4x3 shown)
Use themoviedb.org for missing movie cover art
EPG123 Installation and User's Guide
Version 1.2.0 Page 8
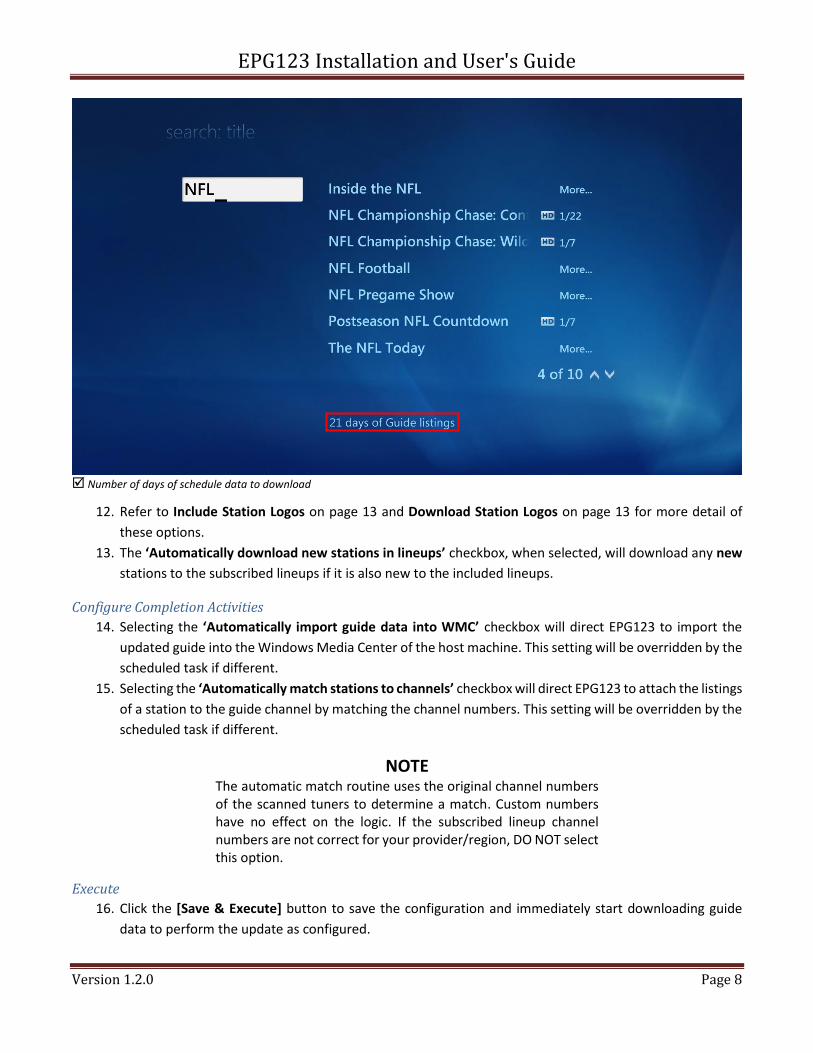
Number of days of schedule data to download
12. Refer to Include Station Logos on page 13 and Download Station Logos on page 13 for more detail of
these options.
13. The ‘Automatically download new stations in lineups’ checkbox, when selected, will download any new
stations to the subscribed lineups if it is also new to the included lineups.
Configure Completion Activities
14. Selecting the ‘Automatically import guide data into WMC’ checkbox will direct EPG123 to import the
updated guide into the Windows Media Center of the host machine. This setting will be overridden by the
scheduled task if different.
15. Selecting the ‘Automatically match stations to channels’ checkbox will direct EPG123 to attach the listings
of a station to the guide channel by matching the channel numbers. This setting will be overridden by the
scheduled task if different.
NOTE The automatic match routine uses the original channel numbers of the scanned tuners to determine a match. Custom numbers have no effect on the logic. If the subscribed lineup channel numbers are not correct for your provider/region, DO NOT select this option.
Execute
16. Click the [Save & Execute] button to save the configuration and immediately start downloading guide
data to perform the update as configured.

EPG123 Installation and User's Guide
Version 1.2.0 Page 9
Transfer Recording Requests from Backup A method has been developed to lessen the burden of a transition from Rovi to EPG123 by providing a tool to
translate Rovi recording requests into EPG123 recording requests and importing them into the WMC database.
The translation table is continually being updated and relies heavily on the ability of Rovi to provide accurate guide
information used to compare with guide information from Gracenote.
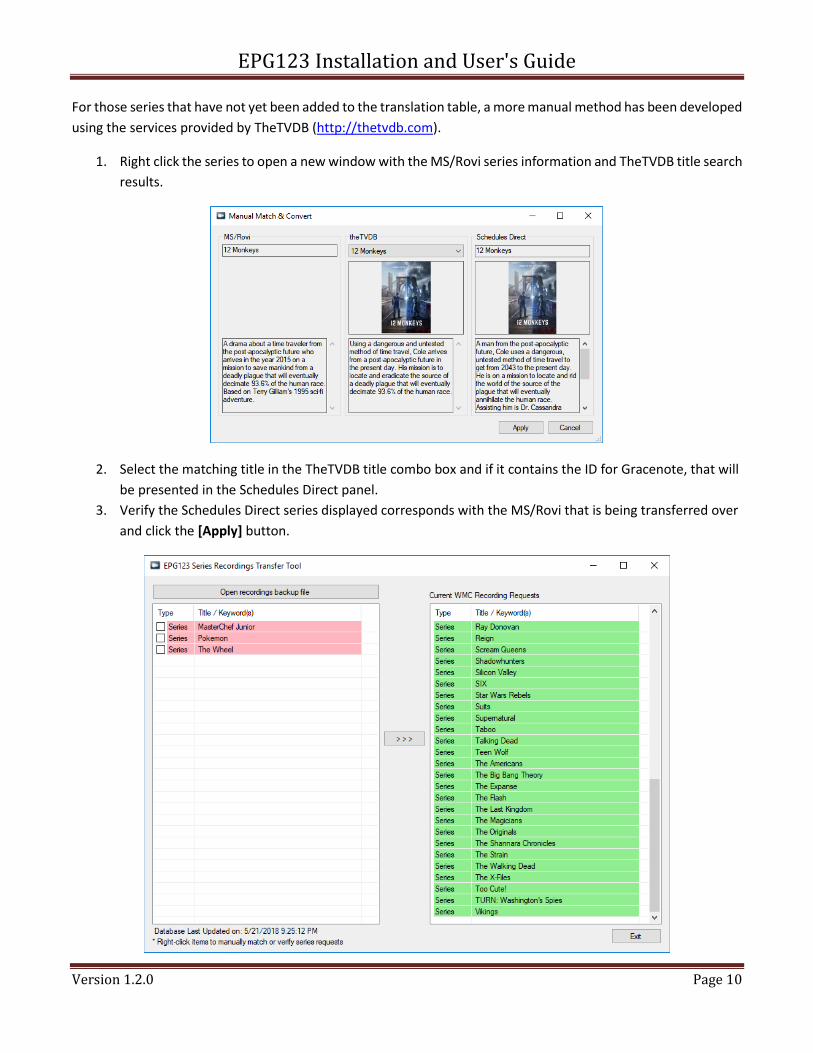
1. Open the EPG123 Transfer Tool. The right panel will be populated with any recording requests currently
in the WMC database.
a. Requests that are green are compatible with an EPG123 WMC database.
b. Any request can be cancelled by right-clicking the item and selecting Cancel.
2. Click the [Open recordings backup file] button to import a recordings backup file. The file can be a
standalone MXF file or as part of the compressed ZIP file created by the Backup Current WMC
Configuration procedure.
3. The contents of the backup file are analyzed and presented in the left panel.
a. Requests that are green are transferrable into the EPG123 WMC database. These items are
selected for transfer automatically.
b. Requests that are pink are Rovi requests that have not yet been translated to a Gracenote value.
These items are not selectable and cannot be transferred to the WMC database.
4. Click the [ > > > ] button to transfer the old recording requests to the WMC database.
EPG123 Installation and User's Guide
Version 1.2.0 Page 10
For those series that have not yet been added to the translation table, a more manual method has been developed
using the services provided by TheTVDB (http://thetvdb.com).
1. Right click the series to open a new window with the MS/Rovi series information and TheTVDB title search
results.
2. Select the matching title in the TheTVDB title combo box and if it contains the ID for Gracenote, that will
be presented in the Schedules Direct panel.
3. Verify the Schedules Direct series displayed corresponds with the MS/Rovi that is being transferred over
and click the [Apply] button.

EPG123 Installation and User's Guide
Version 1.2.0 Page 11
Manual Importing and Matching If either ‘Automatically import’ or ‘Automatically match’ options were not selected, some manual operations need
to be performed to populate the guide using the EPG123 Client program.
Manual Import
The [Manual Import] button is used to import any MXF file into the WMC database. Once the file import has
completed, the guide channels (Left) and the lineup services (Right) will be refreshed to include any new data.
Matching Lineup Service to Guide Channels
For the most part, manually matching the guide channels with the lineup services is intuitive. The below list
provides some of the GUI rules in performing this operation.
• The guide channels can be filtered by Scanned Sources
• The lineup services can be filtered by Lineup
• Match by [Number] and [Call Sign] buttons are available to quickly scan the viewed lineup on the right
and all viewable channels on the left
• The checkbox reflects the Enable/Disable state of the channel in the guide
• Multiple channels on the left can be selected for subscribing, unsubscribing, and deleting guide channels
• Only 1 channel on the right can be selected at a time for subscribing to a guide channel
• To subscribe a channel, at least 1 must be selected on the left and 1 selected on the right
• The labels toggle button is used to toggle between the original call signs and channel numbers with the
custom call signs and channel numbers for matching.
EPG123 Installation and User's Guide
Version 1.2.0 Page 12
Final Step – Create a Scheduled Task To keep the guide listings continually updated, it is necessary to create a daily task to execute epg123 and/or
epg123Client. The intended role of the machine will determine which method to use.
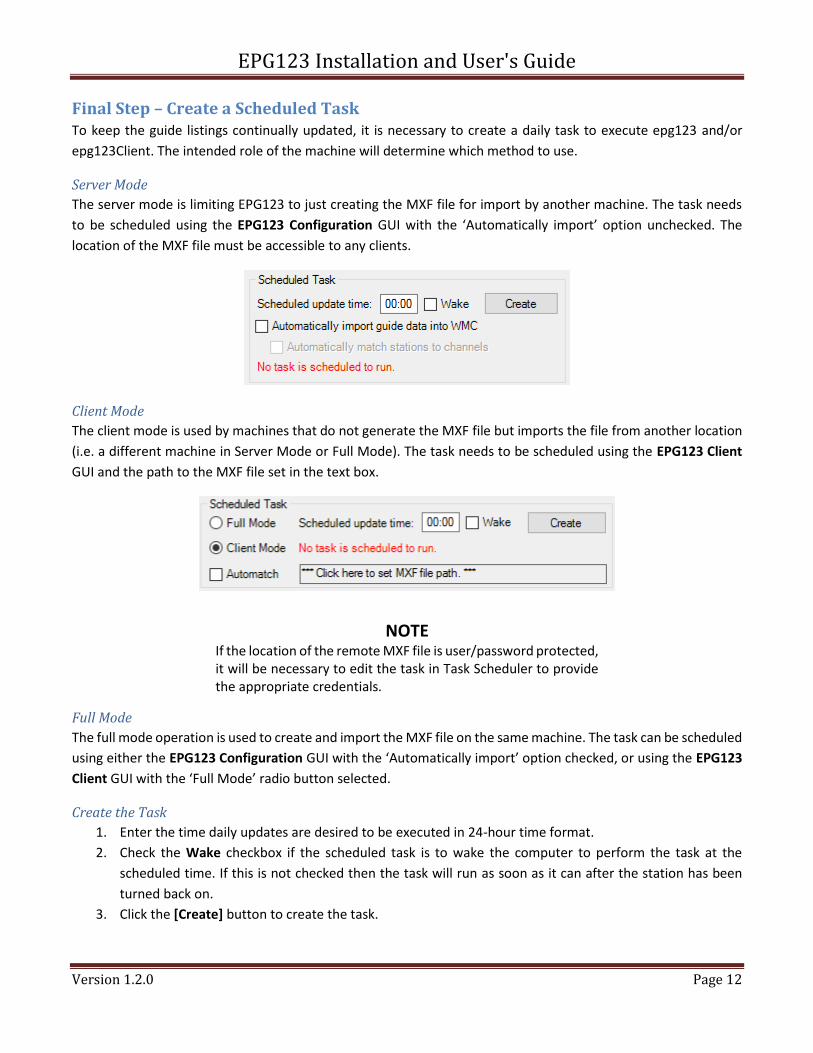
Server Mode
The server mode is limiting EPG123 to just creating the MXF file for import by another machine. The task needs
to be scheduled using the EPG123 Configuration GUI with the ‘Automatically import’ option unchecked. The
location of the MXF file must be accessible to any clients.
Client Mode
The client mode is used by machines that do not generate the MXF file but imports the file from another location
(i.e. a different machine in Server Mode or Full Mode). The task needs to be scheduled using the EPG123 Client
GUI and the path to the MXF file set in the text box.
NOTE If the location of the remote MXF file is user/password protected, it will be necessary to edit the task in Task Scheduler to provide the appropriate credentials.
Full Mode
The full mode operation is used to create and import the MXF file on the same machine. The task can be scheduled
using either the EPG123 Configuration GUI with the ‘Automatically import’ option checked, or using the EPG123
Client GUI with the ‘Full Mode’ radio button selected.
Create the Task
1. Enter the time daily updates are desired to be executed in 24-hour time format.
2. Check the Wake checkbox if the scheduled task is to wake the computer to perform the task at the
scheduled time. If this is not checked then the task will run as soon as it can after the station has been
turned back on.
3. Click the [Create] button to create the task.

EPG123 Installation and User's Guide
Version 1.2.0 Page 13
Custom Configurations/Tools
Additional OTA Configuration Some OTA users will have missing channels once the setup scanning has completed. This is due to Windows Media
Center not scanning the VHF frequencies during setup which are the physical channels 2 - 13. For those missing
channels, it will be necessary to manually add them in WMC.
To determine what the missing station physical (also known as real) channel is, along with the digital (also known
as logical) channel is, it will be necessary to either look that information up or use another source such as the
tuner itself and its software package. A useful source for US OTA information is http://www.tvfool.com.
1. Select [settings]→[TV]→[Guide]→[Add Missing Channels] from the Tasks menu strip.
2. For each missing digital TV channel:
a. Select [Add DTV Channel].
b. Enter the digital/logical channel to add and click the [Next] button.
c. Enter the assigned frequency (physical/real channel) and click the [Next] button.
d. Enter the call sign of the station and click the [Add] button.
3. For each missing analog TV channel:
a. Select [Add Channel].
b. Enter the assigned frequency and click the [Next] button.
c. Enter the call sign of the station and click the [Add] button.
Include Station Logos The ability to include station logos is a built-in feature of WMC that was never used by Microsoft, Zap2it, or Rovi.
EPG123 provides the ability to incorporate custom logos provided by the user or Schedules Direct and stored in
the [epg123]\logos folder. A benefit of including station logos is they are embedded in the MXF file. Any client
that imports the MXF file will also get the station logos.
Logo must be:
• A portable network graphic (PNG) file
• Name must match the station call sign (i.e. ESPNHD.png)
• Recommended aspect ratio is 3:1; logos downloaded from Schedules Direct will be a maximum 360x120
while “big” logos from My Channel Logos XL (http://www.mychannellogos.com) are a maximum 225x75.
• Placed in the [epg123]\logos folder
Download Station Logos In support of including station logos in the generated MXF file, a button is provided on the EPG123 Configuration
GUI labeled [collect]. Clicking the button will download all station logos from the subscribed lineups and saves
them to the [epg123]\sdlogos folder, cropped and named by the respective call sign. The logos are high quality,
but are not optimized for the Windows Media Center in size, aspect ratio, or color scheme. The downloaded logos
are an excellent starting point to edit for the guide using a tool like Paint.NET (http://www.getpaint.net) or GIMP
(https://www.gimp.org). The completed logo images can then be copied into [epg123]\logos folder for inclusion
in the guide on the next update.

EPG123 Installation and User's Guide
Version 1.2.0 Page 14
Rebuild Database There are times that Windows Media Center will refuse to update some programming in the Guide even though
EPG123 is importing correct information. This usually occurs when there have been programming changes due to
current events or special circumstances. If an error is noticed, and possibly verified on the Zap2It website
(http://tvschedule.zap2it.com/), the EPG123 Client GUI provides a method to rebuild the WMC database with the
latest guide data.
NOTE Prior to deleting and rebuilding the database, EPG123 will force a WMC mini-update to create a snapshot of the current tuner configurations and scheduled recordings. This process can take some time but is typically short.
1. Using the EPG123 Client GUI, click the [Rebuild WMC Database] button.
2. Upon successful deletion of the database, a search form will appear to select the desired MXF file to
import (typically epg123.mxf).
Backup Current WMC Configuration It is possible to take a snapshot of your current WMC configurations (tuner configurations, subscribed lineups,
custom channel names and numbers, and scheduled recording requests) for restoral later if desired. Open the
EPG123 Client GUI and click the [Backup] button. The compressed zip file with the configurations will be saved in
the [epg123]\backup folder as backups_yyyyMMdd_HHmmss.zip.
Restore Previous WMC Configuration Restoring a previous WMC configuration is very similar to the Rebuild Database feature except it uses the archived
ZIP file from the Backup Current WMC Configuration. These files can be used to quickly restore WMC to its
previous state but without any guide listings. The tuners will be restored with whatever custom call signs,
numbers, and listings were present at that time.
1. Open the EPG123 Client GUI and click the [Restore] button.
2. For native lineups, the guide listings will have to be downloaded and for EPG123 lineups, the guide listings
will have to be imported for a full restore.
Command Line Arguments
EPG123.EXE [-UPDATE] [-P]
-UPDATE Creates the WMC EPG guide MXF file according to the configuration settings.
-P Displays a message box with progress bars while building the guide MXF file.
EPG123CLIENT.EXE [-I source [-F]] [-MATCH] [-NOLOGO] [-P]
-I source Imports the specified MXF file into the WMC EPG database.
-F Forces import regardless of WMC tuner recording status.
-MATCH Performs the automatching of epg123 stations to the tuner channels in the WMC EPG database.
-NOLOGO Removes all channel logos from the guide.
-P Displays a message box with a progress bar during import.

EPG123 Installation and User's Guide
Version 1.2.0 Page 15
Tweak WMC Guide and Features As part of the EPG123 Client program, it is possible to tweak some WMC settings related to the guide, recordings,
and playback. Click the [Tweak WMC] button to access the form.
Examples:

EPG123 Installation and User's Guide
Version 1.2.0 Page 16