environmental semantic web portal version 1 initial development
TRANSCRIPT

Copyright ENVISION Consortium 2009-2012
Deliverable D2.2
Environmental Semantic Web Portal Version 1
Initial development and user guide
Date:
05/03/2011
Author(s): Florian Husson (BRGM), François Tertre (BRGM), Joël Langlois (BRGM),
Roy Gronmo (SINTEF), Iker Larizgoitia (UIBK), Patrick Maué (UoM), Miha Grčar(JSI)
Dissemination level: PU
WP: 2
Version: 1
Keywords: ENVISION Portal, Modules, Website, User
Description: Report presenting user manual for ENVISION Portal
ICT for Environmental Services and Climate Change Adaption Small or Medium-scale Focused Research Project ENVISION (Environmental Services Infrastructure with Ontologies) Project No: 249120 Project Runtime: 01/2010 – 12/2012

Copyright ENVISION Consortium 2009-2012 Page 2 / 31
Document metadata Quality assurors and contributors
Quality assuror(s) Alejandro Llaves (UoM), Ute Brönner (SINTEF MET)
Contributor(s) All Partners
Version history
Version Date Description
0.1 02/10/2010 First draft
0.2 03/02/2011 New TOC following January Project Meeting
0.3 19/02/2011 Third draft
0.6 22/02/2011 Draft ready for peer review
1.0 02/03/2011 Correction after internal reviewers remarks
Copyright ENVISION Consortium 2009-2012 Page 3 / 31
Executive Summary
This deliverable reports on the first release of the ENVISION Portal. The ENVISION Portal allows the environmental community to use domain specific Web-Models or create new ones building upon the available resources. It is used by non ICT-Skilled users to produce websites dedicated to specific environmental scenarios, which embed web service compositions implementing environmental models. It is a generic solution to be used for different modelling domains and has to provide a community based system. The first release of the ENVISION Portal provides:
1. support of Community with authentication, 2. resource management, 3. an annotation mechanism, 4. discovery of resources, 5. a composition designer, 6. a way to create new scenario websites, 7. an access to dedicated websites.
This deliverable provides details on the aforementioned items and puts them in the context of the overall ENVISION architecture. The first release of the ENVISION Portal presented in this deliverable is functional and already available for internal use for the ENVISION consortium. Significant changes and improvements will be performed during the second and third years of the project and will be reported in the deliverable due for month 24 and month 34 of the project.

Copyright ENVISION Consortium 2009-2012 Page 4 / 31
Table of contents
EXECUTIVE SUMMARY .......................................................................................................................... 3
TABLE OF CONTENTS ............................................................................................................................. 4
1 INTRODUCTION............................................................................................................................... 5
2 THE ENVISION LIFECYCLE ......................................................................................................... 6
3 IMPORT AND RESOURCE MANAGEMENT .............................................................................. 7
3.1 IMPORT RESOURCE ........................................................................................................................... 8
4 ANNOTATION ................................................................................................................................... 9
5 DISCOVERY .....................................................................................................................................11
5.1 NAVIGATE TO DISCOVERY PAGE ......................................................................................................11 5.2 ENTER SEARCH KEYWORDS AND SPATIAL INFORMATION .................................................................11 5.3 DISPLAY RESULTS ............................................................................................................................12 5.4 SELECT RESOURCES AND ADD TO USER COLLECTION .......................................................................12
6 COMPOSITION ................................................................................................................................13
6.1 LOG-IN TO ORYX-ENVISION .........................................................................................................13 6.2 CREATE BPMN PROCESS .................................................................................................................14 6.3 IMPORT SERVICE (FROM THE RESOURCE MODULE) ..........................................................................15 6.4 GENERATION AND DEPLOYMENT......................................................................................................15
7 SETTING UP THE SCENARIO WEBSITE ...................................................................................17
7.1 CREATE A COMMUNITY ....................................................................................................................17 7.2 CREATE A NEW PAGE (WEBSITE) ......................................................................................................18 7.3 ADD AND CONFIGURE MODULES ......................................................................................................18
8 ACCESS SCENARIO WEBSITE ....................................................................................................19
8.1 JOIN A COMMUNITY..........................................................................................................................19 8.2 SCENARIO WEBSITE ACCESS ............................................................................................................19 8.3 INTERACT WITH THE MAP (MAP VIEWER) ........................................................................................20
8.3.1 Standard operations ...............................................................................................................20 8.3.2 Layers manager ......................................................................................................................21 8.3.3 Operations with time .............................................................................................................24 8.3.4 Operations with sensors .........................................................................................................24
CONCLUSION ............................................................................................................................................27
APPENDIX A: COMMON TERMINOLOGY .........................................................................................28
APPENDIX B: ACRONYMS .....................................................................................................................29
APPENDIX C: DOCUMENT REFERENCES .........................................................................................30
APPENDIX D: TECHNICAL IMPLEMENTATION .............................................................................31

Copyright ENVISION Consortium 2009-2012 Page 5 / 31
1 Introduction
The ENVISION project [1] provides an ENVIronmental Services Infrastructure with ONtologies which aims at supporting non ICT-skilled users in the process of semantic discovery and adaptive service chaining of environmental services.
The Description of Work [2] describes the Environmental Semantic Web Portal, herein and after named “ENVISION Portal” as the web-based entry point for all potential users of the ENVISION Infrastructure. It aims at making existing and new environmental models available as a service. In addition, it allows composition of these and other services and the design of dedicated websites to use these compositions.
The Portal allows for managing separate information communities for different scientific domains. For example, the project pilots (oil spill and land slide modelling, see D1.1 [5]) , are of interest for experts with interest in models for either oil spills or landslides.
More precisely, the ENVISION Portal allows people (hereafter End Users) to access a thematic web site (hereafter Website) relevant to their specific domain. It also allows users with specific privileges (hereafter Designers) to create new thematic Websites by managing (import, annotate, register and discover) resources, creating new process compositions, setting up (add and configure modules, select template) Websites and creating communities.
The ENVISION Portal can currently be accessed through the following link: http://envision-portal.brgm-rec.fr/.
We present and then go through the ENVISION lifecycle. We first describe how to access the ENVISION Portal and how to navigate within this Portal. Secondly we look into the resource management and explain how to annotate the resources. We present the discovery of already annotated and registered resources, show the creation of compositions with the help of the designer and how a new scenario website is designed. Finally, we illustrate how to access the scenario websites.
Copyright ENVISION Consortium 2009-2012 Page 6 / 31
2 The ENVISION lifecycle
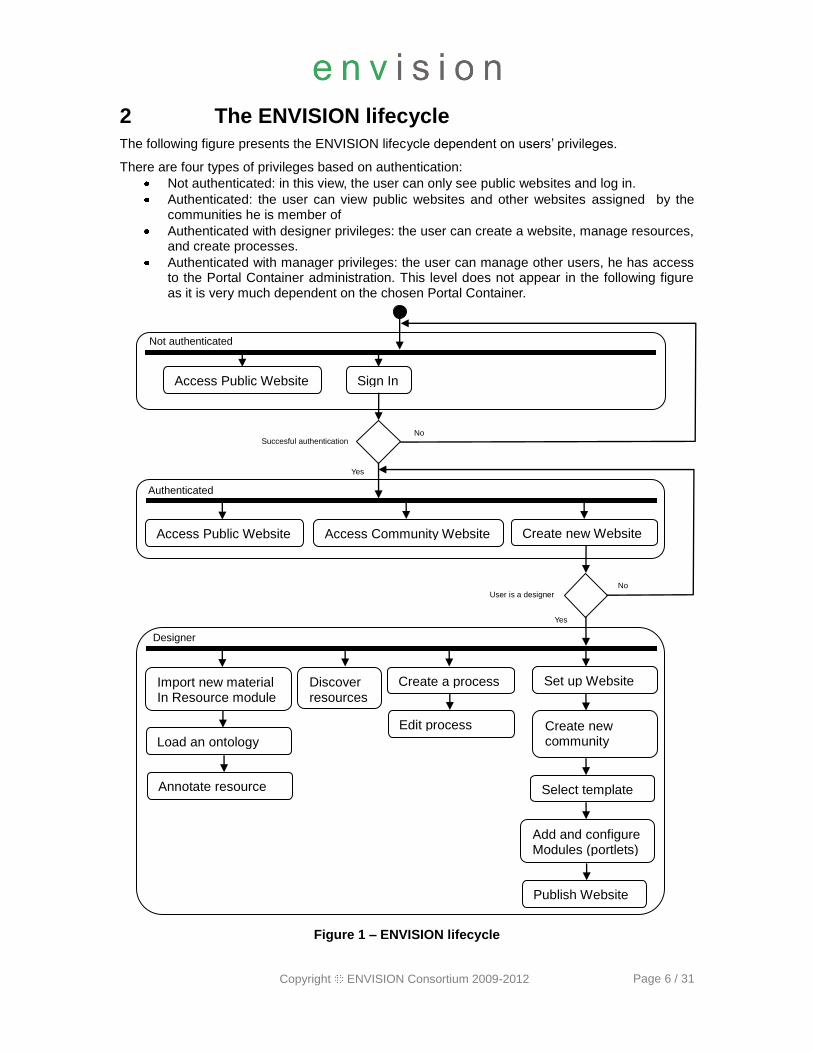
The following figure presents the ENVISION lifecycle dependent on users’ privileges.
There are four types of privileges based on authentication:
Not authenticated: in this view, the user can only see public websites and log in.
Authenticated: the user can view public websites and other websites assigned by the communities he is member of
Authenticated with designer privileges: the user can create a website, manage resources, and create processes.
Authenticated with manager privileges: the user can manage other users, he has access to the Portal Container administration. This level does not appear in the following figure as it is very much dependent on the chosen Portal Container.
Figure 1 – ENVISION lifecycle
Access Public Website Sign In
Not authenticated
Succesful authentication No
Access Public Website Access Community Website Create new Website
Authenticated
Import new material In Resource module
Discover resourcess
Set up Website
Designer
User is a designer
Yes
Create a process
Yes
No
Load an ontology
Annotate resource
Edit process Create new community
Select template
Add and configure Modules (portlets)
Publish Website

Copyright ENVISION Consortium 2009-2012 Page 7 / 31
3 Import and Resource Management
Discovery, Annotation, and Composition are steps in the lifecycle for creating an environmental service. The authenticated user has an associated resource collection, where he can persistently store Web service references, ontologies, and composition drafts. On first login, an empty resource collection is automatically initialized. On each page which involves working with these resources, the Resource Module is used. The resource module is implemented in WP4.
The following screenshots (Figure 2) show the basic structure of the Resource Module. The main part is occupied by a list of resources making up the user collection. A resource may be a composite of other resources (see also Deliverable 4.2 [4] for a more detailed discussion). Each resource has a certain type (e.g. OGC Web Feature Service, WSML Ontology, OGC Feature Type, etc.) and state (e.g. Imported, Annotated, etc.). Each record in the list contains the resource name and the resource type in brackets below. The left screenshot depicts the initial view. The screenshot in the middle illustrates what happens once a resource has been selected.
Figure 2 - Screenshots of initial view (left), selection (center) and search (right) in the Resource Module
A search field is located above the user’s resource collection view. The search is based on simple string-based matching, and is using the name, type, and tags for its index. A search can be cleared by pressing the X-Button near the magnifying glass button. The screenshot on the right of Figure 2 shows a performed search.
At the bottom of the module, further information about the selected resource is displayed on selection. What exactly is listed depends on the type of the resource, and will be extended in the future.
The resource actions are situated between the information panel and the resource list. The following table details the individual commands and their impact on the resource collection.
Refreshes the resource collection by re-fetching the user collection from the Java Content Repository. This action is always enabled.
Import Resource, more details below. This action is always enabled.
Deletes the selected resource. This action is only enabled if the selected resource can be deleted.
Copies the resource identifier to clipboard. The security constraints of

Copyright ENVISION Consortium 2009-2012 Page 8 / 31
javascript prohibit direct access to the user’s clipboard. This function requires an overlay of a flash movie, which might be disabled for certain clients. This action is only enabled if a resource is selected.
Sends the selected resource to other Portlets via JSR 286 Events. Only the resource identifier is sent, it is then in the responsibility of the other modules to fetch the associated resource through the resource API.
This button triggers a state-dependent action. These actions could be “Deploy resource”, “Publish resource”, “Translate resource”, or more. What action is displayed depends on the resource state.
3.1 Import Resource
At any time the user can import new resources to her collection. This step is only applicable if the user knows the location of the resource from where it can be fetched. In the case of a Web service, this would the URL of its endpoint. Figure 3 shows the dialog which is opened once the import button is clicked. Next to the URL the user also has to specify the type. Otherwise the resource API wouldn’t know how to construct the appropriate URLs for retrieving the resource metadata and how to parse the resulting XML.
Figure 3 - Importing a resource
Once imported, the Resource Module automatically refreshes itself and displays the new imported resource.

Copyright ENVISION Consortium 2009-2012 Page 9 / 31
4 Annotation
In order to support efficient browse and search through resources and to enable efficient composition and execution of Web services, the resources need to be semantically annotated. In ENVISION, the semantic annotation is defined as a set of interlinked domain-ontology elements associated with the resource being annotated. The annotation of a resource is a process in which the user (i.e., the domain expert) creates and interlinks domain-ontology instances and placeholders in order to create a semantic description for the resource in question. In WP4, we will provide various modules that will support the user in the annotation task. The first release of the envisaged modules includes the Status Module and Query Module.
The Query Module provides the basic ontology querying functionality. The user is able to enter a natural-language query and select relevant concepts and triples
1 from the provided result lists.
The envisaged user-module interaction is as follows:
1. The user selects a resource and the domain ontology from the Resource Module. He selects the Edit Annotation option from the Resource Actions menu (see Section 4). He can observe
the initialization process in the Status Module as illustrated in Figure 4.
Figure 4 – Status Module
2. The user enters a query, in a Google-like fashion, into the Query Module text box. The query should reflect the semantics that is required to be “attached” to the resource. When the query is set, the user clicks on the “Next >>” button. The module displays several ontology concepts
deemed most relevant with respect to the entered query. This is illustrated in Figure 5.
Figure 5 – Query Module: Query specification and the list of ontology concepts
3. The user inspects the list of proposed concepts and selects relevant concepts by checking the corresponding checkboxes. If the required concepts are not found in the list, the user
1 With “triples” we refer to domain-relation-range triples from the domain ontology (e.g.,
QuarrySite-hasLocation-Location). Note that the elements in a triple are schema elements and not instances.

Copyright ENVISION Consortium 2009-2012 Page 10 / 31
should consider reformulating the query. When the user has selected the relevant concepts,
he clicks on the “Next >>” button to view the list of triples. This is illustrated in Figure 6.
Figure 6 – Query Module: Concept and triple selection
4. The user selects the relevant triples by checking the appropriate check boxes in the list of triples. If all the required concepts have been checked in the previous step, the user only needs to consider the bolded items. When the user has selected the relevant triples, he clicks on the “Finish” button. This action results in an annotation that is constructed fully automati-cally from the provided building blocks. The annotation is “dispatched” to the Resource Mod-ule, which marks the current resource as “annotated”.

Copyright ENVISION Consortium 2009-2012 Page 11 / 31
5 Discovery
New standard-compliant OGC services can be discovered from inside the ENVISION Portal and later added to the user collection to be able to use them in the composition. The Discovery Module provides to the user the interface to define the queries and discover those services.
The steps to carry out the discovery process are shown in the following sections. This is part of the results of WP5, the work of which is planned to be continued for the next year of the project, so the user interface presented here is subject to change.
5.1 Navigate to discovery page
When the discovery page is selected, the user can see the Discovery Module (Figure 7).
Figure 7 –Discovery Module
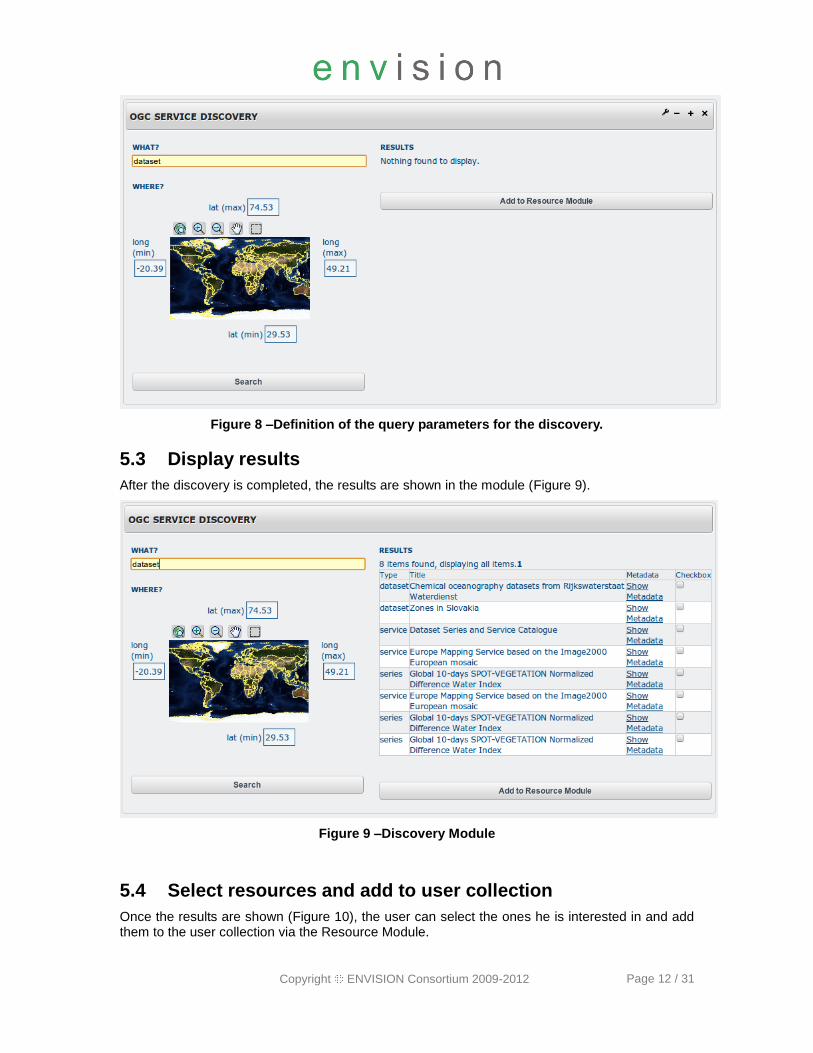
5.2 Enter search keywords and spatial information
At the interface shown in Figure 8, the user can introduce any keyword related to the OGC service he is looking for and the coordinates of the bounding box associated with the service. Pushing the Search button will send the request to the discovery service.
Copyright ENVISION Consortium 2009-2012 Page 12 / 31
Figure 8 –Definition of the query parameters for the discovery.
5.3 Display results
After the discovery is completed, the results are shown in the module (Figure 9).
Figure 9 –Discovery Module
5.4 Select resources and add to user collection
Once the results are shown (Figure 10), the user can select the ones he is interested in and add them to the user collection via the Resource Module.

Copyright ENVISION Consortium 2009-2012 Page 13 / 31
Figure 10 –Selection of resources to be added to the user collection
6 Composition
A composition is created by using the Composition Module which communicates with the Resource Module to find existing services that are chained together to solve the task of the new composite service. The Composition Module is implemented as an ENVISION-specific version of Oryx. Oryx is a web-based, extensible modelling platform (http://oryx-project.org/research).
6.1 Log-in to Oryx-ENVISION
At this stage of development, the authentication mechanism for the Oryx-ENVISION is independent of the authentication to the ENVISION Portal. Log in to Oryx-ENVISION in the Composition Module by entering the user id in the top right corner. Click the login button next to the user id field (Figure 11). Enter the password in the new window that appears and click “Sign on to your OpenID”.
Figure 11 –Composition Module – Log-in to Oryx-ENVISION
Now, the user is logged in to Oryx and can create and store composition.

Copyright ENVISION Consortium 2009-2012 Page 14 / 31
6.2 Create BPMN process
A new composition is created by choosing the “Create New Model” in the top left corner.
Figure 12 –Composition Module – Create a new model
In the drop down menu that appears, choose “BPMN 2.0 Extended Processes” (Figure 12). By choosing “extended”, the user gets a BPMN model in which the ENVISION extensions can be used.
Add an “Expanded Subprocess” by clicking on this item within the “Activities” menu to the left (Figure 13). Left-click the item and drag it into to the model pane.
The subprocess represents a container of the new composite service.
Figure 13 –Composition Module – Create a new composition in the model
Go to the properties view of the sub-process, which can be seen on the right hand side after selecting the sub-process by a single click in the model view. There, the OGC service type of the composite service is defined by selecting a value for the property TaskType (Figure 14).

Copyright ENVISION Consortium 2009-2012 Page 15 / 31
Figure 14 –Composition Module – Edit the properties of the subprocess
In the property view of the sub-process, it is also necessary to give values to the following properties: name, namespace, port type, partner link type, and wsdl.
Next, it is natural to define the internal behaviour of the composite service. Select a “Start Event” from the “Start Events” menu found on the left hand side, and drag it into the sub-process (Figure 15). Similarly, insert an end event into the sub-process by selecting the “End Event” from the “End Events” menu.
Figure 15 –Composition Module – Add the start event
6.3 Import service (from the Resource Module)
The next step is to import the services that are used in a service chain to produce the behaviour of the new composite service. This is done by switching to the Resource Module and searching for resources. Select the relevant resources and send it to Composition Module. Chain the selected services together by control flow by selecting “Sequence Flow” in the “Connecting Objects” menu. Chain together the data objects by selecting “Association (unidirectional)”. The ENVISION framework implicitly assumes that data transformations are needed for each data flow.
6.4 Generation and deployment
After the internal behaviour of the composite service has been defined, it is time to specify the interface by adding input and output data objects by selecting the “Data Object” from the “Data

Copyright ENVISION Consortium 2009-2012 Page 16 / 31
Objects” menu on the left hand side. These are then normally connected to internal data objects inside the sub-process by using data flow.
When the composition model is completed, a BPEL file and a WSDL file can be generated from it. In the next version, there shall be two menu items that automatically performs these transformations. In the current version, the user needs to follow some manual steps.
With the manual steps in the current version, the modeller first ensures that DI XML generation is available by clicking on the “Add additional plugins dynamically” button on the top menu (left hand side of Figure 16). In the pop-up that appears (right hand side of Figure 16), the “ORYX.Plugins.BPMN2_0Serialization” is ticked. This will lead to a new button on the top menu as shown in Figure 17. Then DI XML is generated by selecting “Show BPMN 2.0 DI XML” in the drop-down menu that appears after clicking the button. Save the content in the window that appears as an XML file to hold the generated DI XML. The generated DI XML file needs to be manually updated due to existing bugs in the official Oryx export. Duplicate occurrences of elements need to be deleted. Look for the first duplicated object. Then all the duplicated objects appear in a continuous section. So, it’s sufficient to highlight one section of text in the XML and delete it.
Figure 16 –Composition Module – Add plugin to enable DI XML generation
Figure 17 –Composition Module – Generate DI XML
The generated DI XML is sent as the source to an XSLT process with the BPEL- or WSDL-generator file to produce the desired output. Since mediation is not modelled in the first version, only manual slots are inserted in the relevant positions. Here, it is necessary to insert appropriate copy/assign statements directly in BPEL. The BPEL and WSDL file can be sent to the execution infrastructure to be deployed.

Copyright ENVISION Consortium 2009-2012 Page 17 / 31
7 Setting up the scenario website
The designer has to follow these steps to make a new scenario website available: creating a community, creating a new page, adding and configuring the required modules.
7.1 Create a community
Creating a scenario website is realized through the creation of specific portal instances within the Portal Container. These instances have a dedicated user management, layout, and subpages. They are completely separated from the ENVISION portal described in the preceding sections. In Liferay, these specific portlet instances are called communities. The Designer can create a community using the “My Communities” Module available on the ENVISION welcome page (Figure 18)
Figure 18 – My Communities Module
Three tabs are available in the Community Module:
- “Communities I Own”: Only relevant to users authorized to create and manage communities (i.e. Designers)
- “Communities I Have Joined”: list of all communities which the user is a member of.
- “Available Communities”: list of public and restricted communities. Any user can join a public community by simply pressing the “Join”-Link . To gain access to a restricted community, the user has first to send a request by clicking “Request Membership”.
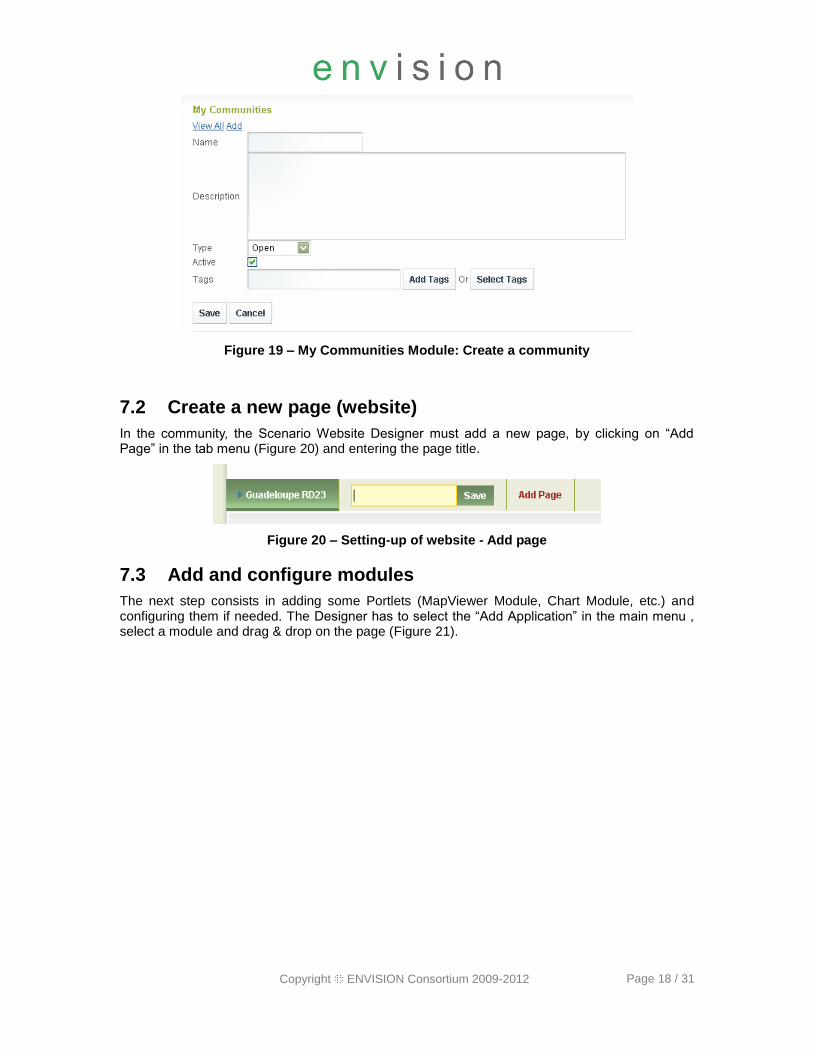
To add adding a community, the Designer has to provide the name of the new community and a description. He also has tochoose its type (open, restricted or private). Figure 19 shows a screenshot of this dialog.
Copyright ENVISION Consortium 2009-2012 Page 18 / 31
Figure 19 – My Communities Module: Create a community
7.2 Create a new page (website)
In the community, the Scenario Website Designer must add a new page, by clicking on “Add Page” in the tab menu (Figure 20) and entering the page title.
Figure 20 – Setting-up of website - Add page
7.3 Add and configure modules
The next step consists in adding some Portlets (MapViewer Module, Chart Module, etc.) and configuring them if needed. The Designer has to select the “Add Application” in the main menu , select a module and drag & drop on the page (Figure 21).

Copyright ENVISION Consortium 2009-2012 Page 19 / 31
Figure 21 – Setting up of website – Adding a module
8 Access Scenario Website
Once a Scenario Website is available, an end-user can access it. We will first explain the mechanism of joining a community, then how to access the website, and finally how use some of the modules typically available on a website.
8.1 Join a community
Communities are created by the Designer. He can assign communities to users in case of a private or restricted community. Users can join a public community by themselves.. Users may send a request to join a restricted community, and in this case the Scenario Website Designer will approve or deny this request. Private communities are not visible to users and access can only be granted through the Designer’s invitation.
8.2 Scenario Website access
A user can access the websites of a community either directly or through the main menu of the portal). A website may contain several pages which can be public or private. These pages can be accessed according to either the type of community orthe user authentication:
Public community Private (or Restricted) community

Copyright ENVISION Consortium 2009-2012 Page 20 / 31
Public page Private page Public page Private page
User authenticated (member of private community)
O O O O
User authenticated (not member of private community)
O O O -
User not authenticated O - O -
Table 1 – Access rights depending on user authentication
8.3 Interact with the map (Map Viewer)
In its default view, this module always visualizes a base map and some basic interaction tools. Depending on the context, certain actions allow for changing the currently visualized content.
In addition to the map, this module contains (Figure 22):
- A toolbar to perform standard operations on the map (left top corner): navigation, zoom in, zoom out, go to max extent.
- An input text (and its button “Go to…”) to locate a place in the world (right top corner).
- A slide panel (on the right) to manage layers and visualize legend.
- A status bar with a scale bar (left bottom corner), while the mouse position is stated in Longitude and Latitude coordinates, in degrees (right bottom corner).
Figure 22 – MapViewer Module
8.3.1 Standard operations
In the Map Viewer, standard operations are available to usefully browsethe map.
Copyright ENVISION Consortium 2009-2012 Page 21 / 31
Pan (default operation): to surf the map.
Zoom in: click on the map to zoom up one level. You can also zoom in to a specific area by keeping the mouse left button pressed and drawing a frame.
Zoom out: click on the map to zoom down one level. You can also zoom out to a specific area by keeping the mouse left button pressed and drawing a frame..
Go to max extent: click on the button to restore max extent (default).
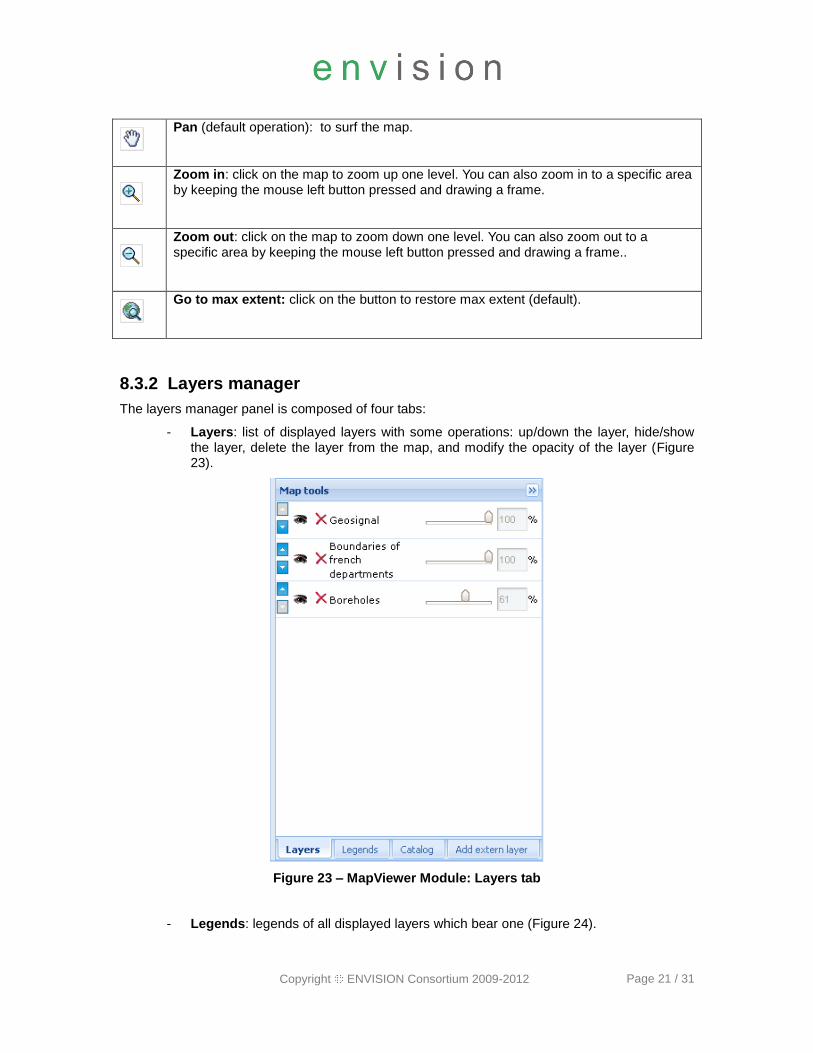
8.3.2 Layers manager
The layers manager panel is composed of four tabs:
- Layers: list of displayed layers with some operations: up/down the layer, hide/show the layer, delete the layer from the map, and modify the opacity of the layer (Figure 23).
Figure 23 – MapViewer Module: Layers tab
- Legends: legends of all displayed layers which bear one (Figure 24).

Copyright ENVISION Consortium 2009-2012 Page 22 / 31
Figure 24 – MapViewer Module: Legends tab
- Catalogue: the layers catalogue of the ENVISION Project (Figure 25). The user has to check/uncheck a layer to display or remove it.

Copyright ENVISION Consortium 2009-2012 Page 23 / 31
Figure 25 – MapViewer Module: Layers tab
- Add extern layer: this panel allows the user to add an external OGC layer of his choice (WMS or WFS) on the map by adding the URL of the service (Figure 26).
Figure 26 – MapViewer Module: Add extern layer tab

Copyright ENVISION Consortium 2009-2012 Page 24 / 31
8.3.3 Operations with time
Some WMS have a time extension: they are called WMS-T and allow to see the evolution of an area along time (e.g. meteorological event), for a given period. In this case, the Layers tab of the Layer Manager display an additional toolbar for this layer (Figure 27):
Figure 27 – MapViewer Module: Time toolbar
With this toolbar the user can choose a date from a calendar. Starting from this date, he can “play” the layer: every 3 seconds, the layer is updated on the map with the next step (e.g. hourly). The input on the right of the calendar shows the hour. The tool also offers rewind and forward buttons as well as two buttons to move backward and forward to the starting or ending time of the layer’s period.
8.3.4 Operations with sensors
Some layers display sensors providing data via OGC SOS service (Figure 28).
Figure 28 – MapViewer Module: Sensors Layer
When such a layer is selected, two new buttons appear in the toolbar:

Copyright ENVISION Consortium 2009-2012 Page 25 / 31
Sensor selection: this tool allows the selection of a sensor by clicking over to show the data of this sensor in a chart or in a table (Figure 29 and Figure 30).
Sensor subscription: this tool allows selection of one or more sensor(s) by clicking or drawing a box over to add them to the Notification Module
2.
The data of the sensor are displayed in two ways. The first is a graph presenting the data depending of the date/time (Figure 29). This graph will evolve to display the uncertainty of the sensor and to allow the user changing the resolution of the time axis. The second is a table presenting the data in the same way that the graph, depending of the date/time (Figure 30).
Figure 29 –ChartViewer module: Chart tab
2 At this stage of development, the notification module is not already available and cannot be
described in this deliverable.

Copyright ENVISION Consortium 2009-2012 Page 26 / 31
Figure 30 –ChartViewer module: Table tab

Copyright ENVISION Consortium 2009-2012 Page 27 / 31
Conclusion
This deliverable provides an overview of the first release of the ENVISION Portal. In this first release, the main achievements have been:
investigating the use of Portals as back-end technology for the desired pluggable and Web-enabled user interfaces
setting up and configuring a Liferay Portal
integrating the modules from the consortium partners: Resources Module, Annotation Module, Discovery Module, and Composition Module;
implementing and integrating the modules dedicated to the end-user Website: MapViewer Module, Chart Module.
The next release of the ENVISION Portal will be available at month 24. The current release will be extended to further fulfil the ENVISION requirement to provide an easy environment for non ICT-Skilled Users. This way, the interface of the modules will be better integrated. Additionally, some new modules will be added to meet the needs for the two pilot scenariios described in the D1.1 [5].

Copyright ENVISION Consortium 2009-2012 Page 28 / 31
Appendix A: Common Terminology
The following table contains the definition of the main terms used in the project.
Term Description
The Infrastructure
ENVISION Infrastructure
The hardware and software set up in order to fulfill the project requirements.
The Pilots
ENVISION Pilots The demonstrators that are set up during the project to illustrate the capabilities of the Infrastructure.
The Portal
ENVISION Portal
Environmental semantic Web Portal
The front-end application of the infrastructure
Website
User Website
Scenario Website
A Website is produced by the Portal for a dedicated purpose for a given community. Also, a website produced by the portal for a dedicated purpose and a given community. During the project, we will produce dedicated Websites for the 2 pilots (landslide and oilspill).
Page One page is made of multiple modules. One particular view rendered in the browser is one page.
Module A user interface module is used to perform a certain task, or to convey a certain message. A module has a standard view, and can be configured through dialogs. Changing the content of module can (but does not have to) have an effect on the content of other components. A module is implemented as Portlet.
Service
Web Service
Web services are typically a web API that are accessible via HTTP and executed on a remote system hosting the requested services
Dialogue A Dialogue is a new frame in the view (a pop up), which allows for additional interaction modes for the selected component.
Composition The executable combination of existing web services. A Web service by itself.
Model
Computer Model
Computer simulation of real world processes to make forecasts of certain behaviour of natural phenomena.
Model as a Service (MaaS) A model made available as a web service. A composition the user can interact with.
Resource A web service (Web Feature Service, Web Processing Service, Sensor Observation Service…) available for processing.

Copyright ENVISION Consortium 2009-2012 Page 29 / 31
Appendix B: Acronyms
The following list contains the main acronyms used in the project:
BPEL Business Process Execution Language
BPMN Business Process Modelling Notation
CAP Common Alerting Protocol
CSW Catalogue Service for the Web
DI XML Standard XML format for BPMN models
EIP Enterprise Information Portal
FTP File Transfer Protocol
GCI GEOSS Common Infrastructure
GeoDRM Geospatial Digital Rights Management
GeoRSS Geospatial RSS
GEOSS Global Earth Observation System of Systems
GML Geography Markup Language
HTTP Hyper-Text Transfer Protocol
ICT Information and Communication Technologies
INSPIRE INfrastructure for SPatial InfoRmation in Europe
MasS Model as a Service
OGC Open Geospatial Consortium
Open-LDAP Lightweight Directory Access Protocol
OWS OGC Web Services
RM-ODP Reference Model of the Open Distributed Processing
RSS Really Simple Syndication
SEIS Shared Environmental Information System
SISE Single Information Space in Europe for the Environment
SoA Service Oriented Architecture
SOS Sensor Observation Service
SPS Sensor Planning Service
UML Unified Modelling Language
WCS Web Coverage Service
WFS Web Feature Service
WMS Web Map Service
WPS Web Processing Service
WSDL Web Service Description Language

Copyright ENVISION Consortium 2009-2012 Page 30 / 31
Appendix C: Document References
[1] ENVISION Project http://www.envision-project.eu/ [2] DOW Description of Work, cf FP7 Grant Agreement N° 249120, annex I [3] D2.1 Environmental Semantic Web Portal - Architecture specification [4] D4.2 Model annotation component and guidelines [5] D1.1 Report presenting definition of pilot cases

Copyright ENVISION Consortium 2009-2012 Page 31 / 31
Appendix D: Technical Implementation
The ENVISION Portal is composed of individual and pluggable user interface software components which enable the user to perform the various steps required to compose and publish environmental models as services. The modules are compliant with the JSR 268 specification (and its predecessor JSR 168) which defines them as “Portlets”.
For the ENVISION Project, we decided to integrate portlets into an existing Portlet Container: Liferay (http://www.liferay.com). The version deployed for the Envision Portal is the #5.2.
Since the modules are implemented against the JSR 268 specification, they are constrained to the Java Programming Language. JDK1.6 is mainly recommended.
The individual components coming from the ENVISION project are free software and are released through an open source project in KENAI (http://kenai.com/projects/envision).