enterprise surveillance manager. version 5.4.5 … surveillance manager. version 5.4 add system...
TRANSCRIPT

4111 Monarch Way | Suite 510 | Norfolk, VA | 23508 p: 877.207.1112 | f: 832.201.0342 | www.ipconfigure.com
Enterprise Surveillance Manager. Version 5.4.5
Access Control Integration
Enterprise Surveillance Manager
Access control| version 5.4
2
About This Document
This document is designed to provide an overview of
ESM 5.4 Access Control integration with various
access control systems including Lenel, AMAG, Barix,
and P2000.
For More Information
Visit ipConfigure at www.ipconfigure.com for
additional product documentation.
IPVS University
ipConfigure’s IPVS University is a one-day training
course that provides physical security and IT
professionals with the knowledge to implement and
manage Enterprise Surveillance Manager and
License Plate Recognition. To register for a course
please visit www.ipconfigure.com/company/
Support
For additional support information, visit
www.ipconfigure.com/support_info/
ipConfigure customer support members are
available from 8am to 8pm EST. To contact a
member of our support team call 1.877.207.1112
option 2 or email [email protected].
©2014 ipConfigure Inc. The material in this document is copyrighted and not to be used or reproduced without the
express written consent of ipConfigure. Information in the document is subject to change without notice.

Enterprise Surveillance Manager
Access control| version 5.4
3
ESM Access Control
Enterprise Surveillance Manager. Version 5.4 Add System Device
This document is designed to take a user through setting up a System (e.g., Lenel, AMAG, Barix I/O, or P2000 – JCI)
in ESM 5.4 and configure it to interact with other cameras and devices.
The Access Control System can be added as a system to one of ESM’s existing locations. This allows for a single
instance of ESM to have multiple access control integrations across multiple sites.
EXAMPLE: If you had a version of ESM that had Houston/Dallas offices that both used different access control
systems, each site could leverage integration with the access control system specific to that site. To be more
specific, if Houston had Lenel Access Control System and Dallas had AMAG, installing ESM on both locations allows
for usage of Lenel and AMAG Access Control Systems at both locations.
SYSTEM SETUP REQUIREMENTS
Depending on which system you have selected there may be additional setup requirements needed on the access
control system before ESM will be able to communicate with the distributed system.
Lenel – DataConduIT (WMI Web Service)
AMAG – Security Management System (XML Web Service)
Barix – No additional setup required on Barix Device
P2000 JCI – Grant access to ESM
Enterprise Surveillance Manager
Access control| version 5.4
4
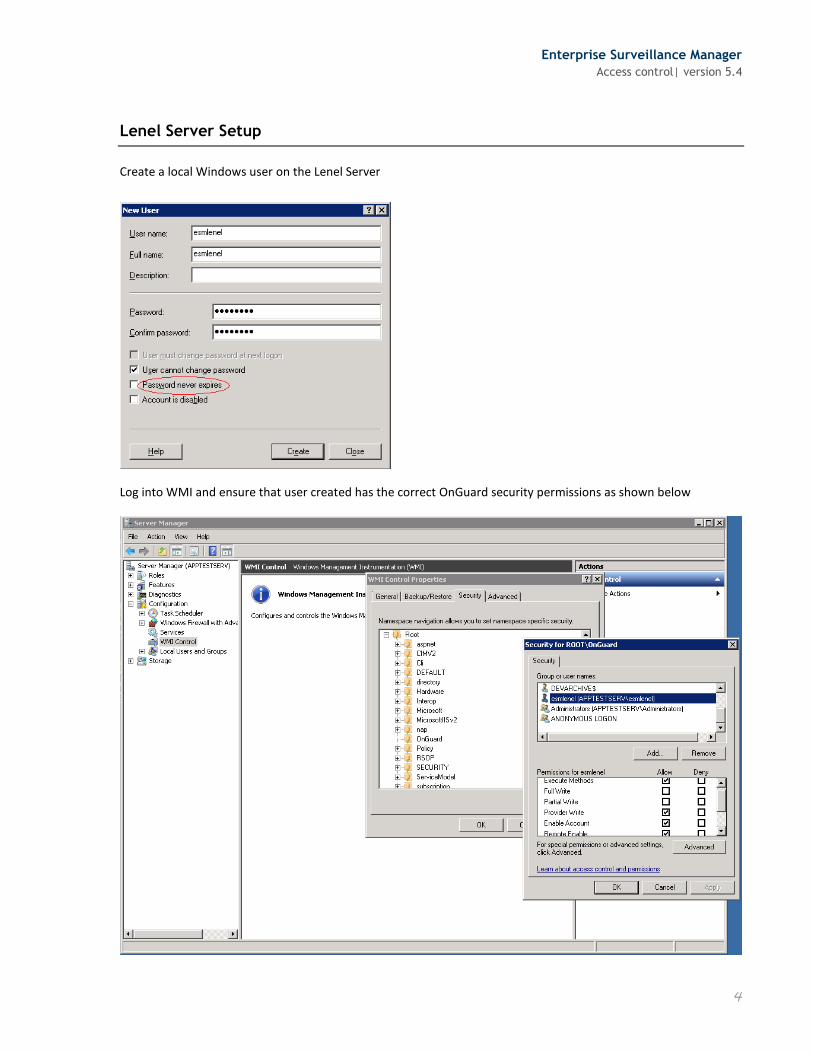
Lenel Server Setup
Create a local Windows user on the Lenel Server
Log into WMI and ensure that user created has the correct OnGuard security permissions as shown below

Enterprise Surveillance Manager
Access control| version 5.4
5
Log into Lenel and navigate to the directories menu
Add a Windows Local Accounts directory

Enterprise Surveillance Manager
Access control| version 5.4
6
Enter the Server name/Hostname of the Lenel Server in the General tab
Select Current Windows account in the Authentication tab

Enterprise Surveillance Manager
Access control| version 5.4
7
Navigate to the directories menu
Link the esmlenel user to the Administrator Note: You can link this to any Lenel role, however ESM will only have access to the role assigned to display events.

Enterprise Surveillance Manager
Access control| version 5.4
8
Ensure the esmlenel user has permissions to the wmi root/OnGuard
Active Directory!
Enterprise Surveillance Manager
Access control| version 5.4
9
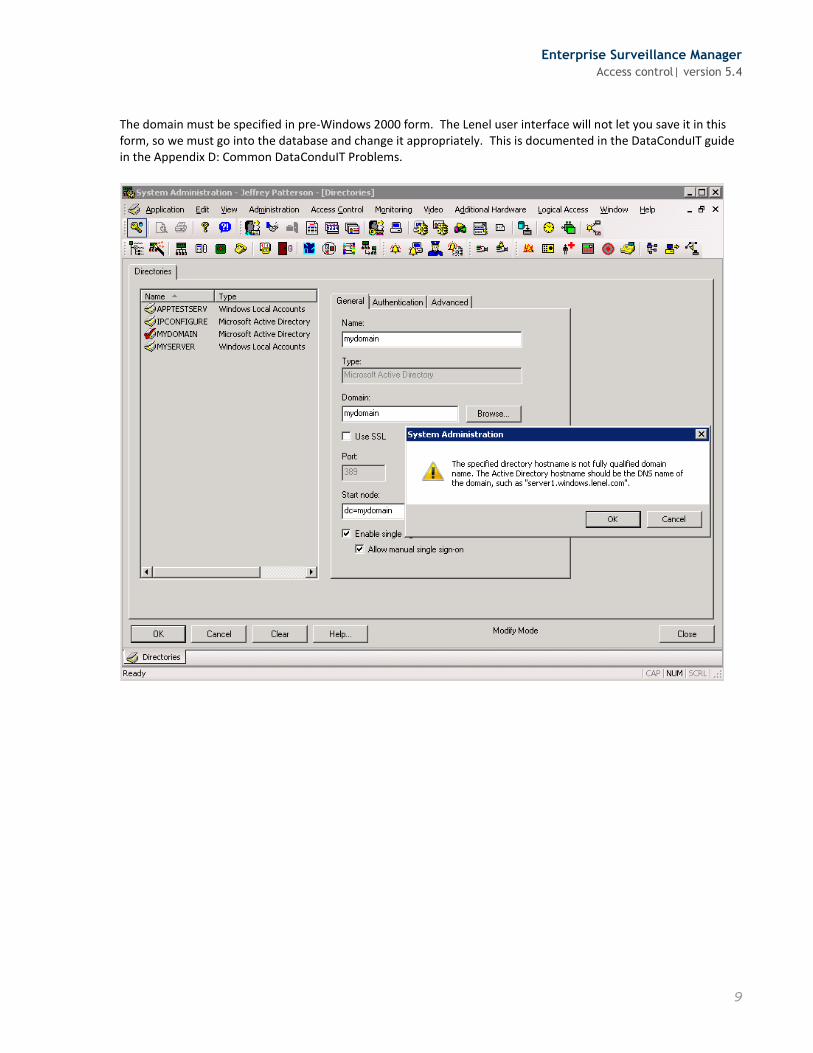
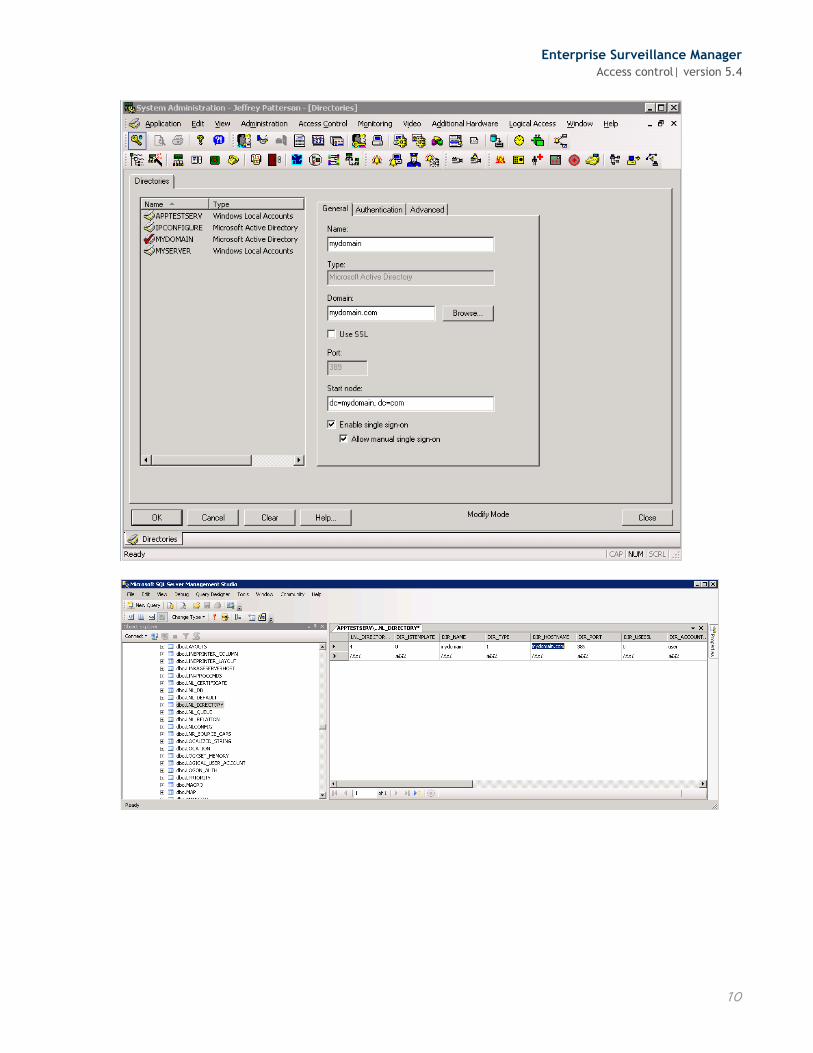
The domain must be specified in pre-Windows 2000 form. The Lenel user interface will not let you save it in this form, so we must go into the database and change it appropriately. This is documented in the DataConduIT guide in the Appendix D: Common DataConduIT Problems.
Enterprise Surveillance Manager
Access control| version 5.4
10
Enterprise Surveillance Manager
Access control| version 5.4
11
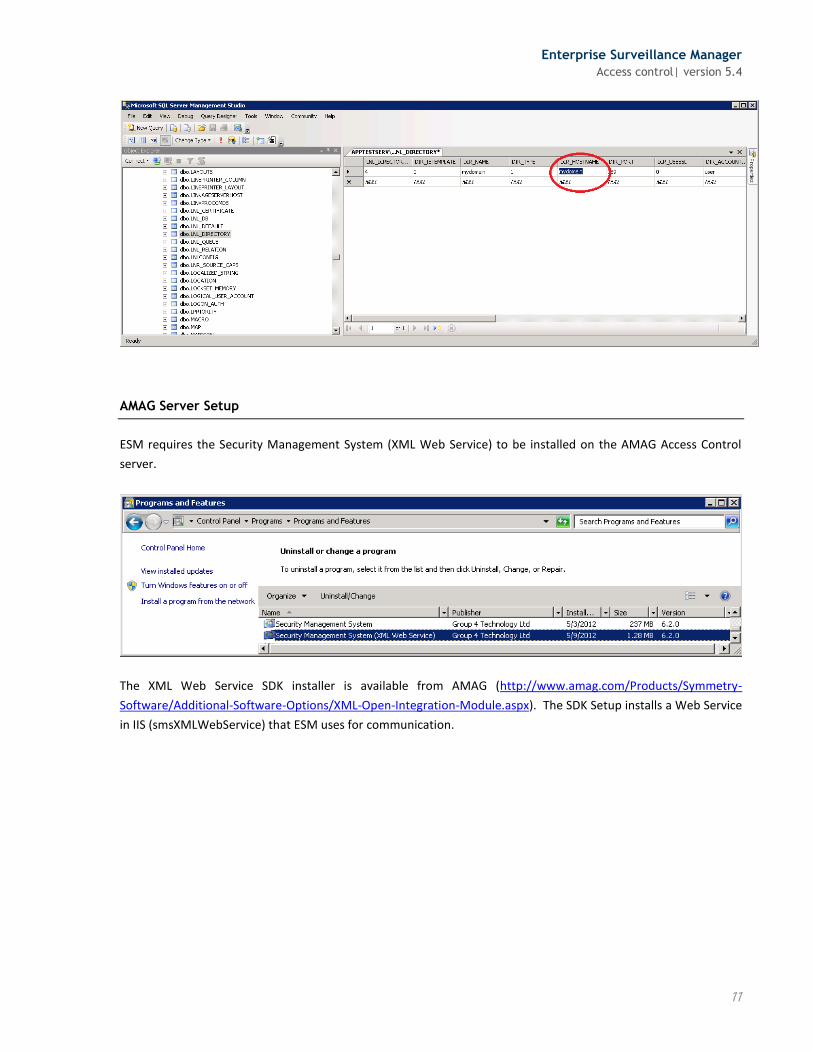
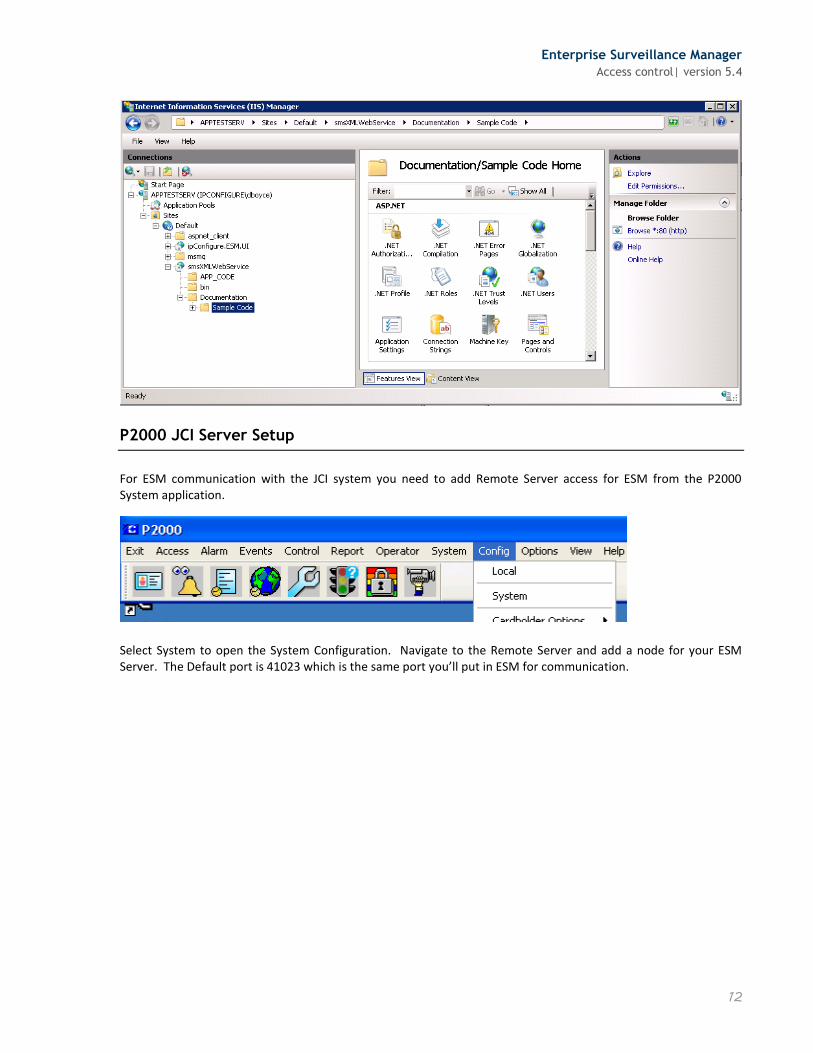
AMAG Server Setup
ESM requires the Security Management System (XML Web Service) to be installed on the AMAG Access Control
server.
The XML Web Service SDK installer is available from AMAG (http://www.amag.com/Products/Symmetry-
Software/Additional-Software-Options/XML-Open-Integration-Module.aspx). The SDK Setup installs a Web Service
in IIS (smsXMLWebService) that ESM uses for communication.
Enterprise Surveillance Manager
Access control| version 5.4
12
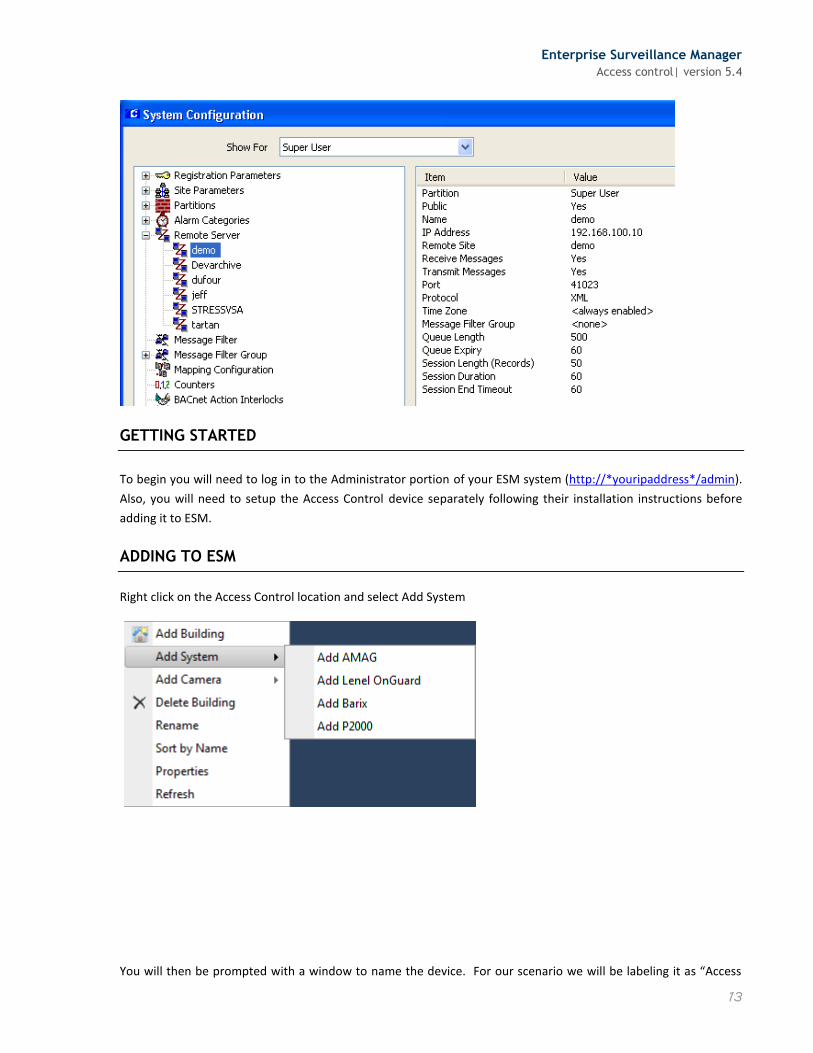
P2000 JCI Server Setup
For ESM communication with the JCI system you need to add Remote Server access for ESM from the P2000 System application.
Select System to open the System Configuration. Navigate to the Remote Server and add a node for your ESM Server. The Default port is 41023 which is the same port you’ll put in ESM for communication.
Enterprise Surveillance Manager
Access control| version 5.4
13
GETTING STARTED
To begin you will need to log in to the Administrator portion of your ESM system (http://*youripaddress*/admin).
Also, you will need to setup the Access Control device separately following their installation instructions before
adding it to ESM.
ADDING TO ESM
Right click on the Access Control location and select Add System
You will then be prompted with a window to name the device. For our scenario we will be labeling it as “Access

Enterprise Surveillance Manager
Access control| version 5.4
14
Control”
You will now be presented with a configuration page which will look like the following:
1. Insert the IP Address of the Access Control Server. This address is programmed on the server when you
are initially setting it up.
2. Enter the unique port in which was configured at the initial setup.
3. Choose which archive server it will be reporting and recording actions to.
4. Enter login information for the device if you have chosen to setup a username and password
5. After applying the above settings and refreshing the page the Device ports will show up. Here you can
modify these to suit your needs as will be explained in the next section.
6. Archive Server Settings is related to the archive server responsible for saving events and how long you
want to save events before purging.

Enterprise Surveillance Manager
Access control| version 5.4
15
CONFIGURING DEVICE PORTS
The next step in the process is suggested as it will make the rules portion of the setup much easier and intuitive for
you. The Device Ports section corresponds to the physical ports that are present on the Access Control device
itself. The system ports will be automatically discovered and added to ESM. To see the ports click on Groups then
a specific group (e.g., Administrator) and the ports will be listed in the parent tree for the Access Control system.

Enterprise Surveillance Manager
Access control| version 5.4
16
Check which ports you want available for which group(s). Then those port(s) will be available for selection in the
Devices tree.
CONFIGURING RULES
The rules engine for Access Control is where events passed from the Access Control system can trigger actions in
ESM and vice versa. The rule consists of one event and one or more actions. This is designed to take common
scenarios and create automation to manage those scenarios.
Scenario: There is a door that leads to a data center that requires proximity badge access for entry. Inside the
data center there is another door which leads to a classified area where additional access is required for entry via
proximity badge access.
Example 1: The door to the data center passes an “access granted” event which will trigger a specified PTZ camera
to move to a preset pointed at the door, thus capturing who enters the data center successfully.
Example 2: The door to the data center remains open for longer than 20 seconds, which passes a “propped door”
event ,which triggers a force record on the 9 cameras in the data center.
Example 3: A camera in the datacenter goes offline, which can trigger another camera in the area to force record
only if there is motion in the area.
Enterprise Surveillance Manager
Access control| version 5.4
17
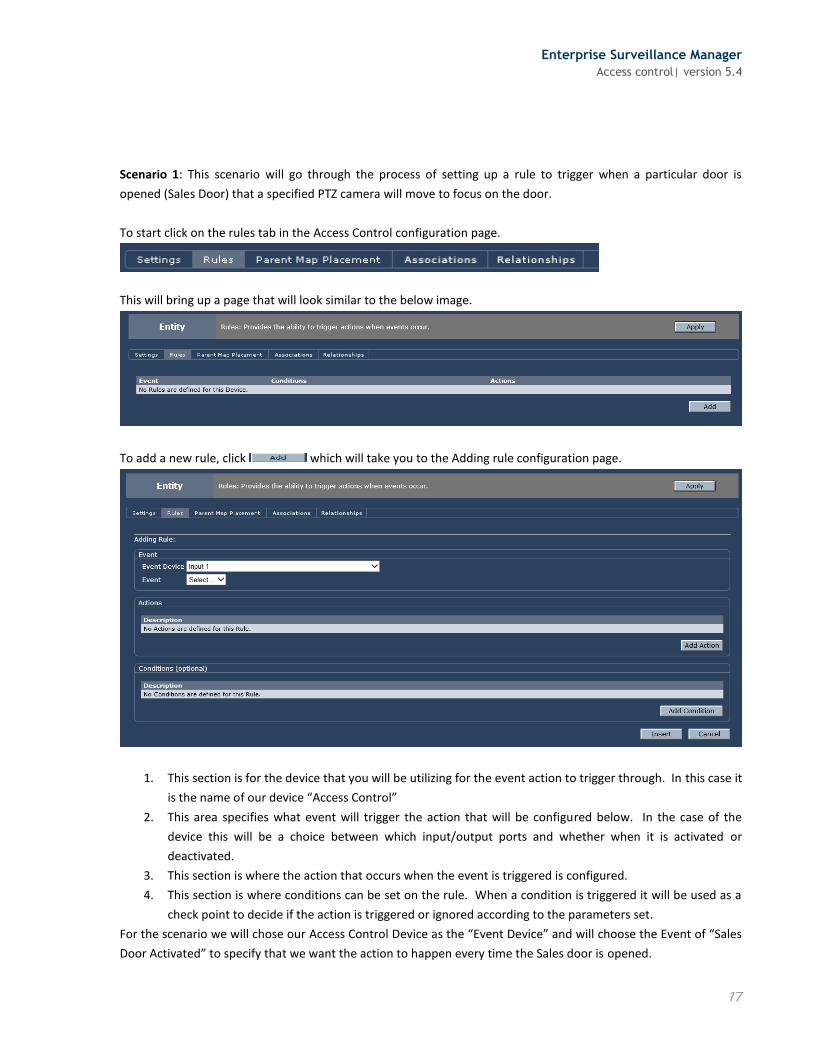
Scenario 1: This scenario will go through the process of setting up a rule to trigger when a particular door is
opened (Sales Door) that a specified PTZ camera will move to focus on the door.
To start click on the rules tab in the Access Control configuration page.
This will bring up a page that will look similar to the below image.
To add a new rule, click which will take you to the Adding rule configuration page.
1. This section is for the device that you will be utilizing for the event action to trigger through. In this case it
is the name of our device “Access Control”
2. This area specifies what event will trigger the action that will be configured below. In the case of the
device this will be a choice between which input/output ports and whether when it is activated or
deactivated.
3. This section is where the action that occurs when the event is triggered is configured.
4. This section is where conditions can be set on the rule. When a condition is triggered it will be used as a
check point to decide if the action is triggered or ignored according to the parameters set.
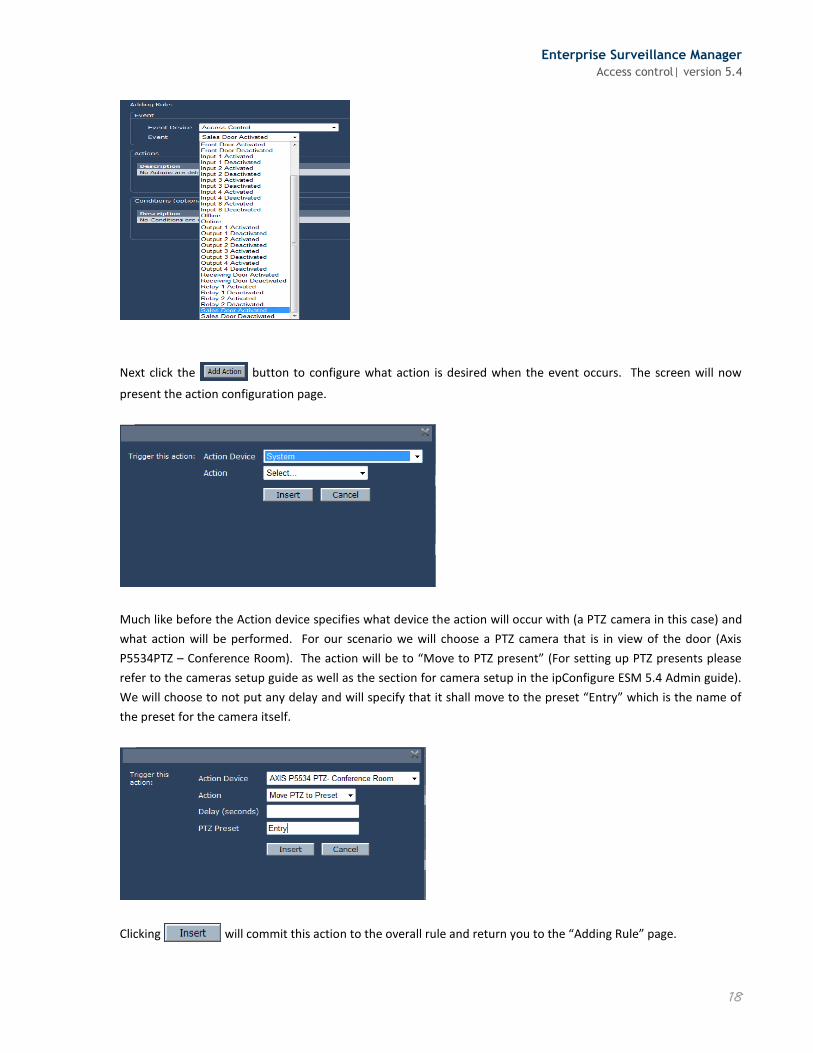
For the scenario we will chose our Access Control Device as the “Event Device” and will choose the Event of “Sales
Door Activated” to specify that we want the action to happen every time the Sales door is opened.
Enterprise Surveillance Manager
Access control| version 5.4
18
Next click the button to configure what action is desired when the event occurs. The screen will now
present the action configuration page.
Much like before the Action device specifies what device the action will occur with (a PTZ camera in this case) and
what action will be performed. For our scenario we will choose a PTZ camera that is in view of the door (Axis
P5534PTZ – Conference Room). The action will be to “Move to PTZ present” (For setting up PTZ presents please
refer to the cameras setup guide as well as the section for camera setup in the ipConfigure ESM 5.4 Admin guide).
We will choose to not put any delay and will specify that it shall move to the preset “Entry” which is the name of
the preset for the camera itself.
Clicking will commit this action to the overall rule and return you to the “Adding Rule” page.
Enterprise Surveillance Manager
Access control| version 5.4
19
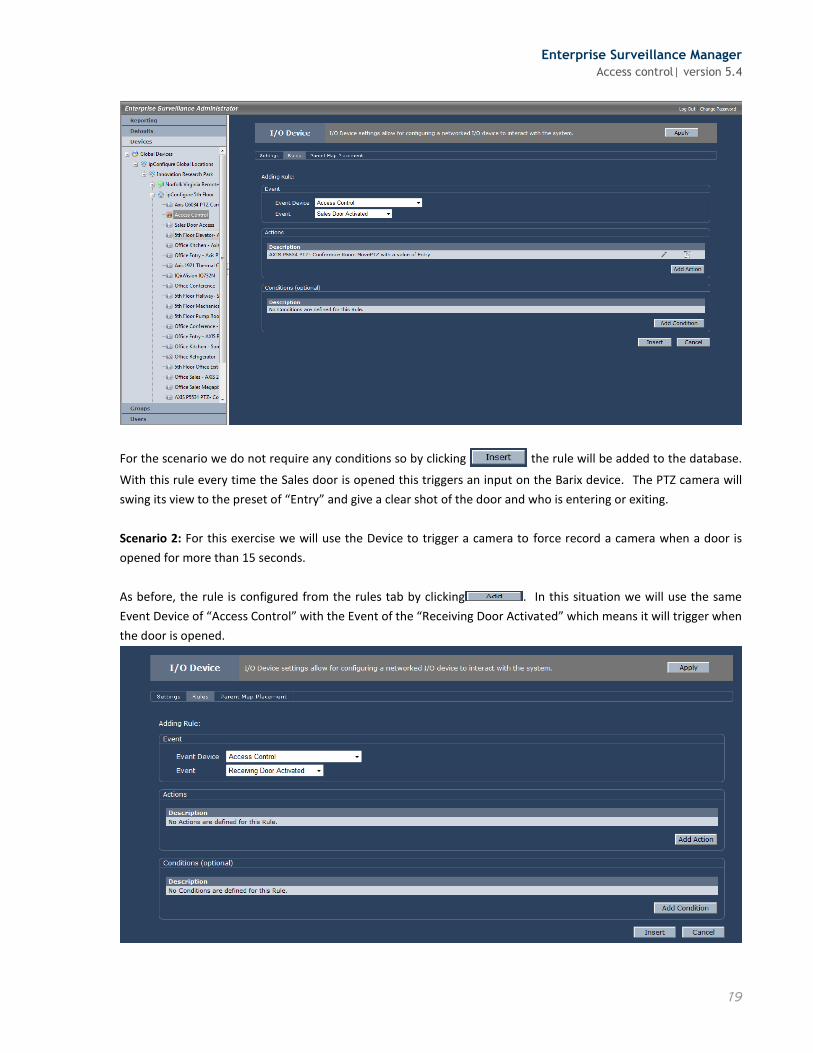
For the scenario we do not require any conditions so by clicking the rule will be added to the database.
With this rule every time the Sales door is opened this triggers an input on the Barix device. The PTZ camera will
swing its view to the preset of “Entry” and give a clear shot of the door and who is entering or exiting.
Scenario 2: For this exercise we will use the Device to trigger a camera to force record a camera when a door is
opened for more than 15 seconds.
As before, the rule is configured from the rules tab by clicking . In this situation we will use the same
Event Device of “Access Control” with the Event of the “Receiving Door Activated” which means it will trigger when
the door is opened.
Enterprise Surveillance Manager
Access control| version 5.4
20
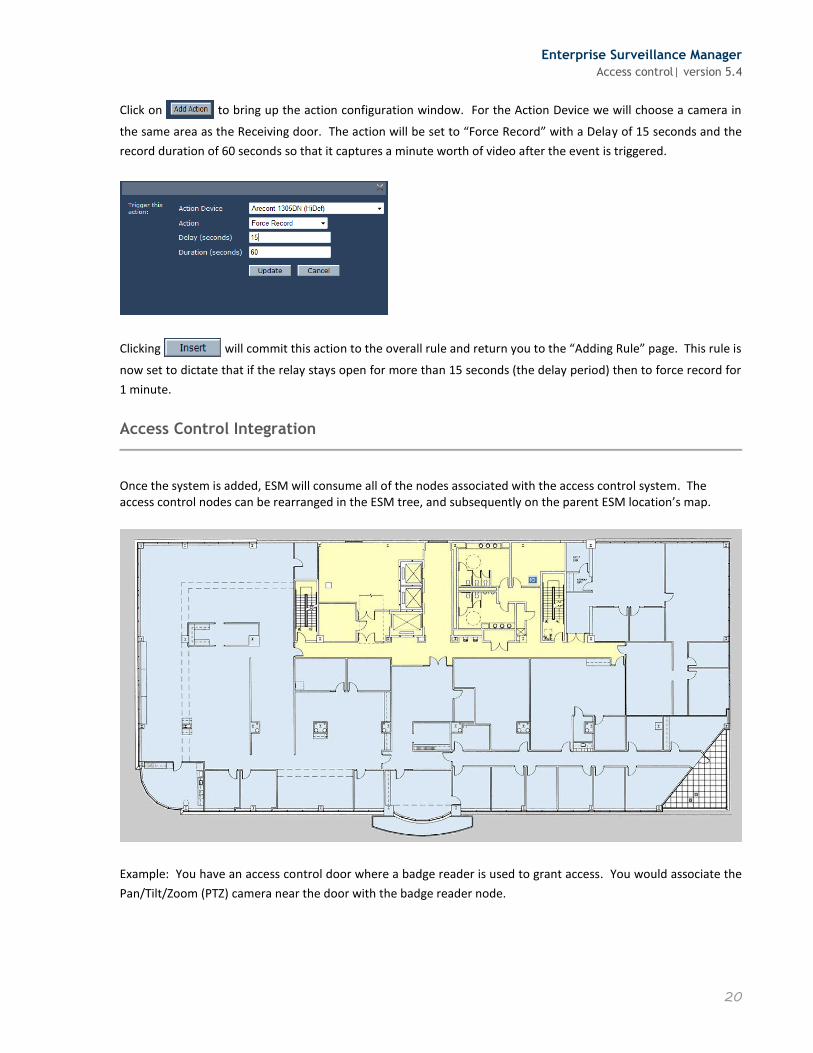
Click on to bring up the action configuration window. For the Action Device we will choose a camera in
the same area as the Receiving door. The action will be set to “Force Record” with a Delay of 15 seconds and the
record duration of 60 seconds so that it captures a minute worth of video after the event is triggered.
Clicking will commit this action to the overall rule and return you to the “Adding Rule” page. This rule is
now set to dictate that if the relay stays open for more than 15 seconds (the delay period) then to force record for
1 minute.
Access Control Integration
Once the system is added, ESM will consume all of the nodes associated with the access control system. The access control nodes can be rearranged in the ESM tree, and subsequently on the parent ESM location’s map.
Example: You have an access control door where a badge reader is used to grant access. You would associate the
Pan/Tilt/Zoom (PTZ) camera near the door with the badge reader node.
Enterprise Surveillance Manager
Access control| version 5.4
21
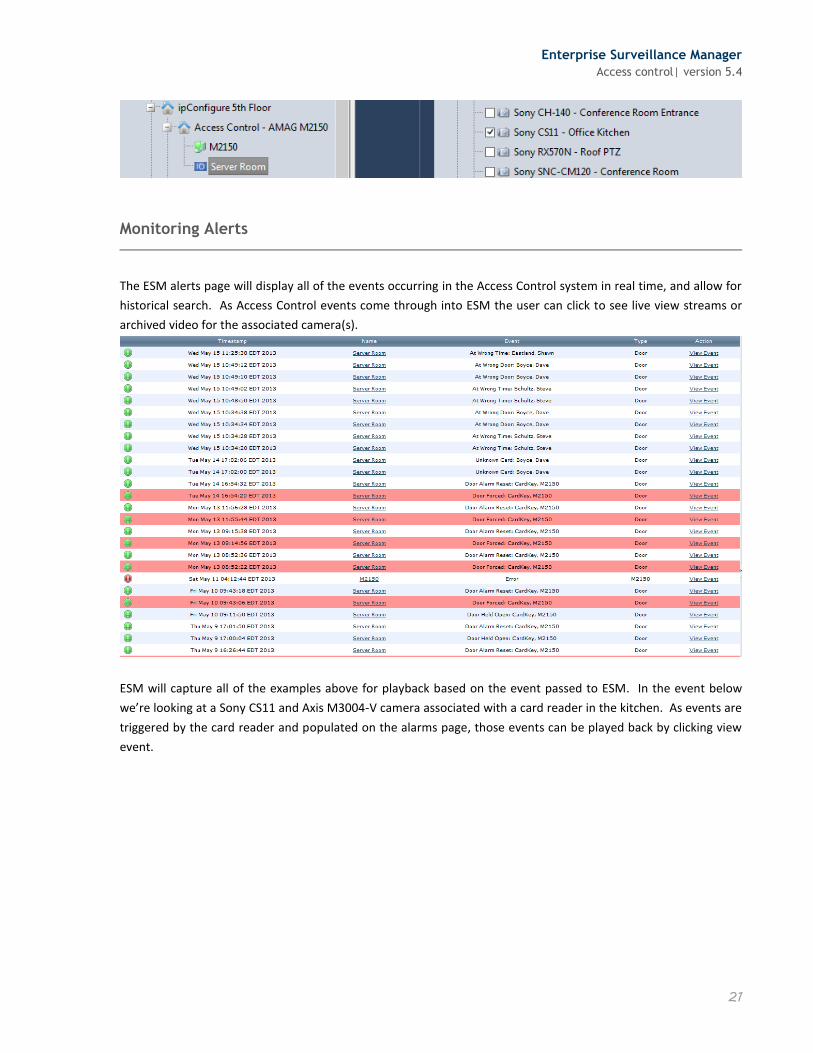
Monitoring Alerts
The ESM alerts page will display all of the events occurring in the Access Control system in real time, and allow for
historical search. As Access Control events come through into ESM the user can click to see live view streams or
archived video for the associated camera(s).
ESM will capture all of the examples above for playback based on the event passed to ESM. In the event below
we’re looking at a Sony CS11 and Axis M3004-V camera associated with a card reader in the kitchen. As events are
triggered by the card reader and populated on the alarms page, those events can be played back by clicking view
event.

Enterprise Surveillance Manager
Access control| version 5.4
22
If you see events popping up for a certain area you can click on the “Name” field to display the live view stream for the primary camera associated with that area.

Enterprise Surveillance Manager
Access control| version 5.4
23
Filtering Alerts
You can filter alerts based on the access control nodes which are depicted in the Global Camera Directory. These
will filter alerts only associated with the access control devices/nodes selected.
Specific event results can be displayed via the filter tree on the right if you only want to see a specific event. In the
example below we show only events for a door forced alarm.

Enterprise Surveillance Manager
Access control| version 5.4
24
You will be in Live mode by default, but if you want to search historical events/alarms you can select history and
put in a date range and those results will be displayed.
Conclusion
Access control teamed with the rules and flexibility of ESM give the user and administrators numerous ways to
customize their security system to suite not only the needs but the wants of an organization. The scenarios
outlined in this guide are only a few of a vast number of various configurations that can be employed using ESM
teamed with an Access Control system.
For Questions about ipConfigure products or Access Control integration please contact the ipConfigure Sales team
at 1-877-207-1112 or by email at [email protected]
For technical support with this feature or any of the other ipConfigure product lines please submit a support ticket
to the ipConfigure Technical Support team by visiting www.ipconfigure.com/support or emailing the team at
©2014 ipConfigure Inc. The material in this document is copyrighted and not to be used or reproduced with the
express written consent of ipConfigure. Information in the document is subject to change without notice.