end-user guide to the procure-to-pay process
TRANSCRIPT
End-User Guide to The Procure-to-Pay Process
Version 1.5 July 5, 2019

End-User Guide
© 2018 SPENDBRIDGE. [email protected] 1
1 E-Procurement ........................................................ 2
2 Creating Requests ................................................... 4
2.1 Shopping Catalogs ........................................... 4
2.2 Favorite Catalogs ............................................. 7
2.3 Shop Off-Catalog ............................................. 7
2.4 Shopping Lists ................................................. 8
2.5 Shopping Cart .................................................. 8
2.6 Checking Out ................................................. 10
2.7 Approval via Email ......................................... 11
2.8 Approval in the Application .......................... 11
3 History ................................................................... 13
3.1 Purchase Orders ............................................ 14
4 Receiving Module .................................................. 15
4.1 Receiving Packing Lists .................................. 15
5 Invoice Module ..................................................... 16
5.1 Receiving an Invoice for a SpendBridge PO .. 16
5.2 New Invoice from File ................................... 20
5.3 Invoice Approval ........................................... 20
5.4 Invoice History .............................................. 21
5.5 Edit Invoice ................................................... 23
5.6 Paying Invoices ............................................. 23
6 Credit Memos ....................................................... 24
7 Contracts ............................................................... 26
7.1 Contract History ............................................ 26
7.2 Agreement Types .......................................... 27
7.3 Other Contract Attributes ............................. 28
7.4 Uploading Contract Items ............................. 30
7.5 Contract workflow ........................................ 31
7.6 Price Discrepancy Log ................................... 31
8 Reports .................................................................. 32
9 Going Further ........................................................ 33
9.1 Notifications ................................................. 33
9.2 Customer Support ......................................... 33
End-User Guide
© 2018 SPENDBRIDGE. [email protected] 2
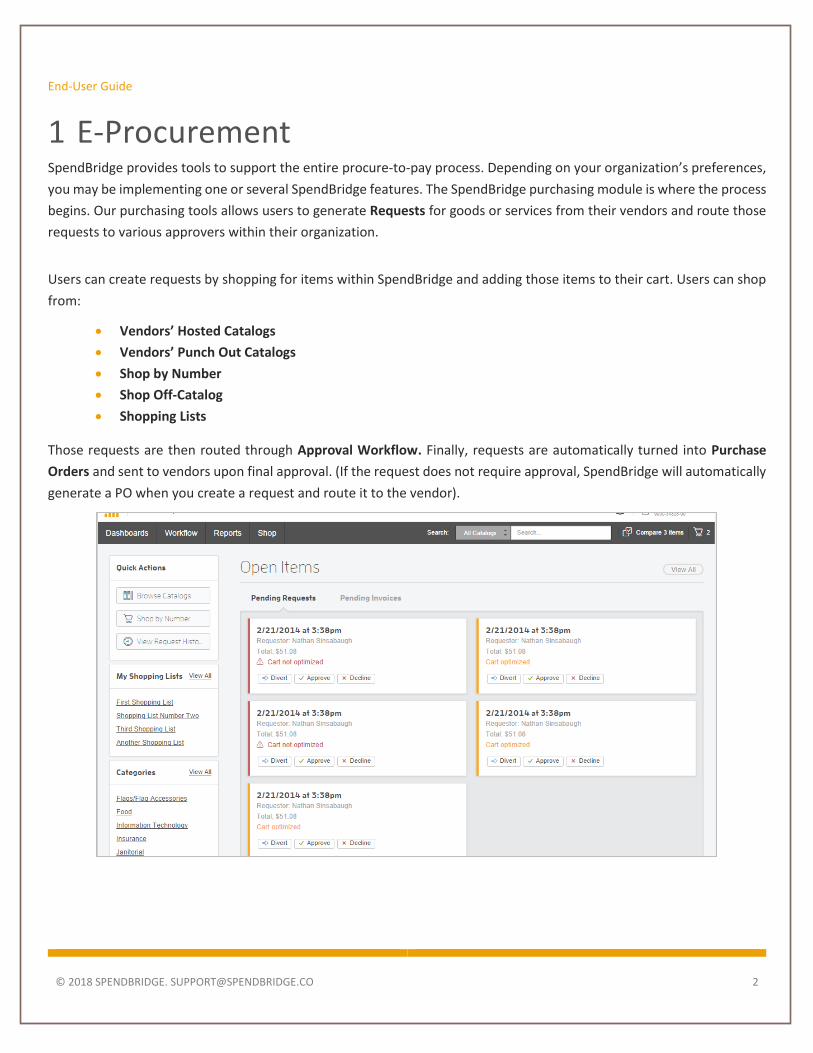
1 E-Procurement SpendBridge provides tools to support the entire procure-to-pay process. Depending on your organization’s preferences,
you may be implementing one or several SpendBridge features. The SpendBridge purchasing module is where the process
begins. Our purchasing tools allows users to generate Requests for goods or services from their vendors and route those
requests to various approvers within their organization.
Users can create requests by shopping for items within SpendBridge and adding those items to their cart. Users can shop
from:
• Vendors’ Hosted Catalogs
• Vendors’ Punch Out Catalogs
• Shop by Number
• Shop Off-Catalog
• Shopping Lists
Those requests are then routed through Approval Workflow. Finally, requests are automatically turned into Purchase
Orders and sent to vendors upon final approval. (If the request does not require approval, SpendBridge will automatically
generate a PO when you create a request and route it to the vendor).


End-User Guide
© 2018 SPENDBRIDGE. [email protected] 4
2 Creating Requests Users can create requests by adding items to their
shopping cart from Hosted Catalogs, Punchout
Catalogs, Shop by Number, Shop Off-Catalog, and
Shopping Lists.
2.1 Shopping Catalogs When you log in to SpendBridge, you’ll land on your
homepage, which we call the User Dashboard. To
start browsing vendor catalogs, click “Browse
Catalogs” button in the Quick Actions area of your
user dashboard.
The catalog page contains catalogs from your vendors, organized on catalog cards and sorted into catalog categories. You
can filter the catalogs using the categories to the left. Contract expiration dates and details regarding the vendor
agreement or the catalog are found on the catalog cards.
End-User Guide
© 2018 SPENDBRIDGE. [email protected] 5
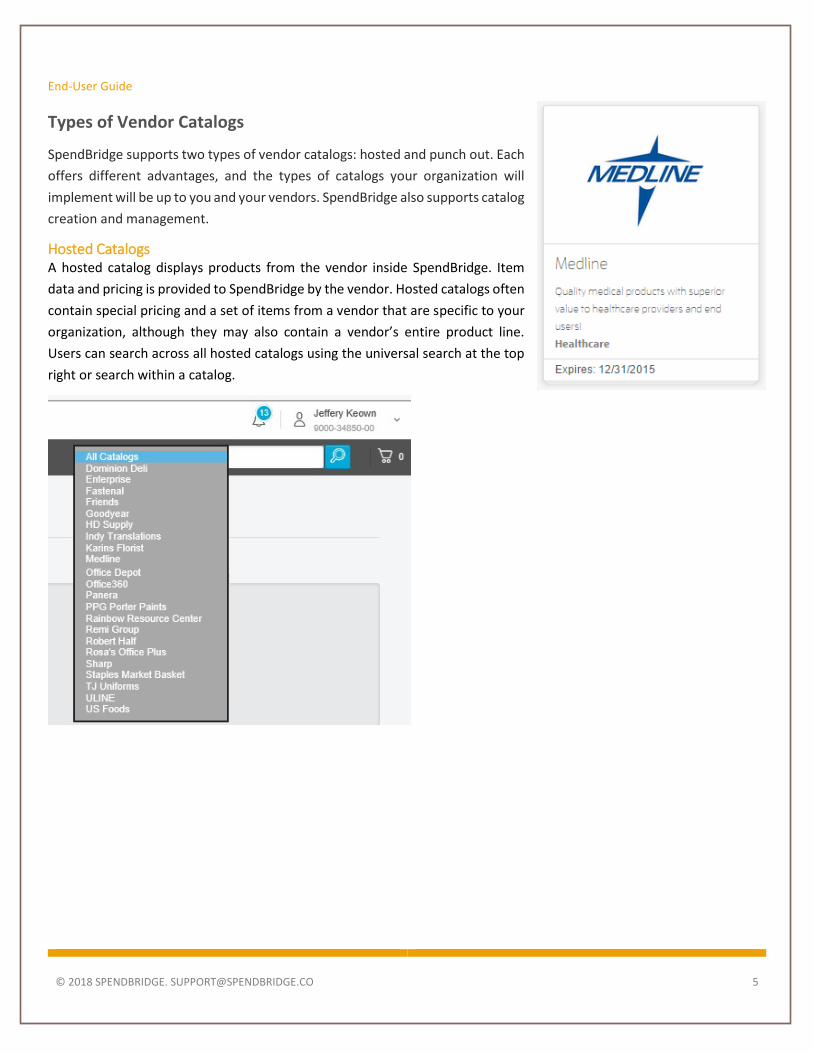
Types of Vendor Catalogs
SpendBridge supports two types of vendor catalogs: hosted and punch out. Each
offers different advantages, and the types of catalogs your organization will
implement will be up to you and your vendors. SpendBridge also supports catalog
creation and management.
Hosted Catalogs A hosted catalog displays products from the vendor inside SpendBridge. Item
data and pricing is provided to SpendBridge by the vendor. Hosted catalogs often
contain special pricing and a set of items from a vendor that are specific to your
organization, although they may also contain a vendor’s entire product line.
Users can search across all hosted catalogs using the universal search at the top
right or search within a catalog.

End-User Guide
© 2018 SPENDBRIDGE. [email protected] 6
Punch-Out Catalogs Indicated by the arrow icon at the bottom right of the catalog card, a punch-out catalog
takes you to the vendor’s site. Once there, users shop for items within the vendor’s site.
Users can bring those items back to their SpendBridge cart by adding the items to the
cart on the vendor’s site and “checking out” of the vendor’s site. The items will be
returned to the SpendBridge cart to complete checkout and route the request through
approval workflow. A PO will be generated from SpendBridge and sent to the vendor
after approval.
You might visit any number of punch-out sites while in SpendBridge, and all of the items
are returned to your SpendBridge shopping cart.

End-User Guide
© 2018 SPENDBRIDGE. [email protected] 7
2.2 Favorite Catalogs Whether it’s a hosted or punch out catalog you can click the little star to make any catalog a Favorite. This will cause the
catalog to rise to the top of the page the next time you load it.
2.3 Shop Off-Catalog The “Shop Off-Catalog” feature allows users to generate requests for
goods or services that are not in a catalog. To use the Shop Off-Catalog
feature, navigate to it from your dashboard or the shop menu.
Step 1- Select Vendor First, a pop-out screen will appear (right), asking you to select your
vendor. On this page, you can search for vendors by name or vendor ID.
Once you find the vendor, click “Select.”
Step 2- Enter Items Next, you will be forwarded to the “Order Off-Catalog Items” page. You
can now create “items” to add to your cart in a free-form style by entering
item number, description, unit of measure, quantity, and price. If you
don’t have an item number, use that field to enter a short description for
your item.
End-User Guide
© 2018 SPENDBRIDGE. [email protected] 8
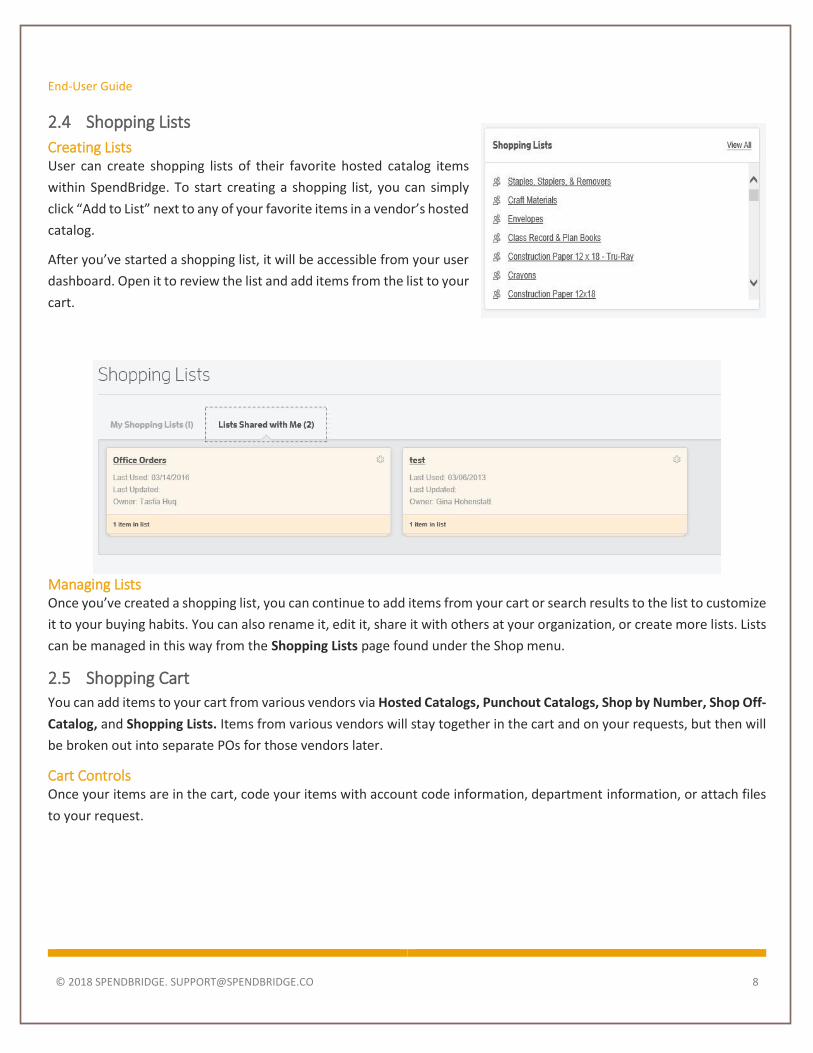
2.4 Shopping Lists
Creating Lists User can create shopping lists of their favorite hosted catalog items
within SpendBridge. To start creating a shopping list, you can simply
click “Add to List” next to any of your favorite items in a vendor’s hosted
catalog.
After you’ve started a shopping list, it will be accessible from your user
dashboard. Open it to review the list and add items from the list to your
cart.
Managing Lists Once you’ve created a shopping list, you can continue to add items from your cart or search results to the list to customize
it to your buying habits. You can also rename it, edit it, share it with others at your organization, or create more lists. Lists
can be managed in this way from the Shopping Lists page found under the Shop menu.
2.5 Shopping Cart You can add items to your cart from various vendors via Hosted Catalogs, Punchout Catalogs, Shop by Number, Shop Off-
Catalog, and Shopping Lists. Items from various vendors will stay together in the cart and on your requests, but then will
be broken out into separate POs for those vendors later.
Cart Controls Once your items are in the cart, code your items with account code information, department information, or attach files
to your request.

End-User Guide
© 2018 SPENDBRIDGE. [email protected] 9
After checkout, your cart will generate a request that’s routed to your approvers. Requests are automatically turned into
Purchase Orders and sent to vendors upon final approval. (If the request does not require approval, SpendBridge will
automatically generate a PO when you create a request and route it to the vendor).
Optimizing Items in Cart Your cart features our Optimize Item tool, which searches for similar items among your hosted catalogs makes alternative
suggestions based on price. If you see the “Lower Priced Options Available” notice under an item in your cart, hover over
it to see other suggested purchases from SpendBridge.
Code all items in your cart at once or do a bulk delete with the “Bulk
Actions” tool.
Select your Account Codes using our fast and friendly account code tool.
Use drop-downs or type and tab.
End-User Guide
© 2018 SPENDBRIDGE. [email protected] 10
The optimization tool is most commonly used by clients who have several vendors with similar products loaded into
SpendBridge (also called “Competing Vendors” or “Competing Catalogs.”
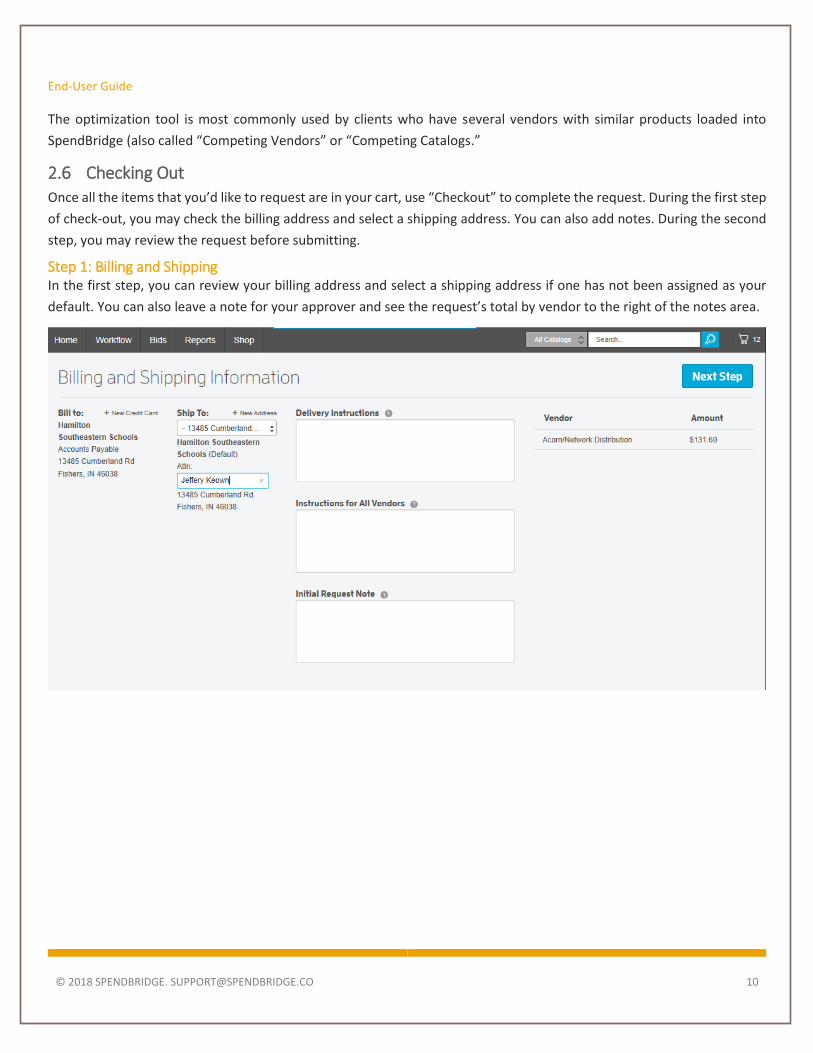
2.6 Checking Out Once all the items that you’d like to request are in your cart, use “Checkout” to complete the request. During the first step
of check-out, you may check the billing address and select a shipping address. You can also add notes. During the second
step, you may review the request before submitting.
Step 1: Billing and Shipping In the first step, you can review your billing address and select a shipping address if one has not been assigned as your
default. You can also leave a note for your approver and see the request’s total by vendor to the right of the notes area.

End-User Guide
© 2018 SPENDBRIDGE. [email protected] 11
Step 2: Review Request At this stage, you can review the entire order, you can head back to the cart, or to your billing & shipping page if you find
anything amiss!
Request Approval When a user completes a request, it is routed through Approval Workflow. Any user required to approve a request will
be notified via email when their approval is required. Approvers then have the ability to review and handle request
approvals either via email or within the application.
2.7 Approval via Email Approvers may approve or decline requests via links within the
notification email (right), which contains line item detail of the
request. If the approver would like to edit or divert a request,
they should login to the application using the “Review, Edit, or
Optimize” link.
2.8 Approval in the Application Users with requests pending their approval can also find those
requests on their user dashboard when they login.
Quick Approve Approvers can use the Approve, Decline, or Divert buttons on the
requests cards to handle pending requests, or they can click on
the request to open it, view further details, and approve, decline,
or divert from the details page.
Request Notes stay internal, while delivery and vendor
instructions can be transferred to the vendor on the PO.
You can find the vendor’s contact information here, as
well as the Submission Method we’ll use to send the PO out
once the request is approved.
End-User Guide
© 2018 SPENDBRIDGE. [email protected] 12
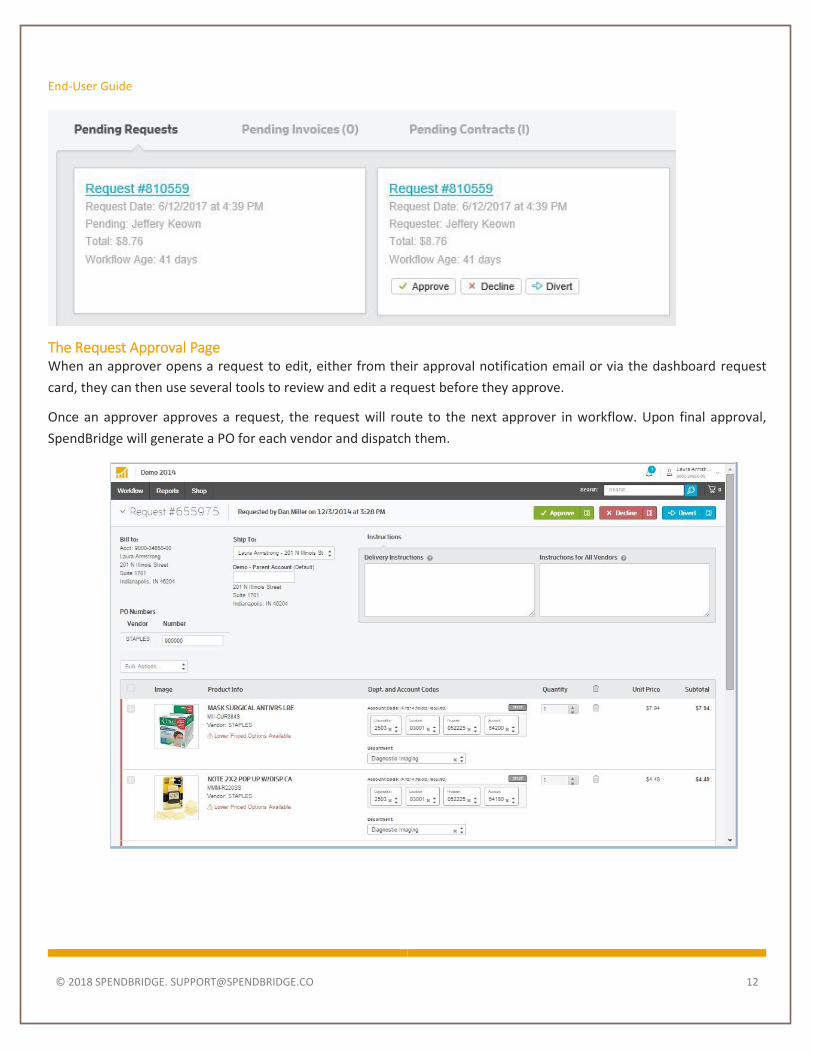
The Request Approval Page When an approver opens a request to edit, either from their approval notification email or via the dashboard request
card, they can then use several tools to review and edit a request before they approve.
Once an approver approves a request, the request will route to the next approver in workflow. Upon final approval,
SpendBridge will generate a PO for each vendor and dispatch them.

End-User Guide
© 2018 SPENDBRIDGE. [email protected] 13
3 History The “History” page allows users to view their request history and track
where their request is in the approval process. Once on the History
page, users can use filters to find a specific request, view pending
approvers, and even use the actions drop down to the right of a
request to view request details or add all the items from a previous
request back to the shopping cart.
End-User Guide
© 2018 SPENDBRIDGE. [email protected] 14
3.1 Purchase Orders
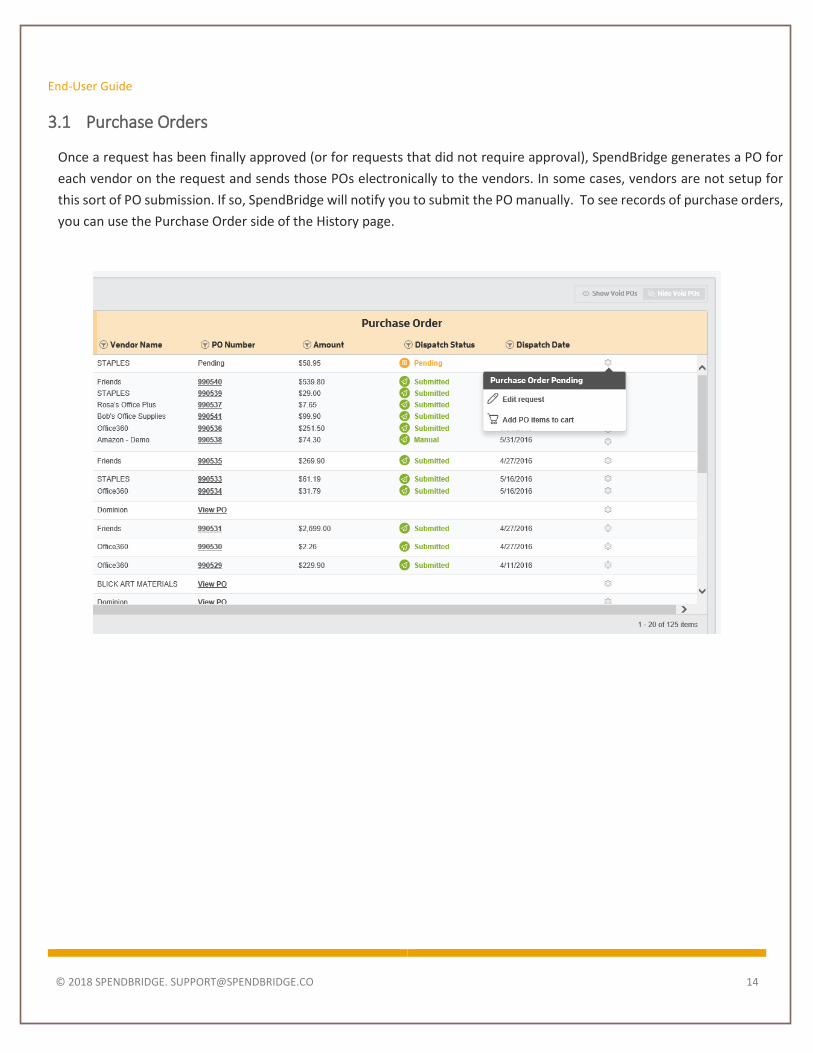
Once a request has been finally approved (or for requests that did not require approval), SpendBridge generates a PO for
each vendor on the request and sends those POs electronically to the vendors. In some cases, vendors are not setup for
this sort of PO submission. If so, SpendBridge will notify you to submit the PO manually. To see records of purchase orders,
you can use the Purchase Order side of the History page.

End-User Guide
© 2018 SPENDBRIDGE. [email protected] 15
4 Receiving Module In addition to our purchasing module, SpendBridge also offers clients tools to capture receiving information. Users may
enter receiving information against a PO in SpendBridge, attach packing slips, and review receiving history and reports.
This can be useful for clients who want to ensure that they receive all items ordered on a PO before they pay an invoice.
Like the request history page, you can use filters to find a specific PO, view the status of the PO submission, and even use
the actions drop down to the right of a PO to view the PO or resubmit or void a PO, if you have those permissions.
4.1 Receiving Packing Lists To enter receiving information in SpendBridge, navigate to Workflow-> Packing List. You’ll be presented with a list of POs
generated in SpendBridge. This area shows all POs that have not been fully received. To view POs that have been fully
received, click “show all POs” at the top.
Search for the PO for which you received a package using the filterable fields at the top. Click the PO Number once you
find the PO you need.
Entering Receiving Information Once you click a PO Number, the details of the PO will open, and you may enter information regarding the quantity of
items you received in the package, as well as attach a copy of the packing slip. We auto-fill the Receiver’s name and the
Date, you have to enter a Packing List Number before the line items will become editable.
When you finish, click Save. Then, if the all the items on the PO were received, the PO will fall off of the “Receive Packing
List” page. If you partially receive a Packing List, you may return to that PO later from the
“Packing List” page and enter additional packing list data and attachments.

End-User Guide
© 2018 SPENDBRIDGE. [email protected] 16
5 Invoice Module In addition to our purchasing and packing list modules, SpendBridge also offers clients tools to receive invoices in
SpendBridge and route those invoices for approval and payment.
This can be useful for clients who want to keep their purchasing, receiving, and invoicing processes in one application.
SpendBridge also provides reports that can be imported into financial systems which highlight purchase orders that are
ready to be paid, because they have a matching invoice and a matching packing slip in SpendBridge.
5.1 Receiving an Invoice for a SpendBridge PO In SpendBridge, you have the option to receive invoices that match a PO that you’ve made in SpendBridge or to receive a
“non-PO invoice.” To receive an invoice against a PO in SpendBridge, navigate to Workflow->Receive Invoice. You’ll be
presented with a list of POs called the Receive Index. This area shows all POs that have not been fully invoiced. To view
POs that have been fully invoiced, click “Include received.”
Search for the PO for which you received an invoice using the filter fields at the top. Hit “Receive” once you find the PO.
5.1.1 Column Headings
On the next page, you can see a full page illustration of the Receive Index with all of the column headings.
End-User Guide
© 2018 SPENDBRIDGE. [email protected] 17
PO# - This is the original request’s Purchase Order Number.
Filter on this column to find the specific PO you want to
receive against.
Amount – The total of the PO. Do you want to process every
invoice over $500? Then filter here to see only those above
your target amount.
Vendor – The Vendor the PO was placed to. Filtering here
allows you to consolidate your receiving activities to single
vendor.
Placed By – This is the user who placed the Request. Filtering
here isolates a given user.
Status – Has this PO had receiving against it? This column shows
this easily.
Account – If you have multiple (Child) accounts, this column is
very handy for isolating a single child and process those invoices
in a batch.
All of these filters can be used at once. Do you want to find all
of Matt Smith’s POs placed with Amazon over $50? In June? You
can do it!
To reset all of these filters, just click the Clear Filters button.

End-User Guide
© 2018 SPENDBRIDGE. [email protected] 18
5.1.2 Batch Processing
You can use the click-boxes on the left to select multiple invoices. As you process each one, you can flip to the next one
with the Next button, or have it flip automatically when you submit each one.
5.1.3 Receive Invoice Data
On the “Receive Invoice” page, enter the invoice number, date, and the quantities of items invoiced as compared to the
PO. If your invoice had additional tax, shipping, or miscellaneous fees, you can add them on this page.
You can also use the attachments area to attach a scanned or PDF copies of the invoice. As before, you can distribute
funds using “Split Reference Codes” on each line, if needed. Just enter the codes and amounts, click save and the splits
are ready to go.

End-User Guide
© 2018 SPENDBRIDGE. [email protected] 19
5.1.4 Upload Received Invoices
You can upload a batch of invoices using an Excel file. You can even create a batch file of Non-PO invoices for upload. This
works exactly as you’re used to, except that columns have been added for Fees and Credits.
5.1.5 Receiving a Non-PO Invoice
If you have an invoice that needs to be entered in SpendBridge, and you did not generate a matching PO in SpendBridge,
you need to create a “non-PO” invoice. Non-PO invoices may be used, for example, to pay an electrical bill or other type
of service for which a PO was not put through the system.
Navigate to Workflow->Receive Invoice. “Create Non-PO Invoice.”
Enter the Invoice Number, grab a Vendor from the drop down (all of your Vendors are loaded into this field) fill in the
Invoice Issue Date, and the optional Due Date. Any changes you make are recorded in the “Changes” area at the bottom
of the page.
When you have finished entering your details, just hit submit to send it to the Workflow
Engine.
5.1.6 Docking and Undocking Documents and Images
If you have a second monitor, you can undock your PDF preview window and move it to
have more room to work. This window is dynamic, and linked to the main window. Should
you flip to a new invoice, the undocked viewer will load the next PDF if it is available.
End-User Guide
© 2018 SPENDBRIDGE. [email protected] 20
Add Items and Attachments Enter the date and invoice number in the top fields. Then, add line items to the invoice in a “free-form” style using the
blank “Add Item” fields at the bottom. You may also add attachments and fees. Once all the line items are added, check
the total and click “Done.”
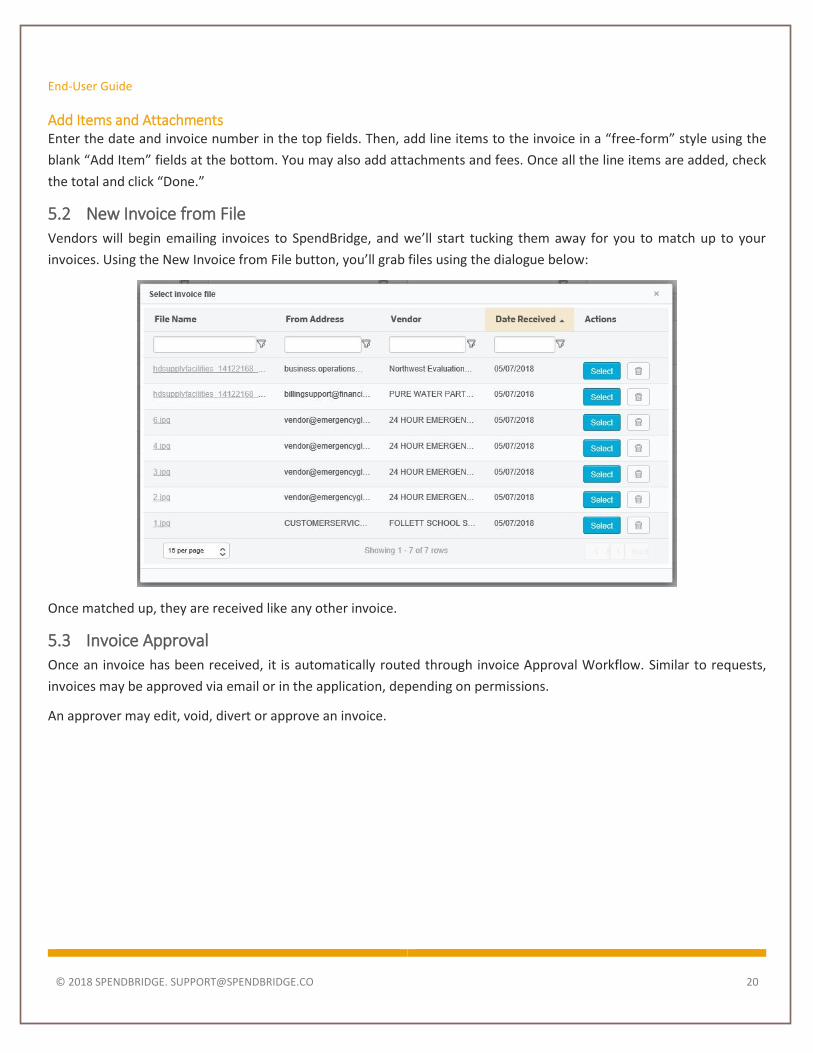
5.2 New Invoice from File Vendors will begin emailing invoices to SpendBridge, and we’ll start tucking them away for you to match up to your
invoices. Using the New Invoice from File button, you’ll grab files using the dialogue below:
Once matched up, they are received like any other invoice.
5.3 Invoice Approval Once an invoice has been received, it is automatically routed through invoice Approval Workflow. Similar to requests,
invoices may be approved via email or in the application, depending on permissions.
An approver may edit, void, divert or approve an invoice.

End-User Guide
© 2018 SPENDBRIDGE. [email protected] 21
5.4 Invoice History The “Invoice History” page allows users to view and edit historical invoices and track invoice approval. It works much as it
did before. It does, however, contain new columns that you will find very useful.
The left half of the Invoice History page…

End-User Guide
© 2018 SPENDBRIDGE. [email protected] 22
Click-Boxes - You will notice the column of click-boxes down the left hand side. These are Bulk Action selectors. You can
select as many or as few as you like, and click on Bulk Actions above to Mark Paid or Enter Payments for your selected
Invoices.
Date –This is the date the invoice was entered.
Invoice # - This is the PO number the Vendor or Receiver assigned. You can click on the Invoice Number to view or edit
the Invoice.
PO # - If the original document was a PO, you’ll be able to find that reference number here.
Check # - Was this paid? On which check? You can filter to find a certain check, or simply use this as a reference.
Amount – This is the total of all lines on the invoice.
Due – How much is left to pay on this Invoice?
PO Match – Do the Invoice received quantities match the PO? This column is TRUE or FALSE to show you.
PL Match – Like PO Match above, PL Match shows whether the Invoice is a match for the Packing List.
Vendor Name – As in the Receive Index, Vendor Name allows you to filter for certain vendors.
Status – This column shows the Approval Status of the Invoice.
Account – If you have multiple Child Accounts, you’ll see which one of them generated the Invoice.
… and the right half of the Invoice History page.

End-User Guide
© 2018 SPENDBRIDGE. [email protected] 23
5.5 Edit Invoice You’ll see this “Action Stripe” across the top of the page. It stays in place as you scroll down the page.
This page works much like the Receive Invoice page, but allows you to make changes if you are authorized.
5.6 Paying Invoices You can make payments by using the click boxes to invoke this popup:
With it, you’ll add the Date, Check #, Amount, and any notes you feel relevant to the payment. Once these are entered,
hit Save to return to Invoice History.

End-User Guide
© 2018 SPENDBRIDGE. [email protected] 24
6 Credit Memos When using Invoices in SpendBridge, the possibility exists that you will use the platform to receive and acknowledge Credit
Memos. To create one, click on the relevant Invoice in Invoice History.
Just above the Notes section, you’ll see a Credit Memo link.
Clicking this link takes you to the Create Credit Memo Pop-up.
From here, you can enter the issue date, the Credit Memo Number and a note for anyone who accesses the document.
When you hit create, you are taken to a specialized copy of your invoice.
End-User Guide
© 2018 SPENDBRIDGE. [email protected] 25
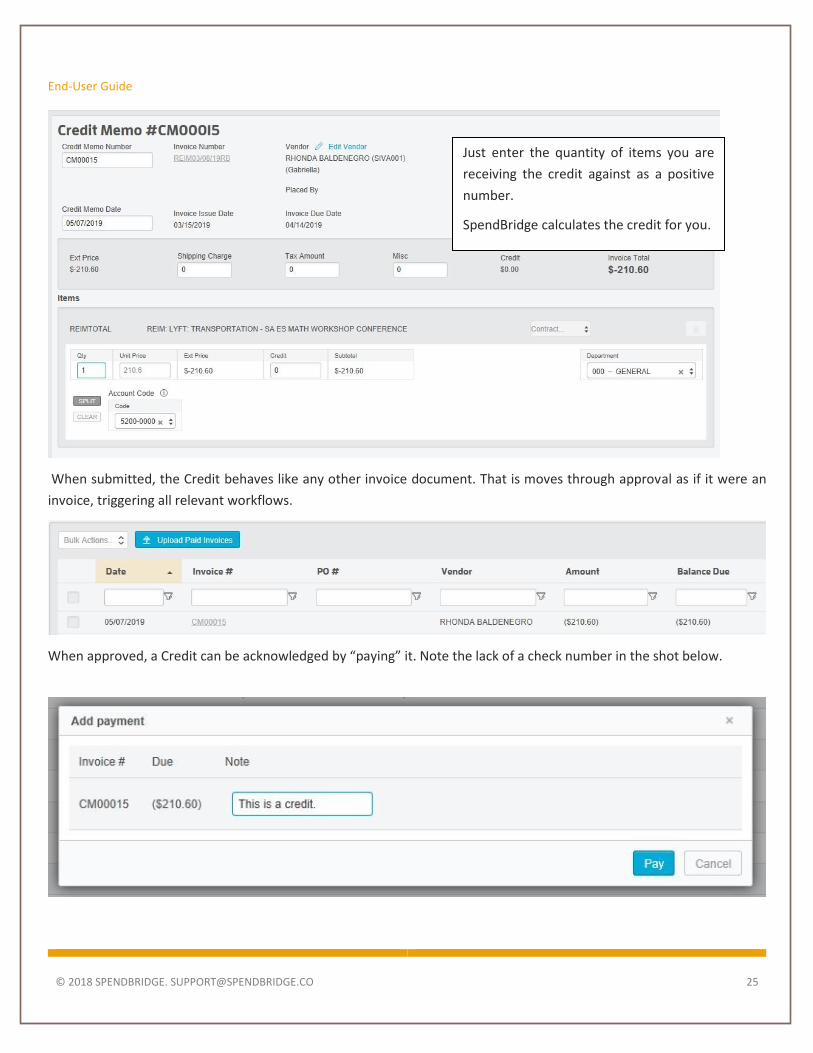
When submitted, the Credit behaves like any other invoice document. That is moves through approval as if it were an
invoice, triggering all relevant workflows.
When approved, a Credit can be acknowledged by “paying” it. Note the lack of a check number in the shot below.
Just enter the quantity of items you are
receiving the credit against as a positive
number.
SpendBridge calculates the credit for you.

End-User Guide
© 2018 SPENDBRIDGE. [email protected] 26
7 Contracts The Contracts feature in SpendBridge allows a user to input contract terms and dates for items purchased through
SpendBridge. By using the contracts feature, you can allow users visibility to which items are currently on contract and
which contract items have expired. This is a quick, easy, and important step to implement after you create a catalog.
7.1 Contract History By default, Contract History shows all existing contracts. It is from here that you create, edit, and view your contracts. You
can filter them by Contract Grouping (if they exist) in order to see similar Contracts.
7.1.1 Account
If you have child accounts, and they each have contract agreements of their own, you’ll see the child account names in
this column. It defaults to your account.
7.1.2 Contract Name
This is the friendly name of the contract. It should be an easy to remember name probably using your organization’s jargon
for this sort of contract and vendor. E.g. “Staples 2018” or “Office Products FY18” or similar entries.
7.1.3 Contract Number
This is a number assigned to the contract for purposes of Catalog Uploads and tracking. If you include the contract number
on your catalog upload, those items will be added to that contract when the catalog is updated.
7.1.4 Vendor Name
This is the name of the contract’s vendor, you can sort on these to see specific contracts in case you have more than one
contract per vendor. The item prices uploaded in this contract will be available whether they are purchased through a
Hosted or Punch Out catalog.
7.1.5 Effective Date
This is the start date of the contract. If it is in the future, and the contract is “active” the prices will not be applied until
this date.

End-User Guide
© 2018 SPENDBRIDGE. [email protected] 27
7.1.6 Expiration Date
If the contract has an expiration date, you’ll see that here.
7.1.7 Status
Active – This contract status indicates the document has been approved and is active. If the effective date is in the past,
the contract will apply to items purchased.
Draft – This contract status indicates the document has not been submitted for approval.
Pending Approval – This is a contract status that indicates a contract has been submitted but has not been approved just
yet.
7.1.8 Notes
Reminder text can be added during contract edit. The last such note is displayed here.
7.1.9 Attachments
The presence and number of attachments is indicated here.
7.2 Agreement Types The most important attribute of a Contract is the Agreement Type.
7.2.1 Item Price
Contract Name and Vendor are required for Item Price Contracts. When you bring items from punch out an Item Price
contract will intercept it, correct the price and alert you to the price discrepancy.
7.2.2 Service
Contract Name and Vendor are required in the case of a Service Contract. These sorts of contracts do not concern
themselves with physical items, but with services performed by your vendors. Examples include ground keeping, uniform
maintenance and copier rentals.
7.2.3 Other
Only Contract Name is required for a Contract to be created if the agreement type is other. Other is a catch all for those
contracts you need to get into your Contract Approval Workflow before you decide on the vendor.
End-User Guide
© 2018 SPENDBRIDGE. [email protected] 28
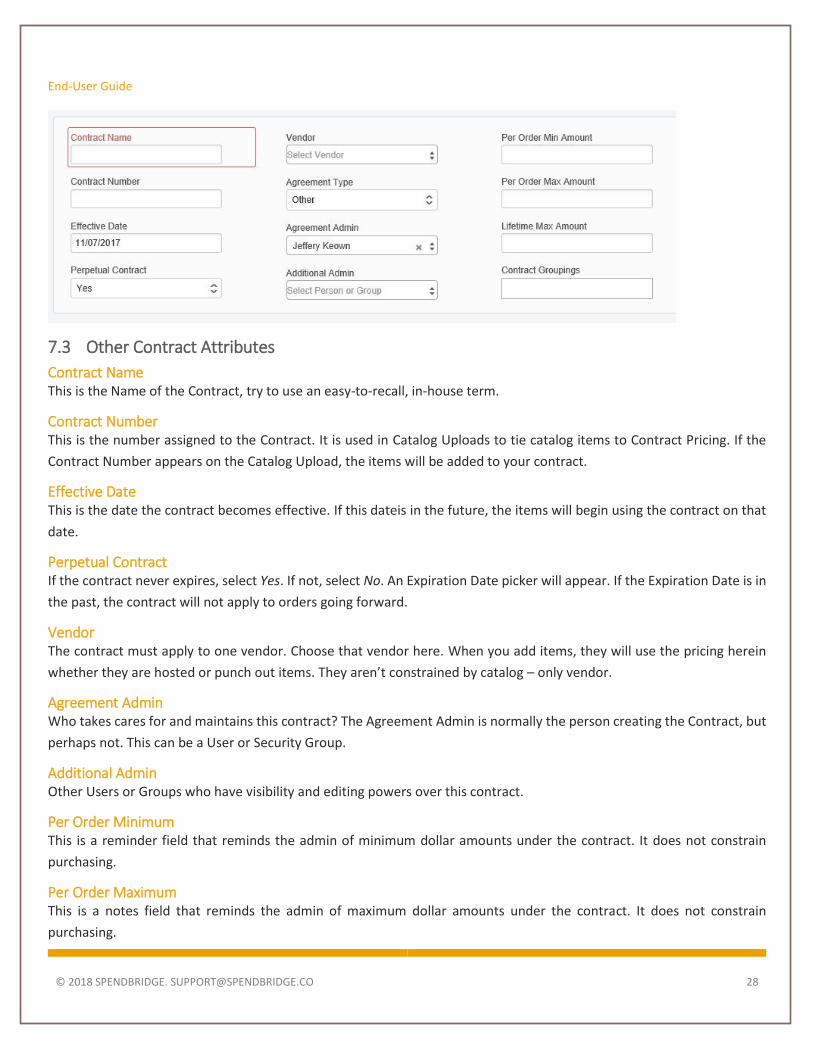
7.3 Other Contract Attributes
Contract Name This is the Name of the Contract, try to use an easy-to-recall, in-house term.
Contract Number This is the number assigned to the Contract. It is used in Catalog Uploads to tie catalog items to Contract Pricing. If the
Contract Number appears on the Catalog Upload, the items will be added to your contract.
Effective Date This is the date the contract becomes effective. If this dateis in the future, the items will begin using the contract on that
date.
Perpetual Contract If the contract never expires, select Yes. If not, select No. An Expiration Date picker will appear. If the Expiration Date is in
the past, the contract will not apply to orders going forward.
Vendor The contract must apply to one vendor. Choose that vendor here. When you add items, they will use the pricing herein
whether they are hosted or punch out items. They aren’t constrained by catalog – only vendor.
Agreement Admin Who takes cares for and maintains this contract? The Agreement Admin is normally the person creating the Contract, but
perhaps not. This can be a User or Security Group.
Additional Admin Other Users or Groups who have visibility and editing powers over this contract.
Per Order Minimum This is a reminder field that reminds the admin of minimum dollar amounts under the contract. It does not constrain
purchasing.
Per Order Maximum This is a notes field that reminds the admin of maximum dollar amounts under the contract. It does not constrain
purchasing.
End-User Guide
© 2018 SPENDBRIDGE. [email protected] 29
Lifetime Max Amount This is a reminder field that reminds the admin of maximum dollar amounts under the contract’s entire active period. It
does not constrain purchasing.
Contract Groupings Groupings act as “Tags” to allow you to search and edit based on common features. Groupings can be anything you find
useful. You can edit these by
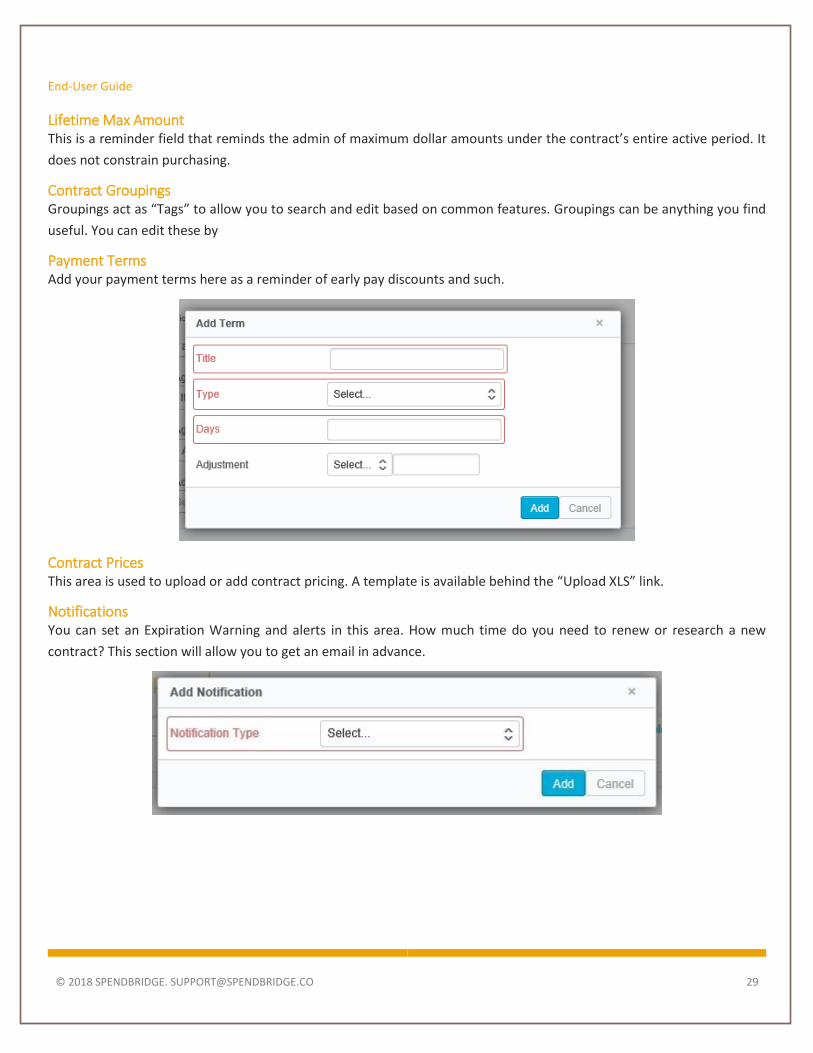
Payment Terms Add your payment terms here as a reminder of early pay discounts and such.
Contract Prices This area is used to upload or add contract pricing. A template is available behind the “Upload XLS” link.
Notifications You can set an Expiration Warning and alerts in this area. How much time do you need to renew or research a new
contract? This section will allow you to get an email in advance.

End-User Guide
© 2018 SPENDBRIDGE. [email protected] 30
Changes The Changes area keeps a log of updates to the contract after its creation. You can add notes to the timeline as well.
7.4 Uploading Contract Items
7.4.1 With your Catalog Upload
Adding items to a contract is very similar to adding items to a catalog. If you include the Contract Number on your Catalog
Upload, the items will be added to the contract as the catalog upload processes. You may either add items to a contract
individually or as an Excel upload.
7.4.2 Directly to your Contract
Find the Contract Item Number Price Upload template on the bottom on of the Edit Contract page. Download the
template, and complete the Catalog Name, Item Number, and Price field for each item. This information can easily be
pasted from your catalog item upload sheet. Then, click “Upload Contract Pricing” and wait for a confirmation that all
items processed correctly.
7.4.3 Manual Entry
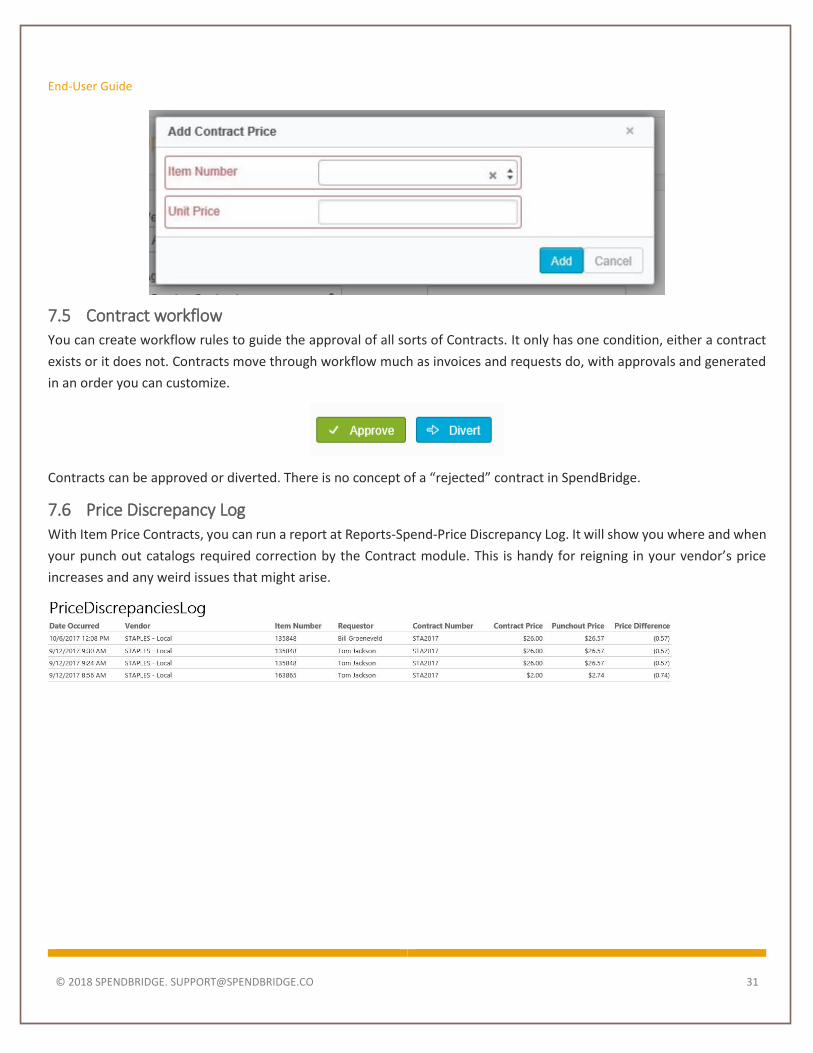
To add the items to a contract individually, click “Add a New Contract Item Price” on the Items page. Then, enter the Catalog, Item Number, and Unit Price for the item.
End-User Guide
© 2018 SPENDBRIDGE. [email protected] 31
7.5 Contract workflow You can create workflow rules to guide the approval of all sorts of Contracts. It only has one condition, either a contract
exists or it does not. Contracts move through workflow much as invoices and requests do, with approvals and generated
in an order you can customize.
Contracts can be approved or diverted. There is no concept of a “rejected” contract in SpendBridge.
7.6 Price Discrepancy Log With Item Price Contracts, you can run a report at Reports-Spend-Price Discrepancy Log. It will show you where and when
your punch out catalogs required correction by the Contract module. This is handy for reigning in your vendor’s price
increases and any weird issues that might arise.

End-User Guide
© 2018 SPENDBRIDGE. [email protected] 32
8 Reports SpendBridge has a variety of reports you can use to track spend, budgets, usage, approval information, and two- and
three-way matches between POs, packing lists, and invoices. Below is an overview of just some of the reports SpendBridge
provides.
Report Category
Report Name Description
Spend Dynamic Spend Report Allows the user to view spending reports grouped by specific categories, departments, codes, users, vendors or locations.
Spend Raw Spend Report Allows the user to view all spending over a specified time period.
Spend Contract Pricing Summary Allows the user to see a summary of purchases on or off contact.
Spend Spend by Vendor Attribute Allows the user to view vendor spend reports based on specific vendor attributes such as MRO.
Spend Purchase Order Detail Allows the user to view spend detail on all purchase orders.
Spend Optimized Savings Detail Allows the user to view savings achieved using Optimizer feature.
Spend Vendor List Shows complete list of vendors loaded on an account.
Spend Vendors Available Shows active vendors available to purchase from for an account.
Spend Budget Utilization
Allows the user to view budget total, amount used, and amount remaining for various budgets loaded into system. Report can be pulled for budgets loaded for locations, users, account codes, or departments.
Spend Change Log Displays all changes made to the system.
Accounts Payable
Two-Way Match Open Accounts Payable
Allows the user to view invoices that match the original receipt and order and are ready to be paid.
Accounts Payable
Three-Way Match Open Accounts Payable
Allows the user to view invoices that match the original purchase order and are ready to be paid.
Accounts Payable
Two-Way Match Exceptions Shows open POs where a two-way match is not complete.
Accounts Payable
Three-Way Match Exceptions
Shows open POs where a three-way match is not complete.
Additional reports may be available depending on the modules you utilize and your permissions. Check out reports by
navigating to the Reports menu, or contact SpendBridge for support.

End-User Guide
© 2018 SPENDBRIDGE. [email protected] 33
9 Going Further SpendBridge also provides tools for clients to manage budgets, track inventory, and integrate with various financial and
ERP systems. SpendBridge can provide support with additional features as needed.
9.1 Notifications Site administrators can post notifications on users’
SpendBridge dashboards to communicate important
announcements and information. SpendBridge will also post
updates and links to informational videos and PDFs when
appropriate, such as when new tools or features are
released.
9.2 Customer Support For more help, check out our Help Center at
http://support.spendbridge.com. Users can view additional training material on this site (with more coming soon!) and
create support tickets which are submitted to our support team at [email protected].
Users can also request support by simply emailing or calling us. Our support team is available Monday to Friday, 8 a.m. to 5 p.m. EST.
1.877.208.4817