enabling single sign-on for common identity using f5 · essential for achieving a single sign-on...
TRANSCRIPT

Enabling Single Sign-On for Common Identity using F5
THE SPECIFICATIONS AND INFORMATION REGARDING THE PRODUCTS IN THIS MANUAL ARE SUBJECT TO CHANGE WITHOUT NOTICE. ALL STATEMENTS, INFORMATION, AND RECOMMENDATIONS IN THIS MANUAL ARE BELIEVED TO BE ACCURATE BUT ARE PRESENTED WITHOUT WARRANTY OF ANY KIND, EXPRESS OR IMPLIED. USERS MUST TAKE FULL RESPONSIBILITY FOR THEIR APPLICATION OF ANY PRODUCTS. THE SOFTWARE LICENSE AND LIMITED WARRANTY FOR THE ACCOMPANYING PRODUCT ARE SET FORTH IN THE INFORMATION PACKET THAT SHIPPED WITH THE PRODUCT AND ARE INCORPORATED HEREIN BY THIS REFERENCE. IF YOU ARE UNABLE TO LOCATE THE SOFTWARE LICENSE OR LIMITED WARRANTY, CONTACT YOUR CISCO REPRESENTATIVE FOR A COPY. The Cisco implementation of TCP header compression is an adaptation of a program developed by the University of California, Berkeley (UCB) as part of UCB's public domain version of the UNIX operating system. All rights reserved. Copyright © 1981, Regents of the University of California. NOTWITHSTANDING ANY OTHER WARRANTY HEREIN, ALL DOCUMENT FILES AND SOFTWARE OF THESE SUPPLIERS ARE PROVIDED “AS IS" WITH ALL FAULTS. CISCO AND THE ABOVE-NAMED SUPPLIERS DISCLAIM ALL WARRANTIES, EXPRESSED OR IMPLIED, INCLUDING, WITHOUT LIMITATION, THOSE OF MERCHANTABILITY, FITNESS FOR A PARTICULAR PURPOSE AND NONINFRINGEMENT OR ARISING FROM A COURSE OF DEALING, USAGE, OR TRADE PRACTICE. IN NO EVENT SHALL CISCO OR ITS SUPPLIERS BE LIABLE FOR ANY INDIRECT, SPECIAL, CONSEQUENTIAL, OR INCIDENTAL DAMAGES, INCLUDING, WITHOUT LIMITATION, LOST PROFITS OR LOSS OR DAMAGE TO DATA ARISING OUT OF THE USE OR INABILITY TO USE THIS MANUAL, EVEN IF CISCO OR ITS SUPPLIERS HAVE BEEN ADVISED OF THE POSSIBILITY OF SUCH DAMAGES. Any Internet Protocol (IP) addresses and phone numbers used in this document are not intended to be actual addresses and phone numbers. Any examples, command display output, network topology diagrams, and other figures included in the document are shown for illustrative purposes only. Any use of actual IP addresses or phone numbers in illustrative content is unintentional and coincidental. Cisco and the Cisco logo are trademarks or registered trademarks of Cisco and/or its affiliates in the U.S. and other countries. To view a list of Cisco trademarks, go to this URL: http:// www.cisco.com/go/trademarks. Third-party trademarks mentioned are the property of their respective owners. The use of the word partner does not imply a partnership relationship between Cisco and any other company. (1110R) © 2015 Cisco Systems, Inc. All rights reserved.

i
Table of Contents
Introduction .................................................................................................................... 1
Introduction ............................................................................................................... 1
Enabling SSO for WebEx Messenger .......................................................................... 3
Configure Federated Web SSO ................................................................................ 3
Create a New Virtual Server...................................................................................... 3
Create New SAML Service Provider ......................................................................... 4
Create New IdP Service ............................................................................................ 4
Bind the Service Provider with the Identity Provider .................................................. 5
Import SAML Metadata in WebEx Messenger ........................................................ 10
Troubleshooting ...................................................................................................... 11
Migration from WebEx Messenger to Common Identity SSO Authentication ........ 13
Request to Add Domain to Common Identity .......................................................... 13
Create a Password in CI ......................................................................................... 13
Configure SSO in Cloud Collaboration Management .............................................. 13
Create New SAML Service Provider in CI ............................................................... 14
Create New IdP Service in CI .................................................................................. 14
Bind the Service Provider with the Identity Provider in CI ....................................... 15
Complete SSO Configuration in Cloud Collaboration Management ........................ 17

ii
Redirect Authentication ........................................................................................... 18
Verification of Cisco Jabber Authentication in CI .................................................... 19
1
1
Chapter 1
Introduction This document covers the configuration of the required software components essential for achieving a Single Sign-on (SSO) solution with WebEx Messenger using F5.
Introduction


2
3
Chapter 2
Configure Federated Web SSO 1. Log into http://www.webex.com/go/connectadmin with your administration
credentials.
2. Select the Configuration tab > System Settings > Security Settings.
3. Select Federated Web SSO Configuration.
4. In the WebEx SAML Issuer (SP ID) field, enter the name for the SAML agreement.
Note: You can use the fully qualified domain name (FQDN) of your organization.
5. Complete all the required fields.
6. Select Export to export the metadata to a location on your computer. You will import this file next.
Create a New Virtual Server 1. Login to the BIG-IP F5 administration interface.
2. Select Local Traffic > Virtual Servers.
3. Select Create.
Enabling SSO for WebEx Messenger

Chapter 2: Enabling SSO for WebEx Messenger
4
4. In the Destination address field, enter the IP address.
5. In the Service Port field and drop-down, enter 443 and select HTTPS.
6. For the SSO Profile (Client), select clientssl.
7. For the SSO Profile (Server), select apm-default-serverssl.
8. Select Finish.
Create New SAML Service Provider 1. Select Access Policy > SAML > BIG-IP as IdP.
2. Select the External SP Connectors tab.
3. From the Create drop-down, select From Metadata.
4. Browse to and select the metadata file you previously download from Cisco WebEx Messenger.
5. In the Service Provider Name field, enter the same SP name as specified in the WebEx SAML issuer Cisco WebEx Messenger Administration Tool.
6. Select OK.
7. Select Security Settings.
8. Select the Response must be signed and the Assertion must be signed check boxes.
9. Select OK.
Create New IdP Service 1. Select Access Policy > SAML > BIG-IP as IdP.
2. Select the Local IdP Service tab.
3. From the Create.
4. In the IdP Service Name field, enter the name.
5. In the IdP Entity ID field, enter the the fully qualified domain name (FQDN) of bigIP box. For example, https://bigip0a.uc8sevtlab13.com/MessngerCAS.
6. Select OK.
7. Select Assertion Settings.

Chapter 2: Enabling SSO for WebEx Messenger
5
8. From the Assertion Subject Type drop-down, select Unspecified.
9. From the Assertion Subject Value drop-down, select %{session.ad.last.attr.mail}.
10. Select the SAML Attributes tab to add the following attributes for Just in Time (JIT) provision:
• email with the value %{session.ad.last.attr.mail}
• firstname with the value %{session.ad.last.attr.givenName}
• lastname with the value %{session.ad.last.attr.sn}
• uid with the value %{session.ad.last.attr.mail}
• updatedTime with the value %{session.ad.last.attr.whenChanged}
11. Select the Security Settings tab.
12. From the drop-downs, select the correct certificate for signing the assertion.
13. Select OK.
Bind the Service Provider with the Identity Provider
1. Select Access Policy > Access Profiles > SAML > BGP-IP as IdP.
2. Select the checkbox adjacent to the local IdP service you created in Cisco Messenger.
3. Select Bind/Unbind SP Connectors.
4. Select the service provider you created earlier as shown below.

Chapter 2: Enabling SSO for WebEx Messenger
6
5. Select Access Policy > Access Profiles > Webtops > Webtops List.
6. Select Create to create a Webtops for the Cisco Collaboration applications with a type Full as shown below.
7. Select Access Policy > Access Profiles > SAML > SAML Resources.
8. Select Create to create a SAML Resource for the IDP created previously as shown below.

Chapter 2: Enabling SSO for WebEx Messenger
7
9. Select Access Policy > Access Profiles to create a new profile for all the Cisco Collaboration applications sharing SAML cookies. For example, CiscoCollab.
10. Select All from the Profile Type drop-down.
11. In the Language Settings section, assign a language.
12. Select Finished.
13. Select Access Policy > Access Profiles > Access Profiles List.
14. Select Edit to edit the access policy.
15. Select Done.
16. In the Logon tab, select Add Item to add a new item called logon page. Leave all the default values as is.

Chapter 2: Enabling SSO for WebEx Messenger
8
17. In the Authentication tab, select Add Item to add a new item called AD Auth. Specify your Active Directory as the server.
18. In the Authentication tab, select Add Item to add a new item called AD Query. Integrate it with your Active Directory and add the attributes whenChanged, sn, givenName and mail.

Chapter 2: Enabling SSO for WebEx Messenger
9
19. In the Branch Rules tab from the Active directory query has drop-down, select Passed.
20. In the Assignment tab, select Add Item to add a new item called Advanced Resource Assign.
21. In the Properties tab, select Add/Delete to add two resources SAML and the Webtop as previously created.
22. In the Select Ending section, select the Allow radio button.
23. Your application should look like this:

Chapter 2: Enabling SSO for WebEx Messenger
10
24. Select Local Traffic > Virtual Servers and associate the access profile with the virtual server you created previously.
25. Select Save.
26. Export the metadata by doing the following:
• Select Access Policy > Access Profiles > SAML > BGP-IP as IdP.
• Select the checkbox adjacent to the local IdP service you created in Cisco Messenger.
• Select Export Metadata to browse to and save the metadata.
Import SAML Metadata in WebEx Messenger 1. Log into http://www.webex.com/go/connectadmin with your administration
credentials.
2. Select the Configuration tab > System Settings > Security Settings.
3. Select Federated Web SSO Configuration.
4. Select Import SAML Metadata to import the metadata file you downloaded.
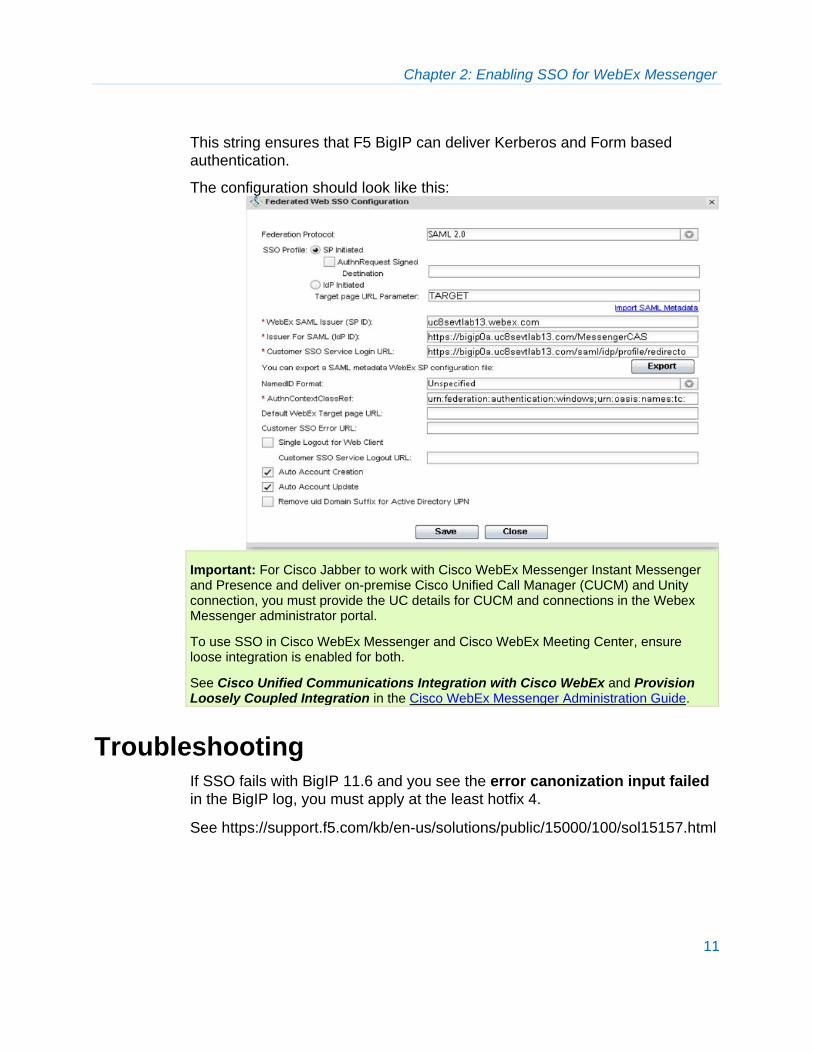
5. In the AuthContextClassRef field, enter urn:federation:authentication:windows;urn:oasis:names:tc:SAML:2.0:ac:classes:PasswordProtectedTransport.
Chapter 2: Enabling SSO for WebEx Messenger
11
This string ensures that F5 BigIP can deliver Kerberos and Form based authentication.
The configuration should look like this:
Important: For Cisco Jabber to work with Cisco WebEx Messenger Instant Messenger and Presence and deliver on-premise Cisco Unified Call Manager (CUCM) and Unity connection, you must provide the UC details for CUCM and connections in the Webex Messenger administrator portal.
To use SSO in Cisco WebEx Messenger and Cisco WebEx Meeting Center, ensure loose integration is enabled for both.
See Cisco Unified Communications Integration with Cisco WebEx and Provision Loosely Coupled Integration in the Cisco WebEx Messenger Administration Guide.
Troubleshooting If SSO fails with BigIP 11.6 and you see the error canonization input failed in the BigIP log, you must apply at the least hotfix 4.
See https://support.f5.com/kb/en-us/solutions/public/15000/100/sol15157.html


13
Request to Add Domain to Common Identity Contact your Customer Success Manager (CSM) or Universal Agent (UA) to submit an ops request to add the domain to CI or email: [email protected]
Create a Password in CI As none of the users migrated from Cisco WebEx Messenger have a password, you must create a password for an existing administrator now.
1. Connect to Https://web.ciscospark.com and enter the email address of the administrator.
2. Select Next.
3. Select Can’t access your account?.
An email is automatically sent to that user asking them to reset their password.
Configure SSO in Cloud Collaboration Management
1. Connect to https://admin.ciscospark.com using the email address and password that you previously reset.
2. Select Users in the left navigation bar to display all the users from the Cisco WebEx Messenger organization.
3. From the top navigation bar, select Service Setup > Enterprise Settings to download the CI metadata.
Migration from WebEx Messenger to Common Identity SSO Authentication

14
4. In the Enterprise Settings window, select Integrate a 3rd-party identity provider (Advanced).
5. Select Next.
6. Select Download Metadata File to browse to and save the metadata file.
Create New SAML Service Provider in CI 1. Select Access Policy > SAML > BIG-IP as IdP.
2. Select the External SP Connectors tab.
3. From the Create drop-down, select From Metadata.
4. Browse to and select the metadata file you previously download from Cisco WebEx Messenger.
5. In the Service Provider Name field, enter the name. For example, uc8sevtlab13.ciscospark.com.
6. Select OK.
7. Select Security Settings.
8. Select the Response must be signed and the Assertion must be signed check boxes.
9. Select OK.
Create New IdP Service in CI 1. Select Access Policy > SAML > BIG-IP as IdP.
2. Select the Local IdP Service tab.
3. From the Create.
4. In the IdP Service Name field, enter the name. For example, https://bigip0a.uc8sevtlab13.com/CI.
5. Select OK.
6. Select Assertion Settings.
7. From the Assertion Subject Type drop-down, select Transient Identifier.
8. From the Assertion Subject Value drop-down, select %{session.ad.last.attr.mail}.

15
9. Select the SAML Attributes tab to add the following attributes for Just in Time (JIT) provision:
• mail with the value %{session.ad.last.attr.mail}
• uid with the value %{session.ad.last.attr.mail}
10. Select the Security Settings tab.
11. From the drop-downs, select the correct certificate for signing the assertion.
12. Select OK.
Bind the Service Provider with the Identity Provider in CI
1. Select Access Policy > Access Profiles > SAML > BGP-IP as IdP.
2. Select the checkbox adjacent to the local IdP service you created in Cisco Messenger.
3. Select Bind/Unbind SP Connectors.
4. Select the service provider you created earlier as shown below.
5. Select OK.

16
6. Select the checkbox adjacent to the local IdP service you created in the CI.
7. Select Export Metadata to browse to and save the metadata.
8. Select Access Policy > Access Profiles > SAML > SAML Resources.
9. Select Create to create a SAML Resource for the IDP created previously as shown below.
10. Select Access Policy > Access Profiles and select Edit adjacent to the access policy for the Cisco WebEx Messenger CAS.

17
11. Select the Advanced Resource Assign link.
12. Select Add/Delete to add the new SAML Resource.
13. Select Save.
14. Close the Access Policy windows and select Apply Access Policy.
Complete SSO Configuration in Cloud Collaboration Management
1. Connect to https://admin.ciscospark.com using the email address and password that you previously reset.
2. From the top navigation bar, select Service Setup > Enterprise Settings to download the CI metadata.
3. In the Enterprise Settings window, select Integrate a 3rd-party identity provider (Advanced).
4. Select Next.
5. Select Import to browse to and import the metatadata file.
A success message is displayed when the import of the metadata file is complete.
6. If the IdP is not signed by a public CA, select the Allow self-signed certification in Metadata (less secure) to allow CI to support a IdP that has self-signed certificate.
7. Select Next.
8. Select Test SSO Configuration .
9. Sign in with the administrator details.
18
Redirect Authentication • Before you can verify the Jabber authentication in CI, authentication must
be redirected from the WebEx Messenger platform to the CI platform, To do this contact the CSM to update the existing ops request or submit a new ops request or email: [email protected].

19
Chapter 3
1. Start Cisco Jabber.
2. Verify that all the on-premise are still using SSO.
3. Verify that WebEx Meeting Center is enabled for loose Integration.
Verification of Cisco Jabber Authentication in CI

20
4. Finally, verify that Cisco Jabber logs contain the string idbroker.webex.com, indicating that it is connecting to CI.