en matrox mxo2 quick installation guide
TRANSCRIPT

8/3/2019 En Matrox MXO2 Quick Installation Guide
http://slidepdf.com/reader/full/en-matrox-mxo2-quick-installation-guide 1/24
v Y11078-101-0200
Matrox MXO2Quick Installation Guide
March 25, 2010

8/3/2019 En Matrox MXO2 Quick Installation Guide
http://slidepdf.com/reader/full/en-matrox-mxo2-quick-installation-guide 2/24
Copyright © 2010 Matrox Electronic Systems Ltd. (English) All rights reserved. (Français) Tous droitsréservés. (Deutsch) Alle Rechte vorbehalten. (Italiano) Tutti i diritti riservati. (Español) Reservados todos los
derechos.Disclaimer Matrox Electronic Systems Ltd. reserves the right to make changes in specifications at any time and without notice. Theinformation provided by this document is believed to be accurate and reliable. However, no responsibility is assumed by Matrox ElectronicSystems Ltd. for its use; nor for any infringements of patents or other rights of third parties resulting from its use. No license is grantedunder any patents or patent rights of Matrox Electronic Systems Ltd.
Unauthorized recording or use of broadcast television programming, video tape, or other copyrighted material may violate copyright laws.Matrox Electronic Systems Ltd. assumes no responsibility for the illegal duplication, use, or other acts that infringe on the rights ofcopyright owners.
Matrox Electronic Systems Ltd.1055 St. Regis Blvd., Dorval, Quebec, Canada H9P 2T4Tel: (514) 685-2630 Fax: (514) 685-2853 World Wide Web:www.matrox.com
Trademarks • Marques déposées • Warenzeichen • Marchi registrati • Marcas registradasMatrox Electronic Systems Ltd. ........................ ........................ ........................ ...Matrox® , MXO™
Adobe Systems Inc..............................................................................................Adobe® , Premiere®
Apple Inc.............................................................................................................Apple® , Final Cut Pro® , Mac®
HDMI Licensing LLC. ..........................................................................................HDMI™
Microsoft Corporation..........................................................................................Microsoft® , Windows®
PCI-SIG ...................... ........................ ........................ ........................ .................PCI-SIG® , PCIe®
Personal Computer Memory Card International Association (PCMCIA)..................PCMCIA ™ , ExpressCard®
HDMI, the HDMI logo and High-Definition Multimedia Interface are trademarks or registered trademarks of HDMI Licensing LLC.
(English) All other nationally and internationally recognized trademarks and tradenames are hereby acknowledged. (Français) Toutes lesautres marques et tous les autres noms déposés reconnus nationalement ou internationalement sont également reconnus par lesprésentes. (Deutsch) Alle sonstigen national und international bekannten Warenzeichen und Produktnamen werden hiermit anerkannt.(Italiano) Eventuali altri nomi di prodotto menzionati in questo manuale sono dei proprietà di rispettivi produttori. (Español) Por medio delpresente se reconocen todas las demás marcas y nombres comerciales reconocidos a nivel nacional e internacional.

8/3/2019 En Matrox MXO2 Quick Installation Guide
http://slidepdf.com/reader/full/en-matrox-mxo2-quick-installation-guide 3/24
About this guide.......................................................................................... 1
Installing your MXO2 software ................................................................... 1
Installing your Matrox MXO2 hardware ...................................................... 1Installing your PCIe host adapter (for desktops)................................................1Installing and removing your PCIe host ExpressCard/34 adapter (for laptops) 2Rack mounting your MXO2 Rack ...................................................................... 2
Powering Matrox MXO2 ............................................................................ 4Matrox MXO2 and MXO2 LE ............................................................................ 4Matrox MXO2 Rack .......................................................................................... 7Matrox MXO2 Mini............................................................................................ 7
Connecting MXO2 to your computer......................................................... 9
Connecting MXO2 LE to your computer................................................... 10
Connecting MXO2 Rack to your computer................................................11
Connecting MXO2 Mini to your computer ................................................ 12
Typical MXO2 digital video connections................................................... 13
Typical MXO2 LE digital video connections ..............................................14
Typical MXO2 Rack digital video connections.......................................... 15
Typical MXO2 Mini HDMI video connections ............................................ 16
Registration and customer support ......................................................... 17
Contacting us .............................. ................... ................... ................... ........... 17
Contents

8/3/2019 En Matrox MXO2 Quick Installation Guide
http://slidepdf.com/reader/full/en-matrox-mxo2-quick-installation-guide 4/24
ii
Contents
Your notes

8/3/2019 En Matrox MXO2 Quick Installation Guide
http://slidepdf.com/reader/full/en-matrox-mxo2-quick-installation-guide 5/24
1
About this guide
About this guideThis guide provides brief instructions for installing your Matrox MXO2 hardware andsoftware. It is intended to help you quickly set up your Matrox MXO2 system. For
detailed installation instructions, please refer to your Matrox MXO2 Installation and User Guide .
Installing your MXO2 softwareIn order to provide our customers with products of the highest quality, we areregularly improving our products through frequent software updates. To ensure thatyou have the latest software version, the Matrox MXO2 software is available on our
website. To download the latest version of the MXO2 software and documentation,visit the MXO2 Support section of our website at www.matrox.com/video/support .You can also contact your Matrox representative for the latest software anddocumentation.
You can install the MXO2 software on a computer with or without the MXO2hardware connected. If you plan on working with third-party applications, such asApple Final Cut Pro and Adobe Premiere Pro, you should install those applicationsbefore installing the MXO2 software.
Installing your Matrox MXO2 hardware
Installing your PCIe host adapter (for desktops)The Matrox PCIe host adapter is designed to operate in your desktop computer’s PCIeslot. For detailed instructions on how to perform the following steps, refer to your
computer’s documentation.
²Caution Static electricity from your body can damage your Matrox PCIe host adapter or your computer. Once you’ve opened your computer, drain static electricity from yourbody by touching a bare metal surface on your computer chassis before you install orremove any parts of your system. If you have a grounding wrist strap, use it whilehandling and installing any components in your computer. You should avoid touchingthe chips and other components on the circuit board. Try to handle the card by its edges.
1 Shut down your computer, remove the power cord and all the cables from thecomputer, and open your computer’s chassis.
2 Insert the Matrox PCIe host adapter in an available PCIe slot in your computer,and secure the adapter into place.
3 Close your computer’s chassis, and reconnect the power cord and all the cables tothe computer. You can now supply power to MXO2 and connect it to your
computer as described in this guide.

8/3/2019 En Matrox MXO2 Quick Installation Guide
http://slidepdf.com/reader/full/en-matrox-mxo2-quick-installation-guide 6/24
2
Installing your Matrox MXO2 hardware
Installing and removing your PCIe hostExpressCard/34 adapter (for laptops)
¡ ImportantFor Mac OS systems, you can install the Matrox PCIe host
ExpressCard/34 adapter when your laptop is on or off. For Windows systems, youmust shut down your laptop before installing the Matrox PCIe host ExpressCard/34adapter.
The Matrox PCIe host ExpressCard/34 adapter is designed to operate in your laptop’sExpressCard/34 slot. Connect the Matrox PCIe cable to the host ExpressCard/34adapter, and then insert the host adapter in your laptop’s ExpressCard/34 slot until the
adapter clicks into place.
For Windows systems, you must shut down your laptop before removing the Matrox
PCIe host ExpressCard/34 adapter. For Mac OS systems, you don’t have to shut downyour laptop, but you must power off the card before removing it from your laptop byclicking the ExpressCard icon ( ) from the menu bar, and then clicking Power offCard .
Rack mounting your MXO2 Rack Use the supplied rackmount brackets to mount your Matrox MXO2 Rack to astandard 19-inch rack. The rackmount brackets can be used to either front or rearmount your MXO2 Rack. You can also mount MXO2 Rack so that it’s recessed toallow more space for cables. MXO2 Rack takes up two vertical rack unit spaces.
1 Unpack the two rackmount brackets and their eight mounting screws.
²Caution Use only the screws supplied with your MXO2 Rack to attach therackmount brackets to your MXO2 Rack. If you use screws that are larger or longerthan the ones supplied, you can damage your equipment.
2 Depending if you want to front or rear mount your MXO2 Rack, position therackmount brackets so that the bracket face is either towards the front (connectorside) or the back of your MXO2 Rack.
A
A
ExpressCard/34 slot
Matrox PCIeExpressCard/34adapter
PCIecable

8/3/2019 En Matrox MXO2 Quick Installation Guide
http://slidepdf.com/reader/full/en-matrox-mxo2-quick-installation-guide 7/24
3
Installing your Matrox MXO2 hardware
3 MXO2 Rack can be recess mounted to allow extra space for connectors andcables. Depending on your mounting needs, align the screw holes on eachrackmount bracket with the desired screw holes on either side of the MXO2
Rack.²Caution For stability and safety, whichever mounting method you choose, makesure to fasten each rackmount bracket to MXO2 Rack using all four suppliedscrews.
4 Using a hand screwdriver only ( no power screwdrivers ), carefully tighten eachscrew until snug. Do not overtighten!
5 Fasten your MXO2 Rack to the standard 19-inch rack as per your rack’s
instructions.
Front rackmounting
Rear rackmounting
Recessed rackmounting
Rackmountbracket MXO2 Rack

8/3/2019 En Matrox MXO2 Quick Installation Guide
http://slidepdf.com/reader/full/en-matrox-mxo2-quick-installation-guide 8/24
4
Powering Matrox MXO2
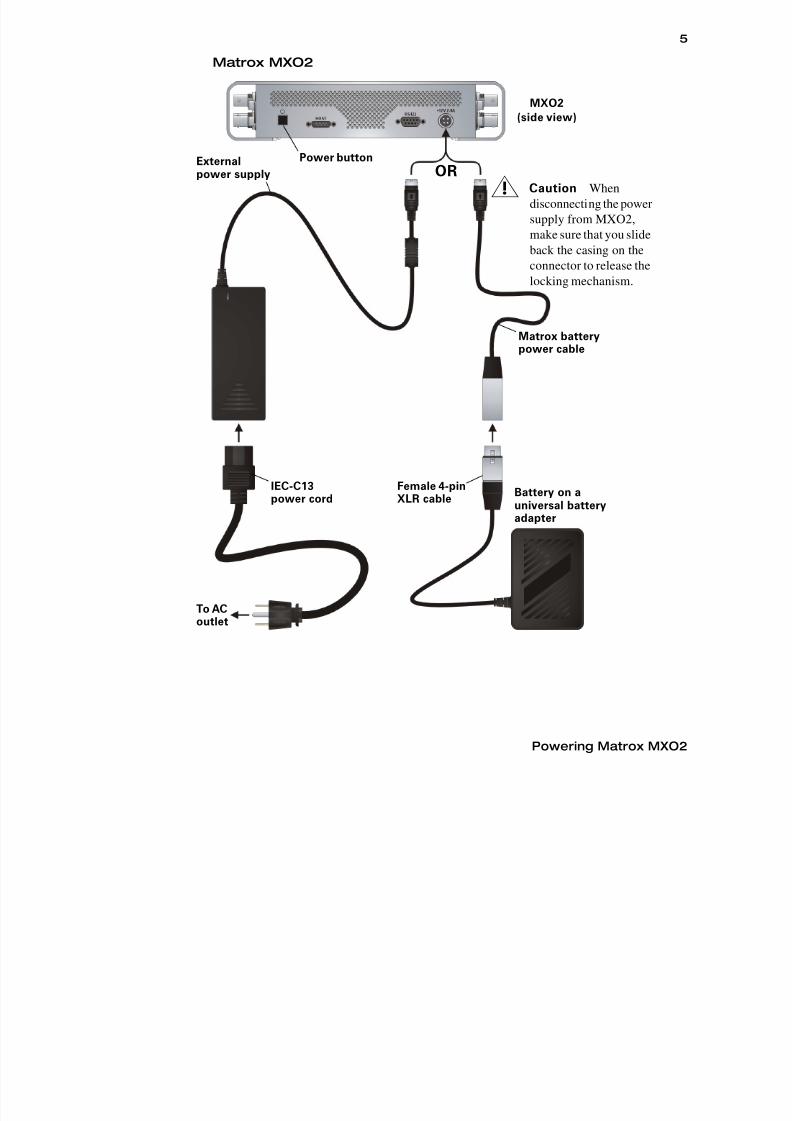
Powering Matrox MXO2This section describes how to supply power to your MXO2 system.
Matrox MXO2 and MXO2 LEYou can power MXO2 and MXO2 LE using an AC outlet via the Matrox externalpower supply and a power cord, or using a battery. MXO2 and MXO2 LE feature apower button that you can use to manually turn the unit on and off. To turn yourMXO2/MXO2 LE on, press the power button. Press and hold the power button for atleast two seconds to turn off the unit.
¡ ImportantWhen MXO2/MXO2 LE is connected to a computer that is running, do
not disconnect the unit from its power source, or power it off. Shut down yourcomputer before removing power from MXO2/MXO2 LE. If using a battery to powerMXO2/MXO2 LE, ensure that the battery is sufficiently charged.
Battery requirements and guidelinesAs an alternative to using an AC outlet, you can use a battery to power Matrox MXO2or MXO2 LE. To avoid damage to your MXO2 system and peripheral devices whenusing a battery, please observe the following requirements and guidelines.
• Use a standard self-protected (fused) battery with a nominal voltage of 12V,13.2V, or 14.4V. A higher-voltage battery will damage your MXO2 system.
• Disconnect the battery when not in use. Do not leave the unit connected to thebattery when not in use as this may damage your MXO2 system and/or battery.
• Do not power your MXO2 system using your vehicle’s battery via the powersocket.
²Caution To avoid damage to your MXO2 system and peripheral devices, use aMatrox-recommended battery. For a list of batteries recommended for use with yourMXO2 system, visit the Matrox MXO2 Support section of our website atwww.matrox.com/video/support .
8/3/2019 En Matrox MXO2 Quick Installation Guide
http://slidepdf.com/reader/full/en-matrox-mxo2-quick-installation-guide 9/24
5
Powering Matrox MXO2
Matrox MXO2
ORExternalpower supply
Female 4-pinXLR cable Battery on a
universal batteryadapter
Matrox batterypower cable
To ACoutlet
IEC-C13power cord
Power button
²Caution Whendisconnecting the powersupply from MXO2,make sure that you slideback the casing on theconnector to release thelocking mechanism.
MXO2
(side view)

8/3/2019 En Matrox MXO2 Quick Installation Guide
http://slidepdf.com/reader/full/en-matrox-mxo2-quick-installation-guide 10/24
6
Powering Matrox MXO2
Matrox MXO2 LE
ORExternalpower supply
Battery on auniversal batteryadapter
To ACoutlet
Power cord
Power button
MXO2 LE(side view)
Female 4-pinXLR cable

8/3/2019 En Matrox MXO2 Quick Installation Guide
http://slidepdf.com/reader/full/en-matrox-mxo2-quick-installation-guide 11/24
7
Powering Matrox MXO2
Matrox MXO2 Rack You can power MXO2 Rack using an AC outlet and an IEC-C13 power cord.
¡ ImportantWhen MXO2 Rack is connected to a computer that is running, do not
disconnect MXO2 Rack from its power source. Shut down your computer beforeremoving power from MXO2 Rack.
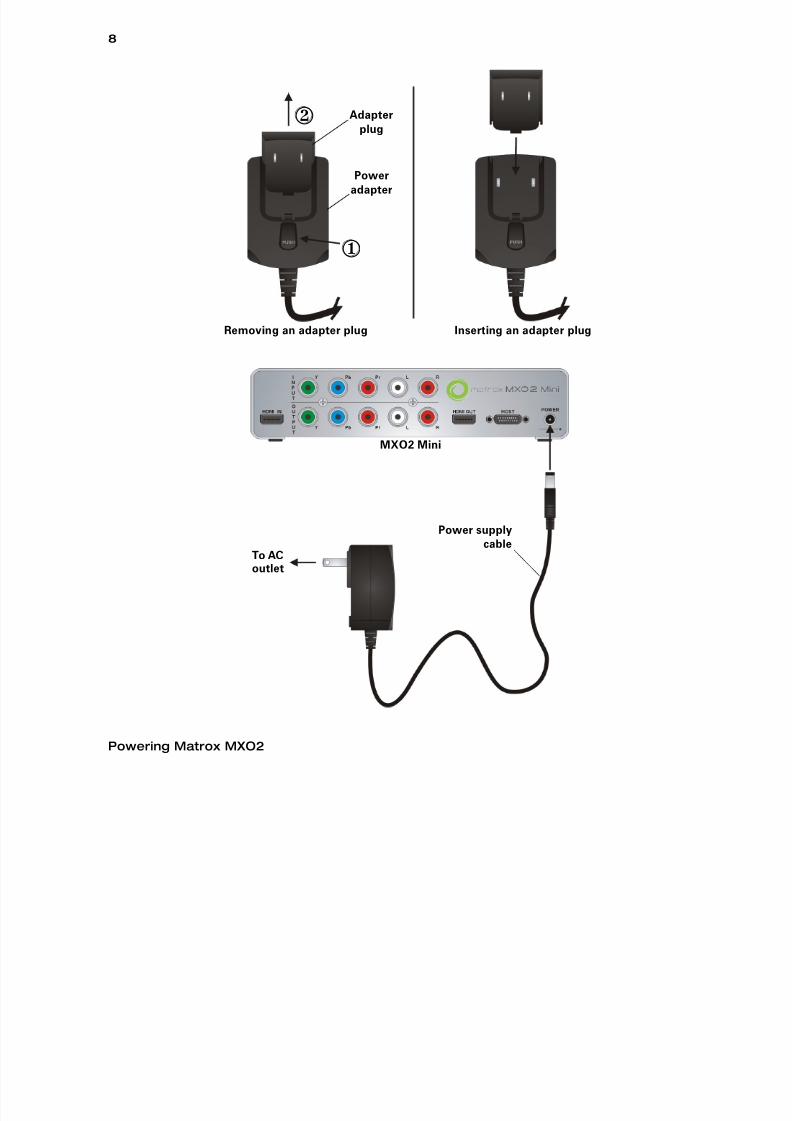
Matrox MXO2 MiniYou can power MXO2 Mini using an AC outlet via the Matrox external power supplycable. MXO2 Mini provides an external power supply cable with internationaladapter plugs for use in different regions:
• To remove an adapter plug from the Matrox power adapter, hold down the buttonlabeled PUSH on the power adapter, and then slide the adapter plug up until itreleases from the power adapter.
• To insert an adapter plug into the Matrox power adapter, ensure that the adapterplug is properly aligned with the corresponding slot on the power adapter, andthen slide the adapter plug down into the power adapter until it locks into place.
To ACoutlet
IEC-C13power cord
MXO2 Rack
8/3/2019 En Matrox MXO2 Quick Installation Guide
http://slidepdf.com/reader/full/en-matrox-mxo2-quick-installation-guide 12/24
8
Powering Matrox MXO2
0
1
Removing an adapter plug Inserting an adapter plug
Poweradapter
Adapterplug
To AC
outlet
MXO2 Mini
Power supplycable

8/3/2019 En Matrox MXO2 Quick Installation Guide
http://slidepdf.com/reader/full/en-matrox-mxo2-quick-installation-guide 13/24
9
Connecting MXO2 to your computer
Connecting MXO2 to your computerConnect MXO2 to your computer using the Matrox PCIe cable. For MXO2 to bedetected on a desktop computer, power must be supplied to MXO2, and it must be
connected to your system before starting your computer.
¡ ImportantDo not disconnect the Matrox PCIe cable from the adapter, or MXO2,when your computer is running. To safely remove the Matrox PCIe hostExpresscard/34 adapter, see “Installing and removing your PCIe host ExpressCard/34adapter (for laptops)” on page 2.
OR
A
A
Matrox PCIe hostExpressCard/34adapter
Matrox PCIehost adapter
PCIe cable ²Caution Ensure proper orientation
when connecting the PCIe cable to avoiddamaging the cable or host connector.
To your laptop’s ExpressCard/34slot (see “Installing and removingyour PCIe host ExpressCard/34adapter (for laptops)” on page 2).
MXO2(side view)

8/3/2019 En Matrox MXO2 Quick Installation Guide
http://slidepdf.com/reader/full/en-matrox-mxo2-quick-installation-guide 14/24
10
Connecting MXO2 LE to your computer
Connecting MXO2 LE to your computerConnect MXO2 LE to your computer using the Matrox PCIe cable. For MXO2 LE tobe detected on a desktop computer, power must be supplied to MXO2 LE, and it must
be connected to your system before starting your computer.
¡ ImportantDo not disconnect the Matrox PCIe cable from the adapter, or MXO2LE, when your computer is running. To safely remove the Matrox PCIe hostExpresscard/34 adapter, see “Installing and removing your PCIe host ExpressCard/34adapter (for laptops)” on page 2.
OR
A
A
Matrox PCIe hostExpressCard/34adapter
Matrox PCIehost adapter
PCIe cable ²Caution Ensure proper orientation
when connecting the PCIe cable to avoiddamaging the cable or host connector.
To your laptop’s ExpressCard/34slot (see “Installing and removingyour PCIe host ExpressCard/34adapter (for laptops)” on page 2).
MXO2 LE(side view)

8/3/2019 En Matrox MXO2 Quick Installation Guide
http://slidepdf.com/reader/full/en-matrox-mxo2-quick-installation-guide 15/24
11
Connecting MXO2 Rack to your computer
Connecting MXO2 Rack to your computerConnect MXO2 Rack to your computer using the Matrox PCIe cable. For MXO2Rack to be detected on a desktop computer, power must be supplied to MXO2 Rack,
and it must be connected to your system before starting your computer.
¡ ImportantDo not disconnect the Matrox PCIe cable from the adapter, or MXO2Rack, when your computer is running. To safely remove the Matrox PCIe hostExpresscard/34 adapter, see “Installing and removing your PCIe host ExpressCard/34adapter (for laptops)” on page 2.
OR
A
A
Matrox PCIe hostExpressCard/34adapter
Matrox PCIehost adapter
PCIe cable
²Caution Ensure proper orientationwhen connecting the PCIe cable to avoid
damaging the cable or host connector.
To your laptop’s ExpressCard/34slot (see “Installing and removing
your PCIe host ExpressCard/34adapter (for laptops)” on page 2).
MXO2 Rack
8/3/2019 En Matrox MXO2 Quick Installation Guide
http://slidepdf.com/reader/full/en-matrox-mxo2-quick-installation-guide 16/24
12
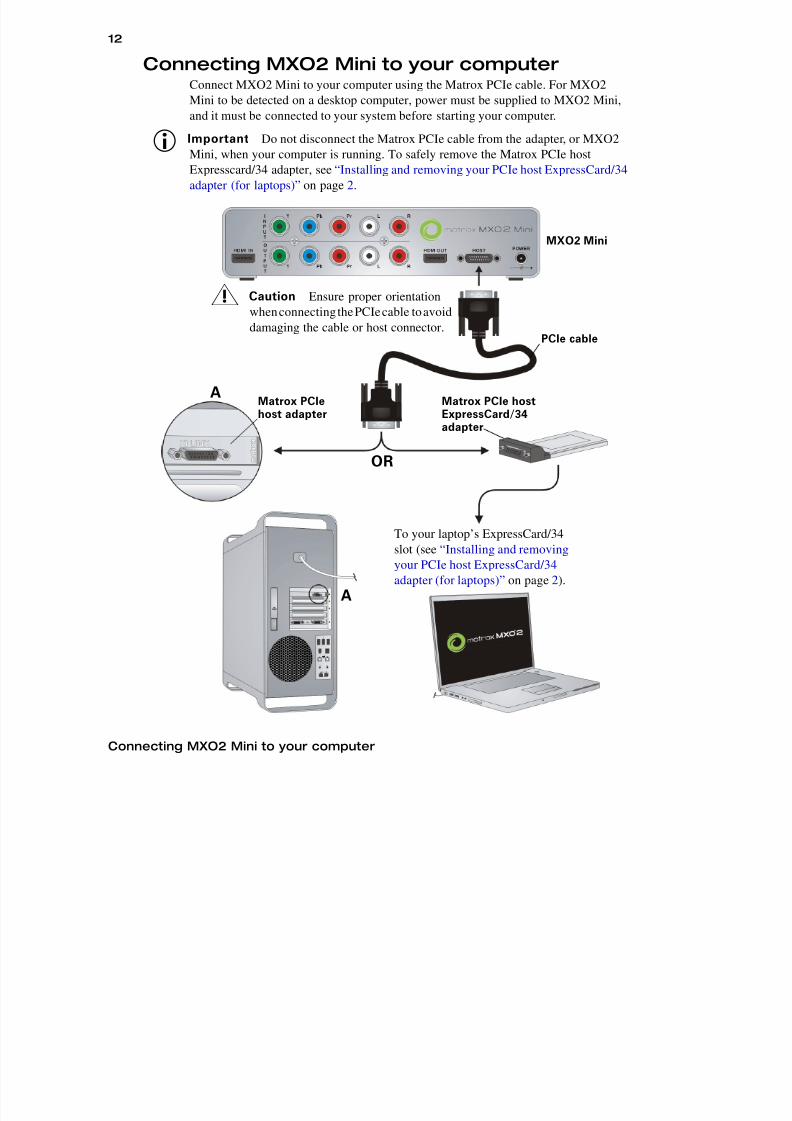
Connecting MXO2 Mini to your computer
Connecting MXO2 Mini to your computerConnect MXO2 Mini to your computer using the Matrox PCIe cable. For MXO2Mini to be detected on a desktop computer, power must be supplied to MXO2 Mini,
and it must be connected to your system before starting your computer.
¡ ImportantDo not disconnect the Matrox PCIe cable from the adapter, or MXO2Mini, when your computer is running. To safely remove the Matrox PCIe hostExpresscard/34 adapter, see “Installing and removing your PCIe host ExpressCard/34adapter (for laptops)” on page 2.
OR
A
A
Matrox PCIe hostExpressCard/34adapter
Matrox PCIehost adapter
PCIe cable
²Caution Ensure proper orientationwhen connecting the PCIe cable to avoiddamaging the cable or host connector.
To your laptop’s ExpressCard/34slot (see “Installing and removingyour PCIe host ExpressCard/34adapter (for laptops)” on page 2).
MXO2 Mini

8/3/2019 En Matrox MXO2 Quick Installation Guide
http://slidepdf.com/reader/full/en-matrox-mxo2-quick-installation-guide 17/24
13
Typical MXO2 digital video connections
Typical MXO2 digital video connectionsIn the following illustration, we’ve connected a video monitor to view the signal thatwill be recorded, and separate source and record decks. You may, however, use the
same deck as both your source and record device by making the input and outputconnections to a single deck. We’re using SDI connectors for video and audio, andmonitoring the audio on a surround sound speaker system through RCA connectors.The video is genlocked using a tri-level sync generator.
Recorder (Deck 2)Video monitor Surround soundspeaker system
Source(Deck 1)
Tri-levelsyncgenerator
MXO2 Outputs
MXO2 Inputs

8/3/2019 En Matrox MXO2 Quick Installation Guide
http://slidepdf.com/reader/full/en-matrox-mxo2-quick-installation-guide 18/24
14
Typical MXO2 LE digita l video connections
Typical MXO2 LE digital video connectionsIn the following illustration, we’ve connected a video monitor to view the signal thatwill be recorded, and separate source and record decks. You may, however, use the
same deck as both your source and record device by making the input and outputconnections to a single deck. We’re using SDI connectors for video and audio, an SDIconnector for video monitoring, and we’re monitoring the audio on a surround soundspeaker system through an HDMI connector. The video is genlocked using a tri-levelsync generator.
Recorder (Deck 2)Video monitor Surround soundspeaker system
Source(Deck 1)Tri-levelsyncgenerator
MXO2 LE Outputs
MXO2 LE Inputs

8/3/2019 En Matrox MXO2 Quick Installation Guide
http://slidepdf.com/reader/full/en-matrox-mxo2-quick-installation-guide 19/24
15
Typical MXO2 Rack digital video connections
Typical MXO2 Rack digital video connectionsIn the following illustration, we’ve connected a video monitor to view the signal thatwill be recorded, and separate source and record decks. You may, however, use the
same deck as both your source and record device by making the input and outputconnections to a single deck. We’re using SDI connectors for video and audio, andmonitoring the audio on a surround sound speaker system through XLR connectors.The video is genlocked using a tri-level sync generator.
Recorder(Deck 2)
Videomonitor
Surround soundspeaker system
Source(Deck 1)
Tri-levelsyncgenerator
MXO2 Rack (partial view)
MXO2 Rack (partial view)
To another device’sreference input. If not used,terminate the signal with aBNC 75-ohm terminator.
8/3/2019 En Matrox MXO2 Quick Installation Guide
http://slidepdf.com/reader/full/en-matrox-mxo2-quick-installation-guide 20/24
16
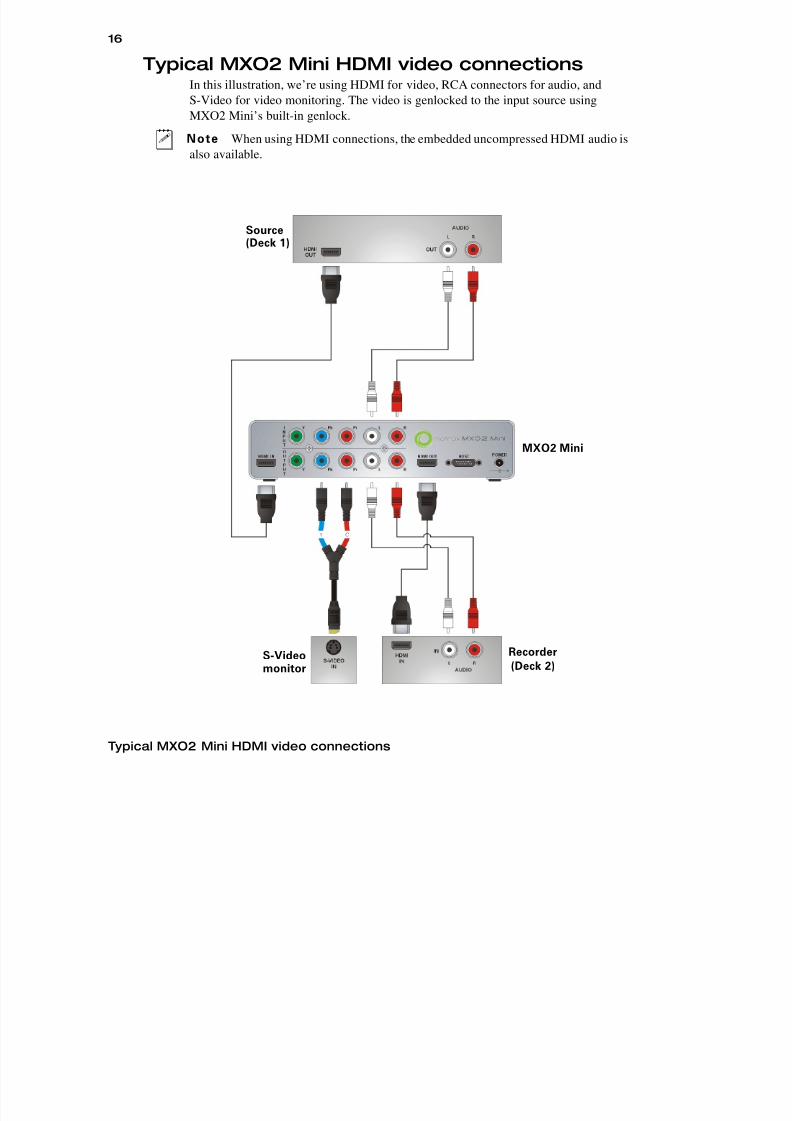
Typical MXO2 Mini HDMI video connections
Typical MXO2 Mini HDMI video connectionsIn this illustration, we’re using HDMI for video, RCA connectors for audio, andS-Video for video monitoring. The video is genlocked to the input source using
MXO2 Mini’s built-in genlock.
¦ Note When using HDMI connections, the embedded uncompressed HDMI audio isalso available.
Recorder(Deck 2)
Source(Deck 1)
MXO2 Mini
S-Videomonitor
17

8/3/2019 En Matrox MXO2 Quick Installation Guide
http://slidepdf.com/reader/full/en-matrox-mxo2-quick-installation-guide 21/24
17
Registration and customer support
Registration and customer supportYou can register your Matrox MXO2 system in the Matrox MXO2 Support section of our website at www.matrox.com/video/support .
¡ ImportantOnly registered users are entitled to customer support, softwareupdates, access to our user forums, and special promotional offers.
Contacting usMatrox is proud to offer worldwide customer support. Please use the Matrox MXO2contact information for your area as provided on our website atwww.matrox.com/video/support .
18

8/3/2019 En Matrox MXO2 Quick Installation Guide
http://slidepdf.com/reader/full/en-matrox-mxo2-quick-installation-guide 22/24
18
Registration and customer support
Your notes

8/3/2019 En Matrox MXO2 Quick Installation Guide
http://slidepdf.com/reader/full/en-matrox-mxo2-quick-installation-guide 23/24

8/3/2019 En Matrox MXO2 Quick Installation Guide
http://slidepdf.com/reader/full/en-matrox-mxo2-quick-installation-guide 24/24
www.matrox.com/video