emt bls treatment protocol - lincoln, nebraska
TRANSCRIPT

LF&R EMT BLS Protocols First edition Jan. 2013
Last Edited 10/27/2021
1
EMT BLS TREATMENT PROTOCOL
January 2013
Approved By: Dr. Jason Kruger
Last Edited 10/27/2021
Changes highlighted in Yellow
LF&R EMT BLS Protocols First edition Jan. 2013
Last Edited 10/27/2021
2
Part I. General Operations .............................................................................................. 4 Introduction ........................................................................................................ 4 Definitions .......................................................................................................... 5 Physician on Scene ............................................................................................ 6 “Do Not Resuscitate” (DNR) Orders and Identification of CPR Only .................. 7 Discontinue or No Initiation of CPR .................................................................... 7 Refusal of Care .................................................................................................. 9
Part II. Patient Assessment ........................................................................................... 10 General ............................................................................................................ 10 Scene Size-Up ................................................................................................. 10 Primary Assessment ........................................................................................ 11 History Taking .................................................................................................. 12 Secondary Assessment ................................................................................... 12 Reassessment ................................................................................................. 13 Documentation ................................................................................................. 13
Part III. General Treatment Principles ........................................................................... 15 Airway and Oxygen .......................................................................................... 15 Cardiac Monitor ................................................................................................ 15 Restraints ......................................................................................................... 16 Physician Orders .............................................................................................. 16
Part IV. Medical Management ....................................................................................... 17 Altered Mental Status ....................................................................................... 17 General Adult Cardiac Arrest Guidelines (Anyone showing signs of puberty) .. 17 All patients found in cardiac arrest: .................................................................. 17 High Quality Chest compressions: ................................................................... 18 Analyze rhythm and pulse checks: ................................................................... 18 Airway and ventilations: ................................................................................... 18 Adult Cardiac Arrest Algorithm (Puberty and older) ......................................... 19 Cardiac Arrest (AED) – Pediatric/Infant ............................................................ 20
Pediatric Cardiac Arrest Algorithm (Infant - Puberty) ........................................... 21 Chest Pain (Non-Traumatic) ................................................................................ 22 Allergic Reaction or Anaphylaxis ...................................................................... 22 Asthma or Toxic Exposure ............................................................................... 22 Emphysema or Chronic Bronchitis ................................................................... 22 Croup ............................................................................................................... 22 FBAO – Conscious Patient Greater Than One Year of Age ............................. 22 FBAO – Conscious Patient Less Than One Year of Age ................................. 23 FBAO – Unconscious Patient Greater Than One Year of Age ......................... 23 FBAO - Unconscious Patient Less Than One Year of Age .............................. 23 Environmental Hyperthermia ............................................................................ 24 Environmental Hypothermia ............................................................................. 24 Hypotension ..................................................................................................... 25 Obstetrics – Normal Delivery............................................................................ 25 Obstetrics – Care of the Newborn .................................................................... 26
APGAR Scoring System .................................................................................. 27 Obstetrics – Newborn/Neonatal Resuscitation ................................................. 27

LF&R EMT BLS Protocols First edition Jan. 2013
Last Edited 10/27/2021
3
Obstetrics – Childbirth Complications .............................................................. 28 Obstetrics – Pregnancy Complications ............................................................ 29 Overdose ......................................................................................................... 29 Seizures ........................................................................................................... 30 Stroke/CVA/TIA ................................................................................................ 30
Part V. Trauma Management ........................................................................................ 32 Scene Assessment .......................................................................................... 32 Patient Assessment & Care ............................................................................. 33 TRAUMA Category Alerts ................................................................................ 34 Abdominal Injuries ............................................................................................ 36 Burns ................................................................................................................ 37 Chest Injuries ................................................................................................... 37 Extremity Injuries .............................................................................................. 37 Eye Injuries ...................................................................................................... 38
Head Injuries ....................................................................................................... 39 Part VI. Appendix .......................................................................................................... 40
NAEMSP Position Statement ........................................................................... 40 Wound Care Tourniquet ................................................................................... 42 LUCAS™ Device .............................................................................................. 43 Infectious Diseases: ......................................................................................... 49 I-gel Insertion Protocol ..................................................................................... 53 Naloxone Administration .................................................................................. 55

LF&R EMT BLS Protocols First edition Jan. 2013
Last Edited 10/27/2021
4
Part I. General Operations Introduction
1. The purpose of protocols in the Lincoln Fire & Rescue Emergency Medical
Services is to establish guidelines between EMS administration, the EMS provider and medical direction for the management, treatment, and transport of specific medical emergencies.
2. The protocols set forth are neither designed nor intended to limit the EMS
provider in the exercise of good judgment or initiative in taking reasonable action in extraordinary circumstances. These protocols are intended to assist in achieving excellent, consistent pre-hospital care for patients. The following protocols are not intended to provide a solution to every problem that may arise.
3. Pre-hospital care is a shared responsibility between the physician and the EMS
provider. The services which EMS providers are authorized to perform pursuant to the Nebraska Emergency Medical Services Rules and Regulations shall be performed by the EMS provider only pursuant to the written or verbal authorization of the Physician Medical Director (PMD) or medical control. The National Education Standards and the National EMS Scope of Practice Model shall be the reference for standard of care. In the Lincoln Fire & Rescue Emergency Medical Services, in all cases where written protocols, directives and policies do not address patient care or disposition, the National Education Standards and the National EMS Scope of Practice Model shall be the standard.
4. The following treatment guidelines are for use by field personnel and the Medical
Control physician. They have been developed to help assure standardized, quality medical care and promote rapid and appropriate quality treatment of all patients regardless of economic or social status in the quickest and most efficient manner possible. The protocols contained in this document detail Basic Life Support (BLS) treatment modalities and are intended for use by all BLS providers operating within the Lincoln Fire & Rescue EMS System.
5. Without actual On-Line Medical Direction, the field provider should not deviate
from these guidelines relating to treatment. If extenuating circumstances necessitate deviation from these guidelines, they must be explicitly detailed in the patient care report. Under no circumstances should providers deviate beyond their Physician Medical Director approved scope of practice.
6. Although these guidelines attempt to cover most situations the field provider will
encounter, it is impossible to delineate all possible situations the field provider will face. When faced with occurrences that are not specifically addressed in these guidelines, the provider shall seek the input of On-Line Medical Direction for advice and direction. It must be emphasized when presented with a situation which is not covered by these guidelines; the most appropriate decision is the one which best serves the interests of the patient and the patient’s family.

LF&R EMT BLS Protocols First edition Jan. 2013
Last Edited 10/27/2021
5
Definitions
1. The Lincoln Emergency Medical Services System:
a. The Lincoln Fire & Rescue Emergency Medical Services System is comprised of those agencies and personnel who facilitate the delivery of pre-hospital health services to the citizens of Lincoln, Nebraska and selected surrounding communities. From the access of emergency medical services, through the actual field treatment and/or transportation, to the evaluation and continuous improvement of medical providers and functions, the EMS system is a chain, with each link dependent upon the others to provide emergency medical care to the victims of illness or injury. Specifically, the EMS system includes: the public, the 911 Emergency Dispatch Center, Lincoln Fire and Rescue, and the Lincoln Police Department.
2. Medical Control:
a. Conceptually, Medical Control is the authority granted to field providers
enabling them to perform out-of-facility assessments and treatments. Actual Medical Control is comprised of the Physician Medical Director, the Quality Improvement staff, and the licensed physicians and advanced level providers designated and authorized to provide Medical Direction.
3. Medical Direction:
a. Medical Direction is the actual medical advice and guidance afforded field
providers for various types of medical or traumatic emergencies. Medical Direction can be provided either “off-line” or “on-line”. Off-line Medical Direction is the written standards of care prescribed by Medical Control. These standards take the form of medical guidelines to be followed when presented with field interventions. These guidelines establish interventions which may be initiated without the actual consultation with a physician. On-Line Medical Direction is the actual verbal authority and advice given to a field provider for certain treatment modalities. For the purposes of uniformity, the written guidelines may include treatment options available only after consultation with On-Line Medical Direction.
4. Basic Life Support (BLS):
a. Basic Life Support is defined as care and treatment modalities which can
be performed without the use of invasive therapies. Examples include patient and scene assessment, cervical spine stabilization, oxygen administration, splinting, bleeding control, and blood sugar assessment. An EMT may function within their scope of practice pursuant to Nebraska Health and Human Services 172 NAC 11 section 11-009.02 Emergency

LF&R EMT BLS Protocols First edition Jan. 2013
Last Edited 10/27/2021
6
Medical Technician Practices and Procedures in accordance with the medical treatment protocols with the following exceptions invoked by the physician medical director for the Lincoln EMS System;
i. Oral glucose must be self-administered by the patient. ii. Starting IV’s is not approved for the EMT. iii. Utilizing advanced airway management devices is not approved for
the EMT. iv. The administration of activated charcoal, albuterol and nitroglycerin
are not approved for the EMT.
b. It is the responsibility of each individual provider to assure they function within their scope of practice, in accordance with State regulations, and in accordance to the medical treatment protocols. Any deviation from scope of practice, State regulations or the medical treatment protocols must be reported to the on-duty EMS Supervisor, and the Chief of EMS.
Physician on Scene
1. When a physician is present on the scene and desires to direct patient care,
EMS personnel should: a. Inform the physician that if the physician directs patient care, the physician
must accompany the patient to the hospital. b. Inform the physician at the onset of the incident that EMS personnel have
strict legal guidelines, established protocols, and they may not exceed those guidelines or protocols.
c. Inform the physician that any procedure outside of these legal guidelines must be carried out by the physician.
2. EMS personnel have the right and obligation at any time there is gross deviation
from the accepted protocol to contact the receiving hospital for further instruction. The physician on the scene should be informed if contact with the hospital is being made.
3. If possible, it may be advisable to contact the receiving hospital via landline or cellular phone and have the receiving hospital physician speak directly to the physician at the scene.

LF&R EMT BLS Protocols First edition Jan. 2013
Last Edited 10/27/2021
7
“Do Not Resuscitate” (DNR) Orders and Identification of CPR Only
1. A DNR is a written order by a physician that a patient should not be resuscitated or have CPR performed. A DNR must be signed by a physician, dated and have the patient’s name on it. An EMT can honor a DNR. The EMS provider must be identified in the patient care report.
2. EMT’s will not initiate or continue cardiopulmonary resuscitation on a patient in cardiac arrest once a valid DNR order is confirmed. In the event of uncertainty, resuscitative measures should be initiated.
3. DNR does not mean that emergency medical care for any other medical condition will be changed or limited. Patients should receive emergency medical treatment up until the point of cardiac arrest.
4. A written DNR order must contain the patient’s name and be signed by the physician or by the RN who received the order from the physician. Verbal confirmation of a DNR by a family member or friend without verification of a written DNR is not sufficient.
5. In a skilled care facility (nursing home), DNR orders documented in the patient’s medical record are considered valid if signed by the physician or by the RN per verbal order of the physician. A DNR form may be used but is not required in the nursing home setting.
6. Once CPR has been initiated, resuscitative measures may be discontinued when any one of the following occurs:
a. A DNR or no code order is confirmed. b. A physician physically present at the scene or medical control for the
service, based on information from the out-of-hospital providers on scene, determines that CPR is futile or should be discontinued.
c. The EMT is following termination of CPR protocols that have been authorized by the Physician Medical Director.
d. Any time the scene becomes unsafe for rescuers.
Discontinue or No Initiation of CPR
1. Situations may occur where CPR has been initiated on an obviously deceased patient prior to the arrival of EMS. If the patient meets the following criteria, the EMS provider may discontinue CPR or may choose not to initiate CPR.
a. No pulse, AND b. No spontaneous respirations, AND c. Pupils fixed and dilated, AND d. One or more of the following:
i. Patient with obvious lethal injury – trauma cardiac arrest with injuries incompatible with life. (I.E., massive blood loss, displacement of brain tissue, decapitation)

LF&R EMT BLS Protocols First edition Jan. 2013
Last Edited 10/27/2021
8
ii. Wrinkled cornea. iii. Rigor mortis. iv. Postmortem lividity. v. Decomposition. vi. Valid DNR form.
e. Physician authorization NOTE: Care should be taken to rule out hypothermia, acute alcoholic intoxication and drug overdose.
LF&R EMT BLS Protocols First edition Jan. 2013
Last Edited 10/27/2021
9
Refusal of Care
1. Adults a. An adult is an individual 19 years old or older or who is or has been
married (NEB REV STAT §43-2101). A competent adult (as determined by the Informed Decision-Making Form) can refuse medical services and/or transportation to a health care facility.
b. A legal guardian can consent to or refuse medical services and/or transportation to a health care facility for an incompetent adult.
c. A person appointed as a Health Care Power of Attorney can consent or refuse consent for medical services and/or transportation to a health care facility for the incompetent adult named in the power of attorney.
2. Minors
a. A minor is an individual under 19 years of age that has never been married. In the absence of suspected abuse and/or neglect, a parent or legal guardian can consent or refuse consent on behalf of a minor, for medical services and/or transportation to a health care facility.
3. Documentation
a. All consents or refusals of consents for medical treatment and/or transportation must be documented on the “Informed Decision - Making Form” and in the patient care report. When possible, the” Informed Decision–Making Form” should be signed and dated by the patient or other individual authorized to give or refuse consent. All refusals to sign a consent or refusal of consent must be documented in the patient care report or other appropriate record(s).

LF&R EMT BLS Protocols First edition Jan. 2013
Last Edited 10/27/2021
10
Part II. Patient Assessment General
1. The AED and the suction device will be brought to the patient’s side of every
medical emergency where it is safe to do so.
2. The patient examination should focus on rapid assessment and interventions. On-scene management of high priority patients should be limited to stabilization of life-threatening problems. Other procedures should always be performed while in route to the hospital.
3. Scene time should not exceed 10 minutes for high priority trauma patients and 20
minutes for medical patients. Shorter scene times are desirable for trauma patients. Rescue efforts for patients that are entrapped or have access/egress problems should be coordinated to minimize scene time.
4. The receiving hospital should be notified as soon as possible to prepare for the
patient.
5. At any time, a provider is uncertain of how to best manage a patient, on-line medical direction must be contacted for instruction.
6. Rarely are emergent transports (red lights and sirens) required once the patient
has been evaluated and treated. It is important that the provider in charge carefully evaluate the risks and benefits of an emergency transport to the hospital.
Scene Size-Up
1. Body Substance Isolation
a. Standard practice in EMS is to use body substance isolation when caring for ALL patients. Gloves and eye protection are required on every patient contact.
b. The use of masks, aprons or gowns shall be used during procedures likely to generate splashes of blood, droplets of blood or body fluid.
c. Hands shall be washed after each patient care incident, even if gloves were worn or waterless soap was used.
d. This policy also applies to immediate disposal of needles and sharps in disposable impervious containers.
e. The practice of not recapping needles is highly encouraged. f. All personnel should don surgical or N-95 masks when in contact with
patients whom an airborne communicable disease is suspected or confirmed by history (e.g., tuberculosis, influenza, COVID-19).

LF&R EMT BLS Protocols First edition Jan. 2013
Last Edited 10/27/2021
11
2. Assess scene safety a. Ensure personal protection on all scenes, especially those that involve
motor vehicle collisions, toxic substances, potential for violence and unstable surfaces (e.g., slope, ice, water).
b. Protect the patient and bystanders (e.g., environmental considerations)
3. Assess mechanism of injury and/or nature of illness. a. Medical – determine nature of the illness from the patient, family, or
bystanders. Why was EMS activated? b. Trauma – determine the mechanism of injury from the patient, family, or
bystanders, and inspection of the scene. c. Determine total number of patients. Initiate a mass casualty plan if
necessary and initiate triage. d. Summon additional resources as necessary to manage the incident.
Primary Assessment
1. Form a general impression of the patient.
a. If a life-threatening condition is found, treat immediately.
2. Assess patient's mental status (maintain spinal immobilization if needed). a. Alert b. Responds to Verbal stimuli c. Responds to Painful stimuli d. Unresponsive to verbal and painful stimuli (no gag or cough)
3. Assess the patient’s airway status.
a. Use head-tilt, chin lift or jaw thrust (with suspected trauma patients) to open airway. Note: Do not hyperextend the neck in infants and small children.
b. Suction the airway with a rigid suction catheter as necessary. c. Consider maintenance of the airway with an oropharyngeal or
nasopharyngeal airway as indicated. d. Consider the use of the i-Gel if indicated.
4. Assess the patient’s breathing.
a. If respirations are absent or agonal (inadequate) and, i. Chest compressions are being performed
1. Adult - Follow Adult General Guidelines. 2. Infant or child - deliver 1 ventilation every 10th compression,
no pauses. ii. Chest compressions are not being performed.
1. Adult – deliver 10-12 ventilations/min. a. Infant or child – deliver 12-20 ventilations/min.
LF&R EMT BLS Protocols First edition Jan. 2013
Last Edited 10/27/2021
12
b. If respirations are present. i. Consider oxygen at
1. 12-15 L/min. via non-rebreather mask 2. 2 to 6 L/min. via nasal cannula
c. Evaluate SpCO if indicated.
d. Monitor SpO2.
1. Assess the patient’s circulation
a. Check pulse for more than 5 seconds but less than 10 seconds. i. Adult/child – carotid ii. Infant – brachial/femoral
1. If no pulse present, initiate CPR. Consult Adult Cardiac Arrest Guidelines
2. In infants and children, if despite oxygenation and ventilation the pulse is less than 60bpm and there are signs of poor perfusion, begin chest compressions.
b. Check for and control major bleeding.
c. Check perfusion by evaluating skin color, temperature, moisture, and
capillary refill.
2. Determine patient disposition. Expedite transport for high priority patients.
History Taking
1. Conduct neurological assessment including Glasgow Coma Scale.
2. Obtain vital signs, including, at minimum. a. Respirations. b. Pulse. c. Blood pressure. d. Skin color, temperature, and moisture. e. SpCO, and SpO2
3. Obtain history of present illness by obtaining a SAMPLE history and OPQRST.
4. Identify pertinent negatives.
Secondary Assessment
1. Systematically assess the patient using a full-body scan or focused assessment.
LF&R EMT BLS Protocols First edition Jan. 2013
Last Edited 10/27/2021
13
Reassessment
1. Repeat the primary assessment. a. For a stable patient, repeat and record every 10 minutes. b. For an unstable patient, repeat and record at a minimum every 5 minutes.
2. Re-establish patient priority.
3. Reassess and record vital signs.
4. Repeat focused assessment regarding patient complaint or injuries.
5. Assess interventions.
6. Assess response to management.
7. Maintain or modify management plan.
Documentation
1. General Guidelines
a. Any time a patient is transported by ambulance to a receiving medical facility, the EMS provider must complete am electronic patient care report (ePCR), The EMS provider is required to give a complete verbal report and any available documentation such as EKG strips, medications, transfer papers, etc., to the hospital provider who is assuming patient care before leaving the facility. All ePCR’s should be completed as soon as possible and must be completed by the end of the EMS providers working shift.
b. Medical Control realizes that there will be times when a deviation from the established medical treatment guidelines is necessary and perhaps even in the best interest of patient care. In these circumstances, the ePCR should clearly reflect the reasons for the guideline deviation and the name of the authorizing physician. The EMS quality assurance observation form is also required to be completed and forwarded. Accurate documentation of field medical care is essential to ensure the consistency of continued medical care in the hospital setting. The minimum documentation standards for all ePCR’s shall include all the information required by State regulation 172 NAC 12-12-004.09C1 and any additional information required by the Physician Medical Director.
c. As required by State regulation 12-004.09C1- The following information, as a minimum, will be recorded for each patient transported:
i. The name, age, and sex of the patient(s). ii. The address or location from which the patient(s) is taken. iii. The date of the call. iv. The time of dispatch, the time the ambulance is in route to the call.
LF&R EMT BLS Protocols First edition Jan. 2013
Last Edited 10/27/2021
14
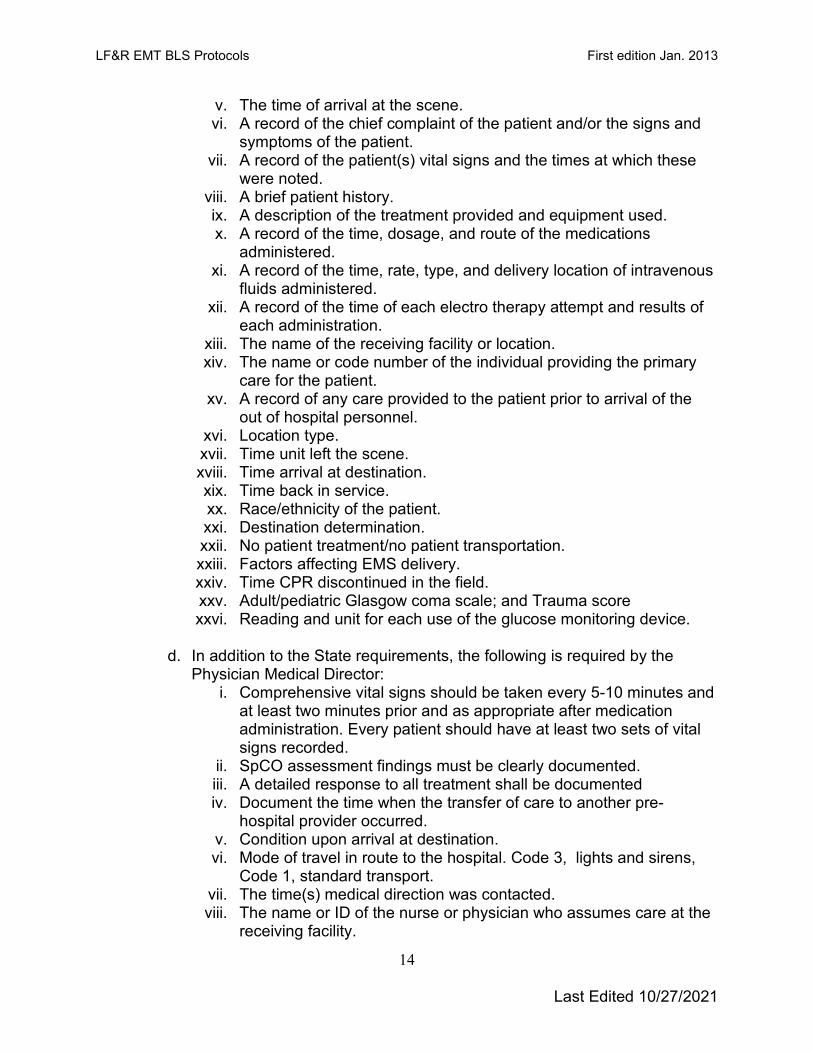
v. The time of arrival at the scene. vi. A record of the chief complaint of the patient and/or the signs and
symptoms of the patient. vii. A record of the patient(s) vital signs and the times at which these
were noted. viii. A brief patient history. ix. A description of the treatment provided and equipment used. x. A record of the time, dosage, and route of the medications
administered. xi. A record of the time, rate, type, and delivery location of intravenous
fluids administered. xii. A record of the time of each electro therapy attempt and results of
each administration. xiii. The name of the receiving facility or location. xiv. The name or code number of the individual providing the primary
care for the patient. xv. A record of any care provided to the patient prior to arrival of the
out of hospital personnel. xvi. Location type. xvii. Time unit left the scene. xviii. Time arrival at destination. xix. Time back in service. xx. Race/ethnicity of the patient. xxi. Destination determination. xxii. No patient treatment/no patient transportation. xxiii. Factors affecting EMS delivery. xxiv. Time CPR discontinued in the field. xxv. Adult/pediatric Glasgow coma scale; and Trauma score xxvi. Reading and unit for each use of the glucose monitoring device.
d. In addition to the State requirements, the following is required by the Physician Medical Director:
i. Comprehensive vital signs should be taken every 5-10 minutes and at least two minutes prior and as appropriate after medication administration. Every patient should have at least two sets of vital signs recorded.
ii. SpCO assessment findings must be clearly documented. iii. A detailed response to all treatment shall be documented iv. Document the time when the transfer of care to another pre-
hospital provider occurred. v. Condition upon arrival at destination. vi. Mode of travel in route to the hospital. Code 3, lights and sirens,
Code 1, standard transport. vii. The time(s) medical direction was contacted. viii. The name or ID of the nurse or physician who assumes care at the
receiving facility.

LF&R EMT BLS Protocols First edition Jan. 2013
Last Edited 10/27/2021
15
Part III. General Treatment Principles
Airway and Oxygen
1. An intact airway and adequate oxygenation and ventilation are essential for all patients with medical or traumatic conditions. Throughout this protocol it is assumed that the EMT will maintain a patent airway and provide appropriate supplemental oxygenation.
2. Maintain patent airway with head-tilt/chin-lift or modified jaw thrust maneuver and consider oral or nasal airway adjunct and/or iGel.
3. If ventilating adequately, consider applying a nasal cannula at 2-6 L/min or non-rebreather mask at 12-15 L/min.
4. High flow oxygen shall be avoided in medical patients unless signs of severe hypoxia are present. High flow oxygen remains the standard of care in trauma patients.
5. If patient NOT ventilating adequately, assist ventilations with BVM and 100% oxygen.
6. Anytime a patient is manually ventilated, including the use of BVM only, ETCO2 shall be monitored.
7. Consider assisting ventilations in those patients whose respiratory status does not improve after receiving oxygen by non-rebreather mask.
8. Supplemental oxygen should be withheld for people with oxygen saturations of 94% and higher. When utilizing supplemental oxygen for medical patients the goal should be 94% to 99% saturation.
9. When pulse oximetry is used, adjust oxygen delivery devices to achieve an oxygen saturation of 94% or above in medical patients and 100% in trauma patients.
10. Position the patient in a way that will support ABC’s. I.E., in a respiratory distress patient, transport in a sitting position.
Cardiac Monitor
1. An EMT may apply the cardiac monitor prior to ALS arrival. This shall be done after the completion of patient assessment, obtaining vitals, and BLS interventions.
LF&R EMT BLS Protocols First edition Jan. 2013
Last Edited 10/27/2021
16
Restraints
1. Physical restraints are a last resort. All possible means of verbal persuasion should be attempted first.
2. Indications: a. A patient who needs to be transported for medical care, who is refusing
transport of care, and who is incompetent to refuse. b. A person, who appears to be confused and who because of such
confusion, appears to be an imminent danger to others or to himself.
3. Precautions / Considerations: a. Any attempt at restraint involves risk to the patient and to the out-of-
hospital provider. The rescuer's safety must come before patient considerations. Do not attempt to restrain the patient without adequate assistance. Ideally law enforcement should be on scene when restraining a patient.
b. Any restrained patient may vomit, be prepared to suction, and reposition as needed. Once restrained, the patient is never to be left alone. Aspiration can occur if the patient is restrained on his/her back and cannot protect their airway.
c. Check restraints as soon as applied and every 10 minutes thereafter to ensure no injury to extremities.
d. Do not restrain a patient in the prone position. e. Do not restrain a patient sandwiched between backboards, scoop
stretchers or other immobilization devices. f. Do not “hog tie” patients (hands restrained behind back, feet restrained
together and the two restrained attached together) g. Remove restraints only with sufficient personnel available to control the
patient, generally only in the hospital setting. h. Other than primary psychiatric disorders, medical causes of
combativeness include hypoglycemia, hypoxia, head injury and drug ingestion.
i. Written and verbal reports must completely document the necessity for the use of physical restraints. Record the condition of limbs before applying restraints, during transport and upon arrival at the hospital.
j. If law enforcement has applied handcuffs, an officer is required to ride in the patient compartment of the ambulance to the hospital.
Physician Orders
1. This protocol, in its entirety, is considered a standing order. Radio
communications are not required prior to performing any protocol action. However, EMS providers may call in for further direction or confirmation of orders whenever the patient's condition or the situation warrants.

LF&R EMT BLS Protocols First edition Jan. 2013
Last Edited 10/27/2021
17
Part IV. Medical Management
Altered Mental Status
1. Determine glucose level by glucometer. a. If glucose less than 60 mg/dL or clinical signs and symptoms indicate
hypoglycemia:
b. If the patient can protect airway, give oral glucose 15 grams. The patient must be able to self-administer without assistance. Repeat in 15 minutes if necessary.
General Adult Cardiac Arrest Guidelines (Anyone showing signs of puberty)
1. If patient is in cardiac arrest, initiate High Performance-CPR (HP-CPR) and
begin chest compressions immediately.
2. Attach cardiac monitor and analyze the rhythm.
3. Initiate continuous chest compressions, insert an I-gel airway, and begin active ventilations on all patients.
4. If the patient presents in a shockable rhythm (ventricular fibrillation or pulseless ventricular tachycardia), perform 30 compressions while the AED is charging, and deliver a defibrillation at 360 J. Resume continuous chest compressions.
5. LP 15 Metronome must be used on every cardiac arrest patient.
All patients found in cardiac arrest:
1. Perform continuous chest compressions at a rate of 100-120 compressions per minute while ventilating at a rate of 10 ventilations per minute. (One ventilation every six seconds). Do not stop compressions to ventilate.
2. If the patient presents in a shockable rhythm (ventricular fibrillation or pulseless ventricular tachycardia), perform 30 compressions while the AED is charging, deliver a defibrillation at 360 J. Resume continuous chest compressions.
3. Rotate person-performing compressions every 2 minutes.
4. Insert an I-gel airway. Do not delay initiation of chest compressions and defibrillation to insert the I-gel.
LF&R EMT BLS Protocols First edition Jan. 2013
Last Edited 10/27/2021
18
5. If the patient regains a pulse, acquire, and transmit a 12 lead EKG. Transport to a hospital with PCI capabilities. (ALS Procedure)
6. If patient is hypothermic from exposure, follow Hypothermia Protocol for cardiac arrest guidelines.
High Quality Chest compressions:
1. Provide adequate rate: 100-120 compressions per minute. 2. Provide adequate depth: at least 2 inches. 3. Allow full chest recoil between compressions. 4. Provide uninterrupted or minimal interruptions in chest compressions. (Less
than 10 seconds) 5. Ensure correct hand placement on the chest. 6. Chest compressions are centered around two (2) minute cycles of 200
compressions. 7. The person providing chest compressions should be rotated every 2
minutes.
Analyze rhythm and pulse checks:
1. Utilize the AED to analyze the cardiac rhythm. Perform 30 compressions while the AED is charging if a shock is indicated.
2. Only perform pulse checks during rhythm checks if signs of life are present, which indicates a potentially perfusing rhythm.
Airway and ventilations:
1. Evaluate the airway for complete or partial airway obstruction and treat
accordingly. 2. Provide jaw thrust and suction as necessary. 3. Active ventilations are defined as:
a. Positive pressure ventilations utilizing a BVM
LF&R EMT BLS Protocols First edition Jan. 2013
Last Edited 10/27/2021
19
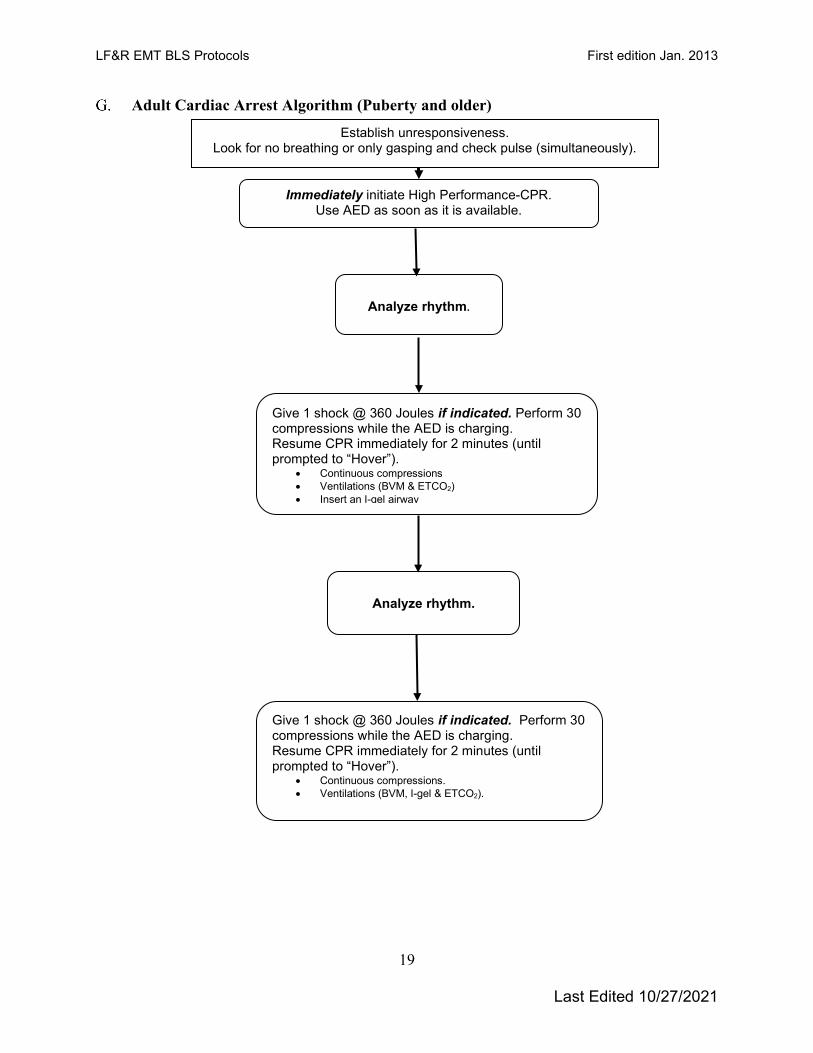
Adult Cardiac Arrest Algorithm (Puberty and older)
Immediately initiate High Performance-CPR. Use AED as soon as it is available.
Analyze rhythm.
Give 1 shock @ 360 Joules if indicated. Perform 30 compressions while the AED is charging. Resume CPR immediately for 2 minutes (until prompted to “Hover”).
• Continuous compressions. • Ventilations (BVM, I-gel & ETCO2).
Analyze rhythm.
Establish unresponsiveness. Look for no breathing or only gasping and check pulse (simultaneously).
Give 1 shock @ 360 Joules if indicated. Perform 30 compressions while the AED is charging. Resume CPR immediately for 2 minutes (until prompted to “Hover”).
• Continuous compressions • Ventilations (BVM & ETCO2) • Insert an I-gel airway
LF&R EMT BLS Protocols First edition Jan. 2013
Last Edited 10/27/2021
20
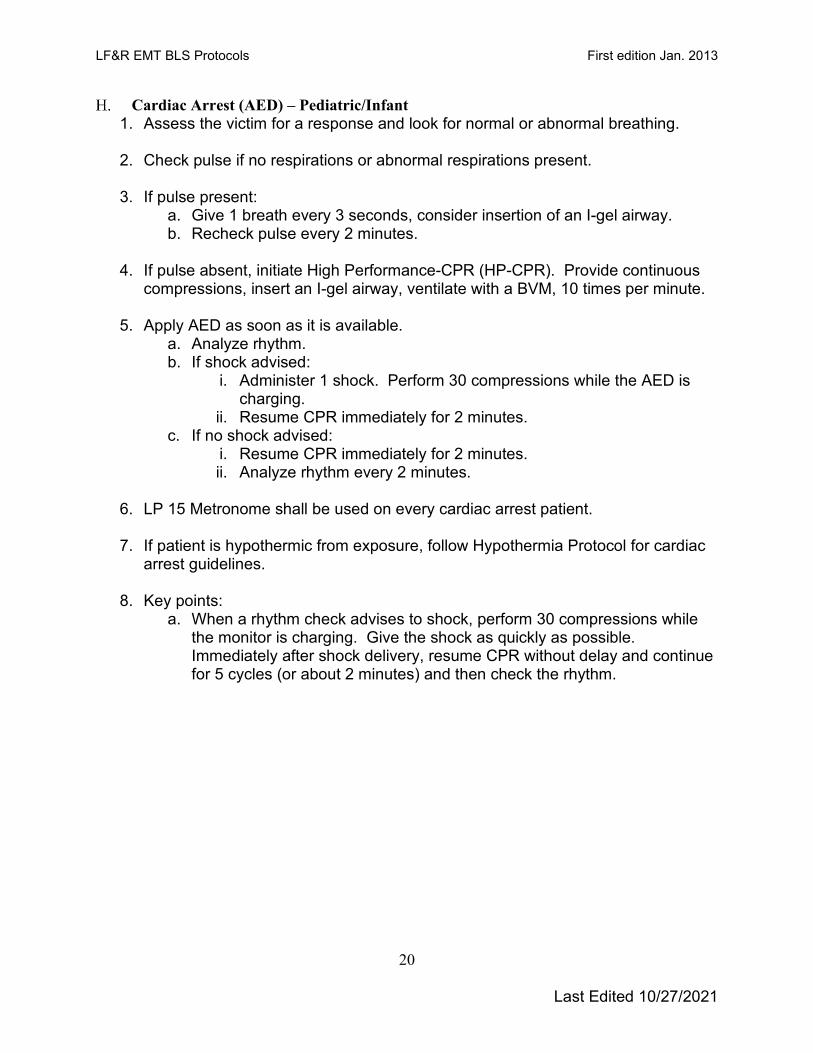
Cardiac Arrest (AED) – Pediatric/Infant 1. Assess the victim for a response and look for normal or abnormal breathing.
2. Check pulse if no respirations or abnormal respirations present.
3. If pulse present:
a. Give 1 breath every 3 seconds, consider insertion of an I-gel airway. b. Recheck pulse every 2 minutes.
4. If pulse absent, initiate High Performance-CPR (HP-CPR). Provide continuous
compressions, insert an I-gel airway, ventilate with a BVM, 10 times per minute.
5. Apply AED as soon as it is available. a. Analyze rhythm. b. If shock advised:
i. Administer 1 shock. Perform 30 compressions while the AED is charging.
ii. Resume CPR immediately for 2 minutes. c. If no shock advised:
i. Resume CPR immediately for 2 minutes. ii. Analyze rhythm every 2 minutes.
6. LP 15 Metronome shall be used on every cardiac arrest patient.
7. If patient is hypothermic from exposure, follow Hypothermia Protocol for cardiac
arrest guidelines.
8. Key points: a. When a rhythm check advises to shock, perform 30 compressions while
the monitor is charging. Give the shock as quickly as possible. Immediately after shock delivery, resume CPR without delay and continue for 5 cycles (or about 2 minutes) and then check the rhythm.
LF&R EMT BLS Protocols First edition Jan. 2013
Last Edited 10/27/2021
21
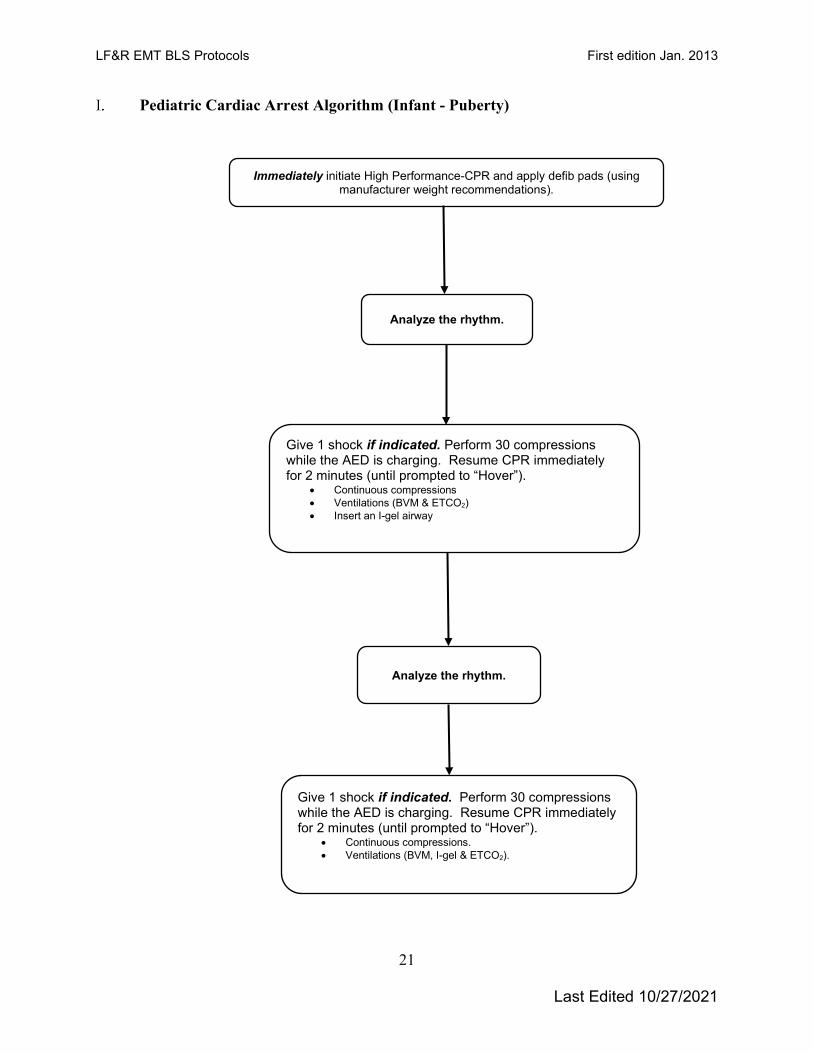
Pediatric Cardiac Arrest Algorithm (Infant - Puberty)
Immediately initiate High Performance-CPR and apply defib pads (using manufacturer weight recommendations).
Analyze the rhythm.
Give 1 shock if indicated. Perform 30 compressions while the AED is charging. Resume CPR immediately for 2 minutes (until prompted to “Hover”).
• Continuous compressions • Ventilations (BVM & ETCO2) • Insert an I-gel airway
Analyze the rhythm.
Give 1 shock if indicated. Perform 30 compressions while the AED is charging. Resume CPR immediately for 2 minutes (until prompted to “Hover”).
• Continuous compressions. • Ventilations (BVM, I-gel & ETCO2).
LF&R EMT BLS Protocols First edition Jan. 2013
Last Edited 10/27/2021
22
Chest Pain (Non-Traumatic)
1. Administer aspirin 324 mg PO and have the patient chew them (four (4) 81 mg baby aspirin).
2. Hyper-oxygenation of chest pain patients should be avoided. Use pulse oximetry and only apply oxygen to patients who have oxygen saturations below 94% or those who are exhibiting signs of hypoxia.
Allergic Reaction or Anaphylaxis
1. Apply an ice pack to sting or injection site if applicable.
2. Consider applying venous constricting band proximal to the sting or injection site, if applicable.
3. For a severe reaction (severe respiratory distress or shock):
a. Administer Epinephrine via an EPI Auto Injector.
Asthma or Toxic Exposure
1. Assist patient with prescribed metered dose inhaler (MDI).
2. For a severe reaction (severe respiratory distress or shock): a. Administer Epinephrine via an EPI Auto Injector.
Emphysema or Chronic Bronchitis
1. Assist patient with prescribed metered dose inhaler (MDI).
Croup
1. Do not attempt to visualize the airway or place anything in the patient’s mouth.
2. Keep the child as calm and comfortable as possible.
FBAO – Conscious Patient Greater Than One Year of Age
1. If the patient has a mild obstruction and is coughing forcefully, do not interfere
with the patient’s spontaneous coughing and breathing efforts.
2. If the FBAO is severe, administer abdominal thrusts (Heimlich maneuver) in rapid sequence until the obstruction is relieved.
a. If the choking patient is obese and the rescuer cannot encircle the patient’s abdomen, use chest thrusts instead of abdominal thrusts.

LF&R EMT BLS Protocols First edition Jan. 2013
Last Edited 10/27/2021
23
b. If the choking patient is in the late stages of pregnancy, use chest thrusts instead of abdominal thrusts.
3. If the patient becomes unresponsive, carefully support the patient to the ground and follow the FBAO – UNCONSCIOUS PATIENT greater than 1 YEAR OF AGE guideline.
FBAO – Conscious Patient Less Than One Year of Age
1. If FBAO is mild, do not interfere. Allow the victim to clear the airway by coughing while you observe for signs of severe FBAO.
2. If the FBAO is severe (i.e., the victim is unable to make a sound), deliver five back blows (slaps) followed by five chest thrusts.
FBAO – Unconscious Patient Greater Than One Year of Age
1. If the patient was previously conscious with an airway obstruction, carefully support the patient to the ground.
2. Use head-tilt, chin lift or jaw thrust (suspected trauma) to open airway. Look for an object in the patient’s mouth. Use a finger sweep only when you can see solid material obstructing the airway.
3. Assess the patient’s breathing: a. If respirations are absent, deliver 2 breaths. If chest rise is not detected,
reposition the airway, make a better mask seal and try again. b. If unable to deliver rescue breaths, start CPR. c. Each time the airway is opened during CPR, look for an object and
remove it if found with a finger sweep.
FBAO - Unconscious Patient Less Than One Year of Age
1. If the patient was previously conscious with an airway obstruction, carefully support the patient to the ground.
2. Use head-tilt, chin lift or jaw thrust (suspected trauma) to open airway. Look for an object in the patient’s mouth. Use a finger sweep only when you can see solid material obstructing the airway.
3. Assess the patient’s breathing: a. If respirations are absent, deliver two breaths. If chest rise is not detected,
reposition the airway, make a better mask seal and try again. b. If unable to deliver rescue breaths, start CPR. c. Each time the airway is opened during CPR, look for an object and
remove it if found with a finger sweep.

LF&R EMT BLS Protocols First edition Jan. 2013
Last Edited 10/27/2021
24
Environmental Hyperthermia
1. Remove the patient from the hot environment to a cool environment.
2. Heat Cramps: Signs and symptoms include muscle twitching, followed by painful spasms, especially in the lower extremities and abdomen, nausea and vomiting, weakness, and diaphoresis.
a. May give Gatorade™, All-Sport™, or similar electrolyte drink. If nausea develops, discontinue oral administrations.
b. Consider applying steady and slow manual pressure to extend contracted and cramped muscle.
2. Heat Exhaustion: Signs and symptoms include pallor, profuse sweating,
orthostatic hypotension, headache, weakness, fatigue, and thirst. a. If patient is alert and can maintain open airway, give salt-containing or
rehydration solution as for heat cramps.
3. Heat Stroke: Signs and symptoms include altered mental status, increased body temperature, minimal or no sweating, collapse, shock, shortness of breath, nausea, and vomiting.
a. Remove the patient’s clothing. b. Do not give anything by mouth. c. Spray the patient’s skin with cool mist and fan the patient. Consider ice
packs at the neck, axillae, and ankles. Continue misting and fanning during transport.
d. Wrap the patient with wet sheets. e. Avoid cooling to the point of shivering as shivering will increase core
temperature. f. If the patient is hypotensive, place patient supine and elevate the legs (if
not contraindicated).
Environmental Hypothermia
1. Hypothermia with a perfusing rhythm (pulse). a. Prevent additional evaporative heat loss by removing garments and
insulating the victim from further environmental exposures. b. Initiate passive warming with warmed blankets and a warm environment. c. Perform procedures gently; these patients are prone to develop ventricular
fibrillation.
2. Hypothermia without a perfusing rhythm (pulse). a. Initiate re-warming procedures as noted in step #1 above. b. Assess the pulse for a period of 30-45 seconds. c. If pulseless with no detectable signs of circulation, start chest
compressions immediately. If there is any doubt about whether a pulse is present, begin compressions.
LF&R EMT BLS Protocols First edition Jan. 2013
Last Edited 10/27/2021
25
d. Ventilate the patient at normal rates, avoid hyperventilation (potentiates V-fib).
e. Attach AED and analyze the rhythm. i. Shock at 360 J if indicated. ii. If the patient does not respond to one shock at 360 J, further
defibrillation attempts should be deferred.
Hypotension Shock is present when pulse greater than 120 and systolic BP less than 100 mmHg in a previously normotensive patient or systolic drops 40-50 mmHg in a previously hypertensive patient, especially if accompanied by pale, clammy skin, and decreased level of consciousness.
1. Control any external bleeding.
2. Position the patient supine with legs elevated (unless contraindicated by trauma).
3. Prevent loss of body heat by keeping the patient covered.
Obstetrics – Normal Delivery
1. Don gloves, mask, gown, eye protection for infection control precautions.
2. Have mother lie with knees drawn up and spread apart. Elevate buttocks with
blankets or pillows.
3. Create sterile field around vaginal opening.
4. Monitor fetal heart rate (using stethoscope).
5. Coach the mother in breathing techniques. Panting through each contraction helps prevent bearing down and tearing of the perineum by the baby’s head. Deep breathing between contractions promotes rest.
6. Encourage mother to push with contractions.
7. When the head appears during crowning, place fingers on bony part of skull (not fontanel or face) and exert very gentle pressure to prevent explosive delivery.
8. If the amniotic sac has not broken, tear the sac and push it away from the head and mouth as they appear.
9. As the head is being delivered, determine if the umbilical cord is around the neck; slip over the head or shoulder. If this is not possible, clamp the cord in 2 places and cut between the clamps. Avoid excessive tension on the cord.

LF&R EMT BLS Protocols First edition Jan. 2013
Last Edited 10/27/2021
26
10. After the head is delivered, support the head; suction the mouth two or three
times, then the nostrils using a bulb syringe (squeezing the bulb prior to inserting it in the mouth and nose). Use caution to avoid contact with the back of the mouth.
11. Provide support as the head rotates and the shoulders deliver. Gently guide the head downward to help the upper shoulder deliver. Gently guide the head upward to help the lower shoulder deliver.
12. As the torso and full body are delivered, support the newborn with both hands. As the feet are delivered, grasp the feet.
13. Wipe blood and mucus from mouth and nose with sterile gauze, suction mouth and nose again.
14. Wrap newborn in a warm blanket and place on its side, head slightly lower than trunk.
15. Do not lower the baby to the level of the vagina.
16. Assign partner to monitor newborn and complete initial care of the newborn.
17. Record the time of birth.
18. Clamp and cut umbilical cord (between the clamps) as pulsations cease. Apply the first clamp approximately 4 inches from newborn and the second clamp approximately 6 inches from the newborn.
19. Observe for delivery of placenta while preparing mother and newborn for transport. Do not delay transport waiting for the placenta to deliver.
20. When delivered, wrap placenta in towel and put in plastic bag; transport placenta to hospital with mother.
21. Place sterile pad over vaginal opening, lower mother's legs, help her hold them together. If excessive bleeding is present, start fundal massage of the uterus to stimulate contraction.
22. Manage perineal tears with direct pressure, if applicable.
23. Transport the mother, newborn and placenta to hospital.
Obstetrics – Care of the Newborn
1. If the newborn does not cry, rub the back, and begin drying.

LF&R EMT BLS Protocols First edition Jan. 2013
Last Edited 10/27/2021
27
2. Ensure preservation of newborn warmth.
3. Give oxygen by blow-by if the newborn not centrally pink and vigorous.
4. If newborn does not cry, has central cyanosis or heart rate less than 100, see
obstetrics – newborn/neonatal resuscitation.
5. Complete drying of the newborn, wrap in a dry towel and apply head cover. Keep the newborn warm.
6. Record the newborn’s APGAR scores at one and five minutes after delivery.
7. Check the umbilical cord for bleeding. If necessary, place an additional clamp.
APGAR Scoring System Clinical Sign 0 points 1 point 2 points A Appearance Blue, pale Body pink, Completely pink Extremities blue P Pulse Absent Below 100 Over 100 G Grimace No response Grimaces Cries A Activity Limp Some flexion of Active motion extremities R Respiratory Effort Absent Slow, irregular Good, strong cry
Obstetrics – Newborn/Neonatal Resuscitation
1. Gently suction the newborn’s mouth, then nostrils, with a bulb syringe for three to five seconds.
2. If meconium staining is present, do not stimulate the newborn.
3. If the newborn is vigorous (strong respiratory effort, good muscle tone, and a heart rate greater than 100 bpm), follow standard suctioning practices.
4. If meconium staining is not present, rub the newborns back vigorously. Simultaneously begin drying and warming measures. KEEP THE NEWBORN WARM AND DRY.
5. Evaluate respirations, heart rate (apical pulse or pulse at the base of the umbilical cord), and skin color.

LF&R EMT BLS Protocols First edition Jan. 2013
Last Edited 10/27/2021
28
6. If respirations are inadequate, HR greater than 100 bpm, but newborn is centrally cyanotic:
a. Properly position newborn; do not hyperextend the neck. Quickly provide blow-by oxygen near the newborn’s mouth and nose.
b. If there is no response in 30 seconds, initiate positive-pressure ventilation with a BVM attached to oxygen. Deliver 40 to 60 breaths per minute. Use only enough volume to make the newborn’s chest rise.
c. Continue positive-pressure ventilation until the newborn is centrally pink.
7. If respirations are inadequate or HR less than 100 bpm: a. Initiate positive-pressure ventilation with a BVM. b. Continue positive-pressure ventilation until HR greater than 100 bpm.
8. If HR less than 60 bpm after 30 seconds of positive-pressure ventilation:
a. Initiate chest compressions at a rate of 120/min and a compression to ventilation ratio of 3:1.
b. Continue chest compressions until HR greater than 60 bpm.
Obstetrics – Childbirth Complications
1. Breech Presentation a. Never attempt to deliver the newborn by pulling on the legs. b. Position the mother with hips elevated, either in head and torso down
position (on hands and knees with knees to chest) or the Trendelenburg position.
c. Allow the buttocks and the trunk of the body to deliver spontaneously, supporting gently. As the newborn’s body is delivered, support it and prevent an explosive delivery. Dry the torso and wrap it in a towel if the delivery is incomplete. Avoid pressure on the cord.
d. With traction of the torso, rotate the body right or left to deliver the shoulders.
e. If the newborn completely delivers, follow care of the newborn. f. If the newborn head does not deliver, establish an airway for the baby to
prevent suffocation by inserting a gloved hand into the vagina with palm toward baby’s face form a “V” with your fingers on either side of baby’s nose and push vaginal wall away from baby’s face.
g. Do not allow an explosive delivery or attempt to pull the baby out. h. Begin immediate transport, positioning the mother with hips elevated,
either in head and torso down position (on hands and knees with knees to chest) or the Trendelenburg position.
2. Prolapsed Umbilical Cord a. Position the mother with hips elevated, either in head and torso down
position (on hands and knees with knees to chest) or the Trendelenburg position.

LF&R EMT BLS Protocols First edition Jan. 2013
Last Edited 10/27/2021
29
b. Elevate the newborn off the cord by inserting a gloved hand in the vagina and pushing up on the newborn’s head.
c. Cover the exposed cord with a warm, moist gauze or cloth pad. d. Monitor for pulsations in the cord. A pulsating cord indicates a viable
newborn. e. Ask the mother to pant during contractions and to NOT bear down. f. Do not push the umbilical cord back in under any circumstance. g. Transport rapidly, but carefully, with continual pressure on the baby’s
head. Notify the receiving hospital as early as possible.
3. Limb or Compound Presentation a. Position the mother with hips elevated, either in head and torso down
position (on hands and knees with knees to chest) or the Trendelenburg position.
b. Initiate rapid transport upon recognition of a limb presentation.
4. Shoulder Dystocia a. Contact base physician for treatment options [Medical Direction].
5. Multiple Births
a. Clamp the cord of the first baby to prevent hemorrhaging from the second baby via the umbilical cord.
b. Care for the delivery of the second baby and placenta(s) as per care of the newborn protocol.
6. Postpartum Hemorrhage
a. Place sterile pad over vaginal opening, lower mother's legs, help her hold them together. If excessive bleeding is present, start fundal massage of the uterus to stimulate contraction.
Obstetrics – Pregnancy Complications
1. Eclampsia - Characterized by hypertension, peripheral edema, and seizures a. Move the patient quietly and gently. Transport patient on left side without
lights and sirens.
Overdose 1. The typical presentation of a patient experiencing an opioid overdose may
include any of the following: altered mental status, respiratory depression (slow, shallow, or no breathing), small or pinpoint pupils, slow or fast heart rate and/or extreme drowsiness (lethargy).
2. Determine glucose level by glucometer. If glucose less than 60 mg/dL or clinical signs and symptoms indicate hypoglycemia:

LF&R EMT BLS Protocols First edition Jan. 2013
Last Edited 10/27/2021
30
a. If the patient can protect airway, give oral glucose 15 grams. The patient must be able to self-administer without assistance. Repeat in 15 minutes if necessary.
3. If opioid overdose is suspected and patient presents with altered mental status
and respiratory depression: a. Consider administering intranasal Naloxone 2 mg. Divide evenly between
nostrils. Do not repeat.
Seizures
1. Do not restrain the patient. Let the seizure take its course. Place a pillow, rolled blanket or other padding material beneath the patient’s head to prevent injury.
2. Determine glucose level by glucometer. If glucose less than 60 mg/dL or clinical signs and symptoms indicate hypoglycemia:
a. If the patient can protect airway, give oral glucose 15 grams. The patient must be able to self-administer without assistance. Repeat in 15 minutes if necessary.
Stroke/CVA/TIA
1. Determine glucose level by glucometer. If glucose less than 60 mg/dL or clinical
signs and symptoms indicate hypoglycemia: a. If the patient can protect airway, give oral glucose 15 grams. The patient
must be able to self-administer without assistance. Repeat in 15 minutes if necessary.
2. Perform Cincinnati pre-hospital stroke scale evaluation.
a. If any stroke scale test finding is abnormal and the onset of symptoms (time last seen normal, time patient last felt normal, etc.) is less than 24 hours, immediately declare a “Stroke Alert” to the receiving hospital.
3. The radio or phone report to the hospital must include.
a. Standard report information. b. Exact time of day the patient was last seen or “felt” normal. c. Stroke scale results. d. Glucose determination value. e. The patient’s stated weight. (Do not estimate) f. Positive or negative history of CVA/TIA, seizures and/or migraine
headaches. g. ETA to emergency department. h. Repeat the “Stroke Alert” declaration twice, once at the beginning of the
radio report and again at the end.
LF&R EMT BLS Protocols First edition Jan. 2013
Last Edited 10/27/2021
31
4. Transport rapidly, but carefully. Notify the receiving hospital as early as possible. Scene time should be less than 10 minutes.
5. Hyper-oxygenation of stroke patients should be avoided. Use pulse oximetry and only apply oxygen to patients who have oxygen saturations below 94% or those who are exhibiting signs of hypoxia.

LF&R EMT BLS Protocols First edition Jan. 2013
Last Edited 10/27/2021
32
Part V. Trauma Management
Scene Assessment
1. Determine scene safety and position apparatus accordingly.
2. The first unit on location must give a brief approach report of their observations at the scene and indicate the number of potential patients.
3. Assess the scene and triage patients using the SALT triage method. Initiate Multiple Casualty Incident (MCI) Plan if incident casualty numbers require deviation from the normal course of EMS operations.
4. Establish the Incident Command Structure (ICS).
5. Conduct a medical size-up and report the following information to the dispatch center on the assigned tac:
a. Extent (number of casualties). b. Nature (mechanism of injuries). c. Severity (by color – RED, YELLOW, GREEN, BLACK/WHITE, BLACK). d. Size / Extent (geographic area covered).
6. Determine MCI level (if applicable).
a. Level 1 – More than 20 patients requiring more than 10 ambulances. i. Activates the entire MCI plan, including possible recall of off-duty
personnel. b. Level 2 – 7-20 patients, requiring no more than 10 ambulances. c. Level 3 – 4-6 patients requiring 4-6 ambulances, due to environmental
adversity, or the risk of additional patients. Note: If the number of casualties exceeds the threshold but few, if any, appear to be seriously injured, consideration should be given to NOT declare the incident an MCI.
7. Categorize patients into one of the following: a. RED: First Priority (Immediate transport) – These patients have life-
threatening injuries who need immediate care and transport. Treat these patients first and transport as soon as possible.
b. YELLOW: Second Priority (Delayed transport) – These patients whose injuries do not pose an immediate life threat, allowing treatment and transportation to be temporarily delayed (30-45 min).
c. GREEN: Third Priority (Walking wounded) – patients who do not require treatment or whose treatment and transportation can be delayed until last.
d. BLACK/WHITE: Fourth Priority (Expectant) – These patients have a very poor prognosis / survivability even with maximal care. These patients shall receive treatment/transport only when resources permit.

LF&R EMT BLS Protocols First edition Jan. 2013
Last Edited 10/27/2021
33
e. BLACK: Fifth Priority (DOA) – Patients who are already dead upon EMS arrival. If resources are limited, treat salvageable patients before attempting treatment on these patients.
Patient Assessment & Care
1. Assess patient for “load-and-go” criteria.
a. Airway compromise and/or severe respiratory distress. b. Uncontrolled bleeding. c. Unresponsiveness. d. Trauma center candidates.
2. Alert responding ambulance if patient is a “load-and-go”.
3. Control the cervical spine. Assume cervical spine injury is present in any patient
with: a. Evidence of high impact with a distracting injury b. Any head or neck injury c. Neck pain following trauma d. Altered mental status e. Presence of any neurological deficit
REMINDER: Loss of sensation or motor activity MAY NOT be present initially with cervical spine fractures
4. Provide airway management while maintaining inline cervical spine immobilization.
5. Refer to “EMS spinal precautions and the use of the long backboard” paper located in the appendix for use of the long backboard with trauma patients.
6. Assess the patient for chest wounds. a. Apply occlusive dressing to open or sucking chest wounds.
7. If severe bleeding is present, control via the use of.
a. Direct pressure. b. Pressure dressing. c. A BP cuff can be utilized proximal to an extremity wound by inflating it to a
pressure between the systolic and diastolic pressure. d. CAT Tourniquet (See appendix for application)
8. Hypovolemic shock (assume shock is present when the pulse is greater than 120
and/or systolic BP less than 100 mmHg in a previously normotensive patient; or systolic drops 40-50 mmHg in a previously hypertensive patient, especially if accompanied by pale clammy skin and decreased level of consciousness).

LF&R EMT BLS Protocols First edition Jan. 2013
Last Edited 10/27/2021
34
a. Place patient in shock position with feet elevated 6”-12” with head and torso in horizontal position. Avoid Trendelenburg position.
9. Impaled objects should be stabilized in place.
a. Remove impaled object if; i. The impaled object compromises the airway and/or airway
management. ii. The impaled object would risk greater injury resulting from chest
compressions during CPR.
TRAUMA Category Alerts
1. Category I patients should be transported to the Bryan West Trauma Center. 2. Category II patients may be transported to CHI Health St. Elizabeth or Bryan
West. a. Category I Trauma Center Alert is indicated for any injured patient with: b. GCS less than 9 with trauma. c. Gunshot wounds to neck, chest, or abdomen or extremities proximal to the
elbow/knee. d. Quadriplegia (following injury). e. Systolic BP less than 90 mmHg (Pediatric age specific). f. Transfer from outside hospital with unstable vital signs. g. Any intubated patient with trauma. h. Respiratory rate less than 10 or greater 29 with trauma. i. Hypothermia (less than 31° C or 87.7° F). j. Unstable multiple pelvic fractures. k. Major crush injury to the torso. l. Penetrating injury or impaled object to the head, neck, torso, and
extremities proximal to the elbow or knee. m. Crushed, mangled, degloved or pulseless extremities. n. Two or more proximal long bone fractures. (Femur, humerus) o. Amputation proximal to the elbow or knee. p. Open or depressed skull fracture. q. Hanging. r. Drowning. s. Electrocution with unstable vital signs.

LF&R EMT BLS Protocols First edition Jan. 2013
Last Edited 10/27/2021
35
3. Category II Trauma Center Alert is indicated for any injured patient with: a. GCS 10-13 with trauma. b. Spinal column fractures with neurologic deficit. c. Fall greater than 20 feet (Adult) or greater than 10 feet. (Pediatric) d. Isolated femur or stable pelvic fracture due to crash or fall. e. MVC with intrusion greater than 12 inches occupant side, or greater than
18 inches any side. f. MVC partial or complete ejection. g. MVC with death in same vehicle. h. MVC with rollover. i. MVC with extrication greater than 20 minutes. j. Motorcycle crash greater than 20 mph. k. Auto versus pedestrian/bicycle thrown, runover or with significant (greater
than 20 mph) impact. l. Stable transfers from outside facilities with EMS Transport.
4. Comorbid Factors (Consider activation on any injured patient with): a. Age less than 5 or greater than 55. b. Patient with predisposing medical conditions such as:
i. Anticoagulation. ii. Bleeding disorders. iii. ESRD requiring dialysis. iv. Pregnancy greater that 20 weeks. v. Cardiac or respiratory disease. vi. Cirrhosis. vii. Morbid obesity.
c. EMS Provider Judgement. 5. All Category I and Category II trauma alerts made from the field must be clearly
documented on the patient care report. 6. Immediate transport to the nearest facility is indicated when trauma related
patients meet the following criteria: a. Patients with obstructed airway. b. Uncontrolled respiratory distress, or c. Life threatening, uncontrolled hemorrhage.

LF&R EMT BLS Protocols First edition Jan. 2013
Last Edited 10/27/2021
36
7. Patients meeting Category I trauma criteria should be transported to Bryan Health West Campus. Trauma patients meeting Category II can be transported to CHI Health St. Elizabeth or Bryan Health West Campus. Patients with trauma that do not meet these guidelines, and are stable, may be taken to any hospital.
8. ANY HOSPITAL OR EMS PROVIDER HAS THE OPTION TO BYPASS TO THE TRAUMA CENTER IF IT IS FELT IT IS IN THE BEST INTEREST OF THE PATIENT.
Abdominal Injuries
1. Dress any penetrating wound with a dry sterile dressing. 2. For evisceration: DO NOT REPLACE eviscerated tissue. Cover with a moist
sterile dressing. Place a dry sterile dressing over moist dressing to maintain warmth.

LF&R EMT BLS Protocols First edition Jan. 2013
Last Edited 10/27/2021
37
Burns
1. Stop the burning process. a. Thermal burns: Lavage the burned area with tepid water (sterile, if
possible) to cool the skin. Do not attempt to wipe off semi-solids (grease, tar, wax, etc.) Do not apply ice. Dry the body when the burn area is greater than 10% BSA to prevent hypothermia.
b. Dry chemical burns: Brush off dry powder, then lavage with copious amounts of tepid water (sterile, if possible) for 20 minutes. Continue en route to the hospital.
c. Liquid chemical burns: Lavage the burned area with copious amounts of tepid water (sterile, if possible) for 20 minutes. Continue en route to the hospital.
d. Electrical burns: Apply clean, dry dressings to entrance and exit wounds
2. Remove clothing around the burned area, but do not remove/peel off skin or tissue. Remove and secure all jewelry and tight-fitting clothing.
3. Assess the extent of the burn using the Rule of Nines and the degree of burn severity.
4. Cover the burned area with a clean, dry dressing/linen.
Chest Injuries
1. Cover sucking chest wounds with occlusive dressing; remove if patient’s condition deteriorates.
Extremity Injuries
1. Assess CMS prior to and after splinting. Reassess CMS every 10 minutes after
splinting.
2. Cover any open wound with a sterile dressing.
3. If transport time is greater than 30 minutes, cover with a moist, sterile dressing.
4. For amputated parts, keep them cool and cover any exposed end with a moist, sterile dressing.
5. Angulated fracture. a. If distal circulation is compromised, attempt to reduce the fracture to
restore circulation. b. In general, fractures with angulations that are overriding in the mid-shaft
may be straightened. This can be done for fractures in the lower extremities with the traction splint if not contraindicated.
LF&R EMT BLS Protocols First edition Jan. 2013
Last Edited 10/27/2021
38
6. Open fracture. a. Remove gross contamination from the wound, control hemorrhage, and
apply appropriate splints if necessary. If distal circulation is compromised, attempt to reduce the fracture to restore circulation.
7. Joint injury.
a. If distal pulses are present, immobilize the joint in its present position. b. If no distal pulse is present, carefully straighten the joint to regain the
distal pulse before immobilizing.
8. For suspected femur fracture (open or closed), consider traction splint.
9. For suspected unstable pelvic fractures, tie a sheet snugly around pelvis, or secure an upside down KED around pelvis.
10. For life threatening uncontrolled extremity hemorrhage that cannot be controlled by other means consider application of tourniquet. (See appendix for application)
Eye Injuries
1. Assess visual acuity by have the patient count fingers from 1-2 arm lengths.
2. If vision is altered or absent, test for perception with a flashlight.
3. Chemical burns.
a. Flush eyes continuously with sterile H2O or Normal Saline Solution until arrival at hospital.
4. Ultraviolet & welder’s flash burns.
a. Cover both eyes with dark patches.
5. Simple foreign object. a. If tears do not wash the object away, use sterile H2O or normal saline
solution to wash the eye letting the fluid drain down and away from the eye. Inversion of the eyelid may be necessary to extract the object.
6. Lacerations and contusions.
a. Assess the globe for injuries. If the globe appears lacerated, DO NOT APPLY PRESSURE-even to stop profuse bleeding.
b. Cover bleeding lids with loose sterile dressings. c. Attempt to recover any torn eyelids, and transport wrapped in a sterile
moist dressing.
7. Avulsion. a. Eyelid tissues should not be immersed in saline; avulsed eyelid tissues
should be stored in a cold moist environment.

LF&R EMT BLS Protocols First edition Jan. 2013
Last Edited 10/27/2021
39
Head Injuries
1. For adult patients receiving assisted ventilations, hyperventilation (a ventilation rate of 20 breaths per minute) should only be utilized if neurological signs of impending brain stem herniation are recognized (i.e., bilateral fixed and dilated pupils, asymmetrical pupils, decerebrate posturing, or total body flaccidity).
2. Apply gentle pressure to bleeding wounds if possibility of skull fracture exists.
3. Any patient experiencing loss of consciousness should be transported to a medical facility.
4. Impaled objects. a. Remove an impaled object only if it impedes the ability to administer CPR
or sustain a patent airway for the patient. b. Control any associated hemorrhage. c. Secure the object in place with dressings and bandages or other
appropriate material. d. If the size or shape of the impaled object prevents the patient from being
loaded into the ambulance, contact the base physician for direction [Medical Direction].
5. Dislodged teeth. a. Place the permanent tooth or teeth into a bag with milk or normal saline
solution. Make sure to transport the tooth or teeth with the patient
LF&R EMT BLS Protocols First edition Jan. 2013
Last Edited 10/27/2021
40
Part VI. Appendix NAEMSP Position Statement
EMS SPINAL PRECAUTIONS AND THE USE OF THE LONG BACKBOARD National Association of EMS Physicians and American College of Surgeons Committee on Trauma ABSTRACT This is the official position of the National Association of EMS Physicians and the American College of Surgeons Committee on Trauma regarding emergency medical services spinal precautions and the use of the long backboard. Key words: spine; backboard; EMS; position statement; NAEMSP; ACS-COT. PREHOSPITAL EMERGENCY CARE 2013; Early Online:1–2 The National Association of EMS Physicians and the American College of Surgeons Committee on Trauma believe that: Long backboards are commonly used to attempt to provide rigid spinal immobilization among emergency medical services (EMS) trauma patients. However, the benefit of long backboards is largely unproven. The long backboard can induce pain, patient agitation, and respiratory compromise. Further, the backboard can decrease tissue perfusion at pressure points, leading to the development of pressure ulcers. Utilization of backboards for spinal immobilization during transport should be judicious, so that the potential benefits outweigh the risks. Appropriate patients to be immobilized with a backboard may include those with: Blunt trauma and altered level of consciousness Spinal pain or tenderness Neurologic complaint (e.g., numbness or motor weakness) Anatomic deformity of the spine High-energy mechanism of injury and any of the following: Drug or alcohol intoxication Inability to communicate Distracting injury Patients for whom immobilization on a backboard is not necessary include those with all of the following: Normal level of consciousness (Glasgow Coma Score [GCS] 15) No spine tenderness or anatomic abnormality No neurologic findings or complaints
POSITION STATEMENT

LF&R EMT BLS Protocols First edition Jan. 2013
Last Edited 10/27/2021
41
No distracting injury No intoxication Patients with penetrating trauma to the head, neck, or torso and no evidence of spinal injury should not be immobilized on a backboard. Spinal precautions can be maintained by application of a rigid cervical collar and securing the patient firmly to the EMS stretcher, and may be most appropriate for: Patients who are found to be ambulatory at the scene Patients who must be transported for a protracted time, particularly prior to interfacility transfer Patients for whom a backboard is not otherwise indicated Whether or not a backboard is used, attention to spinal precautions among at-risk patients is paramount. These include application of a cervical collar, adequate security to a stretcher, minimal movement/transfers, and maintenance of in-line stabilization during any necessary movement/ transfers. Education of field EMS personnel should include evaluation of the risk of spinal injury in the context of options to provide spinal precautions. Protocols or plans to promote judicious use of long backboards during prehospital care should engage as many stakeholders in the trauma/EMS system as possible. Patients should be removed from backboards as soon as practical in an emergency department. Approved by the National Association of EMS Physicians Board of Directors December 17, 2012. Approved by the American College of Surgeons Committee on Trauma October 30, 2012. Received January 15, 2013; accepted for publication January 15, 2013. doi: 10.3109/10903127.2013.773115
LF&R EMT BLS Protocols First edition Jan. 2013
Last Edited 10/27/2021
42
Wound Care Tourniquet
1. Clinical Indications: a. A life-threatening extremity hemorrhage that cannot be controlled by other
means. b. Serious or life-threatening extremity hemorrhage and tactical.
considerations prevent the use of standard hemorrhage control techniques.
2. Contraindications:
a. Non-extremity hemorrhage. b. Proximal extremity location where tourniquet application is not practical.
3. Procedure:
a. Place tourniquet proximal to wound. b. Tighten per manufacturer instructions until hemorrhage stops and/or distal
pulses in affected extremity disappear. c. Secure tourniquet per manufacturer instructions. d. Note time of tourniquet application and communicate this to receiving care
providers. e. Dress wounds per standard wound care protocol. f. If delayed or prolonged transport and tourniquet application time greater
than 45 minutes: consider reattempting standard hemorrhage control techniques and removing tourniquet.
g. If one tourniquet is not sufficient or not functional to control hemorrhage, consider the application of a second tourniquet more proximal to the first.

LF&R EMT BLS Protocols First edition Jan. 2013
Last Edited 10/27/2021
43
LUCAS™ Device
1. INDICATIONS
The LUCAS™ may be used in patients 12 years of age and older who have suffered cardiac arrest, where manual CPR would otherwise be used.
2. CONTRAINDICATIONS a. Patients less than 12 years of age. b. Patients who do not fit within the device.
i. If the unit snaps onto the backboard and the suction cup does not compress the patient’s chest while in the start position, it will operate as intended.
ii. Patients who are too small that you cannot pull the pressure pad down to touch the sternum.
3. PROTOCOL FOR PLACEMENT a. All therapies related to the management of cardiopulmonary arrest
should be continued as currently defined in protocol with a goal of obtaining a return of spontaneous circulation (ROSC) before brain damage occurs.
b. Initiate resuscitative measures following current LF&R protocols. i. Immediately begin performing high quality manual
compressions while applying the defibrillation pads. Do not delay manual CPR for the LUCAS 2™.
ii. Rhythm analysis with early defibrillation should be provided if necessary, based on clinical presentation.
iii. Obtain vascular access. iv. Administer the appropriate medications. v. Place an advanced airway. vi. Turn the LUCAS™ device “on” when removing from the
carrying case. This will allow the device to perform a “self-test”.
vii. Apply the LUCAS™ device to the patient after the third cycle of manual compressions if needed. Continue manual CPR until the device can be placed. Limit interruptions in chest compressions to 10 seconds or less.
viii. Prepare the patient for transportation if appropriate.
ix. Consider using the scoop stretcher for movement of the patient.
c. When resuscitative measures are initiated, the LUCAS™ device should be removed from its carrying device and placed on the patient in the following manner.

LF&R EMT BLS Protocols First edition Jan. 2013
Last Edited 10/27/2021
44
d. Back Plate Placement i. The back plate should be centered on the nipple line and the
top of the back plate should be located just below the patient’s armpits.
ii. In cases for which the patient is already on the stretcher, place the back plate underneath the thorax. This can be accomplished by log-rolling the patient or raising the torso (Placement should occur after two minutes of uninterrupted compressions]).
e. Position the Compressor i. Turn the LUCAS™ Device on (the device will perform a 3
second self test.)
ii. Remove the LUCAS™ device from its carrying case using
the handles. iii. With the index finger of each hand, pull the trigger to ensure
the device is set to engage the back plate. Once this is completed remove your index finger from the trigger loop.
iv. Approach the patient from the side opposite the person performing manual chest compressions.
v. Attach the claw hook to the back plate on the side opposite of the person providing compressions.
vi. Place the LUCAS 2™ device across the patient, between the staff member’s arms who is performing manual CPR.
ON/OFF Switch
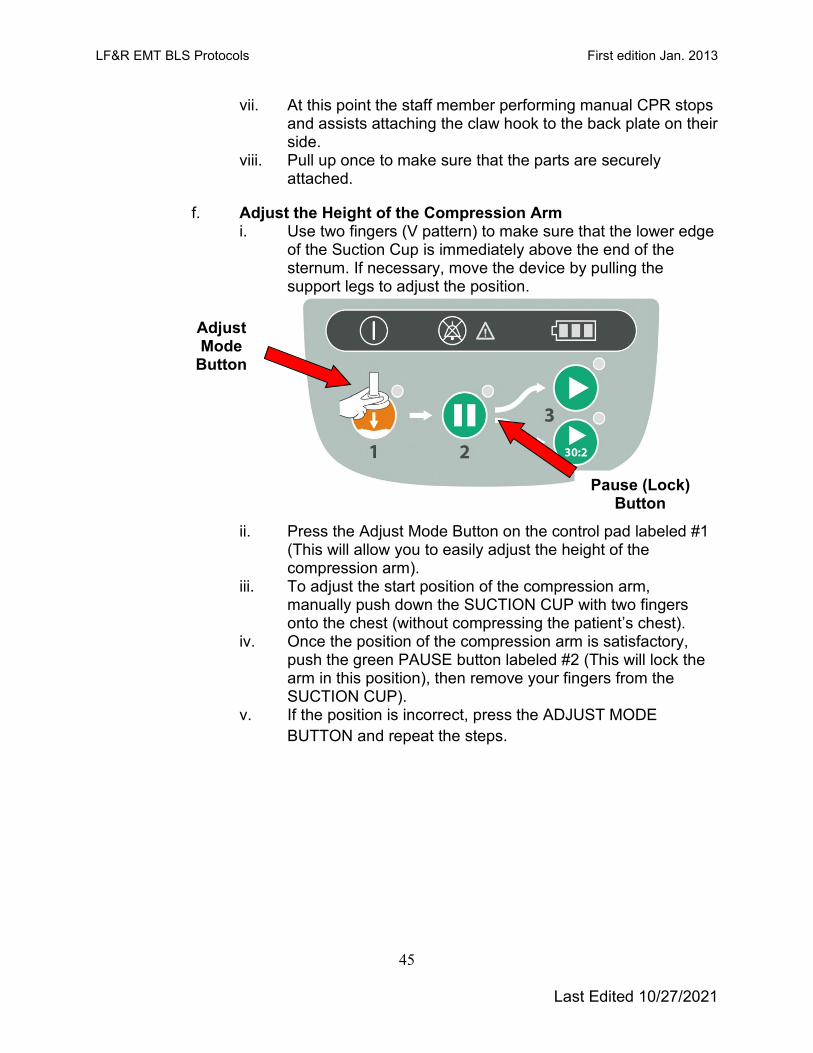
LF&R EMT BLS Protocols First edition Jan. 2013
Last Edited 10/27/2021
45
vii. At this point the staff member performing manual CPR stops and assists attaching the claw hook to the back plate on their side.
viii. Pull up once to make sure that the parts are securely attached.
f. Adjust the Height of the Compression Arm i. Use two fingers (V pattern) to make sure that the lower edge
of the Suction Cup is immediately above the end of the sternum. If necessary, move the device by pulling the support legs to adjust the position.
ii. Press the Adjust Mode Button on the control pad labeled #1
(This will allow you to easily adjust the height of the compression arm).
iii. To adjust the start position of the compression arm, manually push down the SUCTION CUP with two fingers onto the chest (without compressing the patient’s chest).
iv. Once the position of the compression arm is satisfactory, push the green PAUSE button labeled #2 (This will lock the arm in this position), then remove your fingers from the SUCTION CUP).
v. If the position is incorrect, press the ADJUST MODE BUTTON and repeat the steps.
Adjust Mode
Button
Pause (Lock) Button

LF&R EMT BLS Protocols First edition Jan. 2013
Last Edited 10/27/2021
46
g. Start Compressions i. Begin delivering mechanical compressions by pushing the
ACTIVE (continuous) button.
h. Using Patient Adjuncts
i. Place the neck roll behind the patient’s head and attach the straps to the LUCAS™ device. 1) This will prevent the LUCAS™ from migrating toward
the patient’s feet. ii. Place the patients arms in the straps provided.
4. USING THE LUCAS™ DURING THE RESUSCITATION a. Defibrillation
i. Defibrillation can and should be performed with the LUCAS™ device in place and in operation.
ii. Defibrillation electrodes should be applied before the LUCAS 2™ device has been put in position. 1) The defibrillation pads and wires should not be
underneath the suction cup. 2) If the electrodes are already in an incorrect position
when the LUCAS™ is placed, you must apply new electrodes.
iii. Defibrillation should be performed according to the LF&R protocols and following the instructions of the defibrillator manufacturer.
iv. Rhythm analysis cannot be assessed during compressions. The device should be stopped for analysis by pushing the PAUSE BUTTON (The duration of interruption of compressions should be kept as short as possible and should not be greater than 10 seconds. There is no need to interrupt chest compressions other than to analyze the rhythm).
v. Once the rhythm is determined to require defibrillation, the appropriate ACTIVE BUTTON should be pushed to resume
ACTIVE BUTTON
(30:2)
ACTIVE BUTTON
(Continuous)

LF&R EMT BLS Protocols First edition Jan. 2013
Last Edited 10/27/2021
47
compressions while the defibrillator is charging and then the defibrillator should be discharged.
b. Pulse Checks/Return of Spontaneous Circulation (ROSC) i. Pulse checks should occur intermittently while compressions
are occurring. ii. If the patient moves or is obviously responsive, the LUCAS
2™ Device should be paused and the patient evaluated. iii. If there is a change in rhythm, but no obvious indication of
responsiveness or ROSC, a pulse check while compressions are occurring should be undertaken. If the palpated pulse is asynchronous, consider pushing the pause button on the LUCAS™ Device. If the pulse is palpable, reassess the patient. If the pulse is impalpable, immediately restart the LUCAS™ Device.
c. Malfunction or Disruption of LUCAS™ Device i. If malfunction or disruption of the LUCAS™ device
occurs, immediately begin manual chest compressions.
5. Device Management a. Power Supply
i. Battery Operation 1) When fully charged, the Lithium Polymer battery
should allow 45 minutes of uninterrupted operation. 2) Only leave the LUCAS™ device plugged in long
enough to charge the battery. Once the battery is fully charged, unplug the LUCAS™ and store in the cabinet.
3) Make sure that the cord is always with the LUCAS™ device.
4) During use when the orange Battery LED shows an intermittent light, the battery should be replaced or the device should be connected to a wall outlet.
ii. The LUCAS™ Device can be connected to wall power in all operational modes (The battery must be installed in order for the LUCAS™ Device to remain operational).
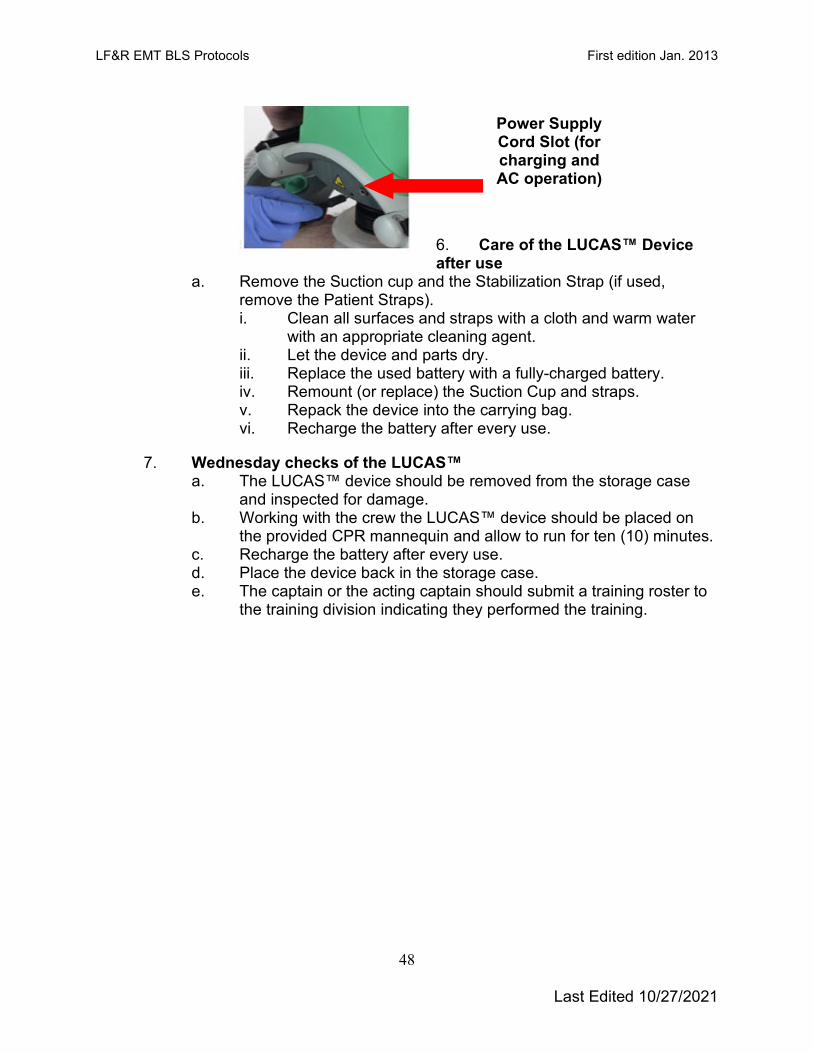
LF&R EMT BLS Protocols First edition Jan. 2013
Last Edited 10/27/2021
48
6. Care of the LUCAS™ Device after use
a. Remove the Suction cup and the Stabilization Strap (if used, remove the Patient Straps). i. Clean all surfaces and straps with a cloth and warm water
with an appropriate cleaning agent. ii. Let the device and parts dry. iii. Replace the used battery with a fully-charged battery. iv. Remount (or replace) the Suction Cup and straps. v. Repack the device into the carrying bag. vi. Recharge the battery after every use.
7. Wednesday checks of the LUCAS™ a. The LUCAS™ device should be removed from the storage case
and inspected for damage. b. Working with the crew the LUCAS™ device should be placed on
the provided CPR mannequin and allow to run for ten (10) minutes. c. Recharge the battery after every use. d. Place the device back in the storage case. e. The captain or the acting captain should submit a training roster to
the training division indicating they performed the training.
Power Supply Cord Slot (for charging and AC operation)
LF&R EMT BLS Protocols First edition Jan. 2013
Last Edited 10/27/2021
49
Infectious Diseases:
COVID-19:
EMS plays a vital role in responding to requests for assistance, triaging patients, and providing emergency medical treatment and transport for ill or injured persons. However, unlike patient care in the controlled environment of a healthcare facility, care, and transports by EMS present unique challenges because of the nature of the setting, enclosed space during transport, frequent need for rapid medical decision-making, interventions with limited information, and a varying range of patient acuity and jurisdictional healthcare resources.
When preparing for and responding to patients with suspected or confirmed SARS-CoV-2 infection, close coordination and effective communications are important among 911 Public Safety Answering Points/Emergence Communication Centers (PSAP/ECCs)— commonly known as 911 call centers, the EMS system, healthcare facilities, and the public health system. Each PSAP/ECC and EMS system should seek the involvement of an EMS medical director to provide appropriate medical oversight. When SARS-CoV-2 infection is suspected in a patient needing emergency transport, prehospital care providers and healthcare facilities should be notified in advance that they may be caring for, transporting, or receiving a patient who might have SARS-CoV-2 infection.
This interim guidance applies to all EMS personnel (i.e., prehospital EMS and medical first responders involved in 911 responses or interfacility transfers) across multiple EMS models including, but not limited to, free standing, third-service, fire-based, hospital-based, and related EMS providers. Note that fire services are also included as they respond to emergency medical calls and may do so with or without an ambulance.
Refer to the CDC guidelines for First Responders.1
EBOLA:
The risk of contracting Ebola in the United States is very minimal.
The following are the suggested steps for providing care to a person suspected of having Ebola or any other extremely infectious disease.
1. Screen the patient for Ebola by asking the appropriate questions if: 2 3
1 https://www.cdc.gov/coronavirus/2019-ncov/hcp/guidance-for-ems.html
2 http://emergency.cdc.gov/han/han00371.asp
3 http://www.cdc.gov/vhf/ebola/pdf/ambulatory-care-evaluation-of-patients-with-possible-ebola.pdf

LF&R EMT BLS Protocols First edition Jan. 2013
Last Edited 10/27/2021
50
a. Do they have flu like symptoms, fever greater than 101.4° F, fatigue, headache, weakness, muscle pain, vomiting, diarrhea, abdominal pain, or unexplained hemorrhage, and
b. Has the patient has lived in or traveled to a country with widespread Ebola Virus transmission or had contact with an individual with confirmed Ebola Virus Disease within the previous 21 days.
2. If the patient meets the above criteria, EVERYONE should retreat from the environment and: 4
a. Someone from the original crew should don contents of the LF&R Infectious disease kit and return to the patient’s side. This will more than likely be someone from the Engine or Truck Company since they will probably arrive on location before the medic unit. Provide patient comfort care only.
i. Place a mask on the patient or ask them to don a mask. 3. Contact 911 dispatch immediately and request an Infectious Disease transport
ambulance. 4. Request that dispatch send the closest HazMat apparatus.
a. The closest HazMat apparatus will determine if they have enough people on their crew trained to deal with donning and doffing and request additional support if needed.
5. Request the appropriate Battalion Chief and EMS-1 to the scene. a. EMS-1 will be responsible for immediately contacting the LLCHD and the
Chief of EMS. 6. The receiving hospital should be notified as soon as possible that we are
transporting a patient potentially infected with Ebola. 7. Once a transport ambulance arrives on scene, two members from the HazMat
apparatus should don the appropriately sized brown Tyvek suits, SCBA’s, and gowns from the Infectious disease kit, and double glove.
a. The required SCBA’s can be removed from the medic unit on location. 8. A trained observer should be designated and should ensure that PPE is donned
properly. 5 9. The two providers wearing the Tyvek suits and SCBA’s should contact the
patient and place them on the ambulance cot. Cot should be covered by the appropriate absorbent drapes before the patient is placed on the cot.
4 http://www.cdc.gov/vhf/ebola/hcp/ed-management-patients-possible-ebola.html
5 http://www.cdc.gov/vhf/ebola/hcp/ppe-training/index.html

LF&R EMT BLS Protocols First edition Jan. 2013
Last Edited 10/27/2021
51
a. The absorbent cot drape should be used to “cocoon” the patient and the “cocoon” should be secured with tape.
b. Only BLS care will be provided to the patient. 10. Once the providers have properly donned their PPE the other members of the
HazMat station apparatus should immediately proceed to the hospital and prepare for decontamination of the two providers in the Tyvek suits.
11. Members from the originally dispatched engine crew shall provide a driver for the Infectious Disease ambulance and accompany the ambulance to the hospital. Drivers should don the contents of the Infectious disease kit, being especially conscious of wearing clean gloves, eye protection and a face mask.
12. The two members of the transport team wearing Tyvek suits and SCBA’s shall accompany the patient in the back of the ambulance to the hospital where they will move them to the designated areas as specified by hospital providers.
13. Someone will be assigned to drive the ambulance and should don the contents of the Infectious Disease kit.
14. The members of the transport team will be de-contaminated using the best judgment of the HazMat captain in conjunction with EMS-1. All personnel that provided patient care will doff their PPE under the auspices of a “trained observer”. (EMS-1 can be used as a reference source but will not be donning PPE).
a. Providers should shower at the hospital and don hospital scrubs until they can return to their station. Clothing should be double bagged and can be laundered using hot water and regular laundry soap.
b. Contact the emergency room Charge Nurse for directions to the showers and surgical scrubs.
15. The providers will return to work and will be screened using the CDC recommendations for someone who has potentially been exposed to Ebola. The LLCHD will be involved in this screening process to ensure the safety of the providers; 6
a. Providers are not considered infectious until they develop symptoms 2-21 days later. Since they are considered asymptomatic, these individuals are in the low (but not zero) risk category. 7
16. The transport ambulance will be parked until a determination has been made if the patient does have Ebola. This will usually take between four (4) and six (6) hours.
6 http://www.cdc.gov/hai/settings/outpatient/outpatient-care-guidelines.html
7 http://www.cdc.gov/vhf/ebola/exposure/monitoring-and-movement-of-persons-with-exposure.html
LF&R EMT BLS Protocols First edition Jan. 2013
Last Edited 10/27/2021
52
a. All PPE, SCBA’s, and the cot should be placed in the back of the transport ambulance.
17. If the patient is found to have Ebola or another extremely infectious disease a private contractor suggested by LLCHD will be hired to decontaminate the interior of the ambulance. 8
18. If the patient does not have Ebola or another extremely infectious disease the ambulance will be cleaned following the appropriate MP.
19. The vehicle can then be placed back into service.
8 http://www.cdc.gov/vhf/ebola/hcp/medical-waste-management.html

LF&R EMT BLS Protocols First edition Jan. 2013
Last Edited 10/27/2021
53
I-gel Insertion Protocol
Non-visualized supraglottic airway placement to establish control of the patient's airway may be performed by a Lincoln system certified paramedic, paramedic intern under the direct supervision of a Lincoln system certified paramedic and all BLS providers.
1. Indications: a. Any patient in cardiac arrest. b. Apneic patient when endotracheal intubation is not possible or not
available. c. Patient must be unconscious, without a gag reflex d. Failed airway
2. Contraindications - Precautions:
a. History of esophageal foreign body, disease or caustic ingestion b. Obstructive lesions below the glottis c. Trismus, limited mouth opening, pharyngo-perilaryngeal abscess,
trauma or mass d. Stoma e. Conscious or semi-conscious patients with an intact gag reflex f. Do not use excessive force to insert the device. g. As with all supraglottic airway devices, particular care should be taken
with patients who have fragile and vulnerable dental work, in accordance with recognized airway management.
h. Use care to avoid the introduction of lubricant in or near the ventilatory openings
Patient Size I-gel Size Patient Weight Patient Height Suction Cath Size
Neonate 1 2-5 kg N/A N/A Infant 1.5 5-12 kg N/A 12 Fr.
Small Pediatric 2 10-25 kg N/A 12 Fr. Large Pediatric 2.5 25-35 kg N/A 12 Fr.
Small Adult 3 30-60 kg 4-5’ 12 Fr. Medium Adult 4 50-90 kg 5-6’ 12 Fr. Large Adult 5 90+ kg >6’ 12 Fr.
3. Procedure:
a. Take and maintain appropriate body substance isolation precautions including eye protection.
b. Determine and select appropriate airway for size of patient. c. Lubricate per the manufacturer’s recommendations d. Grasp the lubricated I-gel firmly along the integral bite block (tube
portion of the device). Position the device so that the I-gel cuff outlet is facing toward the chin of the patient.
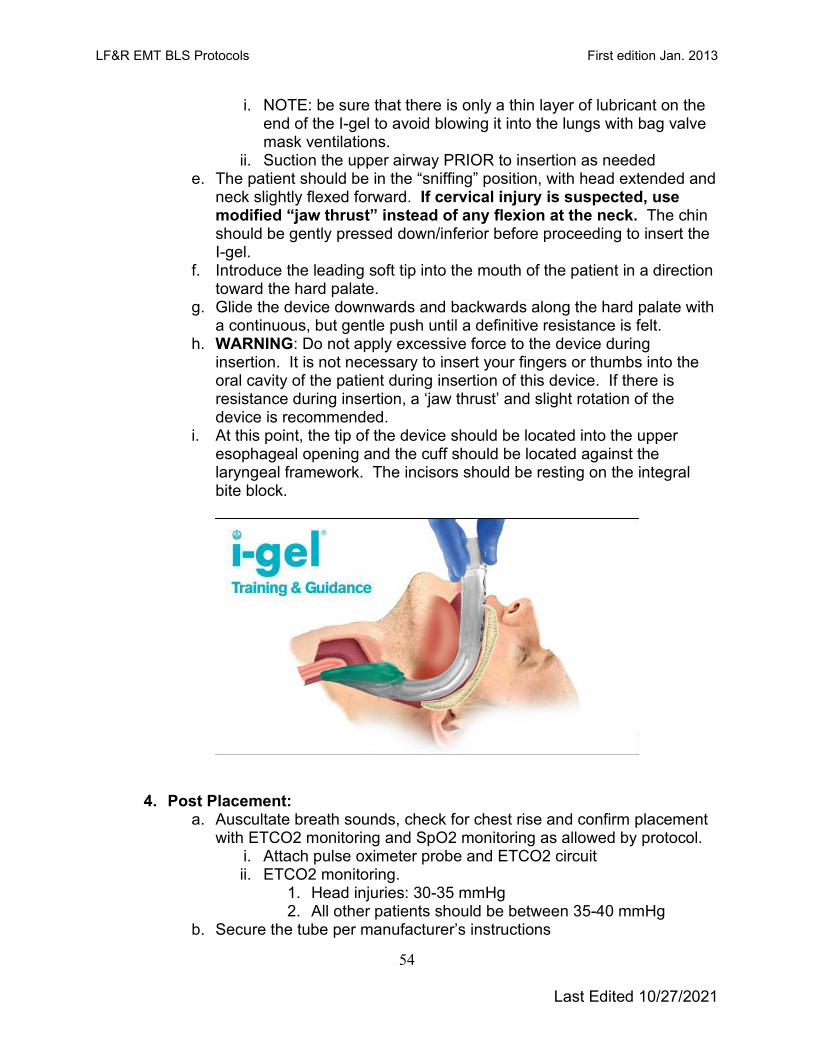
LF&R EMT BLS Protocols First edition Jan. 2013
Last Edited 10/27/2021
54
i. NOTE: be sure that there is only a thin layer of lubricant on the end of the I-gel to avoid blowing it into the lungs with bag valve mask ventilations.
ii. Suction the upper airway PRIOR to insertion as needed e. The patient should be in the “sniffing” position, with head extended and
neck slightly flexed forward. If cervical injury is suspected, use modified “jaw thrust” instead of any flexion at the neck. The chin should be gently pressed down/inferior before proceeding to insert the I-gel.
f. Introduce the leading soft tip into the mouth of the patient in a direction toward the hard palate.
g. Glide the device downwards and backwards along the hard palate with a continuous, but gentle push until a definitive resistance is felt.
h. WARNING: Do not apply excessive force to the device during insertion. It is not necessary to insert your fingers or thumbs into the oral cavity of the patient during insertion of this device. If there is resistance during insertion, a ‘jaw thrust’ and slight rotation of the device is recommended.
i. At this point, the tip of the device should be located into the upper esophageal opening and the cuff should be located against the laryngeal framework. The incisors should be resting on the integral bite block.
4. Post Placement:
a. Auscultate breath sounds, check for chest rise and confirm placement with ETCO2 monitoring and SpO2 monitoring as allowed by protocol.
i. Attach pulse oximeter probe and ETCO2 circuit ii. ETCO2 monitoring.
1. Head injuries: 30-35 mmHg 2. All other patients should be between 35-40 mmHg
b. Secure the tube per manufacturer’s instructions

LF&R EMT BLS Protocols First edition Jan. 2013
Last Edited 10/27/2021
55
c. Place suction catheter in side port and advance to appropriate position, apply suction to decompress the stomach.
d. Continue to monitor, sedate per protocol as necessary (ALS Procedure)
e. Consider definitive airway placement, if possible and necessary. (ALS Procedure)
i. Endotracheal tube placement ii. You can intubate through the I-gel tub with a Bougie introducer.
5. Indications for I-gel removal:
a. Patient regains consciousness. (Consider sedation and/or paralytics {ALS Procedure} if authorized)
b. Protective gag reflex returns. (Consider sedation and/or paralytics {ALS Procedure} if authorized)
c. Ventilation is inadequate. d. Improperly placed I-gel airway.
6. Removal:
a. Ensure suctioning equipment is ready, roll patient onto left side b. Carefully remove I-gel airway with gentle, but firm traction. Suction as
needed. c. Insert an oropharyngeal or nasopharyngeal adjunct, as needed. d. Continue ventilations with a BVM at 10-15 LPM flow, as needed or
place on non-rebreather mask at 15 LPM e. Document time of removal and ongoing vitals
7. Key Points
a. This is NOT a definitive airway and aspiration can occur with this device.
b. Preload the OG port with a 12 French suction catheter to prevent any fluid leakage from this hole during insertion.
c. Apply a small amount of lubricating gel to the tip of the I-gel to aid in insertion, but do not over lubricate!
d. Do not leave in place for greater than 4 hours
Naloxone Administration 1. Indications:
a. Suspected opioid overdose with altered mental status and respiratory depression (slow/shallow breathing)
LF&R EMT BLS Protocols First edition Jan. 2013
Last Edited 10/27/2021
56
2. Contraindications: a. Not appropriate for patients with altered mental status and normal or
increased respiratory rate.
3. Procedure: a. Assemble medication preload and medication atomization device (MAD).
Do not prime the device as this can deliver most of the medication into the air.
b. Perform LF&R medication cross check c. Discontinue positive pressure ventilations and/or oxygen delivery d. Place the head in a neutral/sniffing position e. Insert the tip of the MAD into the nostril and gently pull outward to enlarge
the nare. Ensure the MAD remains parallel to the septum. f. Depress the vial, administering 1 mg in each nare. g. Resume positive pressure ventilations and oxygen delivery h. Discard the medication and MAD in an sharps container i. Evaluate the response to the medication. Improved respiratory status
includes: i. Increased respiratory rate ii. Increased tidal volume iii. Improved SpO2 reading
4. Notes: a. A complete body check shall be performed prior to the administration of
Naloxone. Carefully inspect inside the pockets of patients clothing prior to palpating the patient for needles and syringes.
b. Oxygen therapy and positive pressure ventilations should be initiated early and continued while the mediation is being prepared.
c. Withhold IGEL insertion until patient response to Naloxone is determined. d. If Naloxone was administered by law enforcement or bystander PTA, allow
five minutes to determine patient response. If no improvement in respiratory depression, administer 2mg intranasal, divided equally between nares.
e. Prepare for violent behavior since the administration of Naloxone is known to cause symptoms of acute withdrawal.
f. Observe respirations closely as Naloxone may wear off before the opioid. g. Administration of naloxone is for supportive therapy only and is not a
substitute for emergency medical care (ABC’s management) h. It is possible for patients who have regained consciousness after the
administration on Naloxone to refuse transportation to the ED. When this occurs, you must inform the patient of the following:

LF&R EMT BLS Protocols First edition Jan. 2013
Last Edited 10/27/2021
57
i. The risks and consequences of refusing transport includes: 1. The possibility that Naloxone may wear off before the
narcotic effect wears off and the patient will stop breathing, leading to death.

LF&R EMT BLS Protocols First edition Jan. 2013
Last Edited 10/27/2021
58
Approved by: ___________________________ Medical Director (Print)
___________________________ Medical Director Signature
___________________________ Date
(A signed copy is available at the Training Division)
Edited 11/01/2021