employer guide to connect - floridajobs.org
TRANSCRIPT

Employer Guide to CONNECT

Employer Guide
Version Date: February 10, 2020
Page 2
1. TABLE OF CONTENTS
Table of Contents ................................................................................................................ 2
2. Introduction ................................................................................................................... 4
2.1 Guide Instructions ........................................................................................................................ 4
2.2 CONNECT System Overview ...................................................................................................... 5
2.2.1 What is CONNECT?................................................................................................................. 5
2.2.2 Where can I access CONNECT? ............................................................................................. 5
2.2.3 What are the benefits of CONNECT? ...................................................................................... 5
2.2.4 Who can use CONNECT? ........................................................................................................ 5
3. Log in to CONNECT as an Employer ......................................................................... 7
3.1 Log in to CONNECT as an Employer .......................................................................................... 7
3.2 Navigate the Employer Homepage .............................................................................................. 7
3.3 View Employer Account Profile .................................................................................................... 8
3.3.1 To view your Employer Account Profile, please follow the steps below: ................................. 8
3.4 Access Employer Inbox ............................................................................................................... 9
3.4.1 To Search for Correspondence needing your attention in your inbox ................................... 10
3.4.2 To view ‘All’ correspondence requiring your attention, please follow the steps below: .......... 11
3.4.3 Manage Employer Action Items ............................................................................................. 12
3.4.4 View the Employer Action Item Notice ................................................................................... 12
3.4.5 Respond to UCB-412/Notice of Claim Filed ........................................................................... 13
3.4.6 Respond to Fact Finding ........................................................................................................ 15
3.5 File Appeal ................................................................................................................................. 18

Employer Guide
Version Date: February 10, 2020
Page 3
3.5.1 Withdraw an Appeal ............................................................................................................... 19
3.5.2 View Case Folder ................................................................................................................... 21
3.5.3 Upload a document to Appeal Case Folder ........................................................................... 21
3.6 Short Time Compensation (STC) Plan Benefits ........................................................................ 22
3.6.1 What is STC? ........................................................................................................... 22
3.6.2 STC Employer Requirements…............................................................................................. 23
3.7 Maintain an Employer Account ................................................................................................. 23
3.8 Protest Benefit Charges ............................................................................................................. 25
3.9 Search for completed items in Employer Correspondence ....................................................... 26
3.10 Registering for SIDES E-Response ........................................................................................... 27
3.10.1 Registering for SIDES E-Response ....................................................................................... 28
3.10.2 Ending SIDES E-Response Registration ............................................................................... 30
3.11 Maintain Employer Account Users ............................................................................................. 30
3.11.1 To Maintain maintain users for your Employer Account, please follow the steps below ....... 31
3.11.2 To ‘Modify’ the user information, please follow the steps below ................................................. 32
3.11.3 To view or reset roles, please follow the steps below: ........................................................... 33
3.11.4 To reset a user’s password ............................................................................................................. 34
3.11.5 To remove a user, select ‘Inactivate’ and follow the steps below: ............................................. 34
3.11.6 To create a ‘New’ user. .................................................................................................................... 35
3.12 Assign and Maintain TPA (Third Party Administrator) ............................................................... 36
3.12.1 View and maintain TPA access ............................................................................................. 37
3.12.2 Add a New TPA ...................................................................................................................... 38

Employer Guide
Version Date: February 10, 2020
Page 4
Please note that this icon is where you will find helpful hints, tips, and
reminders.
2. INTRODUCTION
This document is a reference for navigating the system functions and employer uses in the
CONNECT system to access payments, benefits, appeals, determinations, and correspondence
related to Florida Department of Economic Opportunity (DEO) employer accounts.
2.1 Guide Instructions
This document provides a “how to” for an employer who needs to navigate the CONNECT
system.
Topics listed in the table of contents can be jumped to by pressing “Ctrl+Click” to follow the
hyperlink to that topic.
Helpful hints, tips, and reminders are indicated with a pointed hand symbol and text box.
You will find step-by-step instructions, and this red circle icon: 1 indicates the step number
on the screenshot. These are to help you follow along in the guide as you complete the steps
yourself on the CONNECT Website. Please note that the steps are listed before the image.
Sometimes, links or special features of a screen are highlighted with a red rectangle to
make it easier for you to find it on your screen as you follow along

Employer Guide
Version Date: February 10, 2020
Page 5
2.2 CONNECT System Overview
The purpose of the System Overview is to provide a high-level overview of the CONNECT
system. It will cover applications and features of CONNECT, users of CONNECT, how to
access CONNECT, and the benefits of using Connect.
2.2.1 What is CONNECT?
CONNECT is a claims management system that claimants use to apply for benefits. Claimants,
employers and third parties can access information about filed claims and communicate with
DEO Staff through CONNECT.
2.2.2 Where can I access CONNECT?
CONNECT is a Web based system, that anyone with internet access and user credentials can
access. Employers can access CONNECT by typing or copying the following link into a browser
address bar: https://connect.myflorida.com/Employer/Core/Login.ASPX and can also be
accessed from the DEO Web site: http://www.floridajobs.org.
2.2.3 What are the benefits of CONNECT?
CONNECT provides easy, online access to all claim-related information that Employers and
other users can access anywhere, at any time. CONNECT makes it easier and faster to apply
for benefits, resolve issues, and provide information. It provides better processes, systems, and
service for claimants, employers, third parties, and DEO Staff and a stronger connection
between Remployment Assistance and Workforce to expedite the RA process. Using
CONNECT means:
• Less paperwork
• Less filing
• Faster response time
2.2.4 Who can use CONNECT?
CONNECT is a central system that is accessed by six types of users: claimants, employers,
DEO staff, Third Party Representatives (TPRs), Third Party Administrators (TPAs) and Other
State and Federal Agencies.
• Claimants – Claimants use CONNECT to apply for benefits, file an appeal, and view and
send correspondence
• Employers – Employers use CONNECT to file appeals, protest benefit charges, and
view and send correspondence
• DEO Staff – DEO Staff use CONNECT to evaluate information, authorize payments,
adjudicate issues, and maintain data
• TPRs – Third Party Representatives use CONNECT to search and view information
about claimants that have provided access to the TPR

Employer Guide
Version Date: February 10, 2020
Page 6
• TPAs – Third Party Administrators perform reemployment assistance benefit activities on
behalf of an employer, and the employers provide the TPA access to specific information
• Other State and Federal Agencies – Other state and federal agencies have contracts
that outline the specific information that they can access in CONNECT
Employer Guide
Version Date: February 10, 2020
Page 7
1
2
3
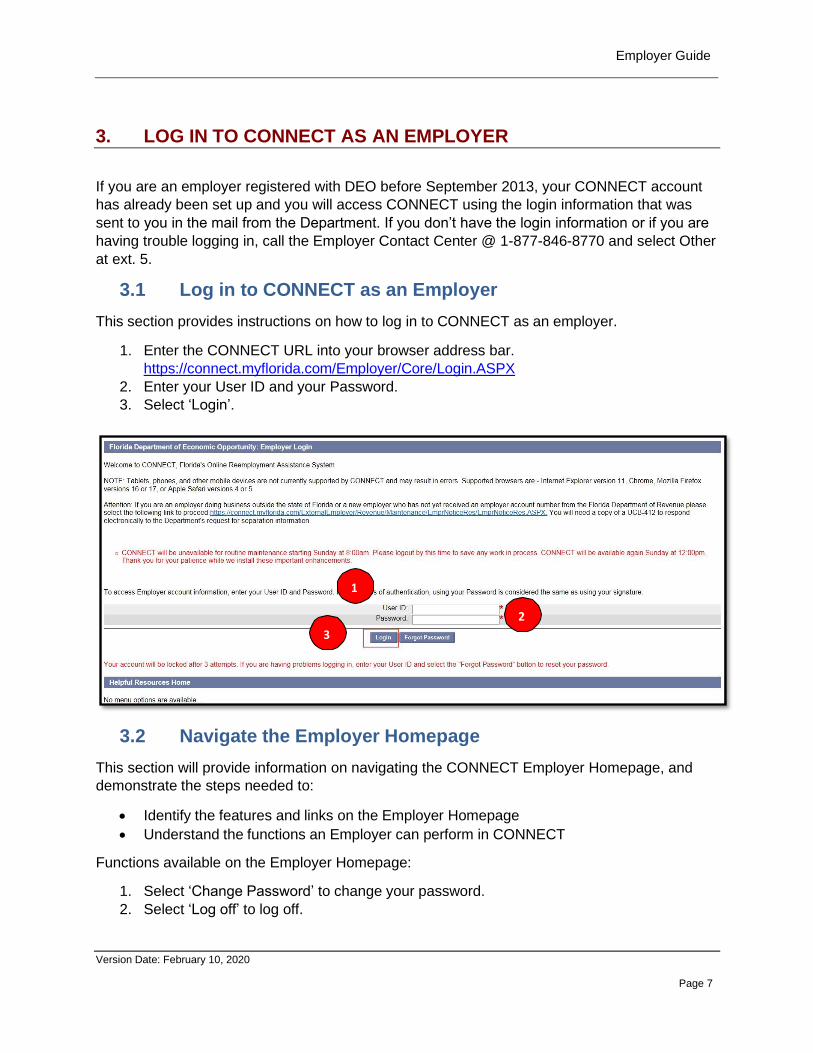
3. LOG IN TO CONNECT AS AN EMPLOYER
If you are an employer registered with DEO before September 2013, your CONNECT account
has already been set up and you will access CONNECT using the login information that was
sent to you in the mail from the Department. If you don’t have the login information or if you are
having trouble logging in, call the Employer Contact Center @ 1-877-846-8770 and select Other
at ext. 5.
3.1 Log in to CONNECT as an Employer
This section provides instructions on how to log in to CONNECT as an employer.
1. Enter the CONNECT URL into your browser address bar.
https://connect.myflorida.com/Employer/Core/Login.ASPX
2. Enter your User ID and your Password.
3. Select ‘Login’.
3.2 Navigate the Employer Homepage
This section will provide information on navigating the CONNECT Employer Homepage, and
demonstrate the steps needed to:
• Identify the features and links on the Employer Homepage
• Understand the functions an Employer can perform in CONNECT
Functions available on the Employer Homepage:
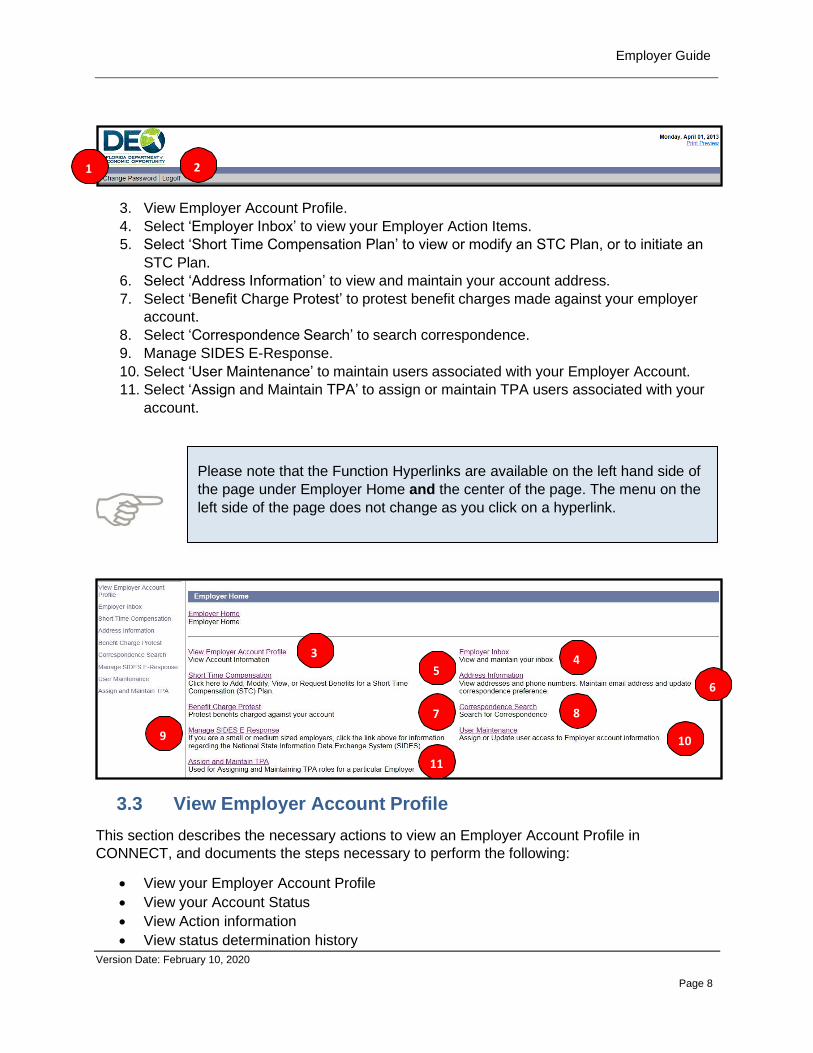
1. Select ‘Change Password’ to change your password.
2. Select ‘Log off’ to log off.
Employer Guide
Version Date: February 10, 2020
Page 8
Please note that the Function Hyperlinks are available on the left hand side of
the page under Employer Home and the center of the page. The menu on the
left side of the page does not change as you click on a hyperlink.
3 4
5
6
7 8
9 10
11
3. View Employer Account Profile.
4. Select ‘Employer Inbox’ to view your Employer Action Items.
5. Select ‘Short Time Compensation Plan’ to view or modify an STC Plan, or to initiate an
STC Plan.
6. Select ‘Address Information’ to view and maintain your account address.
7. Select ‘Benefit Charge Protest’ to protest benefit charges made against your employer
account.
8. Select ‘Correspondence Search’ to search correspondence.
9. Manage SIDES E-Response.
10. Select ‘User Maintenance’ to maintain users associated with your Employer Account.
11. Select ‘Assign and Maintain TPA’ to assign or maintain TPA users associated with your
account.
3.3 View Employer Account Profile
This section describes the necessary actions to view an Employer Account Profile in
CONNECT, and documents the steps necessary to perform the following:
• View your Employer Account Profile
• View your Account Status
• View Action information
• View status determination history
1 2

Employer Guide
Version Date: February 10, 2020
Page 9
1
2
3
3.3.1 To view your Employer Account Profile, please follow the steps below:
1. Select ‘View Employer Account Profile’ from the left-hand menu on the Employer
Homepage.
2. View the section of the page titled ‘Account Profile’ – this is your account information.
3. Select the ‘Status Determination Pending’ hyperlink to view the status of any applicable
determinations associated with your employer account.
3.4 Access Employer Inbox
This section describes the necessary actions to access your Employer Inbox, and documents
the steps necessary to perform the following:
• Locate your Employer Inbox
• Navigate your Employer Inbox
To access your Employer Inbox, please follow the steps below:
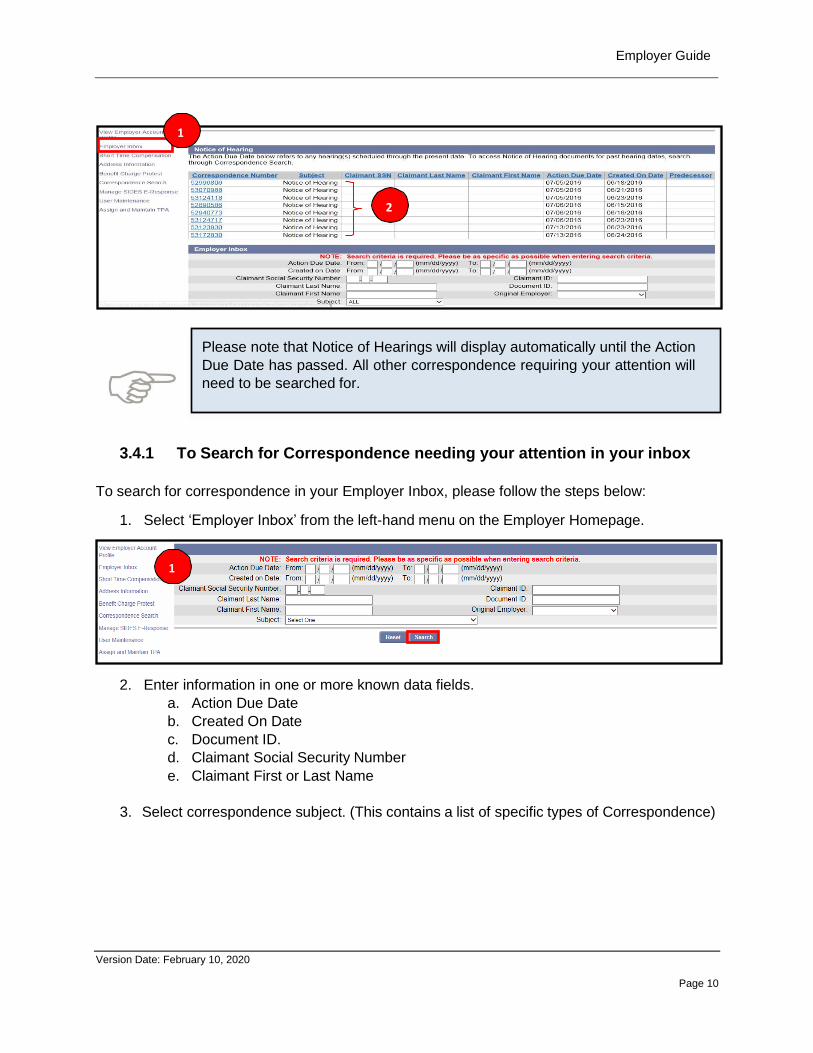
1. Select ‘Employer Inbox’ from the left-hand menu of the Employer Homepage.
2. The Employer Inbox will automatically populate with any Notice of Hearings at the top of
the page.
Employer Guide
Version Date: February 10, 2020
Page 10
Please note that Notice of Hearings will display automatically until the Action
Due Date has passed. All other correspondence requiring your attention will
need to be searched for.
1
3.4.1 To Search for Correspondence needing your attention in your inbox
To search for correspondence in your Employer Inbox, please follow the steps below:
1. Select ‘Employer Inbox’ from the left-hand menu on the Employer Homepage.
2. Enter information in one or more known data fields.
a. Action Due Date
b. Created On Date
c. Document ID.
d. Claimant Social Security Number
e. Claimant First or Last Name
3. Select correspondence subject. (This contains a list of specific types of Correspondence)
1
2

Employer Guide
Version Date: February 10, 2020
Page 11
4
5
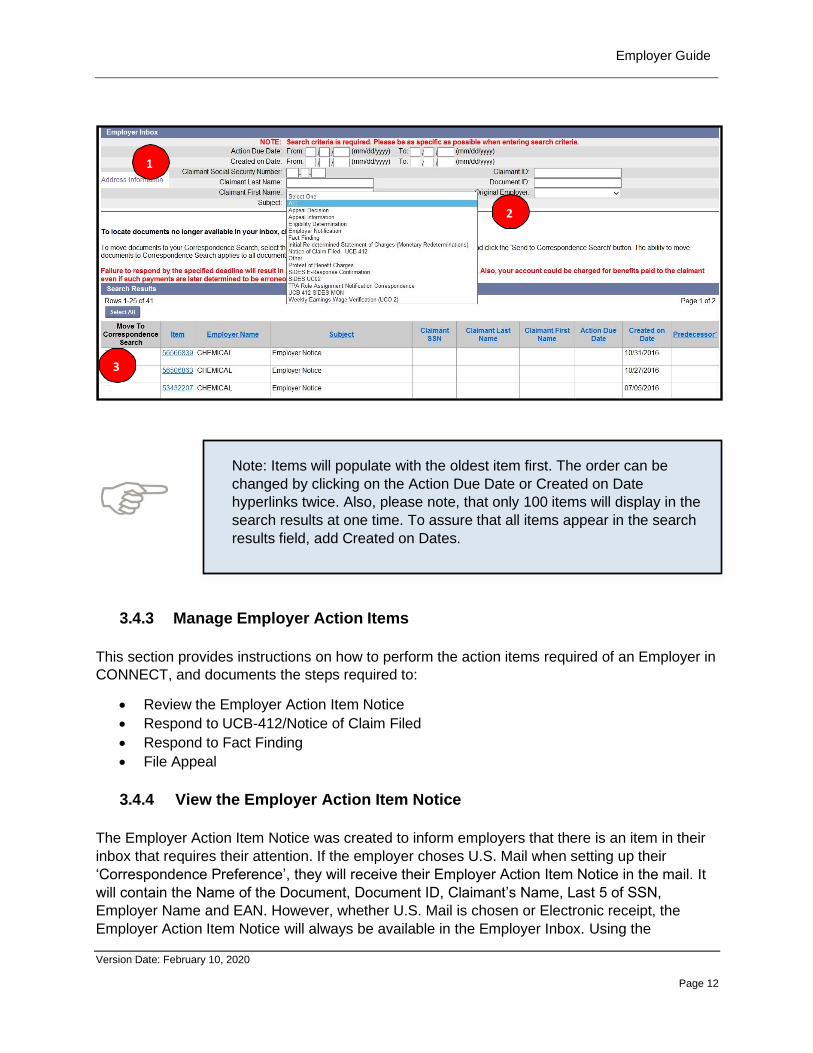
4. Select ‘Search.’
5. All relevant correspondence will populate in the ‘Search Results’ section.
3.4.2 To view ‘All’ correspondence requiring your attention, please follow
the steps below:
1. To view ‘ALL’ correspondence, leave all data fields blank.
2. Select the down arrow on the ‘Subject’ line and select ‘ALL’.
3. All information in your Employer Inbox will populate in the ‘Search Results’ field.
2
3
Employer Guide
Version Date: February 10, 2020
Page 12
Note: Items will populate with the oldest item first. The order can be
changed by clicking on the Action Due Date or Created on Date
hyperlinks twice. Also, please note, that only 100 items will display in the
search results at one time. To assure that all items appear in the search
results field, add Created on Dates.
3.4.3 Manage Employer Action Items
This section provides instructions on how to perform the action items required of an Employer in
CONNECT, and documents the steps required to:
• Review the Employer Action Item Notice
• Respond to UCB-412/Notice of Claim Filed
• Respond to Fact Finding
• File Appeal
3.4.4 View the Employer Action Item Notice
The Employer Action Item Notice was created to inform employers that there is an item in their
inbox that requires their attention. If the employer choses U.S. Mail when setting up their
‘Correspondence Preference’, they will receive their Employer Action Item Notice in the mail. It
will contain the Name of the Document, Document ID, Claimant’s Name, Last 5 of SSN,
Employer Name and EAN. However, whether U.S. Mail is chosen or Electronic receipt, the
Employer Action Item Notice will always be available in the Employer Inbox. Using the
1
2
3

Employer Guide
Version Date: February 10, 2020
Page 13
information in the Notice, the employer can search for specific claimants and documents in their
inbox. (See Section 3.7 for more information on Employer’s ‘Correspondence Preference’.)
To view the Action Item Notice in the Employer Inbox, please follow the steps below:
1. Log into CONNECT.
2. Select ‘Employer Inbox’.
3. Select ‘Employer Notification’ from the ‘Subject’ line drop down drop down arrow.
4. Select ‘Search’ and list will display.
5. Select ‘Item’ hyperlink to open and view notice.
3.4.5 Respond to UCB-412/Notice of Claim Filed
To respond to a UCB-412/Notice of Claim filed, please follow the steps below:
1. Log in to CONNECT to respond to the notice by entering the Unique Document ID and
Claimant ID that are listed on the notice.
2. Select ‘Continue.’
3. Review the pre-populated information on the next screen. (The information is generated
by the claimant’s response to questions about the separation.)
4. Respond to the questions in the ‘Response’ section.
a. Select ‘Yes’ or ‘No’ to indicate if claimant worked for you.
Employer Guide
Version Date: February 10, 2020
Page 14
3
4
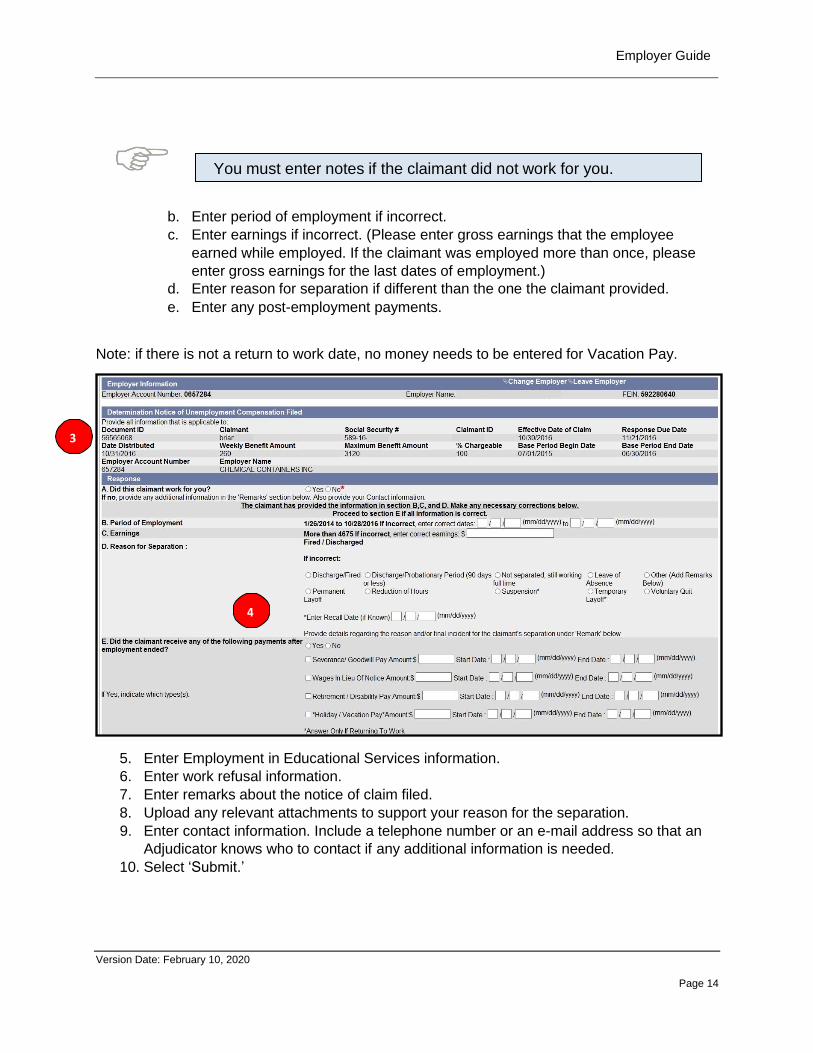
b. Enter period of employment if incorrect.
c. Enter earnings if incorrect. (Please enter gross earnings that the employee
earned while employed. If the claimant was employed more than once, please
enter gross earnings for the last dates of employment.)
d. Enter reason for separation if different than the one the claimant provided.
e. Enter any post-employment payments.
Note: if there is not a return to work date, no money needs to be entered for Vacation Pay.
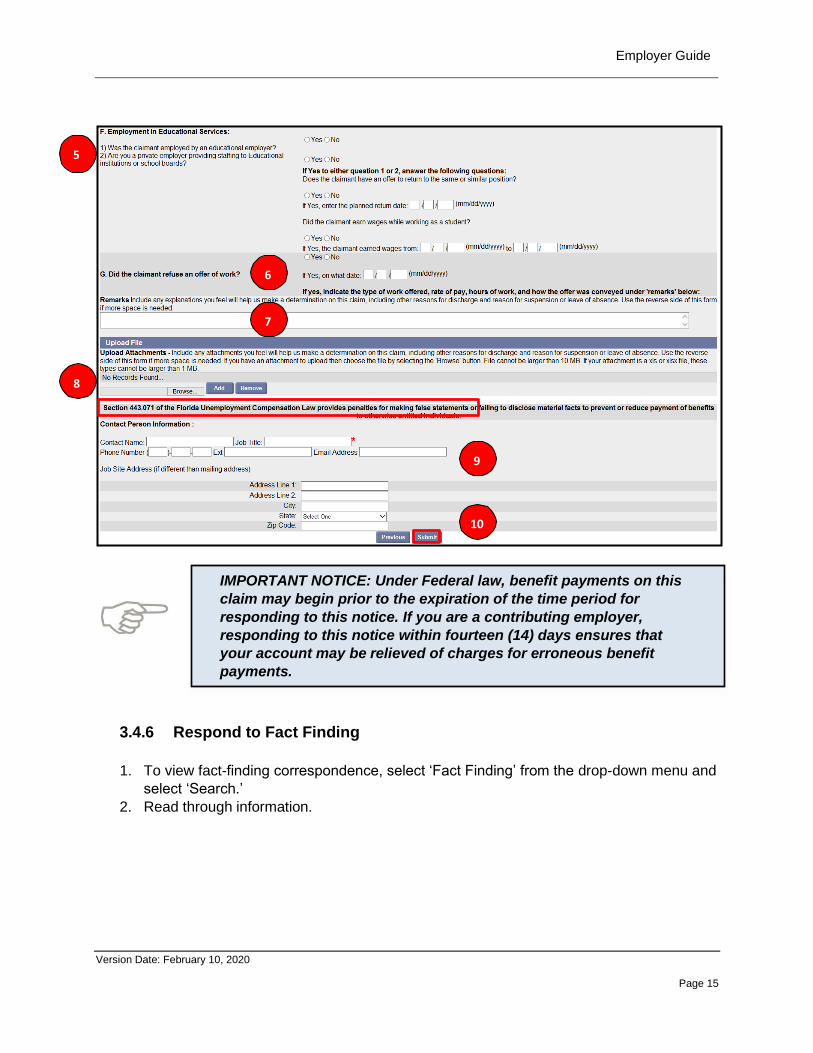
5. Enter Employment in Educational Services information.
6. Enter work refusal information.
7. Enter remarks about the notice of claim filed.
8. Upload any relevant attachments to support your reason for the separation.
9. Enter contact information. Include a telephone number or an e-mail address so that an
Adjudicator knows who to contact if any additional information is needed.
10. Select ‘Submit.’
You must enter notes if the claimant did not work for you.
Employer Guide
Version Date: February 10, 2020
Page 15
IMPORTANT NOTICE: Under Federal law, benefit payments on this
claim may begin prior to the expiration of the time period for
responding to this notice. If you are a contributing employer,
responding to this notice within fourteen (14) days ensures that
your account may be relieved of charges for erroneous benefit
payments.
3.4.6 Respond to Fact Finding
1. To view fact-finding correspondence, select ‘Fact Finding’ from the drop-down menu and
select ‘Search.’
2. Read through information.
5
6
7
8
9
10

Employer Guide
Version Date: February 10, 2020
Page 16
A questionnaire is designed to ask questions specific to the claimant’s
statement for the reason of the separation.
1
2

Employer Guide
Version Date: February 10, 2020
Page 17
3
4
3. Complete questions in Section 1.
4. Scroll down to complete questions in Section 2.
5. Complete contact information and be sure to add a phone number or email address in
the ‘Name and title’ box. This assures that an Adjudicator can reach you if a rebuttal to
the claimant’s statement is needed.
6. Upload Attachments
7. Select ‘Submit.’

Employer Guide
Version Date: February 10, 2020
Page 18
2
3
3.5 File Appeal
1. To file an appeal, you must have an adverse determination.
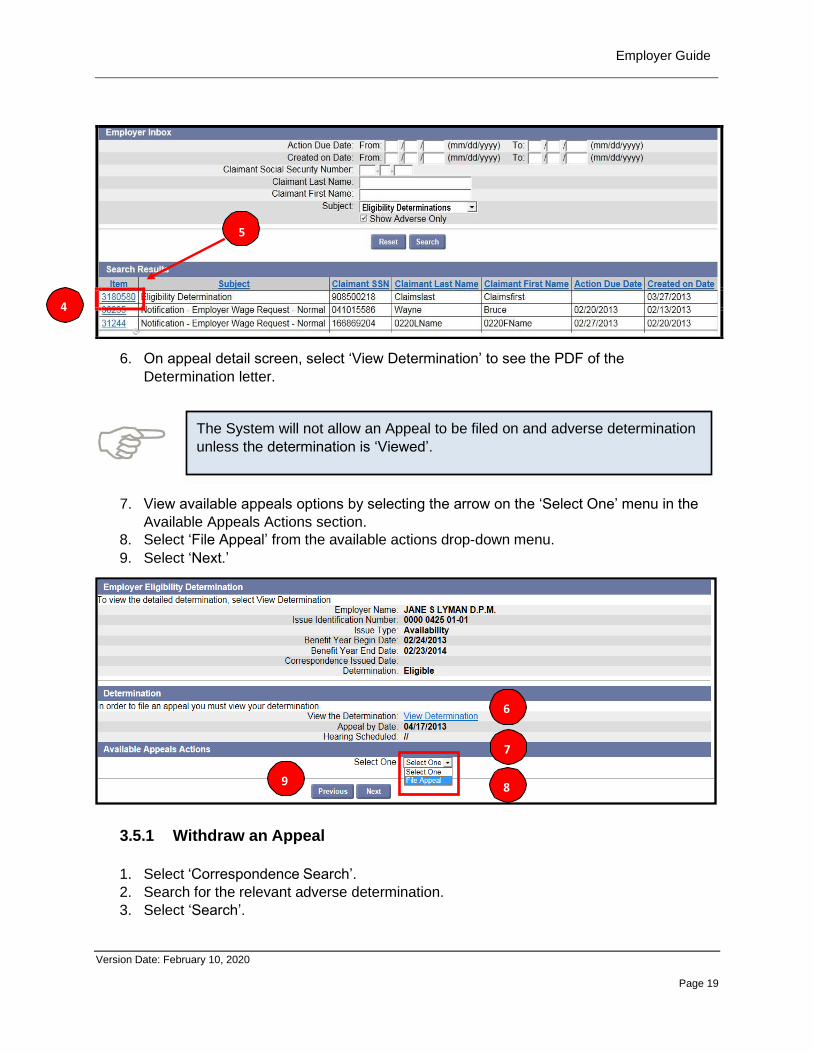
2. To view adverse appeal information only, select ‘Eligibility Determination’ from the drop
down menu and select the checkbox to view adverse only.
3. Select ‘Search.’
4. All available adverse determinaitons will populate in the ‘Search Results’ section.
5. Select the ‘Item’ hyperlink next to the adverse determination that you would like to
appeal to pull up the determination detail screen.
5
6
7
Employer Guide
Version Date: February 10, 2020
Page 19
The System will not allow an Appeal to be filed on and adverse determination
unless the determination is ‘Viewed’.
6
7
9 8
6. On appeal detail screen, select ‘View Determination’ to see the PDF of the
Determination letter.
7. View available appeals options by selecting the arrow on the ‘Select One’ menu in the
Available Appeals Actions section.
8. Select ‘File Appeal’ from the available actions drop-down menu.
9. Select ‘Next.’
3.5.1 Withdraw an Appeal
1. Select ‘Correspondence Search’.
2. Search for the relevant adverse determination.
3. Select ‘Search’.
5
4

Employer Guide
Version Date: February 10, 2020
Page 20
4
5
4. Click on ‘Document ID’ and the Available Appeals Action screen displays.
5. Select ‘Withdraw Appeal’ from the Select One drop down list and select ‘Next’.
6. Enter the reason for withdrawal in the comments box.
7. Select ‘Submit.’
2
1
3

Employer Guide
Version Date: February 10, 2020
Page 21
1
2
3
3.5.2 View Case Folder
1. From the same dropdown menu, select ‘View Case Folder.’
2. View the information.
3. Select ‘Next.’
3.5.3 Upload a document to Appeal Case Folder
1. Select ‘Browse’ to upload file from desktop.
2. Select file.
3. Select ‘Open.’
4. Select ‘Upload.’
7
6

Employer Guide
Version Date: February 10, 2020
Page 22
5
5. Select ‘Send’ to submit the file.
3.6 Short Time Compensation (STC) Plan Benefits
3.6.1 What is STC?
1. The Short Time Compensation (STC) Program is a voluntary employer program
designed to help employers maintain their staff by reducing the weekly hours of their
employees, instead of laying off employees, when the employer is faced with a
temporary slowdown in business. If you establish an STC Plan and the employees meet
the qualifications to establish a reemployment claim against the State of Florida, they will
receive a partial reemployment check to supplement their reduced paycheck.
2. The Short Time Compensation program helps employers retain their workforce in times
of temporary slowdown by encouraging work sharing as an alternative to layoff.
2
4 1
3

Employer Guide
Version Date: February 10, 2020
Page 23
3.6.2 STC Employer Requirements
1. An employer must complete a Short Time Compensation Plan Application, which
lasts for one year but can be renewed for another year if needed.
2. At least 10 percent (a minimum of 2 if less 20) of the Employer’s total staff, or in a
particular department, must work reduced hours.
3. Employers must provide DEO with the names and normal weekly hours
(excluding overtime) of the employees participating in the program.
4. Employers must certify that they will reduce the employee’s normal number of
normal weekly hours by 10 percent, but by no more than 40 percent.
5. Employers must allow employees to retain benefits such as, 401K, paid leave
and other employer benefits.
6. The situation must be a temporary reduction in hours rather than a temporary
layoff.
7. Staff must be a full-time employee, (not part-time or seasonal) with a standard number of
hours worked each week (excluding overtime).
8. Staff must meet all of the normal requirements to establish a Florida reemployment claim
and the Employer must provide the Department of Economic Opportunity with any
necessary information or documentation.
9. While on the Short Time Compensation program, staff must work and/or receive paid
leave for ALL of the hours the employer scheduled them to work in order to receive
Short Time Compensation Benefits for a week.
10. Every two weeks staff will be required to report their hours worked, plus any hours of
paid leave from the STC employer and if they have a part-time job, earnings from that
part-time job must be reported.
11. If your staff have any concerns about the program, they must go through their STC
employer representative which will address those concerns to the STC unit.
3.7 Mainatain an Employer Account
To maintain your Employer Account, please follow the steps below:
1. After logging into CONNECT, the Employer’s Homepage displays.
2. Select ‘Address Information’ from the left-hand menu or from the list of Hyperlinks in the
center of the page.
Employer Guide
Version Date: February 10, 2020
Page 24
6
7
8
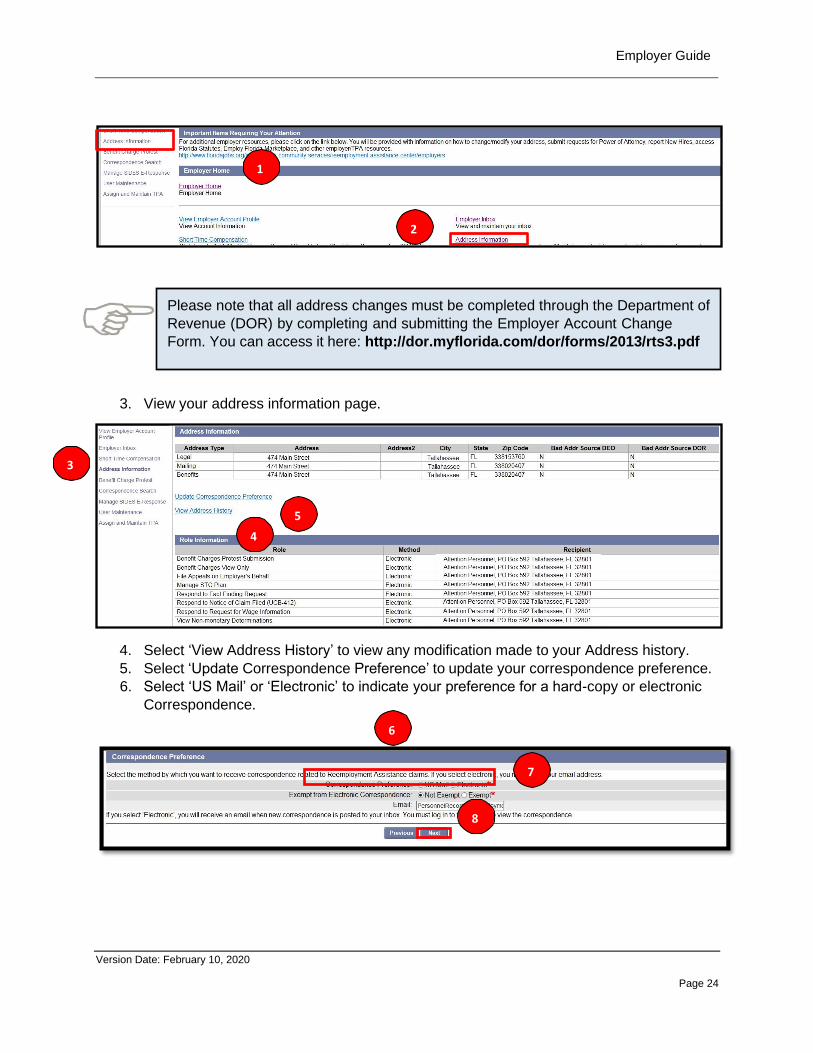
Please note that all address changes must be completed through the Department of
Revenue (DOR) by completing and submitting the Employer Account Change
Form. You can access it here: http://dor.myflorida.com/dor/forms/2013/rts3.pdf
3
5
4
3. View your address information page.
4. Select ‘View Address History’ to view any modification made to your Address history.
5. Select ‘Update Correspondence Preference’ to update your correspondence preference.
6. Select ‘US Mail’ or ‘Electronic’ to indicate your preference for a hard-copy or electronic
Correspondence.
1
2
Employer Guide
Version Date: February 10, 2020
Page 25
The Employer Action Item Notice is a document that when sent to you via US
U.S. Mail or email, advises you that important correspondence requires your
attention in your Employer Inbox. Only the mail and inbox versions, will contain
the Name of the Document, Document ID, Claimant’s Name, Last 5 of SSN,
Employer Name and EAN.
1 2
7. If you select ‘Electronic’ enter your email address. This will trigger the system to send an
e-mail advising that there are documents in the Employer Inbox that need to be reviewed
or completed.
8. Select ‘Next.’
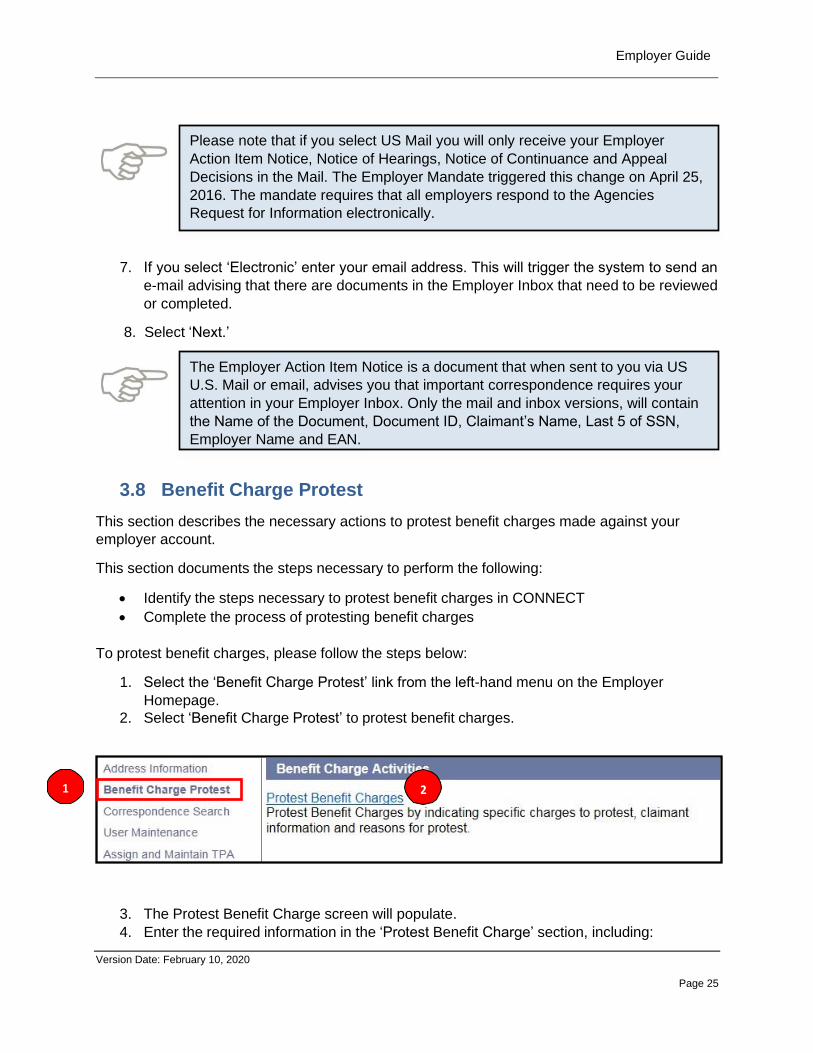
3.8 Benefit Charge Protest
This section describes the necessary actions to protest benefit charges made against your
employer account.
This section documents the steps necessary to perform the following:
• Identify the steps necessary to protest benefit charges in CONNECT
• Complete the process of protesting benefit charges
To protest benefit charges, please follow the steps below:
1. Select the ‘Benefit Charge Protest’ link from the left-hand menu on the Employer
Homepage.
2. Select ‘Benefit Charge Protest’ to protest benefit charges.
3. The Protest Benefit Charge screen will populate.
4. Enter the required information in the ‘Protest Benefit Charge’ section, including:
Please note that if you select US Mail you will only receive your Employer
Action Item Notice, Notice of Hearings, Notice of Continuance and Appeal
Decisions in the Mail. The Employer Mandate triggered this change on April 25,
2016. The mandate requires that all employers respond to the Agencies
Request for Information electronically.

Employer Guide
Version Date: February 10, 2020
Page 26
4
5 6
7
3
a. Statement Mail Date (UCB-412/Notice of Claim Filed)
b. Claimant SSN
c. Claimant’s Last Name
d. Claimant’s Last Day of Work
5. In the ‘Reasons for Protest’ section, select the radio button next to the reason(s) for
entering a protest to the UCB-412/Notice of Claim Filed – you may select all reasons
that apply.
6. If you selected ‘Currently Employed’ or ‘Other’ for your rationale, you must enter
comments.
7. Select ‘Submit’ to complete the benefit charge protest.
3.9 Search for completed items in Employer Correspondence
1. Click on ‘Correspondence Search
2. Search by Created On Date
3. Document ID
4. SSN#
5. First and Last Name
2
3 4
5
1

Employer Guide
Version Date: February 10, 2020
Page 27
6
7
6. Search for Specific item types in Correspondence by selecting type from the Subject
Drop down box.
7. After filtering by the chosen field, click on Search and the Results will display.
3.10 Registering for SIDES E-Response
The State Information Data Exchange System (SIDES) is a nationally standardized format for
employers to respond to requests for separation information and earnings verifications.
Employers can choose to use the SIDES E-Response web portal, which is a website that allows
employers to respond to multiple requests for separation information from different states, all in
the same place. Below are instructions for registering for the SIDES program.

Employer Guide
Version Date: February 10, 2020
Page 28
1
2
3
3.10.1 Registering for SIDES E-Response
1. From your Employer Home page, chose the option to ‘Manage SIDES E-Response’.
2. You will be navigated to the ‘UI SIDES E-Response Registration Information Screen’.
3. Click on ‘SIDES E-Response Registration Screen’.

Employer Guide
Version Date: February 10, 2020
Page 29
5
6
7
The email address provided on this screen will be associated with the
employer’s SIDES account. A notice will be sent to the employer via email
to advise that a request for information has been sent to the SIDES E-
Response website.
4. You will be navigated to the ‘SIDES E-Response Registration Screen’.
5. Click the check box indicating which requests you like to receive.
6. Enter your email address.
7. Click on ‘Submit’.
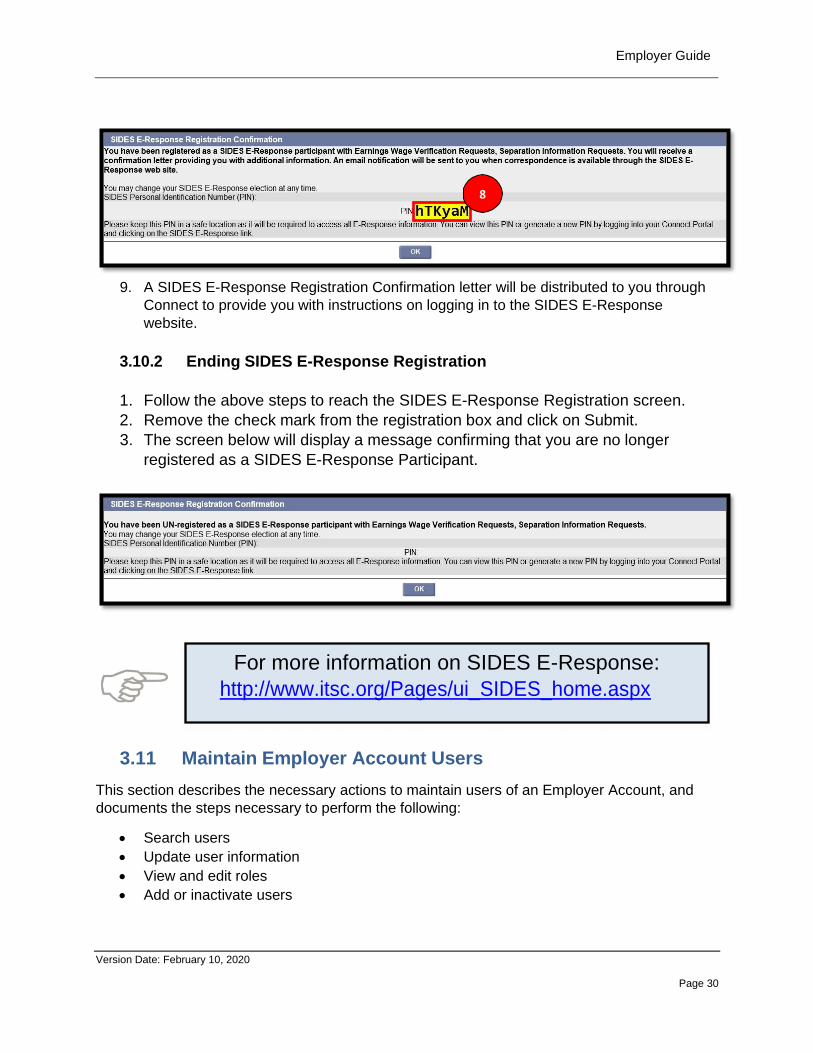
8. The registration confirmation screen below will be displayed providing the PIN which will
be used to log in to the SIDES E-Response website, log in with your Florida Employer
Account Number and FEIN.
Employer Guide
Version Date: February 10, 2020
Page 30
For more information on SIDES E-Response:
http://www.itsc.org/Pages/ui_SIDES_home.aspx
9. A SIDES E-Response Registration Confirmation letter will be distributed to you through
Connect to provide you with instructions on logging in to the SIDES E-Response
website.
3.10.2 Ending SIDES E-Response Registration
1. Follow the above steps to reach the SIDES E-Response Registration screen.
2. Remove the check mark from the registration box and click on Submit.
3. The screen below will display a message confirming that you are no longer
registered as a SIDES E-Response Participant.
3.11 Maintain Employer Account Users
This section describes the necessary actions to maintain users of an Employer Account, and
documents the steps necessary to perform the following:
• Search users
• Update user information
• View and edit roles
• Add or inactivate users
8

Employer Guide
Version Date: February 10, 2020
Page 31
2
3
1
4
5
3.11.1 To maintain users for your Employer Account, please follow the steps
below
1. Select ‘User Maintenance’ from the left-hand menu on the Employer Homepage.
2. Enter known information into the ‘User Search Criteria’ fields.
3. Select ‘Search.’
4. The User ID results will display. To view the user information, select the User ID
hyperlink.
5. The User Details page displays.

Employer Guide
Version Date: February 10, 2020
Page 32
1
2
3
4
5
3.11.2 To ‘Modify’ the user information, please follow the steps below:
1. Select the ‘Modify’ and the User Details page will display.
2. Enter new information in data fields as needed.
3. Review previous comments, if any have been made.
4. Add new comment noting reason for update.
5. Select ‘Save.’
Employer Guide
Version Date: February 10, 2020
Page 33
1
a
b
3
4
5
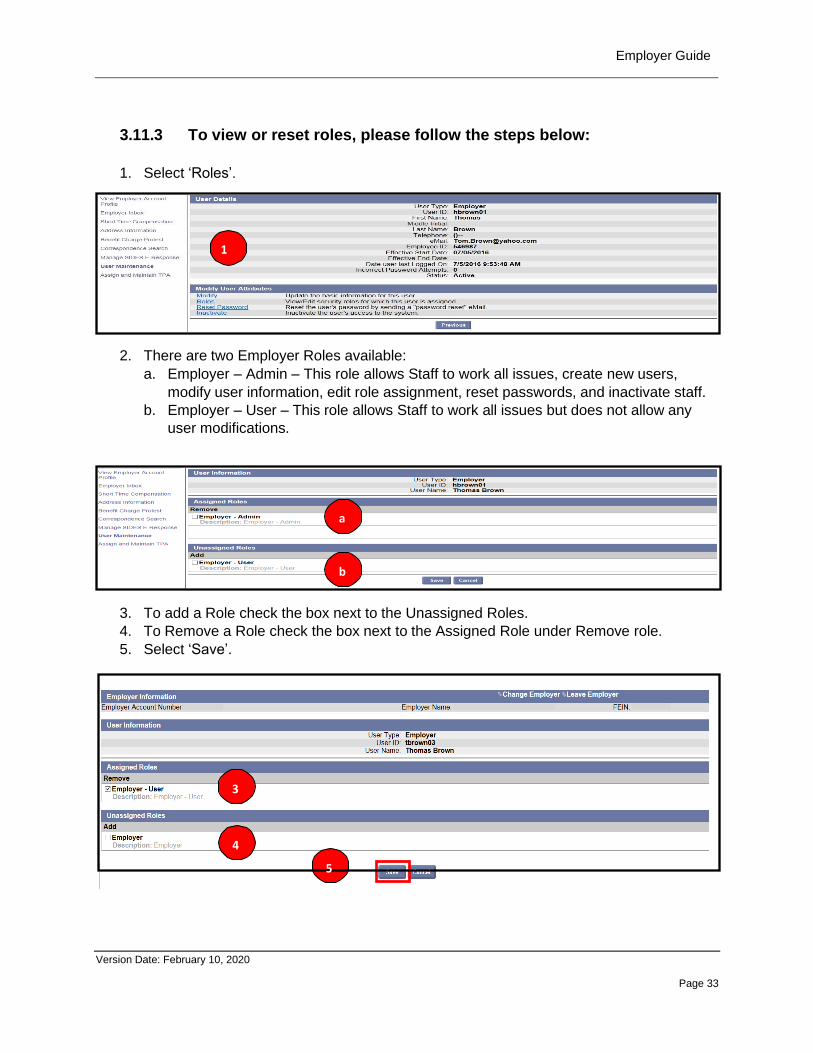
3.11.3 To view or reset roles, please follow the steps below:
1. Select ‘Roles’.
2. There are two Employer Roles available:
a. Employer – Admin – This role allows Staff to work all issues, create new users,
modify user information, edit role assignment, reset passwords, and inactivate staff.
b. Employer – User – This role allows Staff to work all issues but does not allow any
user modifications.
3. To add a Role check the box next to the Unassigned Roles.
4. To Remove a Role check the box next to the Assigned Role under Remove role.
5. Select ‘Save’.
Employer Guide
Version Date: February 10, 2020
Page 34
1
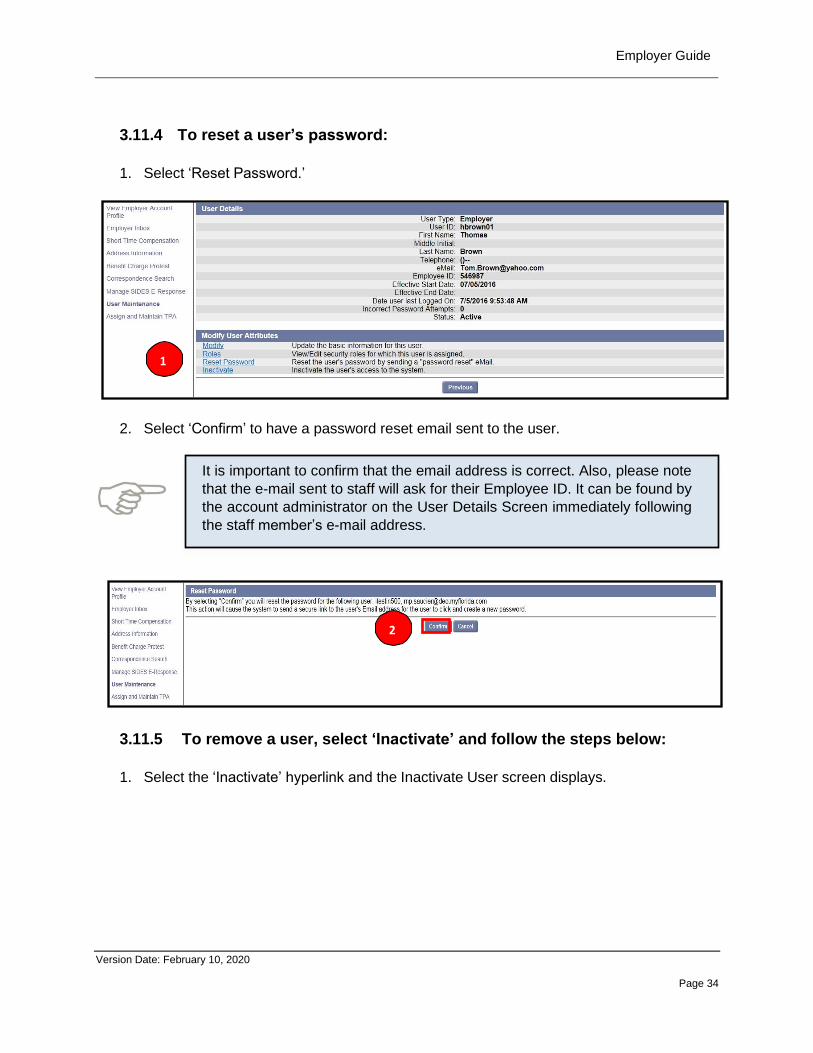
It is important to confirm that the email address is correct. Also, please note
that the e-mail sent to staff will ask for their Employee ID. It can be found by
the account administrator on the User Details Screen immediately following
the staff member’s e-mail address.
2
3.11.4 To reset a user’s password:
1. Select ‘Reset Password.’
2. Select ‘Confirm’ to have a password reset email sent to the user.
3.11.5 To remove a user, select ‘Inactivate’ and follow the steps below:
1. Select the ‘Inactivate’ hyperlink and the Inactivate User screen displays.

Employer Guide
Version Date: February 10, 2020
Page 35
2
3
4
2. Add the reason you are inactivating the user in the ‘Reason’ section.
3. Select ‘Confirm’.
4. The User Details screen will display with a Status of User inactivated.
3.11.6 To create a ‘New’ user.
1. Select ‘User Maintenance’ hyperlink.
2. Select ‘New’.
1
2
1

Employer Guide
Version Date: February 10, 2020
Page 36
3
4
5
The Employee ID should be an ID created by the Employer for that specific
Employee and should not be the Employer EAN. The Employee ID will be
requested from the user when the ‘Reset Password Link’ is sent.
3. Note the message about the Employee ID located at the top of the User Detail screen.
4. Fill in the information for the new Staff member and select ‘Save’.
5. The User Details screen will update and display the information for the new user.
3.12 Assign and Maintain TPA (Third Party Administrator)
This section describes the necessary actions to authorize a new TPA for your employer
account, and maintain TPA access to your account. To assign a TPA, the TPA must be
registered in the CONNECT system and have been assigned a TPA ID.
This section documents the steps necessary to perform the following:
• View and maintain TPA access
• Authorize and assign a new TPA

Employer Guide
Version Date: February 10, 2020
Page 37
2
3
1
4
5
3.12.1 View and maintain TPA access
To view and maintain TPA access for your employer account, please follow the steps below:
1. Select ‘Assign and Maintain TPA’ from the left-hand menu on the Employer Homepage.
2. In the Third Party Administrator (TPA) Authorization section, you will see a list of all
TPAs authorized to access your employer account.
3. Select TPA ID to view TPA profile.
4. In the ‘Assigned Roles’ section, you will see a list of all the access roles assigned
to the TPA.
5. Select Modify to change assigned roles.
6. In the ‘Assigned Roles’ section, ‘Remove’ check boxes will appear next to each
assigned role for the TPA.
7. Select the check boxes next to the roles you’d like to remove.

Employer Guide
Version Date: February 10, 2020
Page 38
10 11
1
8. Scroll down the page to see the ‘Roles Not Assigned’ section.
9. ‘Add’ check boxes will appear next to each unassigned role for the TPA.
10. To add a role that has not been assigned to the TPA, select the check box next to the
role.
11. Select ‘Save’ to update all ‘Remove’ and ‘Add’ selections for the TPA.
3.12.2 Add a New TPA
1. Select ‘New’ to add a new TPA.
2. Enter TPA ID and select ‘Next.’ (The TPA ID will be given to you by the TPA you are
now working with)
6
7

Employer Guide
Version Date: February 10, 2020
Page 39
3
4
5
6
3. Enter TPA Services Begin and End Dates.
4. Remove roles by selecting the check box next to the appropriate role to ‘Remove’ in
Assigned Roles.
5. Assign roles by selecting the check box next to the appropriate role to ‘Add’ in
Roles Not Assigned.
6. Select ‘Save.'
2