employee experience - 3.0 enrollment guide nopw
TRANSCRIPT

Confidential and Proprietary 1
Employee Experience Enrollment Guide
Version 3.4, 11/9/2017

www.plansource.com 2
Table of Contents Table of Contents .................................................................................................................................................. 2 Getting Started ...................................................................................................................................................... 3
Log in to PlanSource .......................................................................................................................................... 3 Welcome Screen ................................................................................................................................................ 3 Overview ............................................................................................................................................................ 4
Updating Your Information .................................................................................................................................... 4 Review Your Profile ............................................................................................................................................ 4 Adding Dependents and Beneficiaries ................................................................................................................ 5
Shop for Benefits ................................................................................................................................................... 6 Enrollment Navigation ....................................................................................................................................... 8 Electing a Plan ................................................................................................................................................. 10 Enrollment Confirmation ................................................................................................................................. 12 Certify Your Dependents .................................................................................................................................. 13
Viewing Your Information at Any Time ................................................................................................................ 14 Wrapping up Your Enrollment .............................................................................................................................. 14 Appendix ............................................................................................................................................................. 14
Adding a Life Event .......................................................................................................................................... 14 Click to Chat ..................................................................................................................................................... 16 Contacts........................................................................................................................................................... 16 Document Management ................................................................................................................................... 17
Benefit Documents ....................................................................................................................................... 17 Tax Documents ............................................................................................................................................ 18 Required Documents .................................................................................................................................... 18 Other Options for Required Documents ....................................................................................................... 19
Employer Credits ............................................................................................................................................. 20 After Employer Credit Applied...................................................................................................................... 20 View Cost Breakdown .................................................................................................................................. 21 Review Page ................................................................................................................................................. 22
My Devices ....................................................................................................................................................... 23 Total Compensation Statement ....................................................................................................................... 23

www.plansource.com 3
Getting Started So you’re ready to enroll in your employer provided benefits! The new PlanSource enrollment experience will help
you do just that, in an intuitive, educational and fun way.
Before you begin enrolling in your benefits, please make sure you have the following items.
Social Security Number (SSN) for all legal dependents you wish to enroll in any coverage.
Date of Birth (DOB) for all legal dependents you wish to enroll in any coverage
Beneficiary Information for Life Insurance, which includes your beneficiaries’ name(s), DOB(s) and SSN(s)
Log in to PlanSource
Before you can do anything in the PlanSource system, you must first log in with your username and password.
1. Type or paste this link into your web browser’s search bar: https://benefits.plansource.com/
2. On the login page, type your username and password.
3. If this is the first time you are using this site, follow the instructions on the HUB
(https://smgov365.sharepoint.com/sites/theHub‐HR/SitePages/Benefits.aspx) or email
First time users will be prompted to select a new password. (Note: Every year during Open Enrollment your
password will reset back to your birthdate in the YYYYMMDD format.) If you forgot your password, click “Forgot
your password.” If you have no email address on file for this process, contact your account manager.
Welcome Screen
From this screen you will be able to begin your enrollment, make changes to your benefits, see your benefits
summary, and review benefit plan information among other resources. First we will go through the enrollment
process; later in this document we will review steps to update enrollment information.

www.plansource.com 4
Figure 1 Welcome Screen
Overview
At the top of the screen you’ll see how many days you have left to enroll, whether you’re a new hire or in an open
enrollment window. You also have until that time to revisit benefits.plansource.com to make any changes to your
enrollment. Failure to enroll by the enrollment due date will result in “NO COVERAGE”.
1. Review the timeline. The timeline will show where you are, or where you left off in the enrollment
process.
2. Click Get Started
If you are not a new hire and it is not annual enrollment, select the Benefits link in the side menu then select
“Update your Current Benefits.”
Updating Your Information After you select “Get Started”, you will be taken through a series of steps in order to update your own personal
information and your dependents information.
Review Your Profile
The first step in your enrollment process is to review your profile. Read through this page and verify that all
information is correct; if there are errors, you can modify the information by selecting “Edit Info” or contact your
HR representative for corrections. Complete any information where the field is empty or incorrect. Once you have
completed your updates, select “Save”. Then select “Next: Review My Family”.

www.plansource.com 5
Figure 2 Review Your Profile
Adding Dependents and Beneficiaries
After you review your profile, you will have an option to add dependents. Each dependent you add is capable of
being a beneficiary. However, adding dependents (i.e. Spouse, Partner, and Child) can be done on any page of the
enrollment. To enter a new dependent not currently listed on the page:
Figure 3 Adding Dependents

www.plansource.com 6
1. Click the “Add Family Member” box. This will open a new page
2. On the new page, enter the dependent information as shown below.
Figure 4 Dependent Information
3. Select “Save.” Once you have saved your dependent, you will be sent back to the Manage you family members page. This allows you to add or remove family members before you move on. When finished with your updates select “Next: Shop for Benefits”.
Shop for Benefits You’ve checked your profile information, and added dependents. Now you’re looking at your benefits dashboard,
and you’re ready to shop! You’ll see available options in the middle of your screen, and the total benefit cost per
pay period will appear in the upper right hand side of the enrollment screen in your cart.

www.plansource.com 7
Figure 5 Benefits Selection
This figure (the dollar amount in your cart) will automatically update as you make each benefit plan selection, and
will keep a current amount of your per pay period costs (based on your employer pay period information). If you
expand your cart you will see your benefit options and selections.

www.plansource.com 8
Figure 6 View Cart
You must select “Review and Checkout” at the end of your enrollment for your benefits to be in force! You can
select it within the cart or at the bottom right of the Benefits Selection page.
Enrollment Navigation
In order to proceed through each enrollment page, use the “Shop Plans” button next to the first benefit type.
www.plansource.com 9
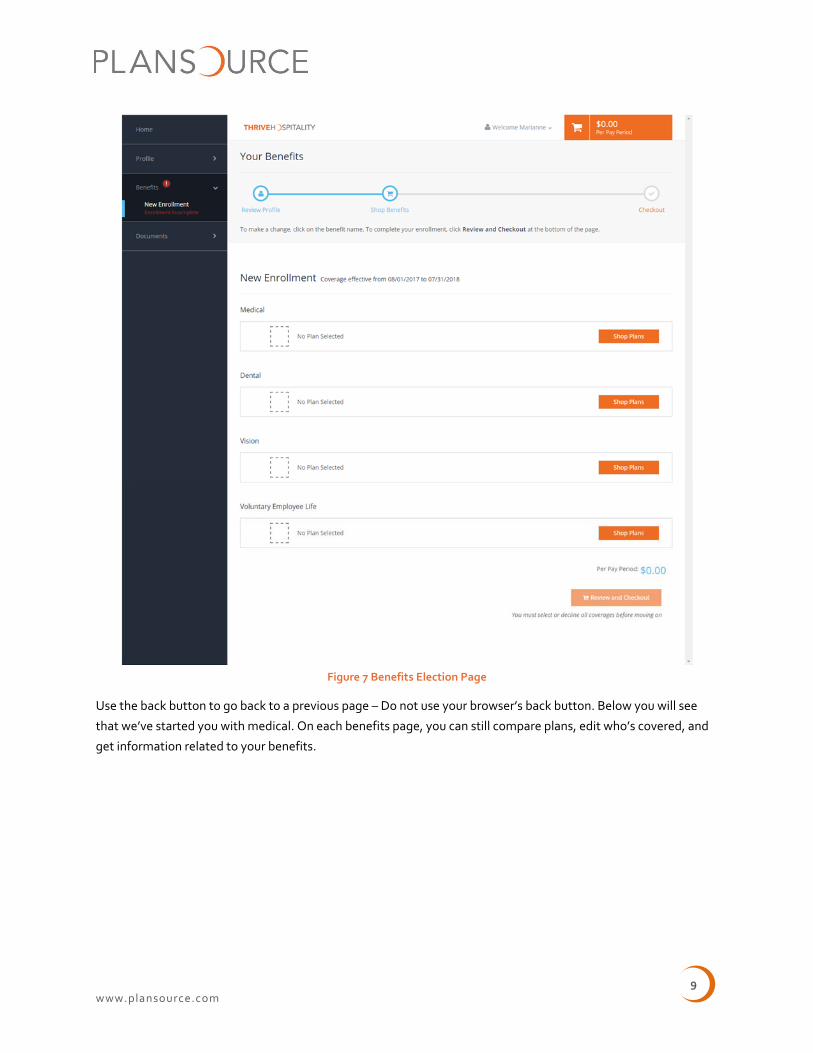
Figure 7 Benefits Election Page
Use the back button to go back to a previous page – Do not use your browser’s back button. Below you will see
that we’ve started you with medical. On each benefits page, you can still compare plans, edit who’s covered, and
get information related to your benefits.

www.plansource.com 10
Figure 8 Shop Plans
The left hand navigation menu will dynamically change based on where you are in your enrollment.
Electing a Plan
All the plans available to you will be listed on the Plan Cards page (see above; the plans in the figures are of
sample plans for demonstration purposes only). So, after you’ve reviewed your options, learned about that
benefit type and decided what plan is right for you and your family, you’ll need to select your benefit.
This is where you can edit who you want to cover, or add, by clicking “Edit Family Covered.”
Click on the benefit you wish to enroll in.

www.plansource.com 11
Figure 9 Update Cart
On this page, you can, again, edit who’s covered (add dependents to this plan, or even add dependents that you
forgot), review the coverage cost by tier, and see the full plan details. For a benefit with multiple plan options you
will be taken back the plan cards view if you decide to add dependents. If there is a single plan offered for that
benefit you will go directly to the plan details page shown above.
If this is the right plan for you, simply click “Update Cart” on the medical card at the right hand side of the page.
Once you update your cart, you will be moved to the next benefit type page which will, again, show you all plan
options for that benefit type. Once you select a plan to view, you again will be allowed to edit dependents, see
coverage amounts by tier, and review the plan types.
As you shop for more benefits, your dashboard page will show progress and your cart will update with the total
price.

www.plansource.com 12
Figure 10 Dashboard Page Progress
To change your benefits from your dashboard, simply click “Change Plan” next to the benefit type you would like
to update. When you have completed your elections you must click “Review & Checkout” for your benefits to be
saved and elected! Think shopping online, if you don’t Checkout then you won’t get anything!
Enrollment Confirmation
This page lists all the benefits you elected: Read through the entire page carefully and verify all information. Your
cost is at the top in your cart, and your confirmed plan elections are shown below. You’ll notice your timeline has
reached checkout as well! To review your plans and who’s covered, simply click View Plan next to each benefits
type. You can also download, email, and print your selections for your own record. Congratulations, you have
completed your enrollment!

www.plansource.com 13
Figure 11 Confirmation Page
To make any changes to your elections (within your enrollment window):
• Click Continue Enrollment, or View Confirmation (i.e. Medical, Dental, etc.)
• Make corrections
• Click Save (which will bring you back to the Your Summary Page)
• Click Review and Checkout
Certify Your Dependents

www.plansource.com 14
If you are making a status change at any time throughout the year you could be required to email, fax, or mail
supporting documentation to your HR Department for your status change request to be approved. If your status
change requires further documentation, you must send that documentation within 31 days of the event or your
request will automatically be denied. Please refer to you HR representative for more information on life change
event documentation.
Viewing Your Information at Any Time At any time throughout the year you can login to your account using your Username and your password. If you do
not remember your password contact your Benefits Administrator to have your Password reset. Click “Benefits” in
the left hand navigation menu. Read through this page and verify that all information is correct; if there are errors,
contact your HR representative for corrections.
Wrapping up Your Enrollment The Enrollment process is designed to be smooth and effortless. Always remember to click Checkout once you
finish enrolling or updating your benefits. If you have any issues, please reach out to your HR department and they
will be able to assist you.
Appendix Adding a Life Event
Some changes in your personal life may qualify you to change your benefit elections. A list of life event changes
can be found by reporting a life event on the main page, or you can call your HR Department with any questions.
To report a status change on the new enrollment page, follow the steps below:
1. From your homepage select Update My Benefits

www.plansource.com 15
Figure 12 Creating a Life Event
2. On the next page you can select the qualifying event from the list. Input the event date information and
click “Continue.”
Figure 13 Report Life Event
3. Add/Remove Dependents (if necessary)
4. Update Benefits as necessary

www.plansource.com 16
5. Review Selection and Checkout
Click to Chat
If your company has the ability to chat with you to assist with your benefits, you can reach out to them via two
tabs. They each open the below Click to Chat modal. Once you submit your information, you will be able to
connect to your administrator to chat.
Need Help? ‐ This tab directly opens up a Click to Chat modal that allows you to insert your name and
email in order to reach your administrator.
GuideMe – Within the GuideMe tab is a button that reads “Click to Chat” select it and the Click to Chat
modal will open.
Figure 14 Click to Chat Modal
Contacts
The Contacts page contains important contact information regarding your employer and carrier for your
convenience. You may also add, remove, or edit your own person contacts.

www.plansource.com 17
Figure 15 Contacts Page
Document Management
Benefit Documents
If your employer has provided any documentation regarding your benefits, they can be found in the left‐hand
navigation under the Documents section, and in the Benefit Documents section, as pictured below:

www.plansource.com 18
Figure 16 Document Library
The documents in the Library are broken out by Plan Year and Benefit. Some documents are global document,
and are in their own category, available to all employees.
Tax Documents
If your company provides you with 1095‐C Tax Forms, they will be listed under Documents as shown below.
Figure 17 Tax Documents
Required Documents
If your selected benefits require any kind of required documents, you will see a red exclamation mark beside “Documents” in the menu. You will be able to upload any required document/s under My Documents as shown below.

www.plansource.com 19
Figure 18 Uploading Required Benefits
Other Options for Required Documents
If you cannot upload the Required Document, we offer other options depending upon your company’s settings.
Select an existing document: This allows you to select a document that you have previously uploaded and apply it to the required document slot.
Cannot provide required document: This slot allows you to provide a reason for why you cannot provide the document. This allows an administrator to reach out to you to discuss other options.
I will supply the document later: This provides you with the date that the document is due by in order to have coverage.

www.plansource.com 20
Figure 19 Other Options
Employer Credits
If your company provides you with employer credits then the Benefits Dashboard and the Review Page will have
additional information for you to look at.
After Employer Credit Applied
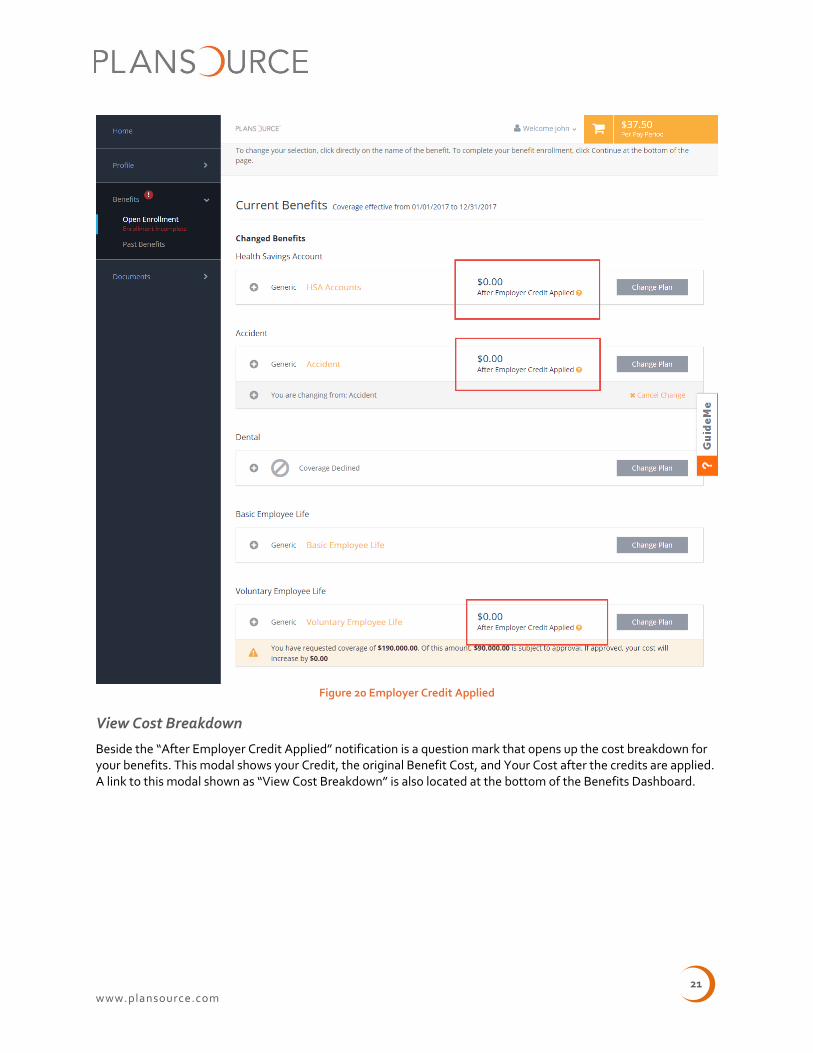
If a benefit is allowed employer credits then you will see the monetary amount that you will have to pay after the employer credit is applied to your plan. This does not appear until after you have selected a plan for the benefit. The example in the image below, shows that all of the benefits with the red boxes are allowed employer credits, while the others do not.
www.plansource.com 21
Figure 20 Employer Credit Applied
View Cost Breakdown
Beside the “After Employer Credit Applied” notification is a question mark that opens up the cost breakdown for your benefits. This modal shows your Credit, the original Benefit Cost, and Your Cost after the credits are applied. A link to this modal shown as “View Cost Breakdown” is also located at the bottom of the Benefits Dashboard.

www.plansource.com 22
Figure 21 Cost Breakdown
Review Page
On the review page, each benefit will show Employer Contribution, Credit Applied, Benefit Cost, and Your Cost. Right above the Checkout button is the link for “What is my Employer Credit?” Selecting this link will give you a model that provides you with your maximum credit amount and a brief description about the employer credit.

www.plansource.com 23
Figure 22 Employer Credit Review Page
My Devices
The My Devices page contains links to Google’s and Apple’s store to download the PlanSource Mobile
Application. It also allows you to register your device for extra security. After you register your mobile device it
will be listed here for easy tracking.
Total Compensation Statement
If your company offers you a Total Compensation Statement, you will see a banner on your home page that states
“My Total Compensation Statement”. Select the “View My Total Compensation link to be taken to your
statement.

www.plansource.com 24
Figure 23 Total Compensation Statement Banner