emc vnxe series - emc my documents level fast cache information .....26 view pool-level fast cache...
TRANSCRIPT
EMC® VNXe® SeriesVersion 3.1
Configuring Storage Pools300-015-479 REV 02
Copyright © 2015 EMC Corporation. All rights reserved. Published in the USA.
Published December, 2015
EMC believes the information in this publication is accurate as of its publication date. The information is subject to changewithout notice.
The information in this publication is provided as is. EMC Corporation makes no representations or warranties of any kind withrespect to the information in this publication, and specifically disclaims implied warranties of merchantability or fitness for aparticular purpose. Use, copying, and distribution of any EMC software described in this publication requires an applicablesoftware license.
EMC², EMC, and the EMC logo are registered trademarks or trademarks of EMC Corporation in the United States and othercountries. All other trademarks used herein are the property of their respective owners.
For the most up-to-date regulatory document for your product line, go to EMC Online Support (https://support.emc.com).
EMC CorporationHopkinton, Massachusetts 01748-91031-508-435-1000 In North America 1-866-464-7381www.EMC.com
2 EMC VNXe Series 3.1 Configuring Storage Pools
Introduction to storage pools 5
About storage pools........................................................................................ 6Storage tiers....................................................................................................6Optimizing disk performance using the FAST Cache and FAST VP (physicaldeployments only)...........................................................................................7Storage pool best practices............................................................................. 8RAID groups (physical deployments only)........................................................ 9
About RAID groups ............................................................................ 9RAID configurations .........................................................................10Disk IOPS by RAID type.....................................................................12
Hot Spares (physical deployments only)........................................................13Hot spare policy .............................................................................. 13View spare disk details (physical deployments only)........................ 14
Configuring storage pools 15
Standard pool configuration using Quick Start mode (physical deploymentsonly)............................................................................................................. 16Configure storage pools using Quick Start mode (physical deployments only)..................................................................................................................... 17About configuring custom storage pools for physical deployments................17Configure a custom storage pool (physical deployments only).......................18Create a storage pool for virtual deployments................................................19Automatic snapshot deletion for storage pools..............................................19Enable automatic snapshot deletion for a storage pool................................. 19Expand a storage pool...................................................................................20View storage pool contents and space usage................................................ 20Monitor storage pool space allocation and usage..........................................20Delete a storage pool.................................................................................... 21
Using the FAST Cache (physical deployments only) 23
About the FAST Cache ...................................................................................24FAST Cache best practices.............................................................................25Create the FAST Cache ..................................................................................25Enable the FAST Cache for a storage pool ..................................................... 25View-system level FAST Cache information ................................................... 26View pool-level FAST Cache information ....................................................... 26Delete the FAST Cache ..................................................................................26
Using FAST VP 27
About FAST VP .............................................................................................. 28Data relocation with FAST VP ........................................................................ 28FAST VP tiering policy ................................................................................... 29Best practices for configuring storage tiers.................................................... 30Enable scheduled data relocations at the system level ................................. 30Modify the data relocation schedule .............................................................31Stop a storage pool from participating in scheduled data relocations ........... 31Manually initiate or stop data relocations for a storage pool ......................... 31
Chapter 1
Chapter 2
Chapter 3
Chapter 4
CONTENTS
EMC VNXe Series 3.1 Configuring Storage Pools 3
Pause or resume data relocations for all storage pools ................................. 32View storage pool tier information.................................................................32View system level data relocation information .............................................. 33View data relocation information for a storage pool ...................................... 33
Configuring storage pools using the CLI 35
Configure storage pools automatically (physical deployments only).............. 36Initiate automatic storage pool configuration................................... 37View configuration settings for automatic storage pool creation....... 37
Configure custom storage pools.................................................................... 38Configure storage pools................................................................... 41View storage pools...........................................................................44Change storage pool settings........................................................... 46Add disks or tiers to storage pools................................................... 48Delete storage pools........................................................................ 49
Manage storage pool tiers............................................................................. 50View storage tiers.............................................................................50
Manage FAST Cache (physical deployments only)..........................................52Create FAST Cache........................................................................... 52View FAST Cache settings.................................................................53Delete FAST Cache........................................................................... 53
Manage FAST VP general settings.................................................................. 54Change FAST VP general settings......................................................55View FAST VP general settings.......................................................... 56
Manage FAST VP pool settings.......................................................................57Change FAST VP pool settings.......................................................... 59View FAST VP pool settings...............................................................59Start data relocation........................................................................ 60Stop data relocation.........................................................................61
View storage pool resources..........................................................................61View storage profiles (physical deployments only)........................................ 63Manage disk groups (physical deployments only)......................................... 65
View disk groups..............................................................................65View recommended disk group configurations................................. 66
The show action command............................................................................67
Chapter 5
CONTENTS
4 EMC VNXe Series 3.1 Configuring Storage Pools

CHAPTER 1
Introduction to storage pools
l About storage pools................................................................................................ 6l Storage tiers............................................................................................................6l Optimizing disk performance using the FAST Cache and FAST VP (physical
deployments only)...................................................................................................7l Storage pool best practices..................................................................................... 8l RAID groups (physical deployments only)................................................................ 9l Hot Spares (physical deployments only)................................................................13
Introduction to storage pools 5
About storage poolsA storage pool is a set of disks that provide specific storage characteristics for theresources that use them. For example, the storage pool configuration defines the typesand capacities of the disks in the pool.
For physical deployments, the storage pool configuration also defines the RAIDconfigurations (RAID types and stripe widths) for these disks.
When multiple pools are configured, you can choose which pool to use when you createnew storage resources. If only one pool is available, the available pool is automaticallyselected when creating any new storage resource.
Note
Before you create storage resources, you must configure at least one storage pool. Onceyou create a pool, you cannot reconfigure the pool's disks without deleting the storageresources configured in the pool and the pool itself. However, you can add disks toexpand the pool.
Storage pools generally provide optimized storage for a particular set of applications orconditions. When you create a storage resource for hosts to use, you must choose astorage pool with which to associate the storage resource. The storage that the storageresource uses is drawn from the specified pool.
If the FAST VP license is installed, and there are multiple disk types on the system, youcan define multiple tiers for the storage pool. For physical deployments, Each tier can beassociated with a different RAID type.
Storage tiersThe storage tiers available for both physical and virtual deployments are described in thetable below.
l For physical deployments, the storage tier is associated with the physical disk type.
l For virtual deployments, the storage tier is associated with the virtual disk'sunderlying characteristics and must be manually assigned.
l For both types of deployments, if FAST VP is installed on the system, you can createtiered storage pools to optimize disk utilization. A tiered pool consists of multipledisk types, such as Flash disks and SAS disks.
Table 1 Storage tier descriptions
Storage tier Disk types Description Default RAIDconfiguration(physicaldeployments only)
ExtremePerformancetier
l SAS Flash - Solid stateextreme performancedisk
l SAS Flash VP - Solidstate extremeperformance disk
Provides very fast access times for resources subject tovariable workloads. For example, databases can achievetheir best performance when using Flash disks. Flashdisks are more expensive than SAS disks per GB ofstorage.
RAID 5 (4 + 1).
Introduction to storage pools
6 EMC VNXe Series 3.1 Configuring Storage Pools
Table 1 Storage tier descriptions (continued)
Storage tier Disk types Description Default RAIDconfiguration(physicaldeployments only)
Note
Only SAS Flash disks can be used in the FAST Cache.
Performancetier
SAS - Rotating performancedisk
Provides high, all-around performance with consistentresponse times, high throughput, and good bandwidth ata mid-level price point. Performance tier storage isappropriate for database resources accessed centrallythrough a network.
RAID 5 (4 + 1).
Capacity tier NL-SAS - Rotating capacitydisk
Provides the highest storage capacity with generally lowerperformance. Capacity storage is appropriate for storinglarge amounts of data that is primarily static (such asvideo files, audio files, and images) for users andapplications that do not have strict performancerequirements.
Note
For data that changes or is accessed frequently, capacitytier storage has significantly lower performance.
RAID 6 (6 + 2).
Optimizing disk performance using the FAST Cache and FAST VP(physical deployments only)
The FAST (Fully Automated Storage Tiering) Suite includes features that enable you to:
l Leverage Flash disks as additional read/write cache for improved performance (FASTCache).
l Dynamically tier data across different types of disks (FAST VP).
Comparison of FAST Cache and FAST VPThe following table describes the differences between the FAST Cache and FAST VPfeatures:
Table 2 Differences between the FAST Cache and FAST VP features
FAST Cache FAST VP
Enables SAS Flash disks to be usedas an additional read/write cache forthe storage system.
Leverages pools to provide sub-LUN and file systemtiering, which moves data to the appropriate tier basedon the FAST VP tiering policy.
Caches 64-KB data chunks for higherperformance.
Relocates 256-MB data chunks based on the FAST VPtiering policy and I/O activity.
Introduction to storage pools
Optimizing disk performance using the FAST Cache and FAST VP (physical deployments only) 7
Table 2 Differences between the FAST Cache and FAST VP features (continued)
FAST Cache FAST VP
Copies data from Hard Disk Drives(HDDs) to Flash disks when the datais accessed frequently.
Moves data between different storage tiers based on theFAST VP tiering policy.
Adapts continuously to changes inworkload.
Uses a data relocation process to periodically makestorage tiering adjustments. The data relocation scheduleis configurable, and the data relocation can take placeonce a day or on an ongoing basis throughout the day.
Interoperability considerationsYou can use FAST Cache and FAST VP functionality together to yield high performance andimprove Total Cost of Ownership (TCO) for the storage system. EMC recommends thatyou:
1. Use available Flash drives for the FAST Cache first, because this can benefit allstorage resources in the storage system.
2. Supplement performance as needed by adding additional Flash drives to storagepool tiers for use by FAST VP.
For example, in scenarios where limited Flash drives are available, you can use Flashdisks to create the FAST Cache, and you can apply FAST VP on a one- or two-tier pool (SASand NL-SAS). From a performance point of view, FAST Cache dynamically providesperformance benefits to bursts of data, while FAST VP moves "hotter" data toperformance drives and "colder" data to capacity drives. From a TCO perspective, FASTCache, with a small number of Flash drives, serves the data that is accessed mostfrequently, while FAST VP optimizes disk utilization and efficiency.
The FAST Cache feature is storage-tier-aware and works with FAST VP to make sure thatthe storage system resources are not wasted by unnecessarily copying data to FASTCache, if it is already on a Flash drive. If FAST VP moves a chunk of data to the ExtremePerformance Tier on a storage pool, the system will not copy that chunk of data into FASTCache, even if FAST Cache criteria is met for promotion. This ensures that the storagesystem resources are not wasted in copying data from one Flash drive to another.
Storage pool best practicesCreate multiple storage pools to:
l Separate workloads that have different I/O profiles. For example, create one set ofpools for workloads that are mostly sequential and another for workloads that aremostly random.
l Separate pools for block and file storage resources.
l Dedicate pools to meet specific performance goals.
l Vary pool parameters, such as enabling the FAST Cache on one pool but not onanother pool.
l Minimize failure domains. For example, although unlikely, loss of a RAID group in apool can compromise the total capacity of that pool. As a result, for physicaldeployments, you may want to create multiple smaller pools rather than use the totalavailable capacity in a single pool.
Introduction to storage pools
8 EMC VNXe Series 3.1 Configuring Storage Pools
Capacity considerationsEMC recommends that you leave free physical space in a pool to accommodate dataservices, as described in the following table.
Table 3 Storage pool capacity considerations
Service Recommendation
Snapshots Maintain about 10% free space to buffer snapped writes.
FAST VP Maintain at least 10% free space to accommodate the fastestrebalancing.
Snapshots and FAST VPtogether
10% free space will meet the requirements of both.
File systems File systems share pool space with their snapshots. They also sharespace with LUNs, if the pool is shared. Follow theserecommendations:
l Do not oversubscribe space in a pool that contains file systems.
l Ensure that the pool has sufficient capacity to cover themaximum size of all file systems, their snapshots, and the LUNssharing the pool.
RAID groups (physical deployments only)
About RAID groupsRedundant array of independent disks (RAID) is a method for providing high levels ofstorage reliability by arranging disks in redundant storage arrays, and dividing andreplicating data among the arrays.
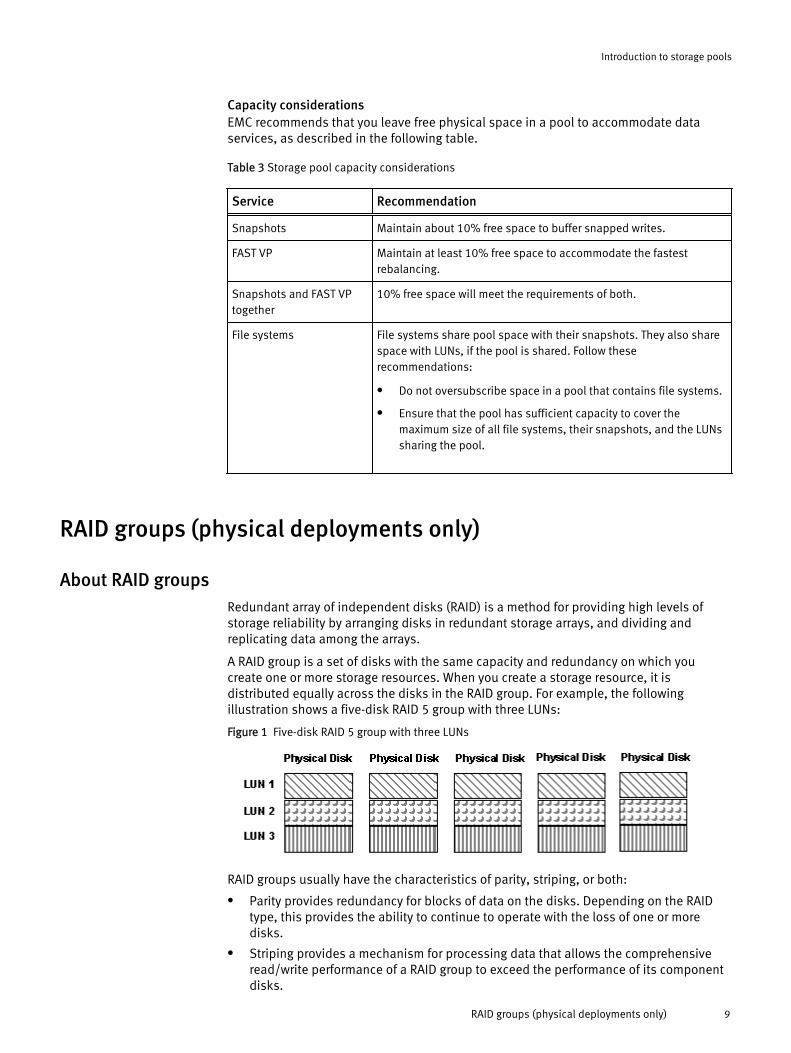
A RAID group is a set of disks with the same capacity and redundancy on which youcreate one or more storage resources. When you create a storage resource, it isdistributed equally across the disks in the RAID group. For example, the followingillustration shows a five-disk RAID 5 group with three LUNs:
Figure 1 Five-disk RAID 5 group with three LUNs
RAID groups usually have the characteristics of parity, striping, or both:
l Parity provides redundancy for blocks of data on the disks. Depending on the RAIDtype, this provides the ability to continue to operate with the loss of one or moredisks.
l Striping provides a mechanism for processing data that allows the comprehensiveread/write performance of a RAID group to exceed the performance of its componentdisks.
Introduction to storage pools
RAID groups (physical deployments only) 9
You select disk types and RAID configurations (RAID types and stripe widths) for a storagepool. The system then creates one or more RAID groups for the pool, based on thespecified configuration. For example, assume there is one storage tier in the pool. Usingthe five-disk RAID 5 example shown above, the system would create the pool with asingle RAID 5 (4+1) RAID group. If you want to create the pool with more than five disks,you must do so in increments of five. Alternatively, you can select the Maximum Capacityoption, which optimizes based on number of disks selected and may create multiple RAIDgroups of the same RAID type but different stripe widths.
If the FAST VP license is installed and there are unused disks of different types, you canconfigure multiple storage tiers for the pool and can specify a different RAID configurationfor each tier.
Once a storage pool is configured, you cannot change the RAID type of a tier. However,you can add a new tier with a different RAID type.
The system supports RAID 5, 6, and 1/0 (also called RAID 10).
RAID configurationsStorage pool tiers are built using a set of one or more individual disk groups based on thetier's RAID type and stripe width. The RAID type determines the performancecharacteristics of each disk group. The stripe width determines the fault characteristics ofeach disk group.
For example, a RAID 5 disk group can still operate with the loss of one disk. A RAID 5(4+1), 5 disk configuration has less risk of multiple disk faults than a RAID 5 (12+1), 13disk configuration.
For best performance from the least number of drives, match the appropriate RAID levelwith the expected workload. The following table describes the supported RAID types forthe intended storage usage:
Table 4 Supported RAID levels
RAID level Description
RAID 1/0 (alsocalled RAID 10)
Best suited for applications with fast or high processing requirements, suchas enterprise servers and moderate-sized database systems. Provides bothhigh performance and reliability at medium cost, while providing lowercapacity per disk.
RAID 1/0 requires a minimum of two physical disks to implement, where twodisks are mirrored together to provide fault tolerance. A RAID 1/0configuration can continue to operate as long as 1/2 of each mirrored diskpair is healthy.
For example, if you have a RAID (2+2) configuration, you can lose two disks,as long as they are not the source and mirror of the same mirrored pair. If youlose both the source and mirror of the same mirrored pair, you mustimmediately replace the disks and rebuild the array.
l RAID 1/0 (1+1): A minimum of two disks can be allocated at a time to apool, with one used strictly for mirroring. One disk out of every two is anexact duplicate of the other, and the usable disk capacity for every two-disk group is approximately one disk (50%). This RAID configuration isequivalent to RAID 1.
l RAID 1/0 (2+2): A minimum of four disks can be allocated at a time to apool, with two used strictly for mirroring. Two disks out of every four areexact duplicates of the other, and the disk usable disk capacity for every
Introduction to storage pools
10 EMC VNXe Series 3.1 Configuring Storage Pools
Table 4 Supported RAID levels (continued)
RAID level Description
four-disk group is approximately two disks (50%). In addition, thisconfiguration is striped to improve I/O performance.
l RAID 1/0 (3+3): A minimum of six disks can be allocated at a time to apool, with three used strictly for mirroring. Three disks out of every six areexact duplicates of the other, and the disk usable disk capacity for everysix-disk group is approximately three disks (50%). In addition, thisconfiguration is striped to improve I/O performance.
l RAID 1/0 (4+4): A minimum of eight disks can be allocated at a time to apool, with four used strictly for mirroring. Four disks out of every eight areexact duplicates of the other, and the disk usable disk capacity for everyeight-disk group is approximately four disks (50%). In addition, thisconfiguration is striped to improve I/O performance.
CAUTION
A failure of a mirrored pair in a RAID 1/0 disk group will render any storage inthe RAID group unavailable until the failed disks are replaced and the data isrestored. This may cause data loss since the last backup of the storage pool.
RAID 5 Best suited for transaction processing and often used for general purposestorage, as well as for relational database and enterprise resource systems.Depending on the disks used, this RAID type can provide a fairly low cost perMB while still retaining redundancy.
RAID 5 stripes data at a block level across several disks and distributes parityamong the disks. No single disk is devoted to parity. Because parity data isdistributed on each disk, read performance can be lower than with other RAIDtypes.
RAID 5 requires all disks but one to be present to operate. If a disk fails, it willreduce storage performance and should be replaced immediately. Data losswill not occur as a result of a single disk failure.
l RAID 5 (4+1): A minimum of five disks can be allocated at a time to eachpool. The usable capacity for every five-disk group is approximately fourdisks (80%).
l RAID 5 (8+1): A minimum of nine disks can be allocated at a time to eachpool. The usable capacity for every nine-disk group is approximatelyeight disks (89%).
l RAID 5 (12+1): (Not for general use) A minimum of 13 disks can beallocated at a time to each pool. The usable capacity for every 13-diskgroup is approximately 12 disks (92%). This configuration should only beused when lower data protection characteristics are acceptable.
CAUTION
A failure of two disks in a RAID 5 disk group will render any storage in theRAID group unavailable until the failed disks are replaced and the data isrestored. This may cause data loss since the last backup of the storage pool.
RAID 6 Best suited for read-biased workloads, such as archiving and backup to disk.
Introduction to storage pools
RAID configurations 11
Table 4 Supported RAID levels (continued)
RAID level Description
RAID 6 is similar to RAID 5, but includes a double parity scheme that isdistributed across different disks and thus offers extremely high fault- anddisk-failure tolerance. RAID 6 also provides block-level striping with paritydata distributed across all disks.
The storage pool will continue to operate even when up to two disks fail.Double parity provides time to rebuild the RAID group, even if another diskfails before the rebuild is complete.
l RAID 6 (6+2): A minimum of eight disks can be allocated at a time toeach pool. The usable capacity for every eight-disk group isapproximately six disks (75%).
l RAID 6 (8+2): A minimum of 10 disks can be allocated at a time to eachpool. The usable capacity for every ten-disk group is approximately eightdisks (80%).
l RAID 6 (10+2): A minimum of 12 disks can be allocated at a time to eachpool. The usable capacity for every 12-disk group is approximately 10disks (83%).
l RAID 6 (14+2): A minimum of 16 disks can be allocated at a time to eachpool. The usable capacity for every sixteen-disk group is approximatelyfourteen disks (88%).
CAUTION
A failure of three disks in a RAID 6 disk group will cause data loss and renderany storage in the RAID group unavailable until the failed disks are replacedand the data is restored. This may cause data loss since the last backup ofthe storage pool.
Mixed RAID configurationsIf FAST VP is installed on the system, you can create a pool with multiple storage tiers.Each tier can have its own RAID type. Only one RAID type can be used within a tier, butthe tier can have different stripe configurations. For example, you can mix RAID 5 (4+1)and RAID5 (8+1) in a tier. To do this:
l Select the Maximum Capacity RAID configuration when you create the pool. Thisconfiguration might mix RAID types in the pool.
l Expand the pool using a different stripe width than currently exists in the pool.
Disk IOPS by RAID typeFront-end application workloads translate into different back-end disk workloads basedon the RAID type in use. For front-end reads, there is no impact by RAID type: 1 front-endread I/O equals 1 back-end read I/O.
The following table shows the impact by RAID type for random front-end writes.
Introduction to storage pools
12 EMC VNXe Series 3.1 Configuring Storage Pools
Table 5 IOPS by RAID type for front-end writes
RAID type IOPS per 1 front-end write I/O
RAID 1/0 2 back-end write I/0s
RAID 5 2 back-end reads and 2 back-end writes
RAID 6 3 back-end reads and 3 back-end writes
Hot Spares (physical deployments only)
Hot spare policyThe storage system uses permanent hot sparing to replace a disk that has failed orfaulted. Any unused disk in the system with the appropriate disk technology and size canbe used to replace a failed or faulted disk in a storage pool. Most of the diskconfigurations require the use of the hot spare, except for the following:
l If the system has only 8 disks in total, and they are of the same type, you mayconfigure RAID 6 (6+2) with no hot spare.
l If the system has only 12 disks in total, and they are of the same type, you mayconfigure RAID 6 (10+2) with no hot spare.
Note
When you create or expand pools for a disk configuration, the system prevents you fromconfiguring all available disks, so as to leave some disks as hot spares.
The hot spare policy follows these rules to determine how many disks are left as spares:
l In general, the system reserves one spare disk for every group of 1-30 disks that havethe same type, capacity, and rotational speed (or Flash type). For example, if thereare 40 300-GB, 15K-RPM SAS disks in the system, the system reserves two of thosedisks as hot spares.
l The system does not reserve a hot spare disk for:
n The FAST Cache.
n A system disk, unless it has user data on it.
l Any unused non-system disk can become a hot spare.
l A system disk that does not contain user data can be a hot spare for a failed systemdisk that has user data.
l A hot spare can be used to replace a failed or faulted disk in the FAST Cache.
l When a hot spare swaps into a pool, it becomes a permanent member of that pooland cannot be used in another pool.
l When a broken disk is fixed, it can be a candidate for a hot spare or used in anotherpool.
Refer to the compatibility and interoperability documentation on the support website fora listing of basic platform and component support for the storage system, includingcapacity limits.
Introduction to storage pools
Hot Spares (physical deployments only) 13
View spare disk details (physical deployments only)Procedure
1. Click Storage > Storage Configuration > Spare Disks.
2. View spare disk information in the following tabs:
l General - Displays the spare disk's status, name, type, and capacity. For physicaldeployments, this tab also displays the rotation speed (or Flash type for Flashdisks).
l Hot Spare Policy (physical deployments only) - For each disk type/capacity/rotational speed or Flash type combination, displays the total number of disks inthe system, number of disks kept unused because of the hot spare policy, andnumber of unused disks that are available for use.
Introduction to storage pools
14 EMC VNXe Series 3.1 Configuring Storage Pools
CHAPTER 2
Configuring storage pools
l Standard pool configuration using Quick Start mode (physical deployments only)............................................................................................................................. 16
l Configure storage pools using Quick Start mode (physical deployments only)....... 17l About configuring custom storage pools for physical deployments........................17l Configure a custom storage pool (physical deployments only)...............................18l Create a storage pool for virtual deployments........................................................19l Automatic snapshot deletion for storage pools......................................................19l Enable automatic snapshot deletion for a storage pool......................................... 19l Expand a storage pool...........................................................................................20l View storage pool contents and space usage........................................................ 20l Monitor storage pool space allocation and usage..................................................20l Delete a storage pool............................................................................................ 21
Configuring storage pools 15
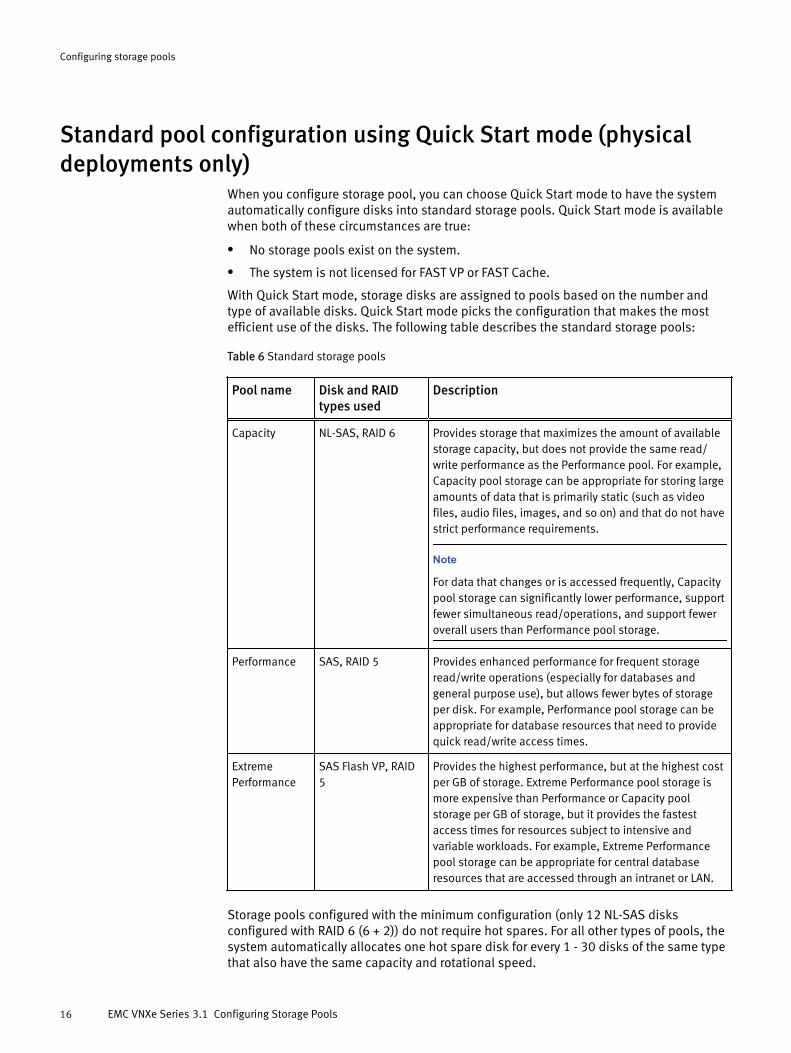
Standard pool configuration using Quick Start mode (physicaldeployments only)
When you configure storage pool, you can choose Quick Start mode to have the systemautomatically configure disks into standard storage pools. Quick Start mode is availablewhen both of these circumstances are true:
l No storage pools exist on the system.
l The system is not licensed for FAST VP or FAST Cache.
With Quick Start mode, storage disks are assigned to pools based on the number andtype of available disks. Quick Start mode picks the configuration that makes the mostefficient use of the disks. The following table describes the standard storage pools:
Table 6 Standard storage pools
Pool name Disk and RAIDtypes used
Description
Capacity NL-SAS, RAID 6 Provides storage that maximizes the amount of availablestorage capacity, but does not provide the same read/write performance as the Performance pool. For example,Capacity pool storage can be appropriate for storing largeamounts of data that is primarily static (such as videofiles, audio files, images, and so on) and that do not havestrict performance requirements.
Note
For data that changes or is accessed frequently, Capacitypool storage can significantly lower performance, supportfewer simultaneous read/operations, and support feweroverall users than Performance pool storage.
Performance SAS, RAID 5 Provides enhanced performance for frequent storageread/write operations (especially for databases andgeneral purpose use), but allows fewer bytes of storageper disk. For example, Performance pool storage can beappropriate for database resources that need to providequick read/write access times.
ExtremePerformance
SAS Flash VP, RAID5
Provides the highest performance, but at the highest costper GB of storage. Extreme Performance pool storage ismore expensive than Performance or Capacity poolstorage per GB of storage, but it provides the fastestaccess times for resources subject to intensive andvariable workloads. For example, Extreme Performancepool storage can be appropriate for central databaseresources that are accessed through an intranet or LAN.
Storage pools configured with the minimum configuration (only 12 NL-SAS disksconfigured with RAID 6 (6 + 2)) do not require hot spares. For all other types of pools, thesystem automatically allocates one hot spare disk for every 1 - 30 disks of the same typethat also have the same capacity and rotational speed.
Configuring storage pools
16 EMC VNXe Series 3.1 Configuring Storage Pools
Configure storage pools using Quick Start mode (physicaldeployments only)
Use the Storage Pool Wizard to configure a storage pool. You can launch this wizard fromthe Unisphere Configuration wizard by clicking Create Storage Pools in the DiskConfiguration step. You can also launch this wizard by clicking Storage > Storage Poolsand then clicking Create.Quick Start mode is available when both of these circumstances are true:
l No pools exist on the system.
l The system is not licensed for FAST VP or FAST Cache.
To configure storage pools using Quick Start mode:
Procedure
1. From the Storage Pool Wizard, select Quick Start, and then click Next.
If a proposed pool mixes rotational speeds or Flash disk types, the wizard displays awarning for that pool. Using a pool that mixes rotational speeds can lowerperformance. It is recommended that you create a custom pool, if you need to create apool that mixes rotational speeds or Flash disk types.
The wizard displays a Summary page that contains the proposed pool configuration.Click the right arrow in the pool description to display additional information aboutthe pool.
2. Click Finish to accept the proposed configuration or Back to select anotherconfiguration mode.
Note
Once you create a pool, you cannot reconfigure the pool's disks without deleting thestorage resources configured in the pool and the pool itself. However, you can adddisks to expand the pool.
About configuring custom storage pools for physicaldeployments
When you configure storage pools with the Storage Pool Wizard, you can configurecustom storage pools based on the storage characteristics associated with available disktypes. Configure a custom pool for physical deployments by specifying the followinginformation:
l RAID configuration for each tier. You can use the default RAID configuration, select anon-default RAID configuration, or select the Maximum Capacity option. Selecting theMaximum Capacity option enables the system to achieve a more efficient use ofdisks. The system can mix stripe widths to achieve this efficiency.
l Number and type of disks to use in the pool. If the FAST VP license is installed, andthe system has multiple disk types, such as SAS and NL-SAS, you can create a multi-tier pool.
l Enable the pool to use the FAST Cache, if the FAST Cache license is installed and thesystem has available SAS Flash disks to support the FAST Cache.
Configuring storage pools
Configure storage pools using Quick Start mode (physical deployments only) 17

Note
Once you create a pool, you cannot reconfigure the pool's disks without deleting thestorage resources configured in the pool and the pool itself. However, you can add disksto expand the pool.
Configure a custom storage pool (physical deployments only)Procedure
1. Launch the Storage Pool Wizard in one of these ways:
l Click Storage > Storage Configuration > Storage Pools, and then click Create.
l In the Configuration Wizard, click Create Storage Pools in the Disk Configurationstep.
2. If the Select Configuration Mode step appears, select Custom.
This step appears only if no pools exist on the system, and the system is not licensedfor FAST VP or FAST Cache.
3. Enter the pool name and optionally, the pool description, and click Next. The poolname can contain up to 63 characters. It cannot contain forward slash (/) or anycontrol characters. It must also not start with period (.) or tilde (~) characters.
The wizard displays the available storage tiers.
4. Select one or more storage tiers to use for the pool. You can only select multiplestorage tiers if the system is licensed to use FAST VP.
The wizard displays the default RAID configuration for the selected tiers.
5. Optionally, change the RAID configuration for the selected tiers. For each tier you wantto change:
l Click the Change link next to the tier name.
l Select a new RAID configuration, and click OK.
6. When the RAID configurations are configured as you like, click Next.
The wizard displays the number and types of disks you can choose based on the RAIDconfiguration and hot spare policy.
7. Select the number and type of disks to include in the pool, and click Next.
l If the FAST Cache exists on the system, the wizard displays the FAST Cache pageand asks if you want the new pool to use the FAST Cache.
l If the FAST Cache does not exist on the system, go to Click Finish to create thepool. on page 18.
8. Click Next to use the FAST Cache for the pool. If you do not want to use the FASTCache, select No, and then click Next.
9. Click Finish to create the pool.
10. Optionally, click Create Another Storage Pool to create another pool.
Note
Once you create a pool, you cannot reconfigure the pool's disks without deleting thestorage resources configured in the pool and the pool itself. However, you can adddisks to expand the pool.
Configuring storage pools
18 EMC VNXe Series 3.1 Configuring Storage Pools
Create a storage pool for virtual deploymentsProcedure
1. Launch the Storage Pool Wizard in one of these ways:
l Click Storage > Storage Configuration > Storage Pools, and then click Create.
l In the Configuration Wizard, click Create Storage Pools in the Disk Configurationstep.
2. Enter the pool name and optionally, the pool description, and click Next. The poolname can contain up to 63 characters. It cannot contain forward slash (/) or anycontrol characters. It must also not start with period (.) or tilde (~) characters.
The wizard displays the available virtual disks and their associated tiers.
3. Select one or more virtual disks to use in the pool, and click Next. When you select avirtual disk, you must also select its associated tier, based on the disk's underlyingcharacteristics. (See your storage administrator for this information.) The selectedvirtual disks must be in the same tier, so selecting a tier for one disk associates thattier with all available disks.
4. Click Finish to create the pool.
5. Optionally, click Create Another Storage Pool to create another pool.
Note
Once you create a pool, you cannot reconfigure the pool's disks without deleting thestorage resources configured in the pool and the pool itself. However, you can adddisks to expand the pool.
Automatic snapshot deletion for storage poolsAutomatic snapshot deletion for storage pools is a space management feature used toautomatically manage the number of snapshots in a pool. Automatic snapshot deletionapplies to pool snapshots, individual snapshots groups of snapshots on a LUN group,and snapshot schedule rules.
You can set automatic snapshot deletion to occur when the total pool space reaches aspecified threshold, total snapshot space reaches a specified threshold, or both. You canalso set an expiration date and time for snapshots. If deleting expired snapshots doesnot satisfy the thresholds, the system deletes the oldest, unattached snapshots with theauto-delete function enabled.
Enable automatic snapshot deletion for a storage poolProcedure
1. Click Storage > Storage Configuration > Storage Pools.
2. Select a storage pool, and click Details.
3. Click the Settings tab.
4. In the automatic deletion section, select whether you want the automatic deletion tooccur when the total pool space reaches a threshold you set, total snapshot spacereaches a threshold you set, or both. For each option, you can also set the thresholdwhen the automatic snapshot deletion stops. When you create a pool, the automatic
Configuring storage pools
Create a storage pool for virtual deployments 19
deletion values are set by default. You cannot change this during the pool creation. Ifyou clear both boxes, you disable automatic deletion for the pool, but you can stilluse an expiration value.
5. Click Apply.
Expand a storage poolYou expand a storage pool by adding disks to the pool:
Procedure
1. Click Storage > Storage Configuration > Storage Pools.
2. Select a storage pool, and click Expand.
3. For physical deployments, follow these steps:
a. Optionally, change the RAID characteristics of each selected tier. If you are addinga new tier to the storage pool, you can select a different RAID configuration for thedisks in the tier. If you are adding disks to an existing tier, you can change thestripe width, but not the RAID type of the new disks.
For each tier you want to change, click the Change link next to the tier name. Thenselect the new RAID type (if applicable), stripe width, or both, and click OK
b. When the RAID configurations are configured as you like, click Next.
4. For virtual deployments, select the virtual disks you want to add, and click Next. Youcan only add virtual disks that have the same tier as the existing disks in the pool.
5. In the Select Amount of Storage step, select the number and type of disks to add, andclick Next.
6. Verify the information shown on the Summary page, and click Finish to expand thepool.
View storage pool contents and space usageProcedure
1. Click Storage > Storage Configuration> Storage Pools.
2. Select a storage pool from the list and click Details.
3. Click on the Storage Resources tab.
The system lists the storage resources and NAS servers in the storage pool. For eachresource, it displays the following information:
l Snapshot Size - Total pool space used by snapshots of the resource (notapplicable to NAS servers).
l Total Pool Size Used - Total pool space by the resource, including space used forprimary data, snapshots, and metadata.
Monitor storage pool space allocation and usageProcedure
1. Click Storage > Storage Configuration > Storage Pools.
2. Select a pool from the list, and click Details.
Configuring storage pools
20 EMC VNXe Series 3.1 Configuring Storage Pools
3. Click the Utilization tab to view the following information:
l Quantity of used space, snapshot size used, available space, and total space forthe pool.
l Subscription amount, which is the percentage of the pool's total space that hasbeen requested by its associated storage resources. When this value is over100%, the pool is oversubscribed.
l Alert threshold, which is the percentage of storage allocation at which Unispheregenerates notifications about the amount of space remaining in the pool. Drag theslider to set the value between 50% and 84%.
l Disk type
l Number of disks within each tier.
l Total and available space for each tier.
Delete a storage poolYou can delete storage pools if they contain no allocated storage resources, includingLUN groups, LUNs, file systems, VMware datastores, or NAS servers.To delete a pool:
Procedure
1. Click Storage > Storage Configuration > Storage Pools.
2. Select the storage pool you want to delete, and click Delete.
Configuring storage pools
Delete a storage pool 21
Configuring storage pools
22 EMC VNXe Series 3.1 Configuring Storage Pools
CHAPTER 3
Using the FAST Cache (physical deploymentsonly)
l About the FAST Cache ...........................................................................................24l FAST Cache best practices.....................................................................................25l Create the FAST Cache ..........................................................................................25l Enable the FAST Cache for a storage pool ............................................................. 25l View-system level FAST Cache information ........................................................... 26l View pool-level FAST Cache information ............................................................... 26l Delete the FAST Cache .......................................................................................... 26
Using the FAST Cache (physical deployments only) 23
About the FAST CacheThe FAST Cache is a large capacity secondary cache that uses SAS Flash disks to improvesystem performance by extending the storage system's existing caching capacity. Youcan configure individual storage pools to use the FAST Cache. When you do this, allstorage resources created in those pools will use the FAST Cache.
The FAST Cache provides the following benefits:
l Improved Total Cost of Ownership (TCO)The FAST Cache reduces the number of disk spindles needed for a given level ofperformance and allows you to replace high performance disks with more economicaloptions. This is possible because the load on back-end hard drives is reduced.Because the FAST Cache copies the busy subsets of large storage capacities in 64 KBdata chunks to Flash disks, the busiest areas of many LUNs or file systems use asmall set of Flash disks. This allows a large set of slower, less expensive disks todeliver the performance typically provided by faster, more expensive disks. Over aperiod of time, pools with faster SAS disks can be replaced by new pools with slowerNL-SAS disks, while maintaining the same application performance. This improvesthe financial (IOPS/dollar) and power (IOPS/KWH) efficiency of the storage system.
l Reduced complexityAt a system level, the FAST Cache helps make the most efficient use of Flash diskcapacity. The FAST Cache does this by using Flash disks for the most frequentlyaccessed data in the storage system instead of dedicating Flash disks to a particularapplication. It adjusts to a hot spot anywhere in the storage system, so that you donot need to analyze specific application requirements. It provides better performanceto all applications in the storage system while using fewer Flash disks.
l Highly scalable cache capacityThe FAST Cache can scale up to a larger capacity than the maximum DRAM Cachecapacity. This larger cache capacity means that all or a higher percentage of acustomers working set can be promoted into the better performing FAST Cache. Theworking set is the most active part of an application.
FAST Cache disk configurationsThe FAST Cache is configured in RAID 1 pairs, and uses one of the following diskconfigurations:
Table 7 Disk configuration options
Disk quantity Disk size FAST Cache capacity
2 100 GB 100 GB
4 100 GB 200 GB
6 100 GB 300 GB
8 100 GB 400 GB
2 200 GB 200 GB
4 200 GB 400 GB
You cannot mix disk types or sizes in the FAST Cache or expand capacity dynamically. Toexpand the capacity, delete the current configuration, and create a new FAST Cacheconfiguration.
Using the FAST Cache (physical deployments only)
24 EMC VNXe Series 3.1 Configuring Storage Pools

Note
Deleting the FAST Cache can impact system performance and the performance of storagepools currently using the FAST Cache. The FAST Cache deletion process can take a longtime, because it has to flush all of the cache data to the storage pool disks.
FAST Cache best practicesUse the FAST Cache under the following circumstances:
l Large working sets of data must be stored and read, accessed frequently, and readilyavailable. Regular (MCC) storage is not suitable for this type of data, because it issmaller and frequently flushed.
l The system has enough disks for both data storage and performance improvement.
For example, use the FAST Cache if the system has enough SAS Flash disks, is active withdaily read/write transactions of big blocks of data, and is not used as stored long termstorage for archival purposes that would be accessed on a weekly or monthly basis.
Avoid using the FAST Cache for data that is sequential or that uses large-block I/O. Forexample, do not use the FAST Cache for database logs or circular logs, since their data issequential.
Create the FAST CacheBefore you begin
To create the FAST Cache, the FAST Cache license must be installed on the system, andthe system must have at least two available 100-GB SAS Flash disks or two 200-GB SASFlash disks.
Procedure
1. Click Storage > Storage Configuration > FAST Cache.
2. Click Create to launch the FAST Cache Wizard.
The wizard displays the number and size of the SAS Flash disks you can use for theFAST Cache. The numbers are based on the number of available SAS Flash disks, hotspare policy, and system limits.
3. Optionally, select No if you do not want the FAST Cache enabled on all existingstorage pools. If you choose No, you can enable the FAST Cache on an existing poollater by accessing the Settings tab on the details page for that pool.
4. Click Next.
The wizard displays the FAST Cache configuration information.
5. Optionally, click the right arrow to see more configuration details.
6. Click Finish to accept the settings and create the FAST Cache.
Enable the FAST Cache for a storage poolProcedure
1. Click Storage > Storage Configuration > Storage Pools.
2. Select the storage pool for which you want to enable the FAST Cache, and clickDetails.
Using the FAST Cache (physical deployments only)
FAST Cache best practices 25
3. Click the Settings tab.
4. Select Allow this pool to use the FAST Cache.
5. Click Apply.
View-system level FAST Cache informationProcedure
1. Click Storage > Storage Configuration > FAST Cache.
2. View information in the following tabs:
l General - Displays the FAST Cache status, total amount of space allocated to theFAST cache, and number of disks in the FAST Cache.
l Disks - Displays the status, name, and capacity of each disk in the FAST Cache.
View pool-level FAST Cache informationAt the pool level, you can verify whether a specific pool is using the FAST Cache.
To view pool-level FAST Cache information:
Procedure
1. Click Storage > Storage Configuration > Storage Pools.
2. Select a storage pool from the list, and click Details.
3. Click the Settings tab to verify whether the FAST Cache is enabled for the storagepool.
Delete the FAST CacheProcedure
1. Click Storage > Storage Configuration > FAST Cache.
2. In the General tab, click Delete to delete the FAST Cache.
3. Click Yes on the confirmation message.
Note
Deleting the FAST Cache can impact system performance and the performance ofstorage pools currently using the FAST Cache. The FAST Cache deletion process cantake a long time, because it has to flush all of the cache data to the storage pooldisks.
Using the FAST Cache (physical deployments only)
26 EMC VNXe Series 3.1 Configuring Storage Pools
CHAPTER 4
Using FAST VP
l About FAST VP ...................................................................................................... 28l Data relocation with FAST VP ................................................................................ 28l FAST VP tiering policy ........................................................................................... 29l Best practices for configuring storage tiers............................................................ 30l Enable scheduled data relocations at the system level ......................................... 30l Modify the data relocation schedule .....................................................................31l Stop a storage pool from participating in scheduled data relocations ................... 31l Manually initiate or stop data relocations for a storage pool ................................. 31l Pause or resume data relocations for all storage pools ......................................... 32l View storage pool tier information.........................................................................32l View system level data relocation information ...................................................... 33l View data relocation information for a storage pool .............................................. 33
Using FAST VP 27
About FAST VPFully Automated Storage Tiering for Virtual Pools (FAST VP) enables the system to retainthe most frequently accessed or important data on fast, high-performance disks andmove the less frequently accessed and less important data to lower-performance, cost-effective disks. FAST VP does the following for storage pools:
l Monitors the usage of the data in a tiered pool. Tiered pools are heterogeneous poolsthat are configured with multiple classes of disks (Flash plus SAS and/or NL-SAS).
l Depending on the tiering policy, uses the monitoring statistics to automaticallyrelocate data chunks, at 256 MB granularity, to other tiers within the pool. Forexample, the Start High then Auto-Tier policy relocates data to the storage tier that isbest suited for that data, based on relative activity.
l Performs load balancing across the disks in tiered and non-tiered pools.
FAST VP is an automated feature that optimizes disk utilization. It requires very littlemanual intervention.
Note
To configure and use the FAST VP feature, the FAST VP license must be installed on thesystem.
The data relocation performed by FAST VP can help you achieve the following benefits:
l Increased performanceIn some cases, you can double performance throughput by adding less than 10percent of a pool's total capacity in Flash disks.
l Reduced Total Cost of Ownership (TCO)Using a combination of NL-SAS, SAS, and Flash disks instead of all SAS disks enablesyou to address performance requirements and still reduce the disk count. In somecases, you can achieve up to a two-thirds reduction in disk count by using FAST VP.
Data relocation with FAST VPData relocation (also called auto-tiering) is the process by which the system relocatesdata to another tier within the same pool and rebalances data within a tier to achievemaximum pool performance gain. Data relocation can be scheduled or manually initiated.
The data relocation process does the following:
l Relocates the most active data up to the highest available tier.
l Relocates the least active data to lower tiers, as needed to free up space for moreactive data in the higher tiers.
l Rebalances data within a tier.
Scheduled data relocationScheduled data relocation is enabled for all storage pools by default when FAST VP isinstalled on your system. The system performs scheduled data relocations for poolsparticipating in the automatic data relocation schedule. By default, the data relocationwindow is every day from 22:00 to 6:00 (UTC time) the next day. The specified datarelocation times provide the window of time in which data relocations occur on anongoing basis, if the system determines the relocations are needed.
You can do the following to configure scheduled data relocations:
Using FAST VP
28 EMC VNXe Series 3.1 Configuring Storage Pools
l Disable or re-enable scheduled data relocations for the system.
l Change the days on which data relocation occurs and the data relocation windowstart time and end time for each scheduled day.
l Configure individual storage pools to participate in scheduled data relocations.
l Pause all scheduled data relocations. (This action also pauses manual datarelocations that are currently in progress.)
l Resume all scheduled data relocations (This action also resumes paused manualdata relocations whose specified end times have not expired.)
Note
The system rebalances data within a tier automatically when a pool tier is expanded.
Manual data relocationYou can manually initiate data relocations for individual storage pools. When you start amanual data relocation, you specify a data relocation rate and an end time for the datarelocation operation.
You can do the following to control manual data relocations:
l Start or stop a manual data relocation.
l Pause manual relocations that are currently in progress. This action also pauses allscheduled data relocations.
l Resume paused manual relocations whose end times are not over. This action alsoresumes all scheduled data relocations.
FAST VP tiering policyThe following table describes the FAST VP tiering policy settings, which are defined at thedata-resource level. This policy defines both the initial tier placement and the ongoingautomated tiering of data during data relocation operations.
Table 8 FAST VP tiering policy settings
Tiering policy Corresponding initialtier placement
Description
Start High thenAuto-Tier(default)
Highest available tier Recommended setting. Sets the initial dataplacement to the highest-performing disks withavailable space, and then relocates portions of thestorage resource's data based on I/O activity.
Auto-Tier Optimize for poolperformance
Sets the initial data placement to an optimum,system-determined setting, and then relocatesportions of the storage resource's data based on thestorage resource's performance statistics such thatdata is relocated among tiers according to I/Oactivity.
HighestAvailable Tier
Highest available tier Sets the initial data placement and subsequent datarelocation (if applicable) to the highest-performingdisks with available space.
Using FAST VP
FAST VP tiering policy 29
Table 8 FAST VP tiering policy settings (continued)
Tiering policy Corresponding initialtier placement
Description
LowestAvailable Tier
Lowest available tier Sets the initial data placement and subsequent datarelocation (if applicable) to the most cost-effectivedisks with available space.
No DataMovement
Based on the previousFAST VP policy used
Prevents any ongoing data movement for theassociated storage resource. The current initialplacement of data is retained. Only available afterthe storage resource is created.
Best practices for configuring storage tiersThe number of tiers required in a storage pool is influenced by performancerequirements, capacity requirements, and the knowledge of the skew between active andinactive capacity. (Skew is when a small percentage of the total storage capacity in astorage system is the target for the majority of the IOPS served by the system.) Bestperformance is achieved when the entire active dataset can be contained within thecapacity of the Extreme Performance (Flash) and Performance (SAS) tiers.
If the skew is known, the capacity per tier should be sized accordingly. Otherwise, followthese general guidelines for configuring storage tiers:
l When the FAST Cache is available, use a 2-tier pool comprised of SAS and NL-SASdisks. Enabling the FAST Cache as a cost-effective way of realizing Flash performancewithout dedicating Flash to the pool. You can add a Flash tier later if the FAST Cachedoes not fully capture the active data.
l Using a 2-tier pool comprised of Flash disks and SAS disks as an effective way toprovide consistently good performance. You can add NL-SAS disks later on, if there isuncertainty about the active data fitting in the Flash tier. Avoid using a 2-tier pool ofFlash and NL-SAS if there is uncertainty about the active data fitting in the flash tier.
l For a 3-tier pool, start with 5% Flash, 20% SAS, and 75% NL-SAS. This works on theassumption that less than 25% of the used capacity will be active and relocationsfrom the lowest tier will be infrequent. You can expand the tiers later, if needed.
l The Performance tier provides a buffer for active data not captured in the Flash tier. Itprovides modest performance, as well as a quicker promotion to Flash whenrelocations occur.
l Add a Flash tier to a pool with thin LUNs so that metadata is promoted to Flash disks.This improves overall performance.
Enable scheduled data relocations at the system levelWhen you enable scheduled data relocations at the system level, storage pools that havescheduled data relocations enabled at the pool level will participate in scheduled datarelocations. Scheduled data relocation functionality is enabled at the system and poollevels by default.To enable scheduled data relocations at the system level:
Using FAST VP
30 EMC VNXe Series 3.1 Configuring Storage Pools
Procedure
1. Click Settings > Data Efficiency Settings.
2. On the General tab, select Enable Scheduled Relocations.
3. On the Schedule tab, view the schedule, and optionally, modify it.
4. Click Apply.
Modify the data relocation scheduleModifying the data relocation schedule changes the schedule for all storage pools thatparticipate in scheduled data relocations. If you change the data relocation schedulewhen a data relocation is taking place, the system will complete the data relocation.To modify the data relocation schedule:
Procedure
1. Click Settings > Data Efficiency Settings.
2. Click the Schedule tab to view the current data relocation schedule.
3. Change the selected days, start time, and end time, as appropriate.
4. Click Apply.
Stop a storage pool from participating in scheduled datarelocations
To stop a storage pool from participating in scheduled data relocations:
Procedure
1. Click Storage > Storage Configuration > Storage Pools.
2. Select the storage pool that you want to stop from participating in scheduled datarelocations, and click Details.
3. Click on the Fast VP tab.
4. Clear the Include this pool in scheduled relocations checkbox.
5. Click Apply.
Manually initiate or stop data relocations for a storage poolIf a FAST VP license is installed on the system, you can manually initiate or stop datarelocations for storage pools.
Procedure
1. Click Storage > Storage Configuration > Storage Pools.
2. Select the storage pool for which you want to initiate or stop data relocations, andclick Details.
3. Click on the FAST VP tab.
4. Do either of the following:
l To start data relocations for the pool, choose Start Data Relocation, and select therate and end time for the data relocation. A data relocation rate of Low has theleast impact on system performance, Medium (the default) has a moderate impacton system performance, and High has the most impact on system performance.
Using FAST VP
Modify the data relocation schedule 31
l To stop data relocations, choose Stop Data Relocation. This stops all datarelocations for the pool, including manually initiated data relocations that arecurrently in progress and scheduled data relocations.
Pause or resume data relocations for all storage poolsPausing data relocations stops all scheduled data relocations as well as manual datarelocations that are in progress. Resuming data relocations restarts these datarelocations.
Procedure
1. Select Settings > Data Efficiency Settings.
2. Do either of the following:
l To pause data relocations for all pools, click Pause Data Relocation, and then clickYes on the confirmation dialog.
l To resume data relocations for all pools, click Resume Data Relocation, and thenclick Yes on the confirmation dialog.
Note
If the end time for a paused data relocation occurs before data relocations areresumed, the data relocation will not resume until the next schduled relocationtime.
View storage pool tier informationProcedure
1. Click Storage > Storage Configuration > Storage Pools.
2. Select a storage pool from the list and click Details.
3. Click one of the following tabs to view the storage pool tier information:
Tab Description
General Describes the disk types and RAID configuration for each tier.Click the arrows next to the disk types to view additional disktype and RAID configuration information.
Utilization Displays the following tier-level information:
l Disk type
l Number of disks within each tier.
l Total and available space for each tier.
FAST VP (physicaldeployments only)
The lower part of the screen shows the following tier-levelinformation:
l Amount of data within each tier to relocate and rebalance.
l Total and available space for each tier.
Using FAST VP
32 EMC VNXe Series 3.1 Configuring Storage Pools
View system level data relocation informationProcedure
1. Click Settings > Data Efficiency Settings.
The General tab shows the following information:
l Whether scheduled relocations are enabled for the system.
l Amount of data scheduled to move to higher and lower tiers.
l Amount of data scheduled to be rebalanced within a tier.
l Estimated data relocation time for scheduled data relocations.
l Data relocation rate. Low has the least impact on system performance, Medium(the default) has a moderate impact on system performance, and High has themost impact on system performance.
2. Click the Schedule tab to view or modify the data relocation schedule.
View data relocation information for a storage poolData relocation is enabled for all storage pools by default when a FAST VP license isinstalled on the system.To view data relocation information for a storage pool:
Procedure
1. Click Storage > Storage Configuration > Storage Pools.
2. Select a storage pool, and click Details.
3. Click the Fast VP tab.
The system displays pool-specific storage tier information, including:
l Data relocation state.
l Data relocation start and end times.
l Estimated time for the data relocation.
l Amount of data relocated. For an active data relocation session, this is the amountof data relocated so far in the relocation process. For a completed data relocationsession, this is the total amount of data relocated during the last relocationsession.
l Amount of data to relocate.
You can use this tab to include or exclude the pool from participating in scheduleddata relocations.
4. Optionally, click FAST VP Settings to view the system-wide data relocation scheduleon the Schedule tab of the FAST VP Settings page.
Using FAST VP
View system level data relocation information 33

Using FAST VP
34 EMC VNXe Series 3.1 Configuring Storage Pools
CHAPTER 5
Configuring storage pools using the CLI
l Configure storage pools automatically (physical deployments only)...................... 36l Configure custom storage pools............................................................................ 38l Manage storage pool tiers..................................................................................... 50l Manage FAST Cache (physical deployments only)..................................................52l Manage FAST VP general settings.......................................................................... 54l Manage FAST VP pool settings...............................................................................57l View storage pool resources..................................................................................61l View storage profiles (physical deployments only)................................................ 63l Manage disk groups (physical deployments only)................................................. 65l The show action command....................................................................................67
Configuring storage pools using the CLI 35
Configure storage pools automatically (physical deploymentsonly)
Storage pools are the groups of disks, called disk groups, on which you create storageresources. The system can automatically configure storage pools by selecting theappropriate disk groups based on the type and availability of disks in the system. Configure custom storage pools on page 38 explains how to configure custom storagepools.
Note
Before you create storage resources, you must configure at least one storage pool.
The following table lists the attributes for automatic pool configuration.
Table 9 Automatic pool configuration attributes
Attribute Description
Target Type of disk configuration. Value is one of the following:
l pool - Disks configured in a pool.
l spares - Disks assigned to storage pools as spares. The number of spares
assigned to a pool is dependent on the disk type and pool type:
n For Capacity pools, no spare disks are assigned.
n For Performance pools, a spare disk is assigned for the first 0-30 disks,and then another spare disk is assigned for every group of thirty disksafter that.
n For Flash pools, a spare disk is assigned for the first 0-30 disks, andthen another spare disk is assigned for every group of thirty disks afterthat.
Name Name of the pool. The system allocates disks to one or more of the followingpools based on the types and characteristics of the disks on the system:
l Capacity - Storage allocated from near-line (NL) serial attached SCSI
(SAS) disks. Provides high-capacity storage, but with lower overallperformance to regular SAS and Enterprise Flash Drive (EFD) disks. Use NLSAS disks to provide extremely economical storage for operations, such asdata backup, that do not require high I/O performance.
l Performance - Storage allocated from serial attached SCSI (SAS) disks.
Provides medium performance and medium capacity storage forapplications that require balance of performance and capacity.
l Flash - Storage allocated from EFD disks. Extremely high level
performance, but at a relatively high cost per GB of storage. EFDs are mostapplicable to applications that require high I/O performance and energyefficiency.
Depending on the pool type, the system configures the disks into different RAIDgroups and assigns disks to pools as spares. The Unisphere online helpprovides more details about storage pools and spares.
Configuring storage pools using the CLI
36 EMC VNXe Series 3.1 Configuring Storage Pools
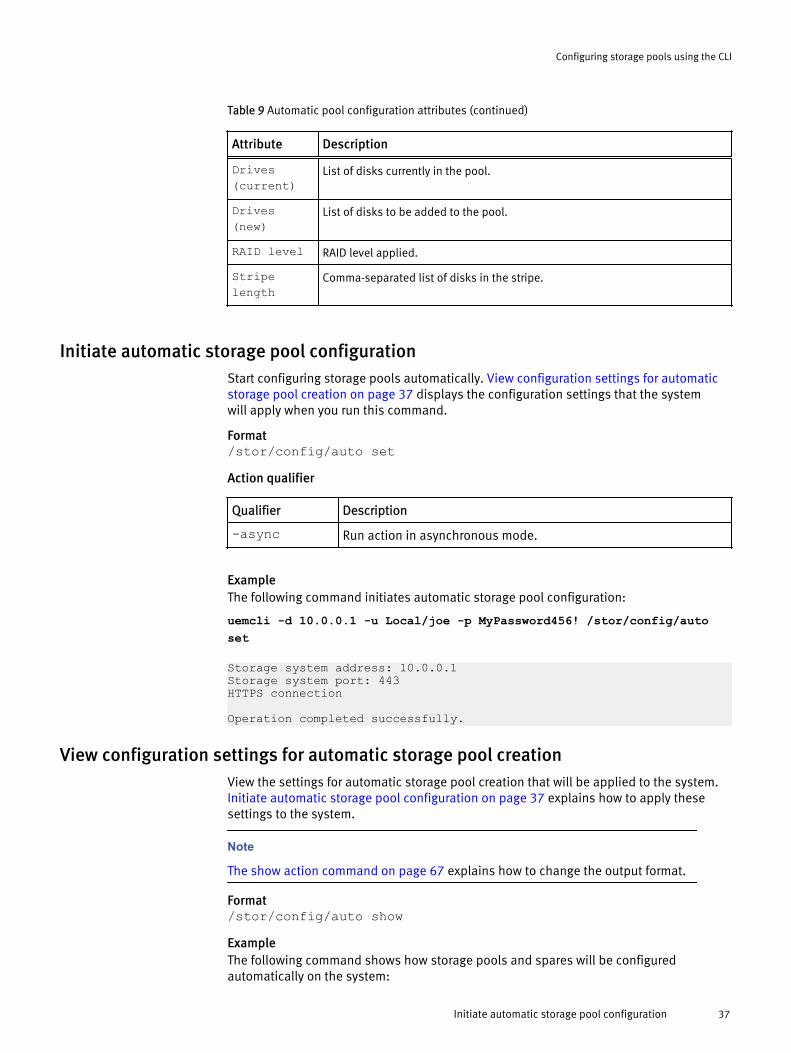
Table 9 Automatic pool configuration attributes (continued)
Attribute Description
Drives(current)
List of disks currently in the pool.
Drives(new)
List of disks to be added to the pool.
RAID level RAID level applied.
Stripelength
Comma-separated list of disks in the stripe.
Initiate automatic storage pool configurationStart configuring storage pools automatically. View configuration settings for automaticstorage pool creation on page 37 displays the configuration settings that the systemwill apply when you run this command.
Format/stor/config/auto setAction qualifier
Qualifier Description
-async Run action in asynchronous mode.
ExampleThe following command initiates automatic storage pool configuration:
uemcli -d 10.0.0.1 -u Local/joe -p MyPassword456! /stor/config/autoset
Storage system address: 10.0.0.1Storage system port: 443HTTPS connection
Operation completed successfully.
View configuration settings for automatic storage pool creationView the settings for automatic storage pool creation that will be applied to the system. Initiate automatic storage pool configuration on page 37 explains how to apply thesesettings to the system.
Note
The show action command on page 67 explains how to change the output format.
Format/stor/config/auto showExampleThe following command shows how storage pools and spares will be configuredautomatically on the system:
Configuring storage pools using the CLI
Initiate automatic storage pool configuration 37

uemcli -d 10.0.0.1 -u Local/joe -p MyPassword456! /stor/config/autoshow
Storage system address: 10.0.0.1Storage system port: 443HTTPS connection
1: Target = Pool Name = Performance Drives (current) = 5 x 600GB SAS; 5 x 300GB SAS Drives (new) = 5 x 600GB SAS RAID level = 5 Stripe length = 5,9
2: Target = Pool Name = Capacity Drives (current) = 10 x 1TB NL-SAS Drives (new) = 2 x 1TB NL SAS RAID level = 5 Stripe length = 5,9
3: Target = Pool Name = Extreme Performance Drives (current) = 10 x 100GB EFD Drives (new) = 10 x 100GB EFD RAID level = 1 Stripe length = 2
4: Target = Spares Name = Unused / Hot Spare Candidates Drives (current) = 1 x 600GB SAS; 1 x 300GB SAS; 1 x 1TB NL SAS Drives (new) = 1 x 100GB EFD RAID level = Stripe length =
Configure custom storage poolsStorage pools are the groups of disks on which you create storage resources. Configurestorage pools based on the type of storage resource and usage that will be associatedwith the pool, such as file system storage optimized for database usage. The storagecharacteristics differ according to the following:
l Type of disk used to provide the storage.
l RAID level implemented for the storage.
Note
Before you create storage resources, you must configure at least one storage pool.
Configure storage pools automatically (physical deployments only) on page 36 explainshow to have the system configure storage pools automatically.
The following table lists the attributes for storage pools:
Table 10 Custom storage pool attributes
Attribute Description
ID ID of the storage pool.
Name Name of the storage pool.
Description Brief description of the storage pool.
Configuring storage pools using the CLI
38 EMC VNXe Series 3.1 Configuring Storage Pools
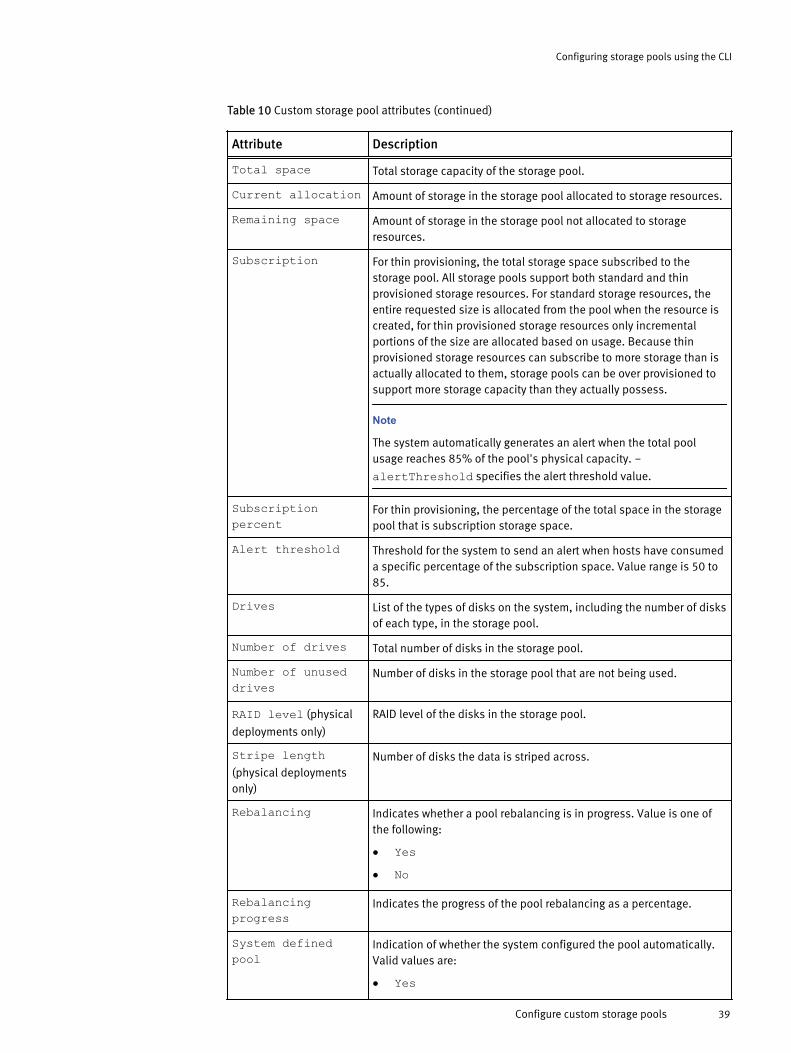
Table 10 Custom storage pool attributes (continued)
Attribute Description
Total space Total storage capacity of the storage pool.
Current allocation Amount of storage in the storage pool allocated to storage resources.
Remaining space Amount of storage in the storage pool not allocated to storageresources.
Subscription For thin provisioning, the total storage space subscribed to thestorage pool. All storage pools support both standard and thinprovisioned storage resources. For standard storage resources, theentire requested size is allocated from the pool when the resource iscreated, for thin provisioned storage resources only incrementalportions of the size are allocated based on usage. Because thinprovisioned storage resources can subscribe to more storage than isactually allocated to them, storage pools can be over provisioned tosupport more storage capacity than they actually possess.
Note
The system automatically generates an alert when the total poolusage reaches 85% of the pool's physical capacity. -alertThreshold specifies the alert threshold value.
Subscriptionpercent
For thin provisioning, the percentage of the total space in the storagepool that is subscription storage space.
Alert threshold Threshold for the system to send an alert when hosts have consumeda specific percentage of the subscription space. Value range is 50 to85.
Drives List of the types of disks on the system, including the number of disksof each type, in the storage pool.
Number of drives Total number of disks in the storage pool.
Number of unuseddrives
Number of disks in the storage pool that are not being used.
RAID level (physical
deployments only)
RAID level of the disks in the storage pool.
Stripe length(physical deploymentsonly)
Number of disks the data is striped across.
Rebalancing Indicates whether a pool rebalancing is in progress. Value is one ofthe following:
l Yesl No
Rebalancingprogress
Indicates the progress of the pool rebalancing as a percentage.
System definedpool
Indication of whether the system configured the pool automatically.Valid values are:
l Yes
Configuring storage pools using the CLI
Configure custom storage pools 39
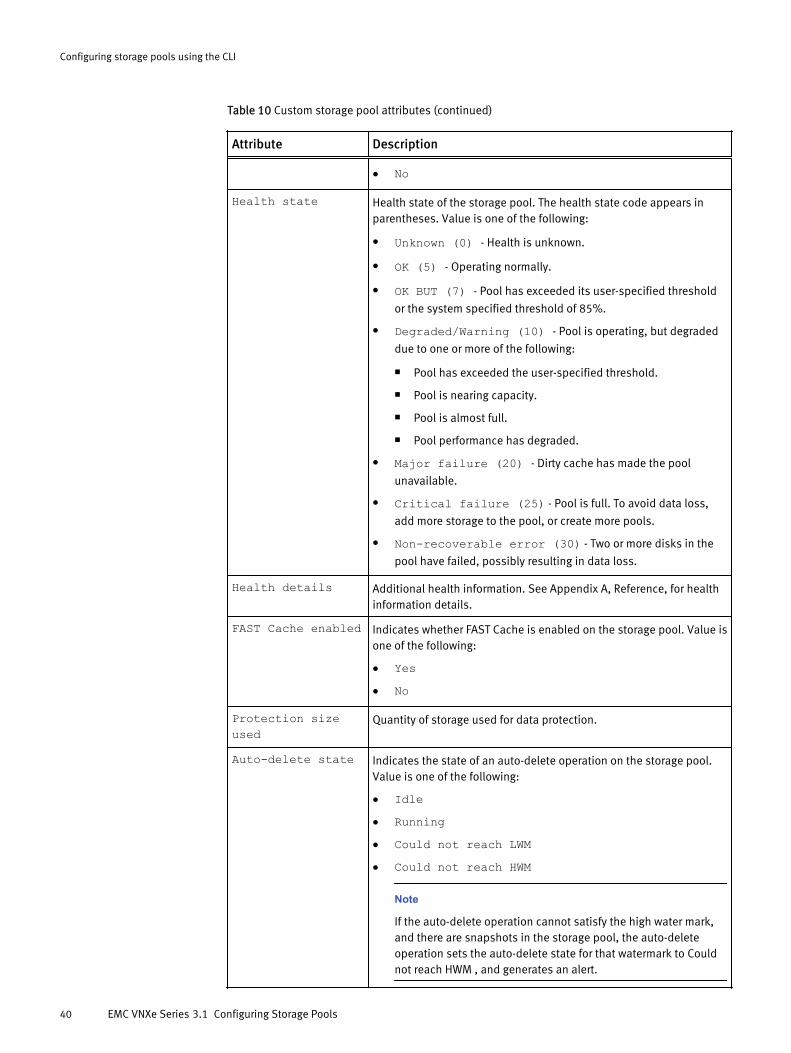
Table 10 Custom storage pool attributes (continued)
Attribute Description
l No
Health state Health state of the storage pool. The health state code appears inparentheses. Value is one of the following:
l Unknown (0) - Health is unknown.
l OK (5) - Operating normally.
l OK BUT (7) - Pool has exceeded its user-specified threshold
or the system specified threshold of 85%.
l Degraded/Warning (10) - Pool is operating, but degraded
due to one or more of the following:
n Pool has exceeded the user-specified threshold.
n Pool is nearing capacity.
n Pool is almost full.
n Pool performance has degraded.
l Major failure (20) - Dirty cache has made the pool
unavailable.
l Critical failure (25) - Pool is full. To avoid data loss,
add more storage to the pool, or create more pools.
l Non-recoverable error (30) - Two or more disks in the
pool have failed, possibly resulting in data loss.
Health details Additional health information. See Appendix A, Reference, for healthinformation details.
FAST Cache enabled Indicates whether FAST Cache is enabled on the storage pool. Value isone of the following:
l Yesl No
Protection sizeused
Quantity of storage used for data protection.
Auto-delete state Indicates the state of an auto-delete operation on the storage pool.Value is one of the following:
l Idlel Runningl Could not reach LWMl Could not reach HWM
Note
If the auto-delete operation cannot satisfy the high water mark,and there are snapshots in the storage pool, the auto-deleteoperation sets the auto-delete state for that watermark to Couldnot reach HWM , and generates an alert.
Configuring storage pools using the CLI
40 EMC VNXe Series 3.1 Configuring Storage Pools
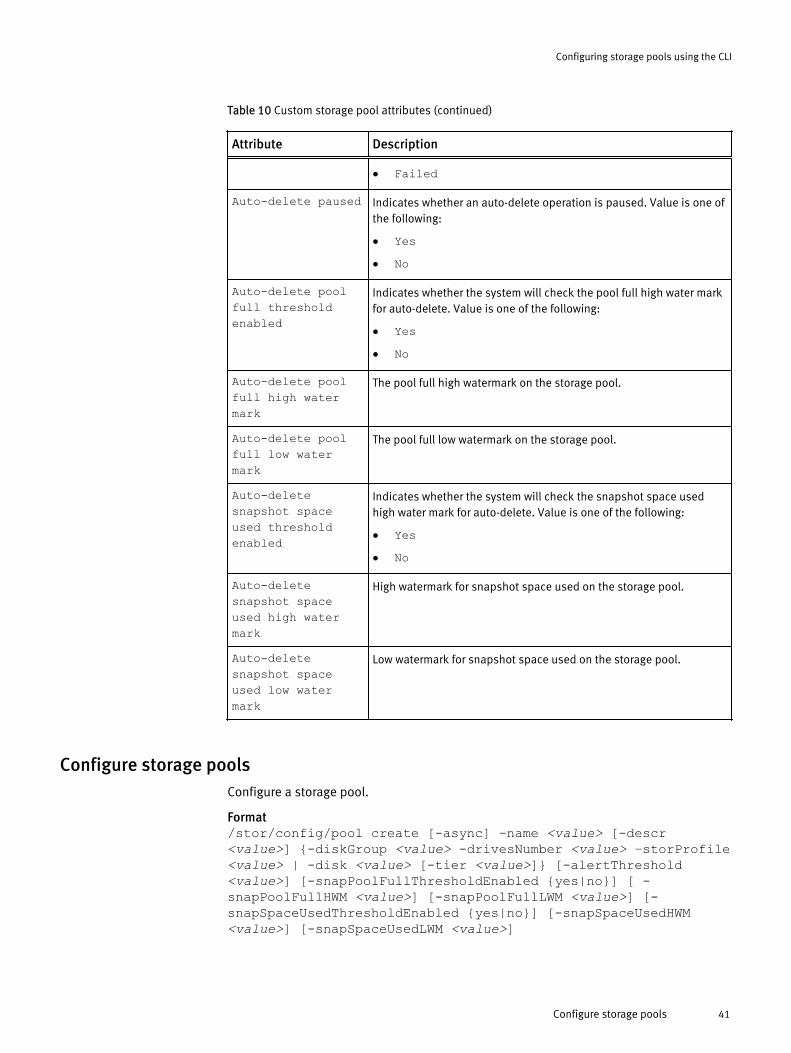
Table 10 Custom storage pool attributes (continued)
Attribute Description
l Failed
Auto-delete paused Indicates whether an auto-delete operation is paused. Value is one ofthe following:
l Yesl No
Auto-delete poolfull thresholdenabled
Indicates whether the system will check the pool full high water markfor auto-delete. Value is one of the following:
l Yesl No
Auto-delete poolfull high watermark
The pool full high watermark on the storage pool.
Auto-delete poolfull low watermark
The pool full low watermark on the storage pool.
Auto-deletesnapshot spaceused thresholdenabled
Indicates whether the system will check the snapshot space usedhigh water mark for auto-delete. Value is one of the following:
l Yesl No
Auto-deletesnapshot spaceused high watermark
High watermark for snapshot space used on the storage pool.
Auto-deletesnapshot spaceused low watermark
Low watermark for snapshot space used on the storage pool.
Configure storage poolsConfigure a storage pool.
Format/stor/config/pool create [-async] –name <value> [-descr<value>] {-diskGroup <value> -drivesNumber <value> –storProfile<value> | -disk <value> [-tier <value>]} [-alertThreshold<value>] [-snapPoolFullThresholdEnabled {yes|no}] [ -snapPoolFullHWM <value>] [-snapPoolFullLWM <value>] [-snapSpaceUsedThresholdEnabled {yes|no}] [-snapSpaceUsedHWM<value>] [-snapSpaceUsedLWM <value>]
Configuring storage pools using the CLI
Configure storage pools 41
Action qualifier
Qualifier Description
-async Run the operation in asynchronous mode.
-name Type a name for the storage pool.
-descr Type a brief description of the storagepool.
-storProfile (physical deploymentsonly)
Type the ID of the storage profiles,separated by commas, to apply to thestorage pool, based on the type of storageresource that will use the pool and theintended usage of the pool. View storageprofiles (physical deployments only) onpage 63 explains how to view the IDs ofavailable storage profiles on the system. Ifthis option is not specified, a default RAIDconfiguration is selected for eachparticular drive type in the selected diskgroup: NL-SAS (RAID 6 with a stripe lengthof 8), SAS (RAID 5 with a stripe length of5), or Flash (RAID 5 with a stripe length of5).
-diskGroup (physical deployments only) Type the IDs of the disk groups to use inthe storage pool. Specifying disk groupswith different disks types causes thecreation of a multi-tier storage pool. Viewdisk groups on page 65 explains how toview the IDs of the disk groups on thesystem.
-drivesNumber (physical deploymentsonly)
Specify the disk numbers, separated bycommas, from the selected disk groups touse in the storage pool. If this option isspecified when -storProfile is notspecified, the operation may fail when the-drivesNumber value does not matchthe default RAID configuration for eachdrive type in the selected disk group.
-disk (virtual deployments only) Specify the list of disks, separated bycommas, to use in the storage pool.Specified disks must be reliable storageobjects that do not require additionalprotection.
-tier (virtual deployments only) Specify the list of tiers, separated bycommas, to which the disks are assigned.If a tier is omitted, it will be assignedautomatically if tiering information for theassociated disk is available. Valid valuesinclude:
l capacityl performance
Configuring storage pools using the CLI
42 EMC VNXe Series 3.1 Configuring Storage Pools
Qualifier Description
l extreme-alertThreshold For thin provisioning, specify the
threshold, as a percentage, when thesystem will alert on the amount ofsubscription space used. When hostsconsume the specified percentage ofsubscription space, the system sends analert. Value range is 50% to 85%.
-FASTCacheEnabled Specify whether to enable FAST Cache onthe storage pool. Value is one of thefollowing:
l Yesl NoDefault value is Yes.
-snapPoolFullThresholdEnabled Indicate whether the system should checkthe pool full high water mark for auto-delete. Value is one of the following:
l Yesl NoDefault value is Yes.
-snapPoolFullHWM Specify the pool full high watermark forthe storage pool. Valid values are 1-99.Default value is 95.
-snapPoolFullLWM Specify the pool full low watermark for thestorage pool. Valid values are 0-98.Default value is 85.
-snapSpaceUsedThresholdEnabled Indicate whether the system should checkthe snapshot space used high water markfor auto-delete. Value is one of thefollowing:
l Yesl NoDefault value is Yes.
-snapSpaceUsedHWM Specify the snapshot space used highwatermark to trigger auto-delete on thestorage pool. Valid values are 1-99.Default value is 95.
-snapSpaceUsedLWM Specify the snapshot space used lowwatermark to trigger auto-delete on thestorage pool. Valid values are 0-98.Default value is 20.
Configuring storage pools using the CLI
Configure storage pools 43
Example 1 (physical deployments only)The following command creates a storage pool that uses storage profiles SP_1and SP_2,and seven disks from disk group DG_1 and five disks from disk group DG_2. Theconfigured storage pool receives ID SPL_4:
uemcli -d 10.0.0.1 -u Local/joe -p MyPassword456! /stor/config/poolcreate -name GlobalPool1 –descr “Oracle databases” –storProfile SP_1SP_2 –diskGroup DG_1 DG_2 –drivesNumber 7 5
Storage system address: 10.0.0.1Storage system port: 443HTTPS connection
ID = SPL_4Operation completed successfully.
Example 2 (virtual deployments only)The following command creates a storage pool with two virtual disks, vdisk_0 andvdisk_2 in the extreme tier. The configured storage pool receives ID pool_4.
uemcli -d 10.0.0.1 -u Local/joe -p MyPassword456! /stor/config/poolcreate -name vPool -descr "my virtual pool" -disk vdisk_0,vdisk_2 -tier extreme
Storage system address: 10.0.0.1Storage system port: 443HTTPS connection
ID = pool_4Operation completed successfully.
View storage poolsView a list of storage pools. You can filter on the storage pool ID.
Note
The show action command on page 67 explains how to change the output format.
Format/stor/config/pool [–id <value>] showObject qualifier
Qualifier Description
-id Type the ID of a storage pool.
Example 1 (physical deployments only)The following command shows details about all storage pools on the system:
uemcli -d 10.0.0.1 -u Local/joe -p MyPassword456! /stor/config/poolshow -detail
Storage system address: 10.0.0.1Storage system port: 443HTTPS connection
1: ID = SPL_1 Name = Performance Description = Multi-tier pool
Configuring storage pools using the CLI
44 EMC VNXe Series 3.1 Configuring Storage Pools
Total space = 4947802324992 (4.5T) Current allocation = 3298534883328 (3T) Remaining space = 1649267441664 (1.5T) Subscription = 10995116277760 (10T) Subscription percent = 222% Alert threshold = 70% Drives = 6 x 100GB EFD; 6 x 300GB SAS Number of drives = 12 RAID level = Mixed Stripe length = Mixed Rebalancing = no Rebalancing progress = Health state = OK (5) Health details = "The component is operating normally. No action is required." FAST Cache enabled = no Protection size used = 1099511625 (1G) Auto-delete state = Running Auto-delete paused = no Auto-delete pool full threshold enabled = yes Auto-delete pool full high water mark = 95% Auto-delete pool full low water mark = 85% Auto-delete snapshot space used threshold enabled = yes Auto-delete snapshot space used high water mark = 25% Auto-delete snapshot space used low water mark = 20%
2: ID = SPL_2 Name = Capacity Description = Total space = 4947802324992 (4.5T) Current allocation = 3298534883328 (3T) Remaining space = 1649267441664 (1.5T) Subscription = 10995116277760 (10T) Subscription percent = 222% Alert threshold = 70% Drives = 12 x 2TB NL-SAS Number of drives = 12 Unused drives = 7 RAID level = 6 Stripe length = 6 Rebalancing = yes Rebalancing progress = 46% Health state = OK (5) Health details = "The component is operating normally. No action is required." FAST Cache enabled = yes Protection size used = 10995116238 (10G) Auto-delete state = Running Auto-delete paused = no Auto-delete pool full threshold enabled = yes Auto-delete pool full high water mark = 95% Auto-delete pool full low water mark = 85% Auto-delete snapshot space used threshold enabled = yes Auto-delete snapshot space used high water mark = 25% Auto-delete snapshot space used low water mark = 20%
Configuring storage pools using the CLI
View storage pools 45
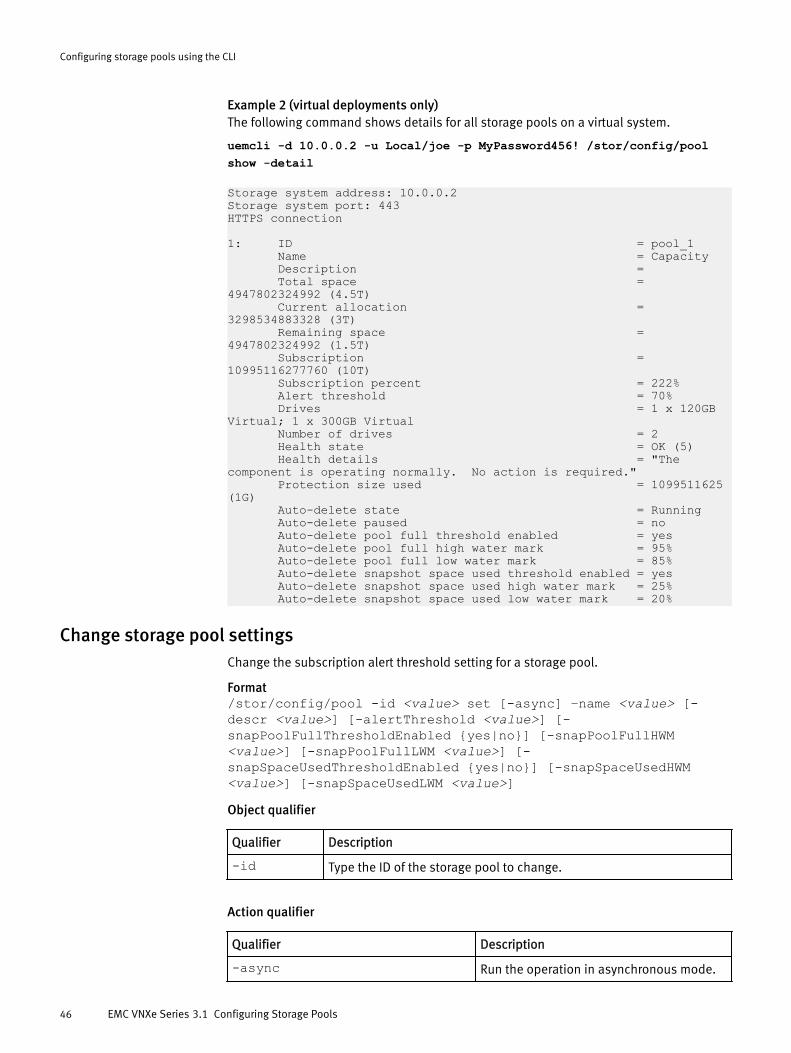
Example 2 (virtual deployments only)The following command shows details for all storage pools on a virtual system.
uemcli -d 10.0.0.2 -u Local/joe -p MyPassword456! /stor/config/poolshow -detail
Storage system address: 10.0.0.2Storage system port: 443HTTPS connection
1: ID = pool_1 Name = Capacity Description = Total space = 4947802324992 (4.5T) Current allocation = 3298534883328 (3T) Remaining space = 4947802324992 (1.5T) Subscription = 10995116277760 (10T) Subscription percent = 222% Alert threshold = 70% Drives = 1 x 120GB Virtual; 1 x 300GB Virtual Number of drives = 2 Health state = OK (5) Health details = "The component is operating normally. No action is required." Protection size used = 1099511625 (1G) Auto-delete state = Running Auto-delete paused = no Auto-delete pool full threshold enabled = yes Auto-delete pool full high water mark = 95% Auto-delete pool full low water mark = 85% Auto-delete snapshot space used threshold enabled = yes Auto-delete snapshot space used high water mark = 25% Auto-delete snapshot space used low water mark = 20%
Change storage pool settingsChange the subscription alert threshold setting for a storage pool.
Format/stor/config/pool -id <value> set [-async] –name <value> [-descr <value>] [-alertThreshold <value>] [-snapPoolFullThresholdEnabled {yes|no}] [-snapPoolFullHWM<value>] [-snapPoolFullLWM <value>] [-snapSpaceUsedThresholdEnabled {yes|no}] [-snapSpaceUsedHWM<value>] [-snapSpaceUsedLWM <value>]Object qualifier
Qualifier Description
-id Type the ID of the storage pool to change.
Action qualifier
Qualifier Description
-async Run the operation in asynchronous mode.
Configuring storage pools using the CLI
46 EMC VNXe Series 3.1 Configuring Storage Pools
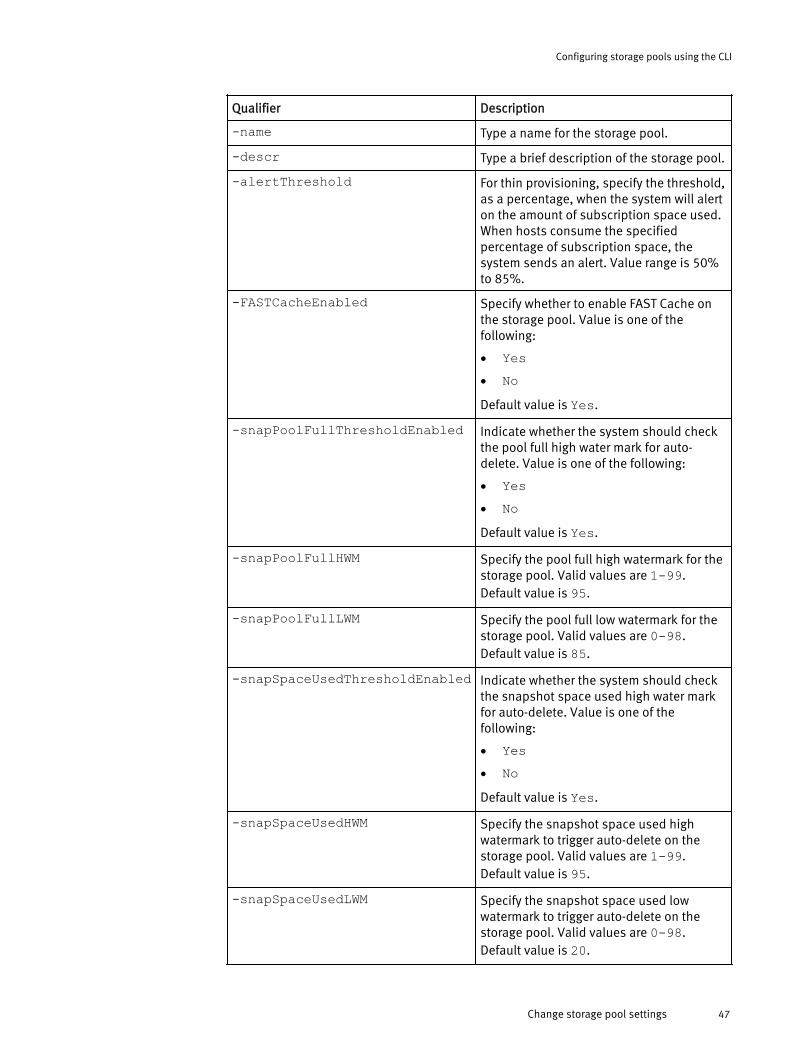
Qualifier Description
-name Type a name for the storage pool.
-descr Type a brief description of the storage pool.
-alertThreshold For thin provisioning, specify the threshold,as a percentage, when the system will alerton the amount of subscription space used.When hosts consume the specifiedpercentage of subscription space, thesystem sends an alert. Value range is 50%to 85%.
-FASTCacheEnabled Specify whether to enable FAST Cache onthe storage pool. Value is one of thefollowing:
l Yesl NoDefault value is Yes.
-snapPoolFullThresholdEnabled Indicate whether the system should checkthe pool full high water mark for auto-delete. Value is one of the following:
l Yesl NoDefault value is Yes.
-snapPoolFullHWM Specify the pool full high watermark for thestorage pool. Valid values are 1-99.Default value is 95.
-snapPoolFullLWM Specify the pool full low watermark for thestorage pool. Valid values are 0-98.Default value is 85.
-snapSpaceUsedThresholdEnabled Indicate whether the system should checkthe snapshot space used high water markfor auto-delete. Value is one of thefollowing:
l Yesl NoDefault value is Yes.
-snapSpaceUsedHWM Specify the snapshot space used highwatermark to trigger auto-delete on thestorage pool. Valid values are 1-99.Default value is 95.
-snapSpaceUsedLWM Specify the snapshot space used lowwatermark to trigger auto-delete on thestorage pool. Valid values are 0-98.Default value is 20.
Configuring storage pools using the CLI
Change storage pool settings 47
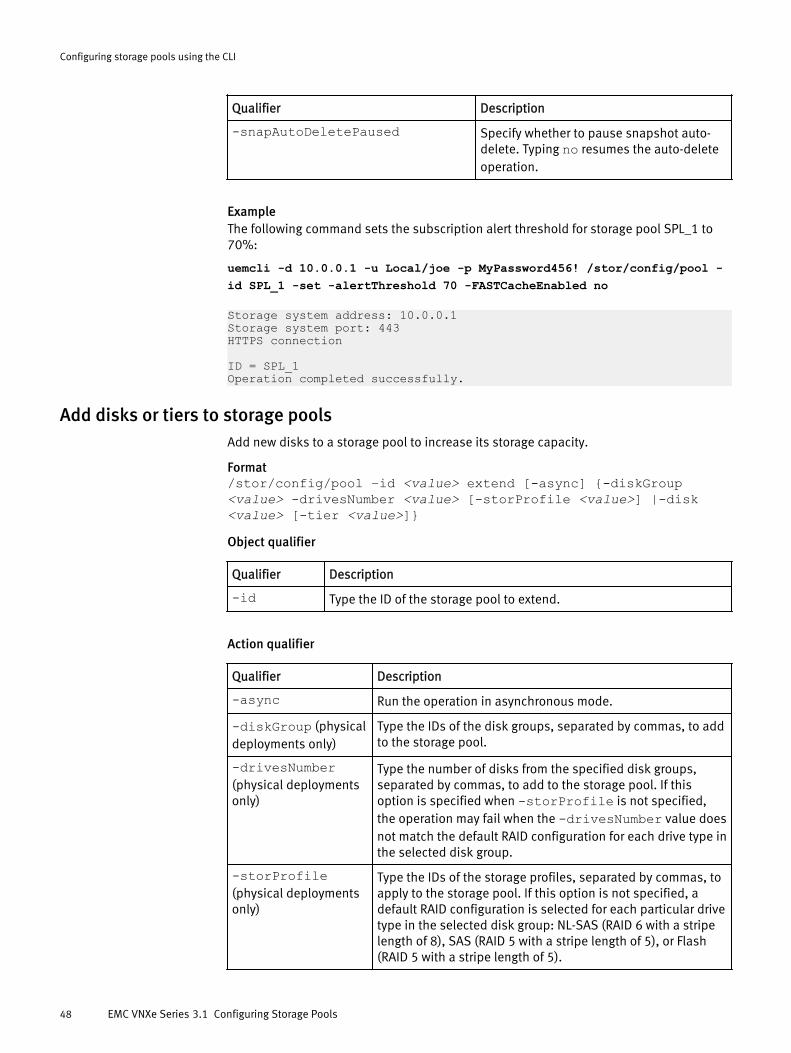
Qualifier Description
-snapAutoDeletePaused Specify whether to pause snapshot auto-delete. Typing no resumes the auto-deleteoperation.
ExampleThe following command sets the subscription alert threshold for storage pool SPL_1 to70%:
uemcli -d 10.0.0.1 -u Local/joe -p MyPassword456! /stor/config/pool -id SPL_1 -set -alertThreshold 70 -FASTCacheEnabled no
Storage system address: 10.0.0.1Storage system port: 443HTTPS connection
ID = SPL_1Operation completed successfully.
Add disks or tiers to storage poolsAdd new disks to a storage pool to increase its storage capacity.
Format/stor/config/pool –id <value> extend [-async] {-diskGroup<value> -drivesNumber <value> [-storProfile <value>] |-disk<value> [-tier <value>]}Object qualifier
Qualifier Description
-id Type the ID of the storage pool to extend.
Action qualifier
Qualifier Description
-async Run the operation in asynchronous mode.
-diskGroup (physicaldeployments only)
Type the IDs of the disk groups, separated by commas, to addto the storage pool.
-drivesNumber(physical deploymentsonly)
Type the number of disks from the specified disk groups,separated by commas, to add to the storage pool. If thisoption is specified when -storProfile is not specified,the operation may fail when the -drivesNumber value doesnot match the default RAID configuration for each drive type inthe selected disk group.
-storProfile(physical deploymentsonly)
Type the IDs of the storage profiles, separated by commas, toapply to the storage pool. If this option is not specified, adefault RAID configuration is selected for each particular drivetype in the selected disk group: NL-SAS (RAID 6 with a stripelength of 8), SAS (RAID 5 with a stripe length of 5), or Flash(RAID 5 with a stripe length of 5).
Configuring storage pools using the CLI
48 EMC VNXe Series 3.1 Configuring Storage Pools

Qualifier Description
-disk (virtualdeployments only)
Specify the list of disks, separated by commas, to add to thestorage pool. Specified disks must be reliable storage objectswhich do not require additional protection.
-tier (virtualdeployments only)
Specify the list of tiers, separated by commas, to which thedisks are assigned. If a tier is omitted, it will be assignedautomatically if tiering information for associated disk isavailable. Valid values include:
l capacityl performancel extreme
Example 1 (physical deployments only)The following command extends storage pool SPL_1 with seven disks from disk groupDG_1:
uemcli -d 10.0.0.1 -u Local/joe -p MyPassword456! /stor/config/pool –id SPL_1 extend –diskGroup DG_1 –drivesNumber 7 -storProfileprofile_12
Storage system address: 10.0.0.1Storage system port: 443HTTPS connection
ID = SPL_1Operation completed successfully.
Example 2 (virtual deployments only)The following command extends storage pool pool_1 by adding two virtual disks, vdisk_1and vdisk_5.
uemcli -d 10.0.0.2 -u Local/joe -p MyPassword456! /stor/config/pool –id pool_1 extend –disk vdisk_1,vdisk_5
Storage system address: 10.0.0.2Storage system port: 443HTTPS connection
ID = pool_1Operation completed successfully.
Delete storage poolsDelete a storage pool.
Format/stor/config/pool –id <value> delete [-async]Object qualifier
Qualifier Description
-id Type the ID of the storage pool to extend.
Configuring storage pools using the CLI
Delete storage pools 49
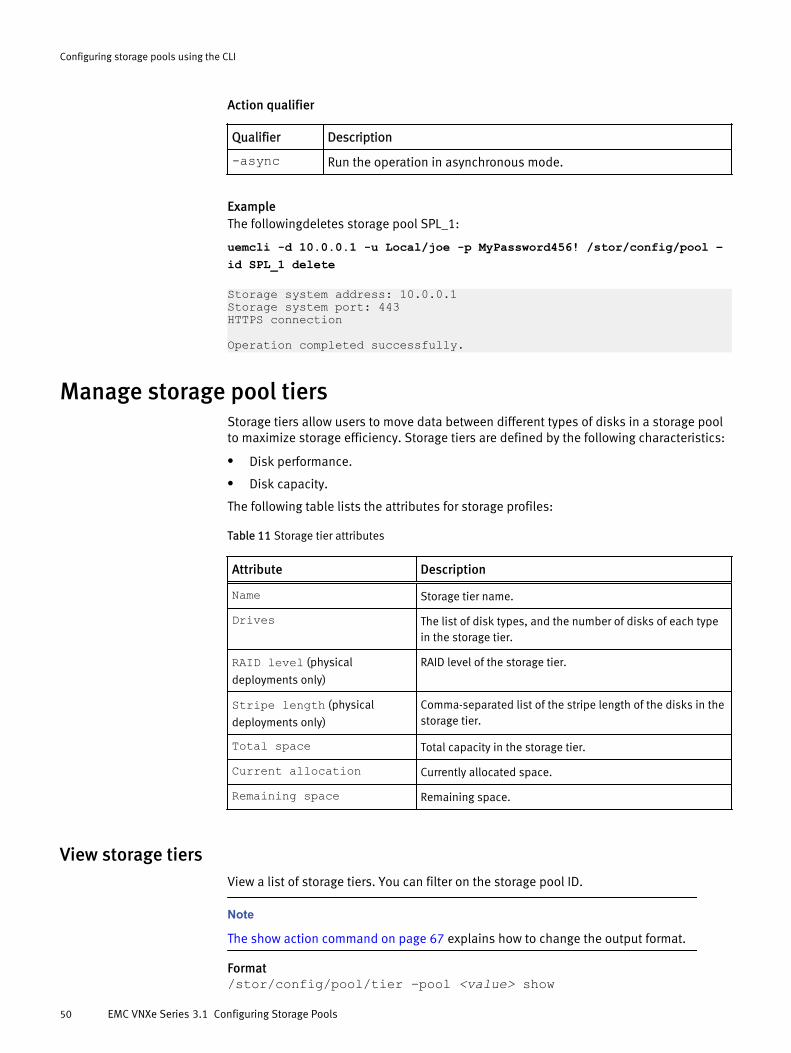
Action qualifier
Qualifier Description
-async Run the operation in asynchronous mode.
ExampleThe followingdeletes storage pool SPL_1:
uemcli -d 10.0.0.1 -u Local/joe -p MyPassword456! /stor/config/pool –id SPL_1 delete
Storage system address: 10.0.0.1Storage system port: 443HTTPS connection
Operation completed successfully.
Manage storage pool tiersStorage tiers allow users to move data between different types of disks in a storage poolto maximize storage efficiency. Storage tiers are defined by the following characteristics:
l Disk performance.
l Disk capacity.
The following table lists the attributes for storage profiles:
Table 11 Storage tier attributes
Attribute Description
Name Storage tier name.
Drives The list of disk types, and the number of disks of each typein the storage tier.
RAID level (physical
deployments only)
RAID level of the storage tier.
Stripe length (physical
deployments only)
Comma-separated list of the stripe length of the disks in thestorage tier.
Total space Total capacity in the storage tier.
Current allocation Currently allocated space.
Remaining space Remaining space.
View storage tiersView a list of storage tiers. You can filter on the storage pool ID.
Note
The show action command on page 67 explains how to change the output format.
Format/stor/config/pool/tier –pool <value> show
Configuring storage pools using the CLI
50 EMC VNXe Series 3.1 Configuring Storage Pools
Object qualifier
Qualifier Description
-pool Type the ID of a storage pool.
Example 1 (physical deployments only)The following command shows details about all storage pools on the system:
uemcli -d 10.0.0.1 -u Local/joe -p MyPassword456! /stor/config/pool/tier -pool SPL_1 show -detail
Storage system address: 10.0.0.1Storage system port: 443HTTPS connection
1: Name = Extreme Performance Drives = RAID level = Stripe length = Total space = 0 Current allocation = 0 Remaining space = 0
2: Name = Performance Drives = 5 x 300GB SAS RAID level = 5 Stripe length = 5 Total space = 928180076544 (864.4G) Current allocation = 8606711808 (8.0G) Remaining space = 919573364736 (856.4G)
3: Name = Capacity Drives = RAID level = Stripe length = Total space = 0 Current allocation = 0 Remaining space = 0
Example 2 (virtual deployments only)The following command shows details about storage pool pool_1 on a virtual system.
uemcli -d 10.0.0.2 -u Local/joe -p MyPassword456! /stor/config/pool/tier –pool pool_1 show -detail
Storage system address: 10.0.0.2Storage system port: 443HTTPS connection
1: Name = Extreme Performance Drives = Total space = 0 Current allocation = 0 Remaining space = 0
2: Name = Performance Drives = 1 x 500GB Virtual Total space = 631242752000 (500.0G) Current allocation = 12624855040 (10.0G) Remaining space = 618617896960 (490.0G)
Configuring storage pools using the CLI
View storage tiers 51
3: Name = Capacity Drives = Total space = 0 Current allocation = 0 Remaining space = 0
Manage FAST Cache (physical deployments only)FAST Cache is a storage efficiency technology that uses disks to expand the cachecapability of the storage system to provide improved performance.
The following table lists the attributes for FAST Cache:
Table 12 FAST Cache attributes
Attribute Description
Capacity Capacity of the FAST Cache.
Drives The list of disk types, and the number of disks of each type in the FASTCache.
Number of drives Total number of disks in the FAST Cache.
RAID level RAID level applied to the FAST Cache disks. This value is always RAID 1.
Health state Health state of the FAST Cache. The health state code appears inparentheses.
Health details Additional health information. See Appendix A, Reference, for healthinformation details.
Create FAST CacheConfigure FAST Cache. The storage system generates an error if FAST Cache is alreadyconfigured.
Format/stor/config/fastcache create [-async] -diskGroup <value> -drivesNumber <value> [-enableOnExistingPools]Action qualifier
Qualifier Description
-async Run the operation in asynchronous mode.
-diskGroup Specify the disk group to include in the FAST Cache.
-drivesNumber Specify the number of disks to include in the FASTCache.
-enableOnExistingPools Specify whether FAST Cache is enabled on all existingpools.
ExampleThe following command configures FAST Cache with six disks from disk group DG_1, andenables FAST Cache on existing storage pools:
Configuring storage pools using the CLI
52 EMC VNXe Series 3.1 Configuring Storage Pools
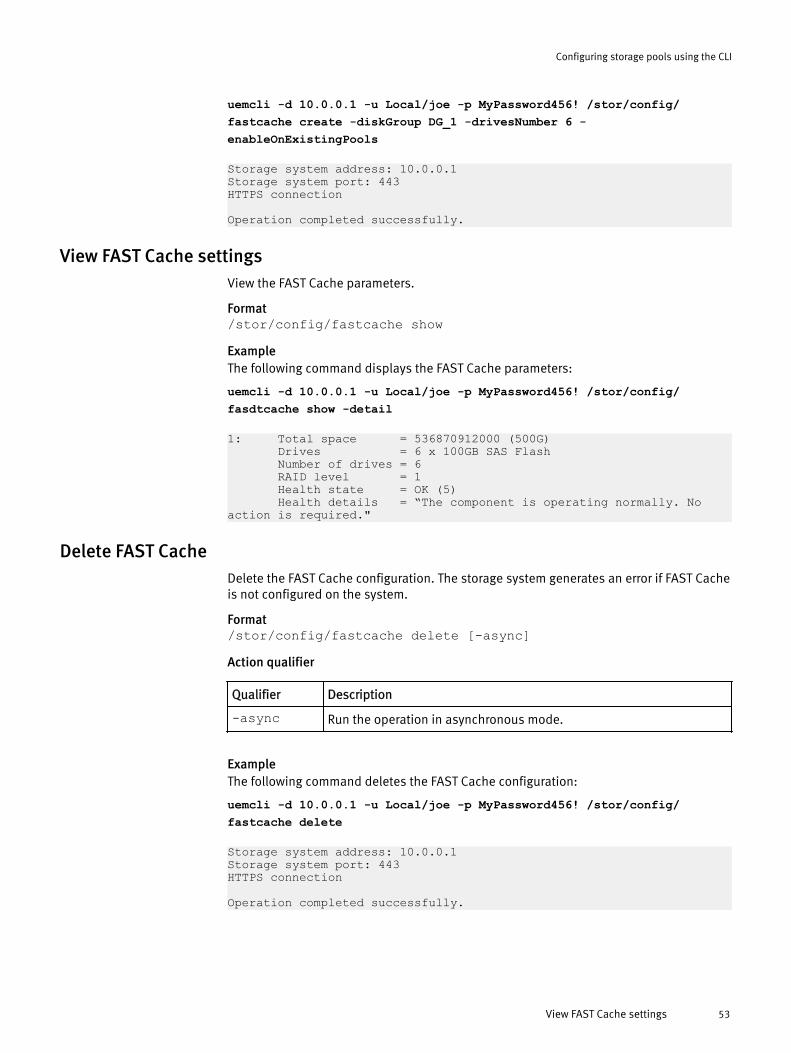
uemcli -d 10.0.0.1 -u Local/joe -p MyPassword456! /stor/config/fastcache create -diskGroup DG_1 -drivesNumber 6 -enableOnExistingPools
Storage system address: 10.0.0.1Storage system port: 443HTTPS connection
Operation completed successfully.
View FAST Cache settingsView the FAST Cache parameters.
Format/stor/config/fastcache showExampleThe following command displays the FAST Cache parameters:
uemcli -d 10.0.0.1 -u Local/joe -p MyPassword456! /stor/config/fasdtcache show -detail
1: Total space = 536870912000 (500G) Drives = 6 x 100GB SAS Flash Number of drives = 6 RAID level = 1 Health state = OK (5) Health details = “The component is operating normally. No action is required."
Delete FAST CacheDelete the FAST Cache configuration. The storage system generates an error if FAST Cacheis not configured on the system.
Format/stor/config/fastcache delete [-async]Action qualifier
Qualifier Description
-async Run the operation in asynchronous mode.
ExampleThe following command deletes the FAST Cache configuration:
uemcli -d 10.0.0.1 -u Local/joe -p MyPassword456! /stor/config/fastcache delete
Storage system address: 10.0.0.1Storage system port: 443HTTPS connection
Operation completed successfully.
Configuring storage pools using the CLI
View FAST Cache settings 53
Manage FAST VP general settingsFully Automated Storage Tiering for Virtual Pools (FAST VP) is a storage efficiencytechnology that automatically moves data between storage tiers within a storage poolbased on data access patterns.
The following table lists the attributes for FAST VP general settings.
Table 13 FAST VP general attributes
Attribute Description
Paused Identifies whether the data relocation is paused. Value is one of thefollowing:
l Yesl No
Schedule-enabled
Identifies whether the pool is rebalanced according to the system FAST VPschedule. Value is one of the following:
l Yesl No
Frequency Data relocation schedule. The format is: Every <days_of_the_week>at <start_time> until <end_time> where:
l <days_of_the_week> - List of the days of the week that data relocationwill run.
l <start_time> - Time the data relocation starts.
l <end_time> - Time the data relocation finishes.
Rate Identifies the transfer rate for the data relocation. Value is one of thefollowing:
l Low - Least impact on system performance.
l Medium - Moderate impact on system performance.
l High - Most impact on system performance.
Default value is medium.
Note
This field is blank if data relocation is not in progress.
Data to moveup
The amount of data in the storage pool scheduled to be moved to a higherstorage tier.
Data to movedown
The amount of data in the storage pool scheduled to be moved to a lowerstorage tier.
Data to movewithin
The amount of data in the storage pool scheduled to be moved within thesame storage tiers for rebalancing.
Estimatedrelocationtime
Identifies the estimated time required to perform the next data relocation.
Configuring storage pools using the CLI
54 EMC VNXe Series 3.1 Configuring Storage Pools
Table 13 FAST VP general attributes (continued)
Change FAST VP general settingsChange FAST VP general settings.
Format/stor/config/fastvp set [-async] [-schedEnabled {yes | no}] [-days <value>] [-at <value>] [-until <value>] [-rate {low |medium | high}] [-paused {yes | no}]Action qualifier
Qualifier Description
-async Run the operation in asynchronous mode.
-paused Specify whether to pause data relocation on the storage system.Value is one of the following:
l Yesl No
-schedEnabled Specify whether the pool is rebalanced according to the systemFAST VP schedule. Value is one of the following:
l Yesl No
-days Specify a comma-separated list of the days of the week to scheduledata relocation. Valid values are:
l Mon – Monday
l Tue – Tuesday
l Wed – Wednesday
l Thu – Thursday
l Fri – Friday
l Sat – Saturday
l Sun – Sunday
-at Specify the time to start the data relocation. The format is:
[HH:MM]
where:
l HH – Hour
l MM – Minute
Valid values are between 00:00 and 23:59. Default value is00:00.
Configuring storage pools using the CLI
Change FAST VP general settings 55
Qualifier Description
-until Specify the time to stop the data relocation. The format is:
[HH:MM]
where:
l HH – Hour
l MM – Minute
Valid values are between 00:00 and 23:59. Default value is eighthours after the time specified with the -at parameter.
-rate Specify the transfer rate for the data relocation. Value is one of thefollowing:
l Low – Least impact on system performance.
l Medium – Moderate impact on system performance.
l High – Most impact on system performance.
Default value is medium.
ExampleThe following command changes the data relocation schedule to run on Mondays andFridays from 23:00 to 07:00:
uemcli -d 10.0.0.1 -u Local/joe -p MyPassword456! /stor/config/fastvpset -schedEnabled yes -days "Mon,Fri" -at 23:00 -until 07:00
Storage system address: 10.0.0.1Storage system port: 443HTTPS connection
Operation completed successfully.
View FAST VP general settingsView the FAST VP general settings.
Format/stor/config/fastvp show -detailExampleThe following command displays the FAST VP general settings:
uemcli -d 10.0.0.1 -u Local/joe -p MyPassword456! /stor/config/fastvpshow -detail
Storage system address: 10.0.0.1Storage system port: 443HTTPS connection
1: Paused = no Schedule enabled = yes Frequency = Every Mon, Fri at 22:30 until 8:00 Rate = high Data to move up = 4947802324992 (1.5T) Data to move down = 4947802324992 (1.5T)
Configuring storage pools using the CLI
56 EMC VNXe Series 3.1 Configuring Storage Pools
Data to move within = 4947802324992 (1.5T) Estimated scheduled relocation time = 7h 30m
Manage FAST VP pool settingsFully Automated Storage Tiering for Virtual Pools (FAST VP) is a storage efficiencytechnology that automatically moves data between storage tiers within a storage poolbased on data access patterns.
The following table lists the attributes for FAST VP pool settings.
Table 14 FAST VP pool attributes
Attribute Description
Pool Identifies the storage pool.
Status Identifies the status of data relocation on the storage pool. Value is one ofthe following:
l Not started - Data relocation has not started.
l Paused - Data relocation is paused.
l Completed - Data relocation is complete.
l Stopped by user - Data relocation was stopped by the user.
l Active - Data relocation is in progress.
l Failed - Data relocation failed.
Relocationtype
Type of data relocation. Value is one of the following:
l Manual - Data relocation was initiated by the user.
l Scheduled or rebalancing - Data relocation was initiated by the
system because it was scheduled, or because the system rebalancedthe data.
Scheduleenabled
Identifies whether the pool is rebalanced according to the system FAST VPschedule. Value is one of the following:
l Yesl No
Start time Indicates the time the current data relocation started.
End time Indicates the time the current data relocation is scheduled to end.
Data relocated The amount of data relocated during an ongoing relocation, or the previousrelocation if a data relocation is not occurring. The format is:
<value>[suffix]
where:
l value - Identifies the size of the data relocated.
l suffix - Identifies that the value relates to the previous relocationsession.
Configuring storage pools using the CLI
Manage FAST VP pool settings 57
Table 14 FAST VP pool attributes (continued)
Attribute Description
Rate Identifies the transfer rate for the data relocation. Value is one of thefollowing:
l Low - Least impact on system performance.
l Medium - Moderate impact on system performance.
l High - Most impact on system performance.
Default value is medium.
Note
This field is blank if data relocation is not in progress.
Data to moveup
The amount of data in the storage pool scheduled to be moved to a higherstorage tier.
Data to movedown
The amount of data in the storage pool scheduled to be moved to a lowerstorage tier.
Data to movewithin
The amount of data in the storage pool scheduled to be moved within thesame storage tiers for rebalancing.
Data to moveup per tier
The amount of data per tier that is scheduled to be moved to a higher tier.The format is:
<tier_name>:[value]
where:
l tier_name - Identifies the storage tier.
l value - Identifies the amount of data in that tier to be move up.
Data to movedown per tier
The amount of data per tier that is scheduled to be moved to a lower tier.The format is:
<tier_name>:[value]
where:
l tier_name - Identifies the storage tier.
l value - Identifies the amount of data in that tier to be moved down.
Data to movewithin pertier
The amount of data per tier that is scheduled to be moved to within thesame tier for rebalancing. The format is:
<tier_name>:[value]
where:
l tier_name - Identifies the storage tier.
l value - Identifies the amount of data in that tier to be rebalanced.
Estimatedrelocationtime
Identifies the estimated time required to perform the next data relocation.
Configuring storage pools using the CLI
58 EMC VNXe Series 3.1 Configuring Storage Pools
Table 14 FAST VP pool attributes (continued)
Change FAST VP pool settingsModify FAST VP settings on an existing pool.
Format/stor/config/pool/fastvp –pool <value> set [-async] -schedEnabled {yes | no}Object qualifier
Qualifier Description
-pool Type the ID of the storage pool.
Action qualifier
Qualifier Description
-async Run the operation in asynchronous mode.
-schedEnabled Specify whether the pool is rebalanced according to the systemFAST VP schedule. Value is one of the following:
l Yesl No
ExampleThe following example enables the rebalancing schedule on storage pool pool_1:
uemcli -d 10.0.0.1 -u Local/joe -p MyPassword456! /stor/config/pool/fastvp -pool pool_1 set -schedEnabled yes
Storage system address: 10.0.0.1Storage system port: 443HTTPS connection
Pool ID = pool_1Operation completed successfully.
View FAST VP pool settingsView FAST VP settings on a storage pool.
Format/stor/config/pool/fastvp [–pool <value>] showObject qualifier
Qualifier Description
-pool Type the ID of the storage pool.
ExampleThe following command lists the FAST VP settings on the storage system:
Configuring storage pools using the CLI
Change FAST VP pool settings 59

uemcli -d 10.0.0.1 -u Local/joe -p MyPassword456! /stor/config/pool/fastvp –show -detail
Storage system address: 10.0.0.1Storage system port: 443HTTPS connection
1: Pool = pool_1 Relocation type = manual Status = Active Schedule enabled = no Start time = 2013-09-20 12:55:32 End time = 2013-09-20 21:10:17 Data relocated = 100111454324 (100G) Rate = high Data to move up = 4947802324992 (4.9T) Data to move down = 4947802324992 (4.9T) Data to move within = 4947802324992 (4.9T) Data to move up per tier = Performance: 500182324992 (500G), Capacity: 1000114543245 (1.0T) Data to move down per tier = Extreme Performance: 1000114543245 (1.0T), Performance: 500182324992 (500G) Data to move within per tier = Extreme Performance: 500182324992 (500G), Performance: 500182324992 (500G), Capacity: 500182324992 (500G) Estimated relocation time = 7h 30m
Start data relocationStart data relocation on a storage pool.
Format/stor/config/pool/fastvp –pool <value> start [-async] [-rate{low | medium | high}] [-endTime <value>]Action qualifier
Qualifier Description
-async Run the operation in asynchronous mode.
-pool Type the ID of the storage pool.
-endTime Specify the time to stop the data relocation. The format is:
[HH:MM]
where:
l HH — Hour.
l MM — Minute.
Default value is eight hours from the current time.
-rate Specify the transfer rate for the data relocation. Value is one of thefollowing:
l Low — Least impact on system performance.
l Medium — Moderate impact on system performance.
l High — Most impact on system performance.
Default value is the value set at the system level.
Configuring storage pools using the CLI
60 EMC VNXe Series 3.1 Configuring Storage Pools
ExampleThe following command starts data relocation on storage pool pool_1, and directs it toend at 04:00:
uemcli -d 10.0.0.1 -u Local/joe -p MyPassword456! /stor/config/pool/fastvp -pool pool_1 start -endTime 04:00
Storage system address: 10.0.0.1Storage system port: 443HTTPS connection
Operation completed successfully.
Stop data relocationStop data relocation on a storage pool.
Format/stor/config/pool/fastvp –pool <value> stop [-async]Object qualifier
Qualifier Description
-pool Type the ID of the storage pool.
Action qualifier
Qualifier Description
-async Run the operation in asynchronous mode.
ExampleThe following command stops data relocation on storage pool pool_1:
uemcli -d 10.0.0.1 -u Local/joe -p MyPassword456! /stor/config/pool/fastvp –pool pool_1 stop
Storage system address: 10.0.0.1Storage system port: 443HTTPS connection
Operation completed successfully.
View storage pool resourcesThis command displays a list of storage resources allocated in a storage pool. This can bestorage resources provisioned on specified storage pool, and NAS servers that have filesystems allocated in the pool.
The following table lists the attributes for storage pool resources.
Table 15 Storage pool resources
Attribute Description
ID Storage resource identifier.
Name Name of the storage resource.
Configuring storage pools using the CLI
Stop data relocation 61
Table 15 Storage pool resources (continued)
Attribute Description
Resource type Type of the resource. Valid values are LUN, File system, LUN group,VMware NFS, VMware VMFS, and NAS server.
Pool Name of the storage pool.
Total pool spaceused
Total space used by the storage pool. This includes primary data usedsize, snapshot used size, and metadata size.
Total poolsnapshot spaceused
Total spaced used by the storage pool for snapshots.
Health state Health state of the file system. The health state code appears inparentheses.
Health details Additional health information. See Appendix A, Reference, for healthinformation details.
Note
The show action command on page 67 explains how to change the output format.
Format/stor/config/pool/sr [–pool <value>] showObject qualifier
Qualifier Description
-pool Type the name of the storage pool.
ExampleThe following command shows details for all storage resources associated with thestorage pool pool_1:
uemcli -d 10.0.0.1 -u Local/joe -p MyPassword456! /stor/config/pool/sr-pool pool_1 show -detail
Storage system address: 10.0.0.1Storage system port: 443HTTPS connection
1: ID = res_1 Name = FileSystem00 Resource type = File system Pool = pool_1 Total pool space used = 23622320128 (220GB) Total pool snapshot space used = 2147483648 (2GB) Health state = OK (5) Health details = "The component is operating normally. No action is required."
2: ID = res_2 Name = LUNGroup00 Resource type = LUN group Pool = pool_1 Total pool space used = 57982058496 (54GB)
Configuring storage pools using the CLI
62 EMC VNXe Series 3.1 Configuring Storage Pools
Total pool snapshot space used = 4294967296 (4GB) Health state = OK (5) Health details = "The component is operating normally. No action is required."
3: ID = nas_1 Name = NASServer00 Resource type = NAS server Pool = pool_1 Total pool space used = Total pool snapshot space used = Health state = OK (5) Health details = "The component is operating normally. No action is required."
View storage profiles (physical deployments only)Storage profiles are preconfigured settings for configuring storage pools based on thefollowing:
l Types of storage resources that will use the pools.
l Intended usage of the pool.
For example, create a storage pool for file system storage resources intended for generaluse. When configuring a storage pool, specify the ID of the storage profile to apply to thepool.
Note
Storage profiles are not restrictive with regard to storage provisioning. For example, youcan provision file systems from an FC or iSCSI database storage pool. However, thecharacteristics of the storage will be best suited to the indicated storage resource typeand use.
Each storage profile is identified by an ID.
The following table lists the attributes for storage profiles.
Table 16 Storage profile attributes
Attribute Description
ID ID of the storage profile.
Description Brief description of the storage profile.
Drive type Types of disks for the storage profile.
RAID level RAID level number for the storage profile. Value is one of the following:
l 1 - RAID level 1.
l 5 - RAID level 5.
l 6 - RAID level 6.
l 10 - RAID level 1+0.
Maximum capacity Maximum storage capacity for the storage profile.
Stripe length Number of disks the data is striped across.
Configuring storage pools using the CLI
View storage profiles (physical deployments only) 63
Table 16 Storage profile attributes (continued)
Attribute Description
Note
For best fit profiles, this value is Best fit .
Note
The show action command on page 67 explains how to change the output format.
Format/stor/config/profile [–id <value> | -driveType <value> [-raidLevel <value>]] showObject qualifier
Qualifier Description
-id Type the ID of a storage profile.
-driveType Specify the type of disk drive.
-raidLevel Specify the RAID type of the profile.
ExampleThe following command shows details for all storage profiles on the system:
uemcli -d 10.0.0.1 -u Local/joe -p MyPassword456! /stor/config/profileshow
Storage system address: 10.0.0.1Storage system port: 443HTTPS connection
1: ID = SP_1 Description = Best Performance Drive type = SAS RAID level = 5 Maximum capacity = 1099511627776 (1TB) Stripe length = 6
2: ID = SP_2 Description = High Capacity Drive type = FAT-SAS RAID level = 6 Maximum capacity = 21990232555520 (20TB) Stripe length = 6
3: ID = SP_3 Name = Performance Drive type = SAS RAID level = 5 Maximum capacity = 5937362789990 (5.4TB) Stripe length = 5
Configuring storage pools using the CLI
64 EMC VNXe Series 3.1 Configuring Storage Pools
Manage disk groups (physical deployments only)Disk groups are the groups of disks on the system with similar characteristics, includingtype, capacity, and spindle speed. When configuring storage pools, you select the diskgroup to use and the number of disks from the group to add to the pool.
Each disk group is identified by an ID.
The following table lists the attributes for disk groups.
Table 17 Disk group attributes
Attribute Description
ID ID of the disk group.
Drive type Type of disks in the disk group.
Drive size Capacity of one disk in the disk group.
Rotational speed Rotational speed of the disks in the group.
Number of drives Total number of disks in the disk group.
Unconfigured drives Total number of disks in the disk group that are not in a storagepool.
Capacity Total capacity of all disks in the disk group.
Recommended number ofspares
Number of spares recommended for the disk group.
View disk groupsView details about disk groups on the system. You can filter on the disk group ID.
Note
The show action command on page 67 explains how to change the output format.
Format/stor/config/dg [–id <value>] showObject qualifier
Qualifier Description
-id Type the ID of a disk group.
ExampleThe following command shows details about all disk groups:
uemcli -d 10.0.0.1 -u Local/joe -p MyPassword456! /stor/config/dg show
Storage system address: 10.0.0.1Storage system port: 443HTTPS connection
1: ID = DG_1
Configuring storage pools using the CLI
Manage disk groups (physical deployments only) 65

Drive type = FAT-SAS Drive size = 536870912000 (500GB) Rotational speed = 10000 rpm Number of drives = 21 Unconfigured drives = 7 Capacity = 11544872091648 (10.5TB) Recommended number of spares = 1
2: ID = DG_2 Drive type = FAT-SAS Drive size = 1099511627776 (1TB) Rotational speed = 7200 rpm Number of drives = 14 Unconfigured drives = 0 Capacity = 15393162788864 (14TB) Recommended number of spares = 1
3: ID = DG_3 Drive type = SAS Drive size = 107374182400 (100GB) Rotational speed = 10000 rpm Number of drives = 10 Unconfigured drives = 3 Capacity = 1099511627776 (1TB) Recommended number of spares = 1
View recommended disk group configurationsView the recommended disk groups from which to add disks to a storage pool based on aspecified storage profile or pool type.
Note
The show action command on page 67 explains how to change the output format.
Format/stor/config/dg recom {–profile <value>|-pool <value>}Action qualifier
Qualifier Description
-profile Type the ID of a storage profile. The output will include the list of diskgroups recommended for the specified storage profile.
-pool Type the ID of a storage pool. The output will include the list of disk groupsrecommended for the specified storage pool.
ExampleThe following command shows the recommended disk groups for storage pool SPL_1:
uemcli -d 10.0.0.1 -u Local/joe -p MyPassword456! /stor/config/dgrecom -pool SPL_1
Storage system address: 10.0.0.1Storage system port: 443HTTPS connection
1: ID = DG_1 Drive type = SAS Drive size = 536870912000 (500GB) Number of drives = 8 Allowed numbers of drives = 4,8
Configuring storage pools using the CLI
66 EMC VNXe Series 3.1 Configuring Storage Pools
Capacity = 4398046511104 (4TB)
2: ID = DG_2 Drive type = SAS Drive size = 268435456000 (250GB) Number of drives = 4 Allowed numbers of drives = 4 Capacity = 1099511627776 (1TB)
The show action commandThe show action command displays a list of objects that exist on the system and theattributes of those objects. You can specify an object qualifier to view the attributes for asingle object. The show action command provides qualifiers for changing the display ofthe output, including the format and the attributes to include. The available outputformats are name-value pair (NVP), table, and comma-separated values (CSV).
Formatuemcli [<switches>] <object> [<object qualifier>] show [{-detail | -brief | -filter <value>] [-output {nvp | table [-wrap] | csv}]Action qualifier
Qualifier Description
-output|-o Specify the output format. Value is one of the following:
l nvp — The name-value pair (NVP) format displays output asname=value. Name-value pair format on page 67 provides anexample of the NVP format.
l table — The table format displays output as a table, with columnheaders and rows. By default, values that are too long to fit in acolumn are cut off. Add -wrap after the table qualifier, separatedby a space, so that the values wrap. Table format on page 68provides an example of the table format.
l csv — The comma-separated values (CSV) format is similar to thetable format, but the names and values are separated by commas. Comma-separated values format on page 68 provides an exampleof the CSV format.
-detail Display all attributes.
-brief Display only the basic attributes (default).
-filter Comma-separated list of attributes which are included into thecommand output.
Name-value pair format
1: ID = la0_SPA SP = SPA Ports = eth0_SPA,eth1_SPA Health state = OK (5)
2: ID = la0_SPB SP = SPB
Configuring storage pools using the CLI
The show action command 67
Ports = eth0_SPB,eth1_SPB Health state = OK (5)
Table format
ID | SP | Ports | Health state--------+-----+-------------------+--------------la0_SPA | SPA | eth0_SPA,eth1_SPA | OK (5)la0_SPB | SPB | eth0_SPB,eth1_SPB | OK (5)
Comma-separated values format
ID,SP,Ports,Health statela0_SPA,SPA,”eth0_SPA,eth1_SPA”,OK (5)la0_SPB,SPB,”eth0_SPB,eth1_SPB”,OK (5)
ExampleThe following command modifies the set of attributes in the show action output. Forexample, if you add -filter "ID,ID,ID,ID" to the command, in the output you will seefour lines with the "ID" attribute for each listed instance:
1: ID = la_0 ID = la_0 ID = la_0 ID = la_0
uemcli /net/nas/server show -filter “ID, SP, Health state, ID, Name”
Filter format
Storage system address: 10.0.0.1Storage system port: 443HTTPS connection
1: ID = nas_1 SP = SPA Health state = OK (5) ID = nas_1 Name = Mynas1
2: ID = nas_2 SP = SPA Health state = OK (5) ID = nas_2 Name = Mynas2
Configuring storage pools using the CLI
68 EMC VNXe Series 3.1 Configuring Storage Pools