embarcadero all-access client 1.0.3 user guide
TRANSCRIPT

Embarcadero® All-Access Client™ 1.0.3 User Guide

Copyright © 1994-2009 Embarcadero Technologies, Inc.
Embarcadero Technologies, Inc. 100 California Street, 12th FloorSan Francisco, CA 94111 U.S.A.All rights reserved.
All brands and product names are trademarks or registered trademarks of their respective owners. This software/documentation contains proprietary information of Embarcadero Technologies, Inc.; it is provided under a license agreement containing restrictions on use and disclosure and is also protected by copyright law. Reverse engineering of the software is prohibited.
If this software/documentation is delivered to a U.S. Government Agency of the Department of Defense, then it is delivered with Restricted Rights and the following legend is applicable:
Restricted Rights Legend Use, duplication, or disclosure by the Government is subject to restrictions as set forth in subparagraph (c)(1)(ii) of DFARS 252.227-7013, Rights in Technical Data and Computer Software (October 1988).
If this software/documentation is delivered to a U.S. Government Agency not within the Department of Defense, then it is delivered with Restricted Rights, as defined in FAR 552.227-14, Rights in Data-General, including Alternate III (June 1987).
Information in this document is subject to change without notice. Revisions may be issued to advise of such changes and additions. Embarcadero Technologies, Inc. does not warrant that this documentation is error-free.
EMBARCADERO TECHNOLOGIES > EMBARCADERO® ALL ACCESS CLIENT™ 1.0.3 USER ’S GUIDE 1
ContentsTechnical Requirements . . . . . . . . . . . . . . . . . . . . . . . . . . . . . . . . . . . . . . . . . . . . . . . . . . . . . . . . . . . . . . . . . . . . . . 2
Additional Product Information . . . . . . . . . . . . . . . . . . . . . . . . . . . . . . . . . . . . . . . . . . . . . . . . . . . . . . . . . . . . . . . . . 3
Licensing All-Access Client. . . . . . . . . . . . . . . . . . . . . . . . . . . . . . . . . . . . . . . . . . . . . . . . . . . . . . . . . . . . . . . . . . . . 4
License Network Licensing Mode . . . . . . . . . . . . . . . . . . . . . . . . . . . . . . . . . . . . . . . . . . . . . . . . . . . . . . . . . . . . 4
License Workstation Mode . . . . . . . . . . . . . . . . . . . . . . . . . . . . . . . . . . . . . . . . . . . . . . . . . . . . . . . . . . . . . . . . . 4
License USB Package Mode . . . . . . . . . . . . . . . . . . . . . . . . . . . . . . . . . . . . . . . . . . . . . . . . . . . . . . . . . . . . . . . 5
Obtain Trial Licenses . . . . . . . . . . . . . . . . . . . . . . . . . . . . . . . . . . . . . . . . . . . . . . . . . . . . . . . . . . . . . . . . . . . . . 5
Getting Started . . . . . . . . . . . . . . . . . . . . . . . . . . . . . . . . . . . . . . . . . . . . . . . . . . . . . . . . . . . . . . . . . . . . . . . . . . . . . 6
Client Overview . . . . . . . . . . . . . . . . . . . . . . . . . . . . . . . . . . . . . . . . . . . . . . . . . . . . . . . . . . . . . . . . . . . . . . . . . . 6
Set Up All-Access Client . . . . . . . . . . . . . . . . . . . . . . . . . . . . . . . . . . . . . . . . . . . . . . . . . . . . . . . . . . . . . . . . . . . 6
Using All-Access Client. . . . . . . . . . . . . . . . . . . . . . . . . . . . . . . . . . . . . . . . . . . . . . . . . . . . . . . . . . . . . . . . . . . . . . . 7
Launching an Application . . . . . . . . . . . . . . . . . . . . . . . . . . . . . . . . . . . . . . . . . . . . . . . . . . . . . . . . . . . . . . . . . . 8
Managing an Application. . . . . . . . . . . . . . . . . . . . . . . . . . . . . . . . . . . . . . . . . . . . . . . . . . . . . . . . . . . . . . . . . . . 9
Downloading and Adding Products Manually . . . . . . . . . . . . . . . . . . . . . . . . . . . . . . . . . . . . . . . . . . . . . . . . . . 14
Configuring All-Access Client . . . . . . . . . . . . . . . . . . . . . . . . . . . . . . . . . . . . . . . . . . . . . . . . . . . . . . . . . . . . . . . . . 15

Welcome to Embarcadero All-Access ClientEmbarcadero All-Access Client is a comprehensive tool chest of award-winning, multi-platform Embarcadero products. All-Access Client enables you to access a wide range of applications from a single launch point, targeting the following roles:
• Architects have access to design and modelling tools.
• Developers involved in general application development, Web development, and database engineering have access to a wide range of tools for developing, testing, and tuning code.
• DBAs can access tools to monitor, analyze, and manage database systems.
All-Access is offered in three different formats, or modes, in order to provide more flexibility and convenience for organizations who want to deploy the products offered in the suite:
• Network Licensing Mode: The Client communicates with All-Access Server to run the available products.
• Workstation Mode: The Client runs independent of All-Access Server.
• USB Mode: The Client runs from a portable USB device, independent of All-Access Server. This is a temporary mode and has a fixed expiry date.
This guide is organized so that each task has specific instructions where that task would differ between formats, as indicated by subheadings or additional notes at the end of each section.
Technical RequirementsAll-Access Client is a Windows application with no significant requirements.
Products offered through the client have the same approximate memory and disk size requirements as the same products obtained outside of the All-Access tool set. For more detailed information on the requirements of each of these products, refer to the product documentation on an application-by-application basis.
Installation NotesThe following table lists the InstantOn/Install applications that can be launched from the All-Access Client.
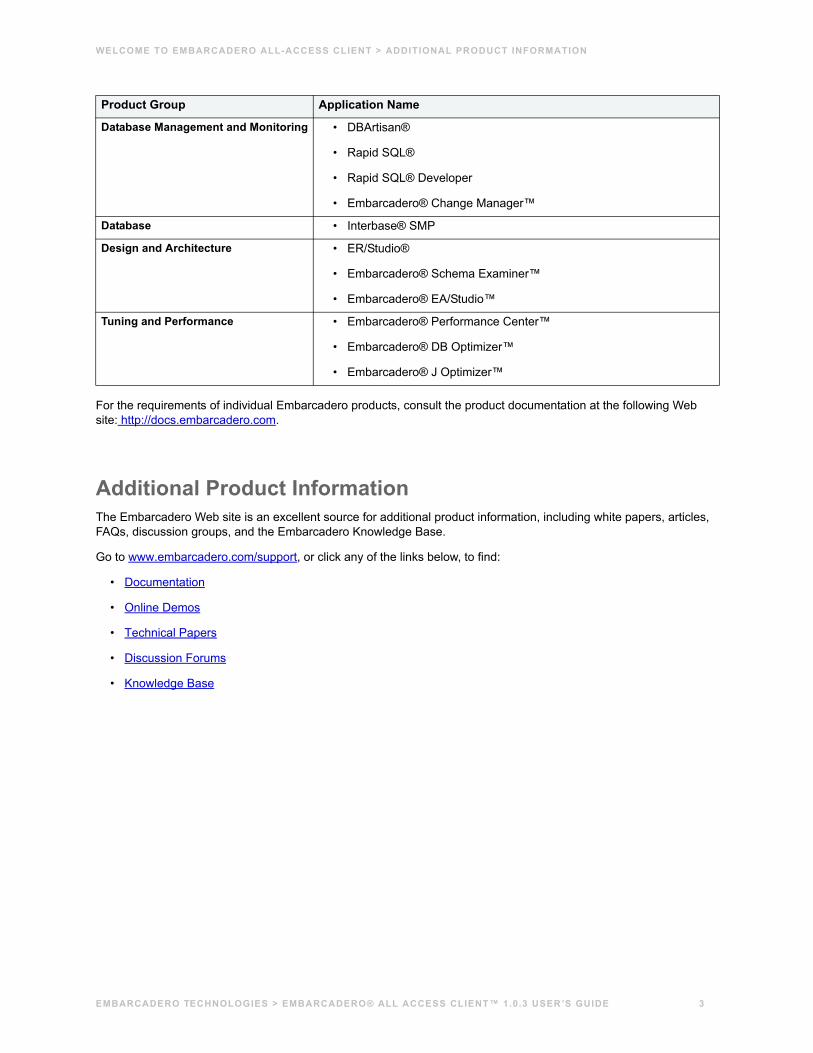
Product Group Application Name
Application Development • Delphi®
• C++ Builder®
• Delphi Prism™
• JBuilder®
Web Development • 3rdRail™
• Delphi for PHP®
EMBARCADERO TECHNOLOGIES > EMBARCADERO® ALL ACCESS CLIENT™ 1.0.3 USER ’S GUIDE 2
WELCOME TO EMBARCADERO ALL-ACCESS CLIENT > ADDITIONAL PRODUCT INFORMATION
For the requirements of individual Embarcadero products, consult the product documentation at the following Web site: http://docs.embarcadero.com.
Additional Product InformationThe Embarcadero Web site is an excellent source for additional product information, including white papers, articles, FAQs, discussion groups, and the Embarcadero Knowledge Base.
Go to www.embarcadero.com/support, or click any of the links below, to find:
• Documentation
• Online Demos
• Technical Papers
• Discussion Forums
• Knowledge Base
Database Management and Monitoring • DBArtisan®
• Rapid SQL®
• Rapid SQL® Developer
• Embarcadero® Change Manager™
Database • Interbase® SMP
Design and Architecture • ER/Studio®
• Embarcadero® Schema Examiner™
• Embarcadero® EA/Studio™
Tuning and Performance • Embarcadero® Performance Center™
• Embarcadero® DB Optimizer™
• Embarcadero® J Optimizer™
Product Group Application Name
EMBARCADERO TECHNOLOGIES > EMBARCADERO® ALL ACCESS CLIENT™ 1.0.3 USER ’S GUIDE 3
USING ALL-ACCESS CLIENT > LICENSING ALL-ACCESS CLIENT
Using All-Access ClientAll-Access Client provides users with an interface that offers instant access to Embarcadero applications. These applications provide database development, administration, and management functionality at the enterprise level, and can be downloaded on a product-by-product basis, depending on the needs of the organization and individual roles.
This section contains the following topics:
• Licensing All-Access Client
• Getting Started
• Using All-Access Client
• Configuring All-Access Client
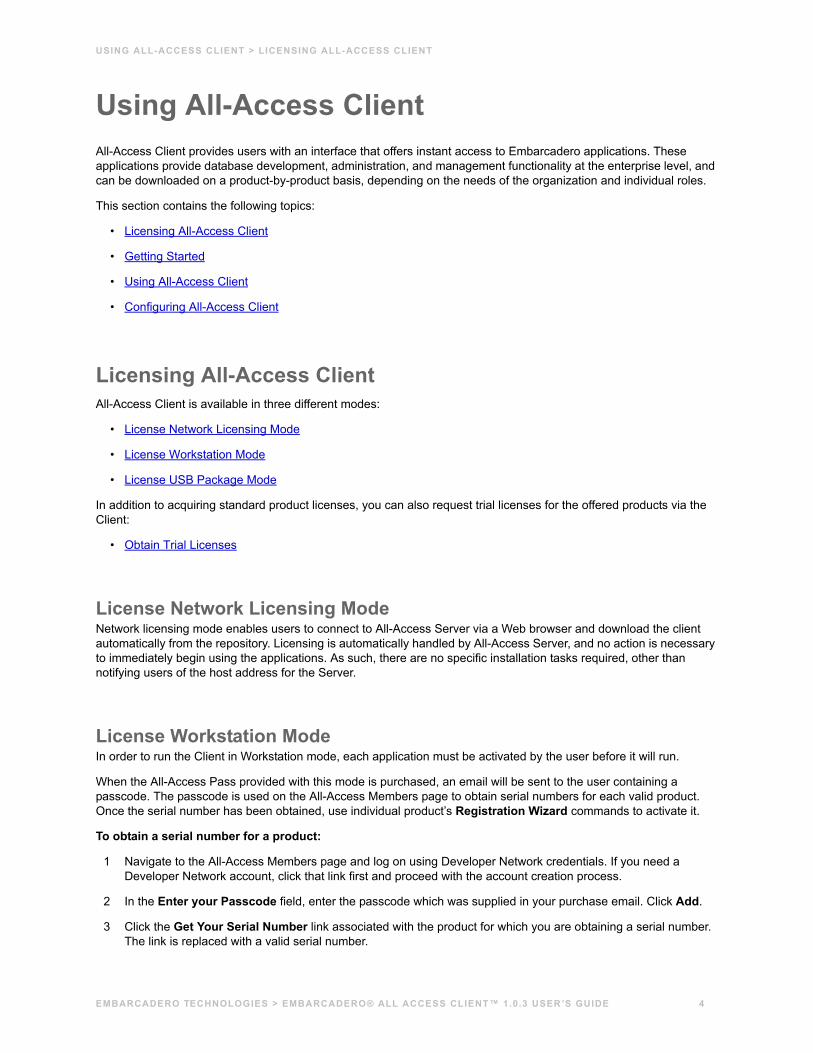
Licensing All-Access ClientAll-Access Client is available in three different modes:
• License Network Licensing Mode
• License Workstation Mode
• License USB Package Mode
In addition to acquiring standard product licenses, you can also request trial licenses for the offered products via the Client:
• Obtain Trial Licenses
License Network Licensing ModeNetwork licensing mode enables users to connect to All-Access Server via a Web browser and download the client automatically from the repository. Licensing is automatically handled by All-Access Server, and no action is necessary to immediately begin using the applications. As such, there are no specific installation tasks required, other than notifying users of the host address for the Server.
License Workstation ModeIn order to run the Client in Workstation mode, each application must be activated by the user before it will run.
When the All-Access Pass provided with this mode is purchased, an email will be sent to the user containing a passcode. The passcode is used on the All-Access Members page to obtain serial numbers for each valid product. Once the serial number has been obtained, use individual product’s Registration Wizard commands to activate it.
To obtain a serial number for a product:
1 Navigate to the All-Access Members page and log on using Developer Network credentials. If you need a Developer Network account, click that link first and proceed with the account creation process.
2 In the Enter your Passcode field, enter the passcode which was supplied in your purchase email. Click Add.
3 Click the Get Your Serial Number link associated with the product for which you are obtaining a serial number. The link is replaced with a valid serial number.
EMBARCADERO TECHNOLOGIES > EMBARCADERO® ALL ACCESS CLIENT™ 1.0.3 USER ’S GUIDE 4

USING ALL-ACCESS CLIENT > LICENSING ALL-ACCESS CLIENT
The Registration Wizard automatically appears when you start an application with the Client that has not been registered via a serial number. Follow the instructions in the Wizard to register the software, entering the serial number you received from the membership site when prompted.
License USB Package ModeThe USB mode of the Client also handles licensing automatically. Therefore, no prerequisites are needed for users to immediately begin using the applications. As such, there are no specific installation tasks required.
This mode has a fixed expiry date, after which the Client will no longer work.
Obtain Trial LicensesTrial licenses are available via the Get Trial Licenses on the main page of the Client.
To obtain trial licenses for All-Access Client:1 Open the Client and select Get Trial Licenses on the lower left-hand side of the screen. The Request Trial
Licenses screen appears.
2 Enter your Embarcadero Developer Network Account Details in the fields provided and click Request Trial.
EMBARCADERO TECHNOLOGIES > EMBARCADERO® ALL ACCESS CLIENT™ 1.0.3 USER ’S GUIDE 5

USING ALL-ACCESS CLIENT > GETTING STARTED
Getting StartedThis section contains information on how to get started with All-Access Client. It contains information on how to obtain the Client, initially, as well as information on downloading applications and running the software on your machine.
• Client Overview
• Set Up All-Access Client
Client OverviewAll-Access Client is the interface through which you launch Embarcadero products. The Client is delivered through three different modes.
• Network Licensing Mode: The Client communicates with All-Access Server to run the available products. Network Licensing Mode users must first get the Client by connecting to All-Access Server, downloading the Client, and then running the executable.
• Workstation Mode: The Client runs independent of All-Access Server. Double-click the Client executable to launch it.
• USB Mode: The Client runs from a portable USB device, independent of All-Access Server. This is a trial mode and has a fixed expiry date, (after which it will not run), but otherwise works in the same manner as Workstation mode.
Set Up All-Access ClientSetting up All-Access Client differs slightly between modes, if you are using All-Access Server, or just the standalone Client in Workstation and USB modes.
In Network Licensing Mode, you need to download the Client executable by connecting to the Server. In Workstation or USB mode, an executable will already be provided and you can launch it from the Desktop.
To set up All-Access Client in Network Licensing Mode:
1 Your administrator will have details regarding the location of the Server, and your log on information. Connect to the Server using your Web browser and log on when prompted. The Server page appears.
2 The Server page lists the available Clients by platform, language, and version. Click Download on the right-hand side of the screen to begin downloading the Client. The Client executable is downloaded to your machine.
3 Minimize your browser and double-click the executable. All-Access Client launches.
To set up All-Access Client in Workstation or USB mode:
• Workstation and USB mode do not require All-Access Server. Double-click the Client executable supplied by Embarcadero. All-Access Client launches.
EMBARCADERO TECHNOLOGIES > EMBARCADERO® ALL ACCESS CLIENT™ 1.0.3 USER ’S GUIDE 6
USING ALL-ACCESS CLIENT > USING ALL-ACCESS CLIENT
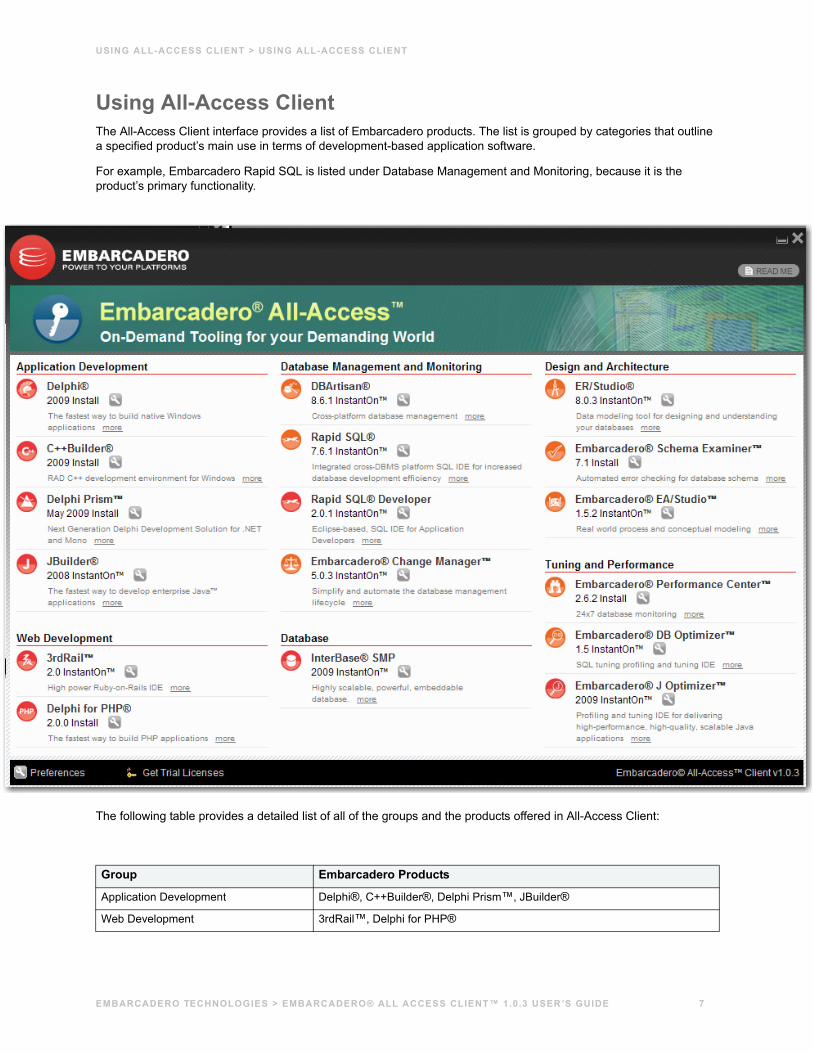
Using All-Access ClientThe All-Access Client interface provides a list of Embarcadero products. The list is grouped by categories that outline a specified product’s main use in terms of development-based application software.
For example, Embarcadero Rapid SQL is listed under Database Management and Monitoring, because it is the product’s primary functionality.
The following table provides a detailed list of all of the groups and the products offered in All-Access Client:
Group Embarcadero Products
Application Development Delphi®, C++Builder®, Delphi Prism™, JBuilder®
Web Development 3rdRail™, Delphi for PHP®
EMBARCADERO TECHNOLOGIES > EMBARCADERO® ALL ACCESS CLIENT™ 1.0.3 USER ’S GUIDE 7
USING ALL-ACCESS CLIENT > USING ALL-ACCESS CLIENT
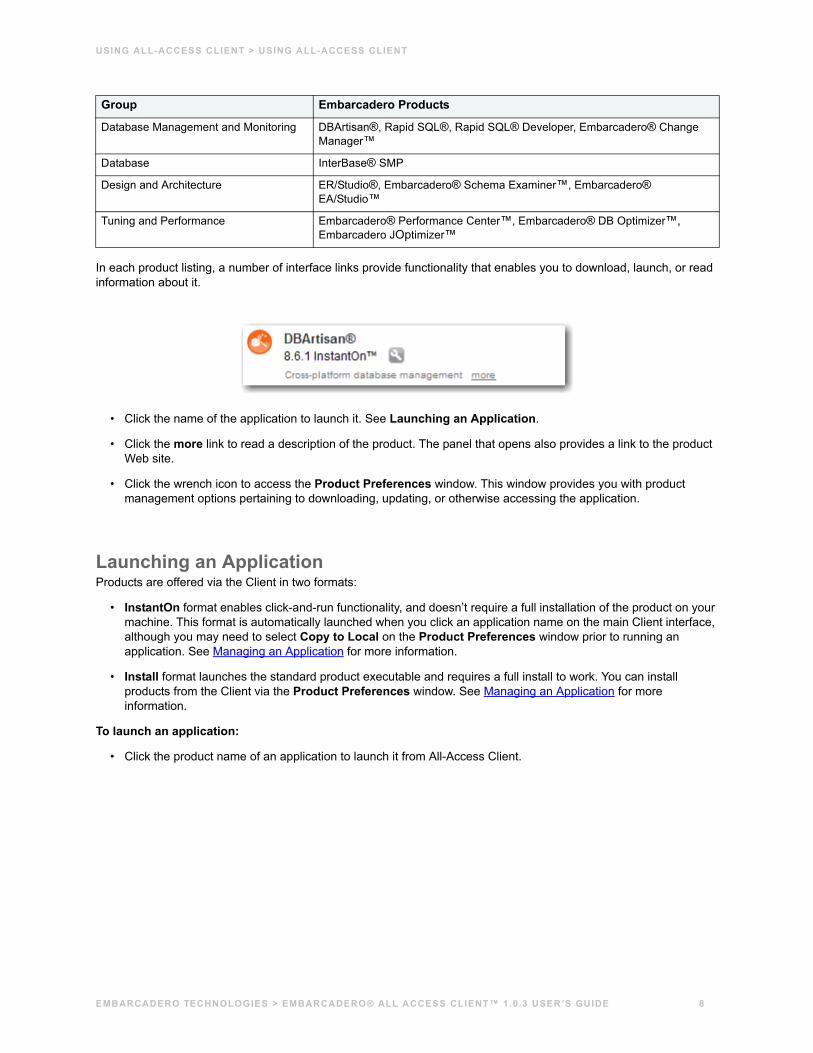
In each product listing, a number of interface links provide functionality that enables you to download, launch, or read information about it.
• Click the name of the application to launch it. See Launching an Application.
• Click the more link to read a description of the product. The panel that opens also provides a link to the product Web site.
• Click the wrench icon to access the Product Preferences window. This window provides you with product management options pertaining to downloading, updating, or otherwise accessing the application.
Launching an ApplicationProducts are offered via the Client in two formats:
• InstantOn format enables click-and-run functionality, and doesn’t require a full installation of the product on your machine. This format is automatically launched when you click an application name on the main Client interface, although you may need to select Copy to Local on the Product Preferences window prior to running an application. See Managing an Application for more information.
• Install format launches the standard product executable and requires a full install to work. You can install products from the Client via the Product Preferences window. See Managing an Application for more information.
To launch an application:
• Click the product name of an application to launch it from All-Access Client.
Database Management and Monitoring DBArtisan®, Rapid SQL®, Rapid SQL® Developer, Embarcadero® Change Manager™
Database InterBase® SMP
Design and Architecture ER/Studio®, Embarcadero® Schema Examiner™, Embarcadero® EA/Studio™
Tuning and Performance Embarcadero® Performance Center™, Embarcadero® DB Optimizer™, Embarcadero JOptimizer™
Group Embarcadero Products
EMBARCADERO TECHNOLOGIES > EMBARCADERO® ALL ACCESS CLIENT™ 1.0.3 USER ’S GUIDE 8
USING ALL-ACCESS CLIENT > USING ALL-ACCESS CLIENT
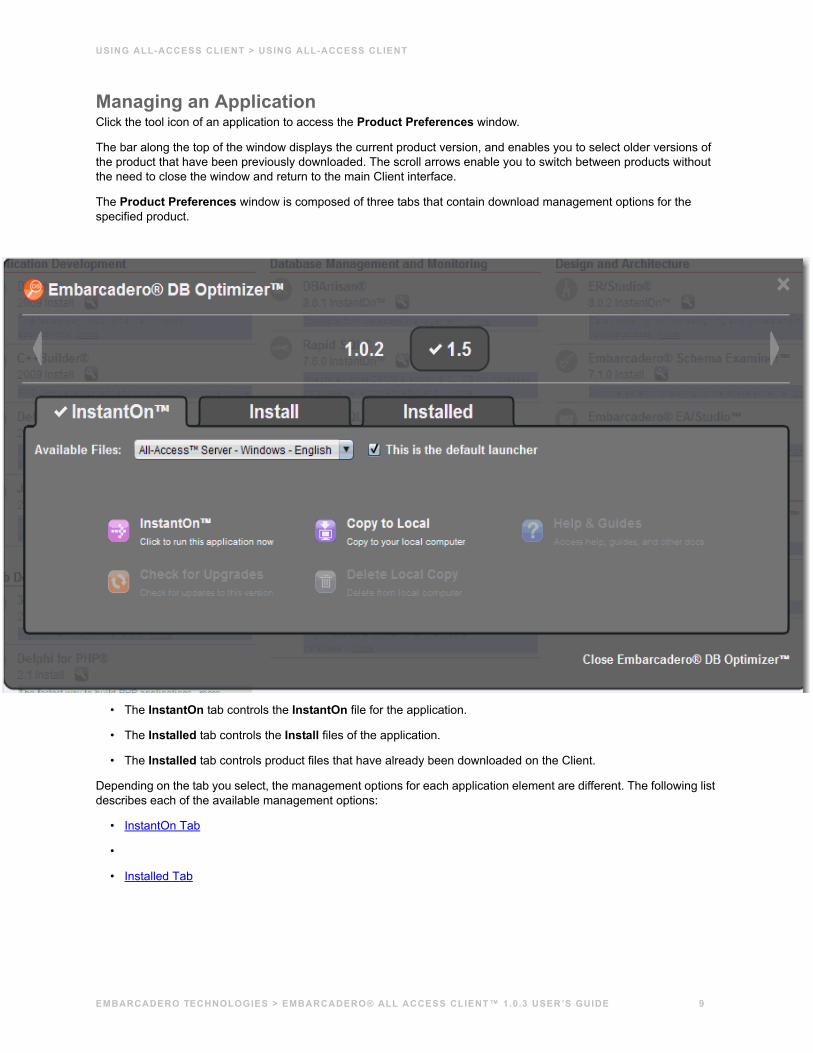
Managing an ApplicationClick the tool icon of an application to access the Product Preferences window.
The bar along the top of the window displays the current product version, and enables you to select older versions of the product that have been previously downloaded. The scroll arrows enable you to switch between products without the need to close the window and return to the main Client interface.
The Product Preferences window is composed of three tabs that contain download management options for the specified product.
• The InstantOn tab controls the InstantOn file for the application.
• The Installed tab controls the Install files of the application.
• The Installed tab controls product files that have already been downloaded on the Client.
Depending on the tab you select, the management options for each application element are different. The following list describes each of the available management options:
• InstantOn Tab
•
• Installed Tab
EMBARCADERO TECHNOLOGIES > EMBARCADERO® ALL ACCESS CLIENT™ 1.0.3 USER ’S GUIDE 9
USING ALL-ACCESS CLIENT > USING ALL-ACCESS CLIENT
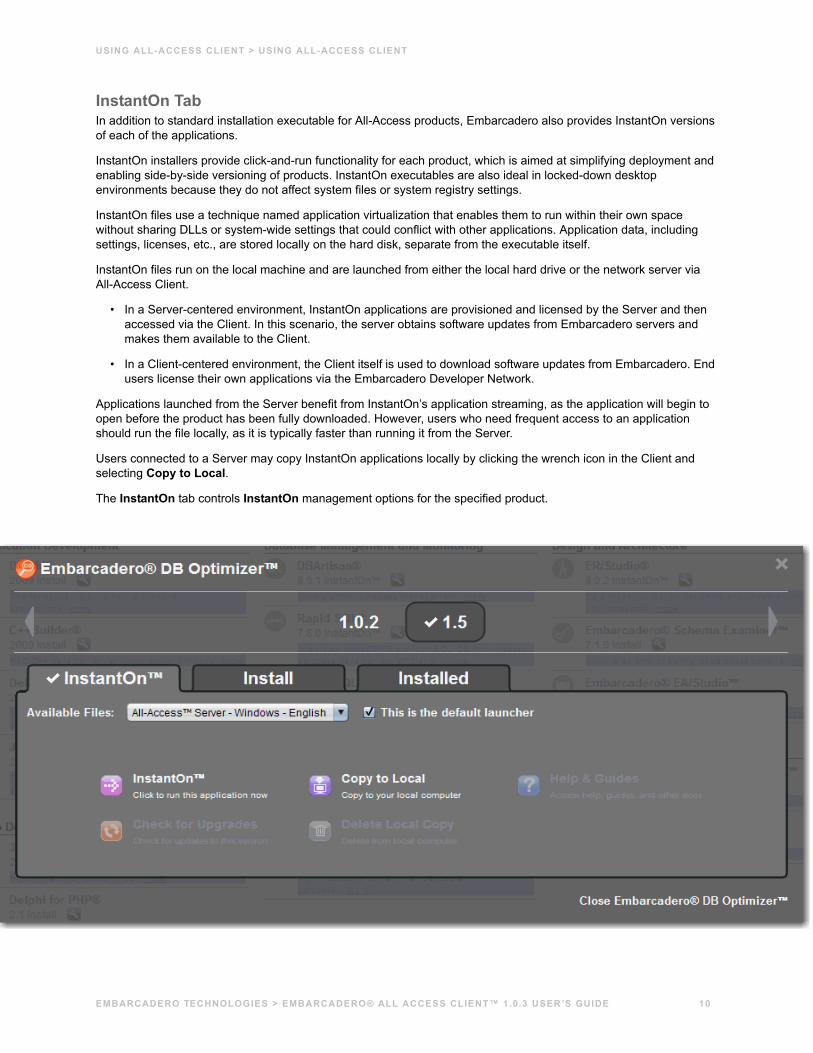
InstantOn TabIn addition to standard installation executable for All-Access products, Embarcadero also provides InstantOn versions of each of the applications.
InstantOn installers provide click-and-run functionality for each product, which is aimed at simplifying deployment and enabling side-by-side versioning of products. InstantOn executables are also ideal in locked-down desktop environments because they do not affect system files or system registry settings.
InstantOn files use a technique named application virtualization that enables them to run within their own space without sharing DLLs or system-wide settings that could conflict with other applications. Application data, including settings, licenses, etc., are stored locally on the hard disk, separate from the executable itself.
InstantOn files run on the local machine and are launched from either the local hard drive or the network server via All-Access Client.
• In a Server-centered environment, InstantOn applications are provisioned and licensed by the Server and then accessed via the Client. In this scenario, the server obtains software updates from Embarcadero servers and makes them available to the Client.
• In a Client-centered environment, the Client itself is used to download software updates from Embarcadero. End users license their own applications via the Embarcadero Developer Network.
Applications launched from the Server benefit from InstantOn’s application streaming, as the application will begin to open before the product has been fully downloaded. However, users who need frequent access to an application should run the file locally, as it is typically faster than running it from the Server.
Users connected to a Server may copy InstantOn applications locally by clicking the wrench icon in the Client and selecting Copy to Local.
The InstantOn tab controls InstantOn management options for the specified product.
EMBARCADERO TECHNOLOGIES > EMBARCADERO® ALL ACCESS CLIENT™ 1.0.3 USER ’S GUIDE 10

USING ALL-ACCESS CLIENT > USING ALL-ACCESS CLIENT
• Remove the InstantOn application by choosing Delete Local Copy.
• Click Check for Upgrades to automatically upgrade your current InstantOn version of the software to the latest available version.
• Click Help & Guides to access the documentation suite of the specified application.
EMBARCADERO TECHNOLOGIES > EMBARCADERO® ALL ACCESS CLIENT™ 1.0.3 USER ’S GUIDE 11
USING ALL-ACCESS CLIENT > USING ALL-ACCESS CLIENT
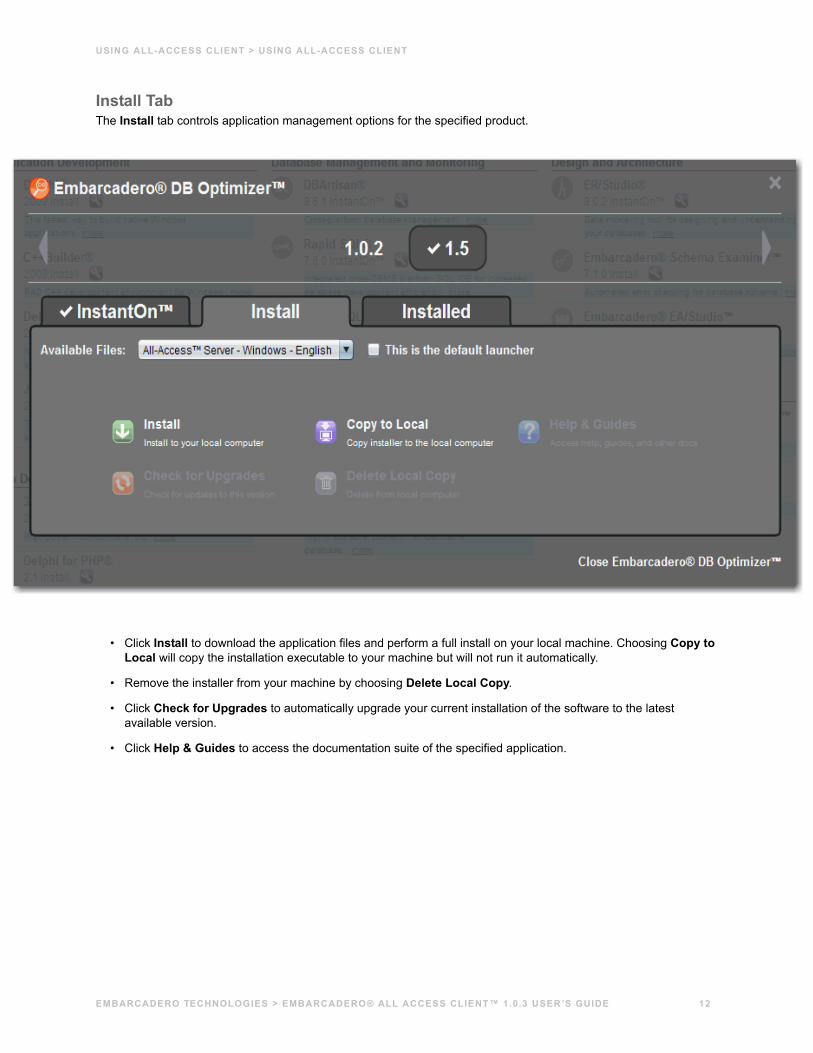
Install TabThe Install tab controls application management options for the specified product.
• Click Install to download the application files and perform a full install on your local machine. Choosing Copy to Local will copy the installation executable to your machine but will not run it automatically.
• Remove the installer from your machine by choosing Delete Local Copy.
• Click Check for Upgrades to automatically upgrade your current installation of the software to the latest available version.
• Click Help & Guides to access the documentation suite of the specified application.
EMBARCADERO TECHNOLOGIES > EMBARCADERO® ALL ACCESS CLIENT™ 1.0.3 USER ’S GUIDE 12

USING ALL-ACCESS CLIENT > USING ALL-ACCESS CLIENT
Installed TabThe Installed tab controls product management options for files that have already been downloaded to the Client.
The Available Files list enables you to choose between the product’s InstantOn files or files that you have installed locally through the Install tab options. Each format displays the directory location where the files are stored.
You can select a format and then select the This is the Default Launcher check box to indicate that the specified format always applies to the management options on the page, even if the Client is closed and opened again.
• Click Launch to execute the product from the Client interface.
• Click Uninstall to remove the specified format from your local machine.
• Click Check for Upgrades to automatically upgrade your current installation of the software to the latest available version.
• Click Help & Guides to access the documentation suite of the specified application.
EMBARCADERO TECHNOLOGIES > EMBARCADERO® ALL ACCESS CLIENT™ 1.0.3 USER ’S GUIDE 13

USING ALL-ACCESS CLIENT > USING ALL-ACCESS CLIENT
Downloading and Adding Products ManuallyIn some cases, you will need to add products to the catalog manually. This might be caused if your network environment does not permit third-party applications to be added via the Server’s online download function, or if you have installed All-Access Client from the DVD.
In these cases, you can download applications directly from the Embarcadero Developer Network.
Once you have downloaded the products, the Client needs to recognize where these applications are located. The product executables need to be placed into specific directories in order to run.
To download and add products manually:1 Navigate to https://members.embarcadero.com/Allaccess.aspx on the Embarcadero Developer Network. You
may be prompted to log on with your network credentials. A list of available products appears.
2 Download the products you want to add. InstantOn files are downloaded via the circular “lightning bolt” icon, while regular application installers are downloaded via the icon to the left-hand side of the InstantOn icon. The specified products are downloaded to your machine.
3 Place the downloaded product executables in the following All-Access Client repository directories, based on the appropriate product name. You will need to create these folders if they do not already exist:
4 Open the Client. When it is started, the new products appear in the interface and run normally.
Product Name Directory Name
3rdRail 3RDRAIL
C++ Builder CBUILDER
DBArtisan DBARTISAN
Delphi DELPHI
Delphi for PHP DELPHI_FOR_PHP
Delphi PRism DELPHI_PRISM
Change Manager EMBARCADERO_CHANGE_MANAGER
DB Optimizer EMBARCADERO_DB_OPTIMIZER
EA/Studio EMBARCADERO_EASTUDIO
Performance Center EMBARCADERO_PERFORMANCE_CENTER
Schema Examiner EMBARCADERO_SCHEMA_EXAMINER
ER/Studio ERSTUDIO
InterBase SMP INTERBASE_SMP
JBuilder JBUILDER
Rapid SQL RAPID_SQL
Rapid SQL Developer RAPID_SQL_DEVELOPER
JOptimizer JOPTIMIZER
EMBARCADERO TECHNOLOGIES > EMBARCADERO® ALL ACCESS CLIENT™ 1.0.3 USER ’S GUIDE 14
USING ALL-ACCESS CLIENT > CONFIGURING ALL-ACCESS CLIENT
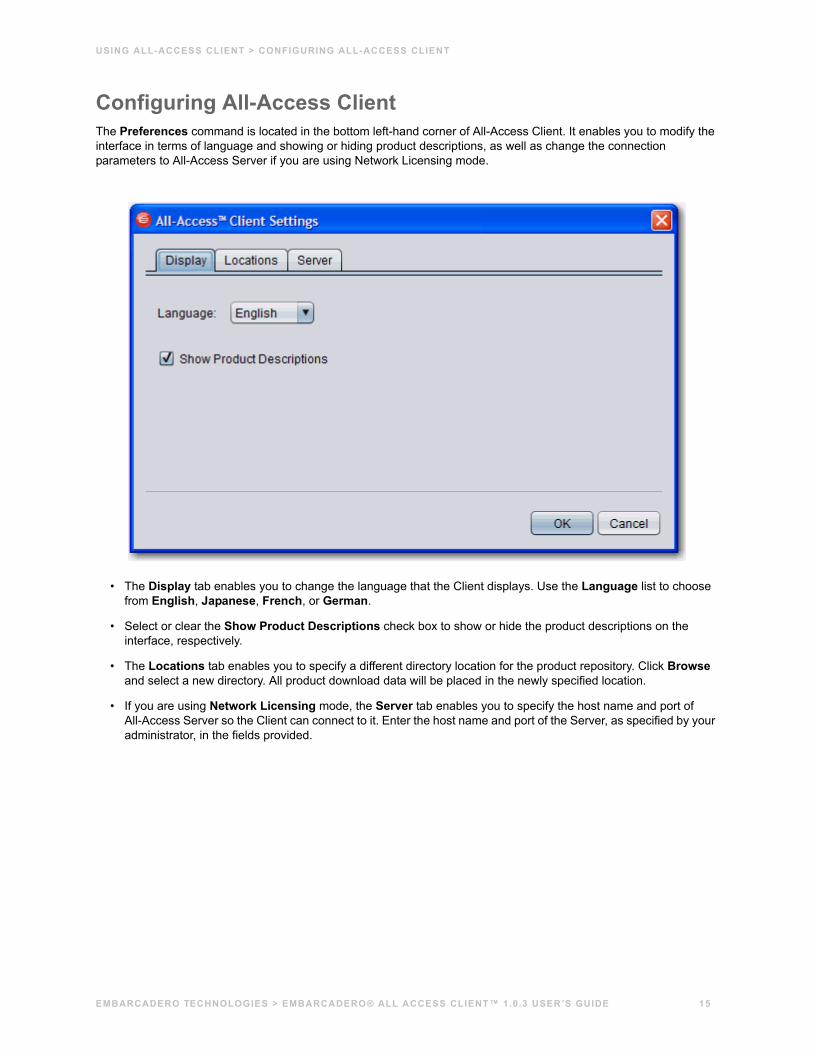
Configuring All-Access ClientThe Preferences command is located in the bottom left-hand corner of All-Access Client. It enables you to modify the interface in terms of language and showing or hiding product descriptions, as well as change the connection parameters to All-Access Server if you are using Network Licensing mode.
• The Display tab enables you to change the language that the Client displays. Use the Language list to choose from English, Japanese, French, or German.
• Select or clear the Show Product Descriptions check box to show or hide the product descriptions on the interface, respectively.
• The Locations tab enables you to specify a different directory location for the product repository. Click Browse and select a new directory. All product download data will be placed in the newly specified location.
• If you are using Network Licensing mode, the Server tab enables you to specify the host name and port of All-Access Server so the Client can connect to it. Enter the host name and port of the Server, as specified by your administrator, in the fields provided.
EMBARCADERO TECHNOLOGIES > EMBARCADERO® ALL ACCESS CLIENT™ 1.0.3 USER ’S GUIDE 15